


— i
Copyright
This publication, including all photographs, illustrations and software, is protected under international copyright laws, with all rights reserved. Neither this
manual, nor any of the material contained herein, may be reproduced without
written consent of the manufactur er.
Version 1.1, June 2006
Disclaimer
The information in this document is subject to change without notice. The manufacturer makes no representations or warranties with respect to the contents
hereof and specifically disclaims any implied warranties of merchantability or
fitness for any particular purpose. The manufactu rer reserves the right to revi se
this publication and to make changes from time to time in the content hereof
without obligation of the manufacturer to notify any person of such revision or
changes.
Trademark Recognition
Bluetooth is a trademark of the Bluetooth SIG, Inc. (Special Interest Group).
The Bluetooth trademark is owned by Bluetooth SIG, Inc. USA. BlueSoleil is a
trademark of IVT Corporation. Dialogue Technology Corporation is a registered
trademark. FlyBook is a trademark of the Dialogue Technology Corporation.
All other product names used in this manual are the properties of their respective owners and are acknowledged.
Federal Communications Commission (FCC)
This equipment has been tested and found to comply with the limit s for a Class
A digital device, pursuant to Part 15 of the FCC Rules. These limits are
designed to provide reasonable protection against harmful interference in a
residential installation. This equipment generates, uses, and can radiate radio
frequency energy and, if not installed and used in accordance with the instructions, may cause harmful interference to radio communications. However,
there is no guarantee that interference will not occur in a particular installation.
If this equipment does cause harmful interference to radio or television reception, which can be determined by turnin g the equip ment of f and on, the user is
encouraged to try to correct the interference by one or more of the following
measures:
User manual

ii —
• Reorient or relocate the receiving antenna.
• Increase the separation between the equipment and the receiver.
• Connect the equipment onto an outlet on a circuit different from that
to which the receiver is connected.
• Consult the dealer or an experienced radio/TV technician for help.
Shielded interconnect cables and a shielded AC power cable must be
employed with this equipment to ensure compliance with the pertinent RF
emission limits governing this device. Changes or modifications not expressly
approved by the system's manufacturer could void the user's authority to operate the equipment.
Declaration of Conformity
This device complies with part 15 of the FCC rules. Operation is subject to the
following conditions:
• This device may not cause harmful interference, and
• This device must accept any interference received, including interference that may cause undesired operation.
FCC Caution
Any changes or modifications not expressly approved by the party responsible
for compliance could void the user's authority to operate this equipment.
The antenna(s) used for this transmitter must not be co-located or operating in
conjunction with any other antenna or transmitter.
FCC Radiation Exposure Statement
This equipment complies with FCC radiation exposure limits set forth for an
uncontrolled environment. This equipment should be installed and operated
with minimum distance 20cm between the radiator & your body.
Power safety
• Only use the supplied power cord.
• Do not place anything on the power cord. Plac e the power c ord where
it will not be in the way of foot traffic.
Flybook

— iii
Table of Contents
Getting Started with the VM - - - - - - - - - - - - - - - - -1
About this manual . . . . . . . . . . . . . . . . . . . . . . . . . . . . . . . . . . 1
Unpacking . . . . . . . . . . . . . . . . . . . . . . . . . . . . . . . . . . . . . . . . 1
Front-left view . . . . . . . . . . . . . . . . . . . . . . . . . . . . . . . . . . . . . 2
Right view . . . . . . . . . . . . . . . . . . . . . . . . . . . . . . . . . . . . . . . . 4
LED descriptions . . . . . . . . . . . . . . . . . . . . . . . . . . . . . . . . . . . 5
Installing the battery . . . . . . . . . . . . . . . . . . . . . . . . . . . . . . . . 7
Connecting the AC adapter . . . . . . . . . . . . . . . . . . . . . . . . . . . 8
Adjusting the display . . . . . . . . . . . . . . . . . . . . . . . . . . . . . . . . 9
Using the fingerprint reader . . . . . . . . . . . . . . . . . . . . . . . . . . 11
Using the keyboard and touchpad - - - - - - - - - - -12
Using the touchpad....................................................................... 12
Using Function (Fn) keys ............................................................. 12
Using the numeric keypad............................................................ 14
Windows™ keys and other keys .................................................. 14
Connecting devices - - - - - - - - - - - - - - - - - - - - - -16
Connecting audio devices . . . . . . . . . . . . . . . . . . . . . . . . . . . 16
Connecting USB devices . . . . . . . . . . . . . . . . . . . . . . . . . . . . 18
Connecting an external display . . . . . . . . . . . . . . . . . . . . . . . 19
Using an ExpressCard . . . . . . . . . . . . . . . . . . . . . . . . . . . . . . 20
Flybook control center - - - - - - - - - - - - - - - - - - - -22
Opening the control center . . . . . . . . . . . . . . . . . . . . . . . . . . 22
Using the control center . . . . . . . . . . . . . . . . . . . . . . . . . . . . . 22
Securing and backing up your system - - - - - - - -23
Before you go online . . . . . . . . . . . . . . . . . . . . . . . . . . . . . . . 23
Install virus protection . . . . . . . . . . . . . . . . . . . . . . . . . . . . . . 24
Install a Firewall . . . . . . . . . . . . . . . . . . . . . . . . . . . . . . . . . . . 24
User manual

iv —
Install spyware blocker . . . . . . . . . . . . . . . . . . . . . . . . . . . . . 24
Networking your computer - - - - - - - - - - - - - - - - -25
Determining IP address settings . . . . . . . . . . . . . . . . . . . . . . 25
Setting up a wired connection . . . . . . . . . . . . . . . . . . . . . . . . 25
Bluetooth . . . . . . . . . . . . . . . . . . . . . . . . . . . . . . . . . . . . . . . . 26
Using the built-in Webcam - - - - - - - - - - - - - - - - -27
Ergonomics - - - - - - - - - - - - - - - - - - - - - - - - - - - -28
Caring for your computer - - - - - - - - - - - - - - - - - - 30
Things not to do with your computer . . . . . . . . . . . . . . . . . . . 30
Cleaning the computer . . . . . . . . . . . . . . . . . . . . . . . . . . . . . 31
The BIOS setup utility - - - - - - - - - - - - - - - - - - - - -32
Accessing the BIOS setup . . . . . . . . . . . . . . . . . . . . . . . . . . . 32
Updating the BIOS firmware . . . . . . . . . . . . . . . . . . . . . . . . . 32
The Main BIOS menu . . . . . . . . . . . . . . . . . . . . . . . . . . . . . . 32
The Advanced menu . . . . . . . . . . . . . . . . . . . . . . . . . . . . . . . 33
The Intel menu . . . . . . . . . . . . . . . . . . . . . . . . . . . . . . . . . . . . 34
The Security menu . . . . . . . . . . . . . . . . . . . . . . . . . . . . . . . . 34
The Boot menu . . . . . . . . . . . . . . . . . . . . . . . . . . . . . . . . . . . 35
The Exit menu . . . . . . . . . . . . . . . . . . . . . . . . . . . . . . . . . . . . 35
Troubleshooting and specifications - - - - - - - - - - 37
Tips for Troubleshooting . . . . . . . . . . . . . . . . . . . . . . . . . . . . 37
The Power-On Self Test . . . . . . . . . . . . . . . . . . . . . . . . . . . . 37
General Hardware Problems . . . . . . . . . . . . . . . . . . . . . . . . . 38
Identifying Problems . . . . . . . . . . . . . . . . . . . . . . . . . . . . . . . 38
Having the VM Serviced . . . . . . . . . . . . . . . . . . . . . . . . . . . . 41
Specifications - - - - - - - - - - - - - - - - - - - - - - - - - - - 42
Flybook

Getting Started with the VM
About this manual
This User manual provides information to help yo u op er at e an d get th e mo st
from your computer. Read the Setup guide to quickly set up and begin using
your computer.
Unpacking
Unpack the VM and check that the following items are included:
VM computer Carry bag
Standard 3-cell battery AC adapter
Quick Start Guide Warranty card
User manual Windows® start here booklet
Recovery CDs
2 — Getting Started with the VM
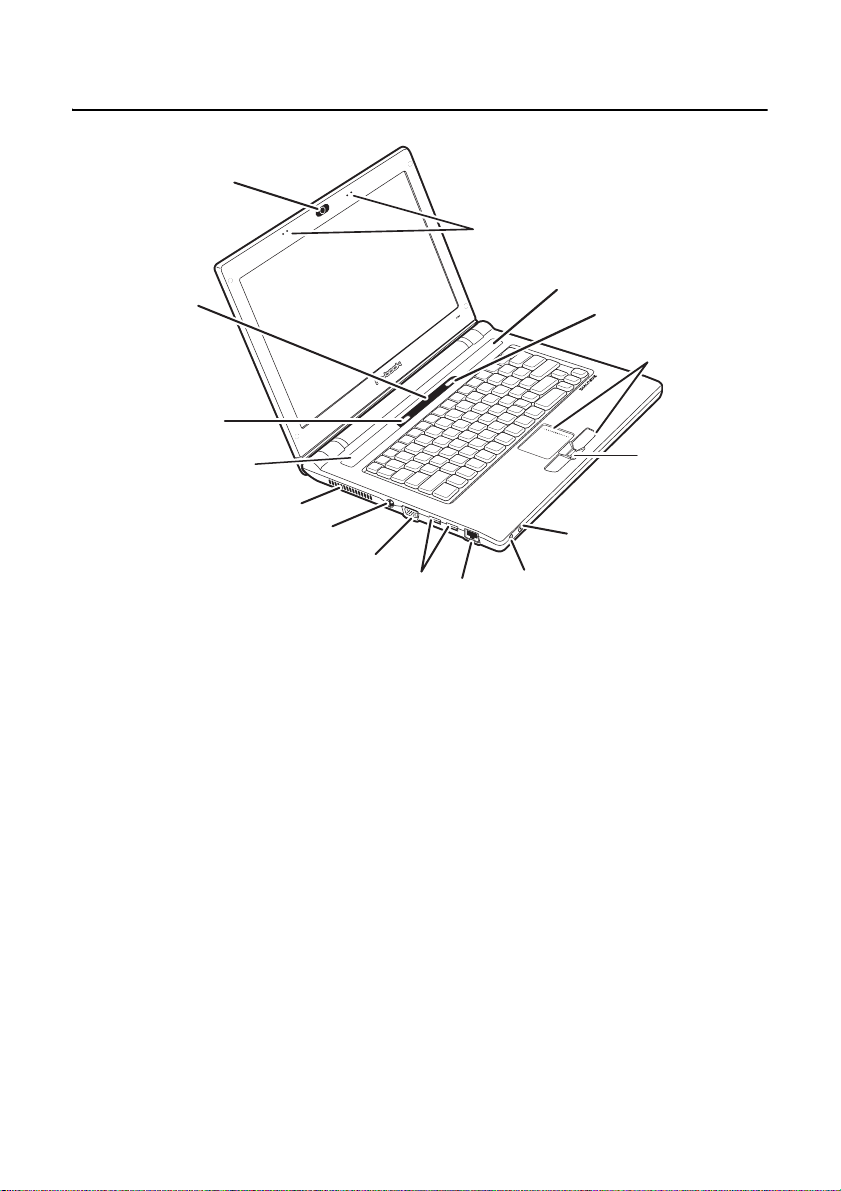
Front-left view
15
1
14
13
12
11
1. STEREO MICROPHONE
• Use the built-in stereo microphone for recording sound and videoconferencing with friends.
2. P
OWER BUTTON
• Press and hold the power button for two seconds to turn on the computer.
3. T
OUCHPAD AND TOUCHPAD BUTTONS
10
12
2
3
4
5
9
8
7
6
• Use the touchpad to move the pointer on the screen. The touchpad
and the touchpad buttons have similar functions to a mouse.
4. F
INGERPRINT READER
• When you set up fingerprint authentication, you can use the fingerprint reader to turn on the computer.
5. H
EADPHONE JACK
• Connect headphones or external speakers to the headphone jack.
Flybook

6. M
ICROPHONE JACK
• Connect a microphone to the microphone jack.
7. E
THERNET CONNECTOR
• Connect the computer to your home or office network (LAN) with the
Ethernet connector.
8. USB
CONNECTORS
• Connect USB devices such such as printers or flash drives to the
USB connectors.
9. M
ONITOR (VGA) CONNECTOR
• Connect an external display or projector to the monitor connector.
10. AC
POWER CONNECTOR
• Connect the AC adapter to this connector.
11. A
IR VENT
• Air vents help to prevent the interior of the computer from overheating. Do not block the air vents.
12. S
PEAKERS
• Stereo speakers are builit in to the computer.
13. W
IRELESS OFF
Front-left view — 3
• Wireless transmission uses power. Use this button to disable the
14. I
NDICATOR PANEL
• The LEDs on the indicator panel provide system status information.
15. C
AMERA
• Use the built-in camera for videoconferencing with friends.
User manual
wireless feature of your computer to save power or when instructed
to do so, for example on an aircraft.

4 — Getting Started with the VM
Right view
1234 5
1. DVD/CD-RW COMBO DRIVE
• Playback your favorite DVDs or burn CDs on the combo drive.
2. DVD/CD-RW LED
• Flashes when the combo drive is accessed.
3. DVD/CD-RW
• Press to eject the drive tray.
4. E
MERGENCY EJECT HOLE
• Insert a straightened paper clip to eject the drive tray when the computer is turned off.
5. E
XPRESSCARD SLOT
EJECT BUTTON
• Install an ExpressCard in the ExpressCard slot.
Flybook
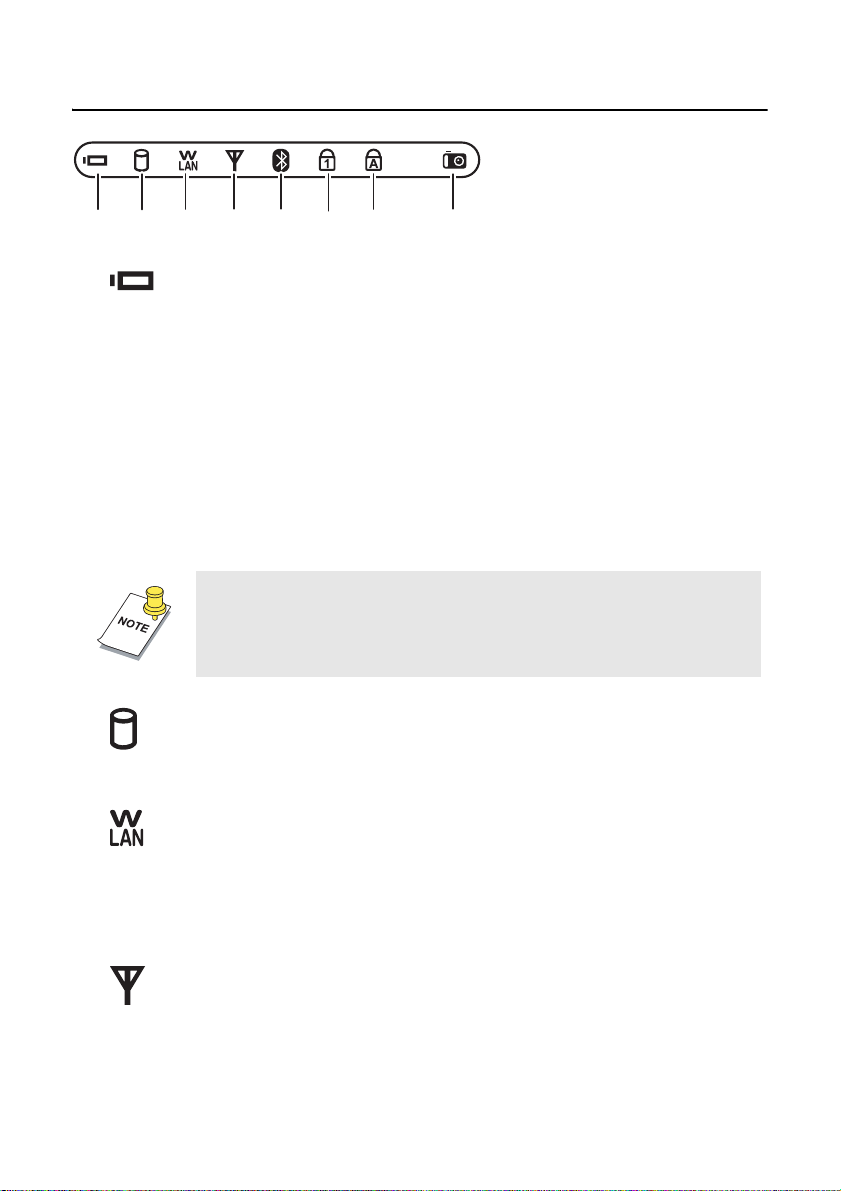
LED descriptions
1234 5 67 8
1. BATTERY
(N
O AC ADAPTER CONNECTED)
• Green: The battery is in use and has has more than 10% capacity.
• Blinking red: The battery has less than 10% capacity.
(AC
ADAPTER CONNECTED)
• Blinking green: The battery is charging.
• Green: The battery is charged.
• Red: The battery has a problem and cannot be charged. Return the
battery to your reseller for servicing.
NOTE: If no battery is installed, then the battery LED is
always off.
LED descriptions — 5
2. H
• Red: The hard drive is being accessed.
3. W
• Off: The wireless LAN module is turned off.
• On: The wireless LAN module is turned on.
• Blinking: Date is being transmitted or received.
4. W
• Off: The wireless WAN module is turned off.
• On: The wireless WAN module is turned on.
User manual
ARD DRIVE
IRELESS LAN
IRELESS WAN

6 — Getting Started with the VM
• Blinking: Data is being transmitted or received.
NOTE: The wireless WAN module is available on some VM
models.
5. B
• Slow blinking: The Bluetooth module is on standby.
• Fast blinking: Data is being transmitted or received.
6. N
• Lights when the numeric keypad is enabled.
7. C
• Lights when Caps Lock mode is enabled. When enabled you can
8. C
• Lights when the built-in Web camera is turned on.
LUETOOTH™
UM LOCK
APS LOCK
type alphabetic characters without holding the Shift key.
AMERA
Flybook
Installing the battery — 7
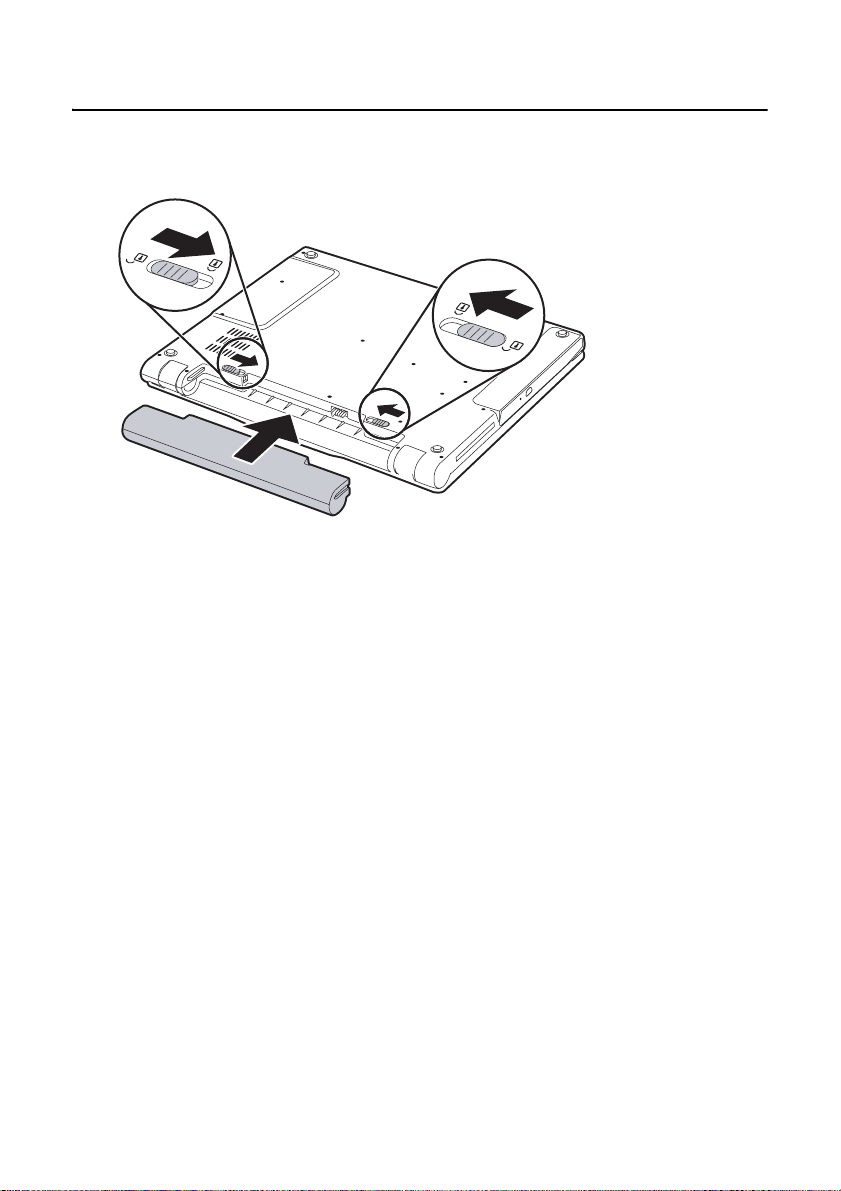
Installing the battery
1. Align the guides on the sides of the battery with the guides in the bay and
then install the battery.
2. Slide the battery release to the closed position.
3. Slide the battery lock to the locked position.
User manual
8 — Getting Started with the VM
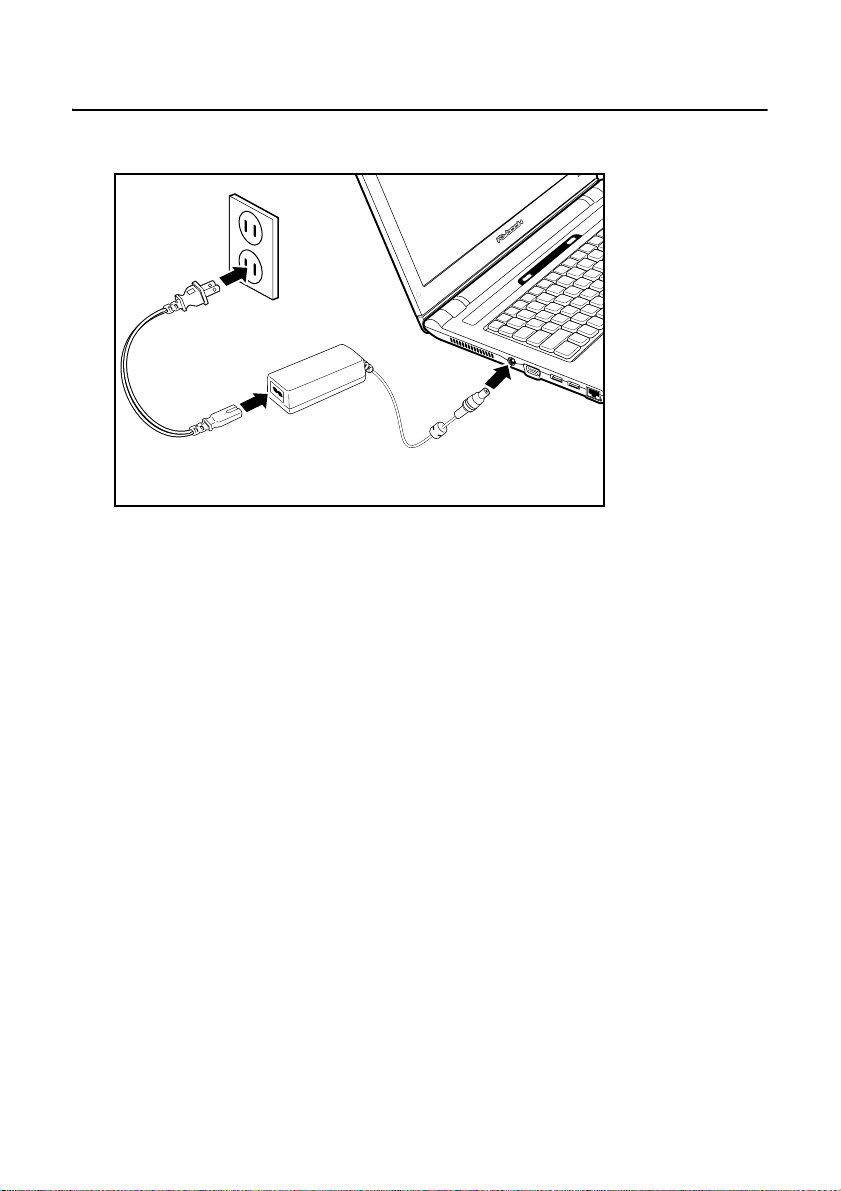
Connecting the AC adapter
1. Connect the AC adapter connector (A) to the AC jack on the computer .
C
B
A
2. Connect the AC cable (B) to the AC adapter.
3. Connect the other end of the AC cable (C) to an electrical outlet.
The power LED and the battery charge LED light.
Flybook

Adjusting the display — 9
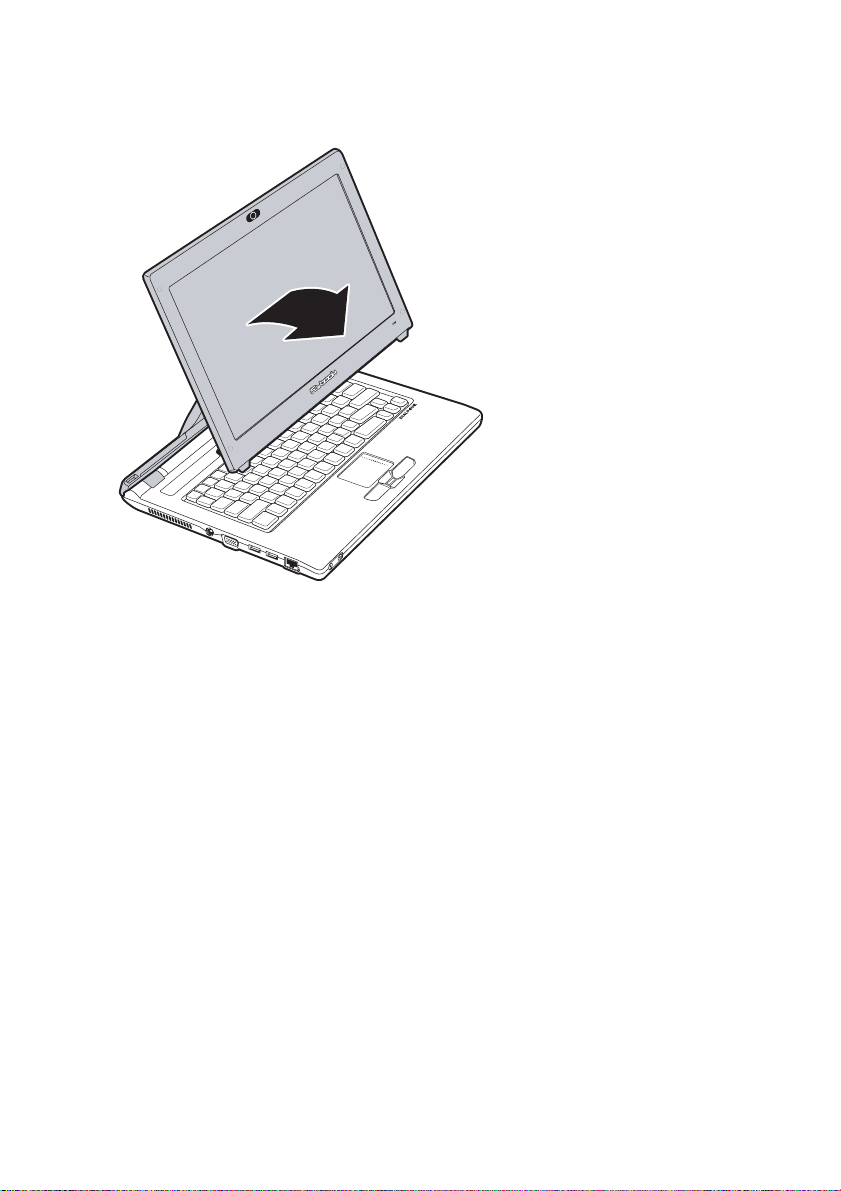
Adjusting the display
Your computer display can adjusted vertically on the rear support and it can be
tilted away from the support to a horizontal position.
1. Open the display.
2. Slide the display upwards on the rear support.
User manual
10 — Getting Started with the VM
3. Hold the display at the bottom and pull it away from the rear support to the
angle you want.
4. Adjust the rear support further to the position yo u want.
Flybook
Using the fingerprint reader — 11
Using the fingerprint reader
The fingerprint reader allows you to control access to your computer.
To enroll your finger:
1. Click Start -> All Prog rams -> Fing erpr in t Applica tion Suit e -> PCA250
-> First-time Wizard. Follow the instructions in the Wizard.
2. When prompted, select the finger that you want to enroll.
3. Place the tip of your finger above the fingerprint reader as shown below.
4. Press your finger down evenly on the reader and then in one smooth
action, swipe your finger across the reader.
Repeat fingerprint enrollment as prompted in the Wizard.
User manual

12 — Using the keyboard and touchpad
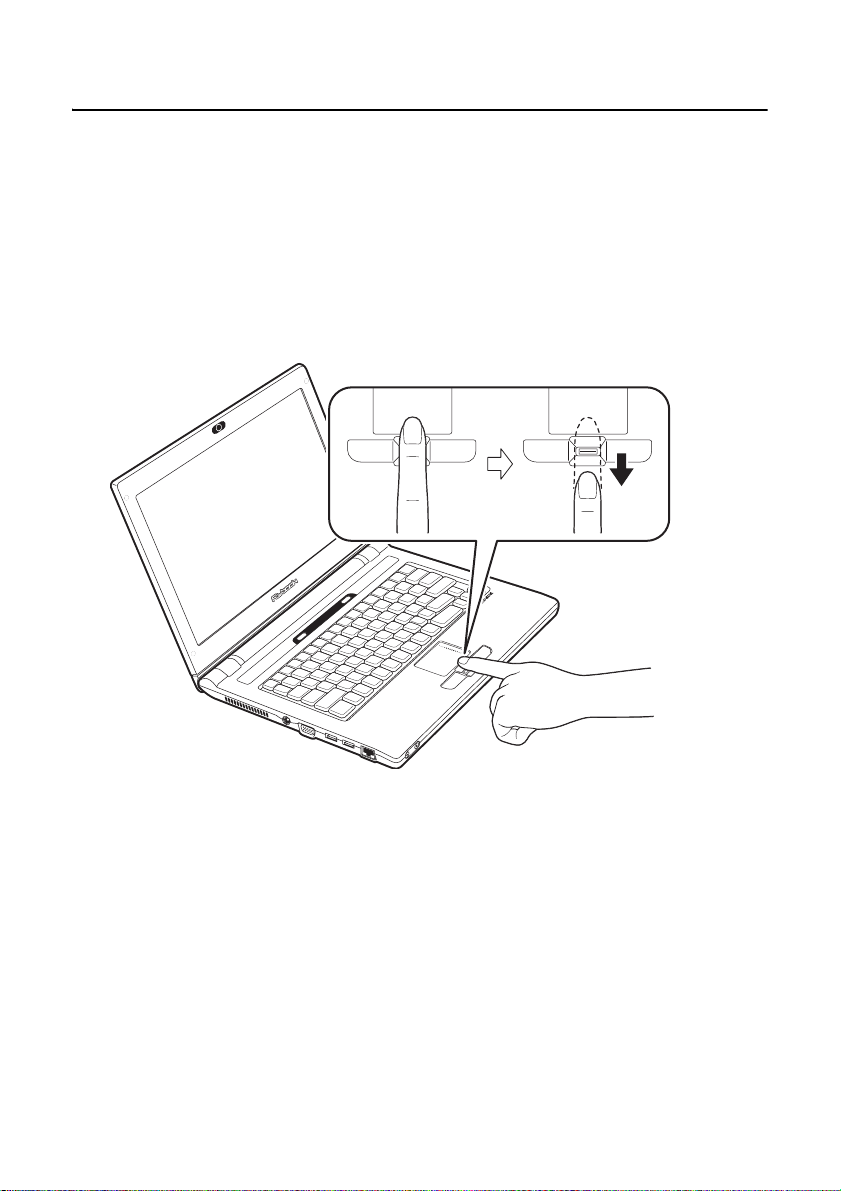
Using the keyboard and touchpad
Your computer’s mini-size keyboard and touchpad provide similar functionality
as a standard keyboard and mouse.
Using the touchpad
The touchpad consists of a p ad and two click-bu ttons. The left and right buttons
correspond to the left and right buttons on a mouse. Slide your finger over the
pad in the direction you want the pointer to move on the screen.
Scroll area
Pad
Left button
Slide your finger up and down in the scroll area to scroll up and down on the
screen.
To customize the touchpad, click Start -> Control Panel. In Control Panel
double-click the Mouse icon to open the touchpad configuration utility.
The configuration utility lets you customize touchpad settings to your preference. Click Help in the touchpad utility for instructions on changing touchpad
settings.
Right button
Using Function (Fn) keys
Using function keys is a quick way to carry out commands or enable features
on your computer . Function keys have a blue icon or have blue text (such as on
the Home and PgDn keys). To use this function, press and hold the Fn key (1)
and then press a function key (2).
Flybook

1
Esc
0
F10
N
k
I
t
P
Break
e
!
@
#
3
$
5
6&8(9)0
_
+
Q
U
O
{
[}]
|
\
k
S
t
CtrlAlt
Alt
Ctrl
A
S
D
FGHJK
:
;
Z
XCVBN
M
,
.
?
/
Back
e
S
t
The Fn key functions are described below.
F1
F2 F3 F4 F5 F6 F7 F8 F9F1
%
Tab
Caps Loc
hif
Using the fingerprint reader — 13
2
F11 F12F12
umL
nser
ause
Delet
Scr Lk Prt Sc SysRq
L
spac
Enter
hif
PgUp
PgUpHome End
• Fn + F1: Changes video output to an external display.
• Fn + F2: Decreases the display brightness.
• Fn + F3: Increases the display brightness.
• Fn + F4: Puts the computer in suspend mode.
• Fn + F5: Puts the computer in hibernation mode.
• Fn + F6: Decreases the volume.
• Fn + F7: Increases the volume.
• Fn + F8: Mutes/enables the volume.
• Fn + F9: Enables or disables the built-in wireless networking feature.
• Fn + F11: Enables or disables the built-in Bluetooth feature.
• Fn + F12: Turns on or off the built-in Web camera.
• Fn + ScrLk: Enables or disables scroll lock. When enabled, pressing
the up or down arrow keys scrolls up or down one line respectively.
• Fn + PrtSc: Print screen captures the on-screen image to the clipboard. You can then copy the contents to an image editing program.
User manual

14 — Using the keyboard and touchpad
F
F8F9F10
F11F12
k
Sc
k
Prt Sc
tDel
6
)
0
+
}
]
|
\
Alt
Ctrl
H
B
N
,
.
PgUp
PgUp
Home
Backspa
E
Shift
77889
44556
+
Enter
-
/
*
1
0
223
• Fn + SysRq: Terminal request. This key is rarely used.
• Fn + Home: Moves the pointer to the beginning of a line in text.
• Fn + End: Moves the pointer to the end of a line in text.
• Fn + PgUp: Moves text up one screen at a time.
• Fn + PgDn: Moves text down one screen at a time.
Using the numeric keypad
The keyboard has an embedded numeric keyboard. When you enable it, the
Num Lock LED is on. To enable or disable the numeric keypad, press Num Lk.
7
&7*8(
9
U I O
9
J K L
1
M
0
6
3
_
-
-
:;"
+
?
/
/
NumL
r L
{
[
Enter
Inser
ete
SysRq
nter
'
*
NOTE: The numpad numbers are printed larger in the illustra-
tion for your convenience. On the VM, the numbers are much
smaller and on the front edge of the keys.
Windows™ keys and other keys
Keys such as the Windows Start and application keys, and the Caps Lock key
function the same as on a standard keyboard in the Windows environment.
• : Opens the Start menu. Use in combination with other keys to
perform Windows shortcuts.
• : The application key has the same function as the right-mouse
button.
Flybook

Using the fingerprint reader — 15
• Caps Lock: Toggles uppercase on and off.
TIP! Refer to the Windows® start here booklet for additional
keyboard shortcuts.
User manual
16 — Connecting devices
Connecting devices
This section covers peripheral devices that you can use with the VM.
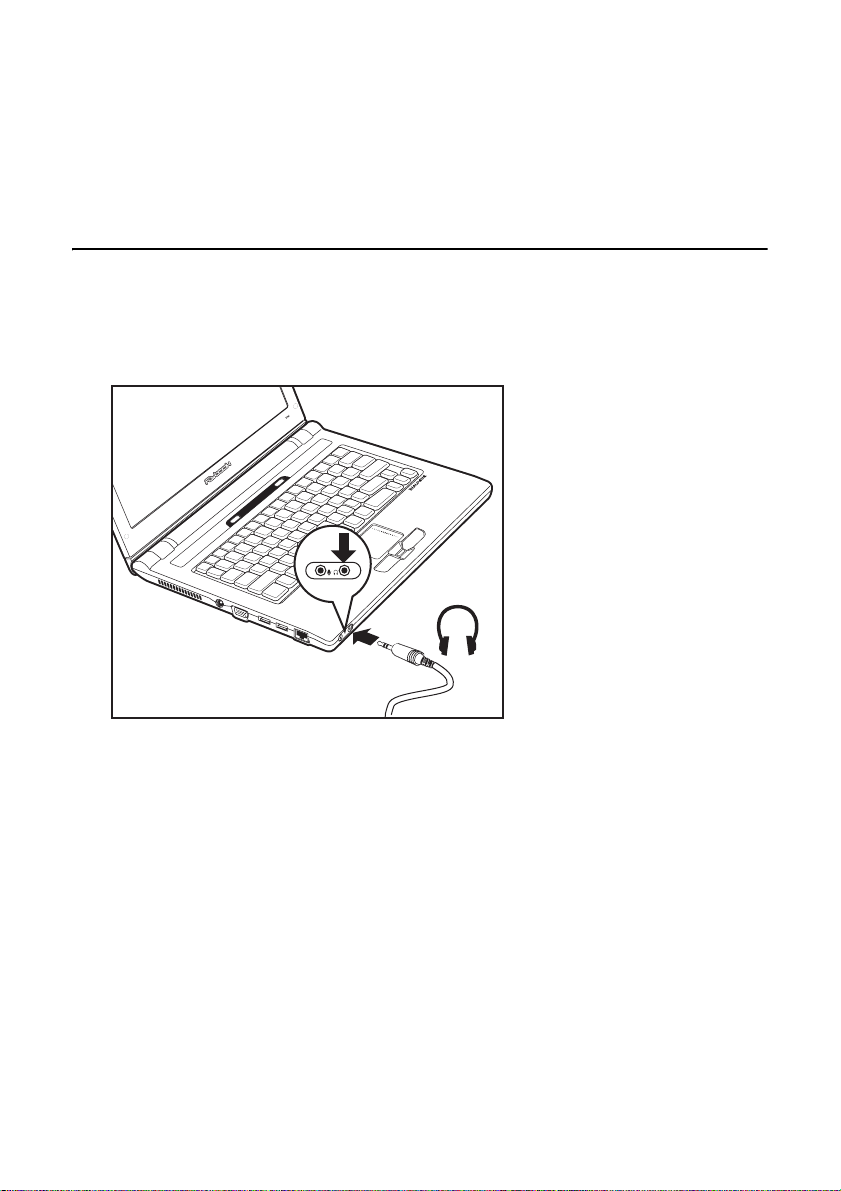
Connecting audio devices
Y our computer has a built- in microphone and speaker. You can al so connect an
external microphone and headset.
1. Connect speakers or headphones to the headphone jack.
Flybook

Connecting audio devices — 17
2. Connect a microphone to the microphone jack.
The Realtek Sound Manager automatically opens a llowing you to configure
audio devices.
NOTE: The built-in speakers and microphone are automati-
cally disabled when you connect external speakers or a
microphone.
User manual

18 — Connecting devices
Connecting USB devices
There are two Universal Serial Bus (USB) connectors on the computer. You
can connect USB devices such as printers or flash drives to either connector.
CAUTION: Be sure the USB icon on the connector is facing
upwards as shown below. Connecting a USB cable incorrectly can damage the connector on the computer.
1. Connect the USB device to one of the USB connectors on the computer.
2. Install drivers for the device as prompted.
Flybook

Connecting an external display — 19
Connecting an external display
Y ou ca n connect an external monitor or LCD to your computer with a resolution
up to 1800 x 1440. Check the user manual of the display to be sure it supports
this resolution.
CAUTION: You can perma nently dama ge a displ ay if it does n ot
support the resolution that your computer is set to. Match the
resolution of the VM to the external display before you attach it
to the computer.
1. With the computer turned off, connect the external display to the VGA connector on the computer.
2. Connect the display to an electrical outlet.
3. Turn on the computer and the external display.
4. Press Fn + F1 to switch output to the external display.
User manual

20 — Connecting devices
Using an ExpressCard
You can use 34 mm-wide and 54 mm-wide ExpressCards with your computer.
NOTE: Do not insert an ExpressCard when the computer is in
standby or hibernate mode. If you do, when you try to resume
the computer it may not respond.
CAUTION: Static electricity in your body can damage Express-
Cards. To reduce the static electricity in your body, touch a bare
metal table or a grounded met al object before installing an
ExpressCard.
To install an ExpressCard:
1. Find the notched edge on the card.
Flybook

2. Insert the card into the slot.
Using an ExpressCard — 21
User manual
22 — Flybook control center
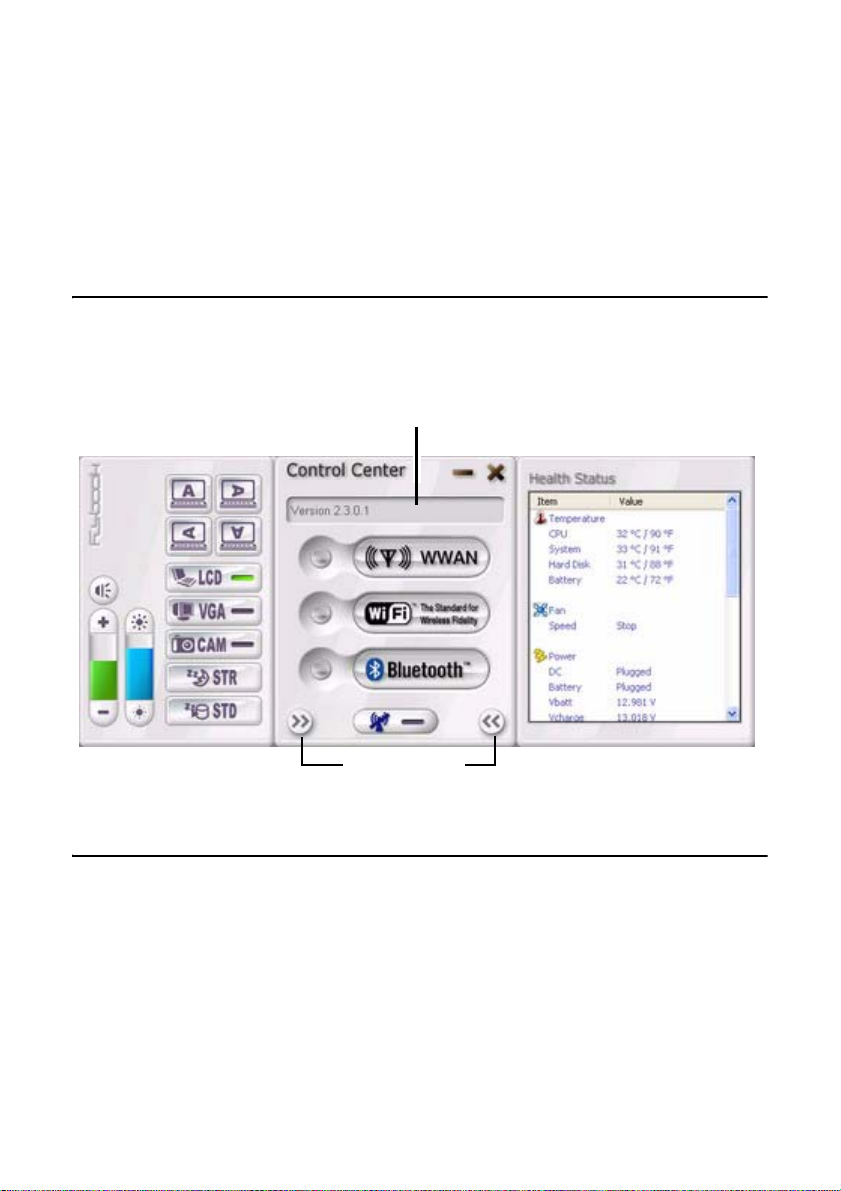
Flybook control center
The Flybook Control Center lets you quickly enable or disable wireless options
and change settings such as volume and display mode. You can also check
system health with this utility.
Opening the control center
To open the Control Center, click the Flybook icon in the system tray an d select
Restore.
Function pane
Expand/hide
Using the control center
Move the pointer over the buttons on the Control Center panel; the function of
the button is described in the Function pane. For example, if you move the
pointer over the WiFi button in the center of the panel, the message Turn on/
off the Wi-Fi module appears in th e Function pane.
Flybook

Before you go online — 23
Securing and backing up your system
Before you go online
Connecting your computer to the Internet opens the way to potential threats
such as viruses and spyware. To best secure your computer purchase security
software (or download it from a secure system), and then install it on your computer before you connect it to the Internet.
To check your computer’s security settings:
1. Click Start -> Control Panel, and then double-click Security Center.
Windows Security Center opens.
2. Ensure Firewall and Automatic Updates are turned ON.
3. Click Get help about Security Center for more information.
User manual

24 — Securing and backing up your system
Install virus protection
Y our computer is inst alled with a free th ree-month trial of Norman V irus Control.
To check your virus settings, click start -> All Programs -> Norman Virus
Control -> Configuration Editor. Click Help for more information.
Install a Firewall
A firewall protects your computer by blocking or allowing traffic between your
computer and the Internet. Windows has a built-in firewall that helps to protect
your computer . For better secu rity, purchase a router that has a built-in firewall.
You can also download free firewall software on the Internet.
Install spyware blocker
Spyware typically retrieves information about your Web-surfing habits. It can be
secretly installed on your computer with a free download and can even be
installed just by visiting a Web site. Spyware can cause your Web searches to
be redirected and pop us annoying adds. Once your computer is infected with
spyware, it can be very difficult to remove it. The key is to prevent infection in
the first place by installing spyware blocker software. Spyware blocking software can be purchased online and you can even download free spyware blocking programs.
Flybook
Determining IP address settings — 25
Networking your computer
Your computer has an Ethernet connector that you can use to connect to a
wired network at home or in the office. If you h ave a wireless a ccess point, you
can also get online using the built-in wireless LAN of your computer.
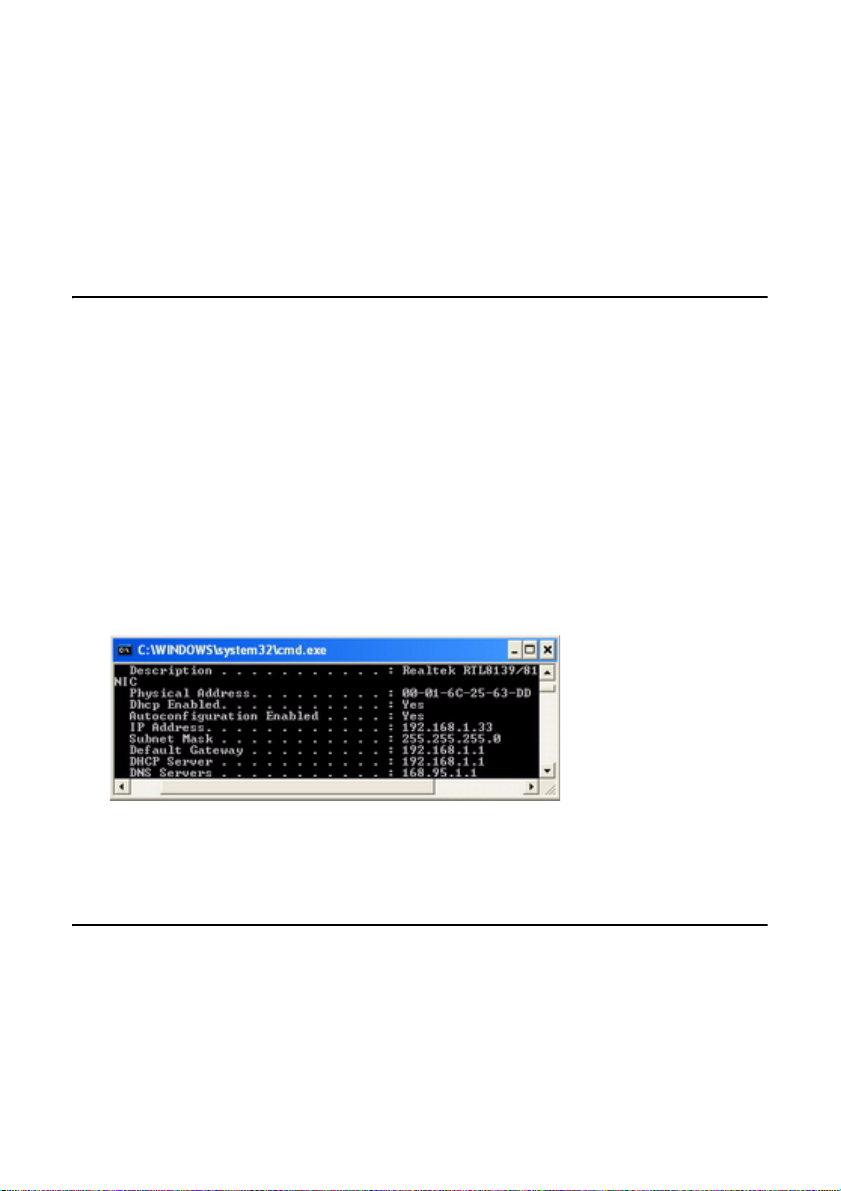
Determining IP address settings
To access a network, your computer must have a network IP address. The IP
address is either assigned manually (a static IP address), or it is assigned automatically by a DHCP router or server . If you already have a home network, you
can check a computer on your network to determine if it is assigned an IP
address automatically or manually.
1. Click Start -> Run.
2. Type cmd and click OK.
3. At the command prompt, type ipconfig /all.
4. Look for the line DHCP Enabled (you may have to scroll up to see it).
If DHCP is enabled, then your router assigns IP addresses automatically. You
should enable DHCP during the initial Windows setup.
Setting up a wired connection
Wired connections are more secure and somewhat more stable than wireless
connections. You can connect your computer to the network while it is turned
on. Refer to the following to set up a wired connection:
User manual

26 — Networking your computer
1. Connect an Ethernet cable to the Ethernet connector on the computer.
2. Connect the other end of the cable to your router or switch.
It takes a few minutes for your router to assign an IP address to your computer. When your computer is connected, the following message appears
over the LAN icon in the system tray.
Local Area Connection
Speed: 100.0 Mbps
Status: Connected
3. Double-click the LAN icon to view details for your connection.
Bluetooth
Your computer has a built-in Bluetooth module and is already installed with the
IVT BlueSoleil utility. Bluetooth allows communication between your computer
and other Bluetooth-enabled devices such as cellphones, printers, and keyboards.
In order to connect and share services via Bluetooth wireless technology, the
two devices must support the same Bluetooth Profile(s). One device must act
as a server; the other must be the client.
To start using Bluetooth, do the following:
1. Press Fn + F11 to enable Bluetooth.
2. Double-click the Bluetooth icon in the taskbar or click start -> All Pro-
grams -> IVT BlueSoleil -> BlueSoleil to open the IVT BlueSoleil program.
3. Click Help on the menu bar for more information.
Flybook
Bluetooth — 27
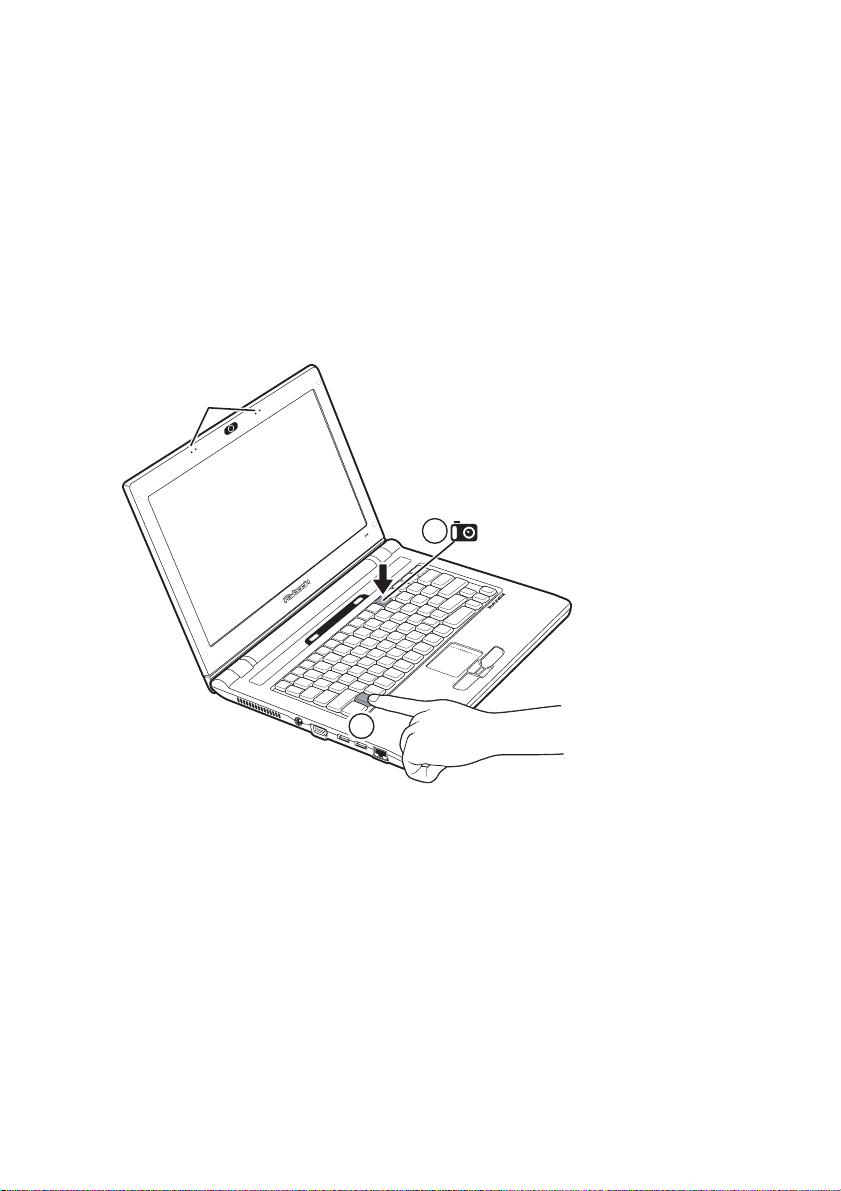
Using the built-in Webcam
Your computer features a built-in Webcam that is already set up and ready to
use. Use your Webcam to make live video calls and keep in touch with friends
and family.
C
APTURING VIDEO
1. Press Fn + F12 to enable the built-in Webcam.
The camera LED lights.
Stereo
microphone
2
1
2. Click start -> AMCap or double-click the AMCap icon on your desktop to
open the AMCap utility.
3. To start recording, click Capture -> Start Capture.
L
AUNCHING YOUR FAVORITE INSTANT MESSANGER
You can use the Webcam with an instant messanger such as MSN Messager,
Y ahoo Messa ger, or Skype. T o begin m essaging, open yo ur instan t messanger
and then launch the Webcam.
User manual

28 — Ergonomics
Ergonomics
Ergonomics is the science of equipment design, particulary for working situations, with the intention of reducing discomfort. Ergonomic products, such as
keboards or mice, are designed to blend smoothly with your actions.
When using your computer try to develop good habits such as the following:
• Periodically get up, stretch and walk around the room.
• Look away from the display frequently. Don’t face a wall so that you can
look up from the screen and into the distance. This exercising of the eyes
can help to prevent eye-strain.
• Do stretching exercises while you sit.
• Don’t work in poor lighting. Position your computer display to minimize
glare or reflection.
When sitting at your computer, use the following illustration and guidelines:
Flybook

Bluetooth — 29
• Position the display to avoid glare from overhead lighting. Adjust the dis-
play to achieve an optimal viewing angle as shown above.
• Approximately arms-length is a good viewing distance to the display.
• Use a comfortable chair that provides good back support.
• Sit up straight, with your shoulders back in a relaxed position.
• Adjust your chair so that your thighs are paralllel to the floor.
• When typing keep your arms, hands, and wrists relaxed and horizontal;
type gently and do not rest your palms on the computer.
User manual

30 — Caring for your computer
Caring for your computer
After you unpack your computer, store the packing materials in case you want
to ship the computer or if you have to return it for servicing.
Your notebook computer is a precision instrument that should be handled with
care. Use common sense and follow the guidlines below, and your computer
will last you for many years.
Things not to do with your computer
• Do not twist the display sideways or bend it upwards at only one corner.
• Do not place heavy objects such as books on the computer.
• Do not expose the computer to
• Do not expose the computer to temperatures above 50° C or below 0° C.
• Keep the computer away from direct sunlight or heat sources.
• Do not expose the computer to rain or moisture.
• Do not spill water or any other liquid on the computer.
• Do not place the computer near magnetic fields.
• Avoid heavy shocks or vibrations to the computer.
• Do not expose the computer to dusty or dirty environments.
• Do not place the computer on uneven surfaces.
• Do not cover air vents around the computer.
• Only use the ac adapter that is provided with your computer.
Flybook

Cleaning the computer — 31
Cleaning the computer
Before cleaing the computer, turn it off, unplug the ac adapter,
and then remove the battery
Wipe the display with a clean soft cloth. If you use a mild glass cleaner to clean
the display, spray a little on the cloth and then wipe the display. Do not spray
cleaner directly onto the display.
Clean the outside of the computer case with a soft cloth. You can moisten the
cloth with a non-alkaline detergent.
Use a vacuum cleaner to clean dust from the keyboard.
Do not wipe the keyboard, touchpad, touchpad buttons, or fingerprint reader with a damp cloth.
.
User manual

32 — The BIOS setup utility
The BIOS setup utility
The BIOS setup utility lets you change core settings on your computer such as
the system time, boot order, and auto-repeat rate for your keyboard. Most
users will find the default settings are already optimal for their needs. Be clear
on changes your make to the BIOS. Choosing incorrect settings can cause
your computer not to boot up.
Accessing the BIOS setup
When you turn on your computer a message “Press F2 to enter BIOS”
appears. Press F2 to enter the BIOS setup.
On the right side of the Setup screen is an area labeled Item Sp ecific Help. This
area lists navigation key shortcuts and information that is specific for the item
that is selected.
Updating the BIOS firmware
You can install updated BIOS for your computer that you can download from
the manufacturer's Web site. New BIOS may provide support for new peripherals, improvements in performance or fixes for known bugs.
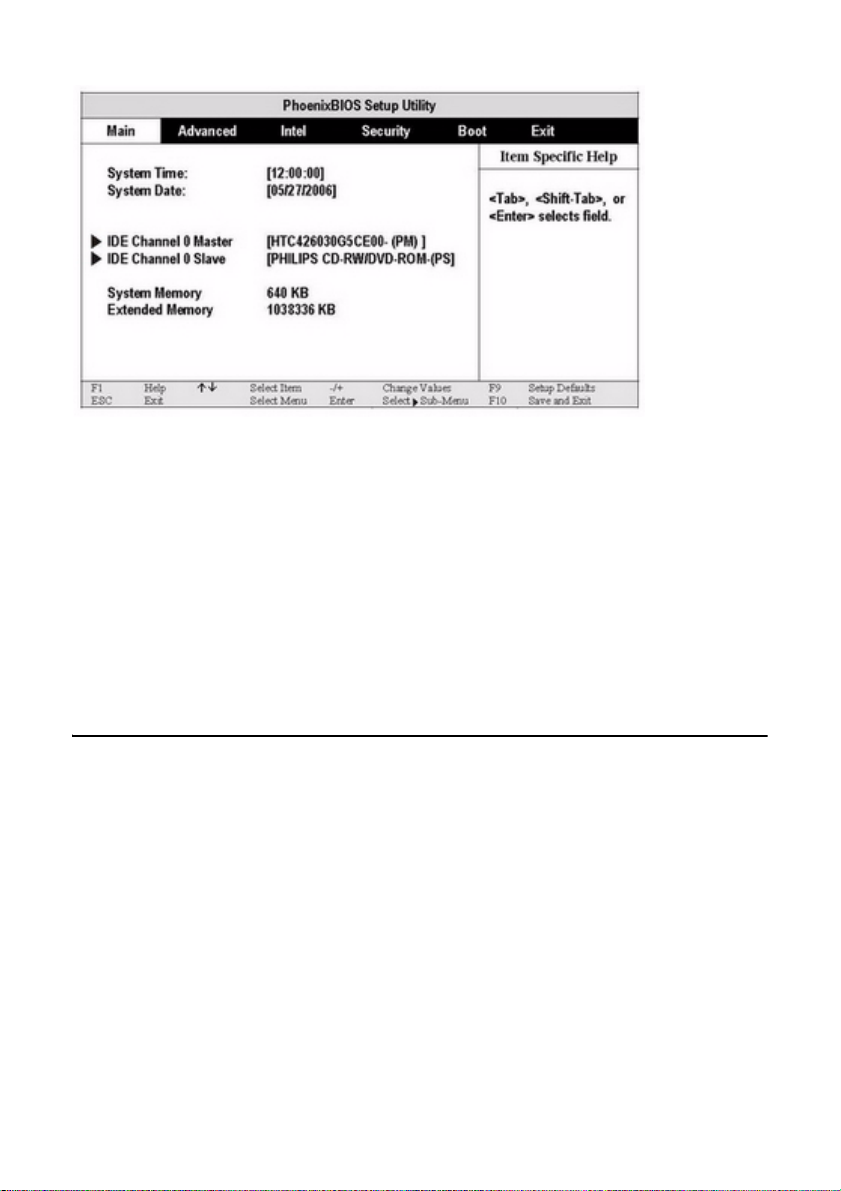
The Main BIOS menu
In the Main menu you can make the following changes:
Flybook
The Advanced menu — 33
S
YSTEM TIME
Sets your system to the time that you specify (usually the current time). The format is hour, minute, second . Insert the appropr iate informatio n. Use the Tab or
Shift + Tab keys to move between the hour, minute, and second fields.
S
YSTEM DATE
Sets your system to the date that you specify (usually the current date). The
format is month, day, year. Type in the appropriate information. Use the Tab or
Shift + Tab keys to move between the month, day, and year fields.
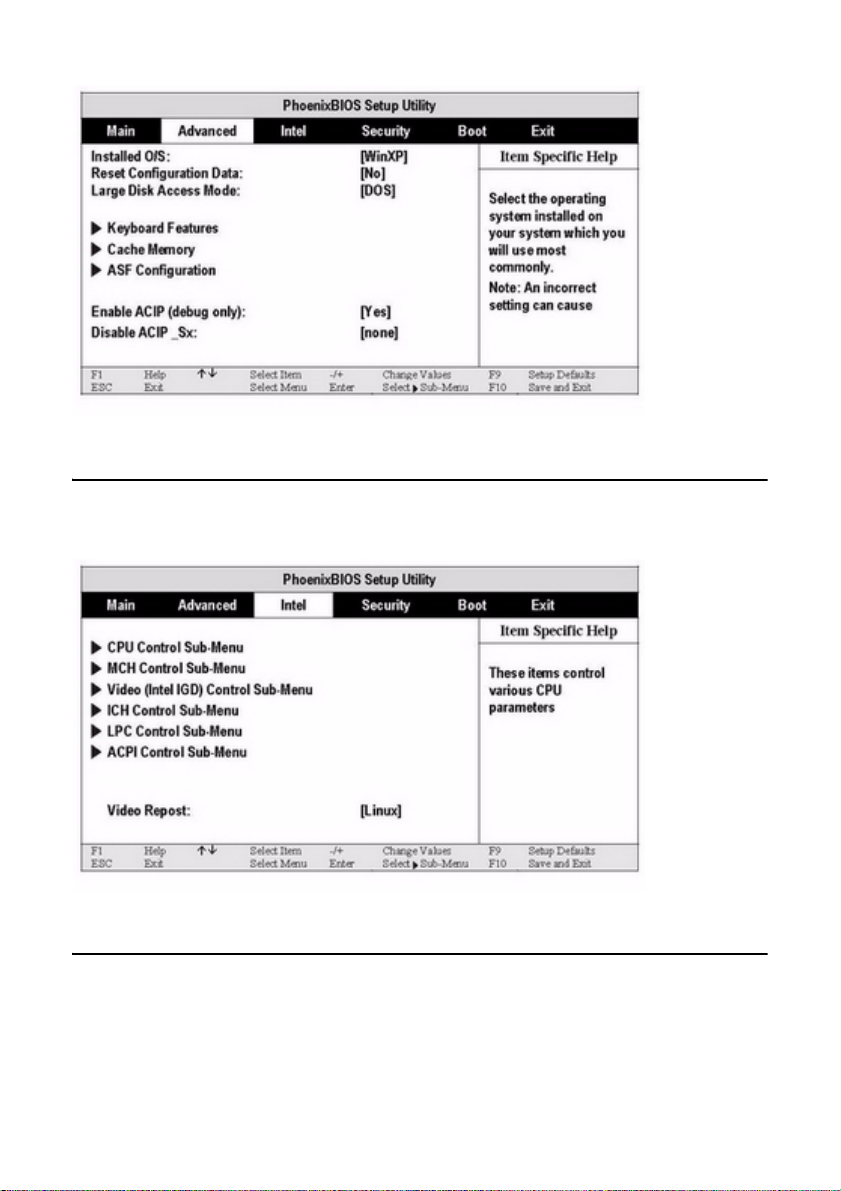
The Advanced menu
Select the item from the menu bar to display the following menu:
User manual
34 — The BIOS setup utility
The Intel menu
Select the item from the menu bar to display the following menu:
The Security menu
Select the item from the menu bar to display the following menu:
Flybook

The Boot menu — 35
The Boot menu
Select the item from the menu bar to display the following menu:
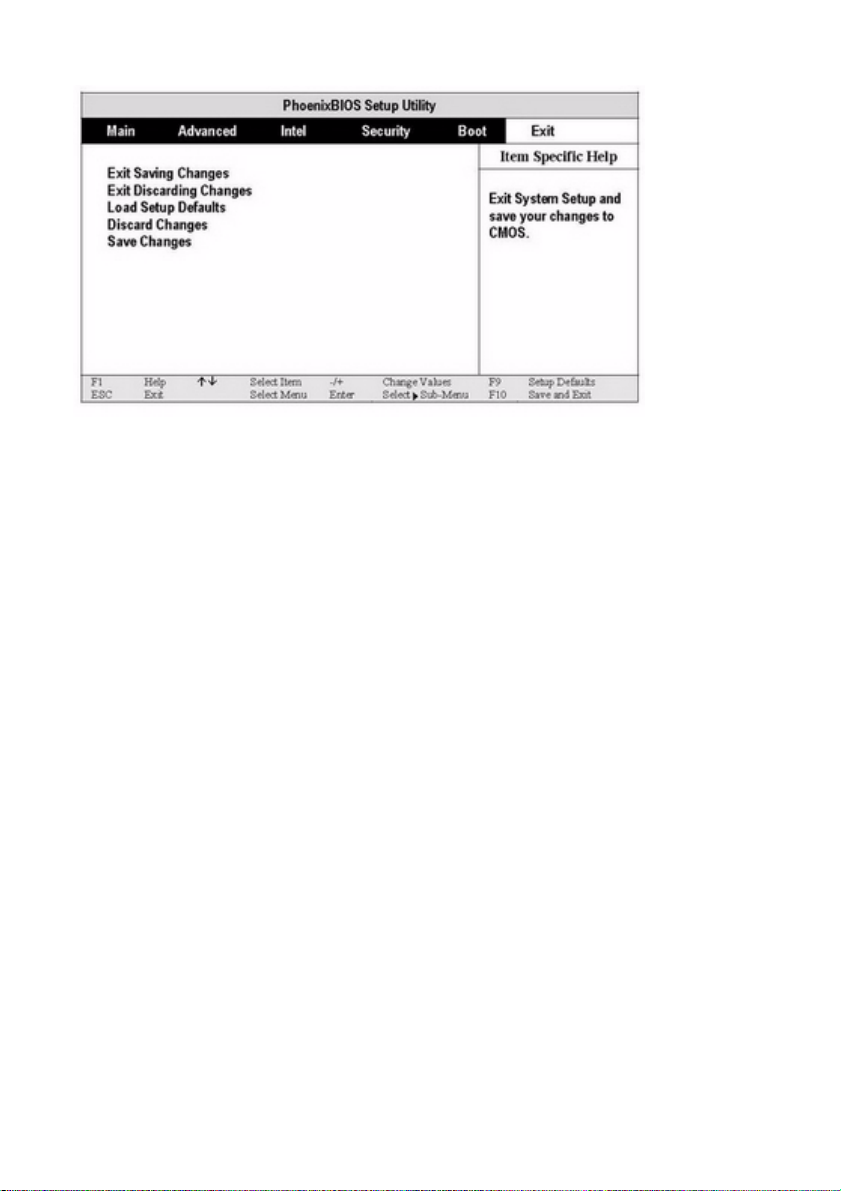
The Exit menu
After you finish making changes to the BIOS use the Exit menu to close the
BIOS setup and restart your system. Select the item from the menu bar to display the following menu:
User manual
36 — The BIOS setup utility
Flybook

Tips for Troubleshooting — 37
Troubleshooting and specifications
Tips for Troubleshooting
In each problem-specific section, try the steps in the order suggested. This may
help you to solve the problem more quickly.
Try to pin point the problem and thus avoid replacing non-defective parts.
Keep a record of the steps you take when troubleshooting: The information
may be useful when calling for technical support or for passing on to service
personnel.
• Use some other electrical device to confirm that the electrical outlet is
working.
• Ensure the VM is turned on.
• Ensure all connections are securely attached.
The Power-On Self Test
The Power-On Self Test (POST) runs every time you turn on or reset the computer. The POST checks memory, the mainboard, the display, the keyboard,
the disk drives, and other installed options.
A few seconds after you turn on your computer, a copyright message appears
on your display screen. A memory test message appears next; as the test continues, memory size increases until all installed memory is tested. Normally , the
only test routine visible on the screen will be the memory test.
If failure is detected in an area other than the mainboard (such as the keyboard
or an adapter card), an error message is disp layed on the screen and testi ng is
stopped.
If your system does not successfully complete the POST, but displays a blank
screen, emits a series of beeps, or displays an error code, consult your dealer.
User manual

38 — Troubleshooting and specifications
General Hardware Problems
A few common hardware problems and suggested solutions are presented in
the table below:
T
HE DISPLAY SCREEN IS DARK.
Adjust the screen brightness.
Make sure that the computer is not in suspend mode.
A
N INCORRECT DATE AND TIME ARE DISPLAYED.
Correct the date and time using the DOS DATE and TIME commands or the
options in the Setup Utility . (You can also set the date and time in Windows by
double clicking the clock on the task bar or in the control panel.) If the date and
time become incorrect after a sh ort time , your CMOS battery may be depleted.
Contact your dealer to change the battery.
A
N UNIDENTIFIED MESSAGE IS DISPLAYED.
Reboot the computer and run the BIOS Setup Utility. Confirm the Setup Utility
parameters. If the same message is displayed after booting up again, contact
your dealer for support.
Identifying Problems
Follow the steps below to identify your problems:
1. Turn off the computer.
2. Disconnect any peripheral devices such as an ex te rn al mou s e or printe r.
3. Make sure that the AC adapter is properly connected to your computer and
the power source is active.
4. Leave the computer off for ap proximately 10 seconds, and then switch it on
again. The computer should enter the boot sequence and start normally.
5. If the computer does not start normally, look for a screen message or other
clues on the malfunction, and try the troubleshooting tips below.
Conquering Possible Problems
Flybook

Identifying Problems — 39
T
HE COMPUTER DOES NOT START OR BOOT-UP
If the power indicator is not on, the computer is without po we r. Make sure you
have properly attached the AC adapter and power cord, or have installed a
charged battery.
If the computer is running on battery power, ensure that the battery charge is
not low. If the battery appears to be charged, it may be faulty.
If the computer is using the AC adapter, ensure that the AC outlet, airplane
seat jack, or car cigarette lighter are working. If the AC outlet power is working,
the AC adapter may be faulty.
H
ARD DRIVE OR EXTERNAL BOOT-UP DEVICE IS INACCESSIBLE
If the hard disk indicator is lit, BIOS may be incorrectly set. Revise the BIOS
settings for the Primary Master.
Security may be set to prevent starting the operating system.
If you choose to boot up your system from an external device through a USB
port, make sure it is on and bootable media have been inserted.
T
HE SCREEN IS BLANK OR THE DISPLAY IS ABNORMAL
The computer may be set to an external display device only. Press Fn + F1 to
switch to the VM display.
The power management system may automatically blank the screen to save
power, and is in video time-ou t, standby mo de, or hiberna tion mode. Press any
key, move the pointer, or push the power button to turn on the display.
The angle of the display and the brightness level is inadequate for the ambi ent
lighting. Adjust the display angle and press Fn + F2 or Fn + F3 to adjust the
brightness level.
The LCD screen has a default resolution of 1024 x 600 (XVGA). If you set the
resolution lower than this, the screen expands to fill the display. When the system can not expand its display to full screen on the LCD screen or on an external display device, you can right click on Windows desktop and select
Properties to open the Display Properties window. Then click the Settings
tab and set the resolution to an appropriate value.
User manual

40 — Troubleshooting and specifications
N
O AUDIO OUTPUT
The audio system is closed or the volume of audio system is too low. Use hot
keys or Flybook Control Center to open the audio system and adjust the volume.
The audio output is disabled or too low for the audio application. Open the
audio output and adjust the volume.
When plugging an earphone or external speaker into the earphone/line-out
jack, the built-in speakers are disabled automatically. If you can not hear sound
from the built-in speakers, ensure that nothing is plugged into the jack.
T
HE KEYBOARD, TOUCHPAD OR MOUSE DOES NOT WORK PROPERLY
The system may have entered Suspend to RAM mode. Push the power bu tto n
to resume the system.
An application may have locked out your input device. Restart your system.
If the keyboard or mouse does not respond on the USB port, ensure that the
devices are installed properly and that drivers are installed.
C
ANNOT CONNECT TO A WIRELESS LAN
An incorrect network name (SSID) or network key may be used. Make sure you
have set the network name (SSID) and key to the same values as the access
point (infrastructure connection) or the computers to be connected (Ad Hoc
connection) have.
The computer may be too far from other communication devices. Retry the
connection after moving your computer closer to the computers to be connected with (Ad Hoc connection) or to the access point (infrastructure connection). Also, check the wave condition in the Wireless Network Connection
Status window.
Check if the wireless LAN module is turned on. Verify that Disable Radio is not
checked in the Network setting window.
Make sure you have access rights or network auth entication to the network you
want to connect to.
Try changing channels to avoid active channel duplication.
Flybook

Having the VM Serviced — 41
Check the setting of the protocol, work group, shared setting, and IP address.
C
ANNOT CHARGE BATTERY OR LOSING POWER QUICKLY
Verify that the battery is properly installed and it is not too hot or too cold.
Calibrate the battery.
The installed battery may be faulty. Replace it with a new one.
Having the VM Serviced
If you are unable to solve the problem, you should have the computer serviced.
Pack the computer in the original carton. Include a description of the problem
and a checklist of the steps you took when trying to fix the problem. The information may be useful to the service personnel. Return the computer to the
place you purchased it.
User manual

42 — Specifications
Specifications
Model VM
Wireless PAN:
Wireless LAN:
Processor:
Main Memory:
Core Logic:
Chipset:
Display:
Hard Disk:
DVD:
BIOS and Flash
External VGA Display
LAN:
Camera:
Audio:
Authentication:
Other I/O ports:
Input Device:
Quick Buttons:
Battery:
Dimensions:
Color selection:
Operating System:
12.1” / 16:10 wide-view Color LTPS TFT LCD with (32-bit) 1280 x 768 high
● USB 2.0 x 2
● PCI-Express x 1
● 82-key standard keyboard
● Mouse Pad and Left/Right button
● Power
● RF Kill
● Dimensions: 292 x 222 x 25.8 (thinnest) mm
● 1.64 Kg (with standard battery)
Bluetooth 2.0 with antenna built-in
IEEE 802.11 a/b/g (Intel 3945) with antenna built-in
(Europe / NA / Japan)
Intel LV DUO 1.66GHz
1 ~ 2GB DDR2
Intel 945GM
ICH7M
resolutions display
1.8” 30GB ATA x 1
DVD Combo built - in
Phoenix TC BIOS
Up to 1800 x 1440 resolutions
(highest to 32-bit color)
10/100/1000Mbps
VGA format built-in
Array Mic. / Stereo Speaker built-in
Finger-Print device and recognition built-i n
Swappable Li-lon rechargeable battery
( standard :3 x 2400mAh ; extended : 6 x 2400mAh )
Black / Grey / Red
Microsoft Windows XP Pro or Vista
Works and Trial Microsoft Office preloaded
Flybook

Having the VM Serviced — 43
28
DC-
IN POWER SUPPLY (THROUGH DC-IN POWER JACK):
Input rating: 19Vdc, 3.42A , 65W
Maximum operating temperature (ambient): 40 degree C
AC A
DAPTER:
Model no.: SADP-65KB DBE
Input rating: 100-240Vac, 50-60Hz, 1.5A
Output rating:19Vdc, 3.42A, Class I, marked LPS
B
ATTERY:
3 cell 18650 Li-Ion rechargeable battery pack
Charging: Direct DC charging
User manual

44 — Specifications
Flybook

 Loading...