

Page 1

Dialogic® 2000 Media Gateway Series
Quick Start Guide for Microsoft®
Office Communications Server 2007
Page 2
Introduction
PBX
IP LAN
T1/E1
Dialogic
®
2000
Media Gateway Series
Mediation Server
Microsoft® Office
Communications
Server 2007
Environment
Dialogic® Media Gateways can link a traditional PBX or PSTN voice circuit to new
VoIP solutions such as Microsoft® Office Communications Server 2007. They are
designed and tested to be easy to deploy, easy to manage, and to provide reliable
operation. This guide provides instructions for installation and configuration of
the Dialogic® 2000 Media Gateway Series (DMG2000).
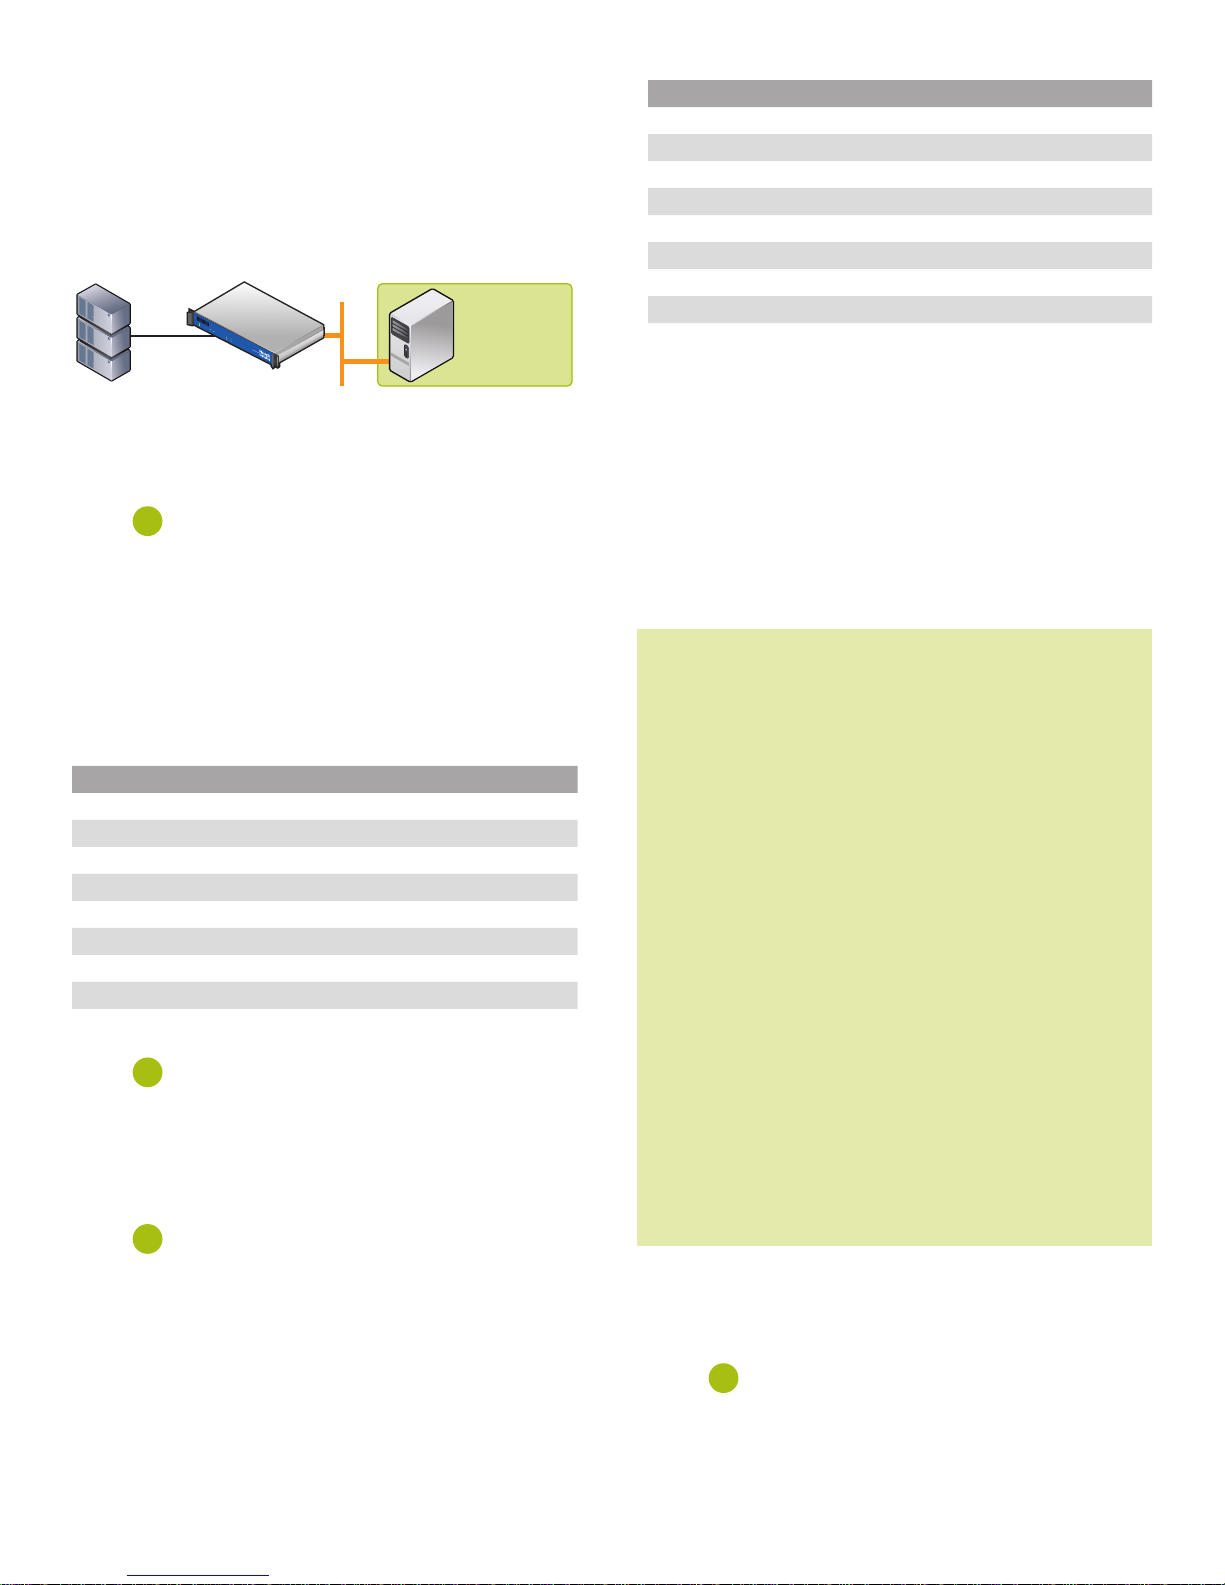
System Diagram
Caption: Dialogic® 2000 Media Gateway Series can link legacy PBX infrastructure and the Microsoft®
Office Communications Server 2007 Environment.
STEP
Trunk Preparation
The PBX-side T1 or E1 trunk must be configured for T1 (NI2, QSIG, 5ESS or DMS
protocols) or E1 (Euro ISDN or QSIG protocols). For more information on PBX
programming, refer to: http://www.dialogic.com/microsoftuc/ocs_integration.htm
Cabling Requirements
Cabling for T1/E1 ISDN Connections must be CAT5e or better. A T1/E1 crossover
cable may be needed depending on the PBX. See Table 1 for the connector pin
designations.
Pin Description
1 RCV_RING
2 RCV_TIP
3 No Connection
4 XMIT_RING
5 XMIT_TIP
6 No Connection
7 No Connection
8 No Connection
Table 1. T1/E1 Connector Pin Designations
STEP
1. Unpack gateway.
2. Connect T1/E1 cables to rear panel.
3. Connect power cord.
4. Turn on power switch.
STEP
There are two options for performing the initial configuration of the gateway -serial or IP.
Connecting with Serial Port
1. Connect a DB9 serial cable to the COM 2 port on the gateway.
2. Establish a connection to the gateway (Baud=115200, Data Bits=8, Stop
Bits=1, Parity=none, Flow Control=none) using a terminal emulation
program (e.g. HyperTerminal). See Table 2 for the serial port pin outs.
– PREPARATION
1
– GATEWAY INSTALLATION
2
– GATEWAY CONFIGURATION
3
Pin Signal
1 Data Carrier Detect
2 Transmit Data
3 Receive Data
4 Data Terminal Ready
5 Signal Ground
6 Data Set Ready
7 Clear to Send
8 Request to Send
9 Ring Indicator
Table 2. Serial Port Pin Outs
Connecting with Ethernet
1. Connect gateway to Network using LAN 1.
2. Configure computer connecting to gateway on the 10.12.13.x subnet
(e.g. 10.12.13.75) and subnet mask of 255.255.255.0.
3. Use Telnet and connect to gateway at: 10.12.13.74.
Initial Gateway Configuration
1. Configure initial gateway. Press Enter key until you get to the “PIMG”
prompt. Follow the steps below and modify the settings in red to match
your environment. The values in bold are what you will be entering.
PIMG> pwd
Enter Password: IpodAdmin
Admin level accepted.
PIMG-admin> quickcfg
LAN 1 IP Address[10.2.2.3] : (Enter new IP Address that
matches gateway IP Address entered in Mediation server)
LAN 1 Subnet Mask[255.255.255.0] :
(Enter new Subnet Mask)
LAN 1 Default Network Gateway Address[10.2.2.5] :
(Enter new Default Network Gateway Address)
LAN 2 IP Address[10.2.2.2] :
LAN 2 Subnet Mask[255.255.255.0] :
Select Line Mode ...
Valid entries:
1. T1
2. E1
Enter Number for Line Mode Selection [T1] : 1
Select Protocol ...
Valid entries:
1. CAS - Loop Start
2. CAS - Ground Start
3. CAS - E&M Immediate
4. CAS - E&M Delay
5. CAS - E&M Wink
6. ISDN - QSIG
7. ISDN - NI-2
8. ISDN - 5ESS
9. ISDN - DMS-100
Enter Number for Protocol Selection [ISDN - NI-2] : 6
Saving parameters now...
Parameters successfully congured!
******* Restart Required ******* (Type ‘restart’)
PIMG-admin> restart
rebooting...
2. Clear ARP Table on computer connecting to gateway (e.g. on Windows-based
machine, the command is “arp -d*” from a Command Shell).
3. Change the IP address on computer connecting to gateway to match the
newly configured gateway IP subnet.
STEP
– FINAL GATEWAY CONFIGURATION
4
Once the initial configuration is complete and the gateway has been reset, you will
need to log into the web interface by browsing to the IP address of the gateway
using “admin” as the user and entering the gateway password (“
IpodAdmin”
is the default).
Page 3
Setting T1/E1 Parameters
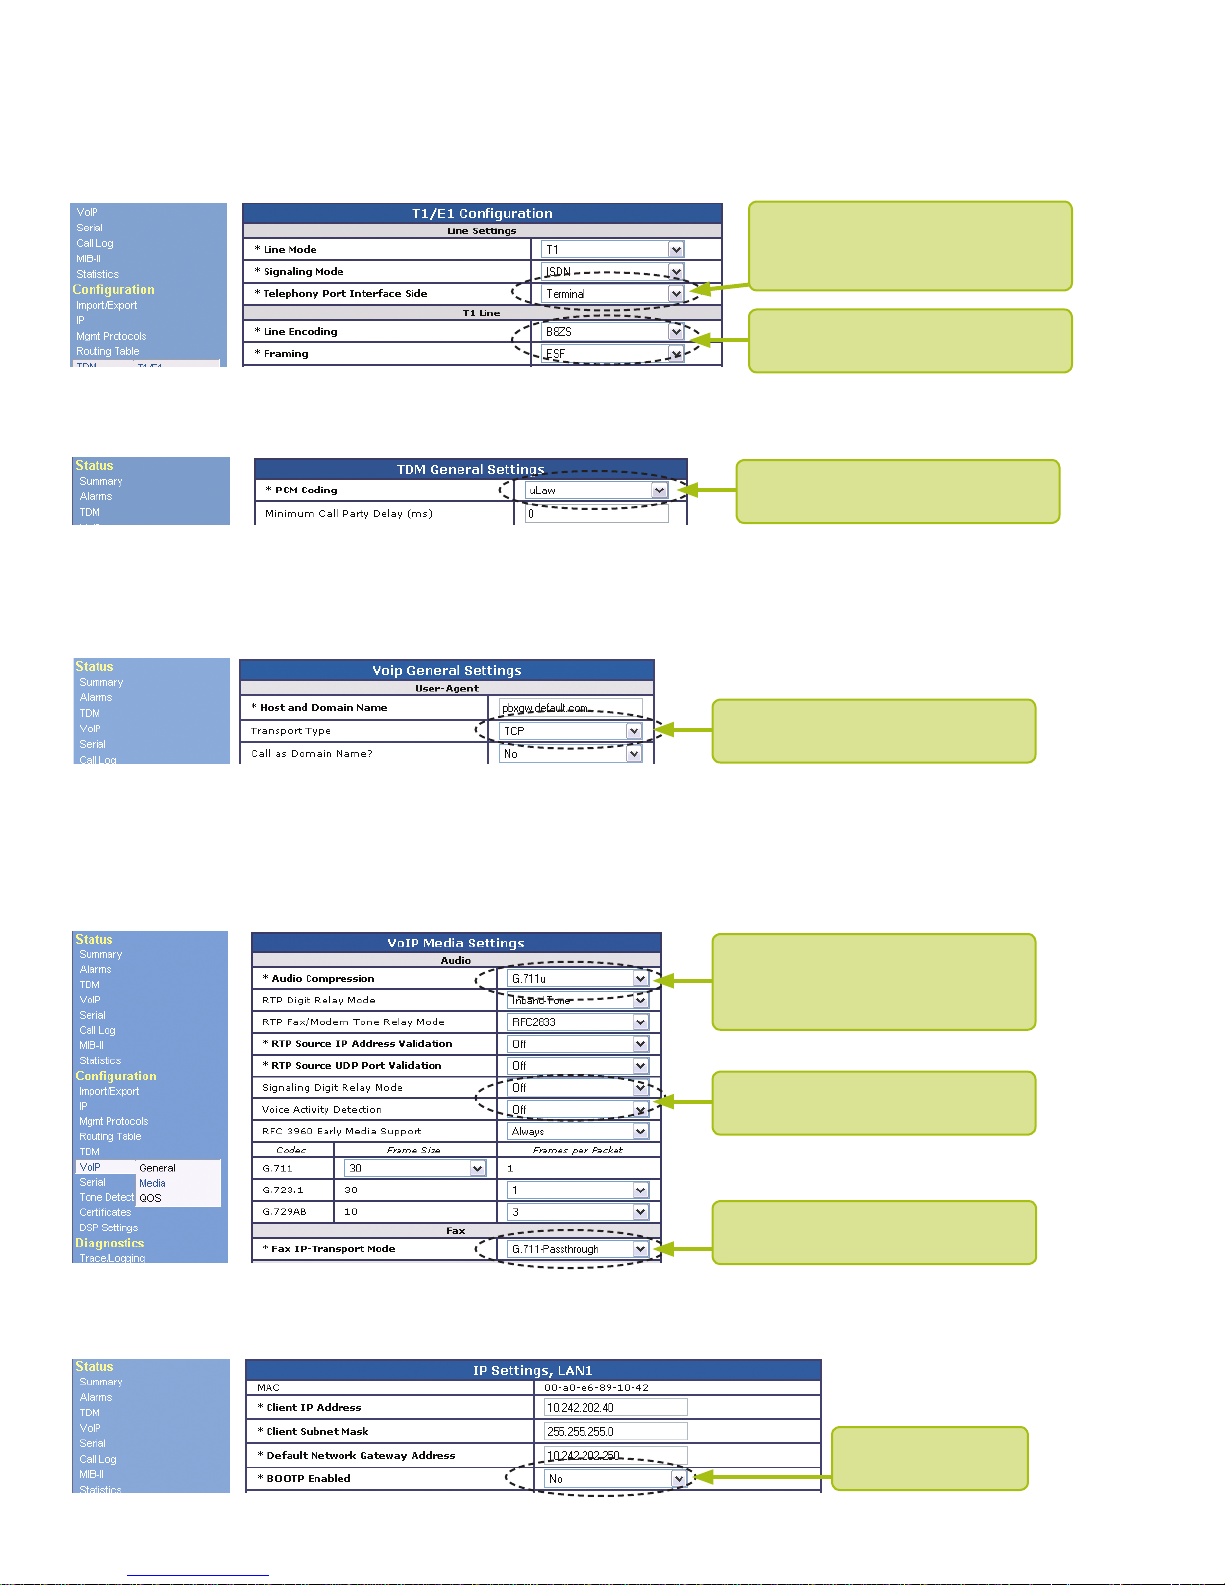
Navigate to: Configuration > TDM > T1/E1 and adjust the following settings -
1. Set Telephony Port Interface Side: This should be Terminal if your PBX is set to Network or Network if your PBX is set to Terminal.
2. Set Line Encoding and Framing: This should match your PBX settings.
3. Click Submit to save settings. This will prevent loss of configuration. Do not restart the gateway.
Set Telephony Port Interface Side to
Network or Terminal, using the opposite
setting from your PBX setting
Set Line Encoding and Framing to match
your PBX settings
Navigate to: Configuration > TDM > General and adjust the following settings -
1. Set PCM Coding: uLaw or aLaw to match your PBX setting.
2. Click Submit to save settings. This will prevent loss of configuration. Do not restart the gateway.
Set PCM Coding: uLaw or aLaw to
match your PBX setting
Setting Microsoft® Office Communications Server 2007 Specific Parameters
Navigate to: Configuration > VoIP > General, and adjust the following setting -
1. Set Transport Type: TCP.
2. Click Submit to save settings. This will prevent loss of configuration. Do not restart the gateway.
Set Transport Type: TCP
Navigate to: Configuration > VoIP > Media, and adjust the following settings -
1. Set Audio Compression: G.711u or G.711a to match your Microsoft® Office Communications Server 2007 setting.
2. Set Signaling Digit Relay Mode: Off.
3. Set Voice Activity Detection: Off.
4. Set Fax IP-Transport Mode: G.711-Passthrough.
5. Click Submit to save settings. This will prevent loss of configuration. Do not restart the gateway.
Set Audio Compression: G.711u or
G.711a to match your Microsoft® Office
Communications Server 2007 setting
Set Signaling Digit Relay Mode and
Voice Activity Detection: Off
Set Fax IP-Transport Mode: G.711
Passthrough
Navigate to: Configuration > IP, and adjust the following setting -
1. Set BOOTP Enabled: No.
2. Click Submit to save settings. This will prevent loss of configuration. Do not restart the gateway.
Set BOOTP Enabled: No
Page 4
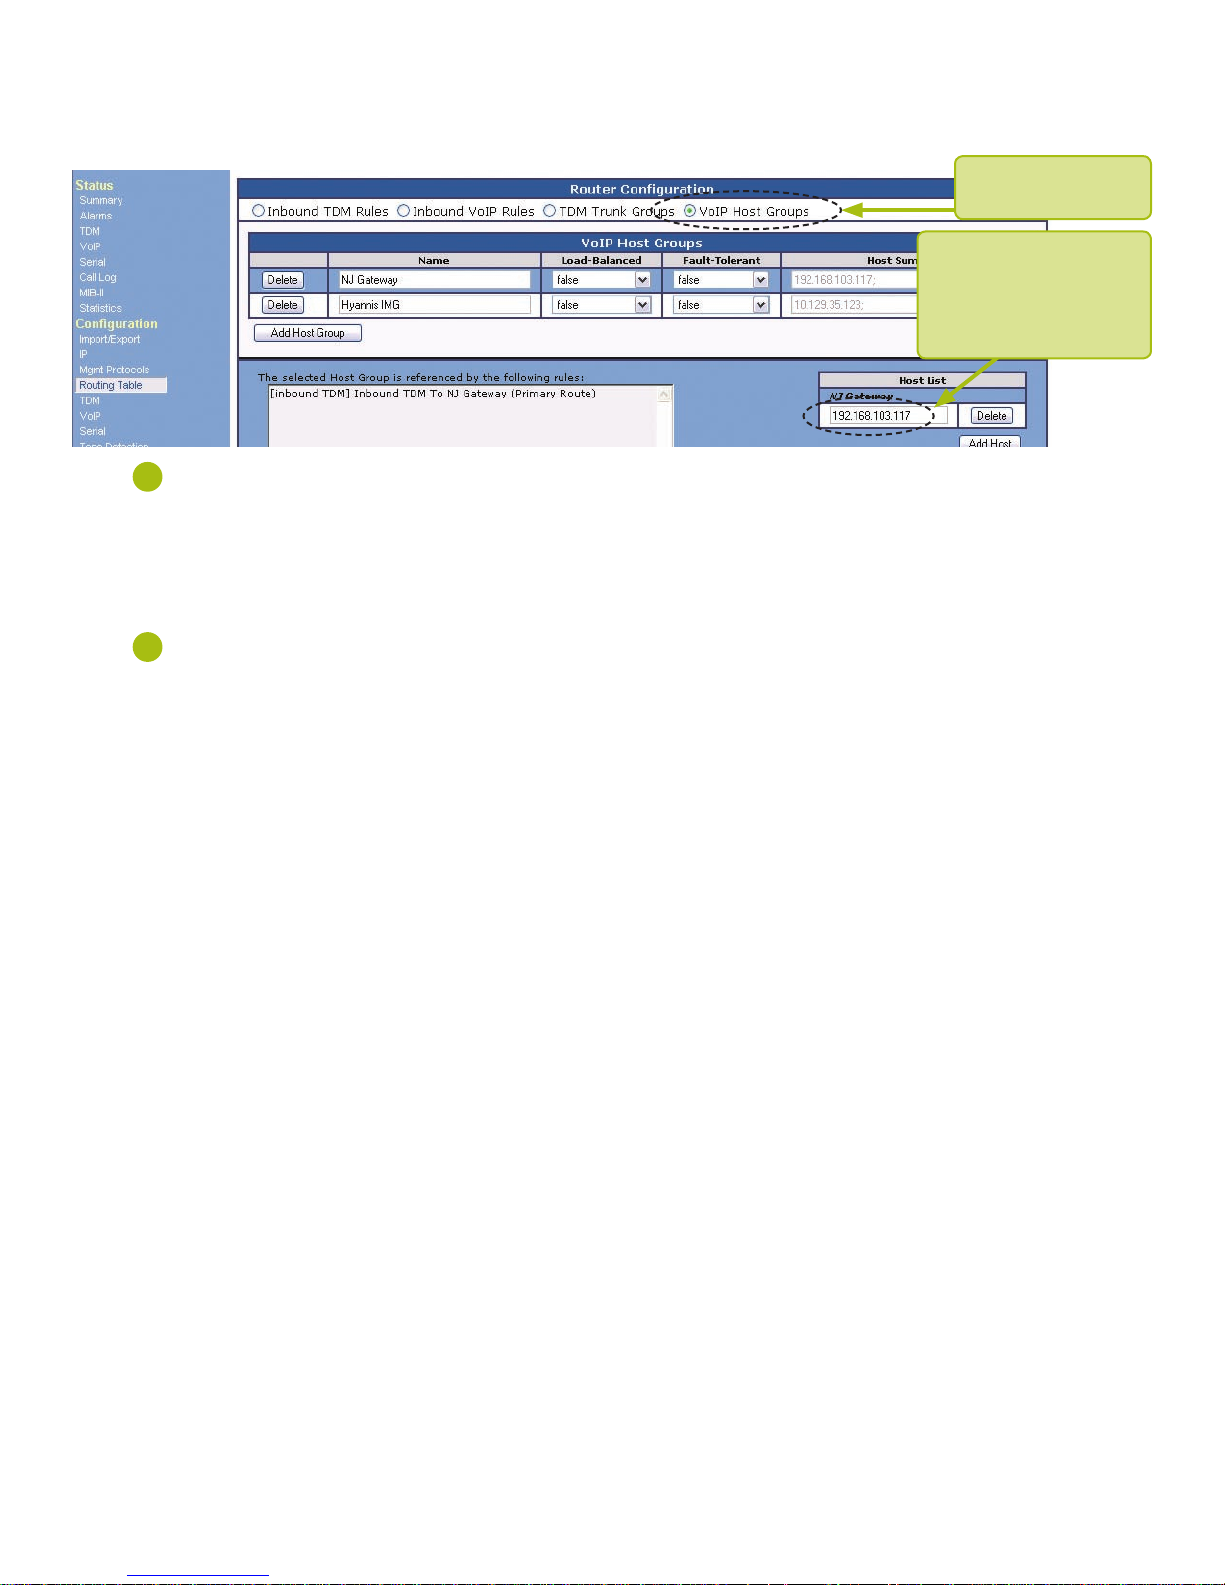
Navigate to: Configuration > Routing Table, and adjust the following settings -
1. Select VoIP Host Groups radio button.
2. Enter your Microsoft
®
Office Communications Server 2007 Mediation Server IP Address in the Host List field.
3. Click Submit to save settings. This will prevent loss of configuration. Do not restart the gateway.
Select VoIP Host Groups
radio button
Enter your Microsoft
®
Office
Communications Server
2007 Mediation Server IP
Address in the Host List field
STEP
For the configuration changes to take effect, you will be prompted to restart the gateway. Select the Restart menu option through the web interface and proceed to click on
Restart Unit Now.
After restarting the gateway, examine the T1 link in front of the gateway and make sure that the T1 LED is green. If it is yellow or red, please check your cable and gateway T1
configuration or consult with your PBX vendor. Once you have a green LED, you can begin making PSTN to Microsoft® Office Communications Server 2007 calls if Normalization
rules were configured for inbound PSTN calls. Microsoft® Office Communications Server 2007 to PSTN calls would require more rules to be added.
STEP
Configuring calls from PSTN to Microsoft® Office Communications Server 2007
No modifications to the Inbound TDM Rules under the Routing Table are needed if Microsoft® Office Communications Server 2007 is configured with Normalization rules for
inbound PSTN calls.
Note: Microsoft recommends that Normalization Rules be completed within the Microsoft® Office Communications Server 2007 configuration. If however, Normalization is not
completed there, then new rules have to be added to the Dialogic® 2000 Media Gateway Series for calls from the PBX to the Microsoft® Office Communications Server 2007
environment. For information on configuring Normalization Rules on the Dialogic® 2000 Media Gateway Series, refer to:
http://www.dialogic.com/microsoftuc/OCS_DMG2000_setup_6x.pdf
Configuring calls from Microsoft® Office Communications Server 2007 to PSTN
Gateway Inbound VoIP Rules need to be added in order to convert E.164 formatted numbers into numbers that can be dialed by the PBX.
Routing Rule Examples can be found in the following documents:
Dialogic® Media Gateway Installation and Configuration Note for Microsoft® Office Communications Server 2007
http://www.dialogic.com/microsoftuc/OCS_DMG2000_setup_6x.pdf
Dialogic® 1000 and 2000 Media Gateway User’s Guide
http://www.dialogic.com/manuals/mediagateway/UsersGuide_6x.pdf
– RESTARTING THE GATEWAY
5
– CONFIGURING DIAL PLAN FOR E.164 SUPPORT
6
Copyright © 2008 Dialogic Corporation. All Rights Reserved. You may not reproduce this document in whole or in part without permission in writing from Dialogic Corporation at the address provided below.
All contents of this document are furnished for informational use only and are subject to change without notice and do not represent a commitment on the part of Dialogic Corporation or its subsidiaries
(“Dialogic”). Reasonable effort is made to ensure the accuracy of the information contained in the document. However, Dialogic does not warrant the accuracy of this information and cannot accept
responsibility for errors, inaccuracies or omissions that may be contained in this document.
INFORMATION IN THIS DOCUMENT IS PROVIDED IN CONNECTION WITH DIALOGIC® PRODUCTS. NO LICENSE, EXPRESS OR IMPLIED, BY ESTOPPEL OR OTHERWISE, TO ANY INTELLECTUAL PROPERTY RIGHTS IS
GRANTED BY THIS DOCUMENT. EXCEPT AS PROVIDED IN A SIGNED AGREEMENT BETWEEN YOU AND DIALOGIC, DIALOGIC ASSUMES NO LIABILITY WHATSOEVER, AND DIALOGIC DISCLAIMS ANY EXPRESS OR
IMPLIED WARRANTY, RELATING TO SALE AND/OR USE OF DIALOGIC PRODUCTS INCLUDING LIABILITY OR WARRANTIES RELATING TO FITNESS FOR A PARTICULAR PURPOSE, MERCHANTABILITY, OR INFRINGEMENT
OF ANY INTELLECTUAL PROPERTY RIGHT OF A THIRD PARTY.
Dialogic products are not intended for use in medical, life saving, life sustaining, critical control or safety systems, or in nuclear facility applications.
Due to differing national regulations and approval requirements, certain Dialogic products may be suitable for use only in specic countries, and thus may not function properly in other countries. You are
responsible for ensuring that your use of such products occurs only in the countries where such use is suitable. For information on specic products, contact Dialogic Corporation at the address indicated
below or on the web at www.dialogic.com.
It is possible that the use or implementation of any one of the concepts, applications, or ideas described in this document, in marketing collateral produced by or on web pages maintained by Dialogic may
infringe one or more patents or other intellectual property rights owned by third parties. Dialogic does not provide any intellectual property licenses with the sale of Dialogic products other than a license
to use such product in accordance with intellectual property owned or validly licensed by Dialogic and no such licenses are provided except pursuant to a signed agreement with Dialogic. More detailed
information about such intellectual property is available from Dialogic’s legal department at 9800 Cavendish Blvd., 5th Floor, Montreal, Quebec, Canada H4M 2V9. Dialogic encourages all users of its products
to procure all necessary intellectual property licenses required to implement any concepts or applications and does not condone or encourage any intellectual property infringement and disclaims any
responsibility related thereto. These intellectual property licenses may differ from country to country and it is the responsibility of those who develop the concepts or applications to be aware of and
comply with different national license requirements.
Dialogic, Dialogic Pro, Brooktrout, Cantata, SnowShore, Eicon, Eicon Networks, Eiconcard, Diva, SIPcontrol, Diva ISDN, TruFax, Realblocs, Realcomm 100, NetAccess, Instant ISDN, TRXStream, Exnet, Exnet
Connect, EXS, ExchangePlus VSE, Switchkit, N20, Powering The Service-Ready Network, Vantage, Making Innovation Thrive, Connecting People to Information, Connecting to Growth and Shiva, among others
as well as related logos, are either registered trademarks or trademarks of Dialogic. Dialogic’s trademarks may be used publicly only with permission from Dialogic. Such permission may only be granted
by Dialogic’s legal department at 9800 Cavendish Blvd., 5th Floor, Montreal, Quebec, Canada H4M 2V9. Any authorized use of Dialogic’s trademarks will be subject to full respect of the trademark guidelines
published by Dialogic from time to time and any use of Dialogic’s trademarks requires proper acknowledgement.
Microsoft is a registered trademark of Microsoft Corporation in the United States and/or other countries. Other names of actual companies and product mentioned herein are the trademarks of their
respective owners.
Publication Date: August 2008 Document Number: 64-0351-01 08/08 11128-01
 Loading...