

Page 1
Modulation Processor
V2.0
User Guide
V1.4
Dialog Audio
© 2017
Page 2

Dialog Audio / MP3244 User Guide
Table of Contents
1! Introduction ...................................................................................................................................... 3!
2! Installation ........................................................................................................................................ 4!
2.1! Mac OS X ................................................................................................................................... 4!
2.2! Windows .................................................................................................................................... 4!
3! Registration & Activation .................................................................................................................. 5!
3.1! Activate Online ........................................................................................................................... 5!
3.2! Activate Offline ........................................................................................................................... 5!
3.3! Deactivate License ..................................................................................................................... 5!
4! Quick Start Guide ............................................................................................................................. 6!
4.1! Basic Host Application Setup .................................................................................................... 6!
4.2! Control External Synthesizer via MIDI CC ................................................................................. 7!
4.3! Control External Synthesizer via SYSEX ................................................................................... 8!
4.4! Control External Synthesizer via CV .......................................................................................... 9!
4.5! Control Internal Synthesizer via MIDI CC ................................................................................ 10!
4.6! Connecting Modules ................................................................................................................ 11!
4.7! Output Oscilloscope ................................................................................................................ 12!
4.8! Creating Custom Waveforms .................................................................................................. 12!
5! MIDI CC & SysEx Messages .......................................................................................................... 13!
5.1! SysEx Messages ...................................................................................................................... 13!
5.1.1! Creating SysEx Messages ................................................................................................ 13!
5.1.2! Special Commands ........................................................................................................... 14!
5.1.3! SysEx Checksum .............................................................................................................. 14!
5.2! Avoiding MIDI Jitter Guideline ................................................................................................. 15!
6! The Modules ................................................................................................................................... 16!
6.1! Low Frequency Oscillator (LFO) .............................................................................................. 16!
6.2! Slope Generator ....................................................................................................................... 17!
6.3! Envelope Generator ................................................................................................................. 18!
6.4! Cross-Fader (X-Fader) ............................................................................................................. 19!
6.5! Voltage Controlled Amplifier (VCA) .......................................................................................... 20!
6.6! MIDI Input ................................................................................................................................ 21!
6.7! Output ...................................................................................................................................... 21!
7! License ........................................................................................................................................... 23!
Page 3
Introduction
Dialog Audio / MP3244 User Guide
3
1 Introduction
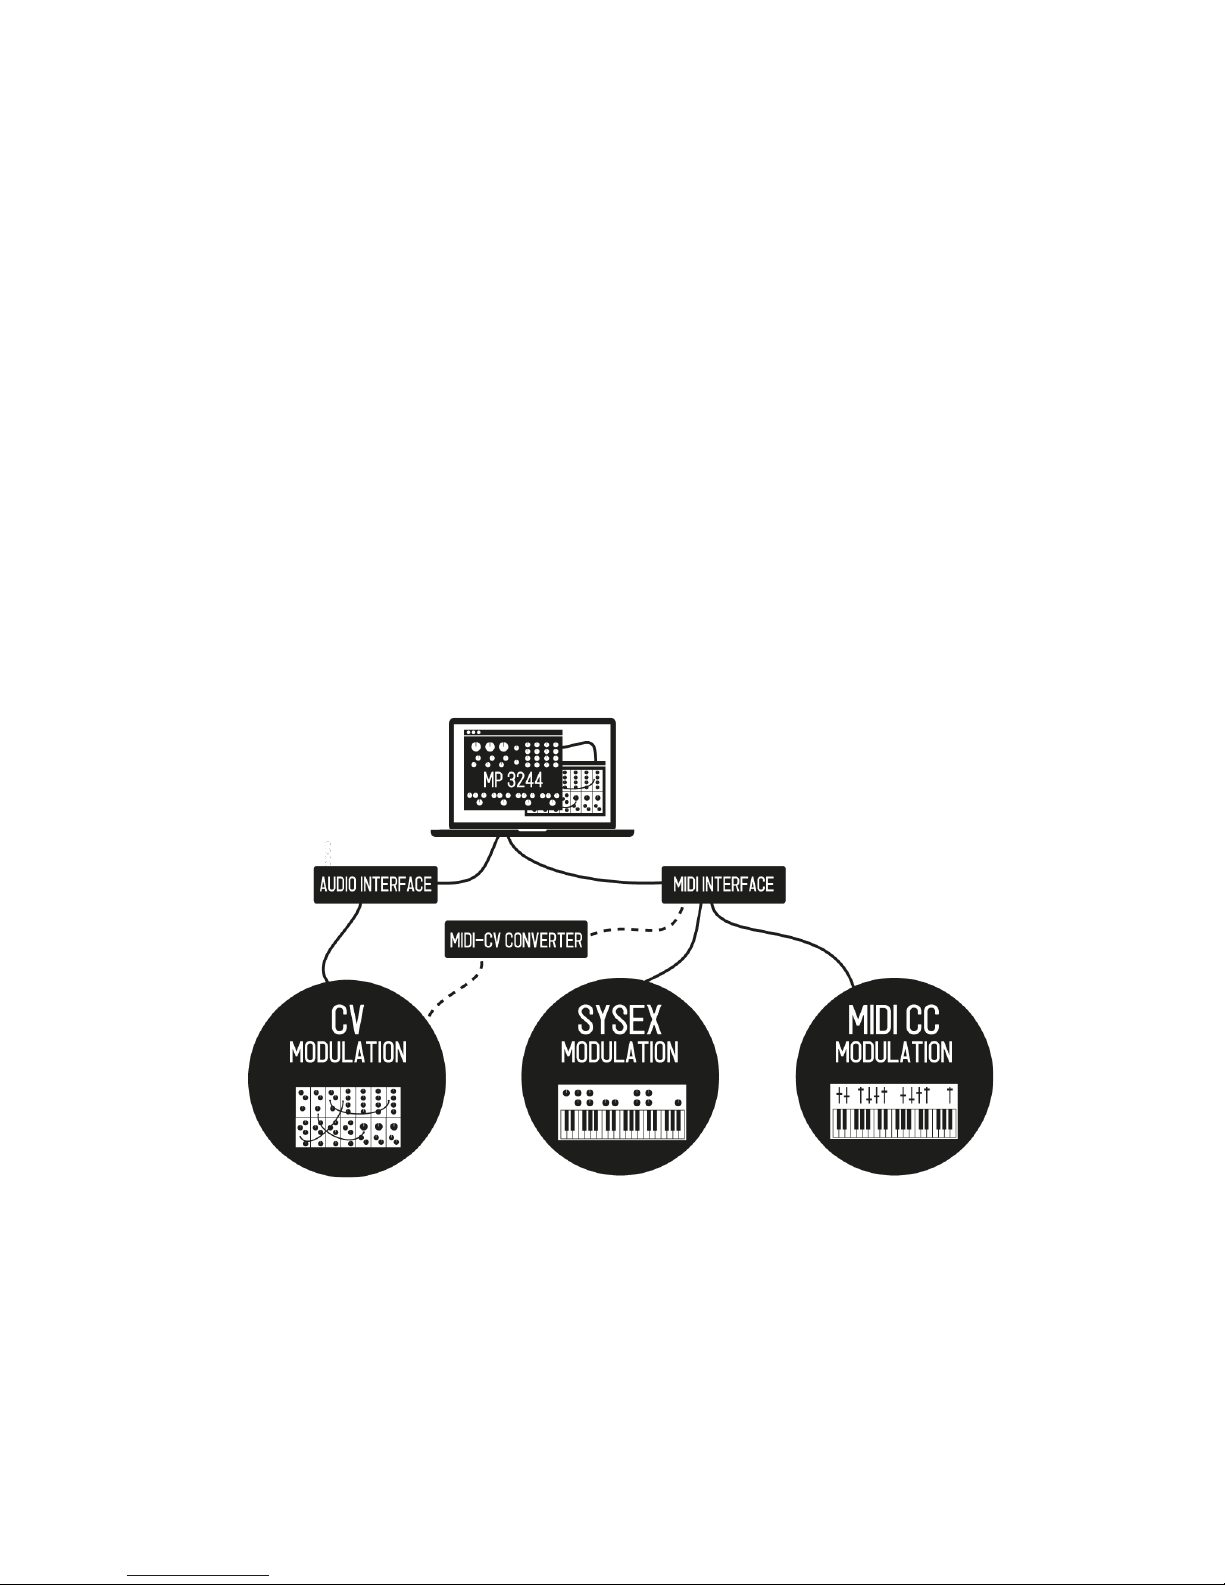
The Modulation Processor (MP3244) audio
software plug-in is especially designed for
synchronizing and modulating hardware
synthesizer parameters within a digital audio
workstation (DAW).
The modular structure of the plug-in allows
you to create various modulations, which can
be sent to any parameters of your synthesizers
and other audio equipment.
Depending on your audio hardware setup,
different connection possibilities are given:
Audio gear with MIDI inputs can be controlled
via MIDI Continuous Controller messages
(MIDI CC), or via MIDI System Exclusive
messages (SysEx).
For audio gear that can be controlled via
Control Voltages (CV), you either can use your
audio interface (if DC-coupled) or you can use
a MIDI to CV converter.
Furthermore the MP3244 can be used to
modulate software synthesizers and audio
plug-ins within the DAW, to give extended
modulation possibilities.
Page 4

Installation
Dialog Audio / MP3244 User Guide
4
2 Installation
2.1 Mac OS X
Requirements
• OSX 10.7 or higher with Intel Processor
• AU (Audio Unit), VST 2.4 or VST3 compatible host, or Pro-Tools 10.0 or higher
Install
• Download ModulationProcessor3244_V*_Mac.zip, unpack and run the installer. The installer
will copy the plug-in into the appropriate directory. All available versions will by installed by
default (VST 32/64bit, AU 32/64bit, AAX 32/64bit).
! Notice: some hosts require a restart to find the installed plug-in. Maybe a rescan is also
required! Ableton Live: if the plug-in does not show up after a plug-in rescan, try to disable
and re-enable VST plug-in support.
Uninstall
• Delete the plug-in in following directories:
/Library/Audio/Plug-Ins/Components/DA_ModulationProcessor3244*.component
/Library/Audio/Plug-Ins/VST/DA_ModulationProcessor3244.vst
/Library/Application Support/Avid/Audio/Plug-Ins/ DA_ModulationProcessor3244.aaxplugin
2.2 Windows
Requirements
• Windows XP or higher
• SSE 2 compatible processor (Pentium II or higher, or an AMD equivalent)
• VST 2.4 or VST3 compatible host, or Pro-Tools 10.0 or higher
Install
• Download ModulationProcessor3244_V*_Win.zip and unpack.
Install VST: Run Install_VST_32bit.exe for the 32 bit version. Run Install_VST_64bit.exe for
the 64 bit version. Please check with your host's manual to see if it takes 32 or 64 bit plugins. You can also install both bit versions.
The wizard will guide you trough the installation and allows you to choose the directory path
where you want to install the plug-in. If you do not choose a directory the standard directory
will be /Program Files/Steinberg/VstPlugins and /Program Files (x86)/Steinberg/VstPlugins for
the 32bit versions on a 64bit operating system.
Install AAX: Run Install_AAX.exe for the Pro-Tools versions. This will install 32bit and 64bit
version.
The wizard will guide you trough the installation and allows you to choose the directory path
where you want to install the plug-in. If you do not choose a directory the standard directory
will be /Program Files/Common Files/Avid/Audio/Plug-Ins.
! Notice: some hosts require a restart to find the installed plug-in. Maybe a rescan is also
required! Ableton Live: if the plug-in does not show up after a plug-in rescan, try to disable
and re-enable VST plug-in support.
Uninstall
• Delete the plug-in in the directory where you have installed it.
Page 5

Registration & Activation
Dialog Audio / MP3244 User Guide
5
3 Registration & Activation
To use the full version of the plug-in you need to purchase a software license. As soon you received
your software license key by email you can activate the plug-in.
3.1 Activate Online
If your DAW is connected to the Internet the activation is very simple.
Go to: Register > Online Activation
1. Copy your SOFTWARE-LICENSE-KEY into the product license field and activate. The plug-in
will connect to the Dialog Audio server and activate itself. For your freedom no further
connections will be made by the plug-in.
2. You’re all set!
3.2 Activate Offline
In case you have no Internet access on your DAW you can activate the plug-in offline.
Go to: Register > Offline Activation
1. Copy the SERIAL-NR into a text file and save on a USB drive.
2. Go to a computer with internet access and go to this web page:
http://dialogaudio.com/authentificate_offline.php
3. Copy your SOFTWARE-LICENSE and your SERIAL-NR into the appropriate fields and
generate the PRODUCT-KEY
4. Copy the PRODUCT-KEY back to the USB drive. Back at your DAW copy the PRODUCTKEY into the corresponding filed and activate.
5. You’re all set!
! Notice: if you have more than one instance loaded in the host, you might need to reload
these instance to make sure all instances are activated.
3.3 Deactivate License
To deactivate a license on a computer due to reinstallation or a new computer, the plug-in can
perform this task internally.
Go to: Menu > Deactivate License
1. Click Deactivate Product. The license will than be deleted on the computer.
Page 6
Quick Start Guide
Dialog Audio / MP3244 User Guide
6
4 Quick Start Guide
4.1 Basic Host Application Setup
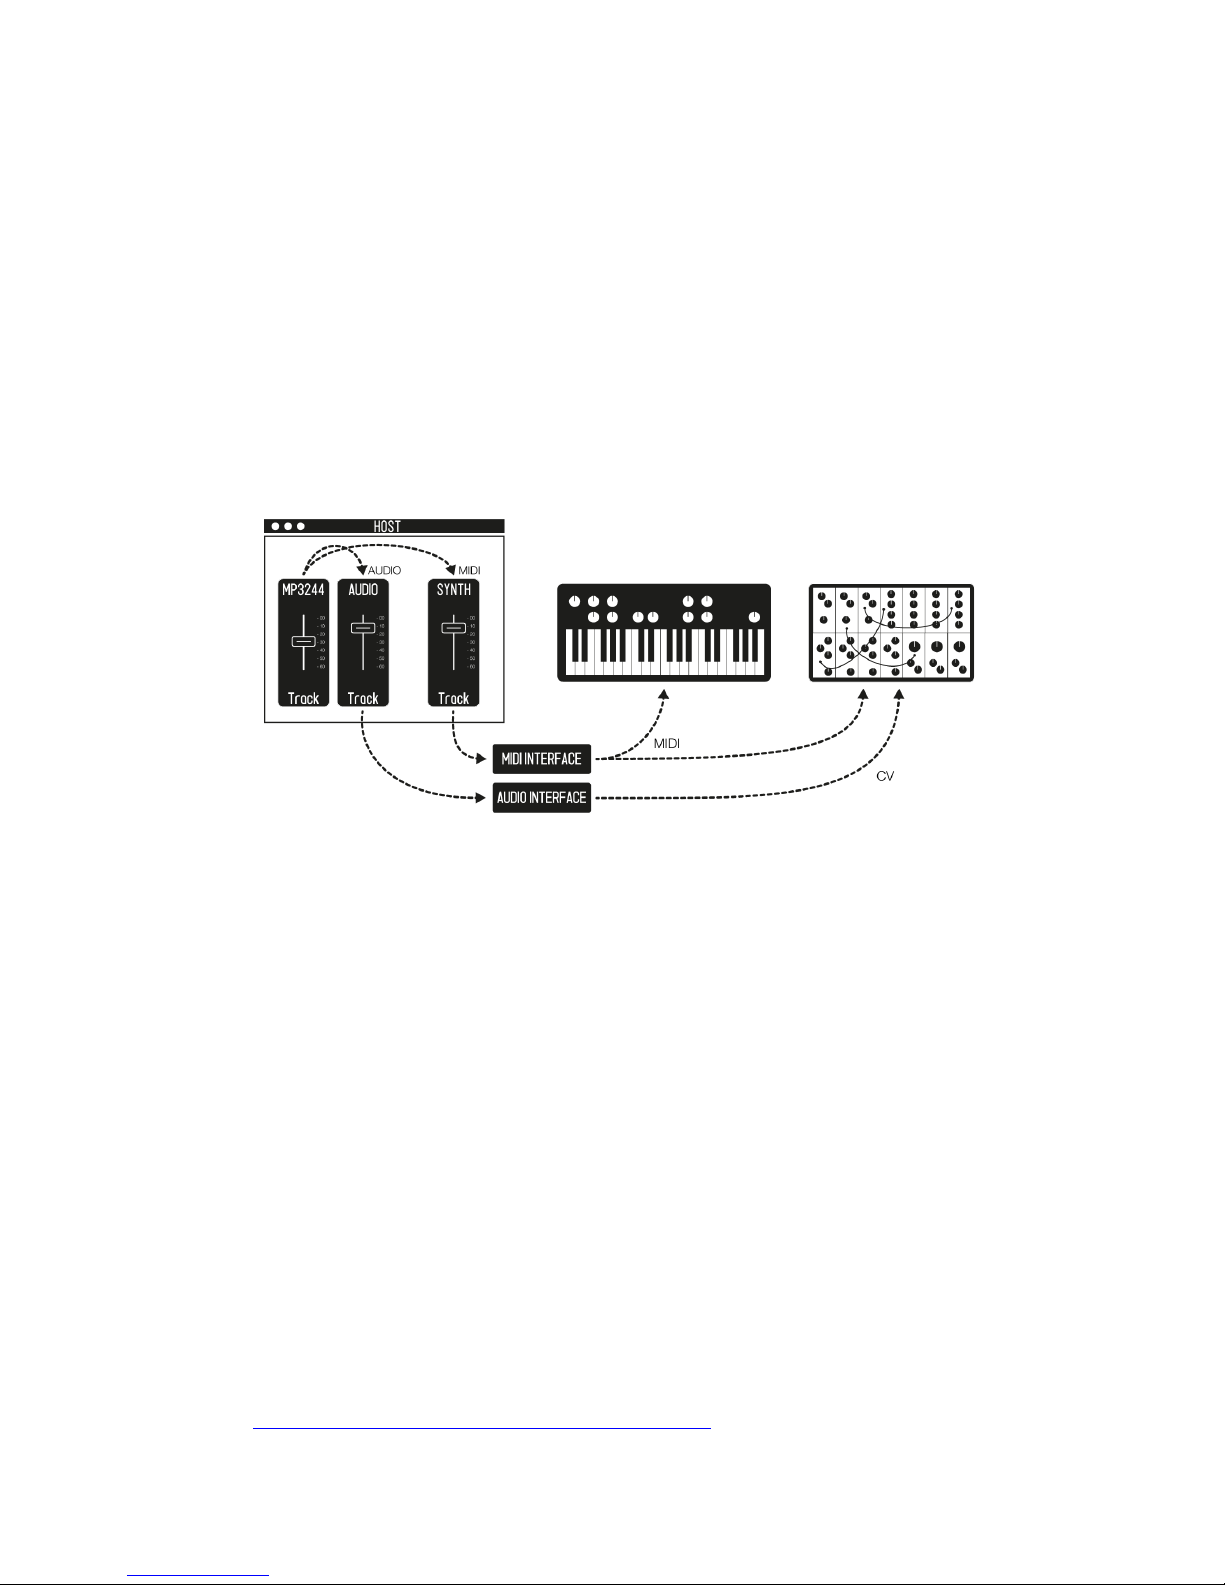
The basic setup is for most host applications
similar. Usually two tracks are needed. On one
track you add the MP3244, on a second track
you add the target device (external instrument,
software instrument). A virtual MIDI connection
needs to be made, to send MIDI messages
from the MP3244 track to the target device
track. All MIDI notes should be recorded on
the MP3244 track. This of course can vary,
depending on your host application.
For CV signals additional audio tracks need to
be added which receive the audio signal from
the MP3244 and send these to a specific DCcoupled audio interface output.
Several DAW specific setup guides can be
found on our website (see below).
1 Create a track for the Modulation Processor and add the plug-in.
2 Create a second track for the target device (external instrument,
software synthesizer, etc.). For external instruments make sure that the
MIDI connection is set correctly.
3 Make a virtual MIDI connection between the MP3244 track and the
target device track. MIDI messages need to be sent from the MP3244
track to the target device track. All notes should be recorded on the
MP3244 track.
4 For audio CV the MP3244 works as a multi channel plug-in. Additional
audio AUX channels need to be added and be connect to a physical
audio output on the audio interface (DC-coupled audio interfaces
only!).
5 Continue with the sections described below!
" Online Help: Detailed setup guides for several host applications can be found at:
https://dialogaudio.com/modulationprocessor/#guides
If you need any further help please feel free to contact us.
Page 7
Quick Start Guide
Dialog Audio / MP3244 User Guide
7
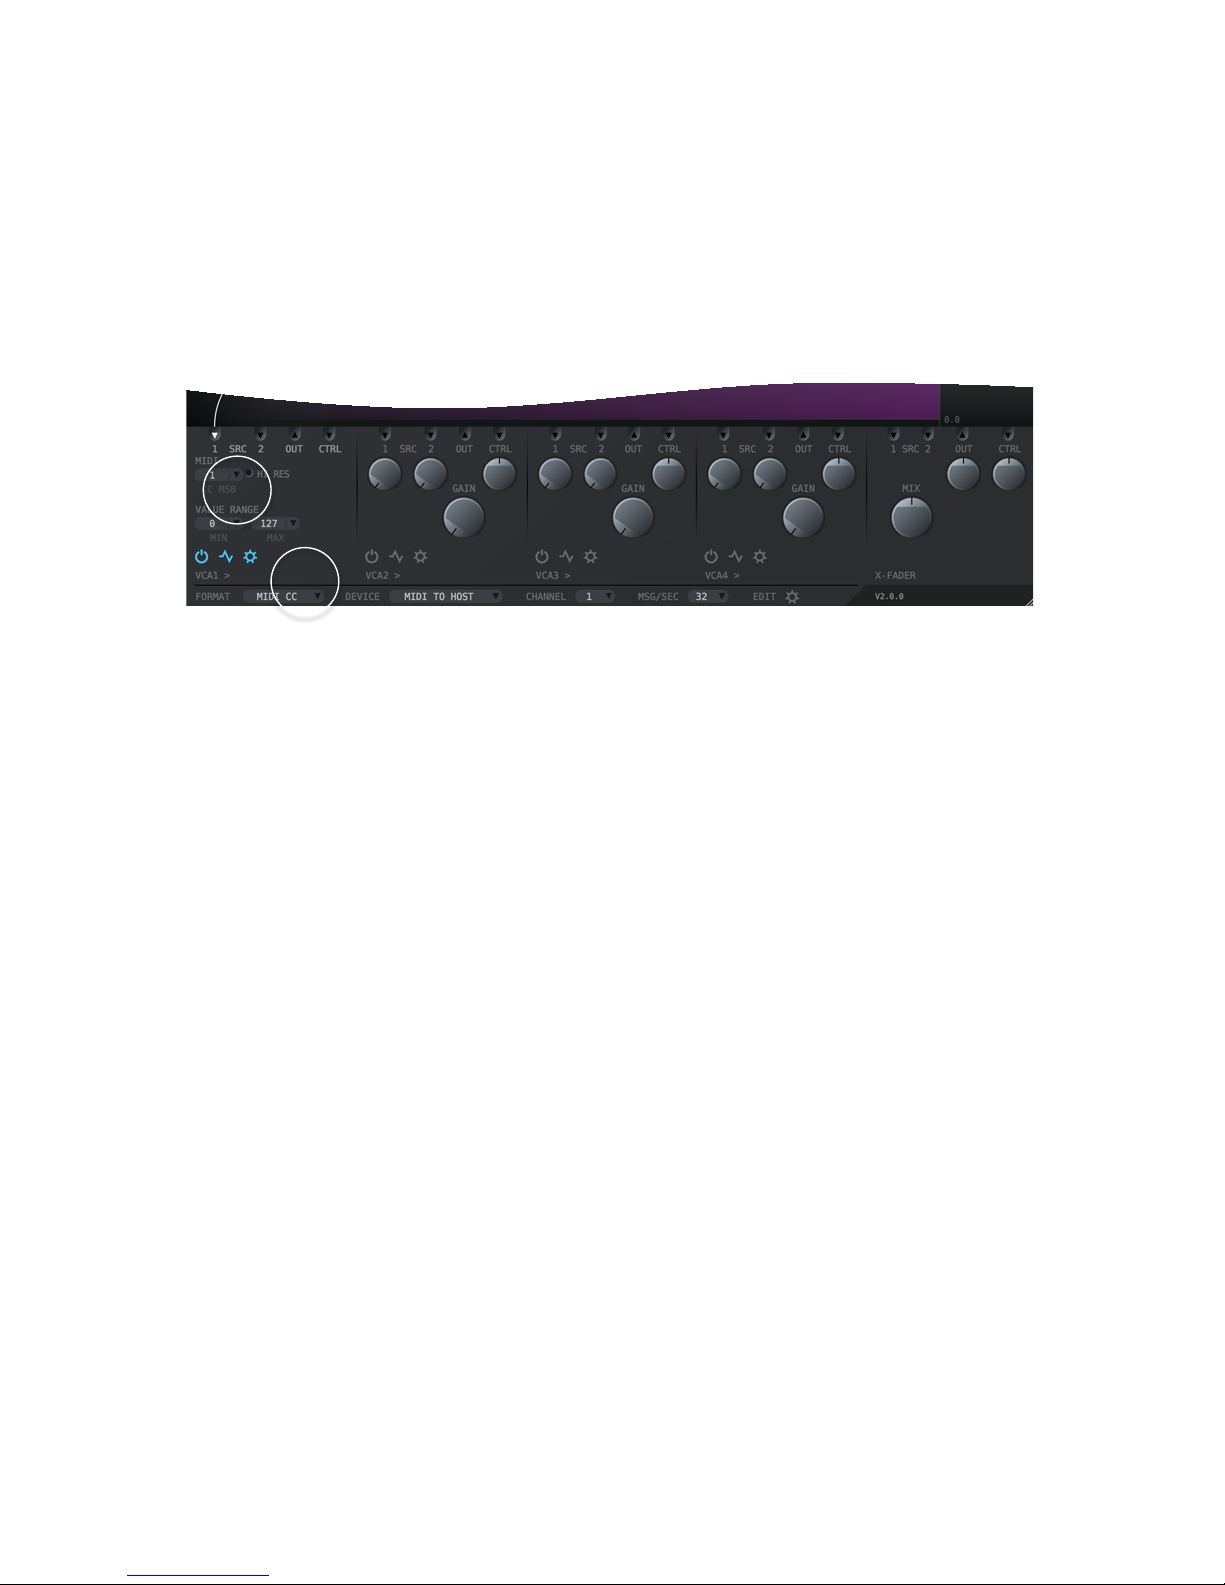
4.2 Control External Synthesizer via MIDI CC
Once the host setup is completed, MIDI
messages can be sent to an external
synthesizer (or device, such as a MIDI to CV
converter). MIDI messages produced by the
MP3244 are in most hosts sent to a second
track, where an external instrument plug-in
takes care of sending the messages to the
external device. Please make sure that you
followed section 4.1 “Basic Host Application
Setup” and looked up the online setup guides
for your host!
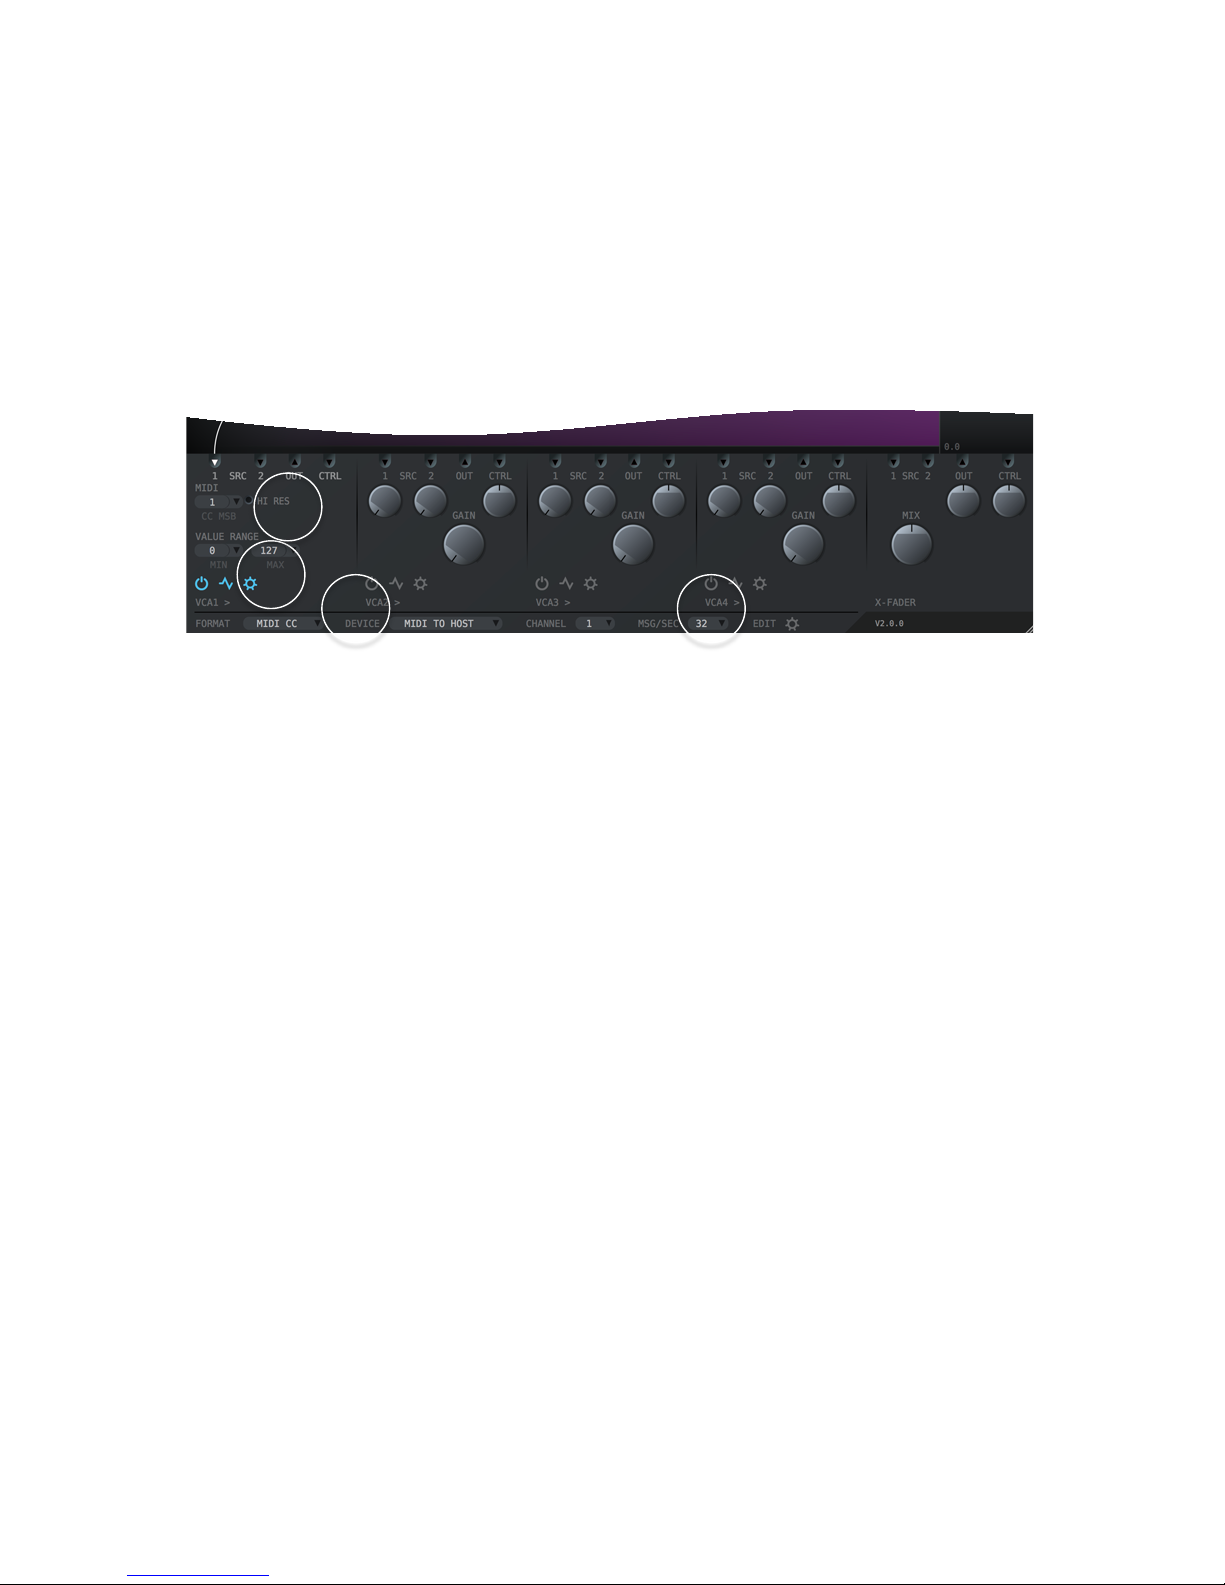
1 Make sure that the FORMAT is set to MIDI CC. Choose the MIDI
output DEVICE that is usually “MIDI TO HOST” (this may depend on
host and setup).
2 Open the output settings by clicking the gear icon within VCA1.
3 Select the Continuous Controller (CC) number within the MIDI (CC
MSB) field, which represents the parameter of your synthesizer, that
you whish to modulate. You might need to refer to the synthesizers
manual to look up the CC assignments. If your synth can process 14bit
high resolution MIDI (MSB + LSB) for a specific parameter you can
activate the HI RES option.
Note: At the beginning the best way to go is modulating the VCF of
your synth or any other parameter which is clearly distinguishable!
4 Press play in your DAW and press a key on your synthesizer. You
should now hear the modulation.
5 Incase the synth is not playing in time, you may need to reduce the
rate, at which the messages are sent (MSG/SEC). Also please refer to
section 6.7 Output.
1 2 3
5
Page 8
Quick Start Guide
Dialog Audio / MP3244 User Guide
8
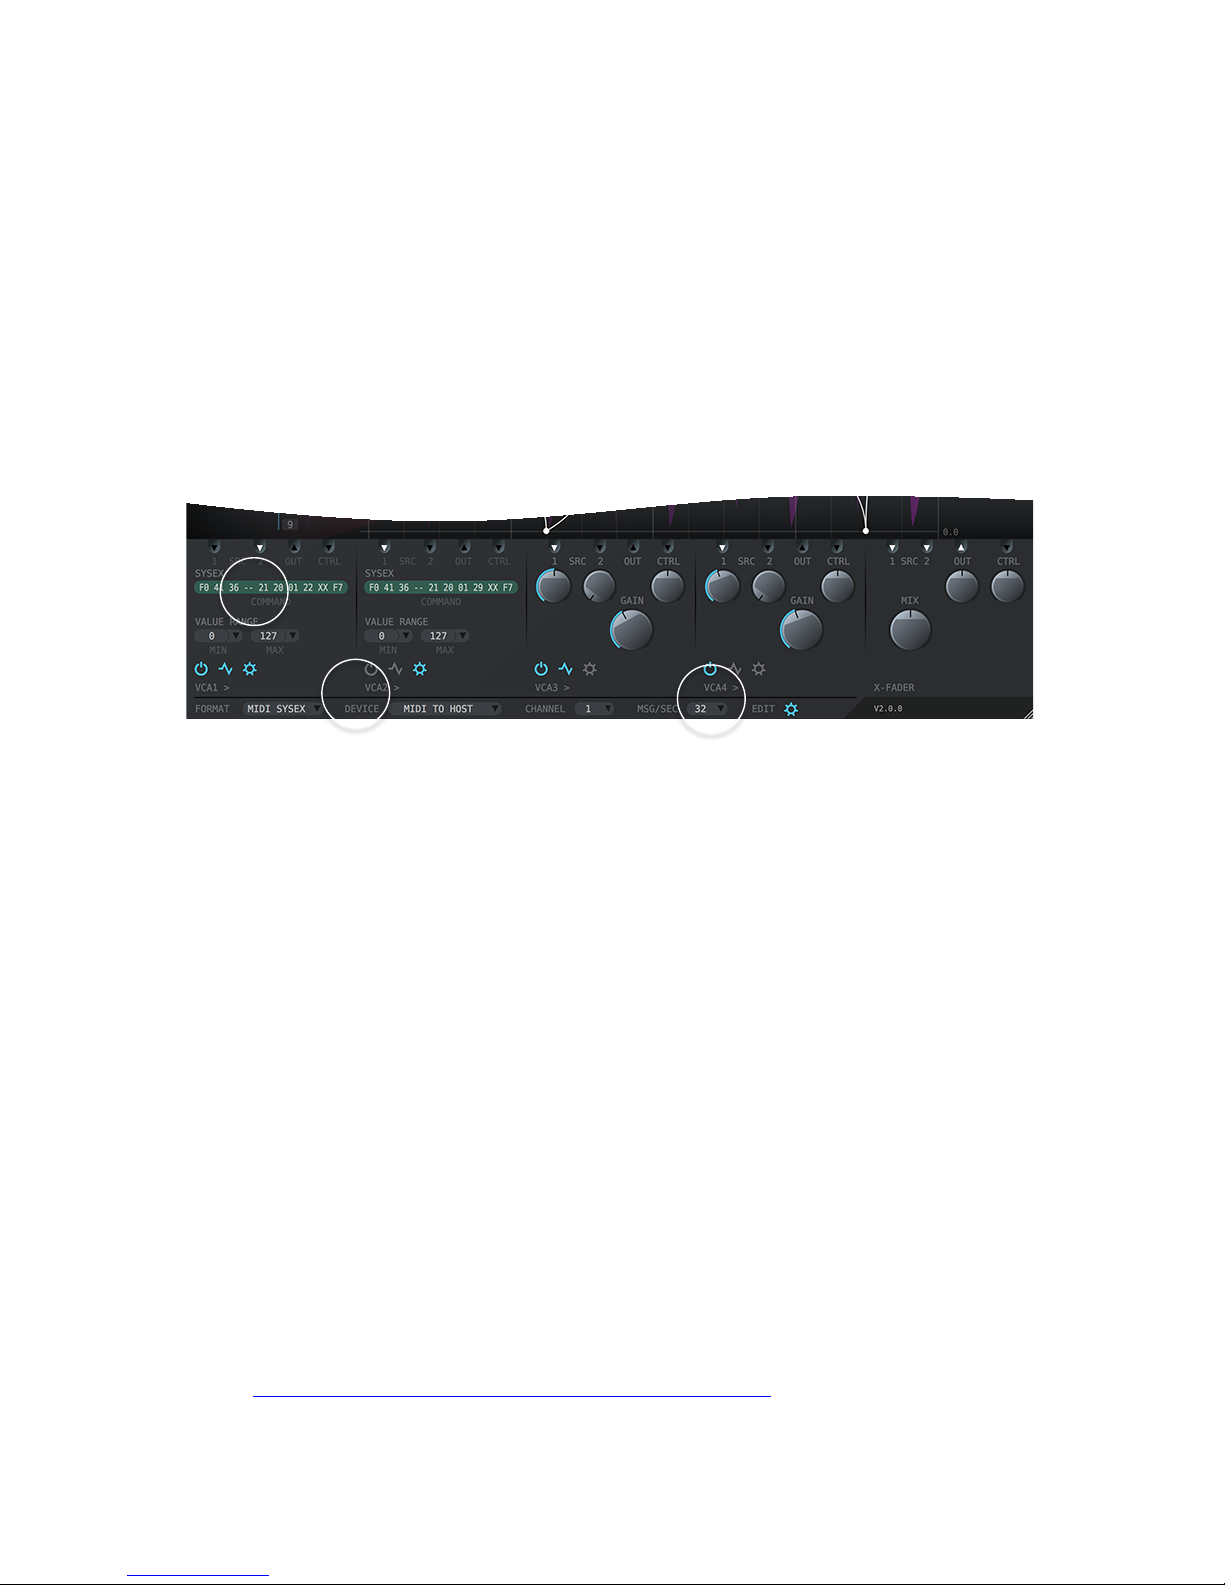
4.3 Control External Synthesizer via SYSEX
Once the host setup is completed, SysEx
messages can be sent to an external device.
Due to the restriction of passing SysEx
messages from plug-ins into most host
application, two scenarios are common:
Mac OS X: send the messages directly to the
MIDI interface port, where the device is
connected (this only works on Mac, Windows
dose not allow to connect two devices to the
same MIDI port).
Windows: send the messages to a virtual
MIDI port, from there back into the host to an
external instrument track and from there to the
specific MIDI port, where the device is
connected.
Please make sure that you followed section
4.1 “Basic Host Application Setup” and looked
up the online setup guides for your host! Also
please refer to chapter 5.1 SysEx Messages.
1 Change the FORMAT to MIDI SYSEX, choose the MIDI output DEVICE
and select the MIDI CHANNEL. On Mac this is usually your physical
MIDI output port where your synth is connected. On Windows this is
usually a virtual MIDI port, which is connected to an external
instrument within the host application.
2 Now it is probably time to refer to the synthesizers manual to look up
the SysEx specifications, or to look at the SysEx database on our
website (see below).
3 Open the output settings of VCA 1 (gear icon) and type the SYSEX
message into the blank field. The string should look similar to:
F0 41 36 -- 21 20 01 22 XX F7
Note: At the beginning the best way to go is modulating the VCF of
your synth or any other parameter, which is clearly distinguishable!
4 Press play in your DAW and press a key on your synthesizer. You
should now hear the modulation. Incase the synth is not playing in
time, or if the entire device locks, you may need to reduce the rate
MSG/SEC, at which the messages are sent. Also please refer to
section 6.7 Output.
" Online Help: Further information and SysEx messages for some synthesizer can be found at:
https://dialogaudio.com/modulationprocessor/sysex_info.php
If you need any further help please feel free to contact us.
4 3 1
Page 9
Quick Start Guide
Dialog Audio / MP3244 User Guide
9
! Notice: getting the SysEx messages correct can take a while. Be patient, once you get this
running your reward will be a perfectly syncing, fantastic sounding classic synthesizer!
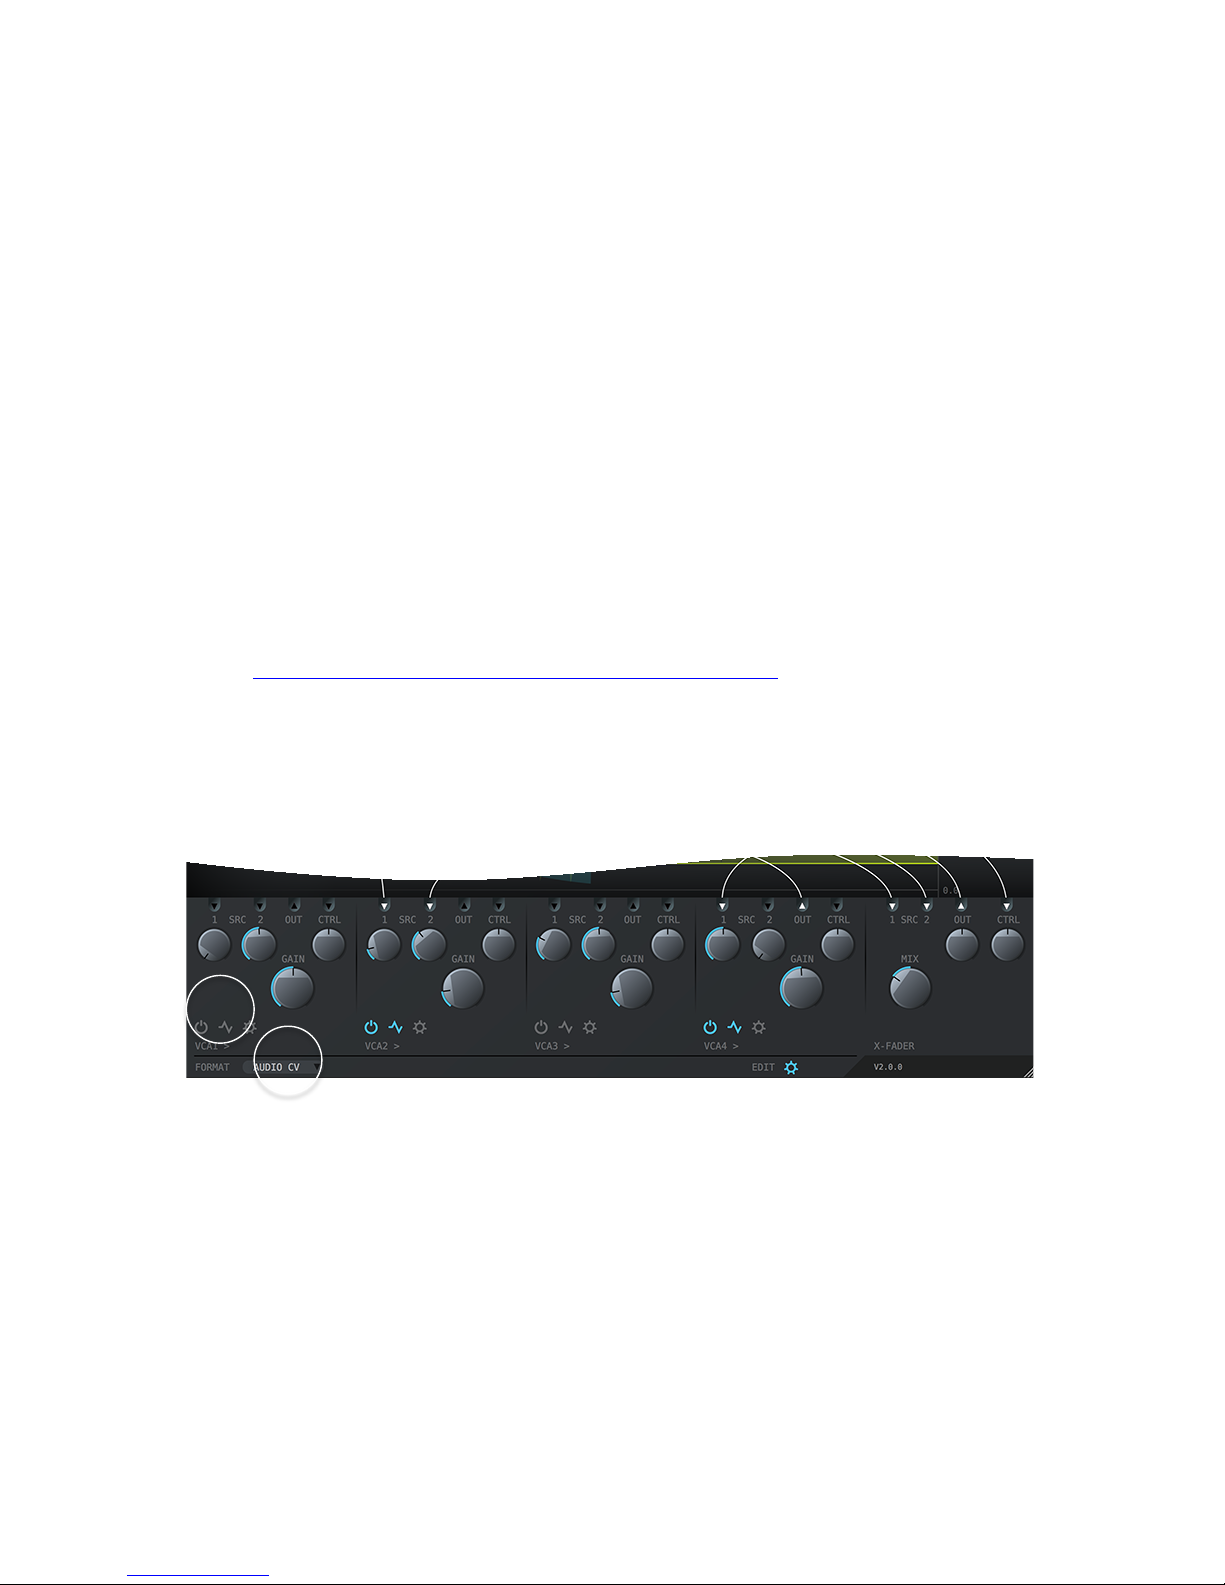
4.4 Control External Synthesizer via CV
To modulate a synthesizer via Control
Voltages (CV) you either need a DC-coupled
audio interface or a MIDI to CV Converter (eg.
Doepfer MCV 4). In case of a MIDI to CV
converter please refer to the section 4.2
“Control External Synthesizer via MIDI CC”.
This section describes how to setup the plugin with a DC-coupled audio interface.
Please make sure that you followed section
4.1 “Basic Host Application Setup” and looked
up the online setup guides for your host!
# WARNING: CV audio signals produced by the plug-in might damage your audio interface
and/or other equipment such as synthesizers, speakers etc.! If you are unsure or do not know
how to use this feature, please contact us before enabling this feature!
" Compatible Audio Interfaces: Please check if your audio interface is DC-coupled and
compatible and what type of cable is required:
https://dialogaudio.com/modulationprocessor/device_info.php
1 For safety reasons the audio CV output option is disabled. You first
need to enable the audio CV output option. Go to MENU > SETTINGS
and enable AUDIO CV.
2 Select AUDIO CV as the FORMAT.
3 Got to VCA 1 and enable the output. You than need to setup your host
application according to its specifications for multi-channel plug-ins. In
order to setup correctly, you might need to add AUX channels within
the DAWs mixer where the MP3244 is located on. Each AUX channel
can then be routed to a specific audio interface output.
Multi-Channel Configuration
In AUDIO CV mode the plug-in functions as a multi-channel plug-in with following configurations:
• Main Out: No output (usually)
• AUX 1 = VCA 1 AUX 2 = VCA 2 AUX 3 = VCA 3 AUX 4 = VCA 4
2
3
Page 10
Quick Start Guide
Dialog Audio / MP3244 User Guide
10
4.5 Control Internal Synthesizer via MIDI CC
Once the host setup is completed, MIDI
messages can be sent to an internal
synthesizer (in-host software). In most hosts
MIDI messages can be sent from one plug-in
to another plug-in via track MIDI in- and
outputs. Please make sure that you followed
section 4.1 “Basic Host Application” and
looked up the online setup guides for your
host!
1 Be sure that the FORMAT is set to MIDI CC. Select the MIDI output
DEVICE and set it to “MIDI TO HOST”.
2 Got to VCA 1 and select a Continuous Controller (CC) number, which
represents the parameter of your synthesizer, which you whish to
modulate.
If your virtual synth has a MIDI learn function you can choose any
number. Enable MIDI learn function on the synth and click on the
desired parameter. Go to the MP3244 and “twittle” the VCA1 GAIN
knob. The synth should now receive the CC messages. As soon you
are finished, turn the MIDI learn function off.
If your synth does not provide any MIDI learn function you need to grab
the synth manual and see if and what MIDI CCs are available. To
modulate the CC you need to select the specific CC number within the
VCA1 of the MP3244.
If your synth can process 14bit high resolution MIDI (MSB + LSB) for a
specific parameter you can activate the HI RES option.
3 Press play in your DAW and press a key on your synthesizer. You
should now hear the modulation.
1
2
Page 11
Quick Start Guide
Dialog Audio / MP3244 User Guide
11
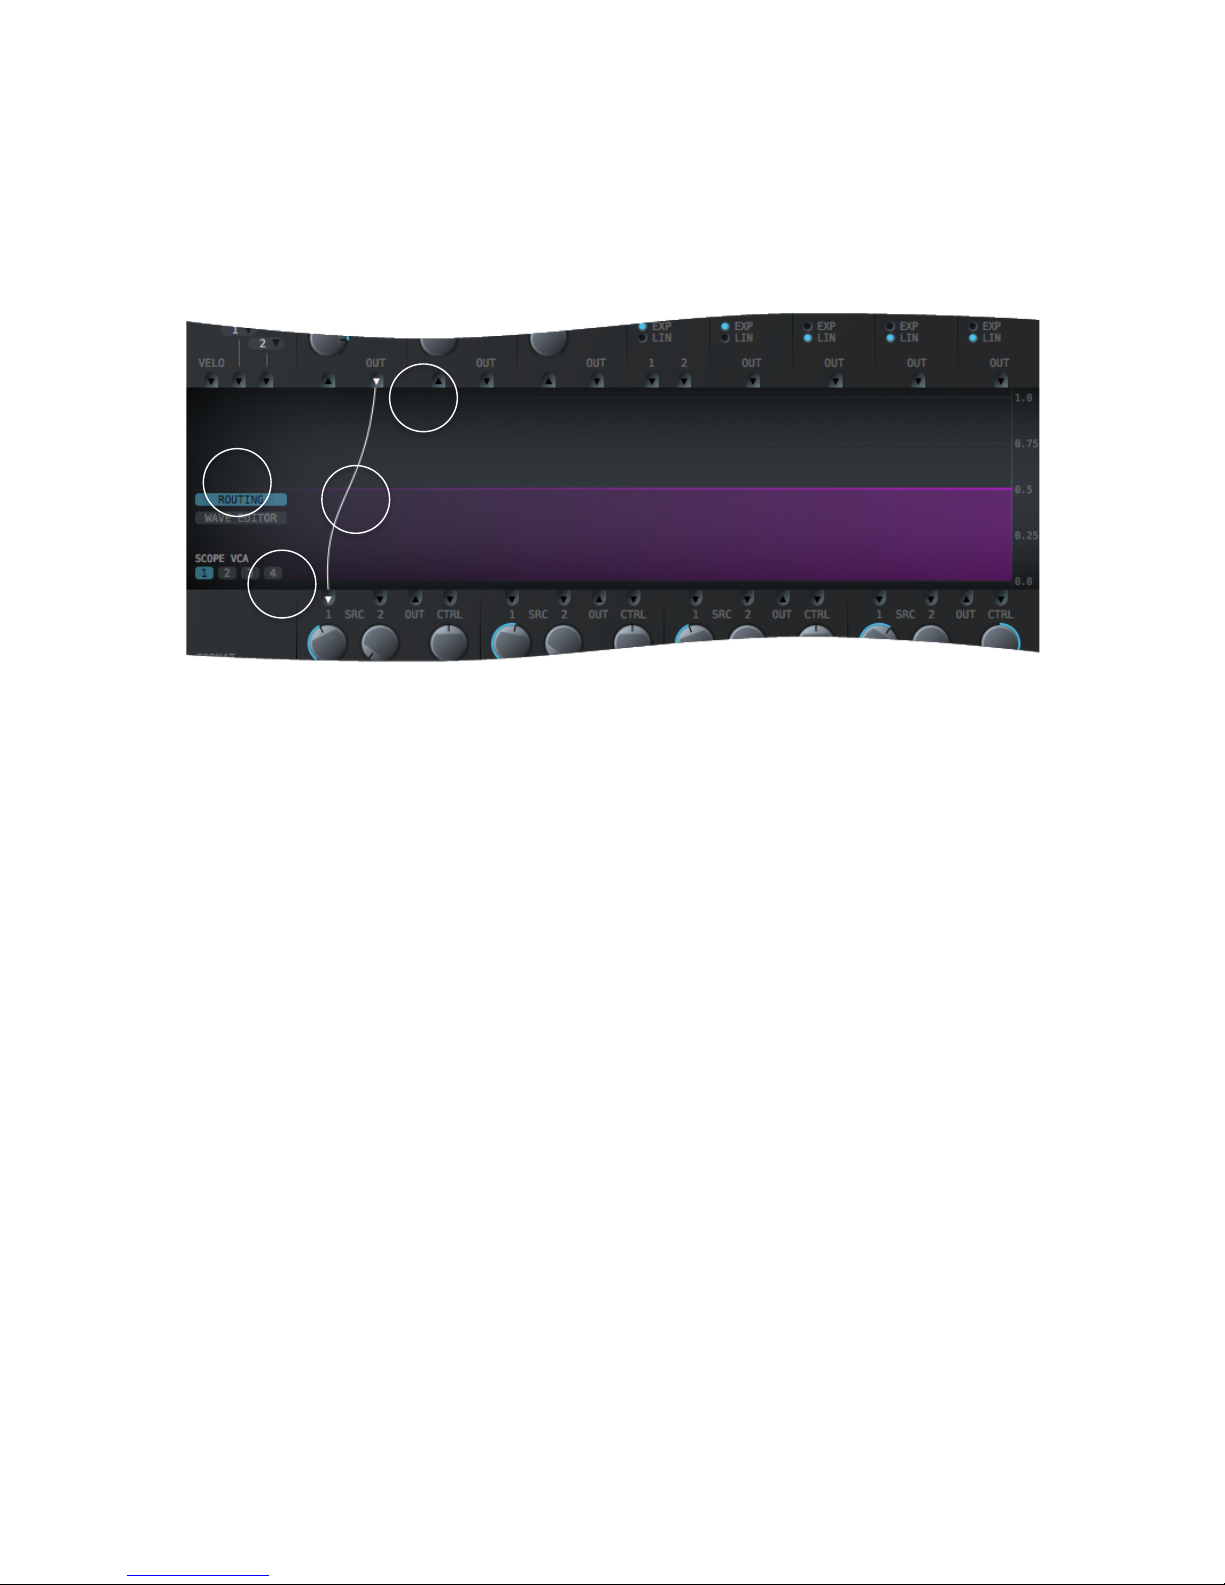
4.6 Connecting Modules
Connecting modules is easily made with “drag
& drop” Just click on one of the connection
pins and drag to another connection pin. Keep
in mind that an input can only be connected to
one output, but one output can be connect to
several inputs.
1 Click on an output pin and move your mouse to an input pin.
2 As soon you are over the destination pin click on it. The connection will
be made. You also can use drag and drop to connect pins.
3 To see all of your connection activate the ROUTING button. For
simplicity you always can add connections even when the ROUTING
button is not activated!
4 To remove a connection you need to have “Routing” activated. To
proceed just double click the line which you want to remove.
1 2 3
4
Page 12
Quick Start Guide
Dialog Audio / MP3244 User Guide
12
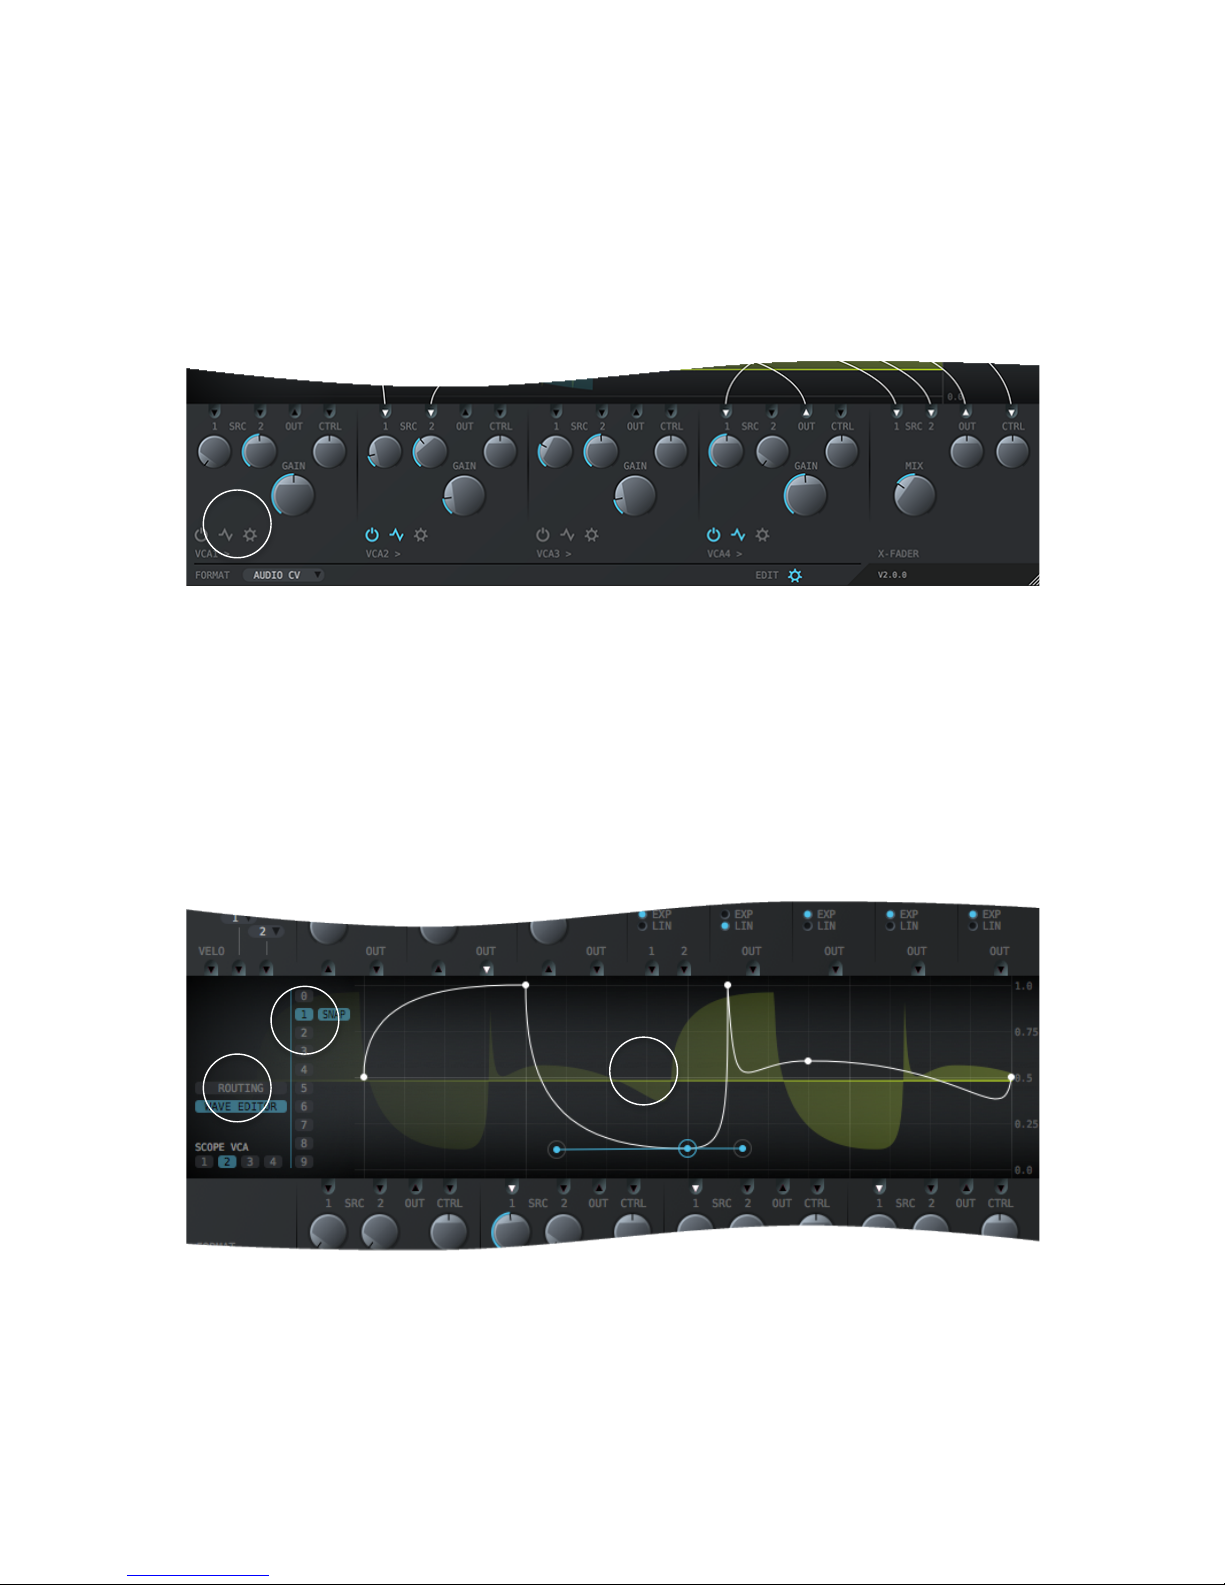
4.7 Output Oscilloscope
Sometimes it is very useful to see what is
happening. For this reason you have an
oscilloscope for each VCA.
1 Click on the “oscilloscope” icon within the VCA for which you want to
see the signal. Enjoy your created waveforms visually!
4.8 Creating Custom Waveforms
You have the freedom to create up to 10
custom waveforms to use with one of the
LFO’s.
1 Select the WAVE EDITOR button.
2 Choose one of the waveform slots you whish to edit. If you want to
draw precisely you can activate SNAP to grid button.
As soon you completed the drawing, you can select the waveform in
one of the LFO’s.
1 1 2
3
Page 13

MIDI CC & SysEx Messages
Dialog Audio / MP3244-Manual
13
5 MIDI CC & SysEx Messages
5.1 SysEx Messages
SysEx Messages are strings composed of several bytes. Each byte string will be interpreted by the
receiving device to perform a specific action. SysEx messages for a specific device are defined by
the manufacturer and usually can be found within the device manual.
For example this command F0 41 06 -- 81 XX F7 is created by following specifications:
F0 = SysEx start command
41 = Manufacturer ID (Roland)
36 = Model ID
-- = MIDI channel (will be automatically replaced by MP3244 with the selected channel)
81 = Parameter ID
XX = Parameter Value (will be automatically replaced by MP3244 with the processed value)
F7 = SysEx End
5.1.1 Creating SysEx Messages
• To start, the System Exclusive Messages Specification of the receiving device is required.
Technically a single parameter edit should be performed. In some manuals this is a section
described as “Remote” or “Real Time” Parameter Edit.
• Every message has to start with F0 and end with F7 (except if a checksums from the head is
required).
• If the specification requires a MIDI channel, simply “--“ can be added at the defined position.
This will be automatically replaced by the selected MIDI channel within the plug-in. The MIDI
channel can also be set manually, in this case the channel number has following convention:
Ch01 = 00
...
Ch10 = 09
Ch11 = 0A
Ch12 = 0B
Ch13 = 0C
Ch14 = 0D
Ch15 = 0E
Ch16 = 0F
• Find the parameter which should be modulate (e.g. VCF = 81)
• The parameter value has to be marked with XX. The plug-in will replace XX with the values
processed
• For example this command F0 41 06 -- 81 XX F7 is created by following specifications:
41=Manufacturer ID, 06=Device ID, --=Midi Channel (from PlugIn), 81=Parameter ID,
XX=Parameter Value
Page 14

MIDI CC & SysEx Messages
Dialog Audio / MP3244-Manual
14
5.1.2 Special Commands
There are several commands, which can be used to let the MP3244 perform special actions. Each
command can be placed within the SysEx string as follows:
XX = Parameter Value, this will be replaced with the actual calculated value of the plug-in
-- = MIDI channel, this will be replaced by the selected MIDI channel
#S = Checksum start command, all bytes after this will be included into the checksum
#T = Checksum start command, all bytes after this will be included into the checksum
#X = Checksum start command, all bytes after this will be included into the checksum
## = Checksum command will be replaced by the actual calculated checksum
For detailed information about checksum please refer to the chapter 5.1.3 SysEx Checksum.
5.1.3 SysEx Checksum
Some devices require a checksum within in the transmitted SysEx message. The MP3244 provides
three different checksum calculation methods:
#S = Standard: 7 least significant bits of the calculated sum
#T = Two’s compliment: subtracts the 7 least significant bits of the calculated sum
#X = XOR: bitwise XOR on all parts of the sum
The command (#S, #T or #X) needs to be positioned within the message from where the checksum
should be calculated.
The actual checksum is automatically placed at the end of the SysEx message, just before the end
byte (F7). This is the usual procedure. If you need to add the checksum at a different position, you
can add “##” within the SysEx string to where the checksum should be placed.
Example Roland D50 (TVF Filter Cutoff Lower Partial 1):
SysEx Message: F0 41 00 14 12 #T 00 01 4D XX ## F7
F0 = SysEx Start
41 = Roland ID
00 = Unit ID
14 = Model ID (D50)
12 = Write Command
#T = Start Checksum (command for two’s complement checksum calculation)
00 = Address
01 = Address
4D = Filter Cutoff Lower Partial 1 (Parameter ID)
XX = Value processed by PlugIn
## = Checksum (can be omitted, plug-in places the checksum automatically at this position)
F7 = SysEx End
Page 15

MIDI CC & SysEx Messages
Dialog Audio / MP3244-Manual
15
5.2 Avoiding MIDI Jitter Guideline
While the Modulation Processor 3244 is
capable to process heavy modulations, MIDI
overflow can easily occur on hardware devices
which may lead to jittering. By considering
following points you can keep jitter as low as
possible. This guideline is proposed to give
you a rough overview of the type and amount
of messages you can send to a hardware
device. Please note that this guideline is not
applicable if you send messages to in-host
software devices, since message rates within
host can be much higher.
I. Avoid overflowing your MIDI interface. Restrict the amount of messages send to a single
output of a MIDI interface to following:
a. 8 x CC, @ 32 messages / second
OR
b. 4 x 14bit (high resolution) CC, @ 32 messages / second
OR
c. 2 x SysEx (10bit), @ 32 messages / second
II. Avoid overflowing your (vintage) MIDI devices. Lower the amount of messages sent per
second to devices which have slow MIDI processing (e.g. 10 – 20 messages / second).
III. Avoid sending unneeded MIDI messages. E.g. while recording a device which is modulated,
make sure to not send any unneeded MIDI messages to other devices on the same MIDI
port.
IV. Try to keep the amount of sent messages between 20 – 50 messages per second.
V. Keep your MIDI daisy chains short. This results in more potential messages, which can be
sent to each synth.
" Avoiding MIDI Jitter : For additional information about MIDI jitter you can check out our
note about “Avoiding MIDI Jitter, During Continuous Parameter Modulations”.
https://dialogaudio.com/modulationprocessor/jitter_guide.php
Page 16
The Modules
Dialog Audio / MP3244-Manual
16
6 The Modules
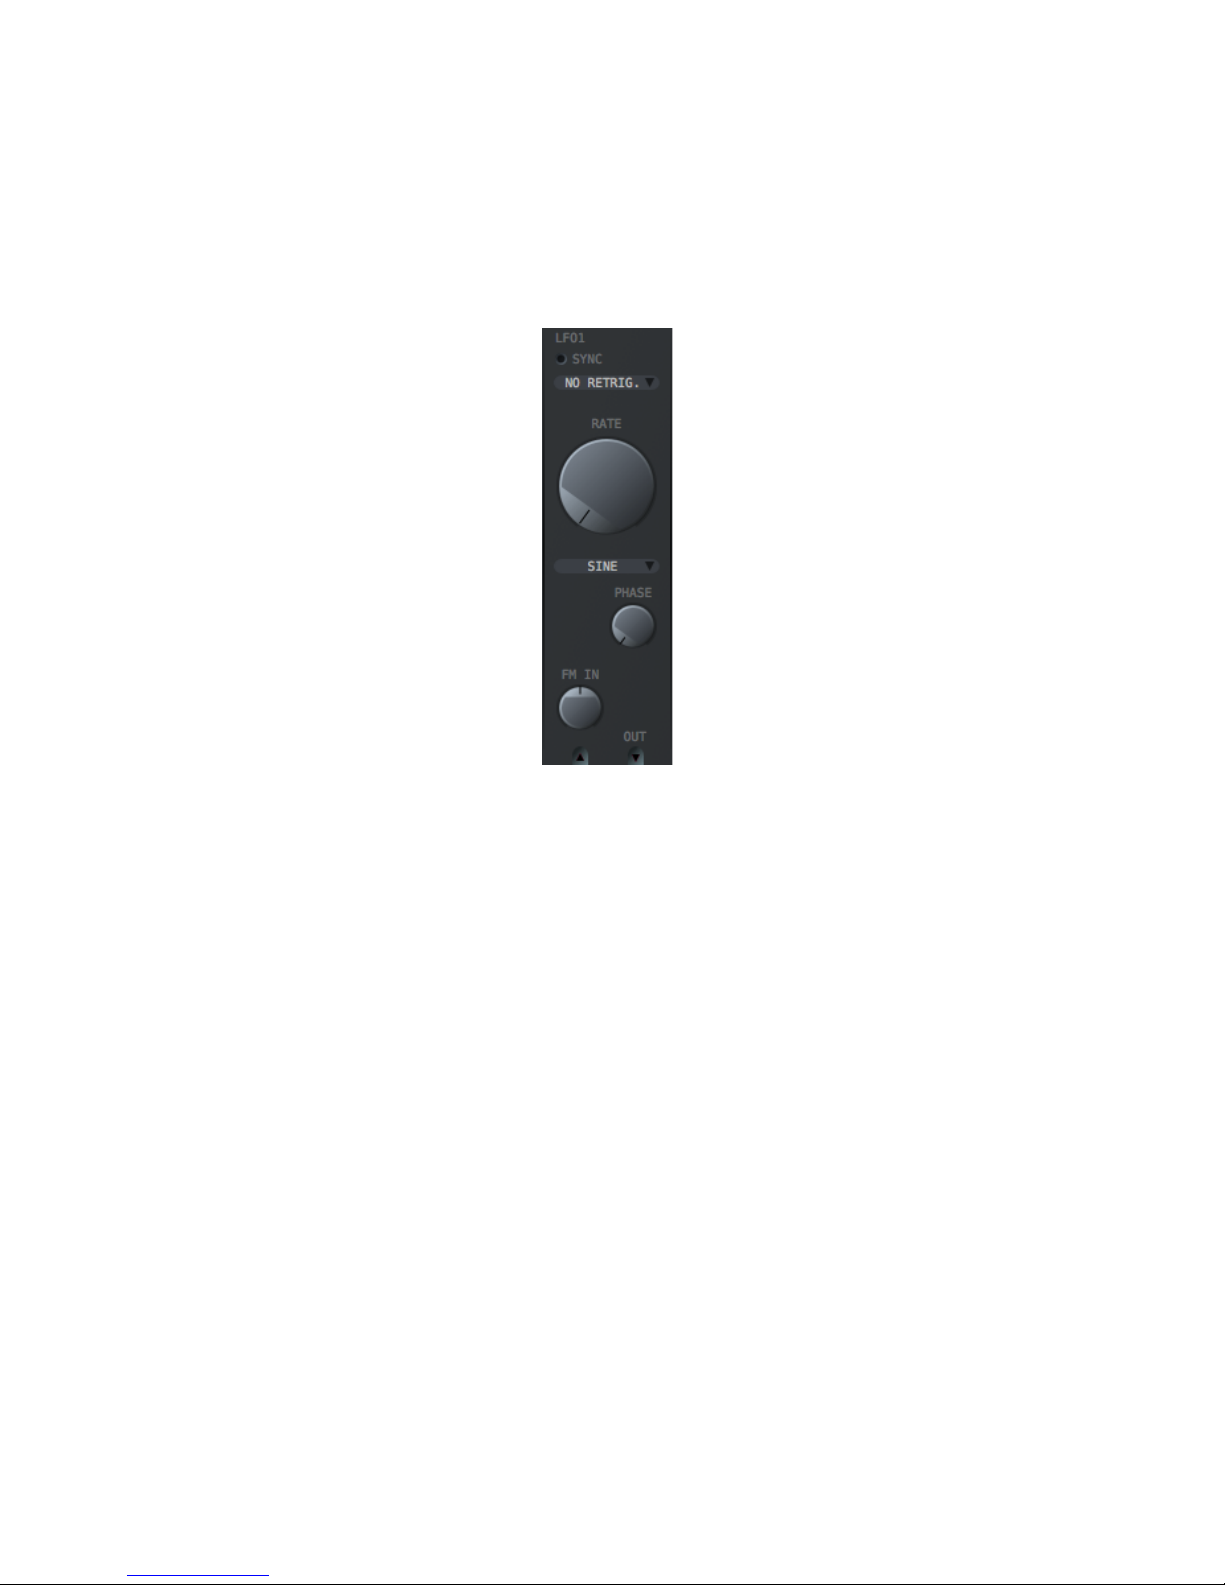
6.1 Low Frequency Oscillator (LFO)
There are three LFO’s available to generate modulation data.
Sync Mode The LFO offers a synchronized and a free running mode.
Sync Mode: In sync mode the LFO rate is synced to the host. The LFO
rate will then be set in measures of bars.
Free Running Mode: In free running mode the LFO rate is not related to
the host. Rates will then be set in seconds.
Retrigger Mode The LFO offers three different retrigger modes.
No Retrig: In this mode the LFO will run continuously, without any option
to retrigger.
Note Retrig: In this mode the LFO will start a new waveform cycle as soon
a new note on event occurs. The start angle of the waveform will depend
on the time when the event occurs. Keep in mind that in
sync mode the start angle can shift depending on the note on event.
Cycle Retrig: In this mode you can choose a host synchronized cycle
when the LFO should retrigger. This is only available when the LFO is free
running.
Rate The rate will set the speed of the LFO. In sync mode the rate will be set in
bars. In free running mode the rate will be set in seconds.
Waveform Typical waveforms such as sine, square, triangle can be selected.
Additionally you can select a random sine (rnd sine) or a random square
(rnd square) where internally the output amount from these two waveforms
is randomly modulated. To use one of the custom created waveforms
select them accordingly.
Rate
Waveform
Waveform Start Phase
Output
Frequency Modulation Input
Retrigger Mode
Sync Mode
Page 17
The Modules
Dialog Audio / MP3244-Manual
17
Waveform Phase The start angle of the wave can be set between 0 and 360 degrees.
Depending on the other settings this allows you to adjust the start phase of
the waveform.
Frequency
Modulation Input
Each LFO has a frequency modulation input. You can connect any output
of the other modules to this input. The amount of how much of the
incoming signal is used to modulate the frequency can be set from 0 to 1
or negative from 0 to -1, which means that the frequency will go slower.
Output The output of the LFO can be connected to any input of the other modules.
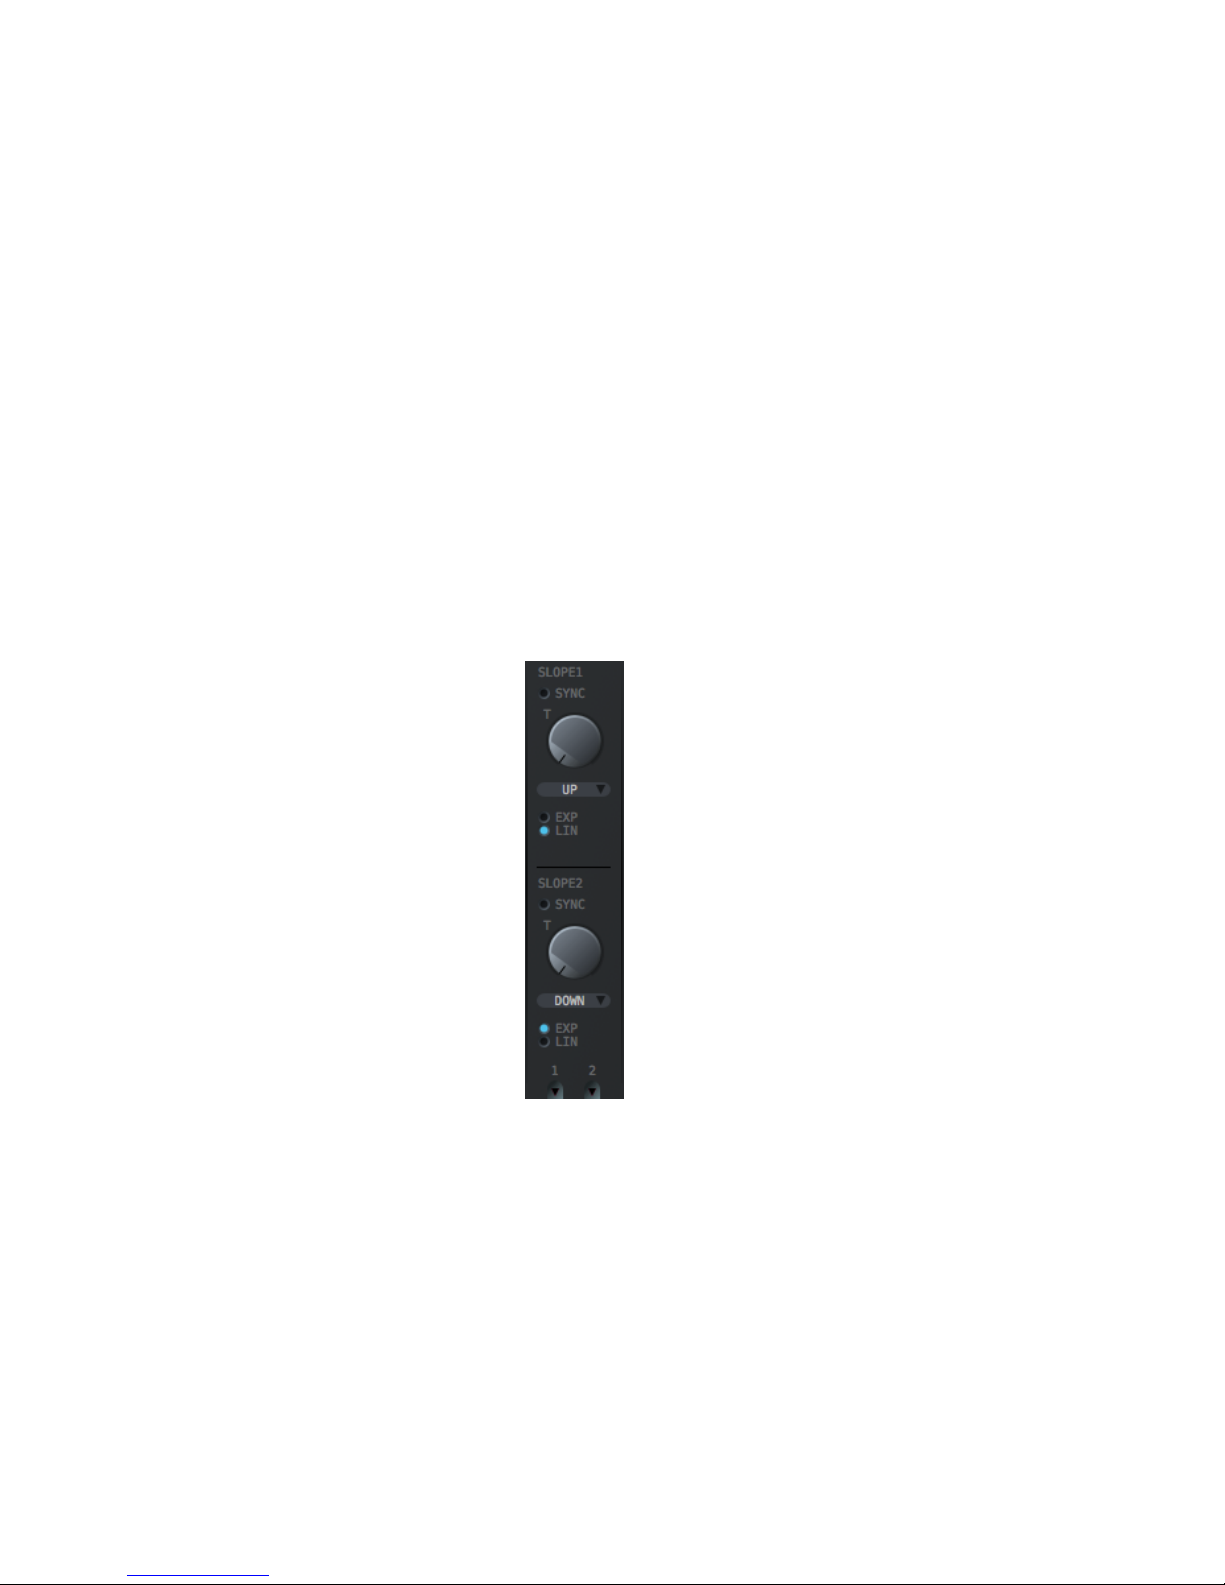
6.2 Slope Generator
The slope generator module is quite unique and is somewhat comparable to an envelope generator
with a single attack or decay. If the curve is set to “up” the generator will run from minimum to
maximum, and will stay at the maximum until a new note event occurs. If the curve is set to “down”
the generator will start from the maximum and will run to the minimum.
Sync Mode The slope generator offers a synchronized and a free running mode.
Sync Mode: In sync mode the time of the slope generator is synced to the
host. The time will then be set in measures of bars.
Free Running Mode: In free running mode the time of the slope generator
rate is not related to the host. Rates will then be set in seconds.
Time This will set the time of how long the generator needs from the note on
event to reach the final state. In sync mode the time will be set in bars. In
free running mode the time will be set in seconds.
Direction The curve of the slope generator can either go up or down.
UP: The curve will go from 0 to 1.
DOWN: The curve will go from 1 to 0.
Time
Sync Mode
Direction
Curve
Outputs
Page 18
The Modules
Dialog Audio / MP3244-Manual
18
Curve The curve of the generator can either be linear or exponentially.
EXP: In exponential mode the curve will first grow slow and at the end fast
until the maximum is reached.
LIN: In linear mode the curve will grow steady until the maximum is
reached.
Outputs The slope generator module has two outputs. The outputs can be
connected to any input.
Output 1: The output marked with 1 is the output of the upper slope
generator.
Output 2: The output marked with 2 is the output of the lower slope
generator.
! Notice: a note on event only triggers this module.
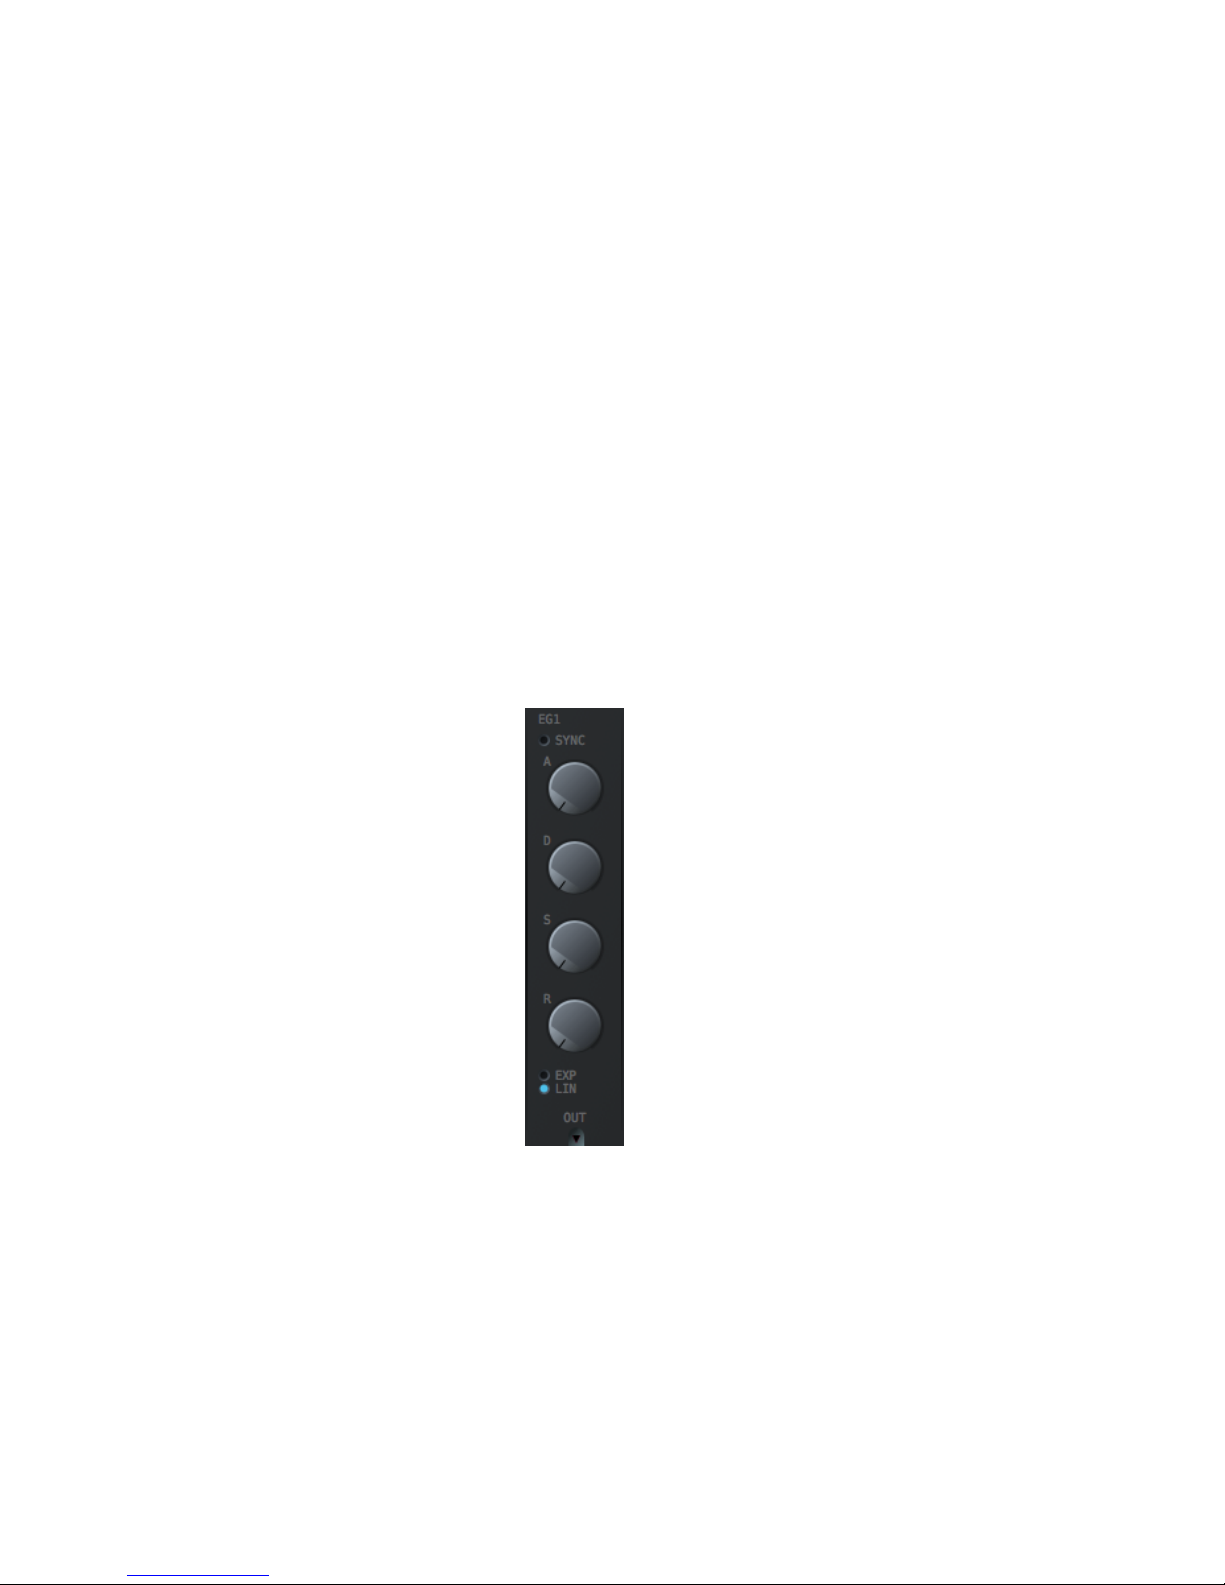
6.3 Envelope Generator
Up to four envelope generators can be used to create the desired modulation.
Sync Mode The slope generator offers a synchronized and a free running mode.
Sync Mode: In sync mode the time of the slope generator is synced to the
host. The time will than be set in measures of bars.
Free Running Mode: In free running mode the time of the slope generator
rate is not related to the host. Rates will then be set in seconds.
Attack Time This will set the time of how long the generator needs to reach the end of
the attack state. In sync mode the time will be set in bars. In free running
mode the time will be set in seconds.
Sync Mode
Attack Time
Decay Time
Release Time
Curve
Output
Sustain Level
Page 19
The Modules
Dialog Audio / MP3244-Manual
19
Decay Time This will set the time of how long the generator needs to reach the end of
the decay state. In sync mode the time will be set in bars. In free running
mode the time will be set in seconds.
Sustain Level This will set the level during the sustain phase.
Release Time This will set the time of how long the generator needs to reach the end of
the release state. In sync mode the time will be set in bars. In free running
mode the time will be set in seconds.
Curve The curve of the generator can either be linear or exponentially.
EXP: In exponential mode the curve of the envelope behaves like a classic
exponential envelope generator.
LIN: In linear mode the envelope curve is straight between each point.
Output The output of the envelope generator can be connected to any input of the
other modules.
! Notice: a note on event only triggers this module.
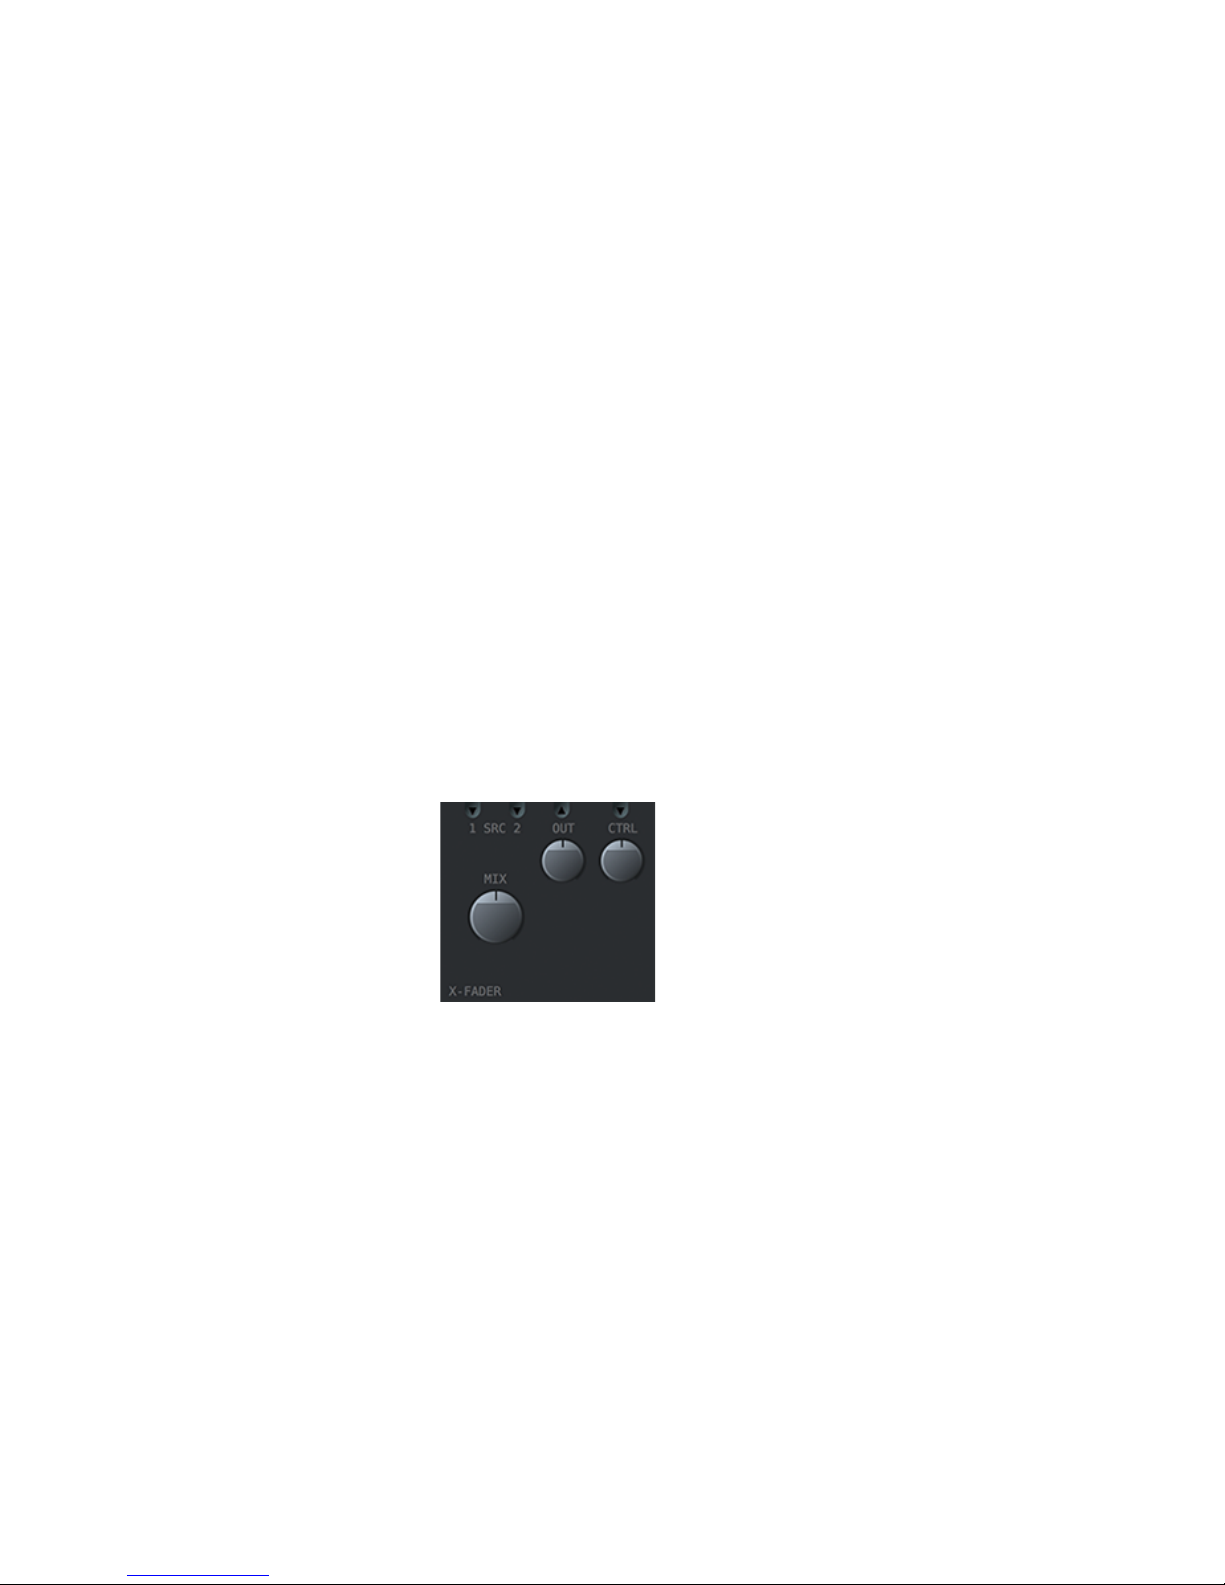
6.4 Cross-Fader (X-Fader)
One Cross-Fader is available to fade (mix) between two input signals. The mix amount for each
source signal can be controlled via a control source (e.g. LFO).
Source 1 & 2 Input One input source signal is mixed with the other signal. If one source is not
connected to another module, the remaining source will be mixed with 0.
Usually VCA’s or LFO’s are connected to the inputs to create a mixed
signal.
Mix The mix amount sets the amount of each input source. Moving the knob to
the left, source 1 will become more present, while moving the knob to the
right, source 2 will become more present.
Control Input The control input can be used to control the mix between the source
inputs. For a control signal at 0, both input signals will be mixed equally. If
the control signal goes towards -1, source 1 will become more present. If
the control signal goes towards +1 source 2 will become more present.
The amount of the control input can either be positive ore negative. The
amount of the control input determines how strong the control signal
affects the mix. Typically a LFO is connected to the control input.
Source 1 & 2 Input
Mix
Output / Control Input
Page 20
The Modules
Dialog Audio / MP3244-Manual
20
Output The output signal of the X-Fader can be routed to any input. The output is
typically connected to a VCA input. The output signal level can be
adjusted.
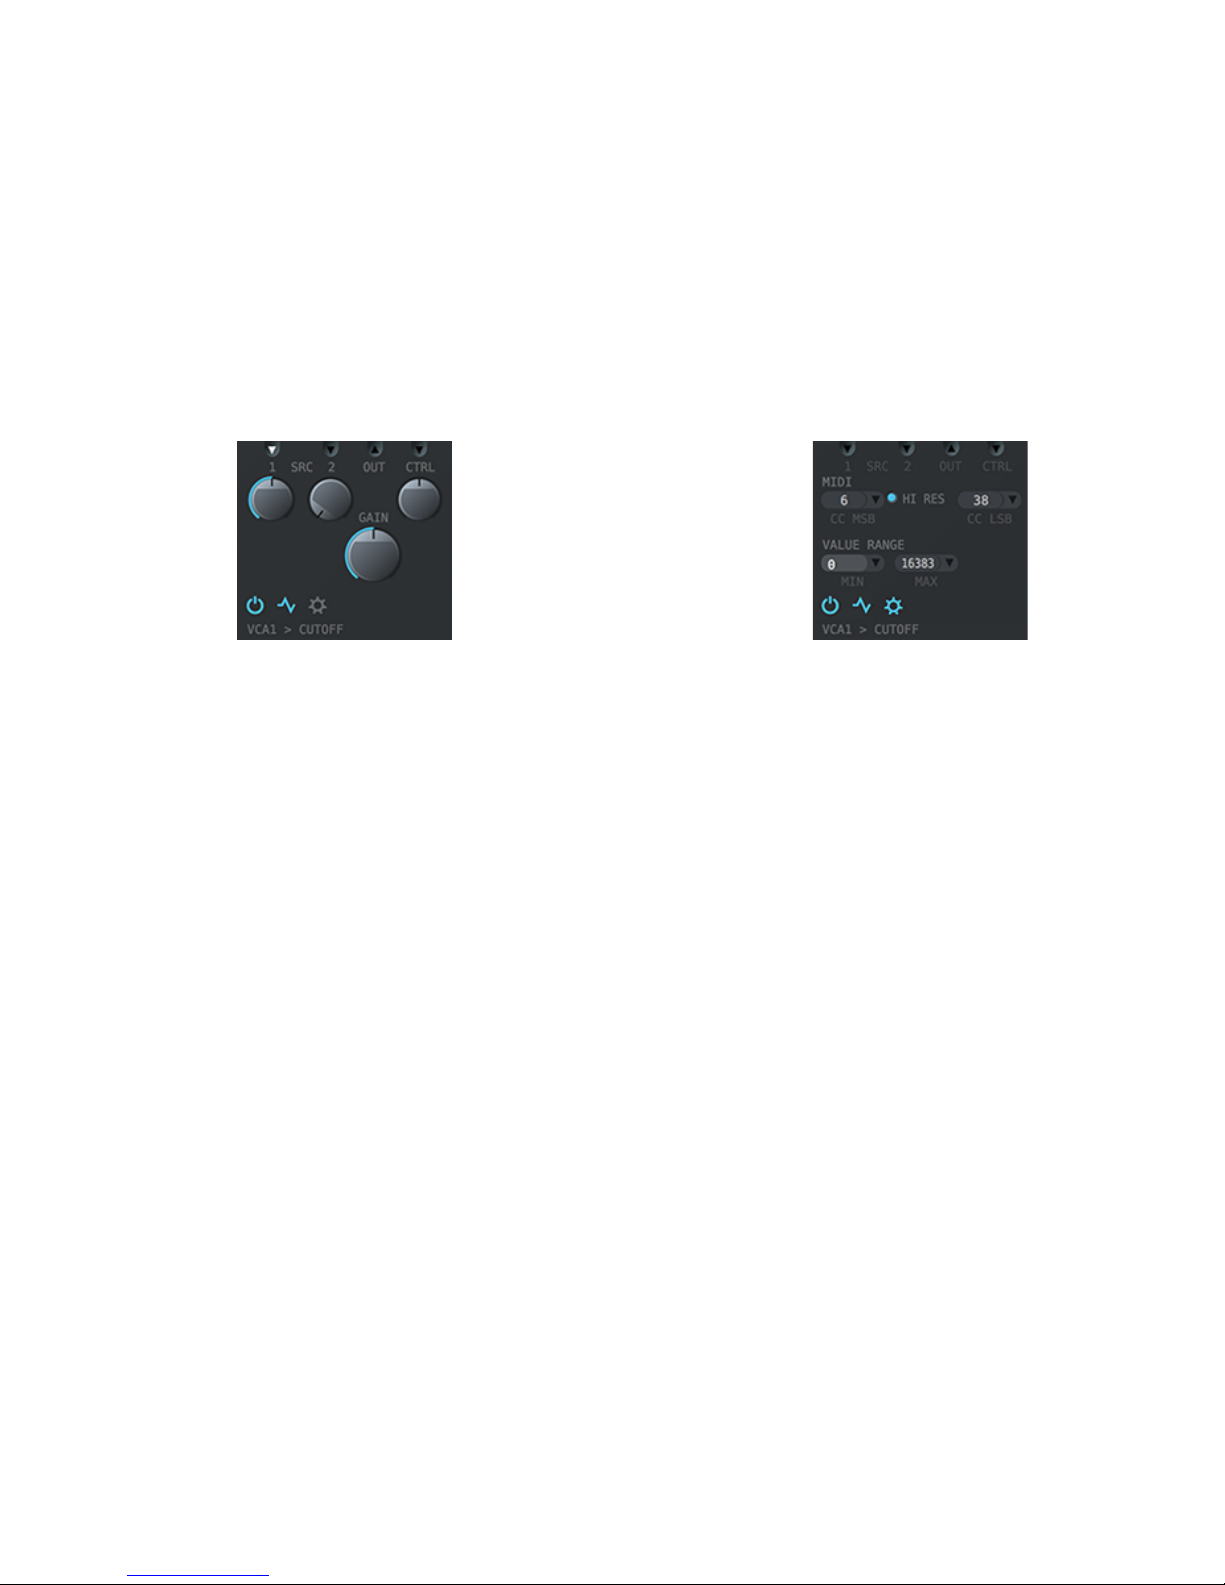
6.5 Voltage Controlled Amplifier (VCA)
The VCA is the final and actual output stage of the modulation processor.
Source 1 & 2 Input The source inputs can be connected to any output of the other modules. If
both inputs are connected the signals are mixed together. The amount of
the input signal can be set for each source.
Control Input The control input can be used to control the source inputs. The amount of
the control input can either be positive ore negative. If the amount is
positive the initial gain will raise as soon as a control level is received. If the
amount is negative the initial gain will fall as soon as a control level is
received. This input is usually connected to an envelope generator.
Gain The gain setting is the initial gain for the entire output level. All operations
are calculated from the initial gain. Use this to set the initial modulation
level.
Output The output can be used to route the VCA output to another module. This is
especially useful when more than two source signals should be mixed. For
this the output can be routed to a second VCA.
On&Off If no modulation output is required, the VCA output can be turned off. The
module itself still can be used for internal processing and the output
connector can be routed to any other module.
Oscilloscope The visual feedback on the VCA output signal can be turned on and off
with the oscilloscope button.
Settings To edit the output settings of each VCA, click the gear icon. Depending on
the FORMAT (MIDI CC, SysEx, Audio CV) the menu will be different.
Source 1 & 2 Input / Output
Control Input
Gain
On&Off / Oscilloscope / Settings
MIDI CC, SysEx, CV
Custom Name
Value Range
Page 21
The Modules
Dialog Audio / MP3244-Manual
21
MIDI CC, SysEx, CV Depending on the FORMAT, the VCA can either sent a specific MIDI CC
number or a specified SYSEX data string. If the FORMAT is set to AUDIO
CV nothing can be selected here.
If the receiving device is capable to process 14bit high resolution MIDI
(MSB + LSB), the HI RES option can be activated. Usually only the MSB
CC (first value) needs to set, LSB is automatically set according to the MIDI
specifications. However, if the device has an unusual MSB + LSB
configuration, LSB can be set to the specific CC.
Value Range For MIDI CC and SysEx the value range can be set according to the
receiving device value specification for a specific parameter.
Custom Name For each VCA the module name can be edited (e.g. VCA > FILTER) to
easily remember which parameter the output is targeting.
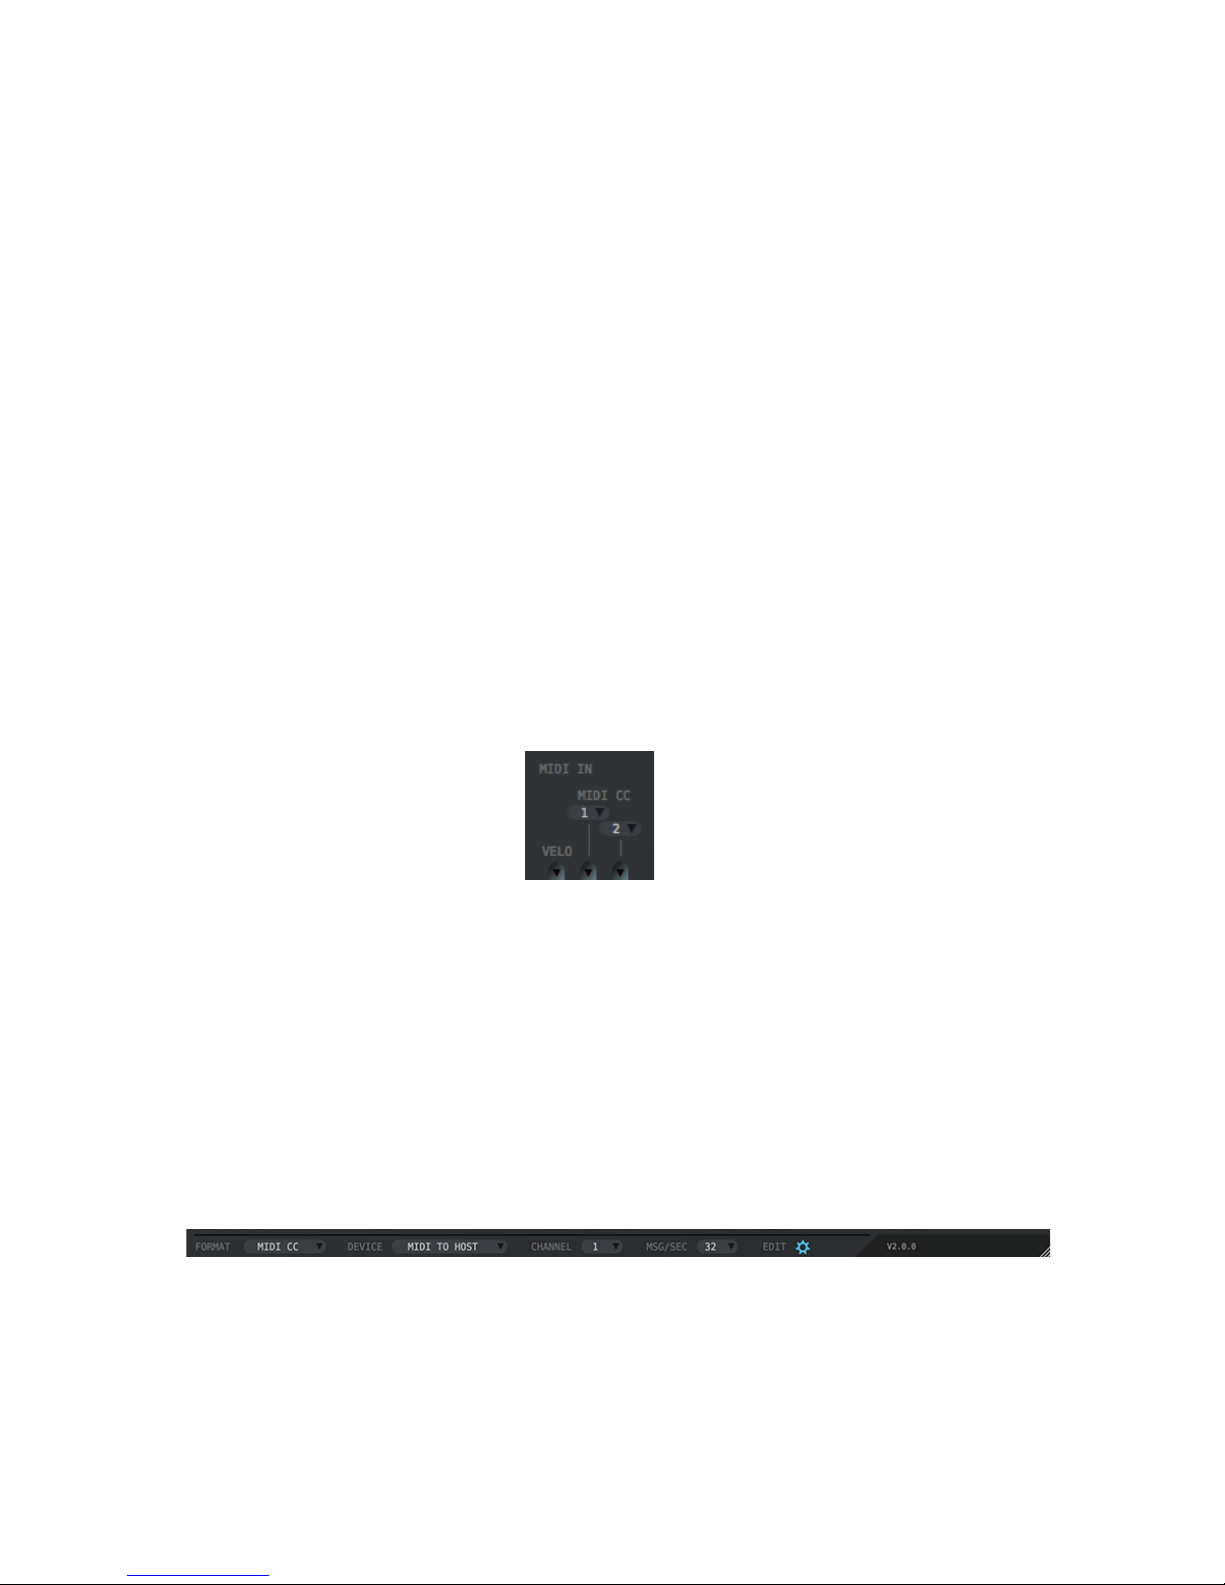
6.6 MIDI Input
With the MIDI input module specified midi data can be received by the Modulation Processor and be
routed to any input.
MIDI CC 1 & 2 Two independent MIDI CC values can be used to route to any input. The
desired CC number has to be set.
Note Velocity To use the velocity of an incoming note on event, this output can be routed
to any input.
6.7 Output
This module defines the type and destination of the modulation processor signal outputs.
Output Format According to the receiving device the output format can be set here. Select
MIDI CC if the receiving device can be modulated by CC messages. Select
SYSEX if the receiving device can be modulated by SYSEX messages.
Select AUDIO CV if the receiving device can be modulated by CV signals.
MIDI CC 1 & 2
Note Velocity
Output Format
MIDI Output Device / Channel
Messages Per Second
Page 22

The Modules
Dialog Audio / MP3244-Manual
22
MIDI Output Device This defines the physical MIDI output device. All available devices are
listed. Select the according device where the modulation data should be
send to.
MIDI TO HOST: If an external instrument plug-in, a virtual instrument or
other plug-ins should be modulated this has to be chosen.
MIDI Channel Depending on the studio setup the according channel has to be chosen
where the data should go.
Messages Per Second This sets the rate at which messages are sent to a device. For external
devices “32” messages per second are recommended. If the device (e.g.
classic synth) has a slow MIDI processing unit, the rate may be reduced to
“10” – “20” messages per second, to prevent jitter or even a locked device.
Also please refer to 5.2 “Avoiding MIDI Jitter Guideline”.
For internal software devices up to “100” messages per second can be
used. Please keep in mind that this dose not applies to plug-ins for
external instruments!
Page 23

License
Dialog Audio / MP3244-Manual
23
7 License
END-USER LICENSE AGREEMENT FOR MODULATION-PROCESSOR-3244 IMPORTANT PLEASE
READ THE TERMS AND CONDITIONS OF THIS LICENSE AGREEMENT CAREFULLY BEFORE
CONTINUING WITH THIS PROGRAM INSTALLATION:
Dialog Audio End-User License Agreement (EULA) is a legal agreement between you (either an
individual or a single entity) and Dialog Audio for the Dialog Audio software product(s) identified
above, which includes computer software and may include associated software components, media,
printed materials, and "online" or electronic documentation ("Software").
By installing, copying, or otherwise using the Software, you agree to be bound by the terms of this
EULA. This license agreement represents the entire agreement concerning the program between you
and Dialog Audio, (referred to as "licenser"), and it supersedes any prior proposal, representation, or
understanding between the parties. If you do not agree to the terms of this EULA, do not install or
use the Software
The Software is protected by copyright laws and international copyright treaties, as well as other
intellectual property laws and treaties. The Software is licensed, not sold.
1. GRANT OF LICENSE
The Software is licensed as follows:
1.1 Installation and Use.
Dialog Audio grants you the right to install and use the number of copies of the Software that you
purchased or for which you were granted a license.
1.2 Evaluation Use.
If you install and use the evaluation version of the Software, you may use the Software only for
evaluation purposes and only during an applicable evaluation period.
1.2 Backup Copies.
You may also make copies of the Software as may be necessary for backup and archival purposes.
2. DESCRIPTION OF OTHER RIGHTS AND LIMITATIONS
2.1 Proprietary Notices.
You may not remove or alter any copyright notices on any and all copies of the SOFTWARE
PRODUCT.
2.2 Distribution.
You may not distribute registered copies of the Software to third parties. Evaluation versions
available for download from Dialog Audio’s websites may be freely distributed. !2.3 No Reverse
Engineering, Decompilation, and Disassembly.!You may not reverse engineer, decompile, decode,
decrypt, disassemble, or derive any source code from the Software.
2.4 No Modification.
You may not modify, alter, or create any derivative works of the Software.
2.5 No Rental.!You may not loan, rent, or lease the Software.!2.6 Support Services.
Dialog Audio may provide you with support services related to the Software ("Support Services"). Any
supplemental software code provided to you as part of the Support Services shall be considered part
of the Software and subject to the terms and conditions of this EULA.
2.7 Compliance with Applicable Laws.
You must comply with all applicable laws regarding use of the Software.
Page 24

License
Dialog Audio / MP3244-Manual
24
3. TERMINATION
Without prejudice to any other rights, Dialog Audio may terminate this EULA if you fail to comply with
the terms and conditions of this EULA. In such event, you must destroy all copies of the Software
and all of its component parts.
4. COPYRIGHT
All title, including but not limited to copyrights, in and to the Software and any copies thereof are
owned by Dialog Audio. All title and intellectual property rights in and to the content which may be
accessed through use of the Software is the property of the respective content owner and may be
protected by applicable copyright or other intellectual property laws and treaties. This EULA grants
you no rights to use such content. All rights not expressly granted are reserved by Dialog Audio.
5. LIMITED WARRANTY
5.1 NO WARRANTIES
Dialog Audio expressly disclaims any warranty for the Software. The Software and any related
documentation is provided “as is” without warranty of any kind, either express or implied, including,
without limitation, the implied warranties or merchantability, fitness for a particular purpose, or
noninfringement.
Dialog Audio does not warrant or assume responsibility for the accuracy or completeness of any
information, text, graphics, links or other items contained within the Software. Dialog Audio makes no
warranties respecting any harm that may be caused by the transmission of a computer virus, worm,
time bomb, logic bomb, or other such computer program. Dialog Audio further expressly disclaims
any warranty or representation to 'Authorised Users' or to any third party.
5.2. LIMITATION OF LIABILITY
In no event shall Dialog Audio be liable for any damages (including, without limitation, lost profits,
business interruption, or lost information) rising out of 'Authorised Users' use of or inability to use the
Software, even if Dialog Audio has been advised of the possibility of such damages. In no event will
Dialog Audio be liable for loss of data or for indirect, special, incidental, consequential (including lost
profit), or other damages based in contract, tort or otherwise. Dialog Audio shall have no liability with
respect to the content of the Software or any part thereof, including but not limited to errors or
omissions contained therein, libel, infringements of rights of publicity, privacy, trademark rights,
business interruption, personal injury, loss of privacy, moral rights or the disclosure of confidential
information.
Some jurisdictions do not allow the limitation or exclusion of liability for incidental or consequential
damages so the above limitation or exclusion may not apply. In no event will Dialog Audio’s total
aggregate and cumulative liability to you for any and all claims of any kind arising hereunder exceed
the amount of license fees actually paid by you for the Software.
 Loading...