

Page 1
®
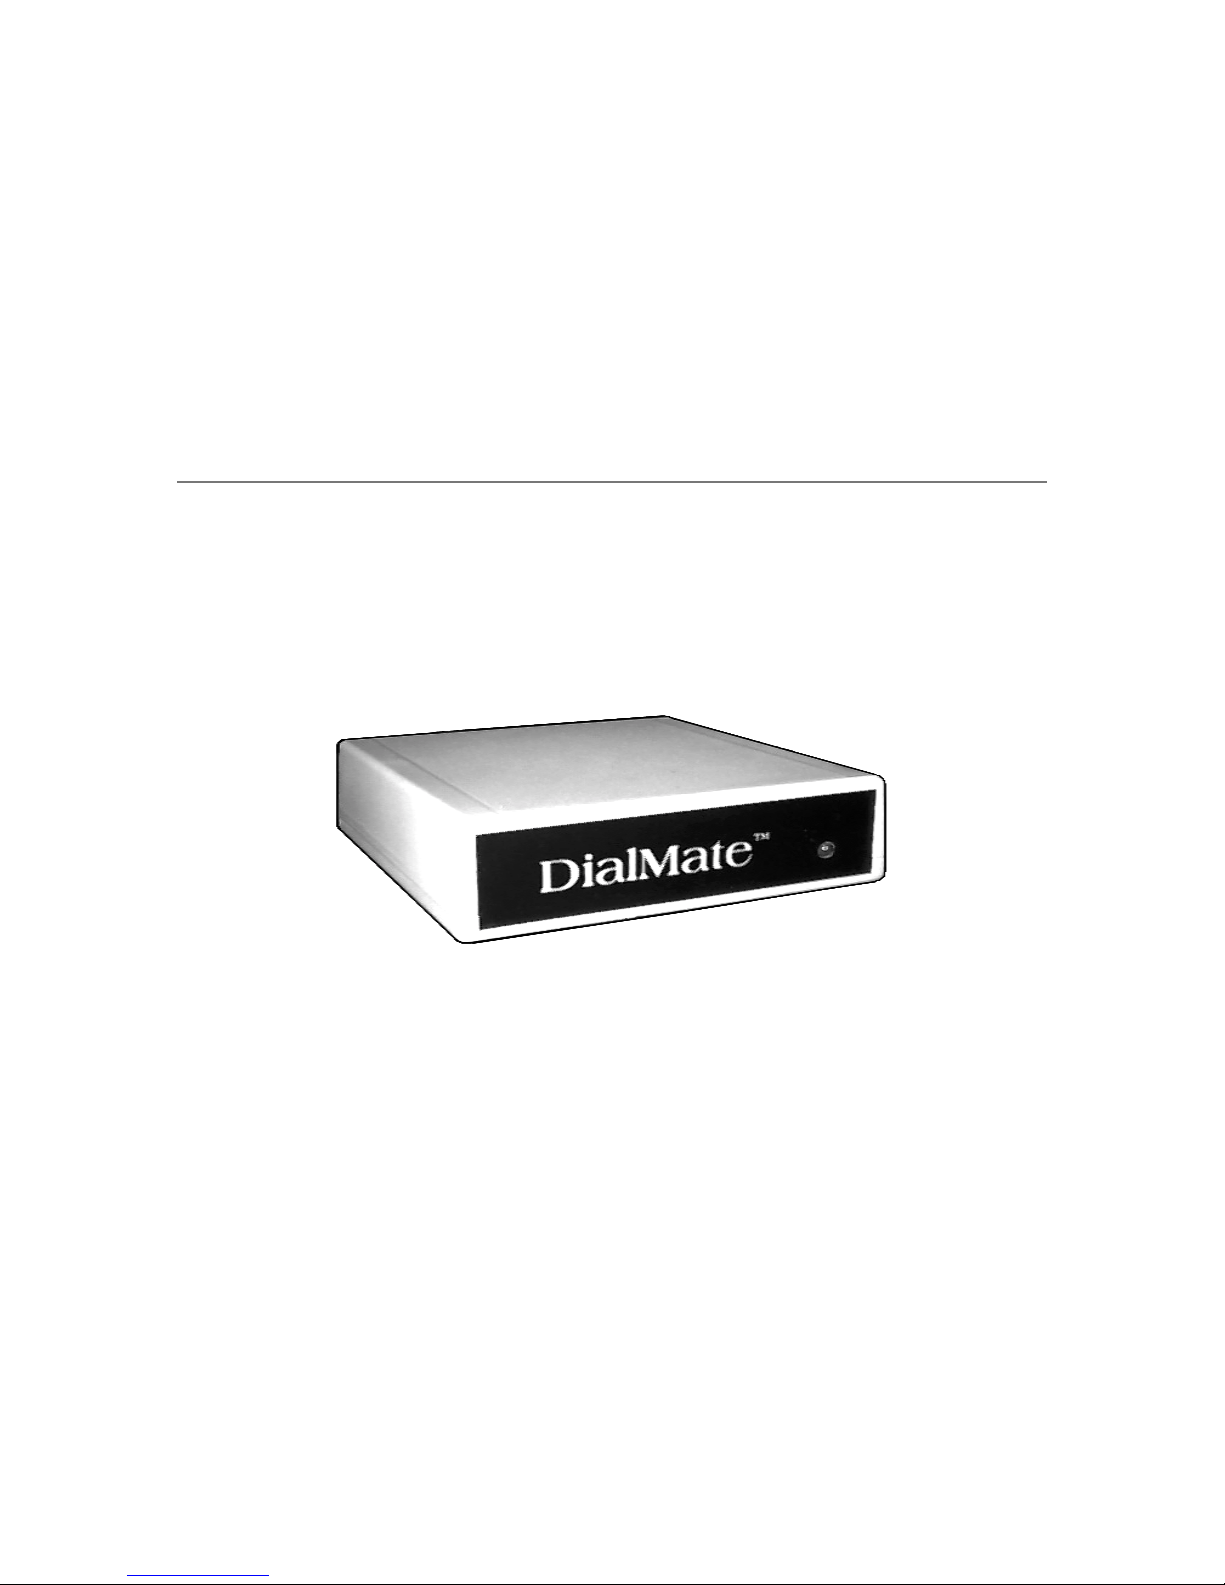
DialMate
User’ s Manual
WoodTel
CM 1003
Page 2

Page 3

I. OWNER’S RECORD
The model and serial numbers are located on the bottom of the equipment.
Record these numbers in the spaces provided below.
Refer to these numbers whenever you call upon your dealer regarding this
product.
Model No. CM 1003
WARNING: To prevent fire or shock hazard, do not expose this
Serial No.___________________
equipment to rain or moisture.
FCC P ART 68 REGISTRA TION
This equipment complies with Part 68 of the FCC rules. The FCC Part 68 label is
located on the bottom of the equipment. This label contains the FCC Registration
Number for this equipment. If requested, this information must be provided to your
telephone company.
The REN is useful to determine the quantity of devices you may connect to your
telephone line and still have all of those devices ring when your telephone number
is called. In most, but not all areas, the sum of the RENs of all devices connected
to one line should not exceed five (5.0). To be certain of the number of devices you
may connect to your line, as determined by the REN, you should contact your local
telephone company to determine the maximum REN for your calling area.
Connection to the telephone network should be made by using standard modular
telephone jacks, type RJ11C. The RJ11C plug and/or jacks used must comply with
FCC Part 68 rules.
If this telephone equipment causes harm to the telephone network, the telephone
company will notify you in advance that temporary discontinuance of service may
be required. But if advance notice isn’t practical, the telephone company will notify
the customer as soon as possible. Also, you will be advised of your right to file a
complaint with the FCC if you believe it is necessary.
The telephone company may make changes in its facilities, equipment, operations
or procedures that could affect the proper functioning of your equipment. If they
do, you will be notified in advance in order for you to make necessary
modifications to maintain uninterrupted service.
This equipment may not be used on coin service provided by the telephone
company. Connection to party lines is subject to state tariffs.
If trouble is experienced with this unit, please contact customer service at the
address and phone listed below. DO NOT DISASSEMBLE THIS EQUIPMENT. It
does not contain any user serviceable components. If the equipment is causing
OWNER’S RECORD i
Page 4

harm to the network, the telephone company may request that you disconnect this
equipment from the telephone network until the problem is resolved.
INTERFERENCE INFORMA TION: P ART 15 OF FCC R ULES
Note: This equipment has been tested and found to comply with the limits for a
Class B digital device, pursuant to Part 15 of the FCC Rules. These limits are
designed to provide reasonable protection against harmful interference in a
residential installation. This equipment generates, uses, and can radiate radio
frequency energy and, if not installed and used in accordance with the instructions,
may cause harmful interference to radio communications. However, there is no
guarantee that interference will not occur in a particular installation.
If this equipment does cause harmful interference to radio or television reception,
which can be determined by turning the equipment off and on, the user is
encouraged to try to correct the interference by one or more of the following
measures:
• Reorient or relocate the receiving antenna.
• Increase the separation between the equipment and receiver.
• Connect the equipment into an outlet on a circuit different from that to which
the receiver is connected.
• Consult the dealer or an experienced radio/TV technician for help.
CAUTION: Any changes or modifications not expressly approved by WoodTel,
Inc. could void the user’s authority to operate the equipment.
SPECIFICA TIONS
• Single Line Call Back/Call Bridge/Call Forward/Call Transfer System
• Power Supply: 120VAC/12VDC/9VAC 50mA Adapter (provided)
• Connections: RJ11C Modular Jack
• Dimensions: 6 1/16” W x 4 1/4” L x 1 1/2” H Weight: Less than 1lb.
• Complies with Part 68 and Part 15 FCC Rules
SY STEM REQUIREMENTS
• Telephone line at installation: Analog, tone and three-way
(conference)/transfer calling capable
• Telephone for on-site programming: Tone capable
• Telephone line at call back location: Analog or digital; pulse or tone capable
• Telephone at call back location: Tone capable or else use a pocket tone
dialer (available in most electronic stores).
OWNER’S RECORD ii
Page 5

II. C O N T E N T S
I. OWNER’S RECORD .................................................................................................I
FCC PART 68 REGISTRATION.................................................................................
INTERFERENCE INFORMATION: PART 15 OF FCC RULES............ .....................
SPECIFICATIONS.....................................................................................................
SYSTEM REQUIREMENTS......................................................................................
II
II
II
II. C O N T E N T S.....................................................................................................III
III. OVERVIEW.............................................................................................................1
FEATURES/APPLICATIONS/BENEFITS..................................................................1
IV. ON-SITE PROGRAMM I NG ....................................................................................4
ON-SITE PROGRAMMING SETUP ..........................................................................4
PROGRAMMING INSTRUCTIONS...........................................................................4
Program A: Setting the Security Code/PIN ...........................................................5
Program B: Setting the Call Back Number............................................................5
Program C: Enable/Disable Call Forward/Call Transfer; Set Number of Rings .....6
Program D: Setting the Call Forward/Transfer Number.........................................6
Program E: Enable Transfer/Three-way Switching................................................7
Program F: Recording a Greeting.........................................................................7
Program G: Setting the Call Length Timer............................................................8
Program H: Setting the Prefix and Suffix...............................................................8
Clearing the Prefix and Suffix.............................................................................9
Phone Card and Dial-Around Services.............................................................10
Program I: Setting the Flash Hook Duration........................................................10
I
V. SETUP FOR NORMAL USE .................................................................................11
CHECK YOUR EQUIPMENT...................................................................................11
MAKE THE CONNNECTIONS ................................................................................11
VI. REMOTE PROGRAMMI NG .................................................................................12
WHEN THE USER IS NOT AT THE CALL BACK NUMBER...................................12
WHEN THE USER IS AT THE CALL BACK NUMBER............................................12
VII. OPERATION .......................................................................................................14
CALL BACK.............................................................................................................14
How the Call Back Feature Works.......................................................................14
Call Back - Voice..................................................................................................14
Call Back - Cellular Phones .................................................................................17
Call Back - Facsimile (Fax)..................................................................................17
Call Back - Modem Operation..............................................................................18
TABLE OF CONTENTS iii
Page 6

CALL FORWARD....................................................................................................19
Forward and Transfer........................................................................................... 20
CALL BRIDGE.........................................................................................................21
Normal Call Bridge...............................................................................................21
Jumping to Call Bridge from Call Forward/Transfer..............................................22
TRANSFER SWITCHING MODE............................................................................23
CHANGING SWITCHING MODE............................................................................23
VOIP........................................................................................................................23
CALL RETURN........................................................................................................23
VIII. TROUBLESHOOTING .......................................................................................24
Unable to Program DialMate On-Site...................................................................24
DialMate Does Not Call Back...............................................................................24
DialMate Does Not Connect to Destination Number ............................................24
DialMate Disconnects Upon Entering the Security Code/PIN ..............................25
DialMate Does Not Call Forward/Transfer............................................................25
DialMate Does Not Connect During Modem Operation........................................25
The On-Site Telephone Used to Program DialMate Does Not Have a Dial Tone
and Does Not Receive Phone Calls.....................................................................25
IX. WARRANTY.........................................................................................................26
WHAT IS COVERED...............................................................................................26
What We W ill Do..................................................................................................26
Limitations............................................................................................................26
What We Ask You to Do......................................................................................26
WHAT THIS WARRANTY DOES NOT COVER......................................................27
YOUR AUTHORIZED DEALER IS ..........................................................................27
TABLE OF CONTENTS iv
Page 7

III. OVERVIEW
DialMate is an intelligent state-of-the-art call management system that, once
installed on an analog telephone line with three-way (conference)/transfer calling,
reverses, bridges and forwards/transfers calls, resulting in tremendous savings on
your phone bills.
DialMate is simple to use and does not require a computer or programming skills.
Because call charges are from DialMate’s location, you can take advantage of low
residential, business, cellular/mobile phone and Voice Over Internet Protocol
(VOIP) rates compared with rates of pay phones, calling cards, hotels and foreign
telephone companies.
The device is equipped with a voice chip that can record a greeting to get through
hotel and PBX operators or request callers to stay on the line while their calls are
being forwarded or transferred. This gives you the convenience and flexibility you
need to communicate wherever you may be. With DialMate, you can make free
calls from hotel rooms, pay phones, and cellular phones; completely bypass
foreign telephone companies’ long distance charges when calling from overseas
and take advantage of VOIP flat domestic and international rates. The CM1003
also has the unique capability of performing transfer switching during call back,
bridge and forward for services (PABX, Centrex and VOIP) that have the call
transfer feature.
FEA TURES/APPLICA TIONS/BENEFITS
• Can be used as a call back, call bridge, call forward or call transfer device
without a computer.
• If installed on a USA 800 number, the line can be used as a toll-free
international number. This will provide foreign companies/individuals with
virtual USA presence.
• Enables foreign (outside the USA) users to access USA 800 numbers
without assistance of an operator.
• Enables international user to take advantage of flat rates charged by
telephone companies/long distance carriers and VOIP providers in the United
States.
• Enables telecommuters to receive and transfer calls as if they were in the
office.
• Enables users to charge their personal calls to their home phone when at
work, and telecommuters to charge their business calls to their companies
when working at home.
OVERVIEW 1
Page 8

• Enables users to make multiple calls without hanging up between calls. This
eliminates surcharges commonly levied by hotels and calling card
companies.
• The desired call back or call forward/transfer telephone numbers (up to 80
digits), as well as other functions, can be programmed on-site (locally) or
remotely over telephone/VOIP lines even when the user is not at the preprogrammed number. This allows the user to have a roaming call back, call
forward or call transfer phone number.
• DialMate can be installed on any direct-dialed analog telephone line or PABX
extension.
• The call back/forward/transfer telephone number can reside in an operator-
assisted PBX (such as in hotels and companies where PBX extensions
cannot be dialed directly). A digital voice chip on the device can record a
message to get through operators or request callers to stay on the line while
their calls are being forwarded/transferred.
• Equipped with non-volatile memory, which is used to save all programmed
data. If the power goes off, saved information will not be lost.
• Programmable four-digit security code prevents unauthorized persons from
using or reprogramming the device.
• When used as a call forward/transfer device on their land-based telephone
lines, users can be reached wherever they may be, including hotels, mobile
phones, or even overseas (Note: phone companies do not forward calls to
international destinations).
• Takes advantage of free air time plans (incoming calls, calls to designated
numbers, etc.) offered by major cellular service providers, using the call
bridge and call back functions.
• Extends the range of cellular phone calls to international destinations without
modifying the user’s calling plan or obtaining special permission from the
cellular service provider.
• Saves on cellular directory assistance calls. Landline 411 calls are free or
much cheaper.
• Secures caller ID and location. The device’s phone number will appear on
the called party’s caller ID machine, not the number from where the user is
calling. This is very useful and most of the time a necessity for users
(especially security and law enforcement personnel) who don’t want to give
out their unlisted numbers or cellular phone numbers and location.
• Eliminates the telephone company’s monthly charges for call forward/transfer
services.
OVERVIEW 2
Page 9

• A “must have” for telecommuters, importers, exporters, SOHOs, sales and
field service personnel, travelers, tourists, expatriates, embassy personnel,
armed services personnel, law enforcement agencies, cellular phone users,
multinational companies, students, or anybody away from their home or
office phone. In other words, don’t leave your phone without it!
OVERVIEW 3
Page 10
IV. ON-SITE PROGRAMMING
ON-SITE PROGRAMMING SETUP
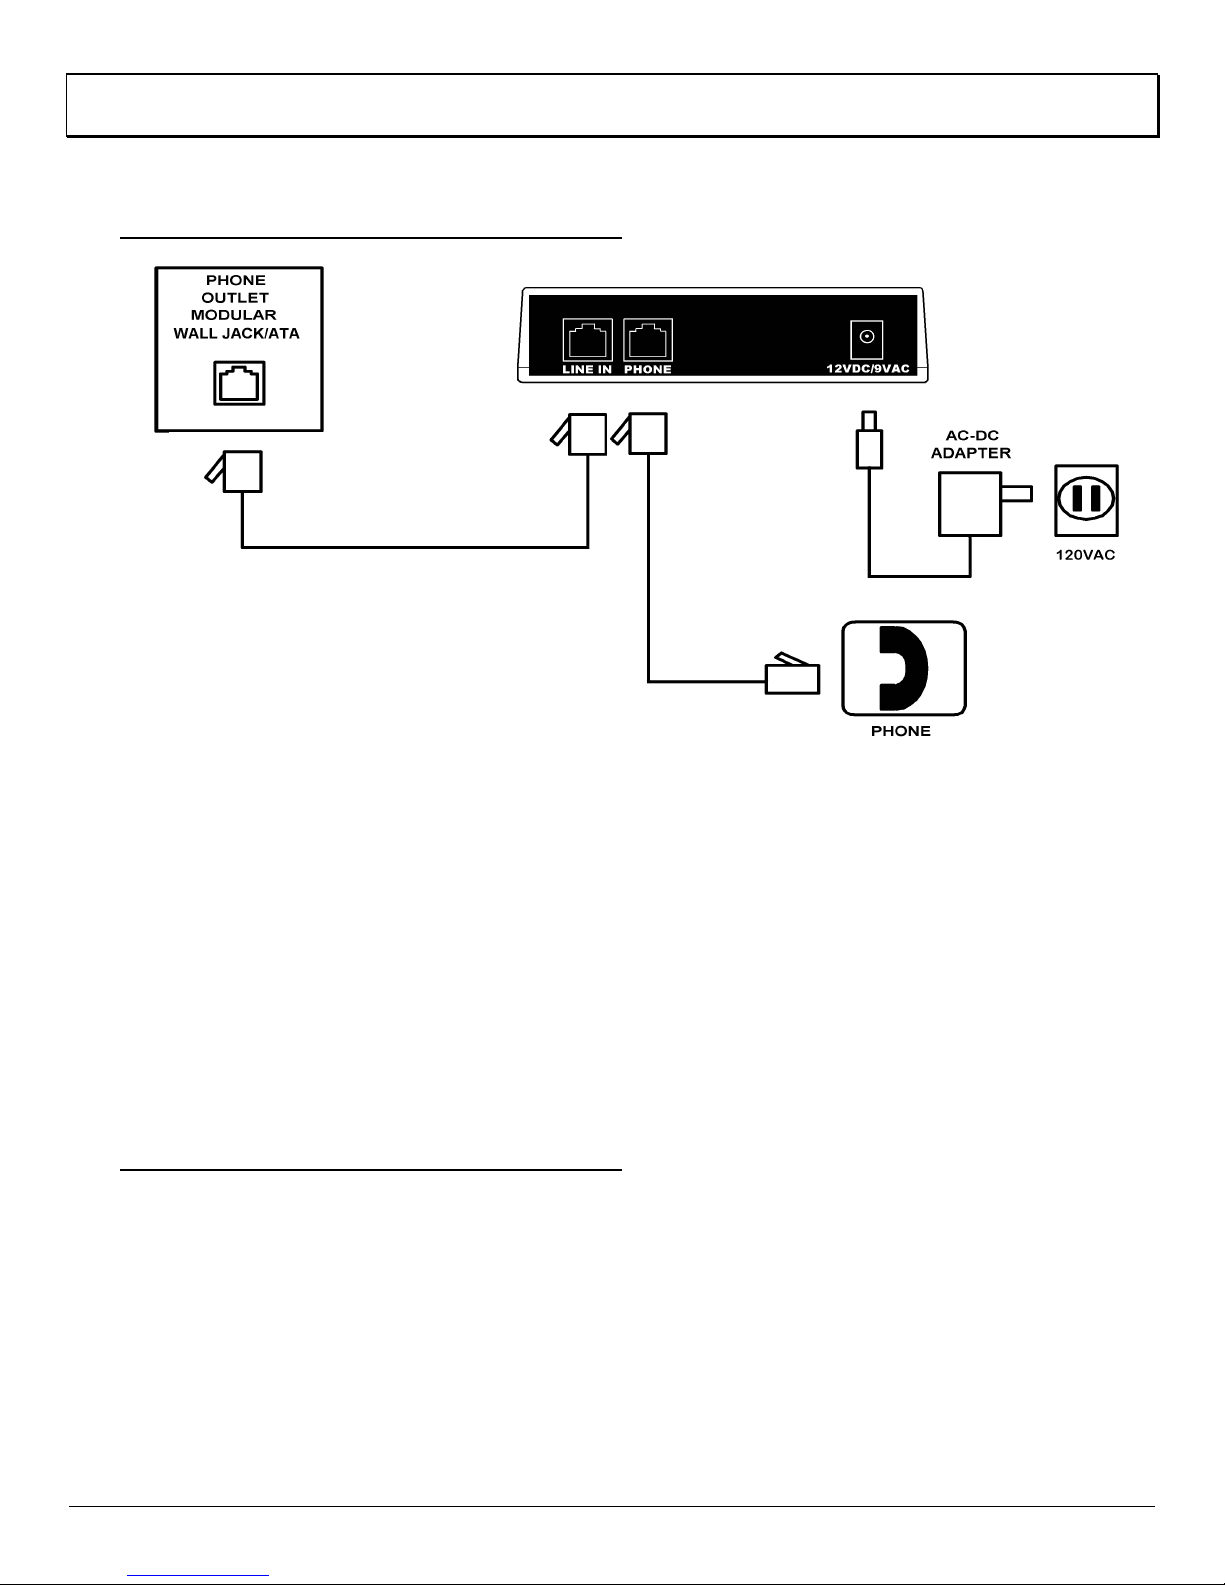
Fig. 1 Connection diagram for on-site programming
⌦ LINE IN - Locate the telephone line that has “tone” and conference calling
capabilities and a telephone that is set to “tone”. Unplug the telephone
from the phone outlet modular wall jack or VOIP Analog Telephone Adapter
(ATA). Locate the supplied modular telephone cord and plug one end into
the wall jack or ATA. Plug the other end of the cord into “Line In”.
⌦ PHONE - Use the telephone cord attached to the telephone and plug the
free end of the telephone cord into DialMate’s jack labeled, “Phone”.
⌦ 12VDC/9VAC - Plug the output of the supplied adapter into DialMate’s
power jack and then plug the adapter into a 120 VAC outlet that is not
connected to a wall switch.
PROGRAMMING INSTRUCTIONS
To enter programming mode, lift the handset of the telephone connected to
DialMate’s “Phone” jack (you will hear no dial tone) and press the “
hearing two beeps, follow the appropriate programming instructions below.
;” key. After
Initiate programming instructions within 3 seconds of the 2-beep prompt.
Otherwise DialMate will go out of program mode in which case, you will have to
wait at least 10 seconds and then press “
Three beeps confirm successful programming and two beeps prompt for the next
instruction.
ON-SITE PROGRAMMING 4
;” again to get another 2-beep prompt.
Page 11
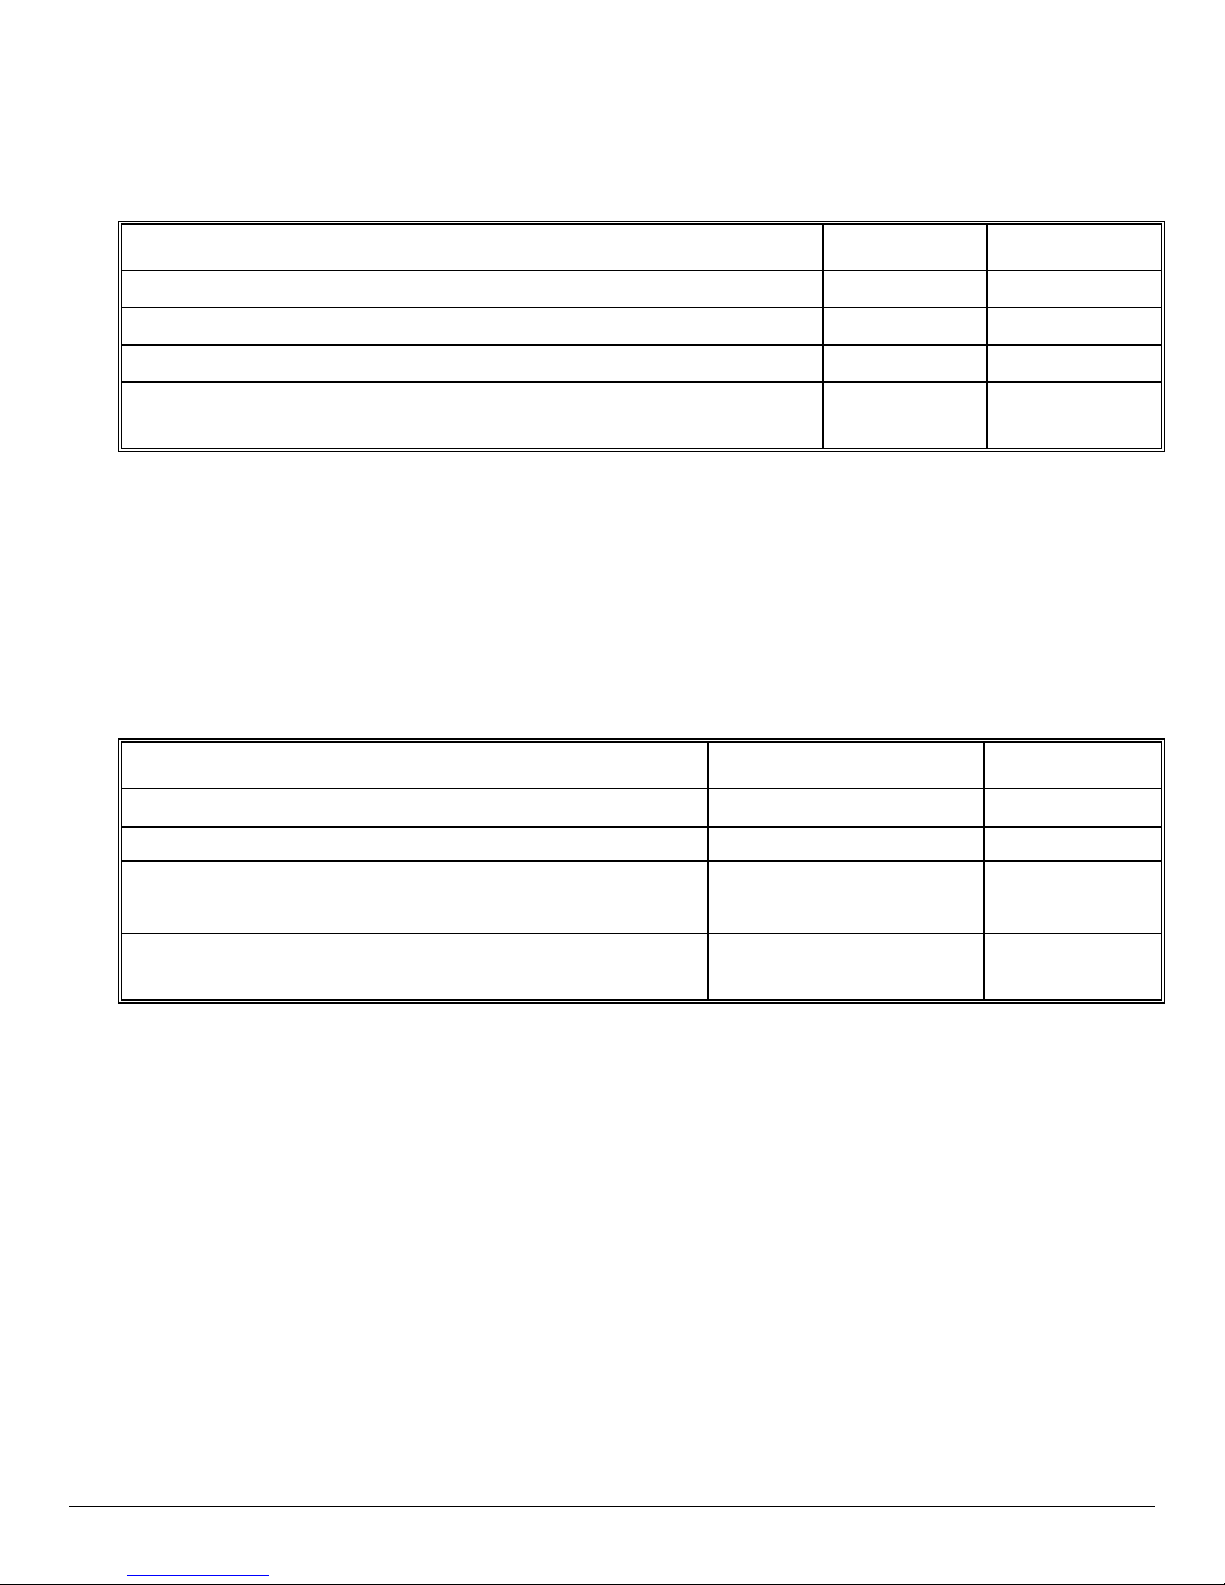
Programs A and B are mandatory for call back, call bridge and remote
access.
Program A: Setting the Security Code/PIN
STEPS USER DIALMATE
press “5”
wait for a beep
enter a 4 digit code (e.g., “4609”)
wait for the 2-beep confirmation/prompt for the next
instruction
PIN is set to ‘4609’
Notes:
− You can change the code remotely if you know the existing code.
− You cannot access and operate DialMate remotely if you forget your
security code. You will have to reprogram DialMate on-site for a new
code.
Program B: Setting the Call Back Number
STEPS USER DIALMATE
press “*”
wait for a beep
M8
LNHQ8
B8
8
8
enter the call back phone number (e.g.,
“9 pause 14153550132”)
wait for the 2-beep confirmation/prompt for
the next instruction
During call back, DialMate will dial ‘9’, pause for 1.5 seconds and then dial ‘14153550132’.
Notes:
− To enter a “
− Enter the call back number
line.
− Enter “
second delay in the dialing sequence and will count as one digit.
− The call back number may be up to 80 digits long and can be any
combination of digits from “0” to “9” as well as “
enables you to program carrier, phone card, or dial-around access
numbers; PINs; etc., together with the call back number. Digit entries
should be timed with appropriate pauses (IP) to synchronize with the
system’s prompts.
#” into the dial string (e.g., 14153550132#), dial “;;”.
exactly as if calling from DialMate’s phone
;B” where a pause is required. Each pause will cause a 1.5
Q;BILIMKM
MHIKJ
*” and “#”. This capability
ON-SITE PROGRAMMING 5
Page 12
− To do an automatic call back for each caller, enter “P\_IPIPIP” as
the call back number. The device will call back the last caller that rang the
CM1003 once (for VOIP) or twice (for regular telephone lines) and then
hang up. This can only be done on lines that have the “Call Return”
feature. Note that the caller has to know the PIN to use the system.
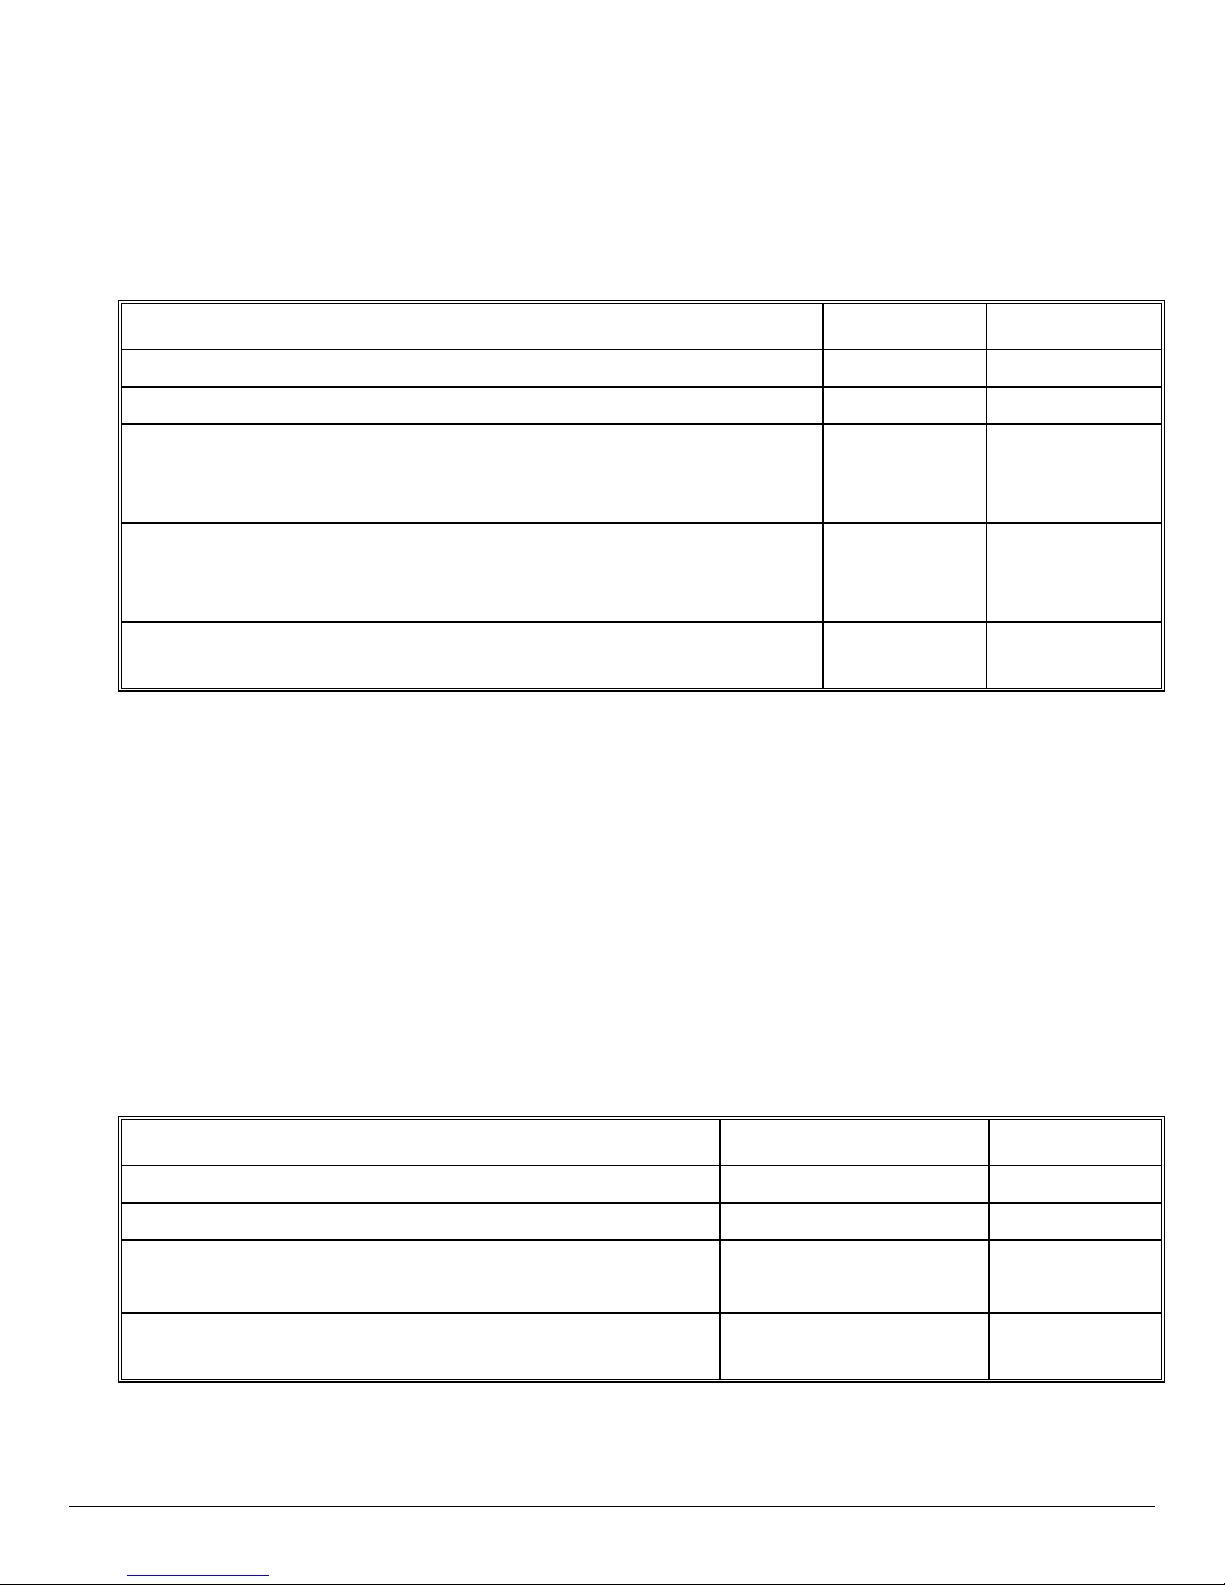
Program C: Enable/Disable Call Forward/T ransfer; Set Number of Rings
STEPS USER DIALMATE
press “4”
wait for the beep
to enable, press any key (e.g., “1”) 1 to 10 times
corresponding to the desired number of rings
before DialMate answers
to disable, do not press any key
wait for the 2-beep confirmation/prompt for the next
instruction
DialMate will answer and forward/transfer incoming calls on the 4th ring, if enabled
For call forward/transfer function to operate properly, make sure that any
answering machine, fax or modem connected to the same line is set to answer
after a higher number of rings. When call forward/transfer is enabled, record an 8second voice message (see Program F) telling the caller to stay on the line as it
takes a few seconds to forward/transfer the call.
Note: When a single ring (desired number of rings before DialMate answers) is
chosen to trigger call forward/transfer, the normal call back mode is disabled.
However, call back can still be initiated by entering “_” during the remote
programming mode (see “Remote Programming”).
L8
IIII8
8
call forward/
transfer is
enabled
call forward/
8
8
transfer is
disabled
Program D: Setting the Call Forward/T ransfer Number
STEPS USER DIALMATE
press “8”
wait for a beep
enter the call forward/transfer number
(e.g., “9 pause 14153550132”)
wait for the 2-beep confirmation/prompt for
the next instruction
DialMate will forward/transfer the call to ‘9, pause for 1.5 seconds, 14153550132’.
ON-SITE PROGRAMMING 6
^8
8
Q;BILIMK
MMHIKJ8
8
Page 13

Notes:
− Enter the call forward/transfer number
telephone connected to DialMate’s phone line.
− The call forward/transfer number may be up to 80 digits long and can be
any combination of digits from “0” to “9” as well as “
Program E: Enable Transfer/Three-way Switching
DialMate can switch calls by means of three-way calling or blind transfer. During
three-way calling, DialMate stays with the call. Therefore, during call back or call
bridge, the caller after finishing their call can do sequential calling by entering
“I^” and waiting for the 2-beep prompt to make another call. During blind
transfer, DialMate will hang up after dialing the destination number and connect the
caller directly to the destination number. In order to transfer calls, the line must
have the call transfer feature such as in a Centrex, PABX, or VOIP. Although the
caller cannot do sequential calling, DialMate, after hanging up, is ready for the next
call. A number of transferred calls can be active at the same time. This is very
useful for family members/company employees who want to use the system
practically at the same time with minimum wait.
STEPS USER DIALMATE
exactly as if calling from a
*” and “#”.
press “0”
wait for three or four beeps
H8
8
8
to toggle or change mode, press “0” again
Program F: Recording a Greeting
The greeting will be played back during call back and call forward/transfer
operations. However, during call forward/transfer, only the first half of the greeting
(first 8 seconds) will be played and the recording will not loop.
STEPS USER DIALMATE
press “6”
wait for a beep
begin speaking to record up to an 18-
second greeting
beep marks end of recording
N8
H8
records greeting
8
8
8
DialMate is
in transfer
mode
DialMate is
in 3- way
mode
ON-SITE PROGRAMMING 7
Page 14

listen to recorded greeting plays recording
wait for the 2-beep confirmation/prompt
for the next instruction
Below is an example of a greeting that can be used for both call forward/transfer
and call back operation. You should time the recording so that only the first
sentence of the greeting is heard during call forward/transfer. Spell the name
when the room or extension number is unknown.
Example of a greeting script:
“Mr./Ms.______ is away at the moment but please stay on the line while we
connect you to his/her other number. Operator, please connect this call to Mr./Ms.
_____, room/extension 1132. This message will be repeated, thank you.” (Spell the
name if room or extension is unknown).
Program G: Setting the Call Length Timer
When DialMate is in the three-way switching mode, it operates unattended and
there are cases where the telephone line is not disconnected even after the caller
hangs up. The call length timer assures that DialMate will disconnect
automatically at the pre-programmed time should the caller forget to turn it off
before hanging up. Allow enough time for fax or modem operations to finish as you
will not hear the disconnect warning beeps during these operations (see
“Operation” section). Choose option 5 (unlimited or no time out) cautiousl y.
STEPS USER DIALMATE
press “3”
wait for a beep
select one from the ff.:
0 (approximately 5 minutes)
1 (approximately 10 minutes)
2 (approximately 20 minutes)
3 (approximately 30 minutes)
4 (approximately 60 minutes)
5 (unlimited or no time out)
wait for the 2-beep confirmation/prompt for the next
instruction
K8
8
H8
8
Call length timer set to 5 minutes. This is the default condition.
Program H: Setting the Prefix and Suffix
(Skip if not installing inside a PABX or not storing any prefix or suffix digits)
Three-way conference calling and Centrex services provided by telephone
companies require only two flash hooks to connect the calls. On PABX systems
however, conference calling is implemented by either using two outside lines
(PABX conference) or by using the three-way calling capability of just one outside
ON-SITE PROGRAMMING 8
Page 15
line (PABX External Feature Access). For each method, PABX systems require a
number of digits to be entered aside from flash hooks to perform the conference
function. DialMate supports these PABXs by providing an option to dial a number
of digits after the first (Prefix) and second (Suffix) flash hooks. This way, DialMate
will work behind PABXs using either method. Check your PABX manual for the
correct dialing procedure.
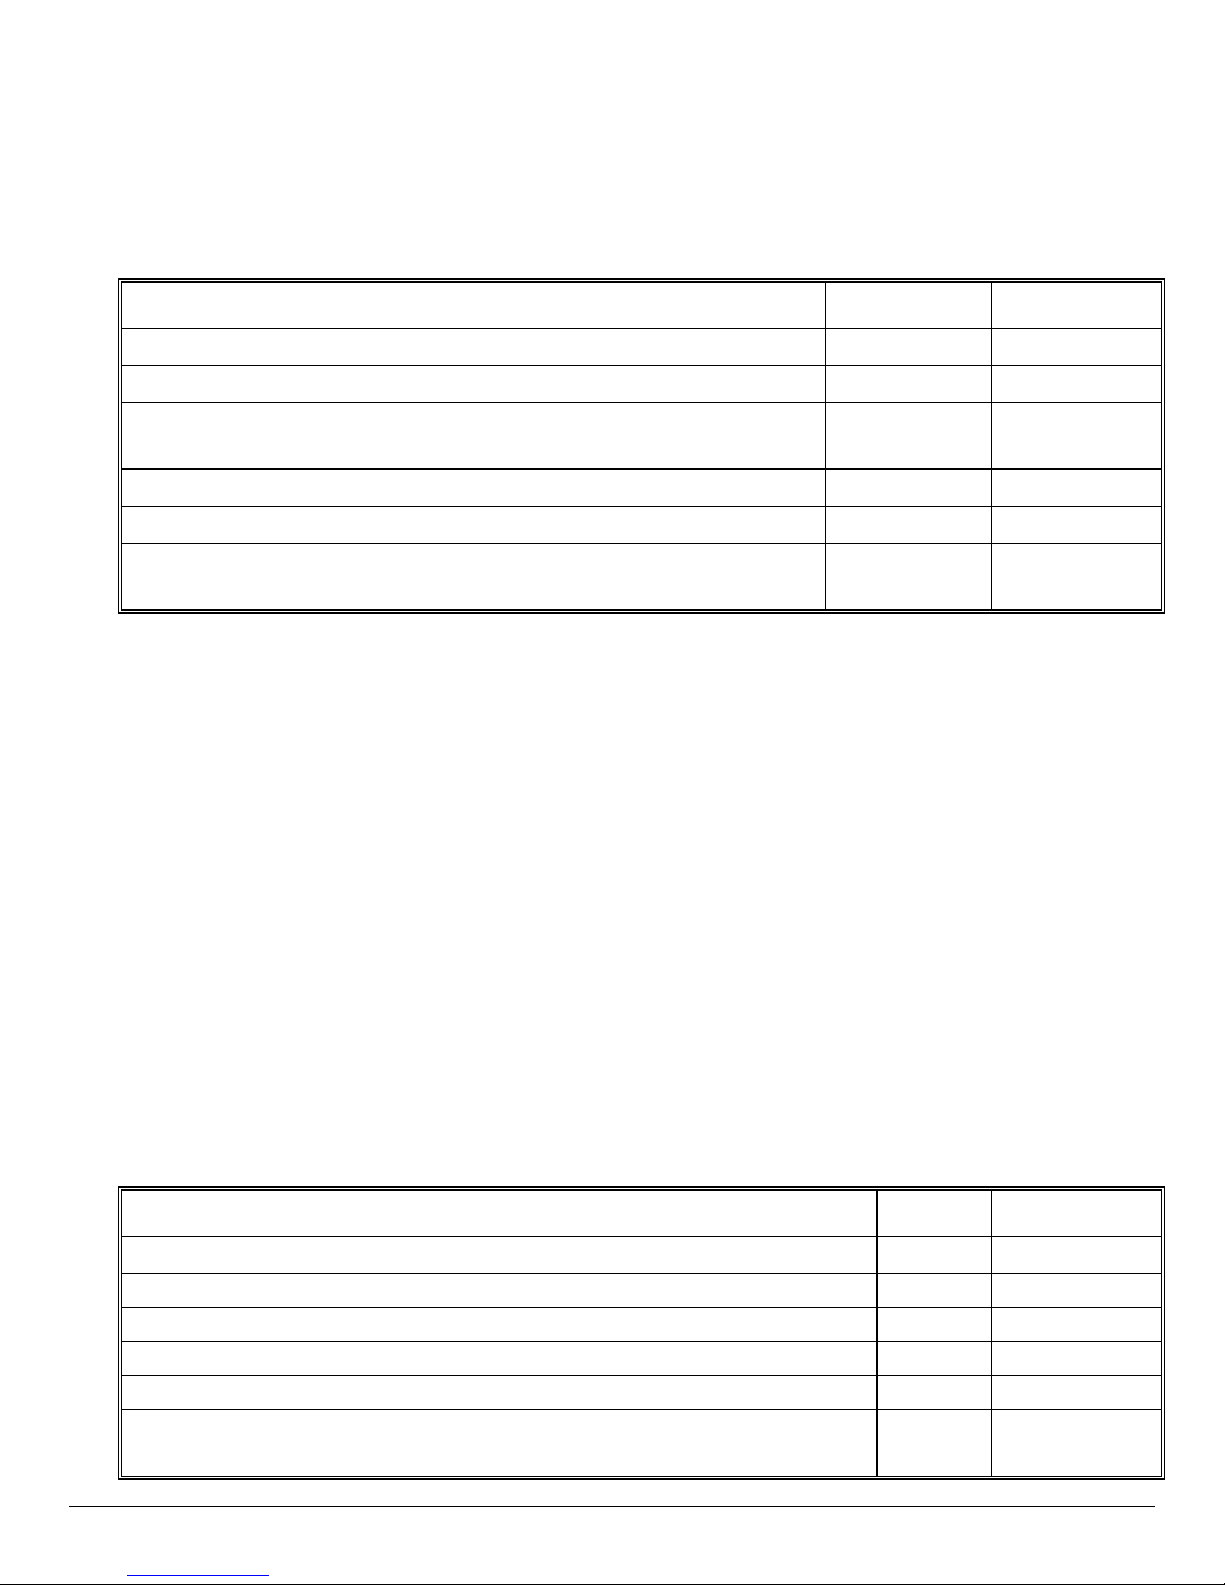
STEPS USER DIALMATE
press “2”
wait for a beep
Enter the PABX Prefix (e.g., “8 pause 9”). See
J8
^;BQ8
8
note
wait for a beep
Enter the PABX Suffix (e.g. “7”). See note
wait for the 2-beep confirmation/prompt for the next
instruction
8
]8
8
PABX prefix is now set to “8”,pause,”9”; PABX suffix is now set to “7”.
Note: Maximum digits for combined prefix and suffix is 48.
For example, using a single outside line with 3-way calling service, the PABX
requires that the digit “0” be entered after each flash hook in order to flash the
outside line:
set the PABX Prefix to “0”, set the PABX Suffix to “0”
to call phone number “988-9923” enter “
after the 1
st
flash hook, DialMate will dial the PABX Prefix (“0”) to flash
Q^^QQJK;”
the outside line, put the caller on hold and then get another dial tone
DialMate will then pause for 3 seconds, then dial “_^^__XY”
after the second flash hook, DialMate will dial the PABX Suffix (“0”) to
flash the outside line again and conference the calls
Make sure the PABX Prefix and Suffix are both clear if not installing
inside a PABX.
Clearing the Prefix and Suffix
press “2”
wait for a beep
do not press any key
wait for a beep
do not press any key
wait for the 2-beep confirmation/prompt for the next
instruction
ON-SITE PROGRAMMING 9
STEPS USER DIALMATE
J8
Page 16

PABX Prefix and Suffix are now both clear. This is the default condition.
Phone Card and Dial-Around Services
DialMate enables you to use your USA phone cards or access other carriers to call
anywhere even from overseas. A phone card’s toll-free access number and PIN or
an alternative carrier’s dial-around number (e.g., 1010321) may be stored as a
prefix so that these numbers do not have to be dialed repeatedly with the
destination number. However, during operation, should you want DialMate to skip
dialing the pre-programmed prefix, enter “P” before the destination number.
Program I: Setting the Flash Hook Duration
By default, DialMate’s flash hook is set at 500 milliseconds. However, some
foreign telephone lines or PABXs expect shorter or longer flash hooks. If DialMate
is not able to get another line after the 1
st
flash hook, i.e., you hear DialMate’s
dialing tones after the flash hook, then adjust the flash hook duration accordingly.
STEPS USER DIALMATE
press “7”
NN8
wait for a beep
select one from the ff.:
0 (100 ms)
1 (250 ms)
2 (500 ms)
3 (700 ms)
4 (800 ms)
5 (1 second)
J8
wait for the 2-beep confirmation/prompt for the next
instruction
Flash hook duration is now set to 500 milliseconds. This is the default condition.
8
8
ON-SITE PROGRAMMING 10
Page 17
V. SETUP FOR NORMAL USE
CHECK Y OUR EQUIPMENT
AC-DC power adapter
DialMate unit
Modular telephone cord (included)
Dual Jack adapter (included)
Tone capable telephone line with 3-Way/Transfer Calling (ordered from your
phone company or VOIP service provider)
Analog telephone with modular telephone cord (user supplied)
The telephone line must have tone and conference/transfer calling capabilities.
DialMate will not work on pulse dialing systems.
MAKE THE CONNNECTIONS
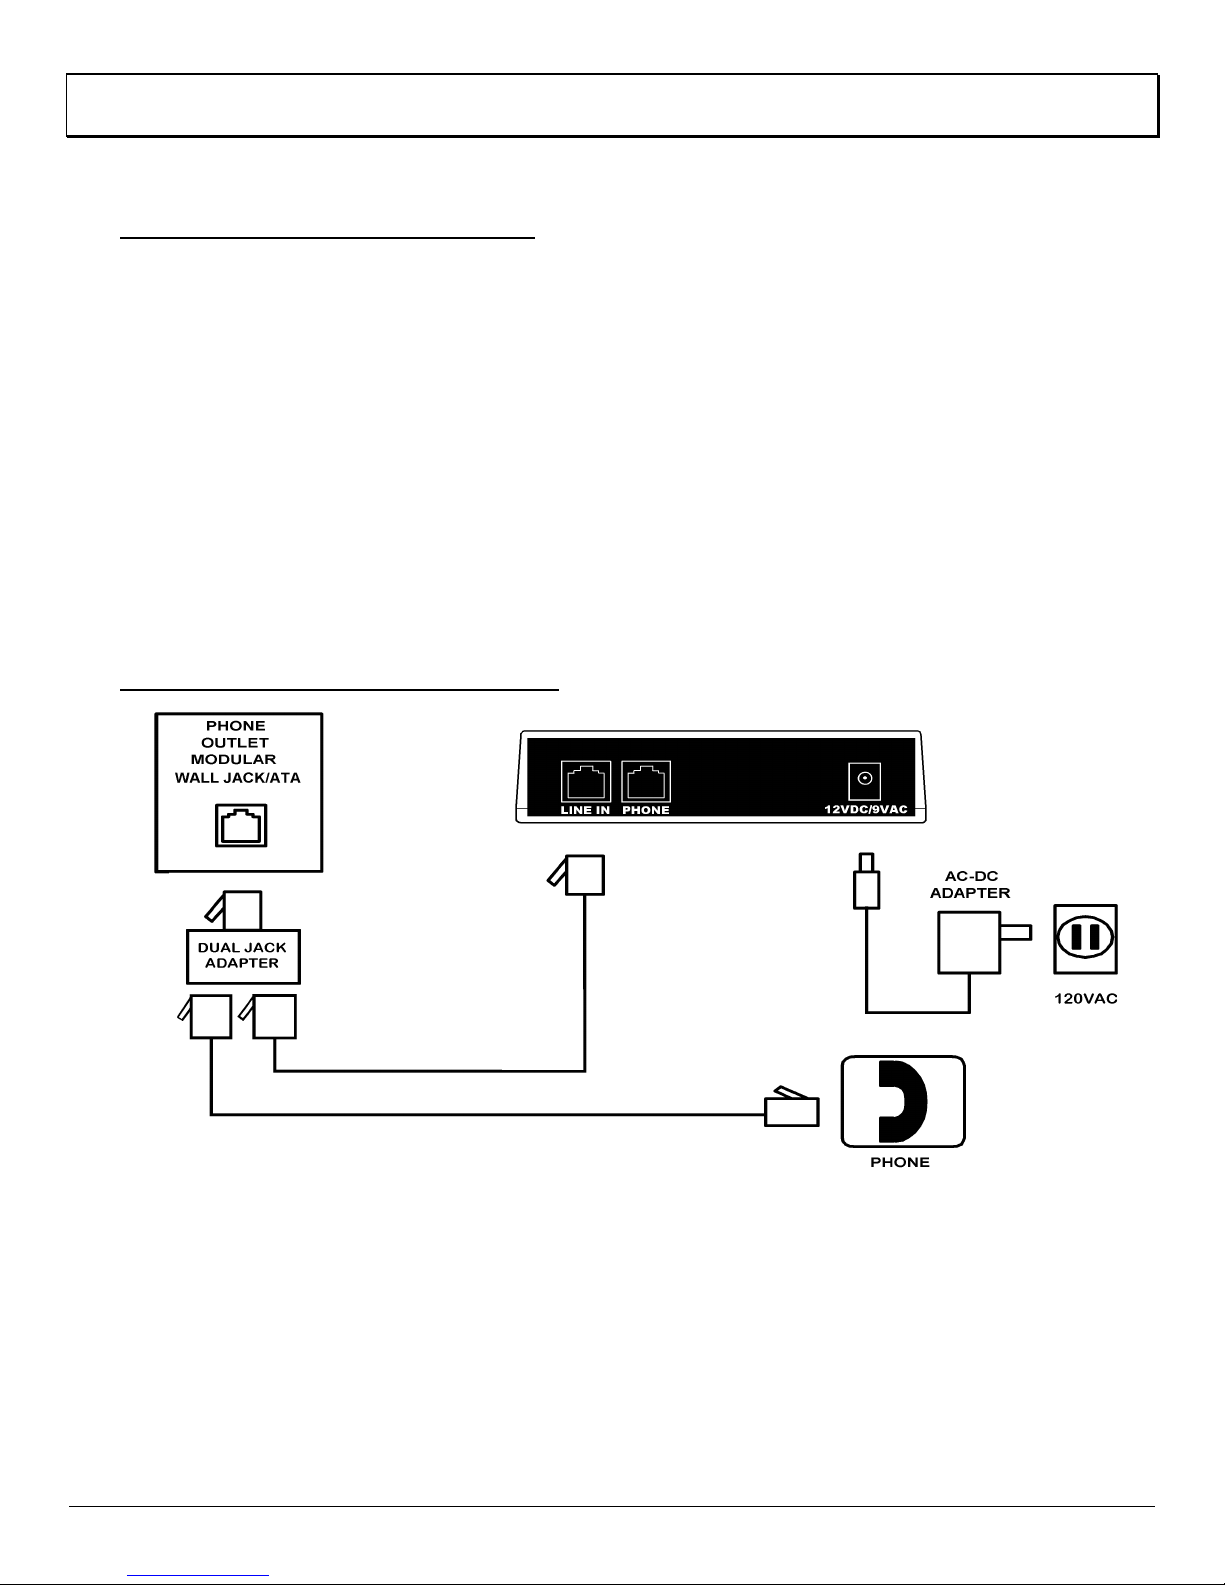
Fig. 2 Connection diagram for normal use.
After on-site programming, disconnect the telephone cord from DialMate’s “Phone”
jack. Disconnect DialMate’s “Line In” cord from the wall jack/PABX extension.
Connect the supplied dual jack adapter into the wall jack or VOIP ATA (see Fig. 2).
Connect DialMate’s “Line In” cord and the telephone cord into the dual jack
adapter. Keep DialMate’s AC-DC adapter plugged in. If you want to connect a
telephone to the same line, plug the phone cord from the telephone set into the
vacant port on the dual jack adapter. This is the equipment configuration for
normal use.
SETUP FOR NORMAL USE 11
Page 18
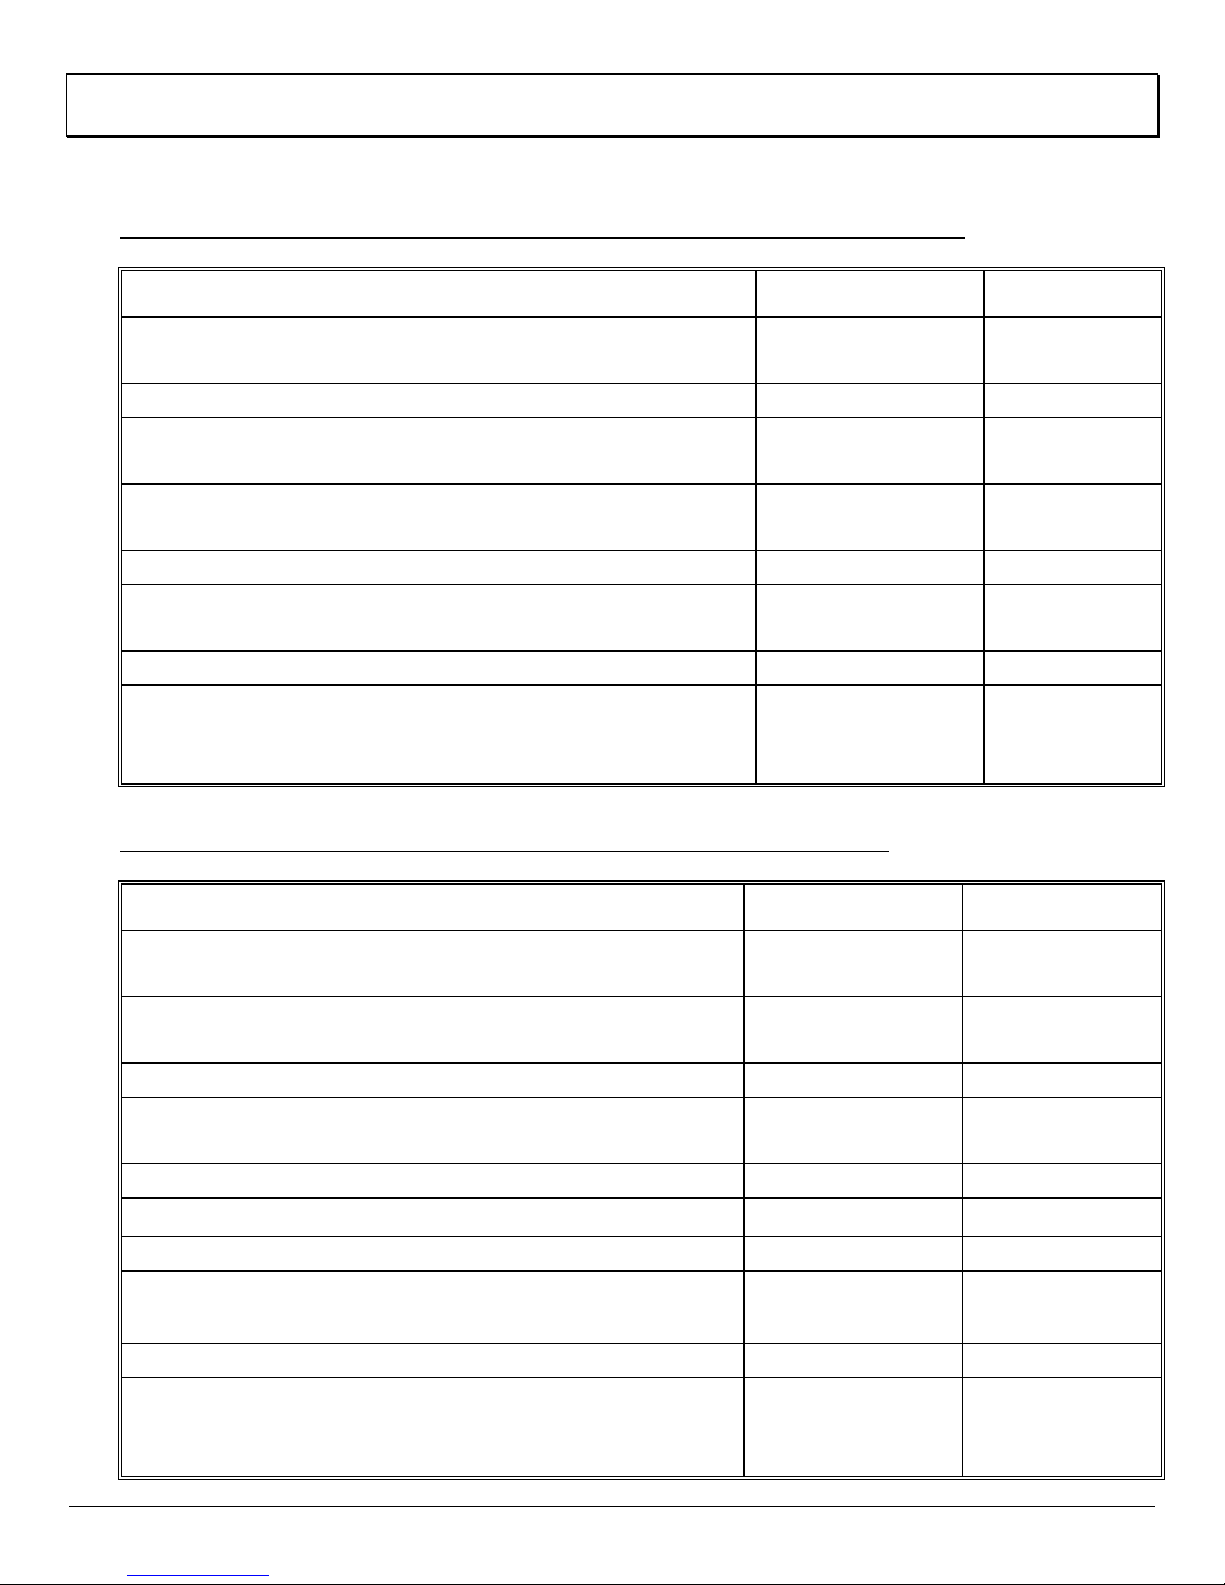
VI. REMOTE PROGRAMMING
WHEN THE USER IS NOT A T THE CALL BA CK NUMBER
STEPS USER DIALMATE
call DialMate (dial the number on which it is
installed, e.g., “851-9566”)
wait for 3 rings then hang up
after 7 seconds but less than 2 minutes, call
DialMate again
wait for DialMate to answer answers on
wait for one beep
enter the PIN (e.g., “1234”) within 3 seconds,
otherwise DialMate will hang up
wait for two beeps
DialMate is now in programming mode.
Select from Programs A through I, as
applicable
^MIQMNN8
^MIQMNN8
IJKL8
rd
3
ring
WHEN THE USER IS A T THE CALL BACK NUMBER
STEPS USER DIALMATE
call DialMate and immediately hang up
after one ring
wait for call back dials the call
answer DialMate’s call
at the end of the message (if any), enter
the PIN (e.g., “1234”)
wait for two beeps
to go to programming mode, enter “;Q” ;Q
wait for one beep
enter the PIN again
^MIQMNN8
IJKL8
IJKL8
back number
8
wait for two beeps
DialMate is now in programming mode.
Select from Programs A through I, as
applicable, from “Programming Instructions”.
REMOTE PROGRAMMING 12
Page 19

Notes:
− Make sure program instructions are entered within three seconds after the
two-beep prompt. Otherwise DialMate will time out and hang up.
− Should you want DialMate to do an immediate call back after re-
programming it to where you are, press the “
Q” key, hear three beeps to
confirm and then hang up immediately. DialMate will disconnect and
immediately call back to your location.
− After completing all desired programming, hang up the phone to exit.
There is no need to enter “
;H” to terminate the call during remote
programming.
REMOTE PROGRAMMING 13
Page 20
VII. OPERATION
DialMate counts the number of rings of each incoming call. When it is
programmed in the Three-Way Switching Mode (see Program E), DialMate
performs one of the following functions:
CALL BA CK
This function allows you to use your home/office phone line to make calls from
another phone,
which the unit is installed
yet all the calls are charged at the rates of the line on
. This is also very useful for cellular phones with free
air time on incoming calls. If DialMate detects one or two rings (and only one or
two) on the phone line, it will call the programmed call back number.
Things to do before using Call Back:
program DialMate with your security code (PIN)
program DialMate with a call back number (e.g., your hotel phone, a
friend’s house or your cell phone)
record a voice message (e.g., telling an operator to connect to your room
or extension), if DialMate has to call back to an operator-assisted location
leave DialMate powered up and connected to the phone line
set any fax or answering machine sharing DialMate’s phone line to answer
after five rings or more
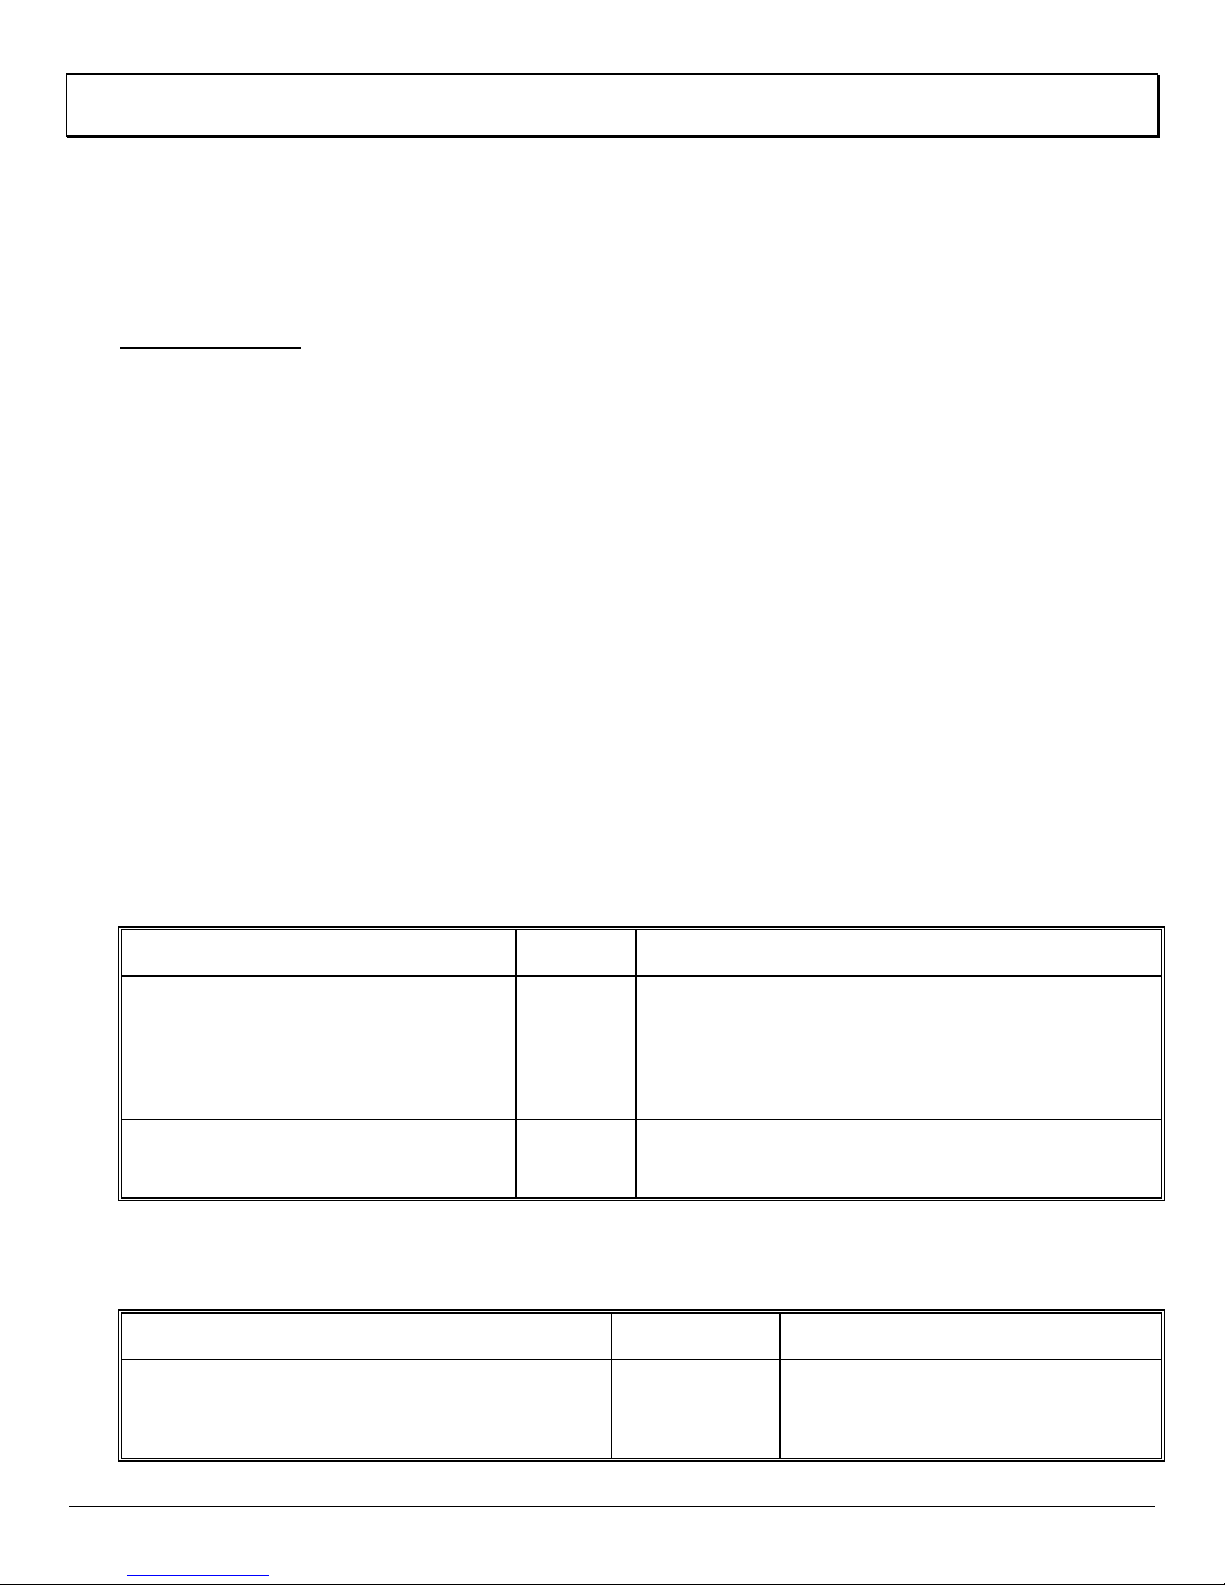
How the Call Back F eature W orks
STEPS USER DIALMATE
call DialMate from the call
back number and then
hang up after 1 or 2 rings
detects 1 or 2 rings, dials the call back
number, plays back the user-recorded
message (if any), loops and waits for the
PIN for approximately 2 minutes
if no PIN is detected after
2 minutes
Call Back – V oice
STEPS USER DIALMATE
call DialMate from the call back
number and hang up after 1
(preferably) or 2 rings
OPERATION 14
discards call back request and goes into
idle mode
8
detects 1 or 2 rings, then
dials the call back number
Page 21

answer call, wait for end of
message, if any, then enter the
PIN (e.g., “1234”)
wait for two beeps
8
IJKL8
dial the destination number (up to
30 digits) followed by “
“14159556666#”)
(to skip prefix, enter “P” before
the destination number)
wait for DialMate to connect the
call
engage in normal conversation
with called party
to make another call, dial “;^” ;^8
wait for 2 beeps
dial next number (e.g., “955-
7777#”)
dial “;Q” to enter REMOTE
PROGRAMMING
wait for 1 beep
;” (e.g.,
ILIMQ
MMNNN
N;
waits for 8 seconds or for 1st
monitors the call for user
8
QMM]]
]];
;Q8
8
stores the dialed digits,
proceeds with 1
dials prefix (if any), then
dials the number
ring back, before doing a 2
flash hook then dials any
pre-programmed suffix and
connects the call
commands and disconnect
codes
disconnects the other party
same as above
st
flash hook,
nd
enter PIN (e.g., “1234”)
wait for 2 beeps
enter programming instructions A
through I, as applicable
dial “;H” to disconnect DialMate
before hanging up
Notes:
− DialMate’s LED lights up every time DialMate goes “off hook”, or blinks
during a flash hook.
− Enter your PIN during silent periods because voice playback and
background noise add distortion and may cause the device to disconnect
or not respond.
OPERATION 15
IJKL8
8
8
;H8
disconnects and goes to idle
mode
Page 22

− Enter the telephone number as if you were calling from DialMate’s location,
including carrier access (e.g., 1010333, 1010222, etc.), area code (e.g.,
1XXX), or outbound international numbers (e.g., 011, from the USA).
− If more than 30 digits are entered, DialMate will reject the number and will
prompt the user with two beeps to try again.
−
The digits must be entered within 12 seconds of each other.
Otherwise, DialMate will assume dialing is finished and move on to the
next step.
− If a mistake is made during dialing but before the first flash hook, dial
“
;^” immediately, wait for 2 beeps and then re-dial the correct number.
− If you want DialMate to dial a “#” after dialing the phone number (for faster
connection on some carriers), hit “
;” quickly two times.
− When calling a cell phone or when DialMate is installed on a VOIP line, you
may need to enter a pause (IP) after the destination number since it
takes longer to connect to cell networks or may need a delay before doing
the second flash hook.
− The PABX Prefix and Suffix are for storing special number codes to enable
DialMate to work inside a PABX system. The PABX Prefix is dialed after
the first flash hook. The PABX Suffix is dialed after the second flash hook.
(see Program H under “Programming Instructions”)
− If your call did not go through, enter “
You can then re-dial the number or call another number.
;^” and wait for the 2-beep prompt.
− When the call is over and you wish to make another call, dial “;^”, wait
for two beeps, then enter the next number you wish to call followed by “
;”.
− Always dial “;H” to disconnect DialMate before hanging up.
Otherwise, it will take time before DialMate detects the end of the call
causing unnecessary charges. This is also true when the called line is
busy or there is no answer.
− DialMate times the call in accordance with the pre-programmed call length
timer (see Program G, under “Programming Instructions”). When the preprogrammed time is reached, DialMate gives a two-beep warning. Dial any
digit to extend the call by another period equal to the pre-programmed
time, or else DialMate will disconnect within ten seconds.
− DialMate also detects silent periods during a call. Silence for two minutes
will cause DialMate to give a two-beep warning. Dial any digit to reset the
two-minute silence timer, otherwise DialMate will disconnect in ten
seconds.
− DialMate also monitors the activity of the call. It can detect busy signal, ring
back, conversation, and both parties hanging up, all of which will cause it
to disconnect after a pre-set time.
OPERATION 16
Page 23

− The following shows the approximate disconnect times should you forget to
enter “
Busy signal - 1 minute.
Ring back (no answer) - 3 minutes.
Both parties hanging up (call supervision provided by telephone
No activity (silence for more than two minutes) - 2 minutes
Other - user programmed call length timer (5 minutes to infinity).
Call Back - Cellular Phones
Make sure your cell phone number is programmed as the call back number.
call DialMate from the cellular phone,
wait for one ring, and hang up
immediately
Answer upon call back, wait for end of
message, if any, then enter the PIN
(e.g., “1234”). Do not press the
“SEND” button.
wait for 2 beeps
;H” before hanging up:
company) - 10 seconds.
STEPS USER DIALMATE
8
IJKL
detects the ring, then dials
the call back number
Dial the destination number (up to 30
digits) followed by “
the “SEND” button. (enter “*” before
the destination number to skip prefix)
wait for DialMate to connect the call,
then Proceed as in Call Back - Voice
Call Back - Facsimile (F ax)
Set the fax machine’s reception mode to manual or set the fax machine to answer
after two or more rings before starting the call back operation.
STEPS USER DIALMATE
Pick up the handset of the fax
machine and call DialMate. After
hearing one or two rings, hang up
immediately.
Within 20 seconds, the fax
machine rings; answer immediately
after a single ring and wait for the
end of the recorded message, if
any.
;”. Do not press
QMM]
]]];
DialMate flash hooks again
8
plays back any recorded
stores the dialed digits,
flash hooks, and dials the
prefix (if any) and the
number
and connects the call
detects the ring, waits 8
seconds then dials the call
back number
message
OPERATION 17
Page 24
enter PIN (e.g., “1234”)
IJKL
wait for 2 beeps
Dial the number to be called (up to
30 digits) followed by a “
;”. (enter
QMM]8
]]];
“P” before the destination number
to skip prefix)
wait for DialMate to connect the
flash hooks, dials suffix (if
call
when the called fax machine
answers and gives a fax tone,
START
press the “start” button to initiate
the fax operation
replace the handset on its cradle
and watch the status of the call
to make another call after the
document has been confirmed
sent, pick up the handset
immediately and press “STOP” on
your fax machine
(only for non-
stores the dialed digits, flash
hooks, dials the prefix (if any)
and the number
any) and connects the call
PABX DialMate installations)
enter “;^” ;^
wait for two beeps
enter the next number to be called
(e.g., “831-4444”) followed by “
after successful transmission, pick
up the handset and press “STOP”
;”
^KIL
LLL;
STOP
connects the call
enter “;H” ;H
disconnects the call and goes
to idle mode
Call Back - Modem Operation
It is recommended that the voice message recorded in DialMate be erased before
starting modem operation since the voice playback might interfere with the
reception of the PIN code dialed by the modem.
Most modems are set up so that they will not dial a number if a dial tone is not
present. In this case, the modem string must be modified to enable the modem to
dial a number without the presence of a dial tone. For most modems, add “X0” or
“X3” to the AT command to prevent dial tone detection. Refer to your modem
manual for this modification.
OPERATION 18
Page 25
The modem must also be set at the “tone” setting. DialMate will not recognize
“pulse” dialing. Lastly, the modem should be set to manual answer (or set the
number of rings before answer to three or more), not on auto. This will prevent the
modem from answering immediately during call back.
To access on-line services or to transmit a fax, the number to be dialed by the
modem must be set accordingly. The dialing sequence shall consist of the four
digit security code, followed by two commas (about a three second pause), the
destination number (including all necessary access numbers) and three commas
(five second pause). Remember to put a “P” before the destination number if you
need to skip the pre-programmed prefix. Then the modem software must be set to
the point of signing on or sending a fax.
Using a regular phone connected to the same line as the modem:
STEPS USER DIALMATE
call DialMate and after hearing
one or two rings, hang up
immediately
when DialMate calls back the
modem, sign on or start fax
8
START
detects the ring, waits 8
seconds then dials the call
back number
stores the dialed digits, flash
hooks and dials the number
transmission
wait for connection flash hooks again and
connects the call
upon sign off or completion of
fax operation, lift telephone
handset and enter “
;H”
;H
disconnects the call and goes
to idle mode
CALL FORWARD
When call forward is enabled, DialMate will forward all incoming calls to wherever
the forward number may be. It can be domestic or international.
STEPS USER DIALMATE
caller calls
caller hears pre-recorded
greeting, if any
caller stays on line flash hooks, dials the pre-
start conversation engage in locks connection
OPERATION 19
8
counts the number of rings of the
incoming call and answers at the
pre-programmed number of rings
plays recorded greeting
programmed call forward number,
flash hooks again and connects
the call
Page 26
conversation
caller hangs up
terminate call
;H8
disconnects and goes to idle
mode
Forward and T ransfer
When DialMate is installed in a PABX extension and the call is forwarded to an offpremise number (user’s cell phone or another landline), the user can transfer the
call back to another on-premise extension after the conversation is concluded.
STEPS USER DIALMATE
caller calls
8
counts the number of rings of the
incoming call, answers at the preprogrammed number of rings, and plays
recorded greeting (if any)
caller stays on line flash hooks, dials the pre-programmed
call forward number, flash hooks again
and connects the call
start conversation con-
verse
locks connection
caller needs to be
transferred back to the
office
user enters transfer
number and caller stays on
line
Notes:
− Fax and modem operation will work during call forward. However,
sequential faxing is not possible since re-dialing is not permitted.
− During call forward, the “
are disabled for security reasons.
− You can change the call forward numbers and enable or disable the call
forwarding function locally or remotely at any time. (see Program C and D
under “Programming Instructions”)
− The voice recording is played back during call back and call forward.
Select a script suitable for both if the two functions will be active at the
same time (see example script under Program F, in “Programming
Instructions”).
;N8
IHH8
and waits for transfer number
disconnects user and transfers call, e.g.,
to extension 100
;^” (re-dial) and “;Q” (re-program) functions
OPERATION 20
Page 27

− Call transfer is also automatically performed if the programmed call forward
number is less than five digits.
− Call transfer is also performed when the destination number dialed during
call back or call bridge is less than five digits.
CALL BRIDGE
During call bridge, the first leg of the call (from your location to DialMate) will be
charged to the phone where you are, but the second leg (from DialMate to the
called number) will be charged to DialMate’s location. For instance, call bridge
allows you to make a local call to DialMate (from a pay phone or office phone) and
then use your home line to make long distance calls.
Normal Call Bridge
STEPS USER DIALMATE
call DialMate from anywhere and after
detects 3 rings
hearing 3 rings, hang up immediately
wait at least 7 seconds (but not more than
answers on
two minutes) and call DialMate again
wait for one beep
enter your PIN (e.g., “1234”) within 3
IJKL
seconds or else DialMate will hang up; it will
disconnect immediately if the wrong PIN is
entered
wait for two beeps
enter “I” I
wait for two beeps
Dial the destination number (e.g., “831-
4444”) followed by a “
;” (up to 30 digits).
^KILL
LL;
Enter “*” before destination number to skip
prefix.
the 3
rd
ring
stores the dialed
digits, flash
hooks, dials
prefix (if any)
and the number,
flash hooks
again, dials
suffix (if any)
and connects
the call
to terminate the call, enter “;H” before
hanging up
OPERATION 21
;H
disconnects the
call and goes to
idle mode
Page 28

Jumping to Call Bridge from Call Forw ard
When call forward is enabled (Program C under “Programming Instructions”), you
can enter the call bridge mode by keying in your PIN during the voice playback
after DialMate answers the call. This eliminates the need to make two calls as in
normal call bridge.
STEPS USER DIALMATE
call DialMate from anywhere and wait
for DialMate to answer the call
counts the number of
rings and answers on
the pre-programmed
ring count for call
forward
wait for the start of voice playback plays back recorded
message
as soon as voice playback starts
(preferably during a pause), enter your
PIN (e.g., “1234”) within 3 seconds
between digits or else DialMate will
IJKL
detects PIN entry,
stops play back and
switches to call bridge
mode
hang up; it will also disconnect
immediately if the wrong PIN is
entered
wait for two beeps
Dial the destination number (e.g.,
“831-4444”) followed by a “
;” (up to
^KILLL
30 digits). Enter “*” before destination
number to skip prefix.
L;
stores dialed digits,
flash hooks, dials
prefix (if any) and the
number, flash hooks
again, dials suffix (if
any) and connects the
call
to terminate the call, enter “;H”
before hanging up
Note: You may enter the remote programming mode before terminating call bridge
by entering “#9” and then the PIN. When call forward/transfer is enabled, you do
not have to call twice to do remote programming when you are not at the call back
number (see “Remote Programming”).
Call bridge is equally useful for mobile phone users who have unlimited free calls
at certain times within their roaming area or those who have free air time calls to a
designated number.
And if you are enrolled in a flat rate calling plan of a long distance carrier, the
mobile phone call will be totally free.
OPERATION 22
;H
disconnects the call
and goes to idle mode
Page 29

TRANSFER SWITCHING MODE
When DialMate is programmed in the transfer switching mode, all three-way
switching performed on the foregoing sections (Call Back, Call Forward and Call
Bridge) are converted to transfer calling, that is, DialMate will hang up after dialing
the destination number and the network will connect the caller directly to the
destination number. Since DialMate drops out after dialing the destination number,
there will be no sequential calling and there will be no call length timer warning.
However, after hanging up, DialMate is ready to transfer the next call.
CHANGING THE SWITCHING MODE
Three-way switching and transfer switching can be toggled on the fly by entering
“PP” before the destination number during call back and call bridge. This feature
comes handy when a change in the switching mode is necessary during domestic
and international calling. In most networks, transfer calls are allowed only on
domestic calls. To make an international call when DialMate is programmed in the
transfer mode, you can dial “PP” before the destination number and command
DialMate to perform three-way switching just for that particular call.
VOIP
VOIP and the Public Switched Telephone Network (PSTN) have different timing for
call completion. This difference is even amplified when the user is calling a
domestic, international or mobile phone number. It takes longer to connect using a
VOIP line versus using the PSTN. It also takes longer to connect calling an
international number or a mobile phone as against calling a domestic landline
phone. It is therefore suggested that the user make use of the pauses (IP) during
programming and operation for successful call completion. In most VOIP lines, you
may need to program a pause (IP) in the prefix to produce a delay after the first
flash hook before dialing the destination number.
CALL RETURN
When DialMate is installed in a line with a call return feature, DialMate can be
programmed to call back the last caller (caller’s caller id must be unblocked) by
programming “*69” (plus several pauses, i.e., three “#*’s” for VOIP) as the call
back number. Combined with transfer switching, a group of users (family members
or employees of a company) can share one DialMate and take advantage of the
free calling plan of the line without having to reprogram the call back number for
each user.
OPERATION 23
Page 30

VIII. TROUBLESHOOTING
Unable to Program DialMate On-Site
1. Connection error. Check connections against installation drawing, Fig. 1 in
the “ON-SITE PROGRAMMING SETUP” section.
2. Phone used to program DialMate is at “pulse” setting. Change to “tone”.
3. Late in entering commands. Enter command buttons within three seconds
of each other. Unplug power for 10 seconds. Plug in power and then
repeat.
DialMate Does Not Call Back
1. Call back number has not been programmed or has been programmed
incorrectly. See “PROGRAMMING INSTRUCTI ONS”.
2. There is a power failure at DialMate’s location. Wait for power.
3. More than two rings have occurred before hanging up. Wait for five
minutes, and then re-dial.
4. Busy carrier or destination country telephone lines. During international
calls, busy carrier or destination country telephone lines will prevent
DialMate from calling back. Wait for five minutes (DialMate will be “offhook” for more than four minutes) and then re-dial.
5. Other telephone accessories (e.g., fax, answering machines, etc.) are
interfering. Set other telephone accessories to answer at a different ring
setting.
6. Call Forward/Transfer is enabled and number of rings is set to one ring.
Set number of rings to two or higher.
7. There is message in voice mail (stutter dial tone). Erase message or
deactivate voice mail.
DialMate Does Not Connect to Destination Number
1. Unnecessary prefix has been inadvertently programmed. Clear the prefix
(see Program H).
2. Phone line where DialMate is installed does not have three-way
(conference) calling. Order three-way calling from the phone company.
3. Phone company Central Office (CO) needs delay after first flash hook or
before second flash hook. Add pause(s) [#*] before, and/or after, dialing
the destination number. A pause may be programmed on the prefix to take
care of any delay needed before dialing the destination number.
TROUBLESHOOTING 24
Page 31

DialMate Disconnects Upon Entering the Security Code/PIN
1. Wrong code was entered. Enter correct code. If you forget your code, you
cannot access DialMate. You must enter a new code through on-site
programming.
2. Code entered during playback of greeting. Wait for the recorded greeting to
end before entering the security code or erase the greeting and repeat.
3. You are using a speakerphone on high volume. Lower the volume.
4.
4.
The telephone at the call back number is set to “pulse”. Set it to “tone”.
4.4.
5.
5.
Digit (DTMF tone) inadvertently entered during recording of greeting. Re-
5.5.
record greeting and make sure no DTMF tone is present.
DialMate Does Not Call F orward/T ransfer
1. Call forward has not been enabled. See Program C under
“PROGRAMMING INSTRUCTIONS”.
2. Other telephone accessories are interfering. Set other telephone
accessories to answer at a higher (5 or more) ring setting.
3. Unnecessary prefix has been inadvertently programmed. Clear the prefix
(see Program H).
4. Phone line where DialMate is installed does not have three-way
(conference)/transfer calling. Order three-way/transfer calling from the
phone company.
5. Phone company Central Office (CO) needs delay after first flash hook or
before second flash hook. Add pause(s) [#*] before, and/or after, dialing
the destination number. A pause may be programmed on the prefix to take
care of any delay needed before dialing the destination number.
DialMate Does Not Connect During Modem Operation
Noisy telephone lines. Modems are very sensitive to noise. You may have
to use another carrier’s line or lower the modem speed setting. Make sure
the other party is on the same speed.
The On-Site Telephone Used to Program DialMate Does Not Have a Dial
T one and Does Not R eceiv e Phone Calls
Check that your equipment is connected in accordance with instructions in
the “SETUP FOR NORMAL USE” section.
TROUBLESHOOTING 25
Page 32

IX. WARRANTY
This warranty applies only to products purchased and used in the United States.
WHA T IS COVERED
Any defect in materials or workmanship.
What We Will Do
If your product is defective and returned within 30 days of the date it is purchased,
we will replace it at no charge to you. If returned after 30 days but within one year
of the date of purchase, we will repair it or, at our option, replace it at no charge to
you. If we repair your product, we may use new or reconditioned replacement
parts. If we choose to replace your product, we may replace it with a new or
reconditioned one of the same or similar design. The repair or replacement will be
warranted for either (a) 90 days or (b) the remainder of the original one-yearwarranty period, whichever is longer.
Limitations
Implied warranties, including those of fitness for a particular purpose and
merchantability (an unwritten warranty that the product is fit for ordinary use), are
limited to one year from date of purchase. We will not pay for loss of time,
inconvenience, loss of use of your product, or property damage caused by your
product or its failure to work, or any other incidental or consequential damages. In
no event shall WoodTel, Inc. and its authorized dealers be liable for any damages
other than the repair or the replacement of the product.
What We Ask You to Do
To get warranty service for your product, you must provide proof of the date of
purchase. Within 30 days of the date it was purchased, return your product to the
dealer from whom you purchased it, for replacement. After 30 days call us at
650-738-1655 for the address of your authorized dealer or refer to the dealer
whose name is written on the last page of this manual. If you ship your product to
your authorized dealer, you must prepay all shipping costs. We suggest you retain
your original packing material in the event you need to ship your product. When
sending your product to your authorized dealer, include your name, address,
phone number, proof of date of purchase, and a description of the operating
problem.
After repairing or replacing your product, we will ship it to your home or office in the
United States at no cost to you.
WARRANTY 26
Page 33

WHA T THIS WARRANTY DOES NOT CO VER
This warranty does not cover defects resulting from accidents, damage while in
transit to our service location, alterations, unauthorized repair, failure to follow
instructions, misuse, use outside of the United States, fire, flood, and acts of God.
Nor do we warrant your product to be compatible with any particular telephone
equipment or party line, key telephone systems or more sophisticated customer
premises switching systems. If your product is not covered by our warranty, call us
at 650-738-1655 for advice as to whether we will repair your product and for other
repair information, including charges.
This warranty is the only one we give on your product and it sets forth
all our responsibilities regarding your product. There are no other
express warranties.
Y OUR AUTHORIZED DEALER IS
Name:
ID:
Phone: Fax:
Street or PO Box:
City:
State:
Country:
To make additional purchases, repair or replace your product, or provide
feedback on any aspect of the product or service, please contact this
authorized dealer.
Patent Numbers: 6,128,375; 4,737,982; 4,670,628
Copyright © 1999 - 2005 WoodTel, Inc. All rights reserved.
7 Brooks Place, Pacifica, CA 94044 USA
Tel. (650) 738-1655; 1-888-851-7861 (USA only) • Fax. (650) 738-1634
Web Site: http:/ /www.woodtel.com
Email: [email protected]
WARRANTY 27
Page 34

 Loading...