

Page 1

Table of Contents
End User License Agreement
Predator Satisfaction Guarantee / Return Policy
Predator Re-flash Policy
Display and Keypad description
Before Installing DiabloSport Performance Tune
Preparing Vehicle for DiabloSport Performance Tune Installation
Important note regarding DiabloSport Performance Tune Parameter modification
OBD-II Diagnostic port locations
Vehicles equipped with the GM OnStar system
Installing a tune into a vehicle
Restoring factory/stock tune
Caution - Modifying Parameters
Modifying Parameters
Parameters Explanation
Important information regarding DiabloSport Performance Tune Parameter modication
Diagnostic Section
How to check and erase the SES light
Monitoring Real Time Data
Options Section
1
Table of Contents
Page 2
2
End User License Agreement, Warranty and Disclaimer
THIS END USER LICENSE AGREEMENT
the purchaser (the “Purchaser”) of either the Diablo Module (the “Module”) or the ToolRama hand-held
computer unit (the “Unit”), and ProgRama Tools, Inc., DiabloSport, LLC or ToolRama, LLC (collectively,
“ToolRama”), as the manufacturer of the Product. The Product and the Unit shall be referred to collectively
herein as the “Product.”
1.
Acknowledgment And Acceptance Of Agreement.
the terms and conditions of this Agreement, do not use the Product. Instead, promptly contact the distributor from which you purchased the Product in writing, requesting a refund of the purchase price. Any use of
the Product by you will constitute your agreement to the terms and conditions contained herein.
2.
Grant Of License.
able restricted license to Purchaser to use the Product for the sole purpose of installation in Purchaser’s
vehicle. ToolRama shall retain all title, ownership rights and intellectual property rights in and to the Product. Purchaser agrees that Purchaser shall not, directly or indirectly, modify, translate, reverse engineer,
decompile, disassemble, or create derivative works based on the Product. Purchaser further agrees not to
permit any third parties to modify, translate, reverse engineer, decompile, disassemble, or create derivative works based on the Product.
any kind, express or implied. The Product is not endorsed by the manufacturer of your vehicle and there is
no afliation between ToolRama and the manufacturer of your vehicle. Installation of the Product in your
vehicle or use of the Product with your vehicle may limit or void your rights under any warranty provided
by the manufacturer of your vehicle, and ToolRama assumes no responsibility in such event. Any warranty
not provided herein, and any remedy which, but for this provision, might arise by implication or operation
of law, is hereby excluded and disclaimed. The implied warranties of merchantability and of tness for
any particular purpose herein are expressly disclaimed.
Warranty and Disclaimer
End User License Agreement,
Injuries Or Incidental, Special Or Consequential Damages.
no circumstances shall ToolRama, Inc., DiabloSport, LLC or ToolRama, LLC, or any other party related to
ToolRama, beliable to Purchaser or any other person for any damage to Purchaser’s vehicle, loss of use of
Purchaser’s vehicle, or for personal injuries suffered by any person, or for any incidental, special or consequential damages, whether arising out of negligence, breach of warranty, breach of contract, or otherwise.
ToolRama’s liability for any damages, loss and/or claims associated with the Product shall be limited to the
price of the Product paid by purchaser. Purchaser hereby releases ToolRama from all liability, claims and
The parties hereto acknowledge that ToolRama is granting a non-transfer-
3.
Disclaimer.
(the “Agreement”) is an agreement between you, as
If you do not agree to
The Product is being sold with no warranties of
4.
No Liability For Damages,
Under
damages associated with the Products, with the sole exception of ToolRama’s liability for the refund of the
purchase price of the Product to Purchaser in the event that a court of competent jurisdiction determines the
Purchaser suffered damages directly resulting from the malfunction of the Product.
withstanding the provisions of the End User License Agreement, DiabloSport warrants the Product to be free
from all defects in material and workmanship for the life of the Product. This limited warranty applies only
to the original Purchaser of the Product. This limited warranty does not cover damage caused by modication, alteration, repair or service of the Product by anyone other than DiabloSport, physical abuse, misuse,
use in a manner contrary to the instructions, which accompany the Product, or any damage caused by acts of
God. Contacting your Distributor or Dealer may make claims for repair service or replacement of the Product
pursuant to this limited warranty. The Chip will either be repaired or replaced, at the option of DiabloSport,
at no cost to Purchaser, if the defective Product is covered by this limited warranty. DiabloSport’s liability
pursuant to this limited warranty and for any damages, loss and/or claims associated with the Product shall
be limited to the price of the Product paid by Purchaser, or, at DiabloSport’s option, repair or replacement of
the Product.
6.
sion or limitation of incidental, special or consequential damages, so the above limitations may not apply to
you. In such states, liability shall be limited to the greatest extent permitted by applicable law.
7.
accordance with the laws of the State of Florida, and venue for any legal proceeding or action at law arising
out of or construing this Agreement shall lie in the state or federal courts of Orange County, Florida, and the
parties specically waive any other venue.
State Law.
Governing Law & Venue.
Some states do not allow limitations of implied warranties, or the exclu-
This Agreement shall be governed by and construed in
5.
Warranty. Not-
DISCLAIMER
trolled motor vehicles. Legal in California only for racing vehicles
which may never be used upon a highway.
Not legal for sale or use on any pollution con-
Back to Table of Contents Back to Table of Contents
Page 3

DiabloSport, LLC.
Predator Satisfaction Guarantee/
Return Policy
All DiabloSport products
have a guarantee of satisfaction.
If in the rst 15 days from date of purchase,
you are not satised with the results the Predator
generates in your vehicle, simply restore the factory
tune to your vehicle and return the Predator to the selling dealer, and
pending examination of the tool by DiabloSport, you will receive a refund
from your selling dealer. Under no circumstances will DiabloSport
accept the return of a Predator unit that has a factory tune
remaining in it.
The Predator will marry to the vehicle upon
upload of the factory tune and cannot
be re-ashed, for any reason, back
to a blank tool. This marrying of the
DiabloSport, LLC.
Predator Re-Flash
Policy
Vin # to the tool is what makes it
possible for us to allow the vehicle to
be re-ashed by GM, and still be re-pro-
grammed again by the Predator. Re-ashing
of the Predator is not possible with out the
complete disassembly, replacement and
reprogramming of critical components
of the Predator tool.
10/02
Page 4

4
Display and Keypad description
This is a simulation of
the Predator’s screen.
Have the tool in front of
you while reading this
manual !
ESC Key: Scroll page back to previous page.
description
Display and Keypad
Back to Table of Contents
Arrow down: Scroll down the menu.
Arrow left: Scroll menu to the left.
Arrow up: Scroll up the menu.
Arrow right: Scroll menu right.
(Use this key to view entire descriptions)
Enter Key: Select parameter highlighted in menu.
Page 5
Before Installing DiabloSport Performance Tune
Please read through the manual before installing tune in
your vehicle, failure to follow proper instructions can result
in a damaged or disabled PCM (Powertrain Control Module).
User MUST ensure that the factory “stock” tune is in the
vehicle’s PCM before installing the DiabloSport tune.
GM dealer re-flashes are the same as stock factory tune.
Serious engine damage can occur if the Predator tune is
installed over a non-factory/aftermarket performance tune.
Very Important!
Do not perform any operations on Predator (expect live
data diagnostics) while vehicle is running. The vehicle must
be parked and engine OFF.
5
Before Installation
Back to Table of Contents
Page 6

6
Installation
Performance Tune
Preparing Vehicle for DiabloSport Performance Tune Installation
The vehicle MUST be running on 91-93 octane Super Un-Leaded/Premium
grade fuel before installing DiabloSport Performance tune. Amoco or Mobil
Super Un-Leaded/Premium grade fuels are highly recommended.
• Apply parking brake to de-activate daytime running lights.
• Always have all the doors closed while installing
the DiabloSport Performance tune, and remain
closed untill the process is complete.
• Do not activate any electrical accessories while installing
the DiabloSport Performance tune. Ensure that there are
no electronic devices wired or plugged into the vehicle
that can cause a substantial voltage drop when activated
during installation of the DiabloSport Performance tune.
Please contact DiabloSport dealer if uncertain about devices
that are on your vehicle.
• Certain cellular phones or radio equipment might also cause
interference, please remove or turn such devices off.
• Do not try to install tune on a vehicle with a low battery voltage,
charge your battery if necessary.
• Never turn the key “OFF” while Predator is plugged in diagnostic
port unless instructed.
• Do not touch the cable while the Predator is installing the
DiabloSport performance tune.
Back to Table of Contents
Page 7

Important note regarding DiabloSport Performance Tune Parameter modification
This feature is designed for users with extended knowledge of automotive tuning. Modifying fuel and spark parameters increases risk of detonation/pinging
and can increase risk to the durability of the vehicle.
These parameters, as well as others in the Predator, should only be modified by
an experienced tuner and should not be modified unless necessary.
7
DiabloSport will not be held responsible for vehicles with modified parameters
since we are not present to monitor the adjusted parameters; therefore we
recommend that this should be left untouched by inexperienced users.
Performance Tune Parameter
modification
Back to Table of Contents
Page 8
8
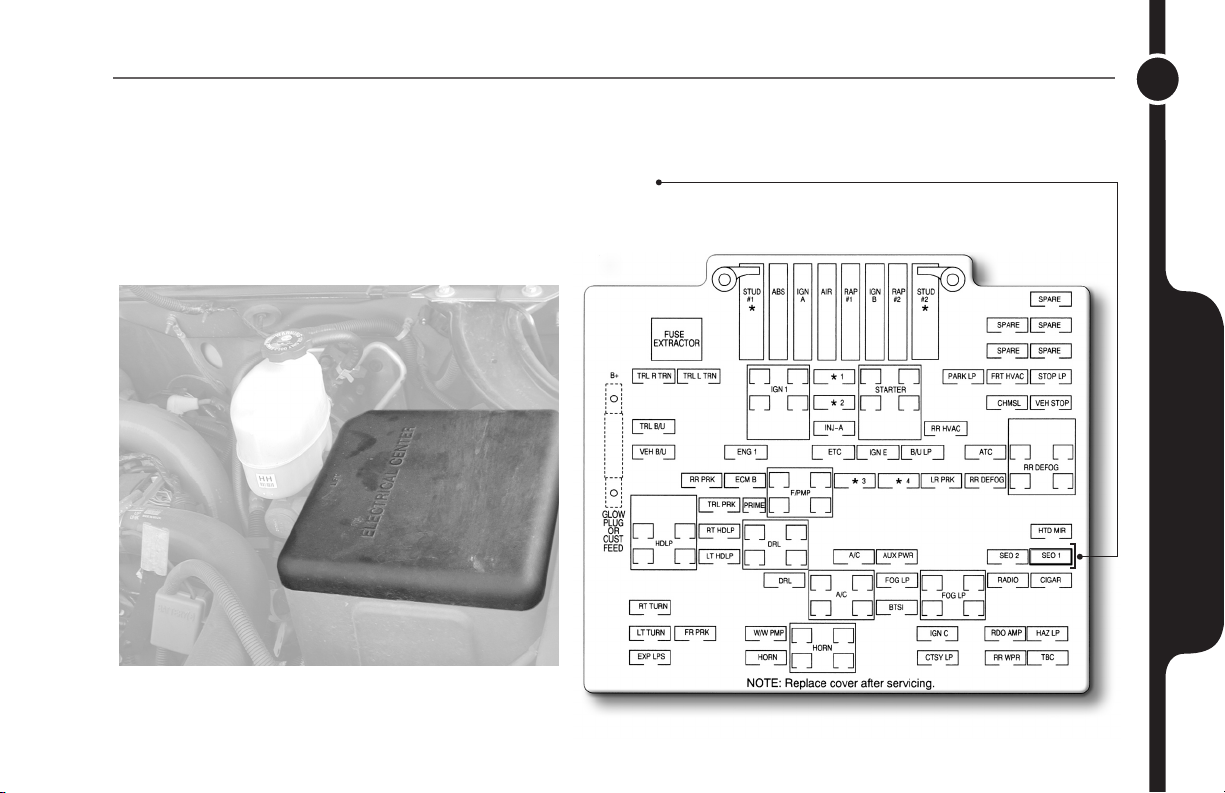
OBD-II Diagnostic port locations
99-03 Vette
Driver side underneath dash in the center, facing oor.
port locations
OBD-II Diagnostic
99-02 Firebird/Camaro
Driver side underneath dash, right hand side facing driver.
Back to Table of Contents
Page 9
OBD-II Diagnostic port locations
99-02 Chevrolet/GMC 1500/2500/3500 trucks
Chevrolet Tahoe / Avalanche / GMC Yukon / Denali
Cadillac Escalade / Escalade EXT
Driver side underneath dash,
left hand side above
parking brake.
9
OBD-II Diagnostic
port locations
Back to Table of Contents
Page 10

10
Vehicles equipped with
the GM OnStar system
Vehicles equipped with the GM OnStar system
Due to fact that the GM OnStar system sends transmissions periodically to the vehicle we
suggest that the system should temporarily be disabled during the installation
and modification process.
If the OnStar system is not disabled during install and modification and the system should receive a
transmission in the middle of tune install or backup, the tool will be interrupted and the process will
have to be started over again.
To avoid this problem it is recommended that the system is disabled during tune install, backup and
modification.
To disable the OnStar system, please refer to your ownersí manual and locate the fuse(s) associated
with OnStar. The OnStar system is disabled when the OnStar light is turned off.
On some vehicles it is necessary to remove more than one fuse; this will be indicated by the OnStar
light still on after removal of fuse in the engine compartment fuse panel.
Back to Table of Contents
Page 11
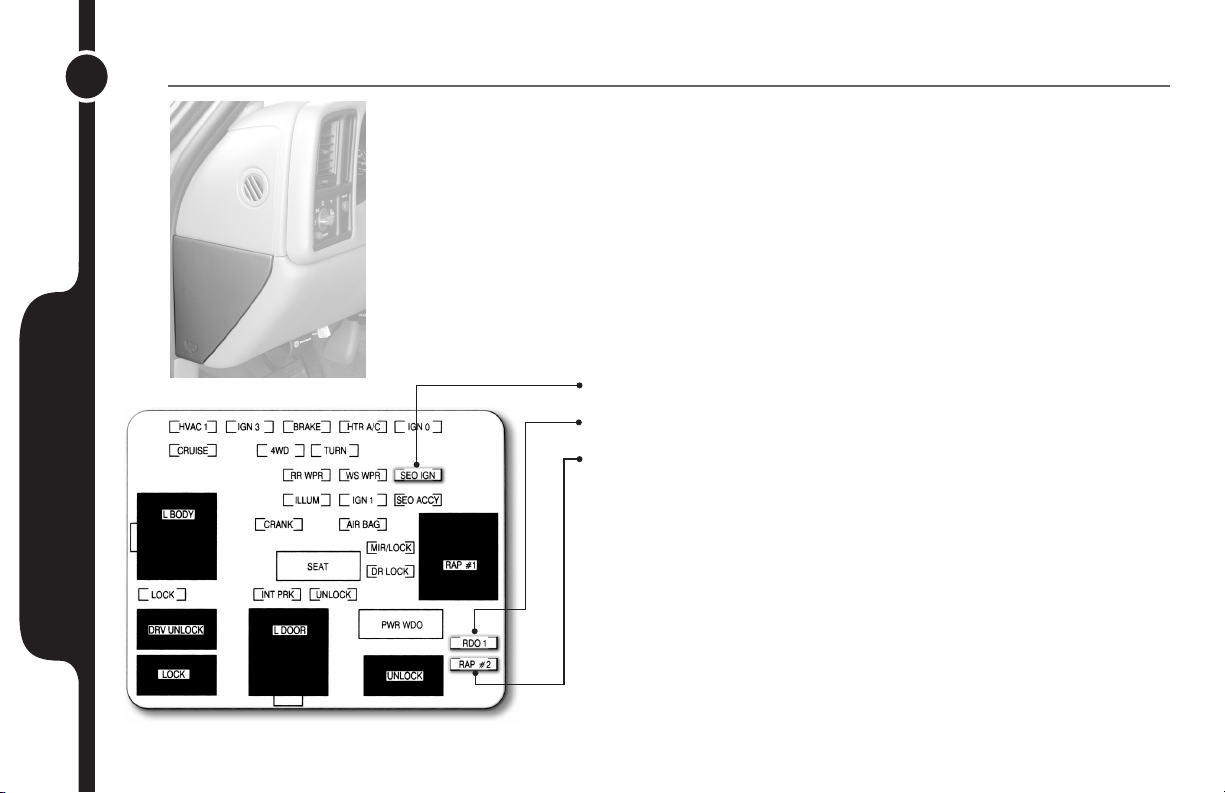
Vehicles equipped with the GM OnStar system - Step1
Turn ignition OFF!
Locate the fuse panel in the engine compartment behind battery on the driver’s side.
Carefully remove cover and locate the SEO 1 fuse (Special Equipment Option Power).
Location may vary from illustration, consult your user manual.
Carefully remove the fuse with the ignition OFF.
11
Vehicles equipped with
the GM OnStar system
Back to Table of Contents
Page 12
12
Vehicles equipped with the GM OnStar system - Step 2 - 3
Turn ignition ON, look and confirm that the OnStar Dash light is turned OFF.
If the light is still ON continue with step 3, if it is OFF continue and install DiabloSport tune.
Step 3
Turn ignition OFF!
Locate the fuse panel located on the driver’s side dashboard, carefully remove cover
and locate the following fuses:
SEO IGN (Special Equipment Option Power)
RAP 2 (Retained Accessory Power Relay)
RDO 1 (Audio System)
Location may vary from illustration, consult your user manual.
Carefully remove each fuse with the ignition OFF.
Vehicles equipped with
the GM OnStar system
Back to Table of Contents
Turn ignition ON, look and confirm that the OnStar Dash light is turned OFF.
Continue and install DiabloSport tune.
Page 13

Vehicles equipped with the GM OnStar system - Step 4
Once completed reinstall the fuses with the ignition OFF.
13
Vehicles equipped with
the GM OnStar system
Back to Table of Contents
Page 14

Installing a tune into a vehicle
14
• Locate OBD-II diagnostic port on your vehicle. (see reference picture in Section “viii” and “ix”)
• Connect Predator into vehicle’s diagnostic port and turn ignition to on position (DO NOT start the engine); the following screen will be displayed:
into a vehicle
Installing a tune
Press ESC to go
to the previous
page during
procedures.
*****Controllers*****
Tune it
Diagnostics
Options
Controllers
Tune It will take the user through the process of
programming and modifying the tune for the vehicle.
Diagnostics will take the user through scanning/erasing
and live data monitoring.
Options contains tool options and troubleshooting menus.
Back to Table of Contents
Page 15

Installing a tune into a vehicle
Select “Tune It”, read and follow the instructions and disclaimers: Continue by pressing any key
15
*****Important*****
App ly pa rki ng br ake
Tur n the ig nitio n O N
To turn off dayt ime
Run ning lig hts
Pre ss an y k ey...
*****Disclaimer*****
Pre dator mu st be us ed wi th
fac tory tun e, ot her wise dam age
may resu lt to yo ur vehic le. If y ou
are not sur e abo ut your tun e,
con tact Dia bloSp ort .
Pre ss an y k ey...
Back to Table of Contents
Installing a tune
into a vehicle
Page 16

16
Installing a tune into a vehicle
Continue by pressing any key
into a vehicle
Installing a tune
*****Disclaimer*****
Pre dator tu nes m ust be u sed
wit h pre miu m/sup er- unlea ded
fue ls on ly! Fail ure to d o s o may
res ult i n d amage to your ve hicle ..
Pre ss an y k ey...
Continue by pressing any key
*****Important*****
Read manual carefully
before proceeding in
predator modify
parameters section.
Press any key...
Back to Table of Contents
Page 17

Installing a tune into a vehicle
Press “Enter” to continue.
17
Select the type of Transmission for your vehicle.
Press “Esc” to return to main menu.
*****Important*****
Do yo u want to contin ue?
Press Enter fo r YES
Press ESC fo r No
Press “Enter” key.
***Transmission Type***
Autom atic
Manua l
Installing a tune
into a vehicle
Back to Table of Contents
Page 18

18
Installing a tune into a vehicle
The tool will automatically back up the factory/stock tune.
Please wait until completed. This may take several minutes.
into a vehicle
Installing a tune
**Vehicle Data Backup**
Please wait...
Saving vehicle data
XX % completed
During the backup process the gauges might sweep and various
messages will be displayed in the message center. This is normal so
do not be alarmed.
Backup 100%
Press Any Key to
continue
Vehicle Data Backup
Back to Table of Contents
Page 19

Installing a tune into a vehicle
The predator will count down 10sec until it is ok to proceed.
19
The Predator will count down 10sec until it is ok to proceed.
(DO NOT start the engine)
Turn Ignition Off!
Then press any key
Turn Ignition On!
Then press any key..
Back to Table of Contents
Installing a tune
into a vehicle
Page 20

20
Installing a tune into a vehicle
Vehicle Data Backup is now complete. Press any key to continue
Installing a performance tune.
into a vehicle
Installing a tune
*****Performance*****
Install Performance
Modify Performance
Restore Saved Data
Troubleshooting
Select “Install Performance”…
*Install Performance*
Insta lling t he file
Do yo u want to contin ue?
Press Enter fo r YES
Or Es c for N O.
Back to Table of Contents
Page 21

Installing a tune into a vehicle
Press Enter.
Please wait until installation is complete. This may take several
minutes…
21
During the installation process the gauges might sweep and various
messages will be displayed in the message center. This is normal so do
not be alarmed.
After installation is complete the Predator will prompt you to:
***Data Uploading***
Please wait...
Writing data
xx% completed
Upload 100%
Press Any Key to
continue
Installing Performance
Back to Table of Contents
Installing a tune
into a vehicle
Page 22

22
into a vehicle
Installing a tune
Installing a tune into a vehicle
Follow instructions on the screen.
Turn Ignition Off!
Then press any key
Wait 10 seconds
Back to Table of Contents
Page 23

Installing a tune into a vehicle
23
DO NOT start the engine
Turn ignition on
Then press any key
Wait 10 seconds
File is successfully
installed
Press any key
Back to Table of Contents
Installing a tune
into a vehicle
Page 24

24
Restoring factory/stock tune
We recommend restoring the stock tune whenever the
vehicle goes in for service.
The stock tune can be re-installed at any time using the
“restore” feature. This feature will take the DiabloSport tune
out and reset the computer to stock. The DiabloSport tune
will be saved in the Predator.
Restoring tune
Plug tool into port, select “Tune It” and go through the same steps as
installing a DiabloSport tune. (Refer to install intructions)
After the transmission selection you should see the following screen.
*****Performance*****
Install Performance
Modify Performance
Restore Saved Data
Troubleshooting
Select Restore
Saved Data.
The tool will go
through the same
installation process
as when installing
a performance
tune.
Back to Table of Contents
Page 25

Restoring factory/stock tune
Follow all the steps, and once you see this screen, your vehicle has
been restored back to stock tune.
File is succesfully
File is successfully
installed
installed
Press any key
Press any key
25
Restoring tune
Back to Table of Contents
Page 26

Caution:
DiabloSport will not be held responsible for vehicles with modied parameters since we are not
present to monitor the adjusted parameters; therefore we recommend that this should be left
untouched by inexperienced users.
Whenever DiaboSport Performance Tune parameters are adjusted, especially power
enrichment and spark parameters, it is very important to monitor the vehicles timing and air fuel
to check for detonation/pinging, to ensure the vehicle is operating within safe parameters.
Do not perform any operations on Predator (expect live data diagnostics) while vehicle
is running. The vehicle must be parked and engine OFF.
Page 27

Modifying Parameters
This feature is designed for users with extended knowledge of automotive tuning. Modifying fuel and spark parameters increases risk of detonation/pinging and
can increase risk to the durability of the vehicle. These parameters, as well as others in the Predator, should only be modied by an experienced tuner and should
not be modied unless necessary.
Select “Modify Performance”
27
*Modify Performance**
View Parameters
Set Parameters
Reset Parameters
View parameters allows user to see parameter settings
Modifying Parameters
Set parameters allows user to adjust parameter settings
Reset parameters allows user to reset parameters back
to original DiabloSport Performance tune.
Using the reset feature will reset ALL modied
parameters back to the original DiabloSport
Performance tune.
Back to Table of Contents
Page 28

28
Modifying Parameters - Parameters Explanation
Select “View Parameters” to
Modifying Parameters
***View Parameters***
Axle Ratio
Cooling Fans
Power Enrichment
Spark
Normal Shift Adaptation
Shift Adaptation
Allows user to adjust the time delay
between shift commitments, i.e.
quickness of the shift.
When adjusting to a negative
percentage, the shift adaptation
will be shorter, hence a quicker shift.
Positive adjustment will yield
a longer and slower shift.
Axle Ratio Adjust only if different gears are installed, and where
necessary. Corrects speedometer and transmission for gear changes.
N/A for Corvette (y-car), please read addendum to manual for instructions.
Cooling Fans Allows user to change temperatures where cooling fans go on and off.
(Applies only to vehicles with electric fans)
“On” temperature MUST be higher than “OFF” temperature for proper
operation of fans.
Power Adjust only if vehicle is running rich or lean as verified by an air/fuel
Enrichment meter. Increase numbers if the air/fuel ratio is lean and decrease
numbers if the air/fuel numbers are rich. When adjusting the Power
Enrichment we will allow up to a 5% increase or decrease of fuel trims
at WOT. This translates to approximately a 1.5 point air/fuel adjustment
range plus or minus.
Spark Adjust only if the vehicle has a spark knock (detonation). Higher number
will advance timing lower number will retard timing. When adjusting
the spark we will allow up to a 10% increase or decrease of timing in
the WOT range. This translates to about a 2 degree +/- range of adjustability.
Normal Shift Applies to automatic transmissions without TOW/ HAUL mode.
Adaptation
Back to Table of Contents
Page 29

Modifying Parameters - Parameters Explanation
***View Parameters***
Per forma nce Shif t A dapta tio n
Shi ft Po int s (MP H)
Shi ft Po int s (RP M)
Shi ft Pr ess ure
Rev Limi t
Fac tory Whe el si ze
Act ual W hee l siz e
Performance Applies to automatic transmissions with TOW/ HAUL
Shift mode. Adjusting Parameters in the Performance
Adaptation section will apply only when the TOW/HAUL mode is
activated.
Shift Points Allows user to adjust at what MPH the shift should
(MPH) take place.
*
Shift Points Allows user to adjust at what RPM the shift should
(RPM) take place.
Shift Pressure Allows user to adjust the firmness of the shift action.
Rev Limit Allows user to adjust Rev Limit
Factory Wheel size: Enter the factory tire size; tire width, aspect ratio
and wheel size.
*
**
Actual Wheel size: Enter the actual tire size; tire width, aspect ratio
and wheel size.
**
29
Modifying Parameters
* **
Go to next page for NOTES
Back to Table of Contents
Page 30

30
Modifying Parameters - Important information regarding DiabloSport Performance Tune Parameter modication
NOTE: The shift point functions work in conjunction
*
with each other, based on load. Use the RPM shift point
function for WOT (wide open throttle) shifts, and MPH shift
point function for part throttle shifts. The vehicle WILL shift
at which ever point it reaches rst! This is dictated by load
on the vehicle, RPM vs MPH
NOTE: Adjust only if speedometer is off due to
**
the increase or decrease in tire size. The factory GM
PCM can only calculate up to a certain tire size before it
will disable the traction control system, however, it WILL
correct the speedo but the traction control system will be
turned off permanently. Traction Control will function once
the tire size is restored to factory.
Modifying Parameters
Select “Tune It”, go through, and read carefully, the disclaimers…
DiabloSport will not be
held responsible for
vehicles with modified
parameters since we
are not present to
monitor the
Back to Table of Contents
Page 31

Modifying Parameters
adjusted parameters;
therefore we recommend
that this should
be left untouched by
inexperienced users.
**Modify performance**
Press Enter if you
understand and agree
else Esc to quit
…until you get to this screen.
*****Performance*****
Install Performance
Modify Performance
Restore Saved Data
Troubleshooting
31
Modifying Parameters
Back to Table of Contents
Page 32

32
Modifying Parameters
Once desired parameter has been selected its current value will be shown.
Press “Enter” to make adjustments.
Modifying Parameters
Make desired adjustments and select “Enter” to save. The new value will
be displayed. Press “Esc” to return to Set Parameters menu. Adjust other
parameters if desired using the same steps as above.
- 0 +
INCREASEDECREASE
Back to Table of Contents
Page 33

Modifying Parameters
Once desired adjustments are completed Press “Esc” while in Set
Parameters screen.
****Data uploading****
****Data uploading****
Install modified
Install modified perforperformance file.?
mance file?
Press “Enter” for Yes
Press “Enter” for Yes
Press “Esc” for No
Press “Esc” for No
33
Press “Enter” to upload new adjusted tune.
The Predator will continue and install tuned le.
Modifying Parameters
Back to Table of Contents
Page 34

34
Diagnostic Section - How to check and erase the SES light.
The diagnostic features on this tool can check and erase SES (service
engine soon) lights as well as monitor live data from sensors supported.
Diagnostic Section
Select “Diagnostics” from main menu.
***Transmission Type**
Automatic
Manual
Back to Table of Contents
Page 35

Diagnostic Section - How to check and erase the SES light.
Select your transmission type
35
*Engine Control Unit*
Trouble Codes
Real Time Data
Abbreviations
Testing
Trouble Codes: Allows user to view and erase trouble codes
Real Time Data: Displays live data
Abbreviations: Displays the abbreviations used in live data.
Testing: This menu is used for troubleshooting only.
Select “Trouble Codes”
****Trouble Codes****
DTC Information
Erase DTC’s
Back to Table of Contents
Page 36

36
Diagnostic Section - How to check and erase the SES light.
To view the specific trouble code, select “DTC information”.
DTC stands for Diagnostic Trouble Code.
Diagnostic Section
****General Data****
DTC All
Specific DTC
DTC Not Ran SCC
DTC All: View all DTC’s
Specic DTC: Enter DTC to view status
DTC Not Ran SCC: Displays what DTC tests where not
performed during the DTC check
NOTE: “DTC Not Ran SCC”: DTC Not Ran Since Code
Cleared. Because the PCM performs tests of modules
during driving cycles, some modules are not tested
at the time the “DTC All” command is performed.
This feature displays what modules where excluded
during the “DTC All” test. This information always
bases itself from last “Erase DTC’s” command
performed.
Back to Table of Contents
Select “DTC All” to view all DTC codes, once viewed, press ESC twice then select
Erase DTC’s, your SES light should now turn off as long as the problem is xed.
Page 37

Monitoring Real Time Data
Real time data is just what it implies. The Predator will display an
array of sensor input values as the engine is running
• Select “Diagnostics” from main screen.
• Select “Real Time Data”
• Monitor desired parameters
37
If you select “Testing” the following screen will be displayed
NOTE: Only values supported by vehicle model will be displayed.
Abbreviation
If you select “Abbreviations” you will be able to look through a
list of all the abbreviations that may be used during the live data
session.
Testing
Unless instructed, DO NOT USE THIS MENU!
The “Testing” menu is designed to aid DiabloSport if we need to
troubleshoot your Predator.
*******Testing*******
Calibration Ids
Ping All
Calibration Ids displays numerical ID’s of each section
of the tune
Ping All monitors communication status between
PCM and modules
Back to Table of Contents
Monitoring Real Time Data
Page 38

38
Options Section
The options menu is mainly for the DiabloSport Predator Dealer.
It contains functions for up/downloading of tunes into tool, tick purchases as well as specic tool identication.
When you select “Options” the following screen will be displayed
• This option is used to upload/download info to the PC
• This option shows the tools serial number
Options Section
Back to Table of Contents
• This option is used to set a security password
• This option is used to clear the security password
• This option is used when user gets les from dealer
• This option displays the amount of ticks available
• This option is used to buy more ticks
• This option is specify price of ticks (password needed)
• This option will display Predator tool data
*****Options*****
PC. Communication
Display Serial No.
Set Password
Clear Password
Tool ID
Show Current Ticks
Buy Ticks
Set Tick Price
About Tool
 Loading...