

Page 1
Page 2
www.diablosport.comTech Support: 561.908.0040
www.diablosport.com Tech Support: 561.908.0040
InTune Comprehensive User Manual
Table of Contents
Introduction 2
Section one: Knowing your intune
Section 1.1-Read Before Installing Tune 4
Tuning....Evolved
Welcome to the new revolution of tuning. The inTune you just purchased contains the latest technology, cutting edge
software, evolutionary vehicle protocol communication and the most powerful/safest tuning available all brought to
you by DiabloSport-the tuning name you can trust! Quality is number one for us which is why we design, engineer, and
manufacture everything right here in Sunny South Florida, USA. We do not batch test like our competition. All products
are individually inspected and each inTune is tested to ensure top quality. We hope you enjoy your new purchase as
much as we did making it. With proper care this inTune will last for years and is compatible with DiabloSport’s “Free
Online Updates for Life” program (Product Life). Welcome to the DiableSport Family and the future of tuning.
Section 1.2-Warranty Information 5
Section 1.3-Contents of inTune Box 6
Section 1.4-OBD-II Cable Connection 7
Section 1.5-inTune Buttons, Interface, and Connections 8
Section 1.6-Updating your inTune 9
Section two: tuning your Vehicle
Section 2.1-inTune “TUNE VEHICLE” MENU 10
Section 2.2-Vehicle Recovery Mode 14
Section 2.3-How To Restore Your Vehicle to Stock Factory Settings 16
Section three: ModificationS and adjuStMentS
Section 3.1-How to Modify Your Tune 18
Section 3.2-Quick Adjustment 19
Section four: logging
Section 4.1-inTune Logging Section 20
Section 4.4-inTune Congure, Gauge Mode, Gauge Units and PID Select 21
Section 4.2-inTune Recording 21
Section 4.3-inTune Playback 21
Section fiVe: diagnoSticS
Your new DiabloSport inTune should already be updated to the most recent revision but due to changing technology
we recommend plugging the inTune into your computer and run the auto update software. As always with DiabloSportthese online updates are free of charge for the life of the product.
Section 5.1-Diagnostic code reader / clearer 24
Section Six: SettingS
Section 6.1-inTune Setting Menu 25
2 3
Page 3

www.diablosport.comTech Support: 561.908.0040
www.diablosport.com Tech Support: 561.908.0040
Section 1.1-Read Before Installing Tune
AFTERMARKET PARTS - Use of the DiabloSport inTune with aftermarket products is at the owners risk; some aftermarket
products create rich or lean conditions based on design by the product’s manufacturer. It is impossible to test every
possible product so please proceed with caution when using any product related to adding airow like throttle bodies,
lters and cold air intake kits or boost in the form of pulleys, or blower upgrades, changes in exhaust systems or exhaust
components. Customers with these modications may need a custom tune from a DiabloSport CMR dealer. DiabloSport
recommends the use of a dyno and wide band oxygen sensor to monitor data when adding aftermarket products to make
the proper tune changes.
Any change in voltage during ash programming procedures WILL interrupt the writing process. Please disconnect or
disable any such add on part. In the event of such an occurrence, unplug the tool, wait 5 seconds and then plug it back in.
The tool will recognize that an interrupted writing error has occurred and will automatically install the original backup. The
vehicle is now in its original state. Please attempt to locate the voltage draw before inTune is used again. Please feel free to
contact DiabloSport directly at any time with questions related to this process. (800)-531-5484 to speak with DiabloSport
Tech Support. IMPORTANT: IT IS NOT NECESSARY TO CONTACT THE VEHICLE MANUFACTURER SHOULD SUCH
ERRORS OCCUR. ANY AND ALL COSTS RELATED TO SUCH ACTIONS ARE THE RESPONSIBILITY OF THE END
USER- NOT DIABLOSPORT OR ITS DEALERS
Important Note: Make sure to remove, disable, or disconnect any of the following (including fuses if applicable due to
possible power draw):
• Aftermarket Electrical fans
• Shift lights
• Aftermarket TV or DVD Players and Speaker Ampliers
• Aftermarket Alarm systems
• Trailer Brake Controllers
• Aftermarket GPS
• On-Star System Fuses
Screen Note: Resistive vs Capacitive touchscreens. This touchscreen is a resistive type of screen and operates based on
pressure.
• Never use abrasive cleaning products.
• Do not use harsh cleaning chemicals.
• Use a clean lint free terry cloth.
• Refrain from using metal items such as keys or pens to touch the screen.
• Remove inTune from temperatures in excess of 158 degrees or lower
than 32 degrees Fahrenheit.
Very Important!
• Do not perform any tuning or ashing operations with your inTune while the vehicle is running.
• The vehicle must be parked and engine OFF.
• Always have all the doors closed while installing any tune and keep them closed until the process is complete.
• Do not activate any electrical accessories while installing the DiabloSport Performance Tune. Ensure that there
are no electronic aftermarket accessories wired or plugged into the vehicle that can cause a substantial voltage
drop. Please contact DiabloSport if you are uncertain about the effect of devices that are installed on your vehicle.
• Certain cellular phones or radio equipment might cause interference. Please remove or turn such devices off while
tuning the vehicle.
• Do not try to install any tune on a vehicle with a low battery voltage - charge your battery if necessary.
• Do not unplug the inTune while it is installing any tune or the Original Backup for ANY reason.
00
inTune Tuning: DiabloSport Performance tunes are designed for stock to mildly modied applications. They are NOT for use
with superchargers, turbochargers, or nitrous systems which require proper custom tunes from a DiabloSport CMR dealer.
Section 1.2-Warranty Information
A. DiabloSport inTune Warranty Policy:
a. DiabloSport offers a 30 day satisfaction guarantee on inTune as well as a one year warranty against defects in
materials or workmanship.
b. DiabloSport’s liability under this warranty shall be limited to the correction or replacement of any defective part
or product in question which DiabloSport determines to be necessary.
c. Screen damages will be reviewed on a case by case basis to determine the actual damage done to any screens,
including user error. Warranty freight charges are the responsibility of the dealer, distributor and/or consumer.
Screen Damage such as excessive exposure to heat/sun, liquids and physical abuse will not be covered.
d. The inTune warranty is to the original purchaser and is non-transferable.
e. This warranty is void unless proof of purchase is submitted. Purchase price must be consistent with DiabloSport’s
MRP pricing policy.
f. Removal of serial numbers and/or alteration of product or packaging will void all warranties.
g. DiabloSport shall not be held responsible for direct or indirect failures due to the use of our product.
h. DiabloSport shall not credit or repair any units that are not properly restored to the original backup upon time of
return or that may be VIN locked.
i. VIN locked units, or improperly restored units, will be returned to the customer.
ii. It is the customer’s responsibility to check any and all DiabloSport products to make sure they are not VIN
locked before the product shall be returned.
B. Technical Support can be reached by calling toll free (561)-908-0040 from 8:30 AM EST through 6:30 EST MonThurs, and Friday 8:30 AM EST-5:30 PM EST.
C. Product updates:
a. DiabloSport will inform customers of any new updates on our website www.diablosport.com, newsletter, or social
media networks (Facebook, Twitter, etc…).
b. DiabloSport cannot be held accountable for any or all damages caused by using an inTune
c. Products that need updates will be handled in the following fashion:
i. DiabloSport will charge a labor and handling fee for products that are deemed non-defective.
ii. DiabloSport shall decide at time of receipt of RMA if units are defective.
iii. All products returned for update purposes must have a corresponding DiabloSport RMA number clearly
written on the outside of the box for processing- all others will be refused.
D. Returns and RMA/RGA policies and procedures:
DiabloSport will not warranty, credit, or exchange any product returned without a valid RMA number.
All RMA numbers are issued by DiabloSport RMA department.
Defective units shall be repaired and returned in like kind. All units that must be re-furbished to like new condition are
subject to labor and parts charges to be determined by DiabloSport.
All refunds for DiabloSport products are at point of purchase- DiabloSport will not credit dealers/customers that did not
purchase products directly through DiabloSport.
E. State Law: Some states do not allow limitations of implied warranties or the exclusion of limitation of incirranties, or
the exclusion or limitation of incidental, special or consequential damages, so the above limitations may not apply to you.
In such states, liability shall be limited to the greatest extent permitted by applicable law.
F. Governing Law & Venue: This warranty shall be governed by and construed in accordance with the laws of the State
of Florida, and venue for any legal proceeding or action at law arising out of or construing this Agreement shall lie in the
state or federal courts of Orange County, Florida, and the parties specically waive any other venue.
4 5
www.diablosport.com Tech Support: 561.908.0040
www.diablosport.comTech Support: 561.908.0040
Page 4

www.diablosport.comTech Support: 561.908.0040
www.diablosport.com Tech Support: 561.908.0040
A. DISCLAIMER: Not legal for sale or use on any pollution controlled motor vehicles. Legal in California for racing
vehicles ONLY- which may never be used upon a highway or other state road. While the majority of DiabloSport products
offer speed limiter adjustments-this is intended for race vehicles ONLY.
B. DISCLAIMER: DiabloSport cannot be held liable for any accident or issue caused by users driving while looking at
their inTune Monitor.
C. DISCLAIMER: DiabloSport cannot be held liable for any accident or issue caused by OBD-II cable interference near
the gas/brake/clutch peddles.
DiabloSport Inc. Satisfaction Guarantee: All DiabloSport products have a satisfaction guarantee. If within the rst 30 days
from date of purchase you are not satised with the results, simply restore the Original Backup to your vehicle and return the
product to the selling dealer. Under no circumstances will DiabloSport accept the return of a inTune unit that is VIN locked
or has not been restored to original settings.
Section 1.4-OBD-II Cable Connection
Locating your OBD-II PORT:
The most common OBD-II port locations
are shown in the diagram on the left. If you
are having trouble locating your OBD-II port
please consult your owners manual.
Left corner of dash
inTune Revisions: In such a technology-based industry, it is sometimes hard to provide our customers with the most
recently updated information. In some cases by the time our materials are printed we have already made an update making
what you read out of date. DiabloSport works very hard to update our tools to include calibration changes from the factory,
additional features as requested by our customers and improvements to our tunes on a daily basis if necessary. In order to
keep our customers up to date with releases, applications, product information, vehicle specic questions and features, we
advise that you visit our website at www.diablosport.com for the most up to date information.
Section 1.3-Contents of inTune Box
Your inTune should come with the following items:
Near center of dash
OBD-II Cable
Depending on your vehicle several options exist for running the OBD-II
cable to your inTune. We have found that most vehicles would benet from
a right angle OBD-II connector and have included it in your box.
Replacement cables are available for purchase, part #T-1025
If this cable interferes with your driving we have an optional straight OBD-II
cable available for purchase, part #T-1026. You can purchase the optional
straight angle OBD-II cable by clicking the image. If you feel that neither
cable would t your vehicle properly there is a simple method for moving
the OBD-II connection to a different location.
How To Relocate the OBD-II Connection:
Important Note: If you choose to relocate your OBD2 connection you must put it back to the original position prior to any
• DiabloSport inTune
• DiabloSport OBDII Cable
• DiabloSport USB Cable
Your new DiabloSport inTune should already be updated to the most recent revision but due to changing technology we
recommend checking the inTune by powering it up (computer or vehicle) and verifying the latest revision. In the chance
that your inTune does require an initial update-have no worries. The update process is easy and only takes a few minutes
of your time. As always with DiabloSport-these online updates are free of charge for the life of the product. See section
1.6 for how to update your inTune.
• inTune Quick Start Guide / DiabloSport Poster
• Comprehensive User Manual (located in your inTune’s drive)
Step 1: Locate your OBD-II connection and determine if it is mounted by 2 small screws or a “snap-out” type of connector. If
Step 2: Either unscrew or “snap-out” the OBD-II connection. You can now freely move the connection to a desired location.
Step 3: Plug the inTune’s OBD-II cable into the vehicle’s connection port and slide the cabling underneath the dash. Using
dealership service/maintenance.
mounted by two small screws-obtain the appropriate screwdriver.
(Make sure to save any screws and not break any plastic connectors)
Velcro, tape, zip ties, or string rmly secure the cables to prevent them from coming lose while driving.
6 7
Page 5
www.diablosport.comTech Support: 561.908.0040
www.diablosport.com Tech Support: 561.908.0040
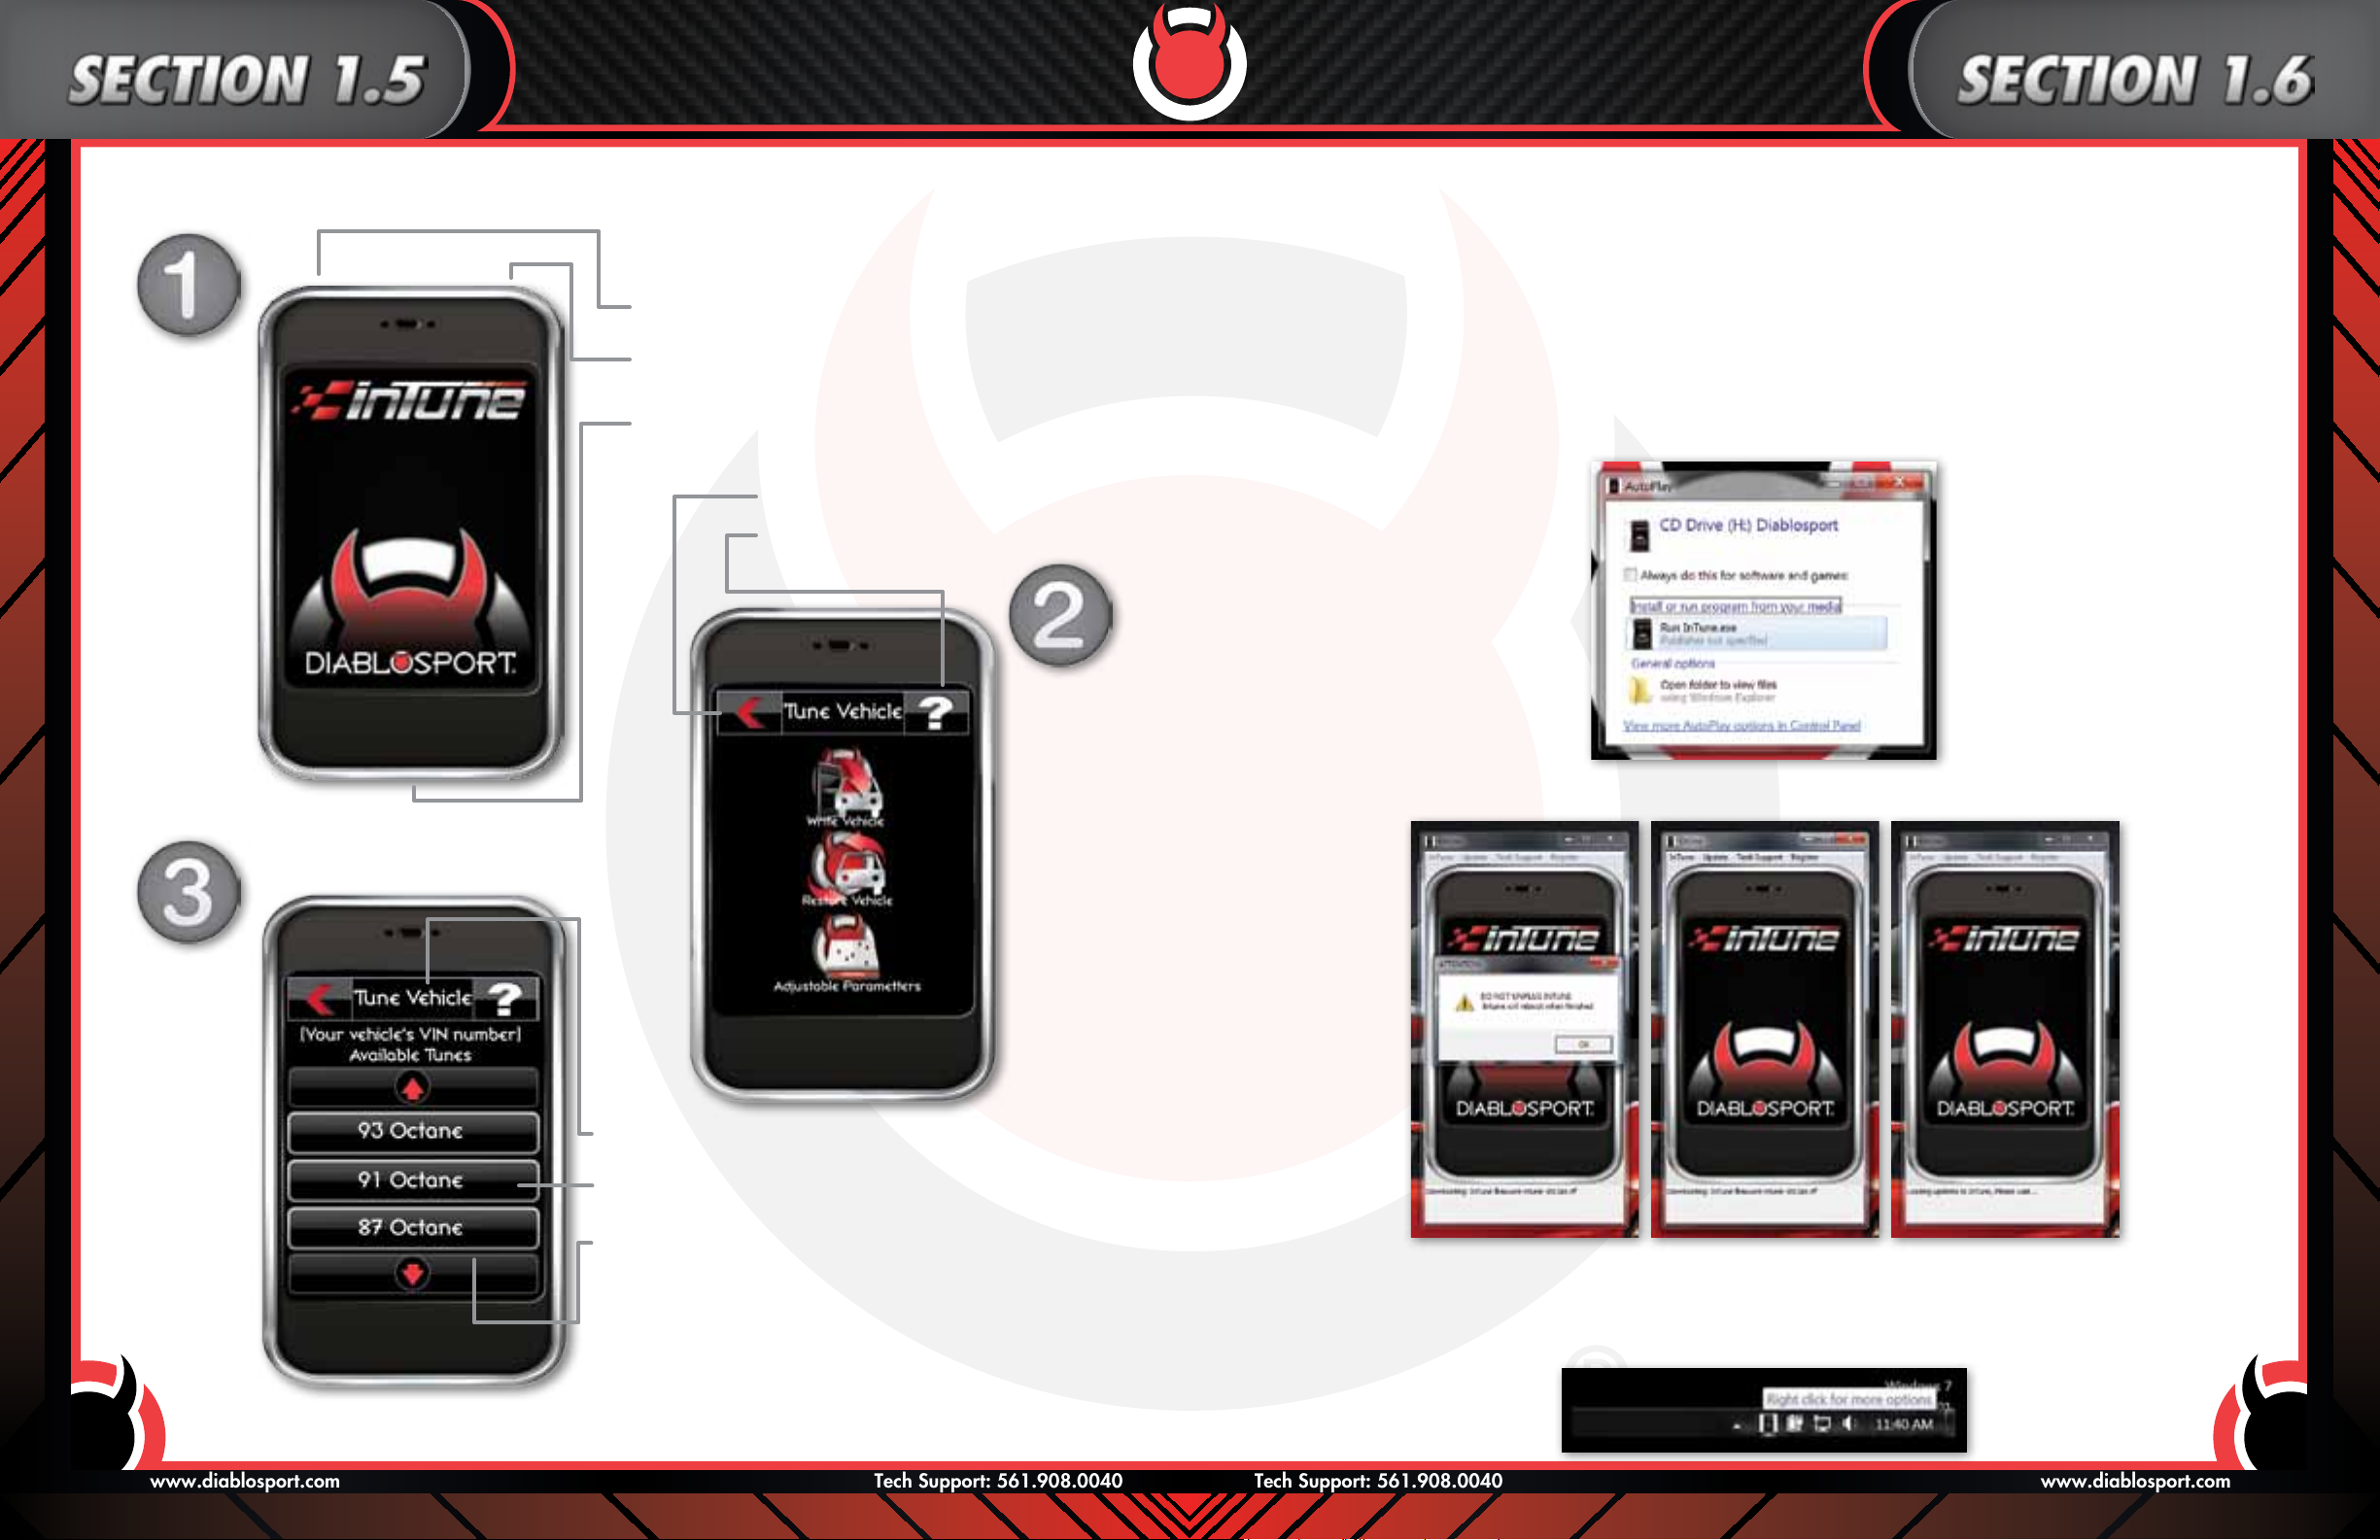
Section 1.5-inTune Buttons, Interface, and Connections Section 1.6-Updating your inTune
How to run the inTune’s “auto update” software for future automatic updates.
USB Connector- Use when connecting to your computer.
Step 1: Plug your inTune into your computer using the supplied USB cable.
Note: This software is not MAC compatible.
Analog Connector- Use when connecting external
analog devices.
OBD-II Cable Connection- Used to connect to your
vehicle.
Back Arrow- used to go back one page.
Help Icon- Hides help notes on screen
when pressed.
Step 2: If auto run settings are not currently turned on, please manually click on inTune.exe to run the update software
(see picture below).
NOTE: To avoid this step in the future, you can click on
the check box “Always do this for software and games.”
Step 3: If there is an update available, you will get a popup window instructing you to not unplug your inTune. Click Ok.
Title- Shows you what page you are on.
Icon/Selection Screen- Simply touch a icon/selection to
proceed to the next screen.
Slider Buttons- Used to move screen down/up to see
other icons/selections.
Step 4: Your inTune will now automatically update itself. Do not unplug your inTune until after it has rebooted.
Step 5: To access the auto update software in the future click on the inTune icon in the lower right corner (toolbar) of
your desktop. (This icon will only appear when your inTune is plugged in).
Note: The bottom of the update software will indicate progress (see above).
8 9
Page 6

www.diablosport.comTech Support: 561.908.0040
www.diablosport.com Tech Support: 561.908.0040
Tuning Menu
Section 2.1-inTune “TUNE VEHICLE” MENU
inTune “TUNE VEHICLE” MENU
The inTune Tune Vehicle Menu contains features which directly read and write to your vehicle’s ECU. Options in the Tune
Vehicle Menu can consist of tunes, original backups, adjustable parameters, factory calibration updates, and other data
used to properly tune or calibrate your vehicle.
inTune MAIN MENU
Step 1: Select “Tune Vehicle”from the main menu.
Tune Vehicle Icon
The Vehicle Tuning menu contains three icons each serving a different purpose:
Write Vehicle
The Write Vehicle icon is used to write data TO
the various ECU’s in a vehicle. Data can consist
of Calibration Data (tunes), calibration/software
updates, or other vehicle data.
Restore Vehicle
The Restore Vehicle icon is used to restore
OEM factory software and calibration data back
to the ECU(s). This must be done prior to taking
your vehicle in for service/maintenance.
Adjustable Parameters
The Adjustable Parameters icon is used when
you want to modify various aspects of the
tune data that is sent to the ECU(s). Some of
the many adjustable parameters include spark,
shift rmness, shift points, tire sizes, gear ratio,
cooling fan adjustment, rev limits, axle ratio,
speed limiters and many more. Adjustable
parameters may differ from vehicle to vehicle.
Note: The Adjustable Parameters icon will not be available
unless a DiabloSport tune is currently on the vehicle.
Now that we have covered the basics of the tuning menu, let’s discuss the process of tuning your vehicle.
DO NOT START
THE ENGINE!
inTune TUNE VEHICLE
Step 2:From the “Tune” menu
select “Write Vehicle”.
Step 3: If prompted, turn key to “ON” position without starting your engine.
The inTune will now attempt to recognize your vehicle by
communicating with the ECU(s). Please do not unplug the tool
during this process.
PLEASE READ AND ACCEPT THE DISCLAIMER ON THE SCREEN
Once your vehicle has been identied the inTune will display
your vehicle’s vin along with any available tunes.
10 11
Page 7

www.diablosport.comTech Support: 561.908.0040
www.diablosport.com Tech Support: 561.908.0040
Step 4: Select your desired tune by touching the name of the tune.
The tune you selected will “glow” conrming your selection.
Note: If the inTune contains custom tunes for your vehicle the
“custom tune” button will appear as the rst tune(you may need to
use the scroll bar if multiple tunes are available). By selecting custom
tune you will be brought to a different tune menu containing all
available custom tunes for your vehicle. From this point you would
select the desired custom tune just like a canned tune. Please note
that the inTune does not come with “custom tunes”. These tunes
are made specically for your vehicle by one of our many ChipMaster
Revolution Dealers (CMR).
Step 6: (automatic) The inTune will now save a copy of your vehicles
back up.
Processing
Step 5: A pop-up window will appear conrming your tune selection.
If additional information is available for the tune, it will be
displayed here. To conrm the tune “touch” the green check.
Conrm by pressing the green check button
To go back and select another tune press the
red X button
Step 7: Once your vehicles backup has been saved, a pop-up window will
appear asking if you wish to modify the tune.
Note: Some tools will not allow for tune adjustments.
(If this is your rst time please skip this step and proceed to 7B).
Step 7A: By selecting the green check you will have the option to make
specic adjustments to the tune, these are also known as adjustable
parameters (tire sizes, gears, spark, fuel, speedo, etc…).
Step 7B: Since this is your rst time tuning your vehicle, touch the red X to skip this step. You can always
make adjustments to the tune at a later time.
Step 7C: Before the inTune writes the selected tune to your vehicle you must conrm the tune selection by clicking
the green check . To change your tune click on the red X
The inTune will now build your tune with any adjustments you made and proceed to write it to your vehicle. This
process can take several moments, please do not unplug the inTune or start your vehicle.
.
12 13
Page 8

www.diablosport.comTech Support: 561.908.0040
www.diablosport.com Tech Support: 561.908.0040
Congratulations, you have successfully tuned your vehicle for
the rst time. We have made this process as simple as possible
and hope you found it easy and trouble free. Remember, you can
always return your vehicle back to stock factory settings (which
is recommended prior to any dealership service /maintenance) by
selecting Restore Vehicle located in the Tuning Menu.
If your inTune fails to install the tune to your vehicle for any reason it will enter into “Vehicle Recovery Mode”. Please
see the next section on how to recover your vehicle’s backup tune.
Press after reading the disclaimer note.
Click the green check to restore your original backup.
After your backup has been restored click .
Section 2.2-Vehicle Recovery Mode
Now your inTune will reboot automatically.
If your tool reboots and you see the following screen:
Click
Ensure your vehicle ignition is turned to the “ON” position
14 15
Page 9

www.diablosport.comTech Support: 561.908.0040
www.diablosport.com Tech Support: 561.908.0040
Section 2.3-How To Restore Your Vehicle to Stock Factory Settings
Important Note: This should be done prior to taking your vehicle in for service / maintenance.
Step 1: Select “Tune
Vehicle” from the
main menu
Step 5: This process can take several minutes. Please do not unplug the tool
while the backup is being restored. Once the original backup has
successfully been loaded you will get a Write Complete message.
Step 2: From the
“Tune” menu
select “Restore
Vehicle”
Step 3: When prompted, turn key
to “on” position without
starting your engine.
Stpep 4: Select the green check to
restore your vehicle and
start the engine.
Step 6: It is now safe to unplug the inTune from your vehicle and start
the engine.
After restoring the original backup to your vehicle the inTune can now be
used on a different vehicle and is no longer married to the previous vehicle.
16 17
Page 10

www.diablosport.comTech Support: 561.908.0040
www.diablosport.com Tech Support: 561.908.0040
Section 3.1-How to Modify Your Tune
There are several ways to make adjustments to your vehicle. We will break this down into two sections-Adjustable
Parameters and Quick Adjust. Adjustable parameters are changes which are made to a tune while quick adjustments
are changes made to the vehicle. All vehicles will have adjustable parameters while only Dodge/Chrysler/Jeep
applications offer quick adjustments. We will cover both adjustable parameters and quick adjust options below.
Adjustable Parameters
There are two methods of changing your vehicle’s adjustable parameters but both methods are dependent on one
thing-tuning your vehicle. Since the adjustable parameters changes are made “to the tune” and not your vehicle, you
have to put a tune on your vehicle for any changes to take effect.
Under the “tune vehicle” menu there is an “adjustable Parameter” icon. If your vehicle currently has a
DiabloSport tune in it, this icon will be available. If your vehicle does not currently have a DiabloSport tune in it, see
section 2.1 for how to tune your vehicle and step 6 for the modify tune option (to modify the tune you would click on
the instead of the to skip the step).
After either clicking the adjustable parameter icon or modify tune option you will be brought to a “tune vehicle” screen
showing A-the current tune you will be adjusting and B-all available adjustable parameters for your vehicle.
To make an adjustment simply select the parameter you wish to edit. You will then be presented with either a text
selection (Fig 1) or a numerical adjustment screen Fig 2).
Make as many adjustments as you need to, there is no limit. Please do not make any adjustments without doing
the proper research as some adjustments can adversely affect the performance of your vehicle. DiabloSport is not
responsible for any damages done to your vehicle due to improper adjustments made to our tunes.
After making a “text” adjustment the inTune will automatically save your change. After making a numerical adjustment
press the accept button to save your changes. After making an adjustment you will notice that the name of the
parameter has an * next to it indicating a change has been made. (See next page)
Note: *indicates that the value has been changed. (See picture)
After all adjustments are complete press the back arrow . You will be asked if you wish to install the current tune
you were modifying. By selecting the the tune along with all modications will be installed on your vehicle.
Section 3.2-Quick Adjustment
To access the inTune’s quick adjust menu
Step 1. Select tune vehicle from the main menu. Step 2. Select write vehicle from the tuning menu.
Step 3. After the inTune communicates with your vehicle (you may be required to
make a key cycle) select quick adjust (Fig1).
Step 4. Select the quick adjustment of your choice. You will now be brought into
that individual quick adjustment’s menu.
Step 5. Make the necessary changes. After making your change select Yes to accept
the changes or no to go back. You will need to perform a key cycle in order
for the changes to take effect.
(only available on Dodge, Chrysler and/or Jeep vehicles):
18 19
Page 11

www.diablosport.com Tech Support: 561.908.0040
www.diablosport.comTech Support: 561.908.0040
Section 4.1-inTune Logging Section Section 4.2-inTune Recording
The inTune also serves as an extremely powerful data logging tool. InTune’s data logging capabilities are easy to use
and can even be customized. Here we will cover how to log your vehicle’s data, how to customize your logs and
playback/record features.
Let’s start by getting to the logging menu.
Step 1. From the Main Menu please select the scan tool icon.
Step 2. After selecting the Scan Tool Icon, the following
screen is displayed. Select Data Logging.
Recording:
By selecting Record your inTune will start recording your vehicle’s data using the default PIDs (Parameter Identication).
DiabloSport has already selected a default PID group for each vehicle. To change the logged PIDs (customize) please
see the selection below on congure/customize logging.
Section 4.3-inTune Playback
Playback:
By selecting playback your inTune will now playback the log le you just recorded. In addition to inTune’s playback
feature, this log can be transferred to your computer to be used with our free Dataviewer software available on our
website. Transferring a data log is a very easy process. Simply plug the inTune into any computer using the supplied
USB cable. When the inTune drive appears double click to “explore folders”. Located on the inTune’s hard drive is a
folder called “Logs”. This folder will contain any saved data logs which can then be dragged to your computer’s desktop
(or any other location) for future use. If your intention is to use the data log with DiabloSport’s Dataviewer software the
program can automatically access your inTune as long as it is plugged into your computer. Just open Dataviewer and
click on File/Open/Select the inTune’s hard drive/ select the Logs folder/then select the log le of your choice.
Section 4.4-InTune Congure, Gauge Mode, Gauge Units and PID Select
Congure:
After selecting Congure from the logging menu you will be presented with the following options: Gauge Mode, Gauge
Units and PID Select.
Step 3. After selecting Data Logging from the scan tool icon, you will be
presented with the Logging menu: Record, Playback and Congure.
Gauge Mode:
By selecting Gauge Mode you will have the option of changing the way your data looks while logging/playback. The
two options are to show Digital gauges (Fig 1) which is also the default setting or you can change the display to a
Formatted Text version (Fig 2).
Gauge Units:
By selecting Gauge Units you will have the option to switch between Standard and Metric unit conversions.
Select your preferred measurement (default is set to standard).
20 21
Page 12

www.diablosport.comTech Support: 561.908.0040
www.diablosport.com Tech Support: 561.908.0040
PID Select:
“By selecting PID Select” (you may need to turn your ignition to the ON position) you will have the option to customize
the individual parameters which are logged by the inTune. DiabloSport has already selected a default grouping of
parameters for each vehicle but you always have the option to change them. To change individual PIDs simply select
asked if you wish to Change or Delete the PID.
If you wish to Delete the PID you had previously chosen, simply select Delete PID.
If you would like to change the PID select Change PID. You will then be brought to a list of all available PIDs organized
by family. Navigate through the groups until you nd the PID of your choice. Once you make your PID selection it will
automatically replace the PID you initially selected to change.
Customize your PID layout as much as you like there are no limits. When you are satised with your PID selections
select the red back arrow and choose the green check to save your changes.
the PID you want to change. You will then be brought to a list of PIDs available for your vehicle (see picture).
Navigate through the PID list until you locate the specic PID you wish to change. After selecting the PID you will be
22 23
Page 13

www.diablosport.com Tech Support: 561.908.0040
www.diablosport.comTech Support: 561.908.0040
Section 5.1-Diagnostic code reader / clearer Section 6.1-inTune Setting Menu
Step 1. Select “SCAN TOOL” from the main menu. Step 2. Select “DTC” from the Scan Tool Menu.
To access the inTune’s Settings menu select the setting icon
After selecting the settings icon, you will be presented with 3 icons:
inTune Setup Advanced Tool Info
from the main menu.
inTune Setup:
Under the inTune Setup menu you will have the options to adjust the LCD brightness, speaker volume, turn on/off the
help text and congure any analog inputs you may have.
Advanced:
This menu should only be entered when advised by a member of DiabloSport’s technical support team.
Tool Info:
Under the Tool Info menu you will nd 3 options. Firmware info, Tool Status and Vehicle Info.
A. Firmware Info: The rmware info option will display all of your inTune’s current database information. This
information may be useful to DiabloSport’s technical support team if you encounter any update problems.
B. Tool Status: The tool status option will display your inTune’s current version, build date and serial number. It
will also inform you if the inTune is currently “locked” to a vehicle.
C. Vehicle Info: The vehicle info option will display your current CALid, vehicle vin, serial number and other information.
Step 3. You will have two options “Read DTC’s” and “Clear DTC’s”.
Step 4. To view your current trouble codes select “Read DTC’s”.
24 25
Step 5. To Erase your current trouble codes select “Clear DTC’s”.
Page 14

 Loading...