

Page 1

Page 2

After Sales Support TEL:1800 189 941 1
INDEX
INDEX............................................................................................................................1
SAFETY AND INSTRUCTIONS.....................................................................................2
ASSEMBLY AND PARTS LIST ......................................................................................3
1.1 PARTS LIST.............................................................................................................3
1.2 FRONT PANEL........................................................................................................4
1.3 REAR PANEL..........................................................................................................5
1.4 REMOTE CONTROL UNIT......................................................................................6
1.5 INSTALLING THE BATTERIES IN THE REMOTE CONTROL................................7
1.6 CONNECTING TO EQUIPMENT ............................................................................8
GETTING STARTED...................................................................................................10
2.1 INSTRUCTIONS....................................................................................................13
2.2 TIMER SETTING ...................................................................................................13
2.3 SYSTEM SETTINGS.............................................................................................14
2.4 CHANNEL MANAGER...........................................................................................16
2.5 PARENTAL CONTROL..........................................................................................17
2.6 FILE MANAGER....................................................................................................18
2.7 INSTALLATION......................................................................................................18
2.8 EPG .......................................................................................................................19
2.9 TELETEXT.............................................................................................................20
PVR FUNCTION..........................................................................................................21
3.1 PVR SETTINGS.....................................................................................................21
4.1 FAQ........................................................................................................................24
5.1 TROUBLE SHOOTING..........................................................................................25
5.2 SPECIFICATION....................................................................................................26
Page 3
After Sales Support TEL:1800 189 941 2
SAFETY AND INSTRUCTIONS
CAUTION: TO PREVENT ELECTRICAL SHOCK, DO NOT REMOVE THE COVER.
THERE ARE NO USER SERVICEABLE PARTS INSIDE. REFER
SERVICING TO QUALIFIED SERVICE PERSONNEL.
SAFETY
.Never place the unit in hot, humid or excessively dusty places.
.Do not install the unit where it may be exposed to mechanical vibrations.
.This product should be operated only from the type of power source indicated on the
rear of the unit.
.Do not touch the power cord with a wet hand or continue to use a damaged power
cord. It may cause an electric shock.
.Never open the cover. High voltage in the unit may result in electrocution.
.Disconnect the power cord to the unit before connecting any cables.
CAUTION
.To prevent fire or electrical shock do not expose the appliance to water.
.Ensure that objects filled with liquids, such as vases, are not placed on the
apparatus.
.If an object or liquid gets into the unit, disconnect the plug and ask an approved
technician to check the unit.
.Never place the unit in a confined space such as a bookcase or built-in cabinet
unless proper ventilation is provided. Leave a 10cm gap around the unit.
.The recommended operating temperature is from 0 ~ 40℃℃ and humidity should be
under 95%.
.For your own safety, do not touch any part of the unit, power lead or aerial
lead during a lightning storm.
.Use a damp cloth to clean the unit.
.Do not use liquid cleaners, solvent or abrasive products, etc.
This symbol indicates that high voltage is present inside. It is dangerous to
make contact with any part inside the case.
This symbol alerts you of important information concerning operation and
maintenance of this product.
Page 4

After Sales Support TEL:1800 189 941 3
ASSEMBLY AND PARTS LIST
1.1 Parts List
Please make sure the following accessories are supplied with the STB.
① High-Definition Personal Video Recorder (PVR )
② Remote Control
③ RCA Video/Audio Cable
④ Batteries (AAA Size)
⑤ User Manual
⑥ IEC Connector Cable
Page 5

After Sales Support TEL:1800 189 941 4
ASSEMBLY AND PARTS LIST
1.2 Front Panel
1. Standby Button
Press to switch between operation and standby mode. The orange LED lights up
when in the standby mode.
2. Volume Left/Right Button (
◄/►)
Moves the cursor left/right when in the menu or adjusts the volume level in the
normal state.
3. CH Up/Down Button (
▲/▼)
Moves the cursor up/down when in the menu or changes the current program to the
previous/next channel in the normal state.
4. OK Button (OK)
Press to select the item in the menu or to list the TV/Radio channels.
5. Menu Button (MENU)
Press to display the Main Menu or to exit from the menu.
6. Front Panel Display
Front panel window displays information concerning current operation such as TIME,
CH number and so on.
7. Infrared Remote Sensor (IR)
A hidden sensor senses infrared signal from the remote control.
Page 6
After Sales Support TEL:1800 189 941 5
ASSEMBLY AND PARTS LIST
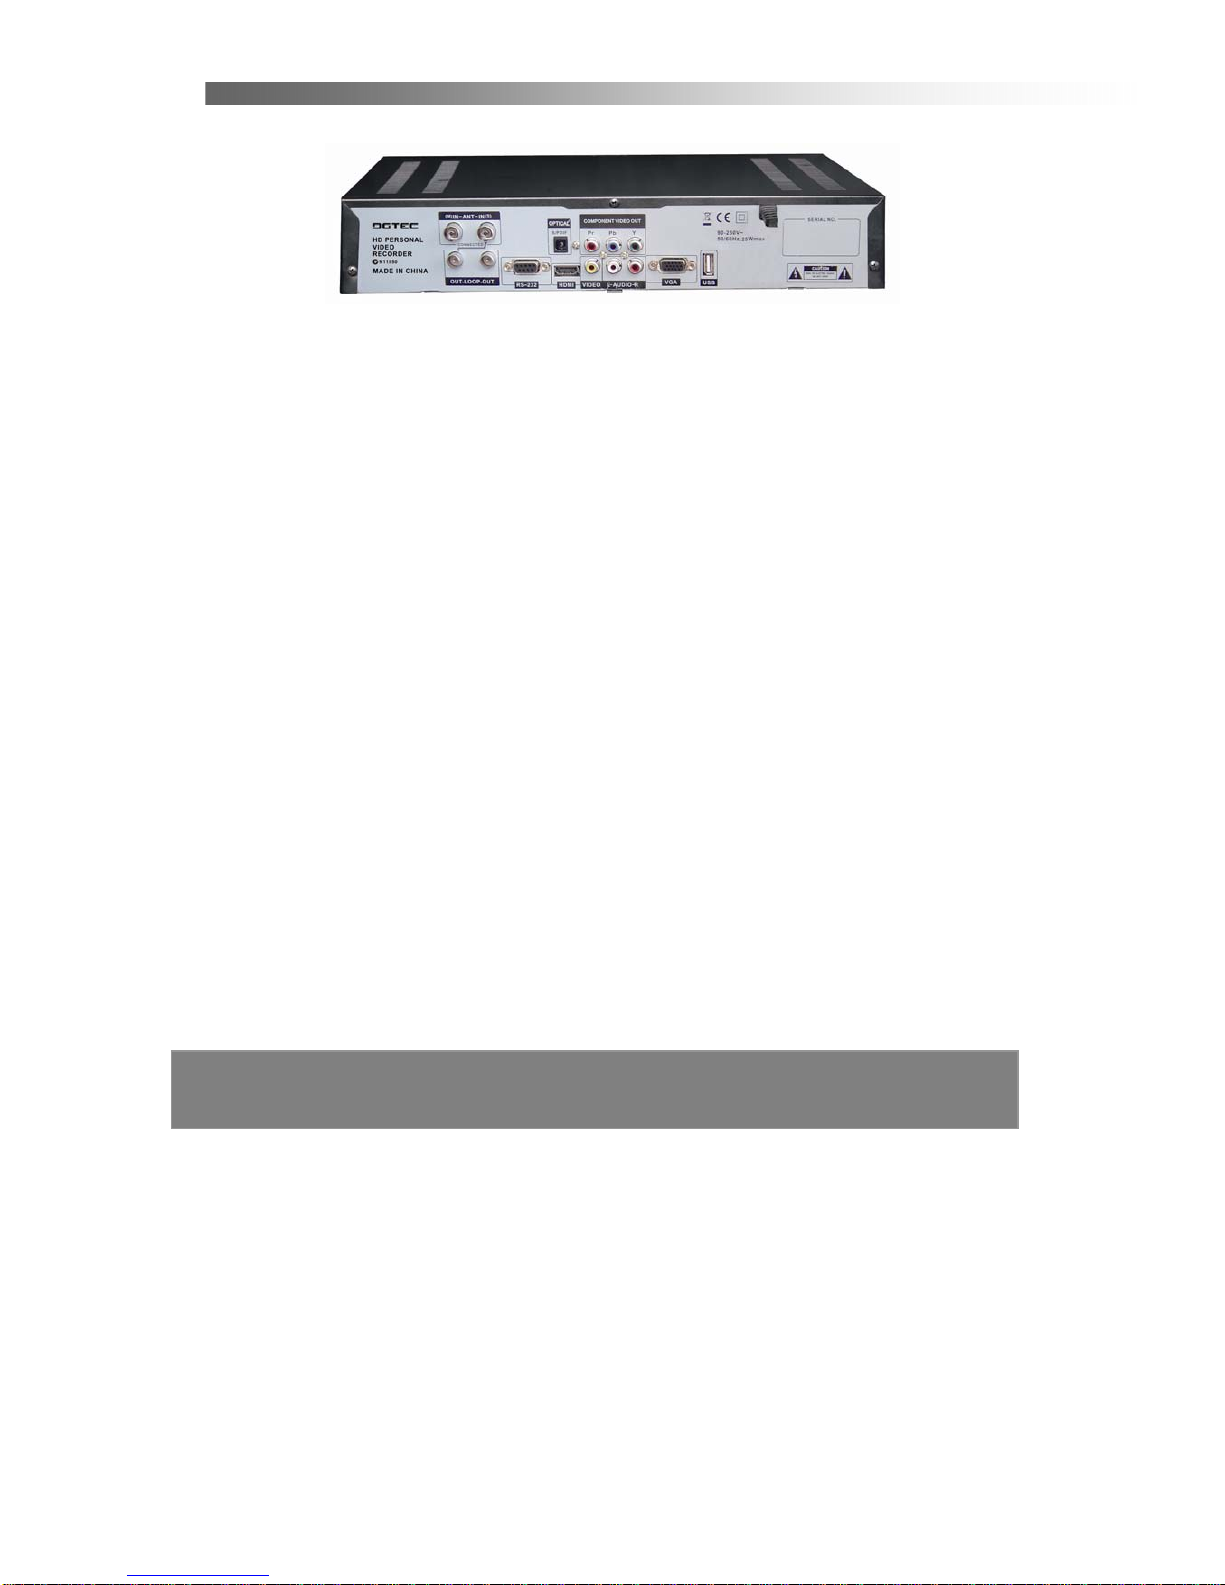
1.3 Rear Panel
1. ANT IN
Used to connect an antenna.
2. ANT OUT (LOOP OUT)
Used to connect an extra analogue or digital STB.
Please connect LOOP OUT (M) with ANT IN (S) correctly.
3. RS232 Serial Port
For firmware update, serial communication port (RS-232).
4. DIGITAL AUDIO (S/PDIF / Optical)
Connect to an External Audio Amplifier with S/PDIF / Optical Digital Audio.
5. HDMI Connector
Connect
High-Definition Multimedia output to HD Monitors (HDMI Type).
6. YPbPr
Connect component video to HD Monitors (YPbPr Type).
7. VIDEO (Yellow RCA)
Connect to a TV with video input.
8. AUDIO L/R (White / Red RCA)
Connect to a TV audio input, HD Monitors audio input or an External Audio Amplifier.
9. VGA Connector
Connect component video to HD Monitors (VGA Type).
10. USB
USB port is used for viewing external files on a memory stick, and for possible
software upgrades. (to be advised by DGTEC technician)
Page 7
After Sales Support TEL:1800 189 941 6
ASSEMBLY AND PARTS LIST
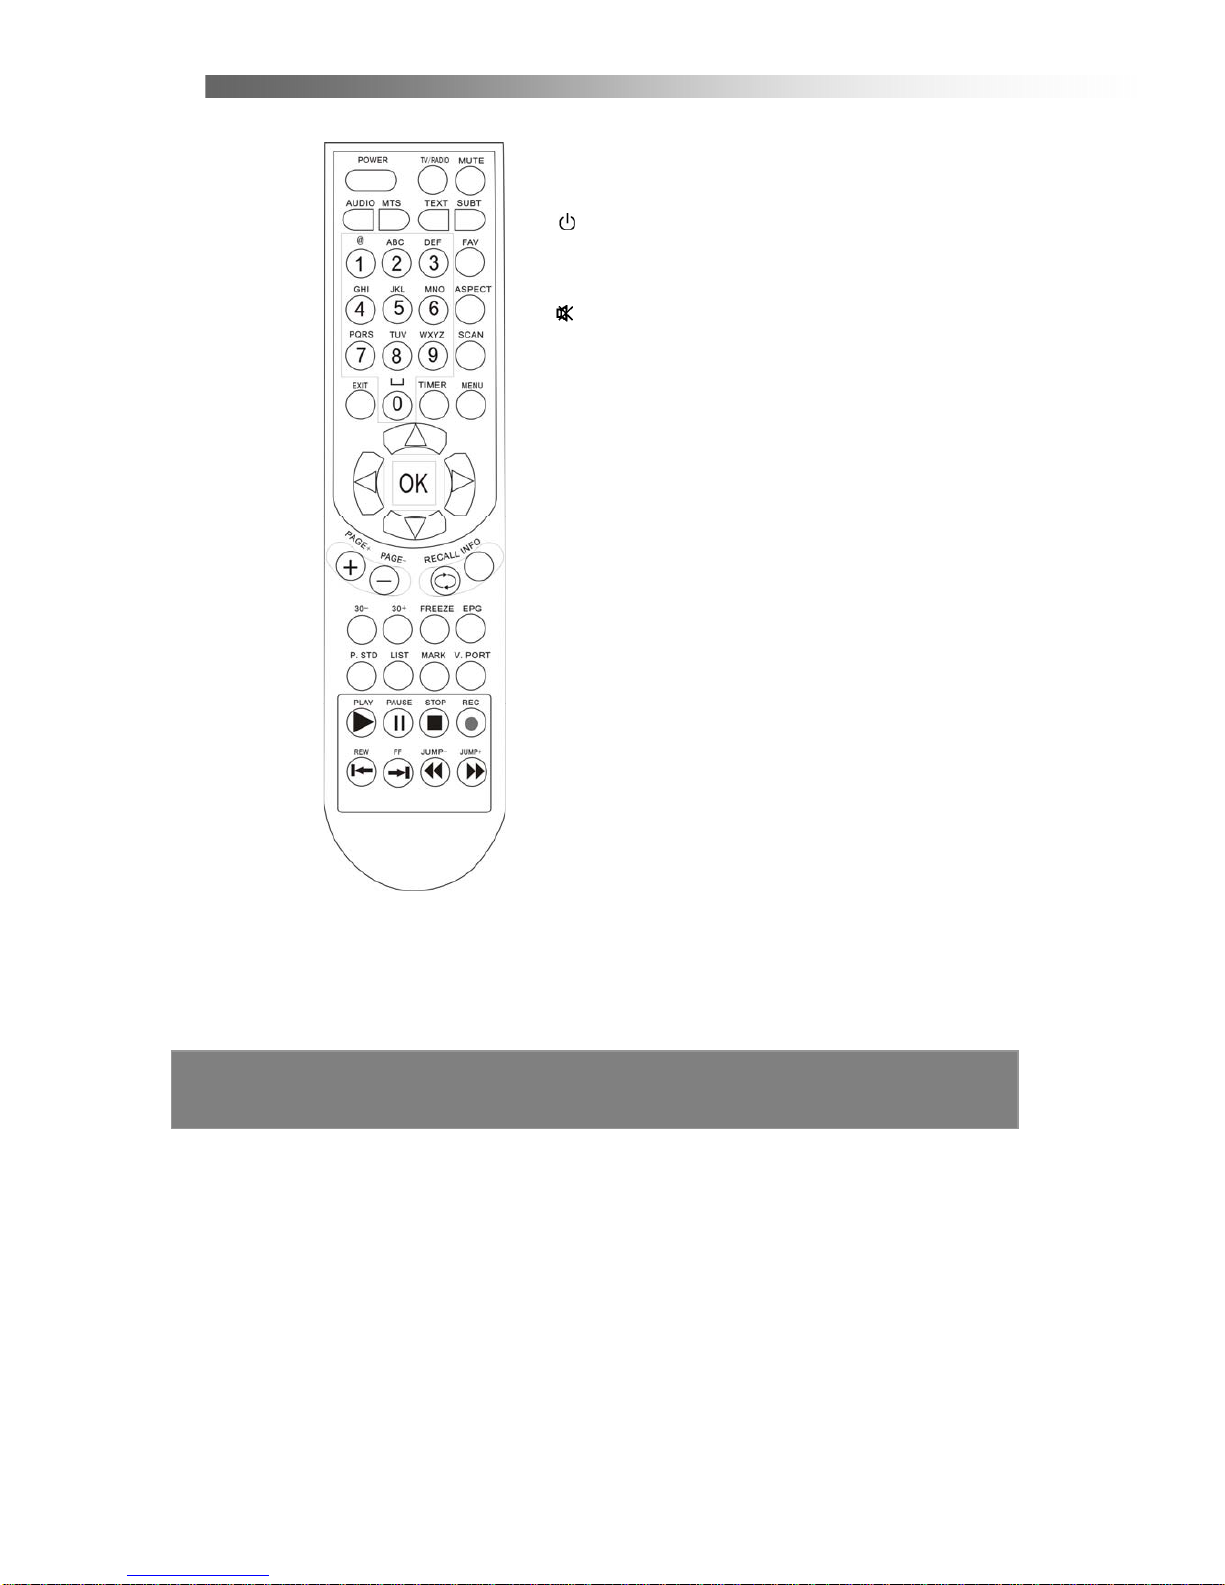
1.4 Remote Control Unit
All features of the STB can be controlled with the
remote control.
1.
POWER:Press to switch between operation
and standby mode.
2. TV/RADIO:Press to switch between TV and RADIO
mode.
3. MUTE:Press to mute the sound.
4. AUDIO:Select the item in the audio mode.
5. MTS:Press to select the item in the sound mode.
6. TEXT:Display the Teletext information.
7. SUBT:Press to directly enter the SUBTITLE mode.
8. NUMERIC KEYS:Press to input Channel Number,
Passwords or Letters.
9. FAV:Press to display Favorite Channel Mode.
10. ASPECT:Press to select 4:3 or 16:9 aspect ratio
mode.
11. SCAN:Press to search program automatically.
12. TIMER:Press to directly enter the TIMER mode.
13. MENU:Press to display the Main Menu.
14. EXIT:Press to return to the previous menu or to
escape from the current mode.
15. Up
▲/ Down▼:Change the channel or move
cursor in the menu.
16. Left
◄/ Right►:Adjust volume or move cursor in
the menu.
17. OK:Press to select the item in the menu or to list
the TV/Radio channels.
18. PAGE +/ PAGE–:Press to page up/down in the
channel list.
19. RECALL:Press to return the previous channel.
20. i:Display the information of the current program.
21. 30-(Red):30sec rewind
22. 30+ (Green):30sec forward
23. FREEZE (Yellow):Stop the video output of the STB.
24. EPG (Blue):Press to display the Electronic Program Guide.
25. P.STD:Press to select the
display mode (1080i/720p/576p).
26. V.PORT:Press to switch between YUV and RGB mode.
Page 8

After Sales Support TEL:1800 189 941 7
ASSEMBLY AND PARTS LIST
1.5 Installing the batteries in the remote control
1. Press down on the retaining catch on the lid of the battery recess on the remote
control and remove the lid.
2. Insert two AAA batteries into the recess.
3. Replace the lid over the recess and gently push down on the lid until it snaps firmly
into leave place.
Caution
1. Keep batteries out of children’s reach.
2. Don’t attempt to recharge, short-circuit, disassemble, heat or throw the batteries
into the fire.
3. Always replace both batteries at the same time. Never mix new and old batteries
or batteries of a different type.
4. If you don’t intend to use the remote controller for an extended period, remove the
batteries to prevent possible leakage and corrosion.
5. Do not drop, apply shock or step on the remote control.
6. Do not spill water on the remote control.
Note: If the STB does not respond when operating the remote control from a
close range, you will need to replace the batteries.
Using the Remote Control
1. To use the remote control, point it towards the front of the PVR.
2. The remote control has a range of up to 7 metres from the set top box at an angle
of up to 60 degrees.
3. The remote control will not operate if its path is blocked.
Note: Sunlight or very bright light will decrease the sensitivity of the remote
control.
Page 9
After Sales Support TEL:1800 189 941 8
ASSEMBLY AND PARTS LIST
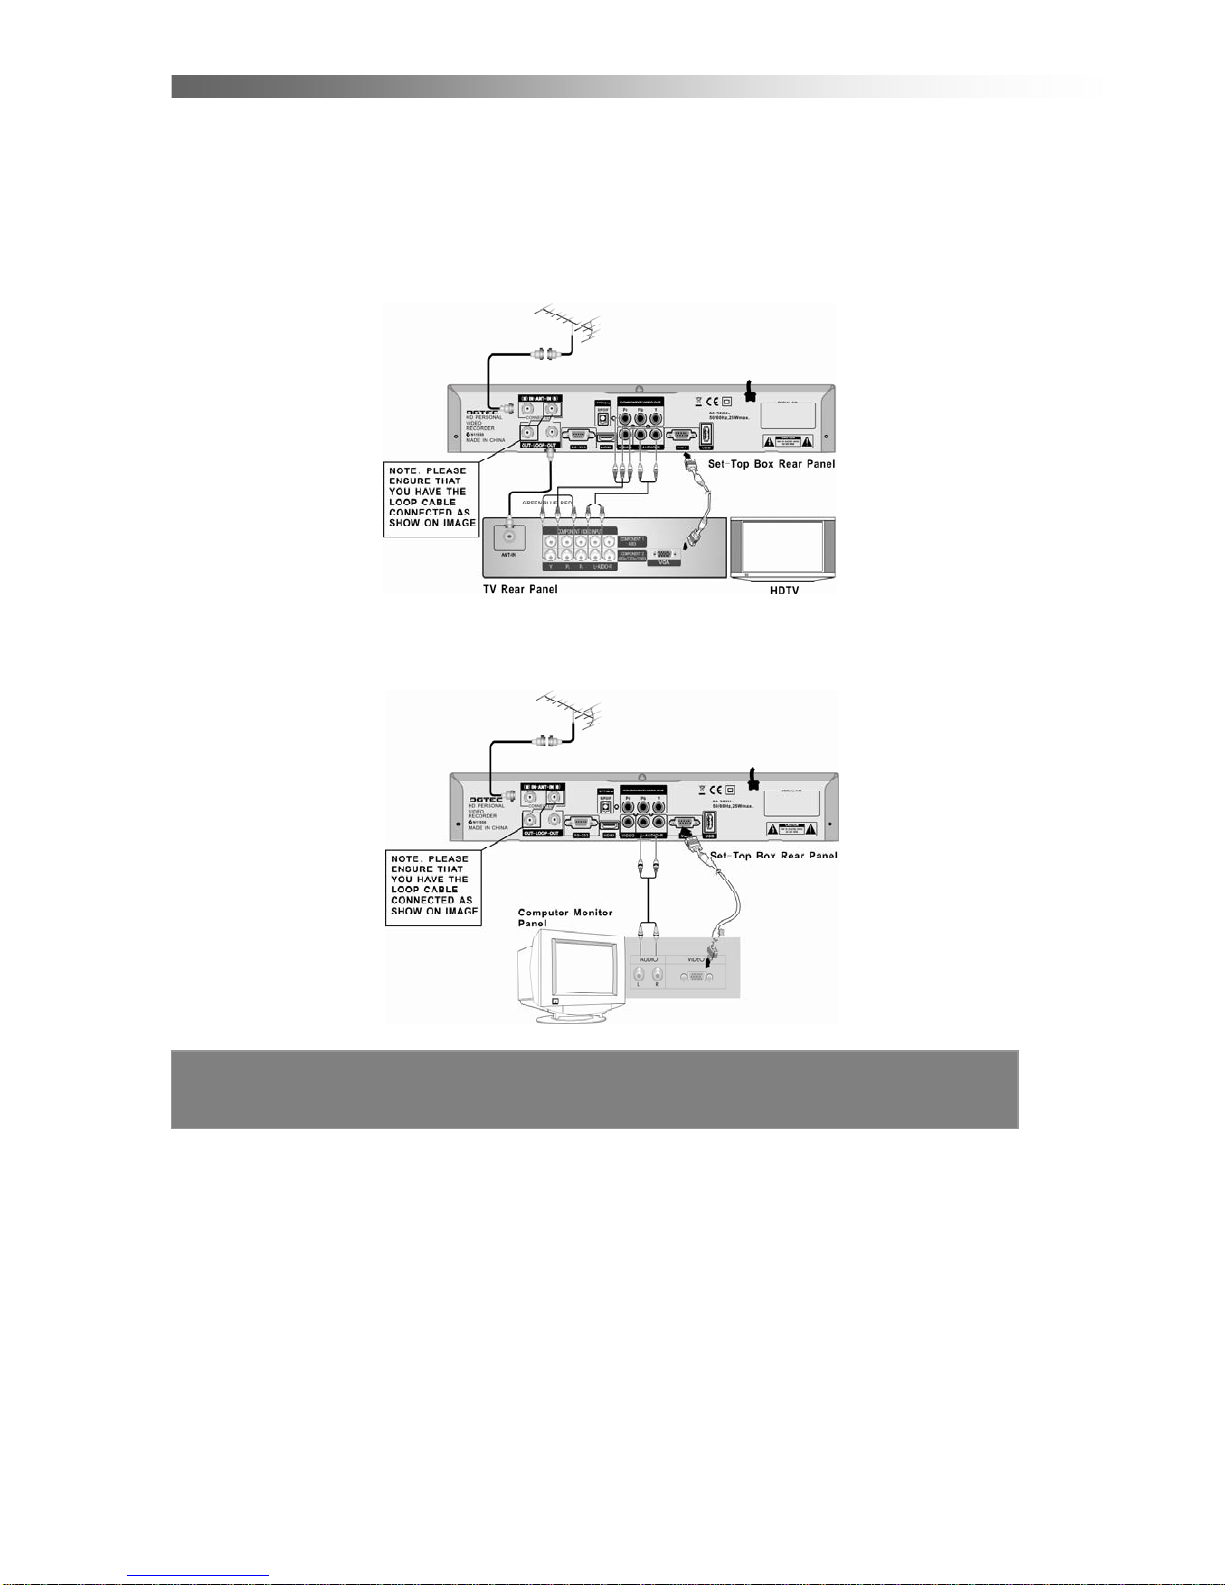
1.6 Connecting to Equipment
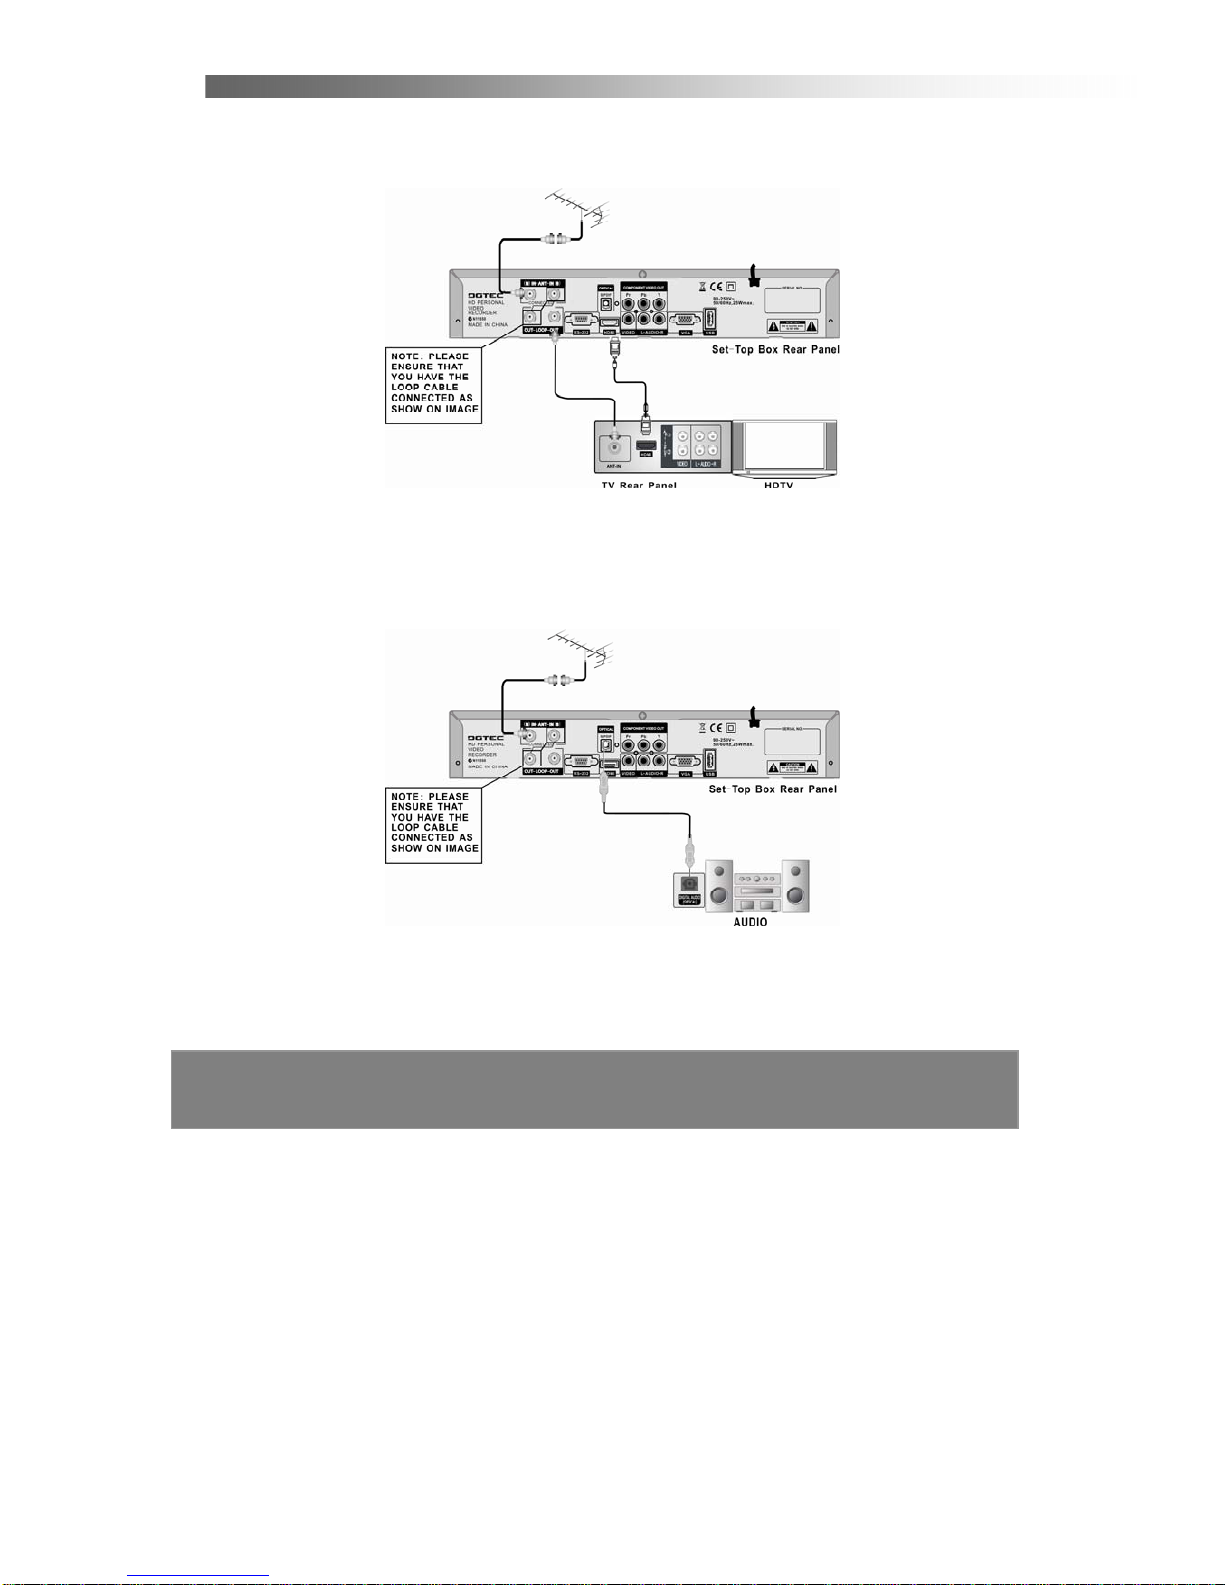
1. Connect your TV antenna cable to the “ANT IN” jack on the back of the PVR using
coaxial RF cable.
YPbPr connection
2. Connect the YPbPr out connectors and AUDIO L/R out connectors on the back of
the PVR STB to the COMPONENT IN on your television using RCA-type cables.
VGA
3. Connect the VGA out connector and AUDIO L/R out connectors on the PVR STB
to the “A/V IN” connectors and VGA on your Computer Monitor using computer
monitor and RCA-type cables.
Page 10
After Sales Support TEL:1800 189 941 9
ASSEMBLY AND PARTS LIST
HDMI
4. Connect the HDMI out connector on the PVR STB to the HDTV and
Audio-Amplifier using HDMI cable.
VIDEO
5. Connect the yellow video lead and AUDIO L/R (red and white lead) out
connectors on the PVR STB to the AV in on the back of the TV. Optional:
Connect Optical S/PDIF out connector on the HDTV STB to the Audio-Amplifier
using optical cable.
Note: Please ensure that your TV is set to the correct inp ut channel depending
on your connection type.
Page 11

After Sales Support TEL:1800 189 941 10
GETTING STARTED
First time installation
Note: Be sure to have the power cord connected to the mains, and the toggle
switch flicked to ON.
After all the connections have been established, switch on your TV. If you are using
the STB for the first time or restored to factory default, a First Time Installation menu
will be displayed to guide you through the scanning of channels.
When finished the scanning, all active channels found will be stored automatically.
(In case you want to stop the scanning, press the EXIT key to exit. The channels
already found will be stored).
Now you are ready to watch digital TV channels and radio broadcasts.
In case you skip the First Time Installation screen, you can press MENU key to bring
up the main menu.
Switching programs
1. Press the NUMERIC keys (0~9) on the remote control to select the channel
number you want.
2. Alternatively Press the ▲/▼ key on the remote control or the front panel to
change the available channels upward/downward.
3. Press the RECALL key to view the previous channel selected.
Volume control
Press the ◄/► key on the remote control or front panel to adjust the volume.
Mute
1. Press the MUTE key to temporarily stop the sound.
2. To cancel mute, press the MUTE key again.
Freezing picture
1. Press FREEZE key to pause current program and the pause icon will appear on
screen.
2. To cancel pause and continue to play, press the FREEZE key again and the
pause icon will disappear.
Page 12

After Sales Support TEL:1800 189 941 11
GETTING STARTED
Change screen aspect
Press ASPECT key to switch screen aspect mode (16:9 full screen, 16:9 Letter box,
4:3 full screen, 4:3 letter box, 4:3 panscan).
Change TV/Radio mode
Press TV/Radio key to change the program list mode between TV and Radio.
View program info
1. Press INFO key to view the detailed information of current program.
2. Press INFO/ EXIT to exit view.
Subtitle
Press SUBT key to switch subtitle on/off.
NOTE: the subtitle depends on the program providers.
Teletext service
1. Press TXT key to open a teletext page (if teletext is transmitted).
2. Press TXT key again or press EXIT key to close the teletext.
EPG (Electric Program Guide)
1. Press EPG key to view the EPG information that are provided by the content
providers.
2. Press EPG key to view the event information such as event name, event time.
3. Press Yellow key to view the detailed information of the current event.
4. Press EXIT key to exit the menu.
Page 13

After Sales Support TEL:1800 189 941 12
GETTING STARTED
Navigation in the main menu
1. Press MENU key to bring up the main menu or return to previous.
2. Press ◄/► key to move left/right to the desired sub menu.
3. Press OK key to enter into the sub menu you select.
4. Press EXIT key to exit the main menu.
The main menu is divided into 7 sections please refer to the menu tree below.
Menu Tree
Timer Settings
System Settings
Channel Manager
Parental Control
File Manager
Installation
PVR Settings
Page 14
After Sales Support TEL:1800 189 941 13
INSTRUCTIONS
2.1 INSTRUCTIONS
< Starting up for the First Time >
1. Turn on your TV and STB.
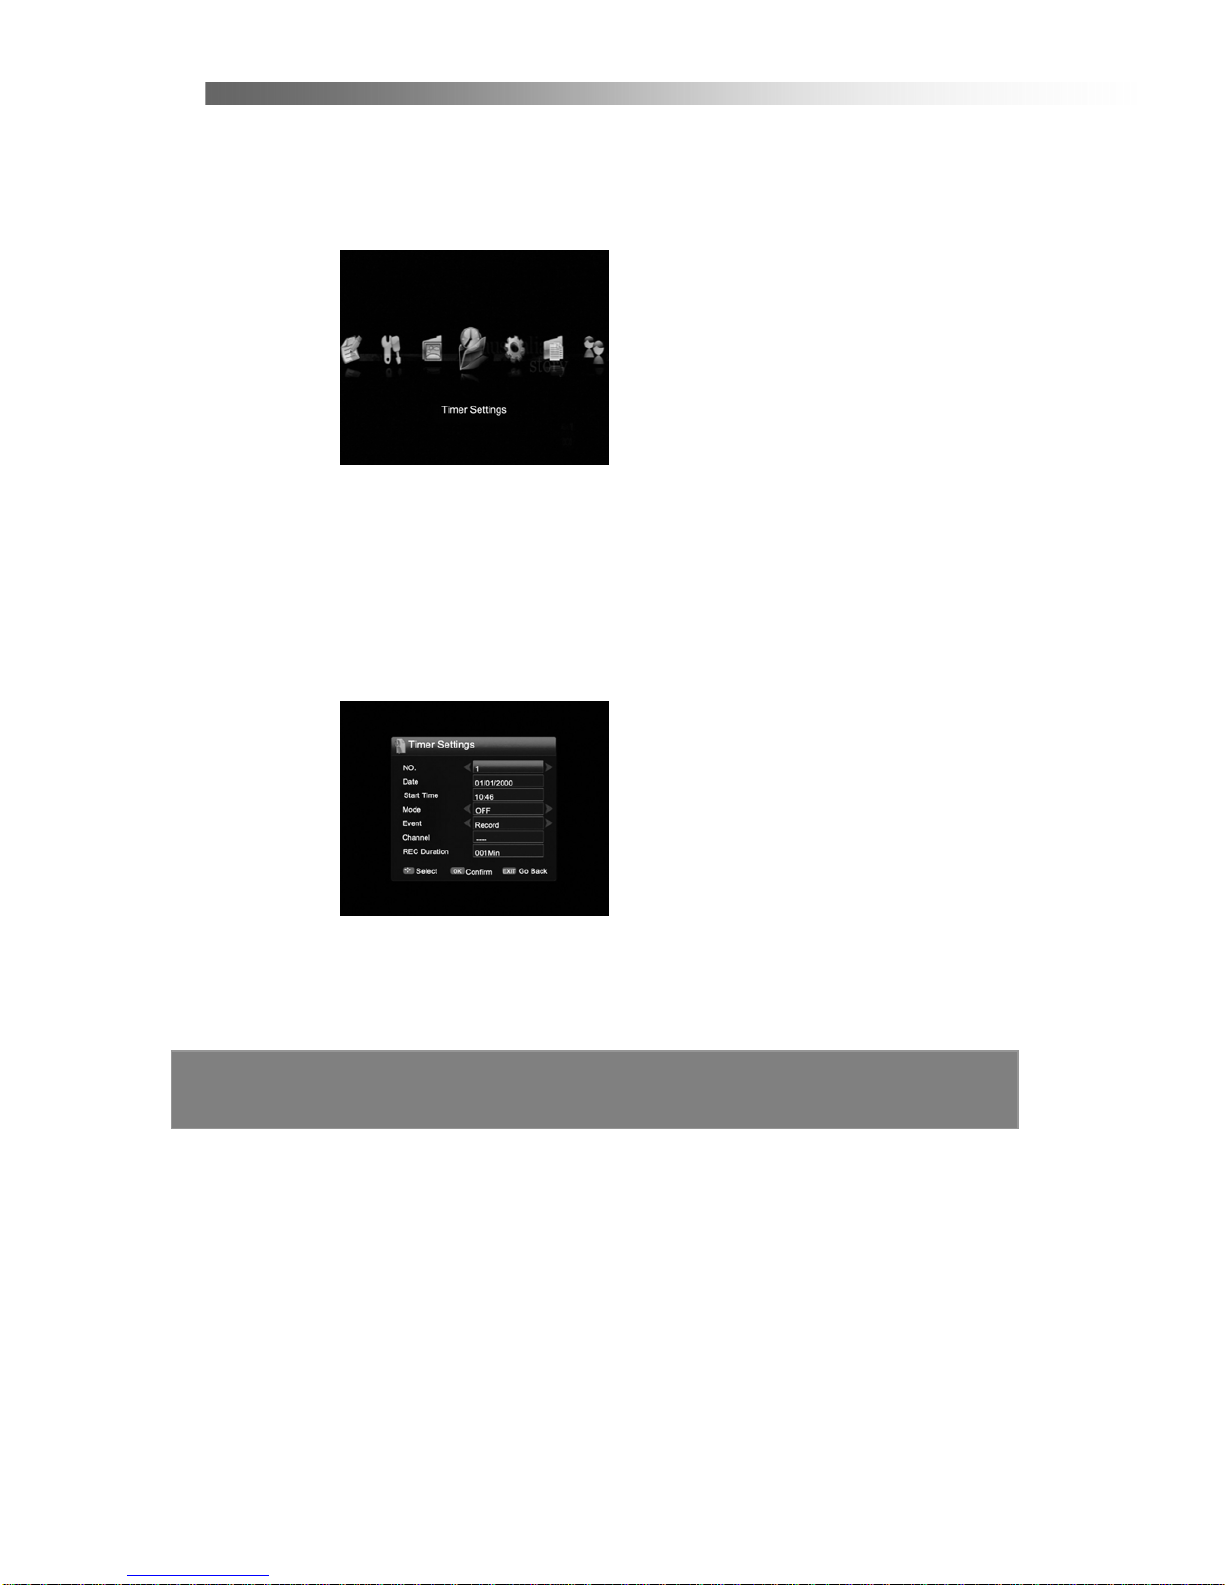
2. If it is the first time using the STB, below is an explanation of the menu settings.
Press the MENU button to bring up the following screen.
< Menu Information >
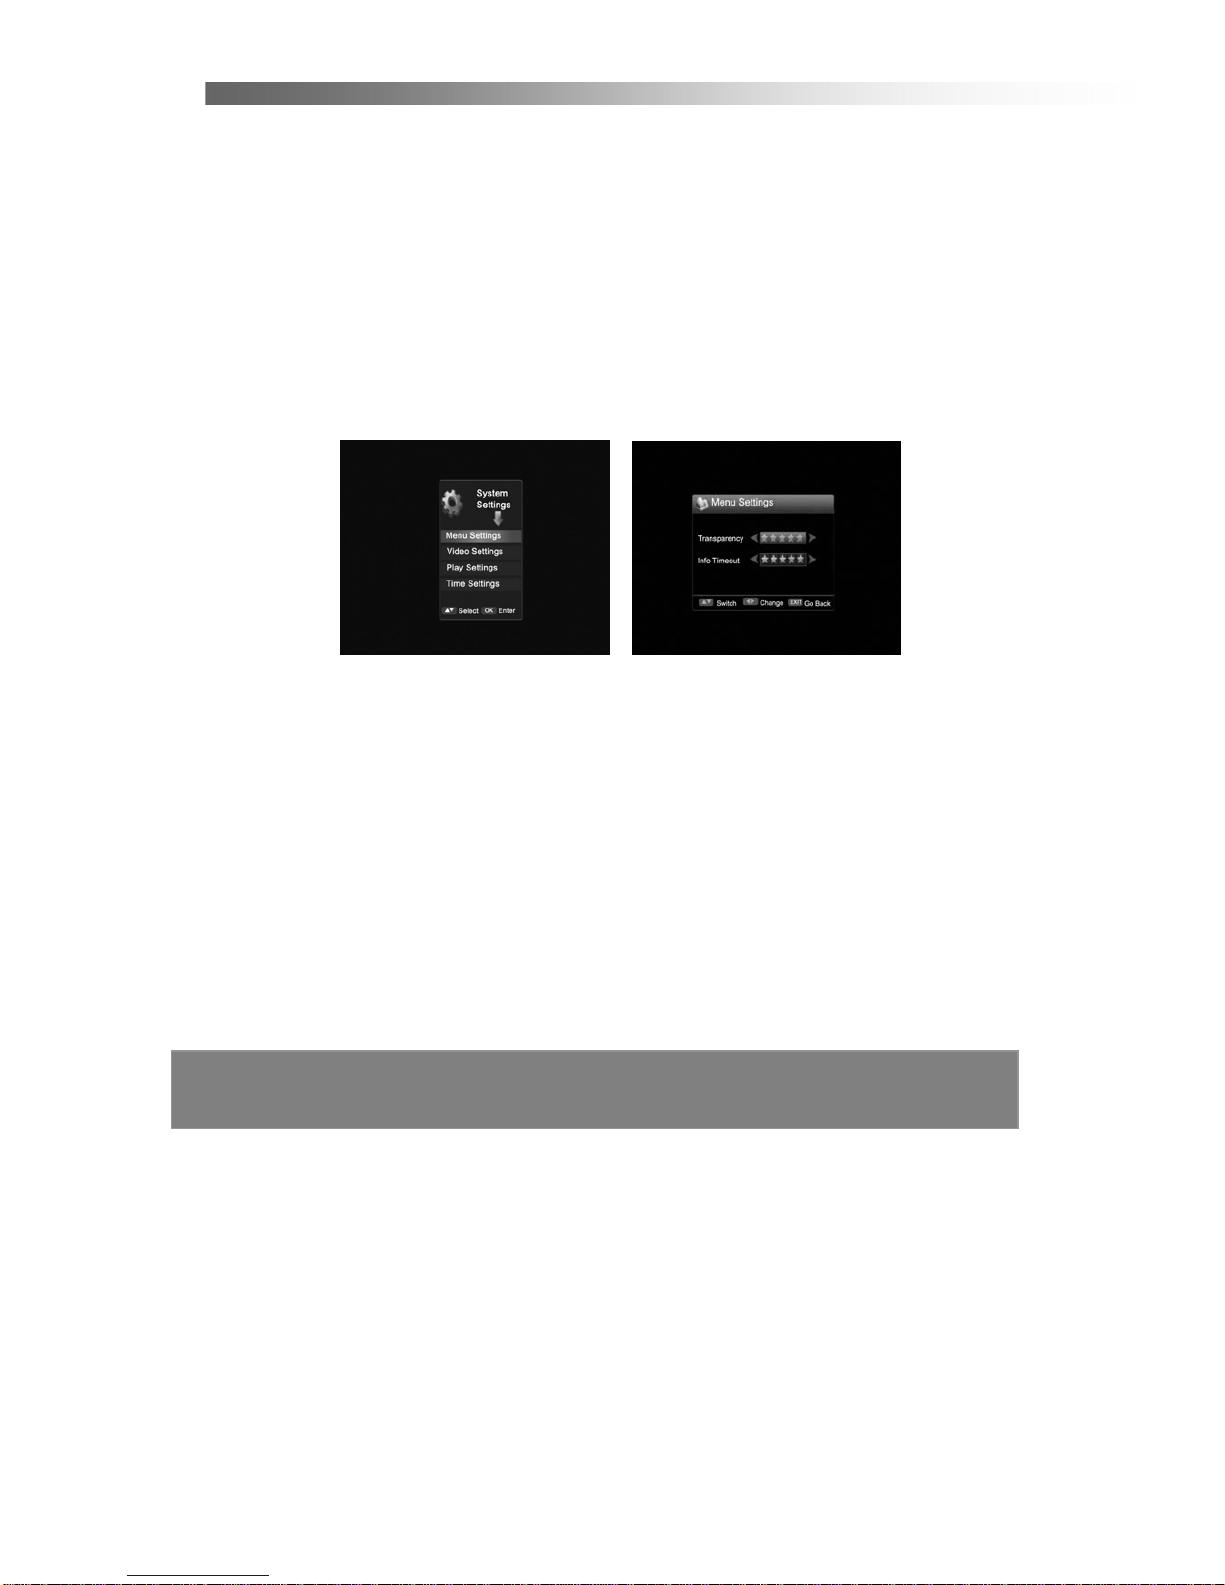
2.2 Timer setting
You can program the STB to perform a certain event at a specified time using the
Timer Settings. Entering Timer Settings will show the following screen.
Use the UP/Down button to select the item, and change the parameters using
Left/Right button.
NO.
You can select up to 25 timer entries.
Date / Start Time
You can set the date and start time of the program you intend to record.
Page 15
After Sales Support TEL:1800 189 941 14
INSTRUCTIONS
Mode
Choose “ON” activates the timer.
Event
You can set the action (Power On/ Record/ LivePlay) that you would like the STB to
perform when the timer is triggered.
Channel
You can select Channel.
REC Duraction
Set the recording length.
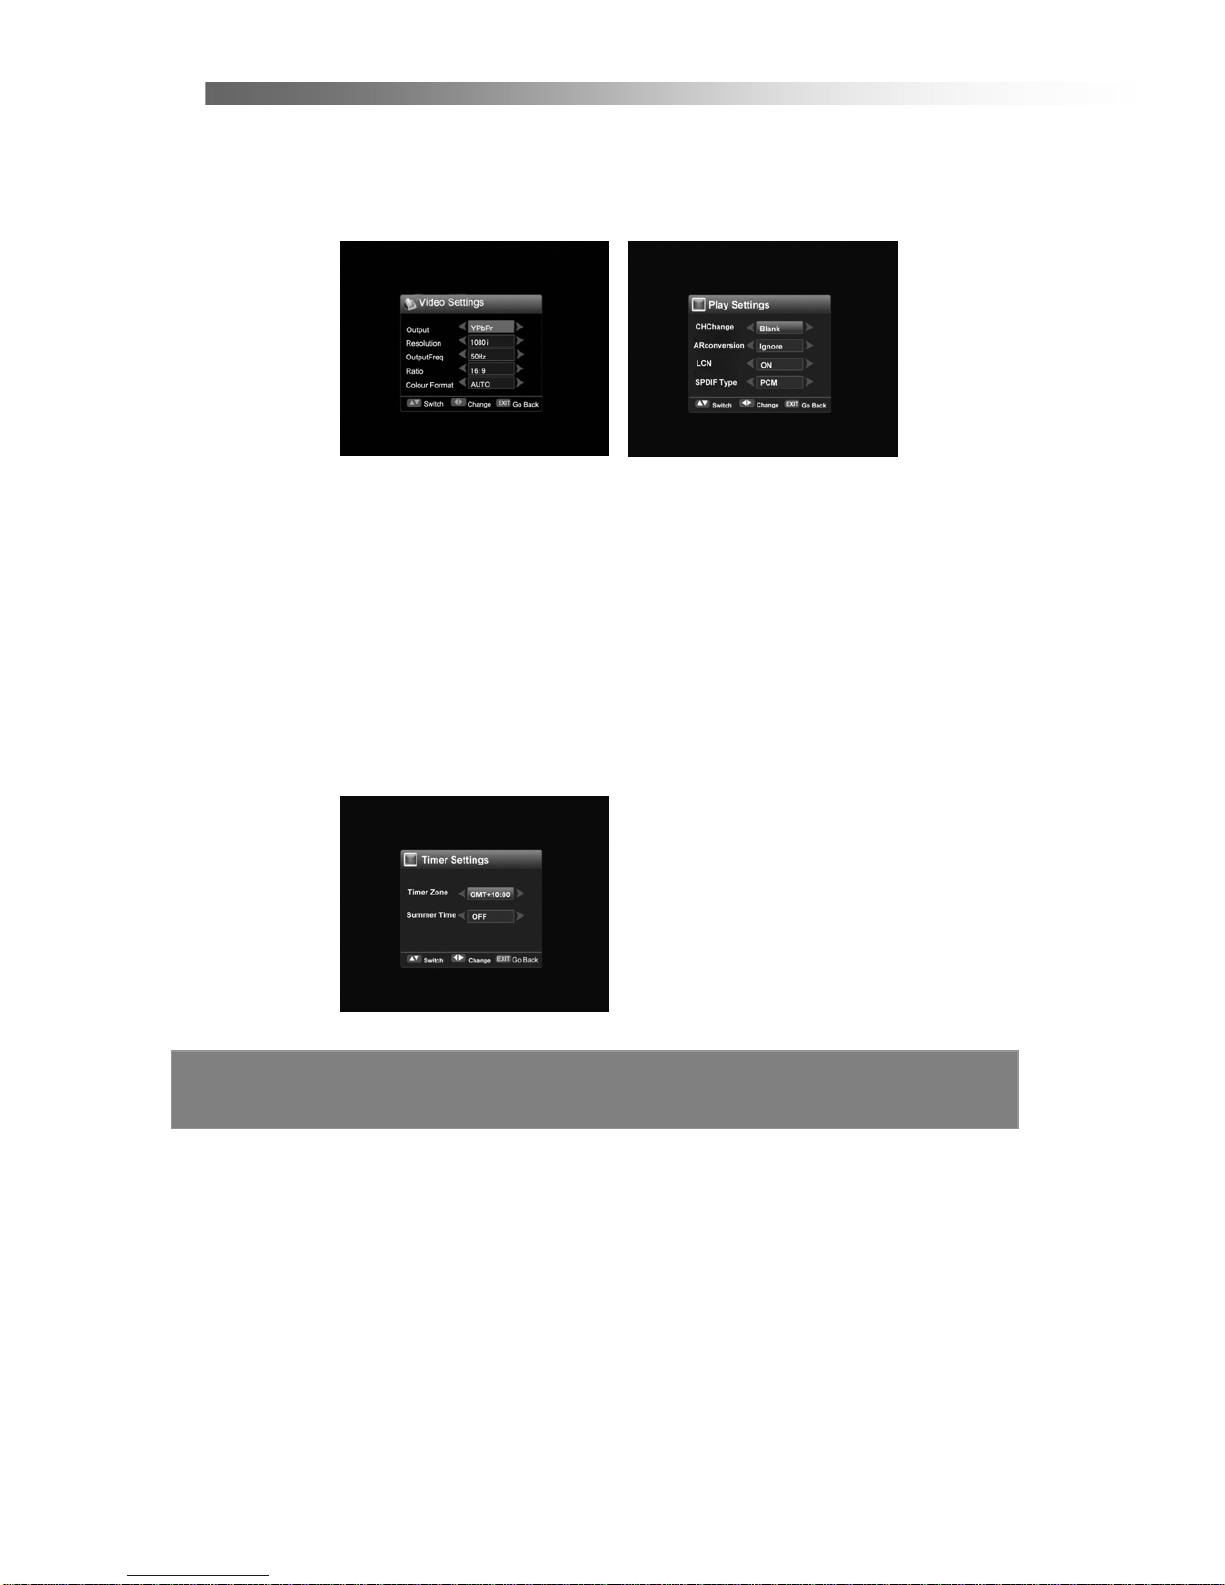
2.3 System Settings
Press the Right button, then press OK button in main menu. The following screen
will appear.
< MENU Setting >
In this menu, you can use the Left/Right button to change the settings, Up/Down to
select the item or press EXIT to cancel.
Transparency
This setting controls the OSD transparency level.
Info Timeout
Select the duration of the visibility when the banner is displayed.
<Video Setting >
Output
You can switch between YPbPr and VGA mode.
Resolution
You can select the
display mode (1080i/720p/576p).
OutputFreq
You can switch freq between 50Hz and 60Hz.
Page 16
After Sales Support TEL:1800 189 941 15
INSTRUCTIONS
Ratio
You can switch aspect ratio between 4:3 and 16:9 Widescreen.
Color Format
You can set Color Format one of Auto, PAL and NTSC. The STB will automatically
convert and output the color mode regardless of the current program’s color system.
< Play Setting >
In this menu, you can use the Left/Right button to change the settings, Up/Down to
select the item or press EXIT to cancel.
Use Left/Right button you can select the mode of screen display when changing
channels (Freeze/Blank).
Use Left/Right button you can select the ARconversion (lgnore/ Pan&Scan
/LetterBox/ Combined).
Use Left/Right button you can select the LCN mode (ON/OFF).
Use Left/Right button you can select the SPDIF type (PCM/AC3).
< Time Setting >
In this menu, you can use the Left/Right button to change the Local Time and the
settings, Up/Down to select the item or press EXIT to cancel.
Page 17

After Sales Support TEL:1800 189 941 16
INSTRUCTIONS
Time Zone: Use Left/Right button you can set the time using GMT in Time Zone
setting.
Summer Time: Use Left/Right button you can select the Summer Time mode to
(ON/OFF).
2.4 Channel Manager
In this menu, you can use the Left/Right button to change the settings, Up/Down to
select the item or press EXIT to cancel. (The default password is 0000.)
Lock: lock a channel or unlock. If Channel lock status is enabled, you must enter
PIN code to view the channel.
Delete: You can delete selected channels. Be aware that the function can.
completely delete the saved channels. When you delete a channel in Edit
Channels, the channel is also deleted from the Favorite List.
Move: You can move a channel position. First press the OK button to pick up the
channel. A check mark will be shown next to the selected channel. Use the
cursor to move to the position you want and press the OK button to drop the
channel.
Alter: Use Alter button to switch between TV and FAV channel lists.
You can create up to 3 lists of your favorite channels. The default favorite list names
are “Fav1 ”,“Fav2 ”,“Fav3 ”.
Move cursor to the required channel with Up/Down buttons, and then press OK
button on the remote controller to add the channel to the current favorites list. One
channel can be selected into more than one favorite list. You can change default
favorite lists by pressing the FAV button.
You may access the favorite list if you press the FAV button while you are watching
TV in Normal State.
Page 18
After Sales Support TEL:1800 189 941 17
INSTRUCTIONS
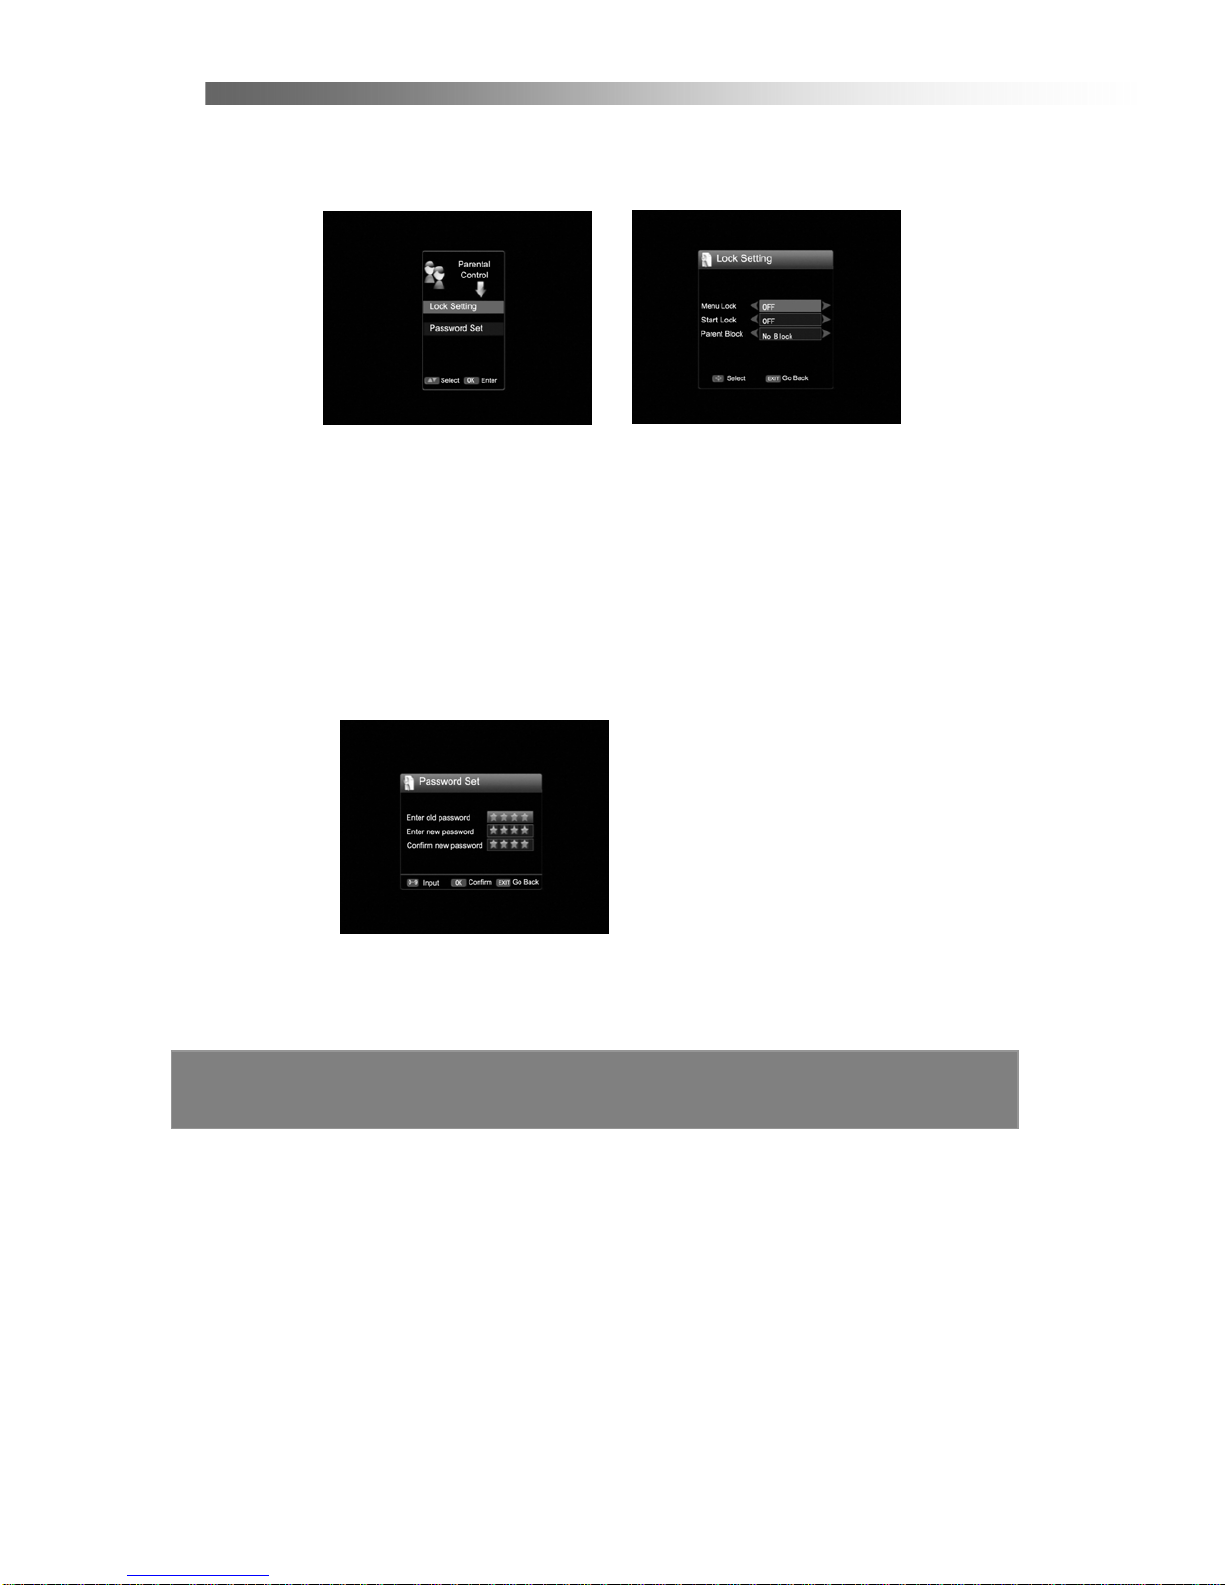
2.5 Parental Control
In this menu, you can use the Left/Right button to change the settings, Up/Down to
select the item or press EXIT to cancel. (The default password is 0000.)
< Lock Setting >
Menu Lock
Setting “Menu Lock” to Open will require you to input a correct PIN code to enter the
main menu.
Start Lock
Setting “Start Lock” to Open will require you to input a correct PIN code to watch
programs that you have locked.
Parent Block
Setting “Parent Block” to Open will require you to input a correct PIN code to watch
programs that you have locked. (No Block, Block ALL, G and Above, etc)
< Password Set > (The default password is 0000)
To change the current PIN code, input the current PIN code then input the new PIN
code you want to use. You must confirm this new PIN code again.
Page 19
After Sales Support TEL:1800 189 941 18
INSTRUCTIONS
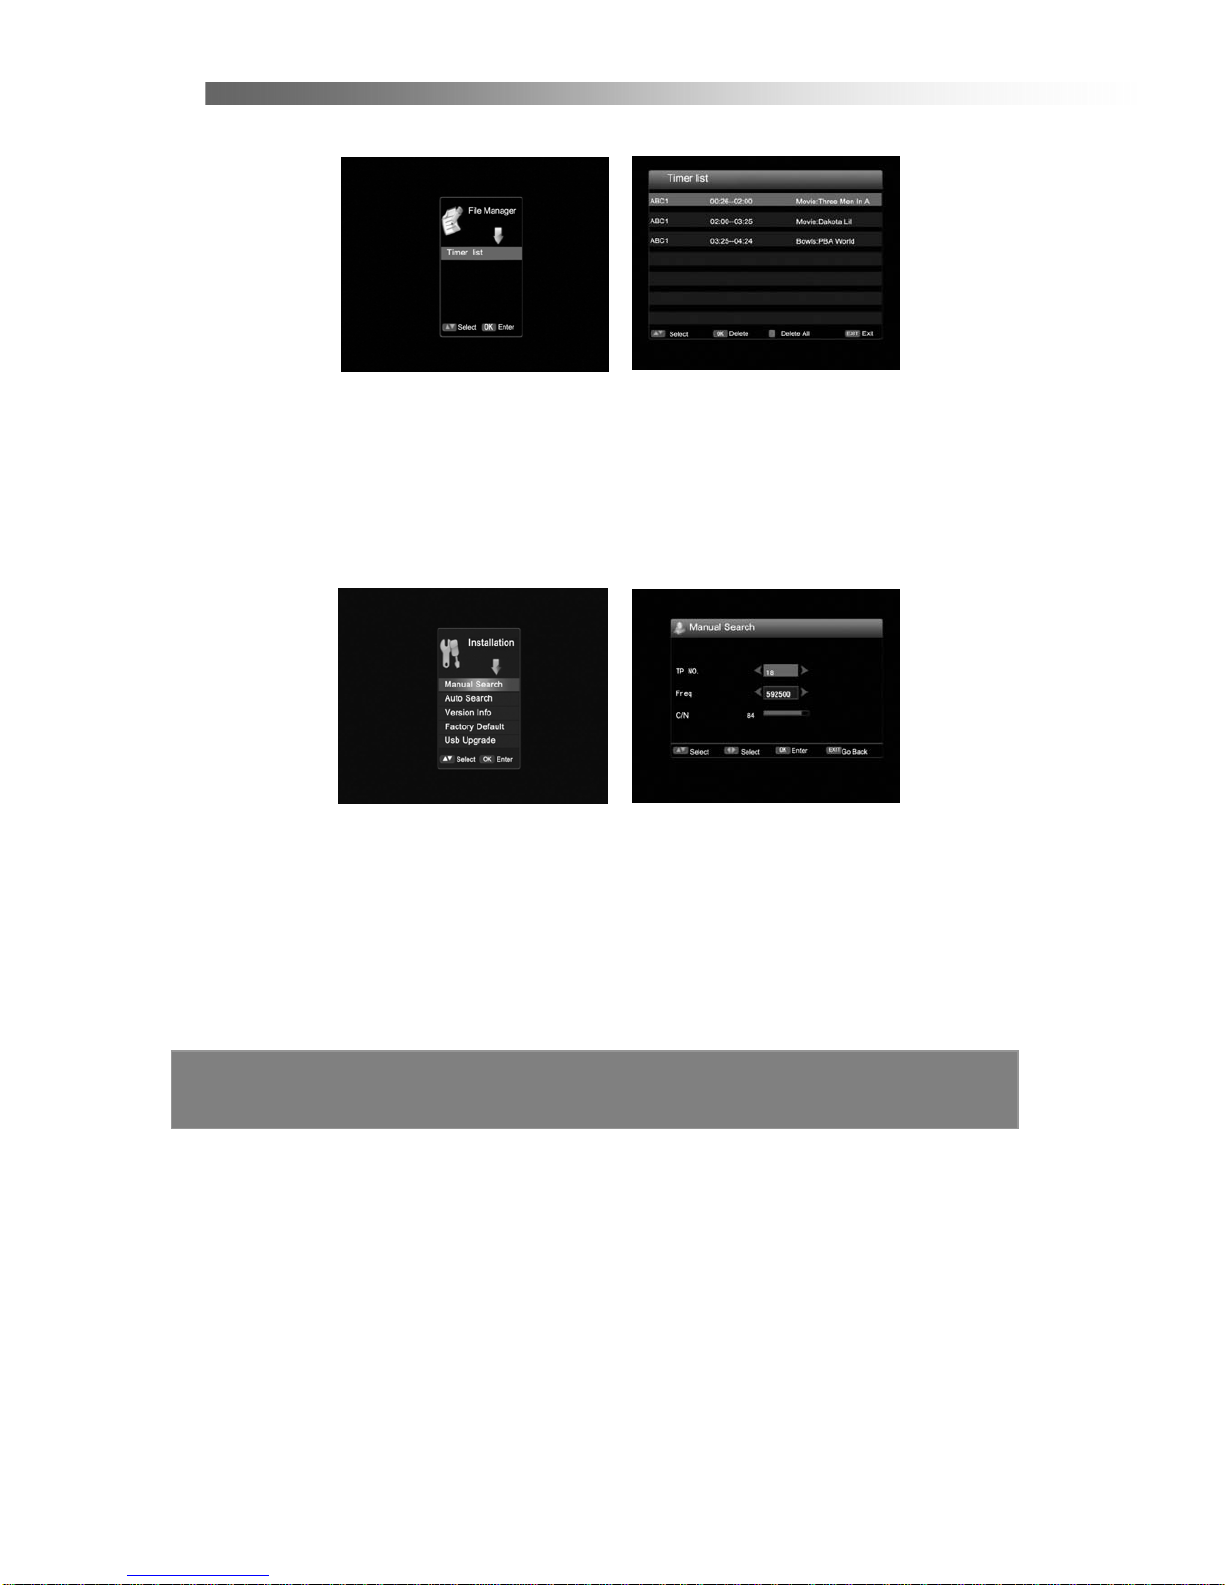
2.6 File Manager
< Timer List >
This is a preview page of the all timer recordings set, using the Timer and EPG.
2.7 Installation
Use Left/Right button to select the Installation Menu, press OK and the following
screen will appear.
< Manual Search >
1. If you press OK in Manual Search of the Installation Menu, the following screen
will appear.
2. Use the Up/Down button to select the item, and change the settings with the
Left/Right and number (0~9) buttons. (used to change input frequency)
3. Once the settings have been entered then press the OK button to scan current
channel or press EXIT button to go back.
Page 20
After Sales Support TEL:1800 189 941 19
INSTRUCTIONS
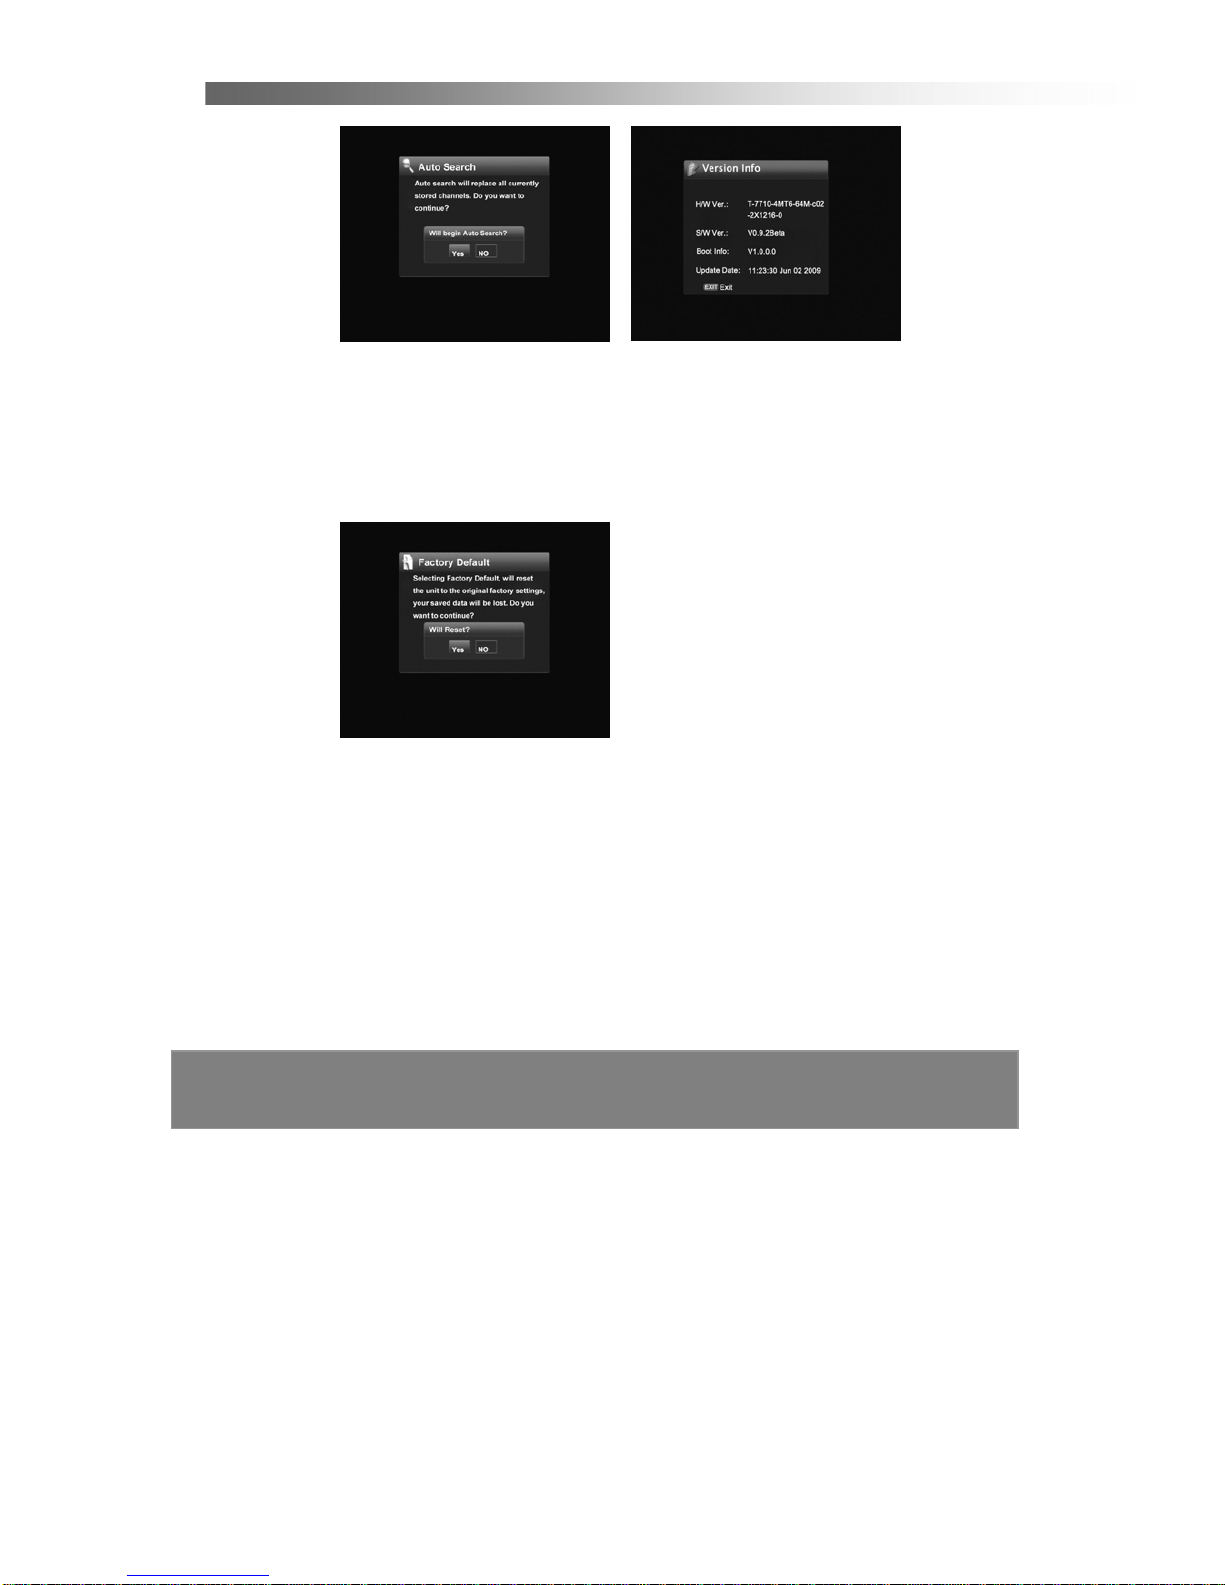
< Auto Search >
If you press OK in Automatic Search of Installation Menu, the STB will scan TV and
RADIO programs automatically. (The default password is 0000)
< Version Info >
Show the hardware and software version.
< Factory Default >
Deletes all the data and settings currently saved and brings the system to the initial
status.
< Usb Upgrade >
An upgrade can be performed using the USB port. (The default password is 0000
only to be advised by DGTEC technician)
2.8 EPG
EPG shows the event information on the current and all channels. The event is
displayed only for the channels that have EPG information. If you press EPG, the
following screen will appear.
Page 21

After Sales Support TEL:1800 189 941 20
INSTRUCTIONS
If you press the OK button on a highlighted channel the channel will appear on
screen. Press the UP/DOWN button to select channel. Press the LEFT/RIGHT
button to view EPG of a particular channel on a daily basis. Press the Blue button to
alter to the program window. If you press the Green button,the highlighted program
will be saved for recording. Press FAV button to go to the Timer List interface to
view stored timer recording scheme. Pressing the Yellow button will access an
information page on the highlighted program. Press the EXIT button to close the
EPG menu.
2.9 TeleText
If you have selected a channel that contains teletext data, you can press TEXT
button to open the OSD Teletext (available on ch7)
< TV/Radio and Favorite List in Simple Mode >
If you press OK on the remote controller at normal state, the channel list is displayed.
You can switch between TV and Radio list by pressing TV/RAD button.
You can select one item from favorite list by pressing FAV button.
You can fast preview the channel by pressing the Up/Down button.
Page 22
After Sales Support TEL:1800 189 941 21
PVR FUNCTION
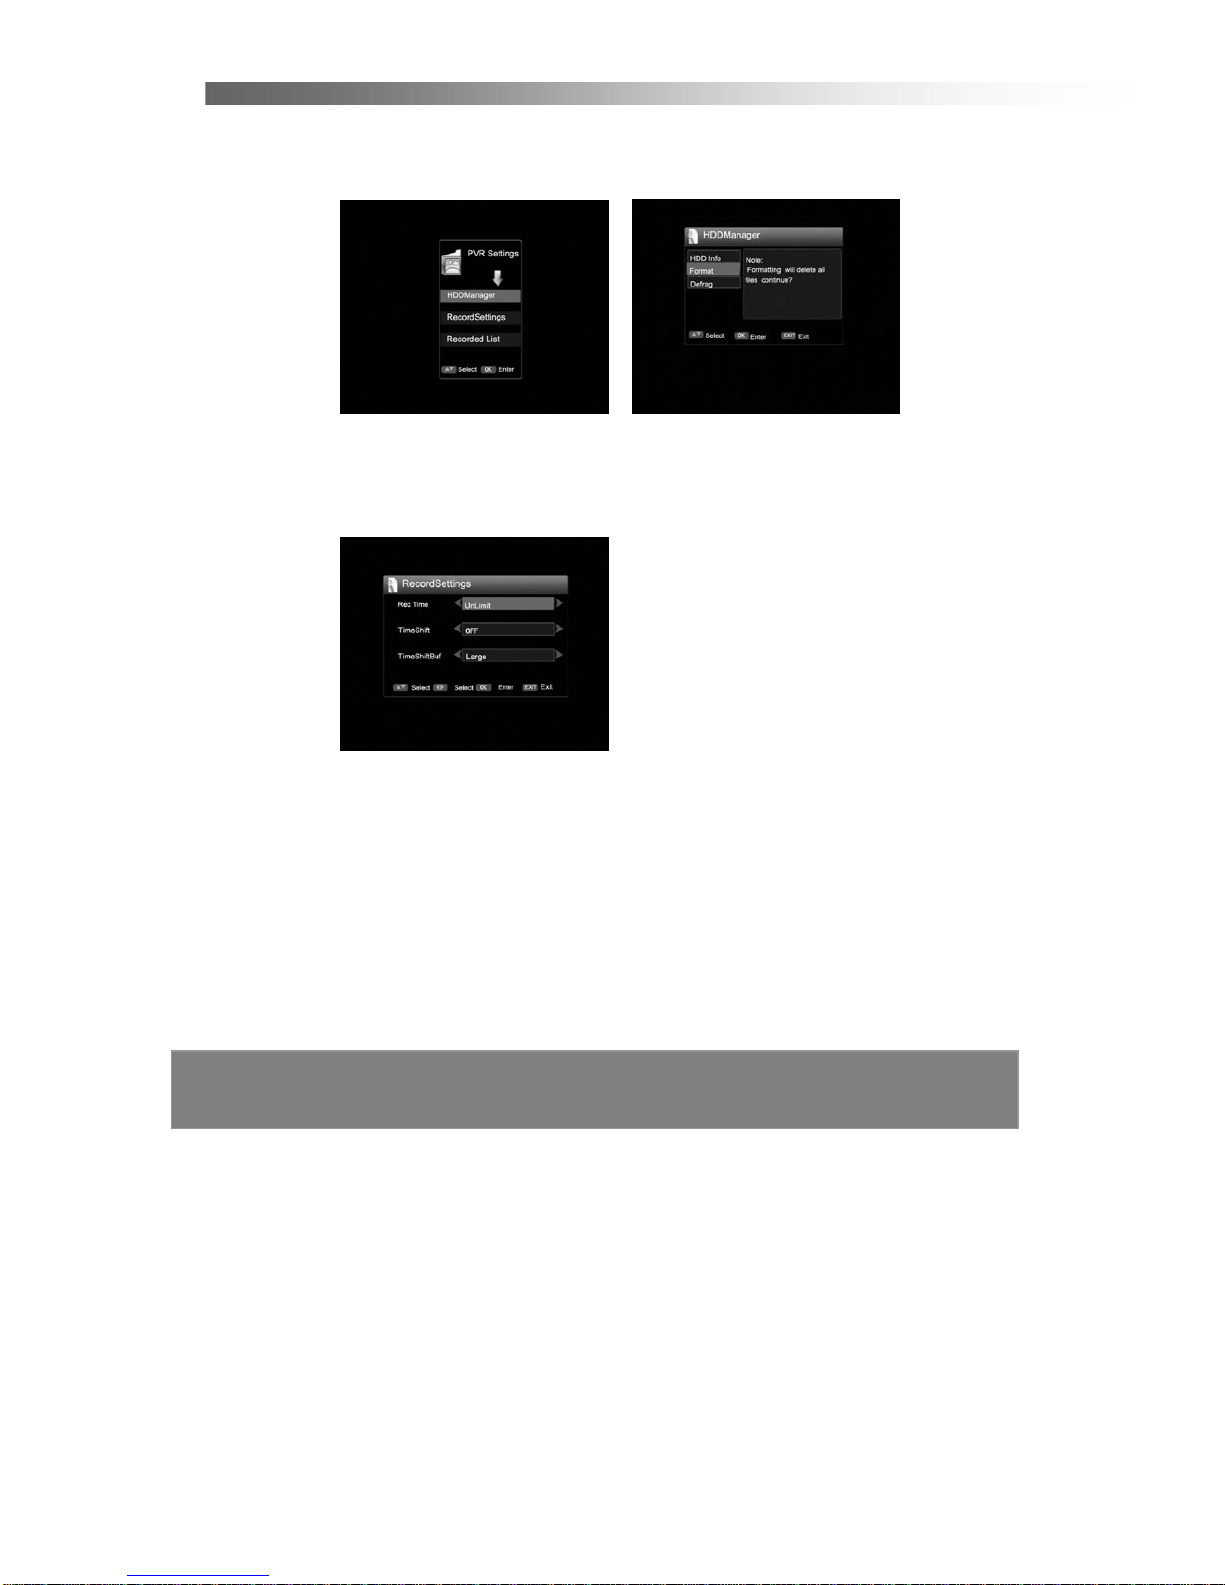
3.1 PVR Settings
In this menu, you can use the Left/Right button to change the settings, Up/Down to
select the item or press EXIT to cancel.
HDD Manager
HDD Info: Looks at the Disk Space, Free Space, Free Rate information.
Format: Reformats the HDD.
Defrag: Compresses the HDD to obtain unused Hard drive space.
Record Settings
Rec Time: Set up the recording time. UnLimit,30min, 60min,90min,120min.
Time Shift: Activates Time Shift.
Time ShiftBuf: Sets up the time shift buffer length.
Page 23
After Sales Support TEL:1800 189 941 22
PVR FUNCTION
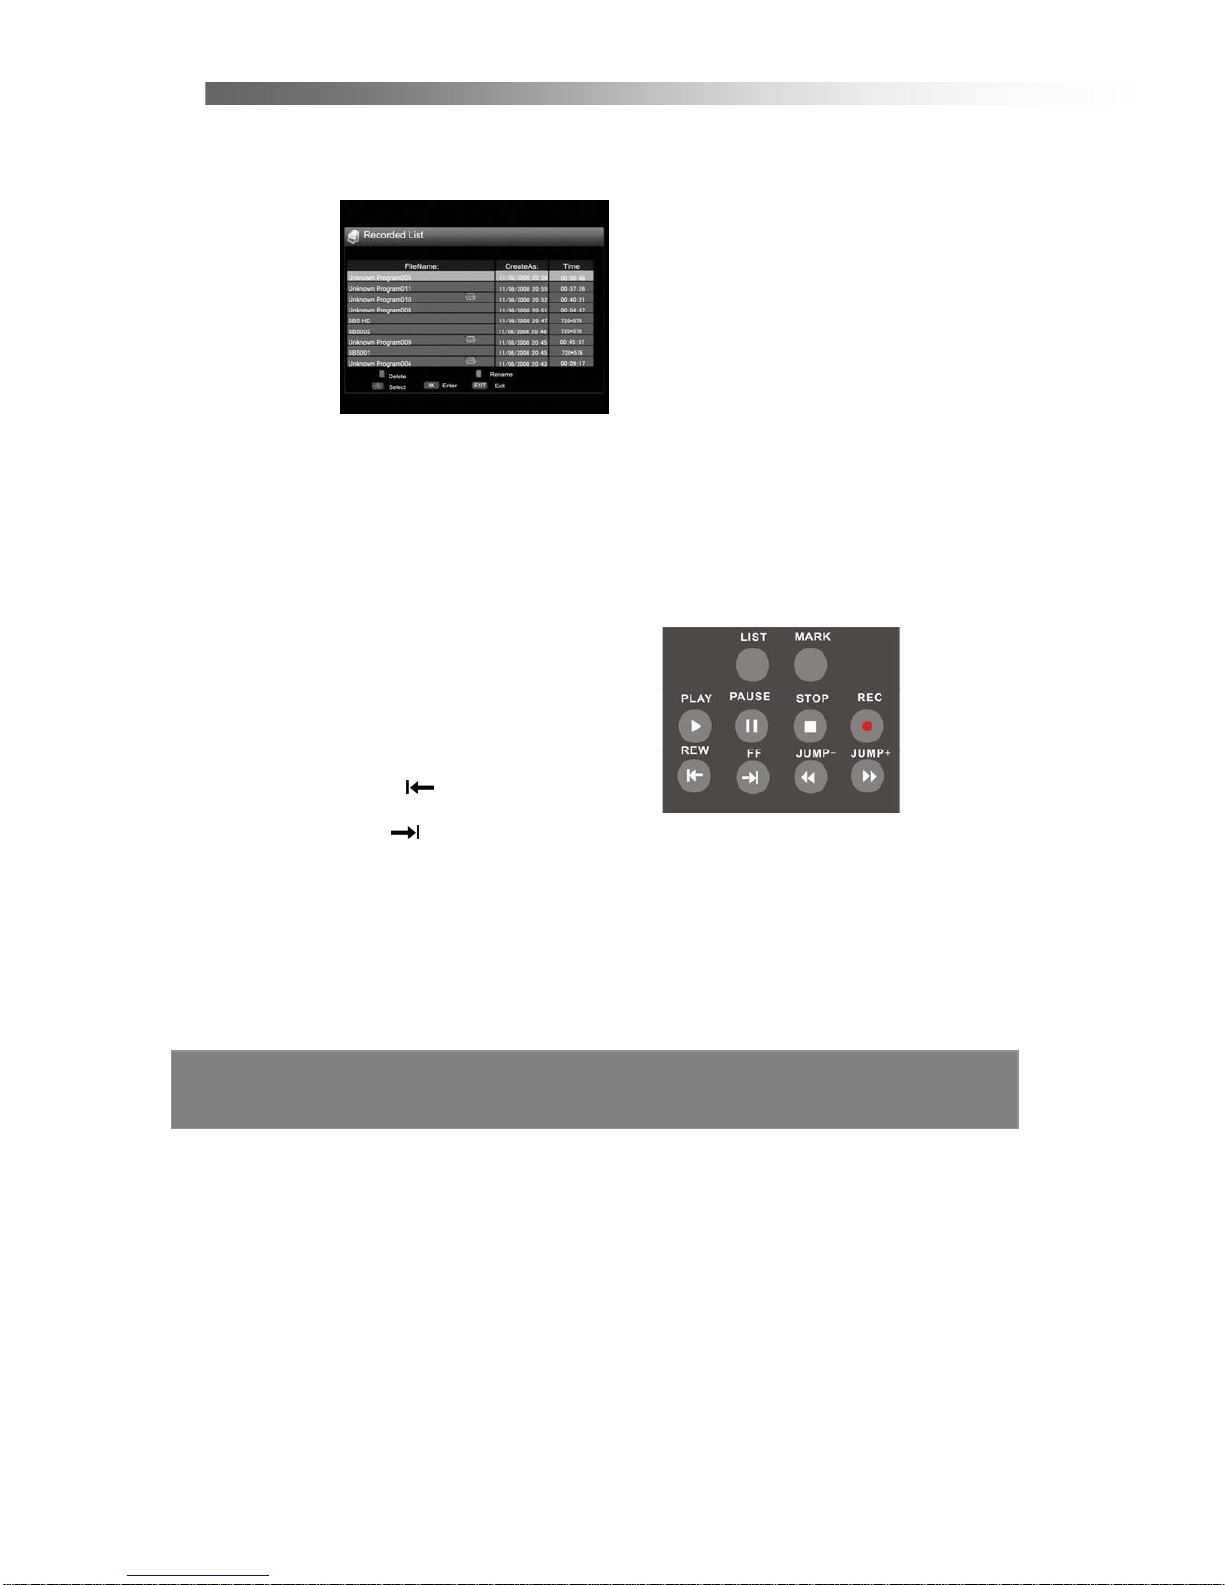
Record List
If you press “List” at normal state, the PVR list is displayed. You can play back
recordings or edit them.
PVR Remote Control Buttons
27. LIST
Press to directly enter the PVR list of all recordings made.
28. MARK
Make marks when you want to watch the part of a recorded program.
29. PLAY
►
Press to play a selected recorded program.
30. PAUSE ▍▍
Press to pause playing or recording program.
31. STOP ■
Press to stop playing or recording program.
32. REC ●
Press to record the current program.
33. REW
X2, X4, X8, X16 Fast Rewind.
34. FF
X2, X4, X8, X16 Fast Forward.
35. JUMP–
◄◄
Skip Fast Rewind
36. JUMP +
►►
Skip Fast Forward
Page 24
After Sales Support TEL:1800 189 941 23
PVR FUNCTION
< Recording Function >
Button Description
● Start recording
■ Stop recording
< Playback Function >
Button Description
►
Start playback at the beginning of the current record session or return
normal playback speed from fast forward or pause
◄◄ Rewind the recording at a special interval
►► Fast forward the recording at a special interval
X2, X4, X8, X16 Fast Rewind
X2, X4, X8, X16 Fast Forward
▍▍ Pause the playback
■ Stop the playback
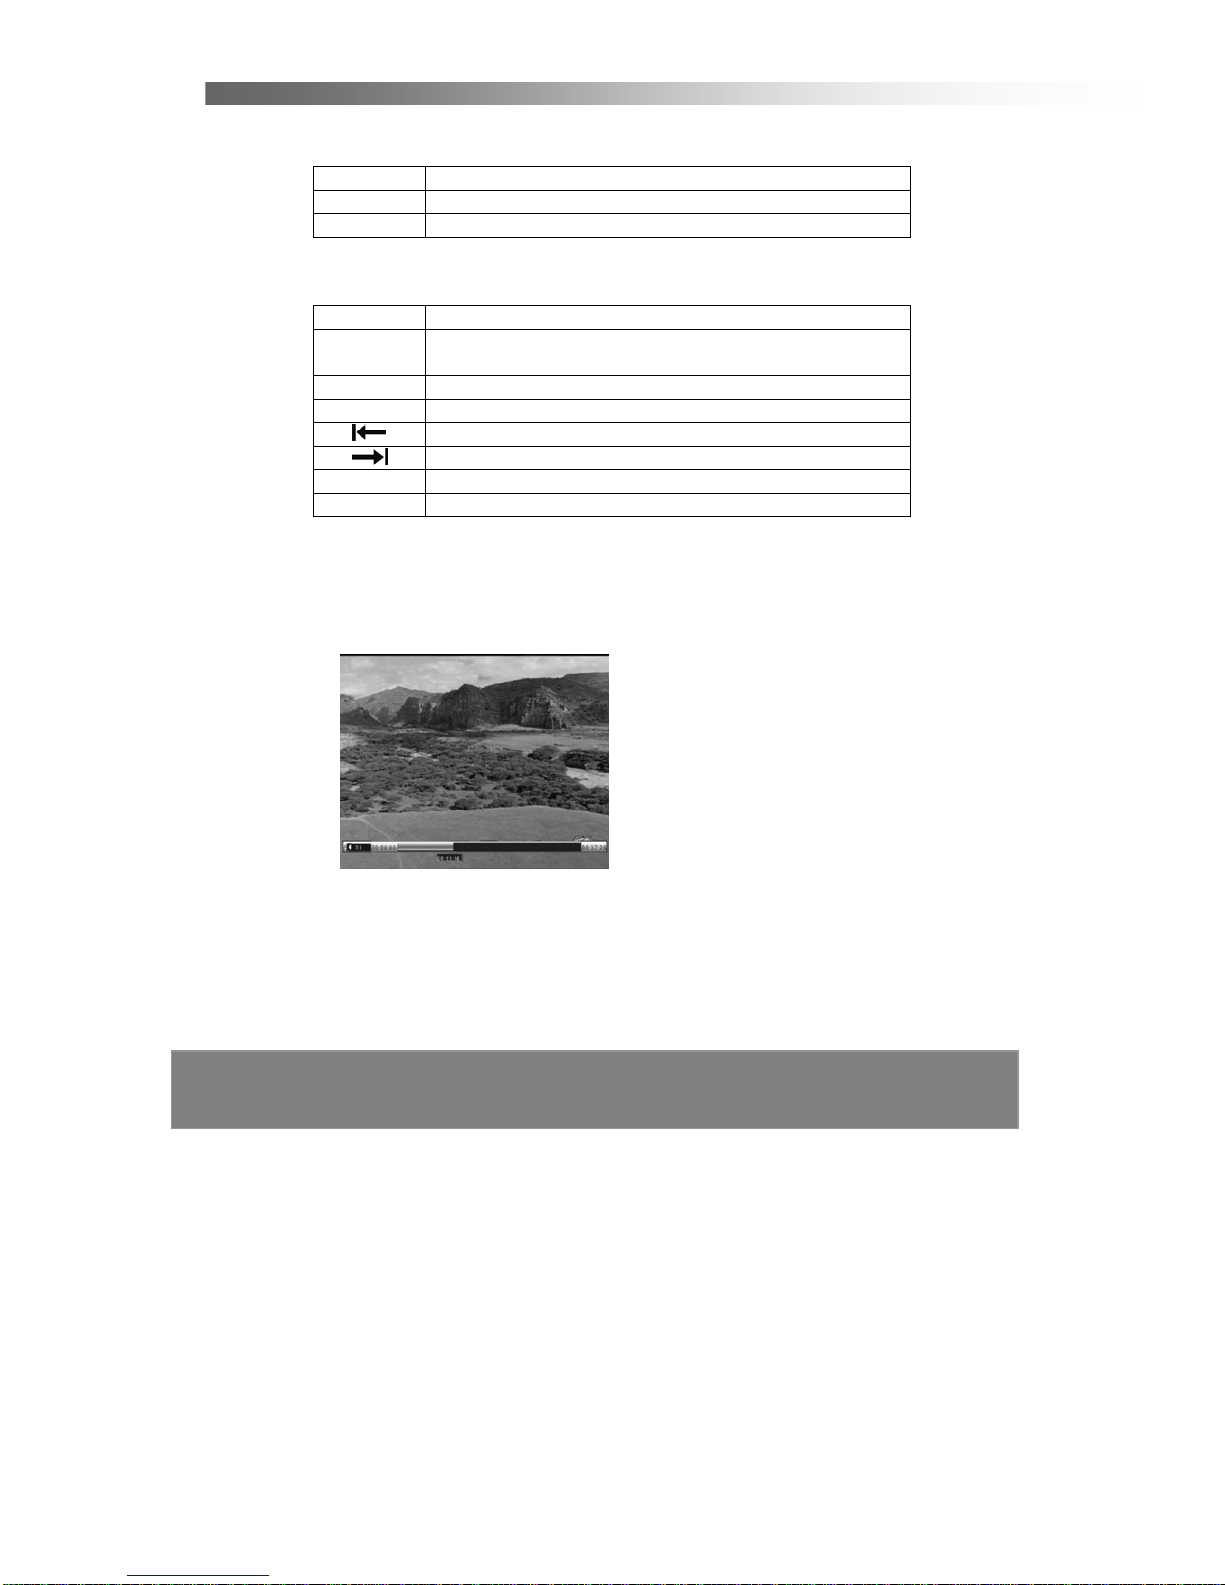
< Play back Recordings Mode >
In this menu, you can use the Left/Right or Up/Down buttons to select a program,
press OK to play the program, and press EXIT to cancel.
Please Note:
The Remote Control Unit and STB may be slightly different to what is described.
So this manual may be different in some ways.
Page 25

After Sales Support TEL:1800 189 941 24
FAQ
4.1 FAQ
What is a HD STB?
A HDTV STB is a device that receives and decodes high definition TV signals.
A HD STB is generally connected to televisions that are HD ready.
Can I connect my HD STB to a CRT television?
Yes this HD STB can be connected to a CRT television, as long as it supports
the appropriate connections. Picture quality will vary compared to HD ready
TV’s, however accessing the additional HD stations is still applicable.
What are the added benefits of a HD STB?
The added benefits of a HD STB include:
. Sharper Pictures
. Clearer Sound
. Widescreen viewing
. Extra Channels
Do I require an antenna in association with this STB?
Yes a professionally installed antenna is recommended.
What aspect ratio does high definition come in?
A high definition signal is transmitted in a 16:9 aspect ratio. 16:9 is also known
as widescreen.
Page 26

After Sales Support TEL:1800 189 941 25
TROUBLE SHOOTING
5.1 Trouble Shooting
Check the STB according to the procedures detailed below.
If the STB does not work properly after conducting Problem Solving Protocols,
please contact the technical department. This unit contains dangerous voltages,
never remove the cover.
When not in use for a long period, it is recommended that you unplug the unit from
the main power socket.
Problem Solution
No Power
Check the power cord for defects.
Check mains power switch is on.
Press power button on RCU.
Check toggle switch on back of unit is on.
No Reception
Check the Signal Strength Indictor and check
the antenna cable and that the antenna has
been inserted correctly.
No Sound
Volume may be set to low or audio muted.
Check the audio cable connection.
No Video
Change video output port or video display type.
Check the video cable connection.
The remote control is in operation,
but the STB is not responding
Check the batteries.
Check the battery contact.
No Channels in the Channel List Please rescan channels.
Page 27
After Sales Support TEL:1800 189 941 26
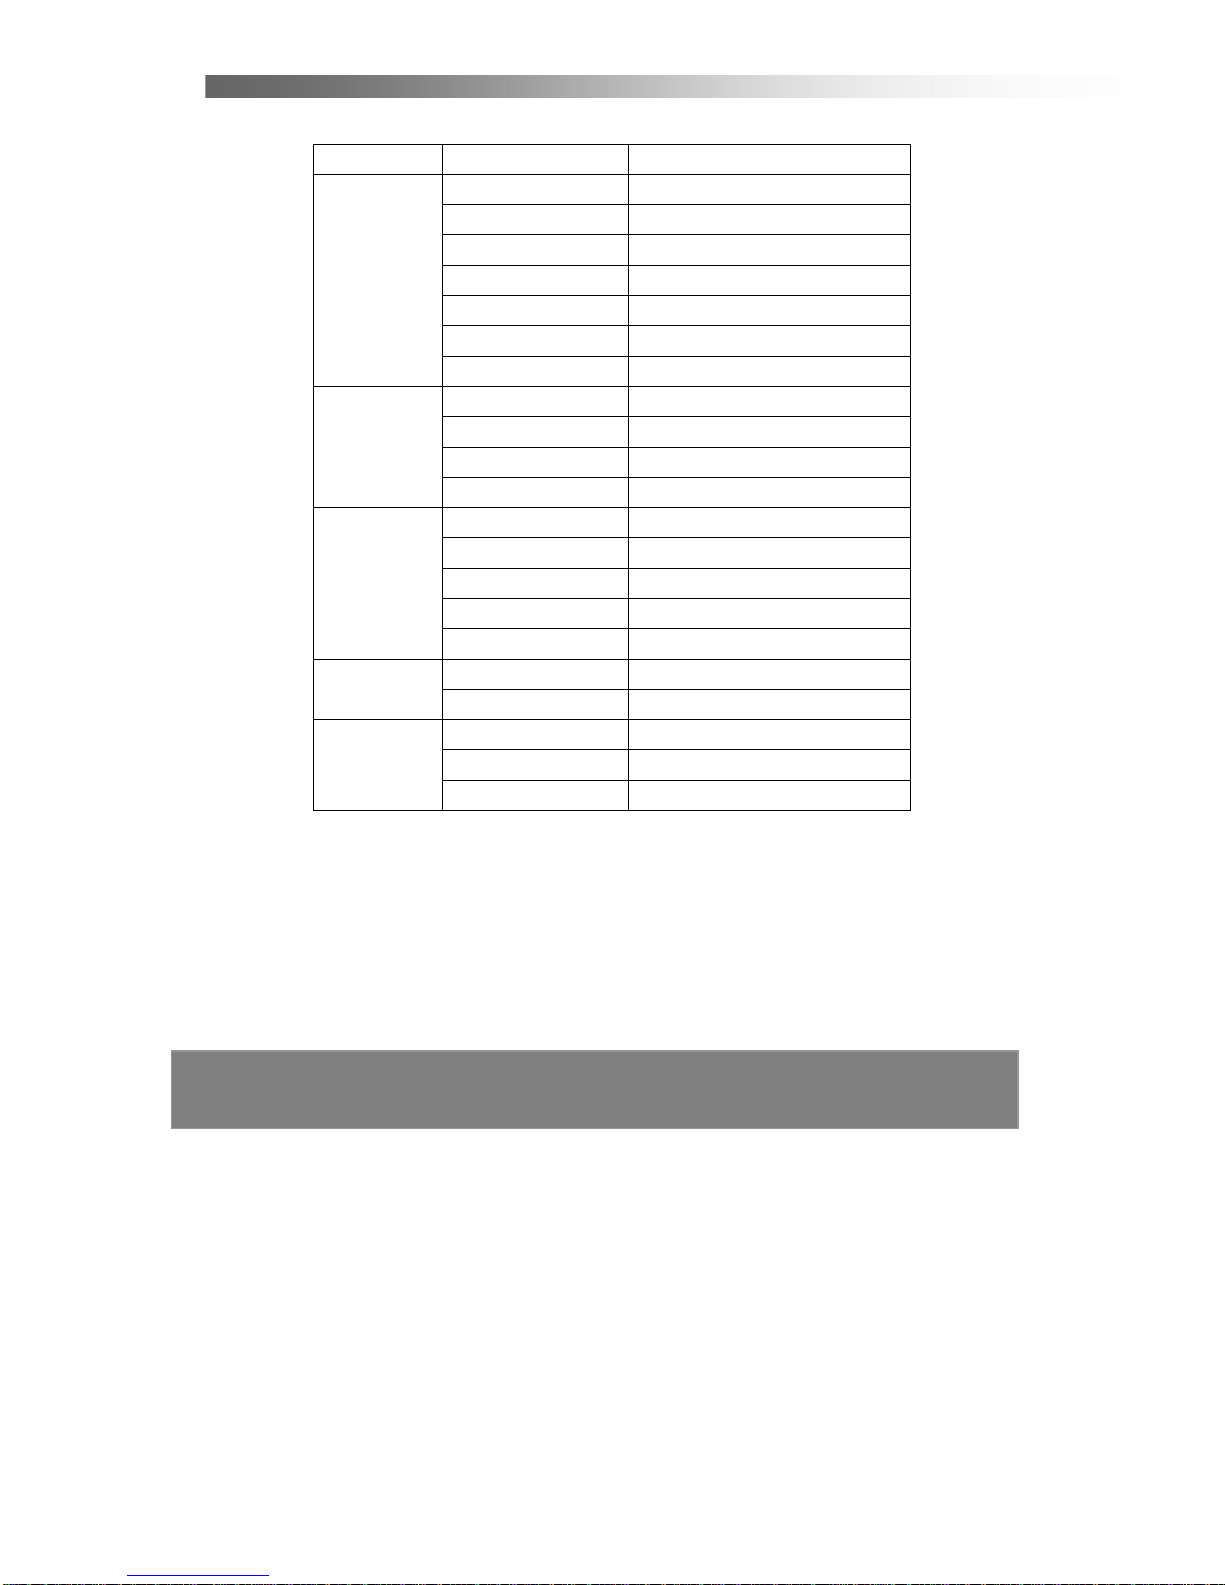
SPECIFICATION
5.2 Specification
Section Detailed Section Explanation
Input Frequency 49 ~ 861MHz UHF& VHF
Input Impedance 75 Ohm
Channel Bandwidth 6M, 7M & 8MHz
OFDM Spectrum 2K/8K-carrier hierarchical
Modulation Mode QPSK, 16QAM, 64QAM
Guard Interval Modes 1/4, 1/8, 1/16, 1/32
Input Signal
Code Modes 1/2, 2/3, 3/4, 5/6, 7/8
Algorithm ISO/IEC 13818-2 MP@HL/MP@ML
Display Video Type 1080i/720p/576p
HD Video Output Type YPbPr, VGA,HDMI
Video
SD Video Output Type S-video and CVBS
Algorithm MPEG-1 layer I and II, Ac3
Frequency Response
20Hz~20k Hz , 0±6dBu
Sampling Frequency 32, 44.1, 48KHz
Audio Output Type Stereo(RCA photo jack)
Audio
Digital Audio Output S/PDIF Optical
Power AC90 ~ 250V
Power
Operating Frequency 50/60Hz
Operating Temperature
0 ~ 40℃
Weight 3.5kg
Environmental
Condition
Dimension 355mm (W) x 240mm (D) x 60mm (H)
Note:
1. This product complies with the legal standards and is manufactured under
constant quality control.
2
.
Technical specifications are up-to-date at the time of printing, however can be
subject to changes without prior notice.
 Loading...