

Page 1

G586OPC/E
Rev. 0 +
System Board
User’s Manual
- D28451207 -
Page 2

v Copyright 1995 by DFI, Inc.
All rights reserved.
No part of this document may be copied, reproduced in
any form or by any means or used to make any transformation/adaptation without the prior written consent
of DFI, Inc.
DFI, Inc. makes no warranties with respect to this
documentation and disclaims any implied warranties of
merchantability, quality, or fitness for any particular
purpose. The information in this document is subject to
change without notice. DFI, Inc. reserves the right to
make revisions to this publication and to make changes
to any and/or all parts of its content, at any time,
without obligation to notify any person or entity of such
changes. Further, DFI, Inc. assumes no responsibility
for any errors that may appear in this document.
DFI is a registered trademark, and G586OPC/E is a
trademark of Diamond Flower, Inc. All other product
names mentioned are trademarks or registered trademarks of their respective companies.
Page 3
v FCC Statement on Class B
This equipment has been tested and found to comply
with the limits for a Class B digital device, pursuant to
Part 15 of the FCC rules. These limits are designed to
provide reasonable protection against harmful interference when the equipment is operated in a residential
installation. This equipment generates, uses and can
radiate radio frequency energy and, if not installed and
used in accordance with the instruction manual, may
cause harmful interference to radio communications.
However, there is no guarantee that interference will
not occur in a particular installation. If this equipment
does cause harmful interference to radio or television
reception, which can be determined by turning the
equipment off and on, the user is encouraged to try to
correct the interference by one or more of the following
measures:
• Reorient or relocate the receiving antenna.
• Increase the separation between the equipment and
the receiver.
• Connect the equipment into an outlet on a circuit
different from that to which the receiver is
connected.
• Consult the dealer or an experienced radio TV
technician for help.
Notice:
1. The changes or modifications not expressly
approved by the party responsible for compliance
could void the user's authority to operate the
equipment.
2. Shielded interface cables must be used in order to
comply with the emission limits.
Page 4
v Table of Contents v
Introdution ................................................................................
Features and Specifications ................................................
Package Checklist ...............................................................
Installation Overview ...............................................................
Preparing the Area ..............................................................
Handling the System Board ................................................
Tips in Handling the System Board ....................................
Hardware Installation ...........................................................
Memory Installation .......................................................
Installing theModules ....................................................
BoardConfiguration .......................................................
Jumper Settings for Display Type and
CMOS Clean .................................................................
Cache Configuration .....................................................
Installing Asynchronous SRAM .....................................
Jumper Settings for Cache Memory .............................
256KB Cache SRAM .............................................
512KB Cache SRAM .............................................
1MB Cache SRAM ................................................
Installing the Synchronous Cache Module ...................
Jumper Settings ............................................................
VRM Header .................................................................
VRM Header and 3.3V Pentium Processor ..................
VRM Header and Future Low-Voltage CPUs ...............
CPU Installation ............................................................
Jumper Settings for CPU ..............................................
Jumpers JP3, JP4, JP5,JP6, JP9, JP10, JP18, JP19,
JP20, JP21 and JP24 ...................................................
Installing Upgrade CPUs ..............................................
1
2
5
6
6
7
7
8
8
11
12
13
15
15
17
18
20
22
24
24
27
27
28
29
30
39
40
Page 5

Built-in Ports ..................................................................
Serial Ports ............................................................
PS/2 Mouse Port ....................................................
Parallel Port ...........................................................
Floppy Disk Drive Connector ........................................
IDE Hard Disk Interface ................................................
Installing Expansion Cards ...........................................
Installing the System Board ..........................................
45
46
47
48
49
51
54
56
BIOS Setup Guide ...................................................................
Award BIOS CMOS Setup Utility ........................................
Standard CMOS Setup .......................................................
BIOS Features Setup ..........................................................
Chipset Features Setup .......................................................
Power Management Setup ..................................................
PCI Configuration Setup .....................................................
Load BIOS Default ..............................................................
Load Setup Default .............................................................
Password Setting ................................................................
IDE HDD Auto Detection .....................................................
Save and Exit Setup ...........................................................
Exit Without Saving .............................................................
Troubleshooting Checklist .....................................................
Appendix A: PCI I/O Pin Assignments ..................................
Appendix B: ISA I/O Pin Assignments ..................................
Appendix C: Connector Pin Assignments ............................
Appendix D: System Error Report .........................................
Appendix E: Award BIOS Hard Disk Table ...........................
58
59
59
63
64
66
67
68
68
68
69
73
73
74
75
76
77
87
91
Page 6
G586OPC/E
Rev. 0 +
System Board
User’s Manual
Page 7

G586OPC/E
Rev. 0 +
System Board
User’s Manual
- 28451207 -
Page 8
G586OPC/E
Rev. 0 +
System Board
User’s Manual
Page 9
v Introduction
The G586OPC/E system board offers several advanced
features integrated into the system board. Its design is
based on the new Peripheral Component Interconnect
(PCI) local bus and Industry Standard Architecture
(ISA) standards.
The G586OPC provides a 321-pin Zero Insertion Force
(ZIF) CPU socket for PentiumTM processors running at
75MHz, 90MHz, 100MHz, 120MHz, 133MHz or
150MHz frequency. This ZIF socket allows users to
easily upgrade their CPUs. It also provides a VRM
(Voltage Regulation Module) header allowing you to
upgrade to future low-voltage CPUs.
The G586OPC/E is equipped with three PCI slots, three
ISA slots and one shared PCI/ISA slot.
The G586OPC/E board has two bus master PCI IDE
connectors. Bus mastering reduces CPU use during disk
transfer. The system board is also equipped with two
NS16C550A-compatible serial ports, an SPP/EPP/ECP
parallel port, a floppy disk drive controller, one PS/2
mouse port and one PS/2 keyboard connector.
G586OPC/E
The G586OPC/E can support 2MB to 128MB of
memory using 256Kx36, 512Kx36, 1Mx36, 2Mx36,
4Mx36 and 8Mx36 72-pin SIM modules.
1
Page 10
PCI/ISA System Board
Product Specifications
Processor
• Intel Pentium™ processor 75/90/100/120/133/
150MHz
• Future Intel Pentium™ processor and Pentium™
OverDrive processor
Chipset
• OPTi Viper-M chipset
Cache Memory
• 256KB, 512KB or 1MB direct map write-back or
write-through cache
• 32Kx8, 64Kx8 or 128Kx8 asynchronous SRAM
(supports 5V/3.3V mixed voltage SRAM)
• 160-pin SRAM upgrade slot for optional synchronous
pipeline burst cache module
System Memory
• Up to 128MB
• Four 72-pin DRAM SIMM sockets
• Supports single and/or double density SIMMs
• 256Kx36, 512Kx36, 1Mx36, 4Mx36 or 8Mx36 parity
SIMMs x32 non-parity SIMMs supported
• Supports 60ns or 70ns fast page mode DRAM or
EDO DRAM
BIOS
• Award Plug and Play BIOS
• Supports Enhanced IDE devices
• Supports Enhanced IDE HDDs larger than 528MB
(LBA mode only)
2
Page 11
G586OPC/E
Energy Efficient Design
• System Power Management supported
• CPU stopped clock control
• Microsoft/Intel APM 1.1 compliant
• Hardware supports SMI green mode
PCI IDE Interface
• PIO Modes 3 & 4 Enhanced IDE (data transfer rate
up to 16.6MB/sec)
• PCI Bus Master IDE (data transfer rate up to
22.2MB/sec)
• Bus mastering reduces CPU use during disk
transfer
• ATAPI IDE CD-ROM supported
Integrated I/O
• SMC FDC37C663GT super I/O controller
• Two NS16C550A-compatible high speed UARTs
• One 720KB/1.2MB/1.44MB/2.88MB floppy controller
• PS/2 mouse port
• PS/2 keyboard or AT keyboard connector
VRM and ZIF Sockets
• VRM (Voltage Regulation Module) header allows
optional upgrade to future low-voltage CPUs
• 321-pin ZIF socket (Intel Socket 7)
Connectors
• 2 serial ports
• 1 parallel port
• 2 IDE connectors
• 1 floppy connector
• 1 mini-DIN-6 PS/2 mouse port
• 1 mini-DIN-6 PS/2 keyboard port or AT keyboard
connector
3
Page 12

PCI/ISA System Board
Expansion Slots
• 3 dedicated PCI slots
• 3 dedicated 16-bit ISA slots
• 1 shared PCI/ISA slot
Architecture
• PCI/ISA
PCB
• Four layer, AT form factor
• 28 cm (11.02") x 22 cm (8.58")
4
Page 13
Package Checklist
The G586OPC package contains the following items:
• The G586OPC system board
• The G586OPC user’s manual
• One set of IDE driver diskettes
• One 34-pin floppy disk drive cable
• One 40-pin IDE hard disk cables
• One 25-pin printer port cable for chassis mounting
• One card-edge bracket with serial and mouse port
cables
If any of these items is missing or damaged, please
contact your dealer or sales representative for assistance.
G586OPC/E
5
Page 14
PCI/ISA System Board
v Installation Overview
This chapter summarizes the steps in installing the
G586OPC system board into your system unit. It also
includes a description of the area in which you must
work and directions for memory installation. Before
installing the system board, obtain the memory you plan
to install. Please refer to the memory chart, on pages 8
and 9, for the number and type of SIM modules
needed for the amount of memory you require.
Preparing the Area
Before unpacking the system board, make sure the
location you have selected is relatively free of dust and
static electricity. Excessive exposure to dust, static
electricity, direct sunlight, excessive humidity, extreme
cold, and water can damage the operational capabilities
of your system board. Avoid placing the unit on surfaces
such as carpeted floors. These areas attract static electricity which can damage some circuits on your system
board.
Make sure the power source has a properly grounded,
three-pronged socket. It is essential that the power
connection be properly grounded for correct functioning
of your system board. For further protection, we recommend that you use a surge suppressor. This will protect
the system board from damage that may result from a
power surge on the electrical line.
Move items that generate magnetic fields away from
your system board, since magnetic fields can also
damage your system board. Once you have selected the
6
Page 15

ideal location, unpack the G586OPC system board
carefully.
Handling the System Board
It is quite easy to inadvertently damage your system
board even before installing it to your system unit.
Static electrical discharge can damage computer components without causing any signs of physical damage.
You must take extra care in handling the system board
to ensure against electrostatic build-up.
Tips in Handling the System Board
1. To prevent electrostatic build-up, leave the board in
its anti-static bag until you are ready to install it.
2. Wear an antistatic wriststrap.
3. Do all preparation work on a static-free surface with
components facing up.
G586OPC/E
4. Hold the system board by its edges only. Be careful
not to touch any of the components, contacts or
connections, especially gold contacts on the board.
5. Avoid touching the pins or contacts on all modules
and connectors. Hold modules and connectors by
their ends.
Warning:
Electrostatic discharge (ESD) can damage your upgrade
processor, disk drives, add-in boards, and other
components. Perform the upgrade instruction
procedures described at an ESD workstation only. If
such a station is not available, you can provide some
7
Page 16
PCI/ISA System Board
ESD protection by wearing an antistatic wrist strap and
attaching it to a metal part of the system chassis. If a
wrist strap is unavailable, establish and maintain
contact with the system chassis throughout any
procedures requiring ESD protection.
Hardware Installation
Memory Installation
The G586OPC system board can support 2MB to
128MB of memory using 72-pin SIMMs (Single In-Line
Memory Module).
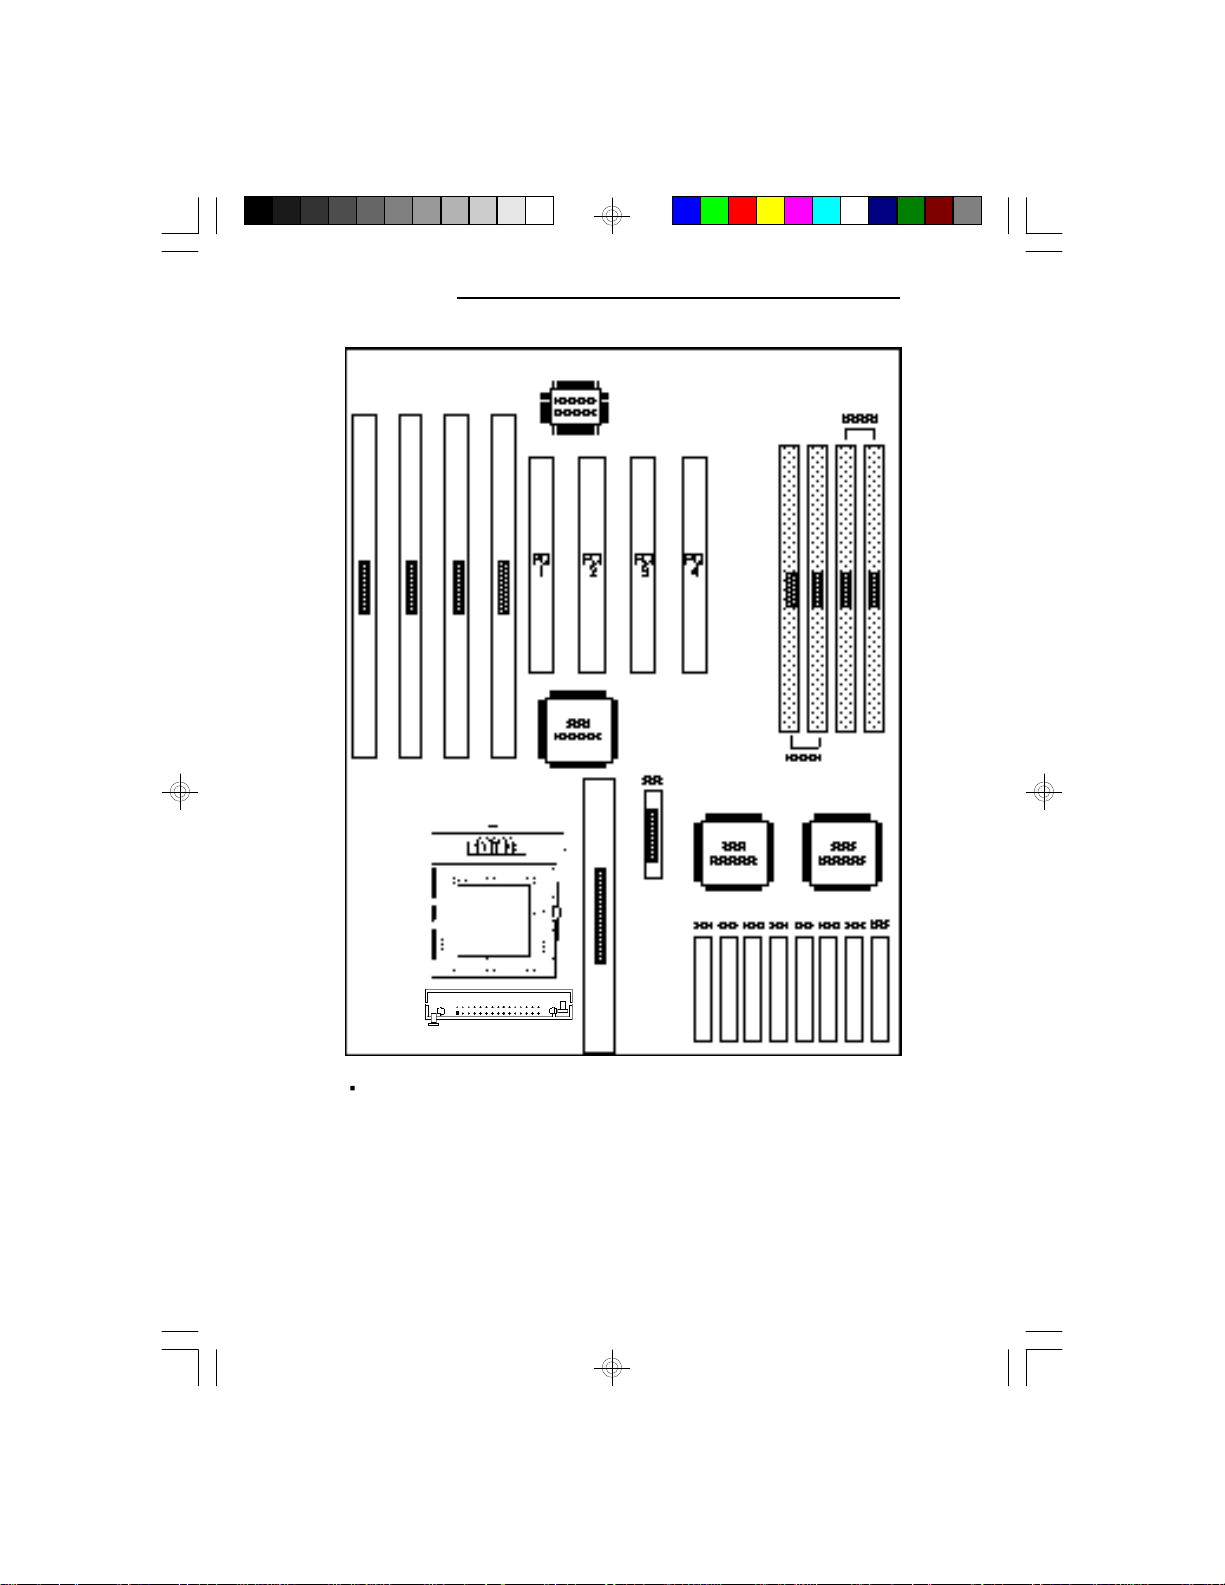
The SIMM sockets are divided into two banks on the
system board. The G586OPC system board uses
256Kx36, 512Kx36, 1Mx36, 2Mx36, 4Mx36 and
8Mx36 SIMMs. Non-parity (x32) SIMMs can also be
used if parity checking is turned off in CMOS setup.
You will need 2 or 4 pieces of SIMMs, depending on
the amount of memory you intend to install.
To install the SIM modules, first populate Bank 0 and
then Bank 1, or the system will not work.
The table on the next page summarizes the bank locations and modules needed for the corresponding memory
sizes. Each bank consists of 2 SIMM sockets.
8
Page 17
Memory Size Bank 0 Bank 1
2MB 256Kx36 4MB 256Kx36 256Kx36
4MB 512Kx36 8MB 512Kx36 512Kx36
8MB 1Mx36 16MB 1Mx36 1Mx36
16MB 2Mx36 32MB 2Mx36 2Mx36
32MB 4Mx36 48MB 2Mx36 4Mx36
64MB 4Mx36 4Mx36
64MB 8Mx36 68MB 512Kx36 8Mx36
72MB 1Mx36 8Mx36
80MB 2Mx36 8Mx36
96MB 4Mx36 8Mx36
128MB 8Mx36 8Mx36
G586OPC/E
9
Page 18
PCI/ISA System Board
10
VRM Header
Pin 1 of the SIMM socket
Locations of the SIM Sockets on the System Board
Page 19
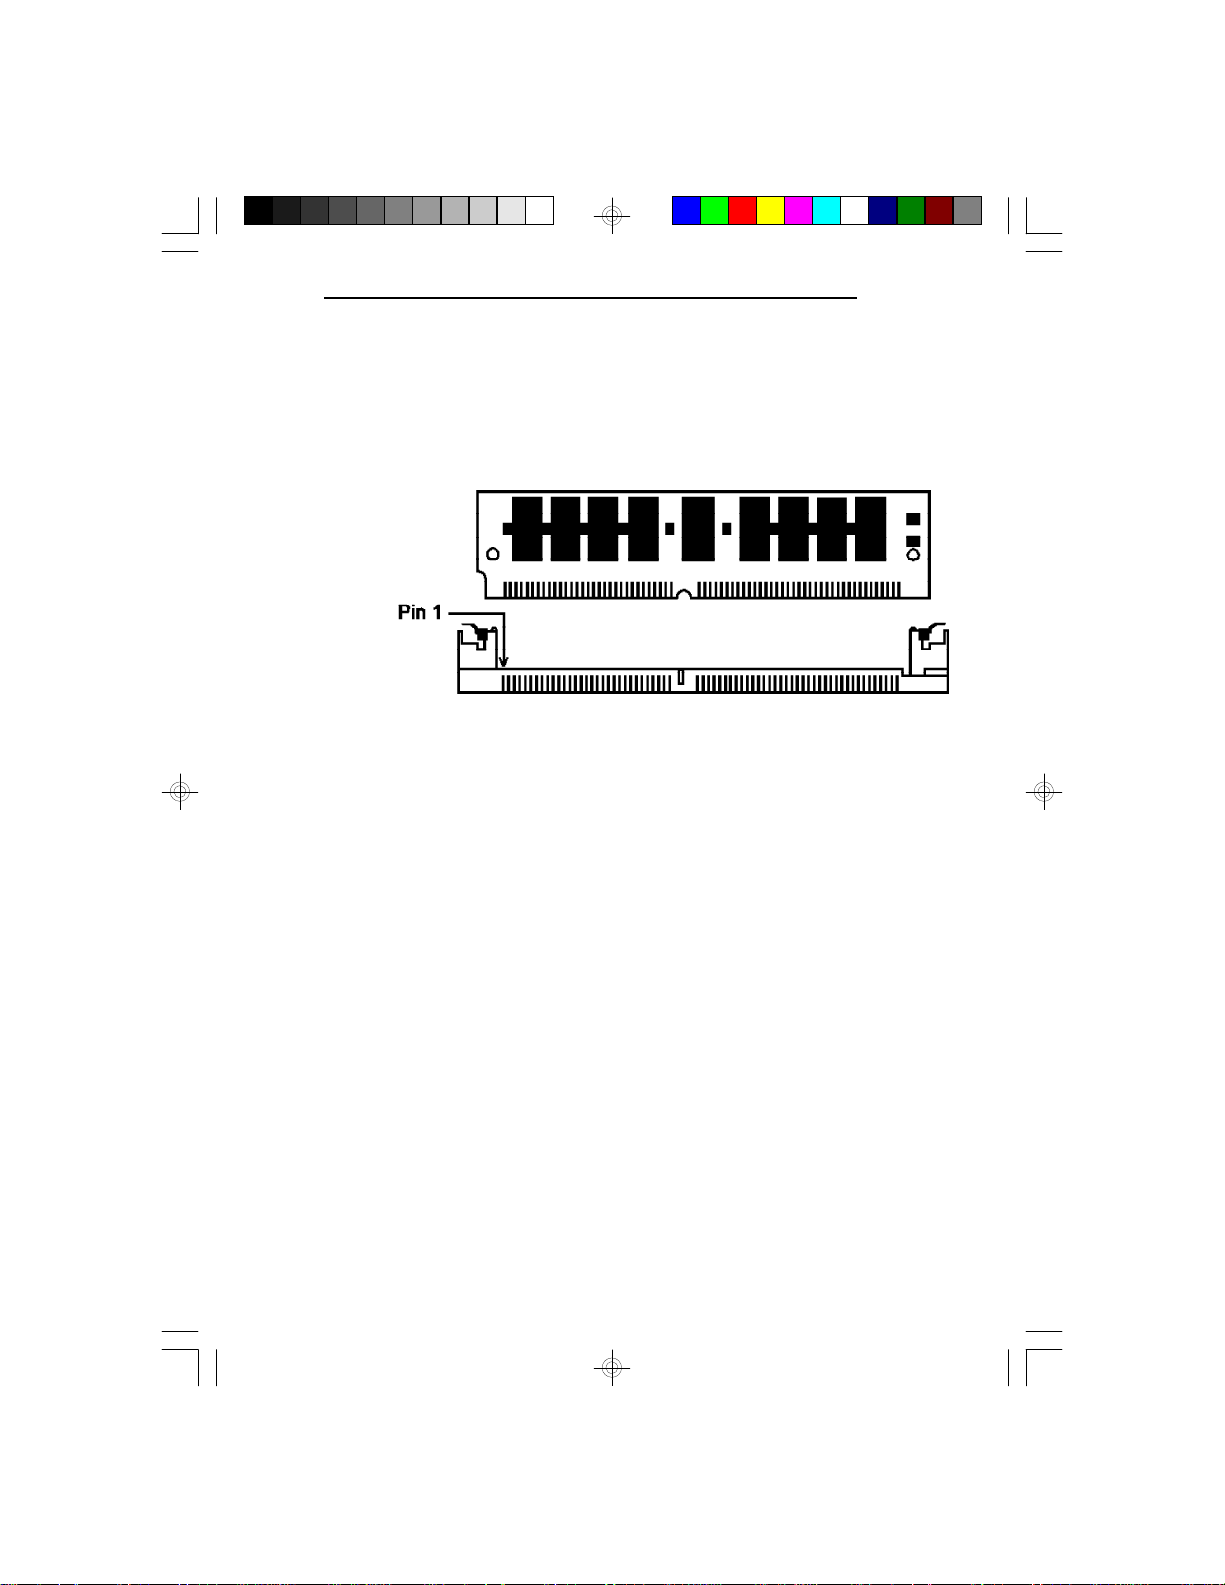
Installing the Modules
A SIMM simply snaps into a socket on the system
board. Pin 1 of the SIMM must correspond with Pin 1
of the socket.
1. Position the SIMM above the socket with the
“notch” in the module aligned with the “key” on the
socket.
2. Seat the module at a 45o angle into the bank. Make
sure it is completely seated. Tilt the module upright
until it locks in place in the socket.
G586OPC/E
11
Page 20
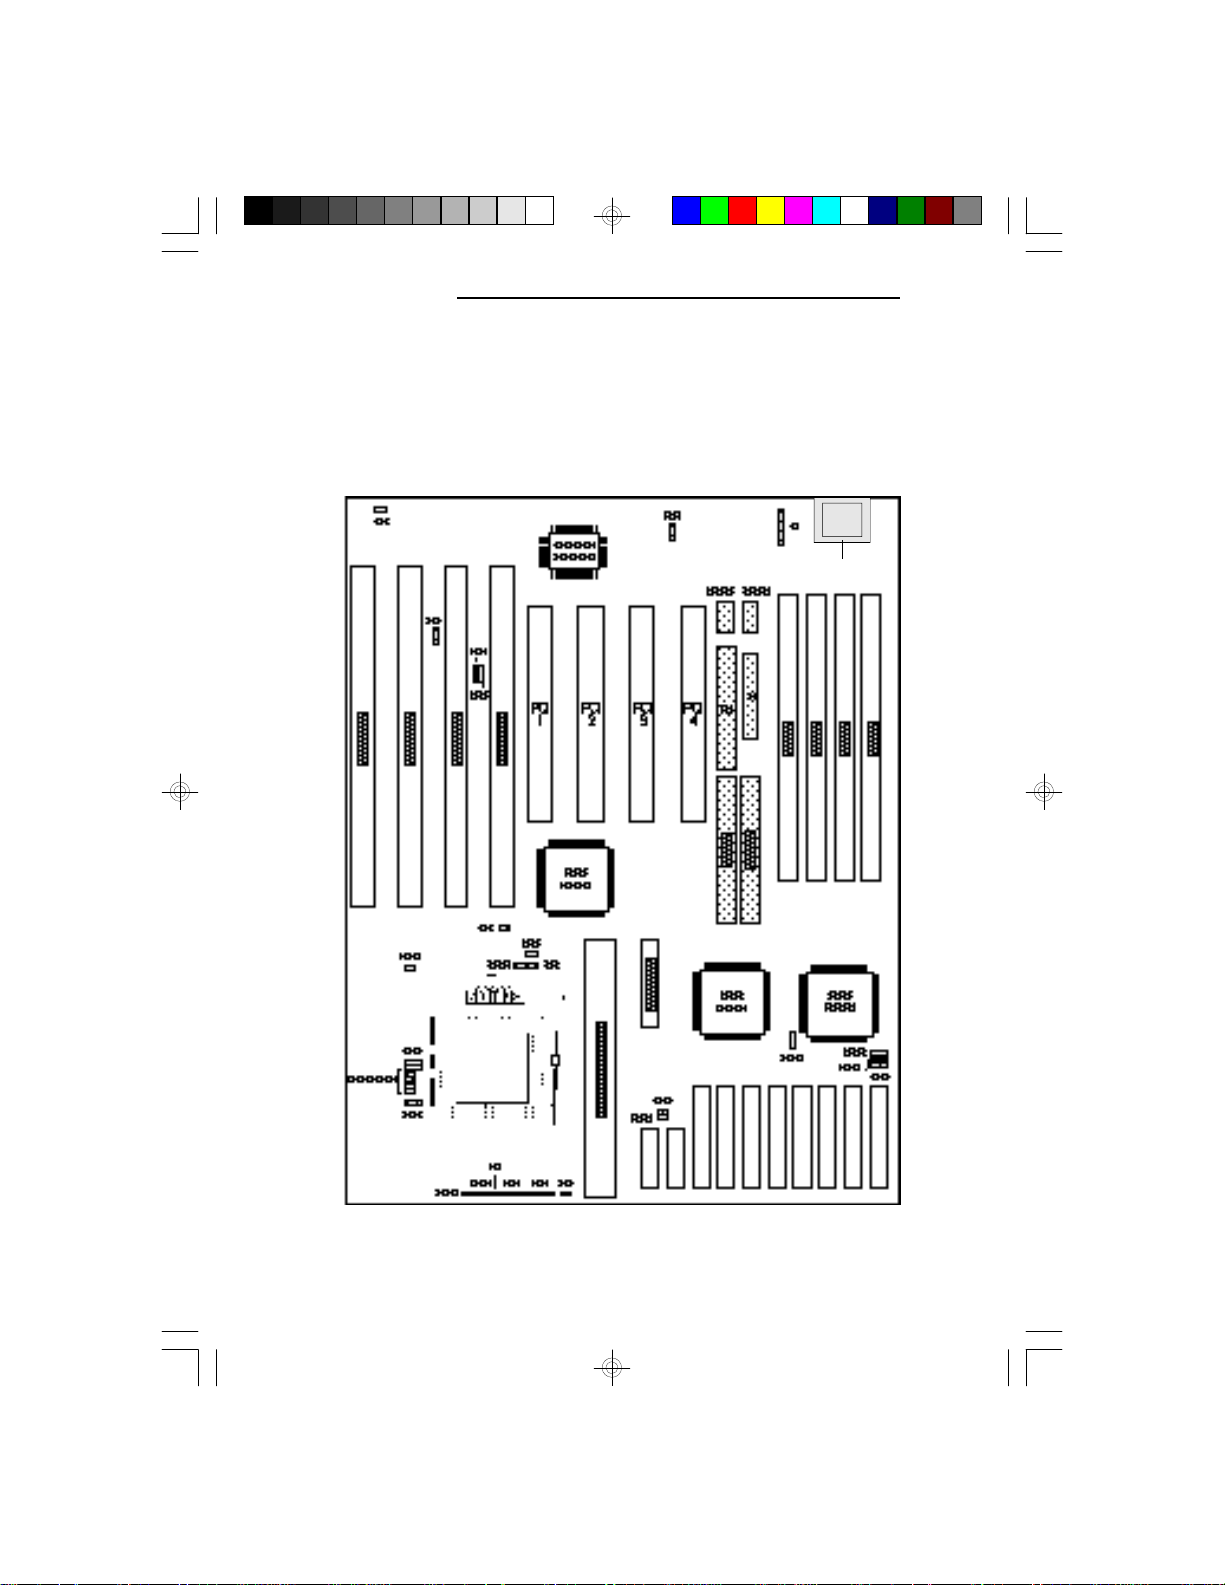
PCI/ISA System Board
Board Configuration
The G586OPC has jumpers and connectors onboard.
Make sure the jumpers are set correctly before installing
the system board into your system unit.
HJ1
J2
12
Page 21
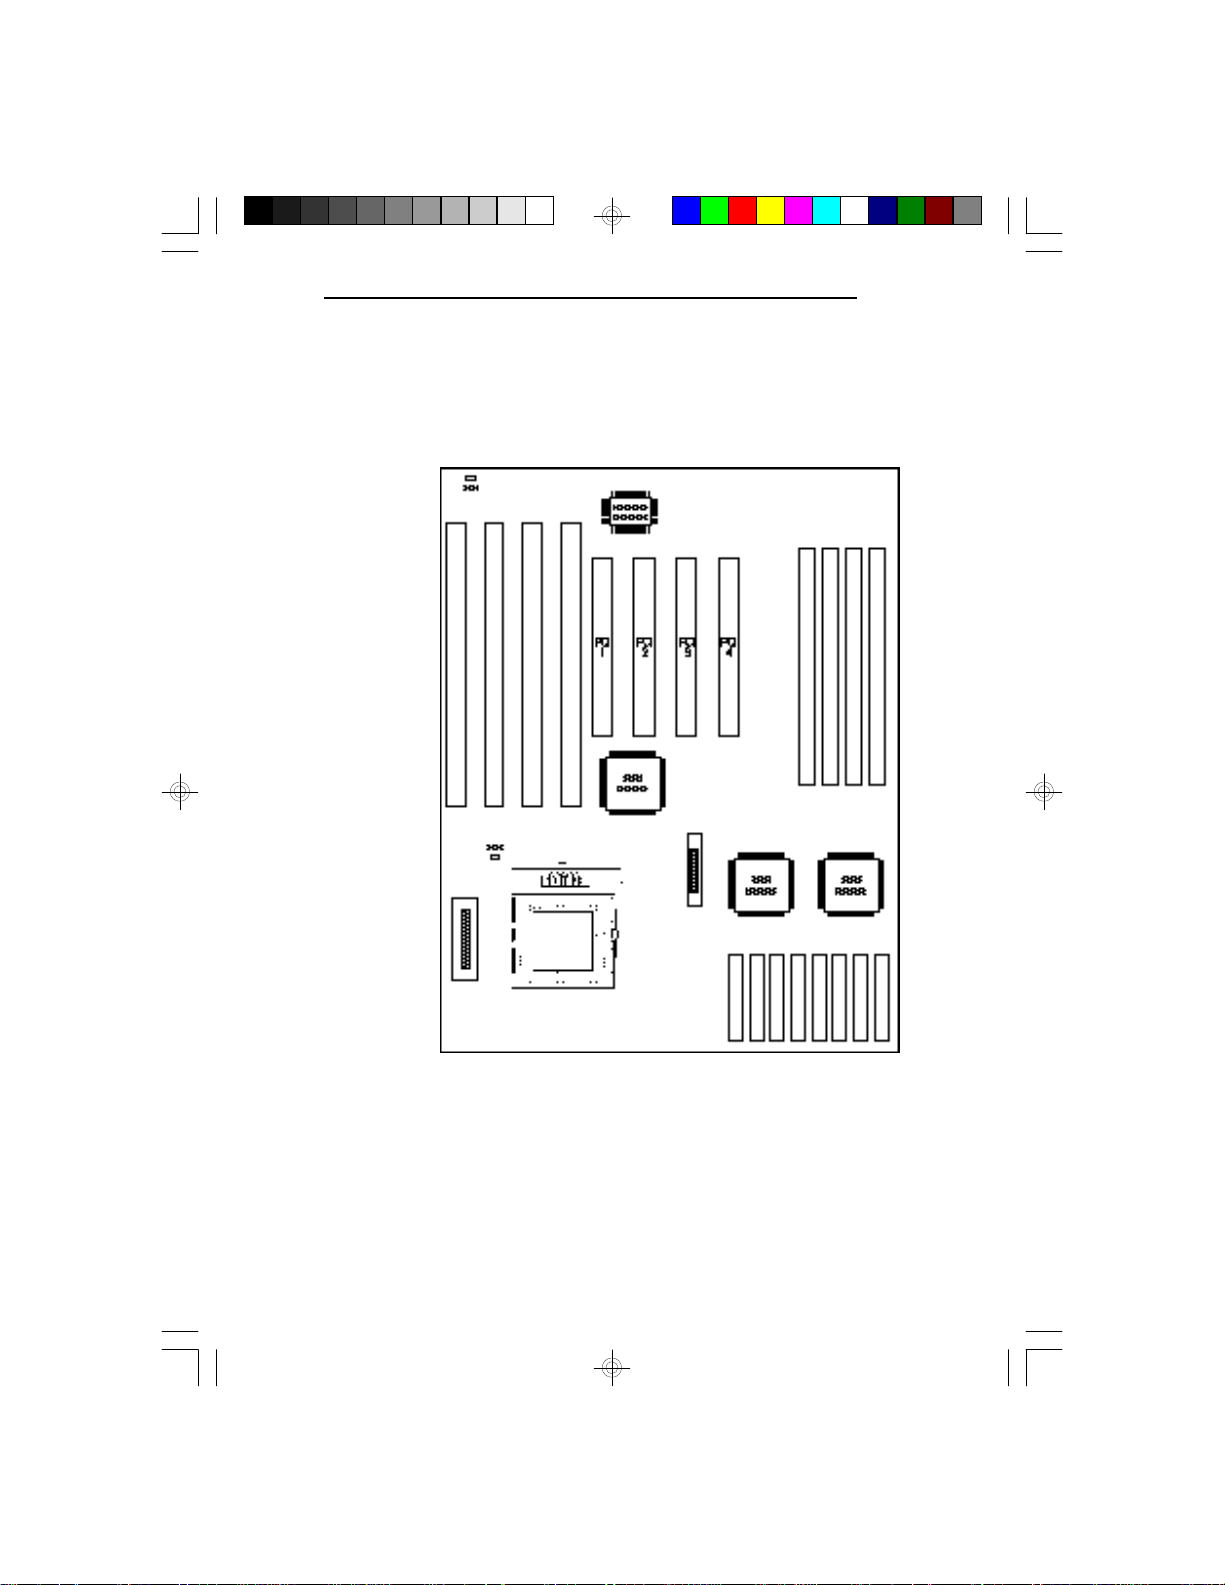
Jumper Settings
Jumper Settings for Display Type and CMOS Clean
G586OPC/E
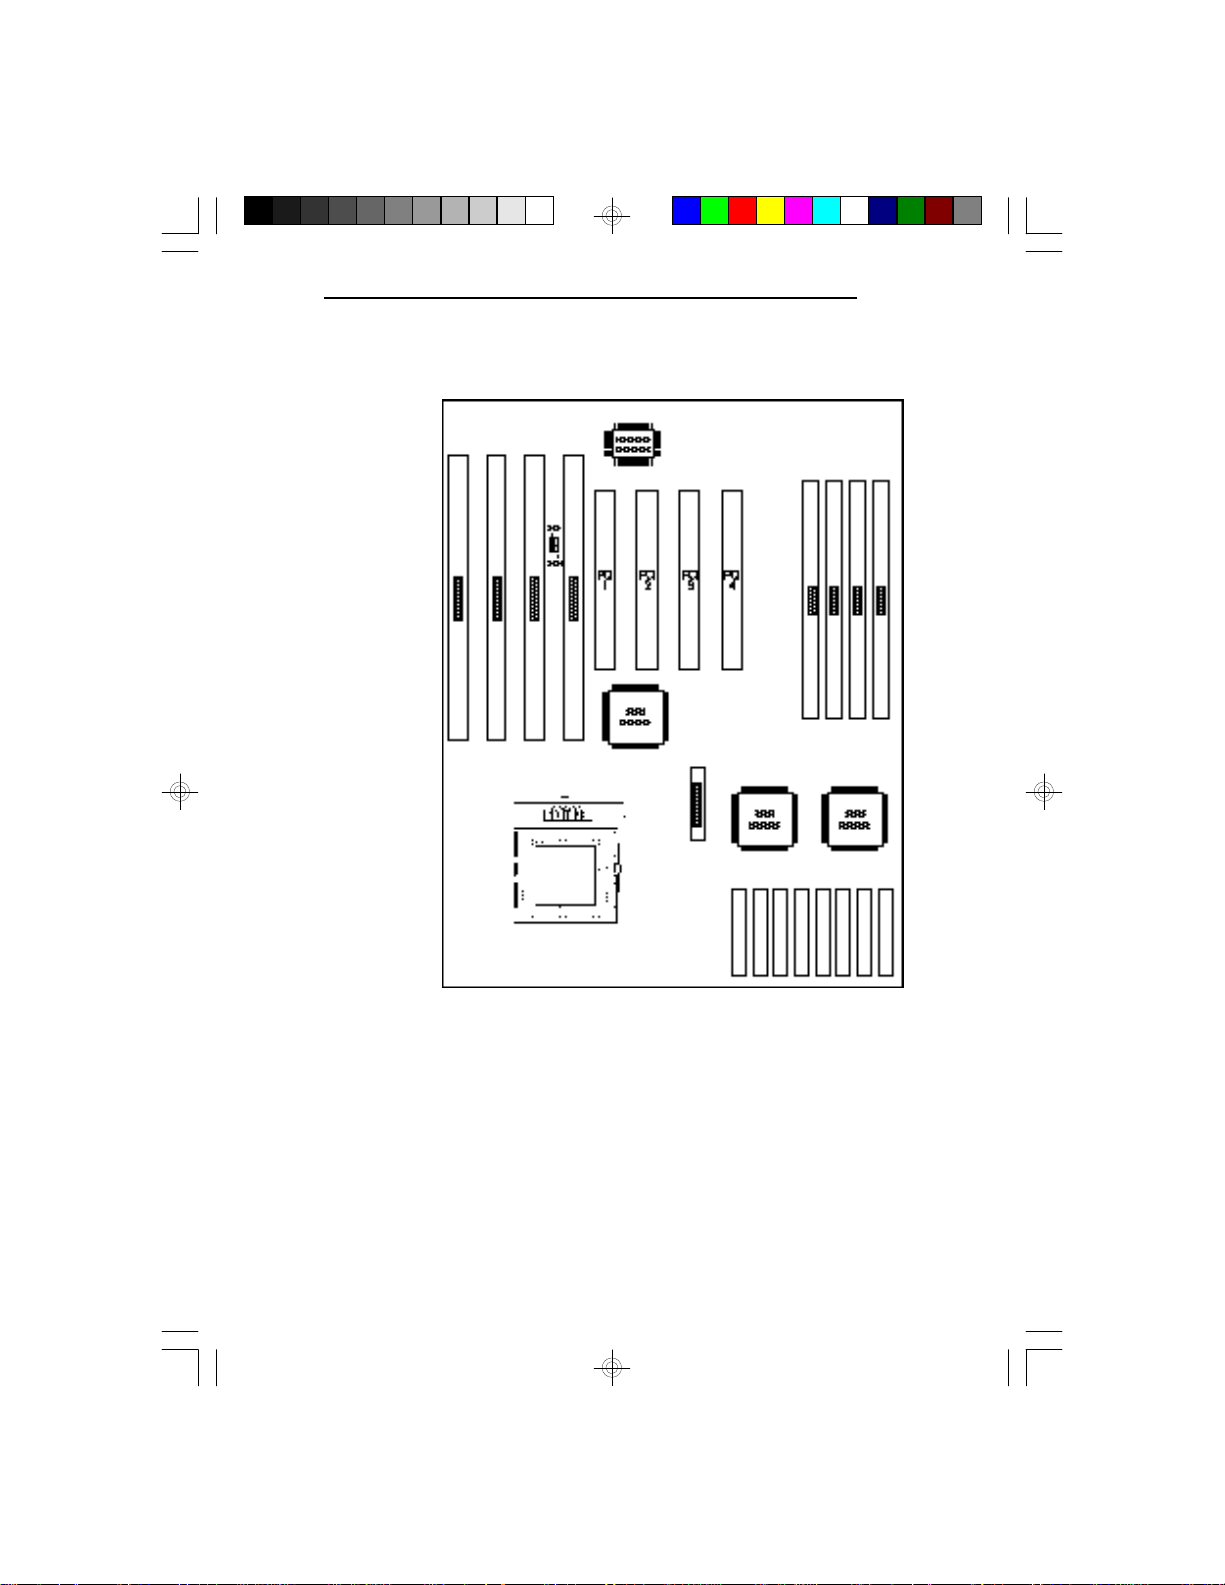
Locations of Jumpers JP1 and JP11 on the
G586OPC System Board
13
Page 22
PCI/ISA System Board
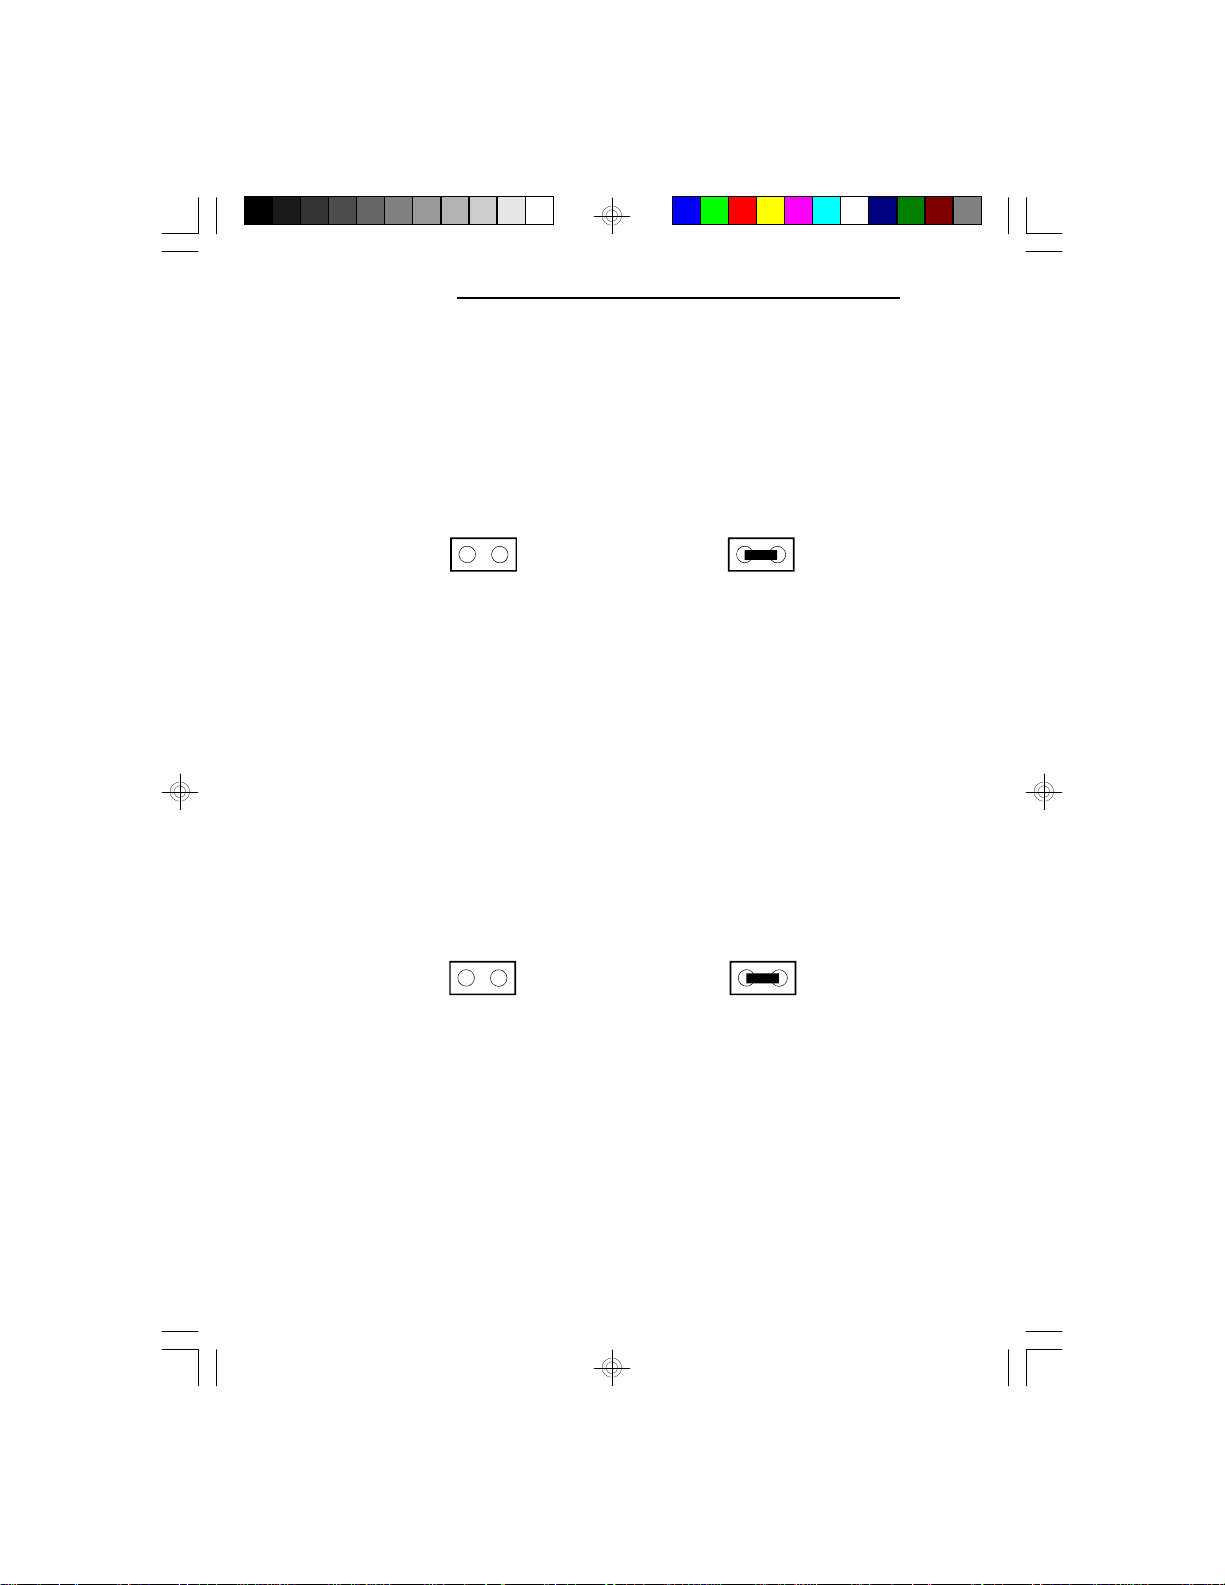
Jumper JP1
Display Type Select
Jumper JP1 sets the display adapter to color or mono.
This jumper must match the type of display adapter
installed. If you change your video adapter, make sure
this jumper is changed accordingly.
JP1 Off: Color
JP1 On: Mono
(Default)
Jumper JP11
CMOS Clean Select
If, for some reason, the CMOS becomes corrupted, the
system can be reconfigured with the default values
stored in the ROM BIOS. To load the default values,
switch off your computer and remove the cover. Touch
the power supply box to discharge any static electric
buildup in your body. Set JP11 to On for approximately
5 seconds, then return to the default position (Off). Put
the cover back and power up your system.
JP11 Off: Normal
(Default)
JP11 On: CMOS
Clean
14
Page 23
Jumper Settings for Super I/O Setting
G586OPC/E
Locations of Jumpers JP5 and JP6
on the G586OPC System Board
15
Page 24
PCI/ISA System Board
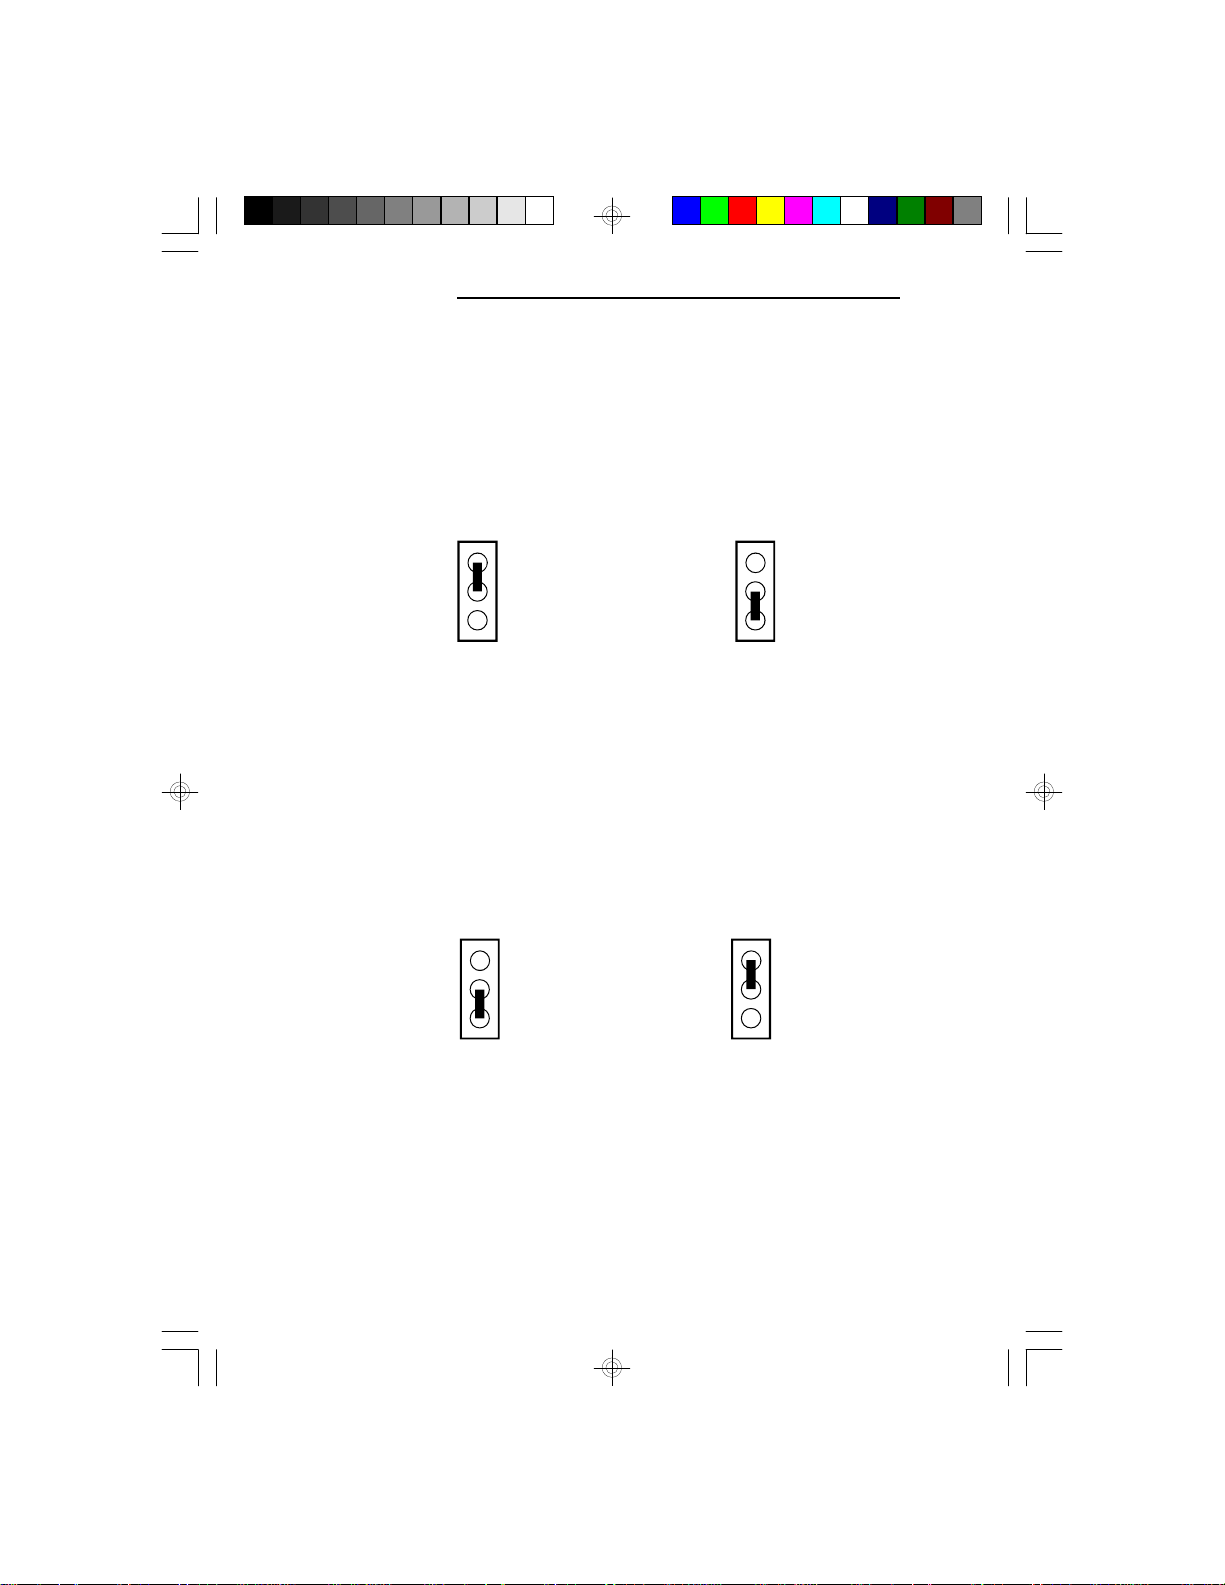
Jumper JP5
ECP DRQ Select (FDC37C665GT only)
The G586OPC system board supports an ECP parallel
port that allows you to use DMA Request (DRQ) Channel 1 or 3. Set Jumper JP5 so the ECP port does not
conflict with an add-on card's DMA channel.
1
2
3
1
2
3
2-3 On: ECP DRQ 11-2 On: ECP DRQ 3
(Default)
Jumper JP6
ECP DACK Select (FDC37C665GT only)
The G586OPC system board supports an ECP parallel
port that allows you to use DMA Acknowledge (DACK)
Channel 1 or 3. Set Jumper JP6 so the ECP port does
not conflict with an add-on card's DMA channel.
1
2
3
2-3 On: ECP DACK 3
1-2 On: ECP DACK 1
1
2
3
(Default)
16
Page 25

Cache Configuration
The G586OPC system board can support either asynchronous cache SRAM or synchronous (pipelined
burst) cache SRAM. Three cache sizes are supported:
256KB, 512KB and 1MB. 256KB is the default size.
Installing Asynchronous Cache SRAM
The SRAM sockets allow you to install either 32Kx8,
64Kx8 or 128Kx8 SRAM. Regardless of the amount of
cache memory installed, one 32Kx8 (U23) is needed for
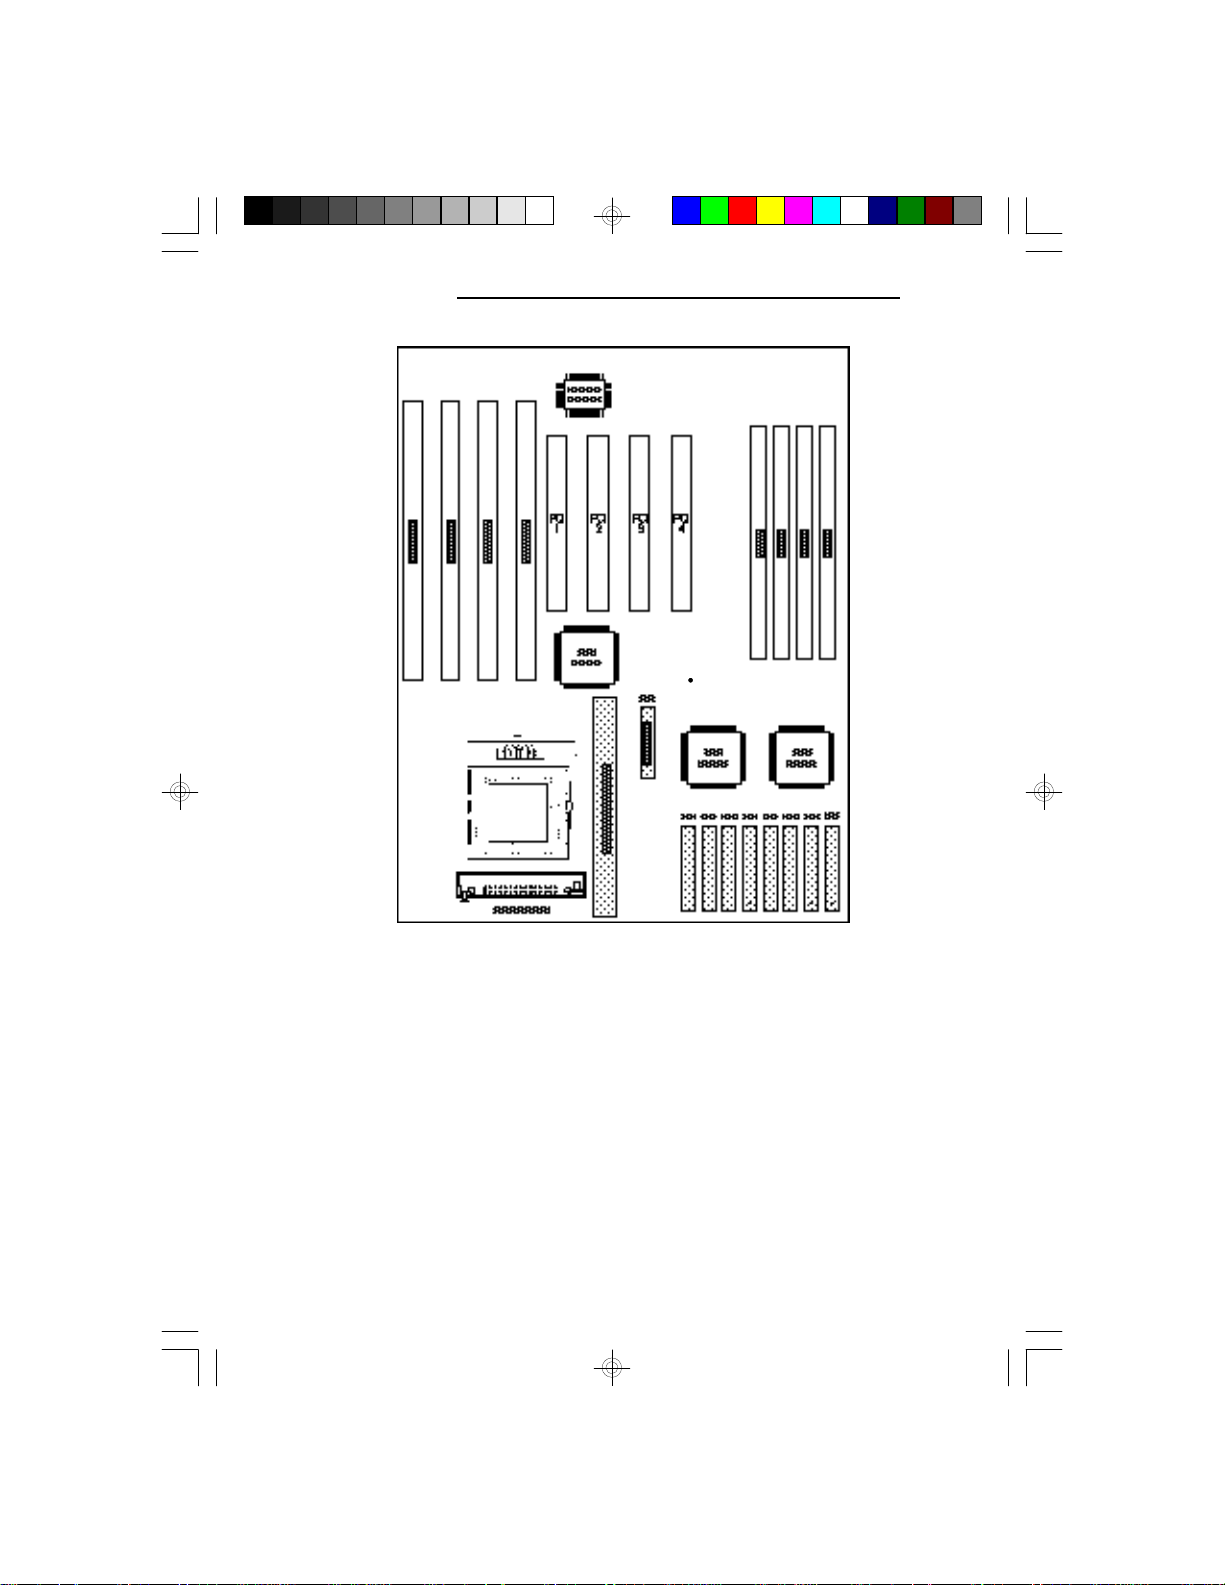
tag RAM to store the cacheable addresses. The locations
of the SRAM sockets on the system board are shown on
the next page.
Note
Use only the 5V/3.3V mixed-voltage or pure 3.3V Data
SRAM chips if you are changing or upgrading the
asynchronous cache RAM of your system board. DO
NOT install the regular 5V cache chips in the Data
SRAM sockets; otherwise problems will occur because
they are not compatible. Regardless of the type of Data
SRAM used, install only 5V Tag SRAM on your system
board.
G586OPC/E
SRAM Socket
17
Page 26
PCI/ISA System Board
Pin 1 of the SRAM
socket
18
Page 27
Jumper Settings for Cache Memory
G586OPC/E
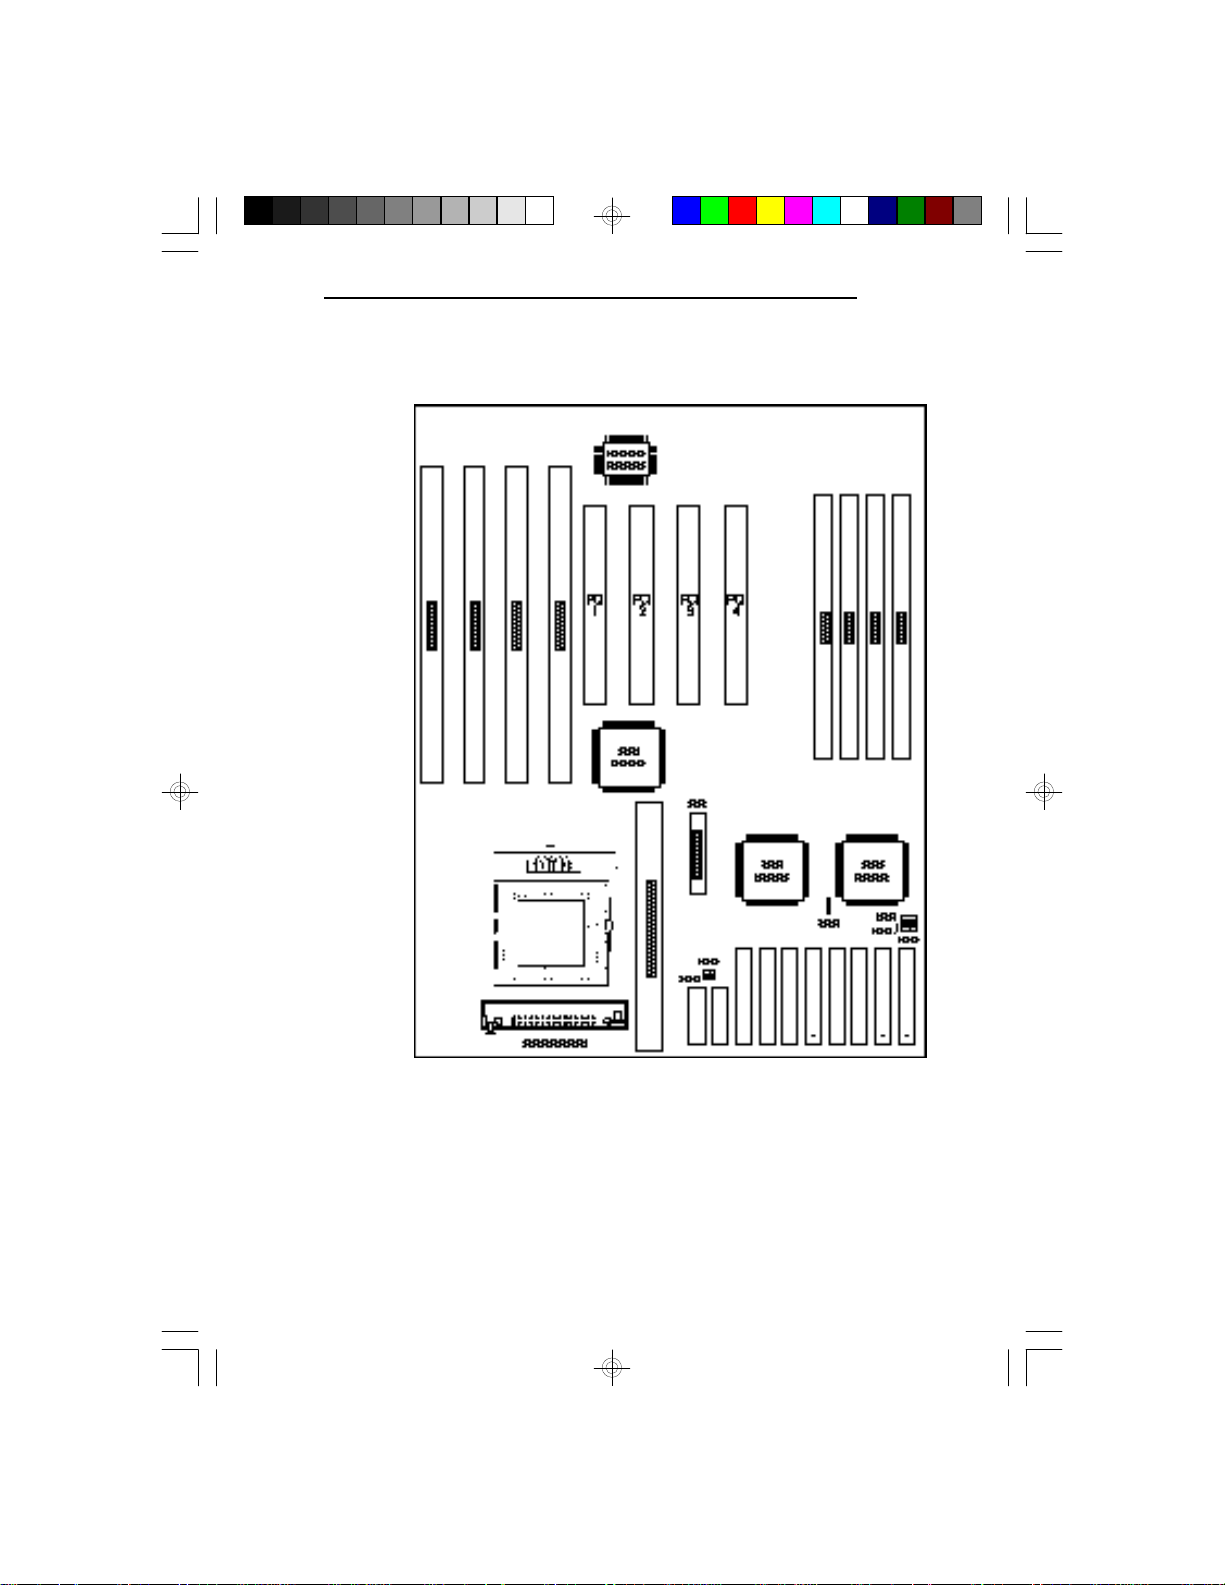
Locations of Jumpers JP12, JP13, JP14, JP15, JP22 and
JP23 on the G586OPC System Board
19
Page 28

PCI/ISA System Board
256KB Cache SRAM *
5V/3V Mixed Voltage SRAM
U23
(5V SRAM)
32Kx8 (TAG)
JP22
JP12
1
2
3
JP13
JP14
2
31
JP15
20
JP23
32Kx8
U35 U34 U33
* Default Setting
32Kx8
32Kx8
32Kx8
32Kx8
32Kx8
32Kx8
32Kx8
U32
U31 U30 U29 U28
Page 29
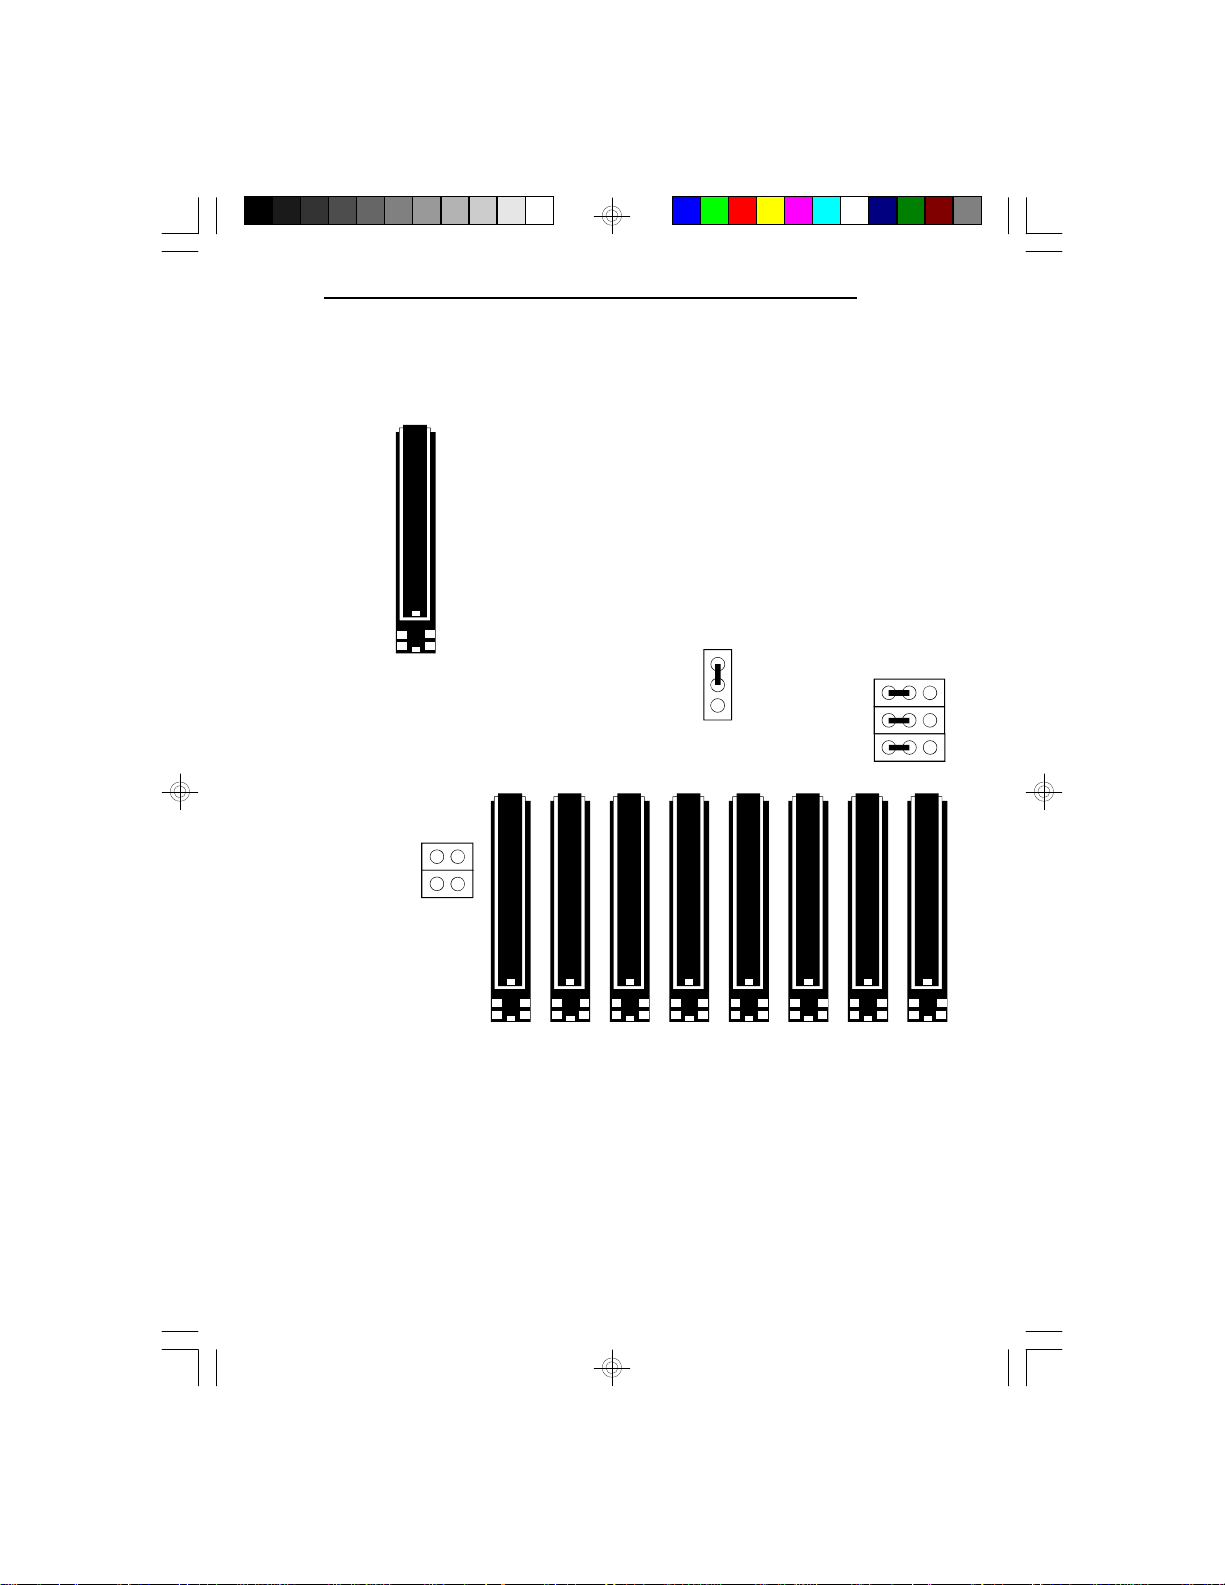
256KB Cache SRAM
3.3V SRAM
(5V SRAM)
32Kx8 (TAG)
JP22
U23
JP12
G586OPC/E
1
2
3
JP13
JP14
2
31
JP15
JP23
32Kx8
32Kx8
U35 U34 U33
32Kx8
32Kx8
32Kx8
32Kx8
32Kx8
32Kx8
U32
U31 U30 U29 U28
21
Page 30
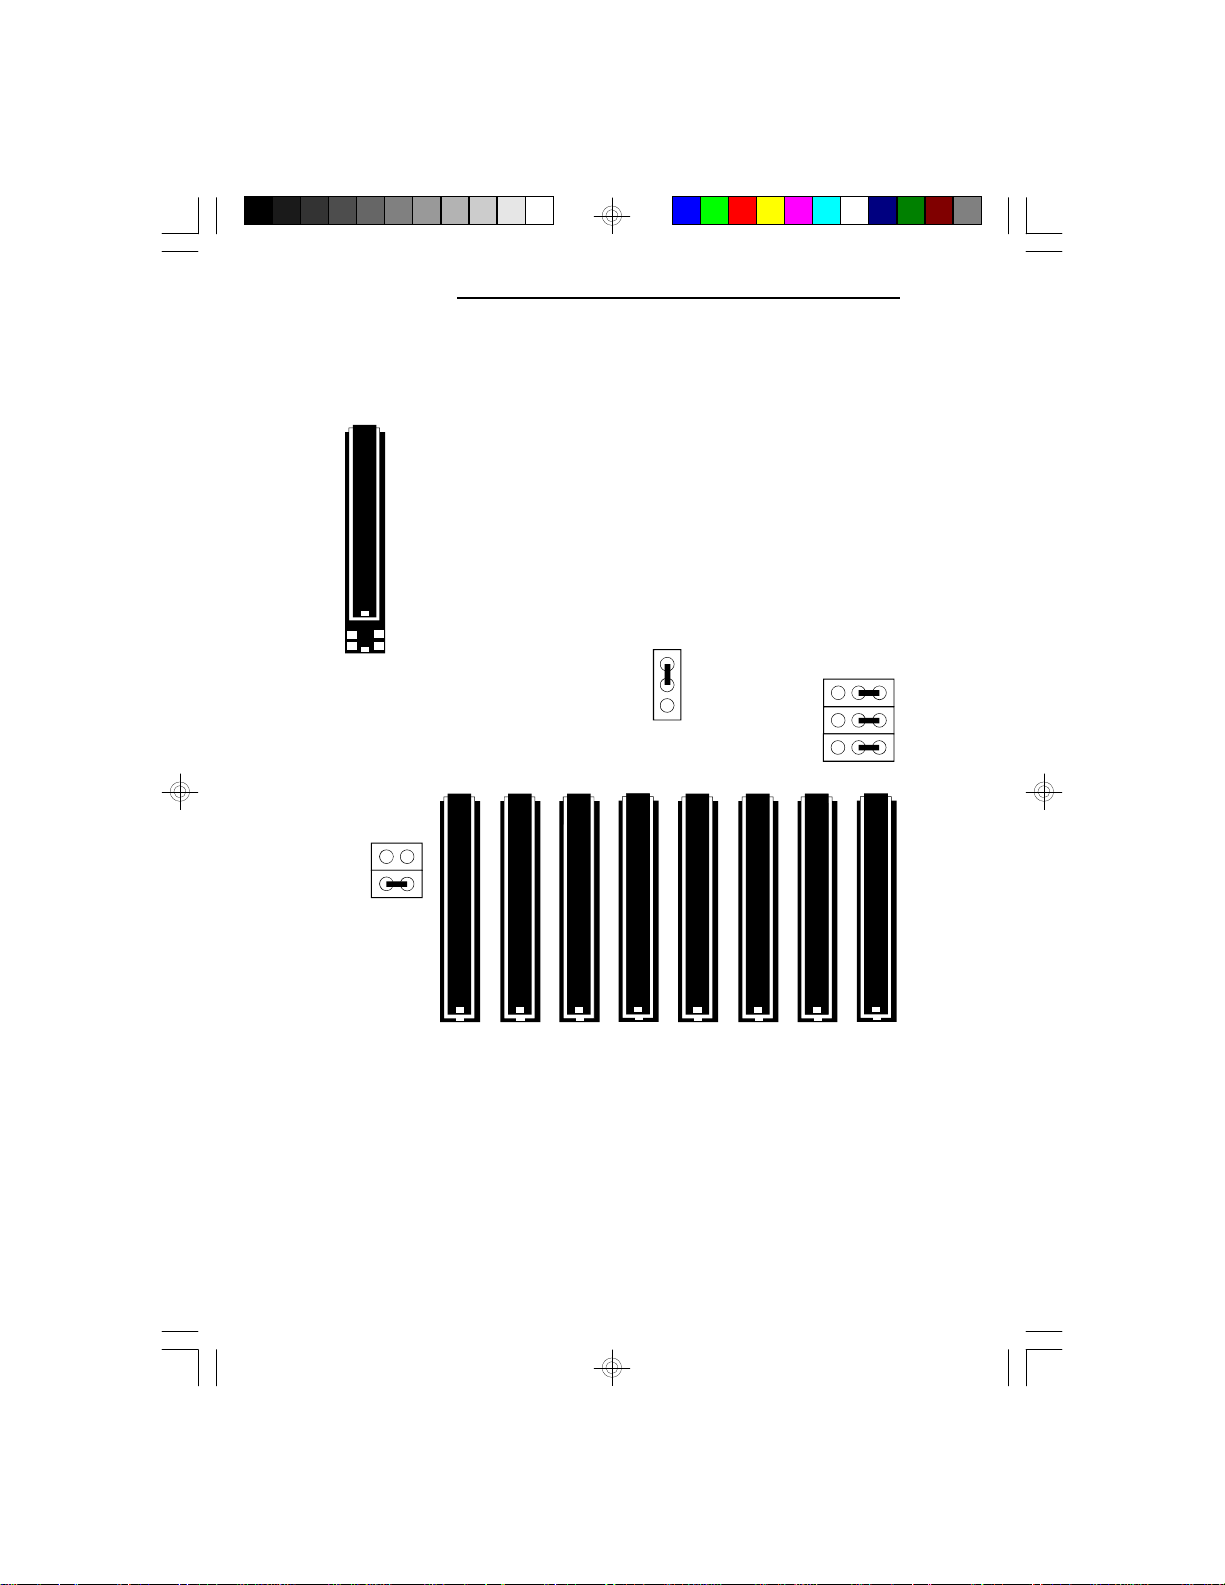
PCI/ISA System Board
512KB Cache SRAM
5V/3.3V Mixed Voltage SRAM
U23
(5V SRAM)
32Kx8 (TAG)
JP22
JP12
1
2
3
JP13
JP14
2
31
JP15
22
JP23
64Kx8
64Kx8
64Kx8
64Kx8
64Kx8
64Kx8
64Kx8
64Kx8
U32U35 U34 U33 U31 U30 U29 U28
Page 31
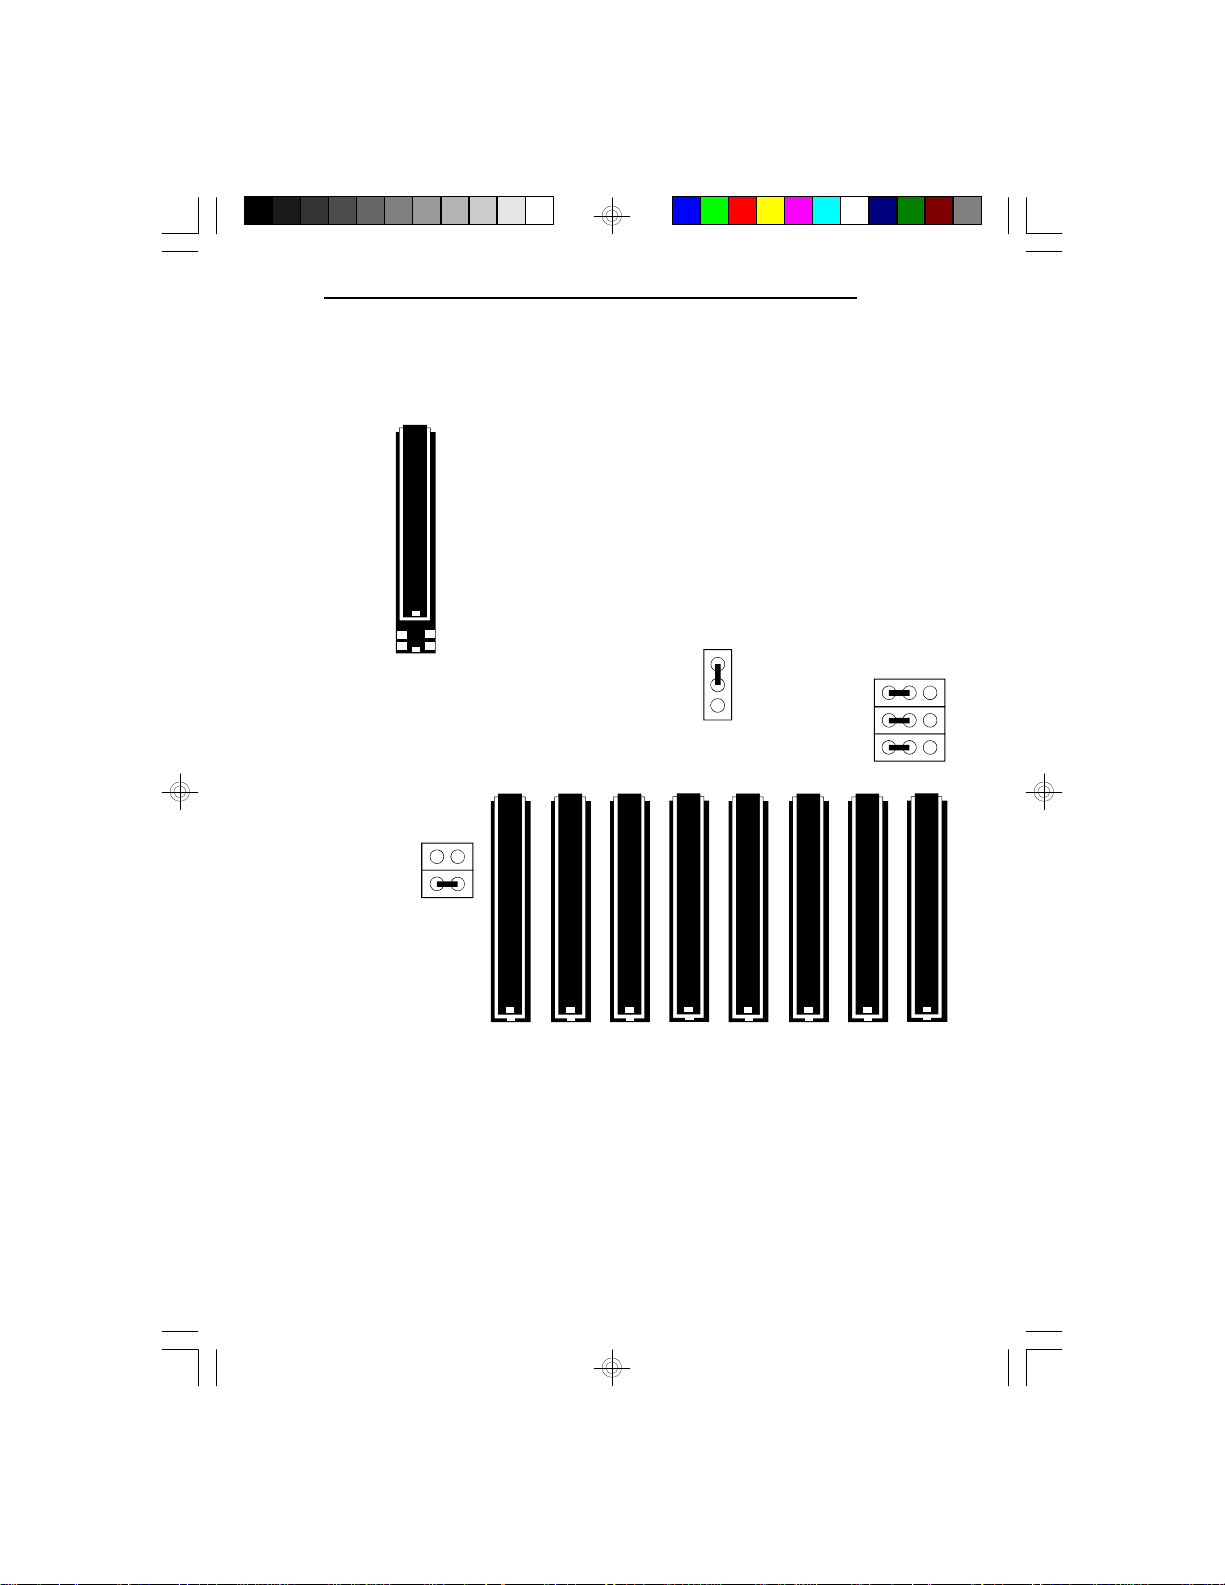
512KB Cache SRAM
3.3V SRAM
(5V SRAM)
32Kx8 (TAG)
JP22
U23
JP12
G586OPC/E
1
2
3
JP13
JP14
2
31
JP15
JP23
64Kx8
64Kx8
64Kx8
64Kx8
64Kx8
64Kx8
64Kx8
64Kx8
U32U35 U34 U33 U31 U30 U29 U28
23
Page 32
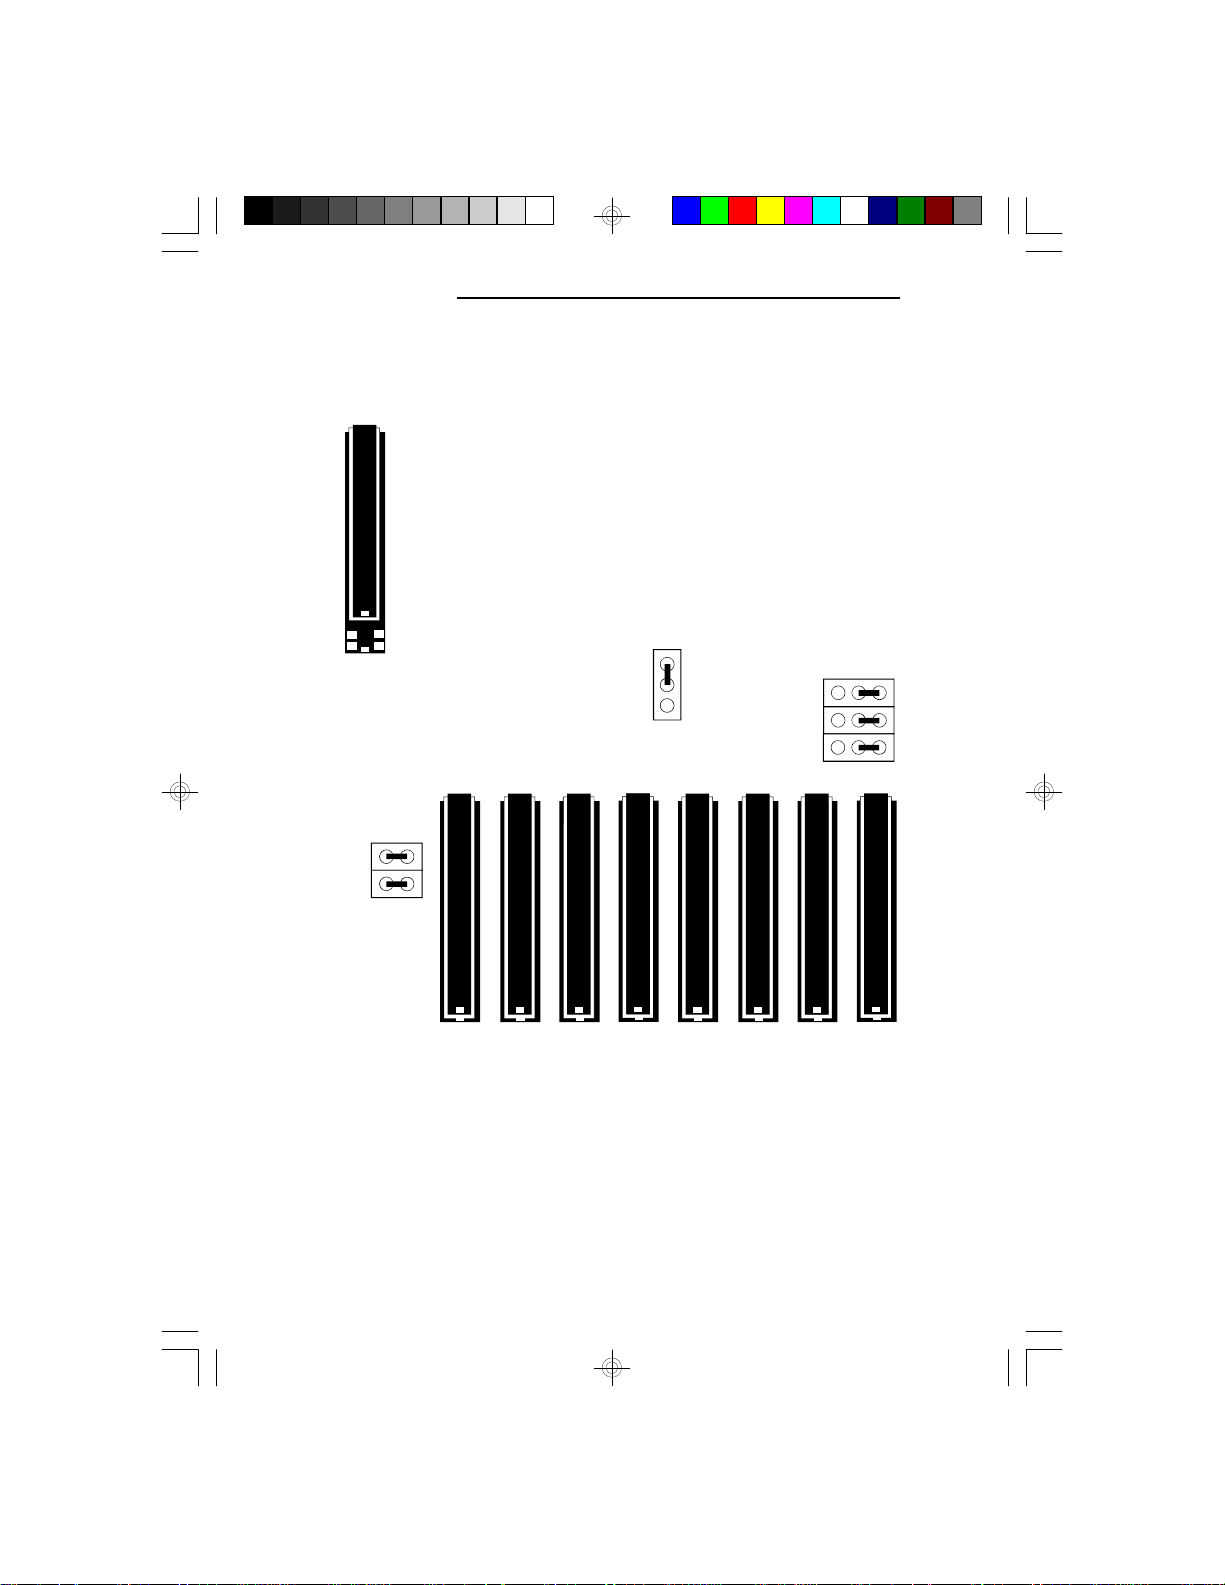
PCI/ISA System Board
1MB Cache SRAM
5V/3.3V Mixed Voltage SRAM
U23
(5V SRAM)
32Kx8 (TAG)
JP22
JP12
1
2
3
JP13
JP14
2
31
JP15
24
JP23
128Kx8
128Kx8
128Kx8
128Kx8
128Kx8
128Kx8
128Kx8
128Kx8
U32U35 U34 U33 U31 U30 U29 U28
Page 33
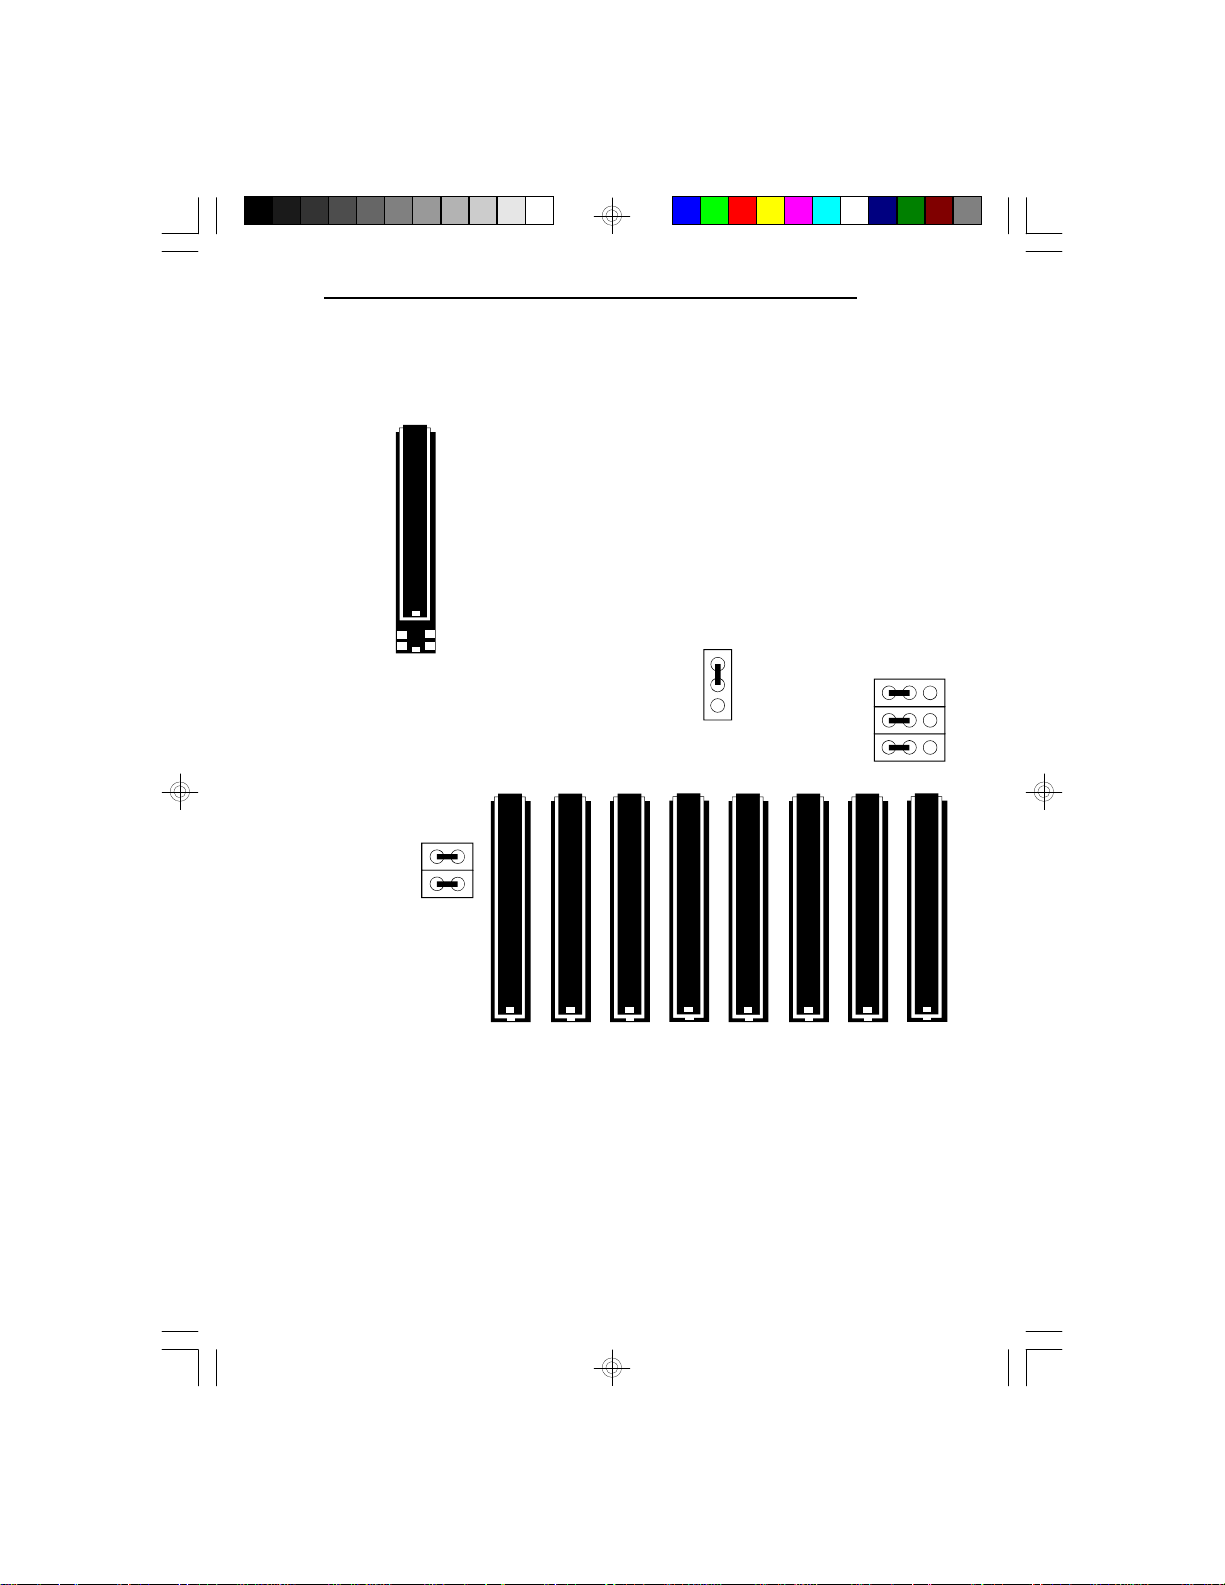
1MB Cache SRAM
3.3V SRAM
(5V SRAM)
32Kx8 (TAG)
JP22
U23
JP12
G586OPC/E
1
2
3
JP13
JP14
2
31
JP15
JP23
64Kx8
64Kx8
64Kx8
64Kx8
64Kx8
64Kx8
64Kx8
64Kx8
U32U35 U34 U33 U31 U30 U29 U28
25
Page 34
PCI/ISA System Board
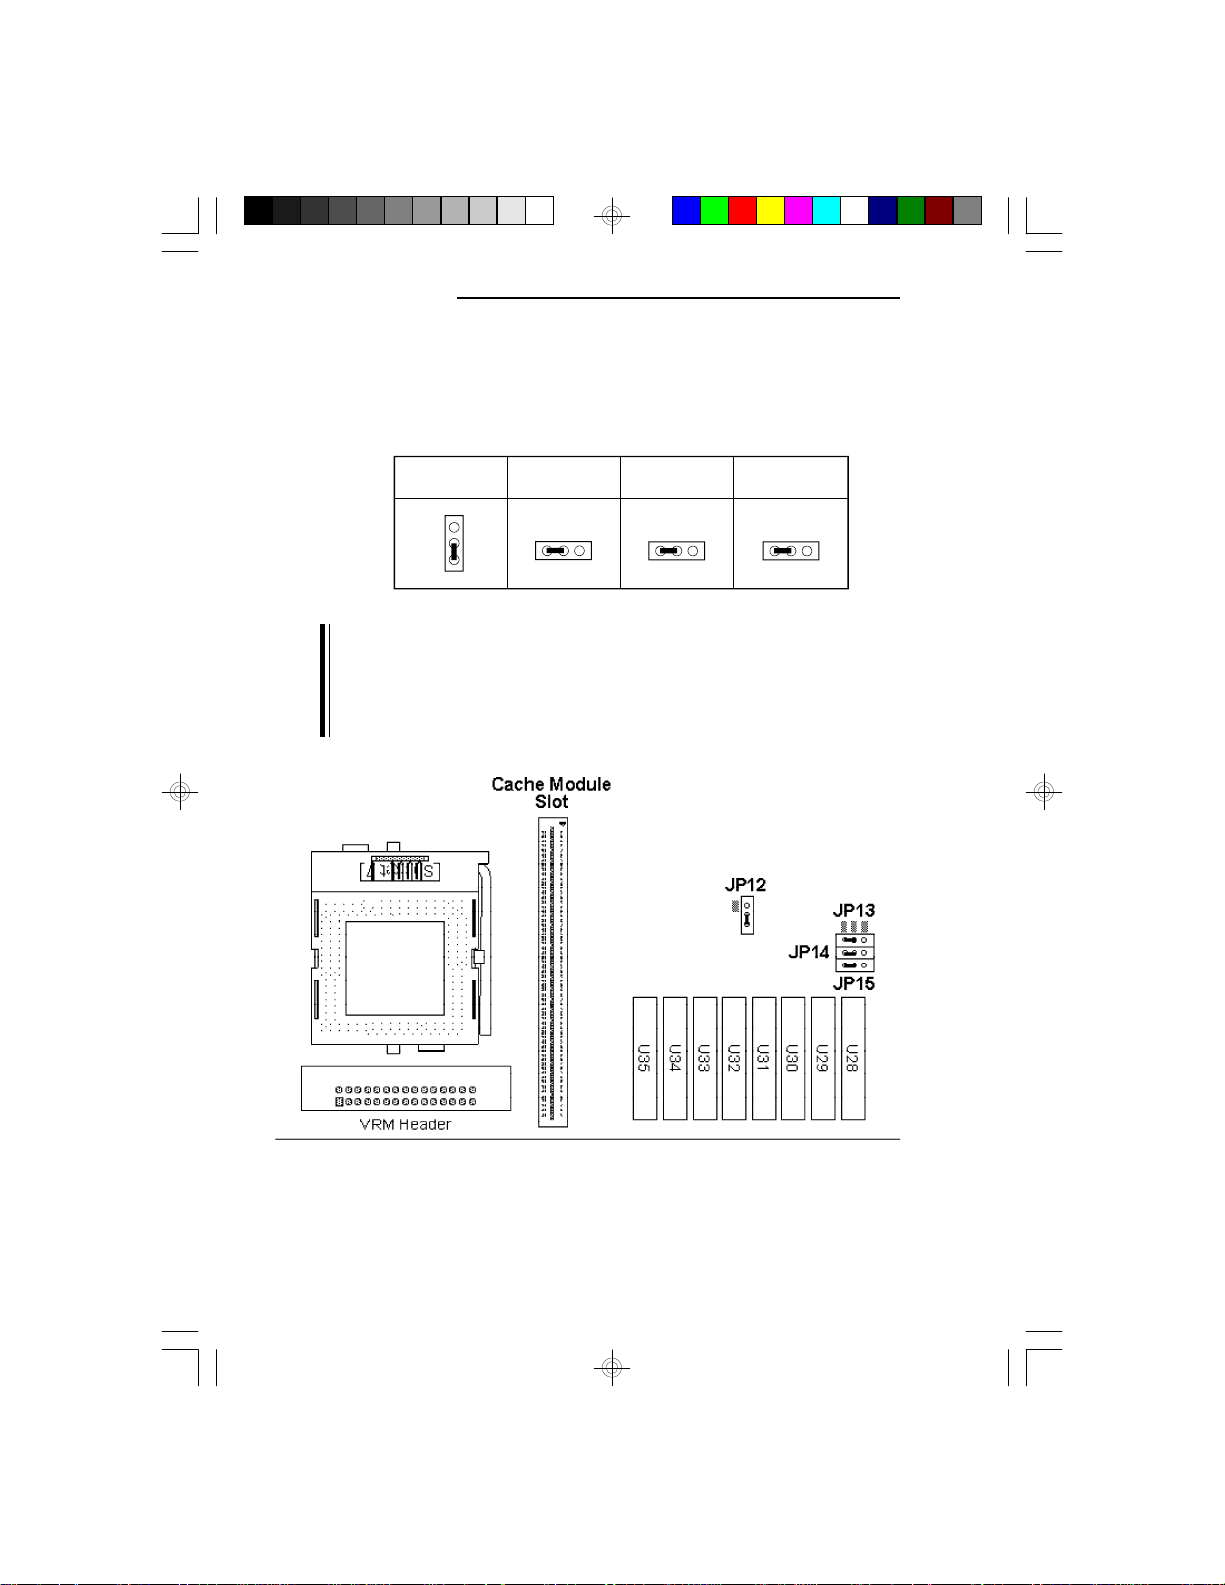
Installing the Synchronous Cache Module
Jumper Settings
JP12
1
2
3
JP13
JP14 JP15
31 2
31 2
31 2
Note:
Jumpers JP22 and JP23 are used to select the Level 2
asynchronous cache size. These two jumpers can be
ignored when installing the optional synchronous cache
module.
26
Page 35
Installation
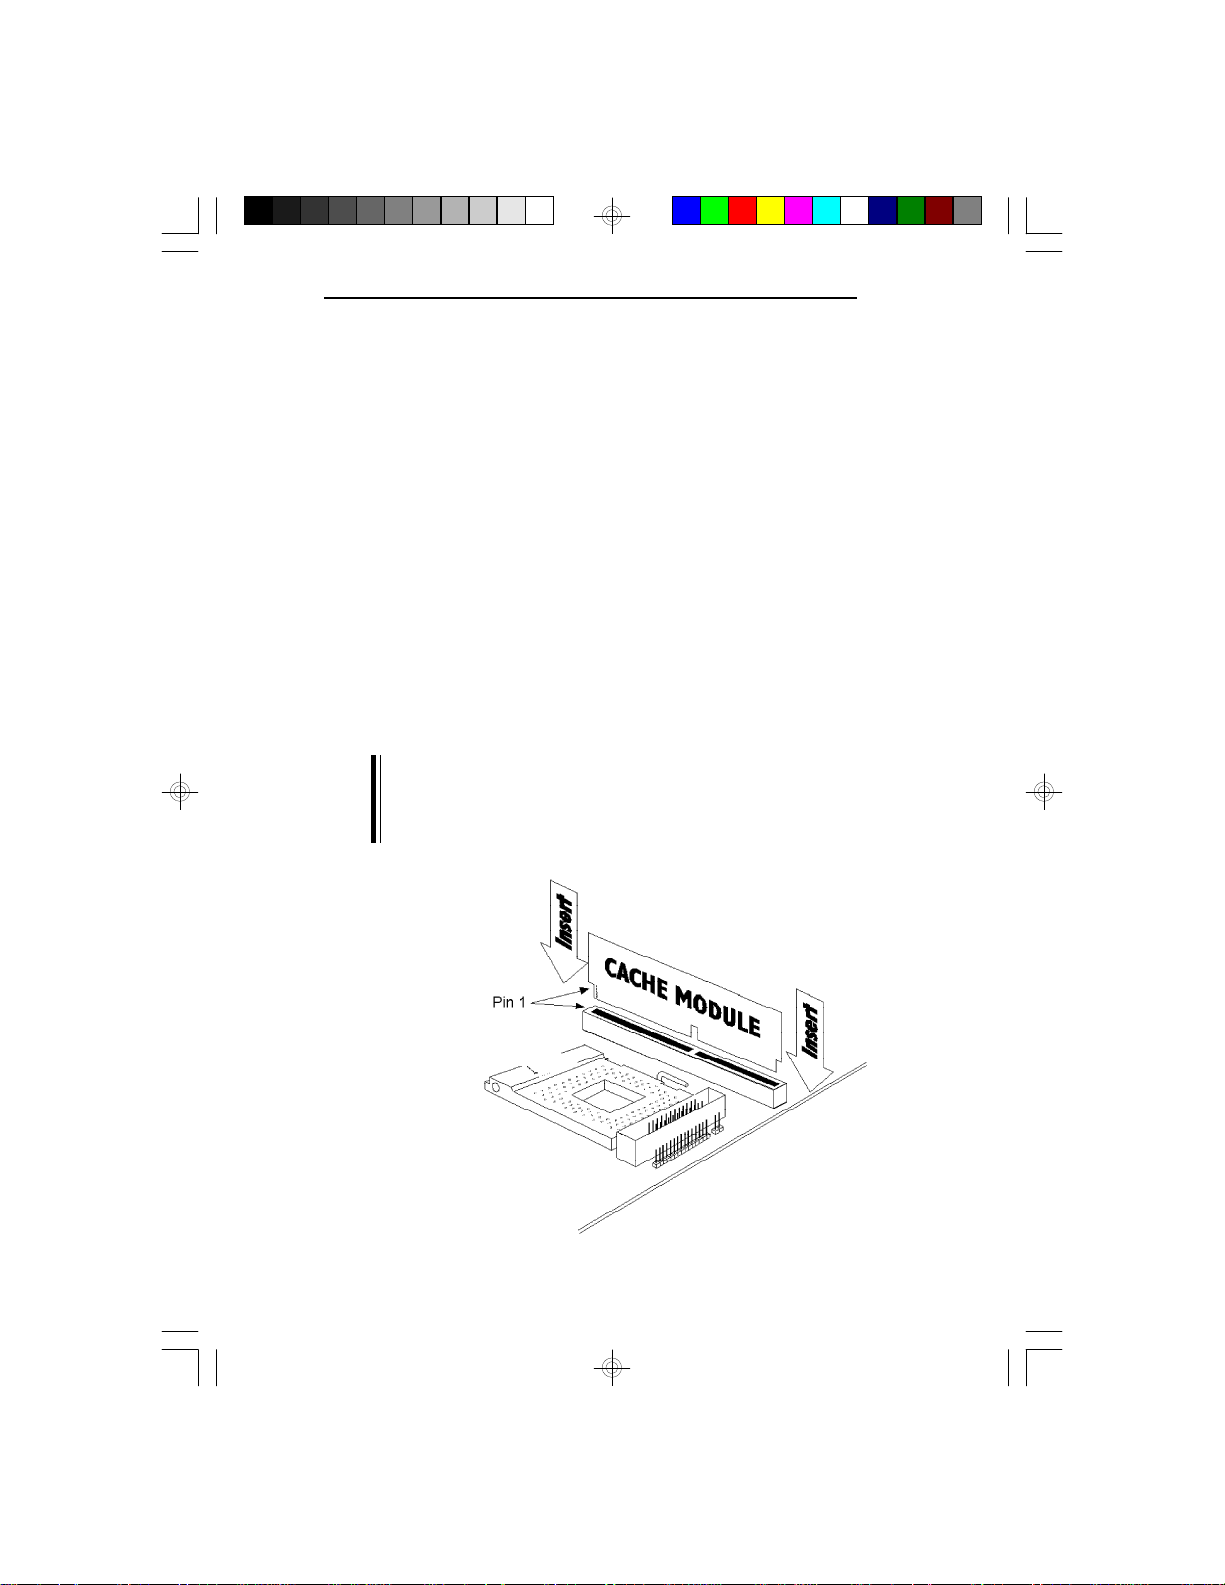
1. Before installing the optional synchronous pipeline burst
cache module, make sure that:
- the cache chips have been removed from the
SRAM sockets U23 (Tag RAM) and U28-U35;
- Jumpers JP12-JP15 have been set properly (page
26).
2. Locate the 160-pin cache module slot on the system
board. Position the cache module above the slot. Make
sure pin 1 of the cache module is aligned with pin 1 of
the slot. Carefully slide the module into the slot. Press
firmly on the top of it to seat it properly.
Note:
With the optional synchronous pipeline burst cache
module installed in the cache module slot, the length of
the add-in card in PCI Slot 2 is limited to 124,65 mm.
G586OPC/E
27
Page 36
PCI/ISA System Board
3. Once the synchronous cache module has been installed,
you should make the following modifications in the
“Chipset Features Setup” menu of the Award BIOS
CMOS Setup Utility.
1. SRAM Type: Sync
2. SYNC SRAM Support: Pipeline
3. Cache Read Burst: 3-1-1-1
4. Cache Write Burst: 3-1-1-1 or 4-1-1-1
28
Page 37
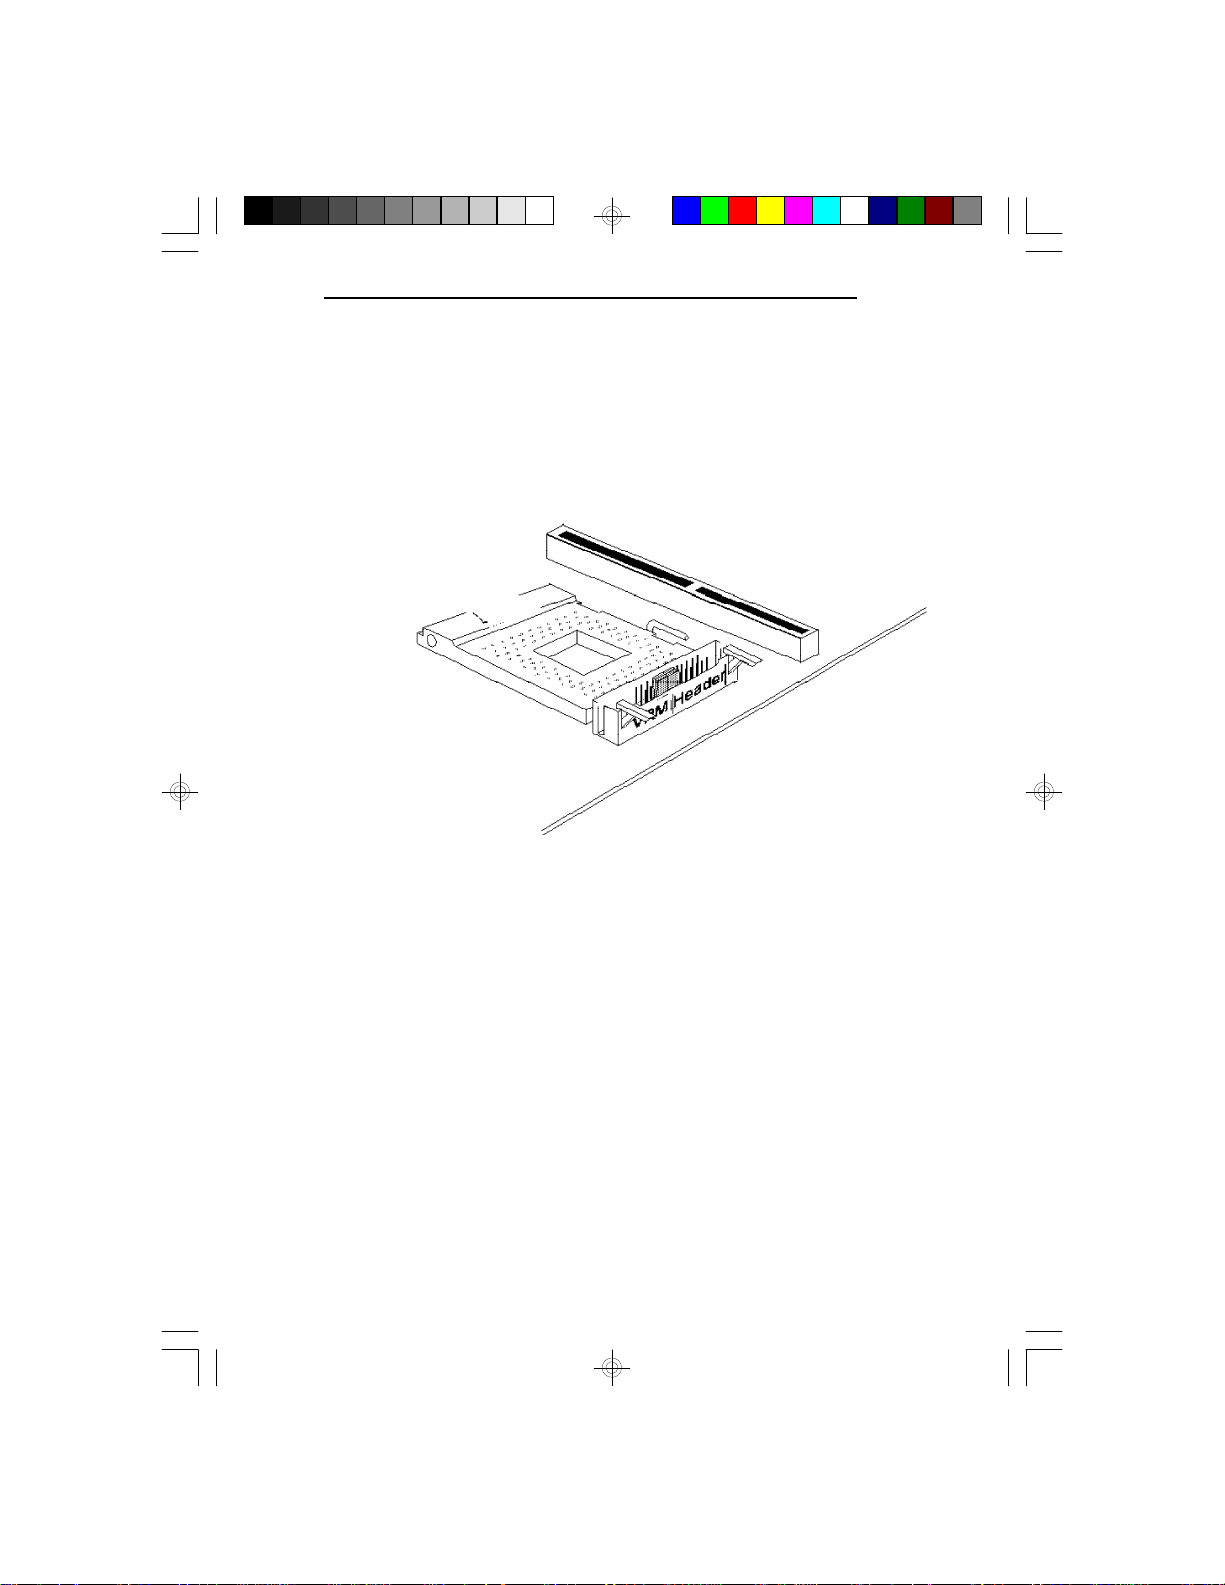
VRM Header
Your G586OPC system board is equipped with a VRM
(Voltage Regulation Module) header shown below. It
allows you to upgrade to future low-voltage CPUs by
installing a Voltage Regulation Module.
G586OPC/E
VRM Header on the System Board
VRM Header and 3.3V Pentium Processor
When using a 3.3V Pentium processor, pins 4-5, 6-7,
19-20 and 21-22 of the VRM header must be set to On.
These settings are presented on the next page.
29
Page 38
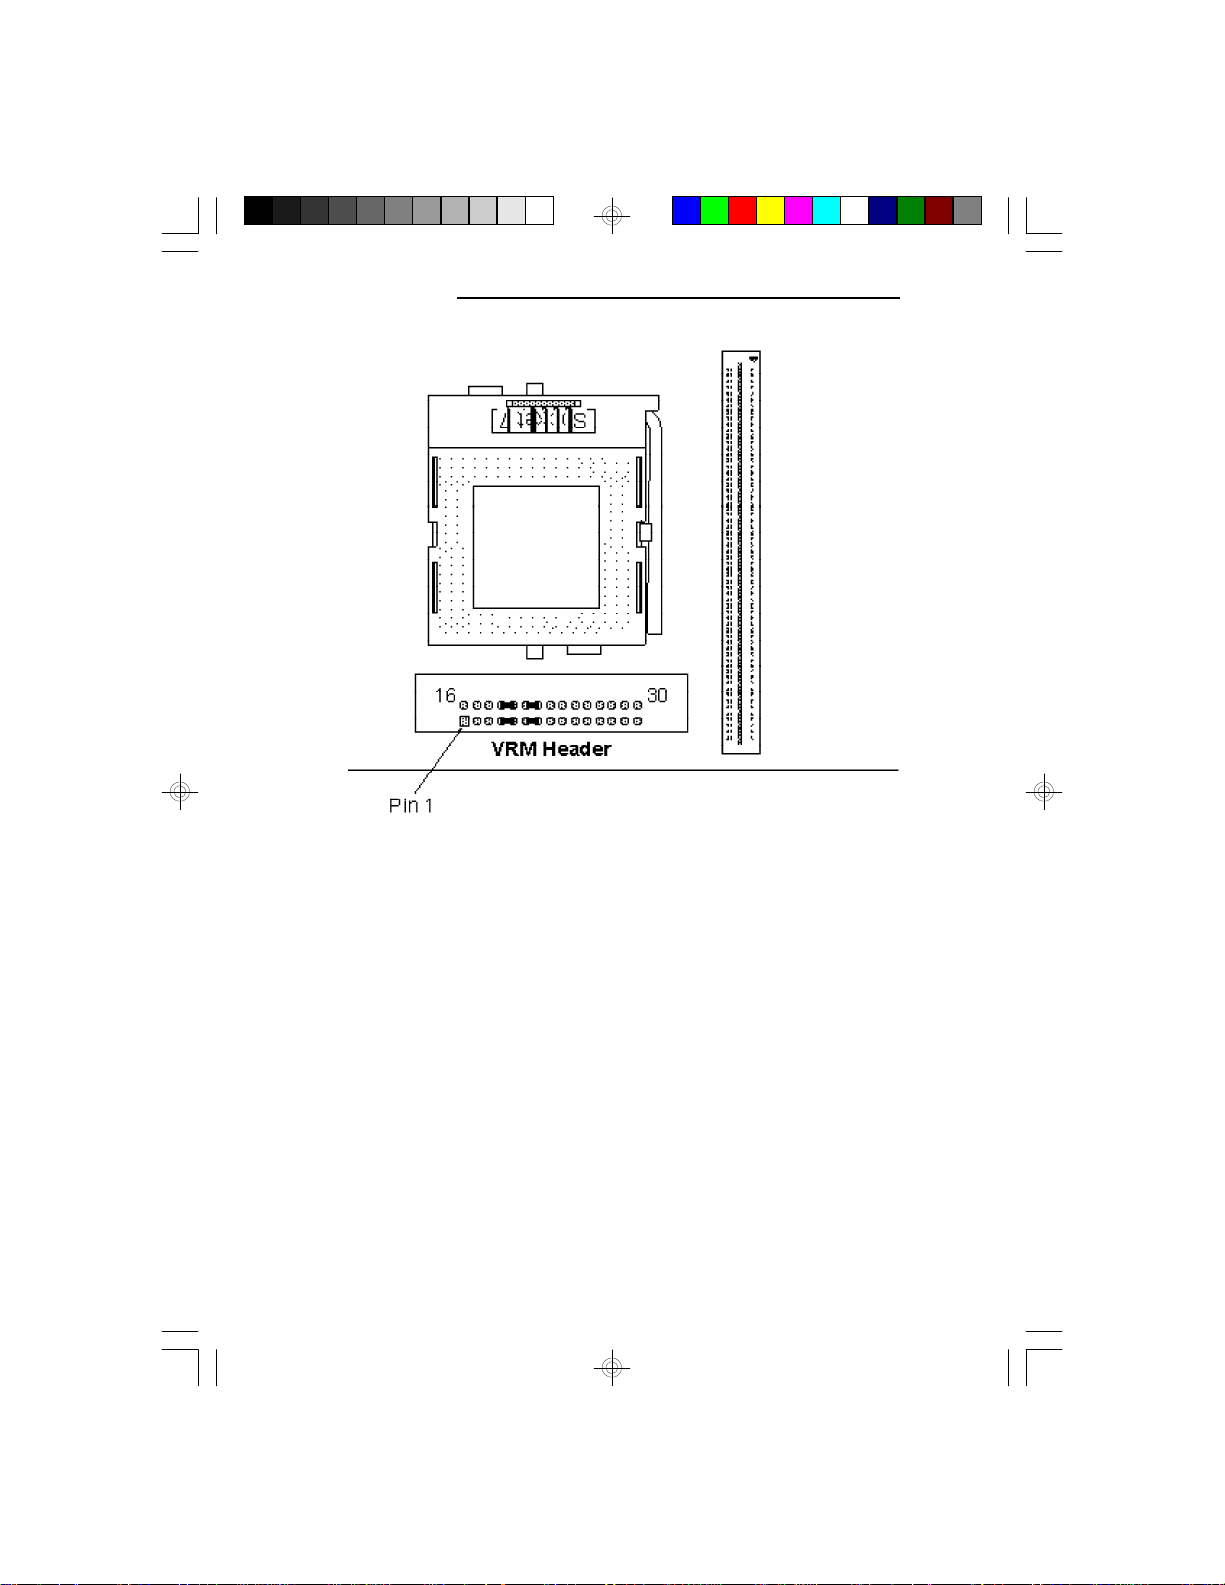
PCI/ISA System Board
Pins 4-5, 6-7, 19-20 and 21-22 are set to On
VRM Header and Future Low-Voltage CPUs
The types of VRM supported and installation procedures
will be described in a future edition of the G586OPC
manual.
30
Page 39
CPU Installation
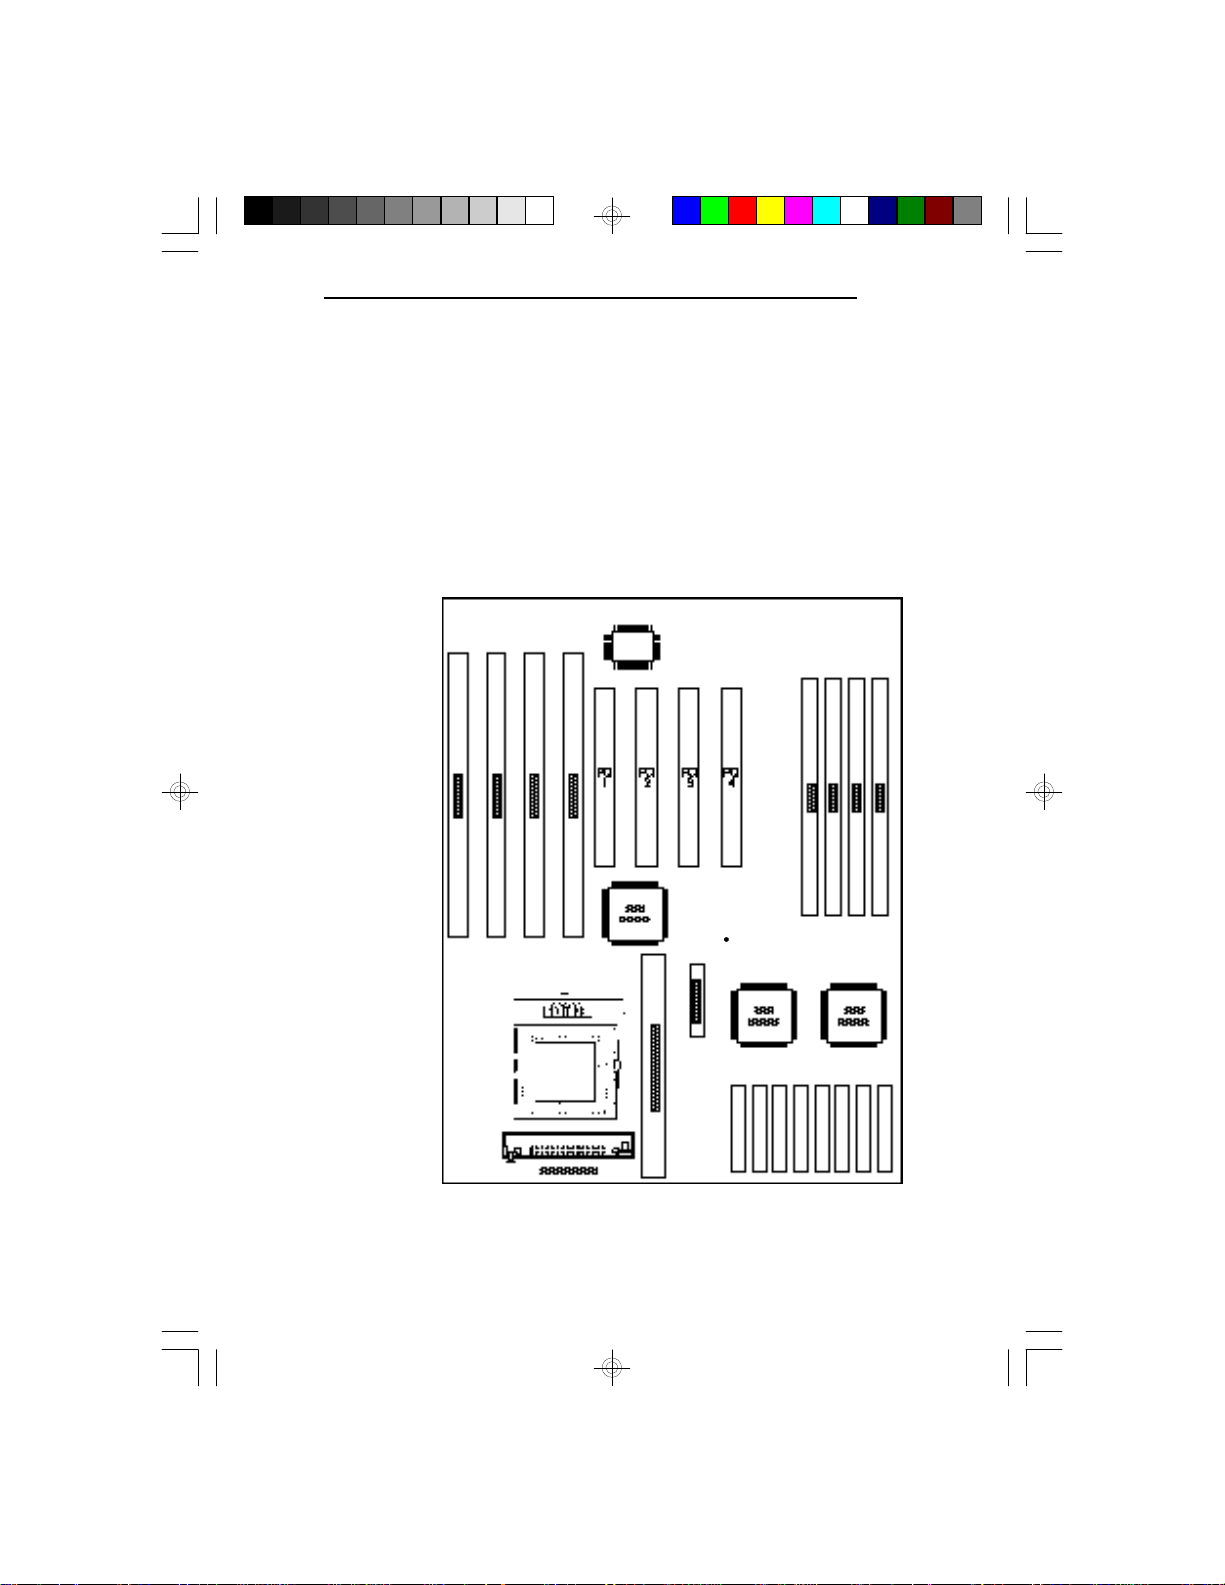
The G586OPC is equipped with a 321-pin Zero
Insertion Force (ZIF) socket at location U26 of the
system board. The ZIF socket allows for easy
installation of upgrade CPUs as your system needs
grow. Make sure all jumpers are set correctly before
applying power, or you may damage the CPU or system
board.
G586OPC/E
Pin 1 of the ZIF socket
U26
Location of the ZIF Socket on the System Board
31
Page 40
PCI/ISA System Board
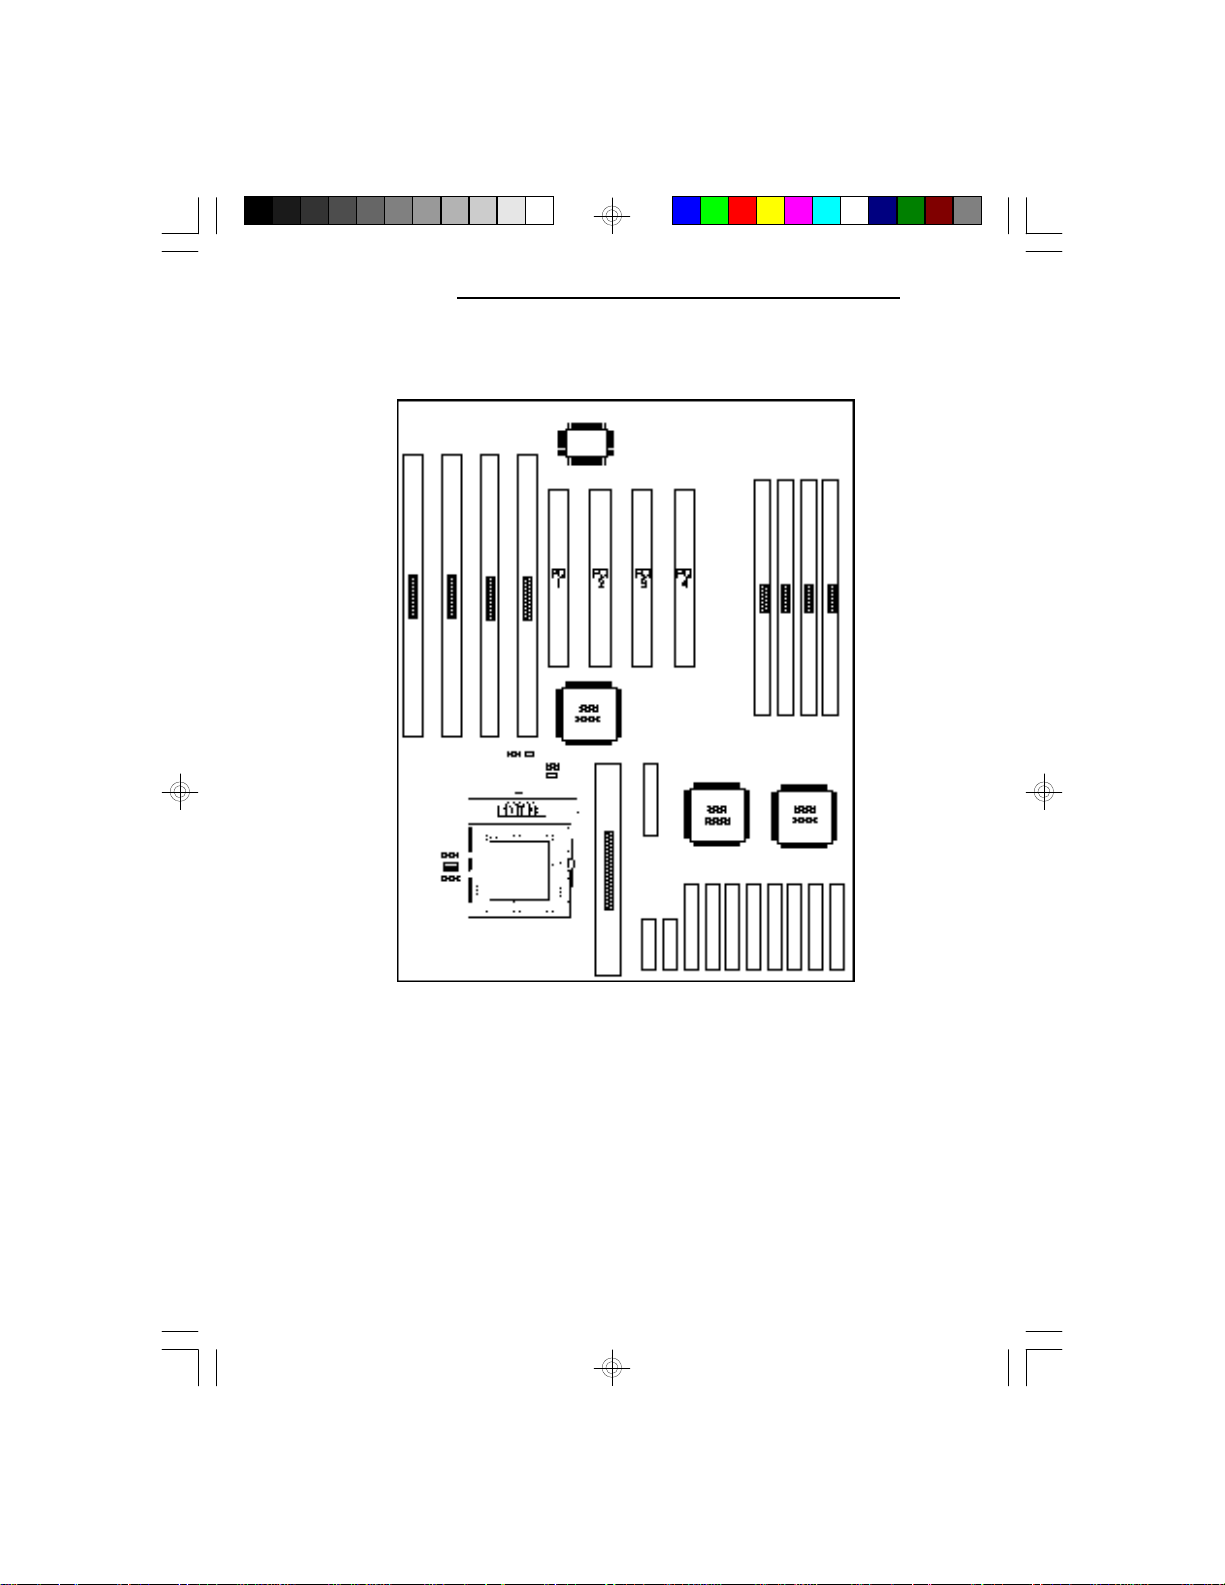
Jumper Settings for CPU
32
Locations of Jumpers JP7, JP8, JP16 and JP17
on the G586OPC System Board
Page 41
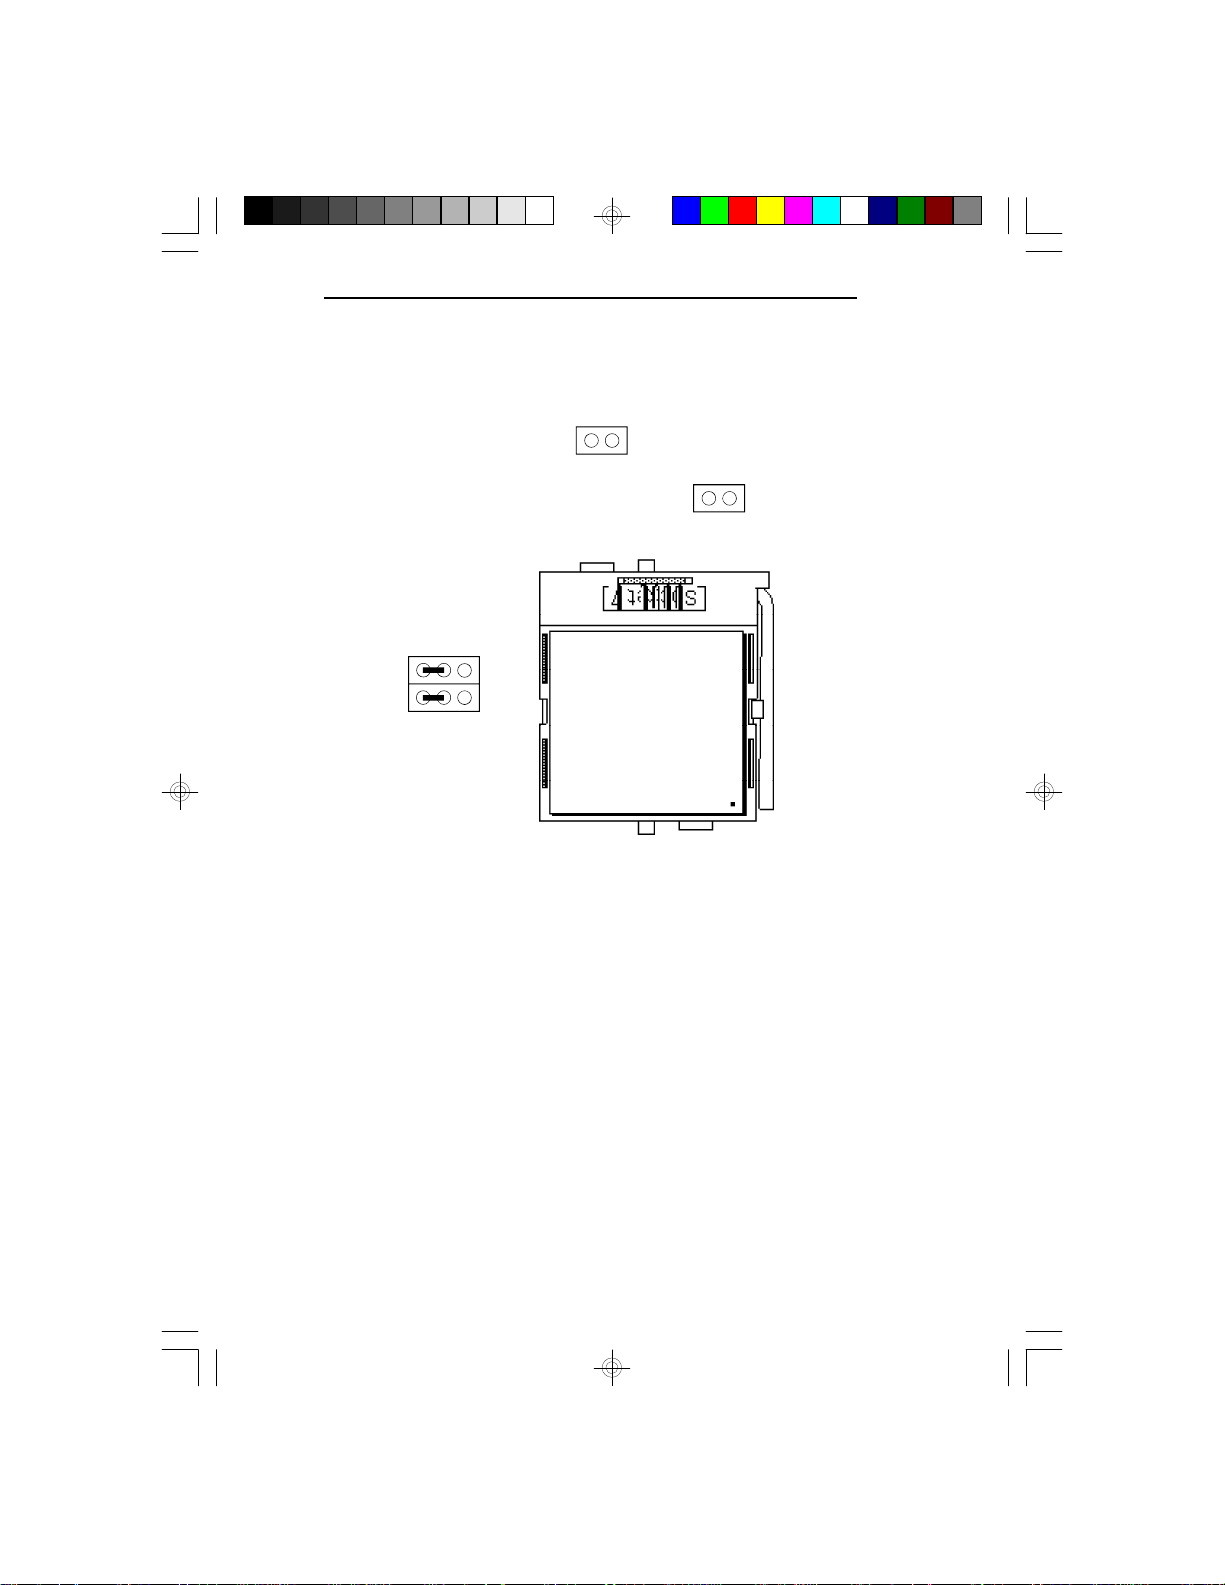
3.3V Pentium Processor (75MHz)
System (External) Bus Speed: 50MHz
JP7
JP16
321
G586OPC/E
JP8
JP17
3.3V Pentium
Processor
Pin 1
33
Page 42
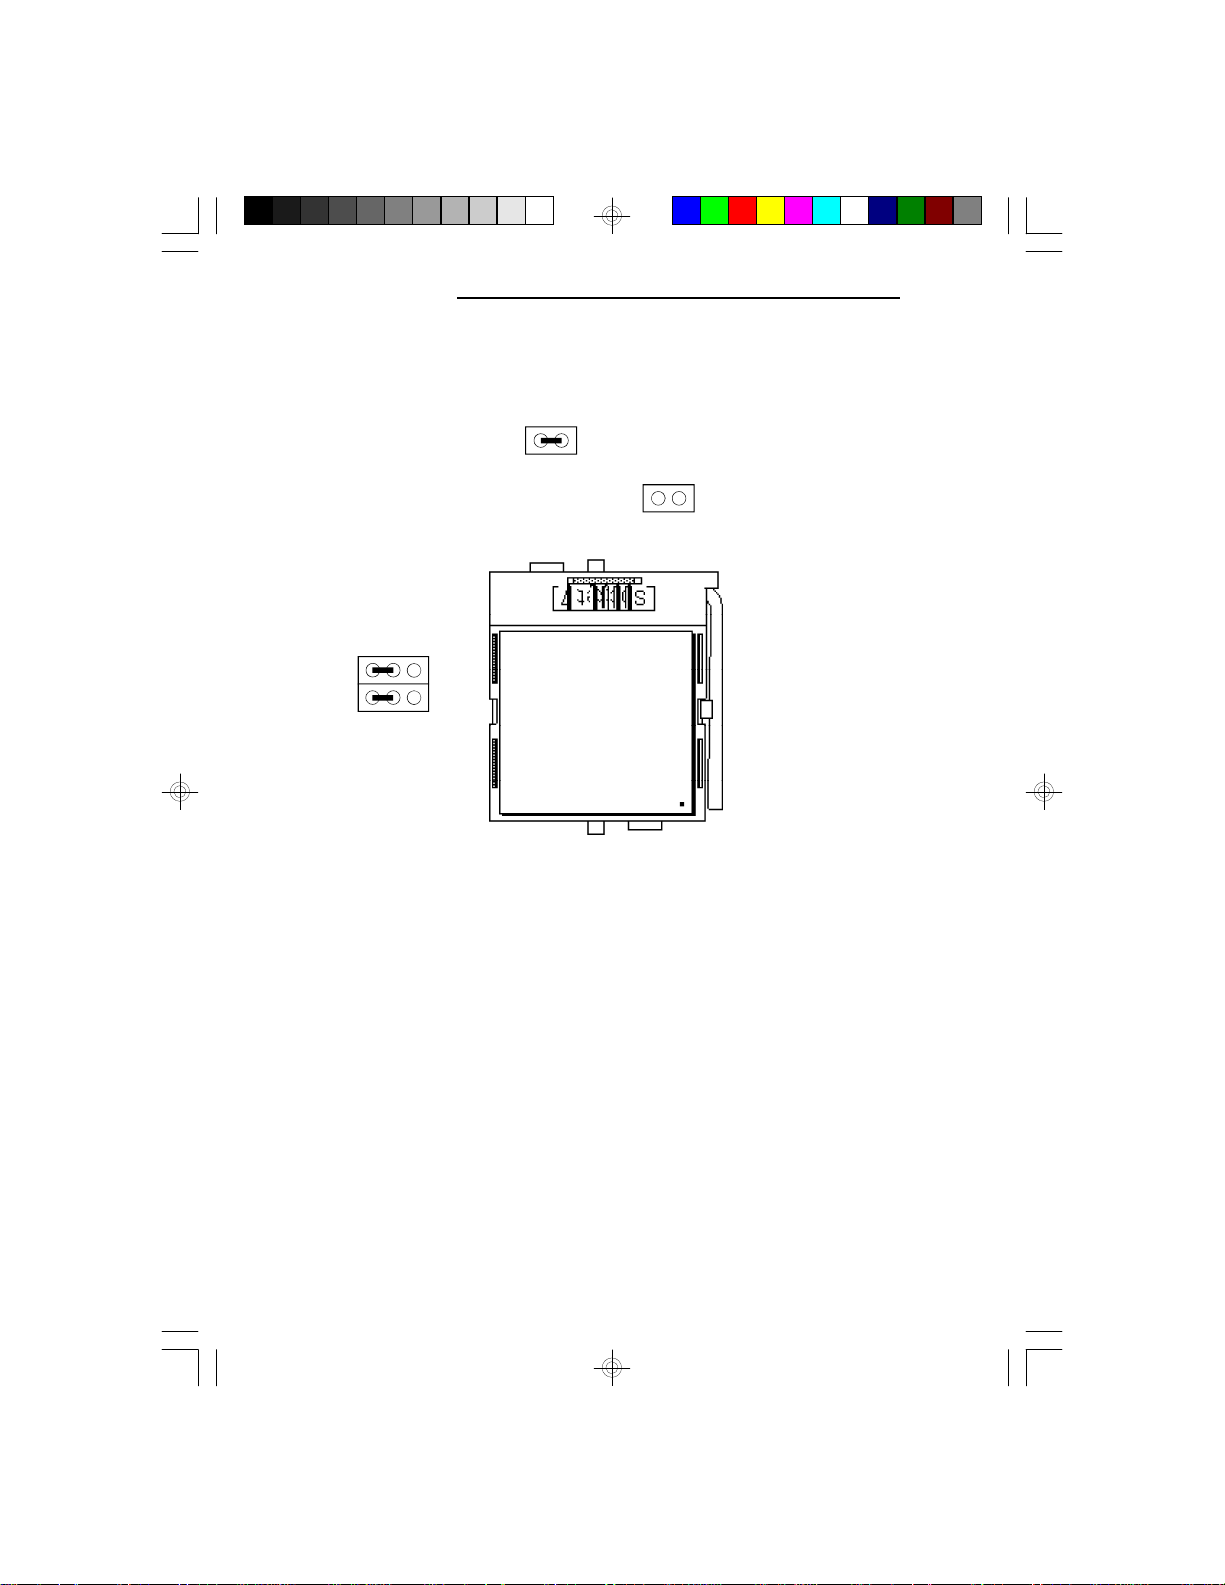
PCI/ISA System Board
3.3V Pentium Processor (90MHz) *
System (External) Bus Speed: 60MHz
JP7
JP16
321
JP8
JP17
* Default Setting
34
3.3V Pentium
Processor
Pin 1
Page 43
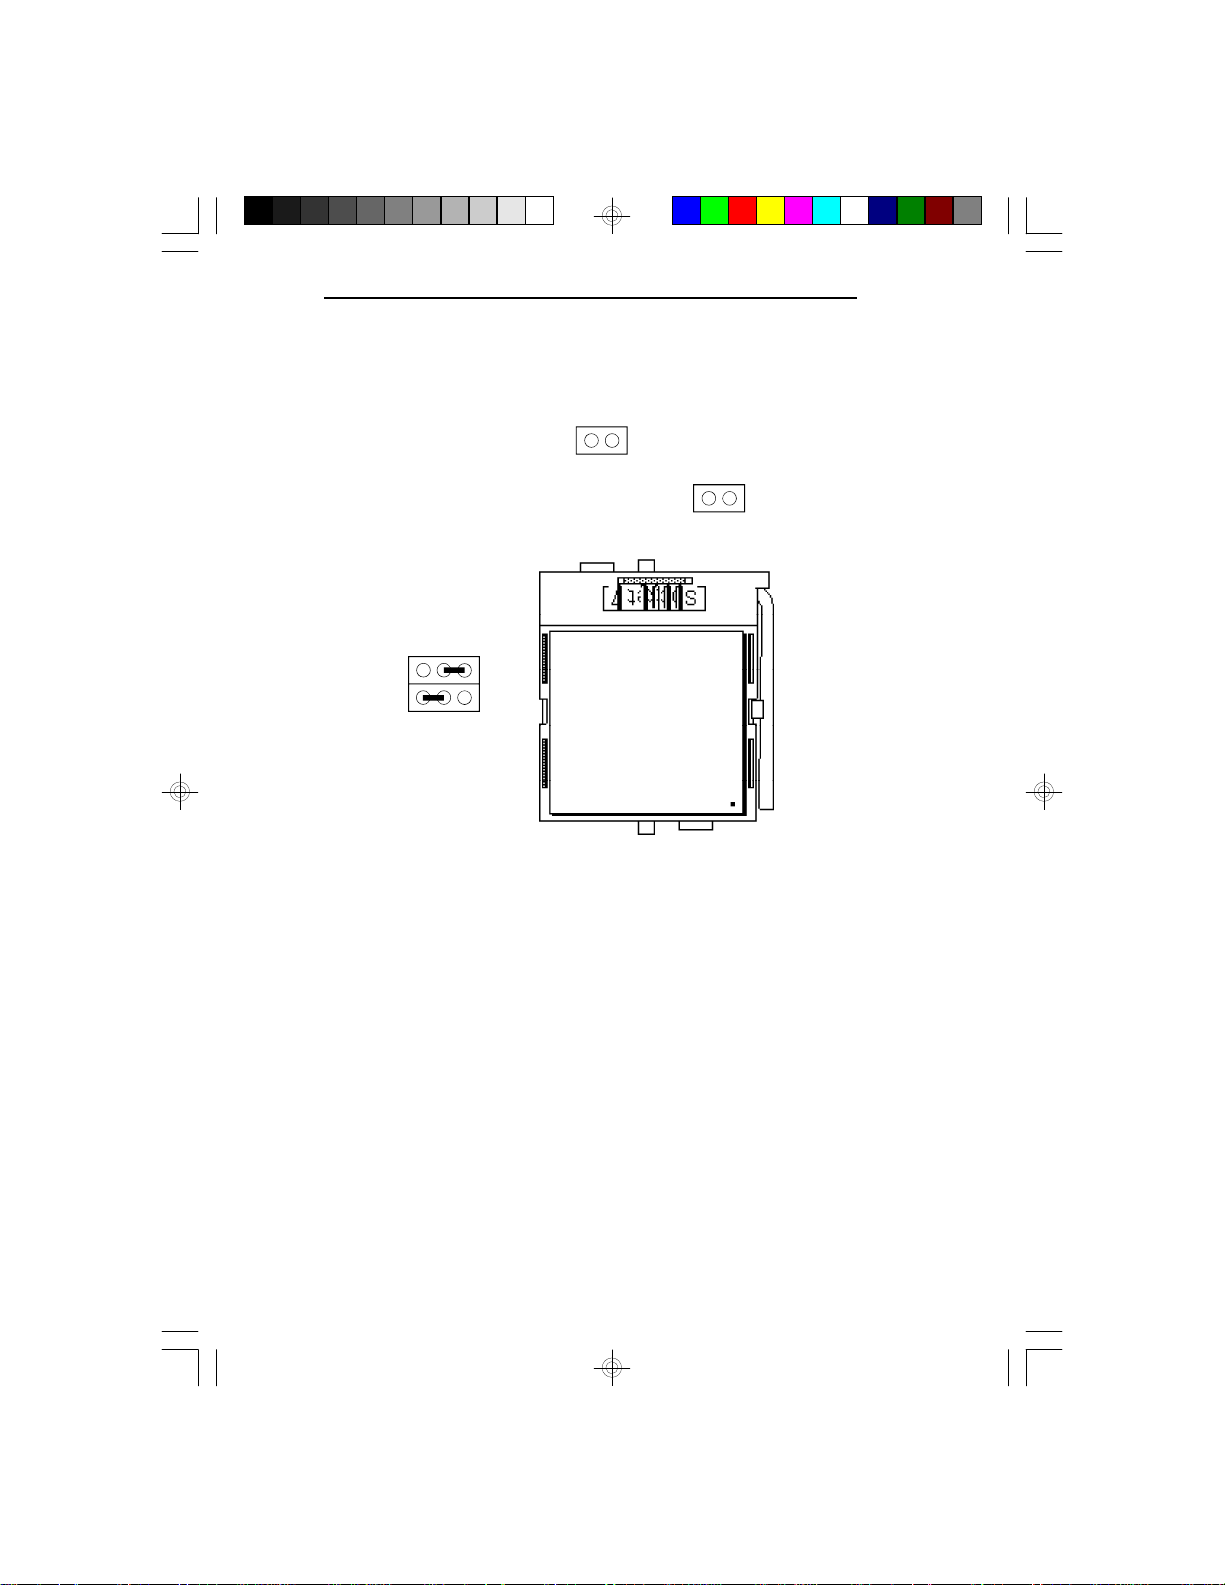
3.3V Pentium Processor (100MHz)
System (External) Bus Speed: 50MHz
JP7
JP16
321
G586OPC/E
JP8
JP17
3.3V Pentium
Processor
Pin 1
35
Page 44
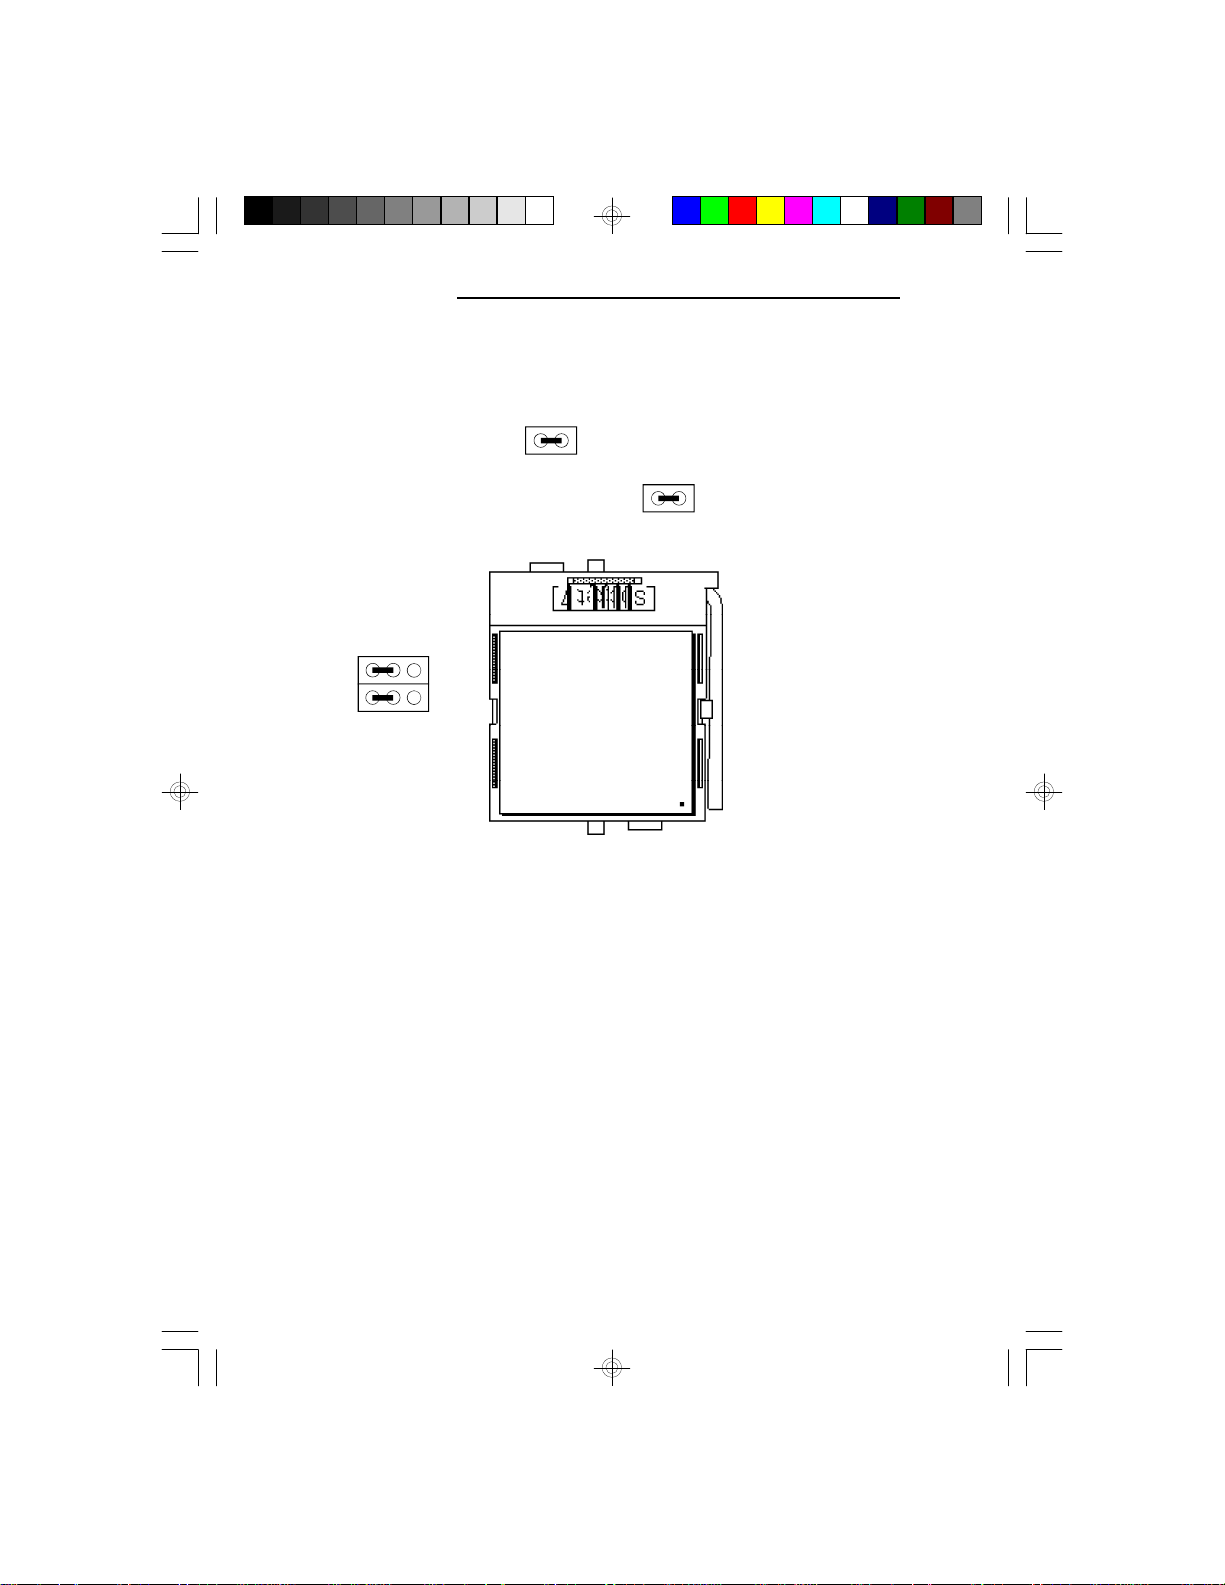
PCI/ISA System Board
3.3V Pentium Processor (100MHz)
System (External) Bus Speed: 66MHz
JP7
JP16
321
JP8
36
JP17
3.3V Pentium
Processor
Pin 1
Page 45
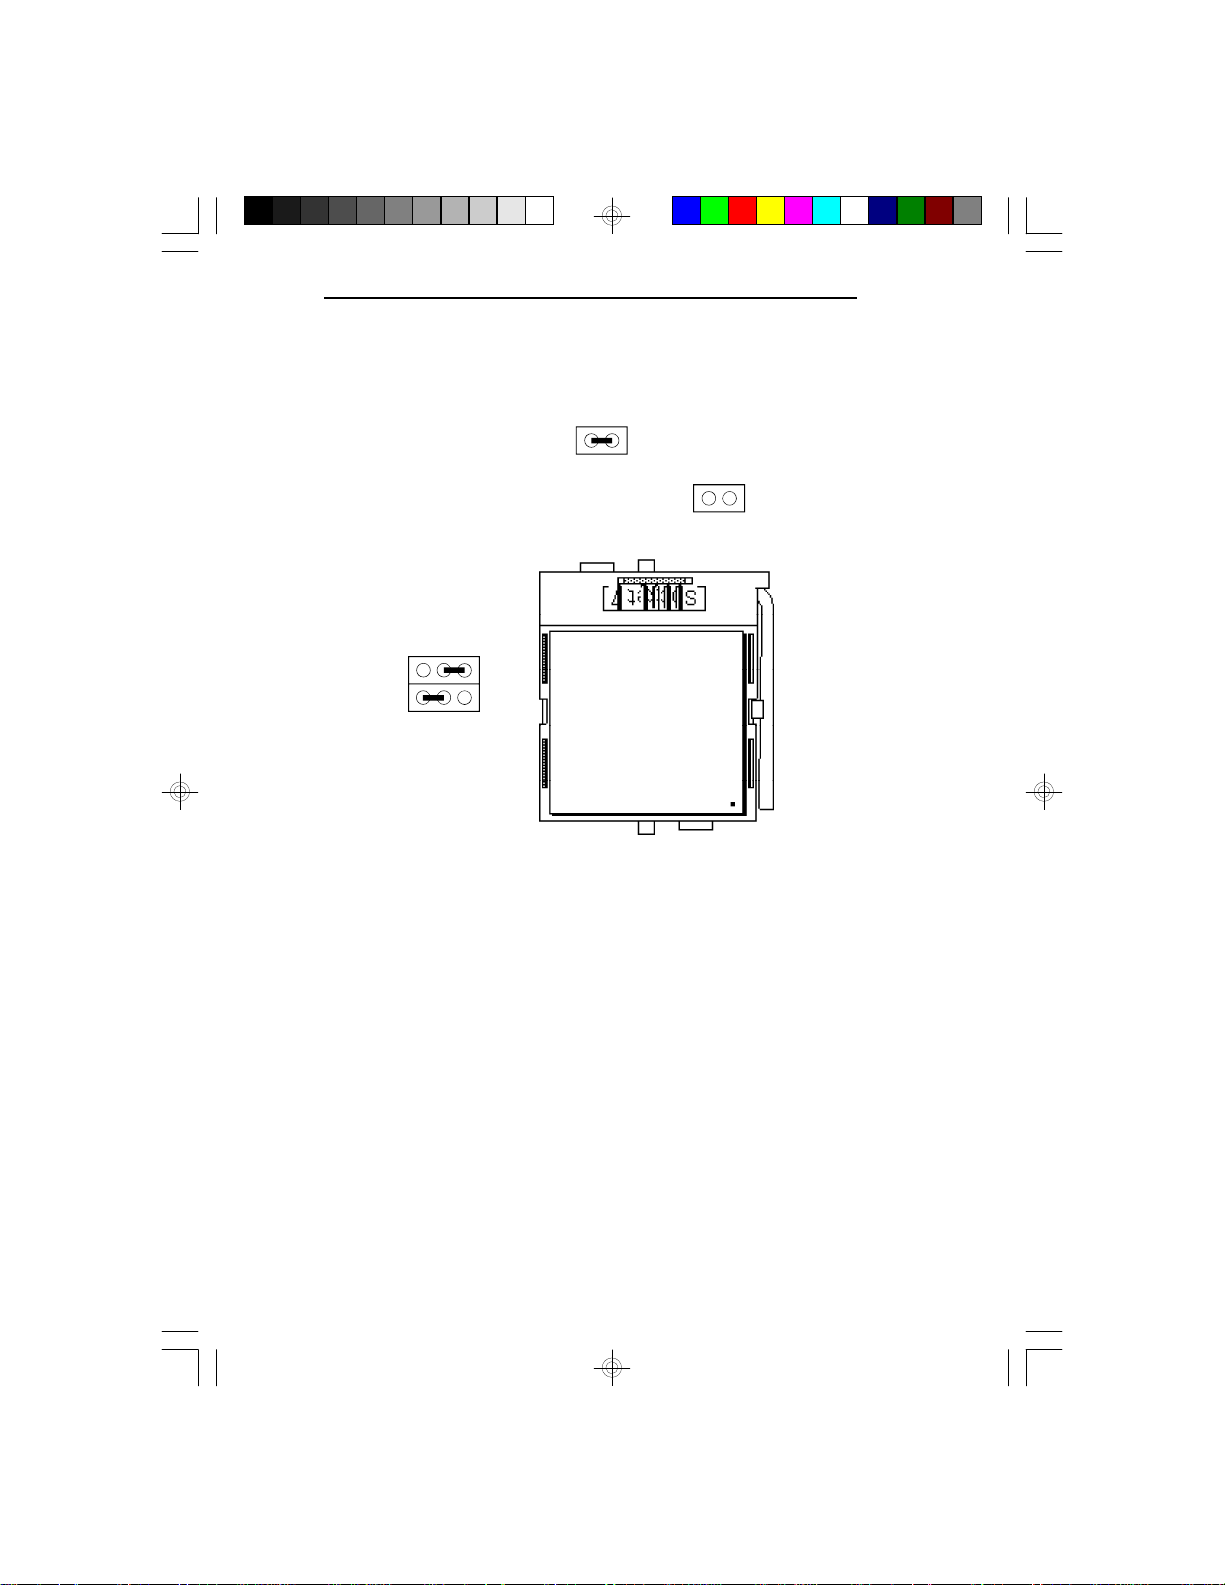
3.3V Pentium Processor (120MHz)
System (External) Bus Speed: 60MHz
JP7
JP16
321
G586OPC/E
JP8
JP17
3.3V Pentium
Processor
Pin 1
37
Page 46
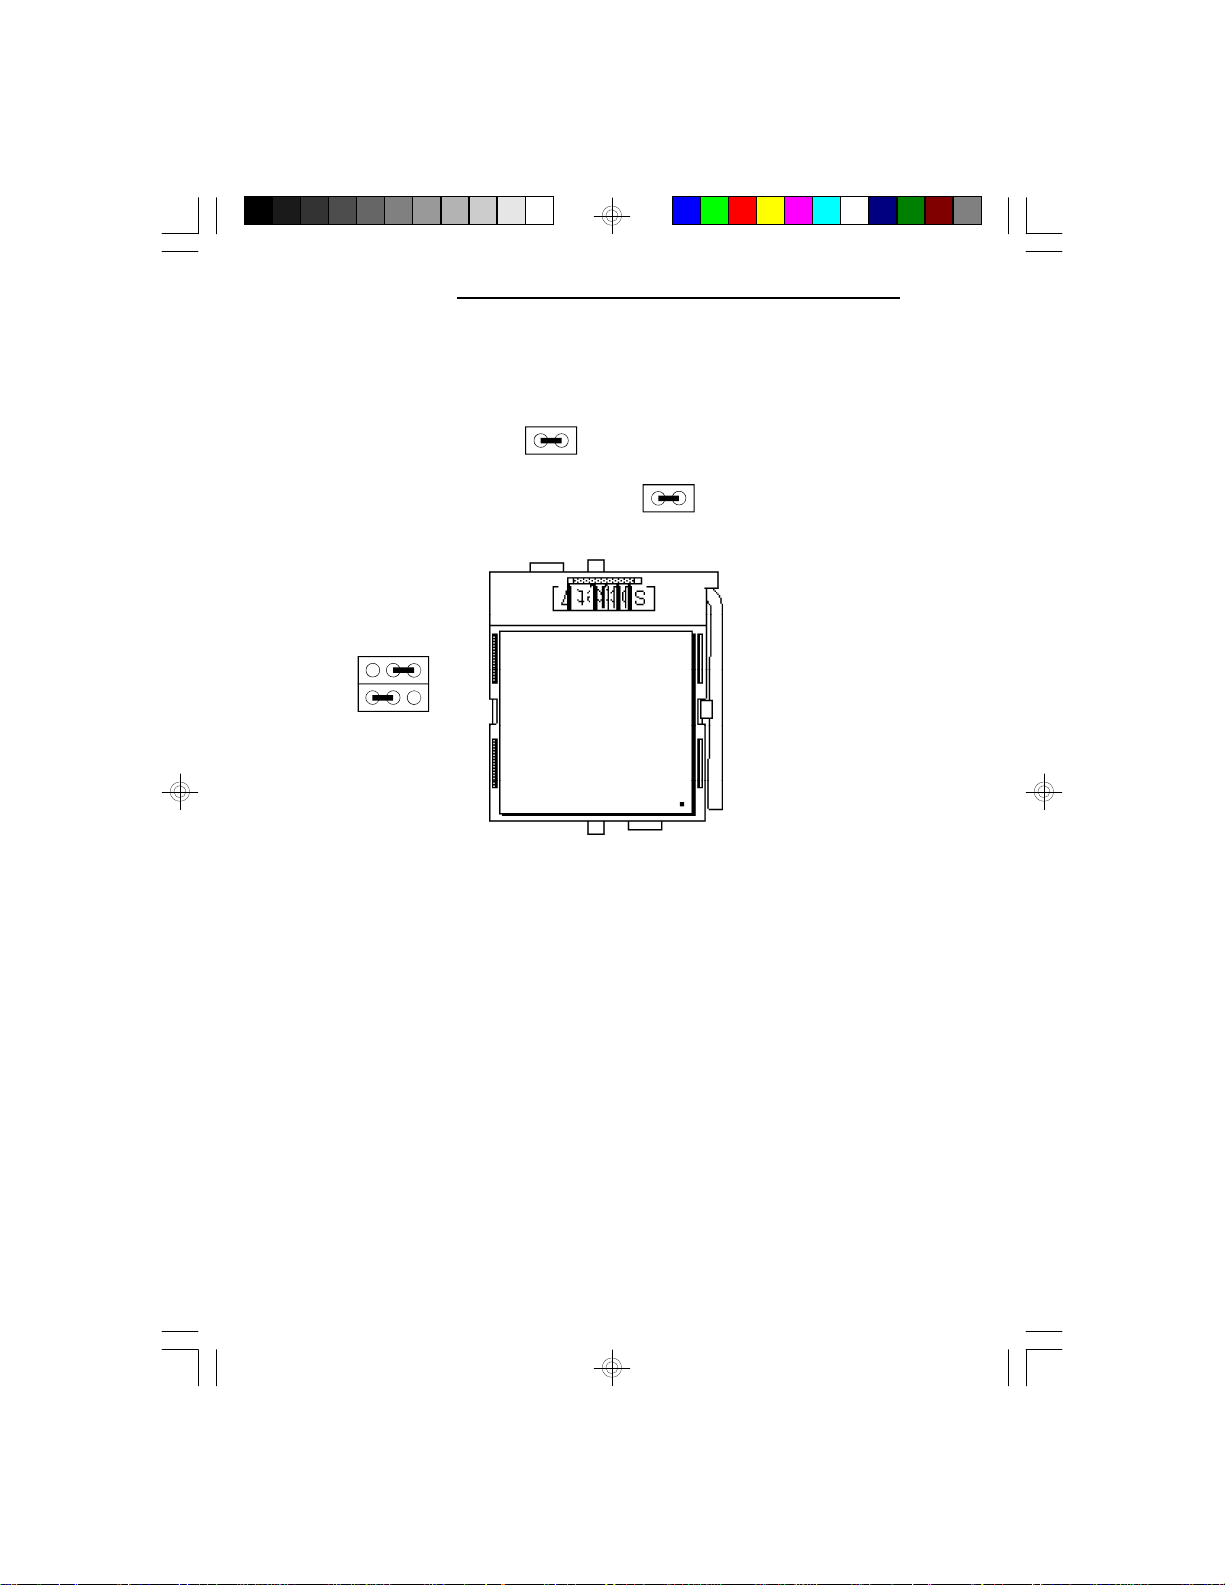
PCI/ISA System Board
3.3V Pentium Processor (133MHz)
System (External) Bus Speed: 66MHz
JP7
JP16
321
JP8
38
JP17
3.3V Pentium
Processor
Pin 1
Page 47
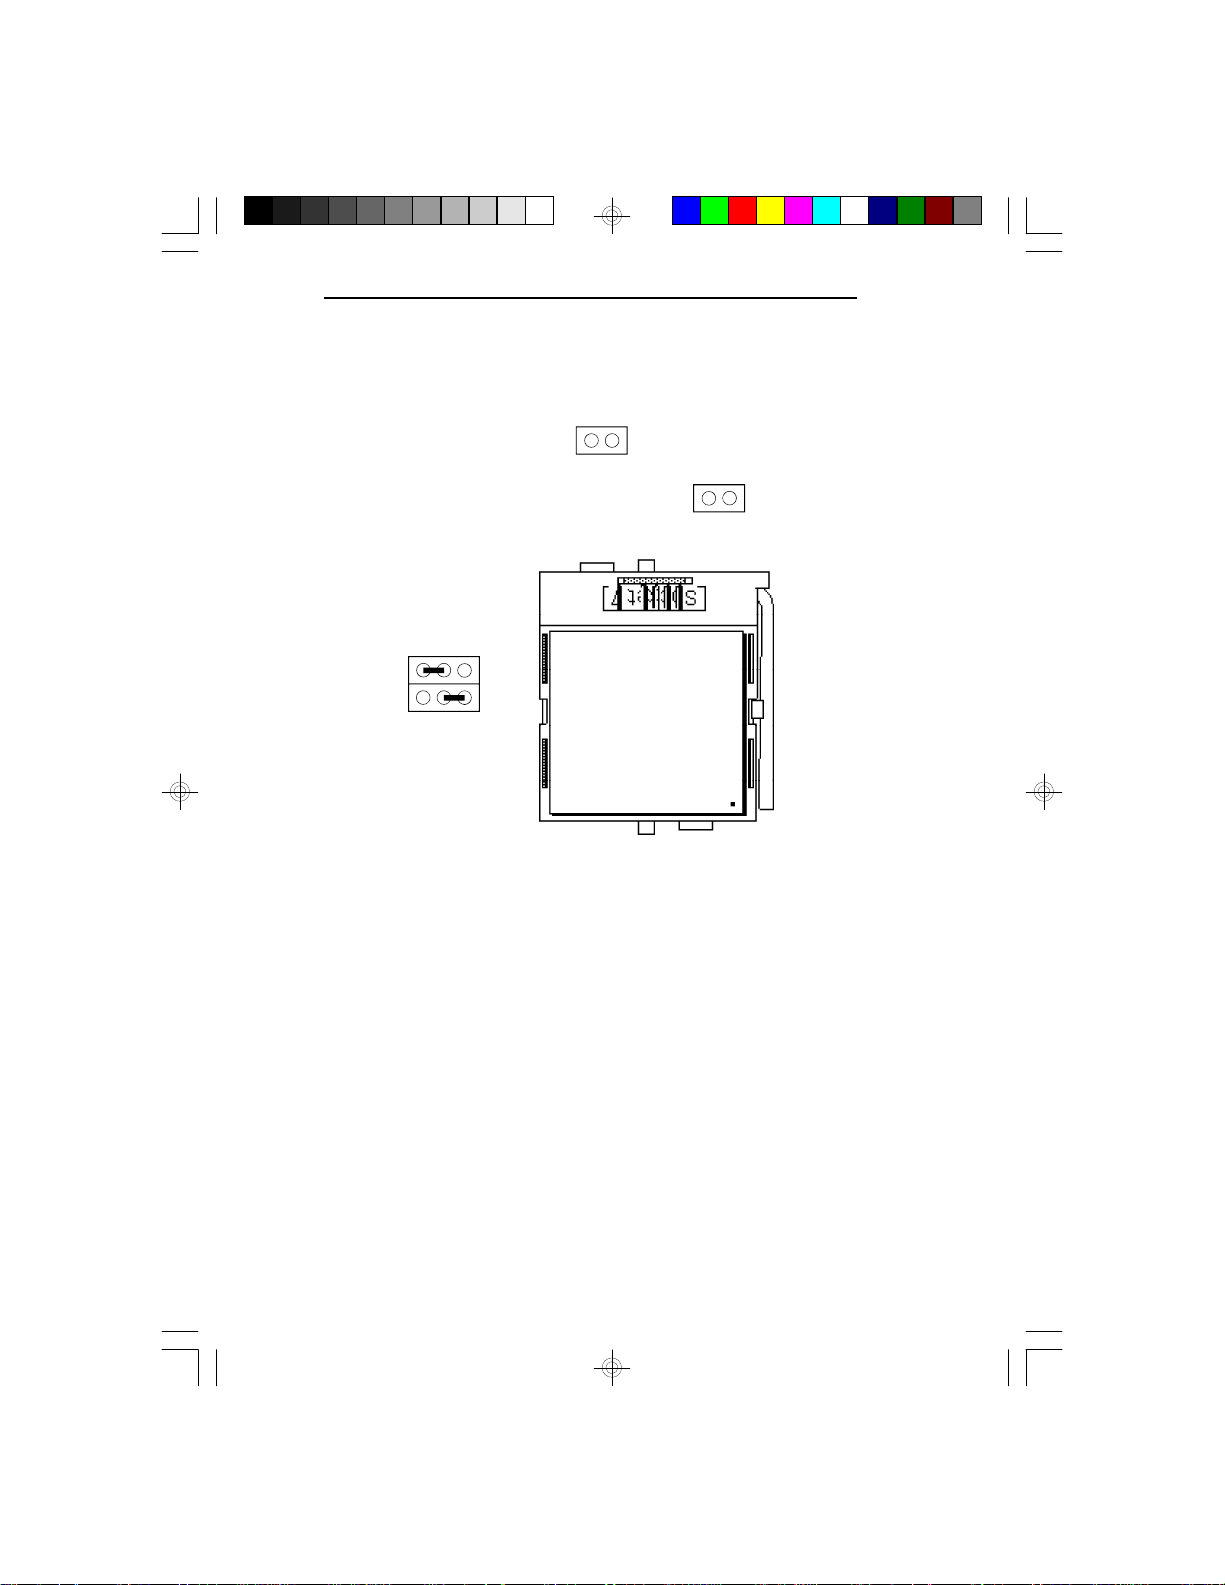
3.3V Pentium Processor (150MHz)
System (External) Bus Speed: 50MHz
JP7
JP16
321
G586OPC/E
JP8
JP17
3.3V Pentium
Processor
Pin 1
39
Page 48
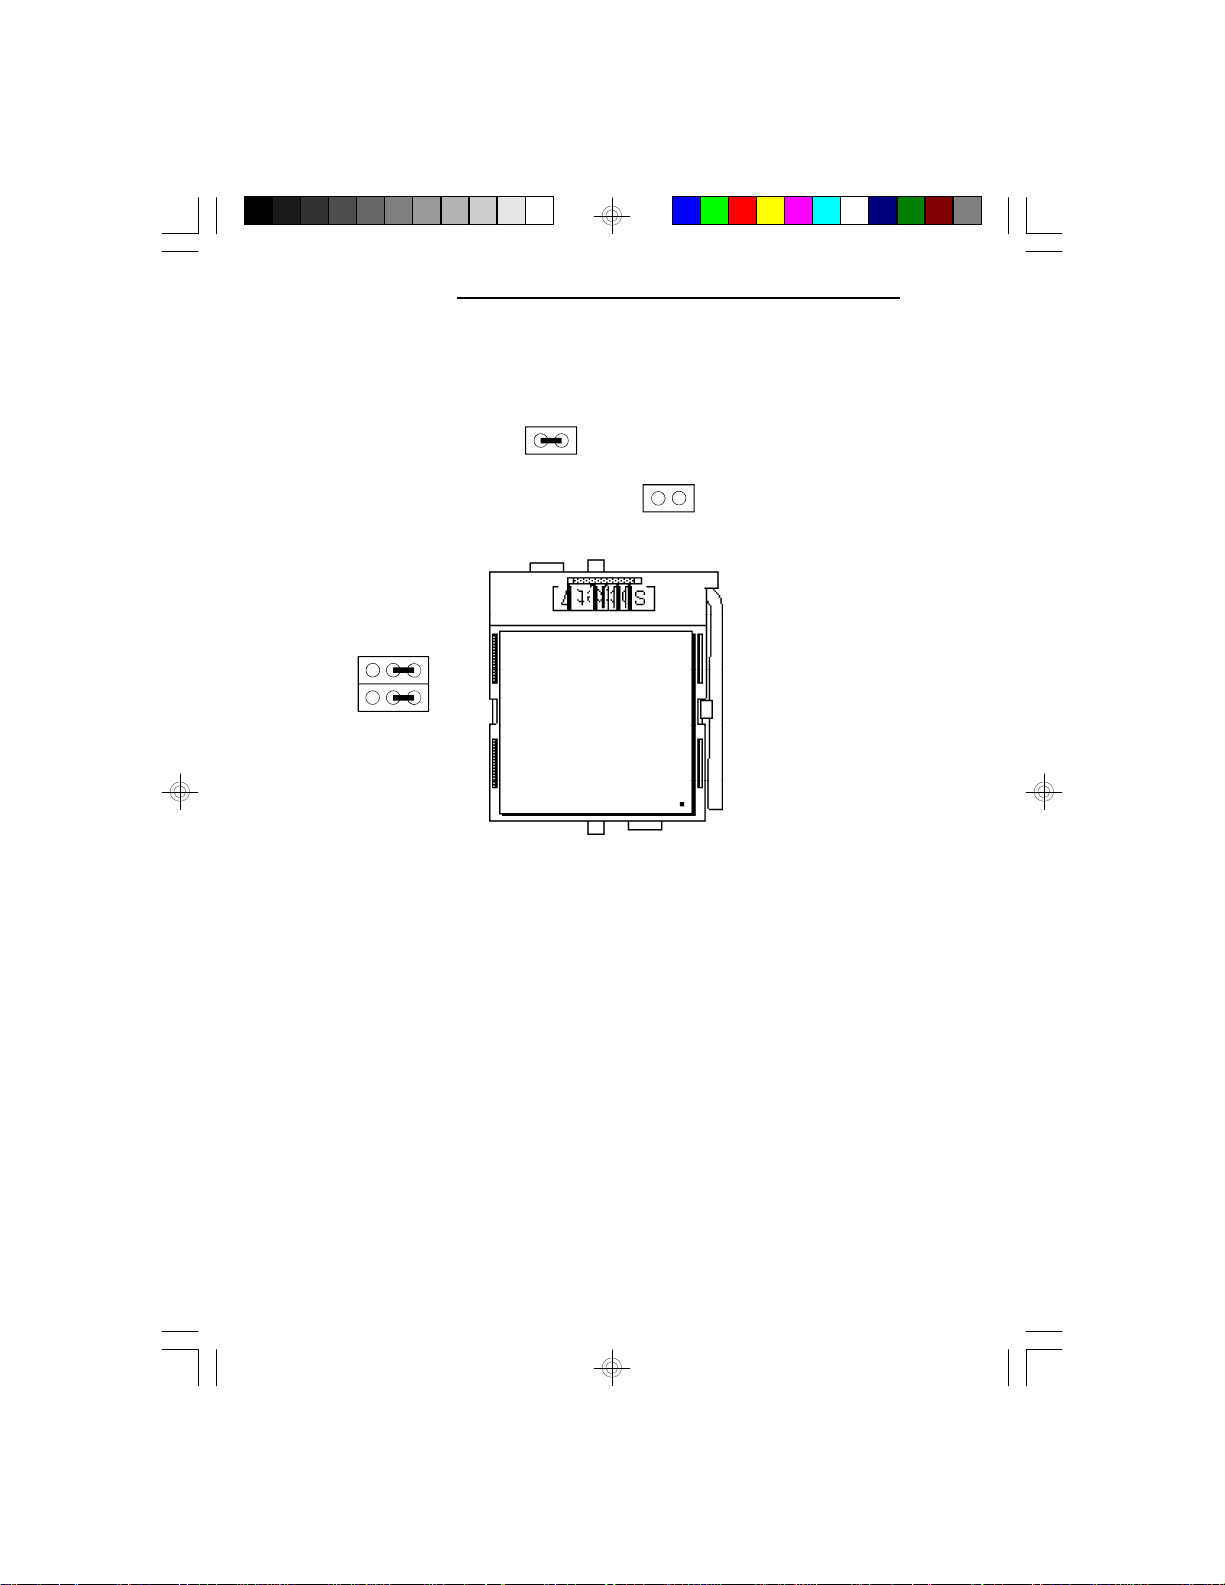
PCI/ISA System Board
3.3V Pentium Processor (150MHz)
System (External) Bus Speed: 60MHz
JP7
JP16
321
JP8
40
JP17
3.3V Pentium
Processor
Pin 1
Page 49
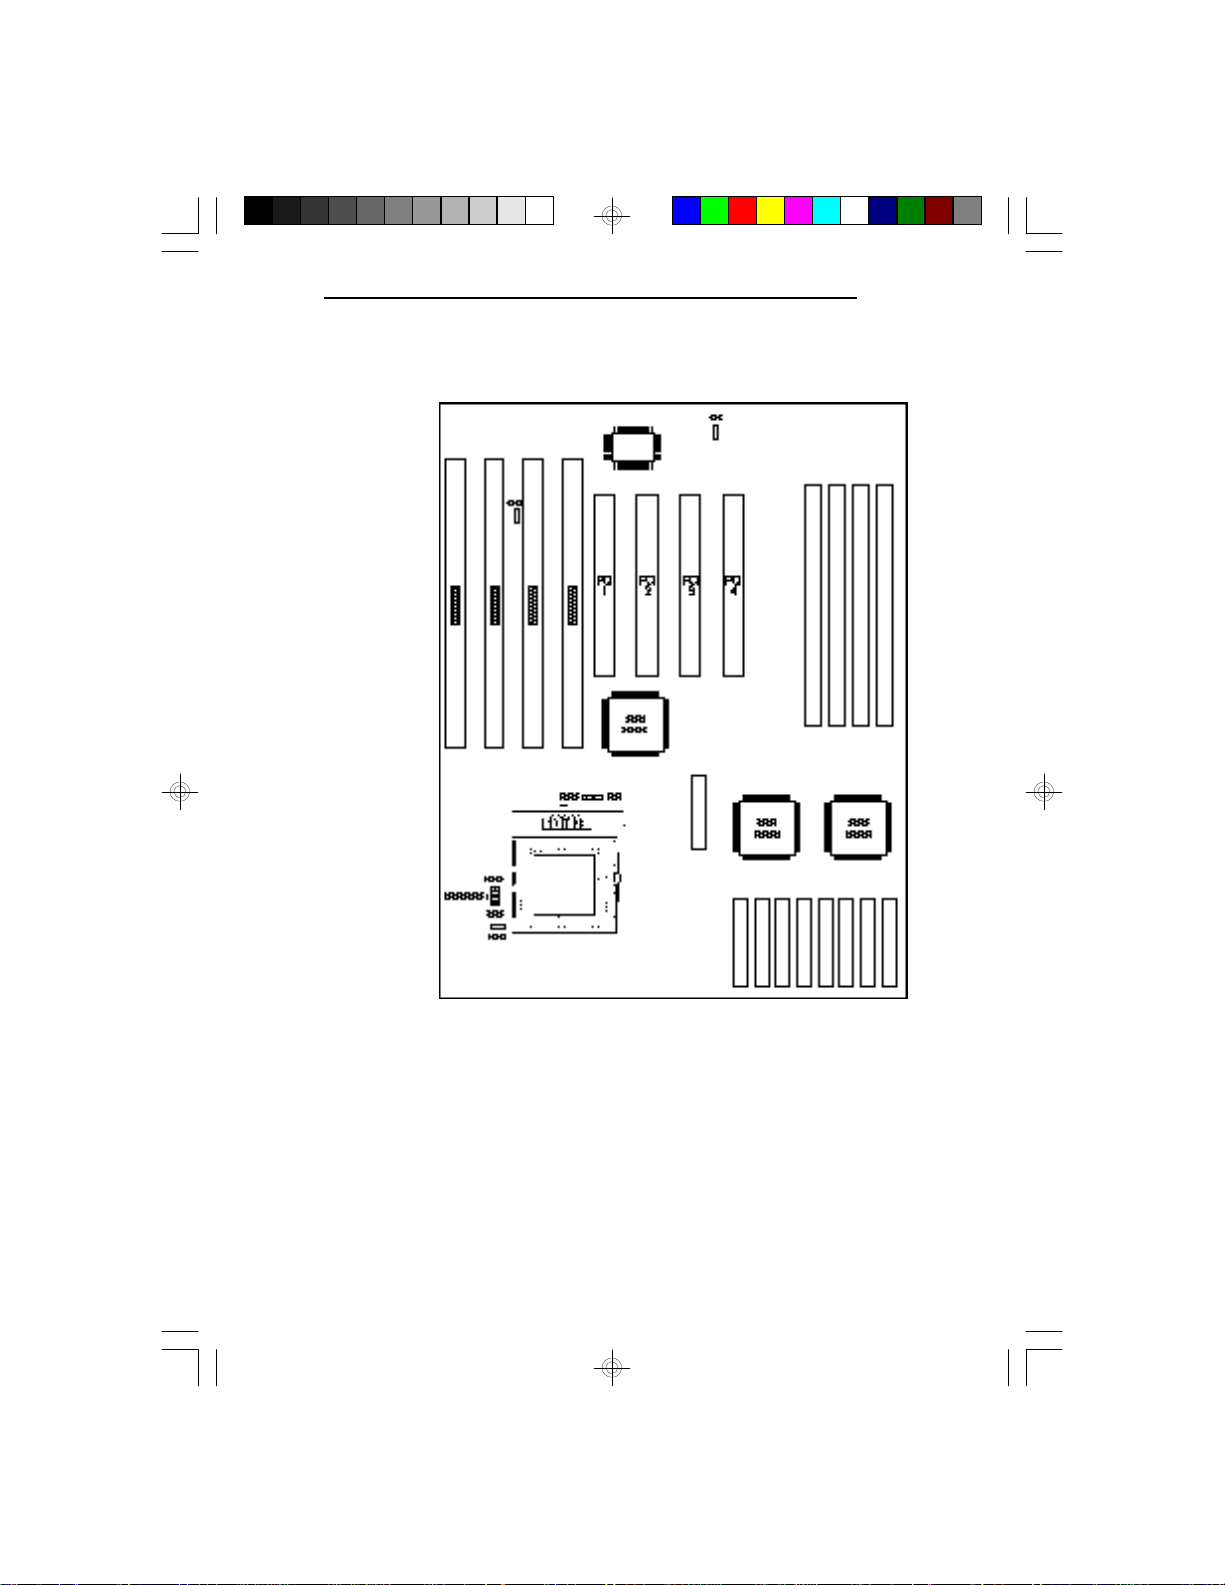
G586OPC/E
Jumpers JP3, JP4, JP9, JP10, JP18, JP19, JP20, JP21 and JP24
The following jumpers are for factory testing only and
should always be set to their default configurations.
Reconfiguring these jumpers will cause problems with
your system board.
JP3: Off
JP4, JP24: 1-2 On
JP9, JP10, JP18, JP19, JP20, JP21: On
41
Page 50
PCI/ISA System Board
Installing Upgrade CPUs
The G586OPC is equipped with a 321-pin Zero
Insertion Force (ZIF) socket at location U26 of the
system board. This socket is designed for easy removal
of the old CPU and easy insertion of the upgrade CPU.
The socket allows you to carefully place the new CPU
into its position. If you need to apply excessive force to
insert the CPU, the installation is being done incorrectly.
Warning:
Open the socket only if actually installing a CPU. The
warranty on the original CPU will be voided if the S/N
seal is broken.
Do not change any factory CPU speed jumper settings.
You do not need to change any jumpers to properly
install the 3.3V Pentium Upgrade Processor.
Before proceeding with the upgrade, take note of the
following. The microprocessor and heat sink may be hot
if the system has been running. To avoid the possibility
of a burn, power the system off and let the processor
and heat sink cool for 10 minutes.
42
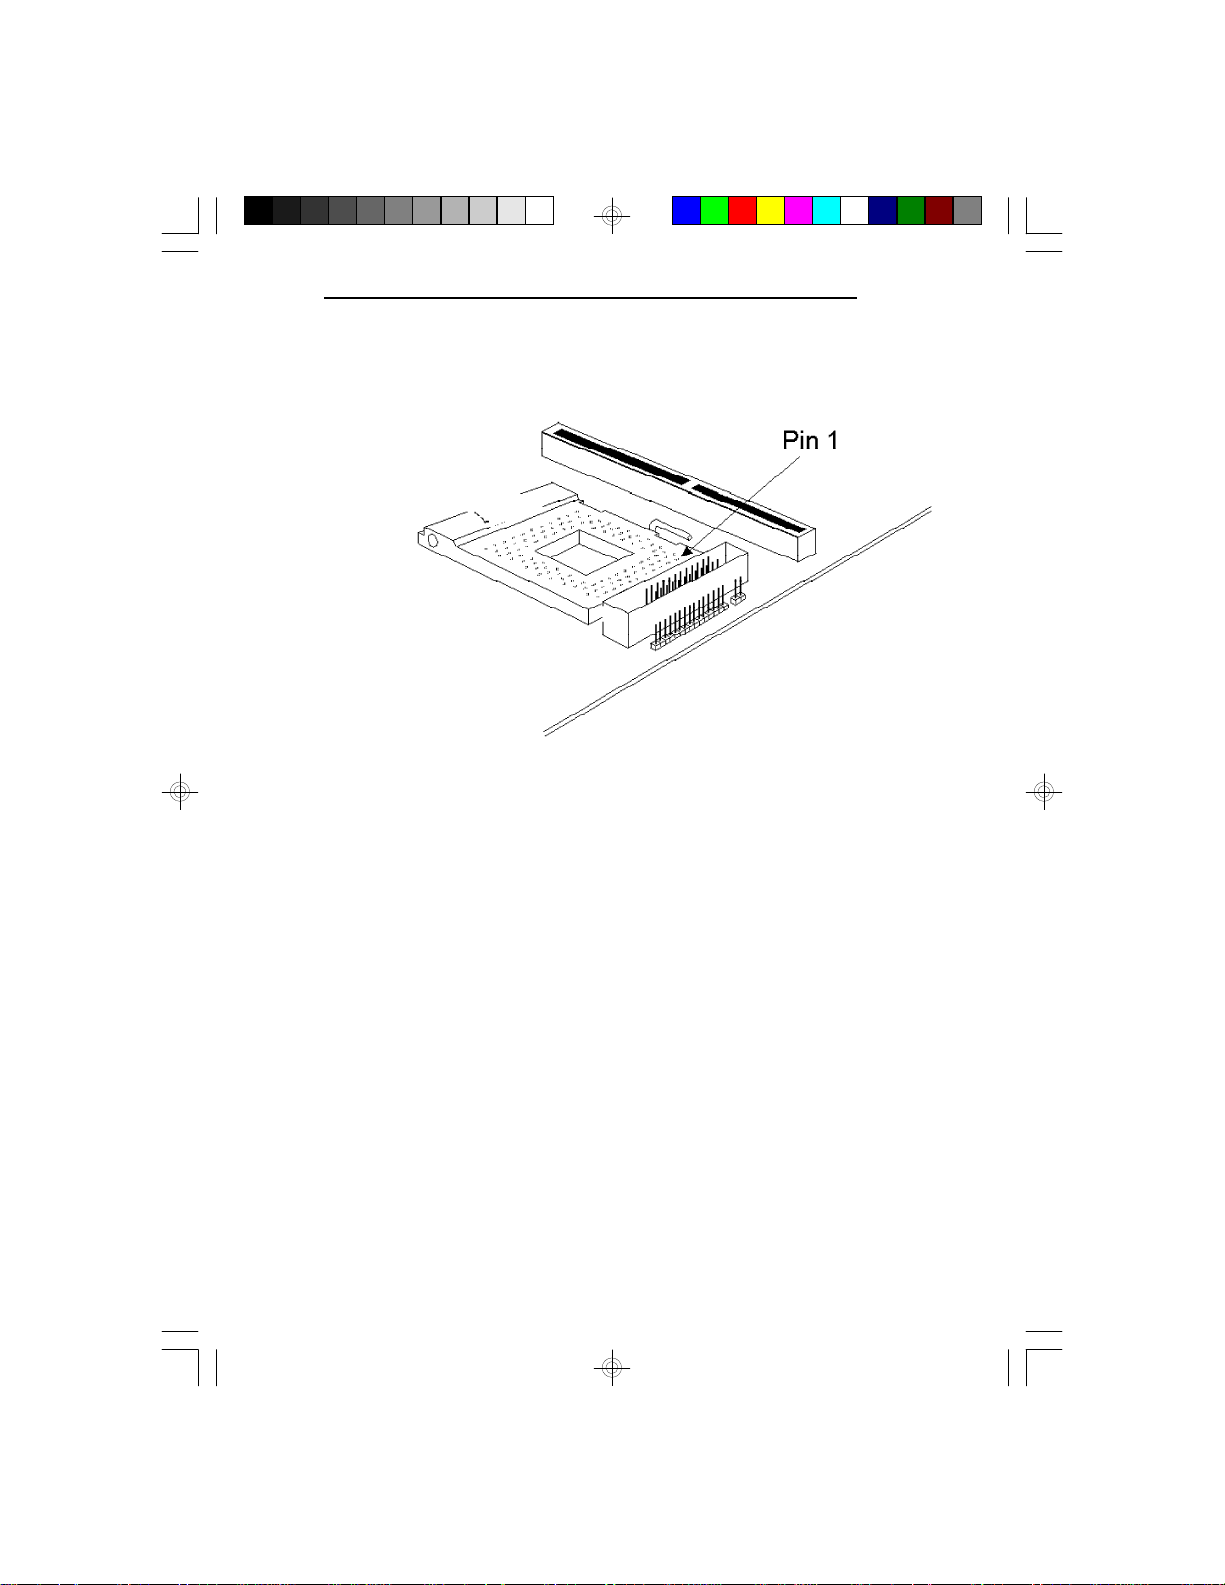
The 321-pin ZIF socket consists of the four rows of pin
holes on each side. To prevent improper OverDrive
Processor installation, the ZIF socket has a Plug/Keying
mechanism. Several holes in the socket are plugged so
OverDrive Processors will go in only one way. If you
cannot easily insert the OverDrive Processor, verify that
pin 1 of the CPU is aligned with pin 1 of the socket. A
warning note — be extremely careful to match pin 1 of
the CPU with pin 1 of the socket. Only Intel's
OverDrive Processor is keyed to prevent improper
placement in the ZIF socket. Other Intel CPUs, as well
Page 51
G586OPC/E
as CPUs from other vendors, can be placed incorrectly
and will be permanently damaged.
Zero Insertion Force (ZIF) Socket
To install an upgrade CPU, do the following.
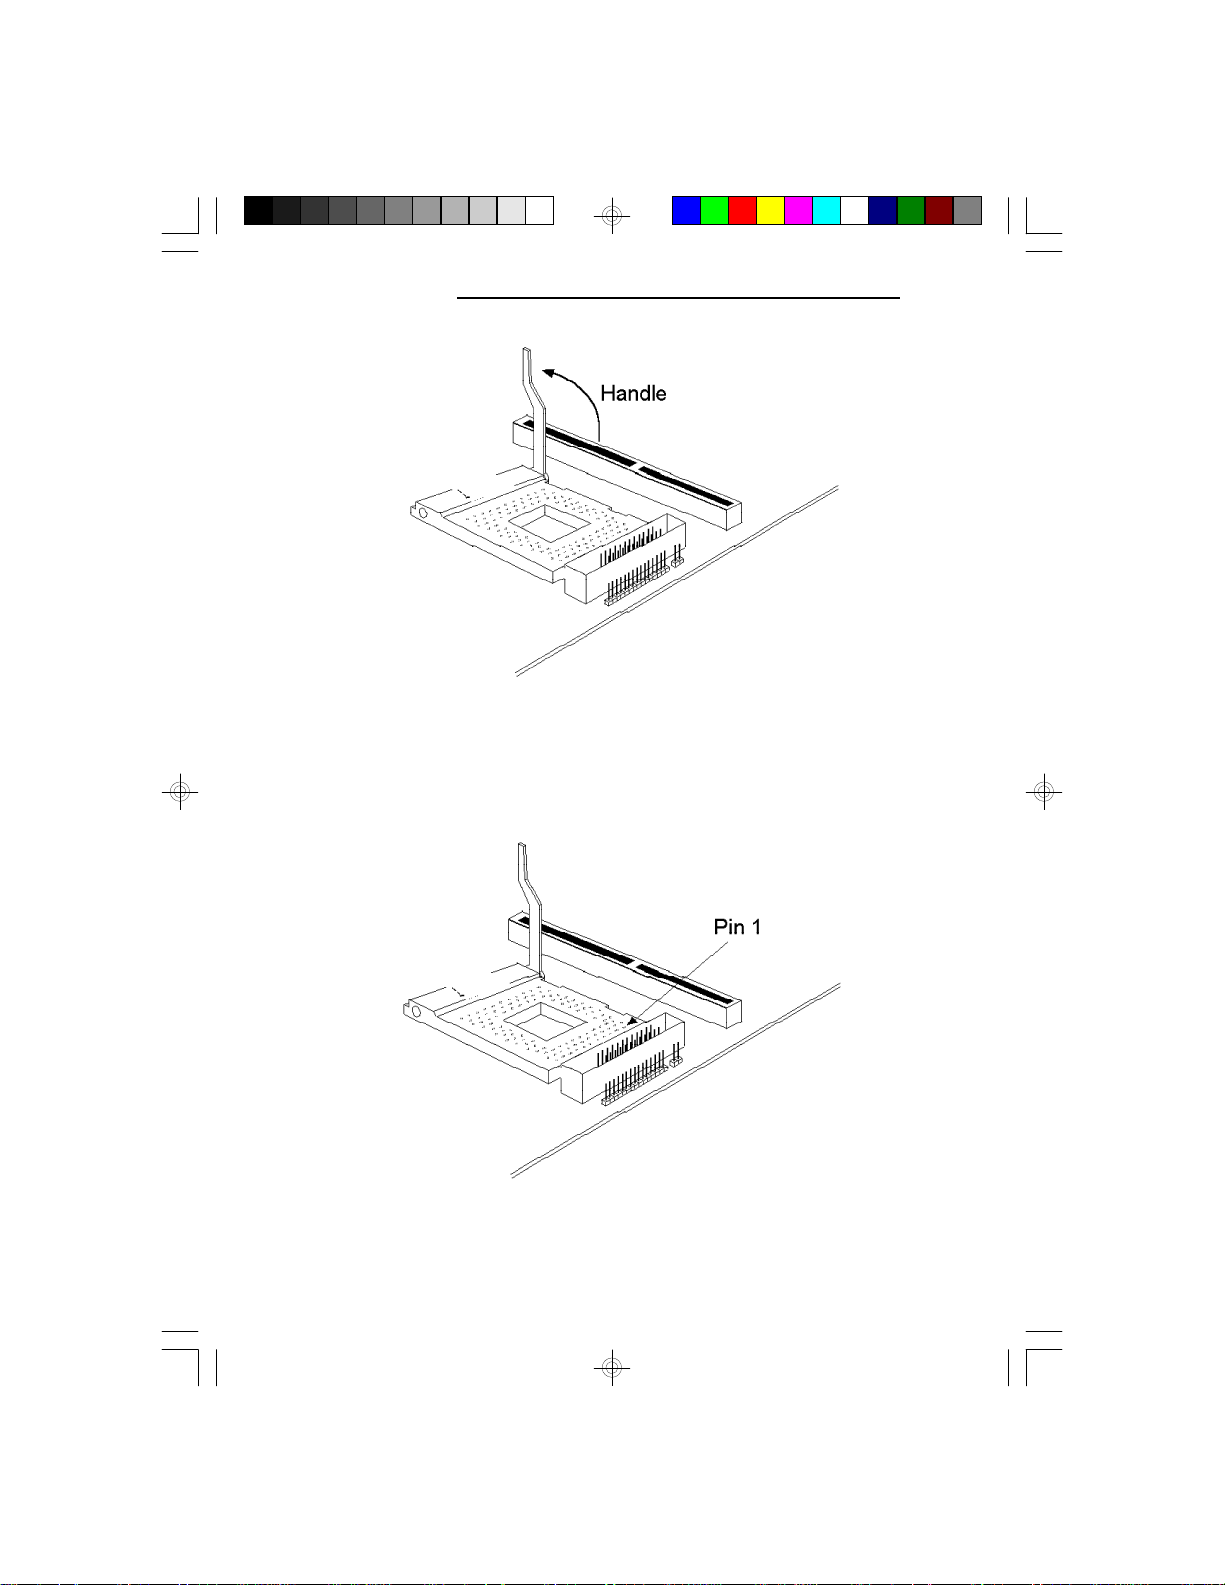
1. Make sure the handle on the side of the ZIF socket
is up. To raise the handle, push down, pull it out to
the side a little and raise it as far as it will go. The
top plate will slide back. Do not use screwdrivers or
other tools to open the socket, or damage may occur
to the system or socket. It may be necessary to
initially apply a small amount of sideways force to
free the handle from its retaining “tab.” Once clear
of the “tab,” the handle will open relatively easily.
43
Page 52
PCI/ISA System Board
2. Once the lever is completely up, remove the old
CPU by carefully lifting it straight out of the socket.
You are now ready to insert the new CPU.
Lifting the Handle
44
Pin 1 of the ZIF Socket
Page 53
G586OPC/E
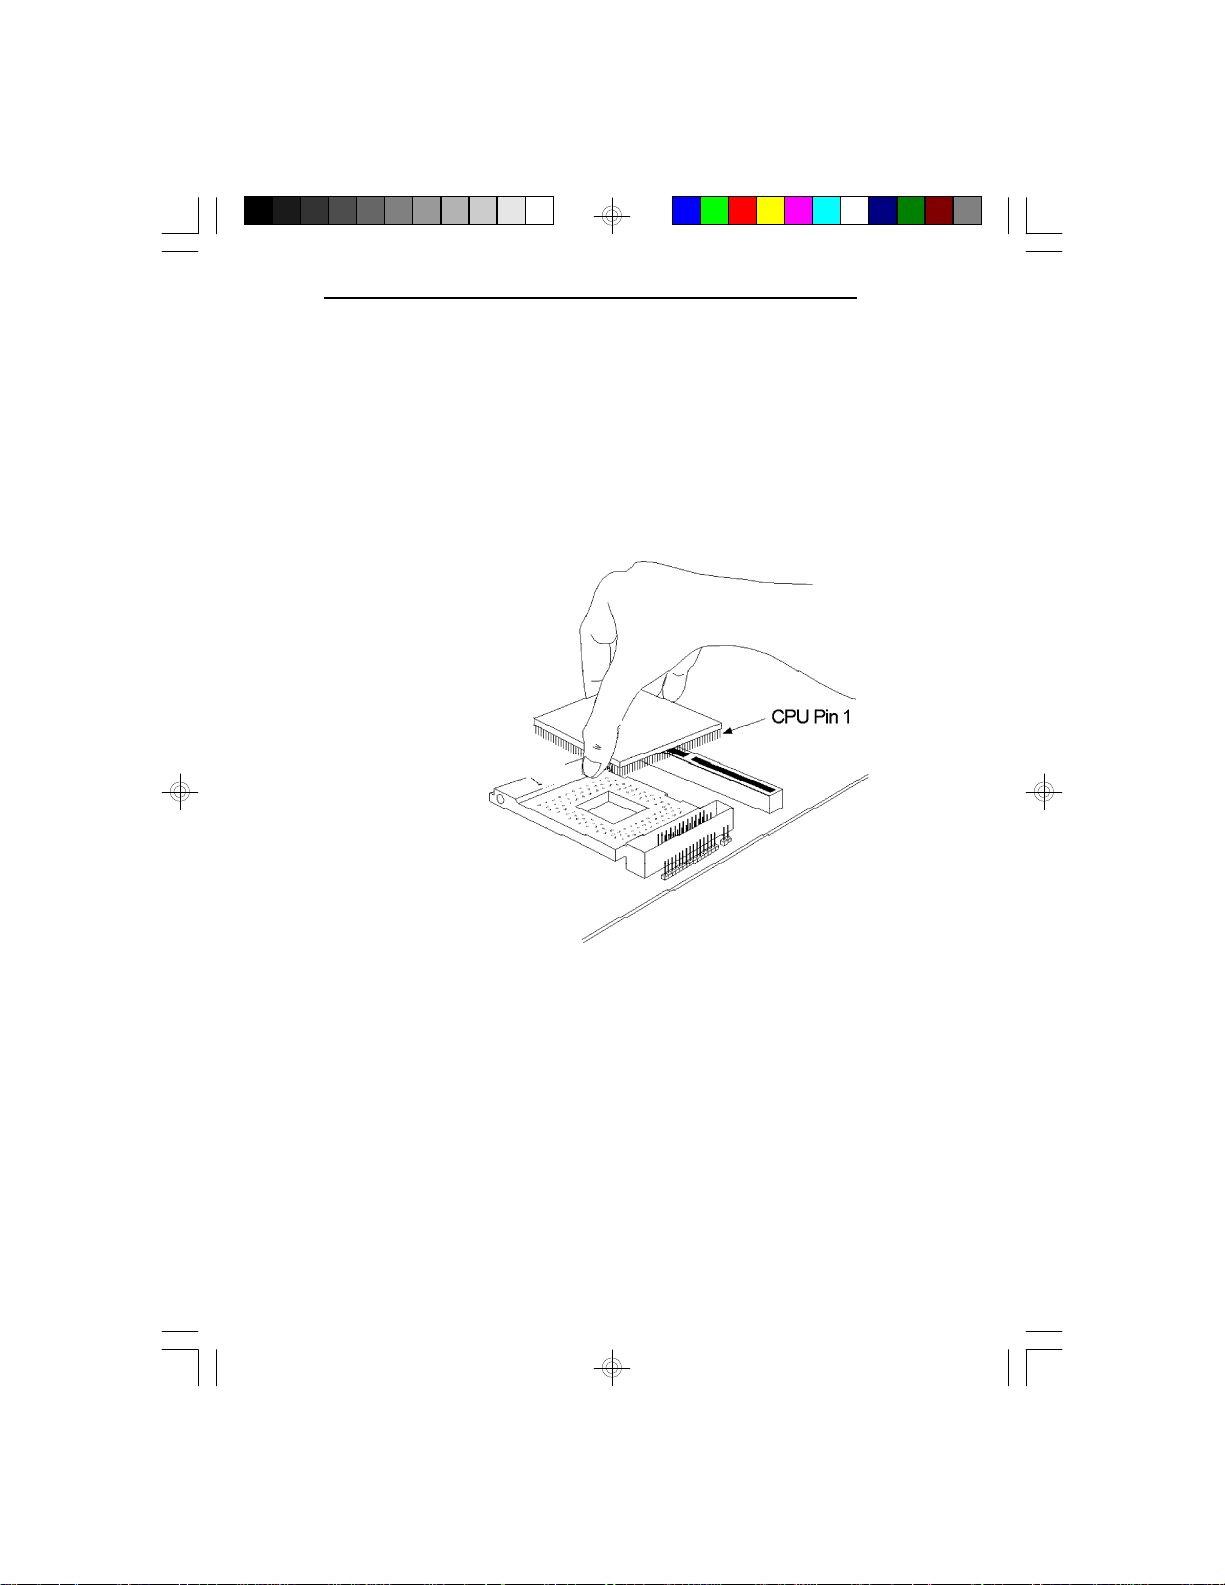
3. Position the CPU above the ZIF socket. Make sure
pin 1 of the CPU is aligned with pin 1 of the socket.
Lower the chip until the pins are inserted properly in
their corresponding holes. Remember that very little
force is needed to install the CPU. If the CPU will
not insert easily, verify pin 1 of the CPU is aligned
with pin 1 of the socket. Applying too much
pressure can damage the CPU or the socket.
Positioning the CPU Above the ZIF Socket
4. Push the handle down until the handle locks into
place. The top plate will slide forward. You will feel
some resistance as the pressure starts to secure the
CPU in the socket. This is normal and will not
damage the CPU. However, if the handle is not
completely closed, damage to the CPU and/or
system board may result.
45
Page 54
PCI/ISA System Board
Clearance Requirements
The 3.3V Pentium Upgrade Processor comes with a heat
sink mounted on top. To maintain proper airflow once
the upgrade is installed on the system board, the
processor and sink require certain space clearances.
The clearance above 3.3V Pentium Upgrade Processor's
fan/heat-sink must be at least 0.4 in. The clearance on at
least 3 of 4 sides of the processor must be at least 0.2
in. The cables (for floppy drive, hard drive, CD-ROM,
etc.) must be routed clear of the CPU and its airspace.
Fan Exhaust
The CPU must be kept cool by using a fan exhaust
configuration in connection with the heatsink. The
temperature of the air entering the fan/heatsink cannot
exceed 45°C. The ambient or room temperature must be
below 37°C (99°F) for a system installed with the 3.3V
Pentium Upgrade Processor.
46
In order to provide proper airflow to the CPU, all
movable obstructions (power supply cables, cards,
floppy disk cables) must be clear of the CPU heatsink/
fan component in accordance with the space clearance
discussed in the CPU installation section of this manual.
Page 55
Built-in Ports
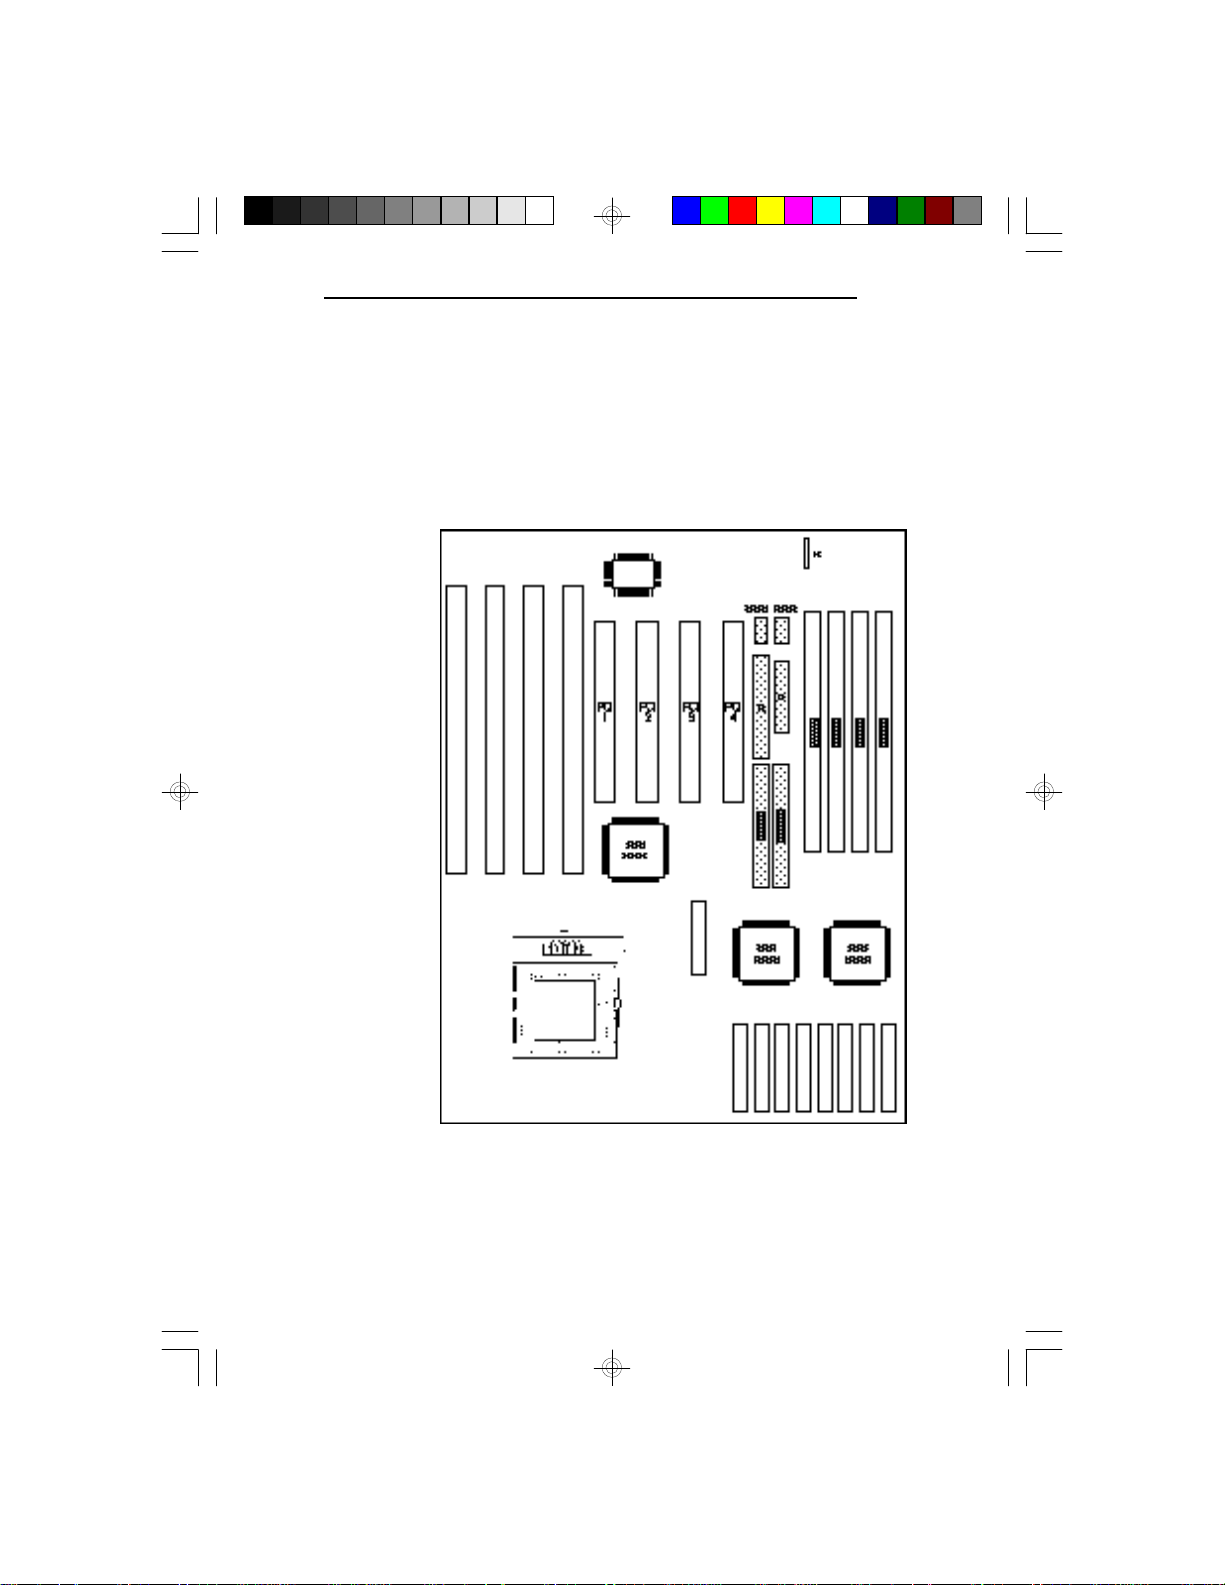
The G586OPC system board is equipped with two serial
ports, one SPP/EPP/ECP parallel printer port, one FDD
connector, one PS/2 mouse port and two IDE hard disk
shrouded headers.
G586OPC/E
Locations of the Built-in Ports on the System Board
47
Page 56
PCI/ISA System Board
Serial Ports
The built-in serial ports are RS-232C asynchronous
communication ports with 16C550A-compatible UARTs
that can be used with modems, serial printers, remote
display terminals, and other serial devices. They use the
following system I/O addresses:
Port Configuration I/O Address
COM1 3F8h
COM2 2F8h
COM3/COM4 3E8h/2E8h
Connecting the Serial Ports
Two DB-9P serial port cables are provided with the
motherboard. They are mounted on a card-edge bracket
along with the PS/2 mouse cable. The upper serial port
cable should be used for the COM 1 primary serial port;
connect it to Connector COM 1 on the motherboard.
The lower serial port cable should be used for the COM
2 secondary serial port; connect it to Connector COM 2
on the motherboard. Make sure the colored stripes on
the ribbon cables align with pin 1 of Connectors COM 1
and COM 2. Mount the card-edge bracket to the system
chassis.
48
Page 57
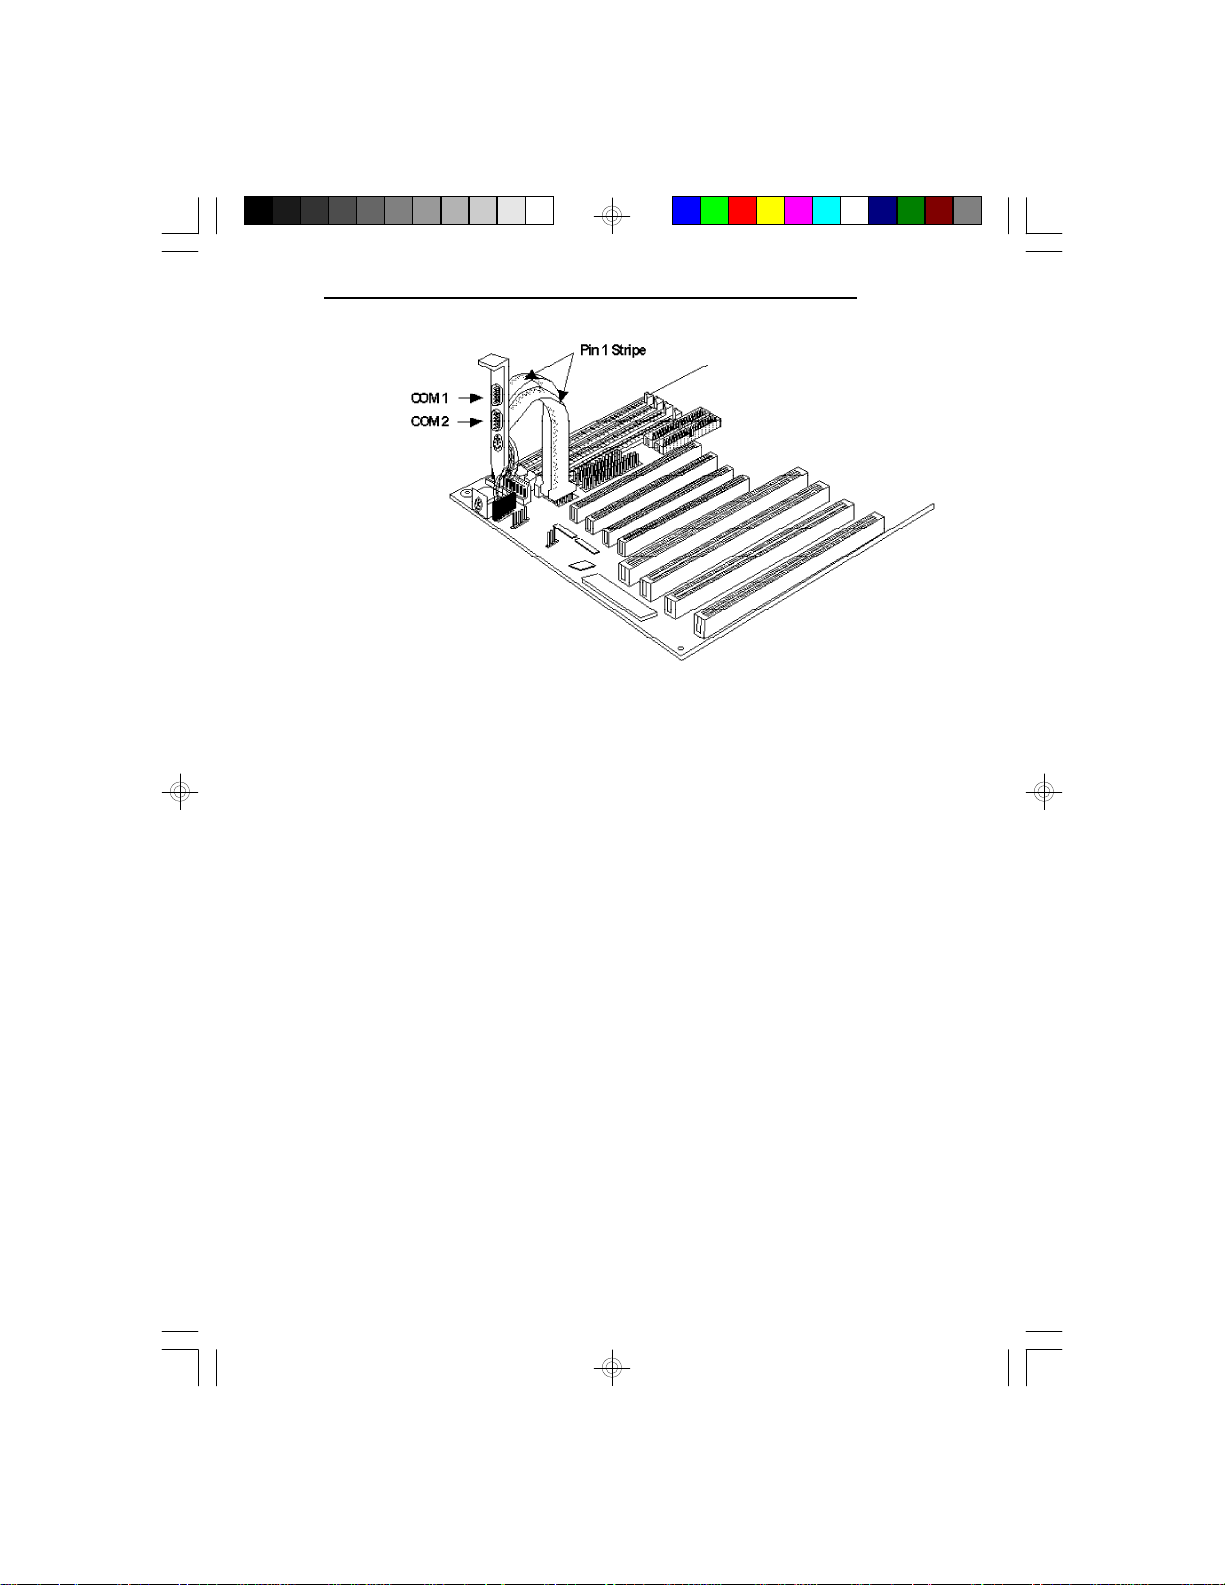
The Primary and Secondary Serial Ports
PS/2 Mouse Port
The PS/2 mouse port is a 6-pin connector on the
system board. Attach the 6-pin mouse port cable, which
came in the G586OPC box, to Connector J1. Make sure
the brown wire on the PS/2 mouse connector aligns with
pin 1 of connector J1.
G586OPC/E
on the G586OPC System Board
49
Page 58
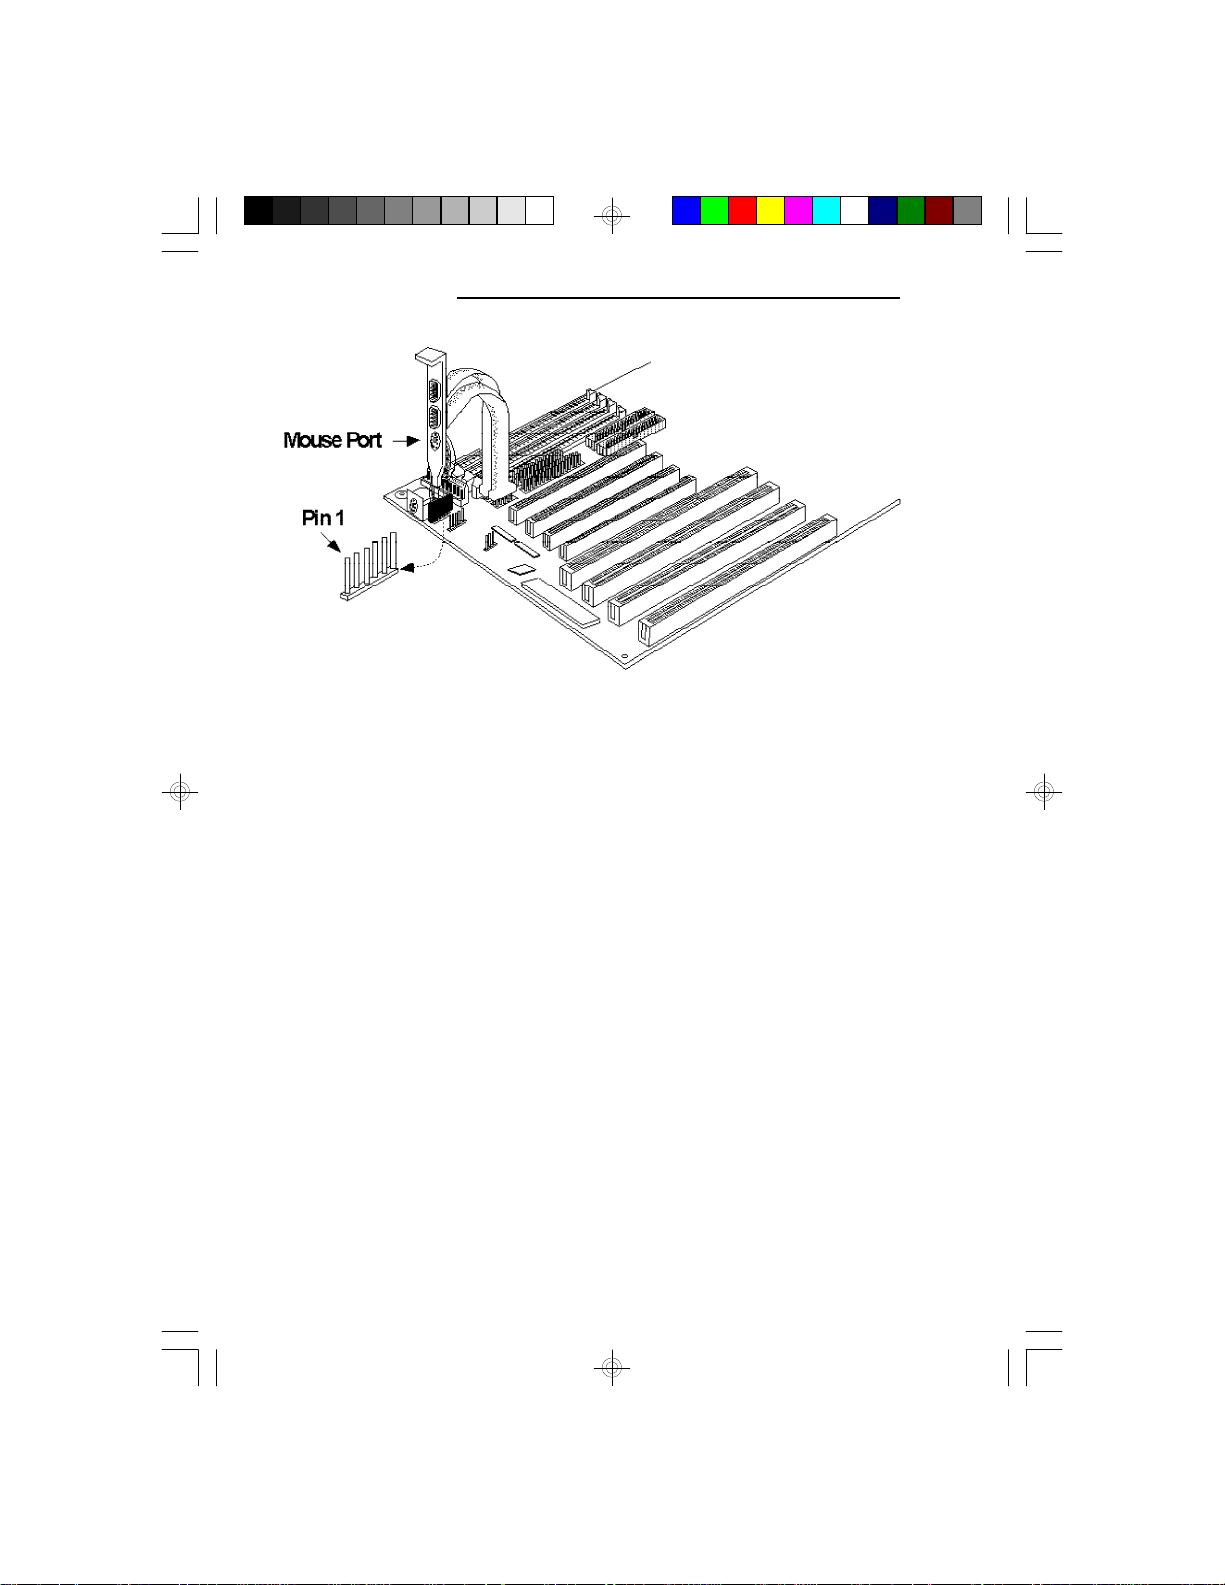
PCI/ISA System Board
The PS/2 Mouse Port on the G586OPC System Board
Parallel Port
The G586OPC system board has a standard connector
for interfacing your PC to a parallel printer. This port is
compatible with both IBM AT printer ports and the
new, high speed, bidirectional Extended Capabilities
Port standard. The parallel port on your system board
can be set to any of the following system I/O addresses:
50
I/O Address: 3BC-3BE Hex
378-37A Hex *
278-27A Hex
* Default setting
Page 59
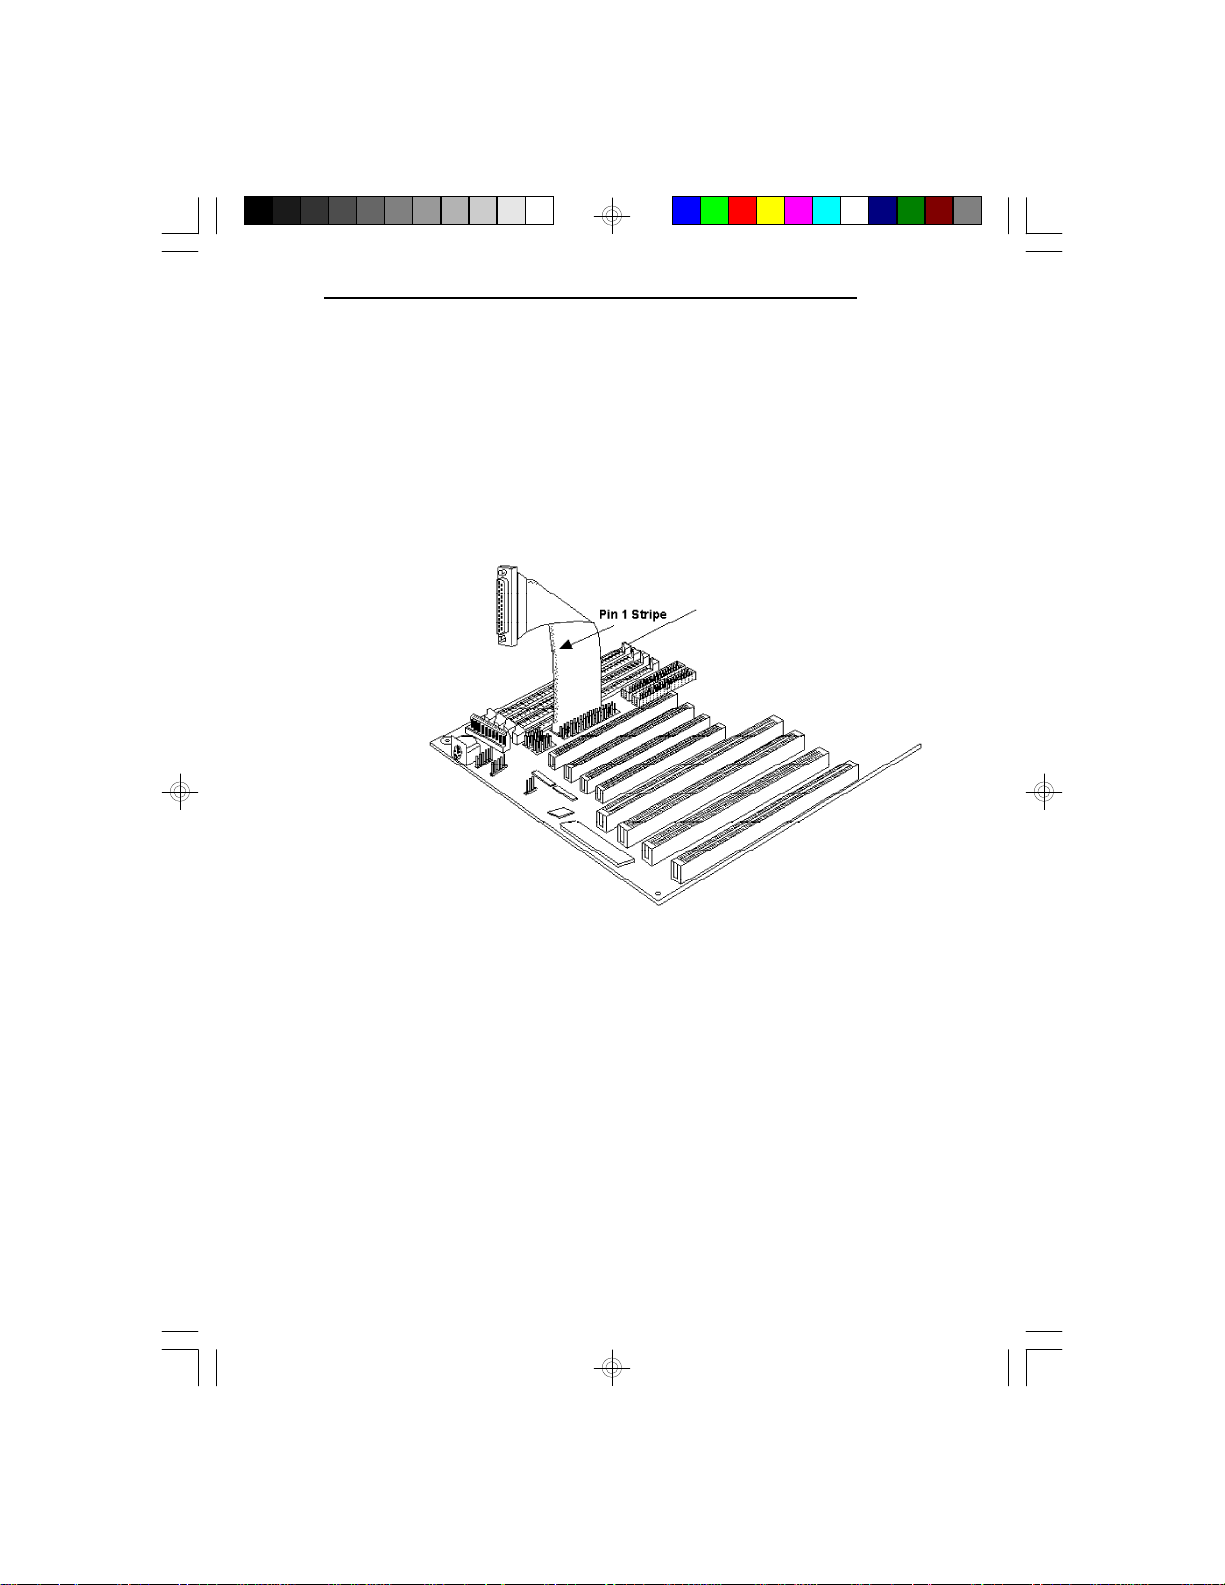
Connecting the Parallel Printer Port
Attach the DB-25S printer port cable, which came with
the motherboard, to Connector J7 on the G586OPC
system board. Make sure the colored stripe on the
ribbon cable aligns with pin 1 of Connector J7. Use a
small nutdriver to mount the cable into a DB-25 cutout
in the system chassis.
G586OPC/E
The Parallel Printer Port on the G586OPC
System Board
Floppy Disk Drive Controller
The G586OPC system board has a built-in floppy disk
controller that supports two standard floppy disk drives.
You can install any 720KB/1.2MB/1.44MB/2.88MB
floppy disk drives.
51
Page 60
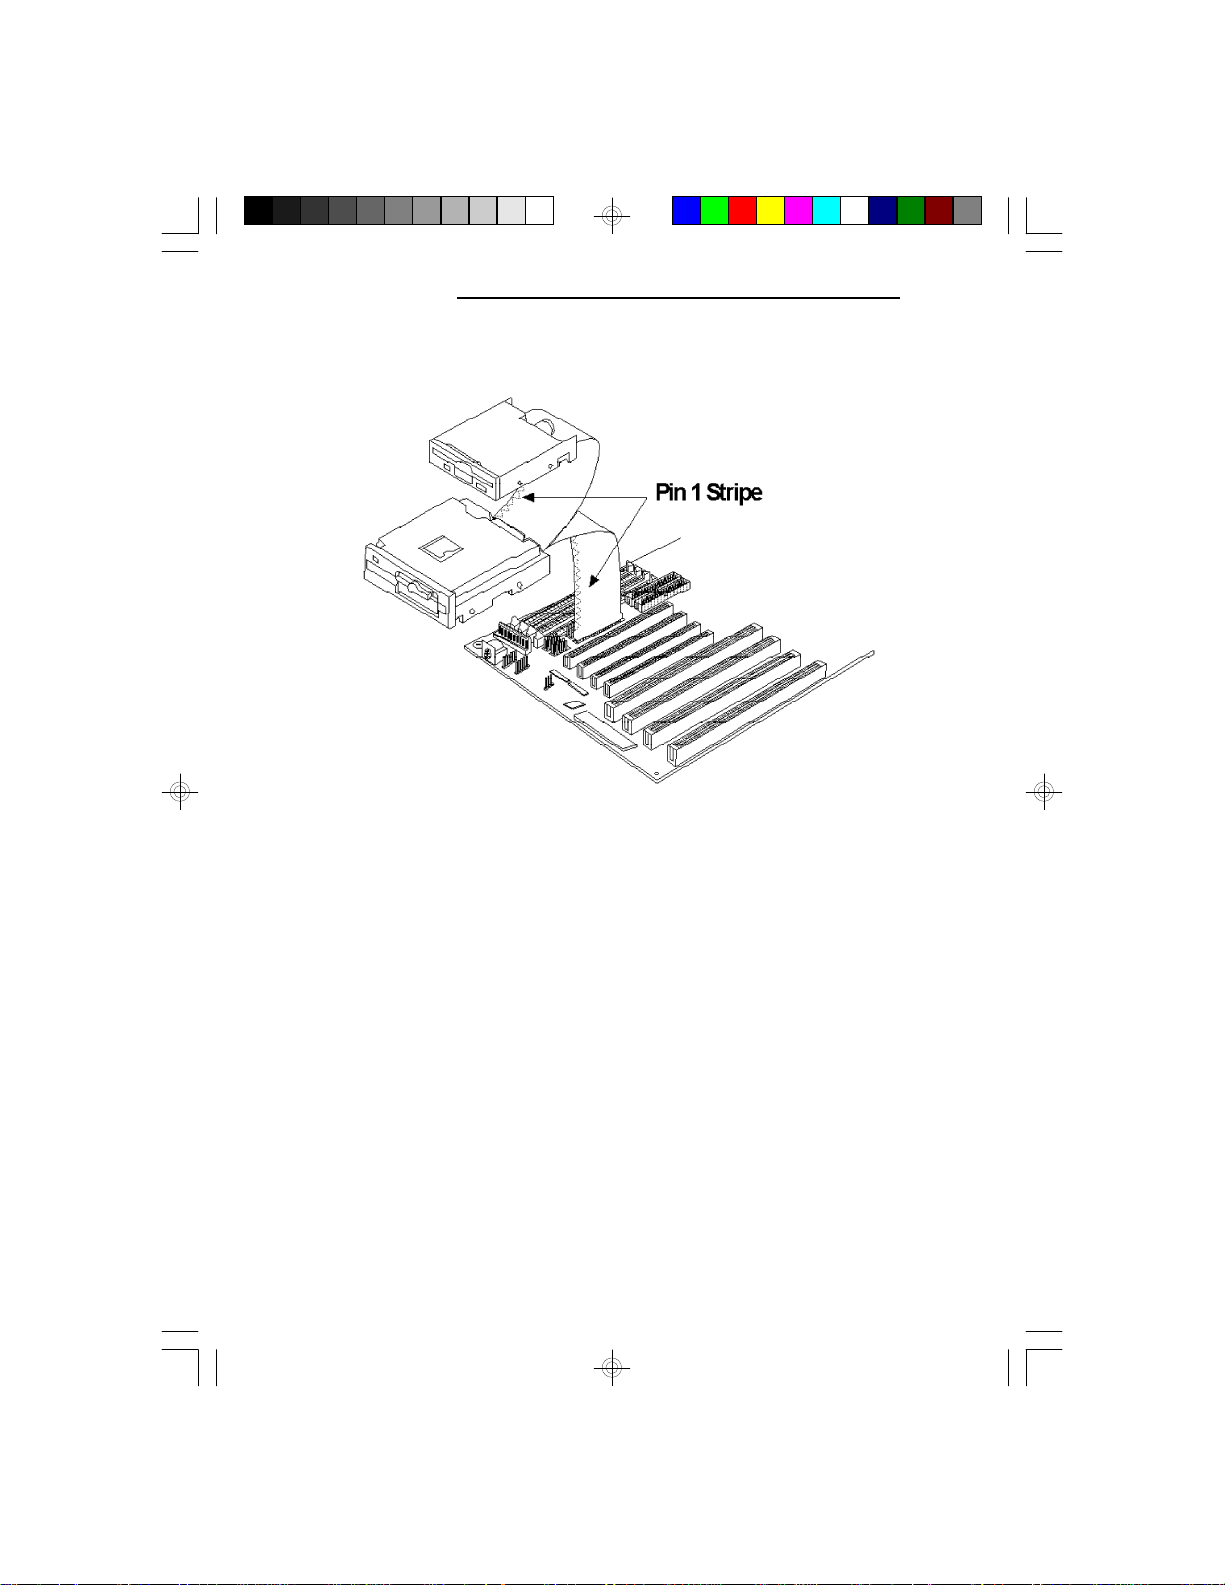
PCI/ISA System Board
Connecting the Floppy Disk Cable
The Floppy Disk Connector on the
G586OPC System Board
52
Step 1
Install the 34-pin header connector into the floppy disk
connector (J8) on the system board. The colored edge of
the ribbon should be aligned to pin 1 of the J8 connector.
Step 2
Install the other 34-pin header connector(s) into the disk
drive(s) with the colored edge of the daisy chained
ribbon cable aligned to pin 1 of the drive edge
connector(s). The end-most connector should be attached to the drive you want to be Drive A.
Page 61
IDE Hard Disk Interface
The G586OPC system board is equipped with two PCI
IDE shrouded headers that will interface four IDE
(Integrated Drive Electronics) hard disk drives.
Note:
Only IDE drives can be connected to the IDE interface.
Connecting the IDE Hard Disk Interface
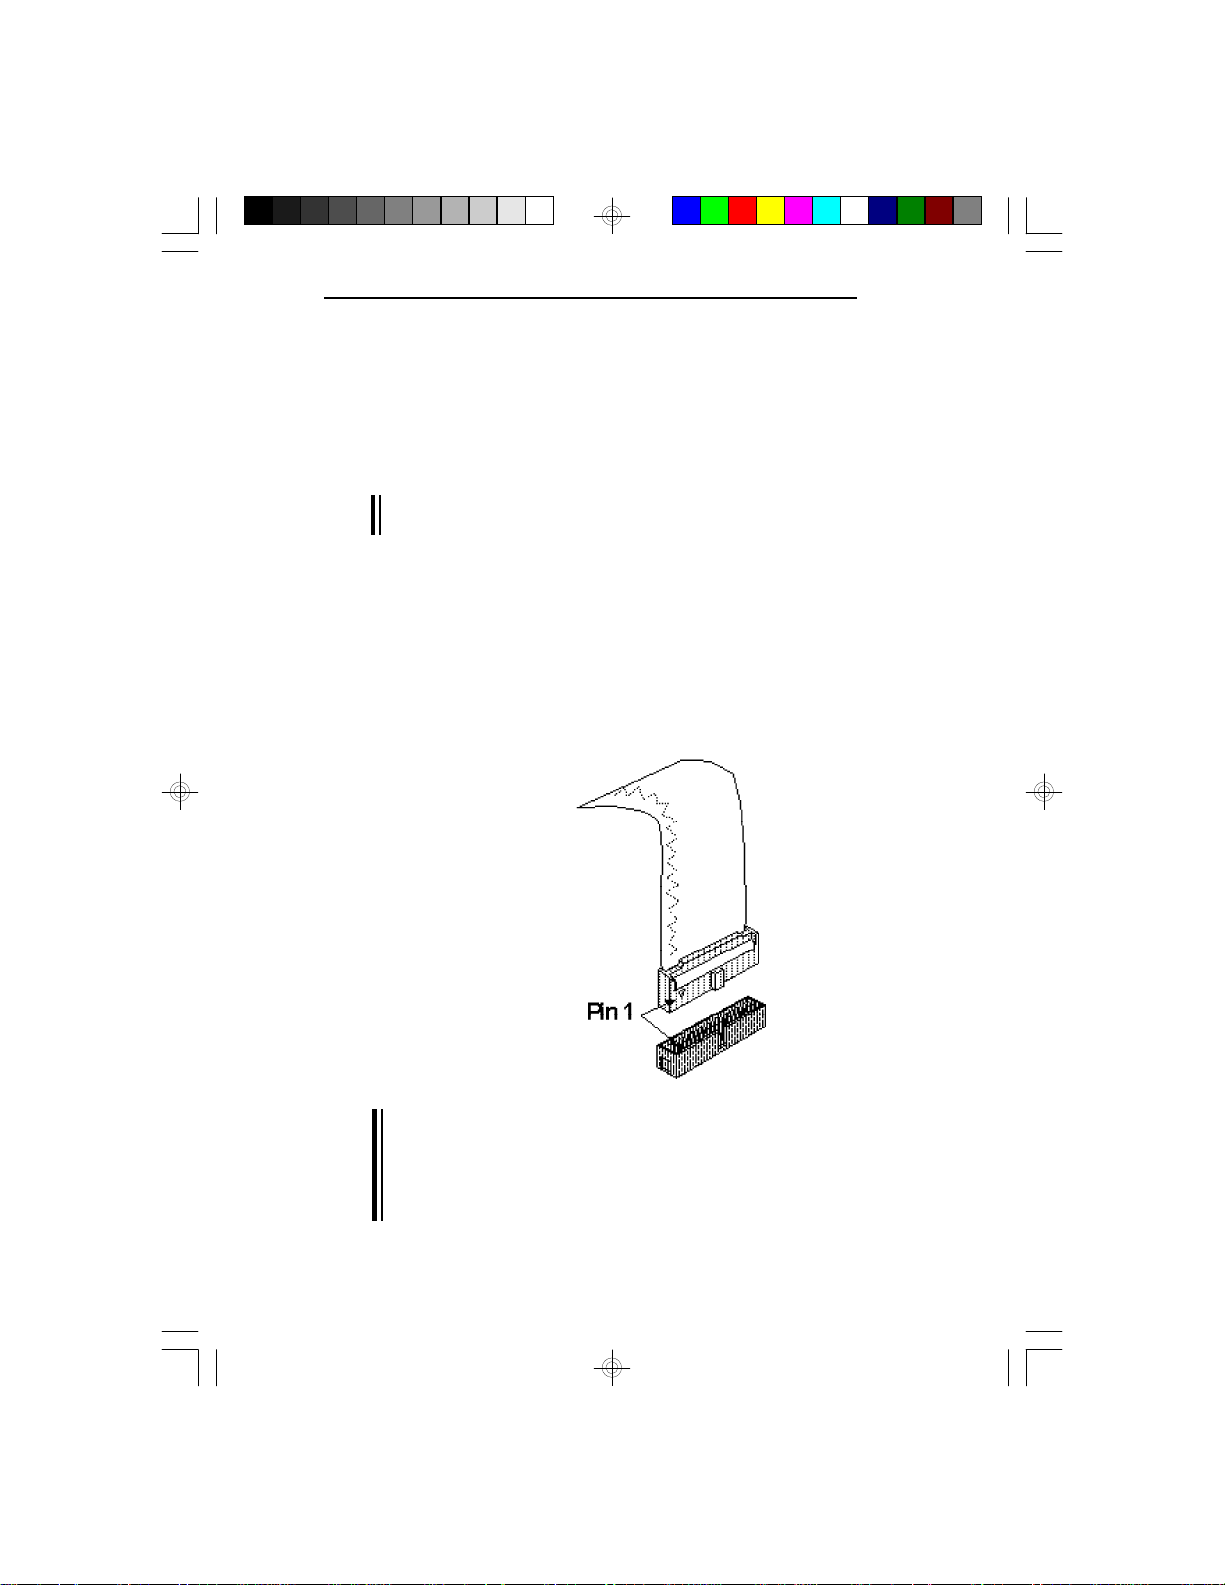
To prevent improper IDE cable installation, each PCI
IDE shrouded header has a keying mechanism. The 40pin connector on the IDE cable can be placed into the
header only if pin 1 of the connector is aligned with pin
1 of the header.
G586OPC/E
Note:
The IDE cable with a standard 40-pin connector can be
installed in the PCI IDE shrouded header. Be extremely
careful to match the colored edge of the ribbon with pin
1 of the header.
53
Page 62
PCI/ISA System Board
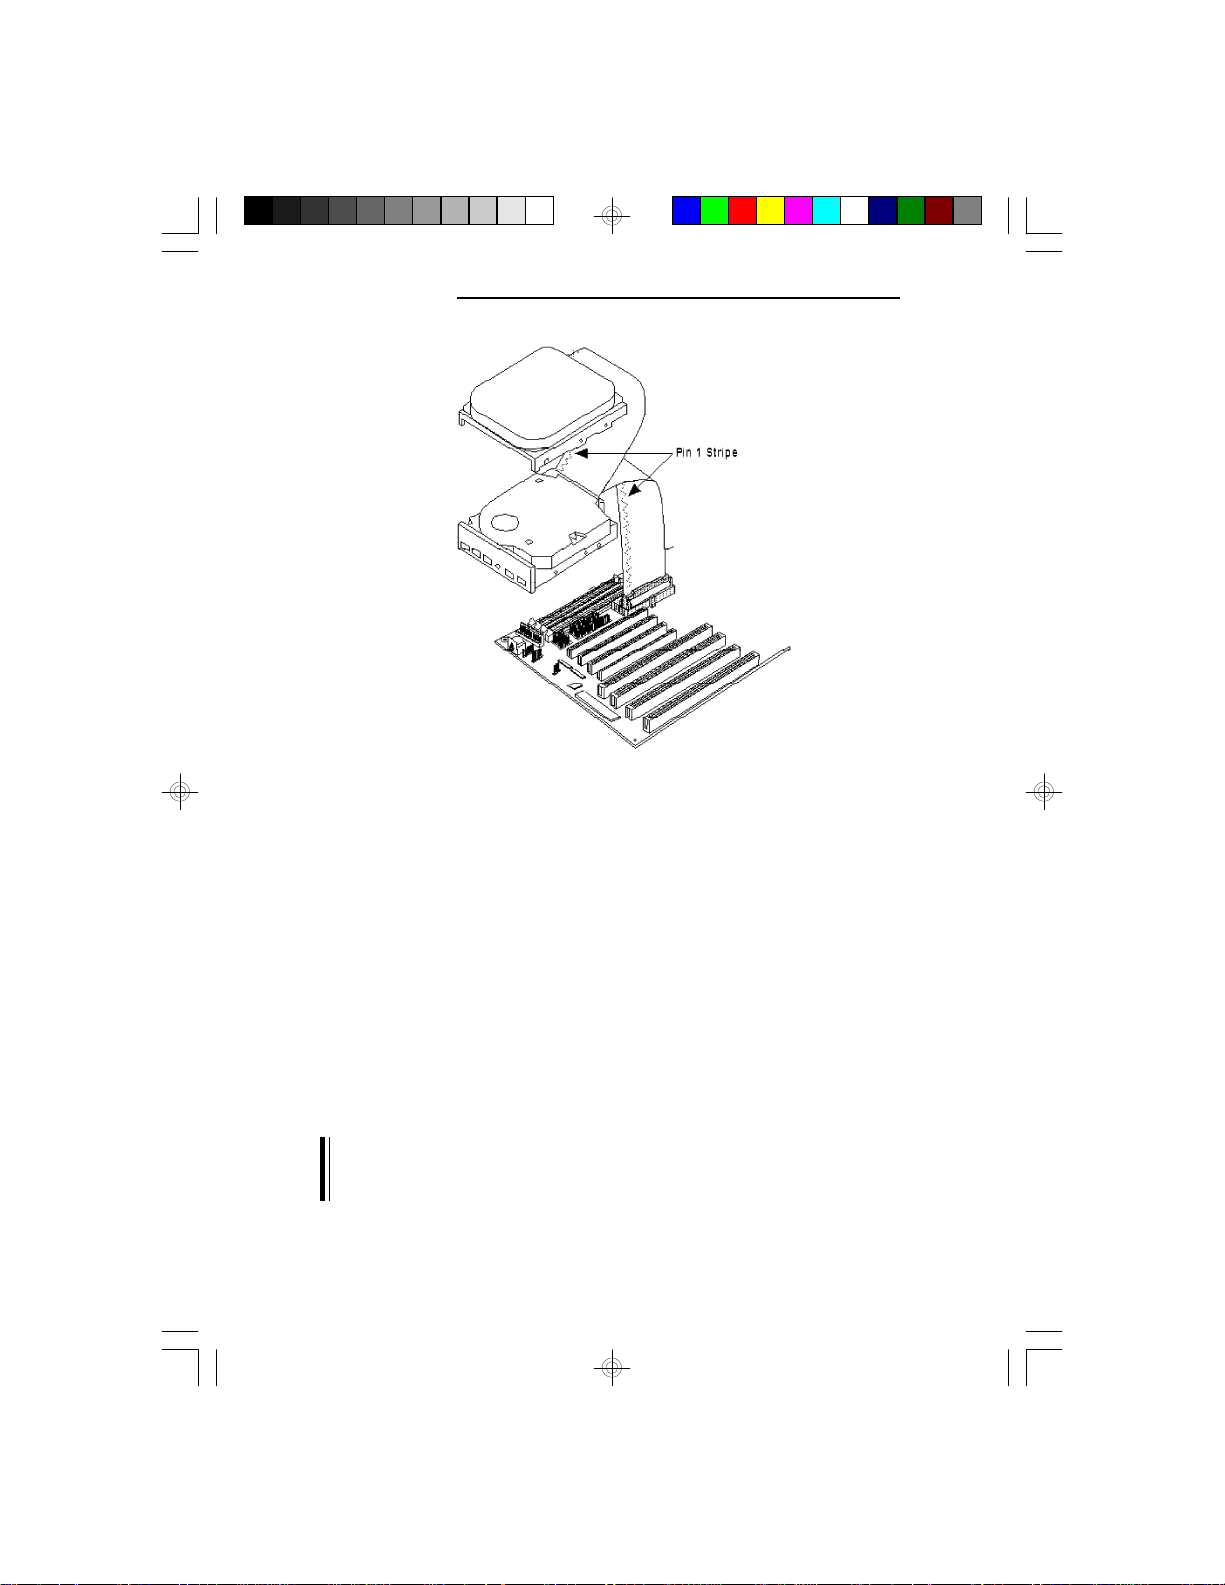
The IDE Hard Disk Connector on the System Board
Step 1
If you are connecting two hard drives, install the 40-pin
connector of the IDE cable into the primary IDE
shrouded header (1st IDE Connector). If you are adding
a third or fourth IDE device, install the 40-pin connector
of the other IDE cable into the secondary IDE shrouded
header (2nd IDE Connector).
54
Step 2
Install the other 40-pin header connector(s) into the
device with the colored edge of the ribbon cable aligned
to pin 1 of the drive edge connector(s).
Note:
Refer to your disk drive user's manual for information
about selecting proper drive switch settings.
Page 63
Adding a Second IDE Hard Drive
When using two IDE drives, one must be set as the
master and the other as the slave. Follow the instructions provided by the drive manufacturer for setting the
jumpers and/or switches on the drives. No changes are
needed on the G586OPC system board when adding a
second hard drive.
We recommend that the IDE hard drives be from the
same manufacturer. In a few cases, drives from two
manufacturers will not function properly when used
together. The problem lies in the hard drives, not the
G586OPC system board.
Preparing an IDE Drive for Use
IDE disk drives are already low-level formatted, with
any bad-track errors entered, when shipped by the drive
manufacturer. Do not attempt to do a low-level format,
or you may cause serious damage to the drive.
G586OPC/E
To use an IDE drive, you need to enter the drive type
(this information is provided by the drive manufacturer)
into the system’s CMOS setup table. Then run FDISK
and FORMAT provided with DOS.
Note:
Do not run FDISK and FORMAT programs on a drive
that has already been formatted, or you will lose all
programs and data stored on the drive.
55
Page 64
PCI/ISA System Board
Installing Expansion Cards
The G586OPC is equipped with three dedicated PCI and
three dedicated ISA slots. One PCI slot and one ISA slot
are shared. You can only install a card in one or the
other of the shared slots at a time; you cannot install
devices in both slots. Due to the size of the the optional
synchronous pipeline burst cache module installed in the
160-pin cache module upgrade slot, the length of the
card in PCI Slot 2 is limited. Refer to page 27 for limitations. The locations of the expansion slots are shown on
the next page.
Note:
The BIOS needs to be configured for the PCI add-on
cards installed in the PCI slots. Refer to the “PCI
Configuration Setup” chapter presented in the “Initial
Setup Program” section of the manual.
56
Page 65
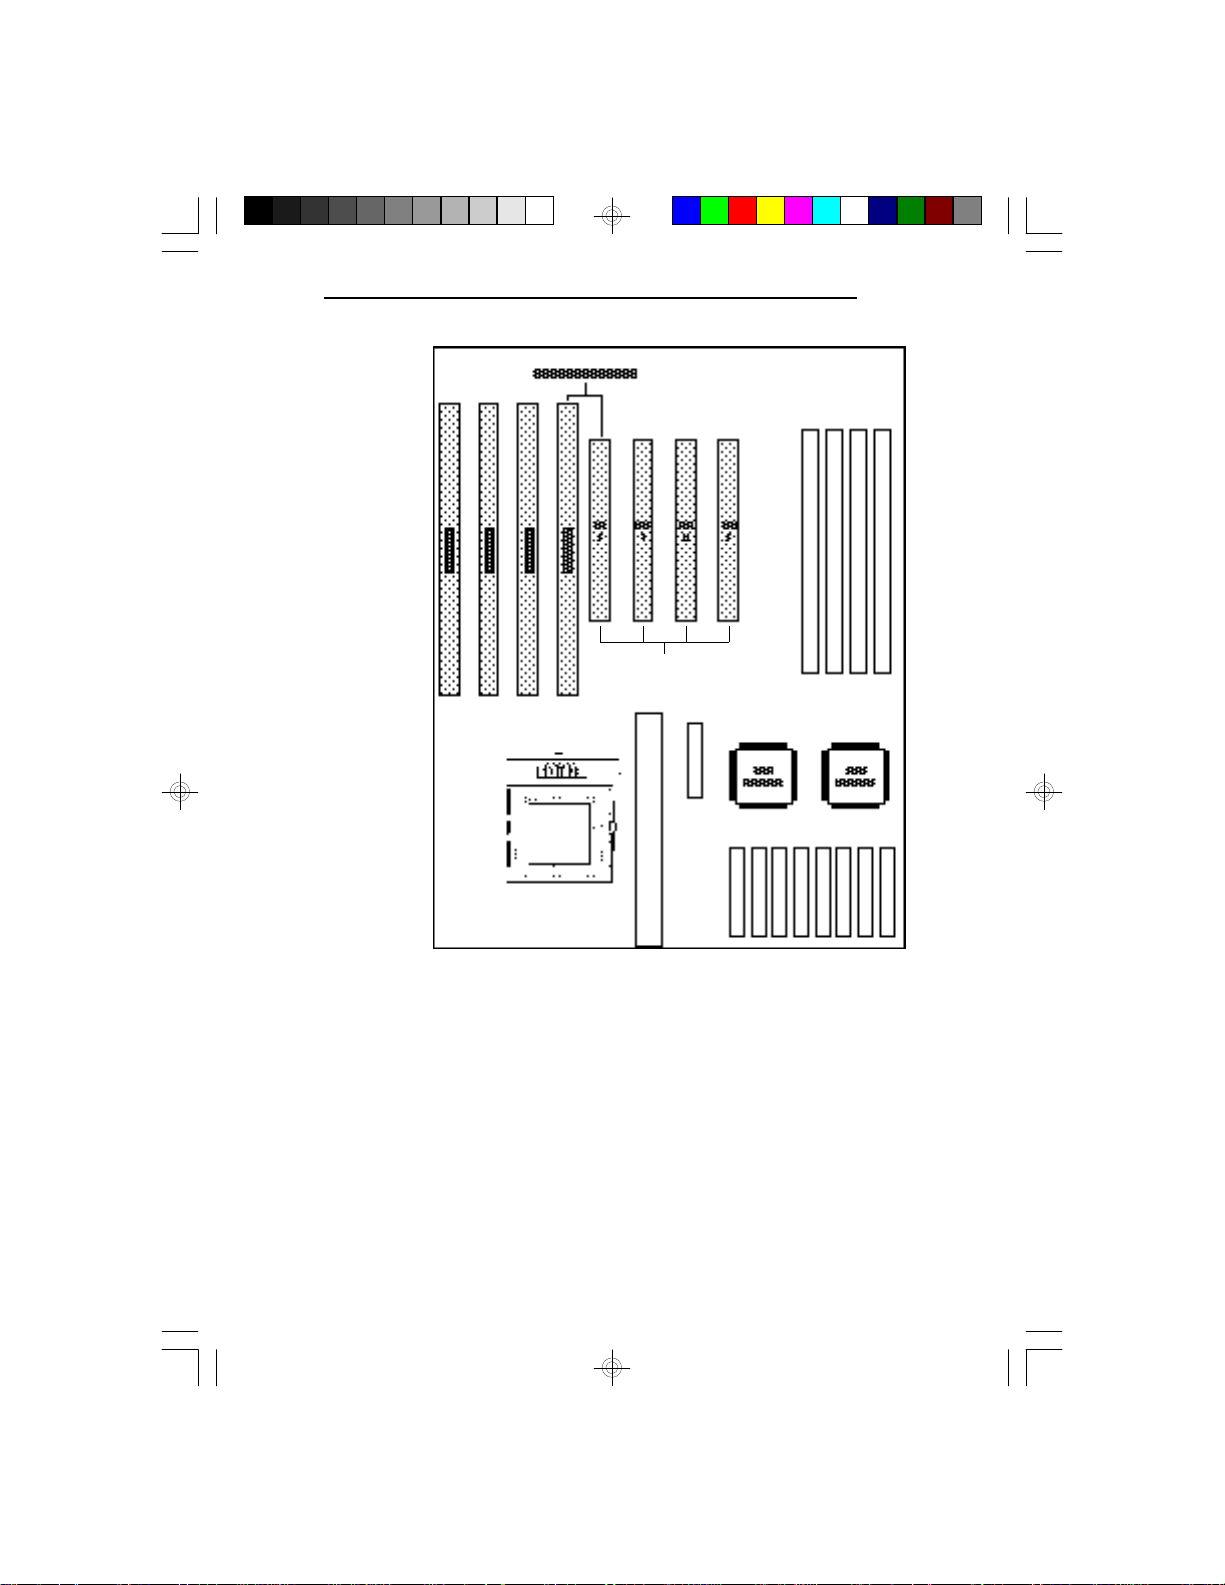
Master/Slave
G586OPC/E
Expansion Slots on the G586OPC
System Board
57
Page 66
PCI/ISA System Board
Installing the System Board
Before installing the system board into your system unit,
you should prepare the tools you will need:
You will need:
• one medium size, flat-bladed screwdriver
• one medium Phillips screwdriver
Step 1
Unlock your system unit. Turn off the power and disconnect all power cords and cables.
Step 2
Remove the system unit cover. Refer to the
manufacturer’s instructions if necessary.
Step 3
Step 4
58
Remove expansion cards seated in any of the expansion
slots and detach all connectors from the old system
board.
Loosen the screws holding the original system board and
remove the board from the system. Save the screws.
Page 67
Step 5
Step 6
Step 7
Step 8
G586OPC/E
Remove the G586OPC from its original packing box.
Be careful to avoid touching all connectors and pins on
the board. Please refer to the handling instructions on
pages 6-8 for proper handling techniques.
Insert the SIMMs into the SIMM banks on the
G586OPC. The quantity and location of the SIMMs is
dependent upon the memory configuration and type of
modules you intend to use.
Install the CPU. Be sure pin 1 of the CPU is aligned
with pin 1 of the socket.
Step 9
Step 10
Set the corresponding jumpers.
Install the prepared G586OPC system board into the
case and replace the screws.
Reinstall all cards and connectors and replace the system unit cover. Reconnect all power cords and cables.
59
Page 68
PCI/ISA System Board
v BIOS Setup Guide
After you power up your system, the BIOS message
appears on your screen and the memory count begins.
After the memory test, the following message will
appear on the screen:
Press DEL to enter setup
If the message disappears before you respond, restart
your system or press the “Reset” button. You may also
restart the system by pressing the <Ctrl> <Alt> <Del>
keys. If you do not press these keys at the correct time
and the system does not boot, the following error message will appear:
Press Del to enter Setup
If you have set a password and selected “System” in the
Security Option of the BIOS Feature Setup menu, you
will be prompted for the password everytime the system
is rebooted or any time you try to enter Setup. Type in
the correct password and press <Enter>.
60
If you selected “Setup” in the Security Option, you will
be prompted for the password only when you try to
enter Setup. Refer to the “BIOS Features Setup” section
for more information.
Page 69
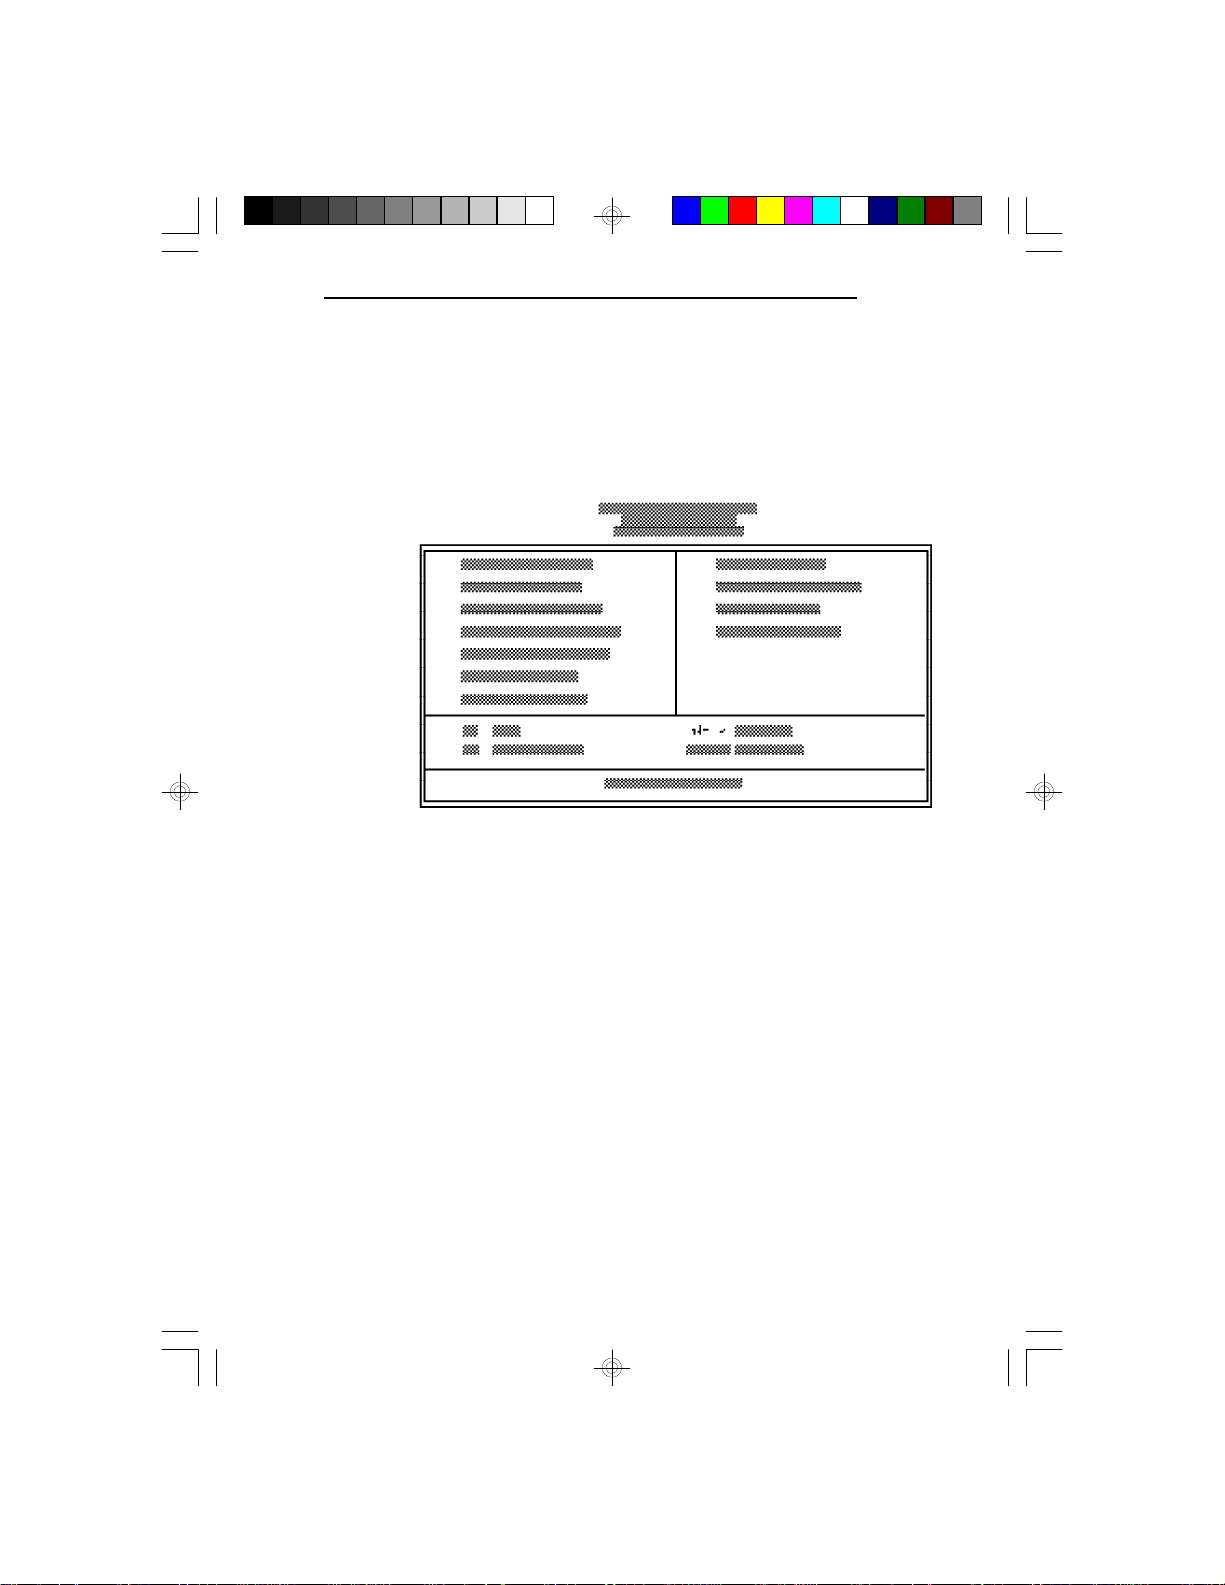
Award BIOS CMOS Setup Utility
Press <Ctrl> <Alt> <Esc> or <Del> simultaneously to
enter the Setup utility. A screen similar to the one below
will appear.
Use the arrow keys to highlight the option you want and
press <Enter>.
G586OPC/E
Standard CMOS Setup
Use the arrow keys to highlight “Standard CMOS
Setup” and press <Enter>, a screen similar to the one on
the next page will appear.
61
Page 70
PCI/ISA System Board
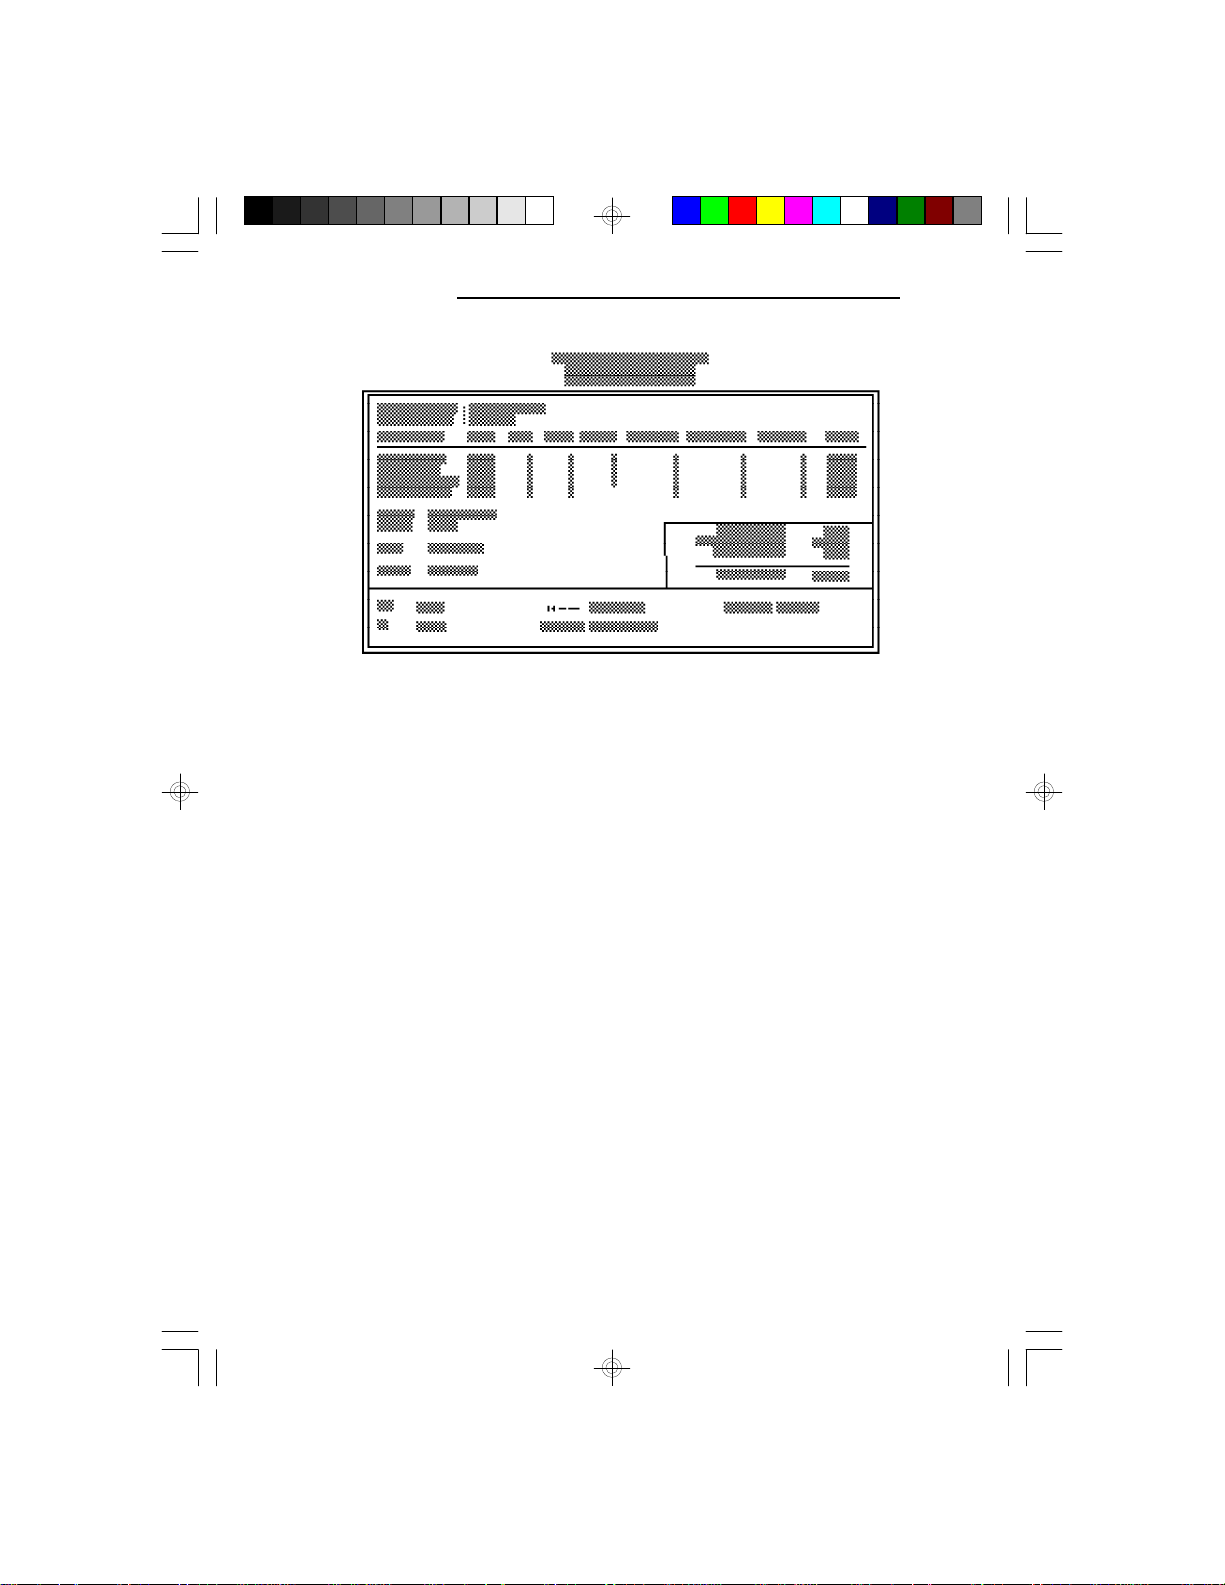
Date and Time
Sets the time and date for the system. Press <F3> for
the calendar. These items cannot be altered; they are
detected and displayed automatically.
Hard Drive Type
62
This allows you to enter the appropriate specifications
for the type of hard disk drive(s) installed in your
system. Under the “Type” category, you can select Auto,
User, one of 46 predefined drive specifications or None.
Auto
This option indicates that the parameters for your hard
disk drive(s) will be automatically detected and displayed when you boot your system.
By default, the LBA mode is selected for a hard disk
drive larger than 528 Megabytes. If you decide not to
accept the LBA mode, you can either specify your
selection in the “IDE HDD Auto Detection” menu, or
use the User option described below.
Page 71
G586OPC/E
User
This type is user definable and allows you to enter the
specifications yourself directly from the keyboard. Six
categories of information are required: Size, Cylinders,
Heads, Precomp, LandZone and Sectors. This information should be provided by your hard disk vendor or
system manufacturer. However, we recommend you use
the “IDE HDD Auto Detection” which provides a more
efficient way to setup your hard drive.
46 Predefined Drive Specifications
The tables on pages 21 and 22 give complete listings of
the available drive types. Any given hard drive must be
set to one specific drive type number. Please refer to
your hard disk documentation for the appropriate type
number.
None
Select <None> and press <Enter> if a hard drive is not
installed.
Drive A and Drive B
These options are used to select the type of floppy disk
drives installed in your system. If neither drive is
present, select “None”. Make sure you choose the
correct drive type; otherwise, your system might format
the device improperly.
63
Page 72
PCI/ISA System Board
Video
This is used to select the type of video adapter installed
in your system.
Halt on
This category controls whether the system will halt in
case an error is detected during power up.
No Errors: The system boot will not stop for any
All Errors: The system will stop whenever the
All, But Keyboard: The system will stop for any
All, But Diskette: The system will stop for any
detected errors.
BIOS detects a non-fatal error.
error except a keyboard error.
error except a disk error.
Memory
64
All, But Disk/Key: The system will stop for any
error except a keyboard or disk
error.
The lower right hand corner shows the base memory
size, extended memory size, and the other memory size
of your system. You cannot alter these items; your
computer automatically detects and displays them.
The Other Memory size refers to the memory located in
the 640K to 1024K address space. This is the memory
used for different applications. DOS uses this area to
load device drivers to free base memory for application
programs.
Page 73
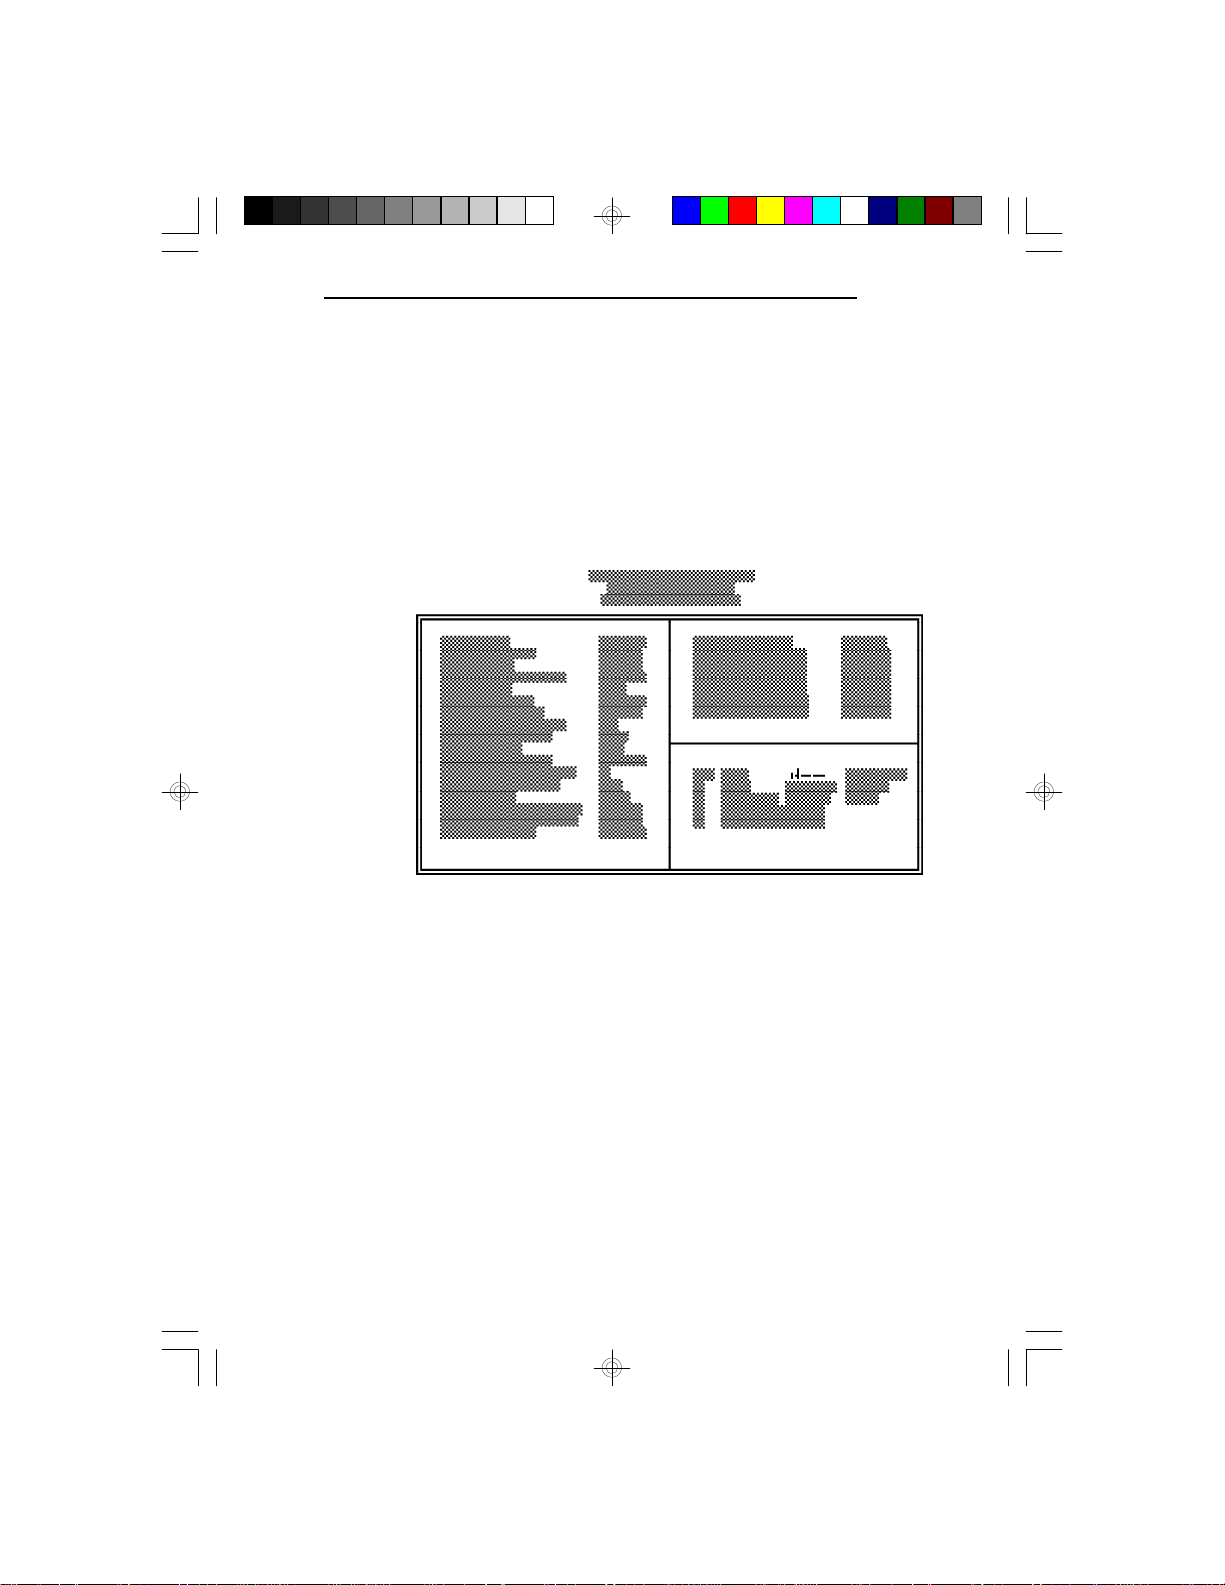
When you are through making changes in the Standard
CMOS Setup, press <Esc> to return to the main menu.
BIOS Features Setup
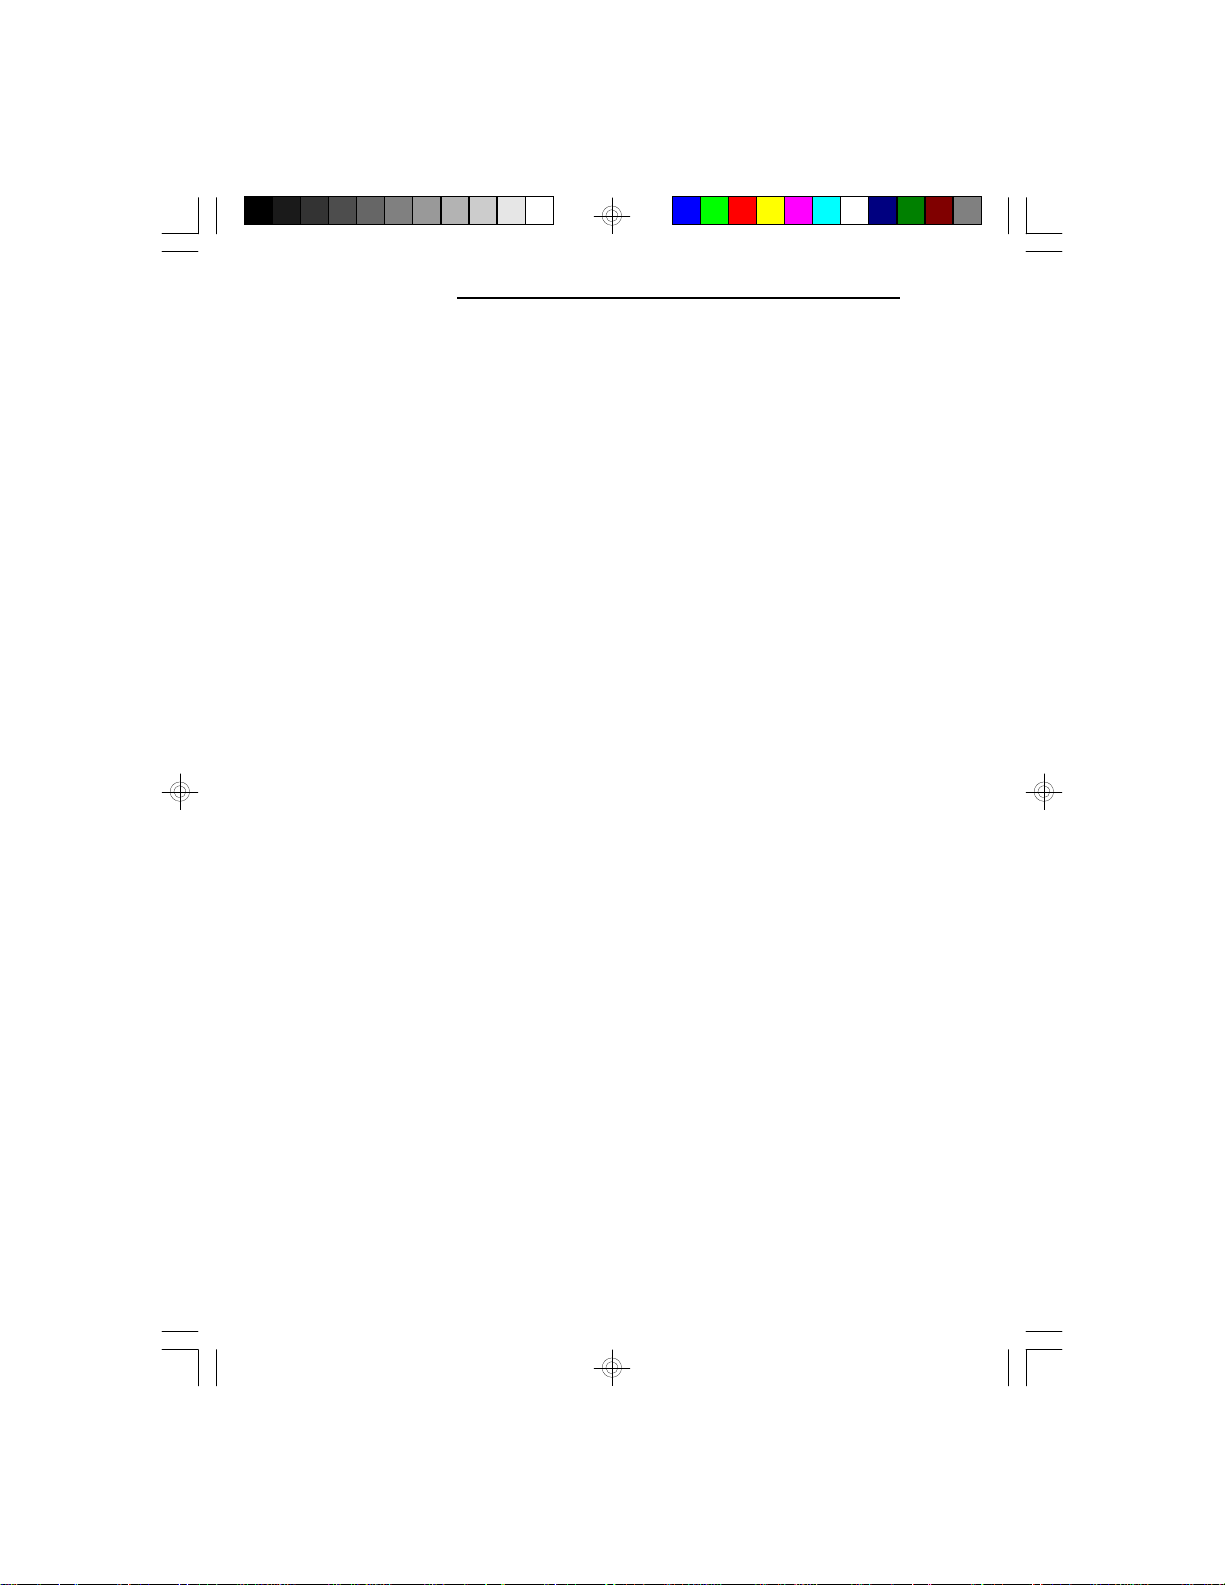
Use the arrow keys to highlight “BIOS Features Setup”
and press <Enter>, a screen similar to the one below
will appear.
G586OPC/E
The Virus Warning option may be set to “Enabled” or
“Disabled”. When enabled, the BIOS issues a warning
when any program or virus sends a Disk Format command or attempts to write to the boot sector of the hard
disk drive.
65
Page 74
PCI/ISA System Board
If you choose “System” in the Security Option, you will
be prompted for a password every time you cold boot
your system or access setup. If you choose “Setup”, you
will be prompted for a password only when trying to
access setup.
Use the arrow keys to move the highlight bar to the
option you wish to change or modify. Use the <Page
Up>, <Page Down>, <+> or <-> keys to make the
corresponding changes. Press <Esc> after making the
changes to return to the main menu.
Chipset Features Setup
The G586OPC uses the OPTi Viper-M chipset. The
Chipset Features Setup allows you to modify some
functions to optimize system performance. It also allows
you to enable, disable or select the port address of the
built-in serial ports, parallel port, floppy disk controller
and hard disk controller.
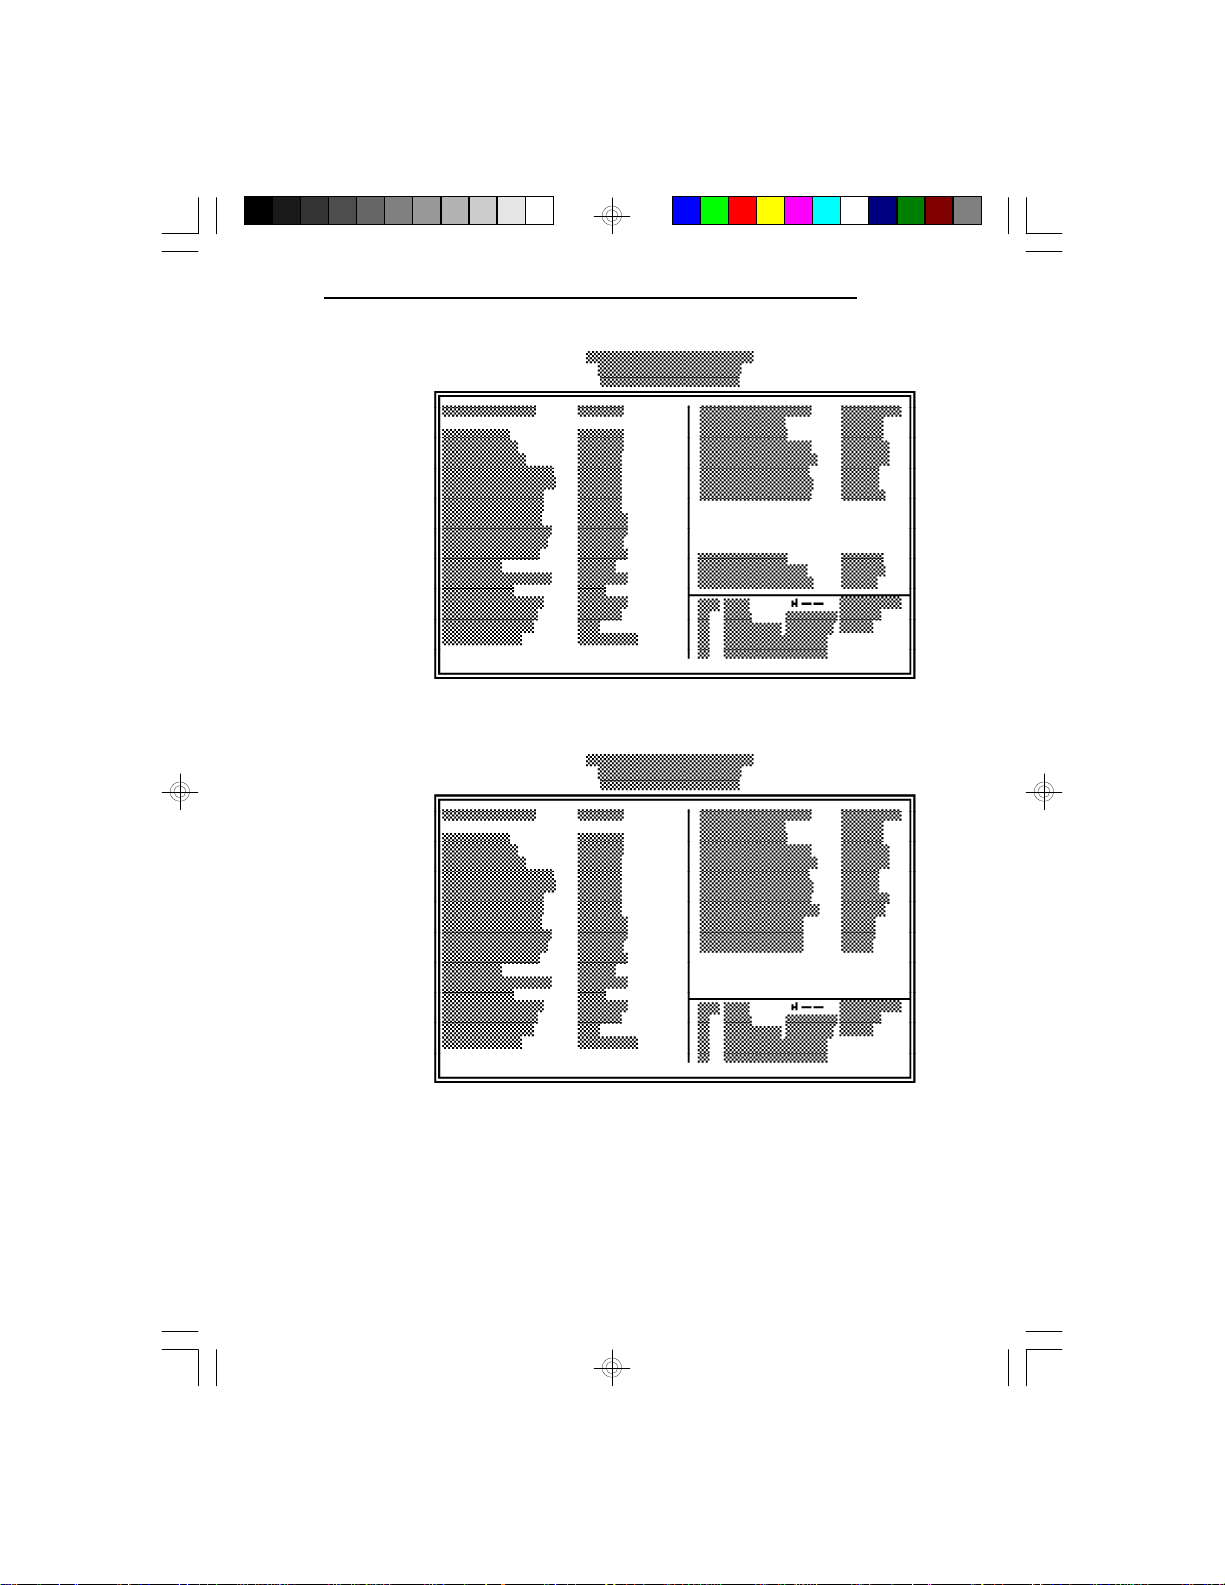
If you press <Enter>, a screen similar to the one on the
next page will appear. Use the arrow keys to move the
highlight bar to the option you wish to change or
modify. Use the <Page Up>, <Page Down>, <+> or <->
keys to make the corresponding changes.
66
If the changes you made are incorrect or you change
your mind, press <F6> or <F7> to return to the default
settings. Press <Esc> after making the changes to return
to the main menu.
Page 75
SMC FD37C665GT Integrated I/O Chip
G586OPC/E
SMC FD37C663GT Integrated I/O Chip
67
Page 76
PCI/ISA System Board
Power Management Setup
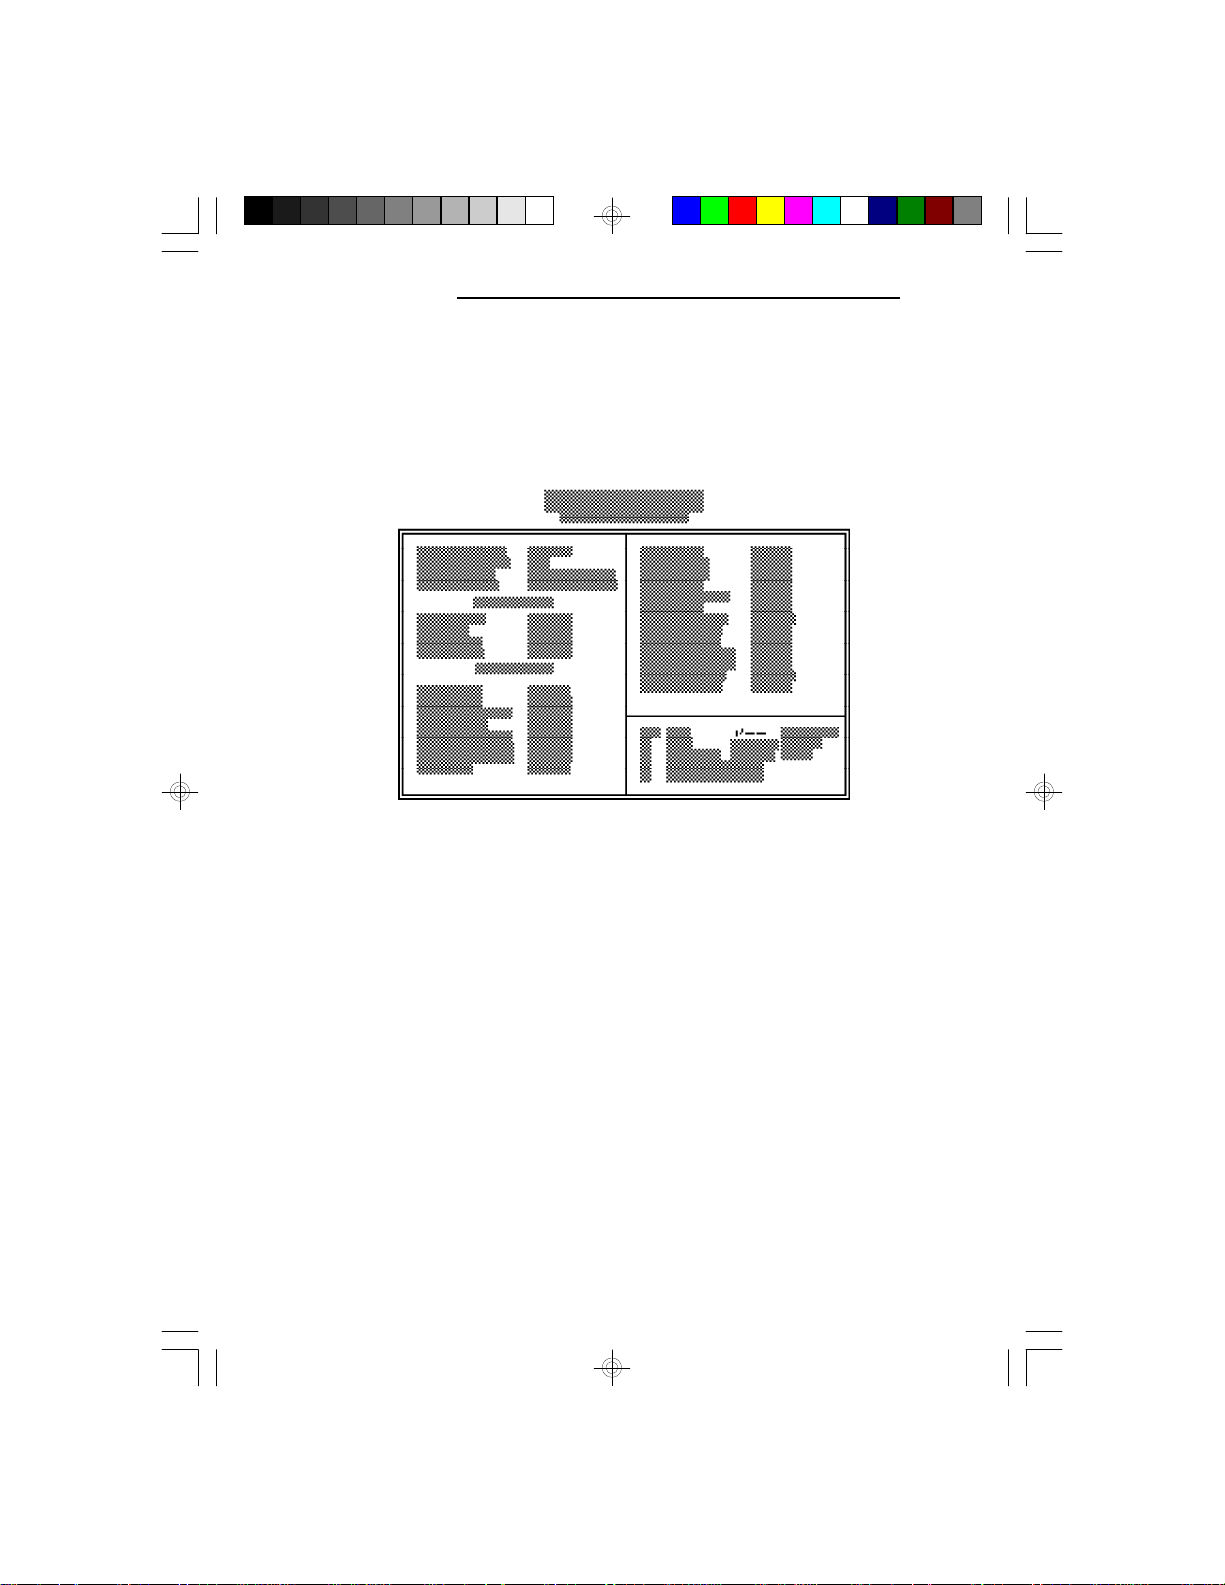
Use the arrow keys to highlight “Power Management
Setup” and press <Enter>. A screen similar to the one
below will appear.
Choosing “Enabled” in the Power Management option
will allow you to set Doze Mode, Standby Mode and
Suspend Mode. Choose “Disabled” if you do not want
your system to enter the power saving mode.
68
Page 77
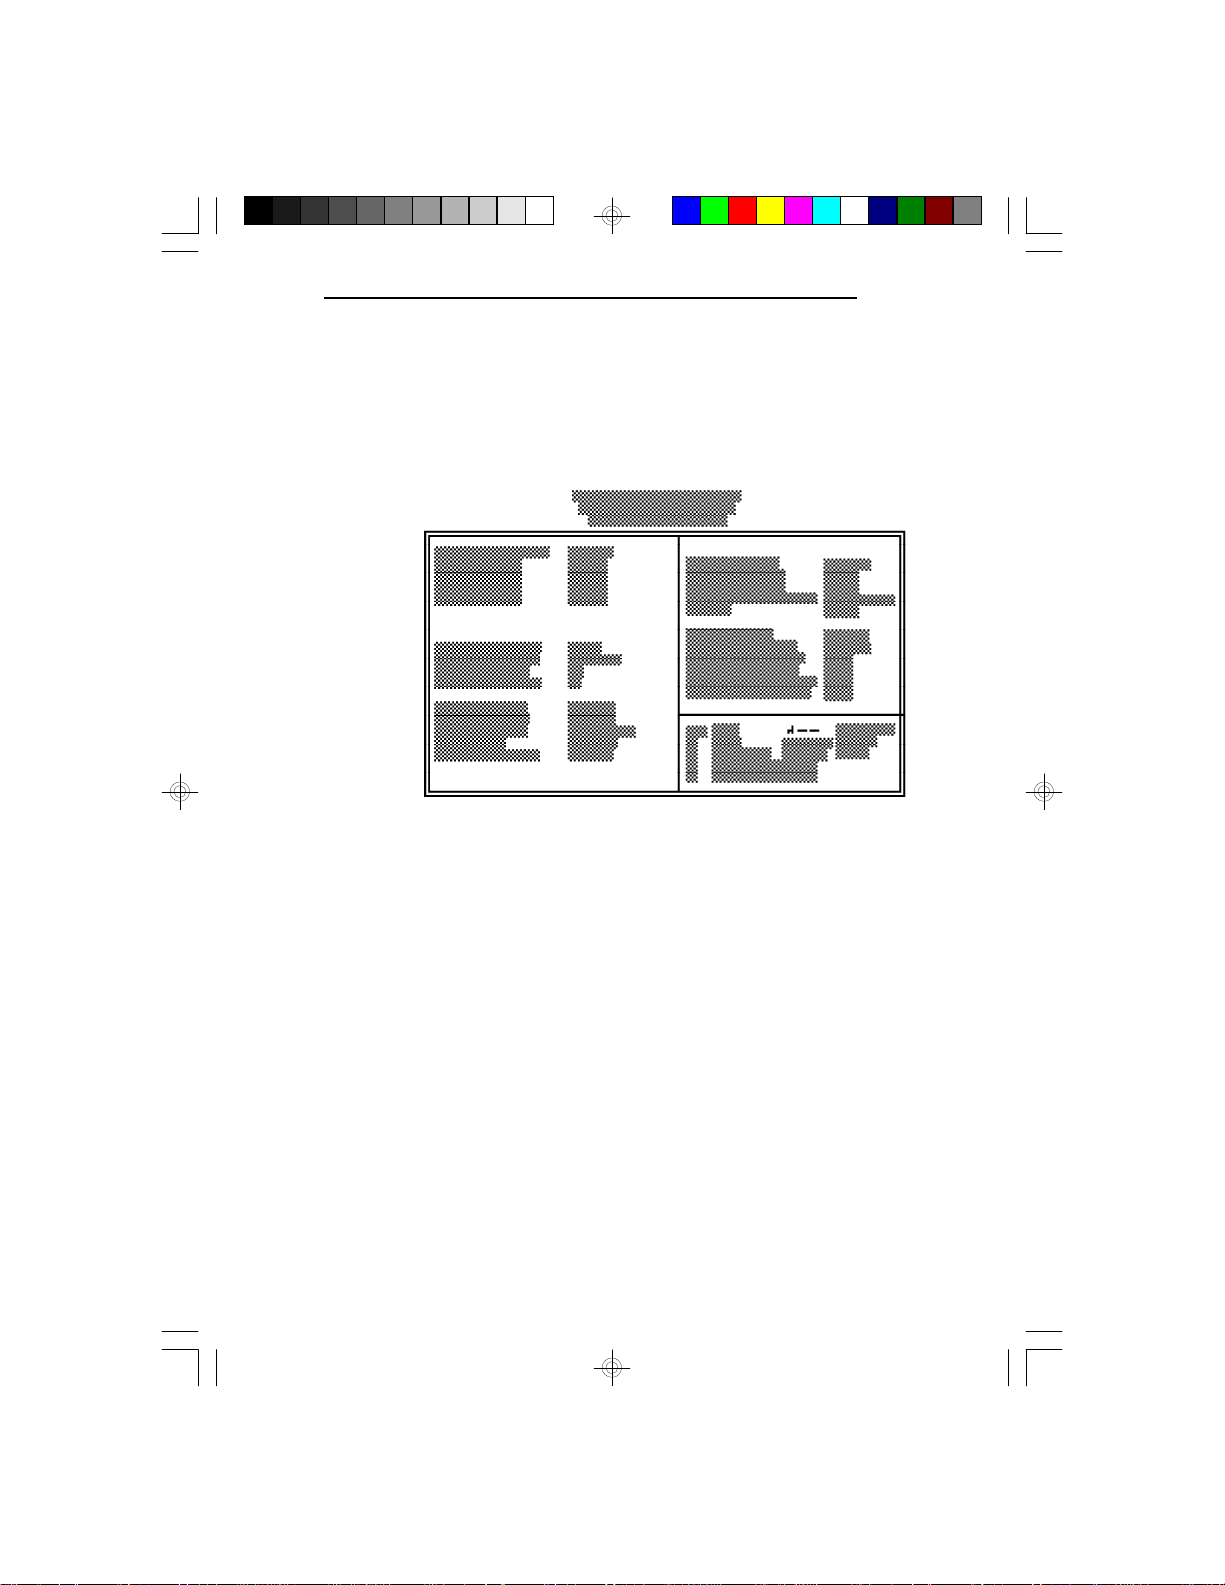
PCI Configuration Setup
Use the arrow keys to highlight “PCI Configuration
Setup” and press <Enter>; a screen similar to the one
below will appear.
The G586OPC system board supports four PCI slots.
Each slot may be assigned INT A, B, C, D if the card
installed in the slot requires an interrupt. Each INT may
then be assigned an IRQ value. This is done automatically if the “PnP BIOS Auto-Config” option is enabled.
G586OPC/E
69
Page 78
PCI/ISA System Board
Load BIOS Defaults
The “Load BIOS Defaults” option loads the troubleshooting default values permanently stored in the ROM
chips. These settings are non-optimal and turn off all
high performance features. You should use these values
only if you have hardware problems. Highlight this
option in the main screen and press <Enter>. The message below will appear.
Load BIOS Defaults (Y/N)? N
If you want to proceed, press <Y> and the default
settings will be loaded.
Load Setup Defaults
The “Load Setup Defaults” option loads optimized
settings from the BIOS ROM. Use the Setup default
values as standard values for your system.
Highlight this option on the main menu and press
<Enter>. The message below will appear.
Type <Y> and press <Enter> to load the Setup default
values.
Password Setting
If you want to set a password, make sure that the Security Option under the BIOS Features Setup is set to
“System” or “Setup”. Refer to the BIOS Features Setup
option for more information.
70
Load Setup Defaults (Y/N)? N
Page 79
Use the arrow keys to highlight the Password Setting
option and press <Enter>. The message below will
appear.
Type in the password. You are limited to eight characters. Type in a password that is eight characters long or
shorter. When done, the message below will appear:
Confirm Password:
You are asked to verify the password. Type in exactly
the same password. If you type in a wrong password,
you will be prompted to enter the correct password
again. Otherwise, enter a new password.
To delete or disable the password function, simply press
<Enter> instead of typing in a new password. Press the
<Esc> key to return to the main menu.
IDE HDD Auto Detection
G586OPC/E
Enter Password:
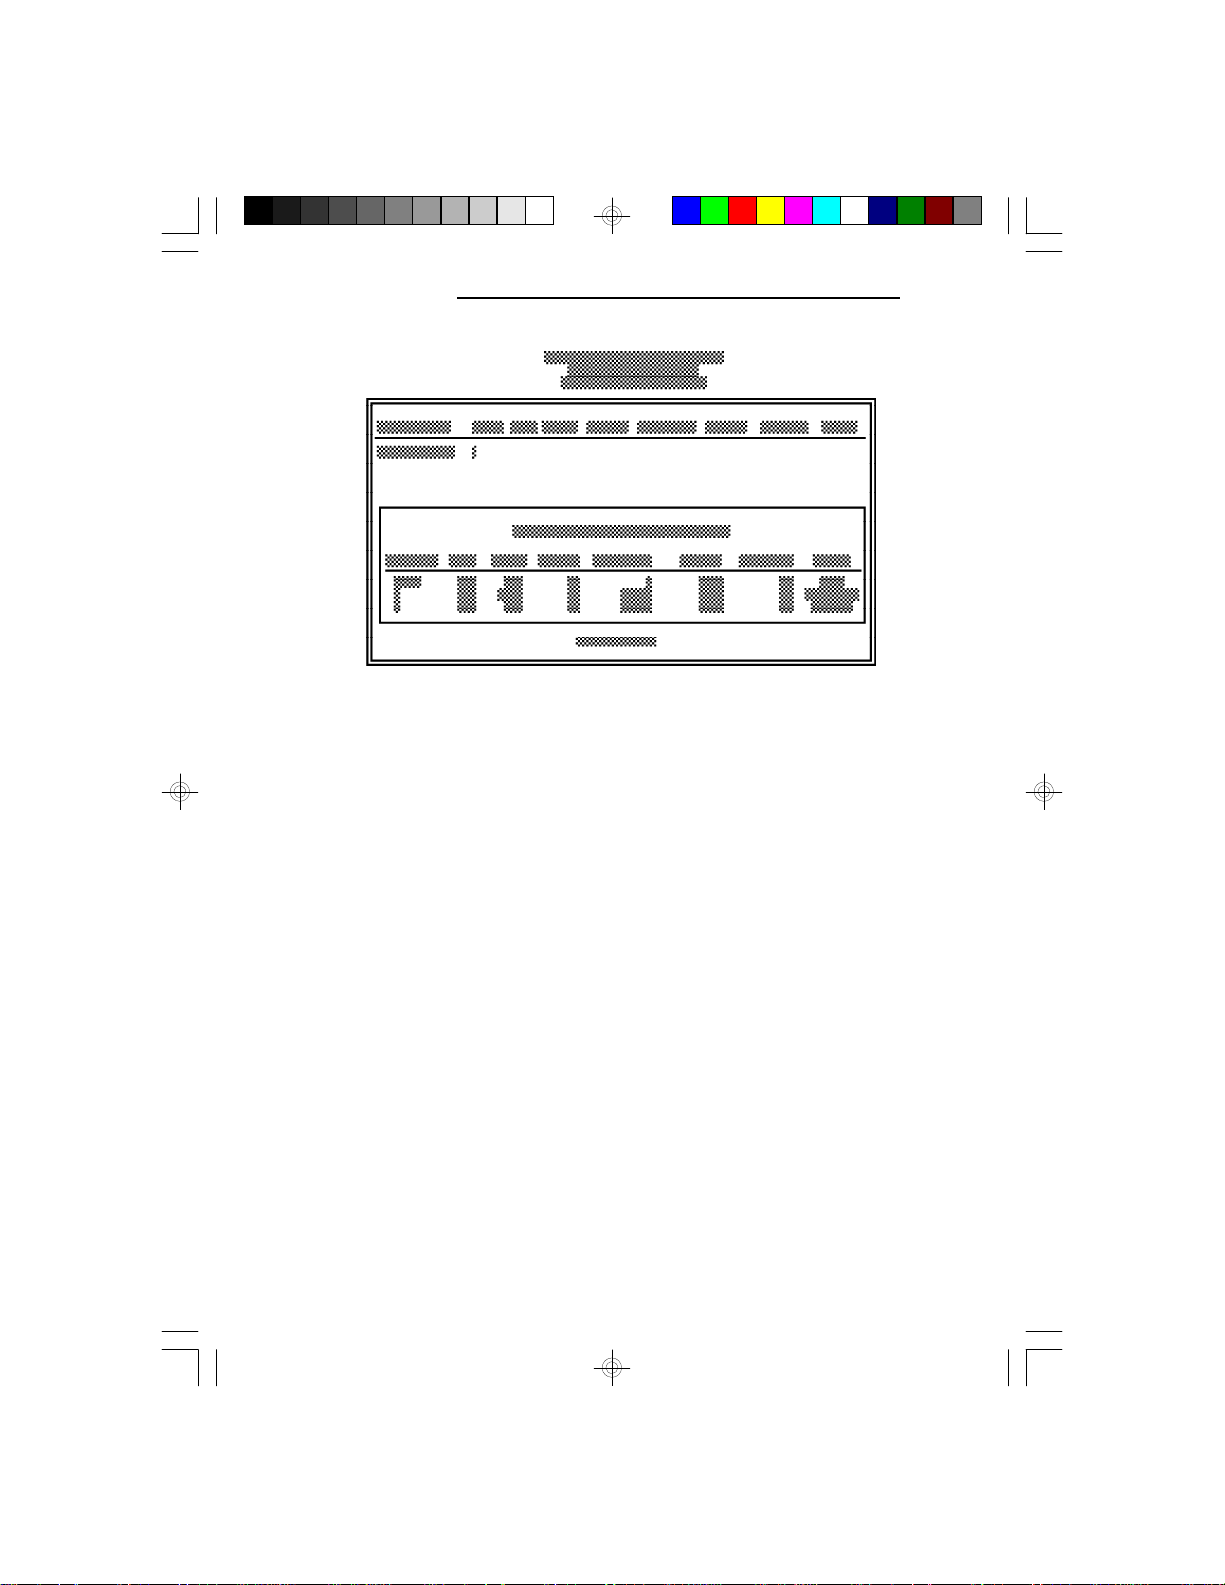
This option detects the hard disk parameters for the hard
disk drives installed in your system. Highlight this
option and press <Enter>. A screen similar to the one on
the next page will appear.
71
Page 80
PCI/ISA System Board
Enter your choice, “Y”, “1” or “3”, and press <Enter>
to accept the parameters or press <Esc> to abort. The
parameters of the hard disk will be displayed in the
Standard CMOS Setup.
Hard Drive Mode
The G586OPC supports three HDD modes: Normal,
LBA and Large. If your hard disk drive does not support
LBA mode, the “LBA” option will not be displayed. If
your HDD has 1024 or fewer cylinders, the “Large”
option will not be displayed.
72
Normal Mode
The Normal mode is the generic access mode in which
neither the BIOS nor the IDE controller will make any
transformations during hard-drive access.
The maximum number of cylinders, heads and sectors
for Normal mode are 1024, 16 and 63, respectively.
Page 81

G586OPC/E
no. Cylinders (1024)
x no. Heads ( 16)
x no. Sectors ( 63)
x bytes per sector ( 512)
528 Megabyte
If you set your HDD to Normal mode, the maximum
accessible HDD size will be 528 Megabytes even
though its physical size may be greater than that.
LBA (Logical Block Addressing) Mode
The LBA mode is a new HDD accessing method to
overcome the 528 Megabyte limitation. The number of
cylinders, heads and sectors shown on the screen may
not be the actual number for the HDD.
During the HDD accessing, the IDE controller will
transform the logical address described by the sector,
head and cylinder number into its own physical address
inside the HDD.
The maximum HDD size supported by the LBA mode is
8.4 Gigabytes. It is obtained by the following formula.
no. Cylinders (1024)
x no. Heads ( 225)
x no. Sectors ( 63)
x bytes per sector ( 512)
8.4 Gigabyte
73
Page 82
PCI/ISA System Board
Large Mode
The Large mode is the extended HDD access mode
supported by the G586OPC system board. Some IDE
HDDs have more than 1024 cylinders without LBA
support (in some cases, you may not want the LBA
mode). The system board provides another alternative to
support these kinds of HDD.
The BIOS tells the operating system that the number of
cylinders is 1/2 of actual and that the number of heads is
double the actual. During the disk access, the reverse
conversion is done by the INT13h routine.
Example of Large mode:
Maximum HDD size:
CYLS. HEADS SECTORS MODE
1120 16 59 NORMAL
560 32 59 LARGE
74
no. Cylinders (1024)
x no. Heads ( 32)
x no. Sectors ( 63)
x bytes per sector ( 512)
1 Gigabyte
Note:
To support LBA or Large mode, address translation
software is included in the Award BIOS HDD Sevice
Routine (INT13h). If you are running an operating
system that bypasses the BIOS Int13 Service Routine,
LBA and Large Mode may fail.
Page 83
Save & Exit Setup
When all the changes have been made, highlight “Save
& Exit Setup” and press <Enter>. The message below
will appear:
Type “Y” and press <Enter>. The following message
will appear:
Type “Y” and press <Enter>. The modifications you
have made will be written into the CMOS memory, and
the system will reboot. You will once again see the
initial diagnostics on the screen. If you wish to make
additional changes to the setup, press <Ctrl> <Alt>
<Esc> or <Del> simultaneously after memory testing is
done.
G586OPC/E
Save to CMOS and Exit (Y/N)? N
Reboot System (Y/N)? N
Exit Without Saving
When you do not want to save the changes you have
made, highlight this option and press <Enter>. The
message below will appear:
Type “Y” and press <Enter>. The system will reboot
and you will once again see the initial diagnostics on the
screen. If you wish to make any changes to the setup,
press <Ctrl> <Alt> <Esc> or <Del> simultaneously after
memory testing is done.
Quit Without Saving (Y/N)? N
75
Page 84
PCI/ISA System Board
v Troubleshooting Checklist
If you experience difficulty with the G586OPC system
board, please refer to the checklist below. If you still
cannot isolate the problem, please contact your dealer.
1) Check the jumper settings to ensure that the jumpers
are properly set. If in doubt, refer to the “Board
Configuration” section.
2) Verify that all SIM modules are seated securely into
the bank sockets.
3) Make sure the SIM modules are in the correct locations.
4) Check that all populated memory banks are filled
with valid size SIM modules.
5) If your board fails to function, place the board on a
flat surface and seat all socketed components (gently
press each component into the socket).
76
6) If you made changes to the BIOS settings, re-enter
setup and load the BIOS defaults.
Page 85
G586OPC/E
v Appendix A: PCI I/O Pin Assignments
Component Side
B
PRSNT1#
PRSNT2#
DEVSEL#
-12V
TCK
Ground
TDO
+5V
+5V
INTB#
INTD#
Reserved
Ground
Ground
Reserved
Ground
CLK
Ground
REQ#
+5V (I/O)
AD[31]
AD[29]
Ground
AD[27]
AD[25]
+3.3V
C/BE[3]#
AD[23]
Ground
AD[21]
AD[19]
+3.3V
AD[17]
C/BE[2]#
Ground
IRDY#
+3.3V
Ground
LOCK#
PERR#
+3.3V
SERR#
+3.3V
C/BE[1]#
AD[14]
Ground
AD[12]
AD[10]
Ground
- 01 -
- 02 -
- 03 -
- 04 -
- 05 -
- 06 -
- 07 -
- 08 -
- 09 -
- 10 -
- 11 -
- 12 -
- 13 -
- 14 -
- 15 -
- 16 -
- 17 -
- 18 -
- 19 -
- 20 -
- 21 -
- 22 -
- 23 -
- 24 -
- 25 -
- 26 -
- 27 -
- 28 -
- 29 -
- 30 -
- 31 -
- 32 -
- 33 -
- 34 -
- 35 -
- 36 -
- 37 -
- 38 -
- 39 -
- 40 -
- 41 -
- 42 -
- 43 -
- 44 -
- 45 -
- 46 -
- 47 -
- 48 -
- 49 -
A
TRST#
+12V
TMS
TDI
+5V
INTA#
INTC#
+5V
Reserved
+5V (I/O)
Reserved
Ground
Ground
Reserved
RST#
+5V (I/O)
GNT#
Ground
Reserved
AD[30]
+3.3V
AD[28]
AD[26]
Ground
AD[24]
IDSEL
+3.3V
AD[22]
AD[20]
Ground
AD[18]
AD[16]
+3.3V
FRAME#
Ground
TRDY#
Ground
STOP#
+3.3V
SDONE
SBO#
Ground
PAR
AD[15]
+3.3V
AD[13]
AD[11]
Ground
AD[09]
Solder Side
AD[08]
AD[07]
+3.3V
AD[05]
AD[03]
Ground
AD[01]
+5V (I/O)
ACK64#
+5V
+5V
- 52 -
- 53 -
- 54 -
- 55 -
- 56 -
- 57 -
- 58 -
- 59 -
- 60 -
- 61 -
- 62 -
C/BE[0]#
+3.3V
AD[06]
AD[04]
Ground
AD[02]
AD[00]
+5V (I/O)
REQ64#
+5V
+5V
77
Page 86
PCI/ISA System Board
v Appendix B: ISA I/O Pin Assignments
B
Gnd
Reset Drv
+5V DC
IRQ9
-5V DC
DRQ2
-12V DC
OWS
+12V DC
Gnd
-SEMEMW
-SEMEMR
-IOW
-IOR
-Dack3
-DRQ3
-Dack1
DRQ1
-Refresh
CLK
IRQ7
IRQ6
IRQ5
IRQ4
IRQ3
-Dack2
Bale
+5V DC
OSC
Gnd
-Mem CS16
-I/O CS16
IRQ10
IRQ11
IRQ12
IRQ13
IRQ14
-Dack0
DRQ0
-Dack5
DRQ5
-Dack6
DRQ6
-Dack7
DRQ7
+5V DC
-Master
Gnd
T/C
D
- 01 -
- 02 -
- 03 -
- 04 -
- 05 -
- 06 -
- 07 -
- 08 -
- 09 -
- 10 -
- 11 -
- 12 -
- 13 -
- 14 -
- 15 -
- 16 -
- 17 -
- 18 -
- 19 -
- 20 -
- 21 -
- 22 -
- 23 -
- 24 -
- 25 -
- 26 -
- 27 -
- 28 -
- 29 -
- 30 -
- 31 -
- 01 -
- 02 -
- 03 -
- 04 -
- 05 -
- 06 -
- 07 -
- 08 -
- 09 -
- 10 -
- 11 -
- 12 -
- 13 -
- 14 -
- 15 -
- 16 -
- 17 -
- 18 -
A
-I/O Chck
SD7
SD6
SD5
SD4
SD3
SD2
SD1
SD0
-I/O Chrdy
AEN
SA19
SA18
SA17
SA16
SA15
SA14
SA13
SA12
SA11
SA10
SA9
SA8
SA7
SA6
SA5
SA4
SA3
SA2
SA1
SA0
C
SBHE
LA23
LA22
LA21
LA20
LA19
LA18
LA17
-Memr
-Memw
SD08
SD09
SD10
SD11
SD12
SD13
SD14
SD15
78
Page 87
G586OPC/E
v Appendix C: Connector Pin Assignments
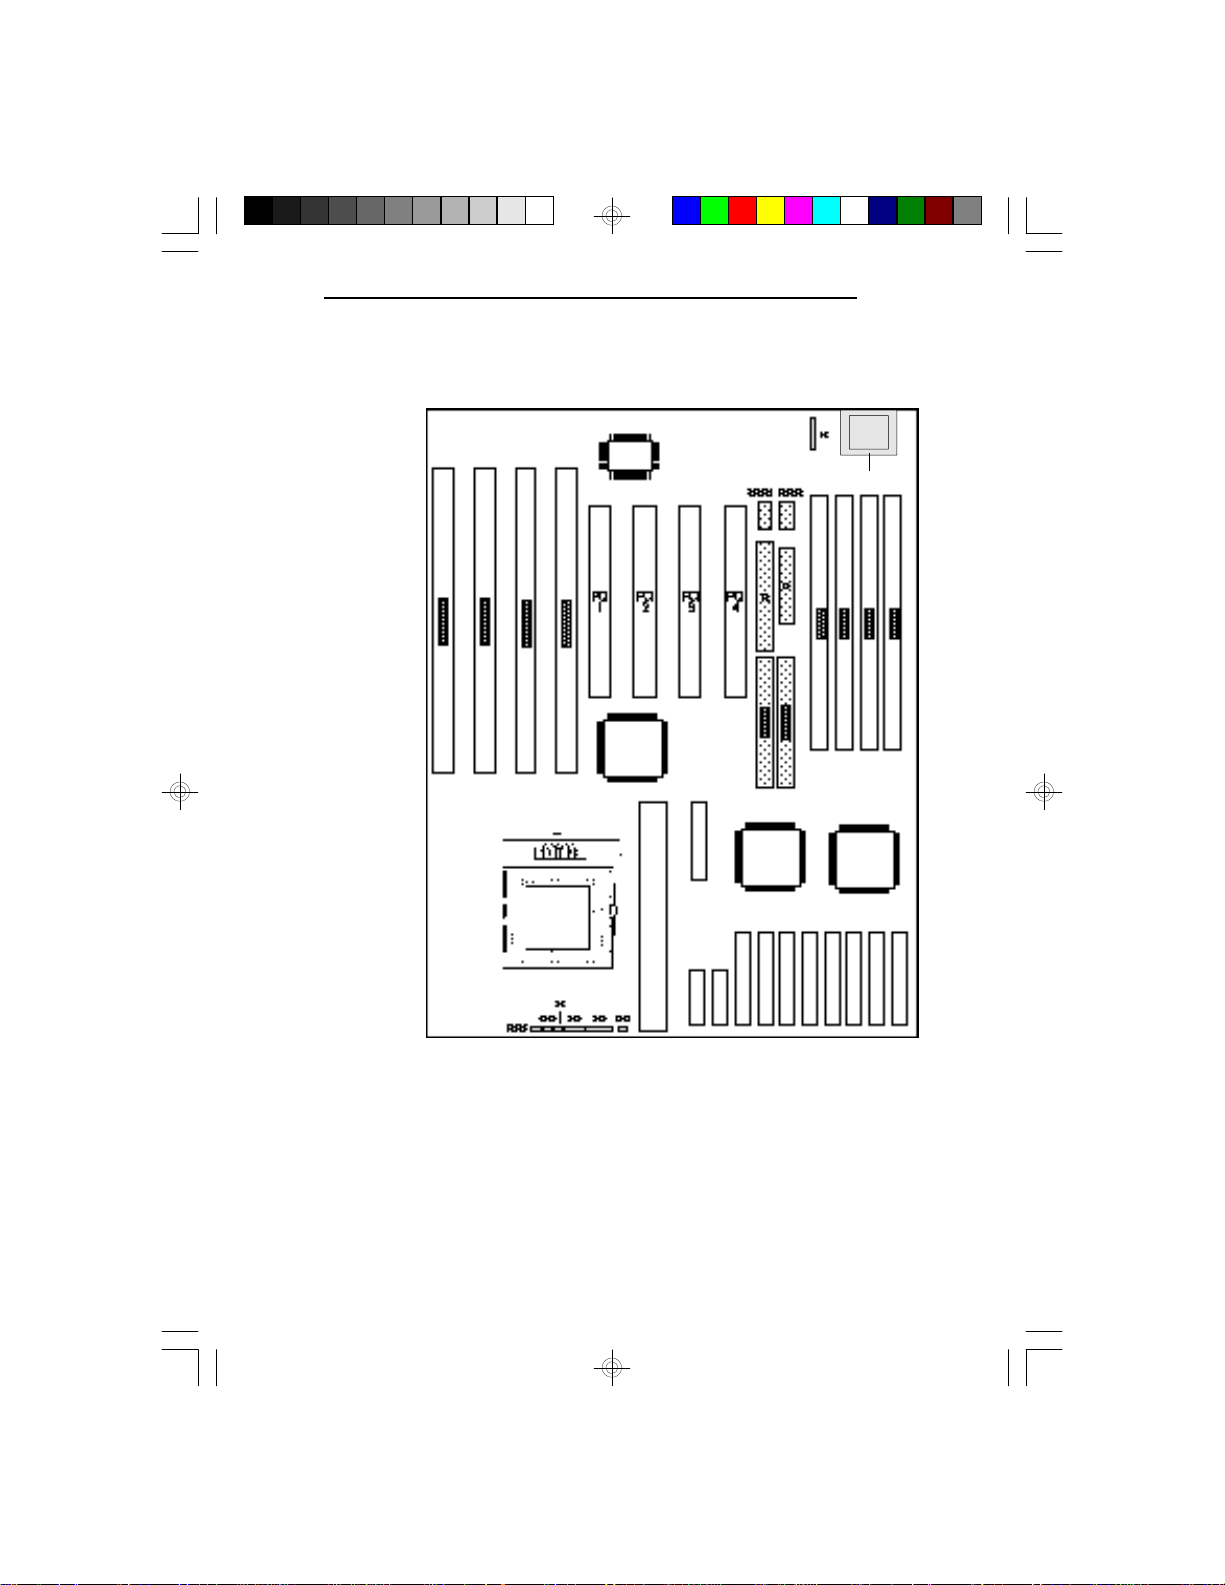
HJ1
J2
79
Page 88

PCI/ISA System Board
Connector J1
PS/2 Mouse Connector
Pin
1
2
3
4
5
6
Connector J7
Parallel Printer Port
Pin
1
2
3
4
5
6
7
8
9
10
11
12
13
14
15
16
17
Function
Mouse Data
Reserved
Ground
+5V
Mouse Clock
Reserved
Function
-Strobe
Data 0
Data 1
Data 2
Data 3
Data 4
Data 5
Data 6
Data 7
-Ack
Busy
Paper Empty
Select
-Autofd
-Error
-Init
-Slctin
80
Page 89
G586OPC/E
Pin
18
19
20
21
22
23
24
25
Connector J8
Floppy Disk Drive Connector
Pin
1
2
3
4
5
6
7
8
9
10
11
12
13
14
15
16
17
Function
Ground
Ground
Ground
Ground
Ground
Ground
Ground
Ground
Function
Ground
DENSEL
Ground
Reserved
Ground
Drate0
Ground
Index
Ground
MTR0
Ground
DR1
Ground
DR0
Ground
MTR1
Drate1
81
Page 90
PCI/ISA System Board
Pin
18
19
20
21
22
23
24
25
26
27
28
29
30
31
32
33
34
Function
Dir
Ground
Step
Ground
Write Data
Ground
Write Gate
Ground
Track 0
MSEN
Wr Protect
Ground
Read Data
Ground
Head Select
Ground
Disk Change
1st IDE
Primary IDE Hard Disk Drive Connector
82
Pin
Function
1
2
3
4
5
6
7
8
9
-Reset
Ground
D7
D8
D6
D9
D5
D10
D4
Page 91
G586OPC/E
Pin
10
11
12
13
14
15
16
17
18
19
20
21
22
23
24
25
26
27
28
29
30
31
32
33
34
35
36
37
38
39
40
Function
D11
D3
D12
D2
D13
D1
D14
D0
D15
Ground
Reserved
DRQ0
Ground
-IOW
Ground
-IOR
Ground
IOCHRDY
BALE
DACK0
Ground
IRQ14
IOCS16
SA1
Reserved
SA0
SA2
HCS0
HCS1
LED
Ground
83
Page 92
PCI/ISA System Board
2nd IDE
Secondary IDE Hard Disk Drive Connector
Pin
10
11
12
13
14
15
16
17
18
19
20
21
22
23
24
25
26
27
28
29
30
Function
1
2
3
4
5
6
7
8
9
-Reset
Ground
D7
D8
D6
D9
D5
D10
D4
D11
D3
D12
D2
D13
D1
D14
D0
D15
Ground
Reserved
DRQ1
Ground
-IOW
Ground
-IOR
Ground
Reserved
BALE
DACK1
Ground
84
Page 93
G586OPC/E
Pin
31
32
33
34
35
36
37
38
39
40
Function
IRQ15
IOCS16
SA1
Reserved
SA0
SA2
HCS0
HCS1
LED
Ground
COM1 and COM2
Primary (COM1) and Secondary (COM2) Serial Ports
Pin
1
2
3
4
5
6
7
8
9
DCD (Data Carrier Detect)
RX (Receive Data)
TX (Transmit Data)
DTR (Data Terminal Ready)
Ground (Signal Ground)
DSR (Data Set Ready)
RTS (Request to Send)
CTS (Clear to Send)
RI (Ring Indicator)
Function
85
Page 94
PCI/ISA System Board
Connector J15
HD LED Connector
Pin
1
2
Connector J17
Speaker Connector
Pin
1
2
3
4
Connector J18
Keylock Connector
Pin
1
2
3
4
5
Function
IDE LED
VCC
Function
Data
NC
Ground
VCC
Function
LED Signal
Reserved
Ground
Keylock Signal
Ground
86
Page 95
Connector JP25
Green LED/Turbo LED Connector
G586OPC/E
Pin
1
2
Function
LED (-)
LED (+)
Note:
Connector JP25 functions as Green LED Connector if
the Power Management option is enabled (“Power
Management Setup”).
Connector JP26
Turbo Switch Connector
Pin
1
2
Function
Turbo
GND
Connector S1
Hardware Reset Connector
Pin
Function
1
2
GND
Reset
87
Page 96
PCI/ISA System Board
Connector HJ1
PS/2 Keyboard Connector
Pin
1
2
3
4
5
6
Connector J2
AT Keyboard Connector
Pin
1
2
3
4
5
Note:
Your G586OPC system board is equipped only with one
of these connectors: Connector HJ1 or Connector J2.
Function
Keyboard Data
NC
Ground
VCC
Keyboard CLK
NC
Function
Keyboard CLK
Keyboard Data
NC
Ground
VCC
88
Page 97
v Appendix D: System Error Report
When the BIOS encounters an error that requires the
user to correct something, either a beep code will sound
or a message will be displayed in a box in the middle of
the screen and a message PRESS F1 TO CONTINUE,
CTRL-ALT-ESC or DEL TO ENTER SETUP will be
shown in the information box at the bottom.
POST Beep
There is one beep code in BIOS. This code indicates
that a video error has occurred and the BIOS cannot
initialize the video screen to display any additional
information. This beep code consists of a single long
beep followed by two short beeps.
Error Messages
One or more of the following messages may be displayed if the BIOS detects an error during the POST.
G586OPC/E
DISK BOOT FAILURE, INSERT SYSTEM DISK AND PRESS
ENTER
No boot device was found. Insert a system disk into
Drive A and press <Enter>. If the system normally boots
from the hard drive, make sure the controller is inserted
correctly and all cables are properly attached. Also be
sure the disk is formatted as a boot device. Then reboot
the system.
DISKETTE DRIVES OR TYPES MISMATCH ERROR - RUN
SETUP
Type of diskette drive installed in the system is different
from the CMOS definition. Run setup to reconfigure the
drive type correctly
89
Page 98
PCI/ISA System Board
DISPLAY SWITCH IS SET INCORRECTLY
The display switch on the motherboard can be set to
either monochrome or color. This indicates the switch is
set to a different setting than indicated in Setup. Determine which setting is correct, and then either turn off
the system and change the jumper, or enter Setup and
change the VIDEO selection.
DISPLAY TYPE HAS CHANGED SINCE LAST BOOT
Since last powering off the system, the display adapter
has been changed. You must configure the system for
the new display type.
ERROR ENCOUNTERED INITIALIZING HARD DRIVE
Hard drive cannot be initialized. Be sure the adapter is
installed correctly and all cables are correctly and firmly
attached. Also, be sure the correct hard drive type is
selected in Setup (refer to page 22).
ERROR INITIALIZING HARD DISK CONTROLLER
Cannot initialize controller. Make sure the card is
correctly and firmly installed in the bus. Be sure the
correct hard drive type is selected in Setup. Also, check
to see if any jumper needs to be set correctly on the
hard drive.
90
FLOPPY DISK CNTRLR ERROR OR NO CNTRLR
PRESENT
Cannot find or initialize the floppy drive controller.
Make sure the controller is installed correctly and
firmly. If no floppy drive is installed, be sure the Diskette Drive selection in Setup is set to NONE.
Page 99
G586OPC/E
KEYBOARD ERROR OR NO KEYBOARD PRESENT
Cannot initialize the keyboard. Make sure the keyboard
is attached correctly and no keys are being pressed
during the boot.
If you are purposely configuring the system without a
keyboard, set the error halt condition in Setup to HALT
ON ALL, BUT KEYBOARD. This will cause the BIOS
to ignore the missing keyboard and continue the boot.
MEMORY ADDRESS ERROR AT...
Indicates a memory address error at a specific location.
You can use this location along with the memory map
for your system to find and replace the bad memory
chips.
MEMORY PARITY ERROR AT...
Indicates a memory parity error at a specific location.
You can use this location along with the memory map
for your system to find and replace the bad memory
chips.
MEMORY SIZE HAS CHANGED SINCE LAST BOOT
Memory has been added or removed since the last boot.
Enter Setup and enter the new memory size in the
memory fields.
MEMORY VERIFY ERROR AT...
Indicates an error verifying a value already written to
memory. Use the location along with your system’s
memory map to locate the bad chip.
OFFENDING ADDRESS NOT FOUND
This message is used in conjunction with the I/O
CHANNEL CHECK and RAM PARITY ERROR
messages when the segment that has caused the problem
cannot be isolated.
91
Page 100
PCI/ISA System Board
OFFENDING SEGMENT
This message is used in conjunction with the I/O
CHANNEL CHECK and RAM PARITY ERROR
messages when the segment that has caused the problem
has been isolated.
PRESS A KEY TO REBOOT
This will be displayed at the bottom screen when an
error occurs that requires a reboot. Press any key and the
system will reboot.
PRESS F1 TO DISABLE NMI, F2 TO REBOOT
When BIOS detects a Non-Maskable Interrupt condition
during boot, this will allow NMI to be disabled and
continue to boot. You can also reboot the system with
the NMI enabled.
RAM PARITY ERROR - CHECKING FOR SEGMENT
Indicates a parity error in Random Access Memory.
SYSTEM HALTED, (CTRL-ALT-DEL) TO REBOOT...
Indicates the present boot attempt has been aborted and
the system must be rebooted. Press and hold down the
CTRL and ALT keys and press DEL simultaneously.
92
 Loading...