

Page 1

DS910-OT
User’s Manual
A20200152
Page 2

Copyright
This publication contains information that is protected by copyright. No part of it
may be reproduced in any form or by any means or used to make any transformation/adaptation without the prior written permission from the copyright holders.
This publication is provided for informational purposes only. The manufacturer
makes no representations or warranties with respect to the contents or use
of this manual and specifically disclaims any express or implied warranties of
merchantability or fitness for any particular purpose. The user will assume the
entire risk of the use or the results of the use of this document. Further, the
manufacturer reserves the right to revise this publication and make changes to
its contents at any time, without obligation to notify any person or entity of such
revisions or changes.
© 2012. All Rights Reserved.
Trademarks
Product names or trademarks appearing in this manual are for identification purpose only and are the properties of the respective owners.
Page 3

FCC and DOC Statement on Class B
This equipment has been tested and found to comply with the limits for a Class B
digital device, pursuant to Part 15 of the FCC rules. These limits are designed to
provide reasonable protection against harmful interference when the equipment
is operated in a residential installation. This equipment generates, uses and can
radiate radio frequency energy and, if not installed and used in accordance with
the instruction manual, may cause harmful interference to radio communications.
However, there is no guarantee that interference will not occur in a particular
installation. If this equipment does cause harmful interference to radio or television reception, which can be determined by turning the equipment off and on,
the user is encouraged to try to correct the interference by one or more of the
following measures:
• Reorient or relocate the receiving antenna.
• Increase the separation between the equipment and the receiver.
• Connect the equipment into an outlet on a circuit different from that to which
the receiver is connected.
• Consult the dealer or an experienced radio TV technician for help.
Notice:
1. The changes or modifications not expressly approved by the party responsible
for compliance could void the user’s authority to operate the equipment.
2. Shielded interface cables must be used in order to comply with the emission
limits.
Page 4

1
4
Introduction
Table of Contents
Copyright ...........................................................................................2
Trademarks ........................................................................................2
FCC and DOC Statement on Class B ..............................................3
About this Manual .............................................................................7
Warranty ..........................................................................................7
Static Electricity Precautions .............................................................8
Safety Measures .................................................................................8
Safety Precautions .............................................................................9
About the Package .......................................................................... 10
Before Using the System .................................................................10
Chapter 1 - Introduction ................................................................11
Overview ..................................................................................... 11
Key Features ...............................................................................12
Specifications ................................................................................ 13
Getting to Know the DS910-OT .................................................... 15
Mechanical Dimensions ................................................................. 17
Chapter 2 - Getting Started ........................................................... 18
Preparing the System .................................................................... 18
Installing Devices ......................................................................... 18
Configuring BIOS .......................................................................... 18
Installing the Operating System ...................................................... 18
Installing the Drivers ..................................................................... 19
Page 5

1
5
Introduction
Chapter 3 - Installing Devices ........................................................20
Removing the Chassis Cover .........................................................20
Installing a SODIMM ..................................................................... 22
Installing a SATA Drive .................................................................. 24
Connecting Cables to Terminal Blocks ............................................ 27
Chapter 4 - Jumper Settings ...........................................................28
Clear CMOS Data ........................................................................ 28
USB Power Select ......................................................................... 29
mSATA/Mini PCIe Select ................................................................ 30
COM1 RS232/ Power Select .......................................................... 31
COM1 RS232/RS422/RS485 Select ................................................. 32
Power-on Select............................................................................ 33
Chapter 5 - Ports and Connectors ................................................ 34
Front Panel I/O Ports .................................................................... 34
COM Port ................................................................................ 35
Digital Input/Output ................................................................. 36
USB Ports................................................................................ 37
SD/MMC .................................................................................. 38
Rear Panel I/O Ports ..................................................................... 39
LAN Port ................................................................................. 40
USB Ports................................................................................ 41
Line-out .................................................................................. 42
DVI-I ...................................................................................... 43
HDMI ...................................................................................... 44
I/O Connectors ............................................................................ 45
Mini PCIe Slot .......................................................................... 45
Front Panel Connectors ............................................................. 46
LEDs ....................................................................................... 47
Cooling Fan Connectors ............................................................. 48
Chassis Intrusion Connector ...................................................... 49
Battery ................................................................................... 50
SATA (Serial ATA) Connector .....................................................51
HDD Power ..............................................................................52
Factory Testing ........................................................................53
Page 6

1
6
Introduction
Chapter 6 - Mounting Options ....................................................... 54
Wall Mounting ............................................................................. 54
VESA Mounting ............................................................................55
Chapter 7 - BIOS Setup .................................................................. 57
Overview .............................................................................................................. 57
AMI BIOS Setup Utility ................................................................. 59
Main ....................................................................................... 59
Advanced ................................................................................ 60
Chipset ................................................................................... 70
Boot ....................................................................................... 78
Security .................................................................................. 80
Save & Exit ............................................................................. 81
Updating the BIOS ........................................................................ 82
Chapter 8 - Supported Software .................................................... 83
Appendix A - NLITE and AHCI Installation Guide ......................... 96
Appendix B - Watchdog Sample Code ......................................... 108
Appendix C - System Error Message ............................................ 111
Appendix D - Troubleshooting ...................................................... 113
Page 7

1
7
Introduction
About this Manual
An electronic file of this manual is included in the DVD. To view the user’s manual in the DVD, insert the DVD into a DVD-ROM drive. The autorun screen (Main
Board Utility CD) will appear. Click “User ’s Manual” on the main menu.
Warranty
1. Warranty does not cover damages or failures that arised from misuse of the
product, inability to use the product, unauthorized replacement or alteration
of components and product specifications.
2. The warranty is void if the product has been subjected to physical abuse,
improper installation, modification, accidents or unauthorized repair of the
product.
3. Unless otherwise instructed in this user’s manual, the user may not, under
any circumstances, attempt to perform service, adjustments or repairs on the
product, whether in or out of warranty. It must be returned to the purchase
point, factory or authorized service agency for all such work.
4. We will not be liable for any indirect, special, incidental or consequencial
damages to the product that has been modified or altered.
Page 8

1
8
Introduction
Static Electricity Precautions
It is quite easy to inadvertently damage your PC, system board, components
or devices even before installing them in your system unit. Static electrical discharge can damage computer components without causing any signs of physical
damage. You must take extra care in handling them to ensure against electrostatic build-up.
1. To prevent electrostatic build-up, leave the system board in its anti-static bag
until you are ready to install it.
2. Wear an antistatic wrist strap.
3. Do all preparation work on a static-free surface.
4. Hold the device only by its edges. Be careful not to touch any of the components, contacts or connections.
5. Avoid touching the pins or contacts on all modules and connectors. Hold
modules or connectors by their ends.
Important:
Electrostatic discharge (ESD) can damage your processor, disk drive and
other components. Perform the upgrade instruction procedures described
at an ESD workstation only. If such a station is not available, you can
provide some ESD protection by wearing an antistatic wrist strap and
attaching it to a metal part of the system chassis. If a wrist strap is
unavailable, establish and maintain contact with the system chassis
throughout any procedures requiring ESD protection.
Safety Measures
To avoid damage to the system:
• Use the correct AC input voltage range.
To reduce the risk of electric shock:
• Unplug the power cord before removing the system chassis cover for installation or servicing. After installation or servicing, cover the system chassis
before plugging the power cord.
Battery:
• Danger of explosion if battery incorrectly replaced.
• Replace only with the same or equivalent type recommend by the manufacturer.
• Dispose of used batteries according to local ordinance.
Page 9

1
9
Introduction
Safety Precautions
• Use the correct AC input voltage range.
• Unplug the power cord before removing the system chassis cover for installation or servicing. After installation or servicing, cover the system chassis before plugging the power cord.
• Danger of explosion if battery incorrectly replaced.
• Replace only with the same or equivalent type recommend by the manufacturer.
• Dispose of used batteries according to local ordinance.
• Keep this system away from humidity.
• Place the system on a stable surface. Dropping it or letting it fall may cause
damage.
• The openings on the system are for air ventilation to protect the system from
overheating. DO NOT COVER THE OPENINGS.
• Place the power cord in such a way that it will not be stepped on. Do not place
anything on top of the power cord. Use a power cord that has been approved
for use with the system and that it matches the voltage and current marked
on the system’s electrical range label.
• If the system will not be used for a long time, disconnect it from the power
source to avoid damage by transient overvoltage.
• If one of the following occurs, consult a service personnel:
- The power cord or plug is damaged.
- Liquid has penetrated the system.
- The system has been exposed to moisture.
- The system is not working properly.
- The system dropped or is damaged.
- The system has obvious signs of breakage.
• The unit uses a three-wire ground cable which is equipped with a third pin to
ground the unit and prevent electric shock. Do not defeat the purpose of this
pin. If your outlet does not support this kind of plug, contact your electrician
to replace the outlet.
• Disconnect the system from the AC outlet before cleaning. Use a damp cloth.
Do not use liquid or spray detergents for cleaning.
Page 10

1
10
Introduction
About the Package
The system package contains the following items. If any of these items are
missing or damaged, please contact your dealer or sales representative for assistance.
1 DS910-OT system unit
1 HDD drive bay kit
- 4 HDD screws
- 1 SATA with power cable
2 Terminal blocks
1 60W power adapter
- AC input: 100-240V, 50-60Hz
- DC output: 12V, 5A max (60W max)
1 Quick Installation guide
1 DVD disk includes:
- Drivers
- Manual
Optional Items
1 VESA mount kit
- 1 VESA bracket
- Bracket screws
1 Wallmount kit
- 2 wallmount brackets
- Bracket screws
1 Power cord
The system and accessories in the package may not come similar to the information listed above. This may differ in accordance to the sales region or models in
which it was sold. For more information about the standard package in your region, please contact your dealer or sales representative.
Before Using the System
Before powering-on the system, prepare the basic system components.
If you are installing the system board in a new system, you will need at least the
following internal components.
• Storage devices such as hard disk drive, DVD-ROM, etc.
You will also need external system peripherals you intend to use which will normally include at least a keyboard, a mouse and a video display monitor.
Page 11

1
11
Introduction
Chapter 1 - Introduction
Overview
DS910-OT
Page 12

1
12
Introduction
DS910-OT
Processor
AMD® T40N
Chipset AMD® A50M
LAN 1 LAN port
COM 1 5-pole RS232 COM
terminal block
DIO 1 9-pole terminal block
for 8-bit DIO
DVI-I 1 DVI-I port
USB 4 USB ports
HDMI 1 HDMI port
Key Features
Page 13

1
13
Introduction
Specifications
Processor
• AMD
®
T40N (Dual-Core 1.0GHz 9W TDP)
Chipset
• AMD
®
A50M
System Memory
• 2 DDR3 1066MHz SODIMM
• Supports up to 16GB memory
• Single channel memory interface
Storage
• 1 2.5" SATA drive bay
• SD/MMC slot
• Supports 1 mS
ATA module via a mini PCIe socket
Graphics
• Supports Hardware H.264/MPEG-4 video decoder or AVC (Advanced Video
Coding)
• 1080p video pla
yback capability
• DVI-I display resolution up to 1920x1080
• HDMI display resolution up to 1920x1080
• Dual display outputs
- DVI-I + HDMI
LAN
• Realtek
®
RTL8111DL Gigabit Ethernet controller
Audio
• Realtek
®
ALC262 2-channel High Definition Audio
COM
• 1 5-pole RS232 COM terminal block
Expansion
• 2 mini PCIe slots
- One of the slots support mS
ATA module
Page 14

1
14
Introduction
I/O Ports
• Front Panel
- 1 9-pole terminal block for 8-bit DIO
- 1 5-pole RS232 COM terminal block
- 2 USB 2.0 ports (T
ype A)
- 1 SD/MMC slot
- 1 Power LED
- 1 HDD LED
• Rear Panel
- 1 HDMI
- 1 DVI-I
- 1 Line-out
- 1 LAN
- 2 USB 2.0 (Type A)
- 1 Reset button
- 1 Power button
- 2 antenna holes
- 12V DC-in
Power
• Power input voltage
- +12V DC
Environment
• Temperature
- Oper
ating: 0oC ~ 45oC
- Storage: -20oC ~ 70oC
• Humidity
- Operating: 10% to 85% non-condensing
- Storage: 10% to 90% non-condensing
Construction
• Aluminum + SGCC
Mounting
• Wall/VESA mounting kit (brackets and screws) - optional
Dimensions
• 210mm x 35mm x 194.3mm (W x H x D)
Weight
• TBD
OS Support
• Windows 7, Windows 7 Embedded, Windows XP, Windows XP Embedded, Linux
Kernel 2.6
Other Features
• Watchdog Timer function
Certification
• CE
• FCC Class B
Page 15

1
15
Introduction
Getting to Know the DS910-OT
Front Panel
HDD LED
Indicates the status of the hard drive.
Power LED
Indicates the power status of the system.
SD/MMC
Used to insert an SD/MMC card.
USB Ports
Used to connect USB 2.0/1.1 devices.
GPIO Port
Supports 8-bit digital output and input.
COM Port
Used to connect serial devices.
Power LED
HDD LED
SD/MMC
USB
COM
GPIO
Page 16

1
16
Introduction
Rear Panel
Wi-Fi Module Antenna
Used to connect to a Wi-Fi antenna.
HDMI Port
Use to connect an HDMI device.
DVI-I
Use to connect an DVI device.
Line-out
Used to connect to a speaker.
LAN Port
Used to connect systems to a local area network.
USB Ports
Used to connect USB 2.0/1.1 devices.
Reset Switch
Press to reset the system.
Power Switch
Press to power-on or power-off the system.
DC-in
Used to plug a 12V DC.
HDMI
Line-Out
USB
DVI-I
LAN
Wi-Fi Module Antenna Hole
Wi-Fi Module Antenna Hole
Reset
Power
+12V DC-in
Page 17

1
17
Introduction
Mechanical Dimensions
Chassis Dimensions
210.00
194.30
35.00
35.00
Page 18

2
18
Getting Started
Chapter 2 - Getting Started
Preparing the System
Before you start using the system, you need the following items:
• SATA hard drive
• AC power adapter
• USB keyboard
• USB mouse
• CD-ROM drive (for installing software/drivers)
• Memory module (optional)
Installing Devices
The following are devices that can be installed in the DS910-OT system.
• Memory module
• SATA hard drive
Configuring the BIOS
To get you started, you may need to change configurations such as the date,
time and the type of hard disk drive.
1. Power-on the system.
2. After the memory test, the message “Press DEL to run setup” will appear on
the screen. Press the Delete key to enter the AMI BIOS setup utility.
Installing the Operating System
Most operating system software are provided in a CD therefore you need to install a CD-ROM drive in order to use the CD.
Make sure a 2.5” SATA drive is already installed.
1. Refer to the following chapters for information on connecting a CD-ROM drive
and installing a SATA drive.
2. Refer to your operating system manual for instructions on installing the oper-
ating system.
Page 19

2
19
Getting Started
Installing the Drivers
The system package includes a CD disk. The CD includes drivers that must be installed to provide the best system performance. Refer to the Supported Software
chapter for instructions on installing the drivers.
Page 20

3
20
Installing Devices
Chapter 3 - Installing Devices
Removing the Chassis Cover
1. Make sure the system and all other peripheral devices connected to it has
been powered-off.
2. Disconnect all power cords and cables.
3. The 8 mounting screws on the sides of the system are used to secure the
cover to the chassis. Remove these screws and then put them in a safe place
for later use.
Mounting
screw
Mounting
screw
Page 21

3
21
Installing Devices
4. After removing the mounting screws, lift the cover up.
Lift the Cover Upward
5. The SODIMM socket and SATA drive bay are readily accessible after removing
the chassis cover.
SODIMM socket
SATA drive bay
Note:
The system comes with an aluminum sheet on the heat sink. Please
do not tear off.
Page 22

3
22
Installing Devices
Installing a SODIMM
1. Locate the SODIMM socket on the system board.
2. Note the key on the socket. The key ensures the module can be plugged into
the socket in only one direction.
SODIMM sockets
Note:
The system board is equipped with two SODIMM sockets. At first, install the memory from SODIMM1.
Page 23

3
23
Installing Devices
3. Grasping the module by its edges, align the module into the socket at an approximately 30 degrees angle. Apply firm even pressure to each end of the
module until it slips down into the socket. The contact fingers on the edge of
the module will almost completely disappear inside the socket.
SODIMM
4. Push the module down until the clips at each end of the socket lock into
position. You will hear a distinctive “click”, indicating the module is correctly
locked into position.
Clip
Clip
Page 24

3
24
Installing Devices
Installing a SATA Drive
1. Remove the 4 mounting screws that secure the HDD brackets to the drive
bay.
Mounting screw
2. Align the mounting holes of the SATA drive with the mounting holes on the
HDD bracket and then use the provided mounting screws to secure the drive
in place.
HDD bracket
SATA drive
Mounting screw
Mounting screw
Page 25

3
25
Installing Devices
3. Place the SATA drive (with HDD bracket) into the chassis.
Replace the 4 mounting screws you removed in step 1.
4. Connect the SATA data cable and SATA power cable to the connectors on the
SATA drive.
Mounting screw
SATA power cable
SATA data cable
SATA power/data connector
Page 26

3
26
Installing Devices
SATA power/data connector
SATA data
connector
SATA power
connector
Page 27

3
27
Installing Devices
Connecting Cables to Terminal Blocks
1. Insert one end of the cable into the holes on the terminal block, and use the
screwdriver to fasten the cables.
2. Connect the terminal block to the connector on the system, and use the
screwdriver to secure the terminal block in place.
Page 28

28
4
Jumper Settings
Chapter 4 - Jumper Settings
Jumper Settings
Clear CMOS Data
If you encounter the following,
a) CMOS data becomes corrupted.
b) You forgot the supervisor or user password.
you can reconfi gure the system with the default values stored in the ROM BIOS.
To load the default values stored in the ROM BIOS, please follow the steps below.
1. Power-off the system and unplug the power cord.
2. Set JP1 pins 2 and 3 to On. Wait for a few seconds and set JP1 back to its
default setting, pins 1 and 2 On.
3. Now plug the power cord and power-on the system.
JP1
2-3 On:
Clear CMOS Data
1-2 On:
Normal (default)
1
3
2
1
3
2
Page 29

29
4
Jumper Settings
USB Power Select
JP5
312
2-3 On:
+5V_standby
1-2 On:
+5V (default)
312
JP6
132
2-3 On:
+5V_standby
1-2 On:
+5V (default)
132
JP5 (for USB 0 and USB 1) and JP6 (for USB 2 and USB 3) are used to select the
power of the USB ports. Selecting 5V_standby will allow you to use a USB device
to wake up the system.
BIOS Setting
“USB KB Wake-Up From S3” in the Power Management Setup submenu of the
BIOS must be set to Enabled. Refer to chapter 3 for more information.
Important:
If you are using the Wake-On-USB Keyboard/Mouse function for 2 USB
ports, the 5V_standby power source of your power supply must support
≥1.5A. For 3 or more USB ports, the 5V_standby power source of your
power supply must support ≥2A.
Page 30

30
4
Jumper Settings
mSATA/ Mini PCIe Select
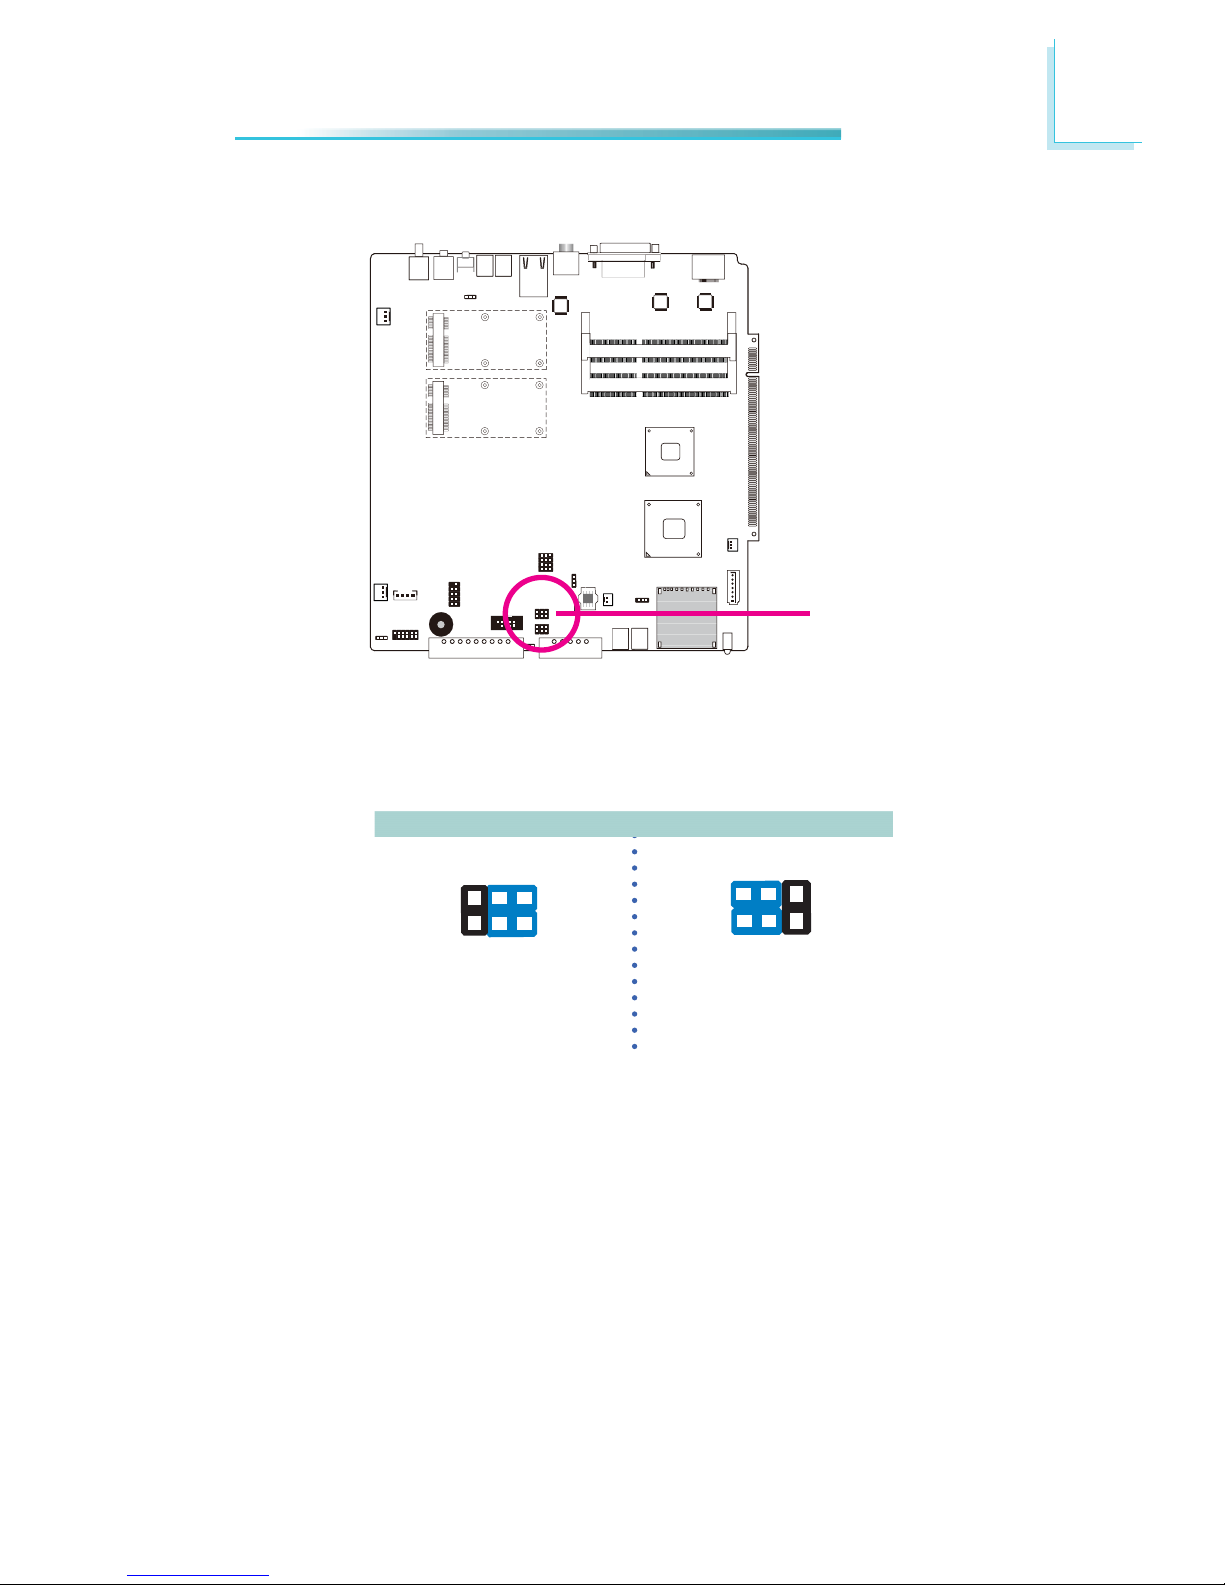
JP7
132
1-2 On:
Mini PCIe
(default)
132
2-3 On:
mSATA
JP7 is used to select whether mSATA or Mini PCIe.
Page 31
31
4
Jumper Settings
COM1 RS232/Power Select
JP9
1-3 (RI), 2-4 (DCD) On:
RS232 (default)
3-5 (+5V), 4-6 (+12V) On:
RS232 with power
JP9 are used to confi gure COM 1 to pure RS232 or RS232 with power.
The pin function of COM 1 will vary according to JP9’s setting respectively.
JP9
13
5
246
13
5
246
Page 32

32
4
Jumper Settings
COM1 RS232/RS422/RS485 Select
1-2 On: RS232
(default)
3-4 On: RS422
Full Duplex
5-6 On: RS485
13
5
246
JP8 (for COM1) is used to confi gure the COM port to RS232, RS422 (Full Duplex)
or RS485.
The pin function of the COM ports will vary according to the jumper’s setting.
JP8
13
5
13
5
246246
JP8
Page 33
33
4
Jumper Settings
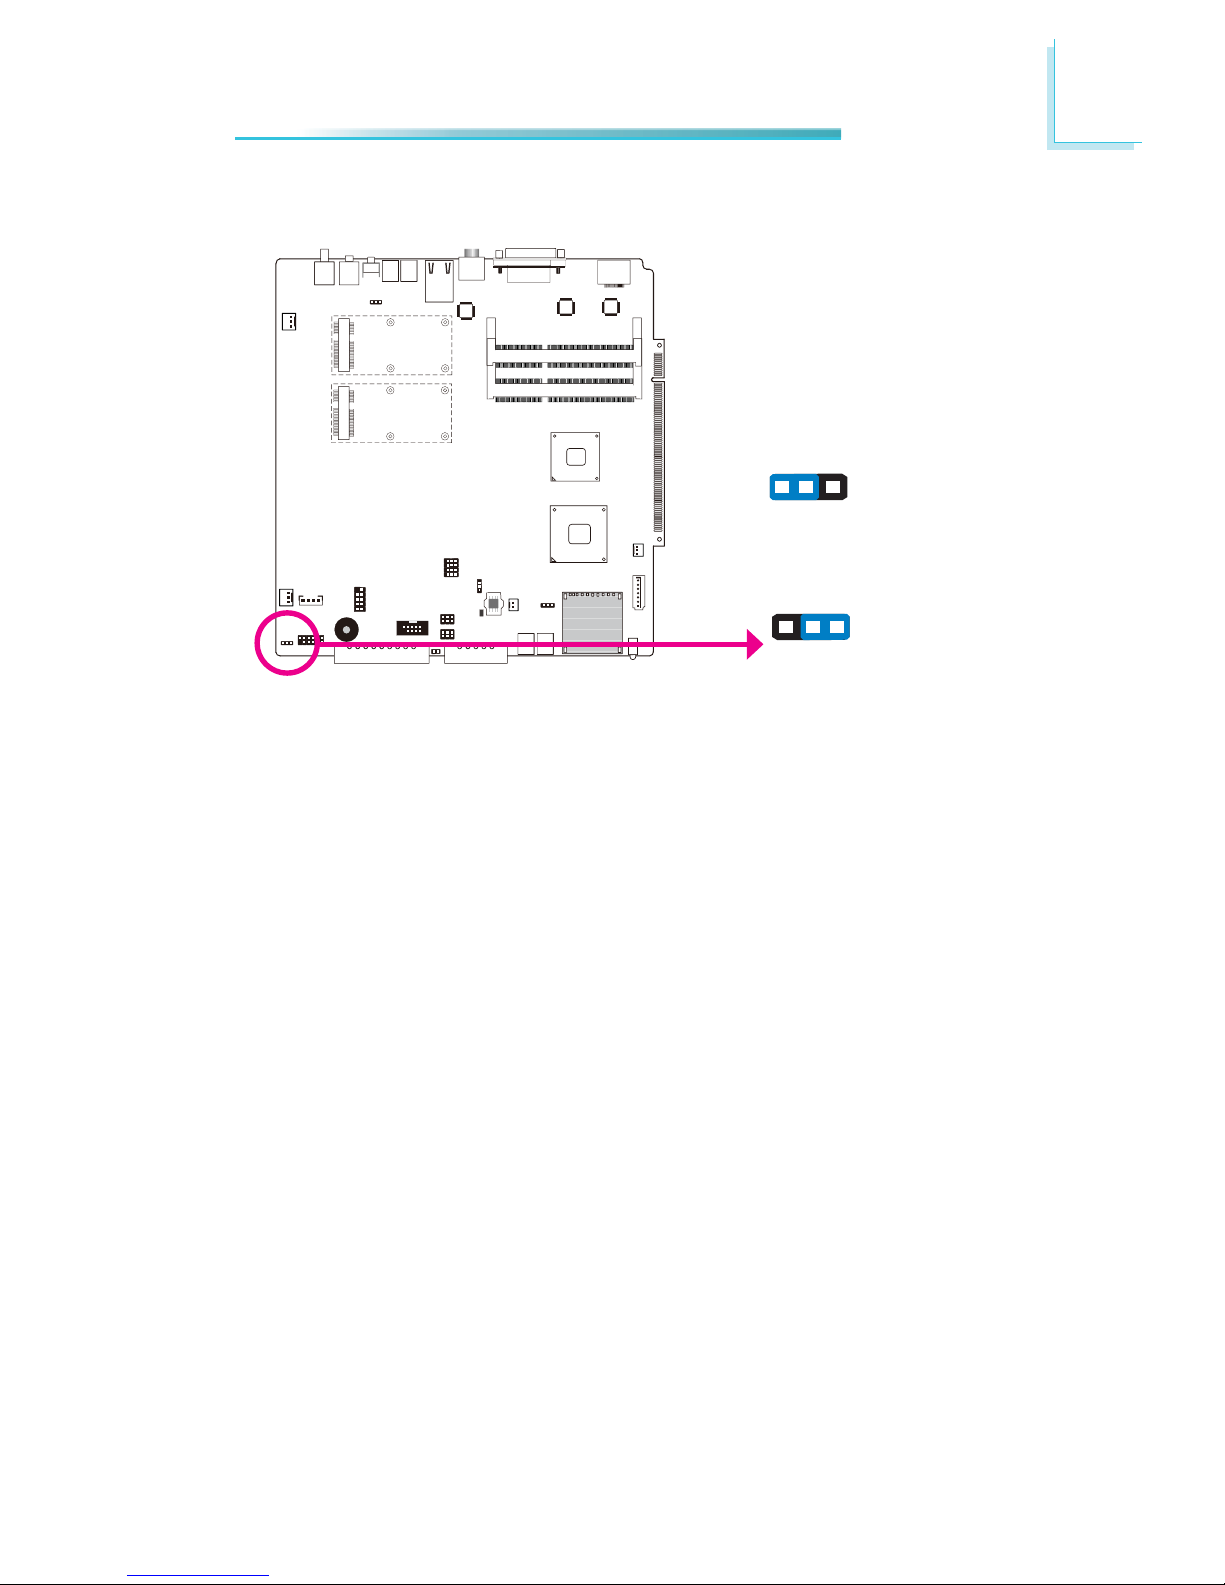
Power-on Select
To power-on via AC Power:
1. Set JP12 pins 2 and 3 to On.
2. Set the “After G3” fi eld to Power On.
1-2 On:
Power-on via power button
(default)
2-3 On:
Power-on via AC power
JP12
312
312
Page 34
34
5
Ports and Connectors
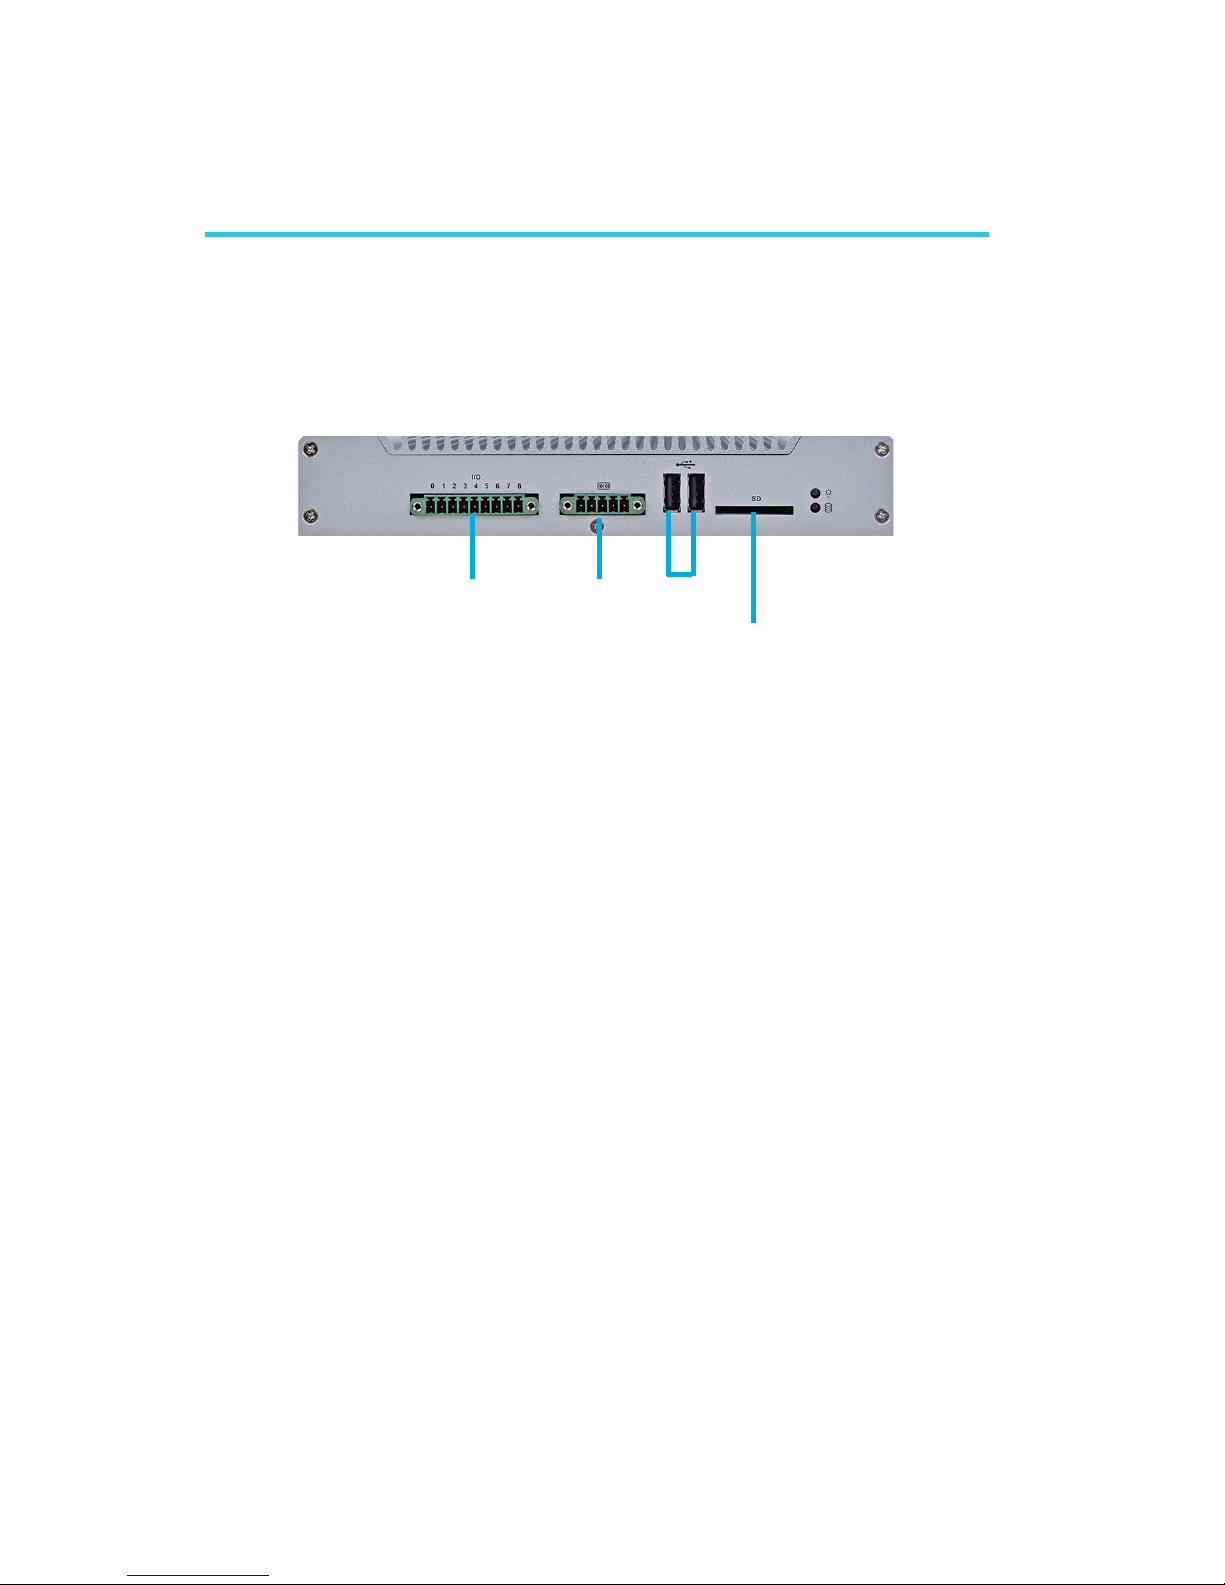
Front Panel I/O Ports
The front panel I/O ports consist of the following:
• 1 GPIO port
• 1 5-pole RS232 COM terminal block
• 2 USB
• 1 SD/MMC slot
Chapter 5 - Ports and Connectors
SD/MMC
USB
COM
GPIO
Page 35
35
5
Ports and Connectors
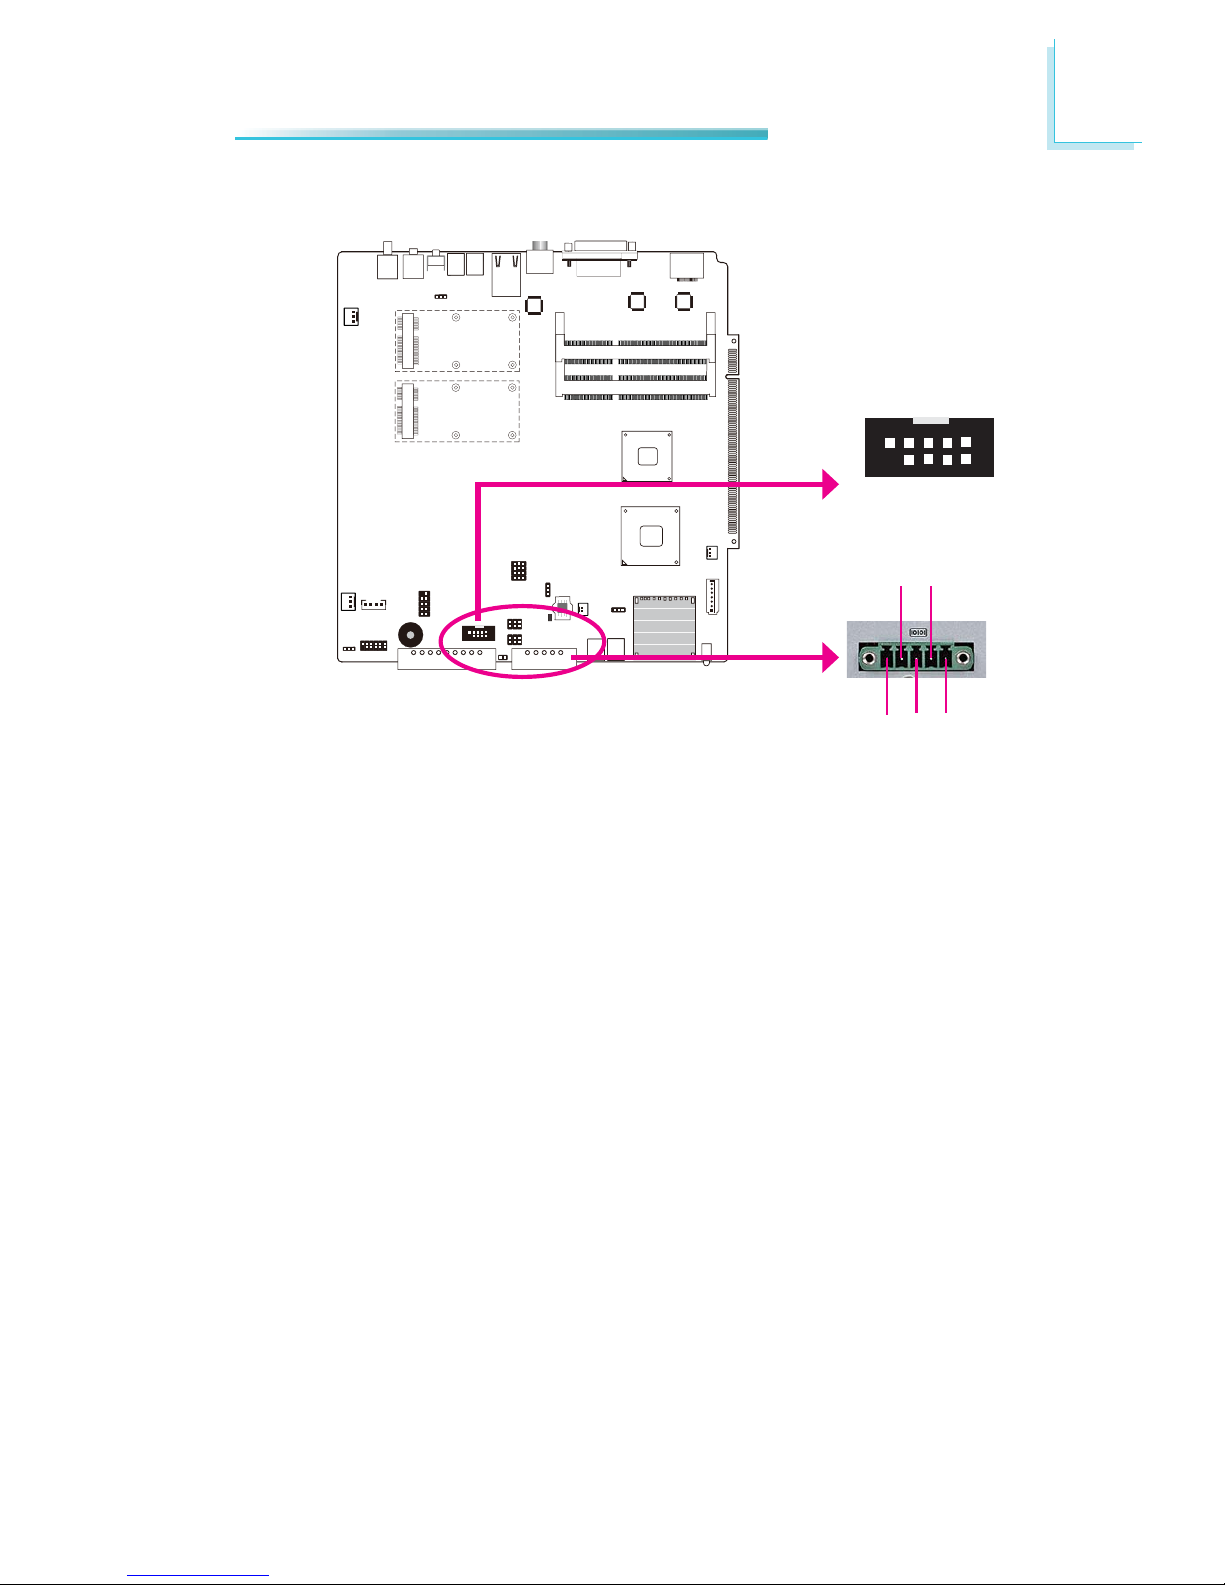
COM Port
COM 2
RTS
TXD
CTS
RXD
GND
12345
COM 1
1
9
2
DCD-
TD
RD
DTR-
GND
RTS-
DSR-
CTS-
RI-
COM 1 and COM 2 are fi xed at RS232.
COM 1’s pin defi nition will vary according to JP8’s settings. Refer to “COM 1
RS232/RS422/RS485 Select” in this chapter for more information.
The serial ports are asynchronous communication ports with 16C550A-compatible
UARTs that can be used with modems, serial printers, remote display terminals,
and other serial devices.
Page 36
36
5
Ports and Connectors
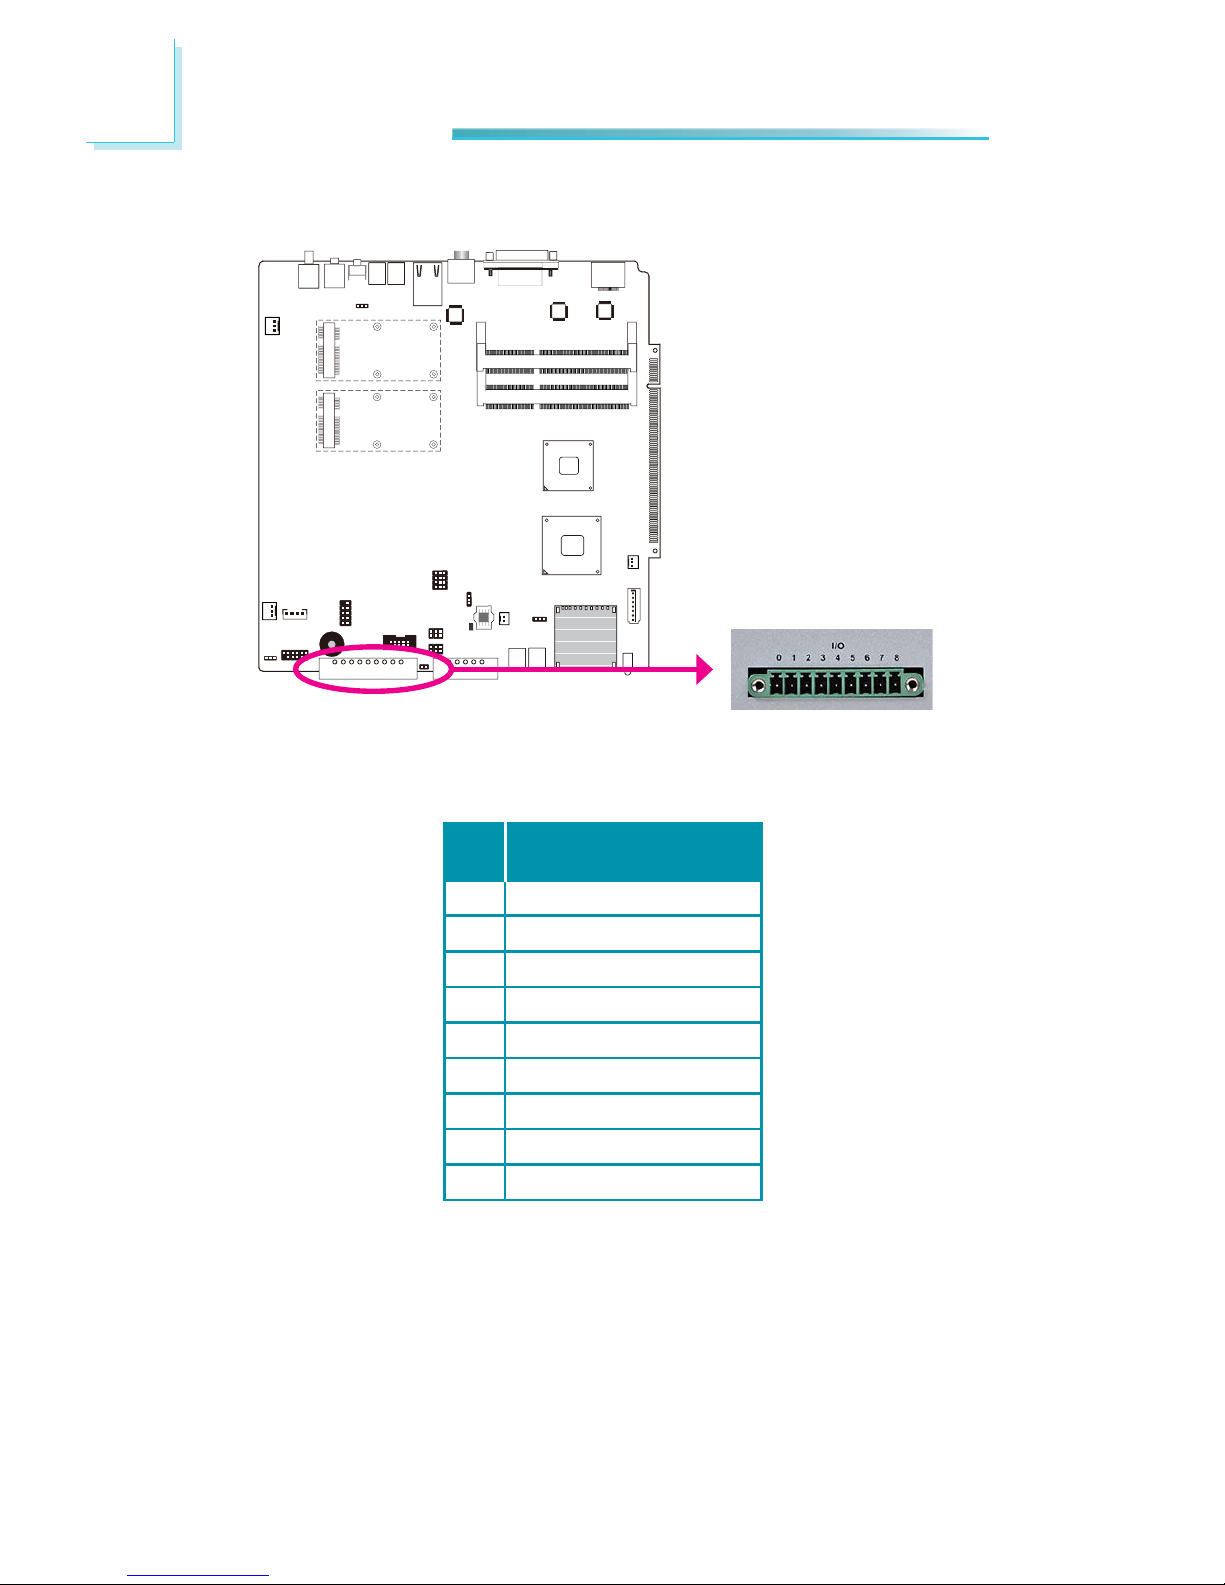
Digital Input/Output
The Digital I/O connector provides powering-on function to an external device
that is connected to this connector.
Pin
Digital Output/ Input
Pin Assignment
0 DIO1
1 DIO2
2 DIO3
3 DIO4
4 DIO5
5 DIO6
6 DIO7
7 DIO8
8 GND
Page 37
37
5
Ports and Connectors
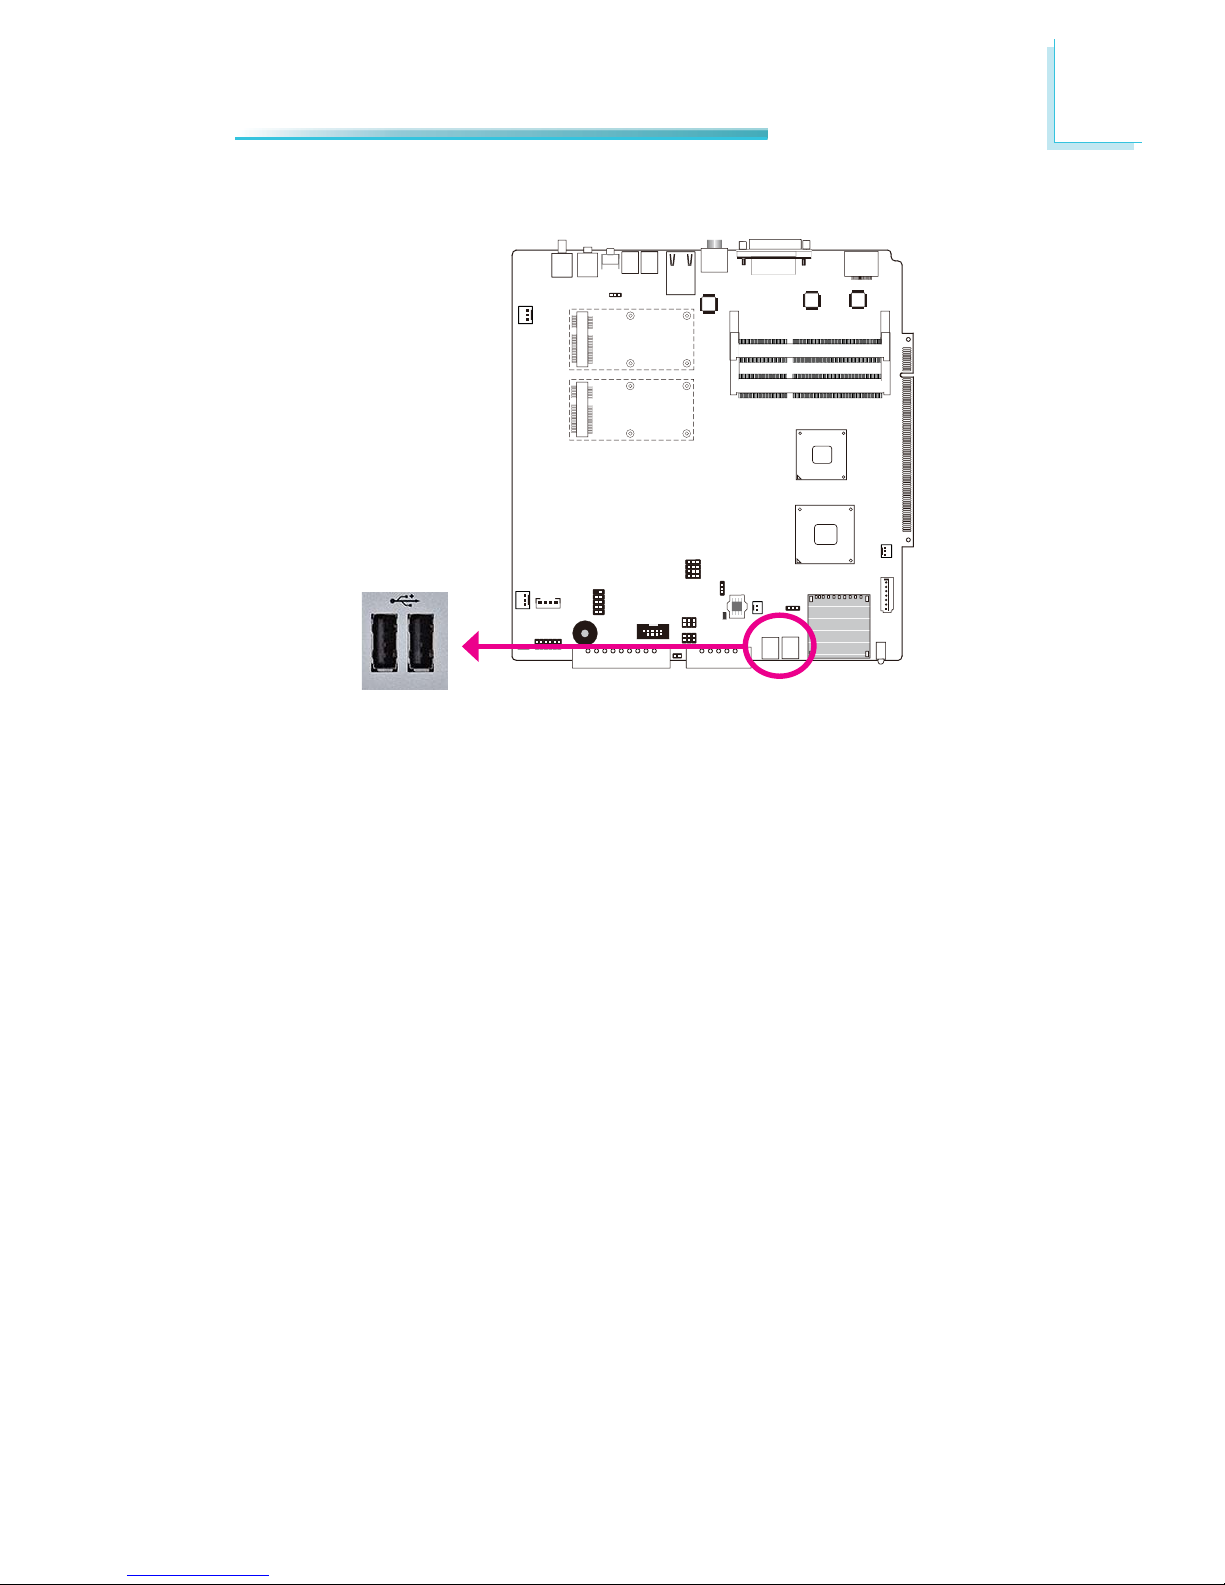
USB Ports
USB allows data exchange between your computer and a wide range of simultaneously accessible external Plug and Play peripherals.
The system board is equipped with 4 USB 2.0/1.1 ports.
USB 2
USB 3
Page 38
38
5
Ports and Connectors
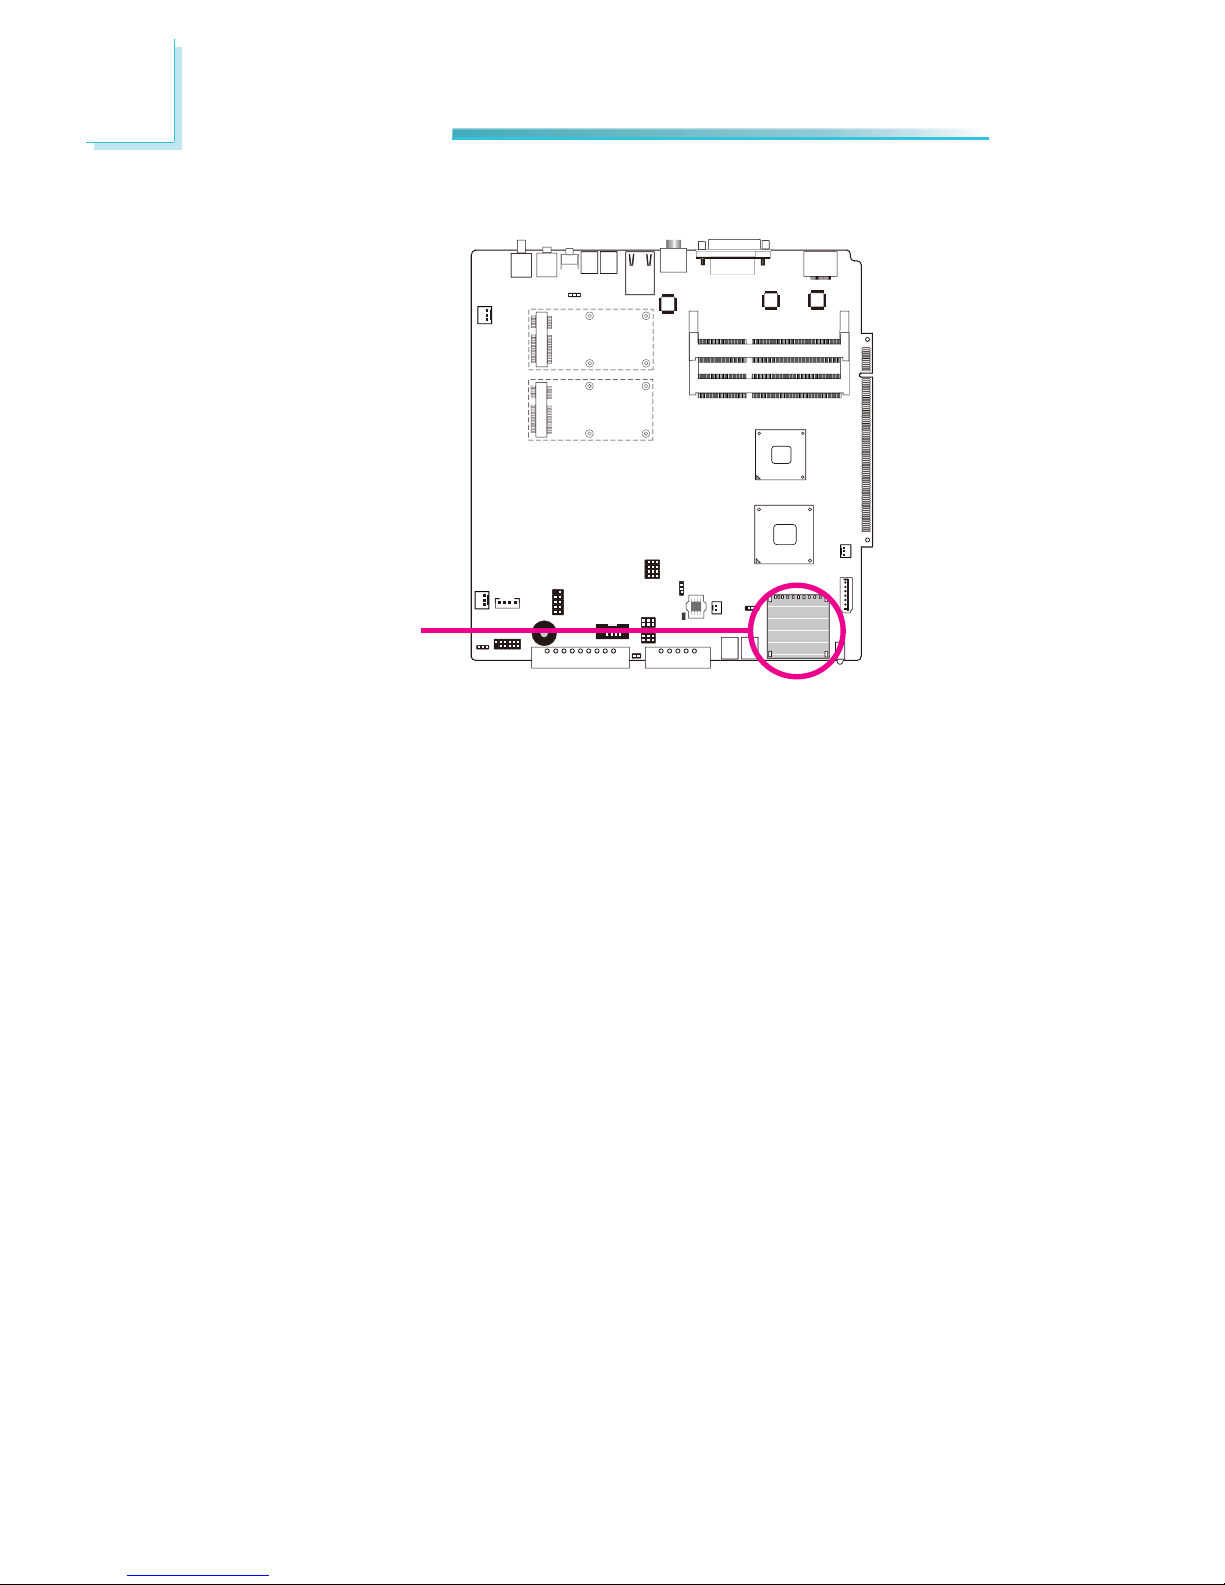
SD/MMC
SD/MMC
This expansion port is used to insert a Secure Digital (SD) or Multimedia Card
(MMC) device. Aside from storing data fi les, an SD card is also capable of storing
powerful software applications.
Page 39
39
5
Ports and Connectors
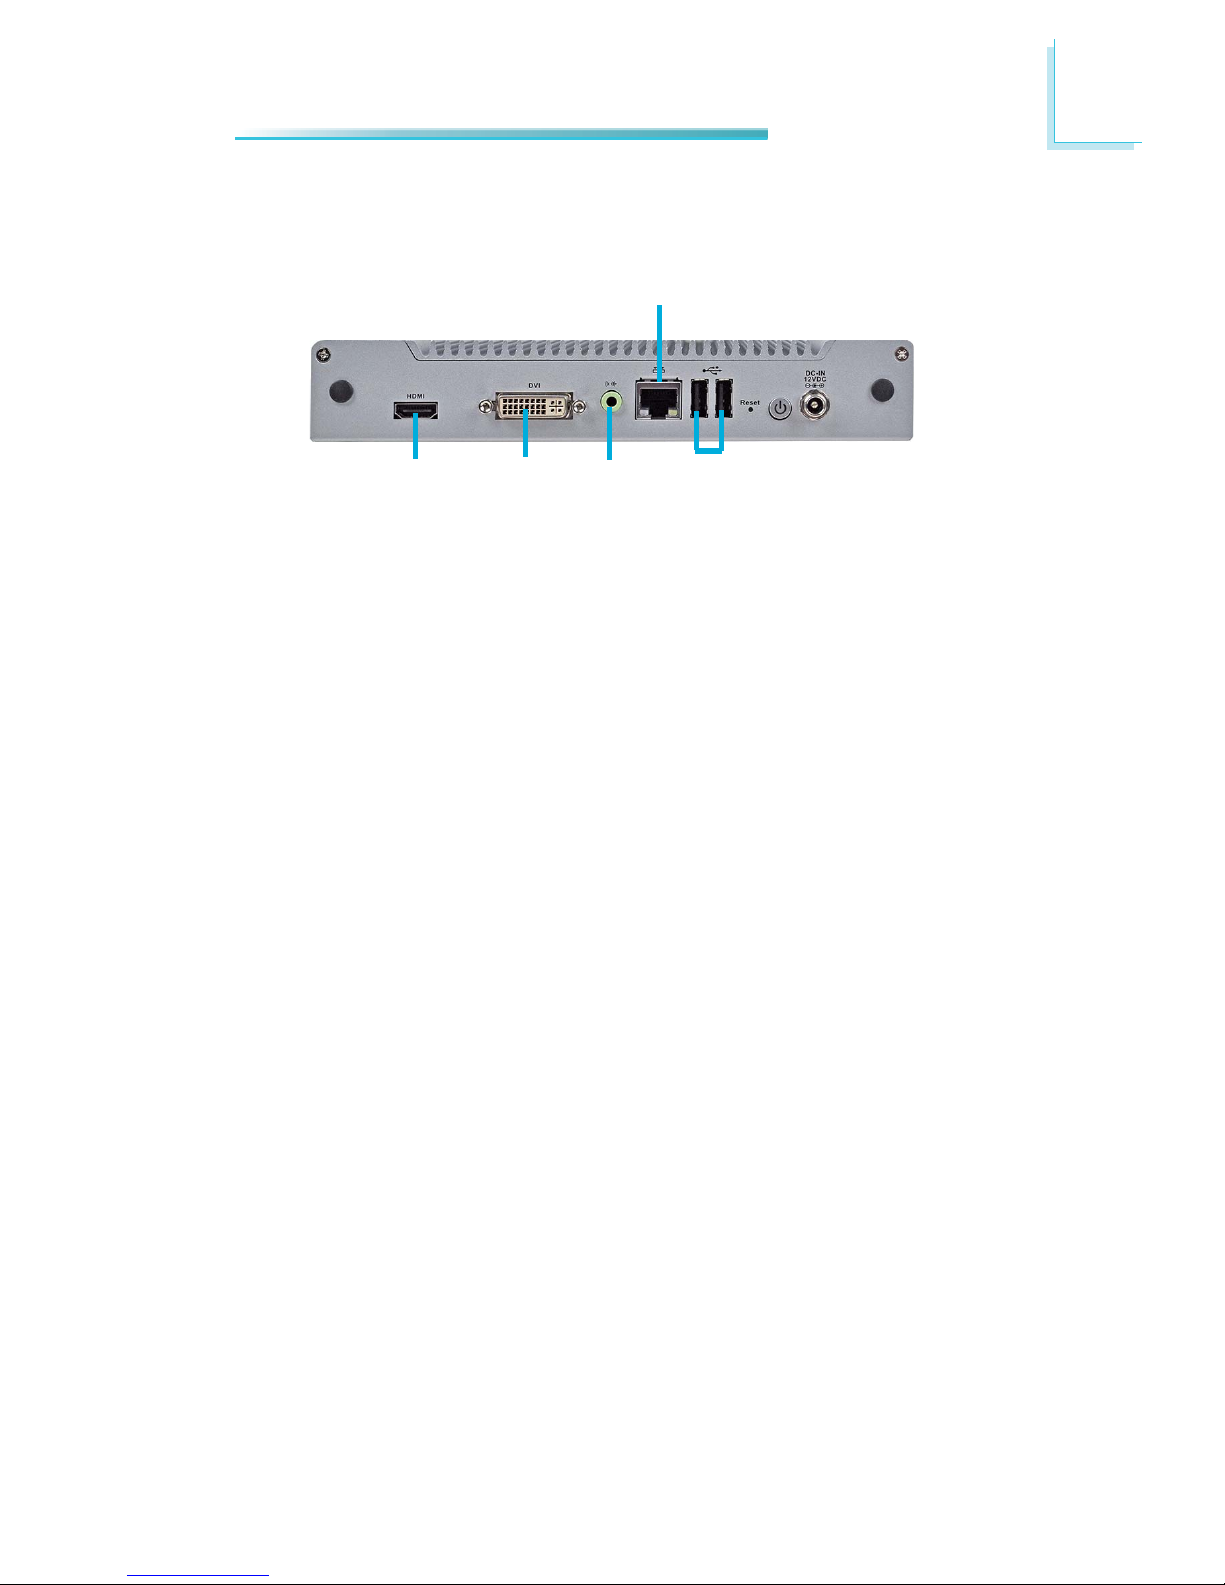
Rear Panel I/O Ports
The rear panel I/O ports consist of the following:
• 1 HDMI port
• 1 DVI-I port
• 1 Line-out
• 1 LAN port
• 2 USB ports
HDMI
Line-Out
USB
DVI-I
LAN
Page 40
40
5
Ports and Connectors
LAN Port
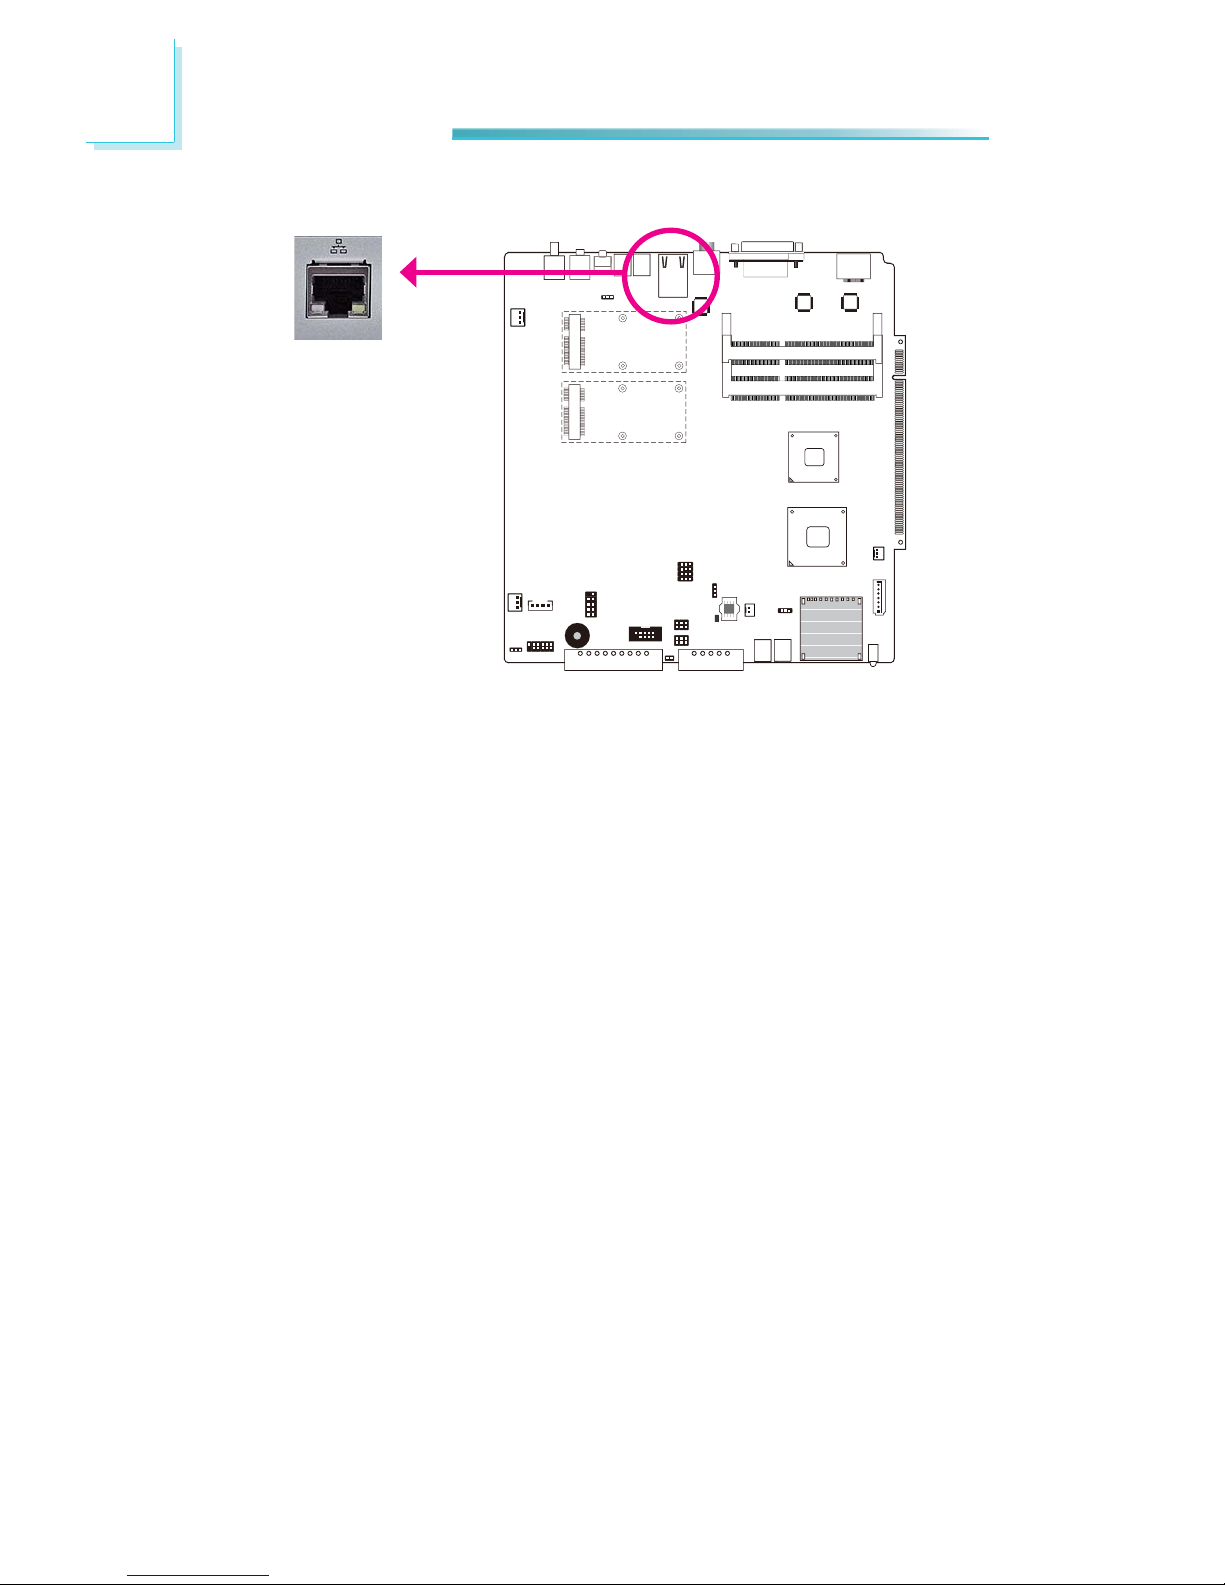
The LAN port allows the system board to connect to a local area network by
means of a network hub.
BIOS Setting
Confi gure “Wake on LAN” in the Advanced menu (“SuperIO Confi guration” sub-
menu) of the BIOS. Refer to chapter 7 for more information.
Driver Installation
Install the LAN drivers. Refer to chapter 8 for more information.
LAN
Page 41
41
5
Ports and Connectors
USB Ports
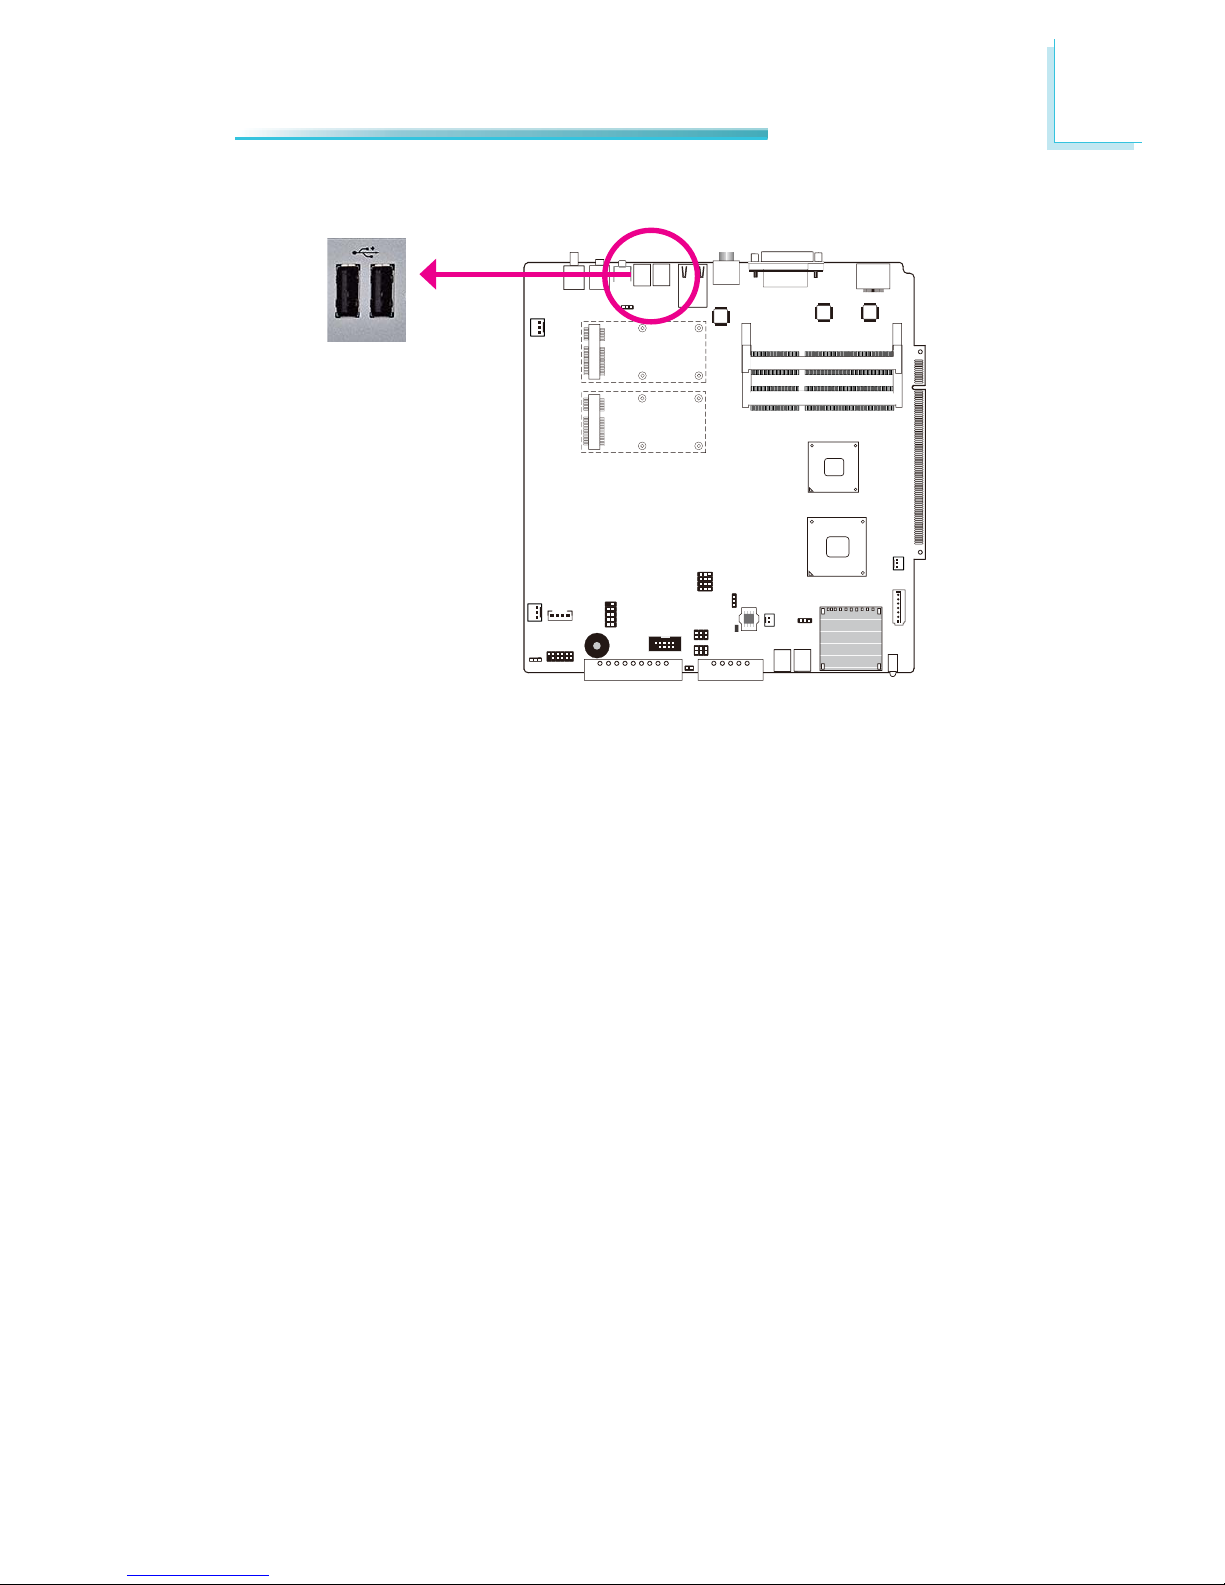
USB allows data exchange between your computer and a wide range of simultaneously accessible external Plug and Play peripherals.
The system board is equipped with 4 USB 2.0/1.1 ports.
USB 1 USB 0
Page 42
42
5
Ports and Connectors
Line-out
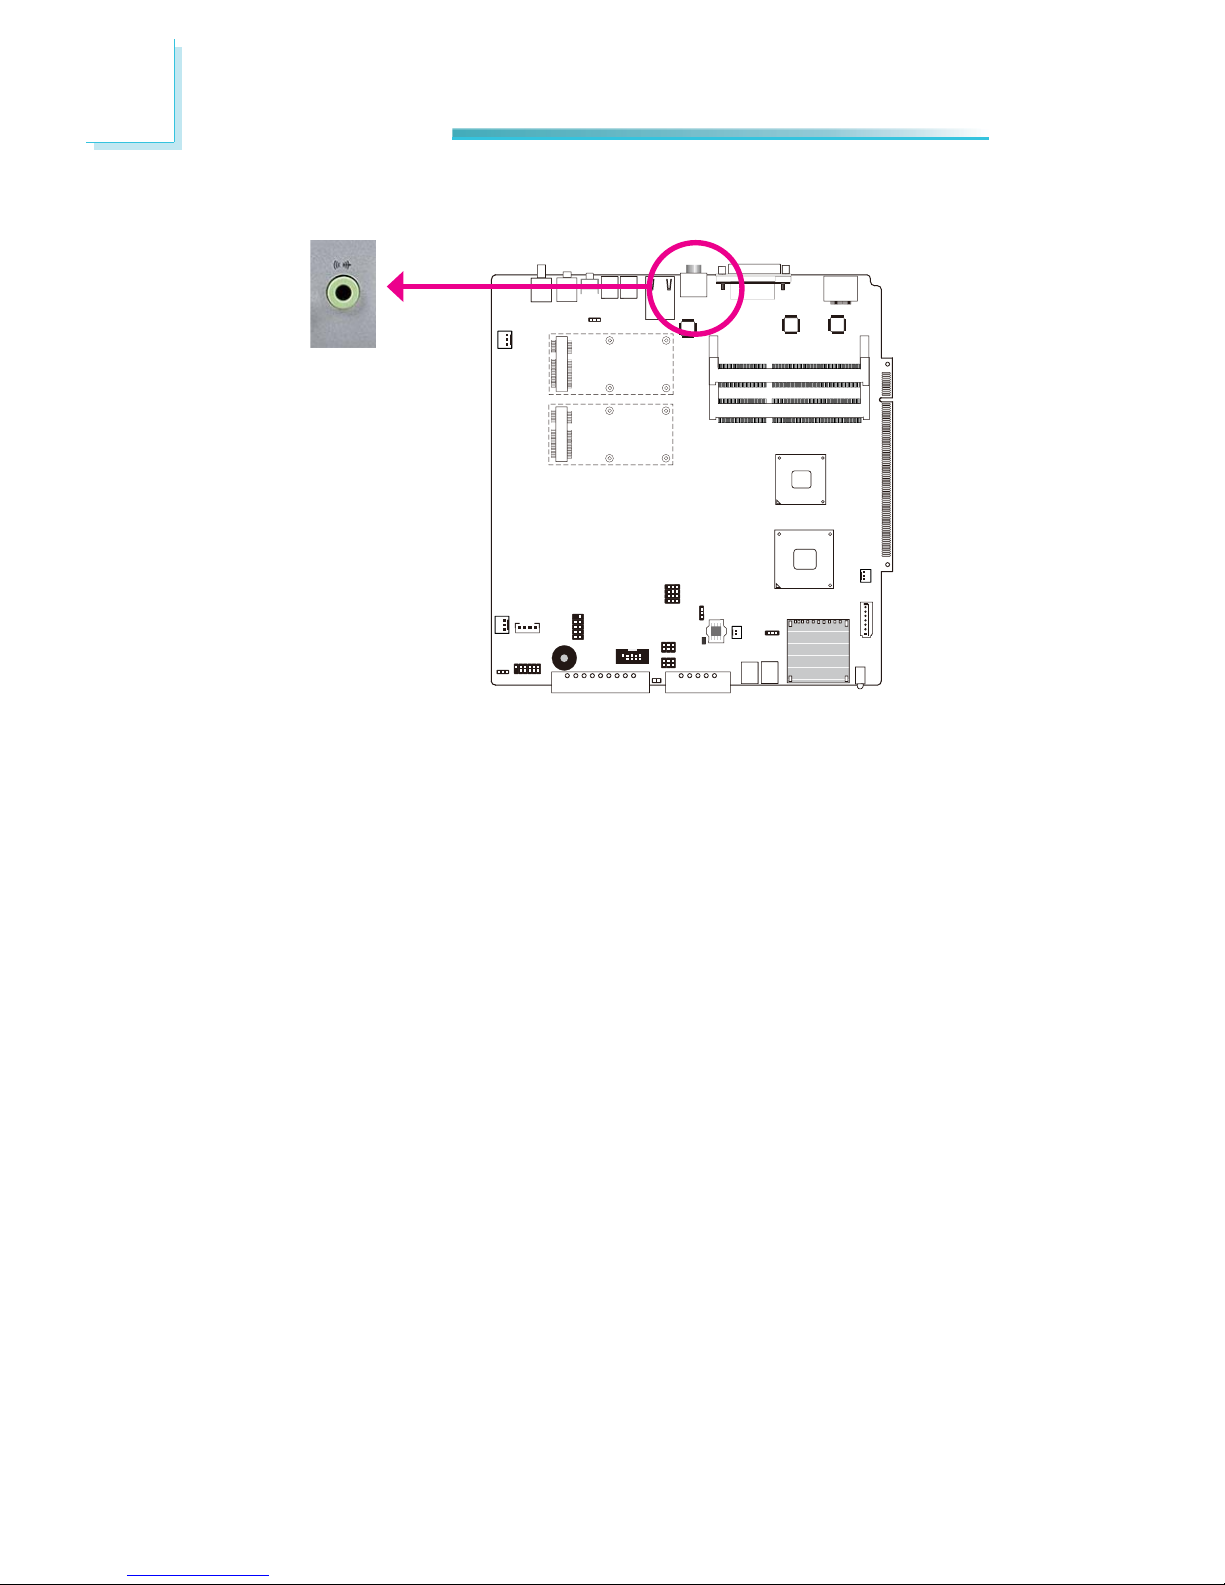
This jack is used to connect a headphone or external speakers.
Page 43
43
5
Ports and Connectors
DVI-I
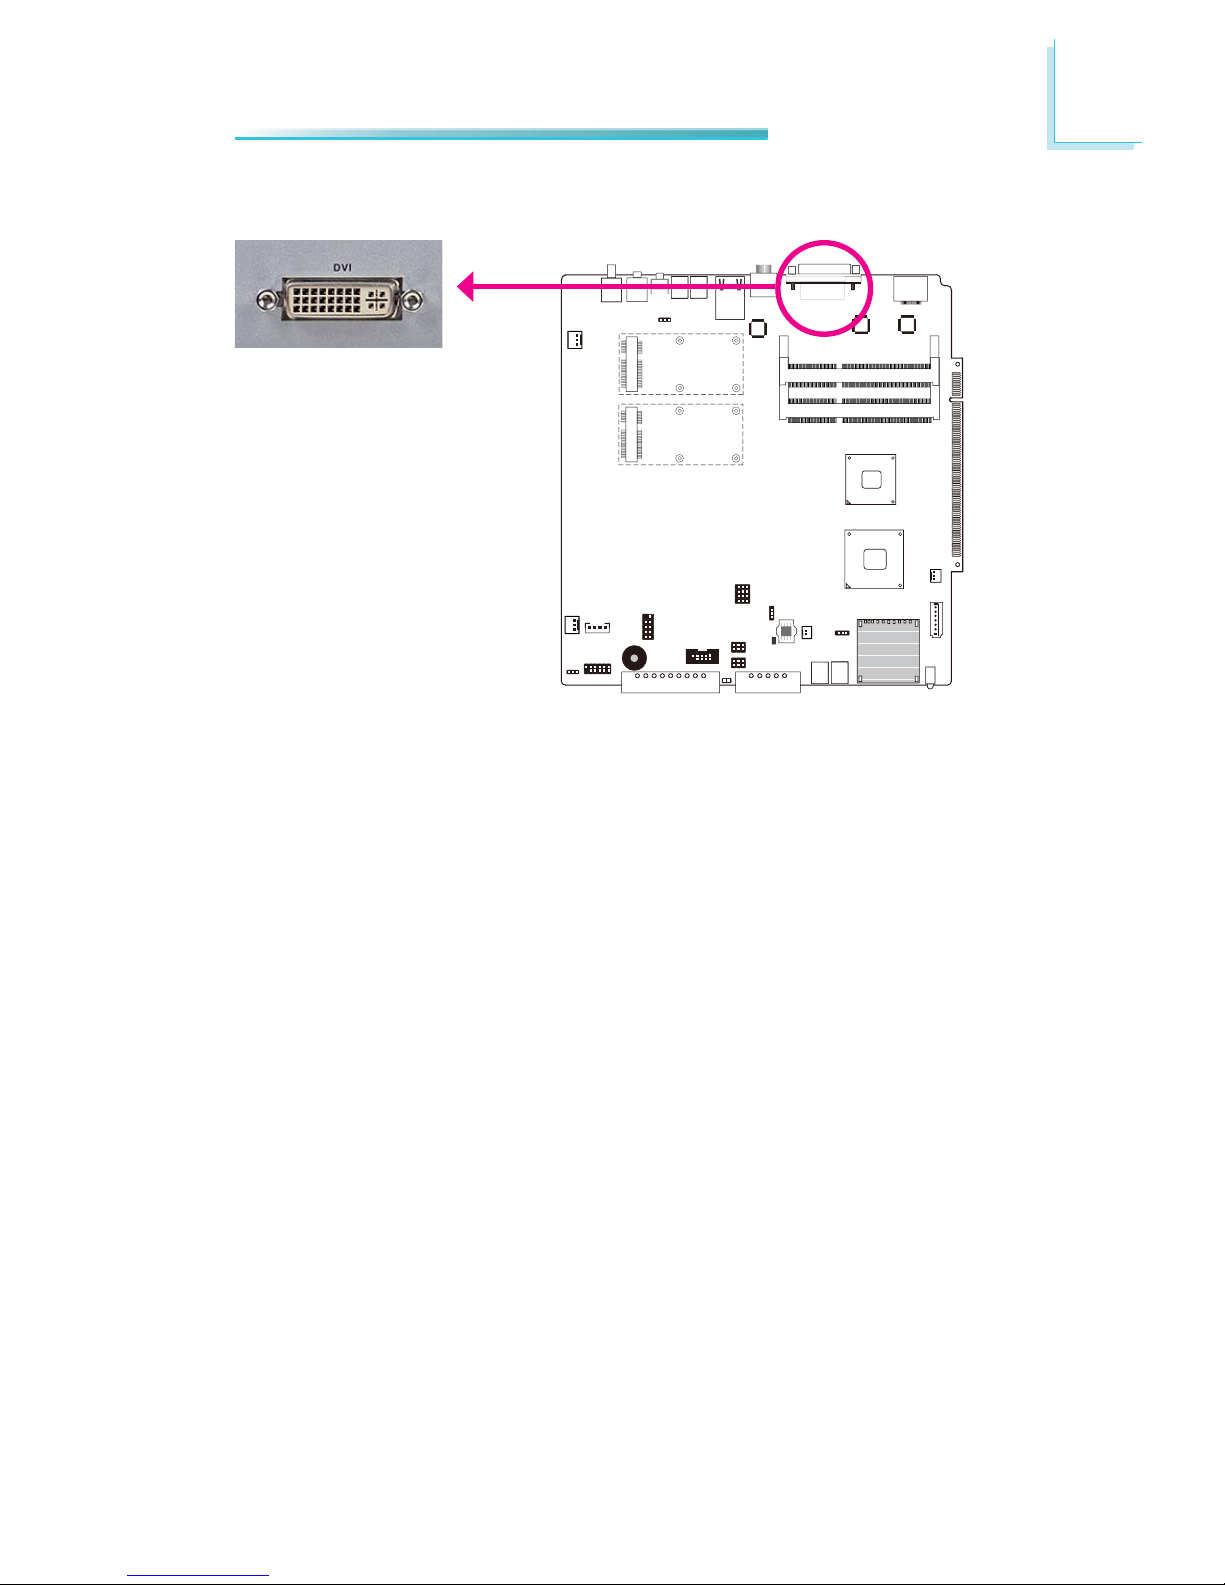
The DVI-I port is used to connect an LCD monitor. Connect the display device’s
cable connector to the DVI-I port. After you plug the cable connector into the
port, gently tighten the cable screws to hold the connector in place.
Connect the display device’s cable connector to the DVI-I port. After you plug the
cable connector into the port, gently tighten the cable screws to hold the connector in place.
BIOS Setting
Confi gure the display device in the Advanced Chipset Features submenu of the
BIOS. Refer to chapter 3 for more information.
Page 44
44
5
Ports and Connectors
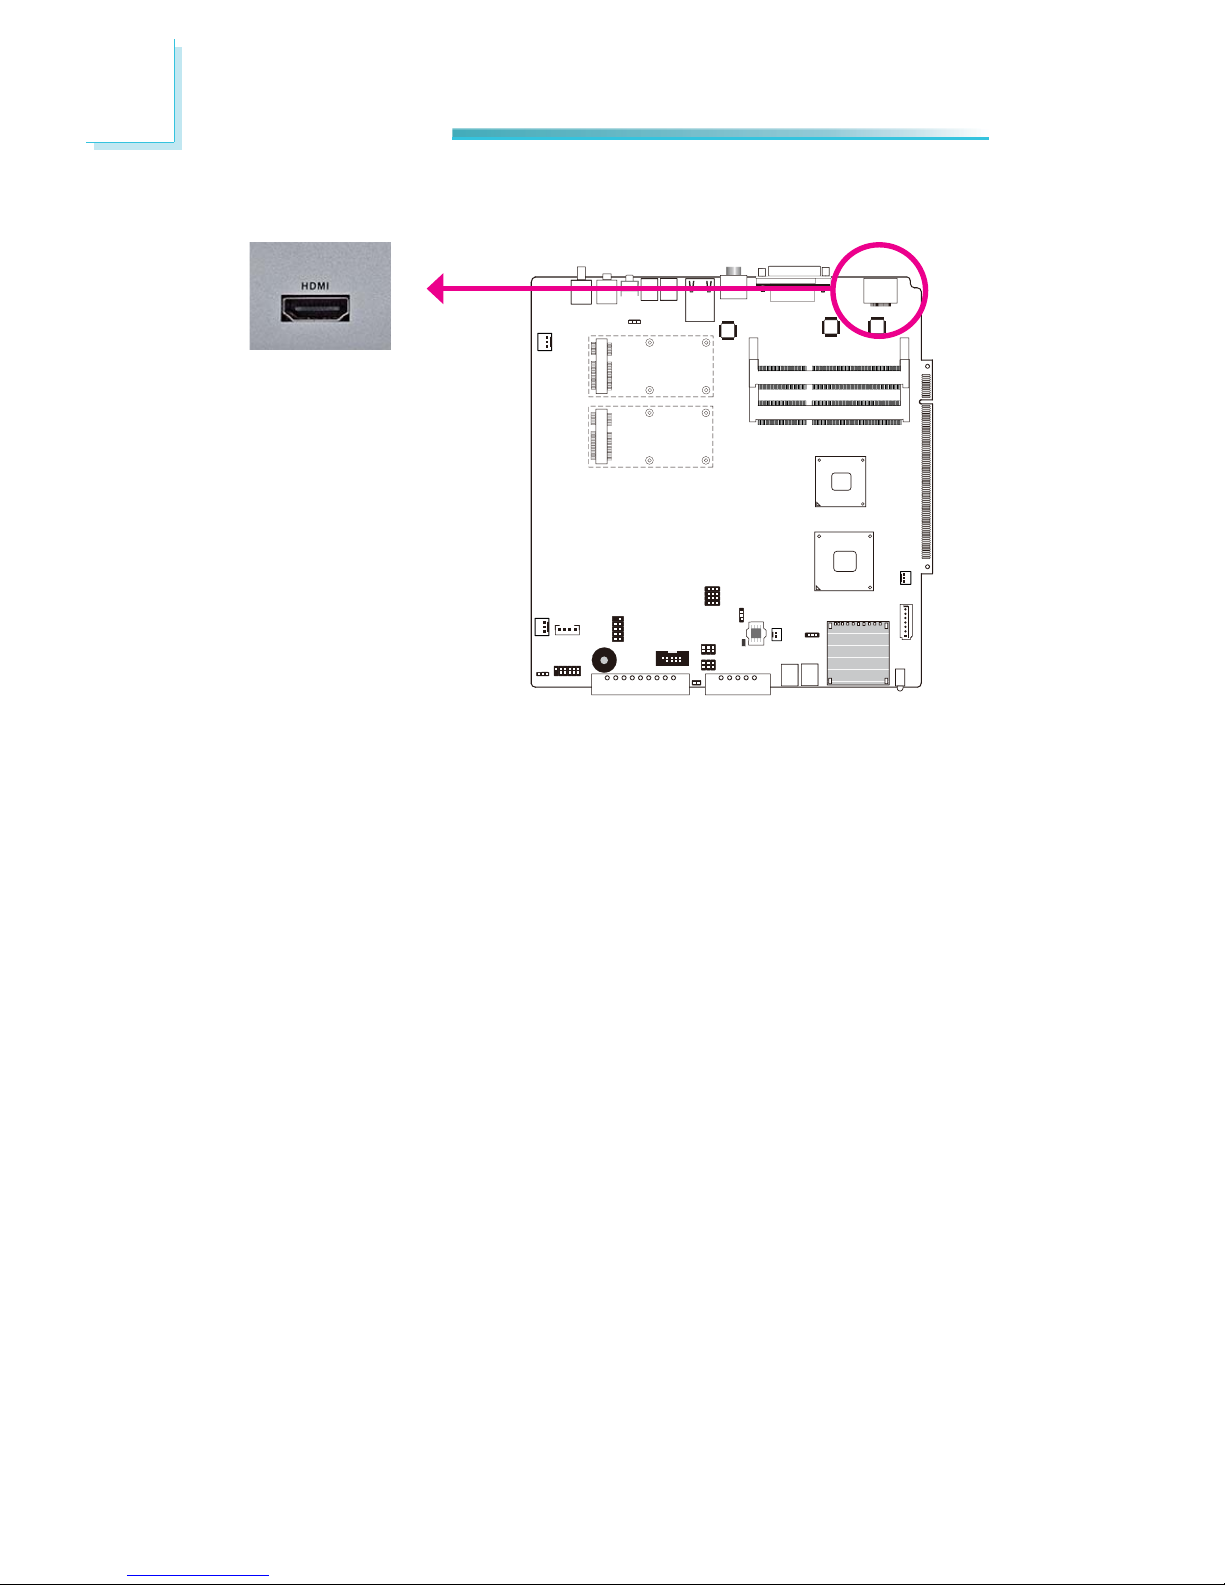
HDMI
The HDMI port which carries both digital audio and video signals is used to connect a LCD monitor or digital TV that has the HDMI port.
Page 45

45
5
Ports and Connectors
Mini PCIe slot
I/O Connectors
Mini PCIe
Install mini PCI Express cards such as network cards or other cards that comply to
the mini PCI Express specifi cations into the mini PCI Express x1 slot.
Page 46

46
5
Ports and Connectors
Front Panel Connectors
HDD-LED - HDD LED
This LED will light when the hard drive is being accessed.
RESET SW - Reset Switch
This switch allows you to reboot without having to power off the system.
PWR-BTN - Power Switch
This switch is used to power on or off the system.
PWR-LED - Power/Standby LED
When the system’s power is on, this LED will light. When the system is in the S1
(POS - Power On Suspend) state, it will blink every second. When the system is
in the S3 (STR - Suspend To RAM) state, it will blink every 4 seconds.
Pin
1
3
5
7
9
11
N. C.
HDD-LED
RESET SW
N. C.
Pin Assignment
N. C.
HDD P
ower
Signal
Ground
RST Signal
N. C.
Pin
2
4
6
8
10
12
PWR
-LED
PWR-BTN
Key
Pin Assignment
LED Power
LED P
ower
Signal
GND
Signal
Key
12
11
2
1
HDD-LED
RESET-SW
PWR-LED
PWR-BTN
Page 47
47
5
Ports and Connectors
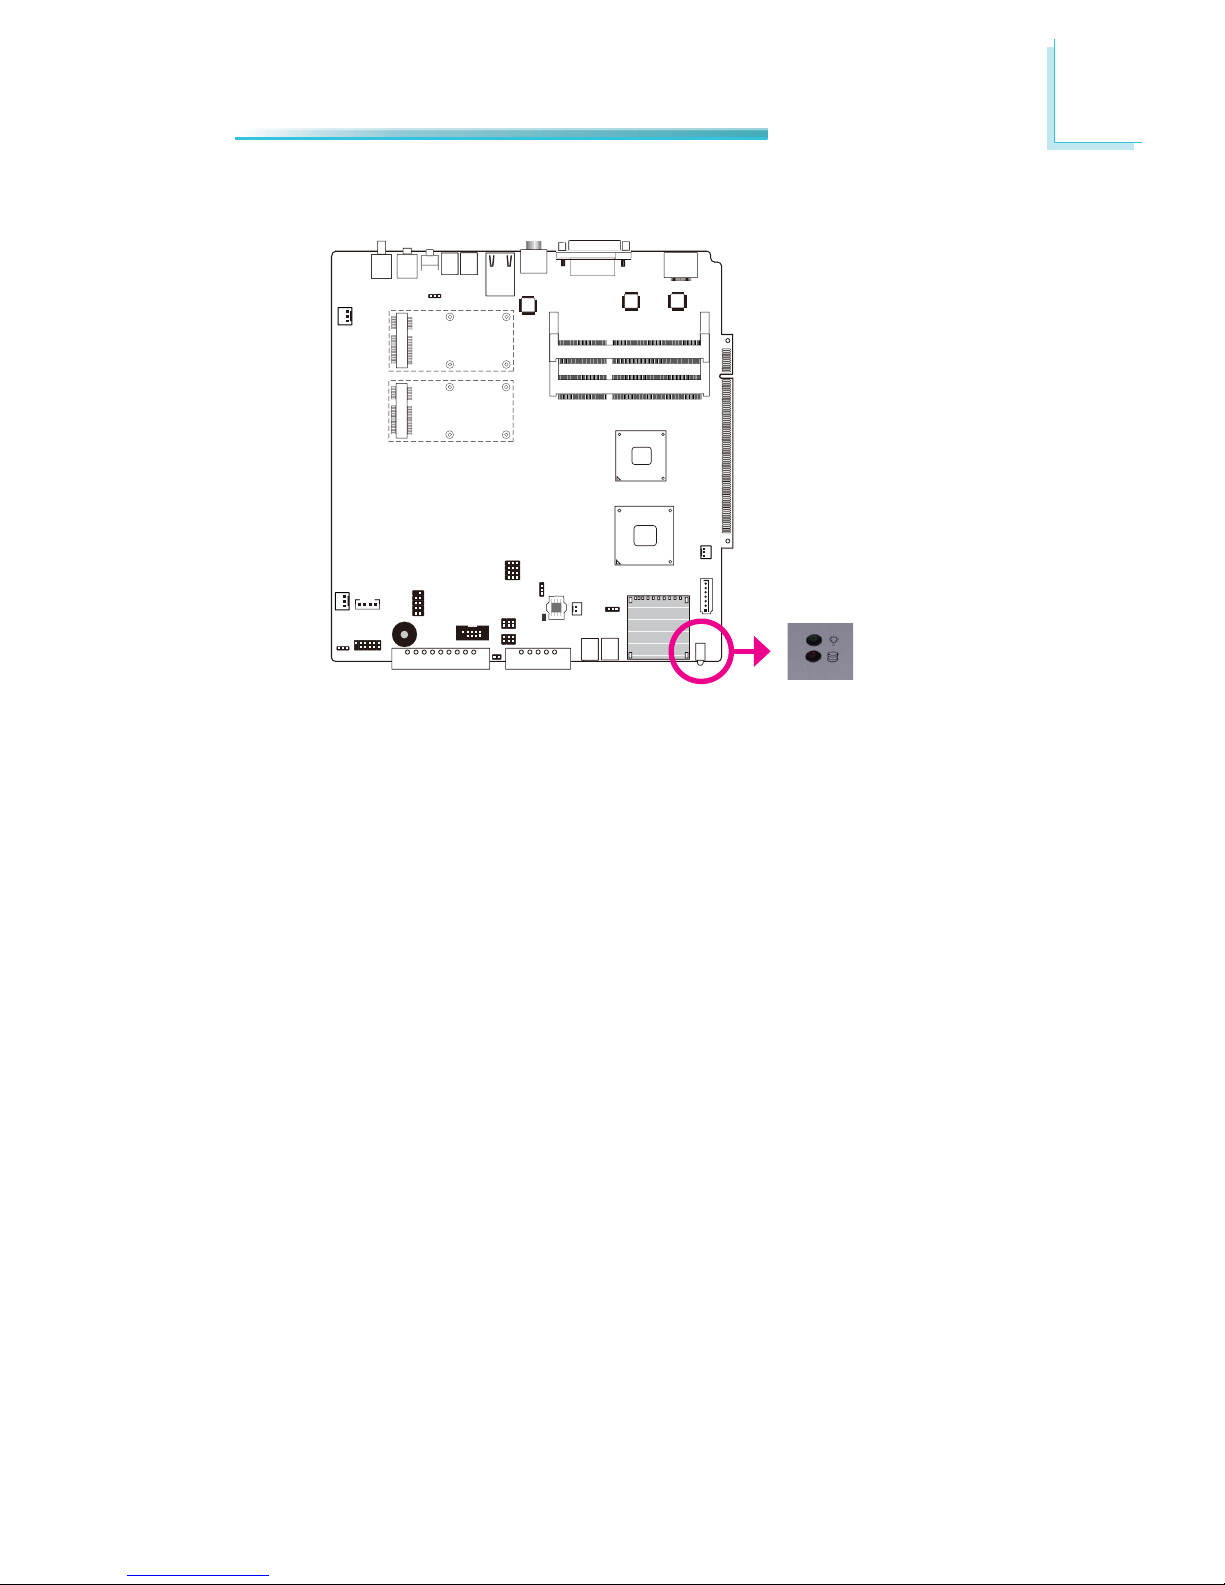
LEDs
PWR LED
The Power LED will light green when the system’s power is on.
PWR LED
HDD LED
HDD LED
The HDD LED will light yellow when the hard drive is being accessed.
Page 48
48
5
Ports and Connectors
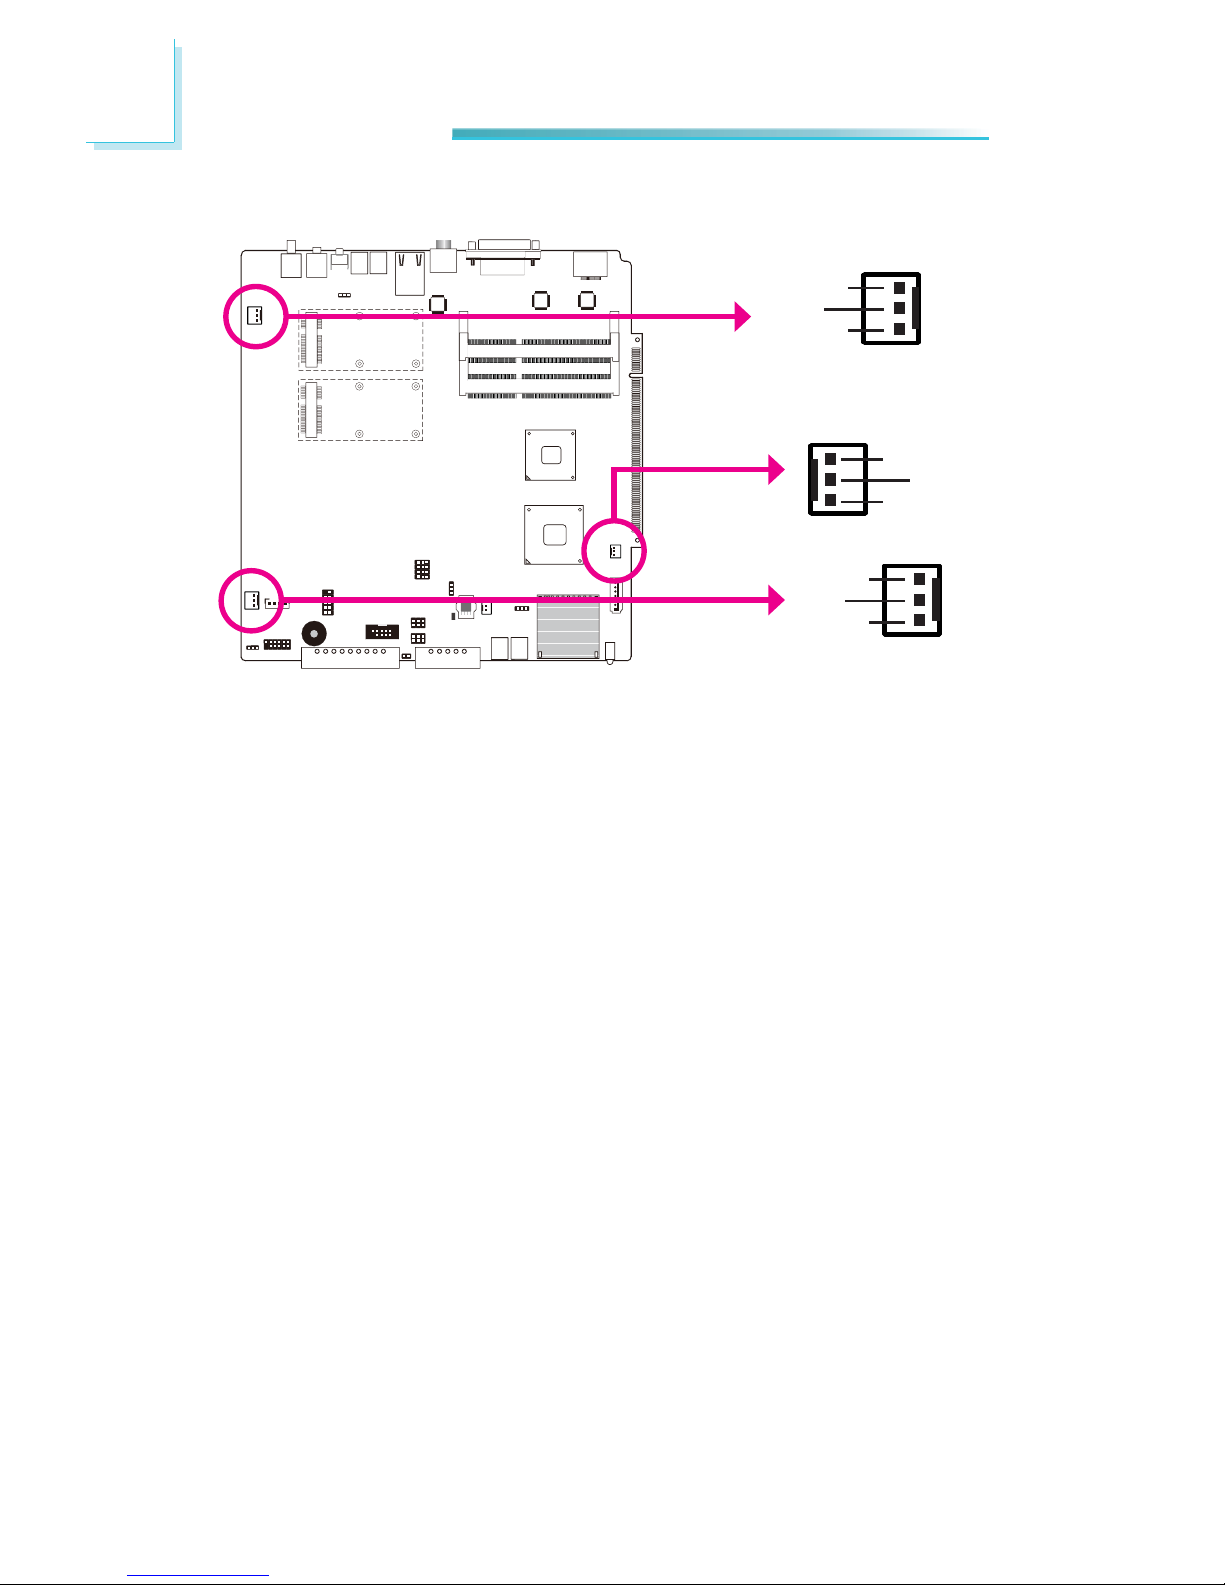
Cooling Fan Connectors
The fan connectors are used to connect cooling fans. The cooling fans will provide adequate airfl ow throughout the chassis to prevent overheating the CPU and
system board components.
BIOS Setting
The Advanced menu (“Hardware Health Confi guration” submenu) of the BIOS will
display the current speed of the cooling fan. Refer to chapter 7 for more information.
System fan 1
System fan 2
3
1
Sense
Power
Ground
3
1
Sense
Power
Ground
3
1
Sense
Power
Ground
CPU fan
Page 49
49
5
Ports and Connectors
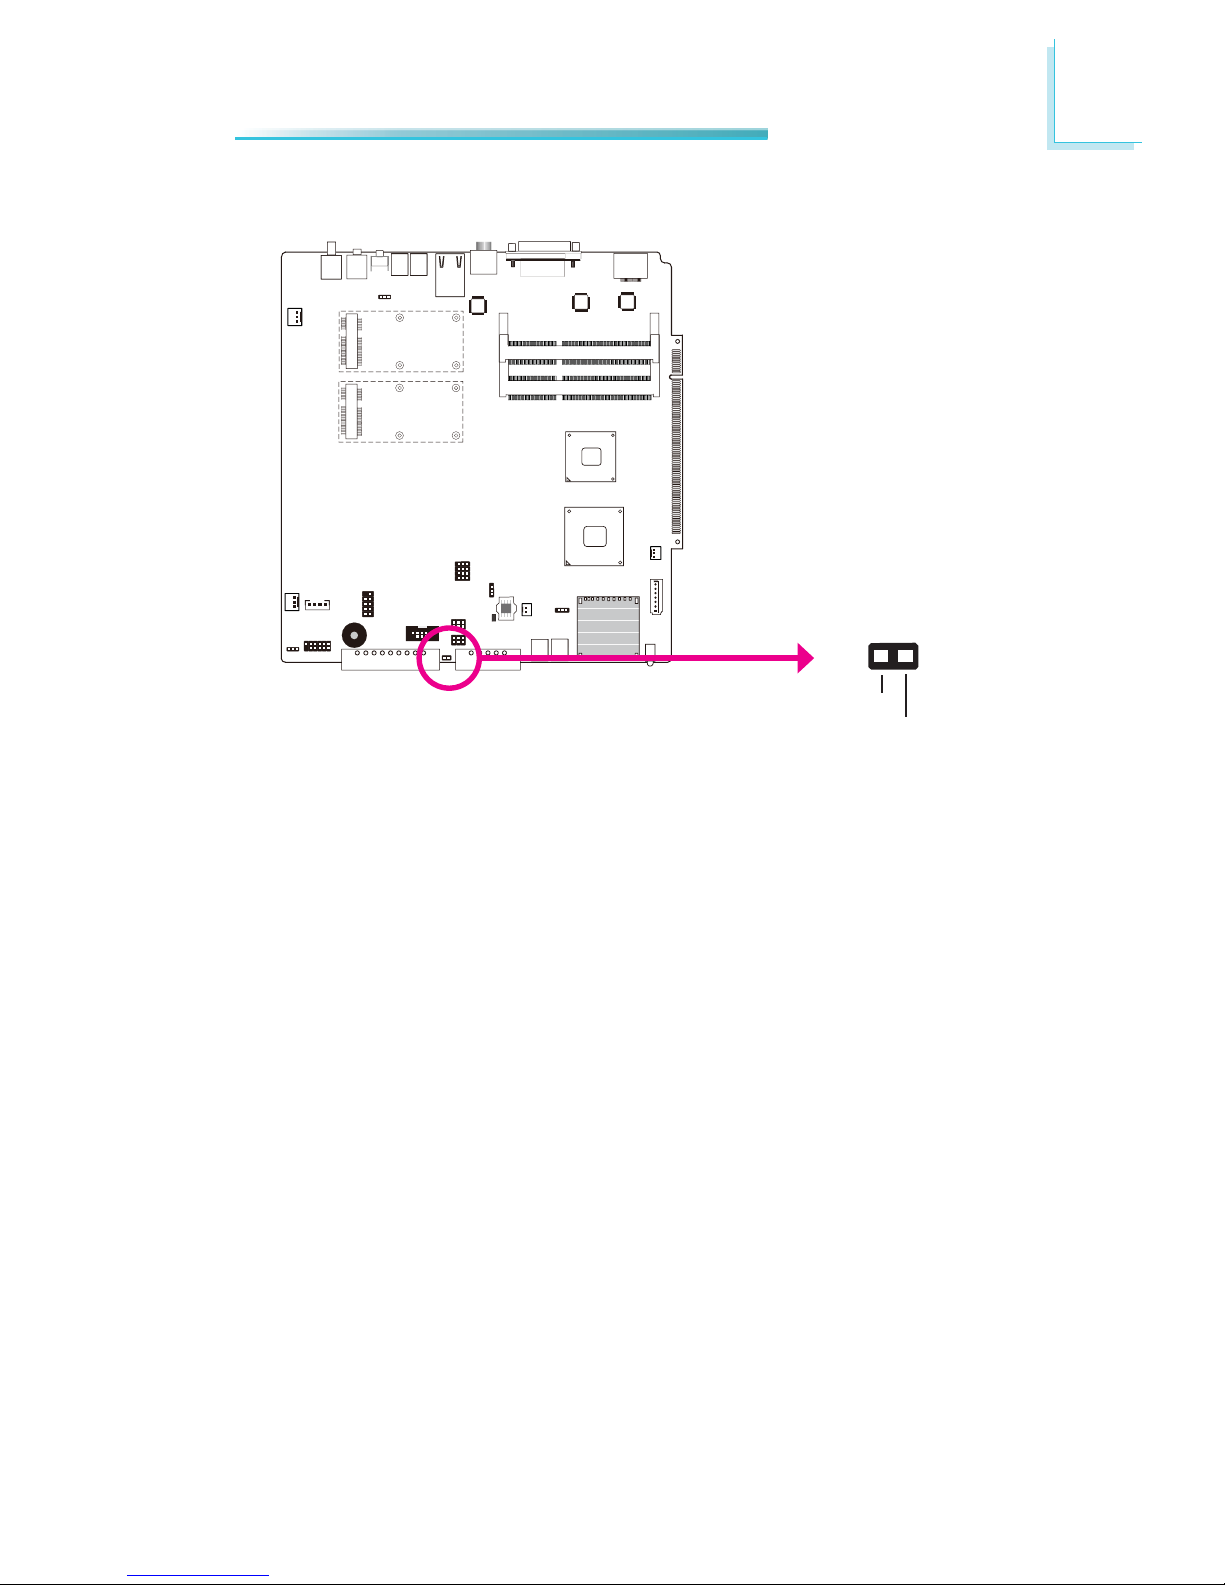
Chassis Instrusion Connector
The board supports the chassis intrusion detection function. Connect the chassis intrusion sensor cable from the chassis to this connector. When the system’s
power is on and a chassis intrusion occurred, an alarm will sound. When the
system’s power is off and a chassis intrusion occurred, the alarm will sound only
when the system restarts.
Hardware Monitor for Windows
Install the “Hardware Monitor for Windows” utility. By default, the chassis intrusion detection function is disabled. When enabled, a warning message will appear
when the chassis is open. The utility can also be confi gured so that a beeping
alarm will sound when the chassis is open. Refer to the “Hardware Monitor for
Windows” section in chapter 8 for more information.
Chassis signal
Ground
21
Page 50
50
5
Ports and Connectors
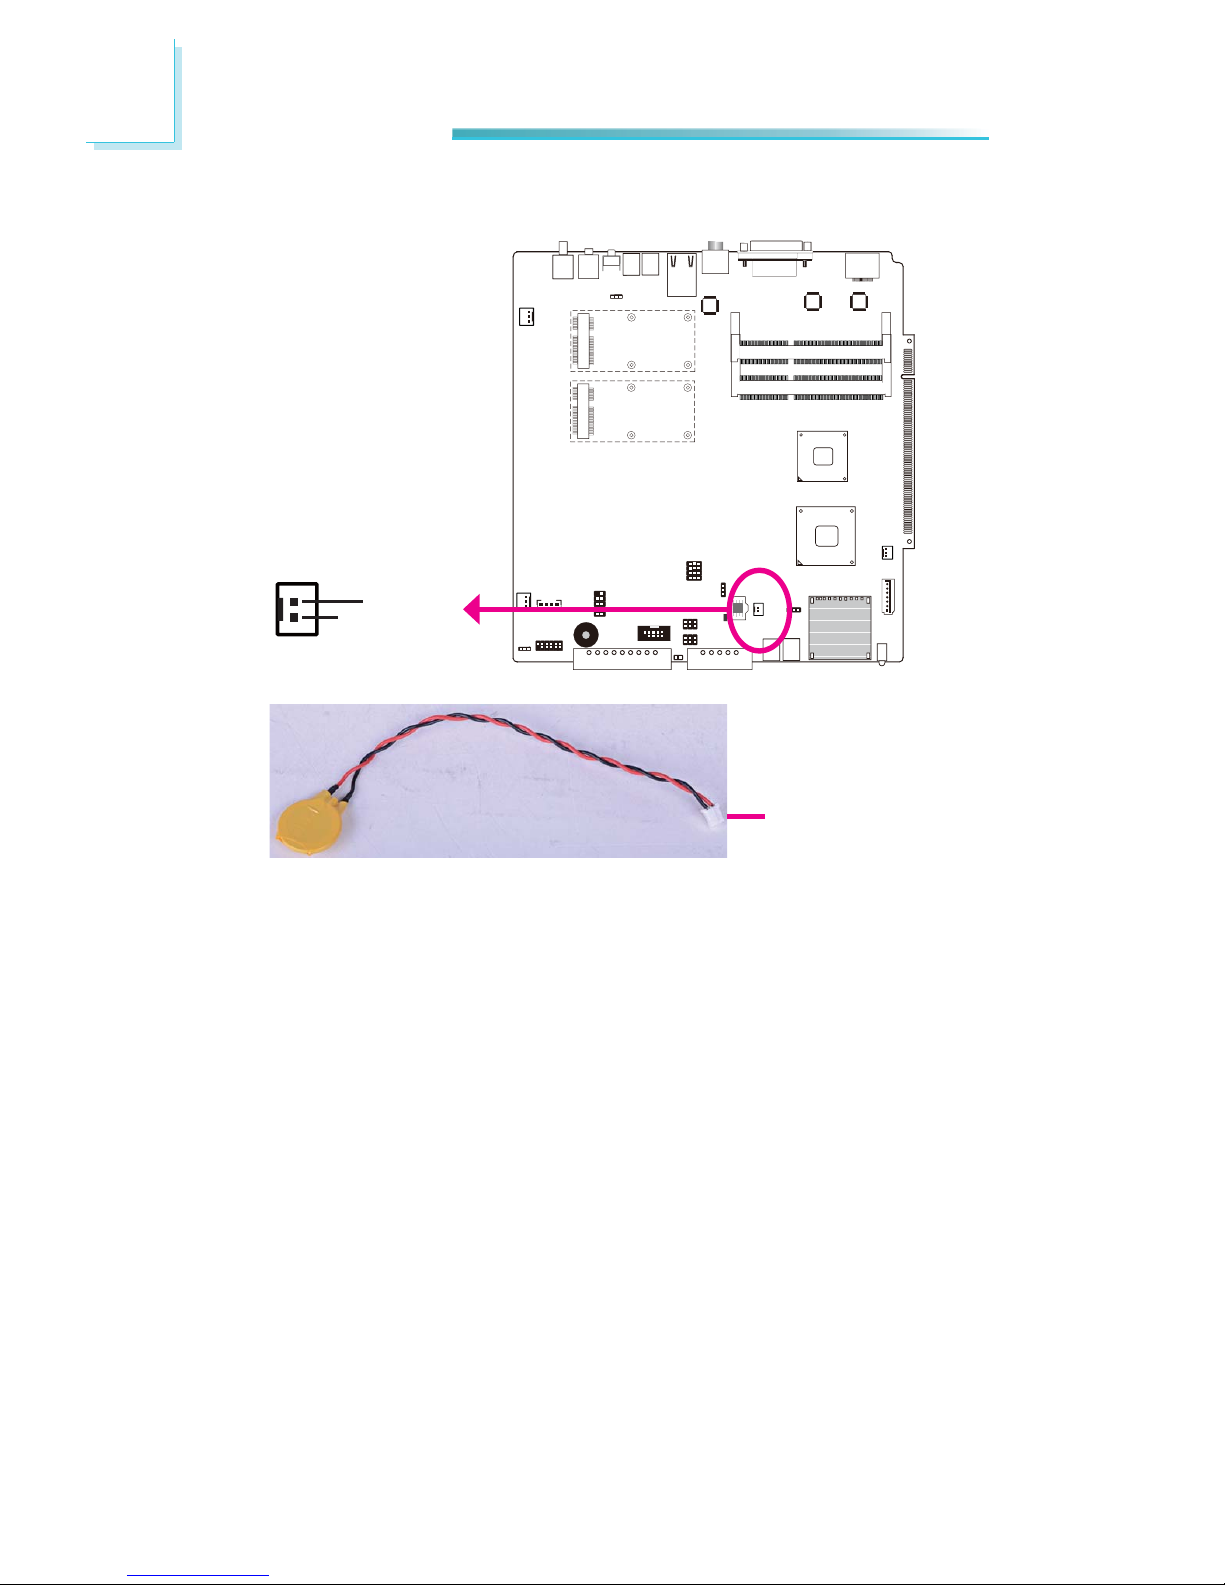
The lithium ion battery powers the real-time clock and CMOS memory. It is an
auxiliary source of power when the main power is shut off.
Safety Measures
• Danger of explosion if battery incorrectly replaced.
• Replace only with the same or equivalent type recommend by the manufacturer.
• Dispose of used batteries according to local ordinance.
Battery
Ground
Battery
1
Connect to the
battery connector
battery
Page 51
51
5
Ports and Connectors
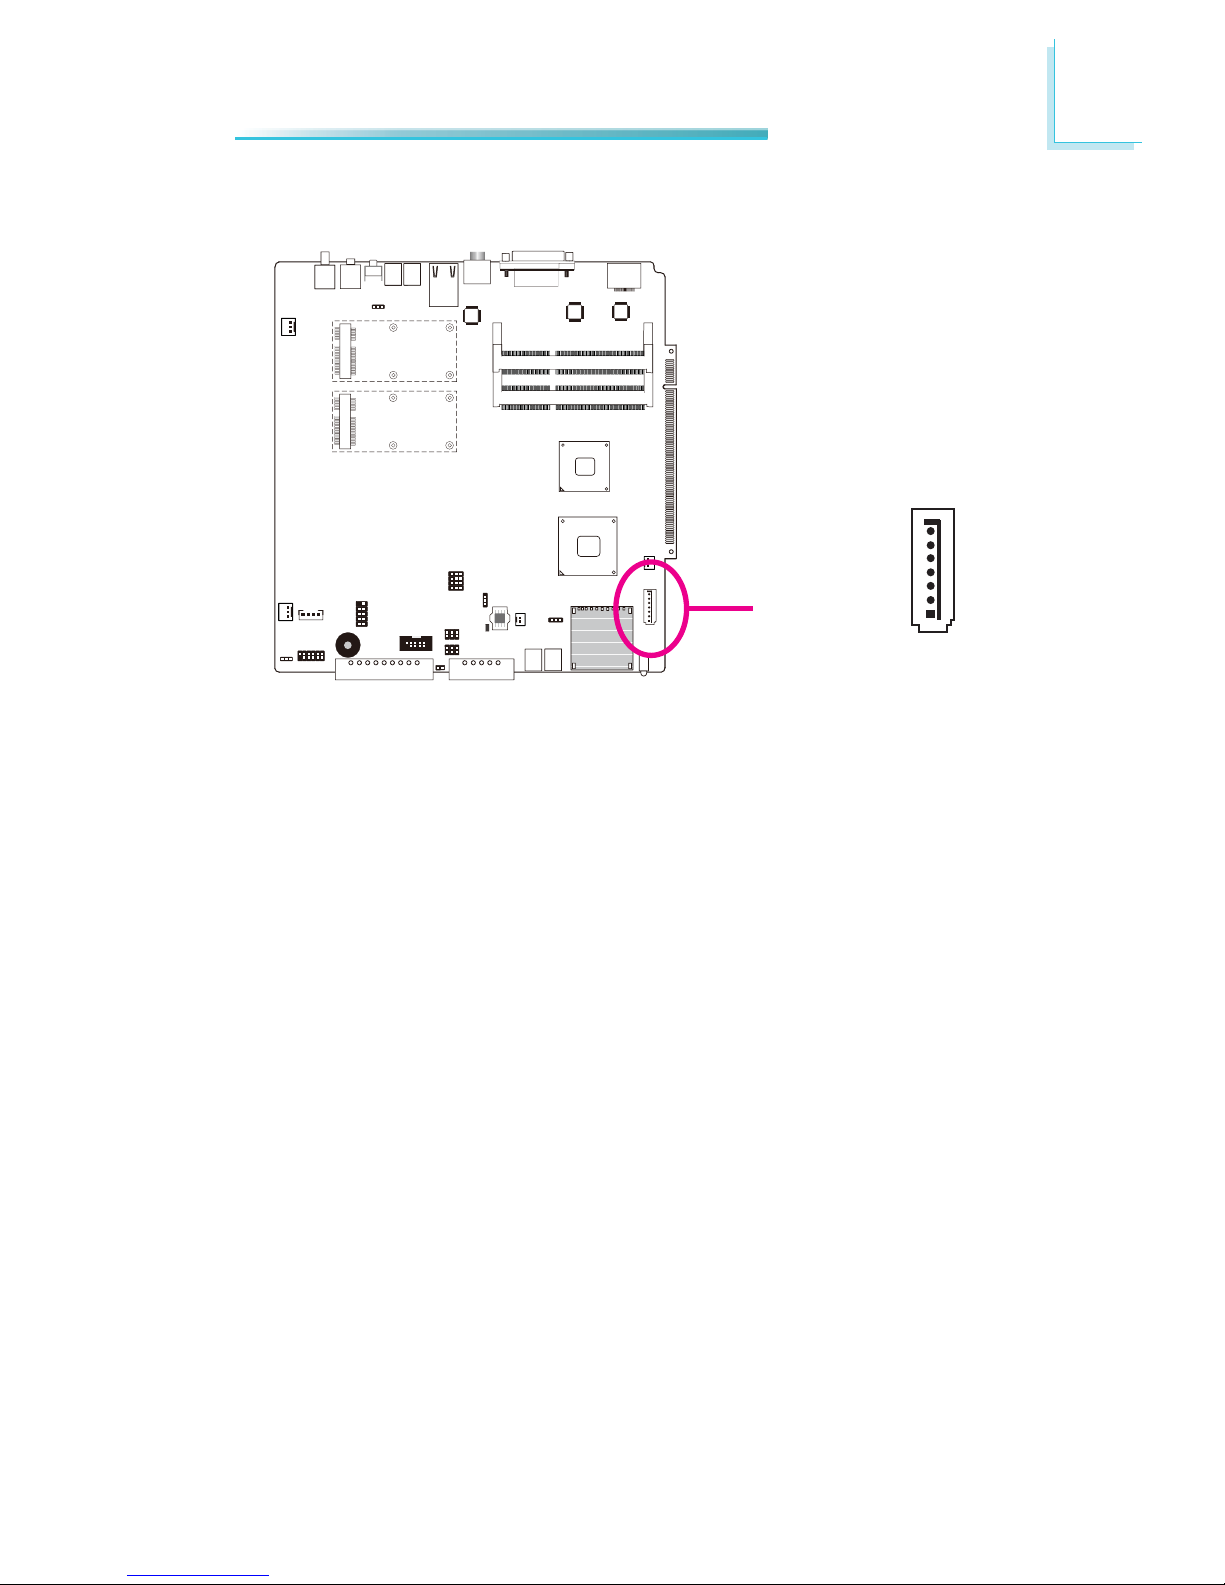
SATA (Serial ATA) Connector
SATA 0
7
RXN
GND
TXP
TXN
GND
1
RXP
GND
The Serial ATA connector is used to connect a Serial ATA device. Connect one
end of the Serial ATA data cable to a SATA connector and the other end to your
Serial ATA device.
The system board package also comes with a power cable that must be connected from the system board to the SATA drive’s power connector in order to
provide power to the drive.
Page 52
52
5
Ports and Connectors
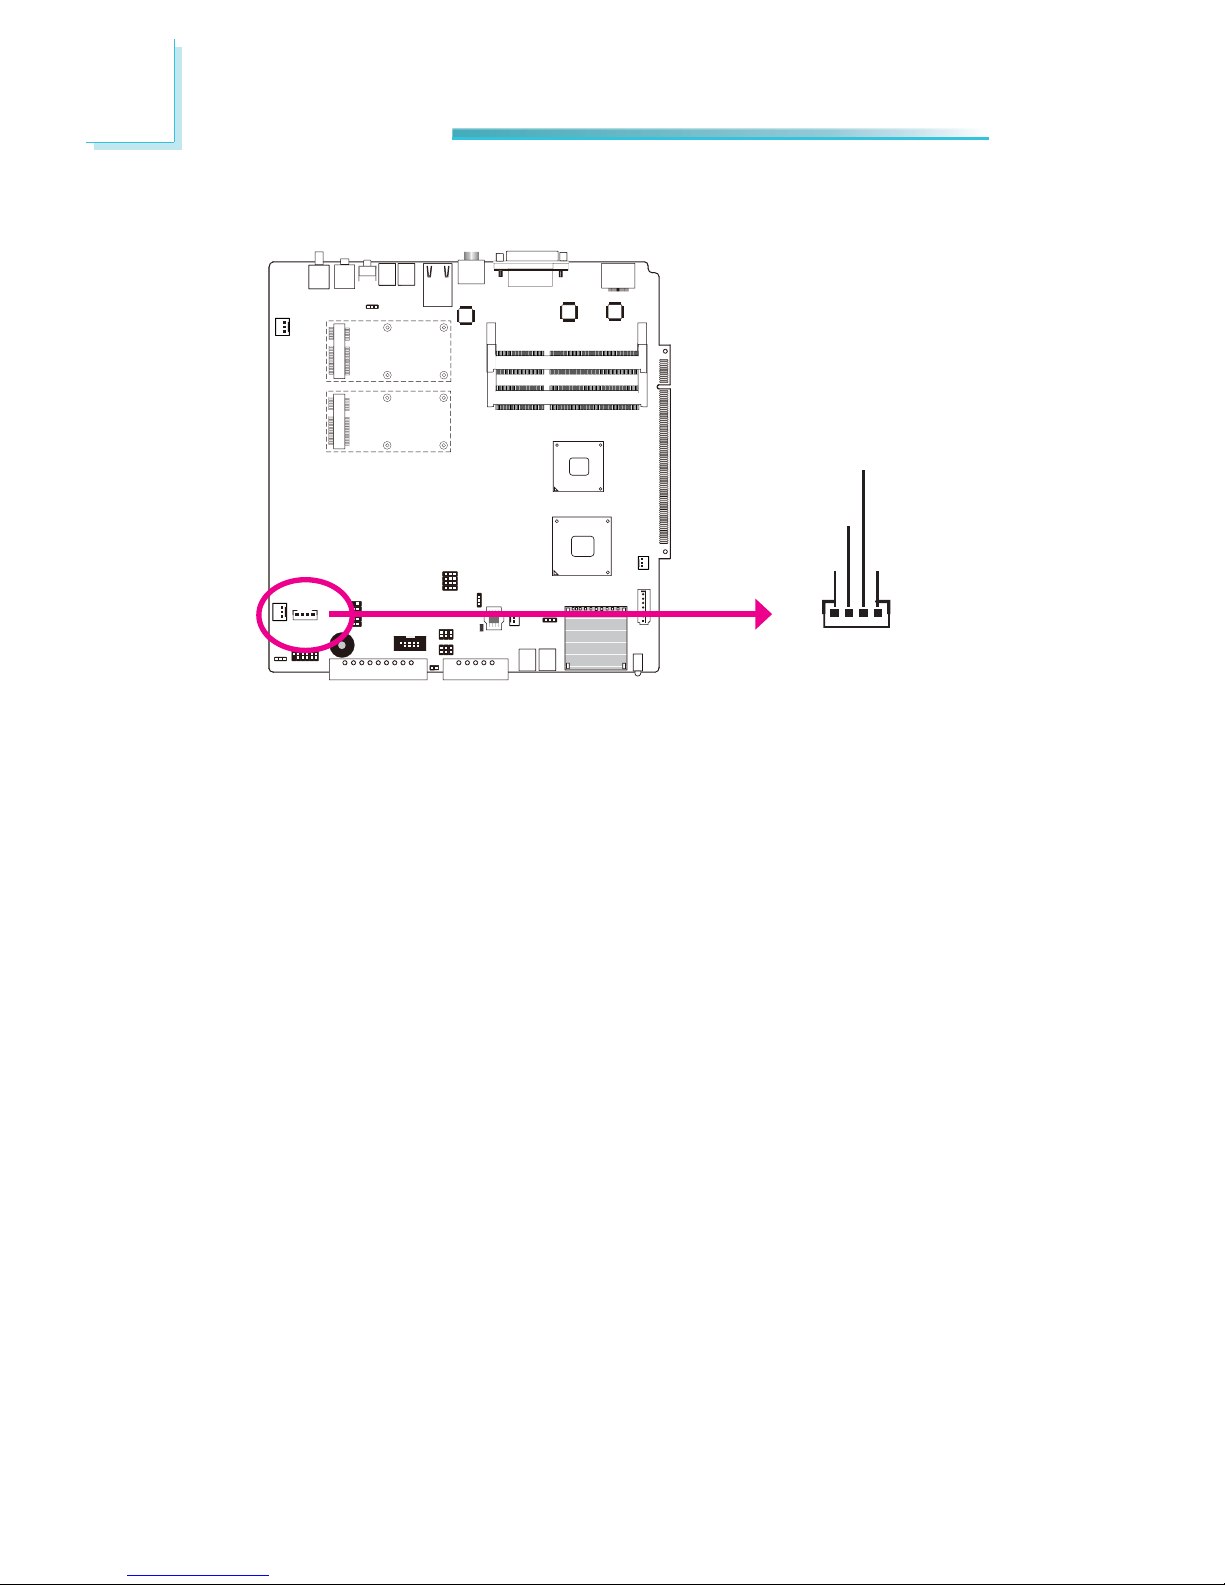
HDD Power
The HDD power connector supplies power to the SATA drive. Connect one end of
the provided power cable to the HDD power connector and the other end to your
storage device.
HDD Power
+12V +5V
Ground
1
Ground
Page 53
53
5
Ports and Connectors
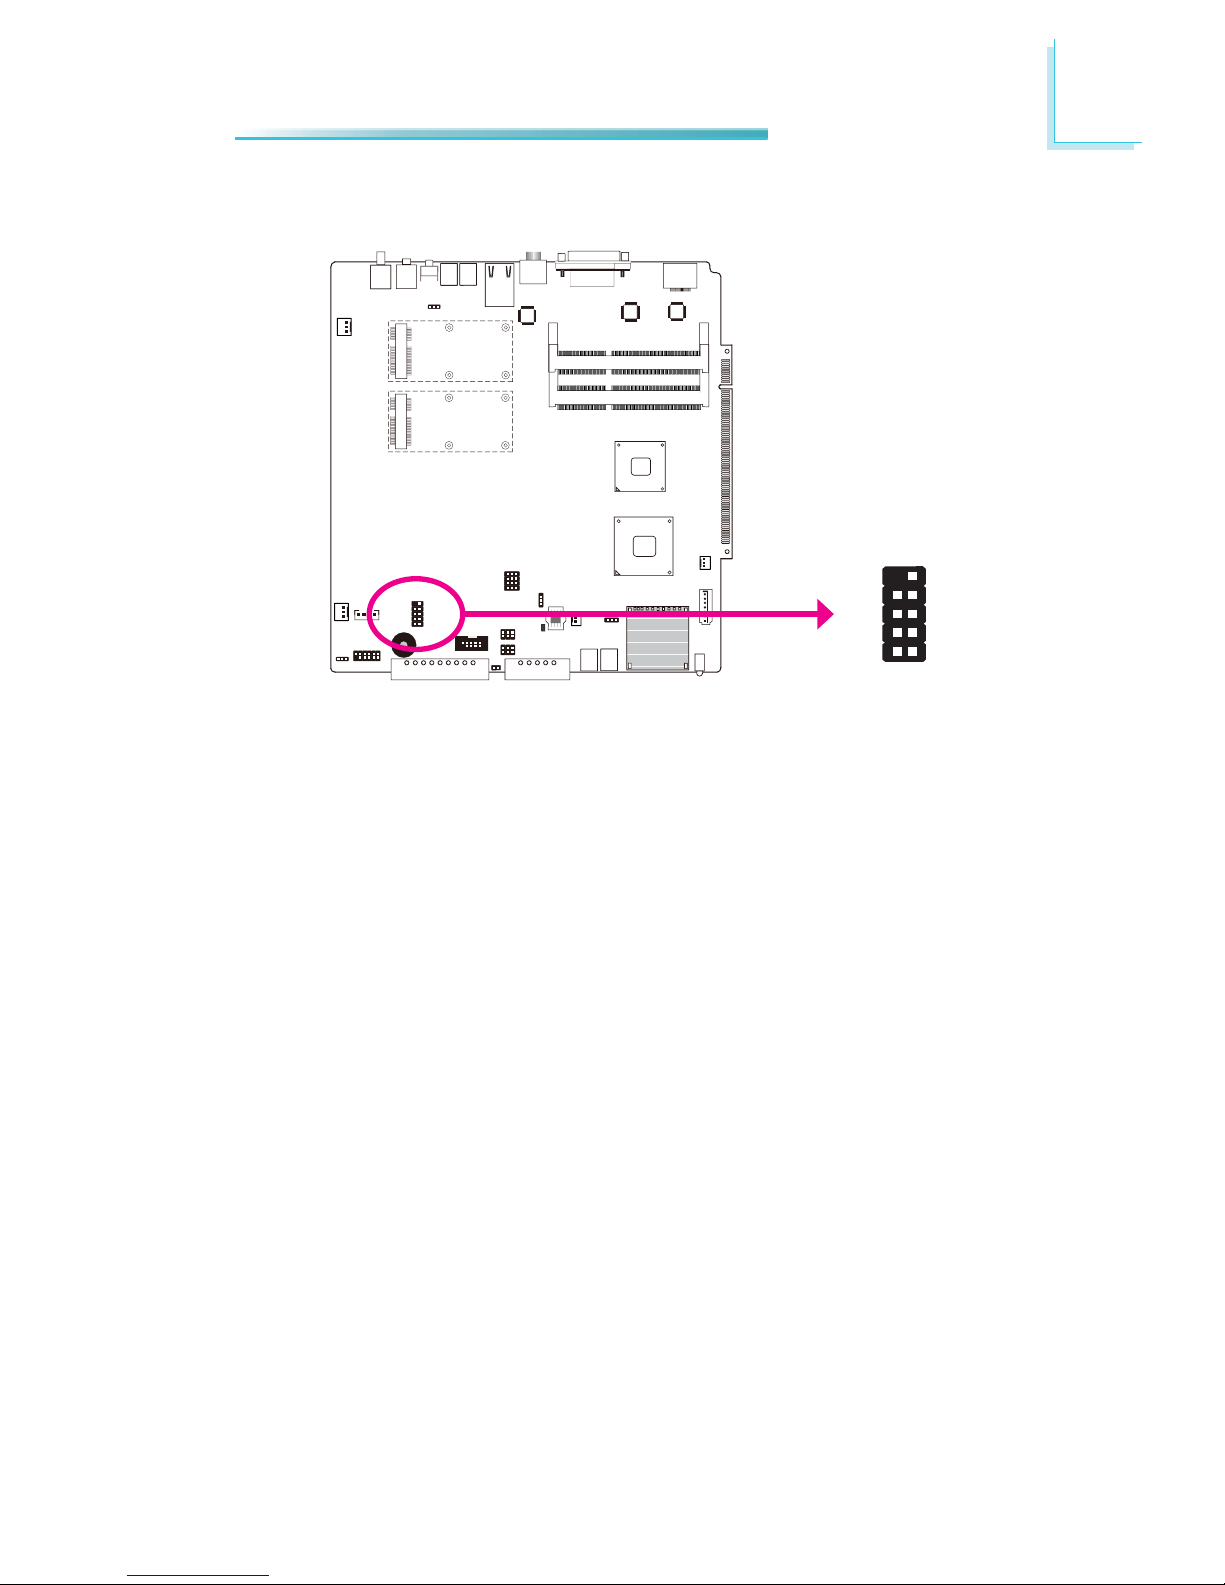
Factory Testing
12
910
Page 54
6
54
Mounting Options
Chapter 6 - Mounting Options
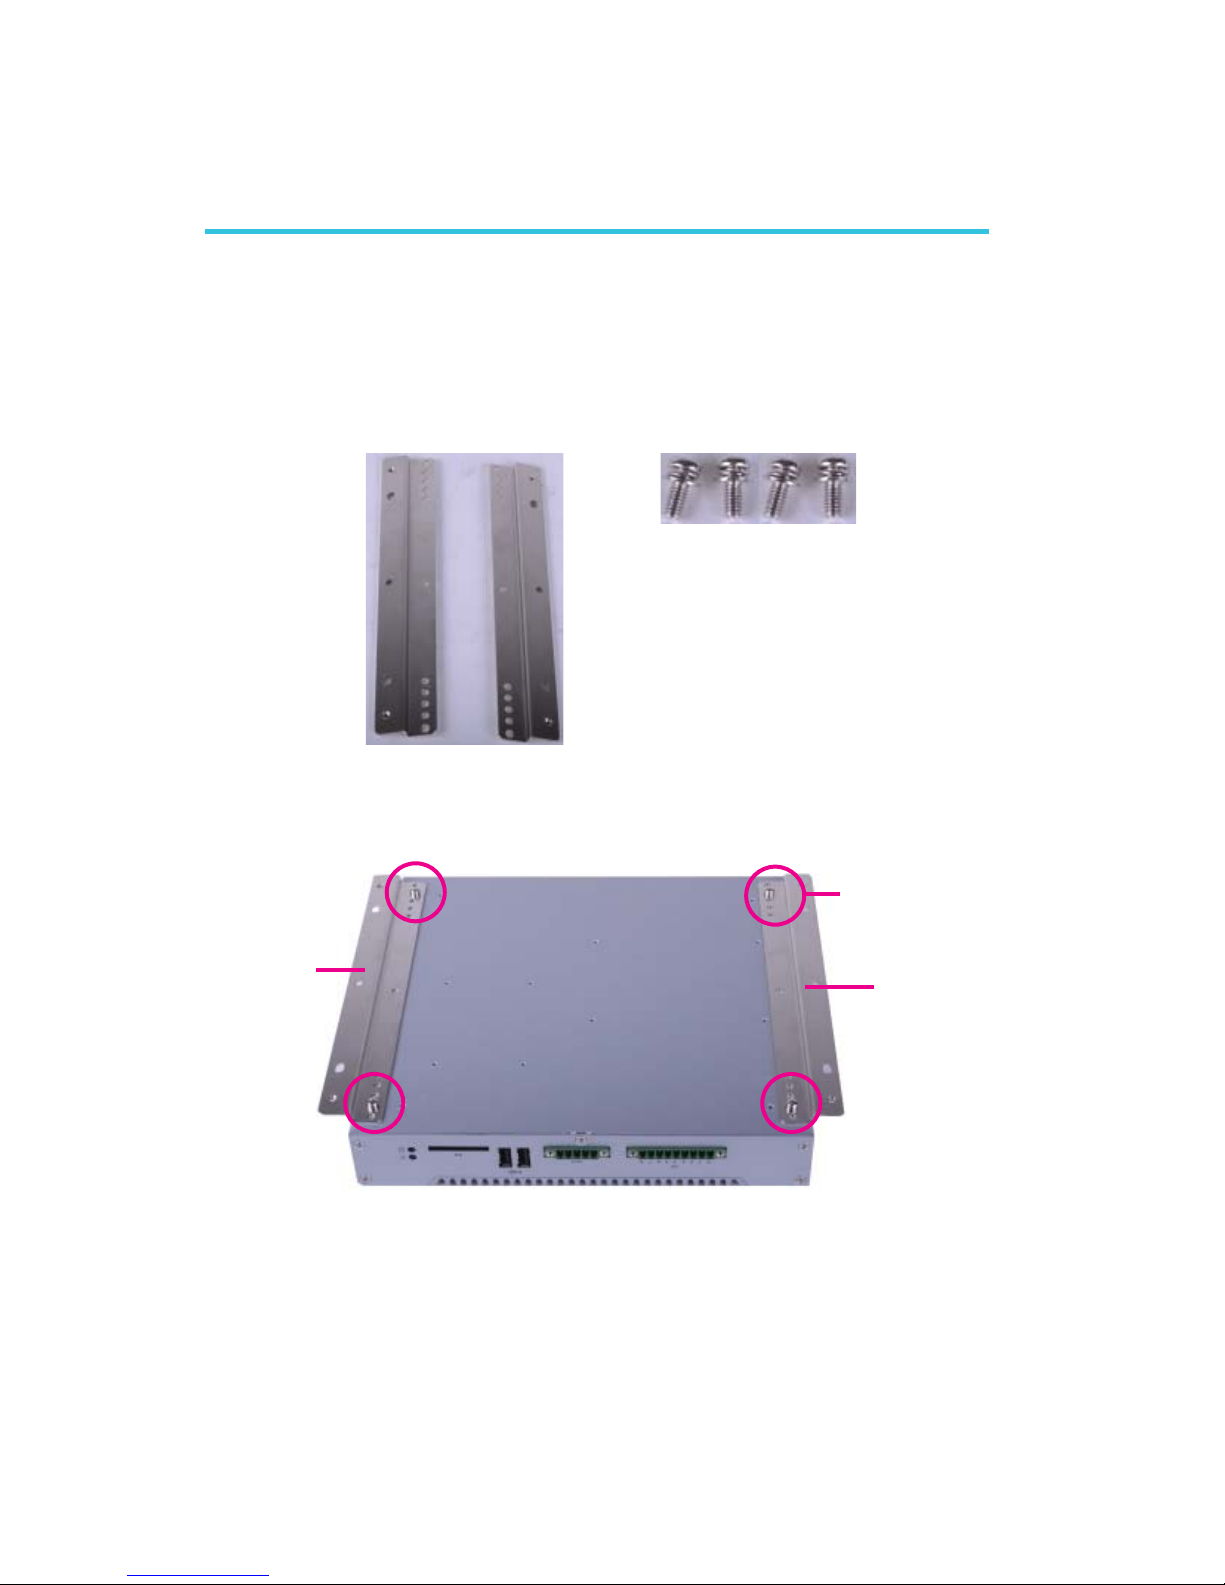
The Wall Mounting kit includes the following:
• 2 Wallmount brackets
• Bracket screws
1. At the bottom side of the system, use the provided mounting screws to secure the wallmount brackets on each side of the system.
Mounting
screw
Wallmount
bracket
Wallmount
bracket
Wall Mounting
Page 55
6
55
Mounting Options
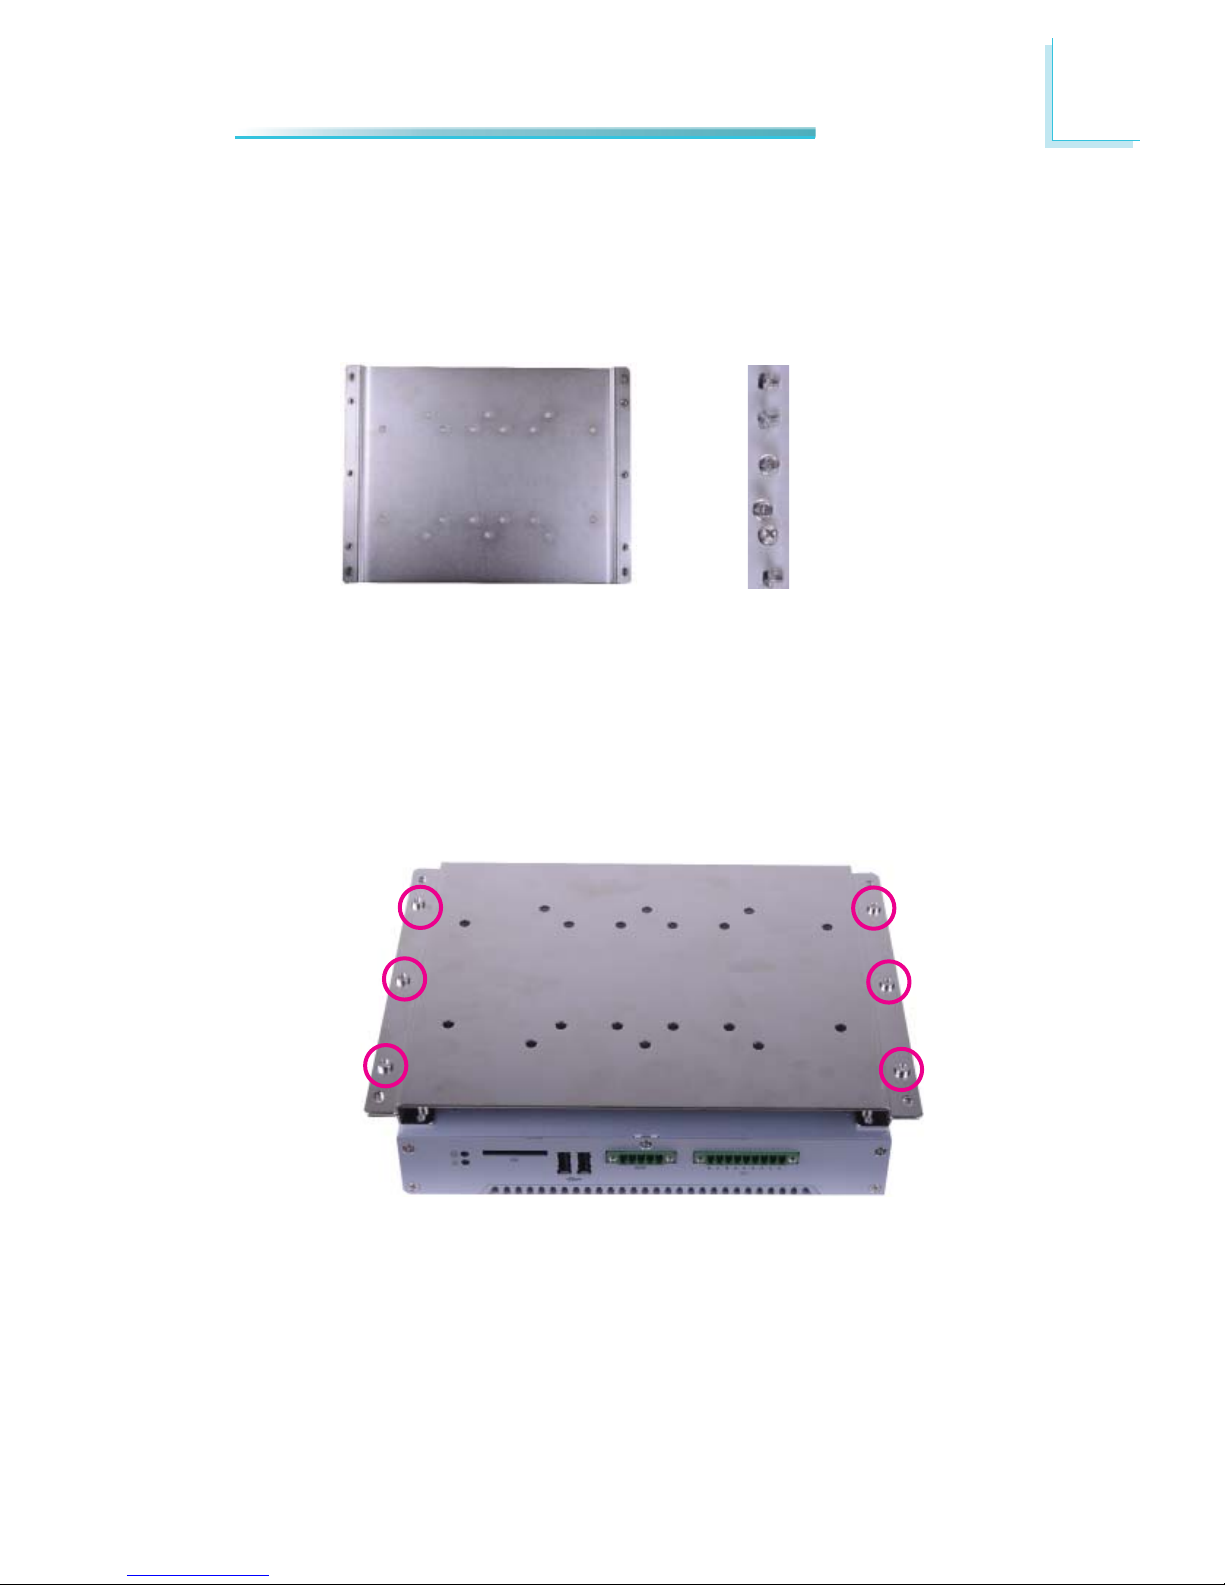
Mounting Kit
• 1 VESA bracket
• Bracket screws
VESA Mounting
1. Prior to installing the VESA bracket, make sure you have already installed the
wallmount brackets.
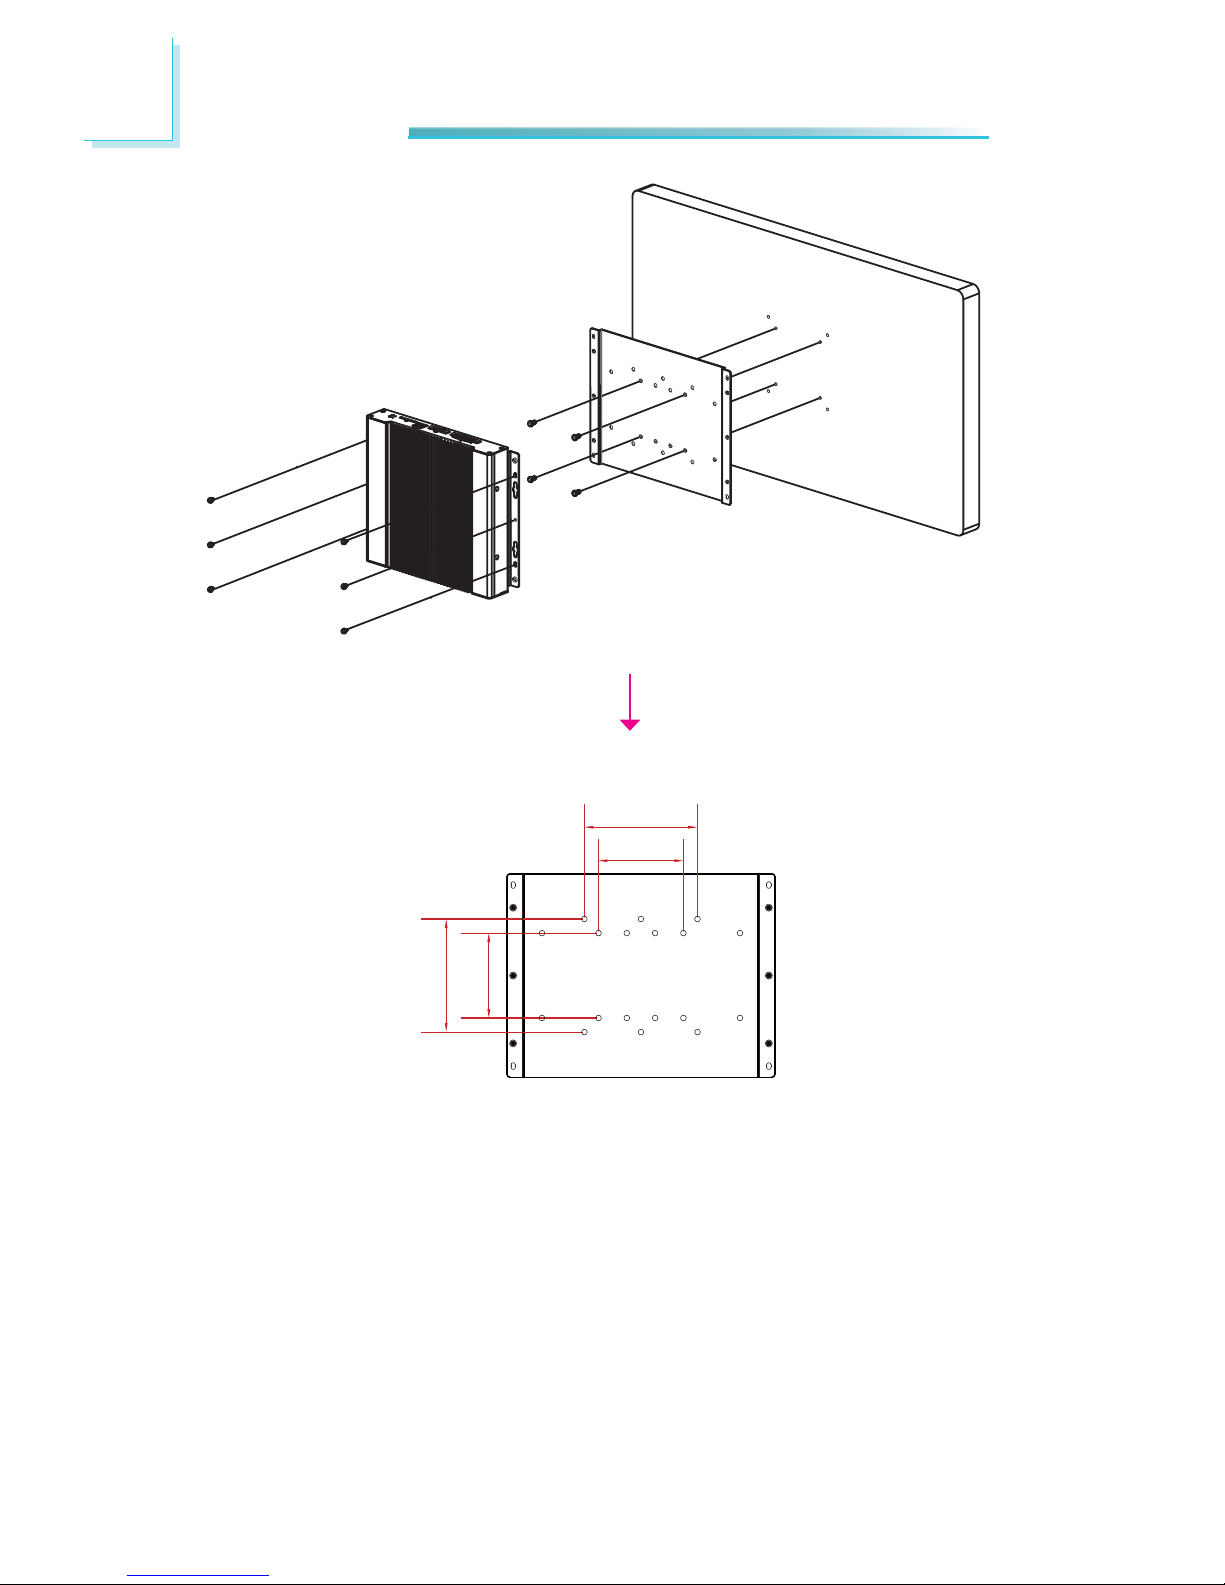
2. Using the provided mouting screws, secure the VESA bracket onto the monitor
3. Align the VESA bracket to the wallmount brackets and then use the provided
mounting screws to secure the bracket in place.
Page 56
6
56
Mounting Options
75.00
100.00
100.00
75.00
Page 57

57
3
BIOS Setup
Chapter 7 - BIOS Setup
Overview
The BIOS is a program that takes care of the basic level of communication between the CPU and peripherals. It contains codes for various advanced features
found in this system board. The BIOS allows you to confi gure the system and
save the confi guration in a battery-backed CMOS so that the data retains even
when the power is off. In general, the information stored in the CMOS RAM of
the EEPROM will stay unchanged unless a confi guration change has been made
such as a hard drive replaced or a device added.
It is possible that the CMOS battery will fail causing CMOS data loss. If this happens, you need to install a new CMOS battery and reconfi gure the BIOS settings.
Note:
The BIOS is constantly updated to improve the performance of the system board; therefore the BIOS screens in this chapter may not appear
the same as the actual one. These screens are for reference purpose
only.
Default Configuration
Most of the confi guration settings are either predefi ned according to the Load Op-
timal Defaults settings which are stored in the BIOS or are automatically detected
and confi gured without requiring any actions. There are a few settings that you
may need to change depending on your system confi guration.
Entering the BIOS Setup Utility
The BIOS Setup Utility can only be operated from the keyboard and all commands are keyboard commands. The commands are available at the right side of
each setup screen.
The BIOS Setup Utility does not require an operating system to run. After you
power up the system, the BIOS message appears on the screen and the memory
count begins. After the memory test, the message “Press DEL to run setup” will
appear on the screen. If the message disappears before you respond, restart the
system or press the “Reset” button. You may also restart the system by pressing
the <Ctrl> <Alt> and <Del> keys simultaneously.
Page 58

58
3
BIOS Setup
Legends
Keys
Right and Left arrows
Up and Down arrows
<Esc>
+ (plus key)
- (minus key)
<F1>
<F2>
<F3>
<F4>
<Enter>
Function
Moves the highlight left or right to
select a menu.
Moves the highlight up or down
between submenus or fi elds.
Exits to the BIOS Setup Utility.
Scrolls forward through the values
or options of the highlighted fi eld.
Scrolls backward through the values
or options of the highlighted fi eld.
Displays General Help.
Previous Values.
Optimized Defaults.
Saves and exits the Setup program.
Press <Enter> to enter the high-
lighted submenu.
Scroll Bar
When a scroll bar appears to the right of the setup screen, it indicates that there
are more available fi elds not shown on the screen. Use the up and down arrow
keys to scroll through all the available fi elds.
Submenu
When ““ appears on the left of a particular fi eld, it indicates that a submenu
which contains additional options are available for that fi eld. To display the sub-
menu, move the highlight to that fi eld and press <Enter>.
Page 59
59
3
BIOS Setup
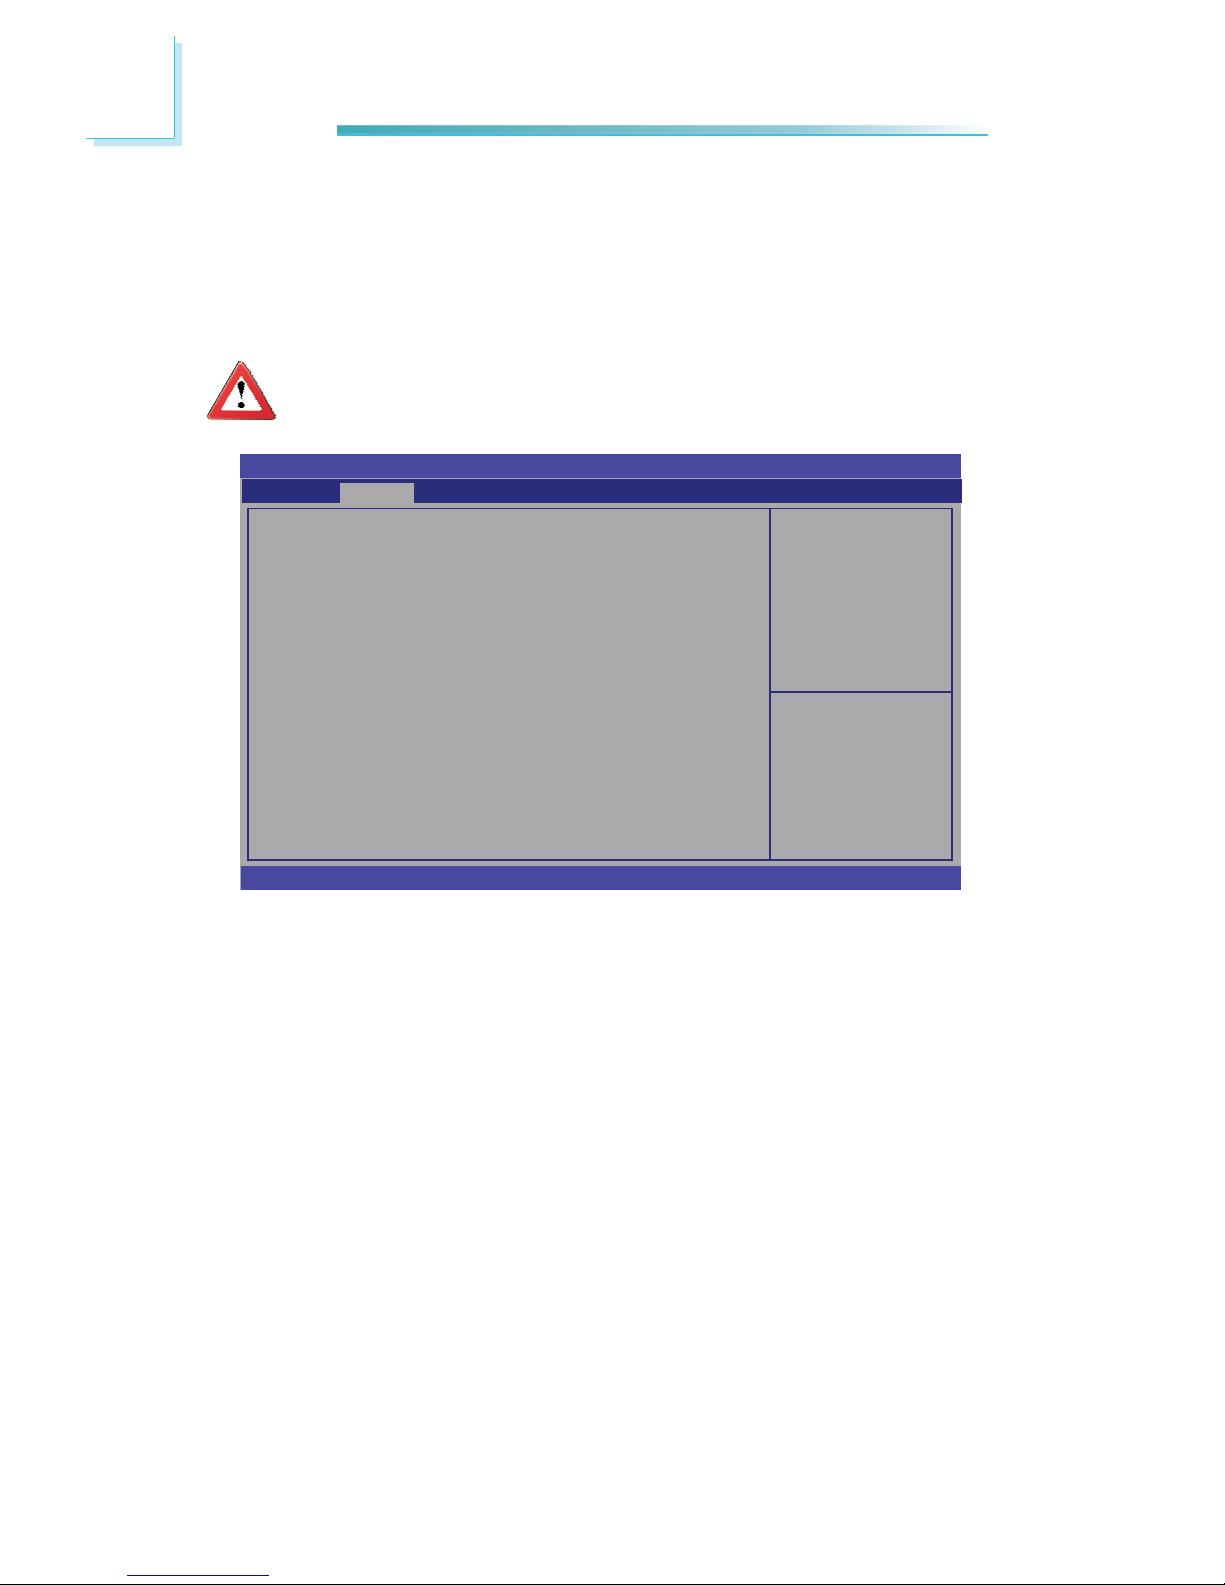
Main
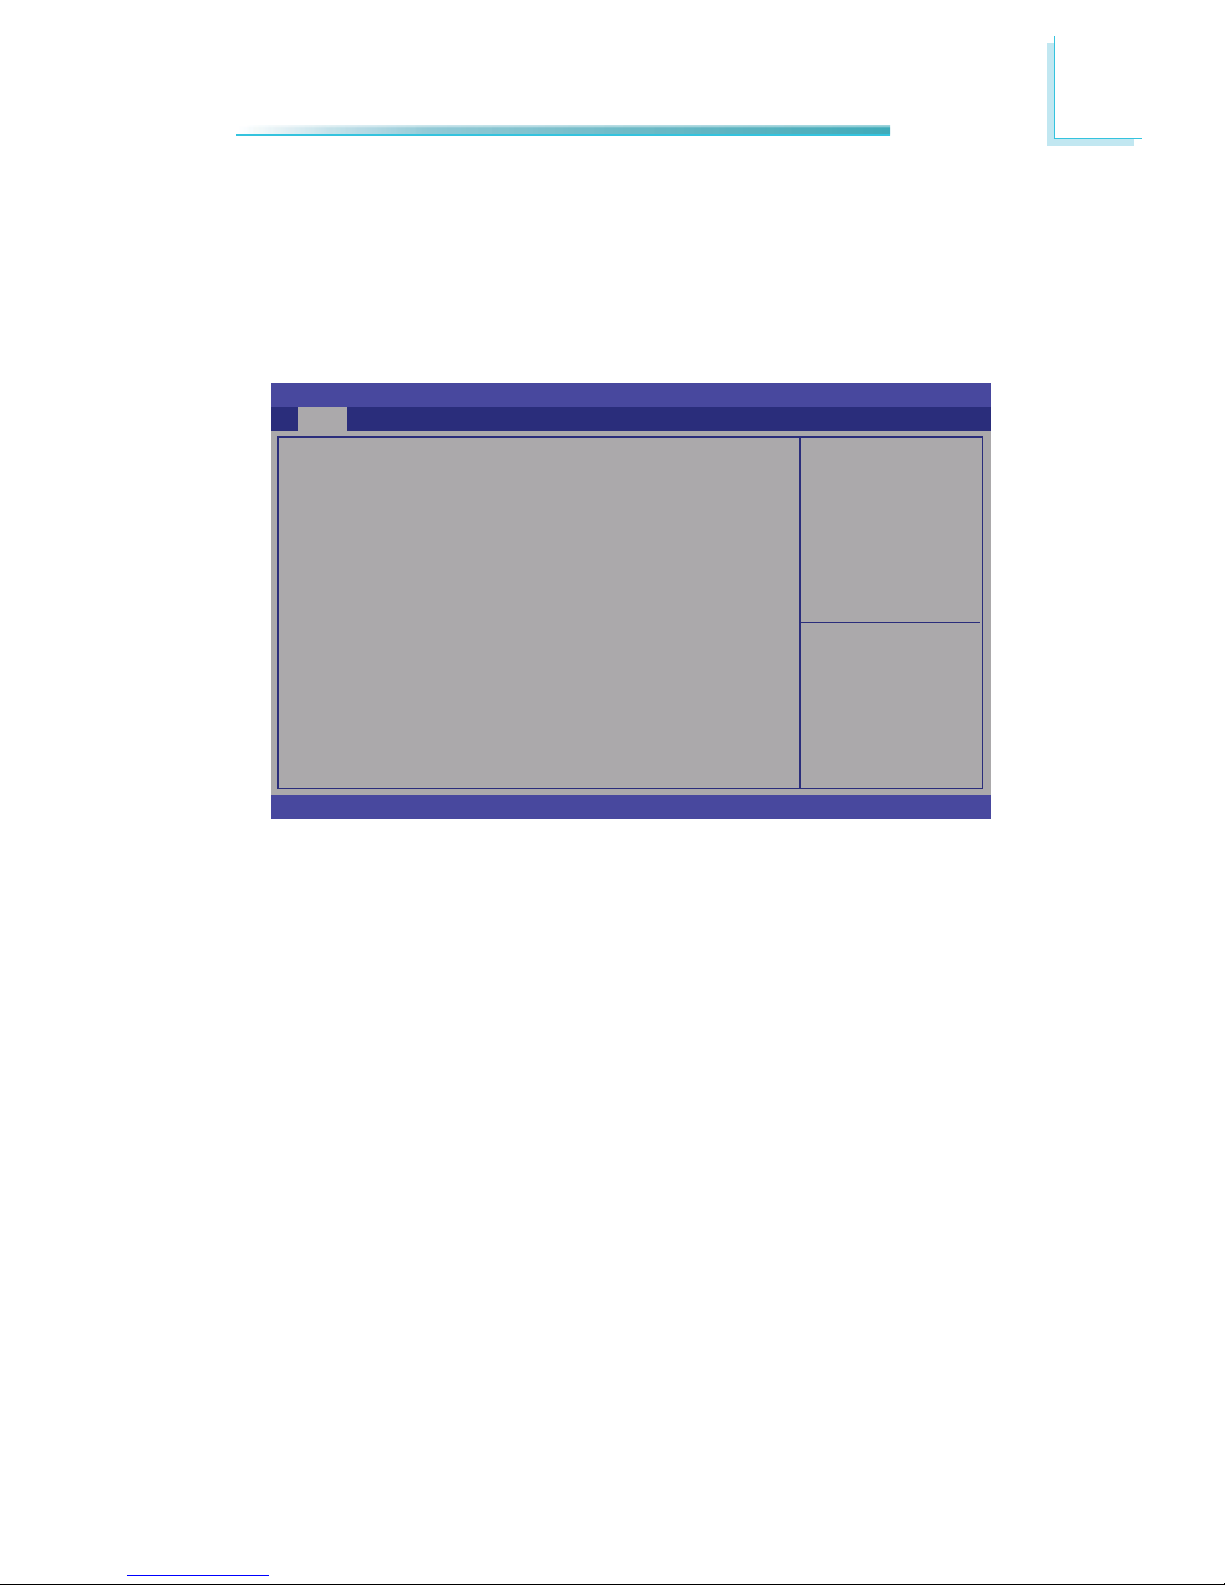
The Main menu is the fi rst screen that you will see when you enter the BIOS
Setup Utility.
System Language
Choose the system default language.
System Date
The date format is <day>, <month>, <date>, <year>. Day displays a day, from
Sunday to Saturday. Month displays the month, from January to December. Date
displays the date, from 1 to 31. Year displays the year, from 1980 to 2099.
System Time
The time format is <hour>, <minute>, <second>. The time is based on the 24hour military-time clock. For example, 1 p.m. is 13:00:00. Hour displays hours
from 00 to 23. Minute displays minutes from 00 to 59. Second displays seconds
from 00 to 59.
Choose the system default
language.
Aptio Setup Utility - Copyright (C) 2011 American Megatrends, Inc.
Save & ExitChipset
Version 2.11.1210. Copyright (C) 2011 American Megatrends, Inc.
Select Screen
Select Item
Enter: Select
+/-: Change Opt.
F1: General Help
F2: Previous Values
F3: Optimized Defaults
F4: Save & Exit
ESC: Exit
BIOS Information
BIOS Vendor
Core Version
Compliancy
Project Version
Build Date and Time
Memory Information
Total Memory
System Language
System Date
System Time
Access Level
American Megatrends
4.6.4.1
UEFI 2.1
OABVQ 0.15 x64
01/02/2012 12:05:12
2048 MB (DDR3)
[English]
[Mon 01/09/2012]
[09:50:57]
Administrator
Advanced
Boot Security
Main
AMI BIOS Setup Utility
Page 60
60
3
BIOS Setup
Advanced
The Advanced menu allows you to confi gure your system for basic operation.
Some entries are defaults required by the system board, while others, if enabled,
will improve the performance of your system or let you set some features according to your preference.
Important:
Setting incorrect fi eld values may cause the system to malfunction.
Launch PXE OpROM
Enables or disables the boot option for legacy network devices.
Launch Storage OpROM
Enables or disables the boot option for legacy mass storage devices with option
ROM.
Enable or Disable Boot
Option for Legacy Network Devices.
Aptio Setup Utility - Copyright (C) 2011 American Megatrends, Inc.
Version 2.11.1210. Copyright (C) 2011 American Megatrends, Inc.
Legacy OpROM Support
Launch PXE OpROM
Launch Storage OpROM
PCI Subsystem Settings
ACPI Power Management Confi guration
Trusting Computing
CPU Confi guration
IDE Confi guration
USB Confi guration
Super IO Confi guration
PC Health Status
[Disabled]
[Enabled]
Save & ExitChipset Boot Security
Main
Advanced
Select Screen
Select Item
Enter: Select
+/-: Change Opt.
F1: General Help
F2: Previous Values
F3: Optimized Defaults
F4: Save & Exit
ESC: Exit
Page 61

61
3
BIOS Setup
PCI Subsystem Settings
This section is used to confi gure the PCI Subsystem settings.
Select the highest ACPI
sleep state the system will
enter, when the SUSPEND
button is pressed.
Aptio Setup Utility - Copyright (C) 2011 American Megatrends, Inc.
Version 2.11.1210. Copyright (C) 2011 American Megatrends, Inc.
PCI Option ROM Handling
PCI ROM Priority
Advanced
[EFI Compatible ROM]
PCI ROM Priority
In case multiple option ROMs exist, select the PCI option ROM to launch.
Select Screen
Select Item
Enter: Select
+/-: Change Opt.
F1: General Help
F2: Previous Values
F3: Optimized Defaults
F4: Save & Exit
ESC: Exit
Page 62

62
3
BIOS Setup
ACPI Power Management Confi guration
This section is used to confi gure the ACPI Power Management.
Enables or disables BIOS
ACPI Auto Confi guration.
Aptio Setup Utility - Copyright (C) 2011 American Megatrends, Inc.
Version 2.11.1210. Copyright (C) 2011 American Megatrends, Inc.
ACPI Power Management Confi guration
Enable ACPI Auto Confi guration
ACPI Sleep State
Resume by PME
Wake system with Fixed Time
Advanced
[Disabled]
[S3 (Suspend to RAM)]
[Disabled]
[Disabled]
Enable ACPI Auto Confi guration
Enables or disables the ACPI function.
ACPI Sleep State
Selects the highest ACPI sleep state the system will enter when the Suspend
button is pressed.
S1(POS) Enables the Power On Suspend function.
S3(STR) Enables the Suspend to RAM function.
Resume by PME
Enable this fi eld to use the PME signal to wake up the system.
Wake System with Fixed Time
Enables or disables the system’s wake on alarm event. When enabled, the
system will wake up on the specifi ed time.
Select Screen
Select Item
Enter: Select
+/-: Change Opt.
F1: General Help
F2: Previous Values
F3: Optimized Defaults
F4: Save & Exit
ESC: Exit
Page 63

63
3
BIOS Setup
Trusted Computing (optional)
This section confi gures settings relevant to Trusted Computing innovations.
Enables or Disables
BIOS support for security
device. O.S. will not show
Security Device. TCG
EFI protocol and INT1A
interface will not be
available.
Aptio Setup Utility - Copyright (C) 2011 American Megatrends, Inc.
Version 2.14.1219. Copyright (C) 2011 American Megatrends, Inc.
Confi guration
TPM Support
Current Status Information
SUPPORTED TURNED OFF
Advanced
TPM Support
Enables or Disables TPM. O.S. will not show TPM. Resetting the platform is
required.
[Disable]
Select Screen
Select Item
Enter: Select
+/-: Change Opt.
F1: General Help
F2: Previous Values
F3: Optimized Defaults
F4: Save & Exit
ESC: Exit
Page 64

64
3
BIOS Setup
CPU Confi guration
This section is used to confi
gure the CPU. It will also display the detected CPU
information.
Enabled for Windows XP
and Linux (OS optimized
for Hyper-Threading
Technology) and Disabled
for other OS (OS not
optimized for
Hyper-Threading
Technology). When
Disabled only one thread
per enabled core is
enabled.
Aptio Setup Utility - Copyright (C) 2011 American Megatrends, Inc.
Version 2.11.1210. Copyright (C) 2011 American Megatrends, Inc.
CPU Confi guration
Node0: AMD G-T56N Processor
Dual Core Running @ 1673 MHz 1350 mV
Max Speed: 1650 MHz Intended Speed: 1650 MHz
Limit CPUID Maximum
C6 Mode
Advanced
Limit CPUID Maximum
The CPUID instruction of some newer CPUs will return a value greater than
3. The default is Disabled because this problem does not exist in the Windows series oper
ating systems. If you are using an operating system other
than Windows, this problem may occur. To avoid this problem, enable this
fi eld to limit the return value to 3 or less than 3.
C6 Mode
Enables or disables C6 mode.
[Disabled]
[Enabled]
Select Screen
Select Item
Enter: Select
+/-: Change Opt.
F1: General Help
F2: Previous Values
F3: Optimized Defaults
F4: Save & Exit
ESC: Exit
Page 65

65
3
BIOS Setup
IDE Confi guration
This section is used to confi gure the IDE.
Aptio Setup Utility - Copyright (C) 2011 American Megatrends, Inc.
Version 2.11.1210. Copyright (C) 2011 American Megatrends, Inc.
IDE Confi guration
OnChip SATA Channel
OnChip SATA Type
SATA Port 0
SATA Port 1
Advanced
[Enabled]
[IDE]
ST500DM002-1BD (500.1
Not Present
Select Screen
Select Item
Enter: Select
+/-: Change Opt.
F1: General Help
F2: Previous Values
F3: Optimized Defaults
F4: Save & Exit
ESC: Exit
OnChip SATA Channel
This fi eld is used to enable or disable the Serial ATA function.
OnChip SATA Type
This fi eld is used to confi gure the SATA devices supported by the processor.
Native IDE This option confi gures the Serial ATA drives as Parallel ATA
storage devices.
RAID This option allows you to create RAID on Serial ATA devices.
AHCI This option allows the Serial ATA devices to use AHCI (
Advanced Host Controller Interface).
Legacy IDE This option confi gures the Serial ATA drives as Legacy IDE
storage devices.
Page 66

66
3
BIOS Setup
USB Confi guration
This section is used to confi gure USB.
Enables Legacy USB
support. AUTO option
disables legacy support if
no USB devices are
connected. DISABLE
option will keep USB
devices available only for
EFI applications.
Aptio Setup Utility - Copyright (C) 2011 American Megatrends, Inc.
Version 2.11.1210. Copyright (C) 2011 American Megatrends, Inc.
USB Confi guration
USB Devices:
1 Keyboard, 1 Drive
Legacy USB Support
EHCI Hand-off
USB hardware delays and time-outs:
Device reset time-out
Advanced
[Enabled]
[Disabled]
[20 sec]
Select Screen
Select Item
Enter: Select
+/-: Change Opt.
F1: General Help
F2: Previous Values
F3: Optimized Defaults
F4: Save & Exit
ESC: Exit
Legacy USB Support
Enabled
Enables legacy USB.
Auto
Disables support for legacy when no USB devices are connected.
Disabled
Keeps USB devices available only for EFI applications.
EHCI Hand-off
This is a workaround for OSes that does not support EHCI hand-off. The
EHCI ownership change should be claimed by the EHCI driver.
Device reset time-out
Selects the USB mass storage device’s start unit command timeout.
Page 67

67
3
BIOS Setup
Super IO Confi guration
This section is used to confi
gure the I/O functions supported by the onboard
Super I/O chip.
Set parameters of Serial
Port 0 (COMA).
Aptio Setup Utility - Copyright (C) 2011 American Megatrends, Inc.
Version 2.11.1210. Copyright (C) 2011 American Megatrends, Inc.
Super IO Confi guration
Super IO Chip
Serial Port 0 Confi guration
Serial Port 1 Confi guration
Case Open Beep
Watchdog
AC Power Loss
Advanced
Winbond W83627DHG
[Disabled]
[Disabled]
[T
urns OFF]
Select Screen
Select Item
Enter: Select
+/-: Change Opt.
F1: General Help
F2: Previous Values
F3: Optimized Defaults
F4: Save & Exit
ESC: Exit
Case Open Beep
Set this fi
eld to Enabled to allow the system to alert you of a chassis intru-
sion event.
Watchdog
This fi
eld is used to enable or disable the Watchdog Timer function.
AC Power Loss
Turns Off
When power returns after an AC power failure, the system’
s power is off. You
must press the Power button to power-on the system.
Turns On
When power returns after an AC power failure, the system will automatically
power-on.
Former-Sts
When power returns after an AC power failure, the system will return to the
state where you left off before power failure occurs. If the system’s power
is off when AC power failure occurs, it will remain off when power returns.
If the system’s power is on when AC power failure occurs, the system will
power-on when power returns
Page 68
68
3
BIOS Setup
Enable or Disable Serial
Port (COM)
Aptio Setup Utility - Copyright (C) 2011 American Megatrends, Inc.
Version 2.11.1210. Copyright (C) 2011 American Megatrends, Inc.
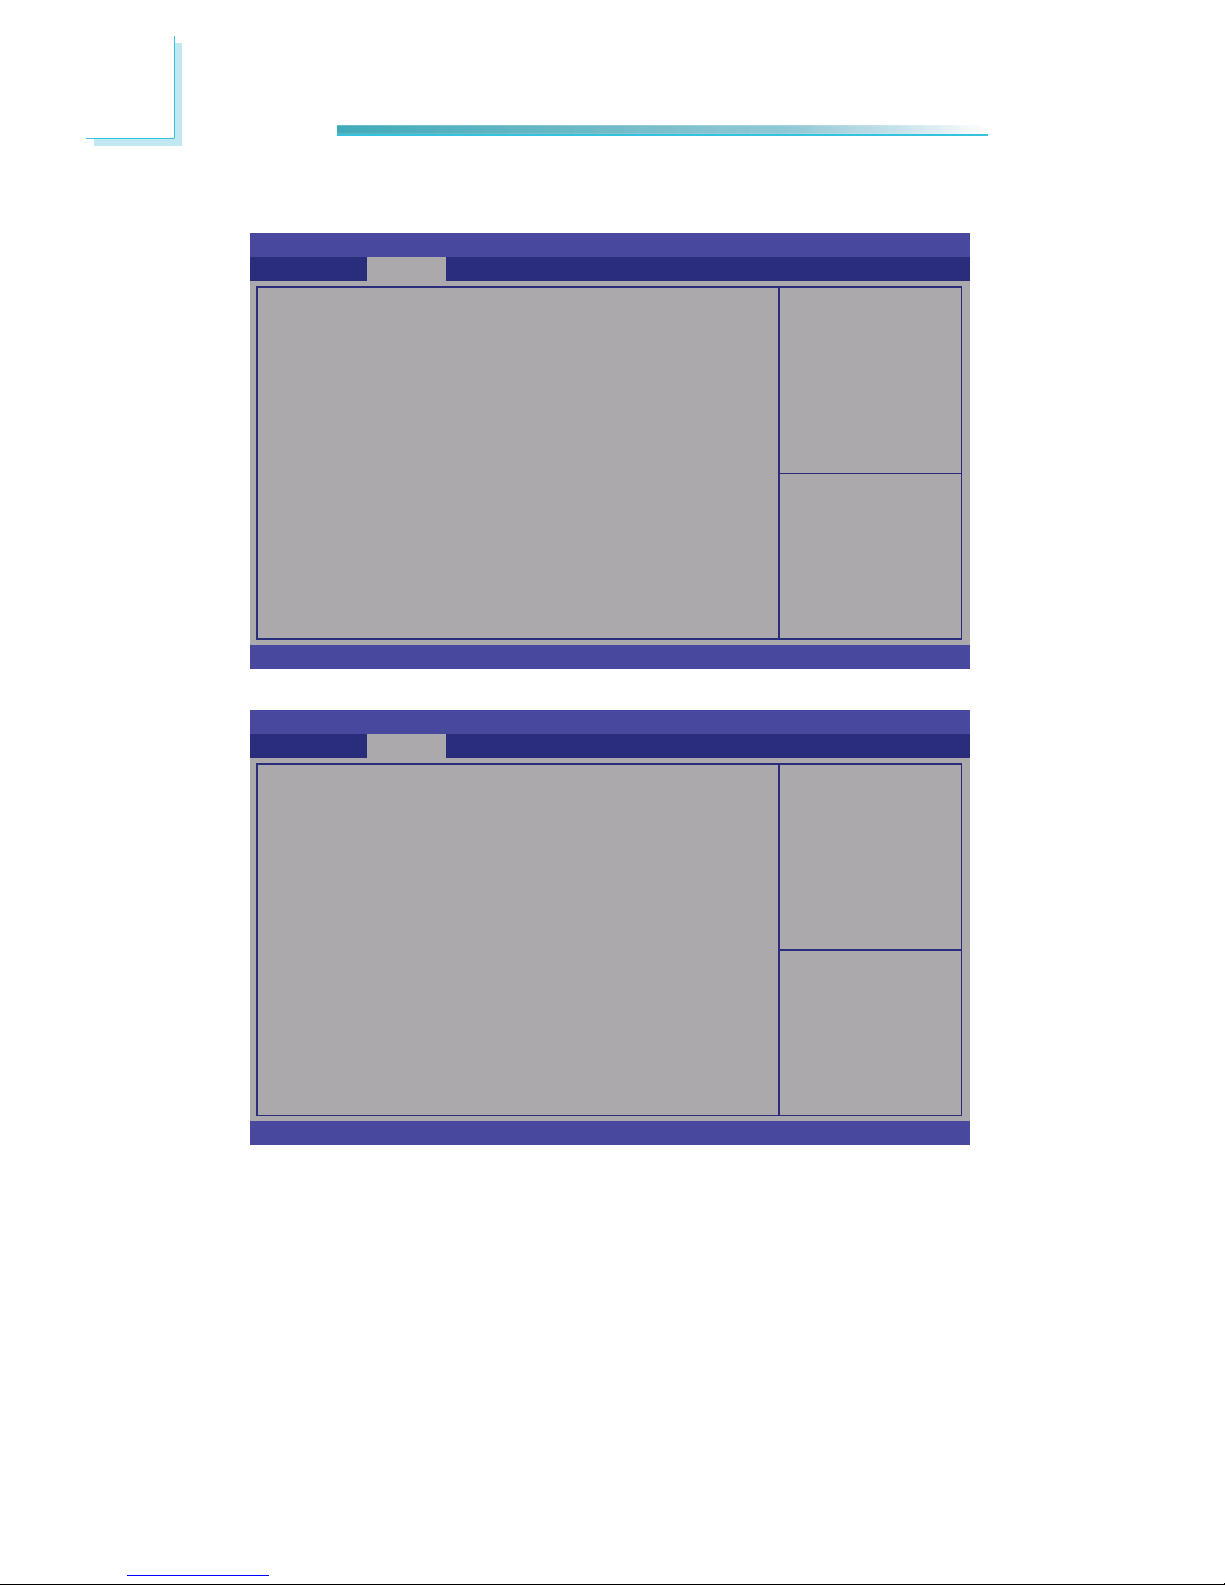
Serial Port 0 Confi guration
Serial Port
Device Settings
Change Settings
Advanced
[Enabled]
IO=3F8h; IRQ=4;
[Auto]
Serial Port 0 Confi guration to Serial Port 1 Confi guration
Select Screen
Select Item
Enter: Select
+/-: Change Opt.
F1: General Help
F2: Previous Values
F3: Optimized Defaults
F4: Save & Exit
ESC: Exit
Serial Port
Enables or disables the serial port.
Change Settings
Selects the IO/IRQ setting of the I/O device.
Enable or Disable Serial
Port (COM)
Aptio Setup Utility - Copyright (C) 2011 American Megatrends, Inc.
Version 2.11.1210. Copyright (C) 2011 American Megatrends, Inc.
Serial Port 1 Confi guration
Serial Port
Device Settings
Change Settings
Advanced
[Enabled]
IO=2F8h; IRQ=3;
[Auto]
Select Screen
Select Item
Enter: Select
+/-: Change Opt.
F1: General Help
F2: Previous Values
F3: Optimized Defaults
F4: Save & Exit
ESC: Exit
Page 69

69
3
BIOS Setup
PC Health Status
This section displays the SIO hardware health monitor.
Aptio Setup Utility - Copyright (C) 2011 American Megatrends, Inc.
Version 2.11.1210. Copyright (C) 2011 American Megatrends, Inc.
PC Health Status
SYSTIN temperature
CPUTIN temperature
CPU FAN Speed
System FAN1 Speed
System FAN2 Speed
CPUVCore
+5V
+3.3V
CPUVNB
VDIMM
+12V
3VSB
VBAT
Advanced
: +35 C
: +70 C
: N/A
: N/A
: N/A
: +1.328 V
: +4.704 V
: +3.344V
: +3.344 V
: +0.976 V
: +1.552 V
: +12.282 V
: +3.424 V
:+3.072 V
Select Screen
Select Item
Enter: Select
+/-: Change Opt.
F1: General Help
F2: Previous Values
F3: Optimized Defaults
F4: Save & Exit
ESC: Exit
Page 70

70
3
BIOS Setup
Chipset
Confi gures relevant chipset functions.
Aptio Setup Utility - Copyright (C) 2011 American Megatrends, Inc.
Version 2.11.1210. Copyright (C) 2011 American Megatrends, Inc.
North Bridge
South Bridge
Save & Exit
Advanced
Boot Security
Main
Chipset
North Bridge Parameters
Select Screen
Select Item
Enter: Select
+/-: Change Opt.
F1: General Help
F2: Previous Values
F3: Optimized Defaults
F4: Save & Exit
ESC: Exit
Page 71

71
3
BIOS Setup
North Bridge
GFX Confi guration
Aptio Setup Utility - Copyright (C) 2011 American Megatrends, Inc.
Version 2.11.1210. Copyright (C) 2011 American Megatrends, Inc.
North Bridge Confi guration
Memory Information
Memory Clock: 667 MHz
Total Memory: 2048 MB (DDR3)
GFX Confi guration
Memory Confi guration
Node 0 Information
Chipset
Select Screen
Select Item
Enter: Select
+/-: Change Opt.
F1: General Help
F2: Previous Values
F3: Optimized Defaults
F4: Save & Exit
ESC: Exit
Page 72

72
3
BIOS Setup
Select Primary Video
Device that BIOS will use
for output.
Aptio Setup Utility - Copyright (C) 2011 American Megatrends, Inc.
Version 2.11.1210. Copyright (C) 2011 American Megatrends, Inc.
GFX Confi guration
Primary Video Device
NB GPP Core Confi g
[IGD Video]
[GPP_CORE_x4x4]
GFX Confi guration
Select Screen
Select Item
Enter: Select
+/-: Change Opt.
F1: General Help
F2: Previous Values
F3: Optimized Defaults
F4: Save & Exit
ESC: Exit
Primary Video Device
Select Primary Video Device that BIOS will use for output.
NB GPP Core Confi g
Selects the NB GPP Core confi guration.
Chipset
Page 73
73
3
BIOS Setup
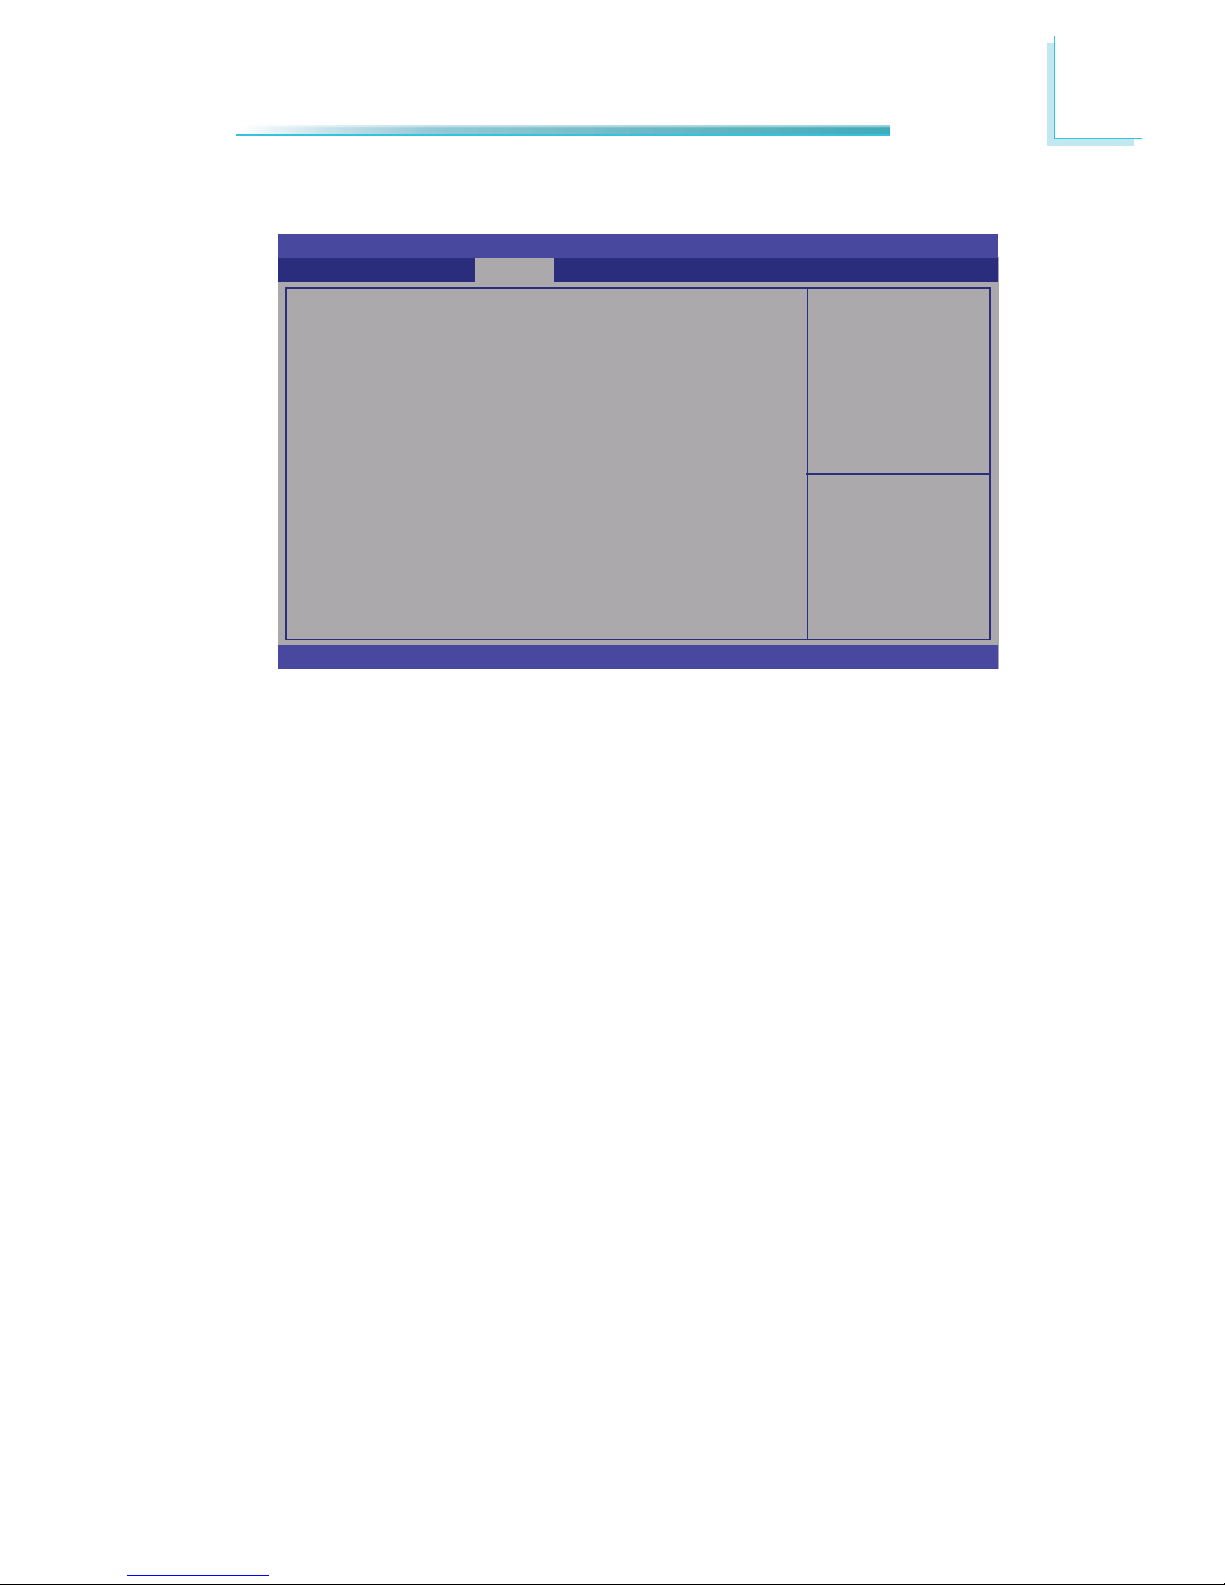
Enable Integrated Graphics controller.
Aptio Setup Utility - Copyright (C) 2011 American Megatrends, Inc.
Version 2.11.1210. Copyright (C) 2011 American Megatrends, Inc.
Memory Confi guration
Integrated Graphics
[Auto]
Memory Confi guration
Select Screen
Select Item
Enter: Select
+/-: Change Opt.
F1: General Help
F2: Previous Values
F3: Optimized Defaults
F4: Save & Exit
ESC: Exit
Chipset
Integrated Graphics
Enables Integrated Graphics controller.
Page 74

74
3
BIOS Setup
Aptio Setup Utility - Copyright (C) 2011 American Megatrends, Inc.
Version 2.11.1210. Copyright (C) 2011 American Megatrends, Inc.
Node 0 Information
Starting Address: 0 KB
Ending Address: 2097151 KB
Dimm0: Not Present
Dimm1: size=2048 MB, speed=1333 MHZ
Node 0 Information
Select Screen
Select Item
Enter: Select
+/-: Change Opt.
F1: General Help
F2: Previous Values
F3: Optimized Defaults
F4: Save & Exit
ESC: Exit
Chipset
Page 75

75
3
BIOS Setup
South Bridge
Options for SB USB
confi gurations.
Aptio Setup Utility - Copyright (C) 2011 American Megatrends, Inc.
Version 2.11.1210. Copyright (C) 2011 American Megatrends, Inc.
SB CIM Version:
SB USB Confi guration
SB HD Azalia Confi guration
1.1.1.2
Chipset
Select Screen
Select Item
Enter: Select
+/-: Change Opt.
F1: General Help
F2: Previous Values
F3: Optimized Defaults
F4: Save & Exit
ESC: Exit
Page 76

76
3
BIOS Setup
Aptio Setup Utility - Copyright (C) 2011 American Megatrends, Inc.
Version 2.11.1210. Copyright (C) 2011 American Megatrends, Inc.
USB PORT 0
USB PORT 1
USB PORT 2
USB PORT 3
SB USB Confi guration
USB Port 0 to USB Port 3
Enables or disables the selected USB port.
Chipset
[Enabled]
[Enabled]
[Enabled]
[Enabled]
Enable or Disable USB
Port 0
Select Screen
Select Item
Enter: Select
+/-: Change Opt.
F1: General Help
F2: Previous Values
F3: Optimized Defaults
F4: Save & Exit
ESC: Exit
Page 77

77
3
BIOS Setup
Aptio Setup Utility - Copyright (C) 2011 American Megatrends, Inc.
Version 2.11.1210. Copyright (C) 2011 American Megatrends, Inc.
HD Audio Azalia Device
SB HD Azalia Confi guration
HD Audio Azalia Device
Enables or Disables HD Audio Azalia Device.
Chipset
[Enabled]
Enable or Disable HD
Audio Azalia Device.
Select Screen
Select Item
Enter: Select
+/-: Change Opt.
F1: General Help
F2: Previous Values
F3: Optimized Defaults
F4: Save & Exit
ESC: Exit
Page 78
78
3
BIOS Setup
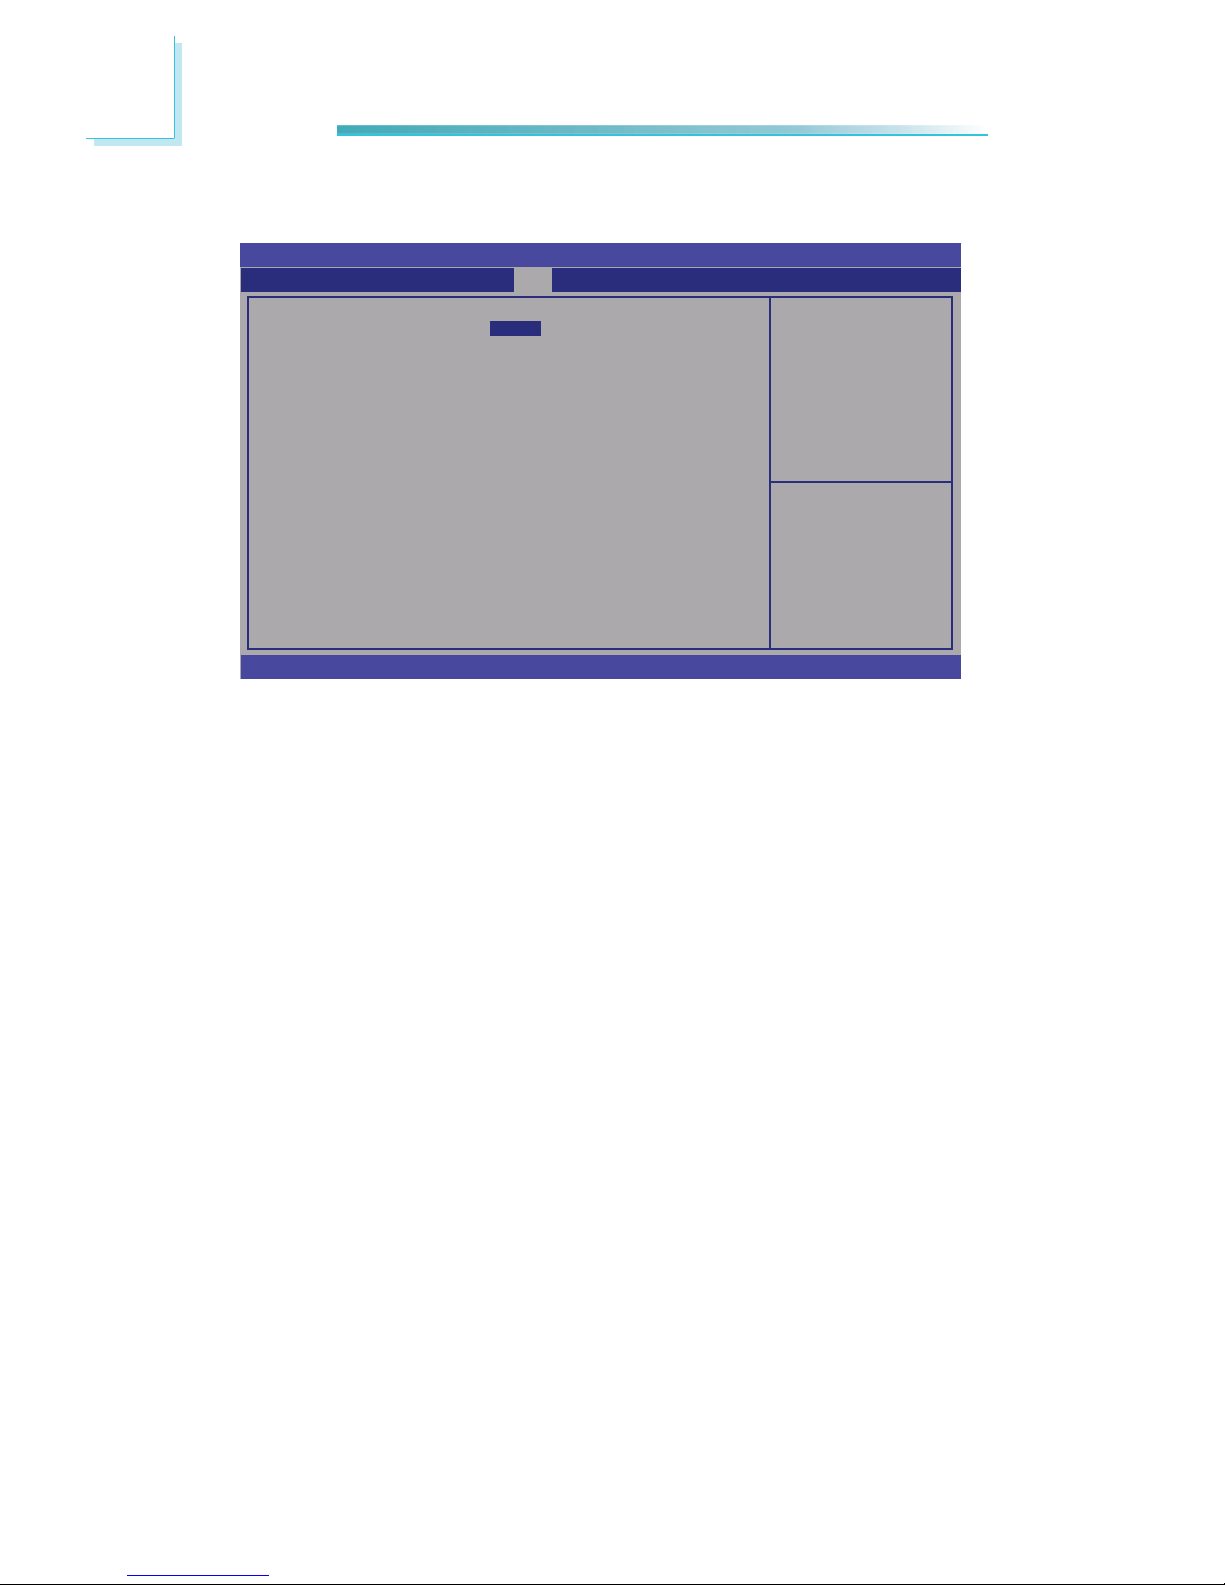
Setup Prompt Timeout
Selects the number of seconds to wait for the setup activation key.
65535(0xFFFF) denotes indefi nite waiting.
Bootup NumLock State
This allows you to determine the default state of the numeric keypad. By
default, the system boots up with NumLock on wherein the function of the
numeric keypad is the number keys. When set to Off, the function of the numeric keypad is the arrow keys.
Quiet Boot
Enables or disables the quiet boot function.
Fast Boot
Enables or disables boot with initialization of a minimal set of devices re
quired to launch active boot option. Has no effect for BBS boot options.
GateA20 Active
Upon Request- GA20 can be disabled using BIOS services.
Alwasy- Do not allow disabling GA20; this option is useful when any RT code
is executed above 1MB.
Boot
Number of seconds to
wait for setup activation
key.
65535(0xFFFF) means
indefi nite waiting.
Aptio Setup Utility - Copyright (C) 2011 American Megatrends, Inc.
Version 2.11.1210. Copyright (C) 2011 American Megatrends, Inc.
Boot Confi guration
Setup Prompt Timeout
Bootup NumLock State
Quiet Boot
Fast Boot
CSM16 Module Version
Gate A20 Active
Option ROM Messages
Interrupt 19 capture
CSM Support
Boot Option Priorities
Boot Option #1
Boot Option #2
Hard Drive BBS Priorities
USB device BBS Priorities
Save & ExitChipset
Advanced
Security
Main
Boot
Select Screen
Select Item
Enter: Select
+/-: Change Opt.
F1: General Help
F2: Previous Values
F3: Optimized Defaults
F4: Save & Exit
ESC: Exit
1
[On]
[Disabled]
[Disabled]
07.64
[Upon Request]
[Force BIOS]
[Enabled]
[Enabled]
[SATA PM: ST500DM0......]
[Generic Storage De......]
Page 79

79
3
BIOS Setup
Option ROM Messages
Set display mode for option ROM.
Interrupt 19 Capture
Enabled: Allows option ROMs to trap Int 19.
Disabled:
CSM Support
Enabled/ disabled CSM support. If auto is selected, based on OS, CSM will be
enabled/ disabled automatically.
Boot Option #1 and Boot Option #2
Selects the boot sequence of the device.
Page 80

80
3
BIOS Setup
Security
Set Setup Administrator
Password
Aptio Setup Utility - Copyright (C) 2011 American Megatrends, Inc.
Version 2.11.1210. Copyright (C) 2011 American Megatrends, Inc.
Password Description
If ONLY the Administrator’s password is set,
then this only limits access to Setup and is
only asked for when entering Setup.
If ONLY the User’s password is set, then this
is a power on password and must be entered to
boot or enter Setup. In Setup the User will
have Administrator rights.
The password length must be
in the following range:
Minimun length
Maximun length
Administrator Password
User Password
HDD Security Confi guration:
HDD 0: ST500DM002-1
Save & ExitChipset
Advanced
Main
Boot Security
Select Screen
Select Item
Enter: Select
+/-: Change Opt.
F1: General Help
F2: Previous Values
F3: Optimized Defaults
F4: Save & Exit
ESC: Exit
Administrator Password
Sets the administrator password.
User Password
Sets the user password.
3
20
Page 81

81
3
BIOS Setup
Save & Exit
Reset the system after
saving the changes.
Aptio Setup Utility - Copyright (C) 2011 American Megatrends, Inc.
Version 2.11.1210. Copyright (C) 2011 American Megatrends, Inc.
Save Changes and Reset
Discard Changes and Reset
Save Options
Save Changes
Discard Changes
Restore Defaults
Save as User Defaults
Restore User Defaults
Boot Override
Generic Storage Device 9454
Launch EFI Shell from fi le system device
Chipset
Advanced
Main
Boot Security Save & Exit
Select Screen
Select Item
Enter: Select
+/-: Change Opt.
F1: General Help
F2: Previous Values
F3: Optimized Defaults
F4: Save & Exit
ESC: Exit
Save Changes and Reset
To save the changes, select this fi eld and then press <Enter>. A dialog box
will appear. Select Yes to reset the system after saving all changes made.
Discard Changes and Reset
To discard the changes, select this fi eld and then press <Enter>. A dialog box
will appear. Select Yes to reset the system setup without saving any changes.
Restore Defaults
To restore and load the optimized default values, select this fi eld and then
press <Enter>. A dialog box will appear. Select Yes to restore the default values of all the setup options.
Save as User Defaults
To save changes done so far as user default, select this fi eld and then press
<Enter>. A dialog box will appear. Select Yes to save values as user default.
Restore User Defaults
To restore user default to all the setup options, select this fi eld and then
press <Enter>. A dialog box will appear. Select Yes to restore user default.
Page 82

82
3
BIOS Setup
Updating the BIOS
To update the BIOS, you will need the new BIOS fi le and a fl ash utility, AFUDOS.
EXE. Please contact technical support or your sales representative for the fi les.
To execute the utility, type:
A:> AFUDOS BIOS_File_Name /b /p /n
then press <Enter>.
C:\AFU\AFUDOS>afudos fi lename /B /P /N
+--------------------------------------------------------------------------------------------------------+
AMI Firmware Update Utility(APTIO) v2.25
Copyright (C)2008 American Megatrends Inc. All Rights Reserved.
+--------------------------------------------------------------------------------------------------------+
|
|
|
|
Reading fi le ..............................
Erasing fl ash .............................
Writing fl ash .............................
Verifying fl ash ..........................
Erasing BootBlock ....................
Writing BootBlock ....................
Verifying BootBlock .................
C:\AFU\AFUDOS>
done
done
done
done
done
done
done
Page 83
83
8
Supported Software
Chapter 8 - Supported Software
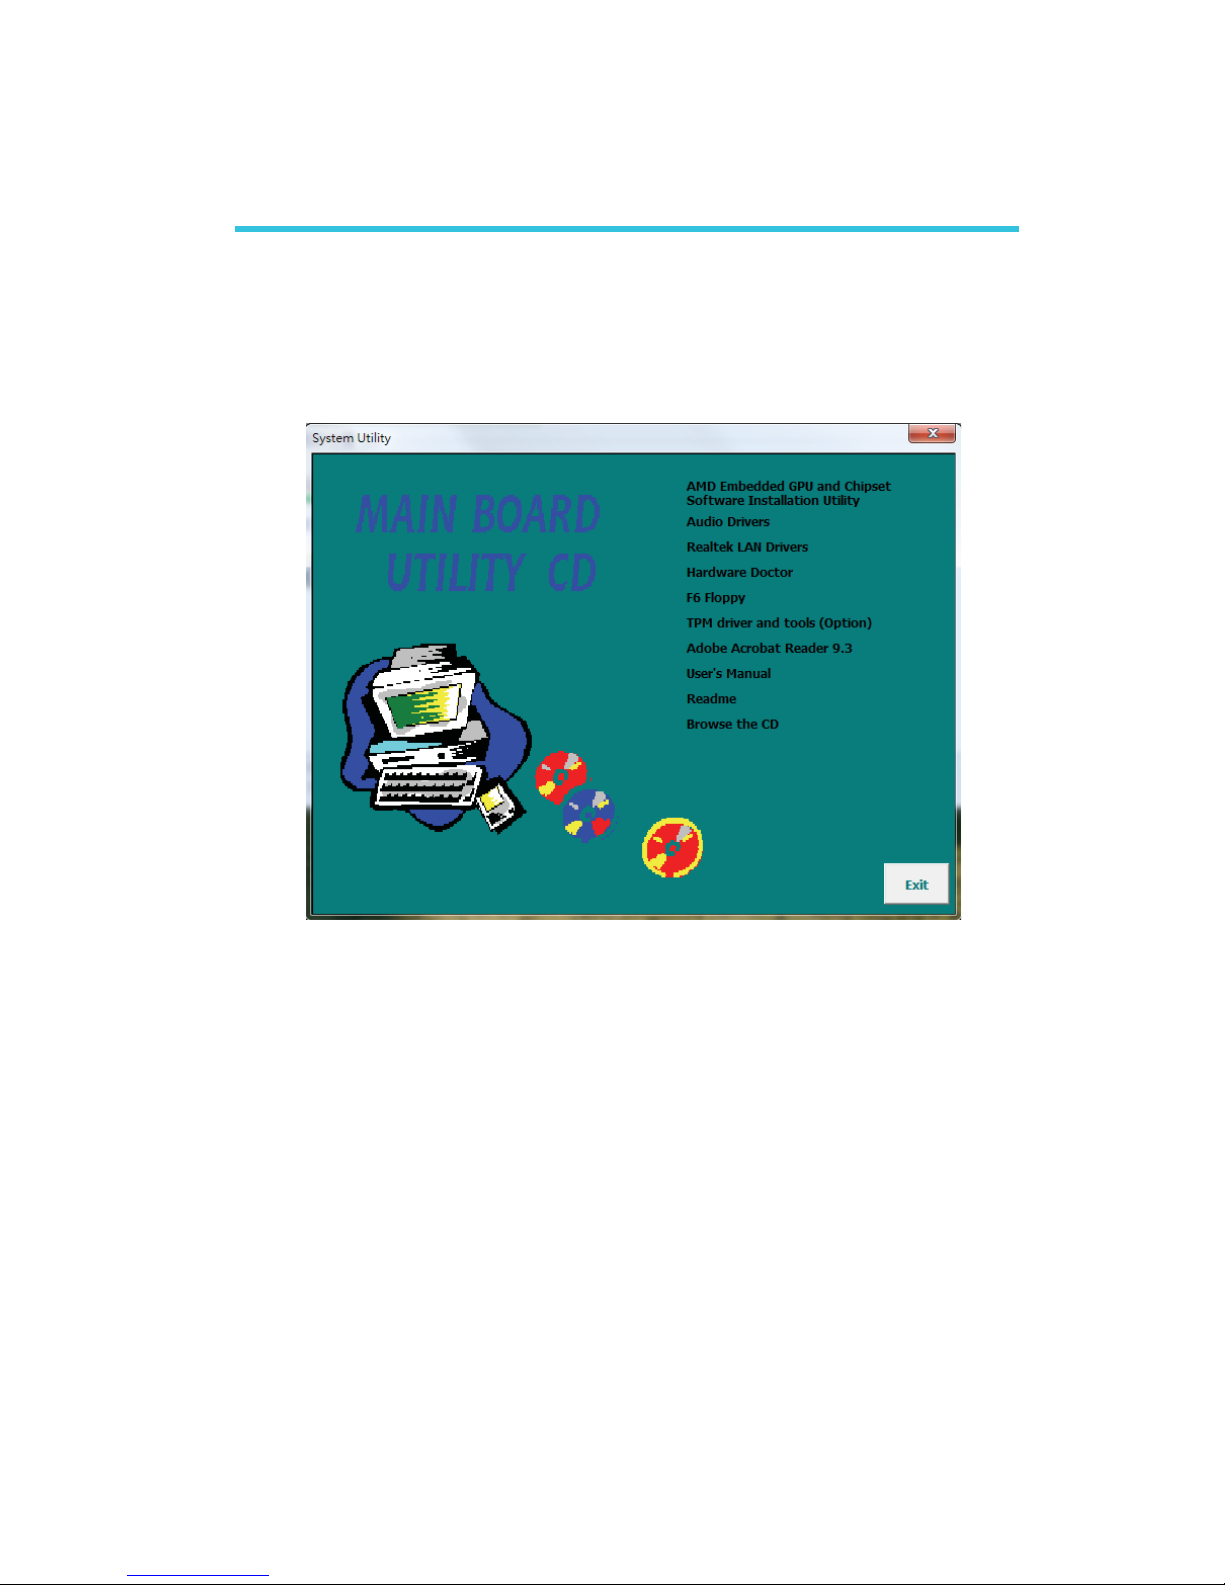
The CD that came with the board contains drivers, utilities and software applications required to enhance the performance of the system board. Insert the CD
into a CD-ROM drive. The autorun screen (Mainboard Utility CD) will appear. If
after inserting the CD, “Autorun” did not automatically start, please go directly to
the root directory of the CD and double-click “Setup”.
Page 84
84
8
Supported Software
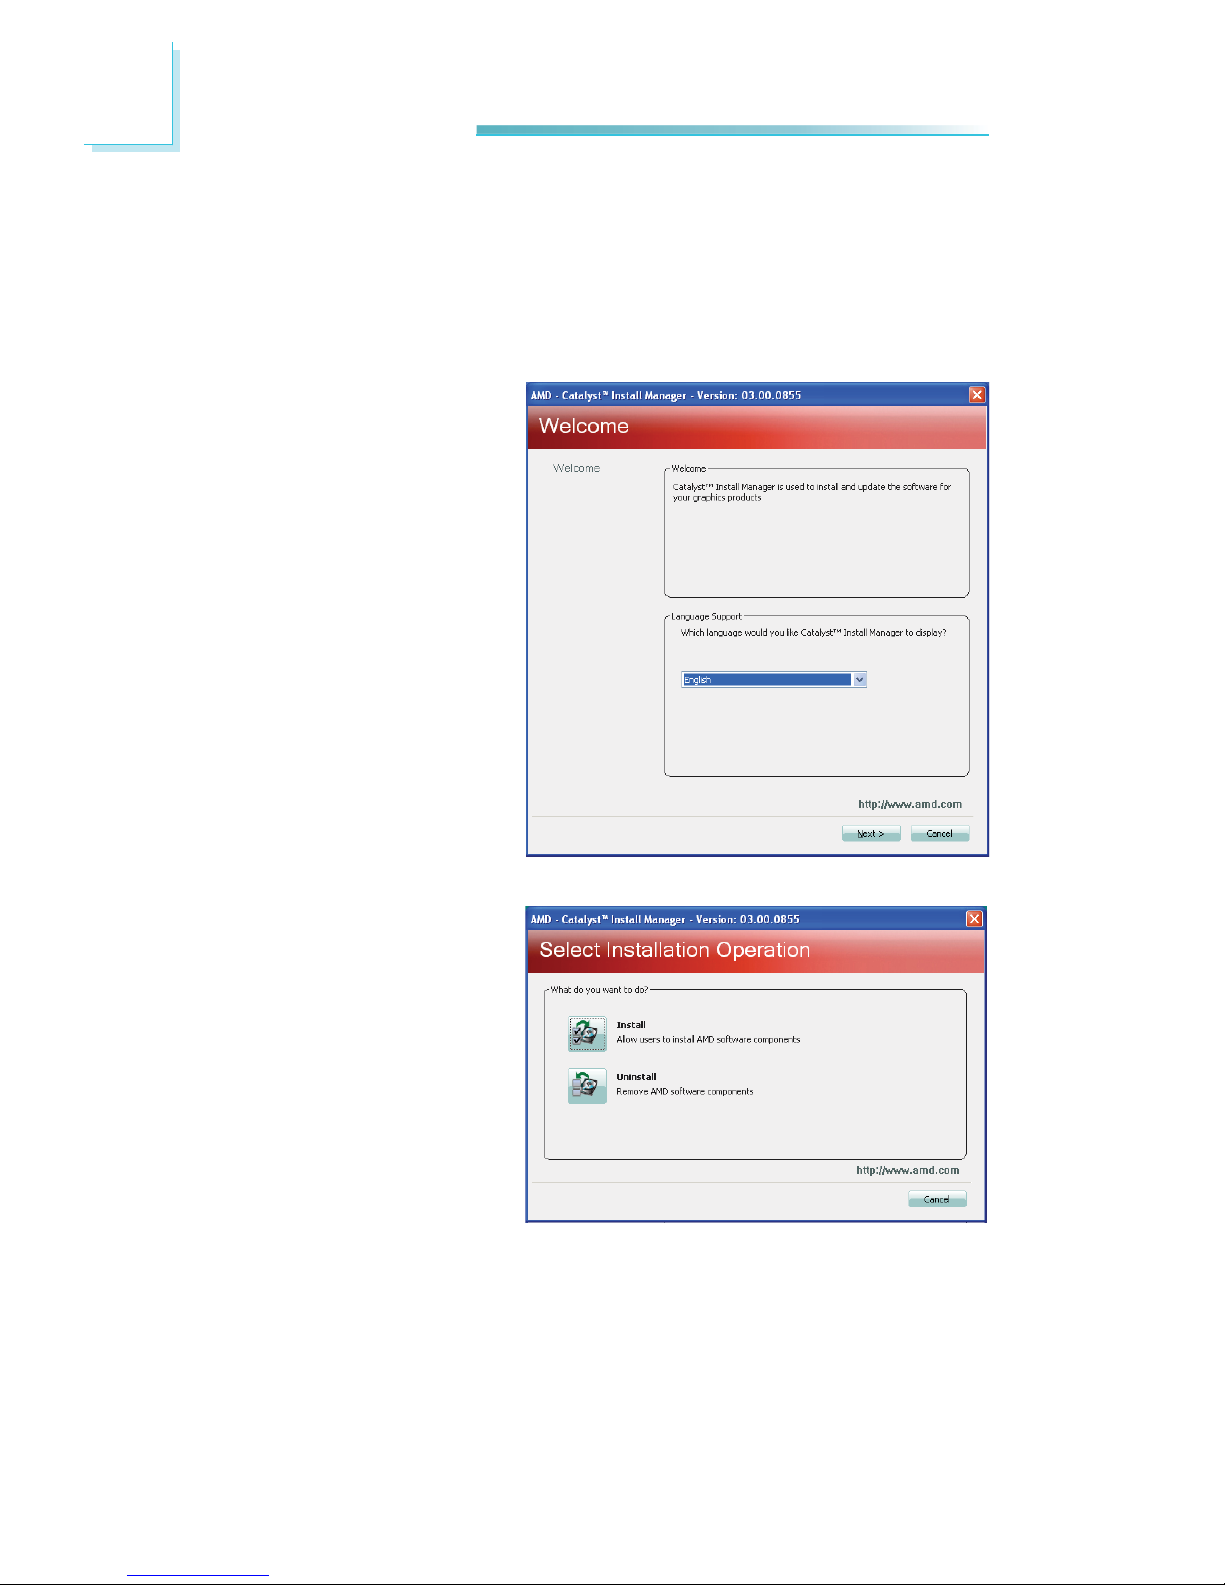
AMD Embedded GPU and Chipset Software
Installation Utility
To install the driver, click “AMD Embedded GPU and Chipset Software Installation
Utility” on the main menu.
2. Click Install to begin the
installation.
1. Under the Language Support section, select the
language you would like
the installation to display
and then click Next..
Page 85
85
8
Supported Software
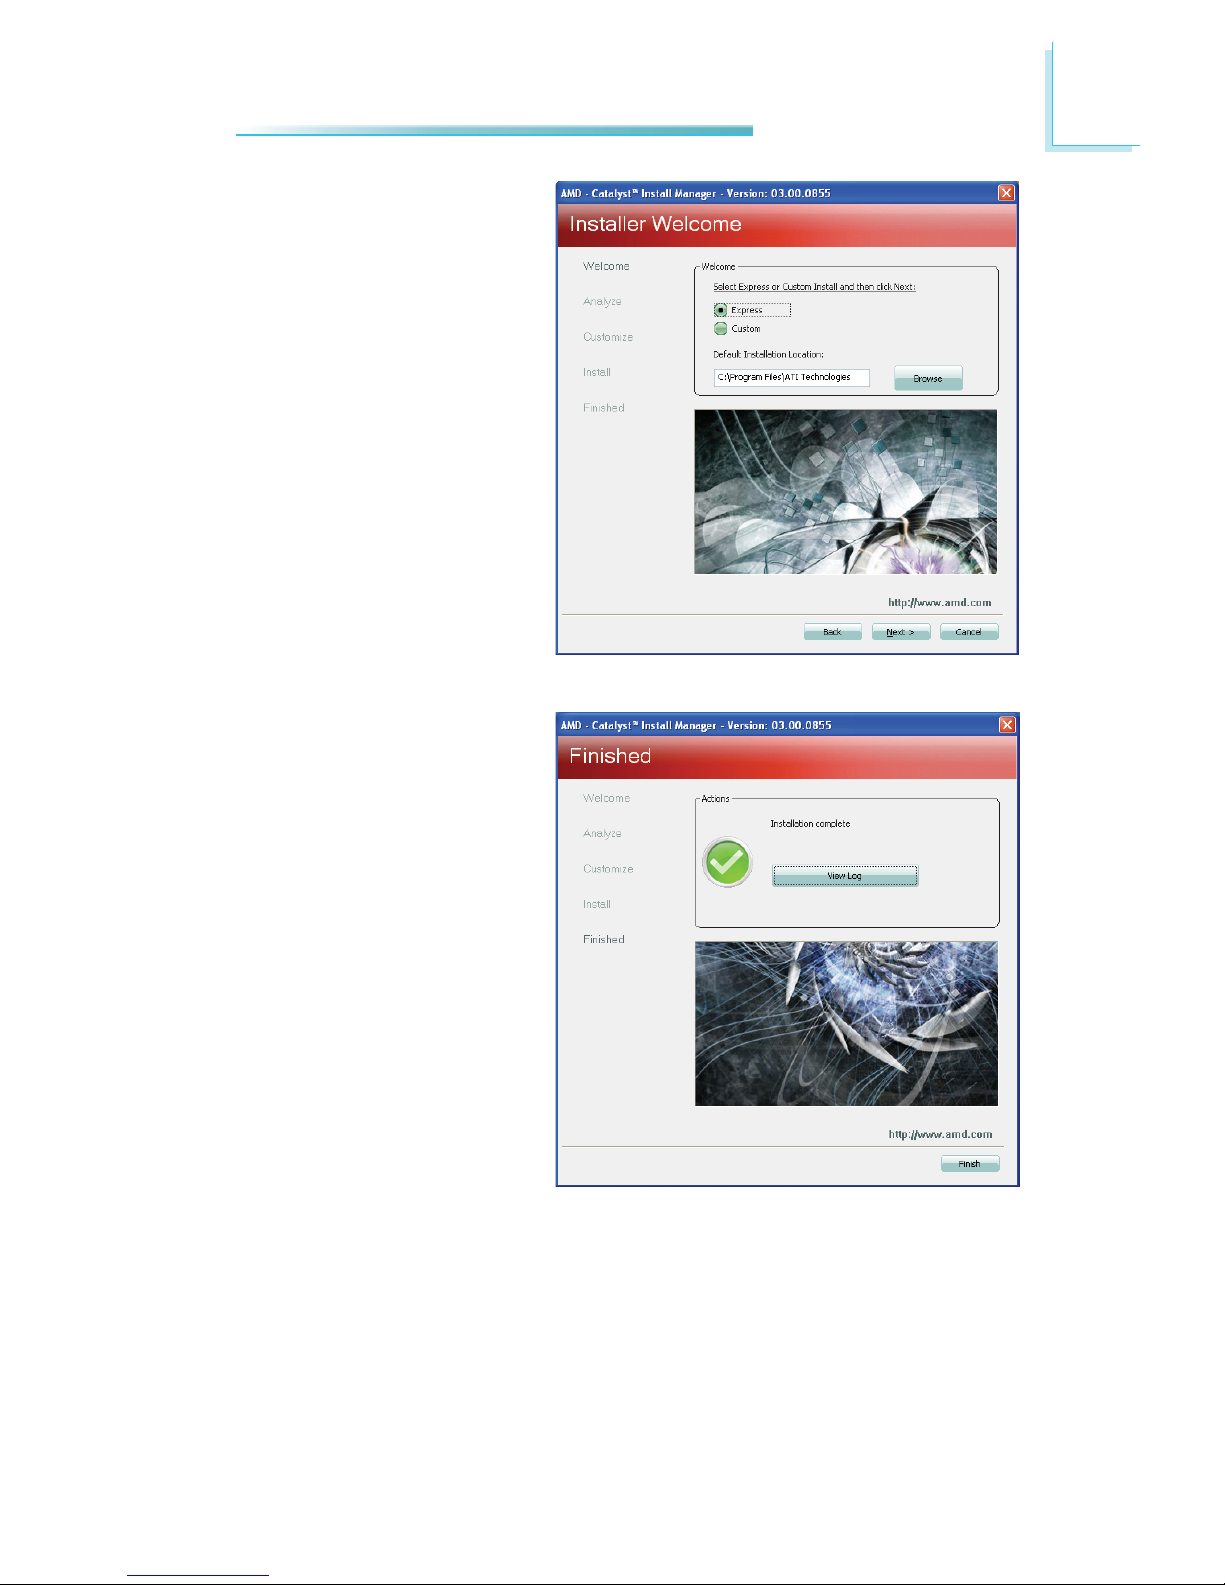
4. After completing installation, click Finish.
3. Click Express and then click
Next.
Page 86
86
8
Supported Software
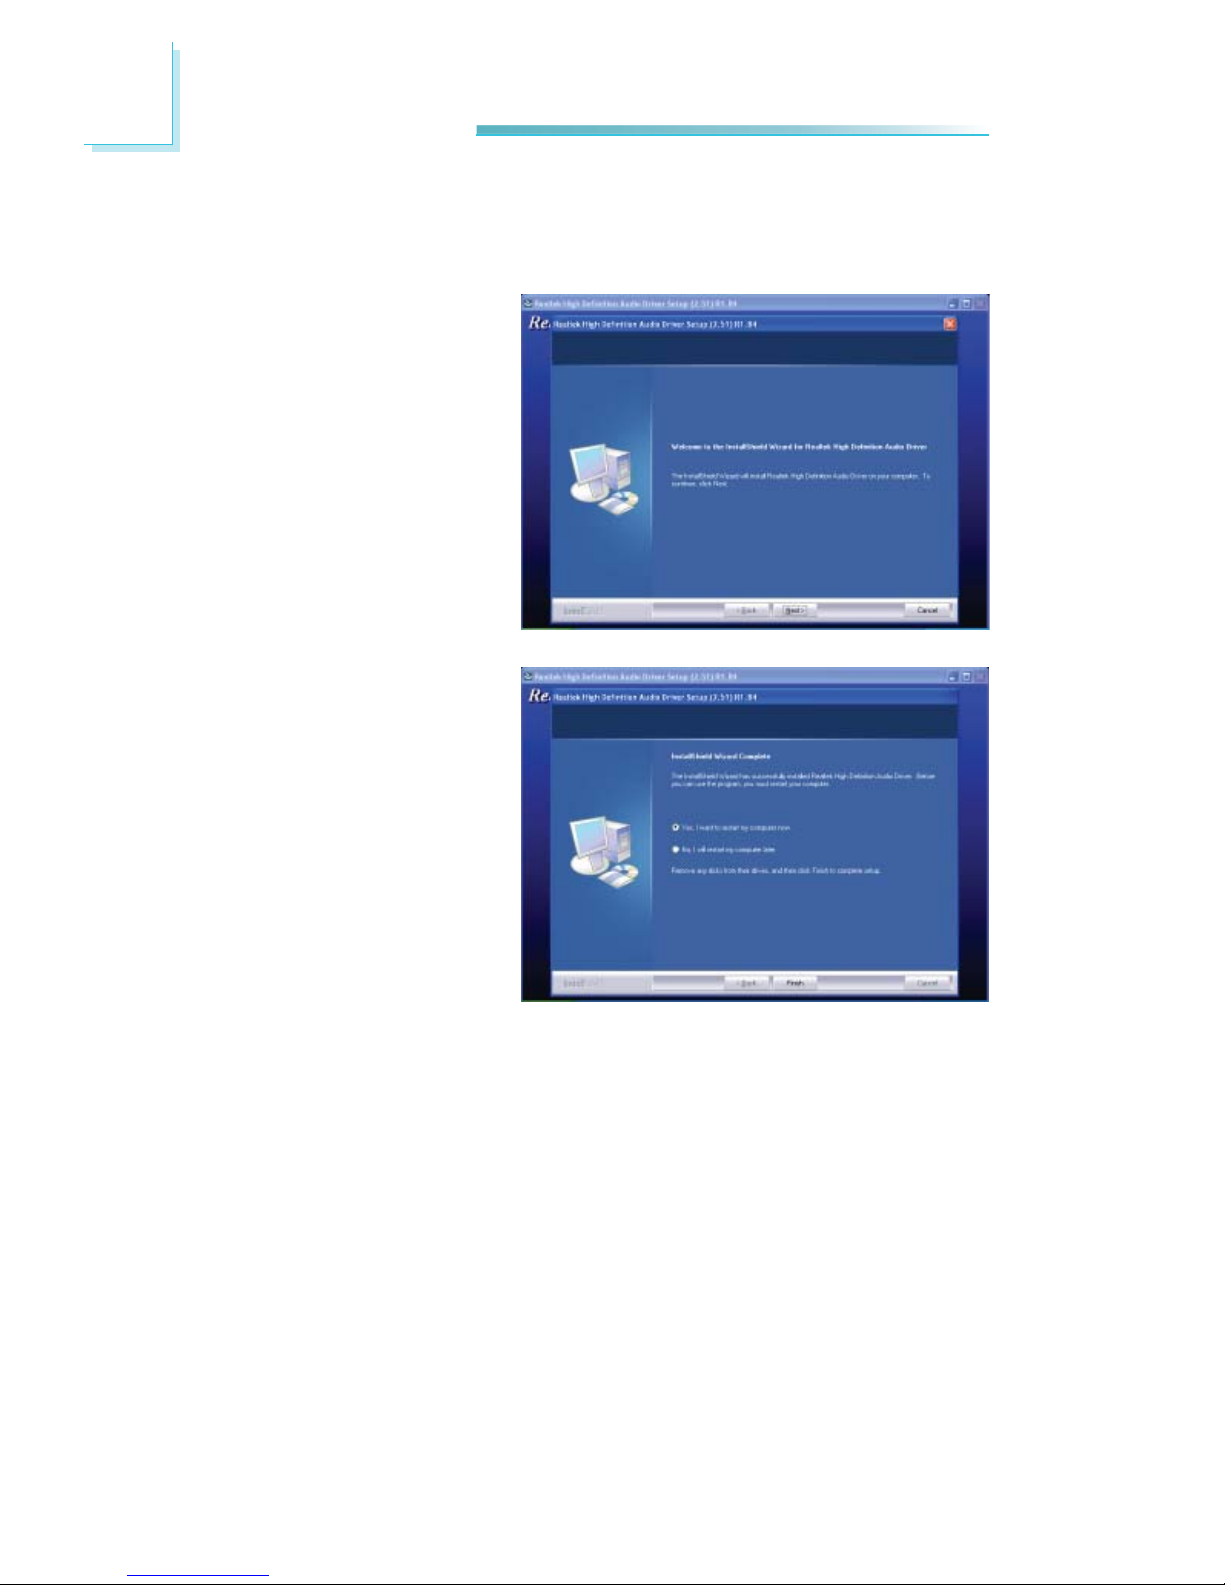
Audio Drivers
To install the driver, click “Audio Drivers” on the main menu.
1. Setup is now ready to install the audio driver. Click
Next.
2. Follow the remainder of the
steps on the screen; clicking “Next” each time you
fi nish a step.
3. Click “Yes, I want to restart
my computer now” then
click Finish.
Restarting the system will
allow the new software installation to take effect.
Page 87
87
8
Supported Software
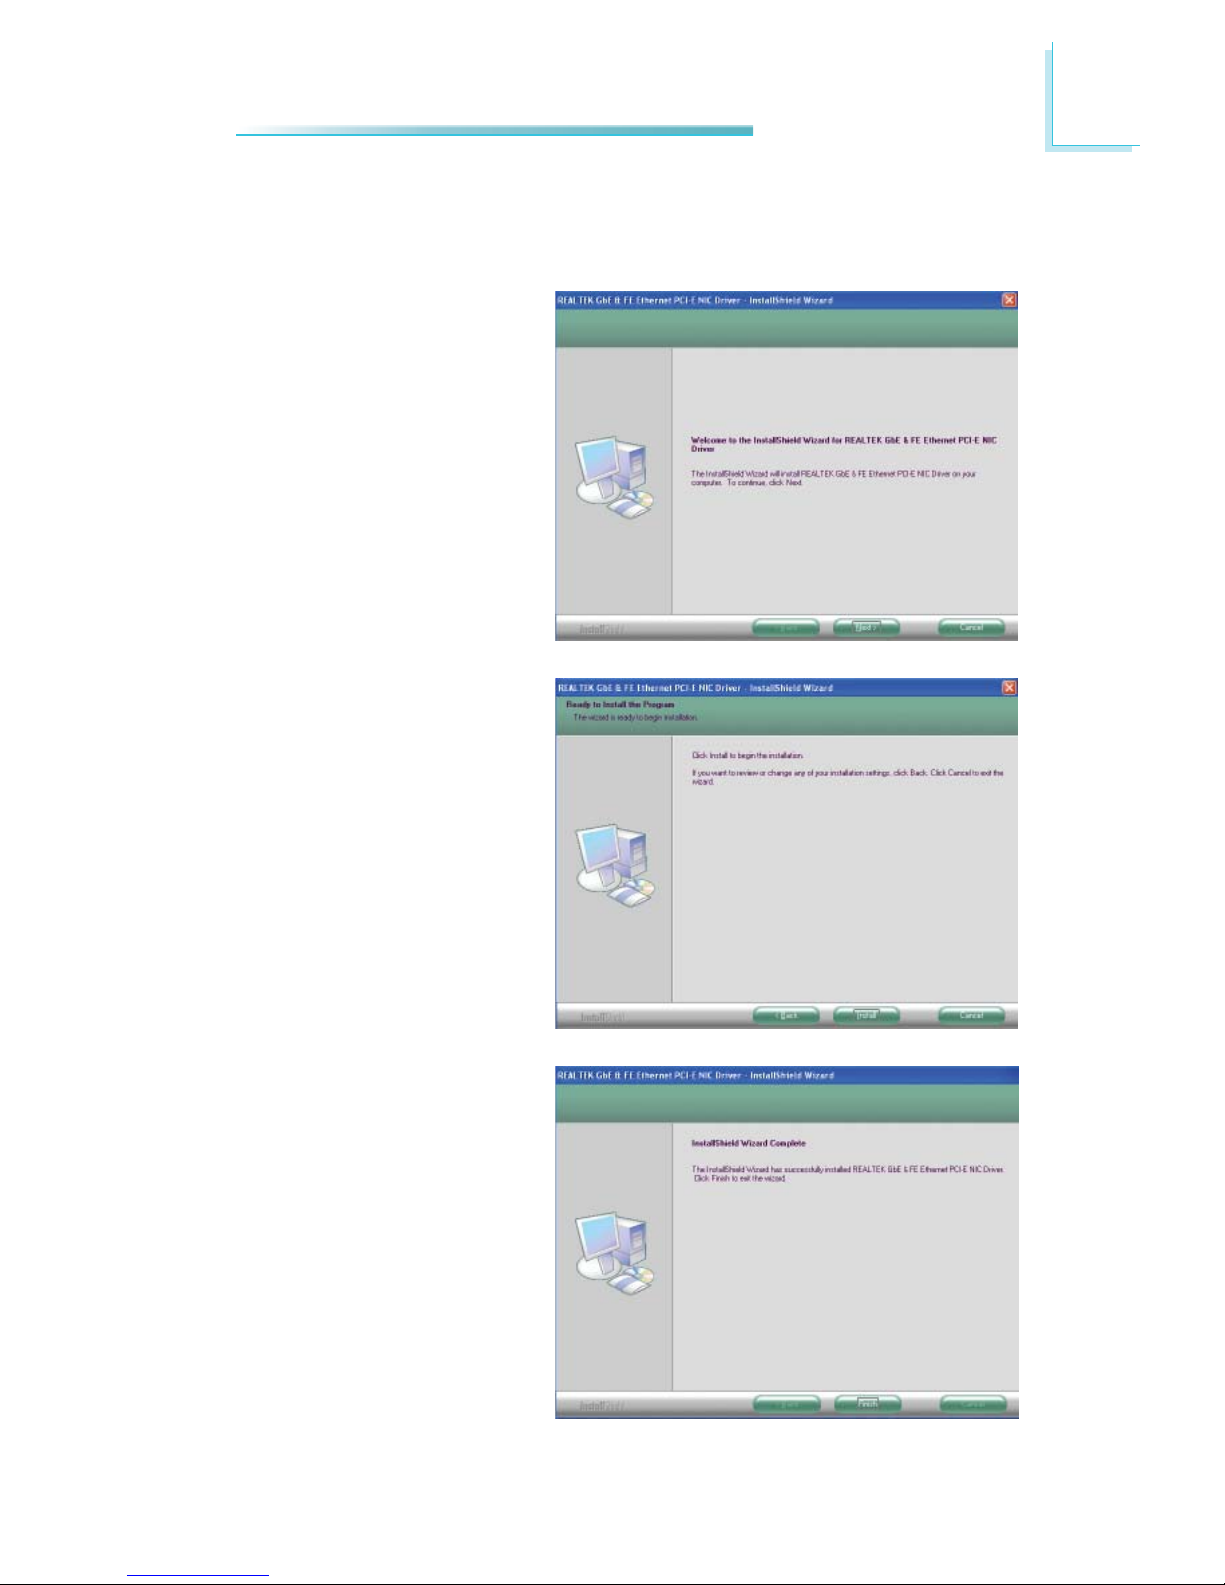
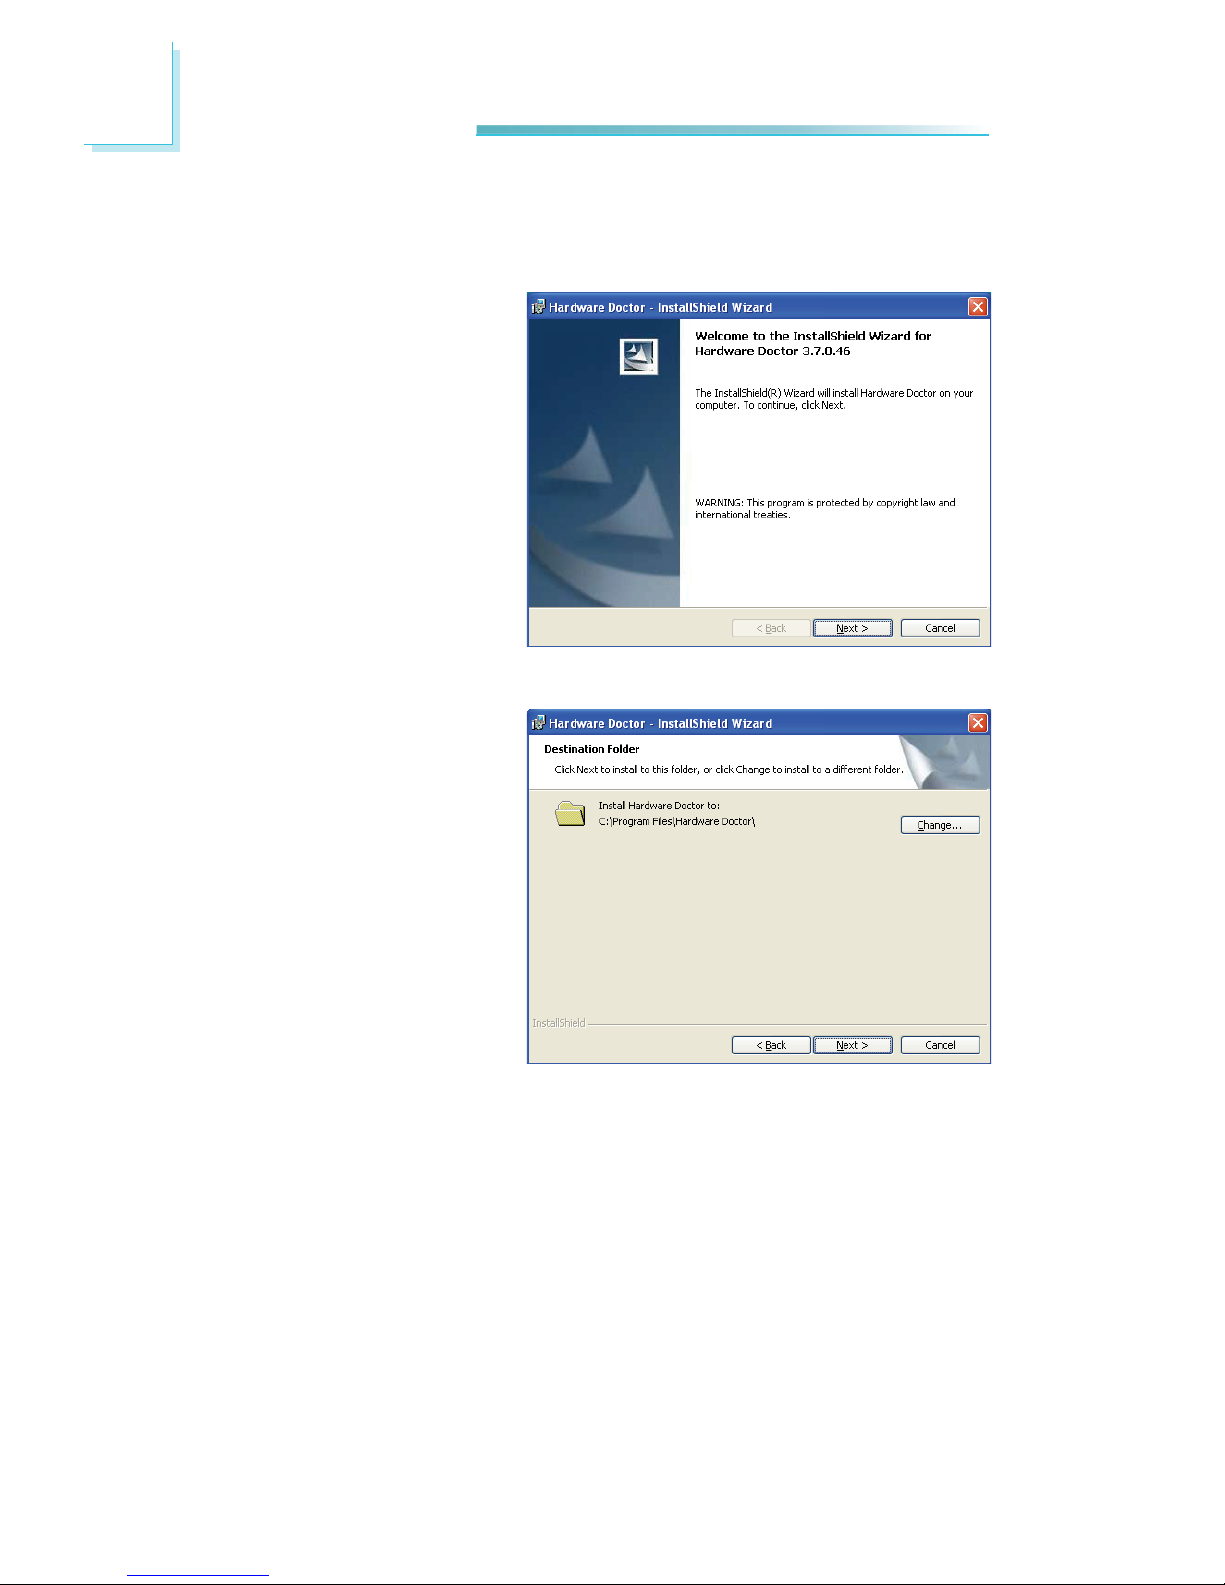
Realtek LAN Drivers
To install the driver, click “Realtek LAN Drivers” on the main menu.
2. Click Install to begin the
installation.
3. After completing installation, click Finish.
1. Setup is ready to install the
driver. Click Next.
Page 88
88
8
Supported Software
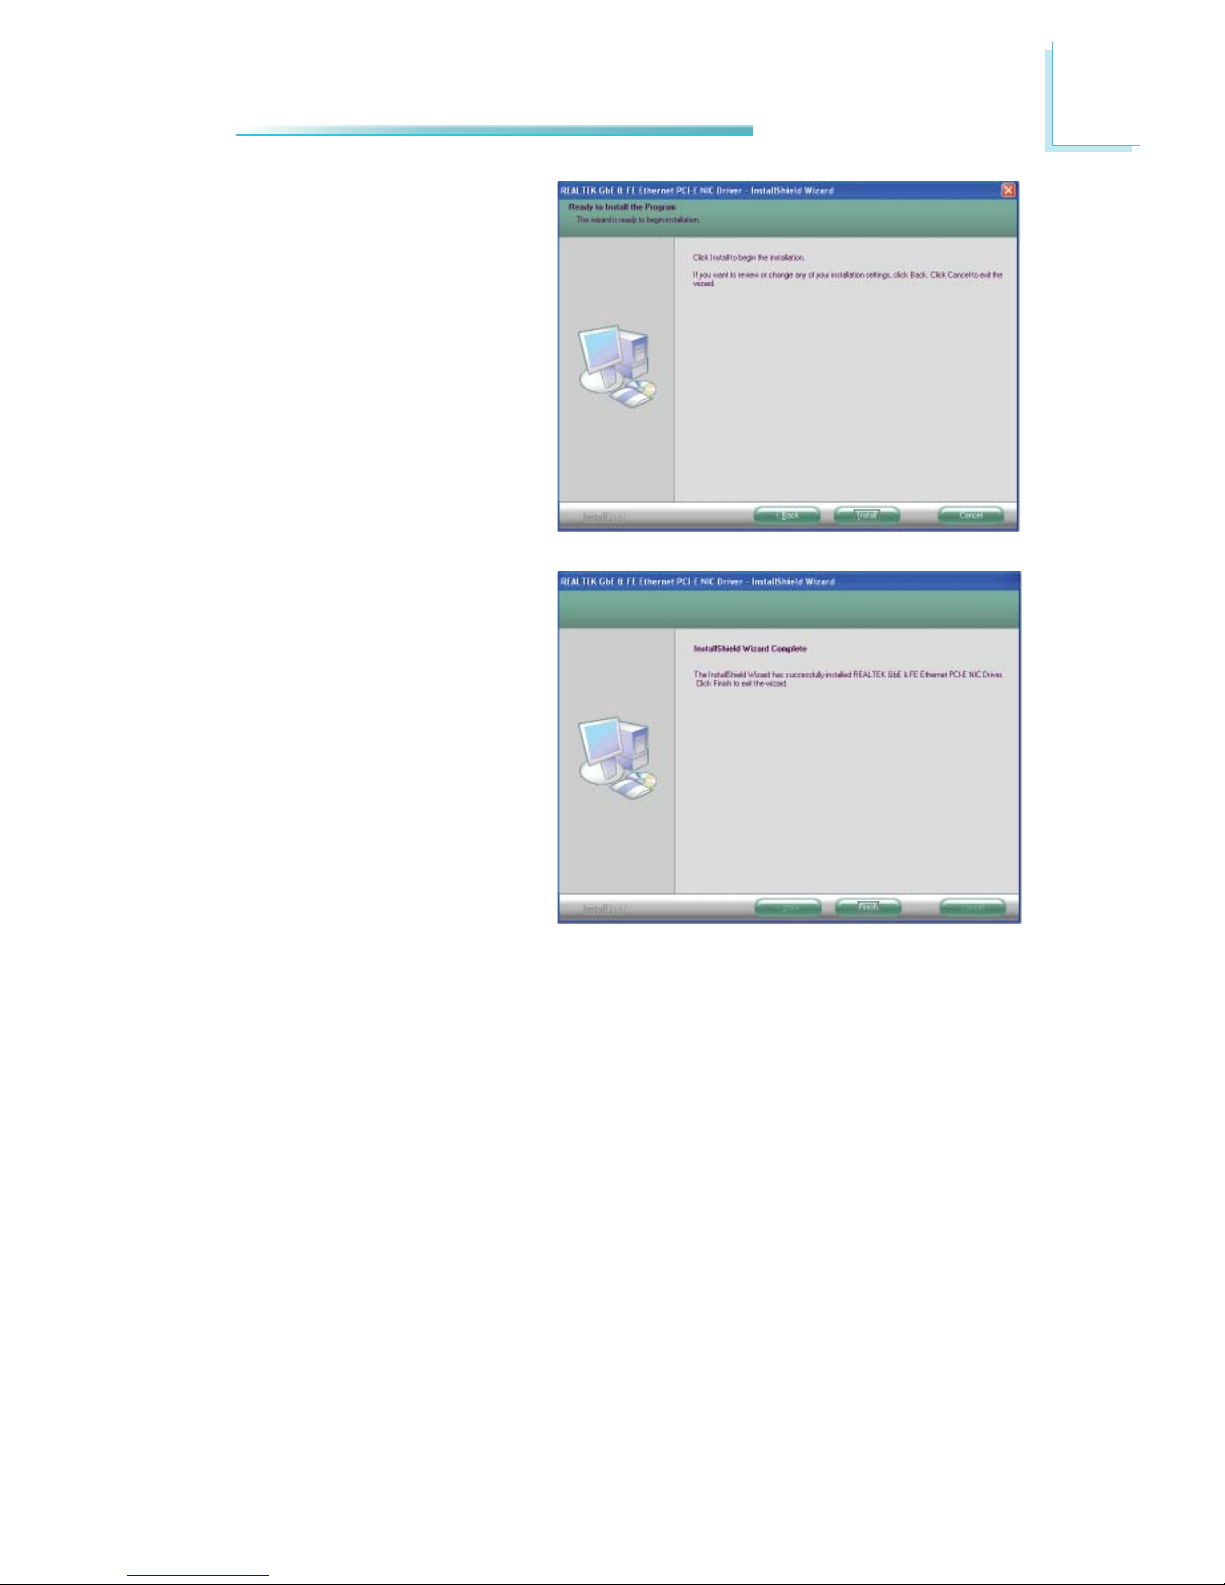
Hardware Doctor
To install the driver, click “Hardware Doctor” on the main menu.
1. Setup is ready to install the
driver. Click Next.
2. Click Next to install to this
folder, or click Change to
install to a different folder.
Page 89
89
8
Supported Software
3. Click Install to begin the
installation.
4. After completing installation, click Finish.
Page 90

90
8
Supported Software
F6 Floppy Configuration Utility
This is used to create a fl oppy driver diskette needed when you install Windows®
XP using the F6 installation method. This will allow you to install the operating
system onto a hard drive when in AHCI mode.
1. Insert a blank fl oppy diskette.
2. Locate for the drivers in the CD then copy them to the fl oppy diskette. The
CD includes drivers for both 32-bit and 64-bit operating systems. The path to
the drivers are shown below.
32-bit
CD Drive:\AHCI_RAID\F6FLOPPY\f6fl py32
64-bit
CD Drive:\AHCI_RAID\F6FLOPPY\f6fl py64
Page 91
91
8
Supported Software
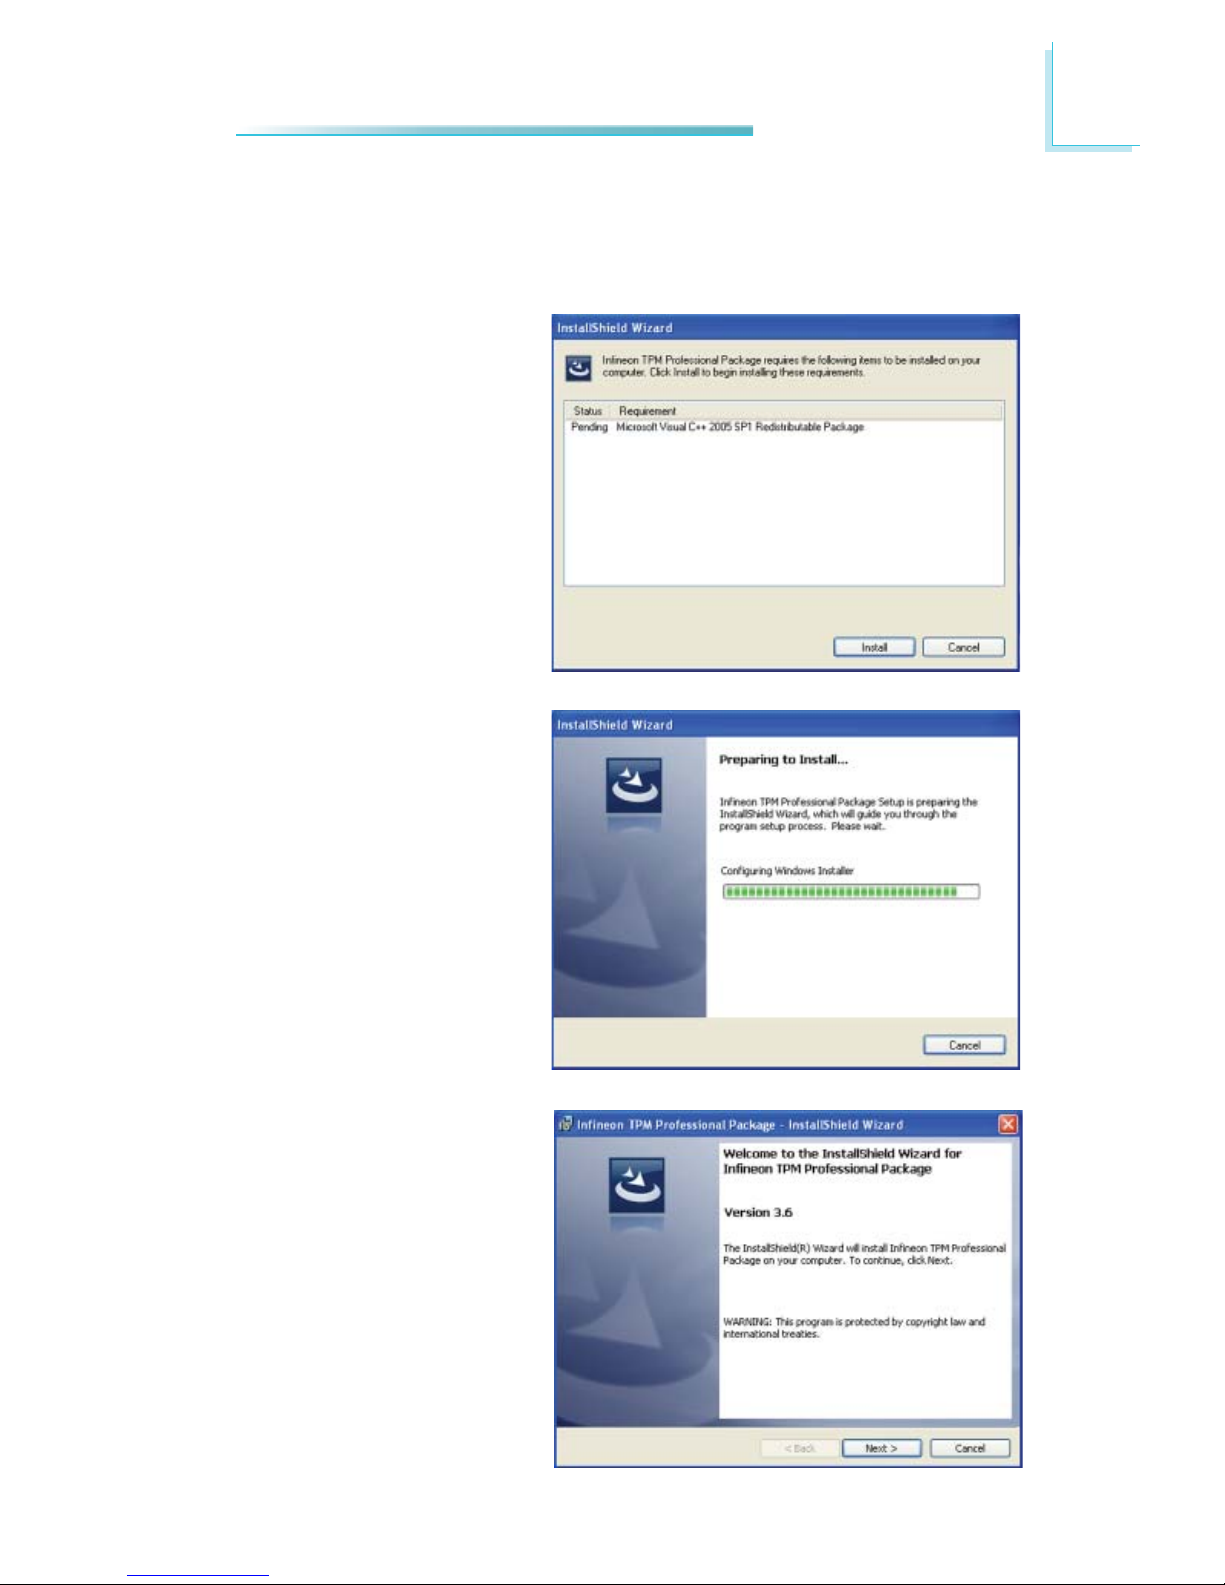
Intel TPM Driver and Tool (option)
To install the driver, click “Infi neon TPM driver and tool (option)” on the main
menu.
1. TPM requires installing the
Microsoft Visual C++ package prior to installing the
driver. Click Install.
2. The setup program is preparing to install the driver.
3. The setup program is ready
to install the driver. Click
Next.
Page 92
92
8
Supported Software
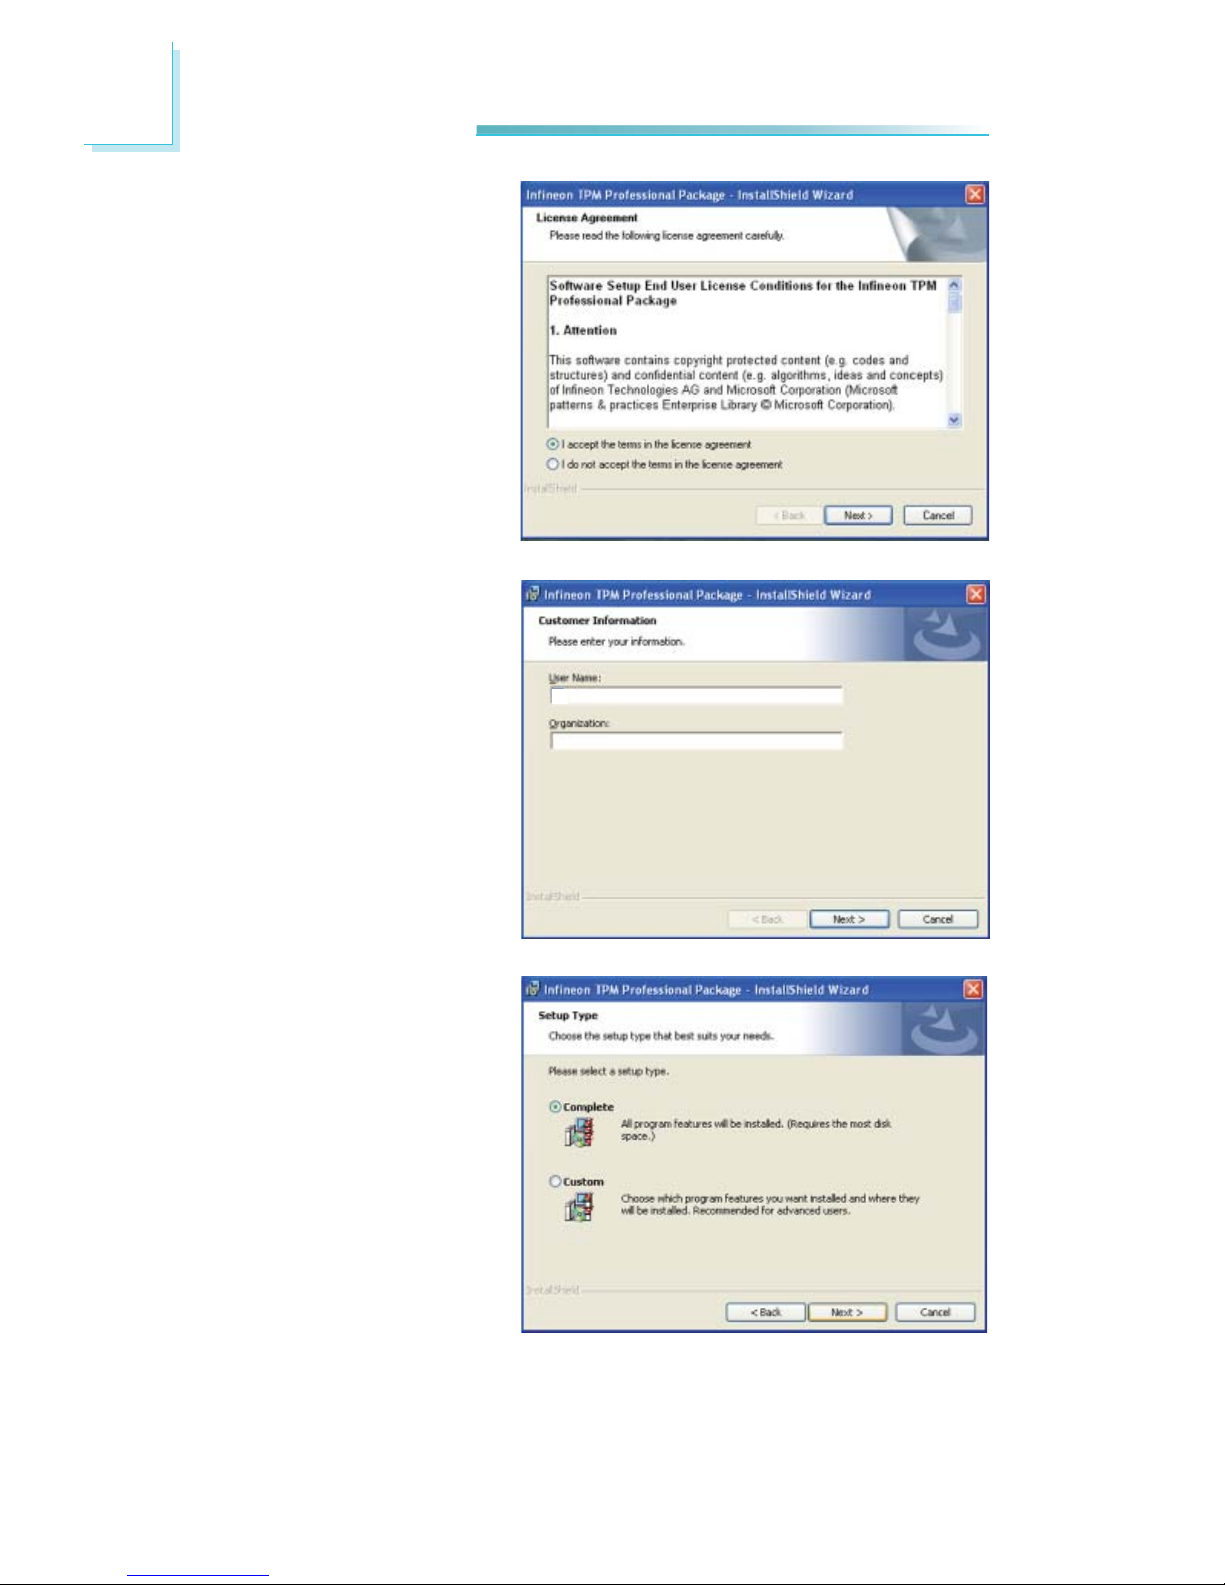
4. Click “I accept the terms in
the license agreement” and
then click “Next”.
5. Enter the necessary information and then click Next.
6. Select a setup type and
then click Next.
Page 93
93
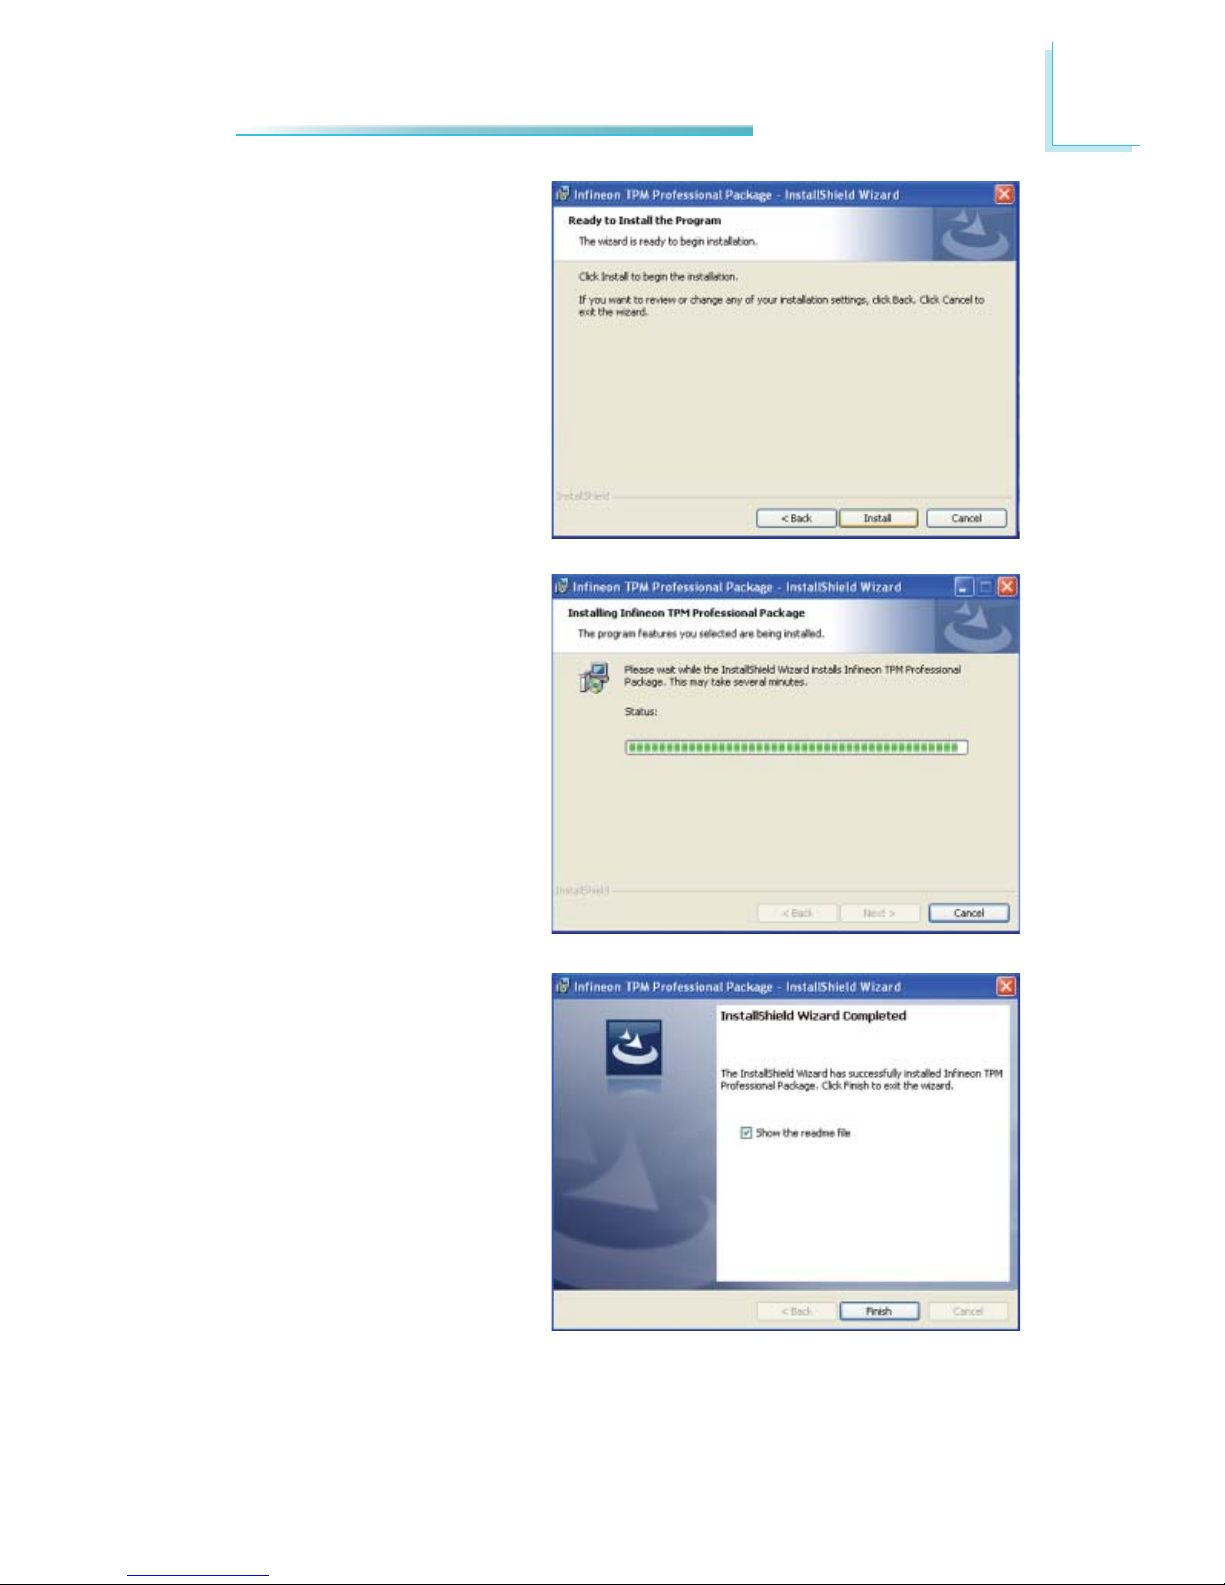
8
Supported Software
7. Click Install.
8. The setup program is currently installing the driver.
9. Click Finish.
Page 94
94
8
Supported Software
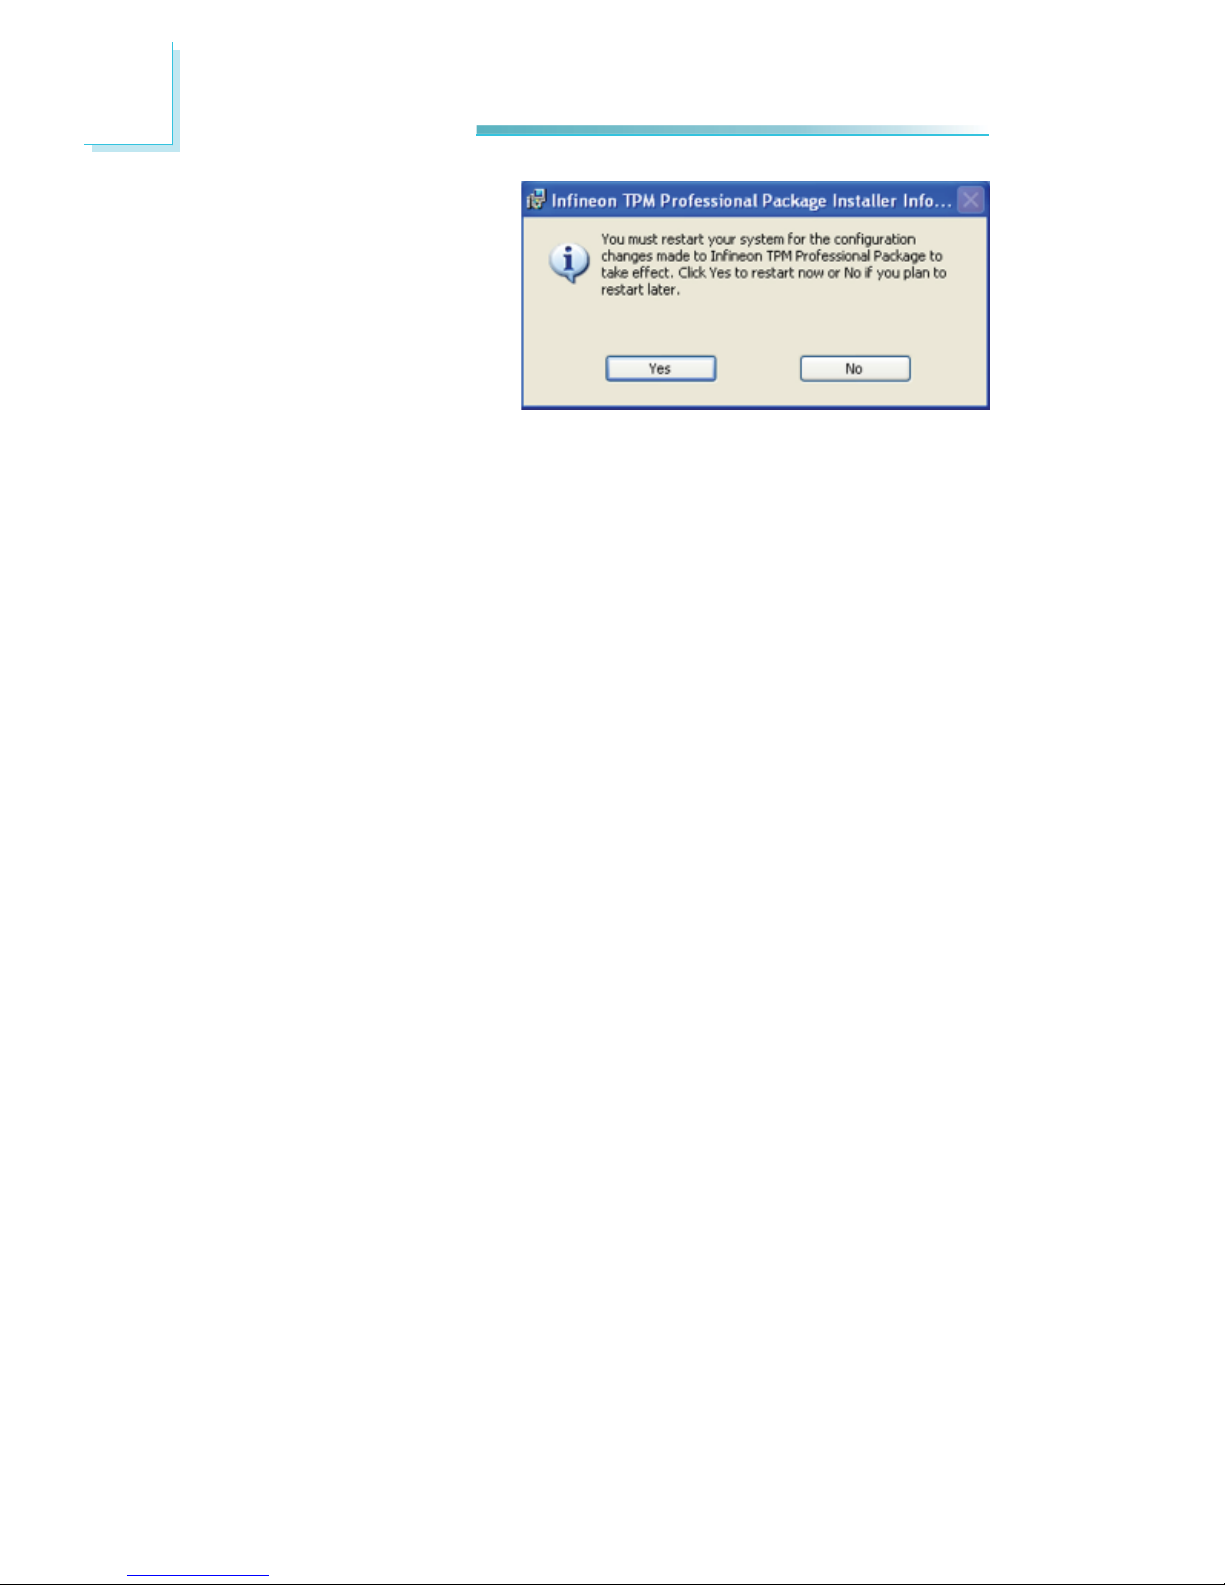
10. Click Yes to restart the
system.
Restarting the system will
allow the new software
installation to take effect.
Page 95
95
8
Supported Software
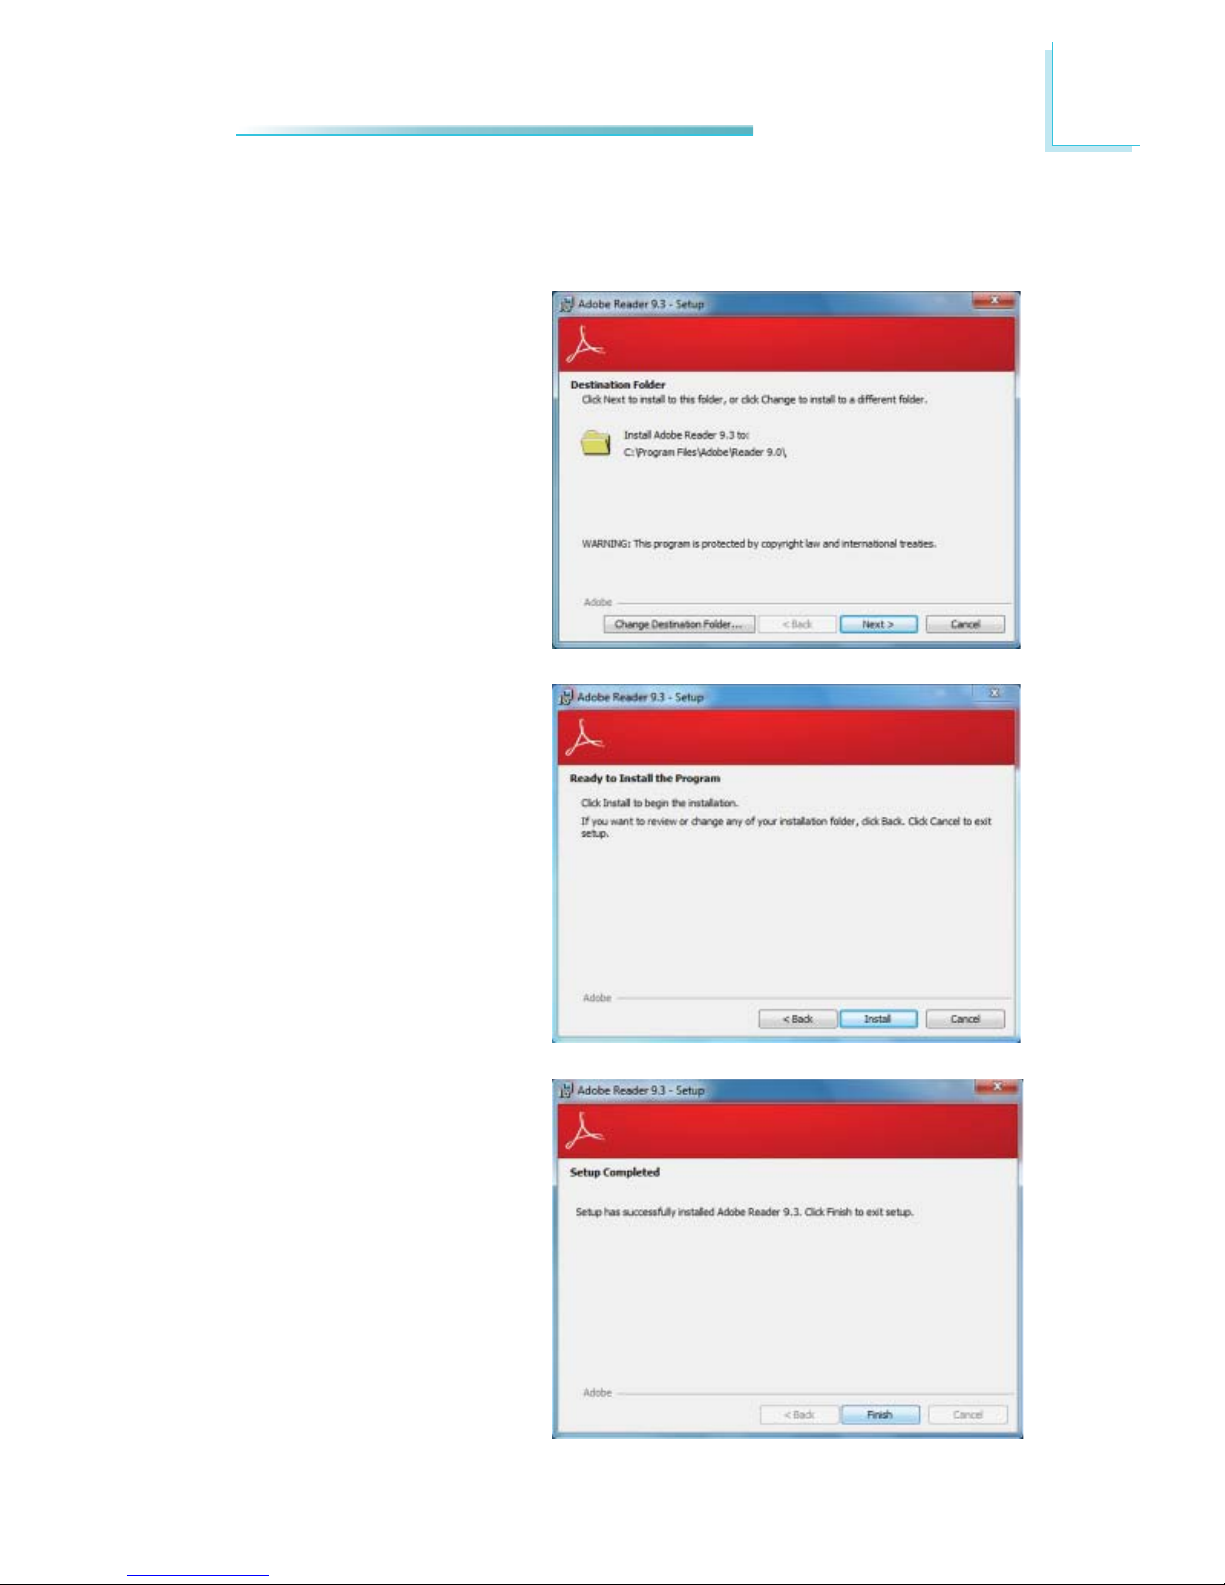
1. Click Next to install to the
destination folder or click
Change Destination folder
to select another folder.
Adobe Acrobat Reader 9.3
To install, click “Adobe Acrobat Reader 9.3” on the main menu.
2. Click Install to begin installation.
3. Click Finish to exit installaion.
Page 96
96
A
NLITE and AHCI Installation Guide
Appendix A - NLITE and AHCI Installation Guide
nLite
nLite is an application program that allows you to customize your XP installation
disc by integrating the RAID/AHCI drivers into the disc. By using nLite, the F6
function key usually required during installation is no longer needed.
Note:
The installation steps below are based on nLite version 1.4.9. Installation procedures may slightly vary if you’re using another version of the
program.
1. Download the program from nLite’s offi cal website.
http://www.nliteos.com/download.html
2. Install nLite.
Important:
Due to it’s coding with Visual.Net, you may need to fi rst install .NET
Framework prior to installing nLite.
3. Download relevant RAID/AHCI driver fi les from Intel’s website. The drivers
you choose will depend on the operating system and chipset used by your
computer.
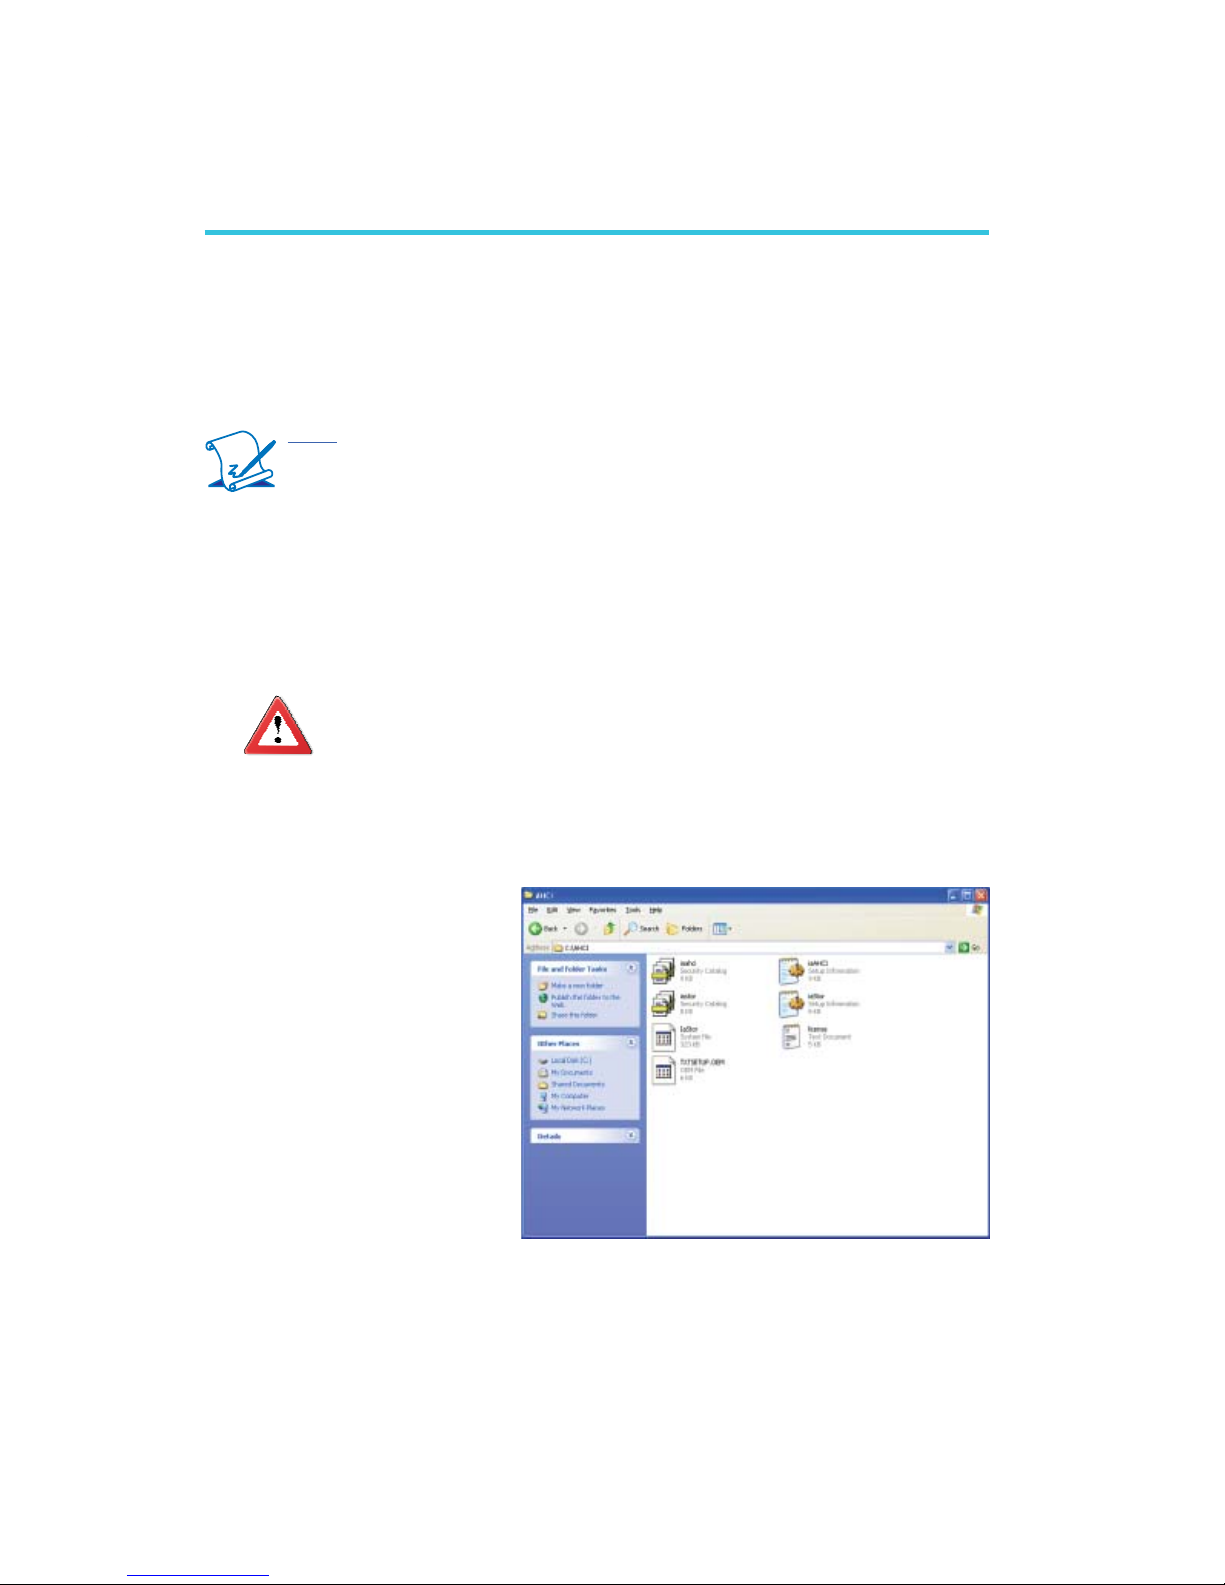
The downloaded driver fi les
should include iaahci.cat,
iaAHCI.inf, iastor.cat, iaStor.
inf, IaStor.sys, license.txt
and TXTSETUP.OEM.
Page 97
97
A
NLITE and AHCI Installation Guide
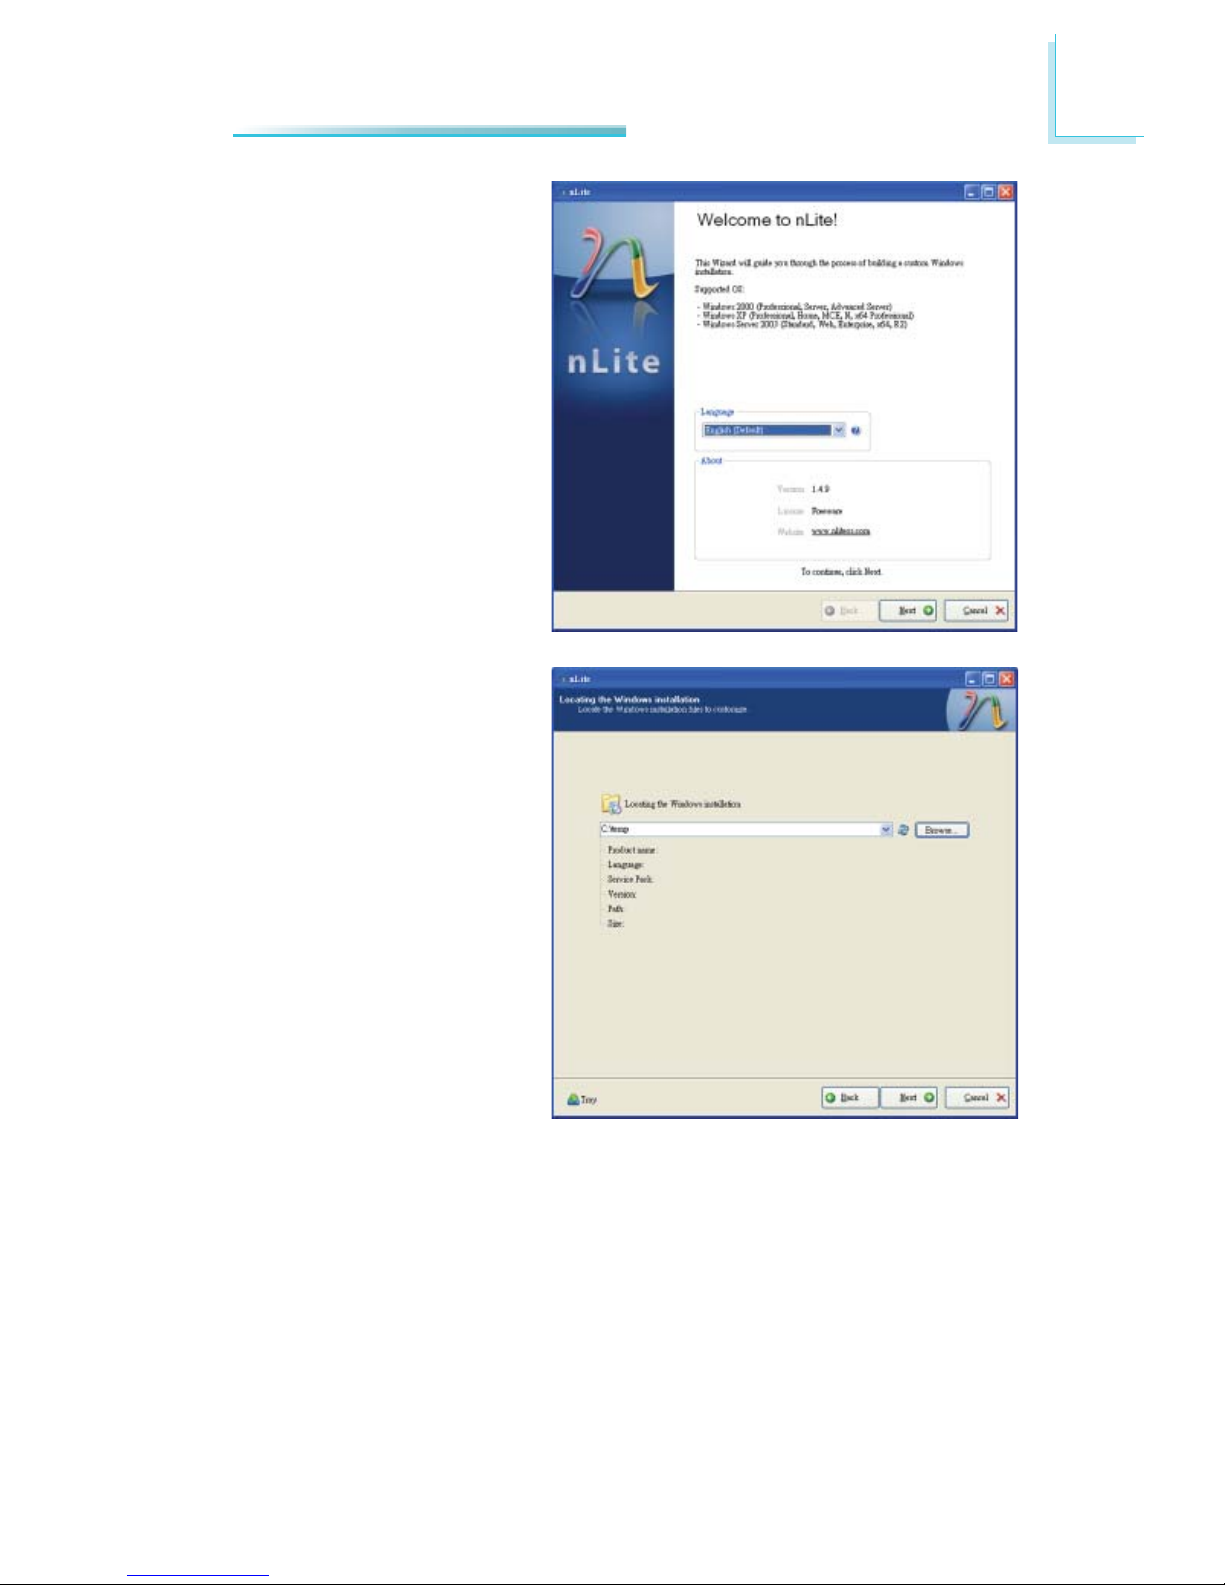
4. Insert the XP installation
disc into an optical drive.
5. Launch nLite. The Welcome
screen will appear. Click
Next.
6. Click Next to temporarily
save the Windows installation fi les to the designated
default folder.
If you want to save them
in another folder, click
Browse, select the folder
and then click Next.
Page 98

98
A
NLITE and AHCI Installation Guide
7. Click Next.
8. In the Task Selection dialog box, click Drivers and
Bootable ISO. Click Next.
Page 99
99
A
NLITE and AHCI Installation Guide
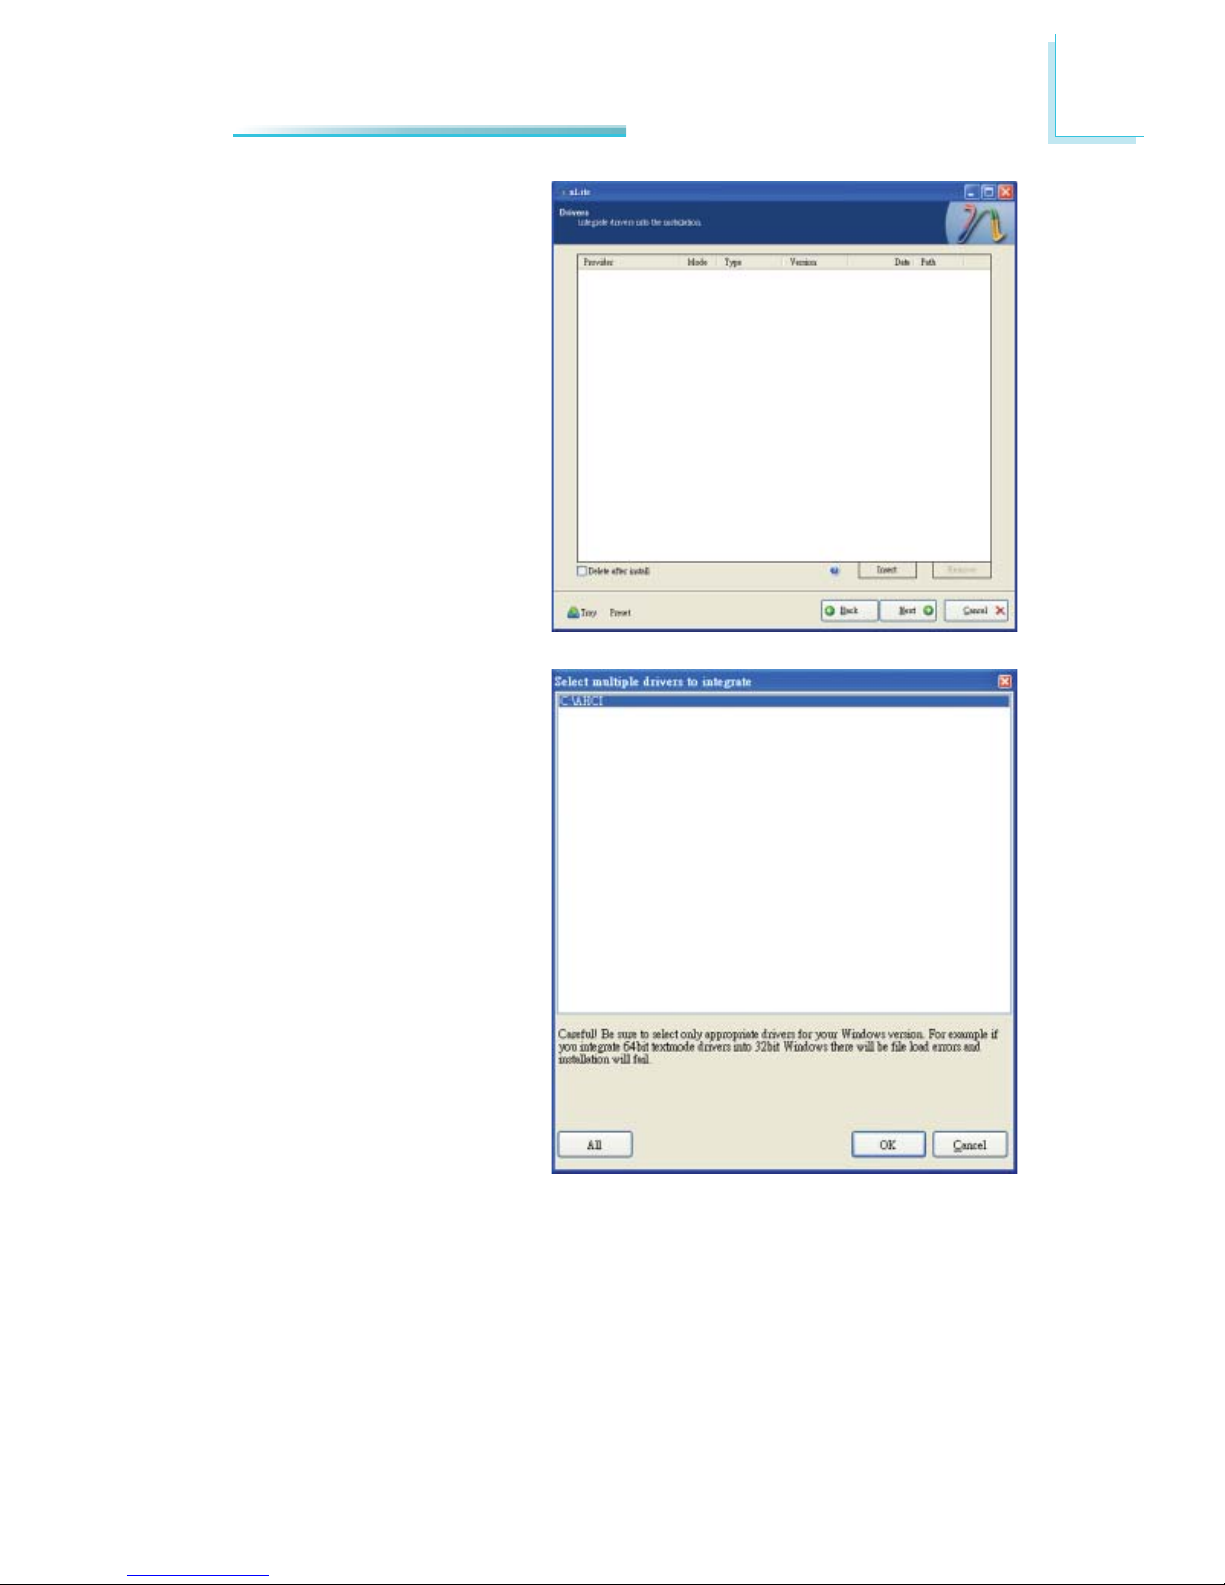
9. Click Insert and then select Multiple driver folder
to select the drivers you
will integrate. Click Next.
10. Select only the drivers
appropriate for the Windows version that you are
using and then click OK.
Integrating 64-bit driv-
ers into 32-bit Windows
or vice versa will cause
fi le load errors and failed
installation.
Page 100
100
A
NLITE and AHCI Installation Guide
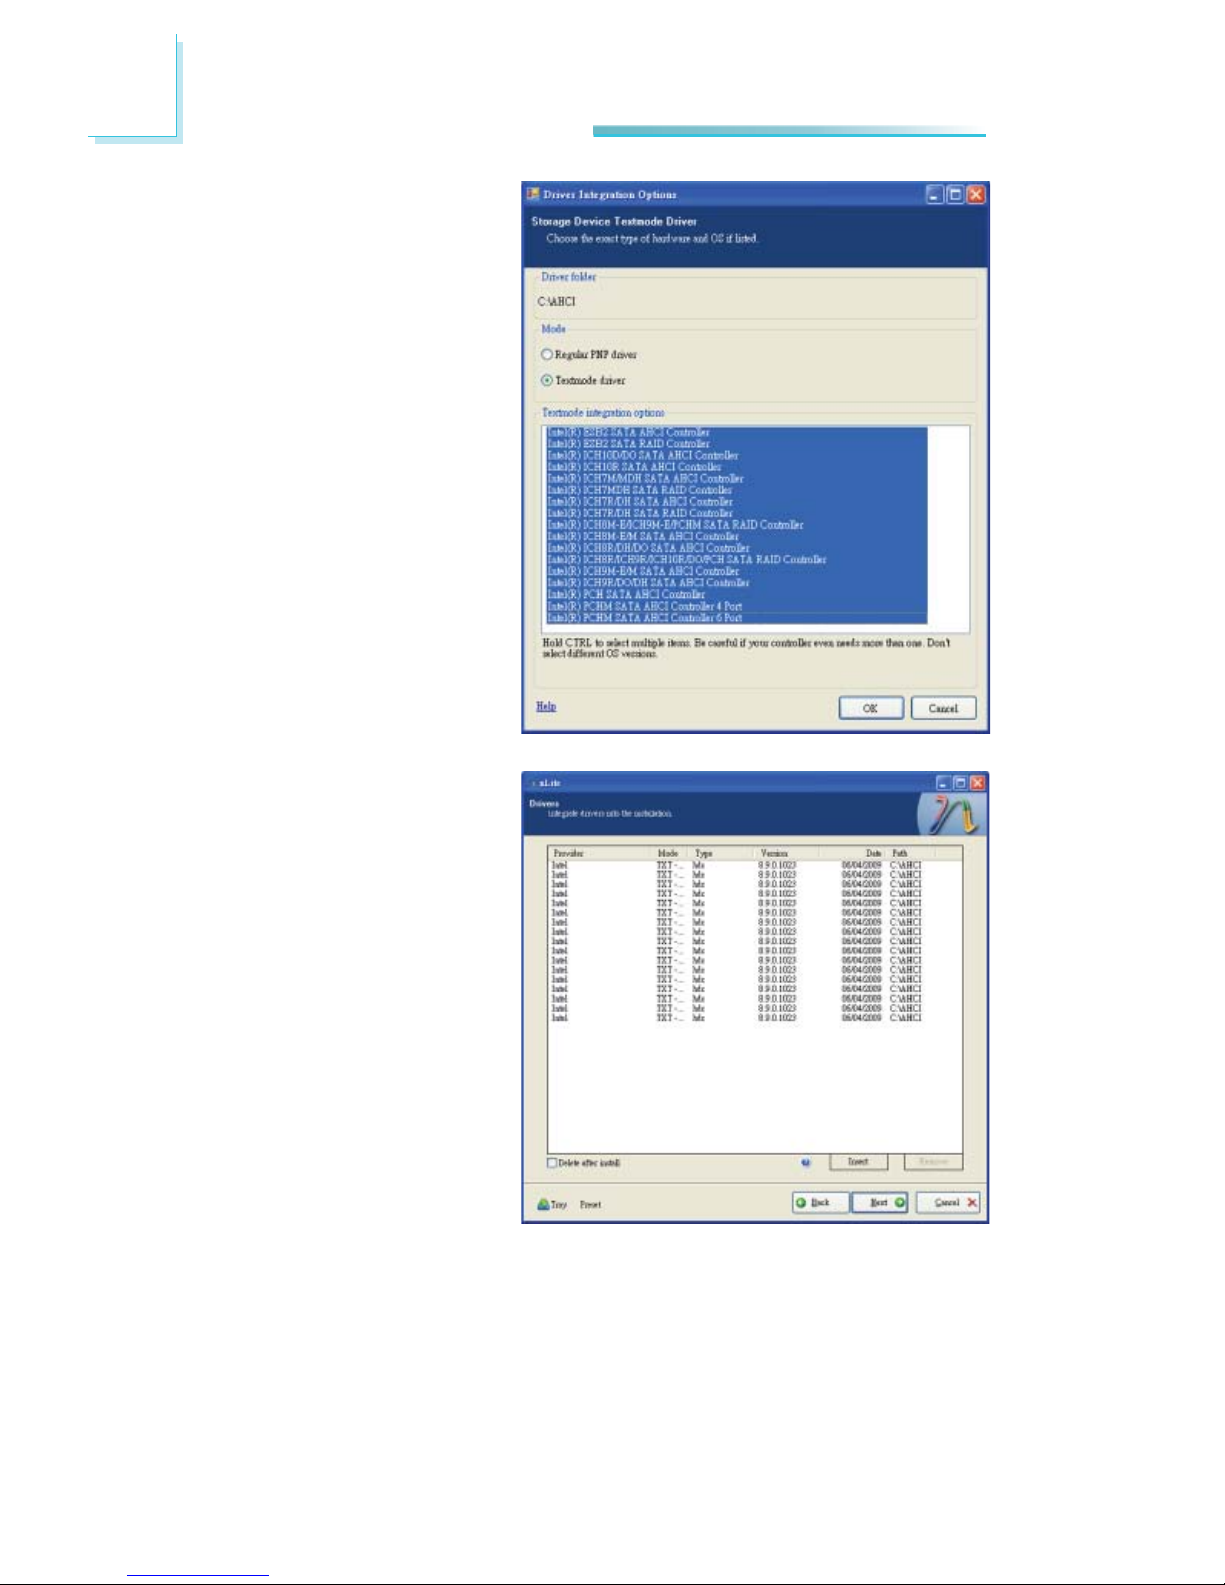
11. If you are uncertain of
the southbridge chip used
on your motherboard,
select all RAID/AHCI controllers and then click
OK.
12. Click Next.
 Loading...