

Dexter Laundry COIN COMPACT DRYER Operator's Manual

OPERATOR’S MANUAL
8514-046-001F
July 2013
for COIN COMPACT DRYER
The dryer must not be stored or installed where it will be exposed to water and/or weather.
WARNING: For your safety the information in this manual must be followed to
minimize the risk of fire or explosion or to prevent property damage, personal
injury or death.
-Do not store or use gasoline or other flammable vapors and liquids in the vicinity of
this or any other appliance.
-WHAT TO DO IF YOU SMELL GAS
-Do not try to light any appliance.
-Do not touch any electrical switch: do not use any telephone in your building.
-Clear the room, building or area of all occupants.
-Immediately call your gas supplier from a neighbor’s telephone. Follow the
gas supplier’s instructions.
-If you cannot reach your gas supplier, call the fire department.
Installation and service must be performed by a qualified installer, service agency or
the gas supplier.
You, the purchaser, must post in a prominent location instructions to be followed in the event the user smells
gas. Consult your local gas supplier for procedure to be followed if the odor of gas is present.
Post the following
Do not store or use gasoline or other flammable vapors or liquids in the vicinity of this or any other appliance.
THIS MACHINE IS FOR DRYING ONLY FABRICS CLEANED IN WATER.
avoid possibility of fire, including spontaneous combustion, do not dry oiled floor mops, items
containing foam rubber or similarly textured rubberlike materials or any material on which you
have used a cleaning solvent or which contains flammable liquids or solids (such as gasoline,
kerosene, waxes, etc.)
It is important that you read this Manual and retain it for future reference.
For service or replacement parts, contact the distributor in your area or:
“For Your Safety”
caution in a prominent location:
FOR YOUR SAFETY
FOR YOUR SAFETY
Dexter Laundry, Inc
2211 W. Grimes
Fairfield, Iowa 52556, USA
To

French Language Warnings
AVERTISSEMENT. Assurez-vous de bien suivre les instructions données dans cette
notice pour réduire au minimum le risque d’incendie ou d’explosion ou pour éviter
tout dommage matériel, toute blessure ou la mort.
Ne pas entreposer ni utiliser d’essence ni d’autres vapeurs ou liquides inflammables dans
le voisinage de cet appareil ou de tout autre appareil.
I. QUE FAIRE SI VOUS SENTEZ UNE ODEUR DE GAZ:
· Ne pas tenter d’allumer d’appareil.
· Ne touchez à aucun interrupteur. Ne pas vous servir des téléphones se trouvant
dans le bâtiment oú vous vous trouvez.
· Évacuez la pièce, le bâtiment ou la zone.
· Appelez immédiatement votre fournisseour de gaz depuis un voisin. Suivez les
instructions du fournisseur.
· Si vous ne pouvez rejoindre le founisseur de gaz, appelez le service des
incendies.
L’installation et l’entretien doivent être assurés par un installateur ou un service d’entretien
qualifié ou par le fournisseur de gaz.
2
Ne pas enteposer ni utiliser d’essence ni d’autres
vapeurs ou liquides inflammables dan le voisinage
de cet appareil ou de tout autre appareil.
POUR VOTRE SÉCURITÉ

TABLE OF CONTENTS
Page No.
Warnings about use and operation ...................................................................................... 3
Installation Instructions ................................................................................................5, 6, 7
Dryer Shutdown .................................................................................................................10
Operating Instructions.........................................................................................................11
Preventative Maintenance Instructions................................................................................16
ILLUSTRATIONS
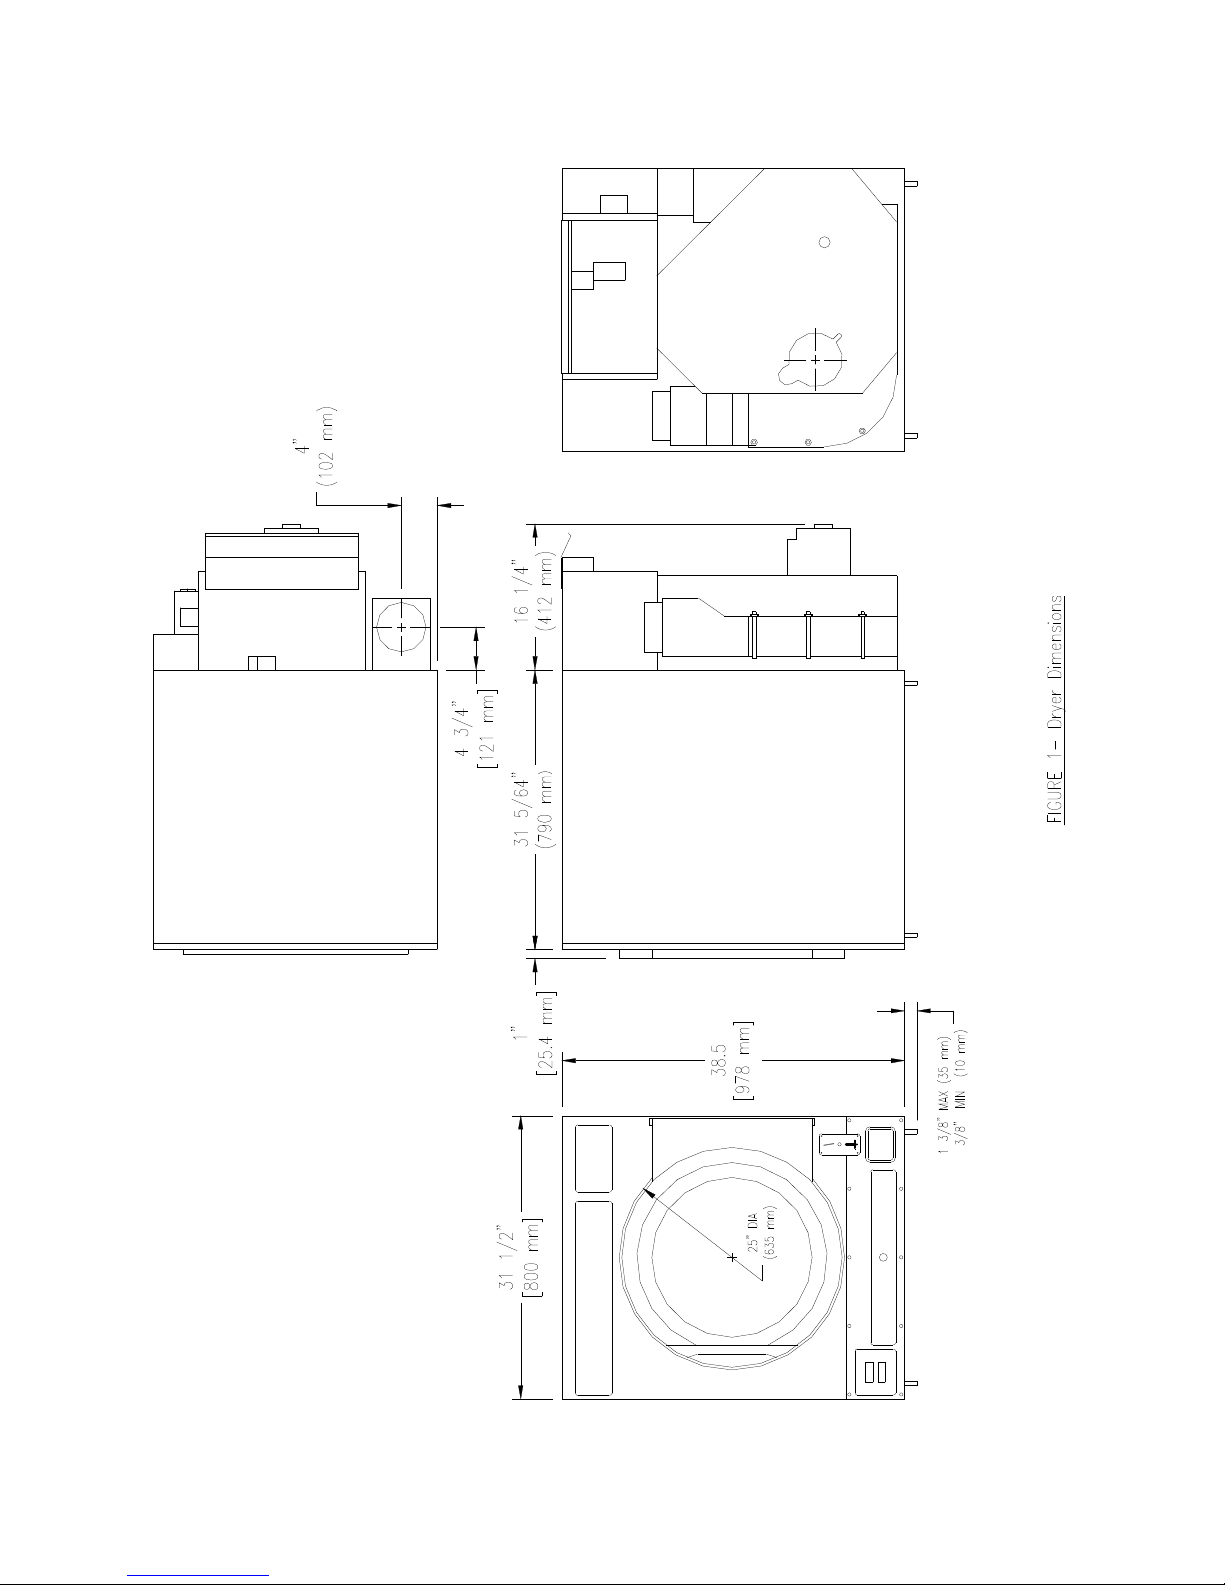
Figure 1 - Dryer Dimensions .................................................................................................4
Figure 2 - Vertical Clearance Dimensions ............................................................................6
Figure 3 - Dryer Exhausting ..................................................................................................9
WARNINGS ABOUT USE AND OPERATION
It is ABSOLUTELY ESSENTIAL that the dryer be grounded to a known earth (zero)
ground. This is not only for personal safety, but is necessary for proper operation.
KEEP SHIELDS, GUARDS AND COVERS IN PLACE. These safety devices are
provided to protect everyone from injury.
A DRYER SHOULD BE CONNECTED TO POWER FOR THREE (3) MINUTES
before it is operated or before a program change is made. Operation or program changes, which
occur during this "power up" period, are subject to loss in case of power interruption. After the
initial three minutes, all programmed data is protected from power interruptions of any length
and the customer's individual cycle is protected up to 3 seconds. This is done without batteries.
LEAVE THE ELECTRICAL POWER TO THE DRYER ON AT ALL TIMES except
when necessary for service or other similar activities. The hour meter function adds only full
hours to its reading. If the power is shut off every night, any fraction of an hour of time that is on
the machine at that time will be lost. Turning the power off every night could also have some
effect on the long-term life of the memory after a number of years. Turning power off
occasionally won’t affect the unit.
THIS DRYER IS EQUIPPED WITH A MANUALLY RESETTABLE OVERTEMPERATURE THERMOSTAT located on the end of the burner housing below the gas valve.
Should the dryer cease to heat, reset the thermostat by inserting a wooden (nonconductive)
pencil or dowel through the guide bushing in the cover. Should the thermostat continue to trip,
the dryer must be inspected by a qualified service person.
CHECK THIS THERMOSTAT WHEN INSTALLING DRYER to assure it is not
tripped. Impacts, such as rough handling in shipment, may trip the thermostat. It may be reset by
inserting a wooden (nonconductive) pencil or dowel through the guide bushing in the cover.
3
4

INSTALLATION AND OPERATING INSTRUCTIONS
This dryer may have been supplied as part of a washer/dryer stacked
appliance. If so, refer to the washer instructions for uncrating and hard
mounting the stacked unit to a concrete floor and observe the dryer clearances
listed below.
UNCRATING AND PLACING DRYER (Stand alone dryer unit):
Tools Required: ½ in. hex socket and ratchet driver, wood block 4 in. or 5 in. (102-127 mm)
thick, a knife and a groove joint pliers, which will open to 1 3/8 in. (35 mm).
1. Remove and discard stretch-wrap, posts, cap and inner packing.
2. The crate base is attached to the dryer by (4) cap screws driven upward from below the crate
base. Remove crate base from dryer, by tipping dryer sidewise and place block under crate base
rail in center of dryer. Using a ratchet and ½ in. hex socket, remove and discard (2) crating bolts
from side, which is raised. Remove block from under crate base. Repeat for other side.
3. Install the leveling legs, which are shipped inside the dryer drum. Using a walking motion,
move dryer sideways about 6 in. (152 mm) off crate base. Tip dryer up and place block under
edge of dryer. Thread two leveling legs about two-thirds into the T-nuts on the base from which
the crating bolts were removed. Remove block from under dryer.
With a walking motion move dryer completely off crate base. Discard crate base.
Tip dryer sidewise, as previously done, and place block under edge of dryer on raised side.
Thread leveling legs into nuts as was done for the first side.
Slide unit into position where it will be installed. Adjust leveling legs, using the groove joint
pliers, to level and align dryer with adjacent units.
DRYER INSTALLATION
1. CODE CONFORMITY: All commercial dryer installations must conform to the local and
national codes for the location of installation.
2. INSTALLATION CLEARANCES: This unit may be installed at the following alcove
clearance.
I. Left Side 0
II. Right Side 0
III. Back 18 in. (457 mm) clearance is necessary behind the motors to allow
IV. Front 48 in. (1220 mm) to allow use of dryer.
servicing and maintenance.
5

V. Top Refer to figure labeled “Vertical Clearance Dimensions”.
AB. 0 clearance is allowable at the top; 4 in. (102 mm) back from the
front. However 1/4 in. (6 mm) clearance should be allowed in case the
dryer needs moving.
C. 10 in. (254 mm) clearance is required from top at all other points.
VI. Floor If used as a stand alone dryer, this unit is intended to be installed upon an
elevated surface. The surface must be of suitable strength to support 450
pounds (205 kg), and the dryer should be bolted or anchored to prevent
horizontal movement. The dryer may be installed upon a combustible
surface.
Refer to the label attached to the Belt Guard on the rear of the dryer for other installation
information and start-up instructions.
6
 Loading...