


Cordless Multimedia-Internet Keyboard Mouse Set
USER’S MANUAL (Model #: KS-2251)
The set contains: a wireless multimedia-internet keyboard, KB-22, a
mini RF optical mouse, MWP2051-L, and a mini size receiver, RX2051.
Important Ergonomic Information
Some experts believe that using any mouse or trackball may cause
serious injury to hands, wrists, arms, neck, or back. If you feel pain,
numbness, or weakness in these areas, see a qualified health professional.
TO REDUCE THE RISK OF INJURY, FOLLOW THESE PRECAUTIONS:
Take frequent breaks, get up and walk around several times every hour.
Vary your tasks throughout the day.
Keep your shoulders relaxed with your elbows at your side. Position your
keyboard and mouse so you do not have to reach.
Adjust your chair and keyboard so your upper arms and wrists are
straight
Avoid resting your wrists on sharp edges
SYSTEM REQUIREMENT
The mouse is compatible with standard Microsoft mode.
rd
button and wheel function require Win98/2000/ME/NT/XP.
3
If your operating system (OS) is Windows98/98SE, please prepare the
Windows98 or 98SE compact disk for system’s request during the
installation of mouse.
Keyboard is compatible with standard Microsoft mode.
These Multimedia-Internet hot-keys will require additional driver as
attached with this product.
The Multimedia/ Internet Hot-keys require Windows 2000/XP/ME to
function.

Getting Started
Congratulations on your purchase the KS-2251 set, wireless
multimedia-internet keyboard and optical mouse set. The slim type
keyboard is an all new design keyboard, the most interesting part is the
key top, slim and thin, different from any one in the market. The mini
wireless mouse is also such an incredible product, using and knowing.
The product will bring you a special experience in using computer and
surfing web.
Package Contains
Your Keyboard/Mouse Set package includes the following:
1. Wireless mouse (MWP2051-L)
2. Wireless keyboard (KB-22)
3. Receiver with cable (RX2051)
4. CD-ROM
5. User’s manual
6. 2 AA batteries for mouse
7. 2 AAA batteries for keyboard
Note:If any part is missing, please contact your dealer for a replacement
immediately.
Precaution
For optimal performance, place the receiver at least 8 inches or 20
centimeters away from other electrical devices, such as the computer, the
computer monitor, speakers or other external storage drives.
Battery Warning!
When replace the batteries, use alkaline. You may use rechargeable
NiMH or other type of batteries, but do not mix then with alkaline. Do not mix
used and new batteries together!
BEFORE YOU BEGIN
Keep this installation guide for future reference! It contains Important
Troubleshooting Information.
Keep your old mouse as a back-up device.
HARDWARE INSTALLATION
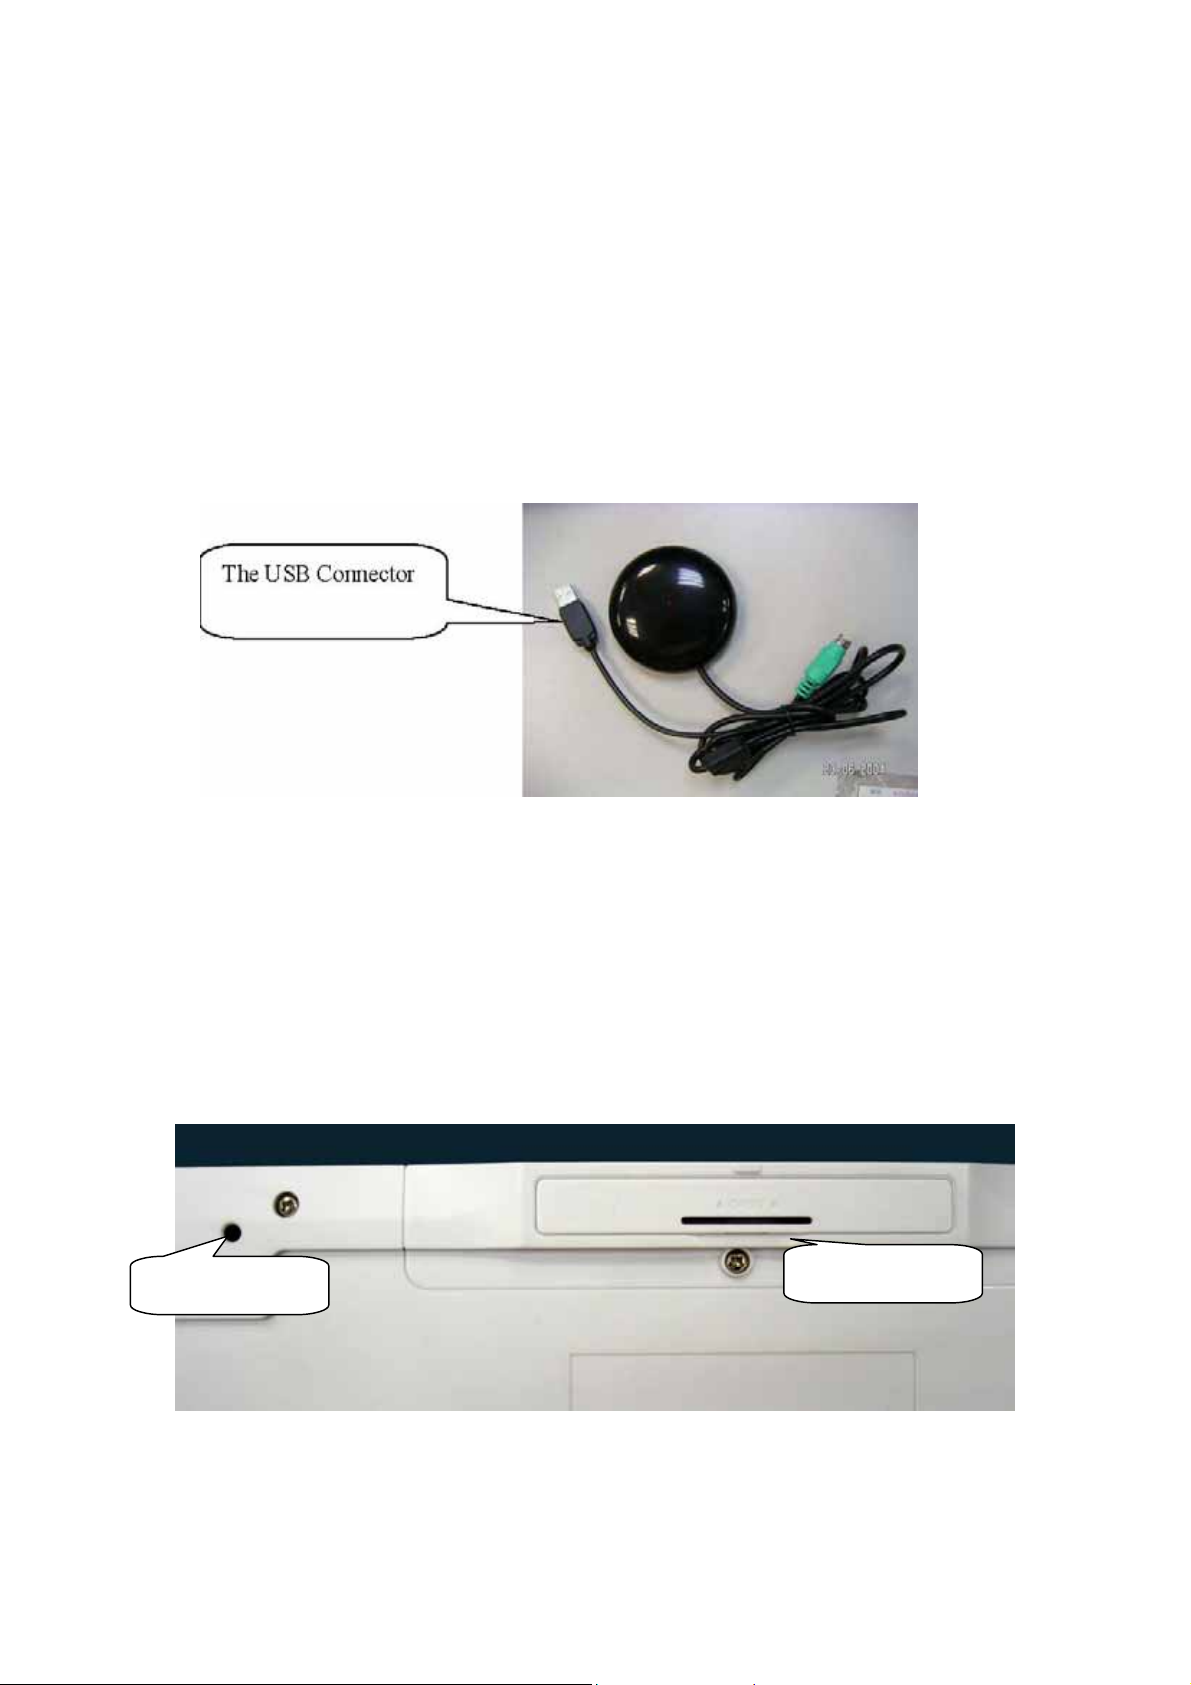
Connecting Receiver
1. Turn off your computer
2. Disconnect the current keyboard and mouse.
3. The receiver comes with a two-headed cable. You just need to plug the
USB connector into USB port because the USB connector is for the
keyboard and the mouse simultaneously.
4. Turn on your computer
Inserting the Batteries
The RF cordless keyboard uses 2 AAA batteries. They are inserted as
follows:
1. Turn the keyboard over to show the underside.
2. Release the battery cover.
3. There are signs to indicate positive and negative orientation for the
batteries. Take care to insert the batteries correctly.
4. Clip the battery cover back into place and make sure it is firmly closed.
ID pairing button
Battery cover
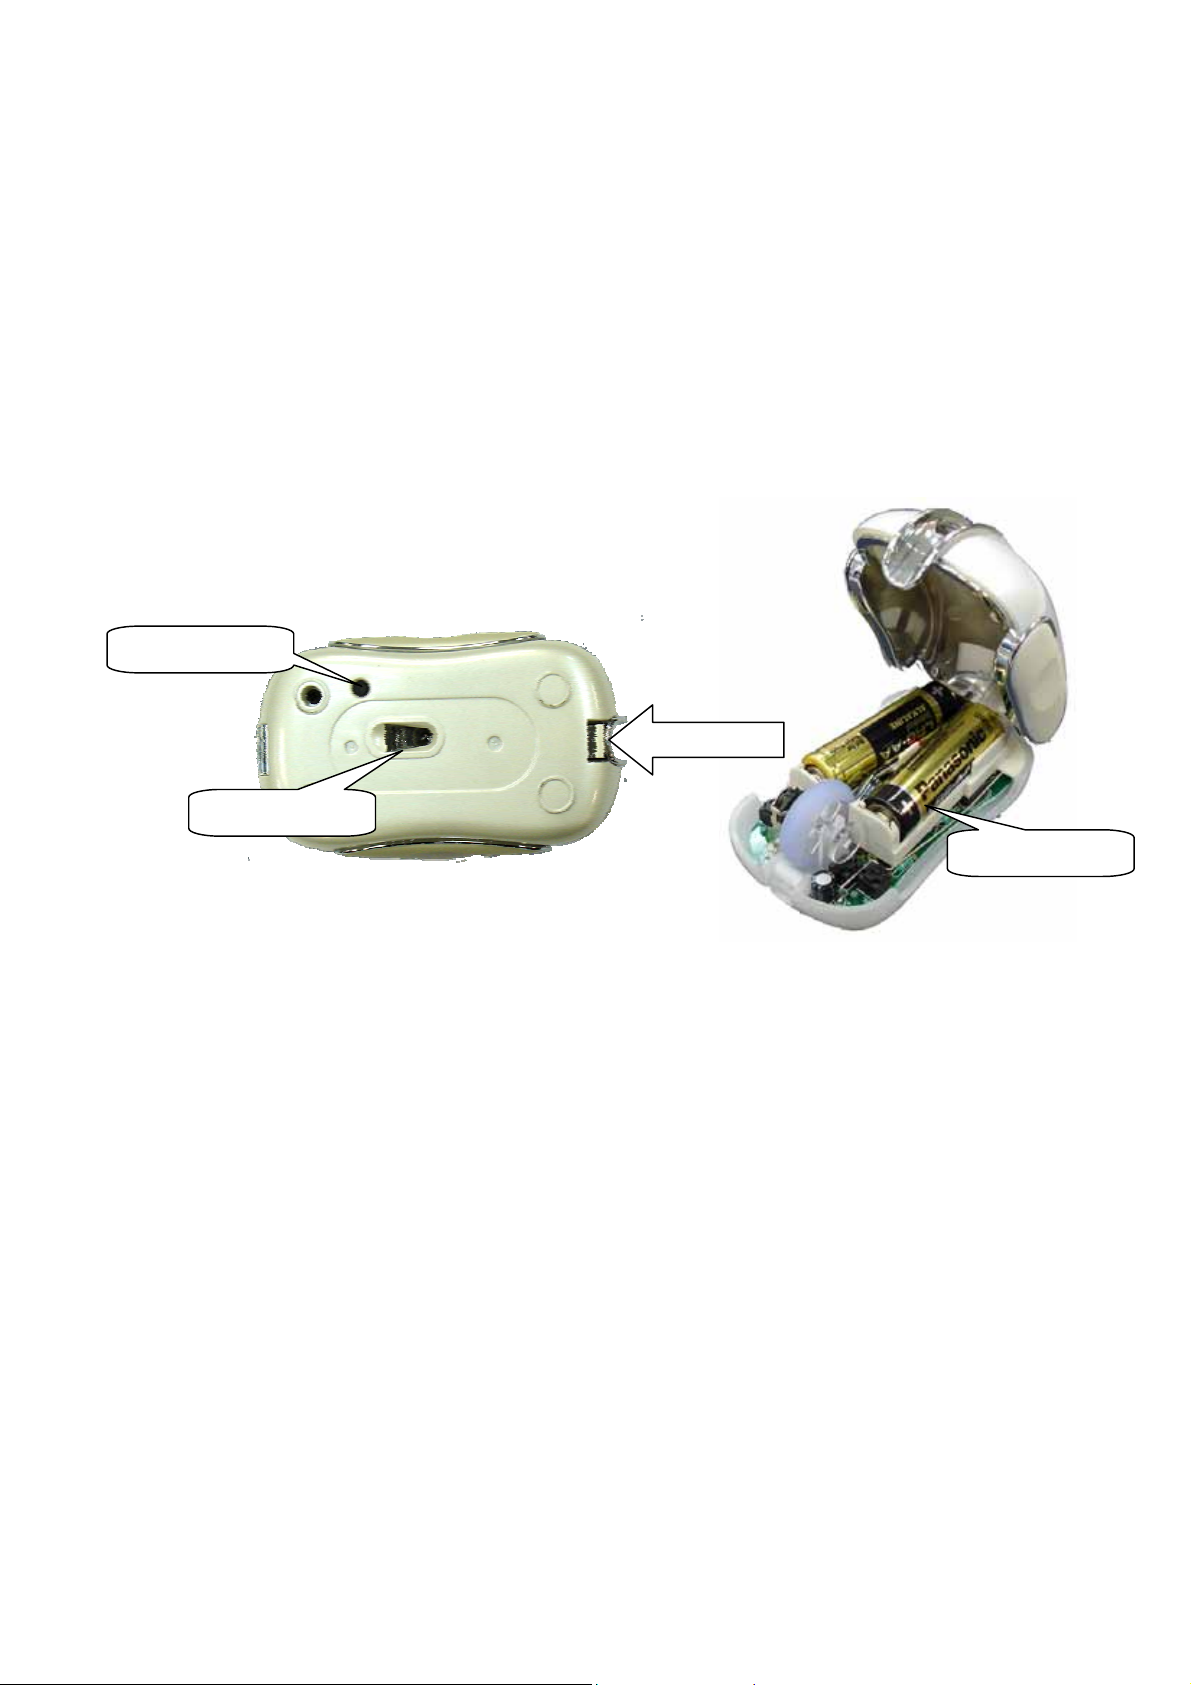
The RF wireless mouse uses 2 AA batteries. They are inserted as follows:
1. Turn the mouse to the bottom side.
2. Remove the batteries cover (Upper case) by moving the opening tabs.
3. There are signs to indicate batteries' positive and negative poles. Follow
the signs to place the batteries
4. Place the batteries cover back and make sure it is firmly closed
ID pairing button
Push and open
Optical Lens
Selecting the ID Channel
The RF wireless keyboard & mouse provide the possibility of 256
different ID to avoid interference with other users of the same model RF
wireless keyboards or mice. Before using the wireless keyboard and mouse,
you must ensure that the same ID is set for the receiver, keyboard and
mouse.
Please follow the steps as below to set up:
1. Turn to the bottom of receiver and you will see a small button (ID code
connection, refer to picture).
2. Establish communication between the receiver and the mouse (Select
identification codes).
2 AA butteries
Press and release the connect ID button on the bottom of receiver.

Within 6 seconds of the previous step, press and release the
“connect” button on bottom of the wireless mouse, and the
“connect” small button on the top-right of the keyboard.
After above “connect” procedure, the same ID is selected on both of
the receiver and the mouse.
Please move the mouse to operate its cursor and test some
keyboard’s function. If there is problem, please do the connect
setting procedure again or check the trouble shooting guide.
Operation Guide
Battery Low Indication
When the voltage level of the battery goes down under the preset level, the
scrolling wheel will flash at least three times on moving or clicking the mouse.
Although the mouse can still work for a while, the user, at this time, should have
a new set of batteries ready for replacement. Or, if the user has a companion
charger base, and two re-chargeable batteries are inside the mouse, charge the
mouse as soon as possible.
Power off the mouse
1. Be sure the mouse is NOT in sleep mode. If it is, press any key to wake it
up.
2. Press and hold the Connect button on the bottom of the mouse for more
than 2 seconds. (The red light will go off while the Connect button is
depressed.)
3. Wait until the red light flash once. Release the Connect button.
4. Now, the mouse is in power off mode. No operation can be done.
Power on the mouse
To activate the mouse again, press the Connect button on the bottom
of the mouse once. (DO NOT depress the Connect button for more than 1.5
seconds when resuming the mouse from power off mode.) The red light will
turn on, and the mouse is ready for normal operation.

Note: Be sure to press the connect button firmly in procedure, if the connect button is
not depressed steadily the red light will be on before 2 seconds expire. This will
result in a change of channel and ID. Don’t panic, just re-connect the mouse to the
receiver, and follow step 4 again.
Operations on power saving mode
In order to conserve battery power, the mouse is designed to reduce power
consumption gradually from standby mode to sleep mode, if it is not being
used.
Standby mode – Around 2 seconds after the mouse stops moving, it
enter into standby mode.
Sleep mode – If the mouse is left intact for around 8 minutes, it goes to
sleep mode and shuts down the optical sensor to maintain minimum power
consumption. No moving operation is possible in this mode.
Wake up the mouse – This mouse can work promptly under Standby mode
so users might not be able to tell the existence of this mode. But, in sleep
mode, users have to press any button to wake up the mouse for normal
operation.

Installing the Software
To install the software, please follow the steps below to finish:
1. Insert the Auto-Run CD-ROM onto CD-ROM driver, the installation menu
will be executed automatically. (If the auto-run does not function itself,
double-click the “setup” icon in the CD files.)
2. The setup program will guide you to finish the installation step by step
After you finish the installation, select "Restart" to reboot your system and
activate multimedia hot keys and wheel scrolling functions.

Codeless Multimedia/ Internet Keyboard
Hot-Key Functions
Note: Please make sure that both hardware and software are correctly
installed in your system before proceeding to use the Multimedia/ Web
Keys.
The Multimedia Keys on the keyboard are labeled as follows:
1. Play/Pause: Press this button once to play CD/VCD, press again to
pause playing
2. Vol +: Increase volume
3. Vol -: Decrease the volume.
4. Mute: Press this button once to mute the volume, press again to un-mute
The Web Keys on the keyboard are labeled as follows:
1. WWW: Press this button to launch the default Internet browser application
2. E-mail: Press this button to launch the default E-mail application.

My Computer Calculator Calendar
Power on/ off
WWW
Battery indicator
E-mail
Favorites
Search
3. Favorites: Press this button to bring up “ My Favorites Window”, Press
again to close “My Favorites Window”.
4. Search: Press this button to bring up “Search window” for web address,
Press again to close “Search window”.
5. My Computer: Press this button to launch the default File-Manager
browser.
6. Calculator: Press this button to launch the default calculator application.
7. Calendar: Press this button to launch the default calendar application.
8. Power on/ off: Turn on/ off computer
MAKING THE KEYBOARD KEYS FOR OTHER ASSIGNMENTS
Start Multimedia/ Web driver from the Control Panel or double click the
mouse icon on the Windows Taskbar.
The Keyboard Properties display, go to the hot-key assignments area and
choose from the available options to set up your keyboard.
Click the down arrow to view the list of functions. Use the scroll bar to see
other functions not displayed. Choose a function by clicking it. The
function you have selected is displayed and highlighted.

MAKING THE MOUSE BUTTONS FOR OTHER ASSIGNMENTS
Start Multimedia/ Web driver from the Control Panel or double click the
mouse icon on the Windows Taskbar.
The Mouse Properties display, go to the button assignments area and
choose from the available options to set up your mouse.
Click the down arrow to view the list of functions. Use the scroll bar to see
other functions not displayed. Choose a function by clicking it. The
function you have selected is displayed and highlighted.
The wheel functions both as a wheel and as a third button. As a wheel,
simply roll the wheel. To use the wheel like a standard mouse button, click
the wheel and select a function for this button.
Uninstalling the Software
How to uninstall the Mouse Driver and Application Software
The Mouse driver can be removed from Windows (except Windows 3.1x) by
clicking the Add/Remove Programs icon in the Control Panel. Select "Remove"
button.

3

Carrier Frequency: 27 MHz Dimensions: 470*230*27 mm
3
Weight: 735 grams
Receiver
Interface: USB
Power: 5V DC, 100mA MAX connected to host computer
Dimensions: 75*75*19 mm (without counting the extended USB
connector)
Weight: 97 grams
ELECTRIC SPECIFICATIONS
Operating Voltage:Transmitter: 2.4 V DC (powered by batteries)
Receiver: 5V DC (powered by USB port)
Operating Current:Transmitter (mouse) : 45mA, operate on a white Paper
Transmitter (keyboard): 1.5mA
Receiver: 16mA typical
Standby Current:6mA
Sleep Current:240uA
Modulation Type:FSK
TROUBLESHOOTING
1. Mouse does not function If mouse is not functional, please turn off the
computer first.
USB port of the computer.
Check the placement of batteries and see if they are properly
connecting.
The "+" and "-" on the batteries must match the "+" and "-" on the slots.
If the batteries aren't inserted correctly, the device won't work.
Check the receiver and make sure it is firmly attached to the
Restart the computer again. If the LED inside the receiver does not light
up when moving the mouse, please re-connect the mouse to the

receiver.
Q: The mouse cursor can only move left & right during operation (it
could be caused by low battery or the optical sensor’s data error).
A: Please take out one of batteries and put it back for a power reset
and then redo the connect procedure.
Q: The mouse does not work after waking up from power off mode by
pressing the connect button once.
A: This might be caused by imprecisely depressing the connect
button to wake up the mouse. Users can gain back normal operation
by pressing connect button on the mouse first, and then pressing the
one on the receiver. As soon as the LED inside the receiver starts
flashing, the mouse is ready to operate.
Optical Sensor Mouse functions best on surfaces with details for tracking. It may
not function on reflective, reflective pattern or non-visible detail surfaces!
2. Reducing Interference with Other Wireless Devices
Reducing Interference with Other Wireless Devices: All 27MHz
radio-based devices are subject to interference from other 27MHz
radio-based devices, such as cordless telephones, cordless baby
monitors, and cordless toys. It may help to move the receiver unit and
the base unit of other wireless devices (such as cordless telephone
cradle) as far apart as possible. You may need to try several times for a
location that is best in your operating environment.
Move the receiver and the mouse closer to each other so that the
receiver is relatively shorter in distance to the mouse than to other
27MHz transmitters. You may need to re-establish the
“connection”.
Note: Avoid using this device on a metal surface because a large surface of
iron, aluminum, copper, or other metal may act like a shielding to the RF
antenna of the mouse and the receiver.
3. Interference with other RF wireless mouse
If the interference comes from other same model of RF wireless mice,

please “Setting up connection between mouse and receiver” of the
installation guide to switch to a new RF channel. A new identification code
is also generated upon the completion of channel switching. Normally, the
effective transmission distance is about 3 feet, depending on the
environment. If the effective distance between the mouse and the receiver
is bad, try to change the location of the receiver.
4. If you have difficulty connecting the wireless mouse:
Increase the distance between the set of wireless mouse and other radio
device units.
Turn off the other wireless devices, or their base units that are in close
proximity to the receiver of this wireless mouse. Try connecting the wireless
mouse and its receiver again. To verify that your device is connected and
working properly, open a document and try the device.
5. My keyboard or mouse does not work or does not work properly after
installation
Make sure you have connected the receiver correctly. For optimal
performance, place the receiver at least 8 inches or 20 centimeters away
from other electrical devices, such as the computer, the computer monitor,
or external storages devices.
Make sure you have installed the batteries correctly.
Make sure you have set the same ID on both transmitter (mouse and
keyboard) and the receiver (see Setting the ID under Hardware Installation).
If the problem persists, try an alternative ID selection to avoid possible
interference. Remember to set the same ID or both transmitter and
receiver.
6. My keyboard or mouse is not detected
Make sure you have connected the receiver correctly. Do not plug or unplug
the receiver cables while the computer is running. You may have other
system devices that conflict with the mouse and keyboard. Check the IRQ /
address settings of these devices for conflicts and change the settings as
required.

Federal Communication Commission Interference Statement
IMPORTANT NOTE:
This transmitter must not be co-located or operating in conjunction with any other antenna
or transmitter.
This equipment has been tested and found to comply with the limits for a Class B
digital device, pursuant to Part 15 of the FCC Rules. These limits are designed to
provide reasonable protection against harmful interference in a residential
installation. This equipment generates, uses and can radiate radio frequency
energy and, if not installed and used in accordance with the instructions, may
cause harmful interference to radio communications. However, there is no
guarantee that interference will not occur in a particular installation. If this
equipment does cause harmful interference to radio or television reception, which
can be determined by turning the equipment off and on, the user is encouraged
to try to correct the interference by one of the following measures:
- Reorient or relocate the receiving antenna.
- Increase the separation between the equipment and receiver.
- Connect the equipment into an outlet on a circuit different from that
to which the receiver is connected.
- Consult the dealer or an experienced radio/TV technician for help. FCC
Caution: Any changes or modifications not expressly approved by the
party responsible for compliance could void the user's authority to operate
this equipment.
This device complies with Part 15 of the FCC Rules. Operation is subject to the
following two conditions: (1) This device may not cause harmful interference, and
(2) this device must accept any interference received, including interference that
may cause undesired operation.
 Loading...