

Page 1
USER’S GUIDE
Page 2
Page 3
Page 4
4 | SEVEN PLUS Continuous Glucose Monitoring System
DexCom Technical Support: 1-888-SEVENGO (738-3646)
DexCom Website: www.DexCom.com
Your Transmitter ID Number:
Your Transmitter Expiration Date:
Your Receiver ID:
Your Healthcare Professional:
Nearest Hospital:
Other Notes:
© 2011 Dexcom, Inc. All rights reserved.
Dexcom®, STS®, SEVEN®, Dexcom Data Manager®, OpenChoice™ and Stay Between the Lines® are
trademarks of Dexcom, Inc. All other trademarks and copyrights are the property of their respective owners.
IMPORTANT CONTACTS AND NUMBERS
Page 5
SEVEN PLUS User’s Guide | 5
SEVEN PLUS CONTINUOUS GLUCOSE
MONITORING SYSTEM KIT CONTENTS:
•
Transmitter
•
Receiver
•
DexCom Data Manager® Accessory Software
•
Receiver Charging Cable
•
Receiver Case
•
User’s Guide
•
Quick Start Guide
• CD Tutorial
• Training Checklist
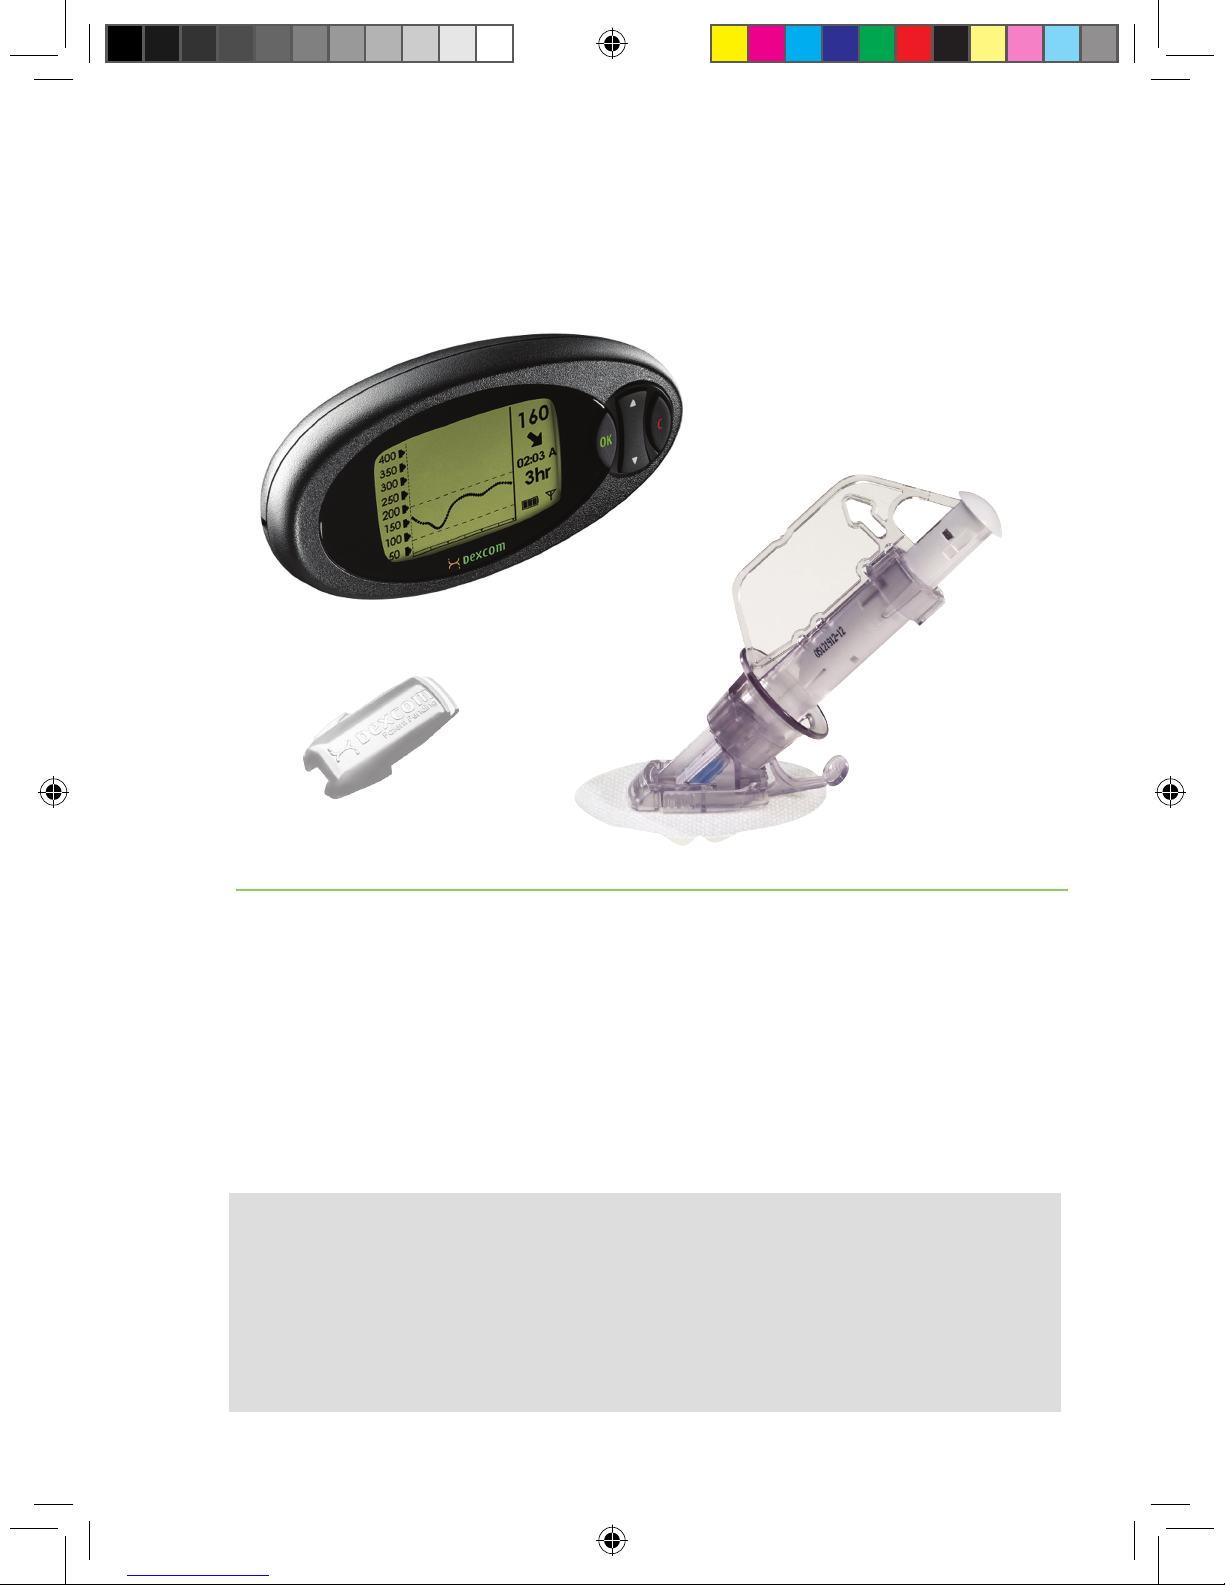
SEVEN® PLUS CONTINUOUS GLUCOSE MONITORING SYSTEM
SEVEN Sensor
and Applicator
SEVEN PLUS
Receiver
SEVEN PLUS
Transmitter
NOTE: Sensors are sold separately. Commercially distributed blood glucose meter
required for use. Make sure to use the correct version of Data Manager with your SEVEN
PLUS. The SEVEN Sensor works with the SEVEN family of products. The SEVEN PLUS
Transmitter and Receiver are not backwards compatible with the SEVEN Transmitter and
Receiver.
Page 6
6 | SEVEN PLUS Continuous Glucose Monitoring System
DexCom would like to thank you
for purchasing the SEVEN PLUS
Continuous Glucose Monitoring System
(SEVEN PLUS)! When you use the
SEVEN PLUS, you will see real-time
continuous glucose readings every 5
minutes for up to 7 days. These readings
will help you detect trends and patterns
in your glucose levels. Glucose trends let
you see where your glucose levels have
been, which direction your levels are
headed, and how fast they may be rising
or falling.
introduction
Page 7
SEVEN PLUS User’s Guide | 7
The SEVEN PLUS is made up of three technologies that all work together: the Sensor,
the Transmitter, and the Receiver. The Sensor is a disposable unit that you insert into
your abdomen (belly) to continuously monitor your glucose levels for up to 7 days. The
Transmitter is a reusable device that snaps into the Sensor Pod. Your Transmitter will
wirelessly send your Sensor-measured glucose information to your Receiver. The Receiver
is a hand-held device that receives and displays your glucose information every 5 minutes.
The Receiver displays your current glucose reading and shows your glucose trend
information from the past 1-hour, 3-hours, 6-hours, 12-hours, and 24-hours. You will also
see Adjustable High and Low Glucose Alerts, and a Low Glucose ALARM to tell you when
you are outside of your target glucose levels. Rise and Fall (Rate of Change) Alerts will let
you know when your glucose levels are changing fast.
You can use any FDA-cleared blood glucose meter for calibration with the OpenChoiceTM
feature on the SEVEN PLUS. The SEVEN PLUS is also directly compatible with the
Lifescan® OneTouch® Ultra® Blood Glucose meter for calibration using an optional
Connection Cable, which is available for purchase from DexCom Customer Support.
This User’s Guide describes how to use your SEVEN PLUS from start to nish of
a continuous glucose monitoring session. Important safety information, warnings,
precautions, cautions, and contraindications of the SEVEN PLUS are described in the
next few pages and throughout this guide. Be sure to read this entire User’s Guide before
beginning a continuous glucose monitoring session.
+
Page 8
8 | SEVEN PLUS Continuous Glucose Monitoring System
INDICATION FOR USE
The SEVEN PLUS Continuous Glucose Monitoring System is a glucose-monitoring device indicated
for detecting trends and tracking patterns in adults (age 18 and older) with diabetes. The
SEVEN PLUS System is intended for use by patients at home and in health care facilities. The
device is for prescription use only.
The SEVEN PLUS Continuous Glucose Monitoring System is indicated for use as an adjunctive
device to complement, not replace, information obtained from standard home glucose monitoring
devices.
The SEVEN PLUS Continuous Glucose Monitoring System aids in the detection of episodes of
hyperglycemia and hypoglycemia, facilitating both acute and long-term therapy adjustments, which
may minimize these excursions. Interpretation of the SEVEN PLUS System results should be based
on the trends and patterns seen with several sequential readings over time.
IMPORTANT SAFETY INFORMATION
Read this entire guide before using your Continuous Glucose Monitoring System. If you do not
understand something or have any questions, please ask your Diabetes Management Team or
another health care provider. Contraindications, warnings, precautions, cautions, and other important
safety information can be found in this section and in boxes throughout your SEVEN PLUS User’s
Guide. The Troubleshooting section (Chapter 8) contains important information on troubleshooting
your SEVEN PLUS. The Technical Information section (Chapter 10) provides information on the
performance characteristics of the device.
CONTRAINDICATIONS
• The SEVEN PLUS System must be removed prior to Magnetic Resonance Imaging (MRI).
• Use of acetaminophen-containing medications while the SEVEN Sensor is inserted may affect the
performance of the device.
WARNINGS
• This device is not designed to replace a blood glucose meter. The SEVEN PLUS must be used with
a blood glucose meter.
• Treatment decisions should not be based solely on results from the SEVEN PLUS. You must
conrm with a blood glucose meter before making therapeutic adjustments.
• Symptoms related to low or high blood glucose levels should not be ignored. If you have symptoms
of low or high glucose, use your blood glucose meter to check the SEVEN PLUS results.
• You should update the SEVEN PLUS’ calibration every 12 hours at a minimum. The performance of
the SEVEN PLUS System when calibrated less frequently than every 12 hours has not been studied.
Page 9
SEVEN PLUS User’s Guide | 9
• Sensors fracture on rare occasions. If a sensor breaks and no portion of it is visible above the
skin, do not attempt to remove it. Seek professional medical help if you have symptoms of
infection or inammation—redness, swelling or pain—at the insertion site. If you experience a
broken sensor, please report this to our Technical Support department.
• The SEVEN and SEVEN PLUS Systems are not approved for use in children or
adolescents, pregnant women or persons on dialysis.
• The safety and effectiveness of the SEVEN and SEVEN PLUS Systems have not been
evaluated for sensor probe insertion sites other than the skin of the abdomen.
PRECAUTIONS
• Always wash hands with soap and water before opening the Sensor package. After opening
the package, avoid touching the adhesive area.
• Before inserting the Sensor, always clean the skin at the Sensor insertion location with a topical
antimicrobial solution such as isopropyl alcohol. Do not apply the Sensor until the cleaned area
is dry.
• Establish a rotation schedule for choosing each new Sensor location. Avoid Sensor locations
that are constrained by clothing, accessories, or subjected to rigorous movement during
exercise.
• Avoid injecting insulin or placing an insulin pump infusion set within 3 inches of a Sensor.
• The Sensor is sterile in its unopened, undamaged package. Do not use any Sensor if its sterile
package has been previously damaged or opened.
• For OpenChoice Calibration you must enter the exact ngerstick reading that your blood
glucose meter displays. Enter all ngerstick readings for calibration within 5 minutes. Entering
incorrect ngerstick readings that occurred more than 5 minutes ago will affect device
performance.
CAUTION
U.S. federal law restricts the sale of the SEVEN PLUS to sale by or on order of
a physician.
Page 10
10 | SEVEN PLUS Continuous Glucose Monitoring System
table of contents
SEVEN PLUS CONTINUOUS GLUCOSE MONITORING SYSTEM:
SYSTEM KIT CONTENTS 5
INTRODUCTION:
6
INDICATION FOR USE
8
IMPORTANT SAFETY INFORMATION
8
CHAPTER 1: THE SEVEN PLUS BASICS 13
1.1 G los sar y 15
1.2 Symbols Used in Labeling 18
1.3 Sensor Overview 20
1.4 Transmitter Overview 21
1.5 Receiver Overview 22
1.5.1 Moving Through the Receiver Screens 24
1.5.2 Receiver Screens & Prompts 25
CHAPTER 2: SEVEN PLUS SET UP 29
2.1 Charging Your Receiver Battery 31
2.2 The Settings Menu 32
2.2.1 Setting your Receiver Time and Date 32
2.2.2 Setting your Transmitter ID 33
2.2.3 About STS Screen 34
2.3 Setting your Alerts 35
2.3.1 Factory Alert Settings 35
2.3.2 Setting Glucose Alerts 36
2.3.3 Setting Other Alerts 38
2.3.4 Setting Out of Range Alert 39
2.4 Auto Upload Meter Registration 40
CHAPTER 3: USING A SENSOR 43
3.1 Before You Start 45
3.2 Removing the Sensor From Its Packaging 47
3.3 Choosing An Insertion Site 47
3.4 Placing the Sensor 48
3.5 Sensor Insertion 49
3.6 Transmitter Attachment 50
3.7 Transmitter and Receiver Communication 52
table of contents
Page 11
SEVEN PLUS User’s Guide | 11
3.8 Beginning a Sensor Session 53
3.9 Sensor Start-Up Period 54
3.10 The SEVEN PLUS and Water 54
3.11 Taping the Sensor Pod 54
CHAPTER 4: CALIBRATING YOUR SEVEN PLUS 55
4.1 How to Calibrate 57
4.1.1 Using OpenChoice for Calibration 58
4.1.2 Using Auto Upload for Calibration 60
4.2 Start-Up Calibration 62
4.3 Calibration Update 63
4.4 Re-Calibration (Blood Drop in Status Box “ ”) 64
CHAPTER 5: CONTINUOUS GLUCOSE READINGS, 65
TRENDS, ALERTS AND ALARM
5.1 Glucose Readings 68
5.2 Glucose Trends 70
5.3 Glucose Alerts and ALARM 72
5.3.1 High Glucose Alert 72
5.3.2 Low Glucose Alert 73
5.3.3 Low Glucose ALARM 73
5.3.4 Rise and Fall Glucose Rate Alerts 74
5.4 Glucose Status 75
5.4.1 Glucose Status Box Symbols 75
5.4.2 Missing Glucose Readings 76
5.4.3 System Glucose Errors 76
5.4.4 Out of Range/No Antenna 77
5.5 Temporary Sensor Shut Down 78
CHAPTER 6: DIABETES MANAGEMENT TOOLS 79
6.1 Diabetes Events 81
6.1.1 How To Enter An Event 81
6.1.2 Carbohydrates 82
6.1.3 Insulin 82
6.1.4 Exercise 83
6.1. 5 Hea lth 83
6.2 Data Manager Software 84
Page 12
12 | SEVEN PLUS Continuous Glucose Monitoring System
contents
CHAPTER 7: COMPLETING YOUR CONTINUOUS
GLUCOSE MONITORING SESSION 85
7.1 Automatic Sensor Shut-Off 88
7.2 Early Sensor Shut-Off 88
7.2.1 Early Shut-Off – Sensor Failure 89
7.2.2 Manual Sensor Shut-Off – “Stop Sensor” 89
7.3 Transmitter Removal 90
CHAPTER 8: TROUBLESHOOTING 91
8.1 Sensor Insertion Troubleshooting 93
8.2 Calibration Troubleshooting 94
8.2.1 Connection Failure And New Meter Screens (Auto Upload Only) 94
8.2.2 Blood Drop Prompts 95
8.2.2.1 Types of Blood Drop Prompts 95
8.2.2.2 Status Box Symbols During Blood Drop Prompts 96
8.3 Sensor Failed Troubleshooting 98
8.4 Error Code Troubleshooting 98
8.5 Receiver and Cables Troubleshooting 99
CHAPTER 9: TAKING CARE OF YOUR SEVEN PLUS 101
9.1 Maintenance 103
9.2 Storage 104
9.3 Cleaning 104
CHAPTER 10: TECHNICAL INFORMATION 105
10.1 Device Performance Characteristics 107
10.2 Product Specications 122
10.3 FCC Requirements 131
CHAPTER 11: 133
APPENDIX 1, OTHER ALERTS 135
INDEX 138
table of contents
Page 13
SEVEN PLUS User’s Guide | 13
1
chapter one
THE SEVEN PLUS BASICS
Page 14
14 | SEVEN PLUS Continuous Glucose Monitoring System
1
Page 15
SEVEN PLUS User’s Guide | 15
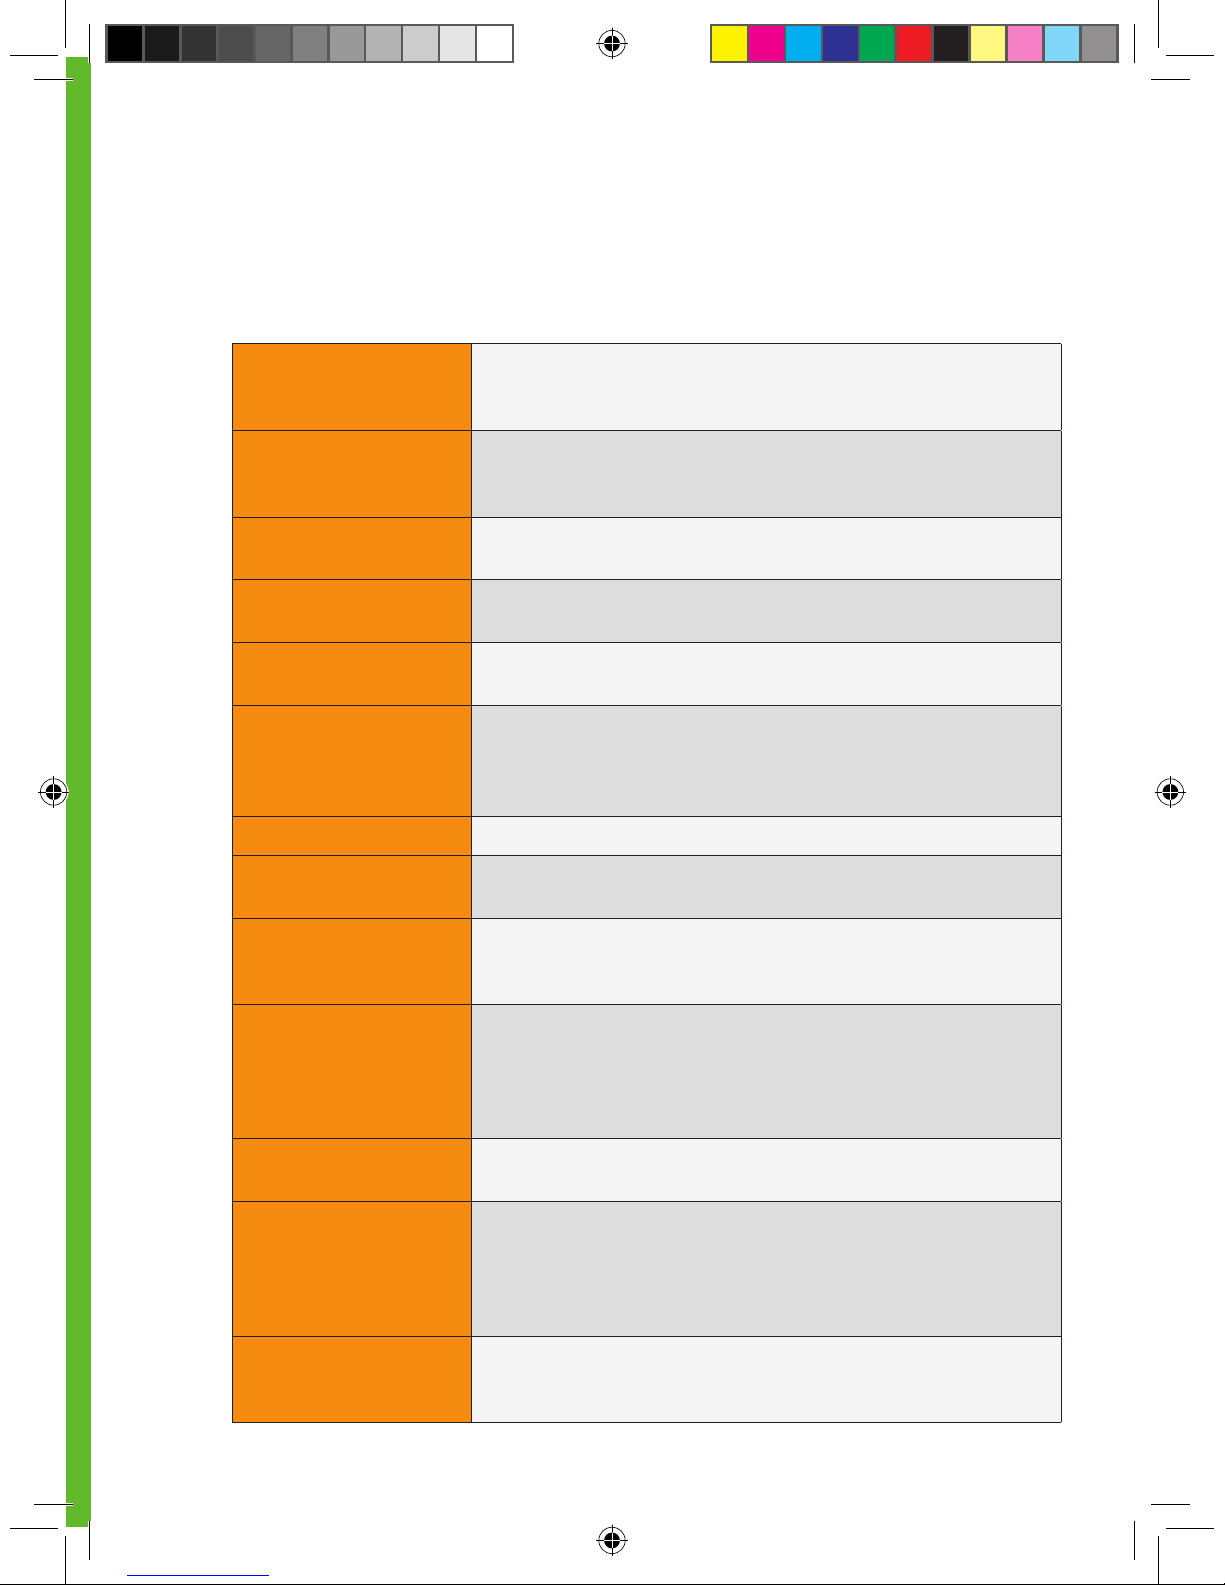
1.1 GLOSSARY
The following list of terms will help you while reading though this guide:
Alternative Site
Testing (BG)
This is when you take ngerstick readings from somewhere on your body
other than your ngertip. Do not use
alternative site testing with the SEVEN PLUS.
Applicator
A disposable piece that comes attached to the Sensor Pod, and inserts
the Sensor Probe under the skin. There is a needle inside the Applicator
that you remove once you have inserted the Sensor Probe.
Auto Upload
To transfer ngerstick readings from the OneTouch Ultra Meter to your
Receiver directly with the optional Connection Cable.
BG meter
Blood Glucose Meter. You can use any FDA-cleared meter with the
OpenChoice feature on your SEVEN PLUS.
BG reading
Blood Glucose reading. A ngerstick blood glucose reading taken with
your FDA-cleared blood glucose meter.
Calibration
This is when you transfer ngerstick readings into the SEVEN PLUS using
Auto Upload or the OpenChoice feature. Calibrations are needed for your
SEVEN PLUS to display continuous glucose readings and trend information.
(Do not use alternative site testing for calibration.)
Default
A setting that is selected automatically unless another option is chosen.
FDA-cleared
The product has met the U.S. Food and Drug Administration’s standards
and may be sold legally in the United States.
Glucose Data Gaps
This can happen when the Receiver does not display a glucose reading
that is sent from the Transmitter. A symbol will appear instead of a glucose reading to let you know that the Receiver cannot display a reading.
Glucose Trends
Trends let you see the pattern of your glucose levels; you can see
where your glucose levels have been and where your glucose levels are
headed. The SEVEN PLUS has ve glucose Trend Graphs: the 1-Hour,
3-Hour, 6-Hour, 12-Hour, and 24-Hour Graphs. Each Trend Graph shows
glucose trends over the amount of time shown on the screen.
mg/dL
Milligrams per deciliter. The standard unit of measure for glucose readings in the United States.
OpenChoice
To transfer ngerstick readings from an FDA-cleared meter to your
Receiver by hand-entering the readings using the “Enter BG” option
from the menu. You should always use the same meter to calibrate your
SEVEN PLUS that you routinely use to measure your blood glucose. Do
not switch your BG meter in the middle of Sensor wear.
Range
The distance between the Receiver and Transmitter. Keep the 2 devices
within 5 feet (1.5 meters) from each other to get glucose information on
your Receiver
Page 16
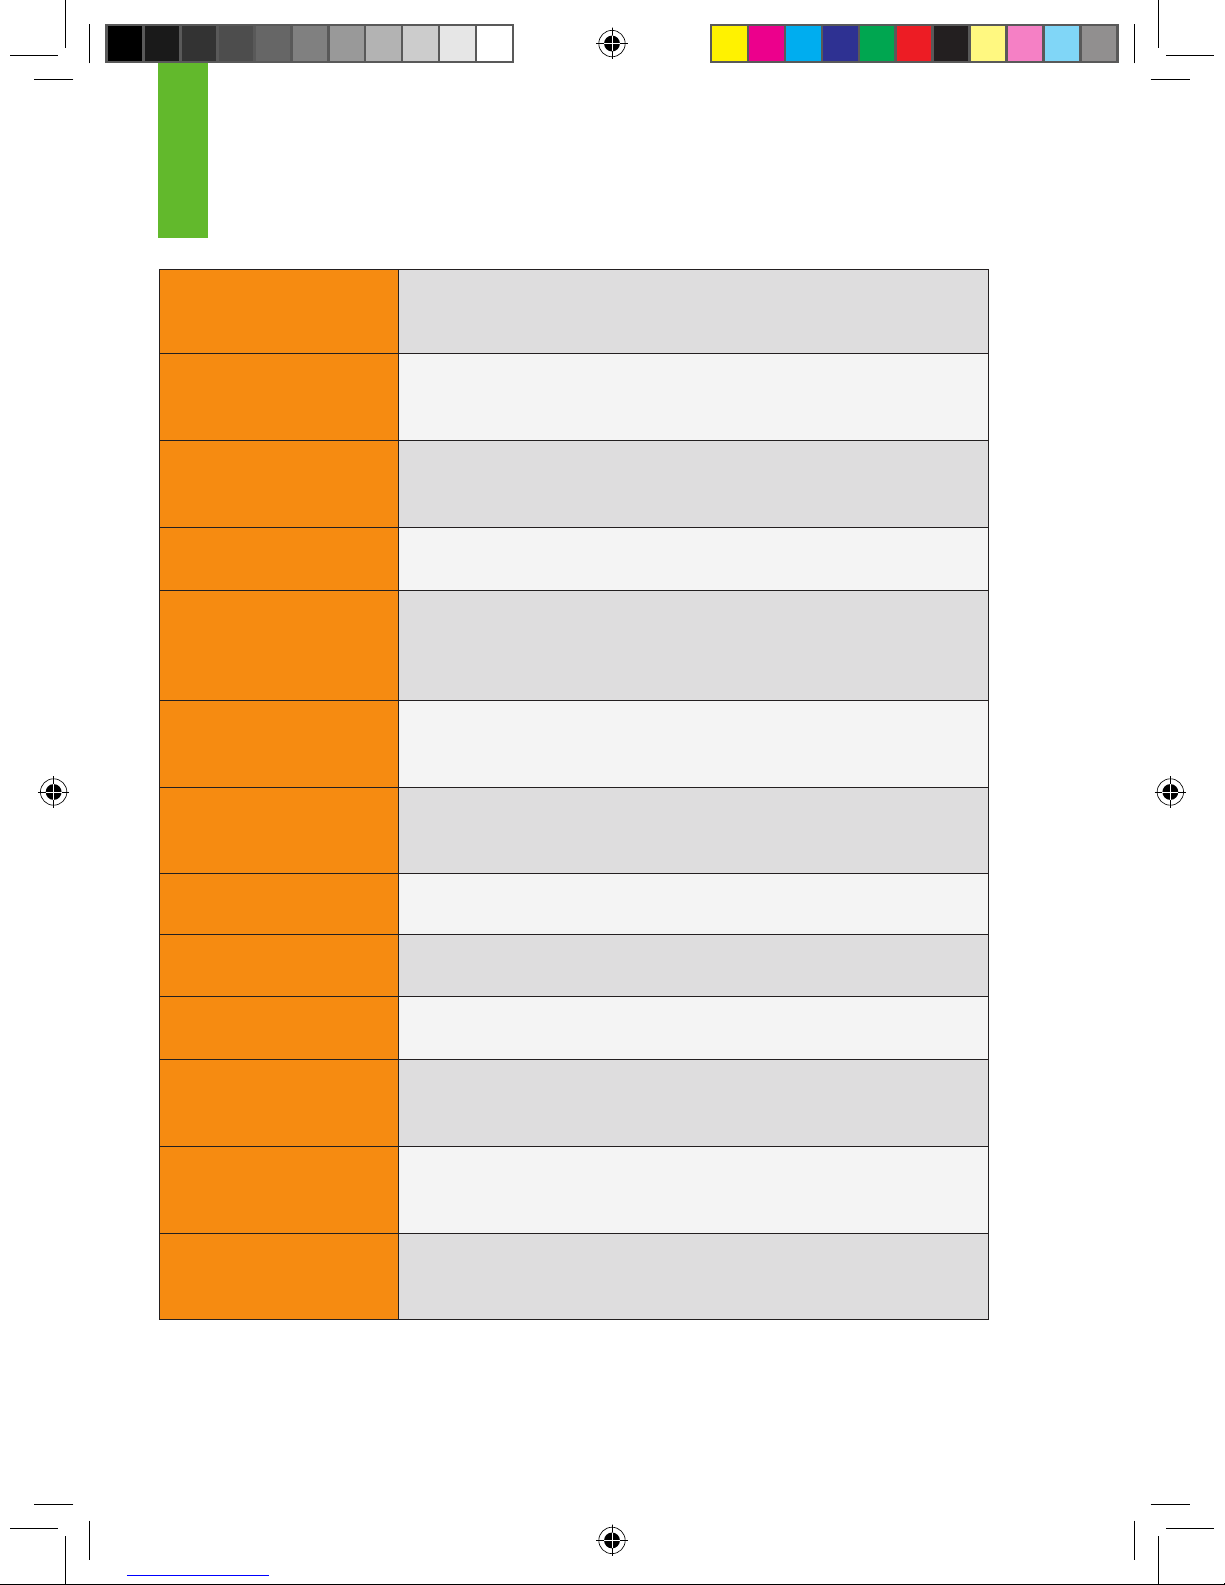
16 | SEVEN PLUS Continuous Glucose Monitoring System
Rise and Fall
(Rate of Change)
Alerts
Alerts based on how fast your glucose levels rise/fall.
Receiver
A cell-phone-like device, which collects your glucose
information from the Transmitter. Your results are displayed on the
screen as a SEVEN PLUS reading (mg/dL) and trend.
Register
To connect a OneTouch Ultra Meter to the Receiver using the Connection Cable to make sure the date and time match. This lets the Receiver
accept Auto Uploads.
RF
Radio-Frequency transmission used to send glucose
information from the Transmitter to the Receiver.
Safety Lock/
Transmitter Key
The Safety Lock keeps the needle inside the Applicator before you are
ready to insert. It also helps you snap the Transmitter out of the Sensor
Pod after your glucose
monitoring session has ended.
Sensor Pod
The small base of the Sensor attached to your belly that holds the
Transmitter in place. The Sensor Pod and Transmitter are all that remain
on your skin during each Sensor use.
Sensor Probe
The part of the Sensor that is inserted under your skin
with the Applicator. It measures the glucose levels in your surrounding
tissue uid.
SEVEN PLUS
SYSTEM
The Sensor, Transmitter, and Receiver.
SEVEN PLUS
Reading
A glucose reading shown on your Receiver. This reading is given in mg/
dL units and is updated every 5 minutes.
Sensor
The SEVEN device that is inserted under the skin to
continuously monitor your glucose levels.
Start-Up Period
The 2-hour “countdown” period after you tell the Receiver you have
inserted a new Sensor (Glucose information cannot be provided during
this time).
Status Box
The upper right corner of the Receiver Trend Graph. Once you calibrate,
there will be a glucose reading or a symbol telling you why a glucose
reading is not available.
Transmitter
The SEVEN PLUS device that snaps into the
Sensor Pod and wirelessly sends glucose information
to your Receiver.
1
Page 17
SEVEN PLUS User’s Guide | 17
Transmitter ID
Transmitter ID Number that is entered into your Receiver to talk to the
Transmitter.
Transmitter Latch
The small disposable piece that snaps the Transmitter into the Sensor
Pod. It is removed after the Transmitter is snapped in.
Trend Arrows
(Rate of Change)
Arrows on your Receiver screen that appear below your glucose reading
to indicate how fast your glucose levels are changing. The SEVEN PLUS
has 7 different Arrows, which show you when your glucose speed and
direction change.
Page 18
18 | SEVEN PLUS Continuous Glucose Monitoring System
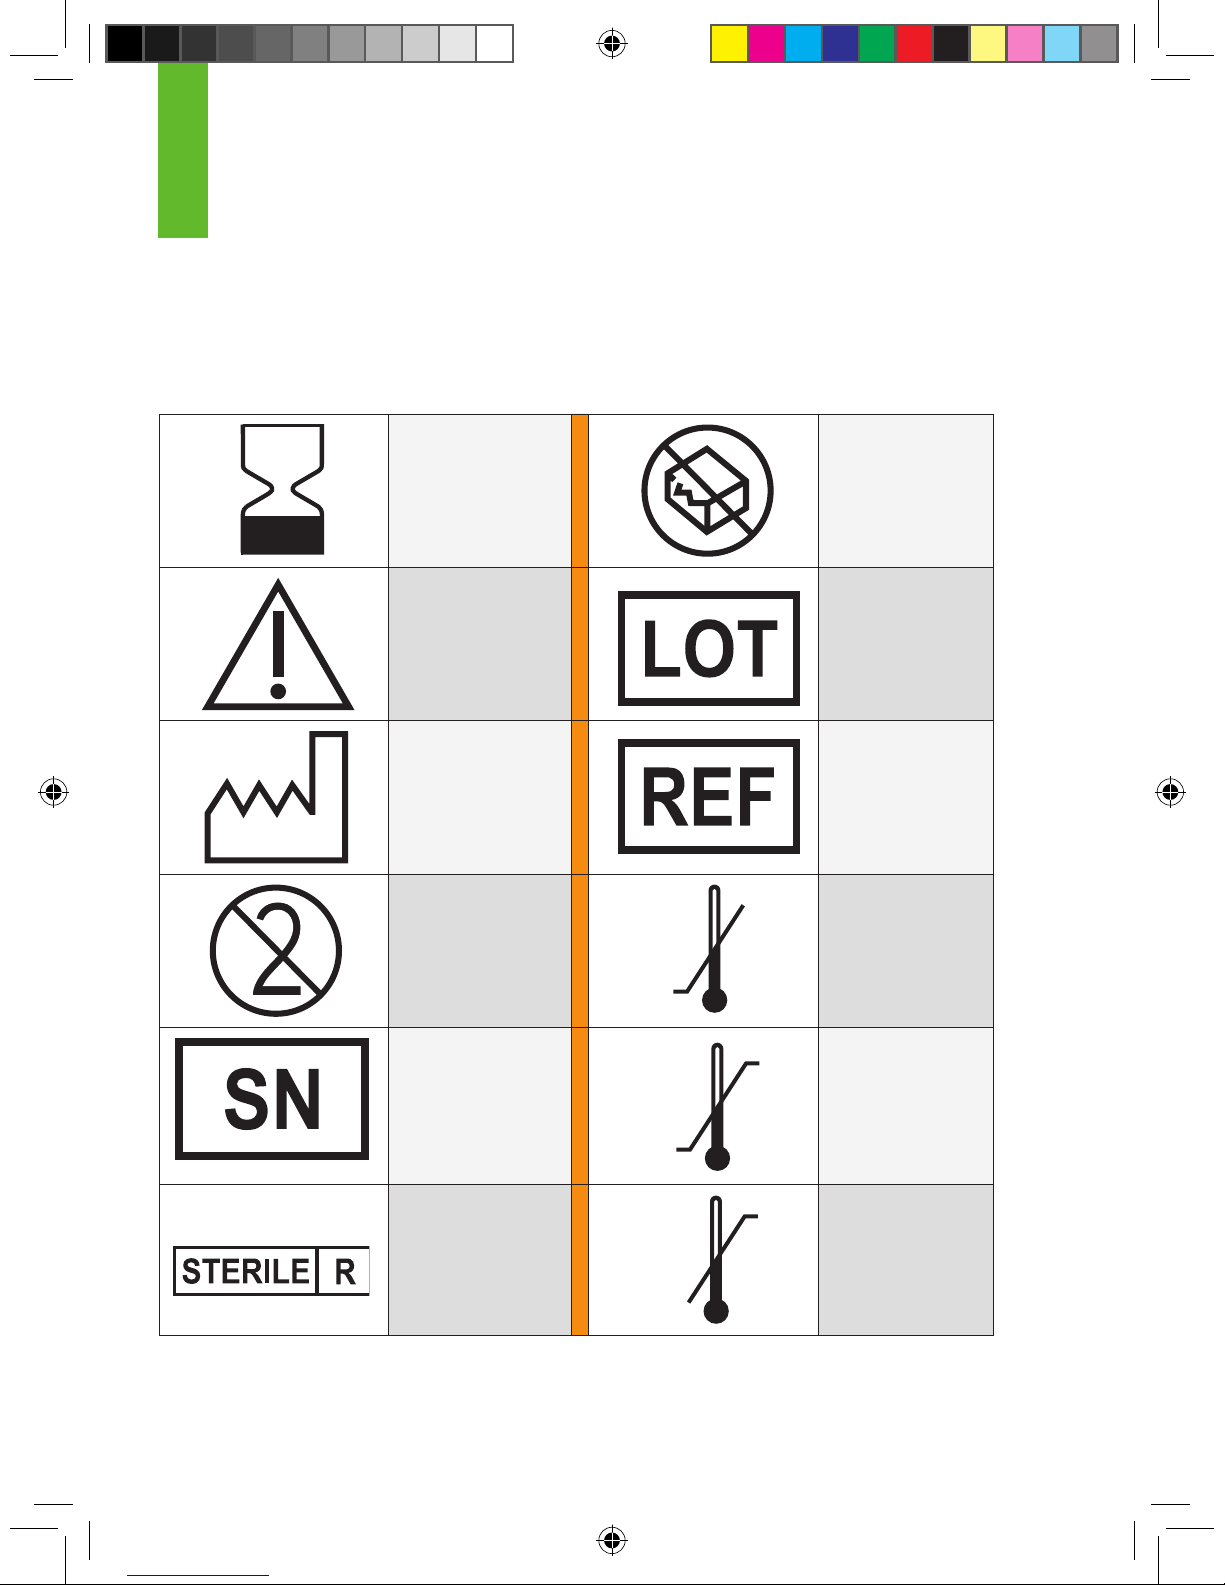
1.2 SYMBOLS USED IN LABELING
The following symbols may be found on the Sensor, Transmitter, and Receiver package labels.
These symbols tell you about the proper and safe use of the SEVEN PLUS. This table shows
what each symbol means.
“ Use By” Date Do Not Use
If Package Is
Damaged
Caution Lot Number
Date of
Manufacture
Part Number,
Catalog
\Number
Do Not Reuse Lower
Limit of
Temperature
Serial Number Two-sided
Temperature
Limits
Sterilized by
Radiation
Upper
Limit of
Temperature
1
Page 19
SEVEN PLUS User’s Guide | 19
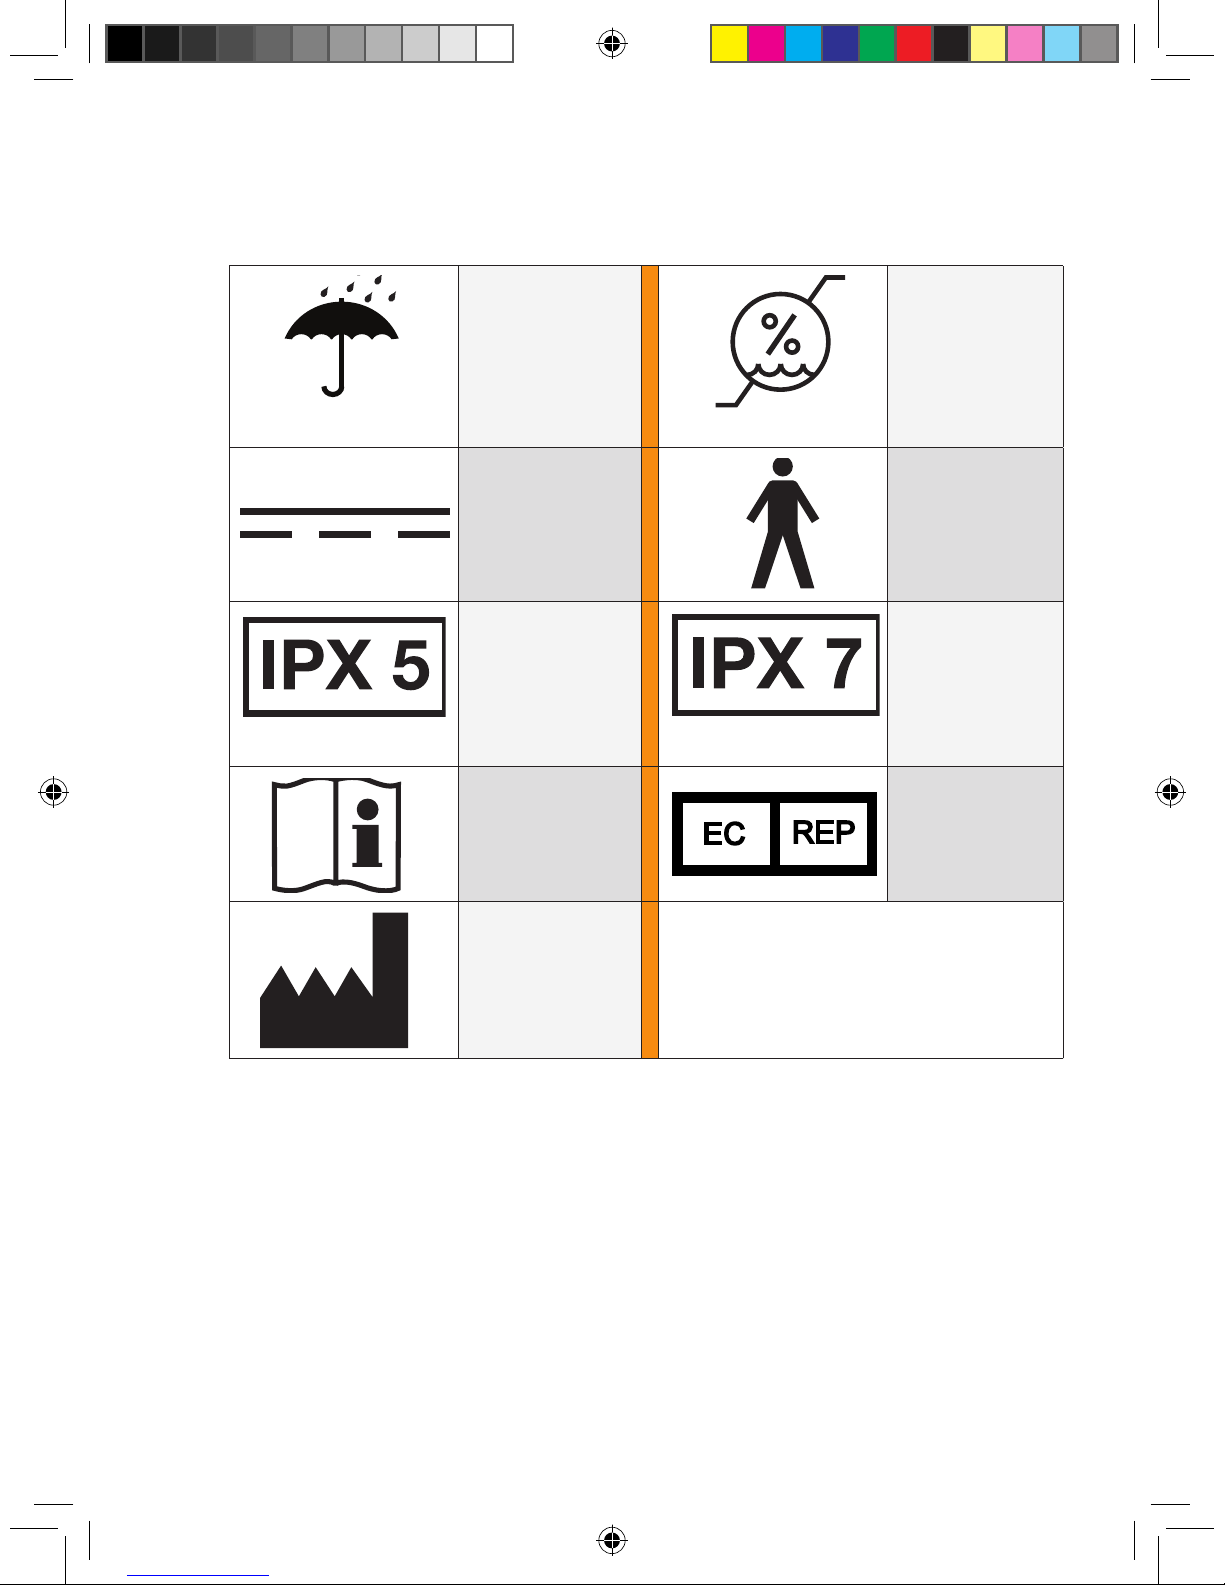
Keep Dry Humidity
Limitation
Direct Current Type B
Applied
Part
Water resistant
to jetting water
Temporary
submersion to
a depth of 1
meter for 30
minutes
Follow
Operating
Instructions
Authorized
Representative
in the European
community
Manufacturer
Page 20
20 | SEVEN PLUS Continuous Glucose Monitoring System
1.3 SENSOR OVERVIEW
The Sensor is a device that continuously measures your glucose levels. You will use a Blood
Glucose meter to calibrate your glucose readings measured by the Sensor. The Transmitter
collects the Sensor readings and sends them to the Receiver using wireless, radio frequency
(RF) technology. This happens every 5 minutes for up to 7 days.
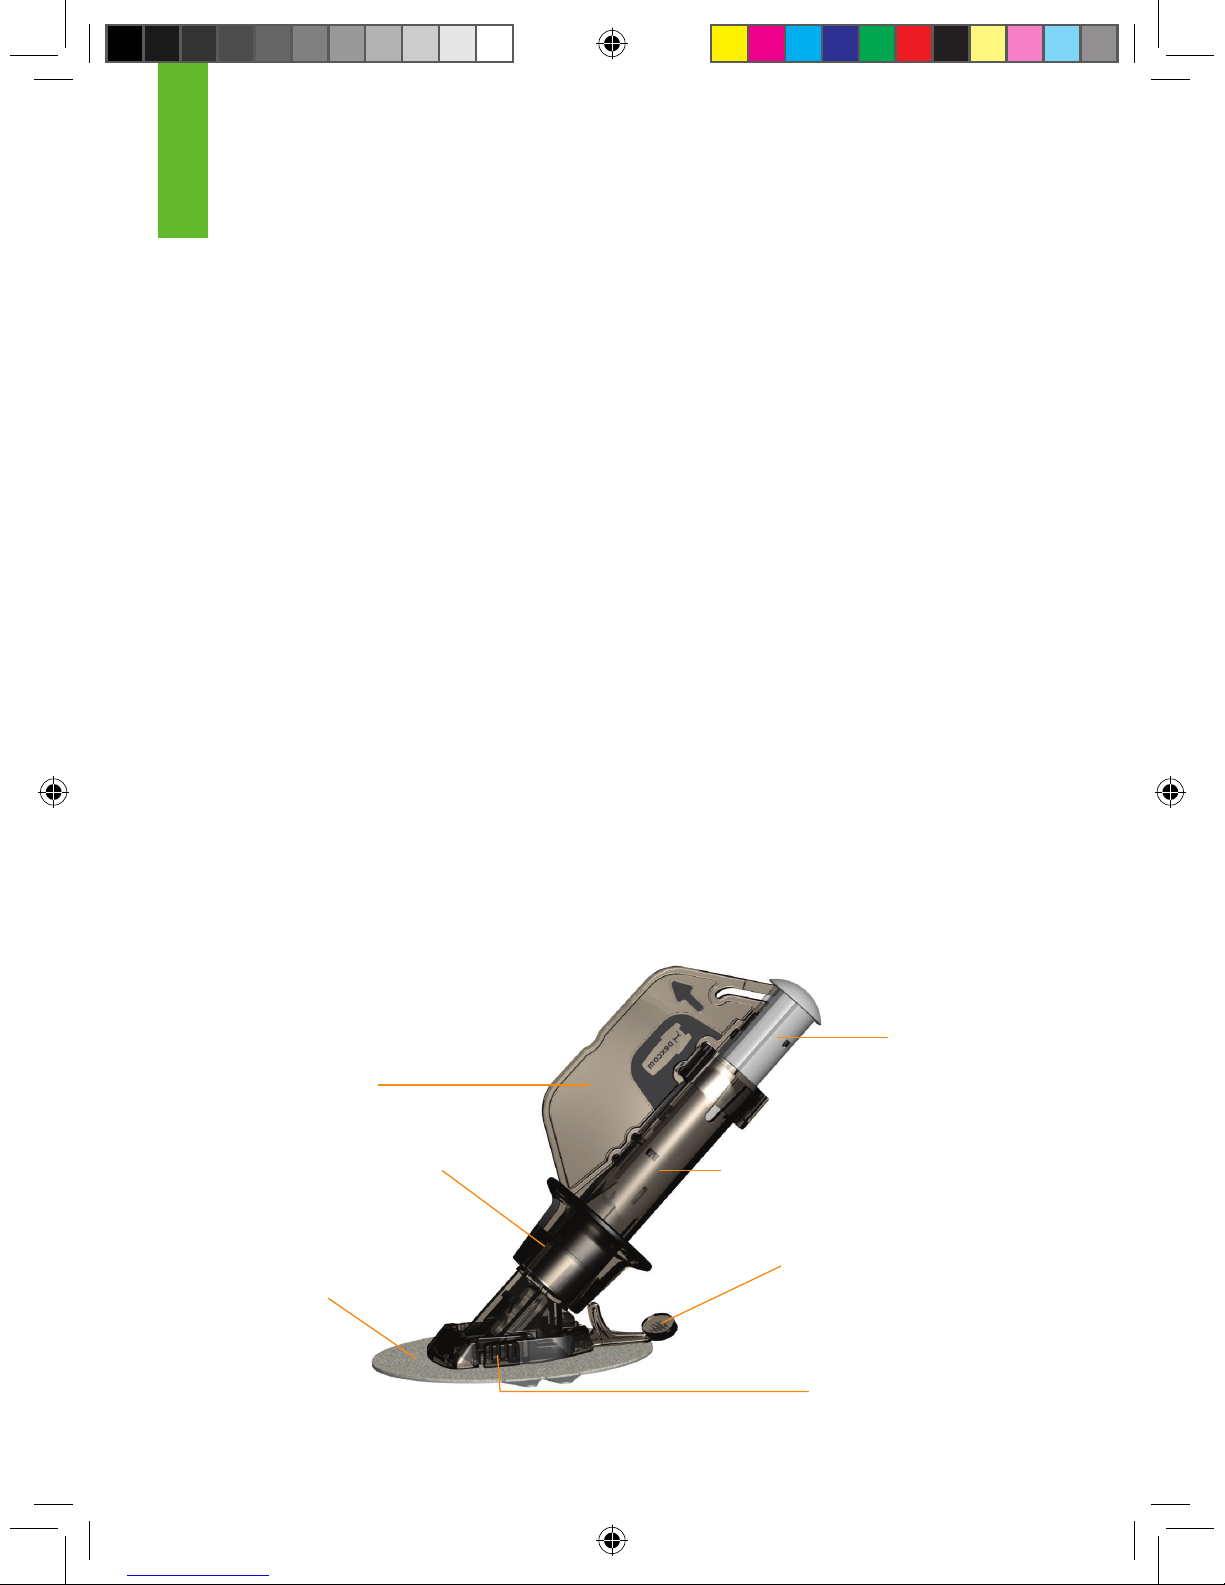
The Sensor unit has an Applicator (needle, sensor, plastic housing), Sensor Probe, and Sensor
Pod. The Applicator includes a Safety Lock/Transmitter Key to keep the needle in place until you
are ready to insert. After taking off the Safety Lock, you will insert the Sensor Probe just beneath
the skin (subcutaneous tissue) of your belly using a small needle inside the Applicator. The
needle is inserted just under the skin at an angle and carries the Sensor Probe with it. After you
insert the needle and Sensor Probe, you will pull the needle back into the Applicator. Doing this
leaves the Sensor Probe behind to continuously measure your glucose levels. The Applicator,
with the needle inside, is pulled off from the Sensor Pod and should be thrown away. Save the
Safety Lock/Transmitter Key because you can use it to remove the Transmitter at the end of a
continuous monitoring session.
The Sensor Probe lies underneath your skin at an angle and continuously measures your glucose
levels for up to 7 days. The Sensor Pod and Transmitter (once snapped in) remain on your belly
for the entire Sensor wear period. The Sensor insertion site is similar to an insulin pump infusion
site.
1
Plunger
Applicator
(needle/sensor probe inside)
Transmitter Latch
Safety Lock/
Transmitter Release
Collar
Sensor Pod
Release Tab
Page 21
SEVEN PLUS User’s Guide | 21
1.4 TRANSMITTER OVERVIEW
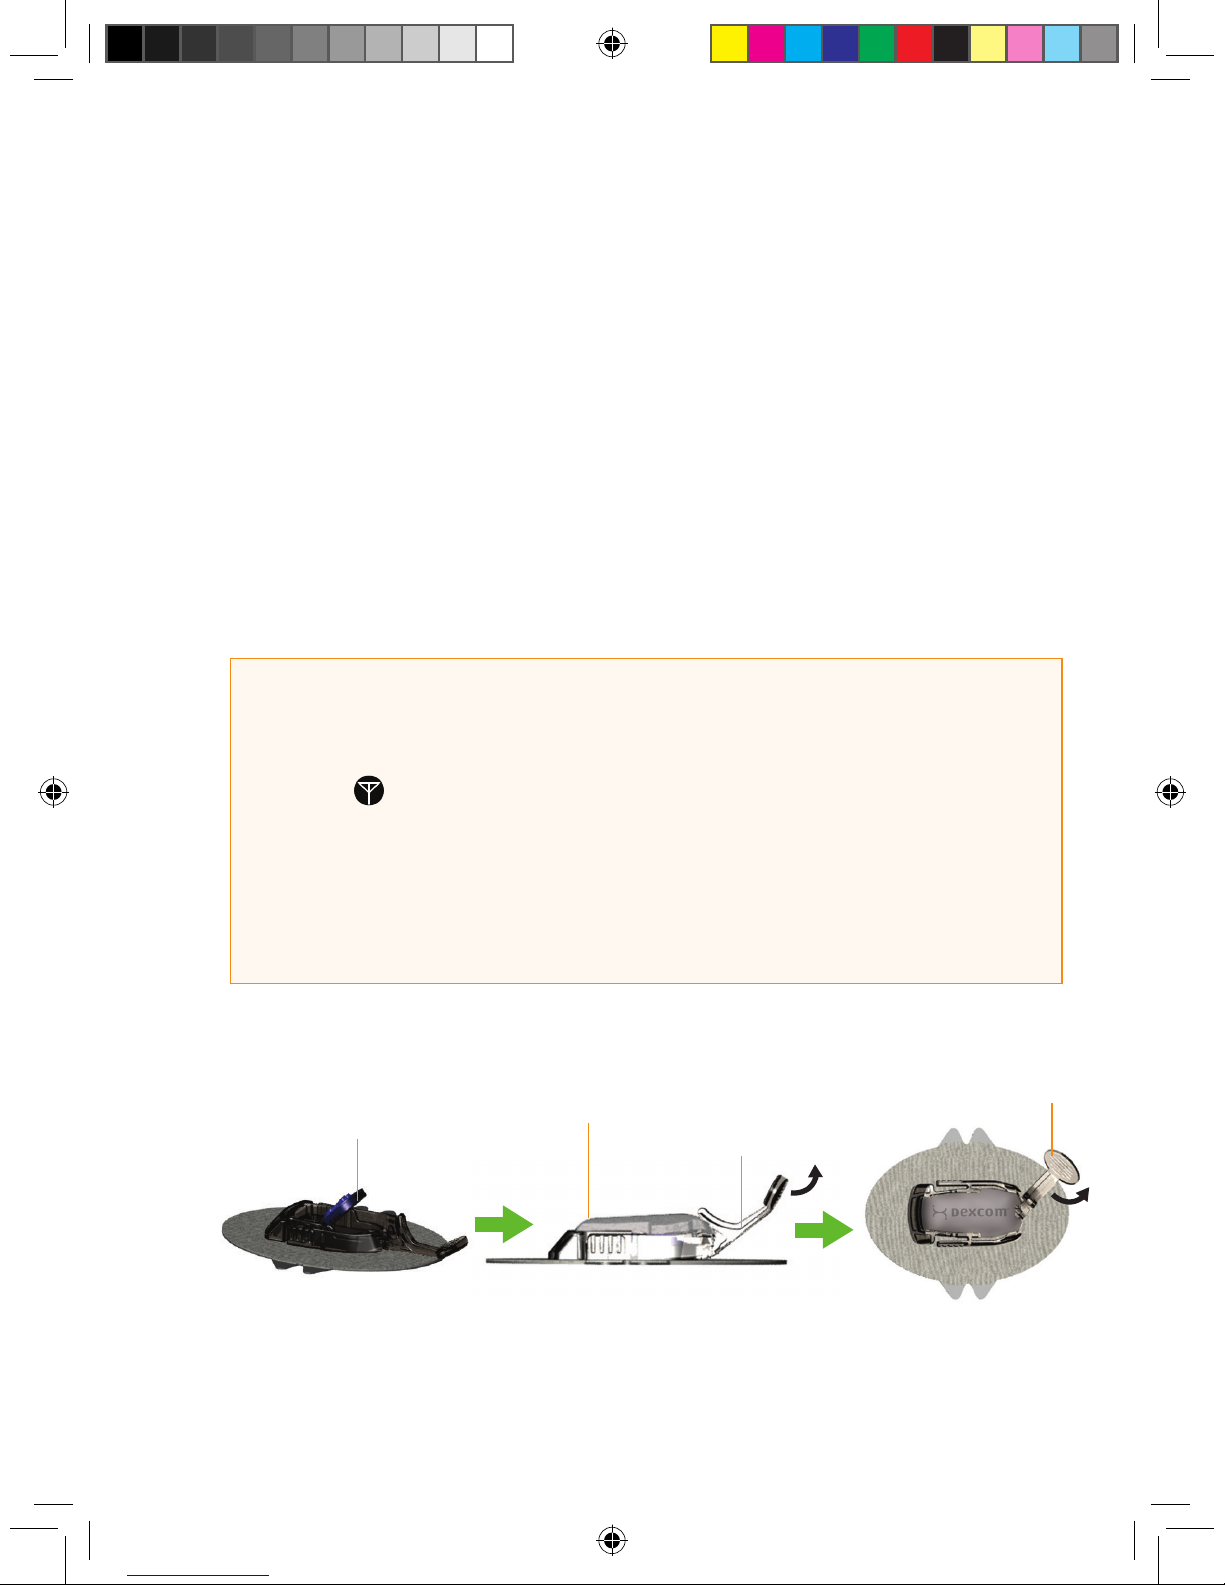
The Transmitter wirelessly sends your glucose information from the Sensor to the Receiver. Once
you insert the Sensor, you will snap the Transmitter into the Sensor Pod using the Transmitter
Latch. The same Transmitter is used when you change Sensors.
As the Transmitter nears the end of its battery life, it can sometimes lose communication with the
Receiver. This can happen even if the Receiver and Transmitter are within 5 feet (1.5 m) of each
other. Once the Transmitter battery has drained, you will need to replace the Transmitter because
it can no longer communicate (talk) to the Receiver. You can easily set up a new Transmitter
to talk with your Receiver (see Chapter 2, Section 2.2.2, “Setting your Transmitter ID”).
HELPFUL HINTS:
• Your Transmitter is re-used for many Sensor uses (1-year warranty).
• If you see in place of a glucose reading: This can happen even when your
Transmitter and Receiver are within 5 feet of each other. Contact Technical Support at
1-888-SEVENGO (738-3646) to determine if you need to purchase a new Transmitter.
• The Receiver and Transmitter are designed and tested to withstand common
electromagnetic interference, including airport security systems.
Install Transmitter
in Sensor Pod
Transmitter Installed
Transmitter Latch
Remove
Transmitter Latch
Page 22
22 | SEVEN PLUS Continuous Glucose Monitoring System
1.5 RECEIVER OVERVIEW
The Receiver looks like a cell phone and shows your Sensor-measured glucose information. The
SEVEN PLUS only shows glucose readings in the milligrams per deciliter (mg/dL) unit of measure.
In the United States, mg/dL is the standard unit used for glucose testing systems (i.e., blood glucose
meters). Please check with your Diabetes Management Team if you do not know which type of unit
your glucose readings are usually displayed in.
Keep the Receiver within 5 feet (1.5 m) of the Sensor and Transmitter at all times for your SEVEN
PLUS to work the best. Good places to keep the Receiver are on your belt in the leather receiver
case provided or in your pocket.
The Receiver is re-chargeable. The re-chargeable battery will last for about 3-5 days before you
need to charge it with the Receiver Charging Cable. Your re-chargeable battery life depends on your
Alert settings and how often you use the Events Menu. The Receiver will tell you when the battery
charge is low. The Receiver takes 3 hours to charge fully if the battery is completely drained. To
charge the Receiver, plug the charger cable provided into a standard wall outlet.
1
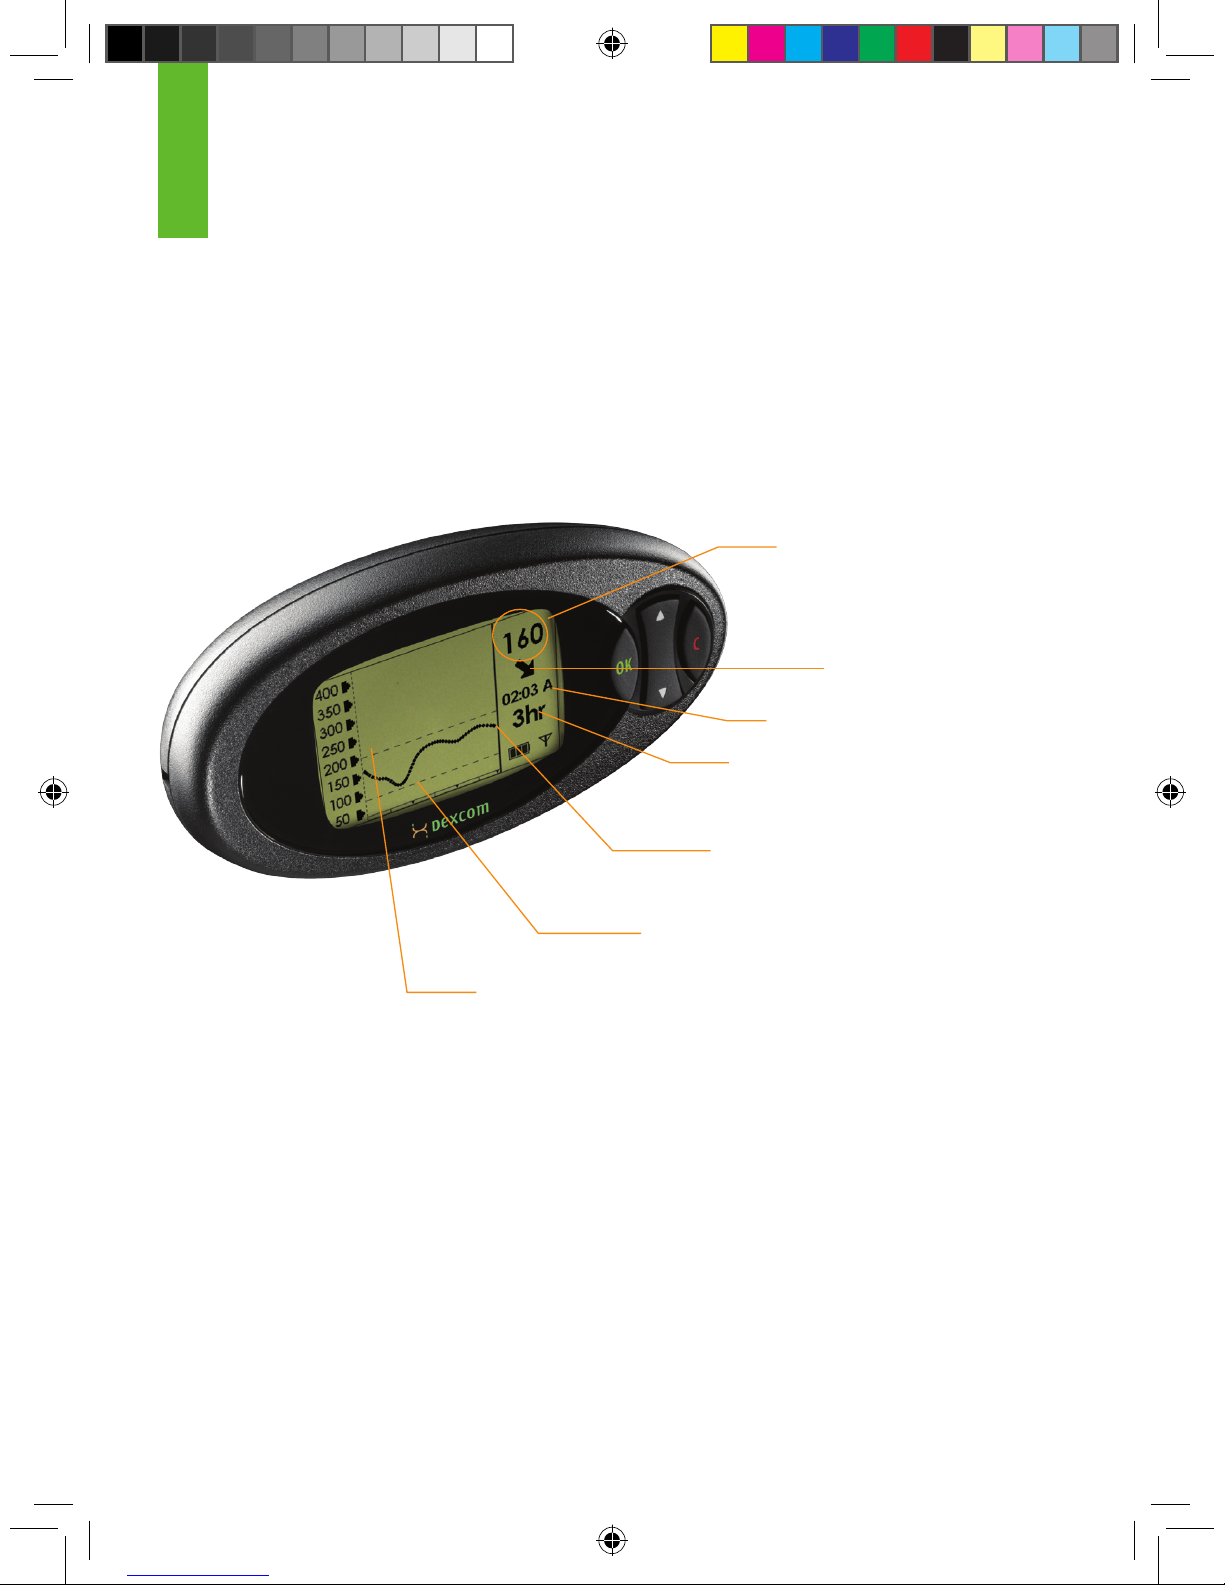
Most recent 5-minute glucose reading
(160 mg/dL)/ Status
Box
High Glucose
Alert Setting = 200 mg/dL (Default)
Trend Arrow
Plot of the most
recent glucose reading
(160 mg/dL) on the 3 hour
Glucose Trend Screen
Time (A=AM, P=PM)
Low Glucose
Alert Setting = 80 mg/dL (Default)
Trend Graph Hours
Page 23
SEVEN PLUS User’s Guide | 23
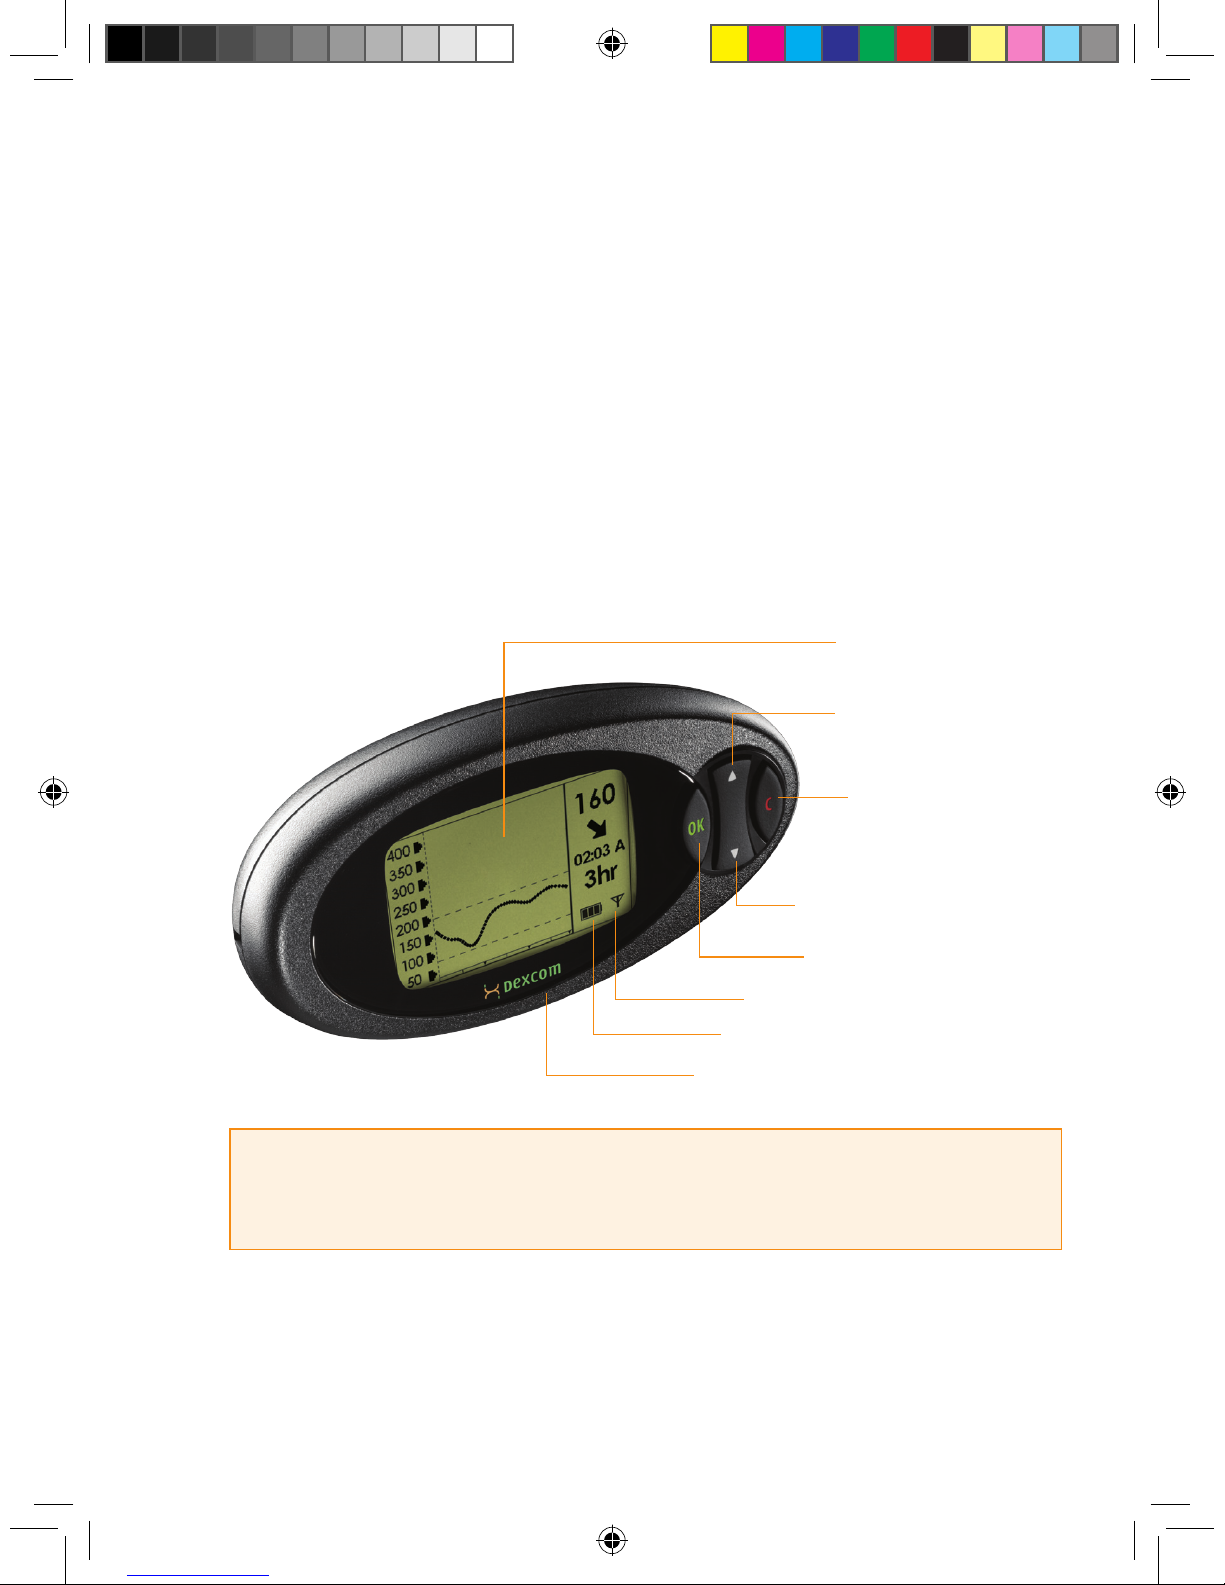
The Receiver has 4 buttons to move you through the screens. The screens display glucose
readings and trend graphs (“Trend Graphs”) and allow you to change your Receiver settings
(“Menu Screens”). The Receiver is programmed with a specic Transmitter ID Number so your
Receiver and Transmitter can talk with each other. Each time you insert a new Sensor, you will
need to notify the Receiver (see Chapter 3, Section 3.8, “Beginning a Sensor Session”).
Each Sensor must be “calibrated” before glucose readings are displayed on the Receiver.
To calibrate, you can hand enter ngerstick readings (see Chapter 4, Section 4.1.1, “Using
OpenChoice for Calibration”) from any FDA-cleared meter or you can calibrate with the OneTouch
Ultra meter using a Connection Cable
(see Chapter 4, Section 4.1.2, “Using Auto Upload for
Calibration”).
HELPFUL HINTS:
• During nighttime use you may want to place the Receiver under
your pillow or on your nightstand.
Receiver
Display Screen
Red C Clear Button
Down qA rrow Button
Connection port to OneTouch
Meter and battery charger
Green OK Button
Up p A rrow Button
Antenna Symbol
Battery Life Indicator
Page 24
24 | SEVEN PLUS Continuous Glucose Monitoring System
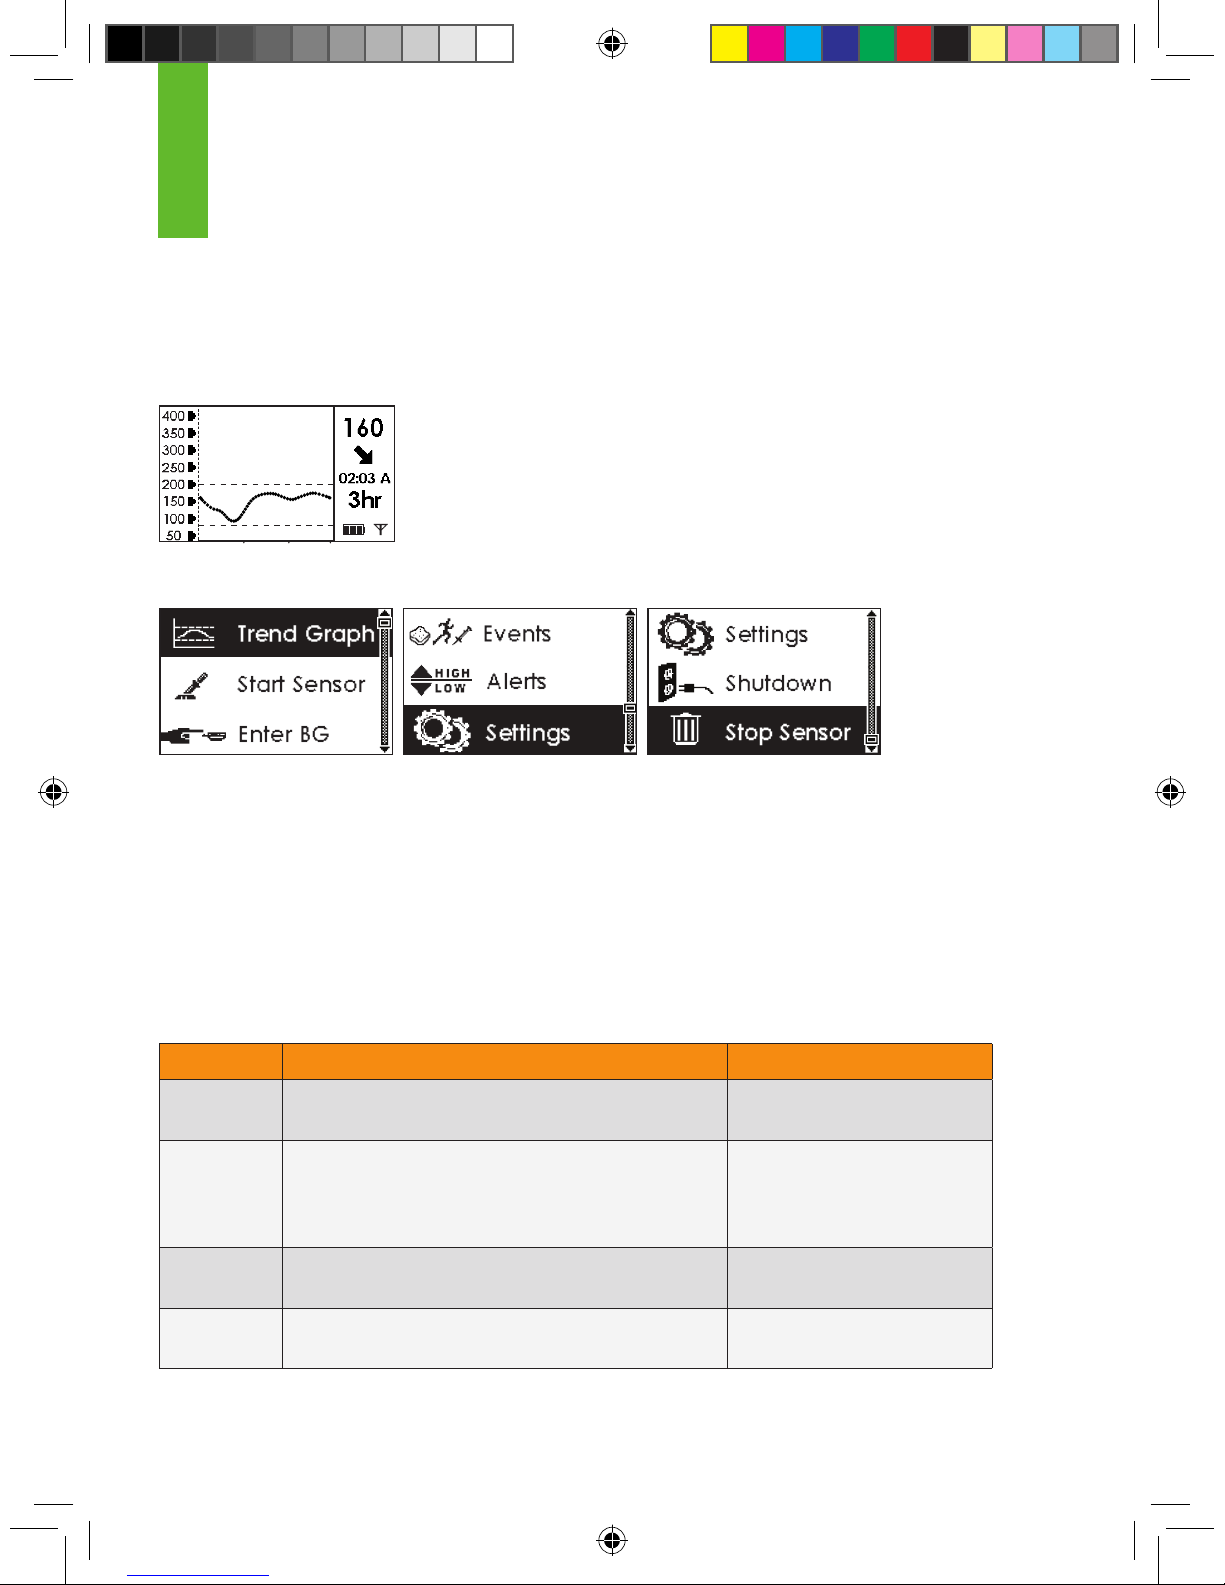
1.5.1 MOVING THROUGH THE RECEIVER SCREENS
1. Turn on the Receiver by pressing any button.
2. The Trend Graphs will appear.
a. The default screen is the 3-Hour Trend Graph, but you may see
additional glucose information over
time by pressing the Up p and Down q Arrow
buttons to see the 1-Hour, 6-Hour, 12-Hour, and
24-Hour Trend Graphs.
3. From any Trend Graph, press the OK button to enter the Menu Screens.
a. The Up p and Down q Arrow buttons allow you to scroll through and highlight different
Menus.
b. Press the OK button when the option you want is highlighted. You will then enter that
Menu.
c. Press the C button to return to the previous Menu.
4. More information on Receiver Menus can be found in the sections listed below:
Menu Purpose User’s Guide Reference
Trend
Graph
To return to the Trend Graphs Section 5.1
Start
Sensor
To start a new Sensor.
• This option only appears if a Transmitter ID has been
entered and if you are not in the middle of using a
Sensor
Section 3.8
Enter BG To enter your ngerstick blood glucose
readings for calibration (OpenChoice)
Section 4.1.1
Events To enter information about meals, insulin, exercise,
and health
Section 6.1
1
Page 25
SEVEN PLUS User’s Guide | 25
Alerts To change the settings for Alerts and
notications from your Receiver, including High, Low,
Out of Range, Rate of Change, and Other Alerts
Section 2.3
Settings To change the time and date and
Transmitter ID number and to look up your SEVEN PLUS’
hardware and software
numbers
Section 2.2
Shutdown To temporarily turn off all communications between
your Sensor, Transmitter and Receiver
Section 5.5
Stop
Sensor
To end a Sensor wear session early
• This option only appears in the middle of Sensor use
Section 7.2
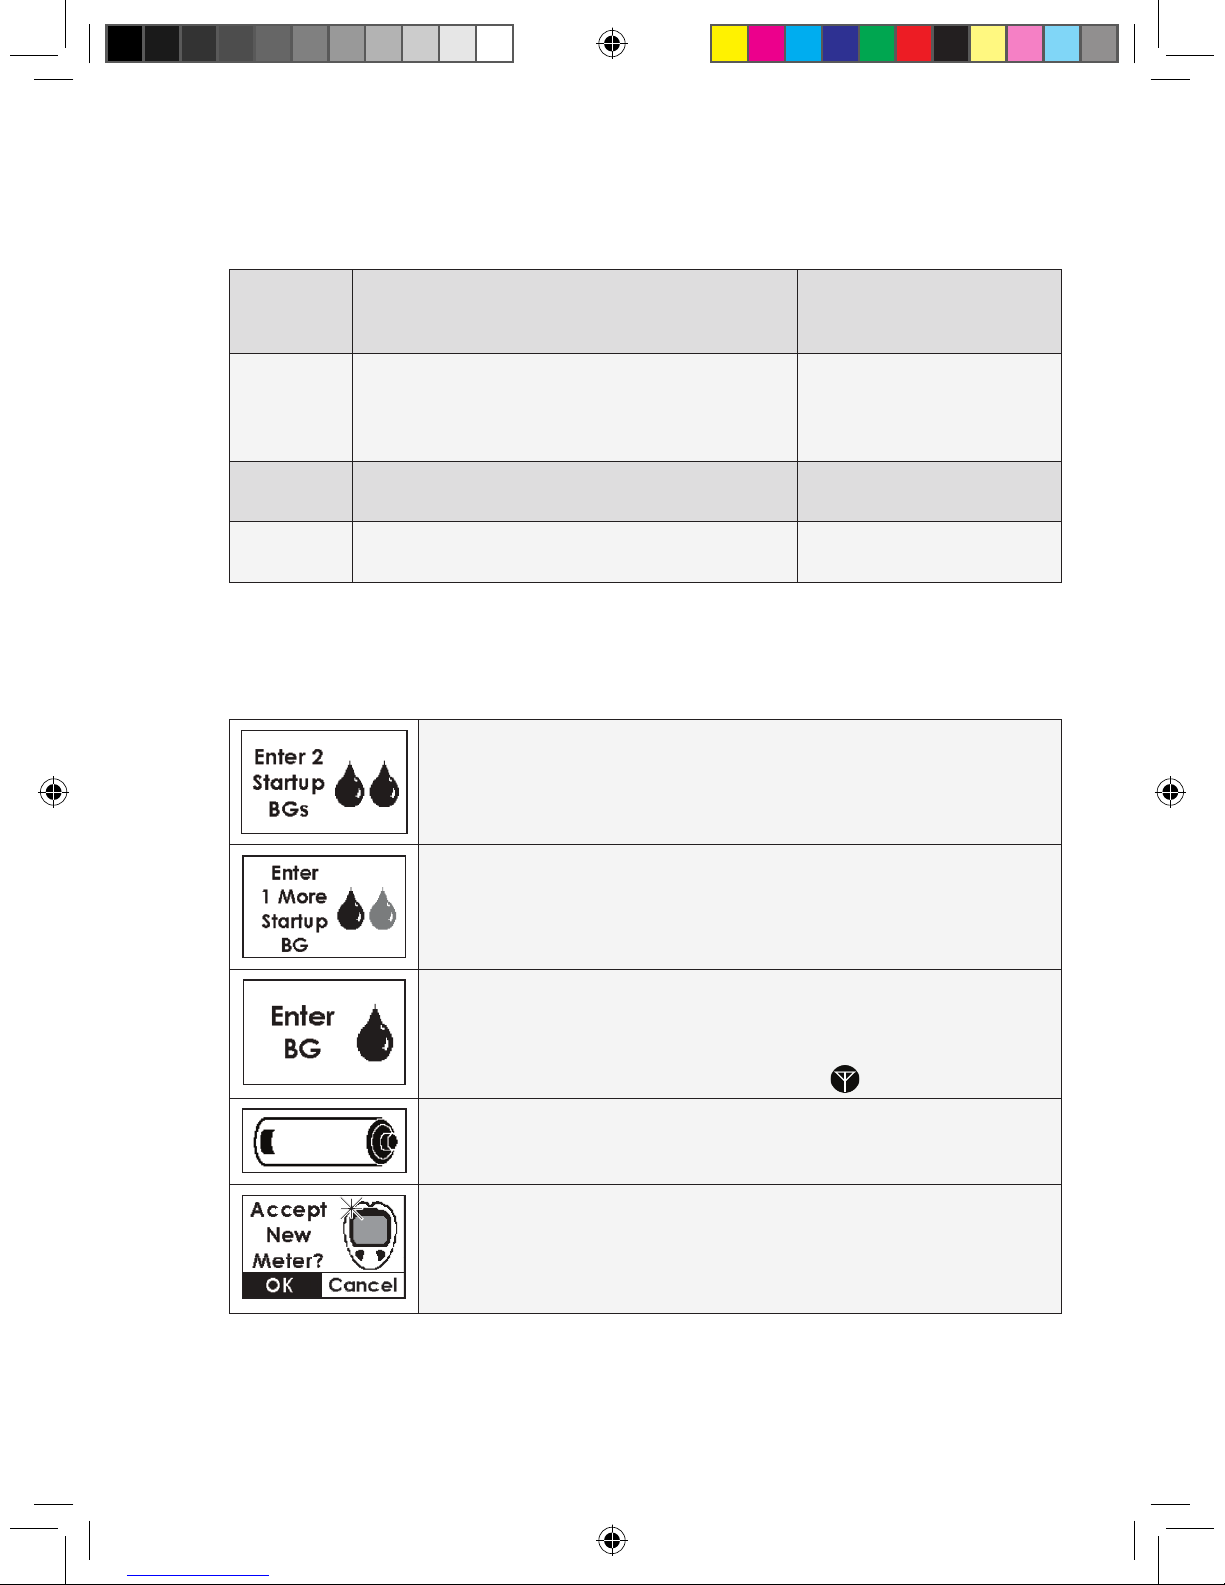
1.5.2 RECEIVER SCREENS & PROMPTS
The following prompt screens may appear on the Receiver during use:
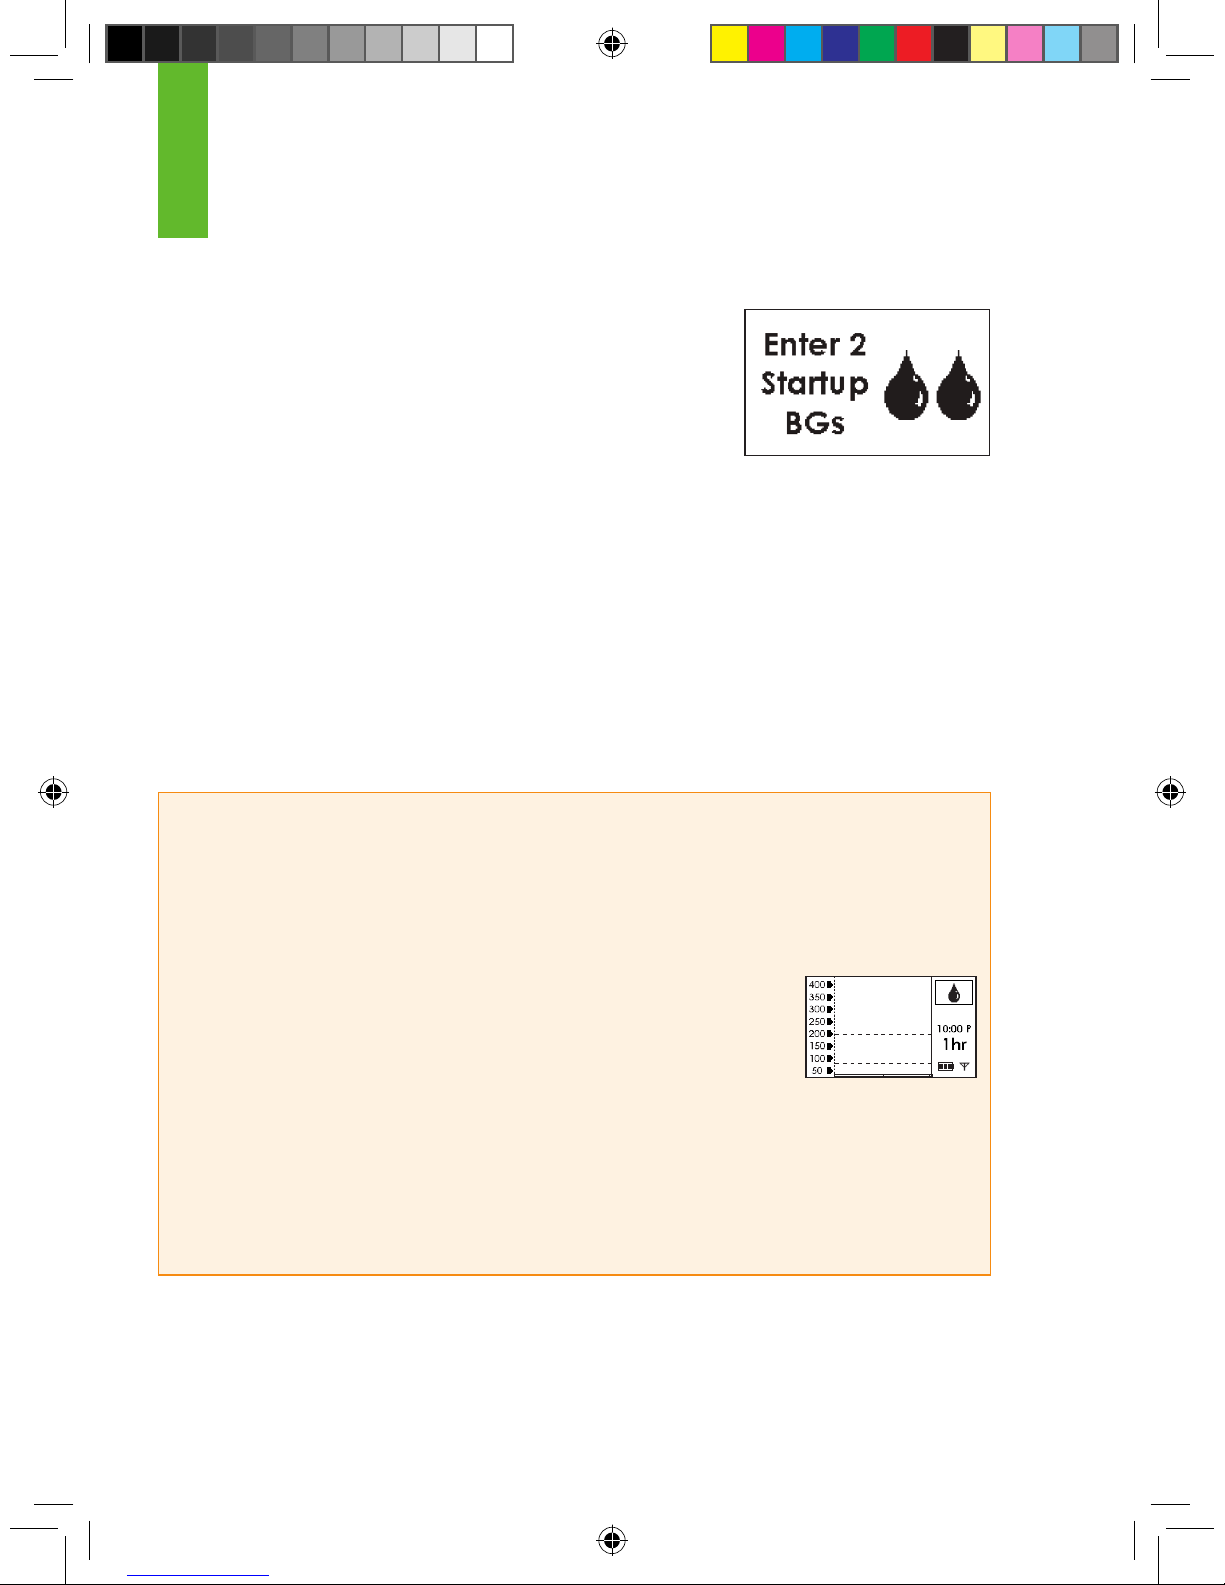
DOUBLE BLOOD DROP PROMPT: Appears about 2 hours after you
insert a new Sensor and tells you that you need to take 2
ngerstick readings on your meter and enter them to calibrate.
SHADED-OUT BLOOD DROP PROMPT: This tells you that only
1 ngerstick reading has been successfully entered. You need to take and enter
at least 1 more ngerstick reading using your
meter for calibration.
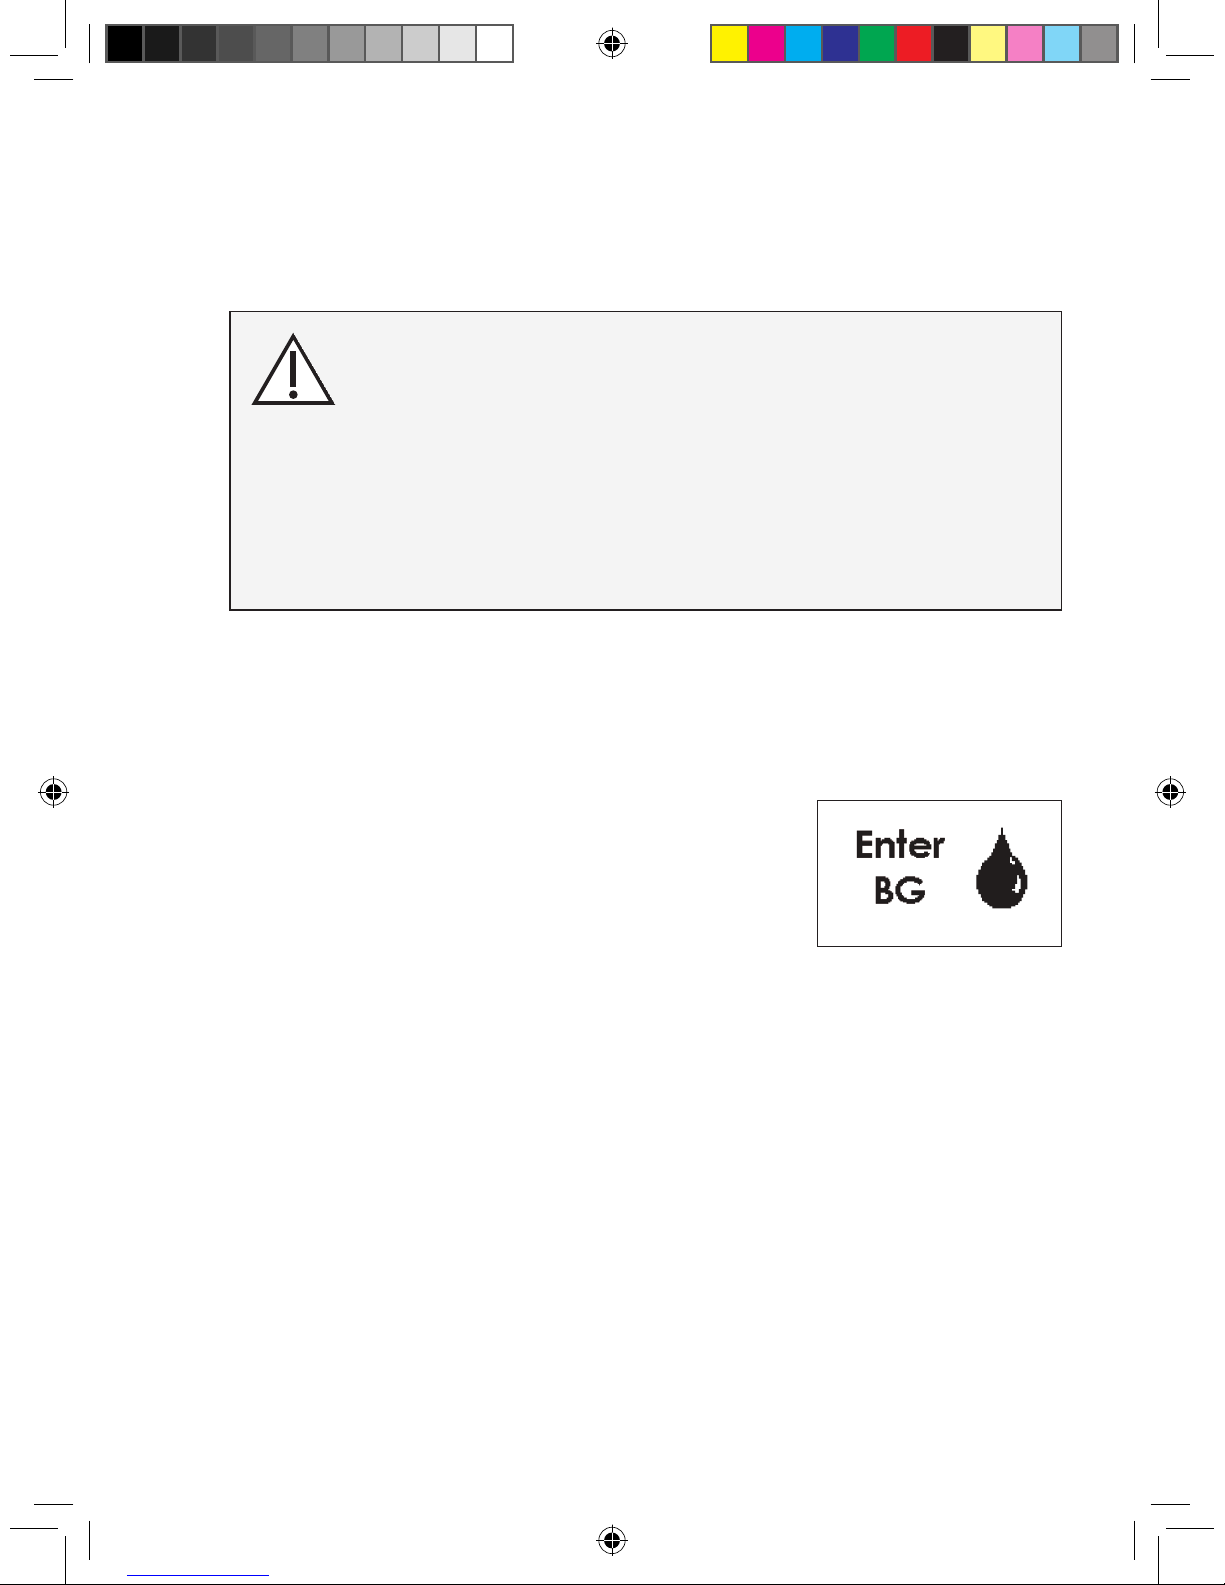
SINGLE BLOOD DROP PROMPT: This Screen appears during
Calibration Update or Re-Calibration. This means it is time for you to take a ngerstick on
your BG meter and enter it into the Receiver. But rst check the Status Box. Only enter
ngerstick readings if the Status Box shows the Single Blood Drop or a Glucose Reading.
Do not enter any ngerstick readings if there are “???” or “ ” in the Status Box.
LOW BATTERY NOTIFICATION: Your Receiver battery is running low and
needs to be recharged. Charge the battery as soon as possible.
NEW METER SCREEN (Auto Upload only): A new OneTouch Ultra
meter has been plugged into your Receiver. This meter has a different serial number
from the meter that was last connected to the Receiver. If you receive this screen
during Auto Upload calibration, you will have to re-take any ngersticks needed for
calibration and then connect the 2 devices again for Calibration Update.
Page 26
26 | SEVEN PLUS Continuous Glucose Monitoring System
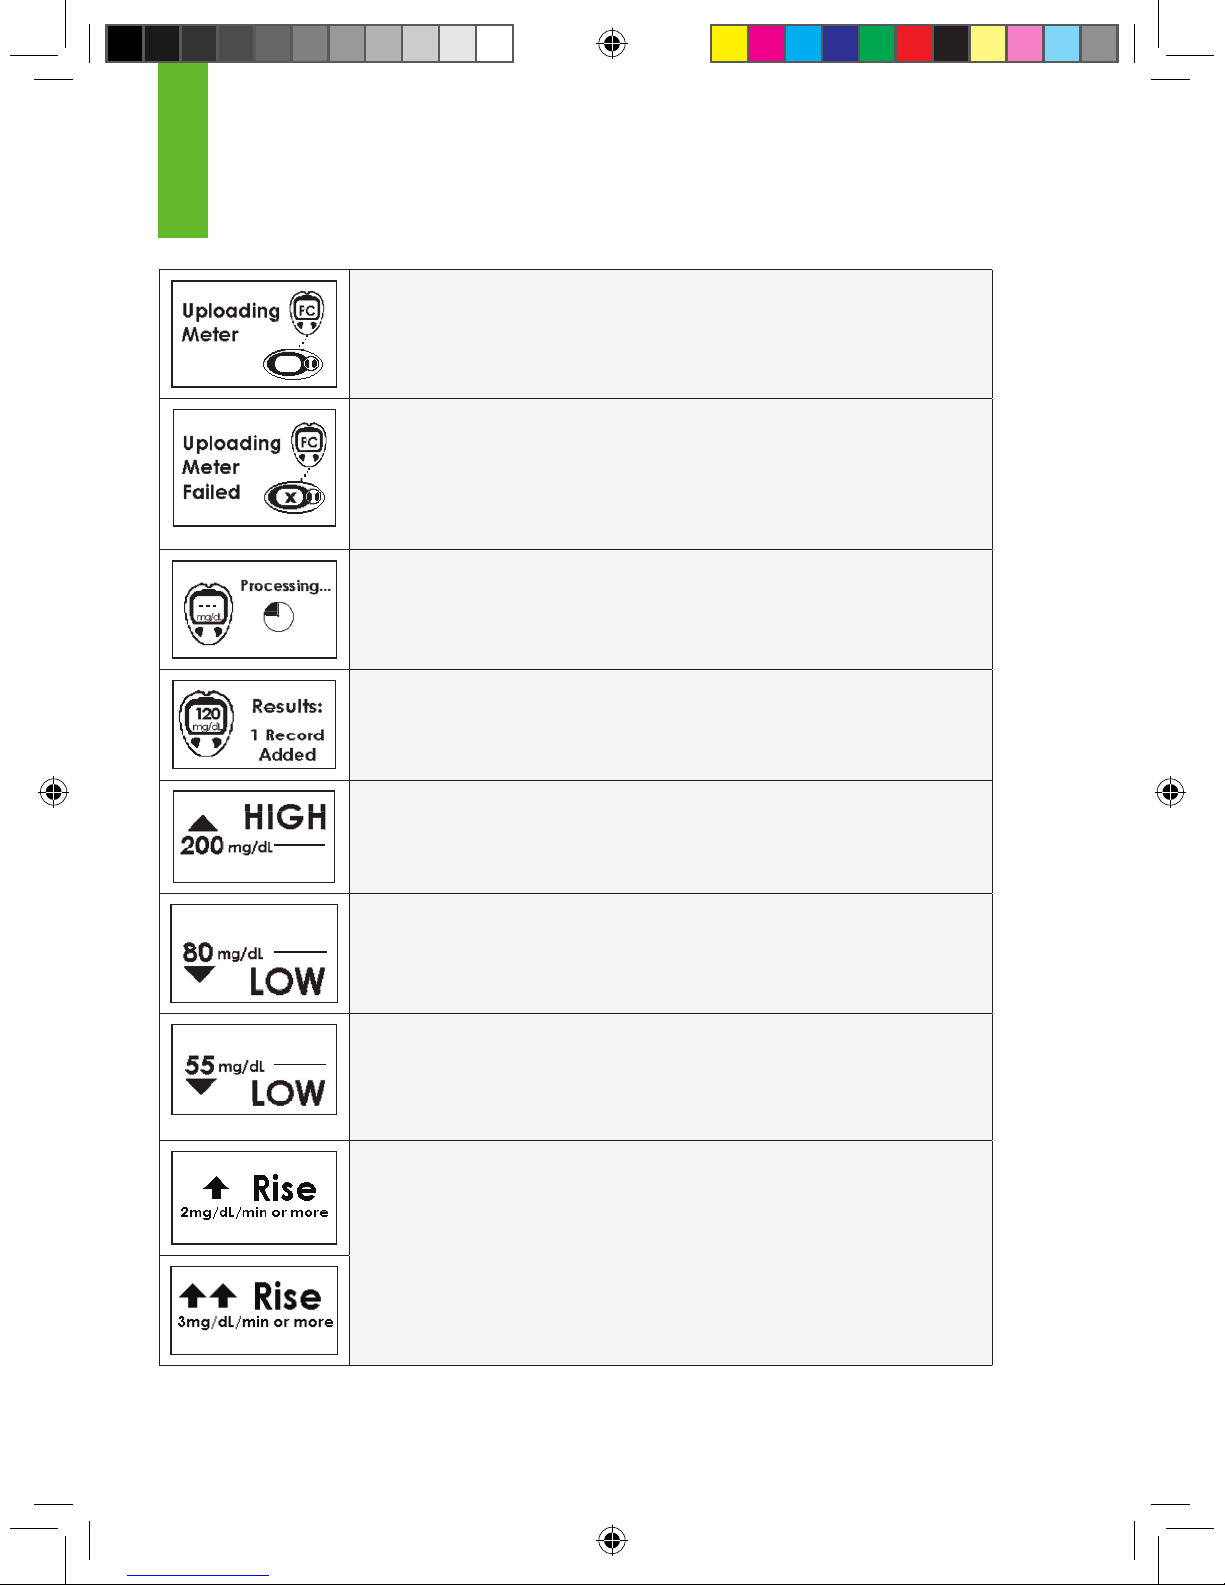
CONNECTION SCREEN (Auto Upload only): Your OneTouch Ultra
meter is successfully transferring ngerstick readings to the Receiver using Auto-
Upload with the Connection Cable.
CONNECTION FAILURE SCREEN (Auto Upload only): Your
OneTouch Ultra meter and the Receiver are not connected properly. Fingerstick
readings have not been successfully transferred. This screen will only be seen
when you attempt to use the Connection Cable. You should reconnect in the
proper order until you see the
Connection Screen or you should use OpenChoice instead.
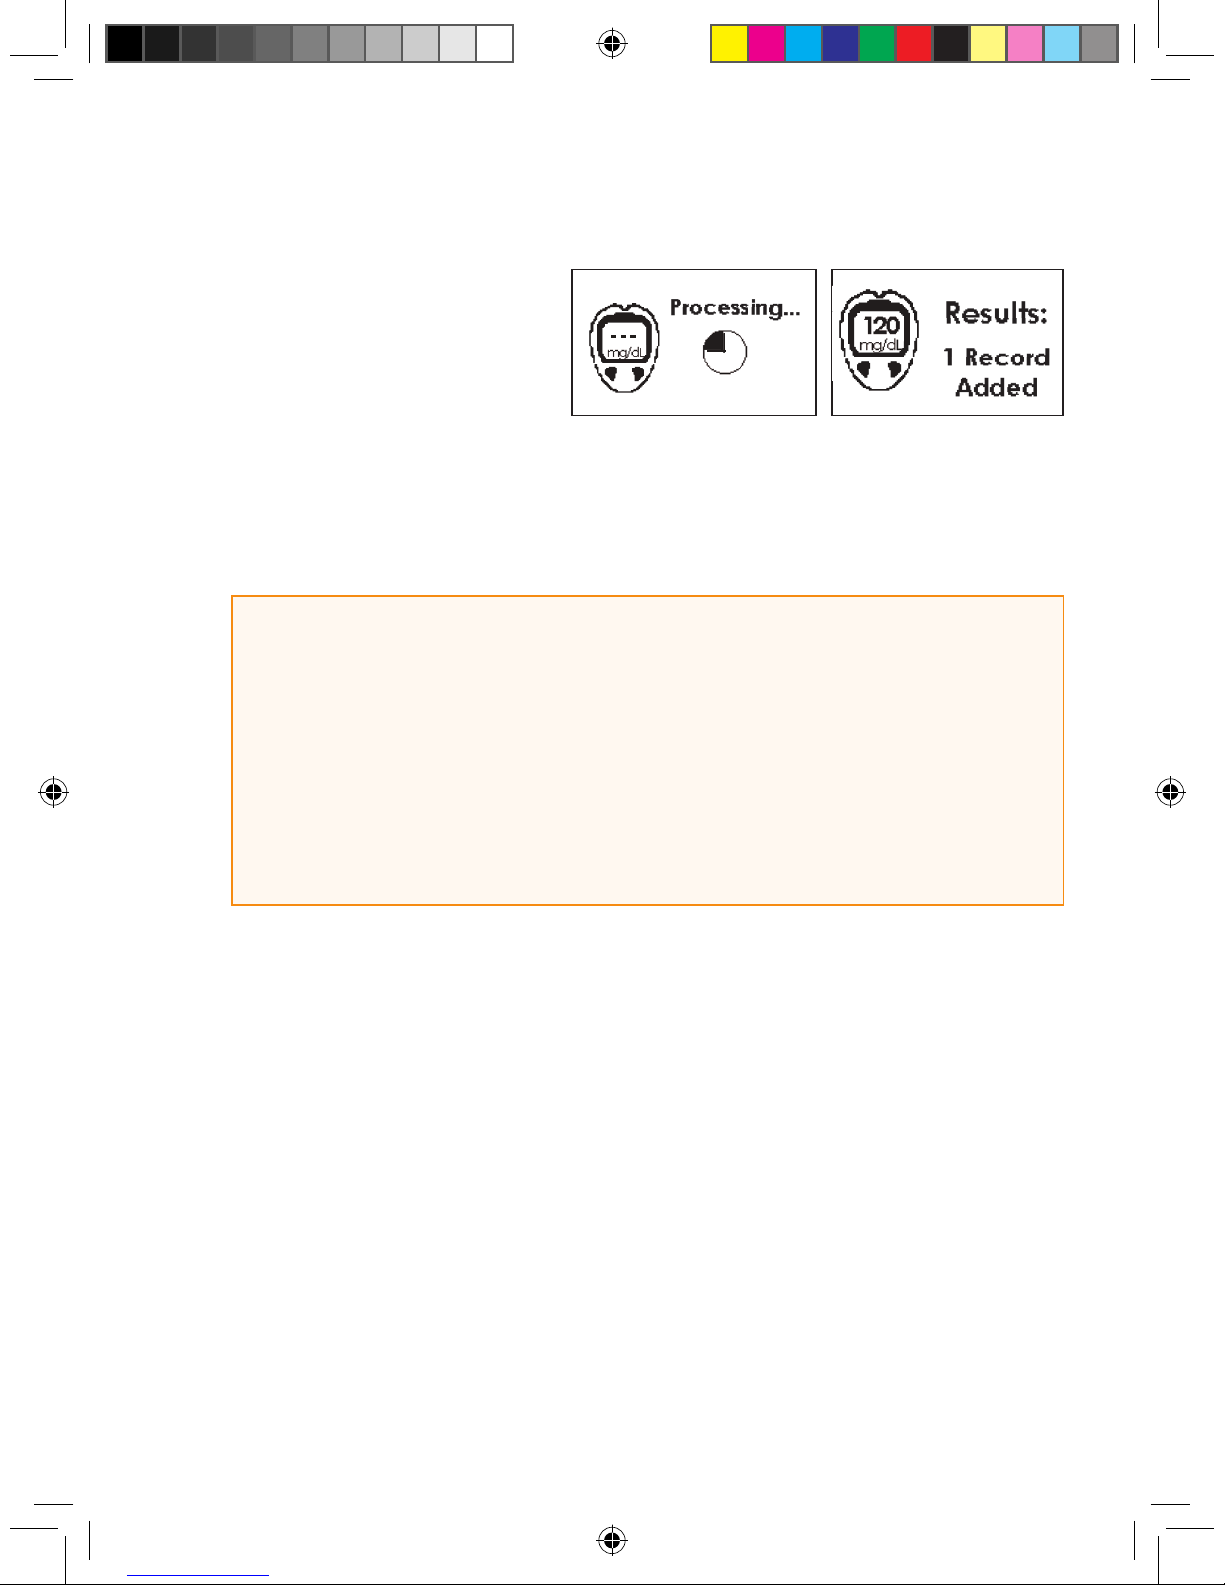
METER READINGS PROCESSING SCREEN: The blood glucose
meter reading that you entered is being processed by the Receiver.
RESULTS ADDED SCREEN: The blood glucose reading
you entered into the Receiver was accepted by the Receiver
for calibration.
HIGH GLUCOSE ALERT: Your System reading is at or above the High
Glucose Alert level you set.
LOW GLUCOSE ALERT: Your System reading is at or below the Low
Glucose Alert level you set.
LOW GLUCOSE ALARM: Your System reading is at or below
the automatic Low Glucose ALARM. You cannot change this ALARM level.
You can set one of these (or neither), but not both.
RISE ALERT: Your glucose levels are rising at 2mg/dL per minute or more.
OR
RAPID RISE ALERT: Your glucose levels are rising fast at 3mg/dL per
minute or more.
1
Page 27
SEVEN PLUS User’s Guide | 27
You can set one of these (or neither), but not both.
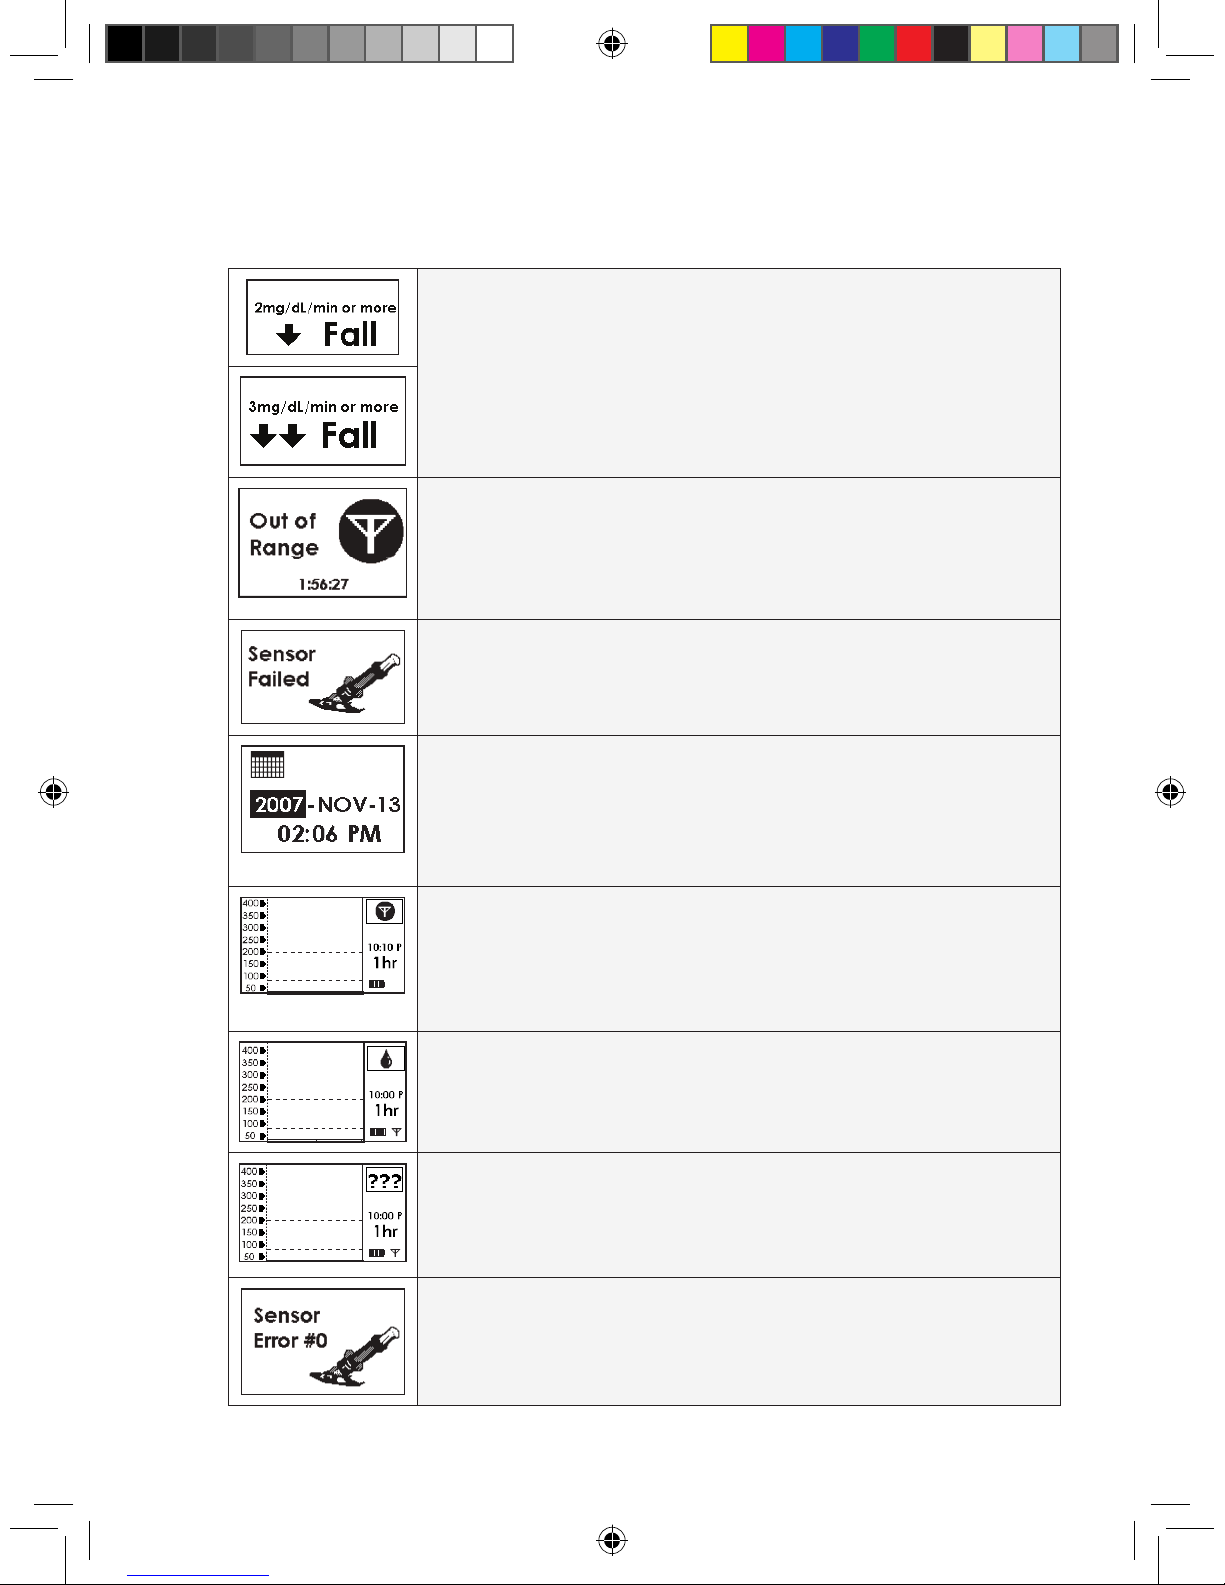
FALL ALERT: Your glucose levels are falling at 2mg/dL per minute or more.
OR
RAPID FALL ALERT: Your glucose levels are falling fast at 3 mg/dL per
minute or more.
OUT OF RANGE ALERT: The Transmitter and Receiver are not talking
and you will not get readings.
FAILED SENSOR SCREEN: The Sensor is not working. You will need to
replace the Sensor at this time.
TIME LOSS ALERT: The Receiver’s back-up battery drained, so you need
to reset the Receiver’s time. The Time Loss Alert will
automatically take you to the Time Setting Screen.
If you were in a Sensor Session, this Alert will end your session. You must set
the correct date and time and then start a new session.
OUT OF RANGE/NO ANTENNA: The Receiver and Transmitter are not
talking and your glucose data has not been sent to the Receiver in the last 5
minutes. If you see this screen you should make sure the Receiver and Transmitter are within 5 feet of each other. See Chapter 8 for Troubleshooting.
OUT OF CALIBRATION: The SEVEN PLUS is not calibrated. If you see
this screen you should take and enter an additional
ngerstick reading.
UNKNOWN SENSOR GLUCOSE READINGS:
The Sensor is sending glucose readings that the Receiver does
not understand.
SENSOR ERROR #0: The Sensor cannot calibrate. If you see this screen,
enter at least 1 more calibration ngerstick reading in the next 10-15 minutes. If
no readings appear on the Receiver, the
Sensor needs to be replaced.
Page 28
28 | SEVEN PLUS Continuous Glucose Monitoring System
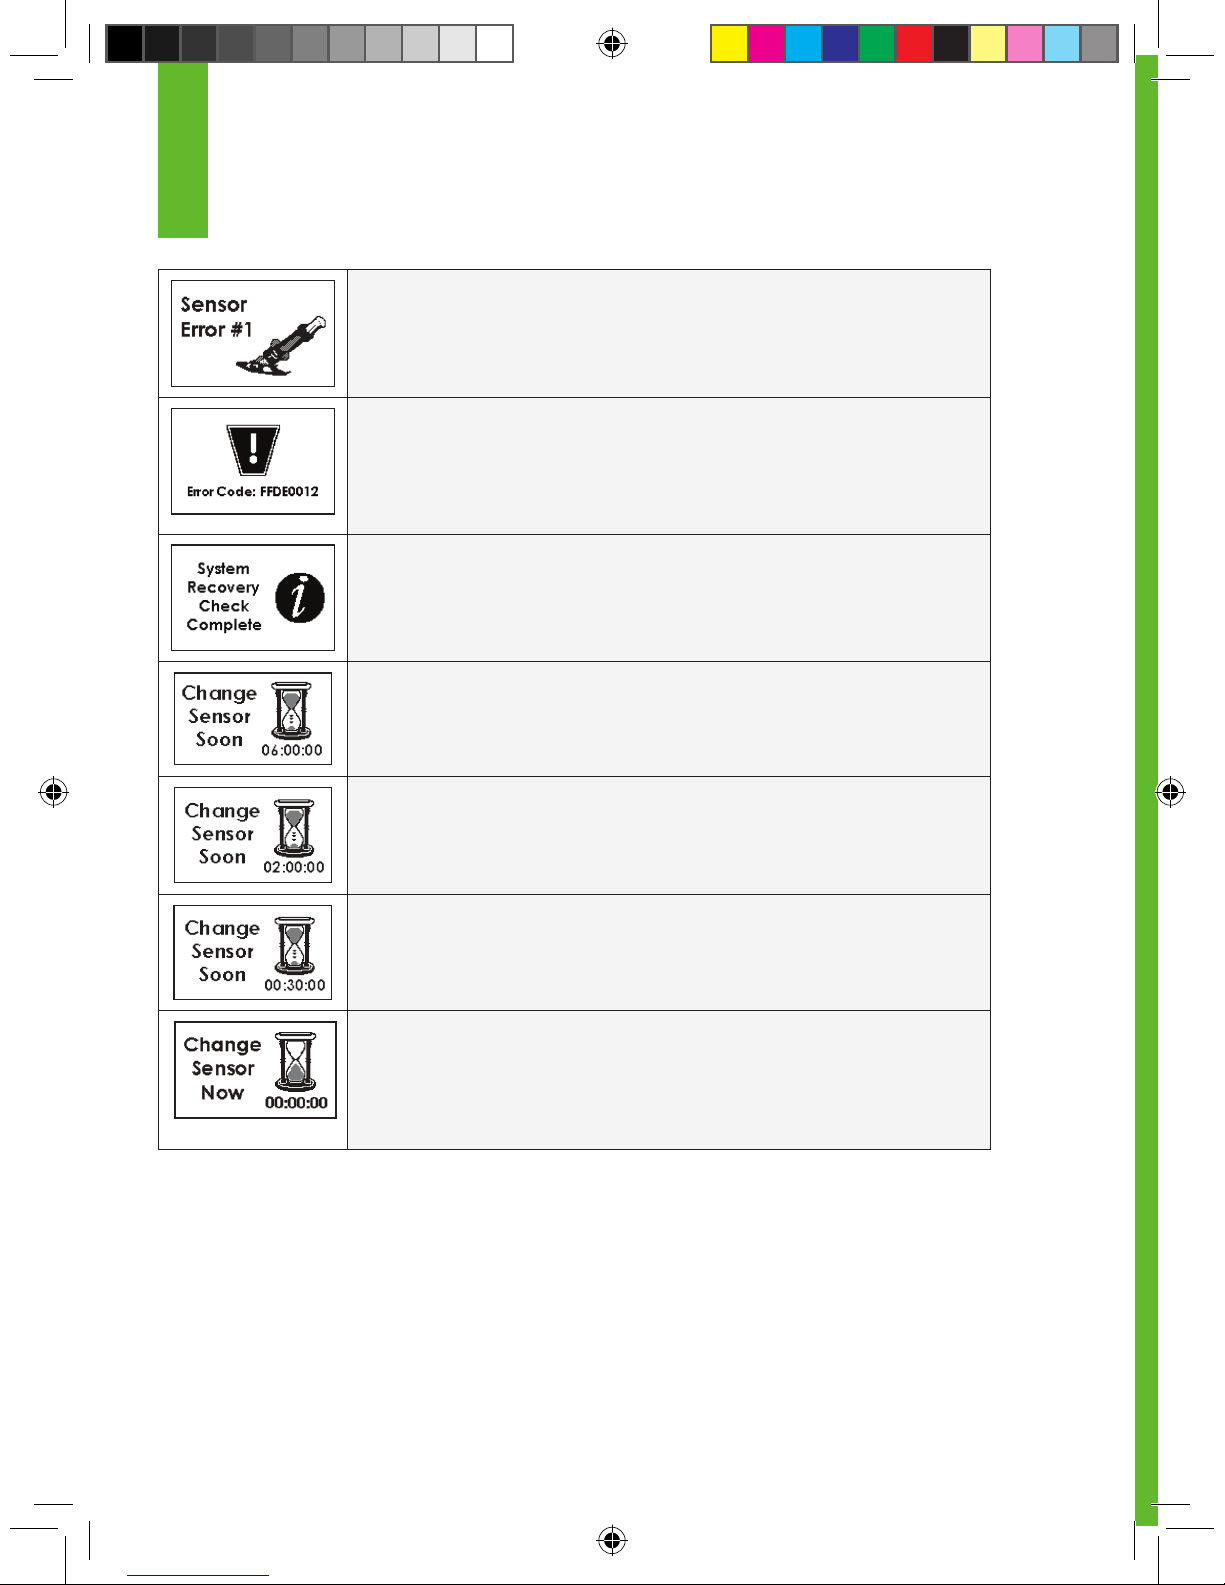
SENSOR ERROR #1: The Sensor is not calibrating correctly. If you see this
screen, wait approximately one hour and then enter at least 1 more ngerstick
reading. If no readings appear up on the Receiver, the Sensor needs to be
replaced.
ERROR CODE: The Receiver may not be working correctly. If you
see this code, write the code down and use your meter to check
your blood glucose readings. Notify DexCom Technical Support at 1-888-SEVENGO (738-3646).
SYSTEM RECOVERY: The Receiver discovered an error that it was able
to x itself. Press the C button to clear this display, and your Sensor Session
(Continuous Glucose Monitoring Session)
will continue.
6-HOUR SENSOR EXPIRATION NOTIFICATION: Your Continuous
Glucose Monitoring Session will end in 6 hours.
2-HOUR SENSOR EXPIRATION NOTIFICATION: Your Continuous
Glucose Monitoring Session will end in 2 hours.
30-MINUTE SENSOR EXPIRATION NOTIFICATION: Your
Continuous Glucose Monitoring Session will end in 30 minutes.
0-HOUR SENSOR EXPIRATION NOTIFICATION: Your
Continuous Glucose Monitoring Session has ended. Once you
clear the alert your Receiver will be notied that the Sensor has been removed.
You should clear this notication and remove your Sensor at this time.
1
Page 29
SEVEN PLUS User’s Guide | 29
2
chapter two
SEVEN PLUS SET UP
Page 30
30 | SEVEN PLUS Continuous Glucose Monitoring System
2
Page 31
SEVEN PLUS User’s Guide | 31
This chapter will help you set up your SEVEN PLUS. You will
want to read this chapter before you insert and start a new Sensor.
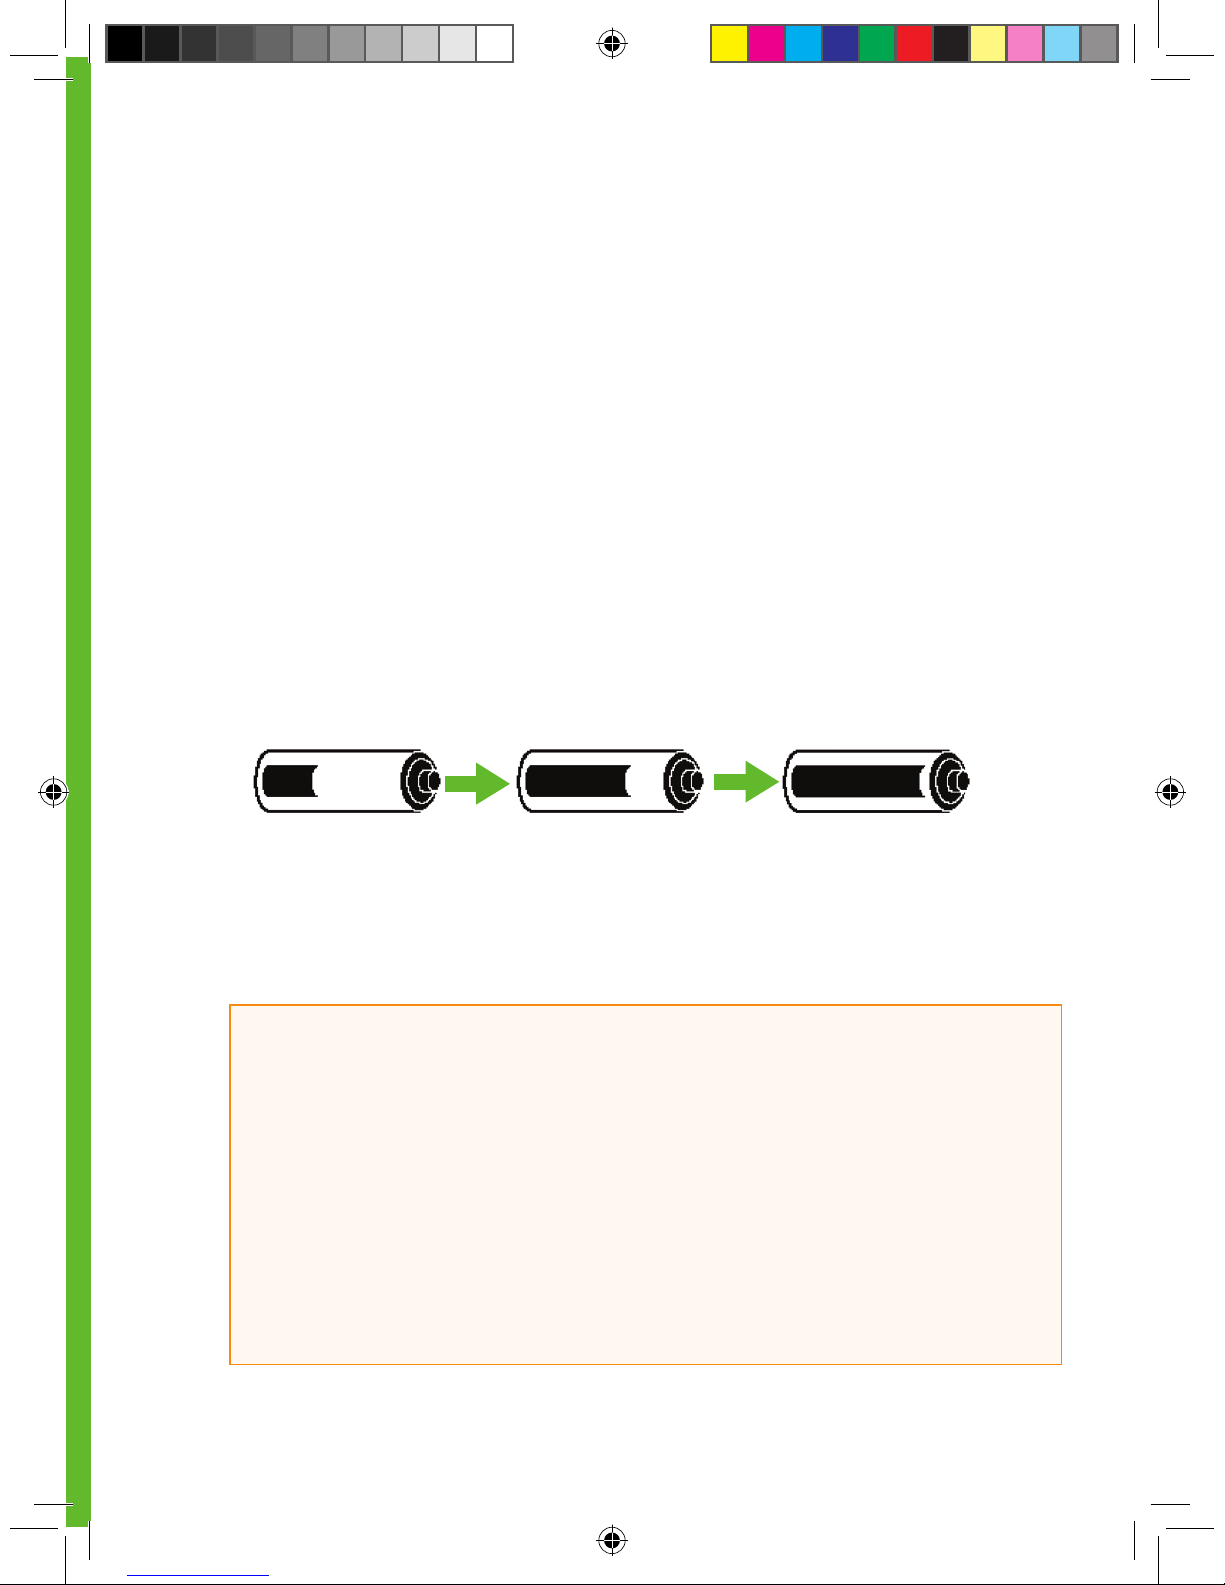
2.1 CHARGING YOUR RECEIVER BATTERY
The Receiver battery is re-chargeable like a cellular phone. The re-chargeable battery will last for about
3-5 days before you need to charge it with the Receiver Charging Cable. Your re-chargeable battery life
depends on your Alert settings and how often you use the Events Menu. The Receiver will tell you when
the battery charge is low. The Receiver takes 3 hours to charge fully if the battery is completely drained.
To recharge your battery, follow the instructions below:
1. Connect the Receiver Charging Cable into the port on the bottom of the Receiver. Make sure the
“Push” button side of the charger cable is facing down.
2. Connect the plug into a standard power outlet.
3. The Receiver will show the symbol below of a battery charging across the Receiver screen:
4. After a few seconds, your Trend Screen will reappear with the Charging Battery symbol shown in
the lower right corner next to the Antenna Symbol.
5. The battery will fully charge after 3 hours.
6. After charging is complete, press the “Push” Button on the charger to disconnect.
HELPFUL HINTS:
• Charge your battery before each Sensor insertion. Periodically check your battery level to
make sure it has enough charge.
• If your battery drains and is not charged for about 6 months, the back-up battery might
also drain. When this happens, you will need to reset your Receiver’s time (see Chapter 2,
Section 2.2.1, “Setting your Receiver Time and Date”).
• Only use the DexCom battery charger provided in the Starter Kit. Do not use any other
battery charger. You should charge the Receiver during daytime inactivity.
Page 32
32 | SEVEN PLUS Continuous Glucose Monitoring System
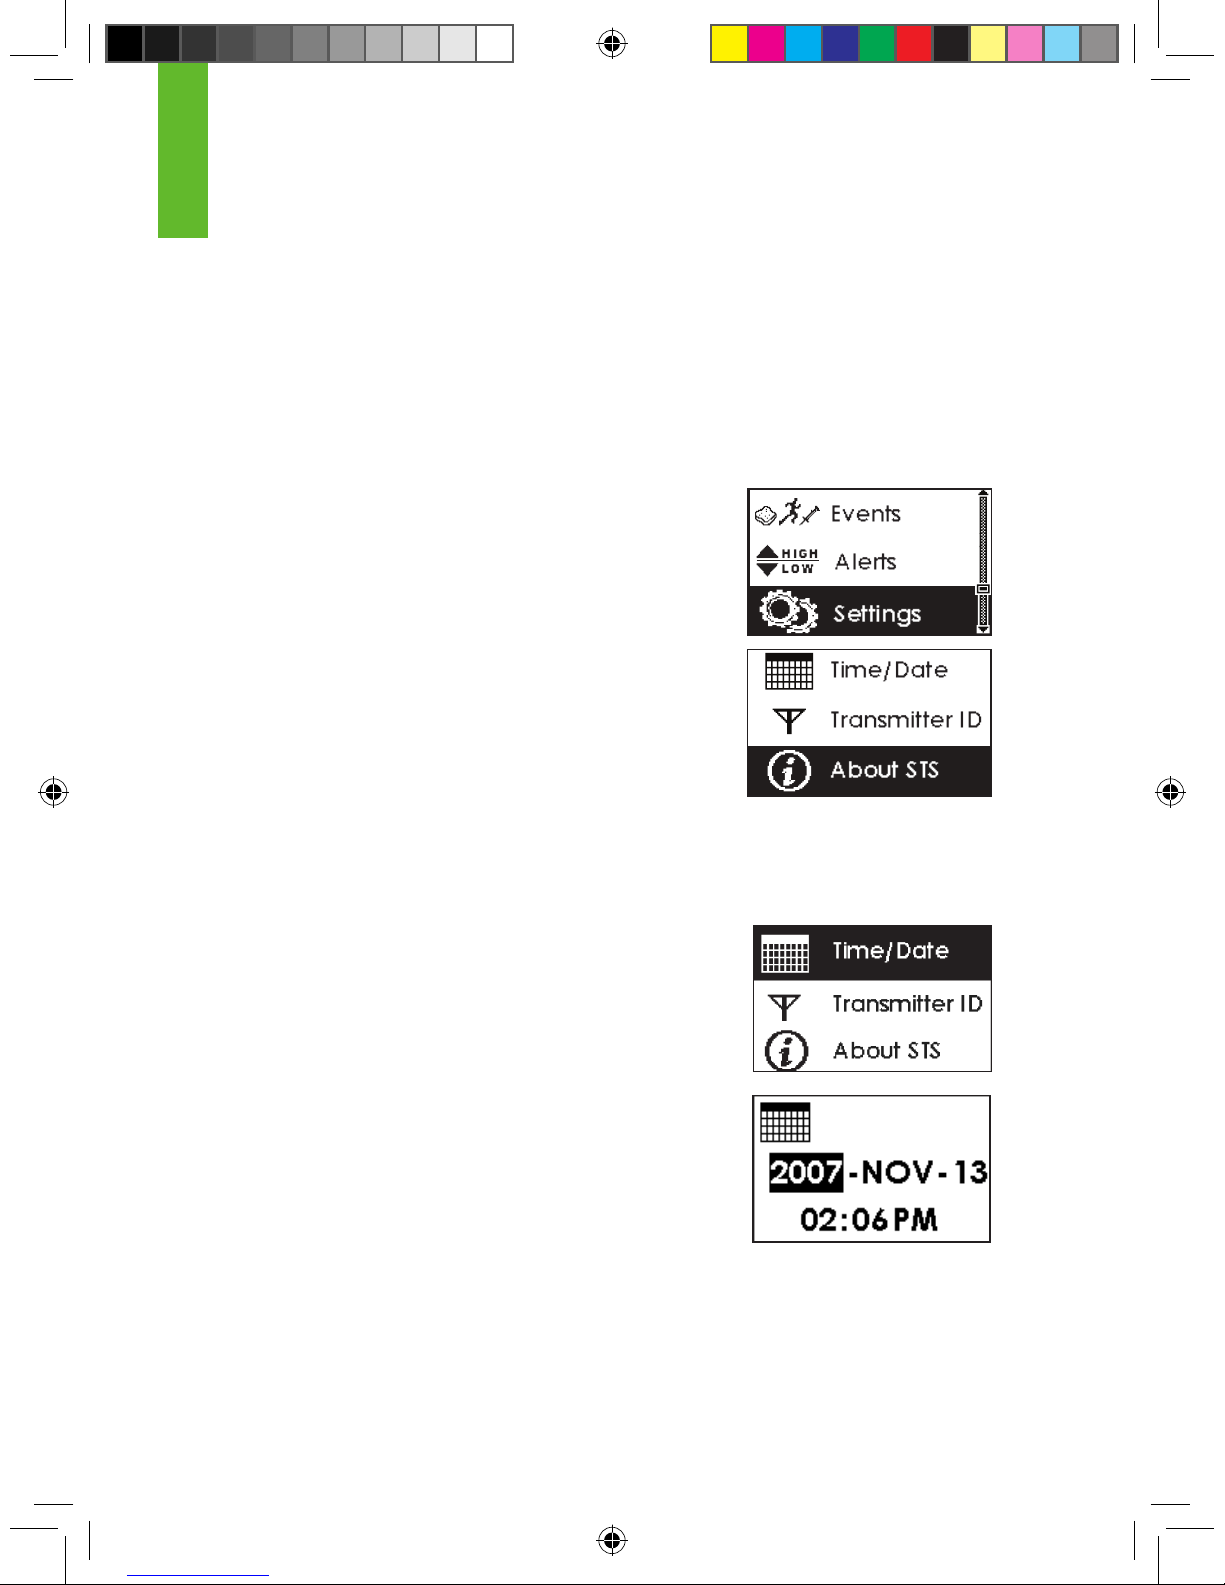
2.2 THE SETTINGS MENU
The Receiver lets you set the Date and Time and the Transmitter ID. It also shows you what
Software version you have.
To reach the Settings Screens, follow these steps:
1. Press any key to turn on the Receiver’s display.
2. Press the OK button to reach the Menus.
3. Use the Up p and Down q Arrow buttons to scroll
until you highlight “Settings.”
4. Press the OK button to go into the Settings Menu.
5. Use the Up p and Down q Arrow buttons to scroll through the
Settings:
a. Time/Date b. Transmitter ID c. About STS
6. Press the OK button to enter the Settings option you want.
2.2.1 SETTING YOUR RECEIVER TIME AND DATE
1. From the Settings Menu, highlight “Time/Date” and press the OK
button to enter the Time/Date Setting Screen.
2. Use the Up p and Down q Arrow buttons to scroll until you
select the year you want. Then press the OK button.
a. You can scroll by 1 digit at a time.
3. Use the Up p and Down q Arrow buttons to scroll until you
select the month you want. Then press the OK button.
4. Use the Up p and Down q Arrow buttons to scroll until you
select the day you want. Then press the OK button.
5. Use the Up p and Down q Arrow buttons to scroll until you select the hour you want. Then
press the OK button.
2
Page 33
SEVEN PLUS User’s Guide | 33
When you choose the hour, the AM/PM will adjust automatically (e.g. if you go from 11AM to
12PM, AM will switch to PM).
6. Use the Up p and Down q Arrow buttons to scroll until you select the minute you want.
Then press the OK button.
2.2.2 SETTING YOUR TRANSMITTER ID
Any time you use a new Transmitter or Receiver, instead of the Transmitter and Receiver that
came in your kit, you must enter the Transmitter ID into your Receiver. The Transmitter ID is a
series of 5 numbers and letters on the back
of the Transmitter.
Entering the ID will begin the unique wireless radio-frequency (RF) communication between the
Transmitter and Receiver. To enter the Transmitter ID, perform the following steps:
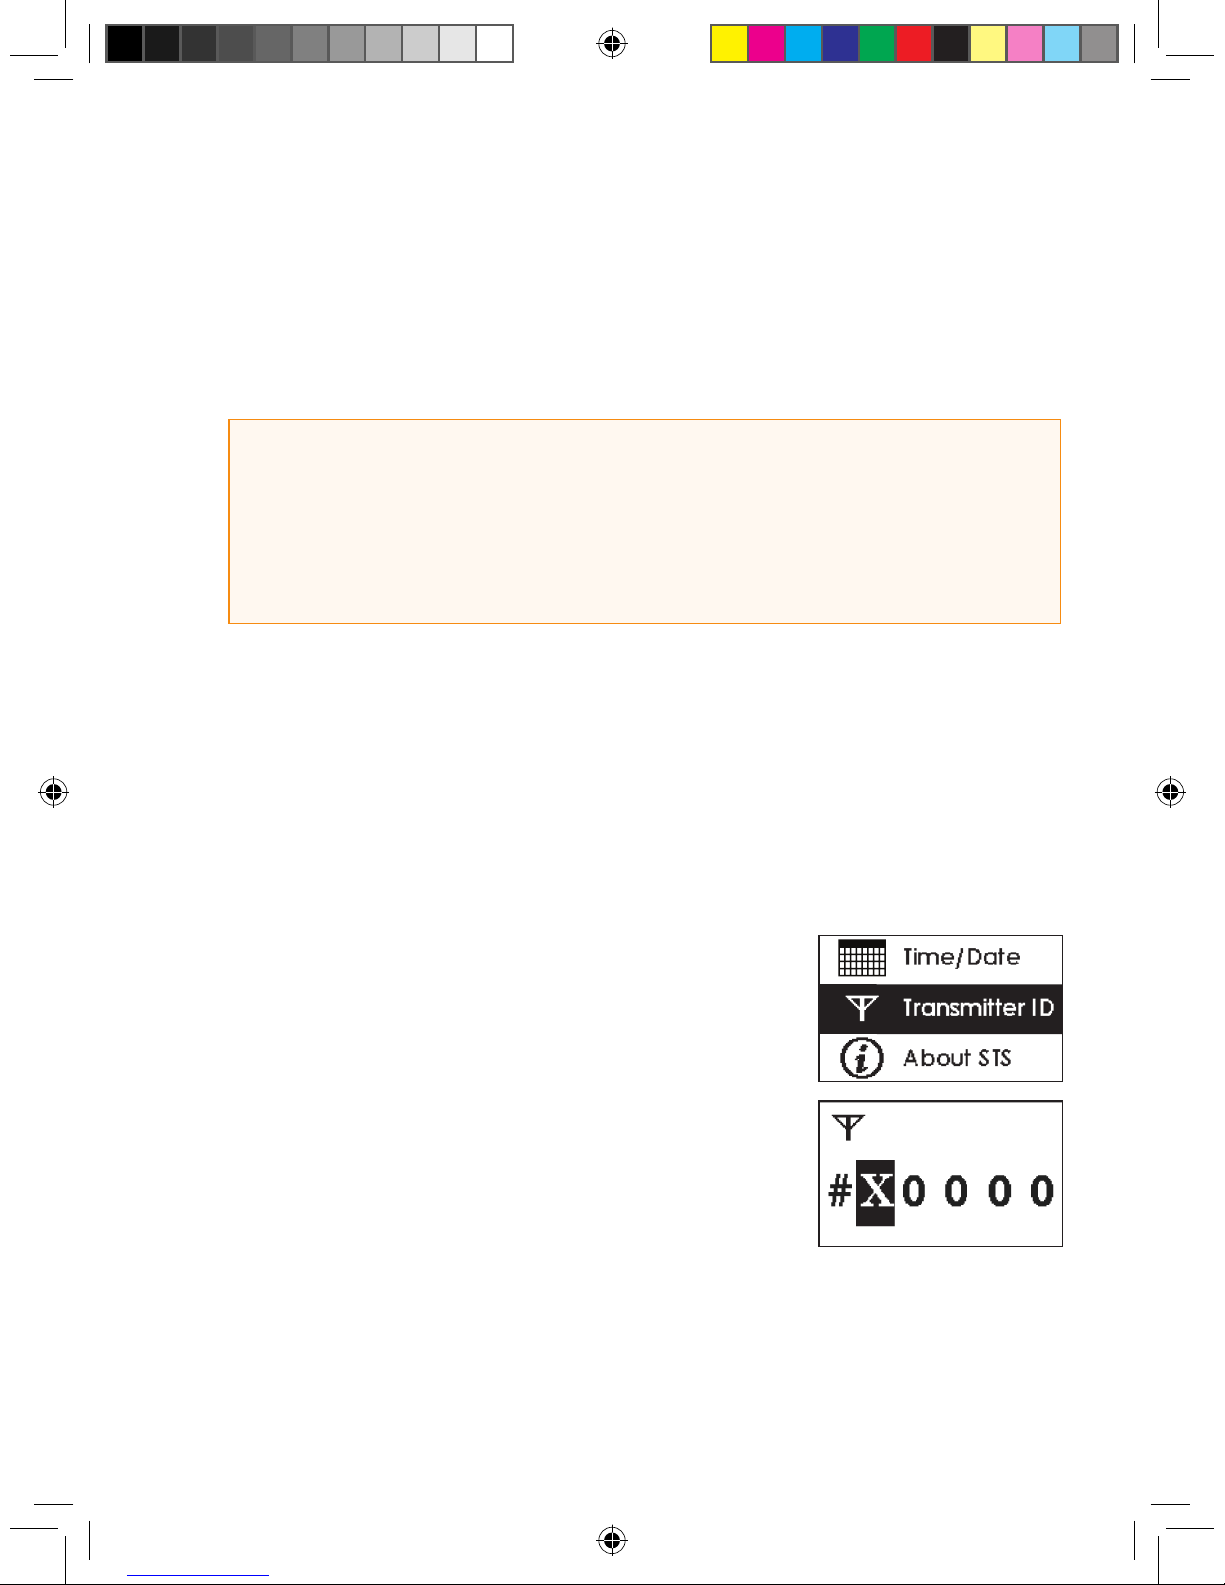
1. From the Settings Menu, highlight “Transmitter ID” and press the
OK button to enter the Transmitter ID Screen.
2. The rst digit will be highlighted. Use the Up p and Down q
Arrow buttons to scroll until you select the number or letter you
want.
a. The digits will “wrap” around, so you can scroll in either direc-
tion if you mistakenly pass the number
or letter you want to enter.
3. Press the OK button to select that letter or number and move to
the next.
4. Continue to follow steps 2-3 until you have entered and accepted the last letter/number by
pressing the OK button. Press the C button if you make a mistake and want to go back.
HELPFUL HINTS:
• Make sure to set the correct time on your Receiver.
• When setting the time, hold the OK button to cycle through the elds quickly.
• The Receiver date is set to Pacic Standard Time (PST) at the factory.
• You might need to reset the Receiver’s time if the back-up battery dies. The Time Loss Alert will
automatically take you to the Time/Date Setting Screen.
Page 34
34 | SEVEN PLUS Continuous Glucose Monitoring System
5. The Receiver will check the ID number.
a. If the ID number is valid, the Receiver will accept it and return to the
Trend Graphs.
b. If the ID number is not valid, the Receiver will show a series of question marks and will
then return to the Transmitter ID Screen so you can enter
the correct ID.
2.2.3 ABOUT STS SCREEN
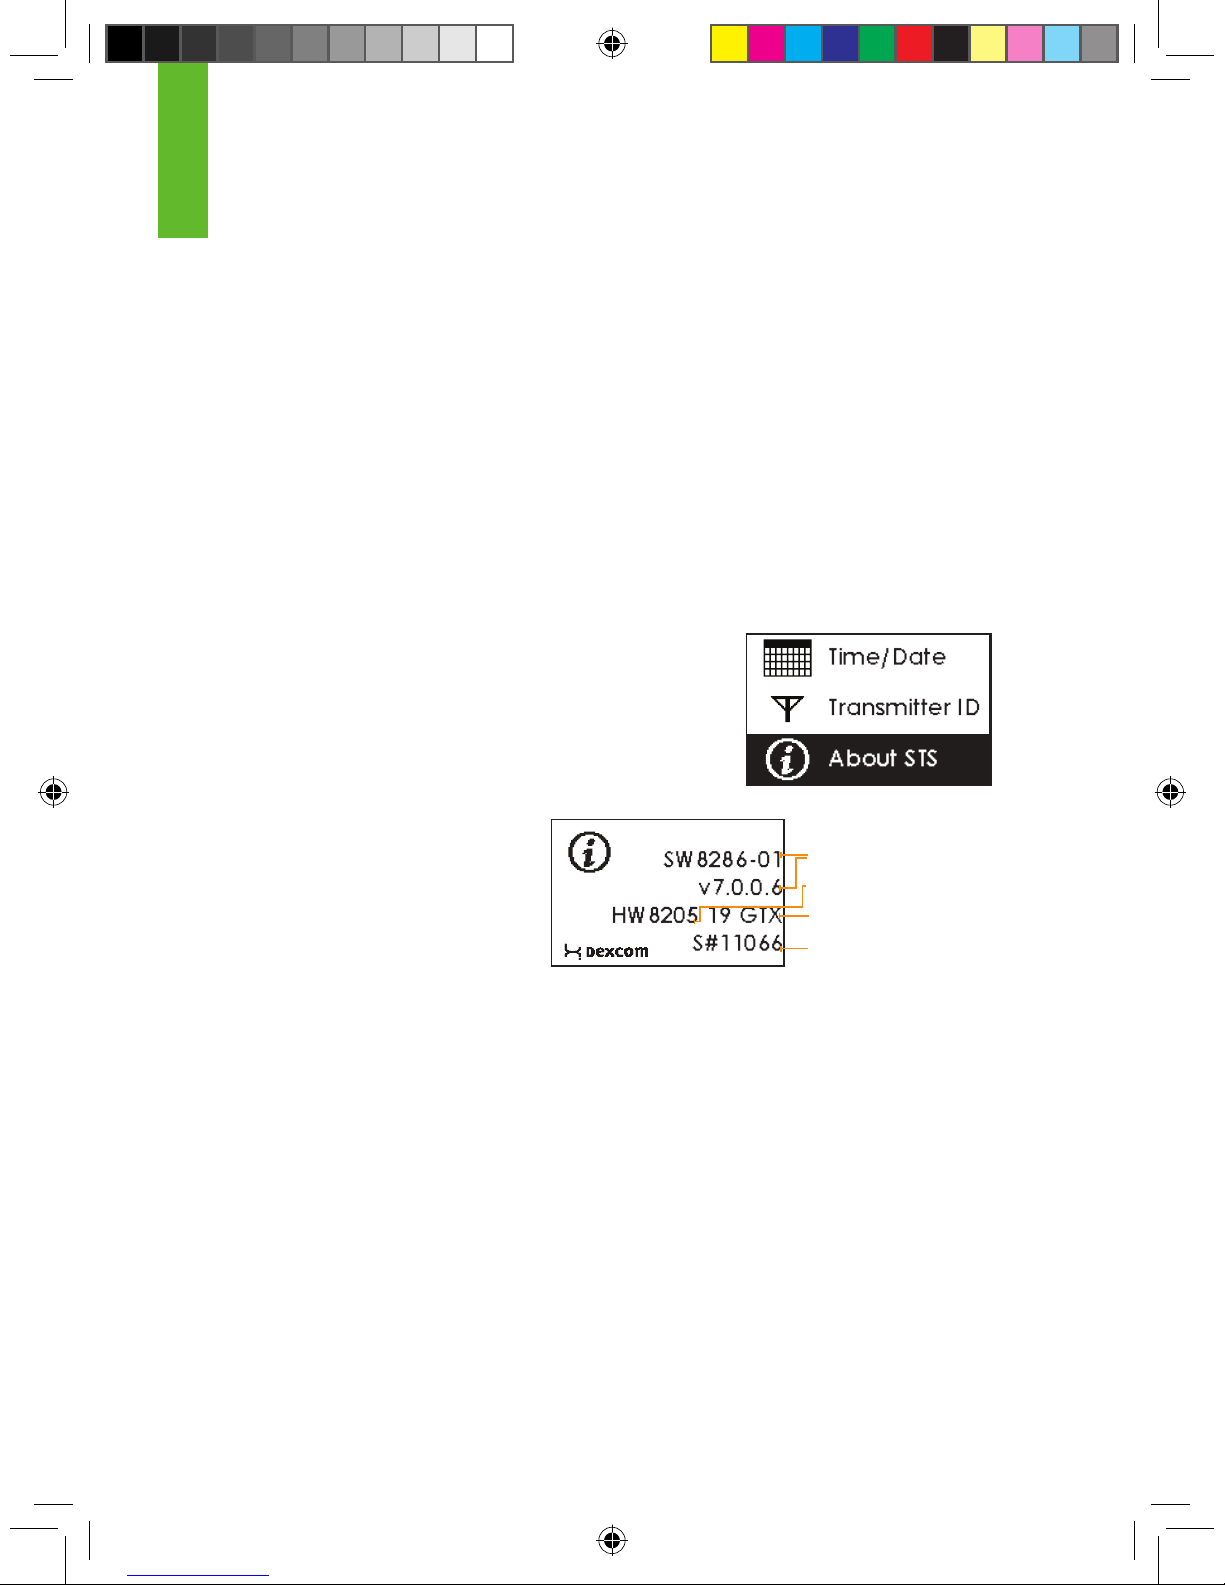
The “About STS” Screen shows information about the Receiver, including the software number
and version, hardware number and version, Transmitter type, and Receiver serial number. (“STS”
is the product family for the SEVEN PLUS.)
To reach the About Screen from the Settings Menu, highlight
“About STS” and press the OK button to enter the About
Screen.
You will see the following screen:
Receiver Software
Receiver Hardware
Transmitter Type
Receiver Serial Number
2
Page 35
SEVEN PLUS User’s Guide | 35
2.3 SETTING YOUR ALERTS
2.3 .1 FACTORY ALERT SETTINGS
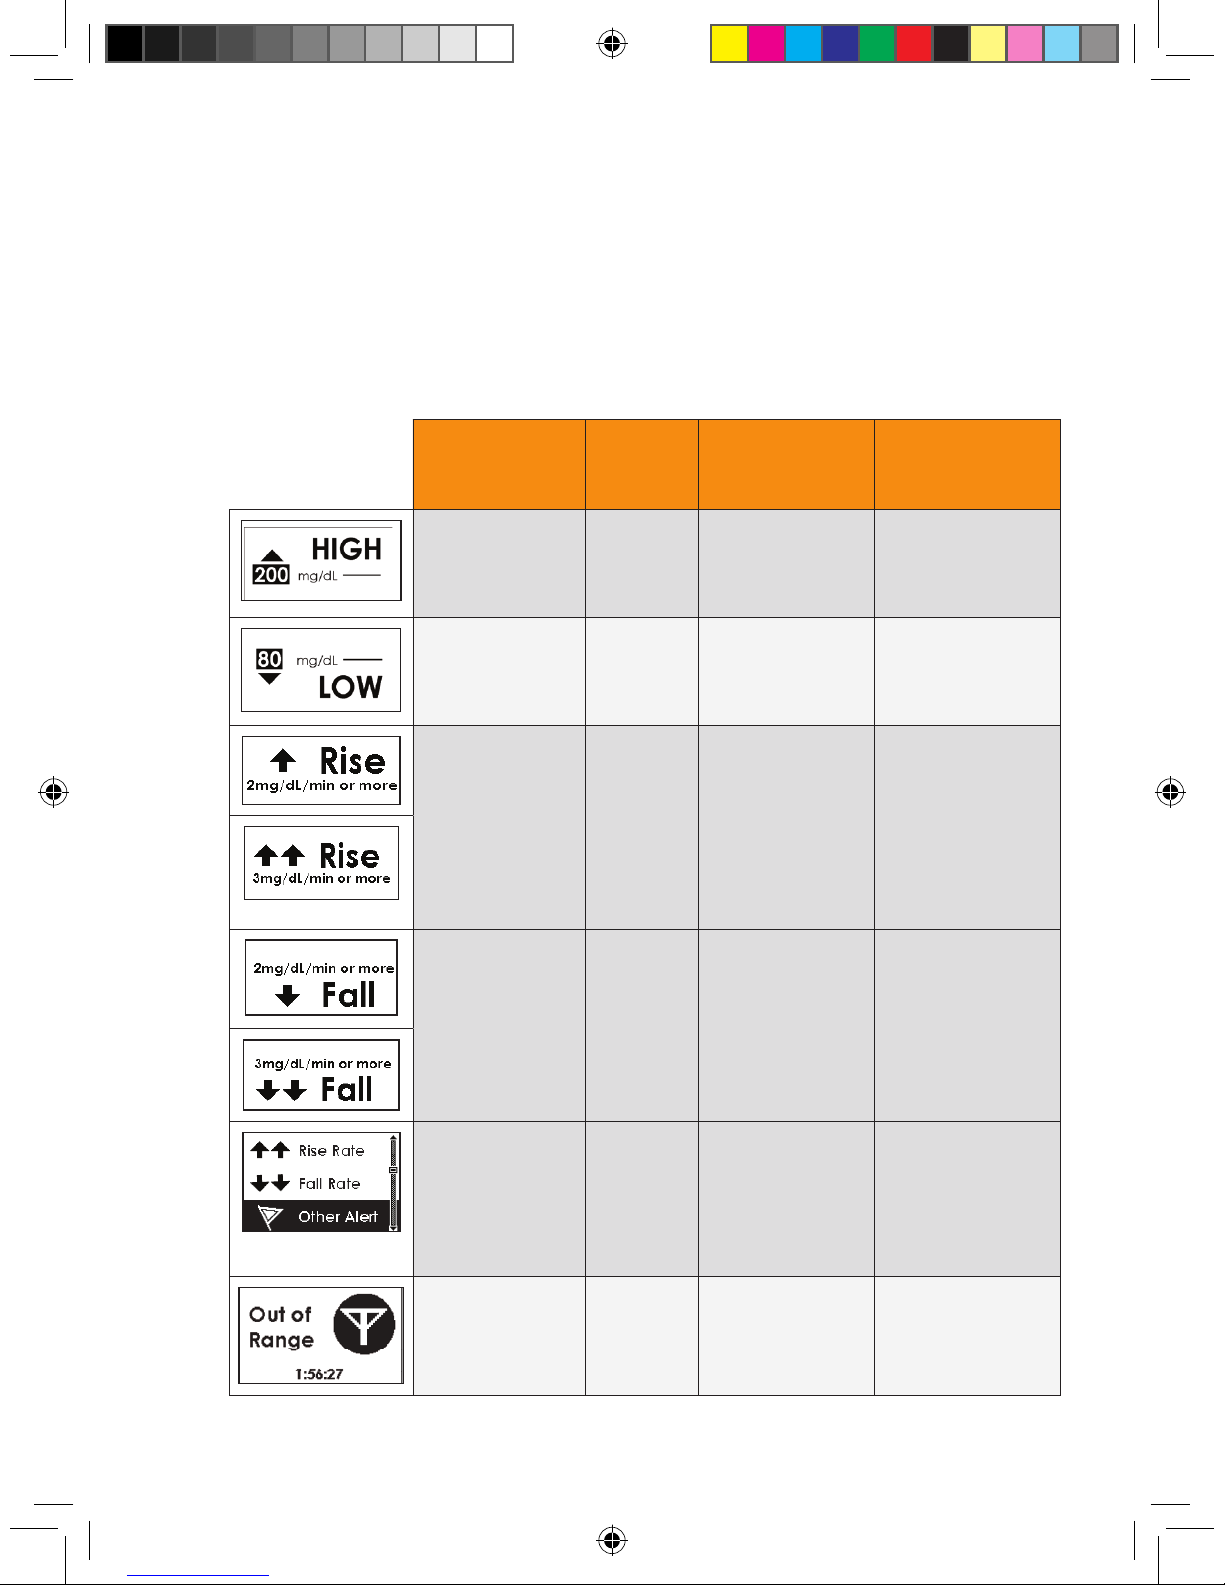
The SEVEN PLUS’ Alerts arrive from the factory with the following “default”
settings. These default Alert Settings are provided in the below table:
Alert Type Default
Settings
Default Prompt
Sound/
Vibrate
Default
Re-alert
Setting
High Alert 200
mg/dL
Vibe then Beep
(vibrate rst, then
2 high beeps and
vibrate)
None
(no re-alerts after
pressing button)
Low Alert 80 mg/dL Vibe then Beep
(vibrate rst, then
3 low beeps and
vibrate)
None
(no re-alerts after
pressing button)
Rise Alert Off Disable (None) None
(no re-alerts after
pressing button)
Fall Alert Off Disable (None) None
(no re-alerts after
pressing button)
Other Alert
(See Chapter
11, Appendix 1
for a detailed
list of all
“Other Alerts.”)
On Vibe then Beep
(Vibrate rst, then
medium beep tone)
Depends on the Alert
Type
(See Chapter 11,
Appendix 1).
Out of
Range Alert
Off Disable (none) Continues to
re-alert you until you
come back into range.
Page 36
36 | SEVEN PLUS Continuous Glucose Monitoring System
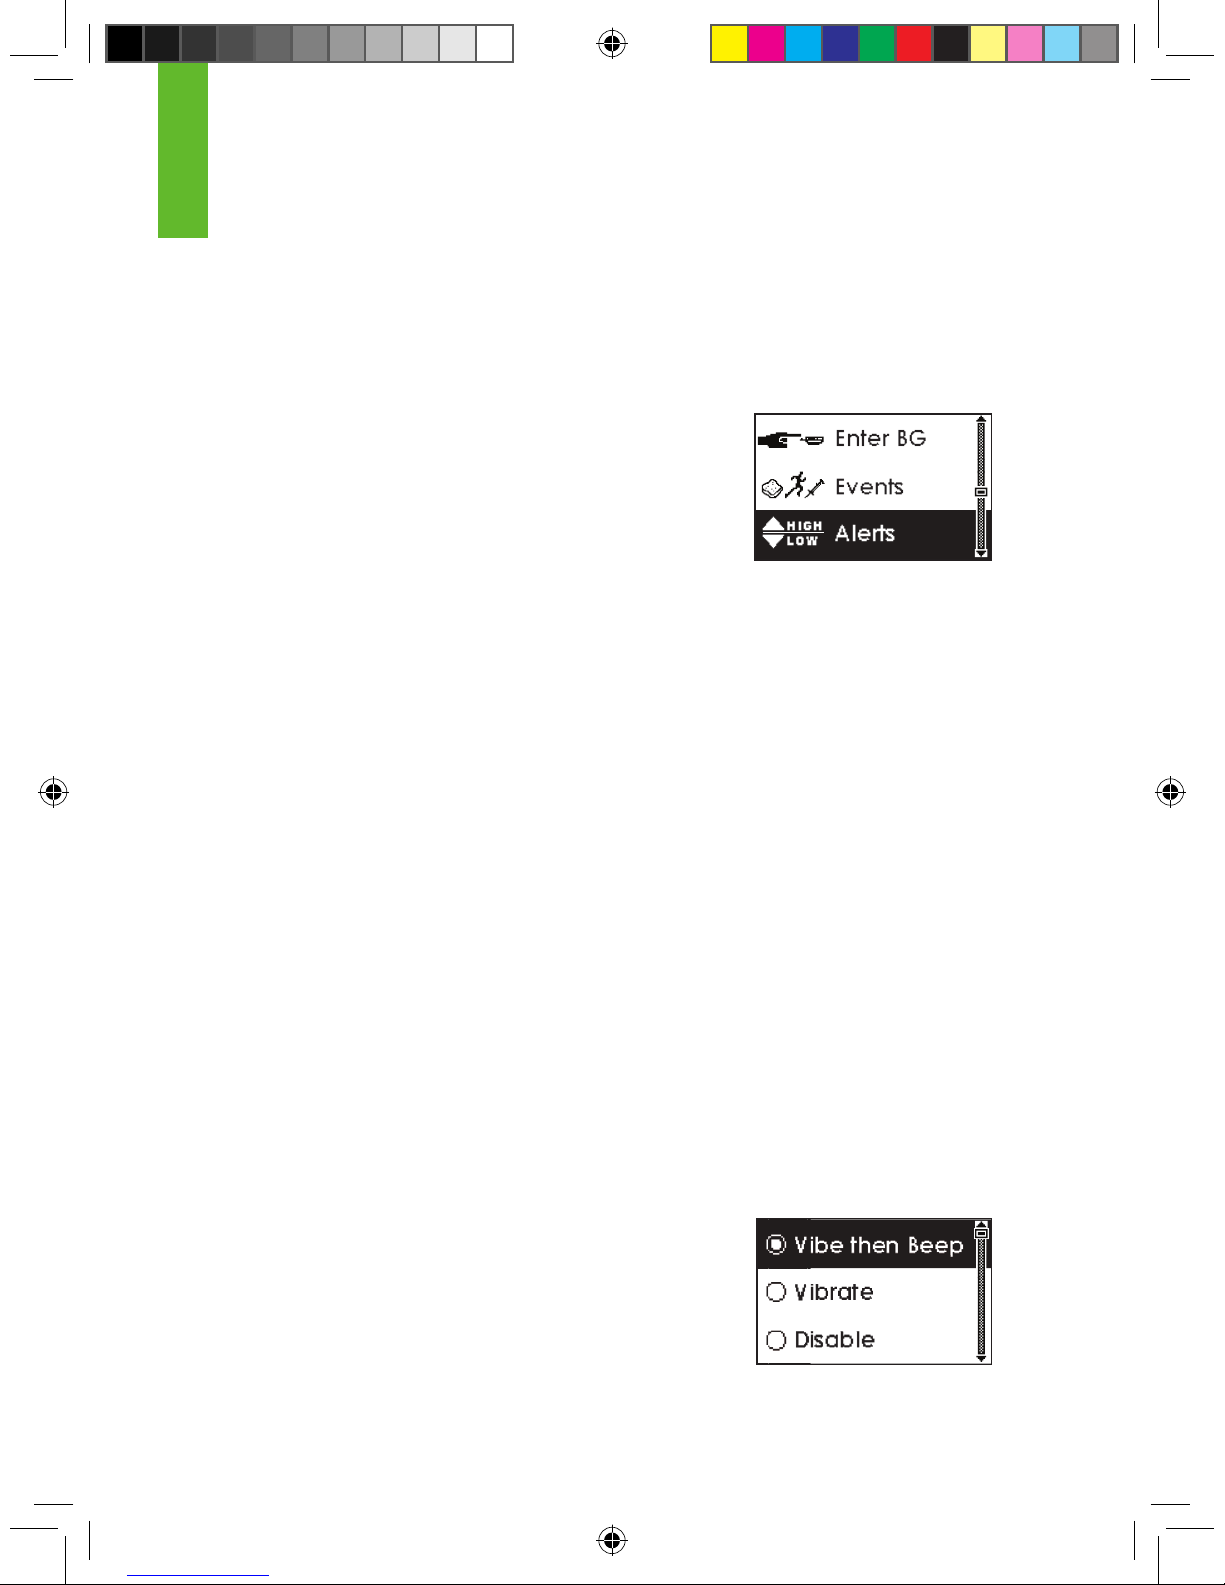
You can change the factory Alert Settings at any time by going to the Alerts Menu. You can
reach the Alerts Menu by following these steps:
1. Press any button to turn on the Receiver display.
2. Press the OK button to reach the Menus.
3. Use the Up p and Down q Arrow buttons to scroll until you
highlight “Alerts.”
4. Press the OK button to go into the Alerts Menu.
5. Use the Up p and Down q Arrow buttons to scroll through the Alerts:
a. High Alert b. Low Alert c. Rise Rate
d. Fall Rate e. Other Alerts f. Out of Range
6. Highlight the Alert you want, and press the OK button.
Sections 2.3.2 – 2.3.4 will show you how to set these Alerts.
2.3.2 SETTING GLUCOSE ALERTS
High Alert, Low Alert, Rise Rate, and Fall Rate Alerts (Chapter 5, Section 5.3, “Glucose Alerts
and ALARM”) provide information about your glucose levels and trends.
The following steps show how to change the High Alert, Low Alert, Rise Rate, and Fall Rate
Alerts settings.
1. Select the Alert you want as described in 2.3.1, “Factory Alert Settings.”
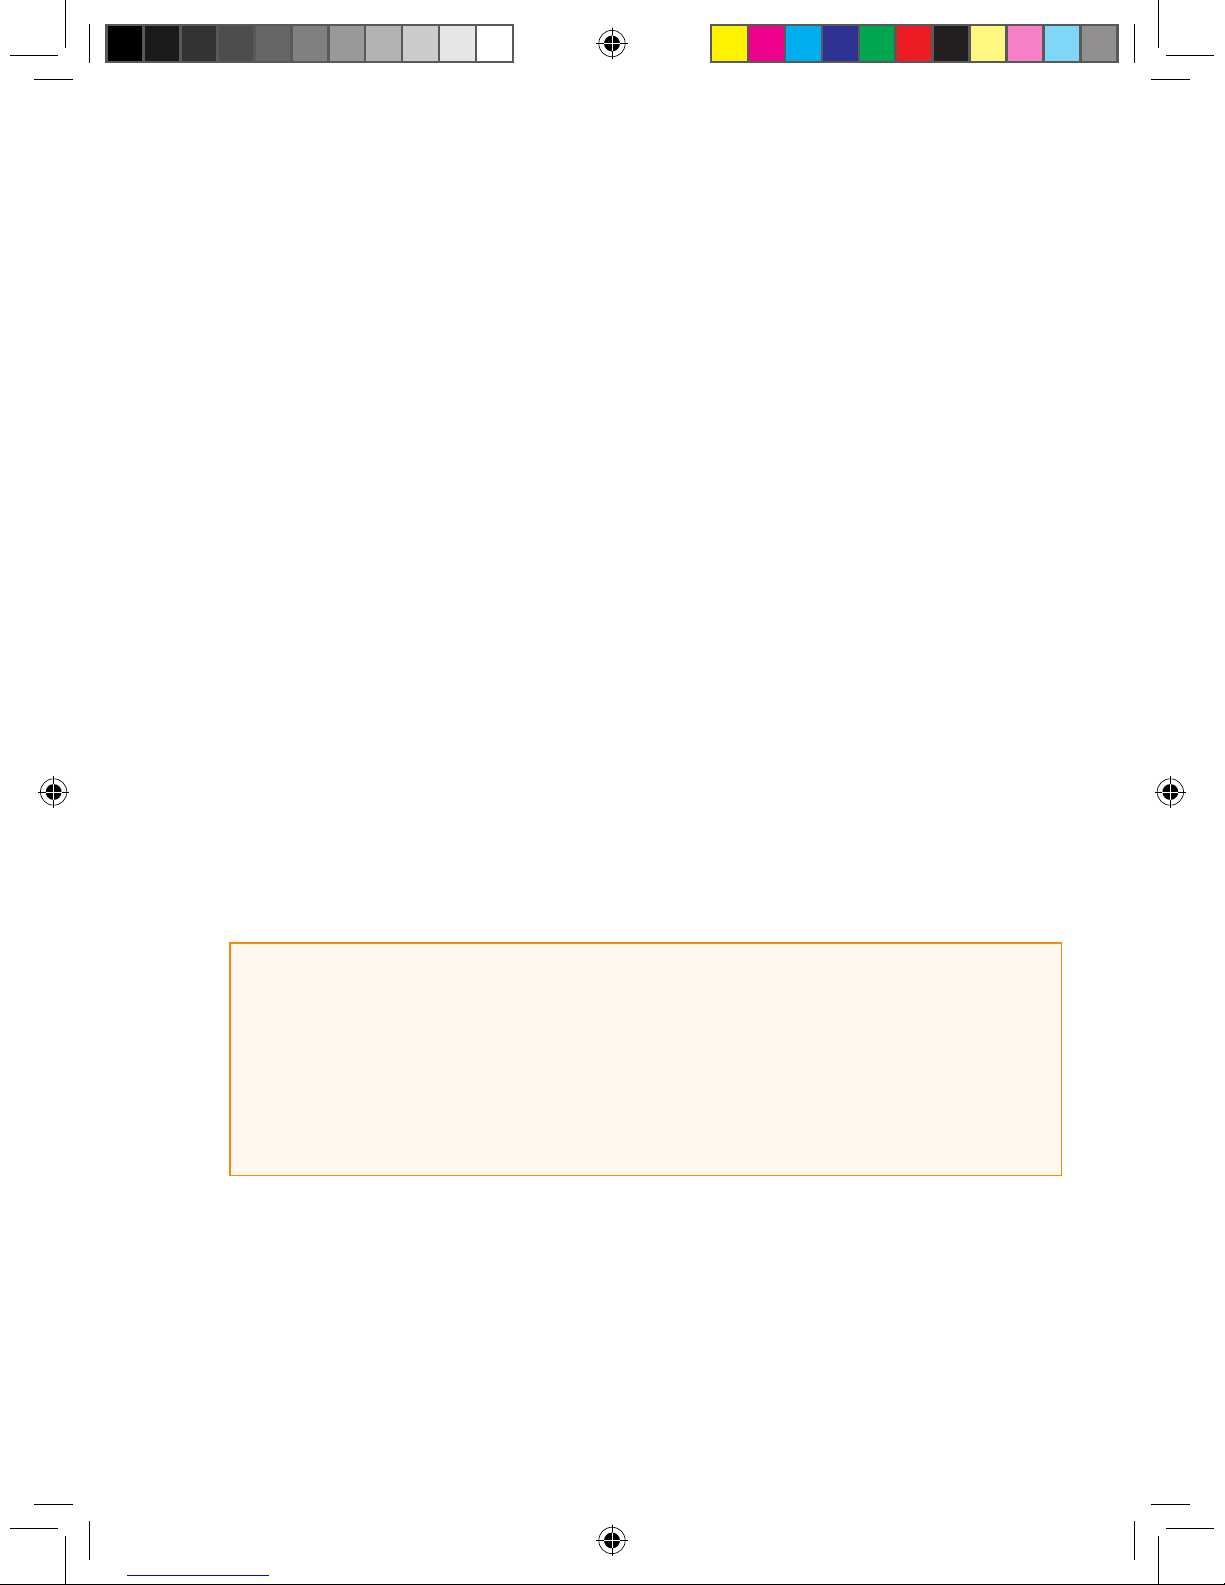
2. Use the Up p and Down q Arrow buttons to scroll to the type of Alert notication you want
to receive:
a. Vibrate then Beep (the rst alert will vibrate, then every 5 minutes the Alert will vibrate and
beep)
i. High Alert sound = 2 high tone beeps
ii. Low Alert sound = 3 low tone beeps
iii. Rise Rate sound = 2 high tone beeps
iv. Fall Rate sound = 3 low tone beeps
2
Page 37
SEVEN PLUS User’s Guide | 37
b. Vibrate (no sound, the Receiver will vibrate only)
c. Disable (to turn off this particular Alert notication)
3. Press the OK button to select the type of Alert notication you want.
a. If you select “Disable” this will turn off this Alert type.
b. If you select “Vibe then Beep” or “Vibrate,” you will be given more Alert Setting options
(depending on which Alert you are setting). Continue using the Up p and Down q Arrow
buttons to scroll to the option you want and press the OK button to select the option.
4. For Low Alert and High Alert, you will then see the Snooze Time Screen. You can set the
amount of time between reminder alerts after the rst alert. Use the Up p and Down q Ar-
row buttons to scroll through the options for Snooze Time.
a. You can delay these re-alerts by pressing the C button to “snooze” (like on an alarm
clock).
b. The High Glucose Alert and Low Glucose Alert can be set to re-alert every 30 minutes or
1, 2, 3, 4, or 5 hours by changing the Snooze settings.
c. If the selection says “None,” this means there are no re-alerts. The Receiver only alerts
until you press the C button to stop the alert.
d. Rise Rate and Fall Rate Alerts do not have a Snooze option.
5. Press the OK button to select the Snooze Time. You will then return to the Trend Graphs.
HELPFUL HINTS:
• Snooze time is the amount of time you would like to set between alerts. If you set this to “None” then
the Receiver will not re-alert you of the event (such as being above your High Glucose Alert).
• Choosing “Disable” turns off this Alert type and the Receiver will not tell you
if your glucose levels are high, low, or falling. The 55 mg/dl ALARM cannot
be disabled.
Page 38
38 | SEVEN PLUS Continuous Glucose Monitoring System
2.3.3 SETTING OTHER ALERTS
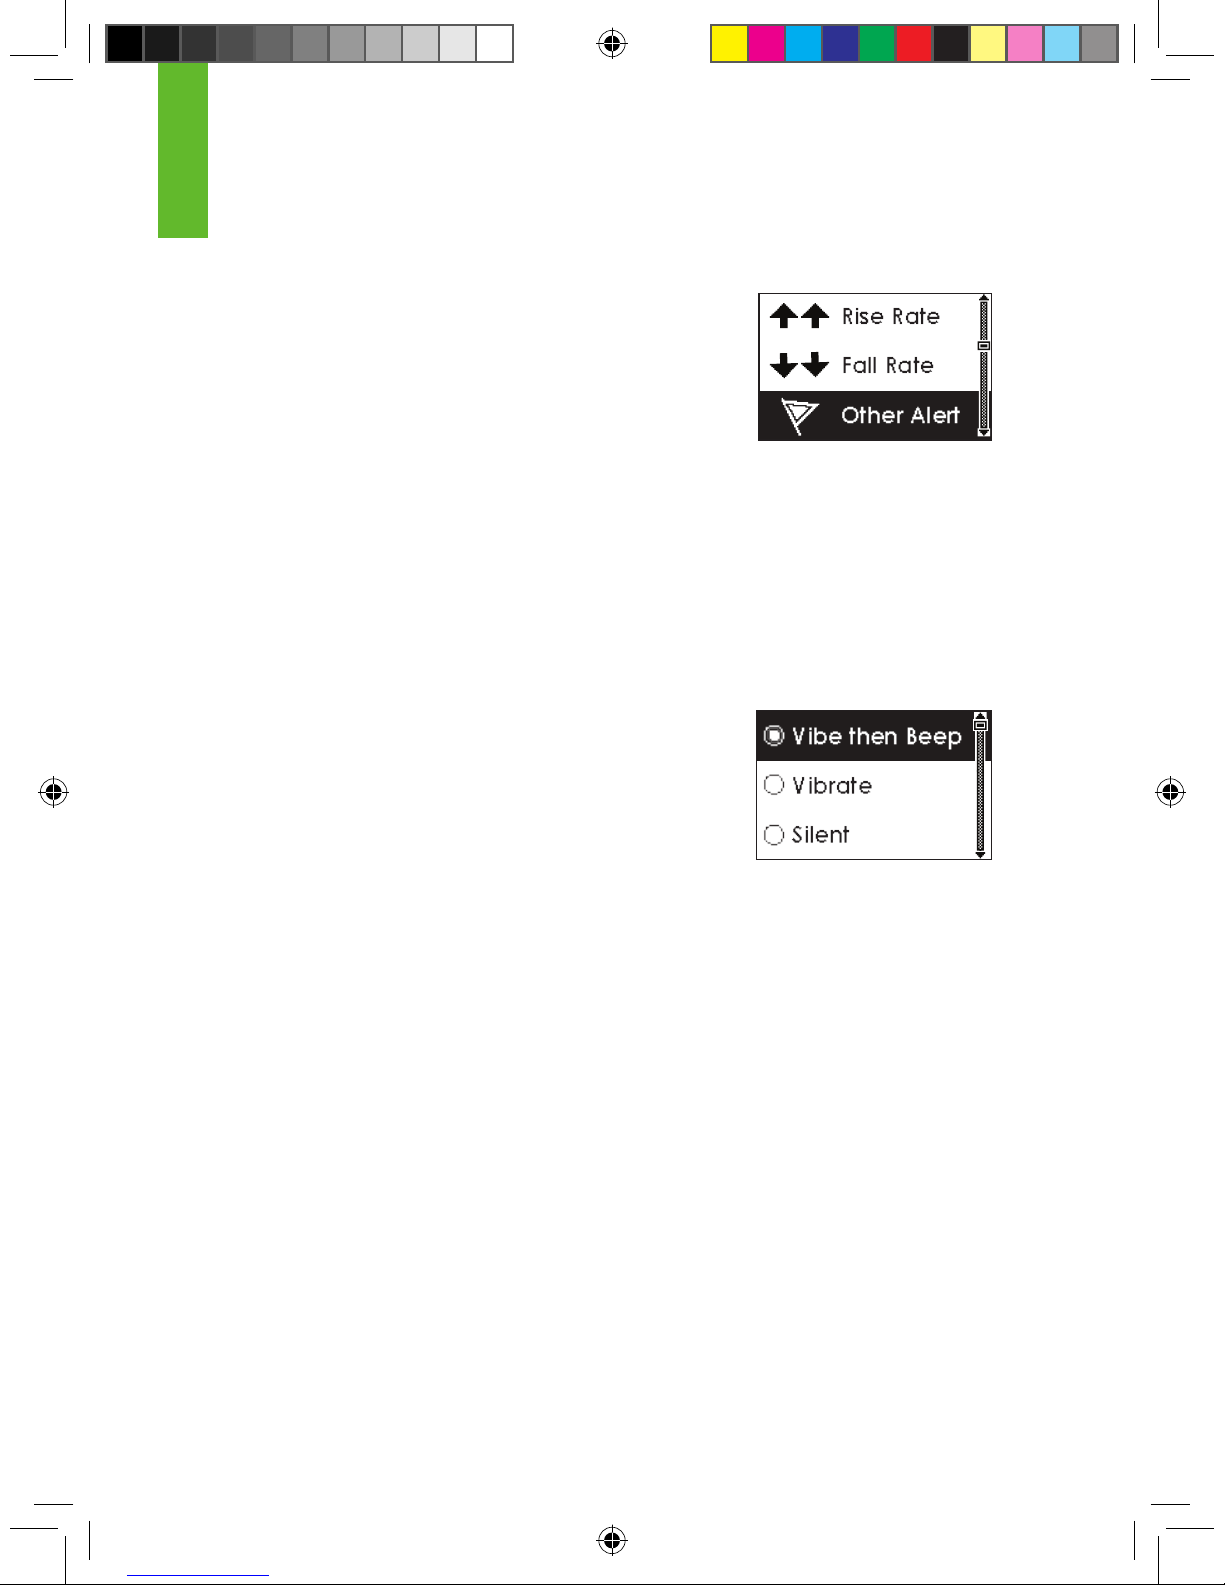
The SEVEN PLUS provides many other notications that you can
set in the “Other Alert” Menu. See Chapter 11, Appendix I for a
complete list of “Other Alerts.”
The default setting for all of these Alerts is “Vibe then Beep.” In the
“Vibe then Beep” setting, the Receiver will notify you with vibrations and a medium beep tone
when these events occur. You can change the settings for all Other Alerts jointly. The following
steps show how to move through the Other Alert settings.
1. Select the Alert you want as described in Section 2.3.1, “Reaching the Alerts Menus.”
2. Use the Up p and Down q Arrow buttons to scroll to the type of Alert notication you want
to receive:
a. Vibrate then Beep (the rst alert will vibrate, then every 5 minutes the Alert will vibrate and
beep).
i. The “Other Alerts” sound is one medium tone
beep.
b. Vibrate (no sound, the Receiver will vibrate only).
c. Silent (a screen will appear, but there will be no sound or
vibration).
3. Press the OK button to select the type of Alert notication you want. Once you press OK
you will return to the Trend Graphs.
2
Page 39
SEVEN PLUS User’s Guide | 39
2.3.4 SETTING OUT OF RANGE ALERT
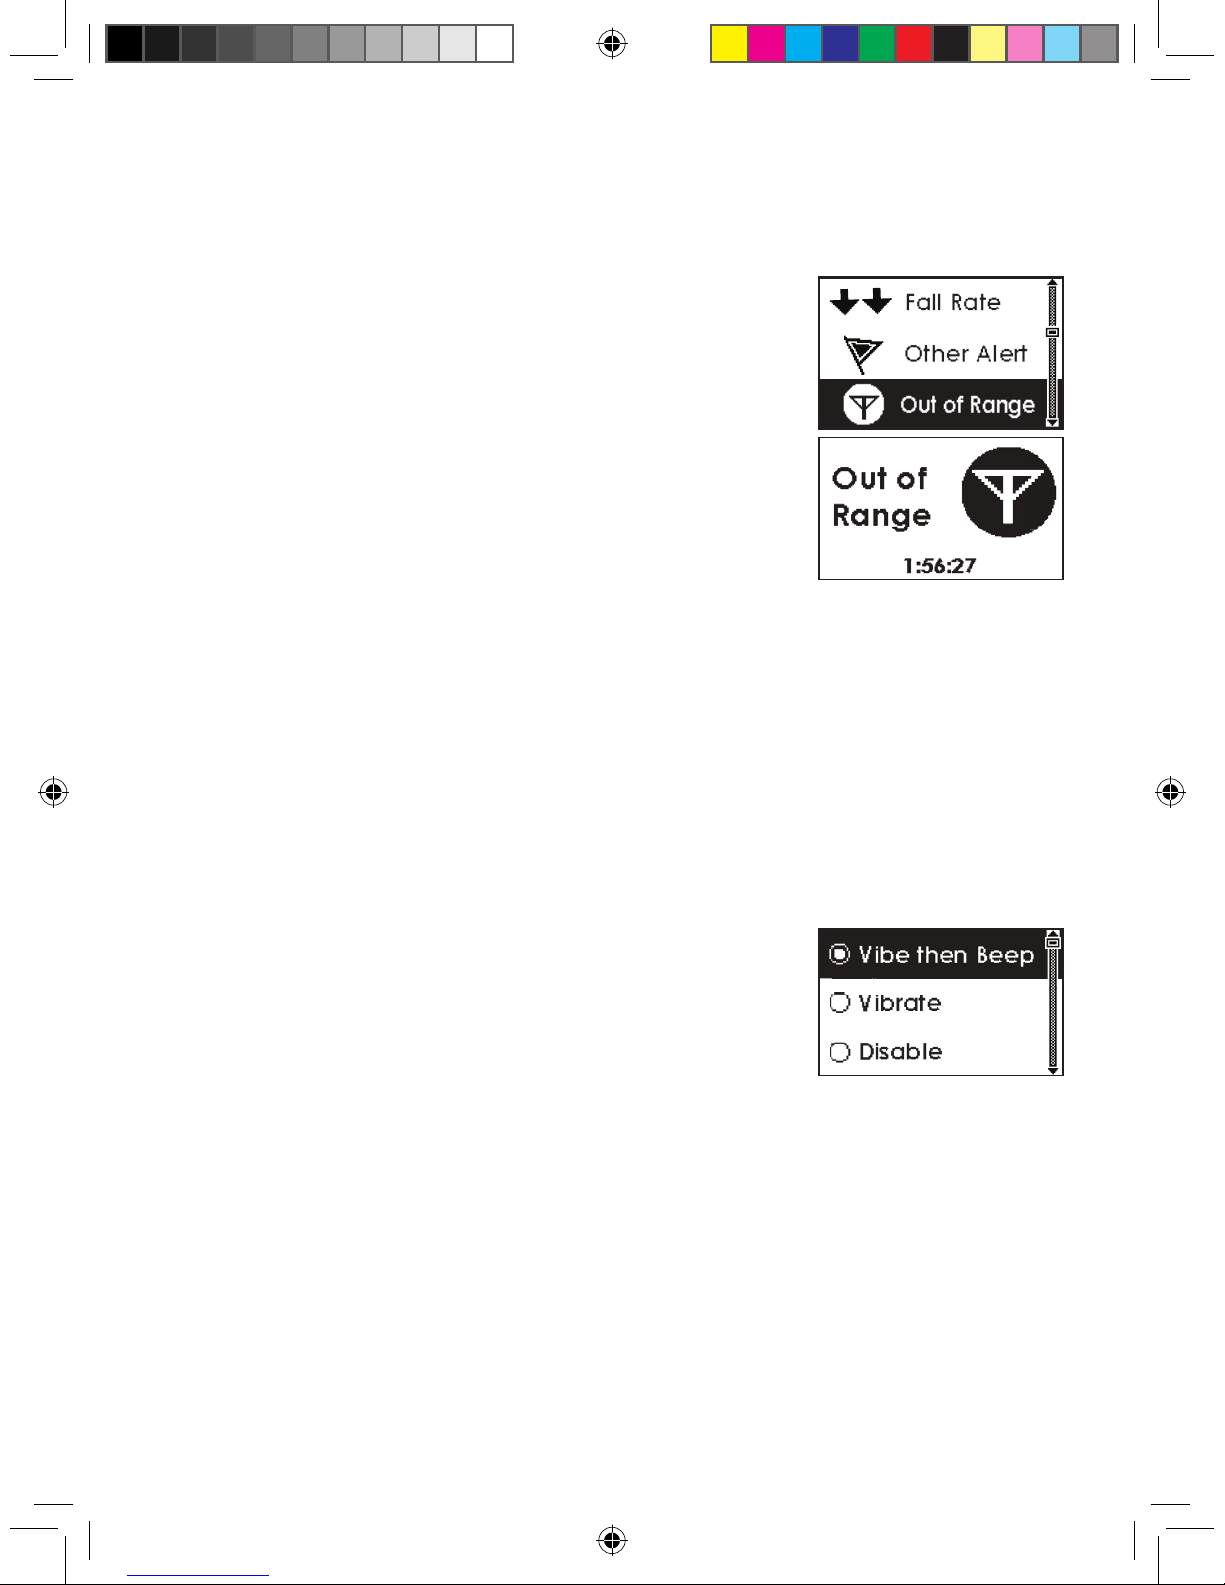
The Out of Range Alert lets you know when the Transmitter and
Receiver are not talking. Typically, you should keep the Transmitter
and Receiver within 5 feet (1.5 meters) of each other.
When the Transmitter and Receiver are too far apart and are
not talking, you will not receive Sensor glucose readings. When
this happens, the Out of Range Symbol will appear in the Status
Box on your Receiver and the screen to the right will appear. The
amount of time out of range will appear on the Out of Range Alert
screen.
The Out of Range Alert’s default setting is off (“Disable”). But, you can set the amount of time
the Transmitter can be out of range before the Receiver alerts you. You can change the settings
so the Alert will beep and vibrate, or vibrate only. You can set the Alert between 20 and 200
minutes. If you go out of range, the Receiver will continue to re-alert you until you come back in
range again or press a Receiver button.
The following steps show how to change the Out of Range Alert settings.
1. Select the Out of Range Alert as described in 2.3.1, “Factory Alert Settings.”
2. Use the Up p and Down q Arrow buttons to scroll to the type of Alert notication you want
to receive:
a. Vibrate then Beep (the rst alert will vibrate, then every 5
minutes the Alert will vibrate and beep)
i. The Out of Range sound is one medium tone
beep.
b. Vibrate (no sound, the Receiver will vibrate only)
c. Disable (to turn off this particular Alert notication)
3. Press the OK button to select the type of Alert notication you want.
a. If you select “Disable” you do not need to change any more settings.
b. If you select Vibe then Beep or Vibrate, you will then set the amount of time “Out of Range”
before the Receiver Alerts you. Continue using the Up p and Down q Arrow buttons to
scroll to the time you want and press the OK button to select it.
You will then return to the Trend Graphs.
Page 40
40 | SEVEN PLUS Continuous Glucose Monitoring System
2.4 AUTO UPLOAD METER REGISTRATION
Meter Registration is only required if you are using Auto Upload with a OneTouch Ultra Meter
and the Connection Cable. It is not required for OpenChoice with any meter.
To register the devices connect the OneTouch Ultra Meter and Receiver following these steps:
1. Make sure the OneTouch Ultra Meter display is off (screen is blank) before connecting the Connection Cable. To turn the display off, press the M button once.
2. Using the optional Connection Cable, follow the steps below. You must do these steps in order.
a. First plug the cable into the connection port of the meter.
(The connection port is at the bottom of the meter).
b. Second connect the wide end of the cable into the Receiver. Make sure the raised Push
button on the cable is facing down.
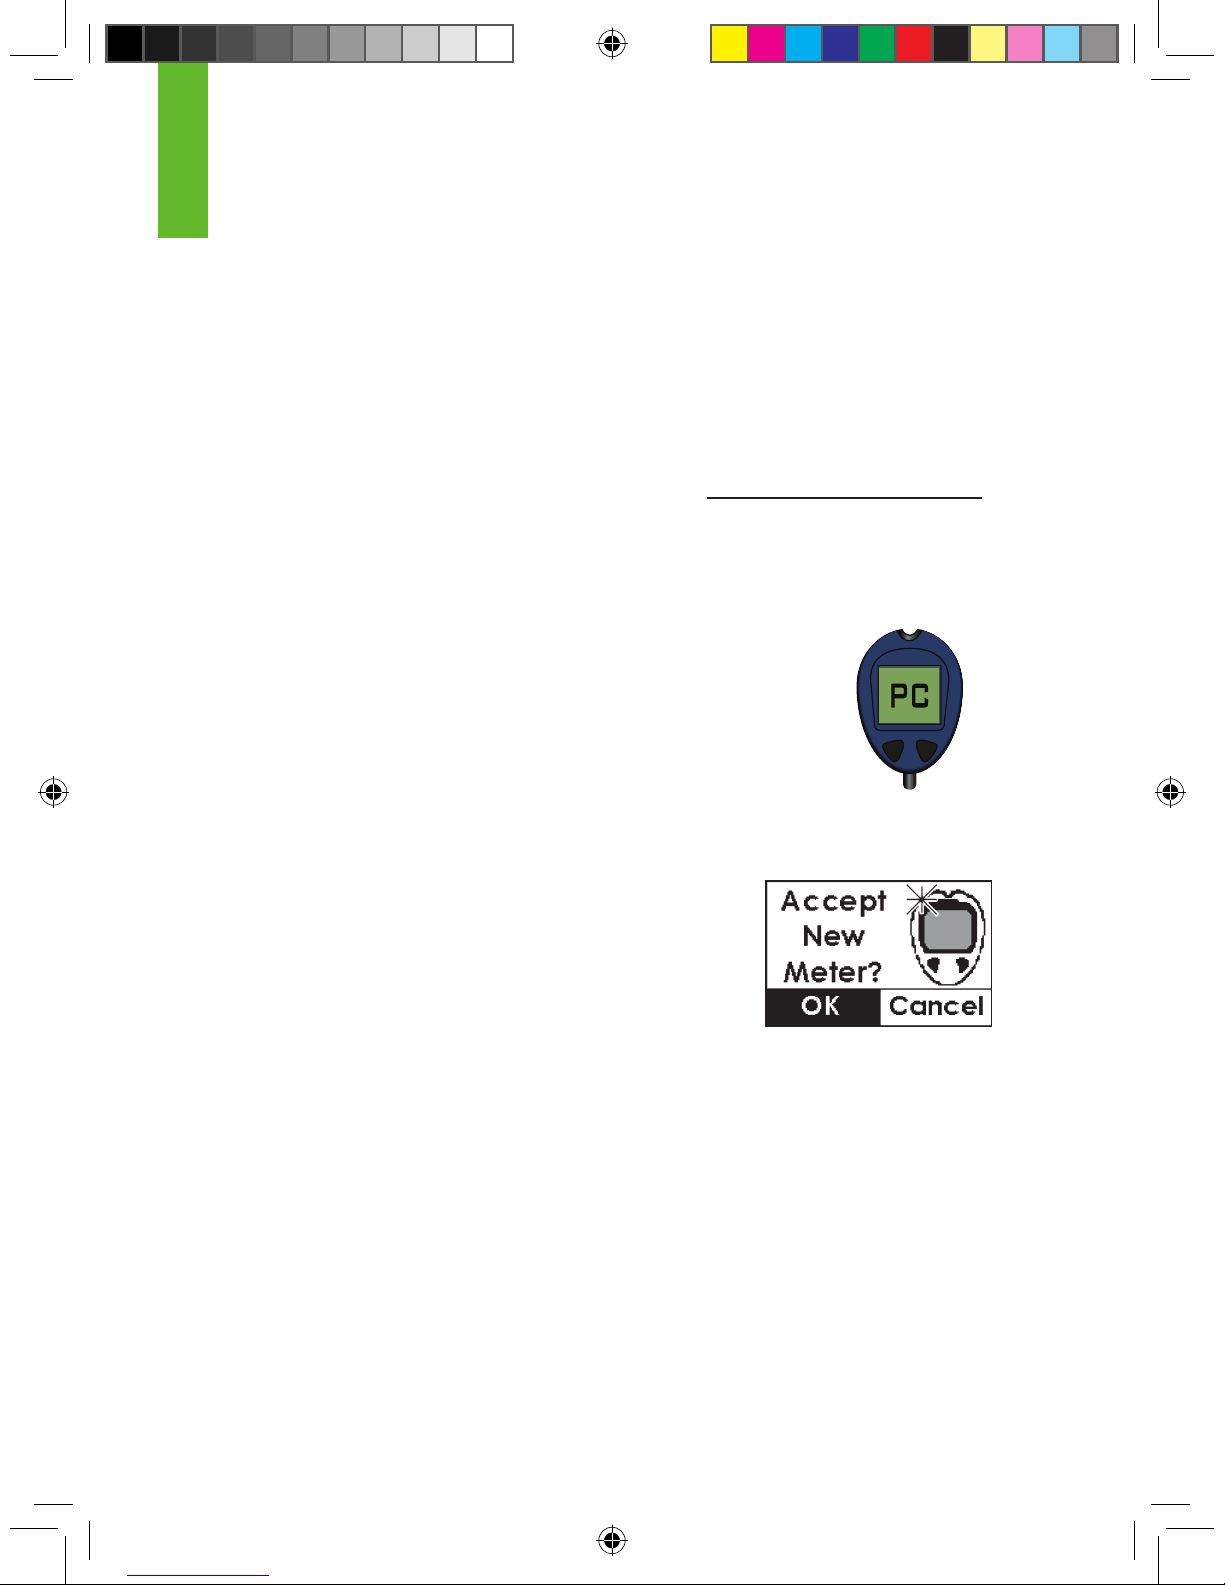
3. After a few seconds, “PC” will appear on the OneTouch Ultra Meter screen
(shown here on the right):
4. You will see the following screen below. If you would like, you can also set your Receiver to beep
and vibrate when this screen appears (see Chapter 2, Section 2.3, “Setting Your Alerts”).
5. Press the OK button to “accept” this new meter. The symbol
above will disappear and the Receiver will return to the 3-Hour
Glucose Trend Graph. This means your registration is complete.
(Note: This process may take a few minutes to complete.)
a. Press the Push button (facing down) on the Connection Cable
to remove it.
b. It doesn’t matter if you remove the cable from the meter or the SEVEN PLUS
System rst.
6. Check to see that the Receiver and meter have the same time.
7. Once you have registered, all new ngerstick readings taken and uploaded from this meter will
be used to calibrate your System.
MC
2
New Meter Screen
Page 41
SEVEN PLUS User’s Guide | 41
HELPFUL HINTS:
• If you use the Auto Upload feature, you must register your OneTouch meter to your Receiver the
rst time you use them together or after you change the time on your Receiver. You do not need to
register each time you calibrate.
• Blood glucose information stored in the OneTouch Ultra Meter before registering it to your Receiver
will not be used for calibration. Always register a new meter before uploading ngersticks for
calibration.
• The Receiver and OneTouch Ultra meter date and time must be the same. If they are not, the
ngersticks will not be accepted by the System for calibration. Anytime you change the date/time on
your Receiver, connect the meter to the Receiver using the Connection Cable (without taking new
ngerstick readings) to match the date/time on the devices. You can upload ngerstick readings as
usual after that.
Page 42
42 | SEVEN PLUS Continuous Glucose Monitoring System
Page 43
SEVEN PLUS User’s Guide | 43
3
chapter three
USING A SENSOR
Page 44
44 | SEVEN PLUS Continuous Glucose Monitoring System
3
Page 45
SEVEN PLUS User’s Guide | 45
To use your SEVEN PLUS Continuous Glucose Monitoring System you will
need a Sensor, a Transmitter, and a Receiver. You will also need a blood glucose
meter and test strips for calibration. Once inserted and calibrated, the Sensor will
continuously measure and display your glucose readings for up to 7 days (166
hours after the 2-hour Start-Up period). The following sections will show you how
to insert the Sensor and start a new continuous glucose
monitoring session.
3.1 BEFORE YOU START
rWash your hands thoroughly.
rMake sure you charge your Receiver completely rst. See Chapter 2, Section 2.1, “Charging
Your Receiver Battery” for directions.
rCheck that the date and time are correct on the Receiver.
rIf this is a new Transmitter, make sure the correct Transmitter ID Number has been entered
into your Receiver (See Chapter 2, Section 2.2.2, “Setting your Transmitter ID”).
r Place the Transmitter next to the Receiver for at least 5 minutes to make sure they are talk-
ing with each other. There will be an Antenna Symbol in the lower right corner of the Trend
Graphs when the two devices are talking.
r
Check the expiration date on the Sensor. The expiration date format is YYYY-MM-DD.
Sensors must be inserted on or before the end of the calendar day printed on the Sensor
package label.
rQuality check (“QC”) your Blood Glucose Meter per the manufacturer’s instructions to make
sure it is providing you the best readings for calibration (e.g., check the code number and
use the control solution).
rClean the bottom of the Transmitter with a damp cloth or alcohol wipe, and dry before you
start a new Sensor session.
rIf you are using Auto Upload from a Lifescan
®
OneTouch® Ultra® meter, you must connect (or
“register”) your meter to your Receiver before you start.
rMake sure your meter and Receiver date and time match.
Page 46
46 | SEVEN PLUS Continuous Glucose Monitoring System
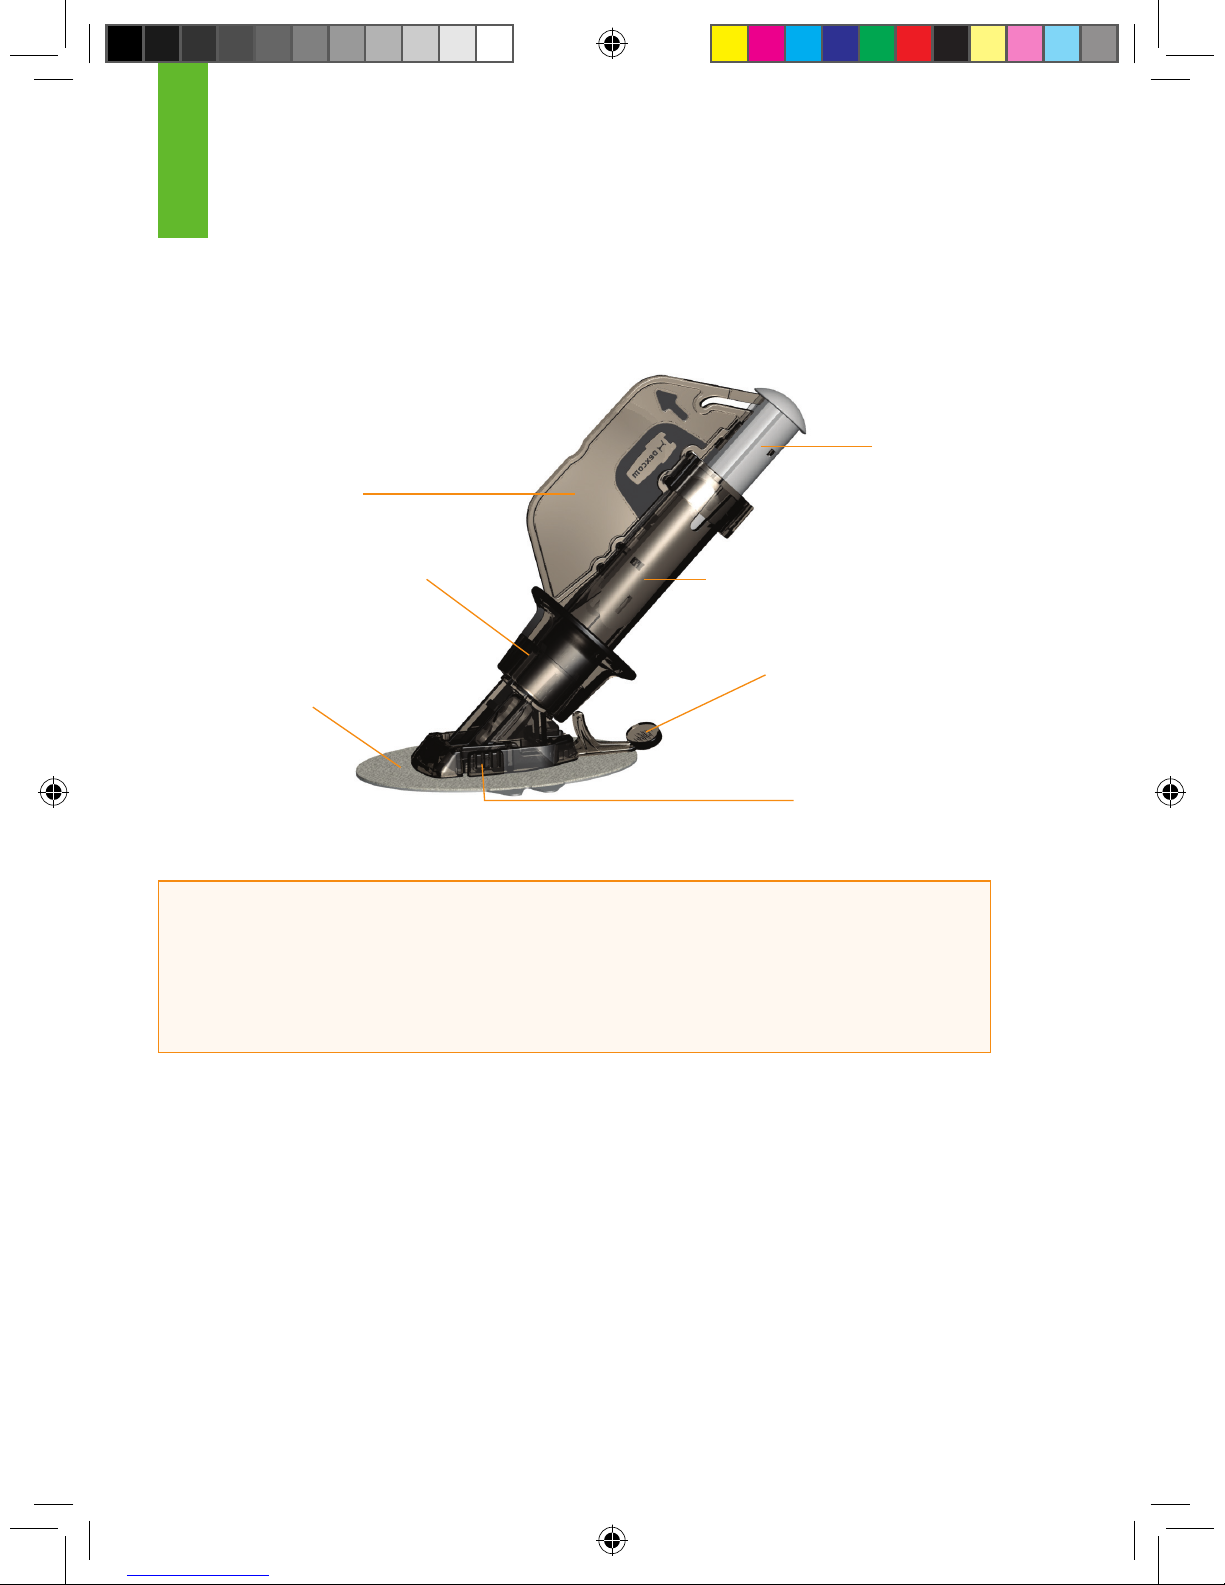
REVIEW THE SENSOR APPLICATOR
Review the Sensor Applicator picture below before using a new Sensor.
HELPFUL HINTS:
• Check the expiration date on the Sensor. The expiration date format is YYYY-MM-DD.
Sensors must be inserted on or before the end of the calendar day printed on the Sensor
package label.
3
Plunger
Applicator
(Needle/Sensor Probe inside)
Transmitter Latch
Safety Lock/
Transmitter Release
Collar
Sensor Pod
Release Tab
Page 47
SEVEN PLUS User’s Guide | 47
3.2 REMOVING THE SENSOR FROM ITS PACKAGING
•
Carefully remove the Sensor from its packaging. Look closely at the Sensor to make sure it is
not damaged.
•
The Applicator is a single use, disposable unit. The Safety Lock prevents you from accidentally
releasing the needle before you are ready.
3.3 CHOOSING AN INSERTION SITE
Choose a site on a fatty area of your belly to place the Sensor. You can choose a site above or
below your beltline. The best areas to insert your Sensor are usually at, “pinchable,” and free
from where rubbing can occur (i.e., pant line, seatbelts).
•
Avoid areas with scarring, tattoos, or rough patches of skin from your insulin injections or pump.
•
Choose an area that is at least 3 inches from where you plan to inject insulin or from where
your pump infusion site is located.
•
Avoid using the same spot repeatedly for Sensor insertion. Never use the same site for 2 Sensor uses in a row.
•
You may need to shave the area where you plan to put the Sensor so that the adhesive patch
sticks well.
•
Make sure there are no traces of lotions, perfumes or medications on the area. Clean the area
rst with an alcohol swab. Make sure the area is clean and completely dry before you insert the
Sensor.
The Sensor is sterile in its unopened, undamaged package. Do
not use any Sensor if its sterile package has been previously
damaged or opened.
Establish a rotation schedule for choosing each new Sensor
location. Avoid Sensor locations that are constrained by clothing,
accessories, or subjected to rigorous movement during exercise.
Avoid injecting insulin or placing an insulin pump infusion set
within 3 inches of the Sensor.
Page 48
48 | SEVEN PLUS Continuous Glucose Monitoring System
3.4 PLACING THE SENSOR
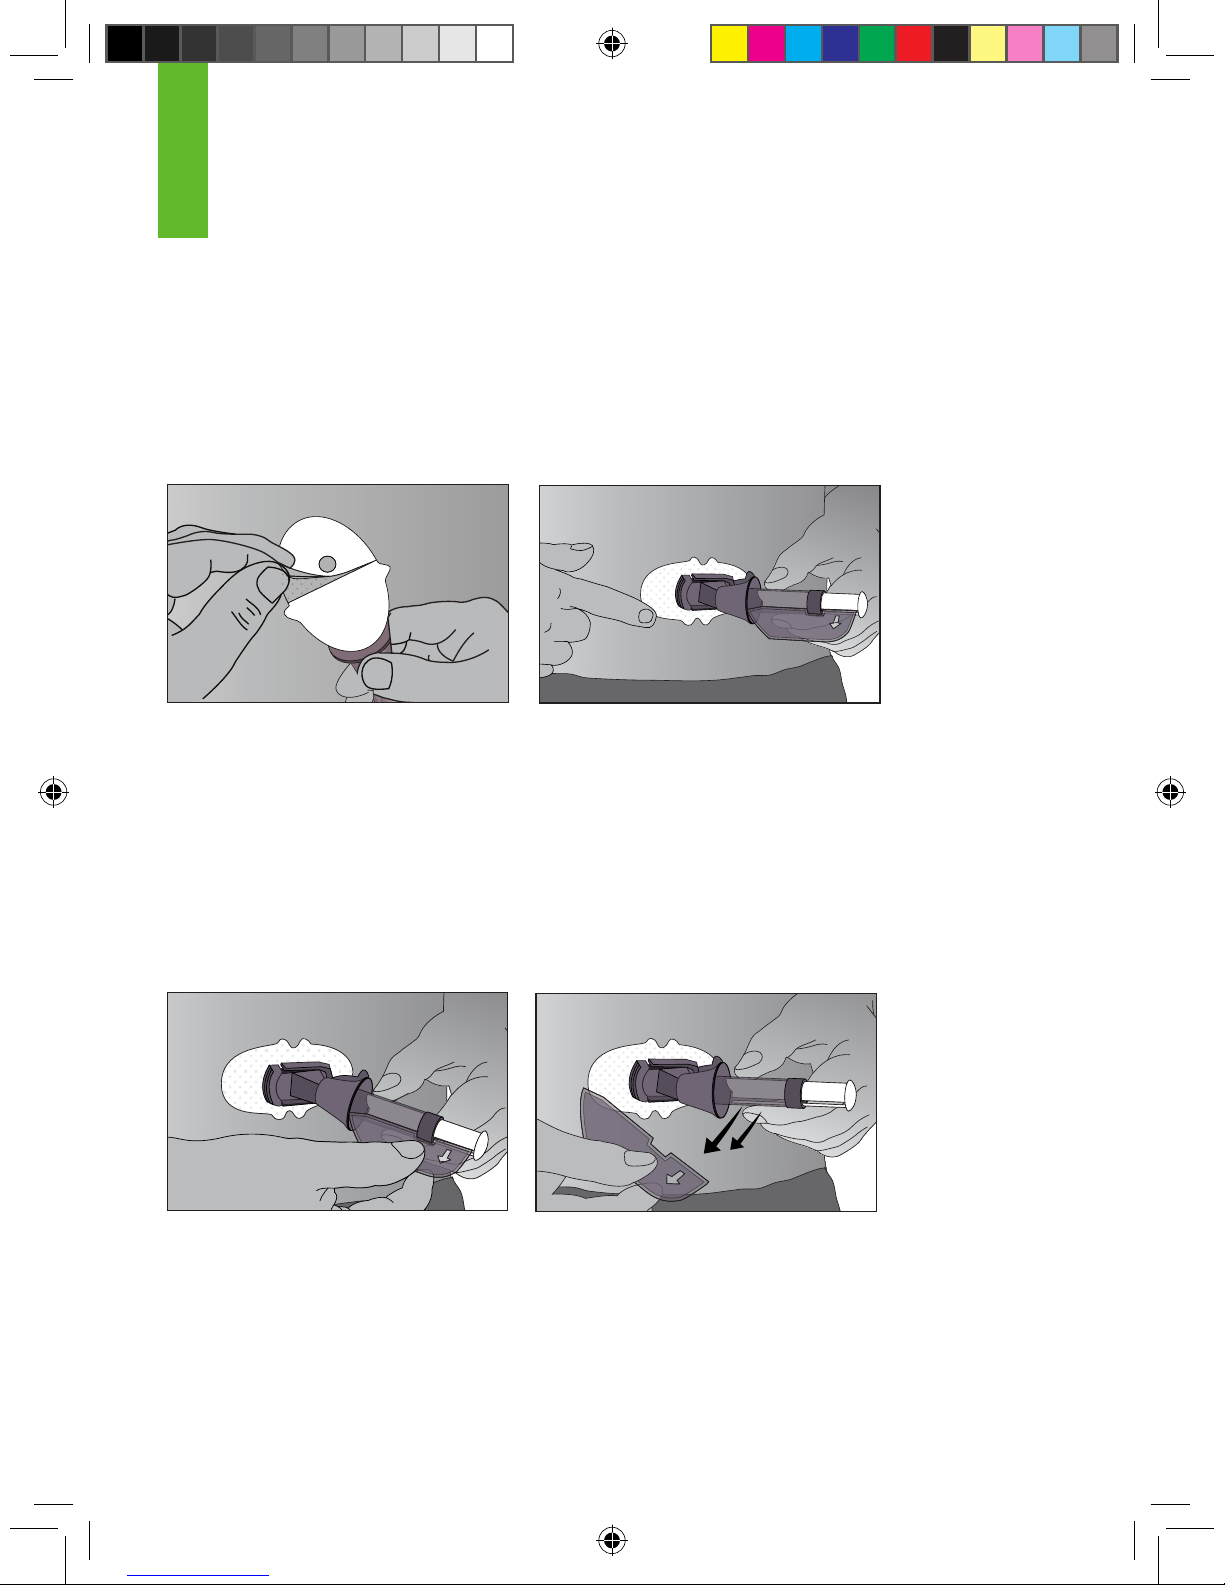
1. After you have cleaned your skin, remove the adhesive backing from the Sensor Pod. Hold the
Sensor by the plastic Applicator and try not to touch the sticky adhesive patch.
2. Place the Sensor on the area. You can place the Sensor at facing to the left or right of your
belly button. Make sure the Sensor is placed in the same direction shown in the picture below.
You should not place the Sensor pointing in the up or down direction.
3. After placing the Applicator, press rmly on and around the outside of the adhesive patch to
make sure it is at.
a. Pressing the patch to remove any wrinkles should help it stick better.
b. Press rmly over the entire patch area.
4. Hold on to the Applicator. Then pull the Safety Lock/Transmitter Key straight out away from the
applicator, in the direction the arrow shows below.
3
Remove the Adhesive backing Adhere the Sensor on the skin
Remove the Safety Lock/Transmitter Key
Page 49
SEVEN PLUS User’s Guide | 49
3.5 SENSOR INSERTION
Once you have placed the Applicator on your belly and removed the Safety Lock (see Chapter
3, Section 3.4, “Placing the Sensor”), you are ready to insert the Sensor. Follow these 4 steps to
successfully insert your Sensor.
1. Hold down the Pod with one hand. With your other hand, place two ngers above the collar
on the barrel of the Applicator.
2. Place your thumb on the plunger. Push the plunger down completely. This action inserts the
needle and Sensor Probe under your skin.
When you are
pushing down on the
plunger, do
not pull back
on the collar.
Push down the plunger – Insert the Needle and Sensor Probe
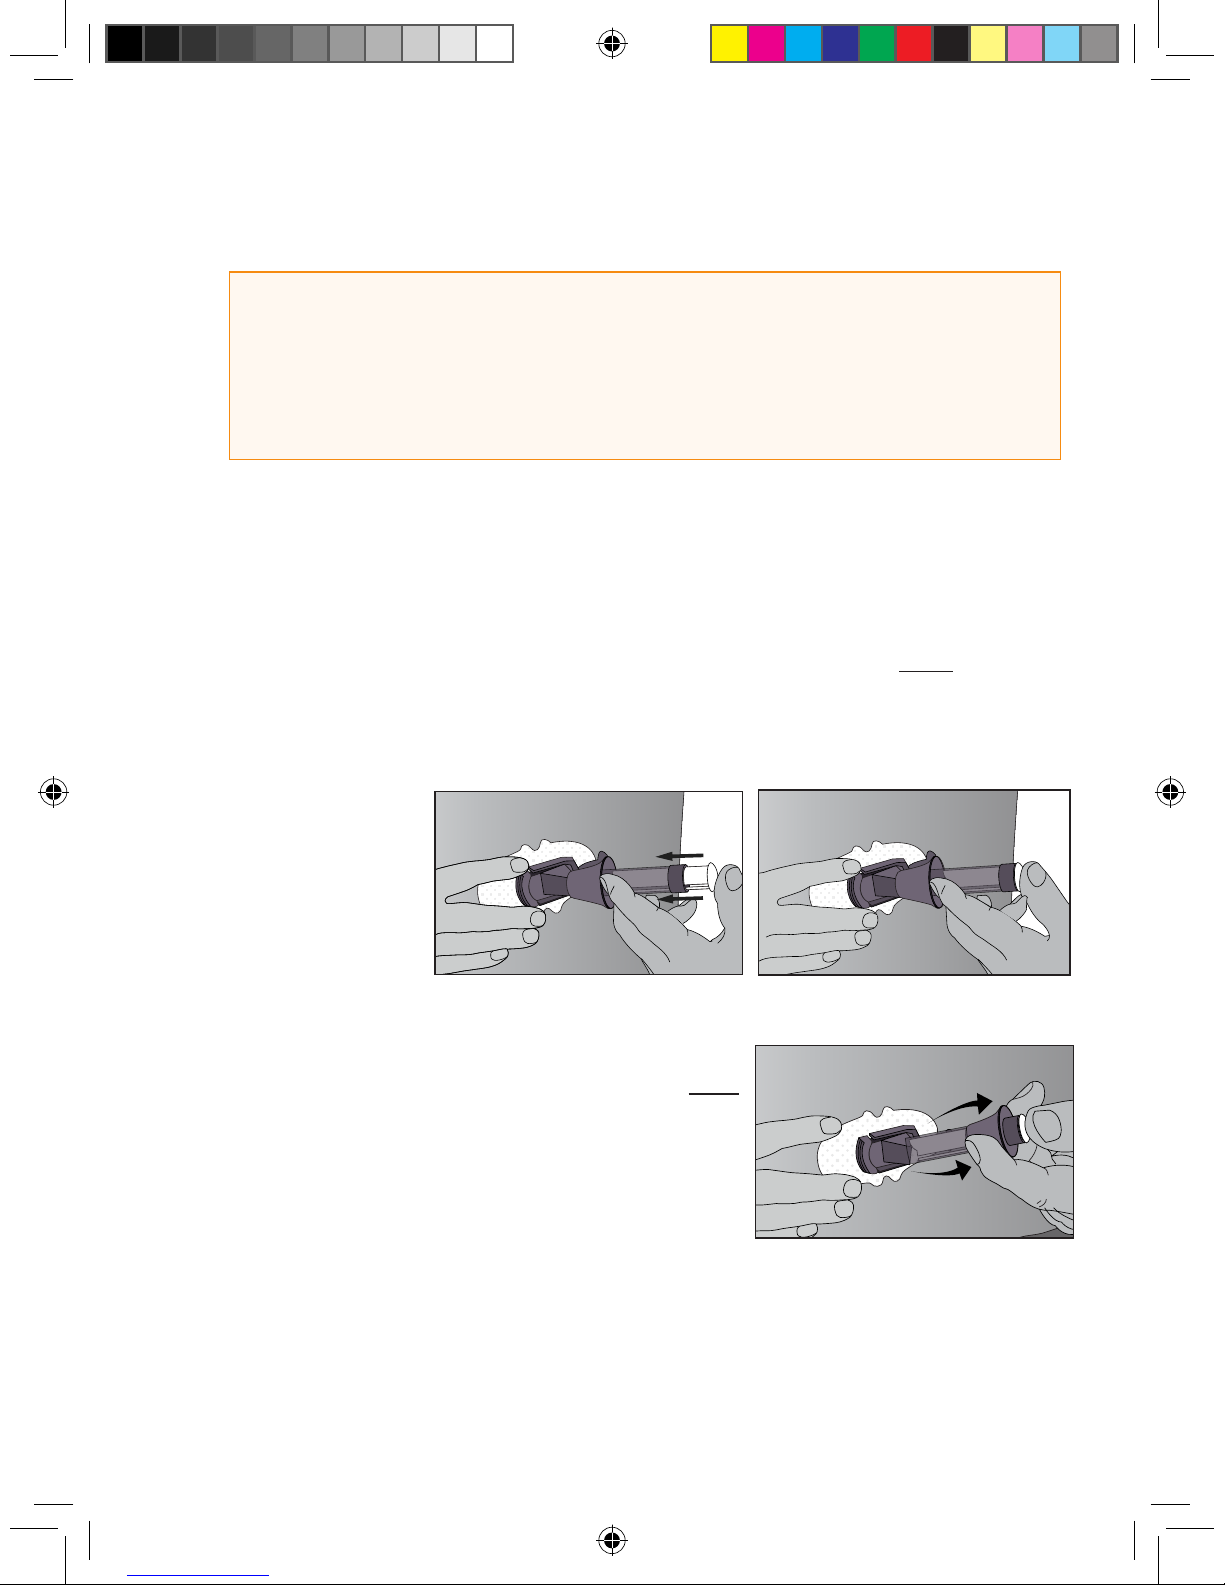
3. To remove the needle, keep holding the Sensor Pod with
one hand. With your other hand, place two ngers under
the collar. Then pull the collar back towards your thumb.
Stop when you hear 2 “clicks” or cannot pull back any
more. This step pulls the needle back into the Applicator
and keeps the Sensor Probe under your skin.
a. Remember to do this in the correct order: push plunger
down, then pull collar up.
HELPFUL HINTS:
• The Safety Lock also serves as the Transmitter Key that is used later for Transmitter removal.
Keep this piece to help you remove the Transmitter at the end of a continuous glucose monitoring
session. When your glucose monitoring session is over, follow the steps in Chapter 7, Section 7.3,
“Transmitter Removal,” to remove the Transmitter.
“CLICK”
“ 2 CLICKS”
Pull back the collar - Retract
the Needle
Page 50
50 | SEVEN PLUS Continuous Glucose Monitoring System
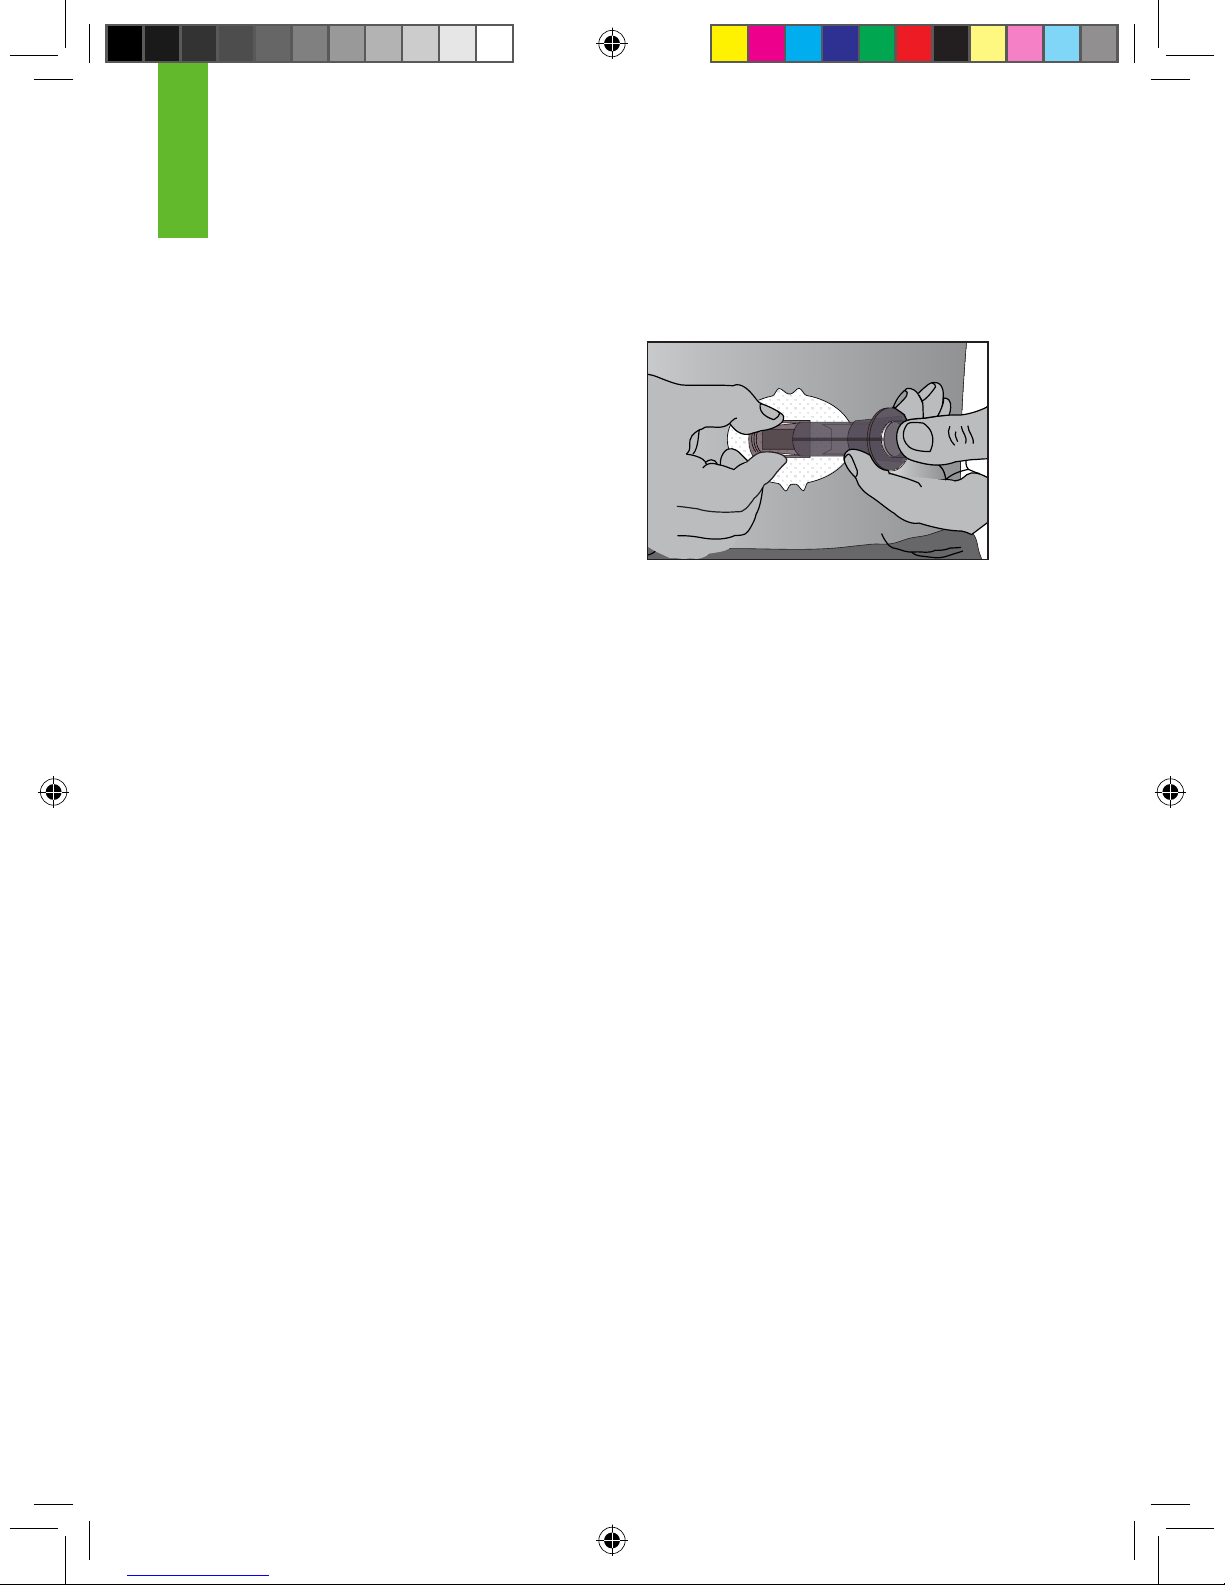
4. Squeeze the ribbed release tabs on the sides of the Sensor Pod to remove the Applicator.
When you squeeze the front release tabs, the back tabs will widen, allowing you to pull off the
Applicator. After this step, only the Sensor Pod will
be left on your body.
a. Make sure the Transmitter Latch is down
(against your body) to remove the Applicator.
5. The used Applicator can be thrown in the trash.
If you have any problems with insertion, save the Sensor and Applicator
and contact DexCom Technical Support at 1-888-SEVENGO (738-3646).
3.6 TRANSMITTER ATTACHMENT
The Transmitter wirelessly sends your Sensor glucose information to the
Receiver. Once you have inserted your Sensor, you will need to snap the
Transmitter into the Sensor Pod. Follow the steps below to attach your Transmitter.
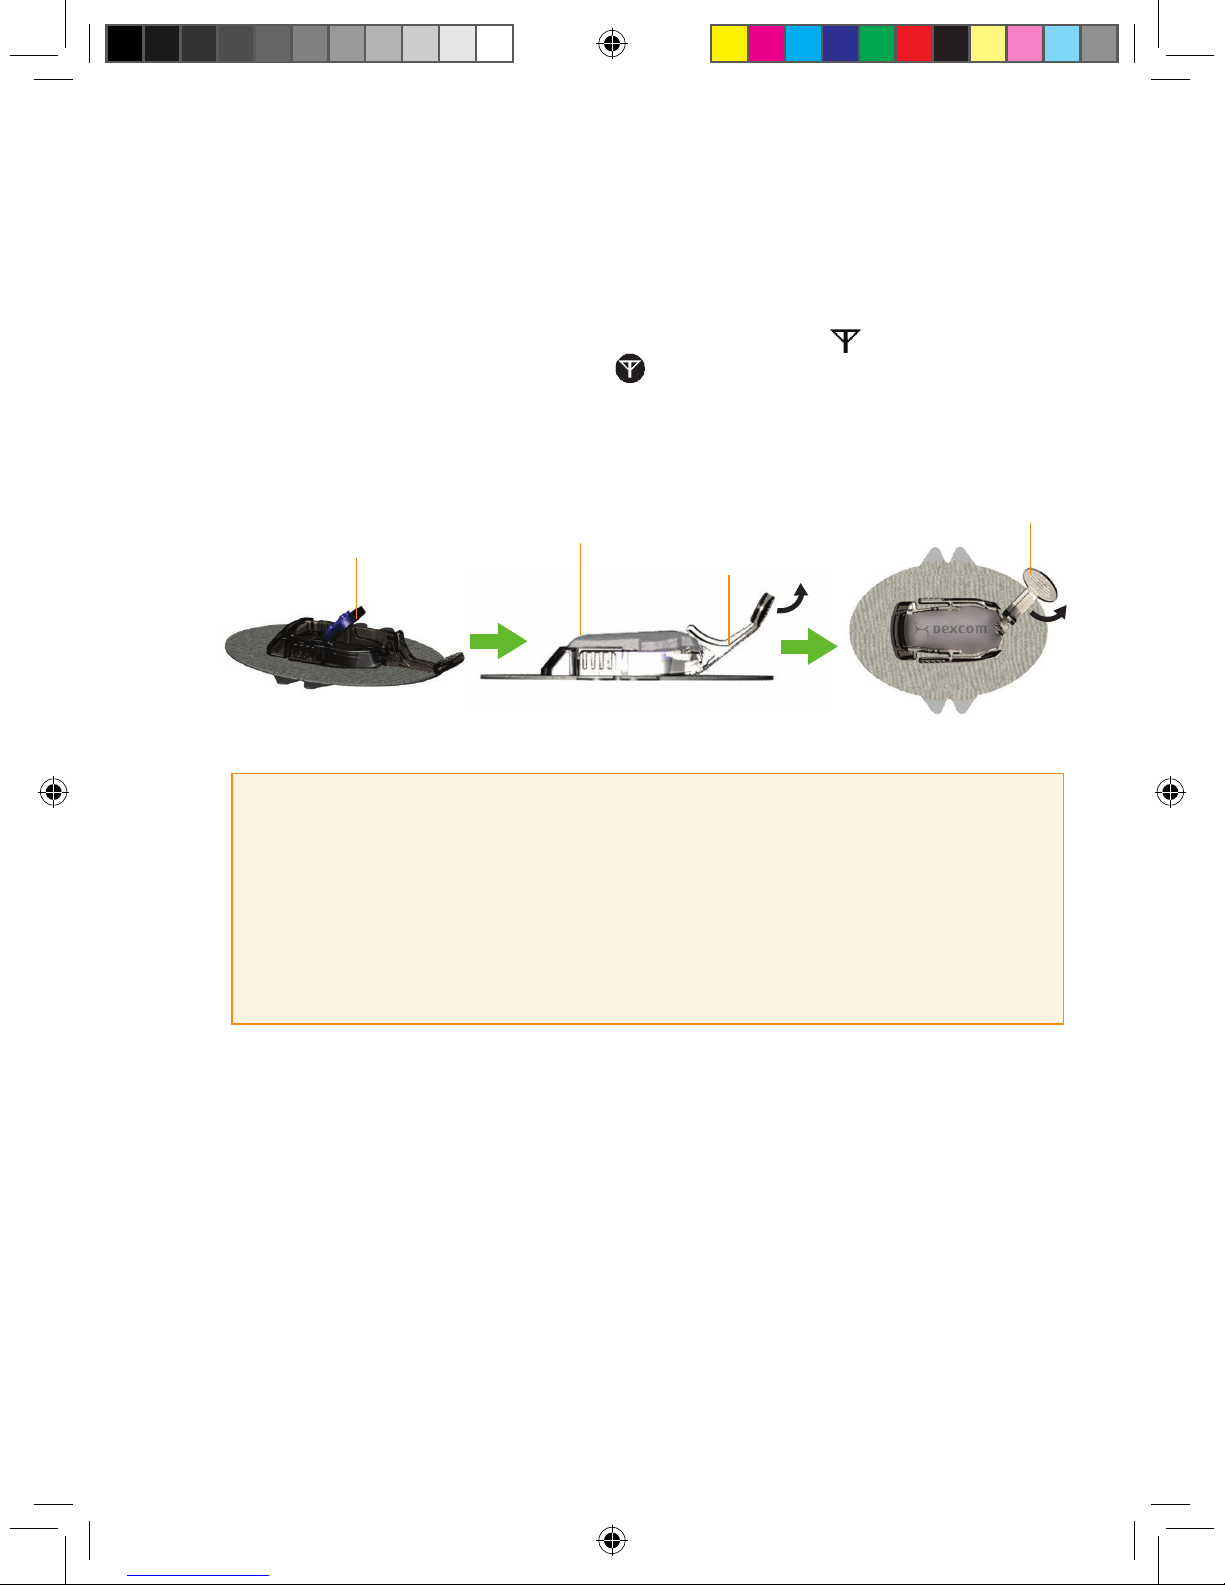
1. Clean and dry the bottom of the Transmitter with a damp cloth or an alcohol wipe before
every use.
a. Be careful not to touch the metal circles on the bottom of the Transmitter.
2. Place the Transmitter in the Sensor Pod with the at side facing down.
3. Pull the Transmitter Latch over the Transmitter to snap the Transmitter into place. The Trans-
mitter should lie at in the Sensor Pod. You should hear 2 “clicks.”
a. If you do not hear 2 clicks, the Transmitter might not be fully snapped in.
4. Make sure both sides of the Transmitter are secure inside the Sensor Pod.
a. Do this by sliding your rst and second ngers under the edge of the Sensor Pod (with
your ngernails against your skin under the Latch).
b. Place your thumb on top of the Transmitter.
c. Then squeeze together to make sure the Transmitter has been snapped in.
3
Release the Applicator
Page 51
SEVEN PLUS User’s Guide | 51
5. Remove the Transmitter Latch by holding the end of the Latch and quickly twisting off the Latch
away from your body.
6. Press any button on the Receiver to check for the Antenna Symbol at the lower right corner
of the screen. If the Out of Range Symbol appears in the Status Box (upper right corner)
instead, move the Receiver closer to your Transmitter. (See Chapter 3, Section 3.7, “Transmitter
and Receiver Communication”).
HELPFUL HINTS:
• Make sure you hear 2 clicks when you snap the Transmitter in place (see
Step 3). This helps ensure your device is water resistant (see Chapter 3,
Section 3.10, “The SEVEN PLUS and Water”).
• Make sure that you have the correct Transmitter ID Number entered into your Receiver (for all
new Receivers, the Manufacturer enters this number). See Chapter 2, Section 2.2.2, “Setting your
Transmitter ID”, for instructions on how to enter the Transmitter ID into your Receiver.
Install Transmitter
in Sensor Pod
Transmitter Installed
Transmitter Latch
Remove
Transmitter Latch
Page 52
52 | SEVEN PLUS Continuous Glucose Monitoring System
3.7 TRANSMITTER AND RECEIVER COMMUNICATION
Keep your Receiver within 5 feet (1.5 m) of the Sensor/Transmitter for best communication. To
check that the Receiver and Transmitter are talking, press any Receiver button to see the Glucose
Trend Graphs.
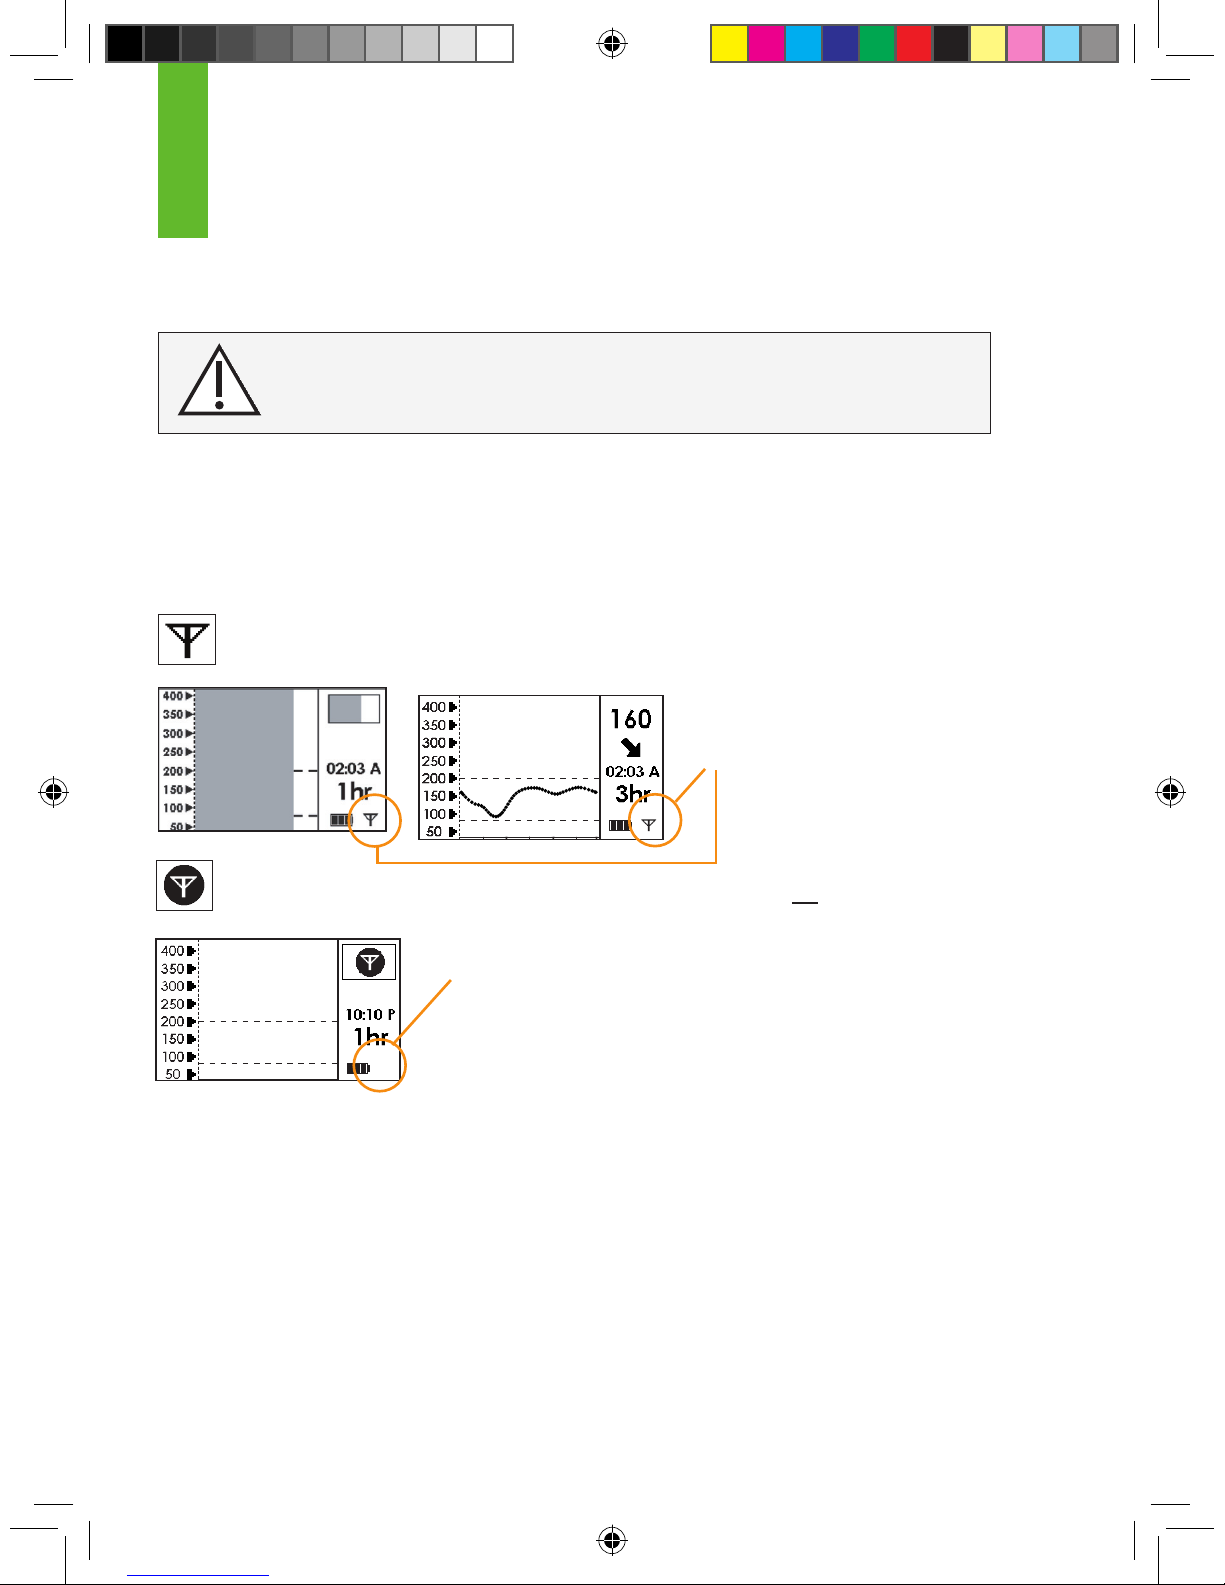
Note the difference between the two Antenna Symbols below:
This Antenna Symbol shows that the Transmitter and Receiver are talking.
This Out of Range Symbol shows the Transmitter and Receiver are not talking.
If you see the Out of Range Symbol in your Status Box, then review
the following troubleshooting tips.
•
Is the Receiver within 5 feet (1.5 m) of your Sensor Pod/Transmitter? If the
Receiver is not close enough, then move it within 5 feet of the Sensor Pod/
Transmitter. Check the Status Box in 5-10 minutes to see if the Out of Range Symbol is gone, and
the normal Antenna Symbol is in the lower right corner
of the Receiver screen.
•
If the Receiver and Transmitter are still not talking, then check to make sure the correct Transmitter ID Number is entered into your Receiver (See Chapter 2, Section 2.2.2, “Setting your Transmitter ID”).
3
CONTRAINDICATION: The SEVEN PLUS must be removed
prior to Magnetic Resonance Imaging (MRI).
The Antenna Symbol
should appear here
The Antenna Symbol is missing
Page 53
SEVEN PLUS User’s Guide | 53
•
If the correct Transmitter ID has been entered into your Receiver and the Receiver and Transmitter are still not talking, then contact DexCom Technical Support for further help at 1-888-SEVENGO (738-3646).
3.8 BEGINNING A SENSOR SESSION
After you have checked that your Transmitter and Receiver are talking, you need to tell the
Receiver that you have inserted a new Sensor.
To tell the Receiver that you have inserted a new Sensor, follow the steps below.
1. Press any button to turn on the Receiver.
2. From any Trend Graph, press the OK button to reach the Menu Screens.
3. Use the Up p and Down q Arrows to scroll until you highlight “Start Sensor.”
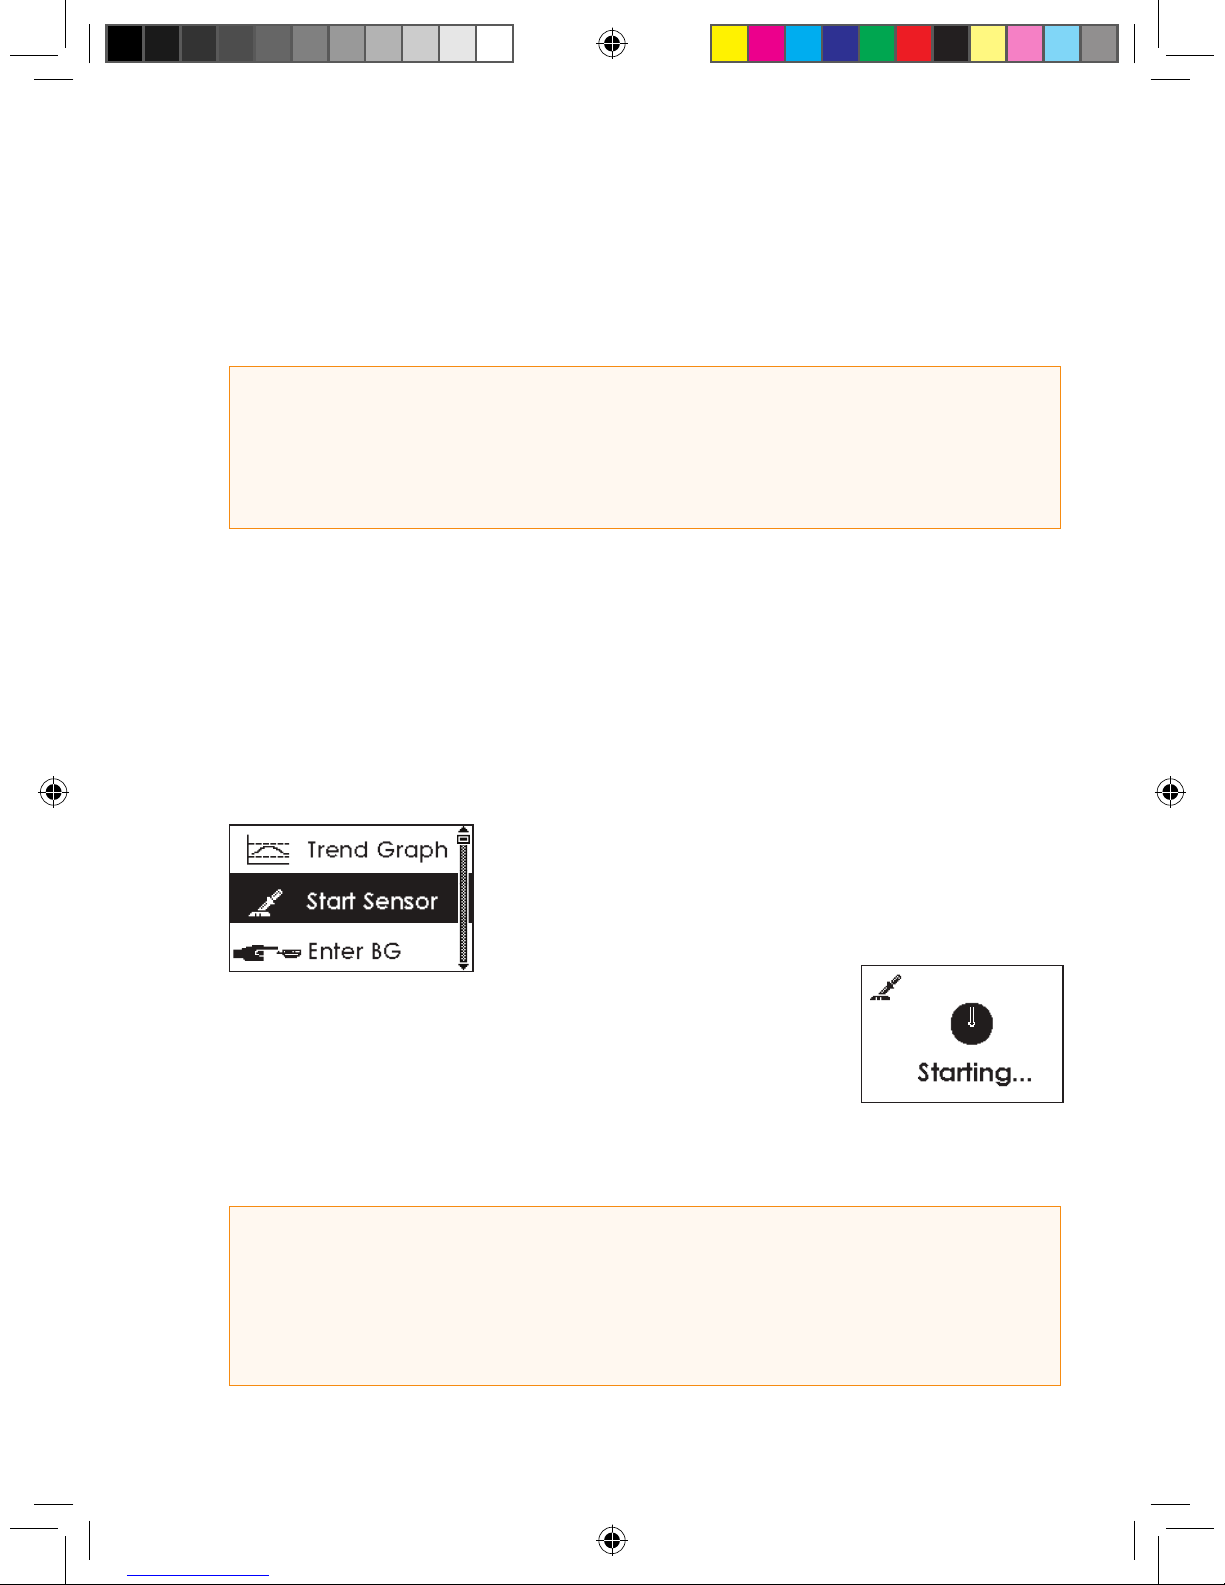
4. Press the OK button to conrm the start of a new Sensor, and you
will see this screen:
5. Your Receiver will return to the 3-Hour Trend Graph.
6. Your 2-hour Start Up period has begun.
HELPFUL HINTS:
The Transmitter and Receiver may lose communication at the following times:
• When they are near metallic objects
• While you are lying on a waterbed
• When you are using an electric blanket
HELPFUL HINT
• The Start Sensor Menu option will now disappear from the menu. The option will only appear again if
an active continuous glucose monitoring session ends.
• Each time you insert a new Sensor and press “OK” on the Start Sensor Screen, you will restart the
2-hour Start-Up period.
Page 54
54 | SEVEN PLUS Continuous Glucose Monitoring System
3.9 SENSOR START-UP PERIOD
The Sensor needs a 2-hour Start-Up period. This is so the Sensor can get used to its new insertion site. During the Start-Up period, check every so often to make sure the Antenna Symbol is in
the lower right corner of the Trend Graphs. Also make sure your Receiver battery is charged.
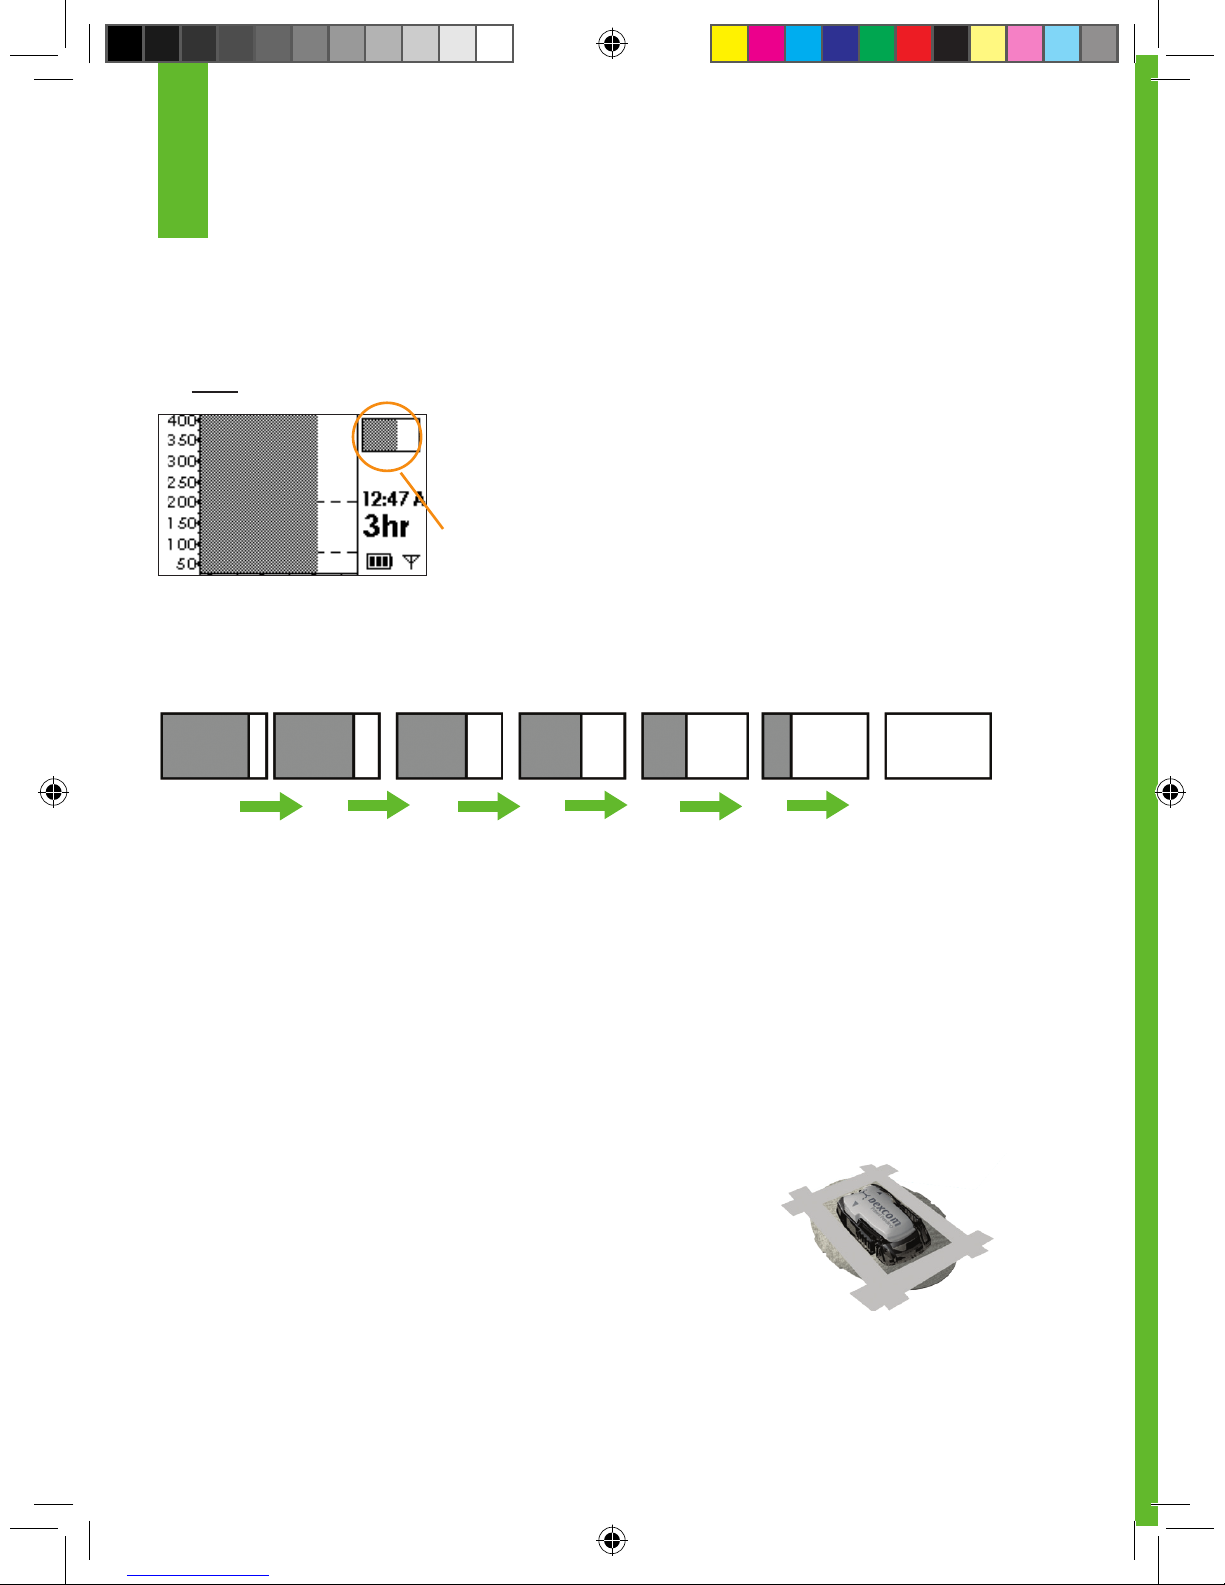
When you press any button during the Start-Up period to turn
on the Receiver dislplay, your Trend Graphs and Status Box will
be shaded dark gray.
A partial grey status box indicates your Sensor is still
in the Start-Up period
Over time, the partial dark gray block on the screen will start to disappear to the left, indicating
that you are getting closer to initial calibration time. See the pictures below for an example of what
this looks like.
At the end of the 2-hour Start-Up period the Receiver will let you know that it is time
to calibrate your Sensor. Chapter 4 tells you how to calibrate your Sensor.
3.10 THE SEVEN PLUS AND WATER
Your Sensor (including the installed Transmitter) is water resistant when showering, bathing, or
swimming. The Sensor has been tested to be water resistant when submerged for up to 3 ft for a
maximum of 30 minutes. For added protection you can use a shower cover. The Receiver is
not water resistant. Do not get your Receiver wet at any time.
3.11 TAPING THE SENSOR POD
The Sensor Pod should stay attached on its own. But, if the patch is
peeling up, you can use medical tape (such as BlendermTM) for extra
support. If you use tape, only tape over the white adhesive patch on all
sides for even support. Do not tape over the
Transmitter or any of the plastic parts of the Sensor Pod. Do not tape
under the Sensor Pod or leave any substance on the skin where you
insert the Needle.
3
Start
Ready for
calibration
Page 55
SEVEN PLUS User’s Guide | 55
4
chapter four
CALIBRATING YOUR SEVEN PLUS
Page 56
56 | SEVEN PLUS Continuous Glucose Monitoring System
4
Page 57
SEVEN PLUS User’s Guide | 57
The SEVEN PLUS System requires you to “calibrate” the Sensor
glucose readings to your blood glucose meter. The purpose of calibration is
so the glucose uid your Sensor measures can be displayed to you in a reading on your Receiver that is like your blood glucose meter reading.
4.1 HOW TO CALIBRATE
There are two methods you can use to calibrate your System. You can either
use the OpenChoice feature on your SEVEN PLUS, or you may use the
Auto Upload method.
The OpenChoice feature allows you to hand enter your readings into the System, and you can
use any FDA-cleared meter you choose. With Auto Upload, you must use the LifeScan OneTouch Ultra meter, and the optional Connection Cable for calibration. This Connection Cable can
be purchased from DexCom Customer Support.
You will need to perform three types of calibration on your Receiver:
1. Start-Up Calibration 2. Calibration Update 3. Re-calibration
Start-Up Calibration happens at the end of the 2-hour Start Up Period. Start-Up Calibration takes
2 blood glucose ngersticks. Calibration Update is a calibration that must be performed every
12 hours (about 2 times per day). The Receiver will remind you when these calibrations are
needed. Re-calibration may be required if one of the blood glucose readings entered for StartUp Calibration or Calibration Update is not accepted by the Receiver.
The sections in this Chapter tell you how to use OpenChoice and AutoUpload methods for
calibrating your system. The sections also describe Start-Up Calibration, Calibration Update,
and How to Re-calibrate in more detail.
CONTRAINDICATION: Use of acetaminophen-containing
medications while the Sensor is inserted may affect the
performance of the device
Page 58
58 | SEVEN PLUS Continuous Glucose Monitoring System
4.1.1 USING OPENCHOICE FOR CALIBRATION
The steps below show you how to hand-enter your ngerstick readings for calibration:
1. Take a ngerstick reading using your meter.
2. From any Trend Graph, press the OK button to reach the Menus.
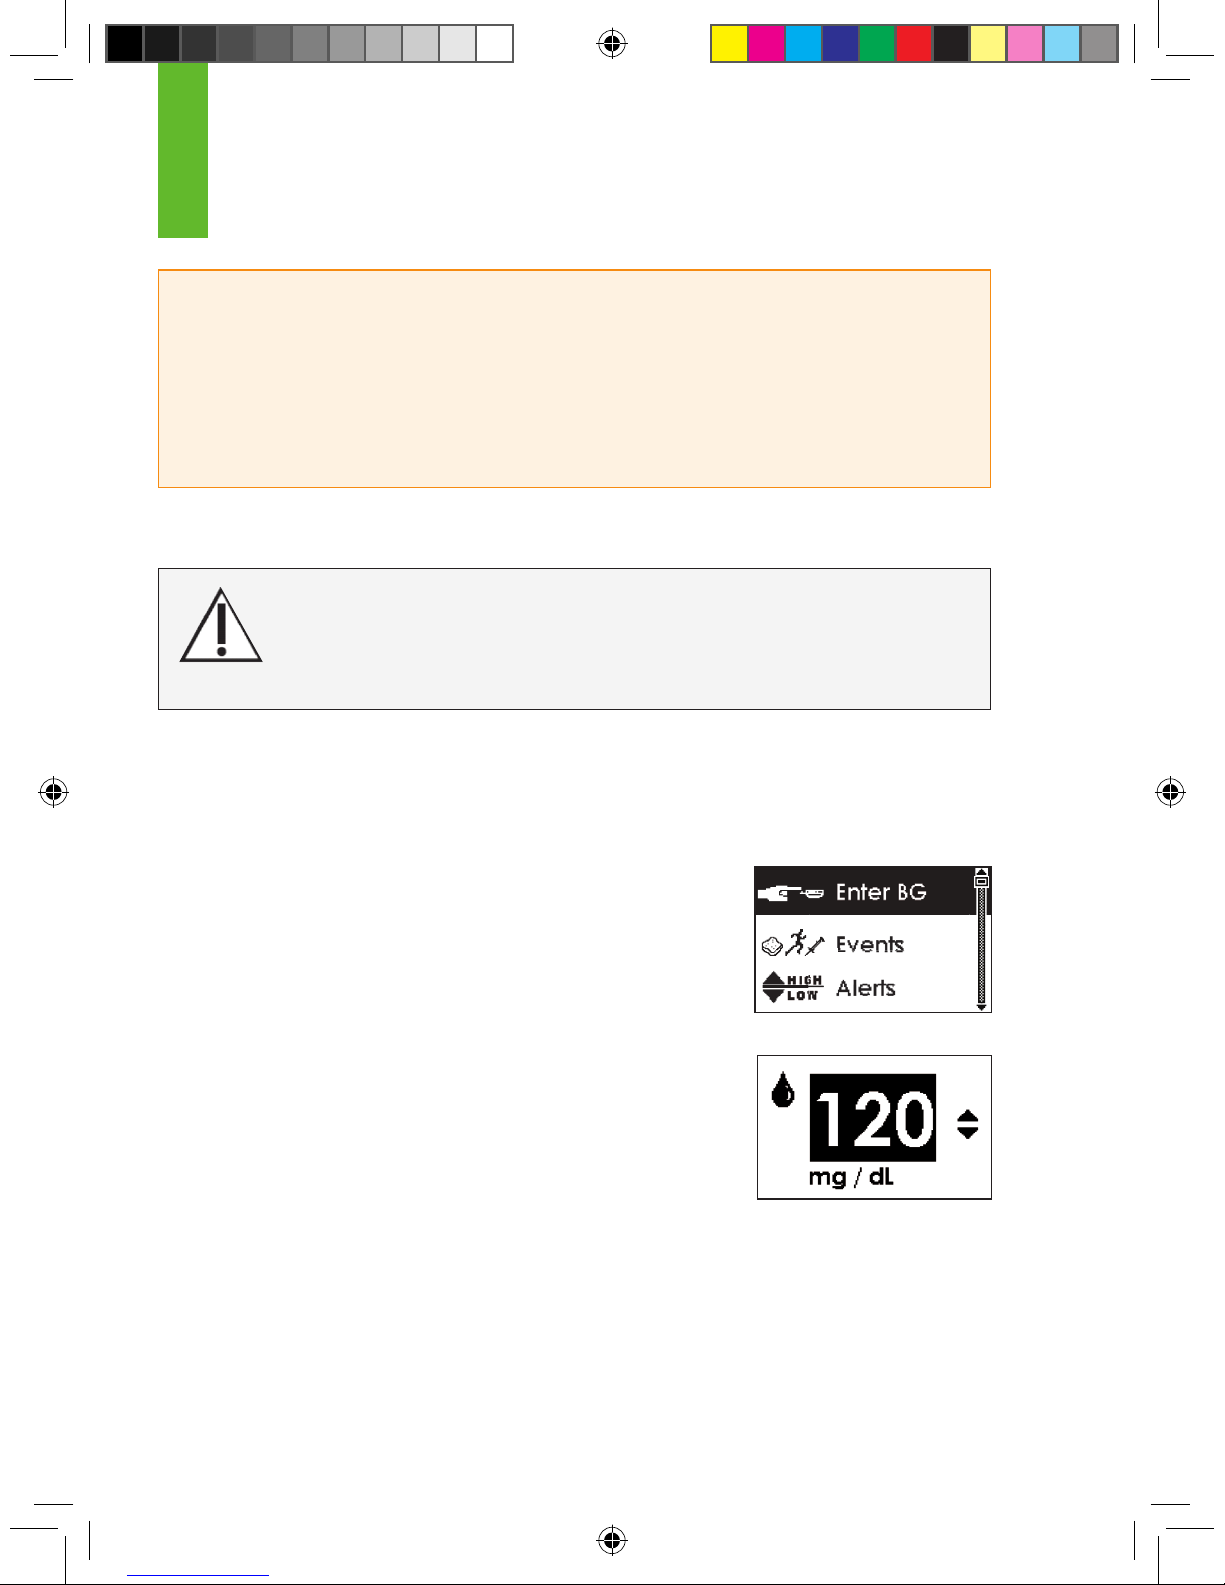
3. Use the Up p and Down q Arrows to scroll until you highlight
“Enter BG.”
Note: “Enter BG” is not the rst menu option at the top of
the screen.
4. Press the OK button to select this option. You will see a screen
with a blood drop and a number in mg/dL units.
a. During initial calibration the SEVEN PLUS will default to the
reading of 120mg/dL.
b. If there has been a reading in the past 15 minutes, the Enter
BG Screen will display your current continuous glucose reading as your starting point. Do not
use the glucose reading for calibration. Use only your BG meter reading.
4
HELPFUL HINTS:
• If you use Auto Upload, all ngerstick readings taken with your OneTouch Ultra meter can affect
calibration. Do not share your blood glucose meter with other people.
• Do not use alternative BG site testing (blood from your palm or forearm, etc.) for calibration. You
must take your blood glucose from your ngertips only for calibration.
For OpenChoice Calibration you must enter the exact ngerstick reading that your
blood glucose meter displays. Enter all ngerstick readings for calibration within
5 minutes. Entering incorrect ngerstick readings or ngerstick readings that oc-
curred more than 5 minutes ago will affect device performance.
Page 59
SEVEN PLUS User’s Guide | 59
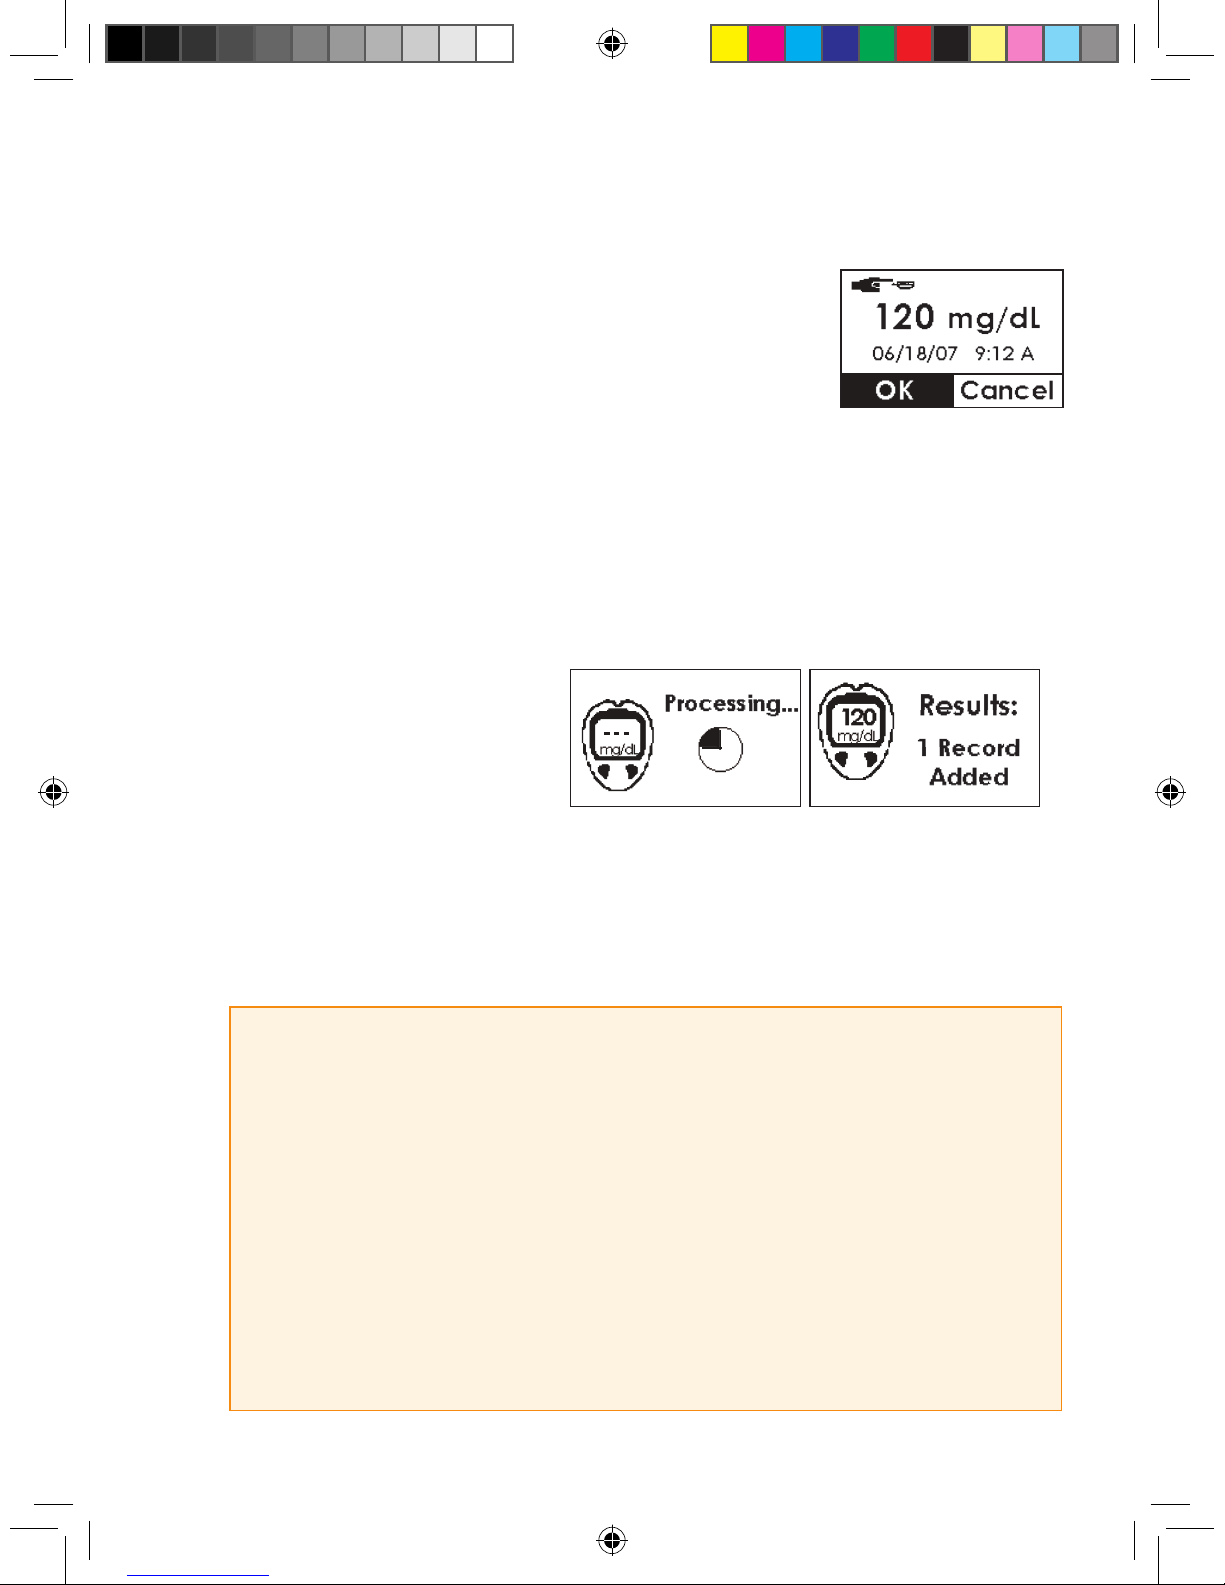
5. To enter the ngerstick reading taken from your meter, press the Up
p and Down q Arrows until you nd the correct reading. Enter a
reading between 40-400 mg/dL. Also make sure this reading was
taken within the past 5 minutes. Press the OK button to enter the
reading.
a. Press the OK button to conrm the reading entered is correct.
b. If the ngerstick reading displayed is incorrect, press the C button and enter in the correct
reading for calibration.
c. If you do not press any button, the Receiver will “time out” and no ngerstick reading informa-
tion will be entered.
d. Pressing the Arrow buttons lets you scroll through by 1 mg/dL. If you want to scroll faster then
hold down the Arrow button.
6. Next the Glucose Readings Processing screen will
appear, followed by the
“Results Added” screen.
7. For Start-Up Calibration, repeat these steps for the second ngerstick reading.
8. A glucose reading will appear on the Receiver right away, and glucose readings will be updated
every 5 minutes.
9. If readings do not appear immediately, see Chapter 8, Section 8.2,
“Calibration Troubleshooting.”
HELPFUL HINTS:
• Always check that the Receiver and meter date and time are the same.
• Make sure a blood drop or glucose reading is displayed in the Status Box on any Trend Graph
before calibrating.
• Only ngerstick readings between 40-400 mg/dL can be used for calibration.
If 1 or more of your readings entered was outside of this range, the SEVEN PLUS will not calibrate.
You will have to wait to calibrate until your blood glucose is in this range.
• Always make sure the Antenna Symbol is displayed in the lower right corner of the Trend Graph
before you take ngersticks for calibration.
• You should always use the same glucose meter to calibrate the SEVEN PLUS that you routinely use
to measure your blood glucose. Do not switch your BG meter in the middle of Sensor wear.
Page 60
60 | SEVEN PLUS Continuous Glucose Monitoring System
4.1. 2 USING AUTO UPLOAD FOR CALIBRATION
If you choose to use Auto Upload for calibration you must make sure your meter is “registered”
to your Receiver (see Chapter 2, Section 2.4, “Auto Upload Meter Registration”). Also make
sure the Receiver date/time and OneTouch Ultra date/time match. You should register your
meter during the Start-Up period.
Auto Upload is when you use the OneTouch Ultra Meter and the Connection Cable that is
available for purchase from DexCom Customer Support. You need to use the OpenChoice
feature for all other meters. The steps below will show you how to use Auto Upload Calibration:
1. Check to see that the Receiver and OneTouch Ultra meter have the same date and time.
2. Take a ngerstick reading using your meter (take 2 ngerstick readings for Start-Up Calibration).
3. Make sure the OneTouch Ultra Meter display is off (screen is blank) before connecting. To
turn the display off, press the M button once.
4. Using the optional Connection Cable, follow the steps below. You must follow these steps in
order for successful ngerstick reading transfer and calibration of the System.
a. First plug the cable into the connection port of the OneTouch Ultra Meter. (The connec-
tion port is at the bottom of the meter).
b. Second connect the wide end of the cable into the Receiver. Make sure the raised
“push” button on the cable is facing down.
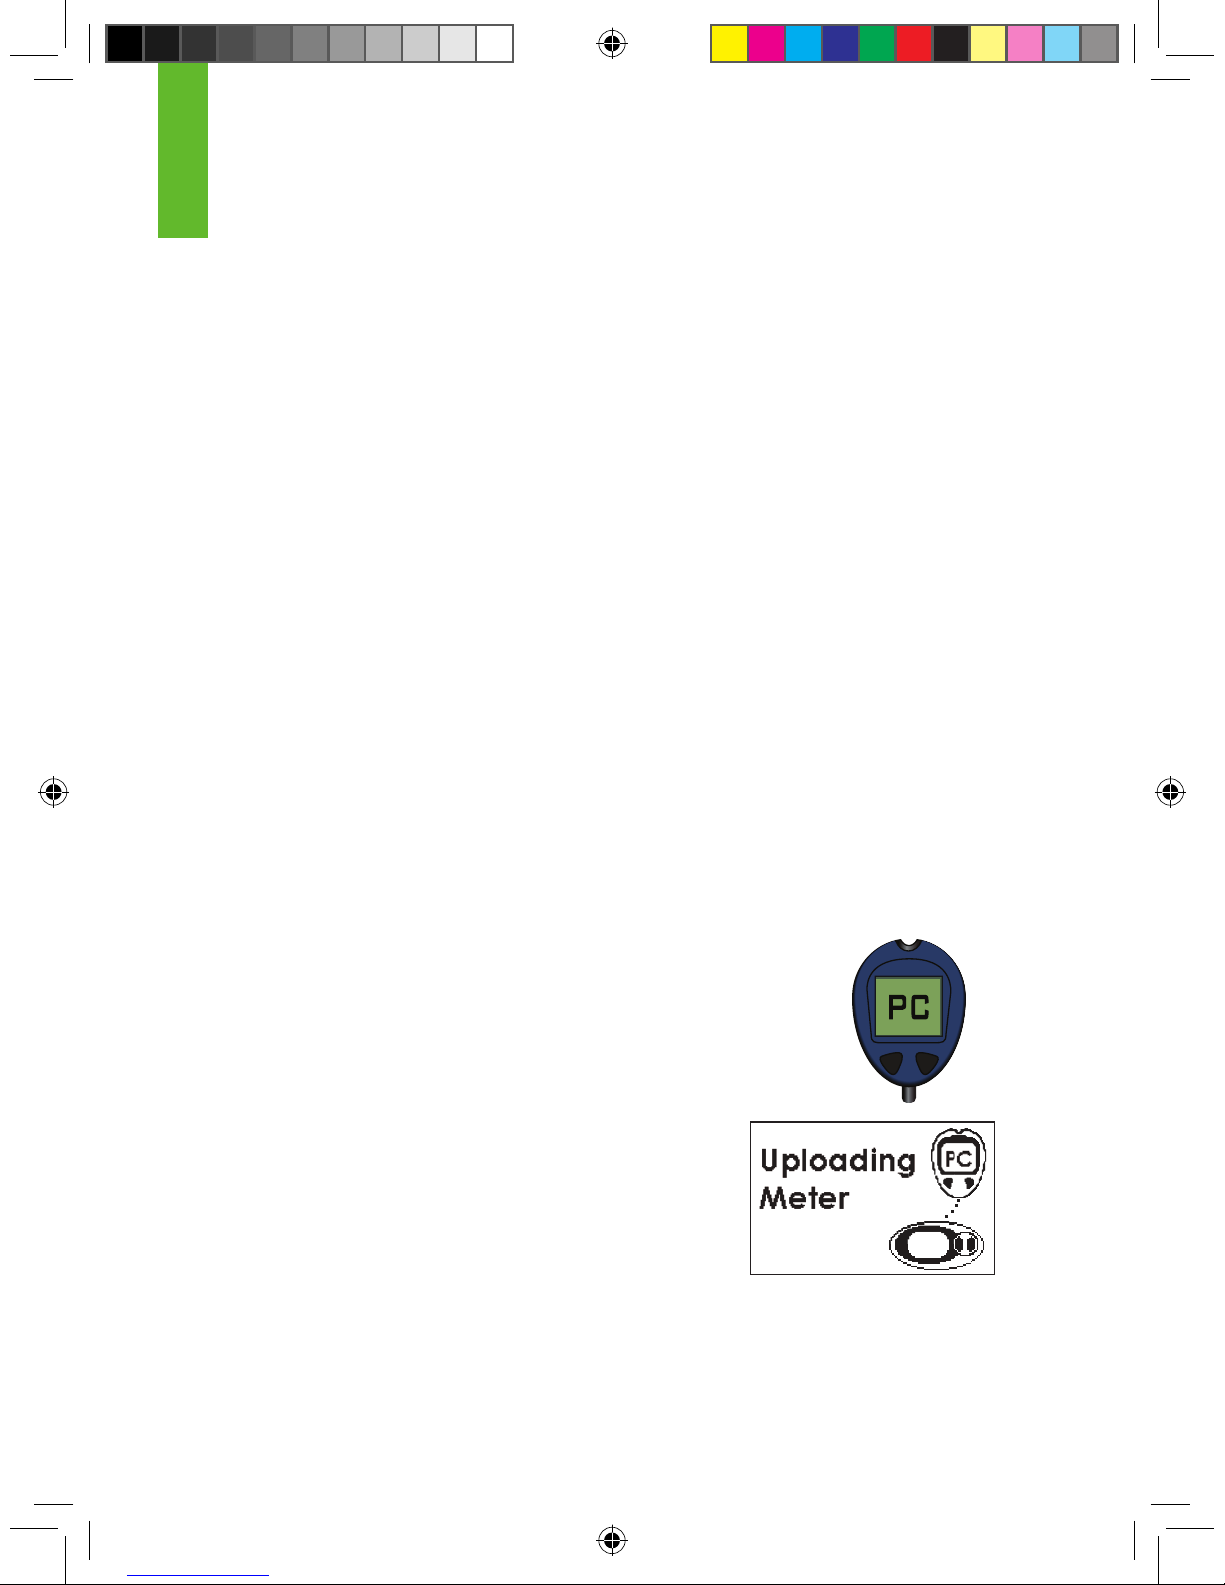
5. After a few seconds, “PC” will appear on the OneTouch Ultra Meter screen
(shown to the right):
6. The Receiver will display the Connection Screen. The Connec-
tion Screen tells you that ngerstick readings from the meter are
successfully being uploaded to the Receiver.
MC
Connection Screen
4
Page 61
SEVEN PLUS User’s Guide | 61
7. The processing screen will
appear, followed by the results
screen.
8. Once you see the Results Screen, then press the Push button on the Connection Cable to
disconnect the cable from the OneTouch Ultra Meter and the Receiver (the order that you
disconnect the cable does not matter).
9. After you are done, press the C button to return to the 3-Hour Trend Graph.
HELPFUL HINTS:
• Always check that the Receiver and meter date and time are the same.
• All ngerstick readings taken with your OneTouch Ultra meter might be used
for calibration. Do not share your blood glucose meter with other people.
• If you use more than 1 OneTouch Ultra meter during SEVEN PLUS use, any ngersticks you take
using the “non-registered” meter will not be used for calibration even if you attach this meter with the
connection cable. You will have to register the meter rst and then take ngerstick readings with the
new meter for Auto Upload calibration.
Page 62
62 | SEVEN PLUS Continuous Glucose Monitoring System
4.2 START-UP CALIBRATION
Two (2) hours after you start the Sensor (see Chapter 3, Section
3.8, “Beginning a Sensor Session”) the Receiver will tell you
that you need to calibrate the Sensor. The Receiver will show
the screen shown to the right. If your Alerts are set to the factory
default settings, the Receiver will also vibrate to tell you it is ready
for calibration.
1. You can set your Receiver to beep and vibrate instead when
this screen appears (see Chapter 2, Section 2.3, Setting your Alerts).
2. When you see this screen, press the C button to clear the display.
3. Take 2 ngersticks with your meter and enter these meter readings. You can use the
OpenChoice Feature or the Auto Upload method to calibrate.
4. Your blood glucose readings must be between 40 mg/dL and 400 mg/dL for calibration.The
SEVEN PLUS cannot use ngerstick readings outside of this range for calibration.
HELPFUL HINTS:
• If your readings are less than 40 mg/dL or greater than 400 mg/dL you should determine if you
should treat yourself and then calibrate when it is convenient for you.
• Always check that the Receiver and blood glucose meter date and time
are the same.
• If you choose to silence the Double Blood Drop Prompt and calibrate later,
the Trend Graph will show a Blood Drop in the Status Box (upper right
corner). This means that ngerstick readings are still needed for calibration
(see inset image).
• Once you clear the Double Blood Drop Prompt, it will reappear every 15 minutes until you
successfully calibrate.
• Always make sure the Antenna Symbol is visible in the lower right corner before you calibrate.
Double Blood Drop Prompt
4
Page 63
SEVEN PLUS User’s Guide | 63
4.3 CALIBRATION UPDATE
Calibration Update is required every 12 hours to make sure your Sensor readings remain
accurate or are close to your BG meter readings. You can enter any ngerstick readings you
take during Sensor wear. If you have not entered any ngerstick readings in the past 12 hours,
the Receiver will ask you for a ngerstick reading to update its calibration. The steps below
show you how to enter this calibration.
1. If you see the reminder symbol show to the right, clear this display by pressing any Receiver button. The Calibration Update
Screen will not go away until you press a button.
2. Take a ngerstick at this time. Enter this reading in the Receiver
to update calibration.
3. This screen will appear every 15 minutes until you enter a new ngerstick reading that is accepted for calibration (using OpenChoice or Auto Upload).
4. If this screen re-appears shortly after you have entered a new ngerstick
reading, review Chapter 5, Section 5.4, “Glucose Status.”
You must update SEVEN PLUS calibration every 12 hours at a
minimum. The performance of the System when calibrated
less frequently than every 12 hours has not been studied.
For OpenChoice Calibration you must enter the exact
ngerstick reading that your blood glucose meter displays.
Enter all ngerstick readings for calibration within 5 minutes.
Entering incorrect ngerstick readings or ngerstick readings that
occurred more than 5 minutes ago will affect device
performance.
Calibration Update
Screen
Page 64
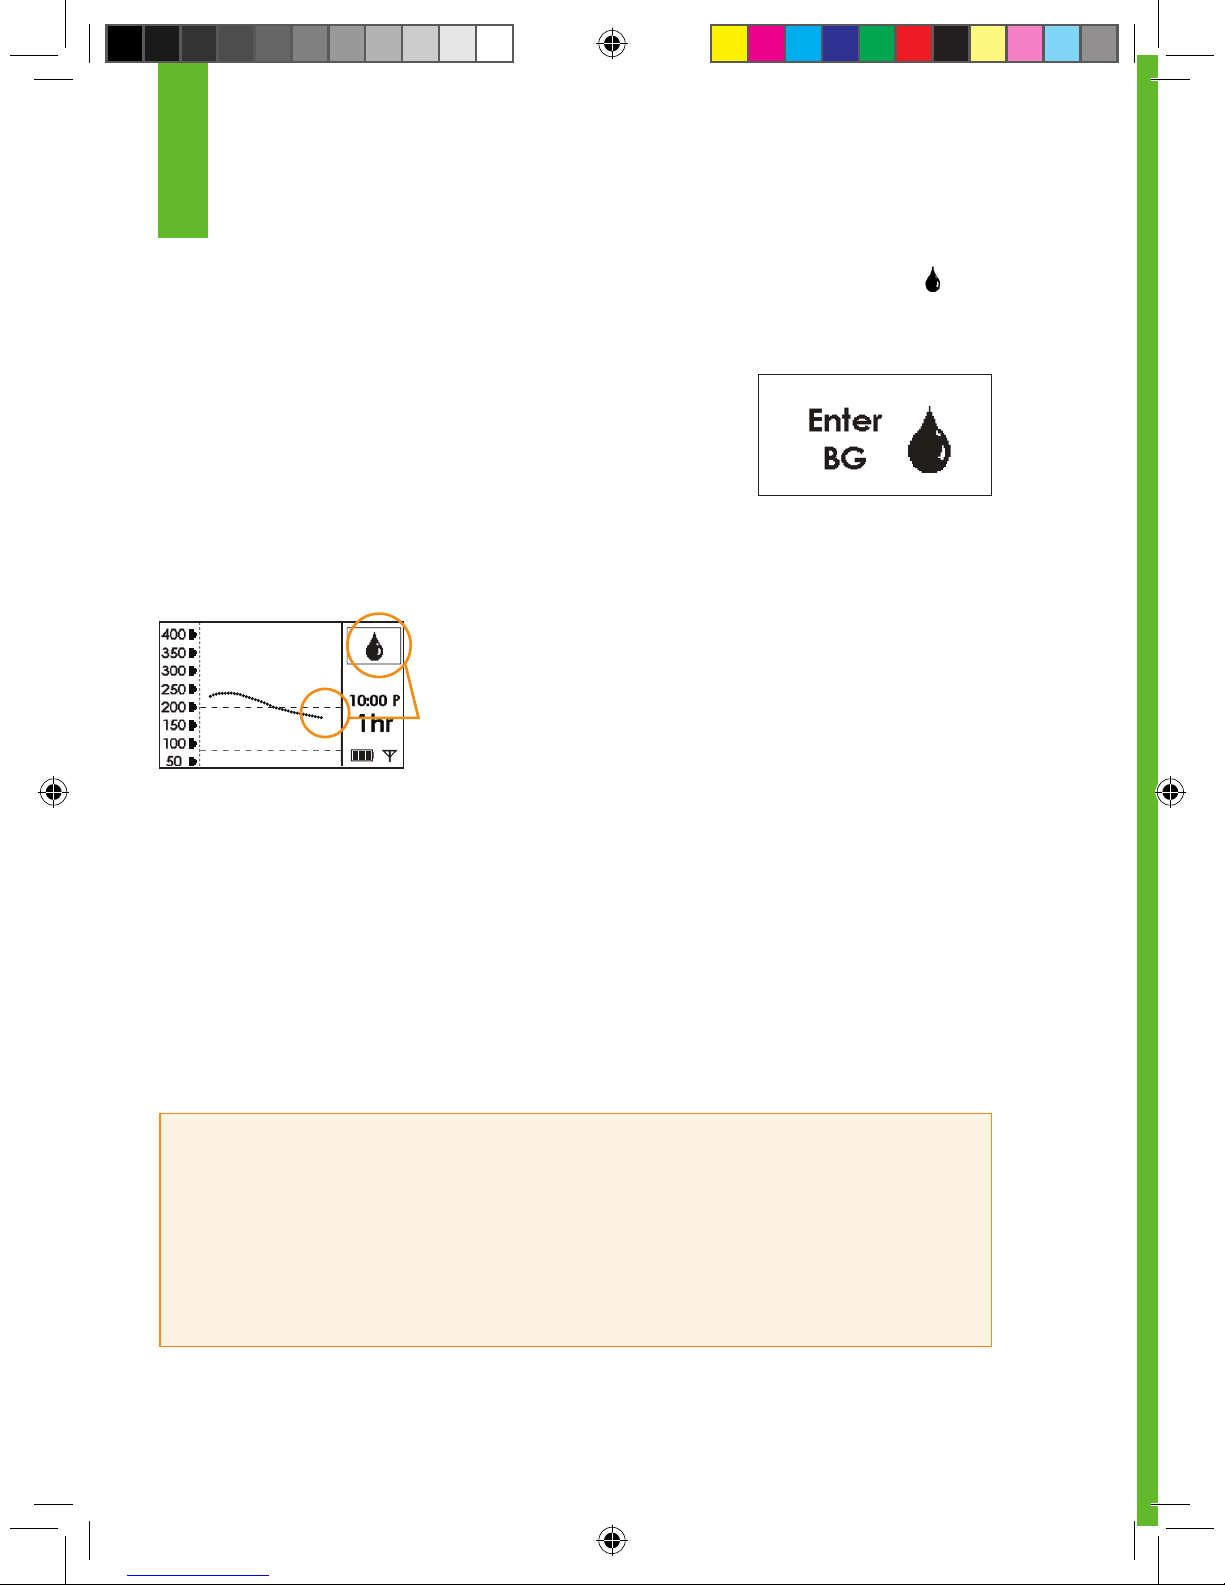
64 | SEVEN PLUS Continuous Glucose Monitoring System
4.4 RE-CALIBRATION (BLOOD DROP IN STATUS BOX “
” )
When you take and enter a ngerstick for 12-Hour Update Calibration (Section 4.3, “Calibration
Update”), the System checks how well it is functioning compared to the blood glucose meter. During each calibration update attempt, the System may tell you that
another ngerstick reading is needed. This Re-Calibration can also be
prompted during Start-Up Calibration. The Calibration Update Screen
will appear (shown to the right).
You can clear this Screen by pressing the C button. The display will
return to the Trend Graph. A blood drop symbol in the Status Box will appear.
This Status Box Symbol tells you that the System needs at least one more
ngerstick reading. You won’t see glucose readings or get Alerts/Alarm when the Blood Drop is still
in the Status Box.
You should take another ngerstick and enter this information to the Receiver.
1. Your System should calibrate immediately.
2. After successful Re-Calibration the System will display glucose readings, trends and provide
Alerts and your ALARM again.
HELPFUL HINTS:
• Refer to Section 8.4, “Error Code Troubleshooting,” if you see “Sensor Error #0” or “Sensor Error
#1” on your Receiver during calibration.
• If you have not received any glucose readings in the past hour, and have attempted ReCalibration by taking and entering at least 3 ngersticks that
are 15 minutes apart each, then contact DexCom Technical Support at
1-888-SEVENGO (738-3646). There may be a problem with your Sensor.
4
No glucose data
Awaiting Fingerstick Reading (Blood Drop) Symbol
Calibration Update Screen
Page 65
SEVEN PLUS User’s Guide | 65
5
chapter ve
CONTINUOUS GLUCOSE READINGS, TRENDS, ALERTS
AND ALARM
Page 66
66 | SEVEN PLUS Continuous Glucose Monitoring System
5
Page 67
SEVEN PLUS User’s Guide | 67
This chapter will teach you how to view your SEVEN PLUS continuous glucose
trend information. Once you have successfully calibrated, the SEVEN PLUS
will show you continuous glucose information every 5 minutes. This will tell you
how your glucose levels are changing.
Your ngerstick blood glucose meter only tells you your blood glucose level at one point in
time (like a still picture). However, the SEVEN PLUS Trend Graphs and Trend Arrows (Rate
of Change) will help you understand the direction your glucose level is moving (like a video
camera).
The SEVEN Sensor sits in the uid under your skin, not in your blood. The Sensor calculates a
glucose reading from this uid when you calibrate your System. So, the glucose reading you see
on your Receiver may be about 5-10 minutes behind the ngerstick reading you get from your
blood glucose meter. The SEVEN PLUS System readings can be 10-20% different from your
meter readings. It is important that you focus on the trends and rate of change on your Receiver,
rather than the exact glucose reading. The Trend Graphs and Arrows will help you determine
how fast your blood glucose is rising or falling. Chapter 10, Section 10.1, “Device Performance
Characteristics” tells you how closely your SEVEN PLUS readings will be to a laboratory
analyzer in the doctor’s ofce.
Glucose Alerts and the Low ALARM are designed to help you stay within your target glucose
zones. Your Low and High Glucose Alerts, and Rapid Rise and Rapid Fall Alerts can tell you
when you fall outside of your target glucose range. Your Alerts are personal tools that you can
set (see Chapter 2, Section 2.3, “Setting your Alerts”) and are determined by you and your
diabetes healthcare team. Your Low Glucose ALARM can tell you when your glucose levels may
be reaching potentially dangerous low levels.
In addition to Alerts and the ALARM, you can also enter information about your meals, insulin,
exercise, and health. That way you and your diabetes care team can receive a bigger picture of
your diabetes management plan. You can see this information on an every 5-minute basis by
looking at your trend screen.Your diabetes healthcare team can transfer this information to the
Data Manager software to see how you are doing over a long period of time.
You must update SEVEN PLUS calibration every 12 hours at a
minimum. The performance of the System when calibrated
less frequently than every 12 hours has not been studied.
Use of acetaminophen-containing medications while the Sensor
is inserted may affect the performance of the device.
Page 68
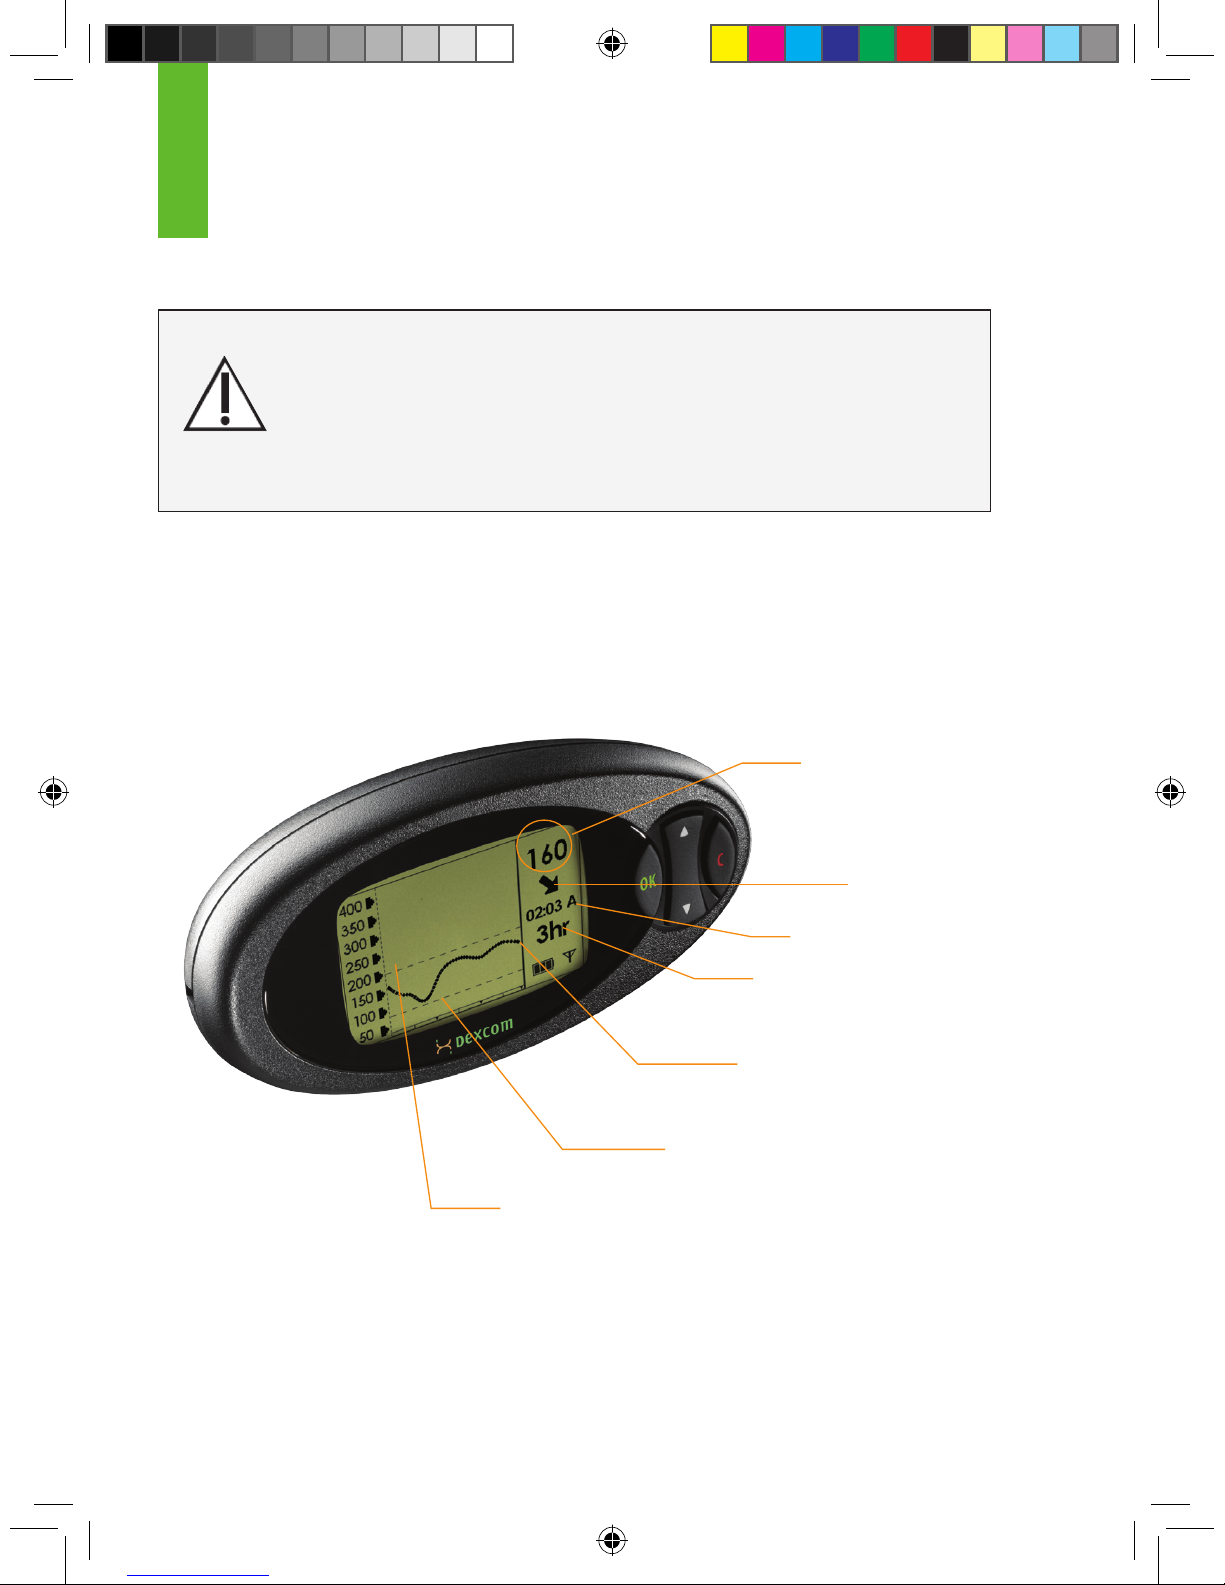
68 | SEVEN PLUS Continuous Glucose Monitoring System
5.1 GLUCOSE READINGS
Press any button on the Receiver and the following glucose information will be shown to you:
5
Treatment decisions should not be based solely on results from
the SEVEN PLUS. You must conrm with a blood glucose meter
before making therapeutic adjustments.
You must update SEVEN PLUS calibration every 12 hours at a
minimum. The performance of the System when calibrated less
frequently than every 12 hours has not been studied.
Most recent 5-minute glucose reading
(160 mg/dL) Status
Box
High Glucose
Alert Setting = 200 mg/dL (Default)
Trend Arrow
Plot of the most
recent glucose reading
(160mg/dL) on the 3 hour
Glucose Trend Screen
Time (A=AM, P=PM)
Low Glucose
Alert Setting = 80 mg/dL (Default)
Trend Graph Hours
Page 69
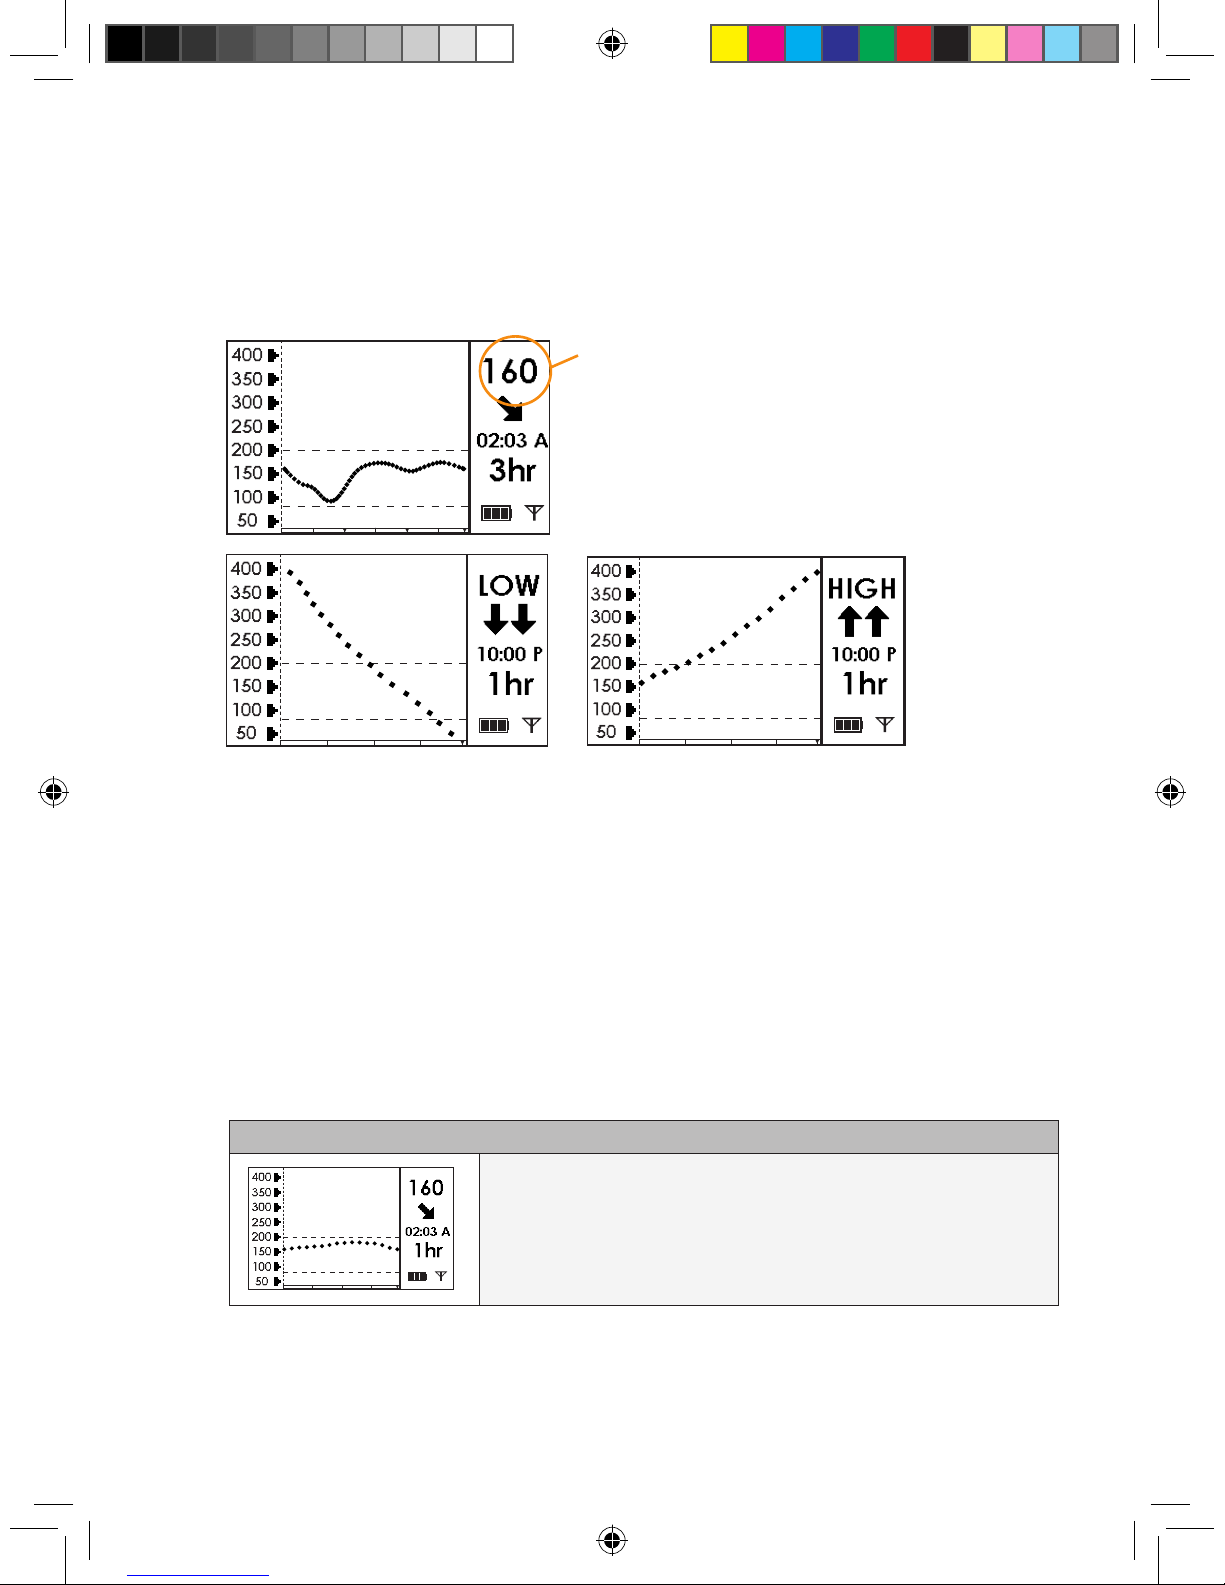
SEVEN PLUS User’s Guide | 69
•
The SEVEN PLUS reports glucose readings from 40-400 mg/dL and updates glucose readings every 5 minutes.
The System reads “LOW” when the glucose reading
is less than 40 mg/dL, and “HIGH” when the glucose
reading is greater than
400 mg/dL.
•
Each “dot” on the glucose Trend Graph is a glucose reading.
•
Each Glucose Trend Graph shows the current time (“A” is AM and “P” is PM).
•
The “dashed lines” on the Glucose Trend Graphs are the High Alert and Low Alert Settings (see
Chapter 2, Section 2.3, “Setting your Alerts,” to change
these settings).
You can see Trend Graphs of your glucose information from the past 1-hour, 3-hour, 6-hour, 12hour, and 24-hour periods by pressing the Up p and Down q Arrows on your Receiver. These
Glucose Trend Graphs show you where your glucose levels have been and where your glucose
levels are headed.
(Scroll up from the 3-Hour Graph to reach the 1-Hour Graph)
1-Hour Glucose Trend Graph: The 1-hour Trend Graph
(1 hr) shows your current glucose reading and the last 1 hour of
glucose readings.
“Low”- Less than 40 mg/dL “High”-Greater than 400 mg/dL
The glucose reading is in milligrams per deciliter
(mg/dL) units.
(continued on next page)
Page 70
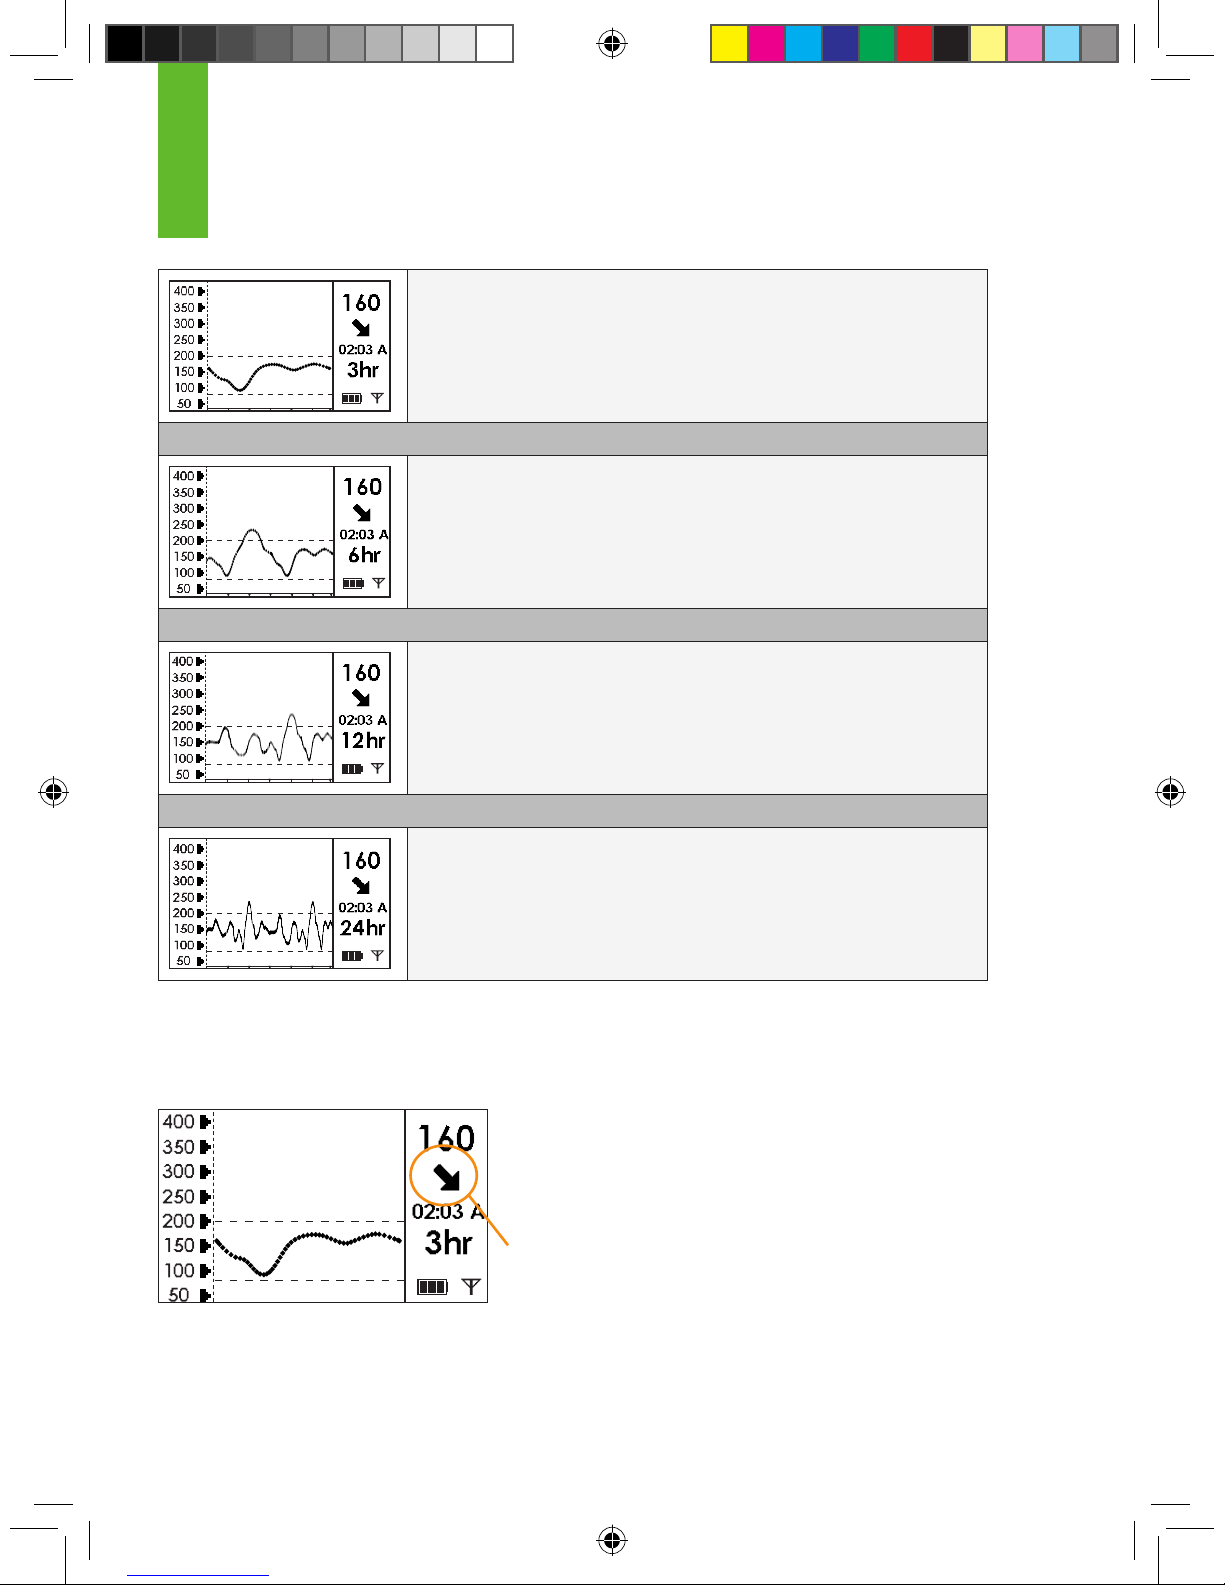
70 | SEVEN PLUS Continuous Glucose Monitoring System
3-Hour Glucose Trend Graph: The 3-hour Trend Graph
(3 hr) shows your current glucose reading and the last 3 hours of
glucose readings (this is your default trend screen).
(Scroll down from the 3-Hour Graph to reach the 6-Hour Graph)
6-Hour Glucose Trend Graph: The 6-hour Trend Graph
(6 hr) shows your current glucose reading and the last 6 hours of
glucose readings.
(Scroll down from the 6-Hour Graph to reach the 12-Hour Graph)
12-Hour Glucose Trend Graph: The 12-hour Trend Graph
(12 hr) shows your current glucose reading and the last 12 hours
of glucose readings.
(Scroll down from the 12-Hour Graph to reach the 24-Hour Graph)
24-Hour Glucose Trend Graph: The 24-hour Trend
Graph (24 hr) shows your current glucose reading and the last
24 hours of glucose readings.
5.2 GLUCOSE TRENDS
In addition to your current glucose reading and Trend Graphs, Trend Arrows may appear to show you
how your glucose readings are changing.
The Trend Arrows appear on the upper right corner of the Trend Graphs, just below your current
glucose reading in the Status Box.
5
Trend arrows appear here
Page 71
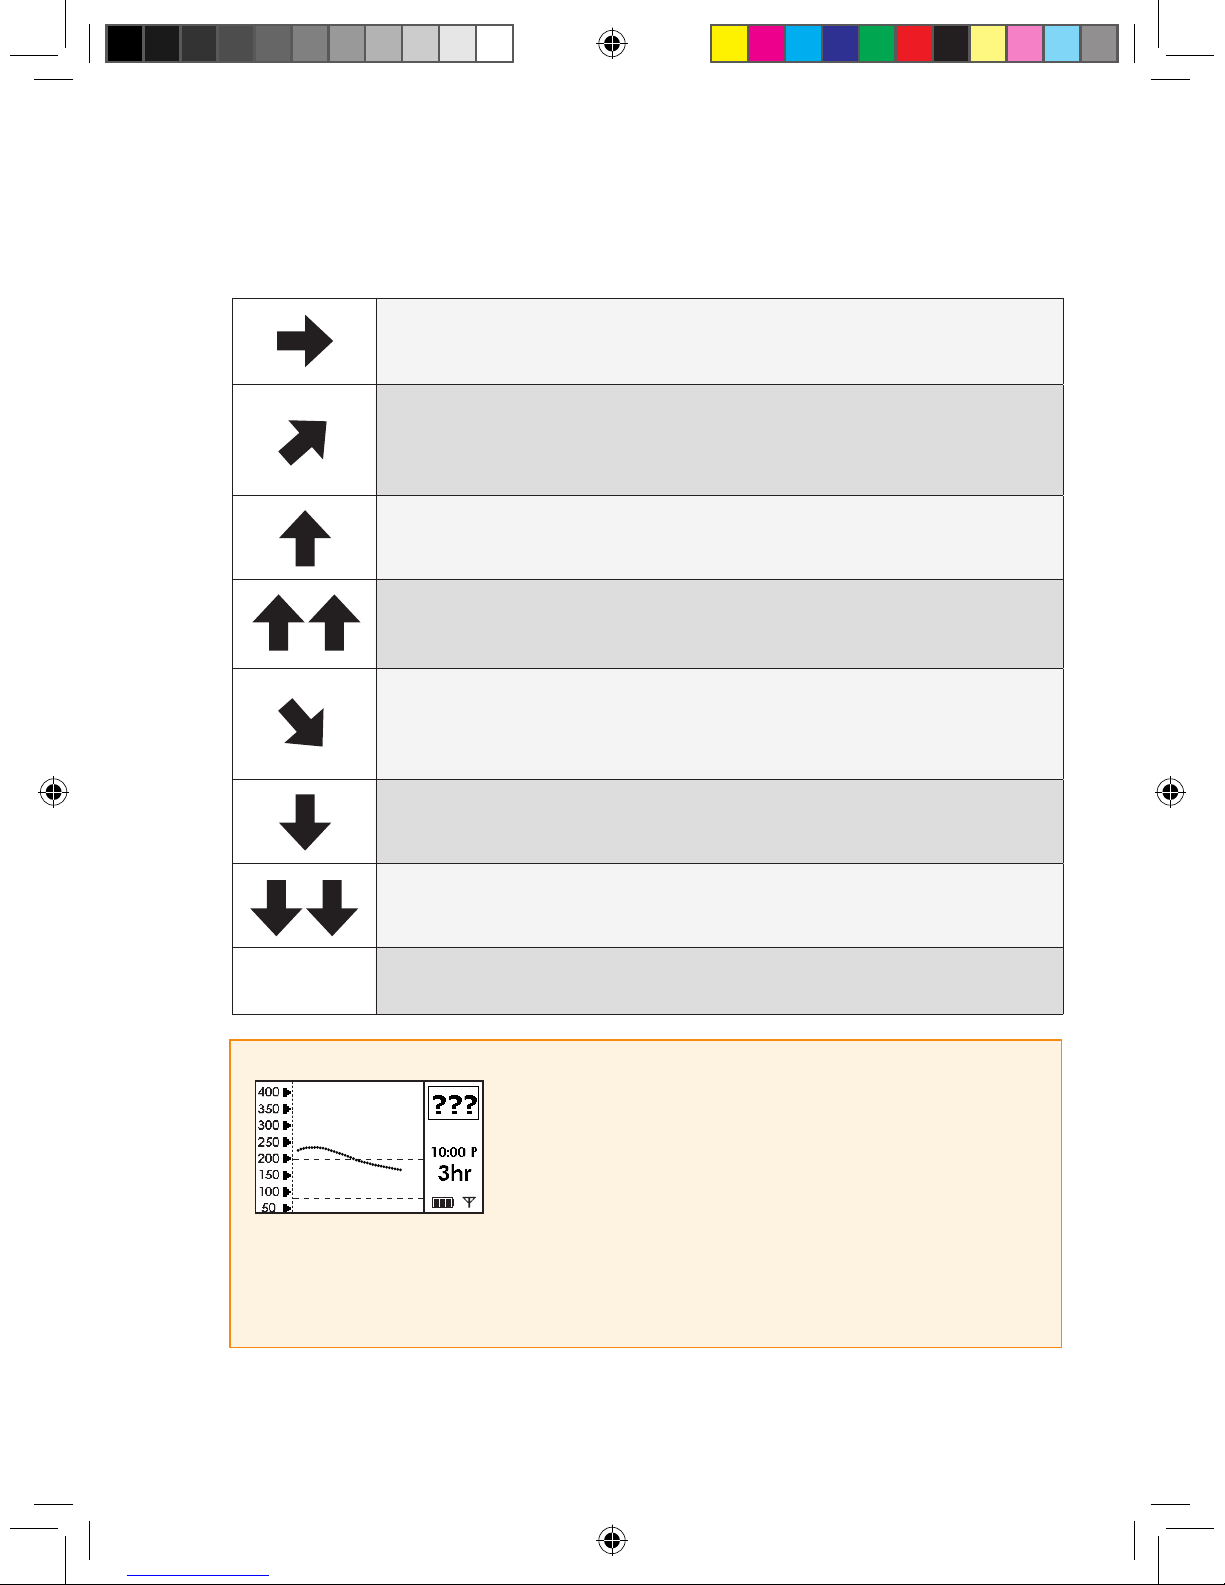
SEVEN PLUS User’s Guide | 71
This table shows the different Trend Arrows your Receiver will display:
Constant: Your glucose is steady (not increasing/decreasing more than 1
mg/dL each minute)
Slowly rising: Your glucose is rising 1-2 mg/dL each minute
Rising: Your glucose is rising 2-3 mg/dL each minute
Rapidly rising: Your glucose is rising more than 3 mg/dL each minute
Slowly falling: Your glucose is falling 1- 2 mg/dL each minute
Falling: Your glucose is falling 2-3 mg/dL each minute
Rapidly falling: Your glucose is falling more than 3 mg/dL
each minute
no arrow
No Rate of Change Information: The Receiver cannot always calculate how fast your glucose is rising or falling
HELPFUL HINTS:
• The Trend Arrows do not appear during Missing Glucose
Information (see Chapter 5, Section 5.4, “Glucose Status”). If
the “???” Symbol, the Out of Range Symbol, or the blood drop
Calibration Update Symbol appears in the Status Box, the Rise
and Fall Arrows will not appear.
• If the Rate of Change Arrow is missing, but you are concerned that your blood glucose level may
be rising or falling, take a ngerstick and use your blood glucose meter to check your readings.
Page 72
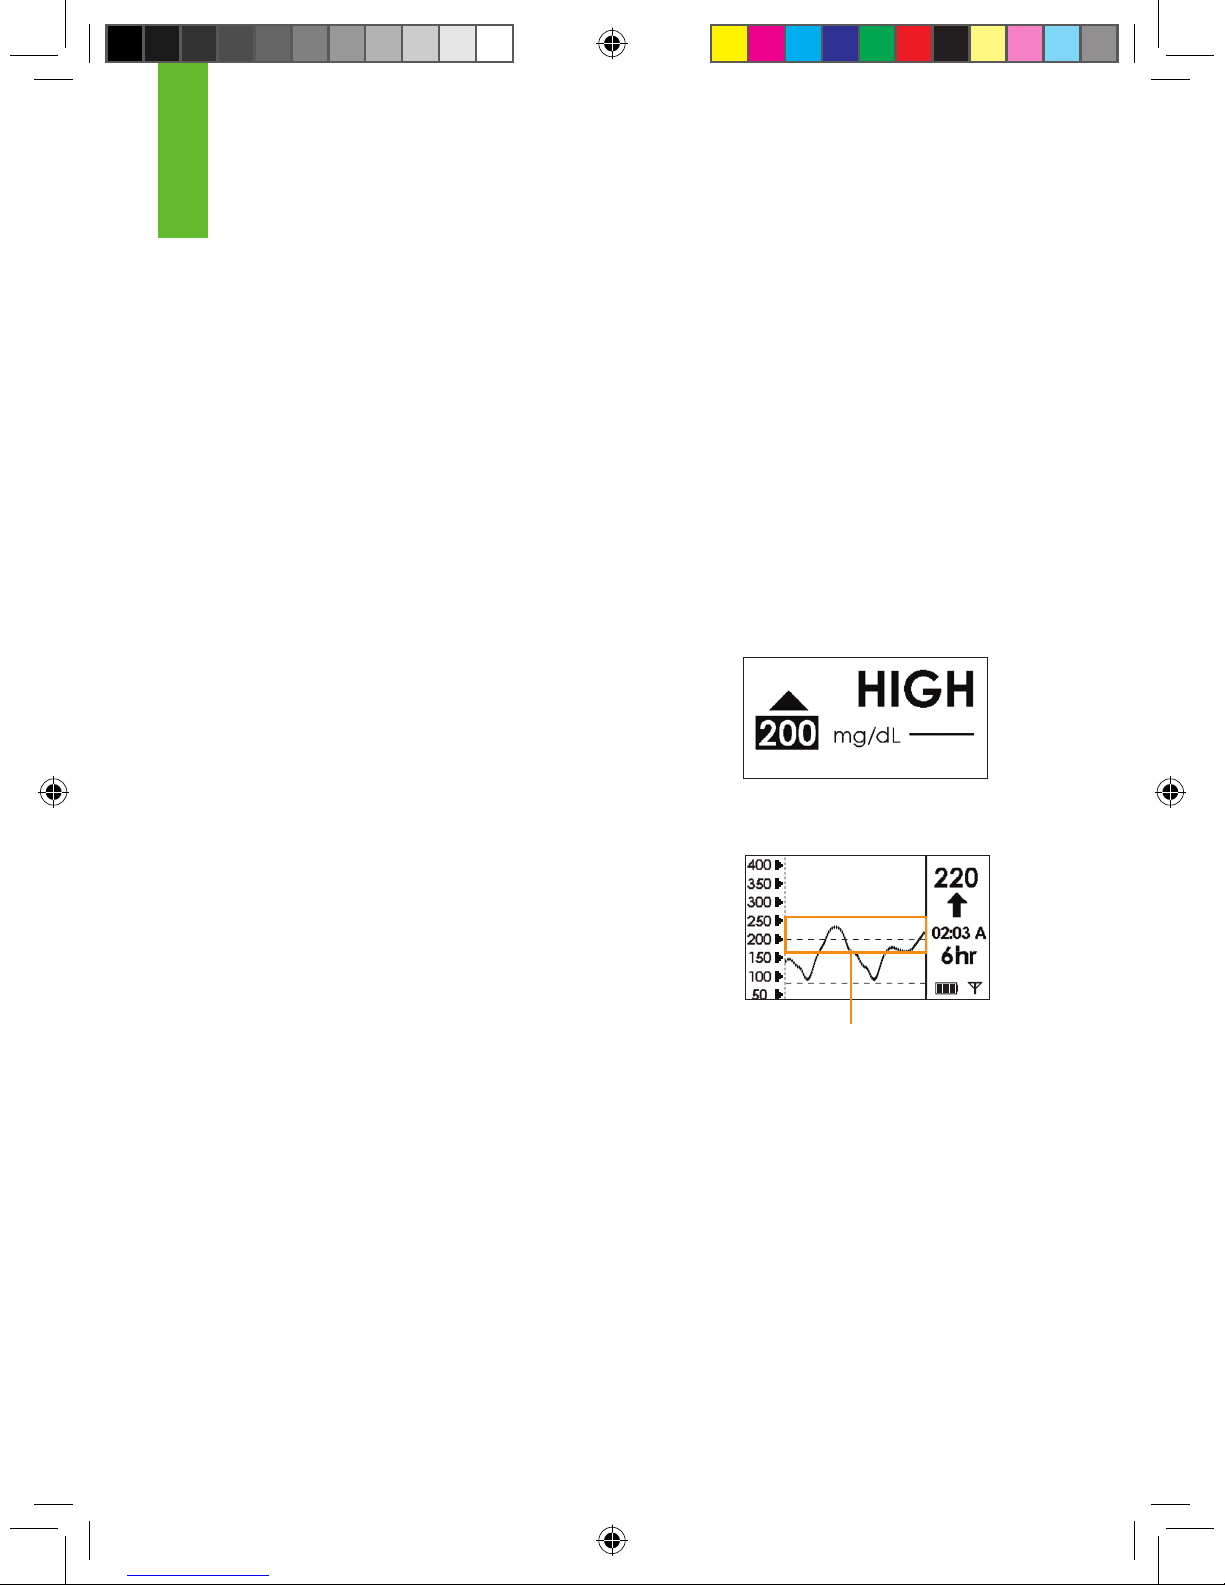
72 | SEVEN PLUS Continuous Glucose Monitoring System
5.3 GLUCOSE ALERTS AND ALARM
The SEVEN PLUS lets you create your own personal settings for how you want the Receiver to
tell you what is going on. The Low and High Glucose Alerts will tell you when you fall outside of
your target glucose range, and Rise and Fall Alerts let you know when your glucose levels are
changing fast. The SEVEN PLUS also features a non-adjustable Low Glucose ALARM that will
tell you when your glucose levels may be reaching potentially dangerous low levels.
With the SEVEN PLUS, you can set High and Low Glucose Alerts that help tell you when your
glucose readings are out of your “target range.” The High and Low Glucose Alerts also have
different tones (high and low beeps) to notify you. This feature can be helpful during times when
you may not test your blood glucose (such as sleeping, driving, exercise, or long meetings).
5. 3.1 HIGH GLUCOSE ALERT
When your SEVEN PLUS glucose readings are at or above your
High Alert level the screen shown to the right will appear. You can
set the Receiver to beep and vibrate when this screen appears
(see Chapter 2, Section 2.3, “Setting your Alerts”). The default is
set at 200 mg/dL, but you can change this.
When you set the High Glucose Alert, it will appear
as a dashed line on your Glucose Trend Graphs.
The Receiver will continue to alert until you press a
button or until your glucose readings drop below your High Glucose
Alert setting. At the default setting, the Receiver will not re-alert
you after you have pressed a button to clear the alert. But, you can
choose to have the Receiver re-alert you every 30 minutes or 1, 2,
3, 4, or 5 hours after pressing a button. You can do this by changing your Snooze settings (see
Chapter 2, Section 2.3, “Setting your Alerts”).
High Glucose Alert set
at 200 mg/dL
High Glucose Alert Setting
5
Page 73
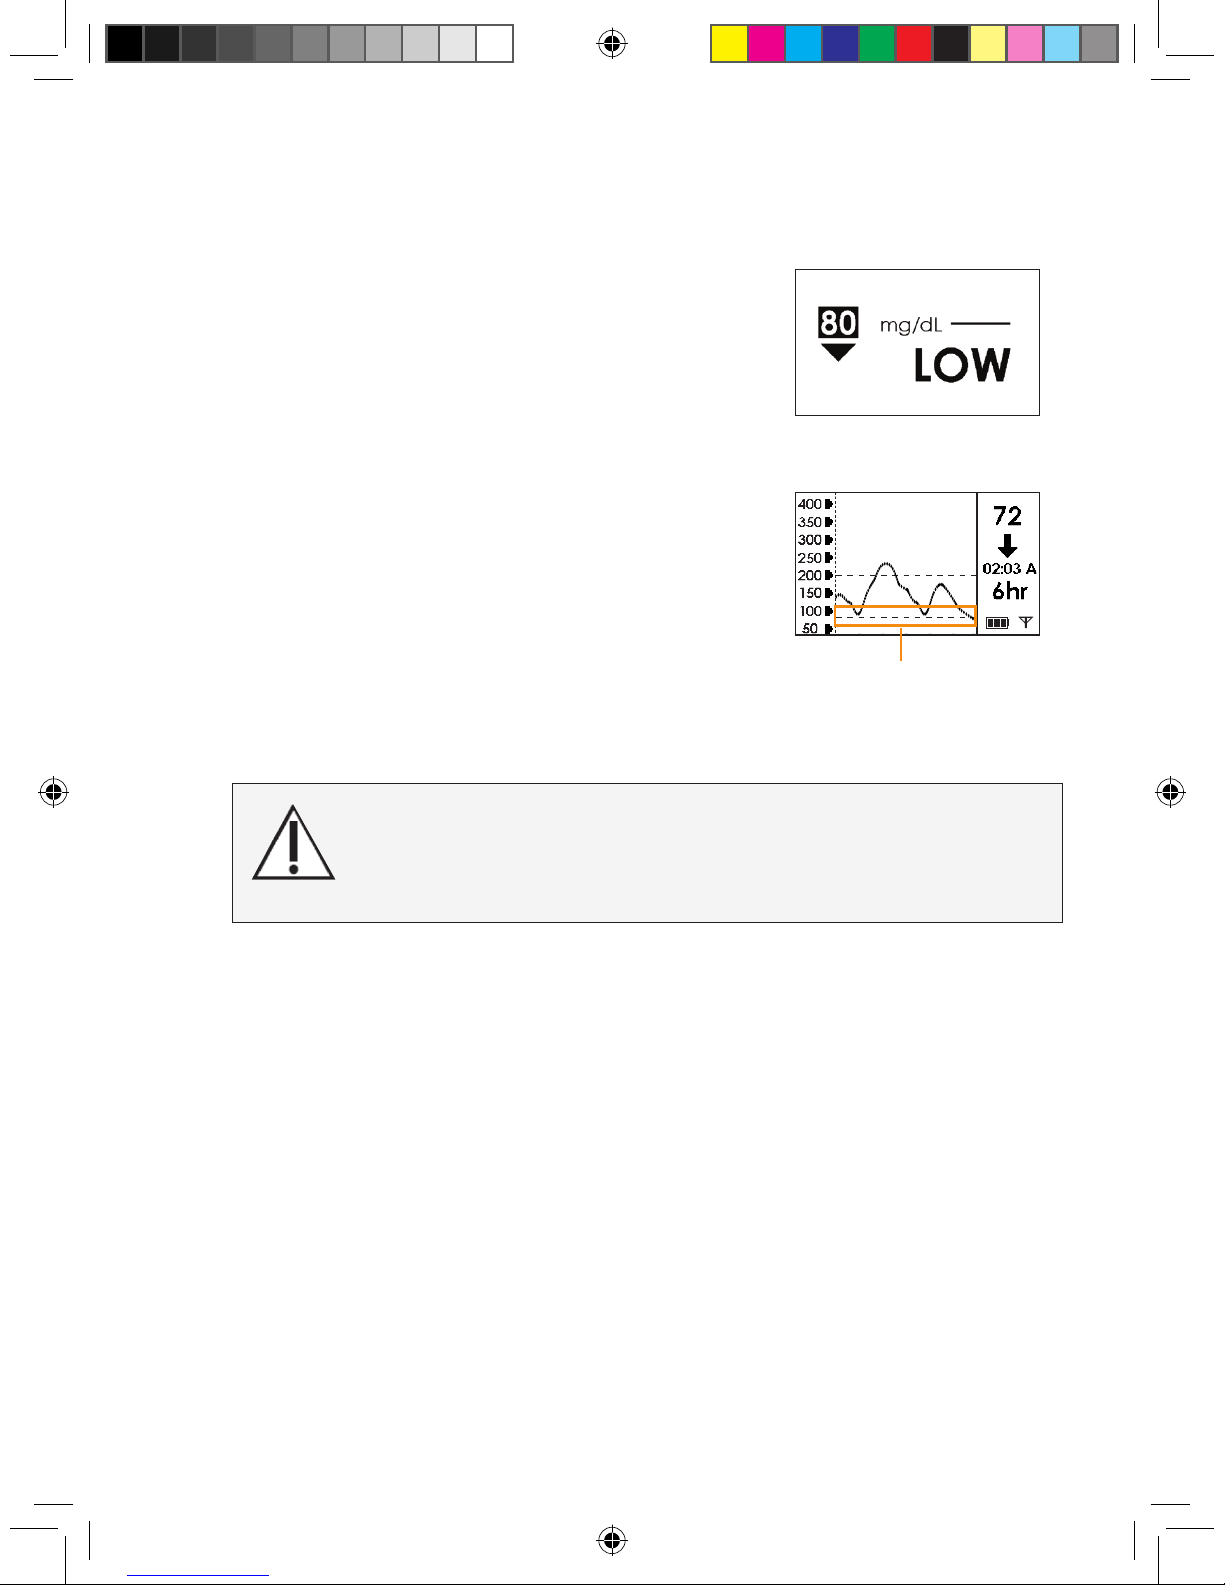
SEVEN PLUS User’s Guide | 73
5.3.2 LOW GLUCOSE ALERT
When your SEVEN PLUS glucose readings are at or below
your Low Alert level, the following screen will appear. You can
set the Receiver to beep and vibrate when this screen appears
(see Chapter 2, Section 2.3, “Setting your Alerts”). The default is
set at 80 mg/dL, but you can change this.
When you set the Low Glucose Alert, it will appear as a dashed
line on your Glucose Trend Graphs.
The Receiver will continue to alert until you press a button or
until your glucose readings rise above your Low Glucose Alert
setting. At the default setting, the Receiver will not re-alert you
after you have pressed a button to clear the alert. But, you can
choose to have the Receiver re-alert you every 30 minutes or
1, 2, 3, 4, or 5 hours after pressing a button. You can do this
by changing your Snooze settings (see Chapter 2, Section 2.3,
“Setting your Alerts”).
5.3.3 LOW GLUCOSE ALARM
The Receiver also has an automatic Low Glucose ALARM set at 55 mg/dL.
This ALARM is a feature in addition to your personal glucose alerts. You cannot change
or turn off this ALARM or its re-Alert settings.
•
When your SEVEN PLUS glucose reading is at or below 55mg/dL the Receiver will notify you
with 4 low beeps and vibration in this order:
- 1st 5-minute ALARM: “Vibrate”
- 2nd 5-minute ALARM: “Vibrate” “Beep” “Beep” “Beep” “Beep”
- 3rd 5-minute ALARM: “Vibrate” “Beep” “Beep” “Beep” “Beep” (louder)
•
The Receiver will vibrate and beep every 5 minutes after the 3rd ALARM if your readings are
still at or below 55 mg/dL until you press the C button.
Low Glucose Alert set
at 80 mg/dL
Low Glucose Alert Setting
Symptoms related to low or high blood glucose levels should
not be ignored. If you have symptoms of low or
high glucose, use your blood glucose meter to check the System results.
Page 74
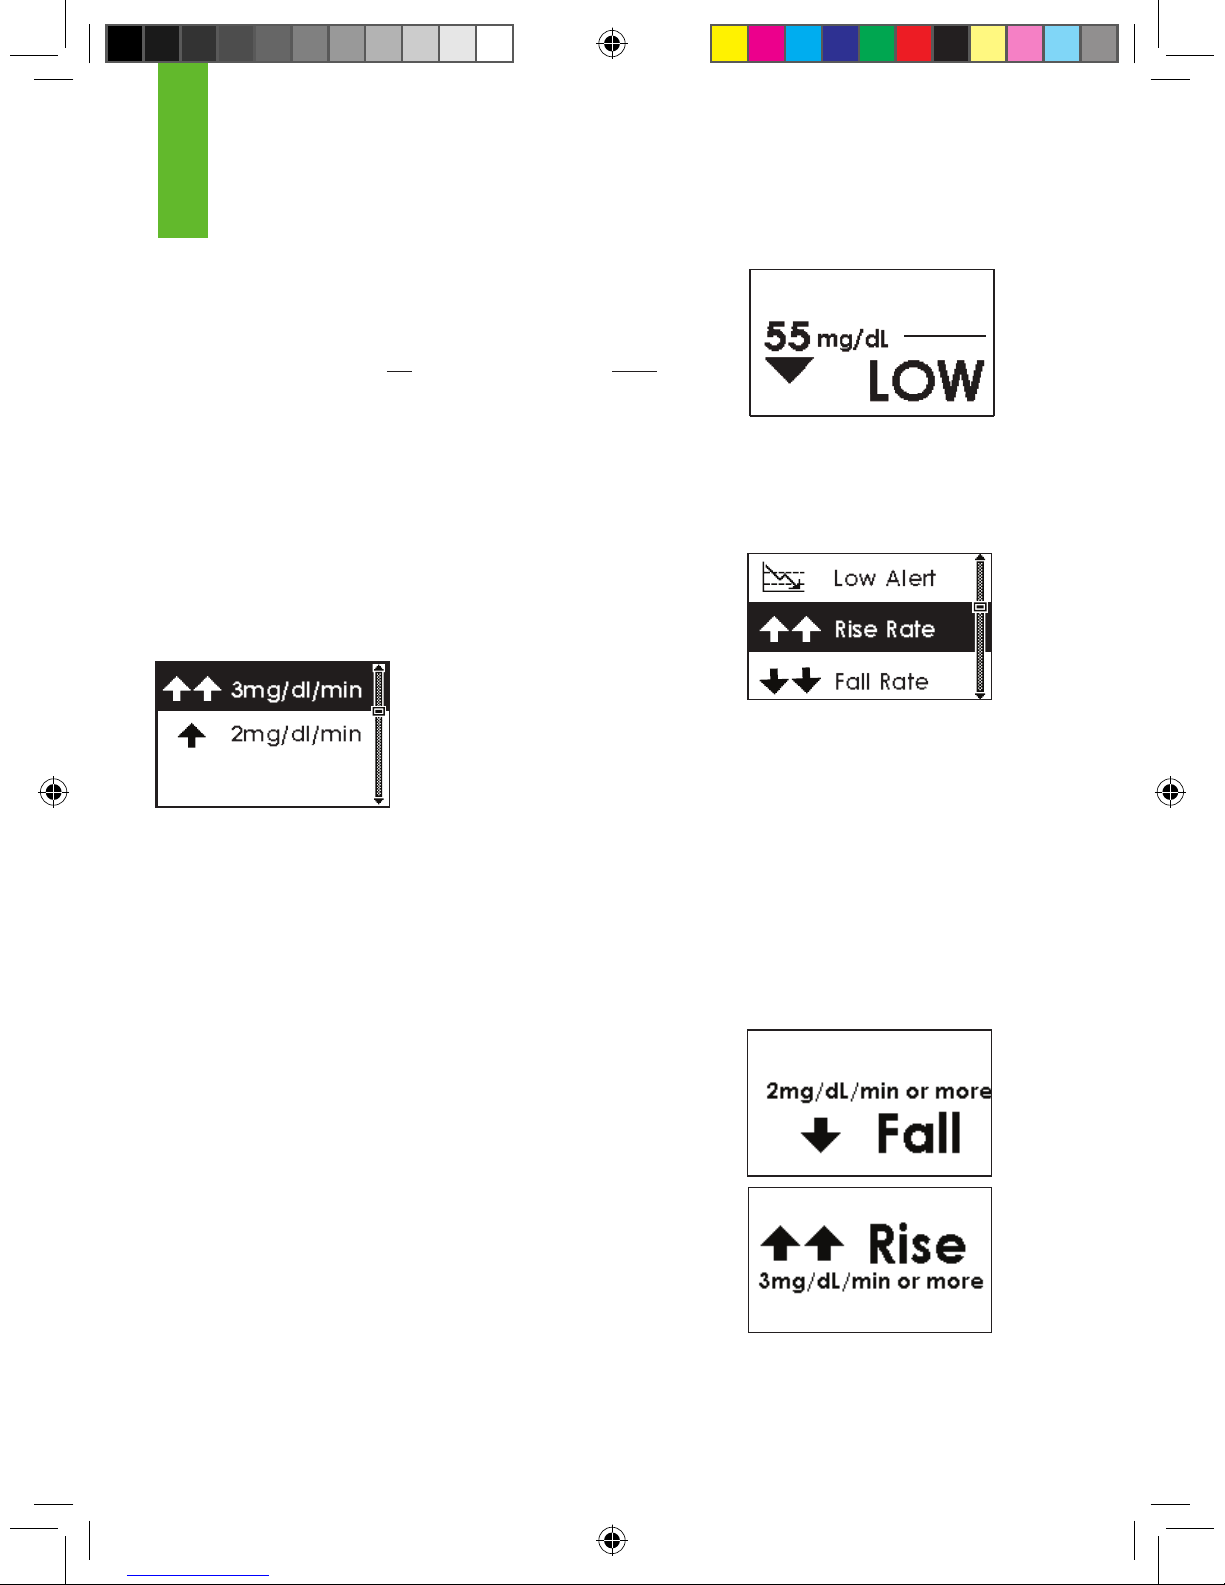
74 | SEVEN PLUS Continuous Glucose Monitoring System
•
For Low ALARMs the Receiver will display the Low Glucose
ALARM screen (see image on right).
•
Re-ALARM: The Receiver will automatically notify you again in 30
minutes after you press the C button if your glucose readings are still
at or below 55 mg/dL.
5.3.4 RISE AND FALL GLUCOSE RATE ALERTS
You can activate these Alerts (see Chapter 2, Section 2.3, “Setting
your Alerts”), to have the Receiver tell you if your glucose levels
are rising or falling fast.
You can choose to set one of the two
Receiver Rise Rates (how fast you
are going up) or none. You can be notied if your glucose level
is rising 2 or more mg/dL each minute, or 3 or more mg/dL each
minute.
You can choose to set one of the two Receiver Fall Rates (how fast you are going down) or none.
You can choose to be notied if your glucose level is falling 2 or more mg/dL each minute, or 3 or
more mg/dL each minute.
If your glucose level rises or falls at the Alert setting you chose, it will display an Alert to you.
You can set the Alert to vibrate or beep (see Chapter 2, Section 2.3, “Setting your Alerts”). Two
examples are shown below:
If you set your Fall Rate to 2 mg/dL per minute
and your glucose levels fall at this level or faster,
the Single Arrow Screen will appear and alert
according to your settings.
If you set your Rise Rate to 3 mg/dL per minute
and your glucose levels rise at this level or faster,
the Double Arrow Screen will appear and alert
according to your settings.
5
Low Glucose ALARM
Page 75
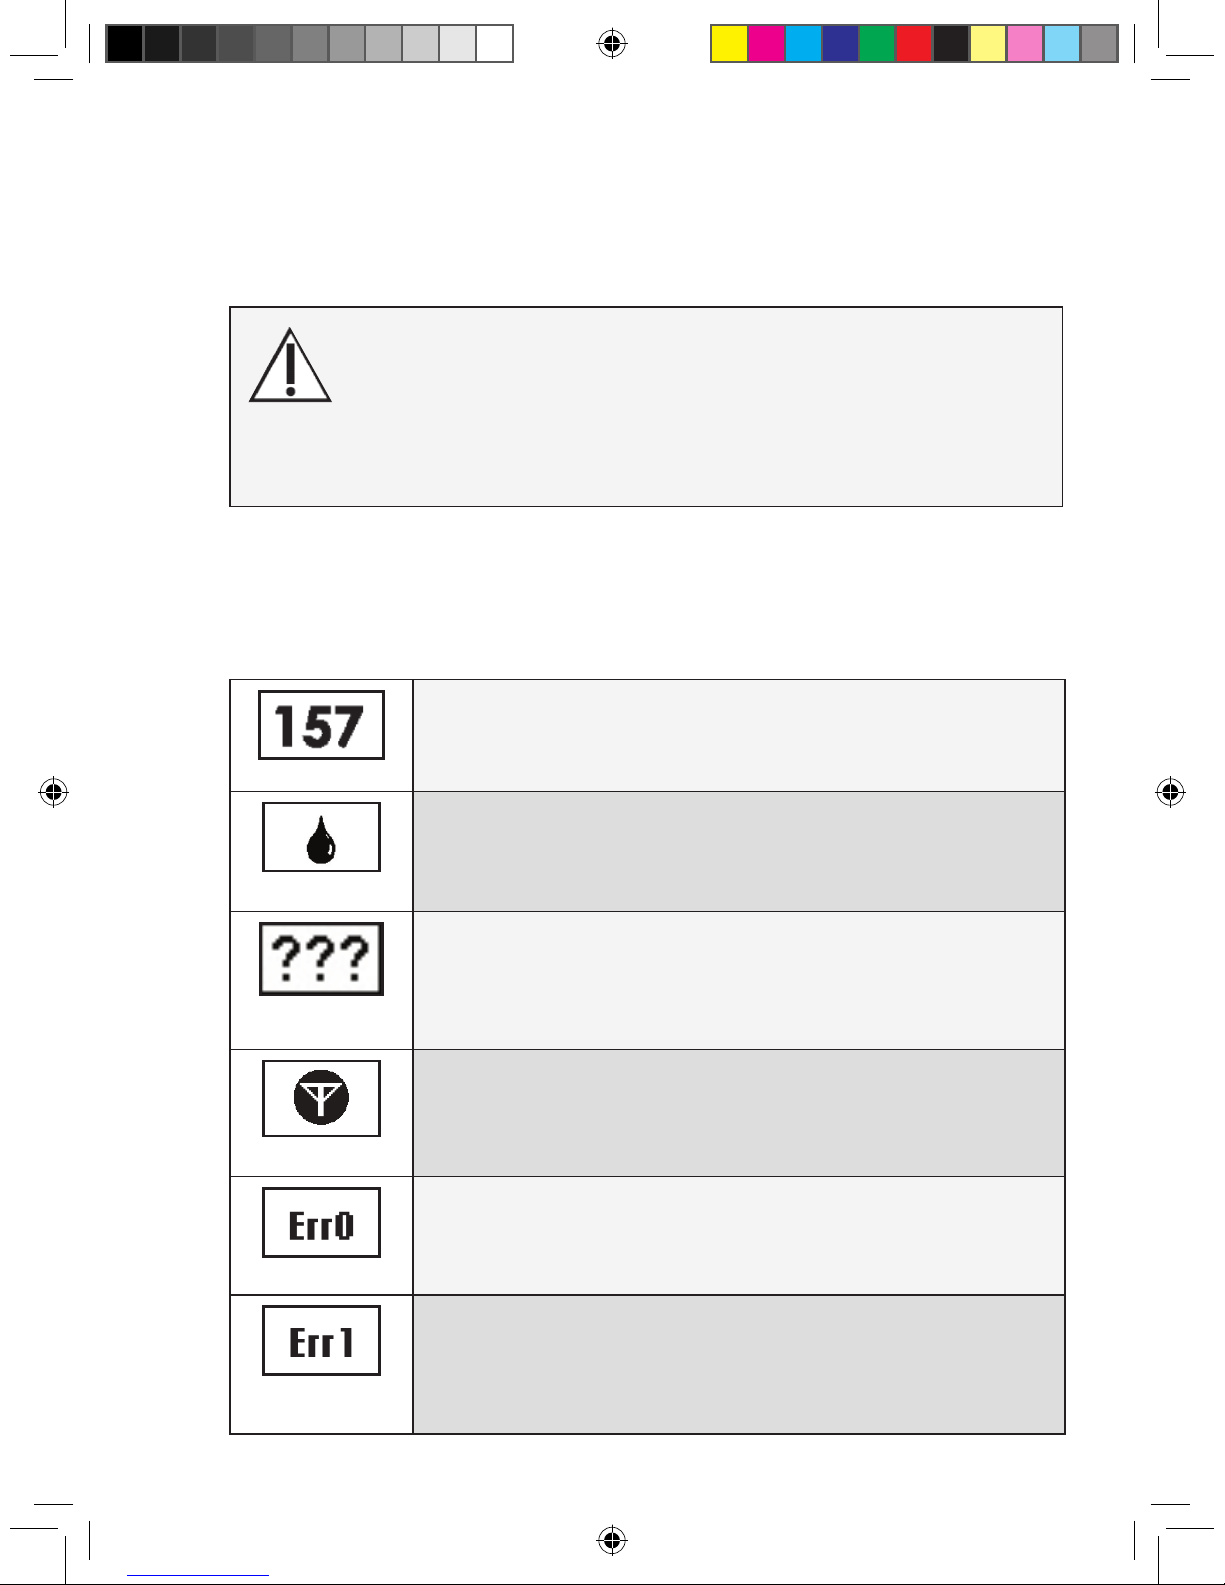
SEVEN PLUS User’s Guide | 75
5.4 GLUCOSE STATUS
5.4.1 GLUCOSE STATUS BOX SYMBOLS
During your Sensor Session the Status Box in the upper right hand corner can display any of the
information below.
Glucose Reading
Once the Receiver is calibrated, your glucose readings will appear in the
Status Box in mg/dL units. Your glucose readings are updated every 5
minutes.
Calibration Needed
A blood drop tells you your System requires another ngerstick reading
entry. You might be due for your 12-hour calibration or the Receiver might
need an additional ngerstick to improve
its calibration. (See Section 4.4)
Glucose Reading
Error
Three question marks mean the Receiver cannot understand the Sensor
signal. You should wait for more prompts and do not enter any ngersticks
when you see this symbol.
(See Section 5.4.3)
RF Error
A white antenna in a black circle, means the Transmitter and Receiver are
out of range. Make sure the Receiver and
Transmitter are within 5 feet of each other. (See Section 5.4.4).
Sensor Error #0
Means the Sensor cannot calibrate right now. If you see this screen, enter
at least 1 more calibration ngerstick reading in the next 10-15 minutes. If
the Sensor still cannot calibrate after this additional ngerstick, the Sensor
needs to be replaced. (See Section 8.4)
Sensor Error #1
Means the Sensor is not calibrating properly. If you see this screen, wait
about one hour and then enter at least 1 more ngerstick reading. If no
readings display on the Receiver after this additional ngerstick, the Sen-
sor needs to be replaced. (See Section 8.4)
This device is not designed to replace a blood glucose meter.
During Missing Glucose Information, rely on your blood glucose
meter.
Symptoms related to low or high blood glucose levels should
not be ignored. If you have symptoms of low or high glucose
conrm them using your blood glucose meter.
Page 76
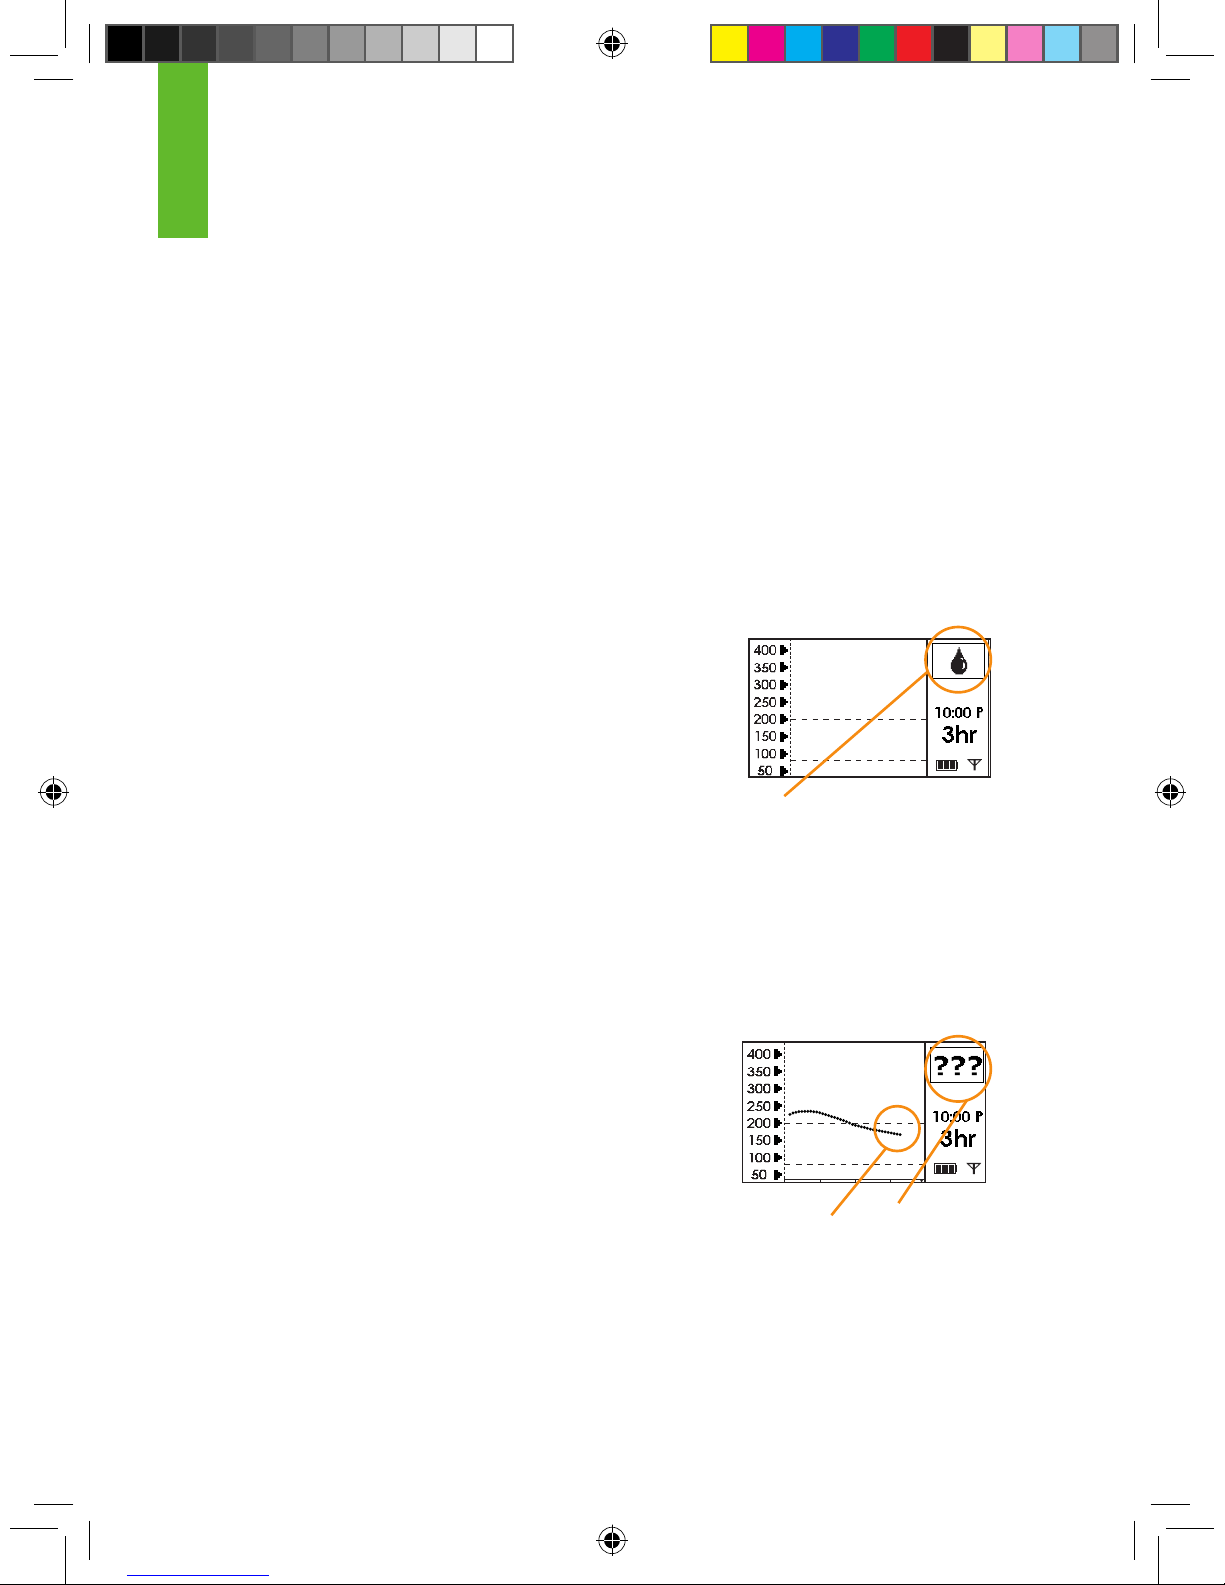
76 | SEVEN PLUS Continuous Glucose Monitoring System
5.4.2 MISSING GLUCOSE READINGS
Glucose readings usually appear in the Status Box. At certain times, a notication symbol can appear in the Status Box instead of the glucose readings. These notications are helpful in trouble-
shooting. The table in this section shows the symbols that might appear in the Status Box.
Missing Glucose Information can happen when:
1. The System needs another ngerstick reading for calibration because the
Sensor readings do not match the recent ngerstick reading you just entered.
2. The Receiver does not understand the Sensor signal.
3. The Transmitter and Receiver are out of range. Make sure the Transmitter and Receiver are
within 5 feet of each other.
For calibration errors see Chapter 8. The following sections will
tell you what happens when the Receiver does not understand the
Sensor signal, and when your Transmitter and Receiver are out of
range.
If your Receiver is not displaying glucose information, look at the
Status Box in the upper right corner of any Trend Graph.
5.4.3 SYSTEM GLUCOSE ERRORS
Sometimes the SEVEN PLUS may tell you that it cannot provide a glucose
reading. When this occurs you will see 3 question marks (???) in the Receiver Status Box.
Check the placement of your Sensor to make sure it is still sticking well to your skin. Also make sure
nothing is rubbing the Sensor Pod (i.e. clothing, seat belts, etc.).
Check to see if the Transmitter is snapped in on both sides.
Oftentimes this error happens when the SEVEN PLUS
detects problems with the glucose signal or insertion area. Section 10.1 tells you how often you might expect seeing this error.
Sometimes the SEVEN PLUS can x the issue and start providing
glucose readings. However, if it has been 3 hours, contact Technical
Support.
Status Box
No Glucose Data
5
Page 77
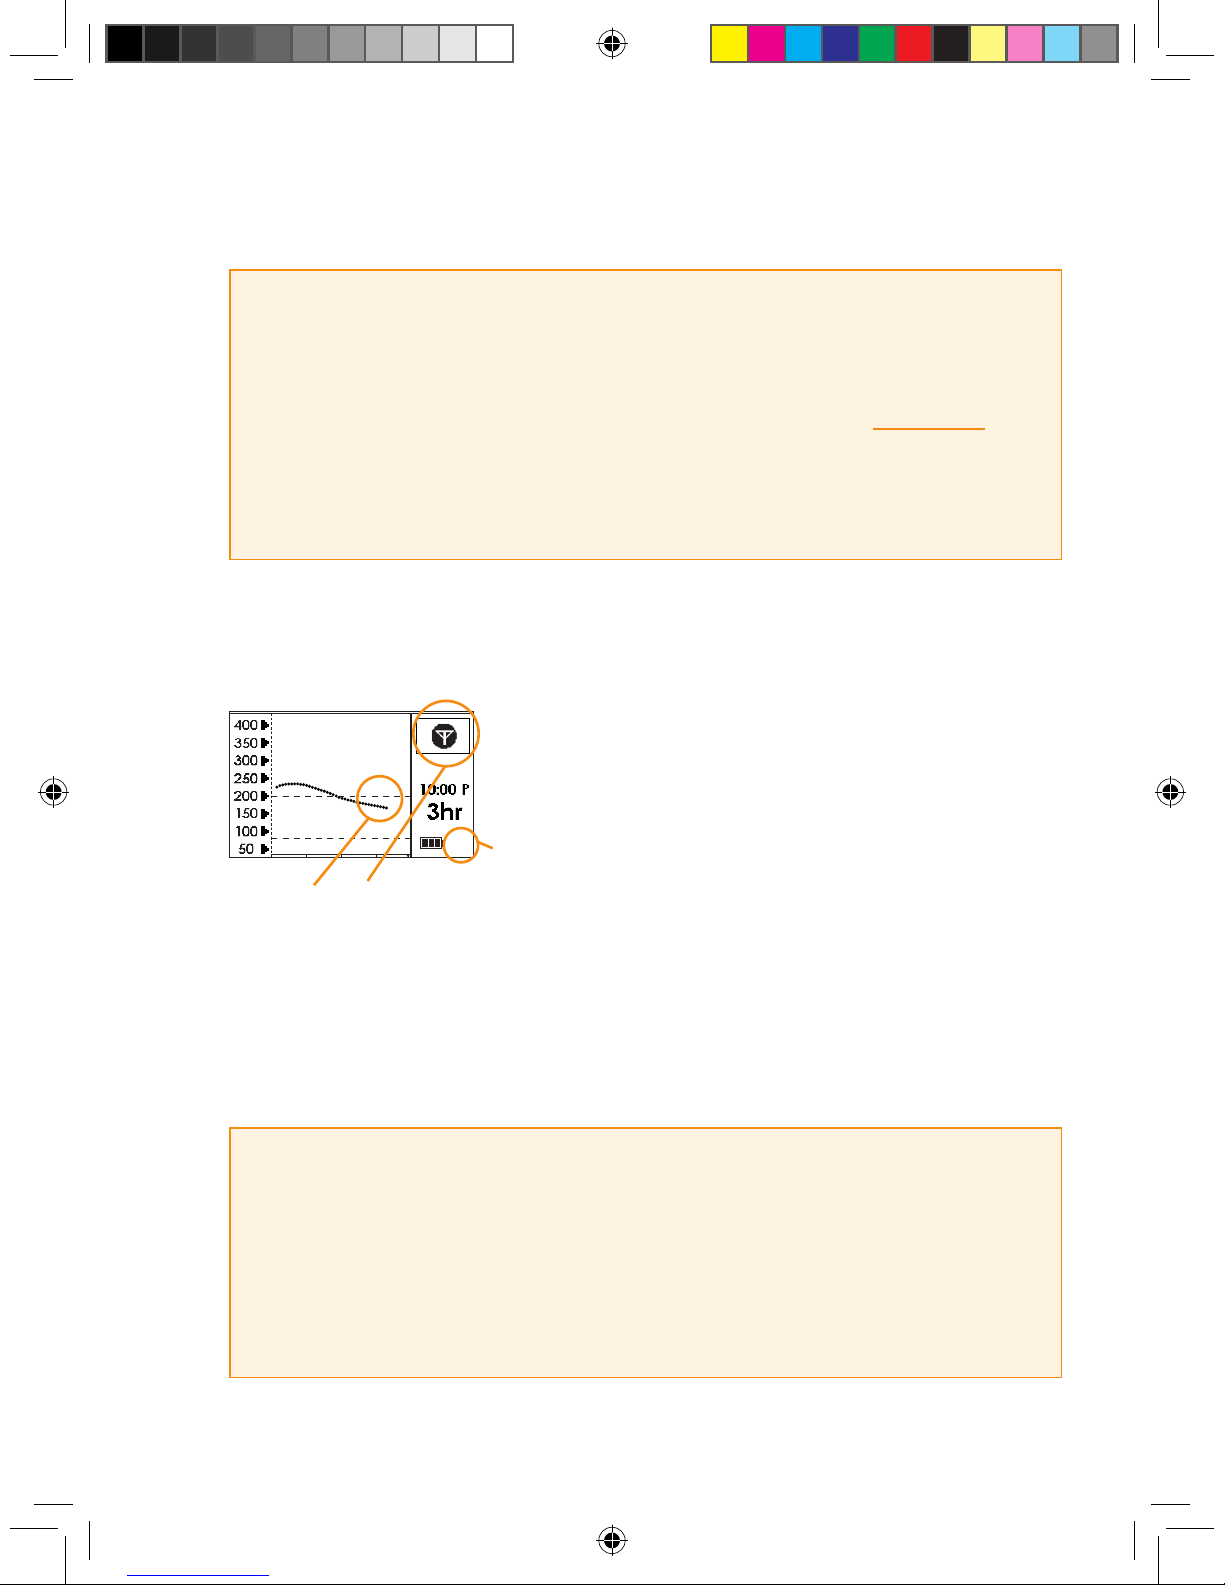
SEVEN PLUS User’s Guide | 77
5.4.4 OUT OF RANGE/NO ANTENNA
•
When you see the Out of Range Symbol in the Status Box instead of a glucose reading, this
means the Receiver has “missed” the last glucose reading sent by the Transmitter.
• If you see this Symbol, make sure the Receiver is within 5 feet
of the Transmitter/Sensor Pod. If it is not, move the Receiver
closer and wait at least
5 minutes.
NOTE: The Antenna Symbol in the lower right corner
will disappear.
•
Once you have moved the Receiver closer and waited 5-10 minutes, the Out of Range Symbol
in the Status Box should go away. The Antenna Symbol should reappear in the lower right
corner, and you should receive a glucose reading in the Status Box.
•
If you are still having trouble receiving System readings because of this
problem, contact DexCom Technical Support at 1-888-SEVENGO (738-3646).
HELPFUL HINTS:
• If you see the “???” in the Status Box of the Receiver Trend Graph, it is recommended that you
wait out this period of time. Do not calibrate your system during this time.
• When you see “???”, taking ngersticks with your meter and entering them does not help the
System display more glucose readings. Any ngersticks
that you take during “???” will be ignored by the System.
• Wait until you see a single blood drop in the Status Box before entering a calibration value into
your Receiver.
No Glucose Data
HELPFUL HINTS:
• You can set an Out of Range Alert to notify you when the Receiver and Transmitter are not
talking (see Chapter 2, Section 2.3.4, “Setting Out of Range Alert”). You can set the amount of
time the Transmitter can be out of range before the Receiver alerts you.
• The Transmitter and Receiver may lose communication during the following circumstances:
While you are lying on a waterbed, while they are near metallic objects, or when you are using an
electric blanket.
Page 78
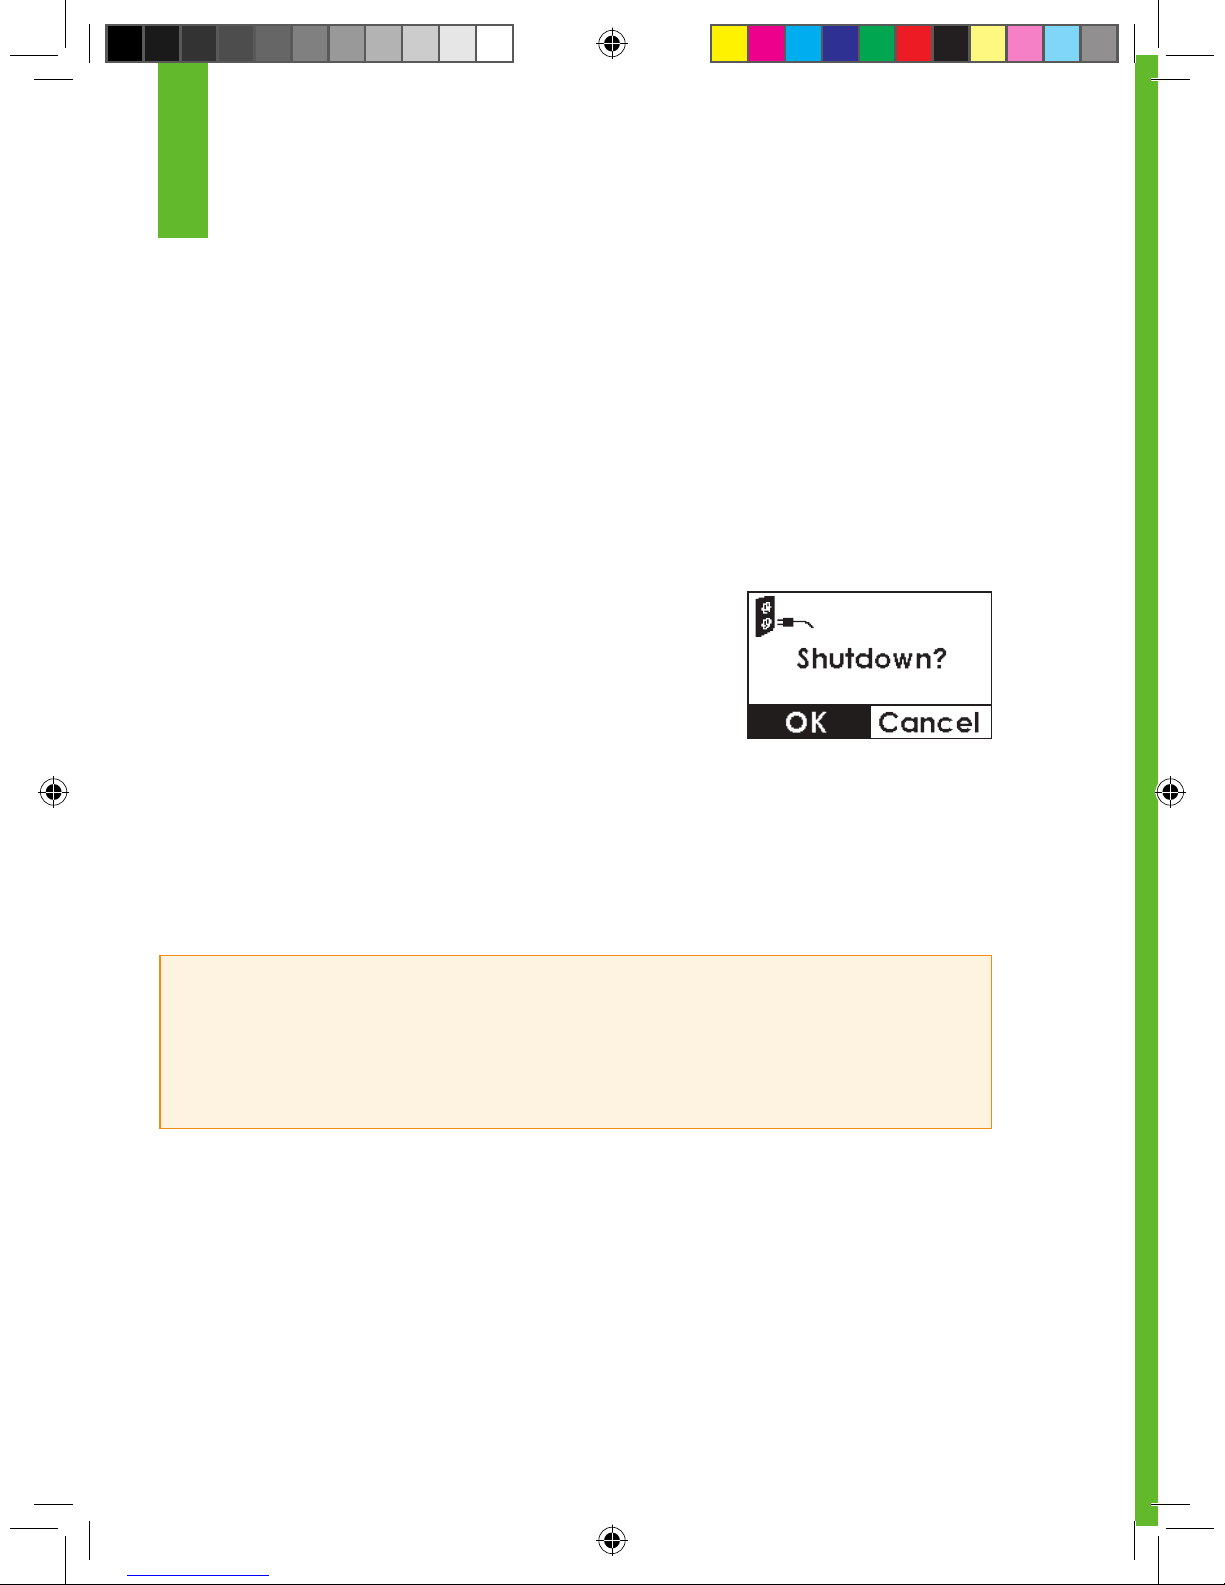
78 | SEVEN PLUS Continuous Glucose Monitoring System
5.5 TEMPORARY SENSOR SHUT DOWN
There may be times when you want to temporarily shut down your Receiver. Shutdown will stop
all communication between the Transmitter and Receiver and will turn the Receiver off. You
will not receive glucose readings while the Receiver is shut down, but your current continuous
monitoring session will remain in progress. Follow these steps to shut down your Receiver:
1. Press any button to turn the Receiver’s display on.
2. Press the OK button to reach the Options Menu.
3. Use the Up p and Down q Arrow buttons to scroll until “Shutdown” is
highlighted.
4. Press the OK button. The Shutdown conrmation screen will
appear.
5. Press the OK button to conrm that you want to shut down.
6. The Receiver will power down. No data will be collected and no Alerts/ALARMS will sound or
appear.
7. Hold down any key to turn the Receiver on again.
HELPFUL HINTS:
• Remember that your Alerts and ALARM will not work when the Receiver is shut down.
• Your Sensor will stop 7 days after you start the Sensor. Shutting down does not extend Sensor
life beyond 7 days.
5
Page 79
SEVEN PLUS User’s Guide | 79
6
chapter six
DIABETES MANAGEMENT TOOLS
Page 80
80 | SEVEN PLUS Continuous Glucose Monitoring System
6
Page 81
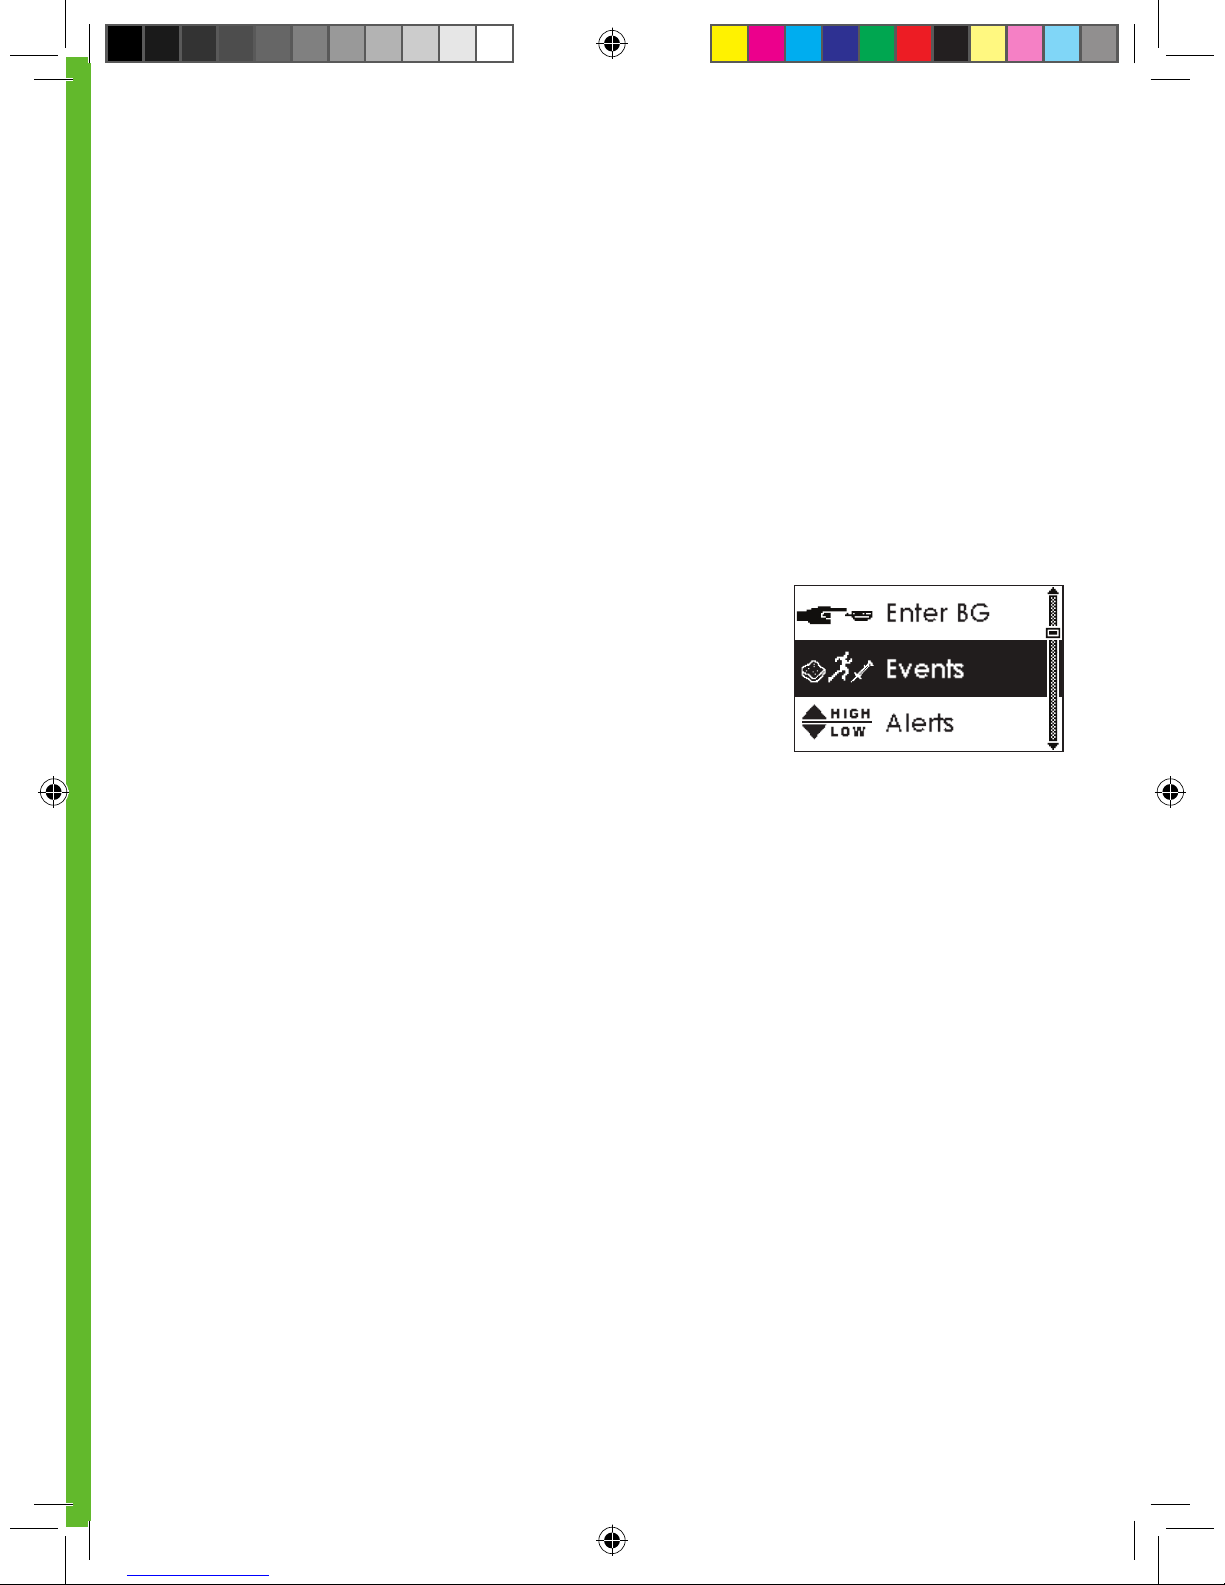
SEVEN PLUS User’s Guide | 81
6.1 DIABETES EVENTS
With the SEVEN PLUS you can enter meal, insulin, health, and activity information. This
information can help you and your diabetes management team review your glucose trends and
patterns and may help you make better decisions about your diabetes management plan. These
events can be reviewed later with the DexCom Data Manager software.
6.1.1 HOW TO ENTER AN EVENT
1. Press any key to turn on the Receiver’s display.
2. Press the OK button to reach the Options Menu.
3. Use the Up p and Down q Arrow buttons to
scroll until you highlight “Events.” (see screen
shown to the right).
4. Press the OK button to go into the Events Menu.
5. Use the Up p and Down q Arrow buttons to
scroll through the different type of Events:
a. Carbohydrates b. Insulin c. Exercise d. Health
6. Highlight the event you want, and press the OK button to enter the Events option you want.
7. In the individual Events Menus, use Up p and Down q Arrow buttons to scroll through the
options you want to select (e.g., grams of carbohydrates, type of exercise), and press the OK
button to select the option.
8. At the time setting screens for each event:
• You will see the current date and time. Press OK if you would like to use this time stamp.
• If you would like to change this entry, use the Up p and Down q Arrow
buttons to highlight “edit”. Press OK.
a. Use the Up p and Down q Arrow buttons to scroll until you select the year you want.
Then press the OK button.
i. You can scroll by 1 digit at a time.
b. Use the Up p and Down q Arrow buttons to scroll until you select the month you want.
Then press the OK button.
Page 82
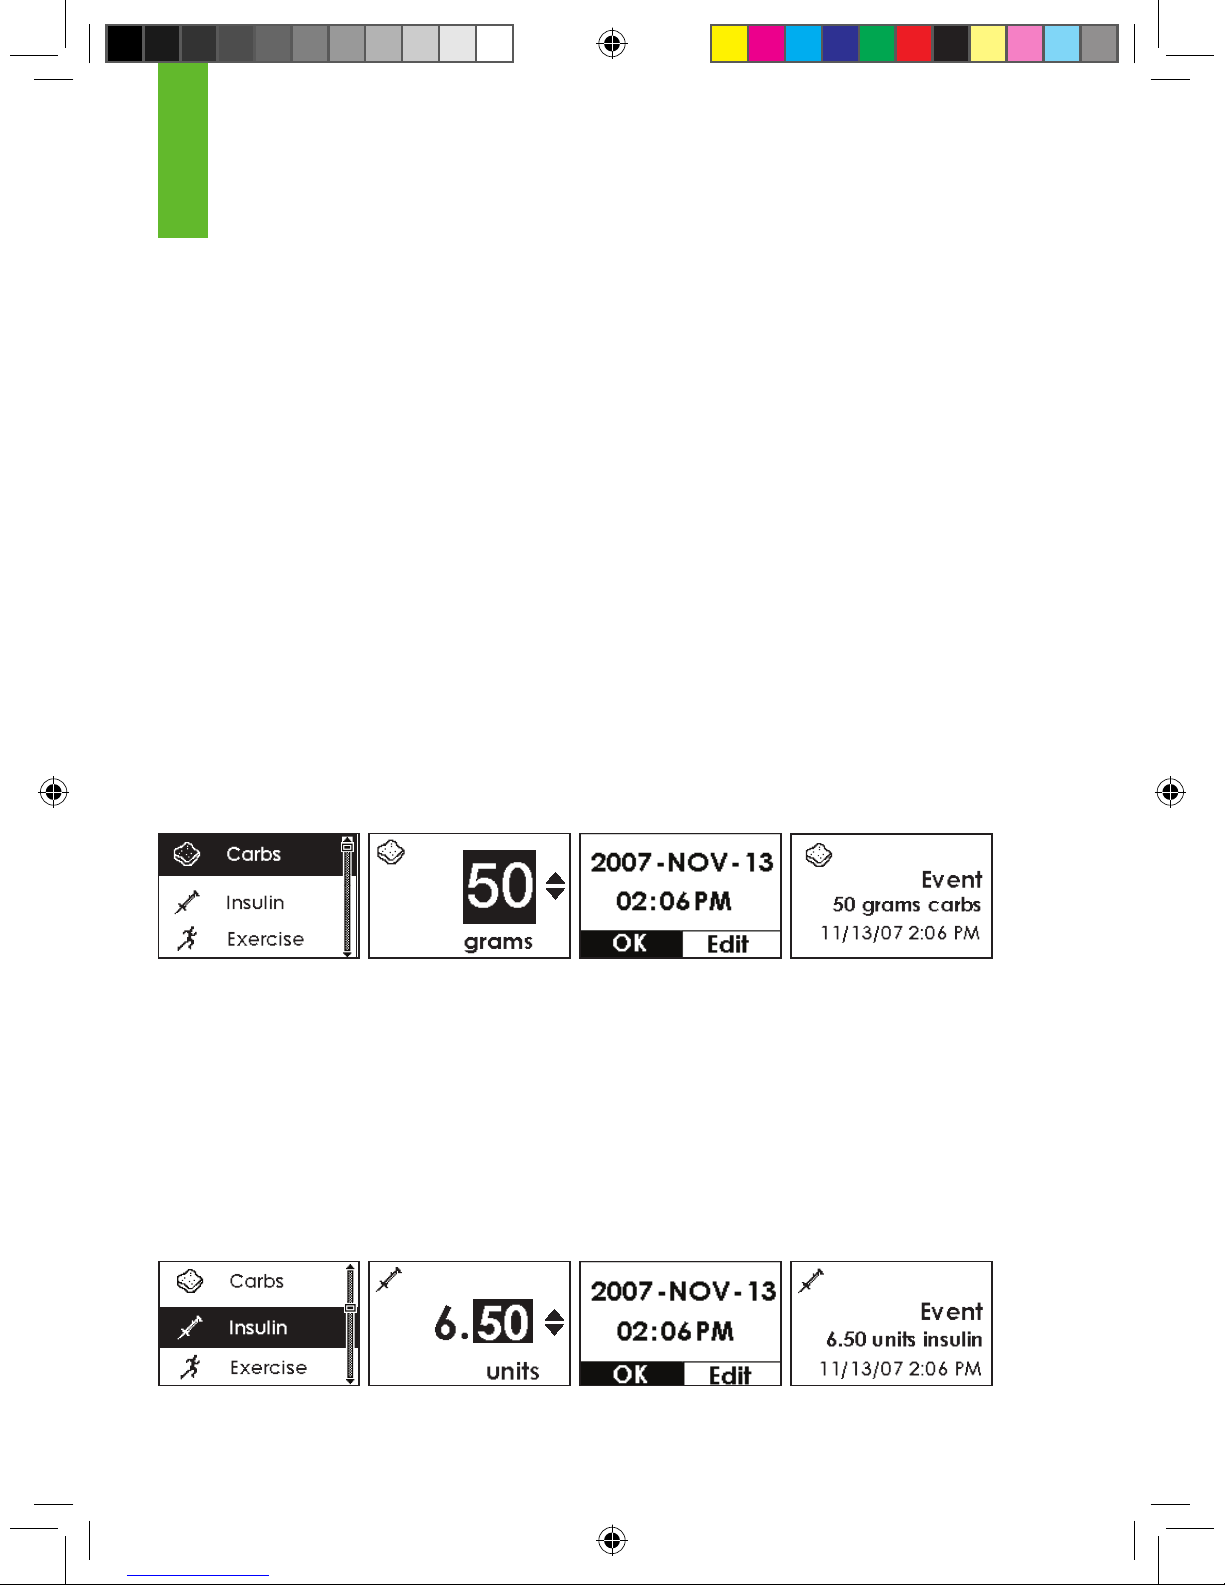
82 | SEVEN PLUS Continuous Glucose Monitoring System
c. Use the Up p and Down q Arrow buttons to scroll until you select the day you want. Then
press the OK button.
d. Use the Up p and Down q Arrow buttons to scroll until you select the hour you want.
Then press the OK button. When you choose the hour, the AM/PM will adjust automatically
(e.g. if you go from 11AM to 12PM, AM will switch to PM).
e. Use the Up p and Down q Arrow buttons to scroll until you select the minute you want.
Then press the OK button.
9. You will see an event summary screen.
a. Press the OK button to conrm.
Press the C button if the information is incorrect and you want to back-up.
6.1. 2 CARBOHYDRATES
You can enter the carbohydrates you eat by using the Carbs Menu.
•
You can enter 0-200 grams.
•
When you enter this menu, you will either see the last number of Carbohydrates grams you
entered or you will see 50 grams (default).
6.1.3 INSULIN
You can enter the insulin you take by using the Insulin Menu.
•
You can enter 0-250 units.
•
When you enter this menu, you will either see the last Insulin units you entered or you will see
10 units (default).
•
You cannot set different types of insulin.
6
Page 83
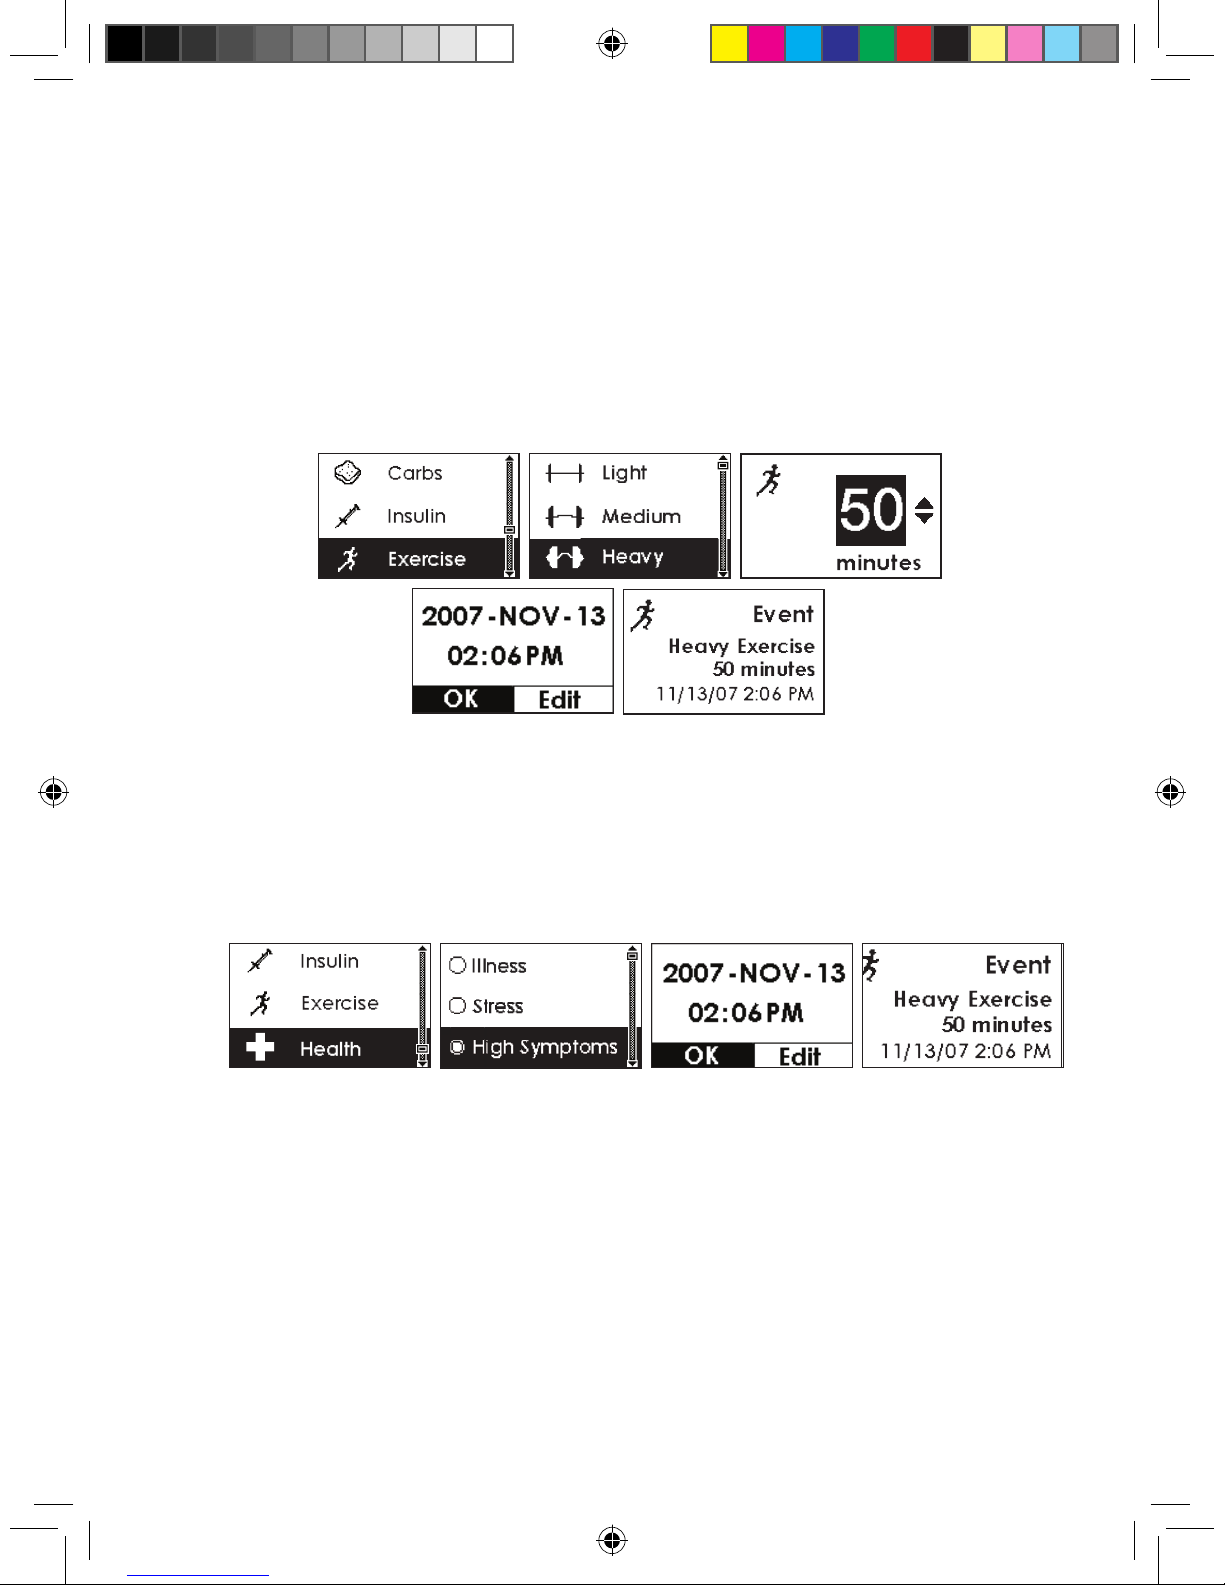
SEVEN PLUS User’s Guide | 83
6.1. 4 EXERCISE
You can enter any exercise you participate in by using the Exercise Menu.
•
You can select Light, Medium, or Heavy Exercise Intensity.
•
You can enter 0-360 minutes for the duration of your exercise. The default is always 30 minutes.
6.1. 5 HE A LTH
You can enter instances of changes in your health using the Health Menu.
•
You can select Illness, Stress, High Symptoms, Low Symptoms, Cycle,
or Alcohol.
Page 84
84 | SEVEN PLUS Continuous Glucose Monitoring System
6.2 DATA MANAGER SOFTWARE
The DexCom Data Manager® computer software comes with your SEVEN PLUS. This software
allows you to view trends and track patterns.
The software creates customizable charts to display your glucose trends. Change the date
ranges to view long- or short-term patterns and trends. Plus, you can use data from current and
previous SEVEN PLUS Receiver downloads and save or print les that you can take to your
next doctor visit.
For system requirements you may contact Customer Support at
1-888-SEVENGO (738-3646) or refer to the DexCom website
(www.dexcom.com). The Data Manager Help File gives you more
information on how to use this software.
chapter seven
6
Page 85
SEVEN PLUS User’s Guide | 85
7
chapter seven
COMPLETING YOUR
CONTINUOUS GLUCOSE MONITORING SESSION
Page 86
86 | SEVEN PLUS Continuous Glucose Monitoring System
7
Page 87
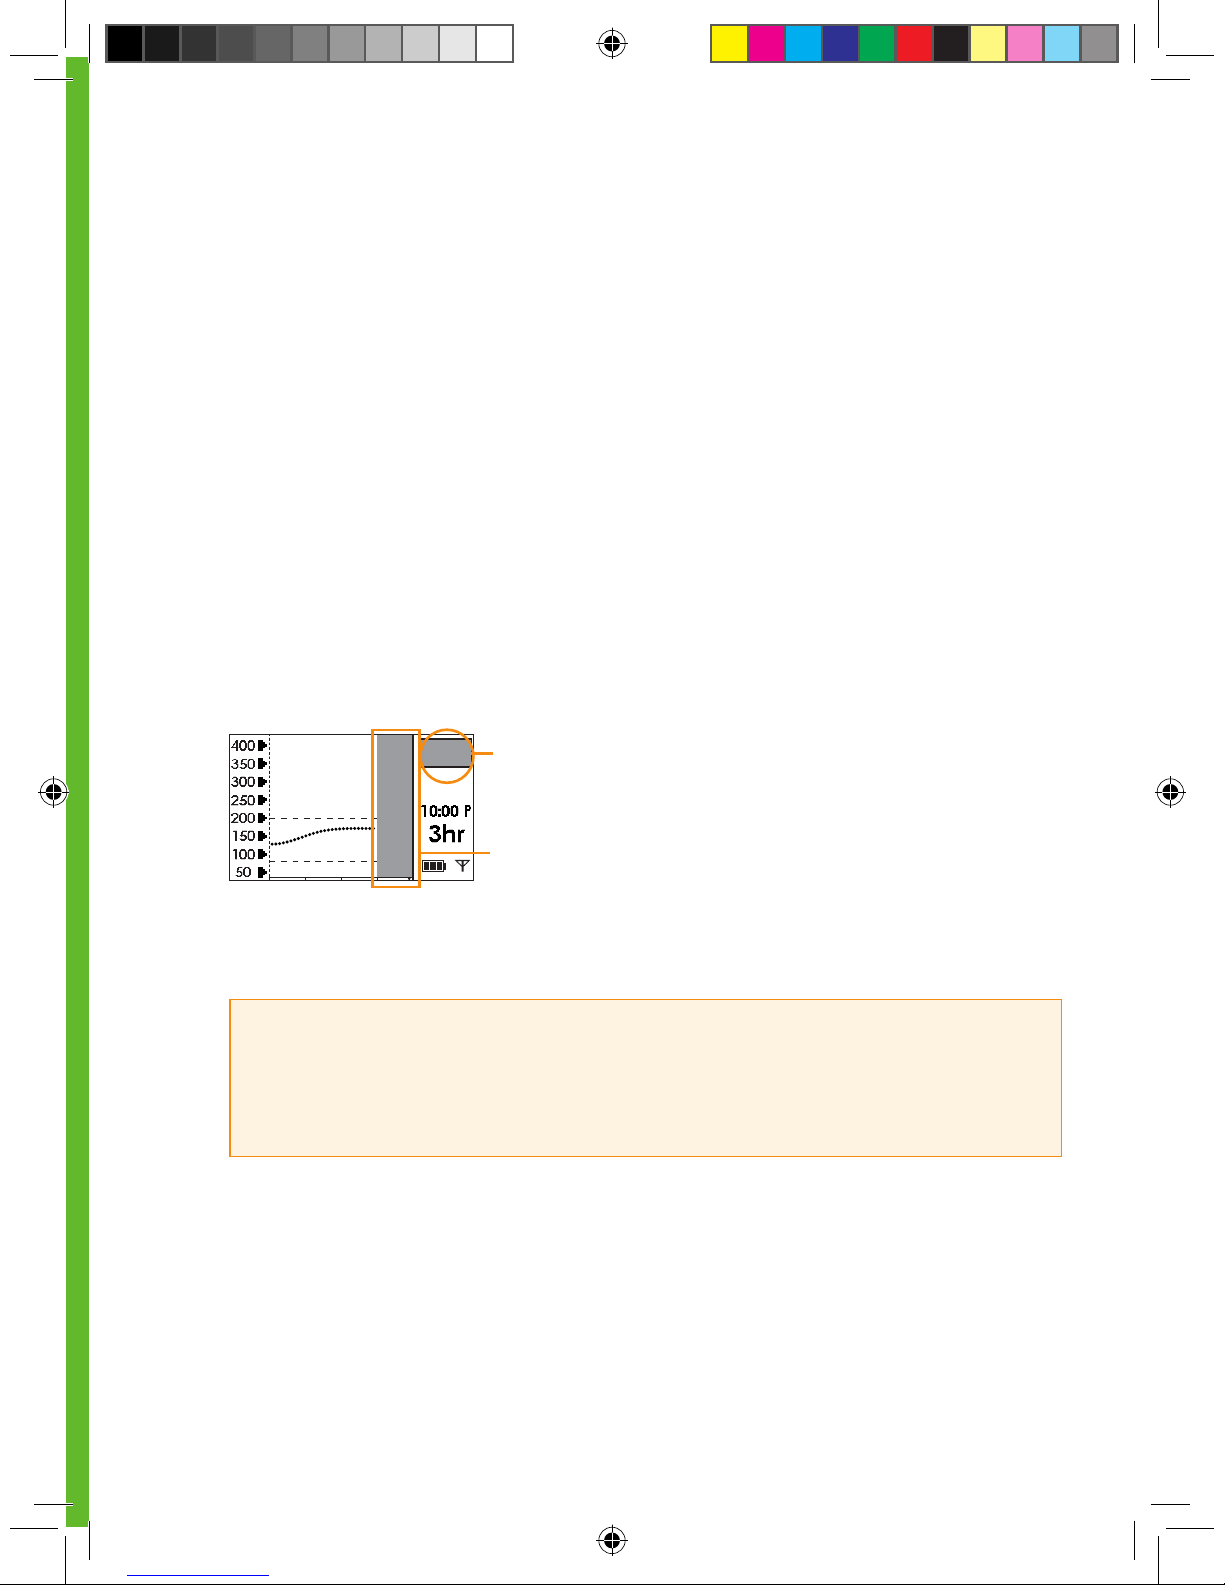
SEVEN PLUS User’s Guide | 87
At the end of your Sensor Session, or wear period, you will need to remove the
Sensor Pod. Gently peel up the adhesive patch from your skin (this will pull out
your Sensor Probe). Then remove the Transmitter from the Sensor Pod and
keep it for your next glucose monitoring session (see Chapter 7, Section 7.3,
“Transmitter Removal”).
Your Sensor Session might end on time when the Sensor expires (after 7 days). You can also
choose to end the wear period early, or it might end early (less than 7 days) due to a Sensor
failure.
Once your Sensor use has ended, glucose readings will no longer be shown on the screen.
The Receiver screen will indicate that the Sensor Session has ended by displaying the gray
rectangle in the Status Box.
Over time the Receiver display (Trend Graph area) will continue to “gray out” until a new Sensor
is inserted.
A grayed out Status Box indicates that your Sensor
Session has ended
HELPFUL HINTS:
• Remember to save your Transmitter after each Sensor removal. The same Transmitter is used
for each session until you have reached the end of the Transmitter battery life. The Sensor can be
thrown in the trash.
The screen begins to gray out after your Sensor Session
has ended
Page 88
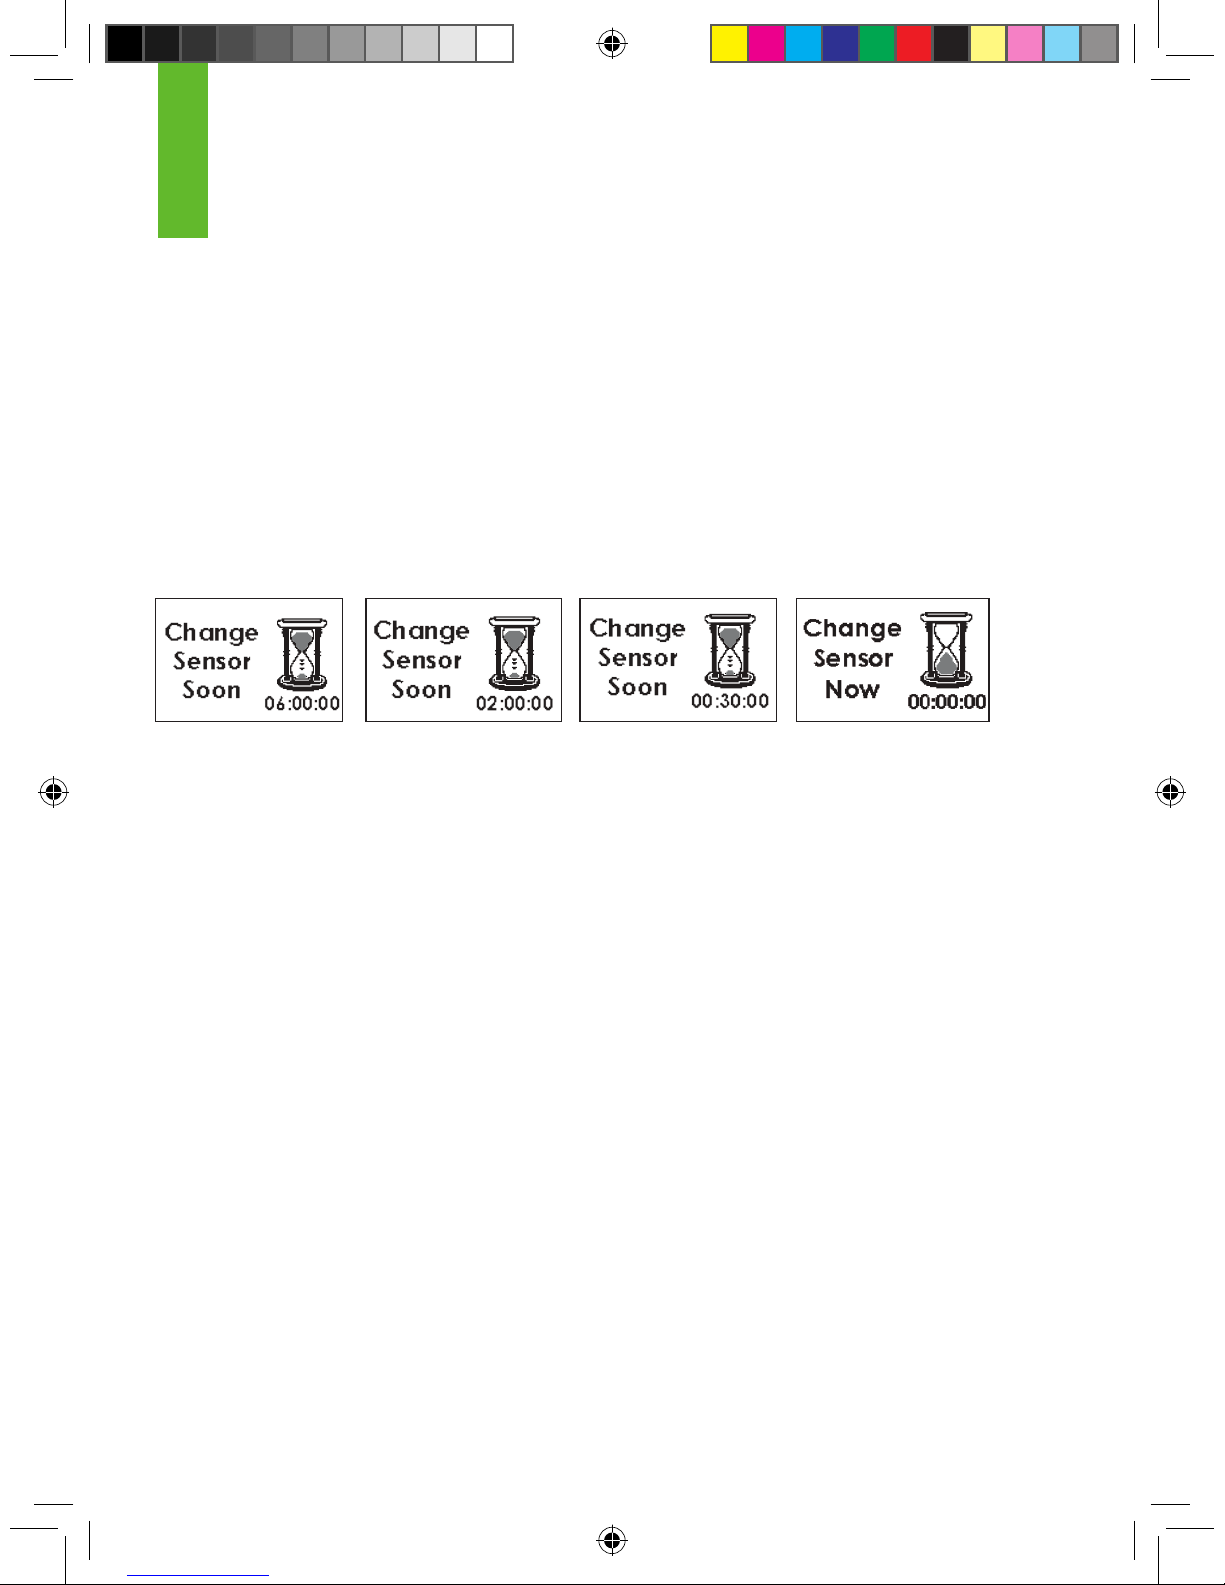
88 | SEVEN PLUS Continuous Glucose Monitoring System
7.1 AUTOMATIC SENSOR SHUT-OFF
The Receiver will tell you how much time you have remaining until your SEVEN Sensor session
is complete. The Expiration Screen will appear 6 hours and 2 hours before your 7-Day session
ends.
At 30-minutes and 0-hours before your 7-day session ends, the Receiver will display the Expiration Screen. You can set the Receiver to vibrate and/or beep with these 30-minute or 0-hour displays if you choose (see Chapter 2, Section 2.3, “Setting your Alerts”). After the 6-hour, 2-hour,
and 30-minute reminders you will still continue to receive System readings. You can clear all of
these screens by pressing the C button on the Receiver. You must remove your Sensor after
the nal Sensor Expiration Screen (00:00:00) appears.
Once the Final Expiration Screen appears, press the C button to clear this notica-
tion.
7.2 EARLY SENSOR SHUT-OFF
In some cases your Sensor Session may end before you have completed a full 7-day period.
You should review Chapter 10, “Technical Information,” of this User’s Guide to determine how
often you should expect this to happen. Examples of why this may occur are described on the
next page.
6-hour Sensor
Expiration
Notication
2-hour Sensor
Expiration
Notication
30-minute Sensor
Expiration
Notication
(+ vibration if set)
Sensor Expiration
Notication
(+ vibration if set)
End of session
7
Page 89
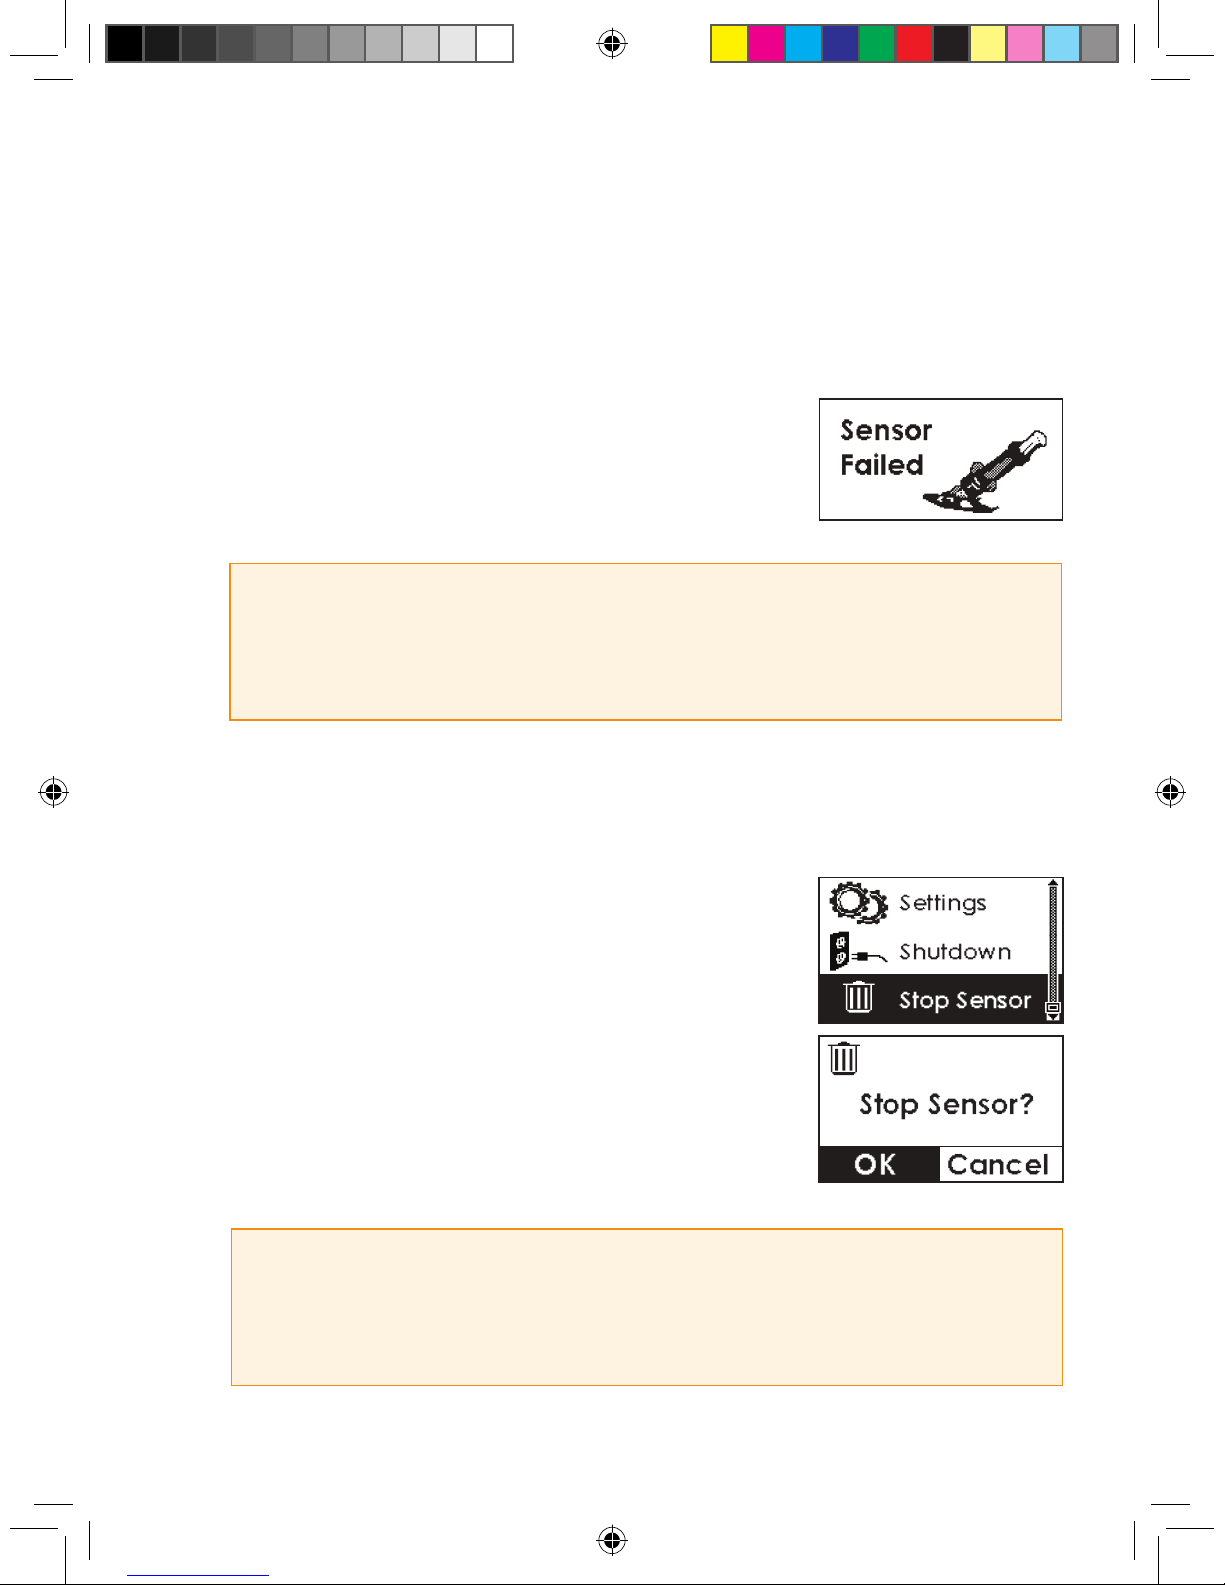
SEVEN PLUS User’s Guide | 89
7.2 .1 EARLY SHUT-OFF – SENSOR FAILURE
During use the Receiver may detect a series of issues with your Sensor signal where it can
no longer determine what your glucose reading is (see Chapter 8, Section 8.3, “Sensor Failed
Troubleshooting”). At this time the System will automatically turn off and show the screen to the
right:
If you see this screen then your continuous glucose monitoring
session has ended. Press the C button to clear this screen.
7.2.2 MANUAL SENSOR SHUT-OFF – “STOP SENSOR”
To manually end your Sensor session, use the Stop Sensor Menu.
This Menu title will only appear during a Sensor wear period. You
must have already started a Sensor with the Start Sensor Menu,
and the Sensor Session must not have expired (Chapter 7,
”Completing Your Continuous Glucose Monitoring Session”) or
failed (Chapter 8, Section 8.3, “Sensor Failed Troubleshooting”).
Press the OK button to conrm that you want to stop the Sensor.
HELPFUL HINT
• If you removed your Sensor before telling the Receiver, the Failed Sensor Screen will show up
automatically. You must press OK before inserting a
new Sensor.
HELPFUL HINT
• You cannot reverse this decision after the nal OK. Press the C button if you do not want to
stop the Sensor wear period.
Failed Sensor Screen
Page 90
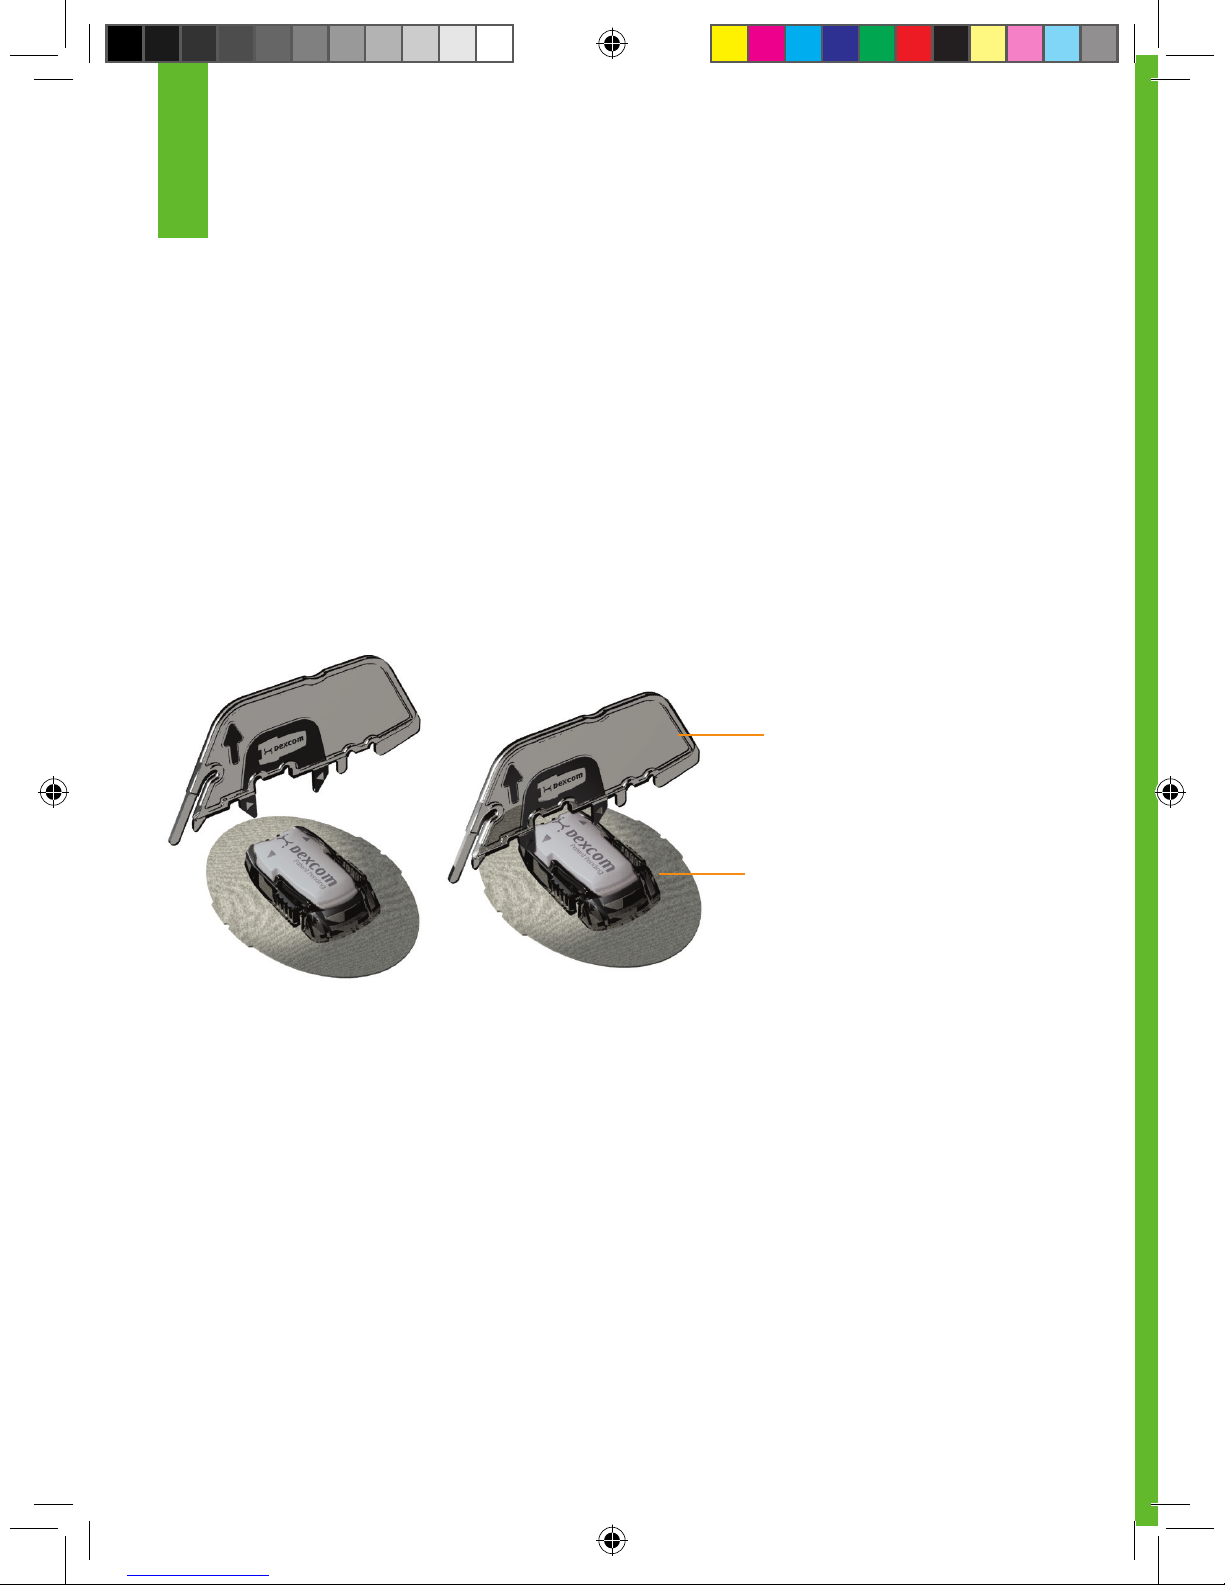
90 | SEVEN PLUS Continuous Glucose Monitoring System
7.3 TRANSMITTER REMOVAL
When you are ready to remove the Sensor, make sure to pull out the Sensor Pod with the Transmitter still inside. Once the Sensor Pod is off your body, you will need to remove the Transmitter. To
do this you can use either of the two methods below:
Method 1
The Safety Lock/Transmitter Key once removed from the Applicator (Chapter 3, Section 3.5, “Sensor Insertion”) can be used as a tool to remove the Transmitter.
1. Place the Sensor Pod on a table.
2. Hold the rounded edge of the Transmitter Key.
3. Make sure the jagged edge of the Transmitter Key is facing down (the direction away from the
removal arrow) as shown below:
4. Insert the jagged edges so that they “hug” the Transmitter wings in the Sensor Pod. Press the
Transmitter Key down until you cannot press down anymore, and the Transmitter wings will
“pop” out of the Sensor Pod.
5. Remove the Transmitter and store it in a cool, dry place until your next glucose monitoring session.
Method 2
If you did not save the Transmitter Key, you can simply use your pointer nger on each hand and
spread out the tabs at the back of the Sensor Pod (end closest to the wings). The Transmitter
wings will “pop” out of the Sensor Pod.
7
Transmitter Key
(from Applicator)
Sensor Pod with
Transmitter Key
snapped in
Page 91
SEVEN PLUS User’s Guide | 91
8
chapter eight
TROUBLESHOOTING
Page 92
92 | SEVEN PLUS Continuous Glucose Monitoring System
8
Page 93
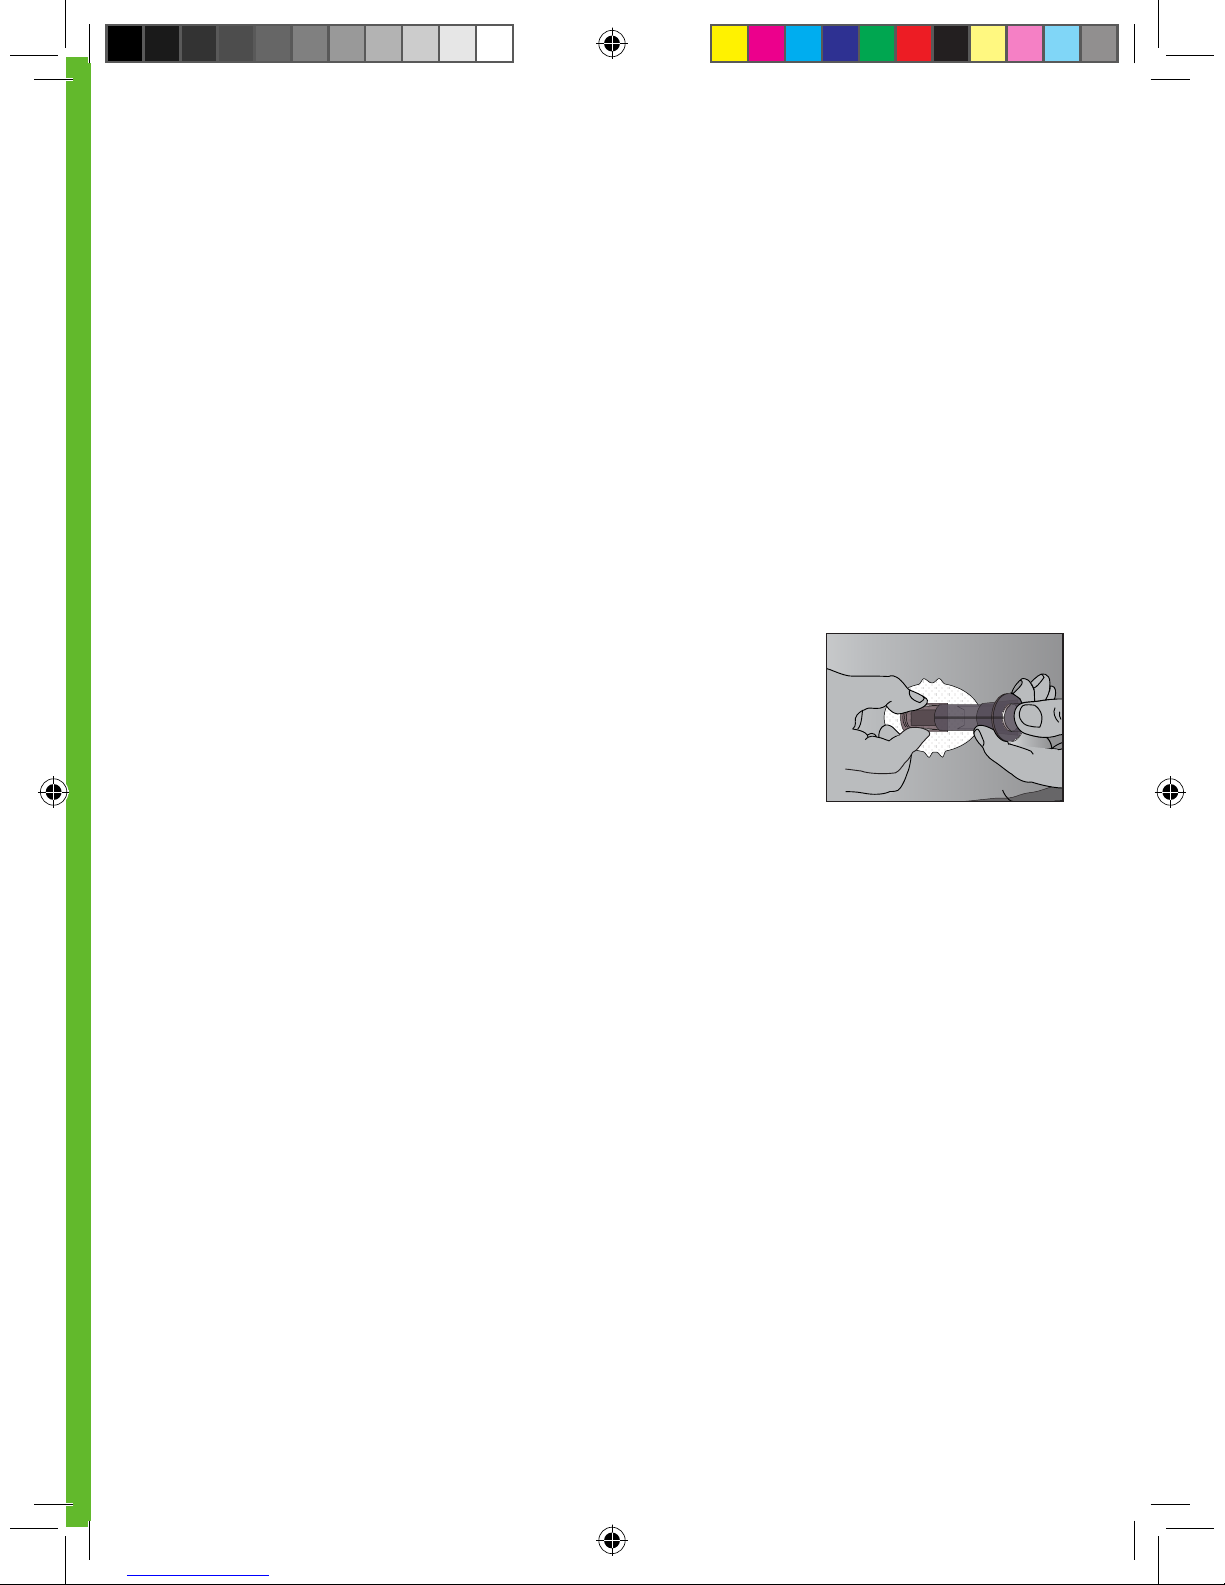
SEVEN PLUS User’s Guide | 93
8.1 SENSOR INSERTION TROUBLESHOOTING
Sensor Insertion Difculties
•
I am having trouble taking out the Safety Lock/Transmitter Key:
- Make sure to pull straight out using the arrows on the Safety Lock as a guide.
- Do not wiggle back and forth.
•
I am not able to pull the Collar up:
- Make sure the plunger is completely pressed down before pulling the collar up.
- When pulling the Collar up you should hear 2 clicks.
- Try using more force when pulling the collar up.
•
I am not able to remove the Applicator from the Sensor Pod:
- Pull the Collar all the way up. It should be very close to the top of
the Applicator.
- Make sure the Transmitter Latch is down before squeezing the
Release Tabs.
- Then squeeze the ribbed Release Tabs (on the side), and lift the
Applicator away from your body.
•
Removing the Transmitter Latch is difcult:
- Hold the Sensor Pod down with one hand and twist the Latch with
the other hand to remove it.
- Do not try to snap it straight off.
Sensor Pod is Not Sticking Long Enough
•
Do not use any cream or lotion on your skin where you attach the Sensor Pod.
•
Clean the skin and make sure it is completely dry before you attach the Sensor Pod. Do not leave
any substance on the skin where the Needle inserts.
•
You may use medical tape (such as BlendermTM) over the white adhesive patch of the Sensor Pod,
but do not place the tape over the Transmitter or the plastic parts of the Sensor Pod.
Release the Applicator
Page 94
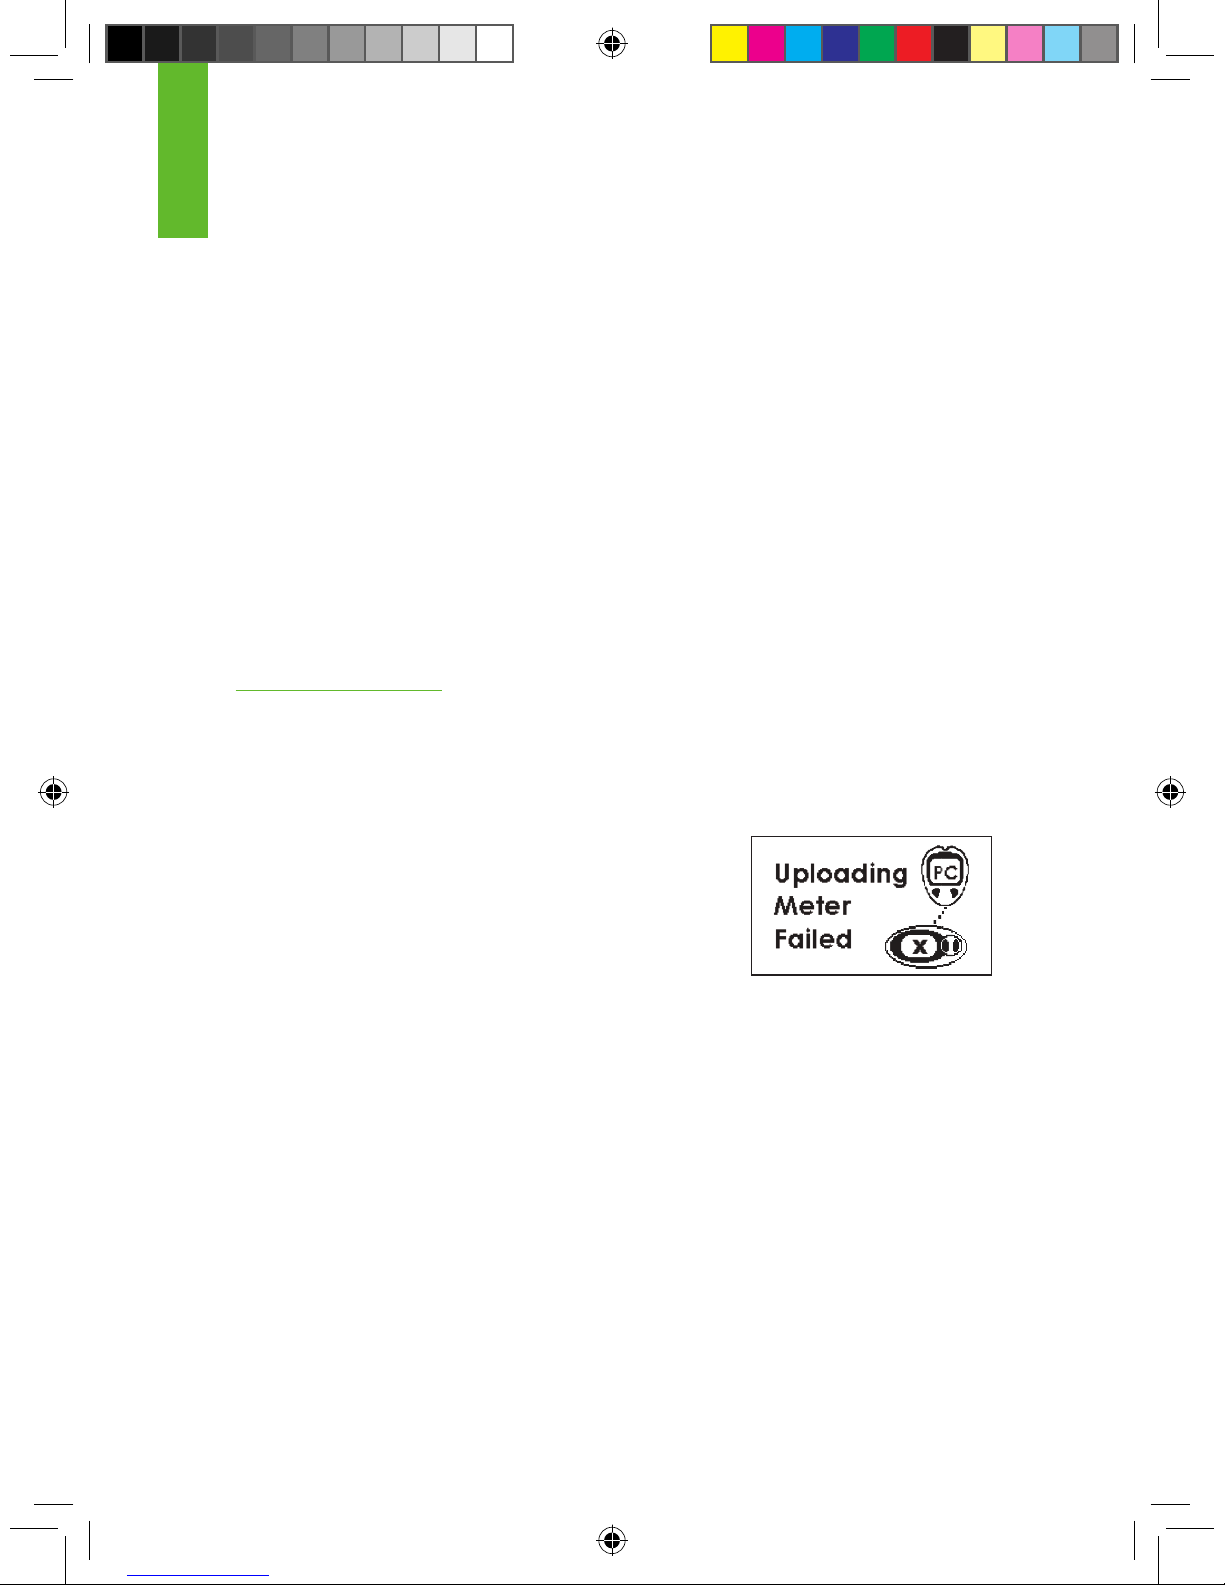
94 | SEVEN PLUS Continuous Glucose Monitoring System
8.2 CALIBRATION TROUBLESHOOTING
The following prompts may appear during or shortly after you try to calibrate your System.
Review the following troubleshooting tips so that your calibration is successful.
•
Make sure you have inserted a Sensor and Started a Sensor Session
•
Do not use expired Sensors
•
Store Sensors at room temperature (see Chapter 9 for Maintenance and Storage
of your System)
•
Make sure your meter readings are between 40 and 400mg/dL before you calibrate
•
Quality check your blood glucose meter per the manufacturer’s instructions
8. 2 .1 CONNECTION FAILURE AND NEW METER SCREENS
(AUTO UPLOAD ONLY)
You should see these two notication screens only if you are using the OneTouch Ultra Meter
with the Connection Cable.
Connection Failure Screen
If you see this screen to the right, (with an “X” on the
Receiver screen), the ngerstick reading transfer failed. First clear
the alert by pressing the C button. No additional ngersticks are
required. Disconnect the devices and review the following:
1. Make sure that the meter screen is always blank before you connect the 2 devices.
2. Make sure you plug the Connection Cable into the meter rst and into
the Receiver second.
3. Do not disconnect the cable while uploading or before you see the
Trend Graph appear.
4. Re-try upload using the proper step order.
8
Connection Failure Screen
Page 95
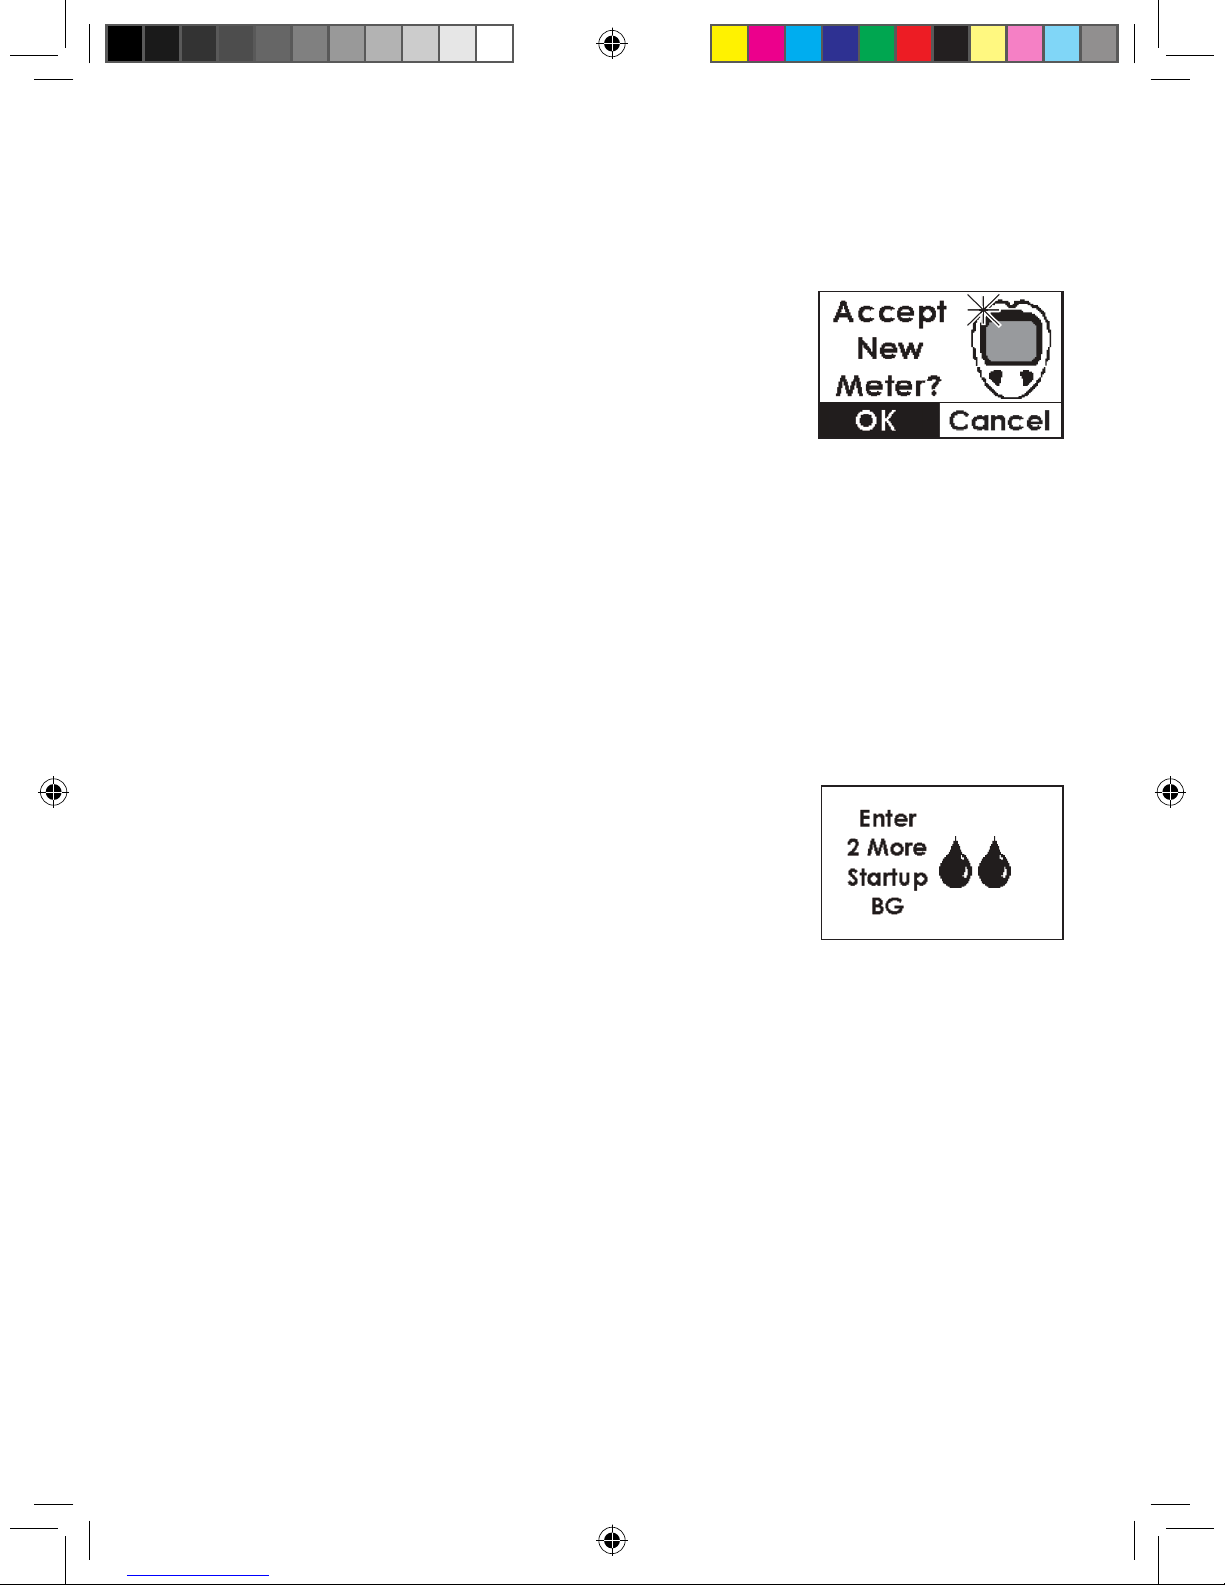
SEVEN PLUS User’s Guide | 95
New Meter Screen
You will see this screen if you have connected a new/
different meter to your Receiver. Your Receiver
will vibrate.
1. You will be asked to register the meter with your System. See
Chapter 4, Section 4.1.2, “Using Auto Upload for Calibration”.
2. You will have to take 2 additional ngersticks and upload them.
8.2.2 BLOOD DROP PROMPTS
8.2.2.1 TYPES OF BLOOD DROP PROMPTS
This section describes the three blood drop symbols you will see. The next section (Section
8.2.2.2, “Status Box Symbols During Blood Drop Prompts”) describes what to do when you see
one of these symbols.
Repeat Double Blood Drop Prompt
If Start-Up calibration is not successful, the Receiver will continue
to display this screen until you correct the problem. Make sure you
have followed the instructions in Section 4.1.1, “Using OpenChoice
for Calibration” and the instructions for how to address the
Connection Failure Screen and New Meter Screen (if using Auto
Upload). If you have followed these steps and you still receive the
Double Blood Drop Prompt, then one of the following errors has
occurred:
•
Both ngerstick readings you took and entered for your rst calibration were outside of the
40-400 mg/dL range, or
•
The Receiver and Transmitter were not talking (Out of Range Symbol in Status Box) with each
other at the time you took the 2 ngersticks entered for calibration, or
•
The Receiver could not understand (“???” in Status Box) your Sensor signal at the time you
entered the ngerstick readings for calibration.
New Meter Screen
Double Blood Drop Prompt
Page 96
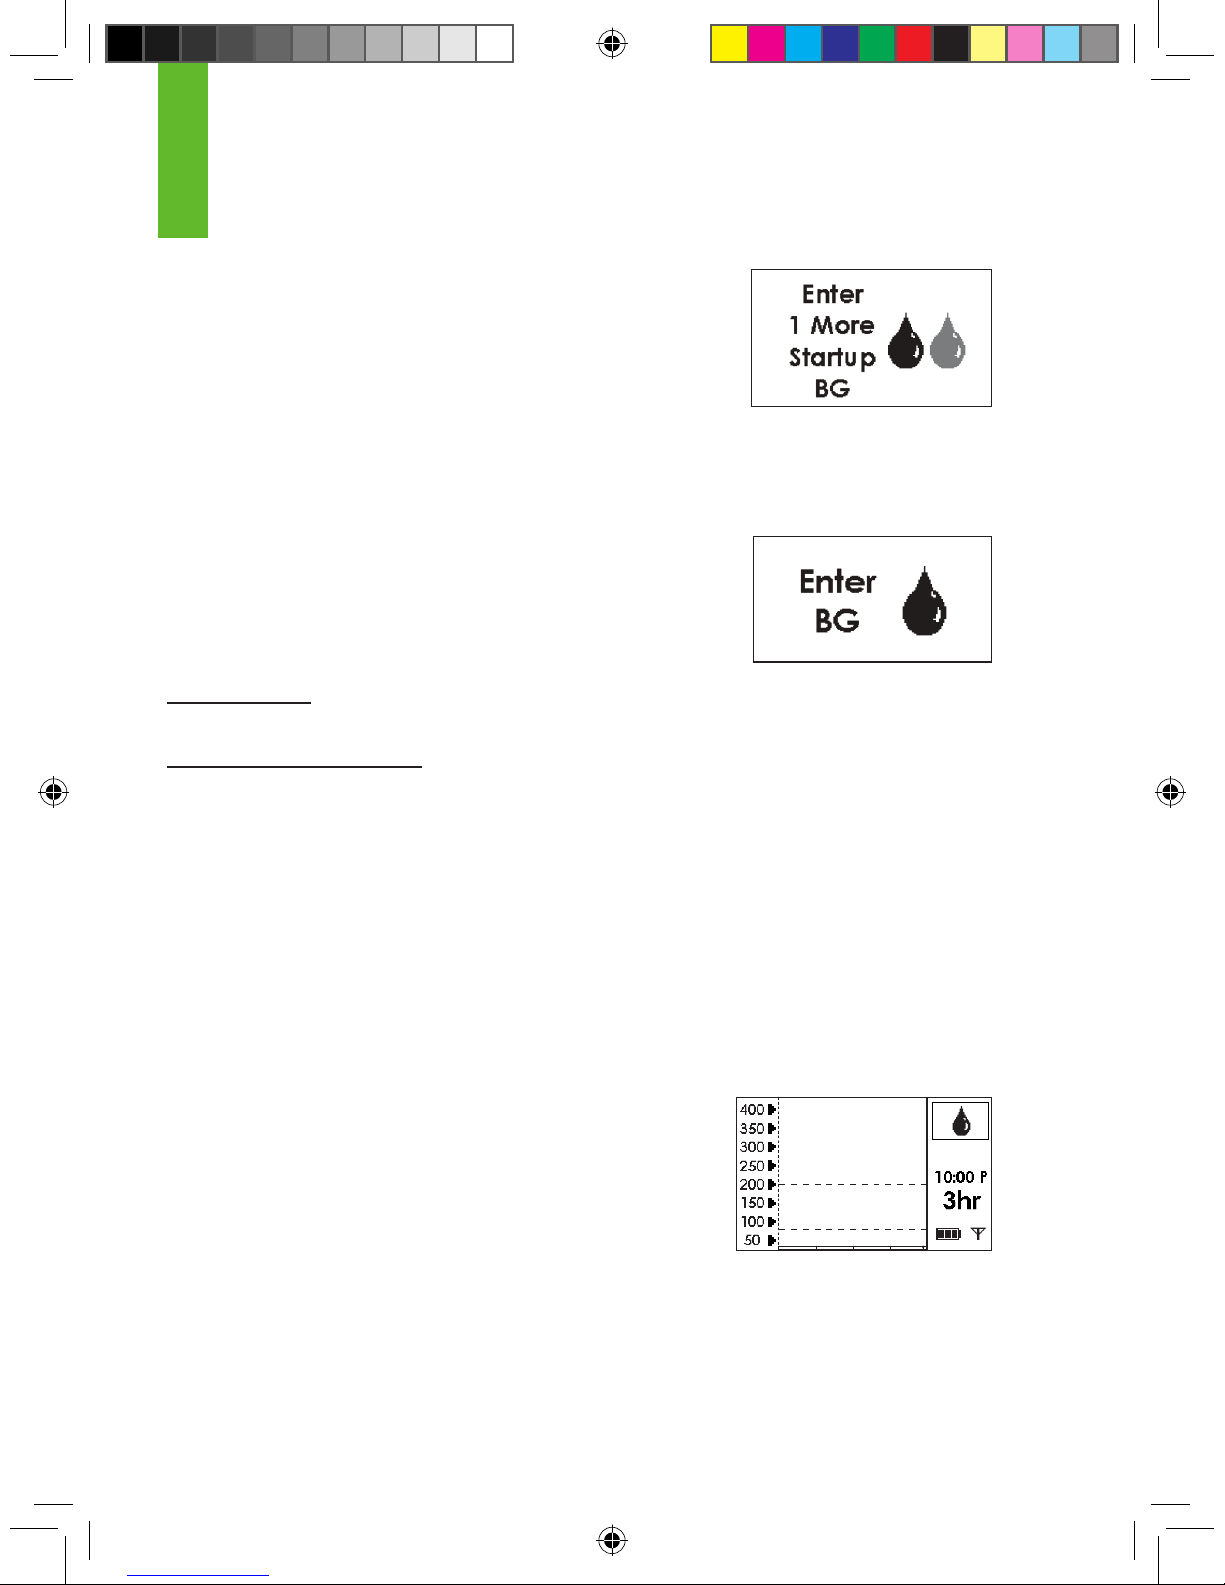
96 | SEVEN PLUS Continuous Glucose Monitoring System
Shaded-Out Blood Drop Prompt
The Shaded-Out Blood Drop Prompt means you need
1 more ngerstick for Start-Up Calibration.
This symbol will appear and the Receiver will make a medium tone
and vibrate once (if set to “Vibe then beep”). The Receiver will
continue to show the Shaded-Out Blood Drop Prompt every 15
minutes until you successfully take the ngerstick and enter it into
the Receiver.
Single Blood Drop Prompt
The Single Blood Drop Prompt means you need 1 more ngerstick
to calibrate. This symbol will appear when it is time for the 12-Hour
Calibration Update or if the Receiver needs another ngerstick for
re-calibration.
•
12-Hour Update: The symbol will prompt you again every 15
minutes until a new ngerstick is successfully entered.
•
Additional ngerstick needed: The Receiver will vibrate and will make a sound. The Receiver will
notify you two more times (to enter a ngerstick), or until a new ngerstick is successfully entered.
8.2.2.2 Status Box Symbols During Blood Drop Prompts
If you are prompted by the Repeat Double Blood Drop, Shaded-Out Blood Drop, or Single Blood
drop, make sure you rst check the Status Box on your Receiver before you take another ngerstick. Then follow the steps below:
1. Clear the prompt from the Screen by pressing the C button.
2. Check the Status Box in the upper right corner of your Receiver. You will decide what to do based
on the Receiver Status Symbol that is shown in the Status Box:
a. If the “Awaiting Fingerstick Reading” Blood Drop Symbol
(shown to the right) is displayed:
•
Take 2 more ngersticks if you are prompted by the Double Blood
Drop.
•
1 more ngerstick if you are prompted by the
Shaded-Out or Single Blood Drop. (Readings must
be within 40-400 mg/dL).
•
Enter your ngerstick readings into the Receiver.
Awaiting Fingerstick Reading
(Blood Drop) Symbol
8
Shaded-out Blood
Drop Prompt
Single Bolld Drop Prompt
Page 97
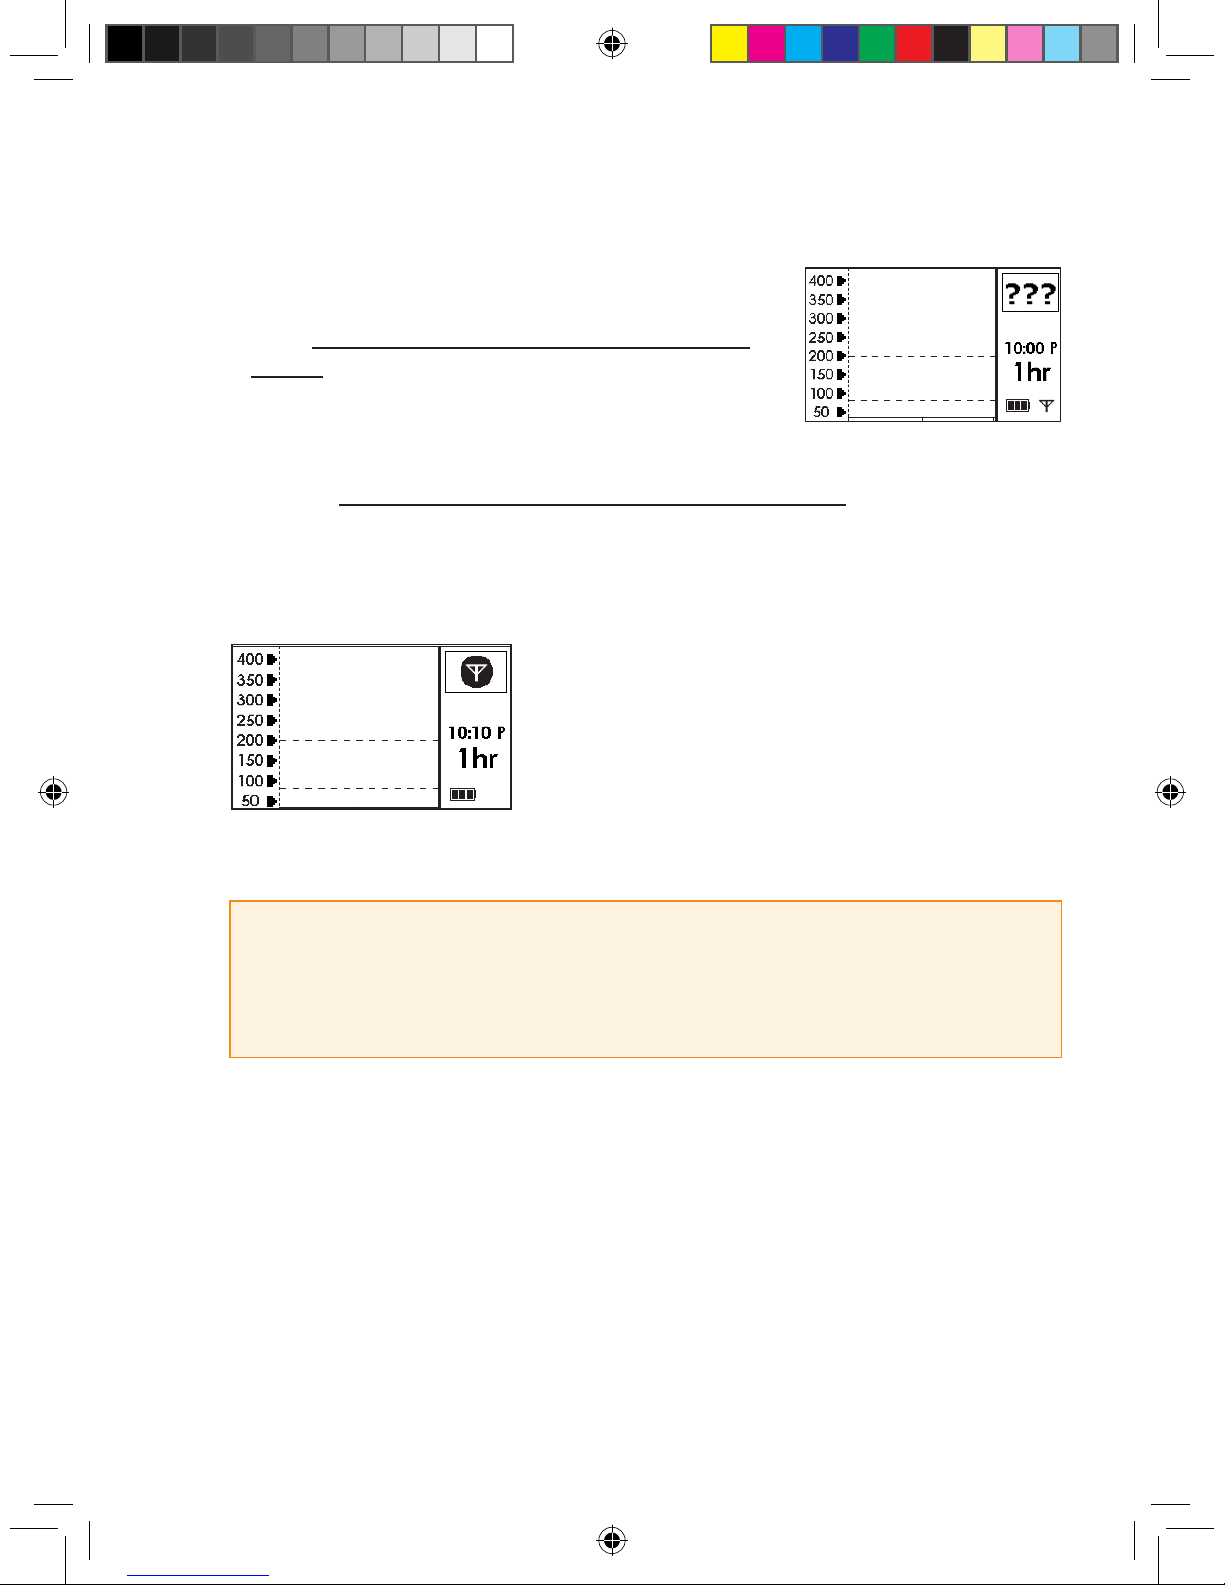
SEVEN PLUS User’s Guide | 97
b. If the “???” Symbol (shown to the right) is displayed, your
Receiver cannot understand your Sensor
signal. Do not take any more ngersticks for calibration at
this time. Wait until you see the Awaiting Fingerstick Reading
(Blood Drop)
Screen again and review Steps 1 and 2.
c. If the “No Communication” Symbol (shown below) is
displayed, do not take any more ngersticks for calibration at this time. Move the Receiver and
Transmitter so that they are within 5 feet of each other and wait at least 5 minutes.
1. Make sure your Transmitter ID is entered into the Receiver (Section 2.2.2)
2. Make sure your Transmitter is fully snapped in
If you are still having problems with communication review
Chapter 5, Section 5.4.4, “Out of Range/No Antenna.” When
you are prompted with either Blood Drop Prompt again,
review the steps at the beginning of this section to calibrate.
“Unknown Glucose
Reading” Symbol
Out of Range Symbol
HELPFUL HINTS:
• If you are still having trouble with SEVEN PLUS calibration (e.g., receiving multiple prompts)
following these steps, contact DexCom Technical Support
at 1-888-SEVENGO (738-3646) for help.
Page 98
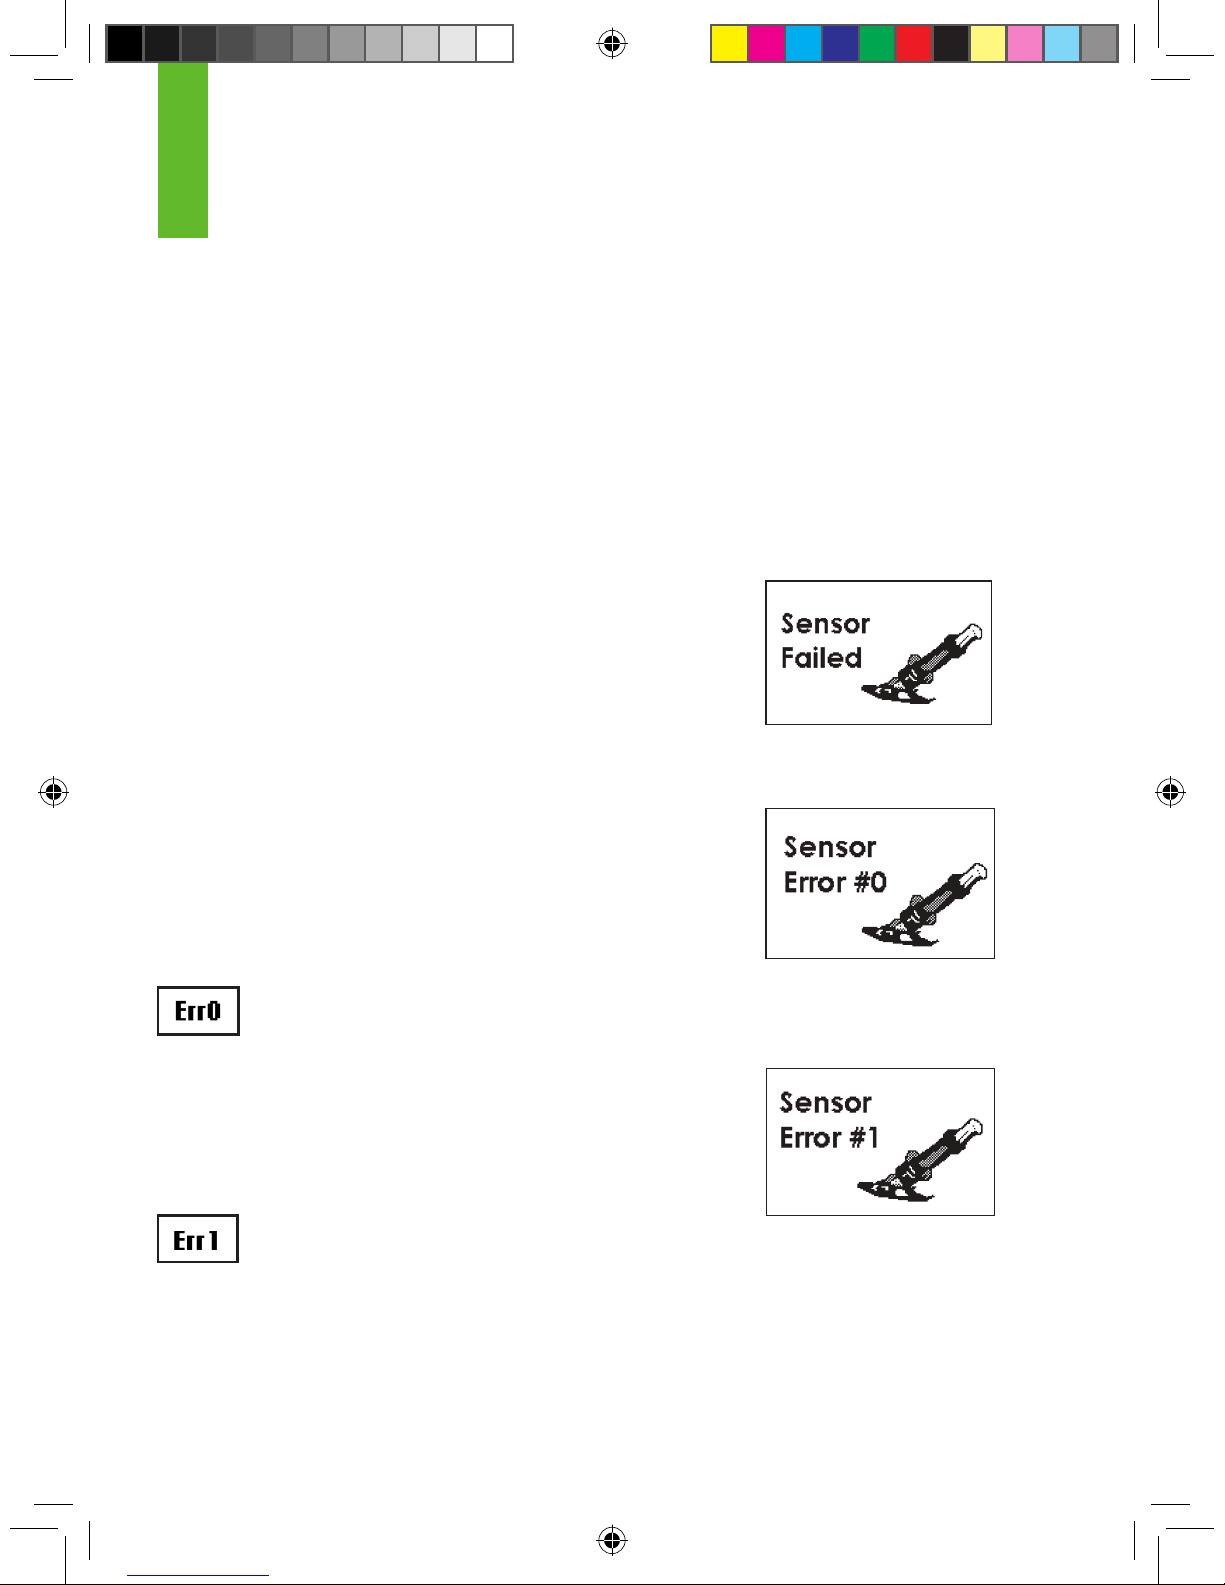
98 | SEVEN PLUS Continuous Glucose Monitoring System
8.3 SENSOR FAILED TROUBLESHOOTING
In some cases your Sensor Session may stop before the end of a full 7-day period. You should
review Chapter 10 of this User’s Guide to see how often you should expect this to happen to
you. Follow the user guidelines below to have the best results with your System.
•
Do not use expired Sensors
•
Store Sensors at room temperature (see Chapter 9 for Maintenance and Storage)
•
Quality check your blood glucose meter
•
Make sure your Transmitter is snapped in fully
•
Make sure your Sensor Pod is not dislodged or peeling up
During use your Receiver may detect a series of problems that make
your Sensor unable to calculate System Glucose Readings (see
Chapter 5 Section 5.4.3, “System Glucose Errors”). At this time the
System will automatically turn off and display the following screen:
8.4 ERROR CODE TROUBLESHOOTING
The screen to the right means your Sensor cannot calibrate. If you
see this screen, enter at least 1 more calibration ngerstick reading
in the next 10-15 minutes. If you still do not see readings after you
enter 2 more ngersticks in the Receiver, the Sensor may need to
be replaced.
If you clear this screen by pressing the C button, you will
see this error code (shown to the left) in the Status Box.
The screen to the right tells you that the Sensor is not calibrating
correctly. If you see this screen, wait approximately one hour. Then
you may enter at least 1 more calibration ngerstick reading. If no
readings are displayed on the Receiver, the Sensor may need to
be replaced.
If you clear this screen by pressing the C button, you will
see this error code (shown to the left) in the Status Box.
Failed Sensor Screen
8
Sensor Error #0 Screen
Sensor Error #1 Screen
Page 99
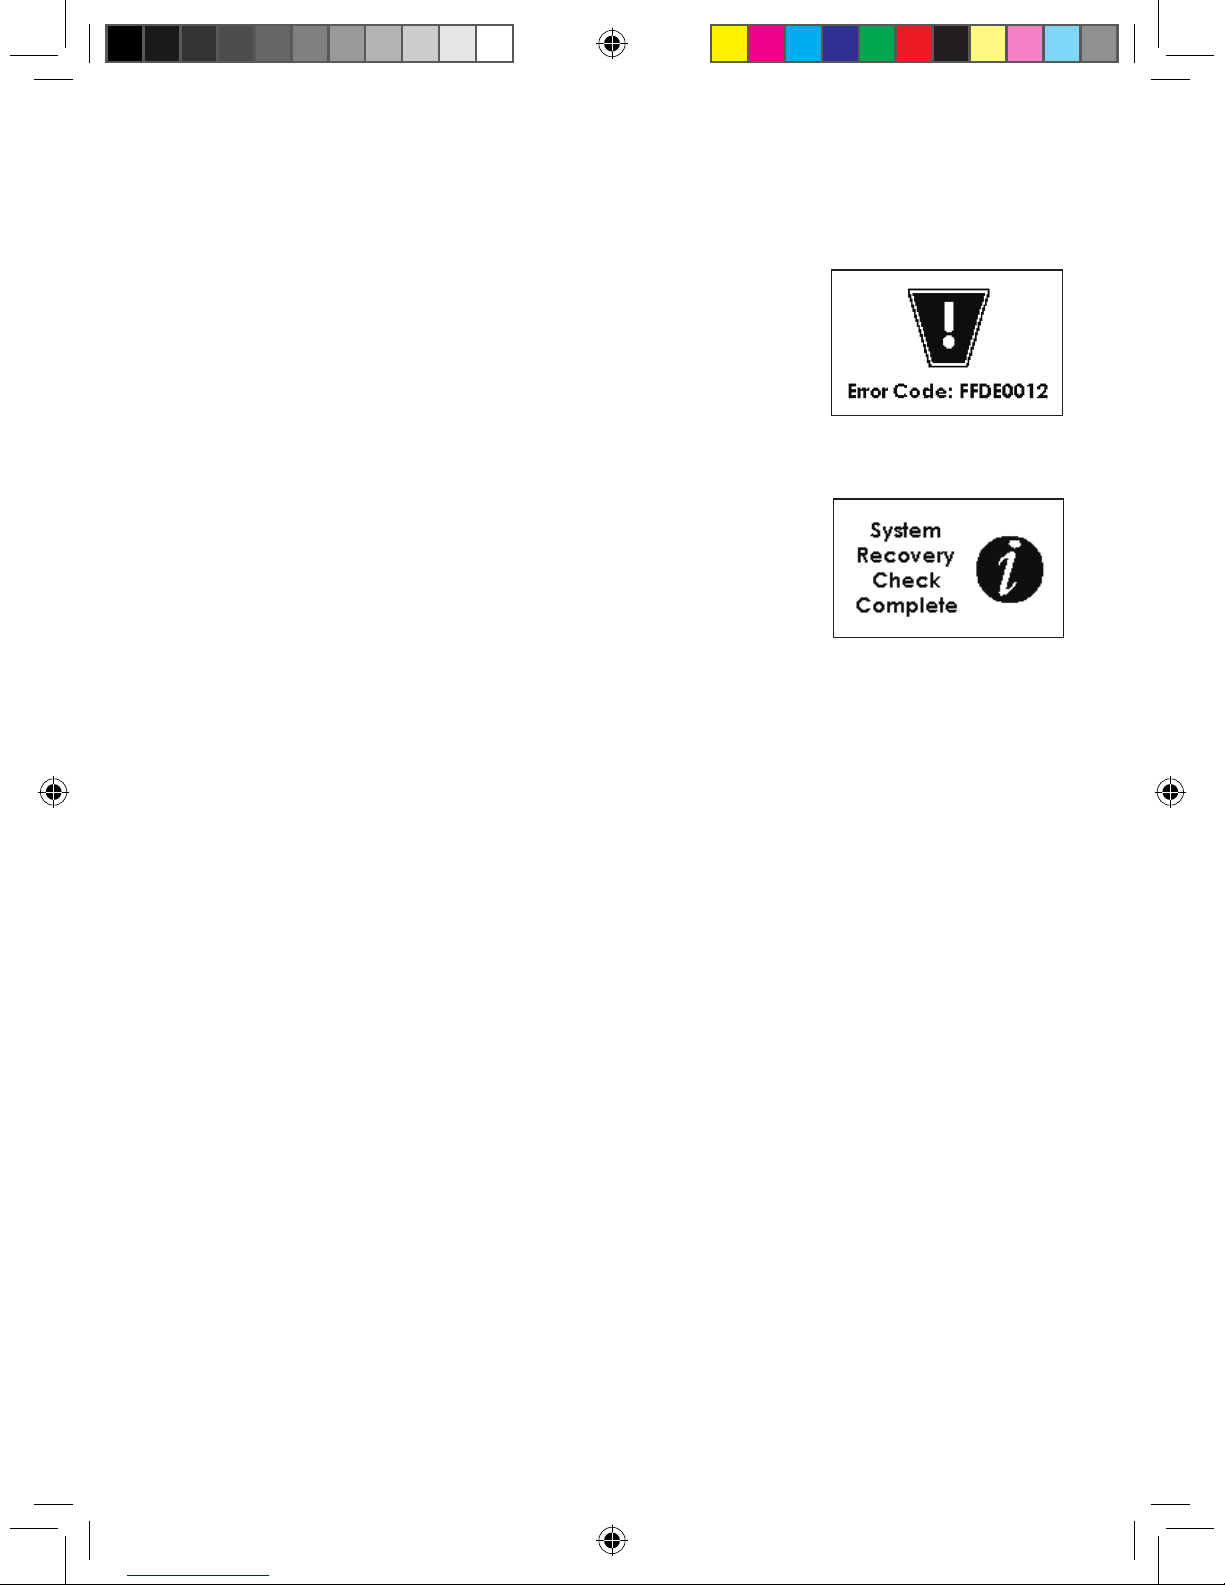
SEVEN PLUS User’s Guide | 99
Receiver Error Code
An error code displayed on your Receiver means the Receiver may
not be working properly. An example is shown to the right:
Note the code that appears on the screen, if any,
and contact DexCom Technical Support at
1-888-SEVENGO (738-3646). Continue to check
BG readings using your meter.
System Recovery Check
This screen indicates there was a problem with the Receiver, but the
System was able to x itself. Press the C button to clear this display,
and your continuous monitoring session will continue.
8.5 RECEIVER AND CABLES TROUBLESHOOTING
Battery and Charging Difculties
1. Remember to charge your Receiver’s battery.
a. The charge will last approximately 3-5 days, depending on how often you turn on your
Receiver’s screens, use the Alerts, and enter Events.
b. Make sure you are not pressing buttons by mistake if you carry the Receiver in your pocket
or bag.
c. Check the Battery image on your Trend Graphs to see how much charge is left in the bat-
tery.
2. Make sure the Charging Cable is fully inserted in the Receiver and in the electrical outlet.
a. If your cable has a Push button, press this to release the cable. Do not pull
out without pressing the button.
b. Pull the cable out carefully so you do not bend the prongs.
c. Only use DexCom cables.
3. If your battery drains and is not charged for about 6 months, the back-up battery might also
drain. When this happens, you will need to reset your Receiver’s time (see Chapter 2, Section
2.2.1, “Setting your Receiver Time and Date”).
4. Only use the DexCom battery charger.
Receiver Error Code Screen
System Recovery
Check Screen
Page 100
100 | SEVEN PLUS Continuous Glucose Monitoring System
Alerts Not Working
1. Make sure you have not disabled the sound and/or vibrations for the Alerts. Chapter 2, Section
2.3, “Setting your Alerts” explains how to change these Alert options.
2. Remember “Vibe then Beep” will vibrate during the rst alert and then will beep during the realert. If you do not hear a sound during the rst alert, this is normal.
8
 Loading...