

Page 1
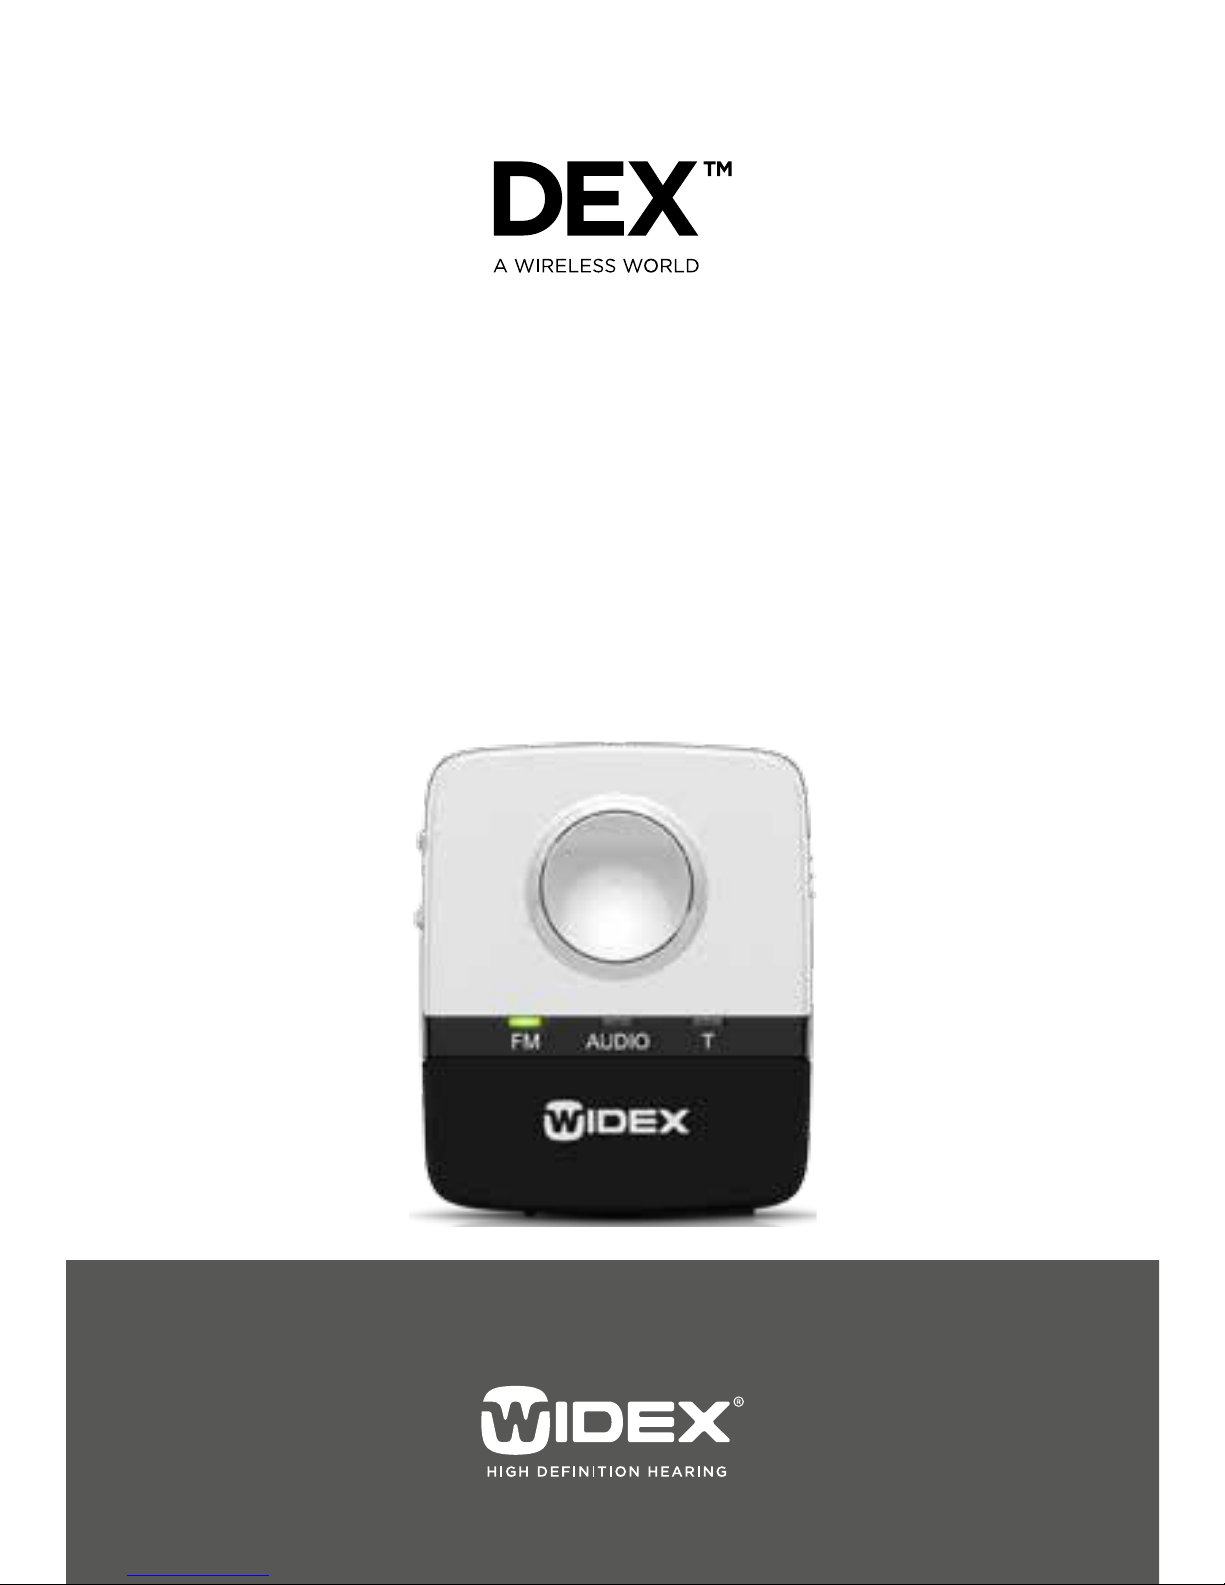
USER INSTRUCTIONS
FM+DEX
Page 2
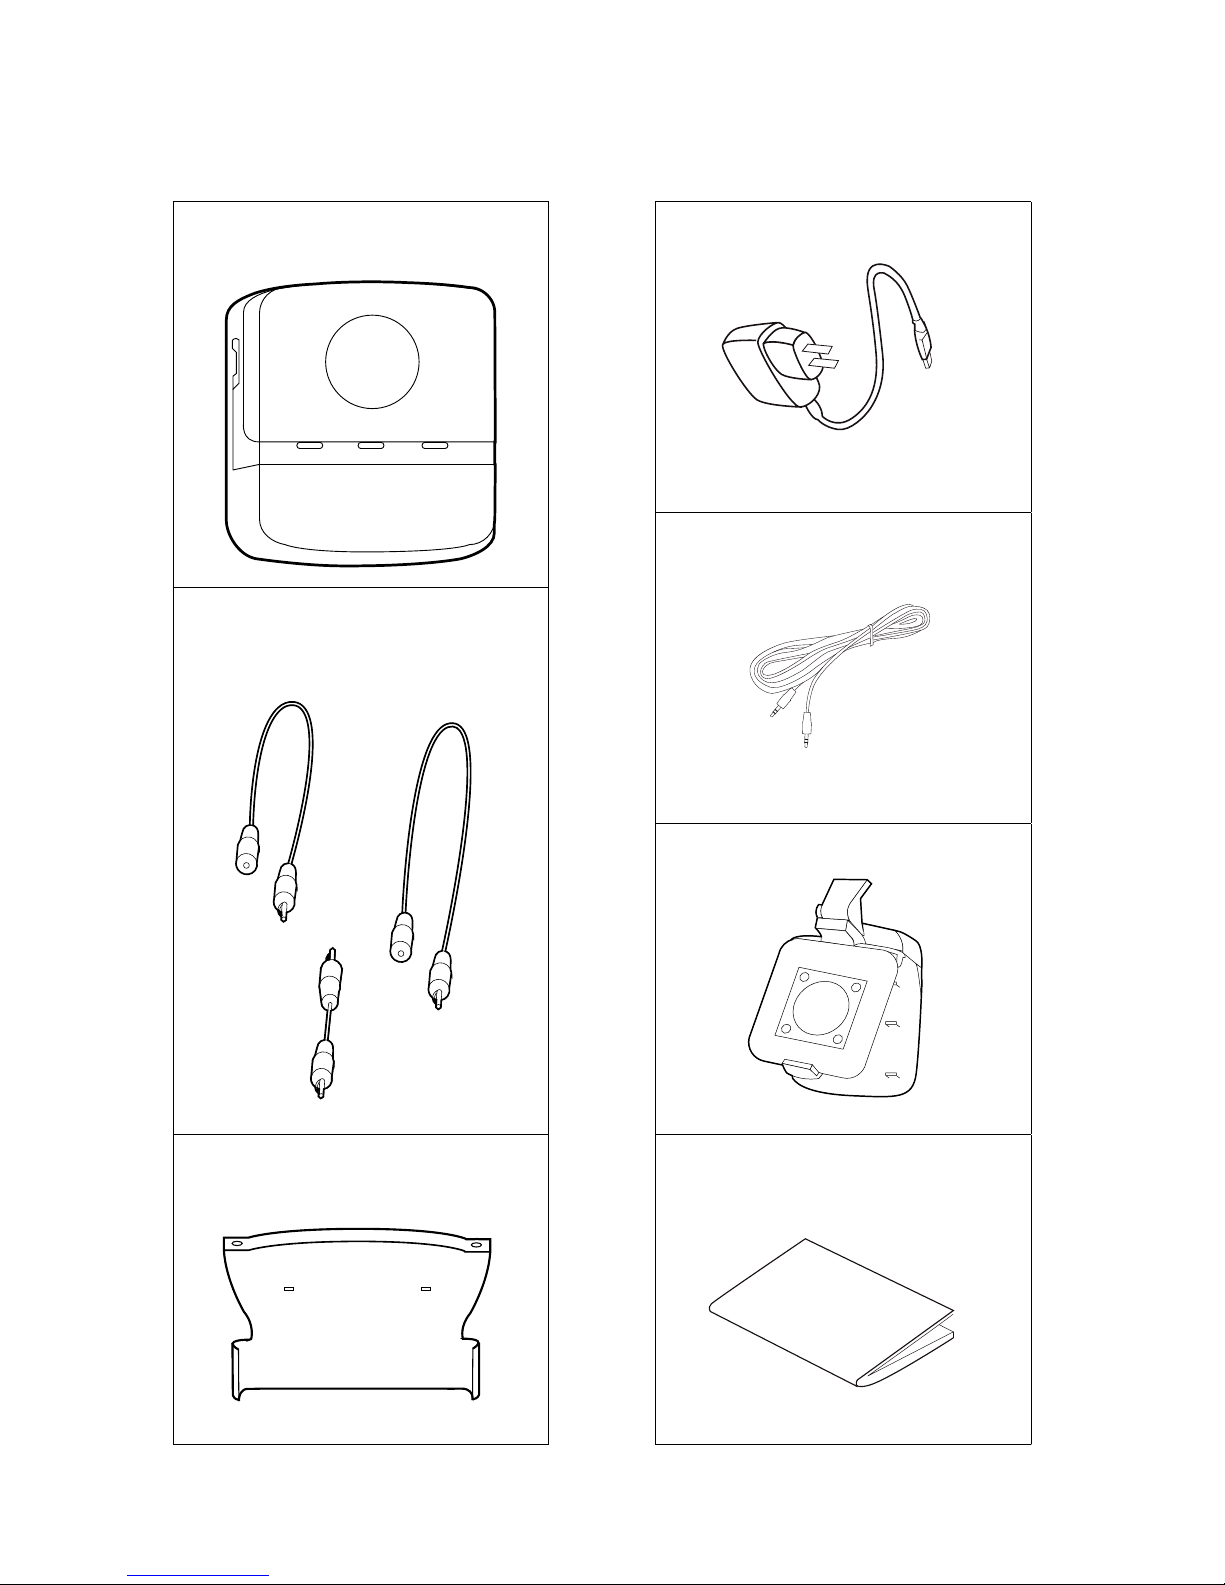
PACKAGE CONTENTS
FM+DEX
Neck loop antenna
(two lengths)
Click-on module
Charger
Jack-to-jack cable
Clip
User instructions
2
Page 3

CONTENTS
YOURNEWFMDEX ..............................
Intendeduse.....................................
Descriptionofdevice .............................
FMDEXOVERVIEW ..............................
LEDS ...........................................
OPERATINGRANGES .............................
GETTINGSTARTED ...............................
Chargingthebattery .............................
PreparingforTelecoilFMorAudio ................
Antenna........................................
TURNINGONTHEDEVICE ........................
ACOUSTICINDICATORS ..........................
SELECTINGINPUTSOURCE .......................
VOLUMEADJUSTMENT ..........................
ROOMOFF .....................................
TURNINGOFFTHEDEVICE .......................
TAMPERSWITCH ................................
CARINGFORYOURFMDEX ......................
WARNINGS .....................................
SAFETYWARNING ..............................
INCASEOFMALFUNCTION ....................
REGULATORYINFORMATION .....................
3
Page 4
YOUR NEW FM+DEX
Your FM+DEX is part of the DEX™ family of assistive listening devices. These user instructions explain how the
FM+DEX should be operated.
WARNING
This booklet contains important information and instructions.
Please read this booklet care fully before you start using the
device.
Intended use
The FM+DEX is a battery-powered device intended to
transmit (or stream) signals to Widex hearing aids using
the wireless WidexLink technology; i.e. signals are
received, altered and transmitted to the hearing aid.
4
Page 5

Description of device
The FM+DEX is offered in order to support Widex hearing aids without DAI (direct audio input) or a telecoil.
When the FM module is attached, the user is able to
receive FM signals.
In the same way, the device can substitute for a telecoil
in hearing aids not fitted with a telecoil. The third input
possibility is the line in, which can be used to stream
music, etc., by connecting a computer or portable unit
to the device.
The FM+DEX is worn on a neck loop antenna or attached
directly to clothing using the included clip.
If you need help to identify the serial number (usually
six or seven digits) on the product, please contact your
hearing care professional.
5
Page 6
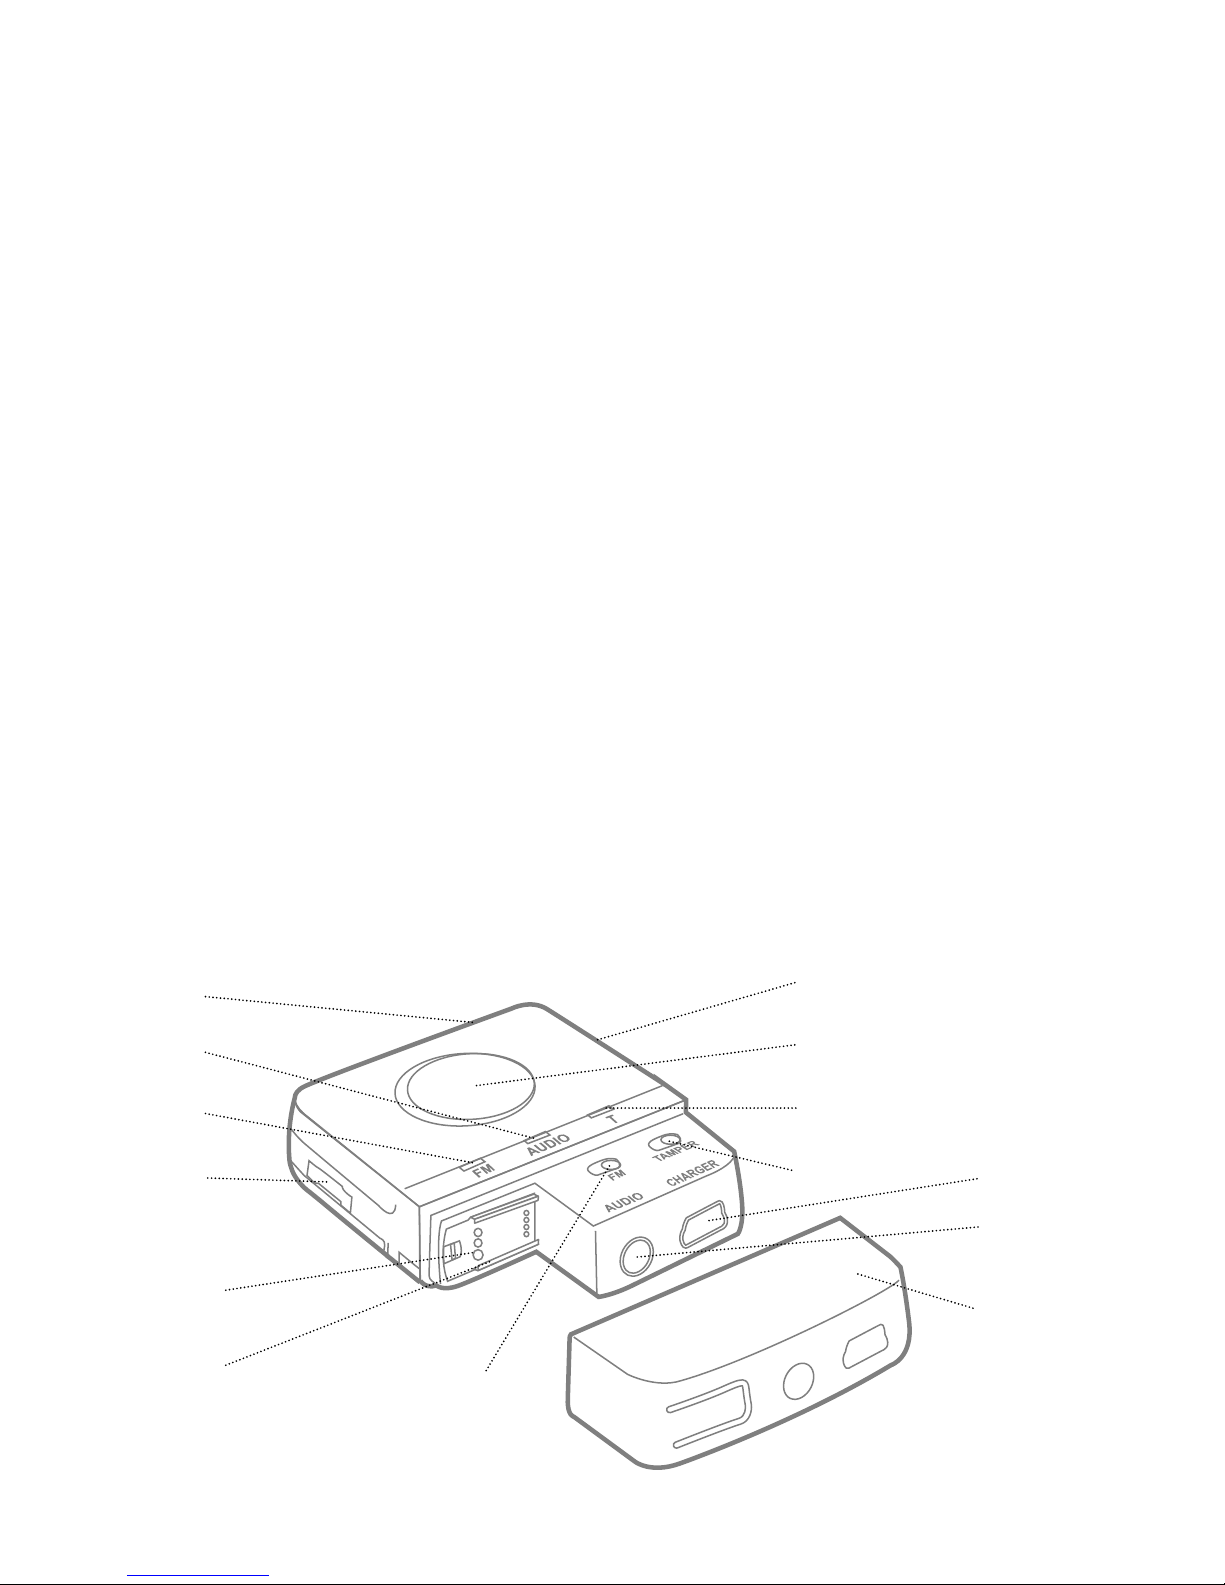
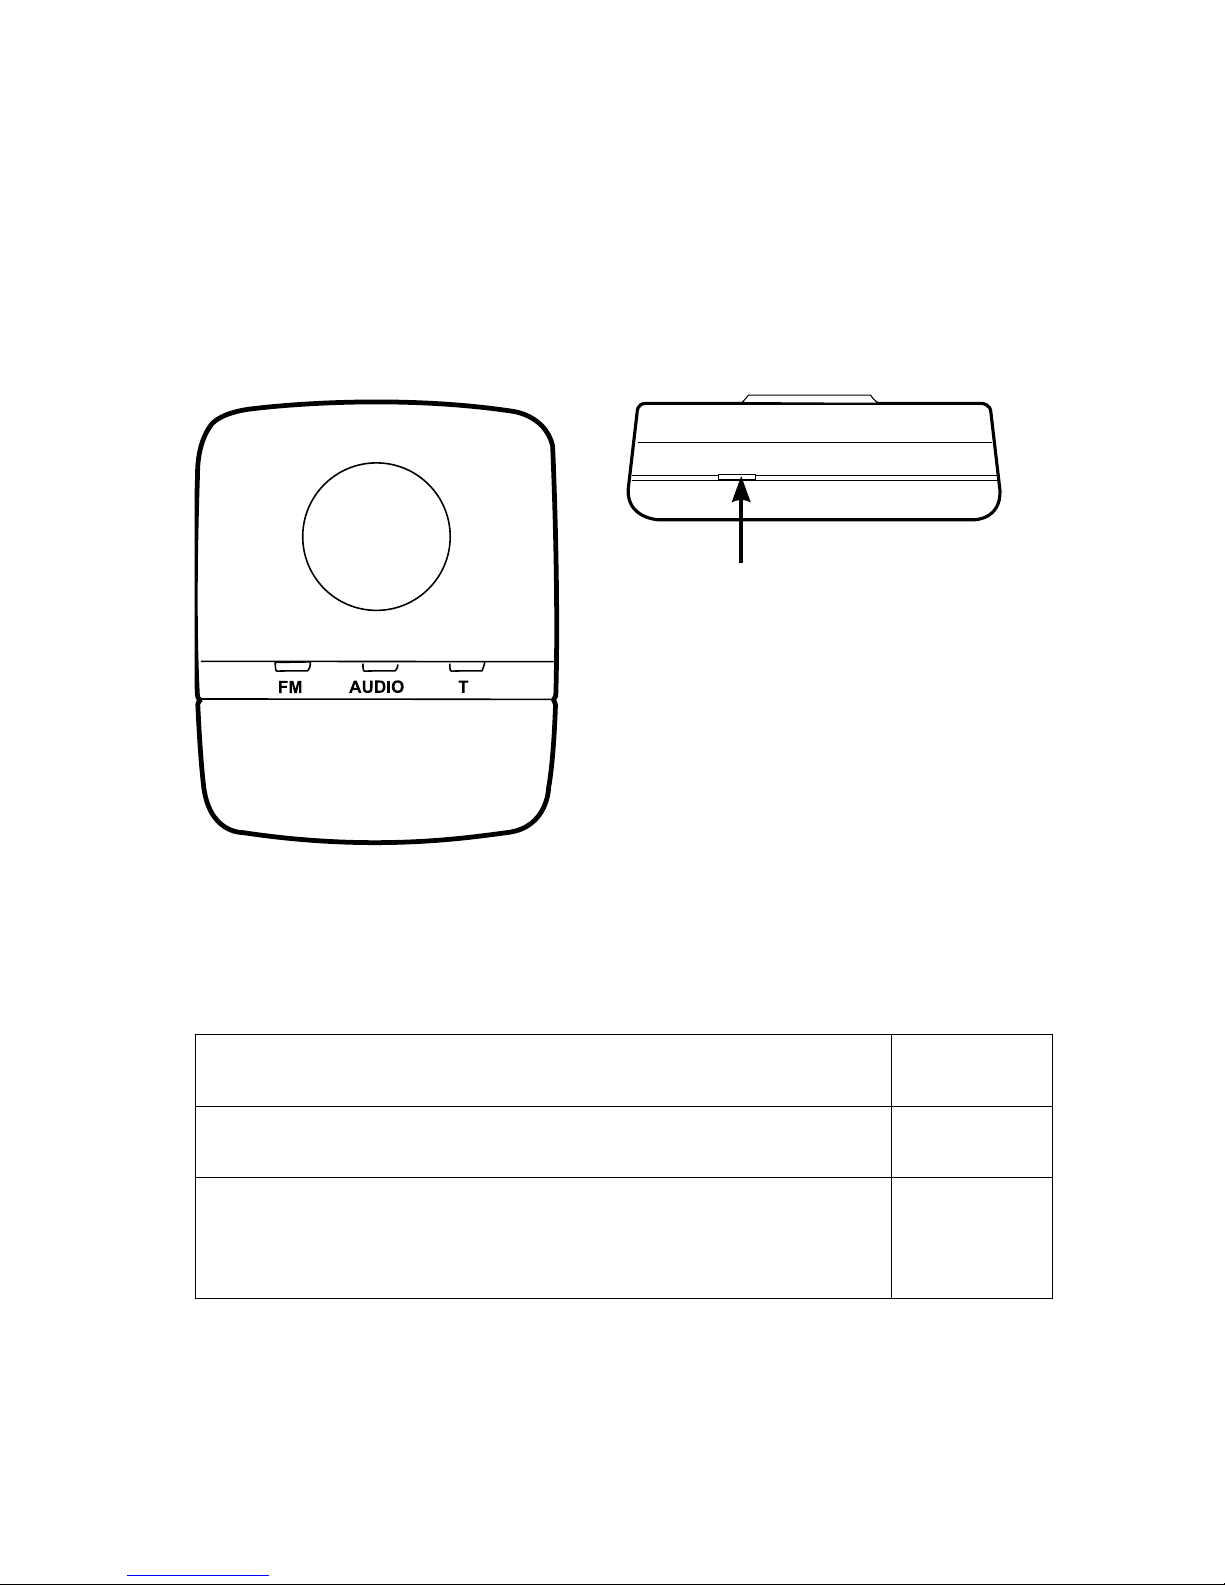
FM+DEX OVERVIEW
OnOff
InputtogglekeyRoomoff
Volumeupdown
FMinputLED
AudioinputLED
T(telecoil)LED
Batterylevelindicator
Tamperswitch
FMswitch
FMconnector(Europlug)
FMconnector(SCOLAFLEXreceiver)
Charge(miniUSBsocket)
Audio(line-in)
Cover
6
Page 7
LEDS
Input indicators
Green light in any of the three input LEDs indicates that
this input source has been chosen.
Batteryindicator
Battery indicator
Battery low red
Battery charging orange
Battery fully charged, charging unit still
connected
green
7
Page 8

OPERATING RANGES
From FM+DEX to hearing aids Up to 40 cm
From FM transmitter to FM+DEX Up to 30 metres
8
Page 9
GETTING STARTED
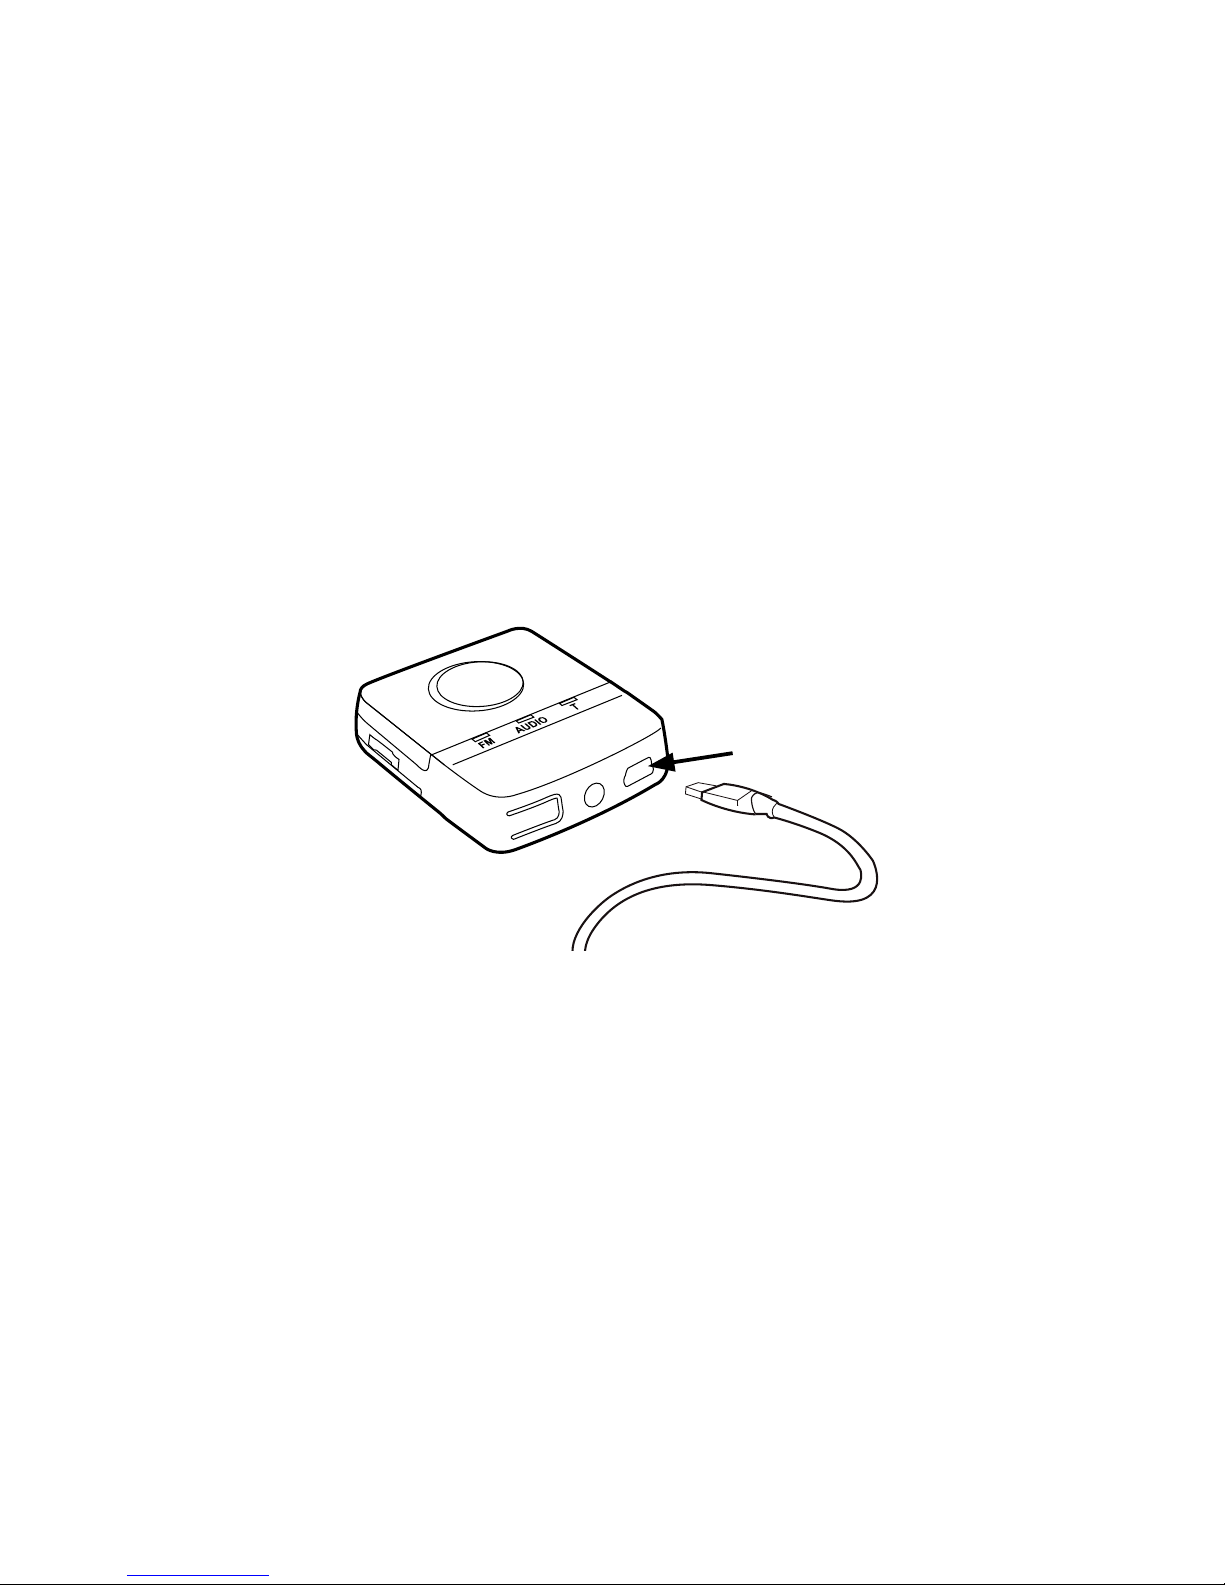
Charging the battery
The device uses a rechargeable battery that is charged
through the mini USB connector. When fully charged,
the battery has a capacity of approx. 10 hours of continuous use. The charger is available in four country
versions. The version you have may therefore not look
exactly as illustrated in this booklet.
9
Page 10
1. Connect the charger to the mini USB connector at
the bottom of the FM+DEX.
2. Plug the charger into a wall socket.
It takes approximately 4 hours to charge the battery
the first time. Recharging takes approx. 2 hours. The
device cannot stream while recharging.
WARNING
Do not attempt to change the battery. Contact your hearing
care professional.
10
Page 11
Preparing for Telecoil, FM or Audio
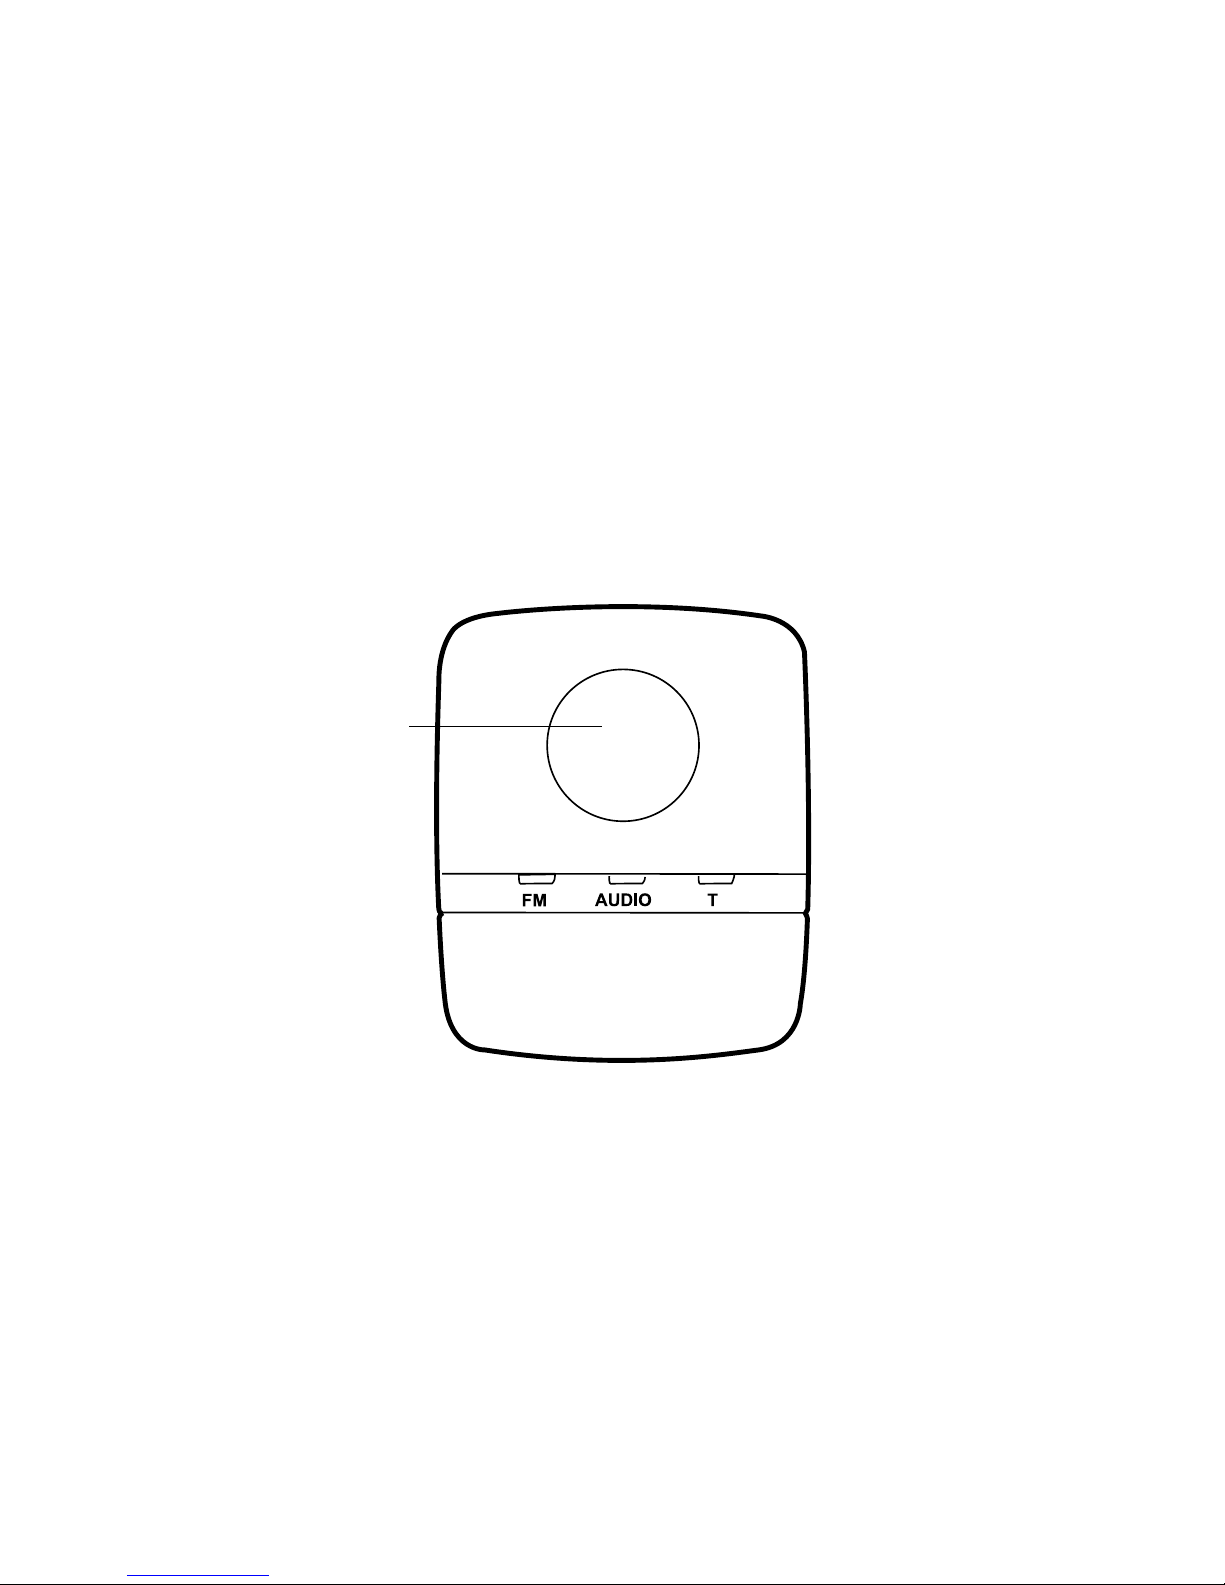
The toggle key allows you to choose between three
input sources, depending on whether you wish to
receive Telecoil, FM or Audio signals. If you wish to use
the Telecoil function, you just need to press the toggle
key until the T LED is green. However, to prepare for FM
or Audio reception, you need to do the following:
Toggle key
11
Page 12
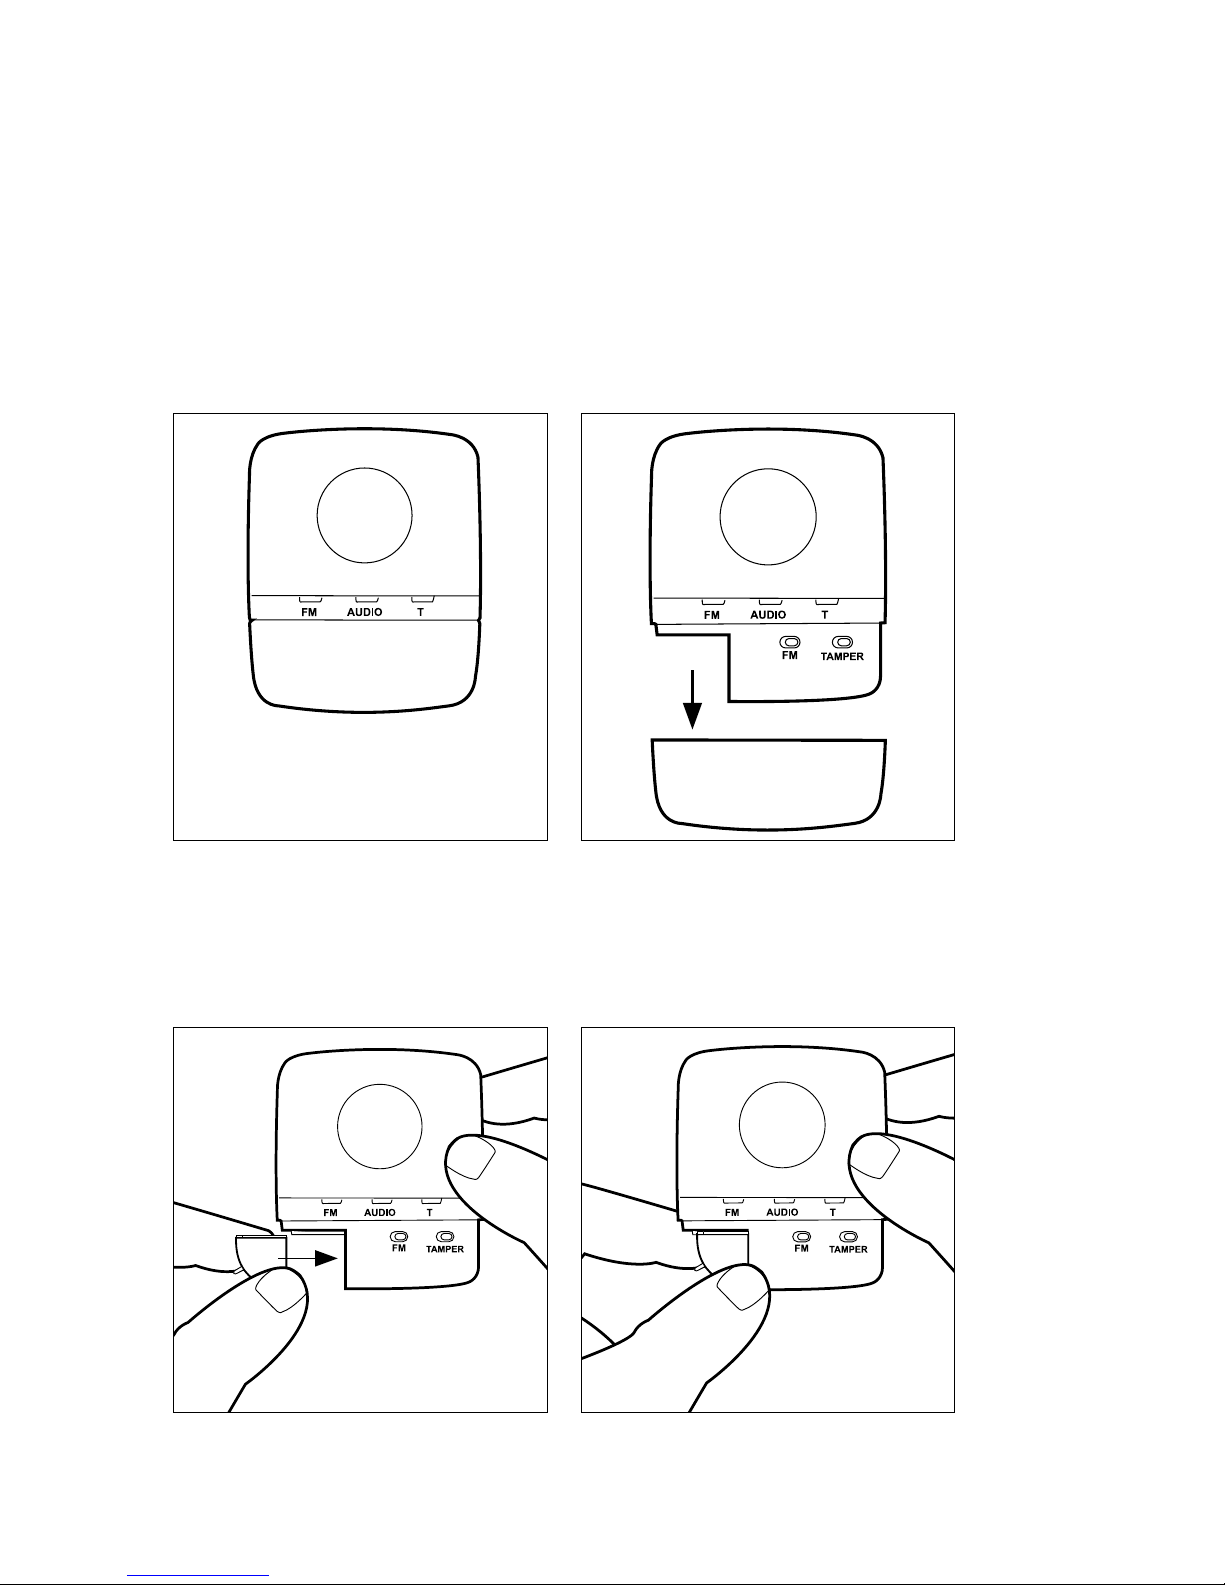
FM
If you wish to listen to an FM source, you will first need
to connect the appropriate FM receiver module.
1. Remove the cover at the bottom of the device by
pressing the sides of the cover.
2a. If you have a Widex SCOLAFLEX receiver, slide it
into place as shown. Set the receiver’s mode switch
in position 2 “FM+M”.
12
Page 13
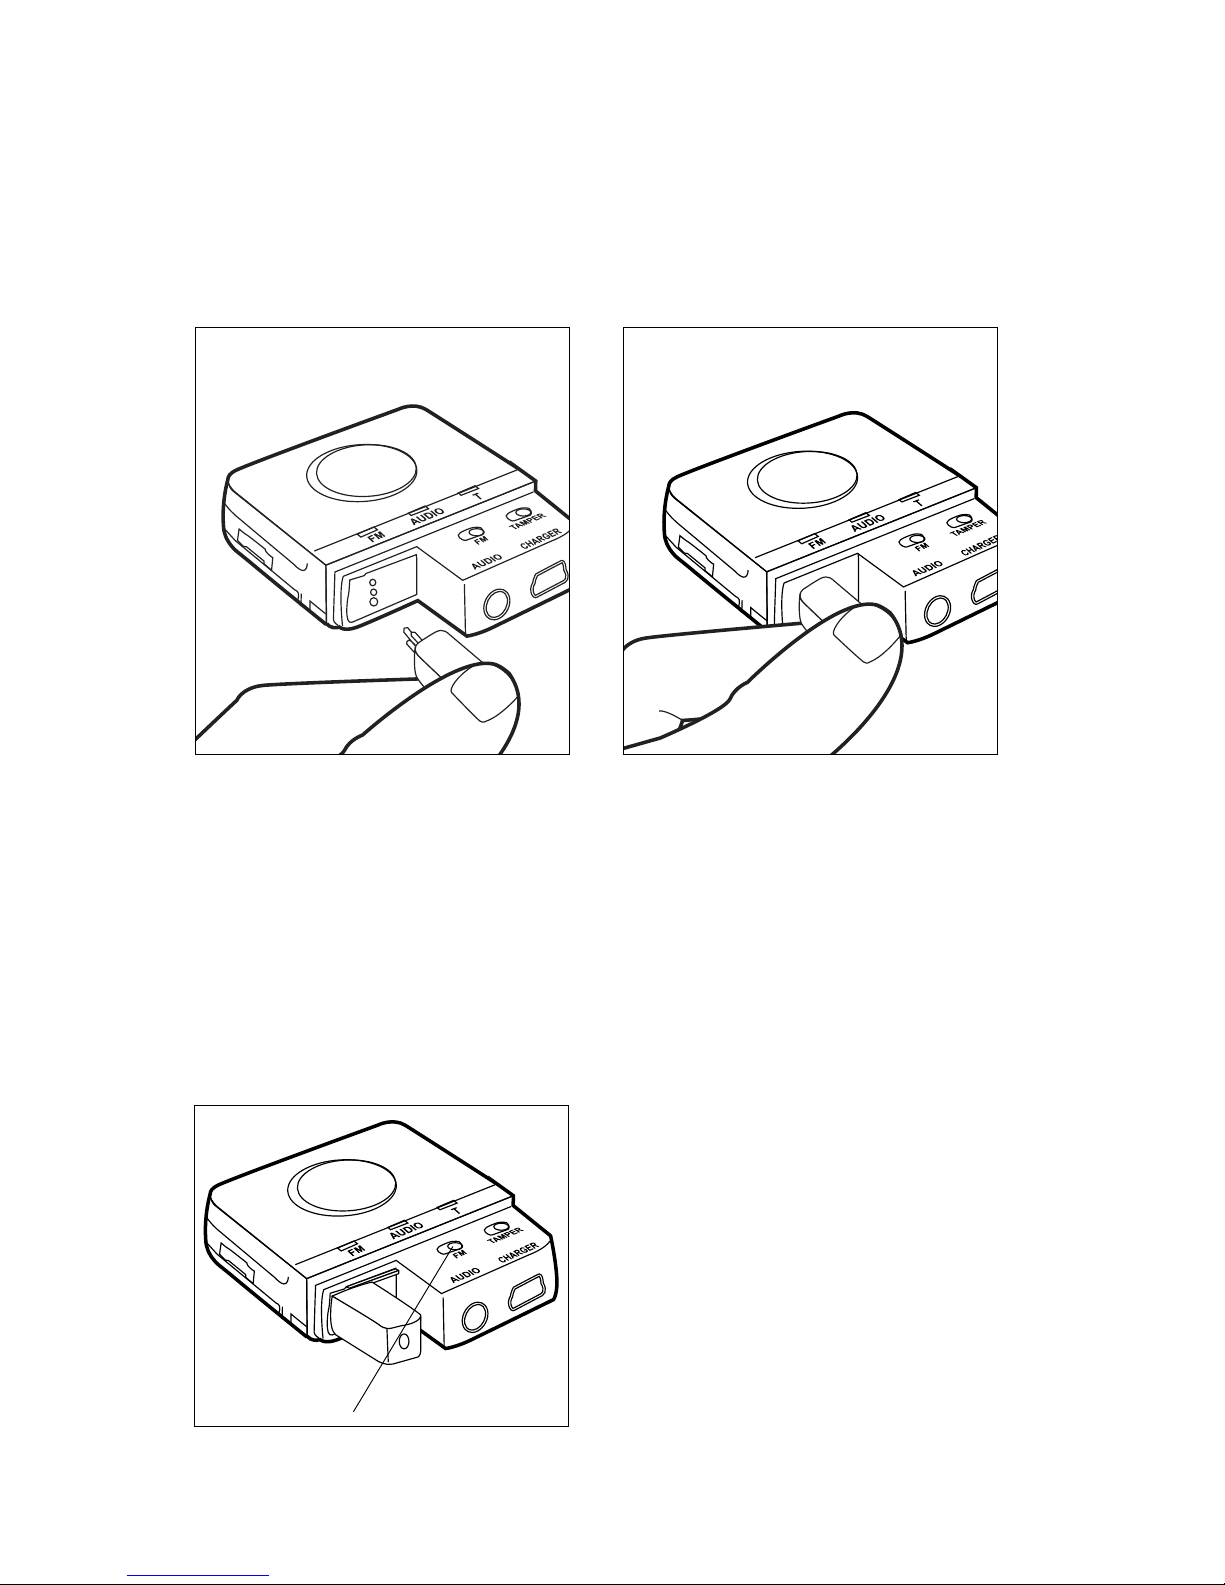
2b. Other compatible modules are connected to the
device via a Europlug. Please be sure to turn and
position the Europlug correctly, i.e. according to
the thickness of the pins.
3. Turn the receiver module on.
4. Slide the FM switch to the right if you are using a
SCOLAFLEX interface or to the left if you are using
a Europlug.
13
Page 14
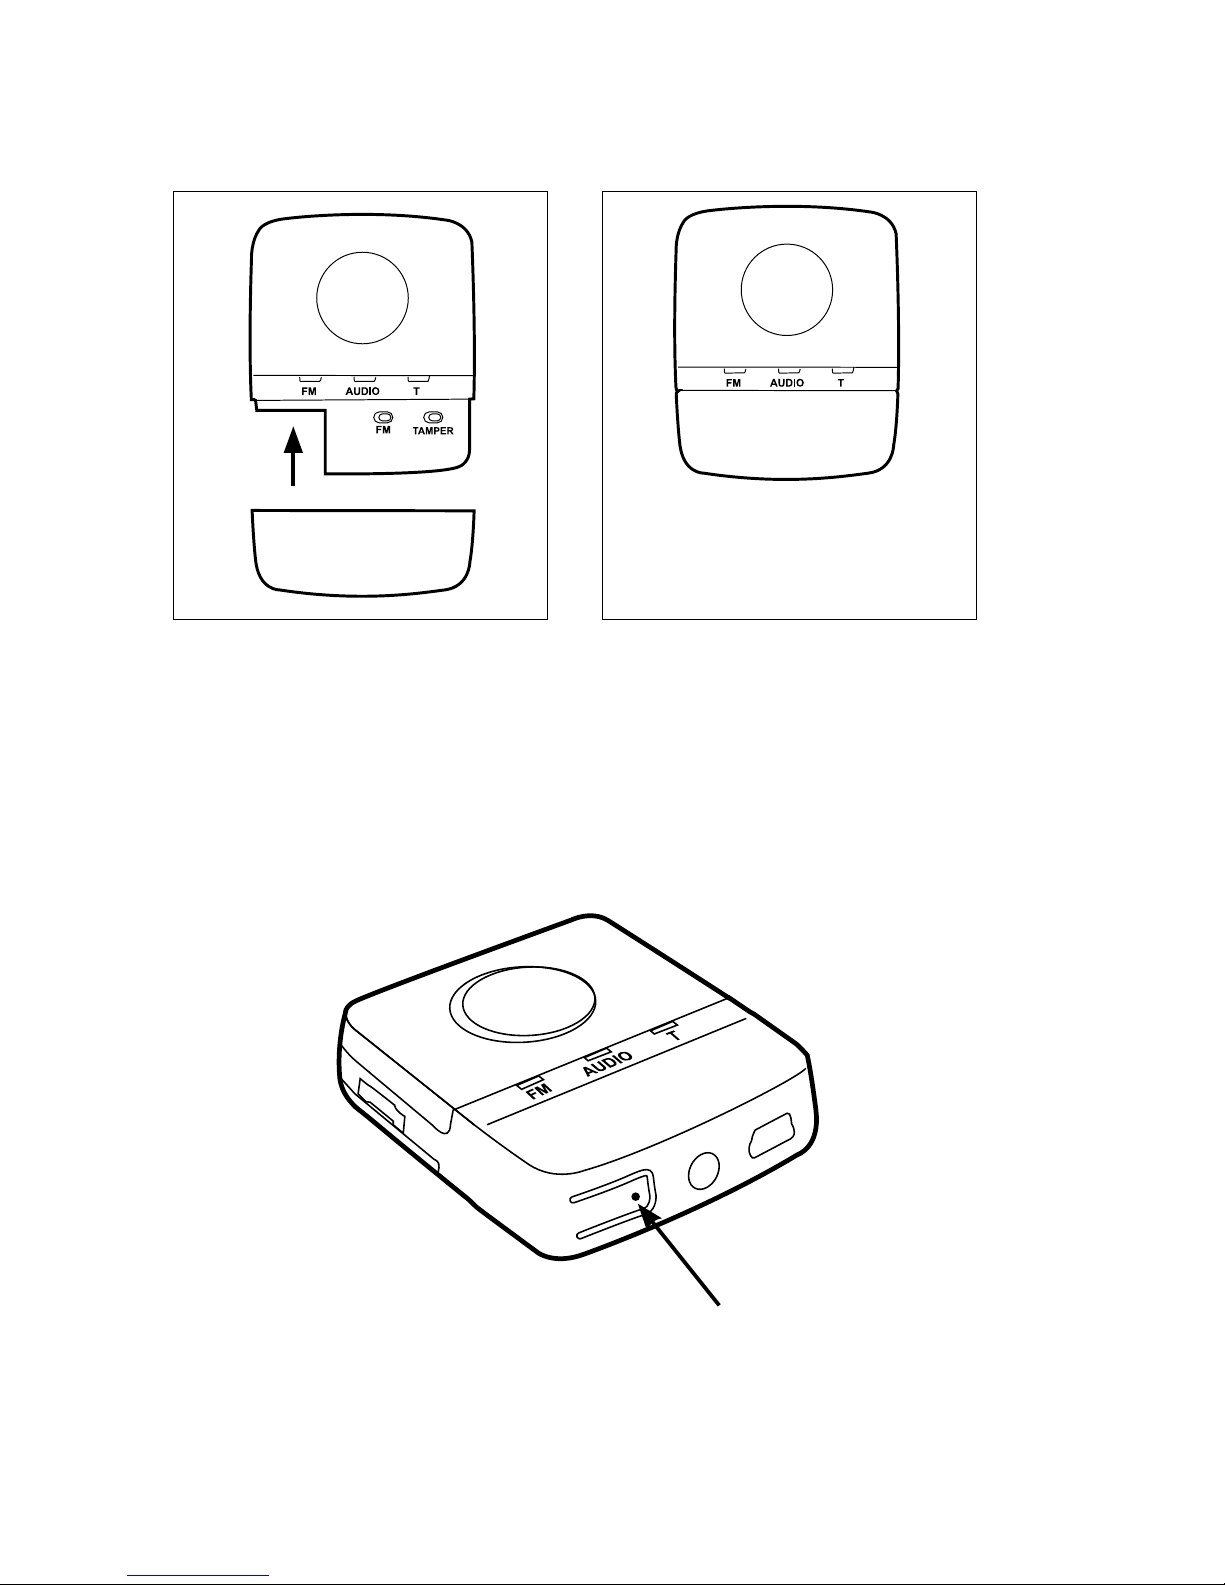
5. Attach the cover again.
Pressing the “button” indicated by the arrow allows you
to activate the scan button of the receiver module.
14
Page 15
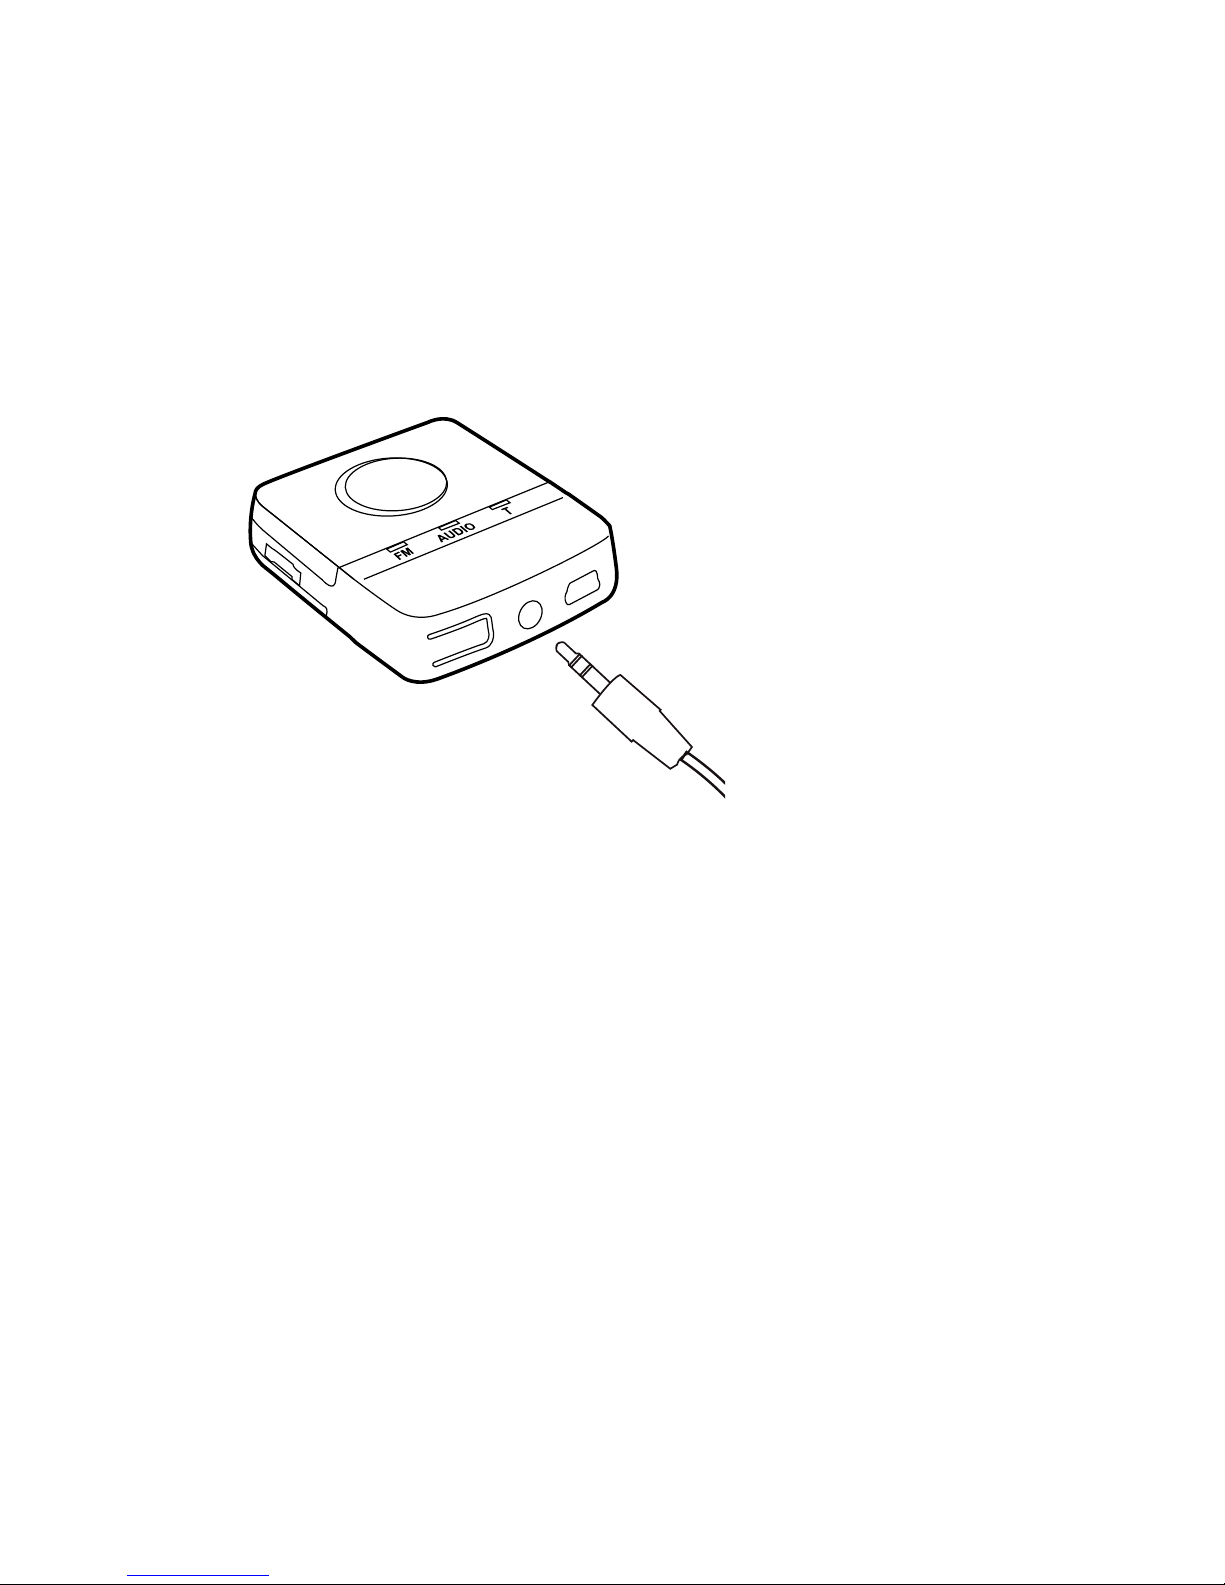
Audio
If you wish to listen to an audio source, plug the jack-tojack cable provided into the Audio (line-in) socket. Connect the other end to the audio source.
15
Page 16
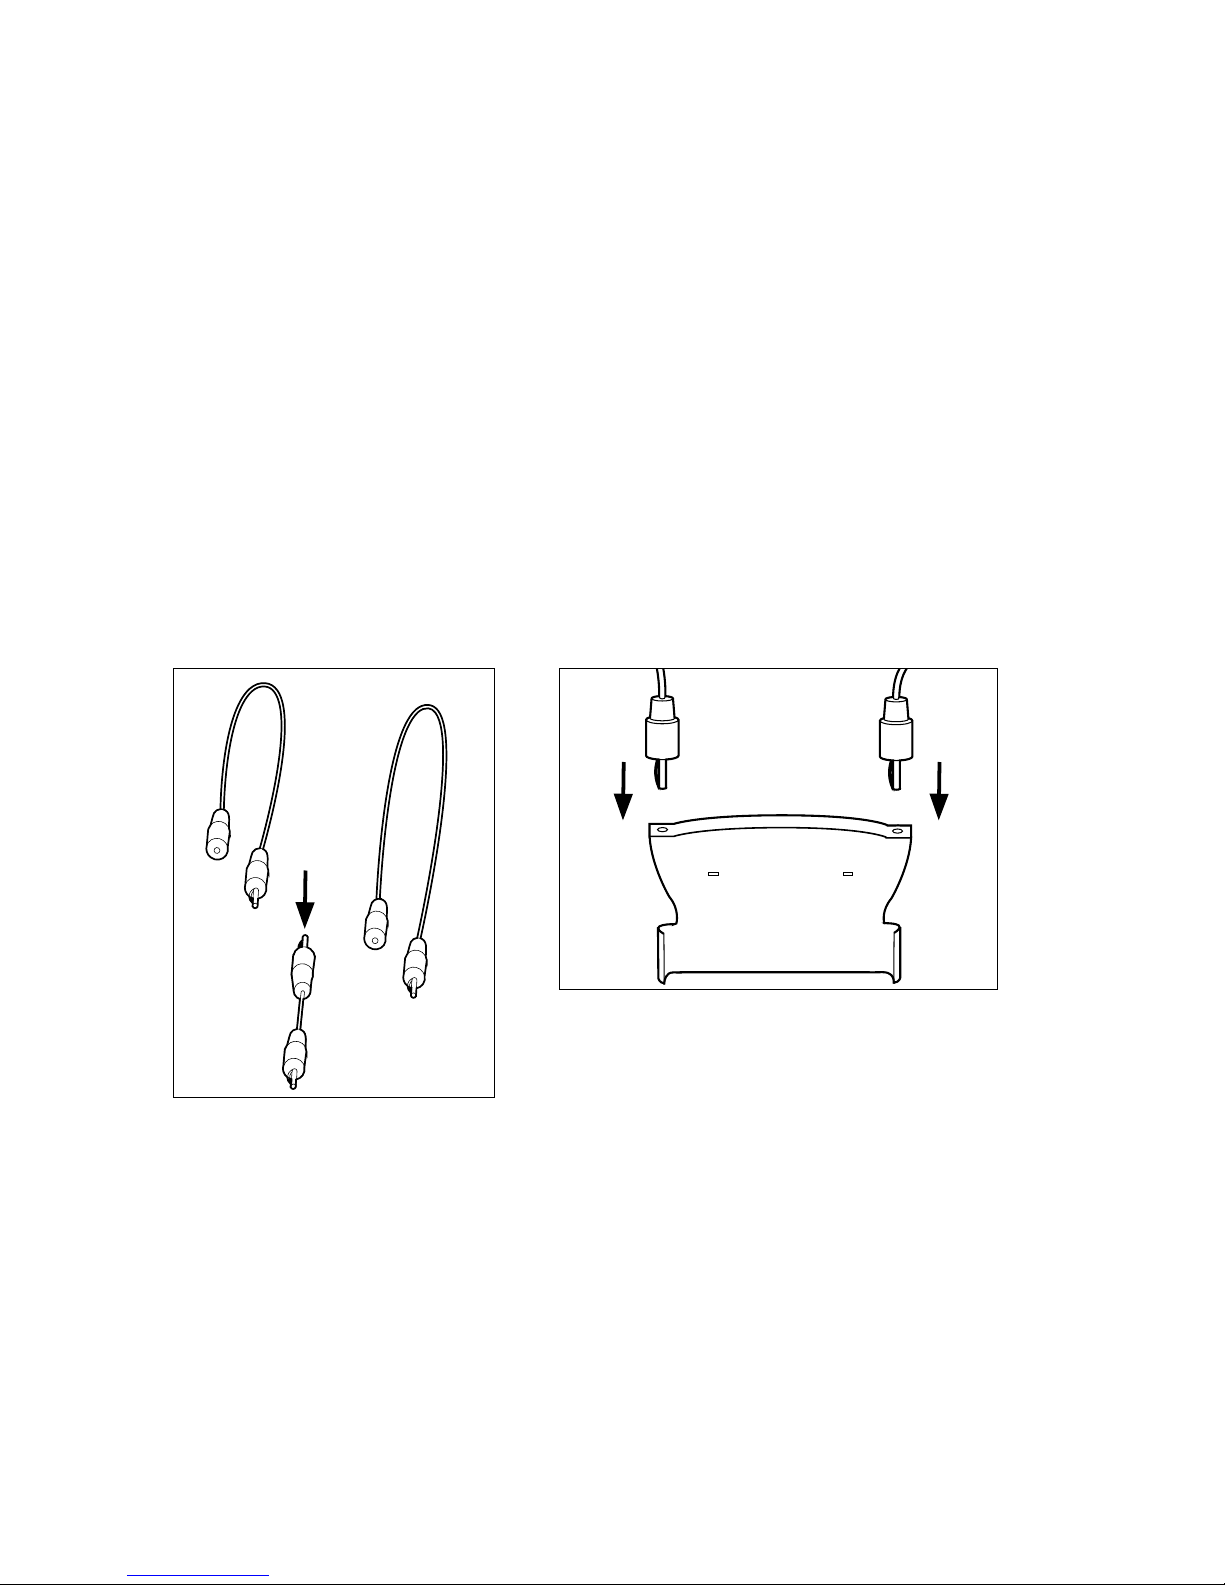
Antenna
The FM+DEX can be used with or without an external
neck loop antenna.
Attaching the neck loop antenna
Assemble the two neck loop wires (if not already
assembled) by connecting the male jack on the short
wire to the female jack on the long wire. Then connect
the jack connectors at the end of the neck loop wires to
the holes in the click-on module.
16
Page 17
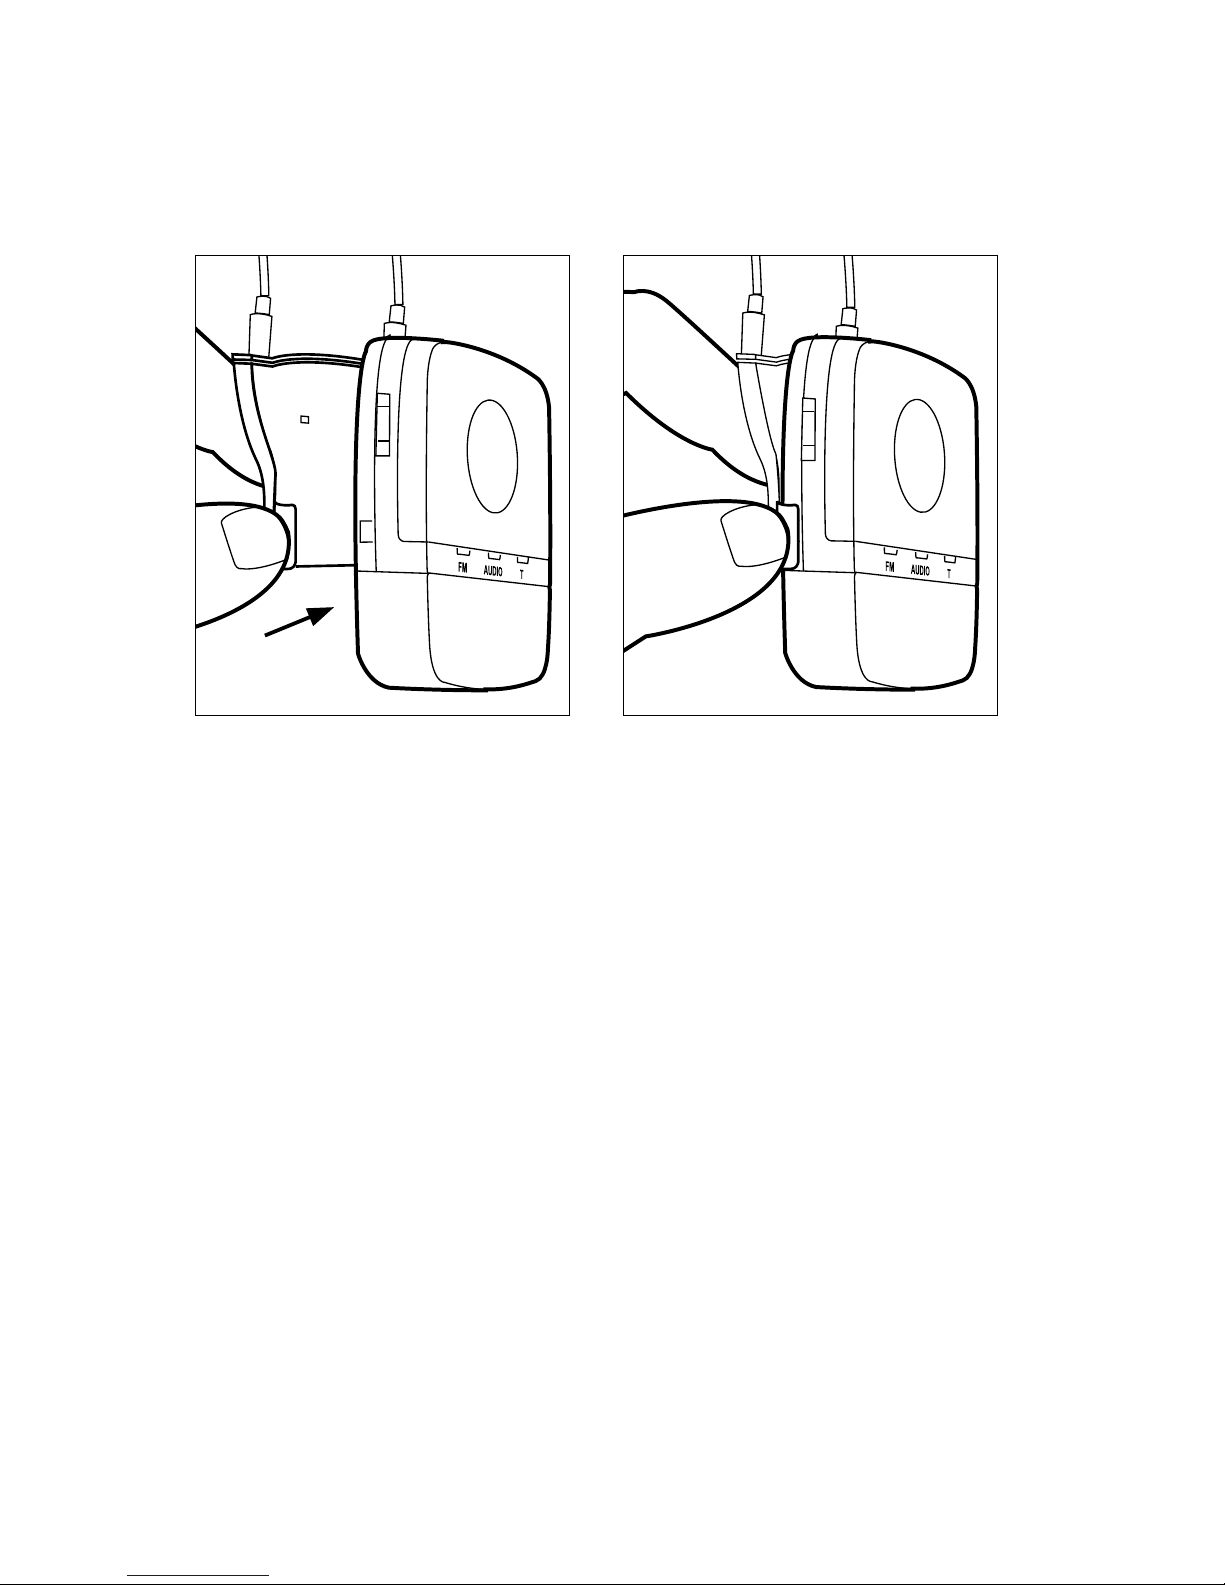
Then attach the assembled module to the device as
illustrated.
17
Page 18
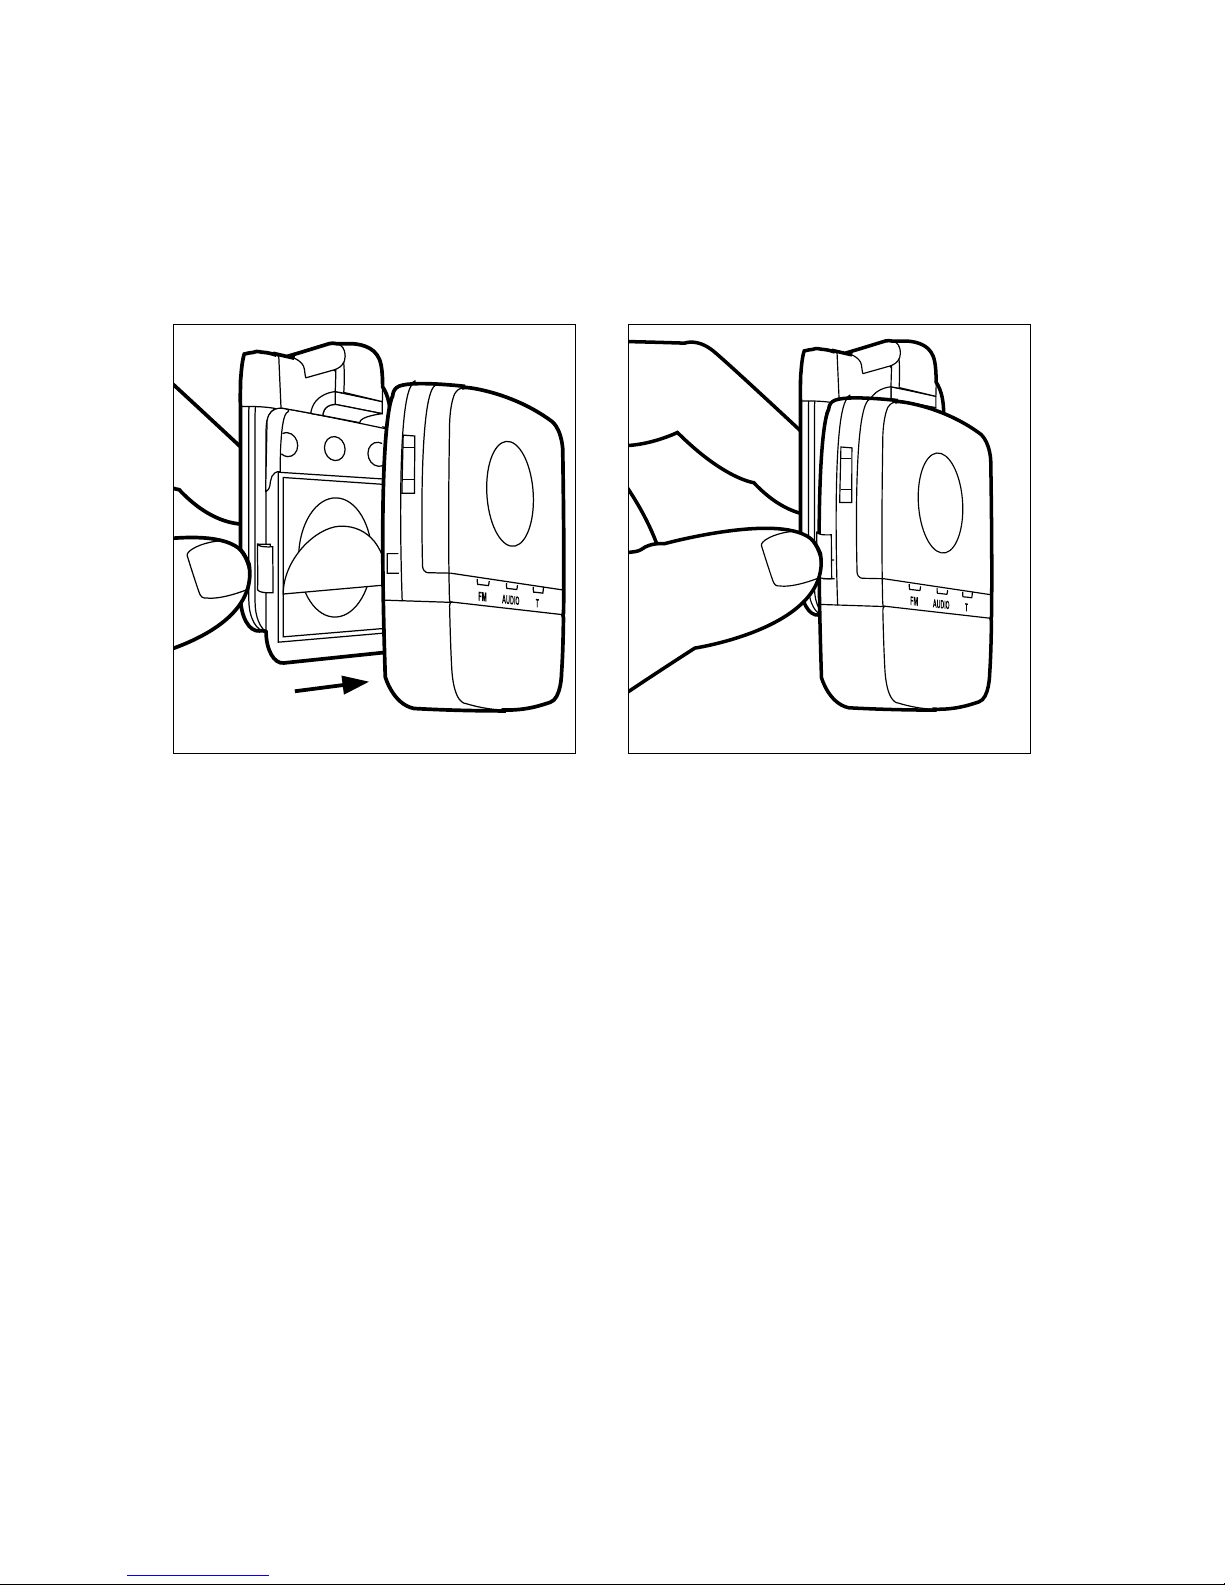
An alternative way of using the device is by attaching it to your clothes using the detachable clip. These
first two illustrations show how to attach the clip to the
device.
18
Page 19
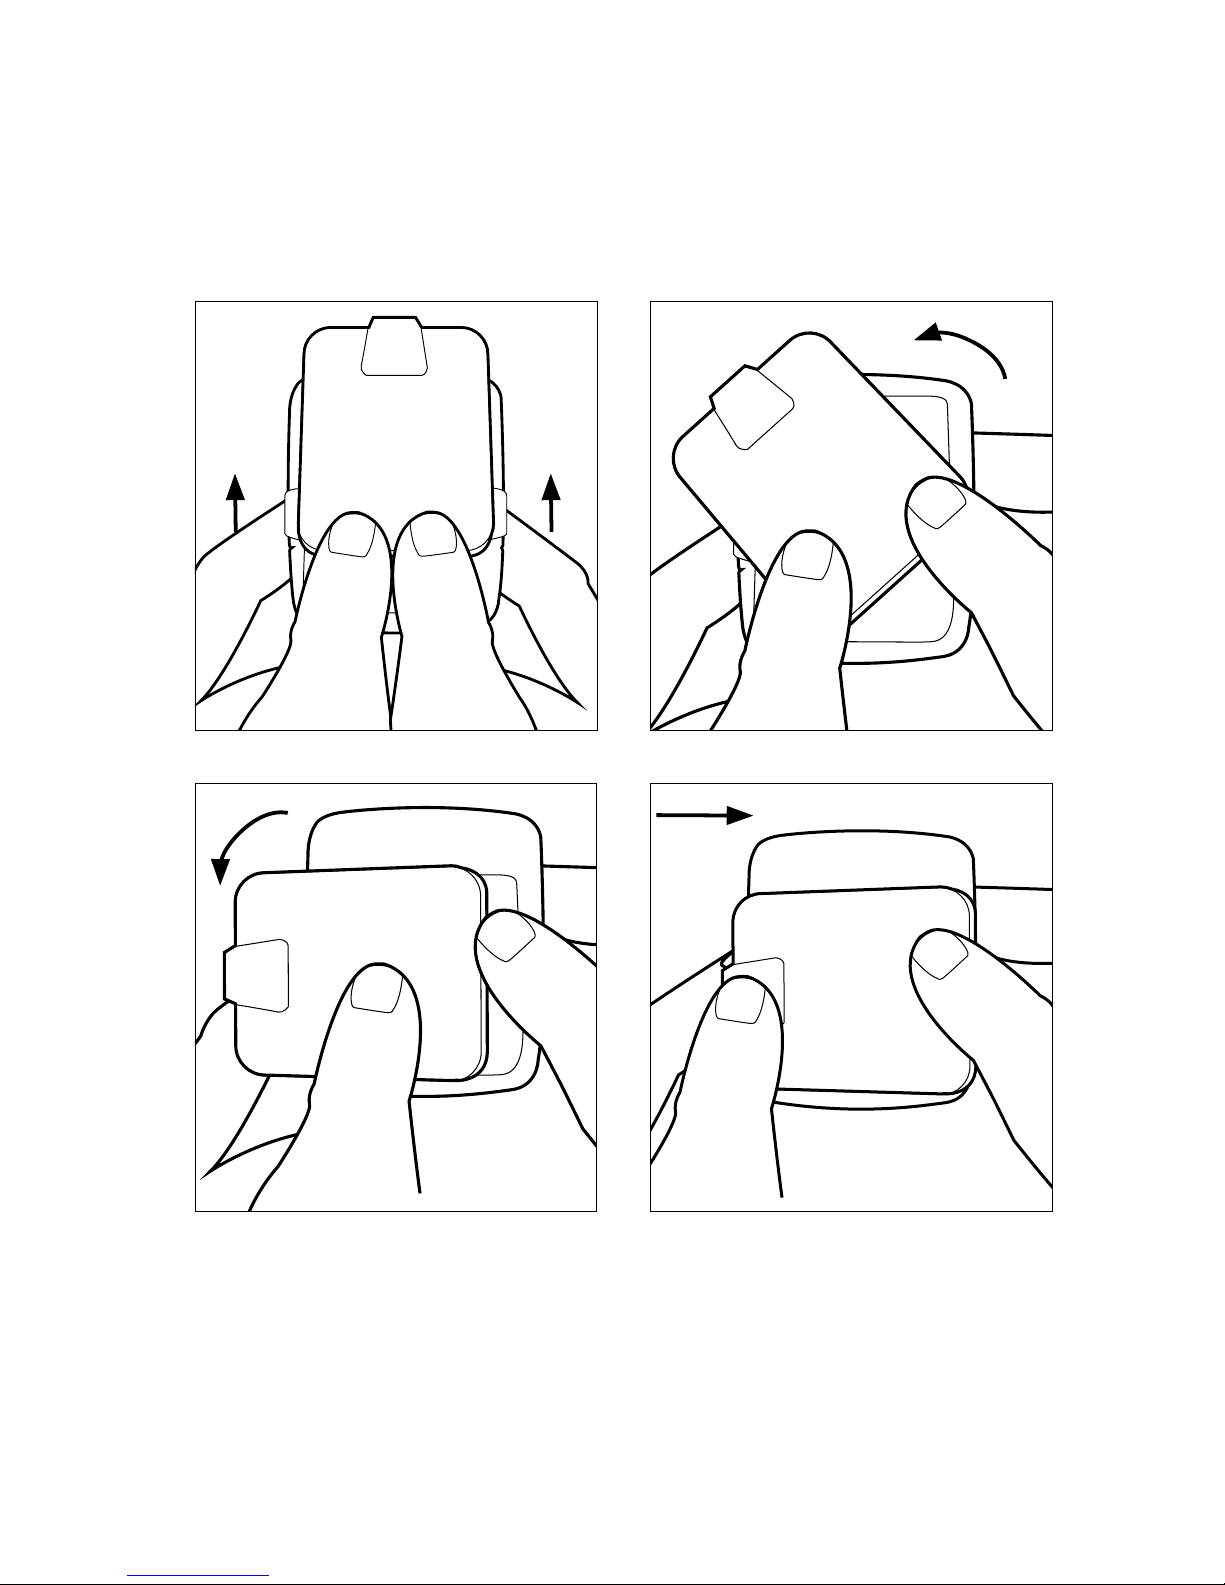
Pushing the clip upwards with two fingers allows you to
turn the clip as required. Push it backwards to fix it in
the desired position.
19
Page 20
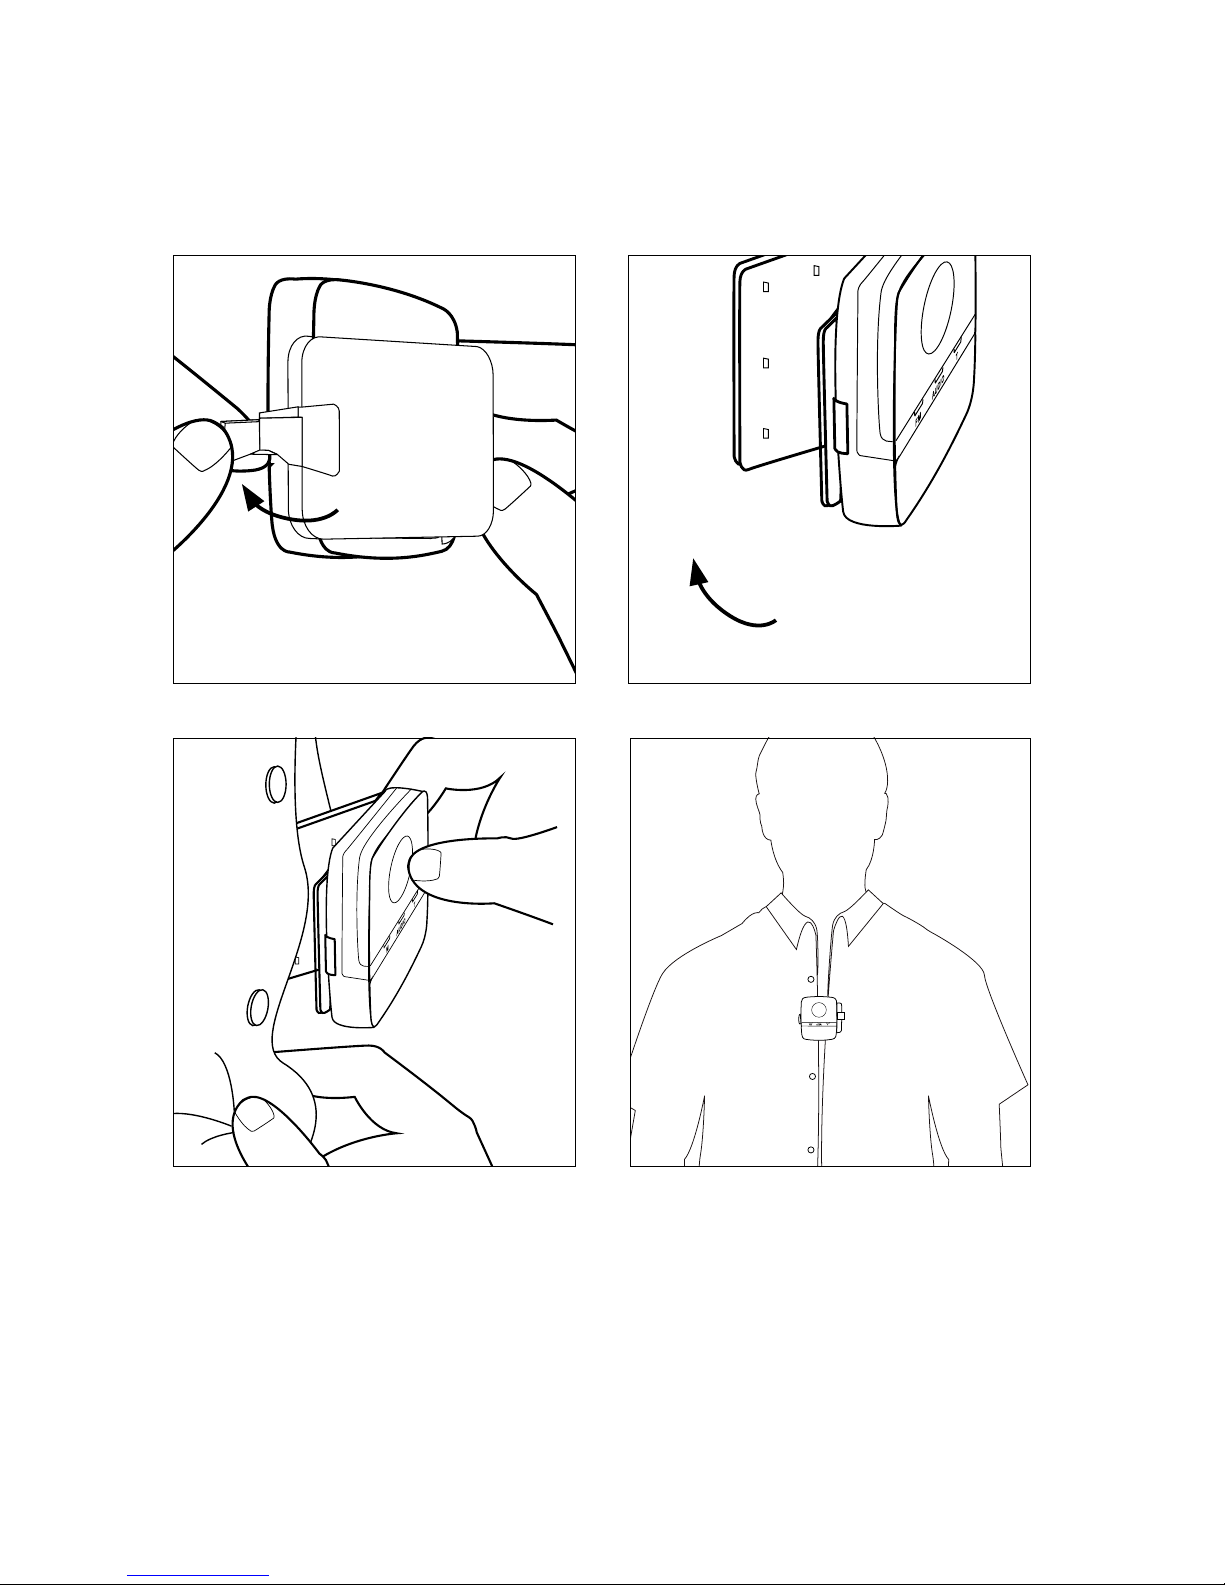
To open the clip, click the lock open, place it on your
clothes and click it closed.
20
Page 21
WARNING
Interference with active Implants
• In order to show caution, we advise to follow the guidelines
recommended by manufacturers of defibrillators and pacemakers regarding use of mobile phones:
• If you wear an active implantable device keep the Wireless Hearing Aids and Hearing Aid Accessories such as wireless devices or communicators at least 15 cm away from the
implant.
• If you experience any interference, do not use the hearing
aids and/or hearing aid accessories and contact the manufacturer of the implant. Please note that interference can also be
caused by power lines, electrostatic discharge, airport metal
detectors etc.
• If you have an active brain implant, please contact the manufacturer of the implant for risk evaluation.
If you have an implantable device, we advise to keep magnets*
at least 15 cm away from the implant. (*= can be specified as
Autophone magnet, hearing instrument case, magnet in a tool,
etc.)
21
Page 22
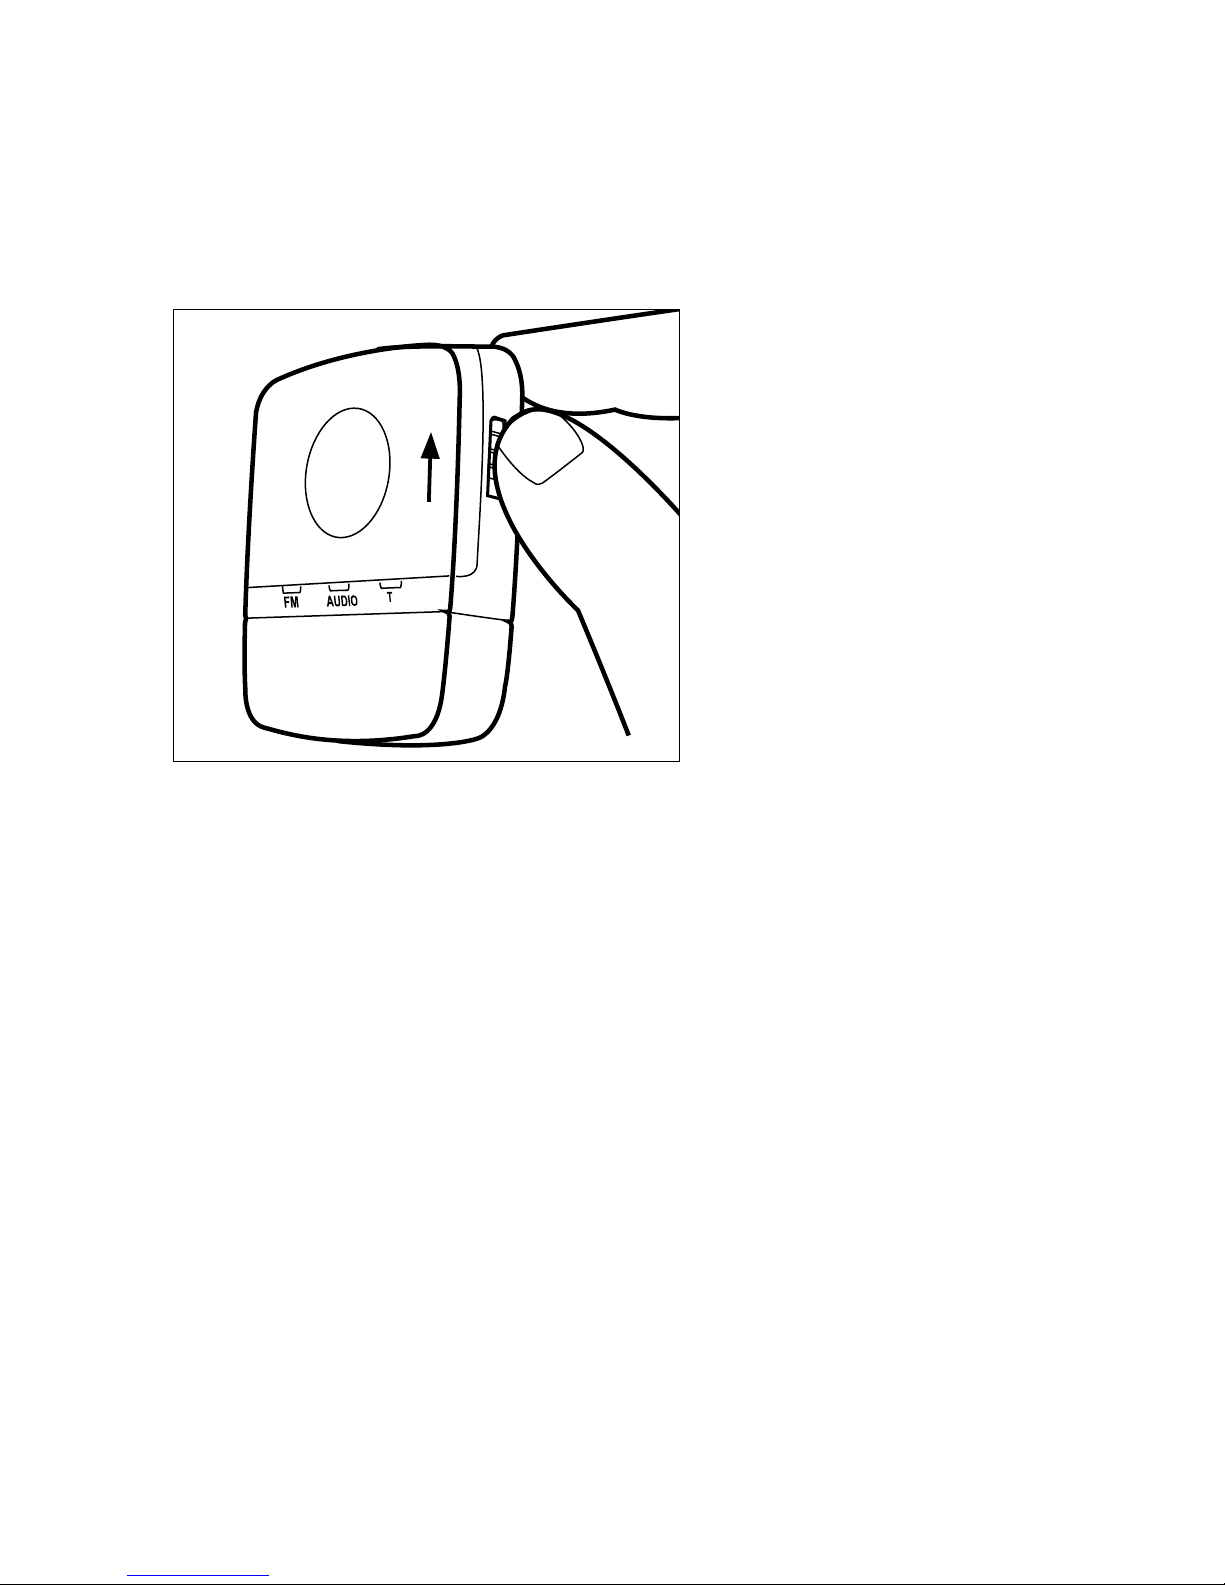
TURNING ON THE DEVICE
Push the slide button on the right side upwards.
22
Page 23
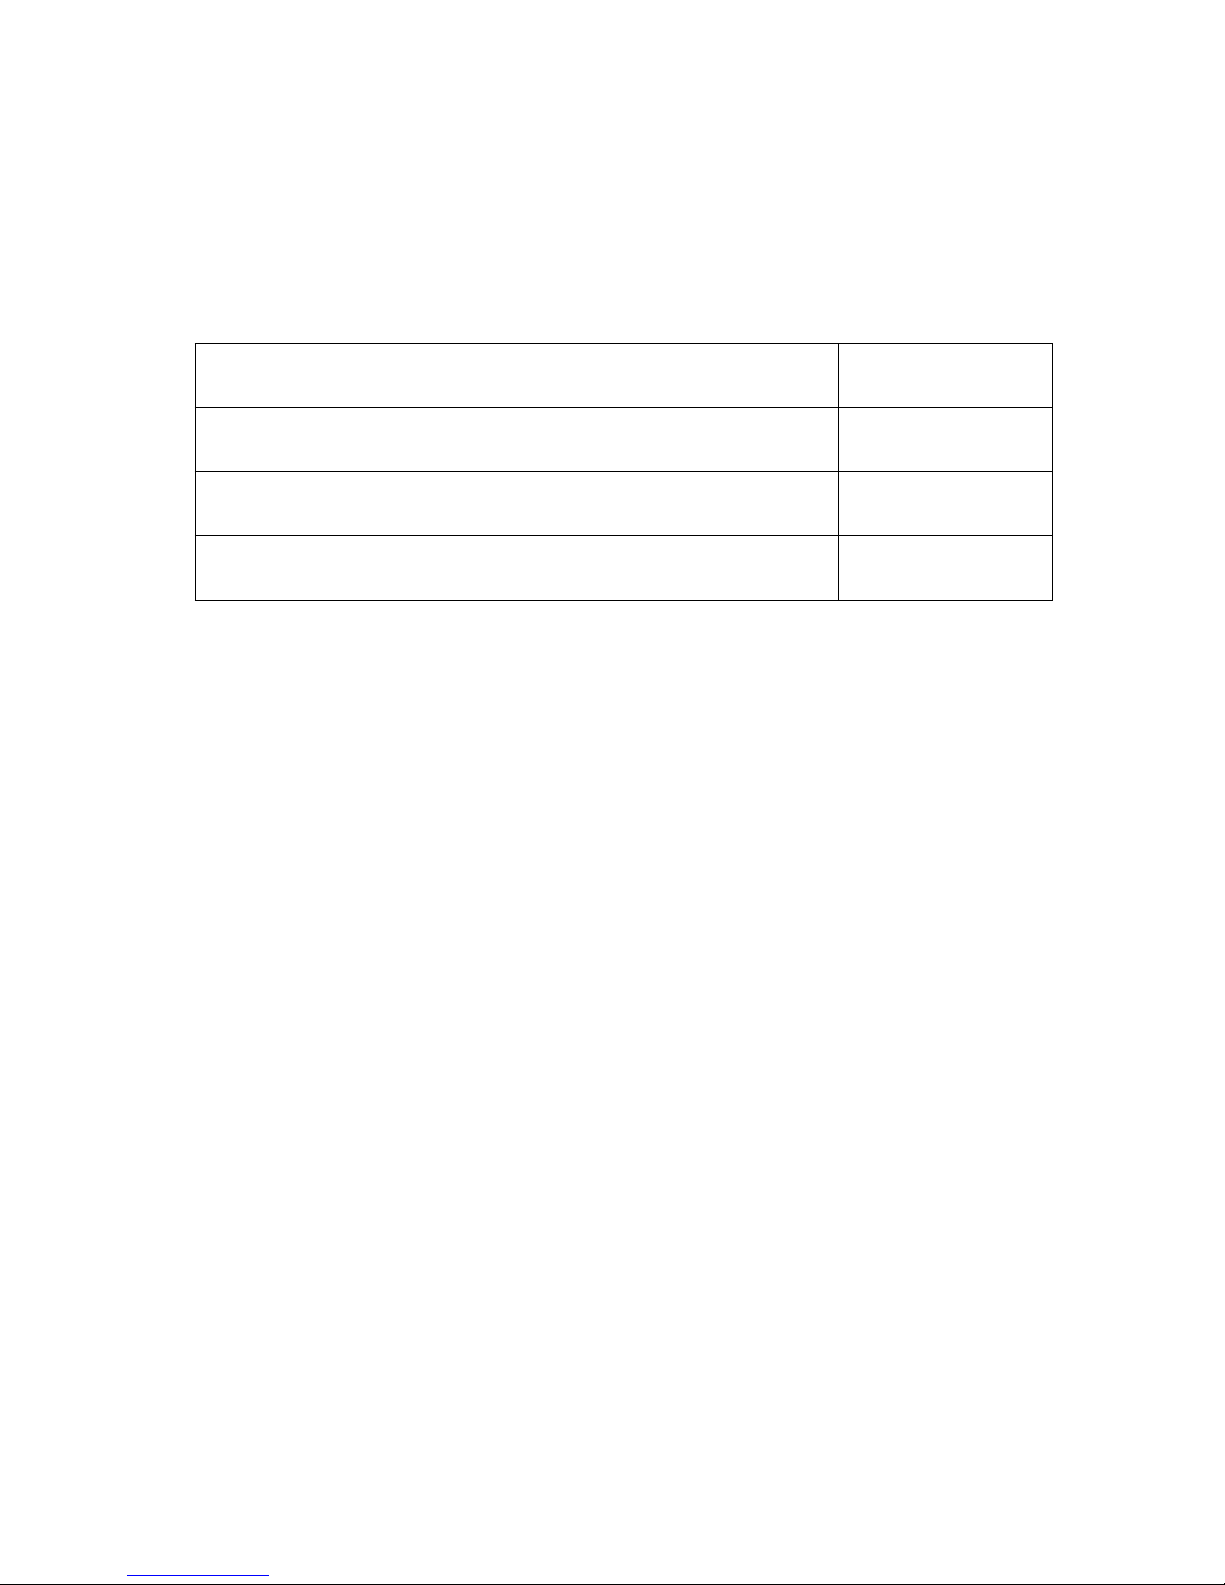
ACOUSTIC INDICATORS
When using any button/switch, a corresponding acoustic indicator will be presented in the hearing aids.
Turning the device on Tone
Change of input source Tone
Room on (start-up setting: On) Tone
Volume adjustment Tones
23
Page 24
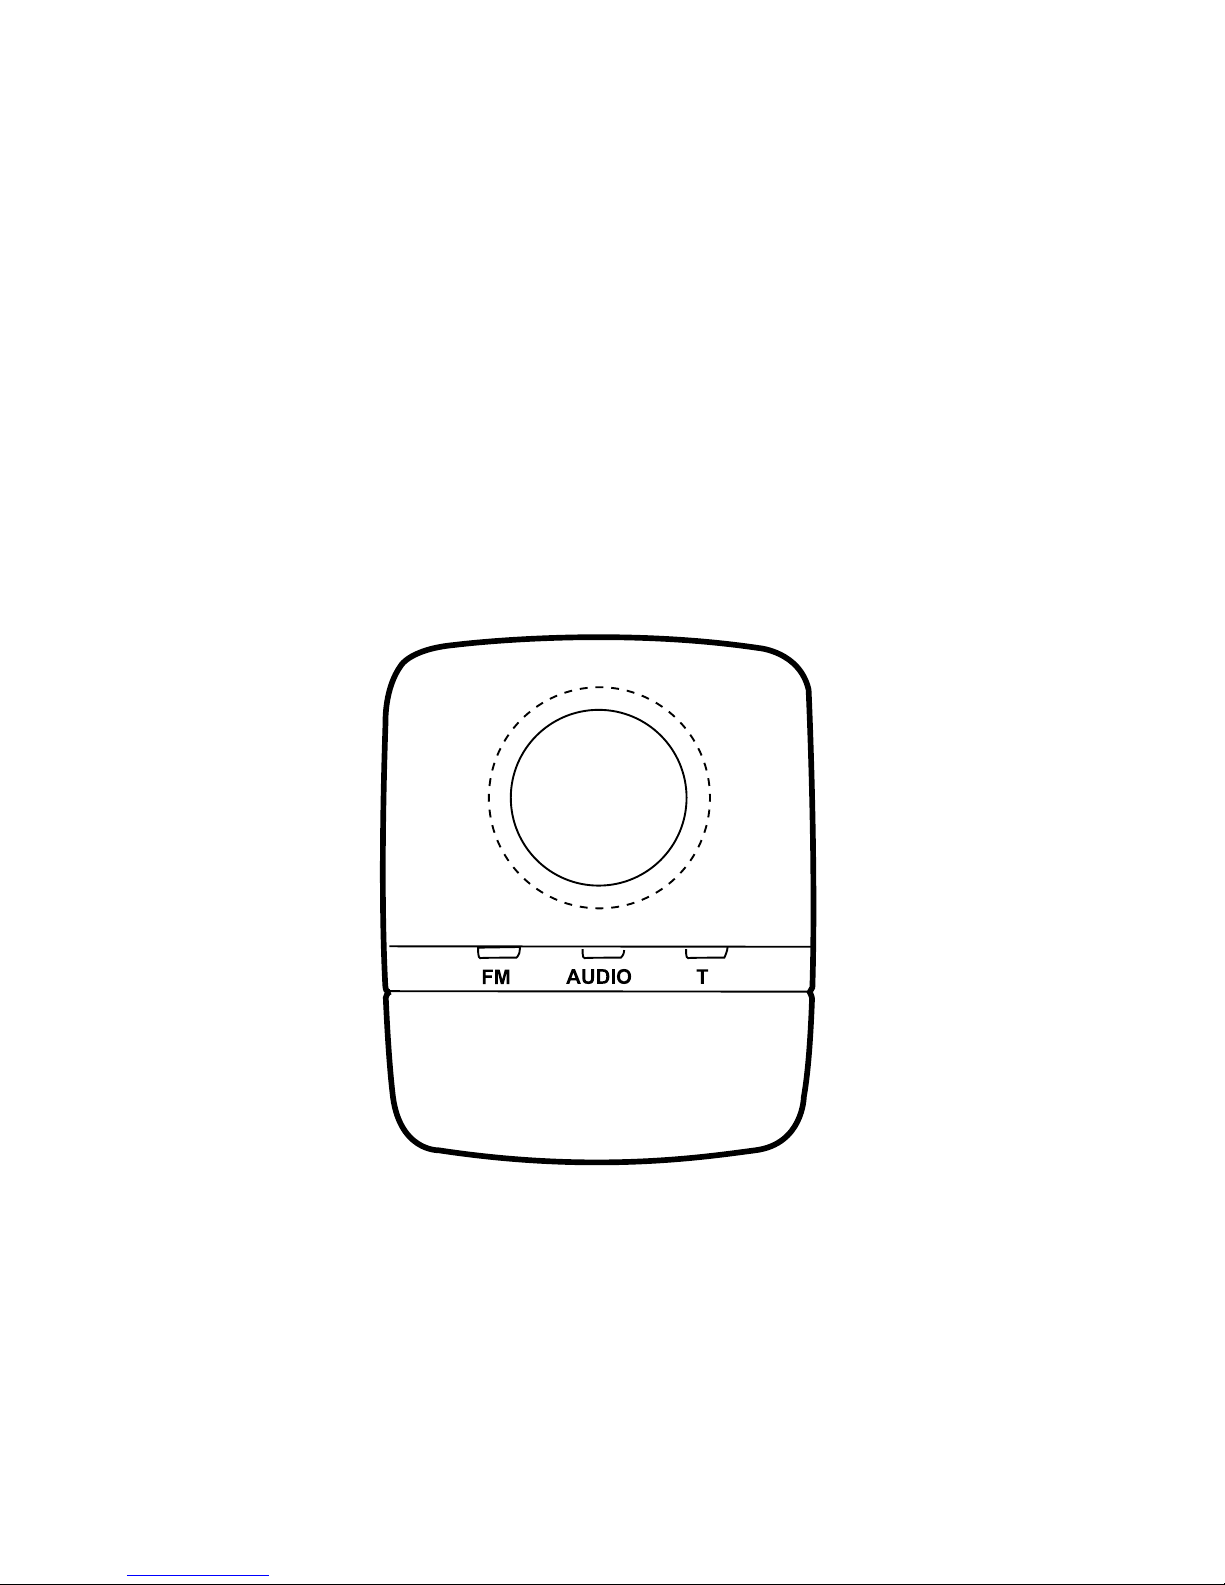
SELECTING INPUT SOURCE
The device starts up in the FM input setting. Using the
toggle key you can change between the three input
options: FM, AUDIO or T (telecoil). The current input
source is indicated by a green light in the corresponding LED. Make sure that the desired source has been
chosen.
24
Page 25
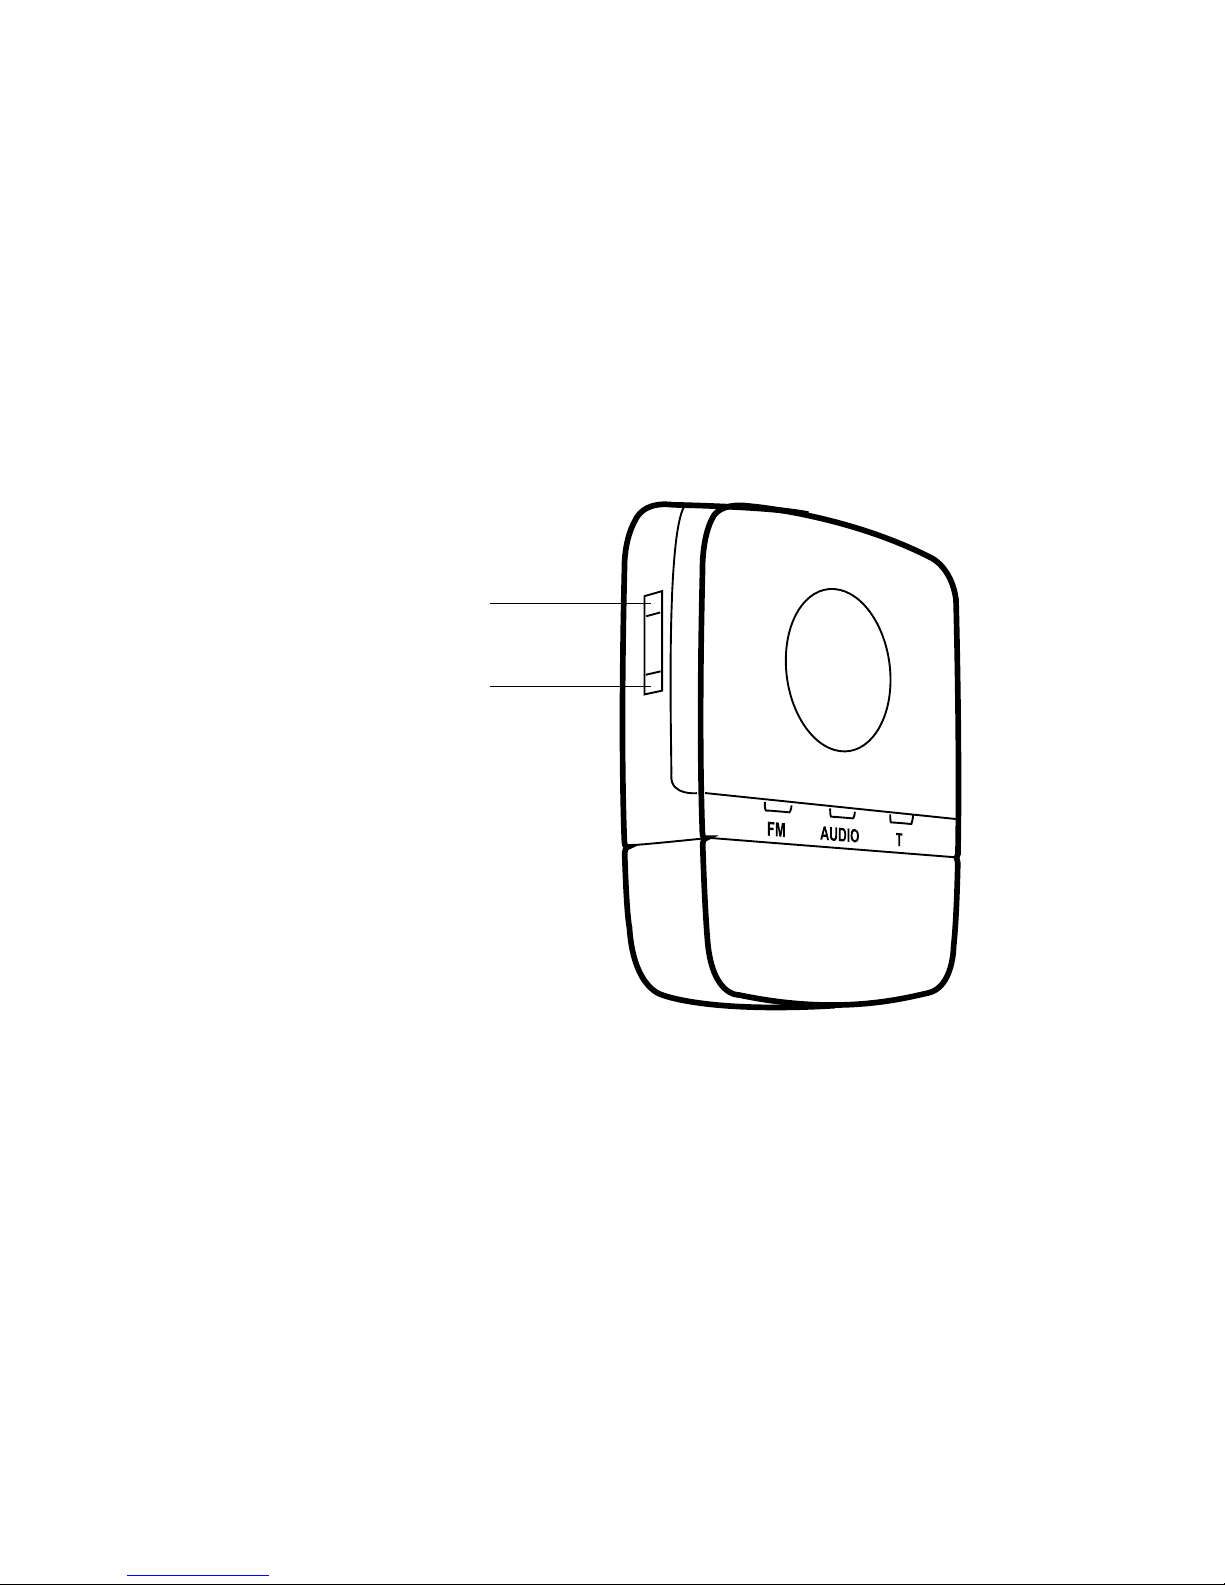
VOLUME ADJUSTMENT
The device starts up at the default volume level.
Use the volume control on the left side to adjust the
volume up or down.
volume up
volume down
25
Page 26

ROOM OFF
If you wish to listen to the input signal only, push the
input toggle key and hold it in for more than one second. This will disable the hearing aid microphones. To
deactivate this function again, push the input toggle
key and hold it in again for more than one second.
26
Page 27
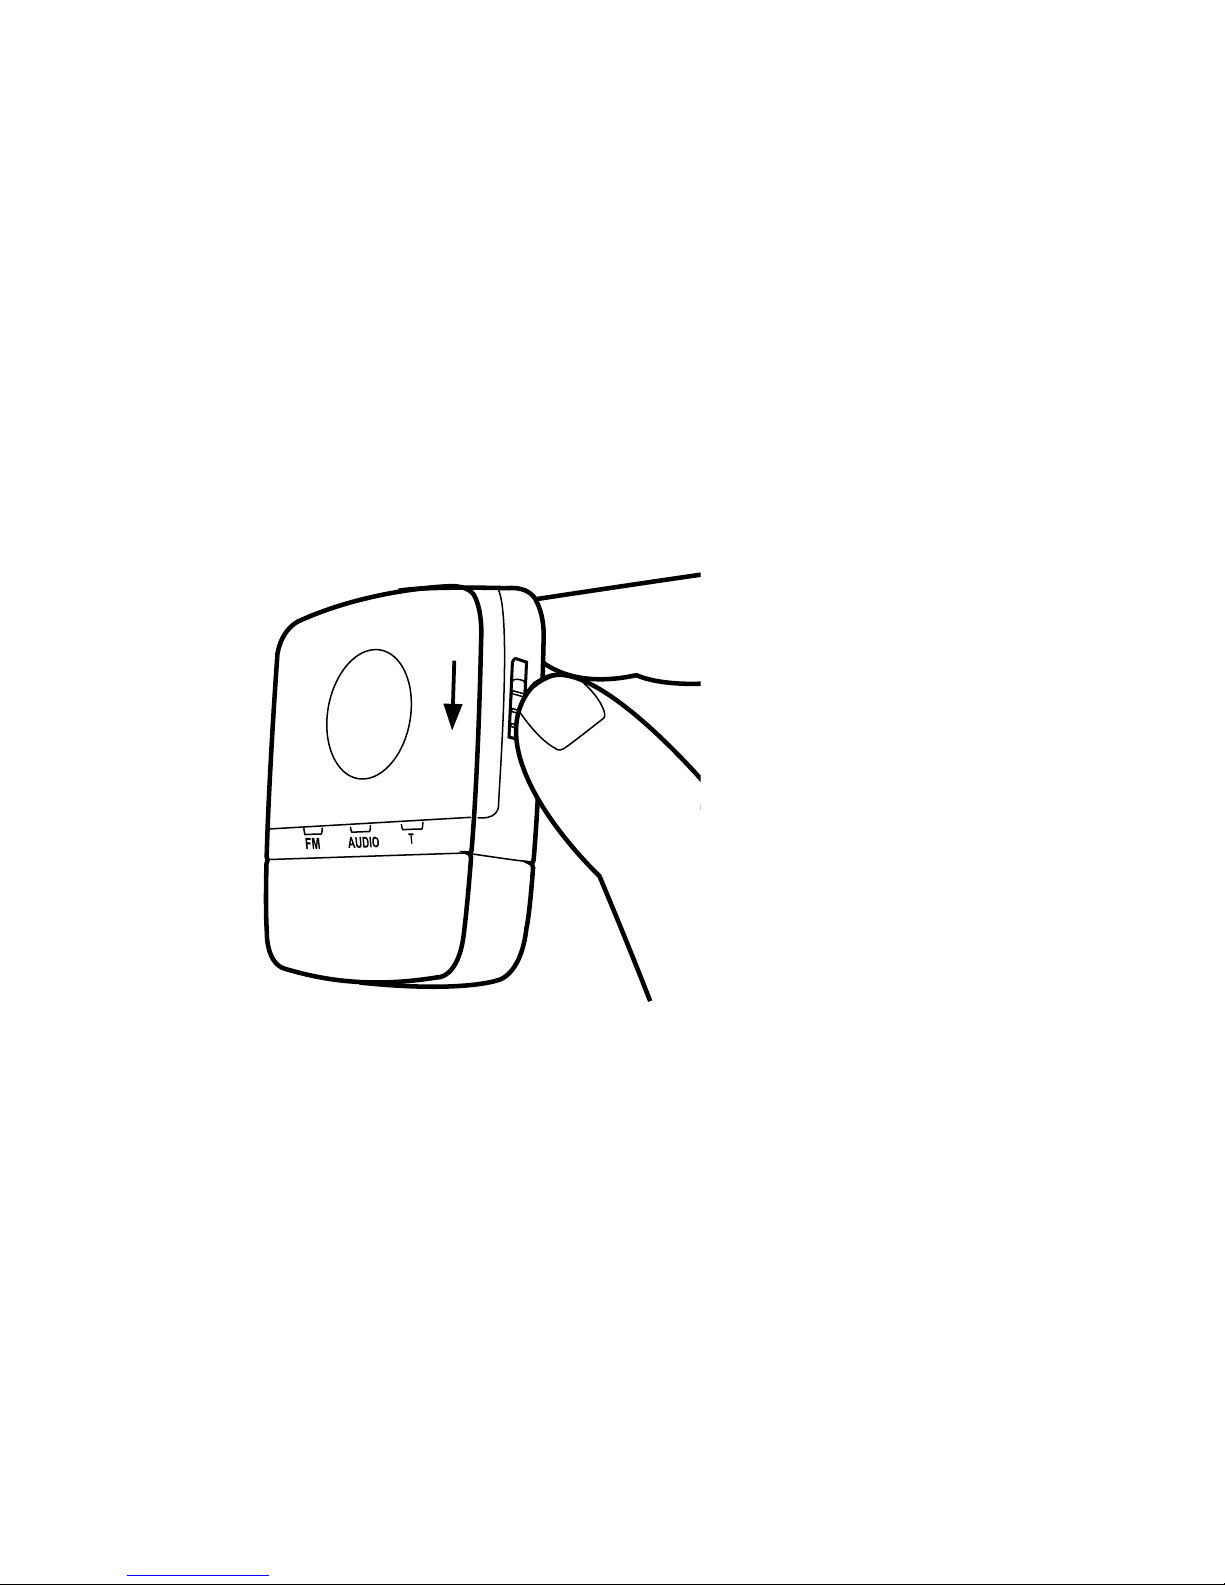
TURNING OFF THE DEVICE
To turn the device off, push the slide button on the right
side of the device downward.
When you turn the device off, it stops streaming and
the hearing aids return to program 1 (usually the Master program).
27
Page 28
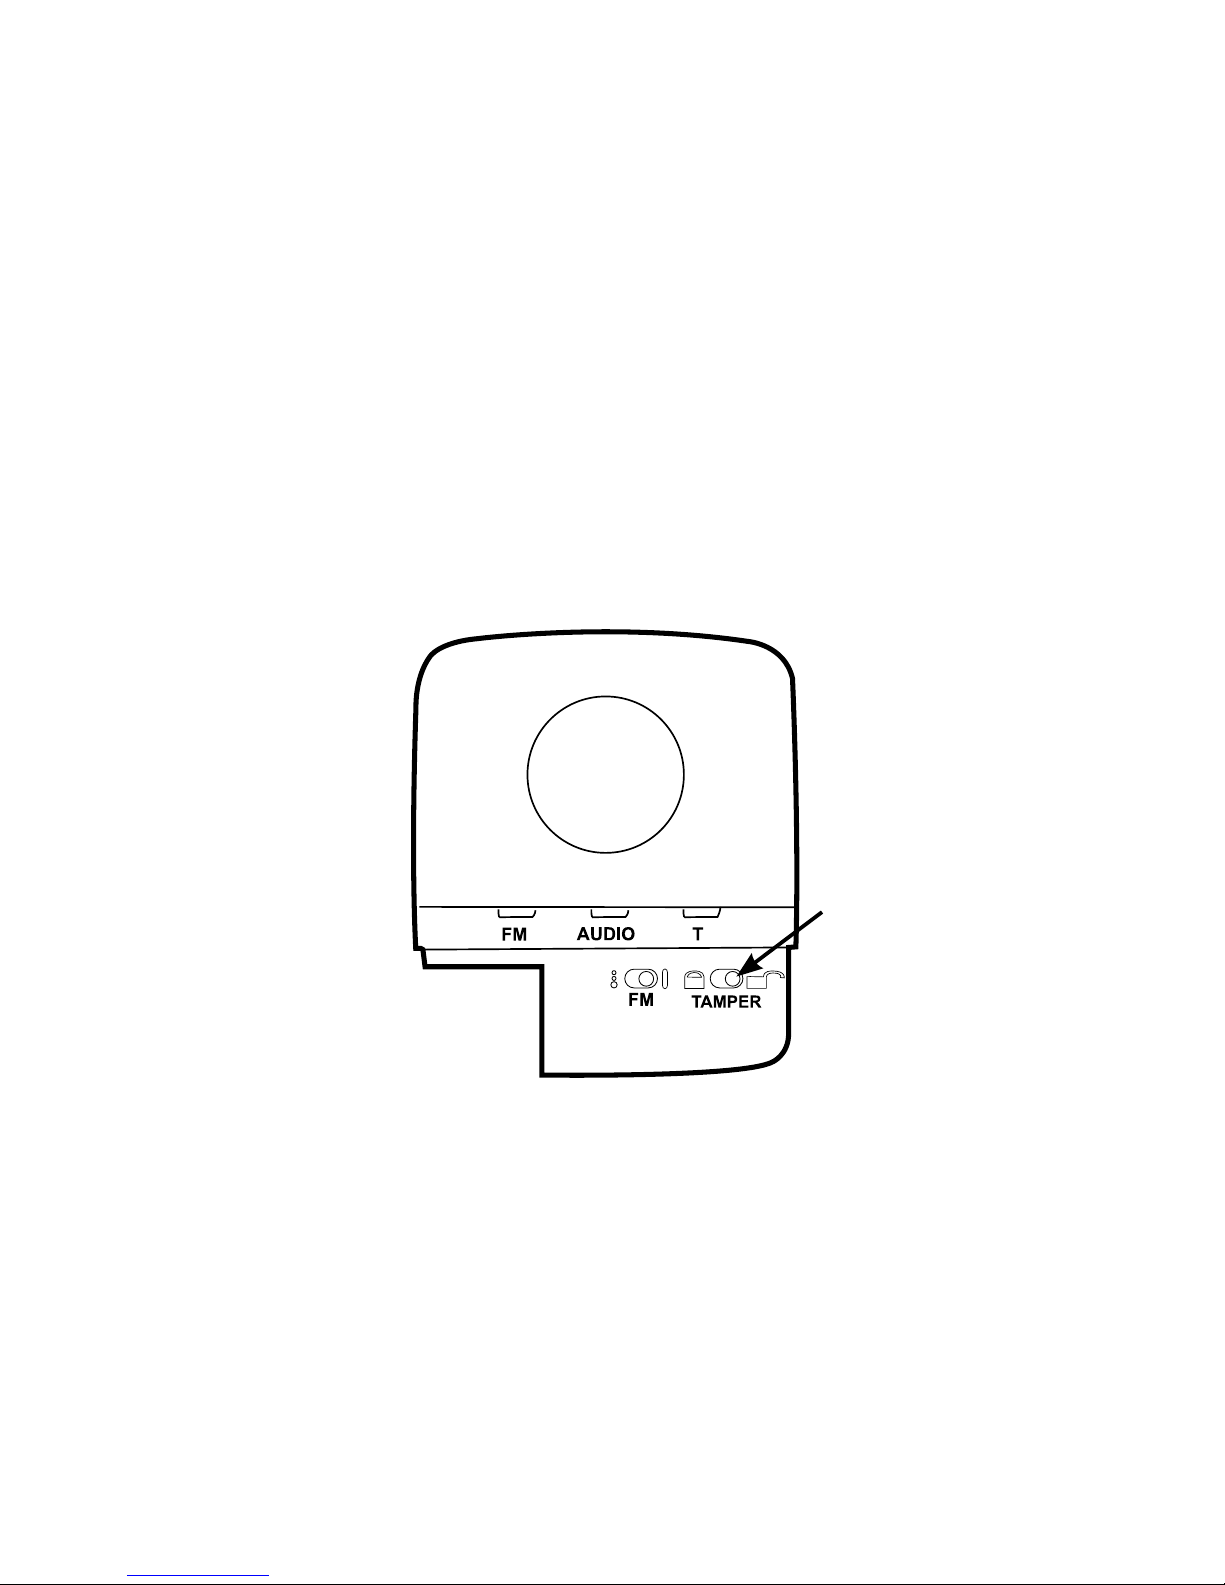
TAMPER SWITCH
The input toggle/room off key and volume control can
be locked using the tamper switch. Slide the switch to
the left to lock the functions, and to the right to unlock
them. When the device is turned off and on again, it will
start up in FM. The input toggle key will still be locked.
AUDIO CHARGE
28
Page 29
CARING FOR YOUR FM+DEX
The device is a valuable object and should be treated
with care. Here are some things you can do to prolong
the life of your device:
CAUTION
• Do not expose the device to extreme temperatures or high
humidity.
• Do not immerse it in water or other liquids.
• Clean the device with a dry, soft cloth. Never clean it with
acids, alcohol, strong detergents or other liquids.
• Avoid dropping the device.
• When the device is not in use, keep it in its case in a dry location out of reach of children and pets.
29
Page 30
WARNINGS
WARNING
• Keep the FM+DEX and its parts and accessories out of reach
of children and anyone else who might swallow parts of the
device, or otherwise cause injury to themselves with these
items. In case of ingestion, contact a physician immediately.
• Do not carry your FM+DEX with you during X-rays, MRIs, CT
or other medical treatments and scans, and never place your
device in a microwave oven. These are some of the types of
radiation that can damage your device.
• Radiation from, for example, room surveillance equipment,
burglar alarms and mobile phones is weaker and will not damage the device, but may create audible interference.
• Do not use the device on aircraft or in hospitals without permission.
• Do not use the device in mines or other areas with explosive
gases.
CAUTION
• Never try to open or repair the device yourself. (This should
only be done by authorized personnel.)
• Although the device has been designed to comply with the
most stringent international electromagnetic compatibility standards, the possibility cannot be excluded that it may
cause interference with other equipment, such as medical
devices.
30
Page 31
WARNING
Interference with active Implants
• In order to show caution, we advise to follow the guidelines
recommended by manufacturers of defibrillators and pacemakers regarding use of mobile phones:
• If you wear an active implantable device keep the Wireless
Hearing Aids and Hearing Aid Accessories such as wireless devices or communicators at least 15 cm away from the
implant.
• If you experience any interference, do not use the hearing
aids and/or hearing aid accessories and contact the manufacturer of the implant. Please note that interference can
also be caused by power lines, electrostatic discharge, airport metal detectors etc.
• If you have an active brain implant, please contact the man-
ufacturer of the implant for risk evaluation.
If you have an implantable device, we advise to keep magnets* at least 15 cm away from the implant. (*= can be specified as Autophone magnet, hearing instrument case, magnet
in a tool, etc.)
31
Page 32

SAFETY WARNING
This device is charged by an external power charger.
• Only connect a charger that is compatible with the
FM+DEX.
• The charger must have an output rating of 5VDC,
500mA, and a mini USB connector.
• The charger input rating voltage and wall plug must
be compatible with the AC wall outlet in your region.
• The charger must have the certification marks showing certification by a safety agency acceptable in
your region.
Widex strongly recommends that you always use a
charger unit that is supplied by your Widex Distributor
to ensure safe and efficient use of your FM+DEX.
When the FM+DEX is connected to external mainsoperated equipment like a PC, audio source or similar, this equipment must comply with IEC 60065, IEC
60950, IEC 60601-1 or equivalent safety standards.
32
Page 33

IN CASE OF MALFUNCTION....
Problem Possible cause Solution
Your FM+DEX does
not work
The device is not
turned on
Turn it on
The device is out of
range
Move the device
within range. See
page 8.
No sound when listening to audio
FM+DEX is not
within range of the
hearing aids
Move the device
within range
Temporary suspension of communication between hearing aids. Message:
“Partner check”
FM+DEX is not
within range of the
hearing aids
Move the device
within range
Streaming is interrupted
Interference with
another device
Move one of the
devices out of range
of the other (2 m)
The FM+DEX is out
of range
Move the device
within range. See
page 8.
33
Page 34
Problem Possible cause Solution
The input toggle
key does not work
The FM+DEX is not
turned on
Turn the FM+DEX on
The battery is low Charge the battery
using the included
charger
The battery does not
work
Contact your hearing
care professional to
have the battery
replaced
The charger is connected to the
FM+DEX
Disconnect the
charger when the
FM+DEX has been
charged
Functions have been
locked with tamper
switch
Unlock
The charger is connected but does not
charge (LEDs are
not green)
The power supply to
the FM+DEX has
been interrupted
Check that the
charger is properly
connected to the
FM+DEX mini USB
socket and a wall
socket, and that the
wall socket is
switched on
No streamed audio
sound even though
the audio input LED
is green.
The cable between
the sound source
and the FM+DEX has
been disconnected.
Connect the sound
source to the
FM+DEX
34
Page 35

Problem Possible cause Solution
No streamed signals even though
the telecoil (T) LED
is green.
No teleloop signal Place the FM+DEX in
an area with teleloop
signals
No streamed FM
signals even though
the FM input LED is
green
No FM module is
attached
Check that an FM
module is attached
The FM module or
the FM transmitter is
switched off
Check that the FM
module and the FM
transmitter are
switched on and are
set to the same
channel
Battery level indicator is red
The battery is low Charge the battery
35
Page 36

REGULATORY INFORMATION
FCC ID: TTY-FMD
IC: 5676B-FMD
Federal Communications Commission Statement
This device complies with part 15 of the FCC Rules. Operation is
subject to the following two conditions:
(1) This device may not cause harmful interference, and
(2) this device must accept any interference received, including
interference that may cause undesired operation.
NOTE:
This equipment has been tested and found to comply with the
limits for a Class B digital device, pursuant to part 15 of the FCC
Rules. These limits are designed to provide reasonable protection
against harmful interference in a residential installation. This
equipment generates, uses and can radiate radio frequency energy and, if not installed and used in accordance with the instructions, may cause harmful interference to radio communications.
However, there is no guarantee that interference will not occur in
a particular installation. If this equipment does cause harmful interference to radio or television reception, which can be determined by turning the equipment off and on, the user is encouraged to try to correct the interference by one or more of the following measures:
— Reorient or relocate the receiving antenna.
— Increase the separation between the equipment and receiver.
— Connect the equipment into an outlet on a circuit different
from that to which the receiver is connected.
— Consult the dealer or an experienced radio/TV technician for
help.
NOTE:
This equipment complies with FCC radiation exposure limits set
forth for an uncontrolled environment. This transmitter must not
be co-located or operating in conjunction with any other antenna
or transmitter.
36
Page 37

Changes or modifications to the equipment not expressly approved by Widex could void the user’s authority to operate the
equipment.
Industry Canada Statement / Déclaration d’industrie Canada
Under Industry Canada regulations, this radio transmitter may
only operate using an antenna of a type and maximum (or lesser)
gain approved for the transmitter by Industry Canada.
To reduce potential radio interference to other users, the antenna
type and its gain should be so chosen that the equivalent isotropically radiated power (e.i.r.p.) is not more than that necessary for
successful communication.
This device complies with Industry Canada licence-exempt RSS
standard(s). Operation is subject to the following two conditions:
(1) this device may not cause interference, and
(2) this device must accept any interference, including interference that may cause undesired operation of the device.
Conformément à la réglementation d’Industrie Canada, le présent
émetteur radio peut fonctionner avec une antenne d’un type et
d’un gain maximal (ou inférieur) approuvé pour l’émetteur par
Industrie Canada.
Dans le but de réduire les risques de brouillage radioélectrique à
l’intention des autres utilisateurs, il faut choisir le type d’antenne
et son gain de sorte que la puissance isotrope rayonnée équivalente (p.i.r.e.) ne dépasse pas l’intensité nécessaire à
l’établissement d’une communication satisfaisante.
Le présent appareil est conforme aux CNR d’Industrie Canada applicables aux appareils radio exempts de licence. L’exploitation
est autorisée aux deux conditions suivantes:
(1) l’appareil ne doit pas produire de brouillage, et
(2) l’utilisateur de l’appareil doit accepter tout brouillage radioélectrique subi, même si le brouillage est susceptible d’en compromettre le fonctionnement.
37
Page 38
Directive 1999/5/EC
Hereby, Widex A/S declares that this FM+DEX is in
compliance with the essential requirements and other
relevant provisions of Directive 1999/5/EC.
A copy of the Declaration of Conformity according to
1999/5/EC can be found at:
http://www.widex.com/doc
38
Page 39

Electrical and electronic equipment (EEE)
contains materials, components and substances that can be hazardous and present
a risk to human health and the environment
when waste electrical and electronic equipment (WEEE) is not handled correctly.
Do not dispose of hearing aids, hearing aid accessories
and batteries with ordinary household waste.
Hearing aids, batteries and hearing aid accessories
should be disposed of at sites intended for waste electrical and electronic equipment, or given to your hearing care professional for safe disposal. Proper disposal
helps to protect human health and the environment.
39
Page 40
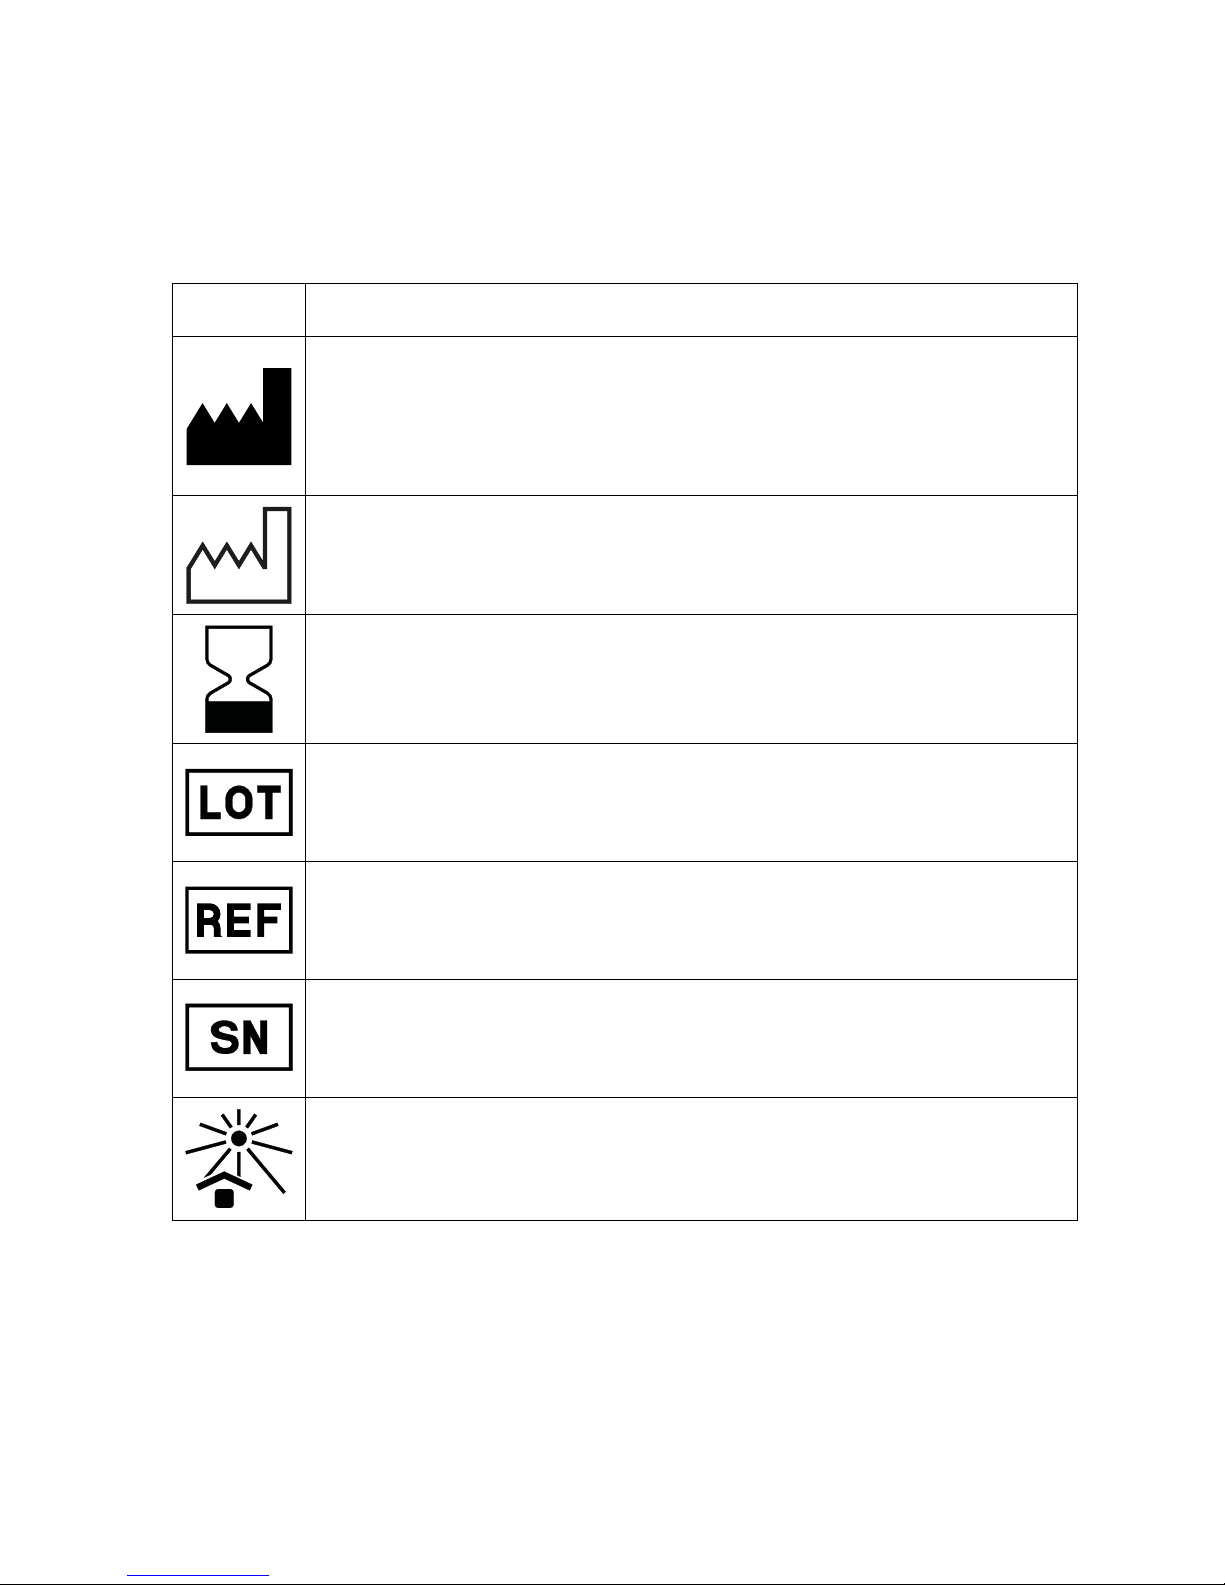
SYMBOLS
SYMBOLS
Symbols commonly used by Widex A/S in medical device
labelling (labels/IFU/etc.)
Symbol Title/Description
Manufacturer
The product is produced by the manufacturer whose
name and address are stated next to the symbol. If appropriate, the date of manufacture may also be stated.
Date of manufacture
The date when the product was manufactured.
Use-by date
The date after which the product is not to be used.
Batch code
The product’s batch code (lot or batch identification).
Catalogue number
The product’s catalogue (item) number.
Serial number
The product’s serial number.*
Keep away from sunlight
The product must be protected from light sources and/or
The product must be kept away from heat
40
Page 41
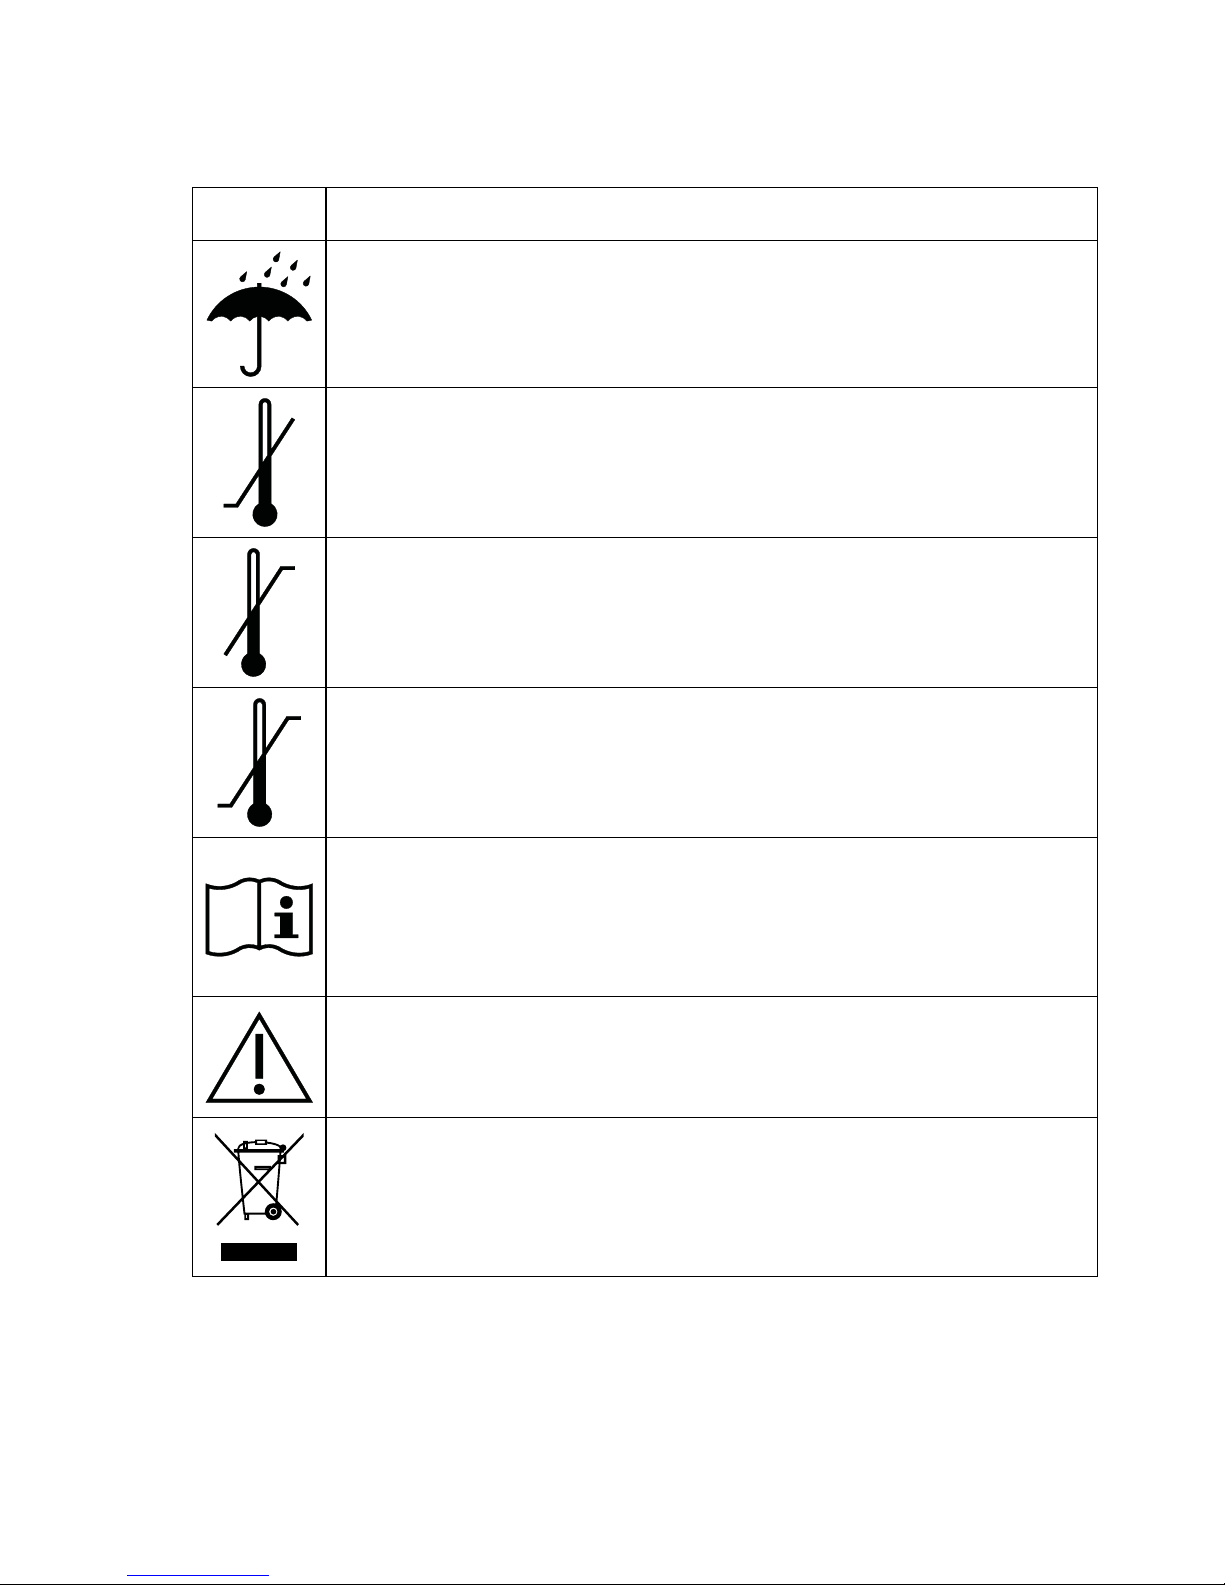
Symbol Title/Description
Keep dry
The product must be protected from moisture and/or
The product must be kept away from rain
Lower limit of temperature
The lowest temperature to which the product can be
safely exposed.
Upper limit of temperature
The highest temperature to which the product can be
safely exposed.
Temperature limits
The highest and lowest temperatures to which the product can be safely exposed.
Consult instructions for use
The user instructions contain important cautionary information (warnings/precautions) and must be read before
using the product.
Caution/Warning
Text marked with a caution/warning symbol must be
read before using the product.
WEEE mark
“Not for general waste”
When the product is to be discarded, it must be sent to
a designated collection point for recycling and recovery.
41
Page 42
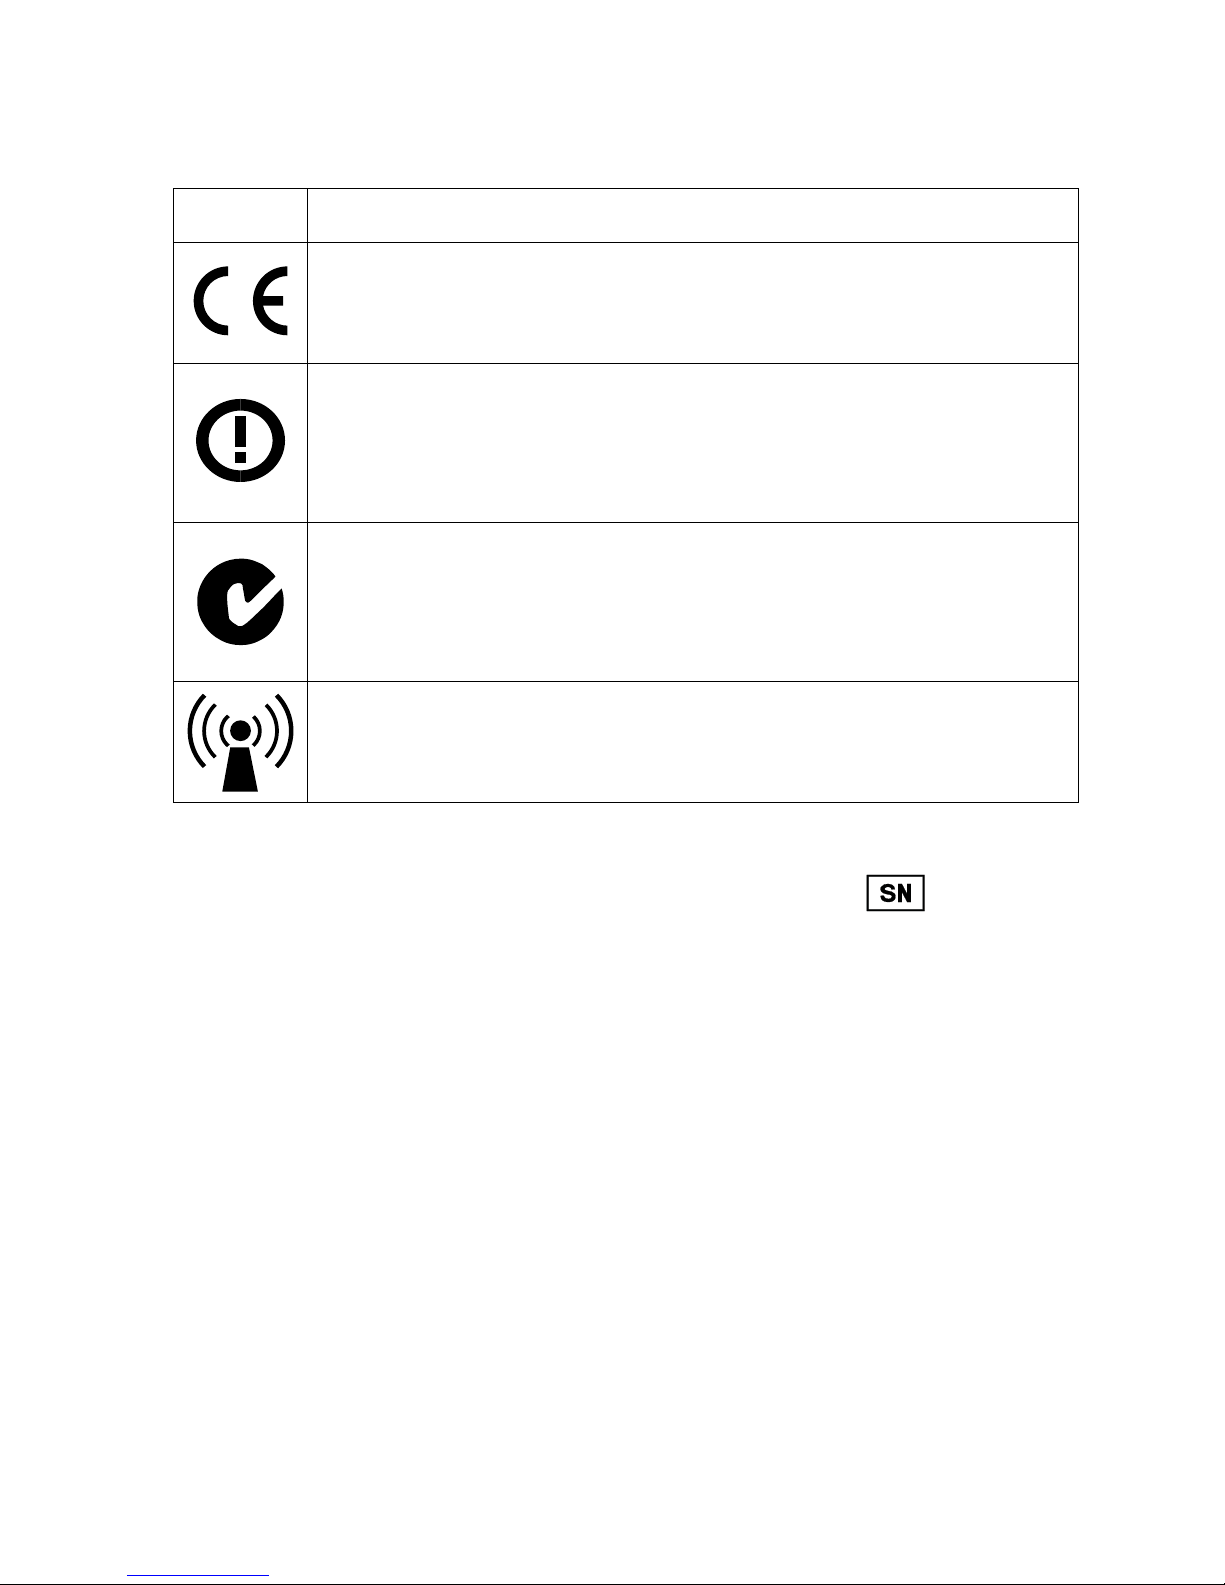
Symbol Title/Description
CE mark
The product is in conformity with the requirements set
out in European CE marking directives.
Alert
The product is identified by R&TTE Directive 1999/5/EC
as an equipment Class 2 product with some restrictions
on use in some CE member states.
C-Tick mark
The product complies with EMC and radio spectrum
regulatory requirements for products supplied to the
Australian or New Zealand market.
Interference
Electromagnetic interference may occur in the vicinity of
the product.
*The six- or seven-digit number on the product is the serial number. Serial numbers may not always be preceded by
42
Page 43

43
Page 44
WIDEX A/S Nymoellevej 6, DK-3540 Lynge, Denmark
www.widex.com
É[5qr0q9|k;;a;h]
Manual no.:
9 514 0198 001 #02
Issue:
2014-12
 Loading...