

Page 1

Page 2

DXAEJ14CA
Jump Starter with Digital Compressor and 3.1A USB Ports
Batterie d’appoint avec compresseur d’air digital et ports USB 3.1A
INSTRUCTION MANUAL
GUIDE D’UTILISATION
If you have questions or comments, contact us.
Pour toute question ou tout commentaire, nous contacter.
1-888-394-3392
RD112018
Page 3

Page 4

English
3
Definitions: Safety Guidelines
The definitions below describe the level of severity for each signal
word. Please read the manual and pay attention to these symbols.
DANGER: Indicates an imminently hazardous situation which,
if not avoided, will result in death or serious injury.
WARNING: Indicates a potentially hazardous situation which,
if not avoided, could result in death or serious injury.
CAUTION: Indicates a potentially hazardous situation which,
if not avoided, may result in minor or moderate injury.
NOTICE: Indicates a practice not related to personal injury
which, if not avoided, may result in property damage.
IF YOU HAVE ANY QUESTIONS OR COMMENTS ABOUT THIS
DEWALT TOOL, CALL US TOLL FREE AT: 1-888-394-3392.
WARNING: Read all instructions before operating product.
Failure to follow all instructions listed below may result in electric
shock, fire and/or serious injury.
Jump Starter with Digital Compressor
and 3.1A USB Ports
The DXAEJ14CA 700A Jump Starter with Digital Compressor and 3.1A
USB Ports is a DeWALT jump starter that features a portable 120 PSI
digital compressor and dual USB ports.
WARNING: This unit or its power cord contains lead, a chemical
known to the State of California to cause cancer and birth defect or
other reproductive harm. Wash hands after handling.
Important Safety
Instructions
1. Keep these instructions.
2. Heed all warnings.
3. Follow all instructions.
4. Avoid dangerous environments. Don’t use this unit in damp or wet
locations; or in the rain or snow.
5. Clean only with a dry cloth.
6. Keep children away from the work area. Keep this unit away from
children. This is not a toy!
7. Store indoors. When not in use, this unit should be stored indoors
in a dry and high or locked-up place – out of the reach of children.
8. Stay alert. Use common sense. Do not operate this equipment
when you are tired or impaired.
9. Only use attachments/accessories specified by the manufacturer.
The use of any accessory or attachment not recommended for
use with this appliance could be hazardous.
10. Use only on a flat, level surface. If a cart is used,
use caution when moving the cart/apparatus
combination to avoid injury from tip-over.
11. To reduce risk of electric shock, disconnect the
unit from any power source before attempting
maintenance or cleaning. Turning off controls
without disconnecting will not reduce this risk.
12. Check for damaged parts. Any part that is damaged should be
properly repaired or replaced by manufacturer unless otherwise
indicated elsewhere in this instruction manual before further use.
Servicing is required when the unit has been damaged in any
way, such as power-supply cord or plug is damaged, liquid has
been spilled or objects have fallen into the unit, the unit has been
Page 5

English
4
exposed to rain or moisture, does not operate normally, or has
been dropped. Contact the manufacturer at 1-888-394-3392 for
more information.
13. Unit shall not be exposed to dripping or splashing and no objects
filled with liquids, shall be placed on the unit.
14. Do not operate this unit near flammable liquids or in gaseous or
explosive atmospheres. Motors in these tools normally spark,
and the sparks might ignite fumes.
15. This unit employs parts (switches, relays, etc.) that produce arcs
or sparks. Therefore, if used in a garage or enclosed area, the
unit MUST be placed not less than 18 inches above the floor.
This Class B digital apparatus complies with Canadian ICES-003.
CAN ICES-3(B).
NOTE: This equipment has been tested and found to comply with
the limits for a Class B digital device, pursuant to Part 15 of the FCC
Rules. These limits are designed to provide reasonable protection
against harmful interference in a residential installation. This equipment
generates, uses and can radiate radio frequency energy and, if not
installed and used in accordance with the instructions, may cause
harmful interference to radio communications. However, there is no
guarantee that interference will not occur in a particular installation. If
this equipment does cause harmful interference to radio or television
reception, which can be determined by turning the equipment off and
on, the user is encouraged to try to correct the interference by one or
more of the following measures:
• Reorient or relocate the receiving antenna.
• Increase the separation between the equipment and the
receiver.
• Connect the equipment into an outlet on a circuit different
from that to which the receiver is connected.
• Consult the dealer or an experienced radio/TV technician
for help.
NOTICE: Per FCC Part 15, changes or modifications to this equipment
not expressly approved by DEWALT could void your authority to operate
this equipment.
READ ALL INSTRUCTIONS
Specific Safety Instructions for Charging
this Unit
• Don’t abuse the cord. Protect the extension cord from being walked
on or pinched particularly at plugs, convenience receptacles, and the
point where it connects to the unit. Never carry the unit by the cord
or yank it to disconnect from receptacle. Pull by the plug rather than
the cord when disconnecting from the unit.
• Ground fault circuit interrupter (GFCI) protection should be
provided on the circuits or outlets to be used. Receptacles are
available having built in GFCI protection and may be used for this
measure of safety.
• IMPORTANT: This unit is delivered in a partially charged state. Fully
charge unit with a household extension cord for a full 40 hours or until
the battery status icon shows 4 solid bars before using for the first
time. You cannot overcharge the unit using the AC charging method.
• To recharge this unit, use only the built-in AC charger with an AC
extension cord (not included) or the supplied DC charger.
• All functions should be turned off when the unit is charging or not
in use. Make sure all functions are turned off before connection to a
power source or load.
Extension Cords
WARNING: Use of an improper extension cord could result in a
risk of fire and electric shock, and will void warranty. Make sure your
extension cord is in good condition. When using an extension cord,
be sure to use one heavy enough to carry the current your product
will draw. An undersized cord will cause a drop in line voltage resulting
in loss of power and overheating. The following table shows the correct
Page 6

English
5
size to use depending on cord length and nameplate ampere rating.
If in doubt, use the next heavier gauge. The smaller the gauge number,
the heavier the cord.
MINIMUM GAGE FOR CORD SETS
Volts Total Length of Cord in Feet
120V 0-25 26-50 51-100 101-150
(0-7.6m) (7.6-15.2m) (15.2-30.4m) (30.4-45.7m)
240V 0-50 51-100 101-200 201-300
(0-15.2m) (15.2-30.4m) (30.4-60.9m) (60.9-91.4m)
Ampere Rating Extension Cord Length
More Not more
0’-25’ 26’-50’ 51 ’-100 ’ 101’ -150 ’
Than Than American Wire Gage (AWG)
0 - 6 18 16 16 14
6 - 10 18 16 14 12
10 - 12 16 16 14 12
12 - 16 14 12 Not Recommended
When an extension cord is used, make sure that:
• the pins of extension cord are the same number, size and shape as
those in the charger,
• the extension cord is properly wired and in good electrical condition,
and
• the wire size is large enough for the AC rating of the charger.
WARNING: NEVER ATTEMPT TO USE THE AC AND DC
CHARGING METHODS AT THE SAME TIME.
CAUTION – To reduce the risk of injury or property damage: Pull
the extension cord by the plug rather than the cord when disconnecting
from the built-in 120 volt AC charger or the AC outlet.
CAUTION – To reduce the risk of injury or property damage when
charging using the 12 volt DC method:
• Recharge using this method only when necessary. Frequent use of
the the 12 volt DC charging method may shorten battery life.
• Do not exceed 6 hours charging time using this method.
Specific Safety Instructions for
Jump Starters
WARNING – Burst hazard: Do not use the unit for charging dry-cell
batteries that are commonly used with home appliances. These
batteries may burst and cause injury to persons and damage property.
Use the unit for charging/boosting a lead-acid battery only. It is not
intended to supply power to a low-voltage electrical system other than
in a starter-motor application.
WARNING: To reduce the risk of electric shock, never immerse this
unit in water or any other liquid, or use when wet.
WARNING – Risk of explosive gases:
• Working in the vicinity of a lead acid battery is dangerous. Batteries
generate explosive gases during normal battery operation. For this
reason, it is of the utmost importance that each time before using
the jump-starter you read this manual and follow instructions exactly.
• To reduce the risk of battery explosion, follow these instructions and
those published by the battery manufacturer and manufacturer of
any equipment you intend to use in the vicinity of the battery. Review
cautionary markings on these products and on the engine.
WARNING – To reduce the risk of fire:
• Do not operate near flammable materials, dust, fumes or gases.
• Do not expose to extreme heat or flames.
CAUTION – To reduce the risk of injury or property damage:
• NEVER ATTEMPT TO JUMP-START OR CHARGE A FROZEN
BATTERY.
• Vehicles that have on-board computerized systems may be damaged
if vehicle battery is jump-started. Before jump-starting, read the
vehicle’s owner’s manual to confirm that external-starting assistance
is suitable.
• When working with lead acid batteries, always make sure immediate
assistance is available in case of accident or emergency.
Page 7

English
6
• Always have protective eyewear when using this product: contact with
battery acid may cause blindness and/or severe burns. Be aware of
first aid procedures in case of accidental contact with battery acid.
• Have plenty of fresh water and soap nearby in case battery acid
contacts skin.
• Never smoke or allow a spark or flame in vicinity of vehicle battery,
engine or power station.
• Stay clear of fan blades, belts, pulleys, and other parts that can
cause injury to persons.
• Remove personal metal items such as rings, bracelets,
necklaces and watches when working with a lead acid battery. A
lead acid battery can produce a short circuit current high enough to
weld a ring, or similar metal object, to skin, causing a severe burn.
• Do not wear vinyl clothing when jump-starting a vehicle. Friction can
cause dangerous static-electrical sparks.
• Do not wear loose clothing or jewelry. They can be caught in
moving parts. Rubber gloves and substantial, non-skid footwear are
recommended when working outdoors. Wear protective hair covering
to contain long hair.
• Be extra careful to avoid dropping a metal tool onto the battery. It
might spark or short-circuit the battery or another electrical part and
could cause an explosion.
• Jump-start procedures should only be performed in a safe, dry,
well-ventilated area.
• Always store battery clamps when not in use. Never touch battery
clamps together. This can cause dangerous sparks, power arcing
and/or explosion.
• When using this unit close to the vehicle’s battery and engine, stand
the unit on a flat, stable surface, and be sure to keep all clamps, cords,
clothing and body parts away from moving vehicle parts.
• Never allow red and black clamps to touch each other or another
common metal conductor — this could cause damage to the unit
and/or create a sparking/explosion hazard.
• Make sure to connect the clamps with correct polarity. Damage
caused by improper connection is not covered by the Warranty.
• Do not expose battery to fire or intense heat since it may explode.
Before disposing of the battery, protect exposed terminals with
heavy-duty electrical tape to prevent shorting (shorting can result
in injury or fire).
• Place this unit as far away from the battery as cables permit.
• Never allow battery acid to come in contact with this unit.
• Do not operate this unit in a closed area or restrict ventilation in any
way.
• This system is designed to be used only on vehicles with a 12 volt DC
battery system. Do not connect to a 6 volt or 24 volt battery system.
• This system is not designed to be used as a replacement for a
vehicular battery. Do not attempt to operate a vehicle that does not
have a battery installed.
• Excessive engine cranking can damage a vehicle’s starter motor. If
the engine fails to start after the recommended number of attempts,
discontinue jump-start procedures and look for other problems that
may need to be corrected.
• Do not use this jump starter on a watercraft. It is not qualified for
marine applications.
• Although this unit contains a non-spillable battery, it is recommended
that unit be kept upright during storage, use and recharging. To avoid
possible damage that may shorten the unit’s working life, protect it
from direct sunlight, direct heat and/or moisture.
Page 8

English
7
Specific Safety Instructions for
Compressors
WARNING – Burst hazzard: Bursting articles can cause serious
injury.
• Carefully follow instructions on articles to be inflated.
• Never exceed the recommended pressure listed in instructions
on articles to be inflated. If no pressure is given, contact article
manufacturer before inflating.
• Always monitor the pressure on the LCD screen.
CAUTION: To reduce the risk of property damage:
• Never leave the compressor unattended while in use.
• Do not operate compressor continuously for longer than 10 minutes.
This could damage the compressor. Follow the instructions in the
“Portable Compressor” section.
Specific Safety Instructions for the
USB Ports
• Do not insert foreign objects into the USB Ports.
• Do not attach USB hubs or more than one personal electronic device
to each USB Port.
• Do not use this unit to operate appliances that require more than 3.1
amps in total to operate from the USB Ports.
First aid
• Skin: If battery acid comes in contact with skin, rinse immediately
with water, then wash thoroughly with soap and water. If redness,
pain, or irritation occurs, seek immediate medical attention.
• Eyes: If battery acid comes in contact with eyes, flush eyes
immediately, for a minimum of 15 minutes and seek immediate
medical attention.
• LCD Liquid Crystal Display: If liquid crystal comes in contact with
your skin: Wash area off completely with plenty of water. Remove
contaminated clothing. If liquid crystal gets into your eye: Flush the
affected eye with clean water and then seek medical attention. If liquid
crystal is swallowed: Flush your mouth thoroughly with water. Drink
large quantities of water and induce vomiting. Then seek medical
attention.
SAVE THESE
INSTRUCTIONS
FOR FUTURE USE
Page 9

English
8
Components (Fig. 1)
A. Handle
B. Jump Starter Power Switch
C. Backlit LCD Screen
D. Compressor Power Button
E. USB Ports
F. USB Power/Fault Indicators
G. Decrease Compressor
Pressure Control Button ( )
H. Area Light Power Button
I. Alternator Check Button
J. Increase Compressor
Pressure Control Button ( )
K. USB Power Button
L. Negative (–) Black Clamp
M. Positive (+) Red Clamp
A
B
C D
G
H
I
J
K
L
M
FE
N. LED Area Light (two banks
of three LEDs)
O. Built-in 120 Volt AC Charger
(under protective cover)
P. 12V DC Charging Port
(under protective cover)
Q. Storage Compartment
R. Air Hose and Sure Fit®
Nozzle
S. 12 Volt DC Charging
Adapter
T. Nozzle Adapter
O
P
Q
R
T
S
N
Page 10
English
9
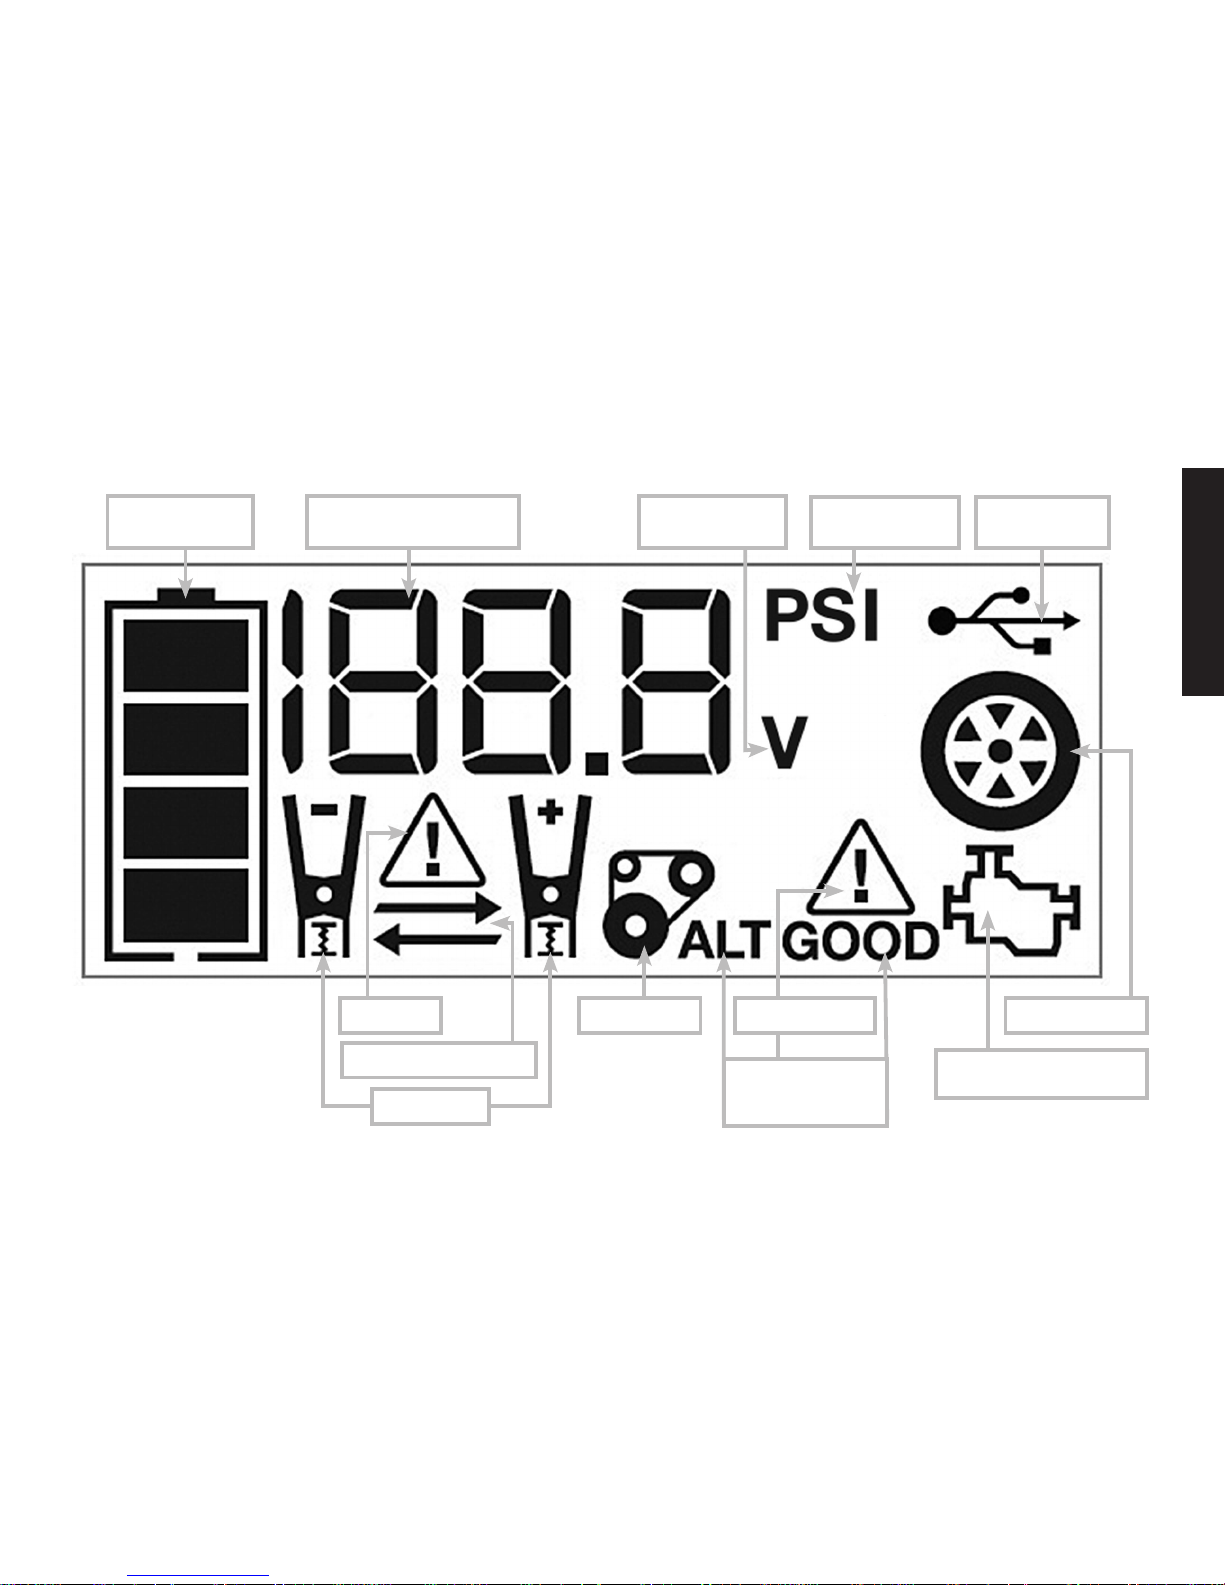
LCD Display Detail (Fig. 2)
Battery Status
Icon
Digital Display (varies by
function)
Alarm Icon
Reverse Polarity Icons
Clamp Icons
Voltage Indicator
Compressor
Pressure Indicator
USB Icon
Compressor Icon
Jump Starter Icon
Alternator Icon
Alternator Good/
Fault Indicators
Fault Icon
Page 11

English
10
Overview
COMMON ACTIONS AND UNIT RESPONSES
The following actions turn the unit on and activate the LCD screen:
Press the Alternator
Check Button. (Refer to the
"Alternator Check" section.)
A beep will sound and the backlit
LCD screen will display the Battery
Status Icon, and the Alternator
Icon will flash. The unit remains on
until the Alternator Check Button is
pressed again to turn it off.
Press the LED Area Light
Power Button. (Refer to the
"LED Area Light" section.)
A beep will sound and the Area
Light will turn on. The backlight
will turn on for 10 seconds (only).
The LCD screen will continue
to display the Battery Status
Icon and Battery Voltage Indicator.
The unit remains on until the LED
Area Light Power Button is pressed
again to turn it off.
Press the USB Power
Button.
(Refer to the "USB Ports"
section.)
A beep will sound and the backlit
LCD screen will display the Battery
Status Icon, Battery Voltage
Indicator, and the USB Icon; and
the USB Power/Fault Indicators
will light solid blue indicating the
two USB Ports are active. The
unit remains on until the USB
Power Button is pressed again to
turn it off.
Press the Compressor
Power Button. (Refer to
the "Portable Compressor"
section.)
A beep will sound and the backlit
LCD screen will display the Battery
Status Icon, "XXX" PSI and the
Compressor Icon. If no further
actions are taken after 1 minute,
the unit will display the Battery
Status Icon and Battery Voltage
Indicator for 10 seconds before
automatically turning off.
Whenever the clamps are
properly connected to a
battery (refer to the "Jump
Starter" section) …
… a beep will sound and the
backlit LCD screen will display
the Battery Status Icon, Battery
Voltage Indicator, the Clamp Icons,
and the “+” and ”–” signs, as
well as the flashing Jump Starter
Icon. The unit remains on until the
clamps are disconnected from the
battery.
If the Jump Starter Power
Switch is rotated to the on
position and the clamps
are not connected to a
battery (refer to the "Jump
Starter" section) …
... a two-second warning will
sound every 10 seconds. The
backlit LCD screen will display
the Battery Status Icon, Battery
Voltage Indicator, the Clamp Icons,
and the “+” and ”–” signs. The
Alarm Icon and the Jump Starter
Icon will flash. The unit remains
on until the Jump Starter Power
Switch is switched off and then
displays the Battery Status Icon
and the voltage on the digital
display for 10 seconds before
automatic shut down.
Page 12
English
11
If the clamp connections
to the battery’s positive
and negative terminals are
reversed (refer to the "Jump
Starter" section) …
… the backlit LCD screen will
display the Battery Status Icon,
Battery Voltage Indicator, and the
Clamp Icons. The Alarm Icon, the
“+” and ”–” signs and the Reverse
Polarity Icons will flash and the unit
will sound a warning continuously
until the clamps are disconnected
from the battery.
When the unit is charging
or recharging using
the built-in 120 Volt AC
Charger or
the 12 Volt DC Adapter
(refer to the "Charging/
Recharging" section) …
… a beep will sound and the
backlight will turn on for 10
seconds (only). The LCD screen
will continue to display the Battery
Status Icon and Battery Voltage
Indicator. The bars on the Battery
Status Icon will change from empty
to solid (bottom to top) repeatedly.
NOTE: The unit will automatically power off once ALL the functions
and the charging process are turned off.
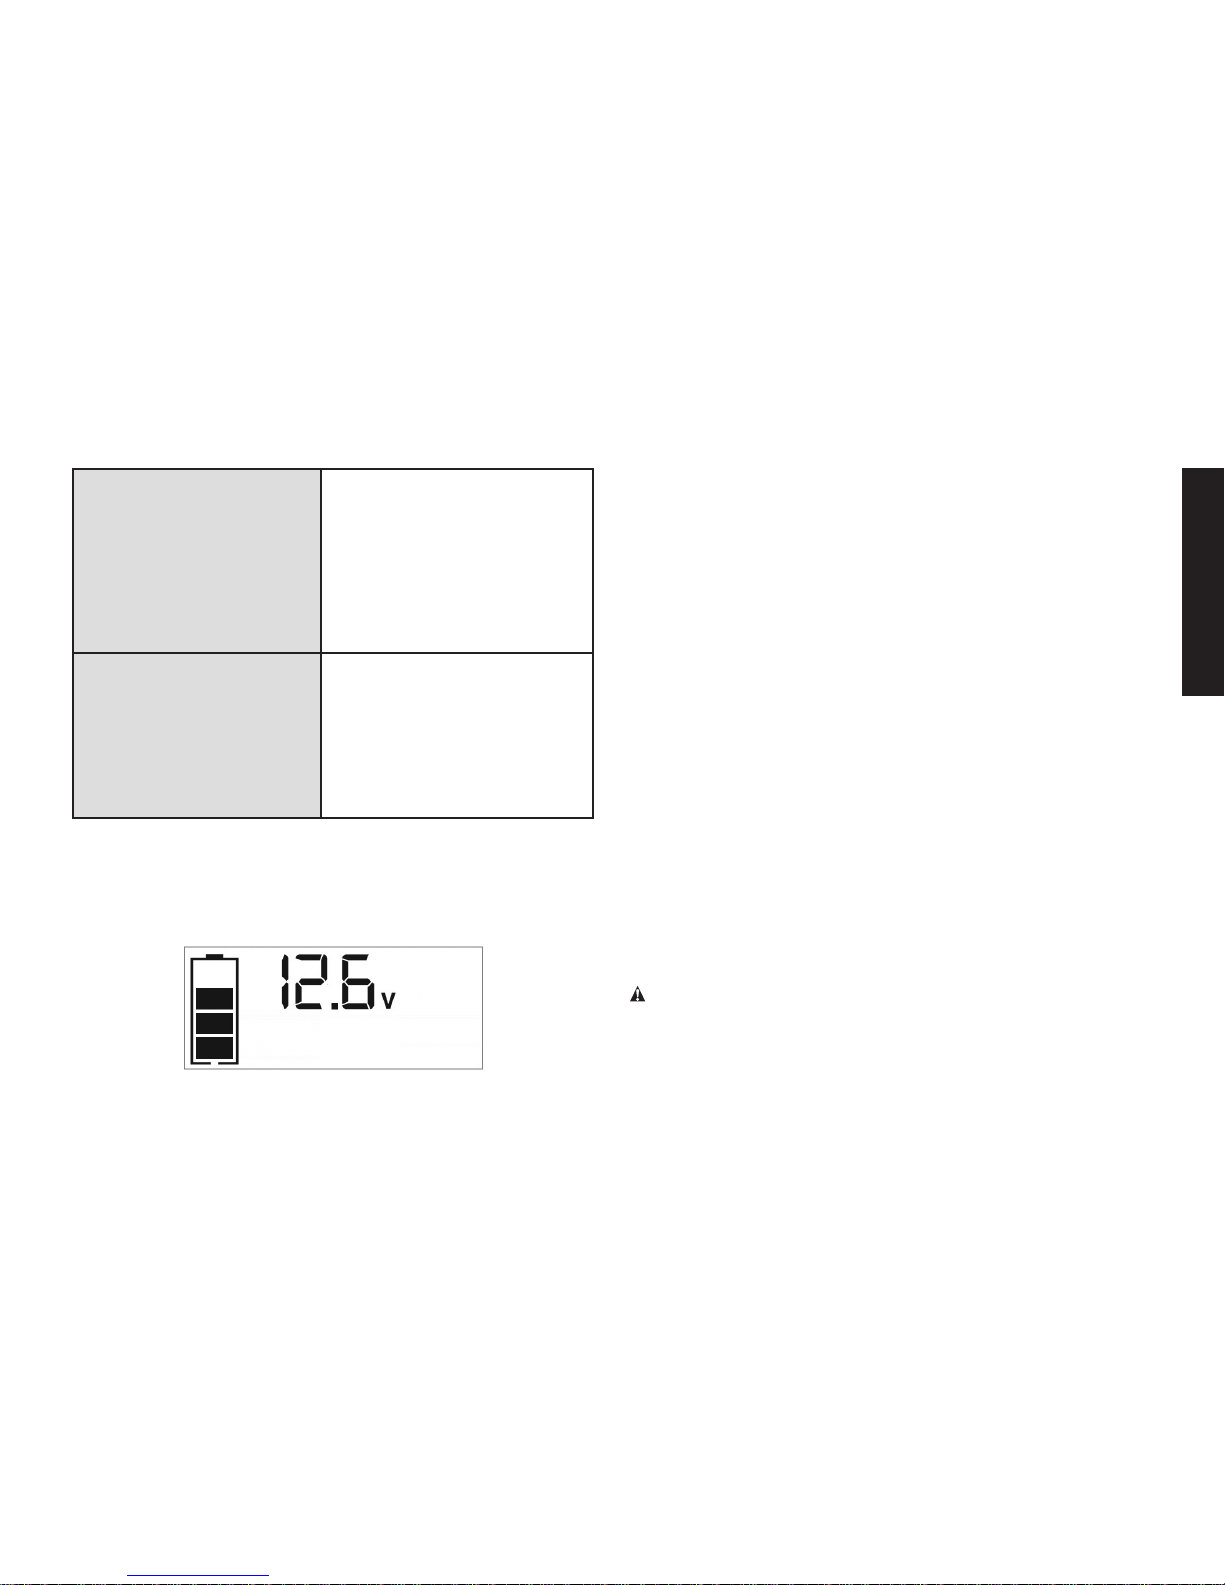
Viewing Battery Status
The Battery Status Icon and Battery Voltage Indicator indicate the
battery charge level as follows:
• If the battery charge level is at full capacity, four solid bars will display.
• If the battery is partially charged, two or three solid bars will display.
• If the battery is nearly empty, one solid bar will display. The unit should
be charged at this time.
• If the battery is completely empty, four blank bars will display. The
unit MUST be charged at this time or the unit’s built-in low voltage
protection will activate. The empty Battery Status Icon will flash for
a short period of time before automatic shut down. The unit will not
operate until the battery is recharged.
Charging/Recharging
Lead-acid batteries require routine maintenance to ensure a full charge
and long battery life. All batteries lose energy from self-discharge over
time and more rapidly at higher temperatures. Therefore, batteries need
periodic charging to replace energy lost through self-discharge. When
the unit is not in frequent use, manufacturer recommends the battery
should be recharged at least every 30 days and after each use.
Important Charging Notes
1. This unit is delivered in a partially charged state – you must fully
charge it before using it for the first time. Initial AC charge should
be for 40 hours or until the Battery Status Icon shows 4 solid bars.
2. Recharging the battery after each use will prolong battery life;
frequent heavy discharges between recharges and/or overcharging
will reduce battery life.
3. The battery can be recharged using the built-in 120 Volt AC Charger
or the 12 Volt DC Adapter.
4. Make sure all other unit functions are turned off during recharging,
as they can slow the recharging process.
CAUTION – To reduce the risk of property damage: Failure to keep
the battery charged will cause permanent damage and result in poor
jump starting performance.
IMPORTANT: If you know the unit is discharged, but the battery icon
displays four solid bars as if the unit is fully charged when connected to
a charging power source, this may be due to the internal battery having
Page 13
English
12
high impedance. The manufacturer suggests leaving the unit charging
for a period of 40 hours using the built-in AC charger before use.
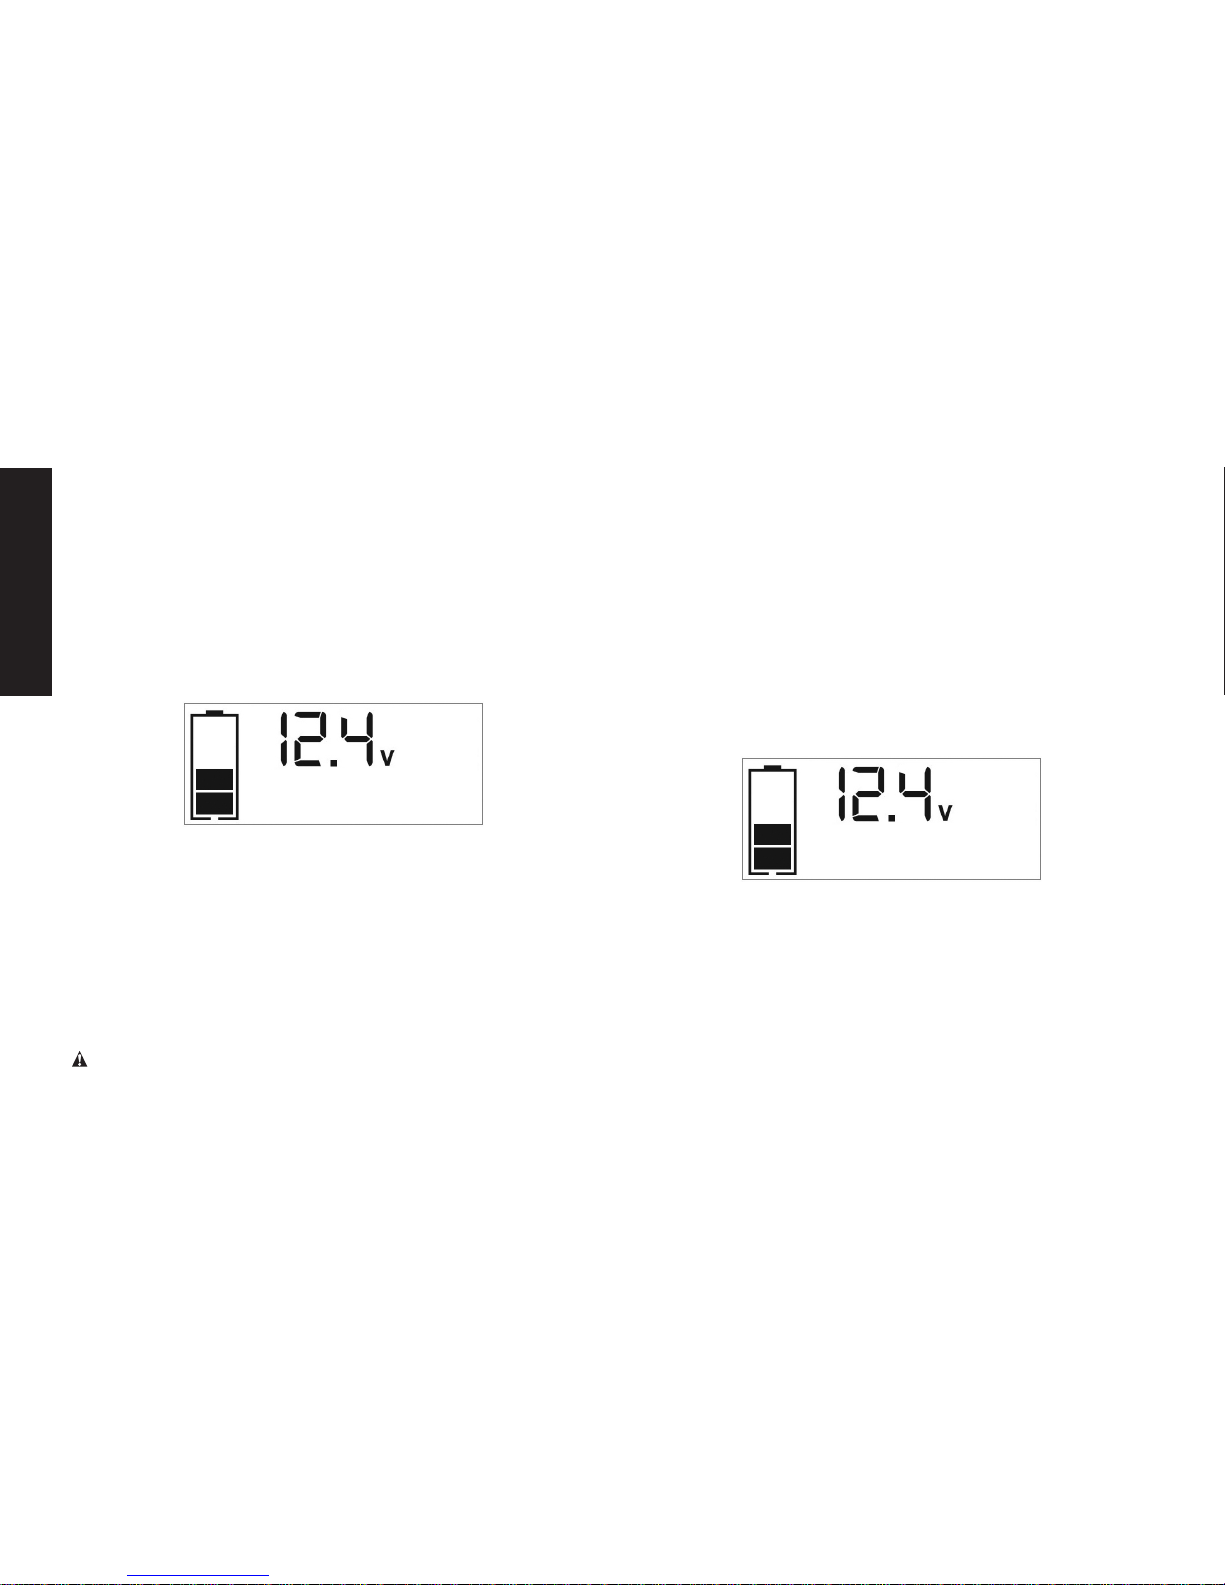
Charging/Recharging Using the
Built-In 120 Volt AC Charger and
AC Extension Cord (not supplied)
1. Lift the protective cover of the built-in 120 Volt AC Charger
located on the back of the unit (refer to Fig. 1 to locate). Connect
an extension cord to the unit. Plug the other end of the cord into
a standard 120-volt AC wall outlet. When the unit is properly
connected to an AC power source, the LCD screen will display
the following:
The bars on the Battery Status Icon represent the charge level of
the unit’s internal battery. The bars on the Battery Status Icon will
change from empty to solid (bottom to top) repeatedly to indicate
the unit is charging. The backlight will turn on for 10 seconds (only).
2. Charge for approximately 40 hours or until the Battery Status Icon
shows 4 solid bars.
3. When charging is complete, unplug the AC extension cord from
the AC outlet and then disconnect it from the unit.
Charging the Unit Using the 12V DC
Charging Adapter
CAUTION – To reduce the risk of property damage:
• NEVER connect this unit to a positive grounded vehicle using the 12
Volt DC Charging Adapter.
• The 12 Volt DC Charging Adapter must only be connected to batteries
with a nominal output voltage of 12 volts. The unit will not operate
from a 6 volt battery and will sustain permanent damage if connected
to a 24 volt battery.
PROCEDURE
1. Lift the protective cover of the Built-in 120 Volt AC Charger located
on the back of the unit (refer to Fig. 1 to locate). Make sure the
AC extension cord is disconnected from the 120 Volt AC Charger.
2. Insert the barrel tip of the 12V DC Charging Adapter into the 12V
DC Charging Port on the back of the unit.
3. Insert the grooved tip of the 12V DC Charging Adapter into the
vehicle’s 12V DC accessory outlet or other functioning 12V DC
power source. When the unit is properly connected to an DC power
source, the LCD Screen will display the following:
The bars on the Battery Icon represent the charge level of the
unit’s internal battery. The bars on the Battery Icon will change from
empty to solid (from bottom to top) repeatedly to indicate that the
unit is charging. The backlight will turn on for 10 seconds (only).
4. Charge for 6 hours. Do not overcharge.
5. Disconnect the DC Charging Adapter from the unit and the 12V
DC power source when not in use.
Notes Concerning the DC Charging Method:
A. IMPORTANT: The DC recharging method will NOT recharge the
unit as effectively as recharging from 120 volt AC. Manufacturer
suggests that you only use the 12 Volt DC Charging Adapter if
Page 14
English
13
the unit needs to be charged immediately and no 120 volt power
source is available.
B. When using a vehicle’s 12V DC accessory outlet as a power
source, be aware that some vehicles require the ignition be turned
on to power the accessory outlet.
C. The bars on the Battery Icon will continue changing from empty
to solid (bottom to top) repeatedly, but may not show 4 solid bars
when using the 12 volt DC charging method.
Jump-Starter
This unit is equipped with a jump starter power switch that allows energy
to flow only when proper connections are made to battery and frame.
A. For negative-grounded systems, connect the positive (red) clamp
to the positive ungrounded battery post and the negative (black)
clamp to the vehicle chassis or engine block away from the
battery. Do not connect the clamp to the carburetor, fuel lines or
sheet-metal body parts. Connect to a heavy gage metal part of
the frame or engine block.
B. For positive-grounded systems, connect the negative (black)
clamp to the negative ungrounded battery post and the positive
(red) clamp to the vehicle chassis or engine block away from the
battery. Do not connect the clamp to the carburetor, fuel lines or
sheet-metal body parts. Connect to a heavy gage metal part of
the frame or engine block.
IMPORTANT: Make sure the Compressor Power Button has been
turned off before attempting to use the unit as a Jump Starter.
WARNING – To reduce the risk of serious injury or property
damage:
• Follow all safety instructions found in the “Specific Safety Instructions
for Jump Starters” section of this instruction manual.
• Never touch red and black clamps together. This can cause
dangerous sparks, power arcing, and/or explosion.
• If the clamps are connected incorrectly with regard to polarity, the unit
will sound a continuous alarm until the clamps are disconnected. The
backlit LCD Screen will display the Battery Status Icon, the Battery
Voltage Indicator and the Clamp Icons. The “+” and”–” signs above
the Clamp Icons, the Reverse Polarity Icons and the Alarm Icon will
flash. The backlit LCD screen will display the following:
CAUTION: The unit will suffer permanent damage if the Jump Starter
Power Switch is turned on while the clamps connected with reverse
polarity. Disconnect the clamps and reconnect to battery with correct
polarity.
• If the Jump Starter Power Switch is turned on and the unit detects
that the clamps are not connected to a battery, a two-second warning
will sound every 10 seconds. The LCD screen will display the Battery
Status Icon, the Battery Voltage Indicator, and the Clamp Icons with
the “+” and”–” signs. The Alarm Icon and the Jump Starter Icon will
flash. The backlit LCD screen will display the following:
Turn off the Jump Starter Power Switch; connect the clamps to the
battery, making sure the clamps are connected with correct polarity;
then turn the Jump Starter Power Switch back on.
Page 15

English
14
• Always disconnect the negative (black) jumper cable first, followed by
the positive (red) jumper cable, except for positive grounded systems.
PROCEDURE
Take the following steps, observing all cautions and warnings in the
“Important Safety Instructions” section at the front of this manual.
1. Turn off vehicle ignition and all accessories (radio, A/C, lights,
connected cell phone chargers, etc.). Place vehicle in “park” and
set the emergency brake.
2. Make sure the jump-starter power switch is in the off position.
3. Remove jumper clamps from clamp tabs. Connect the red clamp
first, then the black clamp.
4. Procedure for jump-starting a NEGATIVE GROUNDED
SYSTEM (negative battery terminal is connected to chassis)
(MOST COMMON)
4a. Connect positive (+) red clamp to vehicle battery’s positive
terminal.
4b. Connect negative (–) black clamp to chassis or a solid, non-
moving, metal vehicle component or body part. Never clamp
directly to negative battery terminal or moving part. Refer to
the automobile owner’s manual.
5. Procedure for jump-starting POSITIVE GROUND SYSTEMS
NOTE: In the rare event that the vehicle to be started has a
Positive Grounded System (positive battery terminal is connected
to chassis), replace steps 4a and 4b above with steps 5a and 5b,
then proceed to step 6.
5a. Connect negative (–) black clamp to vehicle battery’s negative
terminal.
5b. Connect positive (+) red clamp to vehicle chassis or a solid,
non-moving, metal vehicle component or body part. Never
clamp directly to positive battery terminal or moving part. Refer
to the automobile owner’s manual.
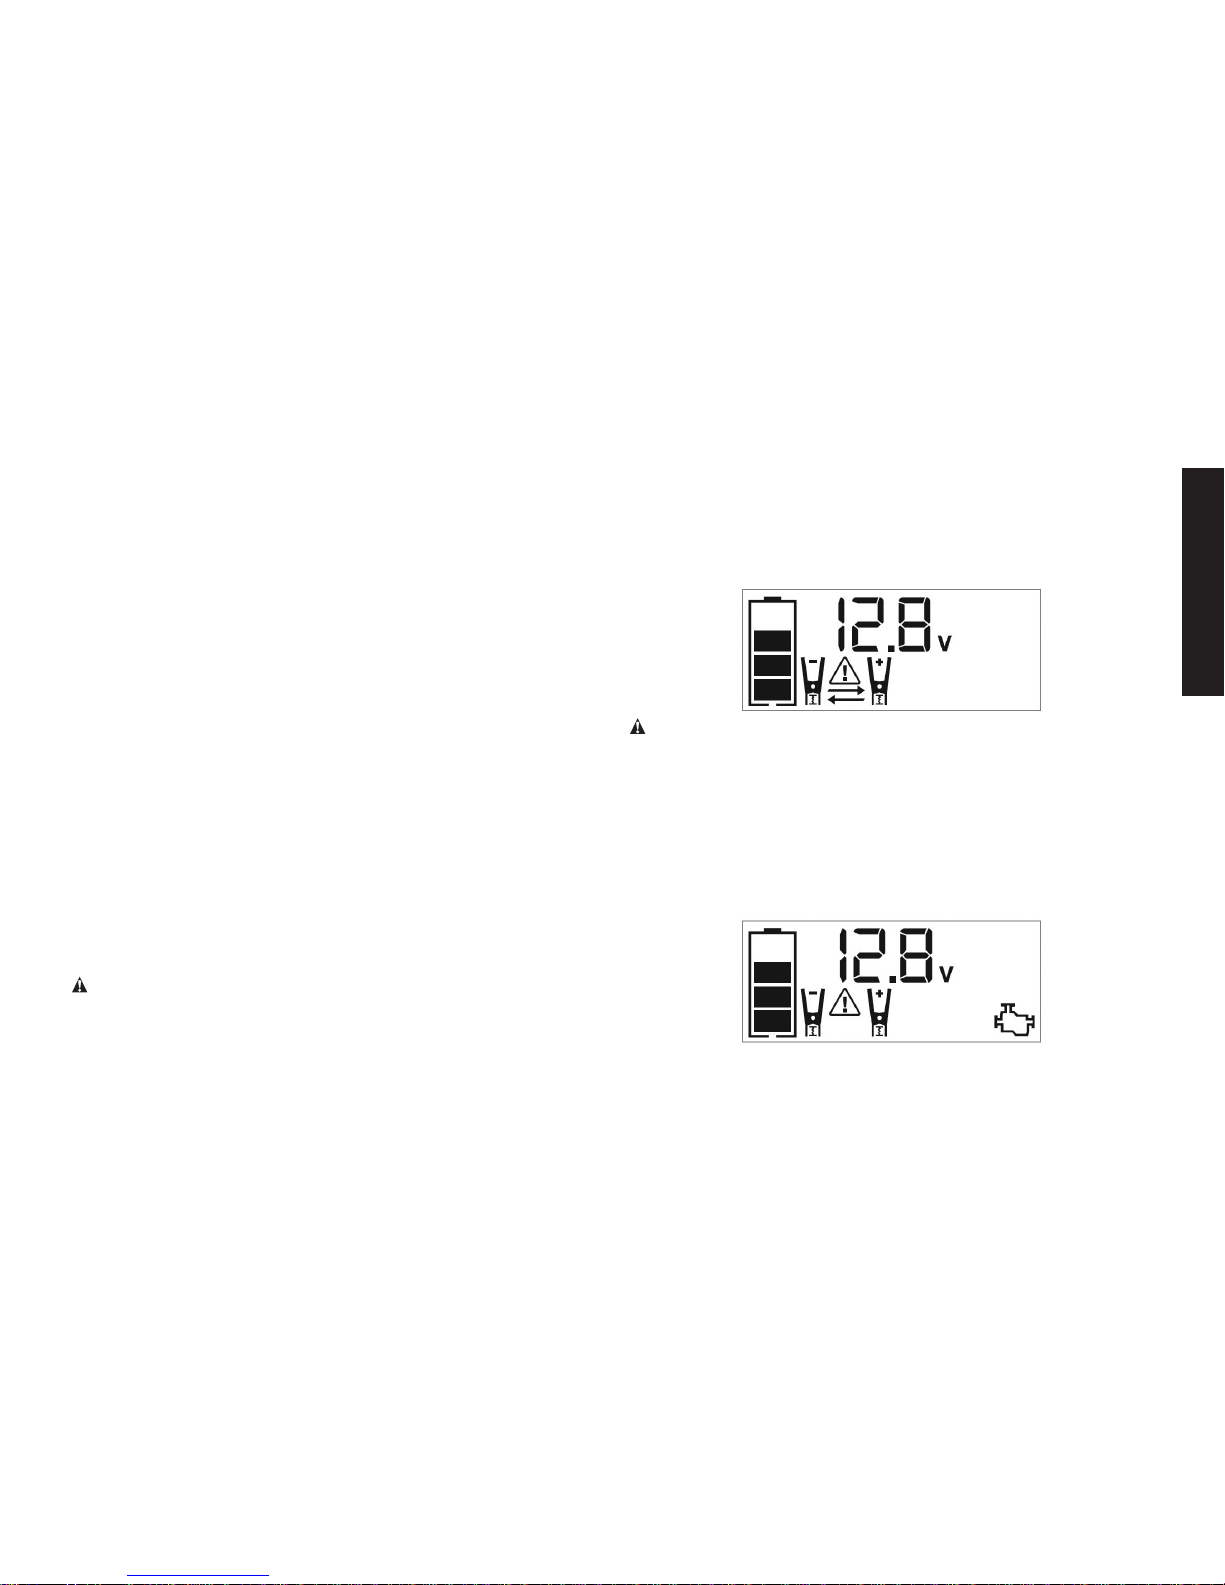
6. When the clamps are connected properly, the backlit LCD screen
will display the following to indicate the unit is ready to jump-start:
The Battery Status icon, Battery Voltage Indicator, Clamp Icons
and the “+” and”–” signs light solid. The jump starter icon will flash
to indicate the clamps are properly connected.
7. Turn the Jump-Starter Power Switch on. When the Jump-Starter
Power Switch is turned on, the Engine Icon lights solid indicating
it is time to start the vehicle. Turn on the ignition and crank the
engine in 5-6 second bursts until engine starts. The backlit LCD
screen will display the following:
The Battery Status Icon, the Battery Voltage Indicator, Jump Starter
Icon, Clamp Icons and the “+” and”–” signs light solid to indicate
the unit is jump-starting.
8. Turn the Jump-Starter Power Switch off.
9. Disconnect the negative (–) engine or chassis clamp first, then
disconnect the positive (+) battery clamp.
IMPORTANT: Always turn the unit off when not in use. Recharge this
unit fully after each use.
Page 16

English
15
CAUTION – TO REDUCE THE RISK OF PROPERTY DAMAGE:
• Vehicles that have on-board computerized systems may be damaged
if vehicle battery is jump-started. Before jump-starting this type of
vehicle, read the vehicle manual to confirm that external-starting
assistance is advised.
• Excessive engine cranking can damage the vehicle‘s starter motor. If
the engine fails to start after the recommended number of attempts,
discontinue jump-start procedure and look for other problems that
need to be corrected.
• If vehicle fails to start, turn off the ignition, turn off the Jump-Starter
Power Switch, disconnect the jump-start system’s leads and contact
a qualified technician to investigate why the engine did not start.
Alternator Check
Set up the unit and connect to the battery following steps 1 through 5
in the “Jump-Starter” section.
Important Notes About the Alternator Check Function
1. The unit may detect that the alternator is out of typical voltage
range because someone has added a number of accessory loads
on the charging system, thereby increasing current demand from
the alternator. MAKE SURE THAT THE ALTERNATOR IS RATED
TO SUPPORT THE APPLICATION.
2. This check may not be accurate for every make, manufacturer and
model of vehicle. Check only 12 volt systems.
PART 1
No Load (turn OFF all vehicle’s accessories): The vehicle battery
must be fully charged before testing the alternator. Run the engine
long enough to achieve normal idle speed and verify there is a no-load
voltage.
1. Press the Alternator Check Button to start the check. The backlit
LCD screen will display the following to indicate the unit is analyzing
the alternator:
The Battery Status Icon will light solid and the Alternator Icon will
flash.
2. If the unit detects that the alternator is good, the backlit LCD screen
will display the following:
The Battery Status Icon, Alternator Icon, and “ALT GOOD” will light
solid.
3. If the unit detects that the alternator is out of typical voltage range,
the backlit LCD screen will display the following:
Page 17

English
16
The Battery Status Icon, Alternator Icon and “ALT” will light solid.
The Fault Icon will flash.
4. Press the Alternator Check Button again to stop the test and turn
off the unit.
PART 2
Under Load (accessories ON): Next, load the alternator by turning
on as many accessories as possible (except for A/C and Defrost).
1. Press the Alternator Check Button to start the check. The backlit
LCD screen will display the following to indicate the unit is analyzing
the alternator:
The Battery Status Icon will light solid and the Alternator Icon will
flash.
2. If the unit detects that the alternator is good, the backlit LCD screen
will display the following:
The Battery Status Icon, Alternator Icon, and “ALT GOOD” will light
solid.
3. If the unit detects that the alternator is out of typical voltage range,
the backlit LCD screen will display the following:
The Battery Status Icon, Alternator Icon and “ALT” will light solid.
The Fault Icon will flash.
4. Press the Alternator Check Button again to stop the test and turn
off the unit.
IMPORTANT: Always turn the unit off when not in use. Recharge this
unit fully after each use.
Portable Compressor
The built-in 12 volt DC compressor is the ultimate compressor for all
vehicle tires, trailer tires and recreational inflatables. A nozzle adaptor
is supplied that screws onto the end of the Sure Fit® nozzle at the free
end of the compressor hose. The compressor hose with tire fitting is
stored in the compressor hose storage compartment. Refer to Fig. 1
to locate the compressor hose. The Compressor Power Button and
Increase ( ) and Decrease ( ) Compressor Pressure Control Buttons
are located on the control panel on the front of the unit.
Before proceeding, check the unit’s battery status on the LCD screen.
Four solid bars in the battery icon indicates a full battery. When the
battery level is nearly empty with only one solid bar, the unit MUST be
recharged before use or the unit’s built-in low voltage protection will
activate. The empty Battery Status Icon will flash for a short period of
time before automatic shut down.
The compressor is capable of inflating up to 120 pounds per square
inch (psi) pressure. The compressor can operate long enough to fill up
Page 18

English
17
to 3 average sized tires before the battery must be recharged. Return
hose to the storage compartment after use.
IMPORTANT: Make sure the Jump Starter Power Button has been
turned off before attempting to use the unit as a Compressor.
WARNING – To reduce the risk of serious injury or property damage:
Follow all safety instructions found in the “Specific Safety Instructions
for Compressors” section of this instruction manual.
CAUTION – To reduce the risk of serious injury or property damage:
When the compressor is operated at a low PSI, the unit may start in
low and gradually rev up. When the compressor is operated at higher
PSIs, the unit may operate normally for several minutes, then rev down
for a few minutes before returning to normal operation. This feature
protects the unit from overheating during normal use. In any event, do
not operate compressor continuously for longer than 10 minutes, as
it may overheat. This could damage the compressor. If the compressor
must be operated for longer periods: every 10 minutes press the
Compressor Power Button to turn the compressor off, then restart
after a cooling down period of approximately 30 minutes.
INFLATING TIRES OR PRODUCTS WITH VALVE STEMS
1. Screw the Sure Fit® nozzle onto the valve stem. Do not overtighten.
2. Press the Compressor Power Button. A beep will sound and the
backlit LCD screen will display the following:
The Compressor Icon will light and the Digital Display will alternately
show the flashing pre-set psi value (that was last set by the
compressor pressure control buttons) and the current pressure of
the item being inflated (which will light solid).
3. Press the “ ” and “ ” Pressure Control Buttons to set the desired
pressure from a range pre-set values (between 3 and 120), which
will display on the backlit LCD Screen. The unit will sound a beep
with each press of the buttons (holding the button speeds up the
upward or downward value selection). Once the desired pressure
has been entered, release the button and the flashing digital display
will show the new selected pressure, as follows:
The new selected value is now stored in the unit’s memory until it
is manually reset.
4. Press the Compressor Power Button once more to begin inflating.
The Compressor Icon will flash and the digital display will only show
the current pressure value (which will light solid) to indicate the
compressor is activated. Monitor the pressure on the LCD Screen.
IMPORTANT NOTE: To interrupt during inflation, press the
Compressor Power Button again.
5. When desired pre-set pressure is reached, the compressor will
automatically stop.
6. Press the Compressor Power Button again to turn off the unit.
7. Unscrew and remove the Sure Fit® nozzle from the valve stem.
8. Allow the unit to cool, then recharge before storing away.
9. Store the compressor hose and Sure Fit® nozzle in the storage
compartment.
Page 19

English
18
INFLATING OTHER INFLATABLES WITHOUT VALVE STEMS
Inflation of other items requires use of the nozzle adapter.
1. Screw the nozzle adapter into the Sure Fit® nozzle. Do not
overtighten.
2. Insert the nozzle adapter into item to be inflated.
3. Follow steps 2 through 4 of the “Inflating Tires or Products With
Valve Stems” section.
IMPORTANT: Small items such as volleyballs, footballs, etc. inflate
very rapidly. Keep this in mind when setting pressure. Take extra
care not to over-inflate.
4. When the desired pressure is reached, the compressor will
automatically stop. Press the Compressor Power Button again to
turn off the unit.
5. Disconnect the adapter from the inflated item.
6. Unscrew and remove the nozzle adapter from the Sure Fit® nozzle.
7. Allow the unit to cool, then recharge before storing away.
8. Store the compressor hose, Sure Fit® nozzle and nozzle adapter
in the storage compartment.
USB Ports
The USB Power Button and the two USB Ports are located on the right
hand side of unit. The USB Power/Fault Indicator is a translucent ring
around each of the USB Ports. Refer to Fig. 1 to locate.
Important Notes Concerning the USB Ports
1. The two USB Ports provide a total of 3.1A (5V each).
2. When the USB Ports are in use, the unit will monitor for the following
USB fault conditions on all the USB Ports: thermal fault, low battery
voltage fault, overload and short circuit. If a fault condition exists in
either of the USB Ports, the USB Power/Fault Indicators will flash
blue. In any of these cases, the backlit LCD screen will continuously
display the following:
The Fault Icon will flash. The USB Ports will automatically shut
down. Should this occur:
a. Disconnect the USB-powered device and press the USB Power
Button again to turn off the USB Ports immediately.
b. Make sure the unit does not need to be recharged.
c. Allow the unit to cool down for several minutes before attempting
to use the USB Ports again.
d. If a fault occurs again, make sure that the total draw of all USB
devices plugged into the USB Ports does not exceed 3.1A.
e. If an individual USB device is within specifications and the fault
occurs, have the USB device checked for malfunction and do
not continue to use it with these USB Ports.
3. This unit’s USB Ports do not support data communication. They
only provide power to external USB-powered devices. The USB
Ports provide a total of 3.1A (5V each).
4. Some household USB-powered electronics will not operate with
this unit.
USING THE USB PORTS
1. Press the USB Power Button to turn on both USB Ports. A beep
will sound, the USB Power/Fault Indicators around each of the
Page 20

English
19
two USB Ports will light blue and the backlit LCD screen will
continuously display the following:
The Battery Status Icon and Battery Voltage Indicator will light
solid, as well as the USB Icon, indicating the USB ports are ready
to use.
2. Plug the USB-powered device into the USB power port(s) and
operate normally.
3. Press the USB power button again to turn off the USB Ports.
Periodically check the unit’s battery status on the backlit LCD screen.
Four solid bars in the battery icon indicates a full battery. When the
battery level is nearly empty with only one solid bar or completely empty
with 4 empty bars, the unit must be recharged at this time or the unit’s
built-in low voltage protection will activate. The empty Battery Status
Icon will flash for a short period of time before automatic shut down.
IMPORTANT: Make sure the USB Ports are turned off when the unit
is being recharged or stored.
LED Area Light
The built-in LED Area Light consists of two banks of three LEDs (one on
the right hand side, one on the left hand side of the back of the unit). It
is controlled by the Area Light Power Button on the control panel (refer
to Fig. 1 to locate).
1. Press the Area Light Power Button once to turn the light on.
2. Press the Area Light Power Button again to turn the Area Light off.
When the Area Light Power Button is pressed to turn it on, a beep will
sound. The backlit LCD screen will turn on for 10 seconds (only) and
will then continuously display the Battery Status Icon and the Battery
Voltage Indicator.
Periodically check the unit’s battery status on the backlit LCD screen.
Four solid bars in the battery icon indicates a full battery. When the
battery level is nearly empty with only one solid bar or completely empty
with 4 empty bars, the unit must be recharged at this time or the unit’s
built-in low voltage protection will activate. The empty Battery Status
Icon will flash for a short period of time before automatic shut down.
IMPORTANT: Make sure the Area Light is turned off when the unit is
being recharged or stored.
Care and Maintenance
WARNING: To reduce the risk of injury, turn the unit off and
disconnect it from any power source before installing and removing
accessories, before adjusting or when performing maintenance. An
accidental start-up can cause injury.
Never submerge this unit in water. Dirt and grease may be removed
from the exterior of the unit using a cloth or soft non-metallic brush
moistened with a mild solution of water and detergent. Never let any
liquid get inside the unit; never immerse any part of the unit into a liquid.
WARNING: Shock hazard. Disconnect the AC extension cord
before cleaning.
Except for the fuse in the 12V DC Charging Adapter, there are
no user-replaceable parts. Periodically inspect the condition of
adapters, connectors and wires. Contact manufacturer to replace any
components that have become worn or broken.
THE INTERNAL BATTERY
All batteries lose energy from self-discharge over time and more rapidly
at higher temperatures. When the unit is not in use, we recommend
that the battery is charged at least every 30 days.
Page 21

English
20
BATTERY REPLACEMENT
The battery should last the service life of the unit. Service life is
dependent on a number of factors including but not limited to the
number of recharge cycles, and proper care and maintenance of the
battery by the end user. Contact manufacturer for any information you
may need.
SAFE BATTERY DISPOSAL
Contains a maintenance-free, sealed, non-spillable, lead
acid battery, which must be disposed of properly. Recycling
is required. Failure to comply with local, state and federal
regulations can result in fines, or imprisonment.
Please recycle.
WARNING – To reduce the risk of serious injury or property
damage:
• Do not dispose of the battery in fire as this may result in an explosion.
• Before disposing of the battery, protect exposed terminals with
heavy-duty electrical tape to prevent shorting (shorting can result
in injury or fire).
• Do not expose battery to fire or intense heat as it may explode.
12 VOLT DC ADAPTER PLUG FUSE REPLACEMENT
The fuse in the plug end of the 12 Volt DC Adapter protects the
adapter’s charging circuit. If the built-in 120 Volt AC Charger operates,
but the DC charging adapter does not, then this fuse may be opened
(blown).
To replace the fuse:
1. Unscrew the end cap of the DC plug (counterclockwise).
2. Remove spring center contact and fuse.
3. Check fuse with a continuity checker.
4. If blown, locate a replacement 2 amp.
5. Replace the fuse, spring, contact and end cap.
6. Screw end cap clockwise until it is finger tight – DO NOT OVERTIGHTEN.
7. Test for proper operation of the 12 volt DC charging adapter.
Troubleshooting
Problem Possible Solution
Unit will not charge Make sure all of the unit’s functions are
turned off.
Make sure a suitable gage extension
cord is properly connected to both the
unit and a functioning AC outlet.
or
Make sure the 12 volt DC charging
adapter is properly connected to both
the unit and a functioning DC power
source.
Check the connection to the AC or DC
power source.
Confirm there is a functioning AC or
DC current.
Check that the fuse in the 12 Volt DC
Adapter is not blown.
Unit fails to jump-start Make sure unit’s Jump Starter Power
Switch is in the on position.
Make sure a proper polarity cable
connection has been established.
Make sure the unit is not being operated
in the Compressor mode.
Page 22

English
21
Problem Possible Solution
Unit fails to jump-start
(continued)
Check that the unit has a full charge.
Recharge the unit if necessary.
Portable Compressor
will not inflate
Make sure the Compressor Power
Button has been pressed to turn the
compressor on.
Make sure the unit is not being
operated in the Jump Starter mode.
Make sure the Sure Fit® nozzle is
securely screwed on to the valve stem
when attempting to inflate tires; or that
the nozzle adapter is securely screwed
into the Sure Fit® nozzle and is inserted
properly into the item to be inflated on
all other inflatables.
Check that the unit has a full charge.
Recharge the unit if necessary.
USB Port will not
power appliance
Make sure the USB Power Button is in
the on position.
Make sure all the USB Power/Fault
Indicators light solid blue. If a fault
condition exists in either of the USB
Ports, the USB Power/Fault Indicators
will flash blue. Refer to the Important
Notes in the “USB Ports” section to
remedy any faults.
Problem Possible Solution
USB Port will not
power appliance
(continued)
Make sure that the total draw of all USB
devices plugged into the USB Ports
does not exceed 3.1A.
Some USB-powered household
electronics will not operate with this
USB charging/power port. Check the
manual of the corresponding electronic
device to confirm that it can be used
with this type of USB charging/power
port.
Check that the unit has a full charge.
Recharge the unit if necessary.
LED Area Light does
not come on
Make sure the Area Light Power Button
is in the on position
Check that the unit has a full charge.
Recharge the unit if necessary.
Accessories
WARNING: Since accessories, other than those offered by
DeWALT, have not been tested with this product, use of such
accessories with this unit could be hazardous. To reduce the risk of
injury, only DeWALT recommended accessories should be used with
this product.
If you need assistance regarding accessories, please contact the
manufacturer at 1-888-394-3392 or CustomerService@dewalt12volt.
com.
Page 23

English
22
Service Information
Whether you need technical advice, repair, or genuine factory
replacement parts, contact the manufacturer at 1-888-394-3392 or
CustomerService@dewalt12volt.com.
One Year Limited Warranty
The manufacturer warrants this product against defects in material and
workmanship for a period of one (1) year from the date of retail purchase
by the original end-user purchaser (“Warranty Period”).
If there is a defect and a valid claim is received within the Warranty
Period, the defective product can be repaired, replaced or refunded,
without charge, in the following ways: (1) Return the product to the
manufacturer for repair, replacement or refund at manufacturer’s option.
Proof of purchase may be required by manufacturer. (2) Return the
product to the retailer where product was purchased for an exchange
(provided that the store is a participating retailer). Returns to retailer
should be made within the time period of the retailer’s return policy for
exchanges only (usually 30 to 90 days after the sale). Proof of purchase
may be required. Please check with the retailer for their specific return
policy regarding returns that are beyond the time set for exchanges.
This warranty does not apply to: accessories, bulbs, fuses and batteries;
defects resulting from normal wear and tear, accidents; damages
sustained during shipping; alterations; unauthorized use or repair;
neglect, misuse, abuse; and failure to follow instructions for care and
maintenance for the product.
This warranty gives you, the original retail purchaser, specific legal rights
and you may have other rights which vary in certain states or provinces.
This product is not intended for commercial use.
90 DAY REFUND POLICY
If you are not completely satisfied with the performance of this product
for any reason, you can return it within ninety (90) days from the date
of purchase with a receipt for a full refund.
Please complete the Product Registration Card and return within
30 days from purchase of the product to: Baccus Global LLC, One
City Centre, 1 North Federal Highway, Suite 200, Boca Raton, FL
33432. Baccus Global LLC, toll-free number: 1-888-394-3392. www.
dewalt12volt.com
Specifications
Boost Ampere 1,400A peak battery,
700A instant
Battery Type SLA, 12 volt DC
Input 120V AC, 60Hz, 13W or
12V DC, 0.6A
Compressor 120 PSI
USB Output 5V DC, 3.1A max.
12 Volt DC Adapter 12V DC
Sure Fit® is a registered trademark owned by Baccus Global, LLC.
Imported by Baccus Global LLC, One City Centre,
1 North Federal Highway, Suite 200, Boca Raton, FL 33432
www.dewalt12volt.com 1-888-394-3392
Copyright © 2017 Baccus Global, LLC. DeWA LT® and the DeWA LT
Logo are trademarks of the DeWALT Industrial Tool Co., or an affiliate
thereof and are used under license. The yellow/black color scheme is
a trademark for DeWALT power tools & accessories.
Page 24

Français
23
Définitions: lignes directrices en
matière de sécurité
Les définitions ci-dessous décrivent le niveau de danger pour
chaque mot-indicateur employé. Lire le mode d’emploi et porter
une attention particulière à ces symboles.
DANGER: indique une situation dangereuse imminente qui,
si elle n’est pas évitée, entraînera la mort ou des blessures
graves.
AVERTISSEMENT : indique une situation potentiellement
dangereuse qui, si elle n’est pas évitée, pourrait entraîner la
mort ou des blessures graves.
ATTENTION : indique une situation potentiellement
dangereuse qui, si elle n’est pas évitée, pourrait entraîner des
blessures légères ou modérées.
AVIS : indique une pratique ne posant aucun risque de
dommages corporels mais qui par contre, si rien n’est fait pour
l’éviter, pourrait poser des risques de dommages matériels.
POUR TOUTE QUESTION OU REMARQUE AU SUJET DE CET OUTIL
DeWALT, COMPOSEZ LE NUMÉRO SANS FRAIS : 1-888-394-3392.
AVERTISSEMENT : Lire toutes les instructions avant d’utiliser
le produit. Défaut de respecter toutes les instructions
mentionnées ci-dessous peut entraîner un choc électrique,
d’incendie et/ou des blessures graves.
Batterie d’appoint avec compresseur
d’air digital et ports USB
La DXAEJ14CA batterie d’appoint 700A avec compresseur d’air digital
et ports USB est une batterie auxiliaire DeWALT qui comporte un
compresseur digital 120 PSI portable et deux ports USB.
AVERTISSEMENT : Ce produit ou son cordon contient du plomb,
un élément chimique reconnu par l’État de la Californie comme étant
la cause de cancers et de malformations congénitales ou d’autres
troubles de la reproduction. Lavez vos mains après les avoir manipulés.
Directives de sécurité
importantes
1. Conserver ces directives.
2. Respecter tous les avertissements.
3. Suivre toutes les directives.
4. Éviter les milieux dangereux. Ne pas utiliser le chargeur dans des
endroits humides ou mouillés. Ne pas utiliser le chargeur sous la
pluie ou de la neige.
5. Nettoyez uniquement avec un chiffon sec.
6. Gardez les enfants loin de la zone de travail. Gardez cette unité
à l’écart des enfants. Ce n’est pas un jouet!
7. Ranger à l’intérieur. Lorsque cette unité est pas utilisé, il doit être
stocké à l’intérieur dans un endroit sec et élevé ou verrouillé - hors
de la portée des enfants.
8. Soyez vigilant. Faites preuve de bon sens. Ne pas utiliser cet
appareil lorsque vous êtes fatigué ou facultés affaiblies.
9. Utilisez uniquement les pièces de fixation/accessoires spécifié
par le fabricant. L’utilisation de tout accessoire ou équipement
non recommandé pour une utilisation avec cet appareil pourrait
être dangereux.
Page 25

Français
24
10. Utilisez uniquement sur une surface plane. Si vous utilisez un
chariot, faites attention lorsque vous déplacez
l’ensemble chariot/appareil pour éviter les
blessures causées par renversement du chariot.
11. Afin de réduire les risques de choc électrique,
débranchez l’unité de toute source d’alimentation
avant l’entretien ou le nettoyage. La désactivation
des contrôles sans débranchement ne permettra
pas de réduire ce risque.
12. Confier l’entretien de l’appareil aux soins d’un personnel qualifié.
Faire systématiquement entretenir l’appareil en cas de dommages
quelconques, tels que: le cordon électrique, ou une fiche, a été
endommagé, un liquide ou un objet a pénétré dans l’appareil,
l’appareil a été exposé à la pluie ou à l’humidité, il ne fonctionne
pas normalement ou il a fait une chute. Contacter le fabricant au
1-888-394-3392 pour plus d’informations.
13. Protéger l’appareil de tout liquide, ou éclaboussure, et ne
disposer aucun objet rempli d’un liquide, (un vase par exemple)
sur l’appareil.
14. N’utilisez pas cette unité près de liquides inflammables, dans
un milieu déflagrant ou en présence de atmosphères gazeuses
ou explosives. Moteurs émettent des étincelles qui risquent
d’enflammer les vapeurs.
15. Cet appareil utilise des pièces (interrupteurs, relais, etc.) qui
produisent des arcs électriques ou des étincelles. Par conséquent,
si l’appareil est utilisé dans un garage ou une aire fermée, il DOIT
être placé au moins à 18 pouces au-dessus du sol.
Cet appareil numérique de classe B est conforme à la norme NMB003 du Canada. NMB-3(B).
REMARQUE : cet équipement a été testé et jugé conforme aux
limites propres aux appareils numériques de Classe B, conformément
au Paragraphe 15 du règlement du FCC. Ces limites sont destinées
à offrir une protection raisonnable contre les interférences nuisibles
d’une installation résidentielle. Cet équipement produit, utilise et
peut émaner des ondes radiofréquences et, s’il n’est pas installé
et utilisé conformément aux directives du fabricant, peut causer
des interférences nuisibles aux communications radio. En fonction
des installations réalisées, il n’est cependant pas garanti que toute
interférence soit exclue. Si cet équipement cause des interférences
nuisibles à toute réception radio ou télévision, ce qui peut être
déterminé en allumant et éteignant l’équipement, l’utilisateur est
encouragé à tenter de corriger ces interférences en prenant l’une ou
plusieurs des mesures suivantes:
• Réorienter l’antenne de réception ou en changer l’emplacement;
• Augmenter la distance entre l’équipement et le récepteur;
• Brancher l’équipement à une prise située sur un circuit différent
de celui sur lequel le récepteur est connecté;
• Contacter le détaillant ou consulter un technicien radio/télé
qualifié.
AVIS: conformément à la norme du FCC, Part 15, tout changement
ou modification apporté à cet équipement, non approuvé expressément
par DeWALT, peut annuler tout droit d’utilisation de cet équipement.
LIRE TOUTES LES INSTRUCTIONS
Consignes de securite particulieres a la
charge de cette unité
• N’abusez pas le cordon. Protéger la rallonge contre être a marché
sur ou pincé notamment au des fiches, des prises de courant et du
point où il se connecte à l’unité. Ne transportez jamais l’unité par le
Page 26

Français
25
cordon d’alimentation ou de débrancher de yank réceptacle. Il est
recommandé de tirer sur la fiche et non sur le cordon au moment
de débrancher de l’unité.
• Utilisez un disjoncteur de fuite à la terre «DDFT» sur les circuits
ou les prises qui seront utilisés«es». Des prises avec disjoncteur
de fuite à la terre sont offertes en magasin et peuvent servir comme
mesure de sécurité.
• IMPORTANT : Cet appareil est livré partiellement chargé. Avant
de l’utiliser pour la première fois, chargez-le à fond en utilisant une
rallonge pendant une période complète de 4 heures ou jusqu’à ce que
l’icône d’état de la batterie affiche 4 barres solide. Il est impossible
de surcharger l’appareil au moyen de la méthode de charge CA.
• Pour recharger cette unité, utilisez seulement le chargeur intégré à
CA oul’adaptateur de charge CC fourni.
• Toutes les fonctions doivent être désactivée lorsque l’unité est en
cours de chargement ou de ne pas en utiliser. Assurez-vous que
toutes les fonctions sont désactivées avant la connexion à une source
d’alimentation ou de chargement.
Rallonges
AVERTISSEMENT : L’utilisation d’une rallonge inadéquate peut
entraîner un risque d’incendie et de choc électrique. Lorsque vous
utilisez une rallonge, assurez-vous que les broches de la rallonge ont
les mêmes numéro, taille et forme que celles dans le chargeur, et veillez
à utiliser une capacité suffisante pour supporter le courant nécessaire
à l’outil. Un cordon trop petit provoquera une baisse de tension
entraînant une perte de puissance et surchauffe. Le tableau suivant
indique le calibre approprié à utiliser selon la longueur du cordon et
l’ampérage de. En cas de doute, utiliser un calibre supérieur. Plus le
numéro de calibre est élevé, plus la corde.
CALIBRE MINIMUM DU CORDON D’ALIMENTATION
Volts Longueur totale du cordon en pieds
120V 0 à 25 26 à 50 51 à 100 101 à 150
(0 à 7,6m) (7,6 à 15,2m) (15,2 à 30,4m) (30,4 à 45,7m)
240V 0 à 50 51 à 100 101 à 200 201 à 300
(0 à 15,2m) (15,2 à 30,4m) (30,4 à 60,9m) (60,9 à 91,4m)
Intensité nominale Longueur de la rallonge
Plus Moins de 0’ à 25’ 26’ à 50’ 51 ’ à 100 ’ 101’ à 150 ’
de de Calibre américain des fils (AWG)
0 - 6 18 16 16 14
6 - 10 18 16 14 12
10 - 12 16 16 14 12
12 - 16 14 12 Non recommandé
Lors de l’utilisation d’une rallonge, assurez-vous que:
• les broches de la fiche de la rallonge sont de même quantité,
dimension et format que celles de la prise du chargeur,
• la rallonge est bien câblée et en bonne condition; et
• le calibre du câble est suffisant pour supporter le courant CA nominal
du chargeur.
AVERTISSEMENT : N’ESSAYEZ JAMAIS D’UTILISER LES
MÉTHODES DE CHARGEMENT CA ET CC EN MÊME TEMPS.
ATTENTION – Pour réduire le risque de blessure corporelles ou
de dommage matériel: Tirez sur la fiche du cordon d’alimentation plutôt
que sur le cordon en débranchant l’adaptateur de charge de 120 V
CA de l’appareil.
ATTENTION – Pour réduire le risque de dommages aux biens lors
de la recharge par la méthode 12 volts cc:
• Rechargez en utilisant cette méthode uniquement lorsque cela est
nécessaire. L’utilisation fréquente de la méthode de chargement de
12 V CC peut raccourcir la vie de la batterie.
• Ne pas dépasser 6 heures en utilisant cette méthode de recharge.
Page 27

Français
26
Consignes de sécurité spécifiques pour démarreurs de
batterie
AVERTISSEMENT – Risque d’éclatement: Ne pas utiliser l’appareil
pour charger des batteries sèches communément utilisées dans les
appareils ménagers. Ces batteries sont susceptibles d’exploser et de
causer des blessures corporelles et des dommages matériels. N’utiliser
le chargeur que pour charger/recharger une batterie au plomb. Il n’est
pas conçu pour alimenter un système électrique à basse tension autre
qu’au sein d’une application avec moteur de démarrage.
AVERTISSEMENT : Pour réduire les risques d’électrocution,
n’immergez jamais cet appareil dans l’eau ou tout autre liquide, ou de
l’utilisation lorsqu’il est mouillé.
AVERTISSEMENT – Risque de gaz explosifs:
• Il est dangereux de travailler à proximité d’une batterie au plomb.
Les batteries génèrent des gaz explosifs dans le cadre de leur
fonctionnement normal. C’est pourquoi il est extrêmement important
de lire le présent mode d’emploi avant chaque utilisation de la batterie
d’appoint et d’en suivre exactement les directives.
• Pour réduire le risque d’explosion de batterie, suivre ces directives et
celles publiées par le fabricant de la batterie et de tout équipement
que vous avez l’intention d’utiliser à proximité de la batterie. Examiner
les indications de mise en garde apposées sur ces produits et sur
le moteur.
AVERTISSEMENT – Pour réduire le risque d’incendie:
• N’utilisez pas à proximité de matières, vapeurs, poussières ou gaz
inflammables.
• Ne pas exposer à une chaleur extrême ou de flammes.
ATTENTION – Pour réduire le risque de blessures ou de dommages
matériels:
• NE JAMAIS ESSAYER DE RECHARGER OU DE CHARGER UNE
BATTERIE GELÉE.
• Les véhicules dotés de systèmes informatisés intégrés peuvent être
endommagés par un démarrage d’appoint de la batterie. Avant
le démarrage d’appoint d’un véhicule de ce type, lire le manuel
du propriétaire pour vous assurer qu’une assistance externe au
démarrage est possible.
• Lors de l’utilisation d’une batterie au plomb, toujours s’assurer qu’une
assistance immédiate est disponible en cas d’accident ou d’urgence.
• Toujours utiliser une protection oculaire lors de l’utilisation du produit:
le contact avec l’acide de batterie pourrait provoquer une perte de
vue, des brûlures graves ou les deux. Connaître les mesures de
premiers soins en cas de contact accidentel avec de l’acide de
batterie.
• Avoir de l’eau et du savon à proximité au cas où l’acide de la batterie
entre en contact avec la peau.
• Ne jamais fumer et toujours éviter la présence d’étincelles et de
flammes à proximité de la batterie du véhicule, du moteur ou la
batterie d’appoint.
• Rester à l’écart des pales du ventilateur, courroies, poulies, et d’autres
parties qui peuvent causer des blessures aux personnes.
• Retirer tous les articles personnels métalliques, notamment bagues,
bracelets, colliers et montres, lors de la manipulation d’une batterie
au plomb. Une batterie au plomb est susceptible de produire un
courant de court-circuit suffisamment important pour faire fondre
une bague ou tout autre article en métal semblable, provoquant
alors une brûlure grave.
• Ne pas porter de vêtements en vinyle lors du démarrage d’appoint
d’un véhicule. En effet, la friction pourrait provoquer des étincelles
d’électricité statique dangereuses.
• Ne pas porter de vêtements amples ni de bijoux. Ils peuvent
s’enchevêtrer dans les pièces mobiles. Des gants de caoutchouc et
des chaussures antidérapantes robustes sont recommandés pour
les travaux à l’extérieur. Couvrir les cheveux s’ils sont longs.
Page 28

Français
27
• Être très prudent pour éviter de faire tomber un outil métallique sur
la batterie. Cela pourrait provoquer une étincelle ou court-circuiter
la batterie ou une autre partie électrique et pourrait provoquer une
explosion.
• Ne jamais fumer et toujours éviter la présence d’étincelles et de
flammes à proximité de la batterie du véhicule, du moteur ou de
l’accumulateur.
• Retirer tous les articles personnels métalliques, notamment bagues,
bracelets, colliers et montres, lors de la manipulation d’une batterie
au plomb. Une batterie au plomb est susceptible de produire un
courant de court-circuit suffisamment important pour faire fondre
une bague ou tout autre article en métal semblable, provoquant
alors une brûlure grave.
• Ne pas porter de vêtements en vinyle lors du démarrage d’appoint
d’un véhicule. En effet, la friction pourrait provoquer des étincelles
d’électricité statique dangereuses.
• Ne jamais laisser les pinces noire et rouge se toucher ou toucher un
autre conducteur métallique commun. Cela pourrait endommager
l’appareil, présenter un risque d’étincelle ou d’explosion ou les deux.
• Assurez-vous de brancher les colliers de serrage en respectant la
polarité. Dommages causés par une mauvaise connexion n’est pas
couverte par la garantie.
• N’exposez pas les piles au feu ou à une chaleur intense puisqu’ils
peuvent exploser. Avant la mise au rebut de la batterie, protéger les
terminaux exposés avec une bande adhésive électrique à usage
intensif pour éviter tout court-circuit (court-circuitage peut entraîner
des blessures ou un incendie).
• Placez cette unité aussi loin de la batterie comme câbles permettent.
• Ne jamais laisser l’acide de batterie entrer en contact avec cette unité.
• Ne pas utiliser cet appareil dans une zone fermée ou restreignent la
ventilation en aucune façon.
• Ce système est conçu pour être utilisé uniquement sur les véhicules
équipés d’un système de batterie 12 volts CC. Ne le connectez pas
à un 6 volts ou 24 volts batterie système.
• Ce système n’est pas conçu pour être utilisé comme un remplacement
pour une batterie des véhicules. Ne pas tenter de faire fonctionner
un véhicule qui n’a pas de batterie installée.
• En cas de lancement du moteur excessif peut endommager un
véhicule moteur de démarreur. Si le moteur ne démarre pas après
le nombre recommandé de tentatives, interrompre les procédures
de démarrage et de chercher d’autres problèmes qui doivent être
corrigés.
• N’utilisez pas ce saut démarreur sur un bateau. Il n’est pas qualifiée
pour les applications marines.
• Bien que l’appareil contient une batterie non inversable, il est
recommandé que l’unité être maintenus en position verticale
pendant l’entreposage, l’utilisation et la recharger. Pour éviter tout
endommagement possible que peut raccourcir la vie de travail de
l’unité, la protéger de la lumière directe du soleil, à une chaleur directe
et/ou à l’humidité.
Consignes de securite particulieres aux
compresseurs
AVERTISSEMENT – Danger d’éclatement: Éclatement objets peut
provoquer des blessures graves
• Suivez attentivement les instructions sur les articles à être gonflés.
• Ne jamais dépasser la pression recommandée dans les instructions
sur les articles à gonfler. Si aucune pression est donnée, contacter
article fabricant avant de gonfler.
• Toujours surveiller la pression sur l’écran LCD.
ATTENTION – Pour réduire le risque de dommages matériels:
• Ne laissez jamais le compresseur sans surveillance pendant son
utilisation.
Page 29

Français
28
• Ne pas faire fonctionner le compresseur continue pendant plus de
10 minutes. Cela pourrait endommager le compresseur. Suivez les
instructions de la section « Compresseur Portable ».
Consignes de sécurité spécifiques pour
les ports USB
• N’insérez pas de corps étrangers dans les ports USB.
• Ne pas attacher les concentrateurs USB ou plus d’un appareil
électronique personnel à chaque port USB.
• Ne pas utiliser cette unité pour l’exploitation d’appareils nécessitant
plus de 3,1A, au total, à l’exploitation de ports USB.
Premiers soins
• Peau : Si de l’acide de batterie entre en contact avec la peau, rincer
immédiatement avec de l’eau, puis laver soigneusement avec de l’eau
savonneuse. Si une rougeur, une douleur ou une irritation se produit,
consulter tout de suite un médecin.
• Yeux : Si de l’acide de batterie entre en contact avec les yeux, les
rincer immédiatement à grande eau pendant un minimum de 15
minutes et consulter immédiatement un médecin.
• ACL — écran a cristaux liquides : si le cristal liquide de l’écran
entre en contact avec la peau : Lavez immédiatement la région
touchée à grande eau. Retirez les vêtements contaminés. Si le cristal
liquide de l’écran pénètre les yeux : Rincez l’œil touché à l’eau propre
puis consultez un médecin. Si le cristal liquide de l’écran est ingéré :
Rincez soigneusement la bouche à l’eau. Buvez de grandes quantités
d’eau et faites-vous vomir puis consultez un médecin.
CONSERVER CES
CONSIGNES POUR
UTILISATION
ULTÉRIEURE
Page 30

Français
29
Composants (Fig. 1)
A. Poignée
B. Interrupteur de la batterie
d’appoint
C. Écran LCD rétroéclairé
D. Bouton d’alimentation du
compresseur
E. Ports USB
F. Indicateurs de alimentation/
de défaillance de USB
G. Bouton de contrôle de la
pression du compresseur
diminution ( )
H. Bouton de lumière DEL de
zone
I. Bouton de contrôle
d’alternateur
J. Bouton de contrôle de la
pression du compresseur
augmentation ( )
A
B C D
G
H
I
J
K
L
M
FE
K. Bouton d’alimentation USB
L. Pince négative (–) noire
M. Pince positif (+) rouge
N. Lumière DEL de zone (deux
banques de trois voyants)
O. Chargeur secteur intégré de
120 V CA (sous couvercle
protecteur)
P. Port de chargement 12V CC
(sous couvercle protecteur)
Q. Compartiment de stockage
R. Tuyau et la buse Sure Fit
®
S. Adaptateur de charge 12V
CC
T. Adaptateur de buse
O
P
Q
R
T
S
N
Page 31

Français
30
Détails de l’écran LCD (Fig. 2)
Icône d’état de la
batterie
Affichage digital (varie
selon la fonction)
Icône d’alarme
Icônes de polarité inversée
Icônes des pinces
Indicateur de
tension de la
batterie
Témoin de pression
du compresseur
Icône de USB
Icône de
compresseur
Icône de la batterie
d’appoint
Icône
d’alternateur
Indicateurs de
alternateur est bon/
défaillance
Icône d’erreur
Page 32

Français
31
Vue d’ensemble
LES ACTIONS COMMUNES ET LES RÉPONSES DE L’UNITÉ
Les actions suivantes mettre l’appareil sous tension et activez l’écran
LCD:
Appuyez sur le
bouton de contrôle
d’alternateur.
(Reportez-vous à la
section «Vérification de
l'alternateur»).
Un bip retentit et l'écran LCD rétroéclairé
affiche l'icône d'état de la batterie, et
l'alternateur icône clignote. L’unité reste
activée jusqu’à ce que le bouton de
contrôle d’alternateur est enfoncé à
nouveau pour l’éteindre.
Appuyez sur
le bouton
d’alimentation de
la lumière DEL de
zone. (Reportez-vous
à la section «Lumière
DELde zone »).
Un bip retentit et la lumière DEL de zone
s'allume. L’écran LCD rétroéclairé s'allume
pendant 10 secondes (uniquement).
L’écran LCD continue à afficher l’icône
d’état de la batterie et l’indicateur de
tension de la batterie. L’unité reste activée
jusqu’à ce que le bouton d’alimentation
de la lumière DEL de zone est enfoncé à
nouveau pour l’éteindre.
Appuyez sur
le bouton
d’alimentation USB.
(Reportez-vous à la
section «Ports USB »).
Un bip retentit et l’écran LCD rétroéclairé
affiche l’icône d’état de la batterie,
l’indicateur de tension de la batterie,
et l’icône USB; et les Indicateurs de
alimentation/de défaillance de USB
s’allume en bleu solide indiquant que
les deux ports USB sont actifs. L’unité
reste activée jusqu’à ce que le bouton
d’alimentation USB est enfoncé à
nouveau pour l’éteindre.
Appuyez sur
le bouton
d’alimentation du
compresseur
Un bip retentit et l’écran LCD rétroéclairé
affiche l'icône d'état de la batterie, «XXX»
psi et l'icône du compresseur. S'il n'y a
pas d'autres mesures sont prises après
1 minute, l'unité affiche l'icône d'état de
la batterie et indicateur de tension de la
batterie pendant 10 secondes avant de
s'éteindre automatiquement.
Chaque fois que
les pinces sont
correctement
connectés à la
batterie (reportez-vous
à la section «Batterie
d’appoint») …
... un bip retentit et l’écran LCD rétroéclairé
affiche l’icône d’état de la batterie,
l’indicateur de tension de la batterie, les
icônes de pinces, et les signes «+ » et
«–», aussi bien que l’icône de la batterie
d’appoint clignotante. L’unité reste activée
jusqu’à ce que les pinces sont
déconnectées de la batterie.
Si l'interrupteur
d'alimentation du
batterie d’appoint
est tourné à la
position marche et
les pinces ne sont
pas connectés à une
batterie (reportez-vous
à la section «Batterie
d’appoint») …
... un deux-deuxième avertissement
retentit toutes les 10 secondes. L’écran
LCD rétroéclairé affiche l’icône d’état
de la batterie, l’indicateur de tension de
la batterie, les icônes de pinces, et les
signes «+» et «– ». L’icône de l’alarme
et l’icône de la batterie d’appoint
clignotent. L’unité reste activée
jusqu’à ce que l’interrupteur de batterie
d’appoint éteint puis affiche l’icône d’état
de la batterie et la tension de la batterie
de affichage digital pendant 10 secondes
avant d’arrêt automatique.
Page 33

Français
32
Si les connexions
des pinces positive
et négative de
la batterie sont
inversés (reportez-
vous à la section
«Batterie d’appoint»)
…
… un bip retentit et l’écran LCD
rétroéclairé affiche l’icône d’état de la
batterie, l’indicateur de tension de la
batterie et les icônes de pinces. L’icône
de l’alarme, les signes «+ » et «– » et
les icônes de polarité inversée clignotent
et l’unité émet un signal sonore en
continu jusqu’à ce que les pinces sont
déconnectés de la batterie.
Lorsque l’unité
est en cours de
chargement
Ou à l’aide de la
recharge intégré
chargeur 120 V c.a.
ou l’adaptateur
de charge 12V CC
(reportez-vous à la
section «Charge/
recharge») …
un bip retentit et l’écran LCD rétroéclairé
se allume pendant 10 secondes
(seulement). L’écran LCD continue à
afficher l’icône d’état de la batterie et
l’indicateur de la tension de la batterie.
Les barres de l’icône d’état de la batterie
passera de vide à solide (bas en haut) à
plusieurs reprises.
REMARQUE : L’appareil s’éteint automatiquement une fois TOUTES
les fonctions et le processus de charge sont désactivés.
Affichage de l’état de la batterie
L’icône d’état de la batterie et indicateur de tension de batterie indiquent
le niveau de charge de la batterie comme suit:
• Si le niveau de charge de la batterie est à pleine capacité, quatre
barres solide s’affichera.
• Si la batterie est partiellement chargée, deux ou trois barres solide
s’affichera.
• Si la batterie est presque vide, une barre pleine s’affichera. L’unité
devrait être chargée en ce moment.
• Si la batterie est complètement vide, quatre barres vide s’affiche.
L’unité doit être chargée à ce moment ou intégré de protection de
basse tension de l’unité activera. L’icône d’état de batterie vide
clignote pendant un court laps de temps avant arrêt automatique.
L’unité ne fonctionnera pas jusqu’à ce que la batterie est rechargée.
Charger/recharger
Les batteries au plomb-acide exigent un entretien courant pour
maintenir une pleine charge et prolonger leur durée de vie. Toutes les
batteries perdent de l’énergie par autodécharge au fil du temps, et
ce, d’autant plus rapidement que les températures sont élevées. Par
conséquent, les batteries exigent une charge périodique pour remplacer
toute l’énergie perdue par autodécharge. Le fabricant recommande
de recharger la batterie au moins tous les 30 jours si l’appareil est
peu utilisé.
Page 34

Français
33
Notes de charge importante
1. Cette unité est livré dans un état partiellement chargé. Vous devez
devez charger complètement avant de l’utiliser pour la première
fois. La charge initiale (par CA) exige 40 heures ou jusqu’à ce que
l’icône d’état de la batterie affiche 4 barres solides.
2. La recharge de la batterie après chaque utilisation prolonge sa
durée de vie. Des décharges fréquentes et poussées entre les
recharges et/ou les surcharges réduisentla durée de vie de la
batterie.
3. La batterie peut être rechargée à l’aide de la fonction intégrée en
120 volts AC chargeur ou l’adaptateur 12 volts CC.
4. Assurez-vous que toutes les autres fonctions de l’appareil sont
désactivées pendant la recharge, car ils peuvent ralentir le
processus de recharge.
ATTENTION – pour réduire le risque de dommage matériel : Défaut
de maintenir la batterie chargé provoque des dommages permanents
et se traduira par performance de démarrage mauvaise.
IMPORTANT : si vous connaissez l’unité est déchargée, mais les
indicateurs d’état de la batterie montre quatre barres pleines comme si
l’unité est entièrement chargée lorsqu’il est connecté à une source de
courant de charge, cela peut être dû à la batterie interne comportant
une haute impédance. Le fabricant recommande de laisser l’unité de
charge pour une période de 40 heures à l’aide de l’AC intégré chargeur
avant de l’utiliser.
Charge/recharge au moyen du chargeur
de 120 V CA intégré et d’une rallonge
standard (non comprise)
1. Soulevez le couvercle protecteur de l’adaptateur CA situé sur
l’arrière de de l’unite (référer à la Fig. 1 pour localiser). Branchez
une rallonge à l’unité. Branchez l’autre extrémité de la rallonge dans
une prise de courant standard de 120V CA. Lorsque l’unite est
correctement connecté à une source d’alimentation CA, l’écran
LCD affiche ce qui suit :
Les barres de l’icône de batterie représentent le niveau de
charge de la batterie interne de l’unité. Les barres de l’icône de la
batterie passe de vide à solide (du bas vers le haut) à plusieurs
reprises pour indiquer que l’unité est en cours de chargement. Le
rétroéclairage s’allume pendant 10 secondes (uniquement).
2. Charger pendant environ 40 heures ou jusqu’à ce que l’icône d’état
de la batterie affiche 4 barres de solides.
3. Lorsque la recharge est terminée, débranchez le rallonge CA et
puis débranchez-le de l’unité.
Charge/recharge au moyen du
adaptateur de charge 12V CC
ATTENTION – pour réduire le risque de dommage matériel :
• NE JAMAIS connecter cet appareil à un taux un véhicule qui est positif
mis à la terre à l’aide de l’adaptateur de charge 12V CC.
• L’adaptateur de charge 12V CC doit uniquement être connecté aux
batteries avec une tension de sortie nominale de 12 volts. L’unité
ne fonctionnera pas à partir d’une batterie de 6 V et maintiendra
des dommages permanents si connecté à une batterie de 24 volts.
PROCÉDURE
1. Soulevez le couvercle protecteur de l’adaptateur CA situé sur
l’arrière de de l’unite (référer à la Fig. 1 pour localiser). Assurez-vous
que l’AC rallonge est déconnecté du chargeur 120V C.A.
Page 35

Français
34
2. Insérez le baril pointe de l’adaptateur de charge 12V CC dans le
port de chargement 12V CC à l’arrière de l’unité.
3. Insérez la pointe rainurée de l’adaptateur de charge 12V CC dans la
prise accessoires 12V CC de le véhicule ou autres fonctionnement
source d’alimentation 12V CC. Lorsque l’unite est correctement
connecté à une source d’alimentation CC, l’écran LCD affiche ce
qui suit :
Les barres de l’icône de batterie représentent le niveau de
charge de la batterie interne de l’unité. Les barres de l’icône de la
batterie passe de vide à solide (du bas vers le haut) à plusieurs
reprises pour indiquer que l’unité est en cours de chargement. Le
rétroéclairage s’allume pendant 10 secondes (uniquement).
4. Charger pendant 6 heures. Ne pas surcharger.
5. Débrancher l’adaptateur de charge CC de l’unité et de la source
d’alimentation 12V CC lorsque vous ne l’utilisez pas.
Notes relatives à la méthode de recharge CC:
A. IMPORTANT: la méthode de recharge c.c. ne sera pas recharger
l’unité aussi efficacement que la recharge de 120 Volt AC. Le
fabricant recommande que vous utilisez uniquement l’adaptateur
de charge 12V CC si l’unité doit être immédiatement rechargée
et aucune source de courant de 120 volts est disponible.
B. Lorsque vous utilisez l’accessoire de sortie 12V DC d’un
véhicule en tant que source d’énergie, il faut savoir que certains
véhicules nécessitent l’allumage être activés pour alimenter la
prise accessoire.
C. Les barres sur l’icône de la batterie continuera de changer de
vide à solide (bas en haut) à plusieurs reprises, mais ne peuvent
pas montrer 4 barres solides lors de l’utilisation de la méthode de
charge 12V CC.
Batterie d’appoint
Cette unité est équipée d’un interrupteur d’alimentation du démarreur
de saut qui permet au courant de circuler uniquement lorsque les
connexions correctes sont faites à la batterie et le châssis.
A. Pour les systèmes de mise à la terre négative, connecter le positif
(rouge) pince au poste de la batterie positif sans mise à la terre
et le négatif (noir) pince au châssis du véhicule ou le bloc moteur
loin de la batterie. Ne pas brancher la pince au carburateur,
les conduites de carburant ou les parties du corps en tôle.
Connectez-vous à une partie lourde jauge de métal du bloc de
châssis ou du moteur.
B. Pour les systèmes de mise à la terre positif, connecter le négative
(noir) pince au poste de la batterie positif sans mise à la terre et
le positif (rouge) pince au châssis du véhicule ou le bloc moteur
loin de la batterie. Ne pas brancher la pince au carburateur,
les conduites de carburant ou les parties du corps en tôle.
Connectez-vous à une partie lourde jauge de métal du bloc de
châssis ou du moteur.
IMPORTANT : Assurez-vous que le bouton d’alimentation du
compresseur a été mis hors fonction avant de tenter d’utiliser l’unité
comme une batterie d’appoint.
AVERTISSEMENT – Pour réduire le risque de blessures graves ou
des dommages matériels :
• Suivre toutes les consignes de securite particulieres aux batteries
d’appoint contenues dans ce guide d’utilisation.
• Ne jamais mettre les pinces rouge et noire en contact. Cela pourrait
provoquer des étincelles dangereuses, un arc électrique et/ou une
explosion.
Page 36

Français
35
• Si les pinces ne sont pas raccordés correctement à l’égard de
polarité, l’unité émet une alarme continue jusqu’à ce que les pinces
sont déconnectés. L’écran LCD rétroéclairé affiche l’icône d’état de la
batterie, l’indicateur de tension de la batterie et les icônes de pinces.
Le «+» et «–» des signes au-dessus de les icônes de pinces, les
icônes de polarité inversée et l’icône de l’alarme clignotent. L’écran
LCD rétroéclairé affiche ce qui suit :
• ATTENTION : L’unité subira des dommages permanents si
l’interrupteur de la batterie d’appoint est activé lorsque les pinces
sont connecté avec la polarité inversée. Débrancher les colliers et
rebranchez à la batterie en respectant la polarité.
• Si l’interrupteur d’alimentation de la batterie d’appoint est activé et
l’unité détecte que les pinces ne sont pas connectés à une batterie,
Un deux-deuxième avertissement retentit toutes les 10 secondes.
L’écran LCD affichera l’icône d’état de la batterie, l’indicateur de
tension de la batterie et les icônes de pinces avec le «+» et «–» des
signes. L’icône de l’alarme et l’icône de batterie d’appoint clignotent.
L’écran LCD rétroéclairé affiche ce qui suit :
Éteignez l’interrupteur d’alimentation de la batterie d’appoint;
connecter les pinces à la batterie, assurant que les pinces sont reliées
à la polarité; puis tournez l’interrupteur d’alimentation de la batterie
d’appoint rallume.
• Toujours déconnecter d’abord le câble négatif (noir) de la batterie
d’appoint, puis le câble positif (rouge), sauf pour les systèmes
positivement mis à la terre.
PROCÉDURE
Prenez les mesures suivantes, en observant toutes les précautions et
avertissements dans les “Instructions de sécurité importantes” au début
de ce guide d’utilisation.
1. Couper le contact et fermer tous les accessoires (radio, climatiseur,
dispositifs d’éclairage, chargeurs de téléphones cellulaires
branchés, etc.). Placer le véhicule en mode « stationnement » et
enclencher le frein à main.
2. S’assurer que le commutateur d’alimentation de la batterie
d’appoint est en position arrêt.
3. Retirer les pinces de batterie de leurs supports. Connecter d’abord
la pince rouge, puis la noire.
4. Procédure de démarrage d’appoint d’un SYSTÈME
NÉGATIVEMENT MIS À LA TERRE (la borne négative de la
batterie est connectée au châssis) (CONFIGURATION LA
PLUS COMMUNE)
4a. Connecter la pince positive (+) rouge à la borne positive de la
batterie du véhicule.
4b. Connecter la pince négative (–) noire au châssis ou à un
composant du véhicule ou à une partie de la carrosserie
solide, immobile et métallique. Ne jamais connecter la pince
directement à la borne négative de la batterie ou à une pièce
mobile. Se reporter au manuel du propriétaire de l’automobile.
Page 37

Français
36
5. Procédure pour un démarrage d’appoint de SYSTÈMES
POSITIVEMENT MIS À LA TERRE
NOTE: Dans le rare cas où le véhicule à démarrer est doté d’un
système mis positivement à la terre (la borne positive de la batterie
est connectée au châssis), remplacer les étapes 4a et 4b ci-dessus
par les étapes 5a et 5b, puis procéder à l’étape 6.
5a. Connecter la pince négative (–) noire à la borne négative de la
batterie du véhicule.
5b. Connecter la pince positive (+) rouge au châssis ou à un
composant du véhicule ou à une partie de la carrosserie
solide, immobile et métallique. Ne jamais connecter la pince
directement à la borne positive de la batterie ou à une pièce
mobile. Se reporter au manuel du propriétaire de l’automobile.
6. Lorsque les pinces de serrage sont correctement connectés,
l’écran LCD rétroéclairé affiche ce qui suit pour indiquer l’unité est
prêt à démarrer le moteur :
L’icône d’état de la batterie, l’indicateur de tension de batterie, les
icônes des pinces, et les signes «+» et «–» s’allument en continu.
L’icône de de la batterie d’appoint clignotera pour indiquer que les
pinces sont correctement connectés
7. Tourner l’interrupteur d’alimentation de la batterie d’appoint sur.
Lorsque l’interrupteur d’alimentation de la batterie d’appoint est
activée, l’icône du moteur s’allume en continu pour indiquer qu’il
est temps de démarrer le véhicule. Mettre le contact et démarrer le
moteur en 5-6 deuxième rafales jusqu’à ce que le moteur démarre.
L’écran LCD rétroéclairé affiche ce qui suit :
L’icône d’état de la batterie, l’indicateur de tension de la batterie,
l’icône de la batterie d’appoint, des icônes des pinces, et les
signes «+» et «–» s’allument en continu pour indiquer l’unité est
le démarrage par batterie auxiliaire.
8. Éteignez l’interrupteur d’alimentation de la batterie d’appoint.
9. Déconnecter d’abord la pince négative (–) reliée au moteur ou au
châssis, puis déconnecter la cosse positive (+) reliée à la batterie.
IMPORTANT: Toujours mettre l’unité hors tension lorsque vous ne l’utilisez
pas. Recharger Cette unité complètement après chaque utilisation.
ATTENTION – Pour réduire le risque de dommage matériel :
• Les véhicules dotés de systèmes informatisés intégrés peuvent être
endommagés par un démarrage d’appoint de la batterie. Avant
de recharger la batterie d’un véhicule de ce type, lire le manuel du
véhicule pour confirmer si une assistance externe au démarrage est
conseillée.
• Un démarrage excessif du moteur peut endommager le démarreur du
véhicule. Si le moteur ne démarre pas après le nombre recommandé
de tentatives, interrompre la procédure de démarrage d’appoint et
rechercher d’autres problèmes à corriger.
• Si le véhicule ne démarre pas, couper le contact, mettre l’interrupteur
d’alimentation de la batterie d’appoint à arrêt, débrancher les câbles
du système de démarrage d’appoint et contacter un technicien
qualifié pour en découvrir la raison.
Page 38

Français
37
Vérification de l’alternateur
Configurer l’unité et connecter à la batterie en suivant les étapes 1 à 5
de la section «Batterie d’appoint».
Remarques importantes concernant la fonction de
vérification de l’alternateur
1. L’unité peut détecter que l’alternateur est hors de la gamme typique
de tension parce que quelqu’un a ajouté un certain nombre de
charges d’accessoire sur le système de remplissage, augmentant
de ce fait une demande courante de l’alternateur. ASSUREZVOUS QUE L’ALTERNATEUR EST ÉVALUÉ POUR SOUTENIR
L’APPLICATION.
2. Ce contrôle peut ne pas être précis pour le chaque font, fabricant
et modèle de véhicule. Vérifiez les systèmes de seulement 12 volts.
PARTIE 1
Aucune charge (arrêtez tous les accessoires du véhicule) : La
batterie doit être entièrement chargée avant d’examiner l’alternateur.
Courez le moteur assez longtemps pour réaliser la vitesse à vide
normale et vérifier il y a une tension sans charge.
1. Appuyez sur le bouton de contrôle d’alternateur pour démarrer la
vérification. L’écran LCD rétro-éclairé affiche les éléments suivants
pour indiquer l’unité est analyser de l’alternateur :
L’icône d’état de la batterie s’allume solide et l’icône d’alternateur
se met à clignoter.
2. Si l’unité détecte que l’alternateur est bon, l’écran LCD rétroéclairé
affiche ce qui suit :
L’icône d’état de la batterie, l’icône de l’alternateur, et « ALT
GOOD» s’allume fixe.
3. Si l’unité détecte que l’alternateur est hors de la plage de tension
typique, l’écran LCD rétroéclairé affiche ce qui suit :
L’icône d’état de la batterie, l’icône d’alternateur et de «ALT»
s’allume fixe. Le défaut icône clignote.
4. Appuyez sur le bouton de contrôle d’alternateur à nouveau pour
arrêter le test et mettez l’appareil hors tension.
Page 39

Français
38
PARTIE 2
Sous la charge (accessoires dessus) : Après, chargez l’alternateur
en mettant en marche autant d’accessoires comme possibles (excepté
l’a/c et dégivrez).
1. Appuyez sur le bouton de contrôle d’alternateur pour démarrer la
vérification. L’écran LCD rétro-éclairé affiche les éléments suivants
pour indiquer l’unité est analyser de l’alternateur :
L’icône d’état de la batterie s’allume solide et l’icône d’alternateur
se met à clignoter.
2. Si l’unité détecte que l’alternateur est bon, l’écran LCD rétroéclairé
affiche ce qui suit :
L’icône d’état de la batterie, l’icône de l’alternateur, et « ALT
GOOD» s’allume fixe.
3. Si l’unité détecte que l’alternateur est hors de la plage de tension
typique, l’écran LCD rétroéclairé affiche ce qui suit :
L’icône d’état de la batterie, l’icône d’alternateur et de «ALT»
s’allume fixe. Le défaut icône clignote.
4. Appuyez sur le bouton de contrôle d’alternateur à nouveau pour
arrêter le test et mettez l’appareil hors tension.
IMPORTANT: Toujours mettre l’unité hors tension lorsque vous ne
l’utilisez pas. Recharger cette unité complètement après chaque
utilisation.
Compresseur portatif
Le intégré 12 volts CC compresseur est le compresseur ultime pour
tous les pneumatiques de véhicules, des pneus de la remorque et
gonflables récréatifs. Un adaptateur de buse est fourni qui se visse
sur l’extrémité de la buse Sure Fit® à l’extrémité libre du tuyau du
compresseur. Le tuyau du compresseur avec connecteur buse Sure
Fit® est stockée dans le compresseur tuyau compartment de stockage.
Reportez-vous à la Fig. 1 pour localiser le tuyau du compresseur. Le
bouton d’alimentation du compresseur et augmentation ( ) et diminuer
la pression du compresseur ( ) Les boutons de commande sont situés
sur le panneau de commande sur la face avant de l’unité.
Avant de commencer, vérifiez l’état de la batterie de l’unité sur l’écran
LCD. Quatre barres de solides dans l’icône de la batterie indique une
batterie pleine. Lorsque la batterie est presque vide avec une seule
Page 40

Français
39
barre pleine, l’appareil doit être rechargé avant de l’utiliser ou l’unité
intégré de protection basse tension activera. L’icône d’état de batterie
vide clignote pendant un court laps de temps avant arrêt automatique.
Le compresseur est capable de gonfler jusqu’à 120 livres par pouce
carré (psi) de pression. Le compresseur peut fonctionner suffisamment
longtemps pour remplir jusqu’à 3 pneus de taille moyenne avant que
la batterie doit être rechargée. Flexible de retour vers le compartiment
de stockage après utilisation.
IMPORTANT : Assurez-vous que le commutateur d’alimentation de
la batterie d’appoint a été mis hors fonction avant de tenter d’utiliser
l’appareil comme un compresseur.
AVERTISSEMENT – Pour réduire le risque de blessures graves ou
des dégâts : Suivez toutes les consignes de sécurité contenues dans
la section «Consignes de sécurité spécifiques pour les compresseurs»
de ce mode d’emploi.
ATTENTION – Pour réduire le risque de blessures ou des dégâts:
Lorsque le compresseur fonctionne à un PSI Bas, l’unité peut démarrer
en faible et peu à gagner de la vitesse. Lorsque le compresseur est
exploité à une PSI supérieur, l’unité peut fonctionner normalement
pendant plusieurs minutes, puis rev vers le bas pendant quelques
minutes avant de revenir à un fonctionnement normal. Cette fonction
protège l’appareil de la surchauffe pendant l’utilisation normale. En
tout état de cause, ne pas faire fonctionner le compresseur pendant
plus de 10 minutes, comme il peut surchauffer. Cela pourrait
endommager le compresseur. Si le compresseur doit fonctionner
pendant de longues périodes : toutes les 10 minutes, appuyez sur le
bouton d’alimentation du compresseur pour mettre le compresseur
hors tension, puis redémarrer l’ordinateur après une période de
refroidissement d’environ 30 minutes.
GONFLAGE DE PNEUS OU D’OBJETS DOTÉS D’UNE TIGE
DE VALVE
1. Visser la buse Sure Fit® sur la tige de valve. Ne pas trop serrer.
2. Appuyez sur le bouton d’alimentation du compresseur. Un bip
retentit et l’écran LCD rétroéclairé affiche ce qui suit :
Le compresseur Icône s’allume et l’affichage numérique en
alternance affiche le pré-set valeur PSI clignotant (qui était
dernier ensemble par les boutons de contrôle de la pression du
compresseur) et la pression actuelle de l’élément étant gonflé (qui
reste allumée).
3. Appuyez sur la touche « » et « » boutons de contrôle de
pression pour régler la pression désirée à partir d’une plage des
valeurs prédéfinies (entre 3 et 120), qui s’affichera sur l’écran LCD
rétroéclairé. L’unité émet un bip à chaque pression des touches
(tout en maintenant le bouton accélère le choix de la valeur à
la hausse ou à la baisse). Une fois que la pression désirée n’a
été entré, relâchez le bouton et le clignotement de l’affichage
numérique indique la nouvelle pression sélectionnée, comme suit:
Page 41

Français
40
La nouvelle valeur sélectionnée est maintenant stockée dans la
mémoire de l’unité jusqu’à ce qu’il est réinitialisé manuellement.
4. Appuyez sur le bouton d’alimentation de compresseur une fois de
plus pour commencer à gonflage. Le compresseur Icône clignote
et l’affichage digitale ne montre seulement la valeur de pression
actuelle (qui est allumée solide) pour indiquer le compresseur est
activé. Surveiller la pression sur l’écran LCD.
REMARQUE IMPORTANT : Pour interrompre pendant le
gonflage, appuyez à nouveau sur le bouton d’alimentation de
compresseur.
5. Lorsque la pression prédéfinie souhaitée est atteinte, le
compresseur s’arrête automatiquement.
6. Appuyez sur le bouton d’alimentation de compresseur à nouveau
pour désactiver l’unité.
5. Dévisser et déposer la Sure Fit® buse à partir de la tige de valve.
6. Laissez l’appareil se refroidir, puis recharger avant de le ranger.
7. Stocker le compresseur flexible et Sure Fit® buse dans le
compartiment de stockage.
GONFLER LES PNEUMATIQUES SANS TIGES DE SOUPAPE
L’inflation des autres objets nécessite l’utilisation de l’adaptateur de
buse.
1. Visser l’adaptateur dans la Sure Fit® buse. Ne pas trop serrer.
2. Insérez l’adaptateur dans l’élément à être gonflés.
3. Suivez les étapes 2 à 4 de la section « Les pneus ou les produits
Gonflage Avec Valve Tiges ».
IMPORTANT: Les petits éléments tels que volleyball, ballons de
football, etc. gonfler très rapidement. Ne pas sur-gonfler.
4. Lorsque la pression souhaitée est atteinte, le compresseur s’arrête
automatiquement. Désactiver l’interrupteur d’alimentation du
compresseur à nouveau pour désactiver l’unité.
5. Débranchez l’adaptateur de la gonflé objet.
6. Dévissez et retirez l’adaptateur de la Sure Fit® buse.
7. Laissez l’appareil se refroidir, puis recharger avant de le ranger.
8. Stocker le compresseur flexible, Sure Fit® buse et l’adaptateur
dans le compartiment de stockage.
Ports USB
Le bouton d’alimentation USB et les deux ports USB sont situés sur
le côté droit de l’unité. L’indicateur de alimentation/de défaillance de
USB est un anneau translucide autour de chacun des ports USB. Se
reporter à la Fig. 1 pour localiser.
Remarques importantes concernant les ports USB
1. Les deux ports USB permettent un total de 3.1A (5V chaque).
2. Lorsque les ports USB sont en cours d’utilisation, l’appareil surveille
les conditions suivantes USB de défaut sur tous les ports USB:
défaut thermique, une faible tension de défaut de la batterie, de
surcharge et de court-circuit. Si une condition d’erreur existe dans
l’un des ports USB, les indicateurs de alimentation/de défaillance
de USB clignotent en bleu. Dans quelconque ces cas, l’écran LCD
rétroéclairé affiche continuellement les suivantes :
Le défaut icône clignote. Les ports USB s’arrête automatiquement.
Si cela se produit :
a. Débranchez le périphérique USB et appuyez sur le bouton
d’alimentation USB de nouveau pour désactiver les ports USB
immédiatement.
b. Assurez-vous que l’unité n’a pas besoin d’être rechargée.
Page 42

Français
41
c. Permettre à l’appareil refroidir pendant plusieurs minutes avant
d’essayer d’utiliser les ports USB de nouveau.
d. Si une panne se produit à nouveau, assurez-vous que la
consommation totale de tous les périphériques USB branchés
sur les ports USB ne dépasse pas 3.1A.
e. Si un périphérique USB individuel est conforme aux spécifications
et que le problème survient, avoir le périphérique USB vérifié
pour un dysfonctionnement et ne pas continuer à l’utiliser avec
ces ports USB.
3. Les ports USB de cet appareil ne prennent pas en charge la
communication de données. Ils ne fournissent que l’alimentation
des dispositifs alimentés par USB externes. Les ports USB
fournissent un total de 3.1A (5V chacun).
4. Certains appareils électroniques alimentés par USB peuvent ne
pas fonctionner avec ce port USB.
UTILISANT LES PORTS USB
1. Appuyez sur le bouton d’alimentation USB pour activer les deux
ports USB. Un bip sonore retentit. Les indicateurs de alimentation/
de défaillance de USB autour de chacun des deux ports USB
s’allume en bleu et l’écran LCD rétroéclairé affiche continuellement
les suivantes :
L’icône d’état de la batterie et tension batterie Indicateur allument
solide, ainsi que l’icône USB, indiquant les ports USB sont prêts
à utiliser.
2. Branchez le périphérique USB alimenté dans le port USB et
fonctionne normalement.
3. Appuyez sur le bouton d’alimentation USB pour éteindre les ports
USB.
Vérifier périodiquement l’état de la batterie de l’unité sur l’écran LCD
rétroéclairé. Quatre barres solides dans l’icône de la batterie indique
une batterie pleine. Lorsque la batterie est presque vide avec une seule
barre solide ou complètement vide avec 4 barres vide, l’unité doit être
rechargée en ce temps ou l’unité intégré de protection basse tension
activera. L’icône d’état de batterie vide clignote pendant un court laps
de temps avant arrêt automatique.
IMPORTANT : Assurez-vous que les ports USB sont désactivés
lorsque l’unité est rechargée ou stockés.
Lumière DEL de zone
La lumière DEL de zone intégrée se compose de deux banques de de
trois DEL (une sur le côté droit, l’un sur le côté gauche de l’arrière de
l’appareil). Il est contrôlé par le bouton de lumière DEL de zone sur le
panneau de commande (se reporter à la Fig. 1 pour localiser).
1. Appuyez sur le bouton de lumière DEL de zone une fois pour
lumière activer les feux.
2. Appuyez à nouveau le bouton de lumière DEL de zone pour
éteindre la lumière.
Lorsque le bouton de lumière DEL de zone est pressé pour l’allumer,
un signal sonore retentit. L’écran LCD rétro-éclairé se met en marche
pendant 10 secondes (seulement) et ensuite en continu affiche l’icône
d’état de la batterie et l’indicateur de la tension de la batterie.
Vérifier périodiquement l’état de la batterie de l’unité sur l’écran LCD
rétroéclairé. Quatre barres solides dans l’icône de la batterie indique
une batterie pleine. Lorsque la batterie est presque vide avec une seule
barre solide ou complètement vide avec 4 barres vide, l’unité doit être
rechargée en ce temps ou l’unité intégré de protection basse tension
Page 43

Français
42
activera. L’icône d’état de batterie vide clignote pendant un court laps
de temps avant arrêt automatique.
IMPORTANT : Assurez-vous que la lumière DEL de Zone est éteinte
lorsque l’unité est rechargée ou stockés.
Soin et entretien
AVERTISSEMENT : Pour réduire les risques de blessures, mettez
l’unité hors tension et débranchez-le de toute source d’alimentation
avant de procéder à l’installation et le retrait des accessoires, avant
de régler ou lorsque vous effectuez une maintenance. Un démarrage
accidentel peut provoquer des blessures.
Ne jamais immerger cette unité dans l’eau. La saleté et la graisse
peut être enlevé de l’extérieur de l’unité à l’aide d’un chiffon ou soft
brosse non-métallique humidifié avec une solution doux de l’eau et
de détergent. Ne laissez jamais de liquide pénétrer à l’intérieur de
l’appareil; Ne jamais immerger toute partie de l’unité dans un liquide.
AVERTISSEMENT : Risque de choc électrique. Débranchez le
cordon d’extension avant de nettoyer AC.
Sauf pour le fusible de l’adaptateur 12V DC de charge, il n’y a pas de
pièces remplaçables par l’utilisateur. Inspecter périodiquement l’état
des adaptateurs, des connecteurs et des câbles. Contactez le fabricant
pour remplacer les composants qui sont devenus usés ou cassés.
LA BATTERIE INTERNE
Tous les blocs d’alimentation d’appoint perdent de l’énergie par
autodécharge au fil du temps, et ce, d’autant plus rapidement que les
températures sont élevées. Lorsque l’appareil n’est pas utilisé, nous
recommandons que la batterie soit rechargée au moins tous les 30
jours.
REMPLACEMENT DE LA BATTERIE
La batterie devrait durer toute la vie utile de l’appareil. La vie de service
de l’unité varie dépend d’un certain nombre de facteurs, y compris,
mais sans s’y limiter le nombre de cycles de recharge et des soins
appropriés et l’entretien de la batterie par l’utilisateur final. Contactez
le fabricant pour toute information dont vous auriez besoin.
ÉLIMINATION SÛRE DE LA BATTERIE
Contient une batterie plomb-acide, qui doivent être éliminés
de façon appropriée. Le recyclage est requis. Défaut de
se conformer aux réglementations locales, étatiques
et fédérales peut entraîner des amendes ou
d’emprisonnement.
S’il vous plaît recycler.
AVERTISSEMENT – Pour réduire le risque de blessures graves ou
des dommages matériels :
• Ne jetez pas la batterie au feu, car vous risqueriez de déclencher
une explosion.
• Avant de mettre la batterie au rebut, protégez les bornes exposées
avec du ruban isolant renforcé pour empêcher un court-circuit
(pouvant provoquer une blessure ou un incendie).
• N’exposez pas la batterie au feu ou à une chaleur intense, car elle
pourrait exploser.
REMPLACEMENT DU FUSIBLE DE L’ADAPTEUR DE CHARGE
12V CC
Le fusible à l’extrémité de la fiche du chargeur de 12 V CC protège le
circuit de charge de l’adaptateur. Si le chargeur de 120 V CA intégré
fonctionne, mais quel’adaptateur CC ne fonctionne pas, il est possible
que le fusible soit ouvert (grillé).
Remplacement du fusible :
1. Dévissez le capuchon de la fiche CC (dans le sens inverse des
aiguilles d’une montre).
2. Retirez le contact à ressort central et le fusible.
3. Vérifiez le fusible avec un dispositif d’essai de la continuité électrique.
4. S’il est grillé, trouvez un fusible de rechange de 2 ampères.
5. Replacez le fusible, le ressort de contact et le capuchon.
Page 44

Français
43
6. Vissez le capuchon en sens horaire en le serrant du bout des
doigts – NE PAS TROP SERRER.
7. Assurez-vous du bon fonctionnement de l’adaptateur de charge
12V CC.
Depannage
Problème Solution possible
Unité ne se charge pas Assurez-vous que toutes les fonctions
de l’unité sont désactivées.
Assurez-vous qu’un cordon d’extension
de gage convenable est correctement
branché à la fois à l’unité et une prise
secteur qui fonctionne.
ou
Assurez-vous que l’adaptateur de
charge 12V DC est correctement
connecté à la fois l’unité et une source
de courant continu fonctionnant.
Vérifier le branchement à la source
d'alimentation CA ou CC.
Confirmer qu'il y a un fonctionnement
courant CA ou CC.
Vérifier que le fusible dans l'adaptateur
CC de 12 V n'est pas grillé.
Problème Solution possible
Unité ne parvient pas à
démarrer le moteur
Assurez-vous que l’interrupteur de la
batterie d’appoint est sur la position
marche.
Assurez-vous qu'une connexion par
câble à la polarité correcte a été établie.
Assurez-vous que l'unité n'est pas
exploité en mode du compresseur.
Vérifier que l'unité a une charge complète.
Recharger l'unité si nécessaire.
Compresseur portatif
ne sera pas gonfler
Assurez-vous que le bouton
d'alimentation du compresseur a été
enfoncé pour activer le compresseur.
Assurez-vous que l'unité n'est pas
exploitée dans le mode de batterie
d’appoint.
Assurez-vous que la buse Sure Fit® est
fermement vissé sur la tige de soupape
lors d’une tentative pour gonfler les
pneumatiques; ou que l’adaptateur de
buse est solidement vissée dans le Sure
Fit® et de buse est correctement inséré
dans l’élément à être gonflé sur toutes
les autres articles gonflables.
Vérifier que l’unité a une charge complète.
Recharger l’unité si nécessaire.
Page 45

Français
44
Problème Solution possible
Port USB ne sera pas
alimenter le dispositif
Assurez-vous que le bouton
d’alimentation de USB a été enfoncé
Assurez-vous que tous les Indicateurs
de alimentation/de défaillance de USB
lumière bleu et fixe. Si une défaillance
est présente dans l’un ou l’autre des
ports USB, l’Indicateur de alimentation/
de défaillance de USB clignote en bleu.
Reportez-vous à la notes importantes
dans la section “Ports USB “ pour
remédier aux erreur.
Assurez-vous que la consommation
totale de tous les périphériques USB
branchés sur les ports USB ne dépasse
pas 3.1A.
Certains appareils électroniques
alimentés par USB peuvent ne
pas fonctionner avec ce port USB.
Consultez le manuel de l’appareil
électronique correspondante pour
confirmer qu’il peut être utilisé avec ce
type de port d’alimentation/de charge
USB.
Vérifier que l’unité a une charge complète.
Recharger l’unité si nécessaire.
Lumière DEL de zone
ne vient pas
Assurez-vous que le bouton de lumière
DEL de zone a été enfoncé
Vérifier que l’unité a une charge complète.
Recharger l’unité si nécessaire.
Accessoires
AVERTISSEMENT : Puisque les accessoires autres que ceux offerts
par DeWALT n’ont pas été testés avec ce produit, leur utilisation pourrait
s’avérer dangereuse. Pour réduire le risque de blessures, utiliser
exclusivement les accessoires DeWALT recommandés avec le présent
produit.
Si vous avez besoin d’aide en ce qui concerne les accessoires, s’il vous
plaît contacter le fabricant au 1-888-394-3392 ou CustomerService@
dewalt12volt.com.
Information de service technique
Que vous ayez besoin de conseil technique, d’une réparation, ou
de véritables pièces de rechange d’usine, s’il vous plaît contacter le
fabricant au 1-888-394-3392 ou CustomerService@dewalt12volt.com.
Garantie limitée d’un an
Le manufacturier garantit ce produit contre tout défaut de matériaux et
de fabrication pour une période d’UN (1) AN à partir de la date d’achat
par le premier acheteur et utilisateur final (« période de garantie »).
Si une réclamation valide est reçue au cours de la période de garantie,
le produit défectueux sera réparé, remplacé ou remboursés, sans frais,
selon les modalités suivantes : (1) Retourner le produit au fabricant pour
une réparation, remplacement ou le remboursement (à la discrétion du
manufacturier). Une preuve d’achat peut être requise par le fabricant.
(2) Retournez le produit chez le marchand où il a été acheté afin de
procéder à un échange « à condition que le marchand soit un détaillant
participant ». Les retours devraient s’effectuer au cours de la période
de temps spécifiée par le détaillant dans sa politique d’échange «
généralement de 30 à 90 jours après la vente ». Une preuve d’achat
pourrait être requise. Veuillez vérifier auprès du détaillant sa politique
particulière concernant les retours de marchandises au-delà de la
période indiquée pour les échanges.
Page 46

Français
45
Cette garantie ne s’applique pas à des accessoires, bulbes fusibles
et batteries, défauts résultant une usure normale, d’accidents, les
dommages subis pendant l’expédition, les modifications, une utilisation
non autorisée ou de la réparation, de la négligence, utilisation abusive,
et l’omission de suivre les instructions pour les soins et de maintenance
pour le produit.
Cette garantie vous donne, l’original acheteur au détail, des droits
légaux spécifiques et vous pouvez avoir d’autres droits qui varient d’état
à état ou province. Ce produit n’est pas destiné à usage commercial.
90 JOURS POLITIQUE DE REMBOURSEMENT
If you are not completely satisfied with the performance of this product
for any reason, you can return it within ninety (90) days from the date
of purchase with a receipt for a full refund.
Veuillez accomplir la carte d’enregistrement de produit et retournez
dans les 30 jours de l’achat du produit à : Baccus Global LLC, 595
S. Federal Highway, Suite 200, Boca Raton, FL 33432, États-Unis.
Numéro sans frais Baccus : 1-888-394-3392. www.Dewalt12volt.com
Spécifications
Boost ampère 1,400A batterie de pointe,
700A instantanée
Type de batterie Acide de plomb scellée,
12 volts CC
Entrée 120V CA 60Hz, 13W ou
12V CC, 0.6A
Compresseur 120 PSI
Sortie USB 5V CC, 3.1A max.
Adaptateur 12V CC 12V CC
Sure Fit® est une marque déposée détenue par Baccus Global, LLC.
Importé par Baccus Global, LLC, One City Centre,
1 North Federal Highway, Suite 200, Boca Raton, FL 33432
www.dewalt12volt.com 1-888-394-3392
Copyright © 2017 Baccus Global, LLC. DeWA LT® et le logo DeWA LT
sont des marques de DeWALT Industrial Tool Co., ou une filiale de
celle-ci et sont utilisés sous licence. Le schéma de couleurs jaune
et noir est une marque commerciale pour DeWALT outils électriques
et accessoires.
Page 47

Page 48

 Loading...