

Page 1
Final page size: A5 (148mm x 210mm)
DWH161
Page 2

English (original instructions) 3
Copyright DeWALT
B
Page 3
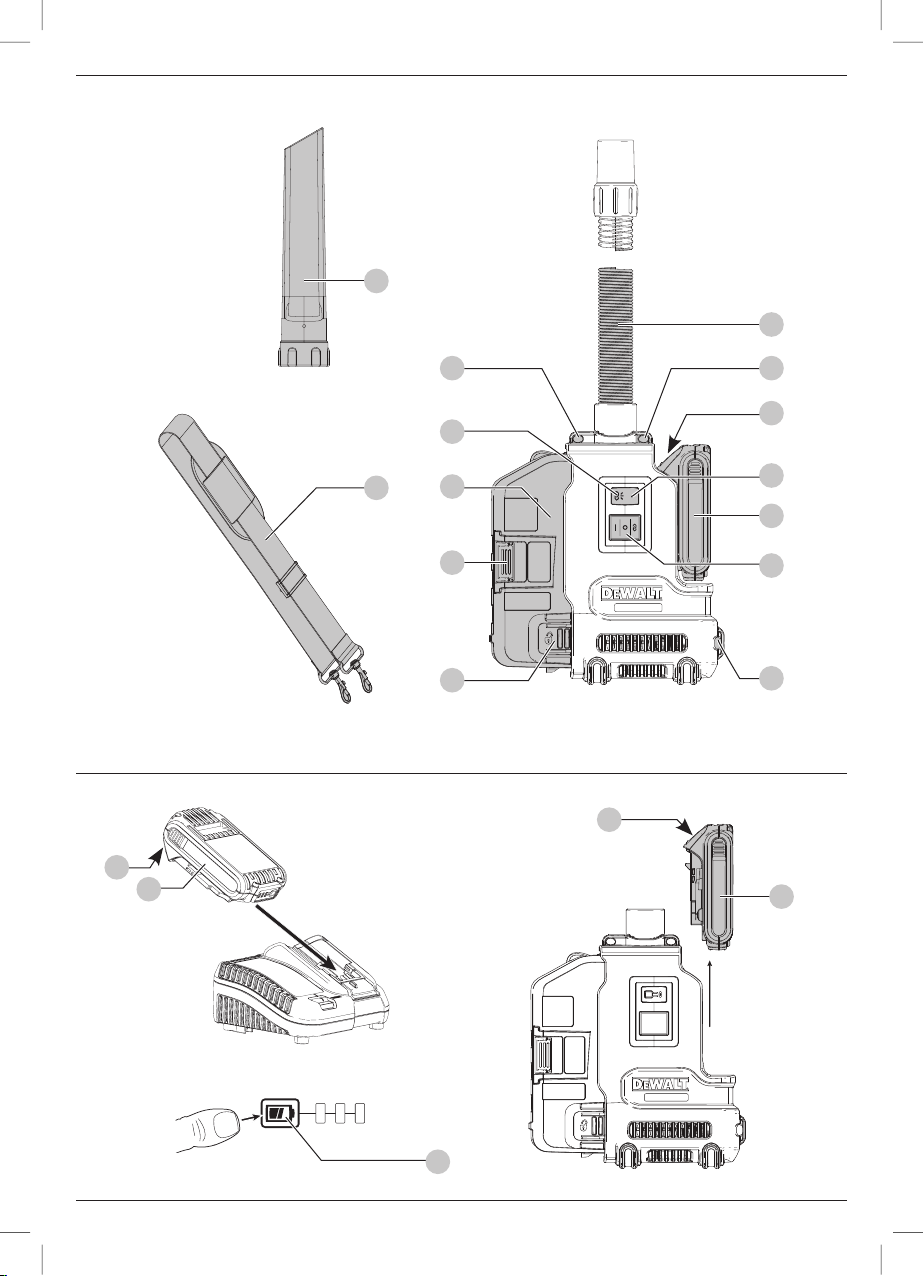
Fig. A
12
6
1111
Fig. B
8
2
10
3
9
1
5
4
7
11
2
2
1
1
15
1
Page 4
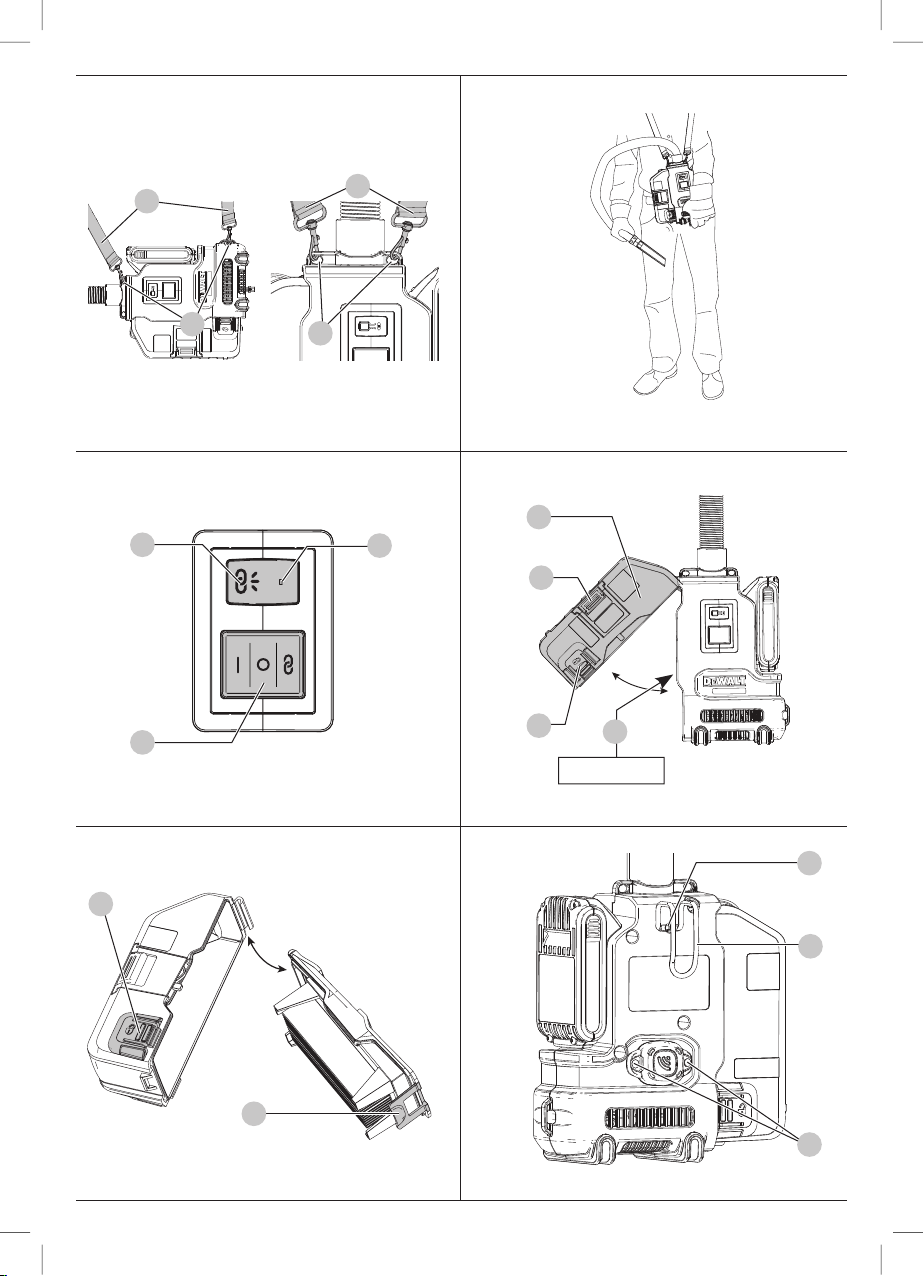
Fig. C Fig. D
Fig. E
10
11
10
11
Fig. F
3
8
9
5
7
4
14
XXXX XX XX
Fig. G Fig. H
4
16
2
13
18
17
Page 5
UNIVERSAL DUST EXTRACTOR
DWH161
Congratulations!
You have chosen a DeWALT dust extractor. Years of experience,
thorough product development and innovation make DeWALT
one of the most reliable partners for professional power
toolusers.
Technical Data
DWH161
Voltage V
Type 1
Battery type Li-Ion
Max. flow rate L/s 9
Max. underpressure kPa 9.5
Hose diameter mm 26
Hose length m 1.0
Weight (without battery pack) kg 1.65
Noise values according to EN60335-2-69:
(emission sound pressure level) dB(A) 66.3
L
PA
(sound power level) dB(A) 82.5
L
WA
K (uncertainty for the given sound level) dB(A) 1.5
The vibration total value ah to which the hand-arm system is
subjected and measurements uncertainty K are determined in
accordance with ISO 5349-1, the machine being supplied at
ratedvoltage.
ah =<2.5 m/s2, K = 0.06 m/s2.
EC-Declaration of Conformity
Machinery Directive and Radio Equipment
Directive
18
DC
ENGLISH
The undersigned is responsible for compilation of the technical
file and makes this declaration on behalf ofDeWALT.
Markus Rompel
Vice-President Engineering, PTE-Europe
DeWALT, Richard-Klinger-Straße 11,
D-65510, Idstein, Germany
10.05.2019
WARNING: To reduce the risk of injury, read
the instructionmanual.
Definitions: Safety Guidelines
The definitions below describe the level of severity for each
signal word. Please read the manual and pay attention to
thesesymbols.
DANGER: Indicates an imminently hazardous
situation which, if not avoided, will result in death or
seriousinjury.
WARNING: Indicates a potentially hazardous situation
which, if not avoided, could result in death or
seriousinjury.
CAUTION: Indicates a potentially hazardous situation
which, if not avoided, may result in minor or
moderateinjury.
NOTICE: Indicates a practice not related to
personal injury which, if not avoided, may result in
propertydamage.
Denotes risk of electricshock.
Denotes risk offire.
Dust Extractor
DWH161
DeWALT declares that these products described under Technical
Data are in compliance with:
2006/42/EC, EN60335-1:2012 + A11:2014 + A13:2017;
EN60335-2-69:2012.
These products also comply with Directive 2014/53/EU and
2011/65/EU. For more information, please contact D
the following address or refer to the back of themanual.
eWALT at
3
Page 6

*Date code 201811475B or later
**Date code 201536 or later
ENGLISH
Batteries Chargers/Charge Times (Minutes)
Cat # V
DCB546 18/54 6.0/2.0 1.05 60 270 170 140 90 60 90 X
DCB547 18/54 9.0/3.0 1.46 75* 420 270 220 135* 75* 135* X
DCB548 18/54 12.0/4.0 1.44 120 540 350 300 180 120 180 X
DCB181 18 1.5 0.35 22 70 45 35 22 22 22 45
DCB182 18 4.0 0.61 60/40** 185 120 100 60 60/40** 60 120
DCB183/B 18 2.0 0.40 30 90 60 50 30 30 30 60
DCB184/B 18 5.0 0.62 75/50** 240 150 120 75 75/50** 75 150
DCB185 18 1.3 0.35 22 60 40 30 22 22 22 X
DCB187 18 3.0 0.54 45 140 90 70 45 45 45 90
DCB189 18 4.0 0.54 60 185 120 100 60 60 60 120
*Date code 201811475B or later
**Date code 201536 or later
DC
Ah Weight (kg)
IMPORTANT SAFETY INSTRUCTIONS
SAVE ALL WARNINGS AND INSTRUCTIONS
FOR FUTURE REFERENCE
READ ALL INSTRUCTIONS BEFORE USING
THISAPPLIANCE
When using this appliance, basic safety precautions should always
be followed including the following:
WARNING: Operators shall be adequately instructed on
the use of this dustextraxtor.
WARNING: To reduce the risk of fire, electric shock
andinjury:
• Do not leave the appliance unattended when the dust
extractor is out of reach or sight. Remove the battery
pack when not in use and beforeservicing.
• Do not allow appliance to be used as a toy. Close
attention is necessary when used by or nearchildren.
• Use this appliance ONLY as described in the manual.
Use only recommended attachments andaccessories.
• Do not use this appliance if it is showing signs of
malfunction in any way. If the appliance is not
working correctly, has been dropped, damaged,
left outdoors, or dropped into water, return it to a
servicecentre.
• Do not handle the appliance with wethands.
• Do not put any objects into the openings of the
appliance. Do not use the appliance with any opening
blocked; keep free of dust, lint, hair and anything else
that may reduce airflow.
• Keep hair, loose clothing, fingers, and all body parts
away from the openings and movingparts.
• Turn off all controls before disconnecting from
powersource.
• Use extra care when cleaning onstairs.
• Use personal protective equipment. Always wear
eye protection. Protective equipment such as dust
mask, non-skid safety shoes, hard hat, or hearing
4
DCB104 DCB107 DCB112 DCB113 DCB115 DCB118 DCB132 DCB119
protection used for appropriate conditions will reduce
personalinjuries.
• Stay alert, watch what you are doing and use
common sense when operating a dust extractor. Do
not use a dust extractor while you are tired or under
the influence of drugs, alcohol or medication. A
moment of inattention while operating dust extractors
may result in serious personalinjury.
Additional Safety Warnings
• Prevent unintentional starting. Ensure the switch is in the
off-position before connecting to battery pack, picking up or
transporting the appliance. Unintentional switch on with the
finger on the switch, can result in hazardoussituations.
• Disconnect the battery pack from the appliance before making
any adjustments, changing accessories, or storing appliance.
Vacuum could be activated by the remote or a paired tool.
Unintended energising of the appliance that has the switch on
invitesaccidents.
• Recharge only with the charger specified by the manufacturer.
A charger that is suitable for one type of battery pack may
create a risk of fire when used with another batterypack.
• Use appliances only with specifically designated battery packs.
Use of any other battery packs may create a risk of injury
andfire.
• Use power tools and accessories which are connected to the
vacuum in accordance with these instructions. Use of power
tools for applications others than those indended, can result in
hazardoussituations.
• When battery pack is not in use, keep it away from other metal
objects, like paper clips, coins, keys, nails, screws or other small
metal objects, that can make a connection from one terminal
to another. Shorting the battery terminals together may cause
burns or afire.
• Under abusive conditions, liquid may be ejected from the
battery; avoid contact. If contact accidentally occurs, flush
with water. If liquid contacts eyes, additionally seek medical
help. Liquid ejected from the battery may cause irritation
orburns.
Page 7

• Do not use a battery pack or appliance that is damaged
or modified. Damaged or modified batteries may exhibit
unpredictable behavior resulting in fire, explosion or risk
ofinjury.
• Do not expose a battery pack or appliance to fire or excessive
temperature. Exposure to fire or temperature above 40°C may
causeexplosion.
• Have servicing performed by a qualified repair person using
only identical replacement parts. This will ensure that the
safety of the product ismaintained.
Specific Safety Rules for Dust Extractors
• The appliance may only be used by persons who are familiar
with it, have been trained on how to use it safely and who
understand the resultinghazards.
• When picking up dusts with an exposure limit value,
precautions must be taken to ensure adequate air exchange in
the room if the exhaust air from the appliance is released into
the room. Be aware of the corresponding nationalregulations.
• Operator should observe any safety regulations to the material
beinghandled.
• Do not use to vacuum combustible explosive materials, such
as coal, grain, or other finely divided combustiblematerial.
• Do not use the appliance to pick up liquids or wet dirt
• Do not use in areas where flammable or combustible liquids
arepresent.
• Do not use to vacuum hazardous, toxic or carcinogenic
materials, such as asbestos or pesticide, unless the vacuuming
of the material is specifically identified in this instruction
manual as an approveduse.
• Static shocks are possible in dry areas or when the relative
humidity of the air is low. This is only temporary and does not
affect the use of thedustextractor.
• To avoid spontaneous combustion, empty the canister after
everyuse.
• Some wood contains preservatives which can be toxic. Take
extra care to prevent inhalation and skin contact when
working with these materials. Request and follow any safety
information available from your materialsupplier.
• Do not use vacuum as a stepladder.
• Do not place heavy objects ondustextractor.
WARNING: To reduce the risk of fire, electric shock and
injury:
• Do not pick up anything that is burning or smoking,
such as cigarettes, matches or hotashes.
• Do not use without filter inplace.
Residual Risks
In spite of the application of the relevant safety regulations
and the implementation of safety devices, certain residual risks
cannot be avoided. These are:
• Impairment ofhearing.
• Risk of personal injury due to flyingparticles.
• Health hazards caused by breathingdust.
• Risk of personal injury due to prolongeduse.
ENGLISH
SAVE THESE INSTRUCTIONS
Chargers
DeWALT chargers require no adjustment and are designed to be
as easy as possible tooperate.
Electrical Safety
The electric motor has been designed for one voltage only.
Always check that the battery pack voltage corresponds to the
voltage on the rating plate. Also make sure that the voltage of
your charger corresponds to that of yourmains.
Your DeWALT charger is double insulated in
accordance with EN60335; therefore no earth wire
isrequired.
If the supply cord is damaged, it must be replaced by a
specially prepared cord available through the D
serviceorganisation.
Mains Plug Replacement
(U.K. & Ireland Only)
If a new mains plug needs to be fitted:
• Safely dispose of the oldplug.
• Connect the brown lead to the live terminal in theplug.
• Connect the blue lead to the neutralterminal.
WARNING: No connection is to be made to the
earthterminal.
Follow the fitting instructions supplied with good quality plugs.
Recommended fuse: 3A.
Using an Extension Cable
An extension cord should not be used unless absolutely
necessary. Use an approved extension cable suitable for
the power input of your charger (see Technical Data). The
minimum conductor size is 1mm
is30m.
When using a cable reel, always unwind the cablecompletely.
Important Safety Instructions for All Battery
Chargers
SAVE THESE INSTRUCTIONS: This manual contains important
safety and operating instructions for compatible battery
chargers (refer to TechnicalData).
• Before using charger, read all instructions and cautionary
markings on charger, battery pack, and product using
batterypack.
WARNING: Shock hazard. Do not allow any liquid to get
inside charger. Electric shock mayresult.
WARNING: We recommend the use of a residual current
device with a residual current rating of 30mA orless.
CAUTION: Burn hazard. To reduce the risk of injury,
charge only D
batteries may burst causing personal injury anddamage.
CAUTION: Children should be supervised to ensure that
they do not play with theappliance.
NOTICE: Under certain conditions, with the charger
plugged into the power supply, the exposed charging
contacts inside the charger can be shorted by foreign
eWALT rechargeable batteries. Other types of
2
; the maximum length
eWALT
5
Page 8
ENGLISH
material. Foreign materials of a conductive nature such as,
but not limited to, steel wool, aluminum foil or any buildup
of metallic particles should be kept away from charger
cavities. Always unplug the charger from the power supply
when there is no battery pack in the cavity. Unplug charger
before attempting to clean
• DO NOT attempt to charge the battery pack with any
chargers other than the ones in this manual. The charger
and battery pack are specifically designed to worktogether.
• These chargers are not intended for any uses other than
charging D
eWA LT rechargeable batteries. Any other uses
may result in risk of fire, electric shock orelectrocution.
• Do not expose charger to rain orsnow.
• Pull by plug rather than cord when disconnecting
charger. This will reduce risk ofdamage to electric plug
andcord.
• Make sure that cord is located so that it will not be
stepped on, tripped over, or otherwise subjected to
damage orstress.
• Do not use an extension cord unless it is absolutely
necessary. Use of improper extension cord could result in risk
of fire,electric shock, orelectrocution.
• Do not place any object on top of charger or place
the charger on a soft surface that might block the
ventilation slots and result in excessive internal heat.
Place the charger in a position away from any heat source. The
charger is ventilated through slots in the top and the bottom
of thehousing.
• Do not operate charger with damaged cord or plug—
have them replacedimmediately.
• Do not operate charger if it has received a sharp blow,
been dropped, or otherwise damaged in any way. Take it
to an authorised servicecentre.
• Do not disassemble charger; take it to an authorised
service centre when service or repair is required. Incorrect
reassembly may result in a risk of electric shock, electrocution
orfire.
• In case of damaged power supply cord the supply cord must be
replaced immediately by the manufacturer, its service agent or
similar qualified person to prevent anyhazard.
• Disconnect the charger from the outlet before
attempting any cleaning. This will reduce the risk of
electric shock. Removing the battery pack will not reduce
thisrisk.
• NEVER attempt to connect two chargerstogether.
• The charger is designed to operate on standard
230V household electrical power. Do not attempt to
use it on any other voltage. This does not apply to the
vehicularcharger.
Charging a Battery (Fig. B)
1. Plug the charger into an appropriate outlet before inserting
batterypack.
2. Insert the battery pack
battery pack is fully seated in the charger. The red (charging)
1
into the charger, making sure the
light will blink repeatedly indicating that the charging
process hasstarted.
3. The completion of charge will be indicated by the red light
remaining ON continuously. The battery pack is fully charged
and may be used at this time or left in the charger. To
remove the battery pack from the charger, push the battery
release button
2
on the batterypack.
NOTE: To ensure maximum performance and life of lithium-ion
battery packs, charge the battery pack fully before firstuse.
Charger Operation
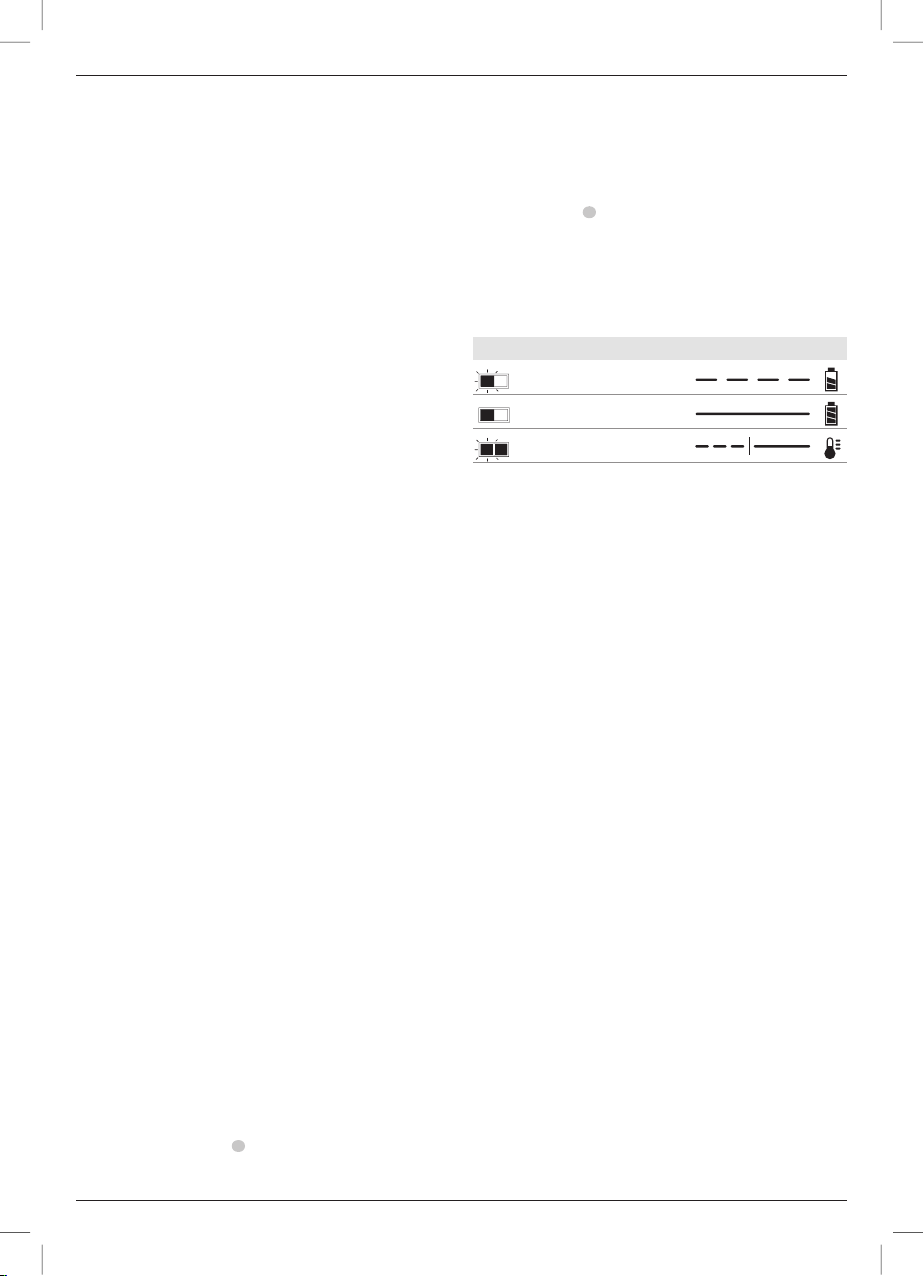
Refer to the indicators below for the charge status of the
batterypack.
Charge Indicators
Charging
Fully Charged
Hot/Cold Pack Delay*
* The red light will continue to blink, but a yellow indicator light
will be illuminated during this operation. Once the battery pack
has reached an appropriate temperature, the yellow light will
turn off and the charger will resume the chargingprocedure.
The compatible charger(s) will not charge a faulty battery pack.
The charger will indicate faulty battery by refusing tolight.
NOTE: This could also mean a problem with acharger.
If the charger indicates a problem, take the charger and battery
pack to be tested at an authorised servicecentre.
Hot/Cold Pack Delay
When the charger detects a battery pack that is too hot or too
cold, it automatically starts a Hot/Cold Pack Delay, suspending
charging until the battery pack has reached an appropriate
temperature. The charger then automatically switches to the
pack charging mode. This feature ensures maximum battery
packlife.
A cold battery pack will charge at a slower rate than a warm
battery pack. The battery pack will charge at that slower rate
throughout the entire charging cycle and will not return to
maximum charge rate even if the battery packwarms.
The DCB118 charger is equipped with an internal fan designed
to cool the battery pack. The fan will turn on automatically when
the battery pack needs to be cooled. Never operate the charger
if the fan does not operate properly or if ventilation slots are
blocked. Do not permit foreign objects to enter the interior of
thecharger.
Electronic Protection System
XR Li-Ion tools are designed with an Electronic Protection
System that will protect the battery pack against overloading,
overheating or deepdischarge.
The dust extractor will automatically turn off if the Electronic
Protection System engages. If this occurs, place the lithium-ion
battery pack on the charger until it is fullycharged.
6
Page 9

Wall Mounting
These chargers are designed to be wall mountable or to sit
upright on a table or work surface. If wall mounting, locate the
charger within reach of an electrical outlet, and away from a
corner or other obstructions which may impede air flow. Use
the back of the charger as a template for the location of the
mounting screws on the wall. Mount the charger securely using
drywall screws (purchased separately) at least 25.4mm long
with a screw head diameter of 7–9mm, screwed into wood to
an optimal depth leaving approximately 5.5mm of the screw
exposed. Align the slots on the back of the charger with the
exposed screws and fully engage them in theslots.
Charger Cleaning Instructions
WARNING: Shock hazard. Disconnect the charger
from the AC outlet before cleaning. Dirt and grease
may be removed from the exterior of the charger using a
cloth or soft non-metallic brush. Do not use water or any
cleaning solutions. Never let any liquid get inside the tool;
never immerse any part of the tool into aliquid.
Battery Packs
Important Safety Instructions for All Battery
Packs
When ordering replacement battery packs, be sure to include
catalogue number andvoltage.
The battery pack is not fully charged out of the carton. Before
using the battery pack and charger, read the safety instructions
below. Then follow charging proceduresoutlined.
READ ALL INSTRUCTIONS
• Do not charge or use battery in explosive atmospheres,
such as in the presence of flammable liquids, gases or
dust. Inserting or removing the battery from the charger may
ignite the dust orfumes.
• Never force battery pack into charger. Do not modify
battery pack in any way to fit into a non-compatible
charger as battery pack may rupture causing serious
personalinjury.
• Charge the battery packs only in D
• DO NOT splash or immerse in water or otherliquids.
• Do not store or use the tool and battery pack in locations
where the temperature may fall below 4 ˚C (34 ˚F) (such
as outside sheds or metal buildings in winter), or reach
or exceed 40 ˚C (104 ˚F) (such as outside sheds or metal
buildings in summer).
• Do not incinerate the battery pack even if it is severely
damaged or is completely worn out. The battery pack can
explode in a fire. Toxic fumes and materials are created when
lithium-ion battery packs areburned.
• If battery contents come into contact with the skin,
immediately wash area with mild soap and water. If
battery liquid gets into the eye, rinse water over the open eye
for 15 minutes or until irritation ceases. If medical attention
is needed, the battery electrolyte is composed of a mixture of
liquid organic carbonates and lithiumsalts.
eWALTchargers.
ENGLISH
• Contents of opened battery cells may cause respiratory
irritation. Provide fresh air. If symptoms persists, seek
medicalattention.
WARNING: Burn hazard. Battery liquid may be flammable
if exposed to spark orflame.
WARNING: Never attempt to open the battery pack for
any reason. If battery pack case is cracked or damaged,
do not insert into charger. Do not crush, drop or damage
battery pack. Do not use a battery pack or charger that
has received a sharp blow, been dropped, run over or
damaged in any way (i.e., pierced with a nail, hit with
a hammer, stepped on). Electric shock or electrocution
may result. Damaged battery packs should be returned to
service centre forrecycling.
WARNING: Fire hazard. Do not store or carry the
battery pack so that metal objects can contact
exposed battery terminals. For example, do not place
the battery pack in aprons, pockets, tool boxes, product kit
boxes, drawers, etc., with loose nails, screws, keys,etc.
CAUTION: When not in use, place tool on its side on
a stable surface where it will not cause a tripping
or falling hazard. Some tools with large battery packs
will stand upright on the battery pack but may be easily
knockedover.
Transportation
WARNING: Fire hazard. Transporting batteries can
possibly cause fire if the battery terminals inadvertently
come in contact with conductive materials. When
transporting batteries, make sure that the battery
terminals are protected and well insulated from materials
that could contact them and cause a shortcircuit.
NOTE: Lithium-ion batteries should not be put in
checkedbaggage.
D
eWALT batteries comply with all applicable shipping
regulations as prescribed by industry and legal standards which
include UN Recommendations on the Transport of Dangerous
Goods; International Air Transport Association (IATA) Dangerous
Goods Regulations, International Maritime Dangerous Goods
(IMDG) Regulations, and the European Agreement Concerning
The International Carriage of Dangerous Goods by Road (ADR).
Lithium-ion cells and batteries have been tested to section 38.3
of the UN Recommendations on the Transport of Dangerous
Goods Manual of Tests andCriteria.
In most instances, shipping a D
excepted from being classified as a fully regulated Class 9
Hazardous Material. In general, only shipments containing a
lithium-ion battery with an energy rating greater than 100 Watt
Hours (Wh) will require being shipped as fully regulated Class 9.
All lithium-ion batteries have the Watt Hour rating marked on
the pack. Furthermore, due to regulation complexities, D
does not recommend air shipping lithium-ion battery packs
alone regardless of Watt Hour rating. Shipments of tools with
batteries (combo kits) can be air shipped as excepted if the Watt
Hour rating of the battery pack is no greater than 100Whr.
Regardless of whether a shipment is considered excepted
or fully regulated, it is the shipper's responsibility to consult
eWALT battery pack will be
eWALT
7
Page 10
ENGLISH
the latest regulations for packaging, labeling/marking and
documentationrequirements.
The information provided in this section of the manual is
provided in good faith and believed to be accurate at the time
the document was created. However, no warranty, expressed or
implied, is given. It is the buyer’s responsibility to ensure that its
activities comply with the applicableregulations.
Transporting the FLEXVOLT
The D
eWALT FLEXVOLT
TM
Battery
TM
battery has two modes: Use
andTransport.
Use Mode: When the FLEXVOLT
TM
battery stands alone or is in
a DeWALT 18V product, it will operate as an 18V battery. When
the FLEXVOLTTM battery is in a 54V or a 108V (two 54V batteries)
product, it will operate as a 54Vbattery.
Transport Mode: When the cap is attached to the FLEXVOLT
TM
battery, the battery is in Transport mode. Keep the cap for
shipping.
When in Transport mode, strings
of cells are electrically
disconnected within the pack
resulting in 3 batteries with a
lower Watt hour (Wh) rating as compared to 1 battery with a
higher Watt hour rating. This increased quantity of 3 batteries
with the lower Watt hour rating can exempt the pack from
certain shipping regulations that are imposed upon the higher
Watt hour batteries.
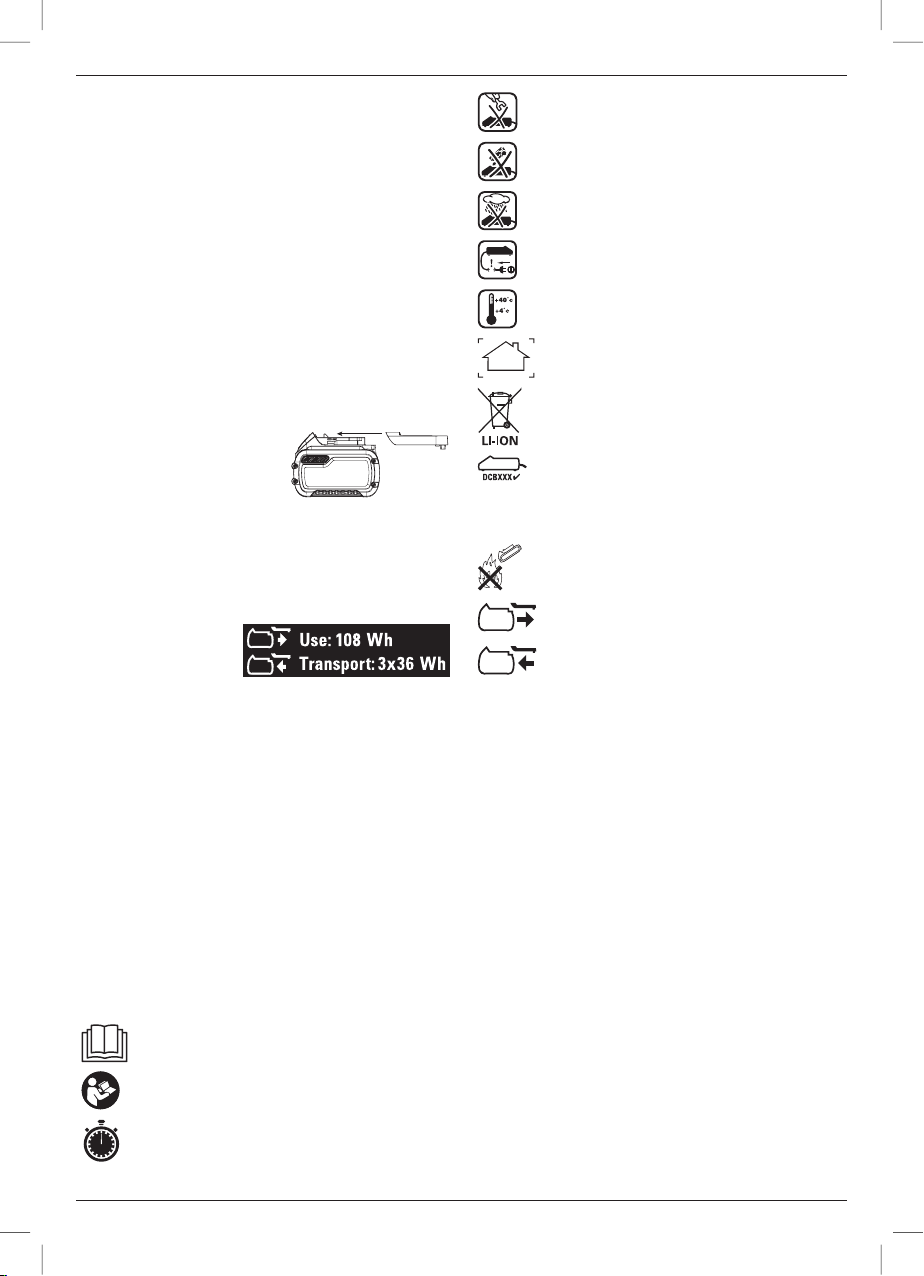
For example, the Transport
Example of Use and Transport Label Marking
Wh rating might indicate
3x36 Wh, meaning 3
batteries of 36 Wh each.
The Use Wh rating might
indicate 108Wh (1batteryimplied).
Storage Recommendations
1. The best storage place is one that is cool and dry away
from direct sunlight and excess heat or cold. For optimum
battery performance and life, store battery packs at room
temperature when not inuse.
2. For long storage, it is recommended to store a fully charged
battery pack in a cool, dry place out of the charger for
optimalresults.
NOTE: Battery packs should not be stored completely depleted
of charge. The battery pack will need to be recharged beforeuse.
Labels on Charger and Battery Pack
In addition to the pictographs used in this manual, the labels
on the charger and the battery pack may show the following
pictographs:
Read instruction manual beforeuse.
See Technical Data for chargingtime.
Do not probe with conductiveobjects.
Do not charge damaged batterypacks.
Do not expose to water.
Have defective cords replacedimmediately.
Charge only between 4 ˚C and 40 ˚C.
Only for indooruse.
Discard the battery pack with due care for
theenvironment.
Charge DeWALT battery packs only with designated
DeWALT chargers. Charging battery packs other than
the designated DeWALT batteries with a DeWALT
charger may make them burst or lead to other
dangeroussituations.
Do not incinerate the batterypack.
USE (without transport cap). Example: Wh rating
indicates 108 Wh (1 battery with 108 Wh).
TRANSPORT (with built-in transport cap). Example:
Wh rating indicates 3 x 36 Wh (3batteries of 36Wh).
Battery Type
The DWH161 operates on a 18 volt batterypack.
These battery packs may be used: DCB181, DCB182, DCB183,
DCB183B, DCB184, DCB184B, DCB185, DCB187, DCB189,
DCB546, DCB547, DCB548. Refer to Technical Data for
moreinformation.
Package Contents
The package contains:
1 Universal dust extractor
1 Crevice tool
1 Carry strap
1 Belt hook
1 Stepped dust nozzle adaptor
1 Screw
1 Charger
1 Li-Ion battery pack (C1, D1, L1, M1, P1, S1, T1, X1, Y1 models)
2 Li-Ion battery packs (C2, D2, L2, M2, P2, S2, T2, X2, Y2 models)
3 Li-Ion battery packs (C3, D3, L3, M3, P3, S3, T3, X3, Y3 models)
1 Instruction manual
NOTE: Battery packs, chargers and kitboxes are not included
with N models. Battery packs and chargers are not included with
NT models. Bmodels include Bluetooth® batterypacks.
8
Page 11
NOTE: The Bluetooth® word mark and logos are registered
trademarks owned by the Bluetooth®, SIG, Inc. and any use of
such marks by DeWALT is under license. Other trademarks and
trade names are those of their respectiveowners.
• Check for damage to the dust extractor, parts or accessories
which may have occurred duringtransport.
• Take the time to thoroughly read and understand this manual
prior tooperation.
Markings on Dust Extractor
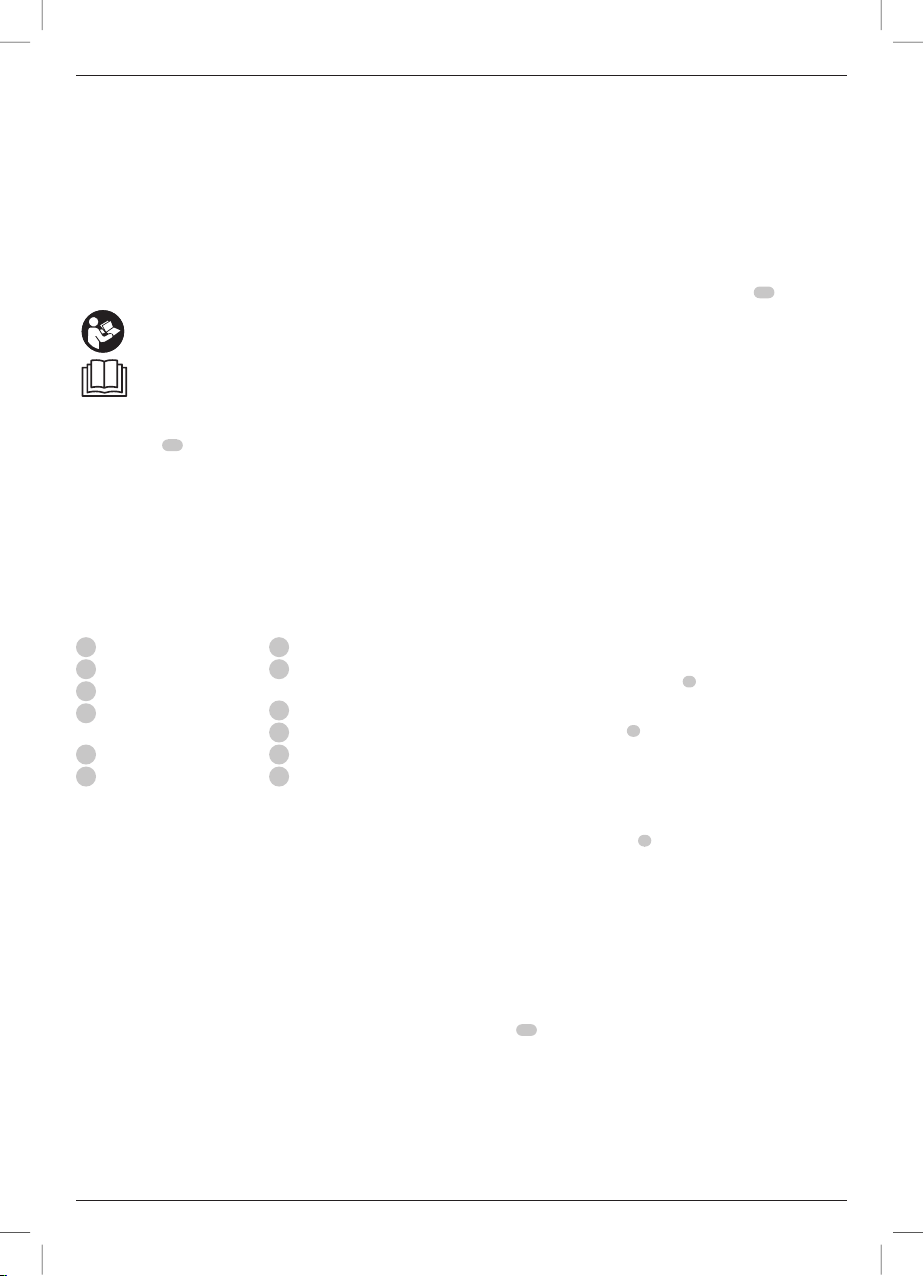
The following pictograms are shown on the dust extractor:
Read instruction manual beforeuse.
Date Code Position (Fig. F)
The date code
is printed into the housing surface that forms the mounting
joint between dust extractor and dustbox.
Example:
14
, which also includes the year of manufacture,
2020 XX XX
Year of Manufacture
Description (Fig. A)
WARNING: Never modify the dust extractor or any part of
it. Damage or personal injury couldresult.
1
Battery pack
2
Battery release button
3
Dust collection box
4
Dust collection box release
buttons
5
Filter cleaning mechanism
6
Dust extractor hose
Intended Use
Your DWH161 cordless dust extractor can be used for mobile
operation to take up dry, non-combustable dusts. Only for
indooruse.
DO NOT use under wet conditions or in the presence of
flammable liquids orgases.
DO NOT pick up materials that present a risk of explosion,
glowing or burning materials, flammable materials, gases or
other hazardoussubstances.
NOTE: This appliance is suited for professional and commercial
use, e.g. in hotels, schools, hospitals, factories, shops, offices,
rental companies, and on constructionsites.
• This machine is not intended for use by persons (including
children) with reduced physical, sensory or mental
capabilities, or lack of experience andknowledge.
• Children should be supervised to ensure that they do not
play with theappliance.
7
Three position switch
8
Wireless Tool Control™
pairing button
9
LED
10
Carry strap
11
Carry strap hooks
12
Crevice tool
ENGLISH
DeWA LT Bluetooth® Tool Tag Ready (Fig.H)
Optional Accessory
WARNING: Read instruction manual for the DeWALT
Bluetooth® ToolTag.
WARNING: Turn dust extractor off and disconnect battery
pack before installing the DeWALT Bluetooth® ToolTag.
WARNING: When installing or replacing the DeWALT
Bluetooth® Tool Tag, use only the screws provided. Be sure
to securely tighten thescrews.
Your dust extractor comes with mounting holes
installing a DeWALT Bluetooth® Tool Tag (DCE041). Use only the
original fasteners included with the tool tag. You will need a T15
(Torx) bit tip to install the tag. The D
for tracking and locating professional power tools, equipment,
and machines using the DeWALT Tool Connect™ app. For proper
installation of the DeWALT Tool Tag refer to the DeWALT Tool
Tagmanual.
eWALT Tool Tag is designed
17
for
ASSEMBLY AND ADJUSTMENTS
WARNING: To reduce the risk of serious personal
injury, turn the dust extractor off and disconnect
battery pack before making any adjustments or
removing/installing attachments or accessories. An
accidental start-up can causeinjury.
WARNING: Use only DeWALT battery packs andchargers.
Inserting and Removing the Battery Pack
from the Dust Extractor (Fig. B)
NOTE: Make sure your battery pack
To Install the Battery Pack into the Dust Extractor
1. Align the battery pack
extractor (Fig.B).
2. Slide the battery pack in until it is firmly seated in the dust
extractor and ensure that you hear the lock snap intoplace.
To Remove the Battery Pack from the Tool
1. Press the release button
out of the dustextractor.
2. Insert battery pack into the charger as described in the
charger section of thismanual.
Fuel Gauge Battery Packs (Fig. B)
Some DeWALT battery packs include a fuel gauge which
consists of three green LED lights that indicate the level of
charge remaining in the batterypack.
To actuate the fuel gauge, press and hold the fuel gauge
15
button
illuminate designating the level of charge left. When the level
of charge in the battery is below the usable limit, the fuel gauge
will not illuminate and the battery will need to berecharged.
NOTE: The fuel gauge is only an indication of the charge left on
the battery pack. It does not indicate tool functionality and is
subject to variation based on product components, temperature
and end-userapplication.
. A combination of the three green LED lights will
1
is fullycharged.
1
with the rails inside the dust
2
and firmly pull the battery pack
9
Page 12

ENGLISH
Attaching the Carry Strap (Fig. C)
Your dust extraction system comes with a carry strap
can be connected to the carry strap hooks
as shown in Fig.C.
11
10
in either manner
that
Attaching the Crevice Tool (Fig. A)
• To attach the crevice tool
insert the end of the dust extractor hose into the open end
of the accessory with a twisting motion untiltight.
NOTE: The dust extraction hose is not compatible with
AirLock®connectors.
• To remove the crevice tool, hold the dust extraction hose
and pull the accessory off using a twistingmotion.
12
to the dust extractor hose
Installing the Belt Hook (Fig. H)
WARNING: To reduce the risk of serious personal
injury, turn the dust extractor off and disconnect
battery pack before making any adjustments or
removing/installing attachments or accessories. An
accidental start-up can causeinjury.
WARNING: To reduce the risk of serious personal
injury, ONLY use the tool’s belt hook to hang the dust
extractor from a work belt. DO NOT use the belt hook
for tethering or securing the dust extractor to a person
or object during use. DO NOT suspend dust extractor
overhead or suspend objects from the belthook.
WARNING: To reduce the risk of serious personal
injury, ensure the screw holding the belt hook
issecure.
IMPORTANT: When attaching or replacing the belt hook
use only the screw
tighten thescrew.
If the hook is not desired at all, it can be removed from the
dustextractor.
13
that is provided. Be sure to securely
18
OPERATION
Instructions for Use
WARNING: Always observe the safety instructions and
applicableregulations.
WARNING: To reduce the risk of serious personal
injury, turn the dust extractor off and disconnect
battery pack before making any adjustments or
removing/installing attachments or accessories. An
accidental start-up can causeinjury.
Proper Hand Position (Fig. D)
WARNING: To reduce the risk of serious personal injury,
ALWAY S use proper hand position asshown.
WARNING: To reduce the risk of serious personal
injury, ALWAYS hold securely in anticipation of a
suddenreaction.
If used as a stand alone dust extractor, proper hand position
requires one hand on theaccessory.
Using the Dust Extractor (Fig.A)
• Before using the universal dust extractor, ensure that the
filter is in place and filter box is securelyfitted.
• Do not use damaged filters. Replace any damaged
filtersimmediately.
• Please observe national applicable regulations/laws on how
6
,
to handle harmful types of dust in yourcountry.
1. Attach the appropriate accessory to the dust extractor
6
hose
.
2. Insert the battery pack
3. To turn dust extractor on, press the three position switch
to the On (I)position.
4. To use in Wireless Tool Control mode press the three position
swtich to the Wireless Tool Control (
paired the trigger of the connected tool will control the
dustextractor.
NOTE: Refer to Pairing the Dust Extractor with a Tool
using Wireless Tool Control Mode to use the dust extractor
with a Wireless Tool Control equippedtool.
5. When finished, turn the dust extractor off by pressing the
three position switch to the Off(O) position or releasing the
trigger of the Wireless Tool Control equippedtool.
1
.
) position. Once
Pairing the Dust Extractor with a Tool using
Wireless Tool Control Mode (Fig. A, E)
CAUTION: When the dust extractor is being controlled by
a paired power tool it may start or stop withoutwarning.
To Pair with a DeWALT Remote or Wireless Tool
,
Control Tool
1. Press the three position switch
2. Press and hold the Wireless Tool Control pairing button
3. The LED
To Unpair with a Wireless Tool Control Tool
• Press and hold the Wireless Tool Control pairing button
• The LED
)position.
Control (
on the DWH161 and pull the trigger on the Wireless Tool
Control equipped tool or press the button on the remote at
the sametime.
9
successfulpairing.
NOTE: Only one transmitter can be paired to the DWH161
at a time. If the unit is already paired the previous transmitter
will beoverridden.
on the DWH161 and pull the trigger on the Wireless Tool
Control equipped tool or press the button on the remote at
the sametime.
successfulunpairing.
will be steadily illuminated to indicate a
9
will flash slowly to indicate a
7
to the Wireless Tool
7
8
8
10
Page 13
ENGLISH
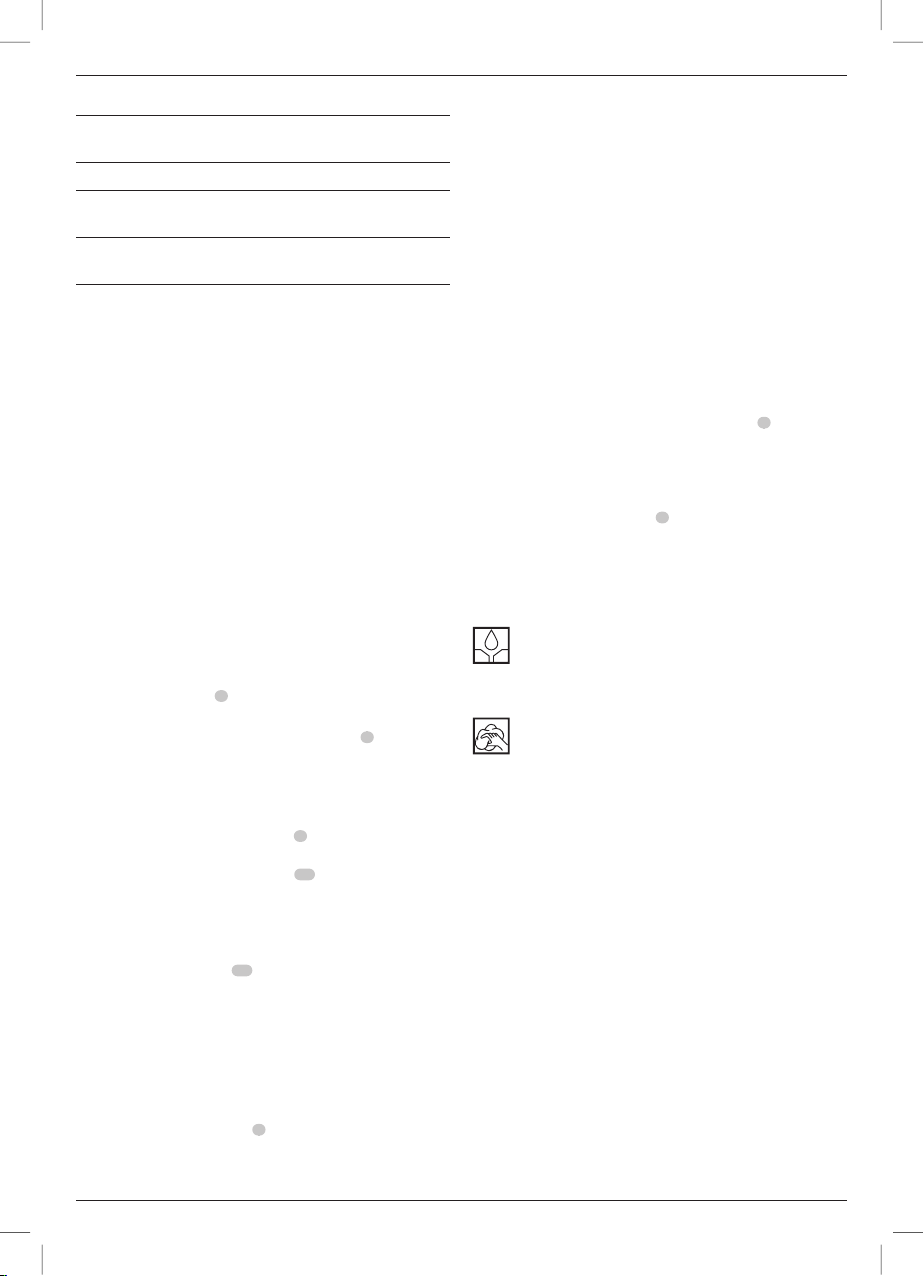
Wireless Tool Control Troubleshooting
LED Light
Pattern
Slow flash Not pressed Wireless Tool Control not paired
Fast flash Pressed Pairing Mode, Waiting for
Solid Not pressed Wireless Tool Control paired,
Pairing Button System Status
signal from tool
Waiting for command from tool
Filter Cleaning Mechanism
Suction power is dependent on the condition of the filter.
Therefore, the filter should be cleanedregularly.
The filter cleaning mechanism is a feature that uses the motor
in the dust extractor to force air through the filter. Refer
to Emptying the Dust Collection Box for instructions on
properuse.
Emptying the Dust Collection Box (Fig.F, G)
WARNING: The vacuum cleaner contains dust particles
that pose a risk to health. Emptying and maintenance
procedures, including the disposal of dust collectors,
should only be carried out by professionals. Suitable
protective equipment is required. Do not operate the
vacuum cleaner without the complete filter system.
Otherwise you endanger yourhealth.
WARNING: Wear approved eye protection and approved
dust mask when performing thisprocedure.
CAUTION: Do not clean with water or compressedair.
The dust collection box
performance has noticeably decreased or isfull.
1. Press the dust collection box release buttons
dust collection box away from the dust extraction system.
Once the catch mechanism is clear of the dust extraction
system the upper joint will also release allowing the dust
collection box to be removedcompletely.
2. To empty the dust collection box
suitable container to catch the dust contained within it.
Lift up the assembly release latch
collection box, separating the canister from the lid. Gently
tapping the dust collection box will encourage any dust
trapped within the filter to also be removed. Once the filter
lid and canister are empty reattach them, ensuring the
assembly release latch
FigureG.
3. To reattach the dust collection box to the dust extraction
system first insert the rounded profile of the upper joint
into the recess on the dust extraction system. Pivot the dust
collection box down so that the release buttons click back
into place. Refer to FigureF.
4. With the dust collection box properly installed, depress the
filter cleaning mechanism
Allow the system to run for 5 seconds and release trigger.
This should be done after every emptying of the dust
collectionbox.
3
should be emptied as soon as the
4
and pull the
3
position it over a
16
to open the dust
16
is securely fastened. Refer to
5
and turn on the dust extractor.
MAINTENANCE
WARNING: To reduce the risk of serious personal
injury, turn the dust extractor off and disconnect
battery pack before making any adjustments or
removing/installing attachments or accessories. An
accidental start-up can causeinjury.
The charger and battery pack are notserviceable.
Replacing the Dust Collection Box Filter
Assembly (Fig.F)
WARNING: Wear approved eye protection and approved
dust mask when performing thisprocedure.
WARNING: Replace any damaged filtersimmediately.
NOTE: The filter should be replaced after every 350 full to empty
filter box emptyingcycles.
1. Press the dust collection box release buttons
dust collection box away from the dust extraction system.
Once the catch mechanism is clear of the dust extraction
system the upper joint will also release allowing the dust
collection box to be removedcompletely.
2. Discard dust collection box
3. Reattach the dust collection box to the dust extraction
system. First insert the rounded profile of the upper joint
into the recess on the dust extraction system. Pivot the dust
collection box down so that the release buttons click back
intoplace.
3
replace with a new filterbox.
4
and pull the
Lubrication
Your dust extractor requires no additionallubrication.
Cleaning
WARNING: Do not use a spray system, pressure jet washer
or running water forcleaning.
WARNING: Wear approved eye protection and approved
dust mask when performing thisprocedure.
WARNING: Do not use a brush or compressed air to clean
the dust collector orfilter.
WARNING: Never use solvents or other harsh chemicals
for cleaning the non-metallic parts of the dust extractor.
These chemicals may weaken the materials used in these
parts. Use a cloth dampened only with water and mild
soap. Never let any liquid get inside the dust extractor;
never immerse any part of the dust extractor into aliquid.
During intensive use the dust collector becomes clogged
with dust. Refer to Replacing The Dust Collector Box Filter
Assembly, underMaintenance.
For cleaning and maintenance in a way that avoids exposing
maintenance personnel and other persons to any hazards, wear
personal protective equipment. Clean the maintenance area in a
way that prevents hazardous substances from escaping into the
surroundingenvironment.
11
Page 14
ENGLISH
Optional Accessories
WARNING: Since accessories, other than those offered
by DeWALT, have not been tested with this product,
use of such accessories with this dust extractor could
be hazardous. To reduce the risk of injury, only D
recommended accessories should be used with
thisproduct.
The replacement filter (N703592) is available as an accessory at
additionalcost.
Consult your dealer for further information on the
appropriateaccessories.
eWALT
Protecting the Environment
Separate collection. Products and batteries marked
with this symbol must not be disposed of with normal
householdwaste.
Products and batteries contain materials that can
be recovered or recycled reducing the demand for raw
materials. Please recycle electrical products and batteries
according to local provisions. Further information is available at
www.2helpU.com.
Rechargeable Battery Pack
This long life battery pack must be recharged when it fails to
produce sufficient power on jobs which were easily done before.
At the end of its technical life, discard it with due care for our
environment:
• Run the battery pack down completely, then remove it from
thedustextractor.
• Li-Ion cells are recyclable. Take them to your dealer or a
local recycling station. The collected battery packs will be
recycled or disposed ofproperly.
12
Page 15

Page 16
Belgique et
Luxembourg België en Luxemburg
Danmark D
Deutschland D
Ελλάς D
España D
France D
Schweiz
Suisse
Svizzera
Ireland D
Italia D
Nederlands D
Norge D
Österreich D
Portugal D
Suomi D
Sverige D
Türkiye
United Kingdom D
Australia D
Middle East Africa D
DeWALT - Belgium BVBA
Egide Walschaertsstraat 16
2800 Mechelen
eWALT (Stanley Black&Decker AS)
Roskildevej 22
2620 Albertslund
eWALT
Richard Klinger Str. 11
65510 Idstein
eWALT (Ελλάς) Α.Ε.
EΔΡΑ-ΓΡΑΦΕΙΑ : Στράβωνος 7
& Λ. Βουλιαγμένης, Γλυφάδα 166 74, Αθήνα
SERVICE : Ημερος Τόπος 2 (Χάνι Αδάμ) – 193 00 Ασπρόπυργος
eWALT Ibérica, S.C.A.
Parc de Negocios “Mas Blau”
Edificio Muntadas, c/Bergadá, 1, Of. A6
08820 El Prat de Llobregat (Barcelona)
eWALT (Stanley Black & Decker France SAS)
62 Chemin de la Bruyère
CS 60105,
69574 DARDILLY Cedex
eWALT
D
In der Luberzen 42
8902 Urdorf
eWALT
Building 4500, Kinsale Road
Cork Airport Business Park
Cork, Ireland
eWALT
via Energypark 6
20871 Vimercate (MB), IT
eWALT
Netherlands BVPostbus 83,
6120 AB BORN
eWALT
Postboks 4613
0405 Oslo, Norge
eWALT
Werkzeug Vertriebsges m.b.H
Oberlaaerstrasse 248, A-1230 Wien
eWALT
Ed. D Dinis, Quina da Fonte
Rua dos Malhoes 2 2A 2º Esq.
Oeiras e S. Juliao da Barra, paço de Arcos e Caxias
2770 071 Paço de Arcos
eWALT
PL47
00521 Helsinki, Suomi
eWALT
BOX 94
43122 Mölndal
Sverige
Sanayi ve Ticareet Bakanlığı tebliğince kullanim ömrü 7 yıldır.
Stanley Black & Decker Turkey Alet Üretim San. Tic. Ltd.Şti.
AND Kozyataği - İçerenköy Mah. Umut Sok. AND Ofis Sit. No: 10-12 / 82-83-84
Ataşehir/İstanbul, Türkiye
eWALT, 210 Bath Road;
Slough, Berks SL1 3YD
eWALT
810 Whitehorse Road Box Hill
VIC 3128 Australia
eWALT
P.O. Box - 17164,
Jebel Ali Free Zone (South), Dubai, UAE
Tel: NL 32 15 47 37 63
Tel: FR 32 15 47 37 64
Fax: 32 15 47 37 99
Tel: 70 20 15 10
Fax: 70 22 49 10
Tel: 06126-21-0
Fax: 06126-21-2770
Τηλ: 00302108981616
Φαξ: 00302108983570
Tel: 934 797 400
Fax: 934 797 419
Tel: 04 72 20 39 20
Fax: 04 72 20 39 00
Tel: 044 - 755 60 70
Fax: 044 - 730 70 67
Tel: 00353-2781800
Fax: 01278 1811
Tel: 800-014353
39 039-9590200
Fax: 39 039-9590311
Tel: 31 164 283 063
Fax: 31 164 283 200
Tel: 45 25 13 00
Fax: 45 25 08 00
Tel: 01 - 66116 - 0
Fax: 01 - 66116 - 614
Tel: +351 214667500
Fax: +351214667580
Puh: 010 400 4333
Faksi: 0800 411 340
Tel: 031 68 61 60
Fax: 031 68 60 08
Tel: +90 216 665 2900
Faks: +90 216 665 2901
Tel: 01753-567055
Fax: 01753-572112
Tel: Aust 1800 338 002
Tel: NZ 0800 339 258
Tel: 971 4 812 7400
Fax: 971 4 2822765
www.dewalt.be
[email protected]
www.dewalt.dk
[email protected]
www.dewalt.de
[email protected]
www.dewalt.gr
[email protected]
www.dewalt.es
[email protected]
www.dewalt.fr
[email protected]
www.dewalt.ch
[email protected]
www.dewalt.ie
[email protected]
www.dewalt.it
www.dewalt.nl
www.dewalt.no
[email protected]
www.dewalt.at
[email protected]
www.dewalt.pt
[email protected]
www.dewalt.fi
[email protected]
www.dewalt.se
[email protected]
www.dewalt.com.tr
[email protected]
www.dewalt.co.uk
[email protected]
www.dewalt.com.au
www.dewalt.co.nz
www.dewalt.ae
[email protected]
N827401
01/20
 Loading...