

Page 1

If you have questions or comments, contact us.
Pour toute question ou tout commentaire, nous contacter.
Si tiene dudas o comentarios, contáctenos.
1-800-4-DEWALT • www.dewalt.com
INSTRUCTION MANUAL
GUIDE D'UTILISATION
MANUAL DE INSTRUCCIONES
DWE46100
Tuckpoint Shroud
Carter de tronçonnage du béton
Cubierta protectora para rejuntar
INSTRUCTIVO DE OPERACIÓN, CENTROS DE SERVICIO Y PÓLIZA DE
GARANTÍA. ADVERTENCIA: LÉASE ESTE INSTRUCTIVO ANTES DE
USAR EL PRODUCTO.
Page 2

Page 3

Defi nitions: Safety Guidelines
The definitions below describe the level of severity
for each signal word. Please read the manual and pay attention
to these symbols.
DANGER: Indicates an imminently hazardous situation
which, if not avoided, will result in death or serious injury.
WARNING: Indicates a potentially hazardous situation which,
if not avoided, could result in death or serious injury.
CAUTION: Indicates a potentially hazardous situation which,
if not avoided, may result in minor or moderate injury.
NOTICE: Indicates a practice not related to personal injury
which, if not avoided, may result in property damage.
IF YOU HAVE ANY QUESTIONS OR COMMENTS ABOUT THIS OR
ANY D
EWALT TOOL, CALL US TOLL FREE AT: 1-800-4-DEWALT
(1-800-433-9258).
WARNING: To reduce the risk of injury, read the instruction
manual.
SAVE ALL WARNINGS AND INSTRUCTIONS
FOR FUTURE REFERENCE
General Safety Warnings
WARNING: For your own safety, read the instruction manual for
both the grinder tool and the dust extractor vacuum before using
any accessory. Failure to heed these warnings may result in personal
injury and serious damage to the tool and the accessory. When
servicing this tool, use only identical replacement parts.
1) WORK AREA SAFETY
a) Keep work area clean and well lit. Cluttered or dark areas
invite accidents.
b) Keep children and bystanders away while operating a
power tool. Distractions can cause you to lose control.
c) Ensure the workplace is well ventilated. Exposure to dust
at a poorly ventilated workplace may result in damage to the
health.
2) ELECTRICAL SAFETY
a) Avoid body contact with earthed or grounded surfaces
such as pipes, radiators, ranges and refrigerators. There
is an increased risk of electric shock if your body is earthed or
grounded.
3) PERSONAL SAFETY
a) Stay alert, watch what you are doing and use common
sense when operating a power tool. Do not use a
power tool while you are tired or under the influence of
drugs, alcohol or medication. A moment of inattention while
operating power tools may result in serious personal injury.
b) Use personal protective equipment. Always wear eye
protection. Protective equipment such as dust mask, nonskid safety shoes, hard hat, or hearing protection used for
appropriate conditions will reduce personal injuries.
c) Do not overreach. Keep proper footing and balance at
all times. This enables better control of the power tool in
unexpected situations.
d) Dress properly. Do not wear loose clothing or jewelry.
Keep your hair, clothing and gloves away from moving
parts. Loose clothes, jewelry or long hair can be caught in
moving parts.
English
1
Page 4

4) POWER TOOL USE AND CARE
a) Do not force the power tool. Use the correct power tool
for your application. The correct power tool will do the job
better and safer at the rate for which it was designed.
WARNING: The use of any accessory or attachment or
performance of any operation with this tool, other than those
recommended in this instruction manual may present a risk of
English
personal injury.
b) Store idle power tools out of the reach of children and do
not allow persons unfamiliar with the power tool or these
instructions to operate the power tool. Power tools are
dangerous in the hands of untrained users.
c) Use the power tool, accessories and tool bits etc., in
accordance with these instructions taking into account
the working conditions and the work to be performed.
Use of the power tool for operations different from those
intended could result in a hazardous situation.
5) SERVICE
a) Have your power tool serviced by a qualified repair
person using only identical replacement parts. This will
ensure that the safety of the power tool is maintained.
Tuckpointing Safety Rules
• Do not use accessories which are not specifically designed
and recommended by the tool manufacturer. Just because
the accessory can be attached to your power tool, it does not
assure safe operation.
• The rated speed of the accessory must be at least equal to
the maximum speed marked on the power tool. Accessories
running faster than their rated speed can break and fly apart.
• The outside diameter and the thickness of your accessory
must be within the capacity rating of your power tool.
Incorrectly sized accessories cannot be adequately guarded or
controlled.
• The arbor size of wheels, flanges, backing pads or any other
accessory must properly fit the spindle of the power tool.
Accessories with arbor holes that do not match the mounting
hardware of the power tool will run out of balance, vibrate
excessively and may cause loss of control.
• The guard must be securely attached to the power tool
and positioned for maximum safety, so the least amount
of wheel is exposed towards the operator. The guard helps
to protect operator from broken wheel fragments and accidental
contact with wheel.
• Hold power tool by insulated gripping surfaces only, when
performing an operation where the cutting accessory may
contact hidden wiring or its own cord. Cutting accessory
contacting a "live" wire may make exposed metal parts of the
power tool "live" and shock the operator.
• Always use side handle. Tighten the handle securely. The
side handle should always be used to maintain control of the tool
at all times.
• Do not use a damaged accessory. Before each use inspect
the accessory such as diamond wheel for chips and cracks,
backing pad for cracks, tear or excess wear, wire brush
for loose or cracked wires. If power tool or accessory is
dropped, inspect for damage or install an undamaged
accessory. After inspecting and installing an accessory,
position yourself and bystanders away from the plane of
the rotating accessory and run the power tool at maximum
no-load speed for one minute. Damaged accessories will
normally break apart during this test time.
2
Page 5

• DO NOT grind or cut metal with a diamond wheel.
• Wear personal protective equipment. Depending on
application, use face shield, safety goggles or safety glasses.
As appropriate, wear dust mask, hearing protectors, gloves
and workshop apron capable of stopping small abrasive or
workpiece fragments. The eye protection must be capable of
stopping flying debris generated by various operations. The dust
mask or respirator must be capable of filtrating particles generated
by your operation. Prolonged exposure to high intensity noise may
cause hearing loss.
• Do not "jam" the cut-off wheel or apply excessive pressure.
Do not attempt to make an excessive depth of cut.
Overstressing the wheel increases the loading and susceptibility
to twisting or binding of the wheel in the cut and the possibility of
kickback or wheel breakage.
• Position the cord clear of the spinning accessory. If you lose
control, the cord may be cut or snagged and your hand or arm may
be pulled into the spinning accessory.
• Never lay the power tool down until the accessory has come
to a complete stop. The spinning accessory may grab the surface
and pull the power tool out of your control.
• Do not run the power tool while carrying it at your side.
Accidental contact with the spinning accessory could snag your
clothing, pulling the accessory into your body.
• Regularly clean the power tool’s air vents. The motor’s fan will
draw the dust inside the housing and excessive accumulation of
powdered metal may cause electrical hazards.
• Do not operate the power tool near flammable materials.
Sparks could ignite these materials.
• Do not use accessories that require liquid coolants. Using
water or other liquid coolants may result in electrocution or shock.
• DO NOT use abrasive wheels.
• ALWAYS use with a dust collector.
WARNING: When not in use, place grinder on a stable surface
where it will not move inadvertantly, roll or cause a tripping or
falling hazard. Serious personal injury may result.
WARNING: ALWAYS use safety glasses. Everyday eyeglasses are
NOT safety glasses. Also use face or dust mask if cutting operation is
dusty. ALWAYS wear certified safety equipment:
• ANSI Z87.1 eye protection (CAN/CSA Z94.3).
• ANSI S12.6 (S3.19) hearing protection.
• NIOSH/OSHA respiratory protection.
WARNING: Some dust created by power sanding, sawing,
grinding, drilling, and other construction activities contains chemicals
known to the State of California to cause cancer, birth defects or other
reproductive harm. Some examples of these chemicals are:
• lead from lead-based paints,
• crystalline silica from bricks and cement and other masonry
products, and
• arsenic and chromium from chemically-treated lumber.
Your risk from these exposures varies, depending on how often you do
this type of work. To reduce your exposure to these chemicals: work
in a well ventilated area, and work with approved safety equipment,
such as those dust masks that are specially designed to filter out
microscopic particles.
• Avoid prolonged contact with dust from power sanding,
sawing, grinding, drilling, and other construction activities.
Wear protective clothing and wash exposed areas with soap
and water. Allowing dust to get into your mouth, eyes, or lay on
the skin may promote absorption of harmful chemicals.
English
3
Page 6

WARNING: Use of this tool can generate and/or disburse dust,
which may cause serious and permanent respiratory or other injury.
Always use NIOSH/OSHA approved respiratory protection appropriate
for the dust exposure. Direct particles away from face and body.
WARNING: Before beginning the work, check to determine
the hazard classification of the dust produced. Use an industrial
dust extractor vacuum of the appropriate officially approved
safety class that is in compliance with your local dust hazard
English
control regulations.
WARNING: Always wear proper personal hearing protection.
Under some conditions and duration of use, noise from this product
may contribute to hearing loss.
Causes and Operator Prevention
of Kickback
Kickback is a sudden reaction to a pinched or snagged rotating
wheel, backing pad, brush or any other accessory. Pinching or
snagging causes rapid stalling of the rotating accessory which
in turn causes the uncontrolled power tool to be forced in the
direction opposite of the accessory’s rotation at the point of the
binding.
For example, if an diamond wheel is snagged or pinched by the
workpiece, the edge of the wheel that is entering into the pinch
point can dig into the surface of the material causing the wheel to
climb out or kick out. The wheel may either jump toward or away
from the operator, depending on direction of the wheel’s movement
at the point of pinching. diamond wheels may also break under
these conditions.
Kickback is the result of tool misuse and/or incorrect operating
procedures or conditions and can be avoided by taking proper
precautions as given below:
a) Maintain a firm grip on the power tool and position your
body and arm to allow you to resist kickback forces.
Always use auxiliary handle, if provided, for maximum
control over kickback or torque reaction during start up.
The operator can control torque reaction or kickback forces, if
proper precautions are taken.
b) Never place your hand near the rotating accessory.
Accessory may kickback over your hand.
c) Do not position your body in the area where power tool
will move if kickback occurs. Kickback will propel the tool
in direction opposite to the wheel’s movement at the point of
snagging.
d) Use special care when working corners, sharp edges etc.
Avoid bouncing and snagging the accessory. Corners,
sharp edges or bouncing have a tendency to snag the rotating
accessory and cause loss of control or kickback.
e) Do not attach a saw chain woodcarving blade or toothed
saw blade. Such blades create frequent kickback and loss of
control.
SAVE ALL WARNINGS AND INSTRUCTIONS
FOR FUTURE REFERENCE
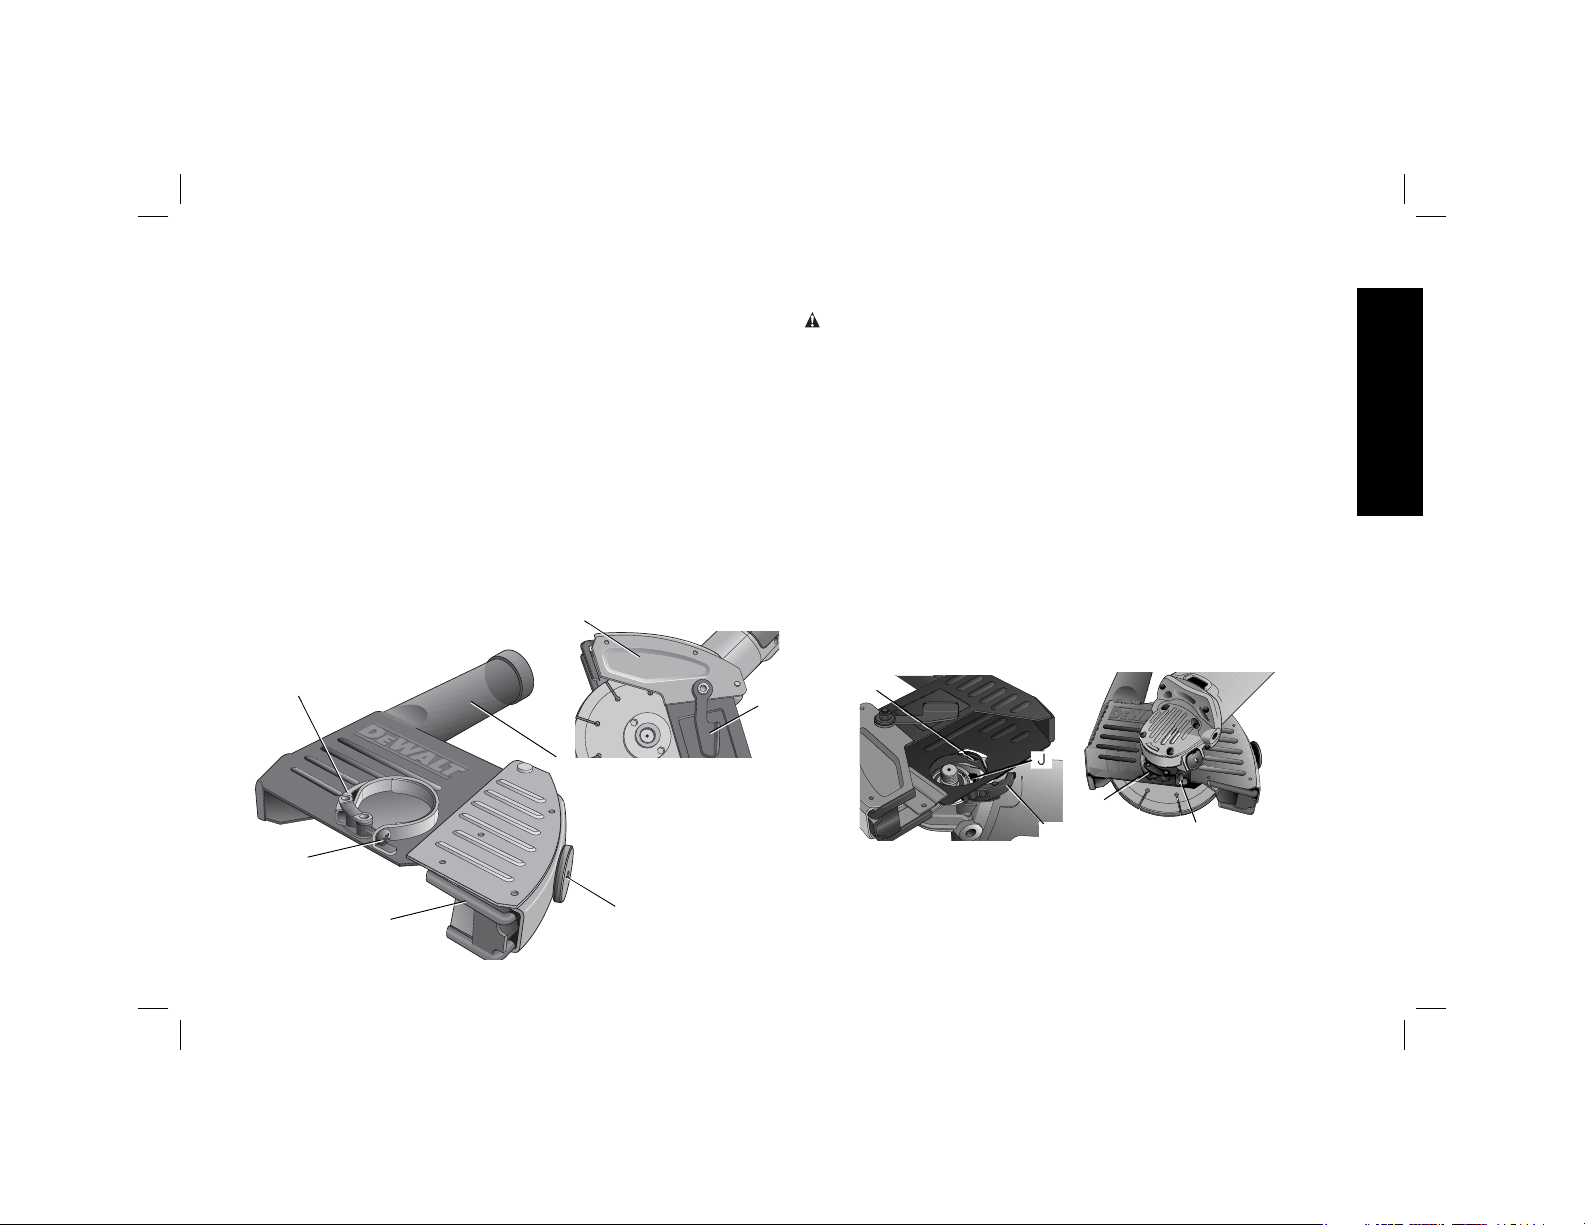
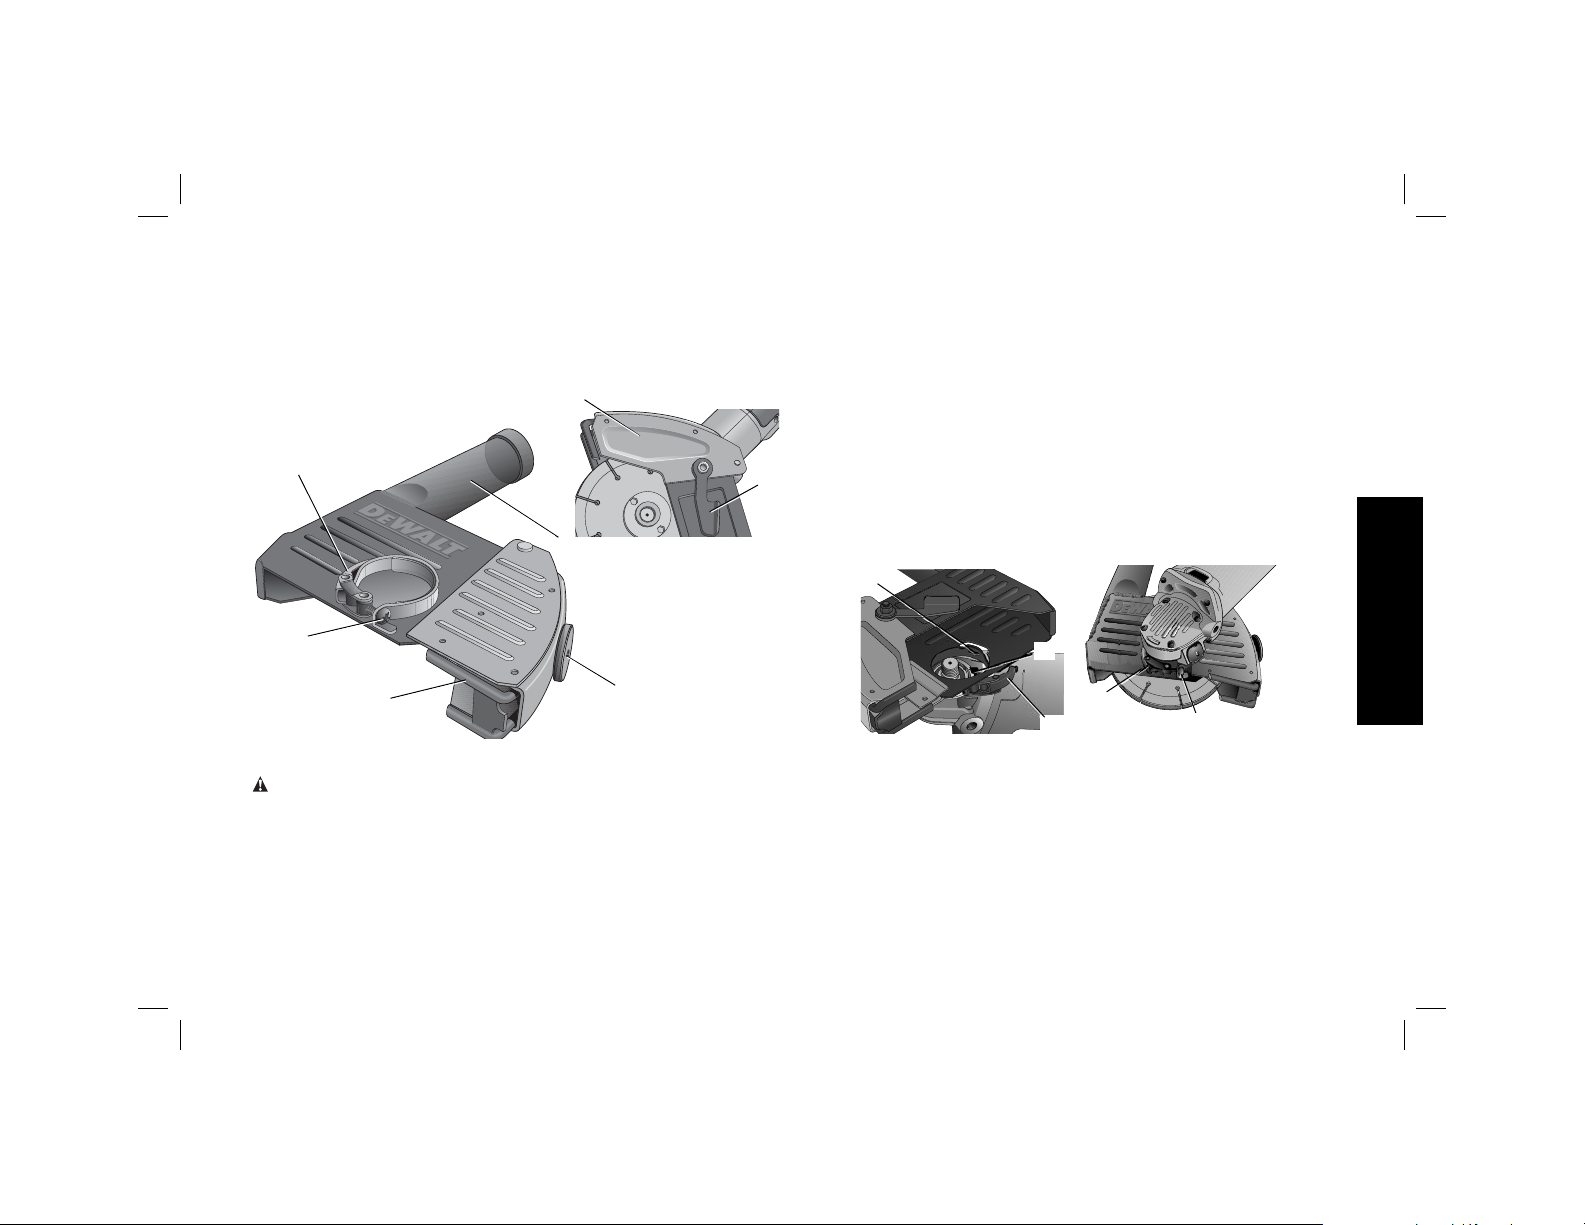
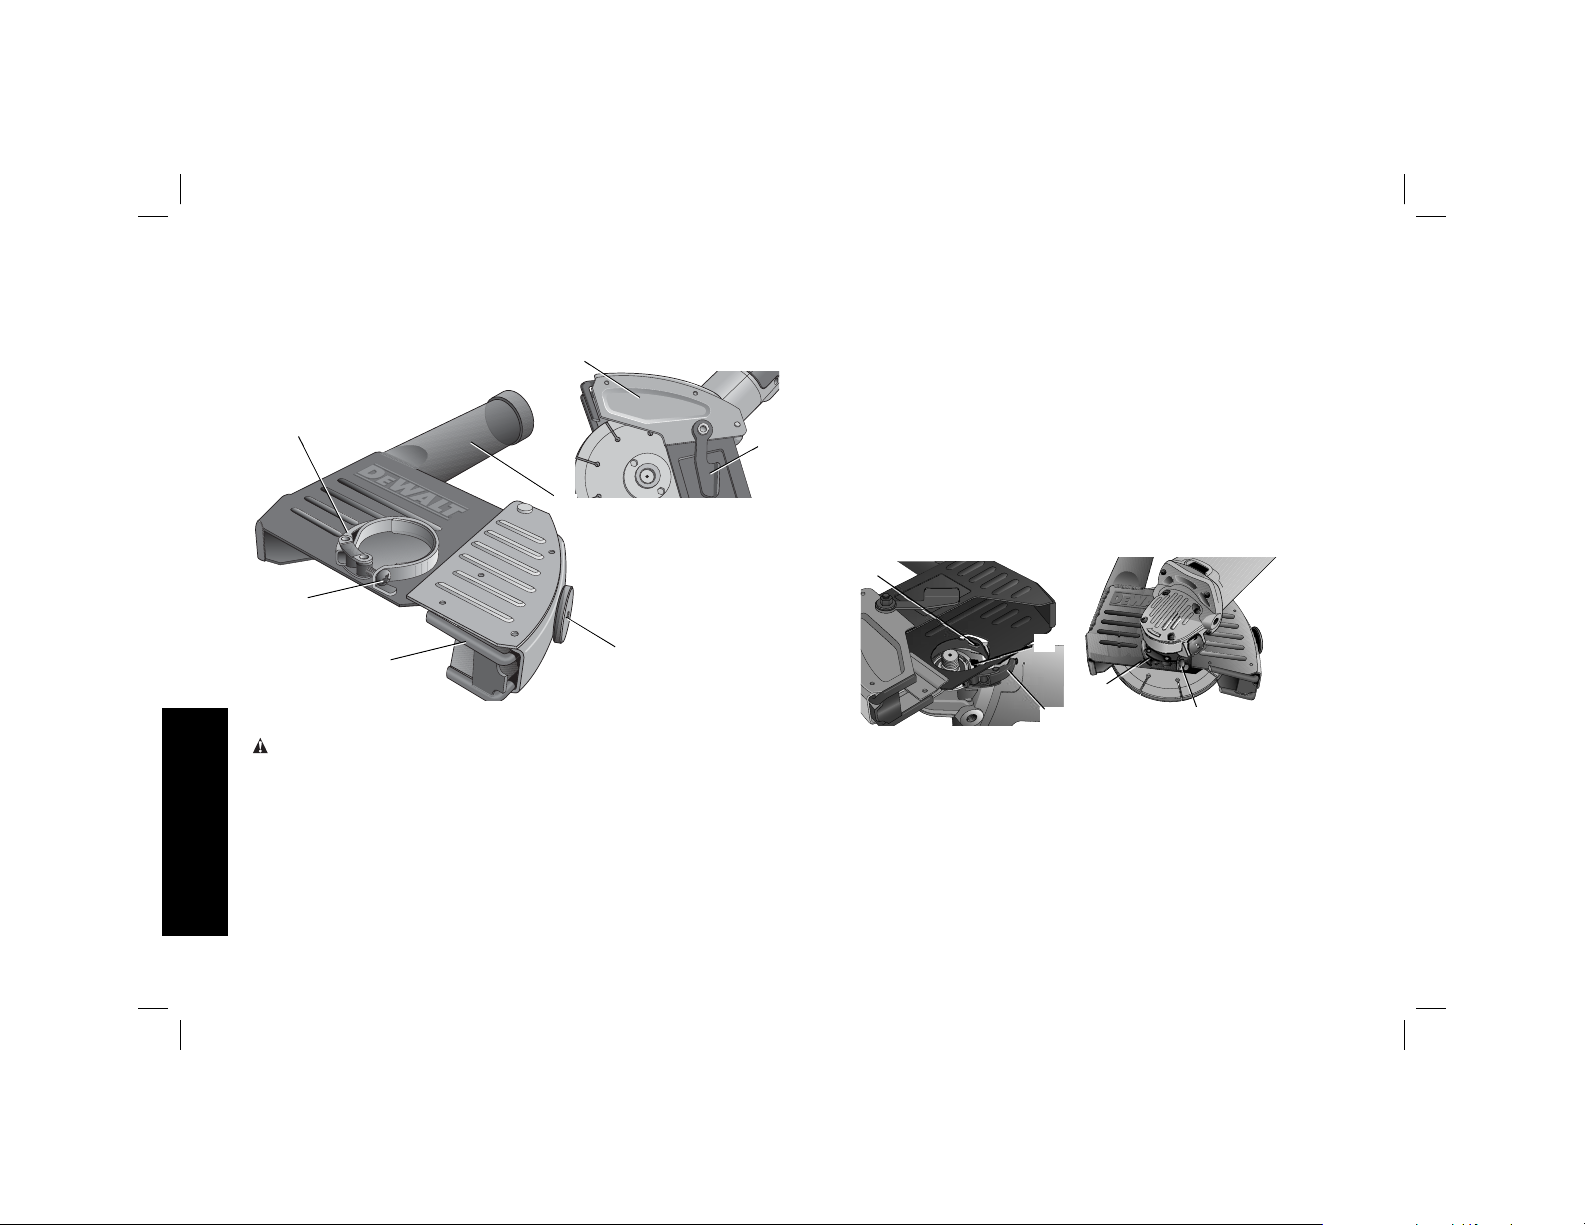
COMPONENTS (FIG. 1)
WARNING: Never modify the power tool or any part of it. Damage
or personal injury could result.
A. Dust port E. Cornering door locking lever
B. Clamp adjusting screw (locks and unlocks cornering door)
C. Depth of cut shoe F. Cornering door (opens and
D. Depth of cut shoe allows cutting of an inside corner)
locking knob G. Clamp lever
INTENDED USE
Your tuckpoint shroud has been designed for professional tuckpoint
masonry applications. It is not intended for use with metal or wood.
4
Page 7
Using the appropriate grinder, wheel and dust extractor vacuum it can
be used to remove the vast majority of static and airborne dust which
without the use of the tuckpoint shroud could otherwise contaminate
the working environment or pose an increased health risk to the
operator and those in close proximity.
DO NOT use under wet conditions or in presence of flammable liquids
or gases.
The tuckpoint shroud is a professional tool. DO NOT let children come
into contact with the tool. Supervision is required when inexperienced
operators use this tool.
Recommended power tools to be used with this attachment are
available at extra cost from your local dealer or authorized service
center. If you need assistance in locating any power tool, please
contact D
MD 21286, call 1-800-4-D
EWALT Industrial Tool Co., 701 East Joppa Road, Baltimore,
EWALT (1-800-433-9258) or visit our
website www.dewalt.com.
FIG. 1
G
F
E
ASSEMBLY AND ADJUSTMENT (FIG. 1, 2)
WARNING: To reduce the risk of injury, ALWAYS turn off the
tool and disconnect the tool from the power source before
making any adjustments or removing or installing attachments
or accessories. This applies to both the grinder and the dust
extractor vacuum. Such preventative safety measures reduce the
risk of starting the tool accidentally.
Mounting and Removing Tuckpoint
Shroud
NOTE: The tuckpoint shroud is only recommended for use with the
DWE46102 heavy-duty small angle grinder.
1. Follow the mounting and removing guard instructions in the tool
manual to remove the guard from grinder (DWE46102).
2. Open the clamp lever (G) on the tuckpoint shroud and align the
tabs (I) on the tuckpoint shroud with the slots (J) on the grinder
gear case.
FIG. 2
I
English
A
B
3. With the clamp lever open, rotate the shroud into the desired
J
G
G
B
working position. The shroud should be positioned between the
C
D
spindle and the operator to provide optimum efficiency.
5
Page 8

4. Close the clamp lever (G) to secure the tuckpoint shroud on the
gear case. Do not operate the grinder with a loose tuckpoint
shroud or the clamp lever in open position.
5. To remove the tuckpoint shroud, open the clamp lever, rotate the
tuckpoint shroud to align the slots and tabs and pull up on the
tuckpoint shroud.
NOTE: The tuckpoint shroud is pre-adjusted to the diameter of the
gear case hub at the factory. If, after a period of time, the tuckpoint
English
shroud becomes loose, tighten the clamp adjusting screw (B) with
clamp lever in the closed position.
NOTICE: Do not tighten the clamp adjusting screw with the clamp
lever in open position. Undetectable damage to the tuckpoint shroud
or the mounting hub may result.
NOTICE: If tuckpoint shroud cannot be tightened by the clamp
adjusting clamp, do not use tool. Take the tool and tuckpoint shroud
to a service center to repair or replace the tuckpoint shroud.
Mounting Cutting (Type 1) Wheels (Fig. 1)
WARNING: Only Type 1 Diamond Wheels shall be used with
Tuck-Point Shroud. Do not cut metal. Do not use with bonded
abrasive wheels.
Follow the mounting and using cutting (Type 1) wheels instructions in
the tool manual and mount the grinding wheel.
It may be necessary to open the cornering door to install 6" (152.4mm)
tuckpointing wheels, see Cornering Door Application.
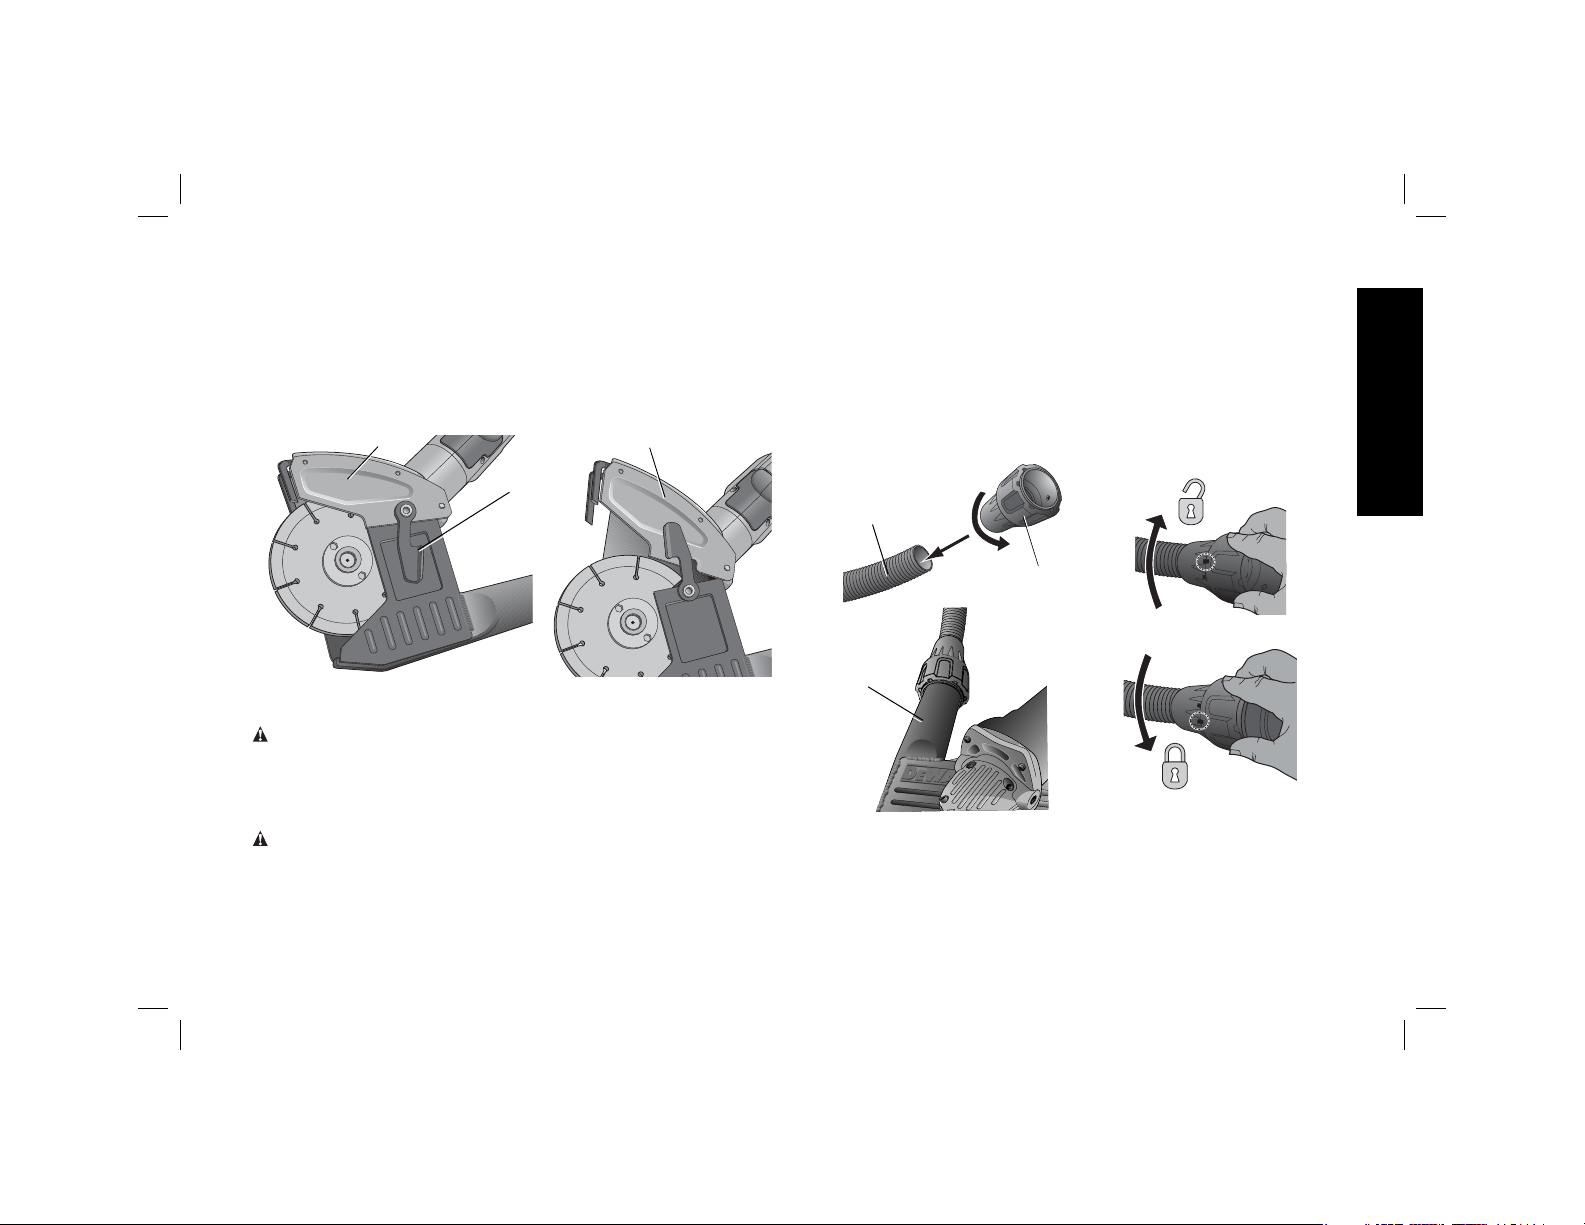
Depth of Cut Adjustment (Fig. 3)
1. Loosen the depth of cut shoe locking knob (D).
2. Slide the depth of cut shoe (C) to the desired position.
3. Tighten depth of cut shoe locking knob.
FIG. 3
C
D
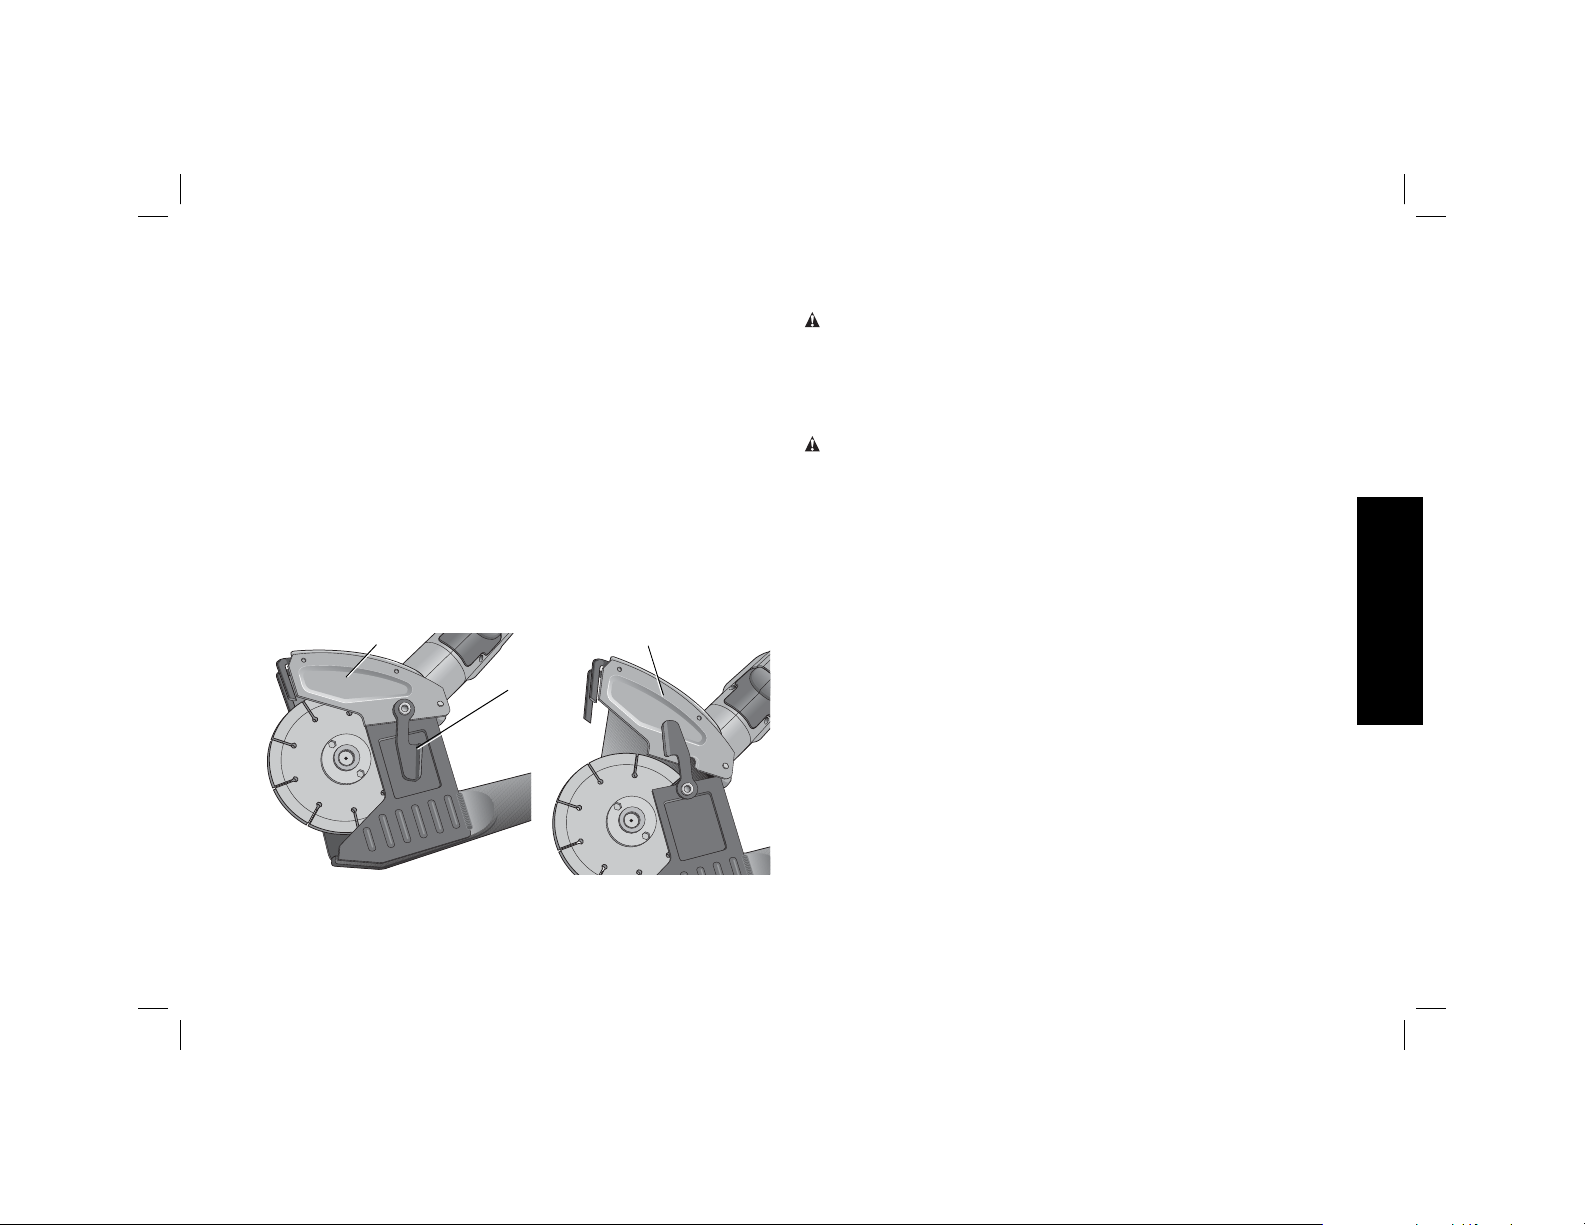
Corner Door Application (Fig. 4)
WARNING: To reduce the risk of injury, ALWAYS turn off
tool and disconnect the tool from the power source before
making any adjustments or removing or installing attachments
or accessories. This applies to both the grinder and the dust
extractor vacuum. Such preventative safety measures reduce the
risk of starting the tool accidentally.
WARNING: Risk of personal injury. The corner door should only
be opened for cutting inside corners. Keep hands and body away
from cutting area at all times. Ensure corner door is closed in all other
applications.
This feature allows the cutting of an inside corner.
1. Ensure the tool is off and wheel has come to a complete stop.
2. Turn cornering door locking lever (E) counterclockwise one full
rotation. Grasp the corner door (F) and rotate open as shown in
Figure 4.
3. Place hands away from the wheel area and position yourself so
the open underside of the shroud is facing away from you.
4. Turn the tool on and allow the tool to reach full speed before
touching the tool to the work surface.
6
Page 9
5. Place the wheel onto the work surface and move the grinder from
right to left to cut around the inside corner for best dust collection.
6. Remove the tool from work surface before turning tool off. Allow
the tool to stop rotating before laying it down.
7. Close the corner door and lock in place using the cornering door
locking lever (E).
FIG. 4
F
E
F
Dust Extraction (Fig. 1, 5)
WARNING: Use only power tools recommended by DEWALT with
this attachment.
For more information about D
attachment, please contact your local dealer, call 1-800-4-D
(1-800-433-9258) or visit our website www.dewalt.com.
WARNING: This attachment MUST BE used with a dust extractor
system. ALWAYS wear certified safety face or dust mask.
NOTE: Ensure hose connection is secure.
EWALT power tools compatible with this
EWALT
NOTE: The amount of dust retained by the dust extractor vacuum
is dependent on its filter system. Refer to the dust extractor vacuum
instruction manual for more information.
All D
EWALT dust collection shrouds are designed to work with the
D
EWALT universal DWV9000 connector.
1. Attach the DWV9000 connector (H) to your dust collector hose (K).
2. Unlock the DWV9000 connector (H) and slide onto dust port (A).
3. Lock the DWV9000 connector (H) to secure.
FIG. 5
K
H
A
TRADITIONAL DUST EXTRACTOR VACUUM HOSES
Attach recommended dust extractor vacuum hose to dust port (A).
English
7
Page 10
OPERATION
WARNING: To reduce the risk of injury, ALWAYS turn off
tool and disconnect the tool from the power source before
making any adjustments or removing or installing attachments
or accessories. This applies to both the grinder and the dust
extractor vacuum. Such preventative safety measures reduce the
risk of starting the tool accidentally.
English
WARNING: For your own safety, read the instruction manual for
both the grinding tool and the dust extractor vacuum before using any
accessory. Failure to heed these warnings may result in personal injury
and serious damage to the tool and the accessory. When servicing this
tool, use only identical replacement parts.
WARNING: Hold the side handle and body of the tool firmly to
maintain control of the tool at start up and during use and until the
wheel or accessory stops rotating. Make sure the wheel has come to
a complete stop be fore laying the tool down.
WARNING: Ensure corner door is closed.
1. Ensure all assembly and adjustment instructions have been
completed.
2. Turn the dust extractor vacuum on as instructed in the dust
extractor vacuum instruction manual.
3. Start grinder as instructed in tool instruction manual.
NOTE: Allow the tool to reach full speed before applying to the
work surface.
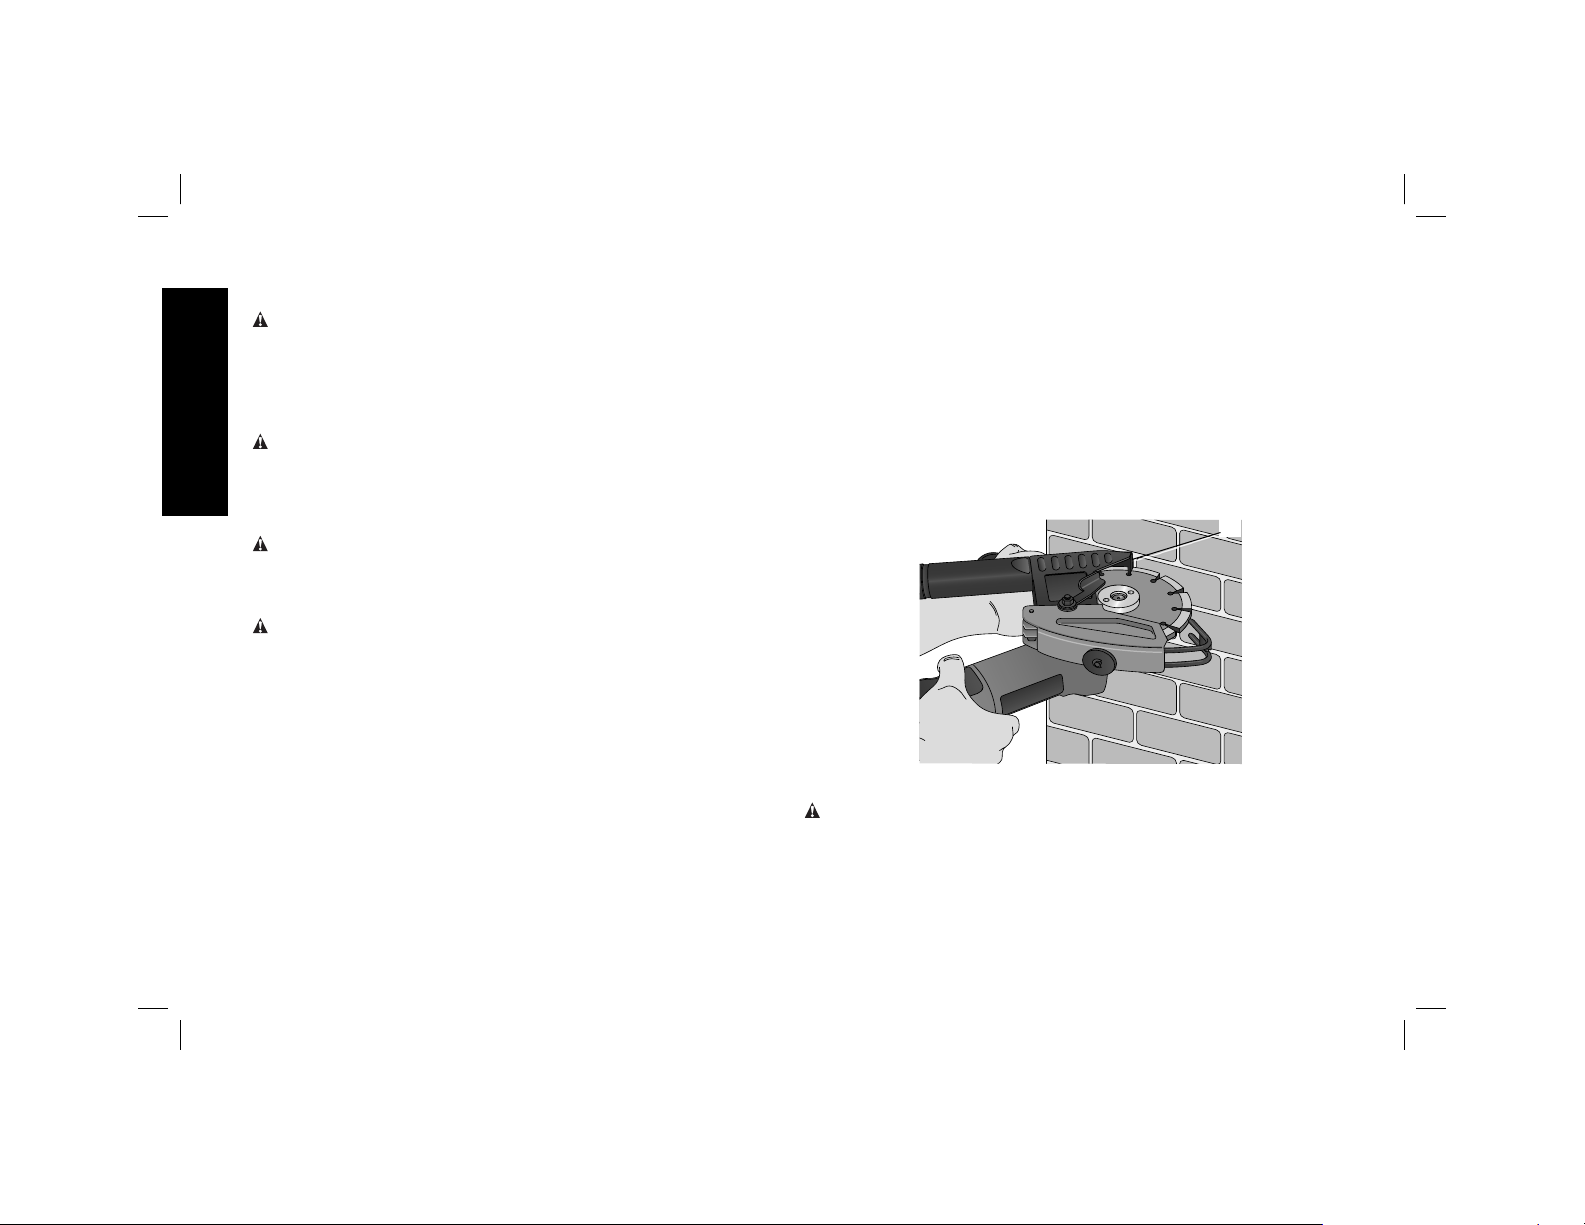
Tuckpointing and Cutting Application
(Fig. 6)
1. Set the desired depth of cut, see Depth of Cut Adjustment
under Assembly and Adjustments.
2. Allow the tool to reach full speed before touching it to the work
surface.
3. Position yourself so the open underside of the shroud and the
wheel are facing away from you.
4. Place the edge (L) of shroud onto the work surface and begin cut
by plunging into the work surface. NOTE: Keep the edge (L) of the
shroud against the work surface to ensure proper dust collection.
5. With the shroud oriented as shown in Figure 6, move the grinder
right to left along the work surface. For the best results the
grinder should be positioned at a 45° angle to the dust port when
tuckpointing/cutting.
6. Remove the tool from work surface before turning off the tool.
Allow the tool to stop rotating before laying it down.
FIG. 6
L
MAINTENANCE
WARNING: To reduce the risk of injury, ALWAYS turn off
tool and disconnect the tool from the power source before
making any adjustments or removing or installing attachments
or accessories. This applies to both the grinder and the dust
extractor vacuum. Such preventative safety measures reduce the
risk of starting the tool accidentally.
8
Page 11
Cleaning
WARNING: Blow dirt and dust out of all air vents with clean, dry air
at least once a week. To minimize the risk of eye injury, always wear
ANSI Z87.1 approved eye protection when performing this.
WARNING: Never use solvents or other harsh chemicals for cleaning
the non-metallic parts of the tool. These chemicals may weaken the
plastic materials used in these parts. Use a cloth dampened only with
water and mild soap. Never let any liquid get inside the tool; never
immerse any part of the tool into a liquid. Accessories
WARNING: Since accessories, other than those offered by DEWALT,
have not been tested with this product, use of such accessories with
this tool could be hazardous. To reduce the risk of injury, only D
EWALT
recommended accessories should be used with this product.
Recommended accessories for use with your tool are available at
extra cost from your local dealer or authorized service center. If you
need assistance in locating any accessory, please contact D
EWALT
Industrial Tool Co., 701 East Joppa Road, Baltimore, MD 21286, call
1-800-4-D
EWALT (1-800-433-9258) or visit our website: www.dewalt.
com.
Repairs
To assure product SAFETY and RELIABILITY, repairs, maintenance and
adjustment (including brush inspection and replacement) should be
performed by a D
EWALT factory service center, a DEWALT authorized
service center or other qualified service personnel. Always use
identical replacement parts.
Three Year Limited Warranty
DEWALT will repair, without charge, any defects due to faulty materials
or workmanship for three years from the date of purchase. This
warranty does not cover part failure due to normal wear or tool abuse.
For further detail of warranty coverage and warranty repair information,
visit www.dewalt.com or call 1-800-4-DEWALT (1-800-433-9258).
This warranty does not apply to accessories or damage caused where
repairs have been made or attempted by others. This warranty gives
you specific legal rights and you may have other rights which vary in
certain states or provinces.
In addition to the warranty, D
EWALT tools are covered by our:
1 YEAR FREE SERVICE
D
EWALT will maintain the tool and replace worn parts caused by
normal use, for free, any time during the first year after purchase.
90 DAY MONEY BACK GUARANTEE
If you are not completely satisfied with the performance of your
EWALT Power Tool, Laser, or Nailer for any reason, you can return it
D
within 90 days from the date of purchase with a receipt for a full refund
– no questions asked.
LATIN AMERICA: This warranty does not apply to products sold
in Latin America. For products sold in Latin America, see country
specific warranty information contained in the packaging, call the local
company or see website for warranty information.
FREE WARNING LABEL REPLACEMENT: If your warning labels
become illegible or are missing, call 1-800-4-D
EWALT (1-800-433-
9258) for a free replacement.
English
9
Page 12
Défi nitions: lignes directrices en
matière de sécurité
Les définitions ci-dessous décrivent le niveau de danger pour
chaque mot-indicateur employé. Lire le mode d’emploi et porter
une attention particulière à ces symboles.
DANGER: indique une situation dangereuse imminente qui,
si elle n’est pas évitée, entraînera la mort ou des blessures
graves.
AVERTISSEMENT : indique une situation potentiellement
dangereuse qui, si elle n’est pas évitée, pourrait entraîner la
mort ou des blessures graves.
ATTENTION : indique une situation potentiellement
dangereuse qui, si elle n’est pas évitée, pourrait entraîner des
blessures légères ou modérées.
AVIS : indique une pratique ne posant aucun risque de
dommages corporels mais qui par contre, si rien n’est fait
pour l’éviter, pourrait poser des risques de dommages
Français
matériels.
POUR TOUTE QUESTION OU REMARQUE AU SUJET DE CET OUTIL
OU DE TOUT AUTRE OUTIL D
SANS FRAIS : 1-800-4-D
AVERTISSEMENT : afin de réduire le risque de blessures, lire
le mode d’emploi de l’outil.
EWALT, COMPOSEZ LE NUMÉRO
EWALT (1-800-433-9258).
CONSERVER TOUS LES AVERTISSEMENTS
ET TOUTES LES DIRECTIVES POUR UN
USAGE ULTÉRIEUR
Consignes générales de sécurité
AVERTISSEMENT : pour votre sécurité, lire le manuel de
l’utilisateur de la meuleuse, mais aussi de l’aspirateur avant
l’utilisation de tout accessoire. Tout manquement à ces avertissements
augmente les risques de blessures, et les risques d’endommager
sérieusement l’appareil et ses accessoires. Lors de la maintenance de
cet outil, n’utiliser que des pièces de rechange identiques.
1) SÉCURITÉ DU LIEU DE TRAVAIL
a) Tenir l’aire de travail propre et bien éclairée. Les lieux
encombrés ou sombres sont propices aux accidents.
b) Éloigner les enfants et les personnes à proximité pendant
l’utilisation d’un outil électrique. Une distraction pourrait en
faire perdre la maîtrise à l’utilisateur.
c) S’assurer que les lieux de travail sont bien aérés. Toute
exposition à la poussière sur des lieux de travail mal aérés pose
des risques à la santé.
2) SÉCURITÉ EN MATIÈRE D’ÉLECTRICITÉ
a) Éviter tout contact physique avec des surfaces mises à la
terre comme des tuyaux, des radiateurs, des cuisinières
et des réfrigérateurs. Le risque de choc électrique est plus
élevé si votre corps est mis à la terre.
3) SÉCURITÉ PERSONNELLE
a) Être vigilant, surveiller le travail effectué et faire preuve
de jugement lorsqu’un outil électrique est utilisé. Ne
pas utiliser d’outil électrique en cas de fatigue ou sous
l’influence de drogues, d’alcool ou de médicaments. Un
simple moment d’inattention en utilisant un outil électrique peut
entraîner des blessures corporelles graves.
b) Utiliser des équipements de protection individuelle.
Toujours porter une protection oculaire. L’utilisation
d’équipements de protection comme un masque antipoussière,
des chaussures antidérapantes, un casque de sécurité ou des
10
Page 13

protecteurs auditifs lorsque la situation le requiert réduira les
risques de blessures corporelles.
c) Ne pas trop tendre les bras. Conserver son équilibre en
tout temps. Cela permet de mieux maîtriser l’outil électrique
dans les situations imprévues.
d) S’habiller de manière appropriée. Ne pas porter de
vêtements amples ni de bijoux. Garder les cheveux, les
vêtements et les gants à l’écart des pièces mobiles. Les
vêtements amples, les bijoux ou les cheveux longs risquent de
rester coincés dans les pièces mobiles.
4) UTILISATION ET ENTRETIEN D’UN OUTIL ÉLECTRIQUE
a) Ne pas forcer un outil électrique. Utiliser l’outil électrique
approprié à l’application. L’outil électrique approprié
effectuera un meilleur travail, de façon plus sûre et à la vitesse
pour laquelle il a été conçu.
AVERTISSEMENT: l’utilisation de tout accessoire ou pièce,
ou l’exécution de toute opération avec cet outil, autre que celle
recommandée dans ce manuel de l’utilisateur pose des risques
de dommages corporels.
b) Ranger les outils électriques hors de la portée des
enfants et ne permettre à aucune personne n’étant pas
familière avec un outil électrique ou son mode d’emploi
d’utiliser cet outil. Les outils électriques deviennent dangereux
entre les mains d’utilisateurs inexpérimentés.
c) Utiliser l’outil électrique, les accessoires, les forets,
etc. conformément aux présentes directives en tenant
compte des conditions de travail et du travail à effectuer.
L’utilisation d’un outil électrique pour toute opération autre que
celle pour laquelle il a été conçu est dangereuse.
RÉPARATION
a) Faire réparer l’outil électrique par un réparateur
professionnel en n’utilisant que des pièces de rechange
identiques. Cela permettra de maintenir une utilisation
sécuritaire de l’outil électrique.
Règles de sécurité propres au
tronçonnage du béton
• Ne pas utiliser des accessoires qui n’ont pas été spécialement
conçus pour cet outil ou recommandés par son fabricant.
Le fait qu’un accessoire peut être connecté à l’outil ne veut pas
automatiquement dire que son utilisation ne posera aucun risque.
• La vitesse nominale des accessoires utilisés doit être
équivalente ou supérieure à la vitesse maximale apposée
sur l’outil. Les accessoires utilisés à une vitesse plus rapide que
leur vitesse nominale peuvent éclater ou se détacher de l’outil.
• Le diamètre externe et l’épaisseur de l’accessoire utilisé
doivent se conformer aux spécifications de la plaque
signalétique de l’outil électrique. Les accessoires aux
spécifications incorrectes ne peuvent être ni maintenus ni contrôlés
de façon adéquate.
• L’alésage des meules, brides, tampons de soutien, ou de
tout autre accessoire, doit correspondre parfaitement à la
taille de la broche de l’outil. Les accessoires dont l’alésage
ne correspond pas au dispositif d’installation de l’outil électrique
ne tourneront pas correctement, vibreront de façon excessive et
pourront causer la perte de contrôle de l’outil.
• Le dispositif de protection doit être solidement fixé à
l’outil électrique et installé pour optimiser la sécurité pour
que l’utilisateur soit le moins possible exposé à la meule.
Le carter aide à protéger l’utilisateur contre toute projection de
fragments et contre tout contact avec la meule.
• Tenir l’outil électrique par les surfaces isolées prévues à cet
effet pendant toute utilisation où l’organe de coupe pourrait
entrer en contact avec des fils électriques cachés ou son
Français
11
Page 14

propre cordon. Tout contact de l’organe de coupe avec un fil sous
tension met les parties métalliques exposées de l’outil électrique
sous tension et électrocute l’utilisateur.
• Utiliser systématiquement la poignée latérale. Fixer la
poignée solidement. La poignée latérale doit être
systématiquement utilisée pour maîtriser l’outil en permanence.
• Ne pas utiliser d’accessoire endommagé. Avant toute
utilisation, vérifier que les accessoires, comme les meules
diamant et les tampons de soutien, ne comportent aucune
fissure ou cassure, ou ne sont affectés d’aucune usure
excessive, et que les fils des brosses métalliques ne sont
ni lâches ni endommagés. En cas de chute, vérifier que
l’outil électrique ou l’accessoire n’a pas été endommagé,
et remplacer toute pièce abîmée. Après avoir inspecté et
installé un accessoire, se positionner, soi-même et tout
individu présent, hors du plan de rotation de l’accessoire
et laisser tourner l’outil une minute à sa vitesse à vide
maximale. En général, les accessoires endommagés se brisent
Français
pendant le temps d’essai.
• NE PAS meuler ou découper le métal avec une meule
diamant.
• Porter un équipement individuel de protection. Utiliser
une protection faciale et des lunettes ou un masque de
protection. Si approprié, porter un masque anti-poussières,
une protection auditive, des gants et un tablier d’atelier
capables de vous protéger contre toute projection abrasive
ou tout fragment. La protection oculaire doit pouvoir arrêter
toute projection de débris engendrés par des opérations diverses.
Le masque anti-poussières, ou l’appareil de protection des voies
respiratoires, doit pouvoir filtrer les particules engendrées par
l’opération en cours. Toute exposition prolongée à un haut niveau
de décibels peut occasionner une perte de l’acuité auditive.
• Ne pas « bloquer « la meule à tronçonner ou lui appliquer une
pression excessive. Ne pas effectuer des profondeurs de
coupe excessives. Surcharger la meule augmente la contrainte
sur l’outil et les risques de torsion ou grippage de la meule dans la
coupe et, en conséquence, les risques de rebonds ou de cassure
de la meule.
• Positionner le cordon hors du chemin de l’accessoire en
rotation. En cas de perte de contrôle de l’outil, le cordon pourrait
être coupé ou arraché, et les mains ou bras pourraient entrer en
contact avec l’accessoire en rotation.
• Attendre systématiquement l’arrêt complet de l’accessoire
avant de poser l’outil électrique. L’accessoire en rotation
pourrait s’accrocher à une surface et vous faire perdre le contrôle
de l’outil électrique.
• Ne pas laisser l’outil électrique tourner alors que vous le
transportez à votre côté. Tout contact accidentel de l’accessoire
en rotation pourrait faire que ce dernier s’accroche aux vêtements
et entre en contact avec le corps.
• Nettoyer régulièrement les orifices d’aération de l’outil. Le
ventilateur du moteur attirera de la poussière à l’intérieur du boîtier
et l’accumulation excessive de poussières métalliques pose des
risques d’électrocution.
• Ne pas utiliser cet outil électrique à proximité de matériaux
inflammables, car des étincelles pourraient les enflammer.
• Ne pas utiliser d’accessoires nécessitant l’utilisation de
réfrigérants fluides. L’utilisation d’eau ou de réfrigérants fluides
pose des risques d’électrocution ou de chocs électriques.
• NE PAS utiliser de meules abrasives.
AVERTISSEMENT : lorsqu’elle est inutilisée, déposer la
meuleuse sur une surface stable où elle sera immobile et ne
risquera pas de rouler ou de faire trébucher ou chuter
quiconque. Cela pose des risques de dommages corporels graves.
12
Page 15

• Utiliser SYSTÉMATIQUEMENT un système de dépoussiérage.
AVERTISSEMENT: porter SYSTÉMATIQUEMENT des lunettes
de protection. Les lunettes courantes NE sont PAS des lunettes de
protection. Utiliser aussi un masque antipoussières si la découpe doit
en produire beaucoup. Porter SYSTÉMATIQUEMENT un équipement
de sécurité homologué:
• Protection oculaire ANSI Z87.1 (CAN/CSA Z94.3);
• Protection auditive ANSI S12.6 (S3.19;
• Protection des voies respiratoires NIOSH/OSHA/MSHA.
AVERTISSEMENT : les scies, meules, ponceuses, perceuses
ou autres outils de construction peuvent produire des poussières
contenant des produits chimiques reconnus par l’État californien pour
causer cancers, malformations congénitales ou être nocifs au système
reproducteur. Parmi ces produits chimiques, on retrouve:
• Le plomb dans les peintures à base de plomb;
• La silice cristallisée dans les briques et le ciment, ou autres
produits de maçonnerie; et
• L’arsenic et le chrome dans le bois ayant subi un traitement
chimique.
Le risque associé à de telles expositions varie selon la fréquence à
laquelle on effectue ces travaux. Pour réduire toute exposition à ces
produits: travailler dans un endroit bien aéré, en utilisant du matériel
de sécurité homologué tel un masque antipoussières spécialement
conçu pour filtrer les particules microscopiques.
• Limiter toute exposition prolongée avec les poussières
provenant du ponçage, sciage, meulage, perçage ou toute
autre activité de construction. Porter des vêtements de
protection et nettoyer à l’eau savonneuse les parties du
corps exposées. Le fait de laisser la poussière pénétrer dans la
bouche, les yeux ou la peau peut favoriser l’absorption de produits
chimiques dangereux.
AVERTISSEMENT : cet outil peut produire et/ou répandre
de la poussière susceptible de causer des dommages sérieux et
permanents au système respiratoire. Utiliser systématiquement un
appareil respiratoire antipoussières homologué par le NIOSH ou
l’OSHA. Diriger les particules dans le sens opposé au visage et au
corps.
AVERTISSEMENT: avant de se mettre au travail, s’assurer
de déterminer la classification des dangers posés par les
poussières produites. Utiliser un aspirateur industriel de
la classe officielle de sécurité, appropriée et homologuée,
conformément aux consignes locales de lutte contre les
risques posés par les poussières.
AVERTISSEMENT: porter systématiquement une protection
auditive individuelle appropriée. Sous certaines conditions et
suivant la durée d’utilisation, le bruit émanant de ce produit pourrait
contribuer à une perte de l’acuité auditive.
Causes de l’effet de rebond et prévention
par l’opérateur
L’effet de rebond est une réaction soudaine d’une meule, d’un
tampon, d’une brosse ou d’un tout autre accessoire, en mouvement,
qui est pincé ou qui s’accroche. Un pincement ou un accrochage
provoque un arrêt rapide de l’accessoire en mouvement qui, à son
tour, projette l’outil électrique, hors de maîtrise, dans la direction
opposée à la rotation de l’outil au point de grippage.
Par exemple, si une meule diamant reste accrochée ou pincée
dans une pièce à travailler, le bord de la meule engagée au point
de grippage peut s’enfoncer dans la surface du matériau et faire
sauter ou rebondir la meule. La meule peut alors rebondir en
direction ou à l’opposé de l’utilisateur, selon le sens du mouvement
de la meule au point de grippage. Dans ces conditions, il peut aussi
arriver que les meules diamant se brisent.
Français
13
Page 16

Un effet de rebond est le résultat d’une mauvaise utilisation de l’outil
et/ou de procédures ou conditions de fonctionnement incorrectes.
Il peut être évité en prenant les précautions nécessaires telles que
décrites ci-dessous:
a) Saisir fermement l’outil électrique et positionner le corps
et les bras de sorte à résister à la force de l’effet de
rebond. Utiliser toujours la poignée auxiliaire, s’il y en
a une, pour contrôler au maximum l’effet de rebond
ou le couple de réaction au démarrage. Avec de bonnes
précautions, l’opérateur est en mesure de contrôler le couple
de réaction ou l’effet de rebond.
b) Ne jamais placer les mains près de l’accessoire en
mouvement. Il pourrait en effet être projeté sur celles-ci en cas
de rebond.
c) Ne pas positionner le corps dans la trajectoire probable
de l’outil électrique, en cas de rebond. Au moment du
grippage, l’outil sera projeté dans la direction opposée au
Français
déplacement de la meule.
d) Être particulièrement attentif lors de travaux dans un coin,
sur des bords tranchants, etc. Éviter de faire rebondir
l’accessoire. Éviter tout type de grippage de l’accessoire.
Un travail dans un coin ou sur des bords tranchants ou un
travail en faisant rebondir l’accessoire provoquent souvent
un grippage et une perte de maîtrise de l’outil ou un effet de
rebond.
e) Ne pas fixer de lame de tronçonneuse pour sculpter
le bois ou de lame de scie dentée. Ces types de lames
provoquent des effets de rebond et des pertes de maîtrise
fréquents.
CONSERVER CES CONSIGNES POUR
UTILISATION ULTÉRIEURE
DESCRIPTION (FIG. 1)
AVERTISSEMENT: ne jamais modifier l’outil électrique ni aucun
de ses composants, car il y a risques de dommages corporels ou
matériels.
A. Buse de dépoussiérage
B. Vis de réglage du collier de serrage
C. Butée de profondeur de coupe
D. Bouton de verrouillage de butée de profondeur de coupe
E. Levier de verrouillage du capot de coin (verrouille et déverrouille
le capot de coin)
F. Capot de coin (amovible pour permettre de couper à l’intérieur
d’un coin)
G. Levier de serrage
USAGE PRÉVU
Votre carter de tronçonnage du béton a été conçu pour effectuer
des applications professionnelles de maçonnerie de tronçonnage du
béton. Il n’a pas été conçu pour être utilisé sur le métal ou le bois. Avec
l’utilisation d’une meuleuse à disque, une meule et d’un aspirateur
appropriés, le carter de tronçonnage du béton peut être utilisé pour
retirer une vaste majorité des poussières statiques atmosphériques
qui en son absence pourraient contaminer l’environnement de travail
ou poser des risques accrus pour la santé de l’utilisateur et de ceux
à proximité.
NE PAS les utiliser en milieu ambiant humide ou en présence de
liquides ou de gaz inflammables.
Ce carter de tronçonnage du béton est un outil de professionnel. NE
PAS le laisser à la portée des enfants. Une supervision est nécessaire
auprès de tout utilisateur non expérimenté.
Les outils électriques recommandés pour être utilisés avec cet
accessoire sont vendus séparément auprès de votre distributeur
14
Page 17
local ou dans les centres de réparation agréés. Si vous avez besoin
d’aide pour localiser ces outils électriques, veuillez contacter D
EWALT
Industrial Tool Co., 701 East Joppa Road, Baltimore, MD 21286, ou
appeler 1-800-4-D
EWALT (1-800-433-9258) ou vous rendre sur notre
site www.dewalt.com.
FIG. 1
G
F
E
A
Installation et retrait du carter de
tronçonnage du béton
REMARQUE : il est recommandé d’utiliser uniquement ce carter
de tronçonnage du béton avec les petites meuleuses angulaires
industrielles DWE46102.
1. Suivez les instructions de la section Installation et retrait du
dispositif de protection dans le manuel de l’outil pour retirer ce
dispositif de la meuleuse (DWE46102).
2. Ouvrez le levier de serrage (G) sur le carter de tronçonnage du
béton puis alignez les languettes (I) du carter de tronçonnage du
béton sur les encoches (J) du carter d’engrenage de la meuleuse.
FIG. 2
I
Français
B
C
D
ASSEMBLAGE ET RÉGLAGE (FIG.1, 2)
AVERTISSEMENT : pour réduire le risque de blessures,
arrêter et débrancher SYSTÉMATIQUEMENT l’outil avant tout
réglage ou avant de retirer ou installer toute pièce ou tout
accessoire. Cela s’applique aussi bien à la meuleuse à disque
qu’à l’aspirateur. Ces mesures préventives de sécurité réduisent les
risques de démarrage accidentel de l’outil.
J
G
G
B
3. Avec le levier de serrage toujours ouvert, faites pivoter le carter
sur la position de travail désirée. Le carter de tronçonnage du
béton devrait se trouver entre la broche et l’utilisateur pour
maximiser son efficacité.
4. Refermez le levier de serrage (G) pour fixer le carter de tronçonnage
du béton sur le carter d’engrenage. N’utilisez pas la meuleuse si
le carter de tronçonnage du béton est lâche ou si son levier de
serrage est ouvert.
15
Page 18

5. Pour retirer le carter de tronçonnage du béton, ouvrez le levier
de serrage, faites pivoter le carter de tronçonnage du béton pour
aligner les encoches sur les languettes puis retirez le carter de
tronçonnage du béton.
REMARQUE: le carter de tronçonnage du béton est préréglé d’usine
au diamètre du moyeu du carter d’engrenage. S’il s’avérait après un
certain temps que le carter de tronçonnage du béton se desserre,
resserrez la vis de réglage du collier de serrage (B) avec le levier de
serrage en position fermée.
AVIS : ne pas resserrer la vis de réglage du collier de serrage si le
levier de serrage est en position ouverte. Le carter de tronçonnage
du béton ou le moyeu d’assemblage pourrait subir des dommages
indécelables.
AVIS : s’il est impossible de resserrer le carter de tronçonnage du
béton avec la vis de réglage du collier de serrage, ne pas utiliser l’outil.
Apportez l’outil et le carter de tronçonnage du béton chez un centre
de réparation pour faire réparer ou remplacer ce dernier.
Installation de meules à tronçonner
Français
(Type1, Fig.1)
AVERTISSEMENT : utiliser exclusivement des meules
diamant de type 1 avec le carter de tronçonnage du béton.
Ne découper aucun métal. Ne pas utiliser avec des meules abrasives
composites.
Suivez les instructions de la section Installation et utilisation des meules
à tronçonner (Type1) dans le manuel de l’outil pour installer la meule.
Il pourra s’avérer nécessaire d’ouvrir le capot de coin pour installer les
meules à tronçonner le béton de 152,4mm (6po), reportez-vous à la
section Applications: capot de coin.
Réglage de la profondeur de coupe
(Fig.3)
1. Desserrez le bouton de verrouillage de butée de profondeur de
coupe (D).
2. Poussez la butée de profondeur de coupe (C) sur la position
désirée.
3. Resserrez le bouton de verrouillage de butée de profondeur de
coupe.
FIG. 3
C
D
Applications: capot de coin (Fig.4)
AVERTISSEMENT : pour réduire le risque de blessures,
arrêter et débrancher SYSTÉMATIQUEMENT l’outil avant tout
réglage ou avant de retirer ou installer toute pièce ou tout
accessoire. Cela s’applique aussi bien à la meuleuse à disque
qu’à l’aspirateur. Ces mesures préventives de sécurité réduisent les
risques de démarrage accidentel de l’outil.
AVERTISSEMENT: risques de dommages corporels. Le capot de
coin ne doit être ouvert que pour couper l’intérieur des coins. Garder
systématiquement les mains et le corps éloignés des zones de coupe.
S’assurer que le capot de coin est fermé pour toute autre application.
Cette fonctionnalité permet de couper à l’intérieur d’un coin.
16
Page 19
1. Assurez-vous de l’arrêt complet de l’outil et de la meule.
2. Tournez le levier de verrouillage du capot de coin (E) vers la gauche
d’un tour complet. Saisissez le capot de coin (F) et faites-le pivoter
pour l’ouvrir, comme illustré en Figure4.
3. Protégez vos mains de la meule et positionnez-vous de façon à ce
que le dessous ouvert du carter soit à votre opposé.
4. Mettez l’outil en marche et laissez-le tourner à plein régime avant
de le mettre en contact avec la surface à travailler.
5. Placez la meule sur la surface à travailler et déplacez la meuleuse
de la droite vers la gauche pour couper à l’intérieur du coin tout en
maximisant la collecte des poussières.
6. Retirez l’outil de la pièce à travailler avant de l’arrêter. Laissez l’outil
s’arrêter complètement de tourner avant de le poser.
7. Fermez le capot de coin et verrouillez-le à l’aide du levier de
verrouillage de capot de coin (E).
FIG. 4
F
E
F
Dépoussiérage (Fig.1, 5)
AVERTISSEMENT : utiliser exclusivement les outils électriques
recommandés par D
Pour plus d’informations concernant les outils électriques D
compatibles avec cet accessoire, contacter votre détaillant local,
appeler le 1-800-4-D
site www.dewalt.com.
AVERTISSEMENT : cet accessoire DOIT ÊTRE utilisé avec un
extracteur de poussière. Porter SYSTÉMATIQUEMENT un écran facial
ou un masque anti-poussières de sécurité homologué.
REMARQUE: vérifier que la connexion tuyau est fiable.
REMARQUE : la quantité de poussière éliminée par l’aspirateur
dépend de son système de filtrage. Se reporter au manuel de
l’utilisateur de l’aspirateur pour des informations complémentaires.
Tous les carters d’aspiration D
avec les connecteurs universels DWV9000 DeWALT.
1. Rattachez le connecteur DWV9000 (H) au tuyau de votre système
de dépoussiérage (K).
2. Déverrouillez le connecteur DWV9000 (H) et l’insérez sur la buse
de dépoussiérage (A).
3. Verrouillez le connecteur DWV9000 (H) pour l’arrimer.
EWALT avec cet accessoire.
EWALT
EWALT (1-800-433-9258) ou se rendre sur notre
EWALT ont été conçus pour fonctionner
Français
17
Page 20

FIG. 5
K
H
A
Français
TUYAUX D’ASPIRATEUR TRADITIONNELS
Rattachez le tuyau d’aspirateur recommandé à la buse de
dépoussiérage (A).
UTILISATION
AVERTISSEMENT : pour réduire le risque de blessures,
arrêter et débrancher SYSTÉMATIQUEMENT l’outil avant tout
réglage ou avant de retirer ou installer toute pièce ou tout
accessoire. Cela s’applique aussi bien à la meuleuse à disque
qu’à l’aspirateur. Ces mesures préventives de sécurité réduisent les
risques de démarrage accidentel de l’outil.
AVERTISSEMENT : pour votre sécurité, lire le manuel de
l’utilisateur de la meuleuse, mais aussi de l’aspirateur avant l’utilisation
de tout accessoire. Tout manquement à ces avertissements augmente
les risques de blessures, et les risques d’endommager sérieusement
l’appareil et ses accessoires. Lors de la maintenance de cet outil,
n’utiliser que des pièces de rechange identiques.
AVERTISSEMENT: saisir fermement la poignée latérale et le corps
de l’outil pour le maîtriser à l’amorçage, en cours de fonctionnement et
jusqu’à l’arrêt complet de la meule ou de l’accessoire. S’assurer que
la meule soit vraiment immobile avant de déposer l’outil.
AVERTISSEMENT: s’assurer que le capot de coin est fermé.
1. Assurez-vous que toutes les instructions d’assemblage et de
réglage ont bien été suivies.
2. Allumez l’aspirateur comme indiqué dans le manuel de l’utilisateur
de l’aspirateur.
3. Mettez la meuleuse à disque en marche comme
indiqué dans le manuel de l’utilisateur de l’outil.
REMARQUE : laisser l’outil tourner à plein régime avant de le
mettre en contact avec la surface à travailler.
Applications de tronçonnage et de coupe
du béton (Fig.6)
1. Réglez la profondeur de coupe désirée, reportez-vous à la section
Réglage de la Profondeur de coupe sous Assemblage et
réglages.
2. Laissez l’outil tourner à plein régime avant de le mettre en contact
avec la surface à travailler.
3. Positionnez-vous de façon à ce que le dessous ouvert du carter
et la meule soient orientés à l’opposée de vous.
4. Placez le bord (L) du carter sur la surface à travailler et commencez
à couper en plongeant dans la surface à travailler. REMARQUE:
maintenir le bord (L) du carter contre la surface à travailler pour
assurer la collecte correcte de la poussière.
18
Page 21

5. Avec le carter orienté comme illustré en Figure 6, déplacez la
meuleuse de la droite vers la gauche le long de la surface à
travailler. Pour des résultats optimums, la meuleuse doit être
positionnée à un angle de 45° de la buse de dépoussiérage lors
du tronçonnage du béton.
6. Retirez l’outil de la pièce à travailler avant de l’arrêter. Laissez l’outil
s’arrêter complètement de tourner avant de le poser.
FIG. 6
L
MAINTENANCE
AVERTISSEMENT : pour réduire le risque de blessures,
arrêter et débrancher SYSTÉMATIQUEMENT l’outil avant tout
réglage ou avant de retirer ou installer toute pièce ou tout
accessoire. Cela s’applique aussi bien à la meuleuse à disque
qu’à l’aspirateur. Ces mesures préventives de sécurité réduisent les
risques de démarrage accidentel de l’outil.
Nettoyage
AVERTISSEMENT : enlever les saletés et la poussière hors des
évents au moyen d’air comprimé propre et sec, au moins une fois
par semaine. Pour minimiser le risque de blessure aux yeux, toujours
porter une protection oculaire conforme à la norme ANSI Z87.1 lors
du nettoyage.
AVERTISSEMENT : ne jamais utiliser de solvants ni d’autres
produits chimiques puissants pour nettoyer les pièces non métalliques
de l’outil. Ces produits chimiques peuvent affaiblir les matériaux
de plastique utilisés dans ces pièces. Utiliser un chiffon humecté
uniquement d’eau et de savon doux. Ne jamais laisser de liquide
pénétrer dans l’outil et n’immerger aucune partie de l’outil dans un
liquide.
AVERTISSEMENT : puisque les accessoires autres que ceux
offerts par D
pourrait s’avérer dangereuse. Pour réduire le risque de blessures,
utiliser exclusivement les accessoires D
présent produit.
Les accessoires recommandés pour cet outil sont vendus séparément
au centre de service de votre région. Pour obtenir de l’aide concernant
l’achat d’un accessoire, communiquer avec D
Co., 701 East Joppa Road, Baltimore, MD 21286 aux États-Unis;
composer le 1 800 433-9258 (1 800 4-D
Web : www.dewalt.com.
EWALT n’ont pas été testés avec ce produit, leur utilisation
EWALT recommandés avec le
EWALT Industrial Tool
EWALT) ou visiter notre site
Réparations
Pour assurer la SÉCURITÉ et la FIABILITÉ du produit, les réparations,
l’entretien et les réglages doivent être réalisés (cela comprend
l’inspection et le remplacement du balai) par un centre de réparation
en usine D
d’autres techniciens qualifiés. Toujours utiliser des pièces de rechange
identiques.
EWALT, un centre de réparation agréé DEWALT ou par
Garantie limitée de trois ans
DEWALT réparera, sans frais, tout produit défectueux causé par un
défaut de matériel ou de fabrication pour une période de trois ans à
compter de la date d’achat. La présente garantie ne couvre pas les
Français
19
Page 22

pièces dont la défectuosité a été causée par une usure normale ou
l’usage abusif de l’outil. Pour obtenir de plus amples renseignements
sur les pièces ou les réparations couvertes par la présente garantie,
visiter le site www.dewalt.com ou composer le 1 800 433-9258 (1 800
4-D
EWALT). Cette garantie ne s’applique pas aux accessoires et ne
vise pas les dommages causés par des réparations effectuées par un
tiers. Cette garantie confère des droits légaux particuliers à l’acheteur,
mais celui-ci pourrait aussi bénéficier d’autres droits variant d’un état
ou d’une province à l’autre.
En plus de la présente garantie, les outils D
EWALT sont couverts par
notre :
CONTRAT D’ENTRETIEN GRATUIT D’UN AN
EWALT entretiendra l’outil et remplacera les pièces usées au cours
D
d’une utilisation normale et ce, gratuitement, pendant une période
d’un an à compter de la date d’achat.
GARANTIE DE REMBOURSEMENT DE 90 JOURS
Si l’acheteur n’est pas entièrement satisfait, pour quelque raison que
Français
ce soit, du rendement de l’outil électrique, du laser ou de la cloueuse
D
EWALT, celui-ci peut le retourner, accompagné d’un reçu, dans les
90 jours à compter de la date d’achat pour obtenir un remboursement
intégral, sans aucun problème.
AMÉRIQUE LATINE : cette garantie ne s’applique aux produits vendus
en Amérique latine. Pour ceux-ci, veuillez consulter les informations
relatives à la garantie spécifique présente dans l’emballage, appeler
l’entreprise locale ou consulter le site Web pour les informations
relatives à cette garantie.
REMPLACEMENT GRATUIT DES ÉTIQUETTES
D’AVERTISSEMENT : si les étiquettes d’avertissement deviennent
illisibles ou sont manquantes, composer le 1 800 433-9258 (1 800
4-D
EWALT) pour en obtenir le remplacement gratuit.
20
Page 23

Defi niciones: Normas de seguridad
Las siguientes definiciones describen el nivel de gravedad de
cada palabra de señal. Lea el manual y preste atención a estos
símbolos.
PELIGRO: indica una situación de peligro inminente que, si
no se evita, provocará la muerte o lesiones graves.
ADVERTENCIA: indica una situación de peligro potencial
que, si no se evita, podría provocar la muerte o lesiones
graves.
ATENCIÓN: indica una situación de peligro potencial que,
si no se evita, posiblemente provocaría lesiones leves o
moderadas.
AVISO: se refiere a una práctica no relacionada a lesiones
corporales que de no evitarse puede resultar en daños a la
propiedad.
SI TIENE ALGUNA DUDA O ALGÚN COMENTARIO SOBRE ÉSTA
U OTRA HERRAMIENTA D
GRATUITO: 1-800-4-D
ADVERTENCIA: Para reducir el riesgo de lesiones, lea el
manual de instrucciones.
EWALT, LLÁMENOS AL NÚMERO
EWALT (1-800-433-9258).
CONSERVE TODAS LAS ADVERTENCIAS
E INSTRUCCIONES PARA FUTURAS
CONSULTAS
Advertencias generales sobre seguridad
ADVERTENCIA: Por su propia seguridad, lea el manual de
instrucciones para la esmeriladora y la aspiradora extractora de
polvo antes de usar los accesorios. De no seguir estas advertencias
podrían producirse lesiones corporales y graves daños a la herramienta
y al accesorio. Cuando realice el mantenimiento de esta herramienta,
utilice únicamente repuestos originales.
1) SEGURIDAD EN EL ÁREA DE TRABAJO
a) Mantenga el área de trabajo limpia y bien iluminada. Las
áreas abarrotadas y oscuras propician accidentes.
b) Mantenga alejados a los niños y a los espectadores de la
herramienta eléctrica en funcionamiento. Las distracciones
pueden provocar la pérdida de control.
c) Asegúrese de que el lugar de trabajo esté bien ventilado.
La exposición al polvo en un lugar de trabajo con poca
ventilación puede dar como resultado el deterioro de la salud.
2) SEGURIDAD ELÉCTRICA
a) Evite el contacto corporal con superficies con descargas
a tierra como, por ejemplo, tuberías, radiadores, cocinas
eléctricas y refrigeradores. Existe mayor riesgo de descarga
eléctrica si su cuerpo está puesto a tierra.
3) SEGURIDAD PERSONAL
a) Permanezca alerta, controle lo que está haciendo y
utilice el sentido común cuando emplee una herramienta
eléctrica. No utilice una herramienta eléctrica si
está cansado o bajo el efecto de drogas, alcohol o
medicamentos. Un momento de descuido mientras se opera
una herramienta eléctrica puede provocar lesiones personales
graves.
b) Utilice equipos de protección personal. Siempre utilice
protección para los ojos. En las condiciones adecuadas, el
uso de equipos de protección, como máscaras para polvo,
calzado de seguridad antideslizante, cascos o protección
auditiva, reducirá las lesiones personales.
Español
21
Page 24

c) No se estire. Conserve el equilibrio y párese
adecuadamente en todo momento. Esto permite un mejor
control de la herramienta eléctrica en situaciones inesperadas.
d) Use la vestimenta adecuada. No use ropas holgadas ni
joyas. Mantenga el cabello, la ropa y los guantes alejados
de las piezas en movimiento. Las ropas holgadas, las joyas
o el cabello largo pueden quedar atrapados en las piezas en
movimiento.
4) USO Y MANTENIMIENTO DE LA HERRAMIENTA
ELÉCTRICA
a) No fuerce la herramienta eléctrica. Utilice la herramienta
eléctrica correcta para el trabajo que realizará. Si se la
utiliza a la velocidad para la que fue diseñada, la herramienta
eléctrica correcta permite trabajar mejor y de manera más
segura.
ADVERTENCIA: El uso de accesorios o adaptadores, o el
desempeño de cualquier operación con esta herramienta,
distintos a los recomendados en este manual de instrucciones
puede representar un riesgo de lesiones personales.
b) Guarde la herramienta eléctrica que no esté en uso fuera
del alcance de los niños y no permita que otras personas
no familiarizadas con ella o con estas instrucciones
operen la herramienta. Las herramientas eléctricas son
peligrosas si son operadas por usuarios no capacitados.
c) Utilice la herramienta eléctrica, los accesorios y las
brocas de la herramienta, etc. de acuerdo con estas
instrucciones y teniendo en cuenta las condiciones
de trabajo y el trabajo que debe realizarse. El uso de la
Español
herramienta eléctrica para operaciones diferentes de aquéllas
para las que fue diseñada podría originar una situación peligrosa.
5) MANTENIMIENTO
a) Solicite a una persona calificada en reparaciones que
realice el mantenimiento de su herramienta eléctrica
y que sólo utilice piezas de repuesto idénticas. Esto
garantizará la seguridad de la herramienta eléctrica.
Normas de seguridad para rejuntar
• No utilice accesorios que no estén diseñados y recomendados
específicamente por el fabricante de la herramienta. El hecho
de que el accesorio pueda acoplarse a la herramienta eléctrica no
garantiza un funcionamiento sin riesgos.
• La velocidad prevista del accesorio debe ser como mínimo
igual a la velocidad máxima marcada en la herramienta
eléctrica. Los accesorios operados a velocidades superiores a su
velocidad nominal pueden romperse y salir despedidos.
• El diámetro externo y el grosor del accesorio deben estar
dentro de la capacidad de su herramienta eléctrica. Los
accesorios de tamaños incorrectos no pueden ser protegidos o
controlados adecuadamente.
• El tamaño del eje de los discos, las bridas, almohadillas
de respaldo o cualquier otro accesorio debe acoplarse
bien al eje de la herramienta eléctrica. Los accesorios que
tienen orificios para montaje en eje que no se corresponden con
los accesorios de montaje de la herramienta eléctrica harán que
la herramienta pierda el equilibrio, vibre excesivamente y que el
operador pierda el control de la herramienta.
• El protector debe ir firmemente ajustado a la herramienta
eléctrica y en posición para el máximo de seguridad, de
modo que se exponga la menor parte posible del disco
al operador. El protector ayuda a proteger al operador de los
fragmentos despedidos por discos rotos y el contacto accidental
con el disco.
22
Page 25

• Sostenga la herramienta eléctrica solamente en superficies
de agarre aisladas cuando realice una operación en la cual
el accesorio para cortar pudiera entrar en contacto con
instalaciones eléctricas ocultas o su propio cable. El contacto
de los accesorios de corte con un cable cargado, puede cargar las
partes metálicas expuestas de la herramienta eléctrica y producir
una descarga eléctrica al operador.
• Siempre use el mango lateral. Apriete con firmeza el mango.
Se debe utilizar siempre el mango lateral para mantener el control
de la herramienta en todo momento.
• No utilice un accesorio dañado. Antes de cada uso
inspeccione el accesorio, como por ejemplo el disco de
diamante, para verificar si tiene muescas o grietas, la
almohadilla de respaldo para verificar si tiene grietas o
roturas o si está muy desgastada, la escobilla de alambre
para comprobar si tiene alambres sueltos o agrietados. Si la
herramienta o el accesorio se cae accidentalmente, revise
que no esté dañado o, si es necesario, cambie el accesorio
por uno que no esté dañado. Después de inspeccionar e
instalar un accesorio, colóquense usted y las personas
presentes alejados del plano del accesorio en movimiento
y ponga la herramienta eléctrica en funcionamiento a
la velocidad sin carga máxima durante un minuto. Si el
accesorio está dañado, normalmente se terminará de romper
durante este período de prueba.
• NO esmerile ni corte metal con un disco de diamante.
• Póngase un equipo de protección personal. Dependiendo de
la aplicación, use un protector facial y gafas protectoras. Si
corresponde, póngase una mascarilla antipolvo, protectores
para el oído, guantes y un delantal de trabajo que pueda
detener pequeños fragmentos abrasivos o de la pieza de
trabajo. La protección ocular utilizada debe ser capaz de detener
desechos despedidos por las diversas operaciones realizadas
con la herramienta. La máscara antipolvo o el respirador debe
poder filtrar partículas generadas por la operación realizada. La
exposición prolongada a ruidos de alta intensidad puede causar
pérdida auditiva.
• No "atasque" el disco de corte ni aplique excesiva presión.
No intente hacer un corte de profundidad excesiva. El
ejercer demasiada presión sobre el disco aumenta la carga y
la susceptibilidad de giro o bloqueo del disco en el corte y la
posibilidad de rebote o rotura del disco.
• Coloque el cable lejos del accesorio rotativo. Si pierde el
control, el cable puede cortarse o engancharse y puede arrastrar a
la mano o el brazo hacia el accesorio rotativo.
• Nunca suelte la herramienta hasta que el accesorio haya
dejado de girar totalmente. El accesorio rotativo puede aferrarse
a la superficie y tirar de la herramienta, haciéndole perder el control
de la misma.
• No ponga en funcionamiento la herramienta eléctrica
mientras la transporte a su lado. El contacto accidental con el
accesorio rotativo podría enganchar su ropa y tirar del accesorio
hacia su cuerpo.
• Limpie periódicamente los orificios de ventilación de la
herramienta eléctrica. El ventilador del motor atraerá el polvo
dentro de la caja protectora y la acumulación excesiva del metal en
polvo puede ocasionar riesgos eléctricos.
• No utilice la herramienta eléctrica cerca de materiales
inflamables. Las chispas podrían prender fuego a estos materiales.
• No utilice accesorios que requieran líquidos refrigerantes.
El utilizar agua u otros refrigerantes líquidos puede ocasionar
electrocución o descarga.
• NO use discos abrasivos.
• SIEMPRE use un colector de polvo.
Español
23
Page 26

ADVERTENCIA: Cuando no la utilice, coloque la esmeriladora
en una superficie estable donde no pueda moverse de manera
accidental, deslizarse ni provocar tropezones o caídas. Puede
resultar en lesiones corporales serias.
ADVERTENCIA: Use SIEMPRE lentes de seguridad. Los
anteojos de diario NO SON lentes de seguridad. Utilice además una
cubrebocas o mascarilla antipolvo si la operación de corte genera
demasiado polvo. SIEMPRE lleve equipo de seguridad certificado:
• Protección ocular ANSI Z87.1 (CAN/CSA Z94.3).
• Protección auditiva ANSI S12.6 (S3.19)
• Protección respiratoria NIOSH/OSHA.
ADVERTENCIA: Algunas partículas de polvo generadas al lijar,
serrar, esmerilar y taladrar con herramientas eléctricas, así como al
realizar otras actividades de construcción, contienen químicos que
el Estado de California sabe que pueden producir cáncer, defectos
congénitos u otras afecciones reproductivas. Ejemplos de estos
químicos son:
• plomo de algunas pinturas en base a plomo,
• polvo de sílice proveniente de ladrillos y cemento y otros
productos de albañilería, y
• arsénico y cromo provenientes de madera tratada químicamente.
Su riesgo de exposición a estos químicos varía, dependiendo de
la frecuencia con la cual realiza usted este tipo de trabajo. Para
reducir la exposición a esas sustancias químicas: trabaje en una zona
bien ventilada y llevando equipos de seguridad aprobados, como
mascarillas antipolvo especialmente diseñadas para filtrar partículas
microscópicas.
• Evite el contacto prolongado con polvo generado por el
Español
lijado, aserrado, pulido, taladrado y otras actividades de
construcción. Vista ropas protectoras y lave las áreas de
la piel expuestas con agua y jabón. Si permite que el polvo se
introduzca en la boca u ojos o quede sobre la piel, puede favorecer
la absorción de productos químicos peligrosos.
ADVERTENCIA: La utilización de esta herramienta puede generar
polvo o dispersarlo, lo que podría causar daños graves y permanentes
al sistema respiratorio, así como otras lesiones. Siempre use protección
respiratoria aprobada por NIOSH (Instituto Nacional de Seguridad y
Salud en el Trabajo) u OSHA (Administración de Seguridad y Salud en
el Trabajo) apropiada para la exposición al polvo. Dirija las partículas
en dirección contraria a la cara y el cuerpo.
ADVERTENCIA: Antes de comenzar el trabajo, verifique para
determinar la clasificación de riesgo del polvo producido. Utilice
una aspiradora extractora de polvo industrial apropiada, de la
clase de seguridad aprobada oficialmente, y en cumplimiento
con sus normativas locales de control de riesgo del polvo.
ADVERTENCIA: Utilice siempre protección auditiva personal
apropiada. Bajo algunas condiciones y duraciones de uso, el ruido
producido por este producto puede contribuir a la pérdida auditiva.
Causas del retroceso y su prevención por
parte del operador
El retroceso es una reacción repentina al pellizco o atascamiento
de un disco giratorio, una almohadilla de respaldo, un cepillo o
cualquier otro accesorio. El pellizco o el atascamiento hacen que el
accesorio giratorio se trabe rápidamente, lo que a su vez provoca
que la herramienta eléctrica fuera de control vaya en sentido
opuesto al giro del accesorio en el punto del atascamiento.
Por ejemplo, si un disco de diamante se atasca o se engancha en
la pieza de trabajo, el borde del disco que está entrando al punto
de atasque puede penetrar la superficie del material y hacer que
el disco rebote o patee. El disco puede entonces saltar hacia el
operador o en dirección contraria al mismo, dependiendo de la
dirección en la que se movía el disco al momento de engancharse.
24
Page 27

En estas condiciones los discos de diamante pueden además
romperse.
El retroceso es el resultado de un mal uso de la herramienta o de
condiciones o procedimientos operativos incorrectos y se puede
evitar tomando las precauciones apropiadas que se indican a
continuación:
a) Sostenga la herramienta eléctrica con firmeza y ubique
el cuerpo y el brazo para poder resistir las fuerzas de
retroceso. Siempre utilice el mango lateral, en caso de
tenerlo, para lograr el máximo control sobre el retroceso
o la reacción de torsión durante el encendido. El operador
puede controlar la reacción de torsión o las fuerzas de retroceso
si toma las precauciones adecuadas.
b) Nunca coloque la mano cerca del accesorio giratorio, ya
que éste puede hacer un retroceso sobre la mano.
c) No ubique el cuerpo en el área hacia donde la herramienta
eléctrica se desplazará si se produce un retroceso. El
retroceso impulsará la herramienta en la dirección opuesta al
movimiento del disco en el punto de atascamiento.
d) Tenga especial cuidado al trabajar en esquinas, bordes
filosos, etc. Evite hacer rebotar o enganchar el accesorio.
Las esquinas, los bordes filosos y el rebote tienden a enganchar
el accesorio giratorio y producir la pérdida de control o el
retroceso de la unidad.
e) No conecte una hoja para carpintería para sierra de
cadena ni una hoja de sierra dentada. Estas hojas puede
producir el retroceso y la pérdida de control frecuentes.
GUARDE ESTAS INSTRUCCIONES
PARA FUTURAS CONSULTAS
COMPONENTES (FIG. 1)
ADVERTENCIA: Nunca modifique la herramienta eléctrica, ni
tampoco ninguna de sus piezas. Podría producir lesiones corporales
o daños.
A. Puerto de polvo
B. Tornillo de fijación de la abrazadera
C. Base de profundidad de corte
D. Base de profundidad de corte botón de bloqueo
E. Palanca de bloqueo de la puerta curva
(bloquea y desbloquea la puerta curva)
F. Puerta curva (abre y permite cortar una curva interna)
G. Palanca de abrazadera
USO DEBIDO
Su cubierta protectora para rejuntar ha sido diseñada para aplicaciones
profesionales de rejuntado de albañilería. No está prevista para
ser usada en metal o madera. Al usar la esmeriladora, el disco y
la aspiradora extractora de polvo adecuadas, se puede usar para
eliminar la mayor cantidad de polvo estático y transportado por el
aire, que sin el uso de la cubierta protectora para rejuntar podría
contaminar el entorno de trabajo o suponer un riesgo elevado para la
salud del operador y de las personas a su alrededor.
NO utilice la herramienta en condiciones de humedad o en presencia
de líquidos o gases inflamables.
La cubierta protectora para rejuntar es una herramienta profesional.
NO permita que los niños toquen la herramienta. Si el operador no
tiene experiencia operando esta herramienta, su uso deberá ser
supervisado.
Las herramientas eléctricas a ser utilizadas con este aditamento están
disponibles con un cargo adicional en su distribuidor local o en el
centro de servicio autorizado. Si necesita ayuda para ubicar alguna
herramienta eléctrica, por favor póngase en contacto con D
EWALT
Español
25
Page 28
Industrial Tool Co., 701 East Joppa Road, Baltimore, MD 21286, llame
al 1-800-4-D
EWALT (1-800-433-9258) o visite nuestro sitio web www.
dewalt.com.
FIG. 1
G
B
F
E
A
Cómo montar y sacar la cubierta
protectora para rejuntar
NOTA: Se recomienda que la cubierta protectora para rejuntar
únicamente se use con la esmeriladora de ángulo pequeño para
trabajo pesado DWE46102.
1. Siga las instrucciones de Montaje y desmontaje del protector
en el manual de la herramienta para quitar el protector de la
esmeriladora (DWE46102).
2. Abra la palanca de abrazadera (G) de la cubierta protectora para
rejuntar y alinee las lengüetas (I) en la cubierta protectora con las
ranuras (J) en la caja de engranaje de la esmeriladora.
FIG. 2
I
C
D
MONTAJE Y AJUSTES (FIG. 1, 2)
ADVERTENCIA: Para reducir el riesgo de lesiones personales
graves, SIEMPRE apague la herramienta y desconéctela de la
fuente de alimentación antes de realizar ajuste alguno, o de
quitar o instalar acoplamientos o accesorios. Esto es relevante
para la esmeriladora y la aspiradora extractora de polvo. Estas
medidas de seguridad preventiva reducen el riesgo de poner en
Español
marcha la herramienta accidentalmente.
J
G
G
B
3. Con la palanca de la abrazadera abierta, gire la cubierta
protectora hasta la posición de trabajo deseada. La cubierta
protectora debe posicionarse entre el eje y el operador para
brindar mayor eficacia.
4. Cierre la palanca de abrazadera (G) para asegurar la cubierta
protectora para rejuntar a la caja de engranajes. No opere la
esmeriladora con una cubierta protectora suelta o la palanca de
abrazadera en posición abierta.
26
Page 29

5. Para quitar la cubierta protectora para rejuntar, abra la palanca de
abrazadera, gire la cubierta protectora para alinear las ranuras y
las lengüetas, y levante la cubierta protectora.
NOTA: La cubierta protectora para rejuntar se preajusta en fábrica
al diámetro del cubo de la caja de engranaje. Si, después de cierto
tiempo, la cubierta protectora para rejuntar se afloja, apriete el tornillo
de fijación de la abrazadera (B) con la palanca de abrazadera en la
posición cerrada.
AVISO: No apriete el tornillo de sujeción con la palanca de abrazadera
en posición abierta. Puede ocasionar daños indetectables a la cubierta
protectora o al área de montaje.
AVISO: Si la cubierta protectora para rejuntar no puede ser ajustada
con el tornillo de fijación de la abrazadera, no use la herramienta. Lleve
la herramienta y la cubierta protectora para rejuntar a un centro de
servicio para que sea reparada o cambiada.
Montaje de discos de corte (Tipo 1) (Fig. 1)
ADVERTENCIA: Únicamente los discos de diamante tipo 1
pueden usarse con la cubierta protectora para rejuntar. No
corte metal. No la use con discos abrasivos.
Siga las instrucciones de montaje y utilización de discos de corte
(Tipo1) en el manual de la herramienta y monte el disco de esmerilar.
Puede ser necesario abrir la puerta curva para instalar discos para
rejuntar de 6" (152,4mm), consultar Aplicación de puertas curvas.
Ajuste de la profundidad de corte (Fig. 3)
1. Afloje el botón de bloqueo de la base de profundidad de corte (D).
2. Deslice la base de profundidad de corte (C) hasta la posición
deseada.
3. Apriete el botón de bloqueo de la base de profundidad de corte.
FIG. 3
C
D
Aplicación de las puertas curvas (Fig. 4)
ADVERTENCIA: Para reducir el riesgo de lesiones personales
graves, SIEMPRE apague la herramienta y desconéctela de la
fuente de alimentación antes de realizar ajuste alguno, o de
quitar o instalar acoplamientos o accesorios. Esto es relevante
para la esmeriladora y la aspiradora extractora de polvo. Estas
medidas de seguridad preventiva reducen el riesgo de poner en
marcha la herramienta accidentalmente.
ADVERTENCIA: Riesgo de lesiones corporales. La puerta curva
únicamente debe abrirse para cortar curvas internas. Mantenga las
manos y el cuerpo alejados de la zona de corte en todo momento.
Asegure que la puerta curva esté cerrada para todas las demás
aplicaciones.
Esta característica permite el corte de una curva interna.
1. Asegúrese que la herramienta esté desconectada y que el disco
se haya detenido por completo.
2. Dé un giro completo a la palanca de bloqueo de la puerta curva (E)
en sentido contrario de las agujas del reloj. Agarre la puerta curva
(F) y gire para abrir como se muestra en la Figura 4.
3. Aleje las manos de la zona del disco y sitúese de modo que la
parte inferior abierta de la cubierta protectora no se encuentra
frente a usted.
Español
27
Page 30

4. Encienda la herramienta y permita que alcance la velocidad
máxima antes de ponerla en contacto con la superficie de trabajo.
5. Coloque el disco sobre la superficie de trabajo y mueva la
esmeriladora de derecha a izquierda para cortar la esquina interna
para una recolección óptima del polvo.
6. Quite la herramienta de la superficie de trabajo antes de apagarla.
Permita que la herramienta deje de girar antes de soltarla.
7. Cierre la puerta curva y bloquéela en su lugar con la palanca de
bloqueo de la puerta curva (E).
FIG. 4
F
E
F
Extracción de polvo (Fig. 1, 5)
ADVERTENCIA: Únicamente use herramientas eléctricas
recomendadas por D
Para más información sobre las herramientas eléctricas de D
compatibles con este accesorio, póngase en contacto con el
proveedor local, llamando al 1-800-4-D
visite nuestro sitio web www.dewalt.com.
Español
ADVERTENCIA: Este accesorio DEBE usarse con un sistema
extractor de polvo. SIEMPRE use una mascarilla protectora o
antipolvo certificada.
EWALT con este accesorio.
EWALT (1-800-433-9258) o
EWALT
NOTA: Asegure que la conexión de la manguera es segura.
NOTA: La cantidad de polvo retenido en la aspiradora extractora
de polvo depende de su sistema de filtro. Consulte el manual de
instrucciones de la aspiradora extractora de polvo para obtener más
información.
Todas las cubiertas de recolección de polvo de D
EWALT están
diseñadas para funcionar con el conector universal DWV9000 de
D
EWALT.
1. Ajuste el conector DWV9000 (H) a la manguera del colector de
polvo (K).
2. Desbloquee el conector DWV9000 (H) y deslícelo sobre el puerto
de polvo (A).
3. Cierre el conector DWV9000 (H) para asegurarlo.
FIG. 5
K
H
A
28
Page 31

MANGUERAS TRADICIONALES DE LA ASPIRADORA
EXTRACTORA DE POLVO
Ajuste la manguera de la aspiradora extractora de polvo recomendada
al puerto de polvo (A).
FUNCIONAMIENTO
ADVERTENCIA: Para reducir el riesgo de lesiones personales
graves, SIEMPRE apague la herramienta y desconéctela de la
fuente de alimentación antes de realizar ajuste alguno, o de
quitar o instalar acoplamientos o accesorios. Esto es relevante
para la esmeriladora y la aspiradora extractora de polvo. Estas
medidas de seguridad preventiva reducen el riesgo de poner en
marcha la herramienta accidentalmente.
ADVERTENCIA: Por su propia seguridad, lea el manual de
instrucciones para la esmeriladora y la aspiradora extractora de polvo
antes de usar los accesorios. De no seguir estas advertencias podrían
producirse lesiones corporales y graves daños a la herramienta y al
accesorio. Cuando realice el mantenimiento de esta herramienta,
utilice únicamente repuestos originales.
ADVERTENCIA Sostenga el mango lateral y el cuerpo de la
herramienta con firmeza para mantener el control de ésta al encenderla
y mientras la utiliza, y hasta que el disco o el accesorio deje de girar.
Asegúrese de que el disco se haya detenido completamente antes de
depositar la herramienta sobre una superficie.
ADVERTENCIA: Asegúrese de que la puerta curva esté cerrada.
1. Asegure que se completaron todas las instrucciones de
ensamblado y ajuste.
2. Encienda la aspiradora extractora de polvo como se indica en el
manual de instrucciones de la aspiradora extractora de polvo.
3. Arranque la esmeriladora como se indica en el manual de
instrucciones de la herramienta.
NOTA: Deje que la herramienta alcance la velocidad máxima
antes de aplicarla en la superficie de trabajo.
FIG. 6
L
Aplicación de rejuntado y corte (Fig. 6)
1. Establezca la profundidad de corte deseada, consulte
Profundidad de corte en Montaje y ajustes.
2. Permita que la herramienta alcance la velocidad máxima antes de
que toque la superficie de trabajo.
3. Sitúese de modo que la parte inferior abierta de la cubierta
protectora y el disco no estén mirando hacia usted.
4. Coloque el borde (L) de la cubierta protectora en la superficie de
trabajo y comience el corte lanzándose sobre la superficie de
trabajo. NOTA: Mantenga el borde (L) de la cubierta protectora
contra la superficie de trabajo para asegurar una recolección de
polvo óptima.
5. Con la cubierta protectora orientada como se muestra en la
Figura 6, mueva la esmeriladora de derecha a izquierda por la
superficie de trabajo. Para mejores resultados, la esmeriladora
debe posicionarse a un ángulo de 45¼ del puerto de polvo al
cortar/rejuntar.
Español
29
Page 32

6. Quite la herramienta de la superficie de trabajo antes de apagarla.
Permita que la herramienta deje de girar antes de soltarla.
MANTENIMIENTO
ADVERTENCIA: Para reducir el riesgo de lesiones personales
graves, SIEMPRE apague la herramienta y desconéctela de la
fuente de alimentación antes de realizar ajuste alguno, o de
quitar o instalar acoplamientos o accesorios. Esto es relevante
para la esmeriladora y la aspiradora extractora de polvo. Estas
medidas de seguridad preventiva reducen el riesgo de poner en
marcha la herramienta accidentalmente.
Limpieza
ADVERTENCIA: Sople la suciedad y el polvo de todos los
conductos de ventilación con aire seco, al menos una vez por
semana. Para reducir el riesgo de lesiones, utilice siempre protección
para los ojos aprobada ANSI Z87.1 al realizar esta tarea.
ADVERTENCIA: Nunca utilice solventes ni otros químicos
abrasivos para limpiar las piezas no metálicas de la herramienta. Estos
productos químicos pueden debilitar los materiales plásticos utilizados
en estas piezas. Utilice un paño humedecido sólo con agua y jabón
neutro. Nunca permita que penetre líquido dentro de la herramienta ni
sumerja ninguna de las piezas en un líquido.
Accesorios
ADVERTENCIA: Debido a que no se han probado con este
producto otros accesorios que no sean los que ofrece D
de dichos accesorios con esta herramienta podría ser peligroso. Para
reducir el riesgo de lesiones, con este producto deben usarse sólo los
accesorios recomendados por D
Español
Los accesorios que se recomiendan para utilizar con la herramienta
están disponibles a un costo adicional en su distribuidor local o
en un centro de mantenimiento autorizado. Si necesita ayuda
EWALT.
EWALT, el uso
para localizar algún accesorio, póngase en contacto con
DEWALT Industrial Tool Co., 701 East Joppa Road, Baltimore,
MD 21286, llame al 1-800-4-D
visite nuestro sitio Web: www.dewalt.com.
EWALT (1-800-433-9258) o
Reparaciones
Para asegurar la SEGURIDAD y la CONFIABILIDAD del producto,
las reparaciones, el mantenimiento y los ajustes deben (inclusive
inspección y cambio de carbones) ser realizados en un centro de
mantenimiento en la fábrica D
autorizado D
Utilice siempre piezas de repuesto idénticas.
PARA REPARACIÓN Y SERVICIO DE SUS HERRAMIENTAS
CULIACAN, SIN
Blvd.Emiliano Zapata 5400-1 Poniente
Col. San Rafael (667) 717 89 99
GUADALAJARA, JAL
Av. La Paz #1779 - Col. Americana Sector Juárez (33) 3825 6978
MEXICO, D.F.
Eje Central Lázaro Cárdenas No. 18
Local D, Col. Obrera (55) 5588 9377
MERIDA, YUC
Calle 63 #459-A - Col. Centro (999) 928 5038
MONTERREY, N.L.
Av. Francisco I. Madero 831 Poniente - Col. Centro
PUEBLA, PUE
17 Norte #205 - Col. Centro (222) 246 3714
EWALT u por otro personal de mantenimiento calificado.
ELÉCTRICAS, FAVOR DE DIRIGIRSE AL CENTRO DE
SERVICIO MÁS CERCANO
EWALT, en un centro de mantenimiento
(818) 375 23 13
30
Page 33

QUERETARO, QRO
Av. San Roque 274 - Col. San Gregorio (442) 2 17 63 14
SAN LUIS POTOSI, SLP
Av. Universidad 1525 - Col. San Luis (444) 814 2383
TORREON, COAH
Blvd. Independencia, 96 Pte. - Col. Centro (871) 716 5265
VERACRUZ, VER
Prolongación Díaz Mirón #4280 - Col. Remes (229) 921 7016
VILLAHERMOSA, TAB
Constitución 516-A - Col. Centro (993) 312 5111
PARA OTRAS LOCALIDADES:
Si se encuentra en México, por favor llame al (55) 5326 7100
Si se encuentra en U.S., por favor llame al
1-800-433-9258 (1-800 4-D
EWALT)
Póliza de Garantía
IDENTIFICACIÓN DEL PRODUCTO:
Sello o firma del Distribuidor.
Nombre del producto: _____________ Mod./Cat.: ________________
Marca: ______________________ Núm. de serie: ________________
(Datos para ser llenados por el distribuidor)
Fecha de compra y/o entrega del producto: _____________________
Nombre y domicilio del distribuidor donde se adquirió el producto:
___________________________________________________________
Este producto está garantizado por un año a partir de la fecha de
entrega, contra cualquier defecto en su funcionamiento, así como
en materiales y mano de obra empleados para su fabricación.
Nuestra garantía incluye la reparación o reposición del producto y/o
componentes sin cargo alguno para el cliente, incluyendo mano de
obra, así como los gastos de transportación razonablemente erogados
derivados del cumplimiento de este certificado.
Para hacer efectiva esta garantía deberá presentar su herramienta y
esta póliza sellada por el establecimiento comercial donde se adquirió
el producto, de no contar con ésta, bastará la factura de compra.
EXCEPCIONES
Esta garantía no será válida en los siguientes casos:
• Cuando el producto se hubiese utilizado en condiciones
distintas a las normales;
• Cuando el producto no hubiese sido operado de acuerdo con
el instructivo de uso que se acompaña;
• Cuando el producto hubiese sido alterado o reparado por
personas distintas a las enlistadas al final de este certificado.
Anexo encontrará una relación de sucursales de servicio de fábrica,
centros de servicio autorizados y franquiciados en la República
Mexicana, donde podrá hacer efectiva su garantía y adquirir partes,
refacciones y accesorios originales.
Garantía limitada por tres años
DEWALT reparará, sin cargo, cualquier falla que surja de defectos en
el material o la fabricación del producto, por hasta tres años a contar
de la fecha de compra. Esta garantía no cubre fallas de las piezas
causadas por su desgaste normal o abuso a la herramienta. Para
mayores detalles sobre la cobertura de la garantía e información acerca
de reparaciones realizadas bajo garantía, visítenos en www.dewalt.
com o dirígase al centro de servicio más cercano. Esta garantía no
aplica a accesorios o a daños causados por reparaciones realizadas
o intentadas por terceros. Esta garantía le otorga derechos legales
específicos, además de los cuales puede tener otros dependiendo del
estado o la provincia en que se encuentre.
Español
31
Page 34

Además de la garantía, las herramientas DEWALT están cubiertas por:
1 AÑO DE SERVICIO GRATUITO
DEWALT mantendrá la herramienta y reemplazará las piezas
gastadas por su uso normal, sin cobro, en cualquier momento
durante un año a contar de la fecha de compra. Los artículos
gastados por la clavadora, tales como la unidad de hoja y retorno del
impulsador, no están cubiertas.
GARANTÍA DE REEMBOLSO DE SU DINERO POR 90 DÍAS
Si no está completamente satisfecho con el desempeño de su
máquina herramienta, láser o clavadora D
EWALT, cualquiera sea el
motivo, podrá devolverlo hasta 90 días de la fecha de compra con su
recibo y obtener el reembolso completo de su dinero – sin necesidad
de responder a ninguna pregunta.
AMÉRICA LATINA: Esta garantía no se aplica a los productos que
se venden en América Latina. Para los productos que se venden en
América Latina, debe consultar la información de la garantía específica
del país que viene en el empaque, llamar a la compañía local o visitar
el sitio Web a fin de obtener esa información.
REEMPLAZO GRATUITO DE LAS ETIQUETAS DE
ADVERTENCIAS: Si sus etiquetas de advertencia se vuelven ilegibles
o faltan, llame al 1-800-4-D
EWALT (1-800-433-9258) para que se le
reemplacen gratuitamente.
Español
32
Page 35

Page 36

DEWALT Industrial Tool Co., 701 East Joppa Road, Baltimore, MD 21286
(MAY12) Part No. N186887 DWE46100 Copyright © 2012 D
The following are trademarks for one or more D
EWALT power tools: the yellow and black color scheme; the "D" shaped air intake grill; the array
EWALT
of pyramids on the handgrip; the kit box configuration; and the array of lozenge-shaped humps on the surface of the tool.
 Loading...