

DeWalt DWE4222N, DWE43066N, DWE43114N, DWE43115N, DWE43144N Installation Manual
...
ENGLISH
Lanyard Attachment Point Installation
To be used with DWE4222N, DWE43066N,
DWE43114N, DWE43115N, DWE43144N, DWE46144N,
DWE46166N Grinders
WARNING: The lanyard attachment point
1
may
only be added to certain models and must be installed
by an authorized service center.
WARNING: For your own safety, read the grinder
instruction manual before using any accessory. Failure
to heed these warnings may result in personal injury
and serious damage to the vacuum and the accessory.
WARNING: Retain this document with the tool
instruction manual for futurereference.
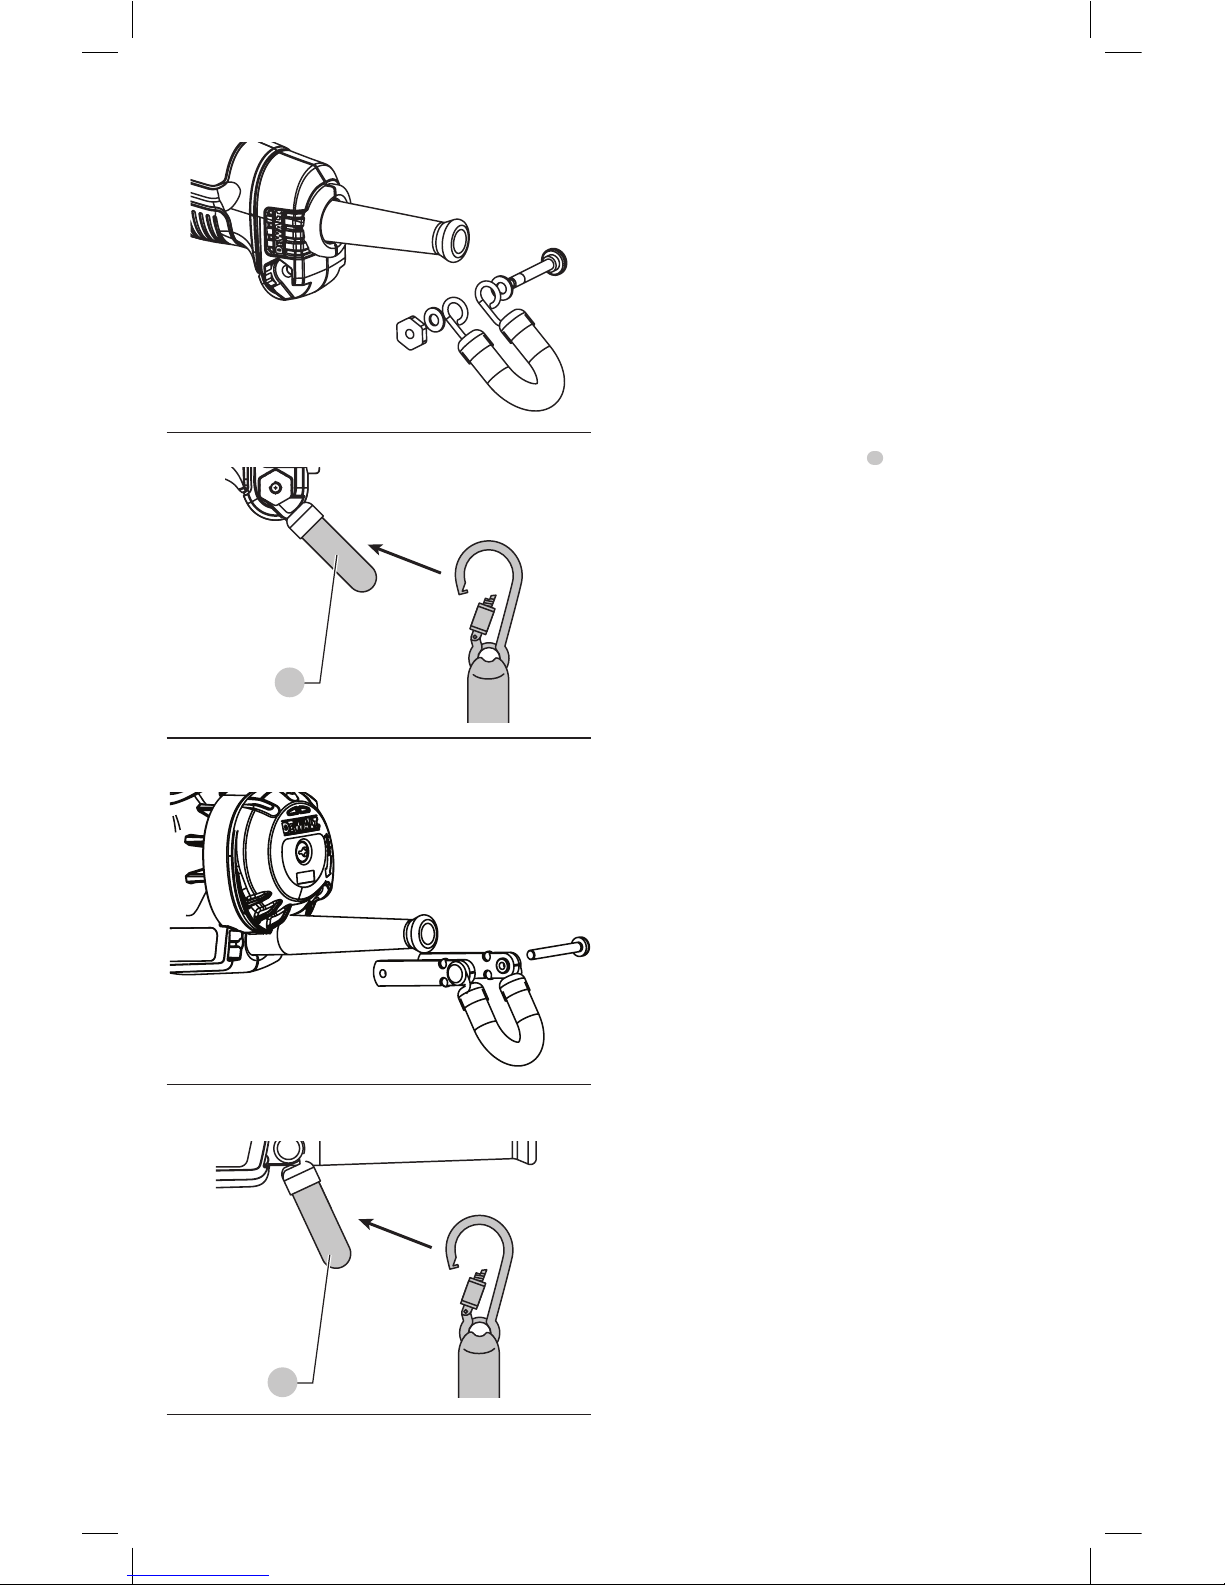
Lanyard Attachment Point (Fig. B)
Safety Warnings Specific for Use At Height
• If the tool is dropped for any reason, the lanyard
attachment point
1
must be inspected and properly
serviced prior to re-use. The lanyard attachment point
is designed to stretch to absorb the shock of a drop. Any
permanent stretch to the device exposing the red marked
internal coils indicates it has been compromised and must
be serviced prior toreuse.
• Always keep the tool and accessories tethered when
working "at height". (Maximum lanyard length: 6.5 ft
[2m])
• Use only with lanyards appropriate for this tool type and
rated for at least 6 lbs (2.72 Kg).
• Crush, cut or entanglement hazard. Do not use near
moving parts, mechanisms or runningmachinery.
• Do not anchor the tool lanyard to anything on your body.
Anchor to a rigid structure that can withstand the forces
of a droppedtool.
• Make sure the lanyard is properly secure at each end prior
touse.
• Inspect tool and lanyard before each use for damage and
proper function (including fabric and stitching). Do not
use if damaged or not functioningproperly.
• Do not alter the lanyard attachment point or use in a
manner other than as instructed in thismanual.
• Only attach tool to a lanyard with a locking carabiner. Do
not attach by looping or knotting the lanyard. Do not use
rope orcord.
• Electrical shock hazard. Be sure power is off when working
in high voltage areas. Some lanyards areconductive.
• Dropped tools will swing on the lanyard, which could
cause injury or loss ofbalance.
• Do not carry the tool by lanyard attachment point or
thelanyard.
• Do not attach more than one tool to eachlanyard.
final page size: 8.5 x 5.5 inches
• Only use appropriate
DeWALT
brand lanyard attachment
point. NEVER modify tools to create attachmentpoints.
• Only transfer the tool between hands while properly
balanced in a stableorientation.
• Do not attach lanyards to tool in a way that keeps guards,
switches or lock-offs from operatingproperly.
• Avoid getting tangled in thelanyard.
• Keep lanyard away from the cutting area of thetool.
• Do not use lanyards or attachment devices to get
additional leverage from thetool.
• Do not use for personal fallprotection.
• Falling object hazard! Only change accessories and
attachments where a dropped object won't cause
a hazard below you. Consult your Authority Having
Jurisdication (AHJ) or site supervisor for procedures for
working atheight.
• Use multi-action and screw gate type carabiners. Do not
use single action spring clipcarabiners.
The lanyard attachment point
1
is intended for use by
competent personnel, who are trained and knowledgeable
regarding working with tools in and around machinery and
"at height".
Installation
DWE43115N, DWE43066N, DWE46166N (Fig. A, B)
1. Position the loops of the lanyard attachment point on
each side of the tool housing.
2. Slide provided bolt through first washer, both loops and
the housing. Install second washer and nut onto bolt
and tighten securely.
IMPORTANT: Always use manual, torque-calibrated
screwdrivers and tighten to
15.9–18.6inlbs (1.8–2.1Nm). Do not use pneumatic or
electric screwdrivers.
DWE4222N, DWE43114N, DWE43144N, DWE46144N
(Fig. C, D)
1. Slide the metal bars of the lanyard attachment point
1
into the slots at the rear of the tool housing, making
note which has the threads.
2. Insert the screw into the housing side without the
threaded bar and feed it through until it engages the
threads of the other bar. Tighten the screw securely.
IMPORTANT: Always use manual, torque-calibrated
screwdrivers and tighten to 15.9–18.6inlbs (1.8–
2.1Nm). Do not use pneumatic or electric screwdrivers.
For more information, please contact
DeWALT
at the
address below or 1-800-4-
DeWALT
(1-800-433-9258).
FRANCAIS
Installation du point de fixation des
longes
À utiliser avec les meuleuses DWE4222N,
DWE43066N, DWE43114N, DWE43115N, DWE43144N,
DWE46144N, DWE46166N
AVERTISSEMENT: le point de fixation des longes
de sécurité
1
peut seulement être ajouté à certains
modèles et doit être installé par un centre de services
autorisé.
AVERTISSEMENT: pour votre propre sécurité,
lisez le manuel d'instructions de la meuleuse
avant d’utiliser tout accessoire. Ne pas suivre
ces avertissements peut entraîner une blessure
corporelle ou des dommages graves à l’aspirateur
ou à l’accessoire.
AVERTISSEMENT: conservez ce document avec
le manuel instructions de l’outil pour référence
ultérieure.
Point de fixation des longes (Fig. B)
Avertissements spécifiques de sécurité pour
l’utilisation en hauteur
• Si l’outil est échappé pour quelque raison que ce soit,
le point de fixation des longes
1
devra être inspecté
et réparé de façon appropriée avant d’être réutilisé. Le
point de fixation de la longe est conçu pour s’étirer afin
d’absorber l’impact de la chute. Toute déformation
permanente de l’outil exposant les ressorts intérieurs
rouges indique qu’il a été endommagé et qu’il doit être
réparé avant de le réutiliser.
• Gardez toujours l’outil et les accessoires attachés lorsque
vous travaillez «en hauteur». [Longueur maximum de
la longe: 2m (6,5 pi)]
• Utilisez seulement les longes appropriées pour ce type
d’outil et conçues pour au moins 2,72kg(6,0lb).
• Risque d’emmêlement, de coupure ou
d’écrasement. Ne pas utiliser près de pièces mobiles, de
mécanismes ou de machinerie enmarche.
• Ne pas fixer la longe de l’outil à quelque chose sur votre
corps. Fixez-la à une structure rigide qui peut résister à
un outiléchappé.
• Assurez-vous que la longe est bien sécurisée à chaque
extrémité avant de l’utiliser.
• Vérifiez l’outil et la longe avant chaque utilisation
pour des dommages et un fonctionnement approprié
(incluant le tissu et les coutures). Ne pas utiliser
si endommagée ou si le fonctionnement n’est
pasapproprié.
• Ne pas altérer le point de fixation des longes ou utiliser
d’une autre façon que celle indiquée dans ce manuel.
• Fixez seulement l’outil à la longe avec un mousqueton
de sécurité. Ne pas fixer en faisant une boucle ou
un nœud avec la longe. Ne pas utiliser une corde ou
uncordon.
• Risque de choc électrique. Assurez-vous que le courant
est coupé lorsque vous travaillez dans zone à haute
tension. Certaines longes sontconductives.
• Les outils échappés balanceront sur la longe ce qui
pourrait entre une blessure ou une perted’équilibre.
• Ne pas transporter l’outil par le point de fixation des
longes ou la longe.
• Ne pas fixer plus d’un outil à chaquelonge.
• Utilisez seulement le bon point de fixation des longes
de la marque
DeWALT
. NE JAMAIS utiliser les outils pour
créer des points defixation.
Fig. A
Fig. C
Fig. B
Fig. D
1
1
 Loading...