

Page 1

If you have questions or comments, contact us.
Pour toute question ou tout commentaire, nous contacter.
Si tiene dudas o comentarios, contáctenos.
1-800-4-DeWALT
Instruction Manual
Guide D’utilisation
Manual de instrucciones
DWBL700
Corded Blower
Page 2

English (original instructions) 1
Français (traduction de la notice d’instructions originale) 7
Español (traducido de las instrucciones originales) 17
Page 3

ENGLISH
1
Definitions: Safety Alert Symbols and Words
This instruction manual uses the following safety alert symbols and words to alert you to hazardous situations and your risk
of personal injury or property damage.
DANGER: Indicates an imminently hazardous situation which, if not avoided, will result in death or seriousinjury.
WARNING: Indicates a potentially hazardous situation which, if not avoided, could result in death or seriousinjury.
CAUTION: Indicates a potentially hazardous situation which, if not avoided, may result in minor or moderateinjury.
(Used without word) Indicates a safety related message.
NOTICE: Indicates a practice not related to personal injury which, if not avoided, may result in propertydamage.
WARNING! Read all safety warnings and all
instructions. Failure to follow the warnings and
instructions may result in electric shock, fire and/or
seriousinjury.
WARNING: To reduce the risk of injury, read the
instructionmanual.
If you have any questions or comments about this or
any
DeWALT tool, call us toll free at:
1–800–4-
DeWALT (1–800–433–9258).
1
Trigger switch
2
Speed lock lever
3
Handle
4
Tube
5
Cord retainer
6
Large end nozzle
7
Narrow end nozzle
8
Wide end nozzle
Fig. A
1
2
876
4
3
5
Page 4

ENGLISH
2
IMPORTANT SAFETY WARNINGS
WARNING: When using an electric tool, basic safety
precautions should always be followed to reduce risk
of fire, electric shock, and personal injury, including
the following.
WARNING: To reduce risk of injury:
• Before any use, be sure everyone using this unit reads and
understands all safety instructions and other information
contained in this manual.
• Save these instructions and review frequently prior to use
and in instructing others.
• Do not point unit discharge at self or bystanders.
• Keep long hair and loose clothing away from openings
and moving parts.
• This appliance is intended for commercial use.
WARNING: Some dust created by this product
contains chemicals known to the State of California to
cause cancer, birth defects or other reproductive harm.
Some examples of these chemicals are:
- compounds in fertilizers
- compounds in insecticides, herbicides and
pesticides
- arsenic and chromium from chemically treated
lumber
To reduce your exposure to these chemicals, wear approved
safety equipment such as dust masks that are specially
designed to filter out microscopic particles.
READ ALL AND UNDERSTAND ALL
INSTRUCTIONS BEFORE USING
General Safety Warnings and Instructions
for All Tools
WARNING: Read all safety
warnings and all instructions. Failure to follow the
warnings and instructions may result in electric shock,
fire and/or serious injury.
• ALWAYS WEAR EYE PROTECTION – Wear safety glasses
or goggles that conforms to ANSI Z87.1 (CAN/CSA Z94.3)
at all times when this unit is in use. Also use face or dust
mask. Safety glasses are available at extra cost at your
local
DeWALT Service Center or authorized service facility.
• DO NOT place outlet of blower near eyes or ears when
operating.
• STORE IDLE UNITS. When not in use, the unit should be
stored in a dry, high or locked-up place - out of reach of
children.
• DON’T OVERREACH. Keep proper footing and balance at
all times.
• MAINTAIN UNIT WITH CARE. Keep unit clean for best
and safest performance. Follow instructions for proper
maintenance.
• DO NOT attempt to repair the blower. To assure product
safety and reliability, repairs, maintenance, and
adjustments should be performed by
DeWALT service
centers or authorized service centers, always using
DeWALT replacement parts.
• DO NOT operate blower in a gaseous or explosive
atmosphere. Motors in these units normally spark, and the
sparks might ignite fumes.
• AVOID DANGEROUS ENVIRONMENTAL CONDITIONS – Do
not use electric units in damp or wet locations. Don’t use
the unit in the rain.
• STAY ALERT - Watch what you are doing. Use common
sense. Do not operate unit when you are tired.
• USE THE RIGHT UNIT – Do not use this unit for any job
except that for which it is intended.
• USE EXTRA CARE when cleaning on stairs.
• DO NOT allow to be used as a toy. Close attention
is necessary when used by or near children. Not
recommended for use by children.
• DO NOT attempt to clear clogs from unit without first
unplugging.
• USE ONLY as described in this manual. Use only
manufacturer’s recommended attachments.
• DO NOT put any objects into openings. Do not use with
any opening blocked; keep free of dust, lint, hair and
everything that may reduce air flow.
• KEEP hair, loose clothing, fingers, and all parts of body
away from openings and moving parts.
• DO NOT immerse any part of the unit in liquid.
• KEEP CHILDREN, BYSTANDERS AND ANIMALS AWAY from
the work area a minimum of 30 feet (10 meters) when
starting or operating the unit.
• INSPECT THE AREA before using the unit. Remove all debris
and hard objects such as rocks, glass, wire, etc. that can
ricochet, be thrown, or otherwise cause injury or damage
during operation.
• DO NOT leave appliance when plugged in. Unplug from
outlet when not in use and before servicing.
• DO NOT use with damaged cord or plug. If appliance is
not working as it should, has been dropped, damaged, left
outdoors, or dropped into water, return it to a service center.
• DO NOT pull or carry by cord, use cord as a handle, or pull
cord around sharp edges or corners. Keep cord away from
heated surfaces.
• DO NOT unplug by pulling on cord. To unplug, grasp the
plug, not the cord.
• Do not handle plug or appliance with wet hands.
• Turn off all controls before unplugging.
• This appliance is provided with double insulation. Use only
identical replacement parts. See instructions for Servicing
of Double-Insulated Appliances.
• To reduce the risk of electric shock, use only with an extension
cord intended for outdoor use, such as SJW or SJTW.
• Make sure your extension cord is in good condition and
is the correct size for your appliance. The Minimum
Gauge for Cord Sets chart below shows the correct size
to use depending on cord length and nameplate ampere
rating. If in doubt, use the next heavier gage. The smaller
Page 5

ENGLISH
3
the gage number, the heavier the cord. An undersized
extension cord will cause a drop in line voltage resulting in
loss of power and overheating
• Maintain Appliance With Care – Inspect extension cords
periodically and replace if damaged.
• To reduce the risk of disconnection of appliance cord from
the extension cord during operating:
i) Make a knot as shown in figure B; or
ii) Use one of the plug-receptacle retaining straps or
connectors described in this manual.
OR
iii) Secure the extension cord to the appliance plug as
shown or described in the Operating Instructions.
fig. B
WARNING: To reduce the risk of personal injury
due to a loose electrical connection between the
appliance’s plug and extension cord, firmly and fully
attach the appliance plug to the extension cord.
Periodically check the connection while operating to
ensure it is fully attached. Do not use an extension
cord that provides a loose connection. A loose
connection may result in overheating, fire, and
increases the risk of a burning.
WARNING: Always wear proper personal hearing
protection that conforms to ANSI S12.6 (S3.19)
during use. Under some conditions and duration of use,
noise from this product may contribute to hearing loss.
WARNING: ALWAYS use safety glasses. Everyday
eyeglasses are NOT safety glasses. Also use face or dust
mask if operation is dusty. ALWAYS WEAR CERTIFIED
SAFETY EQUIPMENT:
- ANSI Z87.1 eye protection (CAN/CSA Z94.3),
- ANSI S12.6 (S3.19) hearing protection,
- NIOSH/OSHA/MSHA respiratory protection.
WARNING: To reduce the risk of electrical shock; do
not expose to rain. Store indoors.
WARNING: Cut Hazard. Turn off and unplug unit,
then wait until fan stops or at least 10 seconds before
removing the blower or vacuum tube assemblies.
Servicing of Double Insulated Appliances
Your Blower/Vac is double-insulated to give you added
safety. In a double insulated appliance, two systems of
insulation are provided instead of grounding. No grounding
means is provided on a double insulated appliance, nor
should a means for grounding be added to the appliance.
Servicing a double insulated appliance requires extreme
care and knowledge of the system and should be done
only by qualified service personnel. Replacement parts for
a double insulated appliance must be identical to the parts
they replace. A double insulated appliance is marked with
the words double insulated or “double insulation”. The
symbol (square within a square) may also be marked on the
appliance.
Safety Rules and Instructions:
Extension Cords
Double insulated tools have 2-wire cords and can be used
with 2-wire or 3-wire extension cords. Only round jacketed
extension cords should be used, and we recommend that
they be listed by Underwriters Laboratories (U.L.) (C.S.A. in
Canada). If the extension will be used outside, the cord must
be suitable for outdoor use. Any cord marked as outdoor
can also be used for indoor work.
An extension cord must have adequate wire size (AWG or
American Wire Gauge) for safety, and to prevent loss of
power and overheating. The smaller the gauge number of
the wire, the greater the capacity of the cable, that is 16
gauge has more capacity than 18 gauge. When using more
than one extension to make up the total length, be sure
each individual extension contains at least the minimum
wire size. Before using an extension cord, inspect it for loose
or exposed wires, damaged insulation, and defective fittings.
Make any needed repairs or replace the cord if necessary.
Minimum Gauge for Cord Sets
Volts
Total Length of Cord in Feet
(meters)
120 V 25 (7.6) 50 (15.2) 100 (30.5) 150 (45.7)
240 V 50 (15.2) 100 (30.5) 200 (61.0) 300 (91.4)
Ampere Rating
American Wire Gauge
More
Than
Not
More
Than
0 6 18 16 16 14
6 10 18 16 14 12
10 12 16 16 14 12
12 16 14 12 Not Recommended
Safety Rules and Instructions:
Polarized Plug
To reduce the risk of electric shock, this equipment has
a polarized plug (one blade is wider than the other). This
equipment must be used with a suitable polarized 2 wire or
3 wire extension cord. Polarized connections will fit together
only one way. Make sure that the receptacle end of the
extension cord has large and small blade slot widths. If the
plug does not fit fully into the extension cord, reverse the
plug. If it still does not fit, obtain a suitable extension cord. If
the extension cord does not fit fully into the outlet, contact a
qualified electrician to install the proper outlet. Do not change
the tool plug or extension cord in any way.
The label on your tool may include the following symbols. The
symbols and their definitions are asfollows:
V ......................... volts
Hz ....................... hertz
min ..................... minutes
or DC ......direct current
...................... Class I Construction
(grounded)
…/min ..............per minute
BPM .................... beats per minute
Page 6
ENGLISH
4
IPM ..................... impacts per minute
RPM .................... revolutions per
minute
sfpm ................... surface feet per
minute
SPM .................... strokes per minute
A ......................... amperes
W ........................ watts
or AC ...........alternating current
or AC/DC .... alternating or
direct current
...................... Class II
Construction
(double insulated)
no ....................... no load speed
n ......................... rated speed
...................... earthing terminal
...................... safety alert symbol
..................... visible radiation
..................... wear respiratory
protection
..................... wear eye
protection
..................... wear hearing
protection
SAVE THESE
INSTRUCTIONS FOR
FUTURE USE
COMPONENTS (FIG. A)
WARNING: Never modify the power tool or any part
of it. Damage or personal injury couldresult.
Refer to Figure A at the beginning of this manual for a
complete list ofcomponents.
INTENDED USE
This appliance is designed for professional outdoor
blowerapplications.
DO NOT use under wet conditions or in presence of
flammable liquids orgases.
This appliance is a professional power tool. DO NOT let
children come into contact with the tool. Supervision is
required when inexperienced operators use thistool.
ASSEMBLY AND ADJUSTMENTS
WARNING: To reduce the risk of serious personal
injury, turn unit off and unplug before making
any adjustments or removing/installing
attachments or accessories. An accidental start-up
can causeinjury.
CAUTION: The tube must be attached to the
housing
9
before use.
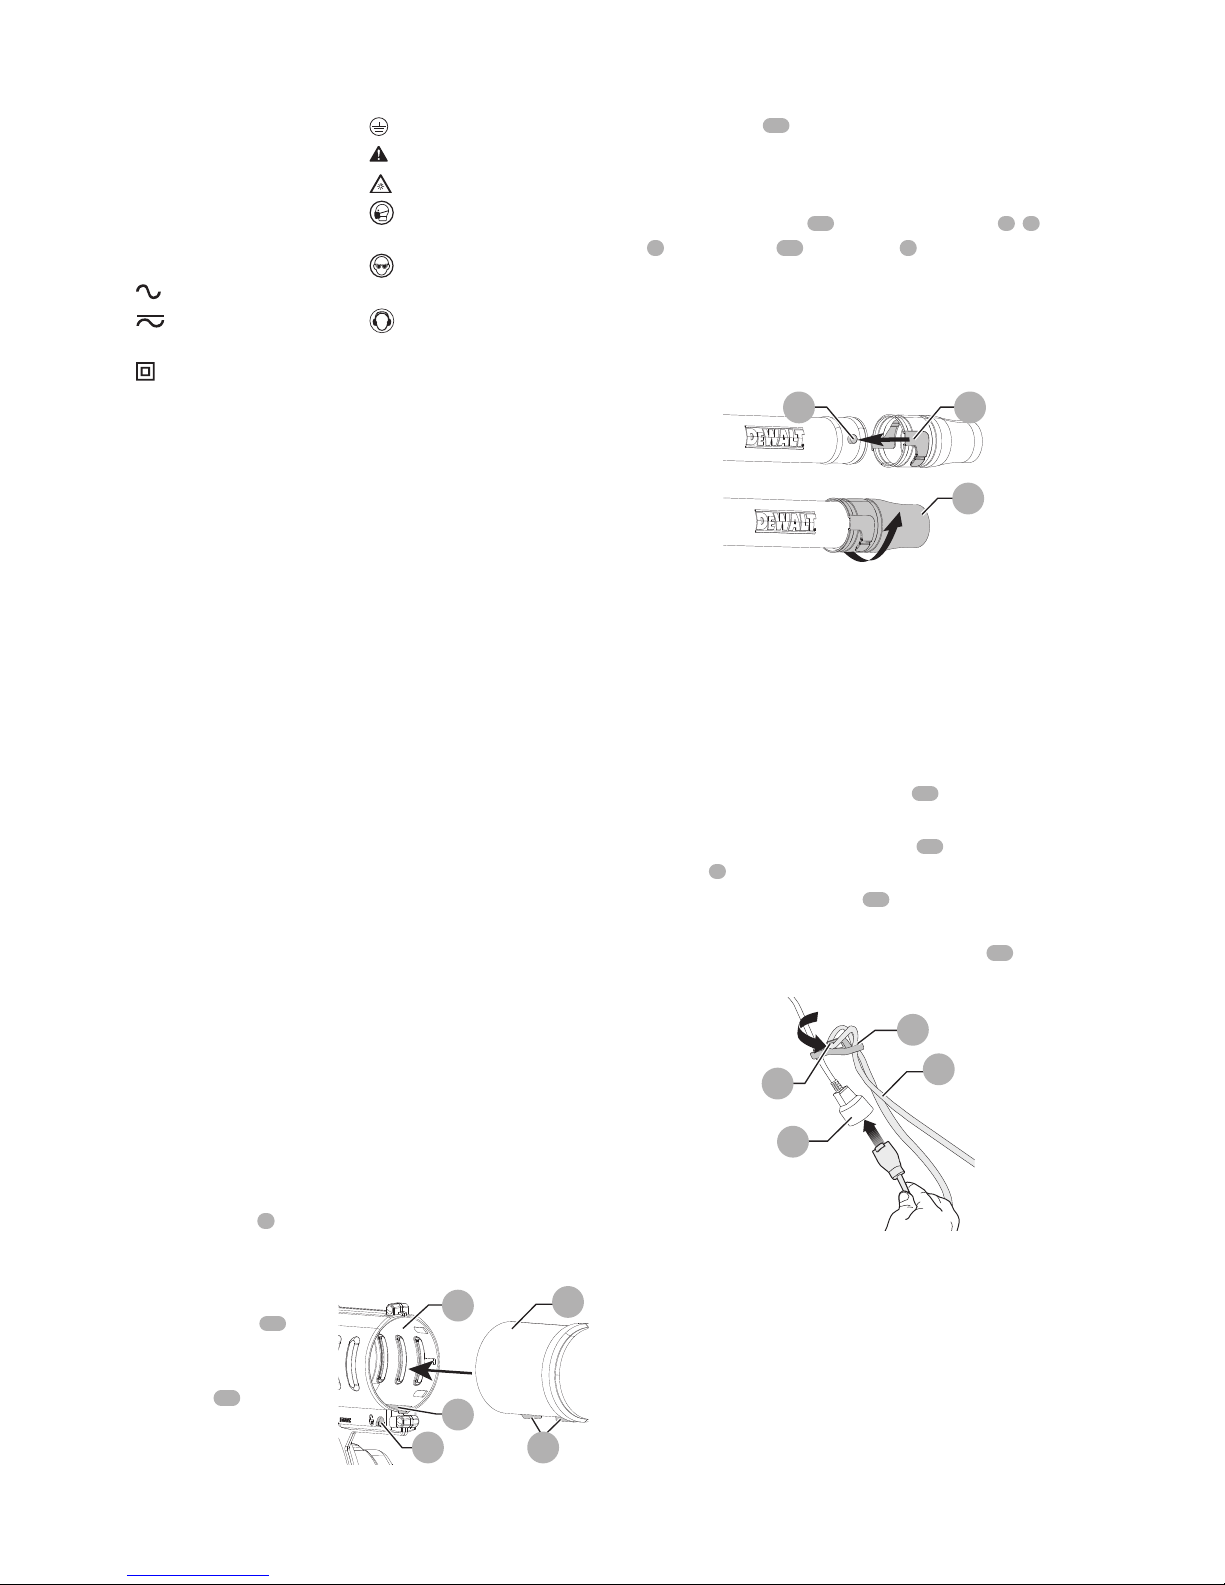
1. TUBE ASSEMBLY:
fig. C
10
9
4
11
12
To attach the tube
to the blower, line
up the pegs
10
on the bottom of
the tube with the
notch
11
on the
bottom of the
housing opening
as shown in
figureC. Push the tube into the blower housing until the
lock engages the tube.
2. Pull on the tube to ensure it is securely in place.
3. To remove the tube, insert a screwdriver into the
unlocking hole
12
on the side of the housing. Lift the
tab inside and pull tube out.
Attaching Nozzles (Fig. D)
1. Line up the channels
13
of the desired nozzle
6, 7
, or
8
with the nubs
14
on the tube
4
.
2. Slide the nozzle onto the tube.
3. Firmly twist the nozzle to lock the nubs completely into
the recesse of the nozzle. Ensure the nozzle is securely
attached.
fig. D
14 13
6
Attaching Extension Cord To Blower
(Fig. A, E)
WARNING: Do not use with tube removed.
WARNING: Ensure the trigger switch is not engaged to
reduce the risk of starting the appliance accidentally.
1. Near the end of the extension cord
15
, fold the
extension cord to create a loop.
2. Feed the loop into the bottom hole
16
of the cord
retainer
5
as shown in figure E.
3. Slide the loop over the hook
17
of the cord retainer so
it rests fully in the cord retainer.
4. Plug the extension cord into the power head
18
.
fig. E
15
16
17
18
OPERATION
WARNING: Do not operate blower without tube
securely in place. Never reach down into housing
through tube hole.
Proper Hand Position (Fig. F)
WARNING: To reduce the risk of serious personal injury,
ALWAYS use proper hand position as shown.
WARNING: To reduce the risk of serious personal injury,
ALWAYS hold securely in anticipation of a sudden
reaction.
Page 7

ENGLISH
5
Proper hand position requires one hand on the main
handle
4
.
fig. F
4
Switching On (Fig. A, F, G)
CAUTION: Do not point unit discharge at self or
bystanders.
CAUTION: Always wear safety glasses. Wear a filter
mask if the operation is dusty. Use of gloves, long
pants and substantial footwear is recommended. Keep
long hair and loose clothing away from openings and
moving parts.
To turn the blower on, depress the trigger switch
1
.
To lock the blower on,
fig. G
pull back on the speed
lock lever
2
, as
shown in figureG. The
blower runs at higher
speeds as the lever is
moved further. The
speed lock lever can
also be pulled back to start the blower without needing to
first depress the trigger switch.
• Hold the blower with one hand as shown in figureF and
sweep from side to side with the tube
4
several inches
above the hard surface. Slowly advance keeping the
accumulated pile of debris in front of you.
MAINTENANCE
WARNING: To reduce the risk of serious personal
injury, turn unit off and unplug before making
any adjustments or removing/installing
attachments or accessories. An accidental start-up
can causeinjury.
Cleaning
WARNING: Blow dirt and dust out of all air vents with
clean, dry air at least once a week. To minimize the risk
of eye injury, always wear ANSI Z87.1 approved eye
protection when performingthis.
WARNING: Never use solvents or other harsh
chemicals for cleaning the non-metallic parts of
the tool. These chemicals may weaken the plastic
materials used in these parts. Use a cloth dampened
only with water and mild soap. Never let any liquid
get inside the tool; never immerse any part of the tool
into aliquid.
Accessories
WARNING: DO NOT use the blower with any type
of accessory or attachment. Such usage might be
hazardous.
WARNING: Since accessories, other than those
offered by DeWALT, have not been tested with this
product, use of such accessories with this tool could be
hazardous. To reduce the risk of injury, only DeWALT
recommended accessories should be used with
thisproduct.
Recommended accessories for use with your tool
are available at extra cost from your local dealer or
authorized service center. If you need assistance in
locating any accessory, please contact
DeWALT Industrial
Tool Co., 701East Joppa Road, Towson, MD 21286, call
1–800–4-DeWALT (1–800–433–9258) or visit our website:
www.dewalt.com.
Repairs
WARNING: To assure product SAFETY and
RELIABILITY, repairs, maintenance and adjustment
(including brush inspection and replacement) should
be performed by a
DeWALT factory service center
or a DeWALT authorized service center. Always use
identical replacementparts.
Register Online
Thank you for your purchase. Register your product nowfor:
• WARRANTY SERVICE: Registering your product will
help you obtain more efficient warranty service in case
there is a problem with yourproduct.
• CONFIRMATION OF OWNERSHIP: In case of
an insurance loss, such as fire, flood or theft, your
registration of ownership will serve as your proof
ofpurchase.
• FOR YOUR SAFETY: Registering your product will
allow us to contact you in the unlikely event a safety
notification is required under the Federal Consumer
SafetyAct.
Register online at www.dewalt.com/register.
Page 8

ENGLISH
6
Three Year Limited Warranty
DeWALT will repair, without charge, any defects due to
faulty materials or workmanship for three years from
the date of purchase. This warranty does not cover part
failure due to normal wear or tool abuse. For further detail
of warranty coverage and warranty repair information,
visit www.dewalt.com or call 1–800–4-
DeWALT (1–800–
433–9258). This warranty does not apply to accessories
or damage caused where repairs have been made or
attempted by others. This warranty gives you specific legal
rights and you may have other rights which vary in certain
states orprovinces.
In addition to the warranty,
DeWALT tools are covered
byour:
1 YEAR FREE SERVICE
DeWALT will maintain the tool and replace worn parts
caused by normal use, for free, any time during the first year
afterpurchase.
90 DAY MONEY BACK GUARANTEE
If you are not completely satisfied with the performance of
your
DeWALT Power Tool, Laser, or Nailer for any reason, you
can return it within 90 days from the date of purchase with
a receipt for a full refund – no questionsasked.
LATIN AMERICA: This warranty does not apply to products
sold in Latin America. For products sold in Latin America,
see country specific warranty information contained in
the packaging, call the local company or see website for
warrantyinformation.
FREE WARNING LABEL REPLACEMENT: If your warning
labels become illegible or are missing, call 1–800–4-
DeWALT
(1–800–433–9258) for a freereplacement.
Page 9

FRANÇAIS
7
Définitions : symboles et termes d'alarmes sécurité
Ces guides d'utilisation utilisent les symboles et termes d'alarmes sécurité suivants pour vous prévenir de situations
dangereuses et de risques de dommages corporels ou matériels.
DANGER: indique une situation dangereuse imminente qui, si elle n’est pas évitée, entraînera la mort ou des
blessuresgraves.
AVERTISSEMENT: indique une situation potentiellement dangereuse qui, si elle n’est pas évitée, pourrait entraîner la
mort ou des blessuresgraves.
ATTENTION: indique une situation potentiellement dangereuse qui, si elle n’est pas évitée, pourrait entraîner des
blessures légères oumodérées.
(Si utilisé sans aucun terme) Indique un message propre à la sécurité.
AVIS : indique une pratique ne posant aucun risque de dommages corporels mais qui par contre, si rien n’est fait
pour l’éviter, pourrait poser des risques de dommages matériels.
AVERTISSEMENT! lire tous les avertissements de
sécurité et toutes les directives. Le non-respect
des avertissements et des directives pourrait se
solder par un choc électrique, un incendie et/ou une
blessuregrave.
AVERTISSEMENT : afin de réduire le risque de
blessures, lire le mode d’emploi del’outil.
Pour toute question ou remarque au sujet de cet outil
ou de tout autre outil
DeWALT, composez le numéro
sans frais : 1–800–4-
DeWALT (1–800–433–9258).
1
Détente
2
Levier de vitesse de verrouillage
3
Poignée de la détente
4
Tube
5
Dispositif de retenue du cordon
6
Large embout
7
Embout étroit
8
Embout évasé
Fig. A
1
2
876
4
3
5
Page 10

FRANÇAIS
8
Avertissements de sécurité importants
AVERTISSEMENT : POUR RÉDUIRE LES
RISQUES DE BLESSURES
• • Avant tout usage, s’assurer que tout utilisateur de cet
appareil lise et comprenne les directives de sécurité ainsi
que l’information comprise dans le présent manuel.
• • Conserver ces directives et les examiner fréquemment
avant d’utiliser l’appareil ou de donner des directives aux
autres.
• • Ne pas diriger la zone d’évacuation de l’appareil vers soi
ou des personnes à proximité.
• • Éloigner les cheveux longs et les vêtements amples des
ouvertures et des pièces mobiles.
• • Cet appareil est conçu pour un usage commercial.
AVERTISSEMENT : afin de réduire les risques
d’incendie, de secousses électriques ou de blessures
lorsqu’on utilise des outils électriques, il faut toujours
respecter les mesures de sécurité suivantes.
AVERTISSEMENT : le produit génère de la poussière
qui peut renfermer des produits chimiques. Selon l’état
de la Californie, ces produits chimiques peuvent causer
le cancer ainsi que des malformations congénitales, et
ils présentent d’autres dangers au système reproductif
humain. Voici des exemples de tels produits chimiques :
- les composés d’engrais;
- les composés d’insecticides, d’herbicides et de
pesticides;
- l’arsenic et le chrome provenant de bois traité.
Afin de minimiser les risques, porter de l’équipement de
sécurité approuvé comme des masques antipoussières
spécialement conçu pour filtrer les particules microscopiques.
BIEN LIRE ET COMPRENDRE TOUTES LES
DIRECTIVES AVANT D’UTILISER L’OUTIL
Avertissements et directives de sécurité
générales pour tous les outils
AVERTISSEMENT : Lire toutes les directives et toutes les
consignes de sécurité. Le non-respect des avertissements
et des directives pourrait se solder par un choc électrique,
un incendie et/ou une blessure grave.
• TOUJOURS PORTER UNE PROTECTION OCULAIRE – Porter
des lunettes de sécurité ou des lunettes protectrices
conformes à la norme ANSI Z87.1 (CAN/CSAZ94.3) en tout
temps lors de l’utilisation de l’appareil. Utiliser également
un masque facial ou antipoussières. Des lunettes
protectrices sont vendues séparément au centre de
réparation D
eWALT ou à un centre de réparation autorisé.
• NE PAS porter l’orifice de sortie de l’outil à proximité des
yeux ou des oreilles lorsque l’outil fonctionne.
• RANGER LES OUTILS NON UTILISÉS dans un endroit sec,
situé en hauteur ou fermé à clé, hors de portée des enfants.
• NE PAS DÉPASSER SA PORTÉE. Toujours demeurer dans
une position stable et garder son équilibre en tout temps.
• BIEN ENTRETENIR L’OUTIL. Garder l’outil propre afin
d’optimiser et de sécuriser le rendement. Suivre les
directives d’entretien.
• NE PAS tenter de réparer l’outil. Pour garantir la sécurité et
la fiabilité du produit, en confier les réparations, l’entretien
et les réglages à un centre de service D
eWALT ou à un
atelier d’entretien autorisé utilisant uniquement des pièces
de rechange D
eWALT.
• NE PAS
utiliser l’outil dans des endroits où l’atmosphère
renferme des vapeurs combustibles ou explosives. Les
étincelles que produit habituellement le moteur en marche
pourraient enflammer ces produits.
• ÉVITER LES CONDITIONS AMBIANTES DANGEREUSES. Ne
pas se servir d’outils électriques dans des endroits humides
ou mouillés. Ne pas se servir de l’outil sous la pluie.
• DEMEURER VIGILANT. Travailler avec vigilance et faire preuve
de bon sens. Ne pas se servir de l’outil lorsqu’on est fatigué.
• UTILISER L’OUTIL APPROPRIÉ. Utiliser l’outil seulement aux
fins pour lesquelles il a été conçu.
• ÊTRE TRÈS PRUDENT lors du nettoyage des escaliers.
• IL NE S’AGIT PAS d’un jouet. Faire particulièrement
attention lorsqu’un enfant utilise l’outil ou qu’on s’en sert
près d’un enfant. Il est déconseillé de laisser un enfant se
servir de l’outil.
• NE PAS tenter de déboucher l’appareil sans l’avoir d’abord
débranché du secteur.
• UTILISER SEULEMENT L’OUTIL
de la manière prescrite
dans le présent guide. Utiliser uniquement les accessoires
recommandés par le fabricant.
• NE RIEN
insérer dans les ouvertures. Ne pas utiliser l’outil
lorsqu’une ouverture est bouchée; garder les ouvertures
exemptes de poussière, de charpie, de cheveux et de tout
ce qui peut réduire le débit d’air.
• ÉLOIGNER les cheveux, les vêtements amples, les doigts et
le corps des ouvertures ainsi que des pièces mobiles.
• NE PAS immerger l’outil, au complet ou en partie.
• S’ASSURER QUE LES ENFANTS, LES OBSERVATEURS ET
LES ANIMAUX SE TROUVENT ÀUNE DISTANCE minimale
de 10mètres (30pieds) de la surface de travail lorsqu’on
démarre l’outil ou qu’on s’en sert.
• EXAMINER LA ZONE
avant d’utiliser l’outil. Enlever tout
débris ou objet dur (comme des pierres, du verre, des fils)
qui peut ricocher, être éjecté ou provoquer des blessures ou
des dommages lors de l’utilisation de l’outil.
• UTILISER SEULEMENT le chargeur fourni par le fabricant
pour recharger l’outil.
• MANIPULER le bloc-pile AVEC SOIN afin de ne pas le
court-circuiter avec des matériaux conducteurs comme
des bagues, des bracelets et des clés. Le bloc-pile ou le
conducteur pourrait alors surchauffer et causer des brûlures.
• NE PAS OUVRIR NI MUTILER le bloc-pile. L’électrolyte
qui s’en dégagerait est corrosive et elle pourrait blesser
les yeux ou la peau. En outre, ce produit est toxique
lorsqu’ingéré.
• NE PAS manipuler la fiche ou l’appareil avec les mains humides.
• Arrêter tout bouton de commande avant de débrancher
l’appareil.
• Cet appareil est doté d'une double isolation. Utiliser
systématiquement des pièces de rechange d’origine. Se reporter
aux instructions Entretien des appareils à double isolation.
Page 11

FRANÇAIS
9
• Pour réduire tout risque de chocs électriques, n'utiliser que des
rallonges conçues pour l'extérieur, telles que SJW ou SJTW.
• S’assurer que la rallonge est en bonne condition, et de la
bonne taille pour votre appareil. Le tableau ci-dessous,
Calibres minimaux des rallonges, illustre les calibres
à utiliser selon la longueur de rallonge et l’intensité
nominale indiquée sur la plaque signalétique. En cas de
doutes, utiliser le calibre suivant. Plus le calibre est petit,
plus la rallonge peut supporter de courant. L’usage d’une
rallonge de calibre insuffisant causera une chute de
tension qui entraînera perte de puissance et surchauffe.
• Entretenir l'appareil avec soin. Vérifier les rallonges
périodiquement et les changer en cas de dommages.
• Pour réduire tout risque de déconnecter l’appareil de sa
rallonge pendant l’utilisation:
i) Faire un nœud comme illustré en Figure B; ou
ii) Utiliser un dispositif de retenue de fiche ou les
connecteurs décrits dans ce manuel.
OU
iii) Arrimer fermement la rallonge à la fiche de
l’appareil comme illustré ou décrit dans les
Instructions d’utilisation.
fig. B
AVERTISSEMENT : pour réduire tout risque
de dommages corporels dû à une connexion
électrique lâche entre la fiche de l’appareil et la
rallonge, les rattacher fermement et à fond. Vérifier
périodiquement que la connexion est sécuritaire
pendant l’utilisation. Ne pas utiliser une rallonge dont
la connexion est lâche. Une connexion lâche pose des
risques de surchauffe et d’incendie, et augmente les
risques de brûlures.
AVERTISSEMENT : Toujours porter une protection
auditive appropriée conformément à la norme
ANSI S12.6 (S3.19) lors de l’utilisation du
produit. Dans certaines conditions et selon la durée
d’utilisation, le bruit émis par ce produit pourrait
contribuer à une perte auditive.
AVERTISSEMENT : TOUJOURS porter des lunettes
de sécurité. Les lunettes de vue ne constituent
PAS des lunettes de sécurité. Utiliser également un
masque facial ou anti-poussière si l’opération de
découpe génère de la poussière. TOUJOURS PORTER
UN ÉQUIPEMENT DE PROTECTION HOMOLOGUÉ :
- protection oculaire conforme à la norme ANSI
Z87.1 (CAN/CSA Z94.3);
- protection auditive ANSI S12.6 (S3.19);
- protection des voies respiratoires conformes
aux normes NIOSH/OSHA/MSHA.
AVERTISSEMENT : afin de minimiser les risques de
secousses électriques, protéger de la pluie, ne pas s’en
servir sur des surfaces mouillées et ranger àl’intérieur.
AVERTISSEMENT : risques de coupure. Arrêter et
débrancher l’appareil, puis attendre l’arrêt complet du
ventilateur ou un minimum de 10 secondes avant de
démonter le dispositif du tube du souffleur.
Entretien des outils a double isolation
La souffleuse-aspirateur à double isolation procure une
protection supplémentaire. Dans ce type d’outil, les deux
systèmes d’isolant remplacent la mise à la terre. Il n’y a
aucun moyen de mettre l’outil à la terre et aucun système
de mise à la terre ne doit être ajouté à l’outil. L’entretien
d’un outil à double isolation exige beaucoup de soin et une
excellente connaissance du système; il ne devrait être confié
qu’à un technicien compétent. Les pièces de rechange de
ce type d’outil doivent être identiques aux pièces d’origine.
Un outil à double isolation porte l’inscription «DOUBLE
INSULATED» ou «DOUBLE INSULATION». Le symbole (un
carré à l’intérieur d’un carré) peut aussi figurer sur l’outil.
Mesures de sécurité : cordons de
rallonge
Les outils à double isolation sont munis d’un cordon bifilaire
et ils peuvent être utilisés avec un cordon de rallonge muni
de 2 ou de 3 fils. Il faut seulement utiliser des cordons de
rallonge à gaine ronde et ils devraient être homologués
par l’organisme américain Underwriters Laboratories (U.L.)
ou la CSA (au Canada). Lorsque le cordon de rallonge est
utilisé à l’extérieur, il doit être prévu à cet effet. Tout cordon
extérieur peut servir àl’intérieur.
Les cordons de rallonge doivent être faits de conducteurs de
calibre approprié (AWG ou calibre moyen de fil) par mesure
de sécurité et afin de prévenir les pertes de puissance et
les surchauffes. Le numéro de calibre du fil est inversement
proportionnel à la capacité du cordon. Ainsi, un cordon de
calibre16 a une capacité supérieure à un cordon de calibre18.
Lorsqu’il est nécessaire d’utiliser plus d’un cordon de rallonge,
veiller àce que chaque cordon ait au moins le calibre minimal.
Avant d’utiliser un cordon de rallonge, s’assurer qu’il n’y a pas
de fils dénudés ni détachés, et que l’isolant et les raccords ne
sont pas défectueux. Effectuer les réparations nécessaires ou
remplacer le cordon, le cas échéant.
Calibre minimum pour les cordons d'alimentation
Volts
Longueur totale du cordon
d'alimentation en mètre (pieds)
120 V 7,6 (25) 15,2 (50) 30,5 (100) 45,7 (150)
240 V 15,2 (50) 30,5 (100) 61,0 (200) 91,4 (300)
Ampères
AWG
Plus que Pas plus
que
0 6 18 16 16 14
6 10 18 16 14 12
10 12 16 16 14 12
12 16 14 12 Non recommandé
Page 12

FRANÇAIS
10
Mesures de sécurité : fiche polarisée
Afin de minimiser les risques de secousses électriques,
le produit comporte une fiche polarisée (une lame plus
large que l’autre). Il faut utiliser une rallonge polarisée
appropriée, bifilaire ou trifilaire, avec ce produit. Ce genre
de fiche n’entre que d’une façon dans une prise polarisée.
S’assurer que la prise de la rallonge comporte des fentes
de dimensions appropriées. Lorsqu’on ne peut insérer la
fiche àfond dans la prise de la rallonge, il faut tenter de le
faire après avoir inversé les lames de côté. Si la fiche n’entre
toujours pas dans la prise, il faut se procurer une rallonge
appropriée. Lorsqu’on ne peut insérer la fiche de la rallonge
àfond dans la prise, il faut communiquer avec un électricien
certifié. Il ne faut pas neutraliser la fiche de l’outil ni celle de
la rallonge.
L’étiquette apposée sur votre outil peut inclure les symboles
suivants. Les symboles et leur définition sont indiqués ci-après:
V ......................... volts
Hz ....................... hertz
min ..................... minutes
or DC ...... courant continu
...................... fabrication classe I
(mis à la terre)
…/min .............. par minute
BPM .................... battements par
minute
IPM ..................... impacts par minute
RPM .................... revolutions per
minute
sfpm ................... pieds linéaires par
minute (plpm)
SPM (FPM) ......... fréquence par
minute
A ......................... ampères
W ........................ watts
or AC ........... courant alternatif
or AC/DC .... courant alternatif
ou continu
...................... fabrication classe I
(double isolation)
no ....................... vitesse à vide
n ......................... vitesse nominale
...................... borne de terre
...................... symbole
d’avertissement
..................... radiation visible
..................... porter une
protection des
voies respiratoires
..................... porter une
protection oculaire
..................... porter une
protection auditive
CONSERVER CES CONSIGNES POUR
UTILISATION ULTÉRIEURE
DESCRIPTION (FIG. A)
AVERTISSEMENT: ne jamais modifier l’outil
électrique ni aucun de ses composants, car il y a
risques de dommages corporels oumatériels.
Reportez-vous en figureA au début de ce manuel pour
obtenir la liste complète descomposants.
USAGE PRÉVU
Cet appareil a été conçu pour le soufflage professionnel en
plein air.
NE PAS les utiliser en milieu ambiant humide ou en
présence de liquides ou de gazinflammables.
C'est un appareil électrique de professionnels. NE PAS
le laisser à la portée des enfants. Une supervision est
nécessaire auprès de tout utilisateur nonexpérimenté.
ASSEMBLAGE ET AJUSTEMENTS
AVERTISSEMENT: pour réduire le risque de
blessures graves, éteindre l’outil et retirer
avant d’effectuer tout réglage et d’enlever
ou d’installer tout accessoire. Un démarrage
accidentel peut provoquer desblessures.
ATTENTION: Le tube doit être fixé sur le boîtier
9
avant d’utiliser l’appareil.
1. ASSEMBLAGE DU TUBE: Pour fixer le tube au
souffleur, aligner les chevilles
10
dans le bas du tube
sur l’encoche
11
au fond de l’ouverture du boîtier
comme le montre la figureC. Enfoncer le tube dans le
boîtier du souffleur de manière à ce que le dispositif de
blocage s’engage dans le tube.
2. Tirer sur le tube pour s’assurer qu’il tient solidement en
place.
3. Pour retirer le tube, insérer un tournevis dans le trou de
déblocage
12
sur le côté du boîtier. Lever la languette à
l’intérieur et sortir le tube.
fig. C
10
9
4
11
12
Installation des embouts (Fig. D)
1. Alignez les gorges
13
de l’embout désiré
6, 7
, ou
8
sur les saillies
14
du tube
4
.
2. Enfoncez l’embout sur le tube.
3. Tournez fermement l’embout pour verrouiller les saillies
à fond sur les cavités de l’embout. Assurez-vous que
l’embout est solidement rattaché.
fig. D
14 13
6
RACCORDEMENT DE LA RALLONGE AU
TAILLE-HAIE (Fig. A, E)
AVERTISSEMENT : ne pas l’utiliser sans son tube.
AVERTISSEMENT : S’assurer que la détente n’est pas
engagée pour réduire le risque de mettre l’outil en
marche accidentellement.
1. Près de l’extrémité de la rallonge
15
, repliez la rallonge
pour faire une boucle.
2. Alimentez la boucle dans le trou inférieur
16
du
dispositif de retenue
5
, comme illustré en figure E.
Page 13

FRANÇAIS
11
3. Faites passer la boucle sur le crochet
17
du dispositif
de retenue de façon à ce qu’elle repose complètement
dans le dispositif de retenue.
4. Branchez la rallonge dans un bloc d’alimentation
18
.
fig. E
15
16
17
18
UTILISATION
AVERTISSEMENT : ne pas faire fonctionner le
souffleur sans que le tube soit solidement en place. Ne
jamais passer la main par le trou du tube en direction
du boîtier.
Position correcte des mains (Fig. F)
AVERTISSEMENT: pour réduire tout risque
de dommages corporels graves, adopter
SYSTÉMATIQUEMENT la position des mains illustrée.
AVERTISSEMENT: pour réduire tout risque
de dommages corporels graves, maintenir
SYSTÉMATIQUEMENT l’outil fermement pour
anticiper toute réaction soudaine.
Position de la main appropriée exige une main sur la
poignée principale
4
.
fig. F
4
Mise en marche (fig. A, F, G)
ATTENTION: ne pas diriger la zone d’évacuation de
l’appareil vers soi ou des personnes à proximité.
ATTENTION: toujours porter des lunettes de sécurité.
En présence de poussières, porter un masque filtrant.
Nous vous recommandons de porter des gants, des
pantalons longs et de bonnes chaussures. Éloigner les
cheveux longs et les vêtements amples des ouvertures
et des pièces mobiles.
Pour allumer le souffleur, enfoncer la détente
1
.
Pour verrouiller le souffleur en position de marche, tirer
le levier de blocage
2
vers l’arrière, comme le montre la
figureG. La vitesse du souffleur augmente si le levier est
déplacé davantage. Il est également possible de tirer sur le
levier de blocage pour démarrer le souffleur sans enfoncer
d’abord la détente.
• Tenir le souffleur d’une main comme le montre la
figureG, puis balayer d’un côté à l’autre en passant le
tube
4
à plusieurs pouces au-dessus de la surface dure.
Avancer lentement en maintenant la pile de débris
devant vous.
fig. G
MAINTENANCE
AVERTISSEMENT: pour réduire le risque de
blessures graves, éteindre l’outil et retirer
avant d’effectuer tout réglage et d’enlever
ou d’installer tout accessoire. Un démarrage
accidentel peut provoquer desblessures.
Nettoyage
AVERTISSEMENT : enlever les saletés et la poussière
hors des évents au moyen d’air comprimé propre et
sec, au moins une fois par semaine. Pour minimiser
le risque de blessure aux yeux, toujours porter une
protection oculaire conforme à la norme ANSI Z87.1
lors dunettoyage.
AVERTISSEMENT : ne jamais utiliser de solvants ni
d’autres produits chimiques puissants pour nettoyer
les pièces non métalliques de l’outil. Ces produits
chimiques peuvent affaiblir les matériaux de plastique
utilisés dans ces pièces. Utiliser un chiffon humecté
uniquement d’eau et de savon doux. Ne jamais laisser
de liquide pénétrer dans l’outil et n’immerger aucune
partie de l’outil dans unliquide.
Accessoires
AVERTISSEMENT : NE PAS utiliser le ce produit
avec un accessoire. Une telle utilisation peut être
dangereuse.
AVERTISSEMENT : puisque les accessoires autres
que ceux offerts par
DeWALT n’ont pas été testés
avec ce produit, leur utilisation pourrait s’avérer
dangereuse. Pour réduire le risque de blessures, utiliser
exclusivement les accessoires DeWALT recommandés
avec le présentproduit.
Les accessoires recommandés pour cet outil sont vendus
séparément au centre de service de votre région. Pour
obtenir de l’aide concernant l’achat d’un accessoire,
communiquer avec
DeWALT Industrial Tool Co., 701 East
Joppa Road, Towson, MD 21286 aux États-Unis;
composer le 1 800 433-9258 (1 800 4-
DeWALT) ou visiter
notre site Web : www.dewalt.com.
Page 14

FRANÇAIS
12
Réparations
AVERTISSEMENT : pour assurer la SÉCURITÉ et la
FIABILITÉ du produit, les réparations, l’entretien et
les réglages doivent être réalisés (cela comprend
l’inspection et le remplacement du balai) par un
centre de réparation en usine
DeWALT ou un centre de
réparation agréé
DeWALT. Toujours utiliser des pièces
de rechangeidentiques.
Registre en ligne
Merci pour votre achat. Enregistrez dès maintenant
votreprodui:
• RÉPARATIONS SOUS GARANTIE: cette carte remplie
vous permettra de vous prévaloir du service de
réparations sous garantie de façon plus efficace dans le
cas d’un probléme avec leproduit.
• CONFIRMATION DE PROPRIÉTÉ: en cas de perte
provoquée par un incendie, une inondation ou un vol,
cette preuve de propriété vous servira de preuve auprès
de votre compagnie d’assurances.
• SÉCURITÉ: l’enregistrement de votre produit
nous permettra de communiquer avec vous dans
l’éventualité peu probable de l’envoi d’un avis de
sécurité régi par la loi fédérale américaine de la
protection desconsommateurs.
Registre en ligne à www.dewalt.com/register.
Garantie limitée de trois ans
DeWALT réparera, sans frais, tout produit défectueux
causé par un défaut de matériel ou de fabrication pour
une période de trois ans à compter de la date d’achat.
La présente garantie ne couvre pas les pièces dont la
défectuosité a été causée par une usure normale ou
l’usage abusif de l’outil. Pour obtenir de plus amples
renseignements sur les pièces ou les réparations couvertes
par la présente garantie, visiter le site www.dewalt.com
ou composer le 1 800 433-9258 (1 800 4-
DeWALT). Cette
garantie ne s’applique pas aux accessoires et ne vise pas les
dommages causés par des réparations effectuées par un
tiers. Cette garantie confère des droits légaux particuliers
à l’acheteur, mais celui-ci pourrait aussi bénéficier d’autres
droits variant d’un état ou d’une province à l’autre.
En plus de la présente garantie, les outils
DeWALT sont
couverts par notre :
CONTRAT D’ENTRETIEN GRATUIT D’UNAN
DeWALT entretiendra l’outil et remplacera les pièces usées
au cours d’une utilisation normale et ce, gratuitement,
pendant une période d’un an à compter de la date d’achat.
GARANTIE DE REMBOURSEMENT DE90JOURS
Si l’acheteur n’est pas entièrement satisfait, pour quelque
raison que ce soit, du rendement de l’outil électrique, du
laser ou de la cloueuse
DeWALT, celui-ci peut le retourner,
accompagné d’un reçu, dans les 90 jours à compter de la
date d’achat pour obtenir un remboursement intégral, sans
aucunproblème.
AMÉRIQUE LATINE : cette garantie ne s’applique aux
produits vendus en Amérique latine. Pour ceux-ci, veuillez
consulter les informations relatives à la garantie spécifique
présente dans l’emballage, appeler l’entreprise locale ou
consulter le site Web pour les informations relatives à
cettegarantie.
REMPLACEMENT GRATUIT DES ÉTIQUETTES
D’AVERTISSEMENT : si les étiquettes d’avertissement
deviennent illisibles ou sont manquantes, composer le
1 800 433-9258 (1 800 4-
DeWALT) pour en obtenir le
remplacementgratuit.
Page 15

ESPAÑOL
13
¡ADVERTENCIA! Lea todas las advertencias de
seguridad e instrucciones. El incumplimiento
de las advertencias e instrucciones puede provocar
descargas eléctricas, incendios o lesionesgraves.
ADVERTENCIA: Para reducir el riesgo de lesiones, lea
el manual deinstrucciones.
Si tiene alguna duda o algún comentario sobre ésta
u otra herramienta
DeWALT, llámenos al número
gratuito: 1–800–4-DeWALT (1–800–433–9258).
1
Interruptor de gatillo
2
Bloqueo palanca de velocidad
3
Mango del interruptor
4
Tubo
5
Dispositivo de retención del cable
6
Boquilla de extremo grande
7
Boquilla de extremo estrecho
8
Boquilla de extremo ancho
Definiciones: Símbolos y palabras de alerta de seguridad
Este manual de instrucciones utiliza los siguientes símbolos y palabras de alerta de seguridad para alertarle de situaciones
peligrosas y del riesgo de lesiones corporales o daños materiales.
PELIGRO: Indica una situación de peligro inminente que, si no se evita, provocará la muerte o lesionesgraves.
ADVERTENCIA: Indica una situación de peligro potencial que, si no se evita, podría provocar la muerte o
lesionesgraves.
ATENCIÓN: Indica una situación de peligro potencial que, si no se evita, posiblemente provocaría lesiones leves
omoderadas.
(Utilizado sin palabras) indica un mensaje de seguridad relacionado.
AVISO: Se refiere a una práctica no relacionada a lesiones corporales que de no evitarse puede resultar en daños a
la propiedad.
Fig. A
1
2
876
4
3
5
Page 16

ESPAÑOL
14
Advertencias importantes de seguridad
ADVERTENCIA: PARA REDUCIR EL RIESGO DE
LESIONES:
• Antes de todo uso, asegúrese de que todos los que utilicen
esta unidad lean y comprendan todas las instrucciones de
seguridad y demás información contenida en este manual.
• Conserve estas instrucciones y revíselas con frecuencia
antes del uso y al instruir a otras personas.
• No apunte la descarga de la unidad hacia usted mismo o
hacia personas a su alrededor.
• Mantenga el cabello largo y la ropa holgada lejos de las
aberturas y las piezas en movimiento.
• Este aparato está destinado para uso comercial.
ADVERTENCIA: Al utilizar una herramienta
eléctrica, siempre deben tomarse precauciones
básicas de seguridad para reducir el riesgo de
incendios, descargas eléctricas y lesiones personales,
incluidas las siguientes:
ADVERTENCIA: Parte del polvo creado por este
producto contiene sustancias químicas reconocidas
por el Estado de California como causantes de
cáncer, defectos de nacimiento u otros problemas
reproductivos. Algunos ejemplos de estas sustancias
químicas son:
- compuestos en los fertilizantes
- compuestos en los insecticidas, herbicidas y
pesticidas
- arsénico y cromo de la madera con
tratamiento químico
Para reducir su exposición a estas sustancias químicas, use
equipos de seguridad aprobados, como máscaras contra
el polvo que estén diseñadas especialmente para filtrar
partículas microscópicas.
LEA Y COMPRENDA TODAS LAS
INSTRUCCIONES ANTES DEL USO
Normas generales de seguridad
ADVERTENCIA: Lire toutes les directives et toutes les
consignes de sécurité. Le non-respect des avertissements
et des directives pourrait se solder par un choc électrique,
un incendie et/ou une blessure grave.
• SIEMPRE USE PROTECCIÓN PARA LOS OJOS: use anteojos o
gafas de seguridad que cumplan con la norma ANSI Z87.1
(CAN/CSAZ94.3) en todo momento que esta unidad esté en
uso. Además, use un protector facial o máscara antipolvo.
Los anteojos de seguridad están disponibles por un costo
adicional en su centro de mantenimiento local de
DeWALT
o en una instalación de mantenimiento autorizada.
• NO coloque la salida del barredor cerca de sus ojos u
oídos cuando esté en operación.
•
GUARDE LAS UNIDADES QUE NO EMPLEE. Cuando no
utilice la unidad, ésta deberá guardarse en un lugar seco y
elevado o bajo llave, fuera del alcance de los niños.
•
NO SE SOBREEXTIENDA. Conserve siempre bien
apoyados los pies así como el equilibrio.
•
CUIDE LA UNIDAD. Conserve limpia la unidad para
que funcione mejor y de manera más segura. Siga las
instrucciones para el mantenimiento apropiado.
• NO intente reparar el barredor. Para garantizar la seguridad
y la confiabilidad del producto, las reparaciones el
mantenimiento y los ajustes deben ser realizados por centros
de servicio
DeWALT u otras organizaciones de servicio
autorizado, que utilicen siempre refacciones DeWALT.
• NO opere el barredor en atmósferas gaseosas o
explosivas. Los motores en estas unidades producen
chispas en condiciones normales, y estas chispas pueden
originar la ignición de los vapores.
•
EVITE CONDICIONES AMBIENTALES PELIGROSAS – No
use herramientas eléctricas en lugares mojados o inundados.
•
ESTÉ ALERTA – Concéntrese en lo que esté haciendo. Utilice
el sentido común. No opere la herramienta si está cansado.
• UTILICE LA UNIDAD ADECUADA – No emplee esta unidad
para ningún trabajo que no sea para el que está diseñada.
• TENGA MUCHO CUIDADO cuando limpie en escalones.
•
NO permita que se utilice como juguete. Se requiere
atención cercana cuando se utilice por niños o cerca de
ellos. No se recomienda para ser usada por niños.
• NO intente limpiar obstrucciones de la unidad sin
desenchufarla primero.
• ÚSESE SOLAMENTE como se describe en este manual.
Solamente utilice los dispositivos recomendados por el fabricante.
• NO coloque ningún objeto en las aberturas. No se use con
ninguna abertura bloqueada; consérvelas libres de polvo,
pelusas y cualquier objeto que pueda reducir el flujo de aire.
•
CONSERVE cabello, ropas flojas, dedos y demás partes del
cuerpo alejados de aberturas y partes móviles.
•
NO sumerja ninguna parte de la unidad en ningún líquido.
•
CONSERVE A LOS NINOS, ESPECTADORES Y ANIMALES
ALEJADOS
del área de trabajo, a un mínimo de 10 metros
cuando encienda u opere la unidad.
•
REVISE EL ÁREA antes de usar la unidad. Elimine todos
los objetos duros como rocas, vidrios, alambres, etc.,
que puedan salir despedidos y por consiguiente, causar
lesiones durante la operación.
•
UTILICE ÚNICAMENTE el cargador suministrado por el
fabricante para recargar.
•
TENGA CUIDADO al manejar las baterías para evitar
que hagan corto con materiales conductores como
anillos, pulseras y llaves. La batería o el conductor pueden
sobrecalentarse y ocasionar quemaduras.
•
NO ABRA NI MUTILE la batería. El electrolito liberado es
corrosivo y puede causarle daños a sus ojos o a su piel.
Puede ser tóxico en caso de ingestión.
• No toque el enchufe o aparato si tiene las manos mojadas.
• Apague todos los controles antes de desenchufar.
• Este aparato tiene aislamiento doble. Utilice siempre
piezas de repuesto idénticas. Véanse las instrucciones para
la reparación de los aparatos de doble aislamiento.
• Para reducir el riesgo de descarga eléctrica, usar sólo con
un alargador diseñado para uso en exterior, como por
ejemplo uno del tipo SJW o SJTW.
Page 17

ESPAÑOL
15
• Asegúrese de que su alargador esté en buen estado y sea del
tamaño correcto para su aparato. La tabla de Calibre mínimo
para cables de alimentación que figura a continuación
muestra el tamaño correcto que debe usarse, dependiendo
de la longitud del cable y del amperaje nominal de la placa
de características. Si tiene dudas sobre cuál calibre usar, use
un calibre mayor. Cuanto más pequeño sea el número del
calibre, más resistente será el cable. Un alargador de calibre
insuficiente ocasionará una caída en la tensión de la línea que
provocará una pérdida de potencia y sobrecalentamiento.
• Mantenga el aparato con cuidado – Inspeccione los
alargadores periódicamente y cámbielos si están dañados.
• Para reducir el riesgo de que el cable del aparato
se desconecte del cable de extensión durante el
funcionamiento:
i) Realice un nudo como se muestra en la Figura A o
ii) Use una de las correas de retención de la toma del
enchufe o uno de los conectores que se describen en
este manual.
O
iii) Asegure el alargador al enchufe del aparato
como se muestra o se describe en las Instrucciones
de operación.
fig. B
ADVERTENCIA: Para reducir el riesgo de lesiones
corporales debidas a una conexión eléctrica suelta
entre el enchufe del aparato y el alargador, inserte
firme y totalmente el enchufe del aparato al alargador.
Compruebe periódicamente la conexión mientras el
aparato esté en funcionamiento para asegurar que
esté totalmente conectado. No use un alargador que
proporcione una conexión suelta. Una conexión suelta
puede resultar en un sobrecalentamiento, incendio y
aumenta el riesgo de quemaduras.
ADVERTENCIA: Durante el uso, utilice siempre
protección auditiva adecuada que cumpla con la
norma ANSI S12.6 (S3.19).
En ciertas circunstancias
y según el período de uso, el ruido de este producto
puede contribuir a la pérdida de audición.
ADVERTENCIA: USE SIEMPRE LENTES DE
SEGURIDAD. Los anteojos de uso diario NO son
lentes de seguridad. Utilice también máscaras faciales
o para polvo si el corte produce polvillo. UTILICE
SIEMPRE EQUIPOS DE SEGURIDAD CERTIFICADOS:
- Protección para los ojos según la norma ANSI
Z87.1 (CAN/CSA Z94.3)
- Protección auditiva según la norma ANSI
S12.6 (S3.19)
- Protección respiratoria según las normas
NIOSH/OSHA/MSHA
ADVERTENCIA: Para disminuir el riesgo de choque
eléctrico, no se exponga a la lluvia, no se use sobre
superficies mojadas. Guárdese bajo techo.
ADVERTENCIA: Riesgo de corte. Apague y desenchufe
el aparato y luego espere hasta que el ventilador se
pare o como mínimo 10 segundos antes de retirar las
unidades del tubo soplador o aspirador.
Servicio a aparatos con doble aislamiento
Su Soplador/Aspiradora cuenta con doble aislamiento para
brindarle protección añadida. En los aparatos con doble
aislamiento, se cuenta con dos sistemas de aislamiento
en lugar de conexión a tierra. No se proporciona ningún
medio de aterrizaje en un aparato con doble aislamiento,
ni se requiere añadirle ninguno. El servicio a aparatos
con doble aislamiento requiere de cuidado extremo y de
conocimiento del sistema, y debe ser efectuado solamente
por personal de servicio calificado. Las piezas de repuesto
para aparatos con doble aislamiento deben ser idénticas
a las que reemplazan. Los aparatos con doble aislamiento
están marcados con las palabras “doble aislamiento”. El
símbolo (un cuadro dentro de otro) puede estar también
marcado en el aparato.
Reglas e instrucciones de seguridad:
Cables de extension
Las herramientas con doble aislamiento tienen cables con
dos líneas y pueden utilizarse con extensiones de 2 o de 3
líneas. Solamente deben usarse extensiones con cubierta
cilíndrica, y le recomendamos que estén aprobadas por
Underwriters Laboratories (U.L.) (NOM en México). Si la
extensión se empleará a la intemperie, deberá ser adecuada
para ello. Cualquier extensión destinada para uso a la
intemperie se puede utilizar para trabajar bajo techo.
Una extensión debe contar con el calibre adecuado (AWG o
American Wire Gauge) por seguridad, y para evitar pérdida
de potencia y sobrecalentamiento. Mientras menor sea el
número, mayor será la capacidad del cable, por ejemplo,
un cable de calibre 16 tiene mayor capacidad que uno
de calibre 18. Cuando emplee más de una extensión para
alcanzar la longitud total, asegúrese que cada extensión
contenga por lo menos el calibre mínimo requerido. Antes
de utilizar un cable de extensión, revíselo en busca de
alambres flojos o expuestos, aislamiento dañado y uniones
defectuosas. Haga las reparaciones necesarias o reemplace
el cable en caso necesario.
Calibre mínimo de conjuntos de cables
Voltios
Longitud total del cable en pies
(metros)
120 V 25 (7,6) 50 (15,2) 100 (30,5) 150 (45,7)
240 V 50 (15,2) 100 (30,5) 200 (61,0) 300 (91,4)
Amperaje
nominal
AWG
Más de Más de
0 6 18 16 16 14
6 10 18 16 14 12
10 12 16 16 14 12
12 16 14 12 Not Recommended
Page 18

ESPAÑOL
16
Advertencias e instrucciones de
seguridad: Clavija polarizada
Este equipo cuenta con una clavija polarizada (con una pata
más ancha que la otra) para reducir el riesgo de choque
eléctrico. El equipo debe utilizarse con una extensión adecuada
de 2 o 3 cables. Las conexiones polarizadas solamente ajustan
de una manera. Asegúrese que la conexión hembra de la
extensión tenga una ranura grande y una más pequeña. Si la
clavija no se ajusta completamente a la extensión, inviértala.
Si aún así no ajusta, consiga una extensión adecuada. Si la
extensión no se ajusta por completo a la toma de corriente
comuníquese con un electricista calificado para que le instale
la toma de corriente adecuada. Por ningún motivo cambie la
clavija en la herramienta o en la extensión de ninguna manera.
La etiqueta de su herramienta puede incluir los siguientes
símbolos. A continuación se indican los símbolos y
susdefiniciones:
V ......................... voltios
Hz ....................... hertz
min ..................... minutos
or DC ...... direct current
...................... Construcción de
Clase I (tierra)
…/min .............. por minuto
BPM .................... golpes por minuto
IPM ..................... impactos por
minuto
RPM .................... revoluciones por
minuto
sfpm ................... pies de superficie
por minuto
SPM .................... pasadas por
minuto
A ......................... amperios
W ........................ vatios
or AC ........... corriente alterna
or AC/DC .... corriente alterna
o directa
...................... Construcción de
Clase II (doble
aislamiento)
no ....................... velocidad sin carga
n ......................... velocidad nominal
...................... terminal de
conexión a tierra
...................... símbolo de
advertencia de
seguridad
..................... radiación visible
..................... use protección
respiratoria
..................... use protección para
los ojos
..................... use protección para
los oídos
GUARDE ESTAS INSTRUCCIONES PARA
VOLVER A CONSULTAR EN EL FUTURO
COMPONENTES (FIG. A)
ADVERTENCIA: Nunca modifique la herramienta
eléctrica, ni tampoco ninguna de sus piezas. Podría
producir lesiones corporales odaños.
Consulte la FiguraA al principio de este manual para
obtener una lista completa de loscomponentes.
USO DEBIDO
Este aparato ha sido diseñado para aplicaciones
profesionales de soplado en el exterior.
NO utilice la herramienta en condiciones de humedad o en
presencia de líquidos o gasesinflamables.
Este aparato es una herramienta eléctrica profesional. NO
permita que los niños toquen la herramienta. Si el operador
no tiene experiencia operando esta herramienta, su uso
deberá sersupervisado.
MONTAJE Y AJUSTES
ADVERTENCIA: Para reducir el riesgo de lesiones
personales graves, apague la herramienta
y desconéctela de la fuente de alimentación
antes de realizar ajustes o de retirar/instalar
dispositivos o accesorios. Un arranque accidental
podría causarlesiones.
ATENCIÓN: El tubo debe instalarse en la carcasa
9
antes del uso.
1. ENSAMBLAJE DEL TUBO:
Para instalar el tubo en el
soplador, alinee las clavijas
10
en la parte inferior del
tubo con la ranura
11
en la parte inferior de la abertura
de la carcasa como se muestra en la FiguraC. Empuje
el tubo dentro de la carcasa del soplador hasta que el
bloqueo encaje en el tubo.
2. Tire del tubo para asegurarse de que esté firmemente
instalado.
3. Para quitar el tubo, inserte un destornillador en el orificio
de desbloqueo
12
en el costado de la carcasa. Levante
la lengüeta en el interior y tire del tubo hacia afuera.
fig. C
10
9
4
11
12
Instalación de las boquillas (Fig. D)
1. Alinee los canales
13
de la boquilla deseada
6
,
7
, u
8
con los topes
14
en el tubo
4
.
2. Deslice la boquilla en el tubo.
3. Gire firmemente la boquilla para bloquear los topes por
completo en la hendidura de la boquilla. Asegúrese de
que la boquilla esté bien fija.
fig. D
14 13
6
Instalación del alargador en el soplador
(Fig. A, E)
ADVERTENCIA: No utilizar con el tubo retirado.
ADVERTENCIA: Asegúrese de que el interruptor de
gatillo no esté activado para reducir el riesgo de poner
en marcha el aparato sin querer.
1. Cerca del extremo del alargador
15
, doble el alargador
para formar un bucle.
Page 19

ESPAÑOL
17
2. Pase el bucle por el orificio inferior
16
del dispositivo de
retención del cable
5
como se muestra en la figura E.
3. Deslice el bucle por encima del gancho
17
del
dispositivo de retención del cable para que descanse
totalmente en dicho dispositivo de retención.
4. Enchufe el alargador en la unidad de potencia
18
.
fig. E
15
16
17
18
OPERACIÓN
ADVERTENCIA: No utilice el soplador sin el tubo
firmemente instalado. Nunca intente alcanzar el
interior de la carcasa a través del orificio del tubo.
Posición adecuada de las manos (Fig. F)
ADVERTENCIA: Para reducir el riesgo de lesión
personal grave, tenga SIEMPRE las manos en una
posición adecuada como se muestra.
ADVERTENCIA: Para reducir el riesgo de lesión
personal grave, sujete SIEMPRE bien en caso de que
haya una reacción repentina.
La correcta posición de la mano requiere una mano en la
empuñadura principal
4
.
fig. F
4
Encendido (Fig. A, F, G)
ADVERTENCIA: No apunte la descarga de la
unidad hacia usted mismo o hacia transeúntes.
ADVERTENCIA: Siempre use anteojos de seguridad.
Use una máscara con filtro si el funcionamiento
produce polvo. Se recomienda el uso de guantes,
pantalones largos y calzado resistente. Mantenga el
cabello largo y la ropa holgada lejos de las aberturas y
las piezas en movimiento.
Para encender el soplador, oprima el interruptor de gatillo
1
.
Para bloquear el soplador en encendido, tire hacia atrás la
palanca de bloqueo en encendido
2
, como se muestra
en la figuraF. El soplador funciona a velocidades más altas
a medida que la palanca se hace avanzar. La palanca de
bloqueo en encendido también puede tirarse hacia atrás
para arrancar el soplador sin necesidad de oprimir primero
el interruptor de gatillo.
• Sostenga la barredora con una mano como se muestra
en la figuraG y barra de un lado a otro con el tubo
4
a varios centímetros (pulgadas) por encima de la
superficie dura. Avance lentamente manteniendo la pila
acumulada de residuos frente a usted.
fig. G
MANTENIMIENTO
ADVERTENCIA: Para reducir el riesgo de lesiones
personales graves, apague la herramienta
y desconéctela de la fuente de alimentación
antes de realizar ajustes o de retirar/instalar
dispositivos o accesorios. Un arranque accidental
podría causarlesiones.
Limpieza
ADVERTENCIA: Sople la suciedad y el polvo de todos
los conductos de ventilación con aire seco, al menos
una vez por semana. Para reducir el riesgo de lesiones,
utilice siempre protección para los ojos aprobada ANSI
Z87.1 al realizar estatarea.
ADVERTENCIA: Nunca utilice solventes ni otros
químicos abrasivos para limpiar las piezas no
metálicas de la herramienta. Estos productos
químicos pueden debilitar los materiales plásticos
utilizados en estas piezas. Utilice un paño humedecido
sólo con agua y jabón neutro. Nunca permita que
penetre líquido dentro de la herramienta ni sumerja
ninguna de las piezas en unlíquido.
Accesorios
ADVERTENCIA: NO utilice este producto con ningún
tipo de accesorio o dispositivo. Puede ser peligroso.
ADVERTENCIA: Debido a que no se han probado
con este producto otros accesorios que no sean los
que ofrece
DeWALT., el uso de dichos accesorios con
esta herramienta podría ser peligroso. Para reducir
el riesgo de lesiones, con este producto deben usarse
sólo los accesorios recomendados por
DeWALT.
Los accesorios que se recomiendan para utilizar con la
herramienta están disponibles a un costo adicional en
su distribuidor local o en un centro de mantenimiento
autorizado. Si necesita ayuda para localizar algún
accesorio, póngase en contacto con
DeWALT Industrial
Tool Co., 701 East Joppa Road, Towson, MD 21286, llame al
1–800–4-DeWALT (1–800–433–9258) o visite nuestro sitio
web: www.dewalt.com.
Page 20

ESPAÑOL
18
Reparaciones
ADVERTENCIA: Para asegurar la SEGURIDAD y
la CONFIABILIDAD del producto, las reparaciones,
el mantenimiento y los ajustes deben (inclusive
inspección y cambio de carbones) ser realizados en
un centro de mantenimiento en la fábrica
DeWALT u
en un centro de mantenimiento autorizado
DeWALT.
Utilice siempre piezas de repuestoidénticas.
Para reparación y servicio de sus herramientas
eléctricas, favor de dirigirse al
Centro de Servicio más cercano
CULIACAN, SIN
Blvd.Emiliano Zapata 5400-1 Poniente Col.
San Rafael
(667) 717 89 99
GUADALAJARA, JAL
Av. La Paz #1779 - Col. Americana Sector
Juárez
(33) 3825 6978
MEXICO, D.F.
Eje Central Lázaro Cárdenas No. 18 - Local
D, Col. Obrera
(55) 5588 9377
MERIDA, YUC
Calle 63 #459-A - Col. Centro (999) 928 5038
MONTERREY, N.L.
Av. Francisco I. Madero 831 Poniente - Col.
Centro
(818) 375 23 13
PUEBLA, PUE
17 Norte #205 - Col. Centro (222) 246 3714
QUERETARO, QRO
Av. San Roque 274 - Col. San Gregorio (442) 2 17 63 14
SAN LUIS POTOSI, SLP
Av. Universidad 1525 - Col. San Luis (444) 814 2383
TORREON, COAH
Blvd. Independencia, 96 Pte. - Col. Centro (871) 716 5265
VERACRUZ, VER
Prolongación Díaz Mirón #4280 - Col.
Remes
(229) 921 7016
VILLAHERMOSA, TAB
Constitución 516-A - Col. Centro (993) 312 5111
PARA OTRASLOCALIDADES:
Si se encuentra en México, por favor llame al
(55) 5326 7100
Si se encuentra en U.S., por favor llame al
1–800–433–9258 (1–800 4-
DeWALT)
Póliza de Garantía
IDENTIFICACIÓN DELPRODUCTO:
Sello o firma delDistribuidor.
Nombre delproducto:
Mod./Cat.:
Marca:
Núm. deserie:
(Datos para ser llenados por el distribuidor)
Fecha de compra y/o entrega delproducto:
Nombre y domicilio del distribuidor donde se adquirió
elproducto:
Este producto está garantizado por un año a partir de
la fecha de entrega, contra cualquier defecto en su
funcionamiento, así como en materiales y mano de obra
empleados para su fabricación. Nuestra garantía incluye
la reparación o reposición del producto y/o componentes
sin cargo alguno para el cliente, incluyendo mano de obra,
así como los gastos de transportación razonablemente
erogados derivados del cumplimiento de estecertificado.
Para hacer efectiva esta garantía deberá presentar su
herramienta y esta póliza sellada por el establecimiento
comercial donde se adquirió el producto, de no contar con
ésta, bastará la factura decompra.
Excepciones
Esta garantía no será válida en los siguientescasos:
• Cuando el producto se hubiese utilizado en condiciones
distintas a las normales;
• Cuando el producto no hubiese sido operado de acuerdo
con el instructivo de uso que se acompaña;
• Cuando el producto hubiese sido alterado o reparado
por personas distintas a las enlistadas al final de
estecertificado.
Anexo encontrará una relación de sucursales de servicio de
fábrica, centros de servicio autorizados y franquiciados en la
República Mexicana, donde podrá hacer efectiva su garantía
y adquirir partes, refacciones y accesoriosoriginales.
Registro en línea
Gracias por su compra. Registre su producto ahorapara:
• SERVICIO EN GARANTÍA: Si completa esta tarjeta,
podrá obtener un servicio en garantía más eficiente, en
caso de que exista un problema con suproducto.
• CONFIRMATCIÓN DE PROPIEDAD: En caso de una
pérdida que cubra el seguro, como un incendio, una
inundacíon o un robo, el registro de propiedad servirá
como comprobante decompra.
• PARA SU SEGURIDAD: Si registra el producto, podremos
comunicarnos con usted en el caso improbable que se
deba enviar una notificación de seguridad conforme a la
Federal Consumer Safety Act (Ley Federal de Seguridad
de Productos para el Consumidor).
Registro en línea en www.dewalt.com/register.
Page 21

ESPAÑOL
19
Garantía limitada por tres años
DeWALT reparará, sin cargo, cualquier falla que surja de
defectos en el material o la fabricación del producto, por
hasta tres años a contar de la fecha de compra. Esta garantía
no cubre fallas de las piezas causadas por su desgaste
normal o abuso a la herramienta. Para mayores detalles
sobre la cobertura de la garantía e información acerca de
reparaciones realizadas bajo garantía, visítenos en
www.dewalt.com o dirígase al centro de servicio más
cercano. Esta garantía no aplica a accesorios o a daños
causados por reparaciones realizadas o intentadas
por terceros. Esta garantía le otorga derechos legales
específicos, además de los cuales puede tener otros
dependiendo del estado o la provincia en que seencuentre.
Además de la garantía, las herramientas
DeWALT están
cubiertaspor:
1 AÑO DE SERVICIO GRATUITO
DeWALT mantendrá la herramienta y reemplazará las
piezas gastadas por su uso normal, sin cobro, en cualquier
momento durante un año a contar de la fecha de compra.
Los artículos gastados por la clavadora, tales como la unidad
de hoja y retorno del impulsador, no estáncubiertas.
GARANTÍA DE REEMBOLSO DE SU DINERO
POR 90 DÍAS
Si no está completamente satisfecho con el desempeño
de su máquina herramienta, láser o clavadora
DeWALT,
cualquiera sea el motivo, podrá devolverlo hasta 90 días de
la fecha de compra con su recibo y obtener el reembolso
completo de su dinero – sin necesidad de responder a
ningunapregunta.
AMÉRICA LATINA: Esta garantía no se aplica a los
productos que se venden en América Latina. Para los
productos que se venden en América Latina, debe consultar
la información de la garantía específica del país que viene
en el empaque, llamar a la compañía local o visitar el sitio
Web a fin de obtener esainformación.
REEMPLAZO GRATUITO DE LAS ETIQUETAS DE
ADVERTENCIAS: Si sus etiquetas de advertencia
se vuelven ilegibles o faltan, llame al 1–800–
433–9258 (1–800–4-
DeWALT) para que se le
reemplacengratuitamente.
Solamente para propósito deMéxico:
Importado por:
DeWALT Industrial Tool Co. S.A. de C.V.
Avenida Antonio Dovali Jaime, # 70 Torre B Piso 9
Colonia La Fe, Santa Fé
Código Postal : 01210
Delegación Alvaro Obregón
México D.F.
Tel. (52) 555-326-7100
R.F.C.: BDE810626-1W7
Page 22

DeWALT Industrial Tool Co., 701 East Joppa Road, Towson, MD 21286
(JUNE16) Part No. 90633227 REV01 DWBL700 Copyright © 2016 DeWALT
The following are trademarks for one or more DeWALT power tools: the yellow and black color scheme, the “D” shaped air
intake grill, the array of pyramids on the handgrip, the kit box configuration, and the array of lozenge-shaped humps on the
surface of the tool.
DeWALT BATTERY AND CHARGER SYSTEMS
Chargers/Charge Time (Minutes)
Chargeurs/Durée de charge (Minutes)
Cargadores de baterías/Tiempo de carga (Minutos)
Battery
Cat #
Output
Voltage
120 Volts 12 Volts
DC9000
DC9310
DC9320
DCB095
DCB101
DCB102
DCB103
DCB107
DCB112
DCB113
DCB114
DCB115
DCB118
DCB132
DCB119
DW0249
DCB606 60/20 X X X X 100 100 100 272 170 140 X 90 60 90 X X
DCB404 40 X X X X X X X X X X 90 X X X X X
DCB406 40 X X X X X X X X X X 130 X X X X X
DC9360 36 45 X X X X X X X X X X X X X X X
DCB361 36 45 X X X X X X X X X X X X X X X
DC9280 28 60 X X X X X X X X X X X X X X X
DW0242 24 X X X X X X X X X X X X X X X 60
DCB200 20 X X X X 60 60 60 140 90 67 X 45 45/30** 45 90 X
DCB201 20 X X X X 30 30 30 70 45 35 X 22 22 22 45 X
DCB203 20 X X X X 35 35 35 90 60 45 X 30 30 30 60 X
DCB203BT* 20 X X X X 35 35 35 90 60 45 X 30 30 30 60 X
DCB204 20 X X X X 70 70 70 185 120 90 X 60 60/40** 60 120 X
DCB204BT* 20 X X X X 70 70 70 185 120 90 X 60 60 60 120 X
DCB205 20 X X X X 95 95 95 240 150 112 X 75 75/47** 75 150 X
DCB207 20 X X X X 30 30 30 60 40 30 X 22 22 22 X X
DC9182 18 X 40 40 X X X 40 X X X X X X X X 40
DCB120 12 X X X X 30 30 30 60 45 35 X 20 X X 45 X
DCB127 12 X X X X 35 35 35 90 60 50 X 30 X X 60 X
DCB080 8 X X X 60 X X X X X X X X X X X X
*BT - Bluetooth® NOTE: The Bluetooth® word mark and logos are registered trademarks owned by the Bluetooth®,
SIG, Inc. and any use of such marks by
DeWALT is under license. Other trademarks and trade names are those of their
respective owners.
**Battery Datecode 201536 or later.
“X” Indicates that the battery pack is not compatible with that specific charger. All charge times are approximate. Actual
charge time may vary. Read the instruction manual for more specific information.
“X” indique que le bloc-piles n’est pas compatible avec ce chargeur. Les durées de charge sont approximatives; la durée de
charge rélle peut varier. Lire le manuel d’utilisation pour obtenir des renseignements plus précis.
Una “X” indica que el paquete de baterías no es compatible con ese determinado cargador. El tiempo de duración de carga es
aproximado; la duración de carga real puede variar. Lea el manual de instrucciones para obtener información más precisa.
 Loading...