

Page 1

DEWALT Industrial Tool Co., 701 East Joppa Road, Baltimore, MD 21286 Printed in Italy (NOV00-1) Form No. 329785-01
DW567, DW567-220 Copyright © 1997
DW567/329785-01 10/1/02 9:56 AM Page 2
Page 2

INSTRUCTION MANUAL
GUIDE D'UTILISATION
MANUAL DE INSTRUCCIONES
DW565, DW567, DW567-220
1”Heavy Duty SDS Rotary Hammers
Perceuses rotatives SDS 26mm (1 po) de service intensif
Rotomartillos SDS 26mm (1”) para trabajo pesado
INSTRUCTIVO DE OPERACIÓN, CENTROS DE SERVICIO Y PÓLIZA
DE GARANTÍA. ADVERTENCIA: LÉASE ESTE INSTRUCTIVO ANTES
DE USAR EL PRODUCTO.
Questions? See us in the World Wide Web at www.dewalt.com
DW567/329785-01 10/1/02 9:56 AM Page 3
Page 3

General Safety Rules
WARNING! READ AND UNDERSTAND ALL INSTRUCTIONS.
Failure to follow all instructions listed below may result in electric
shock, fire and/or serious personal injury.
SAVE THESE INSTRUCTIONS
WORK AREA
• Keep your work area clean and well lit. Cluttered benches and dark
areas invite accidents.
• Do not operate power tools in explosive atmospheres, such as in
the presence of flammable liquids, gases, or dust. Power tools
create sparks which may ignite the dust or fumes.
• Keep bystanders, children, and visitors away while operating a
power tool. Distractions can cause you to lose control.
ELECTRICAL SAFETY
• Grounded tools must be plugged into an outlet properly installed
and grounded in accordance with all codes and ordinances.
Never remove the grounding prong or modify the plug in any way.
Do not use any adapter plugs. Check with a qualified electrician if
you are in doubt as to whether the outlet is properly grounded. If the
tools should electrically malfunction or break down, grounding provides
a low resistance path to carry electricity away from the user.
Applicable only to Class I (grounded) tools.
• Double insulated tools are equipped with a polarized plug (one
blade is wider than the other.) This plug will fit in a polarized outlet
only one way. If the plug does not fit fully in the outlet, reverse the
plug. If it still does not fit, contact a qualified electrician to install a
polarized outlet. Do not change the plug in any way. Double insulation
1
English
eliminates the need for the three wire grounded power cord and
grounded power supply system. Applicable only to Class II (double
insulated) tools.
• Avoid body contact with grounded surfaces such as pipes,
radiators, ranges and refrigerators. There is an increased risk of
electric shock if your body is grounded.
• Don’t expose power tools to rain or wet conditions. Water entering
a power tool will increase the risk of electric shock. Other liquids, such
as perspiration present the same hazard.
• Do not abuse the cord. Never use the cord to carry the tools or
pull the plug from an outlet. Keep cord away from heat, oil, sharp
edges or moving parts. Replace damaged cords immediately.
Damaged cords increase the risk of electric shock.
• When operating a power tool outside, use an outdoor extension
cord marked “W-A” or “W.” These cords are rated for outdoor use
and reduce the risk of electric shock. When using an extension cord,
be sure to use one heavy enough to carry the current your product will
draw. An undersized cord will cause a drop in line voltage resulting in
loss of power and overheating. The following table shows the correct
size to use depending on cord length and nameplate ampere rating. If
in doubt, use the next heavier gage. The smaller the gage number, the
heavier the cord.
Minimum Gage for Cord Sets
Volts Total Length of Cord in Feet
120V 0-25 26-50 51-100 101-150
240V 0-50 51-100 101-200 201-300
Ampere Rating
More Not more AWG
Than Than
0-6 18161614
6 - 10 18 16 14 12
10-1216161412
12 - 16 14 12 Not Recommended
IF YOU HAVE ANY QUESTIONS OR COMMENTS ABOUT THIS
OR ANY D
EWALT TOOL, CALL US TOLL FREE AT:
1-800-4-DEWALT (1-800-433-9258)
DW567/329785-01 10/1/02 9:56 AM Page 1
Page 4

preventative safety measures reduce the risk of starting the tool
accidentally.
• Store idle tools out of reach of children and other untrained
persons. Tools are dangerous in the hands of untrained users.
• Maintain tools with care. Keep cutting tools sharp and clean.
Properly maintained tools, with sharp cutting edges are less likely to
bind and are easier to control.
• Check for misalignment or binding of moving parts, breakage of
parts, and any other condition that may affect the tools operation.
If damaged, have the tool serviced before using. Many accidents
are caused by poorly maintained tools.
• Use only accessories that are recommended by the manufacturer
for your model. Accessories that may be suitable for one tool, may
become hazardous when used on another tool.
SERVICE
• Tool service must be performed only by qualified repair
personnel. Service or maintenance performed by unqualified
personnel could result in a risk of injury.
• When servicing a tool, use only identical replacement parts.
Follow instructions in the Maintenance section of this manual.
Use of unauthorized parts or failure to follow Maintenance Instructions
may create a risk of electric shock or injury.
Additional Specific Safety Rules for
Rotary Hammers
• Hold tool by insulated gripping surfaces when performing an
operation where the cutting tool may contact hidden wiring or its
own cord. Contact with a “live” wire will make exposed metal parts of
the tool “live” and shock the operator.
• Wear ear protectors when hammering for extended periods of
time. Prolonged exposure to high intensity noise can cause hearing
loss.
• Wear safety goggles or other eye protection. Hammering and
drilling operations cause chips to fly. Flying particles can cause
permanent eye damage.
2
PERSONAL SAFETY
• Stay alert, watch what you are doing and use common sense
when operating a power tool. Do not use tool while tired or under
the influence of drugs, alcohol, or medication. A moment of
inattention while operating power tools may result in serious personal
injury,
• Dress properly. Do not wear loose clothing or jewelry. Contain
long hair. Keep your hair, clothing, and gloves away from moving
parts. Loose clothing, jewelry, or long hair can be caught in
moving parts. Air vents often cover moving parts and should also be
avoided.
• Avoid accidental starting. Be sure switch is off before plugging in.
Carrying tools with your finger on the switch or plugging in tools that
have the switch on invites accidents.
• Remove adjusting keys or wrenches before turning the tool on. A
wrench or key that is left attached to a rotating part of the tool may
result in personal injury.
• Do not overreach. Keep proper footing and balance at all times.
Proper footing and balance enables better control of the tool in
unexpected situations.
• Use safety equipment. Always wear eye protection. Dust mask,
non-skid safety shoes, hard hat, or hearing protection must be used for
appropriate conditions.
TOOL USE AND CARE
• Use clamps or other practical way to secure and support the
workpiece to a stable platform. Holding the work by hand or against
your body is unstable and may lead to a loss of control.
• Do not force tool. Use the correct tool for your application. The
correct tool will do the job better and safer and the rate for which it is
designed.
• Do not use tool if switch does not turn it on or off. Any tool that
cannot be controlled with the switch is dangerous and must be
repaired.
• Disconnect the plug from the power source before making any
adjustments, changing accessories, or storing the tool. Such
English
DW567/329785-01 10/1/02 9:56 AM Page 2
Page 5
Your risk from these exposures varies, depending on how often you
do this type of work. To reduce your exposure to these chemicals: work
in a well ventilated area, and work with approved safety equipment,
such as those dust masks that are specially designed to filter out
microscopic particles.
• The label on your tool may include the following symbols.
V ........................volts
A ........................amperes
Hz ........................hertz
W ........................watts
min ........................minutes
........................alternating current
........................direct current
n
o ........................no load speed
........................Class II Construction
…/min ......................revolutions per minute
BPM ........................beats per minute
............................safety alert symbol
3
English
R
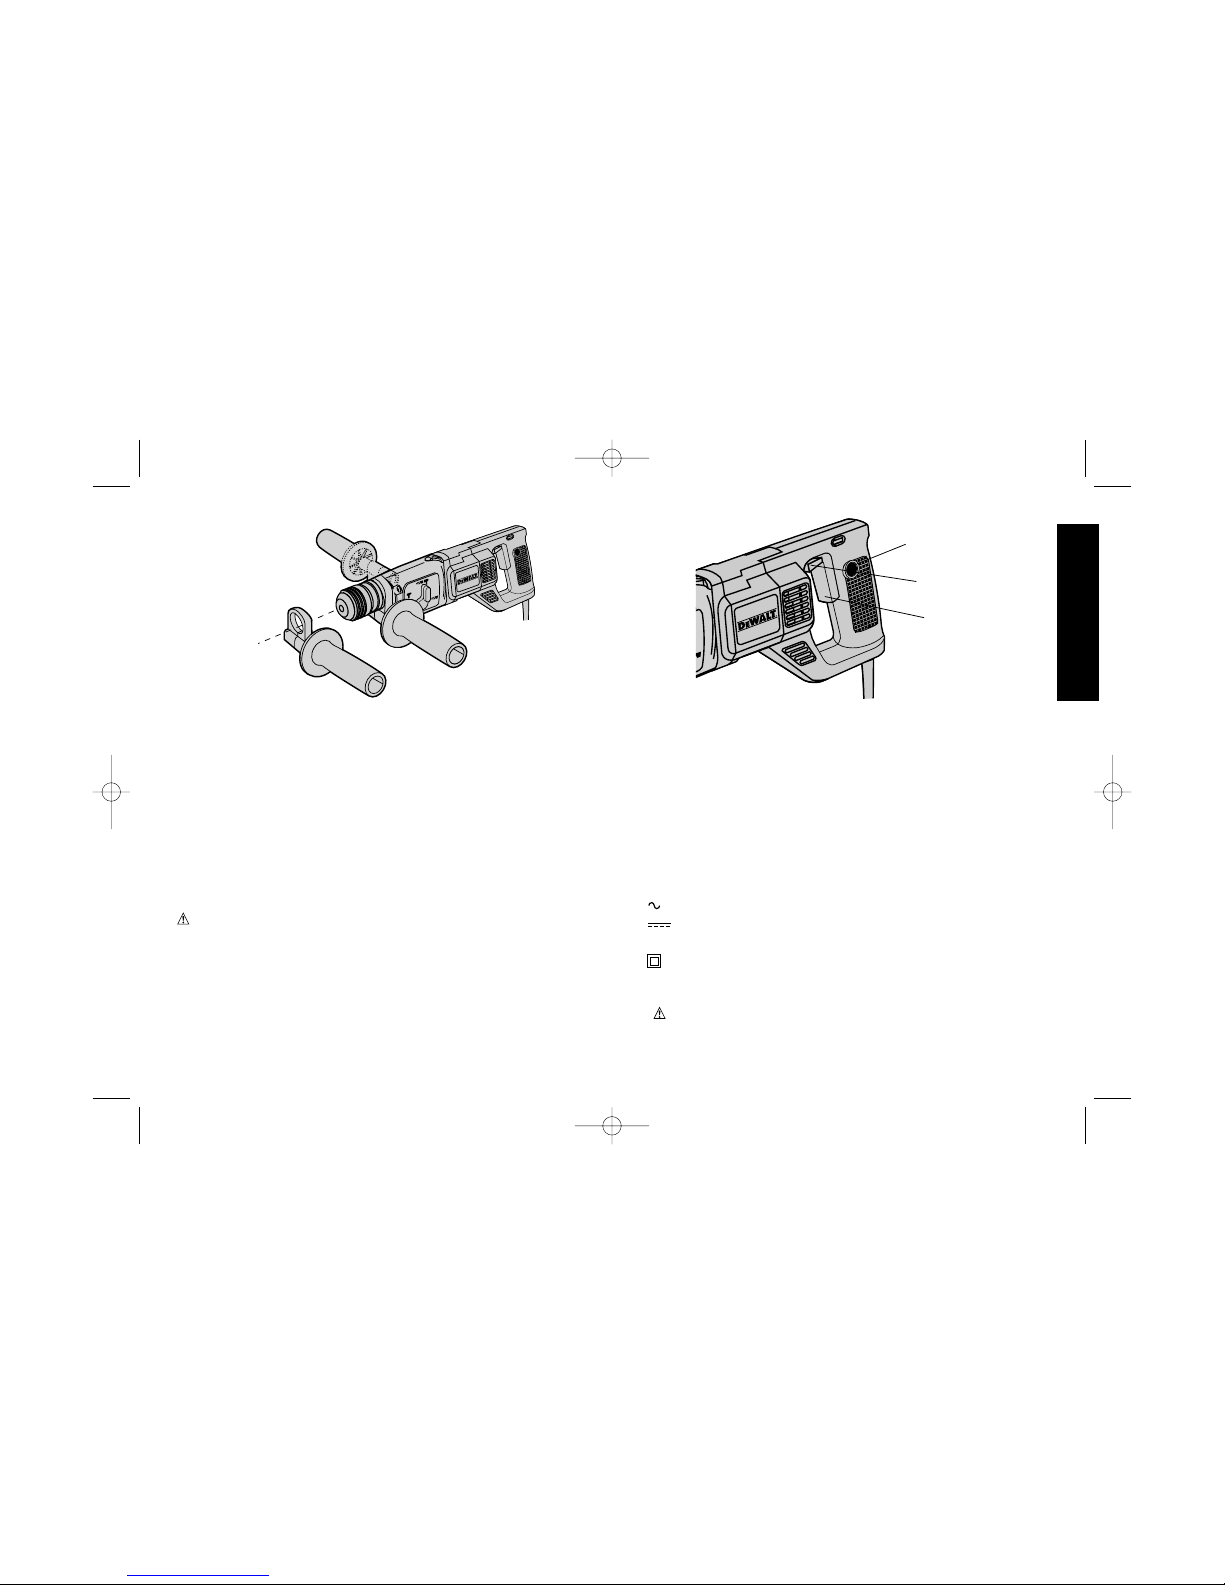
FIGURE 1
R
REVERSING
LEVER
TRIGGER
SWITCH
LOCKING
BUTTON
FIGURE 2
• Always use the side handle supplied with the tool. Keep a firm
grip on the tool at all times. Do not attempt to operate this tool without
holding it with both hands. Operating this tool with one hand will result
in loss of control. Breaking through or encountering hard materials
such as re-bar may be be hazardous as well.
• Do not use chisels in any of the rotation modes. Chisels may jam
causing loss of control.
• Wear gloves when handling hammer bits and tools. Hammer bits
and tools get hot during operation. Gloves and frequent rest periods
will reduce the risk of vibration damage to hands and arms.
• Keep hands and body from between the tool and wall or post, etc.,
to avoid being crushed by the tool should it twist unexpectedly if the bit
binds.
WARNING: Some dust created by power sanding, sawing, grinding,
drilling, and other construction activities contains chemicals known to
cause cancer, birth defects or other reproductive harm. Some
examples of these chemicals are:
• lead from lead-based paints,
• crystalline silica from bricks and cement and other masonry
products, and
• arsenic and chromium from chemically-treated lumber (CCA).
DW567/329785-01 10/1/02 9:56 AM Page 3
Page 6
4
immediately the next time it is plugged in. Damage or injury could
result.
The variable speed trigger switch permits speed control. The
farther the trigger switch is depressed, the higher the speed of the
hammerdrill.
NOTE: Use lower speeds for starting holes without a centerpunch,
drilling in metal, plastics or ceramics, or driving screws. Higher
speeds are better for drilling in wood and composition board and for
using abrasive and polishing accessories.
The reversing lever is used to reverse the rotary hammer for
backing out screws or jammed bits. It is located above the trigger,
shown in Figure 2. To reverse the rotary hammer, turn it OFF and
push the reversing lever to the left (when viewed from the chuck end).
To position the lever for forward operation, turn the rotary hammer
OFF and push the lever to the right.
CAUTION: When reversing to clear jammed bits, be ready for
strong reactive torque.
Hammer/Drill Selector (DW567)
To switch tool from the drill only mode to the rotary hammer or
hammer only mode rotate the dial on the applicable symbol shown in
Figure 3.
NOTE: The selector must be in either drill, rotary hammer or hammer
mode at all times. There are no operable positions between the
positions.
SDS Chuck
To insert bit, insert shank of bit about 3/4” into chuck. Push and
rotate bit until it locks in place. The bit will be securely held.
To release bit, pull the collar back and remove the bit.
English
FIGURE 3
Side Handle
CAUTION: Always hold rotary hammer with both hands. A side
handle is supplied with this rotary hammer. It clamps to the front of
the gear case as shown in Figure 1 and can be rotated 360˚ to permit
right or left hand use. The side handle can be tightened by rotating
the black plastic portion of the side handle clockwise and loosened by
rotating it counterclockwise.
Switch
To start rotary hammer, depress the trigger switch (Figure 2). To
stop rotary hammer, release the switch. To lock the trigger switch in
the ON position for continuous operation, depress the trigger switch
and push in the locking button. The tool will continue to run. To turn
the tool OFF, from a locked ON condition, squeeze and release the
trigger once. Before using the tool (each time), be sure that the
locking button release mechanism is working freely. Do not lock the
switch in the “ON” position when driling by hand so that you can
instantly release the trigger whitch if the bit binds in the hole.
Do not lock the switch ON when drilling by hand so that you can
instantly release the trigger switch if the bit binds in the hole. The
locking button is for use only when the rotary hammer is mounted in
a drill press stand or other wise held stationary. Be sure to release
the locking mechanism before disconnecting the plug from the power
supply. Failure to do so will cause the rotary hammer to start
DRILL
SETTING
HAMMER
SETTING
ROTARY
HAMMER -
SETTING
DW567/329785-01 10/1/02 9:56 AM Page 4
Page 7

Operation
DRILLING
1. Always unplug the drill when attaching or changing bits or
accessories.
2. Use sharp drill bits only. For WOOD, use twist drill bits, spade bits,
power auger bits, or hole saws. For METAL, use steel twist drill bits
or hole saws. For MASONRY, such as brick, cement, cinder block,
etc., use carbide-tipped bits rated for percussion drilling. Be sure
the material to be drilled is anchored or clamped firmly. If drilling
thin material, use a wood “back-up” block to prevent damage to the
material.
3. Always apply pressure in a straight line with the bit. Use enough
pressure to keep drill biting, but do not push hard enough to stall
the motor or deflect the bit.
4. Hold tool firmly to control the twisting action of the drill.
5. IF DRILL STALLS, it is usually because it is being overloaded or
improperly used. RELEASE TRIGGER IMMEDIATELY, remove
drill bit from work, and determine cause of stalling. DO NOT
CLICK TRIGGER ON AND OFF IN AN ATTEMPT TO START A
STALLED DRILL — THIS CAN DAMAGE THE DRILL.
6. To minimize stalling or breaking through the material, reduce
pressure on drill and ease the bit through the last fractional part of
the hole.
7. Keep the motor running when pulling the bit back out of a drilled
hole. This will help prevent jamming.
8. With variable speed drills there is no need to center punch the
point to be drilled. Use a slow speed to start the hole and
accelerate by squeezing the trigger harder when the hole is deep
enough to drill without the bit skipping out.
DRILLING IN METAL
An SDS to round shank adaptor chuck is required. Ensure that
tool is in “rotation only” mode. (DW567 only. The DW565 has no
“rotation only” mode). Start drilling with slow speed and increase to full
5
English
power while applying firm pressure on the tool. A smooth even flow of
metal chips indicates the proper drilling rate. Use a cutting lubricant
when drilling metals. The exceptions are cast iron and brass which
should be drilled dry. The cutting lubricants that work best are
sulphurized cutting oil or lard oil; bacon-grease will also serve the
purpose.
NOTE: Large (5/16” to 1/2”) holes in steel can be made easier if a
pilot hole (5/32” to 3/16”) is drilled first.
DRILLING IN WOOD
An SDS to round shank adaptor chuck is required. Ensure that
tool is in “rotation only” mode. (DW567 only. The DW565 has no
“rotation only” mode). Start drilling with slow speed and increase to full
power while applying firm pressure on the tool. Holes in wood can be
made with the same twist drills used for metal. These bits may
overheat unless pulled out frequently to clear chips from the flutes. For
larger holes, use spade bits, power auger bits, or hole saws. Work that
is apt to splinter should be backed up with a block of wood.
DRILLING IN MASONRY
When drilling in masonry, use carbide tipped bits rated for percussion
drilling and be certain that the bit is sharp. Use a constant and firm
force on the tool to drill most effectively. A smooth, even flow of dust
indicates the proper drilling rate.
Depth Rod
To adjust the depth rod, loosen the handle and move rod so that the
distance between the end of the rod and the end of the bit equals
the desired drilling depth. When drilling with depth rod, stop when
end of rod reaches surface of material.
DW567/329785-01 10/1/02 9:56 AM Page 5
Page 8

6
Maintenance
CLEANING & LUBRICATION
Use only mild soap and damp cloth to clean the tool. Never let any liquid
get inside the tool; never immerse any part of the tool into a liquid.
Self-lubricating bearings are used in the tool and periodic relubrication is not required. In the unlikely event that service is ever
needed, take your tool to an authorized service location.
Accessories
Recommended accessories for use with your tool are available at
extra cost from your distributor or local service center.
CAUTION: The use of any non-recommended accessory may be
hazardous.
MAXIMUM RECOMMENDED CAPACITIES
DW565, DW567 DW567-220
MAXIMUM CAPACITY
MASONRY 1" 1" 1"
STEEL N/A 1/2" 1/2"
WOOD N/A 1 1/2" 1 1/2"
OPTIMUM CAPACITY
MASONRY 5/32"-5/8" 5/32"-5/8" 5/32"-5/8"
Important
To assure product SAFETY and RELIABILITY, repairs, maintenance
and adjustment (including brush inspection and replacement) should
be performed by authorized service centers or other qualified service
organizations, always using identical replacement parts.
Full Warranty
DEWALT heavy duty industrial tools are warranted for one year from
date of purchase. We will repair, without charge, any defects due to
faulty materials or workmanship. For warranty repair information,
call 1-800-4-D
EWALT. This warranty does not apply to accessories
or damage caused where repairs have been made or attempted by
others. This warranty gives you specific legal rights and you may
have other rights which vary in certain states or provinces.
In addition to the warranty, D
EWALT tools are covered by our:
30 DAY NO RISK SATISFACTION GUARANTEE
If you are not completely satisfied with the performance of your
D
EWALT heavy duty industrial tool, simply return it to the participating
seller within 30 days for a full refund. Please return the complete unit,
transportation prepaid. Proof of purchase may be required.
English
DW567/329785-01 10/1/02 9:56 AM Page 6
Page 9

SI VOUS AVEZ DES QUESTIONS OU VOULEZ NOUS FAIRE PART
DE VOS COMMENTAIRES CONCERNANT CET OUTIL OU TOUT
AUTRE OUTIL DEWALT, COMPOSEZ SANS FRAIS LE :
1 800 433-9258.
Règles de sécurité – Généralités
AVERTISSEMENT! LIRE ET COMPRENDRE TOUTES LES
DIRECTIVES; le non-respect des directives suivantes peut entraîner
un choc électrique, un incendie ou des blessures graves.
CONSERVER CES DIRECTIVES
ZONE DE TRAVAIL
· Garder la zone de travail propre et bien éclairée; les établis
encombrés et les endroits sombres sont propices aux accidents.
· Ne pas utiliser les outils électriques dans une atmosphère
explosive, comme à proximité de liquides, de gaz ou de
poussières inflammables; le moteur peut créer des étincelles et
enflammer les vapeurs ou les poussières environnantes.
· Tenir les enfants, les visiteurs ou toute autre personne à l’écart
lorsqu’on utilise un outil électrique; les distractions peuvent faire
perdre la maîtrise de ce dernier.
MESURES DE SÉCURITÉ - ÉLECTRICITÉ
· Les outils mis à la terre doivent être branchés dans une prise bien
installée et mise à la terre conformément à tous les codes et
règlements en vigueur. Ne jamais retirer la broche de terre ni
modifier la fiche. Ne pas utiliser d'adaptateur. Vérifier auprès d'un
électricien qualifié en cas de doute quant à la mise à la terre de la
prise. En cas de défaillance électrique ou de bris de l'outil, la mise à la
terre procure un chemin de faible résistance au courant qui autrement
traverserait l'utilisateur. Cette protection ne s’applique qu’aux outils
de classe I (mis à la terre).
· Les outils à double isolation sont munis d’une fiche polarisée
(c’est-à-dire que l’une des lames est plus large que l’autre),
laquelle ne peut être raccordée qu’à une prise polarisée et ce,
dans un seul sens; on doit l’inverser si on est incapable de l’enfoncer
complètement. Si la fiche ne s’adapte toujours pas, on doit demander
à un électricien qualifié d’installer la prise appropriée. On ne doit
jamais modifier la fiche. La double isolation élimine le besoin d’installer
un cordon d’alimentation trifilaire et un système d’alimentation
électrique pourvus d’une mise à la terre; seuls les outils de classe II
(à double isolation) sont munis d’une telle protection.
· Éviter tout contact entre le corps et les éléments mis à la terre,
comme les tuyaux, les radiateurs, les cuisinières et les
réfrigérateurs, afin de réduire les risques de choc électrique.
· Ne pas utiliser l’outil électrique dans des endroits mouillés, ni
l’exposer à la pluie; l’infiltration d’eau – ou de tout autre liquide,
comme la sueur – à l’intérieur de l’outil augmente les risques de choc
électrique.
· Ne pas utiliser le cordon de manière abusive; on ne doit pas
transporter l’outil en le tenant par le cordon, ou utiliser ce dernier pour
le débrancher. On doit tenir le cordon à l’écart des sources de chaleur,
de l’huile, des bords tranchants ou des pièces mobiles. Remplacer
immédiatement les cordons endommagés, car ces derniers
augmentent les risques de choc électrique.
· Lorsqu’on utilise un outil électrique à l’extérieur, on ne doit
utiliser que des rallonges conçues pour cet usage, comme celles
de type W-A ou W, afin de réduire les risques de choc électrique. Si
on utilise une rallonge, s’assurer d’en choisir une de calibre approprié
aux valeurs nominales de l’outil, sans quoi on risque de causer une
chute de tension et par conséquent, une perte de puissance et une
surchauffe. Le tableau suivant indique le calibre recommandé selon la
longueur de la rallonge et l’intensité nominale indiquée sur la plaque
signalétique. En cas de doute, toujours opter pour un cordon de calibre
supérieur; plus le chiffre désignant le calibre est petit, plus ce dernier
est fort.
Calibre minimal des cordons de rallonge
Longueur totale du cordon
25 ft. 50 ft. 75 ft. 100 ft. 125 ft. 150 ft. 175 ft.
7
Français
DW567/329785-01 10/1/02 9:56 AM Page 7
Page 10

8
7,6 m 15,2 m 22,9 m 30,5 m 38,1 m 45,7 m 53,3 m
Intensité
18 AWG 18 AWG 16 AWG 16 AWG 14 AWG 14 AWG 12 AWG
SÉCURITÉ PERSONNELLE
· Rester vigilant en tout temps et faire preuve de jugement
lorsqu’on utilise un outil électrique; ne pas utiliser l’outil lorsqu’on
est fatigué ou sous l’influence de drogues, d’alcool ou de médicaments
– un moment d’inattention peut entraîner des blessures graves.
· Porter des vêtements appropriés; ne pas porter de vêtements
amples ni de bijoux. Couvrir ou attacher les cheveux longs.
Garder les cheveux, les vêtements, les bijoux et les gants éloignés des
pièces mobiles, car ceux-ci peuvent s’y coincer. Éviter également
d’entrer en contact avec les évents, lesquels recouvrent habituellement
des pièces mobiles.
· Éviter les démarrages accidentels; s’assurer que l’interrupteur soit
en position d’arrêt avant de brancher l’outil. Ne pas transporter l’outil
en laissant le doigt sur l’interrupteur ni le brancher lorsque l’interrupteur
est en position de marche, car cela pourrait causer un accident.
· Retirer les clés de réglage avant de démarrer l’outil; une clé laissée
sur une pièce rotative peut entraîner des blessures.
· Ne pas trop étendre les bras; les pieds doivent rester ancrés
fermement sur le sol afin de maintenir son équilibre en tout temps et de
mieux maîtriser l’outil dans des situations imprévues.
· Utiliser le matériel de sécurité approprié; toujours porter des
lunettes de protection. Porter un masque anti-poussières, des
chaussures antidérapantes, un casque de sécurité ou des protecteurs
auditifs lorsque la situation le requiert.
UTILISATION ET ENTRETIEN DE L’OUTIL
· Fixer et soutenir l’ouvrage sur une plate-forme stable au moyen
d’un étau ou de tout autre dispositif semblable; l’ouvrage est
instable lorsqu’on le retient manuellement ou qu’on l’appuie contre le
corps, ce qui peut faire perdre la maîtrise de l’outil.
· Ne pas forcer l’outil ni l’utiliser pour des travaux autres que ceux
pour lesquels il a été conçu. Pour obtenir de meilleurs résultats et
prévenir les risques de blessure, laisser l’outil couper à la vitesse pour
laquelle il a été conçu.
· Ne pas utiliser l’outil lorsque l’interrupteur marche-arrêt ne
fonctionne pas; tout outil qui ne peut être commandé au moyen de
l’interrupteur est dangereux et doit être réparé.
· Débrancher l’outil avant d’effectuer un réglage, de changer les
accessoires ou de ranger l’outil; ces mesures de sécurité
préventives réduisent les risques de démarrage accidentel.
· Lorsqu’on n’utilise pas l’outil, le ranger hors de la portée des
enfants ou des personnes non qualifiées; les outils sont dangereux
entre les mains de personnes inexpérimentées.
· Bien entretenir l’outil; s’assurer qu’il soit toujours bien propre et
aiguisé; les outils bien entretenus et dont les pièces coupantes sont
bien tranchantes sont moins susceptibles de rester coincés et sont
plus faciles à maîtriser.
· Vérifier les pièces mobiles afin de s’assurer qu’elles soient bien
alignées et qu’elles ne restent pas coincées; vérifier également les
pièces afin de s’assurer qu’il n’y ait ni bris ni aucune autre condition
susceptible de nuire au bon fonctionnement de l’outil; faire réparer
l’outil si ce dernier est endommagé avant de s’en servir de nouveau –
les accidents sont souvent causés par des outils mal entretenus.
· N’utiliser que les accessoires recommandés par le fabricant pour
le modèle concerné; un accessoire destiné à un outil particulier peut
devenir dangereux lorsqu’il est utilisé avec un autre.
ENTRETIEN
· L’outil doit être entretenu par du personnel qualifié seulement;
toute maintenance effectuée par une personne non qualifiée peut
entraîner des risques de blessure.
· Lors de l’entretien, n’utiliser que des pièces de rechange
identiques et suivre les directives de la section «Entretien» du
Français
DW567/329785-01 10/1/02 9:56 AM Page 8
Page 11

présent manuel afin de prévenir les risques de choc électrique ou de
blessure.
Règles de sécurité additionnelles
relatives aux perceuses à percussion
· Tenir l’outil par les surfaces isolées prévues à cette fin lorsque
l’outil risque d’entrer en contact avec des fils cachés ou le
cordon; de tels contacts peuvent mettre les pièces métalliques de
l’outil sous tension, engendrant des risques de choc électrique.
· Porter des protège-oreilles lorsqu’on effectue le martelage pour
des périodes prolongées; une exposition prolongée à des niveaux
acoustiques élevés peut causer une perte d’audition temporaire.
· Porter des lunettes de sécurité ou autre dispositif de protection
oculaire car le martelage et le perçage peuvent faire projeter des
particules en l’air et entraîner des dommages irréversibles aux yeux.
· Toujours utiliser la poignée latérale fournie avec l’outil et tenir
fermement ce dernier. Toujours le faire fonctionner en le tenant avec
les deux mains, sans quoi on risque d’en perdre la maîtrise (à une
main, le fait de traverser l’ouvrage ou de rencontrer des matériaux durs
comme des barres d’armature peut s’avérer dangereux).
· Ne jamais utiliser de burins lorsque l’outil est en mode de
rotation; ces derniers risquent de se coincer et entraîner une perte
de maîtrise.
· Porter des gants pour manipuler les mèches et les accessoires de
l’outil, lesquels peuvent devenir chauds après leur utilisation. Le
port de gants et des arrêts fréquents permettront de réduire les risques
de blessures liées à la vibration aux mains et aux bras.
· S’assurer qu’aucune partie du corps ne se trouve entre l’outil et le
mur ou l’ouvrage à travailler afin d’éviter de rester coincé contre l’outil
si ce dernier devait soudainement faire un mouvement de torsion en
raison du blocage de la mèche.
AVERTISSEMENT : certains outils électriques, comme les
sableuses, les scies, les meules, les perceuses ou certains autres
outils de construction, peuvent soulever de la poussière contenant
des produits chimiques susceptibles d’entraîner le cancer, des
malformations congénitales ou pouvant être nocifs pour le système
reproductif. Parmi ces produits chimiques, on retrouve :
· le plomb dans les peintures à base de plomb;
· la silice cristalline dans les briques et le ciment et autres produits de
maçonnerie;
· l’arsenic et le chrome dans le bois de sciage ayant subi un traitement
chimique.
Le risque associé à de telles expositions peut varier selon la fréquence
avec laquelle on effectue ces travaux. Pour réduire l’exposition à de tels
produits, il faut travailler dans un endroit bien ventilé et utiliser
l’équipement de sécurité approprié tel un masque anti-poussières
spécialement conçu pour filtrer les particules microscopiques.
· L’étiquette apposée sur l’outil peut afficher les symboles suivants :
V ..................volts
A ..................ampères
Hz ................hertz
W..................watts
min ..............minutes
................courant alternatif
............courant continu
n o................aucune option à vide
................construction de classe II
…/min ..........tours ou mouvements alternatifs par minute
BPM ............battement par minute
................symbole d´avertissement
Poignée latérale
MISE EN GARDE : toujours tenir la perceuse à percussion avec les
deux mains. La poignée latérale fournie avec l’outil se fixe sur la partie
antérieure du carter d’engrenages, tel qu’illustré à la figure 1; on peut
la tourner complètement dans un sens ou dans l’autre afin de l’utiliser
à gauche ou à droite, selon le cas. Pour serrer la poignée, tourner la
partie en plastique noir vers la droite; pour la desserrer, la tourner vers
9
Français
DW567/329785-01 10/1/02 9:56 AM Page 9
Page 12

10
la gauche.
Interrupteur
Enfoncer l’interrupteur à gâchette (figure 2) pour faire démarrer la
perceuse à percussion; le relâcher pour l’arrêter. Pour un
fonctionnement continu, enfoncer la gâchette et la bloquer en appuyant
sur le bouton de verrouillage. Pour arrêter l’outil lorsqu’il est verrouillé
en position de marche, enfoncer et relâcher la gâchette. Avant de
mettre l’outil en marche (et ce, à chaque utilisation), s’assurer que le
mécanisme de déverrouillage du bouton fonctionne correctement.
Ne pas verrouiller l’interrupteur en position de marche lorsqu’on utilise
l’outil en mode manuel afin de pouvoir l’arrêter instantanément (si la
mèche reste coincée dans le trou, par exemple). Le bouton de
verrouillage ne doit être utilisé que lorsque la perceuse à percussion
est maintenue immobile au moyen d’un support pour perceuse ou
autrement. S’assurer de relâcher le bouton de verrouillage avant de
débrancher la fiche de la prise murale, à défaut de quoi l’outil se mettra
en marche dès qu’on le branchera de nouveau, ce qui pourrait causer
des dommages matériels ou des blessures corporelles.
L’interrupteur de variation de vitesse permet de choisir la vitesse de
fonctionnement; plus on l’enfonce, plus la vitesse est élevée.
REMARQUE : utiliser les basses vitesses pour amorcer un trou sans
pointeau, pour percer le métal, le plastique ou la céramique, ou pour
enfoncer une vis. On recommande d’utiliser les vitesses plus élevées
pour percer le bois et les panneaux d’agglomérés, ou lorsqu’on utilise
des accessoires d’abrasion ou de polissage.
Le levier de commande de marche arrière sert à mettre la perceuse à
percussion en marche arrière, pour retirer une vis ou une mèche
coincée. Il est situé au-dessus de la gâchette, tel qu’illustré à la figure
2. Pour mettre l’outil en marche arrière, l’arrêter et pousser le levier
vers la gauche (lorsqu’on le regarde du côté du mandrin). Pour le
remettre en position de marche avant, arrêter la perceuse à percussion
et pousser le levier vers la droite.
MISE EN GARDE : lorsqu’on utilise l’outil en marche arrière pour
libérer une mèche coincée, on doit s’attendre à ressentir un brusque
couple de rotation.
Sélecteur de modes martelage/perçage
(DW567)
Pour sélectionner les modes de perçage, de perçage à percussion ou de
martelage, tourner le bouton rotatif vers le symbole approprié (figure 3).
REMARQUE : le sélecteur doit toujours être placé soit en mode de
perçage, de perçage à percussion ou de martelage; l’outil ne
fonctionnera pas si le sélecteur est placé entre deux positions.
Français
R
R
LEVIER DE
COMMANDE DE
MARCHE
ARRIÈRE
INTERRUPTEU
R À GÂCHETTE
BOUTON DE
VERROUILLAGE
FIGURE 2
FIGURE 1
DW567/329785-01 10/1/02 9:56 AM Page 10
Page 13

Mandrin SDS
Pour insérer la mèche, enfoncer la tige de la mèche d’environ 19 mm
(3/4 po) dans le mandrin; la mèche y restera solidement fixée.
Pour retirer la mèche, repousser le collier et enlever la mèche.
Fonctionnement
PERÇAGE
1. Toujours débrancher la perceuse avant de fixer ou de remplacer
les mèches ou les accessoires.
2. Utiliser des mèches aiguisées seulement. Pour percer le BOIS,
utiliser une mèche hélicoïdale, de vrille ou de tarière à moteur ou
encore, une scie à trous; pour le MÉTAL, utiliser une mèche
hélicoïdale ou une scie à trous. Quant aux matériaux de
MAÇONNERIE comme la brique, le ciment, les blocs en béton de
laitier, etc., choisir des mèches à pointe carburée destinées au
forage par percussion. Bien fixer et soutenir l’ouvrage. Dans le cas
de matériaux minces, utiliser des blocs de remplissage en bois afin
de ne pas l’endommager.
3. Appliquer une pression en ligne droite au moyen de la mèche en
exerçant juste assez de pression pour permettre à la mèche de
mordre dans l’ouvrage, en évitant de caler le moteur ou de faire
dévier la mèche.
4. Saisir fermement la perceuse afin de maîtriser la torsion.
5. LE CALAGE DE LA PERCEUSE découle généralement d’une
surcharge ou d’une mauvaise utilisation. Lorsque cela se produit,
RELÂCHER LA GÂCHETTE IMMÉDIATEMENT, retirer la mèche
de l’ouvrage et déterminer la cause du calage. NE PAS
ENFONCER ET RELÂCHER LA GÂCHETTE À PLUSIEURS
REPRISES POUR ESSAYER DE REDÉMARRER LA PERCEUSE
AFIN D’ÉVITER DE L’ENDOMMAGER.
6. Pour réduire les risques de calage et de bris de matériaux, ne pas
exercer trop de pression sur l’outil et percer lentement jusqu’au bout
du trou.
7. Maintenir le moteur en marche lorsqu’on retire la mèche du trou
percé afin d’éviter qu’elle ne reste coincée.
8. Lorsqu’on utilise une perceuse à vitesse variable, il n’est pas
nécessaire de marquer l’emplacement prévu du trou au moyen d’un
pointeau. Faire fonctionner la perceuse à basse vitesse et
augmenter celle-ci en enfonçant davantage la gâchette lorsque le
trou est suffisamment profond pour empêcher la mèche d’en sortir.
PERÇAGE DU MÉTAL
Un mandrin d’adaptation «tige SDS–tige arrondie» est requis pour ce
type de perçage. Mettre l’outil en mode de perçage seulement (modèle
DW567 seulement – le modèle DW565 n’offre pas ce mode). Faire
fonctionner la perceuse très lentement et augmenter la vitesse jusqu’à
ce qu’on obtienne la vitesse maximale, tout en appuyant fermement
sur l’outil; la vitesse choisie est appropriée lorsque les éclats de
métaux sont projetés uniformément et régulièrement. Utiliser une huile
de coupe lorsqu’on perce des métaux, à l’exception de la fonte et du
laiton, car des derniers doivent être percés à sec. Les meilleurs
lubrifiants sont l’huile sulfurée et l’huile de lard; on peut aussi utiliser de
la graisse de bacon.
REMARQUE : il est plus facile de percer de larges trous (c.-à-d., de
7,94 à 12,7 mm ou de 5/16 à 1/2 po) dans l’acier si on perce d’abord
un trou de guidage de 3,97 à 4,76 mm ou de 5/32 à 3/16 po.
11
Français
FIGURE 3
RÉGLAGE DE
PERÇAGE
RÉGLAGE DE
MARTELAGE
RÉGLAGE DE
PERÇAGE À
PERCUSSION
DW567/329785-01 10/1/02 9:56 AM Page 11
Page 14

12
PERÇAGE DU BOIS
Un mandrin d’adaptation «tige SDS–tige arrondie» est requis pour ce
type de perçage. Mettre l’outil en mode de perçage seulement (modèle
DW567 seulement – le modèle DW565 n’offre pas ce mode). Faire
fonctionner la perceuse très lentement et augmenter la vitesse jusqu’à
ce qu’on obtienne la vitesse maximale, tout en appuyant fermement
sur l’outil. On peut percer le bois au moyen des mèches hélicoïdales
qu’on utilise pour le métal. Ces mèches peuvent surchauffer si on ne
les sort pas fréquemment pour enlever les copeaux restés coincés
dans les goujures. Pour réaliser des trous plus grands, utiliser des
mèches de vrille ou de tarière à moteur ou encore, une scie à trous.
Les ouvrages susceptibles de se fractionner doivent être calés au
moyen d’un bloc de bois.
PERÇAGE DE LA MAÇONNERIE
Lorsqu’on perce de la maçonnerie, utiliser des mèches à pointe
carburée destinées au forage par percussion, en s’assurant qu’elles
soient bien aiguisées. Appuyer constamment et fermement sur l’outil
pour assurer un perçage efficace. La vitesse choisie est appropriée
lorsque la poussière est soulevée uniformément et régulièrement.
Tige de profondeur
Pour régler la tige de profondeur, desserrer la poignée et déplacer la
tige de manière à ce que la distance entre son extrémité et celle de la
mèche corresponde à la profondeur de perçage voulue. Lorsqu’on
perce au moyen d’une tige de profondeur, on doit s’arrêter dès que
l’extrémité de la tige atteint la surface de l’ouvrage.
Entretien
NETTOYAGE ET LUBRIFICATION
Nettoyer l’outil seulement au moyen d’un linge humide et d’un savon
doux. Ne jamais laisser de liquide s’infiltrer à l’intérieur de l’outil, et ne
jamais immerger ce dernier dans quelque liquide que ce soit. Comme
les roulements sont autolubrifiants, il n’est pas nécessaire de les
lubrifier manuellement. Dans l’éventualité peu probable qu’un entretien
s’avère nécessaire, on doit apporter l’outil à un centre de service
autorisé.
Accessoires
Les accessoires recommandés pour cet outil sont vendus séparément
chez les distributeurs ou les centres de service locaux.
MISE EN GARDE : l’usage d’un accessoire non recommandé peut
présenter un danger.
CAPACITÉS MAXIMALES RECOMMANDÉES (en pouces)
DW565 DW567 DW567-220
CAPACITÉ MAXIMALE
MAÇONNERIE 1 po 1 po 1 po
ACIER s/o 1/2 po 1/2 po
BOIS s/o 1 1/2 po 1 1/2 po
CAPACITÉ OPTIMALE
MAÇONNERIE 5/32 à 5/8 po 5/32 à 5/8 po 5/32 à 5/8 po
Important
Pour assurer la SÉCURITÉ D’EMPLOI et la FIABILITÉ de l’outil, n’en
confier la réparation, l’entretien et les rajustements (y compris
l’inspection et le remplacement des balais) qu’au personnel d’un
centre de service D
EWALT ou d’un atelier d’entretien autorisé
n’utilisant que des pièces de rechange identiques.
Garantie complète
Les outils industriels de service intensif DEWALT sont garantis
pendant un an à partir de la date d’achat. Toute pièce d’un outil
D
EWALT qui s’avérait défectueuse en raison d’un vice de matière ou
de fabrication sera réparée ou remplacée sans frais. Pour obtenir
de plus amples renseignements sur les réparations couvertes par la
garantie, composer le 1 (800) 4-D
EWALT (! (800) 433-9258). La ga
rantie ne couvre pas les accessories ni les réparations tentées ou
effectuées par des tiers. Les modalités de la présente garantie
donnent des droits légaux spécifiques. L’utilisateur peut également
Français
DW567/329785-01 10/1/02 9:56 AM Page 12
Page 15

se prévaloir d’autres droits selon l’état ou la province qu’il habite.
En outre, la garantie suivante couvre les outils D
EWALT.
GARANTIE DE SATISFACTION DE 30 JOURS OU ARGENT REMIS
Si, pour quelque raison que ce soit, l’outil industriel de service
intensif DEWALT ne donne pas entière satisfaction, il suffit de le
retourner chez le marchand participant dans les 30 jours suivant la
date d’achat afin d’obtenir un remboursement complet. Il faut
retourner, port payé, l’outil complet. On peut exiger une preuve
d’achat.
o tuberías, radiadores, cocinas, y refrigeradoras. Existe un mayor riesgo
13
Français
DW567/329785-01 10/1/02 9:56 AM Page 13
Page 16

14
SI TIENE PREGUNTAS O COMENTARIOS SOBRE ESTA U OTRA
HERRAMIENTA DeWALT, LLÁMENOS GRATIS AL
1-800-433-9258
Reglas generales de seguridad
[symbol] ¡ADVERTENCIA! LEA Y ENTIENDA TODO EL INSTRUCTIVO.
El no seguir todas las instrucciones enumeradas a continuación puede
resultar en electrochoque, fuego y/o seria lesión personal.
GUARDE ESTAS INSTRUCCIONES
ÁREA DE TRABAJO
· Mantenga su área de trabajo limpio y bien iluminado. Bancos de
trabajo abarrotados de cosas y áreas oscuras son una invitación a los
accidentes.
· No opere herramientas eléctricas en atmósferas explosivas,
donde hay presencia de líquidos, gases, o polvos inflamables.
Las herramientas eléctricas crean chispas que podrían encender el
polvo o los gases.
· Mantenga a los transeúntes, niños, y visitantes alejados mientras
opera una herramienta eléctrica. Las distracciones podrían causar
la pérdida de control.
SEGURIDAD ELÉCTRICA
· Las herramientas a tierra deberán conectarse a un tomacorriente
instalado correctamente y puesto a tierra de acuerdo con todos
los códigos y ordenanzas. Nunca debe quitar el clavijero de tierra o
modificar el enchufe de algún modo. No usar enchufes adaptadores.
Infórmese con un electricista competente si duda que el tomacorriente
esté adecuadamente puesto a tierra. Si las herramientas funcionan
mal eléctricamente, o fallan, la puesta a tierra provee una vía de
resistencia baja que aparta del usuario la electricidad extraída.
Sólo aplica a la Clase I herramientas (a tierra).
· Las herramientas con doble aislamiento están equipadas con un
enchufe polarizado (una clavija es más ancha que la otra.) Este
enchufe encajará en un tomacorriente polarizado de una sola
manera. Si el enchufe no encaja bien en el tomacorriente, invierta el
enchufe. Si todavía no encaja, contacte a un electricista competente
para que instale un tomacorriente polarizado. No cambie el enchufe. El
aislamiento doble elimina la necesidad de un cable eléctrico a tierra de
tres alambres y un sistema de alimentación eléctrica puesto a tierra.
Sólo aplica a la Clase II herramientas (aislamiento doble).
· Evite que su cuerpo haga contacto con superficies a tierra tales
como tuberías, radiadores, cocinas, y refrigeradoras. Existe un
mayor riesgo de electrochoque si su cuerpo está a tierra
· No exponga las herramientas eléctricas a la lluvia o condiciones
húmedas. La penetración de agua a una herramienta eléctrica
incrementará el riesgo de electrochoque. Otros líquidos, como el
sudor, presentan el mismo riesgo.
· No maltrate el cable. No lo use nunca para acarrear las herramientas
o halar el enchufe de un tomacorriente. Mantenga el cable alejado del
calor, aceite, bordes afilados o partes en movimiento. Reemplace
inmediatamente los cables dañados. Los cables dañados incrementan el riesgo de electrochoque.
· Al operar una herramienta eléctrica a la intemperie, use un cable
de extensión para exteriores marcado “W-A” o “W.” Estos cables
están hechos para uso exterior y reducen el riesgo de electrochoque.
Cuando utiliza un cable de extensión, asegúrese de que sea lo
suficientemente “pesado” para transportar la corriente que su producto
va a extraer. Un cable de tamaño insuficiente causará una caída en la
línea de voltaje resultando en pérdida de energía y recalentamiento.
La siguiente tabla muestra el tamaño correcto que debe usar
dependiendo del largo del cable y la potencia de amperaje nominal.
Si tiene dudas, use el calibre de mayor peso que le sigue. Cuanto
más reducido sea el calibre, más pesado será el cable.
Calibre mínimo requerido (AWG) para cables de extensión
Español
DW567/329785-01 10/1/02 9:56 AM Page 14
Page 17

Longitud total del cable de extensión
25 ft. 50 ft. 75 ft. 100 ft. 125 ft. 150 ft. 175 ft.
7.,6 m 15,2 m 22,9 m 30,5 m 38,1 m 45,7 m 53,3 m
Calibre promedio del alambre
18 AWG 18 AWG 16 AWG 16 AWG 14 AWG 14 AWG 12 AWG
SEGURIDAD PERSONAL
· Manténgase alerta, observe lo que está haciendo y use sentido
común al usar una herramienta eléctrica. No la use cuando esté
cansado o bajo la influencia de drogas, alcohol, o medicinas. Un
instante de inatención mientras opera herramientas eléctricas puede
resultar en serias lesiones personales.
· Vístase adecuadamente. No use vestimenta suelta o joyas.
Mantenga el cabello largo sujeto. Mantenga su cabello, vestimenta y
guantes apartados de piezas en movimiento. La vestimenta suelta, las
joyas o el cabello largo podrían quedar atrapados en las partes en
movimiento. A menudo las ventosas de aire cubren las partes en
movimiento, y éstas también se deben evitar.
· Evite un arranque accidental. Asegúrese de apagar la herramienta
antes de enchufarla. El cargar las herramientas con el dedo en el
interruptor o enchufar herramientas que tienen el interruptor activado
es una invitación a los accidentes.
· Quite las llaves de ajuste antes de activar la herramienta. Una llave
que se deja anexada a una parte giratoria de la herramienta puede
resultar en lesión personal.
· No se extralimite. Mantenga la pisada firme y el balance apropiado
todo el tiempo.
El pie bien afincado y el balance apropiado permite un mejor control
de la herramienta en situaciones inesperadas.
· Utilice equipo de seguridad. Use siempre protección para los
ojos. Se deberá usar máscara contra el polvo, calzado protector
antirresbalante, casco, o protector de oído en las condiciones que los
justifican.
USO Y CUIDADO DE HERRAMIENTAS
· Utilice tornillos de banco u otra forma práctica para sujetar y
apoyar la pieza de trabajo a una plataforma estable. Sujetar la
pieza manualmente o contra su cuerpo es inestable y puede llevar a
la pérdida de control.
· No fuerce la herramienta. Use la herramienta correcta para la
aplicación. La herramienta correcta hará una labor mejor y más
segura, con la energía nominal para la cual fue diseñada.
· No use la herramienta si el interruptor no prende y apaga. La
herramienta que no se puede controlar con el interruptor es peligrosa
y debe ser reparada.
· Desconecte el enchufe de la fuente de energía antes de efectuar
cualquier ajuste, cambio de accesorios, o guardar la herramienta.
Estas medidas de seguridad preventivas reducen el riesgo a que la
herramienta arranque accidentalmente.
· Mantenga herramientas que no estén en uso fuera del alcance
de los niños y otras personas no entrenadas. Las herramientas
son peligrosas en manos de usuarios no entrenados.
· Las herramientas deben recibir un mantenimiento cuidadoso.
Mantenga las herramientas para corte afiladas y limpias. Las
herramientas bien cuidadas con bordes de corte afilados son menos
susceptibles a trabarse y más fáciles de controlar.
· Revise si hay desalineamiento o traba en las partes movibles,
partes rotas u otra condición que pueda afectar la operación de la
herramienta. De estar dañada, dar servicio a la misma antes de
utilizarla. Muchas veces la causa de accidentes se debe a herramientas con poco mantenimiento.
· Use solamente los accesorios que el fabricante recomienda para
su modelo. Los accesorios adecuados para una herramienta, pueden
resultar peligrosos cuando se usa en otra.
SERVICIO
· El servicio a la herramienta debe ser hecho por personal de
reparación calificado únicamente. El servicio o mantenimiento
hecho por personal no calificado puede entrañar un riesgo o lesión.
15
Español
DW567/329785-01 10/1/02 9:56 AM Page 15
Page 18

16
· Al dar servicio a la herramienta, use sólo piezas de repuesto
idénticas. Siga las instrucciones contenidas en la sección
Mantenimiento de este manual. El uso de repuestos no autorizados o
el no cumplir con las instrucciones de Mantenimiento puede crear el
riesgo de electrochoque o lesión.
Reglas de seguridad específicas
adicionales para rotomartillos
· Usted debe asir la herramienta por las superficies de agarre con
aislamiento, al ejecutar una operación donde la herramienta para
corte pueda hacer contacto con el cableado oculto o el cable de
la misma. El contacto con un cable con corriente hará que las partes
expuestas de la herramienta que sean de metal, tengan corriente y
proporcionen un electrochoque al operador.
· Use protectores de oído cuando debe martillear por tiempo
prolongado. La exposición prolongada a ruidos de alta intensidad
puede causar pérdida auditiva.
· Use gafas de seguridad u otra protección ocular. Las operaciones
de martilleo y taladrado hacen que las astillas vuelen. Las partículas
volantes pueden causar daño ocular permanente.
· Utilice siempre la manija lateral de la herramienta. Sujete siempre
la herramienta de manera firme. No trate de operar esta herramienta
sin asirla con las dos manos. El operar esta herramienta con una mano
resultará en pérdida de control. Atravesar o encontrarse con
materiales duros como barras de refuerzo, también puede ser
peligroso.
· No usar cinceles en ninguna de las modalidades de rotación. Los
cinceles pueden trabarse y causar pérdida de control.
· Use guantes al manejar brocas de martillo y herramientas. Estas
se recalientan durante su funcionamiento. Los guantes y períodos
frecuentes de descanso reducirán el riesgo de daño por vibración a las
manos y brazos.
· No deje que las manos y el cuerpo queden entre la herramienta y
la pared o el poste, etc., para evitar ser estrujado por la herramienta
si ésta se retuerce inesperadamente al trabarse la broca.
[symbol] ADVERTENCIA: Ciertos polvos creados por el lijado, aserrado,
trituración, taladrado y otras actividades de construcción contienen
químicos causantes de cáncer, defectos de nacimiento u otros daños
en la reproducción. Algunos ejemplos de estos químicos son:
· el plomo de las pinturas a base de plomo,
· la sílice cristalina de los ladrillos y cemento y otros productos de
albañilería, y
· el arsénico y el cromo de las maderas tratadas con químicos (CCA).
El riesgo a la exposición varía, dependiendo de cuán a menudo usted
ejecuta este tipo de trabajo. Para reducir la exposición a estos
químicos: trabaje en un área bien ventilada y hágalo con equipos de
seguridad aprobados, tales como las máscaras de polvo que están
especialmente diseñadas para filtrar las partículas microscópicas.
· La etiqueta puesta en su herramienta podría incluir los símbolos
siguientes.
V ....................voltios
A ....................amperios
Hz ..................hertz
W ....................vatios
min..................minutos
..................corriente alterna
................corriente directa
n o ..................velocidad sin carga
....................Construcción Clase II
…/min ............revoluciones por minuto
BPM................golpes por minuto
................símbolo de alerta de seguridad
Manija lateral
ATENCIÓN:Siempre sujete el rotomartillo con ambas manos. Este
rotomartillo viene con una manija lateral. La manija se fija en la parte
frontal de la caja de engranajes como lo demuestra la Figura 1 y puede
girarse 360˚ para permitir el uso de la mano derecha o izquierda. La
Español
DW567/329785-01 10/1/02 9:56 AM Page 16
Page 19

manija lateral se puede apretar girando la porción negra de plástico de
la manija en sentido horario y aflojarse girándola en sentido
antihorario.
Interruptor
Para operar el rotomartillo, oprima el interruptor de disparo (Figura 2). Para
pararlo, suelte el interruptor. Para cerrar el interruptor de disparo en la
posición ON para operación continua, oprima el interruptor de disparo y
empuje el botón de cierre hacia adentro. La herramienta continuará
funcionando. Para apagar el martillo (OFF), desde la posición cerrada ON,
apriete y suelte el interruptor de disparo una vez. Antes de usar la
herramienta (cada vez), asegúrese de que el mecanismo de liberación del
botón de cierre trabaja con soltura.
No cierre el interruptor en la posición “ON” mientras taladra manualmente, a
fin de que pueda soltar el interruptor de disparo instantáneamente si la broca
se traba en el hueco. El botón de cierre se debe usar sólo cuando el
rotomartillo está montado en una prensa de taladrar o se mantenga
estacionario por algún otro medio. Asegúrese de liberar el mecanismo de
cierre antes de desconectar el enchufe del tomacorriente. El no hacerlo
podría resultar en que el rotomartillo arranque inmediatamente la próxima vez
que se enchufe, ocasionando daños o lesiones.
El interruptor de disparo de velocidad variable permite el control de la
velocidad. Cuanto más se oprima el interruptor, mayor será la velocidad del
rotomartillo.
NOTA: Use velocidades más bajas para comenzar huecos sin granetazo,
taladrado en metal, plástico o cerámica, o apretar tuercas. Las velocidades
más altas son más aptas para taladrar madera y tablas de material
compuesto y para usar accesorios de lijar y pulir.
La palanca de inversión se utiliza para reversar el rotomartillo a fin de botar
tornillos o brocas trabadas. Está ubicada encima del disparador, como se
demuestra en la Figura 2. Para reversar el rotomartillo, apague (OFF) y
empuje la palanca de inversión hacia la izquierda (visto desde el extremo del
portabroca ). Para posicionar la palanca en operación de avance, apague el
rotomartillo (OFF) y empuje la palanca hacia la derecha.
ATENCIÓN:Cuando lo ponga en reverso para destrabar un brocas,
prepárese para un momento de torsión fuerte y reactivo.
Selector de Martillo/Taladro (DW567)
Para cambiar la herramienta de la modalidad de taladrado solamente a la de
rotomartillo o sólo martillo, gire el cuadrante al símbolo que aplica como se
demuestra en la Figura 3.
NOTA: El selector debe estar en la modalidad de taladro, rotomartillo o
martillo en todo momento. No hay otras posiciones de operación entre éstas.
Portabroca SDS
Para insertar la broca, inserte la espiga de la broca aprox. 3/4” dentro del
portabrocas. Empuje y gire la broca hasta que encaje bien. La broca quedará
afianzada en forma segura.
Para liberar la broca, empuje el collar hacia atrás y saque la broca.
17
Español
R
FIG. 1
R
PALANCA
INVERSORA
INTERRUPTOR
BOTÓN DE
CIERRE
FIG. 2
DW567/329785-01 10/1/02 9:56 AM Page 17
Page 20

18
Operación
TALADRADO
1. Siempre desenchufe el taladro al cambiar brocas o accesorios.
2. Use sólo brocas afiladas. Use las brocas helicoidales, las de gran
diámetro, de berbiquí, o de perforación para MADERA. Para
METAL, use brocas helicoidales de acero o brocas de perforación.
Para la ALBAÑILERÍA, como por ej. ladrillos, cemento, bloques de
hormigón, etc. use brocas con puntas de carburo, apropiadas para
taladrado de percusión. Cerciórese de que el material a taladrar
esté bien fijado o atornillado. De taladrar un material delgado, utilice
un bloque de madera como soporte para prevenir que el material se
dañe.
3. Aplique siempre presión en línea recta con la broca. Usar suficiente
presión para mantener el taladro mordiendo, pero no empujarlo
tan fuerte que atasque al motor o desvíe la broca.
4. Mantenga la herramienta firme para controlar la acción de
torcionamiento del taladro.
5. SI EL TALADRO SE ATASCA, se debe generalmente a que está
sobrecargado o utilizado incorrectamente. SUELTE EL
INTERRUPTOR DE DISPARO INMEDIATAMENTE, quite la broca
de la pieza de trabajo y determine la causa del atascamiento. NO
ACTIVAR Y DESACTIVAR EL INTERRUPTOR PARA INTENTAR
EL ARRANQUE DE UN TALADRO ATASCADO – ESTO PUEDE
DAÑARLO.
6. Para minimizar que la herramienta se atasque o atraviese el
material, reduzca la presión sobre el taladro y saque la broca
suavemente a través de la última parte fraccionada del hueco.
7. Mantenga el motor en marcha al sacar la broca de un hueco
taladrado. Esto ayudará a que no se trabe.
8. Con taladros de velocidad variable no hay necesidad de centrar el
punto a taladrar con punzón. Use una velocidad baja para
comenzar el hueco y acelere apretando el interruptor de disparo
más fuertemente cuando el hueco sea lo bastante profundo para
taladrar sin que la broca salte hacia afuera.
TALADRADO EN METAL
Se requiere un adaptador de ‘espiga SDS a una espiga redonda’. Cerciórese
de que la herramienta esté en modalidad de “sólo rotación”. (DW567
solamente. El modelo DW565 no tiene la modalidad de “sólo rotación”).
Comience a taladrar a baja velocidad y aumente a velocidad plena mientras
presiona la herramienta firmemente. Un flujo de viruta uniforme indica que la
velocidad del taladro es adecuada. Use un lubricante para corte al taladrar
metales. Las excepciones son hierro forjado y bronce, estos deben taladrarse
en seco. Los lubricantes para corte que mejor funcionan son aceites
sulfurizados para corte o manteca de cerdo; la grasa de tocino también sirve.
NOTA: Huecos grandes (5/16” a 1/2”) en acero se ejecutan más fácilmente
si primero se taladra un hueco piloto (5/32” a 3/16”).
TALADRADO EN MADERA
Se requiere un adaptador de ‘espiga SDS a una espiga redonda’. Cerciórese
de que la herramienta esté en modalidad de “sólo rotación”. (DW567
solamente, el modelo DW565 no tiene la modalidad de “sólo rotación”).
Comience a taladrar a baja velocidad y aumente a velocidad plena mientras
presiona la herramienta firmemente. Los huecos en madera pueden hacerse
con las mismas brocas helicoidales que se utilizan para el metal. Estas
brocas pueden recalentarse si no se sacan frecuentemente para quitar las
virutas de las ranuras. Para huecos más grandes, utilice brocas de gran
diámetro, de berbiquí o de perforación. Las piezas de trabajo que tienden a
Español
FIG. 3
REGLAJE DEL
TALADRO
REGLAJE DEL
MARTILLO
ROTOMARTILLO
- REGLAJE
DW567/329785-01 10/1/02 9:56 AM Page 18
Page 21

astillarse, deberán afincarse con un bloque madera.
TALADRADO EN ALBAÑILERÍA
Cuando se taladra en material de albañilería, use brocas con puntas de
carburo para taladrado de percusión y cerciórese de que la broca esté afilada.
Ejerza una fuerza constante y firme sobre la herramienta para un taladrado
eficaz. Un flujo uniforme de polvo indica que la velocidad del taladro es
adecuada.
Varilla de profundidad
Para ajustar la varilla de profundidad, afloje la manija y mueva la varilla de tal
forma que la distancia entre el extremo de la varilla y el extremo de la broca
iguala la profundidad de taladrado deseada. Cuando se taladra con varilla
de profundidad, parar el taladrado cuando ésta alcanza la superficie del
material.
Mantenimiento
LIMPIEZA Y LUBRICACIÓN
Utilice únicamente un jabón suave y paño húmedo para limpiar la
herramienta. Nunca debe permitir que algún líquido penetre la herramienta;
no sumerja nunca la herramienta o parte de ella en algún líquido.
La herramienta utiliza cojinetes auto-lubricantes y no requiere relubricación
periódica. En caso (poco probable) de necesitar servicio, lleve su herramienta
a un centro de servicio autorizado.
Accesorios
Los accesorios que se recomiendan usar con su herramienta están
disponibles a un costo adicional donde su distribuidor o centro de servicios
local.
ATENCIÓN: Puede ser peligroso usar cualquier accesorio no
recomendado.
CAPACIDAD MÁXIMA RECOMENDADA
DW565, DW567 DW567-220
CAPACIDAD MÁXIMA
ALBAÑILERÍA 1" 1" 1"
ACERO N/A 1/2" 1/2"
MADERA N/A 1 1/2" 1 1/2"
CAPACIDAD ÓPTIMA
ALBAÑILERÍA 5/32"-5/8" 5/32"-5/8" 5/32"-5/8"
Importante
Para garantizar la SEGURIDAD y la CONFIABILIDAD, deberán
hacerse reparaciones, mantenimiento y ajustes de esta herramienta
en los centros autorizados de servicio D
EWALT u otras organizaciones
autorizadas. Estas organizaciones prestan servicio a las herramientas
DeWALT y emplean siempre refacciones legitimas D
EWALT.
PARA REPARACION Y SERVICIO DE SUS HERRAMIENTAS
ELECTRICAS FAVOR DE DIRIGIRSE AL CENTRO DE SERVICIO MAS
CERCANO
CULIACAN
Av. Nicolas Bravo #1063 Sur (91 671) 242 10
GAUDALAJARA
Av. La Paz #1779 (91 3) 826 69 78.
MEXICO
Eje Lázaro Cárdenas No. 18 Local D, Col. Obrera 588-9377
MERIDA
Calle 63 #459-A (91 99) 23 54 90
MONTERREY
Av. Francisco I. Madero Pte. 1820-A (91 83) 72 11 25
PUEBLA
17 Norte #205 (91 22) 46 37 14
QUERETARO
Av. Madero 139 Pte. (91 42) 14 16 60
SAN LOUIS POTOSI
Pedro Moreno #100 Centro (91 48) 14 25 67
TORREON
Blvd. Independencia, 96 pte. (91 17) 16 52 65
VERACRUZ
Prolongación Diaz Miron #4280 (91 29) 21 70 16
VILLAHERMOSA
Constitucion 516-A (91 93) 12 53 17
PARA OTRAS LOCALIDADES LLAME AL: 326 7100
19
Español
DW567/329785-01 10/1/02 9:56 AM Page 19
Page 22

20
Póliza de GarantÍía
IDENTIFICACIÓN DEL PRODUCTO:
Sello o firma del Distribuidor.
Nombre del producto: __________ Mod./Cat.: _____________
Marca: _____________________ Núm. de serie:__________
(Datos para ser llenados por el distribuidor)
Fecha de compra y/o entrega del producto: __________________
Nombre y domicilio del distribuidor donde se adquirió el producto:
_____________________________________________________
Este producto está garantizado por un año a partir de la fecha de
entrega, contra cualquier defecto en su funcionamiento, así como en
materiales y mano de obra empleados para su fabricación. Nuestra
garantía incluye la reparación o reposición del producto y/o
componentes sin cargo alguno para el cliente, incluyendo mano de
obra, así como los gastos de transportación razonablemente erogados
derivados del cumplimiento de este certificado.
Para hacer efectiva esta garantía deberá presentar su herramienta y
esta póliza sellada por el establecimiento comercial donde se adquirió
el producto, de no contar con ésta, bastará la factura de compra.
EXCEPCIONES.
Esta garantía no será válida en los siguientes casos:
• Cuando el producto se hubiese utilizado en condiciones distintas a
las normales;
• Cuando el producto no hubiese sido operado de acuerdo con el
instructivo de uso que se acompaña;
• Cuando el producto hubiese sido alterado o reparado por personas
distintas a las enlistadas al final de este certificado.
Anexo encontrará una relación de sucursales de servicio de fábrica,
centros de servicio autorizados y franquiciados en la República
Mexicana, donde podrá hacer efectiva su garantía y adquirir partes,
refacciones y accesorios originales.
Garantía Completa
Las herramientas industriales DEWALT están garantizadas durante un
año a partir de la fecha de compra. Repararemos, sin cargos, cualquier
falla debida a material o mano de obra defectuosos. Por favor regrese
la unidad completa, con el transporte pagado, a cualquier Centro de
Servicio para Herramientas Industriales de D
EWALT o a las estaciones
de servicio autorizado enlistadas bajo "Herramientas Eléctricas" en la
Sección Amarilla. Esta garantía no se aplica a los accesorios ni a
daños causados por reparaciones efectuadas por terceras personas.
Esta garantía le otorga derechos legales específicos, y usted puede
tener otros derechos que pueden variar de estado a estado.
En adición a la garantía, las herramientas D
EWALT están amparadas
por nuestra:
GARANTÍA DE SATISFACCIÓN SIN RIESGO POR 30 DÍAS
Si usted no se encuentra completamente satisfecho con el desempeño
de su herramienta industrial D
EWALT, sencillamente devuélvala a los
vendedores participantes durante los primeros 30 días después de la
fecha de compra para que le efectúen un reembolso completo. Por
favor regrese la unidad completa, con el transporte pagado. Se puede
requerir prueba de compra.
Español
Epecificaciones DW565, DW567,DW567-220
Tensión de alimentación 120 v c.a.~
Potencia nominal: 828 W
Frecuencia de operación: 50/60 Hz
Consumo de corriente: 6,9 A
IMPORTADO: DEWALT S.A. DE C.V.
BOSQUES DE CIDROS ACCESO RADIATAS NO. 42
COL. BOSQUES DE LAS LOMAS.
05120 MÉXICO, D.F
TEL. 326-7100
Para servicio y ventas consulte
“HERRAMIENTAS ELECTRICAS”
en la sección amarilla.
DW567/329785-01 10/1/02 9:56 AM Page 20
 Loading...