

Page 1

Final page size: A5 (148mm x 210mm)
DCH323
DCH333
DCH334
Page 2

DeWALT
Fig. A
English (original instructions) 4
Copyright
B
Page 3
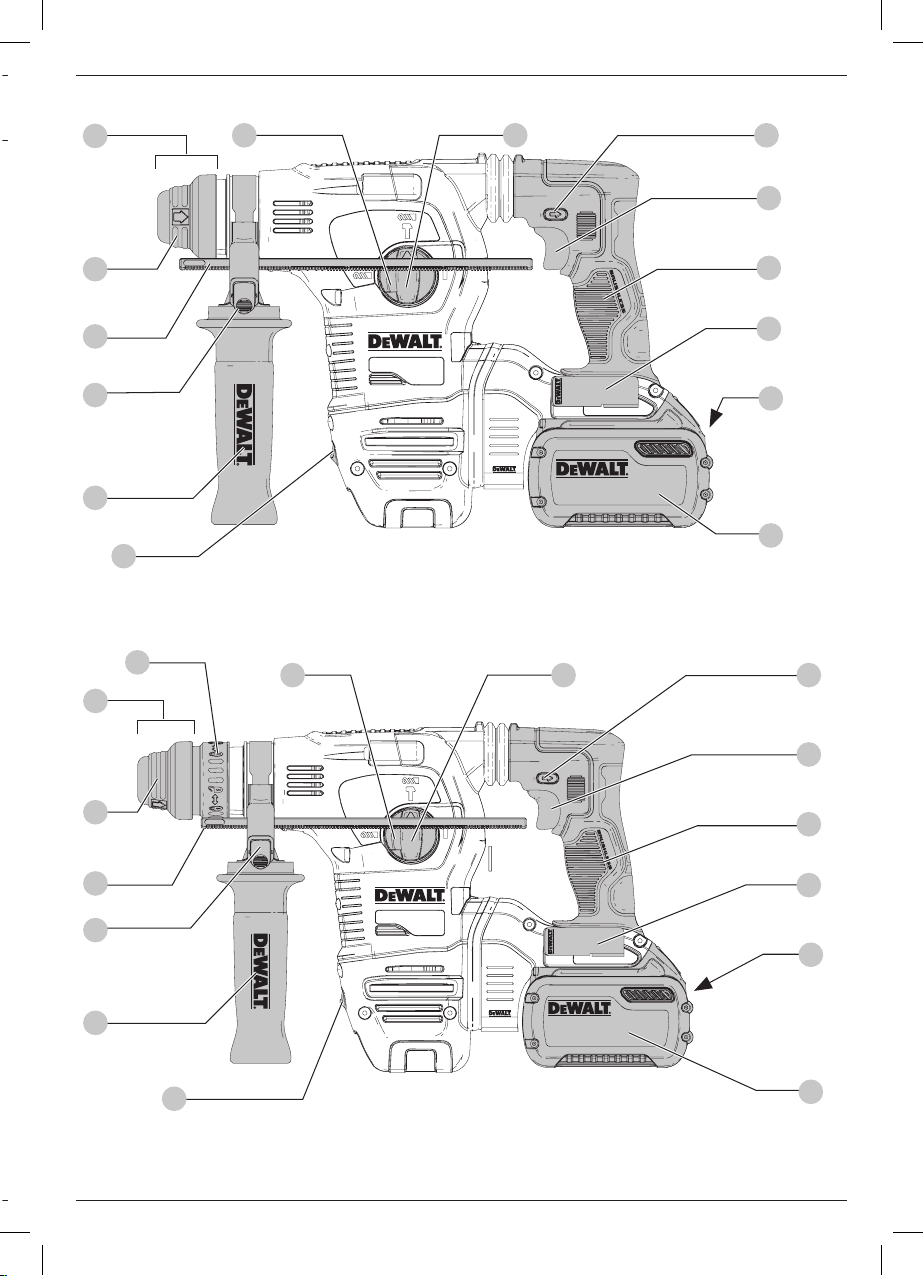
Fig. A
10
9
11
12
5
13
15
10
4
DCH323
4
3
3
2
1
8
14
7
6
2
1
9
11
12
5
13
DCH334
8
14
7
6
1
Page 4
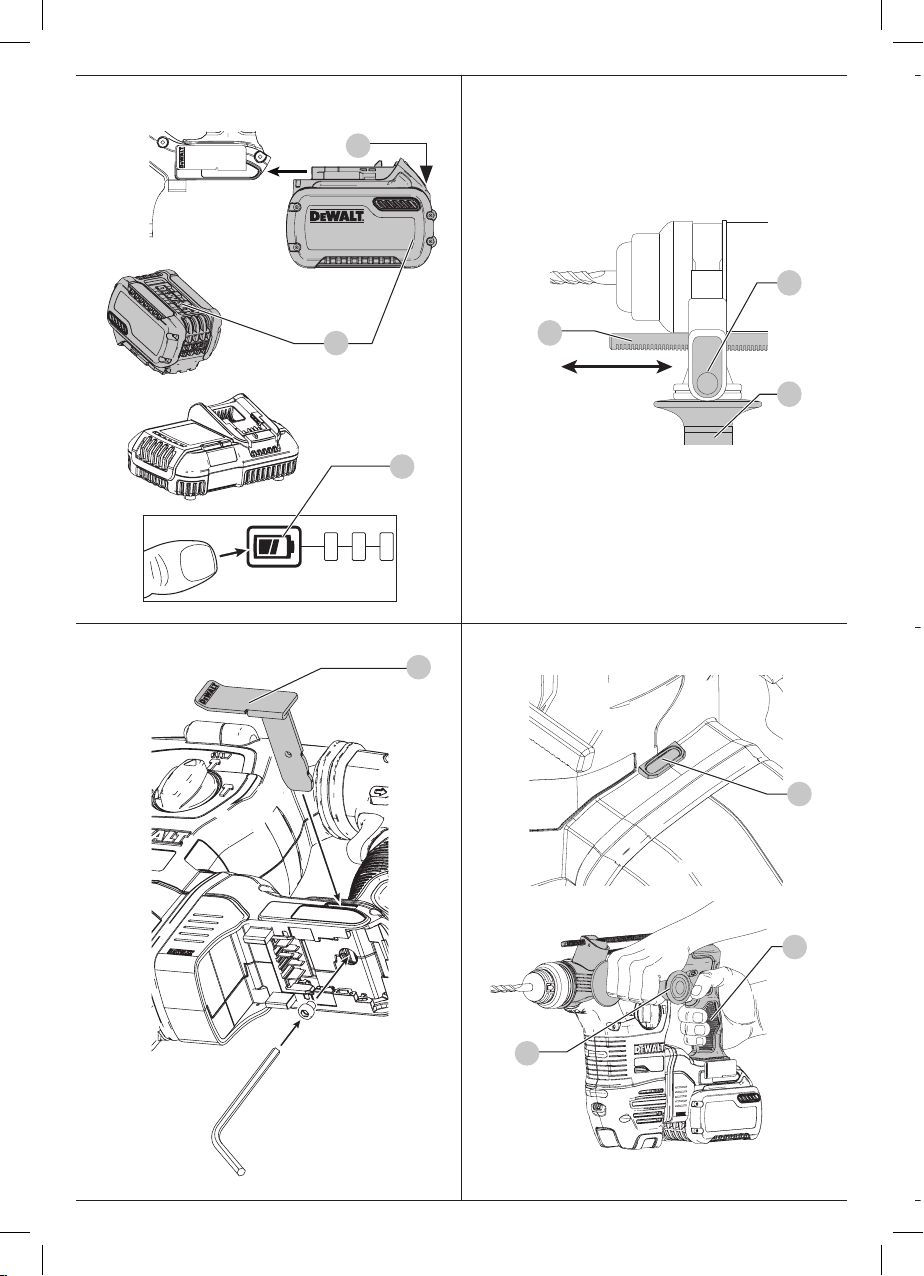
Fig. F
Fig. B Fig. C
7
12
6
19
Fig. D Fig. E
14
11
5
18
8
5
2
Page 5
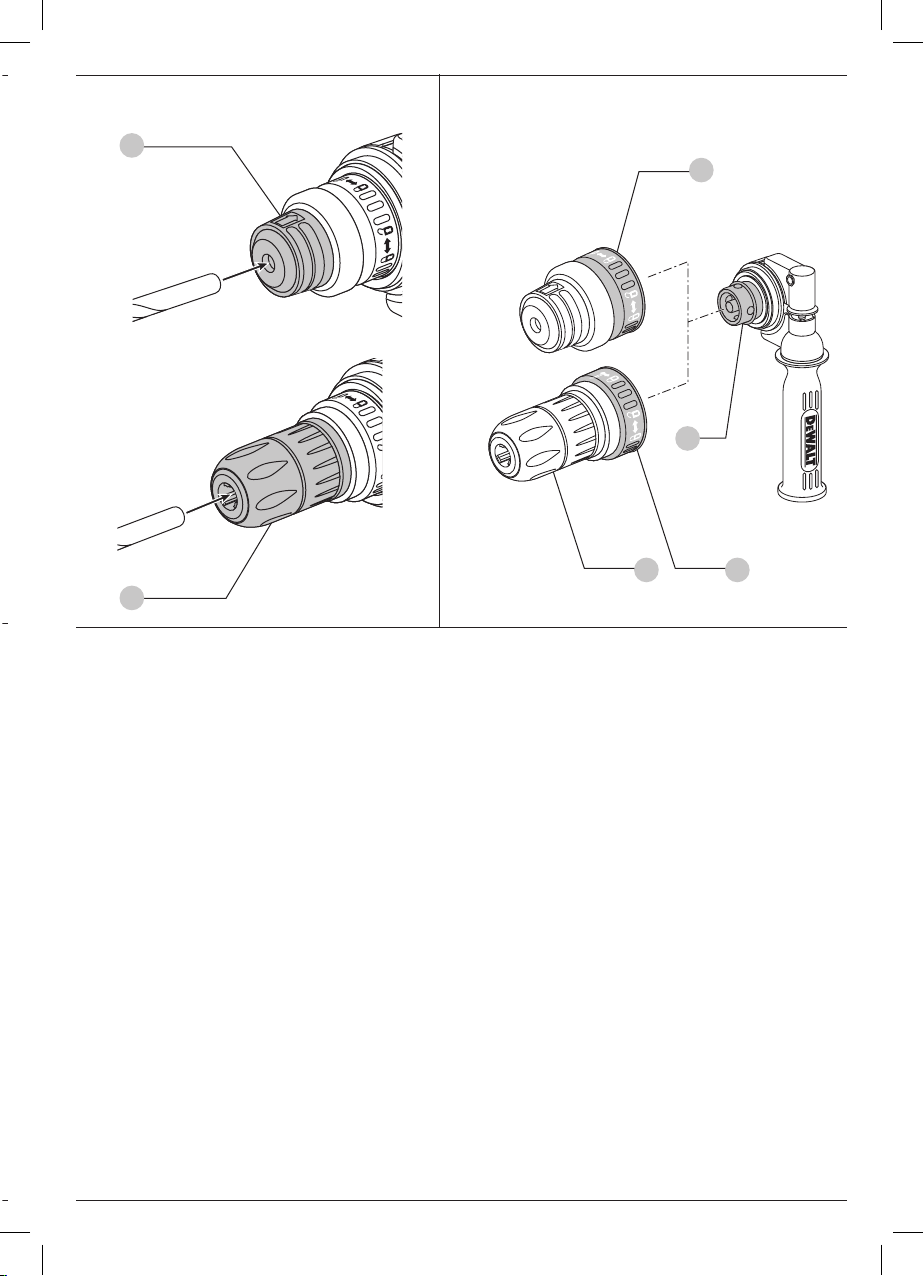
Fig. F Fig. G
10
DCH334
15
17
1516
16
3
Page 6
ENGLISH
DeWALT
DeWALT
DeWALT
DeWALT
DeWALT
DeWALT
General Power Tool Safety Warnings
SAVE ALL WARNINGS AND INSTRUCTIONS
The term “power tool” in the warnings refers to your mains-
operated (corded) power tool or battery-operated (cordless)
powertool.
1) Work area safety
2) Electrical safety
Weight
HEAVY-DUTY CORDLESS ROTARY HAMMERDRILL
DCH323, DCH333, DCH334
Congratulations!
You have chosen a
most reliable partners for professional power toolusers.
tool. Years of experience, thorough product development and innovation make
one of the
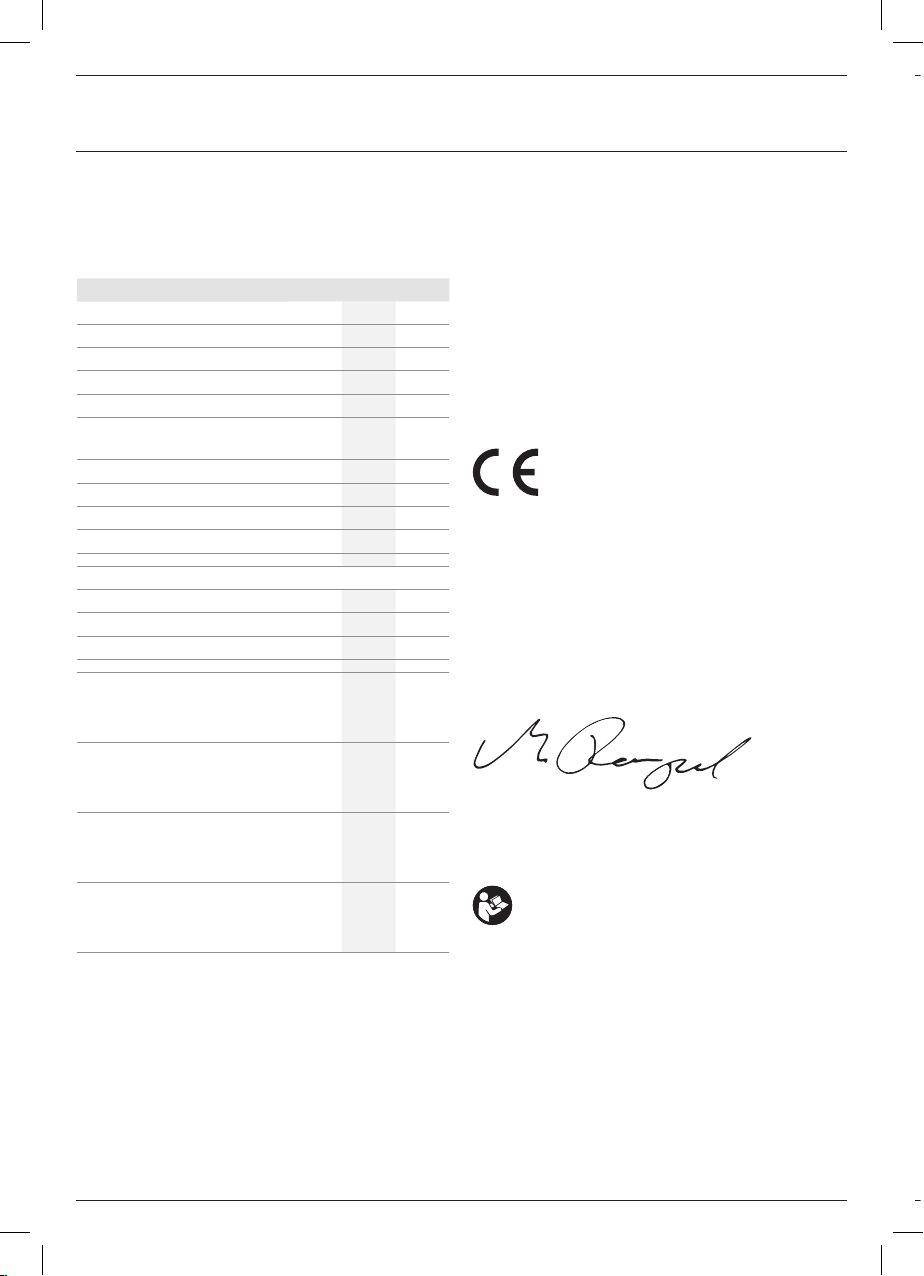
Technical Data
DCH323 DCH333 DCH334
Voltage VDC54 54 54
Type 1 1 1
No-load speed min-10–980 0–1000 0–1000
No-load Impact rate bpm 0–4390 0–4480 0–4480
Single impact energy (EPTA 05/2009) J 2.8 3.5 3.5
Maximum drilling range in steel/
wood/concrete
Tool holdler SDS-Plus SDS-Plus SDS-Plus
Collar diameter mm 54 54 54
Battery Type Li-Ion Li-Ion Li-Ion
Weight (without battery pack) kg 3.6 3.7 3.9
Noise and vibration total values (triax vector sum) according to EN60745-2-6:
LPA (emission sound pressure level)
LWA (sound power level)
K
(uncertainty for the given sound level)
Drilling into concrete
Vibration emission value a
Uncertainty K = m/s² 1.5 1.5 1.5
Chiselling
Vibration emission value a
Uncertainty K = m/s² 1.5 1.5 1.5
Drilling into metal
Vibration emission value a
Uncertainty K = m/s² 1.5 1.5 1.5
Screwdriving
Vibration emission value ah = m/s² ≤ 2.5 ≤ 2.5 ≤ 2.5
Uncertainty K = m/s² 1.5 1.5 1.5
The vibration emission level given in this information sheet has
been measured in accordance with a standardised test given in
EN60745 and may be used to compare one tool with another. It
may be used for a preliminary assessment ofexposure.
WARNING: The declared vibration emission level
represents the main applications of the tool. However if
the tool is used for different applications, with different
accessories or poorly maintained, the vibration emission
may differ. This may significantly increase the exposure
level over the total workingperiod.
An estimation of the level of exposure to vibration should
also take into account the times when the tool is switched
4
mm 13/30/28 13/30/30 13/30/30
dB(A) 94 94 94
dB(A) 105 105 105
dB(A) 3 3 3
= m/s² 7.5 7.5 7.5
h, HD
= m/s² 8.5 8.5 8.5
,
Cheq
h
= m/s² ≤ 2.5 ≤ 2.5 ≤ 2.5
h,D
off or when it is running but not actually doing the job.
This may significantly reduce the exposure level over the
total workingperiod.
Identify additional safety measures to protect the operator
from the effects of vibration such as: maintain the tool
and the accessories, keep the hands warm, organisation
of workpatterns.
EC-Declaration of Conformity
Machinery Directive
Heavy-Duty Cordless Rotary Hammerdrill
DCH323, DCH333, DCH334
declares that these products described under
Technical Data are in compliance with:
2006/42/EC, EN60745-1:2009+A11:2010, EN60745-2-6:2010.
These products also comply with Directive 2014/30/EU and
2011/65/EU. For more information, please contact
the following address or refer to the back of themanual.
The undersigned is responsible for compilation of the technical
file and makes this declaration on behalf of
Markus Rompel
Director Engineering
, Richard-Klinger-Straße 11,
D-65510, Idstein, Germany
11.08.16
WARNING: To reduce the risk of injury, read the
instructionmanual.
.
at
Definitions: Safety Guidelines
The definitions below describe the level of severity for each
signal word. Please read the manual and pay attention to
thesesymbols.
DANGER: Indicates an imminently hazardous
situation which, if not avoided, will result in death or
seriousinjury.
WARNING: Indicates a potentially hazardous situation
which, if not avoided, could result in death or
seriousinjury.
Page 7

Weight
Batteries Chargers/Charge Times (Minutes)
Cat # V
DCB547 18/54 9.0/3.0 1.25 420 220 140 85 140 X
DCB546 18/54 6.0/2.0 1.05 270 140 90 60 90 X
DCB181 18 1.5 0.35 70 35 22 22 22 45
DCB182 18 4.0 0.61 185 100 60 60 60 120
DCB183/B 18 2.0 0.40 90 50 30 30 30 60
DCB184/B 18 5.0 0.62 240 120 75 75 75 150
DCB185 18 1.3 0.35 60 30 22 22 22 X
CAUTION: Indicates a potentially hazardous situation
which, if not avoided, may result in minor or
moderateinjury.
NOTICE: Indicates a practice not related to
personal injury which, if not avoided, may result in
propertydamage.
Denotes risk of electricshock.
DC
Weight
Ah
DCB107 DCB113 DCB115 DCB118 DCB132 DCB119
kg
Denotes risk offire.
General Power Tool Safety Warnings
WARNING: Read all safety warnings and all
instructions. Failure to follow the warnings and
instructions may result in electric shock, fire and/or
seriousinjury.
SAVE ALL WARNINGS AND INSTRUCTIONS
FOR FUTURE REFERENCE
The term “power tool” in the warnings refers to your mainsoperated (corded) power tool or battery-operated (cordless)
powertool.
1) Work area safety
a ) Keep work area clean and well lit. Cluttered or dark
areas inviteaccidents.
b ) Do not operate power tools in explosive
atmospheres, such as in the presence of flammable
liquids, gases or dust. Power tools create sparks which
may ignite the dust orfumes.
c ) Keep children and bystanders away while operating
a power tool. Distractions can cause you to losecontrol.
2) Electrical safety
a ) Power tool plugs must match the outlet. Never
modify the plug in any way. Do not use any adapter
plugs with earthed (grounded) power tools.
Unmodified plugs and matching outlets will reduce risk of
electricshock.
b ) Avoid body contact with earthed or grounded
surfaces such as pipes, radiators, ranges and
refrigerators. There is an increased risk of electric shock if
your body is earthed orgrounded.
ENGLISH
c ) Do not expose power tools to rain or wet conditions.
Water entering a power tool will increase the risk of
electricshock.
d ) Do not abuse the cord. Never use the cord for
carrying, pulling or unplugging the power tool. Keep
cord away from heat, oil, sharp edges or moving
parts. Damaged or entangled cords increase the risk of
electricshock.
e ) When operating a power tool outdoors, use an
extension cord suitable for outdoor use. Use of a cord
suitable for outdoor use reduces the risk of electricshock.
f ) If operating a power tool in a damp location is
unavoidable, use a residual current device (RCD)
protected supply. Use of an RCD reduces the risk of
electricshock.
3) Personal safety
a ) Stay alert, watch what you are doing and use
common sense when operating a power tool. Do not
use a power tool while you are tired or under the
influence of drugs, alcohol or medication. A moment
of inattention while operating power tools may result in
serious personalinjury.
b ) Use personal protective equipment. Always wear
eye protection. Protective equipment such as dust mask,
non-skid safety shoes, hard hat, or hearing protection used
for appropriate conditions will reduce personalinjuries.
c ) Prevent unintentional starting. Ensure the switch
is in the off position before connecting to power
source and/or battery pack, picking up or carrying
the tool. Carrying power tools with your finger on the
switch or energising power tools that have the switch on
invitesaccidents.
d ) Remove any adjusting key or wrench before turning
the power tool on. A wrench or a key left attached
to a rotating part of the power tool may result in
personalinjury.
e ) Do not overreach. Keep proper footing and balance
at all times. This enables better control of the power tool
in unexpectedsituations.
f ) Dress properly. Do not wear loose clothing or
jewellery. Keep your hair, clothing and gloves away
from moving parts. Loose clothes, jewellery or long hair
can be caught in movingparts.
5
Page 8

ENGLISH
Residual Risks
The following risks are inherent to the use of rotary hammers:
• Injuries caused by touching the rotating parts or hot parts of
In spite of the application of the relevant safety regulations
and the implementation of safety devices, certain residual risks
cannot be avoided. These are:
• Impairment ofhearing.
• Risk of squeezing fingers when changing theaccessory.
• Health hazards caused by breathing dust developed when
Electrical Safety
The electric motor has been designed for one voltage only.
Always check that the battery pack voltage corresponds to the
voltage on the rating plate. Also make sure that the voltage of
your charger corresponds to that of yourmains.
If the supply cord is damaged, it must be replaced by a
specially prepared cord available through the DeWALT
serviceorganisation.
Chargers
DeWALT chargers require no adjustment and are designed to be
as easy as possible tooperate.
Important Safety Instructions for All
Battery Chargers
SAVE THESE INSTRUCTIONS: This manual contains important
safety and operating instructions for compatible battery
chargers (refer to TechnicalData).
• Before using charger, read all instructions and cautionary
g ) If devices are provided for the connection of dust
extraction and collection facilities, ensure these are
connected and properly used. Use of dust collection
can reduce dust-relatedhazards.
4) Power tool use and care
a ) Do not force the power tool. Use the correct power
tool for your application. The correct power tool
will do the job better and safer at the rate for which it
wasdesigned.
b ) Do not use the power tool if the switch does not turn
it on and off. Any power tool that cannot be controlled
with the switch is dangerous and must berepaired.
c ) Disconnect the plug from the power source and/or
the battery pack from the power tool before making
any adjustments, changing accessories, or storing
power tools. Such preventive safety measures reduce the
risk of starting the power toolaccidentally.
d ) Store idle power tools out of the reach of children
and do not allow persons unfamiliar with the power
tool or these instructions to operate the power tool.
Power tools are dangerous in the hands of untrainedusers.
e ) Maintain power tools. Check for misalignment or
binding of moving parts, breakage of parts and any
other condition that may affect the power tool’s
operation. If damaged, have the power tool repaired
before use. Many accidents are caused by poorly
maintained powertools.
f ) Keep cutting tools sharp and clean. Properly
maintained cutting tools with sharp cutting edges are less
likely to bind and are easier tocontrol.
g ) Use the power tool, accessories and tool bits etc.,
in accordance with these instructions taking into
account the working conditions and the work to be
performed. Use of the power tool for operations different
from those intended could result in a hazardoussituation.
5) Battery tool use and care
a ) Recharge only with the charger specified by the
manufacturer. A charger that is suitable for one type
of battery pack may create a risk of fire when used with
another batterypack.
b ) Use power tools only with specifically designated
battery packs. Use of any other battery packs may create
a risk of injury andfire.
c ) When battery pack is not in use, keep it away from
other metal objects like paper clips, coins, keys,
nails, screws or other small metal objects that can
make a connection from one terminal to another.
Shorting the battery terminals together may cause burns
or afire.
d ) Under abusive conditions, liquid may be ejected
from the battery; avoid contact. If contact
accidentally occurs, flush with water. If liquid
contacts eyes, additionally seek medical help. Liquid
ejected from the battery may cause irritation orburns.
6) Service
a ) Have your power tool serviced by a qualified repair
person using only identical replacement parts. This
will ensure that the safety of the power tool ismaintained.
Additional Safety Instructions for Rotary
Hammers
• Wear ear protectors. Exposure to noise can cause
hearingloss.
• Use auxiliary handles supplied with the tool. Loss of
control can cause personalinjury.
• Hold power tool by insulated gripping surfaces, when
performing an operation where the cutting accessory
may contact hidden wiring or its own cord. Cutting
accessory contacting a "live" wire may make exposed metal
parts of the power tool "live" and could give the operator an
electric shock.
• Use clamps or other practical way to secure and support the
workpiece to a stable platform. Holding the work by hand or
against your body is unstable and may lead to loss ofcontrol.
• Wear safety goggles or other eye protection. Hammering
operations cause chips to fly. Flying particles can cause
permanent eye damage. Wear a dust mask or respirator
for applications that generate dust. Ear protection may be
required for mostapplications.
• Keep a firm grip on the tool at all times. Do not attempt
to operate this tool without holding it with both hands. It
is recommended that the side handle be used at all times.
Operating this tool with one hand will result in loss of control.
Breaking through or encountering hard materials such as
re-bar may be hazardous as well. Tighten the side handle
securely beforeuse.
• Do not operate this tool for long periods of time. Vibration
caused by hammer action may be harmful to your hands and
arms. Use gloves to provide extra cushion and limit exposure
by taking frequent restperiods.
• Do not recondition bits yourself. Chisel reconditioning should
be done by an authorized specialist. Improperly reconditioned
chisels could causeinjury.
• Wear gloves when operating tool or changing bits. Accessible
metal parts on the tool and bits may get extremely hot
during operation. Small bits of broken material may damage
barehands.
• Never lay the tool down until the bit has come to a complete
stop. Moving bits could causeinjury.
• Do not strike jammed bits with a hammer to dislodge them.
Fragments of metal or material chips could dislodge and
causeinjury.
• Slightly worn chisels can be resharpened bygrinding.
• Keep the power cord away from the rotating bit. Do not
wrap the cord around any part of your body. An electric cord
wrapped around a spinning bit may cause personal injury and
loss ofcontrol.
6
Page 9

Residual Risks
DeWALT
DeWALT
DeWALT
DeWALT
DeWALT
The following risks are inherent to the use of rotary hammers:
• Injuries caused by touching the rotating parts or hot parts of
thetool.
In spite of the application of the relevant safety regulations
and the implementation of safety devices, certain residual risks
cannot be avoided. These are:
• Impairment ofhearing.
• Risk of squeezing fingers when changing theaccessory.
• Health hazards caused by breathing dust developed when
working in concrete and/ormasonry.
Electrical Safety
The electric motor has been designed for one voltage only.
Always check that the battery pack voltage corresponds to the
voltage on the rating plate. Also make sure that the voltage of
your charger corresponds to that of yourmains.
Your
accordance with EN60335; therefore no earth wire
isrequired.
If the supply cord is damaged, it must be replaced by a
specially prepared cord available through the
serviceorganisation.
charger is double insulated in
SAVE THESE INSTRUCTIONS
Chargers
chargers require no adjustment and are designed to be
as easy as possible tooperate.
Important Safety Instructions for All
Battery Chargers
SAVE THESE INSTRUCTIONS: This manual contains important
safety and operating instructions for compatible battery
chargers (refer to TechnicalData).
• Before using charger, read all instructions and cautionary
markings on charger, battery pack, and product using
batterypack.
WARNING: Shock hazard. Do not allow any liquid to get
inside charger. Electric shock mayresult.
WARNING: We recommend the use of a residual current
device with a residual current rating of 30mA orless.
CAUTION: Burn hazard. To reduce the risk of injury,
charge only
batteries may burst causing personal injury anddamage.
CAUTION: Children should be supervised to ensure that
they do not play with theappliance.
NOTICE: Under certain conditions, with the charger
plugged into the power supply, the exposed charging
contacts inside the charger can be shorted by foreign
material. Foreign materials of a conductive nature such
as, but not limited to, steel wool, aluminum foil or any
buildup of metallic particles should be kept away from
charger cavities. Always unplug the charger from the
power supply when there is no battery pack in the cavity.
Unplug charger before attempting to clean
rechargeable batteries. Other types of
ENGLISH
• DO NOT attempt to charge the battery pack with any
chargers other than the ones in this manual. The charger
and battery pack are specifically designed to worktogether.
• These chargers are not intended for any uses other than
charging
may result in risk of fire, electric shock orelectrocution.
• Do not expose charger to rain orsnow.
• Pull by plug rather than cord when disconnecting
charger. This will reduce risk ofdamage to electric plug
andcord.
• Make sure that cord is located so that it will not be
stepped on, tripped over, or otherwise subjected to
damage orstress.
• Do not use an extension cord unless it is absolutely
necessary. Use of improper extension cord could result in risk
of fire,electric shock, orelectrocution.
• Do not place any object on top of charger or place
the charger on a soft surface that might block the
ventilation slots and result in excessive internal heat.
Place the charger in a position away from any heat source. The
charger is ventilated through slots in the top and the bottom
of thehousing.
• Do not operate charger with damaged cord or plug—
have them replacedimmediately.
• Do not operate charger if it has received a sharp blow,
been dropped, or otherwise damaged in any way. Take it
to an authorised servicecentre.
• Do not disassemble charger; take it to an authorised
service centre when service or repair is required. Incorrect
reassembly may result in a risk of electric shock, electrocution
orfire.
• In case of damaged power supply cord the supply cord must
be replaced immediately by the manufacturer, its service agent
or similar qualified person to prevent anyhazard.
• Disconnect the charger from the outlet before
attempting any cleaning. This will reduce the risk of
electric shock. Removing the battery pack will not reduce
thisrisk.
• NEVER attempt to connect two chargerstogether.
• The charger is designed to operate on standard
230V household electrical power. Do not attempt to
use it on any other voltage. This does not apply to the
vehicularcharger.
rechargeable batteries. Any other uses
Using an Extension Cable
An extension cord should not be used unless absolutely
necessary. Use an approved extension cable suitable for
the power input of your charger (see Technical Data). The
minimum conductor size is 1mm2; the maximum length
is30m.
When using a cable reel, always unwind the cablecompletely.
Charging a Battery (Fig. B)
1. Plug the charger into an appropriate outlet before inserting
batterypack.
7
Page 10
ENGLISH
DeWALT
• Contents of opened battery cells may cause respiratory
Transportation
DeWALT batteries comply with all applicable shipping
regulations as prescribed by industry and legal standards which
include UN Recommendations on the Transport of Dangerous
Goods; International Air Transport Association (IATA) Dangerous
Goods Regulations, International Maritime Dangerous Goods
(IMDG) Regulations, and the European Agreement Concerning
The International Carriage of Dangerous Goods by Road (ADR).
Lithium-ion cells and batteries have been tested to section 38.3
of the UN Recommendations on the Transport of Dangerous
Goods Manual of Tests and Criteria.
In most instances, shipping a DeWALT battery pack will be
excepted from being classified as a fully regulated Class 9
Hazardous Material. In general, only shipments containing a
lithium-ion battery with an energy rating greater than 100 Watt
Hours (Wh) will require being shipped as fully regulated Class 9.
All lithium-ion batteries have the Watt Hour rating marked on
the pack. Furthermore, due to regulation complexities, DeWALT
does not recommend air shipping lithium-ion battery packs
alone regardless of Watt Hour rating. Shipments of tools with
batteries (combo kits) can be air shipped as excepted if the Watt
Hour rating of the battery pack is no greater than 100 Whr.
Regardless of whether a shipment is considered excepted
or fully regulated, it is the shipper's responsibility to consult
the latest regulations for packaging, labeling/marking and
documentation requirements.
2. Insert the battery pack
battery pack is fully seated in the charger. The red (charging)
light will blink repeatedly indicating that the charging
process hasstarted.
3. The completion of charge will be indicated by the red
light remaining ON continuously. The battery pack is fully
charged and may be used at this time or left in the charger.
To remove the battery pack from the charger, push the
battery release button
NOTE: To ensure maximum performance and life of lithium-ion
battery packs, charge the battery pack fully before firstuse.
6
into the charger, making sure the
7
on the batterypack.
Charger Operation
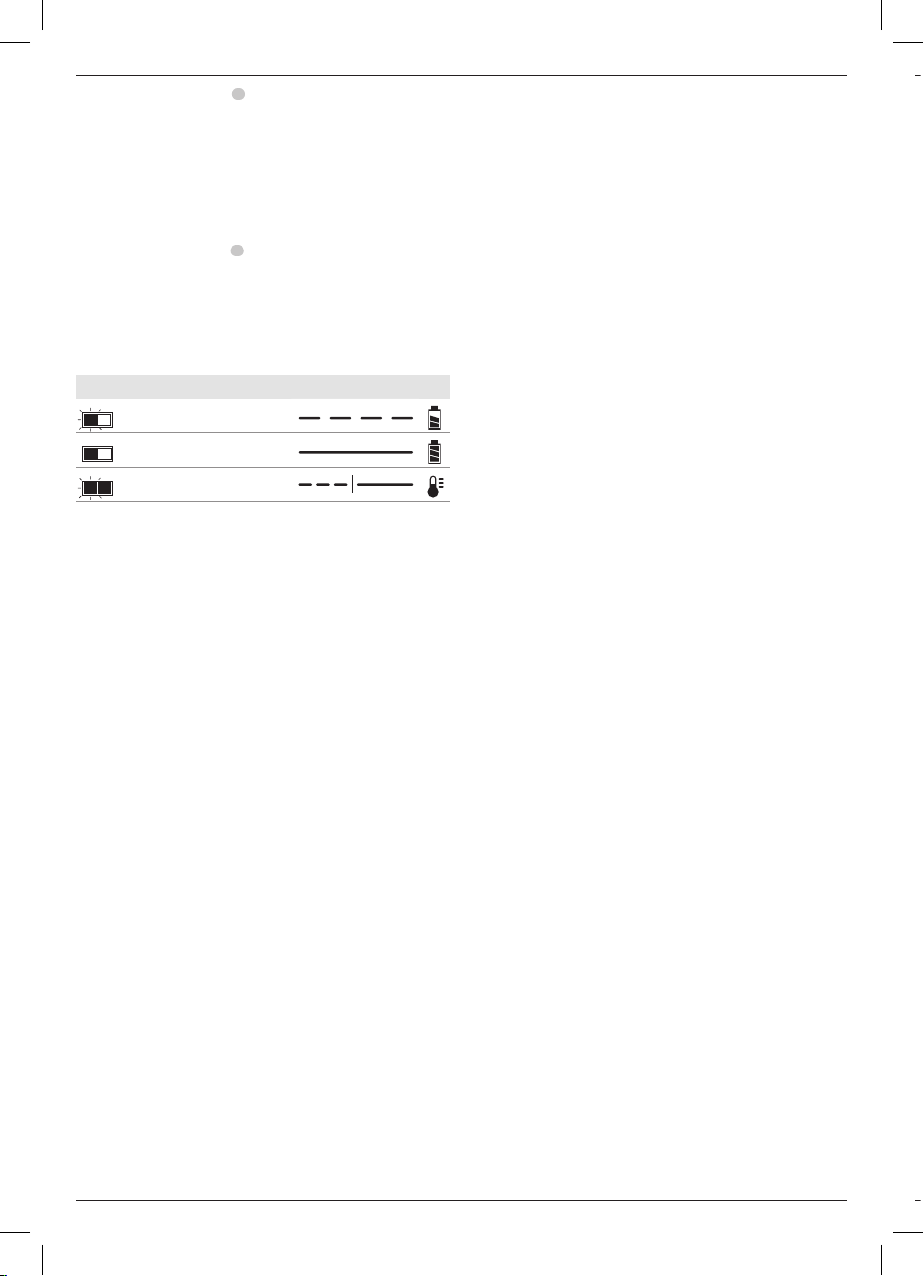
Refer to the indicators below for the charge status of the
batterypack.
Charge Indicators
Charging
Fully Charged
Hot/Cold Pack Delay*
* The red light will continue to blink, but a yellow indicator light
will be illuminated during this operation. Once the battery pack
has reached an appropriate temperature, the yellow light will
turn off and the charger will resume the chargingprocedure.
The compatible charger(s) will not charge a faulty battery pack.
The charger will indicate faulty battery by refusing to light or by
displaying problem pack or charger blinkpattern.
NOTE: This could also mean a problem with acharger.
If the charger indicates a problem, take the charger and battery
pack to be tested at an authorised servicecentre.
Hot/Cold Pack Delay
When the charger detects a battery pack that is too hot or too
cold, it automatically starts a Hot/Cold Pack Delay, suspending
charging until the battery pack has reached an appropriate
temperature. The charger then automatically switches to the
pack charging mode. This feature ensures maximum battery
packlife.
A cold battery pack will charge at a slower rate than a warm
battery pack. The battery pack will charge at that slower rate
throughout the entire charging cycle and will not return to
maximum charge rate even if the battery packwarms.
The DCB118 charger is equipped with an internal fan designed
to cool the battery pack. The fan will turn on automatically
when the battery pack needs to be cooled. Never operate the
charger if the fan does not operate properly or if ventilation slots
are blocked. Do not permit foreign objects to enter the interior
of thecharger.
Electronic Protection System
XR Li-Ion tools are designed with an Electronic Protection
System that will protect the battery pack against overloading,
overheating or deepdischarge.
The tool will automatically turn off if the Electronic Protection
System engages. If this occurs, place the lithium-ion battery
pack on the charger until it is fullycharged.
8
Wall Mounting
These chargers are designed to be wall mountable or to sit
upright on a table or work surface. If wall mounting, locate the
charger within reach of an electrical outlet, and away from a
corner or other obstructions which may impede air flow. Use
the back of the charger as a template for the location of the
mounting screws on the wall. Mount the charger securely using
drywall screws (purchased separately) at least 25.4mm long
with a screw head diameter of 7–9mm, screwed into wood to
an optimal depth leaving approximately 5.5mm of the screw
exposed. Align the slots on the back of the charger with the
exposed screws and fully engage them in theslots.
Charger Cleaning Instructions
WARNING: Shock hazard. Disconnect the charger
from the AC outlet before cleaning. Dirt and grease
may be removed from the exterior of the charger using a
cloth or soft non-metallic brush. Do not use water or any
cleaning solutions. Never let any liquid get inside the tool;
never immerse any part of the tool into aliquid.
Battery Packs
Important Safety Instructions for All
Battery Packs
When ordering replacement battery packs, be sure to include
catalogue number andvoltage.
The battery pack is not fully charged out of the carton. Before
using the battery pack and charger, read the safety instructions
below. Then follow charging proceduresoutlined.
READ ALL INSTRUCTIONS
• Do not charge or use battery in explosive atmospheres,
such as in the presence of flammable liquids, gases or
dust. Inserting or removing the battery from the charger may
ignite the dust orfumes.
• Never force battery pack into charger. Do not modify
battery pack in any way to fit into a non-compatible
charger as battery pack may rupture causing serious
personalinjury.
• Charge the battery packs only in
• DO NOT splash or immerse in water or otherliquids.
• Do not store or use the tool and battery pack in
locations where the temperature may reach or exceed
40 ˚C (104 ˚F) (such as outside sheds or metal buildings
in summer).
• Do not incinerate the battery pack even if it is severely
damaged or is completely worn out. The battery pack can
explode in a fire. Toxic fumes and materials are created when
lithium-ion battery packs areburned.
• If battery contents come into contact with the skin,
immediately wash area with mild soap and water. If
battery liquid gets into the eye, rinse water over the open eye
for 15 minutes or until irritation ceases. If medical attention
is needed, the battery electrolyte is composed of a mixture of
liquid organic carbonates and lithiumsalts.
chargers.
Page 11
• Contents of opened battery cells may cause respiratory
DeWALT
DeWALT
DeWALT
DeWALT
DeWALT
irritation. Provide fresh air. If symptoms persists, seek
medicalattention.
WARNING: Burn hazard. Battery liquid may be flammable
if exposed to spark orflame.
WARNING: Never attempt to open the battery pack for
any reason. If battery pack case is cracked or damaged,
do not insert into charger. Do not crush, drop or damage
battery pack. Do not use a battery pack or charger that
has received a sharp blow, been dropped, run over or
damaged in any way (i.e., pierced with a nail, hit with
a hammer, stepped on). Electric shock or electrocution
may result. Damaged battery packs should be returned to
service centre forrecycling.
WARNING: Fire hazard. Do not store or carry the
battery pack so that metal objects can contact
exposed battery terminals. For example, do not place
the battery pack in aprons, pockets, tool boxes, product kit
boxes, drawers, etc., with loose nails, screws, keys,etc.
CAUTION: When not in use, place tool on its side on
a stable surface where it will not cause a tripping
or falling hazard. Some tools with large battery packs
will stand upright on the battery pack but may be easily
knockedover.
Transportation
WARNING: Fire hazard. Transporting batteries can
possibly cause fire if the battery terminals inadvertently
come in contact with conductive materials. When
transporting batteries, make sure that the battery
terminals are protected and well insulated from materials
that could contact them and cause a short circuit.
batteries comply with all applicable shipping
regulations as prescribed by industry and legal standards which
include UN Recommendations on the Transport of Dangerous
Goods; International Air Transport Association (IATA) Dangerous
Goods Regulations, International Maritime Dangerous Goods
(IMDG) Regulations, and the European Agreement Concerning
The International Carriage of Dangerous Goods by Road (ADR).
Lithium-ion cells and batteries have been tested to section 38.3
of the UN Recommendations on the Transport of Dangerous
Goods Manual of Tests and Criteria.
In most instances, shipping a
excepted from being classified as a fully regulated Class 9
Hazardous Material. In general, only shipments containing a
lithium-ion battery with an energy rating greater than 100 Watt
Hours (Wh) will require being shipped as fully regulated Class 9.
All lithium-ion batteries have the Watt Hour rating marked on
the pack. Furthermore, due to regulation complexities,
does not recommend air shipping lithium-ion battery packs
alone regardless of Watt Hour rating. Shipments of tools with
batteries (combo kits) can be air shipped as excepted if the Watt
Hour rating of the battery pack is no greater than 100 Whr.
Regardless of whether a shipment is considered excepted
or fully regulated, it is the shipper's responsibility to consult
the latest regulations for packaging, labeling/marking and
documentation requirements.
battery pack will be
The information provided in this section of the manual is
provided in good faith and believed to be accurate at the time
the document was created. However, no warranty, expressed or
implied, is given. It is the buyer’s responsibility to ensure that its
activities comply with the applicable regulations.
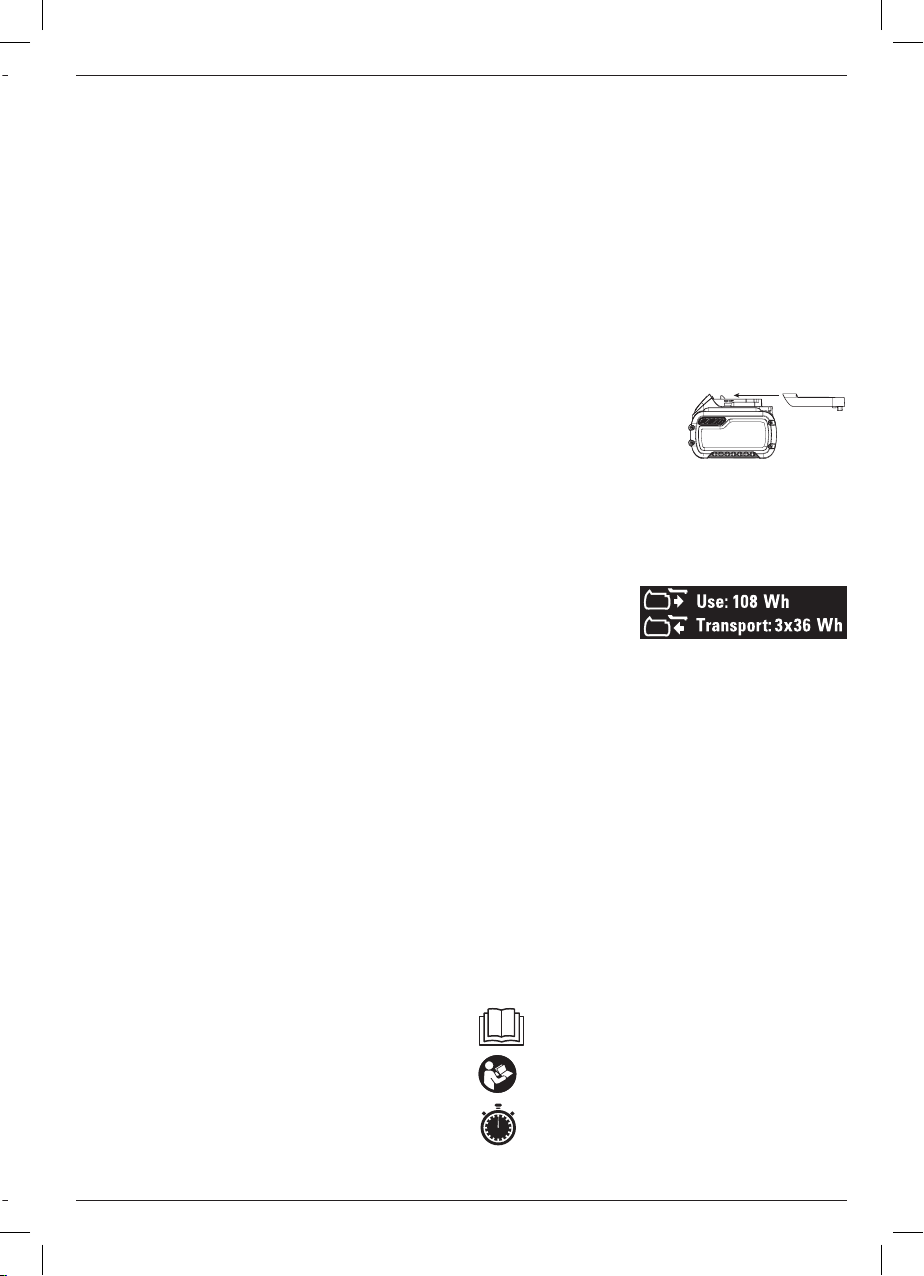
Transporting the FLEXVOLTTM Battery
The
Transport.
Use Mode: When the FLEXVOLTTM battery stands alone or is in
a
the FLEXVOLTTM battery is in a 54V or a 108V (two 54V batteries)
product, it will operate as a 54V battery.
Transport Mode: When the cap is attached to the FLEXVOLTTM
battery, the battery is in Transport mode. Keep the cap for
shipping.
When in Transport mode, strings
of cells are electrically
disconnected within the pack
resulting in 3 batteries with a
lower Watt hour (Wh) rating as compared to 1 battery with a
higher Watt hour rating. This increased quantity of 3 batteries
with the lower Watt hour rating can exempt the pack from
certain shipping regulations that are imposed upon the higher
Watt hour batteries.
For example, the Transport
Wh rating might indicate
3x36 Wh, meaning 3
batteries of 36 Wh each.
The Use Wh rating might
indicate 108Wh (1battery implied).
Storage Recommendations
1. The best storage place is one that is cool and dry away
2. For long storage, it is recommended to store a fully charged
NOTE: Battery packs should not be stored completely
depleted of charge. The battery pack will need to be recharged
beforeuse.
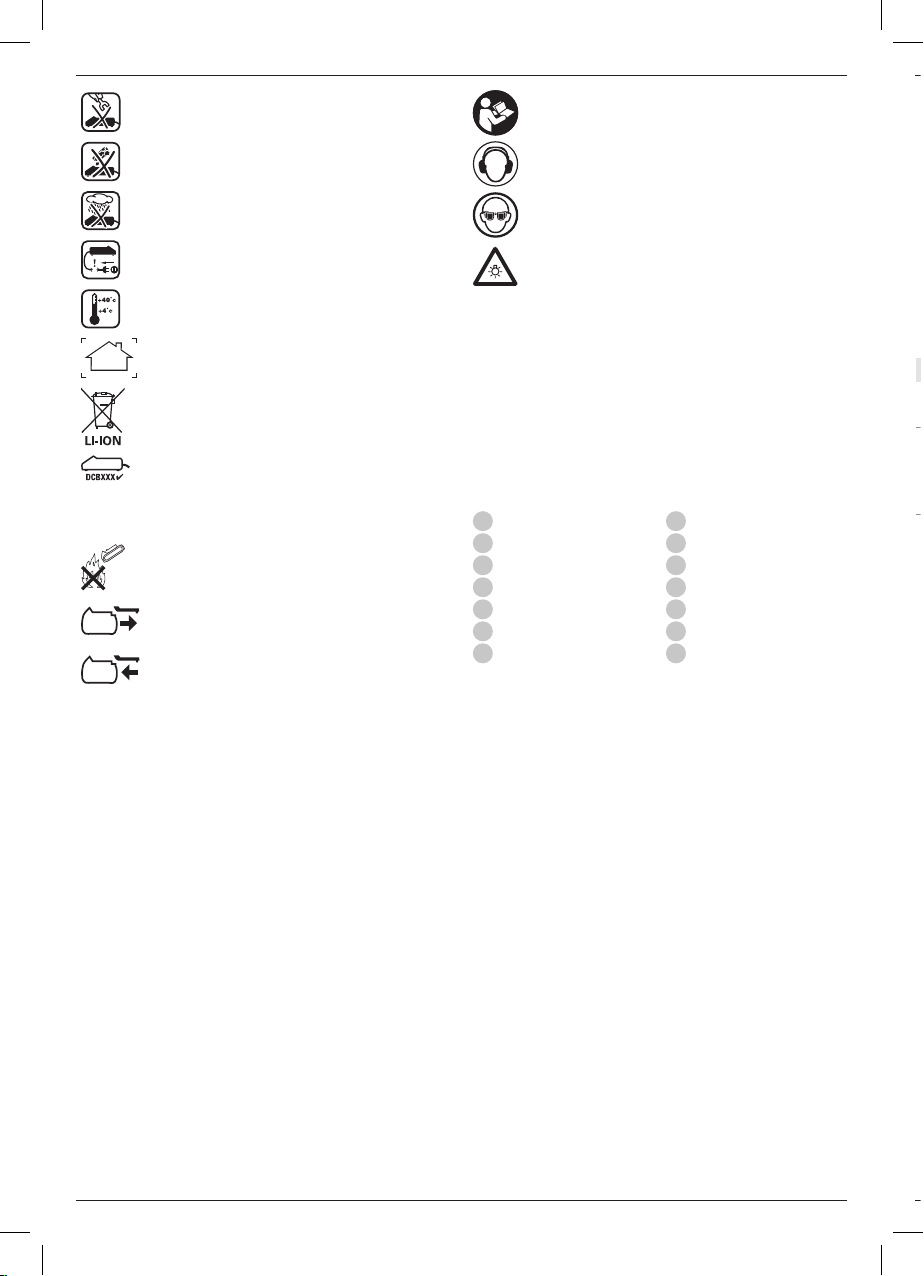
Labels on Charger and Battery Pack
In addition to the pictographs used in this manual, the labels
on the charger and the battery pack may show the following
pictographs:
FLEXVOLTTM battery has two modes: Use and
18V product, it will operate as an 18V battery. When
Example of Use and Transport Label Marking
from direct sunlight and excess heat or cold. For optimum
battery performance and life, store battery packs at room
temperature when not inuse.
battery pack in a cool, dry place out of the charger for
optimalresults.
Read instruction manual beforeuse.
See Technical Data for chargingtime.
ENGLISH
9
Page 12
ENGLISH
DeWALT
DeWALT
DeWALT
DeWALT
Mechanical Clutch
These tools are fitted with a mechanical clutch. The indication
that the clutch has activated will be an audible ratcheting
together with increasedvibration.
Anti-Rotation System (Fig. E)
In addition to the clutch, an anti-rotation system offers increased
user comfort and safety through an on-board, anti-rotation
technology capable of detecting if the user loses control of
thehammer. When a jam is detected, the torque and speed are
reducedinstantly. This feature prevents self rotation of the tool
reducing the occurrence of wristinjuries.
The anti-rotation system indicator
indicatestatus.
Indicator Diagnosis Solution
OFF Tool is functioning
SOLID Anti-Rotation
Active Vibration Control
For best vibration control, hold the tool as described in Proper
HandPosition.
The active vibration control neutralises rebound vibration from
the hammer mechanism. Lowering hand and arm vibration,
it allows more comfortable use for longer periods of time and
extends the life of theunit.
The hammer only needs enough pressure to engage the active
vibraton control. Applying too much pressure will not make
the tool drill or chip faster and active vibration control will
notengage.
ASSEMBLY AND ADJUSTMENTS
Inserting and Removing the Battery Pack
from the Tool (Fig. B)
NOTE: Make sure your battery pack
To Install the Battery Pack into the
Tool Handle
1. Align the battery pack
2. Slide it into the handle until the battery pack is firmly seated
Do not probe with conductiveobjects.
Do not charge damaged batterypacks.
Do not expose to water.
Have defective cords replacedimmediately.
Charge only between 4 ˚C and 40 ˚C.
Only for indooruse.
Discard the battery pack with due care for
theenvironment.
Charge
than the designated
other dangeroussituations.
Do not incinerate the batterypack.
USE (without transport cap). Example: Wh rating
indicates 108 Wh (1 battery with 108 Wh).
TRANSPORT (with built-in transport cap). Example:
Wh rating indicates 3 x 36 Wh (3batteries of 36 Wh).
battery packs only with designated
chargers. Charging battery packs other
charger may make them burst or lead to
batteries with a
Battery Type
The DCH323, DCH333, DCH334 operate on a 54 volt
batterypack.
These battery packs may be used: DCB546, DCB547. Refer to
Technical Data for moreinformation.
Package Contents
The package contains:
1 Cordless rotary hammerdrill
1 Side handle and depth rod
1 Charger
1 Battery pack (T1, X1)
2 Battery packs (T2, X2)
3 Battery packs (T3, X3)
1 Keyless chuck (DCH334)
1 Kit box
1 Instruction manual
• Check for damage to the tool, parts or accessories which may
have occurred duringtransport.
• Take the time to thoroughly read and understand this manual
prior tooperation.
Markings on Tool
The following pictograms are shown on the tool:
10
Read instruction manual beforeuse.
Wear earprotection.
Wear eyeprotection.
Visible radiation. Do not stare intolight.
Date Code Position
The date code, which also includes the year of manufacture, is
printed into thehousing.
Example:
2017 XX XX
Year of Manufacture
Description (Fig. A)
WARNING: Never modify the power tool or any part of it.
Damage or personal injury couldresult.
1
Variable speed switch
2
Forward/reverse button
3
Mode selector dial
4
Mode selector button
5
Side handle
6
Battery pack
7
Release button
8
Main handle
9
SDS-Plus tool holder
10
Sleeve
11
Depth rod
12
Depth rod release button
13
Worklight
14
Utility hook
Intended Use
Your cordless rotary hammerdrill has been designed for
professional drilling and hammerdrilling applications, as well as
screwdriving and chippingapplications.
DO NOT use under wet conditions or in the presence of
flammable liquids orgases.
Your cordless rotary hammerdrill is a professional powertool.
DO NOT let children come into contact with the tool.
Supervision is required when inexperienced operators use
thistool.
• Young children and the infirm. This appliance is not
intended for use by young children or infirm persons
withoutsupervision.
• This product is not intended for use by persons (including
children) suffering from diminished physical, sensory or
mental abilities; lack of experience, knowledge or skills
unless they are supervised by a person responsible for their
safety. Children should never be left alone with thisproduct.
Overload Clutch
In case of jamming of a drill bit, the drive to the drill spindle is
interrupted. Because of the resulting forces, always hold the
tool with both hands and take a firmstance. After the overload,
release and depress the trigger to re-engagedrive.
Page 13

Mechanical Clutch
DeWALT
DeWALT
These tools are fitted with a mechanical clutch. The indication
that the clutch has activated will be an audible ratcheting
together with increasedvibration.
Anti-Rotation System (Fig. E)
In addition to the clutch, an anti-rotation system offers increased
user comfort and safety through an on-board, anti-rotation
technology capable of detecting if the user loses control of
thehammer. When a jam is detected, the torque and speed are
reducedinstantly. This feature prevents self rotation of the tool
reducing the occurrence of wristinjuries.
The anti-rotation system indicator
indicatestatus.
Indicator Diagnosis Solution
OFF Tool is functioning
normally
SOLID Anti-Rotation
System has
been activated
(ENGAGED)
18
will illuminate to
Follow all warnings and instructions
when operating the tool.
With the tool properly supported,
release trigger. The tool will function
normally when the trigger is depressed
again and the indicator light will go out
Active Vibration Control
For best vibration control, hold the tool as described in Proper
HandPosition.
The active vibration control neutralises rebound vibration from
the hammer mechanism. Lowering hand and arm vibration,
it allows more comfortable use for longer periods of time and
extends the life of theunit.
The hammer only needs enough pressure to engage the active
vibraton control. Applying too much pressure will not make
the tool drill or chip faster and active vibration control will
notengage.
ASSEMBLY AND ADJUSTMENTS
WARNING: To reduce the risk of serious personal
injury, turn tool off and disconnect battery pack
before making any adjustments or removing/
installing attachments/accessories or when making
repair. An accidental start-up can causeinjury.
WARNING: Use only
battery packs andchargers.
Inserting and Removing the Battery Pack
from the Tool (Fig. B)
NOTE: Make sure your battery pack
To Install the Battery Pack into the
Tool Handle
1. Align the battery pack
handle (Fig. B).
2. Slide it into the handle until the battery pack is firmly seated
in the tool and ensure that you hear the lock snap intoplace.
6
is fullycharged.
6
with the rails inside the tool’s
ENGLISH
To Remove the Battery Pack from the Tool
1. Press the release button
out of the toolhandle.
2. Insert battery pack into the charger as described in the
charger section of thismanual.
7
and firmly pull the battery pack
Fuel Gauge Battery Packs
Some
consists of three green LED lights that indicate the level of
charge remaining in the batterypack.
To actuate the fuel gauge, press and hold the fuel gauge
button
illuminate designating the level of charge left. When the level
of charge in the battery is below the usable limit, the fuel gauge
will not illuminate and the battery will need to berecharged.
NOTE: The fuel gauge is only an indication of the charge left on
the battery pack. It does not indicate tool functionality and is
subject to variation based on product components, temperature
and end-userapplication.
battery packs include a fuel gauge which
19
. A combination of the three green LED lights will
Side Handle (Fig. A)
WARNING: To reduce the risk of personal injury, ALWAYS
operate the tool with the side handle properly installed.
Failure to do so may result in the side handle slipping
during tool operation and subsequent loss of control. Hold
tool with both hands to maximizecontrol.
The side handle
may be rotated 360˚ to permit right- or left-hand use. The side
handle must be tightened sufficiently to resist the twisting
action of the tool if the accessory binds or stalls. Be sure to grip
the side handle at the far end to control the tool during astall.
To loosen side handle, rotatecounterclockwise.
5
clamps to the front of the gear case and
To Adjust the Depth Rod (Fig. C)
1. Push in and hold the depth rod release button
sidehandle.
2. Move the depth rod
end of the rod and the end of the bit equals the desired
drillingdepth.
3. Release the button to lock rod into position. When drilling
with the depth rod, stop when end of rod reaches surface
ofmaterial.
11
so the distance between the
12
on the
Utility Hook (Fig. A, D)
A utility hook
side of the tool. To extend the utility hook pull it out from the
side of the tool. To store the utility hook push it back flush with
the side of thetool. If use of the hook is not desired at all, it can
be removedcompletely.
14
is fitted below the main handle
To Remove and/or Reinstall the
Utility Hook
1. Position the utility hook into the extended position and
remove the hex head screw located on the underside of the
mainhandle.
2. Pull out the utility hook until it is free from theunit.
8
on the left
11
Page 14
ENGLISH
Performing an Application (Fig. A)
1. Choose and install the appropriate chuck, adapter, and/or
2. Using the mode selector dial
3. Adjust the side handle
4. Place the bit/chisel on the desiredlocation.
5. Select the direction ofrotation using the forward/reverse
6. Depress the trigger switch
MAINTENANCE
Your DeWALT power tool has been designed to operate
over a long period of time with a minimum of maintenance.
Continuous satisfactory operation depends upon proper tool
care and regularcleaning.
The charger and battery pack are notserviceable.
3. To reinstall, insert the utility hook into the the slot below the
mainhandle.
Bit and Bit Holder
WARNING: Burn Hazard. ALWAYS wear gloves when
changing bits. Accessible metal parts on the tool and bits
may get extremely hot during operation. Small bits of
broken material may damage barehands.
The hammerdrill can be fitted with different bits depending on
the desired application. Use sharp drill bitsonly.
Bit Reccomendations
• For wood, use twist bits, spade bits, power auger bits or
holesaws.
• For metal, use high-speed steel twist drill bits or holesaws.
Use a cutting lubricant when drilling metals. The exceptions
are cast iron and brass which should be drilleddry.
• For masonry, such as brick, cement, cinder block, etc., use
carbide-tipped bits rated for percussiondrilling.
SDS-Plus Bit Holder (Fig. F)
NOTE: Special adapters are needed to use the SDS-plus tool
holder with straight shank bits and hexagonal screwdriver bits.
Refer to OptionalAccessories.
To insert a drill bit or other accessory:
1. Insert the shank of the bit about 19mm into SDS-Plus
toolholder.
2. Push and rotate bit until it locks in place. The bit will be
securelyheld.
3. To release bit, pull the sleeve
Keyless Chuck (Fig. F, G)
DCH334
On some models, a keyless chuck can be installed in place of the
SDS-Plus bitholder.
WARNING: Never use standard chucks in the rotary
hammeringmode.
Replacing the SDS-Plus Bit Holder with the Keyless Chuck
1. Select hammering only mode (see Operation Modes), this
locks the spindle to prevent it from rotating when unlocking
the removable toolholder.
2. Turn the locking collar
pull the installed bit holderoff.
3. Push the keyless chuck
the locking collar into the lockingposition.
4. To replace the keyless chuck with the SDS-Plus bit holder,
first remove the keyless chuck the same way as the SDSPlus bit holder was removed. Then replace the SDS-Plus
bitholder the same way as the keyless chuck wasreplaced.
To insert a drill bit or other accessory in keyless chuck:
1. Grasp the sleeve
the other hand grasping the base of thechuck.
2. Rotate the sleeve counterclockwise (as viewed from the
front) far enough to accept the desiredaccessory.
3. Insert the accessory about 19mm into the chuck and
tighten securely by rotating the chuck sleeve clockwise
12
16
10
back and remove thebit.
15
into the unlocked position and
16
onto the spindle
of the chuck with one hand and use
17
and turn
with one hand while holding the tool with the other hand.
Continue to rotate the chuck sleeve until several ratchet
clicks are heard to ensure full grippingpower.
Be sure to tighten chuck with one hand on the chuck sleeve and
one hand holding the tool for maximum tightness.
To release the accessory, repeat Steps 1 and 2above.
OPERATION
Instructions for Use
WARNING: Always observe the safety instructions and
applicableregulations.
WARNING: To reduce the risk of serious personal
injury, turn tool off and disconnect battery pack
before making any adjustments or removing/
installing attachments/accessories or when making
repair. An accidental start-up can causeinjury.
Proper Hand Position (Fig. E)
WARNING: To reduce the risk of serious personal injury,
ALWAYS use proper hand position asshown.
WARNING: To reduce the risk of serious personal
injury, ALWAYS hold securely in anticipation of a
suddenreaction.
Proper hand position requires one hand on the main handle
with the other hand on the side handle
5
.
8
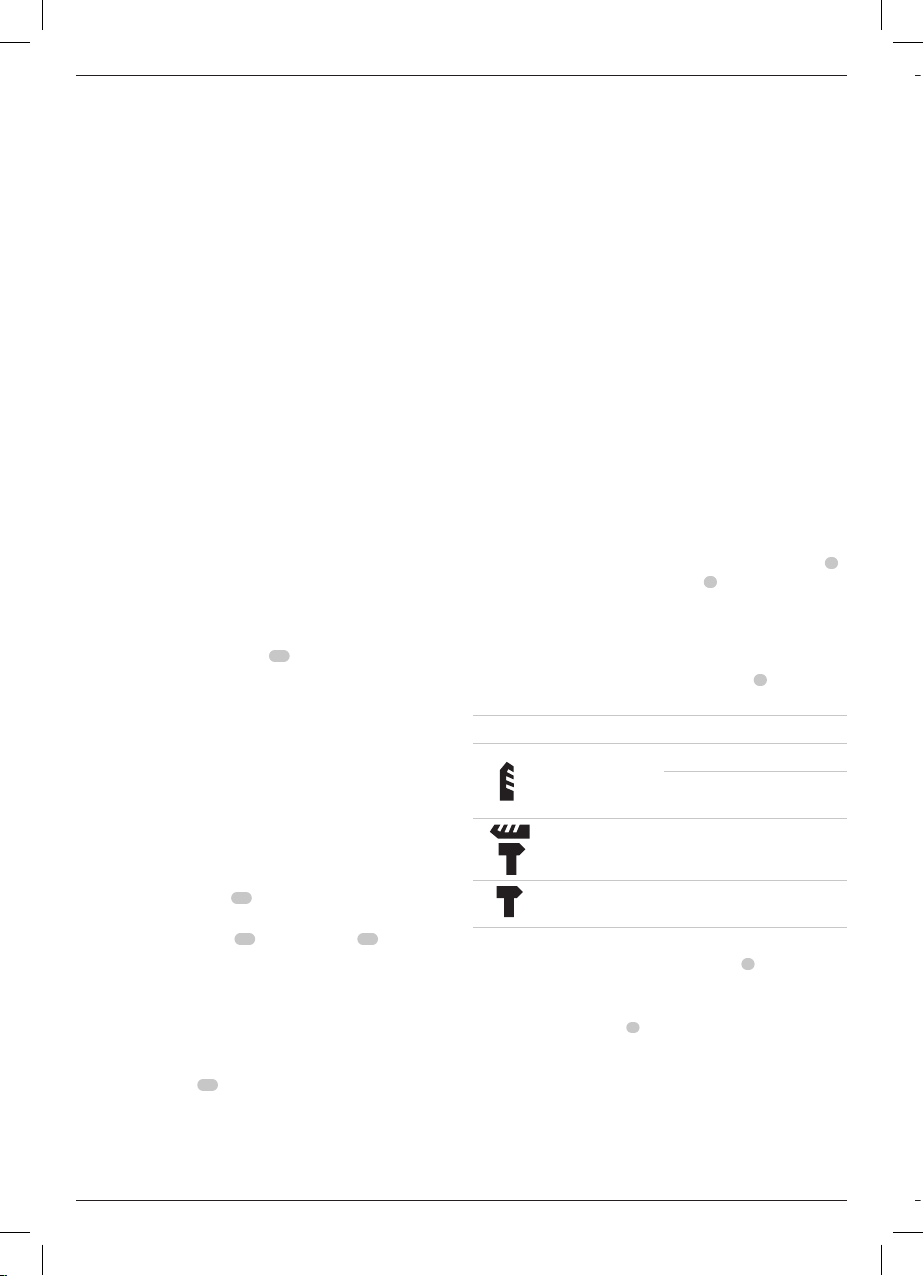
Operation Modes (Fig. A)
WARNING: Do not select the operating mode when the
tool isrunning.
Your tool is equipped with a mode selector dial
mode appropriate to desiredoperation.
Symbol Mode Application
Screwdriving
Rotary Drilling
Rotary
Hammering
Hammering
only
To select an operating mode:
1. Depress the mode selector release button
2. Rotate the mode selector dial so that the arrow points to the
symbol corresponding with the desiredmode.
NOTE: The mode selector
hammering or hammering only mode at all times. There are no
operable positions inbetween. It may be necessary to briefly
run the motor after having changed from 'hammering only' to
'rotary' modes in order to align thegears.
Drilling into steel, wood
andplastics
Drilling into concrete and
masonry
Lightchipping
3
must be in rotary drilling, rotary
3
to selectthe
4
.
,
Page 15
Performing an Application (Fig. A)
DeWALT
DeWALT
DeWALT
WARNING: TO REDUCE THE RISK OF PERSONAL
INJURY, ALWAYS ensure workpiece is anchored or
clamped firmly. If drilling thin material, use a wood “backup” block to prevent damage to thematerial.
WARNING: Always wait until the motor has come to
a complete standstill before changing the direction
ofrotation.
1. Choose and install the appropriate chuck, adapter, and/or
bit onto to the tool. Refer to Bit and BitHolders.
2. Using the mode selector dial
appropriate to desired application. Refer to
OperationModes.
3. Adjust the side handle
4. Place the bit/chisel on the desiredlocation.
5. Select the direction ofrotation using the forward/reverse
2
button
. When changing the position of the control
button, be sure the trigger isreleased.
- To select forward rotation, press the for ward/re verse
control button on the right side of thetool.
- To select reverse, press the forward/reverse control
button on the left side of thetool.
NOTE: The center position of the control button locks
the tool in the offposition.
6. Depress the trigger switch
the trigger switch, the faster the tool will operate. For
maximum tool life, use variable speed only for starting holes
orfasteners.
NOTE: Depending on your tool, depressing the trigger
switch activates a worklight
immediate work surface. Refer to Description. The worklight
will automatically turn off 20 seconds after the trigger
switch isreleased.
WARNING:
• Do not use this tool to mix or pump easily combustible
or explosive fluids (benzine, alcohol, etc.).
• Do not mix or stir inflammable liquids
labelledaccordingly.
3
, selectthe mode
5
asrequired.
1
. The farther you depress
13
designed to illuminate the
MAINTENANCE
Your
over a long period of time with a minimum of maintenance.
Continuous satisfactory operation depends upon proper tool
care and regularcleaning.
The charger and battery pack are notserviceable.
power tool has been designed to operate
WARNING: To reduce the risk of serious personal
injury, turn tool off and disconnect battery pack
before making any adjustments or removing/
installing attachments/accessories or when making
repair. An accidental start-up can causeinjury.
ENGLISH
Lubrication
Your power tool requires no additionallubrication.
Cleaning
WARNING: Blow dirt and dust out of the main housing
with dry air as often as dirt is seen collecting in and around
the air vents. Wear approved eye protection and approved
dust mask when performing thisprocedure.
WARNING: Never use solvents or other harsh chemicals
for cleaning the non-metallic parts of the tool. These
chemicals may weaken the materials used in these parts.
Use a cloth dampened only with water and mild soap.
Never let any liquid get inside the tool; never immerse any
part of the tool into aliquid.
Optional Accessories
WARNING: Since accessories, other than those offered
by
of such accessories with this tool could be hazardous.
To reduce the risk of injury, only
accessories should be used with thisproduct.
Various types of SDS-Plus drill bits and chisels are available as
anoption. Accessories and attachments used must be regularly
lubricated around the SDS-Plusfitment.
Consult your dealer for further information on the
appropriateaccessories.
, have not been tested with this product, use
recommended
Protecting the Environment
Separate collection. Products and batteries marked
with this symbol must not be disposed of with normal
householdwaste.
Products and batteries contain materials that can
be recovered or recycled reducing the demand for raw
materials. Please recycle electrical products and batteries
according to local provisions. Further information is available at
www.2helpU.com.
Rechargeable Battery Pack
This long life battery pack must be recharged when it fails
to produce sufficient power on jobs which were easily done
before. At the end of its technical life, discard it with due care for
our environment:
• Run the battery pack down completely, then remove it from
thetool.
• Li-Ion cells are recyclable. Take them to your dealer or a
local recycling station. The collected battery packs will be
recycled or disposed ofproperly.
13
Page 16

Belgique et
Luxembourg België
en Luxemburg
DeWALT - Belgium BVBA
Egide Walschaertsstraat 16
2800 Mechelen
Tel: NL 32 15 47 37 63
Tel: FR 32 15 47 37 64
Fax: 32 15 47 37 99
www.dewalt.be
[email protected]
Danmark DeWALT
Roskildevej 22
2620 Albertslund
Tel: 70 20 15 10
Fax: 70 22 49 10
www.dewalt.dk
[email protected]
Deutschland DeWALT
Richard Klinger Str. 11
65510 Idstein
Tel: 06126-21-1
Fax: 06126-21-2770
www.dewalt.de
[email protected]
Ελλάς DeWALT (Ελλάς) Α.Ε.
EΔΡΑ-ΓΡΑΦΕΙΑ : Στράβωνος 7
& Λ. Βουλιαγμένης, Γλυφάδα 166 74, Αθήνα
SERVICE : Ημερος Τόπος 2 (Χάνι Αδάμ) – 193 00 Ασπρόπυργος
Τηλ: 00302108981616
Φαξ: 00302108983570
www.dewalt.gr
[email protected]
España DeWALT Ibérica, S.C.A.
Parc de Negocios “Mas Blau”
Edificio Muntadas, c/Bergadá, 1, Of. A6
08820 El Prat de Llobregat (Barcelona)
Tel: 934 797 400
Fax: 934 797 419
www.dewalt.es
[email protected]
France DeWALT
5, allée des Hêtres
BP 30084, 69579 Limonest Cedex
Tel: 04 72 20 39 20
Fax: 04 72 20 39 00
www.dewalt.fr
[email protected]
Schweiz
Suisse
Svizzera
DeWALT
In der Luberzen 42
8902 Urdorf
Tel: 044 - 755 60 70
Fax: 044 - 730 70 67
www.dewalt.ch
[email protected]
Ireland DeWALT
Calpe House Rock Hill
Black Rock, Co. Dublin
Tel: 00353-2781800
Fax: 00353-2781811
www.dewalt.ie
Italia DeWALT
via Energypark
20871 Vimercate (MB), IT
Tel: 800-014353
39 039 9590200
Fax: 39 039 9590313
www.dewalt.it
Nederlands DeWALT Netherlands BV
Holtum Noordweg 35
6121 RE BORN, Postbus 83, 6120 AB BORN
Tel: 31 164 283 063
Fax: 31 164 283 200
www.dewalt.nl
Norge DeWALT
Postboks 4613, Nydalen
0405 Oslo
Tel: 45 25 13 00
Fax: 45 25 08 00
www.dewalt.no
[email protected]
Österreich DeWALT
Werkzeug Vertriebsges m.b.H
Oberlaaerstrasse 248, A-1230 Wien
Tel: 01 - 66116 - 0
Fax: 01 - 66116 - 614
www.dewalt.at
[email protected]
Portugal DeWALT Limited, SARL
Centro de Escritórios de Sintra Avenida
Almirante Gago Coutinho, 132/134, Edifício 14
2710-418 Sintra
Tel: 214 66 75 00
Fax: 214 66 75 80
www.dewalt.pt
[email protected]
Suomi DeWALT
PL 47
00521 Helsinki
Puh: 010 400 4333
Faksi: 0800 411 340
www.dewalt.fi
[email protected]
Sverige DeWALT
Box 94
431 22 Mölndal
Tel: 031 68 61 60
Fax: 031 68 60 08
www.dewalt.se
[email protected]
Türkiye KALE Hırdavat ve Makina A.Ş.
Defterdar Mah. Savaklar Cad. No:15
Edirnekapı / Eyüp / İSTANBUL 34050 TÜRKİYE
Tel: 0212 533 52 55
Faks: 0212 533 10 05
www.dewalt.com.tr
United
Kingdom
DeWALT, 210 Bath Road;
Slough, Berks SL1 3YD
Tel: 01753-567055
Fax: 01753-572112
www.dewalt.co.uk
[email protected]
Australia DeWALT
810 Whitehorse Road Box Hill
VIC 3103 Australia
Tel: Aust 1800 338 002
Tel: NZ 0800 339 258
www.dewalt.com.au
www.dewalt.co.nz
Middle East Africa DeWALT
P.O. Box - 17164,
Jebel Ali Free Zone (South), Dubai, UAE
Tel: 971 4 812 7400
Fax: 971 4 2822765
www.dewalt.ae
[email protected]
N490009
01/17
 Loading...