

Page 1
INSTRUCTION MANUAL
GUIDE D'UTILISATION
MANUAL DE INSTRUCCIONES
D51321 Coil Roofing Nailer (3/4" - 1 3/4")
D51321 Cloueuse à bobine pour toitures de 19,1 à 45 mm (3/4 à 1-3/4 po.)
D51321 Clavadora para techado en rollo (20 – 50 mm ó 3/4 – 1-3/4 pulg.)
INSTRUCTIVO DE OPERACIÓN, CENTROS DE SERVICIO Y
PÓLIZA DE GARANTÍA. ADVERTENCIA: LÉASE ESTE
INSTRUCTIVO ANTES DE USAR EL PRODUCTO.
Questions? See us on the World Wide Web at www.dewalt.com
DEWALT Industrial Tool Co., 701 East Joppa Road, Baltimore, MD 21286 (MAR04) Form No. 614989-00 D51321 Copyright © 2004
The following are trademarks for one or more DEWALT power tools: the yellow and black color scheme; the “D” shaped air intake grill; the array of pyramids on the handgrip; the kit box configuration; and the array of lozengeshaped humps on the surface of the tool.
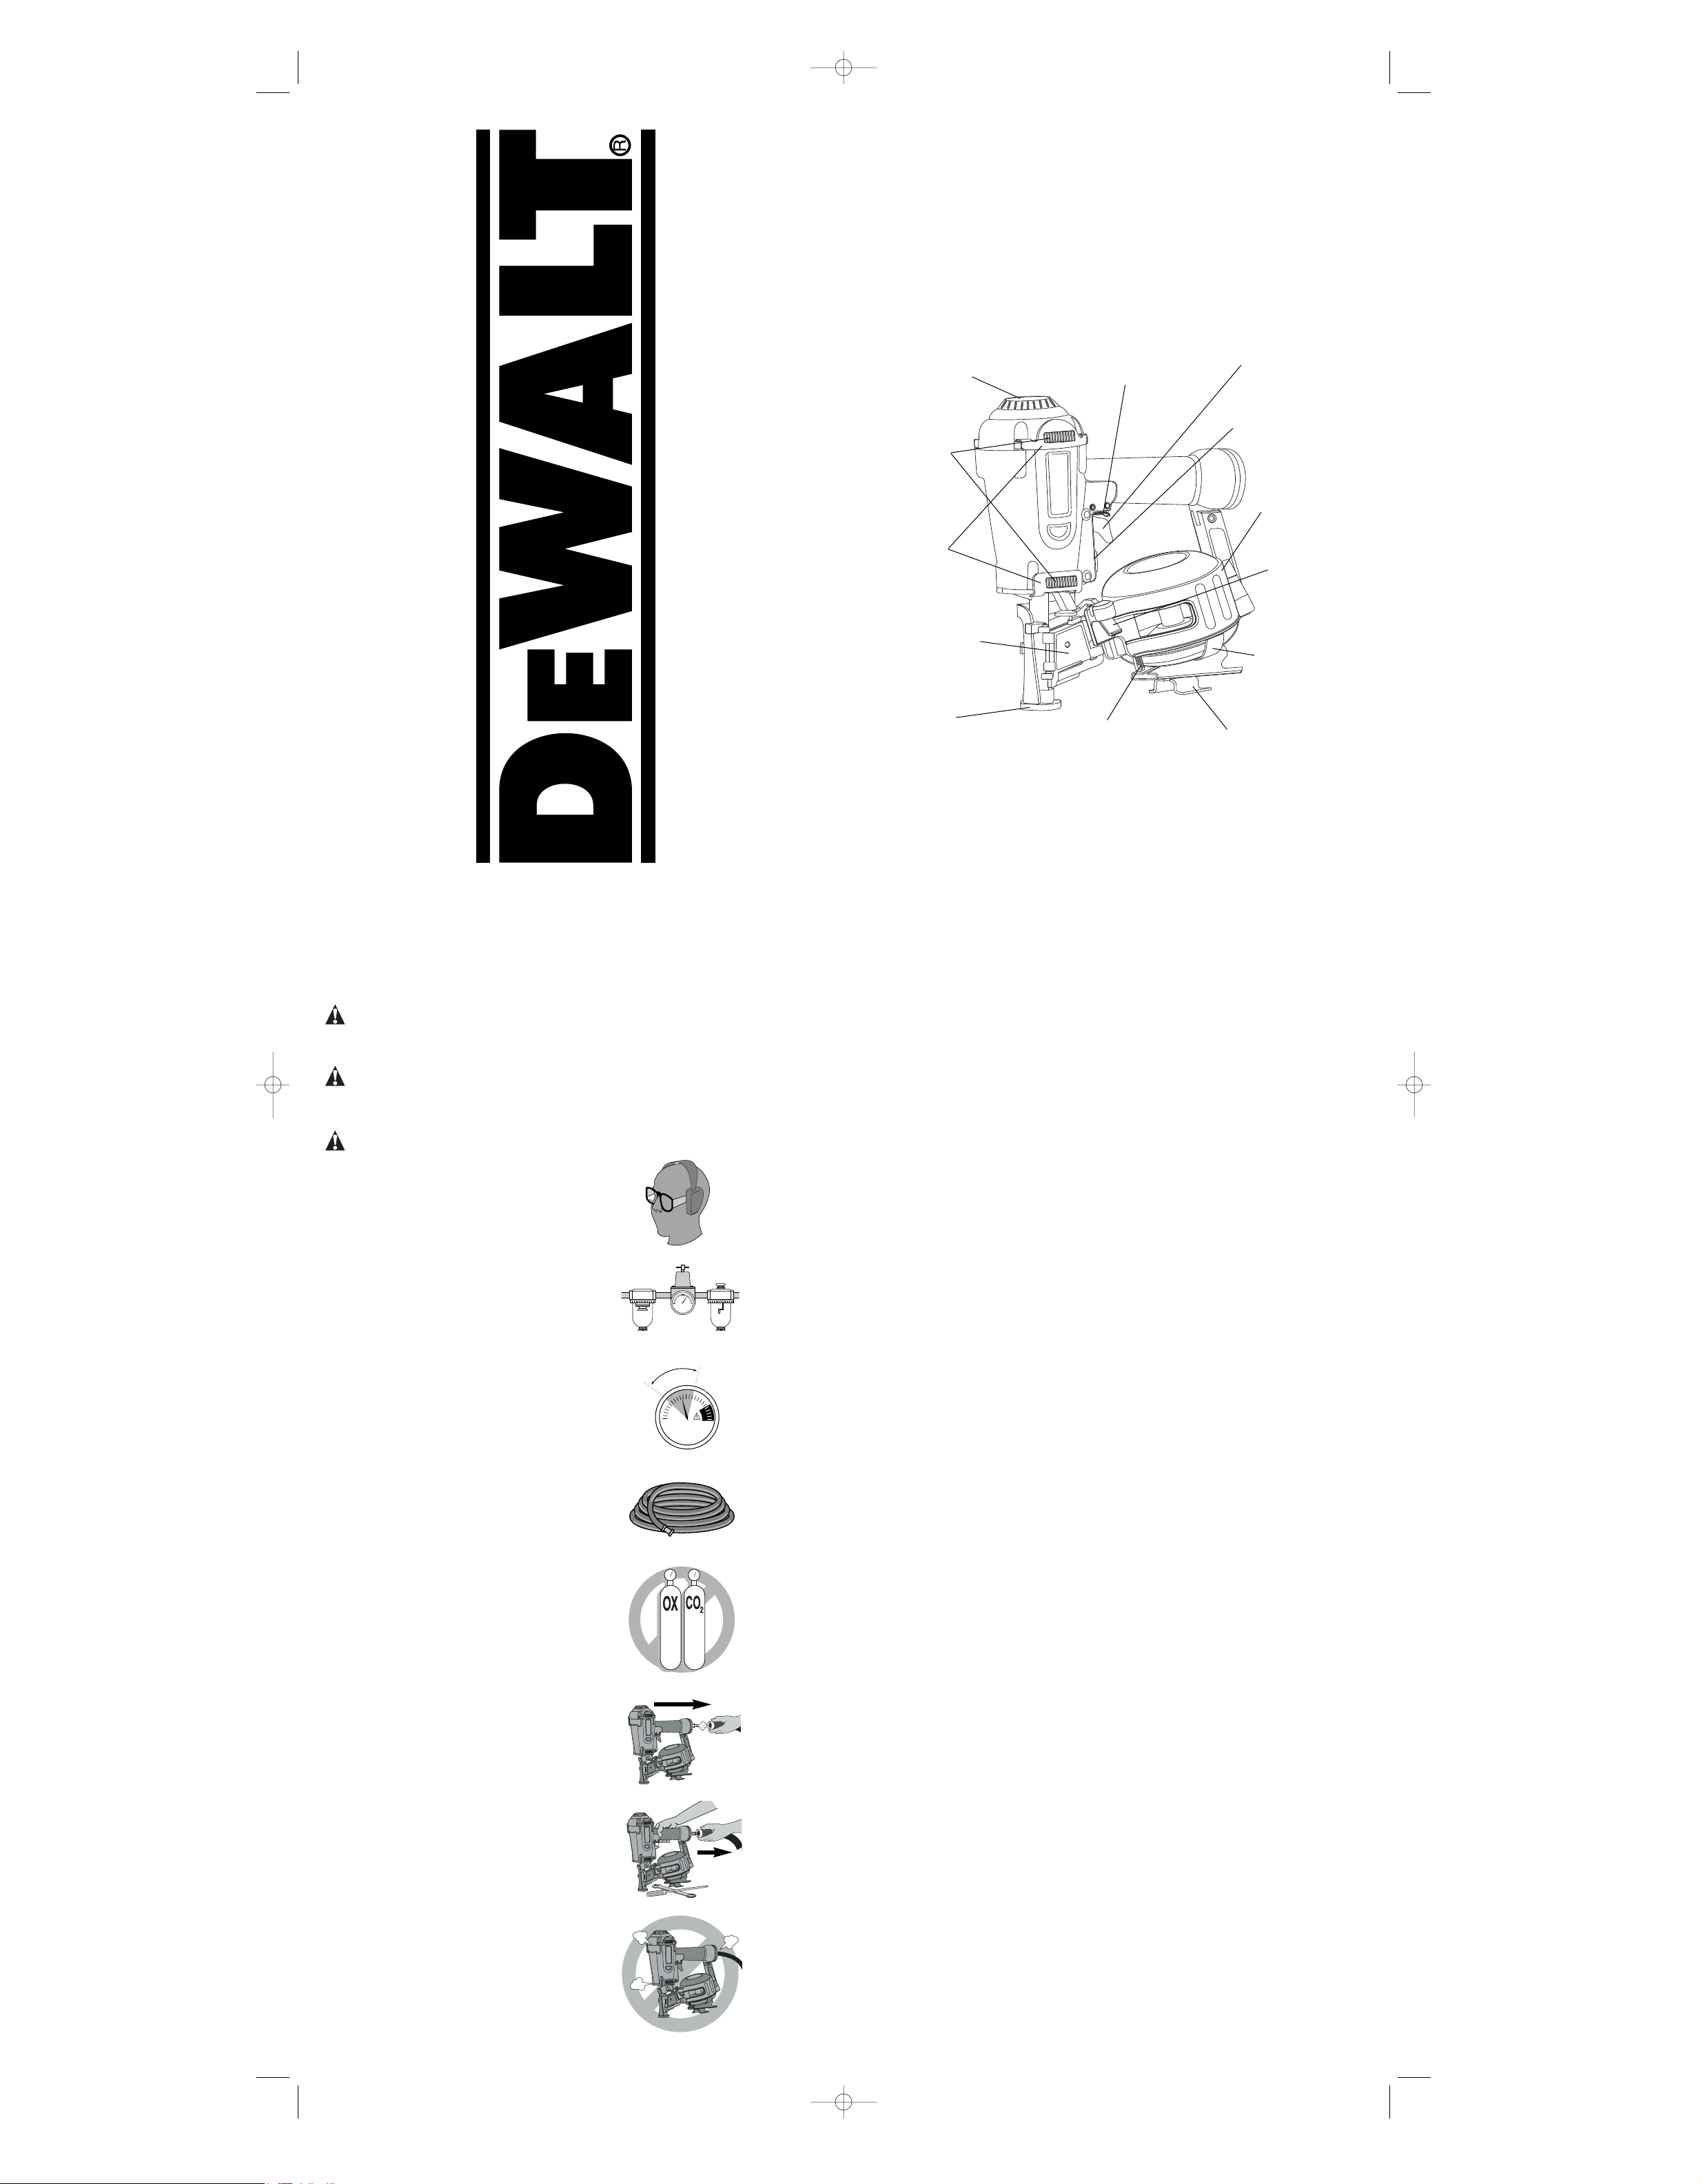
EXTERNAL TOOL PARTS
D51321 COIL ROOFING NAILER
PIÈCES EXTERNES
D51321, CLOUEUSE À BOBINE POUR TOITURES
PIEZAS EXTERNAS DE LA HERRAMIENTA
D51321 CLAVADORA PARA TECHADO EN ROLLO
TRIGGER LOCK-OFF
BOUTON DE VERROUILLAGE DE
LA GÂCHETTE
BLOQUEO EN OFF DEL GATILLO
TRIGGER
GÂCHETTE
GATILLO
DEPTH SETTING
WHEEL
BOUTON DE RÉGLAGE
DE PROFONDEUR
DISCO DE AJUSTE DE
PROFUNDIDAD
CONTACT TRIP
DÉCLENCHEUR
PAR CONTACT
ACTIVADOR POR
CONTACTO
70 psi
4.9 bar
120 psi
8.3 bar
IF YOU HAVE ANY QUESTIONS OR COMMENTS ABOUT THIS OR ANY DEWALT TOOL, CALL US TOLL FREE AT: 1-800-4-DEWALT (1-800-433-9258)
SI VOUS AVEZ DES QUESTIONS OU VOUS VOULEZ NOUS FAIRE PART DE VOS COMMENTAIRES CONCERNANT CET OUTIL OU TOUT AUTRE OUTIL DEWALT, COMPOSEZ SANS FRAIS LE :
1 800 433-9258. (1-800-4-DEWALT).
SI TIENE ALGUNA PREGUNTA O COMENTARIO ACERCA DE ESTA O CUALQUIER OTRA HERRAMIENTA D
EWALT, LLÁMENOS GRATUITAMENTE AL 1-800-4-DEWALT (1-800-433-9258)
SAVE THESE INSTRUCTIONS
Important Safety Instructions for Pneumatic Tools
WARNING: When using any pneumatic tool, all safety precautions, as outlined below, should be followed to avoid the risk of death or serious injury. Read and understand all instructions
before operating the tool.
CONSERVER CES DIRECTIVES
Consignes de sécurité importantes concernant les outils pneumatiques
AVERTISSEMENT : Lorsqu’on utilise un outil pneumatique, on doit suivre toutes les consignes de sécurité, y compris celles précisées ci-dessous, afin d’éviter les risques de blessure grave
ou mortelle. Lire et comprendre toutes les directives du présent guide avant d’utiliser l’outil.
GUARDE ESTAS INSTRUCCIONES
Instrucciones importantes de seguridad para herramientas neumáticas
ADVERTENCIA: Cuando utilice una herramienta neumática, debería tomar toda precaución de seguridad descrita a continuación para evitar correr riesgo de muerte o lesiones graves. Lea
y comprenda todas las instrucciones antes de operar la herramienta.
• Actuating tool may result in flying debris, col-
lation material, or dust which could harm
operator’s eyes. The operator and all those per-
sons in the general area should wear safety
glasses with permanently attached side shields.
Approved safety glasses are imprinted with the
characters “Z87.1”. It is the employer’s responsibility to enforce the use of eye protection equipment by the tool operator and other people in the
work area. (Fig. A)
• Always wear appropriate personal hearing
and other protection during use. Under some
conditions and duration of use, noise from this
product may contribute to hearing loss. (Fig. A)
• Use only clean, dry, regulated air. Conden-
sation from an air compressor can rust and damage the internal workings of the tool. (Fig. B)
• Regulate air pressure. Use air pressure com-
patible with ratings on the nameplate of the
tool. (Not to exceed 120 psi, 8.3 bar) Do not con-
nect the tool to a compressor rated at over 175
psi. The tool operating pressure must never
exceed 175 psi even in the event of regulator
failure. (Fig. C)
• Use air hoses rated for safe operation of the
tool. Hoses rated for a maximum operating pressure of 150 psi or 150% of the maximum system
pressure, whichever is greater, must be utilized.
(Fig. D)
• Do not use bottled gases to power this tool.
Bottled compressed gases such as oxygen,
carbon dioxide, nitrogen, hydrogen, propane,
acetylene or air are not for use with pneumatic
tools. Danger of explosion and/or serious
personal injury may result. (Fig. E)
• Use couplings that relieve all pressure from
the tool when it is disconnected from the
power supply. Use hose connectors that shut off
air supply from compressor when the tool is
disconnected. (Fig. F)
• Disconnect tool from air supply when not in
use. Do not remove the air hose with your finger on the trigger. Always disconnect tool
from air supply and remove fasteners from
canister before leaving the area or passing
the tool to another operator. Do not carry tool
to another work area with air supply connected. Do not make adjustments, remove canister, perform maintenance or clear jammed
fasteners while connected to the air supply. If
the contact trip is adjusted when the tool is connected to the air supply and nails are loaded,
accidental discharge may occur. (Fig. G)
• Do not remove, tamper with, or otherwise
cause the tool, trigger, or contact trip to
become inoperable. Do not tape or tie trigger or
contact trip in the ON position. Do not remove
spring from contact trip. Uncontrolled discharge
could result.
• Do not operate a tool if any portion of the tool,
trigger, or contact trip is inoperable, disconnected, altered, or not working properly.
Leaking air, damaged parts or missing parts
should be repaired or replaced before use.
(Fig. H)
• La mise en marche de l’outil pourrait entraîner
une projection de débris, d’éléments d’assemblage ou de poussière susceptible de causer
des blessures oculaires; l’opérateur et toute
autre personne présente dans l’aire de travail
doivent porter des lunettes de sécurité munies
d’écrans latéraux fixés en permanence, telles que
des lunettes approuvées de marque
« Z87.1 ». L’employeur a la responsabilité de s’assurer que l’opérateur et les visiteurs qui se trouvent
dans l’aire de travail portent un dispositif de protection oculaire. (fig. A)
• Toujours porter un dispositif de protection
personnel anti-bruit approprié ou tout autre
dispositif semblable durant l’utilisation. Sous
certaines conditions et pendant toute la durée de
l’utilisation, le bruit émanant de ce produit pourrait
contribuer à la perte d’audition. (fig. A)
• Toujours s’assurer de faire circuler de l’air
régulé, propre et sec, car la condensation produite par le compresseur d’air peut rouiller et
endommager les pièces internes de l’outil. (fig. B)
• Toujours régler la pression d’air de manière à
ce qu’elle corresponde à celle indiquée sur la
plaque signalétique de l’outil (celle-ci ne doit
jamais dépasser 8,5 kg/cm
2
[120 lb/po2ou 8,3
bar]). Ne jamais raccorder l’outil à un compresseur
ayant une pression supérieure à 12,3 kg/cm
2
(175
lb/po
2
ou 12,1 bar). La pression d’utilisation de
l’outil ne doit jamais dépasser 12,3 kg/cm2 (175
lb/po
2
ou 12,1 bar), même lorsque le régulateur fait
défaut. (fig. C)
• Afin de travailler en toute sécurité, utiliser des
boyaux d’air qui conviennent à l’outil en question; on doit utiliser des boyaux pouvant accepter
une pression d’utilisation maximale de 10,5 kg/cm
2
(150 lb/po2 ou 10,3 bar) ou équivalant à 150 % de
la pression maximale du système, le chiffre le plus
élevé étant retenu. (fig. D)
• Ne pas utiliser de gaz en bouteille pour action-
ner l’outil; on ne doit pas faire fonctionner un outil
pneumatique au moyen de gaz comprimés en
bouteille, tels que l’oxygène, le dioxyde de carbone, l’azote, l’hydrogène, le propane, l’acétylène
ou l’air et ce, afin d’éviter tout risque d’explosion ou
de blessure grave. (fig. E)
• Toujours réduire la pression au moyen de rac-
cords lorsque l’outil est débranché; utiliser des
raccords de boyaux pour couper l’alimentation en
air du compresseur lorsque l’outil est débranché.
(fig. F)
• Débrancher l’outil du circuit d’alimentation en
air après chaque utilisation. Ne pas retirer le
boyau d’air lorsqu’on a le doigt sur la gâchette.
Toujours débrancher l’outil du circuit et retirer
les attaches du boîtier avant de quitter l’aire de
travail ou de remettre l’outil à quelqu’un
d’autre. Ne pas transporter l’outil, retirer le boîti-
er, ou effectuer des opérations de réglage, d’entretien ou de désenrayage lorsque celui-ci est
raccordé au circuit d’alimentation en air, car les
clous contenus dans le boîtier pourraient se
décharger accidentellement lorsqu’on règle le
déclencheur par contact. (fig. G)
• Al activar la herramienta puede a veces des-
pedir partículas de desecho, material de colado
o polvo los cuales pueden dañar los ojos del
operador. El operador y todas aquellas personas
que se encuentren en proximidad del área de trabajo deberían usar gafas de seguridad con protectores laterales permanentes. Las gafas de seguridad aprobadas tienen impresos los caracteres
“Z87.1”. Es responsabilidad del empleador asegurar el uso de equipos de protección ocular por
parte del operador de la herramienta y de otras
personas en el área de trabajo. (Fig. A)
• Siempre use protección auditiva personal ade-
cuada y otros tipos de protección necesarios
durante el uso de esta herramienta. Bajo algu-
nas circunstancias y duraciones de uso, el ruido
producido por esta herramienta puede contribuir a
pérdida auditiva. (Fig. A)
• Use sólo aire limpio, seco y regulado. La con-
densación de un compresor de aire puede oxidar y
dañar las piezas internas de la herramienta. (Fig. B)
• Regule la presión del aire. Use una presión de
aire compatible con las especificaciones de la
placa de identificación de la herramienta (No
exceda 120 psi ó 8,3 bar, 8,5 kg/cm
2
). No conecte
la herramienta a un compresor de más de 175 psi
(79,5 kg/cm
2
, 12,1 bar). La presión de operación
de la herramienta jamás debería exceder las 175
psi (79,5 kg/cm
2
, 12,1 bar) aun en el caso de una
falla en el regulador. (Fig. C)
• Use mangueras de aire especificadas para la
debida operación de la herramienta. Deberán
usarse mangueras especificadas para una presión
de operación máxima de 150 psi (68,1 kg/cm
2
ó
10,3 bar) ó 150% de la presión máxima del sistema, la que sea mayor. (Fig. D)
• No use gases envasados para operar esta herramienta. Los gases envasados comprimidos
tales como oxígeno, dióxido de carbono, nitrógeno,
hidrógeno, propano, acetileno o aire no son indicados para ser usados con herramientas neumáticas. Podría causar una explosión o lesión corporal
grave. (Fig. E)
• Use acoplamientos que liberen toda la presión
de la herramienta cuando esté desconectada
de la toma de corriente. Use conectores de
manguera que suspendan el abastecimiento de
aire del compresor cuando la herramienta sea
desconectada. (Fig. F)
• Desconecte la herramienta de la toma de aire
cuando no esté en uso. No ponga el dedo en el
gatillo cuando desconecte la manguera del
aire. Desconecte siempre la herramienta de la
toma de aire y quite los clavos del recipiente
antes de dejar el área de trabajo o de pasarle la
herramienta a otro operador. No lleve la herramienta a otra área de trabajo con el aire
conectado. No realice ajustes, quite el recipiente, realice mantenimiento o despeje clavos
trabadas mientras la herramienta esté conectada a la toma de aire. Si el activador por contacto
se ajusta mientras la herramienta está conectada
al aire y los clavos están cargados, podría descargarse accidentalmente. (Fig. G)
EXHAUST CAP
CAPUCHON DU
DÉFLECTEUR
D’ÉCHAPPEMENT
TAPÓN DE ESCAPE
NAIL GUIDE DOOR
PORTE DE GUIDAGE
DES CLOUS
PUERTA DE GUÍA DE
CLAVOS
CANISTER
LATCH
VERROU DU
BOÎTIER
PESTILLO DEL
RECIPIENTE
SHINGLE GAUGE
JAUGE DES
BARDEAUX
MEDIDOR DE TEJAS
NAIL PLATFORM ADJUSTMENT LEVER
LEVIER DE RÉGLAGE DE LA
PLATE-FORME DES CLOUS
PALANCA DE AJUSTE DE LA
PLATAFORMA DE CLAVOS
CANISTER
BOÎTIER
RECIPIENTE
ANTI-SKID PADS
COUSSINETS
ANTI-DÉRAPANTS
PLACAS
ANTIDERRAPANTES
WEAR GUARDS
PROTECTEURS
ANTI-USURE
PROTECTORES DE
DESGASTAMIENTO
WEAR GUARD
PROTECTEUR
ANTI-USURE
PROTECTOR DE
DESGASTAMIENTO
FIG. C
FIG. B
FIG. A
FIG. D
FIG. E
FIG. F
FIG. G
FIG. H
614989-00, D51321 3/19/04 5:45 PM Page 1
Page 2
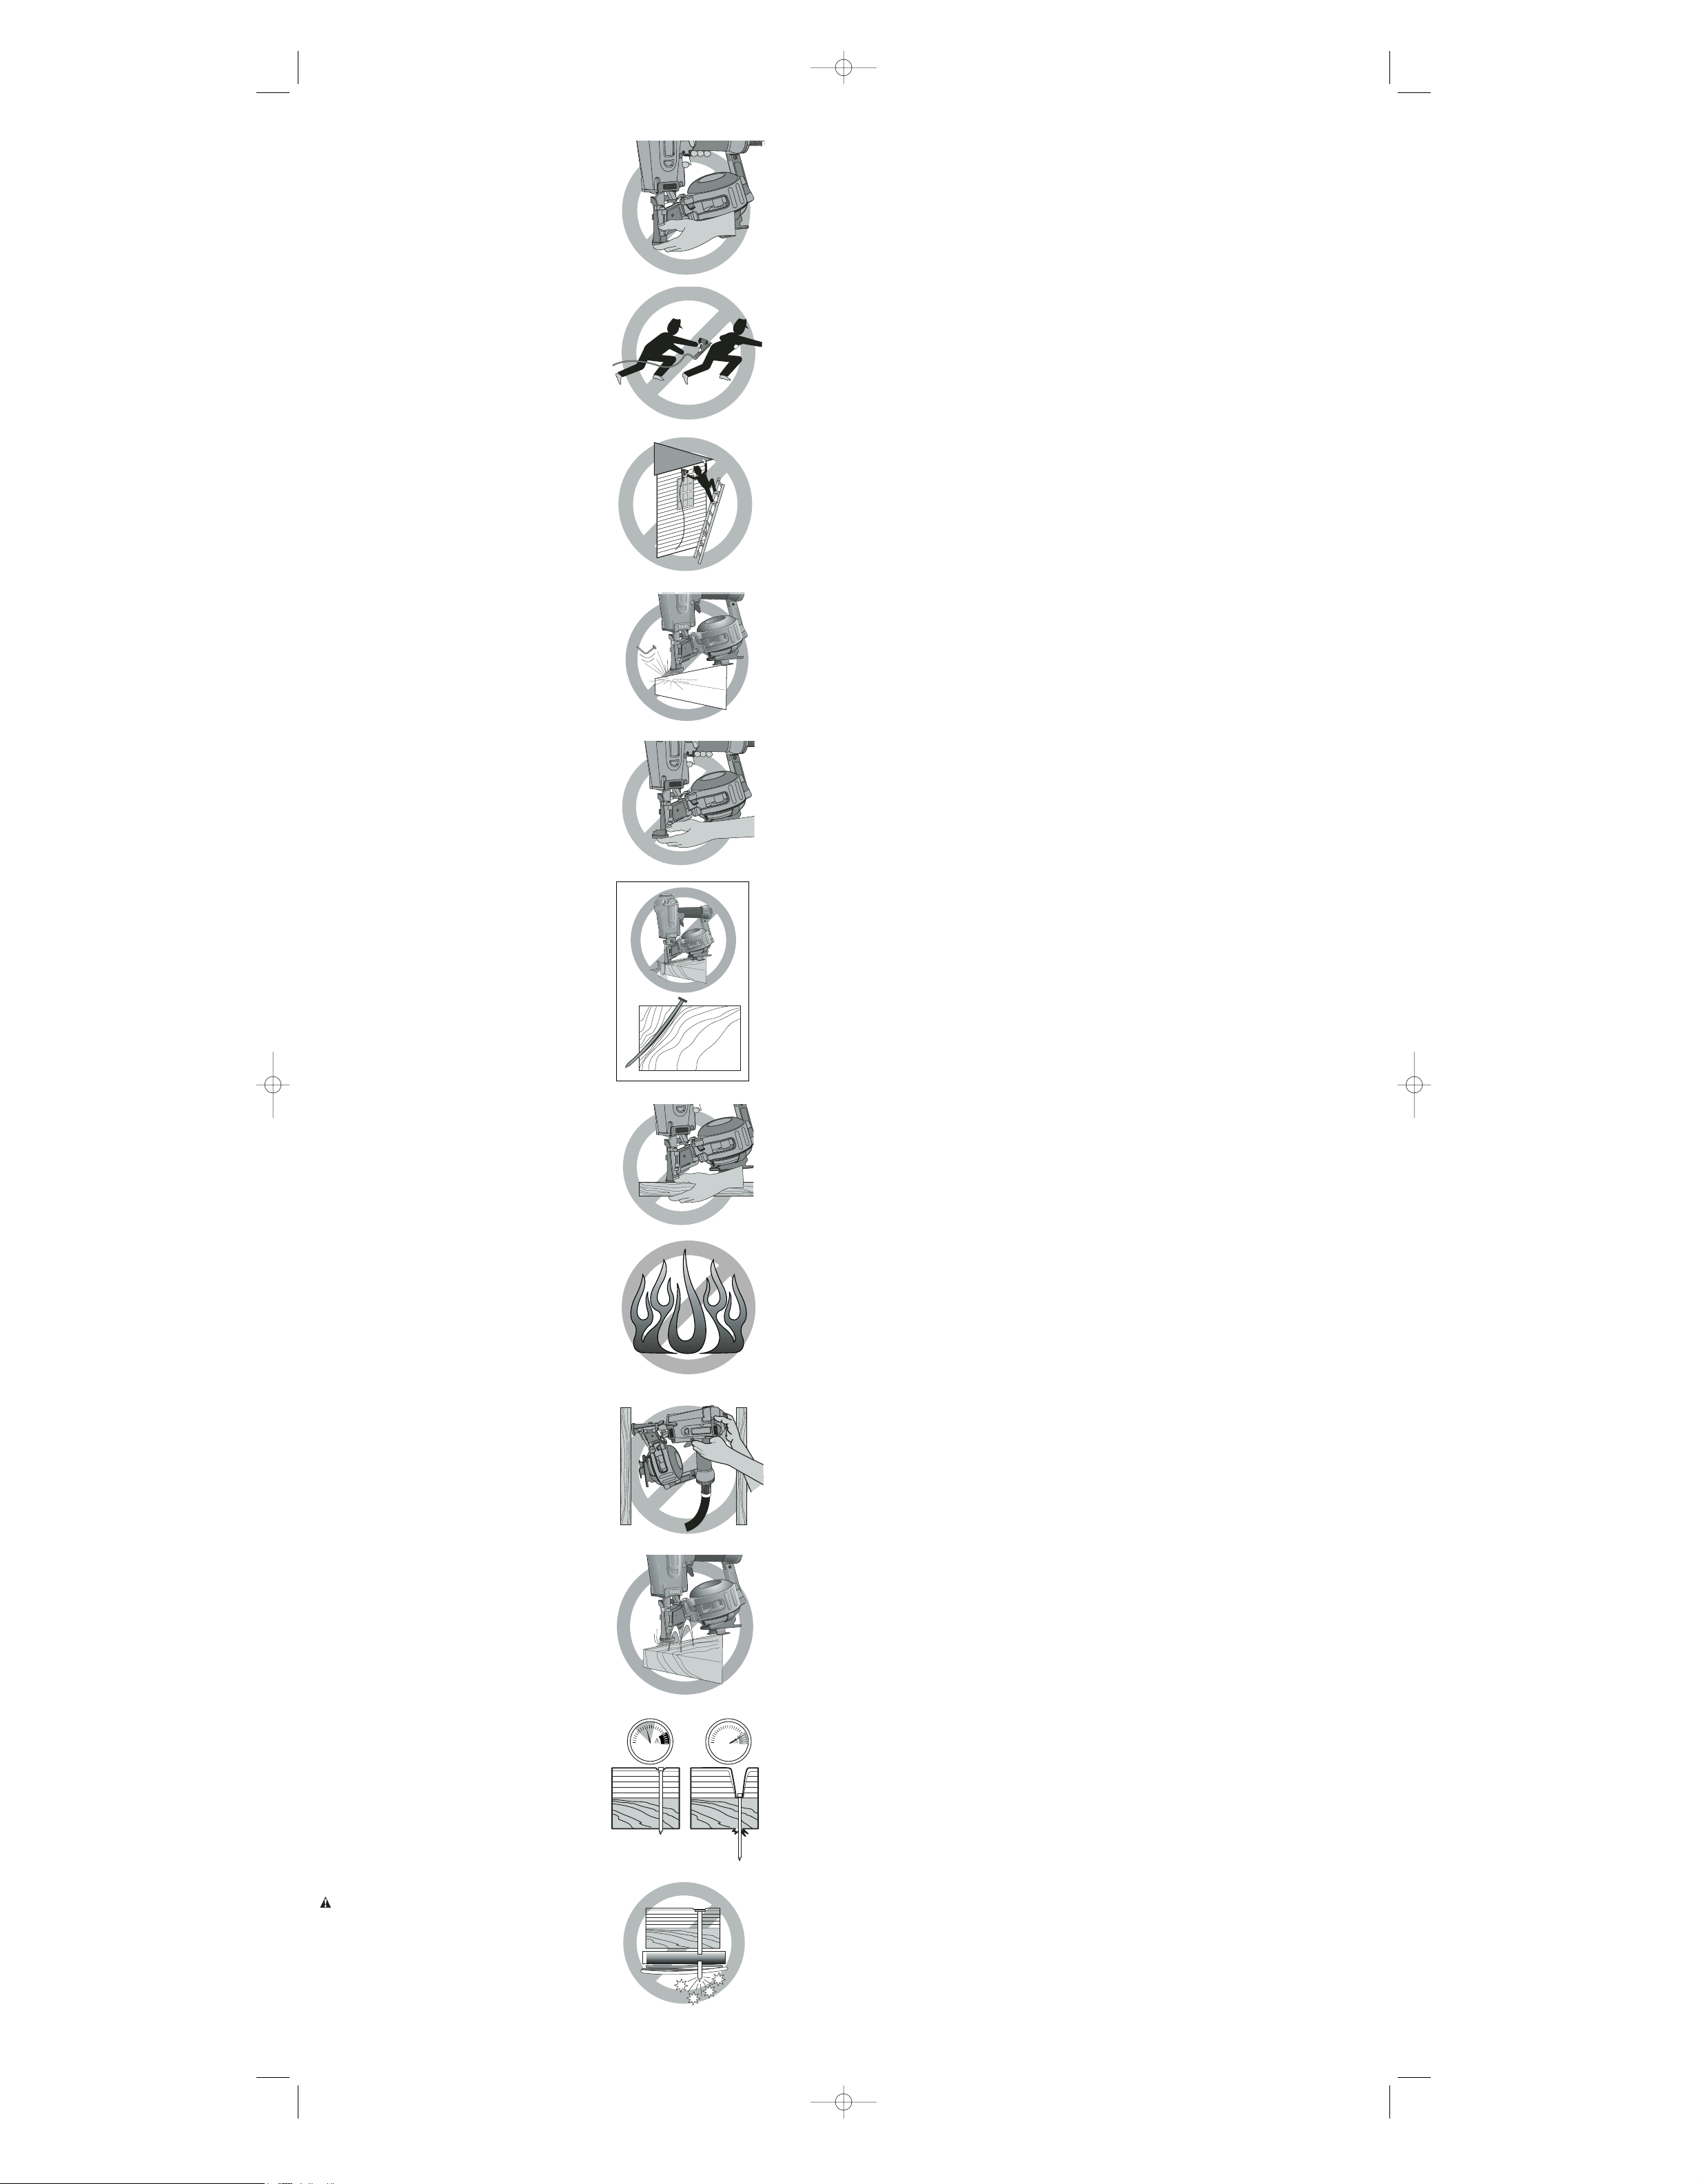
• Do not alter or modify the tool in any way.
(Fig. I)
• Do not use a belt hook accessory with this
tool.
• Always assume that the tool contains
fasteners.
• Do not point the tool at co-workers or yourself
at any time. No horseplay! Work safe! Respect
the tool as a working implement. (Fig. J)
• Keep bystanders, children, and visitors away
while operating a power tool. Distractions can
cause you to lose control. When the tool is not in
use, it should be locked in a safe place out of
reach of children.
• Do not carry the tool from place to place
holding the trigger. Accidental discharge could
result.
• Always use trigger lock-off when tool is not in
immediate use. Using the trigger lock-off will prevent accidental discharge.
• Do not overreach. Maintain proper footing and
balance at all times. (Fig. K)
• Use extreme caution when operating the tool
in elevated areas such as a rooftop. Be sure to
move up the slope of the elevated surface as you
operate the tool. It is easy to slip or lose footing
while moving down on an elevated surface.
• Make sure hose is free of obstructions or
snags. Entangled or snarled hoses can cause
loss of balance or footing.
• Use the tool only for its intended use. Do not
discharge fasteners into open air, concrete,
stone, extremely hard woods, knots or any
material too hard for the fastener to penetrate.
Discharged fasteners may follow unexpected
path and cause injury. (Fig. L)
• Always keep fingers clear of contact trip to
prevent injury from inadvertent release of
nails. (Fig. M)
• Refer to the Maintenance and Repairs sections for detailed information on the proper
maintenance of the tool.
• Always operate the tool in a clean, lighted
area. Be sure the work surface is clear of any
debris and be careful not to lose footing when
working in elevated environments such as
rooftops.
• Do not drive fasteners near edge of material.
The workpiece may split causing the fastener to
ricochet, injuring you or a co-worker. Be aware
that the nail may follow the grain of the wood
(shiner), causing it to protrude unexpectedly from
the side of the work material. Drive the chisel
point of the fastener perpendicular to the grain to
reduce risk of injury. (Fig. N)
• Keep hands and body parts clear of immedi-
ate work area. Hold workpiece with clamps
when necessary to keep hands and body out of
potential harm. Be sure the workpiece is properly
secured before pressing the nailer against the
material. The contact trip may cause the work
material to shift unexpectedly. (Fig. O)
• Do not use tool in the presence of flammable
dust, gases or fumes. The tool may produce a
spark that could ignite gases causing a fire.
Driving a nail into another nail may also cause a
spark. (Fig. P)
• Keep face and body parts away from back of
the tool cap when working in restricted
areas. Sudden recoil can result in impact to the
body, especially when nailing into hard or dense
material. (Fig. Q)
BUMP ACTION TRIGGER
• When using the bump action trigger, be
careful of unintentional double fires resulting from tool recoil.
Unwanted fasteners may
be driven if the contact trip is allowed to accidentally re-contact the work surface. (Fig. R)
TO AVOID DOUBLE FIRES:
• Do not engage the tool against the work
surface with a strong force.
• Allow the tool to recoil fully after each
actuation.
• Use sequential action trigger.
• When “bump” actuating the coil roofing
nailer, always keep tool in control.
Inaccurate placement of tool can result in misdirected discharge of a fastener.
SEQUENTIAL ACTION TRIGGER
• When using the sequential action trigger,
do not actuate the tool unless the tool is
placed firmly against the workpiece.
• Do not drive nails onto the heads of other fasteners. Strong recoil, jammed fasteners, or rico-
cheted nails may result.
• Be aware of material thickness when using
the coil roofing nailer. A protruding nail may
cause injury.
• Be aware that when the tool is being utilized
at pressures on the high end of its operating
range, nails can be driven completely
through thin or very soft work material. Make
sure the pressure in the compressor is set so
that nails are set into the material and not
pushed completely through. (Fig. S)
• DEPTH ADJUSTMENT: To reduce risk of serious injury from accidental actuation when
attempting to adjust depth, ALWAYS;
• Lock OFF trigger.
• Disconnect air supply.
• Avoid contact with trigger during adjustments.
• Do not drive nails blindly into walls, floors or
other work areas. Fasteners driven into live
electrical wires, plumbing, or other types of
obstructions can result in injury. (Fig. T)
• Stay alert, watch what you are doing and use
common sense when operating a power tool.
Do not use tool while tired or under the influence of drugs, alcohol, or medication. A
moment of inattention while operating power tools
may result in serious personal injury.
WARNING: Use of this product will expose you to
chemicals known to the State of California to cause
cancer, birth defects and other reproductive harm.
Avoid inhaling vapors and dust, and wash hands
after using.
BEFORE OPERATING THIS TOOL, CAREFULLY
READ AND UNDERSTAND ALL INSTRUCTIONS
IN THE “IMPORTANT SAFETY INSTRUCTIONS”
SECTION.
• Ne pas retirer, modifier ou rendre non fonctionnel l’outil, la gâchette ou le déclencheur
par contact. Ne pas fixer la gâchette ou le
déclencheur par contact en position de marche
au moyen d’un ruban ou d’une corde, ni retirer le
ressort du déclencheur, afin d’éviter une
décharge accidentelle.
• Ne pas utiliser l’outil lorsque certains éléments de l’outil (comme la gâchette ou le
déclencheur par contact). ne fonctionnent pas
ou fonctionnent incorrectement ou lorsqu’ils
sont débranchés ou qu’ils ont été modifiés de
quelque manière que ce soit. Lorsque certaines
pièces sont endommagées ou manquantes, ou
qu’elles comportent une fuite d’air, les remplacer
ou les faire réparer avant d’utiliser l’outil. (fig. H)
• Ne pas transformer ou modifier l’outil de
quelque façon que ce soit. (fig. I)
• Ne pas utiliser un crochet de courroie (accessoire) avec cet outil.
• Toujours prendre pour acquis que l’outil contient des attaches.
• Ne jamais pointer l’outil en direction d’un collègue de travail ou de soi-même. Aucune bous-
culade! Pensons sécurité! Respecter l’outil en
tant qu’élément essentiel de travail. (fig. J)
• Tenir les enfants, les visiteurs ou toute autre
personne à l’écart lorsqu’on utilise un outil
électrique; les distractions peuvent faire perdre
la maîtrise de ce dernier. Lorsqu’on n’utilise pas
l’outil, le ranger sous clé dans un endroit sécuritaire, hors de la portée des enfants.
• Ne pas transporter l’outil au moyen de la
gâchette afin d’éviter une décharge accidentelle.
• Toujours verrouiller la gâchette en position
d’arrêt lorsqu’on n’utilise pas l’outil afin
d’éviter une décharge accidentelle.
• Ne pas trop étendre les bras; les pieds doivent
rester ancrés fermement au sol afin de maintenir
son équilibre en tout temps. (fig. K)
• Faire preuve d’une grande prudence
lorsqu’on utilise l’outil dans un endroit
surélevé, tel un toit; s’assurer de toujours mon-
ter la pente d’une surface surélevée lorsqu’on
utilise l’outil, car on peut facilement glisser et perdre l’équilibre en la descendant.
• S’assurer que le boyau est libre de toute
obstruction et qu’il n’est pas emmêlé ou placé
de manière à ce que les personnes s’y prennent
les pieds et trébuchent.
• N’utiliser l’outil que pour les travaux pour
lesquels il a été conçu; ne pas décharger les
attaches à l’air libre ni dans des matériaux
durs, comme le béton, la pierre, le bois ou les
nœuds ou tout autre matériel trop difficile à
pénétrer. Les attaches éjectées peuvent suivre
une trajectoire inattendue et causer des
blessures. (fig. L)
• Toujours garder les doigts éloignés du
déclencheur par contact afin d’éviter une
décharge accidentelle et les risques de
blessure. (fig. M)
• Consulter les sections « Entretien » et
« Réparations » afin d’obtenir des renseignements détaillés sur l’entretien approprié de
l’outil.
• Toujours utiliser l’outil dans un endroit propre
et bien éclairé; s’assurer que la surface de tra-
vail est exempte de débris et prendre soin de ne
pas perdre l’équilibre lorsqu’on travaille dans un
endroit surélevé, tel un toit.
• Ne pas enfoncer les attaches près des bords
de la pièce; celle-ci pourrait se fractionner, ce qui
risque de faire ricocher l’attache et de blesser
quelqu’un, y compris l’utilisateur ou un collègue de
travail. S’assurer de ne pas enfoncer l’attache en
direction du fil du bois afin qu’il ne dépasse pas le
bord de la pièce. Enfoncer la pointe tranchante de
l’attache perpendiculaire au fil du bois afin de
réduire les risques de blessure. (fig. N)
• Garder les mains et le corps éloignés de
l’aire de travail immédiate; on doit les protéger
en retenant la pièce au moyen de brides de serrage. S’assurer que celle-ci est bien fixée avant
d’y appuyer la cloueuse, car le déclencheur par
contact pourrait la déplacer accidentellement.
(fig. O)
• Ne pas utiliser l’outil à proximité de pous-
sières, de gaz ou de vapeurs inflammables;
l’outil, ou le contact entre deux clous, peut créer
des étincelles susceptibles d’enflammer les
vapeurs environnantes et de causer un incendie.
(fig. P)
• Garder le visage et le corps éloignés de la
section arrière du capuchon de l’outil
lorsqu’on travaille dans des zones d’accès
restreint, afin d’éviter que l’outil ne recule
soudainement et blesse l’opérateur, surtout
lorsqu’on enfonce des attaches dans des matériaux durs ou épais. (fig. Q)
GÂCHETTE POUR UN FONCTIONNEMENT EN
MODE SACCADÉ
• Lorsqu’on utilise l’outil en mode saccadé, s’assurer de ne pas effectuer un double déchargement lorsque l’outil recule soudainement et
d’enfoncer inutilement des attaches lorsque le
déclencheur par contact touche de nouveau
accidentellement la surface de travail. (fig. R)
POUR ÉVITER LES DOUBLES DÉCHARGEMENTS, ON DOIT :
• ne pas appuyer fortement l’outil contre la
surface de travail;
• attendre que l’outil soit revenu à sa position
initiale avant de l’actionner de nouveau;
• utiliser la gâchette pour le fonctionnement
en mode séquential.
• Toujours bien maîtriser l’outil lorsqu’on
l’actionne en mode saccadé; un outil mal
placé pourrait faire en sorte que les attaches
seraient mal orientées.
GÂCHETTE POUR UN FONCTIONNEMENT EN
MODE SÉQUENTIEL
• Lorsqu’on utilise l’outil en mode séquentiel,
on doit l’appuyer fermement contre la pièce
avant de l’actionner.
• Ne pas enfoncer les clous dans la tête d’une
autre attache afin de ne pas causer un recul
brusque, de coincer les clous ou de faire ricocher
les clous.
• Connaître l’épaisseur du matériau dans lequel
on enfonce les clous; un clou qui dépasse peut
causer des blessures.
• Savoir que quand on utilise l’outil à des pres-
sions élevées, les clous peuvent facilement
traverser les surfaces minces ou souples;
s’assurer de régler la pression du compresseur
de manière à ce que les clous ne traversent pas
le matériau. (fig. S)
• RÉGLAGE DE PROFONDEUR : Afin de
réduire les risques de blessure grave causée
par le démarrage accidentel de l’outil
• No quite, toque ni haga de otra forma que la
herramienta, el gatillo o el activador por contacto dejen de funcionar. No pegue con cinta
adhesiva ni ate el gatillo en la posición de
encendido (ON). No quite el resorte del activador por contacto. Podría descargarse en
forma incontrolable.
• No opere una herramienta si alguna porción
de la herramienta, el gatillo o activador por
contacto no funciona, ha sido desconectado,
alterado o no funciona debidamente. Si exis-
ten filtraciones de aire, piezas dañadas o si faltan
piezas, estas deberían ser reparadas o repuestas antes de usarse. (Fig. H)
• No cambie o modifique la herramienta de
ninguna manera. (Fig. I)
• No porte esta herramienta colgada de un gancho en su cinturón portaherramientas.
• Suponga siempre que la herramienta contiene clavos.
• No apunte la herramienta a sus compañeros
de trabajo o a sí mismo en ningún momento.
¡No juegue con la herramienta! ¡Trabaje en forma
segura! Respete la herramienta como un instrumento de trabajo. (Fig. J)
• Mantenga alejados a visitas, niños y otras
personas circunstantes cuando opere una
máquina herramienta. Las distracciones
pueden hacer que pierda el control. Cuando la
herramienta no esté en uso, debería estar
guardada bajo llave, fuera del alcance de niños.
• No lleve la herramienta de un lado a otro con
el dedo en el gatillo. Podría resultar en una
descarga accidental.
• Siempre use el bloqueo en off de la herramienta cuando esta no vaya a ser usada de
inmediato. El uso del bloqueo en off del gatillo
evitará causar descargas accidentales de la
herramienta.
• No se sobreextienda. Mantenga siempre el
equilibrio y los pies apoyados. (Fig. K)
• Use mucha cautela cuando opere la herra-
mienta en lugares elevados, como tejados.
Asegúrese de moverse hacia arriba por la pendiente del área de trabajo elevado, cuando opere
la herramienta. Es fácil resbalarse o perder el
equilibrio cuando uno se desplaza hacia abajo
por una superficie en pendiente.
• Asegúrese que la manguera esté libre de
obstrucciones o lugares enganchados. Las
mangueras enredadas o atascadas pueden hacerle perder el equilibrio o tropezarse.
• Use la herramienta sólo para lo que fue diseñada. No descargue grapas al aire, en concreto, piedra, maderas muy duras, nudos o
cualquier otro material que sea demasiado
duro para que la grapa lo penetre. Las grapas
descargadas podrían seguir trayectorias inesperadas y causar lesiones. (Fig. L)
• Mantenga siempre los dedos alejados del
activador por contacto para evitar lesiones
por la descarga inadvertida de clavos. (Fig. M)
• Refiérase a las secciones de mantenimiento y
reparación para información detallada acerca
del mantenimiento debido de la herramienta.
• Opere siempre la herramienta en un área
limpia e iluminada. Asegúrese de que la super-
ficie de trabajo esté limpia de todo desecho y
tenga cuidado de no perder el equilibrio cuando
trabaje en entornos elevados como tejados.
• No intente insertar grapas cerca del borde del
material. La pieza de trabajo podría quebrarse y
hacer que la grapa rebotase, lesionándolo a
usted o a un compañero. Observe también que
la grapa puede insertarse siguiendo la dirección
de la veta de la madera, haciendo que sobresalga inesperadamente de un lado del material de
trabajo. Inserte la punta biselada de la grapa perpendicular a la veta para reducir el riesgo de
lesiones. (Fig. N)
• Mantenga las manos y partes del cuerpo alejadas del área inmediata de trabajo. Sujete la
pieza de trabajo con abrazaderas cuando sea
necesario para mantener las manos y el cuerpo
fuera de peligro de daños potenciales.
Asegúrese que la pieza de trabajo esté debidamente sujeta antes de presionar la clavadora
contra el material. El activador por contacto
podría hacer que el material de trabajo se
moviera inesperadamente. (Fig. O)
• No use la herramienta en entornos que presenten polvos o gases inflamables. La her-
ramienta podría producir una chispa que podría
inflamarlos y causar un incendio. Si inserta un
clavo encima de otro clavo, esto también podría
causar chispas. (Fig. P)
• Mantenga la cara y el cuerpo alejados de la
parte de atrás de la tapa de la herramienta
cuando trabaje en áreas restringidas. Si retro-
cede repentinamente, podría impactar al cuerpo,
especialmente cuando clave en materiales duros
o densos. (Fig. Q)
GATILLO DE TOPE
• Cuando use el gatillo de tope, tenga cuida-
do de no disparar dos veces en forma accidental si la herramienta retrocede. Puede
que clavos no deseados se inserten si se permite que el activador por contacto vuelva a
hacer contacto con la superficie de trabajo en
forma accidental. (Fig. R)
PARA EVITAR DISPAROS DOBLES:
• No use demasiada fuerza cuando presione la herramienta contra la superficie
de trabajo.
• Permita que la herramienta retroceda completamente luego de cada activación.
• Utilice el gatillo de acción secuencial.
• Cuando active por tope la clavadora para
techado en rollo, mantenga siempre el control sobre la herramienta. La colocación no
debida de la herramienta podría causar la
descarga de un clavo en una dirección no
deseada.
GATILLO DE ACCIÓN SECUENCIAL
• Cuando utilice el gatillo de acción secuencial, no active la herramienta a no ser que
ésta sea colocada firmemente contra la
pieza de trabajo.
• No inserte clavos sobre las cabezas de otros
clavos. Podría resultar en un retroceso fuerte,
clavos trabados o clavos rebotados.
• Tenga conciencia del grosor del material
cuando use la clavadora para techado en
rollo. Un clavo sobresaliente podría causar
lesiones.
• Esté consciente que cuando una herramienta
es utilizada a presiones que se encuentran en
el extremo alto de su rango de operación, los
clavos pueden atravesar completamente un
material de trabajo delgado o muy blando.
Asegúrese que la presión del compresor esté
FIG. I
FIG. J
FIG. K
FIG. L
FIG. M
FIG. N
FIG. O
FIG. P
FIG. Q
FIG. R
FIG. S
FIG. T
614989-00, D51321 3/19/04 5:45 PM Page 2
Page 3
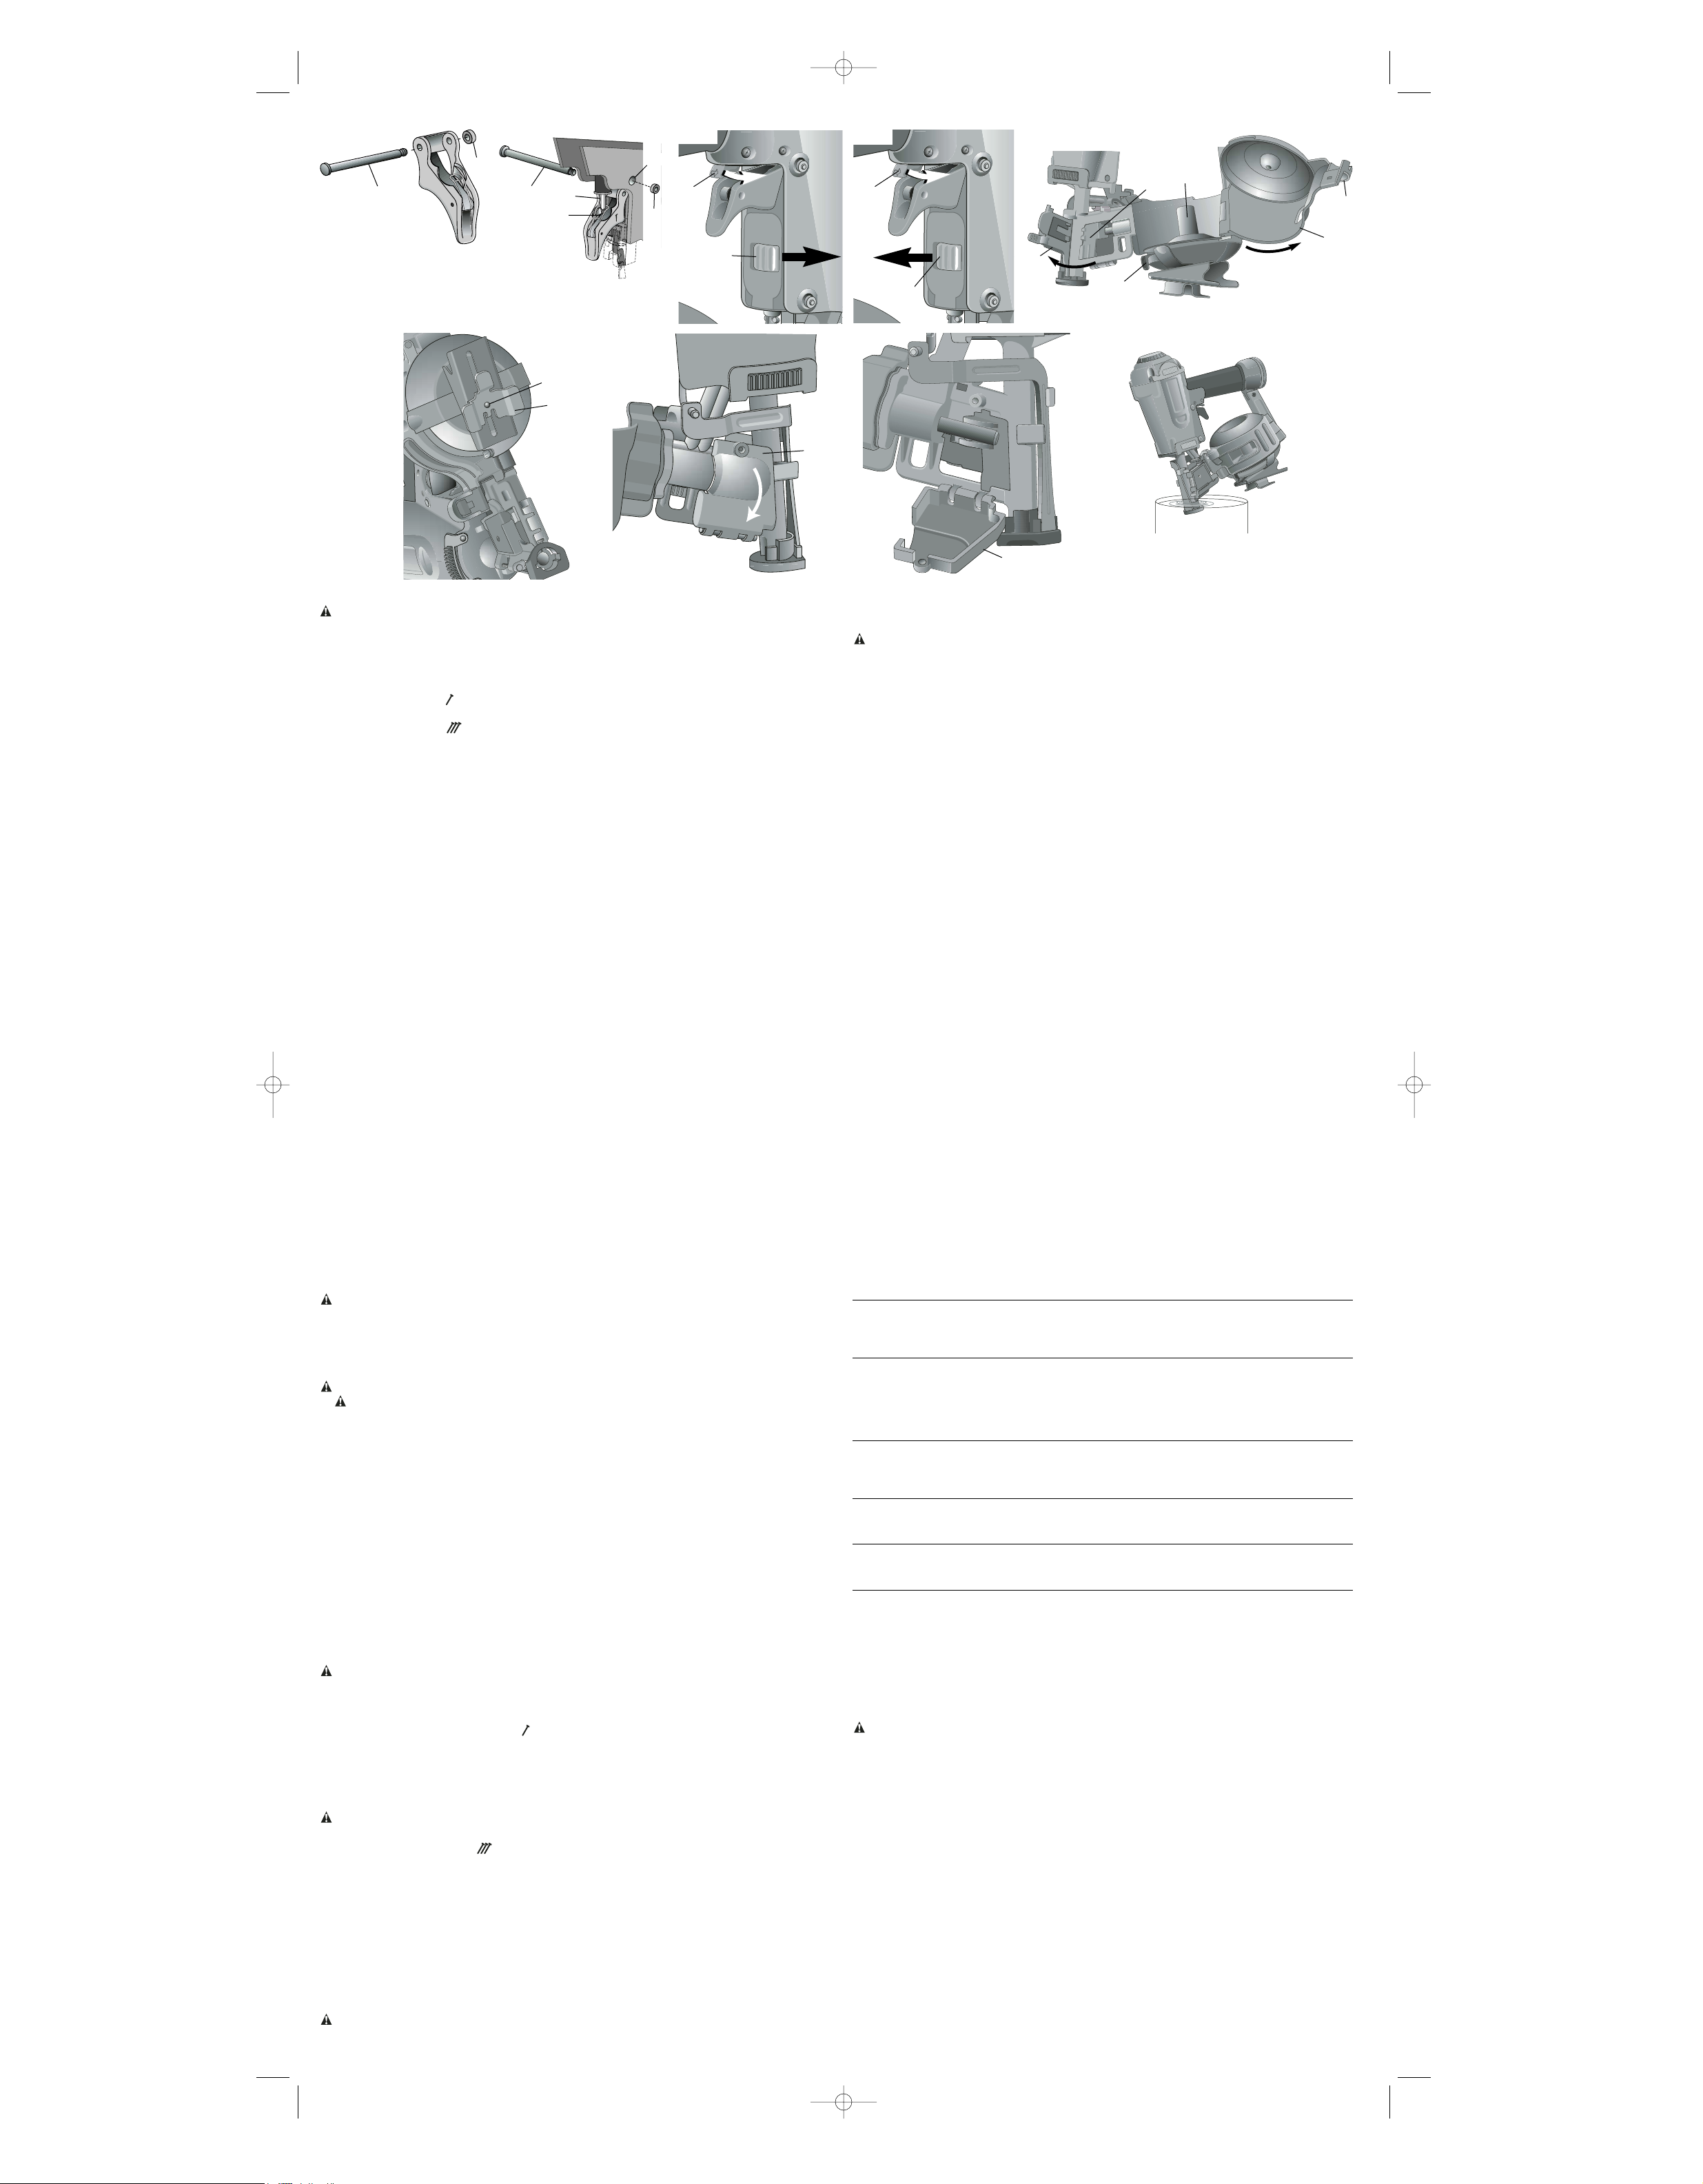
Adjusting Depth (Figures 3, 4)
The depth that the fastener is driven can be adjusted using the depth adjustment next to the
trigger of the tool.
WARNING: To reduce risk of serious injury from accidental actuation when attempt-
ing to adjust depth, ALWAYS:
• Lock OFF trigger.
• Disconnect air supply.
• Avoid contact with trigger during adjustments.
1. To drive the nail shallower, rotate the depth setting wheel (K) to the right (Fig. 3).
2. To drive a nail deeper, rotate the depth setting wheel (K) to the left (Fig. 4).
Shingle Gauge Adjustment (Fig. 6)
1. Lock off trigger.
2. Disconnect air supply.
3. Loosen the screw (L) with the Allen key provided. Move the gauge (M) up or down to attain
desired position.
4. Tighten the screw.
Clearing a Jammed Nail (Fig. 5)
If a nail becomes jammed in the nosepiece, keep the tool pointed away from you and follow
these instructions to clear:
1. Lock OFF trigger.
2. Disconnect the air supply from the tool.
3. Open the canister door (G).
4. Open the nail guide door (H).
5. Remove the jammed nail.
6. Correct any deformation that may have occurred to the nail coil.
NOTE: Should nails continue to jam frequently in nosepiece, have tool serviced by an
authorized D
EWALT service center.
Cold Weather Operation
When operating tools at temperatures below freezing:
1. Make sure compressor tanks have been properly drained prior to use.
2. Keep tool as warm as possible prior to use.
3. Make certain all fasteners have been removed from canister.
4. Put 5 to 10 drops of D
EWALT Pneumatic Tool Oil in the air inlet.
5. Lower air pressure to 80 psi or less.
6. Reconnect air and and load nails into canister.
7. Actuate the tool 5 or 6 times into scrap lumber to lubricate O-rings.
8. Turn pressure up to operating level (not to exceed 120 psi) and use tool as normal.
9. Re-lubricate at least once daily.
10. Always drain the compressor tanks at least once a day.
Hot Weather Operation
Tool should operate normally. However, keep tool out of direct sunlight as excessive heat can
deteriorate bumpers, O-rings and other rubber parts resulting in increased maintenance.
MAINTENANCE (Figures 7, 8, 9)
Daily Maintenance Chart
ACTION Lubricate tool with 5-7 drops of DEWALT Pneumatic Tool Oil.
WHY Prevents failure of O-rings.
HOW Insert drops into air fitting on end cap of tool.
ACTION Drain compressor tanks and hoses daily.
WHY Prevents accumulation of moisture in compressor and nailer.
HOW Open petcocks or other drain valves on compressor tanks. Allow any accumulated water
to drain from hoses.
ACTION Clean contact trip.
WHY Permits smooth operation of contact trip.
HOW Dip the front end of the tool into solvent allowing the dust and dirt to dissolve (Fig. 9). Dry
off nailer before use. NOTE: Only use kerosene, #2 fuel oil, or diesel fuel as a solvent.
NEVER use gasoline, this will damage the O-rings. DO NOT dip the tool beyond the feed
piston.
ACTION Clean canister.
WHY Permits smooth operation of tool and allows nails to consistently move into the feeder sec-
tion of the tool.
HOW Blow clean with compressor air.
ACTION Clean feed piston area.
WHY Permits smooth operation of feed pawl.
HOW Open feed piston cover (N) as shown in Figures 7 and 8. Blow clean with compressor air.
ACTION Before each use, check to insure all screws, nuts and fasteners are tight and undamaged.
WHY Prevents jams, leaks and premature failure of tool parts.
HOW Tighten loose screws or other fasteners using the appropriate allen wrench or screwdriver.
Repairs
To assure product SAFETY and RELIABILITY, repairs, maintenance and adjustment should
be performed by authorized service centers or other qualified service personnel, always using
identical replacement parts. Refer to the Troubleshooting Guide at the end of this section.
Accessories
Recommended accessories for use with your tool are available for purchase from your local
dealer or authorized service center. If you need assistance in locating any accessory for your
tool, contact: D
EWALT Industrial Tool Co., 701 East Joppa Road, Baltimore, MD 21286 (1-800-
4-DEWALT).
WARNING: Only use accessories recommended by DEWALT. The use of any other acces-
sory not recommended for use with this tool could be hazardous.
Three Year Limited Warranty
DEWALT will repair, without charge, any defects due to faulty materials or workmanship for
three years from the date of purchase. This warranty does not cover part failure due to normal
wear or tool abuse. For further detail of warranty coverage and warranty repair information,
visit www.dewalt.com or call 1-800-4-D
EWALT (1-800-433-9258). This warranty does not apply
to accessories or damage caused where repairs have been made or attempted by others. This
warranty gives you specific legal rights and you may have other rights which vary in certain
states or provinces.
In addition to the warranty, D
EWALT tools are covered by our:
1 YEAR FREE SERVICE
D
EWALT will maintain the tool and replace worn parts caused by normal use, for free, any time
during the first year after purchase. Nailer wear items, such as O-rings and driver blades, are
not covered.
90 DAY MONEY BACK GUARANTEE
If you are not completely satisfied with the performance of your D
EWALT Power Tool, Laser,
or Nailer for any reason, you can return it within 90 days from the date of purchase with a
receipt for a full refund – no questions asked.
FREE WARNING LABEL REPLACEMENT: If your warning labels (Fig. 10) become illegible
or are missing, call 1-800-4-D
EWALT for a free replacement.
ASSEMBLY
CAUTION: Lock off trigger, disconnect air line from tool and remove fasteners from canis-
ter before making adjustments.
Trigger
In accordance with the ANSI Standard SNT-101-2002, the DEWALT Nailers are assembled with
a bump action trigger. However, a sequential action trigger kit is included and attached to the
tool. For a replacement trigger contact your authorized service center or call 1-800-4-D
EWALT.
The gray trigger with imprinted on the side, (Cat.# D510022 kit) is the single sequential
action trigger and causes the tool to operate in this mode.
The black trigger with imprinted on the side, (Cat.# D510020 kit) is the bump action trig-
ger and permits the tool to be actuated in this manner.
For defining the use of the sequential action trigger and bump action trigger, see the
Actuating Tool section of this manual.
TRIGGER REMOVAL (FIG. 1)
1. Lock off trigger.
2. Remove air from the tool.
3. Remove rubber grommet (A) from end of dowel pin (B).
4. Remove dowel pin.
5. Remove trigger assembly from trigger cavity under the handle of the tool housing.
TRIGGER INSTALLATION (FIG. 2)
1. Select either the sequential or bump trigger to be installed on the tool. Both triggers are
included in the tool packaging.
2. Insert the trigger subassembly into trigger cavity.
3. Ensure that trigger spring (C) is placed around the trigger valve stem (D).
4. Align the holes of the trigger with the housing holes (E), then insert the dowel pin (B)
through the entire assembly as shown.
5. Push the rubber grommet (A) onto the end of the dowel pin as shown.
OPERATION
Preparing the Tool
1.
Read Safety Instruction section of this manual.
2. LUBRICATE TOOL
a. Use D
EWALT Pneumatic Tool Oil or a non-detergent S.A.E. 20 weight oil. DO NOT use
detergent oil or additives as they will damage O-rings and rubber parts.
b. Use a Filter and Regulator when possible.
c. Add 5 to 7 drops of oil in the air fitting a least twice a day.
3. Wear eye and ear protection.
4. Ensure canister is empty of all fasteners.
5. Check for smooth and proper operation of contact trip. Do not use tool if assembly is not
functioning properly. NEVER tamper with the contact trip. NEVER use a tool that has the
contact trip restrained in the actuated position.
6. CHECK AIR SUPPLY: Ensure air pressure does not exceed recommended operating
limits; 70 to 120 psi, (4.9 to 8.3 bar, 5 to 8.5 kg/cm
2
).
7. Keep tool pointed away from yourself and others.
8. Lock off trigger.
9. Connect air hose.
10. Check for audible leaks around valves and gaskets. Never use a tool that leaks or has
damaged parts.
Using the Lock-off (Figures 3, 4)
WARNING: Always wear eye and ear protection when operating tool.
Each DEWALT nailer is equipped with a trigger lock-off switch (P) which when rotated to the
right, prevents the tool from actuating. When the switch is centered, the tool will be fully operational. The trigger should always be locked off whenever any adjustments are made or when
tool is not in use.
Loading the Tool (Fig. 5)
CAUTION: Keep tool pointed in a safe direction when loading nails.
CAUTION: Never load nails with the contact trip or trigger activated.
1. Lock OFF trigger.
2. Disconnect the air supply from the tool.
3. Pull the canister latch (R) to open the canister door (G).
4. Place your finger under the nail guide door (H) and pull to open the door.
5. Rotate the nail platform adjustment lever (F) to properly accommodate the nail length being
used. There are three different positions. The lowest position is used for 1-1/2" to 1-3/4"
(38 - 45 mm) nails, the center position is used for 1" to 1-1/2" (25 - 38 mm) nails and the
highest position is used for 3/4" to 7/8" (19 - 25 mm) nails.
6. Place the nail coil on spindle (I) in canister.
7. Uncoil enough nails (approximately 3") to reach the nose of the tool.
8. Insert the first nail into the nose and the second nail between the two rails of the feed
pawl (J).
NOTE: Be careful not to deform the coil of nails during the loading process. Otherwise, the
nail guide door will not close and the nails might not feed consistently.
9. Close the nail guide door (H) completely.
10. Close the canister door (G) completely by engaging the canister latch (R) with your fingers
and locking the canister closed.
Actuating Tool
WARNING: Always wear eye and ear protection when operating tool.
The tool can be actuated using one of two modes: single sequential action trigger mode and
bump action trigger mode. The trigger installed on the tool as described in the Trigger section
of this manual determines the mode of operation.
SEQUENTIAL ACTION TRIGGER - (GRAY)
The sequential action trigger’s intended use is for intermittent nailing where very careful and
accurate placement is desired.
To operate the nailer in sequential action mode:
1. Depress the contact trip firmly against the work surface.
2. Depress the trigger.
CAUTION: A nail will fire each time the trigger is depressed as long as the contact trip
remains depressed.
BUMP ACTION TRIGGER - (BLACK)
The bump action trigger’s intended use is for rapid nailing on flat, stationary surfaces.
Using the bump action trigger, two methods are available: place actuation and bump
actuation.
To operate the tool using the PLACE ACTUATION method:
1. Depress the contact trip against the work surface.
2. Depress the trigger.
To operate the tool using the BUMP ACTUATION method:
1. Depress the trigger.
2. Push the contact trip against the work surface. As long as the trigger is depressed, the tool
will fire a nail every time the contact trip is depressed. This allows the user to drive multiple nails in sequence.
CAUTION: Do not keep trigger depressed when tool is not in use. Keep the lock-off switch
rotated to the right (OFF) when the tool is not in use.
P
P
FIG. 9
FIG. 3
FIG. 4
FIG. 6
FIG. 8
FIG. 5
A
B
E
D
B
C
A
FIG. 1
FIG. 2
FIG. 7
N
N
K
K
L
M
G
F
H
I
J
R
614989-00, D51321 3/19/04 5:45 PM Page 3
Page 4

lorsqu’on tente de régler la profondeur, on doit TOUJOURS :
• verrouiller la gâchette en position d’arrêt;
• débrancher l’outil du circuit d’alimentation en air;
• éviter tout contact avec la gâchette lors des réglages
• Ne pas enfoncer des attaches au hasard dans les murs, les planchers ou toute autre
surface de travail; les attaches pourraient percer des fils sous tension, des tuyaux ou tout
autre obstacle et causer ainsi des blessures. (fig. T)
• Rester vigilant en tout temps et faire preuve de jugement lorsqu’on utilise un outil
électrique; ne pas utiliser l’outil lorsqu’on est fatigué ou sous l’influence de drogues,
d’alcool ou de médicaments; un moment d’inattention pourrait entraîner des blessures
graves.
AVERTISSEMENT : L’utilisation de ce produit augmente les risques d’exposition à des pro-
duits chimiques qui, dans l’État de la Californie, sont reconnus comme étant susceptibles de
causer le cancer, d’entraîner des malformations congénitales ou d’être nocifs pour le système
reproductif. Éviter d’inhaler les vapeurs et les poussières environnantes. Se laver les
mains après chaque utilisation.
AVANT D’UTILISER L’OUTIL, LIRE ATTENTIVEMENT ET COMPRENDRE TOUTES LES
DIRECTIVES INDIQUÉES À LA SECTION « IMPORTANTES CONSIGNES DE SÉCURITÉ ».
ASSEMBLAGE
MISE EN GARDE : Verrouiller la gâchette en position d’arrêt et débrancher l’outil du circuit
d’alimentation en air, puis retirer les attaches du boîtier avant d’effectuer un réglage.
Gâchette
Bien que, conformément à la norme ANSI SNT-101-2002, les cloueuses DEWALT sont
assemblées au moyen d’une gâchette permettant un fonctionnement en mode saccadé, une
gâchette pour un fonctionnement séquentiel est également fournie et fixée sur l’outil. Pour
obtenir des gâchettes de rechange, communiquer avec le centre de service autorisé le plus
près ou appeler D
EWALT directement en composant le 1 800 433-9258.
La gâchette grise pour le mode de fonctionnement séquentiel simple comporte une étiquette
« » représentant un seul clou sur le côté (n
o
de catalogue D510022). Elle sert à actionner
l’outil selon ce mode de fonctionnement.
La gâchette noire pour le mode de fonctionnement saccadé comporte une étiquette « »
représentant plusieurs clous sur le côté (n
o
de catalogue D510020). Elle sert à actionner l’outil
selon ce mode de fonctionnement.
Les modes de fonctionnement en mode saccadé et en mode séquentiel sont définis à la
section « Actionnement de l’outil » du présent guide.
RETRAIT DE LA GÂCHETTE (FIG. 1)
1. Verrouiller la gâchette en position d’arrêt.
2. Purger l’air de l’outil.
3. Enlever l’oeillet en caoutchouc (A) fixé à l’extrémité de la goupille (B).
4. Retirer la goupille.
5. Sortir l’ensemble de la gâchette de sa cavité située sous la poignée du logement de l’outil.
INSTALLATION DE LA GÂCHETTE (FIG. 2)
1. Sélectionner l’une des deux gâchettes fournies, soit celle pour le fonctionnement en mode
séquentiel ou celle pour le fonctionnement en mode saccadé.
2. Insérer le sous-ensemble de la gâchette dans sa cavité.
3. S’assurer que le ressort de la gâchette (C) est placé autour de la tige de la soupape de la
gâchette (D).
4. Aligner les trous de la gâchette avec ceux du logement (D), puis insérer la goupille (B)
dans l’ensemble, tel qu’illustré.
5. Enfoncer l’oeillet en caoutchouc (A) sur l’extrémité de la goupille, tel qu’illustré.
FONCTIONNEMENT
Préparation de l’outil
1.
Lire la section portant sur les consignes de sécurité du présent guide.
2. LUBRIFIER L’OUTIL. Pour ce faire,
a. utiliser l’huile pour outils pneumatiques D
EWALT ou de l’huile de poids 20 de grade
S.A.E. non-détergente. NE PAS utiliser d’huile détergente ou d’additifs afin de ne pas
endommager les joints toriques et les pièces en caoutchouc;
b. dans la mesure du possible, utiliser un filtre et un régulateur;
c. appliquer de 5 à 7 gouttes d’huile dans le raccordement à air au moins deux fois par jour.
3. Porter des lunettes de protection et des protecteurs auditifs.
4. S’assurer que le boîtier ne contient aucune attache.
5. S’assurer que les éléments du déclencheur par contact fonctionnent bien; ne pas utiliser
l’outil si ces éléments ne fonctionnent pas correctement. Ne JAMAIS modifier le
déclencheur par contact. Ne JAMAIS utiliser l’outil lorsque le déclencheur par contact est
verrouillé en position de marche.
6. VÉRIFIER LE CIRCUIT D’ALIMENTATION EN AIR afin de s’assurer que la pression d’air
ne dépasse pas la limite recommandée, soit de 5 à 8,5 kg/cm
2
ou de 4,9 à 8,3 bar (de
70 à 120 lb/po
2
).
7. Ne jamais pointer l’outil en direction d’une autre personne ni vers soi.
8. S’assurer que la gâchette est verrouillée en position d’arrêt.
9. Raccorder le boyau d’air.
10. S’assurer qu’il n’existe aucune fuite audible autour des soupapes et des garnitures. Ne
jamais utiliser un outil comportant des fuites ou des pièces endommagées.
Utilisation du bouton de verrouillage en position d’arrêt
(fig. 3 et 4)
AVERTISSEMENT : Toujours porter des lunettes de protection et des protecteurs auditifs
durant l’utilisation.
Chaque cloueuse DEWALT est munie d’un interrupteur à gâchette (P). Pour verrouiller l’outil
en position d’arrêt, tourner l’interrupteur vers la droite; pour le mettre en marche, placer l’interrupteur au centre. La gâchette doit toujours être verrouillée en position d’arrêt lorsqu’on
effectue un réglage ou après chaque utilisation.
Chargement de l’outil (fig. 5)
MISE EN GARDE : Garder l’outil pointé dans une direction sécuritaire durant le chargement
des clous.
MISE EN GARDE : Ne jamais charger des clous lorsque le déclencheur ou la gâchette sont
actionnés.
1. Verrouiller la gâchette en position d’arrêt.
2. Débrancher l’outil du circuit d’alimentation en air.
3. Tirer le verrou du boîtier (R) afin d’ouvrir la porte du boîtier (G).
4. Mettre le doigt sous la porte de guidage des clous (H) et tirer pour ouvrir la porte.
5. Tourner le levier de réglage de la plate-forme des clous (F) afin de pouvoir insérer les clous
selon leur longueur. (Il y a trois positions différentes : la position inférieure est utilisée
pour des clous de 38 à 45 mm (1-1/2 à 1-3/4 po) de longueur, la position centrale, pour
des clous de 25 à 38 mm (1 à 1-1/2 po) et la position supérieure, pour ceux de 19 à 25
mm (3/4 à 7/8 po).
6. Placer la bobine de clous sur la tige (I) située dans le boîtier.
7. Dérouler suffisamment de clous (environ 76 mm ou 3 po) pour atteindre l’embout de
l’outil.
8. Introduire le premier clou dans l’embout et le deuxième clou, entre les deux rails du cliquet
d’alimentation (J).
REMARQUE : Prendre soin de ne pas déformer la bobine de clous durant le processus de
chargement. Sinon, l’utilisateur ne pourra pas fermer la porte de guidage des clous et alimenter uniformément les clous.
9. Fermer complètement la porte de guidage des clous (H).
10. Fermer complètement la porte du boîtier (G) en enclenchant son verrou (R) avec les doigts
et en verrouillant le boîtier en position fermée.
Actionnement de l’outil
AVERTISSEMENT : Toujours porter des lunettes de protection et des protecteurs auditifs
durant l’utilisation.
L’outil peut être actionné selon deux modes de fonctionnement : séquentiel simple et saccadé. On sélectionne le mode voulu au moyen de la gâchette installée sur l’outil, tel que décrit
à la section « Gâchette » du présent guide.
MODE DE FONCTIONNEMENT SÉQUENTIEL (GÂCHETTE GRISE)
On sélectionne ce mode lorsqu’on veut placer soigneusement les clous par intermittence à
des endroits très précis.
Pour enfoncer un clou selon ce mode, on doit :
1. appuyer fermement le déclencheur par contact contre la surface de travail, puis
2. enfoncer la gâchette.
MISE EN GARDE : Chaque fois qu’on enfonce un clou, on doit appuyer sur la gâchette et
maintenir le déclencheur par contact enfoncé.
MODE DE FONCTIONNEMENT SACCADÉ (GÂCHETTE NOIRE)
On sélectionne ce mode pour enfoncer rapidement des clous dans une surface plane et fixe.
Dans ce cas-ci, on peut utiliser l’outil selon deux modes, soit le mode par contact ou le mode
saccadé.
Pour enfoncer un clou selon le mode par contact, on doit :
1. appuyer le déclencheur par contact contre la surface de travail, et
2. enfoncer la gâchette.
Pour enfoncer un clou selon le mode saccadé, on doit :
1. enfoncer la gâchette, et
2. appuyer le déclencheur par contact contre la surface de travail, Tant que la gâchette est
enfoncée, l’outil éjectera un clou chaque fois qu’on appuie sur le déclencheur par contact,
permettant à l’utilisateur d’enfoncer plusieurs clous les uns à la suite des autres.
MISE EN GARDE : Lorsqu’on n’utilise pas l’outil, relâcher la gâchette et déplacer l’inter-
rupteur de verrouillage en position d’arrêt vers la droite (OFF).
Réglage de profondeur (fig. 3 et 4)
On peut régler la profondeur d’enfoncement au moyen du bouton de réglage de profondeur
située près de la gâchette, sur le côté de l’outil.
AVERTISSEMENT : Afin de réduire les risques de blessure grave causée par le
démarrage accidentel de l’outil lorsqu’on tente de régler la profondeur, on doit
TOUJOURS :
• verrouiller la gâchette en position d’arrêt;
• débrancher l’outil du circuit d’alimentation en air;
• éviter tout contact avec la gâchette lors des réglages.
1. Pour réduire la profondeur, tourner le bouton de réglage de profondeur (K) vers la droite
(fig. 3).
2. Pour augmenter la profondeur, tourner le bouton de réglage de profondeur (K) vers la
gauche (fig. 4).
Réglage de la jauge des bardeaux (fig. 6)
1. Verrouiller la gâchette en position d’arrêt.
2. Débrancher l’outil du circuit d’alimentation en air.
3. Desserrer la vis (L) au moyen de la clé Allen fournie, puis déplacer la jauge (M) vers le
haut ou vers le bas afin d’atteindre la position voulue
4. Resserrer la vis.
Désenrayage des clous coincés (fig. 5)
Pour dégager un clou qui est resté coincé dans l’embout de l’outil, on doit pointer ce dernier
dans la direction opposée et procéder comme suit :
1. verrouiller la gâchette en position d’arrêt;
2. débrancher l’outil du circuit d’alimentation en air;
3. ouvrir la porte du boîtier (G);
4. ouvrir la porte de guidage des clous (H);
5. retirer le clou coincé;
6. corriger la bobine déformée, s’il y a lieu.
REMARQUE : Si le problème persiste, apporter l’outil à un centre de service D
EWALT autorisé
afin de le faire réparer.
Fonctionnement par temps froid
1. Avant d’utiliser l’outil à des températures de gel, on doit :
2. s’assurer que les réservoirs du compresseur sont complètement purgés;
3. réchauffer l’outil autant que possible;
4. s’assurer que le boîtier ne contient aucune attache;
5. appliquer de 5 à 10 gouttes d’huile pour outils pneumatiques D
EWALT dans l’entrée d’air;
6. réduire la pression d’air à 5,6 kg/cm
2
(80 lb/po2 ou 5,5 bar) ou moins;
7. raccorder de nouveau le circuit d’alimentation en air et remplir le boîtier de clous;
8. actionner l’outil de 5 à 6 fois en l’appuyant contre la surface d’une pièce en bois et en tirant
sur la gâchette afin de lubrifier les joints toriques;
9. hausser la pression jusqu’à ce qu’elle atteigne la limite recommandée (soit une pression
égale ou inférieure à 8,5 kg/cm
2
(120 lb/po2 ou 8,3 bar) et se servir de l’outil de la manière
habituelle;
10. lubrifier l’outil au moins une fois par jour;
11. s’assurer de toujours purger les réservoirs du compresseur au moins une fois par jour.
Fonctionnement par temps chaud
Bien que l’outil devrait fonctionner correctement par temps chaud, on doit tout de même le protéger contre les rayons directs du soleil, car la chaleur excessive pourrait endommager les
butées, les joints toriques ou toute autre pièce en caoutchouc et augmenter ainsi le nombre
d’opérations d’entretien requis.
ENTRETIEN (Figures 7, 8, 9)
Fiche d’entretien quotidien
OPÉRATION Lubrifier l’outil en appliquant de 5 à 7 gouttes d’huile pour outils pneumatiques
D
EWALT.
POURQUOI Prévenir tout dommage aux joints toriques.
COMMENT Verser les gouttes dans le raccordement à air situé sur le capuchon supérieur de
l’outil.
OPÉRATION Purger quotidiennement les réservoirs du compresseur et les boyaux
.
POURQUOI Prévenir toute accumulation d’humidité dans le compresseur et la cloueuse.
COMMENT Ouvrir les robinets de purge des réservoirs et laisser toute l’eau s’écouler des boy-
aux.
OPÉRATION Nettoyer le déclencheur par contact.
POURQUOI Assurer le bon fonctionnement du déclencheur.
COMMENT Immerger l’extrémité avant de l’outil dans un solvant afin de dissoudre la poussière
et la saleté (fig. 9); sécher l’outil avant de l’utiliser. REMARQUE : Utiliser uniquement du kérosène, du mazout n
o
2, ou du carburant diesel. NE JAMAIS utiliser de
l’essence afin d’éviter d’endommager les joints toriques. NE PAS immerger l’outil
au-delà du piston d’alimentation.
OPÉRATION Nettoyer le boîtier.
POURQUOI Assurer le bon fonctionnement de l’outil afin de permettre aux clous de se déplacer
uniformément dans la section d’alimentation de l’outil.
COMMENT Nettoyer au moyen d’un jet d’air comprimé.
OPÉRATION Nettoyer la zone du piston d’alimentation.
POURQUOI Assurer le bon fonctionnement du cliquet d’alimentation.
COMMENT Ouvrir le couvercle du piston d’alimentation (N), tel qu’illustré aux figures 7 et 8.
Nettoyer au moyen d’un jet d’air comprimé.
OPÉRATION Avant chaque utilisation, s’assurer que les vis, les écrous et les attaches sont bien
serrés et en bon état.
POURQUOI Prévenir le blocage des attaches, les fuites et la défaillance prématurée des pièces.
COMMENT Serrer les vis et les attaches au moyen d’une clé Allen ou d’un tournevis approprié,
s’il y a lieu.
Réparations
Pour assurer la SÉCURITÉ et la FIABILITÉ de cet outil, toutes les opérations de réparation,
d’entretien et de réglage doivent être effectuées dans un centre de service autorisé ou par du
personnel qualifié; on ne doit utiliser que des pièces de rechange identiques. Consulter le
« Guide de dépannage » à la fin de cette section.
Accessoires
Les accessoires recommandés pour chaque outil sont offerts chez les dépositaires locaux ou
dans les centres de service autorisés. Pour obtenir plus d’information sur les accessoires,
communiquer avec D
EWALT Industrial Tool Co., 701 East Joppa Road, Baltimore, MD 21286,
aux États-Unis ou composer le 1 800 433-9258.
AVERTISSEMENT: N’utiliser que les accessoires recommandés par DEWALT. L’usage
d’un accessoire non recommandé avec cet outil pourrait présenter un danger.
Garantie limité de trois ans
DEWALT réparera, sans frais, tout produit défectueux causé par un défaut de matériel ou de
fabrication pour une période de trois ans à compter de la date d’achat. La présente garantie
ne couvre pas les pièces dont la défectuosité a été causée par une usure normale ou l’usage
abusif de l’outil. Pour obtenir de plus amples renseignements sur les pièces ou les réparations
couvertes par la présente garantie, visiter le site www.dewalt.com ou composer le 1 800 4339258 (1 800 4-D
EWALT). Cette garantie ne s’applique pas aux accessoires et ne vise pas les
dommages causés par des réparations effectuées par un tiers. Cette garantie confère des
droits légaux particuliers à l’acheteur, mais celui-ci pourrait aussi bénéficier d’autres droits
variant d’un état ou d’une province à l’autre.
En plus de la présente garantie, les outils D
EWALT sont couverts par notre :
CONTRAT D’ENTRETIEN GRATUIT D’UN AN
D
EWALT entretiendra l’outil et remplacera les pièces usées au cours d’une utilisation normale
et ce, gratuitement, pendant une période d’un an à compter de la date d’achat (à l’exception
des articles de la cloueuse susceptibles de s’user rapidement, comme les joints toriques et les
lames de l’enfonceur), et la
GARANTIE DE REMBOURSEMENT DE 90 JOURS
Si l’acheteur n’est pas entièrement satisfait, pour quelque raison que ce soit, du rendement de
l’outil électrique, du laser ou de la cloueuse D
EWALT, celui-ci peut le retourner, accompagné
d’un reçu, dans les 90 jours à compter de la date d’achat pour obtenir un remboursement intégral, sans aucun problème.
REMPLACEMENT GRATUIT DE L’ÉTIQUETTE D’AVERTISSEMENT : en cas de perte des
étiquettes d’avertissement (fig. 10) ou de dommages à ces dernières, composer le 1 800 4339258 afin d’en obtenir de nouvelles sans frais.
Français (suite)
614989-00, D51321 3/19/04 5:45 PM Page 4
Page 5

configurada de modo que los clavos queden insertados en el material y que no atraviesen
completamente el material. (Fig. S)
• AJUSTE DE PROFUNDIDAD: Para reducir el riesgo de lesiones graves producidas
por la activación accidental mientras se intenta ajustar la profundidad, SIEMPRE:
• Bloquee el gatillo en OFF.
• Desconecte el aire.
• Evite el contacto con el gatillo durante los ajustes.
• No inserte los clavos a paredes, pisos u otras áreas de trabajo sin antes asegurarse
que es seguro. Los clavos que se insertan en cables eléctricos cargados, las instalaciones
de agua u otros tipos de obstrucciones pueden resultar en lesiones. (Fig. T)
• Manténgase alerta, mire lo que hace y use su sentido común cuando opere una
máquina herramienta. No use la herramienta si está cansado o bajo la influencias de
drogas, alcohol o medicamentos. Basta sólo un momento de distracción para sufrir una
lesión corporal grave cuando se operan máquinas herramienta.
ADVERTENCIA: El uso de este producto lo expondrá a químicos que en el estado de
California se sabe causan cáncer, defectos congénitos y otros daños reproductivos. Evite
inhalar gases y polvo y lávese las manos luego de usarlo.
ANTES DE OPERAR ESTA HERRAMIENTA, LEA DETENIDAMENTE Y COMPRENDA
TODAS LAS INSTRUCCIONES EN LA SECCIÓN “INSTRUCCIONES IMPORTANTES DE
SEGURIDAD”.
ENSAMBLAJE
PRECAUCIÓN: Bloquee el gatillo en
off
, desconecte la línea de aire de la herramienta y
quite los clavos del recipiente antes de realizar ajustes.
Gatillo
En cumplimiento con la norma ANSI SNT-101-2002, las clavadoras DEWALT vienen ensambladas con un gatillo de tope. Sin embargo, viene un kit de gatillo de acción secuencial incluido y sujeto a la herramienta. Para obtener un gatillo de repuesto, contacte a su centro de servicio autorizado o llame al 1-800-4-D
EWALT.
El gatillo gris que tiene impreso en el costado, (No. Cat. D510022 kit) es el gatillo de
acción secuencial y hace que la herramienta opere en esta modalidad.
El gatillo negro que tiene impreso en el costado, (No. Cat. D510020 kit) es el gatillo de
tope y permite que la herramienta sea activada de esta manera.
Para una definición del uso del gatillo de acción secuencial y gatillo de tope, vea la sección de “activación de la herramienta” de este manual.
DESINSTALACIÓN DEL GATILLO (FIG. 1)
1. Bloquee el gatillo en
off
.
2. Quítele el aire a la herramienta.
3. Quite la arandela de goma (A) del extremo de la espiga (B).
4. Quite la espiga.
5. Quite la unidad de gatillo de la cavidad para el gatillo que se encuentra debajo del mango
de la caja protectora de la herramienta.
INSTALACIÓN DEL GATILLO (FIG. 2)
1. Seleccione el gatillo ya sea secuencial o de tope para instalarlo en la herramienta. Ambos
gatillos vienen incluidos en el paquete de la herramienta.
2. Inserte la subunidad del gatillo en la cavidad del gatillo.
3. Asegure que el resorte del gatillo (C) esté puesto alrededor del vástago de la válvula del
gatillo (D).
4. Alinee los orificios del gatillo con los orificios de la caja protectora (E), luego inserte la espiga (B) por la unidad entera, como aparece ilustrado.
5. Empuje la arandela de goma (A) en el extremo de la espiga como aparece ilustrado.
OPERACIÓN
Preparación de la herramienta
1.
Lea la sección de instrucciones de seguridad de este manual.
2. LUBRIQUE LA HERRAMIENTA
a. Use aceite D
EWALT para herramientas neumáticas o un aceite sin detergente de vis-
cosidad S.A.E. 20. NO use aceite detergente o aditivos ya que dañarán los anillos tóri-
cos y otras piezas de goma.
b. Use un filtro y regulador cuando sea posible.
c. Agregue 5 a 7 gotas de aceite en la instalación del aire al menos dos veces diarias.
3. Use protección ocular y auditiva.
4. Asegure que el recipiente esté vacío de todos los clavos.
5. Verifique que el activador por contacto funcione debida y suavemente. No use la herramienta si la unidad no está funcionando debidamente. NUNCA altere el activador por
contacto. NUNCA use una herramienta si tiene el activador por contacto retenido en la
posición de activación.
6. REVISE EL ABASTECIMIENTO DE AIRE: Asegure que la presión de aire no sobrepase
los límites de operación recomendados; 70 a 120 psi, (4,9 a 8,3 bar, 5 a 8,5 kg/cm
2
).
7. Mantenga la herramienta apuntada en dirección contraria a usted y de otros.
8. Bloquee el gatillo en
off
.
9. Conecte la manguera del aire.
10. Revise para ver si tiene fugas audibles alrededor de las válvulas y juntas. Nunca use una
herramienta que tenga fugas o piezas dañadas.
Utilización del bloqueo en off (Figuras 3, 4)
ADVERTENCIA: Siempre use protección ocular y auditiva cuando opere una herramienta.
Cada clavadora DEWALT viene equipada con un conmutador de bloqueo del gatillo en
OFF
(P)
el cual, al ser girado a la derecha, previene que la herramienta se active. Cuando el conmutador esté centrado, la herramienta estará lista para ser operada. El gatillo debería siempre ser
bloqueado en OFF siempre que se hagan ajustes o cuando la herramienta no esté en uso.
Cargado de la herramienta (Fig. 5)
PRECAUCIÓN: Mantenga la herramienta apuntada en una dirección segura cuando
|cargue los clavos.
PRECAUCIÓN: Nunca cargue los clavos si el activador por contacto o el gatillo están
activados.
1. Bloquee el gatillo en OFF.
2. Desconecte el abastecimiento de aire de la herramienta.
3. Tire del pestillo del recipiente (R) para abrir la puerta del recipiente (G).
4. Ponga el dedo debajo de la puerta de guía de los clavos (H) y tire de ella para abrirla.
5. Gire la palanca de ajuste de la plataforma de clavos (F) para acomodar debidamente el
largo de clavos que se está utilizando. Existen tres posiciones diferentes. La posición de
más abajo se usa para clavos de 1-1/2 a 1-3/4 pulg. (38 - 45 mm), la posición del medio
se usa para clavos de 1 a 1-1/2 pulg. (25 - 38 mm) y la posición de más arriba se usa para
clavos de 3/4 a 7/8 pulg. (19 - 25 mm).
6. Ponga el rollo de clavos en el eje (I) dentro del recipiente.
7. Desenrolle suficientes clavos (aproximadamente 80 mm ó 3 pulg.) como para alcanzar la
tobera de la herramienta.
8. Inserte el primer clavo a la tobera y el segundo clavo entre los dos rieles del trinquete de
alimentación (J).
NOTA: Tenga cuidado de no deformar el rollo de clavos durante el proceso de carga. Sino, la
puerta de guía de los clavos no cerrará y puede que los clavos no sean alimentados en forma
consistente.
9. Cierre completamente la puerta de guía de los clavos (H).
10. Enganche el pestillo del recipiente (R); con los dedos corra el pestillo para cerrar la puerta del recipiente (G) completamente.
Activación de la herramienta
ADVERTENCIA: Use siempre protección ocular y auditiva cuando opere la herramienta.
La herramienta puede ser activada utilizando una de dos modalidades: la modalidad del gatillo de acción secuencial y la modalidad del gatillo de tope. El gatillo que viene instalado en la
herramienta como se describe en la sección Gatillo de este manual determina la modalidad
de operación.
GATILLO DE ACCIÓN SECUENCIAL - (GRIS)
El gatillo de acción secuencial fue diseñado para clavado intermitente cuando se desee una
colocación cuidadosa y precisa.
Para operar la clavadora en modalidad de acción secuencial:
1. Presione el activador por contacto firmemente contra la superficie de trabajo.
2. Presione el gatillo.
PRECAUCIÓN: Se disparará un clavo cada vez que el gatillo sea presionado, mientras se
mantenga presionado el activador por contacto.
GATILLO DE TOPE - (NEGRO)
El gatillo de tope fue diseñado para clavado rápido sobre superficies planas y estacionarias.
Cuando use el gatillo de tope habrán dos métodos disponibles: activación por posición y
activación por tope.
Para operar la herramienta con el método de ACTIVACIÓN POR POSICIÓN:
1. Presione el activador por contacto contra la superficie de trabajo.
2. Presione el gatillo.
Para operar la herramienta con el método de ACTIVACIÓN POR TOPE:
1. Presione el gatillo.
2. Empuje el activador por contacto contra la superficie de trabajo. Mientras el gatillo sea presionado, la herramienta disparará un clavo cada vez que se presione el activador por contacto. Esto permite al usuario clavar clavos múltiples en secuencia.
PRECAUCIÓN: No mantenga presionado el gatillo cuando la herramienta no esté en uso.
Mantenga el conmutador de bloqueo en off girado a la derecha (APAGADO) cuando la herramienta no esté en uso.
Ajuste de profundidad (Figuras 3, 4)
La profundidad a la cual queda insertado el clavo puede ser regulada con el dispositivo de
ajuste de profundidad que se encuentra a un costado del gatillo de la herramienta.
ADVERTENCIA: Para reducir el riesgo de lesiones graves causadas por la activación
accidental de la herramienta mientras se intenta ajustar la profundidad, SIEMPRE:
• Bloquee el gatillo en OFF.
• Desconecte la toma de aire.
• Evite el contacto con el gatillo durante estos ajustes.
1. Para insertar el clavo a menor profundidad, gire el disco de ajuste de profundidad (K) a la
derecha (Fig. 3).
2. Para insertar un clavo a mayor profundidad, gire el disco de ajuste de profundidad (K) a
la izquierda (Fig. 4).
Ajuste del medidor de tejas (Fig. 6)
1. Bloquee el gatillo en OFF.
2. Desconecte la toma de aire.
3. Afloje el tornillo (L) con la llave Allen incluida. Deslice el medidor (M) hacia arriba o hacia
abajo para obtener la posición deseada.
4. Ajuste el tornillo.
Despejado de un clavo atascado (Fig. 5)
Si se atora un clavo en la tobera, mantenga la herramienta apuntada en dirección contraria a
usted y siga estas instrucciones para despejarlo:
1. Bloquee le gatillo en OFF.
2. Desconecte la toma de aire de la herramienta.
3. Abra la puerta del recipiente (G).
4. Abra la puerta de la guía de clavos (H).
5. Saque el clavo atorado.
6. Corrija cualquier deformación que pudiera haber ocurrido en el rollo de clavos.
NOTA: Si se siguieran atorando clavos en forma frecuente en la tobera, lleve la herramienta
a un centro de servicio autorizado D
EWALT para que la reparen.
Operación en climas fríos
Cuando opere herramientas en temperaturas bajo cero:
1. Asegúrese que los tanques del compresor hayan sido debidamente drenados antes de ser
usados.
2. Mantenga la herramienta a la temperatura más cálida posible antes de usarla.
3. Asegúrese que todos los clavos hayan sido sacados del recipiente.
4. Ponga 5 a 10 gotas de aceite D
EWALT para herramientas neumáticas en la entrada de
aire.
5. Baje la presión del aire a 80 psi (5,5 bar ó 36,3 kg/cm
2
) o menos.
6. Vuelva a conectar el aire y cargue los clavos en el recipiente.
7. Active la herramienta 5 ó 6 veces usando madera de desecho para lubricar los anillos
tóricos.
8. Aumente la presión al nivel de operación (no sobrepase los 120 psi ó 8,3 bar, 8,5 kg/cm
2
)
y use la herramienta como de costumbre.
9. Vuelva a lubricarla al menos una vez por día.
10. Siempre drene los tanques del compresor al menos una vez por día.
Operación en climas cálidos
La herramienta debería operar como de costumbre. Sin embargo, mantenga la herramienta
alejada de la luz directa del sol ya que el calor excesivo puede deteriorar los paragolpes, anillos tóricos y otras piezas de goma, lo cual resultaría en una mayor necesidad de mantenimiento.
MANTENIMIENTO (Figuras 7, 8, 9)
Cuadro de mantenimiento diario
ACCIÓN Lubrique la herramienta con 5-7 gotas de aceite DEWALT para herramientas
neumáticas.
POR QUÉ Previene fallas en los anillos tóricos.
CÓMO Inserte las gotas en la instalación de aire en el tapón terminal de la herramienta.
ACCIÓN Drene los tanques del compresor y las mangueras a diario.
POR QUÉ Previene la acumulación de humedad en el compresor y la clavadora.
CÓMO Abra las llaves de escape u otras válvulas de drenaje en los tanques del com-
presor. Permita que cualquier agua acumulada sea drenada de las mangueras.
ACCIÓN Limpie el activador por contacto.
POR QUÉ Permite la operación sin problemas del activador por contacto.
CÓMO Meta el extremo delantero de la herramienta al solvente, permitiendo así disolver
el polvo y la tierra (Fig. 9). Seque la clavadora antes de usarla. NOTA: Use sólo
kerosén, aceite pesado #2 o combustible diesel como solvente. NUNCA use
gasolina; esto dañaría los anillos tóricos. NO sumerja la herramienta más allá del
pistón de alimentación.
ACCIÓN Limpie el recipiente.
POR QUÉ Permite la operación sin problemas de la herramienta y permite que los clavos se
muevan sistemáticamente a la sección de alimentación de la herramienta.
CÓMO Limpie con el aire del compresor.
ACCIÓN Limpie el área del pistón de alimentación.
POR QUÉ Permite la operación sin problemas del trinquete de alimentación.
CÓMO Abra la cubierta del pistón de alimentación (N) como se muestra en las Figuras 7
y 8. Limpie con el aire del compresor.
ACCIÓN Antes de cada uso, revise para asegurar que todos los tornillos, tuercas y clavos
estén ajustados y no dañados.
POR QUÉ Previene atoramientos, fugas y la falla prematura de las piezas de la herramienta.
CÓMO Ajuste los tornillos u otros sujetadores sueltos con la llave Allen o el atornillador
adecuado.
Reparaciones
Toda reparación, todo mantenimiento y ajuste debería ser realizado por centros de servicio
autorizados u otro personal de servicio calificado para asegurar la SEGURIDAD y FIABILIDAD
del producto, utilizando siempre repuestos originales. Refiérase a la Guía de resolución de
problemas al final de esta sección.
Accesorios
Podrá encontrar los accesorios recomendados para ser usados con su herramienta donde su
distribuidor o centro de servicio autorizado local. Si necesita ayuda para ubicar cualquier accesorio para su herramienta, contacte a D
EWALT Industrial Tool Co., 701 East Joppa Road,
Baltimore, MD 21286 (1-800-4-DEWALT).
PRECAUCIÓN: Use sólo los accesorios recomendados por DEWALT. El uso de cualquier
otro accesorio no recomendado para ser usado con esta herramienta podría ser peligroso.
Garantía limitada por tres años
DEWALT reparará, sin cargo, cualquier falla que surja de defectos en el material o la fabricación
del producto, por hasta tres años a contar de la fecha de compra. Esta garantía no cubre fallas
de las piezas causadas por su desgaste normal o abuso a la herramienta. Para mayores
detalles sobre la cobertura de la garantía e información acerca de reparaciones realizadas bajo
garantía, visítenos en www.dewalt.com o llámenos al 1 800 433-9258 (1-800-4-D
EWALT). Esta
garantía no aplica a accesorios o a daños causados por reparaciones realizadas o intentadas
por terceros. Esta garantía le otorga derechos legales específicos, además de los cuales puede
tener otros dependiendo del estado o provincia en que se encuentre.
Además de la garantía, las herramientas D
EWALT están cubiertas por:
1 AÑO DE SERVICIO GRATUITO
D
EWALT mantendrá la herramienta y reemplazará las piezas gastadas por su uso normal, sin
cobro, en cualquier momento durante un año a contar de la fecha de compra. Las piezas gastadas de la clavadora, tales como anillos tóricos y hojas del impulsor, no están cubiertas.
GARANTÍA DE REEMBOLSO DE SU DINERO POR 90 DÍAS
Si no está completamente satisfecho con el desempeño de su máquina herramienta, láser o
clavadora D
EWALT, cualquiera sea el motivo, podrá devolverlo hasta 90 días de la fecha de
compra con su recibo y obtener el reembolso completo de su dinero – sin necesidad de
responder a ninguna pregunta.
REEMPLAZO GRATUITO DE ETIQUETAS DE ADVERTENCIA: Si sus etiquetas de
advertencia (Fig. 10) se vuelven ilegibles o no las tiene, llame al 1-800-4-D
EWALT para reem-
plazarlas gratuitamente.
Versión en español sigue
614989-00, D51321 3/19/04 5:45 PM Page 5
Page 6

Compressor will be sufficient for tools at all production rates.
Le compresseur peut actionner tout outil, quel que soit le taux de production.
El compresor será suficiente para las herramientas a todo índice de producción.
Compressor will be sufficient at slow or moderate production rates, but may have difficulty at very rapid rates.
Le compresseur peut actionner des outils à des taux de production faibles ou modérés, mais peut avoir de la difficulté à
des taux très élevés.
El compresor será suficiente a índices de producción lentos o moderados pero tendrá dificultad con índices demasiado rápidos.
Compressor will be adequate only when tools are utilized at slow production rates. (punch-out or occasional use)
Le compresseur ne sera vraiment efficace que lorsque les outils sont utilisés à de faibles taux de production (p. ex., lors de
travaux rapides ou occasionnels).
El compresor será adecuado sólo cuando las herramientas sean utilizadas a índices de producción lentos (perforación o uso
ocasional).
Not Recommended
Taux non recommandés
No se recomienda
Troubleshooting Guide
MANY COMMON PROBLEMS CAN BE SOLVED EASILY BY UTILIZING THE CHART BELOW. FOR MORE SERIOUS OR PERSISTENT PROBLEMS,
CONTACT A D
EWALT SERVICE CENTER OR CALL 1-(800)-4-DEWALT.
DISCONNECT AIR FROM TOOL BEFORE ALL REPAIRS
Trigger valve housing leaks O-ring or valve stem failure Replace valve using: Trigger Valve Kit: Cat. # D510005
Top cap leaks air Loose cap screws Tighten cap screws using appropriate Allen wrench
Damaged or worn gasket or O-ring Replace gasket/O-rings using: O-ring Repair Kit, Cat. # D513211
Exhaust leaks Main seal or O-ring damaged, debris in tool. Replace gasket/O-rings using: O-ring Repair Kit, Cat. # D513211
Air leaks around nose when Damaged or worn O-rings Replace gasket/O-rings using: O-ring Repair Kit, Cat. # D513211
tool is at rest. (Driver blade in up position)
Air leaks around nose when tool is in
actuated position. (Driver blade in Damaged or worn bumper Replace bumper using: Bumper Kit, Cat. # D513213
down position)
Tool does not cycle in cold weather Tool not receiving air Check air supply
Valve may be frozen Warm up tool
Damaged or worn O-rings Replace gasket/O-rings using: O-ring Repair Kit, Cat. # D513211
Broken or damaged driver blade Replace Driver Blade Kit: Cat. # D513212
Lack of power; sluggish Low air pressure Check air supply
Lack of lubrication Lubricate tool using approved pneumatic tool oil.
Damaged or worn O-rings Replace gasket/O-rings using: O-ring Repair Kit, Cat # D513211
Exhaust port blocked or clogged Disconnect air, remove exhaust plate from top of tool, clean port
Skipping nails; intermittent feed Air restricted Check air supply and couplers
Lack of lubrication Lubricate tool using approved pneumatic tool oil
Nose piece screws loose Tighten nosepiece screws using appropriate allen wrench
Wrong size/angle fasteners Use only recommended fasteners
Dirty canister Clean canister track and nosepiece
Worn canister Replace canister
Broken or damaged driver blade Replace Driver Blade Kit; Cat. # D513212
Trigger valve O-ring worn or damaged Replace valve using: Trigger Valve Kit; Cat. # D510005
Worn piston O-ring Replace Piston O-Ring using: O-Ring Repair Kit, Cat.# D513211
Worn or damaged check pawl and/or feed pawl Replace check pawl and/or feed pawl
Canister loose Check that canister latch is holding firmly
Nail platform at incorrect setting Set nail platform to proper nail setting
Feed piston O-ring worn or damaged Replace feed piston O-ring using: O-Ring Repair Kit, Cat. # D513211
Fasteners jam in tool Driver channel in nose piece worn Replace nosepiece
Wrong size/ angle fasteners Use only recommended fasteners
Canister loose Check that canister screws are holding firmly
Worn driver blade Replace Driver Blade Kit; Cat # D513212
Nose piece screws loose Tighten nosepiece screws using appropriate Allen wrench
Nails not feeding properly Ensure nails are feeding properly into nose.
NAIL SPECIFICATIONS
D51321 COIL ROOFING NAILER
CARACTÉRISTIQUES DES CLOUS
D51321 CLOUEUSE À BOBINE POUR TOITURES
ESPECIFICACIONES DE LOS CLAVOS
D51321 CLAVADORA PARA TECHADO EN ROLLO
Nail Lengths .75'' - 1.75''
Longueur 20 – 40 mm (0,75 – 1,75 po.)
Largo de clavos 20 – 40 mm (0,75 – 1,75 pulg.)
Shank Diameters .120
Diamètre de tige 3 mm (0,120 po.)
Diámetro del vástago 3 mm (0,120 pulg.)
Nail Coil Angle 15˚
Angle de la bobine 15°
Ángulo del rollo de clavos 15˚
TOOL SPECIFICATIONS
D51321 COIL ROOFING NAILER
CARACTÉRISTIQUES DE L’OUTIL
D51321 CLOUEUSE À BOBINE POUR TOITURES
ESPECIFICACIONES DE LA HERRAMIENTA
D51321 CLAVADORA PARA TECHADO EN ROLLO
Height / Hauteur / Altura 11.4'' (289,6 mm)
Width / Largeur / Ancho 4.6" (118,1 mm)
Length / Longueur / Largo 10.6'' (269,7 mm)
Weight / Poids / Peso 4.90 lbs. (2,22 kg)
Recommended Operating Pressure 70 - 120 psig (4.9 - 8.3 bar, 5 to 8.5 kg/cm2)
Pression d’utilisation recommandée de 5 à 8,5 kg/cm
2
(70 à 120 lb/po2ou 4,9 à 8,3 bar)
Presión de operación recomendada 70 - 120 psi (4,9 – 8,3 bar, 5 a 8,5 kg/cm2)
Air Consumption per 100 cycles 4.15 scfm @ 100 psi
Consommation d’air par 100 cycles 4,15 scfm à 100 psi (0,12 scmm a 6,9 bar)
Consumo de aire por cada 100 ciclos 4,15 scfm a 100 psi (0,12 scmm a 6,9 bar)
Loading capacity Up to 120 nails
Capacité de charge Jusqu’à 120 clous
Capacidad de carga Hasta 120 clavos
5.5 HP Gas
2 HP Elec.
8 - 9 CFM
Portable
Handcarry
3.2 - 4 CFM
8 HP Gas
14 - 16
CFM
Industrial
23+ CFM
Petit
outil
portatif
5,4 – 6,8 CMM
(3,2 – 4 CFM)
Outil à gaz
(5,5 hp)
Outil élec-
trique
(2 hp)
13,6 – 15,3
CMM
(8 - 9 CFM)
Outil à gaz
(8 hp)
23,8 – 27,2
CMM
(14 – 16
CFM)
Outil indus-
triel
39,1+ CMM
(23+ CFM)
Portátil
5,4 – 6,8 CMM
(3,2 – 4 CFM)
5,5 HP Gas
2 HP Elec.
13,6 – 15,3
CMM
(8 - 9 CFM)
8 HP Gas
23,8 – 27,2
CMM
(14 – 16
CFM)
Industrial
39,1+ CMM
(23+ CFM)
NUMBER OF TOOLS CONNECTED TO COMPRESSOR
NOMBRE D’OUTILS RACCORDÉS AU COMPRESSEUR
NÚMERO DE HERRAMIENTAS CONECTADAS AL COMPRESOR
1
2
3
4
5
6
7
8+
Fig. 10
614989-00, D51321 3/19/04 5:45 PM Page 6
Page 7

GUÍA DE RESOLUCIÓN DE PROBLEMAS
MUCHOS PROBLEMAS COMUNES PUEDEN RESOLVERSE FÁCILMENTE CON LAAYUDA DEL SIGUIENTE CUADRO. PARA PROBLEMAS MÁS SERIOS O PERSISTENTES,
LLAME AL CENTRO DE SERVICIO DEWALT O AL 1-(800)-4-DEWALT.
DESCONECTE EL AIRE DE LA HERRAMIENTA ANTES DE HACER CUALQUIER REPARACIÓN
La caja protectora de la válvula del gatillo gotea Avería en el anillo tórico o en el vástago de la válvula Cambie la válvula con el kit de válvula del gatillo: Cat. # D510005
La tapa superior pierde aire Tornillos sueltos en la tapa Ajuste los tornillos de la tapa con la llave Allen adecuada
Junta o anillo tórico gastado o dañado Cambie la junta o anillo tórico con el kit de reparación de anillos tóricos,
Cat. # D513211
Fuga en el escape Sello principal o anillo tórico dañados, desechos Cambie la junta o anillo tórico con el kit de reparación de anillos
en la herramienta anillos tóricos, Cat. # D513211
Pérdidas de aire por la tobera cuando Anillos tóricos dañados o gastados Cambie las juntas o los anillos tóricos con el kit de reparación
la herramienta está en reposo (hoja del de anillos tóricos, Cat. # D513211
impulsor en posición superior)
Pérdidas de aire por la tobera cuando la Paragolpes dañado o gastado Cámbielo con el kit de paragolpes, Cat. # D513213
herramienta está en funcionamiento (hoja
del impulsor en posición inferior)
La herramienta no efectúa el ciclo en climas fríos La herramienta no recibe aire Compruebe el suministro de aire
La válvula puede haberse congelado Caliente la herramienta
Anillos tóricos dañados o gastados Cambie las juntas o los anillos tóricos con el kit de reparación de
anillos tóricos, Cat. # D513211
Hoja del impulsor dañada o rota Cambie la hoja del impulsor con el kit, Cat. # D513212
Falta de potencia; no responde bien Presión del aire baja Compruebe el suministro de aire
Falta de lubricación Lubrique la herramienta con aceite aprobado para
herramientas neumáticas
Anillos tóricos dañados o gastados Cambie las juntas o los anillos tóricos con el kit de reparación de
anillos tóricos, Cat. # D513211
Puerto de escape bloqueado o tapado Desconecte el aire, extraiga la placa de escape de la parte superior
de la herramienta, limpie el puerto
Se salta clavos; alimentación intermitente Restricción de aire Compruebe el suministro de aire y conectadores
Falta de lubricación Lubrique la herramienta con aceite aprobado para herramientas
neumáticas
Los tornillos de la tobera están sueltos Ajuste los tornillos de la tobera con la llave Allen adecuada
Sujetadores con un ángulo o tamaño inadecuado Utilice solamente sujetadores recomendados
Recipiente sucio Limpie la vía del recipiente y la tobera
Recipiente gastado Cambie el recipiente
Hoja del impulsor dañado o roto Cambie la hoja del impulsor con el kit, Cat. # D513212
Anillo tórico de la válvula del gatillo gastada o dañada Cambie la válvula con el kit de válvula del gatillo; Cat. # D510005
Anillo tórico del pistón gastado Cámbielo con el kit de reparación de anillos tóricos, Cat. # 513211
Trinquete de revisión o alimentación gastado o dañado Cambie el trinquete de revisión o alimentación
Recipiente suelto Compruebe que el pestillo del recipiente esté firmemente asegurado
Plataforma de clavos en configuración inadecuada Coloque la plataforma en la configuración adecuada
Anillo tórico del pistón de alimentación gastado o dañado Cámbielo con el kit de reparación de anillos tóricos, Cat. # 513211
Clavos atascados en la herramienta Canal del impulsor de la tobera gastado Cambie la tobera
Clavos de un ángulo o tamaño inadecuado Utilice solamente los clavos recomendados
Recipiente suelto Revise que los tornillos del recipiente estén ajustados
Hoja del impulsor gastada Cambie la hoja del impulsor con el kit, Cat. # D513212
Los tornillos de la tobera están sueltos Ajuste los tornillos de la tobera con la llave Allen adecuada
Los clavos no se alimentan debidamente Compruebe que los clavos se estén alimentando debidamente por
la tobera
GUIDE DE DÉPANNAGE
PLUSIEURS PROBLÈMES COURANTS PEUVENT ÊTRE FACILEMENT RÉGLÉS EN CONSULTANT LE TABLEAU CI-DESSOUS. PAR CONTRE, EN PRÉSENCE
D’UN PROBLÈME PLUS GRAVE OU PERSISTANT, ON DOIT COMMUNIQUER AVEC UN CENTRE DE SERVICE DEWALT OU COMPOSER LE 1 800 433-9258.
DÉBRANCHER L’OUTIL DU CIRCUIT D’ALIMENTATION EN AIR AVANT D’EFFECTUER TOUTE OPÉRATION D’ENTRETIEN.
Le logement de la vanne de déclenchement présente Le joint torique ou la tige de soupape Remplacer la vanne ou la soupape au moyen de la trousse
une fuite est défectueux de la vanne de déclenchement (node catalogue D510005
Le capuchon supérieur présente une fuite d’air Les vis du capuchon sont desserrées Serrer les vis du capuchon au moyen de la clé Allen appropriée
La garniture ou le joint torique est Remplacer la garniture ou le joint torique au moyen de la trousse
endommagé ou usé de réparation des joints toriques (node catalogue D513211)
Le déflecteur d’échappement présente une fuite Le joint d’étanchéité ou le joint torique Remplacer le joint d’étanchéité ou le joint torique au moyen de la
principal est endommagé, entraînant une trousse de réparation des joints toriques toriques
accumulation de débris à l’intérieur de l’outil (node catalogue D513211)
L’air s’échappe de l’embout lorsque l’outil n’est pas Les joints toriques sont endommagés ou usés Remplacer la garniture ou les joints toriques au moyen de la
actionné (La lame de l’enfonceur est dirigée vers le haut) trousse de joints toriques (node catalogue D513211)
L’air s’échappe de l’embout lorsque l’outil est actionné La butée est endommagée ou usée Remplacer la butée au moyen de la trousse de butée
(La lame de l’enfonceur est dirigée vers le bas) (node catalogue D512563)
L’outil ne fonctionne pas correctement par temps froid Il n’y a aucune alimentation en air Vérifier le circuit d’alimentation en air
La vanne est peut être gelée Réchauffer l’outil
Les joints toriques sont endommagés ou usés Remplacer les garnitures ou les joints toriques au moyen de la
trousse de réparation des joints toriques (n
o
de catalogue D513211)
La lame de l’enfonceur est brisée Remplacer la lame au moyen de la trousse appropriée
ou endommagée (node catalogue D513212)
L’outil démarre difficilement en raison d’une perte de puissance La pression d’air est faible. Vérifier le circuit d’alimentation en air
L’outil n’est pas suffisamment lubrifié Lubrifier l’outil au moyen d’une huile pour outils pneumatiques
approuvée
Les joints toriques sont endommagés ou usés. Remplacer la garniture ou les joints toriques au moyen de la
trousse de réparation des joints toriques (n
o
de catalogue D513211)
Le déflecteur d’échappement est bloqué Débrancher le circuit d’alimentation en air et retirer les plaques du
ou obstrué du déflecteur d’échappement de la partie supérieure de l’outil;
nettoyer le déflecteur
Certains clous ne sont pas alimentés correctement; L’alimentation en air est insuffisante Vérifier le circuit d’alimentation en air et les raccords
l’alimentation est intermittente L’outil n’est pas suffisamment lubrifié Lubrifier l’outil au moyen d’une huile pour outils pneumatiques
approuvée
Les vis de l’embout sont desserrées Serrer les vis de l’embout au moyen de la clé Allen appropriée
Les attaches n’ont pas les dimensions ni les N’utiliser que des attaches recommandées
angles appropriés
Le boîtier est sale Nettoyer le conduit du boîtier et l’embout.
Le boîtier est usé Remplacer le boîtier
La lame de l’enfonceur est brisée ou Remplacer la lame au moyen de la trousse appropriée
endommagée (n
o
de catalogue D513212)
Le joint torique de la vanne de déclenchement Remplacer la vanne au moyen de la trousse de la vanne de
est usé ou endommagé. déclenchement (n
o
de catalogue D510005)
Le joint torique du piston est usé Remplacer le joint torique du piston au moyen de la trousse de
réparation des joints toriques (n
o
de catalogue D513211)
Le cliquet d’arrêt ou d’alimentation est usé Remplacer le cliquet d’arrêt ou d’alimentation.
ou endommagé
Le boîtier n’est pas bien fixé S’assurer que le verrou du boîtier est bien enclenché
La plate-forme des clous n’est pas réglée Régler la plate-forme correctement selon la longueur des clous
correctement
Le joint torique du piston d’alimentation est usé Remplacer le joint torique du piston d’alimentation au moyen de
ou endommagé la trousse des joints toriques (node catalogue D513211)
Les attaches restent coincées dans l’embout de l’outil Le conduit de l’enfonceur à l’intérieur de l’embout Remplacer l’embout au complet
est usé
Les attaches n’ont pas les dimensions ni les N’utiliser que des attaches recommandées
angles appropriés
Le boîtier n’est pas bien fixé. S’assurer que les vis du boîtier sont bien serrées.
La lame de l’enfonceur est usée Remplacer la lame de l’enfonceur au moyen de la trousse
appropriée (n
o
de catalogue D513212)
Les vis de l’embout sont desserrées Serrer les vis qui retiennent l’embout au moyen de la clé
Allen appropriée
Les clous ne sont pas alimentés correctement S’assurer que les clous sont bien introduits dans l’embout
614989-00, D51321 3/19/04 5:45 PM Page 7
 Loading...