

Page 1
<:O3
NLU
__q_-
"O Z
n<_
>-o
©_>
rr
LI.Ib-
r._ rS)
w_z
_m
r.D P--
E,,,
z U)
w_
cul_O
O>C3
Wg©
>'F- M
cr,_
F-_D
C3_
@
¢,
o
0 ¢_
o
m _
o_
W
Z
O
m
=.a
-J O
< zo
Z_7--
DEWALT Industrial Tool Co., 701 Joppa Road, Baltimore, MD 21286
(OCT06) Form No. 495266-02 D25111, etc. Copyright © 2006 DEWALT
The following are trademarks for one or more DEWALT power tools: the yellow and black color
scheme; the "D" shaped air intake grill; the array of pyramids on the handgrip; the kit box
configuration; and the array of lozenge-shaped humps on the surface of the tool.
{/ Definitions: Safety Guidelines \
The definitions below describe the level of severity for each signal word. Please read the
manual and pay attention to these symbols.
DANGER; Indicates an imminently hazardous situation which, ff not avoided, will result
in death or serious injury.
WARNING: Indicates a potentially hazardous situation which, ff not avoided, could
result in death or serious injury.
,_t,CAUTION: Indicates a potentially hazardous situation which, ff not avoided, may result
in minor or moderate injury.
CAUTION: Used without the safety alert symbol indicates a potentially hazardous situation
which, ff not avoided, may result in property damage.
IF YOU HAVE ANY QUESTIONS OR COMMENTS ABOUT THIS OR ANY DEWALT TOOL,
CALL US TOLL FREE AT: 1-800-4-DEWALT (1-800-433-9258)
General Safety Rules
A WARNING! To reduce risk of injury, user must read instruction manual.
Failure to follow all instructions listed below may result in electric shock, fire
and/or serious injury. The term "power tool" in all of the warnings listed below
refers to your mains-operated (corded) power tool or battery-operated (cordless)
power tooL
1) WORK AREA SAFETY
a) Keep work area clean and well lit. Cluttered or dark areas invite accidents.
b) Do not operate power tools in explosive atmospheres, such as in the presence of
flammable liquids, gases or dust. Power tools create sparks which may ignite the dust
or fumes.
c) Keep children and bystanders away while operating a power tool. Distractions can
cause you to lose control
2) ELECTRICAL SAFETY
a) Power tool plugs must match the outlet. Never modify the plug in any way. Do not
use any adapter plugs with earthed (grounded) power tools. Unmodified plugs and
matching outlets will reduce risk of electric shock.
b) Avoid body contact with earthed or grounded surfaces such as pipes, radiators,
ranges and refrigerators. There is an increased risk of electric shock ff your body is
earthed or grounded.
c) Do not expose power tools to rain or wet conditions. Water entering a power tool will
increase the risk of electric shock
d) Do not abuse the cord. Never use the cord for carrying, pulling or unplugging the
power tool. Keep cord away from heat, oil, sharp edges or moving parts. Damaged
or entangled cords increase the risk of electric shock. Have damaged cords repaired
or replaced by an authorized service center. Use only 3-wire extension cords that have
3-prong grounding-type plugs and 3-pole receptacles that accept the tool's plug.
e) When operating a power tool outdoors, use an extension cord suitable for outdoor
use. Use of a cord suitable for outdoor use reduces the risk of electric shock. Make sure
your extension cord is in good condition. When using an extension cord, be sure to use
one heavy enough to carry the current your product will draw. An undersized cord will
cause a drop in line voltage resulting in loss of power and overheating. The following table
shows the correct size to use depending on cord length and nameplate ampere rating. If in
doubt, use the next heavier gauge. The smaller the gauge number, the heavier the cord.
Ampere Rating
MO re
Than
0
6
10
12
z
SAVE TH_S_ INSTRUCTIONS
Minimum Gauge for Cord Sets
Volts Total Length of Cord in Feet
120V 25 50 100
240V 50 100 200
Not More
Than
6
10
12
16
18
18
16
14
AWG
16
16
16
12
o o
_ _ _ • 0 _
oo
150
3OO
16 14
14 12
14 12
Not Recommended
3) PERSONAL SAFETY
a) Stay alert, watch what you are doing and use common sense when operating a
power tool. Do not use a power tool while you are tired or under the influence of
drugs, alcohol or medication. A moment of inattention while operating power tools may
result in serious personal injury.
b) Use safety equipment. Always wear eye protection. Safety equipment such as
dust mask, non-skid safety shoes, hard hat, or hearing protection used for appropriate
conditions will reduce personal injuries.
c) Avoid accidental starting. Ensure the switch is in the off-position before plugging
in. Carrying power tools with your finger on the switch or plugging in power tools that have
the switch on invites accidents.
d) Remove any adjusting key or wrench before turning the power tool on. A wrench or
a key left attached to a rotating part of the power tool may result in personal injury.
e) Do not overreach. Keep proper footing and balance at all times. This enables better
control of the power tool in unexpected situations.
f) Dress properly. Do not wear loose clothing or jewellery. Keep your hair, clothing and
gloves away from moving parts. Loose clothes, jewellery or long hair can be caught in
moving parts. Air vents often cover moving parts and should also be avoided.
g) ff devices are provided for the connection of dust extraction and collection facilities,
ensure these are connected and properly used. Use of these devices can reduce dust-
related hazards.
4) POWER TOOL USE AND CARE
a) Do not force the power tool. Use the correct power tool for your application. The
correct power tool will do the job better and safer at the rate for which it was designed.
b) Do not use the power tool if the switch does not turn it on and off. Any power tool
that cannot be controlled with the switch is dangerous and must be repaired.
c) Disconnect the plug from the power source and/or the battery pack from the power
tool before making any adjustments, changing accessories, or storing power tools.
Such preventive safety measures reduce the risk of starting the power tool accidentally.
d) Store idle power tools out of the reach of children and do not allow persons
unfamiliar with the power tool or these instructions to operate the power tool. Power
tools are dangerous in the hands of untrained users.
e) Maintain power tools. Check for misalignment or binding of moving parts, breakage
of parts and any other condition that may affect the power tools operation, ff
damaged, have the power tool repaired before use. Many accidents are caused by
poorly maintained power tools.
f) Keep cutting tools sharp and clean. Properly maintained cutting tools with sharp cutting
edges are less likely to bind and are easier to control.
g) Use the power tool, accessories and tool bits etc., in accordance with these
instructions and in the manner intended for the particular type of power tool, taking
into account the working conditions and the work to be performed. Use of the power
tool for operations different from those intended could result in a hazardous situation.
5) SERVICE
a) Have your power tool serviced by a qualified repair person using only identical
replacement parts. This will ensure that the safety of the power tool is maintained.
_dditional Safety Instructions for Rotary Hammers
• Hold power tools by insulated gripping surfaces when performing an operation
where the cutting tool may contact hidden wiring or its own cord. Contact with a "live"
wire will make exposed metal parts of the tool 'live" and shock the operator.
Be certain that the material being drilled does not conceal electric or gas service and that
their locations have been verified with the utility companies.
Wear ear protectors. Exposure to noise can cause hearing loss.
Use auxiliary handles supplied with the tool
Loss of control can cause personal injury.Keep a firm grip on the tool at all times. Do not
attempt to operate this tool without holding # with both hands. Operating this tool with one
hand will result in loss of control Breaking through or encountering hard materials such as
re-bar may be hazardous as weft. Tighten the side handle securely before use.
, Use clamps or other practical way to secure and support the workpiece to a stable
platform. Holding the work by hand or against your body is unstable and may lead to loss of
control.
* Wear safety goggles or other eye protection. Hammering operations cause chips to
fly. Flying particles can cause permanent eye damage. Wear a dust mask or respirator for
applications that generate dust. Ear protection may be required for most applications.
* Keep a firm grip on the tool at all times. Do not attempt to operate this tool without
holding it with both hands. It is recommended that the side handle be used at all
times. Operating this tool with one hand will result in loss of control. Breaking through or
encountering hard materials such as re-bar may be hazardous as well.
* Do not operate this tool for long periods of time. Vibration caused by hammer action may
be harmful to your hands and arms. Use gloves to provide extra cushion and limit exposure
by taking frequent rest periods.
* Do not recondition bits yourself. Chisel reconditioning should be done by an authorized
specialist. Improperly reconditioned chisels could cause injury.
* Wear gloves when operating tool or changing bits. Accessible metal parts on the tool
and bits may get extremely hot during operation. Small bits of broken material may damage
bare hands.
* Never lay the tool down until the bit has come to a complete stop. Moving bits could
cause injury.
* Do not strike jammed bits with a hammer to dislodge them. Fragments of metal or
material chips could dislodge and cause injury.
* Slightly worn chisels can be resharpened by grinding.
* Keep the power cord away from the rotating bit. Do not wrap the cord around any part
of your body. An electric cord wrapped around a spinning bit may cause personal injury and
loss of control.
NOTE: Do not overheat the bit (discoloration) while grinding a new edge. Badly worn chisels
require reforging. Do not reharden and temper the chisel
WARNING: ALWAYS use safety glasses. Everyday eyeglasses are NOT safety glasses. Also
use face or dust mask ff cutting operation is dusty. ALWAYS WEAR CERTIFIED SAFETY
EQUIPMENT:
* ANSI Z87.1 eye protection (CAN/CSA Z94.3),
* ANSI S12.6 ($3.19) hearing protection,
, NIOSH/OSHA/MSHA respiratory protection.
WARNING: Some dust created by power sanding, sawing, grinding, drilling, and other
construction activities contains chemicals known to cause cancer, birth defects or other
reproductive harm. Some examples of these chemicals are:
* lead from lead-based paints,
* crystalline silica from bricks and cement and other masonry products, and
* arsenic and chromium from chemically-treated lumber.
Your risk from these exposures varies, depending on how often you do this type of work. To
reduce your exposure to these chemicals: work ina well ventilated area, and work with approved
safety equipment, such as those dust masks that are specially designed to filter out microscopic
particles.
* Avoid prolonged contact with dust from power sanding, sawing, grinding, drilling,
and other construction activities. Wear protective clothing and wash exposed areas
with soap and water. Allowing dust to get into your mouth, eyes, or lay on the skin may
promote absorption of harmful chemicals.
_ WARNING: Use of this tool can generate and/or disburse dust, which may cause serious and
permanent respiratory or other injury. Always use NIOSH/OSHA approved respiratory protection
appropriate for the dust exposure. Direct particles away from face and body.
WARNING: Always use eye protection. All users and bystanders must wear eye protection
that conforms to ANSI Z87.1.
_ WARNING: Always wear proper personal hearing protection that conforms to ANSI
$12.6 ($3.19) during use. Under some conditions and duration of use, noise from this product
may contribute to hearing loss.
* The label on your tool may include the following symbols. The symbols and their definitions
are as follows:
V.................. volts
Hz................ hertz
min .............. minutes
--_ ............ direct current
................ Class I Construction
(grounded)
[] ................. Class II Construction
(double insulated)
BPM ............ beats per minute
A .................... amperes
W................... watts
"_, .................. alternating current
no................... no load speed
................... earthing terminal
................... safety alert symbol
.../min ............ revolutions or reciprocation
per minute
Motor
Your DEWALT tool is powered by a DEWALT-built motor. Be sure your power supply agrees
with the nameplate markings. Voltage decrease of more than 10% will cause loss of power and
overheating. All DEWALT tools are factory tested.
Page 2
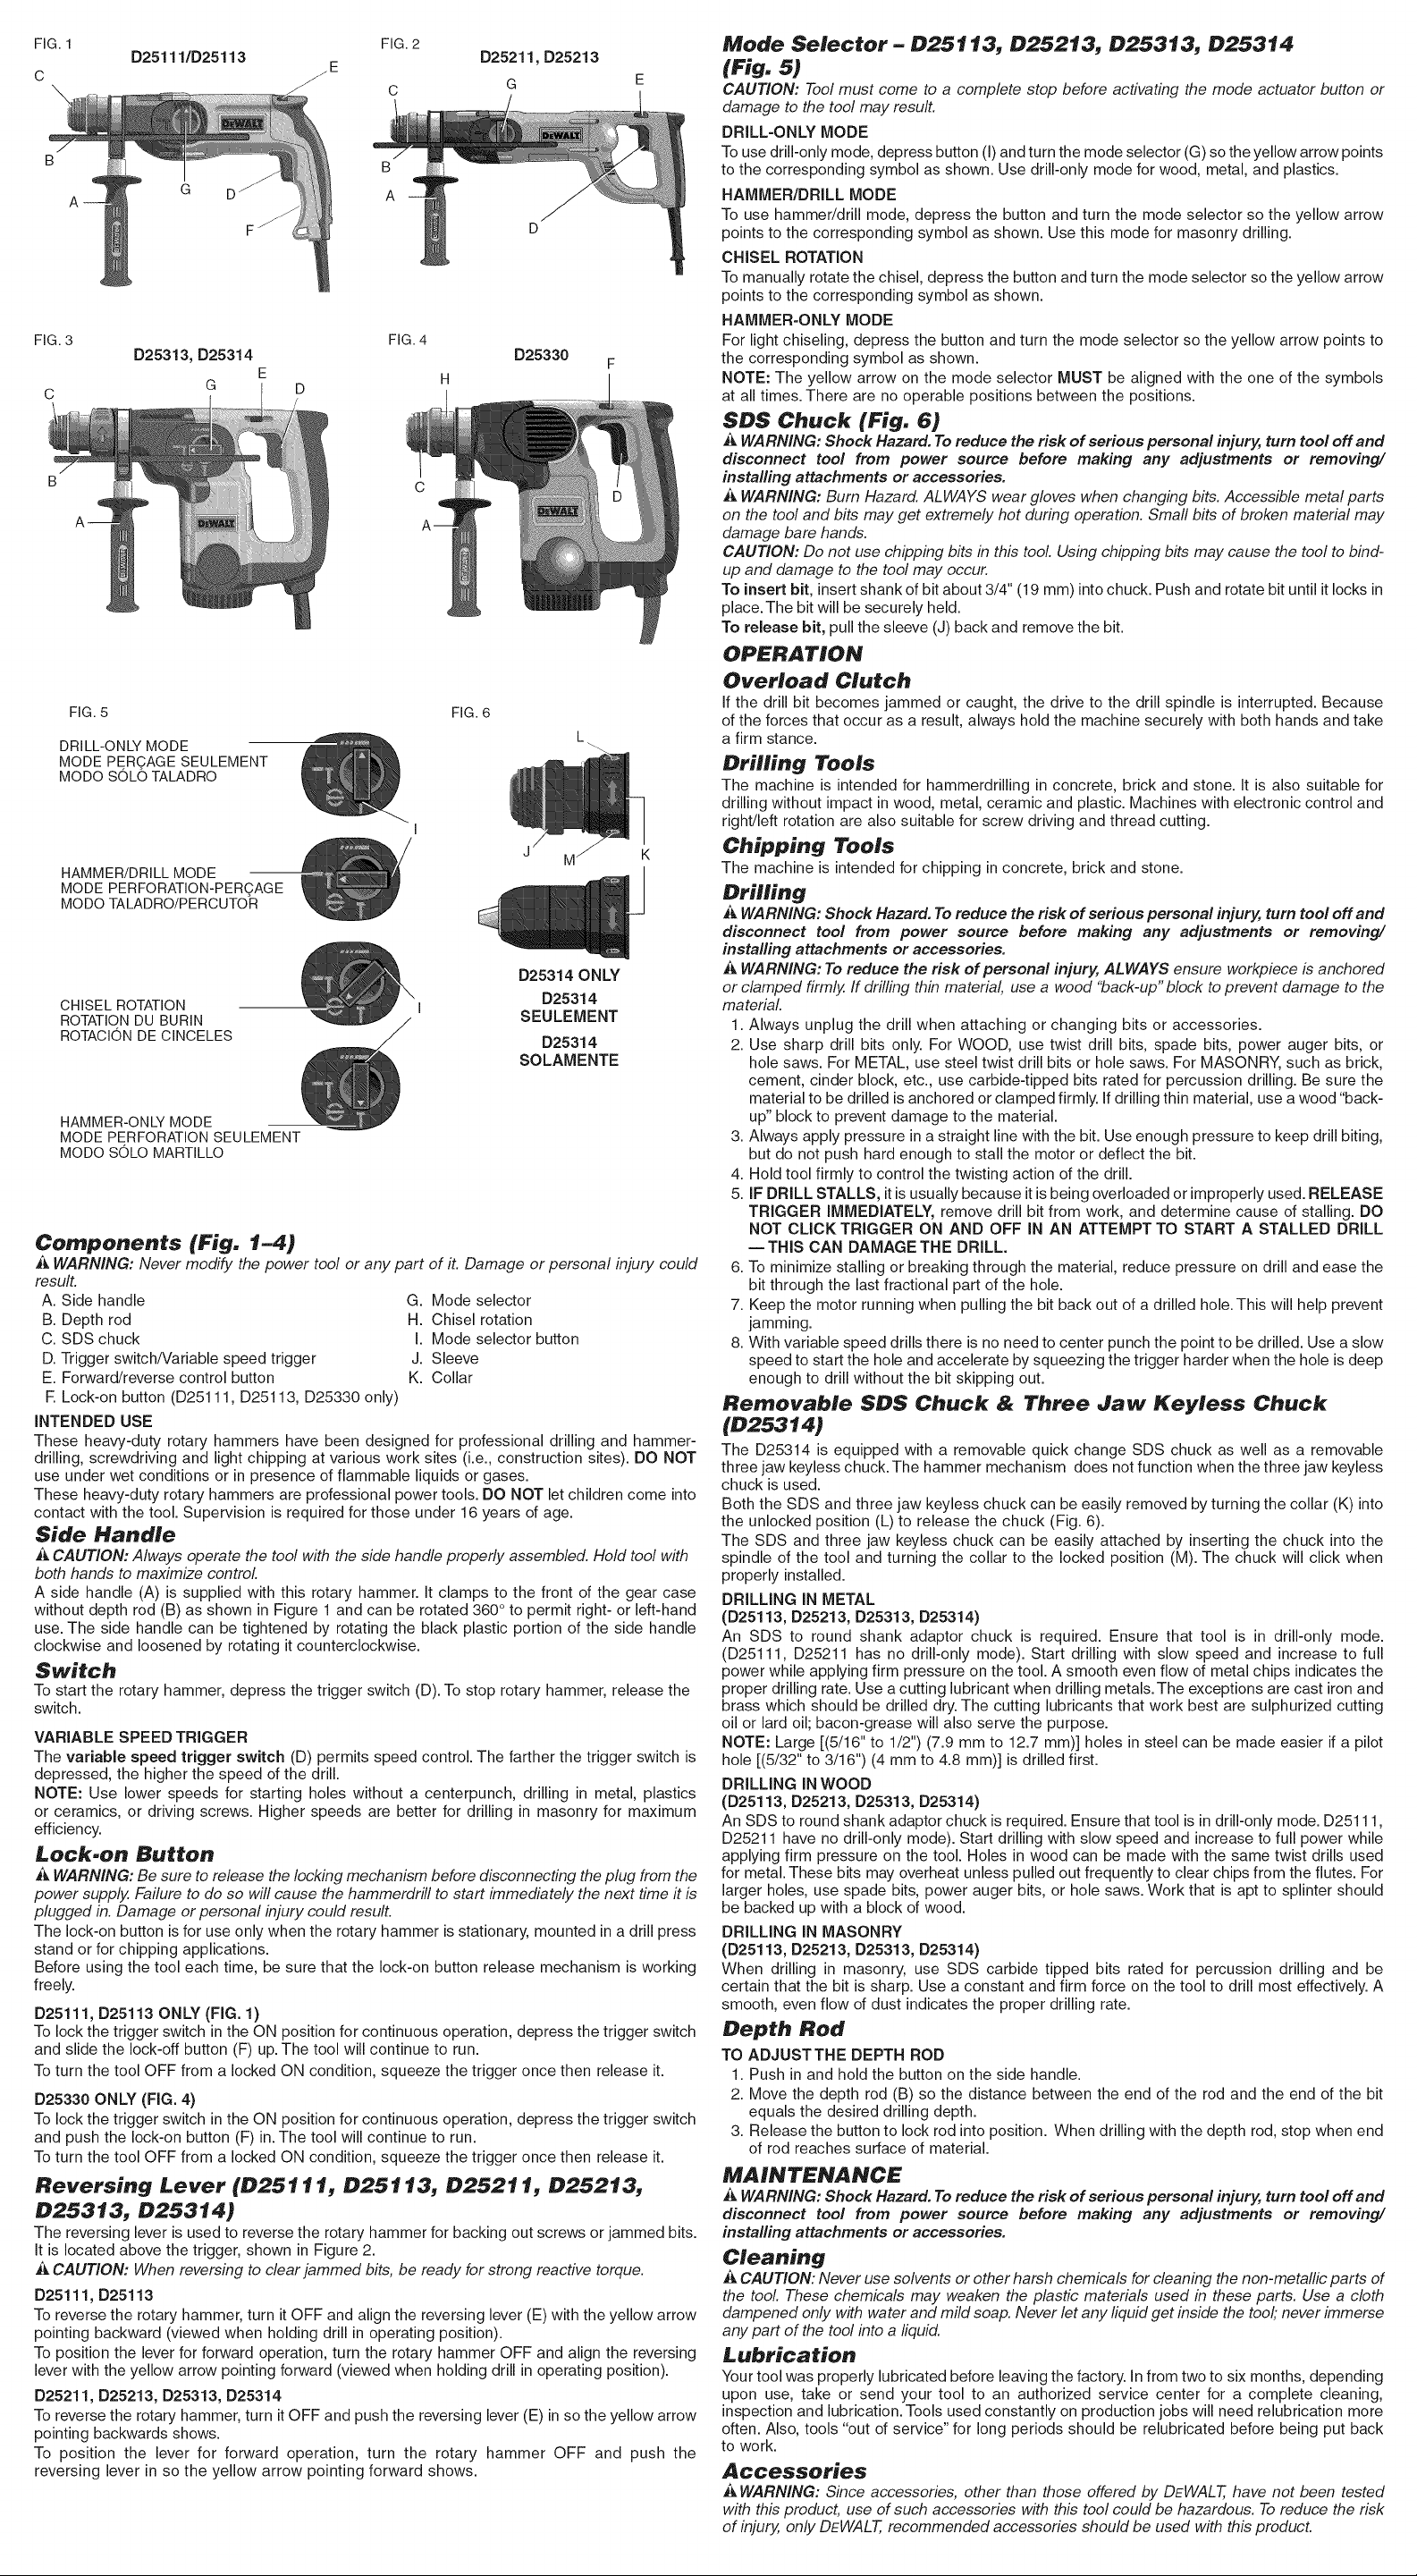
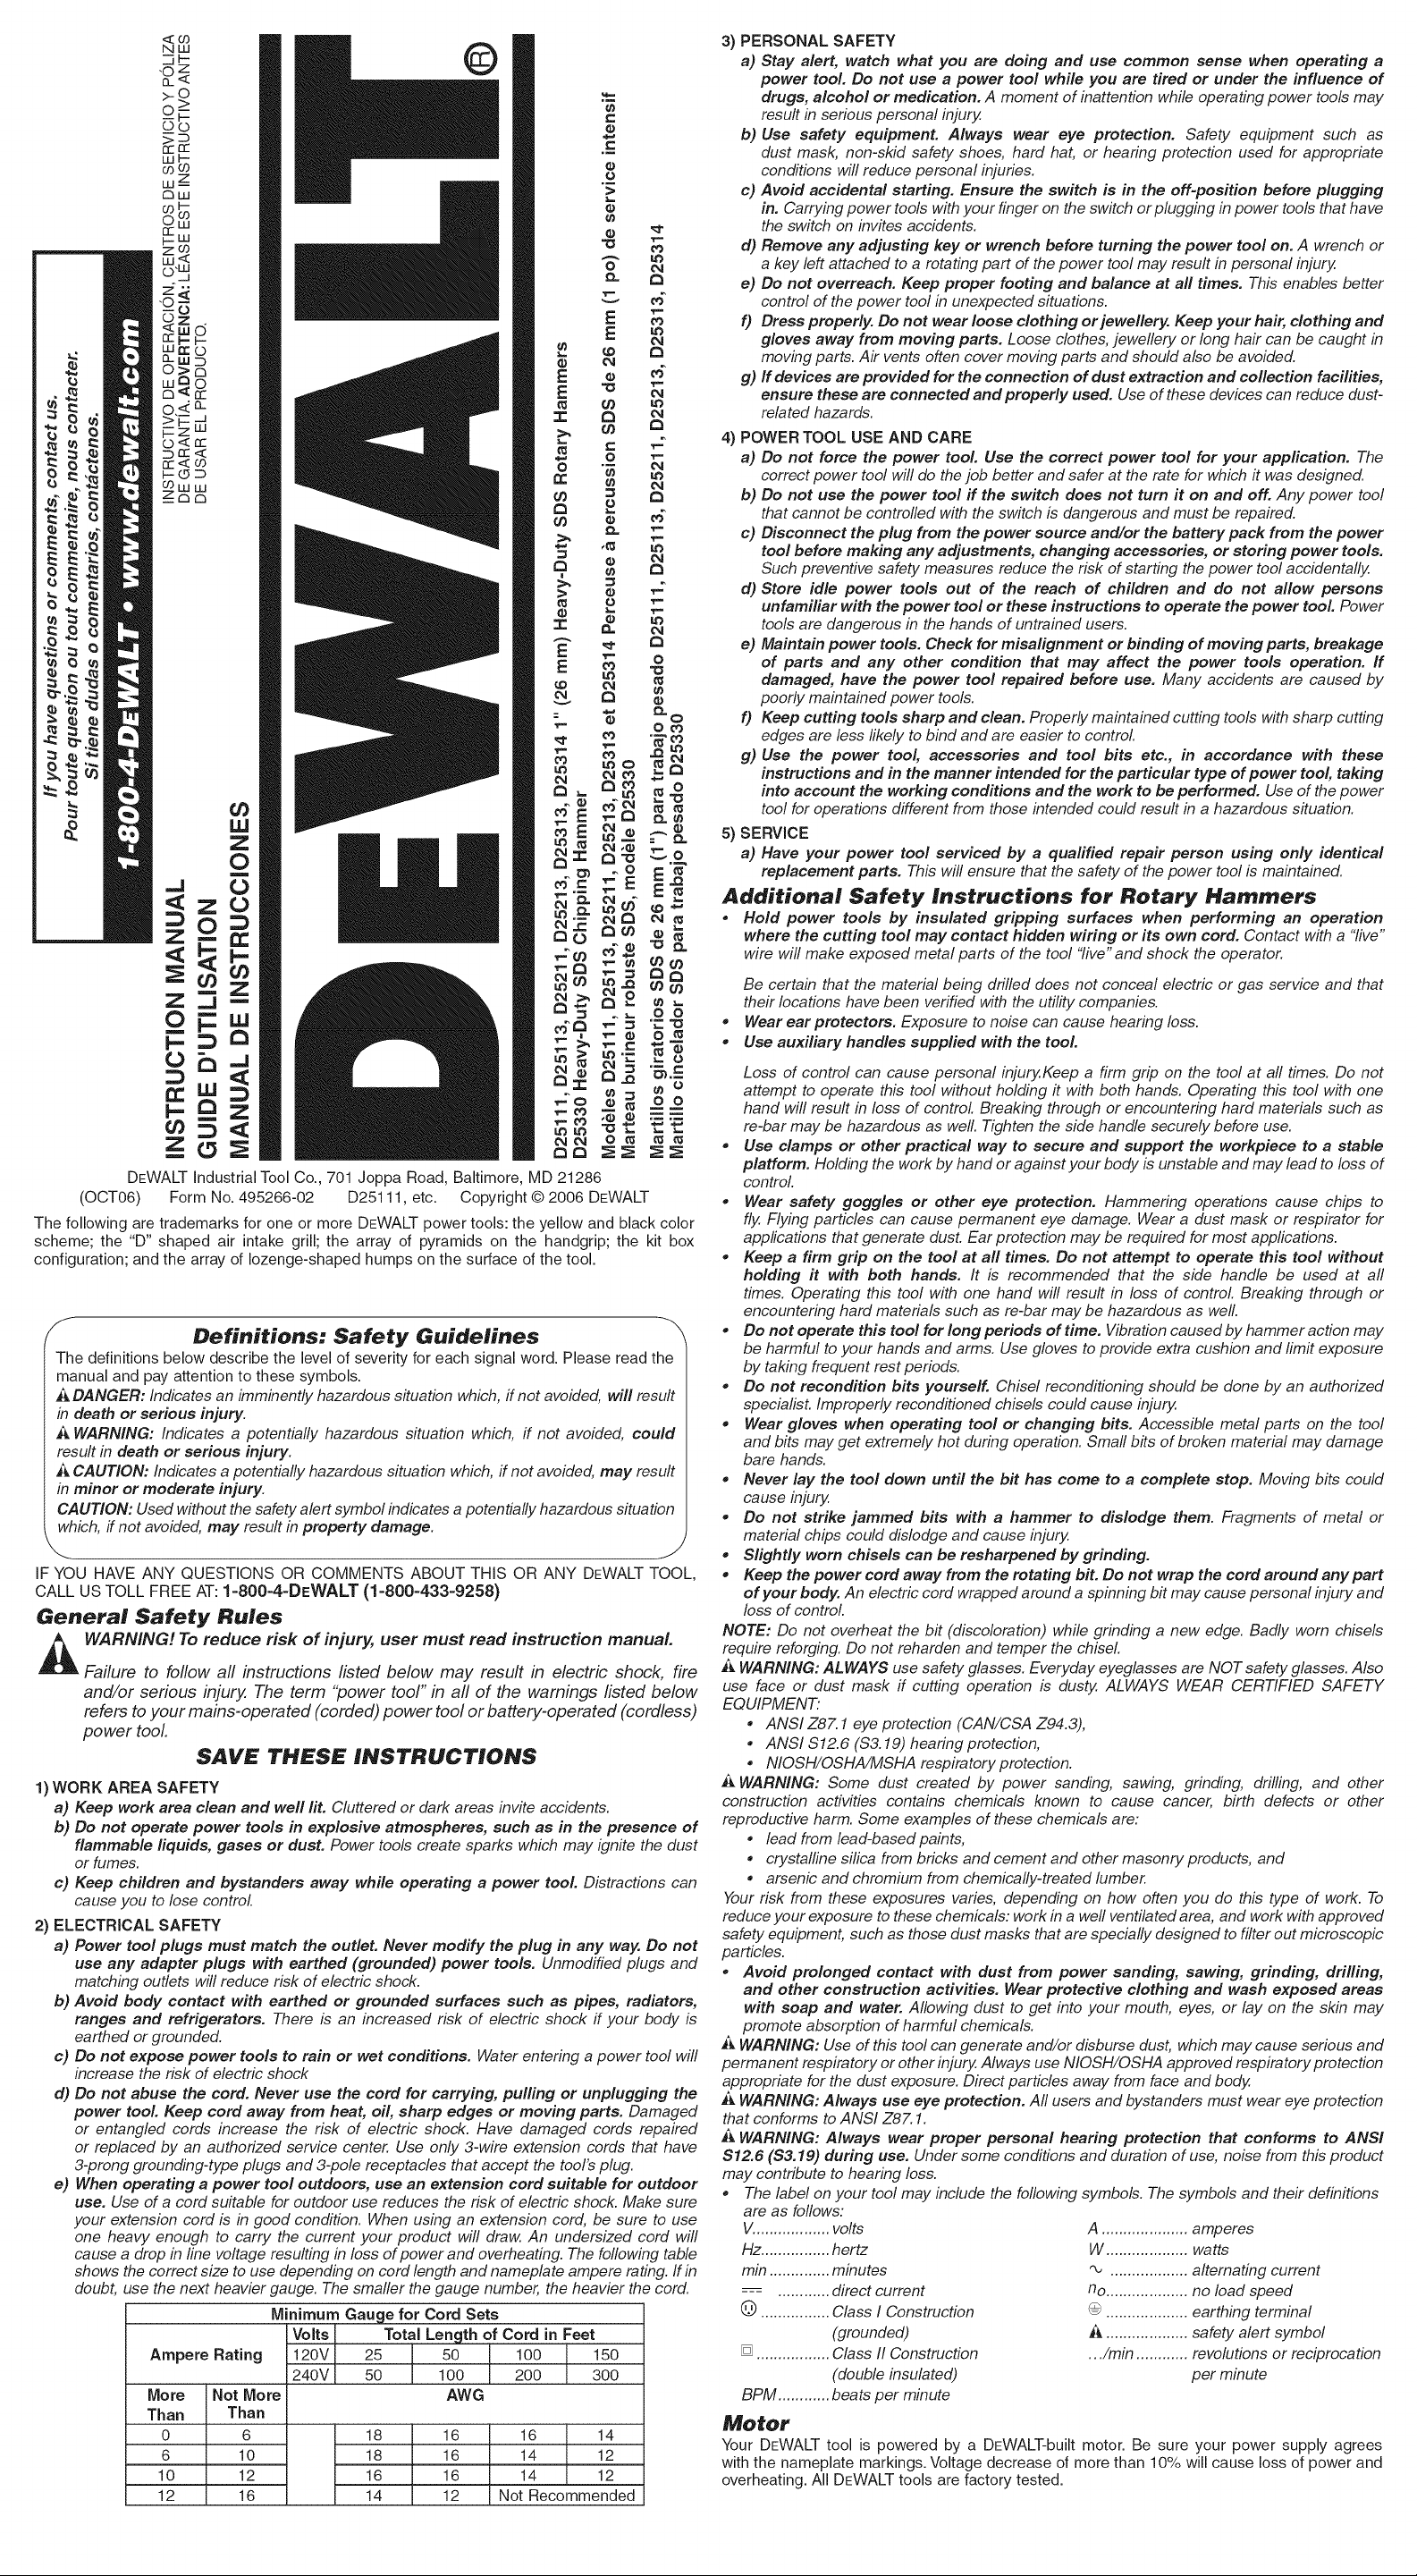
FIG.1
D25111/D25113
C
\
G
FIG. 3
FIG.5
DRILL-ONLYMODE
MODE PER_AGE SEULEMENT
MODO SOLOTALADRO
HAMMER/DRILL MODE
MODE PERFORATION-PEROAGE
MODO TALADRO/PERCUTOR
CHISEL ROTATION
ROTATION DU BURIN
ROTACION DE CINCELES
HAMMER-ONLY MODE
MODE PERFORATION SEULEMENT
MODO SOLO MARTILLO
D25313, D25314
G
zE
FIG. 2
C
B
A
FIG. 4
D25211, D25213
G
D25330
C
FIG. 6
L
K
D25314 ONLY
D25314
SEULEMENT
D25314
SOLAMENTE
Components (Fig. 1-4)
,& WARNING: Never modify the power tool or any part of it. Damage or personal injury could
result.
A. Side handle G. Mode selector
B. Depth rod H. Chisel rotation
C. SDS chuck I. Mode selector button
D. Trigger switch/Variable speed trigger J. Sleeve
E. Forward/reverse control button K. Collar
R Lock-on button (D25111, D25113, D25330 only)
INTENDED USE
These heaw-duty rotary hammers have been designed for professional drilling and hammer-
drilling, screwdriving and light chipping at various work sites (i.e., construction sites). DO NOT
use under wet conditions or in presence of flammable liquids or gases.
These heavy-duty rotary hammers are professional power tools. DO NOT let children come into
contact with the tool. Supervision is required for those under 16 years of age.
Side Handle
_ CAUTION: Always operate the tool with the side handle properly assembled. Hold tool with
both hands to maximize control
A side handle (A) is supplied with this rotary hammer. It clamps to the front of the gear case
without depth rod (B) as shown in Figure 1 and can be rotated 360° to permit right- or left-hand
use. The side handle can be tightened by rotating the black plastic portion of the side handle
clockwise and loosened by rotating it counterclockwise.
Switch
To start the rotary hammer, depress the trigger switch (D). To stop rotary hammer, release the
switch.
VARIABLE SPEED TRIGGER
The variable speed trigger switch (D) permits speed control. The farther the trigger switch is
depressed, the higher the speed of the drill.
NOTE: Use lower speeds for starting holes without a centerpunch, drilling in metal, plastics
or ceramics, or driving screws. Higher speeds are better for drilling in masonry for maximum
efficiency.
Lock-on Button
_ WARNING: Be sure to release the locking mechanism before disconnecting the plug from the
power supply. Failure to do so will cause the hammerdrill to start immediately the next time it is
plugged in. Damage or personal injury could result.
The lock-on button is for use only when the rotary hammer is stationary, mounted in a drill press
stand or for chipping applications.
Before using the tool each time, be sure that the lock-on button release mechanism is working
freely.
D25111, D25113 ONLY (FIG. 1)
To lock the trigger switch in the ON position for continuous operation, depress the trigger switch
and slide the lock-off button (F) up. The tool will continue to run.
To turn the tool OFF from a locked ON condition, squeeze the trigger once then release it.
D25330 ONLY (FIG. 4)
To lock the trigger switch in the ON position for continuous operation, depress the trigger switch
and push the lock-on button (F) in.The tool will continue to run.
To turn the tool OFF from a locked ON condition, squeeze the trigger once then release it.
Reversing Lever (D25111_ D25113_ D25211_ D25213_
D25313_ D25314)
The reversing lever is used to reverse the rotary hammer for backing out screws or jammed bits.
It is located above the trigger, shown in Figure 2.
CAUTION: When reversing to clear jammed bits, be ready for strong reactive torque.
D25111, D25113
To reverse the rotary hammer, turn it OFF and align the reversing lever (E) with the yellow arrow
pointing backward (viewed when holding drill in operating position).
To position the lever for forward operation, turn the rotary hammer OFF and align the reversing
lever with the yellow arrow pointing forward (viewed when holding drill in operating position).
D25211, D25213, D25313, D25314
To reverse the rotary hammer, turn it OFF and push the reversing lever (E) in so the yellow arrow
pointing backwards shows.
To position the lever for forward operation, turn the rotary hammer OFF and push the
reversing lever in so the yellow arrow pointing forward shows.
Mode Selector - D25113_ D25213_ D25313_ D25314
(Fig. 5)
CAUTION: Tool must come to a complete stop before activating the mode actuator button or
damage to the tool may result.
DRILL-ONLY MODE
Touse drill-only mode, depress button (I) and turn the mode selector (G) sothe yellow arrow points
to the corresponding symbol as shown. Use drill-only mode for wood, metal, and plastics.
HAMMER/DRILL MODE
To use hammer/drill mode, depress the button and turn the mode selector so the yellow arrow
points to the corresponding symbol as shown. Use this mode for masonry drilling.
CHISEL ROTATION
To manually rotate the chisel, depress the button and turn the mode selector so the yellow arrow
points to the corresponding symbol as shown.
HAMMER-ONLY MODE
For light chiseling, depress the button and turn the mode selector so the yellow arrow points to
the corresponding symbol as shown.
NOTE: The yellow arrow on the mode selector MUST be aligned with the one of the symbols
at all times. There are no operable positions between the positions.
SDS Chuck (Fig. 6)
A WARNING: Shock Hazard. To reduce the risk of serious personal injury, turn tool off and
disconnect tool from power source before making any adjustments or removing/
installing attachments or accessories.
i_ WARNING: Burn Hazard. ALWAYS wear gloves when changing bits. Accessible metal parts
on the tool and bits may get extremely hot during operation. Smafl bits of broken material may
damage bare hands.
CAUTION: Do not use chipping bits in this tool. Using chipping bits may cause the tool to bind-
up and damage to the tool may occur.
To insert bit, insert shank of bit about 3/4" (19 mm) into chuck. Push and rotate bit until it locks in
place.The bit will be securely held.
To release bit, pull the sleeve (J) back and remove the bit.
OPERATION
Overload Clutch
If the drill bit becomes jammed or caught, the drive to the drill spindle is interrupted. Because
of the forces that occur as a result, always hold the machine securely with both hands and take
a firm stance.
Drilling Tools
The machine is intended for hammerdrilling in concrete, brick and stone. It is also suitable for
drilling without impact in wood, metal, ceramic and plastic. Machines with electronic control and
right/left rotation are also suitable for screw driving and thread cutting.
Chipping Tools
The machine is intended for chipping in concrete, brick and stone.
Drilling
i_ WARNING: Shock Hazard. To reduce the risk of serious personal injury, turn tool off and
disconnect tool from power source before making any adjustments or removing/
installing attachments or accessories.
WARNING: To reduce the risk of personal injury, ALWAYS ensure workpiece is anchored
or clamped firmly. If drilling thin material use a wood "back-up" block to prevent damage to the
material
1. Always unplug the drill when attaching or changing bits or accessories.
2. Use sharp drill bits only. For WOOD, use twist drill bits, spade bits, power auger bits, or
hole saws. For METAL, use steel twist drill bits or hole saws. For MASONRY, such as brick,
cement, cinder block, etc., use carbide-tipped bits rated for percussion drilling. Be sure the
material to be drilled is anchored or clamped firmly. If drilling thin material, use a wood "back-
up" block to prevent damage to the material.
3. Always apply pressure in a straight line with the bit. Use enough pressure to keep drill biting,
but do not push hard enough to stall the motor or deflect the bit.
4. Hold tool firmly to control the twisting action of the drill.
5. IF DRILL STALLS, it is usually because it is being overloaded or improperly used. RELEASE
TRIGGER IMMEDIATELY, remove drill bit from work, and determine cause of stalling. DO
NOT CLICK TRIGGER ON AND OFF IN AN ATTEMPT TO START A STALLED DRILL
--THIS CAN DAMAGE THE DRILL.
6. To minimize stalling or breaking through the material, reduce pressure on drill and ease the
bit through the last fractional part of the hole.
7. Keep the motor running when pulling the bit back out of a drilled hole.This will help prevent
jamming.
8. With variable speed drills there is no need to center punch the point to be drilled. Use a slow
speed to start the hole and accelerate by squeezing the trigger harder when the hole is deep
enough to drill without the bit skipping out.
Removable SDS Chuck & Three ,law Keyless Chuck
(D25314)
The D25314 is equipped with a removable quick change SDS chuck as well as a removable
three jaw keyless chuck. The hammer mechanism does not function when the three jaw keyless
chuck is used.
Both the SDS and three jaw keyless chuck can be easily removed by turning the collar (K) into
the unlocked position (L) to release the chuck (Fig. 6).
The SDS and three jaw keyless chuck can be easily attached by inserting the chuck into the
spindle of the tool and turning the collar to the locked position (M). The chuck will click when
properly installed.
DRILLING IN METAL
(D25113, D25213, D25313, D25314)
An SDS to round shank adaptor chuck is required. Ensure that tool is in drill-only mode.
(D25111, D25211 has no drill-only mode). Start drilling with slow speed and increase to full
power while applying firm pressure on the tool. A smooth even flow of metal chips indicates the
proper drilling rate. Use a cutting lubricant when drilling metals.The exceptions are cast iron and
brass which should be drilled dry. The cutting lubricants that work best are sulphurized cutting
oil or lard oil; bacon-grease will also serve the purpose.
NOTE: Large [(5/16" to 1/2") (7.9 mm to 12.7 mm)] holes in steel can be made easier if a pilot
hole [(5/32" to 3/16") (4 mm to 4.8 ram)] is drilled first.
DRILLING IN WOOD
(D25113, D25213, D25313, D25314)
An SDS to round shank adaptor chuck is required. Ensure that tool is in drill-only mode. D25111,
D25211 have no drill-only mode). Start drilling with slow speed and increase to full power while
applying firm pressure on the tool. Holes in wood can be made with the same twist drills used
for metal. These bits may overheat unless pulled out frequently to clear chips from the flutes. For
larger holes, use spade bits, power auger bits, or hole saws. Work that is apt to splinter should
be backed up with a block of wood.
DRILLING IN MASONRY
(D25113, D25213, D25313, D25314)
When drilling in masonry, use SDS carbide tipped bits rated for percussion drilling and be
certain that the bit is sharp. Use a constant and firm force on the tool to drill most effectively. A
smooth, even flow of dust indicates the proper drilling rate.
Depth Bed
TO ADJUSTTHE DEPTH ROD
1. Push in and hold the button on the side handle.
2. Move the depth rod (B) so the distance between the end of the rod and the end of the bit
equals the desired drilling depth.
3. Release the button to lock rod into position. When drilling with the depth rod, stop when end
of rod reaches surface of material.
MAINTENANCE
WARNING: Shock Hazard. To reduce the risk of serious personal injury, turn tool off and
disconnect tool from power source before making any adjustments or removing/
installing attachments or accessories.
Cleaning
A CAUTION: Never use solvents or other harsh chemicals for cleaning the non-metallic parts of
the tooL These chemicals may weaken the plastic materials used in these parts. Use a cloth
dampened only with water and mild soap. Never let any liquid get inside the tool; never immerse
any part of the tool into a liquid.
Lubrication
Your tool was properly lubricated before leaving the factory. In from two to six months, depending
upon use, take or send your tool to an authorized service center for a complete cleaning,
inspection and lubrication. Tools used constantly on production jobs will need relubrication more
often. Also, tools "out of service" for long periods should be relubricated before being put back
to work.
Accessories
A WARNING: Since accessories, other than those offered by DEWALT, have not been tested
with this product, use of such accessories with this tool could be hazardous. Toreduce the risk
of injury, only DEWALT, recommended accessories should be used with this product.
Page 3

Recommended accessories for use with your tool are available at extra cost from your local
dealer or authorized service center. If you need assistance in locating any accessory, please
contact DEWALT Industrial Tool Co., 701 East Joppa Road, Baltimore, MD 21286, call 1-800-4-
DEWALT (1-800-433-9258) or visit our website www.dewalt.com.
MAXIMUM RECOMMENDED CAPACiTiES
D25111 D25113, D25213
D25211 D25313 D25314
Masonry 1" (25.4 mm) 1" (25.4 mm)
Steel n/a 1/2" (12.7 mm)
Wood n/a 1-1/2" (38 mm)
OPTIMUM CAPACITY
Maso nry 5/32"-5/8" 5/32"-5/8"
(4 mm- 4.8 mm) (4 mm- 4.8 mm)
Repairs
To assure product SAFETY and RELIABILITY, repairs, maintenance and adjustments (including
brush inspection and replacement) should be performed by a DEWALT factory service center,
a DEWALT authorized service center or other qualified service personnel. Always use identical
replacement parts.
Three Year Limited Warranty
DEWALT will repair, without charge, any defects due to faulty materials or workmanship for
three years from the date of purchase. This warranty does not cover part failure due to normal
wear or tool abuse. For further detail of warranty coverage and warranty repair information, visit
www.dewalt.com or call 1-800-4-DEWALT (1-800-433-9258). This warranty does not apply to
accessories or damage caused where repairs have been made or attempted by others. This
warranty gives you specific legal rights and you may have other rights which vary in certain
states or provinces.
In addition to the warranty, DEWALT tools are covered by our:
1YEAR FREE SERVICE
DEWALT will maintain the tool and replace worn parts caused by normal use, for free, any time
during the first year after purchase.
90 DAY MONEY BACK GUARANTEE
If you are not completely satisfied with the performance of your DEWALT Power Tool, Laser, or
Nailer for any reason, you can return it within 90 days from the date of purchase with a receipt
for a full refund - no questions asked.
LATIN AMERICA: This warranty does not apply to products sold in Latin America. For products
sold in Latin America, see country specific warranty information contained either in the
packaging, call the local company or see website for warranty information.
FREE WARNING LABEL REPLACEMENT: If your warning labels become illegible or are
missing, call 1-800-4-DEWALT for a free replacement.
DXXXXX
SER:
PROPER EYE, EAR AND RESPIRATORY PROTECTION. ALWAYS USE
SiDERANDLE. _ AMMIBMlrEMC8A: LEAELMANOALOE
INSTRDCCiONES PARA DN FUNCJONAMJENTO SEGURO, SJEMPRE
OTiUOE PROTECCi()N AOECUADA PARA LOS OJDS, DIDOS Y VJAS
RESPiRATOMAS. SJEMPRE DYD.iCE EL MANGO LATERAL.
,_ AVNWltJJSSNMEMT= /_ TJTRE PREVENTJE, LJRE LEGUIDE,
TOUJDUDS UTJLJSER UNE PROTECTION OCULAIRE, ADDITIVE ET
RESPJRATOJRE ADI_QUATE, UTJLiSER LA POJGNEE LATERALE.
DEWALT iNDUSTRiAL TOOL CO., BALTIMORE, MD 21286 USA
FORSERVICEII_FOSNATiO N, CALL 1-800-4-SEWALT www.D_WALT.¢o_
f
XXX XXXX X
MOST READ AND UNDERSTAND THE
TO SEDUCE THE RiSK OFiNJURY, USES
iNSTRUCTiON MANUAL. ALWAYS USE
Voltage:
Ampere rating:
Frequency:
RPM:
Beats per minute
DXXXXX xЧЧЧЧЧxЧЧxxЧЧ
SER.
UNDERSTAND THE iNSTRUCTiON MANUAL. ALWAYS USE
TO REDUCE THE RiSK OFiNJURY, USER MUST READ AND
USESiDEHANDLE. _&ADVt=RTIN@L_: LEAELMANUALDEiNSTRUCCiONESPARAUN
FUNCJONAM|ENTO SEGURO. SJEMPRE UTJLiCE PROTECCiON ADECUADA PARA LOS OJOG,
OiOOS YViAS RESPIRATORiAS. SEMPRE UTJLiCEEL MANGO LATERAL _ AVEITit|S$1EMENT:
A TITRE PREVENTiF, LiRE LE GUIDE. TOUJOURS UTiLiSER ONE PROTECTION OCULAiRE,
AUU|TiVE ET RESPiRATOiGE ADEQUATE. UT|LIGER LA PO|GNEE LATERALE.
DEWALTiNDUSTRiALTOOLCO.,BALTIMORE,MD 21286USA
FORSERVICEiNFORMATiON, CALL1-800-4-DEWALT Www.OEWALT.com
J
L
SPECIFICATIONS
D25111, D25113, D25211,
D25213, D25313, D25314 D25330
120 V AC~ 120 V AC~
8A 6.3A
60 Hz 60 Hz
0 - 1 150/rain
0 - 4 300 0 - 4 100
PROPER EYE,EAR AND RESPIRATORYPROTECTiRN, ALWAYS
D_finitions : iignes directrices en
rnati_re de s_curit_
Les d6finitions ci-dessous d6crivent le niveau de danger pour chaque mot-indica-
teur employ& Veuillez lire le mode d'emploi et porter une attention particuli_re & ces
symboles.
i_DANGER : indique une situation dangereuse imminente qui, si elle n'est pas
_vit_e, causera la mort ou des blessures graves.
i_AVERTISSEMENT : indique une situation potentieilement dangereuse qui, si
eile n'est pas _vit_e, pourrait se solder par un d_c_s ou des blessures graves.
i_MISE EN GARDE : indique une situation potentieilement dangereuse
qui, si eile n'est pas _vit_e pourrait se solder par des blessures mineures ou
mod_r#es.
MISE EN GARDE : utilis6 sans le symbole d'alerte a la securit6, indique une situation
potentiellement dangereuse quL si efle n'est pas evit6e pourrait se solder par des
dommages b la proprietY.
I/
SI VOUS AVEZ DES QUESTIONS OU VOULEZ NOUS FAIRE PART DE VOS COMMENTAIRES
CONCERNANT CET OUTIL OU TOUT AUTRE OUTIL DEWALT, COMPOSEZ SANS FRAIS
LE : 1 800 433=9258.
R_gles g_n_rales de se_.curit_ concernant
les outiis a piles
_ VERTISSEMENT ! Afin de r_duire le risque de blessures, I'utilisateur dolt
/ire le mode d'emploL
Tout manquement aux directives suivantes pose des risques de choc electrique,
d'incendie et/ou de blessure grave. Le terme , outil electrique _ clans tousles
avertissements ci-apr#s se rapporte _ votre outil electrique 9 alimentation sur
secteur (avec ill) ou par piles (sans ill).
CONSERVER CES DIRECTIVES
1) SECURITI_ - AIRE DE TRAVAIL
a) Maintenir I'aire de travail propre et bien _clair_e. Les lieux encombr_s ou sombres sont
propices aux accidents.
b) Ne pas faire fonctionner un outil #lectrique dans une atmosphere explosive, en
presence par exemple de poussi#res, gaz ou liquides inflammables. Les outils elec-
triques peuvent engendrer des #tincelles qui pourraient enflammer toute #manation ou
poussiere ambiante.
c) Tenir les enfants, ou route autre personne, #loign#s pendant I'utilisation d'un outil
#lectrique. Toute distraction pourrait vous faire perdre la mMtrise de ce dernier.
2) Si_CURITE - I_LECTRIClTI_
a) La fiche #lectrique de I'outil dolt correspondre _ la prise murale. Ne jamais
modifier la fiche en aucune fa_on. Ne jamais utiliser de fiche d'adaptation avec un
outil #lectrique mis _ la terre. L'utilisation de fiches d'origine et de prises appropriees
r#duira les risques de choc #lectrique.
b) Eviter tout contact corporel avec des #l#ments mis _ la terre comme tuyaux,
radiateurs, cuisini#res ou r#frig#rateurs. Les risques de choc #lectrique augmentent
Iorsque le corps est mis a la terre.
c) Ne pas exposer les outils _lectriques _ la pluie oub I'humidit_. Toute p_netration d'un
outil _lectrique par un liquide augmente les risques de choc electrique.
d) Ne pas utiliser le cordon de fa_on abusive. Ne _amais utiliser le cordon pour
transporter, tirer ou d_brancher un outil _lectrique. EIoigner le cordon de la chaleur,
de I'huile, des bords tranchants ou des pi&ces mobiles. Les cordons endommages
ou enchev_tr_s augmentent les risques de choc _lectrique. Confier la reparation ou le
remplacement de cordons endommages a un centre de reparation autorise. Utiliser
uniquement des rallonges a 3 ills pourvues d'une fiche de mise a la terre a 3 lames et une
prise a 3 fentes correspondant a la fiche.
e) Pour I'utilisation d'un outil _lectrique _ I'ext_rieur, se servir d'une railonge
convenant _cet effet. L'utilisation d'une rallonge congue pour I'ext_rieur reduit les risques
de choc _lectrique. S'assurer que la rallonge est en bon _tat. Lorsqu'une rallonge est
utilisee, s'assurer d'en utiliser une de calibre suffisamment _lev_ pour assurer le transport
du courant necessaire au fonctionnement de I'appareil. Un cordon de calibre inferieur
causera une chute de tension de ligne et donc une perte de puissance et une surchauffe.
Le tableau suivant indique le calibre approprie a utiliser scion la Iongueur du cordon et
I'intensit# nominale de la plaque signal_tique. En cas de doute, utiliser le calibre suivant le
plus rros. Plus le numero de calibre est petit, plus le cordon est Iourd.
CALIBRE MINIMAL DES CORDONS DE RALLONGE
Volts Longueur totale du cordon en m_tres
IntensitY(A) 120V De0&7 De7&15 De15&30 De 30&45
240V De0&7 De7&15 De15&30 De 30&45
Au
moins
0
6
10
12
Au
plus
6
10
12
16
Calibre moyen de fiJ
18
18
16
14
16
16
16
12
16 14
14 12
14 12
Non recommand_
3) SE_CURITE_PERSONNELLE
a) Rester vigilant en tout temps et faire preuve de jugement pendant I'utilisation
d'un outil _lectdque. Ne pas utiliser d'outil _lectrique en cas de fatigue ou sous
I'influence de drogues, d'alcool ou de m_dicaments. Tout moment d'inattention
pendant I'utifisation d'un outil _lectrique pose des risques de blessure grave.
b) Utiliser le materiel de s_curit_ appropri_. Toujours porter des lunettes de protection.
Le fait de porter un masque anti-poussieres, des chaussures antid_rapantes, un casque
de securit_ ou des protecteurs auditifs Iorsque la situation le requiert r_duira les risques
de blessure.
c) Eviter tout d_marrage accidentel. S'assurer que I'interrupteur est en position
d'arr_t avant tout branchement. Transporter un outil le doigt sur I'interrupteur ou
brancher un outil _lectrique alors que I'interrupteur est en position de marche invite les
accidents.
d) Retirer toute cl_ de r_glage avant de d_marrer I'outil. Une cle laissee sur une piece
rotative d'un outil _lectrique pose des risques de blessure.
e) Ne pas effectuer de travaux hors de pottle. Les pieds doivent rester bien ancr_s
au sol afin de maintenir son _quilibre en tout temps. Cela permet de mieux mMtriser
I'outil _lectrique clans les situations imprevues.
f) Porter des v_tements appropri_s. Ne pas porter de v_tements amples ni de bijoux.
Maintenir cheveux, v_tements et gants _loign_s des pi_ces mobiles. V_tements
ample& bijoux ou cheveux longs risquent de rester coinc_s clans ces pi_ces mobiles.
Prendre des precautions autour des _vents car ils recouvrent des pieces mobiles.
g) Lorsque un dispositif de connexion _un syst_me de d_poussi_rage ou d'_limination
est foumi, s'assurer qu'il est connect_ et utilis_ correctement. L'utilisation de ces
dispositifs peut r_duire les risques engendr_s par les poussieres.
4) UTIUSATION ET ENTRETIEN DES OUTILS ELECTRIQUES
a) Ne pas forcer un outil _lectrique. Utiliser I'outil appropri_ au travail en cours. L'outil
approprie effectuera un meilleur travail, de fagon plus sore eta la vitesse pour laquelle il a
_t_ con_u.
b) Ne pas utiliser un outil _lectrique dont I'interrupteur est d_fectueux. Tout appareil
dont I'interrupteur est d_fectueux est dangereux et dolt _tre repar_.
c) D_brancher la fiche du secteur et/ou le bloc-piles de I'outil _lectrique avant de
faire tout r_glage ou changement d'accessoire, ou avant de ranger ce dernier. Ces
mesures preventives reduisent les risques de d_marrage accidentel de I'appareiL
d) Apr_s usage, ranger les outils _lectriques hors de la port_e des enfants, et ne
permettre _ aucune personne n'_tant pas famili_re avec un outil _lectrique (ou son
manuel d'instruction) d'utiliser ce dernier. Les outils peuvent _tre dangereux entre les
mains des novices.
e) Entretenir les outils _lectriques. V_rifier les pi_ces mobiles pour s'assurer qu'eiles
sont bien align_es et tournent librement, qu'eiles sont en bon _tat et ne sont
affect#es d'aucune condition susceptible de nuire au bon fonctionnement de I'outil.
En cas de dommage, faire r_parer I'outil _lectrique avant toute nouveile utilisation.
Bien des accidents sont causes par des outils mal entretenus.
f) Maintenir tout outil de coupe bien aiguis_ et propre. Les outils de coupe bien entrete-
nus et affOt_s sont moins susceptibles de se coincer et sont plus faciles a contrSler.
g) Utiliser un outil _lectrique, ses accessoires, m_ches, etc., conform_ment aux
pr_sentes directives et suivant la mani_re pr_vue pour ce type particulier d'outil
_lectrique, en tenant compte des conditions de travail et du travail _ effectuer.
L'utilisation d'un outil _lectrique pour toute operation autre que celle pour laquelle il a _te
congu est dangereuse.
5) SERVICE
a) Faire entretenir les outils _lectriques par un r_parateur qualifi_ en n'utilisant que
des pi_ces de rechange identiques. Cela permettra d'assurer I'integrite de I'outil _lec-
trique et la securit_ de I'utilisateur.
Directives de s_curit_ suppi_mentaires pour les
perceuses _ percussion
* Tenir I'outil par sa surface de prise isol_e dans une situation ob I'outil de coupe peut
entrer en contact avec un c&blage cach_ ou avec son propre cordon d'alimentation.
Tout contact avec un fil , sous tension _ mettra _ sous tension ,_les pi_ces m_talliques de
Ibutil et causera un choc _lectrique a I'op_rateur de Ibutil.
S'assurer que le mat_riau pem_ ne cache pas de conduite _lectrique ou de gaz et que leur
emplacement a _t_ verifi_ avec les entreprises de services publiques.
Porter des protecteurs d'oreilles. Une exposition au bruit peut entra_ner une perte
auditive.
Utiliser les poign_es auxiliaires fournies avec I'outil. Une perte de ma_trise de Ibutil peut
entrMner des blessures corporelles.
Tenh"fermement Ibutil en tout temps. Ne pas utiliser Ibutil sans le tenh"des deux mains. Faire
fonctionner cet outil d'une seule main risque de provoquer la perte de maftrise de IbutiL fl
peut aussi #tre dangereux de percer ou de tomber sur des mat#riaux durs comme une barre
d'armature. Bien serrer la poign#e lat#rale avant d'utiliser IbutiL
, Utiliser des brides de fixation ou tout autre dispositif de fixation permettant de
soutenir et de retenir la piece sur une plate-forme stable. Tenir la piece avec la main ou
contre son corps est instable et risque de provoquer une perte de ma_trise de I'outil.
* Porter des lunettes de s_curit_ ou une autre protection oculaire. Les operations de
percussion peuvent projeter les copeaux. Les particules projet_es peuvent endommager
les yeux irr_versiblement. Porter un masque antipoussieres ou un appareil respiratoire.
La plupart des applications peuvent demander I'utilisation d'un dispositif de protection des
oreilles.
* Tenir fermement I'outil en tout temps. Ne pas utiliser I'outil sans le tenir des deux
mains. II est recommand_ d'utiliser en tout temps la poignee lat_rale. Faire fonctionner cet
outil d'une seule main risque de provoquer la perte de ma_trise de I'outil. IIpeut aussi _tre
dangereux de percer ou de tomber sur des mat_riaux durs comme une barre d'armature.
* Ne pas faire fonctionner cet outil durant de Iongues p_riodes. Les vibrations causees
par la percussion du marteau peuvent _tre nuisibles pour vos mains et vos bras. Utiliser des
gants pour amortir davantage les vibrations et limiter I'exposition a Ibutil par de fr_quentes
periodes de repos.
* Ne pas remettre _ neuf les m_ches vous-m_me. La remise a neuf du burin dolt _tre
r_alisee par un specialiste autorise. Les burins mal remis a neuf peuvent causer des
blessures.
* Porter des gants pour utiliser I'outil ou pour changer les m_ches. Les pieces
metalliques accessibles de Ibutil et les meches peuvent devenir extr_mement chaudes
durant le fonctionnement de I'outil. De petits morceaux de materiau qui se d_tachent
peuvent endommager les mains nues.
* Ne jamais d_poser I'outil tant que la mbche ne s'est pas compl_tement arr_t#e. Les
meches mobiles peuvent provoquer des blessures.
* Ne pas frapper sur les mbches coinc_es avec un marteau pour les d_loger. Des frag-
ments de metal ou des copeaux de mat_riau peuvent se d_loger et causer des blessures.
* Les burins I_g_rement uses peuvent _tre r_affQt_s par le meulage.
, Tenir #loign# le cordon d'alimentation de la mbche rotative. Ne pas enrouler le cordon
autour de toute pattie du corps. Un cordon d'alimentation enroul# autour d'une meche
rotative risque de causer des blessures corporelles et une perte de mMtrise de I'outil.
REMARQUE : ne pas surchauffer la m#che (d#coloration) durant le meulage d'un nouveau
tranchant. Les burins mal uses demandent a #tre de nouveau forges. Ne pas durcir ni ne faire
revenir les burins.
AVERTISSEMENT : TOUJOURS porter des lunettes de securitY. Les lunettes de vue ne
constituent PAS des lunettes de securitY. Utiliser egalement un masque facial ou anti-poussiere
si I'operation de decoupe gen#re de la poussiere. TOUJOURS PORTER UN EQUIPEMENT DE
PROTECTION HOMOL OGUE :
* protection oculaire conforme a la norme ANSI 787.1 (CAN/CSA 794.3);
* protection auditive ANSI $12.6 ($3.19);
* protection des voles respiratoires conformes aux normes NIOSH/OSHA/MSHA.
_ AVERTISSEMENT : certaines poussieres produites par les activit#s de pongage, sciage,
meulage, per_age et autres activit#s de construction peuvent contenir des produits
chimiques pouvant causer le cancer, des anomalies congenitales ou d'autres probl#mes li#s aux
fonctions reproductrices. Void quelques exemples de ces produits chimiques :
* le plomb contenu clans les peintures a base de plomb;
* la silice cristalline de la brique, du ciment et d'autres produits de magonnerie; et
, I'arsenic et chrome provenant de bois trait# chimiquement.
Les risques relies a I'exposition aces poussi#res varient selon la frequence a laquelle
I'utilisateur travaille avec ce type de materiaux. Pour r#duire votre exposition aces produ-
Page 4

itschimiques: travaillerclansunendroitbienventil@etporterun@quipementdes@curit@
approuv@commeunmasqueantipoussi@rescongusp@cialementpourfiltrerlesparticules
microscopiques.
* E:viter le contact prolong_ avec les poussi@res produites par les activit_s de port,age,
sciage, meulage, per_age et autres activit_s de construction. Porter des v@tements
de protection et laver les parties du corps expos_es avec une solution d'eau et de
savon. Laisser /a poussi@re p@n@trerclans la bouche, los yeux ou reposer sur la peau pout
favoriser /'absorption de produits chimiques nocifs.
_&AVERTISSEMENT :/'utilisation de cot outil peut produire et/ou d@gager des poussi@res qui
risqueraient de causer des probl@mes respiratoires graves et permanents ou d'autres prob-
/@mesm@dicaux. Toujours porter un appareil respiratoire approuv@ par la NIOSH/OSHA pour
se prot@ger de/a poussi@re. Diriger /es particules loin du visage et du corps.
_ AVERTISSEMENT : toujours utiliser une protection oculaire. Tousles utilisateurs et per-
sonnes a proximit@ doivent porter une protection oculaire conforme a la norme ANSI Z87.1.
AVERTISSEMENT: TOUJOURSporter une protection auditive appropri_e conform_ment
b la norme ANSI $12.6 ($3.19)/ors de I'utilisation du produit. Dans certaines conditions et
solon la dur@ed'utilisation, /e brufl @mispar ce produit pout contribuer a une porte auditive.
* L'@tiquette appos@e sur votre outil pout comprendre los symboles suivants. Los symboles et
leurs d@finitions sont indiqu@s ci-apr@s •
V.................. volts
Hz................ hertz
min .............. minutes
--_ ............ courant continu
@.................. Construction de classe I
(mis a la terre)
[] ................. Construction de classe II
(a double isolation)
BPM ............ coups par minute
Moteur
Votre outil DEWALT fonctionne avec un moteur construit par DEWALT. S'assurer que le bloc
d'alimentation est compatible avec les inscriptions de la plaque signal@tique. Une diminution de
tension de plus de 10 % provoquera une perte de puissance et une surchauffe. Tousles outils
DEWALT sont test@sen usine.
A..................... amp@res
W.................... watts
"_ .................. courant alternatif
no ................... vitesse a vide
................... borne de torte
A ................... symbole d'alerte a la s@curit@
.../min ............. rotations ou alternance
par minute
COMPOSANTS (fig. 1-4)
,_ AVERTISSEMENT : ne jamais modifier I'outil @lectrique ou I'une de ses parties. Une telle
pratique risque de provoquer des dommages mat@riels ou des blessures corporelles.
A. Poign@e lat@rale H.
B. Tige de r@glage de profondeur I.
C. Mandrin SDS J.
D. D@tente/d@tente& vitesses variables K.
E. Bouton de commande marche
avant/marche arri@re
R Bouton de verrouillage (mod@les D25111, D25113, D25330 seulement)
G. S@lecteur de mode
UTILISATION PRE_VUE
Ces perceuses b,percussion robustes sont conques pour le per£:age et le per£:age au marteau
perforateur professionnels, le vissage et les applications I@g@resde I'@br@chement&divers lieux
de travail (c.-a-d., chantiers de construction). NE PAS utiliser sous des conditions pluvieuses ou
en pr@sence de liquides ou de gaz inflammables.
Ces perceuses b,percussion robustes sont des outils @lectriques professionnels. NE PAS mettre
les enfants en contact avec I'outil. Les utilisateurs de moins de 16 ans doivent @tresupervis@s.
Poign_e lat_rale
A MISE EN GARDE : toujours utiliser I'outil avec la poign@e lat@ralebien assembl@e. Tenir I'outil
des deux mains pour obtenir une plus grande maTtrise de I'outil.
Une poign@e lat@rale (A) est livr@e avec la perceuse & percussion. Elle se fixe b, I'avant du
carter d'engrenages sans la tige de r@glagede profondeur (B), comme le montre la figure 1, et
pout @tretourn@e sur 360 ° pour permettre une utilisation de la main droite ou gauche. Serrer
la poign@e lat@raleen tournant la portion de plastique noire de la poign@een sens horaire et la
desserrer en la tournant en sens antihoraire.
D_tente
Pour mettre la perceuse b, percussion en marche, enfoncer la d@tente (D), pour arr@ter la
perceuse, relb,cher la d@tente.
DETENTE A VlTESSE VARIABLE
La d_tente a vitesse variable (D) assure le r@glage de la vitesse. Plus on enfonce la d@tente,
plus la vitesse de la perceuse augmente.
REMARQUE : utiliser les vitesses plus basses pour d@buterle per£:age d'un trou sans pointeau,
percer le m@tal,les plastiques ou la c@ramiqueet visser. Les vitesses @lev@essont mieux adapt@es
pour optimiser refficacit@du portage de la ma_onnerie.
Bouton de verrouillage
_AVERTISSEMENT : s'assurer de bien d@gager le m@canisme de verrouillage avant de
d@brancher la fiche clans I'alimentation sur secteur. L'inobservation de cette mesure provoquera
le demarrage imm@diat du marteau perforateur d@sle prochain branchement. Une telle pratique
risque de provoquer des dommages mat@rielsou des blessures corporelles.
Le bouton de verrouillage s'utilise uniquement Iorsque la perceuse a percussion est un dis-
positif de fixation, fix@e sur un socle de perceuse & colonne ou les applications I@g@resde
I'@br@chement.
Avant chaque utilisation de I'outil, s'assurer que le m@canisme de d@gagement du bouton de
verrouillage/d@verrouillage fonctionne librement.
MODELES D25111 ET D25113 SEULEMENT (FIG. 1)
Pour bloquer la d@tenteen position de marche pour un fonctionnement continu, I'enfoncer et
remonter le bouton de verrouillage (F). L:outil maintiendra son r@gime.
Pour @teindreroutil bloqu@en mode de marche, enfoncer une fois la d@tente et la rel&cher.
MOD#LE D25330 SEULEMENT (FIG. 4)
Pour bloquer la d@tenteen position de marche pour un fonctionnement continu, enfoncer la d@tente
et le bouton de verrouillage (F). L:outilmaintiendra son r@gime.
Pour @teindreroutil bloqu@en mode de marche, enfoncer une fois la d@tenteet la rel&cher.
Levier de changernent de rnarche (modUles D25111_
D25113_ D25211_ D25213, D25313 et D25314)
Le levier d'inversion sort & inverser la rotation de la perceuse pour enlever des vis ou d@gager
des forets coinc@s. IIse trouve sous la g&chette (voir la Figure 2).
_ MISE EN GARDE : au moment d'effectuer un changement de marche pour lib@rot des
m@ches coinc@es,s'attendre a une forte pouss@e de/'outil (couple r@actif).
MODELES D25111 ET D25113
Pour inverser le sens de rotation de la perceuse a percussion, I'@teindre et aligner le levier
de changement de marche (E) pour que la fl@che jaune pointe vers I'arri@re (vue Iorsque la
perceuse est en position de fonctionnement).
Pour mettre le levier de changement de marche en mode de marche avant, @teindrela perceuse
& percussion et aligner le levier pour que la fl@che jaune pointe vers I'avant (vue Iorsque la
perceuse est en position de fonctionnement).
MODELES D25211, D25213, D25313 ET D25314
Pour inverser le sens de rotation de la perceuse & percussion, r@teindre et enfoncer le levier de
changement de marche (E) de sorte que la fl@chejaune qui pointe vers I'arri@reapparaisse.
Pour mettre le levier de changement de marche en mode de marche avant, @teindrela perceuse
percussion et enfoncer le levier de sorte que la fl@chejaune qui pointe vers I'avant apparaisse.
S_iecteur de mode- rno_les D25_ _3_ D252_3_ D253_3
et D253 _ 4 (fig. 5)
MISE EN GARDE : I'outildoit @trecompl@tement immobile avant d'actionner le bouton-actionneur
pour @viterd'endommager I'outil.
MODE PER(_AGE SEULEMENT
Pour utiliser le mode per(_age seulement, enfoncer le bouton (I) et tourner le s@lecteur de mode
(G) de sorte que la fl@che jaune pointe sur le symbole correspondant comme il est indiqu@.
Putiliser uniquement pour le per£:age du bois, du m@talet des mati@resplastiques.
MODE PERFORATION=PER(_AGEE
Pour utiliser le mode perforation-perqage, enfoncer le bouton et tourner le s@lecteur de mode de
sorte que la fl@chejaune pointe sur le symbole correspondant comme ilest indiqu@.Putiliser pour le
per(_agede la ma(2onnerie.
ROTATION DU BURIN
Pour tourner le burin & la main, enfoncer le bouton et tourner le s@lecteurde mode de sorte que la
fl@chejaune pointe sur le symbole correspondant comme il est indiqu@..
MODE PERFORATION SEULEMENT
Pour le gougeage I@ger,enfoncer le bouton et tourner le s@lecteur de mode de sorte que la
fl@chejaune pointe sur le symbole correspondant comme il est indiqu@.
REMARQUE : la fl@chejaune du s@lecteur de mode NE PEUT pointer que sur un des symboles
&la fois. Aucune autre fonction n'est offerte entre celles-ci.
Rotation du burin
Bouton du s@lecteur de mode
Manchon
Collet
Mandrin SDS (fig. 6)
_AVERTISSEMENT : Risque de choc _lectrique. Pour r_duire le risque de blessures
corporelles graves, #teindre I'outil et le d#brancher avant d' effectuer tout r#glage, d'enlever
ou d'installer tout accessoire.
_,AVERTISSEMENT : Risque de brOlure. TOUJOURS porter los gants lots de changements de
m@ches ou burins. Los pi@ces m@talliques accessibles de I'outil et les m@ches/burins peuvent
devenir extr@mement chaud(e)s durant le fonctionnement de I'outil. De petits morceaux de mat@-
riau qui se d@tachent peuvent endommager les mains nues.
MISE EN GARDE : ne pas utiliser de m@chesa buriner avec I'outil, car I'outil pourrait se gripper
et s'endommager.
Pour insurer la m_che, ins@rerla queue d'environ 19 mm (3/4 po) dans le mandrin. Pousser et
faire tourner la m@chejusqu'& ce qu'elle s'enclenche. La m@chesera bien maintenue.
Pour d6gager la m_che, retirer le manchon (J) et enlever la m@che.
FONCTIONNEMENT
Ernbrayage prot_g_ contre los surcharges
Si la m@chese coince, I'entrainement de la broche s'interrompt. En raison des forces en cause,
toujours tenir fermement I'outil & deux mains et se positionner pour maintenir fermement son
@quilibre.
Outils de portage
L:appareil est pr@vupour percer au marteau perforateur le b@ton,la brique et la pierre. II convient
@galement pour le per£_agesans choc du bois, des m@taux, de la c@ramique et des mati@res
plastiques. Les appareils &commande @lectronique et & rotation droite-gauche conviennent
@galement pour visser et fileter.
Outils pour I'_br_c_ernent
L:appareil est pr@vupour @br@cherle b@ton, la brique et la pierre.
Perk:age
_, AVERTISSEMENT : Risque de choc #lectrique. Pour r_duire le risque de blessures cor-
porelles graves, #teindre I'outil et le d#brancher avant d'effectuer tout r#glage, d'enlever
ou d'installer tout accessoire.
,_AVERTISSEMENT : pour r#duire le risque de blessures corporelles, TOUJOURS
s'assurer que la pi@ceest ancr@e ou fix@efermement. En cas de pergage clans un mat@riau fin,
utiliser un bloc en bois pour @vitertout dommage au mat@riau.
1. Toujours d@brancher la perceuse pour la fixation ou le changement de m@ches ou
d'accessoires.
2. N'utiliser que des m@ches bien aiguis@es. Pour le BOIS, utiliser des forets b, vrille, des
forets & trois pointes, des forets & bois pour outil @lectrique ou des scies- cloches.
Pour le METAL, utiliser des forets h@liCO'l'dauxen acier ou des scies-cloches. Pour la
MA(_,ONNERIE, par exemple les briques, le ciment, les blocs de b@ton, etc., utiliser des
m@ches b, pointe carbur@e pour portage b, percussion. Assurez-vous que le mat@riau &
percer est ancr@ ou fix@fermement. En cas de portage dans un mat@riau fin, utiliser un
bloc en bois pour @vitertout dommage au mat@riau.
3. Toujours exercer une pression en ligne droite par rapport b,la m@che.Exercer suffisamment
de pression pour faire mordre la m@che mais ne pas trop appuyer pour @viter de bloquer
le moteur ou de faire d@vier la m@che.
4. Tenez I'outil fermement afin de contr61er la torsion de la perceuse.
5. SI LA PERCEUSE SE BLOQUE, le probl_me est g@nfiralement attribuable & une
surcharge ou une mauvaise utilisation. RELACHER IMMEDIATEMENT LA DETENTE,
retirer la m@chedu trou perc@et d@terminer la cause du blocage. NE PAS APPUYER DE
FA(_ON R#PI_TEE SUR LA DETENTE POURTENTER DE DEMARRER UNE PERCEUSE
EN PANNE, CAR CETTE PRATIQUE PEUT ENDOMMAGER L'OUTIL.
6. Pour @viter les blocages ou un bris Iorsque vous effectuez un portage, r@duire la pression
sur la perceuse et percer en douceur la derni@re partie du trou.
7. Faire tourner la perceuse pour retirer la m@che du trou perc@.Cette pratique emp@che la
m@che de se coincer.
8. Los perceuses b, r@gime variable n'ont pas besoin d'un pointeau pour amorcer le trou.
Utiliser une vitesse lente pour amorcer le trou et acc@l@reren appuyant davantage sur la
d@tente Iorsque le trou est assez profond pour percer sans que la m@che n'en d@borde.
Mandrin SDS arnovible et rnandrin _ trois rn_c_oires
sans cl_ (D25314)
Le mod@le D25314 est muni d'un mandrin SDS amovible &changement rapide de m@meque
d'un mandrin amovible _.trois m_.choires sans cl@.Le m@canisme de perforation ne s'actionne
pas Iors de I'utilisation du mandrin & trois mb,choires amovible sans cl@.
II est facile de d@gager les mandrin SDS et &mb, choires sans cl@en tournant la bague (K) en
position de d@verrouillage (L) pour d@gager le mandrin (fig. 6).
IIest tout aussi facile de les installer en ins@rantle mandrin sur la broche de I'outil et en tournant
la bague en position de verrouillage (M). Le mandrin @metun d@clicIorsqu'il est bien ins@r@.
PER(_AGE DANS LE MI_TAL
(MODELES D25113, D25213, D25313 ET D25314)
Un mandrin adaptateur est n@cessaire pour passer d'une queue SDS & une queue ronde.
S'assurer que I'outil est en mode de per(_age seulement (les mod@les D25111 et D25211 ne dis-
posent pas de mode de per£:age seulement). Amorcer le trou b,faible vitesse puis passer b,plein
r@gimetout en appuyant fermement sur I'outil. Une @vacuation continue et r@guli@rede copeaux
m@talliques indique que la vitesse de per£:age est ad@quate. Utiliser un lubrifiant de coupe pour
percer les m@taux.Souls la fonte et le laiton doivent @treperc@s & sec. Les meilleurs lubrifiants
sont I'huile de coupe sulfuris@e, I'huile de lard, voire la graisse de bacon.
REMARQUE :le per_age de grands trous [7,9 mm (5/16 po) & 12,7 mm (1/2 po)] dans I'acier sera
facilit@si on perce d'abord un avant-trou [4 mm (5/32 po) & 4,8 mm (3/16 po)].
PER(_AGE DANS LE BOIS
(MODELES D25113, D25213, D25313 ET D25314)
Un mandrin adaptateur est n@cessaire pour passer d'une queue SDS & queue ronde. S'assurer
que I'outil est en mode de per(_age seulement. Los mod@lesD25111 et D25211 ne dispose pas de
mode de per£_age seulement). Amorcer le trou &faible vitesse puis passer & plein r@gimetout en
appuyant fermement sur I'outil. II est possible d'utiliser les m@mesforets h@lico'l'dauxqui percent
le m@tal.Cos forets peuvent surchauffer s'ils ne sont pas fr@quemment retir@spour nettoyer les
cannelures. Pour les trous plus gros, utiliser des forets & trois pointes, des forets & bois pour
outil @lectrique ou des scies-cloches. Les pi@cessusceptibles de provoquer des @clatsde bois
devraient @tresoutenues avec un bloc de bois.
PER(_AGE DANS LA MA_ONNERIE
(MODELES D25113, D25213, D25313 ET D25314)
Pour le per£'age de la ma£_onnerie, utiliser des m@chesSDS & pointes carbur@es pr@vues pour
une utilisation avec une perceuse &percussion et s'assurer que la m@cheest bien affOt@e.Utiliser
une force ferme et constante sur I'outil pour un per_age plus efficace. Une @vacuation continue de
poussi@reindique que votre vitesse de per_age est ad@quate.
Tige de r_glage de profondeur
RE_GLAGE DE LATIGE DE PROFONDEUR
1. Enfoncer le bouton de la poign@e lat@raleet le maintenir enfonc@.
2. D@placer la tige de profondeur (B) de sorte que la distance s@parant son extr@mit@et
I'extr@mit@de la m@checorresponde & la profondeur de per£:age recherch@e.
3. Rel&cher le bouton pour verrouiller la tige en position. Pour le per£:age avec une tige de r@glage
de profondeur, arr@terI'outil Iorsque I'extr@mit@de la tige atteint la surface du mat@riau.
ENTRETIEN
,_,AVERTISSEMENT : Risque de choc _/ectrique. Pour r_duire le risque de b/essures
corporelles graves, _teindre I'outil et le d_brancher avant d' effectuer tout r_glage, d'enlever
ou d'installer tout accessoires.
Nettoyage
MISE EN GARDE : ne jamais utiliser de solvants ni d'autres produits chimiques puissants
pour nettoyer les pi@ces non m@talliques de I'outil. Cos produits chimiques peuvent affaiblir los
mat@riaux de plastique utilis@sclans ces pi@ces. Utiliser un chiffon humect@ uniquement d'eau et
de savon doux. Ne jamais laisser de liquide p@n@trerclans I'outil et n'immerger aucune pattie de
/'outil clans un liquide.
Lubrification
L:outil a @t@parfaitement lubrifi@avant de quitter I'usine. Dans deux & six mois, selon I'utilisation,
amener ou envoyer I'outil & un centre de r@paration autoris@pour un nettoyage, une inspection
et une lubrification totale. Les outils utilis@sconstamment pour des travaux doivent @trelubrifi@s
plus fr@quemment. De plus, les outils _ inutilis@s _ pendant une Iongue p@riode doivent @tre
lubrifi@s de nouveau avant d'@tre r@utilis@s.
Accessoires
t&AVERTISSEMENT : puisque los accessoires autres que ceux offerts par DEWALT n'ont pas
@t@test#s avec ce produit, leur utilisation pourrait s'av@rer dangereuse. Pour r@duirele risque de
blessures, utiliser exclusivement los accessoires DEWALT recommand@s avec ce produit.
Les accessoires recommand@s pour utilisation avec I'outil sont disponibles, & un coot suppl@-
mentaire, aupr@s du distributeur ou du centre de r@paration autoris@ de votre r@gion.Pour toute
demande d'assistance pour trouver un accessoire, veuillez contacter DEWALT Industrial Tool Co.,
701 East Joppa Road, Baltimore, MD 21286, ¢:tats-Unis, composer le 1-800-4-DEWALT (1-800-
433-9258) ou visiter notre site Web & www.dewalt.com.
Page 5

CAPACITIESMAXIMALES RECOMMANDEES
D25111 D25113, D25213
D25211 D25313, D25314
Ma£:onnerie
Acier
Bois
CAPACWI_ OPTIMALE
Ma_onnerie
R_parations
Pour assurer la S¢:CURITE_et la FIABILIT¢: du produit, les rSparations, I'entretien et les rSglages
(y compris I'inspection et le remplacement de la brosse) doivent 6tre rSalisSs par un centre de
rSparation en usine DEWALT, un centre de r_paration autoris6 DEWALT ou par un personnel de
rSparation professionnel. Toujours utiliser des pi_ces de rechange identiques.
Garantie lirnit_e trois ans
DEWALT r_parera gratuitement tous les probl_mes dus & des dSfauts de matSriau ou de
fabrication pendant trois ans A compter de la date d'achat. Cette garantie ne couvre pas des
dSfaillances de piece dues A une usure normale ou & une mauvaise utilisation de I'outil. Pour
plus de d_tails relatifs A la couverture de la garantie et aux rSparations sous garantie, visiter le
site Web www.dewalt.com ou composer le 1-800-4-DEWALT (1-800-433-9258). Cette garantie
ne s'applique pas aux accessoires ni aux dommages causSs par des rSparations rSalisSes ou
tentSes par des tiers. Cette garantie vous accor.de des droits 16gaux spScifiques et il est possible
que vous ayez d'autres droits qui varient d'un Etat ou d'une province A I'autre.
En plus de la garantie, les outils DEWALT sont couverts par notre :
SERVICE D'ENTRETIEN GRATUIT DE 1 AN
DEWALT entretiendra I'outil et remplacera les pi_ces us_es par une utilisation normale et ce,
gratuitement, Atout instant pendant la premiere annSe A compter de la date d'achat.
GARANTIE DE REMBOURSEMENT DE 90 JOURS
Si vous n'Stes pas enti_rement satisfait des performances de votre outil 61ectrique, laser ou
de votre marteau-cloueur DEWALT pour quelque raison que ce soit, vous pouvez le retourner
accompagn6 d'un re£:u dans les 90 jours suivant la date d'achat et nous vous rembourserons
enti_rement - sans poser de questions.
AMCRIQUE LATINE : cette garantie ne s'applique pas aux produits vendus en AmSrique latine.
Pour ceux-ci, veuillez consulter les informations relatives b,la garantie sp_cifique prSsente dans
I'emballage, appeler I'entreprise locale ou consulter le site Web pour les informations relatives
Acette garantie.
REMPLACEMENT GRATUIT DES I_TIQUETTES D'AVERTISSEMENT : si les 6tiquettes
d'avertissement deviennent illisibles ou sont manquantes, composer le 1-800-4-DEWALT pour
en obtenir le remplacement gratuit.
DXXXXX
SER:
PRDPER EYE, EAR AND RESPJRATORY PROTE_ION. ALWAYS USE
SiDE HANDLE, ,_ _U)VERT_C_: [EAELMANDALBE
IHSTRUCCIONER P_,RA UN FUNCIDNAMBENTD REGDRO. SIEMPRE
Q_LJGE PRDTEGCION ADECUADA PARA LDS DJOR, DIDOS Y ViAG
RESPIRATORBAS. SIEMPRE UTiLIGG ELMANGO LATERAL,
,_ AVIDI_'IR$$Mt_ MNT; ,_ TITRE PD_VENTIF, tiDE LE GUIDE,
TDUJOUD$ U"NBSER ONE PROTECTION OCULAIRE AUBITIVE ET
DESPJRATOJRE ADEQUATE. UTILISER LA POJGNEE LATEDALE.
I_WALT INDUSTRIAL TOOL CO_RALTIMD_E, M9 21Z86USA
FORSERVaCEa;DFOR_MION. CALLI-BOO-_-DEWALT_W,EI_WALT,CO_
XXXXXXXX
TO _EDUCE THE RiSK OF iNJURY, USERMUST READ AND UNDERSTAND THE
INS{RUCtiON MANUAL. ALWAYS USE
D25111, D25113, D25211,
Volts: 120V AC~ 120V AC~
Amperes: 8 A 6,3 A
Frequency: 60 Hz 60 Hz
Rotations par minute 0 - 1 150/rain -
Coups par minute • 0 - 4 300 0 - 4 100
F Definiciones: Norrnas de seguridad
Las siguientes definiciones describen el nivel de gravedad de cada palabra de
seSal. Lea el manual y preste atenciSn a estos simbolos.
_PELIGRO: indica una situacidn de pefigro inminente que, si no se evita,
provocara la muerte o lesiones graves.
_ADVERTENCIA: indica una situacidn de peligro potencial que, si no se
evita, podr[a provocar la muerte o lesiones graves.
i_,PRECAUCION: indica una situacidn de peligro potencial que, si no se evita,
posiblemente provocarfa lesiones /eves o moderadas.
PRECAUCION: cuando se utiliza sin el sfmbolo de alerta de seguridad indica
una situacidn de peligro potencial que, si no se evita, puede provocar dafios
en la propiedad.
Reglas de seguridad generales
A ADVERTENC/A! Para reducir el riesgo de lesiones, el usuario debe leer elmanual de instrucciones.
El incumplimiento de todas y cada una de las instrucciones enumeradas a
continuacidn puede provocar descarga electrica, incendio o lesiones graves. El
termino "herramienta electrica" incluido en todas las adverten cias enumeradas
a continuacidn hace referencia a su herramienta electrica operada con corriente
(albmbrica) o a su herramienta electrica operada con baterfas (inalambrica).
GU_RDE ESTAS INSTRUCCIONES
1) SEGURIDAD EN EL _,REA DE TRABAJO
a) Mantenga su #rea de trabajo limpia y bien iluminada. Los accidentes abundan en las
areas de trabajo desordenadas u oscuras.
b) No opere m#quinas herramienta en ambientes explosivos, tales como en presencia
de liquidos, gases o polvos infiamables. Las maquinas herramienta generan chispas
que pueden inflamar el polvo o los gases.
c) No use m#quinas herramienta en presencia de nifios u otras personas circunstan=
tes. Las distracciones pueden hacerle perder el control.
2) SEGURIDAD ELECTRlCA
a) Los enchufes de/as mbquinas herramienta deben poder acoplarse a la toma de cor-
riente. Jambs modifique el enchufe de ninguna manera. No emplee adaptadores de
enchufe con mbquinas herramienta conectadas a tierra. Los enchufes no modificados
y las tomas de corriente que correspondan al enchufe reduciran el riesgo de descarga
el_ctrica.
b) Evite el contacto corporal con superficies conectadas a tierra, tales como tuber[as,
radiadores, cocinas y refrigeradores. Existe un mayor riesgo de descarga el_ctrica
cuando su cuerpo esta conectado a tierra.
c) No exponga m#quinas herramienta a condiciones fluviosas o h_medas. Si entra
agua a la maquina herramienta, aumentara el riesgo de descarga electrica.
d) No use el cable indebidamente. Nunca utilice el cable para transportar, tirar o des-
enchufar la herramienta el_ctrica. Mantenga el cable alejado de/ calor, el ace#e,
los bordes filosos o/as piezas mdviles. Los cables dafiados o enredados aumentan
el riesgo de descarga el_ctrica. Los cables dafiados deben set reparados o reemplaza-
dos en un centro de mantenimiento autorizado. Use solamente cables prolongadores de
3 conductores que tengan enchufes a tierra de 3 patas y receptaculos tripolares que se
adapten al enchufe de la herramienta.
e) AI operar una herramienta el_ctrica en el exterior, utilice un cable prolongador
adecuado para tal uso. Utilice un cable adecuado para uso en exteriores a fin de reducir
el riesgo de descarga el_ctrica. Aseg_rese de que el cable prolongador est_ en buenas
condiciones. Cuando utilice un cable prolongador, aseg_rese de que tonga la capacidad
para conducir la corriente que su producto oxide. Un cable de menor capacidad provocara
una disminucidn en el voltaje de la Ifnea, Io cual producira una perdida de potencia y
sobrecalentamiento. La siguiente tabla muestra la medida correcta que debe utilizar sedan
la Iongitud del cable y la capacidad nominal en amperios indicada en la placa. En caso de
duda utilice el calibre inmediatamente superior. Cuanto menor sea el n_mero de calibre,
mas _rueso sera el cable
Calibre minimo para cordones de extensibn
Amperaje 120V 0-7,6 7,6-15,2 15,2-30,4 30,4-45,7
Mas
de
0
6
10
12
No mas
de
6
10
12
16
1 po (25,4 ram) 1 po (25,4 ram)
S/O 1/2 po (12,7 mm)
S/O 1-1/2 po (38 mm)
5/32 & 5/8 de po
(4 mm - 4,8 mm)
5/32 a 5/8 po
(4 mm - 4,8 mm)
DXXXXX ×x×x×xxx× ×xx
GER.
UNDERSTAND THE iNSTRUCTiON MANUAL. ALWAYS USE
TO REDUCE THE RiSR OF iNJURY, USER MUST READ AND
USE SIDE HANDLE. _* ADMI_R_MC|A; LEA EL MANO/_L RE JNSTRUCCJRNES PARA DN
EUNCJONAMJENTO SEGORO. SiEMPRE OTiLICE PROTECCJON ADECUADA PAPA LOS OJO$,
QJRDS Y VJA.SRESPJRATOMAS, SIEMPRE DTJLJCEEL MANGO LATERAL. _ A!/EEIT|SSEMRNT:
A TiTRE PREVENTIF, LiRE LE GUIDE. TOUJOURS UTiLiSER U.NE PR.OTECTiON OCULAiRE,
AUDiTJVE ET RESMRATOiRE ADEQUATE. UTJLiSER LA POISNEE LATERALE,
BEWALT INDUSTRIAL TOOL CO., RALTIMDRE, MD 21286 USA
FOR SERVICE INFORMATION, CALL 1-800.4-D_WALT Www,DEWALT,com
CARACTERISTIQUES
D25213, D25313, D25314 D25330
Voltios Longitud total del cordSn en metros
240V 0-15,2 15,2-30,4 30,4-60,9 60,9-91,4
Calibre del cordSn AWG
18
18
16
14
PROPER EYE, EARAND RESPIRATORY PROTECTION. ALWAYS
16
16
16
12
16 14
14 12
14 12
No recomendado
3) SEGURIDAD PERSONAL
a) Mant#ngase alerta, fijese en Io que est# haciendo y utilice su sentido com#n
cuando opere una m#quina herramienta. No utilice una m#quina herramienta si
est# cansado o bajo la influencia de drogas, alcohol o medicamentos Sdlo hace falta
un momento de distraccidn durante la operacidn de maquinas herramienta para causar
lesiones corporales serias.
b) Use equipo de seguddad. Utilice siempre proteccidn ocular. El uso de un equipo de
seguridad apropiado alas condiciones de trabajo, tal como mascaras antipolvo, calzado
de seguridad anti-derrapante, cascos oproteccidn auditiva, reducira la posibilidad de sufrir
lesiones corporales.
c) Evite engender la m#quina herramienta en forma accidental Verifique que el
conmutador est# apagado antes de enchufar la m#quina herramienta. El sujetar una
maquina herramienta con el dedo en el conmutador o enchufar maquinas herramienta con
el conmutador encendido se presta para que ocurran accidentes.
d) Retire toda l/ave de ajuste antes de engender la m#quina herramienta. Sise deja
alguna /lave en una pieza giratoria de la maquina herramienta, podrfa provocar lesiones.
e) No se sobreextienda. Mant#ngase siempre bien apoyado y equilibrado. Esto permite
tenor un mayor control de la maquina herramienta en situaciones inesperadas.
f) Vistase debidamente. No se ponga ropa suelta o joyas. Mantenga su pelo, ropa y
guantes alejados de piezas mdviles. La ropa sue#a, las joyas y el polo largo pueden
quedar atrapados en las piezas mdviles. Los orificios de ventilacidn suelen cubrir piezas
en movimiento, pot Io que tambien se deben evitar.
g) Sila m#quina herramienta viene con alg_n dispositivo de conexidn para la
extracciSn y colecciSn de polvo, aseg#rese que este sea debidamente conectado
y utilizado. El uso de estos dispositivos puede reducir los peligros relacionados a la
generaciSn de polvo.
4) USO Y CUIDADO DE LA M_,QUINA HERRAMIENTA
a) No fuerce la mbquina herramienta. Use la mbquina herramienta correcta para su
aplicaciSn. La mbquina herramienta apropiada hat# un trabajo mejor y robs seguro si se
usa de la forma para la cual fue disefiada.
b) No use la mbquina herramienta si el conmutador no puede encenderla y apagarla.
Cualquier mbquina herramienta que no pueda ser controlada con el conmutador es
peligrosa y debe ser reparada.
c) Desenchufe la mbquina herramienta de la toma de corriente y/o de la unidad de
alimentaciSn antes de ajustarla, cambiar de accesorio o guardarla. Estas medidas
de seguridad preventiva reducen el riesgo de poner en marcha la mbquina herramienta
accidentalmente.
d) Guarde su mbquina herramienta fuera del alcance de nifios cuando no la est#
usando y no permita que personas que no est#n familiarizadas con la mbquina
herramienta o estas instrucciones la usen. Las mbquinas herramienta son peligrosas
en manos de personas no capacitadas.
e) Mantenga su mbquina herramienta. Revise la mbquina herramienta para verificar
que no est# mal alineada, que sus piezas mSviles no est#n trabadas o rotas y que
no exista otra condiciSn que pudiera afectar su operaciSn. Si est# dafiada, haga
reparar la m#quina herramienta antes de utilizarla. Muchos accidentes son causados
pot usar maquinas herramienta que no han sido bien mantenidas.
f) Mantenga m#quinas herramienta que son usadas para cortar afiladas y limpias. Las
maquinas herramienta de corte debidamente mantenidas y afiladas tienen mends proba-
bilidades de trabarse y son mas faciles de controlar.
g) Use la m#quina herramienta, sus accesorios, etc., en cumplimiento con estas
instrucciones yen la manera para la cual la m#quina herramienta rue disefiada,
tomando en cuenta /as condiciones de trabajo y el trabajo a realizar. El uso de una
maquina herramienta para operaciones fuera de aquellas para las que fue disefiada
podrfa resultar en una situacidn peligrosa.
5) SERWCIO
a) Haga reparar su m#quina herramienta pot un t#cnico de reparacidn calificado,
utilizando sdlo repuestos originales. Esto garantizara la seguridad de la maquina
herramienta.
Instrucciones de seguridad adicionales para
rotornartillos
• Sostenga la herramienta por/as superficies de agarre ais/adas cuando realice una
operaciSn en la que la herramienta de corte pueda tocar cables e/dctricos ocu/tos o
el cable de _sta. El contacto con un cable con corriente el_ctrica hara que las partes expues-
tas de la herramienta tengan corriente y que el operador reciba una descarga el#ctrica.
Aseg#rese de que el material por taladrar no contenga cableados o tuberfas de gas ocultos,
cuyas ubicaciones deben haber sido constatadas con las empresas de servicios p#blicos
correspondientes.
Use protectores auditivos. La exposicidn al ruido puede ocasionar la p#rdida de la
audicidn.
Use los mangos auxiliares que se suministran con la herramienta. La p#rdida del
control podrfa ocasionar lesiones personales.
Sujete la herramienta firmemente en todd momento. No intente hacer funcionar esta her-
ramienta sin sostenerla con ambas manos. Si intenta hacerla funcionar con una sola mano,
podrfa perder el control de la herramienta. Tambien podrfa ser peligroso perforar o encontrar
materiales duros, como barras de refuerzo. Ajuste firmemente el mango lateral antes de
utilizar la herramienta.
, Utilice abrazaderas u otra forma prbctica para asegurar y sostener la pieza de trabajo
en una plataforma estable. Sostener el trabajo con la mano o contra el cuerpo no brinda la
estabilidad requerida y puede Ilevar a la perdida del control.
, Use lentes de seguridad u otra proteccidn similar para los ojos. AI martillar se producen
astillas. Las partfculas volatiles pueden provocar lesiones oculares permanentes. Utilice una
mascara para polvo o una mascarilla de respiracidn en aplicaciones que generen polvo. La
mayorfa de las aplicaciones pueden requerir proteccidn auditiva.
, Sujete la herramienta firmemente en todd momento. No intente hacer funcionar esta
herramienta sin sostenerla con ambas manos. Se recomienda utilizar el mango lateral
en todd momento. Si intenta hacerla funcionar con una sola mano, podrfa perder el control
de la herramienta. Tambien podrfa set peligroso perforar o encontrar materiales duros, como
barras de refuerzo.
, No haga funcionar esta herramienta durante per[odDs prolongados. La vibracidn
que produce la accidn de percusidn puede ser perjudicial para las manos y los brazos.
Use guantes que provean amortiguacidn extra y limite la exposicidn tomando descansos
frecuentes.
, No reacondicione /as brocas usted mismo. El reacondicionamiento del cincel debe
set realizado pot un especialista autorizado. Los cinceles reacondicionados de manera
incorrecta pueden provocar lesiones.
, Use guantes cuando utilice la herramienta o Gamble/as brocas. Mientras la herramienta
se encuentra en funcionamiento, las piezas metalicas accesibles de la misma y las brocas
pueden sobrecalentarse. Los trozos pequehos de material roto pueden dahar las manos sin
guantes.
, Nunca apoye la herramienta hasta que la broca se haya detenido completamente. Las
brocas en movimiento podrfan provocar lesiones.
, No golpee/as brocas atascadas con un martillo para desatascarlas. Los fragmentos de
metal o astillas del material podrfan desprenderse y provocar lesiones.
, Los cinceles levemente gastados pueden afilarse con una esmeriladora.
, Mantenga el cable el#ctrico alejado de la broca giratoria. No enrosque el cable
alrededor de ninguna parte de/cuerpo. Un cable el#ctrico enroscado alrededor de una
broca giratoria puede provocar lesiones personales y perdida del control.
NOTA: No sobrecaliente la broca (decoloracidn) mientras esmerila un borde nuevo. Los cinceles
muy gastados deben set reforjados. No temple ni endurezca nuevamente el cincel.
_, ADVERTENCIA: Use SIEMPRE lentes de seguridad. Los anteojos de uso diario NO son
lentes de seguridad. Utilice tambien mascaras faciales o para polvo si el corte produce polvillo.
UTILICE SIEMPRE EQUIPOS DE SEGURIDAD CERTIFICADOS:
* Proteccidn para los ojos ANSI Z87. I(CAN/CSA Z94.3),
* Proteccidn auditiva seg#n la norma ANSI $12.6 ($3.19),
* Proteccidn respiratoria seg#n las normas NIOSH/OSHA/MSHA.
_ ADVERTENCIA: Algunas partfculas originadas al lijar, aserrar, amolar, taladrar y
realizar otras actividades de construccidn contienen productos qufmicos que producen cancer,
defectos de nacimiento y otros problemas reproductivos. Algunos ejemplos de estos productos
qufmicos son:
* el plomo de las pinturas de base plomo,
* la sflice cristalina de ladrillos, cemento y otros productos de mamposterfa, y
* el arsenico y el cromo de la madera con tratamiento qufmico.
El riesgo defivado de estas exposiciones varfa sedan la frecuencia con la que se realice este
tipo de trabajo. Para reducir la exposicidn a estos productos qufmicos, se recomienda trabajar
en areas bien ventiladas y usar equipos de seguridad aprobados, como las mascaras para
polvo especialmente disehadas para filtrar las partfculas microscdpicas.
, Evite el contacto prolongado con/as part[culas de polvo originadas al lijar, aserrar,
esmerilar, taladrar y realizar dem#s actividades de la construccidn. Use indumentaria
protectora y lave/as #rear expuestas con agua y jabdn. Evite que el polvo entre en la
boca yen los ojos o se deposite en la piel, para impedir la absorcidn de productos qufmicos
nocivos.
_,ADVERTENCIA: El uso de esta herramienta puede generar o dispersar partfculas de polvo,
que pueden causar lesiones respiratorias permanentes y graves u otras lesiones. Use siempre
proteccidn respiratoria apropiada para la exposicidn al polvo aprobada pot el Instituto Nacional
Page 6

de Salud y Seguridad Ocupacional de EE.UU. y la Administracidn de Salud y Seguridad
Ocupacional de EE. UU. (NIOSH y OSHA respectivamente, por sus siglas en ingles). Aleje la
cara y el cuerpo de/contacto con las partfculas.
_, ADVERTENCIA: Utilice siempre protecciSn para los ojos. Todos los usuarios y especta-
dotes deben utilizar protecci6n para los ojos conforme con las normas ANSI 787.1.
J_ADVERTENCIA: Durante el uso, use siempre protecciSn auditiva adecuada que cumpla
con la norma ANSI $12.6 ($3.19). Bajo ciertas circunstancias y seg#n el perfodo de uso, el
ruido producido pot este producto puede contribuir a la pdrdida de audicidn.
* La etiqueta de su herramienta puede incluir los siguie ntes sfmbolos. Los sfmbolos y sus
definiciones son los siguientes:
V.................. voltios
Hz................ hertz
min .............. minutos
............ corriente directa
@ ................ Construcci6n Clase I
con conexidn a tierra)
[] ................. Construccidn Clase II
(con aislamiento doble)
BPM ............ golpes por minuto
A................... amperios
W.................. vatios
"_ ................ corriente alterna
no ................. velocidad sin carga
@ .................. terminal a tierra
_, ................. sfmbolo de alerta de seguridad
.../min ........... revoluciones o reciprocidad
pot minuto
Motor
Su herramienta DEWALT esta alimentada pot un motor DEWALT. Aseg0rese de que la fuente
de energia concuerde con Io que se indica en la placa. Un descenso en el voltaje de mas del
10% producira una p_rdida de potencia y sobrecalentamiento. Todas las herramientas DEWALT
estan probadas en fabrica.
Componentes (Fig. t-4)
i_,ADVERTENCIA: Nunca modifique la herramienta eldctrica ni ninguna pieza de dsta. Puede
ocasionar un dafio o una lesidn personal
A. Mango lateral G. Selector de modos
B. Varilla de profundidad H. Rotaci6n de cinceles
C. Portabrocas SDS I. Bot6n del selector de modos
D. Interruptor disparador/Disparador J. Manguito
de velocidad variable K. Anillo
E. Bot6n de control de avance/reversa
R Bot6n de bloqueo (Lock-on) (D25111, D25113, D25330 solamente)
USO PREVISTO
Estos martillos giratorios para trabajo pesado se han diseSado para tareas profesionales
de taladrado y percusi6n, destornillado, labrado y cincelado livianos en diversas Areas de
trabajo (por ejemplo, construcciones). NO USE la herramienta en condiciones de Iluviosas o en
presencia de gases o liquidos inflamables.
Estos martillos giratorios para trabajo pesado son herramientas el6ctricas profesionales. NO
PERMITA que los niSos tengan contacto con la herramienta. Supervise a los menores de 16
aSos que operen la herramienta.
Mango lateral
i_,PRECAUCION: Opere siempre la herramienta con el mango lateral montado correctamente.
Sostenga la herramienta con ambas manos para maximo control.
Este martillo giratorio viene con un mango lateral (A). El mango lateral se fija en el frente de la
caja de engranajes sin la varilla de profundidad (B), como se muestra en la figura 1 y puede
girarse 360 ° para utilizarlo tanto con la mano derecha como con la izquierda. El mango lateral
se puede ajustar girando la parte de plastico negro en sentido de las agujas del reloj y se puede
aflojar girandola en sentido contrario alas agujas del reloj.
Interrupter
Para encender el martillo giratorio, oprima el interruptor disparador (D). Para apagar el martillo
giratorio, suelte el interruptor.
DISPARADOR DEVELOCIDAD VARIABLE
El interruptor disparador de velocidad variable (D) permite controlar la velocidad. Cuanto
masse optima el interruptor disparador, mayor sera la velocidad del taladro.
NOTA: Para comenzar orificios sin marcar el centro con un punz6n; taladrar en metal, plastico
o ceramicos; o para colocar tornillos, use velocidades bajas. Las velocidades altas son mejores
para taladrar en mamposteria y Iograr la maxima eficiencia.
Bot6n de bioqueo
_ ADVERTENCIA: Antes de desconectar el enchufe de la fuente de alimentacidn, aseg_rese
de liberar el mecanismo de bloqueo. De no hacerlo, la herramienta arrancara inmediatamente
la prdxima vez que se la enchufe. Puede ocasionar un dafio o una lesidn personal.
El bot6n de bloqueo se utiliza solamente cuando el martillo giratorio se usa en forma fija, con
una base de prensa de taladro o en aplicaciones de cincelado.
Antes de usar la herramienta (cada vez), aseg0rese de que el mecanismo de liberaci6n del
bot6n de bloqueo funcione correctamente.
SOLAMENTE EN LOS MODELOS D25111, D25113 (FIG. 1)
Para bloquear el interruptor disparador en la posici6n de ENCENDIDO para un funcionamiento
continuo, oprima el interruptor disparador y deslice el interruptor de bloqueo (F) hacia arriba. La
herramienta continuara en funcionamiento.
Para APAGAR la herramienta cuando esta en una posici6n de BLOQUEO, apriete el disparador
una vez y luego su_ltelo.
SOLAMENTE EN EL MODELO D25330 (FIG. 4)
Para bloquear el interruptor disparador en la posici6n de ENCENDIDO para un funcionamiento
continuo, optima el interruptor disparador y empuje el bot6n de bloqueo (F) hacia adentro. La
herramienta continuara en funcionamiento.
Para APAGAR la herramienta cuando esta en una posici6n de BLOQUEO, apriete el disparador
una vez y luego su61telo.
Palanca de cambio de marcha (D25111, D25113_
D25211_ D25213_ D25313_ D25314)
La palanca de cambio de marcha se utiliza para cambiar la marcha del martillo giratorio con
el fin de quitar tornillos o brocas atascadas. Esta ubicada encima del disparador, segOn se
muestra en la figura 2.
•& PRECAUCION: AI funcionar en reversa para liberar brocas atascadas, se producira una
reaccidn de alta torsidn.
D25111, D25113
Para que el martillo giratorio funcione en reversa, AP_,GUELO y alinee la palanca de cambio
de marcha (E) con la flecha amarilla apuntando hacia atras (vista desde la posici6n de
funcionamiento del taladro).
Para colocar la palanca en la posici6n de avance, APAGUE el martillo giratorio y alinee la
palanca de cambio de marcha con la flecha amarilla apuntando hacia adelante (vista desde la
posici6n de funcionamiento del taladro).
D25211, D25213, D25313, D25314
Para que el martillo giratorio funcione en reversa, AP_,GUELO y empuje la palanca de cambio
de marcha (E) de manera que se vea la flecha amarilla apuntando hacia atras.
Para colocar la palanca en la posici6n de avance, APAGUE el martillo giratorio y empuje la
palanca de cambio de marcha hacia adentro de manera que se vea laflecha amarilla apuntando
hacia adelante.
Selector de modes: D25113_ D25213_ D25313_ D25314
(Fig. 5)
PRECAUCION: La herramienta debe detenerse completamente antes de activar el selector de
modos, de Io contrario la herramienta puede sufrir dafios.
MODO SOLO TALADRO
Para utilizar el modo s61otaladro, optima el bot6n (I) y gire el selector de modos (G) de manera
que la flecha amarilla apunte hacia el simbolo correspondiente, como se muestra. Utilice el
modo s61o taladro para madera, metal y plasticos
MODO TALADRO/PERCUTOR
Para utilizar el modo taladro/percutor, optima el bot6n y gire el selector de modos de manera
que la flecha amarilla apunte hacia el simbolo correspondiente, como se muestra. Utilice este
modo para taladrar en mamposteria.
ROTACI()N DE ClNCELES
Para girar el cincel en forma manual, oprima el bot6n y gire el selector de modos de manera
que laflecha amarilla apunte hacia el simbolo correspondiente, como se muestra.
MODO SOLO MARTILLO
Para cincelados livianos, optima el bot6n y gire el selector de modos de manera que la flecha
amarilla apunte hacia el simbolo correspondiente, como se muestra..
NOTA: La flecha amarilla del selector de modos debe estar alineada con la de los simbolos en
todos los casos. No hay otras posiciones de operaci6n entre las indicadas.
Portabrocas SDS (Fig. 6)
AADVERTENCIA: Riesgo de descarga el_ctrica. Para reducir el riesgo de lesiones
personales graves, apague la herramienta y descon#ctela de la fuente de alimentacidn
antes de realizar ajustes o de retirar/instalar cualquier dispositivo o accesorio.
AADVERTENCIA: Peligro de quemadura. SIEMPRE use guantes cuando cambie las brocas.
Mientras la herramienta se encuentra en funcionamiento, las piezas metalicas accesibles de la
misma y las brocas pueden sobrecalentarse. Los trozos pequehos de material roto pueden
dahar las manos sin guantes.
PRECAUCION: No utilice brocas de cincel en esta herramienta. Las brocas de cincel pueden
provocar que la herramienta se atasque y se dafie.
Para insertar una broca, inserte el vastago de la broca aproximadamente 19 mm (3/4") dentro
del portabrocas. Empuje y gire la broca hasta que se ajuste en su lugar. La broca estara bien
sujetada.
Para liberar la broca, tire el manguito (J) hacia atras y retire la broca.
FUNCiONAMIENTO
Embrague de sobrecarga
Si la broca se atasca o atora, el impulso hacia el eje del taladro se interrumpe. Debido alas
fuerzas que se producen como resultado, sostenga siempre la herramienta con ambas manos
y adopte una postura firme.
Herramientas para taladrado
La maquina esta dise_ada para aplicaciones de percusi6n en hormig6n, ladrillos y piedras.
Tambi6n se puede utilizar para taladrar sin impacto en madera, metal, ceramica y plastico. Las
maquinas con control electr6nico y rotaci6n derecha/izquierda tambi6n se pueden utilizar para
colocar tornillos y cortar roscas.
Herramientas para cincelado
La maquina esta dise_ada para trabajos de cincelado en hormig6n, ladrillo y piedra.
Taladrado
_,ADVERTENCIA: Riesgo de descarga el_ctrica. Para reducir el riesgo de lesiones
personales graves, apague la herramienta y descon#ctela de la fuente de alimentacidn
antes de realizar ajustes o de retirar/instalar cualquier dispositivo o accesorio.
AADVERTENCIA: Para reducir el riesgo de lesiones personales, aseg_rese SIEMPRE de
sujetar o fijar firmemente la pieza de trabajo. Siva a taladrar un material delgado, utilice un
bloque de madera "de respaldo" para evitar dafiarlo.
1. Siempre desenchufe el taladro al colocar o cambiar brocas o accesorios.
2. Use solamente brocas para taladro afiladas. Para MADERA, utilice brocas helicoidales,
brocas de pala, brocas salom6nicas, o sierras perforadoras. Para METAL, utilice brocas
helicoidales de acero o sierras perforadoras. Para MAMPOSTERJA, tal como ladrillos,
cemento, bloques de hormig6n, etc., utilice brocas con puntas de carburo indicadas para
el taladrado por percusi6n. AsegOrese de sujetar o fijar firmemente el material a taladrar.
Siva a taladrar un material delgado, utilice un bloque de madera "de respaldo" para
evitar daSarlo.
3. Aplique siempre presi6n en linea recta con la broca. Utilice la presi6n suficiente para
mantener la broca funcionando, pero no tanta como para ahogar el motor o ladear la
broca.
4. Sostenga firmemente la herramienta para controlar la torsi6n del taladro.
5. SI EL TALADRO SE ATASCA, probablemente se deba a una sobrecarga o al uso
inadecuado de la herramienta. SUELTE EL DJSPARADOR INMEDIATAMENTE, retire la
broca de la pieza de trabajo, y determine la causa del atascamiento. NO OPRIMA EL
DISPARADOR PARA INTENTAR DESTRABAR EL TALADRO - PODR|A DANARLO.
6. Para minimizar los atascamientos o las roturas del material, reduzca la presi6n y deje ir
suavemente la broca hacia el final del orificio.
7. Mantenga el motor en funcionamiento cuando retire la broca de un orificio taladrado.
Esto ayudara a prevenir atascamientos.
8. Con los taladros de velocidad variable, no es necesario marcar con un punz6n el centro
del lugar que desea taladrar. Utilice una velocidad baja para producir el orificio y acelere
oprimiendo el disparador mas fuerte cuando el orificio sea Io suficientemente profundo
para taladrar sin que la broca sake hacia afuera.
Portabrocas SDS y portabrocas sin Ilave con tres
mordazas desmontables (D25314)
El modelo D25314 esta equipado con un portabrocas SDS de recambio rapido y un portabrocas
sin Ilave con tres mordazas, desmontables. El mecanismo de martillo no funciona cuando se
utiliza el portabrocas sin Ilave con tres mordazas.
Tanto el portabrocas SDS como el portabrocas sin Ilave con tres mordazas se pueden retirar
facilmente girando el anillo (K) hacia la posici6n de desbloqueo (L) para liberar el portabrocas
(Fig. 6).
El portabrocas SDS y el portabrocas sin Ilave con tres mordazas se pueden instalar con facilidad
insertando el portabrocas en el eje de la herramienta y girando el anillo hacia la posici6n de
bloqueo (M). El portabrocas hara un ruido seco cuando est6 instalado correctamente.
TALADRADO EN METAL
(D25113, D25213, D25313, D25314)
Se requiere un adaptador SDS a vastago redondo. AsegL_rese de que la herramienta est6 en
el modo s61o taladro. (los modelos D25111 y D25211 no poseen modo s61otaladro). Comience
taladrando a baja velocidad y aumente a potencia completa mientras aplica presi6n firme en la
herramienta. Un flujo uniforme y suave de astillas metalicas indica que se taladra a la velocidad
adecuada. Utilice un lubricante de corte cuando taladre metales. Las excepciones son el bronce
y el hierro fundido que deben taladrarse en seco. Los lubricantes de corte que mejor funcionan
son el aceite de corte sulfurizado o el aceite de grasa de cerdo; tambi6n puede utilizarse grasa
de tocino.
NOTA: Los orificios grandes [(7,9 mm a 12,7 ram) ( 5/16" a 1/2")] en acero se pueden realizar
con mayor facilidad si se perfora primero un orificio piloto [(4 mm a 4,8 mm) (5/32" a 3/16")].
TALADRADO EN MADERA
(D25113, D25213, D25313, D25314)
Se requiere un adaptador SDS a vastago redondo. AsegL_rese de que la herramienta est6 en
el modo s61o taladro. (los modelos D25111 y D25211 no poseen modo s61otaladro). Comience
taladrando a baja velocidad y aumente a potencia completa mientras aplica presi6n firme en
la herramienta. Los orificios en madera se pueden realizar con las mismas brocas helicoidales
que se utilizan para el metal. Estas brocas pueden sobrecalentarse a menos que se retiren con
frecuencia para limpiar las virutas de las ranuras. Para orificios mas grandes, utilice brocas de
pala, brocas salom6nicas o sierras perforadoras. Las piezas de trabajo que pueden astillarse
deben respaldarse con un bloque de madera.
TALADRADO EN MAMPOSTERJA
(D25113, D25213, D25313, D25314)
Cuando taladre en mamposteria, use brocas con puntas de carburo SDS aptas para taladrado
pot percusi6n y aseg0rese de que la punta est6 afilada. Aplique fuerza constante y firme en la
herramienta para taladrar con mayor eficacia. Un flujo de virutas uniforme y suave indica que
se taladra a la velocidad adecuada.
Varilla de profundidad
PARA AJUSTAR LA VARILLA DE PROFUNDIDAD
1. Mantenga presionado el bot6n del mango lateral.
2. Mueva la varilla de profundidad (B) de manera que la distancia entre el extremo de la varilla
y el extremo de la broca sea igual a la profundidad de perforaci6n deseada.
3. Suelte el bot6n para bloquear la varilla en posici6n. Cuando pen'ore con la varilla de
profundidad, det6ngase cuando el extremo de la varilla Ilegue a la superficie del material.
MANTENIMIENTO
AADVERTENCIA: Riesgo de descarga el_ctrica. Para reducir el riesgo de lesiones
personales, apague la herramienta y descon_ctela de la fuente de alimentaci6n antes de
realizar ajustes o de retirar/instalar cualquier dispositivo o accesorio.
Limpieza
•_ PRECAUCION: Nunca utilice solventes u otros qufmicos abrasivos para Iimpiar las piezas
no metalicas de la herramienta. Estos productos qufmicos pueden debilitar los materiales
plasticos utilizados en estas piezas. Utilice un patio humedecido sdlo con agua y jabdn neutro.
Nunca permita que penetre Ifquido dentro de la herramienta ni sumerja ninguna de las piezas
en un Ifquido.
Lubricaci_n
Su herramienta fue adecuadamente lubricada antes de salir de fabrica. Entre un periodo de dos
a seis meses, dependiendo del uso, Ileve o envie su herramienta a un centro de mantenimiento
autorizado para limpieza, inspecci6n y lubricaci6n completas. Las herramientas que se utilicen
en forma constante para trabajos de producci6n necesitaran que se las lubrique mas a menudo.
Las herramientas "sin mantenimiento" durante periodos prolongados deben volver a lubricarse
antes de set utilizadas nuevamentee.
Accesorios
_ADVERTENCIA: Debido a que no se han probado con este producto otros accesorios
que no sean los que ofrece DEWALT, el uso de dichos accesorios podrfa set peligroso. Para
reducir el riesgo de lesiones, con este producto deben usarse sdlo los accesorios DEWALT
recomendados.
Los accesorios que se recomiendan para utilizar con la herramienta estan disponibles a un
costo adicional en su distribuidor local o en un centro de mantenimiento autorizado. Si necesita
ayuda para Iocalizar algOn accesorio, p6ngase en contacto con DEWALT Industrial Tool Co.,
701 East Joppa Road, Baltimore, MD 21286, Ilame al 1-800-4-DEWALT (1-800-433-9258) o
visite nuestro sitio web www.dewalt.com.
CAPAClDADES MA,XIMAS RECOMENDADAS
D25111 D25113, D25213
D25211 D25313, D25314
Mamposteria
Acero
Madera
CAPACIDAD OPTIMA
Mamposteria
25,4 mm (1") 25,4 mm (1")
n/d 12,7 mm (1/2")
n/d 38 mm (1-1/2")
(4 mm - 4,8 mm) (4 mm - 4,8 mm)
5/32"-5/8" 5/32"-5/8"
Page 7

Repairs
Para garantizar la SEGURIDAD y CONFIABILIDAD, las reparaciones, el mantenimiento y los
ajustes (incluida la inspecci6n y reemplazo de cepillos) deben ser realizados por un centro de
mantenimiento de fabrica de DEWALT, un centro de mantenimiento DEWALT autorizado u otro
personal de mantenimiento calificado. Utilice siempre piezas de repuesto id6nticas.
PARA REPARAClON Y SERVlCIO DE SUS HERRAMIENTAS ELE_CTRICAS, FAVOR DE
DIRIGIRSE AL CENTRO DE SERVlCIO MA,S CERCANO
CUMACAN, SIN
Av.Nicol&s Bravo#1063 Sur - Col.industrial Bravo (667)7 12 42 11
GUADALAJARA, JAL
Av.La Paz#1779 - Col.Americana Sector Jub,rez (33) 3825 6978
MEXICO,D.F.
Eje Central L_,zaroCb,rdenas No.18
Local D,Col. Obrera (55) 5588 9377
MERIDA,YUC
Calle 63 #459-A - Col.Centro (999) 9285038
MONTERREY,N.L.
Av.Francisco J.Madero No.831- Col. Centro (81) 8375 2313
PUEBLA, PUE
17 Norte #205 - Col.Centro (222) 2463714
QUERETARO,QRO
Av.Madero 139 Pte.- Col. Centro (442) 214 1660
SAN LUIS POTOSI,SLP
Av.Universidad 1525 - Col.San Luis (444) 8142383
TORREON,COAH
Blvd.Independencia,96 Pte.- Col.Centro (871) 7165265
VERACRUZ,VER
Prolongaci6nDiaz Mir6n#4280 - Col.Remes (229) 9217016
VILLAHERMOSA,TAB
Constituci6n516-A - Col.Centro (993) 3125111
PARAOTRAS LOCALIDADESLLAME AL: (55) 53267100
PGliza de Garantia
IDENTIFICACION DEL PRODUCTO:
Sello o firma del Distribuidor.
Nombre del producto: Mod./Cat.:
Marca: N0m. de serie:
(Datos para ser Ilenados pot el distribuidor)
Fecha de compra y/o entrega del producto:
Nombre y domicilio del distribuidor donde se adquiri6 el producto:
Este producto esta garantizado pot un aSo a partir de la fecha de entrega, contra cualquier
defecto en su funcionamiento, asi como en materiales y mano de obra empleados para su
fabricaci6n. Nuestra garanfia incluye la reparaci6n o reposici6n del producto y!o componentes
sin cargo alguno para el cliente, incluyendo mano de obra, asi como los gastos de transport-
aci6n razonablemente erogados derivados del cumplimiento de este certificado.
Para hacer efectiva esta garanfia debera presentar su herramienta y esta p61iza sellada por
el establecimiento comercial donde se adquiri6 el producto, de no contar con 6sta, bastara la
factura de compra.
EXCEPCIONES.
Esta garanfia no serb, v&lida en los siguientes casos:
• Cuando el producto se hubiese utilizado en condiciones distintas alas normales;
• Cuando el producto no hubiese sido operado de acuerdo con el instructivo de uso que se
acompaSa;
• Cuando el producto hubiese sido alterado o reparado por personas distintas alas enlis-
tadas al final de este certificado.
Anexo encontrara una relaci6n de sucursales de servicio de fb,brica, centros de servicio autor-
izados y franquiciados en la Rep0blica Mexicana, donde podra hacer efectiva su garantia y
adquirir partes, refacciones y accesorios originales.
Garantia limitada de tres a_os
DEWALT reparar& sin cargo cualquier defecto ocasionado por materiales defectuosos o mano
de obra, durante tres aSos a partir de la fecha de compra. Esta garantia no cubre fallas en las
piezas que resulten del desgaste normal de la herramienta o de su utilizaci6n inadecuada.
Para obtener informaci6n detallada sobre la cobertura de la garanfia y sobre reparaciones,
visite nuestra pagina Web www.dewalt.com o Ilame al 1-800-4-DEWALT (1-800-433-9258). Esta
garanfia no se extiende a los accesorios o a los daSos causados por terceros al intentar realizar
reparaciones. Esta garantia le concede derechos legales especificos; usted goza tambi6n de
otros derechos que varian segOn el estado o provincia.
Ademas de la garantia, las herramientas DEWALT estan cubiertas por nuestro:
SERVIClO GRATUITO DE 1 ANO
DEWALT realiza el mantenimiento de la herramienta y reemplaza las piezas gastadas tras
el uso normal, sin costo alguno, en cualquier momento durante el primer aSo despu6s de la
compra.
GARANT|A DE REEMBOLSO DE DINERO DE 90 D|AS
If you are not completely satisfied with the performance of your DEWALT Power Tool, Laser, or
Nailer for any reason, you can return it within 90 days from the date of purchase with a receipt
for a full refund - no questions asked.
AIVIE_RICALATJNA: Esta garanfia no se aplica a los productos que se venden en Am6rica
Latina. Para los productos que se venden en Am6rica Latina, debe consultar la informaci6n de
la garanfia especifica del pais que viene en el empaque, Ilamar a la compahia local o visitar el
sitio Web a fin de obtener esa informaci6n.
REEMPLAZO GRATUITO DE LAS ETIQUETAS DE ADVERTENClA: Si sus etiquetas de
advertencia se tornan ilegibles o faltan, Ilame al 1-800-4-DEWALT para que se le reemplacen
gratuitamente.
DXXXXX'""
SER:
PROPER EYE, EAR AND RESPIRATORY PROTECTION. ALWAYS USE
SIDEHANIDLE. ,_ ADVIEMTENCI_: LEAELMANUALDE
iNSTRIDCCiONES Pp,RA ON FUNCiONAMJENTO SEGURO. SJEMpRE
UTILICE PROTECCION AOECUADA PARA LOS OJOS, OIROS Y VIAS
RESPiRATORiAS. SJEMPRE UTJLJCE EL MANGO LATERAL.
,_ AV_RTHSSmMENT:/_ TiTRE PREVENTIF, LIRE LE GUIDE.
TOUJOURS UTILISER UNE PROTECTION OCULAIffE, AUDITIVE ET
RESPJRATOIRE ADEQUATE. UTILISER LA PGIGN_E LAT_RALE.
J0EWALT INDUSTRIAL TOOL CO., BALTIMORE, MD 21286 USA
FORSERVICEiNFORMATION, CALL 1-800-'_-DEWALTwww.D_WALT.com
_,. rJ
XXX XXXX×
TO REDUCE THE RJSR OF INJURY, USERMOST REAl[} AND UNOERSTANO THE
iNSTRUCTiON MANUAL. ALWAYS USE
D25111, D25113, D25211,
Tensi6n de alimentaci6n: 120 V AC~ 120 V AC~
Consumo de corriente: 8 A 6,3 A
Frecuencia de alimentaci6n: 60 Hz 6 Hz
Rotaci6n sin carga: 0 - 1 150/rain -
Golpes pot minuto 0 - 4 300 0 - 4 100
IMPORTADOR: DEWALT S.A. DE C.V.
BOSQUES DE CIDROS ACCESO RADIATAS NO. 42
COL. BOSQUES DE LAS LOMAS, 3A. SECCION, CP 05120
DELEGACION CUAJIMALPA, MEXICO, D.F
Para servicio y ventas consuJte
"HERRAMIENTAS ELECTRICAS" SECCIQN
DXXY,X× ××x×x××xx××××
SER._
UNDERSTAND THE iNSTRUCTION MANUAL. ALWAYS USE
TO REDUCE THE RiSK OFiNJURY, USER MUST READ AND
USESiDE HANDLE. _ ADVIRTIENG|A: LEA EL MANUAL DE INSTRUCCIONES PARAUN
FI)NCIONAMIENTO SEGURO. SIEMPRE UTiLiCE PROTECCiON ADECUADA PARA LOS OJOS,
OIDOS YViAS RESPiRATORIAS. SiEMPRE UTILICEEL MANGO LATERAL _ AVIIRTiSSEMENT:
A TITSE PRI_VENTiE, LIRE LE GUIDE. TOUJOURS UTiLISER ONE PROTECTION OCULAiRE,
AODBTIVE El"RESPIRATOIRE ADEQUATE. UT|LISER LA POgGNEE LATERALE.
IDEWALTINDUSTRIALTOOLCO.,BALTIMORE,MID21286USA
FORSERVBCEINFORMATION,CALL1-SOO-4-REWALTwww.OEWALT.cem
ESPECIFICACIONS
D25213, D25313, D25314 D25330
TEL. 5 326 7100
R.RC.: BDE810626-1W7
PROPER EYE,EAR AND RESPIRATORYPROTECTION. ALWAYS
 Loading...