

Page 1
Devon IT TC5 Terminal
Quick Start Guide
version1
For proper ventilation, the thin client must be placed in an open area in its vertical posi-
tion. Improper mounting can use the unit to overheat and become damaged.
TC5D, TC5DW, TC5X, TC5XW
Page 2
Inspect all parts visually for damage. If anything is damaged, please contact
Devon IT immediately to report the issue. You may use our web form
(http://www.devonit.com/support) to create an inquiry ticket with the
Devon IT Technical Support Department, or contact us by phone at
1-(800)-369-7290. Support Analysts are available 24/7/365.
Unpack
Your thin client terminal is typically
shipped with the following items:
Power Adapter
Stand
Quick Start Guide
Warranty Card
Please see the accompanying documents in the package for warranty Information.
Alternative Desktop Computing
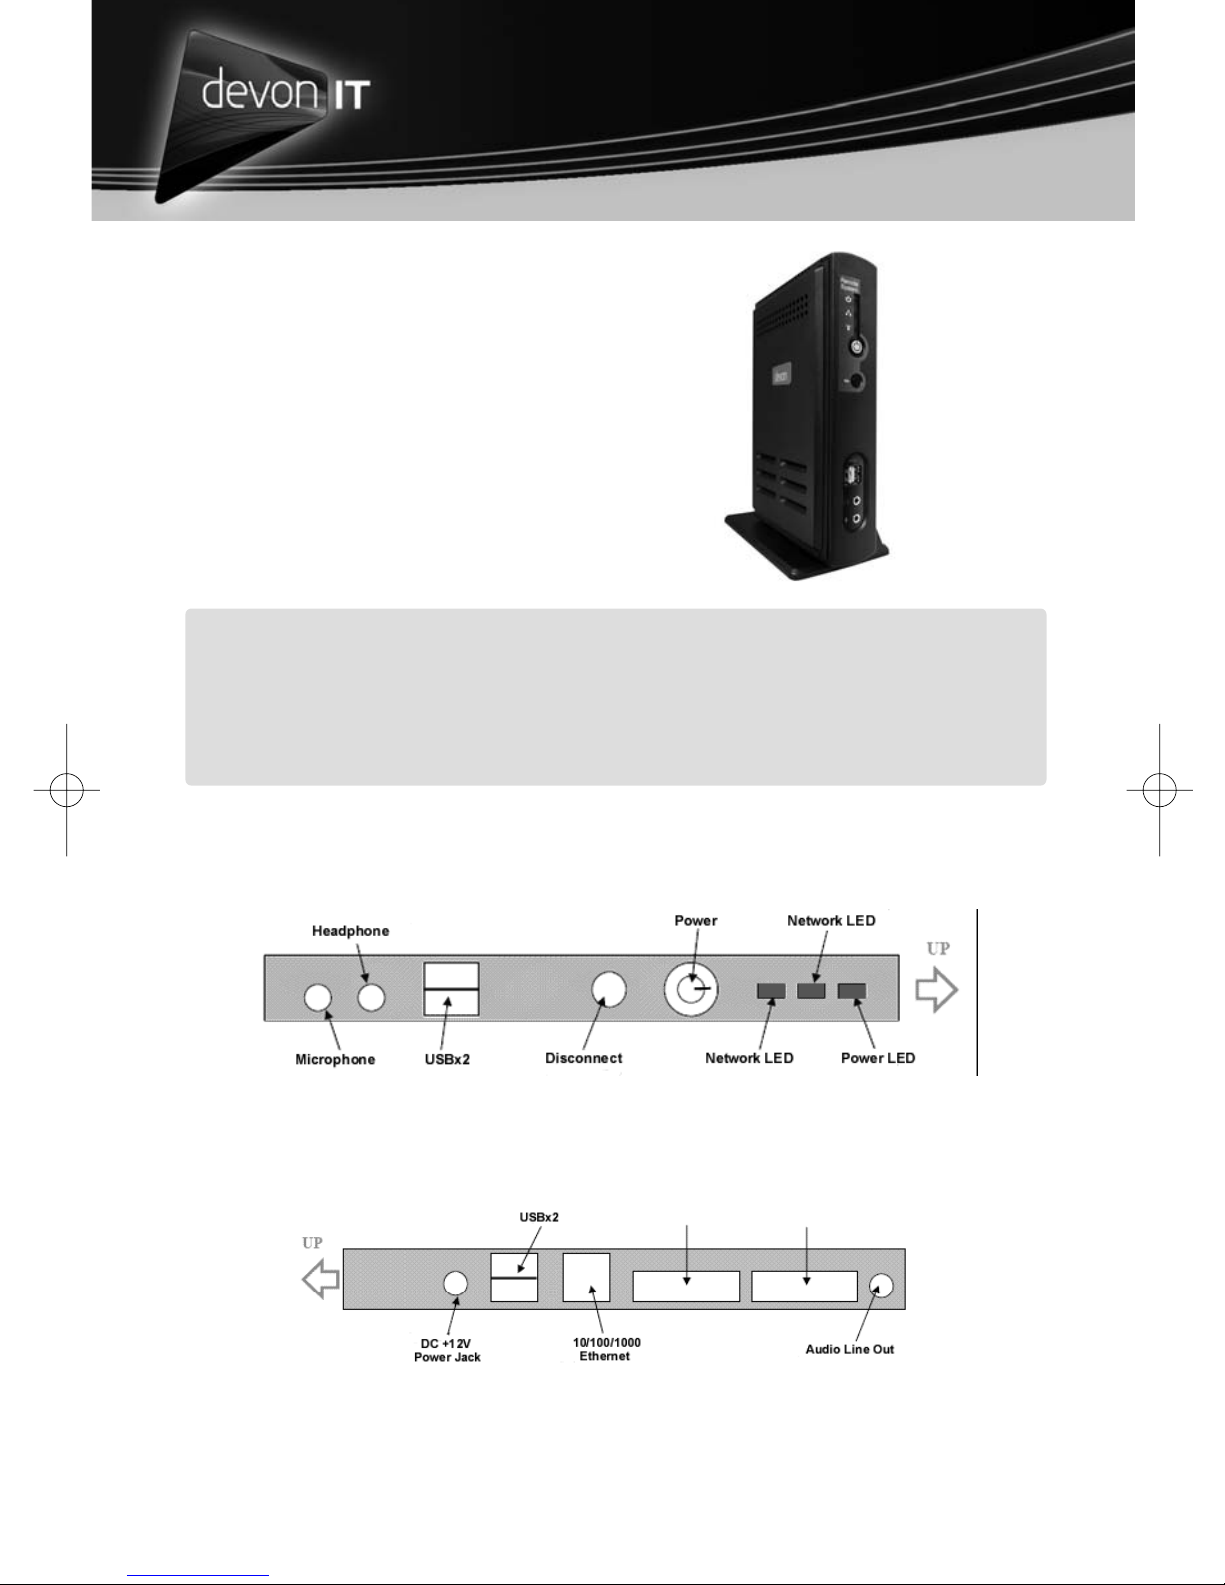
Front Panel Diagram
Back Panel Diagram
1.
DVI-2
DVI-1
Page 3

© 2008 Devon IT, Inc. All Rights Reserved Visit us on the web: http://www.devonit.com
Setup
1. Connect your monitor to the appropriate DVI port on the back of the unit.
(Caution: The monitor must be connected to the appropriate DVI port
as specified on page 3 of XPe and page 5 of DeTOS).
2. Connect the mouse and keyboard to the USB ports.
3. Connect the network cable to the LAN Port on the unit and the other end of
the cable to your local network.
4. Connect the power supply to the TC5’s power supply port on the back of the
unit.
5. Plug the power cord into a surge-protected AC Outlet.
6. Power on the monitor before turning on the TC5.
7. Power on the TC5 by pressing the power button on the front of the device.
Warnings
• Make sure the monitor is plugged into the appropriate DVI port and turned
on, before powering unit on. Failure to do so may make the unit appear as if
it is not functioning properly.
• For proper ventilation, the thin client must be placed in an open area in it
vertical position. Improper mounting can use the unit to overheat and
become damaged.
• Do not shut the thin client down by removing the power cord. The sudden
loss of power can damage the unit.
• It is important to not interrupt the power to the thin client while doing a
firmware upgrade. Loss of power can result in a damaged operating system.
• Do not place anything on or over the terminal.
• Excessive sound pressure from earphones and headphones can cause hearing
loss. Adjustment of the volume to “Maximum” increases the earphones' and
headphones' output voltage and therefore the sound pressure.
Caution: Risk of explosion if battery is replaced by an incorrect type. Dispose of
used batteries according to the instructions.
• Power Adapter ADP-36CH B 12V 3A output.
• Best Management Practices for Perchlorate Materials: The battery contains
perchlorate substances. Do not throw it in the water or in the normal
garbage. You cannot burn them as a way to dispose of them. Contact your
local household hazardous waste. “Perchlorate Material-special handling may
apply. See www.dtsc.ca.gov/hazardouswaste/perchlorate.
• Product documentation and additional warnings are available from Devon
IT’s web site at www.devonit.com.
Devon IT TC5 Terminal
Quick Start Guide
version1
2.
Page 4
Windows XPe
Instructions for TC5 Terminals Running Windows XPe
System Start
1. For setups utilizing a single monitor, the monitor must be connected to DVI-1 port.
2. For setups utilizing dual monitors, the DVI-2 port must be enabled via the
Windows XP display settings before it will function.
Two local user accounts exist on the system:
• Administrator – The default password is Administrator (case sensitive)
• User – By default, there is no password required for this account.
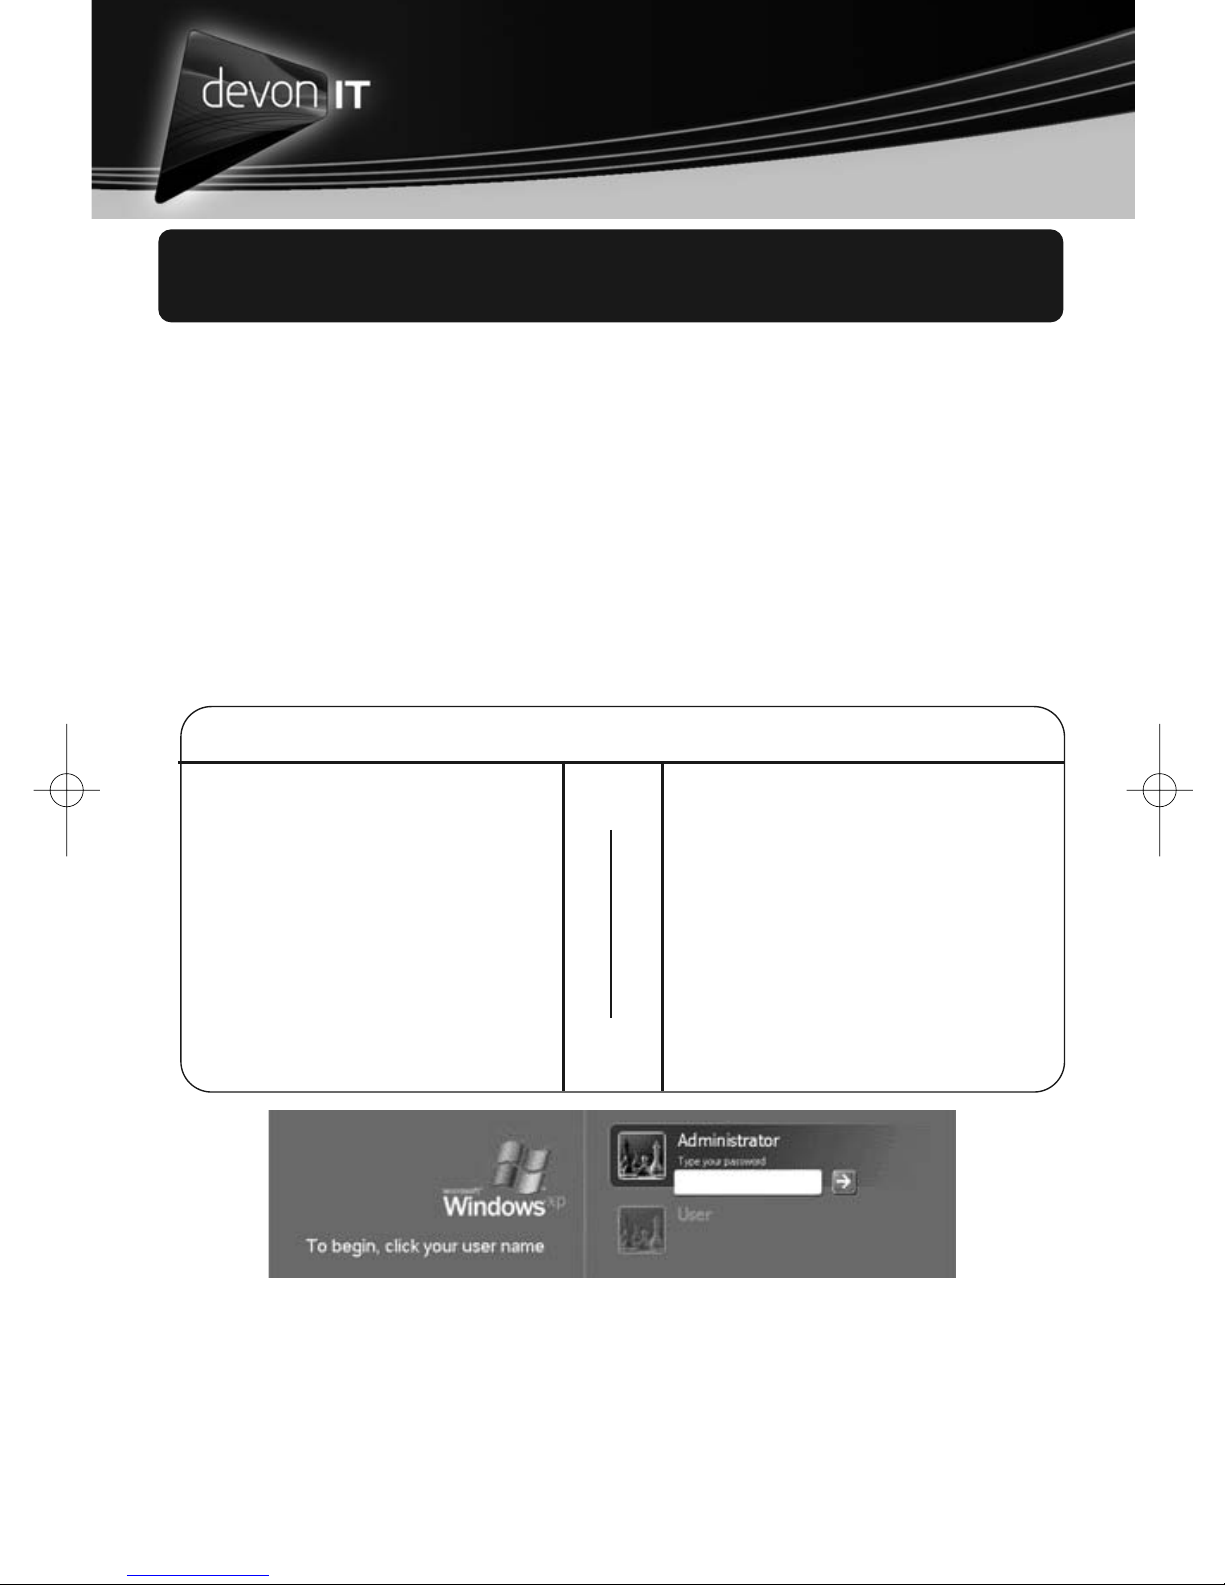
The thin client automatically logs in as the “User” account. In order to log in as the
“Administrator,” you must first gain access to the Window XP Logon screen. There
are two ways to do this:
Alternative Desktop Computing
During User Logoff
While logged in as “User,” select
“Start Menu -> Log Off.”
You will receive a small window
prompt asking you to confirm.
Hold down the Shift key as you
press the Log Off button.
You will now be presented with
the Windows XP Logon screen.
During System Bootup
As the unit is booting the Windows OS, hold down the Shift
key. This will bypass the automatic
login and present you with the
Windows XP Logon screen.
You may now choose to login with
the Administrator or User account.
Figure A – Hold the Shift key during bootup or logoff to access the Windows XP Logon Screen
-OR-
FBWF Manager
The FBWF (File Based Write Filter) operates by providing a “shadow write” to the system RAM. When enabled, any writes that are normally written to the storage media,
are instead redirected to the RAM overlay. During a reboot, this overlay is discarded,
so the operating system remains in its original state.
3.
Page 5
© 2008 Devon IT, Inc. All Rights Reserved Visit us on the web: http://www.devonit.com
Devon IT TC5 Terminal
Quick Start Guide
version1
Windows XPe
Instructions for TC5 Terminals Running Windows XPe (continued)
As its name implies, FBWF is based on files. This
means you can exclude certain files and directories
from the protection of the write filter. Any files that
are in this list are ignored by FBWF and subject to
modification (or deletion) just as they normally
would in any standard Windows XP environment.
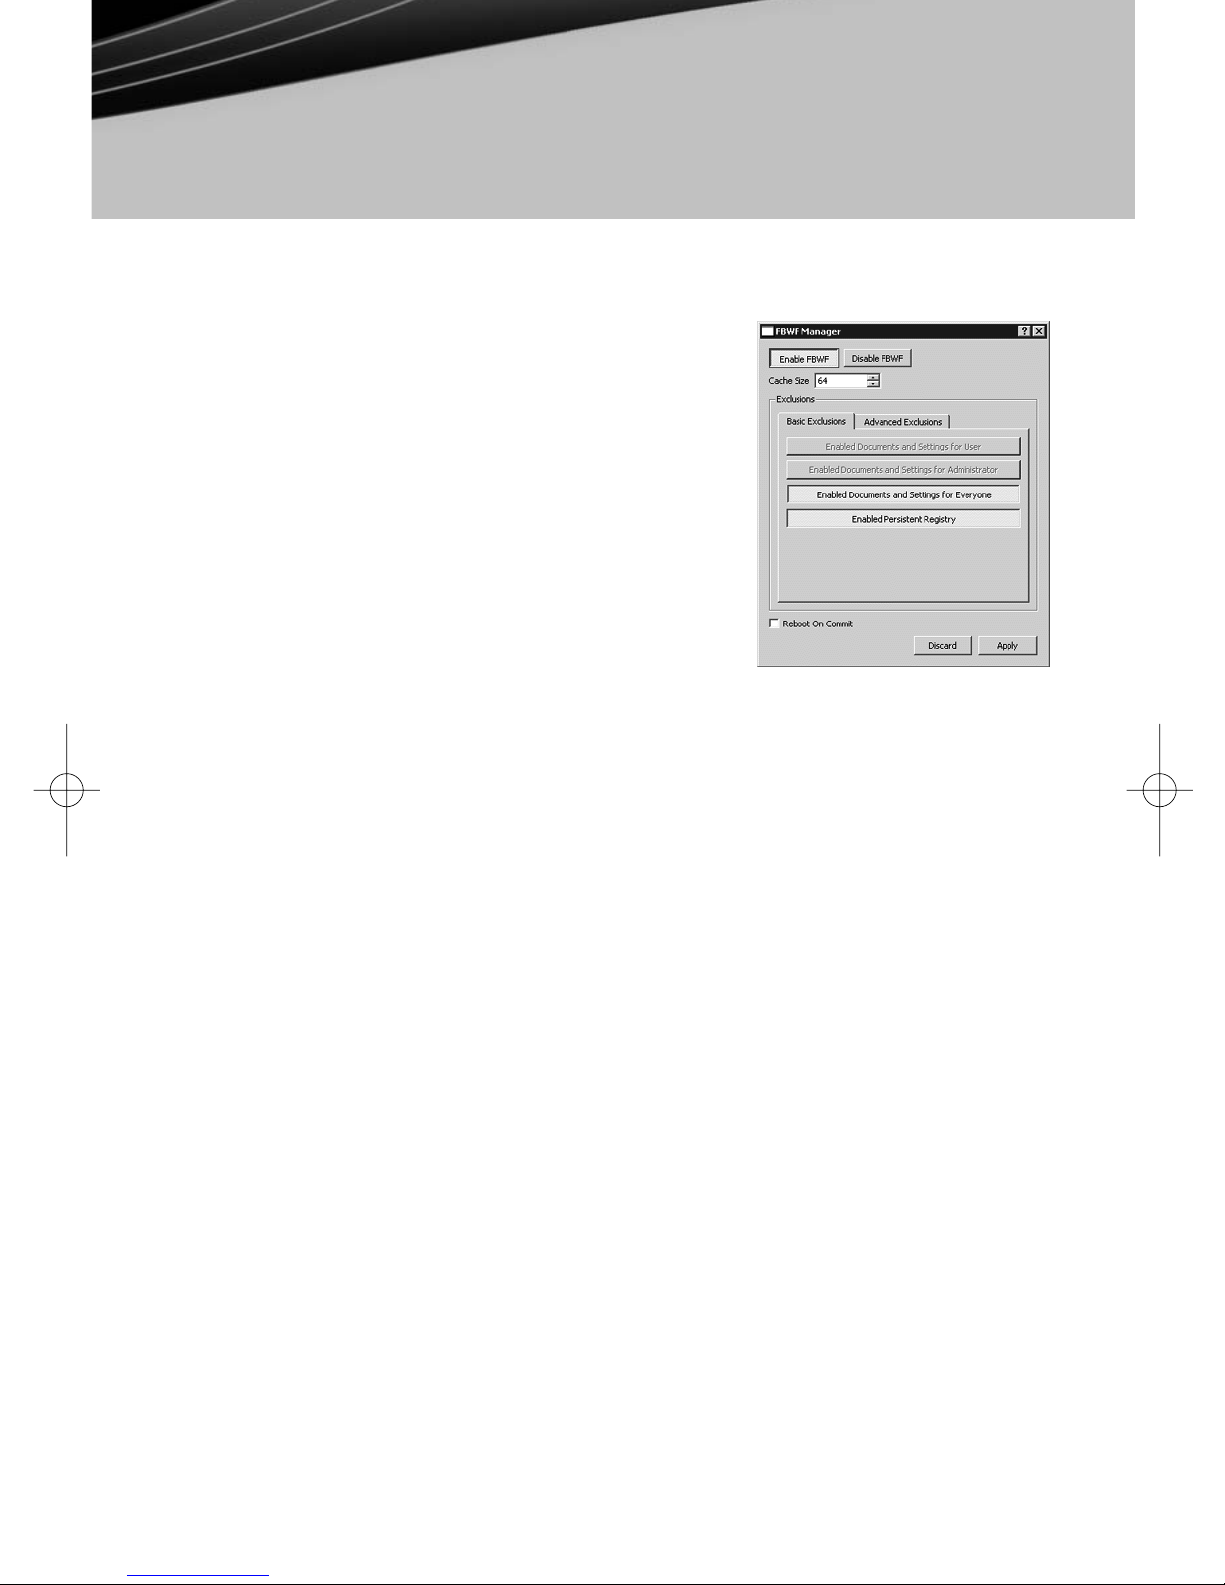
The TC5 includes a management utility for configuring FBWF. Only Administrators can access this utility.
To open the FBWF Manager:
• Login is Administrator.
• Choose “Start Menu -> All Programs ->
FBWFGUI”
• This will open the FBWF Manager window.
By default, FBWF is in an enabled state, with basic exclusions set for the “Persistent
Registry” and “Documents and Settings” for all users. This means any changes made
under the “C:\Documents and Settings” folder, such as desktop icons, start menu
items, and browser favorites, will be written directly to the flash device immediately
and without overlay protection.
Installing Additional Software
You may install third party licensed software as long as there is adequate space on
the flash media. This section describes the recommended procedure for using FBWF
to permanently install additional software applications:
• Login as Administrator and select “Start Menu -> All Programs -> FBWFGUI”
• Temporarily disable the write filter by clicking the Disable FBWF button, then
press the Apply button.
• Reboot the terminal.
• Login again as Administrator and install the new software.
• After installation, verify the application is working as expected.
• Launch the FBWF Manager and click the Enable FBWF button. Also, make sure
to re-enable the Basic Exclusions. For default exclusions, this would mean
selecting the buttons for Enabled Documents and Settings for Everyone and the
Enabled Persistent Registry buttons.
• Click the Apply button and Reboot the terminal one last time.
4.
Page 6

Alternative Desktop Computing
DeTOS
Instructions for TC5 Terminals Running DeTOS
System Start
1. For set-ups utilizing a single analog monitor with a DVI converter, the monitor
must be connected to the DVI-1 port.
2. For set-ups utilizing a digital monitor with a DVI connector, the monitor must be
connected to the DVI-2 port.
3. By default DeTOS is configured to output VGA on DVI-1 and DVI on DVI-2. If you
want to use 2 DVI monitors, go under Setup->Display and in the DVI-1 dropdown
box change the output from VGA to DIGITAL.
4. For dual monitor applications, see “Display Settings” below to configure second
monitor.
5. Press the Power Button to turn on the terminal.
6. Once the boot process is finished, you will be presented with the terminal desktop
and launch window. To enter the terminal SETUP, select “System --> Setup” from
the Launch window. The network configuration is set to DHCP by default.
7. To change the network settings, double click on the “Network” icon located on
the left-hand side of the Setup window.
Display Settings
To change resolutions:
1. From Launcher, select “System --> Setup.”
2. Click the “Display” icon on the left hand side of the Setup window.
3. Select the desired resolution from the dropdown list named, Screen Resolution.
4. You may also change the color depth on this screen.
5. Click the Save Settings button.
6. Click the Quit Setup button.
7. Reboot the thin client for the display settings to take effect.
Administrator Password
An Admin Password can be set to restrict access to the Setup screen in DeTOS.
To set the Admin Password:
1. From Launcher, select “System --> Setup.”
2. Click the “Network” icon on the left-hand side of the Setup window.
3. Click the “Admin” tab along the top this screen.
4. Enter a Password in the “Admin Password” field.*
5. Re-enter the same password in the “retry” field below.
6. Press the “Set” button to apply it.
7. Click Save Settings and Quit Setup.
*Note: The password must be at least 8 characters long.
5.
Page 7

© 2008 Devon IT, Inc. All Rights Reserved Visit us on the web: http://www.devonit.com
Devon IT TC5 Terminal
Quick Start Guide
version1
DeTOS
Instructions for TC5 Terminals Running DeTOS (continued)
Creating an RDP Connection
The following steps describe how to create a simple RDP connection for your terminal:
1. Select "System -> Setup" from the Launch window.
2. Click the "Sessions" icon on the left-hand side.
3. Double-click the connection type named, "xRDP, Window Terminal Server."
4. This will display a screen with three tabs: General, Display and Program. The
General tab is selected by default.
5. In the first field called Session Name, enter a name for this RDP connection.
6. In the "WTS Address" field, enter the IP address or the fully qualified hostname
(if DNS is configured) of the terminal server you wish to connect to.
7. The next 3 fields, Username, Password and Domain are optional fields. The user will
be prompted for these values, if you decide to leave them blank.
8. You also have the option of launching this RDP connection automatically at the
time the terminal is booted. If you would like to enable this feature, click the
checkbox called "Autostart."
9. Click the "OK" button.
10. You will now be returned to the Setup screen. Click the "Save Settings" button to
save the RDP connection you just configured.
11. Click "Quit Setup" to close the Setup window and return to the Launch window.
12. Your new RDP connection will now be available in the Launch window.
Where to Go From Here
Please visit the support page on our website (http://www.devonit.com/support) to create inquiry tickets with the Technical Support department, submit Return Material Authorization (RMA) forms, or download documentation for Devon IT software and
hardware products.
Support Center phone lines are open 24 hours, 7 days a week.
Toll Free: 1-800-369-7290
Local Phone: 610-757-4220
Warranty information and registration can be found at:
http://www.devonit.com/products/products-warranty.php
6.
Page 8
Devon IT, Inc.
1100 First Ave.
King of Prussia, PA 19406
devonit.com
 Loading...