

Page 1
Devon IT Terminal
Operating System
(DeTOS)
Dell Edition
Administration
Manual
Page 2
Notes, Cautions, and Warnings
NOTE:
A NOTE indicates important information that helps you make better use of your
computer.
CAUTION: A CAUTION indicates potential damage to hardware or loss of data
if instructions are not followed.
WARNING: A WARNING indicates a potential for property damage, personal
injury, or death.
______________
Information in this publication is subject to change without notice.
© 2011 Dell Inc. All rights reserved.
Reproduction of these materials in any manner whatsoever without the written permission
of Dell Inc. is strictly forbidden.
Trademarks used in this text: Dell™, the DELL logo, and OptiPlex™ are trademarks of
Dell Inc. Devon IT, the Devon IT logo, Devon IT Echo™ Thin Client Management
Software, and VDI Blaster™ are registered trademarks of Devon IT Inc. in the U.S. and
other countries. Microsoft®, Windows®, Windows Server®, MS-DOS® and Windows
Vista® are either trademarks or registered trademarks of Microsoft Corporation in the
United States and/or other countries. Citrix®, Xen®, XenServer
®
, XenDesktop™, ICA™,
and XenMotion® are either registered trademarks or trademarks of Citrix Systems, Inc. in
the United States and/or other countries. VMware
®
, VMware View™, View Client
™,Virtual SMP
®
, vMotion®, vCenter®, and vSphere® are registered trademarks or
trademarks of VMware, Inc. in the United States or other countries.
Other trademarks and trade names may be used in this publication to refer to either the
entities claiming the marks and names or their products. Dell Inc. disclaims any
proprietary interest in trademarks and trade names other than its own.
2011 - 11 Rev. A01
Page 3

Contents | 3
Contents
Introduction ....................................................................................6
What is DeTOS?....................................................................................... 6
DeTOS Features ...................................................................................... 6
DeTOS Installation ................................................................................... 7
Getting Started ...............................................................................8
Control Panel .......................................................................................... 10
Network Tools ........................................................................................ 11
Launch Terminal ..................................................................................... 12
Export Config .......................................................................................... 14
Echo Agent System Information ............................................................. 15
ELO Touch Screen Support .................................................................... 17
Page 4

4 | Contents
Persistence ................................................................................... 19
Persistence in DeTOS Thin Clients ........................................................ 19
System Settings ........................................................................... 22
Display Settings ...................................................................................... 22
Input/Time .............................................................................................. 25
Local Storage ......................................................................................... 26
Management .......................................................................................... 28
Network .................................................................................................. 30
Printer Settings ....................................................................................... 32
Sounds ................................................................................................... 33
Connections ................................................................................. 34
Citrix ICA ................................................................................................ 36
Firefox Web Browser .............................................................................. 41
No Machines .......................................................................................... 44
VMware View ......................................................................................... 46
X11 Connection ...................................................................................... 48
rDesktop ................................................................................................. 49
Kaviza .................................................................................................... 54
Page 5

Contents | 5
Getting Help.................................................................................. 55
Contacting Dell ....................................................................................... 55
Page 6

6 | Introduction
1
1
Introduction
What is DeTOS?
Devon IT Terminal Operating System (DeTOS) Dell Edition is an embedded
Thin Client Operating System designed to be simple, secure and centrally
manageable. DeTOS can be used to access hosted desktops using Microsoft
Remote Desktop Services, VMware View, Citrix XenApp or XenDesktop, webbased applications, and more.
DeTOS Features
Simple-
Configuring a session out of the box is quick and painless using
the DeTOS intuitive web based control panel. The same control panel can
be used either locally from the thin client or remotely from the
management software.
Modern-
DeTOS can connect to hosted desktops using the industry’s best
protocols including PCoIP, Citric ICA Client, Citrix XenDesktop,
rDesktop (RDP) or Windows Terminal Services, and VMware View
Client. DeTOS also includes a built-in browser that allows accessing
web-based applications or kiosk usage.
Centrally Managed-
DeTOS-based terminals can be centrally managed
using Devon IT Echo Management Console Dell Edition.
Echo is shipped as a virtual appliance, so it is easy to set up.
Echo can automatically discover and inventory the thin clients on your
network.
Echo has the concept of a default profile. Using a default profile,
additional thin clients are automatically configured when you plug them
into your network.
Page 7

Introduction | 7
Echo allows individual profiles for different users, including specific
Connections, Thin Client Settings, Passwords, and Customizable Desktop
Icons.
Echo allows you to update the thin client’s firmware. Updates can be
scheduled to happen outside of production hours, for example over the
weekend.
Echo allows you to remotely take control of thin clients (shadowing) to
help troubleshooting users’ issues.
DeTOS Installation
No installation is required for customers who have purchased DeTOS based thin
clients from Dell. Your thin client already contains a factory installed DeTOS
operating system. A USB re-flash utility is available if you need to reinstall the
operating system at any point in the future.
Visit
support.dell.com
to download the USB re-flash utility tool for reinstalling
the operating system for OptiPlex FX130 and OptiPlex FX170.
Page 8
8 | Getting Started
2
2
Getting Started
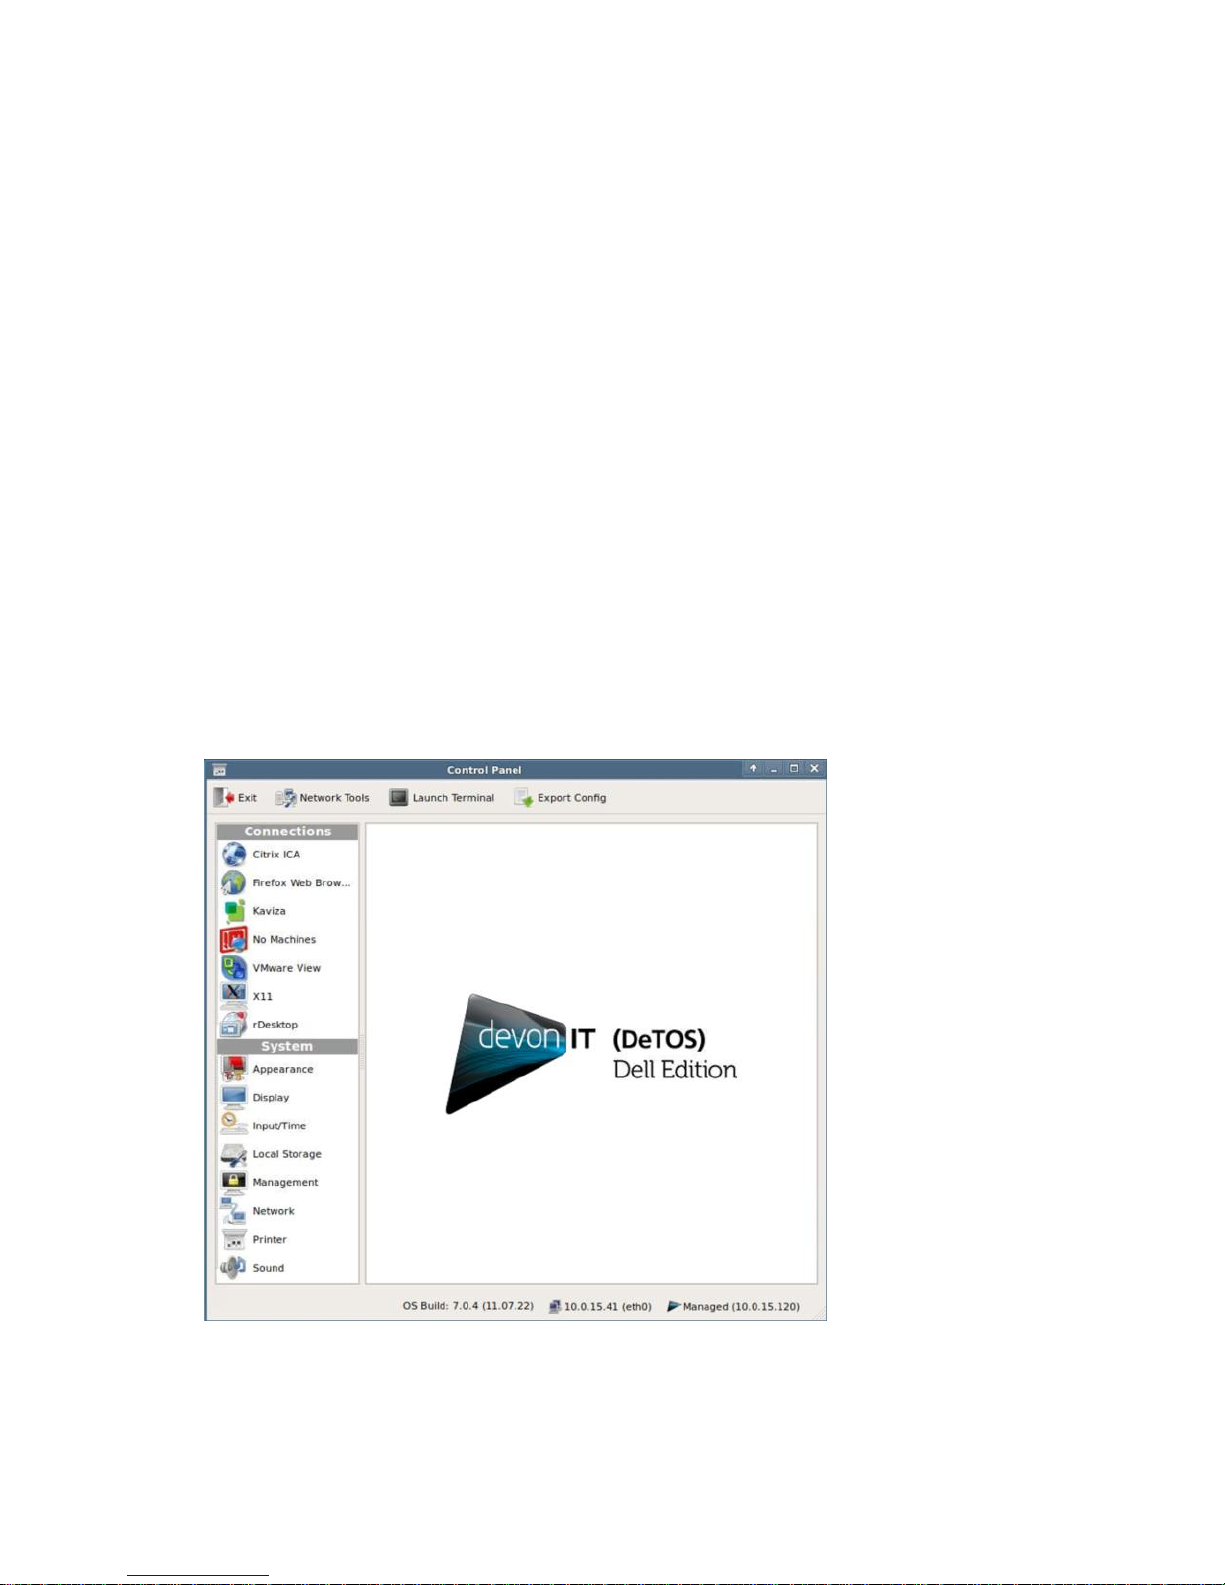
After the initial bootup, or when booting up after having selected the
Reset to
Factory Settings
, your thin client will display the DeTOS desktop and taskbar.
To get started, do the following:
Check that your thin client is connected to the network.
If you have set up a management server in your network, check that the
thin client was able to contact the management server and is in managed
mode.
Create a desktop shortcut to allow thin client users to get connected to a
remote server. (See Chapter 5, “Connections,” for more information.)
To check the network connection status, click the
DeTOS
button and then select
Control Panel
.
Page 9
Getting Started | 9
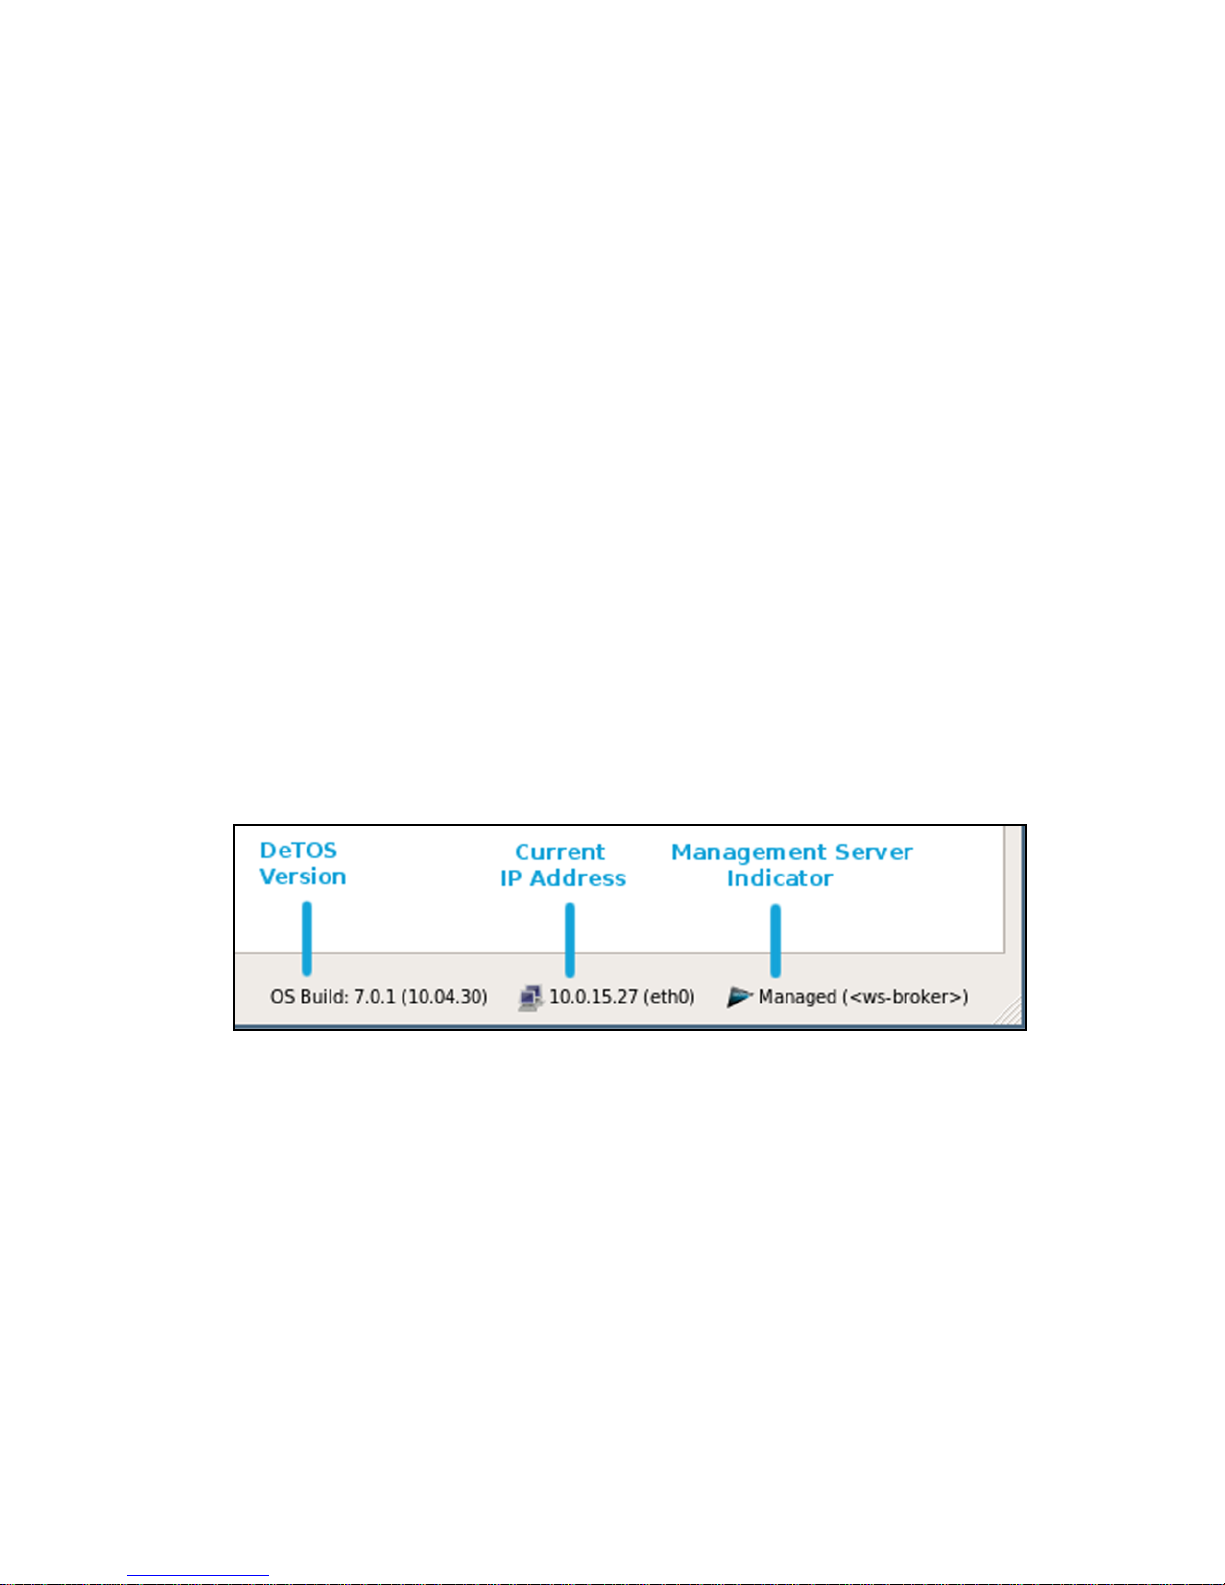
Along the bottom of the
Control Panel
is a row of status messages. These
messages include the DeTOS build number, the terminal's current IP address,
and a Thin Client Management Connection Indicator.
DeTOS default factory setting is DHCP. If you have a DHCP server on your
network, the status bar should show the leased IP address. If you want the thin
client to use a fixed IP address please refer to this guide's network section. A
message of
no ip address
will appear if network connectivity is lost or was
never established in the first place. This may be related to a loose or faulty
network cable. It may also be an indication of DHCP issues. If you need to
troubleshoot a network issue, please refer to the network diagnostic section
below.
Along with the IP address, the
Control Panel
status section also shows you
whether your thin client is in managed or unmanaged (stand alone) mode. By
default, DeTOS based terminals try to locate a management server. If a
management server is found, the terminal switches to managed mode, where it
“pulls” its configuration from the management server. If not, it will stay in
standalone/unmanaged mode and use its local configuration.
The
Control Panel
status area also shows the OS build. This is a string based
on the DeTOS version and the build date, using the following format: 7.x.x
(YY.MM.DD)
Management Server Splash Screen
During bootup, if the terminal cannot make contact with a Management Server,
then a black splash screen will appear just prior to the DeTOS desktop loading.
This screen contains the Devon IT logo and displays a message saying,
Attempting to connect to Management Server
. The splash
screen will be displayed until successful contact is made with a management
server, the cancel button is pressed, or the specified timeout (30 seconds by
default) is reached.
Page 10

10 | Getting Started
The
Management
section, found under the
Control Panel
, allows you to
configure the behavior of this splash screen. Configuration options include:
Setting the terminal to
Managed
or
Unmanaged
modes.
Specifying a different management server address
Adjusting the timeout value
Enabling or disabling the splash screen
Cancel
button
Management Server Indicator
Once you are on the DeTOS Desktop, the Echo Agent running on your terminal
will continue to periodically contact a Management Server named
ws-broker
on your local area network. When successful, the Management
Server
Indicator
box found along the bottom of the
Control Panel
will read
Managed
.
Otherwise, the icon will change to a red circle and the status will say
Unmanaged
. In this case, verify that your management server is online and
accessible on your LAN. Also be sure to check your DNS server to verify that
an entry for
ws-broker
exists and points to the IP address of your
management server.
Control Panel
The
Control Panel
is the local tool for configuring
Connection and System
settings on your thin client.
Connection Settings -
Your terminal has the ability to connect to remote
servers utilizing several types of protocols. The rDesktop client uses the
RDP protocol and allows you to connect to Microsoft Windows Terminal
Servers. The Citrix ICA client is used to establish connections to Citrix
Presentation and XenApp servers. The VMware View client allows you
to connect to a VMware View server, which in turn, provides the end-user
with their own virtual desktop session. Lastly, you may create a Firefox
web browser connection to surf the web. This can be used for several
purposes:
Connect to a web applications; e.g., a webmail server.
Connect to a connection broker web interface; e.g., Citrix XenDesktop.
Use the thin client as a Kiosk (select the Enable Kiosk Mode button under
the Kiosk Mode panel)
Page 11
Getting Started | 11
System Settings -
These are the display, sound, keyboard, mouse, printer
and date/time configurations for your terminal. Also under the System
section is the ability to set an administrative password for the control panel
and change the local storage mode.
Network Tools
The toolbar along the top of the
Control Panel
window contains a button named
Network Tools
. Clicking this button will open a separate, smaller window that
provides you with current network status and useful diagnostic programs.
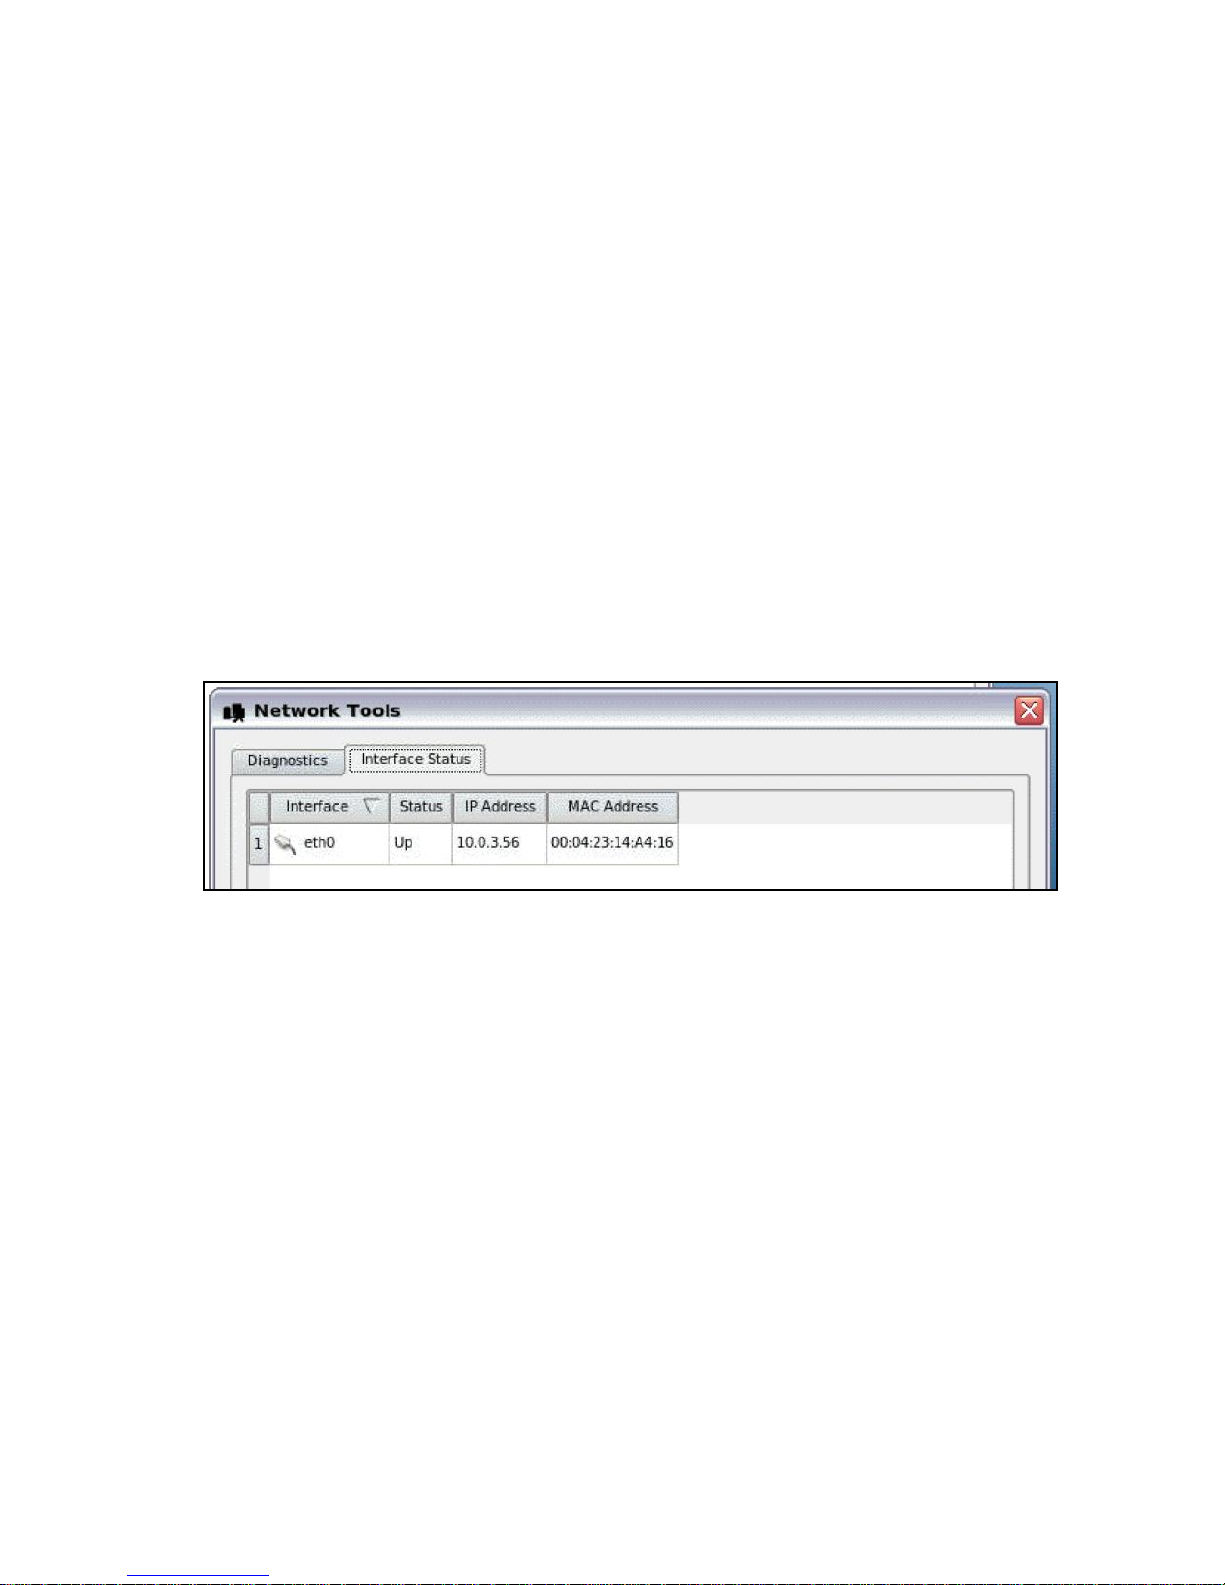
Interface Status
Click the
Interface Status
tab along the top of the
Network Tools
window to
view the IP address that is currently assigned to this terminal. The MAC
Address for this machine is also reported on this screen.
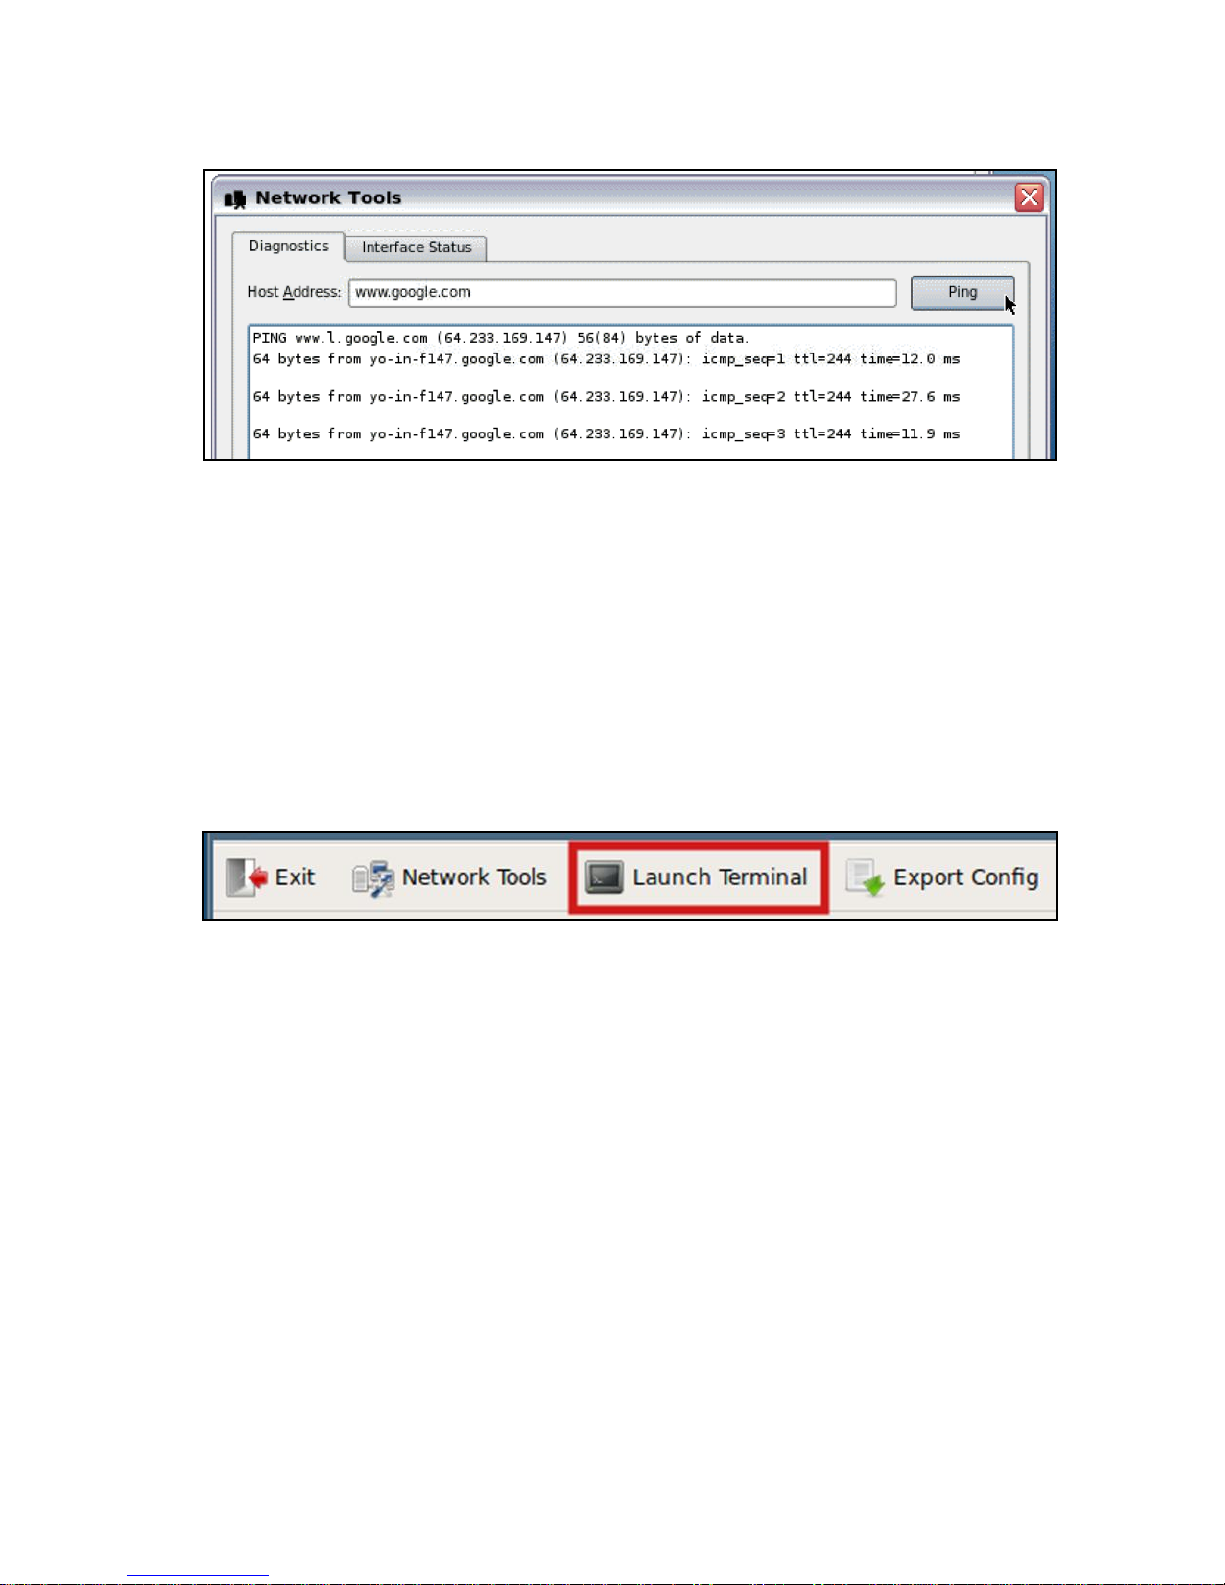
Diagnostics
If you are experiencing difficulty connecting to servers on certain segments of
your LAN, then you may want to use the ping command to verify you are
reaching specific servers and/or gateways on the subnet in question. To use
ping:
1. Select the
Diagnostics
tab from the
Network Tools
window.
2. In the
Host Address field, type in the IP address or website you want
to test against and then press the
Ping
button.
3. If there is an error in the delivery to the destination, the ping
command displays an error message. Otherwise, replies will
continuously display for each packet successfully sent and received.
4. Press the
Stop
button to terminate the ping loop.
Page 12
12 | Getting Started
Launch Terminal
There may be times when you wish to open a Terminal window to run
command-line tools only accessible from a Linux shell. To access the shell,
click the button found at the top of the Control Panel named
Launch
Terminal
.
The
ifconfig
and
ping
commands are two popular Linux tools used for
diagnosing network connectivity and interface settings. The following two
sections describe their basic usage.
Page 13
Getting Started | 13
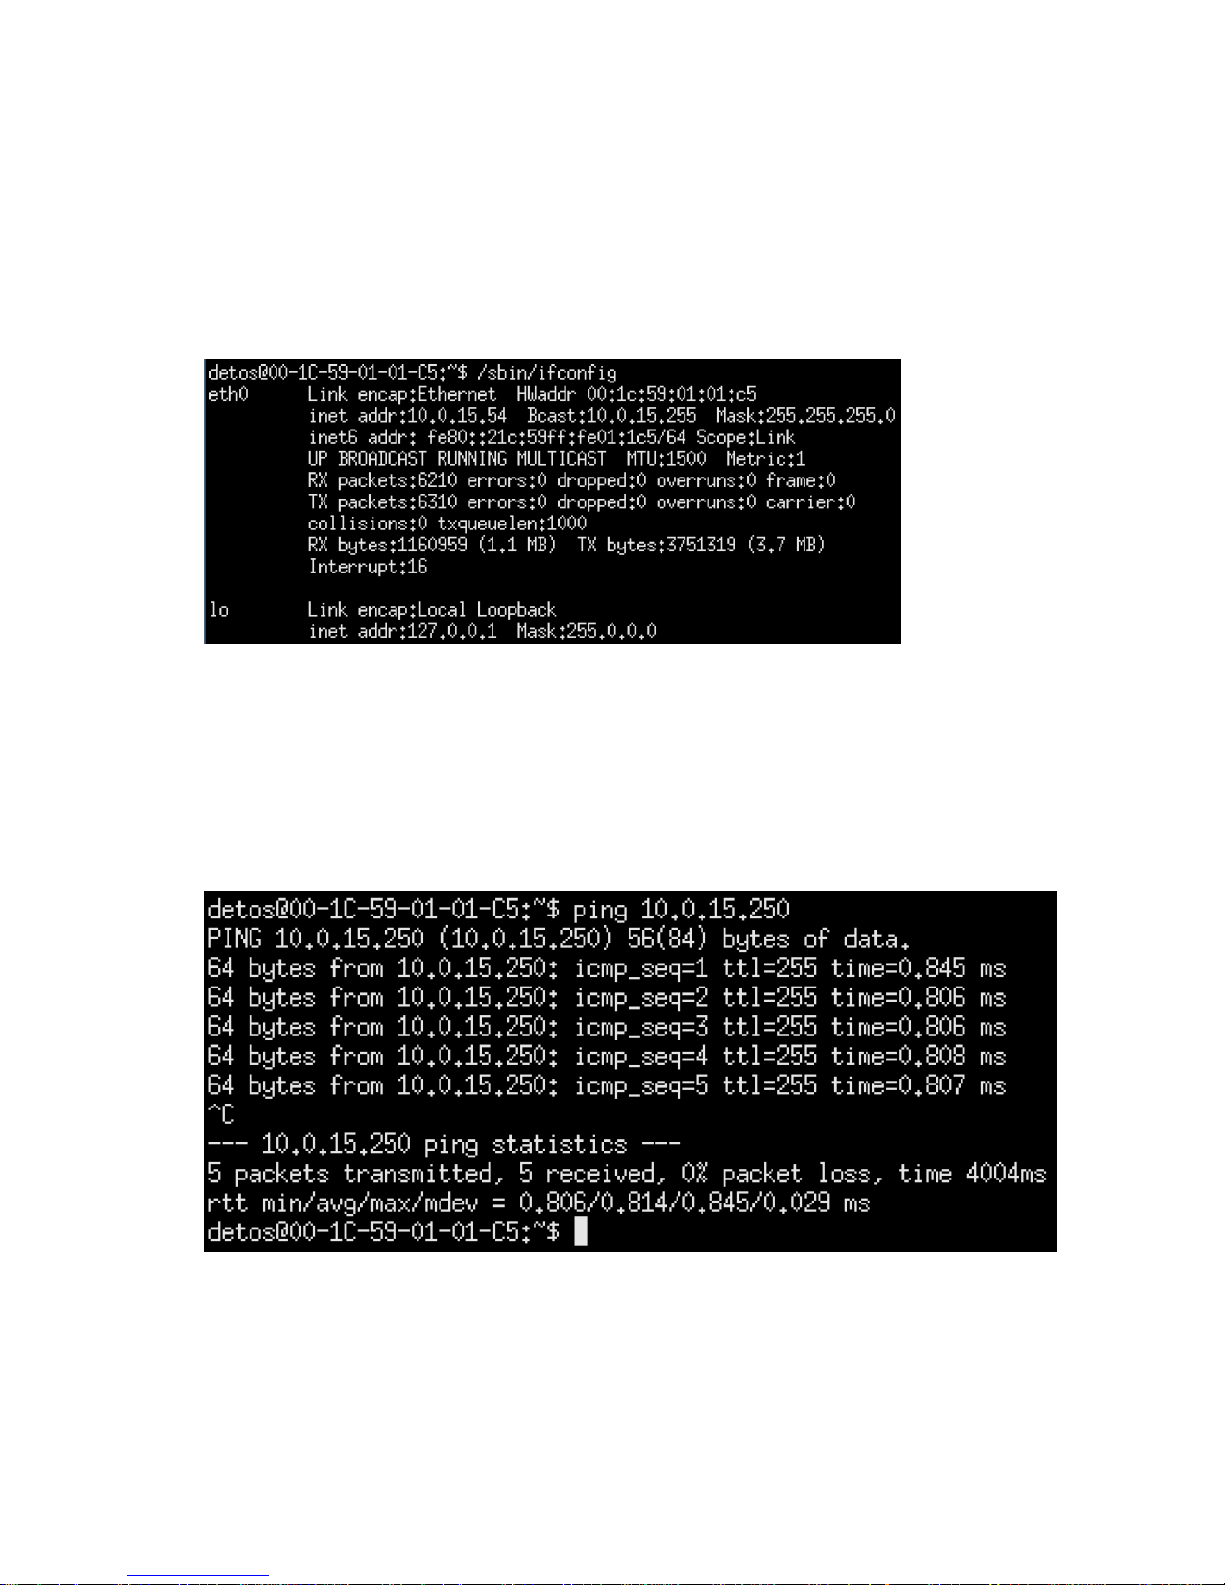
Viewing Current Network Interface Settings
Type
/sbin/ifconfig
and press <Enter> to display the status of the currently
active network interfaces.
The value of
inet addr
, in the
eth0
group of statistics, is the currently
assigned IP Address of your DeTOS terminal. If DHCP was used, this is the IP
address that your terminal acquired during bootup. If you configured static
network settings, then this address should match the value you entered in the
IP
Address
field.
Page 14
14 | Getting Started
Export Config
If you are working with a Dell Support Analyst to troubleshoot a problem on
your terminal, you may be asked to send your terminal's
Config
file. You can
easily export your own
Config
file by following these steps:
Plug a USB flash drive into the terminal.
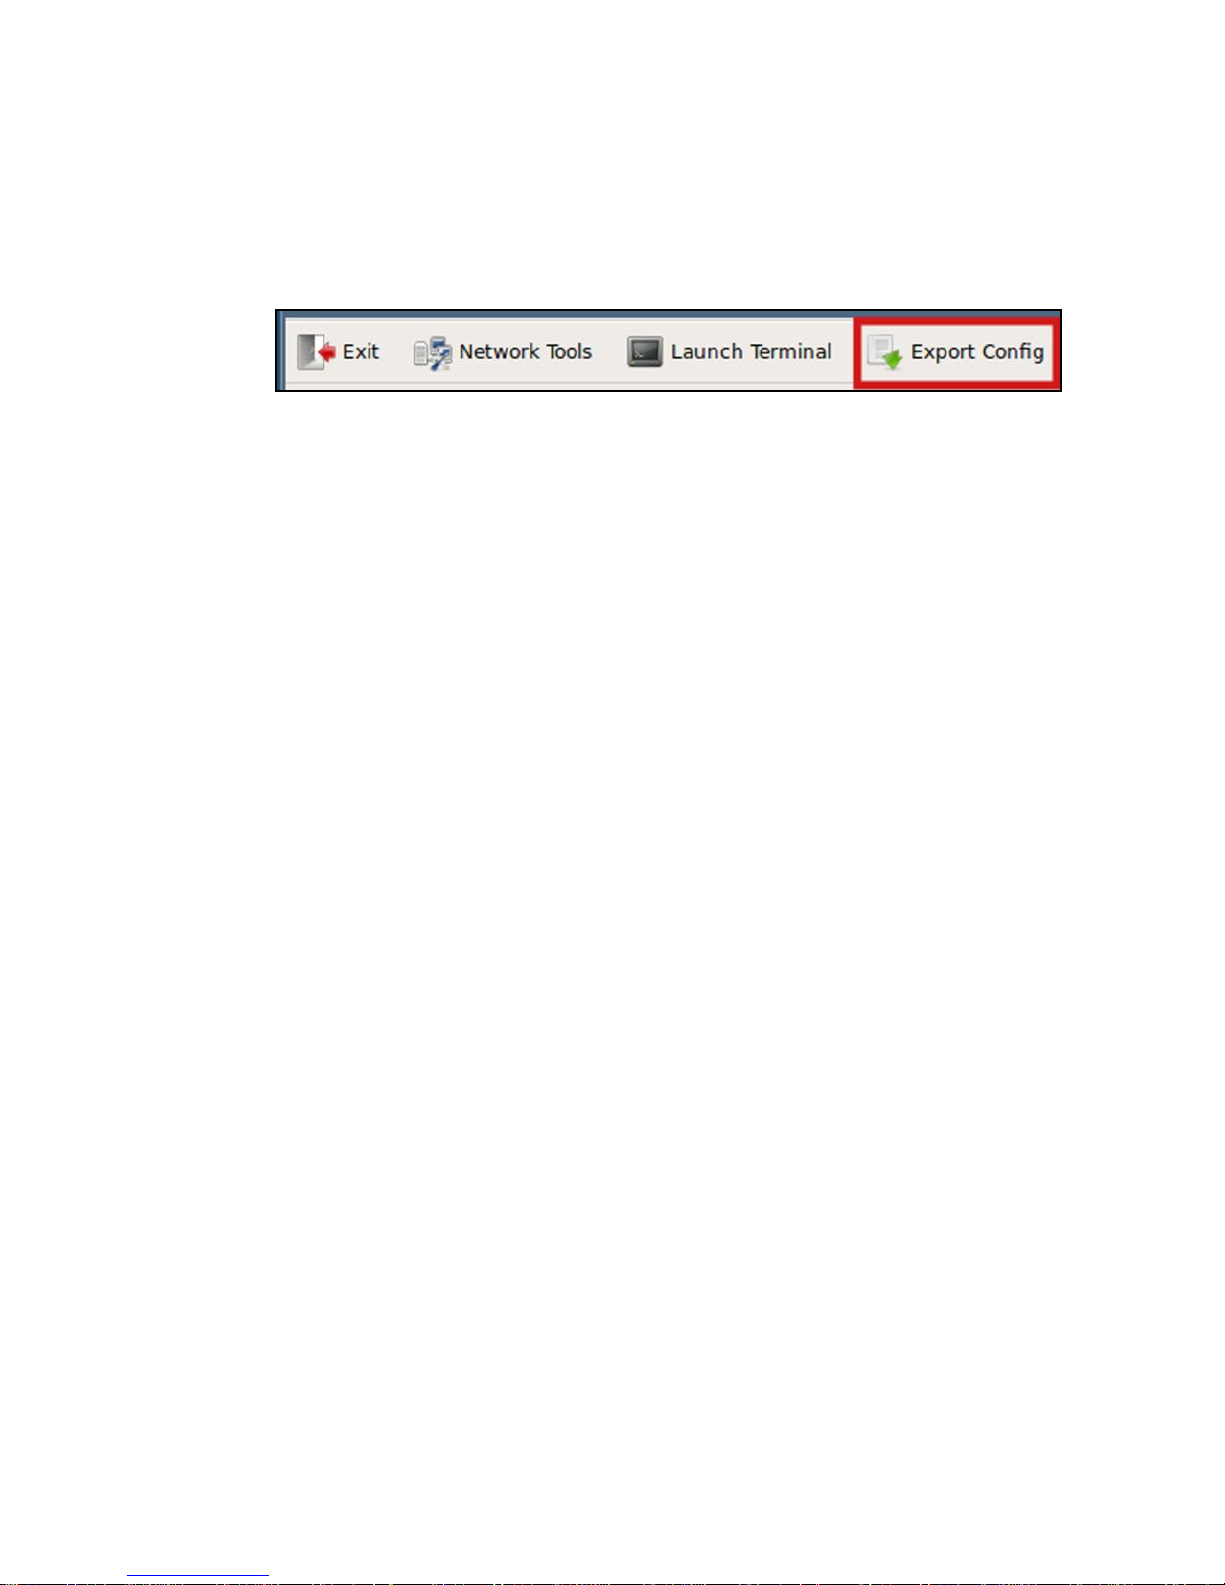
Click the button found along the top of the
Control Panel
named
Export
Config
.
Page 15
Getting Started | 15
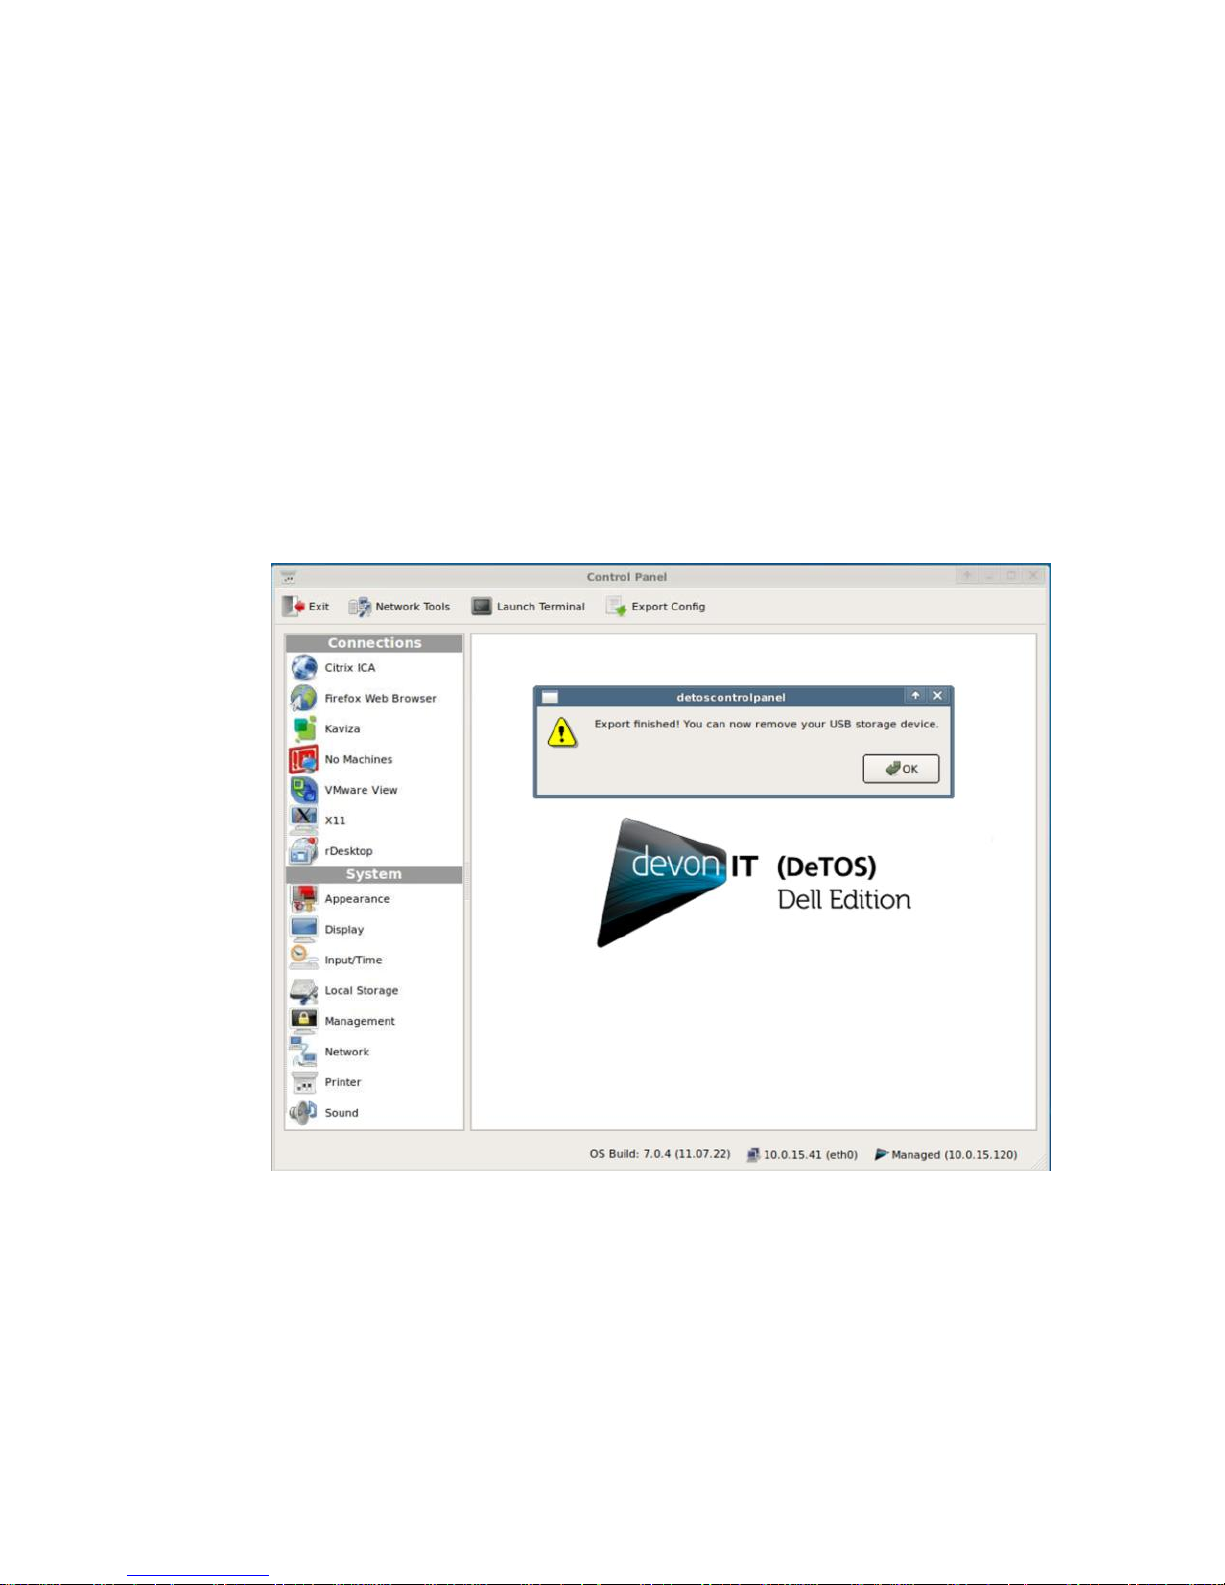
The process only takes a few seconds. Once it is finished you will receive a
message saying the export is finished and you may remove the flash
drive.
A
file named
detosConfig
.tar will now exist on the flash drive. This file
contains important diagnostic information that can be analyzed by Dell
Support and will help troubleshoot and solve issues you may be
experiencing
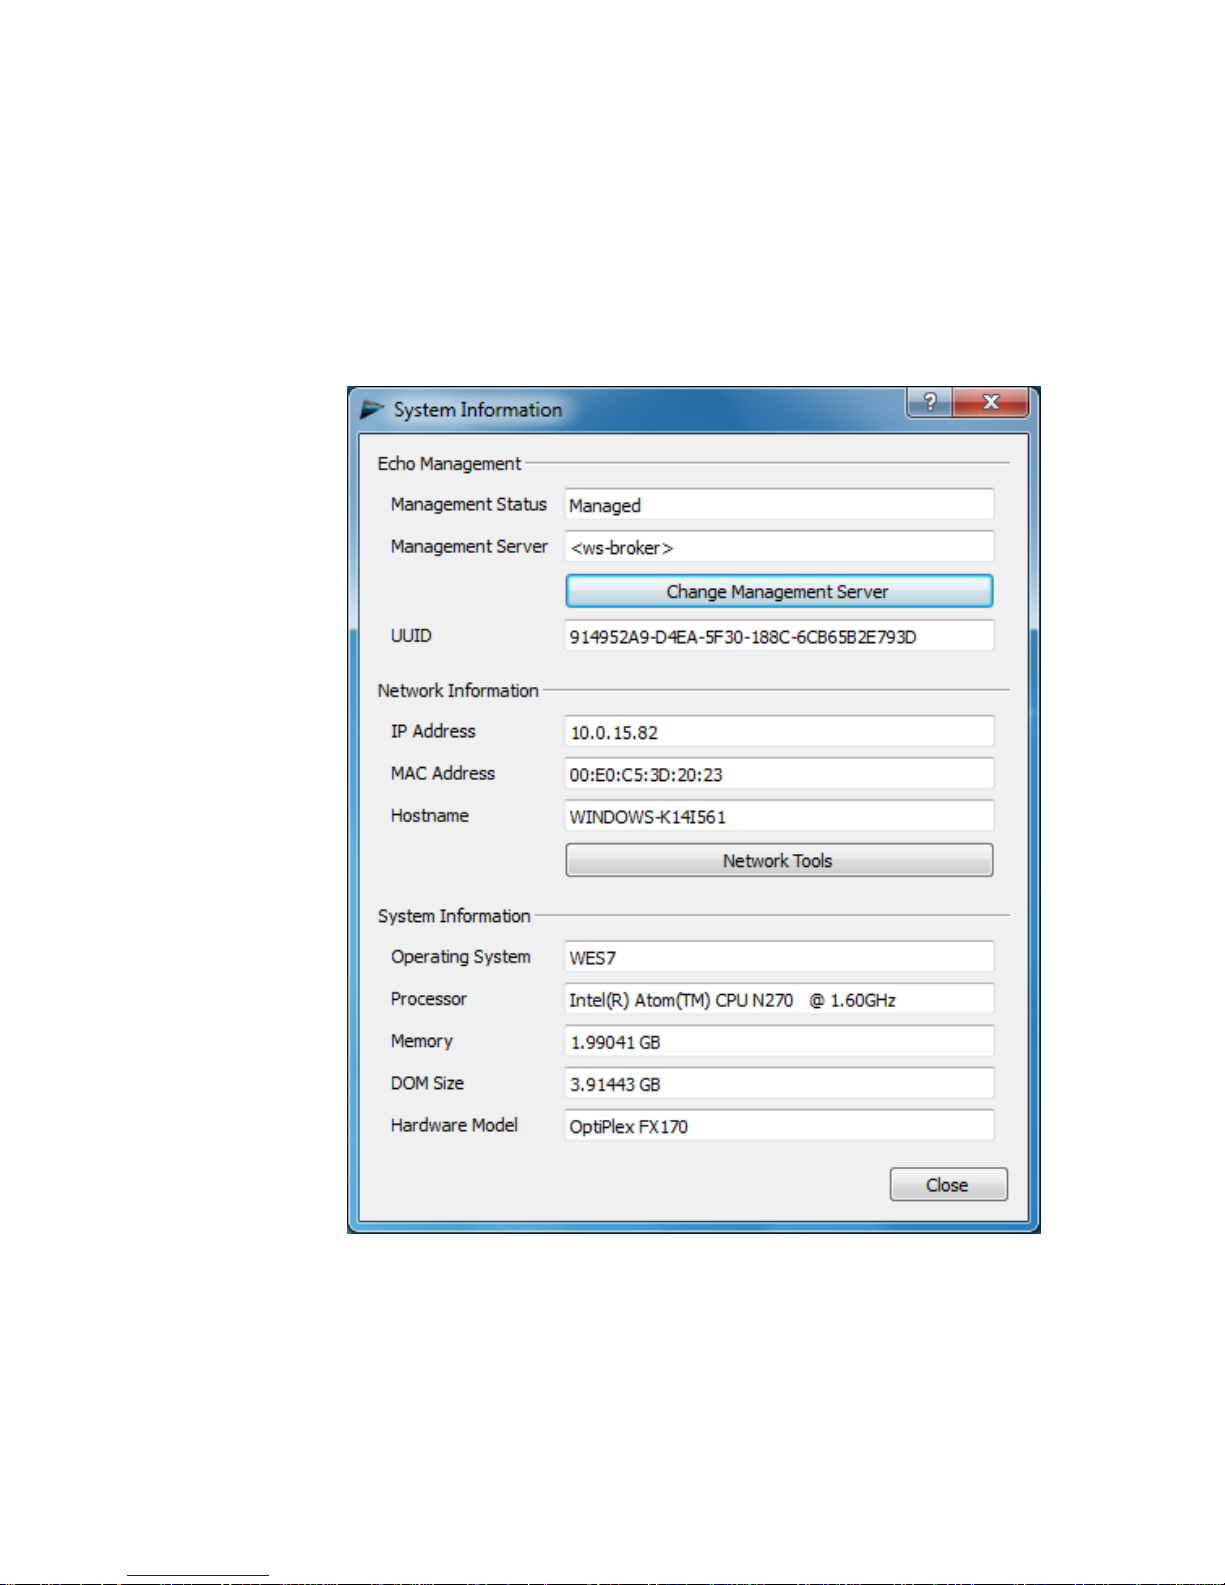
Echo Agent System Information
Echo Management- Displays the current status and information of the Echo
Management server to which your thin client is connected.
Management Status-Displays when the thin client is being managed by
an Echo server.
Management Server-Displays the current address of the Echo server.
Change Management Server-Allows you to change the Echo server.
UUID-Displays the current UUID assigned to the terminal.
Network Information-This displays information about the current network connection.
IP Address-Displays the current IP address assigned to the thin client.
MAC Address-Displays the current MAC address assigned to the thin
client.
Hostname-Displays the name assigned to the thin client.
Network Tools-Allows you to run diagnostics test with the network
connection and to check on the current status of the network connection.
System Information-Displays information about the operating system and the thin
client.
Operating System-Displays the name of the image or operating system
that is in use.
Page 16
16 | Getting Started
Processor-Displays the processor that the thin client is using.
Memory-Displays the total internal memory of the thin client.
DOM Size-Displays the total storage capacity size of the thin client.
Hardware Model-Displays the name of the thin client in use.
Page 17
Getting Started | 17
ELO Touch Screen Support
Upon connecting an ELO Touch Screen to your thin client you will be presented
with a calibration screen on first boot to ensure your unit functions properly.
There are two ways to calibrate your ELO Touch Screen device when attached
to your thin client.
Calibration – Option 1
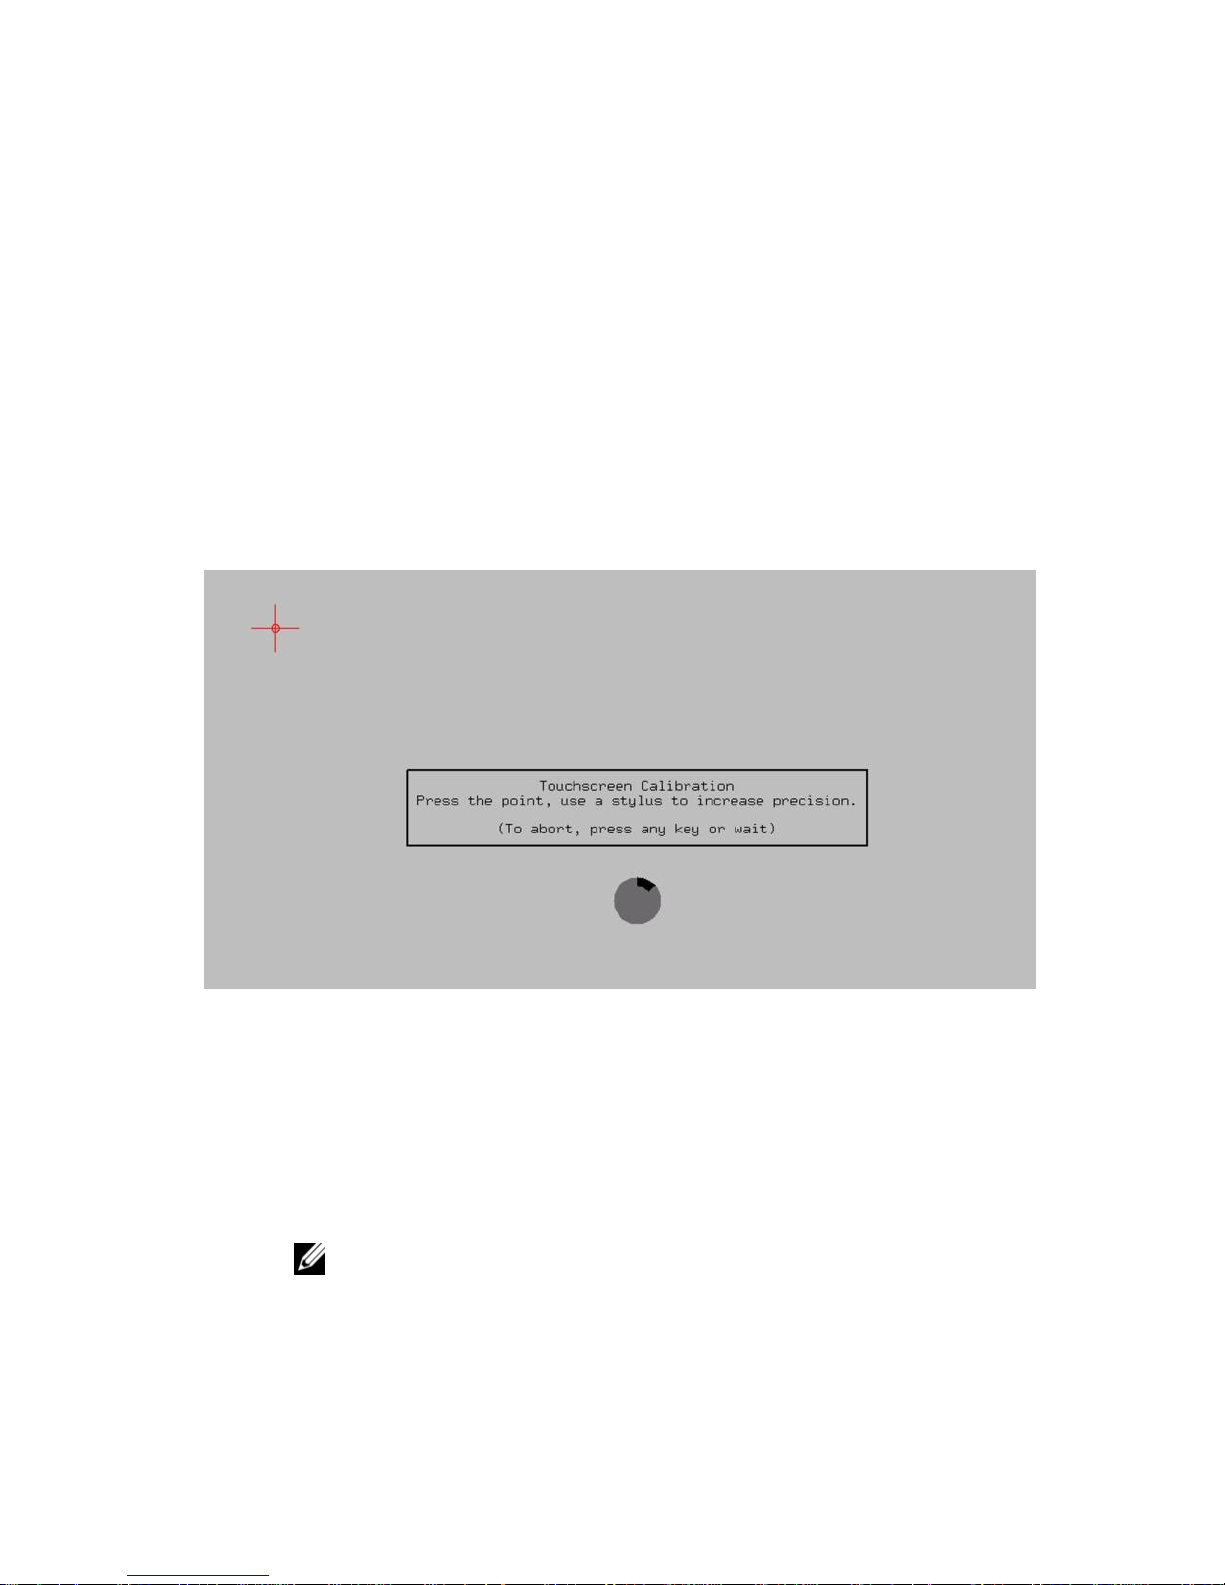
Upon first boot of the operating system, you will see a gray calibration screen
with a countdown timer in the middle if an ELO device is found.
1
Use your finger or a stylus to tap the center of the red cross that displays
in the upper left-hand corner. Try to get as close as possible to the small
circle in the center of the red cross.
Another calibration spot will appear in the top right-hand corner. Use your
finger or a stylus to tap the center of the red cross. Repeat for the
calibration spots that appear in the bottom right-hand corner of the screen,
and then the bottom left-hand corner of the screen.
NOTE:
If the calibration is inaccurate, the calibration tool will ask you to re-try
the process until a more accurate reading is achieved. You can wait until
calibration is achieved or press any key to cancel the dialog at any time.
Page 18
18 | Getting Started
You will see your normal desktop screen once the Touch Screen is calibrated.
Calibration – Option 2
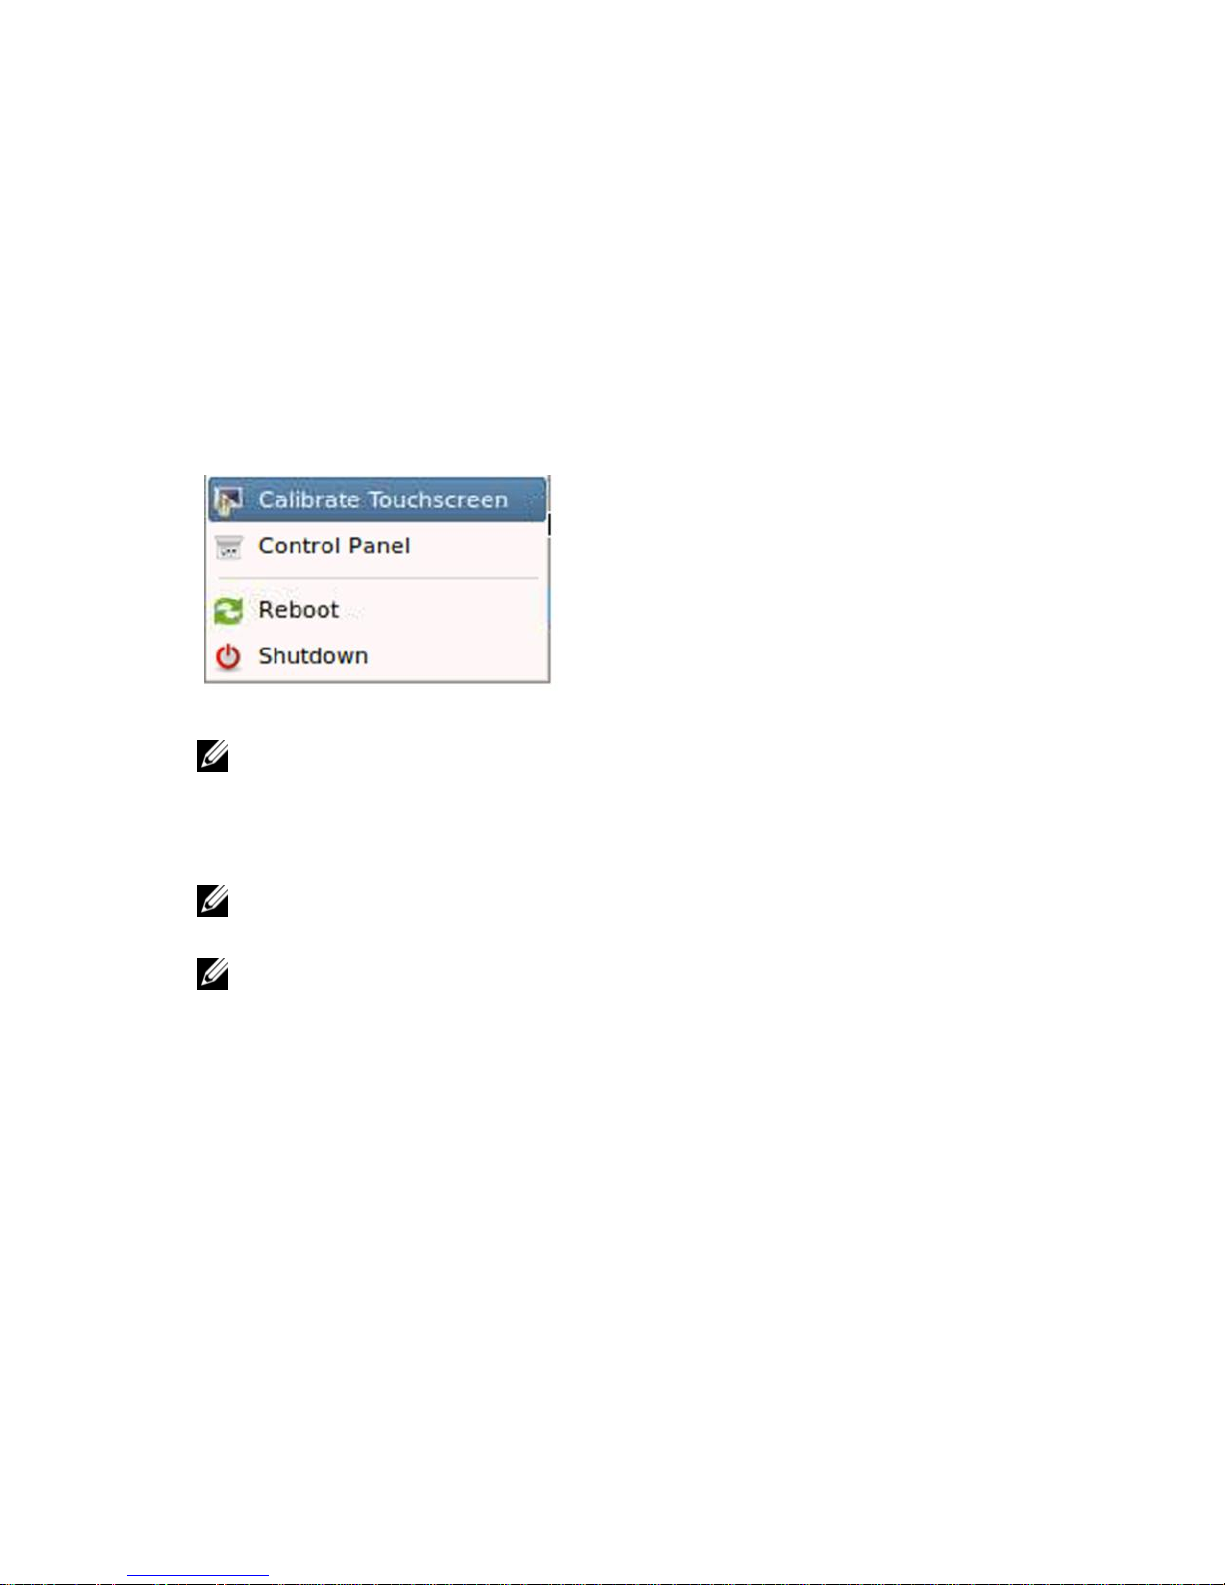
The second method of calibrating the hardware can be found in the DeTOS
Start Menu
. Select
Calibrate Touchscreen
. You will see the gray calibration
screen.
Follow the steps from Option 1 to calibrate the touch screen.
NOTE:
There is currently no way to configure the calibration of an individual device and
push that setting via the Devon IT Echo Management Console Dell Edition software.
Calibration files will not be persistent through rebooting, so the device must always have
to be calibrated when attempting to use a touch screen device with Devon IT VDI Blaster
Dell Edition.
NOTE:
Re-imaging or updating your thin client will require you to re-calibrate the
device.
NOTE:
If at any time the calibration seems inaccurate you can plug in a mouse and
attempt to re-calibrate the device.
Page 19

Persistence | 19
3
3
Persistence
Persistence, within the scope of thin client computing, refers to the continuing
existence of connections and settings after a terminal has been rebooted.
Default Behavior
By default, or after resetting your terminal to default factory setting, DeTOS is
set to persistent mode. This means that any configuration change you make will
persist across reboots. You can change this to a stateless mode where the thin
client settings and connections are dynamically “pulled” from the management
server, or a snapshot mode where you define the desired configuration and
prevent users from making any changes. These options are all configured in the
Control Panel
, under the
System Settings
, in a section called
Local Storage
.
Persistence in DeTOS Thin Clients
There are two strategies for achieving persistence on DeTOS-based thin clients.
Strategy #1: Maintain Profiles via Remote Management Server
DeTOS thin clients can be centrally managed using the Devon IT Echo
Management Console Dell Edition. Using Echo, administrators can create
several connections and settings and then group them together to form one
single collection called a profile. This profile can then be pushed or assigned to
one or more thin clients. With your profile properly configured, each time a
terminal is booted up and discovered by Echo, all connections and system
settings according to its assigned profile are immediately applied – or pushed
out – to that terminal.
Page 20

20 | Persistence
Strategy #2: Allow Configurations to be Stored Locally on the Thin
Client
The second approach for achieving persistence is to allocate a specific area of
the local DOM for reading and writing system settings and connections. DeTOS
allows for even greater flexibility by offering two variations of this strategy:
Enable Local Storage-
While running in this mode, DeTOS will write to
the local DOM each and every time configurations are added, deleted or
modified under the Control Panel.
Enable Snapshot Storage-
When this mode is selected, DeTOS allows
writes to the local DOM, but in a more finely controlled manner. An
administrator can configure the settings and then store the current
configurations to the DOM by clicking
Take Snapshot
. The only settings
and connections that will persist across reboots are the ones captured
during the snapshot. The terminal essentially falls back into a nonpersistent operating mode after the snapshot and discards any new
configurations from here on out – until the administrator clicks
Take
Snapshot
again, and a new snapshot is used as the primary configuration.
In some ways, this mode can be thought of as a hybrid of the standard
Enable Local Storage and No Local Storage modes.
Case Examples
The
Local Storage
section of the
Control Panel
allows you to use three
methods for local storage:
No Local Storage
Enable Local Storage
Enable Snapshot Storage
These case examples are provided below to help you decide which of these three
options will work best for you.
Page 21

Persistence | 21
Case 1:
“I do not want any users to mess up the thin client’s configuration. I
am currently using, or plan to use, Devon IT Echo Management Console Dell
Edition to centrally manage my thin client.”
Solution:
You will be utilizing strategy #1, as described earlier. Choose the
No
Local Storage
option on the thin client and make sure you have an Echo server
properly configured and accessible on your LAN. With persistence disabled, the
thin client becomes stateless and relies completely on the management server for
all its configurations.
Case 2:
“I simply want the thin client to maintain its configuration settings
locally. I do not want to rely on a management server.”
Solution:
Choose the
Enable Local Storage
radio button option. While
running in this mode, DeTOS will write to the local DOM each and every time
configurations are added, deleted, or modified. A remote management server is
not needed.
Case 3:
“I like the idea of having a non-persistent terminal with an assigned
profile, but do not want to use Devon IT Echo Management Console Dell
Edition to manage my terminals. What's the alternative?”
Solution:
Choose the
Enable Snapshot Storage
radio button option, press
Apply
, and then reboot the terminal. Next, configure the terminal as desired,
and then press the
Take Snapshot
button. From then on, the thin client will use
the same exact configuration as when the snapshot was taken – even after being
rebooted. A remote management server is not needed.
NOTE: If you would like to change your configuration later, you will have to press the
Take Snapshot
button again to save all of the changes made to your terminal. Upon
reboot, your terminal will load whichever Snapshot was is currently being used.
Pressing the
Clear Local Storage
button will ask the terminal to clear all connections
and settings saved locally, clear the current snapshot used for the reboot, and restore
itself to factory settings on the next reboot.
Page 22
22 | Connections
4
4
System Settings
Display Settings
Strategy #1: Maintain Profiles via Remote Management Server
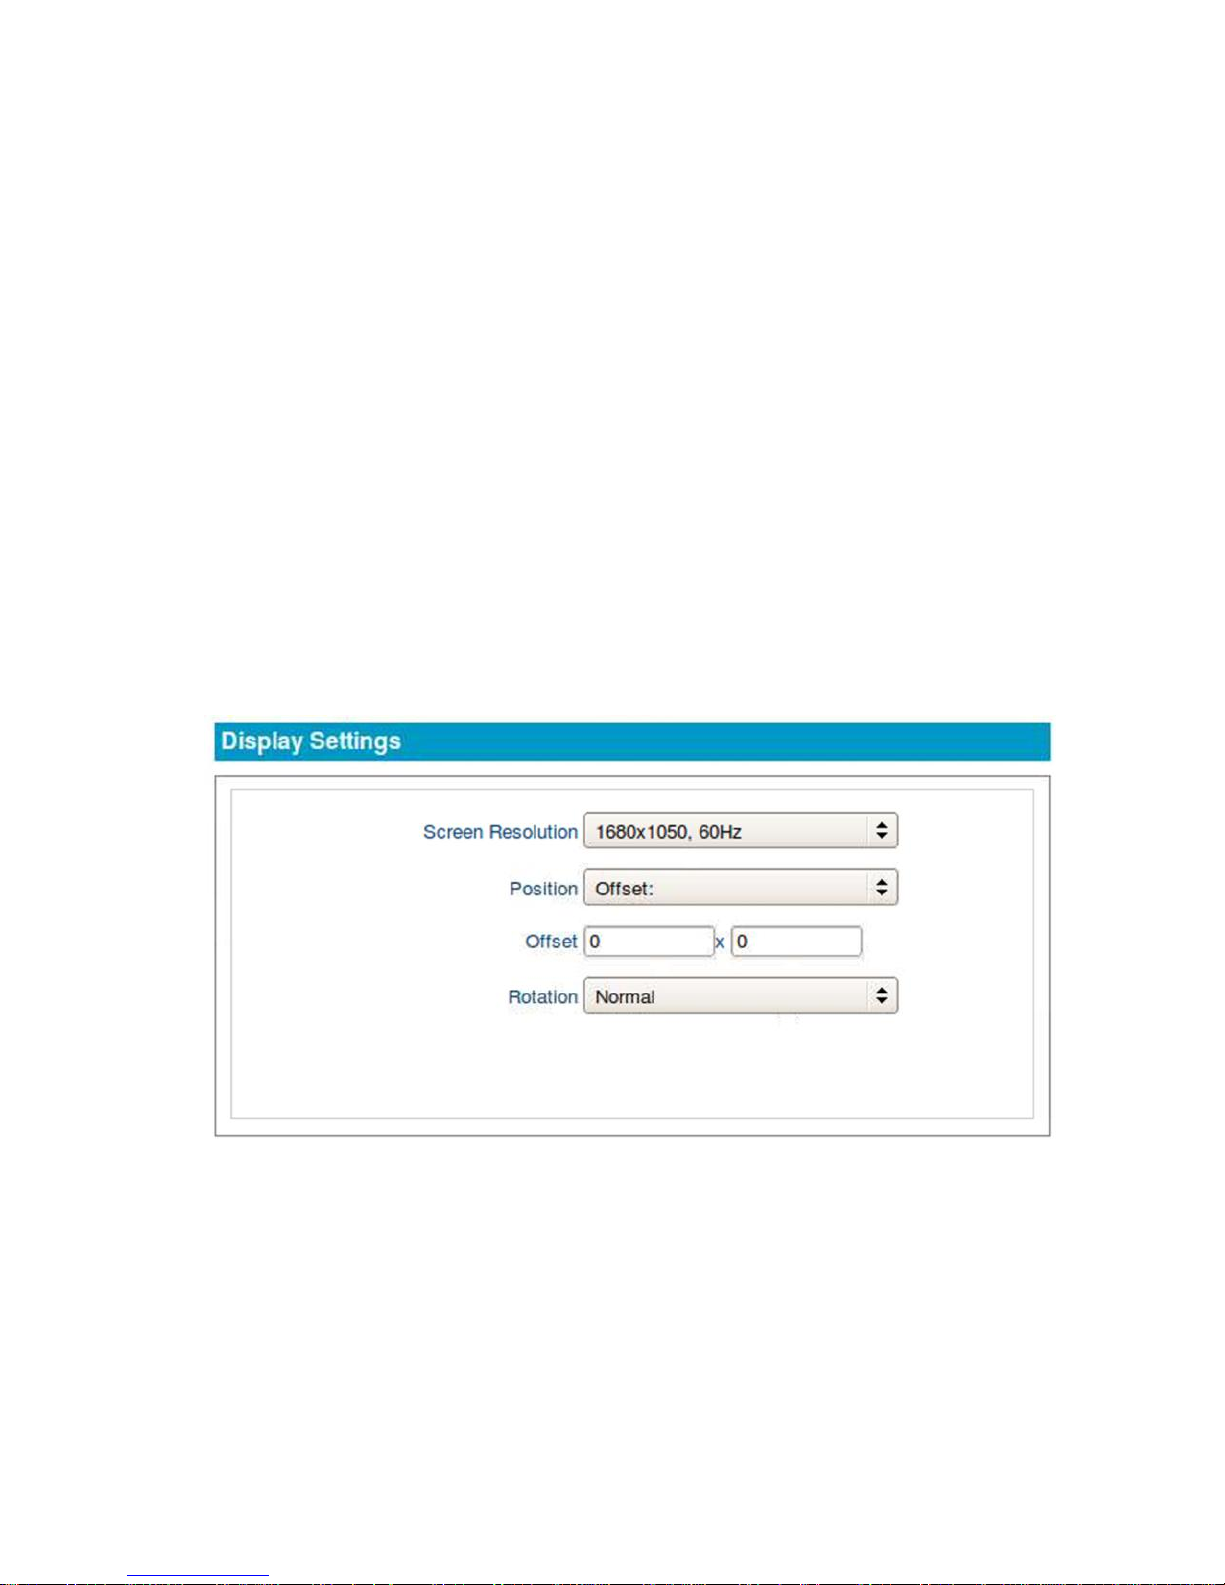
This section describes the display options available for a single monitor attached
to a terminal.
1
From the DeTOS desktop, select
DeTOS->Control Panel
.
2
Click the
Display
icon on the left-hand side of the
Control Panel
, under
System Settings
.
Screen Resolution-
Select the desired resolution from the dropdown list
OR select
Auto-detect
to allow DeTOS to automatically choose the best
resolution for the attached monitor.
Page 23

Connections | 23
Color Depth-
All supported color depths for your monitor will be listed in
this dropdown box.
Enable Screen Blanking-
Checking this box will reveal two timeout
values for screen blanking and suspend time.
Once you are finished, press the
Apply
button for the changes to take effect. If
you selected
Auto-Detect
for the screen resolution, then the change in
resolution will occur on next reboot. Otherwise, all other display changes will
take effect immediately.
Dual Monitors
This section describes how to set up and configure dual monitors (OptiPlex
FX170 only).
1
While the unit is turned off, attach both monitors to the thin client.
2
Turn on the thin client.
3
Upon bootup, the display will be mirrored on both monitors.
4
From the DeTOS Desktop, select
DeTOS-> Control Panel
.
5
Click the
Display
icon on the left-hand side of the
Control Panel
, under
System.
6
You will be presented with display settings for
Color Depth
and
Screen
Blanking
options. These settings apply to both monitors associated with
the DVI-1 (bottom) port and the LVDS1 represents the DVI-2 (top) port.
7
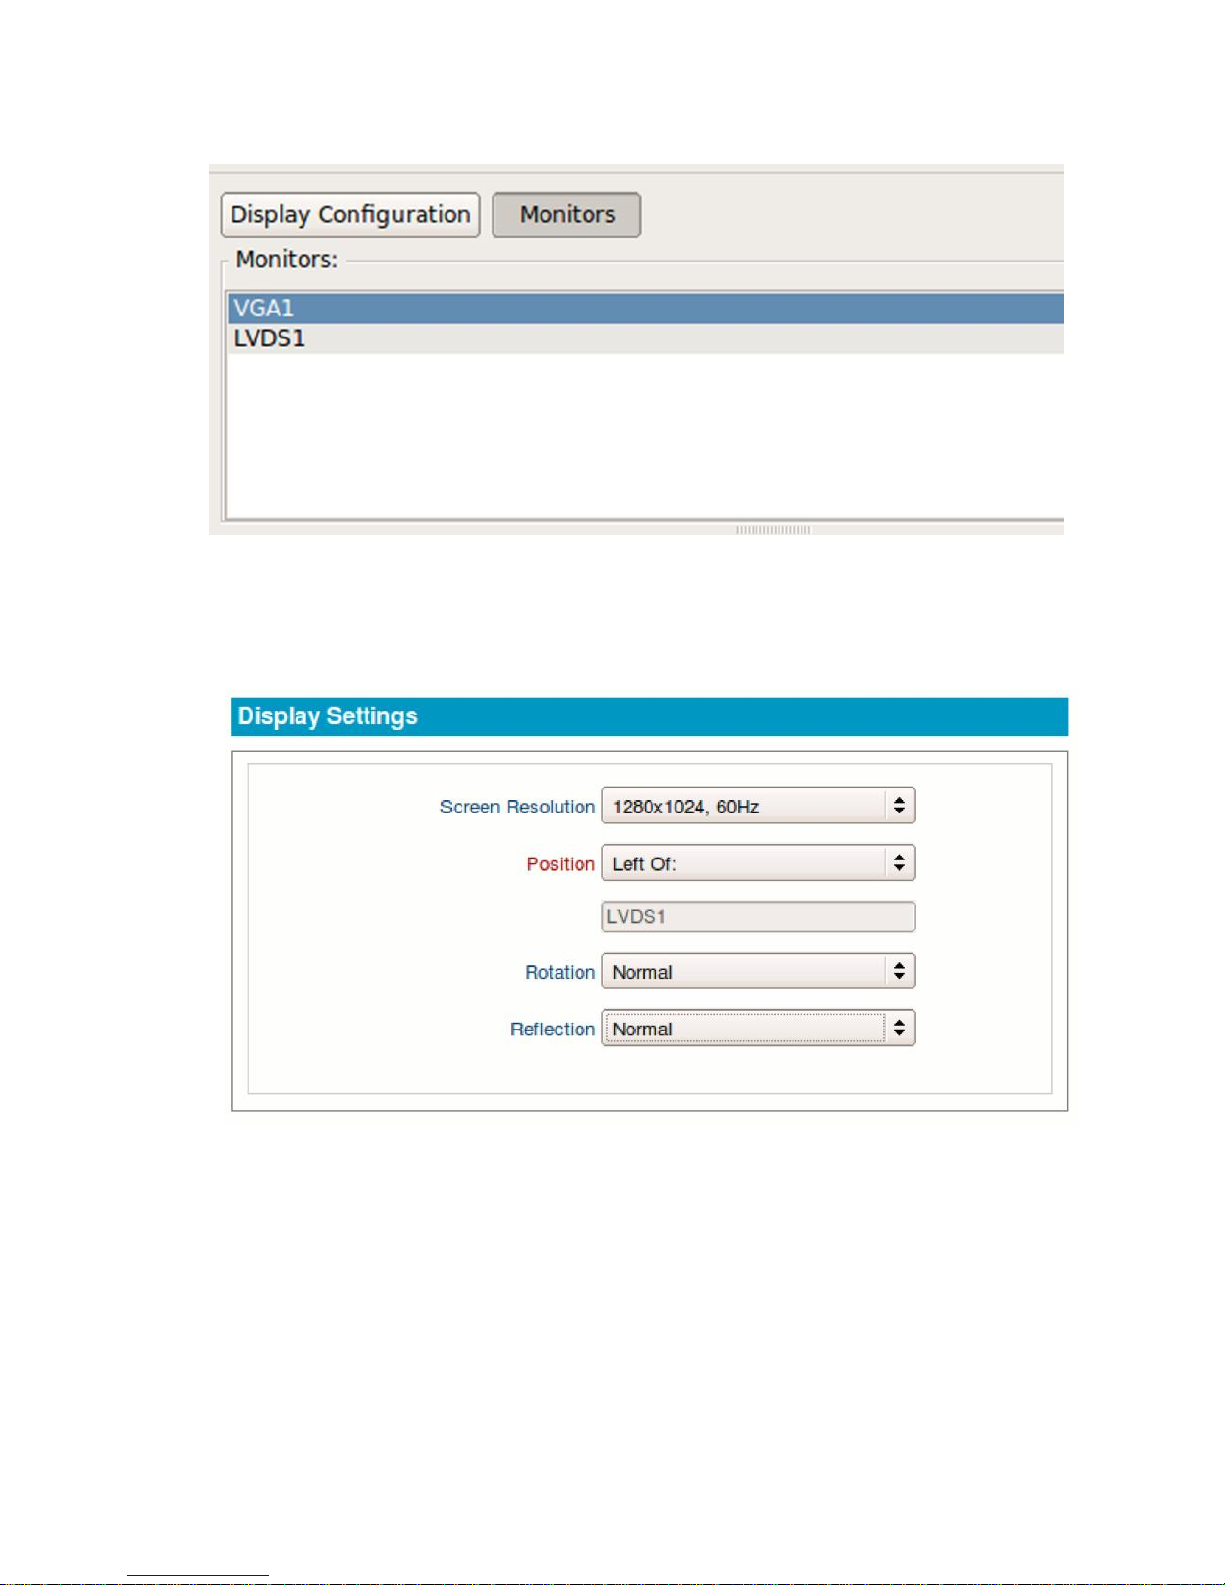
To adjust specific properties for each monitor, click the
Monitors
button
along the top of the
Control Panel
. You will then be presented with the
names of the two monitors attached to the terminal. The exact names will
vary depending on how they are detected on that particular terminal. For
an OptiPlex FX170 thin client, the VGA1 port is typically associated with
the DVI-1 (bottom) port and the LVDS1 represents the DVI-2 (top) port.
Page 24
24 | Connections
8
Click one of the monitor names from the list. This will open a
configuration screen that contains
Resolution, Position, Rotation
, and
Reflection
properties for that specific monitor.
Screen Resolution-
Select the desired resolution from the dropdown list
OR select
Auto-detect
to allow DeTOS to automatically choose the best
resolution for the attached monitor.
Position
Page 25

Connections | 25
Left of or Right of -If your monitors are positioned in a side-by-side
arrangement, then you'll want to specify one of the monitors as being to
the Left of or Right of the opposite monitor.
Above or Below-If your monitors are positioned in a top and bottom
arrangement, then you'll want to specify one of the monitors as being to
the Above or Below the opposite monitor.
Clone-Choosing the Clone option will cause the display to be duplicated
on both monitors. (Also known as “Mirrored.”)
NOTE:
This is the default behavior for dual monitors when powered on for the
first time.
Offset-When you select the offset option, you will be presented with two
additional fields for X and Y coordinates. For example: 50x50 will
cause the display to be positioned 50 pixels left of and 50 pixels higher
than its normal centered state.
Rotation-
Select
Right
to rotate the display clockwise and
Left
to rotate
the screen counter-clockwise. You can also select
Invert
to flip the entire
display upside down.
Reflection-
Select
X, Y
, or XY values to rotate the screen along the XY
plane.
NOTE:
The X plane is Horizontal. The Y plane is Vertical.
Once you are finished, press the
Apply
button and reboot the thin client for the
changes to take effect.
Input/Time
This section allows you to configure keyboard, mouse, and time settings for the
terminal.
1
From the DeTOS Desktop, select
DeTOS->Control Panel
.
2
Select the
Input/Time
icon on the left-hand side of the
Control Panel
under
System
.
Page 26
26 | Connections
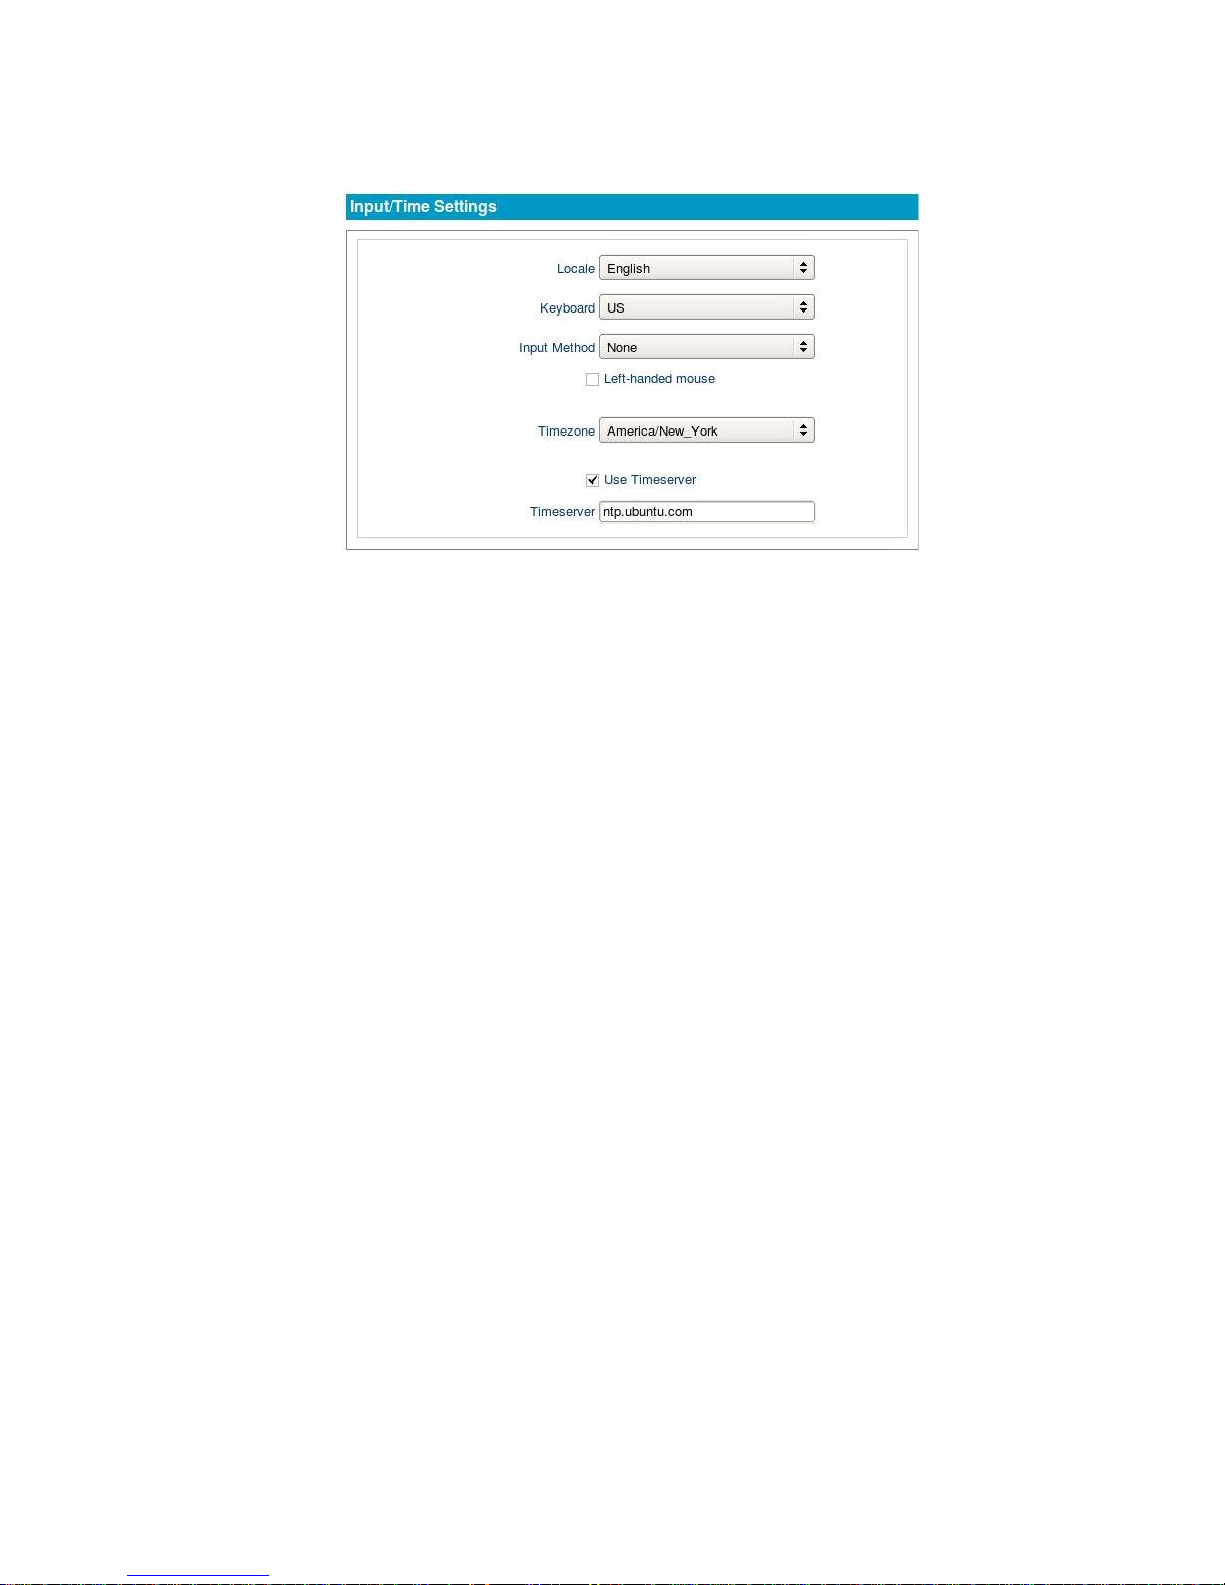
Locale-
English is the default locale setting. Switching to a new locale
will, upon reboot, adjust the system locale and translate the user interface
of the local DeTOS desktop to the selected language.
Keyboard-USA
is the default keyboard input setting. Switching to a new
keyboard input will alter the keyboard mapping immediately after
selecting
Apply.
Left-Handed Mouse-
Select this checkbox if you are using a left-handed
mouse and need to invert the right and left mouse buttons.
Time Zone-
The time zone options are organized geographically by region
first and then by city. Select the appropriate time zone for your location.
Timeserver-
Defining a timeserver allows the terminal to query an NTP
service in order to keep its date and time in sync. By default, this is
enabled and set to Ubuntu's timeserver.
Press the
Apply
button for the changes to take effect. Most settings will be
changed immediately, but changes to system locale will require a reboot.
Local Storage
The
Local Storage
section of the
Control Panel
allows the administrator to
choose one of three modes for how local storage is utilized.
1
From the DeTOS Desktop, select
DeTOS->Control Panel
.
Page 27
Connections | 27
2
Click the
Local Storage
icon on the left-hand side of the
Control Panel
under
System
.
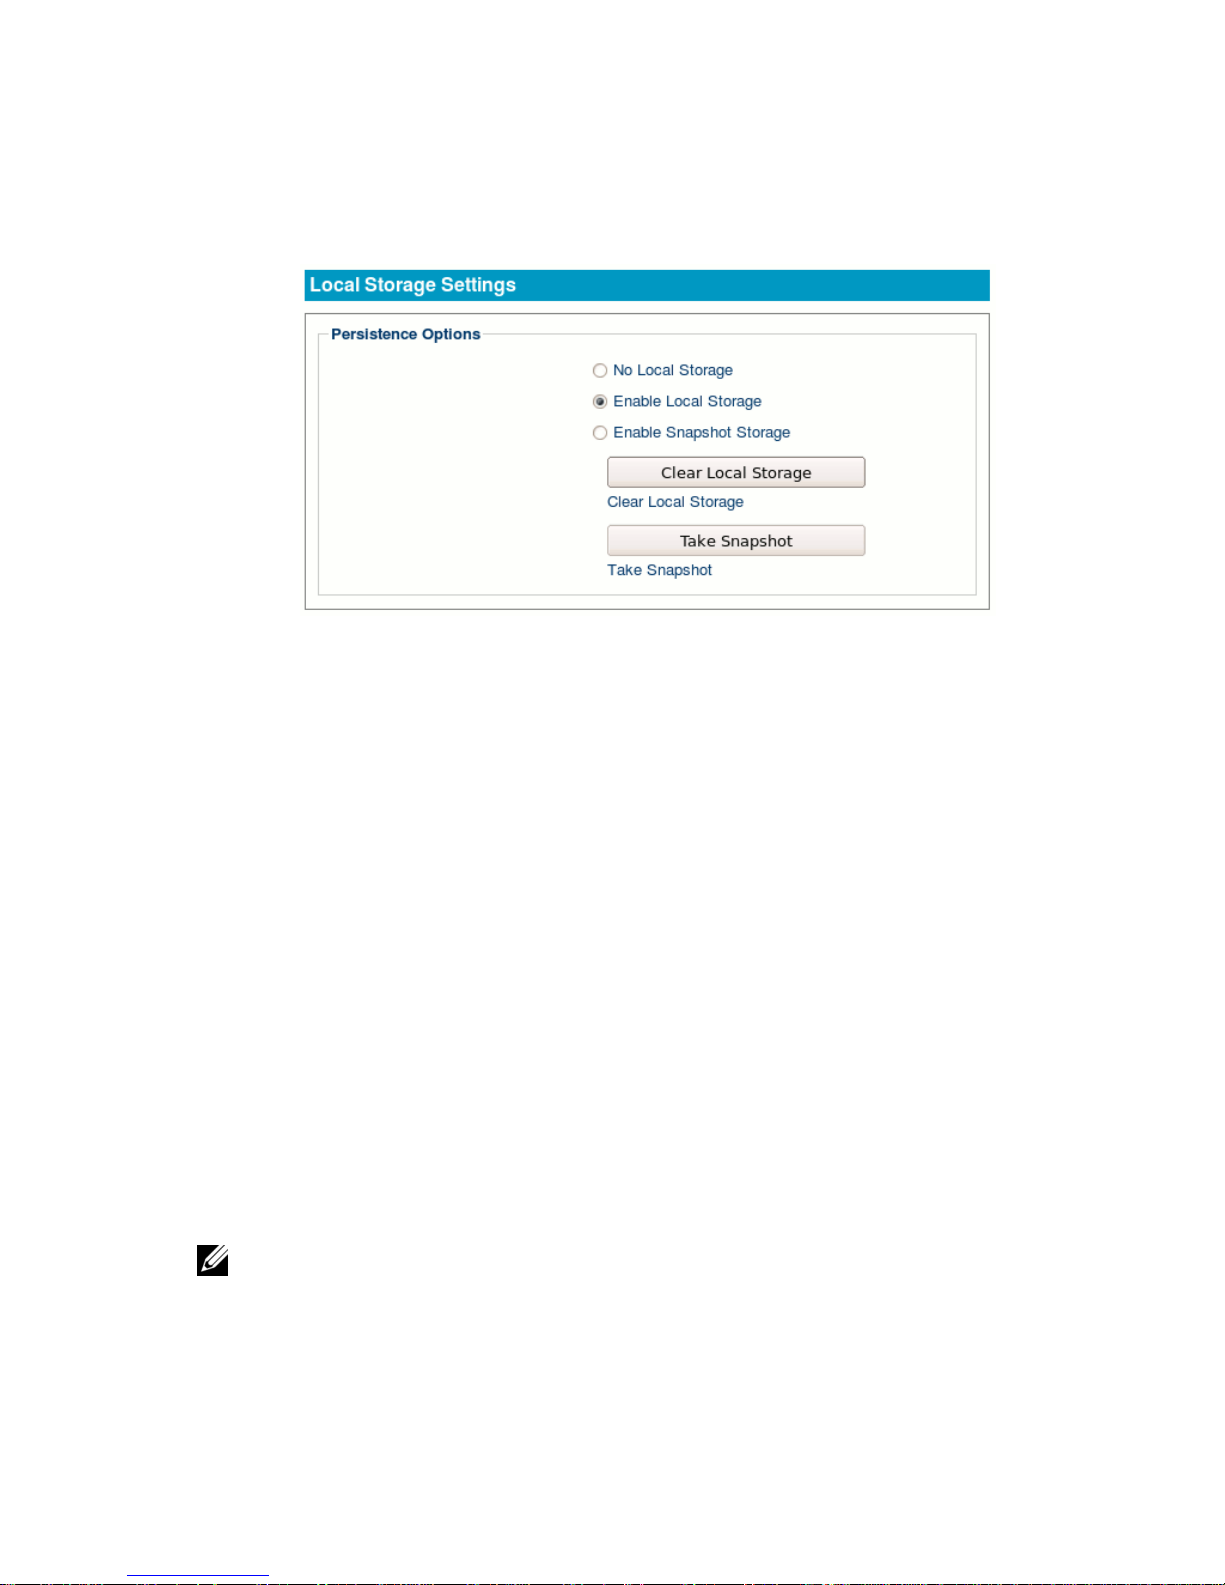
No Local Storage-
Selecting this mode disables persistence. The thin
client becomes stateless and relies completely on the management server
for all its configurations. Be sure to press the
Apply
button and then
reboot
the thin client for this mode to take effect.
Enable Local Storage (default)-
While running in this mode, DeTOS will
write to the local DOM each and every time configurations are added,
deleted or modified under the Control Panel. Press the
Apply
button and
then
reboot
the thin client for this mode to take effect.
Enable Snapshot Storage-
To utilize local storage in a profile-like
manner. Be sure to press the
Apply
button, and then reboot. Upon reboot,
configure the thin client as desired, and then press the
Take Snapshot
button. From now on, the thin client will use the same configuration as
when the snapshot was taken – even after reboots.
Clear Local Storage-
Press this button to clear-out all settings currently
stored in local or snapshot storage. Be sure to reboot the thin client after
you pressed this button.
Take Snapshot-
While running in a
Snapshot Storage
mode, you may
press this button to capture the thin client’s current connections and
settings configuration. Be sure to reboot the terminal after you pressed
this button.
NOTE:
No matter which persistence option you select, it is recommended that you
password protect the Control Panel to prevent your end-users from accidentally changing
the mode.
Page 28
28 | Connections
Management
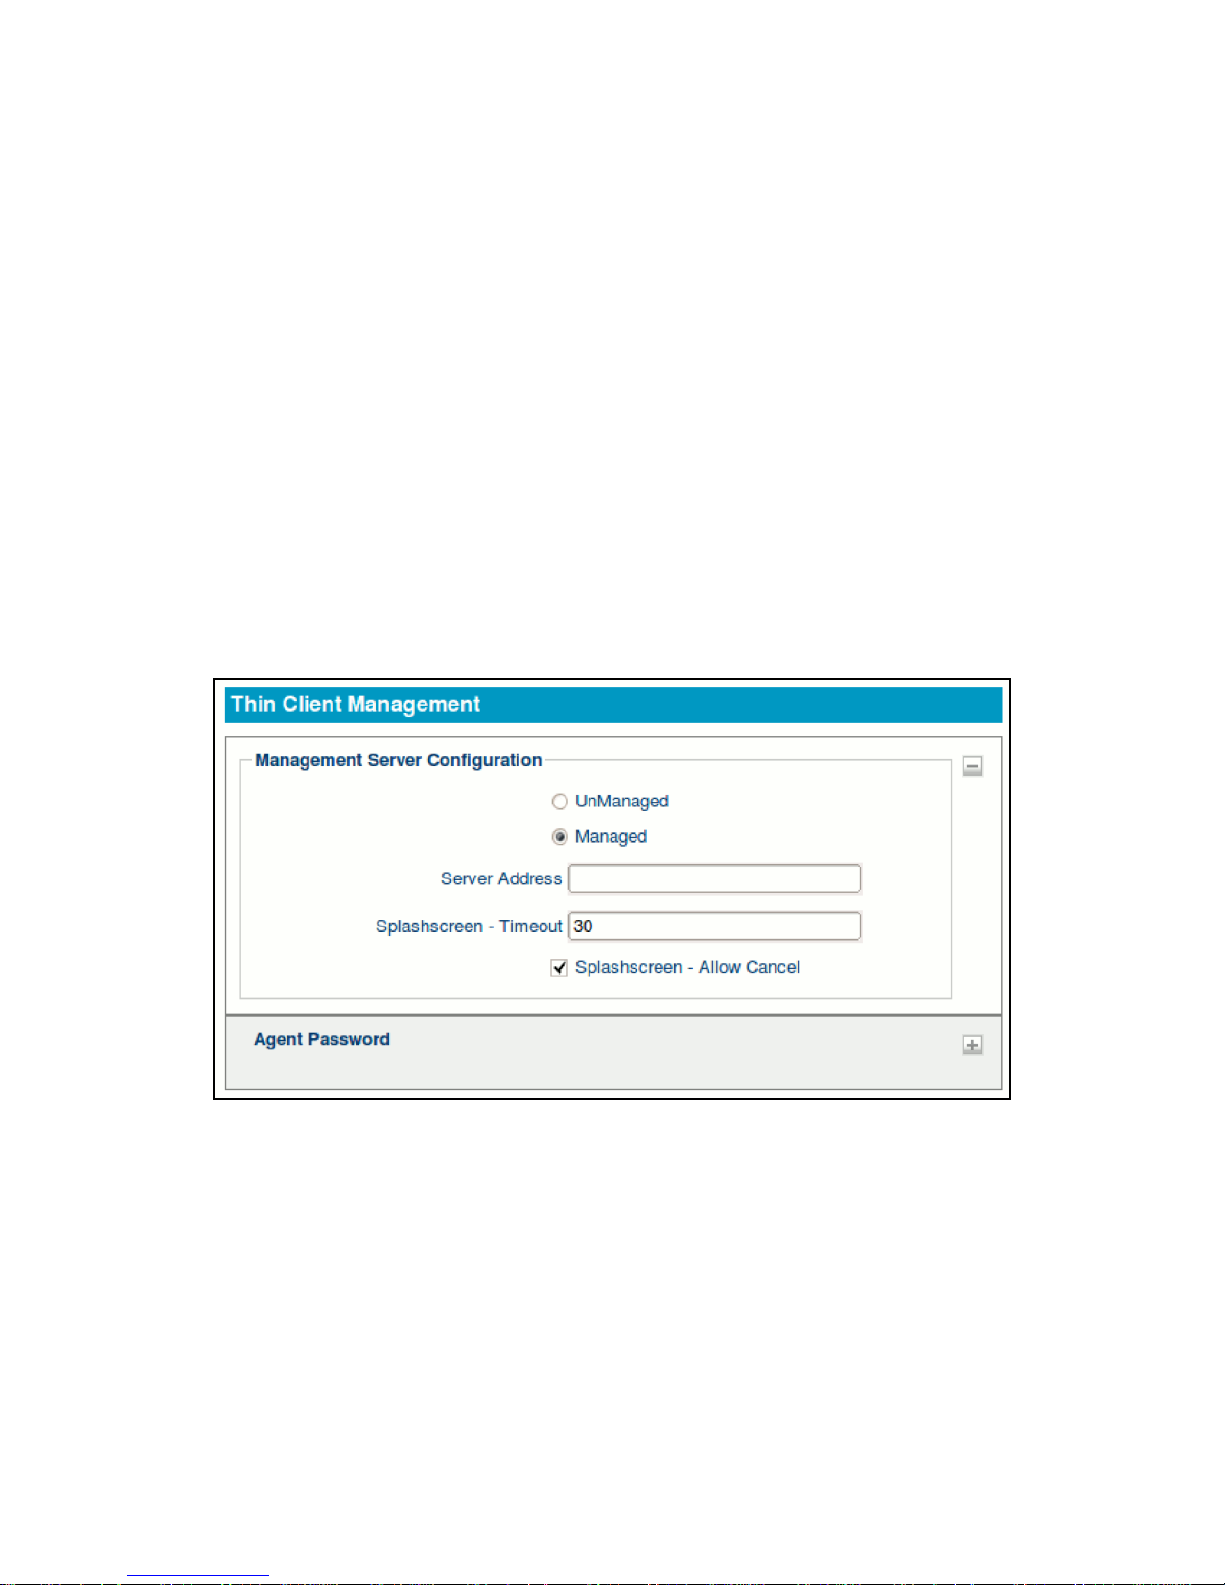
Management Server Configuration
During bootup, if the thin client cannot make contact with a Management Server,
then a white splash screen will appear just prior to the DeTOS desktop loading.
This screen contains a message saying
Attempting to connect to
Management Server
. The splash screen will be displayed until successful
contact is made with a management server, the cancel button is pressed, or the
specified timeout (30 seconds by default) is reached. The
Management Server
Configuration
screen allows you to configure the behavior of this splash screen,
along with other management server options.
1
From the DeTOS Desktop, select
DeTOS->Control Panel
.
2
Click the
Management
icon on the left-hand side of the
Control Panel
under
System
.
Managed/Unmanaged-
By default, the thin client is set to
Managed
mode and will attempt to make contact with a management server. You
have the option of severing all communications with a management server
by selecting the
Unmanaged
radio button. Press
Apply
and reboot the
thin client for this to take effect.
Page 29
Connections | 29
Server Address-
While in managed mode, the thin client will maintain
contact with a management server named
ws-broker.
Use this field to
specify a different hostname or IP address for your management server.
Splash Screen – Timeout-
Use this field to adjust the number of seconds
the splash screen appears on the screen before it times-out and loads the
DeTOS Desktop. Enter a value of 0 to bypass the screen altogether.
Splash Screen – Allow Cancel-A Cancel
button is provided on the
splash screen that allows the user to abort the timeout delay. Uncheck
this box to hide the cancel button and force the user to wait the required
amount of time.
NOTE:
The purpose of the splash screen feature is to gracefully handle network latency
that may occur during the thin client’s first contact with a management server during
bootup. This feature becomes vital in the case where you have a management server
applying connections to the thin client that are configured to Autostart on bootup.
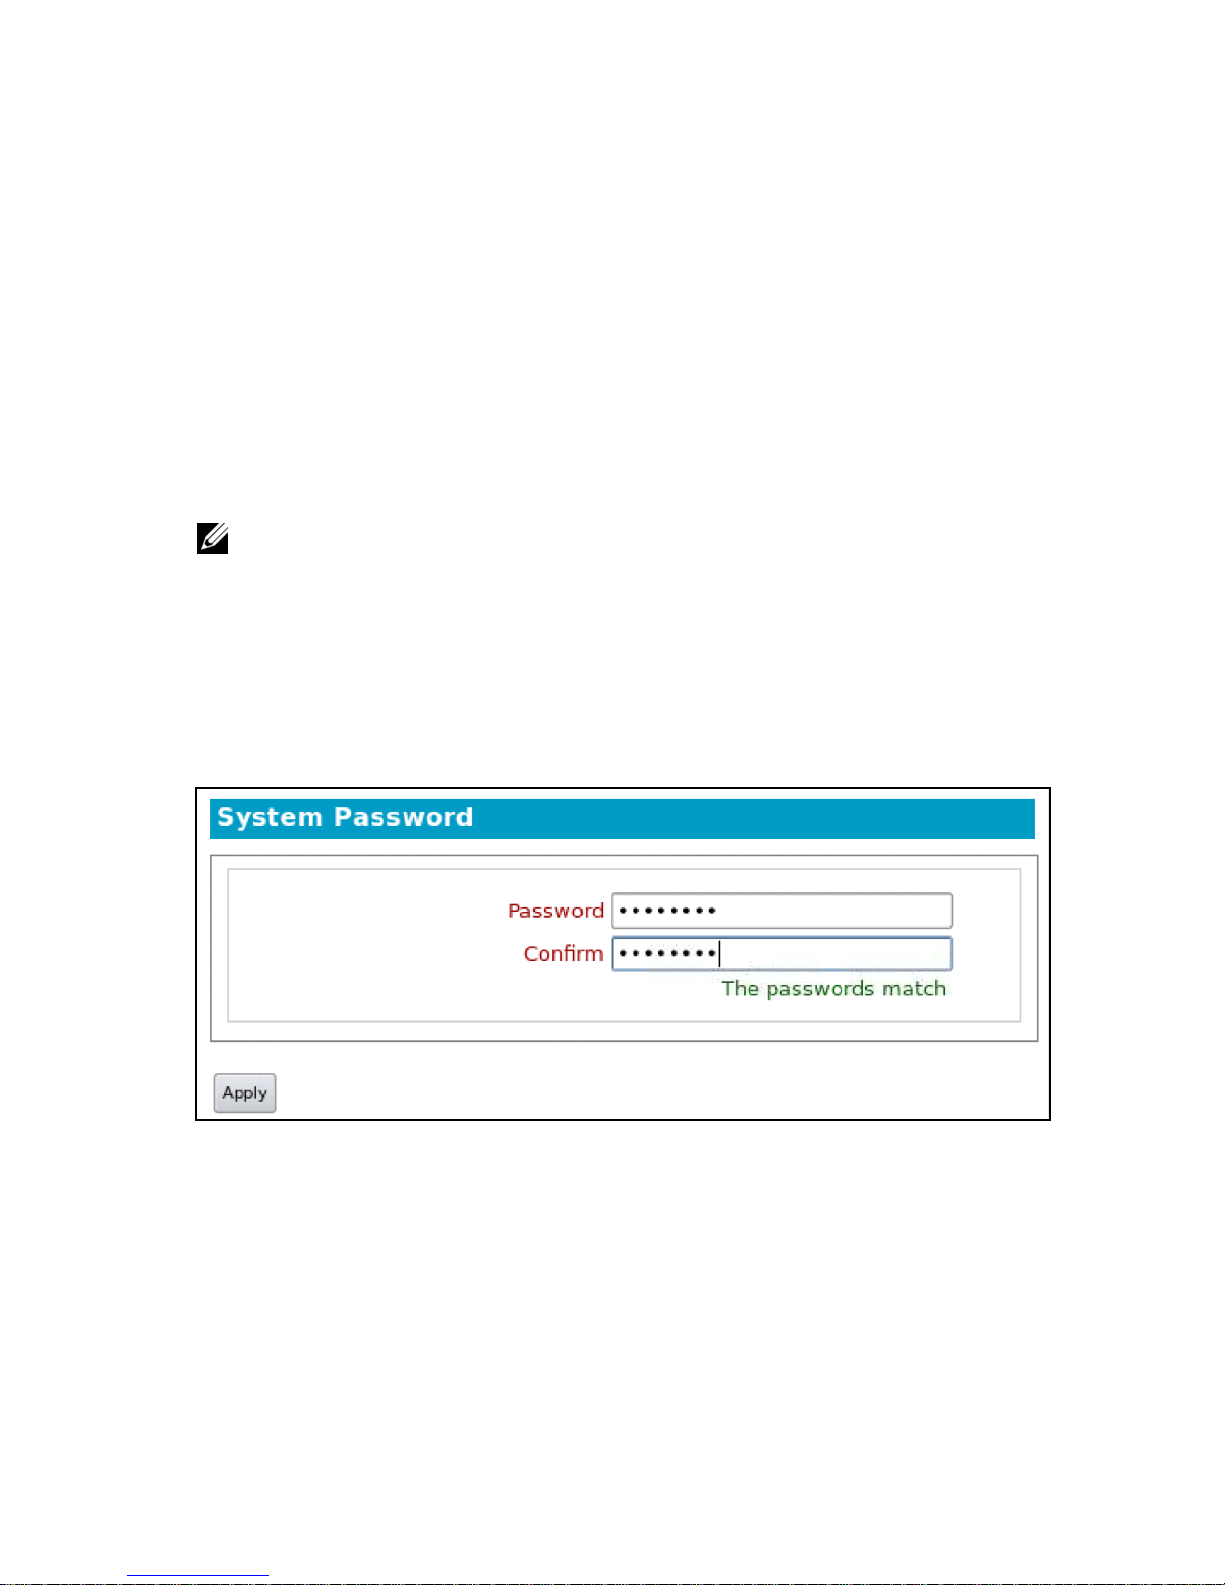
Agent Password
A System Password can be set to restrict access to the
Control Panel
.
To set the Password:
1
Select
DeTOS->Control Panel.
2
Click the
Management
icon on the left-hand side of the
Control Panel
under
System
.
3
Select the plus
[+]
to open the
Agent Password
section of this screen.
Page 30

30 | Connections
4
Enter a password in the password field and re-enter it to confirm your
password.
5
Press the
Apply
button to save your password.
NOTE:
Once a system password is set, the user will be prompted for the password when
they attempt to open the
Control Panel
. If the
Cancel
button is pressed or a user
incorrectly types the password, then the
Control Panel
will open in a read-only mode. A
small padlock icon will also appear along the bottom of the
Control Panel
window,
indicating that edits are not allowed. Keep your password safe!
Network
By default, the thin client attempts to contact a DHCP server on your network
during boot up. If you have a DHCP server on your network, then the thin client
will acquire an IP address automatically and no further network configuration is
required on your part.
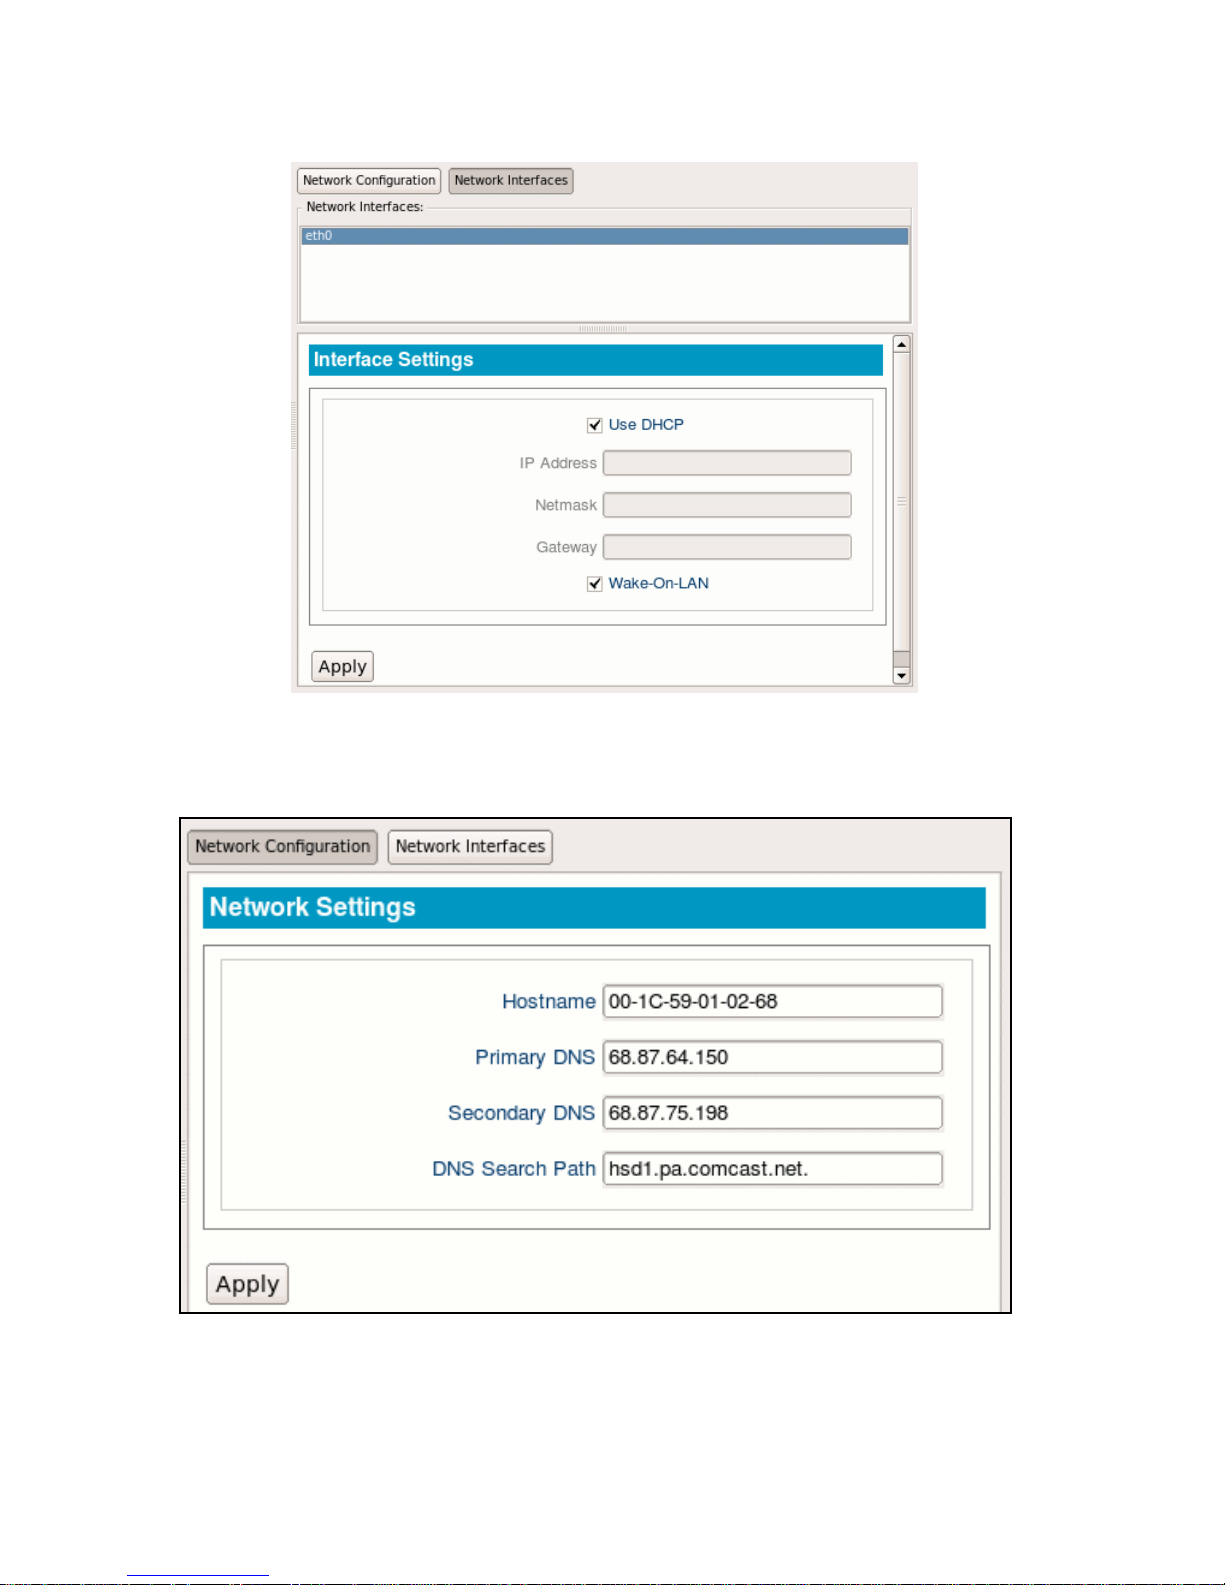
If you need to set a Static IP address on a DeTOS thin client:
1
From the DeTOS Desktop, select
DeTOS-> Control Panel
.
2
Select the
Network
icon on the left-hand side of the
Control Panel
under
System
.
3
Select the
Network Interfaces
tab found near the top of the window,
then select
eth0.
4
Deselect the
Use DHCP
checkbox.
5
Type in appropriate values for the IP Address, Netmask, and Gateway
address fields and then press
Apply
.
6
Sometimes, depending on your network, it may take 15-20 seconds to
reconfigure to the Static IP. This is normal, and a reboot is NOT required.
Page 31
Connections | 31
7
To make any changes to the Host Name, or to add or edit your own DNS
servers, click the
Network Configuration
tab found near the top of the
window. Press
Apply
when finished to save.
Page 32
32 | Connections
8
When changing your Network settings, this may take 15-20 seconds,
depending on your network speed, for your changes to take effect. This
is normal and your thin client will NOT need to be rebooted for the
changes to take effect.
Printer Settings
DeTOS supports redirected printing to a locally attached USB or Parallel printer.
Once the Printer Settings are properly configured and applied, redirected
printing will be enabled for all RDP, Citrix ICA, and VMware View
connections created on your thin client.
1
From the DeTOS Desktop, select
DeTOS-> Control Panel.
2
Click the
Printer
icon on the left-hand side of the
Control Panel
, under
System
.
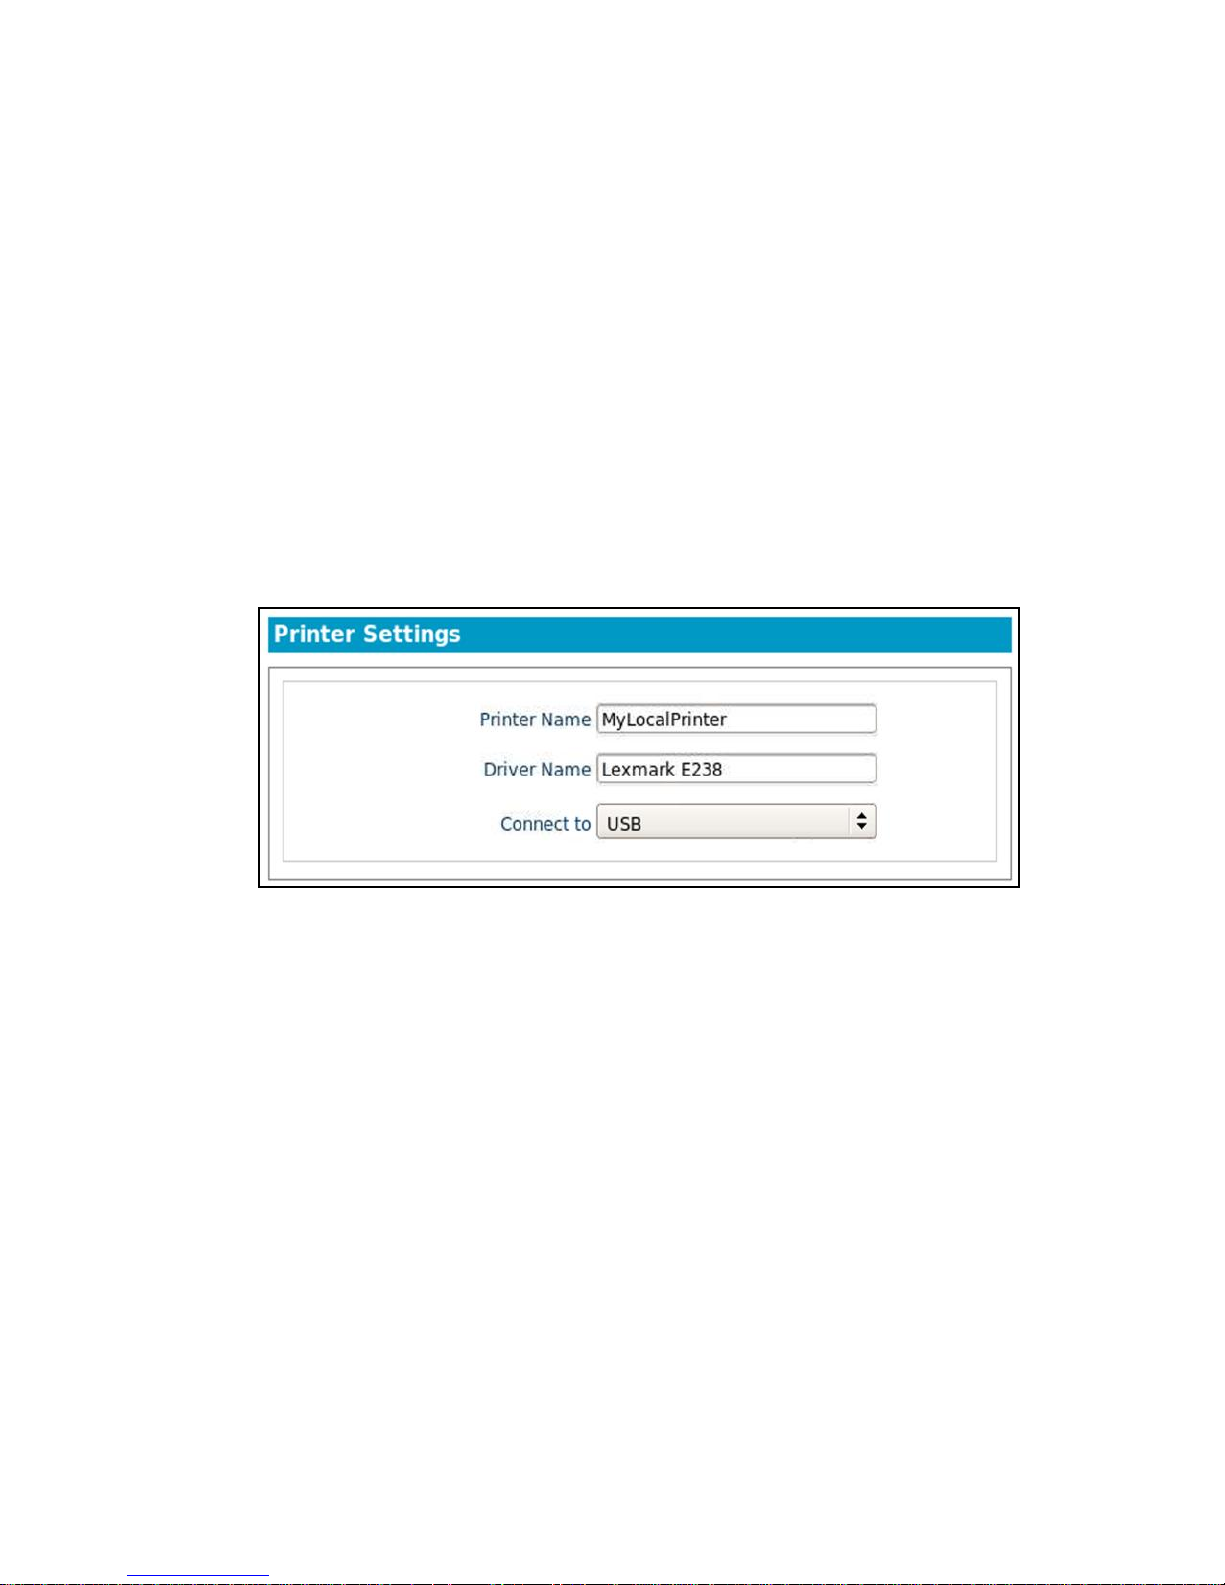
3
Enter the following values:
a. Printer Name-
Enter a name for this printer. Do not include
spaces.
b. Driver Name-
Make sure the driver for the printer you will be
using has been installed on the server(s) you plan on connecting to.
To check the exact driver name on a Windows server:
i. Click
Start->Settings->Control Panel-> Printers
and Faxes
.
ii. Select
File->Server Properties.
iii. Select the
Drivers
tab. This will display installed printer
drivers.
Page 33
Connections | 33
iv. Find the driver name of the printer you will are using. The
driver name that appears here must be entered into the
Driver Name
field exactly the same way – including spaces
and proper case. For example, if the driver name on the
server is reported as
Lexmark E238
, then you must type
Lexmark E238
into the
Driver Name
field. Values are
case sensitive.
c. Connect to-S
elect the appropriate connection type from this
dropdown list. (USB or Parallel).
4
Press the
Apply
button to save. The printer changes will take place
immediately. No reboot is required.
5
Launching any of your RDP, Citrix ICA, or VMware View connections,
you will find your printer under the Printers and Faxes Window and it will
be automatically designated as the default printer.
NOTE:
To redirect printing to all of your protocols such as rDesktop, make sure that all
options for redirection are enabled, including Printing and Disk Drive Mapping.
Sounds
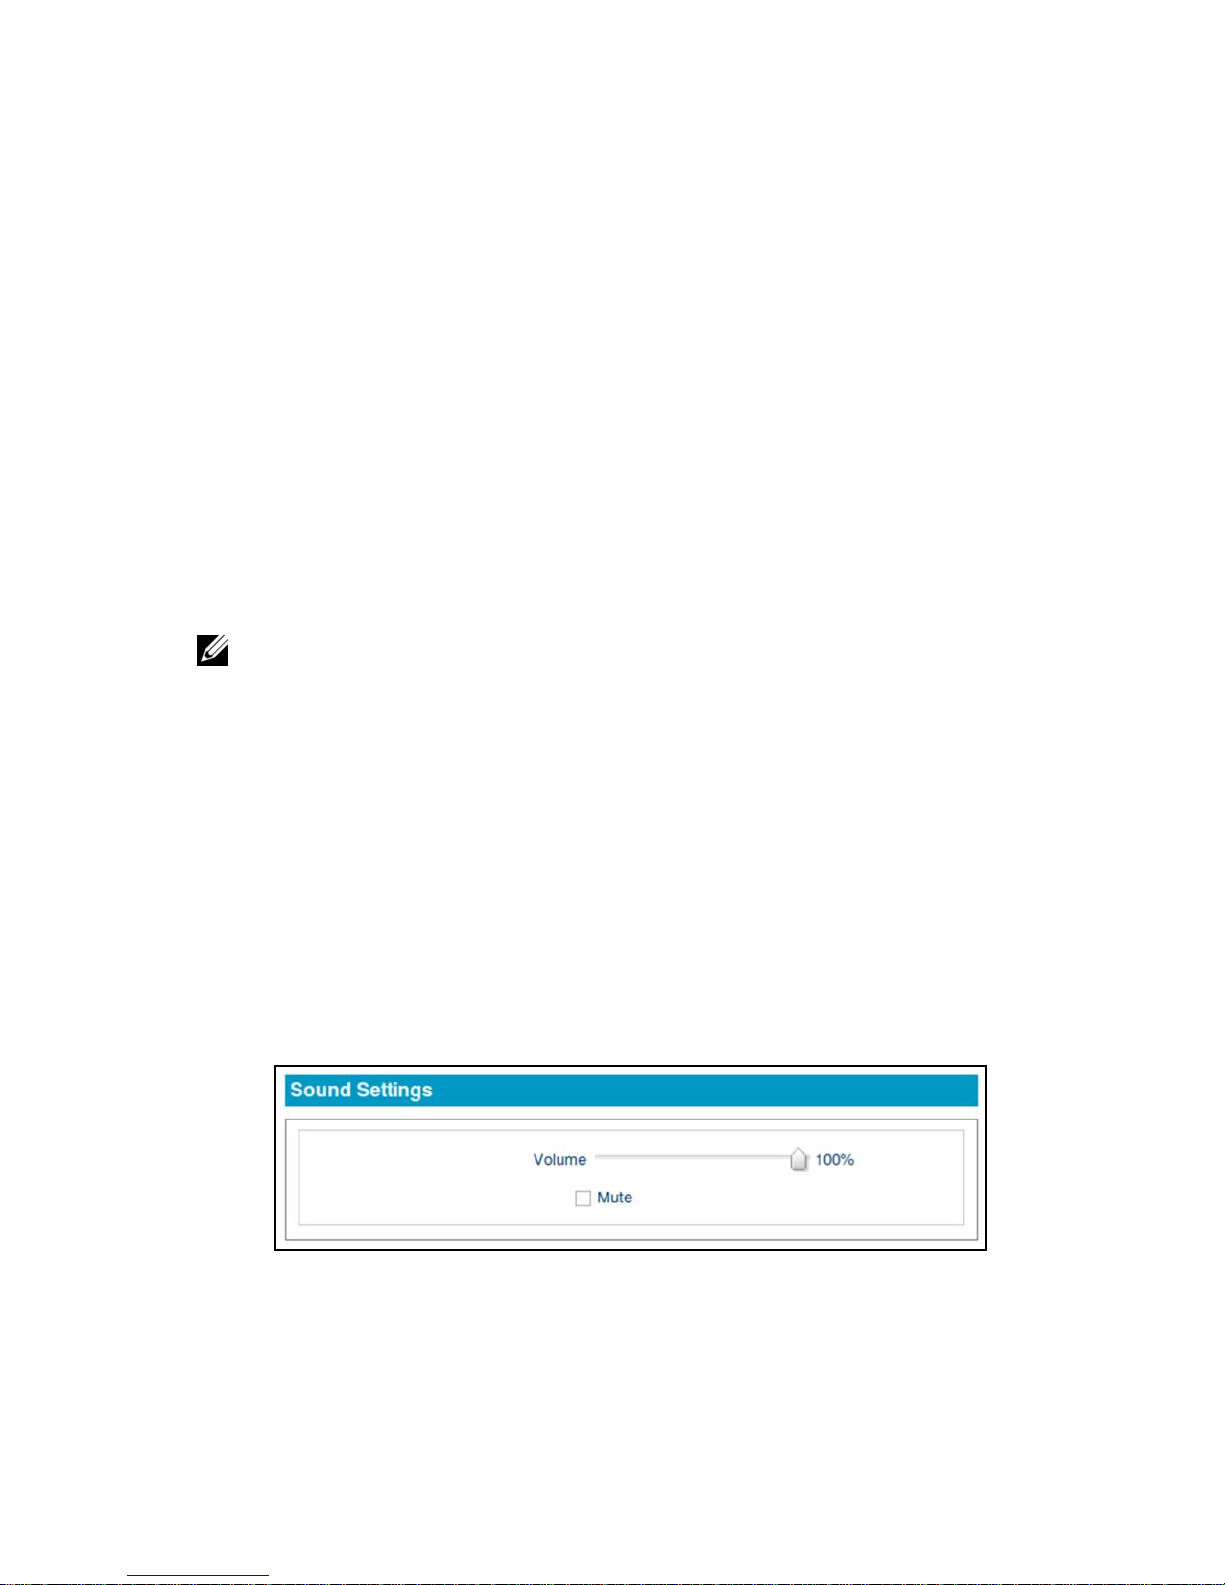
This section allows you to adjust the master volume level for the terminal.
1
From the DeTOS Desktop, select
DeTOS->Control Panel
.
2
Click the
Sound
icon on the left-hand side of the
Control Panel
under
System
.
3
Left-click and drag the bar left or right to decrease or increase the volume.
4
Press the
Apply
button to save. Your changes will take place
automatically.
Page 34

34 | Connections
5
5
Connections
Adding New Connections
1
From the DeTOS Desktop, select
DeTOS->Control Panel
.
2
Click the icon you wish to create; it is listed under the
Connections
bar,
on the left-hand side of the
Control Panel
.
3
The main window will split into two separate frames. The top frame will
list all existing connections for this particular type or protocol. To add a
new connection, click the plus
[+]
button.
4
You will be prompted to enter a name for this connection. Enter a name
for this connection and press the
OK
button to continue.
5
The bottom frame will display configuration fields that are specific to the
connection type you are creating. Some connections, like Firefox Web
Browser, will only have a couple of fields required for configuration and
be listed on a single form. Connections that have several configuration
options associated with them, like RDP and Citrix, will have their
settings grouped and sorted under separate sections, called form panels.
These panels can be opened and closed by clicking the plus
[+]
and
minus
[-]
buttons found along the top, right-hand side of each panel box.
NOTE:
The number of form panels will vary, depending on the type of connection
you are creating. Click the plus [+] or minus [-] buttons to expand and collapse
these sections.
6
Once you are finished setting up your connection, click the
Apply
button
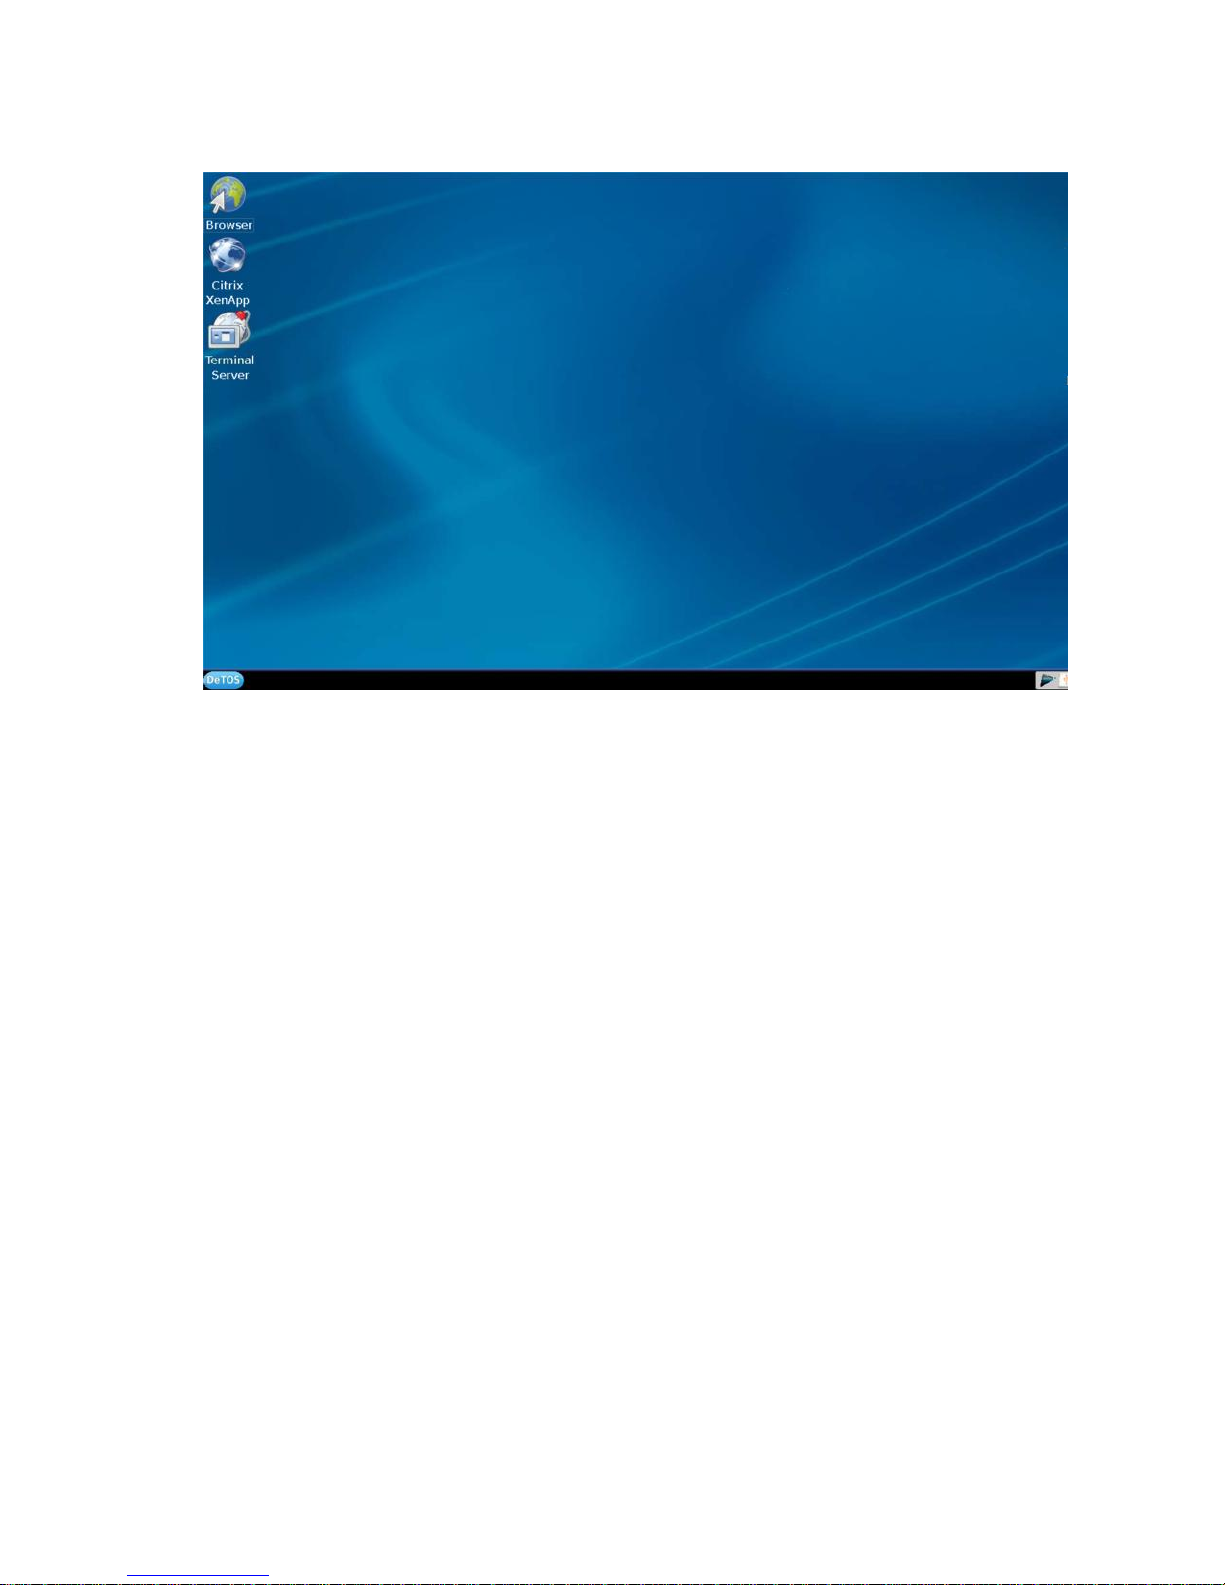
along the bottom of the frame. An icon for the new session will be
created on the DeTOS Desktop. The end user can double-click this icon
to launch the connection.
Page 35
Connections | 35
7
As you create connections in the
Control Panel
, icons for those sessions
will appear on the desktop. Double-click the icon to launch that session.
How to Rename or Delete Connections
1
From the DeTOS Desktop, select
DeTOS-> Control Panel
.
2
In the
Control Panel
, the top center panel lists your currently added
connections in the
Connections window.
3
Select the session type to view the list, and then select the specific name
of the connection you want to edit.
To Rename-Double-click the entry. Your pointer will change to a [I]
cursor and highlight the connection name, allowing you to type in a new
name for this connection. Press <Enter> to save your changes.
To Delete-Press the minus [-] button to remove that connection. You
will be asked to confirm the removal. Click Apply to remove that
connection completely.
Page 36
36 | Connections
Citrix ICA
The Citrix Receiver client in DeTOS allows you to connect to Citrix XenApp
Servers (formerly known as Presentation Server). This Citrix client also
contains the necessary plug-in used for connecting to XenDesktop via the thin
client's local web browser.
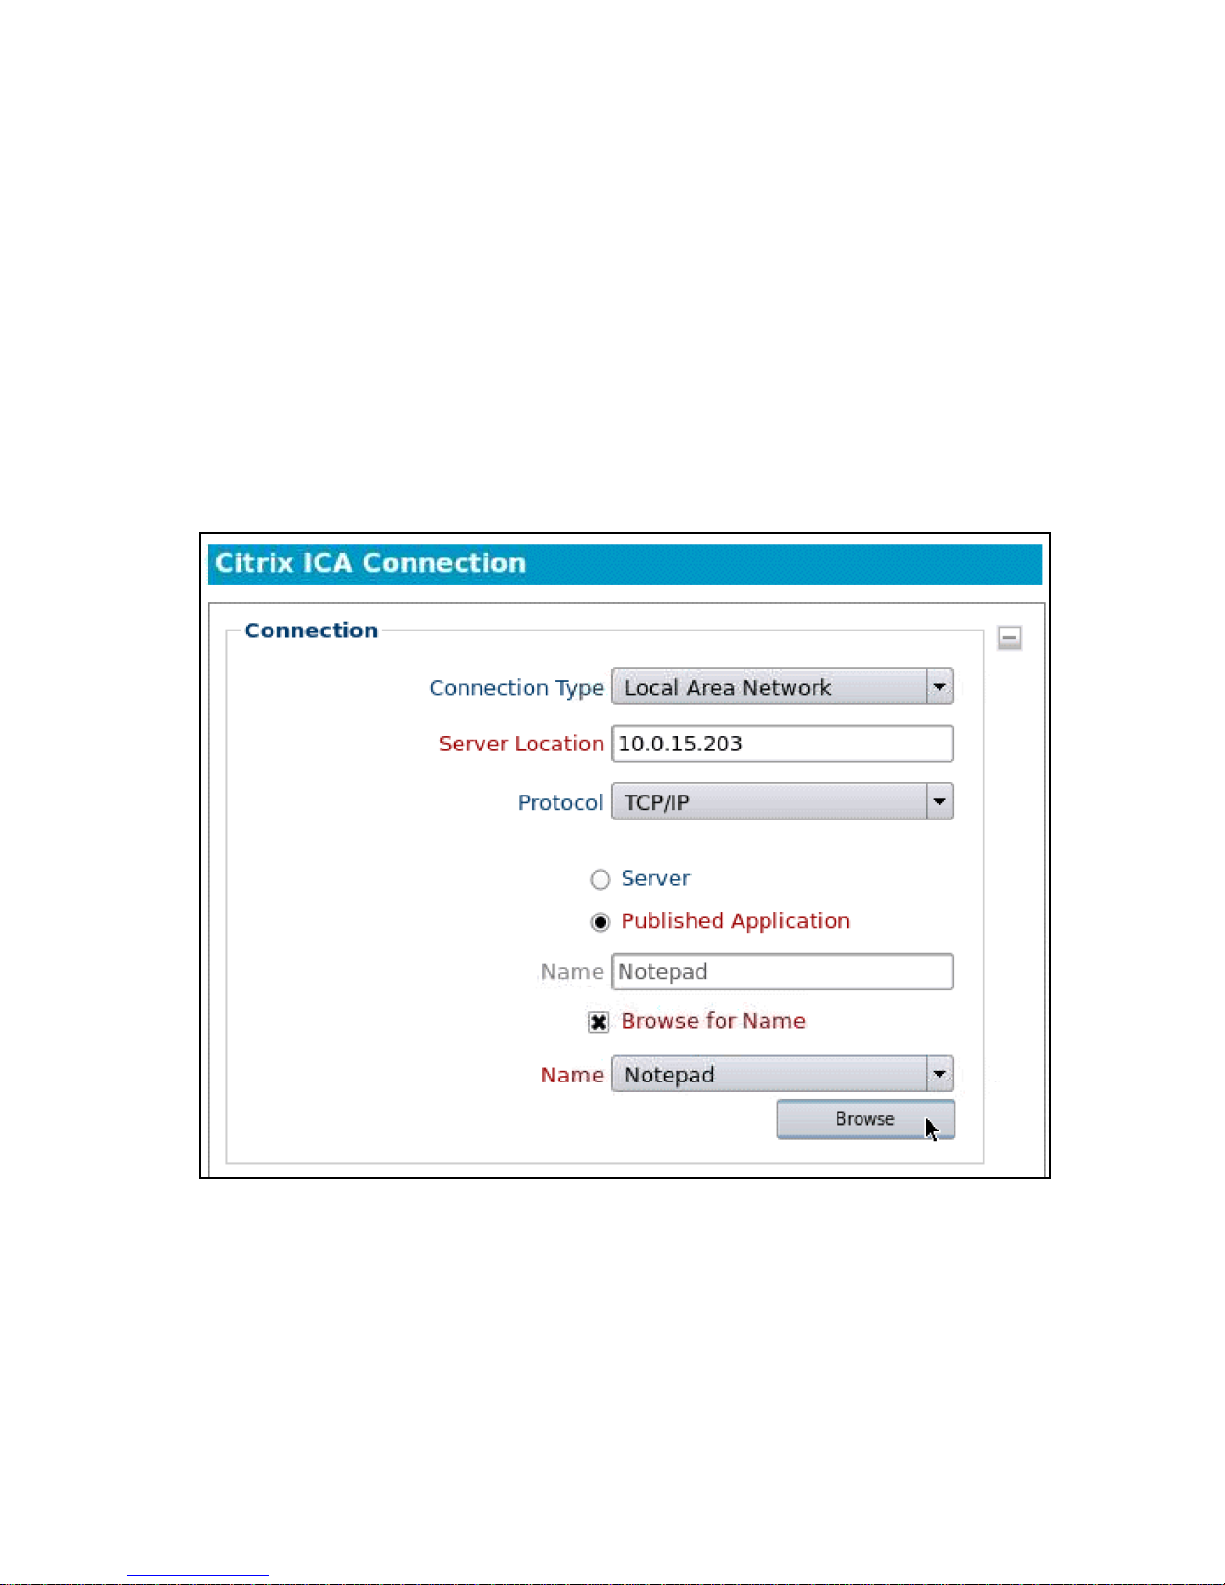
The Connection Section
The first section displayed for a Citrix ICA session is
Connection
. This form
panel will already be expanded for you.
Server Location-
Type in the IP address or hostname of your Citrix server.
Page 37
Connections | 37
Protocol-
Select the appropriate protocol needed to connect to your Citrix
Server. There are two methods for connecting to your Citrix Server:
Server-If you wish to connect to the desktop of your Citrix Server, click
the radio button called Server.
Published Application-If you wish to connect to a published application
on your Citrix Server, select the radio button called Published
Application.
Browse for Name-
Mark the checkbox called
Browse for Name. Then
click the
Browse
button once. This will contact the server and populate
the list. Click the down arrow on the
Name
list and select your server
name or published application name.
The Options Section
Page 38

38 | Connections
1
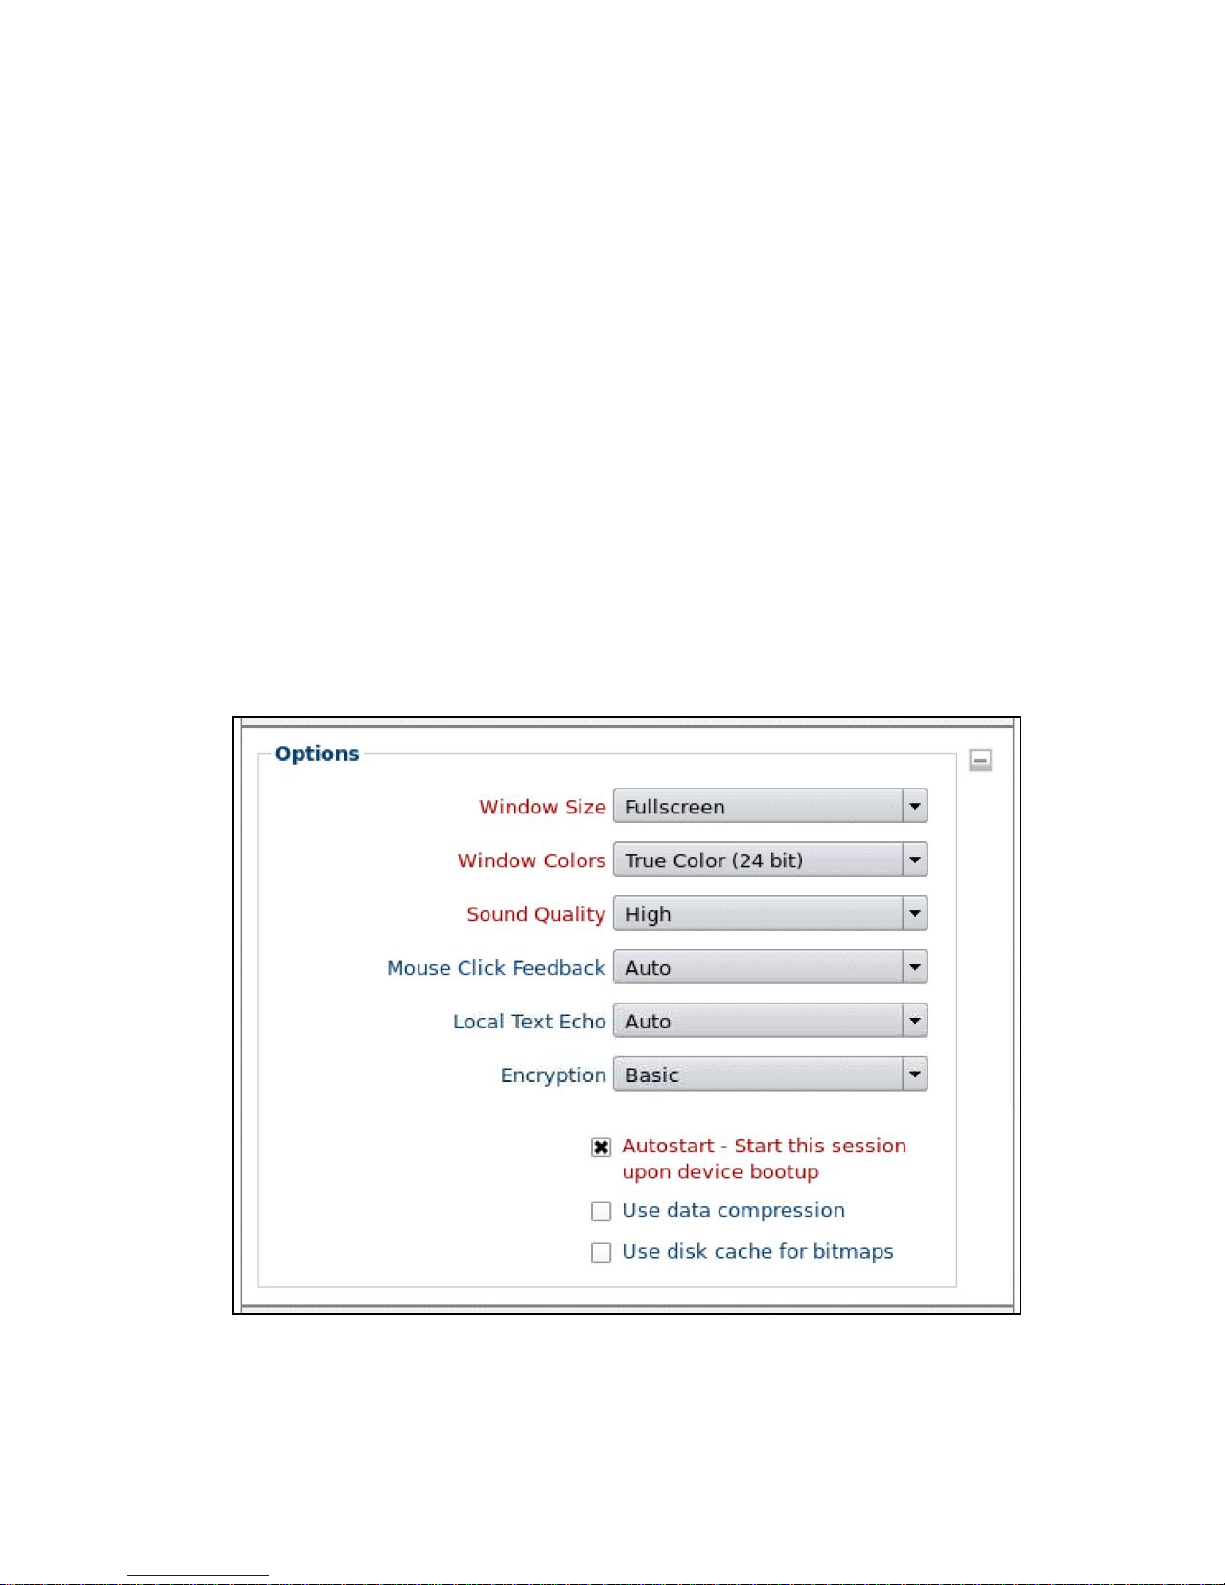
Window Size-
Select the type of window you want your ICA session to
display in.
Full screen-The ICA session will take up the entire display.
Fixed Size-You may select fixed sized windows, such as 640x480,
800x600, and 1024-x768.
Percentage Based-You may select a size based on the percentage of
available desktop display, such as 25%, 50%, and 75%.
Seamless-When using the Published Application feature, you can select
Seamless mode to launch Windows applications like Notepad directly on
DeTOS, without using the Citrix Window.
2
Windows Colors-
Color depth options are
16 colors, 256 colors, 16-bit
,
and
24-bit
.
3
Sound Quality-
Adjust the sound from
Low, Medium
, or
High Quality
.
4
Citrix SLR (Speed Screen Latency Reduction) Options-
Enabling the
following two options are usually only needed when high latency is
occurring or poor bandwidth conditions exist.
Mouse Click Feedback-The mouse cursor will change to an hourglass as
soon as a user performs a mouse click on an event and will wait for a
response from the server before it changes back.
Local Text Echo-This option allows a user to see the character they type
into their session on the screen, without this key press hitting the actual
server at that time.
5
Encryption-
Select the appropriate level of encryption to be used when
connecting to this Citrix Server.
6
Autostart-
Enable this checkbox to automatically launch this session each
time the thin client completes its boot procedure.
7
Auto Restart-
Select
Yes
or
Prompt
to automatically restart the
connection.
Yes-Once the session is terminated, the session will automatically restart.
There is no way for the end-user to stop it from occurring every time it
closes.
Prompt-Once the session is terminated, the user will receive a YES/NO
prompt asking them if they wish to reconnect to the session.
Page 39
Connections | 39
8
Use data compression-
In an environment where system and client
resources are not a concern, data compression can be used to decrease the
amount of data that must be sent across the network.
9
Use disk cache for bitmaps-
Allows graphical objects to be stored in the
local disk cache on the client device.
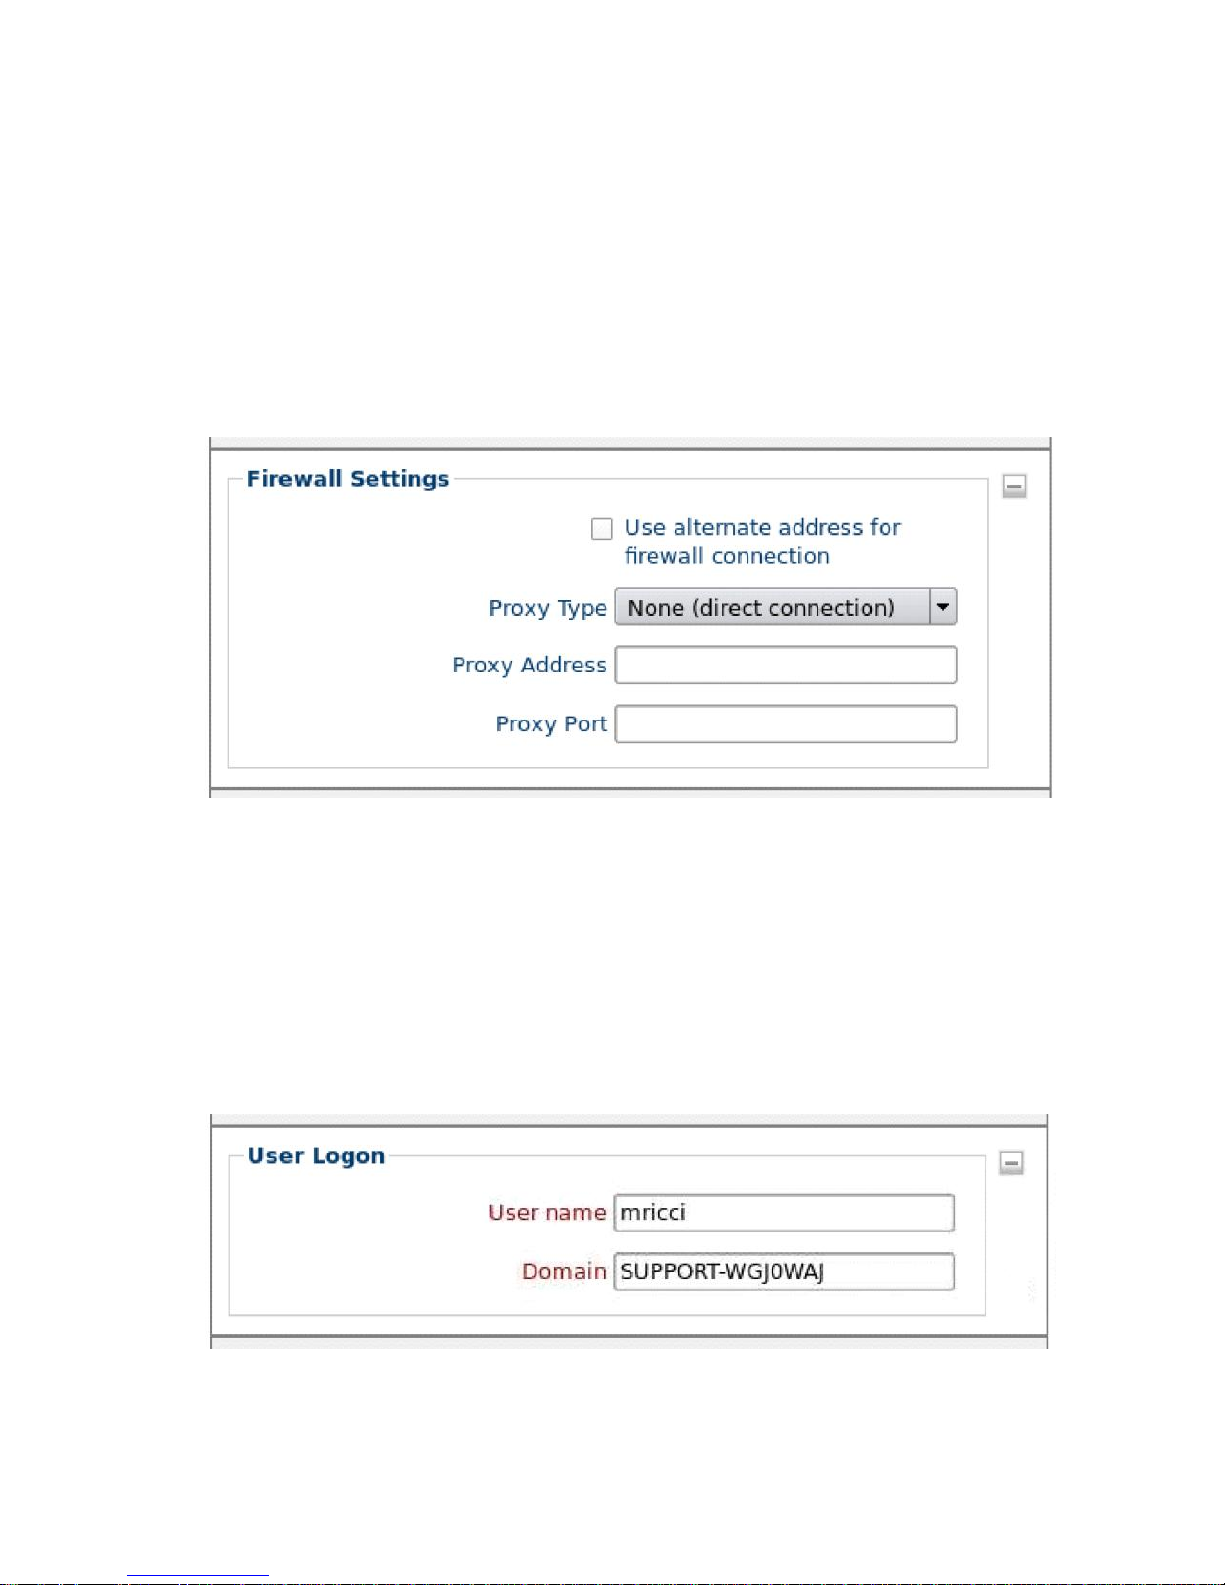
The Firewall Settings Section
Use alternative address for firewall connection-
Mark this checkbox if
you need the ICA session to connect to the Citrix server's external IP
address. The external address for the server is specified as the alternate
address.
Proxy Settings-
If your Citrix environment utilizes a proxy server, then
choose the appropriate type from the
Proxy Type field
. Enter the address
of the proxy server and port number in the
Proxy Address
and
Proxy
Port
fields, respectively.
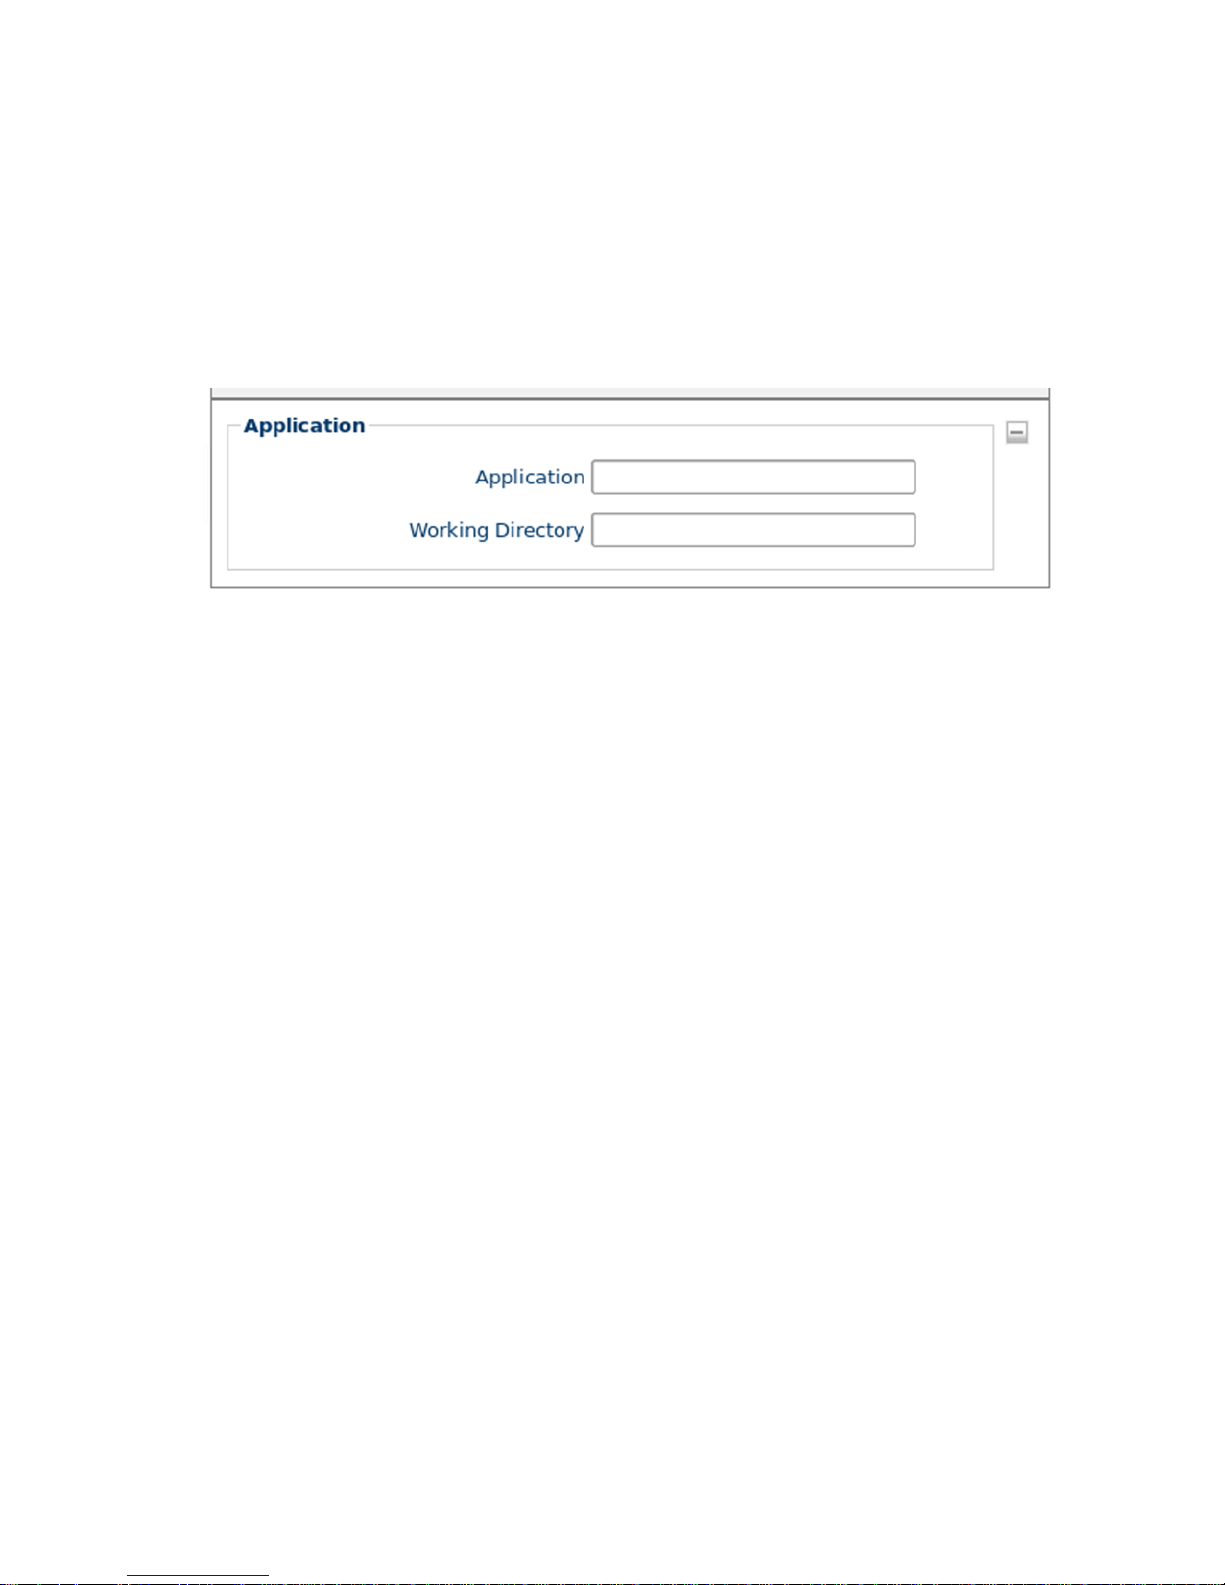
The User Log On Section
Page 40
40 | Connections
User Name-
Specify the name of a user account to log on as. This is an
optional field.
Domain-
Specify the domain to log on to. This is an optional field.
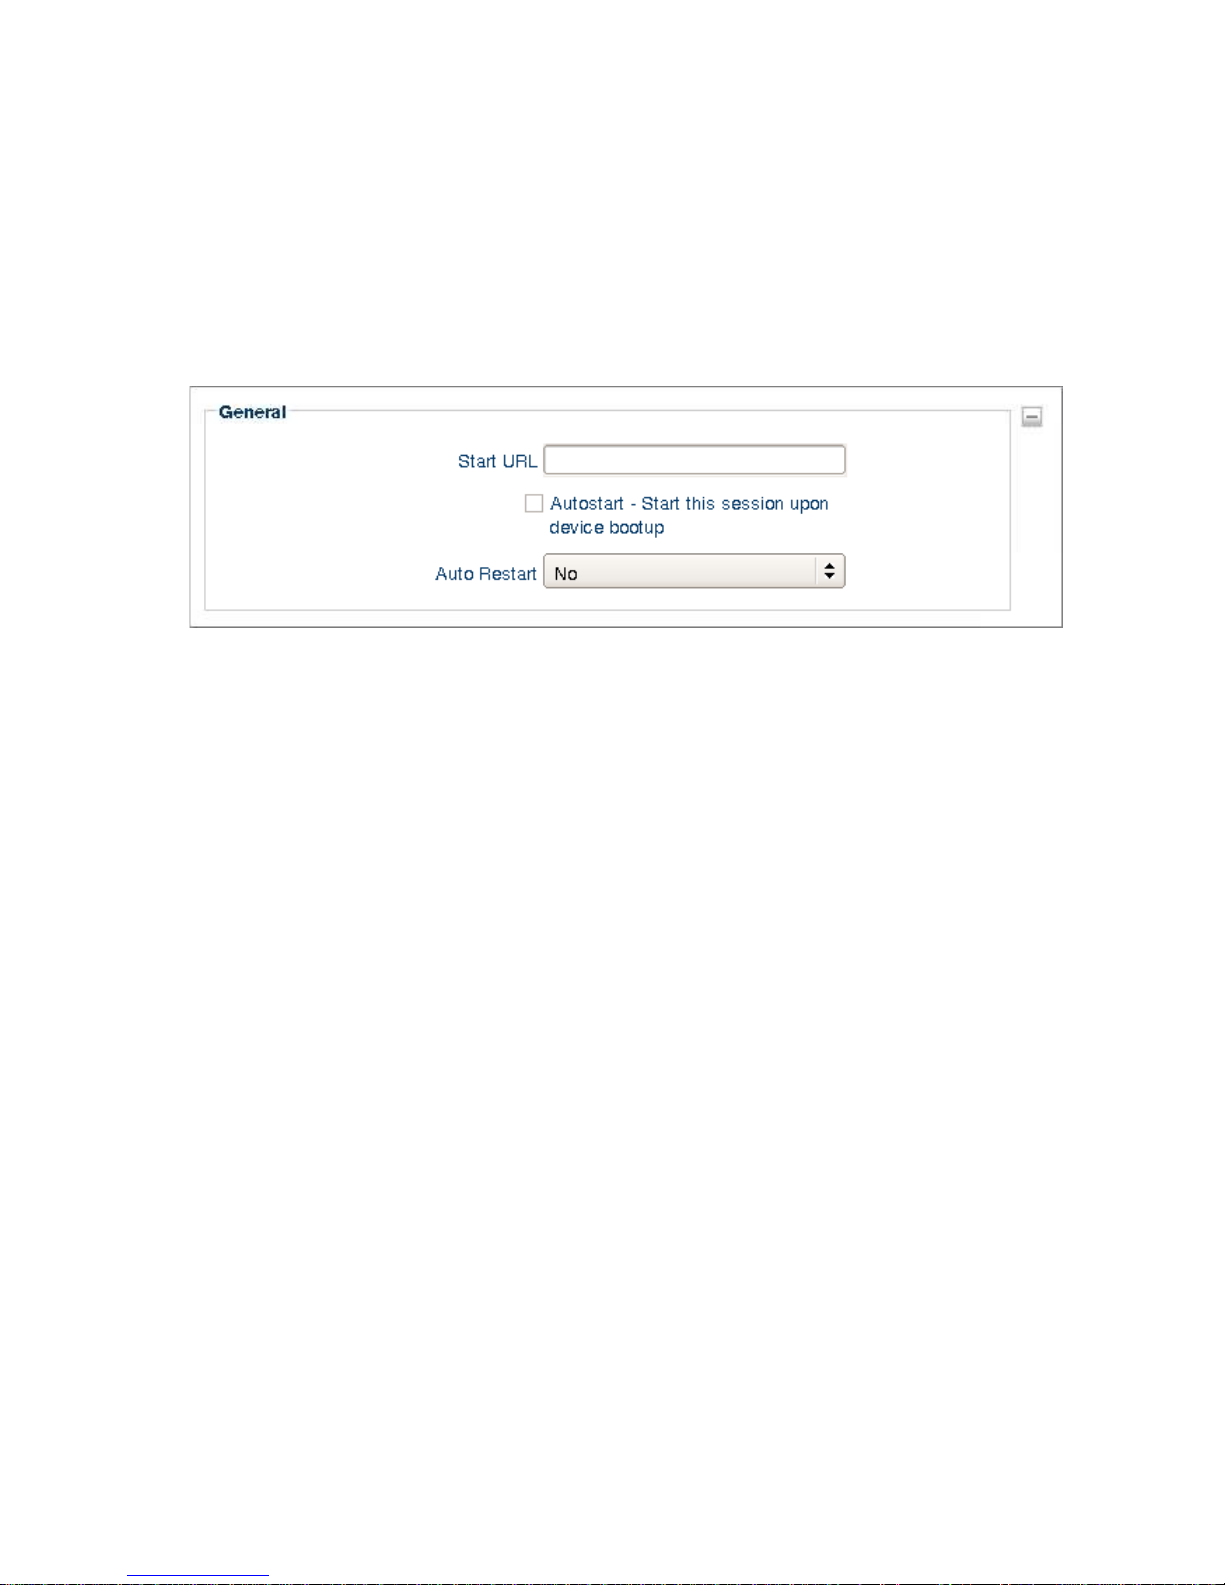
The Application Section
Application-
Specifies the path of the application on the Citrix server to
be automatically launched when the connection is made. This is an
optional field.
Working Directory-
Specifies the working directory used for the
application.
Page 41
Connections | 41
Firefox Web Browser
The following section describes the steps for configuring the local Firefox web
browser on DeTOS.
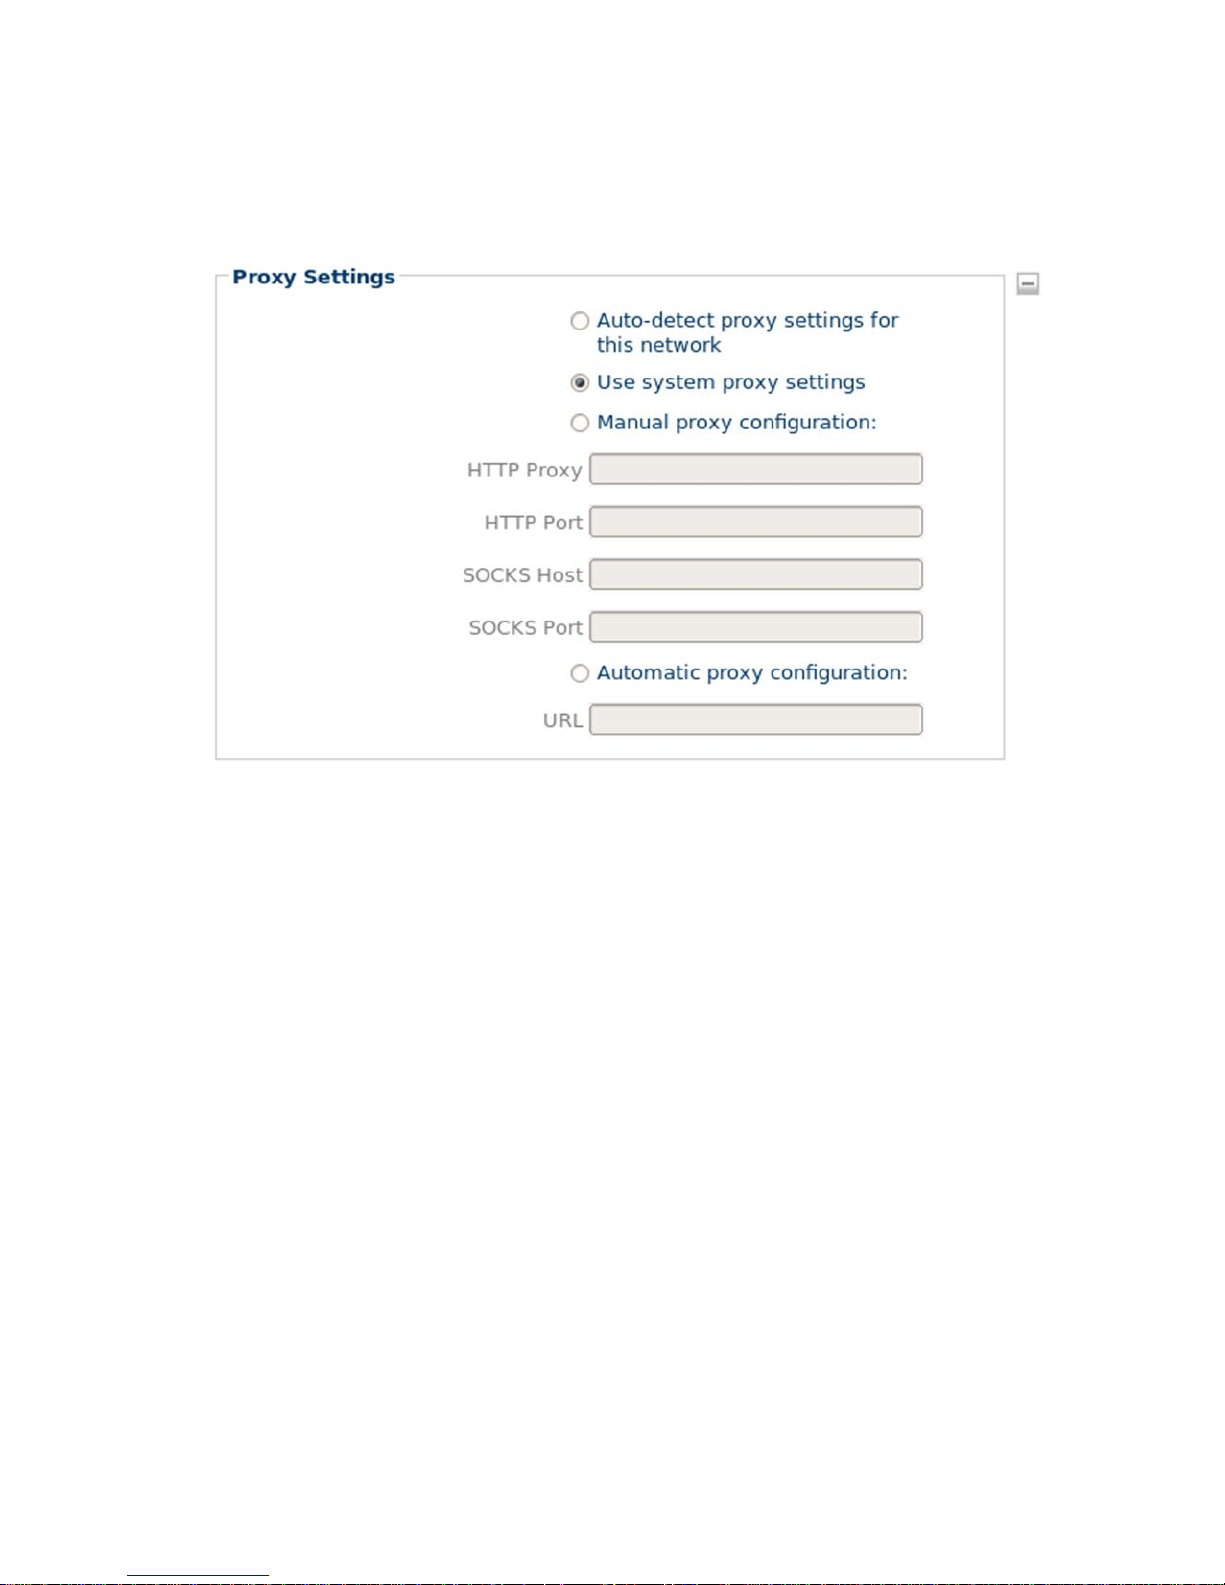
The General Section
Start URL-
Specifies the initial web page to appear when the browser is
first launched.
Autostart-
Enable this checkbox to automatically launch this session after
the thin client completes its boot procedure.
Auto Restart
-Select
Yes
or
Prompt
to automatically restart the
connection.
Yes-Once the session is terminated, the session will automatically restart.
There is no way for the user to stop it from occurring.
Prompt- Once the session is terminated, the user will receive a YES/NO
prompt asking them if they wish to reconnect to the session.
Click the
Apply
button to save the connection. Double-click the Firefox icon
the desktop to launch the browser session. Browser plug-ins for Flash Player
and Java have been pre-installed.
Page 42
42 | Connections
The Proxy Settings Section
Auto-detect proxy settings for this network-
This option will allow
Firefox to automatically detect the proxy settings for your network.
Use system proxy settings-
This option allows you to use the proxy
settings configured for your system.
Manual proxy configuration
-Choose this option if you have more than
one proxy server and you would like to specify which server to use.
Complete these fields:
HTTP Proxy, HTTP Port, SOCKS Host
, and
SOCKS Port
.
Automatic proxy configuration
-If you have a proxy configuration (
.pac
)
file, use this field to specify the URL address to the
.pac
file.
Page 43
Connections | 43
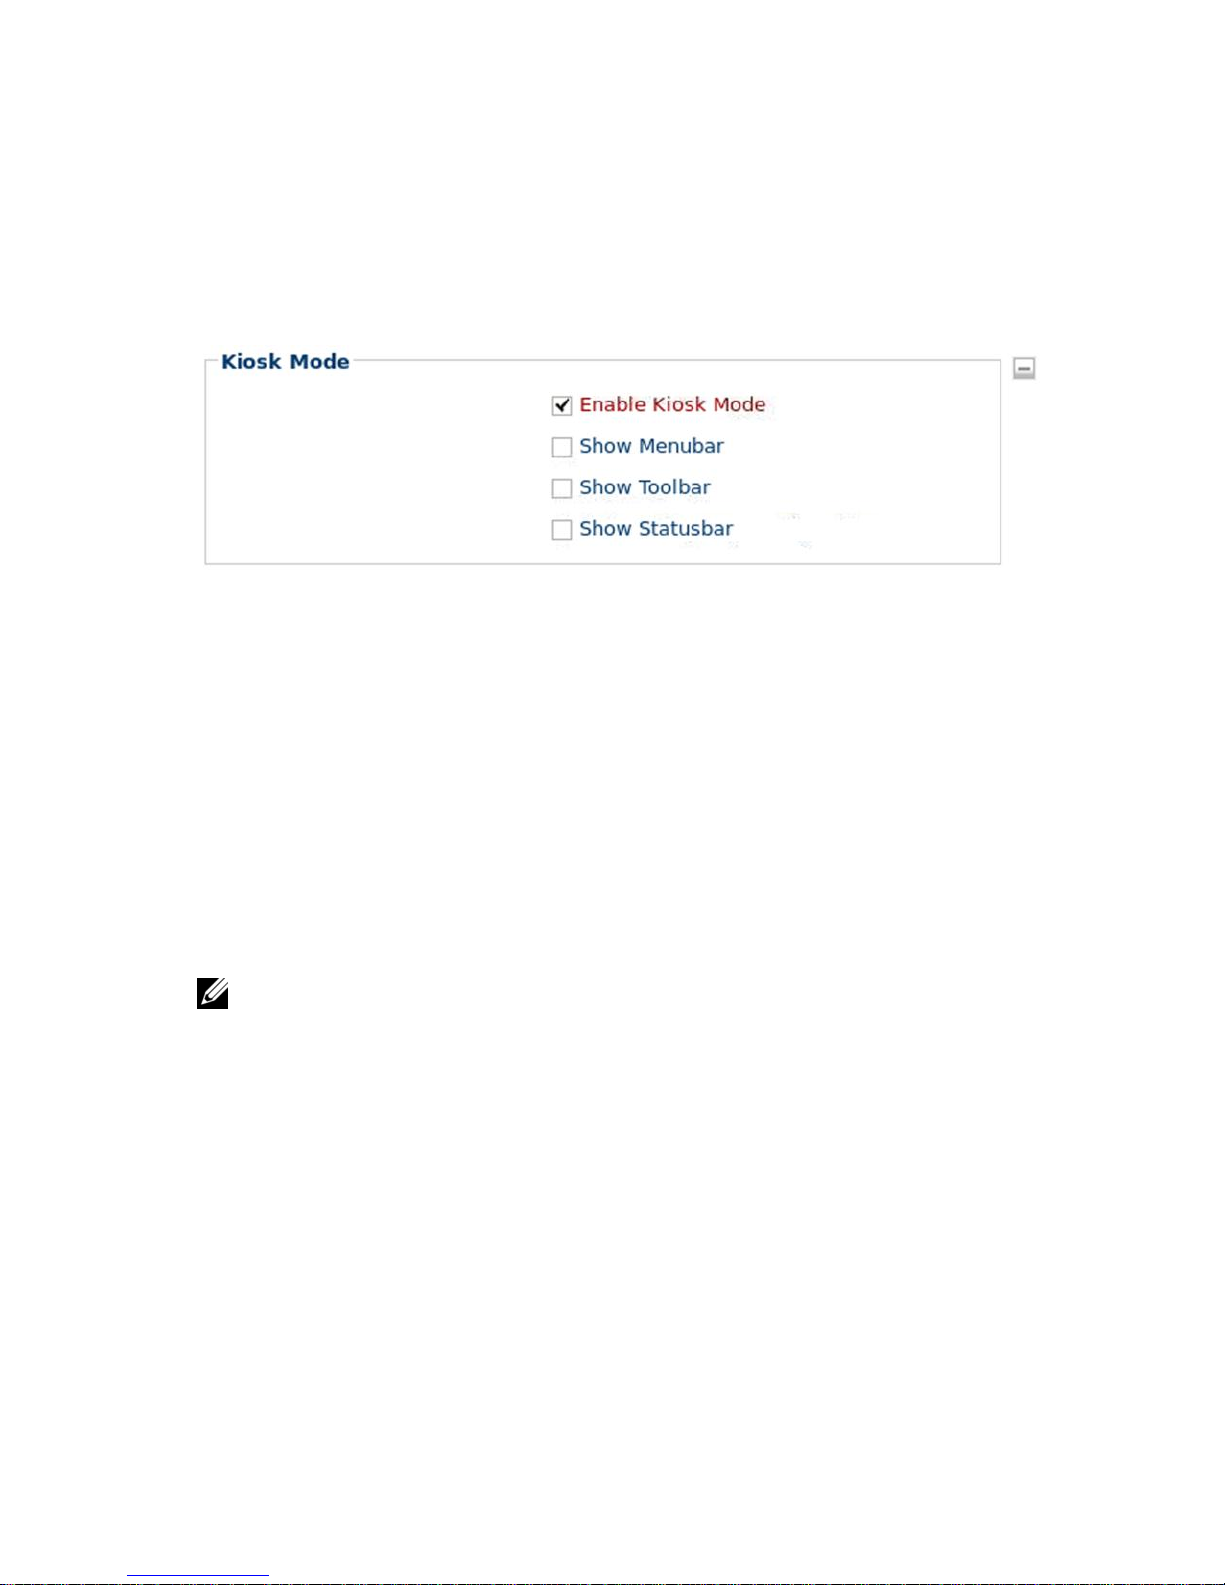
The Kiosk Mode Section
The Firefox web browser in DeTOS 7 includes a Kiosk Mode. When activated
you can hide certain things in the web browser, like the
Address
bar,
Menu
bar,
Tool
bar, or
Status
bar.
Enable Kiosk Mode-
This checkbox must be enabled to even view the
other three options below:
Show Menu Bar-With this box checked, the File, Edit, View, etc.
Menu bar will appear.
Show Toolbar-With this box checked, the user has access to the Address
bar to change websites, and access to the Back, Forward, Stop, and
Refresh buttons in the Toolbar, usually below the Menu bar.
Show Status Bar-Check this box to un-hide the internet status bar below
the webpage. This is the Status bar that shows the progress of websites,
such as Waiting for Address, Connecting to Address, and Done.
NOTE:
To use Kiosk Mode correctly, make sure you have a Starting URL in the
requested field. Launching Firefox in Kiosk Mode will automatically launch a Full Screen,
inescapable Firefox session for end-users with Internet-ONLY access. The only way to
leave the browser is to shut down the thin client.
Page 44
44 | Connections
No Machines
The following section describes the steps for configuring a No Machine
connection on DeTOS.
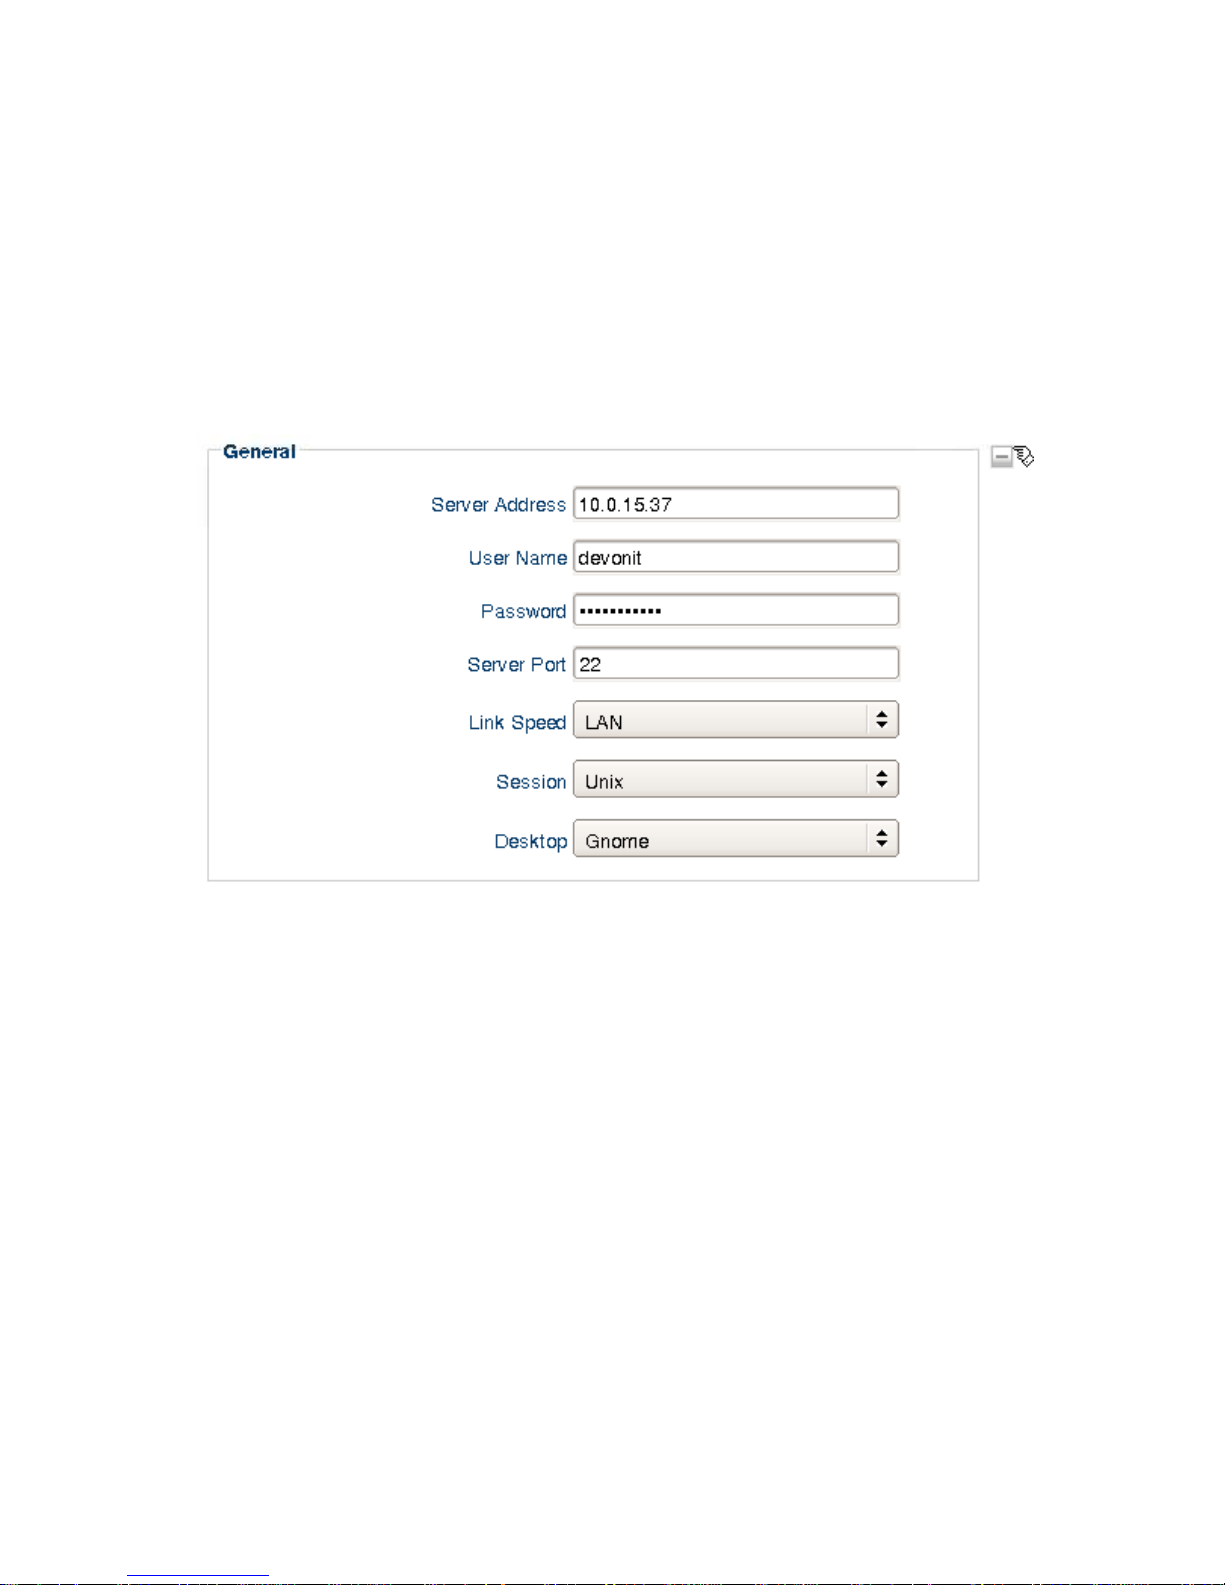
The General Section
1
Server Address-
Enter the IP Address of your No Machine server.
2
Credentials-
Enter the User Name and Password for your No Machine
session.
3
Server Port-
This is the port number needed to connect properly to the
No Machine session.
4
Link Speed-
Choose a connection speed (this is optional).
5
Session-
Select the desired session from the following choices:
Unix- Launch an X11 desktop such as KDE, Gnome, XDM, or CDE. Or
you can select Custom to launch a specific single application in a window.
Shadow-Attach to and shadow an already running X11 session to see the
display or desktop share.
Page 45
Connections | 45
Windows-Run an rDesktop session on a Windows Terminal Server.
VNC-Run a VNC session on a particular VNC server.
Depending on your selected session, another drop box may or may not appear
requesting additional information. If launching a Unix session, you will have to
confirm which Desktop to connect to. If you are launching a Windows session,
you will need to supply an IP address and the Domain name. If you are
launching a VNC session, you will need to supply the VNC IP Address and
Display Screen. If connecting to a Shadow No Machine connection, you
shouldn't have to supply any other information than the fields above.
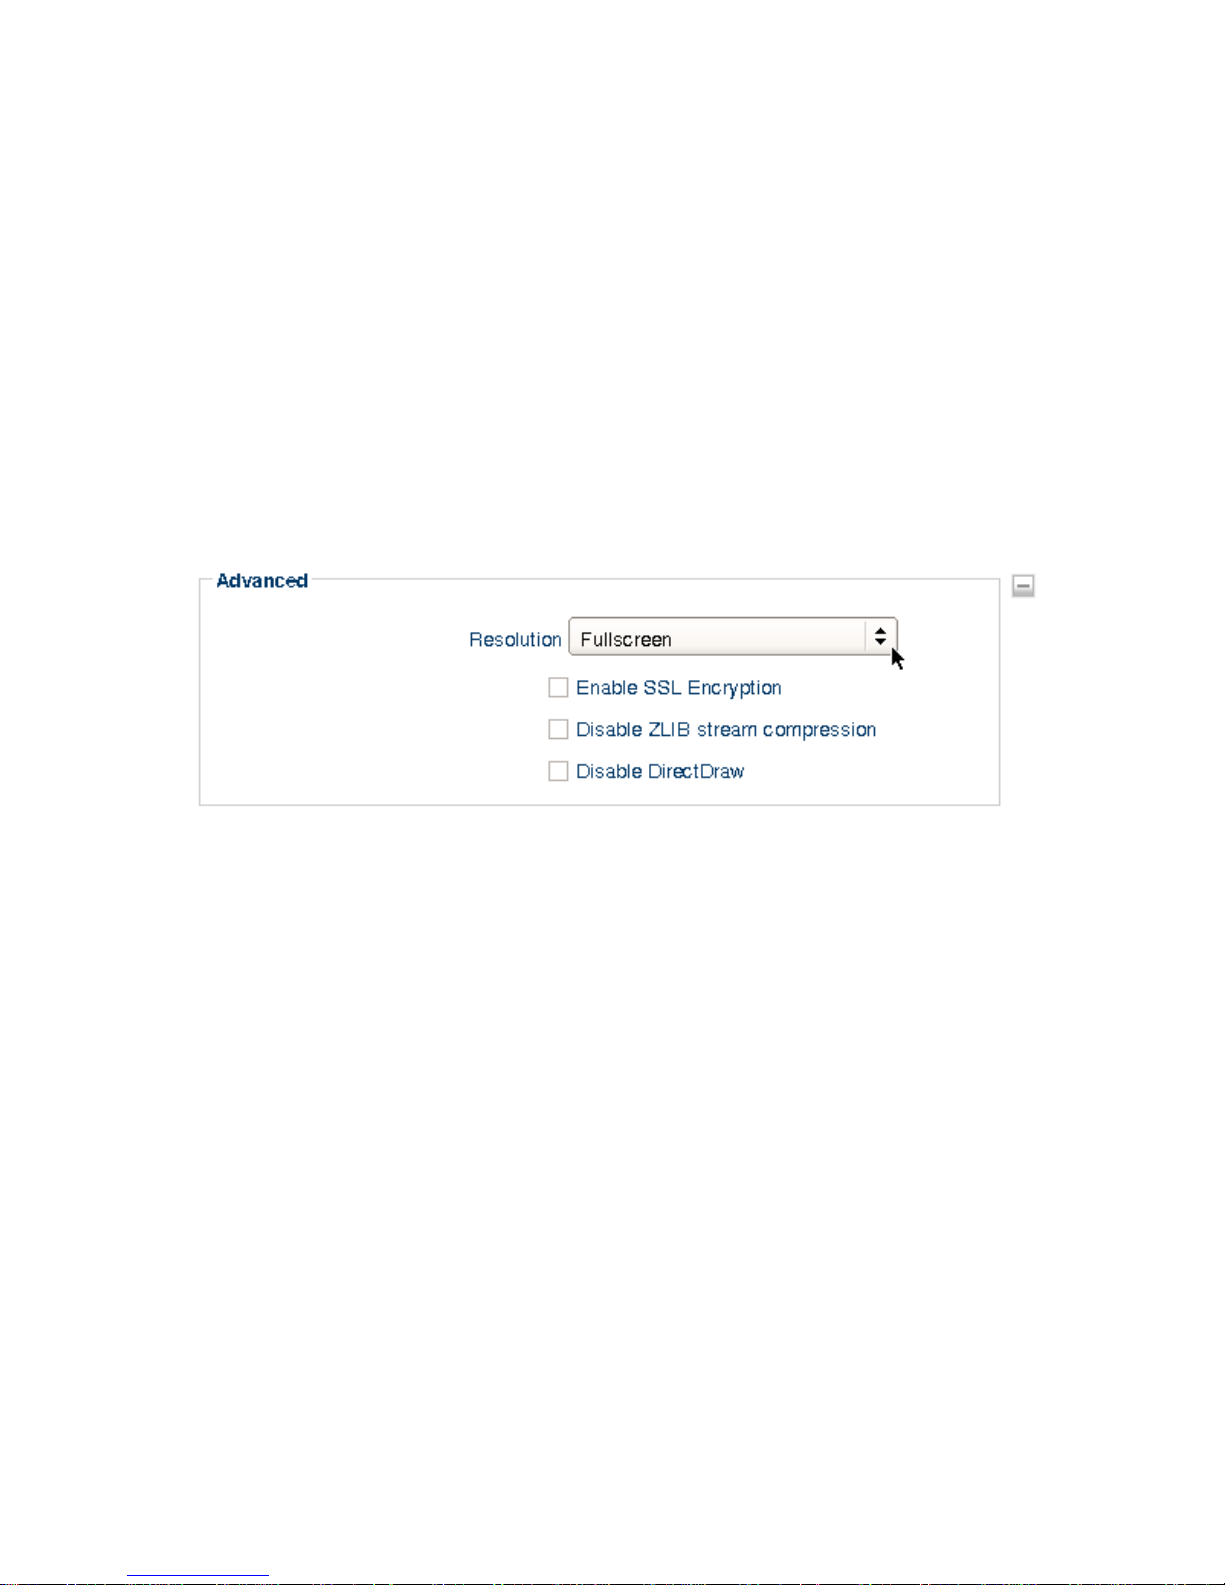
The Advanced Section
Resolution+
This dropdown allows you to choose from a
Full Screen
mode or several fixed sizes.
Enable SSL Encryption-
By default, this box will be checked. Un-
checking this box will disable
SSL Encryption
.
Disable ZLIB Stream Connection
-Checking this box disables ZLIB
stream compression. This removes the overhead associated with
compression VPN network traffic, lowering server processor usage.
Disable Direct Draw
-This option is available for the No Machine client
for Windows. This disables the use of the DirectDraw engine in favor of
the GDI engine. This can resolve later conflicts with other Windows
applications that may use DirectDraw. This also results in a much better
performance using Windows Vista.
Page 46
46 | Connections
VMware View
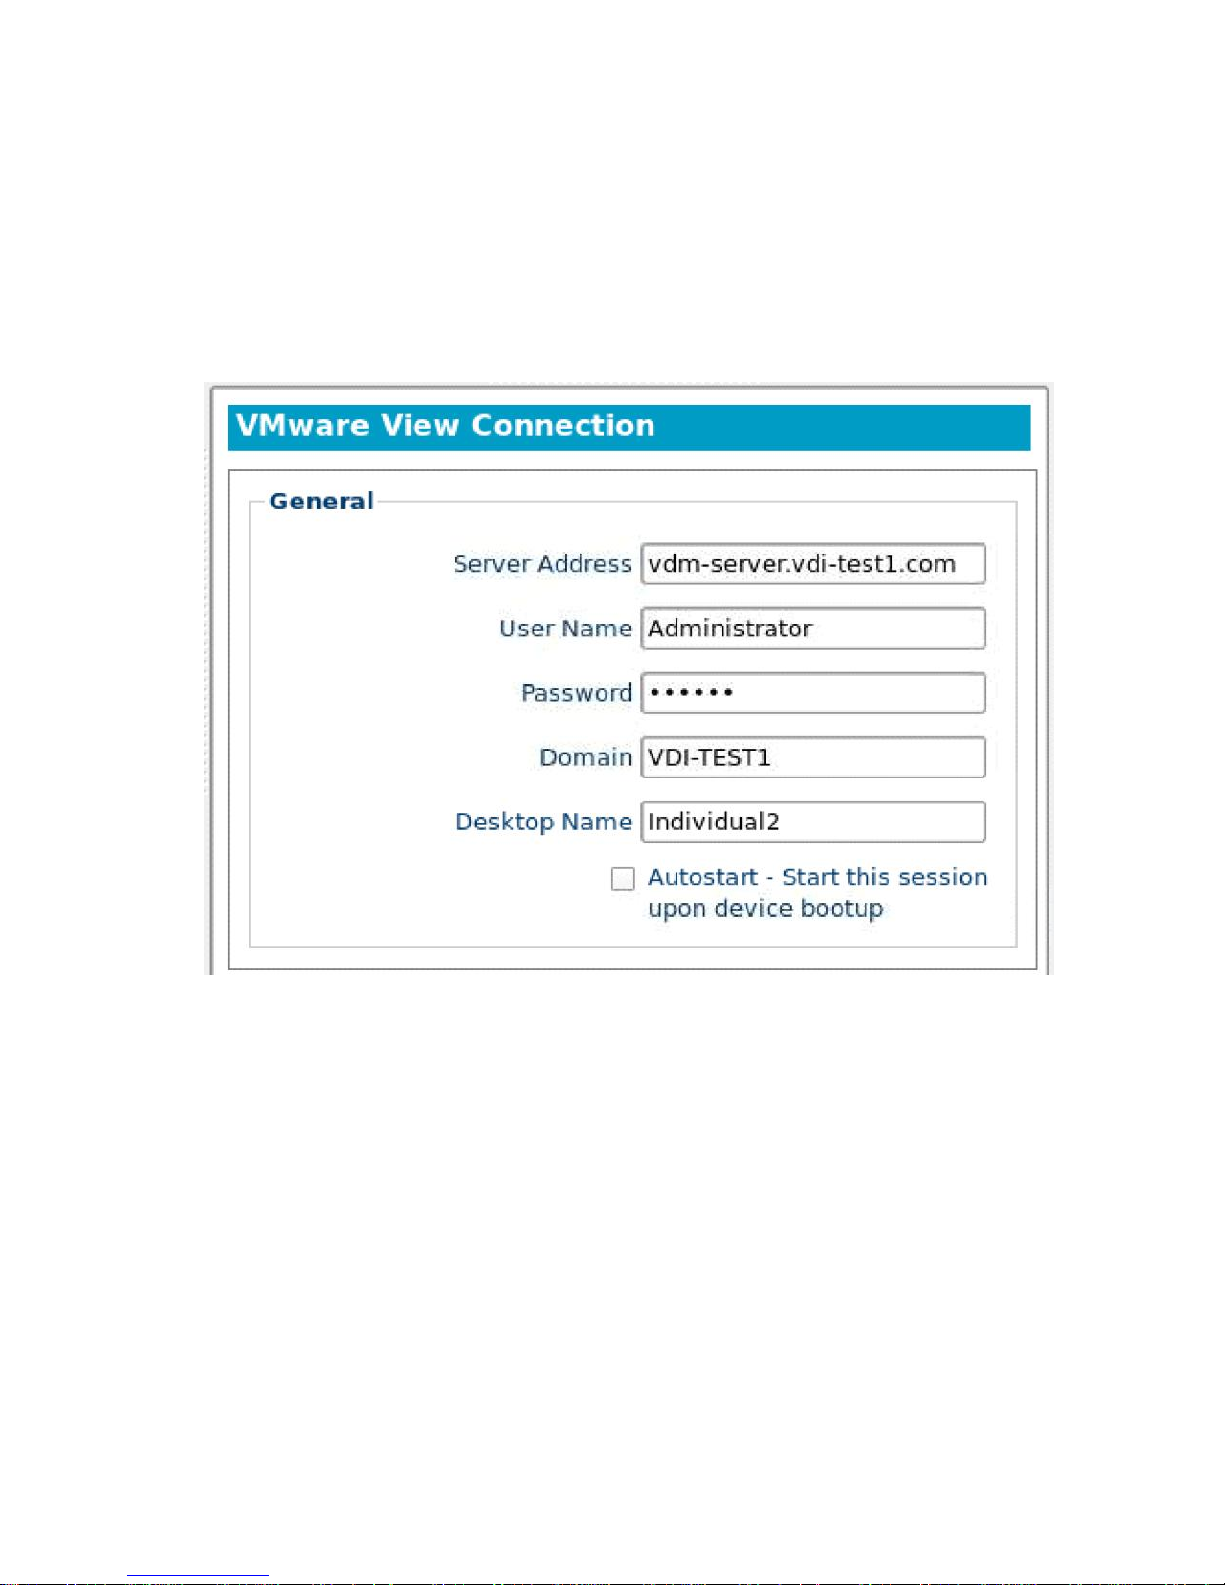
The VMware View client allows you to connect to a VMware server, which in
turn, provides the end-user with their own virtual desktop session. The
following section describes the basic steps for configuring the View Client in
DeTOS.
1
Server Address-
Enter the Hostname or IP address of your VMware
View Broker.
2
Credentials-
Specify the User Name and Password of a user account you
wish to log on as.
3
Domain-
Specifies the domain to log on to.
4
Desktop Name-
If the user of this thin client should always connect to the
same desktop, then you may consider entering its name into this field. If
you choose to leave the field empty, then the user will be prompted to
select an available desktop at the time they connect to the VMware View
server.
Page 47

Connections | 47
5
Autostart:
-Enable this checkbox to automatically launch this session
after the thin client completes its boot procedure.
6
Auto Restart:
Select
Yes
or
Prompt
to automatically restart the
connection.
Yes-Once the session is terminated, the session will automatically restart.
There is no way for the user to stop it from occurring.
Prompt-Once the session is terminated, the user will receive a YES/NO
prompt asking them if they wish to reconnect to the session.
Troubleshooting Tips for VMView Connection
If you set your session to full screen but the display covers only a fraction
of the entire screen, then your allocated RAM for the virtual desktop may
need to be set a little higher.
If certain features like foreign keymaps, CD-ROM, USB stick, or printer
redirection are not passing through to the virtual desktop session, check if
your VM is at the correct version. You can download the latest agent
software executables at VMware's website at:
http://www.vmware.com/downloads.
If you plan to use USB flash drives within your session, it is best to use
sticks formatted in FAT or NTFS. Long delays sometimes occur when
using flash drives formatted in FAT32. Other USB troubleshooting tips
can be found at the following VMware site:
http://kb.vmware.com/kb/1026991.
Page 48
48 | Connections
X11 Connection
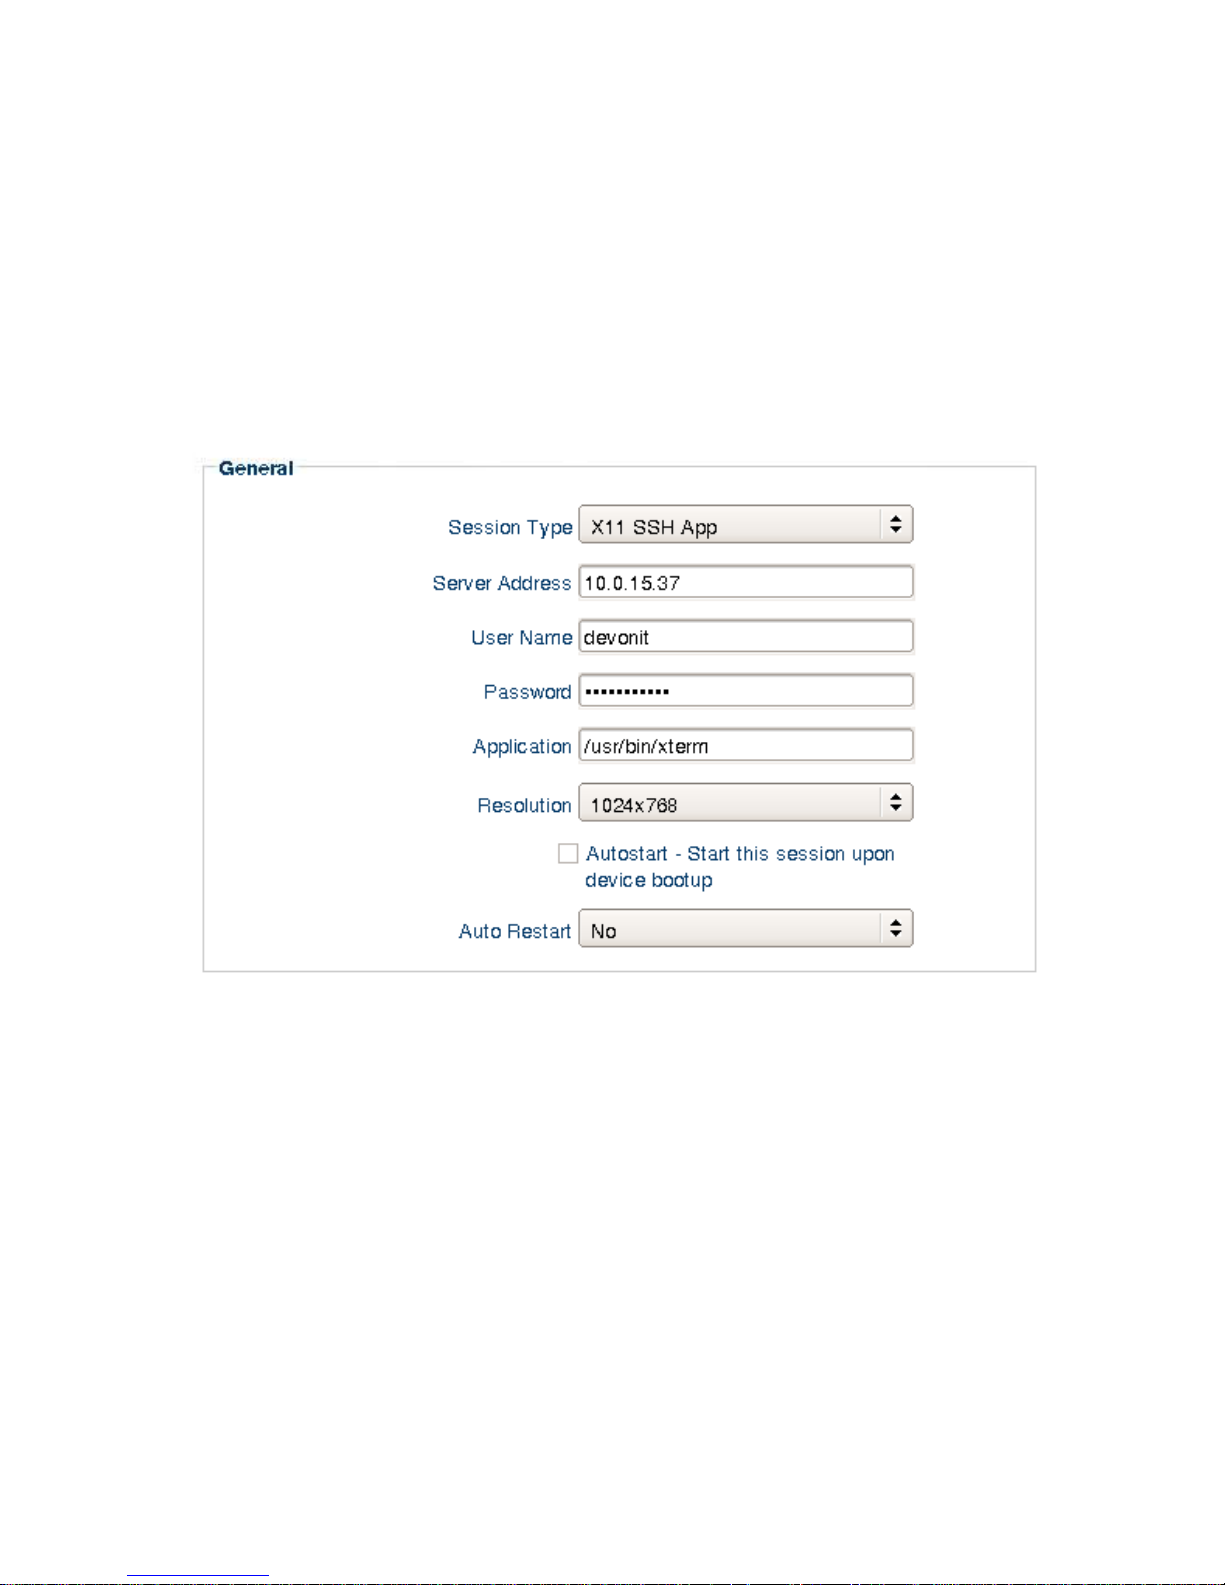
The X11 client allows you to connect to an X11 server, which provides the user
with their own virtual desktop session. The following section describes the
basic steps for configuring the X11 connection in DeTOS.
1
Session Type-
Choose from the single
SSH App
type or the
XDMCP
connection.
2
Server Address-
Specify which IP address is the X11 server.
3
Credentials-
Specify the User Name and Password of a user account you
wish to log on as.
4
Application-
This is the file path of the application if you are planning on
launching a single application within DeTOS, using the X11 connection.
This is only available when choosing the
SSH App
session type.
5
Resolution-
Choose the resolution for your connection, ranging from full
screen to various fixed resolutions.
Page 49
Connections | 49
6
Autostart-
Enable this checkbox to automatically launch this session after
the thin client completes its boot procedure.
7
Auto Restart-
Select
Yes
or
Prompt
to automatically restart the
connection.
Yes-Once the session is terminated, the session will automatically restart.
There is no way for the user to stop it from occurring.
Prompt-Once the session is terminated, the user will receive a YES/NO
prompt asking them if they wish to reconnect to the session.
NOTE:
Not all of these fields will be available to you if you chose
XDMCP
as the
Session
Type
. You will not be required to supply credentials and there will be no application line.
By default,
SSH App
is the
Session Type
.
rDesktop
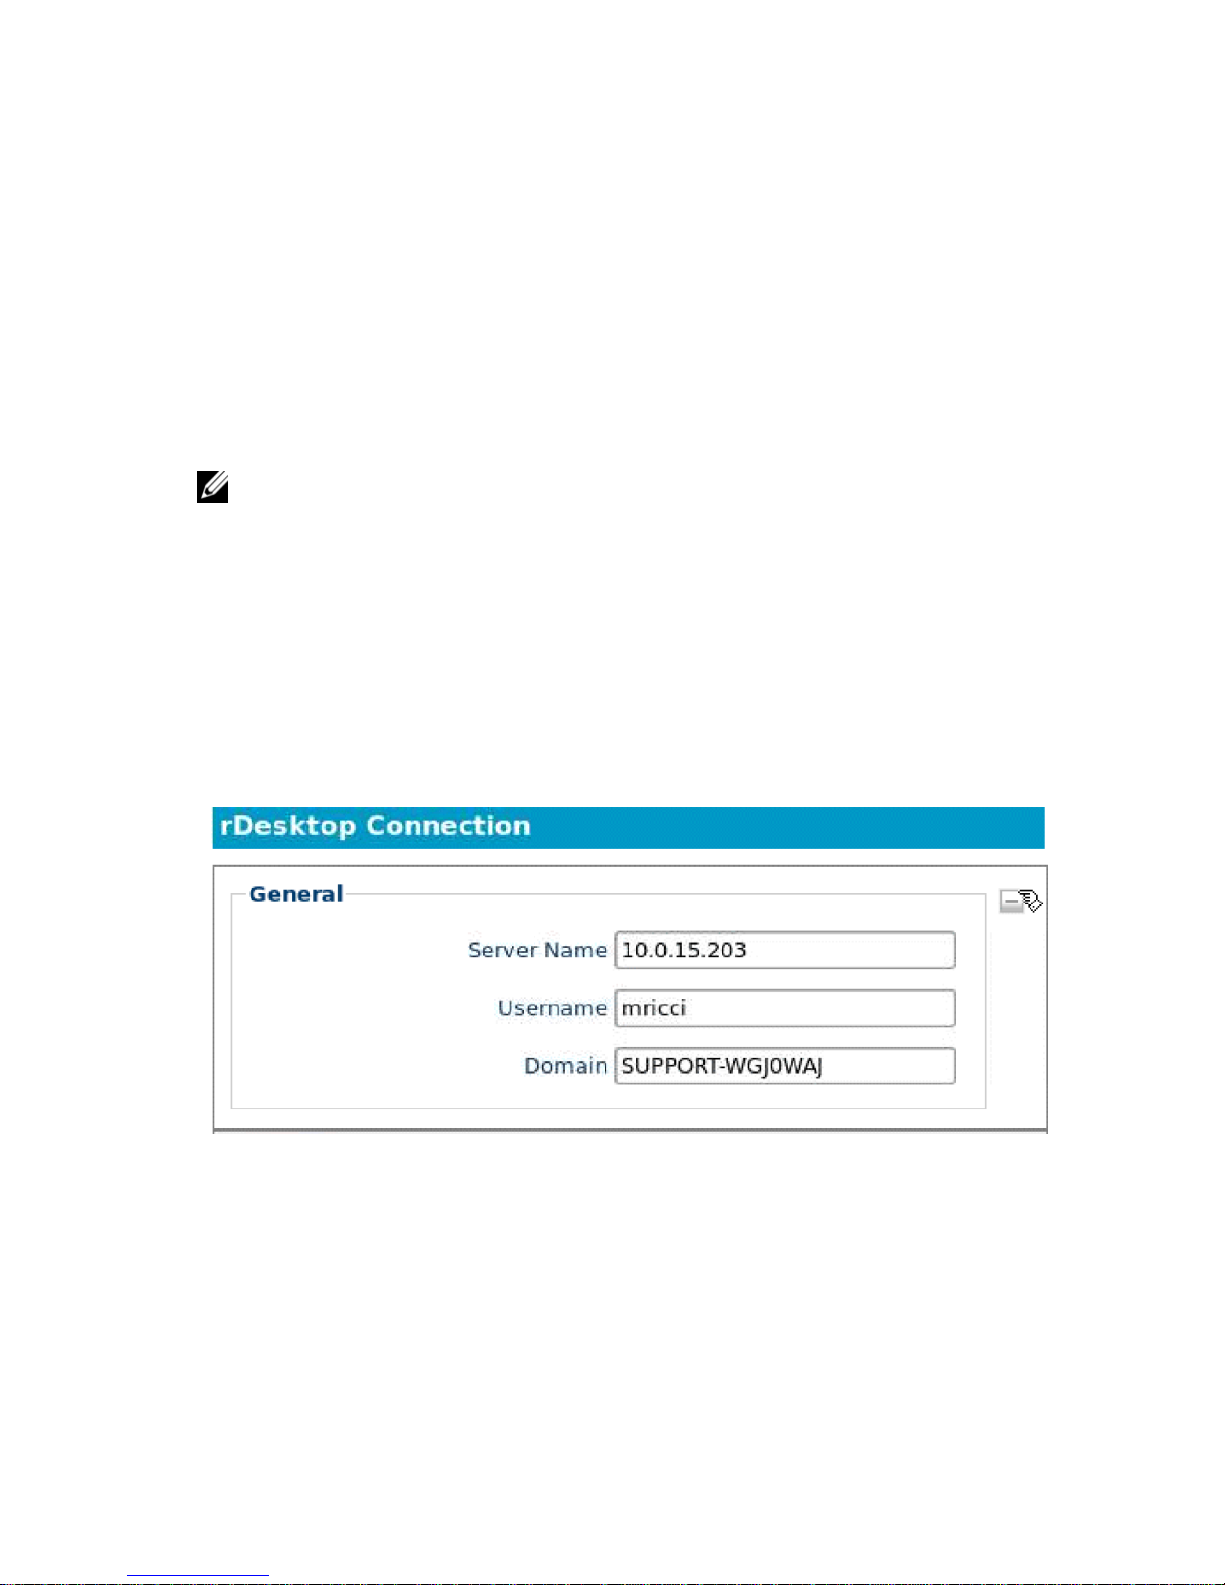
The General Section
The first section displayed for an rDesktop session, is named General. This
form panel will already be expanded for you.
1
Server Name-
Enter the hostname or IP address of the Windows
Terminal Server.
2
User Name-
Specifies the name of a user account to log in as. This is
optional.
3
Domain-
Specifies the domain to log on to.
Page 50
50 | Connections
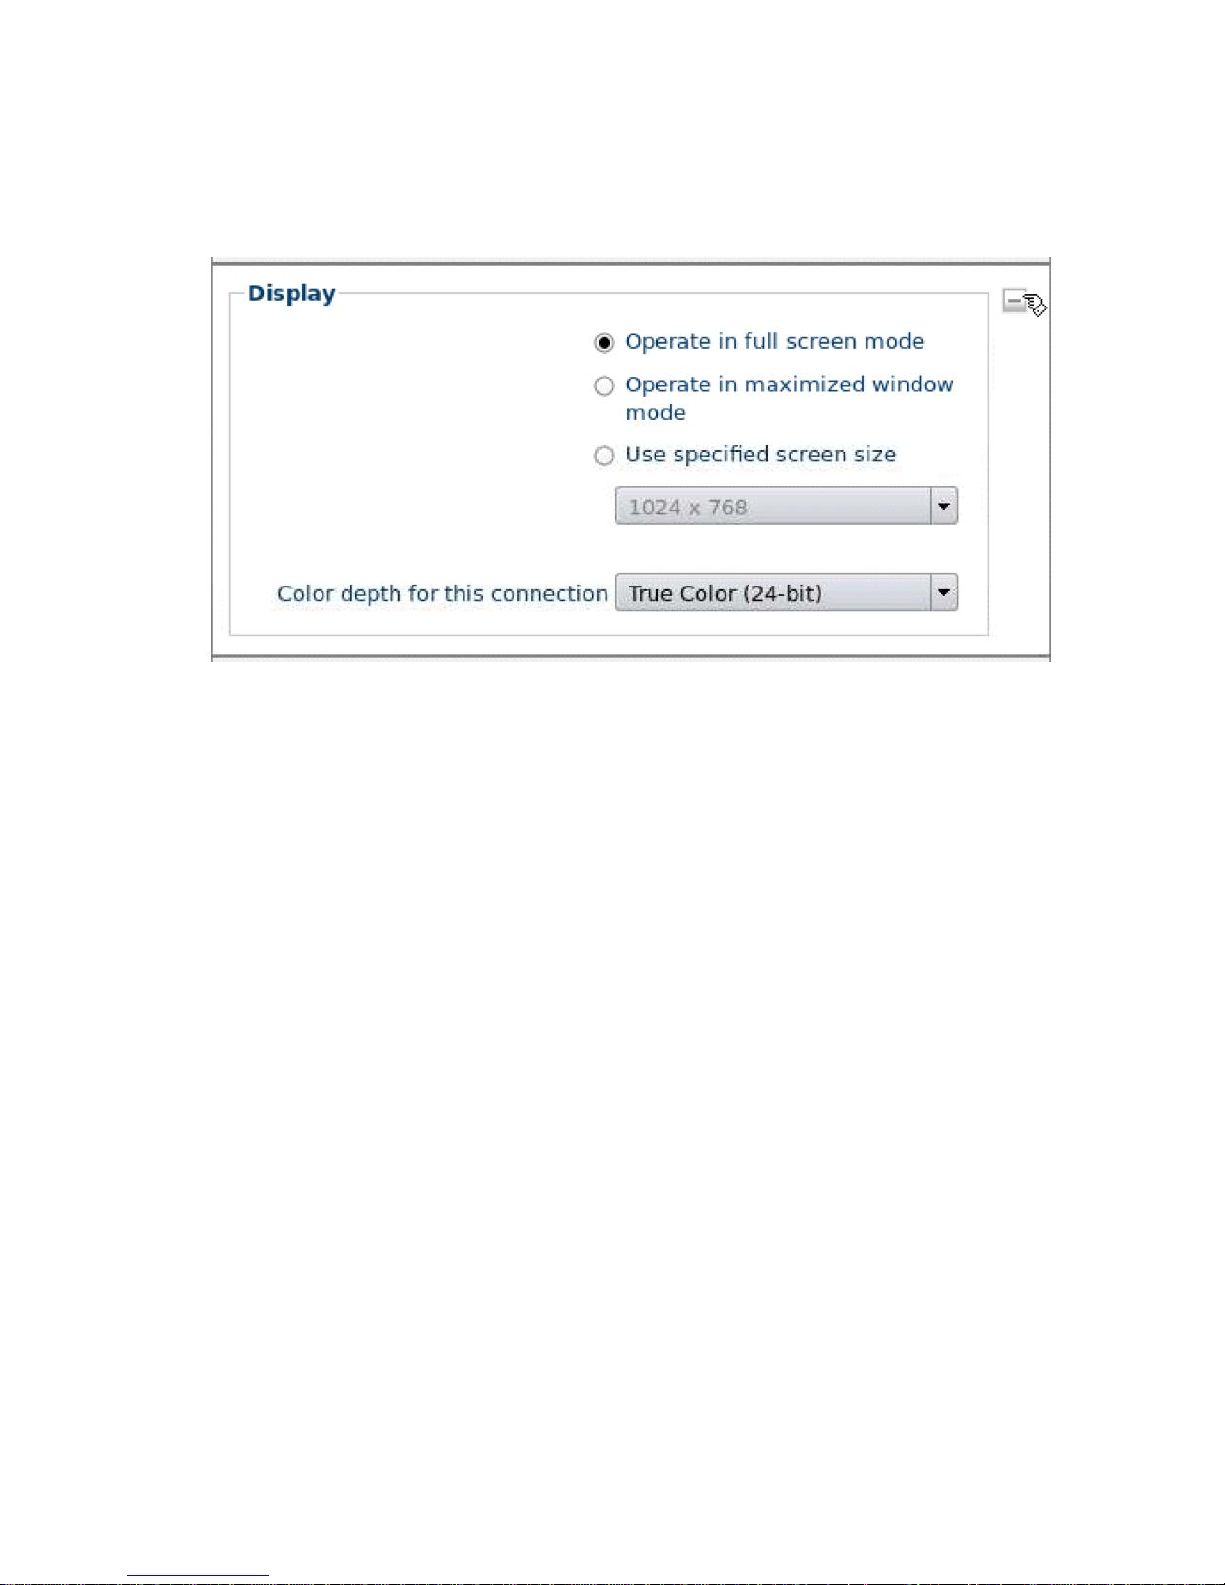
The Display Section
Operate in full screen mode
-The RDP session will take up your entire
display and will not allow minimization.
Operate in maximized window mode
-This option will display the RDP
session in a window within DeTOS. You will be able to maximize and
minimize this window if you want.
Use specified screen size
-The RDP session will launch in a fixed sized
window, specified by the dimensions chosen in the dropdown list below.
You can ONLY minimize this window, the fixed size is the MAX size
allowed.
Color depth for this connection
-Select the desired color depth for this
RDP session.
Page 51
Connections | 51
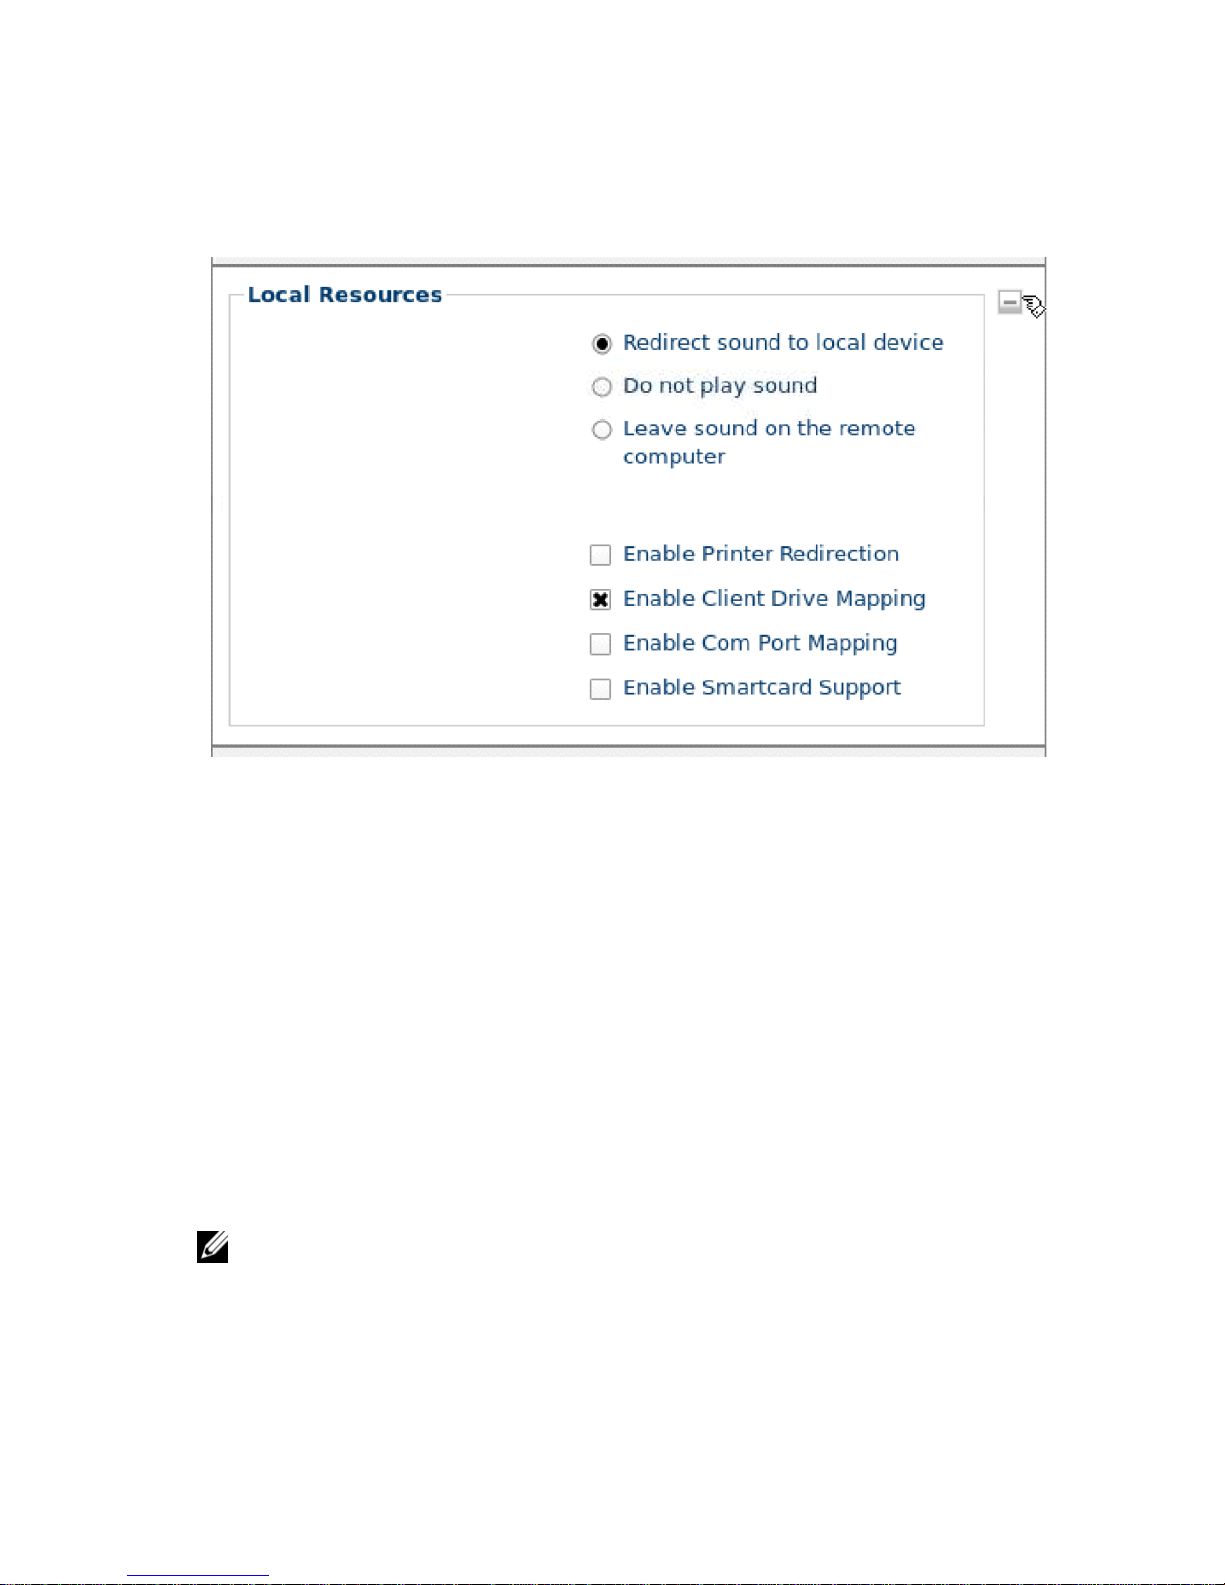
The Local Resources Section
Sound Redirection Options
-By default, sound from the server will
redirect to the local thin client. If you do not want sound to be sent to the
local device, then select either the
Do not play sound
or Lea
ve sound
on the remote thin client
radio buttons below
Redirect sound to local
device
(selected by default).
Enable Printer Redirection
-Mark this checkbox to redirect printing to a
printer attached the local terminal.
Enable Client Drive Mapping
-Allows the user plug USB Flash Drives
locally into the terminal and access the contents of the drive via the RDP
session.
Enable Com Port Mapping
-Redirects serial devices on your terminal to
the server.
Enable Smartcard Support-
Specifies whether redirection of Smart
Cards is permitted during server authentication.
NOTE:
To correctly set up Printing, make sure you have also entered fields in the
Printer
Name and Driver Name
fields in the
Control Panel
. This can be found in the
Printer
section, under
System Settings
.
Page 52
52 | Connections
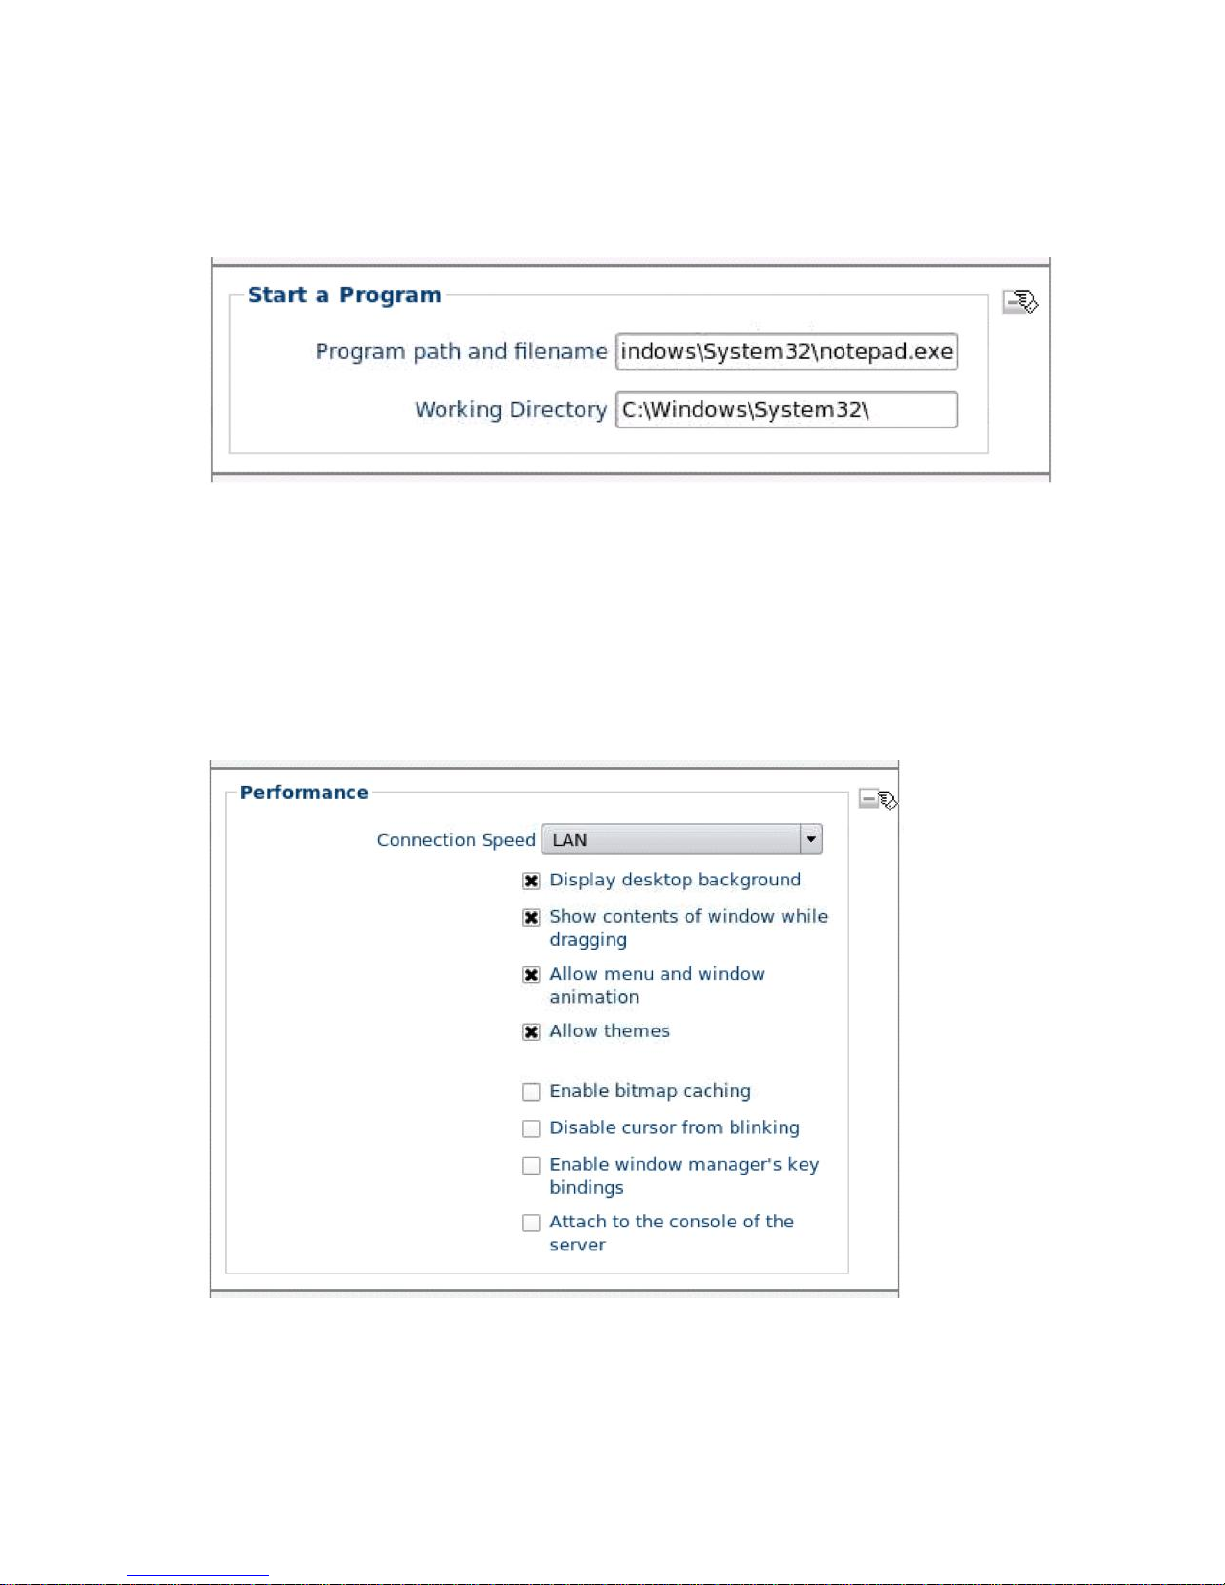
The Start a Program Section
Program path and filename
-Specifies the path of the application on the
Terminal server to be automatically launched when the connection is
made. This will launch the application in a window within DeTOS, not
rDesktop.
Working Directory-
Specifies the working directory used for the
application.
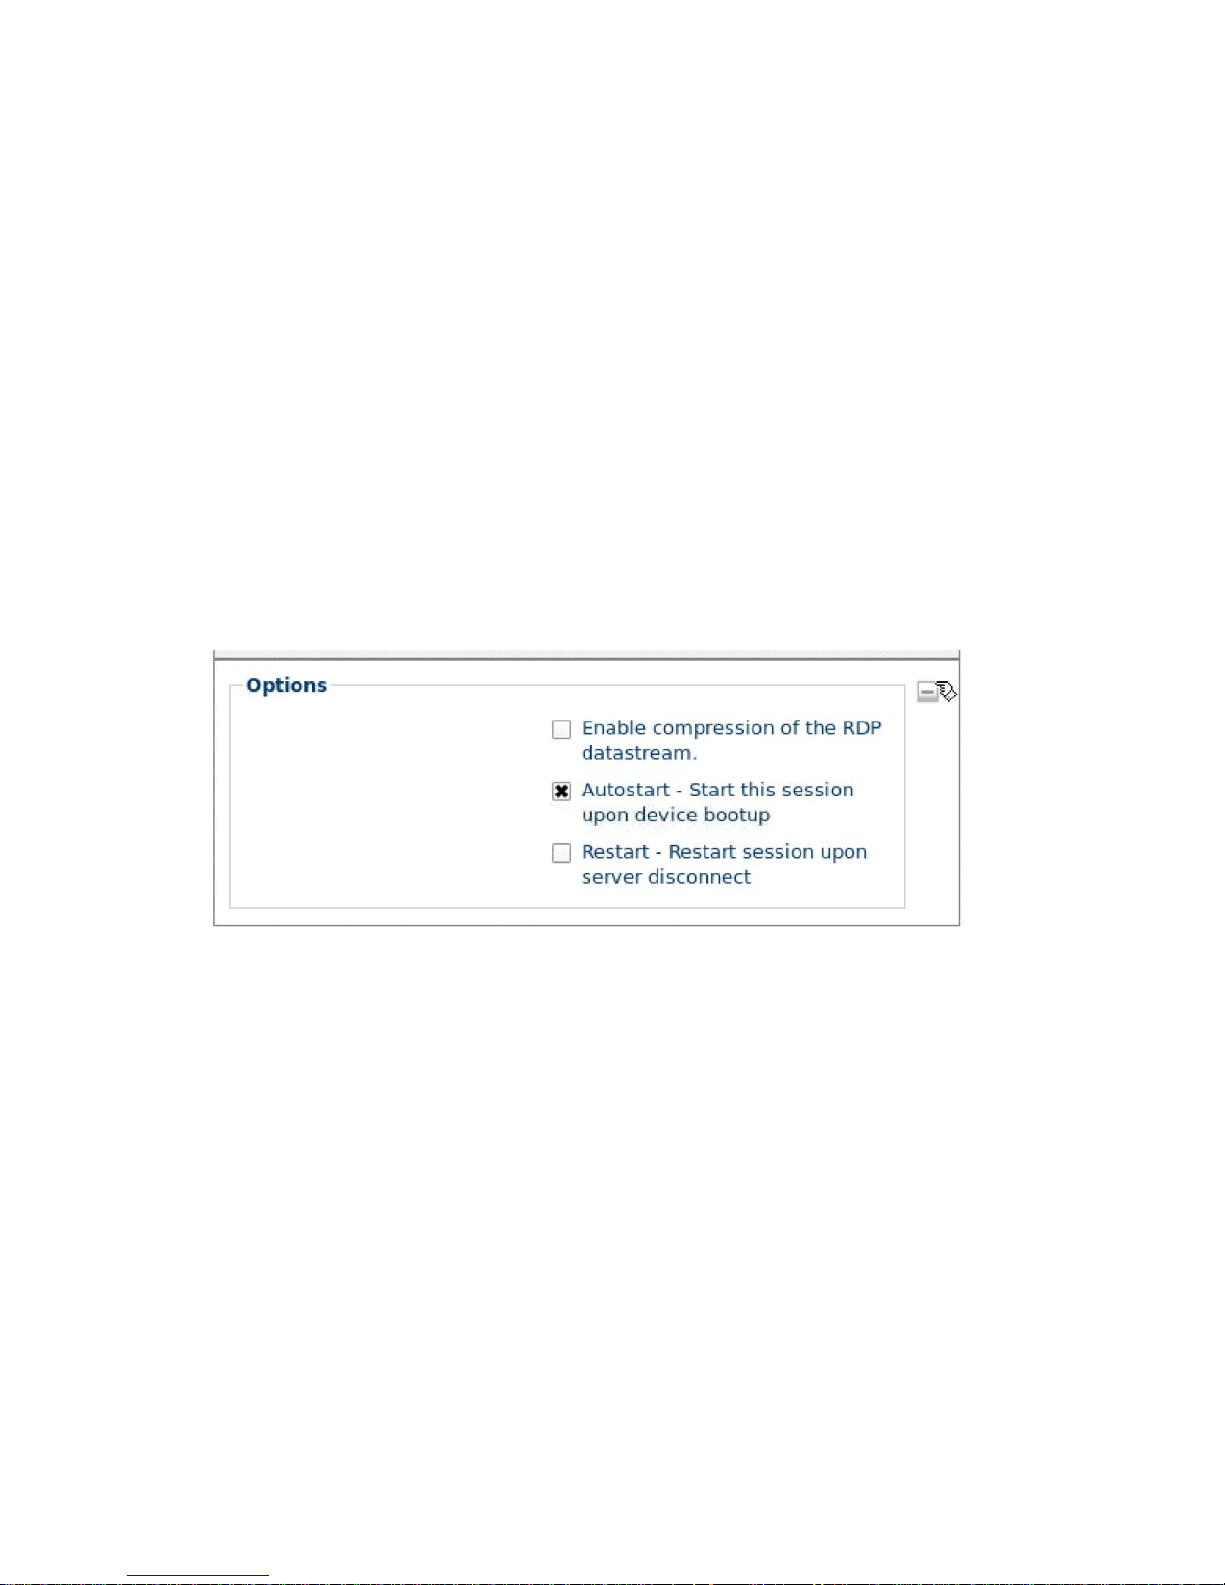
The Performance Section
Page 53
Connections | 53
Connection Speed-
Specifies the RDP Experience. As you change
connection options in this dropdown box, associated behaviors in the
checkboxes below will be selected or deselected accordingly.
Enable bitmap caching-
Enable caching of bitmaps to disk (persistent
bitmap caching).
Disable cursor from blinking-
Indicates that cursor blinking should be
disabled during the RDP session.
Enable window manager's key bindings-
By default rDesktop attempts
to grab all keyboard input when it is in focus.
Attach to the console of the server-
The session will connect to the
console of the server (requires Windows Server 2003 or newer).
The Options Section
Enable compression of the RDP DataStream-
In an environment where
system and client resources are not capable, data compression can be used
to decrease the amount of data that must be sent across the network.
Autostart-
Enable this checkbox to automatically launch this session after
the thin client completes its boot procedure.
Auto Restart-
Select
Yes
or
Prompt
to automatically restart the
connection.
Yes-Once the session is terminated, the session will automatically restart.
There is no way for the user to stop it from occurring.
Prompt-Once the session is terminated, the user will receive a YES/NO
prompt asking them if they wish to reconnect to the session.
Page 54
54 | Connections
Kaviza
Your thin client running DeTOS comes pre-configured with Java Web Start and
Citrix that enables users to creation connections to Kaviza servers. Since the
client does not reside natively on the thin client, you will need a web address
that points to your
kavizaclient.jnlp
file.
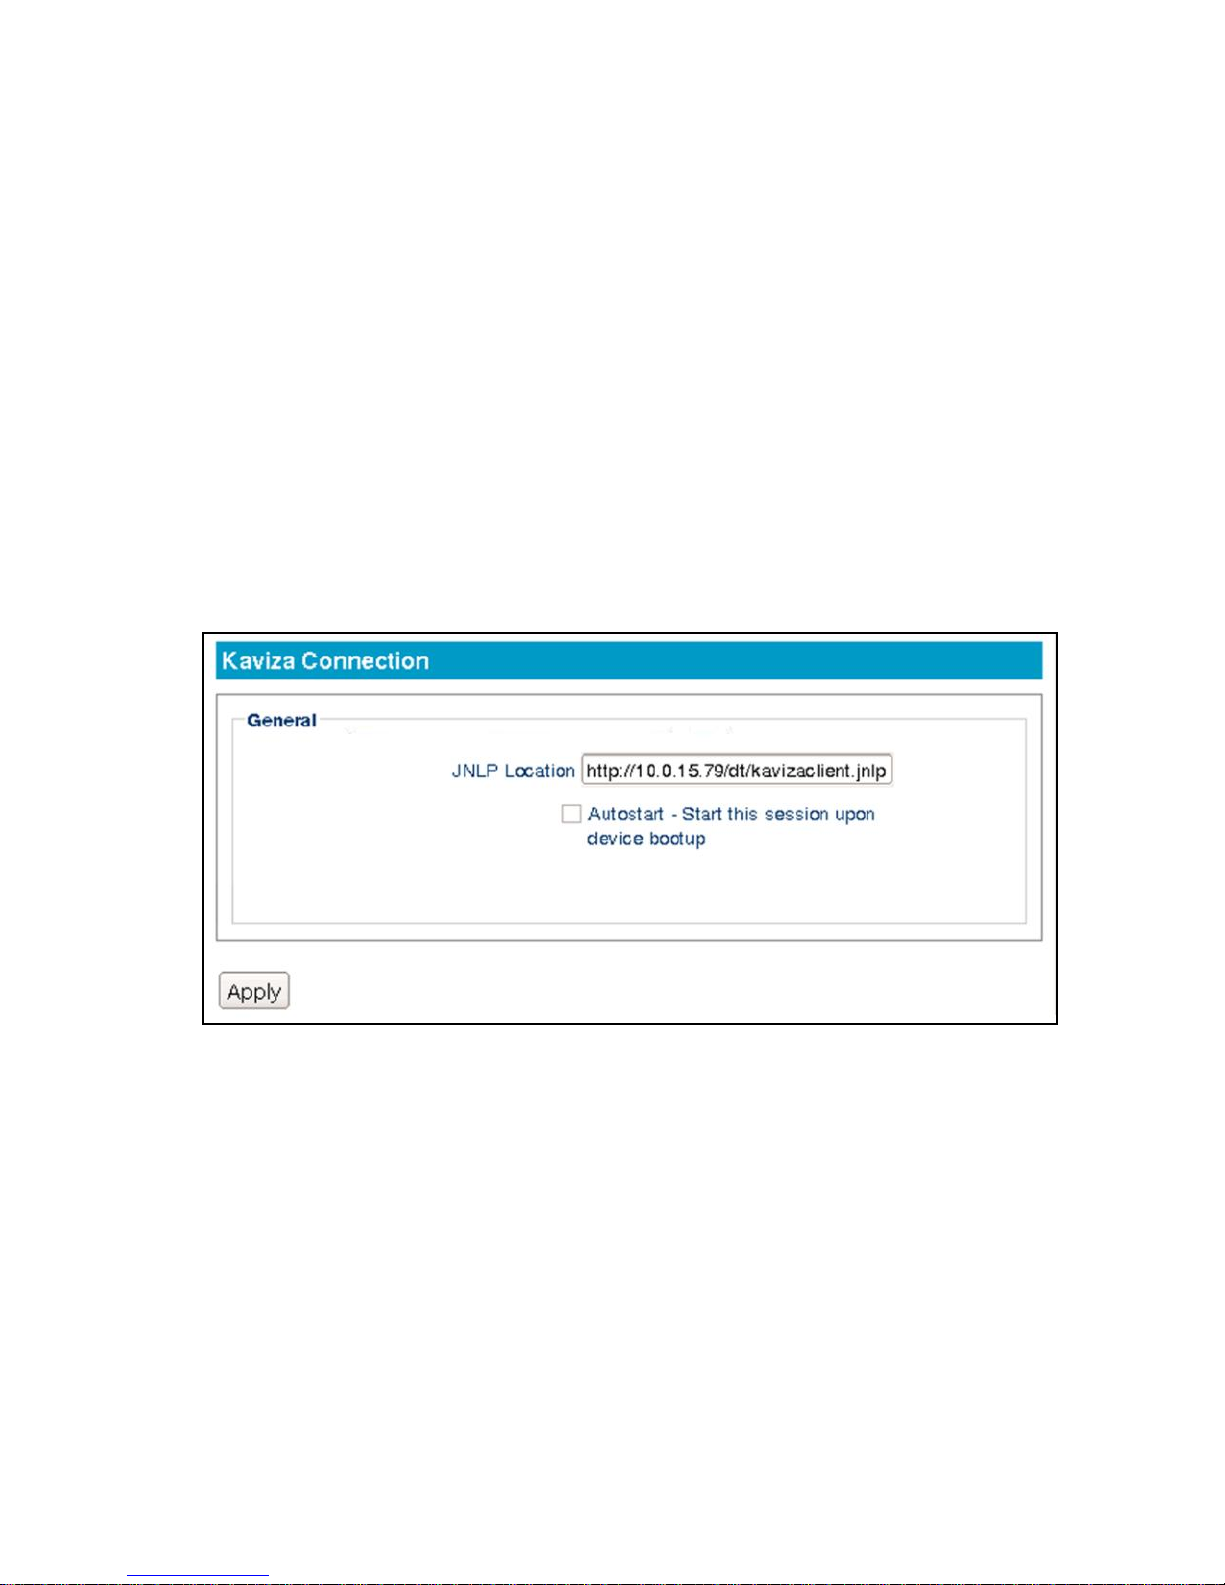
The General Section
You will need the location of the JNLP (Java Network Launching Protocol) which
resides on your remote Kaviza server.
JNLP Location
-Type in the appropriate location of the
kavizaclient.jnlp
file. The typical format will look something like the following:
http://10.0.15.79/dt/kavizaclient.jnlp.
Autostart
-Enable this checkbox to automatically launch this session each
time the thin client completes its boot procedure.
Page 55

Getting Help | 55
6
Getting Help
Contacting Dell
For customers in the United States, call 800-WWW-DELL (800-999-3355).
Dell provides several online and telephone-based support and service options.
Availability varies by country and product, and some services may not be
available in your area. To contact Dell for sales, technical support, or customer
service issues:
1
Visit
support.dell.com
.
NOTE:
If you do not have an active internet connection, you can find contact
information on your purchase invoice, packing slip, or Dell product catalog.
2
Click your country/region at the bottom of the page. For a full listing of
country/region click
All
.
3
Click
All Support
from
Support
menu.
4
Select the appropriate service or support link based on your need.
5
Choose the method of contacting Dell that is convenient for you.
 Loading...