


devolo Vianect® AIR TV

© 2010 devolo AG Aachen (Germany)
While the information in this manual has been compiled with great care, it may not be deemed an assurance of product characteristics. devolo shall be liable only
to the degree specified in the terms of sale and delivery.
The reproduction and distribution of the documentation and software supplied with this product and the use of its contents is subject to written authorization from
devolo. We reserve the right to make any alterations that arise as the result of technical development.
Trademarks
®
, the HDMI Logo and „High-Definition Multimedia Interface” are registered trademarks of HDMI Licensing LLC in USA and other countries.
HDMI
®
and Mac OS X® are registered trademarks of Apple Computer, Inc.
Mac
®
Windows
Wireless USB
devolo, dLAN
and Microsoft® are registered trademarks of Microsoft, Corp.
TM
is registered trademarks of USB-IF, Inc.
®
, Vianect® and the devolo logo are registered trademarks of devolo AG.
All other names mentioned may be trademarks or registered trademarks of their respective owners. Subject to change without notice. No liability for technical errors
or omissions.
devolo AG
Charlottenburger Allee 60
52068 Aachen
Germany
www.devolo.com
Aachen, July 2010

Contents
Contents
1 Preface . . . . . . . . . . . . . . . . . . . . . . . . . . . . . . . . . . . . . . . . . . . . . . . . . . . . . . . . . . . . . . . . . . . 5
2 Introduction . . . . . . . . . . . . . . . . . . . . . . . . . . . . . . . . . . . . . . . . . . . . . . . . . . . . . . . . . . . . . . . 7
2.1 A brief summary of the highlights of the Vianect AIR TV . . . . . . . . . . . . . . . . . . . . . . . . . . . . 7
2.2 Sample applications . . . . . . . . . . . . . . . . . . . . . . . . . . . . . . . . . . . . . . . . . . . . . . . . . . . . . . . 8
3 Initial use . . . . . . . . . . . . . . . . . . . . . . . . . . . . . . . . . . . . . . . . . . . . . . . . . . . . . . . . . . . . . . . . 11
3.1 Package contents . . . . . . . . . . . . . . . . . . . . . . . . . . . . . . . . . . . . . . . . . . . . . . . . . . . . . . . 12
3.2 System requirements . . . . . . . . . . . . . . . . . . . . . . . . . . . . . . . . . . . . . . . . . . . . . . . . . . . . .12
3.3 Functions . . . . . . . . . . . . . . . . . . . . . . . . . . . . . . . . . . . . . . . . . . . . . . . . . . . . . . . . . . . . . 12
3.3.1 Vianect AIR computer adapter . . . . . . . . . . . . . . . . . . . . . . . . . . . . . . . . . . . . . . 12
3.3.2 Vianect AIR TV station . . . . . . . . . . . . . . . . . . . . . . . . . . . . . . . . . . . . . . . . . . . . . 13
3.4 Setup instructions . . . . . . . . . . . . . . . . . . . . . . . . . . . . . . . . . . . . . . . . . . . . . . . . . . . . . . . 13
3.5 Software installation . . . . . . . . . . . . . . . . . . . . . . . . . . . . . . . . . . . . . . . . . . . . . . . . . . . . . 14
3.5.1 Software for Windows . . . . . . . . . . . . . . . . . . . . . . . . . . . . . . . . . . . . . . . . . . . . . 14
3.5.2 Software for Mac OS X . . . . . . . . . . . . . . . . . . . . . . . . . . . . . . . . . . . . . . . . . . . . 14
3.6 Connecting the Vianect AIR TV . . . . . . . . . . . . . . . . . . . . . . . . . . . . . . . . . . . . . . . . . . . . . . 15
3.7 Restoring the pairing . . . . . . . . . . . . . . . . . . . . . . . . . . . . . . . . . . . . . . . . . . . . . . . . . . . . . 16
4 Vianect AIR Manager . . . . . . . . . . . . . . . . . . . . . . . . . . . . . . . . . . . . . . . . . . . . . . . . . . . . . . . 17
4.1 Calling up the configuration interface . . . . . . . . . . . . . . . . . . . . . . . . . . . . . . . . . . . . . . . . 19
5 Vianect AIR TV DisplayLink Manager . . . . . . . . . . . . . . . . . . . . . . . . . . . . . . . . . . . . . . . . . . . 23
5.1 Mirror mode . . . . . . . . . . . . . . . . . . . . . . . . . . . . . . . . . . . . . . . . . . . . . . . . . . . . . . . . . . . 23
5.2 Extended mode . . . . . . . . . . . . . . . . . . . . . . . . . . . . . . . . . . . . . . . . . . . . . . . . . . . . . . . . . 24
5.3 Configuration in Windows 7 . . . . . . . . . . . . . . . . . . . . . . . . . . . . . . . . . . . . . . . . . . . . . . . 25
5.4 Configuration in Windows XP/Vista . . . . . . . . . . . . . . . . . . . . . . . . . . . . . . . . . . . . . . . . . . 28
5.4.1 Configuring mirror mode . . . . . . . . . . . . . . . . . . . . . . . . . . . . . . . . . . . . . . . . . . . 28
5.4.2 Configuring extended mode . . . . . . . . . . . . . . . . . . . . . . . . . . . . . . . . . . . . . . . . 28
5.5 Configuration in Mac OS X . . . . . . . . . . . . . . . . . . . . . . . . . . . . . . . . . . . . . . . . . . . . . . . . . 31
devolo Vianect AIR TV

Contents
6 Appendix . . . . . . . . . . . . . . . . . . . . . . . . . . . . . . . . . . . . . . . . . . . . . . . . . . . . . . . . . . . . . . . . 33
6.1 Important safety instructions . . . . . . . . . . . . . . . . . . . . . . . . . . . . . . . . . . . . . . . . . . . . . . . 33
6.2 Disposal of old devices . . . . . . . . . . . . . . . . . . . . . . . . . . . . . . . . . . . . . . . . . . . . . . . . . . .34
6.3 Warranty conditions . . . . . . . . . . . . . . . . . . . . . . . . . . . . . . . . . . . . . . . . . . . . . . . . . . . . .34
devolo Vianect AIR TV
Preface 5
1Preface
The Vianect AIR TV from devolo transmits audio and
video content from a computer to a monitor, TV set
or projector – without the need for any cables whatsoever, thanks to Wireless USB technology. The installation is as easy as child's play, and with the
preconfigured devices, you can set up the connection
between your computer and television or projector in
no time.
Description of the symbols
Here we briefly describe the meaning of the symbols
used in this manual.
Very important note. Failure to observe this note may result in damage.
Important note that should be observed.
Additional information, background material
and configuration tips for your device.
If you have any further ideas or suggestions related to
our products, we would be delighted to hear from you
at support@devolo.com
!
devolo on the Internet
For detailed information on our products, visit
www.devolo.com
contains product descriptions and documentation, but
also updates of devolo software and your device's
firmware.
. The Service centre area not only
devolo Vianect AIR TV

6 Preface
devolo Vianect AIR TV

Introduction 7
2Introduction
With the Vianect AIR TV, devolo presents a simple solution for transmitting multimedia content (in HD quality) from a computer to a big screen such as a flatscreen television or projector. You do not need any cables to do so, as the Vianect AIR TV solution uses Wireless USB technology. Therefore, in no time, your
television or projector can be used as a second big
screen. This is ideal for sharing photos or videos with
friends and family or for presenting them in a professional way.
2.1 A brief summary of the highlights of the Vianect AIR TV
쎲 Wireless transmission of audio and video content
from a computer (PC/Mac) to a monitor, TV set or
projector.
쎲 Ideal for viewing pictures and videos – at home or
at the office.
쎲 Highest HD image quality with 720p support.
쎲 Maximum screen resolution of 1,400 x 1,050 pix-
els.
쎲 Long range thanks to Wireless USB technology
(USB-IF).
쎲 All common connections, such as HDMI and D-
Sub RGB (VGA), on the receiver
쎲 Transmission of audio via HDMI or 3.5-mm jack
socket
쎲 Software for Windows XP, Windows Vista and
Windows 7
쎲 Software for Mac OS X (10.5 or higher)
devolo Vianect AIR TV

8 Introduction
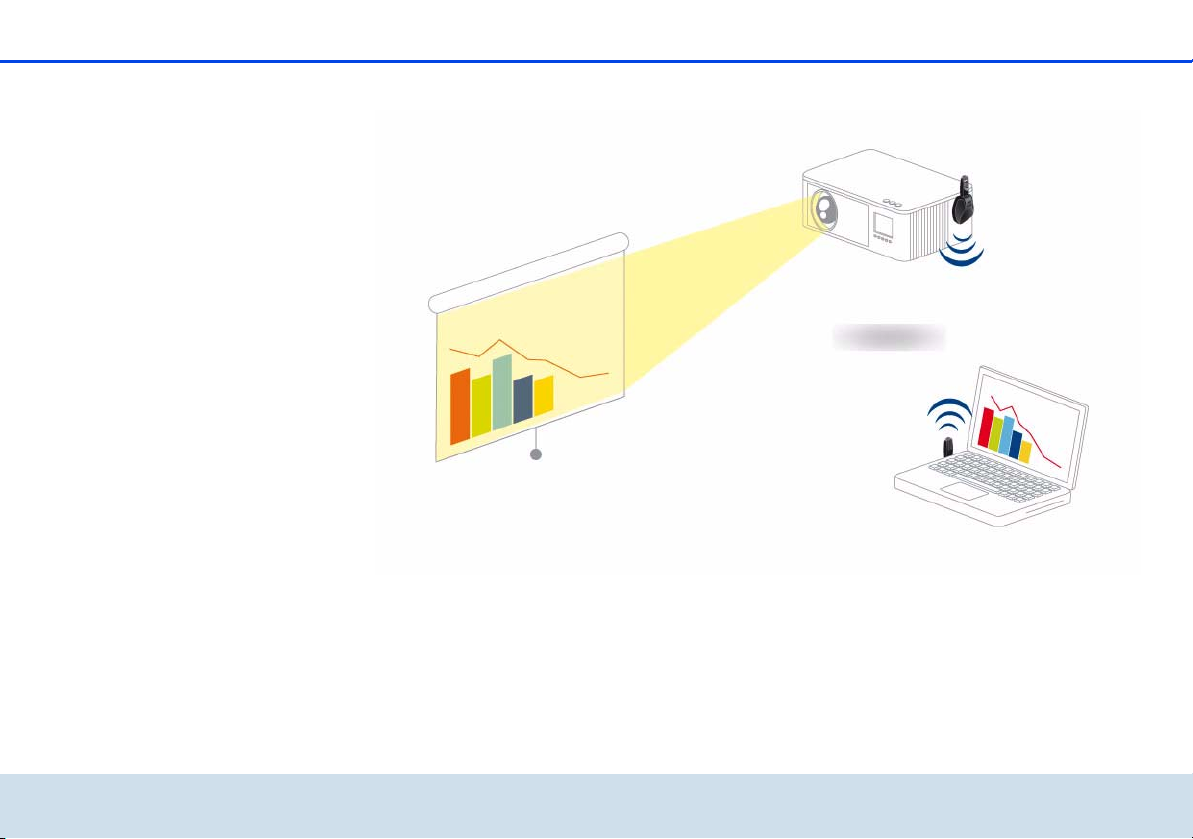
2.2 Sample applications
Internet on your TV set
Extended mode for work and play: work on the
computer while others are watching a movie
devolo Vianect AIR TV
Introduction 9
Show presentations on the large screen
devolo Vianect AIR TV

10 Introduction
devolo Vianect AIR TV
Initial use 11
3Initial use
This chapter covers everything you need to know to set
up your Vianect AIR TV. It will explain connecting the
devices and their functions. We will also briefly intro-
duce the included devolo software and then guide you
through its installation.
devolo Vianect AIR TV

12 Initial use
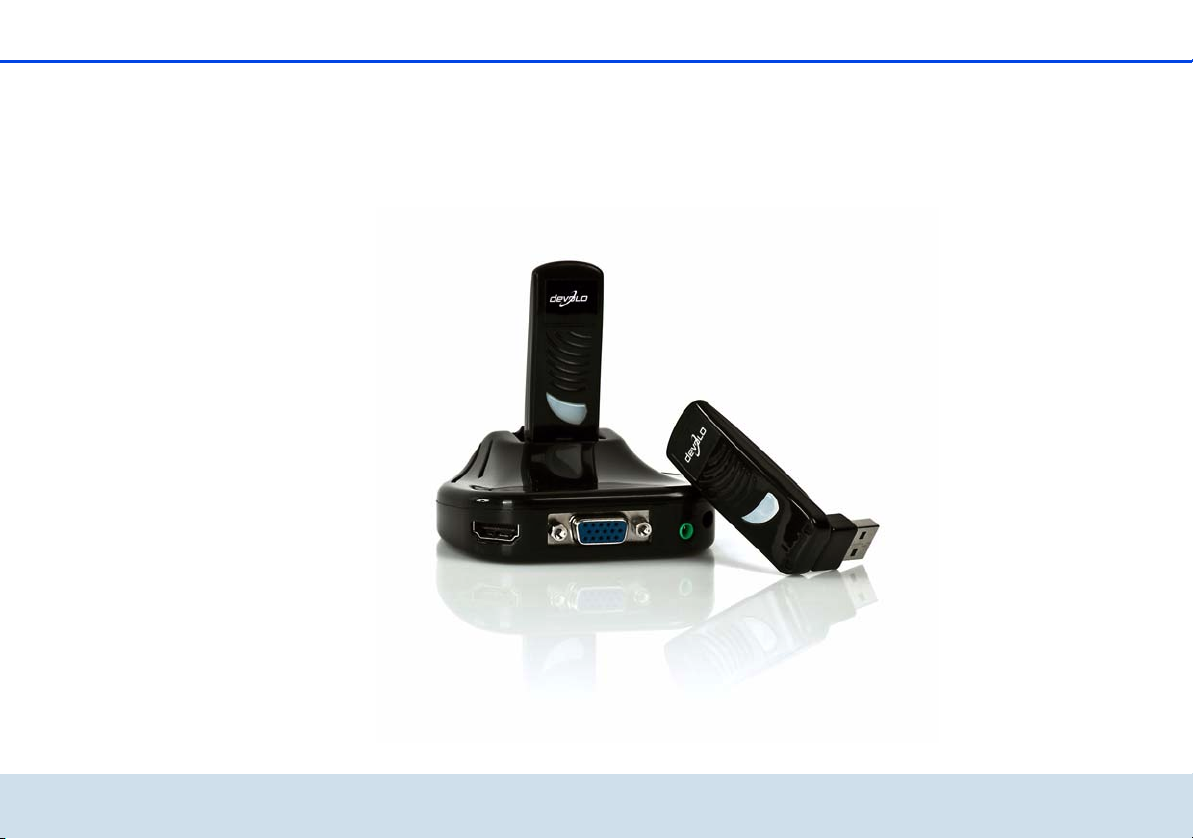
3.1 Package contents
Please ensure that the delivery is complete before
beginning with the installation of your Vianect AIR TV.
쎲 devolo Vianect AIR TV consisting of
쑗 devolo Vianect AIR computer adapter and
쑗 devolo Vianect AIR TV station (with adapter)
쎲 Mains adapter, including country-specific adapter
쎲 Hard copy of installation guide
쎲 CD containing software and online documenta-
tion
devolo AG reserves the right to change the package
contents without prior notice.
3.2 System requirements
쎲 Operating systems: Windows XP (32-bit), Win-
dows Vista Home Premium (32-bit/64-bit), Win-
dows 7 Home Premium (32-bit/64-bit), Mac OS X
(10.5 or higher) (Leopard)
쎲 Computer: USB connection
쎲 TV set or projector:
쑗 HDMI connection or
쑗 VGA connection
쎲 HDMI cable
쎲 VGA cable
3.3 Functions
The Vianect AIR TV enables you to transmit audio and
video data wirelessly from a computer to your TV set or
projector. The individual components – Vianect AIR
computer adapter and Vianect AIR TV station with
adapter are preconfigured ("paired") at the factory
and are ready to use immediately.
Should you ever lose the preconfiguration
("pairing") of the devices, it can be restored
easily. For more information, refer to Chapter 3.7 Restoring the pairing.
3.3.1 Vianect AIR computer adapter
Connections and LEDs of the computer adapter
The computer adapter is used for connection to the
desktop or laptop computer. It has a rotating USB
connector (depending on the placement of the USB
socket on the computer) and an integrated antenna.
The Power LED is illuminated in blue when the
computer adapter is ready to operate; it flashes during
data transmission.
devolo Vianect AIR TV

Initial use 13
3.3.2 Vianect AIR TV station
Connections of the station
In addition to the power jack for connection to the
mains supply, the station has
쎲 Two USB ports
쎲 One HDMI socket for connection to a projector or
TV set
쎲 One VGA socket for connection to a projector or
TV set
쎲 One 3.5 mm jack socket (audio) for connection
to a TV set, projector or stereo system
Connections and LEDs of the TV adapter
The TV adapter is used for the connection to the USB
socket of the station. It has a USB connector and an
integrated antenna.
The Power LED is illuminated in blue when the TV
adapter is ready to operate, i.e. the station is supplied
with current. The Power LED flashes during data
transmission.
3.4 Setup instructions
always plugged into the USB socket at a 90-degree
angle to the station, i.e.
쎲 Wall mounting
쎲 Positioning on level surface
You can mount the Vianect AIR TV station on the wall
or position it on a level surface. The TV adapter is
devolo Vianect AIR TV

14 Initial use
The Vianect AIR TV station can be used
in conjunction with a TV adapter (included) only. The slider above the USB
sockets is used only to select a USB
socket.
To attain optimum data transmission between the TV adapter and computer adapter,
both devices should be placed within sight of
each other. During initial installation, we also
recommend a maximum distance of up to 3
meters.
3.5 Software installation
When installing or uninstalling the
devolo software, the computer adapter
must not be connected to the computer.
3.5.1 Software for Windows
Use the installation wizard to set up the following software components for using the Vianect AIR TV with
the Windows operating system:
쎲 The devolo Vianect AIR Manager shows all
wireless Vianect AIR TV stations within the possi-
ble range.
쎲 You can configure your screen settings using the
devolo Vianect AIR TV DisplayLink Manager.
To install the software, insert the included CD-ROM in
the CD drive of your computer and click Install
Vianect AIR TV. If autoplay is installed on your
computer, the installation will start automatically.
Otherwise, open the folder with the Windows Explorer
by right-clicking on Start and selecting Explorer from
the context menu. Double-click to start the installation
wizard manually.
You can find the installed software applications in the
Start 쒁 All Programs 쒁 devolo program group.
Then, continue with the hardware installation (see 3.6
Connecting the Vianect AIR TV).
3.5.2 Software for Mac OS X
For the devolo Vianect AIR Manager and
Vianect AIR TV DisplayLink Manager software for
operating the devices in Mac OS (min. Mac OS X 10.5
Leopard), visit the download area of the
Vianect AIR TV on our website, www.devolo.com
The included product CD contains a link,
Mac OS X Software-Download, which takes you
directly there if you have an active Internet connection.
.
devolo Vianect AIR TV

Initial use 15
햲 To install the devolo software, download the cor-
responding installation packages to your compu-
ter:
쑗 Vianect AIR Manager
(drivers for MAC OS X 10.5 Leopard) or
쑗 Vianect AIR Manager
(drivers for MAC OS X 10.6 Snow Leopard)
쑗 Vianect AIR TV DisplayLink Manager
(software for Mac OS X 10.5 and 10.6)
햳 Open the Vianect AIR Manager installation
package by double-clicking. The CD icon for
Vianect AIR TV appears on the desktop; double-
click this also. A dialogue window opens.
햴 Then follow the prompts of the installation wizard.
After successful installation, the
Vianect AIR Manager icon appears
in the toolbar.
햵 Double-click to open the installation package for
the Vianect AIR TV DisplayLink Manager
(Mac OS X 10.5 and 10.6 software). A
dialogue window opens.
햶 Then follow the prompts of the installation wizard.
햷 Finally, continue with the hardware installation
(see 3.6 Connecting the Vianect AIR TV).
Uninstalling the software
To uninstall the Vianect AIR Manager
software, open the installation package downloaded earlier and select Un-
installer.
To uninstall the
Vianect AIR TV DisplayLink Manager
software, click the Uninstaller link under Apple 쒁 Programs.
3.6 Connecting the Vianect AIR TV
In this section, we show you how to connect the individual components of the Vianect AIR TV.
When the devices are connecting for the
first time, the screen can flicker or
switch on and off briefly. The detection
of the computer adapter on the computer is indicated by audio signals.
햲 Insert the computer adapter into an available USB
socket of your computer.
햳 Plug the TV adapter into the USB socket provided
on the station.
devolo Vianect AIR TV

16 Initial use
Observe the setup instructions listed in
the previous section. (see 3.4 Setup in-
structions)
햴 To connect the Vianect AIR TV station to a TV set
or projector via HDMI, connect both devices via
an HDMI cable; digital image and sound data
are transmitted via the HDMI cable simultane-
ously.
or
햵 To connect the Vianect AIR TV station to a TV set
or projector via VGA (image transmission), con-
nect both devices via a VGA cable. For sound
transmission, connect the 3.5 mm jack sock-
ets of the devices (TV set, projector or stereo sys-
tem) via a cable with 3.5 mm jack plug.
If the sound transmission does not work automatically after complete and correct installation of the hardware and software, in the
sounds and audio devices properties, under
Audio select as the default device for sound
playback USB PnP Sound device. For more
detailed help on verifying the settings, refer
to our online FAQs on our website at
www.devolo.com
.
햶 If you want to connect additional TV sets or pro-
jectors, simply repeat steps
to for each
device.
3.7 Restoring the pairing
To again configure the devices, proceed as follows:
햲 If you have not done so already, install the pro-
vided devolo software on your computer. (see
Chapter 3.5 Software installation)
햳 Then insert the computer adapter into an availa-
ble USB socket of your computer.
햴 Remove the computer adapter and, in its place,
plug the TV adapter into the now available USB
socket of your computer. After a few seconds, a
message appears stating that the pairing is
completed.
devolo Vianect AIR TV

Vianect AIR Manager 17
4 Vianect AIR Manager
The devolo Vianect AIR Manager monitors all reachable Vianect AIR TV stations and shows their connection
status.
After successful installation, call up the program via
the devolo Vianect AIR Manager link created on
the desktop or by clicking in the Windows toolbar.
The appearance of the icon changes to provide information about the current connection status of the devices:
Connected
The wireless connection to the Vianect AIR TV station
exists.
The Vianect AIR computer adapter is switched on.
The computer adapter is switched on and connected to
the computer; no wireless connection exists.
The Vianect AIR computer adapter is not plugged
in.
The computer adapter is not connected to the computer.
The Vianect AIR computer adapter is switched off.
The computer adapter is without power.
The wireless channel is occupied.
Low connection quality; despite this, a Vianect AIR TV
station is connected.
The wireless channel is not available.
No available channel is found.
devolo Vianect AIR TV

18 Vianect AIR Manager
For more detailed help on this topic, refer to
the Help file (see ? of the configuration interface) or the online FAQs on our website
www.devolo.com
.
devolo Vianect AIR TV

Vianect AIR Manager 19
4.1 Calling up the configuration
interface
After successful installation, call up the program via
the devolo Vianect AIR Manager link created on
The Host ID defines the connected computer adapter.
In addition, all connected Vianect AIR TV stations are
displayed with the current connection status.
the desktop or by double-clicking in the Windows toolbar. The following dialogue window opens:
devolo Vianect AIR TV

20 Vianect AIR Manager
The corresponding bar graph provides information
about the current connection quality of the devices:
쎲 Disabled – The connection between the compu-
ter adapter and TV adapter is interrupted.
쎲 Not connected – The computer adapter is not
connected to the computer.
쎲 Connected – The wireless connection to the
Vianect AIR TV station exists.
쎲 Average connection quality
쎲 Good connection quality
쎲 Very good connection quality
쎲 Ideal connection quality
In Advanced settings... you can check the region,
channel quality, the current channel and the
speed. All values are configured optimally by default
and do not need to be changed.
devolo Vianect AIR TV

Vianect AIR Manager 21
Using the context menu of a displayed Vianect AIR
TV station (accessed by right-clicking the respective TV
station), you can reach the following functions:
쎲 You can temporarily disable the station (Block
remote device), i.e. configure that the computer
adapter cannot establish a connection to the TV
station.
쎲 Disconnect the station (Disassociate reote
device), i.e. remove it from the network; this
device is then deleted from the list.
In the event of disconnection, the devices lose the mutual preconfiguration
("pairing"), i.e. if used again, these
must be reconfigured first. For more
information, refer to Chapter 3.7 Re-
storing the pairing.
쎲 Renaming the Vianect AIR TV station.
쎲 Under Properties..., you can define whether you
want a status message.
devolo Vianect AIR TV

22 Vianect AIR Manager
devolo Vianect AIR TV

Vianect AIR TV DisplayLink Manager 23
5 Vianect AIR TV DisplayLink
Manager
The Vianect AIR TV DisplayLink Manager helps you
configure the screen settings of your TV set or projector. Depending on the application, select one of the
possible working modes:
쎲 Mirror mode – Screen content of the computer is
reflected exactly to the TV set or projector.
쎲 Extended mode – Television or projector screen
serves as screen extension
In the factory defaults, the
Vianect AIR TV is set to mirroring.
5.1 Mirror mode
The mirror mode reflects the screen display of the
computer identically to the TV set or projector. This setting is particularly useful for applications such as pres-
entations or slide shows. This allows slide content,
images, etc. to be presented conveniently on a larger
and higher-resolution screen.
devolo Vianect AIR TV

24 Vianect AIR TV DisplayLink Manager
5.2 Extended mode
The extended mode is particularly useful for playing
back different content on each screen. In this case,
the screen connected via the Vianect AIR TV adapter
serves as an expansion or addition to the computer
screen. The advantage: individual images positioned
next to each other can be "joined together" to create a
composite image; this allows you to view multiple applications simultaneously so you can work in them. Extended mode is ideally suited for playing back HD
videos (1280 x 720).
The image quality of videos played back
directly from the Internet can be optimised
using Adobe Flash Player. For detailed
information on this topic, refer to the Help file
of the Vianect AIR Manager or the online
FAQs on our website, www.devolo.com
.
devolo Vianect AIR TV

Vianect AIR TV DisplayLink Manager 25
5.3 Configuration in Windows 7
Windows 7 supports the connection of external screens
by default. Call up the corresponding menu by pressing
the Windows and P keys simultaneously.
쎲 Select Computer only if you are working via the
computer screen exclusively.
쎲 Select Duplicate to configure mirror mode.
쎲 Select Extend to configure extended mode.
쎲 Select Projector only if you work with a con-
nected laptop screen and want to operate the
external screen connected via the Vianect AIR TV
adapter using the keyboard and mouse of the lap-
top.
devolo Vianect AIR TV

26 Vianect AIR TV DisplayLink Manager
As soon as a connection to the Vianect AIR TV adapter
is established, the icon of the
Vianect AIR TV DisplayLink Manager appears in
the Windows toolbar. By clicking this icon, you can
reach the display settings.
쎲 Clicking the Check for updates... option takes
you automatically to our website at
www.devolo.com
ware updates.
쎲 Enable the Optimize for video option to attain
the best possible image quality for HD videos.
and notifies you of any soft-
devolo Vianect AIR TV

Vianect AIR TV DisplayLink Manager 27
쎲 Under Advanced..., you are provided with addi-
tional setting options for the screen resolution:
쎲 Display: From the drop-down menu (or by click-
ing the respective screen icon), select the screen
that is connected to the Vianect AIR TV adapter.
쎲 Resolution: Select the desired resolution on the
external screen.
쎲 Orientation: Select portrait or landscape format.
쎲 Multiple displays:
쑗 Configure mirror mode by selecting Dupli-
cate these displays.
devolo Vianect AIR TV
쑗 Configure extended mode by selecting
Extend these displays.
쎲 To define the external screen as the main
screen, select the corresponding device under
Display and enable the option Use this screen
as main screen.

28 Vianect AIR TV DisplayLink Manager
5.4 Configuration in Windows XP/
Vista
During the configuration, the computer
screen switches off and on again briefly
until the screen resolution has adjusted.
5.4.1 Configuring mirror mode
As soon as a connection to the Vianect AIR TV adapter
is established, the icon of the
Vianect AIR TV DisplayLink Manager appears in
the Windows toolbar. If you click this icon, you are taken to the display settings.
Select the entry Mirror.
If the connected screen supports only a lower resolution than the primary screen, it adjusts to the lower resolution. If the connected screen is larger than the first
selected one, the displayed content is enclosed in a
frame to maintain the aspect ratio.
Enable the option Notebook Monitor Off if you work
with closed laptop screen and want to operate the external screen connected via the Vianect AIR TV using
the keyboard and mouse of the laptop connected.
5.4.2 Configuring extended mode
As soon as a connection to the Vianect AIR TV adapter
is established, the icon of the
Vianect AIR TV DisplayLink Manager appears in
the Windows toolbar. If you click this icon, you are taken to the display settings.
devolo Vianect AIR TV
The Screen resolution and Color Quality of the first
selected screen are transferred automatically to the
screen connected via the Vianect AIR TV adapter.

Vianect AIR TV DisplayLink Manager 29
Select the entry Extend. Using the Extend to option,
select the direction in which the image area is to be extended.
Enable the option Notebook Monitor Off if you work
with closed laptop screen and want to operate the external screen connected via the Vianect AIR TV using
the keyboard and mouse of the laptop connected.
To position the window of an application on
the extended image area, minimise the
window to approximately half size and drag
and drop it to the header bar in the extended
area. Then, readjust the desired size of the
window.
Any applications that are running, such
as movies, should be stopped before
moving.
For additional display settings for extended mode, re-
fer to Advanced....
쎲 You can switch the positions of the monitors using
drag&drop. If you are not sure which monitor is
assigned which number, select Identify. The
identification number of each monitor is shown.
쎲 Display: From the drop-down menu (or by click-
ing the respective screen icon), select the screen
that is connected to the Vianect AIR TV adapter.
devolo Vianect AIR TV

30 Vianect AIR TV DisplayLink Manager
쎲 If using extended mode, enable the option
Extend Windows desktop onto this monitor.
쎲 Configure the desired Screen resolution using
the slider.
쎲 In the drop-down menu for Color quality, select
the desired colour depth.
To define the monitor connected via the Vianect AIR TV
adapter as the primary screen, observe the following
settings:
쎲 In the Display drop-down menu, select the moni-
tor connected via the Vianect AIR TV adapter.
쎲 Enable the options Extend Windows desktop
on this monitor and Use this device as the
primary monitor. Then confirm your settings
with OK.
In Windows Vista, optimise the image qual-
ity by selecting the colour scheme Aero.
devolo Vianect AIR TV

Vianect AIR TV DisplayLink Manager 31
5.5 Configuration in Mac OS X
For the screen settings, navigate to Apple 쒁 System
Preferences 쒁 Monitor.
To configure mirror mode, navigate to Arrangement
and enable the option Mirror Displays.
For extended mode, the option Mirror Displays sim-
ply remains disabled. The screen icons can be arranged as desired using the mouse, i. e. prioritised.
Using the tabs Display and Color, you can configure
additional settings for the screen.
devolo Vianect AIR TV

32 Vianect AIR TV DisplayLink Manager
devolo Vianect AIR TV

Appendix 33
6 Appendix
For the permitted voltage range for operating the Vianect AIR TV station and
the power consumption, refer to the label on the underside of the device.
The CE declaration for this product is
included with the product. For additional
technical information, refer to the Service
Centre at www.devolo.com
6.1 Important safety instructions
It is essential to have read and understood all safety
and operating instructions before the device is used for
the first time; these should then be kept safely for future reference.
쎲 The devices must not be opened. There are no
user-serviceable parts inside the device.
Do not attempt to service the product
yourself; call on qualified technicians
for assistance with all service tasks!
There is a danger of electric shock!
쎲Use the devices only in a dry location.
쎲 Do not insert any objects in the openings in the
devices.
.
쎲 To disconnect the Vianect AIR TV station from the
power supply grid, pull out the plug.
쎲 Do not expose the devices to direct sunlight.
쎲 Slits and apertures in the case are intended to
provide ventilation and must not be blocked or
covered.
쎲 The devices must not be set up in close proximity
to a radiator.
쎲 The devices should be installed only in locations
that ensure adequate ventilation.
쎲 Disconnect the devices from the power supply grid
before cleaning. Never use water, paint thinner,
benzene, alcohol or other strong cleaning agents
when cleaning the devices, as these could damage the case. Only use a slightly moist soft cloth.
쎲 The Vianect AIR TV station should be operated
exclusively on a public power supply as described
on the rating plate.
쎲 In the event of damage, disconnect the Vianect
AIR TV station from the mains supply, unplug the
computer adapter from the computer and contact
your after-sales service. Damage is deemed to
have occurred
쑗 if the power cable or plug is damaged
쑗 if the devices are sprayed with liquid or if
objects have got inside the devices
devolo Vianect AIR TV

34 Appendix
쑗 if the devices have been exposed to rain or
water
쑗 if the devices do not work, despite the fact
that all operating instructions have been followed properly
쑗 if the cases of the devices have been dam-
aged.
6.2 Disposal of old devices
The icon with crossed-out wastebasket on the device
means that this adapter is an electrical or electronic
device that falls within the scope of application of the
German Electrical and Electronic Equipment Act. Since
24 March 2006, these types of devices may no longer
be disposed of with household waste. Rather, in Germany, they can be given to a municipal collection point
free of charge. Contact your municipal government to
find out the address and hours of the nearest collection
point.
6.3 Warranty conditions
The devolo AG warranty is given to purchasers of devolo products in
addition to the warranty conditions provided by law and in accordance with the following conditions:
1 Warranty coverage
a) The warranty covers the equipment delivered and all its parts.
Parts will, at devolo's sole discretion, be replaced or repaired
free of charge if, despite proven proper handling and adherence to the operating instructions, these parts became defective due to fabrication and/or material defects. Alternatively,
devolo reserves the right to replace the defective product with
a comparable product with the same specifications and features. Operating manuals and possibly supplied software are
excluded from the warranty.
b) Material and service charges shall be covered by devolo, but
not shipping and handling costs involved in transport from the
buyer to the service station and/or to devolo.
c) Replaced parts become property of devolo.
d) devolo is authorized to carry out technical changes (e.g.
firmware updates) beyond repair and replacement of defective
parts in order to bring the equipment up to the current technical state. This does not result in any additional charge for the
customer. A legal claim to this service does not exist.
2Warranty period
The warranty period for this devolo product is three years. This
period begins at the day of delivery from the devolo dealer. Warranty services carried out by devolo do not result in an extension of
the warranty period nor do they initiate a new warranty period. The
warranty period for installed replacement parts ends with the warranty period of the device as a whole.
devolo Vianect AIR TV

Appendix 35
3Warranty procedure
a) If defects appear during the warranty period, the warranty
claims must be made immediately, at the latest within a period
of 7 days.
b) In the case of any externally visible damage arising from trans-
port (e.g. damage to the housing), the person carrying out the
transportation and the sender should be informed immedi-
ately. On discovery of damage which is not externally visible,
the transport company and the sender are to be immediately
informed in writing, at the latest within 3 days of delivery.
c) Transport to and from the location where the warranty claim is
accepted and/or the repaired device is exchanged, is at the
purchaser's own risk and cost.
d) Warranty claims are only valid if a copy of the original pur-
chase receipt is returned with the device. devolo reserves the
right to require the submission of the original purchase receipt.
4 Suspension of the warranty
All warranty claims will be deemed invalid
a) if the label with the serial number has been removed from the
device,
b) if the device is damaged or destroyed as a result of acts of
nature or by environmental influences (moisture, electric
shock, dust, etc.),
c) if the device was stored or operated under conditions not in
compliance with the technical specifications,
d) if the damage occurred due to incorrect handling, especially to
non-observance of the system description and the operating
instructions,
e) if the device was opened, repaired or modified by persons not
contracted by devolo,
f) if the device shows any kind of mechanical damage, or
g) if the warranty claim has not been reported in accordance with
3a) or 3b).
5Operating mistakes
If it becomes apparent that the reported malfunction of the device
has been caused by unsuitable hardware, software, installation or
operation, devolo reserves the right to charge the purchaser for the
resulting testing costs.
6 Additional regulations
The above conditions define the complete scope of devolo's legal
liability.
a) The warranty gives no entitlement to additional claims, such as
any refund in full or in part. Compensation claims, regardless
of the legal basis, are excluded. This does not apply if e.g.
injury to persons or damage to private property are specifically
covered by the product liability law, or in cases of intentional
act or culpable negligence.
b) Claims for compensation of lost profits, indirect or consequen-
tial detriments, are excluded.
c) devolo is not liable for lost data or retrieval of lost data in
cases of slight and ordinary negligence.
d) In the case that the intentional or culpable negligence of
devolo employees has caused a loss of data, devolo will be liable for those costs typical to the recovery of data where periodic security data back-ups have been made.
e) The warranty is valid only for the first purchaser and is not
transferable.
f) The court of jurisdiction is located in Aachen, Germany in the
case that the purchaser is a merchant. If the purchaser does
not have a court of jurisdiction in the Federal Republic of Germany or if he moves his domicile out of Germany after conclusion of the contract, devolo's court of jurisdiction applies. This
is also applicable if the purchaser's domicile is not known at
the time of institution of proceedings.
g) The law of the Federal Republic of Germany is applicable. The
UN commercial law does not apply to dealings between devolo
and the purchaser.
devolo Vianect AIR TV

36 Appendix
devolo Vianect AIR TV

Index
Index
C
Channel quality 20
Closed laptop screen
Computer adapter
Configuration interface
Connection quality
Connection status
Connections of the computer adapter
Connections of the station
Connections of the TV adapter
D
Disabling a TV station 21
Disconnecting a TV station
Disposal of old devices
E
Extended mode 24
H
HD video 24
Help file
18
L
LEDs of the computer adapter 12
LEDs of the TV adapter
M
Mac OS X 14
Mirror mode
25, 28, 29
12
19
20
17
13
13
21
34
13
23
12
O
Online FAQ 18, 24
P
Package contents 12
Pairing (preconfiguration)
Positioning on level surface
12, 21
13
R
Rotating USB connector 12
S
Safety instructions 33
Software download for Mac OS X
Software uninstallation (Mac OS X)
System requirements
12
W
Wall mounting 13
Warranty
Windows
Wireless USB technology
34
14
7
14
15
devolo Vianect AIR TV

Index
devolo Vianect AIR TV
 Loading...