

Page 1

MicroLink® ISDN Router
MicroLink
®
dLAN® ISDN Router
Page 2

© 2004 devolo AG, Aachen (Germany)
While the information in this manual has been compiled with great care, it may not be deemed
an assurance of product characteristics. devolo AG shall be liable only to the degree specified in
the terms of sale and delivery.
The reproduction and distribution of the documentation and software supplied with this product
and the use of its contents is subject to written authorization from devolo AG. We reserve the
right to make any alterations that arise as the result of technical development.
Trademarks
Windows
HomePlug
®
and Microsoft® are registered trademarks of Microsoft, Corp.
®
is a registered trademark of HomePlug Power Alliance.
The devolo logo is a registered trademark of devolo AG. All other names mentioned may be trademarks or registered trademarks of their respective owners.
Subject to change without notice. No liability for technical errors or omissions.
devolo AG
Sonnenweg 11
52070 Aachen
Germany
www.devolo.com
Aachen, October 2004
41580/1004
Page 3

|
Preface
Thank you for placing your trust in this devolo product.
By purchasing the MicroLink ISDN Router or MicroLink dLAN ISDN Router,
you have chosen an ISDN router that innovatively combines the functions and
advantages of an ISDN modem, a switch, a router and a firewall all in a single
device. This combination makes it the optimal, user-friendly network and
Internet access solution for home network solutions and small-office and
home-office (SOHO) environments.
The ISDN modem provides satisfyingly fast Internet access:
With transmission speeds of up to 128 kbps, long waits when down-
loading files, loading Web pages or playing online games are a thing
of the past.
An installation wizard helps you get connected to the Internet quickly.
Access settings for common ISPs are already preconfigured.
It serves as an optimal combination of Internet-access device and net-
work switch:
The router simplifies the installation of Internet access significantly,
as no special drivers are required for the connected individual com
puters. The access protocol has been implemented in the router
itself.
The router functionality lets multiple users access the Internet at the
same time. The firewall function provides protection from hacker
attacks. DHCP automates the TCP/IP configuration of the connected
computers. The router can be configured conveniently using a Web
browser.
The integrated switch is the foundation for small networks. Up to four
computers can be connected simultaneously. Each of the four ports
can also be used as an uplink port to connect additional routers,
switches or hubs.
A HomePlug adapter allows access to the router throughout the building
without having to lay new lines. Instead of network cables, household
power lines are used to transfer data.
Combine your MicroLink ISDN Router together with a devolo Home-
Plug adapter to connect to other network devices via the household
power cables.
EN
-
devolo MicroLink ISDN Router & MicroLink dLAN ISDN Router
|
|
Page 4

|
MicroLink dLAN
ISDN Router only
EN
Model
restrictions
The HomePlug adapter is already built into your MicroLink dLAN
ISDN Router. The router is automatically networked to all other
HomePlug adapters simply by connecting it to the power supply grid
of the building.
DES
encryption provides the highest degree of interception protec-
pro
tion during data transmission over the power supply grid.
Model versions
This documentation is intended for users of the following devices:
MicroLink ISDN Router
MicroLink dLAN ISDN Router
If a part of the documentation applies to a certain model only, this is indicated
by a note in the margin.
In the other parts of the documentation, the models are referred to collectively as the MicroLink (dLAN) ISDN Router.
About this manual
Exacting manufacturing standards and stringent quality control are the basis
for high product standards and consistent quality to ensure your fullest satis
-
faction with this MicroLink (dLAN) ISDN Router.
This documentation was compiled by several members of our staff from a
variety of departments in order to ensure you the best possible support when
using your product.
For further information, please visit 'www.devolo.com'
Our online services (www.devolo.com) are available to you around the clock
should you have any questions or require any further support.
devolo MicroLink ISDN Router & MicroLink dLAN ISDN Router
|
|
Page 5

|
Package contents:
Please ensure that the delivery is complete before beginning with the installation of your router:
MicroLink ISDN Router or MicroLink dLAN ISDN Router
ISDN cable (RJ11 – RJ45) 5m
Power supply pack: 230V / 9V AC; 800 mA (MicroLink ISDN Router) or
Power supply pack: 230V / 12V DC; 700 mA (MicroLink dLAN ISDN
Router)
CD-ROM with manual (PDF) and installation support
printed manual
devolo AG reserves the right to change the package contents without prior
notice.
EN
devolo MicroLink ISDN Router & MicroLink dLAN ISDN Router
|
|
Page 6

|
Contents
1 Introduction ............................................................................................8
1.1 What does the MicroLink (dLAN) ISDN Router have to offer? .....8
EN
1.2 What exactly is dLAN?.................................................................. 8
2 Connection and installation ..............................................................10
2.1 Display and connections .............................................................10
2.2 Connecting the MicroLink (dLAN) ISDN Router .......................... 11
2.3 Networking examples .................................................................12
3 Router configuration........................................................................... 15
3.1 Set up Internet access................................................................. 15
3.1.1 Setting up Internet access using the setup wizard ....15
3.1.2 Setting up Internet access manually ...........................16
3.1.3 Checking your Internet connection ..............................17
3.2 Advanced configuration ..............................................................18
3.2.1 Start Advanced configuration ......................................19
3.2.2 General......................................................................... 19
3.2.3 Internet connection ......................................................20
3.2.4 Local network............................................................... 22
3.3 Saving and restoring your configuration..................................... 26
3.4 Uploading new firmware............................................................. 27
4 devolo MicroLink dLAN software ....................................................28
4.1 Overview of the devolo software................................................ 28
4.1.1 MicroLink dLAN Configuration Wizard ........................28
4.1.2 MicroLink Informer....................................................... 28
4.1.3 MicroLink EasyShare.................................................... 28
4.2 Installation of the devolo MicroLink dLAN software.................. 29
4.3 Configuring the dLAN network with the MicroLink dLAN
Configuration Wizard ..................................................................29
4.4 Overview of the dLAN with the MicroLink Informer................... 31
4.5 Communication in the dLAN with the MicroLink EasyShare...... 32
4.5.1 Configuration................................................................ 32
devolo MicroLink ISDN Router & MicroLink dLAN ISDN Router
|
|
Page 7

5 Appendix............................................................................................... 34
5.1 Performance data and specifications.......................................... 34
5.2 Declarations of conformity.......................................................... 35
5.3 CE conformity ..............................................................................37
5.4 Care and maintenance of the device ..........................................37
5.5 Warranty conditions.................................................................... 38
|
EN
devolo MicroLink ISDN Router & MicroLink dLAN ISDN Router
|
|
Page 8

Introduction
8
|
1 Introduction
1.1 What does the MicroLink (dLAN) ISDN Router
EN
MicroLink dLAN
ISDN Router only
have to offer?
The following is an outline of the principal features of the device giving you
a quick overview of its capabilities.
Simple installation
Connect the computers in the LAN (Ethernet) to the MicroLink (dLAN)
ISDN Router.
Connect the MicroLink (dLAN) ISDN Router to the ISDN connection.
Connect the MicroLink (dLAN) ISDN Router to the power supply grid.
Configure Internet access
That's it!
Versatile networking
Because of the built-in 4-port switch, the PCs connected to the MicroLink
(dLAN) ISDN Router form an internal network with transfer rates of up to
100
Mbps.
The MicroLink dLAN ISDN Router lets you choose how you would like to connect your PCs to the Internet— you can connect them using either the power
supply grid or network cables.
Thanks to the built-in HomePlug technology, the network can be expanded
through household power cables without the need to lay new lines. Each PC
simply needs a MicroLink dLAN connected to an electrical outlet. With dLAN,
you can connect to the Internet, exchange data, share printers or play exciting
multiplayer games from any room of your house. Simply connect the router to
the rest of the dLAN network via the power cable. The four Ethernet ports
remain available for connecting other network devices.
1.2 What exactly is dLAN?
There is now a new alternative to the well-known wired LAN and Wireless
LAN network technologies: dLAN (direct LAN, i.e. directly networked). dLAN
is networking using the electric wiring already installed in the building.
devolo MicroLink ISDN Router & MicroLink dLAN ISDN Router
|
|
Page 9

Introduction
|
Cost factor and transmission quality
dLAN is an especially easy-to-use networking technology. You don't need to
lay cables and you can connect to the network at every power point.
The dLAN standard modulates and demodulates additional frequencies on
the power lines. Modulation and demodulation is a well-known and proven
method of data transmission, which has been in use in other applications for
a number of years. Now it is used to set up Internet and network accesses.
Depending on the attenuation factor, dLAN is capable of covering distances
of at least 200 meters.
With a maximum data transmission rate of 14 Mbps and symmetrical upload
and download, the dLAN standard is equivalent to classical Ethernet net
working solutions and is faster than the wireless standard 802.11b. Depending on the line quality, bandwidths of 6 to 8 Mbps are possible in practice—
quite sufficient for extending the Internet connection.
Data security and radiation
For security reasons, DES
data transfer within the network. In addition, the power meter in the building
can act as a physical barrier against unwanted access from outside.
dLAN devices from devolo meet the stringent EU industrial standards and
comply with the current standards for electromagnetic radiation. Its radiation
level is actually well below that of Wireless LAN technologies.
encryption is used, which guarantees secure
pro
9
EN
-
devolo MicroLink ISDN Router & MicroLink dLAN ISDN Router
|
|
Page 10

Connection and installation
10
|
2 Connection and installation
In this chapter, we will explain the displays and connections of the MicroLink
(dLAN) ISDN Router and show you how to set up the device and connect com
EN
2.1 Display and connections
puters as well as other network devices. A couple of network examples are
illustrated at the end of the chapter.
-
Only for MicroLink
dLAN ISDN Router
쐃
쐇
쐋
쐏
쐄
쐂
쐃 dLAN Link Lit when connected to another dLAN adapter.
dLAN
쐇 dLAN Act Flashes during data transfers via dLAN.
쐋 Power Lit when the device is switched on.
쐏 S0 Lit when the ISDN bus is active.
쐄 Link/Act Lit when ISDN connection is active, flashes during data
ISDN
쐂 Multilink Lit when channel bundling is active.
쐆 Link/Act Lit when a computer (or hub/switch) is connected to the
쐊 FD/Col Lit in full duplex mode, flashes during data collisions (FD =
쐎 10/100 10 or 100 Mbps. Lit when data transfer rate is 100 Mbps.
LAN connections 1 to 4
transmission (Link = connection, Act = activity).
device. Flashes during data transfers in the LAN.
Full Duplex, Col = Collision).
쐆
쐊
쐎
devolo MicroLink ISDN Router & MicroLink dLAN ISDN Router
|
|
Page 11
Connection and installation
|
쐃쐋
쐇
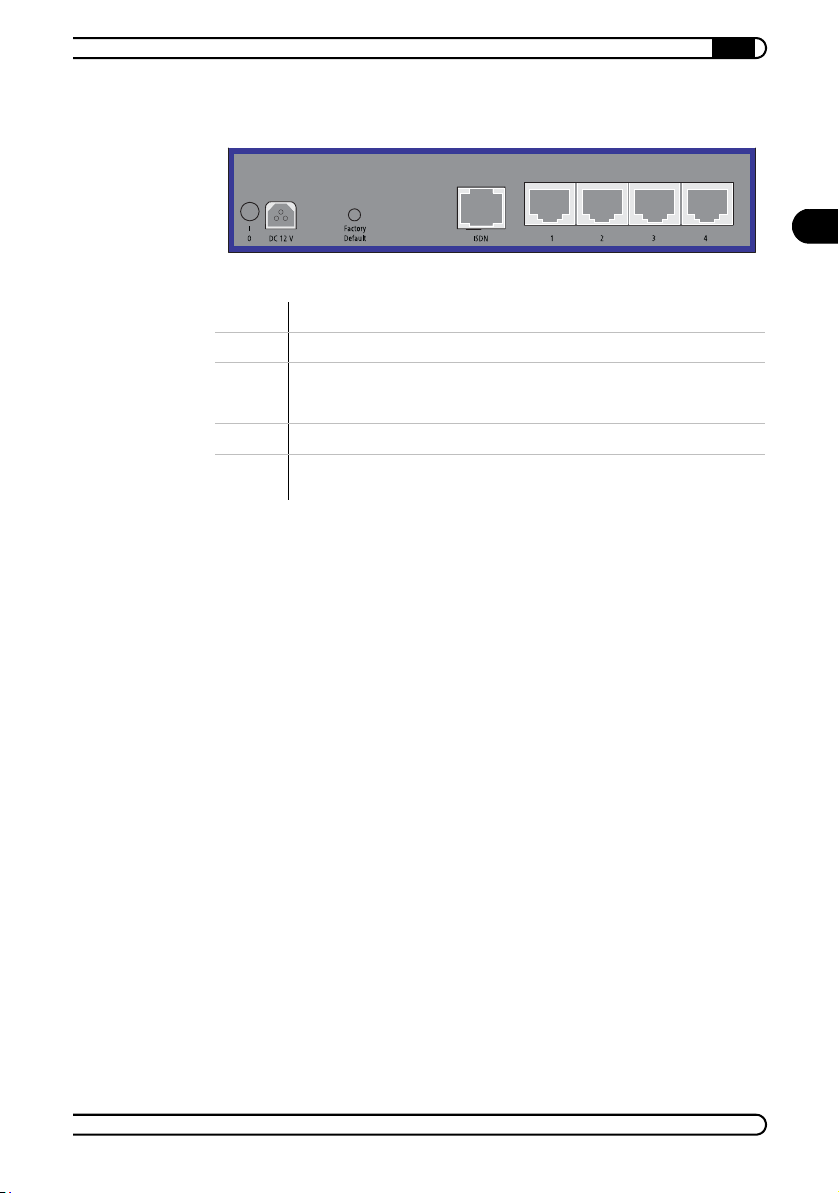
쐃 Power switch.
쐇 Connection for AC adapter.
쐋 Button for manual reset; if this button is pressed for longer than five seconds,
쐏 RJ45 jack for ISDN cable for the ISDN connection.
쐄 RJ45 sockets for network cables (patch cables, at least UTP CAT5) to connect
all of the stored configuration data will be deleted and the router will be
restored to its factory defaults.
computers in the LAN or additional network devices.
쐏쐄
2.2 Connecting the MicroLink (dLAN) ISDN Router
Preconditions
Your MicroLink (dLAN) ISDN Router requires a computer running an operating
system with TCP/IP support (e.g. Windows 98, Windows Me, Windows 2000,
Windows XP, MAC OS X, Linux) connected to the MicroLink (dLAN) ISDN
Router via LAN (Ethernet).
To connect a computer to the integrated switch via LAN, use a network cable
with RJ45 plugs, also known as a patch cable. The computer must have a free
LAN port (RJ45).
11
EN
Connection
햲 Connect the MicroLink (dLAN) ISDN Router to an AC outlet using the AC
adapter. Turn on the power with the switch on the back. The green
'Power' LED on the front panel will light up.
햳 Connect the ISDN cable first to the 'ISDN' socket on your router and then
to the ISDN connection.
햴 Next, use network cables to connect up to four computers to a router's
RJ45 socket (LAN port) respectively and start the connected computers.
The associated 'Link/Act' control lamps light up.
devolo MicroLink ISDN Router & MicroLink dLAN ISDN Router
|
|
Page 12
Connection and installation
12
|
It is important to always start the router before the computers so that the
computers can receive their TCP/IP configuration from the router's DHCP
server while booting.
As each of the RJ45 sockets also functions as an uplink port, you may connect
EN
either a computer or an additional switch (hub) to any of the four ports to link
more than four computers. Thanks to Auto MDI/X, you can use either cross
over or normal cables. An LED labeled 'Link/Act' will be lit on the front panel
for every computer or every network device which is connected and powered
up.
For information on configuring the MicroLink (dLAN) ISDN Router, please see
the following Chapter
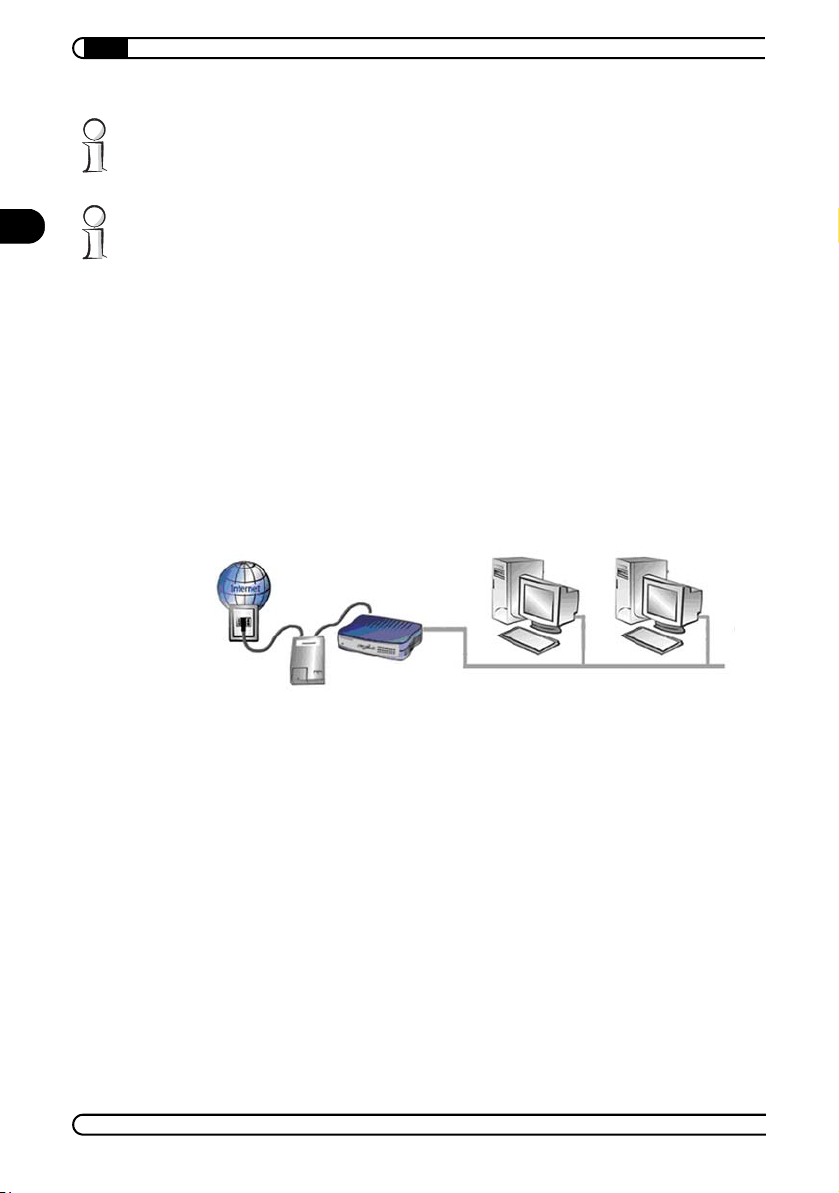
2.3 Networking examples
햲 Networking of multiple workstations; Internet access via the MicroLink
ISDN Router
“Router configuration” on page 15.
PC
-
PC
ISDN
NTBA
devolo MicroLink ISDN Router & MicroLink dLAN ISDN Router
|
MicroLink ISDN
Router
Ethernet
|
Page 13
Connection and installation
|
13
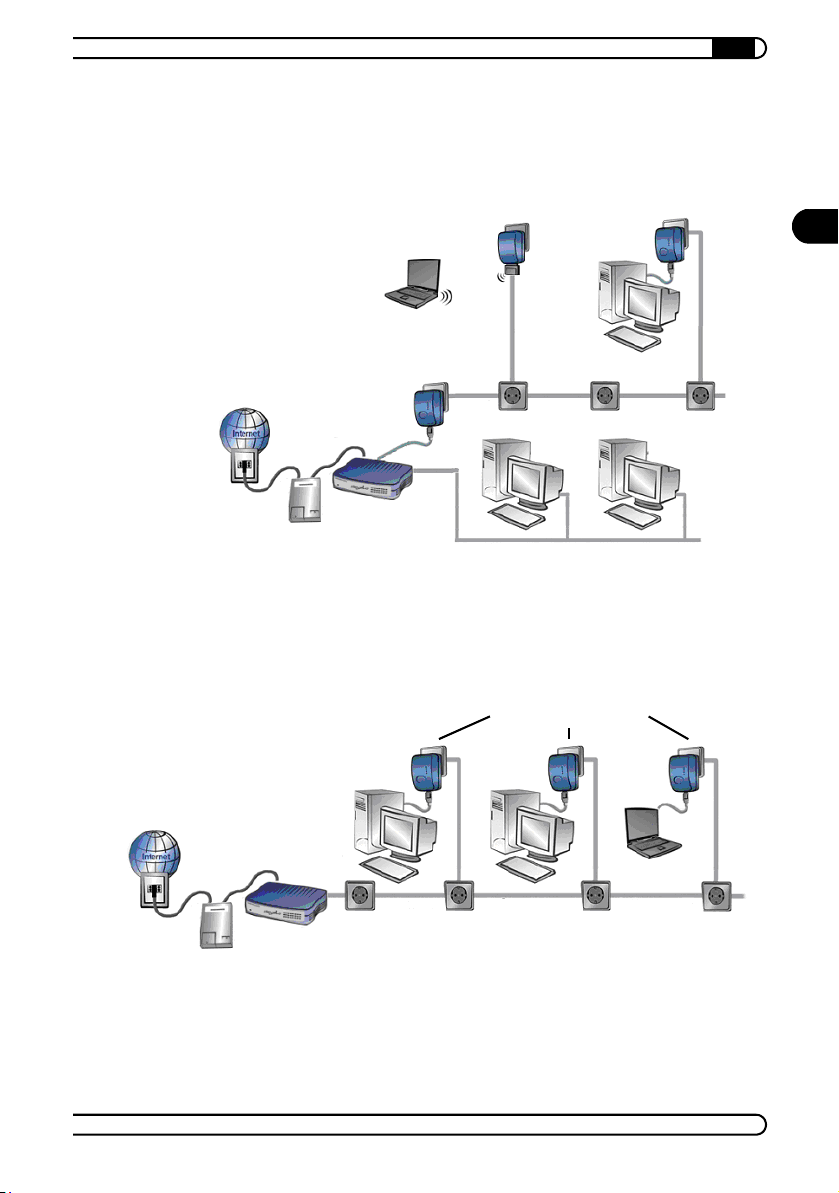
햳 Networking multiple workstations via the power supply grid and/or Eth-
ernet; Internet access via the MicroLink ISDN Router
MicroLink dLAN Ethernet
MicroLink dLAN Wireless
MicroLink dLAN Ethernet
grid
Power supply
MicroLink dLAN USB
PC
PCPC
EN
ISDN
ISDN
NTBA
MicroLink ISDN
Router
햴 Networking via MicroLink dLAN USB or Ethernet; data exchange
between all computers in the network and Internet access via the
MicroLink dLAN ISDN Router
MicroLink dLAN Ethernet
MicroLink dLAN USB
PC
grid
Power supply
NTBA
PC
MicroLink dLAN
ISDN Router
devolo MicroLink ISDN Router & MicroLink dLAN ISDN Router
|
|
Page 14

Connection and installation
14
햵 Linking an additional WLAN network using MicroLink dLAN Wireless;
|
data exchange between all computers in the subnets and Internet access
via the MicroLink dLAN ISDN Router
EN
ISDN
NTBA
Ethernet
MicroLink dLAN
ISDN Router
MicroLink dLAN Wireless
PC
grid
Power supply
devolo MicroLink ISDN Router & MicroLink dLAN ISDN Router
|
|
Page 15

3 Router configuration
This chapter will explain how to set up Internet access and how to take
advantage of additional functions and settings of your router with advanced
configuration.
If you intend to use a computer connected via dLAN to configure the router,
you must set up the dLAN network first. For more information, please see
“Configuring the dLAN network with the MicroLink dLAN Configuration Wizard” on page 29.
The configuration of the MicroLink (dLAN) ISDN Router takes place in the following stages:
Check the network settings of the computer on the local network and
modify them as necessary
Set up Internet access
Configure additional router functions
For configuring the network and setting up Internet access, we recommend
using the setup wizard, which will help you configure the necessary settings
(
“Setting up Internet access using the setup wizard ” on page 15). Alternatively, you may also set up Internet access using browser-based configuration
(
“Setting up Internet access manually” on page 16). The MicroLink (dLAN)
ISDN Router is already optimally pre-configured for simple Internet access.
Router configuration
|
15
EN
The additional functions of the router must be set up manually using the
browser-based configuration (
If you have switched the router's power off and back on, or reset the router
using the 'Factory Default' button, you must then also restart all of the connected computers to update the network settings.
“Advanced configuration” on page 18).
3.1 Set up Internet access
3.1.1 Setting up Internet access using the setup wizard
If you are using a computer with a Windows operating system to configure
the router, you have the option of using the setup wizard.
햲 Put the enclosed devolo product CD in your CD-ROM drive. The 'devolo
MicroLink (dLAN) ISDN Router' setup application will start automatically.
devolo MicroLink ISDN Router & MicroLink dLAN ISDN Router
|
|
Page 16

Router configuration
16
|
If the Setup software does not start automatically, run the file ’autorun.exe’
in the root folder of the product CD.
햳 Select 'Install MicroLink (dLAN) ISDN Router software'.
EN
햴 The wizard will now install the selected devolo software on your com-
puter. When the installation is complete, the router configuration wizard
will automatically start. During this process, the wizard first checks the
computer's network settings and modifies them as necessary. Then the
wizard helps you set up Internet access for the router.
햵 Finally, the wizard will contact the devolo website to ensure that the
Internet access is working. If the Internet connection is working correctly,
configure all other connected computers. Insert the devolo product CD in
the computers to be configured and install 'MicroLink (dLAN) ISDN Router
installation' as a minimum. The wizard will then check the settings of the
network and correct them as necessary, and will skip setting up Internet
access again if so requested.
Note that modern operating system features (like the Windows Update feature) and various programs such as e-mail and file-sharing clients can be configured to connect to the Internet automatically, which can cause charges
from your service provider.
For this reason, once you are done setting up the router, pay attention to the
router to see how and when it connects to and disconnects from the Internet.
The cost control setting is pre-configured to a maximum of seven online hours
per week (see
“Cost control” on page 21).
3.1.2 Setting up Internet access manually
To configure Internet access for your MicroLink (dLAN) ISDN Router, you will
need a computer that is connected to the router with a network cable and is
installed with an Internet browser.
The computer you are using to configure the MicroLink (dLAN) ISDN Router
must be set up to receive network settings automatically. For further information, please see the documentation of your operating system.
햲 Open your browser and enter the URL 'http://192.168.0.251'.
햳 Click 'Set up Internet connection', to start the corresponding wizard.
devolo MicroLink ISDN Router & MicroLink dLAN ISDN Router
|
|
Page 17

Router configuration
|
햴 A list of countries appears. For each country, selected Internet service
providers have been pre-configured. Select your location from the list and
click 'Next'.
햵 Choose your Internet provider from the list and confirm your choice by
clicking 'Next'
If you are using an unlisted provider, select the entry 'other provider' and set
up the connection manually.
햶 Enter the call number for your Internet provider. If your router is con-
nected to a branch exchange, enter the number you have to dial to access
an outside line in the 'Number to access an outside line' field (such as
"9"). Then click 'Next'.
.
17
EN
햷 Some Internet service providers require you to enter additional access
data (such as a user name and password). This is data that you receive
from your Internet service provider. Enter the data accordingly and then
click 'Next'.
햸 To confirm and save the new data to your router, click 'Finish'.
햹 Finally, check whether the Internet connection works by entering a URL
such as www.devolo.com in your Web browser. Once your Internet
access is working correctly, set the remaining connected computers to
automatically receive network settings. For further information, please
see the documentation of your operating system.
3.1.3 Checking your Internet connection
After you have configured your Internet connection correctly, the router can
establish a connection to the Internet automatically for all computers on the
devolo MicroLink ISDN Router & MicroLink dLAN ISDN Router
|
|
Page 18

EN
Router configuration
18
|
network. Data for checking the Internet connection is provided on the entry
page of the router configuration utility (http://192.168.0.251).
From this site, you can view whether you are currently connected to the Internet in the section called 'Status'. The advanced status includes, in addition to
ISDN connection data, the current IP and DNS addresses assigned to the
router from your Internet service provider and the duration of the current
Internet connection. The 'Cost control' section indicates the valid time limits
and the amount of minutes used so far (see
To update and view the latest data, simply click the refresh button in your
browser.
“Cost control” on page 21).
If you want to disable access to the Internet from the computers on your network completely, you can disable the Internet connection on the entry page
of the router configuration utility. This does not affect the router settings. All
access data for the Internet connection remain intact for later use. To enable
the Internet connection again, simply click the 'Activate Internet connection'
button on the entry page of the router configuration utility.
3.2 Advanced configuration
In this chapter, we will be guiding you through the advanced configuration of
the MicroLink (dLAN) ISDN Router, explaining its functions and settings.
devolo MicroLink ISDN Router & MicroLink dLAN ISDN Router
|
|
Page 19

3.2.1 Start Advanced configuration
햲 Open your browser and enter the URL 'http://192.168.0.251'.
햳 Select 'Management (for advanced users)'.
Router configuration
|
19
햴 Click the 'Display expert configuration' link.
Keep in mind that the settings you have configured only take effect if you confirm them by clicking 'Save'.
3.2.2 General
Configuration access
Specify the configuration password here.
Select a password to prevent unauthorized access to the configuration of
your router. Enter it into both fields. Should you ever forget your password,
you will need to press the 'Factory Default' button. However, this will also
delete all of your configuration data. You will then need to set up the router
again. Save your new password by clicking 'Save'
Please note that changing the configuration password will block the setup
wizard. Use of the setup wizard is disabled if a configuration password is set
up.
EN
.
ISDN connection
For 'Own phone number (MSN)', specify the call number of your ISDN connection (without area code). If your router is connected to a branch exchange,
specify the number you have to dial to access an outside line in the 'Number
to access an outside line' field (such as "9").
devolo MicroLink ISDN Router & MicroLink dLAN ISDN Router
|
|
Page 20

Router configuration
20
|
3.2.3 Internet connection
Access data
Here you can view and modify the access data for your Internet service pro-
EN
vider.
Connection control
Your router can connect automatically to the Internet when an application on
a computer on your network (such as an Internet browser or e-mail program)
requests access to the Internet. If you want to disable this feature, select 'No'
for the 'Set up Internet connection automatically' option.
The 'Idle time, after which the connection is disconnected' option indicates
how many seconds the connection should be kept even though none of the
computers on the network has sent any data to the Internet. To keep the con
nection from being interrupted too frequently, which requires the router to
reestablish the connection when needed, do not enter this value too low. We
recommend setting this value between 60 and 180 seconds initially, and
adjusting later as necessary.
Note that modern operating system features (like the Windows Update feature) and various programs such as e-mail and file-sharing clients can be con-
devolo MicroLink ISDN Router & MicroLink dLAN ISDN Router
|
-
|
Page 21

Router configuration
|
figured to connect to the Internet automatically, which can cause charges to
add up from your service provider.
For this reason, once you are done setting up the router, pay attention to the
router to see how and when it connects to and disconnects from the Internet.
The cost control setting is pre-configured to a maximum of seven online hours
per week (see
Channel bundling
If the connection to the Internet becomes too slow for your needs, you can
combine the bandwidths of two ISDN lines (called channel bundling).
The difference between channel bundling and a "normal" connection is that
bundling uses two ISDN lines simultaneously to transfer data to and from the
Internet.
You can use the 'Activate automatic channel bundling' option to enable or
disable this feature. The 'Idle time, after which the second line is discon
nected' indicates how long the router should keep the second ISDN line open
if it is not being used.
Be aware that the use of a second ISDN line incurs additional charges. Furthermore, using the second ISDN line for the Internet connection may make
it impossible for you to use the telephone at the same time.
“Cost control” on page 21).
21
EN
-
Cost control
Your MicroLink (dLAN) ISDN Router can help you keep online costs under control. To do so, specify for 'Cost control' how much online time is to be allowed
during a specific period. Once this time has elapsed within this period, the
router will no longer establish any connections to the Internet. If you want to
disable cost control, simply specify "0" for the 'Maximum connection time'.
If the maximum online time limit has elapsed within the specified period, the
router automatically closes the current connection. Reconnecting to the Inter
net is possible if:
You click the 'Remove connection block' option on the entry page of the
router configuration utility.
You shut off and then switch on the router.
You modify the value for the period or for the maximum online time.
Or the specified period ends.
devolo MicroLink ISDN Router & MicroLink dLAN ISDN Router
|
|
-
Page 22

Router configuration
22
EN
If cost control is enabled, be sure you have enough time when connected to
complete large downloads. Once the maximum online time limit has elapsed,
the router disconnects from the Internet without any warning. Another option
is to use a download manager that allows you to resume downloads that
have been interrupted.
3.2.4 Local network
|
Network settings
On this screen you can specify the 'IP address' to be used to access your
router from the network. The default setting is '192.168.0.251'. This screen is
also used to specify the subnet mask (default: '255.255.255.0'). If you want to
use your MicroLink (dLAN) ISDN Router as a DHCP server, check the box next
to 'Automatically assign network settings for computers in the local area net
work (DHCP server)'.
devolo MicroLink ISDN Router & MicroLink dLAN ISDN Router
|
-
|
Page 23

Router configuration
|
Please note that changing the IP address will block the setup wizard. The
setup wizard can only be used if the MicroLink (dLAN) ISDN Router can be
reached at its default IP address of '192.168.0.251' with the subnet mask of
'255.255.255.0'.
23
Port forwarding
The computers on your network are not directly accessible from other computers on the Internet. To make web servers, FTP servers and other applications available, you can enable port forwarding.
Follow these steps to configure a port for port forwarding:
햲 Click 'Port forwarding table'. The window that appears contains a table
that lists port ranges and the IP address corresponding to the target com
puter.
햳 Click 'Add'.
EN
-
햴 Use the 'From port' and 'To port' fields to define the range of ports from
which incoming requests will be forwarded to the target computer (for
example, "80" for HTTP requests).
햵 For 'Forward to IP address', enter the IP address of the target computer to
which requests are to be forwarded.
devolo MicroLink ISDN Router & MicroLink dLAN ISDN Router
|
|
Page 24

Router configuration
24
|
Confirm your settings and return to the port forwarding table by clicking
'Save'. The table now displays the new port forwarding settings. You can
change the forwarding settings by clicking the start port. The two icons to the
left of each entry allow you to copy or delete the port forwarding settings.
EN
Firewall
The 'Firewall' screen allows you to enable or disable the firewall of the
MicroLink (dLAN) ISDN Router.
The other settings here allow you to define how your router and your network
are protected.
Many attacks on a computer network begin with a simple ping to an IP
address. If a ping is responded to, the attacker knows that he has found a
potential target. Blocking the ping prevents the router from answering it. This
also makes it impossible to find the router via a "traceroute" request.
In addition to the actions mentioned above, reactions to certain port requests
may also reveal whether there is a computer at the queried address. To pre
vent this, use the 'Stealth mode' feature. If enabled, it hides all non-open
ports.
-
devolo MicroLink ISDN Router & MicroLink dLAN ISDN Router
|
|
Page 25

Router configuration
|
You can also protect the router from Denial-of-Service attacks. Denial of Service (DoS) attacks are attacks to a computer or network with the objective of
creating as much data traffic as possible and thereby overloading the system.
If DoS protection is enabled using the 'Activate protection against Denial Of
Service' setting, the router, after detecting a DoS attack, discards all corre
sponding packets.
The Intrusion Detection System (IDS) is used to detect intruders in a computer
or network.
The 'Activate Intrusion Detection System' option lets you configure how the
firewall is to react to a detected intrusion attempt and how it is to deal with
the corresponding packets. The following are your options:
'Yes': The packets are discarded without notification.
'No': The packets are forwarded.
Additionally, you can instruct the firewall to filter out certain data packets.
햲 Click 'Rules table'. This opens a window with a list of rules. Click 'Add'.
25
-
EN
햳 You can define the rules in the window that follows. The following
options are available:
'Source IP address': Source IP address, or 0.0.0.0 if the filter is to
apply to all IP addresses.
'Source subnet mask': Source subnet mask which, together with the
source IP address, determines the source network, or 0.0.0.0 if the fil
ter is to apply to all IP addresses.
'From source port' and 'To source port' define the port range for the
packets being filtered. If both values are specified as 0, the filter
applies to all source ports.
devolo MicroLink ISDN Router & MicroLink dLAN ISDN Router
|
|
-
Page 26

EN
Router configuration
26
|
'Target IP address': Target IP address, or 0.0.0.0 if the filter is to apply
to all IP addresses.
'Target subnet mask': Target subnet mask which, together with the
target IP address, determines the target network, or 0.0.0.0 if the fil
ter is to apply to all IP addresses.
'From target port' and 'To target port' define the port range for the
packets being filtered. If both values are specified as 0, the filter
applies to all target ports.
'Action': This is used to define how the firewall is to treat a specific
packet. The following are your options:
'Transmit packet': The packet is allowed through.
'Reject packet': The packet is discarded without notification.
'Discard packet': The packet is rejected and the sender is notified
accordingly.
Confirm your settings and return to the list of rules by clicking 'Save'. You can
modify the entry by clicking the source IP address. The two icons to the left
of the entry allow you to copy or delete it.
Clicking the 'Event table' opens a list containing all the logged events that
have been triggered by the rule. To make sure you can accurately trace events
in the log, check that the system time is set correctly in the router. To do so,
go to the router utility start page, then select 'Management (for advanced
users)' and then 'See date and time'.
-
3.3 Saving and restoring your configuration
You can save all of the settings for your MicroLink (dLAN) ISDN Router to a
file on disc simply by selecting 'Management (for advanced users)' and then
'Save configuration as file' on the entry page of the router configuration util
ity. If at a later time your settings are inadvertently changed, you can load the
settings of the saved file into the router by clicking 'Restore configuration
from file'.
devolo MicroLink ISDN Router & MicroLink dLAN ISDN Router
|
|
-
Page 27

3.4 Uploading new firmware
The firmware is the router's internal program. It may be updated from time to
time. If you experience problems with your MicroLink (dLAN) ISDN Router,
download the latest firmware version from the devolo homepage at
www.devolo.com. Then carry out these steps:
햲 On the start screen of the configuration utility, click 'Management (for
advanced users)' and then click 'Upload new firmware'.
햳 Click 'Browse'.
햴 Specify the location of the firmware file and then click 'Open'.
햵 Now click 'Start upload' to load the new firmware into the router.
Router configuration
|
27
EN
devolo MicroLink ISDN Router & MicroLink dLAN ISDN Router
|
|
Page 28

devolo MicroLink dLAN software
28
|
4 devolo MicroLink dLAN software
In this chapter, we will introduce you to the devolo MicroLink dLAN Configuration Wizard, the MicroLink Informer MicroLink EasyShare software and the
EN
4.1 Overview of the devolo software
4.1.1 MicroLink dLAN Configuration Wizard
4.1.2 MicroLink Informer
HTML configuration interface. We will also describe the installation and con
figuration of your dLAN network using the MicroLink dLAN Configuration
Wizard.
The MicroLink dLAN Configuration Wizard helps you to build and change your
encrypted dLAN network. With its help, you can add the MicroLink (dLAN)
ISDN Router to your network. It allows you to configure all dLAN adapters on
the network from a central location, such as from a single workstation. For
the encryption process, you need the security IDs of all MicroLink dLAN
adapters and the MicroLink (dLAN) ISDN Router (provided on the underside
of unit) and a network password of your choosing, which you will assign.
-
The MicroLink Informer displays information regarding all dLAN devices on
your network, such as their MAC addresses and current transfer speeds.
The MAC address (Media Access Control) is a serial number which is unique
throughout the entire world. It is permanently programmed in the hardware
and cannot be altered. You can find the MAC address of the MicroLink (dLAN)
ISDN Router on the bottom of the unit.
4.1.3 MicroLink EasyShare
MicroLink EasyShare is a file-sharing and chat tool for your local network. It
allows you to exchange files easily between local Windows computers. The
chat function allows instant communication between all network users.
MicroLink EasyShare is very user-friendly and easy to use.
devolo MicroLink ISDN Router & MicroLink dLAN ISDN Router
|
|
Page 29

devolo MicroLink dLAN software
|
4.2 Installation of the devolo MicroLink dLAN software
The devolo MicroLink dLAN software is normally installed together with the
setup wizard. To install the devolo software separately on a computer with a
Windows operating system, follow the steps below.
햲 Put the enclosed devolo product CD in your CD-ROM drive. The 'devolo
MicroLink dLAN ISDN Router' setup software will start automatically.
If it does not start automatically, run the file ’autorun.exe’ in the root folder
of the product CD.
햳 In the CD setup select 'Install MicroLink dLAN ISDN Router software'.
햴 Select the software components ('devolo MicroLink dLAN Configuration
Wizard', 'devolo MicroLink Informer' and/or 'devolo MicroLink
EasyShare') that you want to install and click Next.
햵 The next dialog window shows the default target directory (preset by
devolo), to which the devolo software will be installed. You can accept
the suggested directory or select a new one. Confirm your selection by
clicking Next.
29
EN
햶 Confirm once again by clicking Next, then end the installation by clicking
Finish.
햷 Once the installation has completed successfully, launch the devolo
application via Start Programs devolo MicroLink dLAN Con
figuration Wizard, MicroLink EasyShare, MicroLink Informer or
MicroLink dLAN ISDN Router installation.
4.3 Configuring the dLAN network with the MicroLink dLAN Configuration Wizard
Please have at hand the security IDs of the dLAN adapter, which you have
written down earlier. The MicroLink dLAN Configuration Wizard requires this
for configuring the network. You can find the security ID on the bottom of the
unit.
햲 Start the MicroLink dLAN Configuration Wizard by clicking Start Pro-
grams devolo MicroLink dLAN Configuration Wizard.
devolo MicroLink ISDN Router & MicroLink dLAN ISDN Router
|
-
|
Page 30
EN
devolo MicroLink dLAN software
30
햳 Confirm with Next. The MicroLink dLAN Configuration Wizard starts the
network analysis and searches your network for the dLAN adapters.
Make sure that all of the dLAN adapters that you want to add to your network
are also connected to the power supply grid.
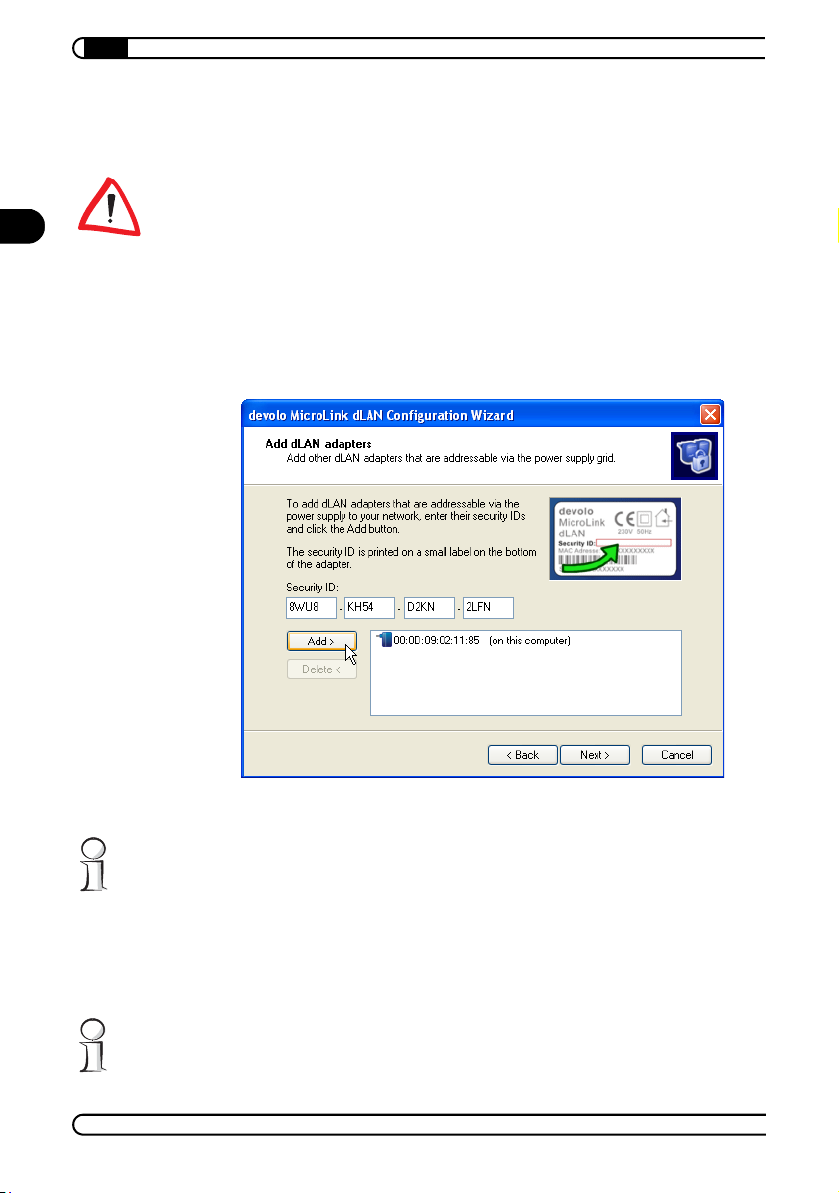
햴 The dLAN adapter that is directly connected to your computer is detected
automatically. All other dLAN adapters must be registered manually. To
do so, enter in sequence the security IDs of the dLAN adapters which,
together, you want to make form a network.
햵 Then, click Add and confirm with Next after you have entered all the
dLAN adapters you want to add.
|
햶 In the next dialog window, enter the network password you have chosen
twice and confirm with Next.
The password set up initially by devolo is HomePlug.
햷 Your network password is now assigned to the dLAN adapters you have
selected for the network.
햸 Finish the process of protecting your network by clicking Finish. Your
dLAN network is now protected from unauthorized access from outside.
You can change and/or update the configuration of the dLAN network at any
time. To do so, repeat the configuration process described above.
devolo MicroLink ISDN Router & MicroLink dLAN ISDN Router
|
|
Page 31

devolo MicroLink dLAN software
|
4.4 Overview of the dLAN with the MicroLink Informer
With MicroLink Informer, you always have an overview of the dLAN adapters
on your dLAN network. MicroLink Informer displays the dLAN adapter con
nected directly to the computer, as well as all dLAN adapters which are available on the network and which belong to the same dLAN network.
In addition to other information, MicroLink Informer displays the MAC
address of each dLAN adapter and the current connection data rate.
You can use the Device Rename command to change the name of the
highlighted device.
Right-clicking on one of the dLAN adapters opens a context menu in which
the following commands are available:
'Rename' opens a dialog in which you can assign a new name to the
device.
'Start dLAN configuration wizard' opens a dialog in which you can add
new dLAN adapters to the dLAN network and assign the network pass
word.
31
-
EN
-
devolo MicroLink ISDN Router & MicroLink dLAN ISDN Router
|
|
Page 32

devolo MicroLink dLAN software
32
|
4.5 Communication in the dLAN with the MicroLink EasyShare
All users on the local network who have started MicroLink EasyShare are
EN
automatically recognized by the program and listed:
4.5.1 Configuration
The MicroLink EasyShare software provides two easy wizards, which will
guide you quickly and easily through the configuration process: the first setup
wizard, which starts automatically the first time the program is started, and
the sharing wizard, which allows you to add shared items at any time. The
individual functions of the MicroLink EasyShare software are described here:
Folder sharing
To share data with others, a MicroLink EasyShare network user has to make
the data available in a shared folder. When a folder is shared, all of its files
as well as the files of all its subdirectories become available to all users on
the MicroLink EasyShare network. Folders can be shared either by using the
initial setup wizard, which opens automatically the first time the MicroLink
EasyShare is started, or by using the sharing wizard. You can open the shar
ing wizard by clicking the Add share button, or by selecting File Add
share from the menu.
devolo MicroLink ISDN Router & MicroLink dLAN ISDN Router
|
-
|
Page 33

devolo MicroLink dLAN software
|
Refreshing shared folders
To view (newly) shared folders of other MicroLink EasyShare network users,
select File Refresh from the menu, or Refresh from the context menu
(right mouse button). The contents of all shared folders will appear in the top
right-hand window.
Downloading files
To download shared files from other MicroLink EasyShare network users,
select the computer belonging to the user and then mark the shared folder for
that user. The upper-right window then lists all the contents of the folder.
From the list, mark the files and/or folders that you want to download and
then select File Download from the menu, or Download from the con
text menu (right mouse button). Choose a target folder on your computer and
confirm by clicking OK. The files are now downloaded to your computer. The
status of the download is displayed in the lower-right window entitled 'Data
transfer in process'.
Data transfer in process
All 'Data transfer in process' are displayed in the lower right window and disappear from the screen once they are finished.
The 'Name' column indicates the name of the file being downloaded.
The 'Status' column shows the current transfer progress and the transfer
speed.
The 'Host' column shows the computer from which the file is being down-
loaded, or to which it is being uploaded from your computer.
You can cancel the current download by clicking the file and selecting Can-
cel from the context menu (right mouse button).
33
EN
-
Chatting
The lower left window functions as a chat room, which is visible and accessible to all MicroLink EasyShare users on the local network. Users can "chat"
by writing messages and clicking Send.
devolo MicroLink ISDN Router & MicroLink dLAN ISDN Router
|
|
Page 34

Appendix
34
|
5 Appendix
5.1 Performance data and specifications
EN
MicroLink ISDN Router MicroLink dLAN ISDN Router
LAN standards Ethernet specification IEEE 802.3; Fast Ethernet specification IEEE 802.3u;
ISDN standard DSS1 (Euro-ISDN), 1TR6 (German national ISDN standard), basic connection
dLAN HomePlug-compatible
Transfer throughput ISDN up to 64,000 – 128,000 bps with channel bundling
Firewall Protection against the following attacks: IP spoofing, ping of death, land
dLAN security DES
Ports 4 LAN with Auto MDI-X (LAN ports can also be used as uplink ports)
WAN connection Connection type: RJ 11
LEDs Power, 4x3 status LEDs for Ethernet
Computer interface RJ45
Protocols CSMA/CD, TCP/IP
System requirements CD-ROM drive, for Internet access: ISDN connection
Power supply 9 V AC/800 mA adapter Power supply pack: 230V / 12V DC;
Ambient conditions 5–40°C, 10–80% humidity (non-condensing)
CE conformity CE conformity in accordance with the technical requirements for all EU
Warranty 3 years
Full duplex specification IEEE 802.3x
(multi-device connection)
attack, reassembly attack, SYN flooding, DoS attack
encryption over the power
pro
supply grid
connections and uplink port, 3 for
ISDN status
countries and Switzerland:
EN 60950-1: 2001
EN 55024: 1998+A1: 2001
EN 55022: 1998 +A1 :2000 (Class A)
Power, 4x3 status LEDs for Ethernet
connections and uplink port, 3 for
ISDN status, 2 for HomePlug con
nection
700 mA
-
devolo MicroLink ISDN Router & MicroLink dLAN ISDN Router
|
|
Page 35

5.2 Declarations of conformity
KONFORMITÄTSERKLÄRUNG
EC DECLARATION OF CONFORMITY
Die Firma: devolo AG
The Company: Sonnenweg 11
erklärt, dass das Produkt: MicroLink
declares that the product:
Verwendungszweck: ISDN-zu-Ethernet-Router
Intended purpose: ISDN-to-Ethernet router
52070 Aachen
®
ISDN Router
Appendix
|
35
EN
den grundlegenden Anforderungen des § 3 und den übrigen einschlägigen Bestimmungen
complies with the appropriate essential requirements of the FTEG (Article 3 of R&TTE) and the other relevant
Harmonisierte Normen: Gesundheit und Sicherheit gemäß §3 (1) 1. (Artikel 3 (1) a))
Harmonised standards: Health and safety requirements contained in §3 (1) 1. (Article 3 (1) a))
Harmonisierte Normen: Schutzanforderungen in Bezug auf die EMV §3 (1) 2, (Artikel 3
Harmonised standards: Protection requirements with respect to EMC §3 (1) 2, (Article 3 (1) b)
Diese Erklärung wird verantwortlich abgegeben durch:
This declaration is submitted by:
Aachen, 21. September 2004
Aachen, 21stSeptember 2004 Heiko Harbers
des FTEG (Artikel 3 der R&TTE) entspricht.
provisions.
EN 60950-1: 2001
(1) b)
EN 55024: 1998 +A1: 2001
EN 55022: 1998 +A1: 2000 +A2: 2003
Vorstandsvorsitzender
CEO
devolo MicroLink ISDN Router & MicroLink dLAN ISDN Router
|
|
Page 36

EN
36
Appendix
|
KONFORMITÄTSERKLÄRUNG
EC DECLARATION OF CONFORMITY
Die Firma: devolo AG
The Company: Sonnenweg 11
erklärt, dass das Produkt: MicroLink
declares that the product:
Verwendungszweck: ISDN-zu-Ethernet-Router mit PLC-Adapter
Intended purpose: ISDN-to-Ethernet router with PLC adapter
52070 Aachen
®
dLAN®ISDN Router
den grundlegenden Anforderungen des § 3 und den übrigen einschlägigen Bestimmungen
complies with the appropriate essential requirements of the FTEG (Article 3 of R&TTE) and the other relevant
Harmonisierte Normen: Gesundheit und Sicherheit gemäß §3 (1) 1. (Artikel 3 (1) a))
Harmonised standards: Health and safety requirements contained in §3 (1) 1. (Article 3 (1) a))
Harmonisierte Normen: Schutzanforderungen in Bezug auf die EMV §3 (1) 2, (Artikel 3
Harmonised standards: Protection requirements with respect to EMC §3 (1) 2, (Article 3 (1) b)
Diese Erklärung wird verantwortlich abgegeben durch:
This declaration is submitted by:
Aachen, 21. September 2004
Aachen, 21stSeptember 2004 Heiko Harbers
devolo MicroLink ISDN Router & MicroLink dLAN ISDN Router
|
des FTEG (Artikel 3 der R&TTE) entspricht.
provisions.
EN 60950-1: 2001
(1) b)
EN 55024: 1998 +A1: 2001
and Expert Opinion by Competent Body EMC (CE 0682)
EN 55022: 1998 +A1: 2000 +A2: 2003
Vorstandsvorsitzender
CEO
|
Page 37

5.3 CE conformity
The product conforms to the basic requirements of Directive 1999/5/EC
(R&TTE) and the other relevant provisions of the FTEG (Radio and Telecommunications Terminal Equipment Act), and is designed for use in the EU and
Switzerland.
MicroLink dLAN
ISDN Router only
This product is class A equipment. This equipment may cause interference
with radio waves in home use; if this occurs the operator may be required to
take corrective action.
5.4 Care and maintenance of the device
There are no user-serviceable parts inside the case. Do not open the case.
Clean the unit by wiping dirt from the case using an eyeglasses cleaning cloth
or other soft cloth. Never use water, paint thinner, benzene, alcohol or other
strong cleaning agents when cleaning the MicroLink (dLAN) ISDN Router, as
these could damage the case.
Appendix
|
37
EN
devolo MicroLink ISDN Router & MicroLink dLAN ISDN Router
|
|
Page 38

Appendix
38
|
5.5 Warranty conditions
The devolo AG warranty is given to purchasers of devolo products in addition to the warranty
conditions provided by law and in accordance with the following conditions:
EN
1 Warranty coverage
a) The warranty covers the equipment delivered and all its parts. Parts will, at devolo's sole
discretion, be replaced or repaired free of charge if, despite proven proper handling and ad
herence to the operating instructions, these parts became defective due to fabrication and/
or material defects. Alternatively, devolo reserves the right to replace the defective product
with a comparable product with the same specifications and features. Operating manuals
and any supplied software are excluded from the warranty.
b) Material and service charges shall be covered by devolo, but not shipping and handling
costs involved in transport from the buyer to the service station and/or to devolo.
c) Replaced parts become property of devolo.
d) devolo is authorized to carry out technical changes (e.g. firmware updates) beyond repair
and replacement of defective parts in order to bring the equipment up to the current tech
nical state. This does not result in any additional charge for the customer. A legal claim to
this service does not exist.
2 Warranty period
The warranty period for this devolo product is three years. This period begins at the day of delivery from the devolo dealer. Warranty services rendered by devolo do not result in an extension
of the warranty period nor do they initiate a new warranty period. The warranty period for in
stalled replacement parts ends with the warranty period of the device as a whole.
3 Warranty procedure
a) If defects appear during the warranty period, the warranty claims must be made immedi-
ately, at the latest within a period of seven days.
b) In the case of any externally visible damage arising from transport (e.g. dama ge to the case),
the person responsible for the transportation and the sender should be informed immedi
ately. On discovery of damage which is not externally visible, the transport company and
devolo are to be immediately informed in writing, at the latest within three days of delivery.
c) Transport to and from the location where the warranty claim is accepted and/or the repaired
device is exchanged, is at the purchaser's own risk and cost.
d) Warranty claims are only valid if a copy of the original purchase receipt is returned with the
device. devolo reserves the right to require the submission of the original purchase receipt.
-
-
-
-
4 Suspension of the warranty
All warranty claims will be deemed invalid if
a) the label with the serial number has been removed from the device,
b) the device is damaged or destroyed as a result of acts of nature or by environmental influ-
ences (moisture, electric shock, dust, etc.),
c) the device was stored or operated under conditions not in compliance with the technical
specifications,
d) the damage occurred due to incorrect handling, especially due to non-observance of the sys-
tem description and the operating instructions,
devolo MicroLink ISDN Router & MicroLink dLAN ISDN Router
|
|
Page 39

Appendix
|
e) the device was opened, repaired or modified by persons not authorized by devolo,
f) the device shows any kind of mechanical damage,
g) the warranty claim has not been reported in accordance with 3a) or 3b).
5 Operating mistakes
If it becomes apparent that the reported malfunction of the device has been caused by unsuitable
software, hardware, installation or operation, devolo reserves the right to charge the purchaser
for the resulting testing costs.
6 Additional regulations
a) The above conditions define the complete scope of devolo’s legal liability.
b) The warranty gives no entitlement to additional claims, such as any refund in full or in part.
Compensation claims, regardless of the legal basis, are excluded. This does not apply if e.g.
injury to persons or damage to private property are specifically covered by the product lia
bility law, or in cases of intentional act or culpable negligence.
c) Claims for compensation of lost profits, indirect or consequential detriments, are excluded.
d) devolo is not liable for lost data or retrieval of lost data in cases of slight and ordinary neg-
ligence.
e) In the case that the intentional or culpable negligence of devolo employees has caused a
loss of data, devolo will be liable for those costs typical to the recovery of data where pe
riodic security data back-ups have been made.
f) The warranty is valid only for the first purchaser and is not transferable.
g) The court of jurisdiction is located in Aachen, Germany in the case that the purchaser is a
merchant. If the purchaser does not have a court of jurisdiction in the Federal Republic of
Germany or if he moves his domicile out of Germany after conclusion of the contract, devo
lo’s court of jurisdiction applies. This is also applicable if the purchaser's domicile is not
known at the time of institution of proceedings.
h) The law of the Federal Republic of Germany is applicable. The UN commercial law does not
apply to dealings between devolo and the purchaser.
39
EN
-
-
-
devolo MicroLink ISDN Router & MicroLink dLAN ISDN Router
|
|
 Loading...