

MixDesk PA 802,MixDesk PA 802FX,MixDesk PA 1002,MixDesk PA 1002FX-MP,MixDesk PA 1202 ,MixDesk PA 1202FX-MP
Devine MixDesk PA 802,MixDesk PA 802FX,MixDesk PA 1002,MixDesk PA 1002FX-MP,MixDesk PA 1202 ,MixDesk PA 1202FX-MP Devine_MixDesk_series_user_manual_EN

MixDesk PA mixers
802 / 1002 / 1202 (-FX-MP)
User manual
The information in this user manual is subject to change at any time without notice.
Version:
1.0
Date of creation and author's initials:04-12-2018 RV Revision date and author's initials: -

Introduction
Thank you for purchasing this Devine PA mixer. We advise that you read this user manual in its entirety
before unpacking the contents of the box, so that you are familiar with all of the functionality that this product
has to offer. Please be sure to check that all of the parts and accessories listed below under 'box contents'
are included in the package. In the event that the product does not function properly, or if you have any
issues while operating it, please remove the plug from the power socket and contact your dealer for
assistance.
Box contents:
– Devine MixDesk mixer (802 / 1002 / 1202 (-FX-MP))
– power adapter
Please inspect the device and the included accessories.
Should you discover that either the device or one or more of the included parts have been damaged or
rendered defective while in transit, please contact your dealer directly.
Please note that the pictures in this user manual serve illustrative purposes only and may differ slightly from
the product you receive.
Contact:
Devine Pro Audio Products
Verrijn Stuartweg 18
4462 GE Goes
The Netherlands
Please do not send any products to this correspondence address.
Should you wish to send in a product for repair or for a refund, please contact your dealer for an RMA
(Return Merchandise Authorisation).
The information in this user manual is subject to change at any time without notice.
Version:
1.0
Date of creation and author's initials:04-12-2018 RV Revision date and author's initials: -

Safety instructions
Everyone involved with the installation, operation and maintenance of this device must:
- Be qualified
- Be skilled
- Have read the instructions in this user manual
- Be sure that neither the device nor the included accessories are damaged. Should the device or the
included accessories be damaged, please contact your dealer for more information.
- Ensure that the device is in good working condition and is safe to operate. Please follow the advice and
instructions as they are described in this user manual.
Damage caused by misuse and/or modifications made to the device are not covered by the warranty.
This device does not contain any parts that need to be repaired or replaced by the user. Should maintenance
or repairs be necessary, they must be handled by a qualified technician.
Important information regarding health and safety:
- Do not remove any labels or stickers from this device.
- Do not leave any cables lying around.
- The device should not be opened up, and any hardware or software that may be present should not be
modified.
- To achieve optimal performance, inputs on this device should not be fed with a signal higher than
necessary.
- The device should only be used indoors; contact with water, rain and moisture should always be avoided.
Do not place any objects containing liquids on top of the device.
- Remove the device from any nearby flames or heat sources; do not place it near flammable fluids, gasses
or objects.
- Disconnect this device from the power supply if it will not be used for a longer period of time, if maintenance
is necessary, or if the device needs to be cleaned.
- Do not pull on the cable to remove a connector, as this could cause damage.
- Do not use any cables other than the ones described in this manual. Do not use defective cables. Please
contact your dealer if the included or necessary cables do not function properly with this device.
- Only use this device with power from a grounded power source.
- In the event that the device is exposed to extreme temperature changes (e.g. transported through a cold
outside environment into a warm indoor environment), it should not be turned on until it has reached room
temperature. This is necessary to prevent moisture from forming in the device, which could lead to electric
shocks.
- Ensure there is sufficient space around the mixer for cooling purposes.
Guidelines and operation of this device:
- This device is intended for indoor use by adults.
- This device is not suitable for use by children, and should always be operated by an adult.
- This device may only be used in a suitable environment where no damage to the device can occur. Do not
use the device in moist or dusty environments such as:
- indoor swimming pools where chlorine is used
- beaches where there is sand and salt
- outdoors
- indoors in spaces where intense heat sources are present, or where it reaches temperature levels
that would be considered uncomfortable for a person
The information in this user manual is subject to change at any time without notice.
Version:
1.0
Date of creation and author's initials:04-12-2018 RV Revision date and author's initials: -
WARNING!
Keep this device away from moisture, water and rain to avoid the chance of electric shocks.

- Avoid impacts and collisions during use and transport. Do not transport the device while it is in use. Avoid
using excessive force when installing and operating the device.
- The user should become familiar with the functions of this device before using it.
- The user should be able to stop the devices's power supply in case of emergencies. At least one of the
following should therefore be accessible at all times:
- a connector the supplied power cable is plugged into
- an all-pole power socket switch or all-pole extension cable switch
- Should the device not be used in the manner described in this user manual, damages or even injuries could
occur. Devine cannot be held responsible for any injuries or damages that occur as a result of improper use
of this product.
Storage and transport:
- This product is designed for mobile use. It can be transported separately as long as it’s well-protected
against shocks and collisions.
- This device is not designed for permanent (24/7) use. The expected lifespan of the device will not be
affected by occasionally turning the device off. Disconnect the device or turn off the power when it is not
actively in use.
- If the device will not be used for a longer period of time, it should be disconnected and stored in a dust-free
environment.
- Do not expose the device to extreme temperature differences.
Housing
- Inspect the device's housing frequently, and always just before use. Avoid operating the device if there are
large dents or cracks, or if screws are missing. Do not use the device if the housing is not in good condition.
Contact your dealer or a qualified technician if you are unsure about the state of the device.
- Check the device and the screws for corrosion. Corrosion must not be present on this device. Contact your
dealer or a qualified technician if you find any corrosion on the screws.
Every power and signal connector should be securely mounted. Do not use the device if the connectors are
not secure.
Avoid dust and dirt build-up. Clean the device once a month by disconnecting it from the power supply and
wiping it down with a dry or slightly moist cloth. If the device is used frequently, the cleaning intervals should
increase.
Symbol explanation:
WEEE: Ensure that this device is disposed of properly. This product falls under the WEEE
(Waste Electrical and Electronic Equipment) directive. The requirements of this directive apply
to all manufacturers and producers of electronic devices in the EU. Do not throw this product
away with regular rubbish. Please contact your local authority for more information about how
to recycle and dispose of these products in your region. By recycling this product in the proper
manner, we can work together to ensure that we can continue to enjoy these kinds of
products and still protect the environment as much as possible from pollution.
CE: The CE logo indicates that this product meets the European norms and requirements to
which it must legally conform.
Only suitable for indoor use: this product was only designed for indoor use. The maximum
environmental temperature must not exceed 40 degrees Celsius (104 degrees Fahrenheit).
The information in this user manual is subject to change at any time without notice.
Version:
1.0
Date of creation and author's initials:04-12-2018 RV Revision date and author's initials: -

Guidelines and operation of this device
While the various MixDesk mixers are similar to use and built in much the same way, some of the following
information and images may not apply to your model. Be sure to check whether certain features are present
on your model by comparing it to the information shown in this user manual for best results.
Mono channels
A mono channel on a PA mixer is normally used for standard microphone signals. They're occasionally used
for mono line signals too, but stereo line signals are normally used unless this is not possible for some
reason.
A complete mono channel with all its controls is called a channel strip. Depending on the model
of your mixer, you'll have multiple mono channels available with the following functions:
Mic: microphone input with a 3-pin XLR connector.
Line in: to connect a line signal to a mono channel use the TRS jack connector. A balanced or
unbalanced signal can be used.
HPF: for certain signal sources, such as vocal microphones, it can be undesirable for
frequencies below 80 Hz to be processed. By activating the HPF (high-pass filter), all
frequencies below 80 Hz received from the signal source will be dampened by 18 dB. In visual
terms, this would be seen as a descending line with less and less of the signal remaining the
lower the frequencies go.
Gain: with the gain knob, the amplification of the channel's input signal can be adjusted in order
to realise its full dynamic potential and prevent distortion. When connecting to an input, the gain
knob should be turned all the way down (as far to the left as possible). Once connected, the
input signal can be amplified by slowly turning the gain knob up again (to the right) until the
CLIP level is reached. This is the point that the signal has its fullest dynamic range without
distortion. If this level is surpassed, the signal will start to clip and distortion will occur. This will
also be seen on the PEAK LED indicator and when this occurs, you should turn the gain knob
down again until the signal is no longer clipping. It's best turn the gain knob down a little further
too to allow some extra space for any dynamic differences in the signal that may occur. This
extra space is known as headroom. With practice you will become more familiar with the best
settings for certain situations. The signal level from microphones used by novice speakers or
vocalists may fluctuate widely and you should consider turning down the gain knob a little more
to compensate for any peaks that may occur in order to avoid potential problems with clipping.
EQ: the mono channels all have a 3-band EQ giving you control over the balance between the
low (80 Hz), mid (2.5 kHz) and treble (12 kHz) frequencies. Each one can be cut or boosted with
values between -15 and +15 dB. This can be handy for accentuating the high tones in vocals,
for instance.
Aux: with the Aux knob, you can determine how much of the input signal is sent to the Aux
Send output and with the PRE/POST control, you can determine whether the signal is sent to
the Aux Send output before (pre) or after (post) the fader.
FX: some mixers have a built-in effects module and other mixers have the possibility to connect
external effects. With the FX knob, the effect level on the channel can be adjusted. This can be
handy for adding a touch of reverb to a vocalist's performance, for instance. More information
about the effects function can be found later on in this manual.
The more the FX knob is turned up (to the right), the more of the channel's sound will be sent to
the effects module or output. When it's set to 0 dB, it will be sent optimally, but without any
amplification. Turing it up (to the right) will amplify it by up to a maximum 15 dB. Note that this
may cause distortion in the signal. When the knob is turned all the way down (to the left),
nothing will be sent from the channel to the effects module.
The information in this user manual is subject to change at any time without notice.
Version:
1.0
Date of creation and author's initials:04-12-2018 RV Revision date and author's initials: -
Please note: the FX pad is activated post fader. If the gain knob of the channel is turned all the way down so
that no sound is sent to the Master signal, no signal will be sent to the effects section either.
Pan: the Pan knob makes it possible to direct the mono channel's output signal towards the left or right side.
This means you could direct the sound towards the left side for a vocalist standing on the left side of the
stage, for instance. Experiment with this feature to find the best balance.
PFL: PFL stands for ‘pre-fader listening’. When the PFL knob is pressed, the PFL LED
indicator will light up to indicate that the sound level is no longer affected by the volume
fader. This lets you check how the input signal sounds before you determine the end level
with the fader.
PEAK: the PEAK LED indicator shows you when the dynamic range of the input signal
has been exceeded. This can have unpleasant consequences for the sound, so it's
important to set the gain at an appropriate level in order to prevent this from happening.
See the Gain section for more information.
Level fader: once the gain and EQ settings have been optimised, the level fader can be
used to adjust the signal. When the fader is set to 0 dB, the sound level is determined by
the setting of the gain knob. It's not recommended to boost the signal by more than 0 dB
as this can have negative consequences for the sound. The gain knob lets you get the full
dynamic potential out of the input signal and the faders allow you to determine a good
level for the final mix.
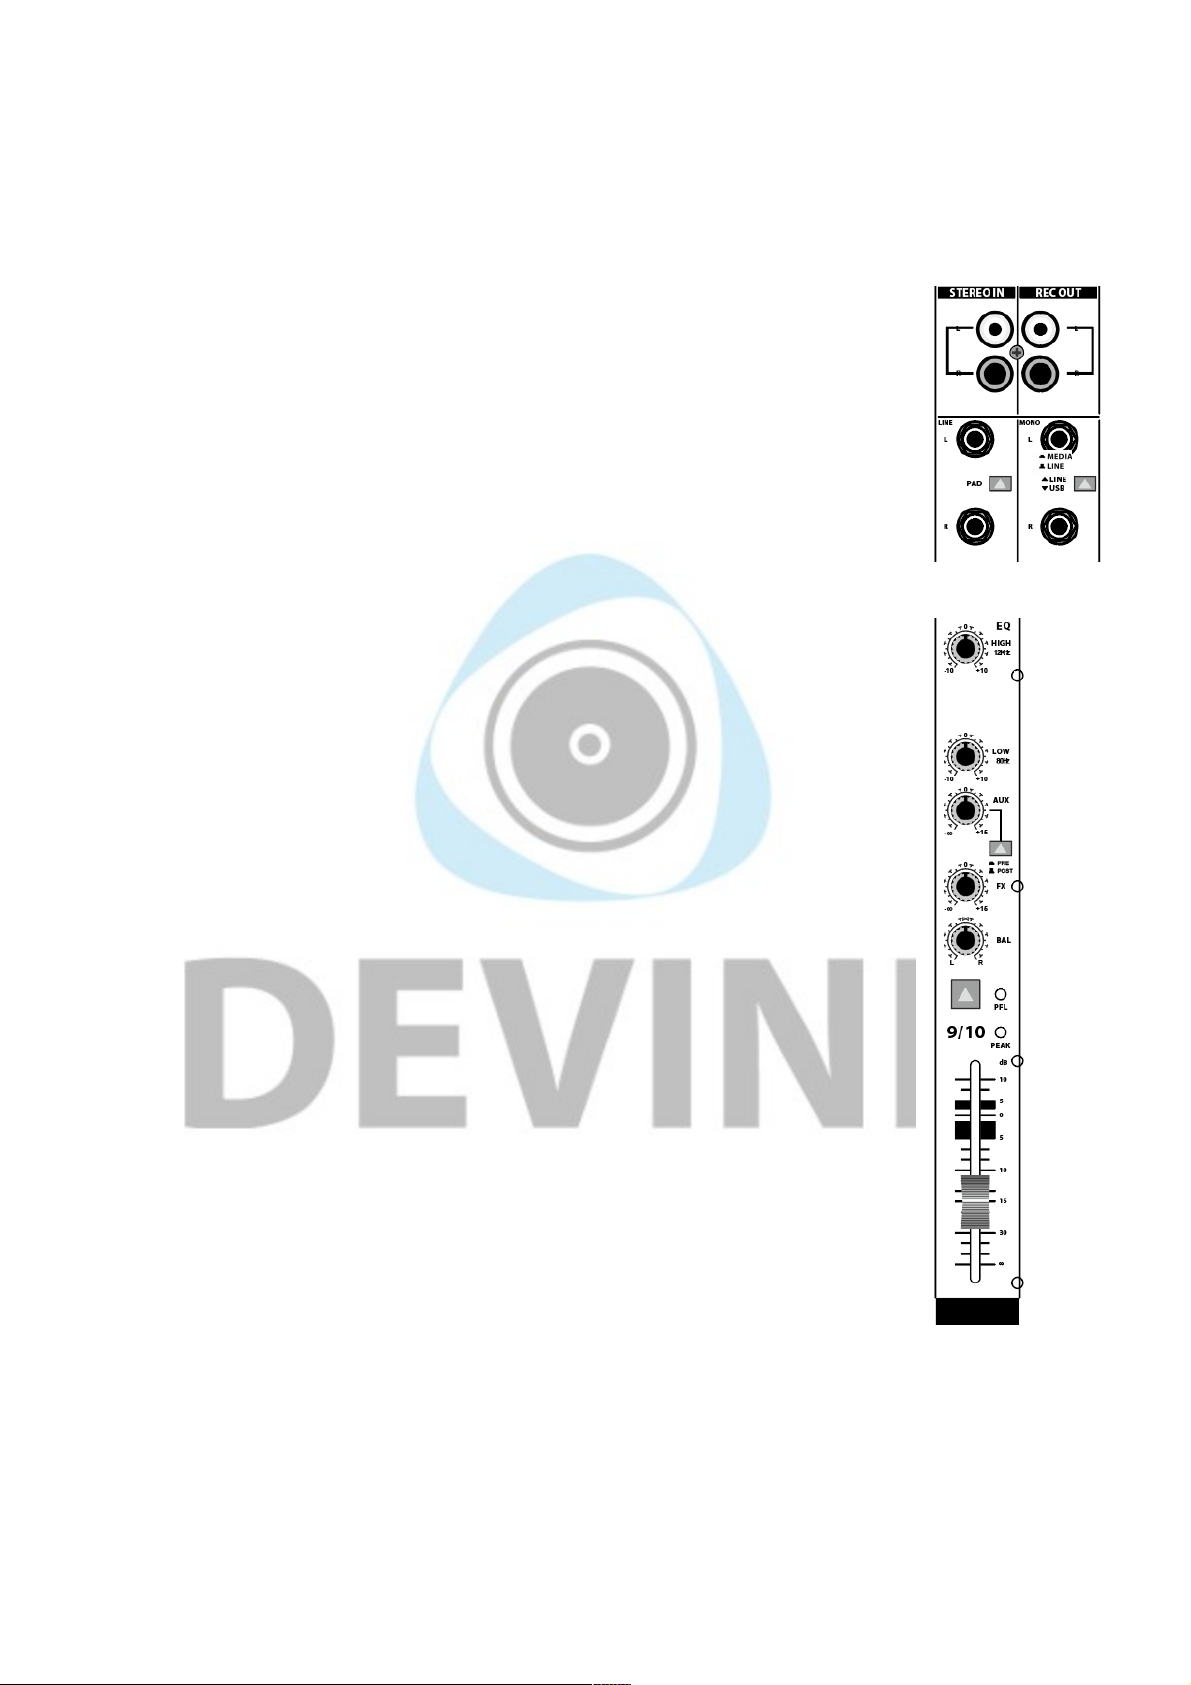
Stereo channels
A stereo channel on a mixer is designed to handle a stereo signal that consists of
individual left and right sides that are sent to separate left and right master channels. This
is very different from a mono signal that sends the same centralised signal to both sides
unless the pan knob is used to adjust the balance.
A stereo channel doesn't have a gain control because the input signal is already optimised
or can be optimised on the source device like the volume control on a keyboard, for
instance.
Stereo in: stereo sources can be plugged in via the RCA stereo inputs and normally, no
further adjustments need to be made. These connectors can be used for a wide variety of
line signals including those from smartphones, laptops, tablets, MP3 players and similar
devices.
This input has unbalanced stereo RCA connectors.
Line in: the stereo channels have two jack inputs that can be used for balanced or
unbalanced signals depending on the signal source. The signal will only be balanced if
both devices have balanced connectors and the cables used support signals with +, - and
GND (ground/earth). A balanced audio signal is more stable because it's less susceptible
to external influences that can cause unwanted interference. Over short distances, an
unbalanced signal doesn't normally suffer from problems either.
The Line in connectors are marked L and R for left and right. For a mono signal, the left
connector needs to be used, but you should consider using a mono channel instead.
Pad: when the Pad button is activated, the line input signal will be attenuated by 10 dB.
This can be handy for input signals that are too loud.
Line/USB switch: this button lets you set the input signal on the mixer's last stereo channel to LINE (the
jack line in socket) or MEDIA (the digital media player on some models). On the 1202FX-MP, that's channel
11/12 and on the 1002FX-MP, it's channel 9/10.
The information in this user manual is subject to change at any time without notice.
Version:
1.0
Date of creation and author's initials:04-12-2018 RV Revision date and author's initials: -

EQ: the stereochannels all have a 2-band EQ that gives you control over the balance between the low and
high frequencies. At 80 Hz or 12 kHz, sounds can be dampened or boosted by -15 or +15 dB. This can be
handy for accentuating the high tones in vocals, for instance.
Aux: with the Aux knob, you can determine how much of the input signal is sent to the Aux Send output
which is separately adjustable. With the PRE/POST button, you can determine whether the signal is sent to
the Aux Send output before (pre) or after (post) the fader.
FX: see the mono channel section for more information. For the stereo channels, the FX work the same way,
but left and right signals are sent to the effects processor or external equipment. Bear in mind that the effects
signal will become mono if one of the chains in the circuit is switched to mono.
Please note that the FX pad is activated post fader. That means if the Level fader on the channel is turned all
the way down so that no sound reaches the Master signal, no signal will reach the effects section either.
Balance knob: the balance knob on the stereo channels is similar to the Pan knob on the mono channels,
but it determines the balance between the left and right signals rather than the position of the mono signal. If
the knob is turned towards the left, the right signal will be dampened appropriately and vice versa.
PFL: see the mono channel section for more information.
Level fader: see the mono channel section for more information.
Digital media player
The MixDesk-MP models have a digital media player with a
display. Sound can be played via a USB stick, an SD card or
through Bluetooth® and everything can be controlled using the
buttons underneath the display. The USB/SD/ Bluetooth button
allows you to switch between the different sound sources. The
media player is ideal for playing background music, for
instance.
The signal from the media player is sent out through the last stereo channel on the mixer (11/12 for 1202FXMP, 9/10 for 1002FX-MP).
Signal outputs
There are different ways to send the mixed signals from the MixDesk mixers to
recording equipment, speakers or external effects, for instance, that can then be
returned to the mixer again.
Phones/CR out: the Phones and Control Room output use the same signal.
This is actually the same as the master signal before it reaches the master
fader. Changing the level of the master signal will not affect the level of the
Phones or Control Room signal, therefore. This can be adjusted using the CR &
Phones volume knob.
This setup can be handy for situations like the following:
- (internet) radio broadcasting where the Main Out signal is sent to speakers in the room and the Control
Room signal is sent to recording equipment, for instance.
- recording live performances where the Control Room output is sent to recording equipment and the Main
Out signal needs to be adjusted before it reaches the audience.
There are separate left and right Control Room connectors that support balanced signals when TRS jacks
are used. The headphone socket also accepts a TRS jack, but if your headphones have a mini jack
connector, you can always use a mini jack to jack adapter plug (not included).
The information in this user manual is subject to change at any time without notice.
Version:
1.0
Date of creation and author's initials:04-12-2018 RV Revision date and author's initials: -

Rec out: via the Rec Out (RCA) output a stereo signal can be sent to recording equipment. This output is
linked to the Main out.
USB: the 2-in, 2-out USB interface on the mixer can be connected to almost any computer. This makes it
possible to play music or record the Main Out signal for internet radio or podcasting purposes, for instance.
This can be done with separately available software like the free program Audacity.
Please note: the USB interface is not available on all models.
FX Send: the FX Send output can be used to send a signal to external effects
equipment. The FX knobs on the individual channels can be used to determine
how much of each channel is sent to this output. After that, you can adjust the
effects on your external equipment.
FX Return: some MixDesk models have a dedicated FX Return input. This can
be used to receive a signal from external effects equipment. On mixer models
that don't have a dedicated FX Return input, one of the mono or stereo inputs
can be used.
Aux Send: this is an output that can be controlled separately and used for
different purposes. Per channel and with the Aux Send knob (see Mix section),
you can determine which signals are sent via this channel.
Main outputs: See 'Back of Mixer' section.
Mix section
The Mix section doesn't just consist of the two Mix faders and associated LED
indicators, but also some knobs for extra control over other signals.
Phantom power: this is used to provide condenser microphones with +48V of
power. Phantom power only works with condenser microphones and does not
normally affect dynamic microphones. Turning on phantom power activates it
on all of the mono channels.
An LED indicator will light up above the LED VU meters whenever phantom
power is activated.
PLEASE NOTE: bear in mind that certain equipment like special ribbon
microphones, for instance, absolutely cannot handle phantom power! Never
attempt to use phantom power in combination with ribbon microphones or make
use of a phantom blocker. For more information, please consult the manual that
came with your microphone.
PLEASE NOTE: when using phantom power, no unbalanced XLR signals
should be connected where pins 1 and 3 are transferred. This can cause permanent damage to the mixer
and connected equipment.
PLEASE NOTE: it's recommended to only switch on phantom power once all of the necessary equipment
has been connected to the mono channels. Connecting microphones and other equipment while phantom
power is already switched on can cause permanent damage in exceptional cases.
Power LED: this green LED shows that the mixer in powered on and ready for use.
Level indicators: these LED VU meters show the output level or strength of the left and right signals that
are going to the Main out. It's important to prevent the red (clip) LEDs from coming on because this will likely
have a negative impact on the sound quality.
Aux Send: the Aux Send knob allows you to determine the level at which the output signal is sent out via the
Aux Send output. This can be adjusted using the Aux knob per channel.
The information in this user manual is subject to change at any time without notice.
Version:
1.0
Date of creation and author's initials:04-12-2018 RV Revision date and author's initials: -

FX Send: the FX Send knob allows you to determine the level at which the output signal is sent out via the
FX Send output. This can be adjusted using the FX knob per channel.
FX (Return) to mix: the FX (Return) to mix knob allows you to determine the level at which the FX Return
input or the effects processor (see effects processor) reaches the mix fader.
FX (Return) to aux: the FX Return to aux knob allows you to determine the level at which the FX Return
input or effects processor reaches the Aux Send output.
CR & Phones: see Phones/Control room.
Footswitch: some MixDesk models have a footswitch
connector. A connected footswitch can be used to turn the
built-in effects on and off. A footswitch can be purchased
separately from your dealer.
Level faders: MixDesk mixers have faders for the left and right channels that
allow you to determine the overall level of the mix. Excessive levels are not
recommended so be sure to keep an eye on the level indicators to avoid
unwanted and potentially damaging distortion.
Effects processor (not applicable to all models)
Some MixDesk mixers have a built-in, 24-bit digital effects module with various
effects. The 16 numbered effects can be selected with the dedicated control.
Effects include reverbs, delays, chorus and other modulation.
The effects module has its own Signal LED that indicates when it's receiving a
signal. Bear in mind that the FX knob on each channel can amplify the signal by
up to 15 dB, but 0 dB is the recommended level.
Parameter: the parameter knob allows you to adjust the parameters of
parametric effects. This includes things like the length of delays and the amount
of reverb or distortion, for instance.
On/off knob: this turns the effects on or off.
FX to aux/FX to mix/Aux Send/FX Send: See ‘Mix section’.
Back of mixer
Main Out: the Main Out connectors are designed to send
the master signal (after it's passed through the fader) to
external equipment. Depending on the purpose, this could
be a PA speaker system or recording equipment. These
connectors are TRS jacks that support balanced audio
signals or XLR.
AC power input: IEC C14 connector with fuse holder and
on/off switch.
How to connect products
It's possible to connect lots of different products to the MixDesk mixers. The table below shows some
examples of products that can be connected and ways to connect them. This list is by no means exhaustive
and there are plenty of other possibilities. You'll also need to make sure you use the right cables for the
products you're connecting. If in doubt, consult your product manuals or contact your dealer.
The information in this user manual is subject to change at any time without notice.
Version:
1.0
Date of creation and author's initials:04-12-2018 RV Revision date and author's initials: -

Product type Which inputs and outputs
Laptop, smartphone, MP3 player,
tablet
Stereo channel if a lot of control is desired
Tape in if a lot of control is desired
Dynamic vocal microphone Mono channel, phantom power not required
Ribbon microphone Mono channel, don't activate phantom power!
Condenser vocal or instrument
microphone
Mono channel, activate phantom power
Keyboard, DJ set, DJ controller,
media player, etc.
Stereo channel
Active speakers Main out
Passive speakers Via main out and a separately available amplifier
PA power amplifier Main out
Monitor speakers for the sound
engineer
CTR out
Effects equipment Sent out via the Send FX and returned on a mono or stereo channel
with the FX turned off to prevent effects loops.
The information in this user manual is subject to change at any time without notice.
Version:
1.0
Date of creation and author's initials:04-12-2018 RV Revision date and author's initials: -

Mixer troubleshooting guide
If you have a problem with your mixer, please consult this troubleshooting section for possible solutions. If,
after consulting this section, the problem remains unresolved, please contact your dealer for more
information and/or help.
This troubleshooting section contains information on how to solve the most common problems that occur
with PA mixers and equipment regularly used with them, but it does not and cannot cover every eventuality. It
is possible that you won't find your problem, cause and solution in this section due to differences between
products.
Problem Possible cause Solution
Mixer does not turn on with mains
power
Power adapter not connected
properly.
Check that the power adapter is
connected to the mixer properly
(locked connection) and plugged
into an active mains socket.
Power adapter is defective. If the power adapter is correctly
connected to the mixer and an
active power socket, but the Power
LED is not lit up and the mixer has
no power, there could be a
problem with the mixer or the
power adapter itself. Disconnect
the power adapter and contact
your dealer.
No sound via one of the inputs Cable not connected properly Make sure that the cable is
properly connected to both the
source and the mixer.
Gain not set correctly Check the gain settings by first
lowering the fader and then slowly
turning up the gain control until the
CLIP LED lights up.
Fader (channel or Main) turned
down
Check that the faders that should
be turned up are actually turned up
to the required level.
No sound from the master output Main Mix fader turned down Turn up the Main Mix fader
Red Clip Limiter LED lights up
often or continually
Volume is too high Lower the volume on the source
that's causing the Clip Limiter LED
to light up. Continuous clipping can
cause permanent damage to your
equipment.
Distorted, clipping or crackling
sound
Connected device is transferring a
distorted signal
Check if any of the connected
source devices are transferring a
distorted signal and turn down the
volume on the offending device if
necessary.
Volume control is too loud Turn the volume down
The tone controls for treble and/or
bass are too high or too low.
Turn the tone controls back to 12
o'clock and listen to hear if clipping
is still audible.
Woofer or tweeter is defective If a speaker is exposed to a loud,
The information in this user manual is subject to change at any time without notice.
Version:
1.0
Date of creation and author's initials:04-12-2018 RV Revision date and author's initials: -

distorted, or clipped signal for a
longer period of time, this can
cause permanent damage to its
internal components. If you
suspect that the woofer or tweeter
is damaged, contact your local
dealer for assistance.
Insufficient volume through
microphone
Phantom power is not on Check whether your microphone
requires phantom power. If it does,
check that phantom power is
turned on for the microphone
channel and if not, turn it on.
The information in this user manual is subject to change at any time without notice.
Version:
1.0
Date of creation and author's initials:04-12-2018 RV Revision date and author's initials: -

Specifications
General specifications for all models:
- practical and compact PA mixers
- desktop design with clear layout
- suitable for mixing various audio sources
- various inputs and outputs for microphone and line signals
- various options for connecting equipment
- optimal control over all inputs
- robust metal housing with synthetic side panels
- power connector (C14) with fuse holder (5 x 20 mm, T1.6AH250V)
- models with and without built-in effects module
- models with and without built-in 2-in, 2-out USB audio interface
- models with and without USB/SD/Bluetooth media player
Channel strip:
Mono channel strip:
- microphone input via balanced 3-pin XLR
- mono line output via balanced TRS jack or unbalanced TS jack
- gain control (trim)
- 3-band EQ with low, mid and high tone controls (80 Hz, 2.5 kHz, 12 kHz, range from -15 to +15 dB with
zero point)
- aux send control with on/off switch
- FX intensity control (-infinite to +15 dB with zero point)
- pan control (far left to far right mix positioning)
- PFL function
- peak LED indicator
- channel volume control (-infinite to +10 dB with zero point
Stereo channel strip:
- mono (L) or stereo input (L+R)
- suitable for balanced TRS jack and unbalanced TS jack
- 2-band EQ with low, mid and high tone controls (80 Hz, 2.5 kHz, 12 kHz, range from -15 to +15 dB with
zero point)
- aux send control with on/off switch
- FX intensity control (-infinite to +15 dB with zero point)
- pan control (far left to far right mix positioning)
- PFL function
- peak LED indicator
- channel volume control (-infinite to +10 dB with zero point)
Technical specifications per model:
Model 802 802FX 1002 1002FX-MP 1202 1202FX-MP
Number of
mono channels
4 6 8
Number of
stereo channels
2
Dimensions (l x
b x h)
262 x 350 x 98 mm 310 x 350 x 98 mm 363 x 350 x 98 mm
Weight 3.3 kg 3.8 kg 4.3 kg
Power
consumption
30 W 36 W 40 W
The information in this user manual is subject to change at any time without notice.
Version:
1.0
Date of creation and author's initials:04-12-2018 RV Revision date and author's initials: -

Trademark footnote
The Bluetooth® wordmark and logo are registered trademarks owned by Bluetooth SIG, Inc. and any use of
such marks by DEVINE is under license. Other trademarks and trade names are from their respective
owners.
The information in this user manual is subject to change at any time without notice.
Version:
1.0
Date of creation and author's initials:04-12-2018 RV Revision date and author's initials: -
 Loading...