


Installation Manual
4520 South MacArthur Blvd
Oklahoma City, OK 73179
Ph. 405.680.5600 F. 405.680.9314
1
devincicaststone.com
1

Anatomy Of A Fireplace
2

Table of Contents
Shipping and Receiving Information ................................................. 4
Hearth .................................................................................................. 6
Filler Panels .......................................................................................... 10
Mantel ..................................................................................................14
Grouting ................................................................................................ 19
3

Shipping and Receiving
Receiving Shipment
The utmost care is taken at our factory to protect the integrity of our shipping crates and the fireplace
components within. In the event that the shipping container is damaged in transit you should be prepared
to capture photo documentation of the damaged container prior to signing for receipt of the shipment.
Please document-shipping damages such as forklift cuts and gouges as well as signs of the crate being
dropped on the driver’s delivery receipt and have the driver initial.
Uncrating Product
Within twenty-four (24) hours of signing for receipt of the fireplace, it must be uncrated and all contents
inspected for damage. During the uncrating process, care must be taken to protect the integrity of the
contents. Never stack the stone material upon each other without placing foam packing material
or plastic shims between them carefully. Should any damage be identified, De Vinci Cast Stone must
be notified via phone (405-680-9000) and or email (mail@devincicaststone.com) within that 24-hour
period. Such email notification must include photographic evidence of damage(s) along with photographs
of the crating and packing components. Should damages be identified, De Vinci Cast Stone will work with
the client in the most expeditious manner to bring resolution to the identified issue(s). While DeVinci will
work with the client to resolve any issues, DeVinci is not and will not accept liability except as set forth in
the terms of sale. DeVinici is not liable for any damage that results from delivery, unloading or unpacking.
DeVinci shall only be liable for damages which resulted from packing or crating.
Receipt of Shipment and Inspection of Contents
The shipping crate and contents are extremely heavy. Assure that appropriate equipment and personnel
are available to assist the shipping carrier with staging as well as breaking down its content for inspection.
DeVinci is not liable for damages that
occur because of delivery, unloading or
unpacking.
CAUTION
Here are pictures of how a typical
fireplace is packaged. When you receive
a crate and remove the top you will see
a bed of packaging foam. Under the
foam are the various pieces of stone
individually separated by foam material.
Never stack the stone material
upon each other without placing
foam packing material or
plastic shims between them
carefully.
4

They are also covered with plastic wrap to separate
the foam from the stone as well as ensure the foam
surrounds all sides of the stone inside the crate.
The crate is then shot with expanding foam to
secure all parts as one in a monolithic package.
Removing the packing foam takes some time and
requires some patience. It is advised to break out in
large chunks at a time and dispose of in a trash bag
to help keep the work area clean. Remember that
you have stone not far underneath and tools used
to cut and remove the foam can scar and chip the
underlying stone.
Inspecting Contents
De Vinci Cast Stone products are thoroughly inspected and carefully packaged for shipment. Care must be
taken during the unpacking process to assure that components do not strike one another causing chipping
or abrasion.
Whenever possible, we request that our customers continue to compile a photo journal during the
unpacking process for review by our shipping department in case of a claim.
• Carefullyremovetoppanelofpackingcrate.
• Locateandremovepackinglistforusewithinventoryingcratecontents.
• Carefullyremoveformedfoamprotectivepackagingassuringthatfireplacecomponentsdonotshift
striking one another.
CAUTION
• Removeallfireplacecomponentspositioningthemseparatelyonacleanandlevelsurface.(HEAVY)
• Inventoryallcratecontentsusingthepackinglist.
• Carefullyinspectallcontents.
• NotifyDeVinciCastStonewithintwenty-four(24)hoursofsigningforreceiptofshipmentat
Carefully remove packing crate sides as necessary during the inventory and inspection process
assuring that contents do not shift.
405-680-5600 or email mail@devincicaststone.com, should any deficiencies or damage(s) be identified.
DeVinci is not liable for any damges that occur because of delivery, unloading or upacking.
5

Installation
n preparation for the installation, assure that appropriate equipment and personnel are available to
assist during the installation process as some fireplace components are heavy and unwieldy; always wear
I
appropriate personal protective equipment.
Throughout the installation process, assure that components do not strike one another causing chipping or
abrasion by using the shims and packing foam provided or other similar material.
A very important aspect of your installation will be maintaining level. Any deviation from level throughout
the build will be magnified and can affect the aesthetics of the final product.
NOTE
De Vinci Cast Stone components may have some minor irregularities in thickness. Along with
the standard spacers provided to create proper grout spacing, additional plastic shim stock is
provided in two thicknesses that can be cut to size and added to spacers to maintain level. Assure
that the mounting surface is clean, level and capable of supporting the final product
weight.
6

Using a level to transfer the
centerline up the wall to
the intersecting point with
the final height on the wall.
Mark the line with a ‘C’.
Measure and mark the
centerline of your firebox for
reference. Measure to mark
the final height of your top
stone.
Find and lightly mark all studs
in the wall with your level, as
they will identify attaching
points during the install.
7

Hearth
Find and mark centerline of hearth.
sing a tape measure, determine the position of the hearth on the floor and mark its rough outline
in pencil. This will assist in applying the mastic more accurately later. Shim mounting surface as
U
Thin set or construction adhesive can be used as mastic during installation. If thin set is used it should be
mixed to the consistency of thick pancake batter and can be applied using a trowel or grout bag. Mastic
should be applied generously but must remain back from faces of fireplace surround at least ¾” to provide
space for grout.
necessary to gain appropriate base height and level side to side and front to back.
8

Apply a generous amount of mastic
to the mounting surface within the
outline previously drawn. Position
the hearth and compress the mastic
side-to-side, front to back until
you have achieved the appropriate
height and the centerline of the wall
is aligned with the centerline mark
of the hearth. Important: Check the
level of the hearth, as it will affect the
level of the remaining pieces.
NOTE
Wall brackets must always be located such that they will be completely covered by panels.
Drill pilot holes and attach the hearth
to the wall studs using angled wall
brackets (two places).
9

iller panels can be located at the bottom, sides and/or top of the fireplace opening. The installation depicted, uses all of these panels. Some on-site preparation is necessary prior to installation.
F
The following steps identify the preparation and installation procedures for filler panels.
Locateandmarkcenterof
bottom filler panel.
Filler Panels
Mark and drill pin placement holes in the
top of the bottom filler panel and bottom
of the side filler panels.
Pins are used to stabilize connection of
bottom to side filler panels.
10

Black spacers are normally used to provide the appropriate grout spacing but minor irregularities in level
are offset using the thin red spacer stock and the medium blue spacer stock. All panels should be dry set and
checked for level prior to permanent installation.
A grout bag can be used to apply mastic during installation of the filler panels. To prepare the grout bag,
cut the small end of the bag so that the opening is approximately 3/8” in diameter. Rinse the interior of the
bag with clean water to prevent sticking of the mastic. Fill the bag half to two-thirds full and twist top to
seal the bag. Squeeze to expel the mastic as needed.
Place two grout spacers on the hearth top adjacent to the back wall, aligning centerlines of hearth and dry
fit the bottom filler panel and apply additional shims as necessary to assure the panel is level.
Apply mastic and install
bottom filler panel.
Recheck centerline and level,
side to side and front to back,
and install wall brackets (two
places).
11

Insert mastic and stabilizer
pin in predrilled holes and
place grout spacers.
Dry fit right and left side filler
panels confirming individual
level of panels, side-to-side
and front to back, as well as
level across panels.
NOTE
Always position
shims within the
perimeter of the piece, making
certain they will never be
exposed to direct heat/flame
and that there is adequate
space for grout.
Apply mastic to both sides
of bottom filler panel, into
the predrilled hole on the
bottom of the side filler
panels, and install both side
filler panels while rechecking
all levels. Secure side filler
panels with wall brackets.
To help stabilize the piece,
apply mastic to the back of
the filler panel where it will
come in contact with the
wall.
12

Position grout spacers and
recheck for level across side
filler panels. (Add shims as
necessary to assure level)
Check that the top filler panel matches
side filler panels on both sides and check
it for level, side-to-side and front to
back. Install wall brackets (two places).
Apply mastic to top of both side filler
panels and position top filler panel.
Clean any extraneous mastic off of
installed panels. Wedges can be used
to level components front to back
during assembly.
13

rill holes (one each) in
bottom of each leg and
D
hearth for insertion of stabilizer
pins. Insert stabilizer pins,
position grout spacers and dry
fit both fireplace legs checking
for level front to back, side to
side and between legs. Using a
straight edge or string, assure
that top surface of legs is even
with the surface of filler panels
(if filler panels are used). Use
shims on grout spacers to level
legs.
matching holes in top of
Mantel
Insert mastic in hole in bottom of legs
and install legs.
Pins are used to stabilize connection of
bottom to the hearth.
14

Place grout spacers and dry
fit header checking for level
side to side and front to back
assuring that the header is
even with the top of legs.
Insert shims as necessary.
Recheck all levels and spacing
and install wall brackets on
each leg.
Apply mastic and install
header-rechecking level sideto-side and front to back.
Assure that top of header is
even with top of legs. Install
wall brackets (2 places).
15

This fireplace surround incorporates an accent shelf. In some styles, the accents, if any, are cast into the
mantel component(s).
All vertical joints and spaces between pieces of the surround (e.g. spaces between legs and header) that will
later become covered, or otherwise obstructed should be filled with mastic throughout the install. This will
reduce any chances for lateral movement.
Mark center at top front of
header and top and bottom
front of the center accent
shelf. Place grout spacers
on top of legs and header
and dry fit accent shelf
components. Use shims
as necessary to level accent
shelf components.
Apply mastic and install
accent shelf components. Use
two wall brackets on center
component, one wall bracket
on each side component, one
flat strap between center and
left component and one flat
strap between center and right
component.
16

Apply mastic and install
center mantel component
securing with wall brackets
on both sides.
Mark center on the front
bottom edge of the center
mantel component and dry fit
for level.
Predrill holes for stabilizer
pins in top of the right and
left accent shelf components
and matching holes in bottom
of the right and left mantle
components.
17

Insert mastic and stabilizer
pins in predrilled holes in
right and left accent shelves
and in predrilled holes of
bottom of right and left
mantle components. Apply
mastic to top of accent
shelves and install right and
left mantle components.
Recheck all levels and edges.
Insert stabilizer pins, place
grout spacers and dry fit right
and left mantle components.
Use shims as necessary
to level across all mantle
components
Clean up tools and mastic
containers and prepare to
grout.
18

Carefully tape both sides of areas to
be grouted.
Grouting
NOTE
When taping, set tape back
1/32” to 1/16” from opening
to provide a slight overlap.
This aids in ease of finishing
the grout lines. Added care
given to the taping process will
greatly enhance the finished
product.
CAUTION
Grout can stain floors,
walls and ceilings. Take
necessary precautions to
cover areas surrounding
the work space.
Once taping is complete,
apply drop cloths and
shielding to all surfaces
that might be stained by
grout.
19

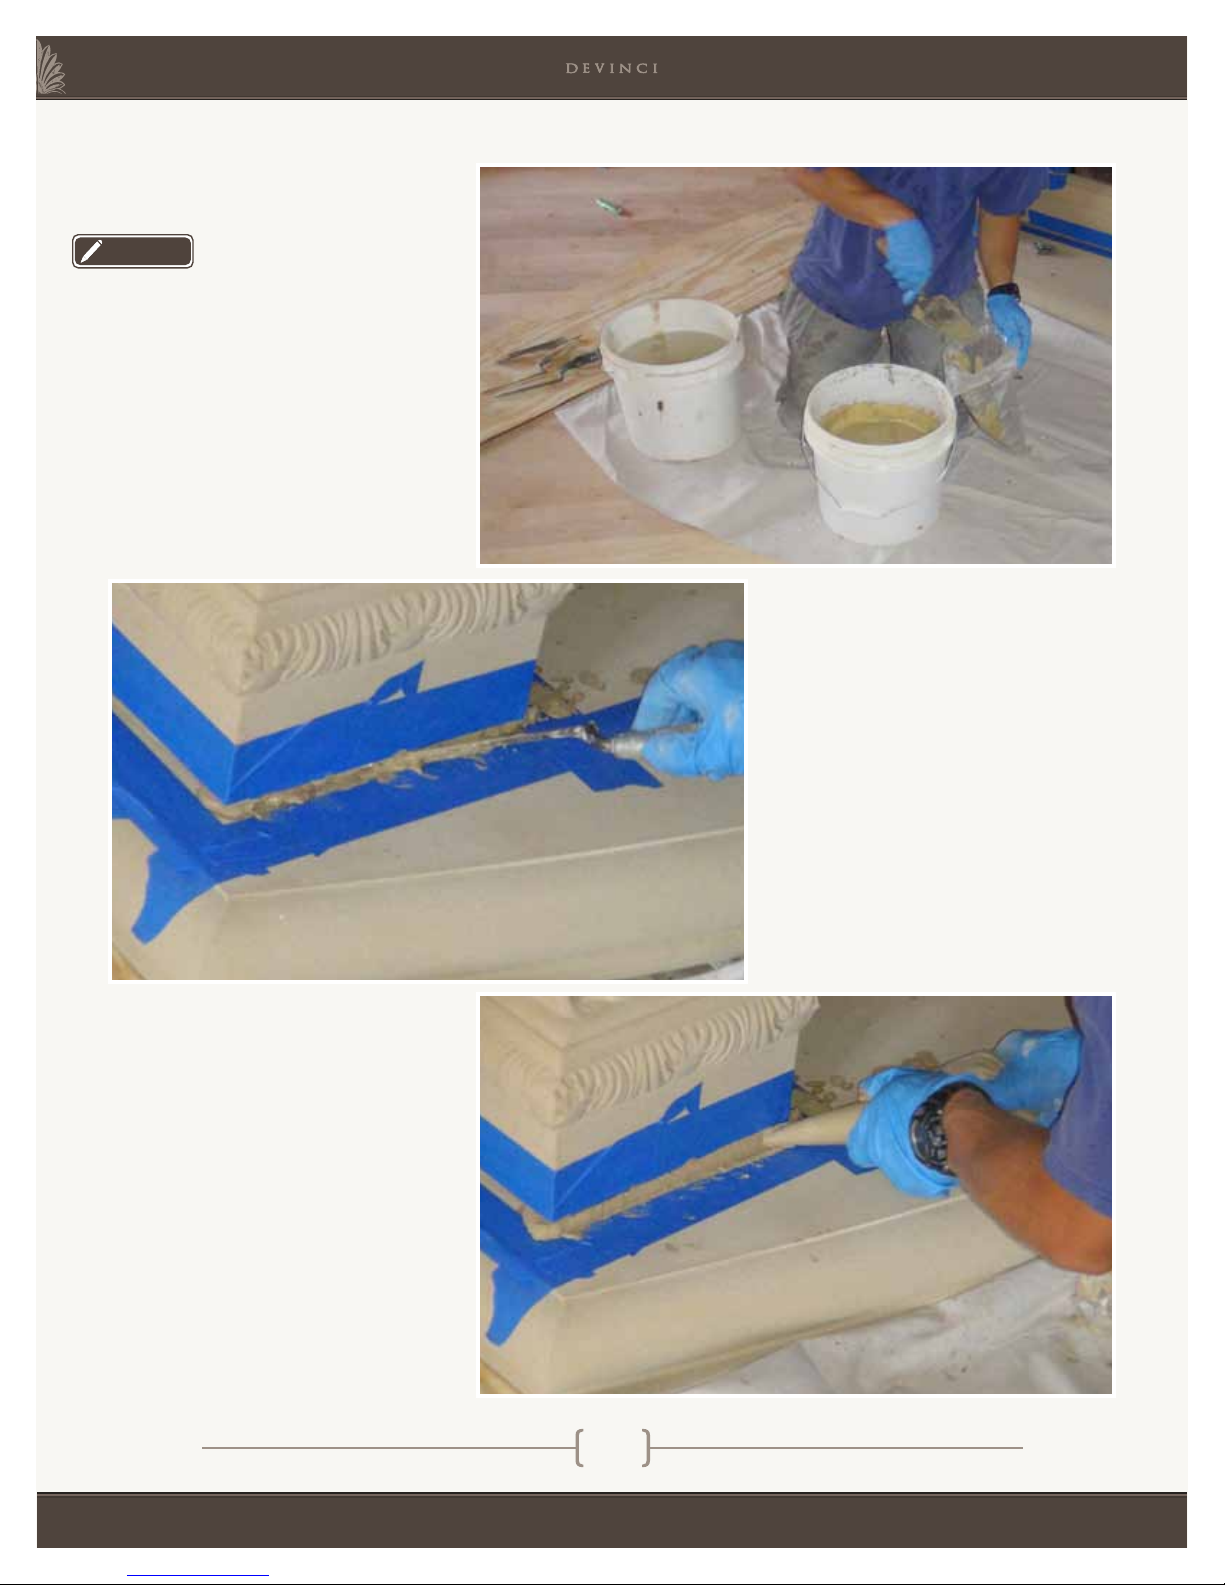
Prepare Grout
We provide a bottle of Polymer
Emulsiontobeaddedtothe
water at 8:1 ratio (8 parts water
to 1 part polymer). The additive
will help reduce shrinkage and
improve bonding properties.
Mix water into grout to
attain the desired consistency,
usually the consistency of thick
pancake batter.
grout bag should be used during the grouting process. To prepare the grout bag, cut the small end
of the bag so that the opening is approximately 3/8” in diameter. Rinse the interior of the bag with
A
the bag. The bag can be squeezed to expel the grout from the small end and the top twisted as necessary as
the contents are used. We cannot stress enough the importance of competent grouting.
clean water to prevent sticking of the grout. Fill the bag half to two-thirds full and twist top to seal
20
NOTE
It’s always good to have a
container of clean water and
sponge available for cleaning
up spatters throughout the
grouting process.
Begin grouting fireplace surround
from bottom, working up.
Fill grout joint liberally and
work first course back into joint
approximately ¼” to ½” with grout
knife or similar tool.
Apply second course of grout
leaving it standing out from the
joint.
Continue the two course
grouting method throughout.
21

Allow grout to set up until it provides resistance to slight finger pressure and grout does not transfer to
finger when touched.
Before shaving off the grout flush with the stone surface, press it into the joint with a pointing tool. The
blade of the tool should be flat and wider than the joint width and free of rust. A mastic trowel will do
perfectly. This helps reduce chances of the mortar cracking later on. The pressure applied pushes the
mortar farther into the joint and eliminates any unseen voids.
Use flat bladed tool to work
grout flush with tape. Once
flush, the joints can be tooled
smooth with a trowel or
rubbed with a piece of carpet.
A mildly damp sponge may be
used alternatively.
Remove tape, touching up minor
inconsistencies as you go with a
flat bladed tool.
22

CAUTION
Avoid cleaning the joints in a way one might do with freshly grouted tile. Too much water in
a wet sponge will expose the aggregate in the grout as well as smear the surface of the fireplace.
Mistakes will happen, but if a joint looks bad and messy it is sometimes better to clean it out,
wash the surface, and repoint it, rather than try to salvage the look with water.
A mildly damp sponge can
be used to remove minor
blemishes. Rinse sponge
frequently in clean water
container and wring out
excess water.
High grit sandpaper (120-200 grit) will help rub off minor
stains and blemishes that might have been missed during
the install. A gentle sanding can easily replace risky acid
washes. It is certainly a lot tidier.
Joints between the surround and the wall can be grouted
but hairline cracks should be expected to appear later where
the grout meets the wall. Caulking may be used to avoid
the hairline cracks.
Clean tools,
equipment
and work
area.
23
 Loading...