

DeVilbiss IntelliPAP2 DV63 Standard Plus CPAP Series, IntelliPAP2 DV64 AutoAdjust CPAP Series Instruction Manual
EN
DeVilbiss IntelliPAP® 2 Positive
Airway Pressure Device Instruction
Guide
RX ONLY
Made in USA of US and Imported Parts. Not manufactured with natural rubber latex.
ES
Guía de instrucciones del
Dispositivo de presión positiva en
las vías respiratorias DeVilbiss
IntelliPAP
®
2
SOLO CON PRESCRIPCIÓN
Hecho en EE. UU. con piezas nacionales e importadas. No está hecho de látex de
caucho natural.
FR
Guide d’instructions pour l’appareil
à pression positive DeVilbiss
IntelliPAP
®
2
UNIQUEMENT SUR PRESCRIPTION
Fabriqué aux États-Unis avec des pièces des États-Unis et des pièces importées. Non
fabriqué avec du latex de caoutchouc naturel.
for air travel!
Approved
DV63 DeVilbiss® Standard Plus &
DV64 DeVilbiss AutoAdjust
®
CPAP Series
EN - 2 A-DV64
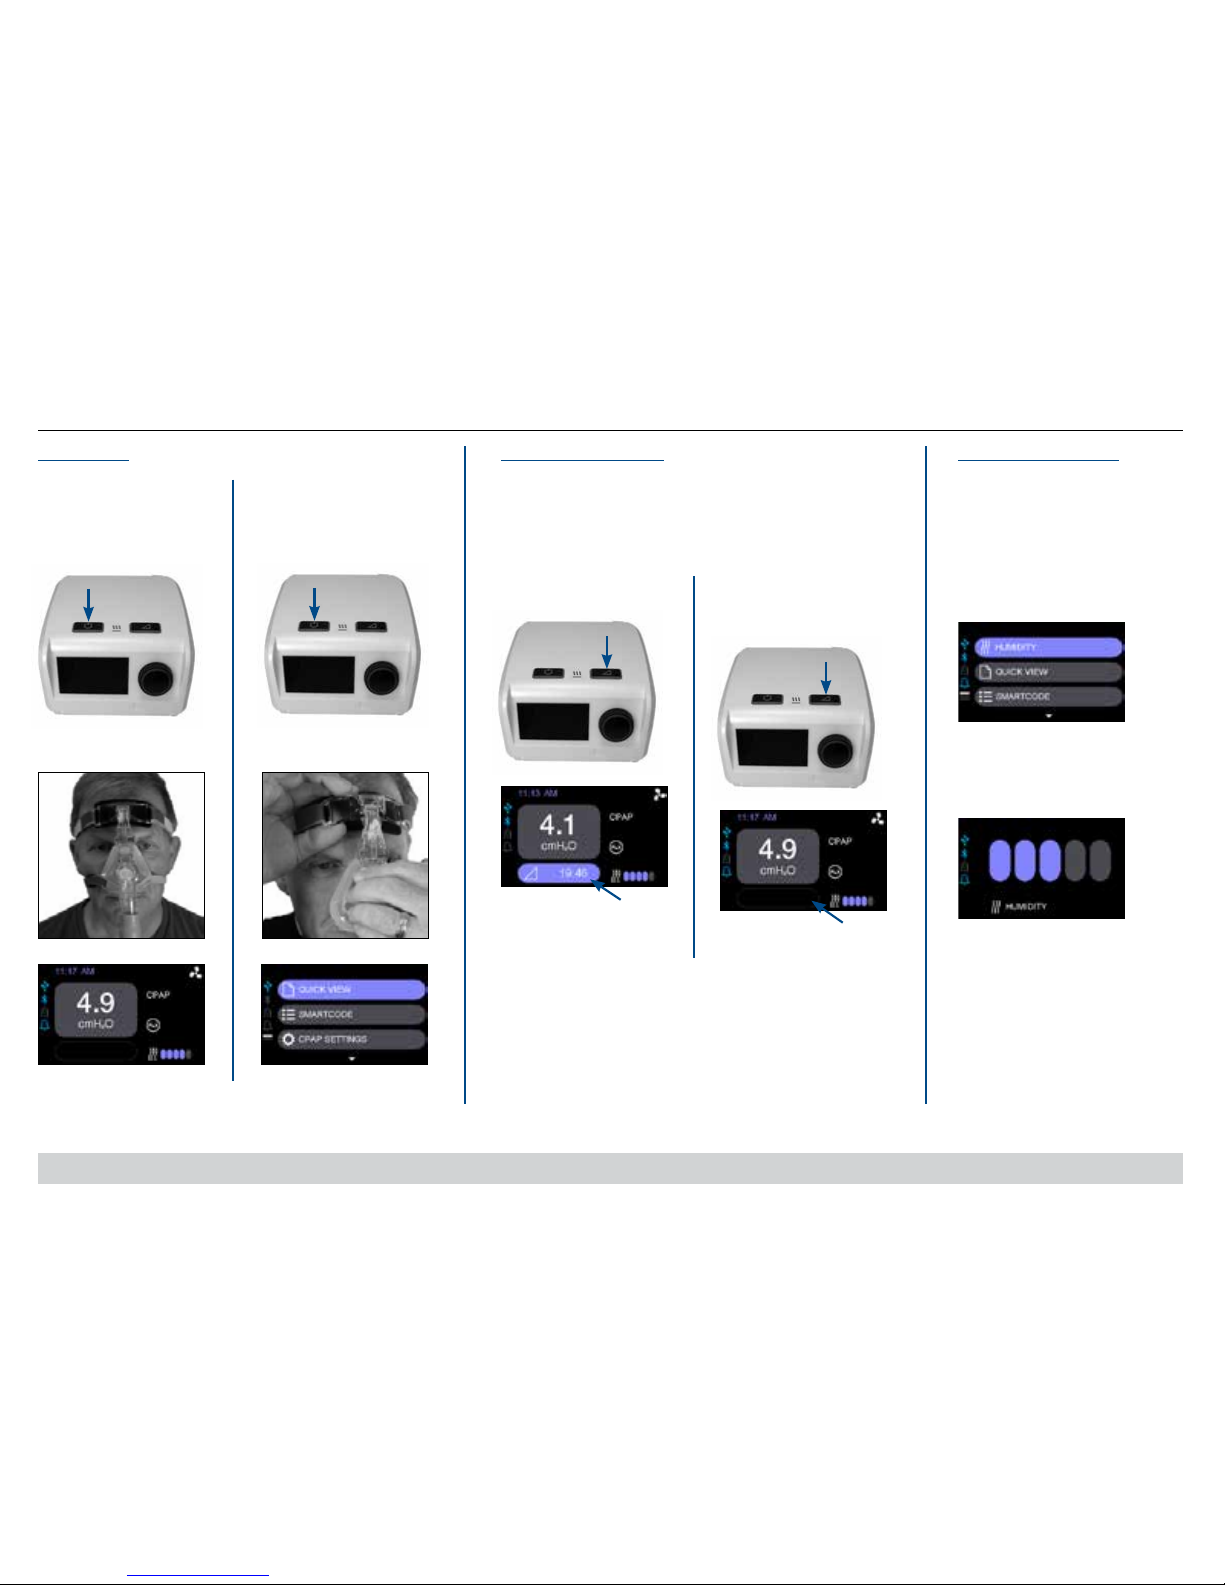
QUICK START – OPERATING YOUR CPAP
OPTION A
Press ON/OFF button OR
THERAPY
OPTION B
Breathe into mask**
Display
OPTION A
Press ON/OFF button OR
Stopping Therapy
To turn blower off:
OPTION B
Remove mask**
Display
**if Auto-START/STOP feature is activated
Press RAMP button
To start ramp:
Display
Press RAMP button again
To stop ramp: (begin
prescription pressure)
Display
Humidification (optional)
Clean, ll and install humidier
chamber daily. NOTE: Use distilled
water to avoid mineral deposit build
up inside the chamber.
To Set Humidication Controls:
1. Select Humidity.
2. Choose humidity setting
of OFF or 1 through 5 bars.
(NOTE- 5 bars is the
highest humidity)
Starting Therapy
To turn blower on:
PRESSURE RAMP HUMIDIFICATION
When activated, this feature gradually ramps up the device to
prescription pressure to help you fall asleep easier. Ramp time
can be set from 0-45 minutes; refer to Features & Settings for
details on adjusting length of time.
Ramp On
(Time
Remaining)
Ramp Off
NOTE – For models with heated
humidication option, please refer
to humidier guide for device set
up.

EN - 3A-DV64
ENGLISH.................................................................... EN - 2
ESPAÑOL ................................................................... ES - 31
FRANÇAIS ................................................................. FR - 62
TABLE OF CONTENTS
Quick Start - Operating Your CPAP ................................................................ EN - 2
Symbol Definitions .......................................................................................... EN - 4
Important Safeguards ..................................................................................... EN - 4
Introduction ..................................................................................................... EN - 6
Intended Use .............................................................................................. EN - 6
Contraindications ....................................................................................... EN - 6
Set Up ............................................................................................................ EN - 6
Important Parts .............................................................................................. EN - 7
Understanding your Display ....................................................................... EN - 7
Understanding your Controls ..................................................................... EN - 8
Understanding your Device ........................................................................ EN - 8
System Assembly ........................................................................................... EN - 9
Features and Settings .................................................................................... EN - 10
Main Menu Items ....................................................................................... EN - 10
Quick View Menus ..................................................................................... EN - 10
SmartCode
®
Data Menus ........................................................................... EN - 11
SmartCode Rx Submenu ....................................................................... EN - 11
CPAP Settings Menus ................................................................................ EN - 12
Rx Pressure ........................................................................................... EN - 12
Auto Mode ............................................................................................. EN - 12
CPAP Mode ........................................................................................... EN - 12
SmartFlex™ Exhalation Relief Comfort Technology ............................. EN - 12
Ramp Options ........................................................................................ EN - 13
Humidity Settings ................................................................................... EN - 13
Tubing Settings ...................................................................................... EN - 13
Master Volume Settings ......................................................................... EN - 14
Brightness Settings ................................................................................ EN - 14
Enable Menu .................................................................................................. EN - 14
Clock Settings Menus ..................................................................................... EN - 15
Clock - Current Time .................................................................................. EN - 15
Format ........................................................................................................ EN - 15
Wake-Up Alert ............................................................................................ EN - 15
Add-Ons ......................................................................................................... EN - 16
Bluetooth ................................................................................................... EN - 16
Oximeter ..................................................................................................... EN - 16
Info ............................................................................................................. EN - 16
Patient Messages ........................................................................................... EN - 17
Notifications ................................................................................................ EN - 17
Messages ................................................................................................... EN - 17
Add-On Device Messages ......................................................................... EN - 17
Service Codes ............................................................................................ EN - 17
SmartLink® Patient Therapy Management System ........................................ EN - 18
Using an SD Card ...................................................................................... EN - 18
Travel Information ........................................................................................... EN - 19
Supplemental Oxygen .................................................................................... EN - 20
Replacement Items/Spare Parts .................................................................... EN - 21
Cleaning ......................................................................................................... EN - 22
Maintenance ................................................................................................... EN - 24
Expected Service Life ..................................................................................... EN - 24
Product Disposal ............................................................................................ EN - 24
Network/Data Coupling .................................................................................. EN - 24
Troubleshooting .............................................................................................. EN - 25
Specifications ................................................................................................. EN - 27
Guidance and Manufacturer’s Declaration ..................................................... EN - 29

EN - 4 A-DV64
SYMBOL DEFINITIONS
It is mandatory to read Operating
Instructions prior to use.
Heat
Consult instructions for use
RTCA / DO-160 Section 21
Category M for battery use only
Rx Only = Prescription required Manufacturer
Class II electrical protection-
double insulated
Date of Manufacture
DC input Radio Transmitter
DC Jack
C US
TUV Rheinland C-US approval mark
Type BF equipment-applied part
EC REP
European Representative
Catalog Number European Rep CE mark
Serial Number
MR Unsafe – Unsafe for Magnetic
Resonance Environment
IP21
Ingress Protection - Protected against nger access to hazardous parts;
protected against vertically falling water drops
This device contains electrical and/or electronic equipment that must be
recycled per EU Directive 2012/19/EU-Waste Electrical & Electronic Equipment
IMPORTANT SAFEGUARDS
READ ALL INSTRUCTIONS BEFORE USING THIS DEVICE.
SAVE THESE INSTRUCTIONS.
The device is to be used only on the instruction of a licensed physician. The system can
deliver CPAP therapy or Auto-CPAP therapy. For enhanced pressure relief, the device can
also deliver SmartFlex pressure relief. Your home care provider will make the correct
pressure settings according to your health care professional’s prescription.
When set in the Auto-CPAP therapy, the system will monitor your breathing as you sleep
and automatically adjust the pressure to meet your needs. When in CPAP therapy, the
system will deliver a continuous, set pressure during the night.
WARNING
A warning indicates the possibility of injury to the user or the operator.
• Electric Shock Hazard – Do not use while bathing.
• Electric Shock Hazard – Do not immerse this device into water or any other liquid.
• Electric Shock Hazard – Do not attempt to open or remove the cabinet; there are no
user-serviceable internal components. If service is required, contact your equipment
provider for instructions on obtaining service. Opening or attempting to service your
device will void the warranty.
• Refer to International Standard IEC 60601-1 Ed 3.0 Amendment 1 for safety
requirements applicable to Medical Electrical Systems
• Oxygen supports combustion. To avoid possible physical injury, do not smoke while
using this device with supplemental oxygen. Do not use this device near hot objects,
volatile substances or sources of open ames.
• Always turn on the CPAP device before turning on the oxygen source. Turn off the
oxygen source before turning off the device. Never allow the oxygen source to run
continuously while connected to the device if the device is not in use. If the device is
not being used, turn off the oxygen ow.
• CPAP pressure must be set higher than 8 cmH2O for supplemental oxygen use to
prevent patient breathing pattern from forcing oxygen back into the CPAP.
• At a xed ow rate of supplemental oxygen, the inhaled oxygen concentration will vary
depending on the pressure setting, patient breathing pattern, mask selection, and leak
rate. This warning applies to most types of CPAP devices.
• The device should be used only with vented CPAP masks recommended by DeVilbiss,
your physician or respiratory therapist. These include nasal, full face, nasal pillow and
nasal cannula masks designed for CPAP use. Do Not use a non-vented mask with this
CPAP device.
• To avoid rebreathing of exhaled air, do not use a CPAP mask unless the device is
turned on and providing a supply of air. Venting in the mask should never be blocked.
When the device is turned on and providing a fresh supply of air, exhaled air is
ushed out of the mask vent. However, when the device is not operating, exhaled air
may be rebreathed. Rebreathing of exhaled air for longer than several minutes can in
some circumstances lead to suffocation. This warning applies to most CPAP devices.
• The device is not a life support device and may stop operating with certain device
faults or with a power failure. It is intended to be used on spontaneously breathing
individuals weighing 66 lbs/30 kg or greater.
• To avoid electric shock, always unplug power cord from wall outlet power source when
cleaning or servicing.

EN - 5A-DV64
• The following surface temperatures may exceed 41 ˚C under certain conditions:
• External surface of CPAP ........................................ 43˚C
• Patient tubing connector .......................................... 45˚C
• Encoder shaft (with control knob removed) ............. 42˚C
• Humidier heater plate ............................................ 65˚C
• External power supply ............................................. 42˚C
• Equipment not suitable for use in the presence of a ammable anesthetic mixture with
air or with oxygen or nitrous oxide.
• Medical Electrical Equipment needs special precautions regarding EMC and needs to
be installed and put into service according to the Electromagnetic Compatibility [EMC]
information provided in the accompanying documents.
• Portable and Mobile RF Communications Equipment can affect Medical Electrical
Equipment.
• The equipment or system should not be used adjacent to or stacked with other
equipment and that if adjacent or stacked use is necessary, the equipment or system
should be observed to verify normal operation in the conguration in which it will be
used.
• If you are using a full face mask (a mask covering both your mouth and your nose),
the mask must be equipped with a safety (entrainment) valve.
• Do not connect the device to an unregulated or high pressure oxygen source.
• Do not use the device near a source of toxic or harmful vapors.
• Do not use this device if the room temperature is warmer than 40° C (104° F). If the
device is used at room temperatures warmer than 40° C (104° F), the temperature of
the airow may exceed 43° C (109° F). This could cause irritation or injury to your
airway.
• Do not operate the device in direct sunlight or near a heating appliance because
these conditions can increase the temperature of the air coming out of the device.
• Contact your health care professional if symptoms of sleep apnea recur.
• If you notice any unexplained changes in the performance of this device, if it is
making unusual or harsh sounds, if it has been dropped or mishandled, if water is
spilled into the enclosure, or if the enclosure is broken, disconnect the power cord
and discontinue use. Contact your home care provider.
• Periodically inspect electrical cords and cables for damage or signs of wear.
Discontinue use and replace if damaged.
CAUTION
A Caution indicates the possibility of damage to the device.
• For proper operation, place system on a at, sturdy, level surface. Do not place the
device where it can be knocked onto the oor or where the power cord may create a
trip hazard.
• Never block air openings of the device. Do not insert objects into any openings or
tubes.
• Use only accessories recommended by DeVilbiss.
• The USB port located on the back of the device is for provider use only. The port
must only be used with accessories approved for use by DeVilbiss. Do not attempt to
attach any other device to this port as it may damage the CPAP or the accessory
device.
• Only the DeVilbiss DV6 series Heated Humidier system is recommended for use
with this device. Other humidier systems may prevent the device from detecting
respiratory events and may cause inappropriate pressure levels in the mask.
• The height of the device must be lower than the mask when using a humidier to
prevent water from getting into the mask
• Never rinse or place the device in water. Never allow liquids to get into or around any
of the ports, switches or air lter; doing so will result in product damage. If this
occurs, do not use the device. Disconnect the power cord and contact your
equipment provider for service.
• Condensation may damage the device. If this device has been exposed to either very
hot or very cold temperatures, allow it to adjust to room temperature (operating
temperature) before starting therapy. Do not operate the device outside of the
operating temperature range shown in the Specications.
• Do not place the device directly onto carpet, fabric, or other ammable materials.
• Tobacco smoke may cause tar build-up within the device, which may result in the
device malfunctioning.
• Dirty inlet lters may cause high operating temperatures that may affect device
performance. Regularly examine the inlet lters as needed for integrity and
cleanliness.
• Never install a wet lter into the device. You must ensure sufcient drying time for the
cleaned lter.
• Only use a DeVilbiss DC Power Cord and Battery Adapter Cable. Use of any other
system may cause damage to the device.
• Oxygen is a prescribed gas and should only be administered under the supervision of
a physician.
EN - 6 A-DV64
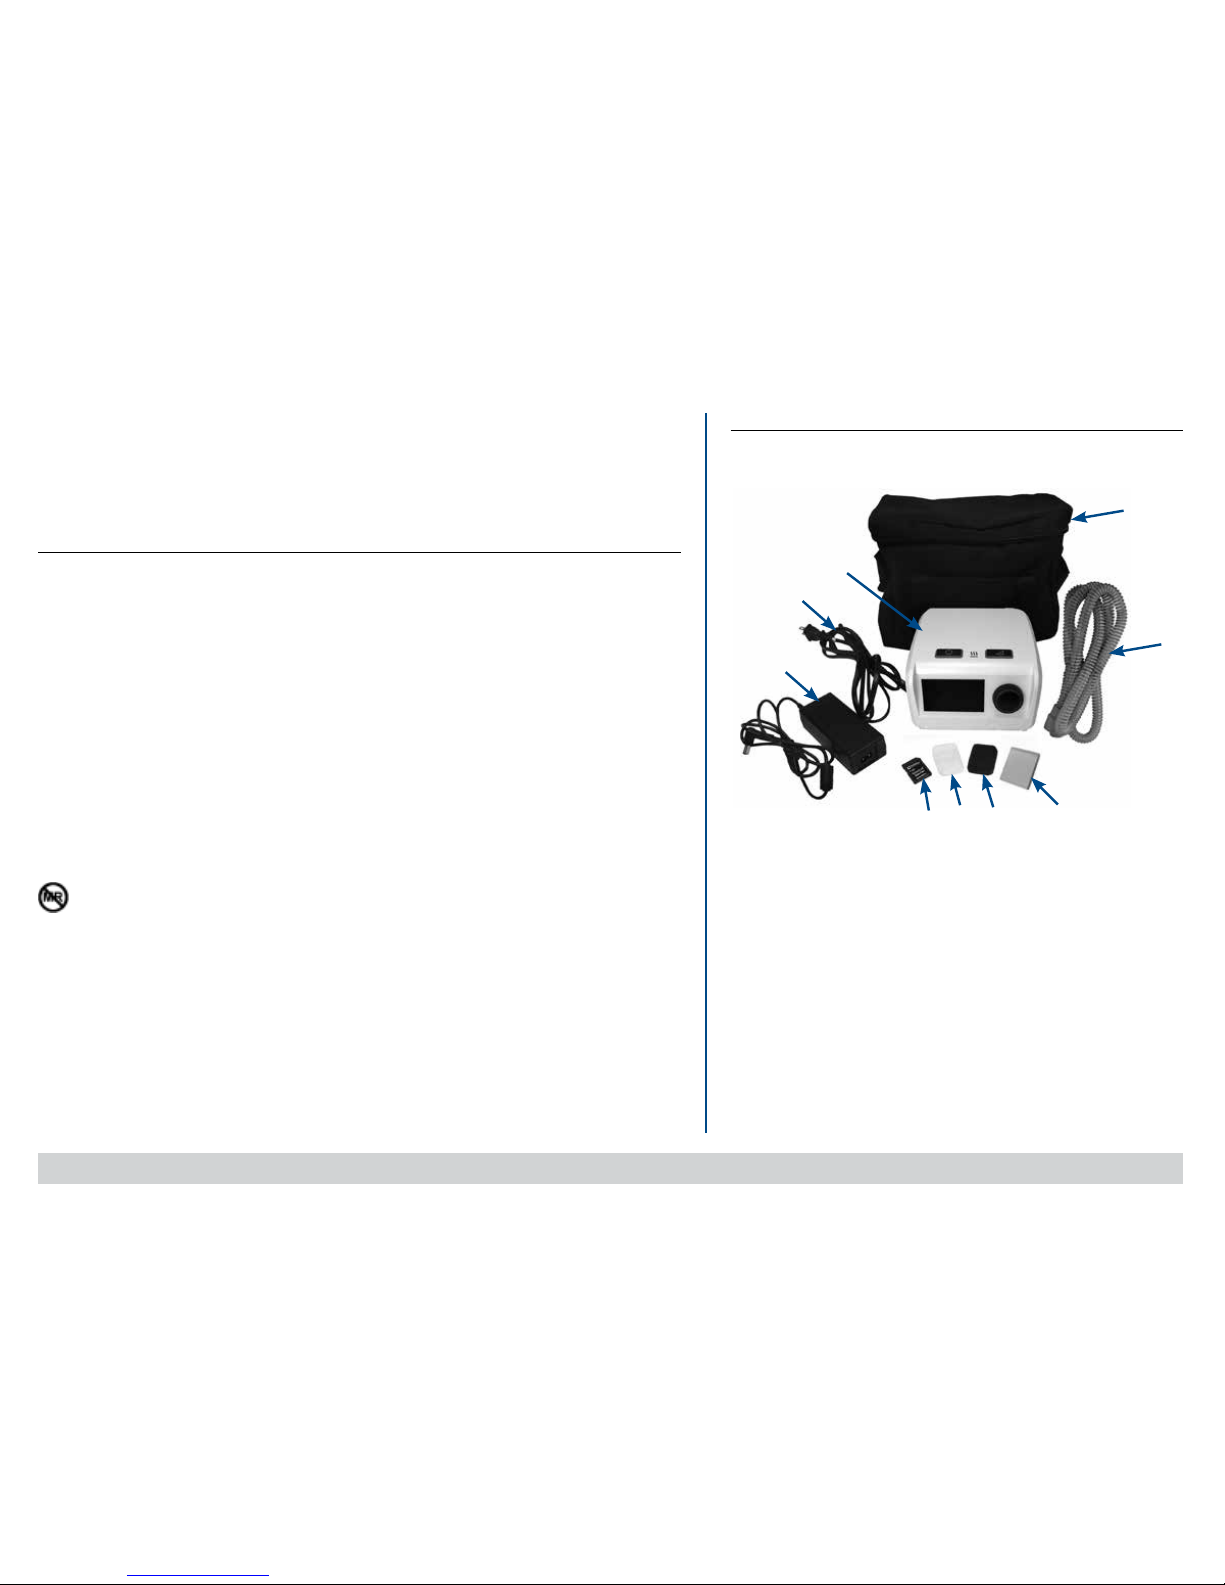
SET UP
First, unpack your CPAP and identify all items.
1. Carrying Case
2. Tubing
3. Filter Cover
4. Extra Air Inlet Filters
5. Optional Fine Particle Filter
6. SD Card (optional)
7. Power Supply
8. Power Cord
9. CPAP Device
Instruction Guide (not shown)
NOTE - Contents vary by model. Please refer to the contents list on the
device carton for items specic to your model.
NOTE - For models with heated humidication option, please refer to
humidier guide for device set up.
Contents
6
1
2
3
4
7
9
8
5
• The ow setting of the oxygen source must be specied by a physician.
• Maximum oxygen pressure is 50 psi. Maximum oxygen ow rate is 10 lpm.
• Always turn on CPAP before turning on oxygen ow.
• Always turn off oxygen ow before turning off CPAP.
• Proper lter function is important for the operation of the device and to protect the device from
damage.
INTRODUCTION
Intended Use
The DeVilbiss Intellipap2/DeVilbiss BLUE Series is intended for use in treating OSA in spontaneously
breathing patients 30 Kg (66 lbs) and above by means of application of positive air pressure. The
Device is to be used in Home and Healthcare Environments.
Contraindications
Positive airway pressure therapy may be contraindicated in some patients with the following pre-
existing conditions:
• severe bullous lung disease
• pneumothorax
• pathologically low blood pressure
• dehydration
• cerebrospinal uid leak, recent cranial surgery or trauma
• a bypassed upper airway
• hypoventilation
The use of positive airway pressure therapy may be temporarily contraindicated if you exhibit signs of a
sinus or middle ear infection. Contact your physician if you have any questions concerning your therapy.
MR Unsafe
Do not bring the device or accessories into a Magnetic Resonance (MR) environment as it may cause
unacceptable risk to the patient or damage to the CPAP or MR medical devices. The device and
accessories have not been evaluated for safety in an MR environment.
Do not use the device or accessories in an environment with electromagnetic equipment such as CT
scanners, Diathermy, RFID and electromagnetic security systems (metal detectors) as it may cause
unacceptable risk to the patient or damage to the CPAP. Some electromagnetic sources may not be
apparent, if you notice any unexplained changes in the performance of this device, if it is making
unusual or harsh sounds, disconnect the power cord and discontinue use. Contact your home care
provider.
This device is for single patient reuse only.
EN - 7A-DV64
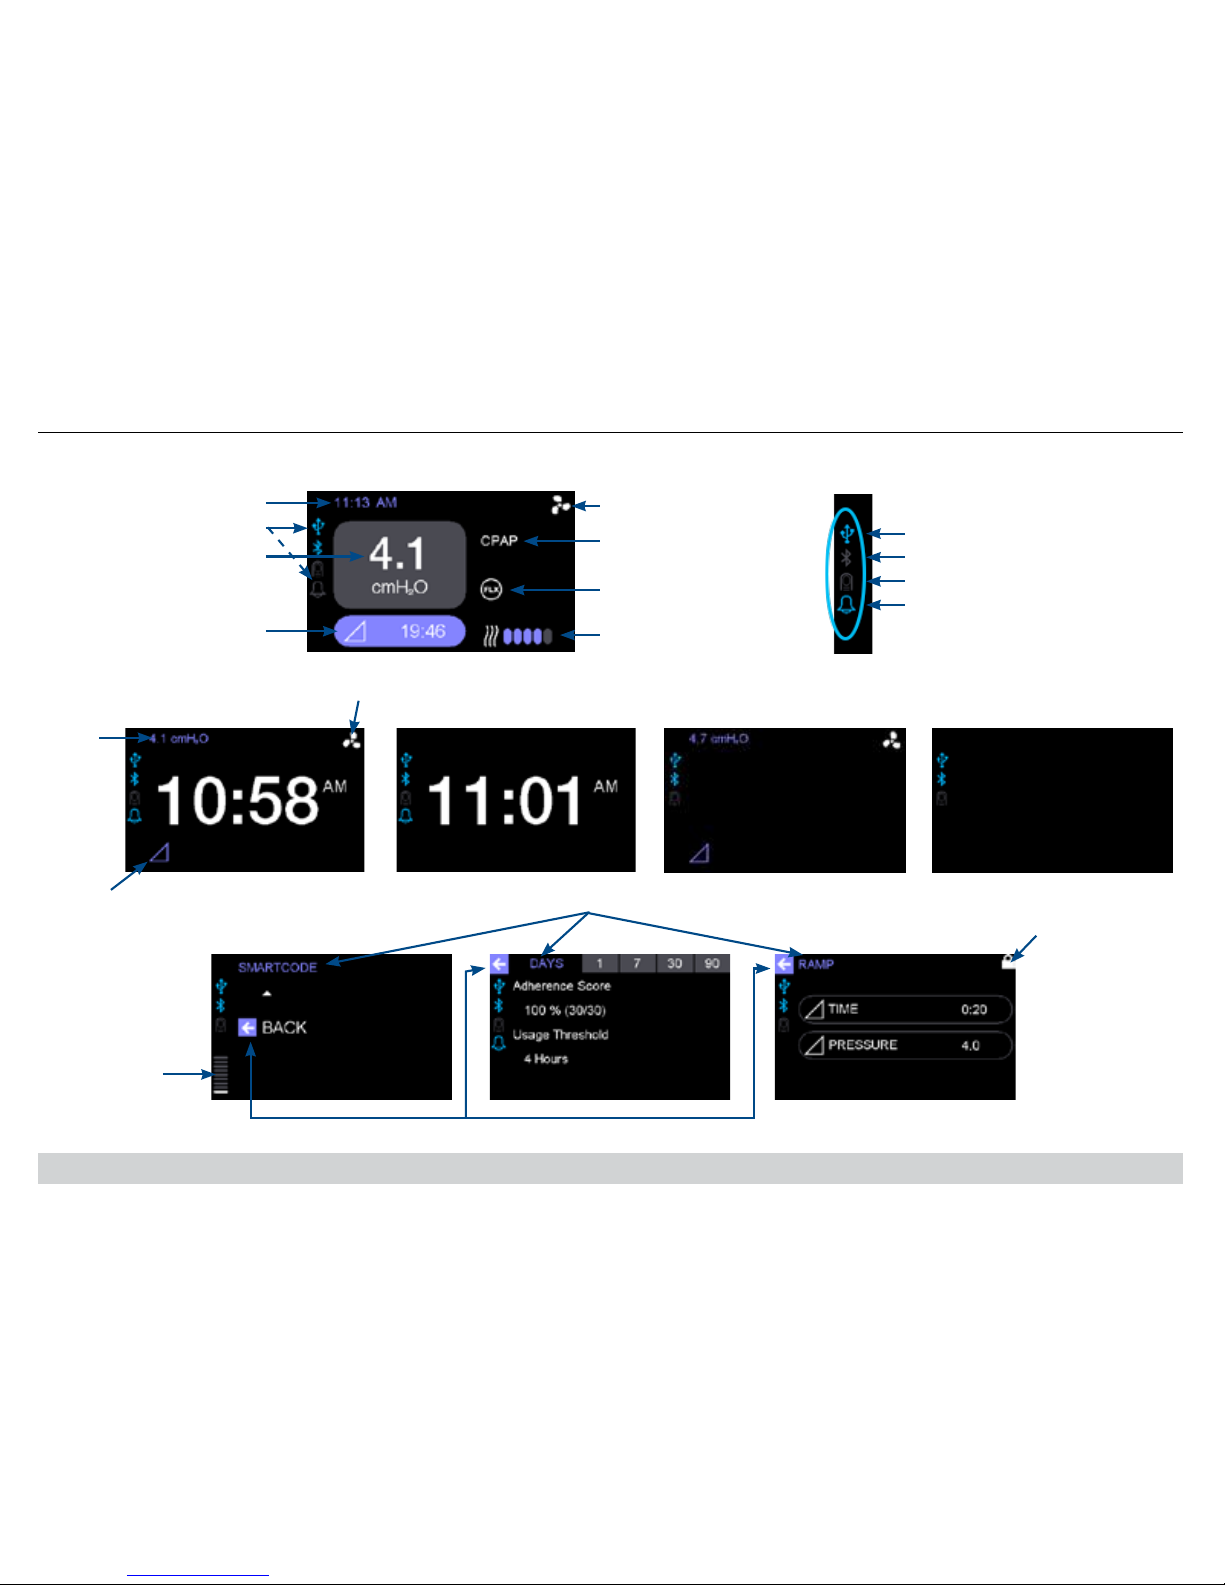
IMPORTANT PARTS
Understanding Your Display
Therapy Screen: Blower On
Clock (if active)
Status Icons (see inset)
Current delivered
pressure
Ramp On and Time
Remaining Indicator
SmartFlex On Indicator
Mode Indicator
Blower On Indicator
Humidifier On and Setting
Indicator (only illuminated if
optional humidifier is attached)
Idle Screen: Blower Off
Inset: Status Icons
Bluetooth Signal Indicator
Wake-Up Alert Indicator
Oximeter Connected Indicator
USB Connected Indicator
Submenu Title
Screen Overview
Back Indicator
Setting Locked Indicator
Idle Screen: Blower On
Ramp Indicator
Therapy
Pressure
Blower On Indicator
Idle Screen: Blower On (Without Clock)
Page Indicator
Idle Screen: Blower Off (Without Clock)

EN - 8 A-DV64
IMPORTANT PARTS
Understanding Your Controls
Heater On / Hot Surface LED Indicator
(only active with optional heated humidification)
Blower ON / OFF
Button - starts and
stops Therapy
Ramp Button - starts
and stops Ramp
Rotary Knob - Simple
Press & Turn opera
-
tion
Display
- returns to Idle Screen after 10 seconds
without user action when in Main Menu.
- returns to Main Menu after 2 minutes
without user action when in any sub
-
menu.
Understanding Your Device
Display
Rotary Knob
Ramp Button
Filter Cover
Blower On/Off Button
Speaker
Tubing
Connector
Power
Connector
SD Card
Slot
USB Port (for
provider use only)
Air Supply Port Cover
Air Filter
EN - 9A-DV64
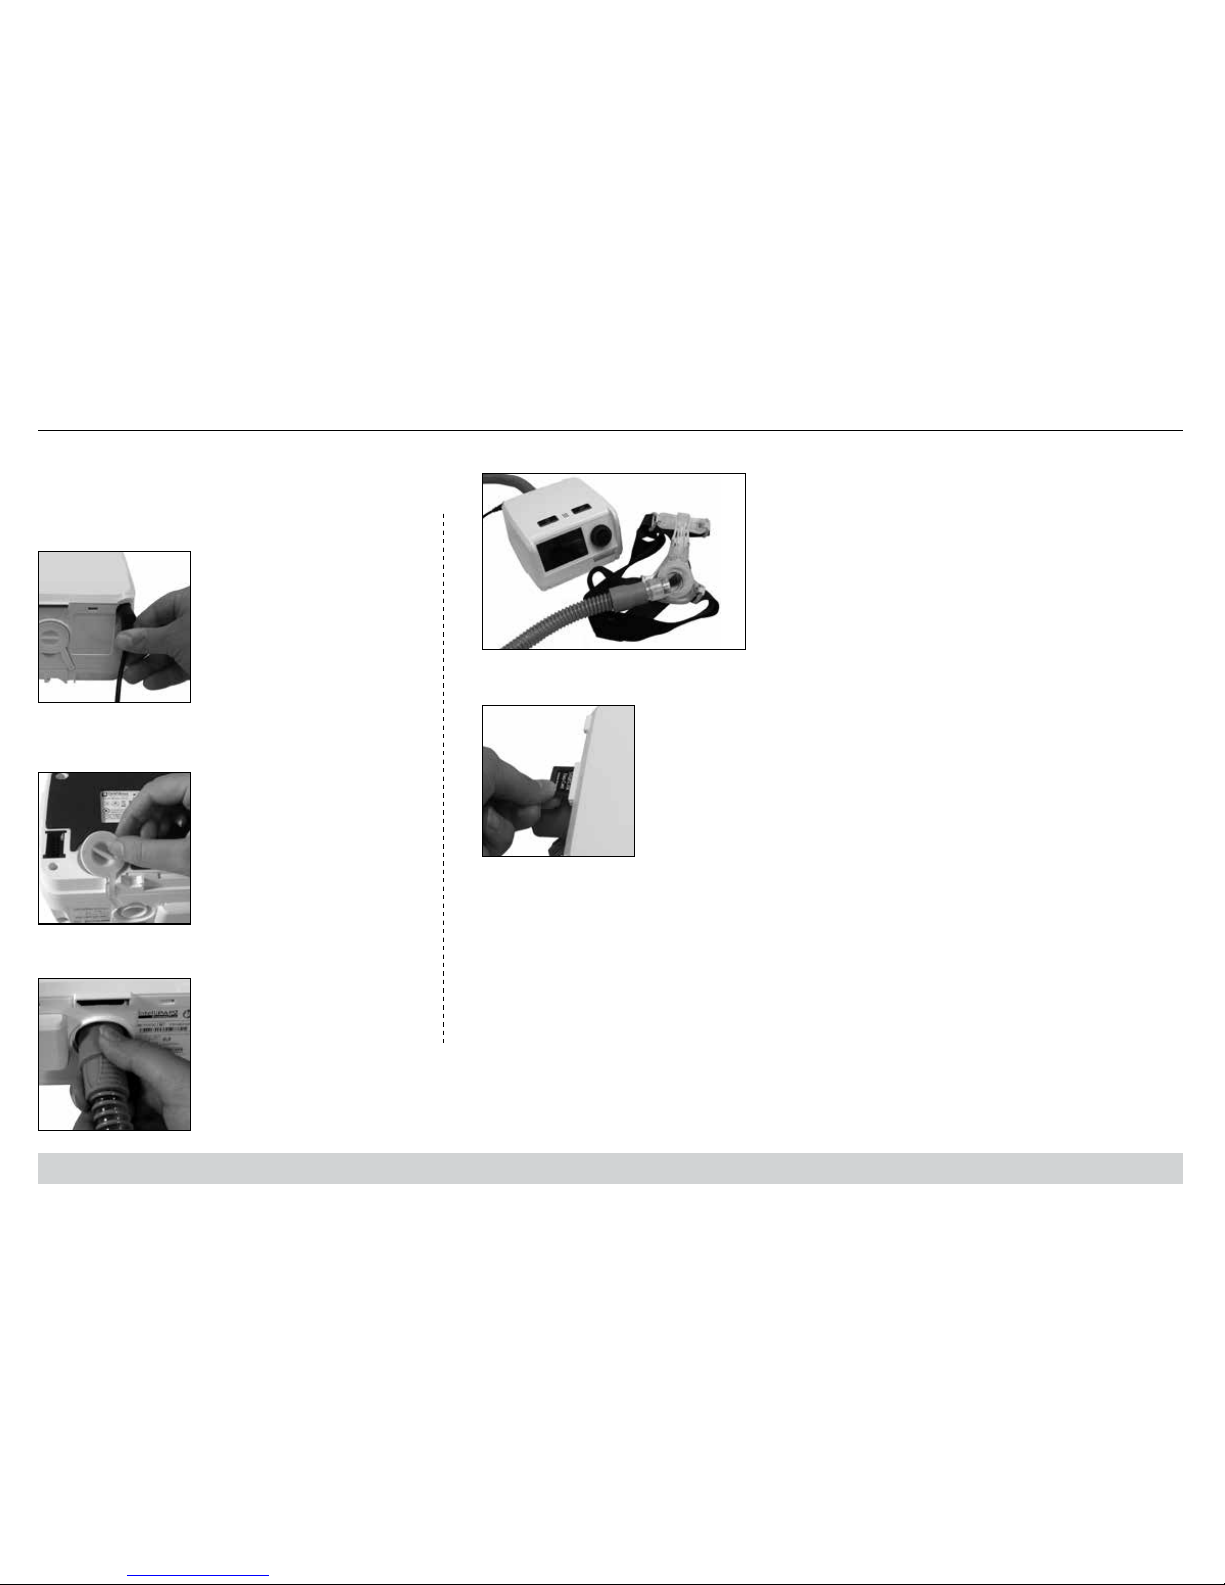
SYSTEM ASSEMBLY
1. Place system components on a stable surface.
NOTE – For models with heated humidication option,
please refer to humidier guide for device set up.
5. Prepare mask and connect to tubing.
4. Attach tubing to device.
2. Insert power cord into back of device and wall outlet.
6. Insert SD card into slot (if applicable).
3. Verify air supply port cover is inserted into port on
bottom of device.
EN - 10 A-DV64
FEATURES AND SETTINGS
Navigating
Screens: Simply
turn rotary knob to
desired item and
press knob to
select item.
Your device has many features and settings to
personalize and improve your therapy experience. Many
of these are fully adjustable, while others may have
limited or no adjustability. The following legend is used
throughout this section:
Informational Only - Indicates a non-adjustable
setting
Enabled/Disabled – Allows you to turn selected
options on or off
Locked - Indicates a setting that can be locked by
your provider. Locked or unlocked icon will
be shown in the upper right side of the Display.
Locked settings are only adjustable by your
provider.
Shown/Hidden - Indicates a feature that can be
hidden by your provider. If a feature is hidden, you
will not see it in your device.
Within menu, select Back to return to previous
screen. NOTE: Pressing On/Off button while in
any menu will exit to therapy screen.
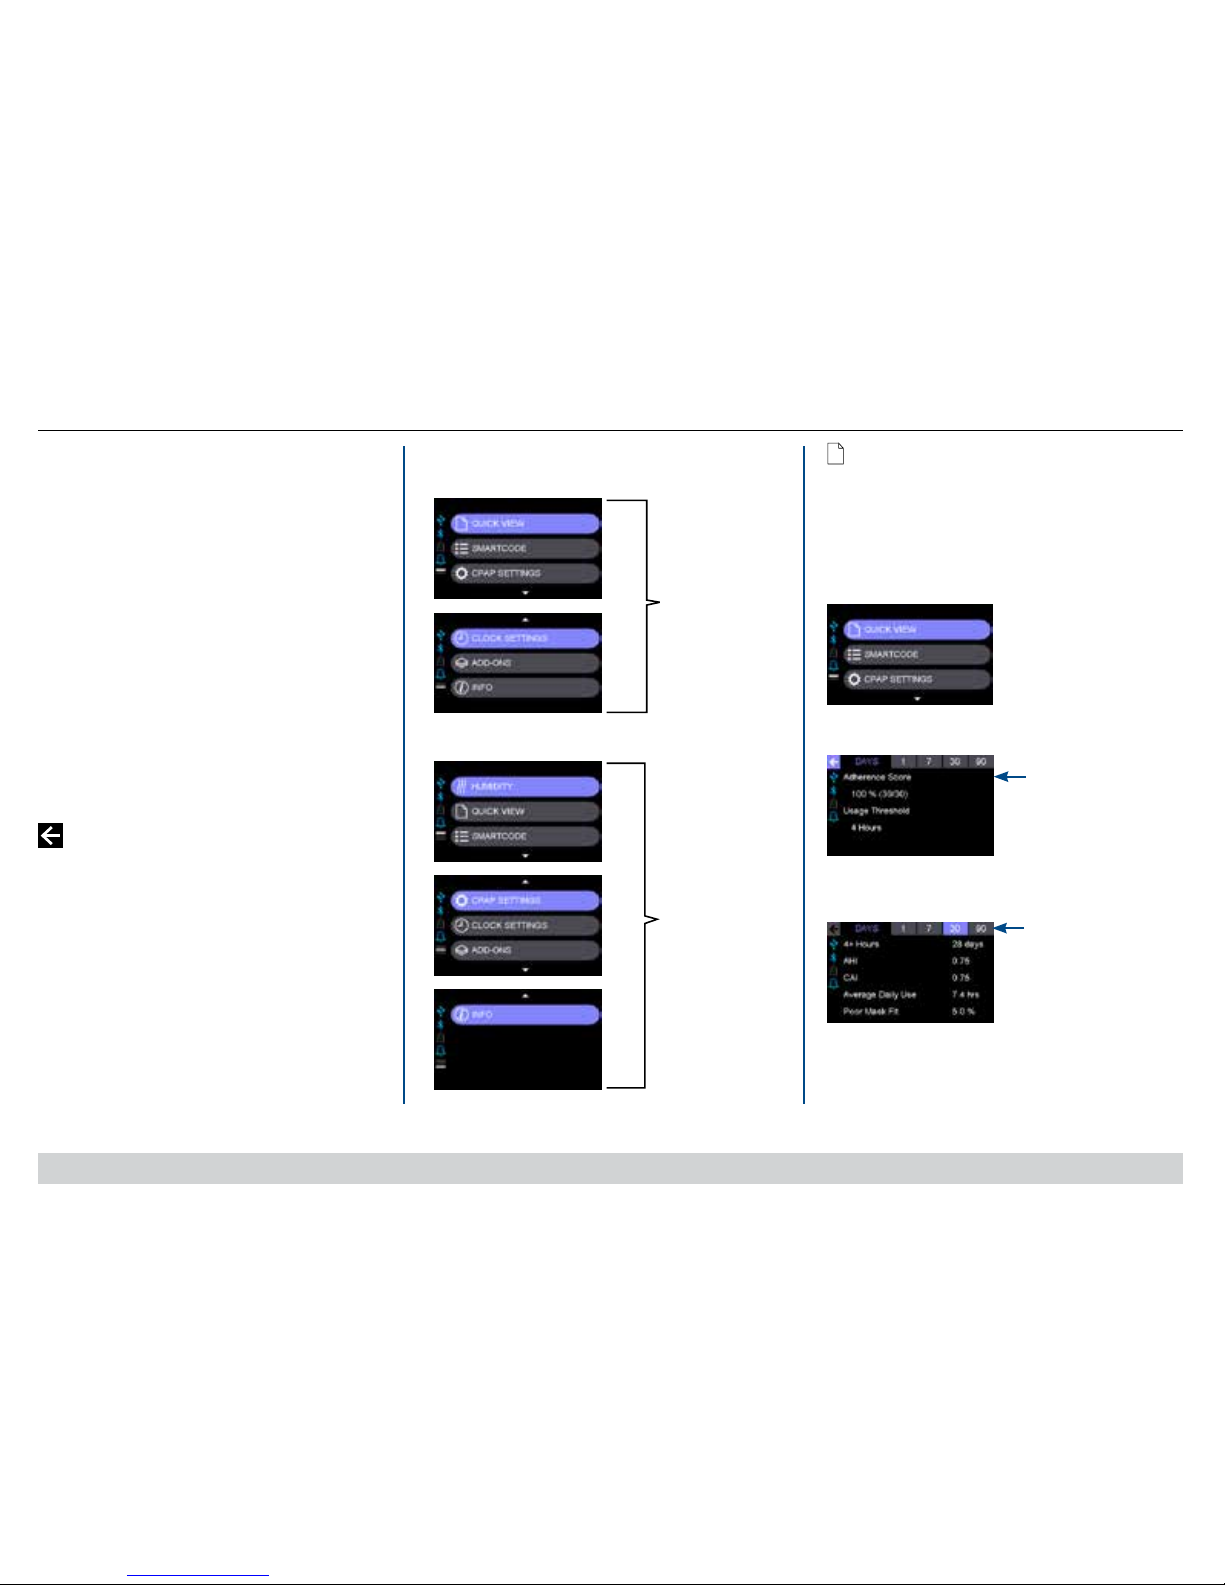
Main Menu Items
Without humidier option:
Quick View Menus
Quick View shows an overview of your therapy, as well
as more-detailed information for a preset number of
days. There is no user adjustability in Quick View. Your
provider will contact you for this information if required by
your insurer.
1. Press to select Quick View.
2. Overview screen appears.
3. Turn knob to choose
number of days to view.
SmartCode Adherence
Score™
With optional humidier:
Navigating
Screens: Simply
turn rotary knob to
desired item and
press knob to
select item.
EN - 11A-DV64
FEATURES AND SETTINGS
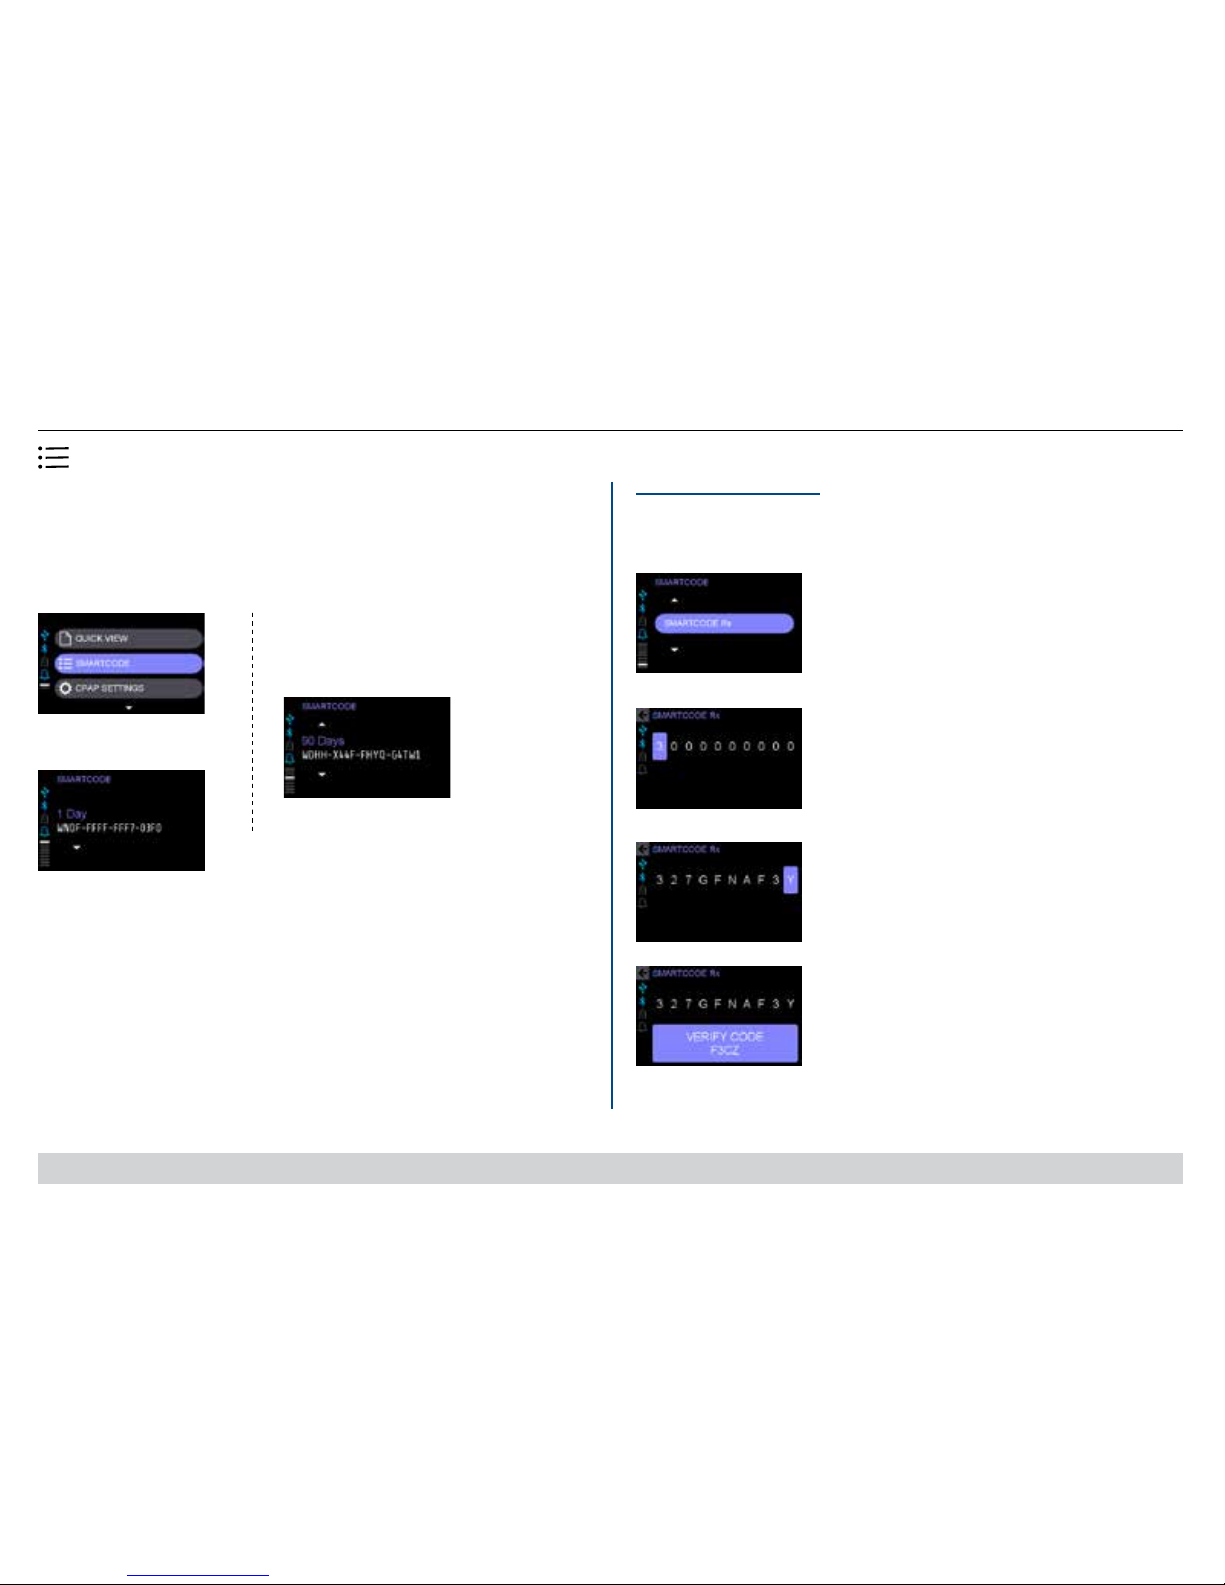
SmartCode® Data Menus
SmartCode data sets offer a detailed look at your therapy through an encrypted code.
The decrypted data includes info required by many insurers to continue coverage of your
equipment. Data sets can be decrypted by visiting the www.intellipap.com website and
entering the code. Your provider will contact you for this data set if required by your
insurer.
1. Select SmartCode option
2. 1-Day data set appears
3. Continue to turn knob to view screens:
• 7 Days
• 30 Days
• 90 Days
• Compliance
• Date
• Serial number
• SmartCode Rx (see
following section)
SmartCode Rx Submenu
This submenu allows your provider to adjust your prescription through input of an
encrypted code. Code may contain letters or numbers and knob may be turned
either way to roll through 0-9 and A-Z.
1. Select SmartCode Rx to input
code supplied by your provider
2. Highlight, then turn knob
to select rst digit and press.
3. Continue through all digits
4. Write down Verify Code and
give to provider
Generating Compliance Reports for Employer/Insurer/Physician
SmartCode reports satisfy most requirements for ongoing compliance/adherence information, and the software retains 2,046 days (5.6 years) of data. We recommend you work with
your provider to establish a routine for clearing SmartCode data to ensure current usage
information is available. Compliance meter should be cleared only after the required report
is generated, submitted, and approved by the requestor. Once cleared, a new cycle of 5.6
years begins and the only source for the previous data will be the hard-copy reports.
NOTE-Only the provider has access to clear the meter.
EN - 12 A-DV64
FEATURES AND SETTINGS
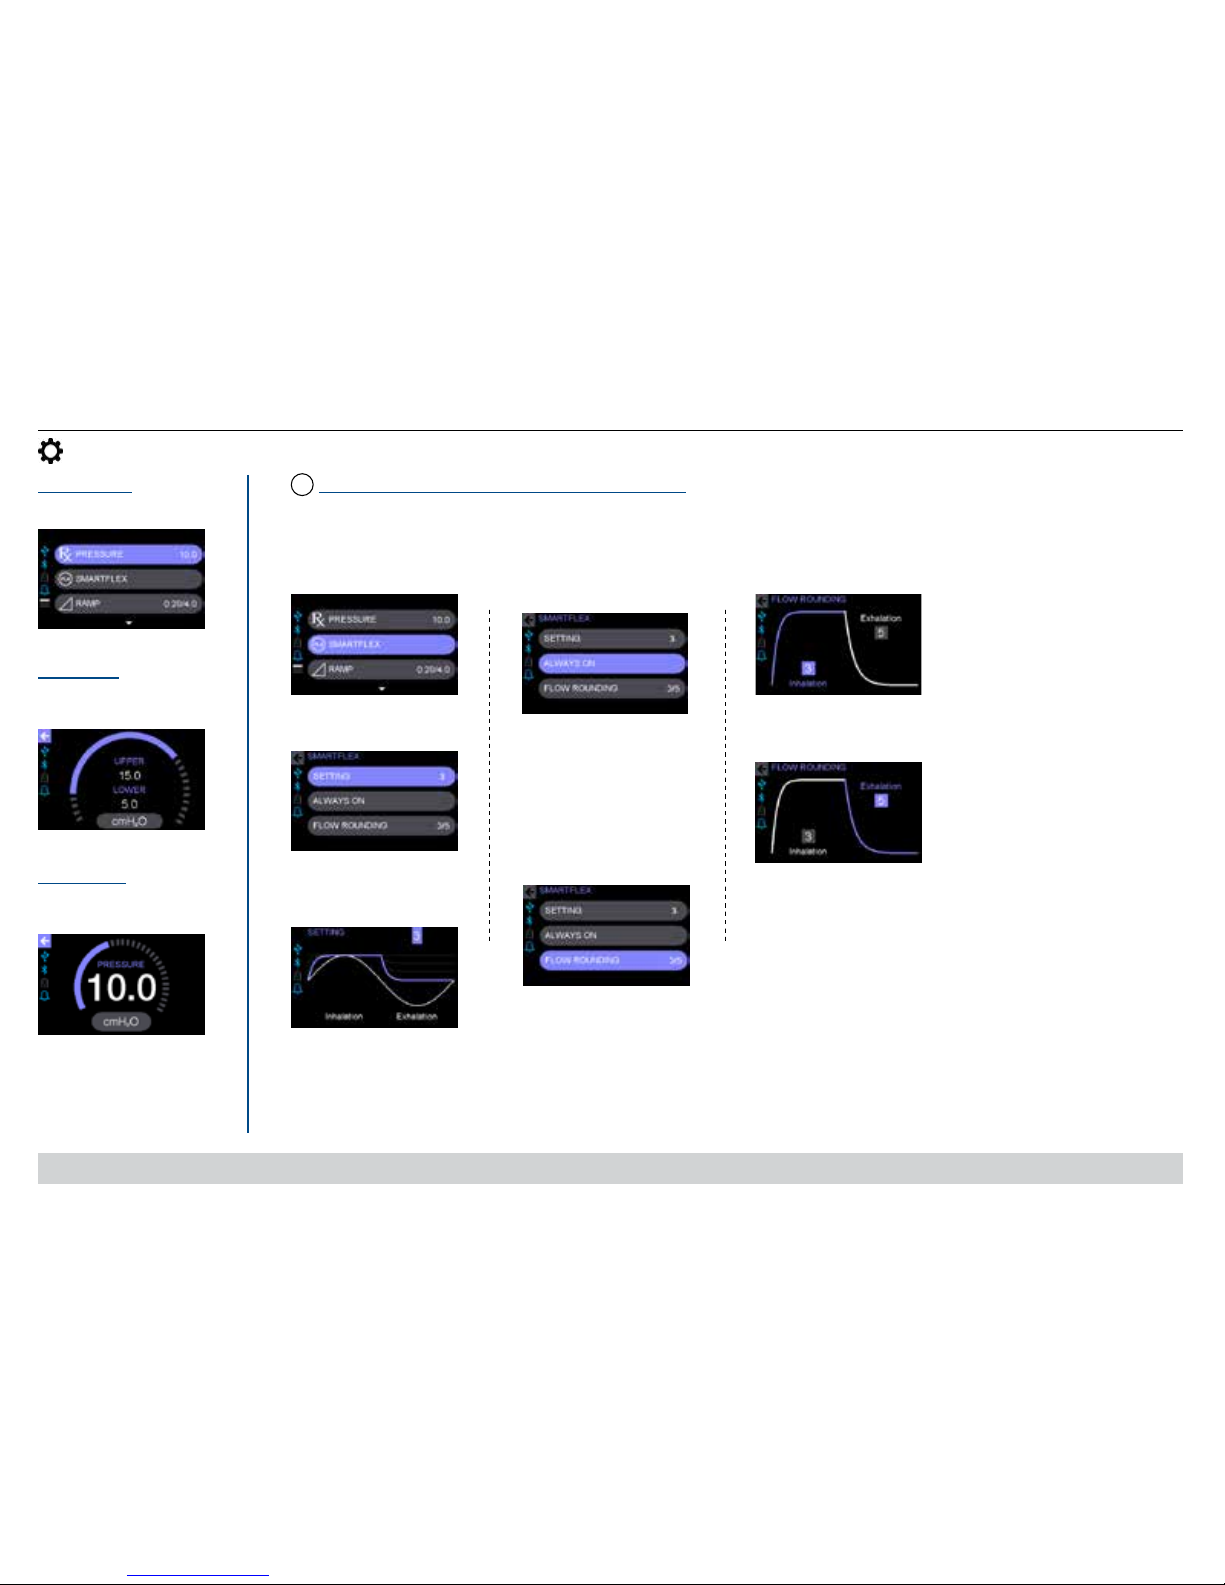
CPAP Settings Menus
RX Pressure
Select Rx Pressure
View your prescription
pressure setting
SmartFlex™ Pressure Relief Comfort Technology
1. Select SmartFlex
2. Select Setting
3. Choose 1-3 or OFF
NOTE – 1 is the least relief
and 3 is the most.
4. Press to choose
Always On or Ramp Only
5. Select Flow Rounding
6. Choose 0-5 for Inhalation
7. Choose 0-5 for Exhalation
NOTE – 0 is the least rounding and 5 is the most.
When activated, the SmartFlex pressure relief feature helps make it easier for you to exhale against your prescribed pressure by slightly
lowering the pressure during exhalation. If you experience a respiratory event when using the pressure relief function, the device will
automatically deactivate this function until normal breathing resumes.
Auto Mode
View your prescription
pressure setting
CPAP Mode
Always On = SmartFlex
pressure relief is active
throughout the night.
Ramp Only = SmartFlex
pressure relief is on
during ramp only.
FLX
(Flow Rounding determines the speed at which the
SmartFlex pressure relief changes.)
EN - 13A-DV64
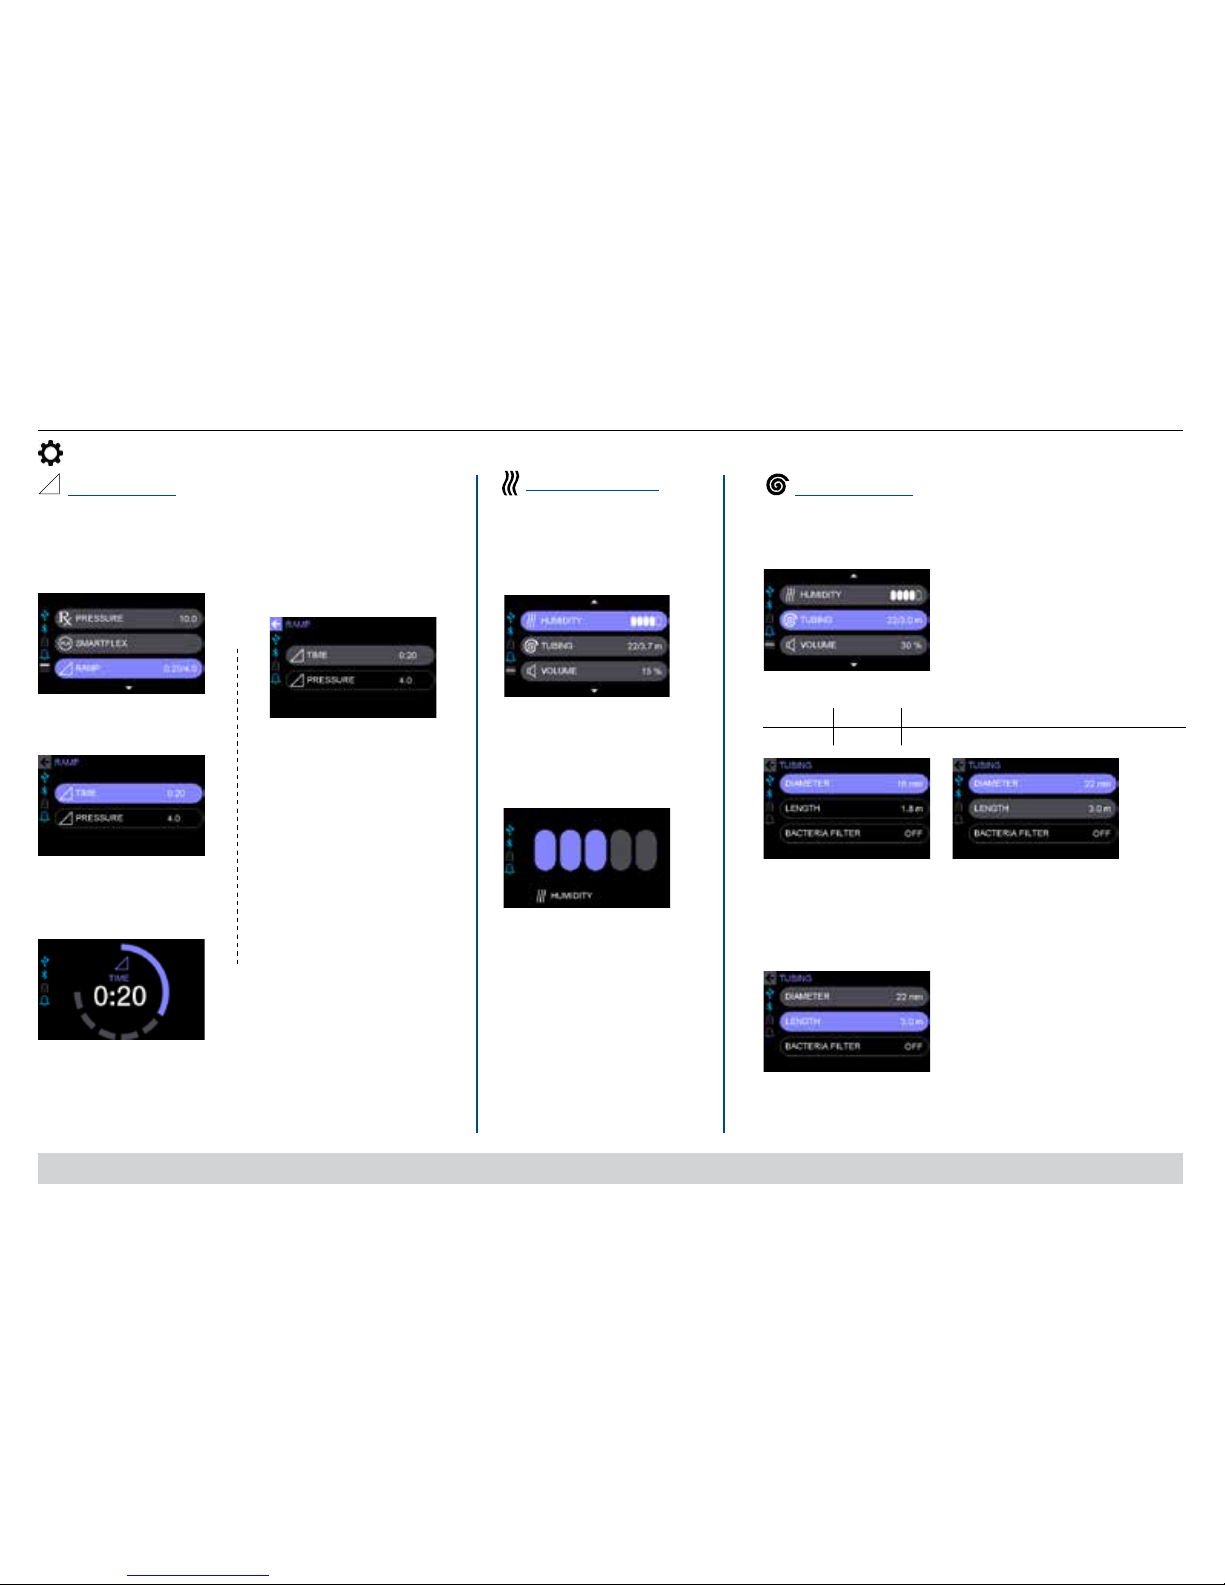
Ramp Options
1. Select Ramp
2. Choose Ramp Time.
(if unlocked).
3. Set Ramp Time
(From 0-45 minutes in 5
min increments)
4. View Ramp Pressure
(set by the provider)
Humidity Settings
1. Select Humidity
2. Choose humidity
setting of OFF or 1
through 5 bars. NOTE: 5
bars is the highest
humidity.
Tubing Settings
1. Select Tubing
2. Select Diameter: 15mm or 22mm
3. Select Length if 22 mm
Diameter. NOTE: These
settings must match the tubing
you are using for pressure at
the mask to be correct.
FEATURES AND SETTINGS
CPAP Settings Menus
Diameter 15mm 22 mm
Length 1.8 m (6’) 1.8 m (6’), 2.4 m (8’), 3.0 m (10’), 3.7 m (12’)
When activated, this feature gradually ramps up
the device to prescription pressure to help you fall
asleep easier.
Allows adjustment for optimal therapy based on your
tubing dimensions.
(Setting only applicable if you
have the optional heated
humidication.)
NOTE: Refer to Replacement Items/Spare Parts section to verify
tubing diameter.
NOTE: Bacteria lter option is set by the provider.
EN - 14 A-DV64
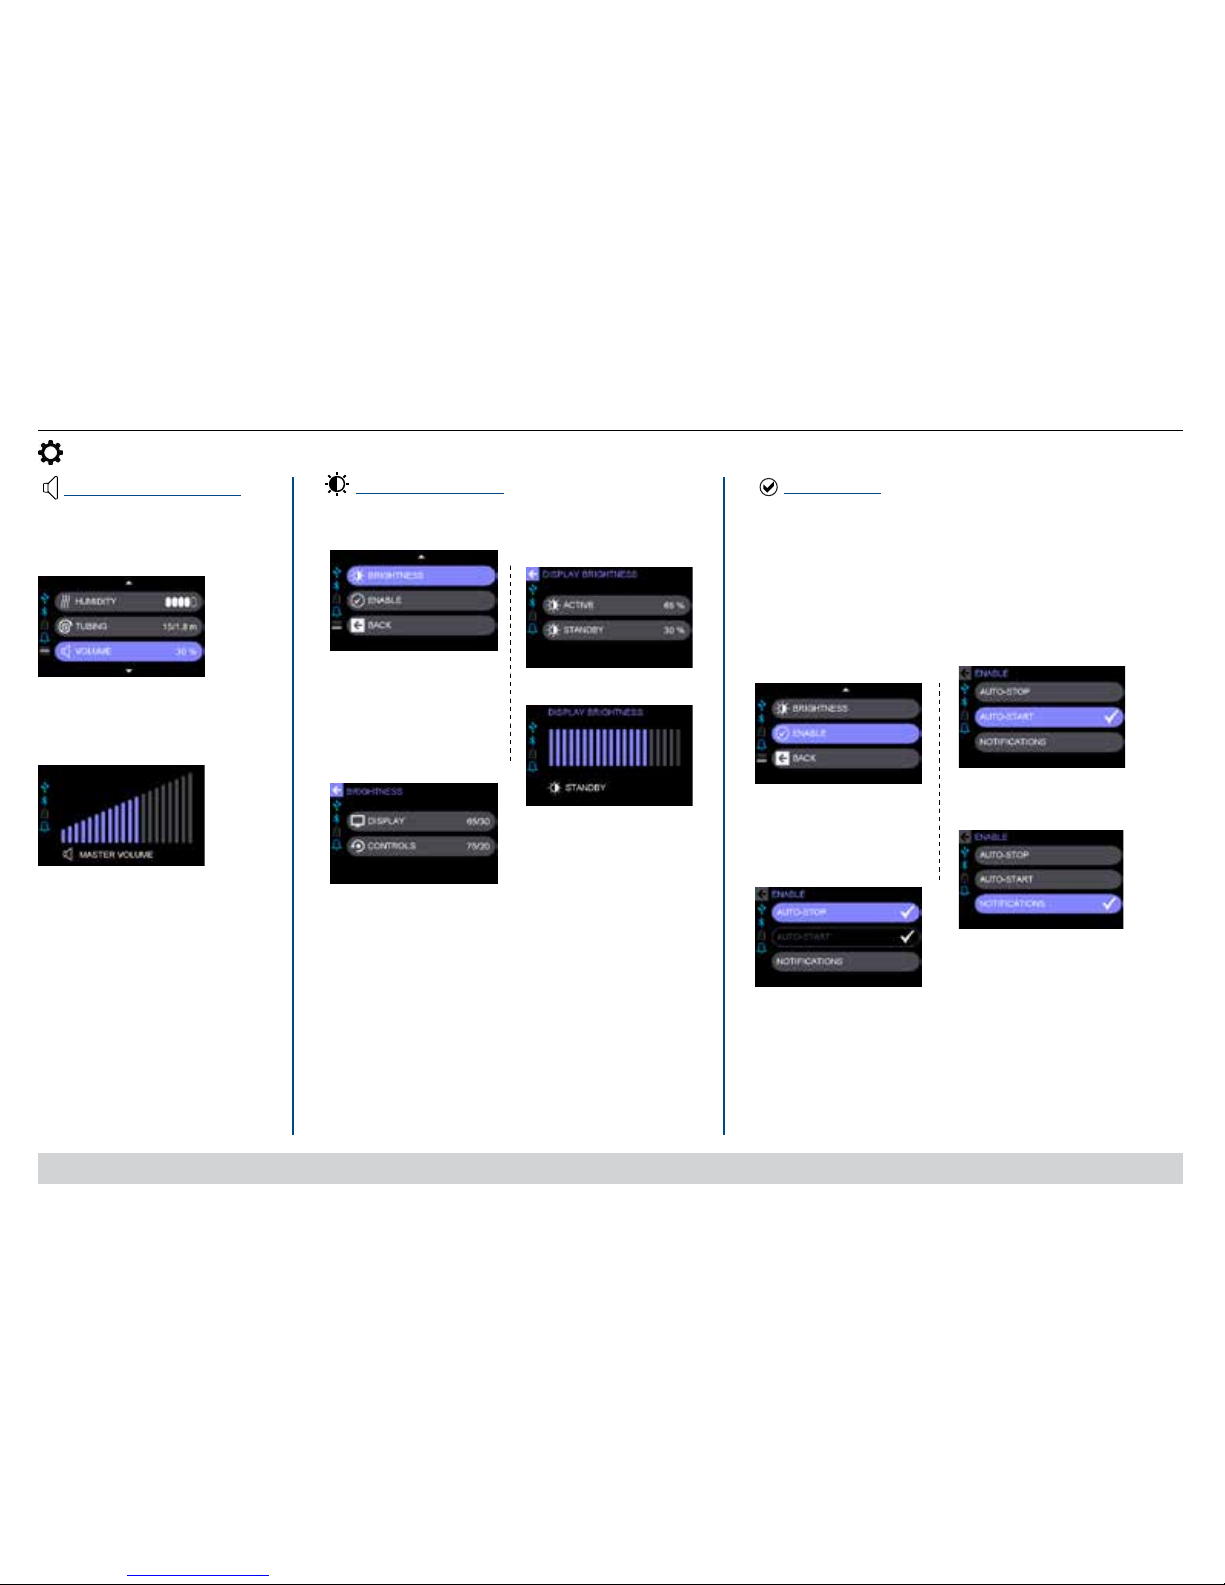
CPAP Settings Menus
FEATURES AND SETTINGS
Brightness Settings
1. Select Brightness
2. Select Display
(brightness of display
area) or Controls
(brightness of top buttons,
heater-on indicator, and
rotary knob)
3. Select Active or
Standby
4. Select Brightness Level
Enable Menu
= Enabled (ACTIVATED)
1. Select Enable and then
select desired options
2. Auto-STOP NOTE-
If Auto-STOP is enabled,
Auto-START is
automatically enabled.
3. Auto-START
4. Notications
(Refer to
Patient Messages for details.)
Active = Brightness during user activity (when using
buttons or menus). Settings from 10% to 100% (must be
equal to or higher than Standby brightness)
Standby = Brightness when no user activity (idle).
Settings from 0% to Active (must be equal to or lower than
Active brightness)
Display and controls change to Standby brightness after 2
minutes of no activity.
NOTE – If Standby controls brightness is set to 0, the
heater on indicator remains on at a low level.
Allows adjustment of display and controls brightness.
Allows Auto-Start/Stop feature and Notications to be
activated or deactivated. Activating Auto-Start/Stop allows you
to start therapy by breathing into your mask and to stop
therapy by removing your mask. Activating Notications will
ensure they are displayed on your screen when generated.
Master Volume Settings
1. Select Volume
2. Set Master Volume
(sound level) from 0-100%
0 = Off (mute)
Allows adjustment of alert volume for
patient messages.

EN - 15A-DV64
FEATURES AND SETTINGS
Clock Settings Menu
Clock - Current Time
1. Select Current Time
2. Set hour, minutes, and
AM/PM (if applicable)
Format
1. Select 12 or 24 hour
Clock Format
Wake-Up Alert
1. Select Wake-Up Alert
2. Select Wake-Up Alert
On
3. Select & Set Alert Time
4. Select Volume
5. Set Wake-UP Alert
Volume (sound level)
0=Off (mute)
NOTE – Wake-Up Alert Volume is separate from Master Volume.
If provider hides clock, wake up alert is hidden. If clock is shown, wake up alert can be shown or hidden.
NOTE – If Standby display brightness of 0% (Off) is chosen, the Clock will not be visible when idle.
Wake-Up Alert is available and changes the screen to Active upon activation.
12
24
Wake up alert allows your CPAP to also function as an alarm clock.
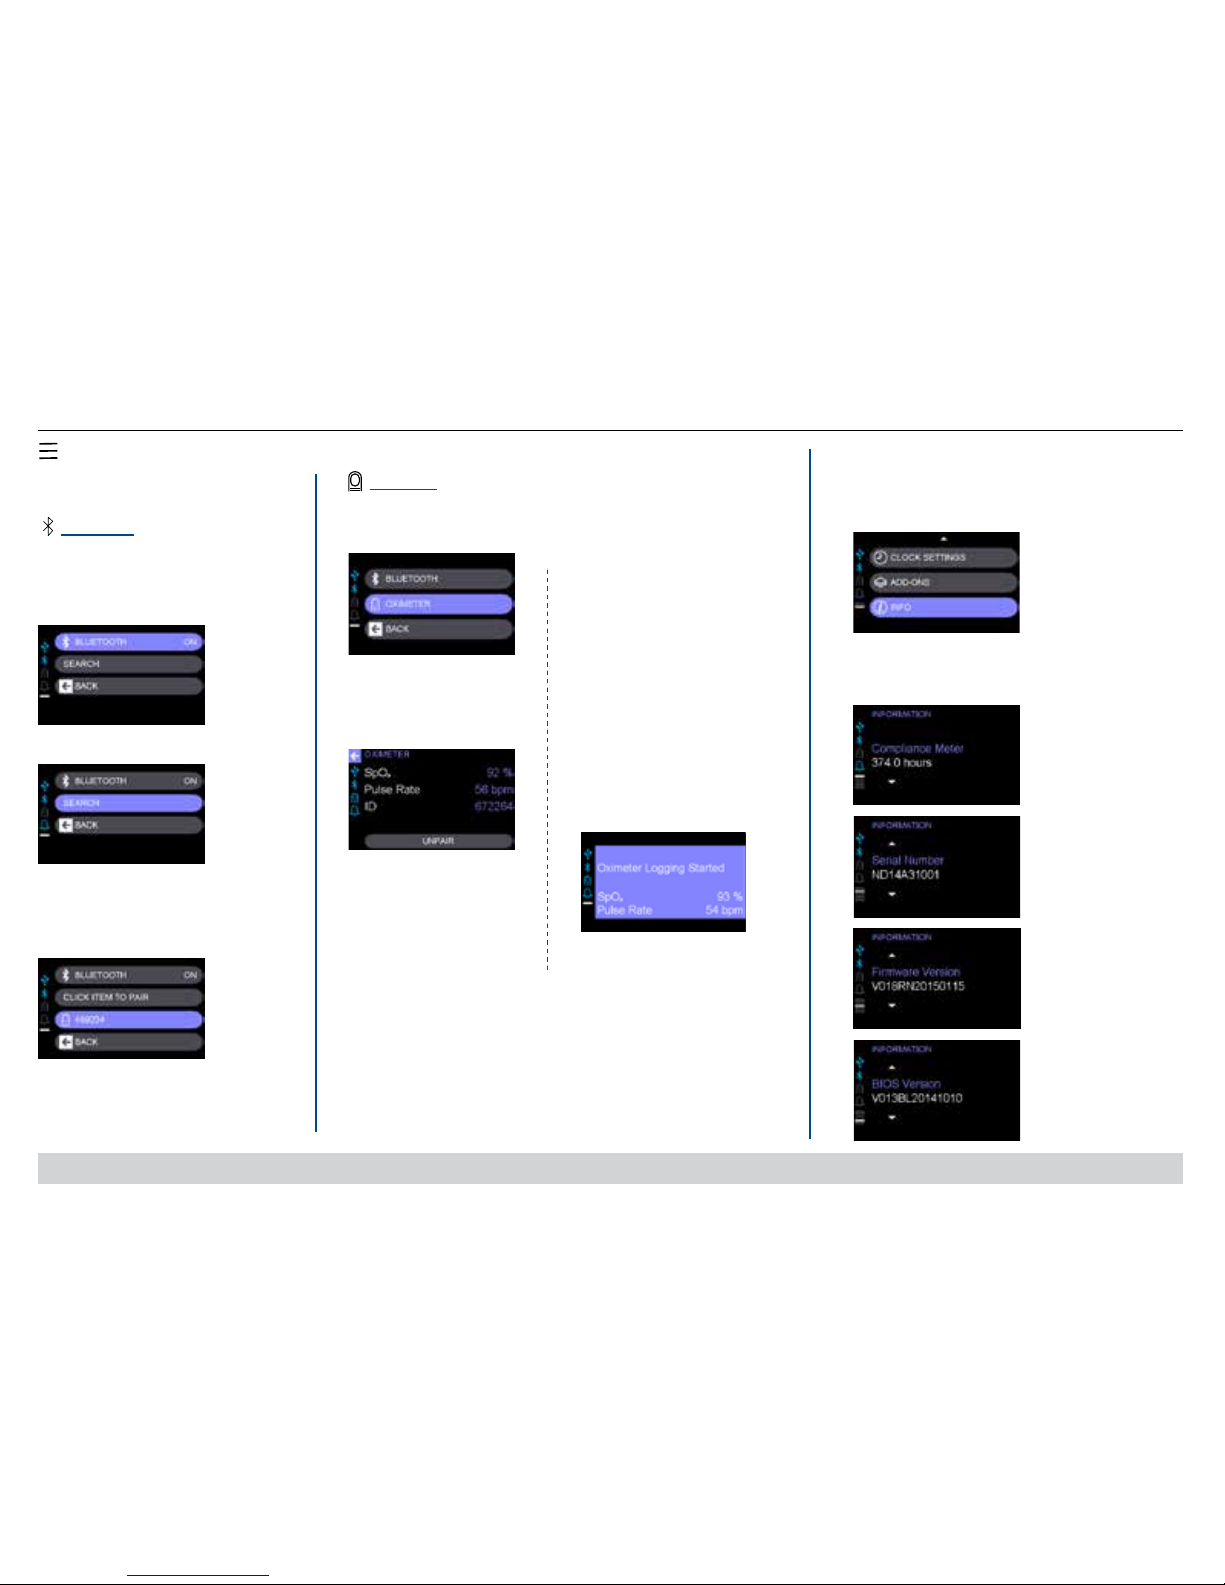
EN - 16 A-DV64
This menu allows the connection of the
Nonin® WristOx2® wireless oximeter.
FEATURES AND SETTINGS
Add-Ons
1. Select Bluetooth and press to
select On.
1. Select Oximeter
2. Select search.
3. Searching for Bluetooth
devices. Shows list of oximeters
in range. Click the item serial
number to pair with the CPAP.
1. Connect wireless
oximeter to CPAP and place
probe on nger.
2. Wait until your CPAP
display shows the pop-up
message “Oximeter Logging
Started” which means your
CPAP is recording data from
the oximeter.
NOTE – If more than one
person in the house is using
a wireless oximeter, each
person must do this check
at a different time.
NIGHTLY
Bluetooth
®
Oximeter
Bluetooth allows connection of the
Bluetooth enabled oximeter.
Information on optional Nonin WristOx2 wireless oximeter.
2. Oximeter information
screen. NOTE – Refer to
Oximeter Instruction Guide
for details.
Info
Allows you to see basic device information.
2. Turn knob to scroll through
Compliance Meter, Serial Number,
Firmware, and BIOS screens.
1. Select Info.
For Airline Use – Select Bluetooth
and press to select Off.
3. After recording is
nished, remove nger
probe and disconnect the
sensor cable from the
oximeter. The CPAP will
display a message ‘Oximeter
Logging Stopped’ and beep
once.
EN - 17A-DV64
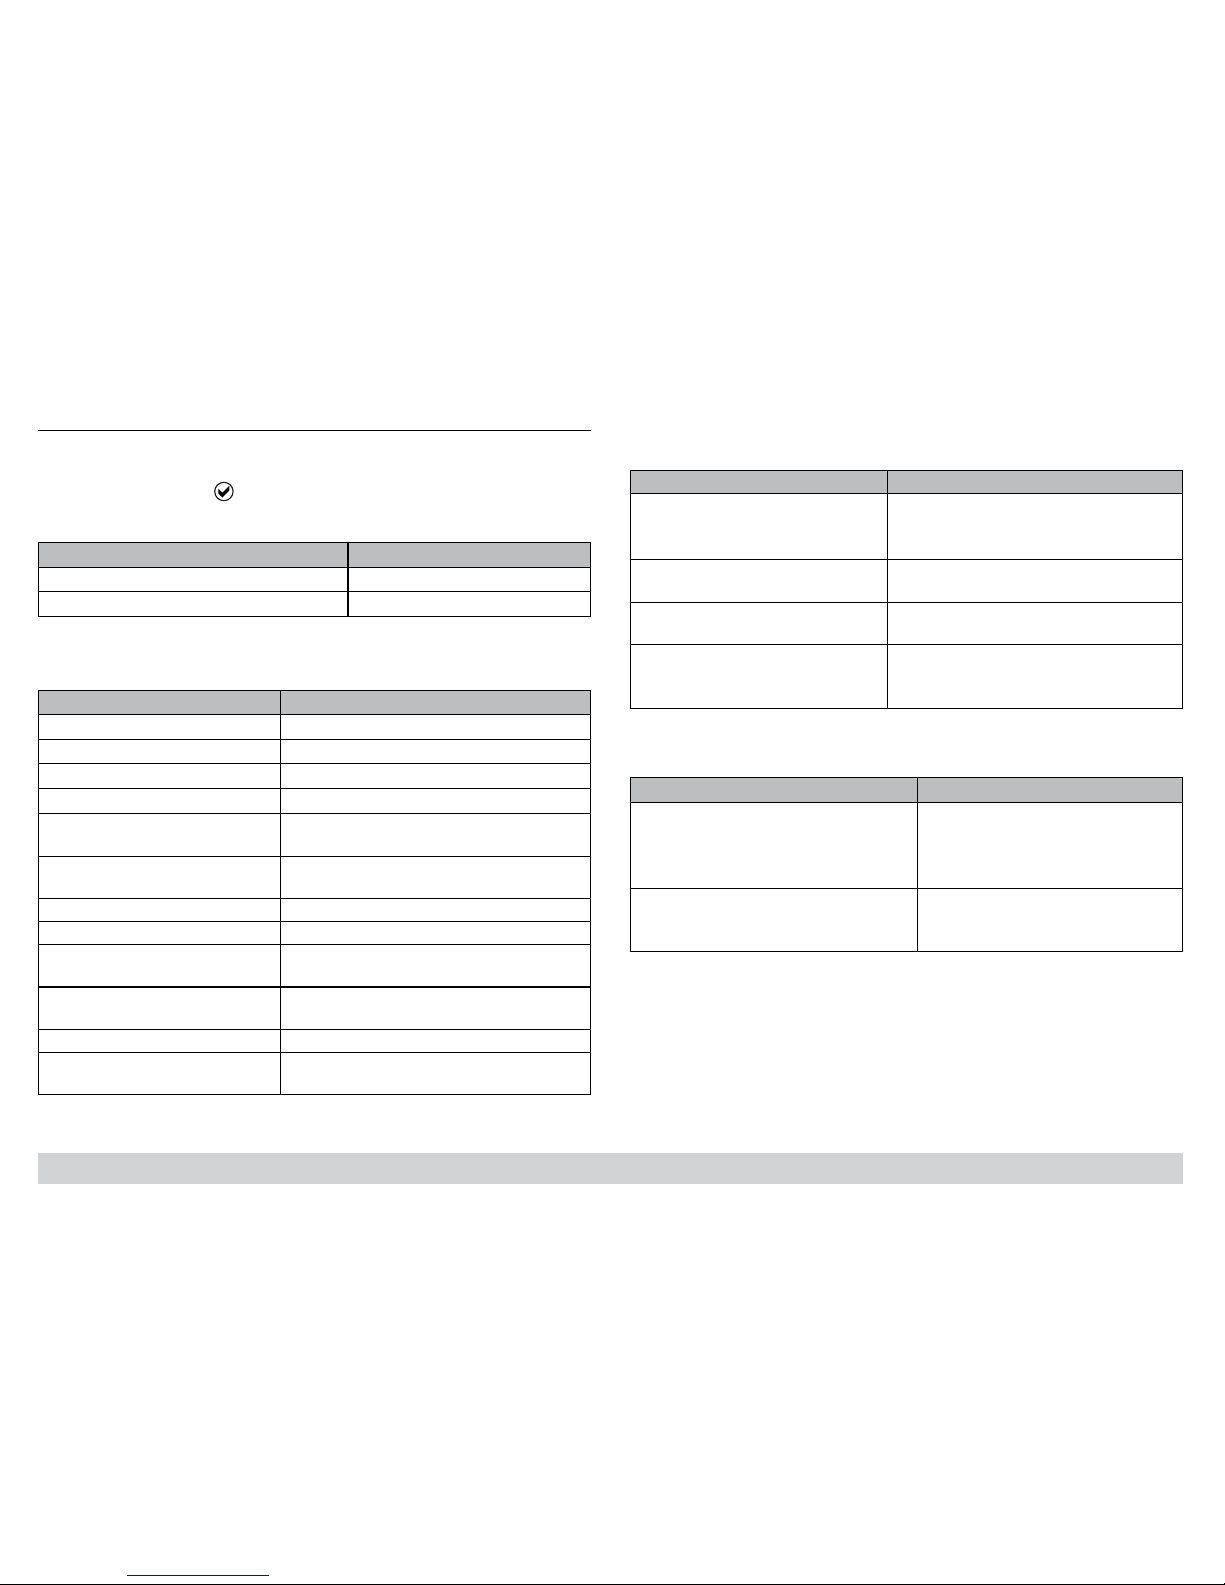
PATIENT MESSAGES
Various messages may be displayed during your therapy; some include an audible alert
that is controlled by Master Volume Setting.
1. Notifications
These are friendly reminders to clean or replace components and, if enabled, are
generated as follows. Dismiss from Display by Button Press or Knob Movement.
Displayed Notification Recurrence interval
Air Intake Filter Due for Cleaning 50 hours of use (while breathing)
Mask, Tubing, and Chamber Due for Cleaning 35 hours of use (while breathing)
2. Messages
These identify conditions that may require action by you/your provider or are
informational only. Dismiss from Display by Button Press or Knob Movement.
Displayed Message Condition for Occurrence
Mask Off Please Check Mask Fit 10 seconds after mask off condition detected.
Auto-STOP Detected When Auto-STOP occurs.
Auto-START Detected When Auto-START occurs.
Wake-Up Alert <current time> When Wake-Up Alert activates (alarm clock).
Error with Code, Prescription Not
Updated
When SmartCode Rx is entered but incorrect.
Card Detected Please Wait … When SD card is detected. Do not remove SD
card while this message is displayed.
Card Removed Send to Provider When SD card is removed after data transfer.
Card Error Contact Provider If SD card error condition detected.
Settings Not Updated Contact
Provider
When prescription change via SD Card fails.
Card Transfer Successful When valid SD Card inserted and data transfer
complete.
Card Detected Ready for use When valid SD Card is inserted.
Firmware Update Please Wait … When SD Card containing firmware update is
inserted.
3. Add-On Device Messages
These messages may be displayed when Add-On items are in use, Dismiss from Display
by Button Press or Knob Movement.
Displayed Message Condition for Occurrence
Oximeter Logging Started
SpO2 _____
Pulse Rate _____
When Oximeter first detected and logging
starts
Oximeter Logging Stopped When Oximeter signal is lost and logging
stops
Oximeter Finger Probe Off When Oximeter finger probe off condition
detected
Oximeter Finger Probe On
SpO2 _____
Pulse Rate _____
When Oximeter finger probe off condition corrected
4. Service Codes
These are divided into Critical or Non-Critical. Critical service codes put the unit in a failsafe (blower off) state.
Displayed Message Action
Critical Service Code E0X - Where (X) is a
number or letter
NOTE – Code E01 is always shown in
English since language setting is unknown
Contact your equipment provider to
return unit for service. Message remains
on Display and cannot be dismissed.
Service Code E8X (non-critical - Where (X)
is a number or letter
Contact your equipment provider.
Dismiss from Display by Button Press or
Knob Movement.
NOTE- Service Code alerts are unaffected by notication enable/disable setting.

EN - 18 A-DV64
DEVILBISS SMARTLINK® PATIENT THERAPY MANAGEMENT SYSTEM
DeVilbiss SmartLink technology is included in every device. It is used by your provider in conjunction with our exclusive software to monitor the effectiveness of your therapy and how
consistently you use the device. Information can be obtained through the use of an SD card or by direct download to a computer with SmartLink software installed.
Using an SD Card
Your provider may give you an SD card to collect data. It should be installed during device set up and kept in device. Your provider will instruct you on when to return the card.
1. Insert card face up.
Press until it clicks into
place.
2. Message will display
and tone will sound.
Card Detected
Ready For Use
1. Device is copying
card. Card should remain
in device until copying is
complete
1. Press and release card;
remove from CPAP.
Card Detected
Please Wait...
2. Message will display
and tone will sound.
To install the card Data transfer To remove the card
NOTE – DO NOT remove
SD card while showing
“Card Detected Please
Wait.” SD card may be
corrupted if removed
during this message.
Card Removed
Send to Provider
EN - 19A-DV64
TRAVEL INFORMATION
NOTE – For details on part numbers for alternate power sources, refer to Replacement Items/Spare Parts.
Air Travel
Your device is RTCA/D0-160 Section 21 Category M approved for use on commercial airlines when using battery power. You must turn off the Bluetooth. Refer to Features & Settings Add-Ons in this guide for details on Bluetooth.
International Travel
Your device is capable of accepting line voltages of 100-240V~, 50/60Hz. For travel to another country, simply order the correct power cord for that region from your provider or use
proper adapter.
Altitude
This device automatically compensates for altitude between 1060 hPa and 700 hPa (~ 1,400 ft below sea level to 9,800 ft). At higher altitudes, breathing patterns change and you may
lose some benet of your CPAP therapy.
Battery/DC Operation
Several DC power source options are available:
1. Your device can be operated from a 12 V DC power source by using the optional DC Cable.
2. Lastly, instead of connecting12V DC power directly to the CPAP device, you can pass the DC power through an AC Inverter that will deliver AC power to the system. The power
rating of the inverter must be at least 200 watts @ 110V~ / 400 watts @ 220V~.
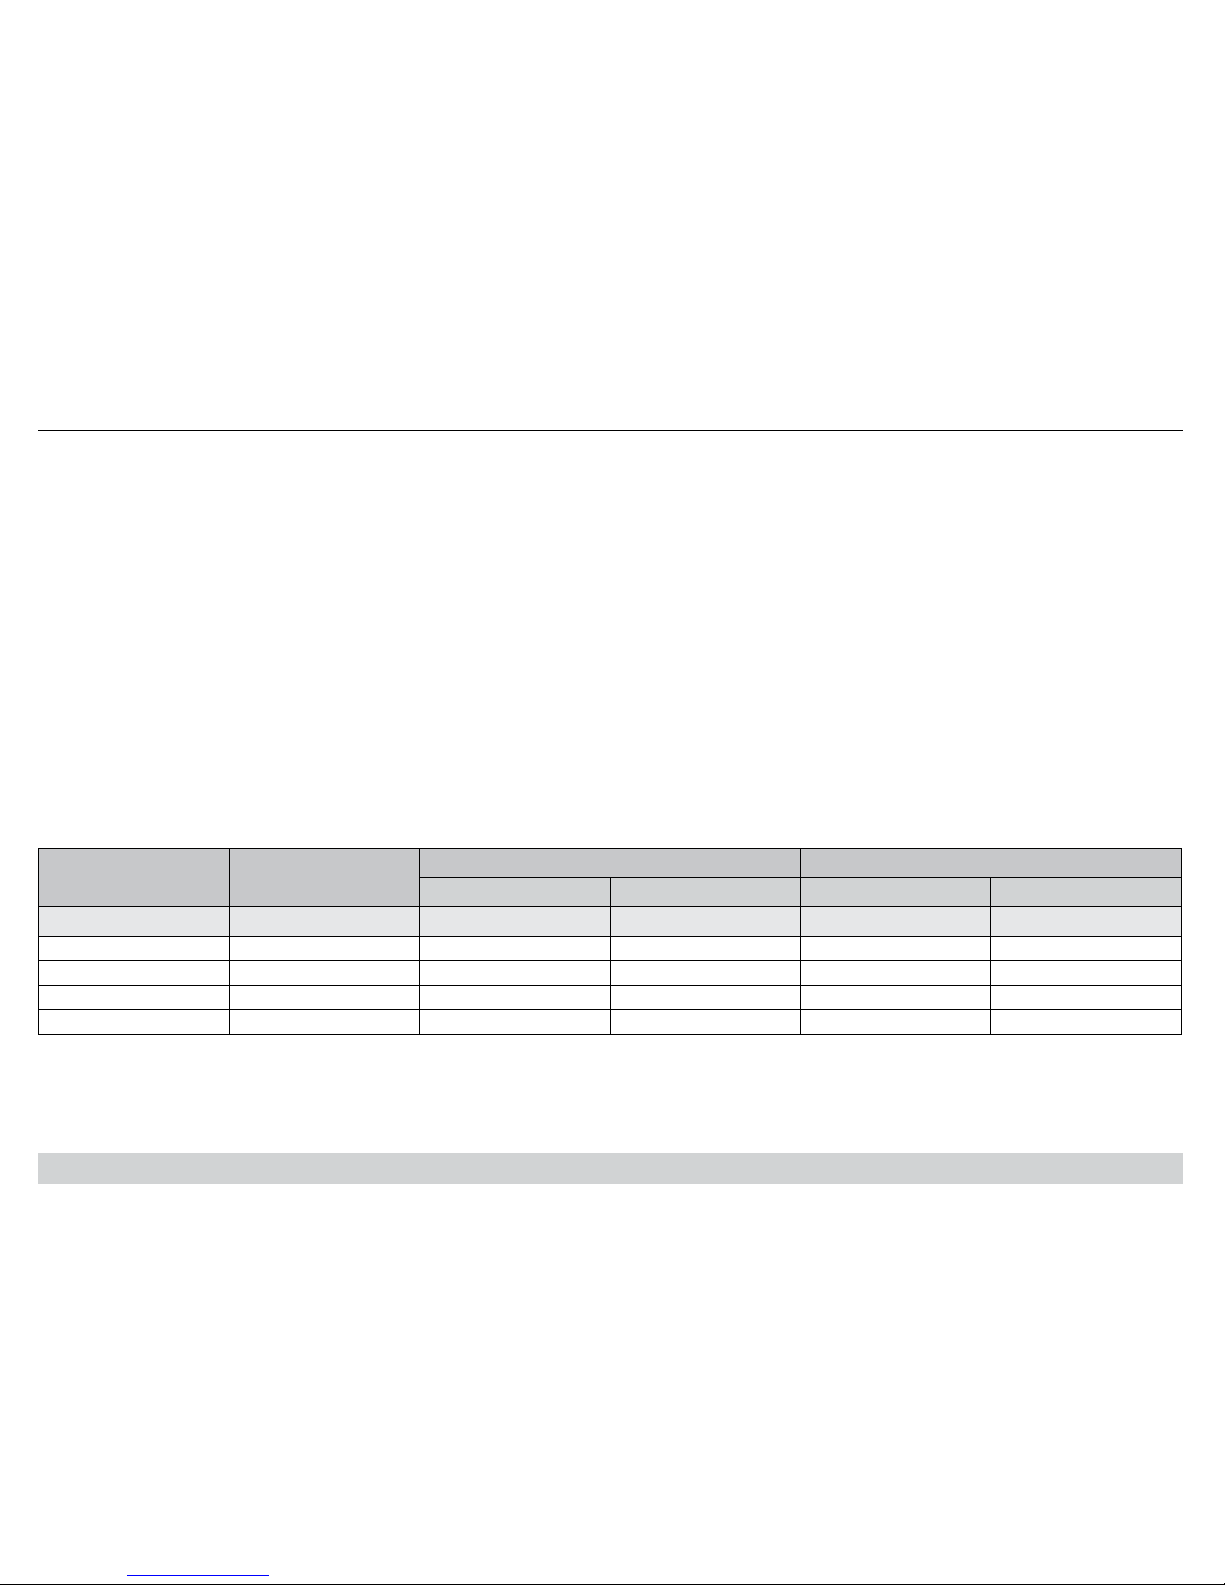
Approximate Battery Operation Run Time
Example Battery Size = 100 W/Hr
CPAP Only
CPAP with Heated Humidier CPAP with Heated Humidier and PulseDose Module
Heater Setting = 3 Heater Setting = 5 Heater Setting = 3 Heater Setting = 5
CPAP Setting (cmH20) Minimum Run Time (Hrs) Minimum Run Time (Hrs) Minimum Run Time (Hrs) Minimum Run Time (Hrs) Minimum Run Time (Hrs)
5 16.9 8.7 5.6 9.5 5.9
10 11.9 7.5 4.7 7.8 5.4
15 8.7 6.4 4.4 7.1 4.7
20 6.8 5.8 4.0 6.1 4.4
NOTE – Run times are at a breath rate of 20 breaths per minute and standard mask leak.
EN - 20 A-DV64
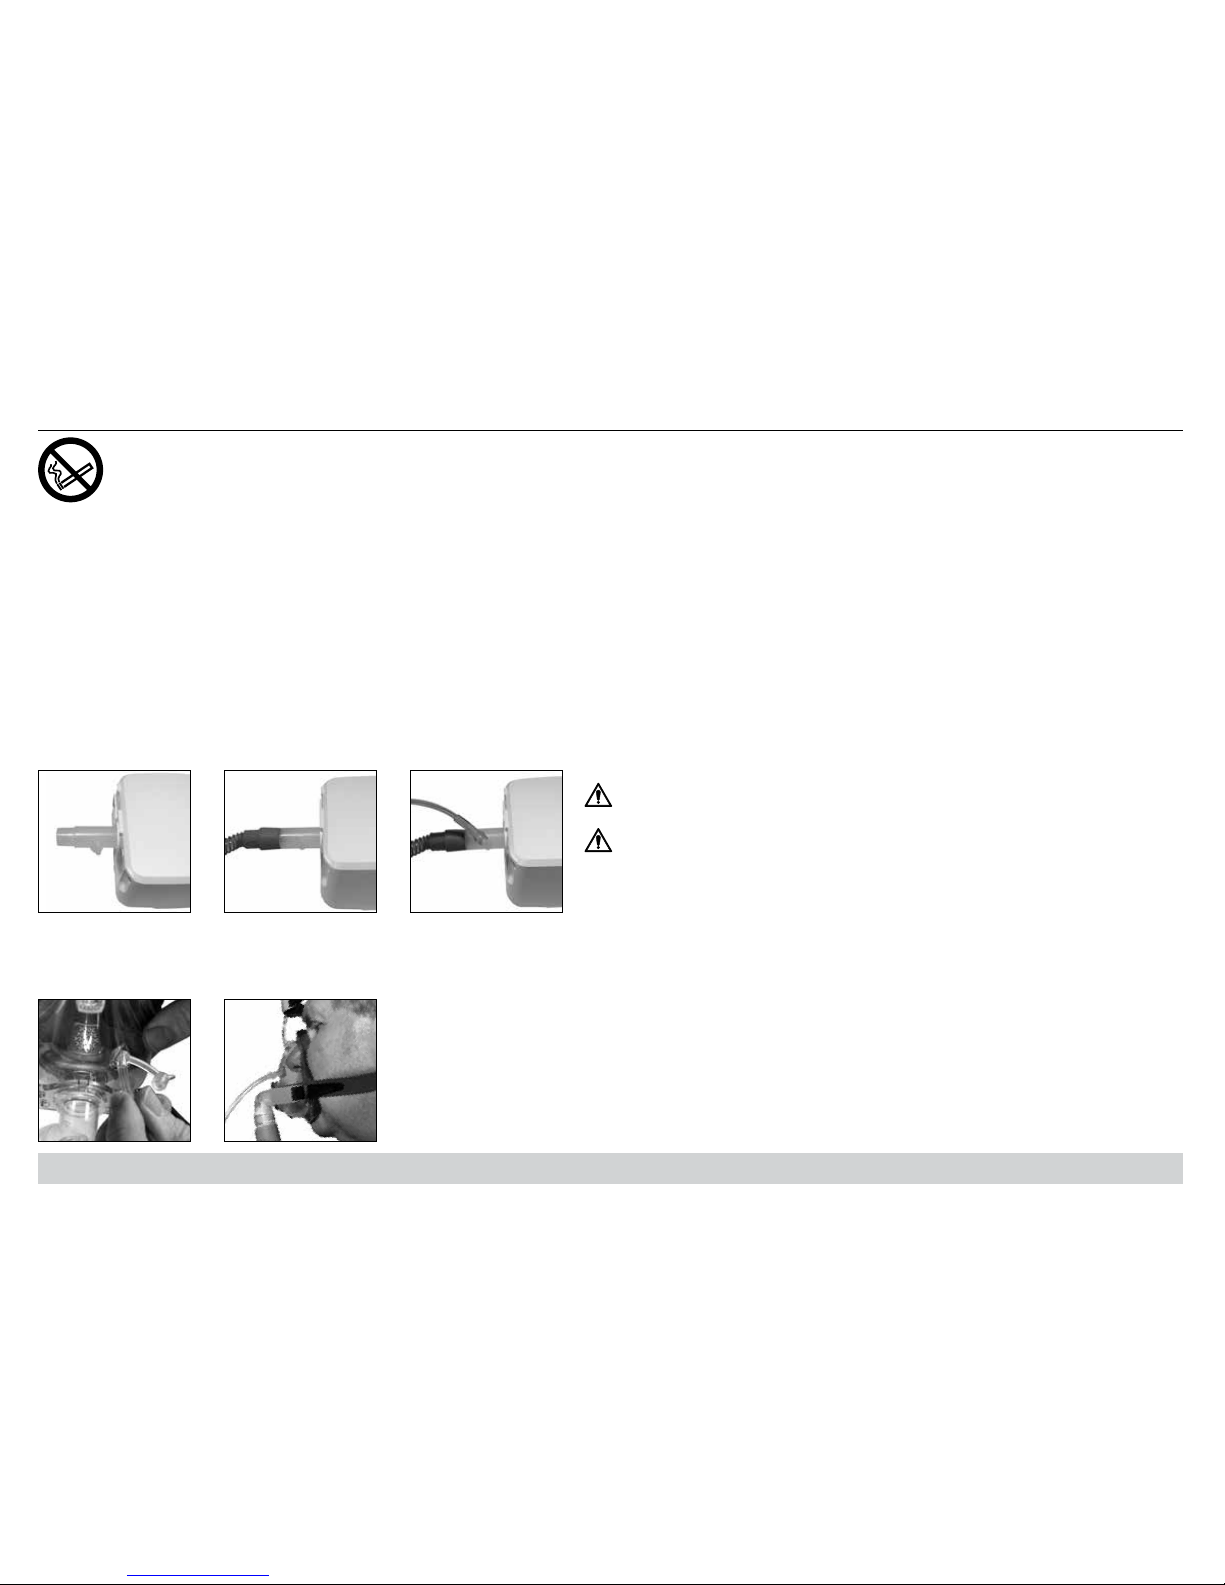
1. Place optional oxygen
adapter into air supply port.
3. Attach oxygen
tubing to the adapter.
2. Insert CPAP tubing
into adapter.
1. Attach oxygen tubing directly to the oxygen port on
the mask.
OR
Always turn on CPAP before
turning on oxygen ow.
Always turn off oxygen ow
before turning off CPAP.
SUPPLEMENTAL OXYGEN
WARNING-OXYGEN USE
• Oxygen supports combustion. To avoid possible physical injury, do not smoke while using this device with supplemental oxygen. Do not use this device near hot objects,
volatile substances or sources of open ames.
• Always turn on the CPAP device before turning on the oxygen source. Turn off the oxygen source before turning off the device. Never allow the oxygen source to run
continuously while connected to the device if the device is not in use. If the device is not being used, turn off the oxygen ow.
• CPAP pressure must be set higher than 8 cmH2O for supplemental oxygen use to prevent patient breathing pattern from forcing oxygen back into the CPAP.
• At a xed ow rate of supplemental oxygen, the inhaled oxygen concentration will vary depending on the pressure setting, patient breathing pattern, mask selection, and leak rate.
This warning applies to most types of CPAP devices.
CAUTION
• Oxygen is a prescribed gas and should only be administered under the supervision of a physician.
• The ow setting of the oxygen source must be specied by a physician.
• Maximum oxygen pressure is 50 psi. Maximum oxygen ow rate is 10 lpm.
If your physician prescribed supplemental oxygen it can be added one of two ways:
EN - 21A-DV64
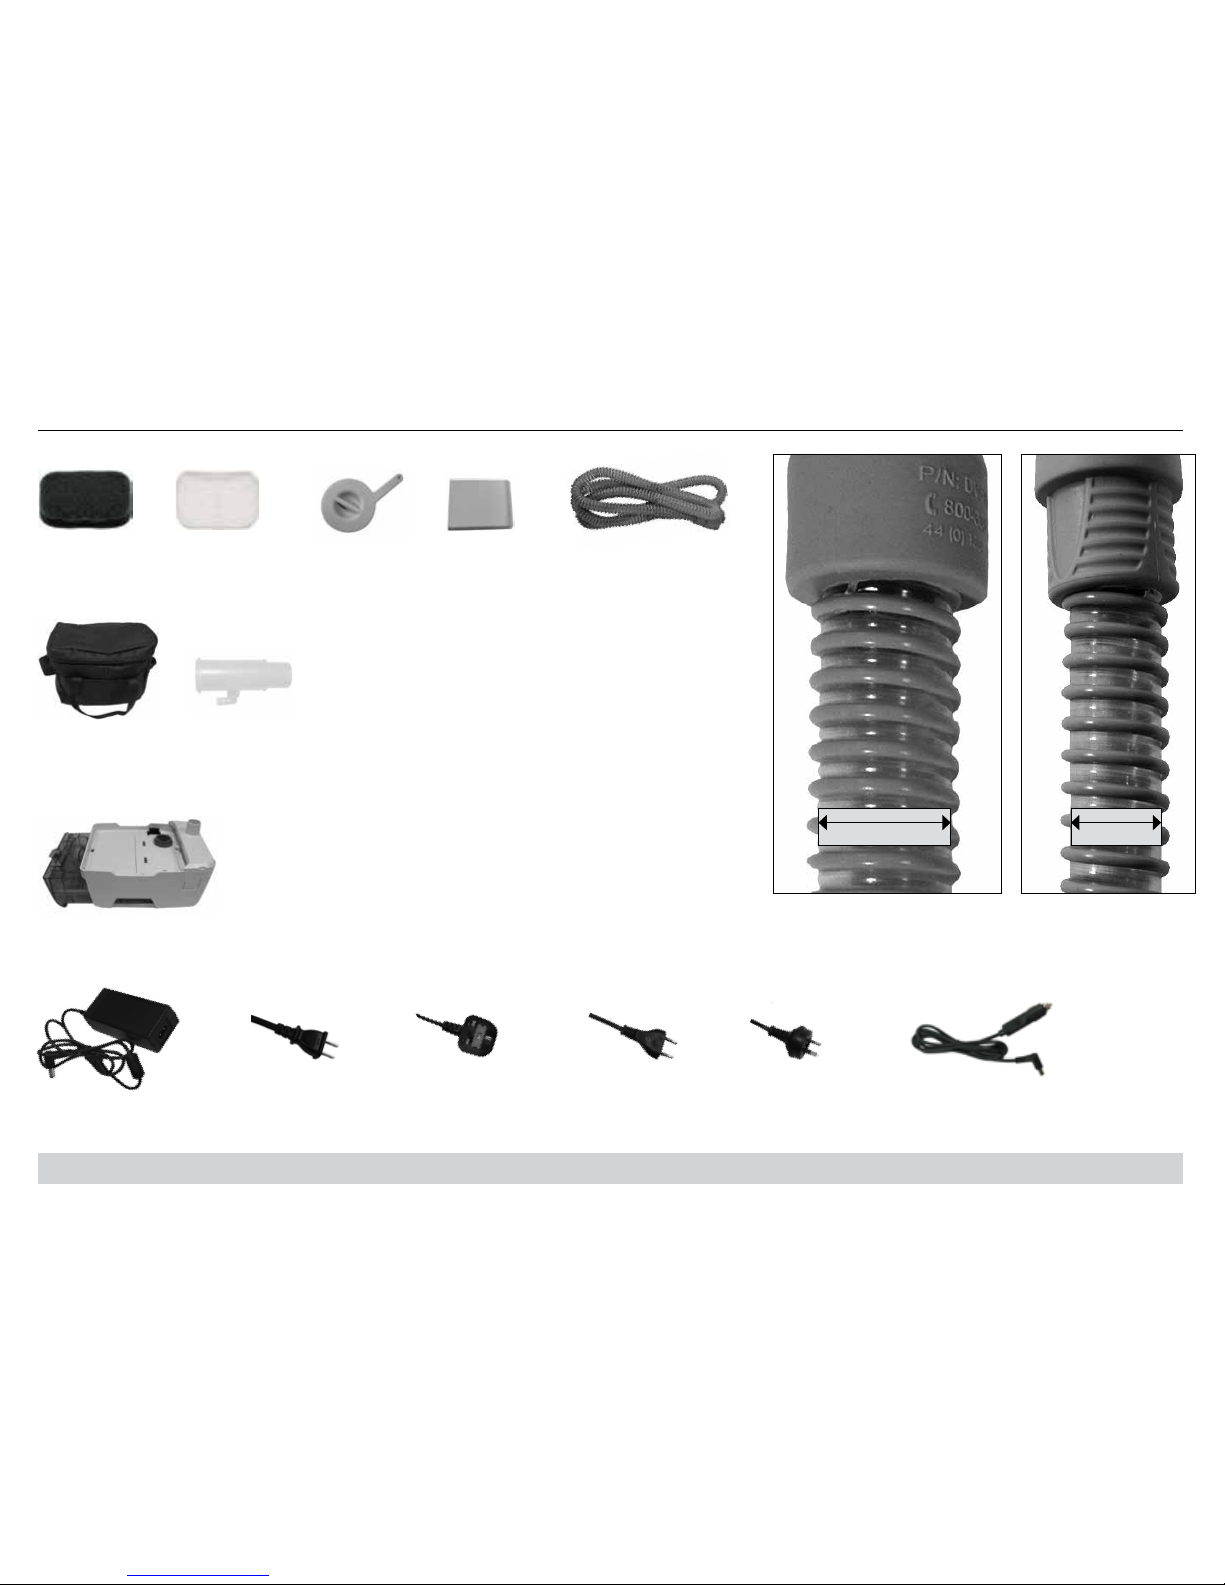
REPLACEMENT ITEMS/SPARE PARTS
Replacement Items/Spare Parts
Air-inlet lter
(4/pk)
#DV51D-602
Fine particle
lter (4/pk)
#DV51D-603
Air supply tubing
22 mm x 1.8 m (6’) - #DV51D-629
15 mm x 1.8 m (6’) - #DV61D-629
Air supply port
cover
#DV61D-604
Carrying Case
#DV63D-610
Oxygen Adapter
#7353D-601
Optional Heated Humidification
Heated Humidier with Standard Humidication - #DV6HH
Heated Humidier with PulseDose® Humidication upgrade - #DV6HHPD
Power Items
AC power cord
(USA)
#DV51D-606
AC power cord (UK)
#DV51D-608
AC power cord (EU)
#DV51D-607
AC power cord
(Australia)
#DV51D-609
DC power cord
(cigarette lighter
adapter)
#DV6X-619
Power supply
#DV63D-613
Filter Cover
#DV63D-631
22 mm 15 mm
NOTE: Tubing shown at right is
actual size to easily verify diameter
of your tubing.
EN - 22 A-DV64
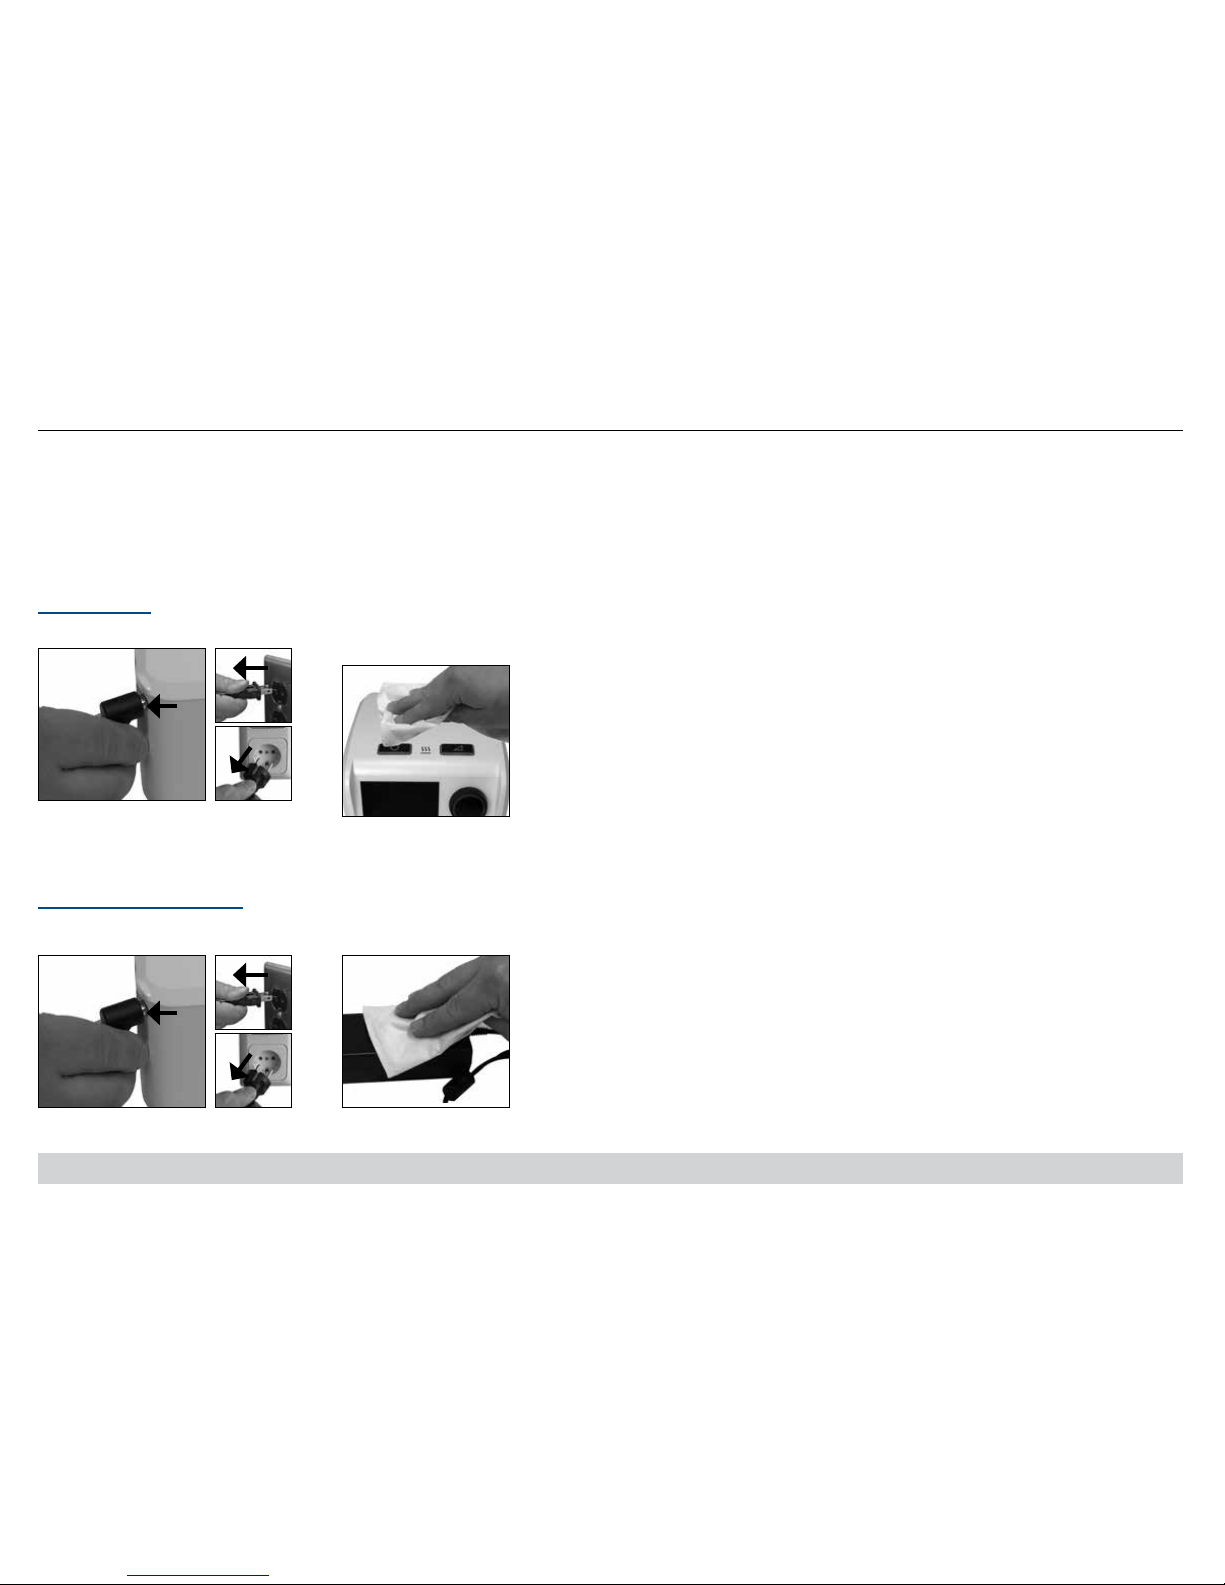
CLEANING
WARNING
To avoid electric shock, always unplug the power cord from the wall outlet power source before cleaning.
CAUTION – Never rinse or place the device in water. Never allow liquids to get into or around any of the ports, switches or air lter; doing so will result in product damage. If this occurs,
do not use the device. Disconnect the power cord and contact your equipment provider for service.
This device is for single patient reuse only.
NOTE – Allow to dry completely before plugging into power source.
2. Wipe the adapter with a clean,
damp cloth every few days.
Device Cabinet, AC Adapter (Power Supply)
Device Cabinet
AC Adapter (Power Supply)
1. Disconnect from device and power
source.
2. Wipe the cabinet with a clean,
damp cloth once per week (7 days).
1. Disconnect from power source.
EN - 23A-DV64
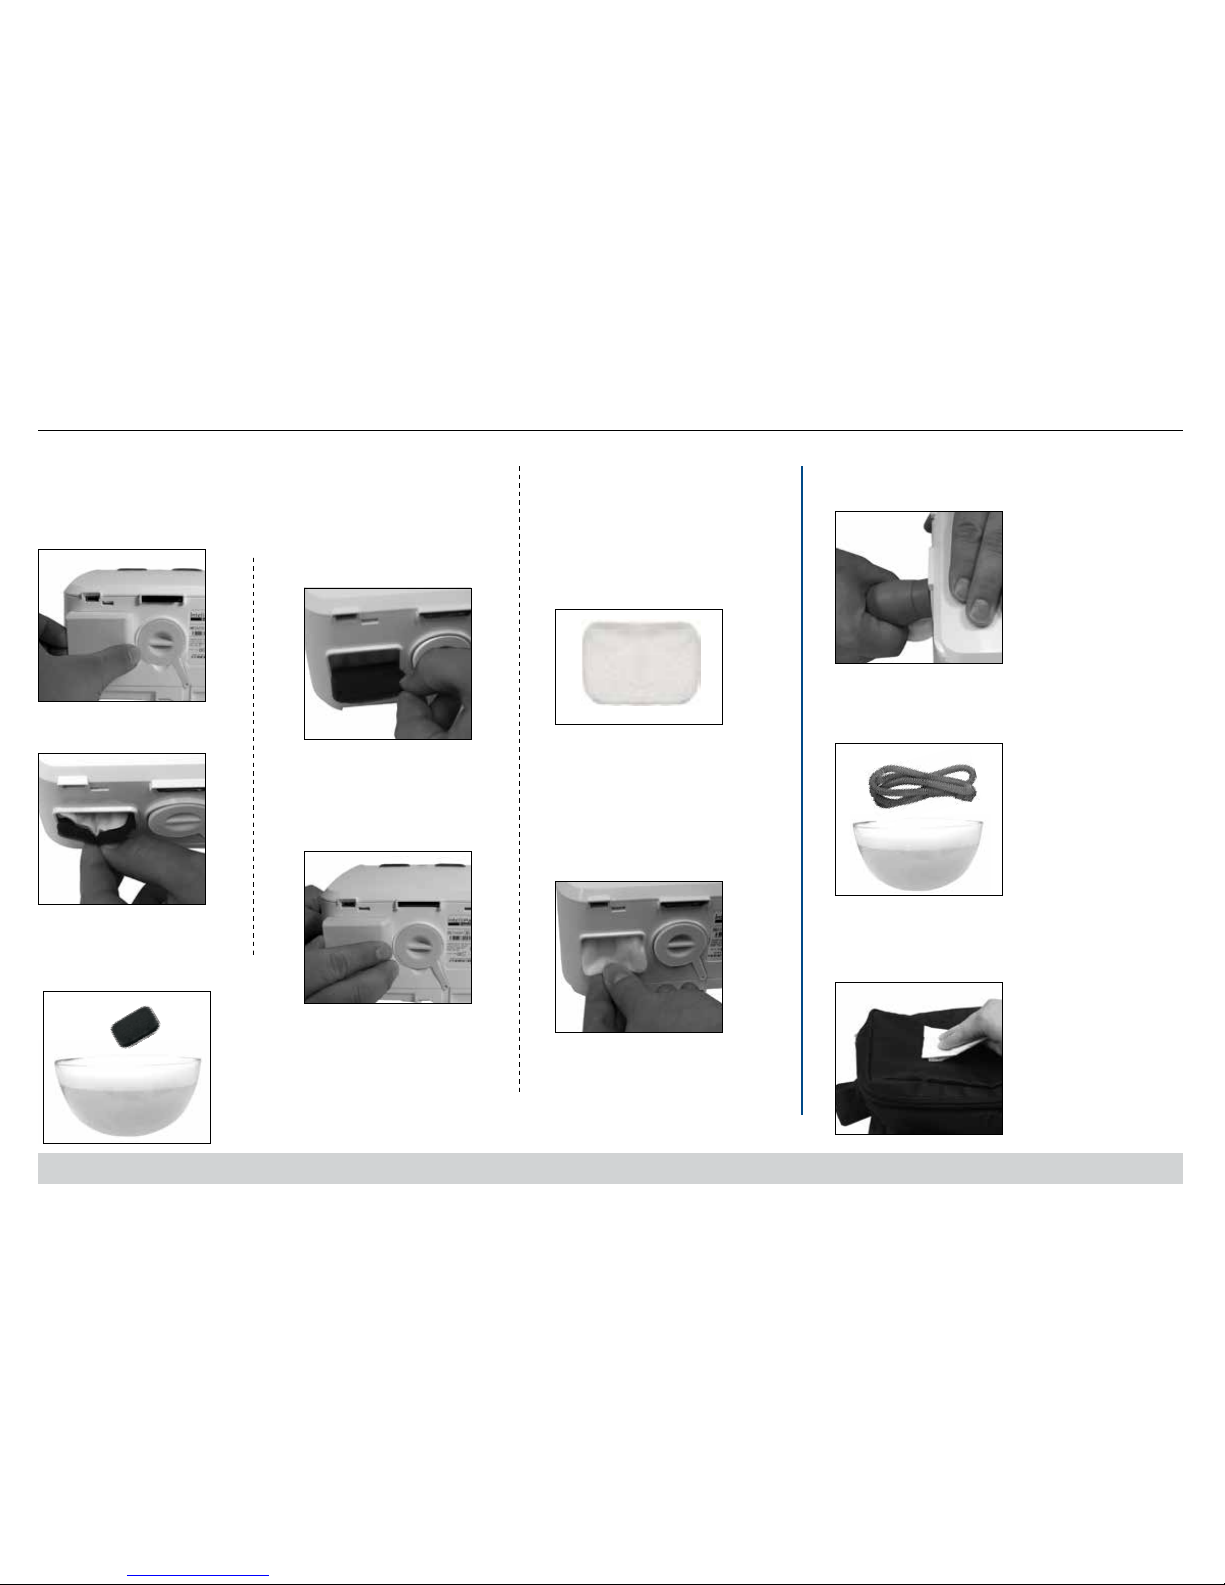
CLEANING
2. Remove the dark outer
foam lter from the frame.
3. Wash the lter in a
solution of warm water and
dishwashing detergent, and
rinse with water.
4. Ensure the lter is
completely dry before
installation and use.
Filters
Air-Inlet Filter - Check every 10 days and clean as necessary.
CAUTION – Proper lter function is important for the operation of the
device and to protect the device from damage.
Tubing
Tubing should be cleaned daily.
1. Remove the tubing from the device and mask.
2. Use a mild detergent (e.g. Dawn
®
dishwashing liquid)
and warm water to clean the inside of the tubing. Rinse
the tubing and allow to air dry.
Carrying Case
1. Wipe with clean cloth dampened with
detergent or disinfectant.
NOTE-If a reduced drying
time is desired, connect the
tubing to the CPAP device
and allow air to ow
through the tubing until dry.
Visually inspect the tubing
to ensure that it is dry.
NOTE – Replace every 6
months.
Optional Fine Particle Filter Check every 10 days and replace
if dirty. CAUTION – Proper lter
function is important for the
operation of the device and to
protect the device from damage.
1. Replace every 30 days.
2. Install the ne particle lter
rst; then install the standard lter.
NOTE – If the ne particle lter is
not installed rst according to the
directions, the life of the lter will
be reduced requiring more
frequent replacement.
1. Remove lter cover.
5. Install lter cover on
back of device. NOTE: If
lter cover is missing,
device will operate
normally.
NOTE – If lter is
damaged, contact your
equipment provider for
replacement.

EN - 24 A-DV64
MAINTENANCE
WARNING
Electric shock hazard-Do not attempt to open or remove the cabinet; there are no
user-serviceable internal components. If service is required, contact your
equipment provider for instructions on obtaining service. Opening or attempting
to service your device will void the warranty.
Disconnect supply before servicing.
Pressure Accuracy–No routine calibration or service is required provided the device is
used in accordance with the manufacturer’s directions. NOTE–Some countries require
periodic servicing and calibration of this kind of medical device. Contact your equipment
provider for further information.
Standard Air-Inlet Filter–Check the lter every 10 days and clean it if necessary.
Replace the lter every 6 months or sooner if it is damaged. The standard lter is
designed to lter particles larger than 3.0 microns in size. The device MUST have the
standard lter in place during operation.
Optional Fine Particle Filter–Check the lter every 10 days and replace it if it is dirty or
damaged; otherwise replace the lter every 30 days. The optional ne particle lter is
designed to lter particles as small as 0.3 microns in size.
Tubing–Check the tubing daily. Replace every 6 months.
EXPECTED SERVICE LIFE
• CPAP - 5 years • CPAP Tubing - 6 months
PRODUCT DISPOSAL
The outer packaging is made of environmentally friendly materials that can be used as
secondary raw materials. If you no longer need this packaging, take it to your local
recycling and waste disposal facility according to the applicable regulations for your
location.
The equipment, including accessories and internal components, does not belong in your
regular household waste; such equipment is manufactured from high-grade materials
and can be recycled and reused. The internal motor, speaker, PC boards, display board,
and wiring should be removed from the unit and recycled as electronic waste. The
remaining plastic components should be recycled as plastics.
The European Directive 2012/19/EU on Waste Electrical and Electronic Equipment
(WEEE) requires that electrical and electronic equipment be collected and disposed of
separately from other unsorted municipal waste with the aim of recycling it. The crossed
out waste bin symbol indicates that separate collection is required.
NETWORK/DATA COUPLING
• Connection of the DV6 series CPAP and accessories to a network/data coupling
that includes other equipment could result in previously unidentied risks to patients
and operators, and the responsible organization should identify, analyze, and
control such risks;
• Subsequent changes to network/data coupling may introduce new risks, requiring
new analysis;
Changes to network/data coupling include:
• Changes in network/data coupling conguration
• Connection of additional items to network/data coupling
• Disconnecting items from network/data coupling
• Update of equipment connected to network/data coupling
• Upgrade of equipment connected to network/data coupling
EN - 25A-DV64
TROUBLESHOOTING
WARNING
Electric Shock Hazard - Do not attempt to open or remove the cabinet; there are no user-serviceable internal components. If service is required, contact your equipment
provider for instructions on obtaining service. Opening or attempting to service your device will void the warranty.
Issue Possible Cause Remedy
Nothing shows on the
display.
1. Device is not plugged in or the power cord is not fully
inserted.
1a. Verify that power cord is rmly connected to the device and the power outlet.
1b. If you are using a DC power source, make sure the cable connections are secure.
Verify that battery is charged.
2. Optional Humidier-The ow generator is not fully seated on
humidier cradle.
2. Refer to assembly instructions to ensure proper contact is made.
3. There is no outlet power. 3. Locate a suitable functioning power source.
The device does not
start when breathing
into the mask.
1. The Auto-START feature has been disabled. 1a. Use the ON/OFF button to start and stop device.
1b. If shown, go to CPAP setting then Enable menu.
2. There is no power to the device. 2. Verify that the power cord is rmly connected to the device and the power outlet.
3. Breath is not deep enough for the Auto-ON feature to detect. 3. Breathe deeply in and out to start the device.
4. You are using a full face mask that has an anti-asphyxia valve. 4. Auto-START may not work because your exhaled breath escapes through the open
valve. Use the ON/OFF button to start and stop the device.
5. The air supply port plug is missing or not fully inserted. 5. Ensure the air supply port plug is fully inserted into the device.
6. The optional humidier chamber is not fully engaged or is
missing.
6. Slide the humidier chamber fully into cradle. Verify the release latch clicks into
place.
The airow has stopped
unexpectedly during use
or reports mask leak.
1. The Auto-STOP feature has detected large airow because of
loosely tting mask.
1. Ensure you have a good mask t; adjust mask and headgear.
2. During use, your mouth opens and you begin to mouth-
breathe.
2. Contact equipment provider for a chin strap or different mask to prevent mouthbreathing.
3. The optional humidier chamber is not fully engaged or is
missing.
3. Slide the humidier chamber fully into cradle. Verify the release latch clicks into
place.
4. The air supply port plug is missing or not fully inserted. 4. Ensure the air supply port plug is fully inserted into the device.
The display shows a
service code.
An error has occurred in the device and requires servicing. Contact your equipment provider for service.
Apnea symptoms have
recurred.
1. Air lter may be dirty. 1. Clean or replace the air lter and relocate device away from drapes or other dusty
surfaces.
2. Apnea condition has changed. 2. Contact your physician or equipment provider.
EN - 26 A-DV64
Issue Possible Cause Remedy
Skin becomes irritated
where mask contacts
face.
1. Headgear is too tight or improperly adjusted. 1. Loosen headgear to reduce contact pressure on face.
2. Your mask may not be sized properly or is not the most
appropriate shape for you.
2. Contact physician or equipment provider.
Dryness of throat or
nose.
Inadequate humidity. 1a. Add a DeVilbiss DV6 heated humidier.
1b. Increase the heater setting on the optional humidier.
Water condensation
collecting in the hose
causing a gurgling
sound when using
optional humidier.
1. Humidication is too high. 1. Reduce humidier heater setting.
2. Room temperature uctuates from higher to lower levels
through the night.
2. Increase room temperature.
Air from ow generator
seems to be too warm.
1. Air lters are dirty. 1. Clean lters.
2. Air inlet port is blocked. 2. Unblock air inlet.
3. Room temperature is too high. 3. Lower room temperature.
4. Device is located near a heat source. 4. Locate device away from heat source.
5. Optional humidier heater setting is too high. 5. Lower heater setting.
Nasal, sinus or ear pain,
runny nose
You may have a reaction to air ow pressure. Discontinue use and contact physician.
Heater setting is not
visible on display
1. The ow generator is not fully seated onto the humidier
cradle.
1. Refer to assembly instructions to ensure proper contact is made.
2. Your CPAP device is not equipped with the optional humidier. 2. Add a DeVilbiss DV6 series heated humidier

EN - 27A-DV64
SPECIFICATIONS
CPAP
Size ............................................................................................................................................................................................................. 3.7” (9.4 cm) H x 6.1” (15.5 cm) W x 5.9” (15 cm) D
Weight ................................................................................................................................................................................. 1.93 lbs (0.9 kg) CPAP only; 3.8 lbs. (1.75 kg) including humidifier
Electrical Requirements AC .........................................................................................................................................................................................................................100-240V~, 50/60 Hz
Electrical Requirements DC ........................................................................................................................................................................................................................11-17 VDC, 5.2 Amps
Maximum Power Consumption (including humidifier) ......................................................................................................................................................... 65 watts max from AC power source
Typical Power Consumption with Humidifier .................................................................................................................................................................................................................... 25 watts
Typical Power Consumption without Humidifier ............................................................................................................................................................................................................... 10 watts
Pressure Range .........................................................................................................................................................................................................................................................3-20 cmH
2
O
Operating Temperature Range .......................................................................................................................................................................................................... 41˚F to 104˚F (5˚C to 40˚C)
Operating Humidity Range ........................................................................................................................................................................................................ 15% to 93% RH non-condensing
Operating Atmospheric Conditions .................................................................................................................................................. 1060 hPa - 700 hPa (~ 1,400 ft below sea level to 9,800 ft)
Storage & Transportation Temperature Range ...........................................................................................................................................................................-13˚F to +158˚F (-25˚C to 70˚C)
Storage & Transportation Humidity Range ................................................................................................................................................................................15% to 93% RH non-condensing
Maximum Limited Pressure ..............................................................................................................................................................................................................30 cmH
2
O under normal use
Sound Pressure Level (tested per ISO 17510-1:2007) .................................................................................................................................................................................................. 26.6 dBA
Sound Power Level ........................................................................................................................................................................................................................................................ 34.6 dBA
Wireless Specications:
This medical device contains a radio transmitter. The Bluetooth radio integrated into this device is active when the Bluetooth icon ( ) on the LCD display is illuminated. Bluetooth is
used to connect your medical device wirelessly to approved accessories. Turn off the Bluetooth radio when not using a wireless accessory, see ADD ONS section of this guide. If you
notice any unexplained changes in the performance of the wireless function or your device, turn off the Bluetooth radio to see if that is the cause. You may experience issues with
wireless technology such as delays in displayed or stored data, artifact or gaps in the data due to information lost during wireless transfer.
Radio Technology ............................................................................................................................................................................................................. Bluetooth 2.1 +EDR and Bluetooth 4.0
Bluetooth Power Class ..............................................................................................................................................................................................................................................................1.5
Network Topology ..................................................................................................................................................................................................................................................... Point to Point
Bluetooth Profile Supported ................................................................................................................................................................................................................................................... SPP
Effective Range ........................................................................................................................................................................................................................................50 meters (line of sight)
Effective Radiated Power ................................................................................................................................................................................................................................. 10 dBm (100 mW)
Radio frequency band (Tx and Rx) .........................................................................................................................................................................................................2.402 GHz ~ 2.480 GHz
Minimum Separation Distance (to other RF transmitters) ........................................................................................................................................................................................ 1 cm (0.4 in.)
Security Requirements:
Authentication ......................................................................................................................................................................................... Enforced on all data channels (outgoing and incoming)

EN - 28 A-DV64
Filter Specifications
Standard Filter ............................................................................................................................................................................................................................................ > 3.0 micron particles
Optional Fine Particle Filter ........................................................................................................................................................................................................................ > 0.3 micron particles
Dynamic Short-Term Pressure Accuracy with and without DV6HH Humidifier (Per ISO 17510-1:2007)
Waveform Volume [mL] Breath Rate [min-1]
Set Pressure
[cmH2O]
Pressure Accuracy
CPAP only
[Pk-Pk cmH2O]
Pressure Accuracy
CPAP with Humidier
[Pk-Pk cmH2O]
Sinusoidal cycle with
I:E = 1:1
500 10, 15, 20
3.0 0.5 0.5
7.0 0.5 0.5
12.0 1.0 1.0
16.0 1.0 1.0
20.0 1.0 1.0
Maximum Flow-Rate (per ISO 17510-1:2007)
Test Pressures
3.0 cmH
2
O 7.0 cmH2O 12.0 cmH2O 16.0 cmH2O 20.0 cmH2O
Measured pressure at the patient connection port (cmH
2
O) 2.9 6.6 11.4 15.0 19.0
Average ow at the patient connection port (l/min)
78.2 123.5 166.8 157.7 138.0
Long Term Static Pressure Accuracy .....................................................................................................................................................................................................................+/- 0.5 cmH
2
O
Additional Specifications
Equipment classification with respect to protection from electric shock ........................................................................................................................................................................... Class II
Degree of protection from electric shock .................................................................................................................................................................................................... Type BF Applied Part
Degree of protection against ingress of liquids ................................................................................................. IP21 Ingress Protection – Protected against finger access to hazardous parts;
protected against vertically falling water drops
Mode of operation ....................................................................................................................................................................................................................................................... Continuous
Equipment not suitable for use in the presence of a flammable anesthetic mixture with air or with oxygen or nitrous oxide. See instructions for use with supplemental oxygen.
US Patents
SmartCode Technology is protected under ................................................................................................................................................................................................... US Patent 8649510
Approvals
Meets RTCA/DO-160 .................................................................................................................................................... DO-160 Section 21 Category M for battery operation only Airline Use
 Loading...