

Page 1

EasyFit™ Nasal Mask
EasyFit Nasal Mask, Silicone
EasyFit Nasal Mask, Gel
Nasal Mask
Device Description and Instructions for Use
Caution:
Federal Law (U.S.A.) restricts this device to sale by or on the order of a physician.
Latex-free
Page 2
Overview
1
2
3
4
13
8
10
11
6
9
12
7
EasyFit Nasal Mask, Silicone
EasyFit Nasal Mask, Gel
5
Note: The complete user information consists of this leaflet and the instructions for use.
DV67105 - 09.09
a
b
A B
Page 3
C
E
F
G
1
2
3
1
2
3
D
Operation
DV67105 - 09.09
Page 4

2
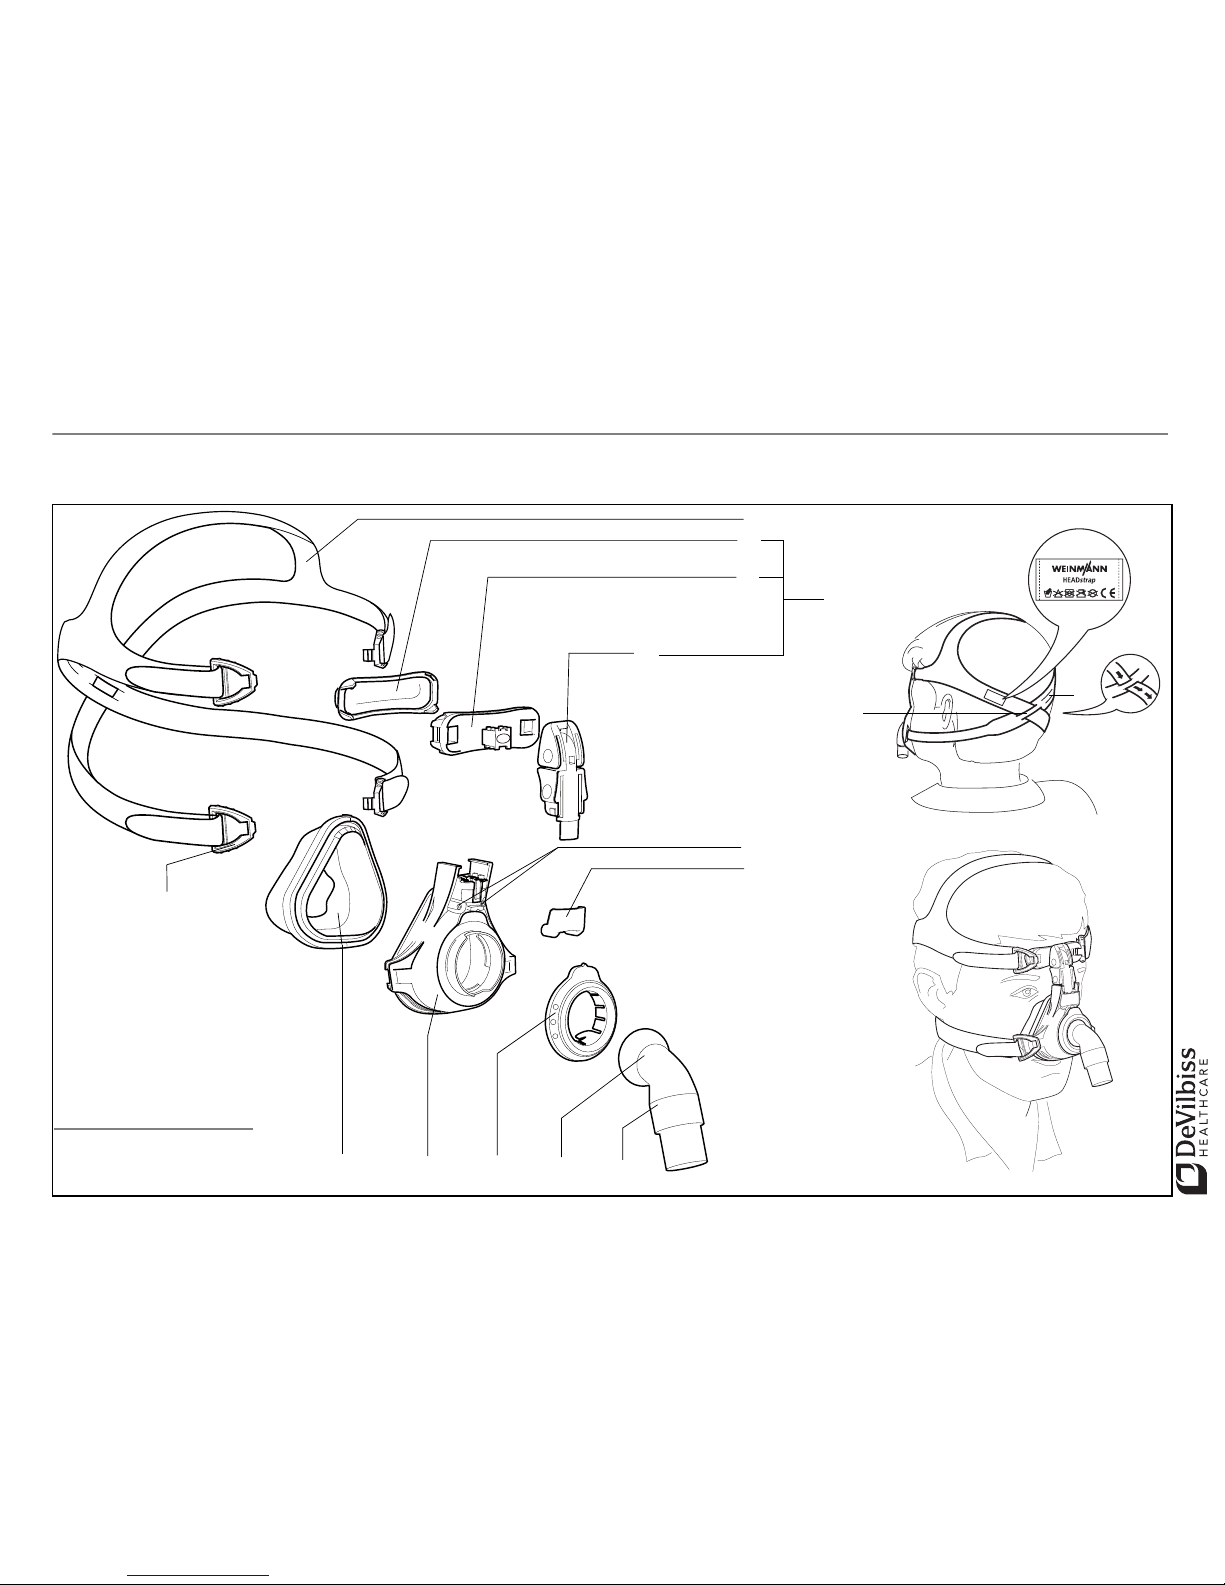
1 Device Description
Legend
(Description of individual parts: see
enclosed leaflet)
1 Headgear
2 Forehead cushion
3 Fine adjustment component
4 Coarse adjustment component
5 Forehead support
6 Ports for pressure measurement
7 Oxygen port cap
8 Rotating sleeve
9 Elbow
10 Retaining ring
11 Mask frame
12 Mask cushion
13 Headgear clip
Intended Use
The nasal mask is intended for prescription use
to be used during nasal CPAP or Bi-level
Positive Pressure therapy for adult patients
(> 66 pounds or 30 kg). The nasal mask is
offered in two versions:
EasyFit Nasal Mask, Silicone
EasyFit Nasal Mask, Gel
Before use by the patient
Patients must be instructed in the use of the
mask by qualified personnel before therapy
begins.
2 Safety instructions
Warnings and cautions
For your safety, please observe the following
points:
Warning
• Please read these instructions for use very
carefully. They are a part of the product
and should be available at all times.
• This mask should be used only with CPAP
or bi-level systems recommended by your
physician or respiratory therapist.
• If oxygen is used with the CPAP or bi-level
system, the oxygen flow must be turned off
when the CPAP or bi-level machine is not
operating.
Explanation of the warning: When the
CPAP or bi-level device is not in
operation, and the oxygen flow is left on,
oxygen delivered into the CPAP tubing
may accumulate within the CPAP or bilevel machine enclosure. Oxygen
accumulated in the CPAP or bi-level
machine enclosure will create a risk of
fire. This warning applies to most types of
CPAP or bi-level systems.
• The mask is designed for therapy pressure
between 4 and 30 cm H
2
O. The nasal
mask must not be used at higher or lower
therapy pressures.
• Patients with limited spontaneous
respiration must be monitored at all times.
The appropriate negative pressure/leak
alarm on the ventilation device must be
activated.
• Patients with obstructive and restrictive lung
diseases should be examined on an individual basis during use of the mask, for example with regard to re-inhalation of CO
2
.
• The mask is equipped with an integral
exhalation valve. Do not connect any
additional exhalation valves as desired
therapy pressure may not be reached.
Page 5

3
• Do not put the nasal mask over your face
for a prolonged period unless the therapy
device is connected to the mask and
switched on. The flow of air from the
therapy device serves among other things
to remove the exhaled air from the mask
and hose. If the therapy device is not
switched on, there is a risk of re-inhalation
when you breathe through your nose. In
some circumstances this may lead to
suffocation.
• Do not close the openings in this mask
except in situations described in these
instructions for use. Otherwise there is a risk
of re-inhaling CO
2
and suffocation.
• The connection to the device’s hose system
must be airtight and should not be allowed
to loosen due to therapy pressure.
• Do not use a breathing hose that is
electrically conductive.
• Clean the mask as described under Section 4
“Cleaning Instructions.” Inappropriate
cleaning procedures, unsuitable cleaning
agents and infrequent cleaning can result in
an infection or bacterial contamination and
can impede the functioning of the mask.
Caution
• At low CPAP pressures the flow through the
exhalation slots may be inadequate to
clear all exhaled gas from the tubing.
Some re-inhalation may occur.
• If supplemental oxygen is used, the inhaled
oxygen concentration will vary, depending
on the pressure settings, patient breathing
pattern, mask selection and the leak rate.
• Malfunctions and a lack of biocompatibility
may result if third-party articles are used.
Bear in mind that in these cases any
warranty entitlement and liability shall lapse
if the accessories recommended in the
instructions for use or original spare parts
are not utilized.
Side effects
The following side effects may occur during
short-term or long-term use: nasal congestion,
dry nose, dry mouth in the morning, sinus
pressure, irritation of the conjunctiva as well as
irritating noises during exhalation.
Wearing the mask can also lead to tenderness
of the face or reddening of the skin.
3Operation
Fig. C-G: see enclosed leaflet.
3.1 Adjust forehead support (Fig. C)
Fine adjustment
Squeeze the upper side tabs of the coarse
adjustment component inwards. Place the fine
adjustment component in one of the stop
positions shown.
The height of the forehead cushion can be
adjusted (approx. 1 cm). To do this, turn the
fine adjustment component through 180° and
position it as described above.
Coarse adjustment
Squeeze the lower side tabs of the coarse
adjustment component inwards. Place it in one
of the slots in the mask frame.
3.2 Putting on the mask (Fig. B)
1. Unhook one of the lower headgear clips
on the mask.
2. Guide the headgear over your head and
hook the headgear clip back onto the
mask.
3. Adjust the upper and lower straps of the
headgear so that the mask sits firmly, but
not too tightly, on your face.
The headgear provides the following
options for you to do this (see also
"Overview" on the attached leaflet):
– coarse adjustments: slot "
a" or "b" of the
headgear.
– fine adjustments: four hook-and-loop
straps.
Page 6

4
4. If necessary, re-adjust the forehead support.
3.3 Exhaled air system (Fig. G)
The mask has an integrated exhaled air
system: the retaining ring and mask frame are
shaped in such a way that a gap is formed
between these parts. Through this gap the
exhaled air can escape. The special geometry
of the parts guarantees that when putting on
the retaining ring the gap cannot be closed.
Do not connect an external exhaled air system,
otherwise the therapy pressure will not be
reached.
3.4 Gel-filled mask components
EasyFit Nasal Mask, Gel comes with gel-filled
mask and forehead cushion. Gel forehead
cushions and gel mask cushions are also
available as replacement parts.
Caution
Gel-filled mask components are highly
sensitive. Always handle them with care
to prevent deformation and damage.
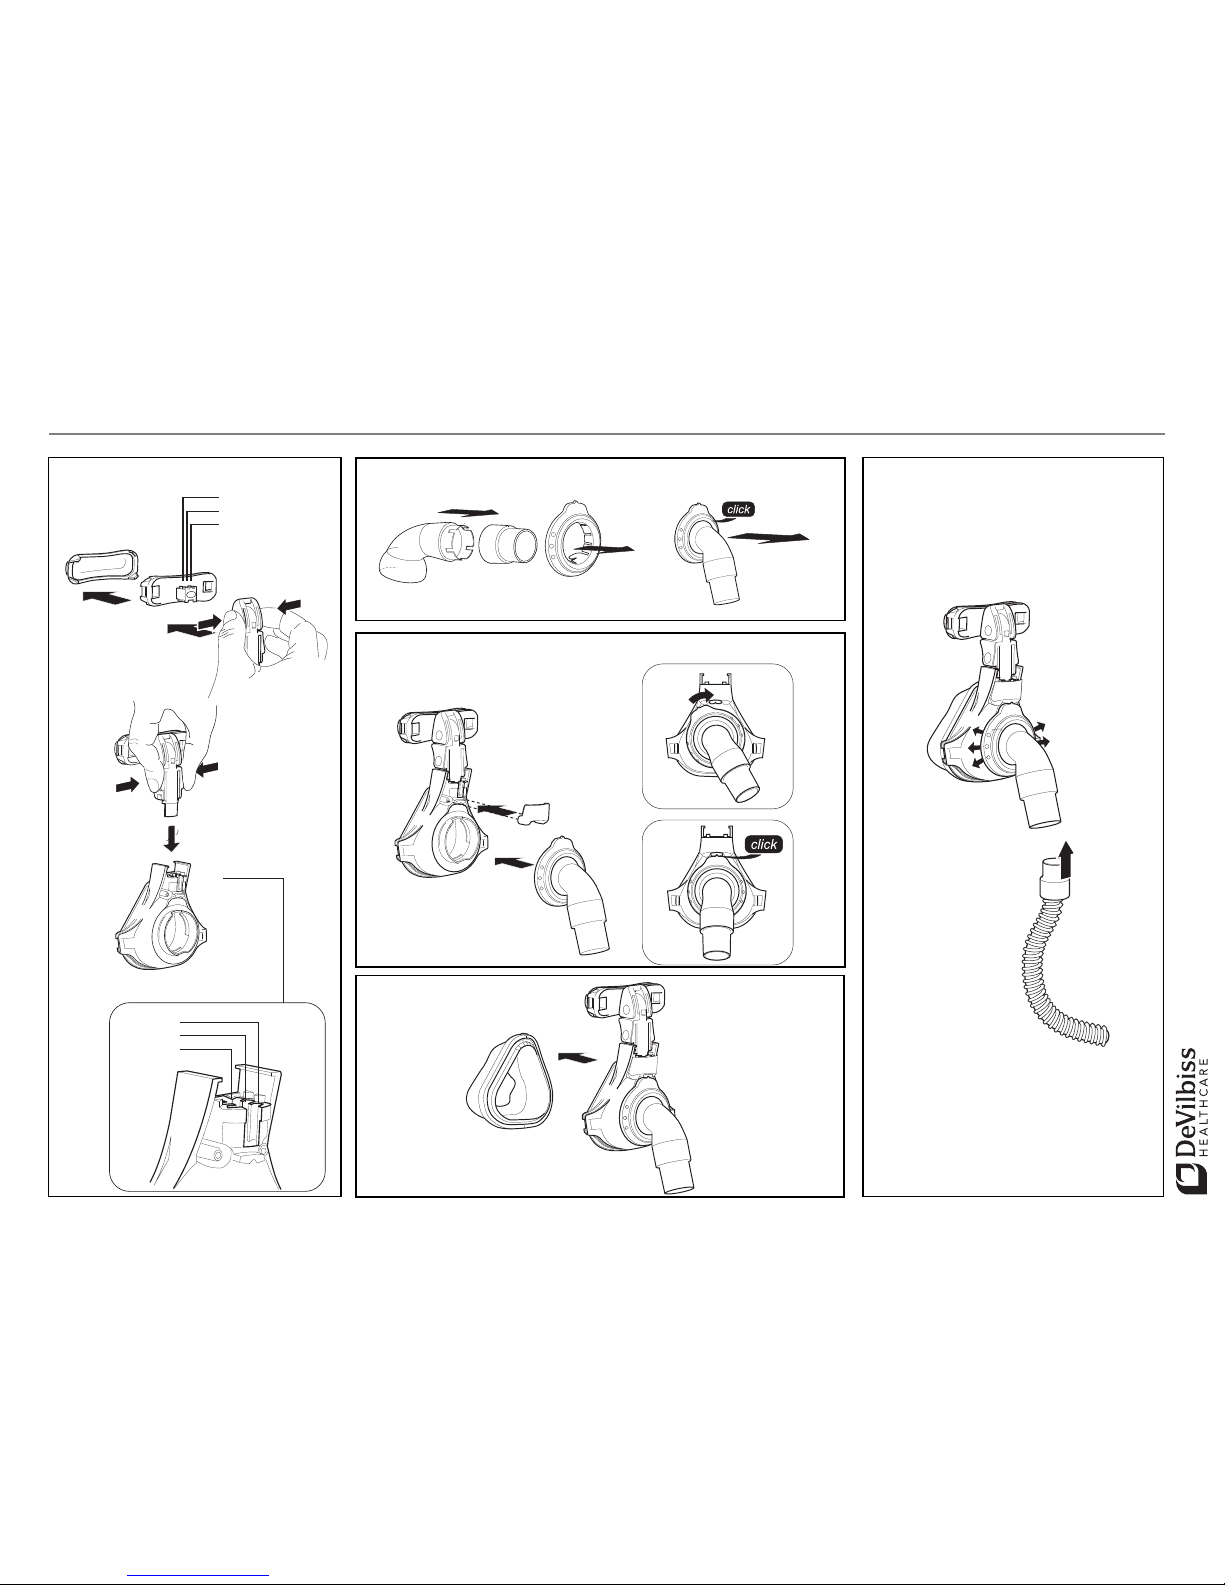
3.5 Connecting the mask to a therapy
device (Fig. G)
Push the hose of your therapy device onto the
rotating sleeve.
Ensure that the connection to the hose is secure
and airtight. The connection must not be
loosened by the therapy pressure.
If you want to detach the mask temporarily from
the hose, pull the rotating sleeve off the elbow.
Warning
In situations where the risk of
contamination between the patient
and the therapy device is high, a
bacteria filter should be placed
between the therapy device and the
patient. Also refer to the instructions
for use of your therapy device.
3.6 Ports for pressure measurement
(Fig. E)
The mask is fitted with two ports that can be used
to measure pressure or to feed in oxygen.
Caution
• Oxygen therapy can have side-effects if
incorrectly administered or used in the
wrong dosage. Use oxygen therapy only
as prescribed by a physician.
• When carrying out oxygen therapy, strictly
follow the instructions for use of your O
2
system and your therapy device.
When the oxygen ports are not in use, always
close them with the cap provided, otherwise air
will escape from the ports and the therapy
pressure will not be reached.
3.7 Combining the mask with other
devices
Therapy devices
The mask can be combined with all devices
designed for carrying out the therapies
described under "Intended Use."
Note that if unsuitable device combinations
are used, the actual pressure in the mask may
not correspond to the therapy pressure you
have been prescribed.
This may also happen even if the correct
pressure is indicated on the therapy device.
Have your device combination adjusted by a
physician or homecare provider so that the
pressure in the mask corresponds to your
therapy pressure.
Take account of the specifications in the
instructions for use for the devices you intend
combining with the nasal mask.
Using the mask with humidifiers
The nasal mask system can be used with a
cold-air or warm-air humidifier.
The degree of humidity you choose should not
be so high that water condenses in the air
hose. Please be sure to read the instructions for
use for your humidifier and your therapy
device.
Page 7

5
3.8 After use
1. Unhook one of the lower headgear clips
from the mask, and guide headgear over
your head to remove.
2. Proceed as described in Section 4
"Cleaning Instructions."
3.9 Disassembling/reassembling the
mask
Disassembling the mask (Fig. F-C)
1. Detach the mask cushion from the mask
frame.
2. Remove the cap from the pressure
measurement ports.
3. Rotate the retaining ring counter-clockwise.
Now pull the retaining ring and the elbow
away from the mask frame.
4. Press the elbow through and out of the
retaining ring and pull the rotating sleeve
off the elbow.
5. Detach the coarse adjustment component
from the mask frame.
6. Detach the fine adjustment component from
the coarse adjustment component. Then
detach the forehead cushion from the fine
adjustment component.
Reassembling the mask (Fig. C-F)
1. Attach the forehead cushion to the fine
adjustment component. Then attach the fine
adjustment component to the coarse
adjustment component.
2. Attach the coarse adjustment component to
the mask frame.
3. Push the rotating sleeve onto the elbow until
you hear it click into place.
4. Press the elbow into the retaining ring until
you hear it click into place.
5. Attach the retaining ring and elbow onto
the mask frame. Turn the retaining ring
clockwise until you hear it click into place.
6. Push the cap onto the pressure
measurement ports.
7. Attach the mask cushion to the mask frame.
8. Fasten the headgear to the mask with the
clips.
4 Cleaning Instructions
4.1 Schedule
Daily
Disassemble the mask before cleaning.
Immerse all mask components in warm water.
Use a mild cleaning agent (e.g., hand
dishwashing detergent). Use a piece of soft
cloth to remove residue. To clean cavities use
a soft brush. After cleaning, rinse all parts
carefully with clean water.
Warning
For patients with a weakened
immune system or a special
medical history daily disinfection
or sterilization may be necessary.
In this case, please consult your
physician.
Caution
• Take great care when cleaning the contact
surfaces between the mask frame and the
retaining ring. Residues on these surfaces
can reduce the success of the therapy and
the functioning of the integrated exhaled air
system.
Note
This mask system is approved for multiplepatient use in sleep laboratories,
provided that appropriate hygienic
measures are taken. Please contact your
distributor to obtain detailed cleaning
and disinfection instructions for multiplepatient use (order no. DV67106).
Weekly
Wash the headgear weekly by hand in warm
water. Use a mild detergent. Then rinse all
parts in clean water and allow to air-dry.
Page 8

6
Note
• Wash the headgear before using for the
first time, as the color might run.
• The headgear may only be washed by
hand!
• Do not iron the headgear, otherwise the
hook-and-loop closures will no longer work.
4.2 After cleaning
Dry all parts thoroughly after cleaning. Check
the components for residual contamination or
damage. If necessary, repeat the cleaning.
Replace damaged parts. Reassemble the
mask.
5Functional Checks
Carry out a visual check once per week.
If the mask cushion is no longer airtight due to
cracks or splits, replace it with a new one.
Yellowing of the mask cushion or the forehead
cushion does not indicate malfunction or
damage.
Please check the functional capacity and air
tightness of the ball-and-socket joint. If it no longer moves easily or is no longer airtight due to
cracks or splits, replace the elbow connection
and/or the body of the mask accordingly.
See section 7 "Item List" for information
regarding replacement parts.
Parts no longer used can be disposed of as
normal household waste.
6 Troubleshooting
Problem Cause Solution
Painful
pressure
on the
face.
Mask is too
tight.
Loosen headgear
slightly.
Adjust position of
forehead support.
Draft in the
eyes.
Mask is too
loose.
Tighten headgear
slightly.
Adjust position of
forehead support.
Mask does
not fit.
Use a different size of
mask; contact your
distributor.
Therapy
pressure is
not
reached.
Mask not
adjusted
correctly.
Adjust headgear.
Adjust position of
forehead support.
Mask
cushion is
damaged.
Replace mask
cushion.
Hose system
is leaking.
Check rotating sleeve
and hose fit
connection.
Air is escaping from
pressure
measurement
ports.
Cover pressure
measurement ports
with cap (included in
package).
Page 9

7
7Item List
Note
All masks are supplied fully assembled.
Headgear and instructions for use
DV67105 are included.
Complete System
Replacement Cushions
Replacement Frame
Replacement Headgear
Parts and Accessories
Instructions
Frame, Cushions, and Headgear
Description Item No.
Fig. A
Label No.
Silicone, Small DV97210 1-12
Silicone, Medium DV97220 1-12
Silicone, Large DV97230 1-12
Silicone, X-Large DV97240 1-12
Gel, Small DV97312 1-12
Gel, Medium DV97322 1-12
Gel, Large DV97332 1-12
Gel, X-Large N/A
Description Item No.
Fig. A
Label No.
Silicone, Small DV15812 12
Silicone, Medium DV15813 12
Silicone, Large DV15814 12
Silicone, X-Large DV15815 12
Forehead Cushion,
Silicone
DV97300 2
Gel, Small DV97313 12
Gel, Medium DV97323 12
Gel, Large DV97333 12
Gel, X-Large N/A
Forehead Cushion,
Gel
DV97227 2
Frame only (mask without Cushions or
Headgear)
Description Item No.
Fig. A
Label No.
Silicone, Small DV97215 5-11
Silicone, Medium DV97225 5-11
Silicone, Large DV97235 5-11
Silicone, X-Large DV97344 5-11
Gel, Small DV97317 5-11
Gel, Medium DV97327 5-11
Gel, Large DV97337 5-11
Gel, X-Large N/A
Description Item No.
Fig. A
Label No.
Headgear,
Universal Size
DV97360 1
Description Item No.
Fig. A
Label No.
Exhalation Port
Assembly
DV97206 8-10
Oxygen Port Cap DV97213 7
Headgear Clips
Set, 4 Pieces
DV97218 13
Forehead Support,
Silicone
DV97217 5
Forehead Support,
Gel
DV97216 5
Rotating Sleeve DV97229 8
Description Item No.
Fig. A
Label No.
Instructions for Use DV67105 N/A
Disinfection
Instructions
DV67106 N/A
Page 10

8
8Technical Data
Specifications
* depending on size and type
Material
All mask components are latex-free.
Characteristic pressure/flow graph
The characteristic pressure/flow graph shows
outlet flow as a function of therapy pressure.
EasyFit masks Value
Dimensions (WxHxD)*:
c. 80 x 130 x 90 mm
c. 3.15 x 5.2 x 3.54‘‘
Weight*:
c. 110 grams
c. 3.88 oz
Therapy pressure range: 4 to 30 cm H
2
O
Hose connector:
male Ø 22 mm
conical connector
Pressure measurement
ports:
Ø 4 mm = 0.157‘‘
Width of headgear clip:
max. 20 mm =
0.787‘‘
Temperature range
Operation:
Storage:
+5°C to +40°C
41 °F to 104 °F
–20°C to +70°C
–4 °F to 158 °F
Dead space
Size S
Size M
Size L
Size XL
Gel, Size S
Gel, Size M
Gel, Size L
96 ml (5.86 in
3
)
112 ml (6.83 in
3
)
120 ml (7.32 in
3
)
150 ml (9.15 in³)
80 ml (4.88 in³)
100 ml (6.10 in³)
130 ml (7.93 in³)
Flow resistance
at 50 l/min
at 100 l/min
0.02 cm H
2
O
0.11 cm H
2
O
Sound pressure level
at 10 cm H
2
O27 dB(A)
Article Material
Mask cushion, oxygen
port cap
Silicone
Mask cushion Gel
Silicone,
silicone gel
Forehead cushion, retaining
ring
TPE,
Polypropylene
Forehead cushion Gel
Silicone,
silicone gel,
polycarbonate
Mask frame, elbow Polycarbonate
Headgear
Nylon/
Spandex
Polyurethane
Polyester/Lycra
Rotating sleeve, forehead
support coarse adjustment
component, forehead support
fine adjustment component
Polypropylene
Headgear clips POM
Mean leakage flow
EasyFit masks (l/min)
Output pressure of therapy device (cm H2O)
Page 11

9
9 Warranty
DeVilbiss warrants that on delivery your EasyFit
mask system including its components: mask
cushion, mask frame, elbow, oxygen port cap,
forehead cushion, forehead support, retaining
ring, rotating sleeve, headgear clips and
headgear is free from defects in material and
workmanship.
Patents
US 6,926,004; US 5,715,814 and other US
patents pending.
Page 12

Page 13

Page 14

Manufactured by:
Weinmann
Geräte für Medizin GmbH+Co. KG
P.O. Box 54 02 68 · 22502 Hamburg
Germany
Phone +49/40/5 47 02-0
Fax +49/40/54 70 24 61
E-mail info@weinmann.de
Internet www.weinmann.de
Distributed by:
DeVilbiss Healthcare LLC
100 DeVilbiss Drive
Somerset, Pennsylvania, 15501
USA
Phone 814.443.4881
Internet www.devilbisshealthcare.com
© 2009 DeVilbiss Healthcare
EasyFit™ is a trademark of DeVilbiss
Healthcare LLC.
DV67105 - 09.09
 Loading...