

Page 1
Height Adjustable Rollator
Instruction Manual
Please read these instructions before assembling or using this product.
Page 2

2
CONTENTS
1. Contents
2. Introduction
3. Parts Description
4. Personal Safety
5. Assembly
6. Folding
7. Adjustments for
Comfort
8. Brake Operation
9. Care &
Maintenance
10. Specification
11. Warranty
INTRODUCTION
The Drive lightweight 4-wheeled rollator is
designed to aid the user to walk and, as an
option, carry items such as shopping.
The R8HA is suitable for both indoor and outdoor
use. It is intended to be lightweight and portable
whilst offering stability and security to the user.
It features an aluminium frame, a height
adjustable padded seat and height adjustable
handles with arthritic friendly brake levers. The
rollator has 19cm (7.5”) diameter wheels with
solid tyres.
Page 3
3
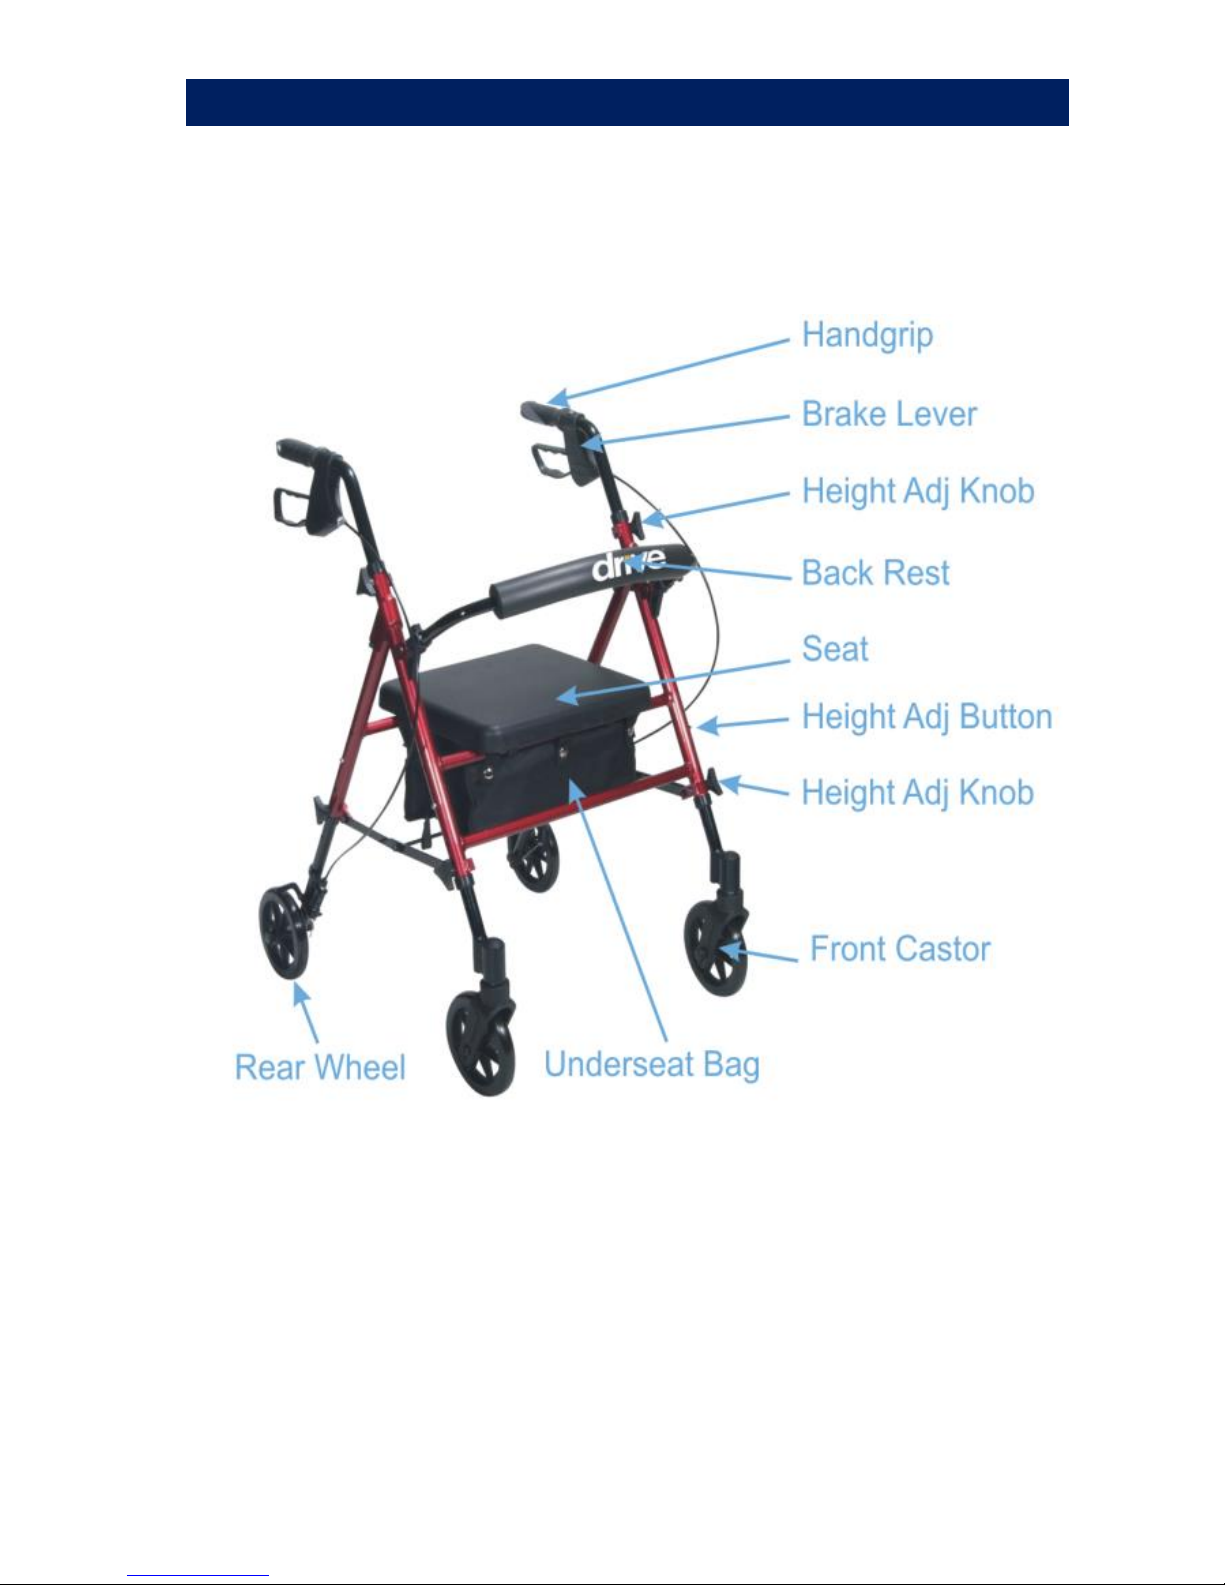
PARTS DESCRIPTION
Page 4

4
PERSONAL SAFETY
• For your health and comfort, make sure that
you adopt a comfortable posture and that
you can operate the brakes with ease.
• Ensure that the handles are at equal heights
and securely locked in position.
• Ensure the rollator is always fully folded out
before using.
• Ensure that all the wheels are stable and are
on the ground before using.
• Ensure that the brakes are adequate and test
before using.
• Ensure that the user sits in the centre of the
seat.
• Do not use the rollator on gradients of 7°
(1 in 8) or above.
• Ensure that the brakes are always locked
on when sitting on the seat.
• Ensure that the latest health and safety
practice is used for carrying and lifting items,
such as wheeled walkers.
Page 5

5
ASSEMBLY
1. Remove all contents from carton
2. Open the frame and place up-side-down on
the floor. Attach the front legs, with the
castors on, to the front of the rollator by
pushing in the Height Adjustment Button and
inserting the leg into the receptacle, to the
required height.
3. Attach the back legs (with brakes) using the
same process. The left and right legs are
labelled as 3 & 4 respectively.
4. Ensure that all the legs are set at the same
height and secure by screwing in a Height
Adjustment Knob into the hole at the bottom
of each receptacle.
5. Insert the handle into the frame and set to the
desired height. Screw in the Height
Adjustment Knob into the hole at the top of
the frame receptacle to secure. Repeat for the
second handle, ensuring both handles are set
at the correct height.
Page 6

6
6. Attach the padded back rest by pressing in
the black thumb buttons and sliding the frame
into the plastic back rest receivers.
FOLDING
• To fold the rollator for
transporting, lift up the
seat and pull the black
strap whilst holding the
rollator handles, lifting
the rollator at the same
time.
Warning! Keep hands away from the side
braces when folding the rollator.
• To unfold the rollator before use, lift the
rollator by the handles and strap then lower
the rollator onto its wheels. Push down on
the central bar until the side braces are
horizontal.
• The back rest will flip up for storage, when
not in use.
Page 7
7
ADJUSTMENTS FOR COMFORT
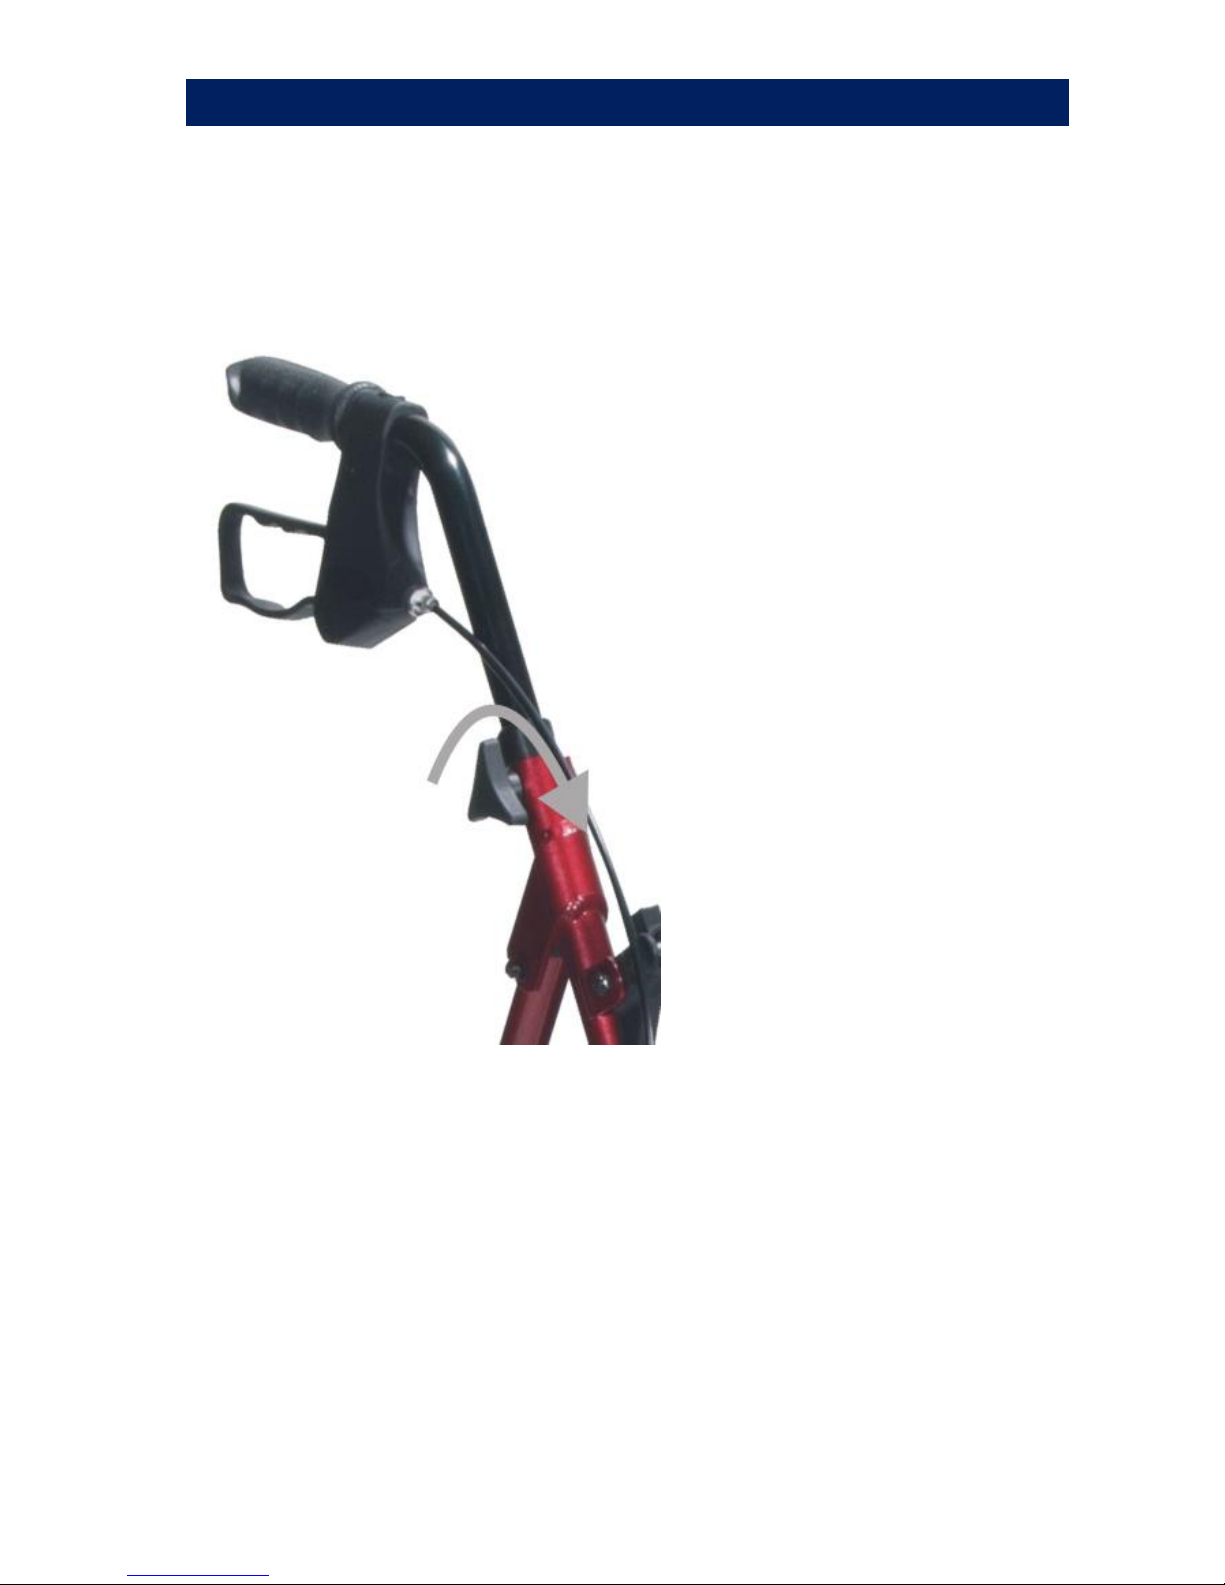
• HANDLE HEIGHT
To adjust the height
of the rollator
handles, unscrew
the knobs at either
side of the rollator,
anticlockwise.
Adjust the height of
the rollator handles
to suit the user and
then tighten by
turning the knobs
clockwise to secure
(as shown in the
photo)
Ensure that the
height adjustment
knobs are on the
outside of the
rollator.
Page 8
8
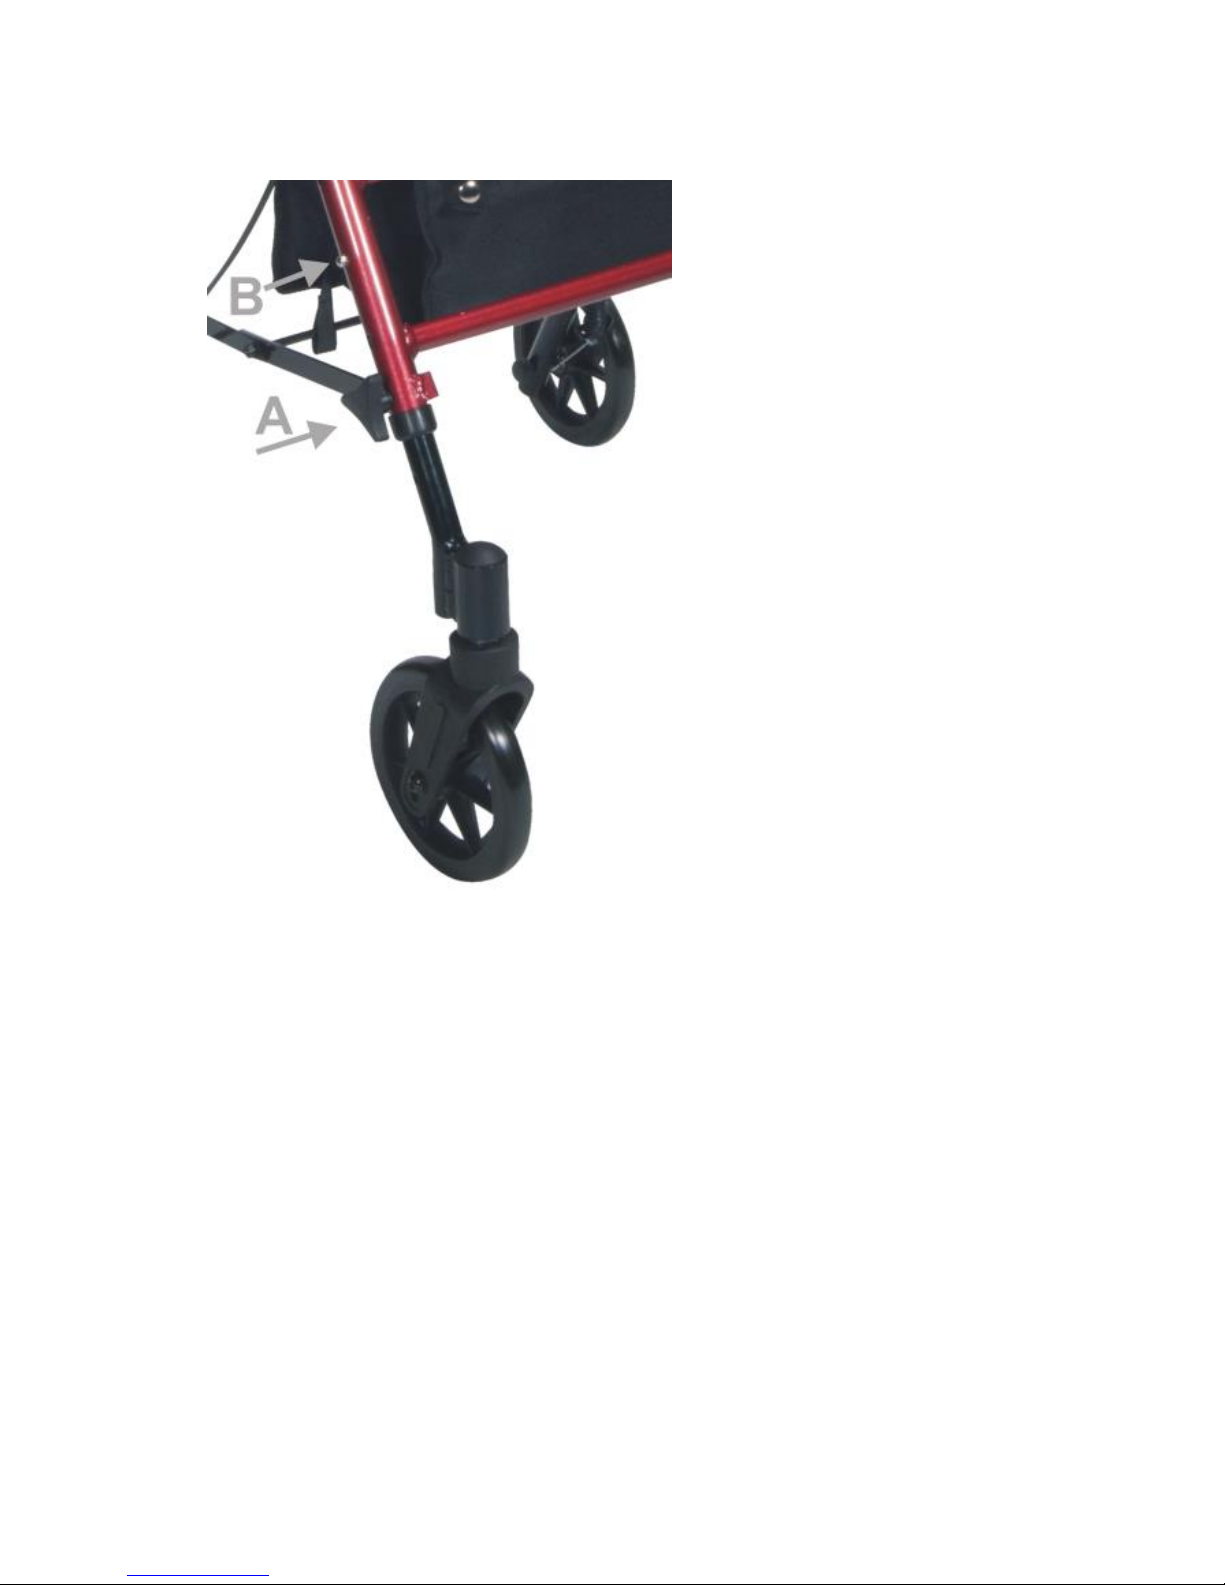
• SEAT HEIGHT
The seat height is set
by the position of the
legs on the rollator.
1. Loosen the Height
Adj Knob (A) by
turning anticlockwise
and remove.
2. Press the Height Adj
Button (B) and
adjust the leg until it
locks to the required
height. Ensure that
the button ‘clicks’
into one of the holes.
3. Re-insert the Height Adj Knob (A) into the
original hole and turn clockwise to secure.
4. Repeat the procedure for the other 3 legs,
ensuring they are all set at the same
height.
Page 9
9
BRAKE OPERATI ON
To operate the cable brakes:
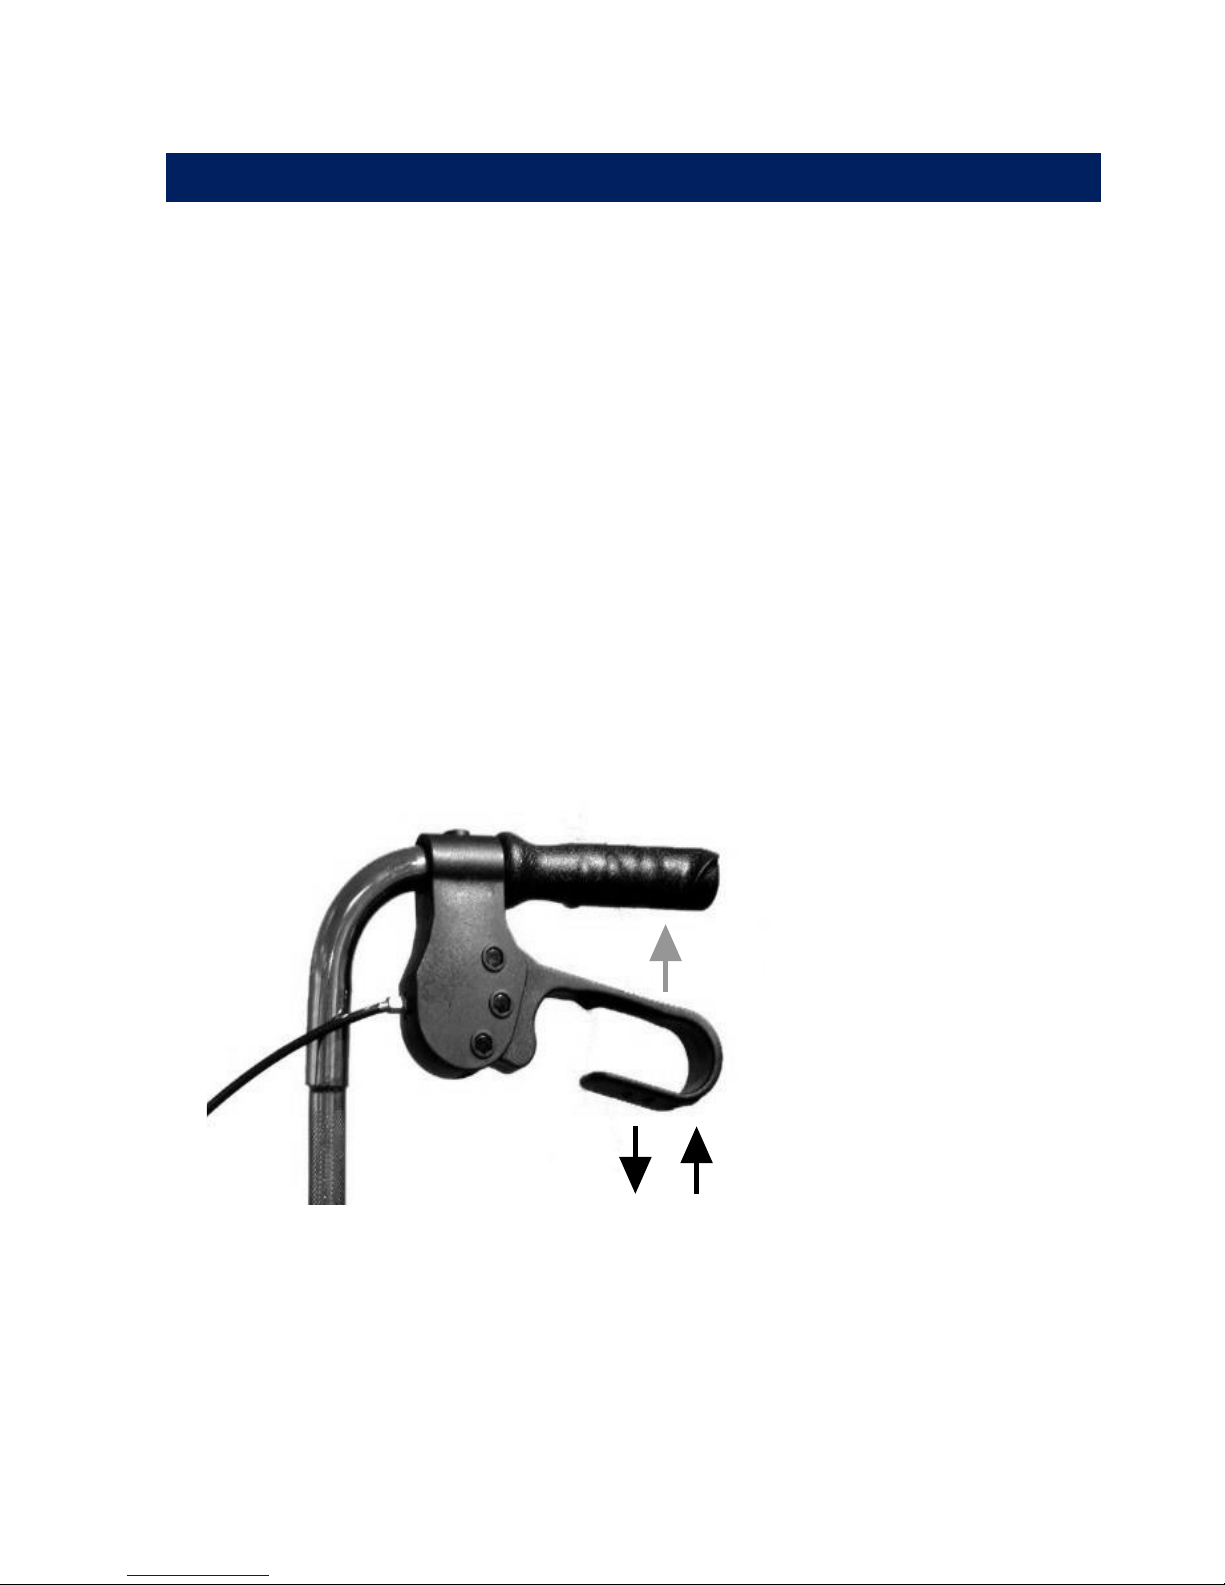
• Squeeze the brake lever up to engage the
brake (in the direction shown by the grey
arrow). To lock the brakes, push down on the
brake lever until it locks (as shown by the
black downwards arrow in the photo). To
unlock the brakes, pull up on the brake lever
until the lock removes (as shown by the black
upwards arrow)
NOTE: The brakes on
rollators are factory
set and should not
require adjustment.
For technical
assistance on the
brakes, contact your
Drive dealer.
Page 10

10
CARE AND MAINTENAN C E
• Ensure the rollator is used only as an aid for
mobility.
• Ensure the rollator is kept clean. Wipe down the
rollator with a damp cloth on a regular basis.
• Check the moving parts (e.g. – wheels and height
adjustment) regularly. All moving parts should
operate freely without excessive movement or
play.
• Ensure that the hand operated cable brakes are
functioning correctly. When squeezed or locked
on, the two rear wheels should not be able to turn.
• All the fasteners (screws, nuts and bolts) are to be
checked regularly to ensure they are securely
tightened.
• It is recommended that the rollator is serviced on
an annual basis, if the rollator is used by a single
user. If the rollator is used in a multi-user
environment (such as in communal housing)
servicing may be required more frequently. Any
servicing, maintenance or repairs should be done
by competent personnel such as a Drive dealer.
• Check that the front castor wheel(s) swivels freely.
• Withdraw the rollator from use if it does not.
• The estimated service life for the rollator is 6 years
given normal everyday use by a single user. After
6 years, the device should be replaced.
Page 11

11
SPECIFICATION
R8RDHA / R8BLHA
Dimensions
(L x W x H) (cm/in)
68–79 x 62 x 79–99cm
27-31” x 24.5” x 31”–39”
Dimensions folded
(L x W x H) (cm/in)
95-119 x 62 x 31cm
37.5-47” x 24.5” x 12”
Seat Height (cm/in)
49 - 59cm (19”-23”)
Weight (kg/lb)
7.3kg (16lb)
Bag (SWL) (kg)
5kg (11Ib)
Maximum User Mass
135kg / 21 stone
WARRANTY
Your Drive branded product is warranted to be free
of defects in materials and workmanship for one
year from date of purchase.
This device was built to exacting standards and
carefully inspected prior to shipment. This warranty
is an expression of our confidence in the materials
and workmanship of our products and our
assurance to the customer.
In the event of a defect covered by this warranty, we
will at our option supply parts or replace the device.
Page 12

Issue 2019-02
Symbol Definitions
Manufacturer
Date of Manufacture
Consult the Instructions for Use
MD
Medical Device
The following symbols are found on the Rollator:
Drive DeVilbiss Healthcare Ltd
Heathfield Lane, Birkenshaw, BD11 2HW, UK
Drive DeVilbiss Healthcare Ltd is an ISO 9001 certified company.
For more details about our products please see your local dealer.
This warranty does not cover device failure due to
owner misuse or negligence, or normal wear and
tear. The warranty does not extend to nondurable
components, such as rubber accessories, castors
and grips, which are subject to normal wear and
need periodic replacement.
If you have any queries or require full warranty
conditions, please contact your Drive stockist.
 Loading...