

Page 1

Folding Scooter
User Manual
Page 2
CONTENTS
1. Safety Instructions
SAFETY INSTRUCTIONS
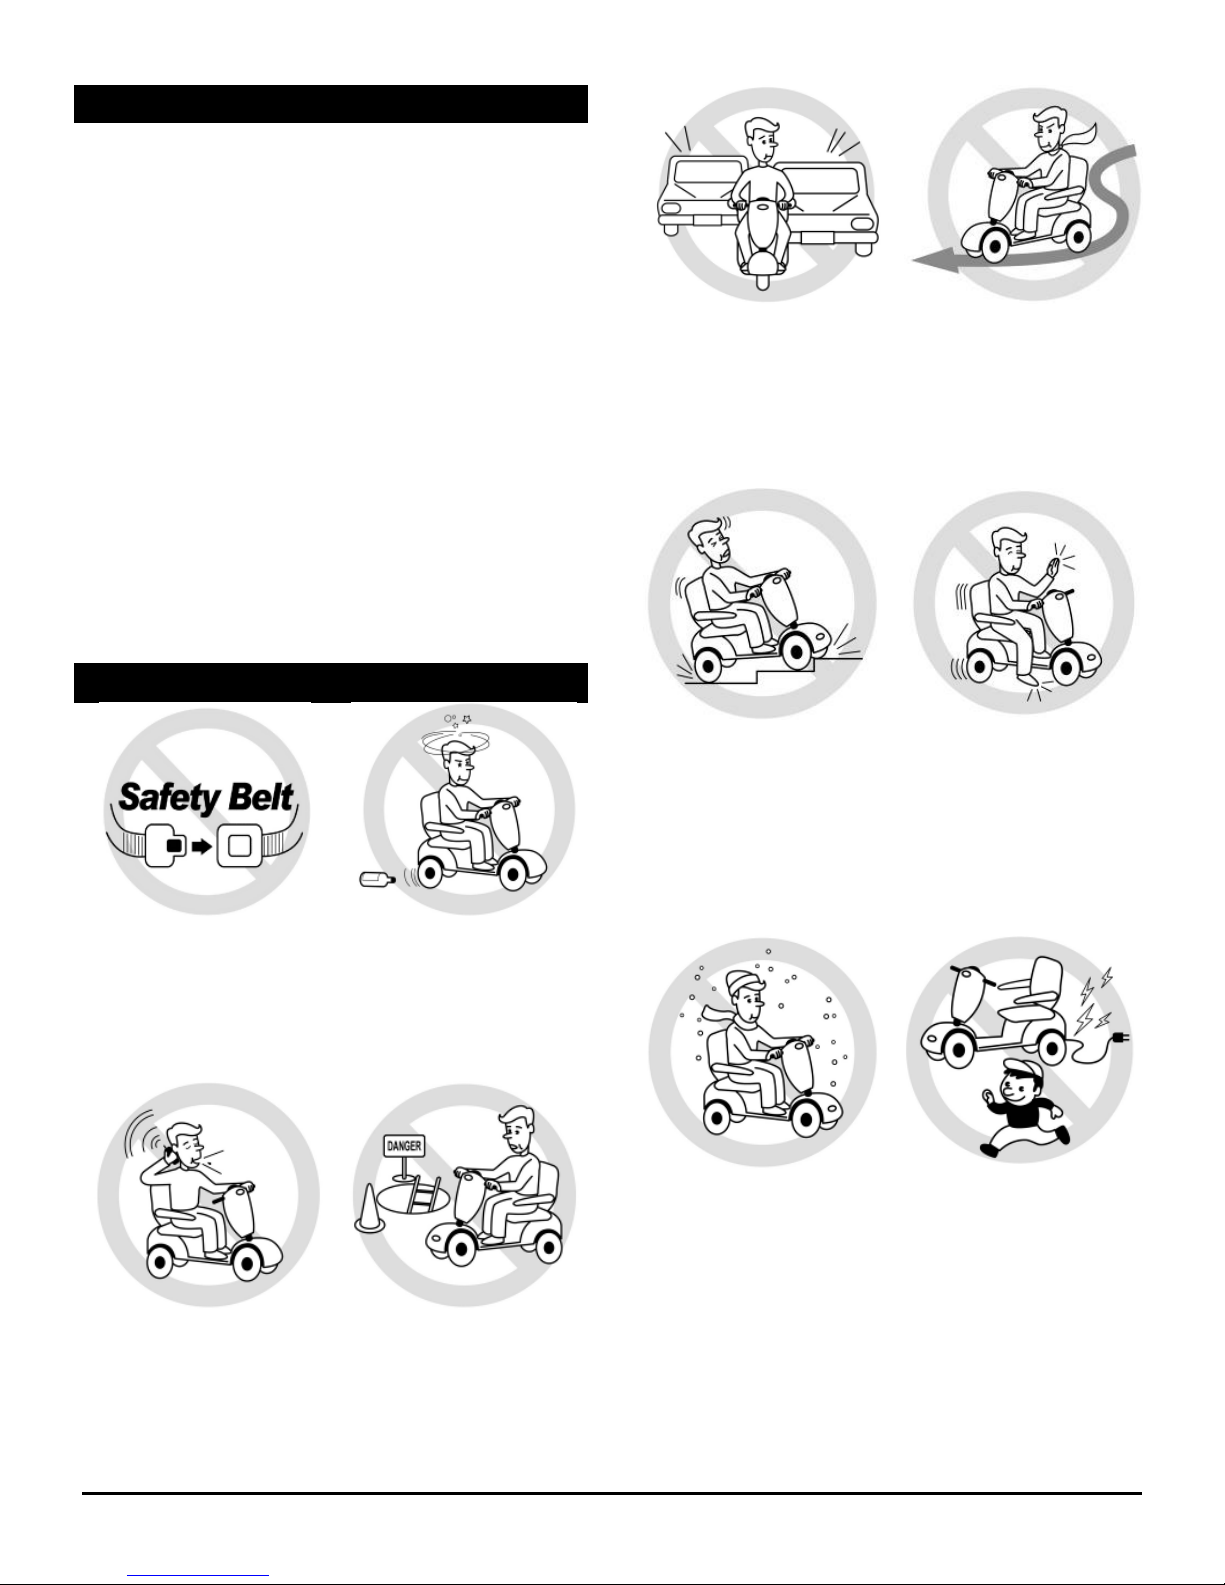
Always use a seat belt,
and keep your feet on
the scooter at all times.
Never operate the
scooter while you are
under the influence of
alcohol.
Never use mobile
phones or radio
transmitters such as
walkie-talkies.
Make sure that there
are no obstacles
behind you while
reserving your scooter.
Do not ride your
scooter in traffic.
Do not make a sharp
turn or a sudden stop
while riding your
scooter.
Do not attempt to
climb kerbs greater
than limitation shown in
the specification
Do not remove your
hands and legs from
the scooter when
driving.
Do not ride your
scooter during snow in
order to avoid
accidents.
Do not allow
unsupervised children
to play near this
equipment while the
batteries are charging.
2. Electromagnetic Interference (EMI)
3. Transporting the Scooter
4. Specification
5. Folding Out the Scooter
6. Folding Up the Scooter
7. Scooter Operation
8. Driving Out and About
9. Emergency Charging Procedure
10. Battery Charging and Care
11. Charging Instructions
12. Scooter Maintenance and Repair
13. Troubleshooting and Fault Repair
14. Warranty
15. Appendix A: Service Record
16. Appendix B: Quick Start Guide
HW008 Folding Scooter Owner’s Handbook Page 1
Page 3

Page 4
Page 5

Page 6
FOLDING OUT THE SCOOTER
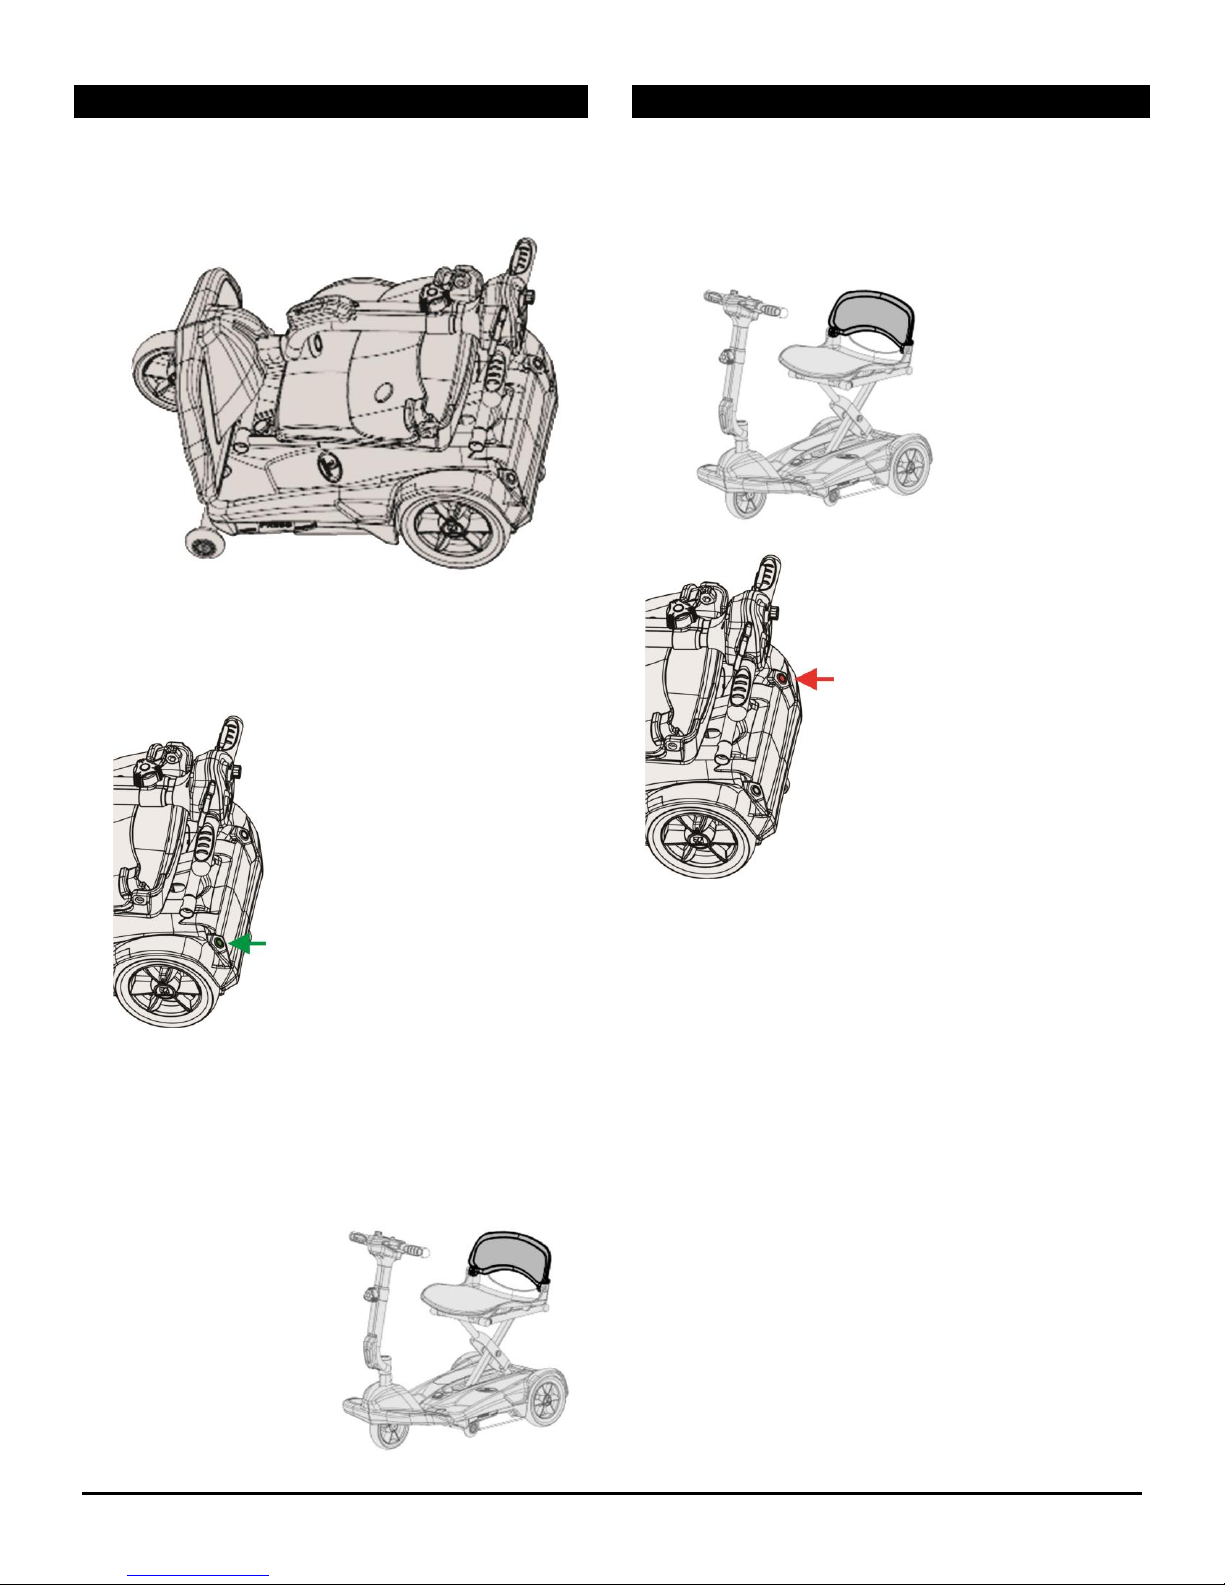
3. The green button (arrowed
below) on the scooter
should now be illuminated.
Press this for 3 seconds
then release the button
and the scooter will
automatically fold out.
Alternatively, press the
green button on the
remote.
(If case of emergency, press the red button on the
rear of the scooter to stop the folding procedure. If
this happens, remove the hazard and keep your
finger on the green button until the scooter is fully
folded out).
4. Switch off the
scooter using
the key and lift
up the backrest
(highlighted in
the diagram
right)
FOLDING UP THE SCOOTER
3. The red button (arrowed
below) on the scooter
should now be
illuminated. Press this for
3 seconds then release
the button and the
scooter will automatically
fold up.
Alternatively, press the
red button on the remote.
(If case of emergency, press
the green button on the rear
of the scooter the stop the
folding procedure. If this
happens, remove the hazard
and keep your finger on the
red button until the scooter
is fully folded up).
1. Position the scooter with rear wheels and anti-tip
wheels on the ground (as shown below):
2. Insert the key in to the ignition of the scooter and
switch the scooter on.
1. The user should vacate the scooter.
2. Fold down the backrest of the seat (highlighted
on the diagram below).
HW008 Folding Scooter Owner’s Handbook Page 5
4. Switch the scooter off using the ignition and
remove the key.
5. Store the scooter in the holdall (if required).
The holdall features holes in the bottom for the
scooter front wheel and anti-tip wheel to go
through. This is to allow the scooter to be pushed
even when in the holdall.
Page 7
SCOOTER OPERATION
Do not turn the ignition off whilst driving
as this will lead to an emergency stop and
possible risk of damage or injury.
Do not adjust the speed dial whilst driving
as this could result in loss of control. Do
not set to the highest speed whilst driving
indoors.
Warning
Do not operate both left and right hand
sides of the wigwag simultaneously.
You will not be able to control the
scooter.
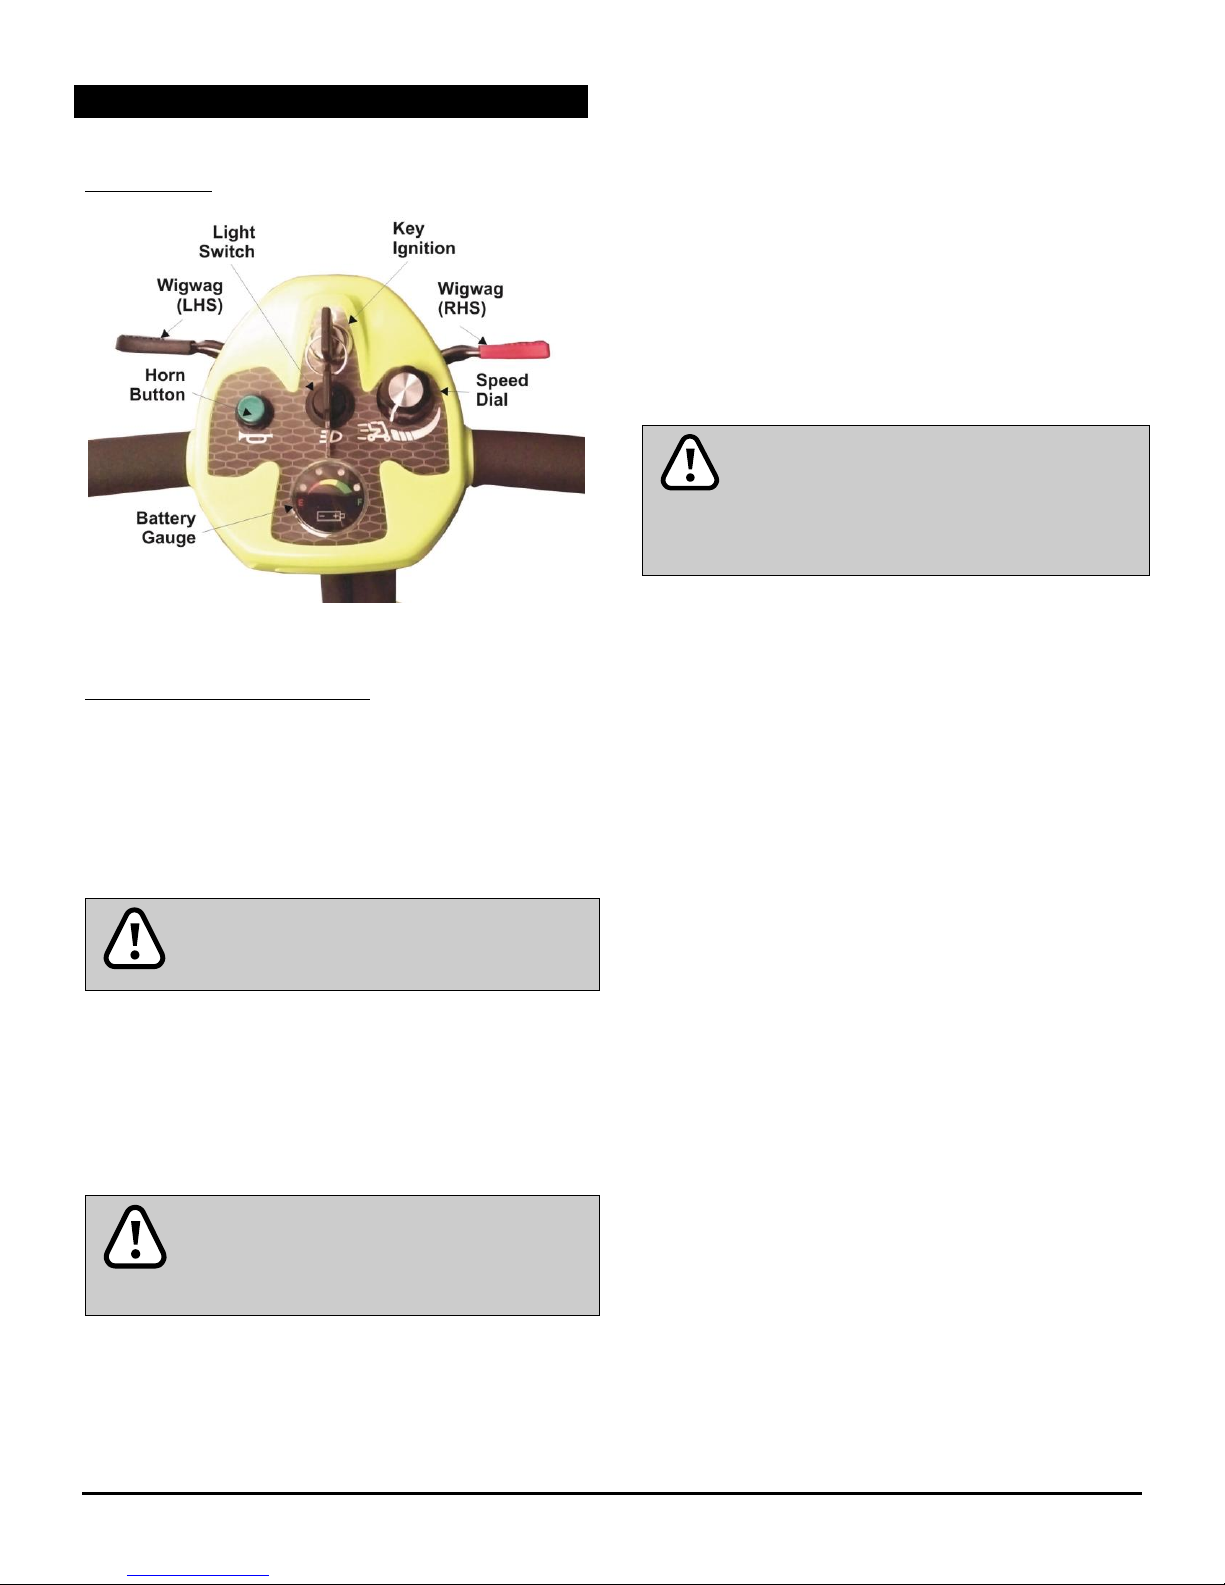
Control Panel
handle bars. Squeeze the left hand side of the
wigwag paddle (BLACK) towards you and the
scooter will move backwards. To brake, release
the wigwag paddle which will return to neutral
and activate the electromagnetic brake
automatically and bring the scooter to a prompt
stop. The wigwag paddle allows you to control the
speed of the scooter up to a maximum speed
determined by the Speed Dial. The further the
wigwag paddle is deflected, the faster the scooter
will go (up to 3.5mph).
How To Operate Your Scooter
Key Ignition. The key ignition acts as the power
switch for the scooter. To switch the power on,
turn the key clockwise and battery gauge should
illuminate. To switch the power off, turn the key
anticlockwise, after which the battery gauge
should switch off and the key can be removed.
Speed Dial. Turn the speed dial to determine the
maximum speed of the scooter. Turn the dial
clockwise to increase the speed setting and turn
the dial anticlockwise to decrease the speed
setting.
Horn Button. Press the horn button to sound the
horn. Release the button to stop the horn. The
horn is the green button located on the control
panel.
Braking – Electromagnetic Brake. Release the
wigwag paddle completely, and the
electromagnetic brake will be activated
automatically and the scooter will stop.
Light. Press the light switch to turn on the
headlight. Press the light switch again to turn the
light off.
Note: the light will only operate if the scooter is
switched on at the ignition.
Handlebar Height Adjustment. Turn the large
adjustment knob on the front of the tiller
anticlockwise to release the handlebar. Slide the
handlebar to the required position, then turn the
knob clockwise to secure the handlebar in place.
Moving and Braking. To move forward, squeeze
the right hand side (RED) of the wigwag paddle
with your hand towards you whilst holding the
HW008 Folding Scooter Owner’s Handbook Page 6
Page 8
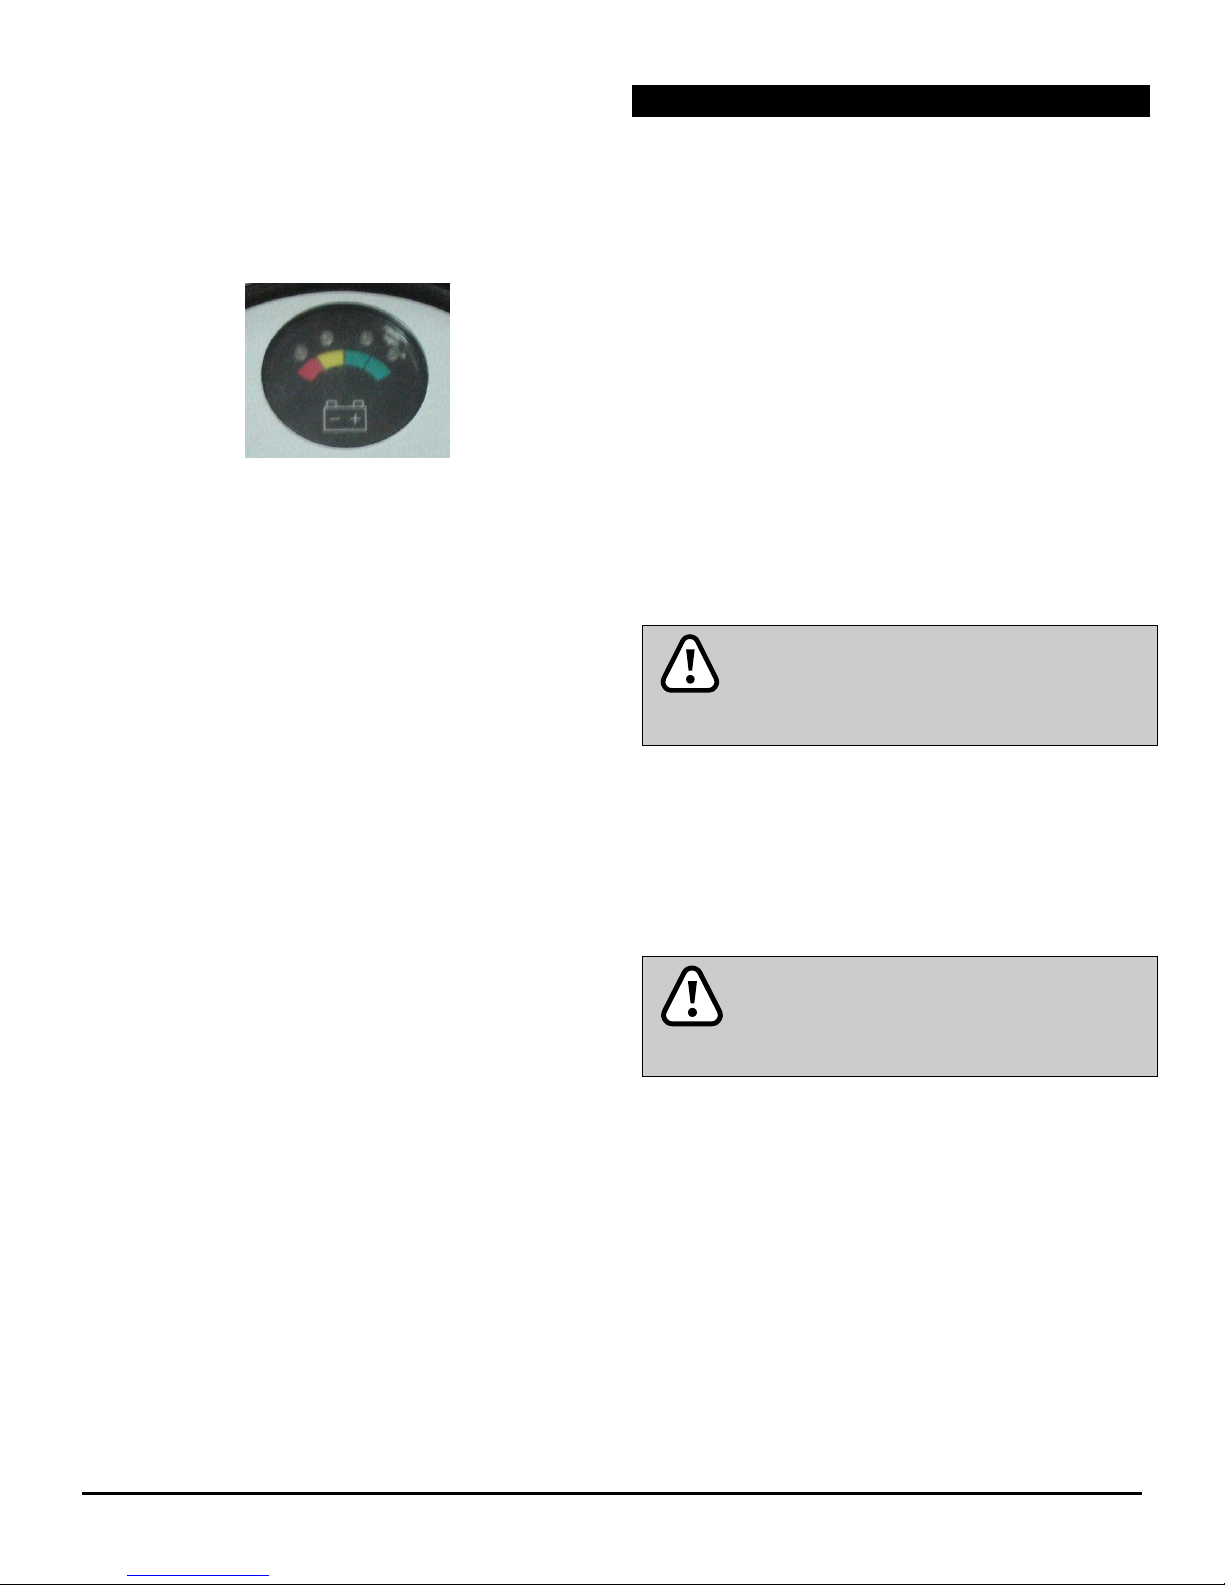
Battery Gauge. The battery gauge on the tiller
DRIVING OUT AND ABOUT
Warning
Be careful whilst driving in heavy traffic or
crowded areas. Whilst reversing the vehicle,
be aware of people or objects behind you.
Stopping distance will vary with speed so
begin braking as early as possible.
Always park on flat ground, switch off and
remove the key before dismounting.
console lights LEDs to show remaining power:
Green (3 or 4 LEDS lit) - 40% - 100% capacity
Yellow (2 LEDs lit) - draining charge (10% - 30%)
Red (1 LED lit) - immediate recharge is necessary.
The remaining power indicated by the battery gauge
will vary by the driving time incurred and how you
drive. Repeated starting, stopping and climbing will
consume power more quickly.
Starting and Driving
1. Make sure the scooter is fully folded out. Failure
to do so can affect the handling of the scooter.
2. Make sure the tiller has been secured properly.
3. Switch the key ignition on.
4. Check the battery gauge to check there is enough
power for your journey. If you have any doubt
about the remaining power, recharge the battery
pack before use.
5. Set the speed dial to a position you feel safe and
comfortable with.
6. Check the wigwag paddle and automatic brake
work correctly.
7. Before driving, check the environment around you
is safe for you to drive.
Stopping
1. Release the wigwag paddle completely. The
vehicle will automatically brake and stop.
2. Switch the scooter off at the key ignition and pull
out the key.
HW008 Folding Scooter Owner’s Handbook Page 7
Page 9
EMERGENCY CHARGING PROCEDURE
BATTERY CHARGING AND CARE
Status
Power LED
Status LED
Standby or Charging
Complete
RED
GREEN
Charging in progress
RED
RED
Over current/voltage/
Temperature, or other
fault status
RED
Flashing
RED and
GREEN
Ensure that the charger is removed from
the mains and the scooter after charging.
Failure to do this may flatten the battery.
Do not remove the battery pack whilst the
scooter is switched on.
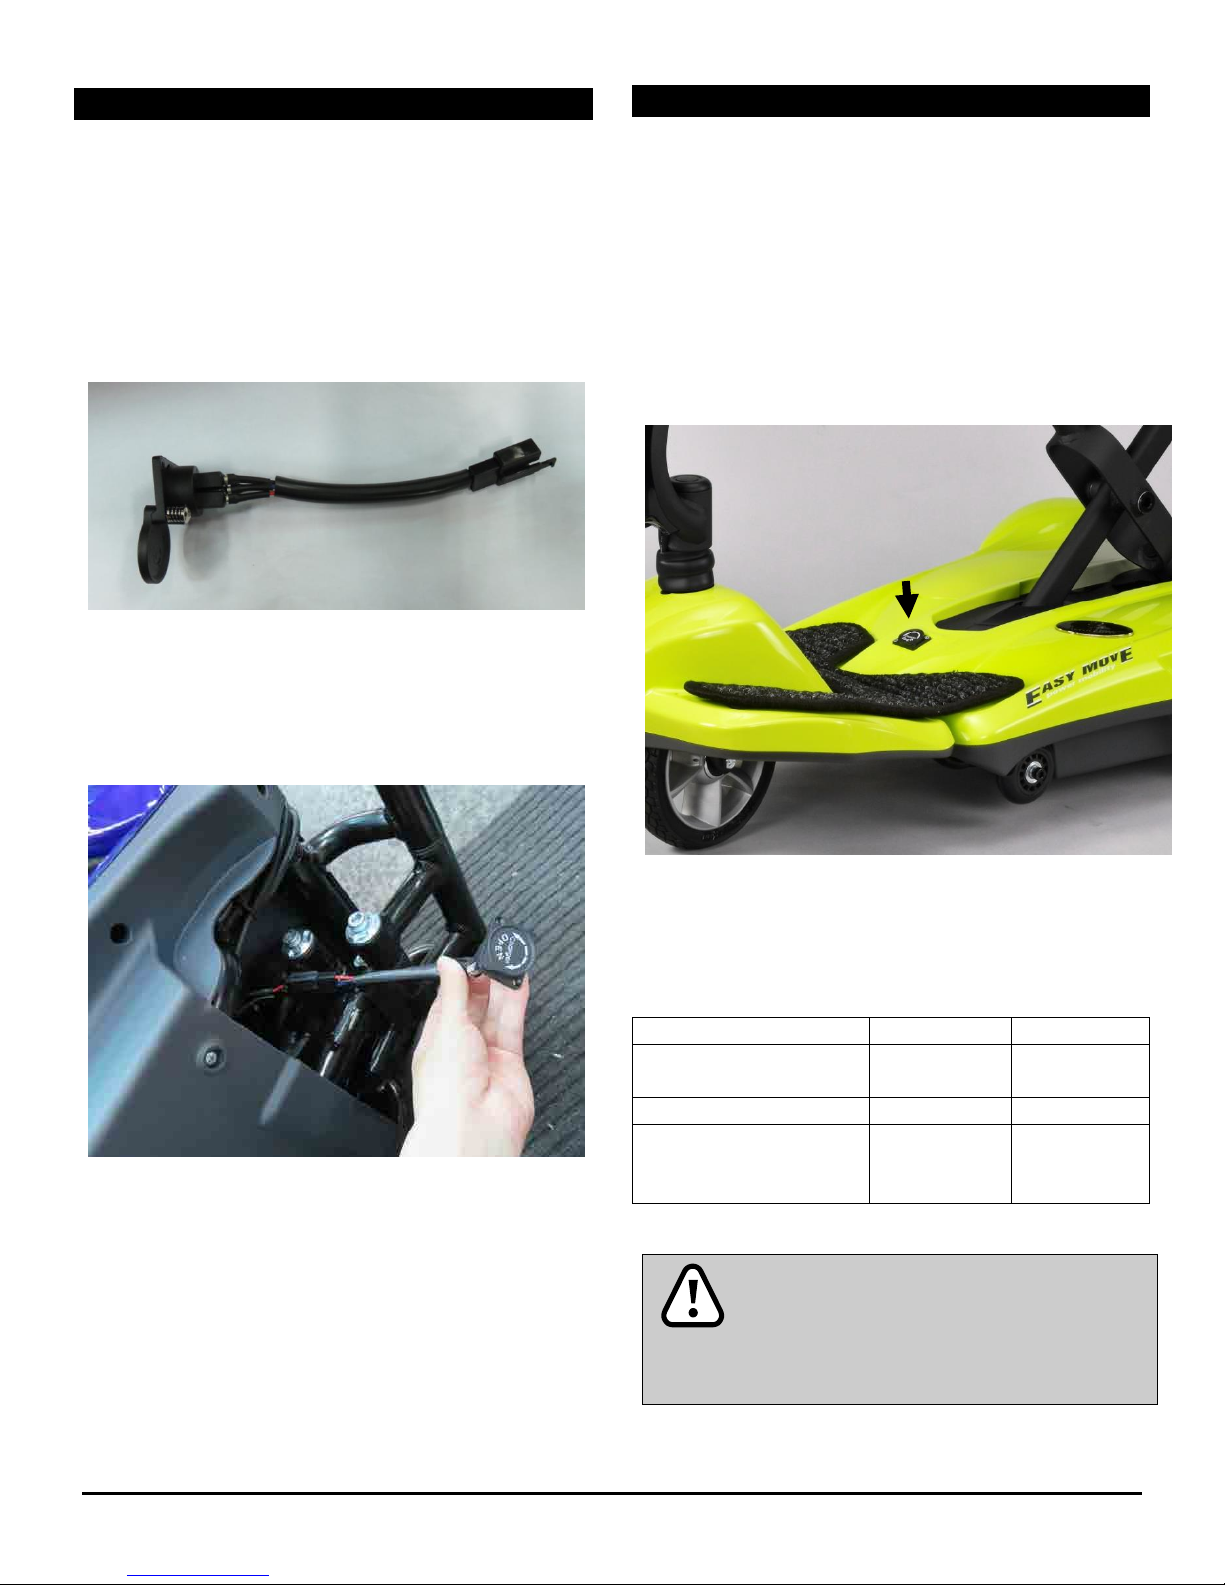
The scooter comes with an emergency charging
cable. If the scooter is folded up and the battery is
completely flat, then the standard charging socket
can be difficult to access. In this instance, the
emergency charging cable can be installed to allow
the battery to be charged whilst the scooter is folded.
The emergency charging cable is shown below:
To install the charging cable, plug this in to the fly lead
located at the front of the underside of the scooter
(as shown below).
Step 1. Insert the charger in to the mains and switch
the power on. Ensure the charger is not connected to
the scooter, and one of the charger LEDs is lit green.
Step 2. Insert the round plug on the charger in to the
charging socket of the scooter (arrowed below). The
LED should change from green to red. The LED will
change back from red to green when charging is
complete.
Install the cable, then proceed to charge the battery
as described in the next section.
HW008 Folding Scooter Owner’s Handbook Page 8
The scooter should be left on charge until the battery
is fully recharged. A full recharge takes around 5
hours. The status of the charge is shown by the LED
lights on the charger, and is described below:
Page 10
Warning
1. Only use the charger supplied with the
scooter. Using the wrong type of
charger may cause damage. Never
disassemble or modify the scooter.
2. Always charge the scooter in a well
ventilated space. Avoid direct sunlight
or contact with water and moisture.
3. Do not charge or operate the scooter in
temperatures below -10ºC or above
50ºC. Do not expose the battery to
these temperatures.
4. The charger is for indoor use only.
Suggestions
1. Do not disconnect the charger cord until
charging is completed.
2. When fully charged the battery charger
will still trickle charge the battery for
optimum range.
3. Even when not in use, the scooter should
be charged at least every week to
ensure battery longevity.
4. Ambient temperature will effect
charging time. Charging time will be
longer in cold environments.
5. The battery carries a 1 year warranty
which covers manufacturing defects
only. It does not cover battery faults as
result of not following the guidelines
herein.
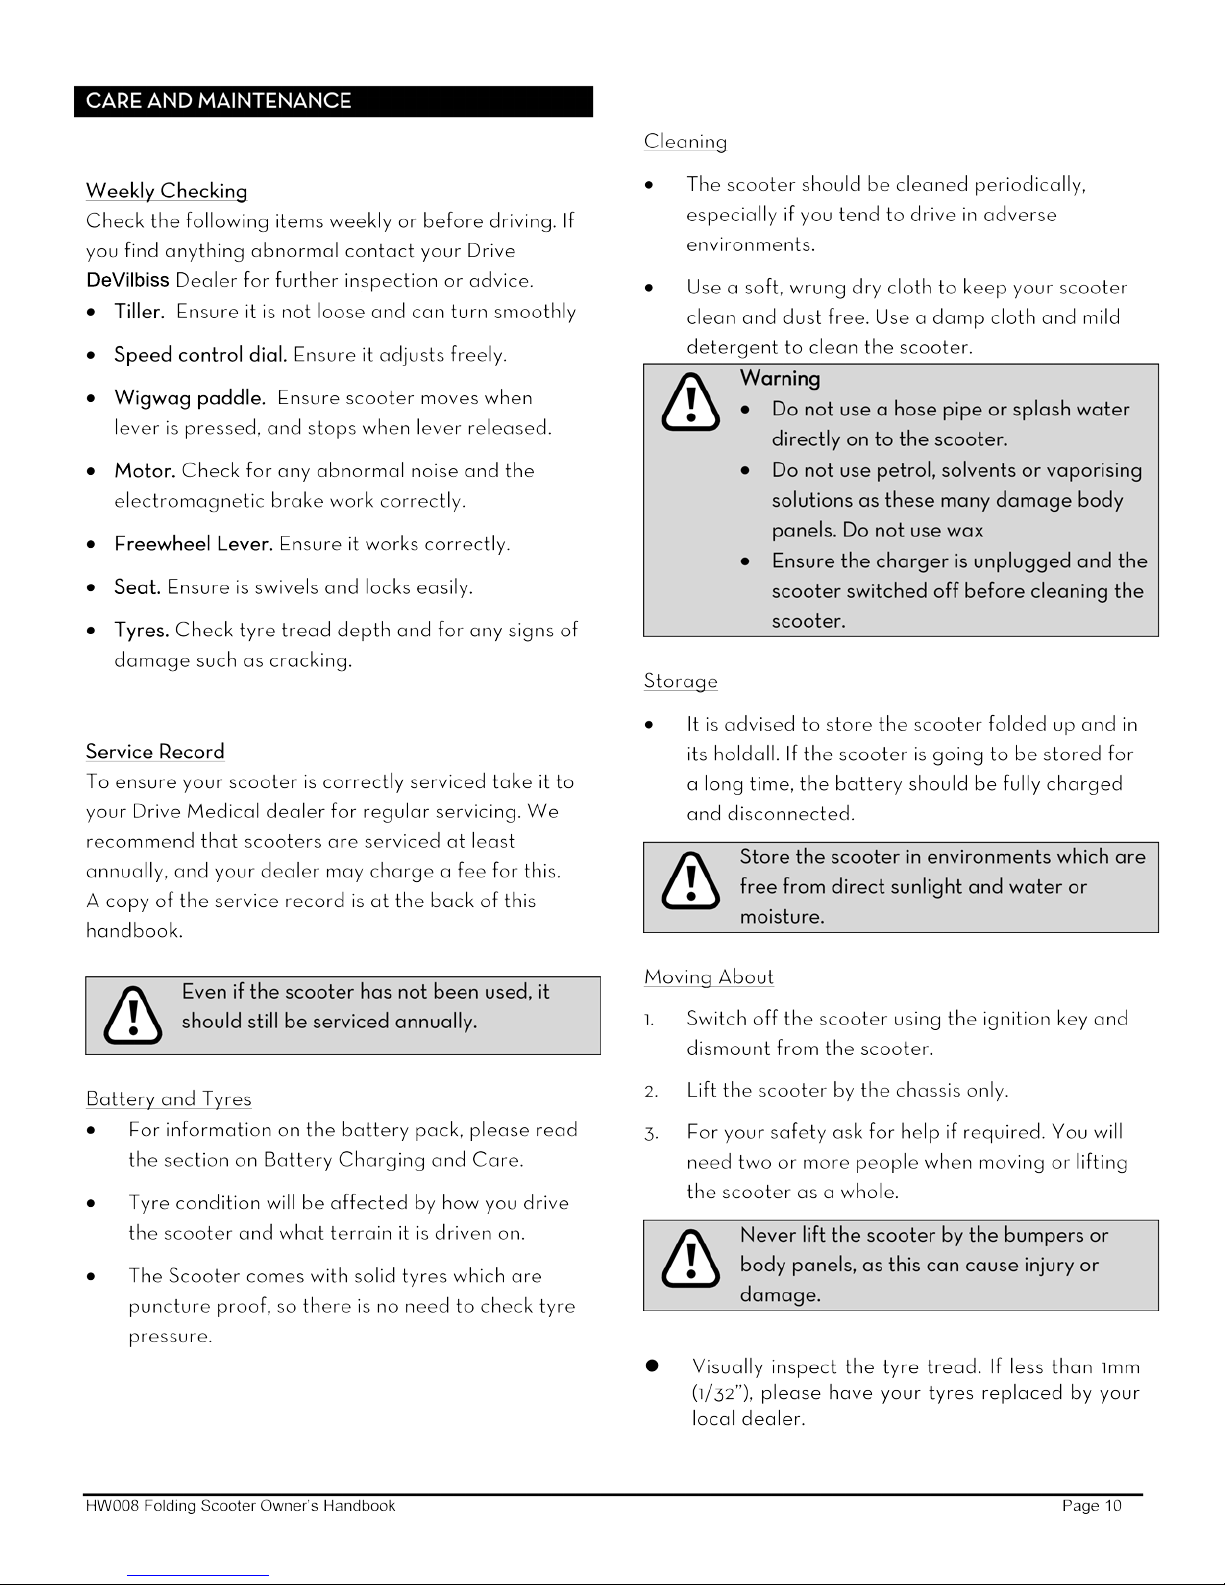
To disconnect the battery:
1. Remove the battery compartment cover by
levering the cover up using the ignition key or
similar as a lever.
2. Once the cover is removed, unplug the black
connector shown below.
Battery Disconnection
It is recommended that the battery is disconnected if
the scooter is not going to be used for a long period of
time, or for certain methods of transportation.
For air transportation the battery should be
disconnected before transporting.
HW008 Folding Scooter Owner’s Handbook Page 9
3. Reinstall the battery compartment cover to
prevent dust and moisture getting in to the
compartment.
4.
Page 11
Page 12

Page 13
Page 14

Appendix A: Service Record
YEAR
1 2 3 4 5
YEAR
1 2 3 4 5
Service Dates
Service Dates
Controller
Upholstery
On/off switch
Seat
Control Lever
Back
Braking
Armrests
Recharge point
Electrics
Batteries
Connections
condition
Levels
Lights
Connections
Test run
Discharge test
Forwards
Wheels and
Tyres
Reverse
Wear
Emergency stop
Pressure
Left turn
Bearings
Right turn
Wheel nuts
Slope test
Motors
Over obstacles
Wiring
List Items repaired
Noise
Connections
Brake
Brushes
Chassis
Condition
Steering
HW008 Folding Scooter Owner’s Handbook Page 13
Page 15
Appendix B: Quick Start Guide
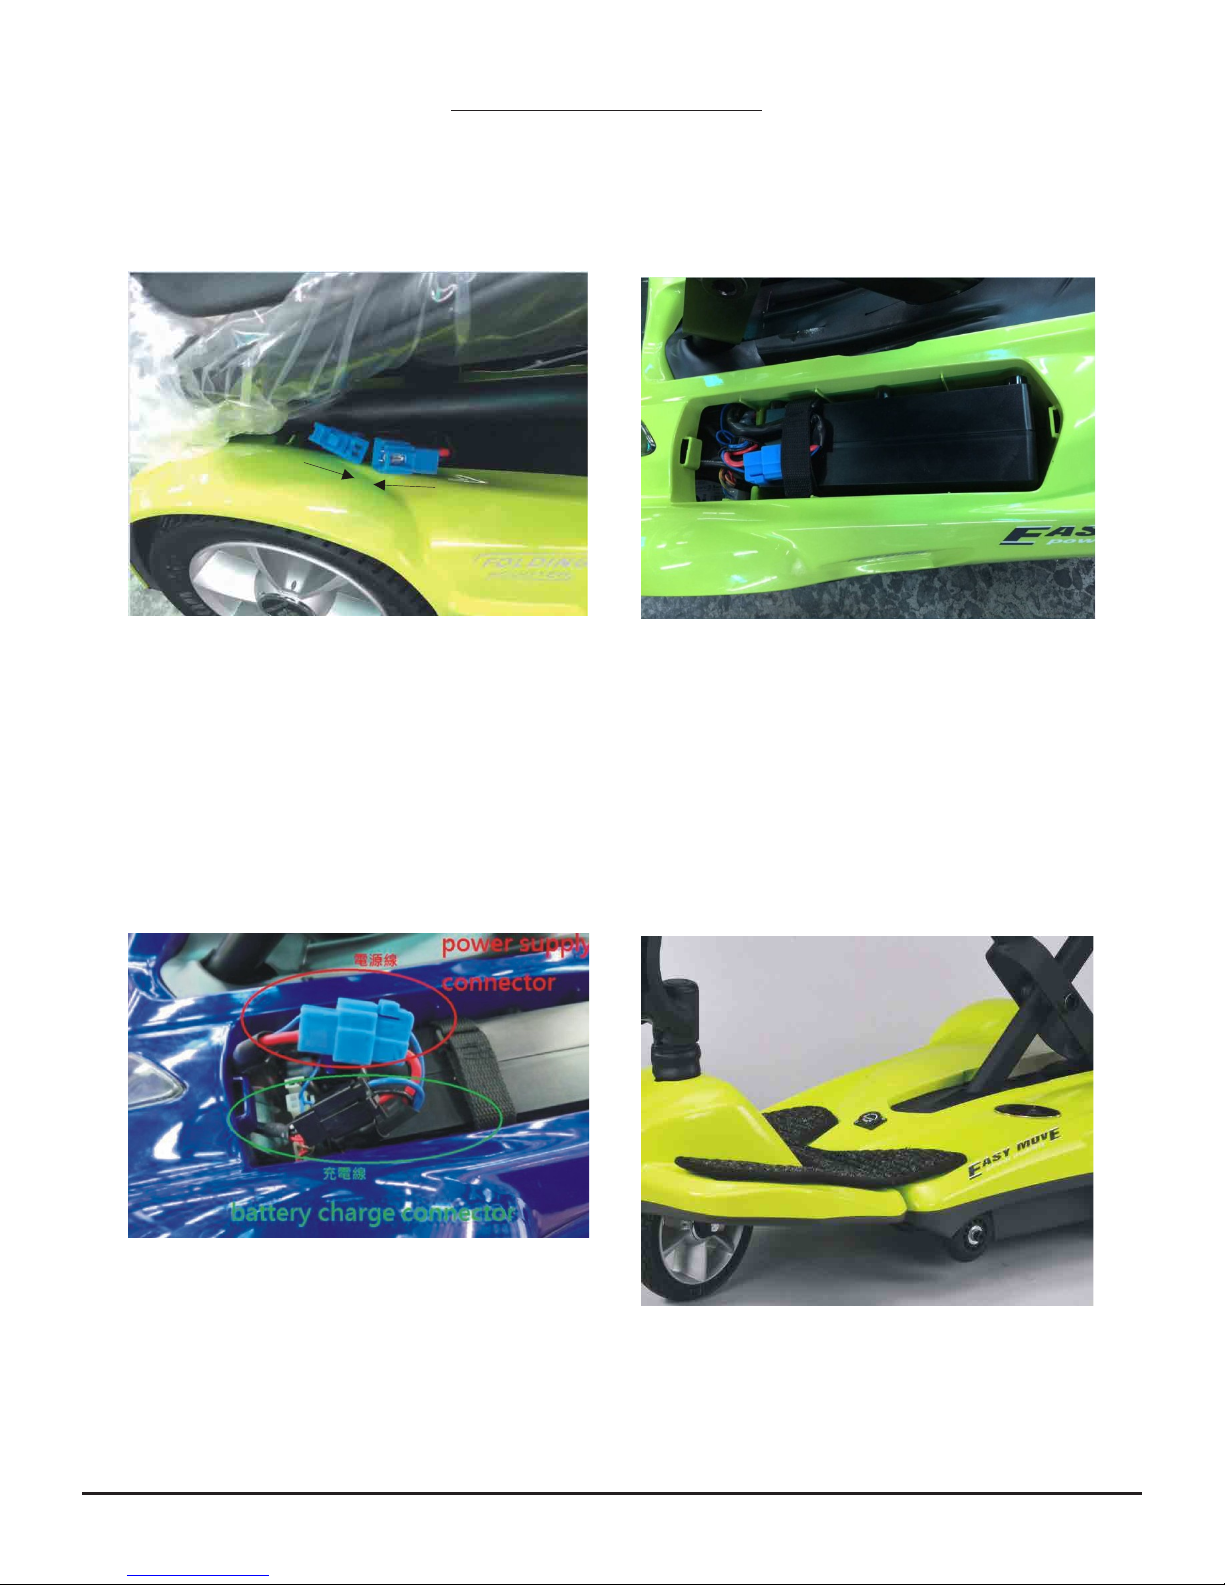
For safety reasons, the auto-folding scooter is
shipped with the Lithium battery disconnected.
Step 1:
Place the scooter on the floor.
Connect the blue battery connectors together.
Press the green button to unfold.
There should be sufficient power in the battery to
unfold the scooter. However, the battery has been
stood and is completely flat refer to the Emergency
Charging Procedure in the handbook.
Step 3:
Position the battery in to the battery compartment
and secure with the velcro straps supplied (as
shown below). Replace the compartment cover.
Step 2:
Once the scooter has fully unfolded, also connect
the black battery charger connectors together.
HW008 Folding Scooter Owner’s Handbook Page 14
Step 4:
Plug the charger in to the charging point (arrowed)
and then plug the charger in to the mains then
switch on the charger. Ensure the scooter is fully
charged before use.
Page 16

Dealer Stamp
Drive DeVilbiss Healthcare Ltd, Heathfield Lane,
Birkenshaw, West Yorkshire, BD11 2HW
Tel: 0845 0600 333
Fax: 0845 0600 334
Email: info@drivedevilbiss.co.uk
www.drivedevilbiss.co.uk
The Team at Drive DeVilbiss
develops its products to give
our customers the freedom to live
independently. This encompasses
their daily home life and provides
them with the opportunity to enjoy
an outing with family and friends.
Our goal is to develop a range that
will provide individuals with a
chance to enjoy every day life.
 Loading...