

Page 1

NAILER/STAPLER KIT
OPERATOR’S MANUAL
SAFETY ● ASSEMBLY
●
OPERATION ● MAINTENANCE
●
TROUBLESHOOTING ● ESPAÑOL
D24156 Rev. 0 6/11/01
Read Operator’s Manual. Do not operate equipment until you have read this
Operator’s Manual for Safety, Assembly, Operation, and Maintenance
Instructions.
Model ANK20
Page 2
2 - Eng
D24156
TABLE OF CONTENTS
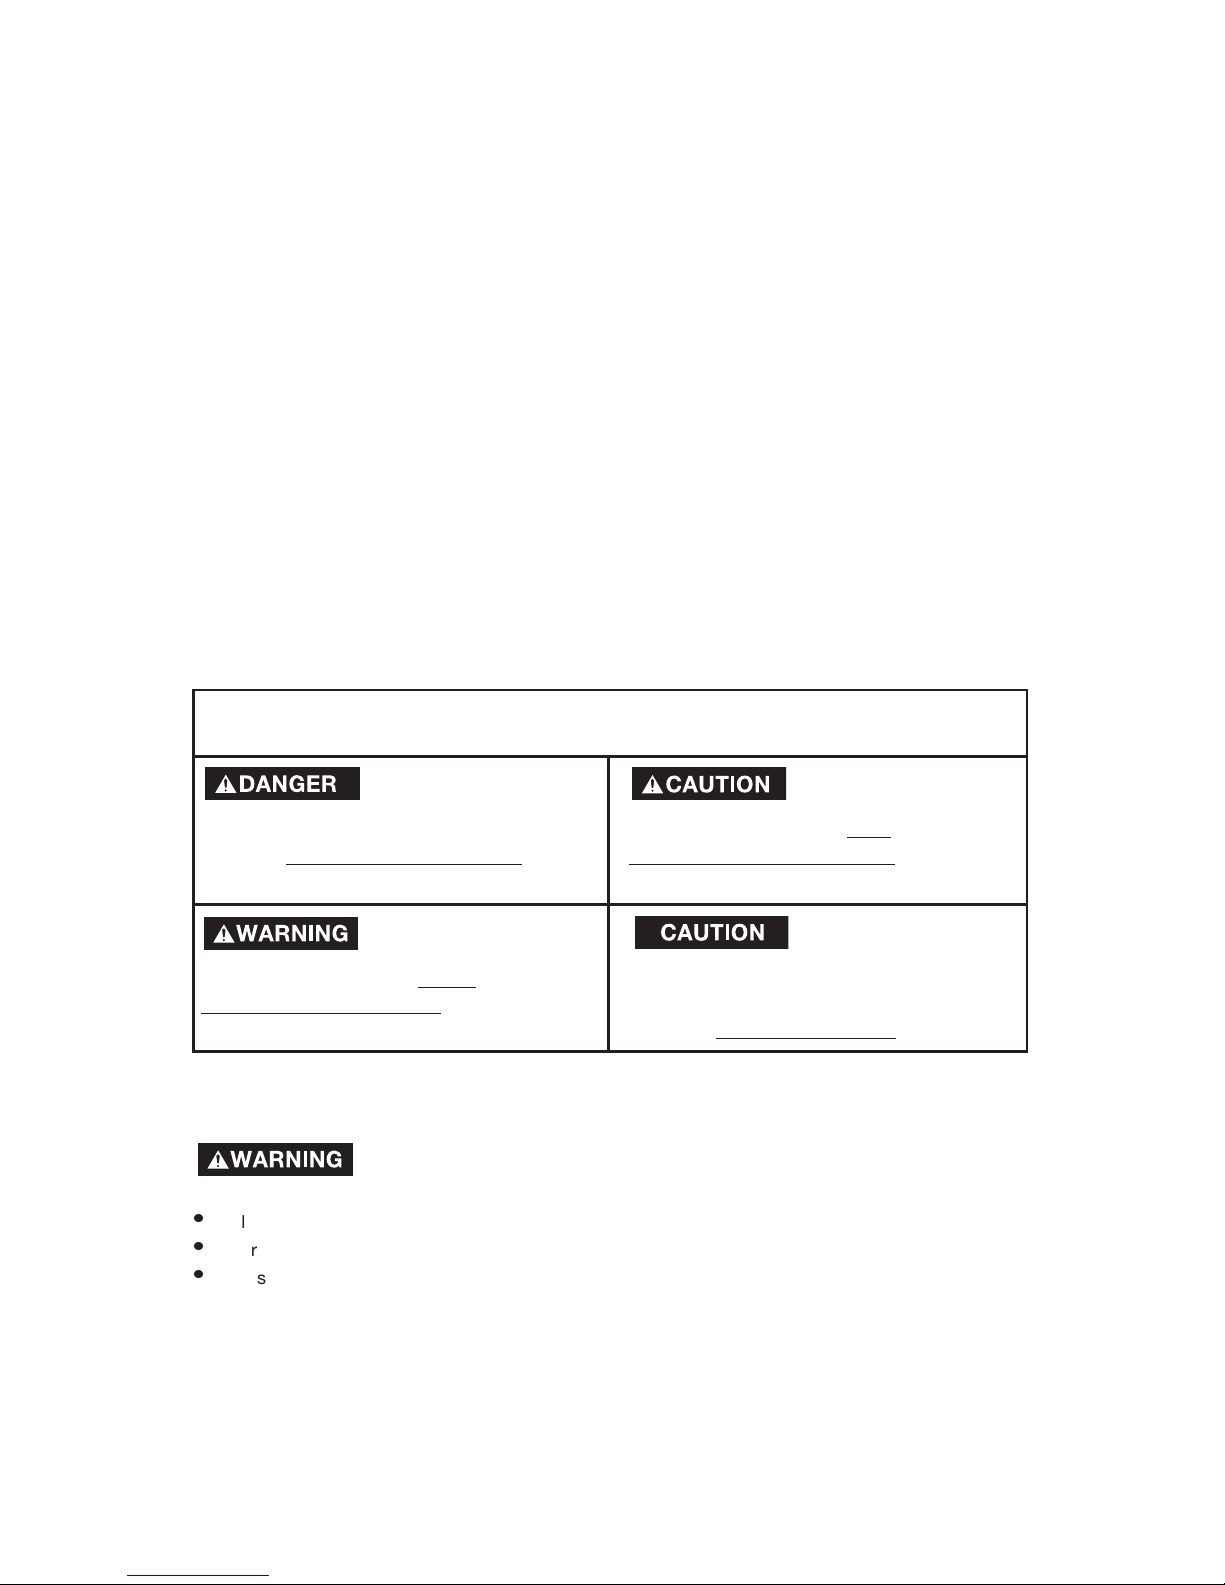
SAFETY GUIDELINES - DEFINITIONS
Indicates an
imminently hazardous
situation which, if not avoided, will
result in death or serious injury
.
Indicates a potentially
hazardous situation
which, if not avoided, could
result in
death or serious injury
.
Indicates a potentially
hazardous situation
which, if not avoided, may
result in
minor or moderate injury.
Used without the
safety alert symbol
indicates a potentially hazardous
situation which, if not avoided, may
result in pr
operty damage.
SAFETY and PREVENTING EQUIPMENT PROBLEMS. To help you recognize this information, we
use the symbols below. Please read the manual and pay attention to these sections.
This manual contains information that is important for you to know and
understand. This information relates to protecting YOUR SAFETY and
PREVENTING EQUIPMENT PROBLEMS. To help you recognize this
information, we use the symbols below. Please read the manual and pay
attention to these sections.
IMPORTANT SAFETY INSTRUCTIONS
Some dust created by power sanding, sawing, grinding, drilling, and other
construction activities contains chemicals known (to the State of California) to
cause cancer, birth defects or other reproductive harm. Some example of these chemicals are:
l
lead from lead-based paints
l
crystalline silica from bricks and cement and other masonry products
l
arsenic and chromium from chemically-treated lumber
Your risk from these exposures varies, depending on how often you do this type of work. To reduce
your exposure to these chemicals: work in a well ventilated area, and work with approved safety
equipment, always wear MSHA/NIOSH approved, properly fitting face mask or respirator when using
such tools.
When using air tools, basic safety precautions should always be followed to reduce the risk of of
personal injury.
Safety Guideline-Definitions . . . . . . . . . . . . . . . . . . . . . . . . . . . . . . . .2
Important Safety Instructions . . . . . . . . . . . . . . . . . . . . . . . . . . . . .2-5
Lubrication and Maintenance . . . . . . . . . . . . . . . . . . . . . . . . . . . . .6-7
Recommended Hook-up . . . . . . . . . . . . . . . . . . . . . . . . . . . . . . . . . .7
Contact Trip Safety Mechanism . . . . . . . . . . . . . . . . . . . . . . . . . . .8-9
Loading the Tool . . . . . . . . . . . . . . . . . . . . . . . . . . . . . . . . . . . . . .9-10
Operating the Tool . . . . . . . . . . . . . . . . . . . . . . . . . . . . . . . . . . . . . .10
Clearing a Jam From the Tool . . . . . . . . . . . . . . . . . . . . . . . . . . .11-12
Troubleshooting . . . . . . . . . . . . . . . . . . . . . . . . . . . . . . . . . . . . . . . .13
Specifications . . . . . . . . . . . . . . . . . . . . . . . . . . . . . . . . . . . . . . . . . .14
Fasteners . . . . . . . . . . . . . . . . . . . . . . . . . . . . . . . . . . . . . . . . . . . . .15
Warranty . . . . . . . . . . . . . . . . . . . . . . . . . . . . . . . . . . . . . . . . . . . . .16
Page 3
3 - Eng
D24156
IMPROPER OPERATION OR MAINTENANCE OF THIS PRODUCT COULD RESULT IN SERIOUS
INJURY AND PROPERTY DAMAGE. READ AND UNDERSTAND ALL WARNINGS AND OPERATING INSTRUCTIONS BEFORE USING THIS EQUIPMENT.WHEN USING AIR TOOLS, BASIC
SAFETY PRECAUTIONS SHOULD ALWAYS BE FOLLOWED TO REDUCE THE RISK OF
PERSONAL INJURY.
SA
VE!
IMPORTANT SAFETY INSTRUCTIONS
SA
VE!
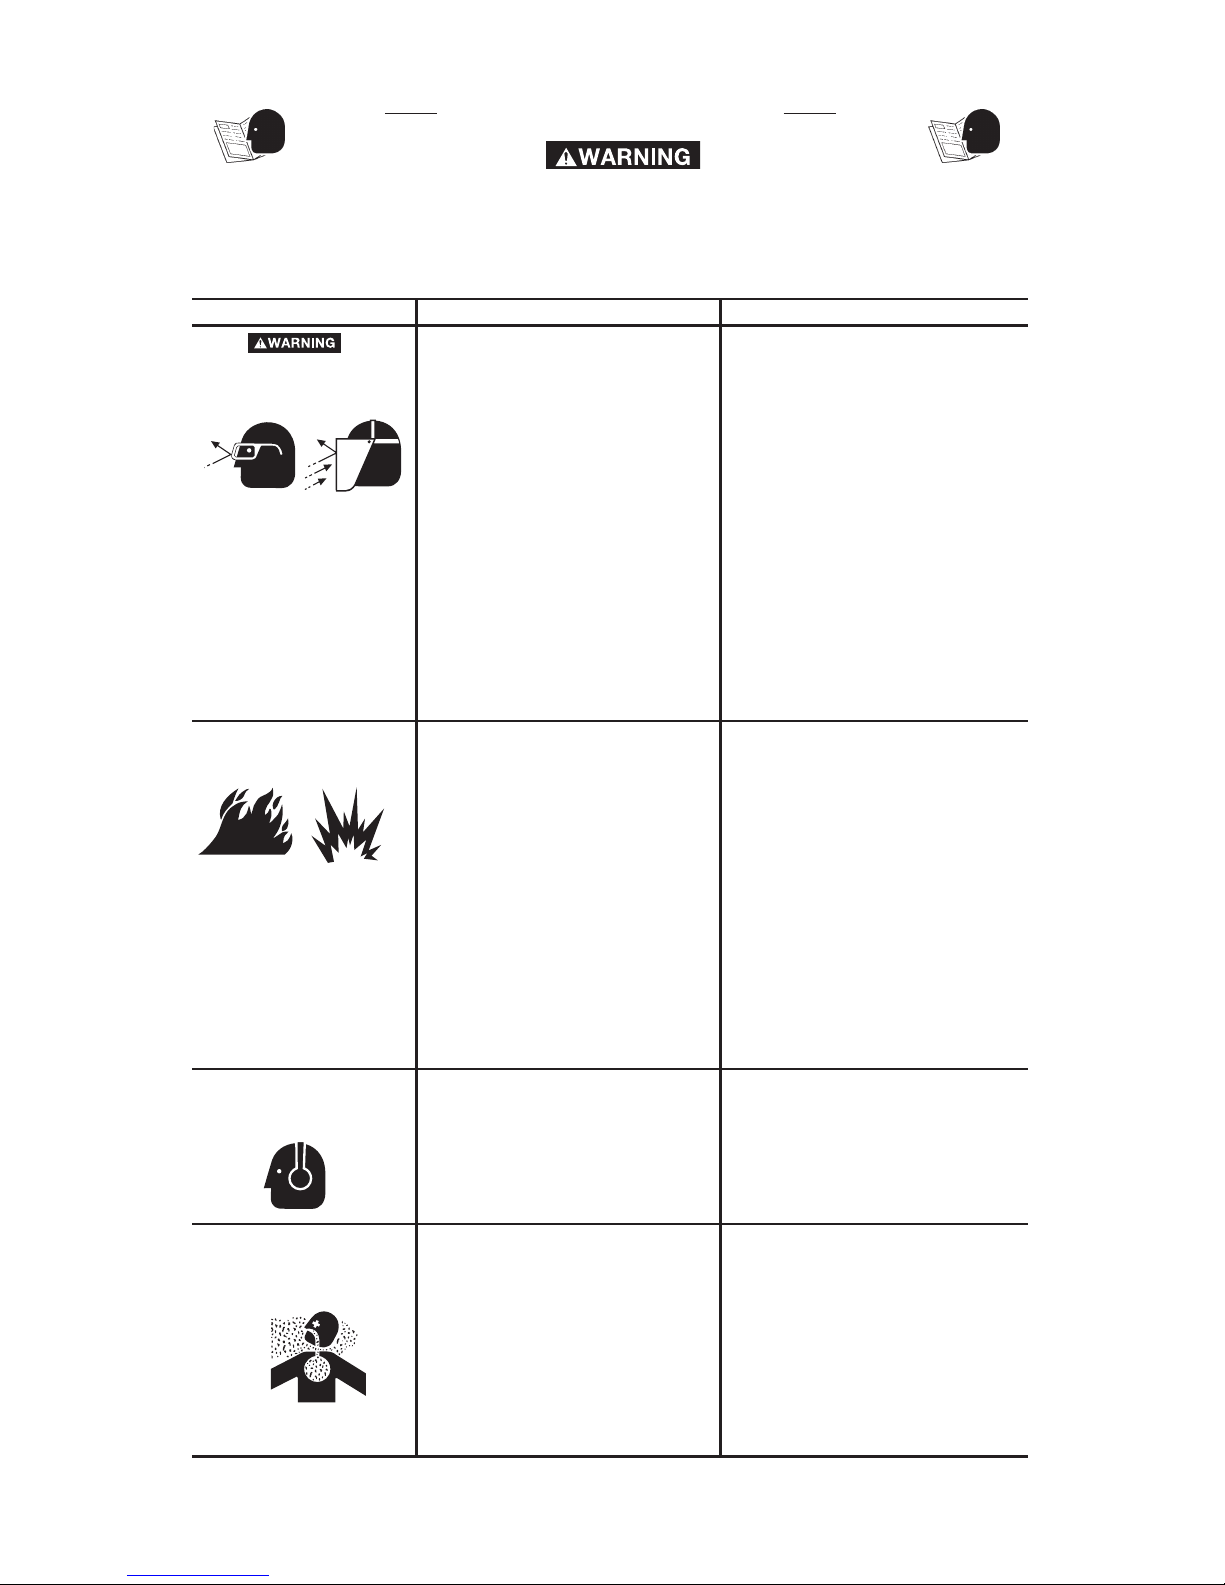
HAZARD
WHAT COULD HAPPEN HOW TO PREVENT IT
RISK OF EYE OR HEAD
INJURY
• Air powered equipment and
power tools are capable of
propelling materials such as
fasteners, metal chips, saw
dust, and other debris at high
speed, which could result in
serious eye injury.
• Compressed air can be hazardous. The air stream can
cause injury to soft tissue areas
such as eyes, ears, etc.
Particles or objects propelled
by the stream can cause injury.
• Tool attachments can be come
loose or break and fly apart
propelling particles at the
operator and others in the work
area.
• Always wear ANSI approved
Z87.1 safety glasses with side
shields.
• Never leave operating tool
unattended. Disconnect air
hose when tool is not in use.
• For additional protection use
an approved face shield in
addition to safety glasses.
RISK OF FIRE OR
EXPLOSION
• Abrasive tools such as sanders
and grinders, rotating tools
such as drills, and impact tools
such as nailers, staplers,
wrenches, hammers, and
reciprocating saws are capable
of generating sparks which
could result in ignition of flammable materials.
• Exceeding the maximum pressure rating of tools or
accessories could cause an
explosion resulting in serious
injury.
• Make sure that any attachments are securely assembled.
• Never operate tools near
flammable substances such
as gasoline, naptha, cleaning
solvents, etc.
• Work in a clean, well ventilated
area free of combustible
materials.
• Never use oxygen, carbon
dioxide or other bottled gases
as a power source for air tools.
• Use compressed air regulated
to a maximum pressure at or
below the rated pressure of
any attachments.
RISK OF LOSS OF
HEARING
• Long term exposure to noise
produced from the operation
of air tools can lead to
permanent hearing loss.
• Always wear ANSI S3.19
hearing protection.
RISK TO BREATHING
INHALATION HAZARD
• Abrasive tools, such as
grinders, sanders, and cut-off
tools generate dust and
abrasive materials which can
be harmful to human lungs and
respiratory system.
• Some materials such as
adhesives and tar, contain
chemicals whose vapors
could cause serious injury with
prolonged exposure.
• Always wear MSHA/NIOSH
approved, properly fitting face
mask or respirator when using
such tools.
• Always work in a clean, dry,
well ventilated area.
Page 4
4 - Eng
D24156
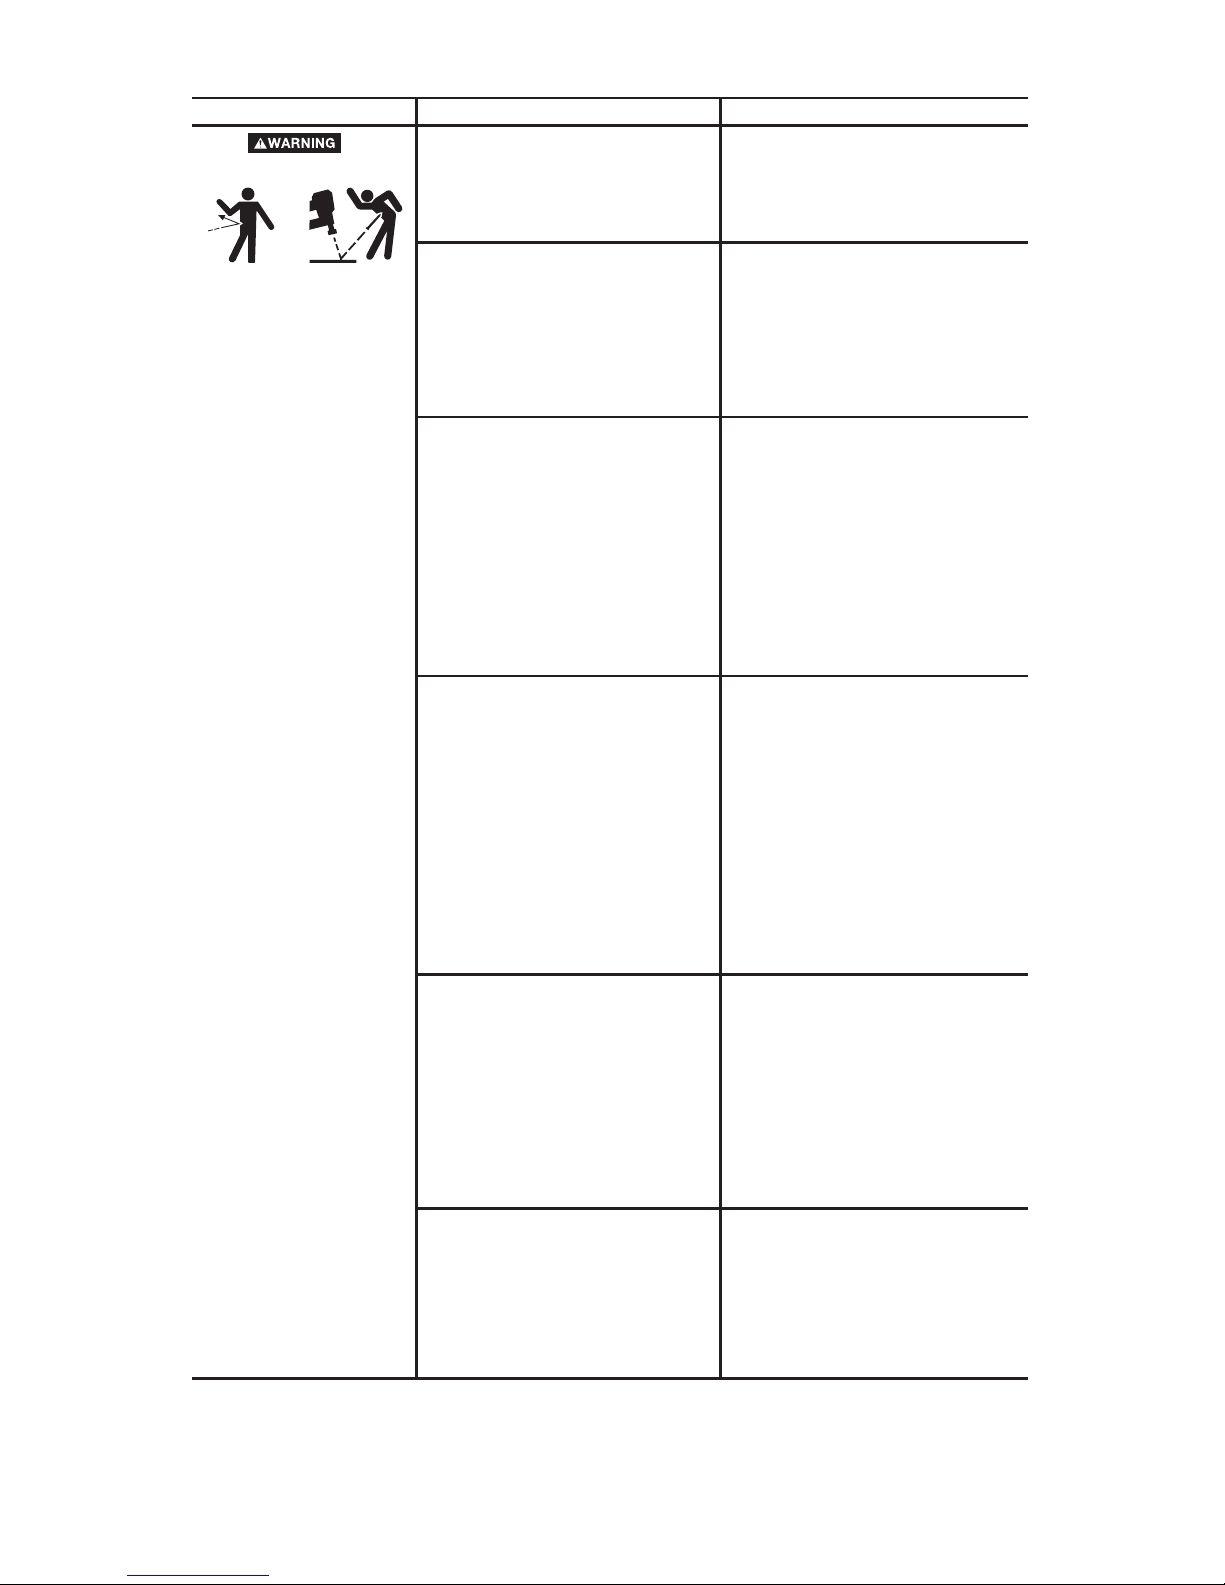
HAZARD
WHAT COULD HAPPEN HOW TO PREVENT IT
RISK OF INJURY
• Tools left unattended, or with
the air hose attached can be
activated by unauthorized
persons leading to their injury
or injury to others.
• Air tools can propel fasteners
or other materials throughout
the work area.
• Air tools can become
activated by accident during
maintenance or tool changes.
• Air tools can cause the
workpiece to move upon
contact leading to injury.
• Loss of control of the tool can
lead to injury to self or others.
• Poor quality, improper, or
damaged tools such as grinding wheels, chisels, sockets,
drills, nailers, staplers, etc., can
fly apart during operation, propelling particles throughout the
work area causing serious
injury.
• Remove air hose when tool is
not in use and store tool in
secure location away from
reach of children.
• Use only parts, fasteners, and
accessories recommended by
the manufacturer.
• Keep work area clean and free
of clutter. Keep children and
others away from work area
during operation of the tool.
• Keep work area well lit.
• Remove air hose to lubricate
or add grinding attachments,
sanding discs, drills, etc. to the
tool.
• Never carry the tool by the
hose.
• Avoid unintentional starting.
Don't carry hooked-up tool
with finger on trigger.
• Repair servicing should be
done only by an authorized
service representative.
• Use clamps or other devices
to prevent movement.
• Never operate tool while under
the influence of drugs or
alcohol.
• Don't overreach. Keep proper
footing and balance at all
times.
• Keep handles dry, clean, and
free from oil and grease.
• Stay alert. Watch what you are
doing. Use common sense. Do
not operate tool when you are
tired.
• Always use tool attachments
rated for the speed of the
power tool.
• Never use tools which have
been dropped, impacted or
damaged by use.
• Use only impact grade sockets on an impact wrench.
• Do not apply excessive force
to the tool – let the tool
perform the work.
• Using air tools to attach
electrical wiring can result in
electrocution or death.
• Never use nailer/staplers to
attach electrical wiring while
energized.
• Fasteners coming in contact
with hidden electrical wiring
could cause electrocution or
death.
• Never use nailer/staplers to
attach material to areas that
may contain hidden electrical
wires.
Page 5
5 - Eng
D24156
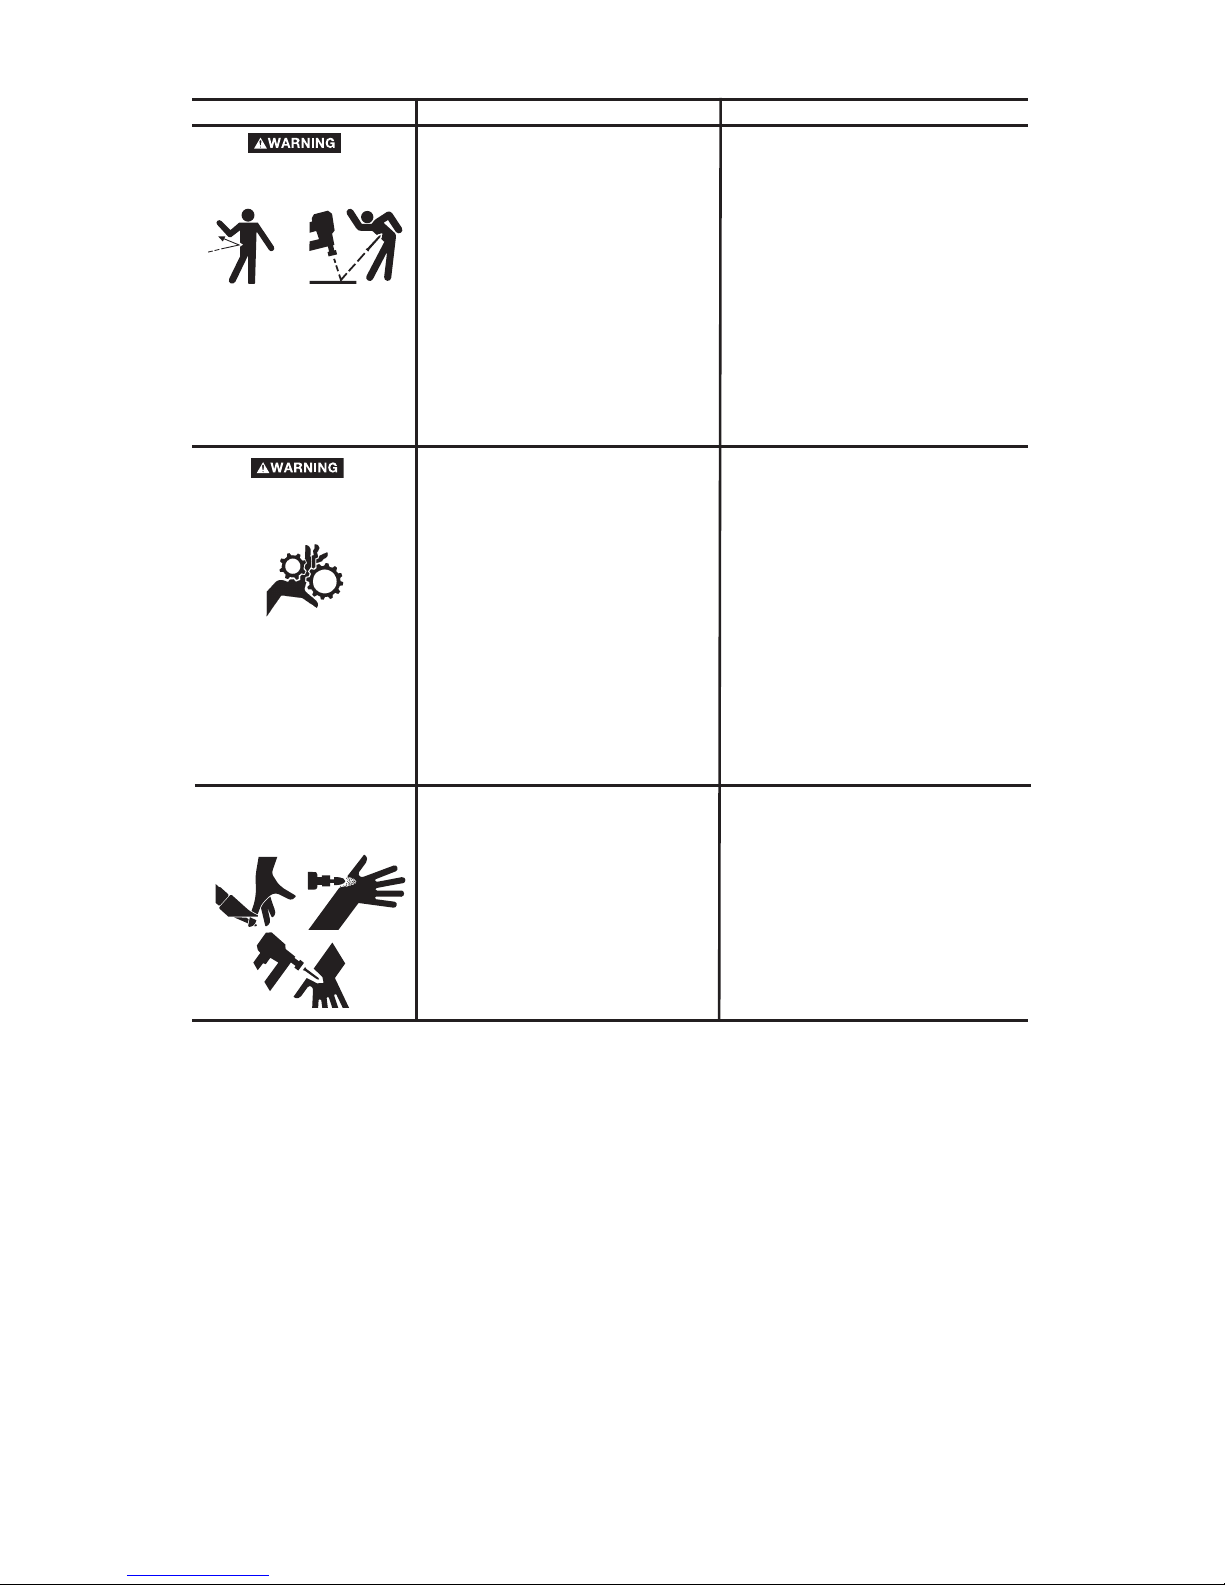
Fasteners could ricochet or be
propelled causing serious injury or
property damage.
Never point discharge of tool at self
or others.
Do not pull trigger unless tool contact safety device is against work
surface.
Never attempt to drive fasteners
into hard surfaces such as steel,
concrete, or tile.
Take care to avoid driving a fastener on top of another fastener.
Position tool carefully so that fasteners will be delivered to the
proper location.
RISK OF
ENTANGLEMENT
• Tools which contain moving
elements, or drive other
moving tools, such as grinding
wheels, sockets, sanding
discs, etc. can become entangled in hair, clothing, jewelry
and other loose objects,
resulting in severe injury.
• Never wear loose fitting
clothes, or apparel which
contains loose straps or ties,
etc. which could become
entangled in moving parts of
the tool.
• Remove any jewelry, watches,
identifications, bracelets,
necklaces, etc. which might
become caught by the tool.
• Keep hands away from moving
parts. Tie up or cover long hair.
• Always wear proper fitting
clothing and other safety
equipment when using this
tool.
RISK OF
CUT OR BURNS
• Keep the working part of the
tool away from hands and
body.
HAZARD
WHAT COULD HAPPEN HOW TO PREVENT IT
RISK OF INJURY
(continued)
• Tools which cut, shear, drill,
staple, punch, chisel, etc. are
capable of causing serious injury.
Page 6
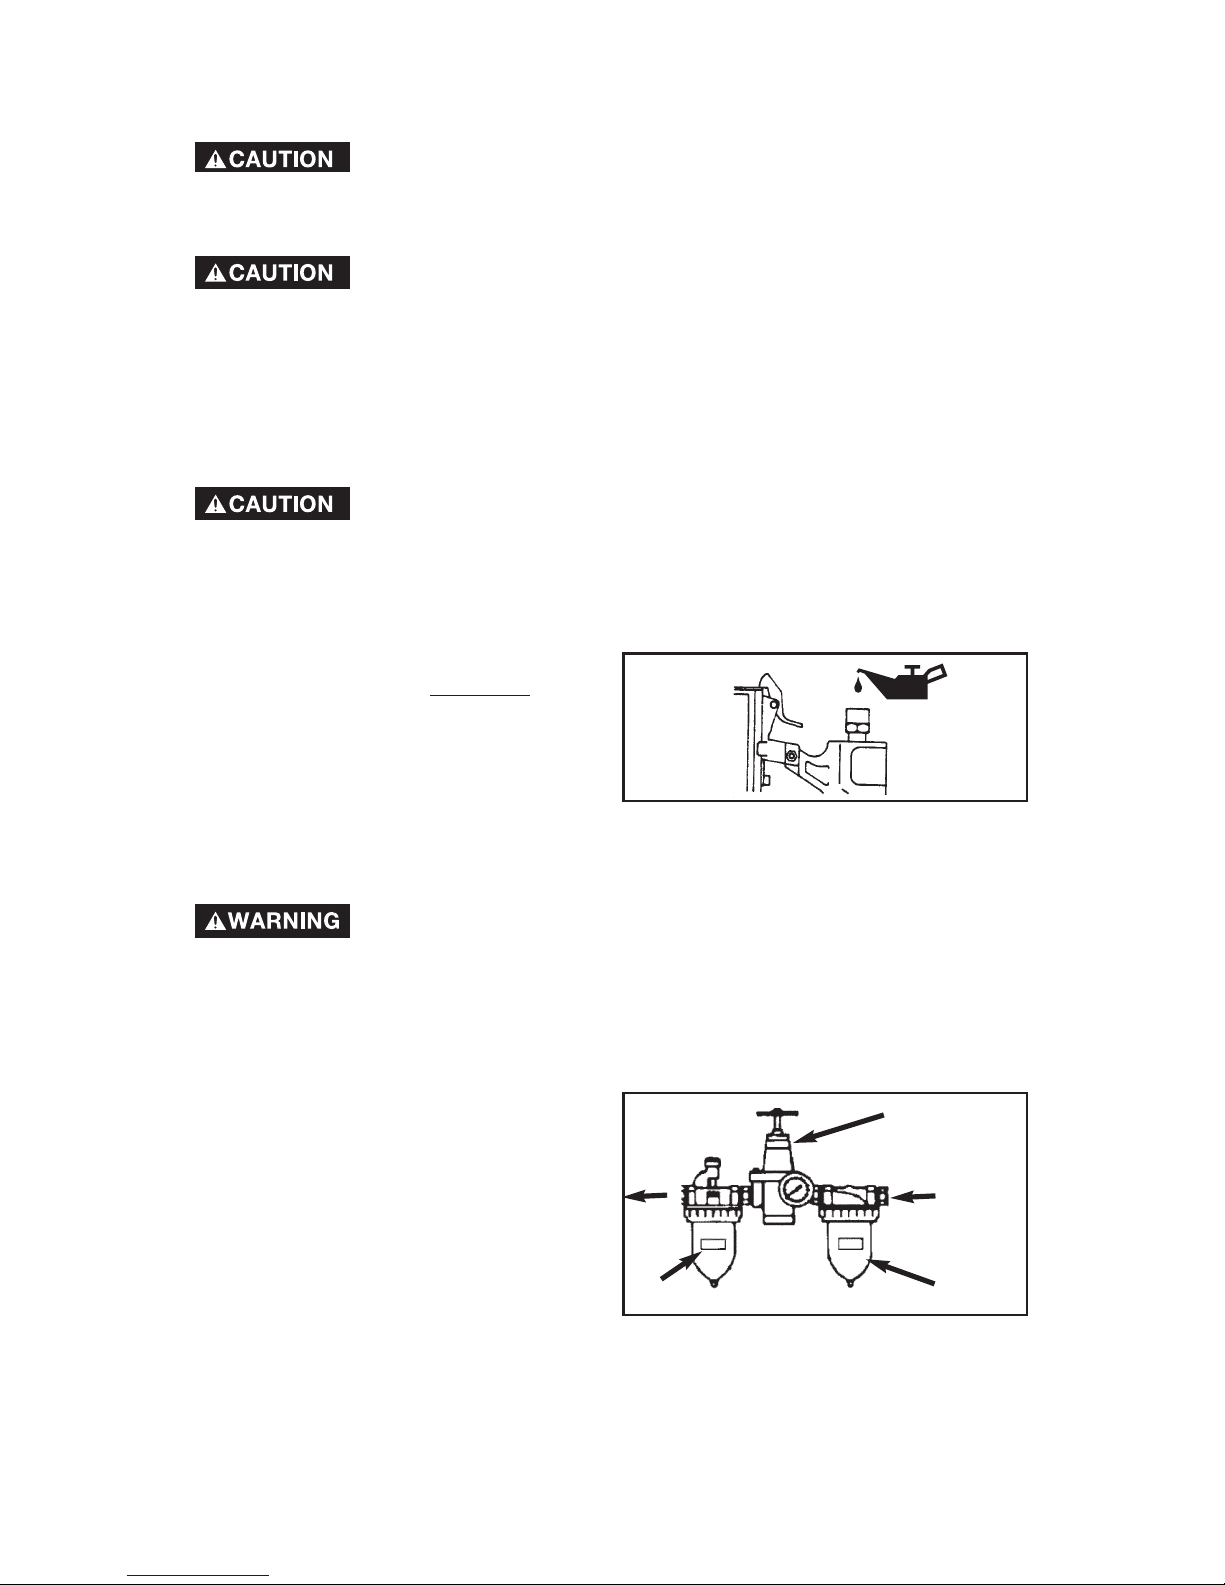
1. Disconnect the air supply from the tool before manually lubricating.
2. Turn the tool so the air inlet is
facing up and put one dr
op of
DeVilbiss Air Tool Oil (supplied)
into the air inlet. High speed
spindle oil, such as Unocal RX22,
or 3-in-1 oil can be used, DO NOT
USE detergent oil or additives.
Operate the tool briefly after adding
oil. (See Figure 1)
Keep out of the reach of children. If taken internally, do not
induce vomiting, call a doctor immediately or contact your local
poison control center.
DO NOT OVER LUBRICATE AIR TOOL.
3. Wipe off excessive oil at the exhaust.
NOTE: Many air tool users find it convenient to use an Oiler to help provide oil
circulation through tool. An Oiler also
increases the efficiency and useful life
of the tool. An oiler is recommended for
tools that receive heavy or constant
use. Check oil level in the oiler daily.
(See Figure 2)
Many air tool users find it convenient to
use a Filter to remove liquid and solid
impurities which can rust or "gum up"
internal parts of the tool. A Filter also increases the efficiency and useful life of the tool. Filter will need to be properly
maintained, see maintenance information supplied with filter for proper
maintenance care. (See Figure 2)
Do not store the tool in cold weather. Frost or ice can form on
the operating valves or mechanisms and the tool may not
operate correctly.
6 - Eng
D24156
Filter
In cold weather operation (near or below freezing), DO NOT
USE a permanent antifreeze such as ethylene glycol for a cold
weather lubricant. This type of anitfreeze will damage o-rings and seals of the
tool.
NOTE: Proper lubrication is the owner's responsibility. Failure to lubricate
the tool properly will dramatically shorten the life of the tool and void your warranty.
Your tool requires lubrication before you use it for the first
time and before and after each additional use. If an Oiler is
used, manual lubrication through the air inlet is not required on a daily basis.
Lubrication prevents wear and prevents rust from forming.
LUBRICATION AND MAINTENANCE
Figure 1
Figure 2
Regulator
Air Flow
Oiler
Page 7
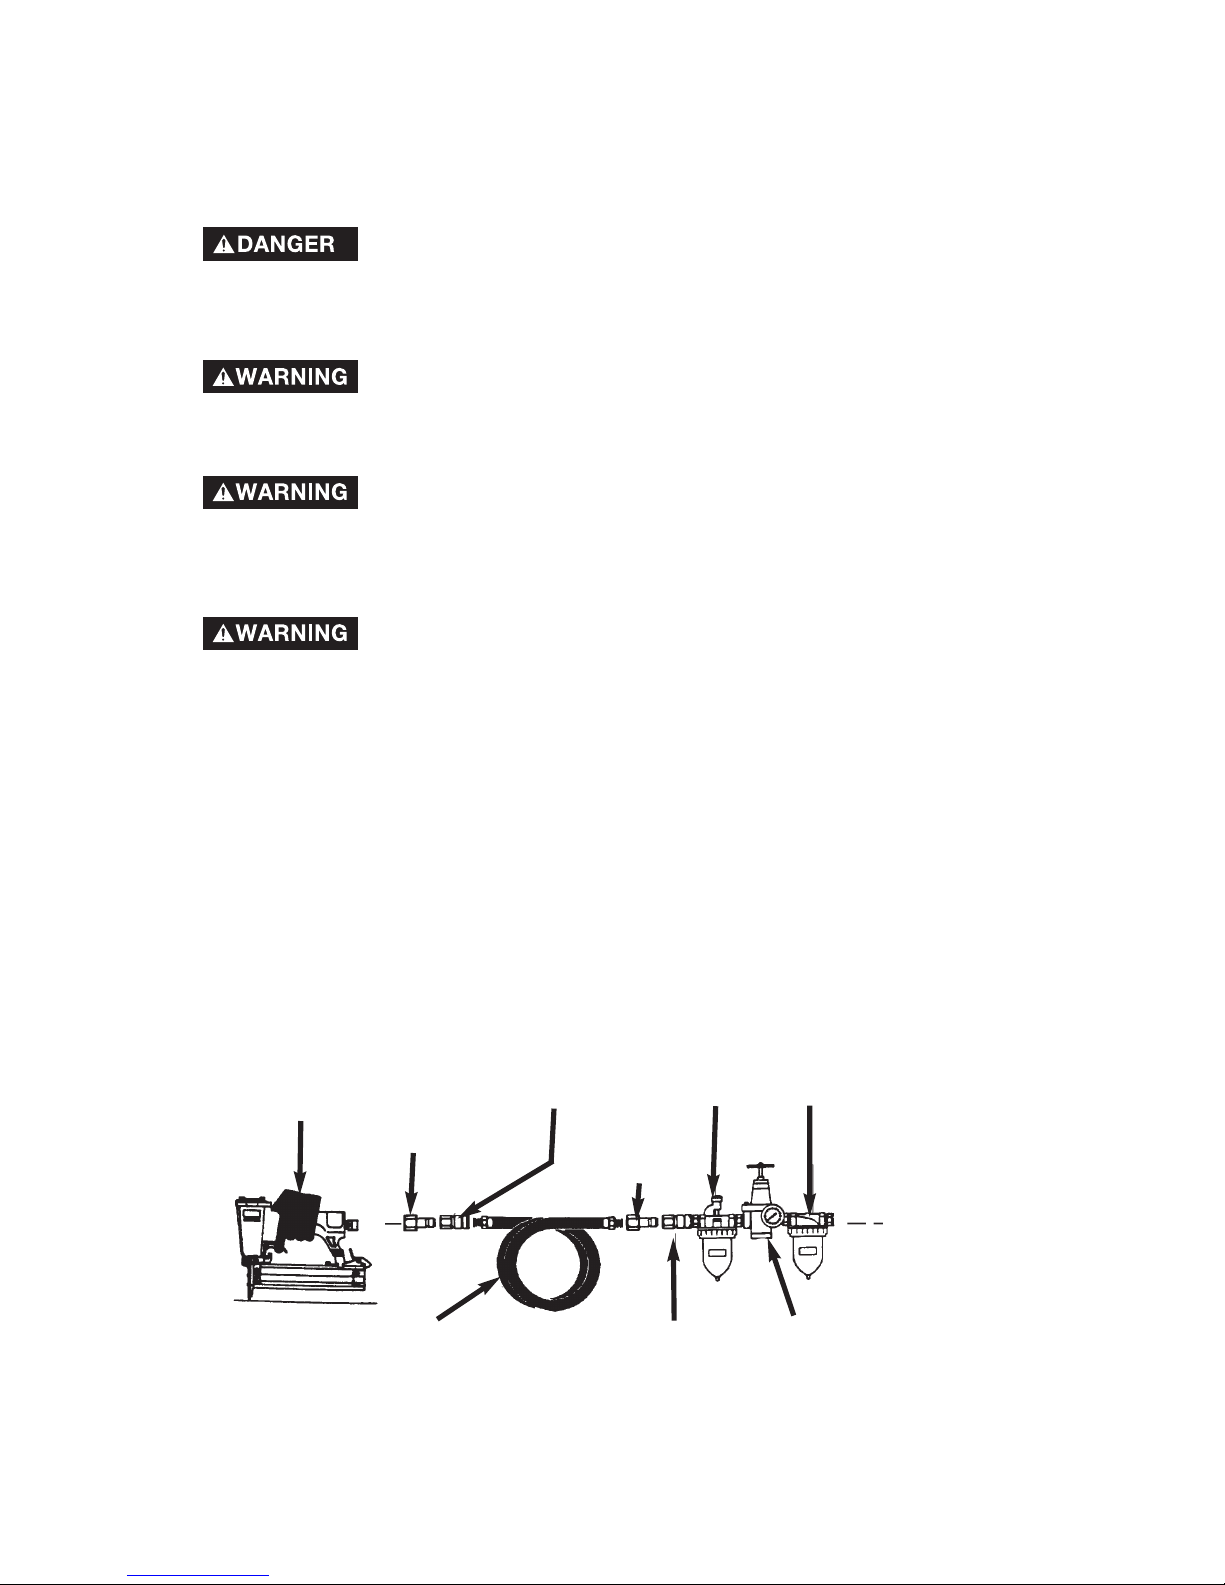
7 - Eng
D24156
IMPORTANT: Always connect the quick connect body to the air hose. Never
connect the quick connect body to the tool.
NOTE: Excessive oil will damage o-rings and seal of tool. If in-line oiler is
used, manual lubrication through the air inlet is not required on a daily
basis.
The air compressor must be able to maintain a minimum of 65 PSI when the tool
is being used. An inadequate air supply can cause a loss of power or
inconsistent operation.
Do not use any type of flammable gases or oxygen as a power
source for the tool. Use filtered, lubricated, regulated compressed air only. Use of compressed gas instead of compressed air may
cause the tool to explode and cause death or serious personal injury.
Do not use a check valve or any other fittings which will allow
air to remain in the tool. Serious personal injury or property
damage could occur.
Use a Pressure Regulator on your compressor with an
operating pressure of 0-125 PSI. A Pressure Regulator is
required to control the operating pressure of your tool. Refer to the label on
your nailer/stapler for the maximum P.S.I.
Never carry the tool by the hose or pull the hose to move the
tool or a compressor. Keep hoses away from heat, oil,
and sharp edges. Replace any damaged, weak or worn hoses.
BRAD NAILER/
STAPLER
QUICK
CONNECT
BODY
QUICK
CONNECT
PLUG
OILER
FILTER
RECOMMENDED HOOK-UP
AIR
COMPRESSOR
AIR
HOSE
(3/8" I.D.)
QUICK
CONNECT
BODY
QUICK
CONNECT PLUG
(Supplied with Tool)
The following illustration shows the proper hook-up which will help prolong the
life of the Tool.
REGULATOR
Page 8

8 - Eng
D24156
OPERATING A CONTACT TRIP TOOL:
1. Requires finger to be off the trigger and the nose of the Tool to be placed
on the work surface.
2. The contact trip safety mechanism is then depressed against the work
surface and the trigger pulled to drive a fastener.
3. The trigger is released after each fastener is driven.
4. Move the tool to the next desired fastener location and repeat the
procedure above.
CHECKING THE OPERATION OF CONTACT TRIP SAFETY MECHANISM
1. Disconnect the air supply from the tool.
2. Remove all fasteners from the magazine.
3. Make sure the trigger and contact trip safety mechanism move up and
down without any sticking or binding.
4. Reconnect air supply to the tool.
5. Depress the contact trip safety mechanism against the work surface without pulling the trigger. The tool must not cycle. Do not use the tool if a
cycle occurs.
Check the operation of the contact trip safety mechanism often.
Do not use the tool if the contact trip safety mechanism is not
working correctly.
Your Nailer/Stapler is a contact trip operated tool. When the operator depresses
the contact trip safety mechanism against the work surface and then pulls the
trigger, a fastener will be driven.
CONTACT TRIP SAFETY MECHANISM
Never keep the trigger pulled on contact trip tools when
carrying or holding the tool. Death or a serious puncture wound
could occur if the contact trip bumps something or someone.
Keep your hands and body away from the fastener discharge
area of the tool. Serious personal injury or property damage
could occur.
Do not hold the tool against the work surface with extra force.
Allow the tool to drive the fastener.
Do not use the contact trip mechanism as a means of
discharging a fastener because:
1. It could result in personal injury
2. It could result in an accidental release of a fastener.
3. It may cause damage to the mechanism.
4. It could result in improper placement of fastener in work piece.
Page 9
6. Hold the tool clear of the work surface. The contact trip safety mechanism
should return to its original down position. Pull the trigger. The tool must
not cycle. Do not
use the tool if a cycle occurs.
7. Depress the contact trip safety mechanism against the work surface. Pull
the trigger. The tool must cycle.
9 - Eng
D24156
LOADING THE TOOL
Disconnect tool from air supply before adjusting, clearing jams,
servicing, relocating or during non-operation. Failure to do so
could result in serious injury or property damage.
Make sure not to pull the trigger or depress the contact trip
safety mechanism when connecting the tool to an air compres-
sor. Serious personal injury or property damage can occur if the tool cycles.
Never place your hand or any part of your body in the fastener
discharge area of the tool when air supply is connected to the
tool. Serious personal injury may occur.
Handle the tool carefully. Respect the tool as a working
implement and always assume the tool contains fasteners:
a. Never use the tool as a toy and engage in horseplay.
b. Never aim or point the tool at anyone. The tool may contain fasteners.
c. Always keep people and animals at a safe distance from the work area in
case of accidental discharge of fasteners.
d. Never pull the trigger unless the nose of the tool is against
the work
surface.
e. Do not pull the trigger or depress the contact trip when loading the tool.
NOTE: See specification and fastener section for fastener information.
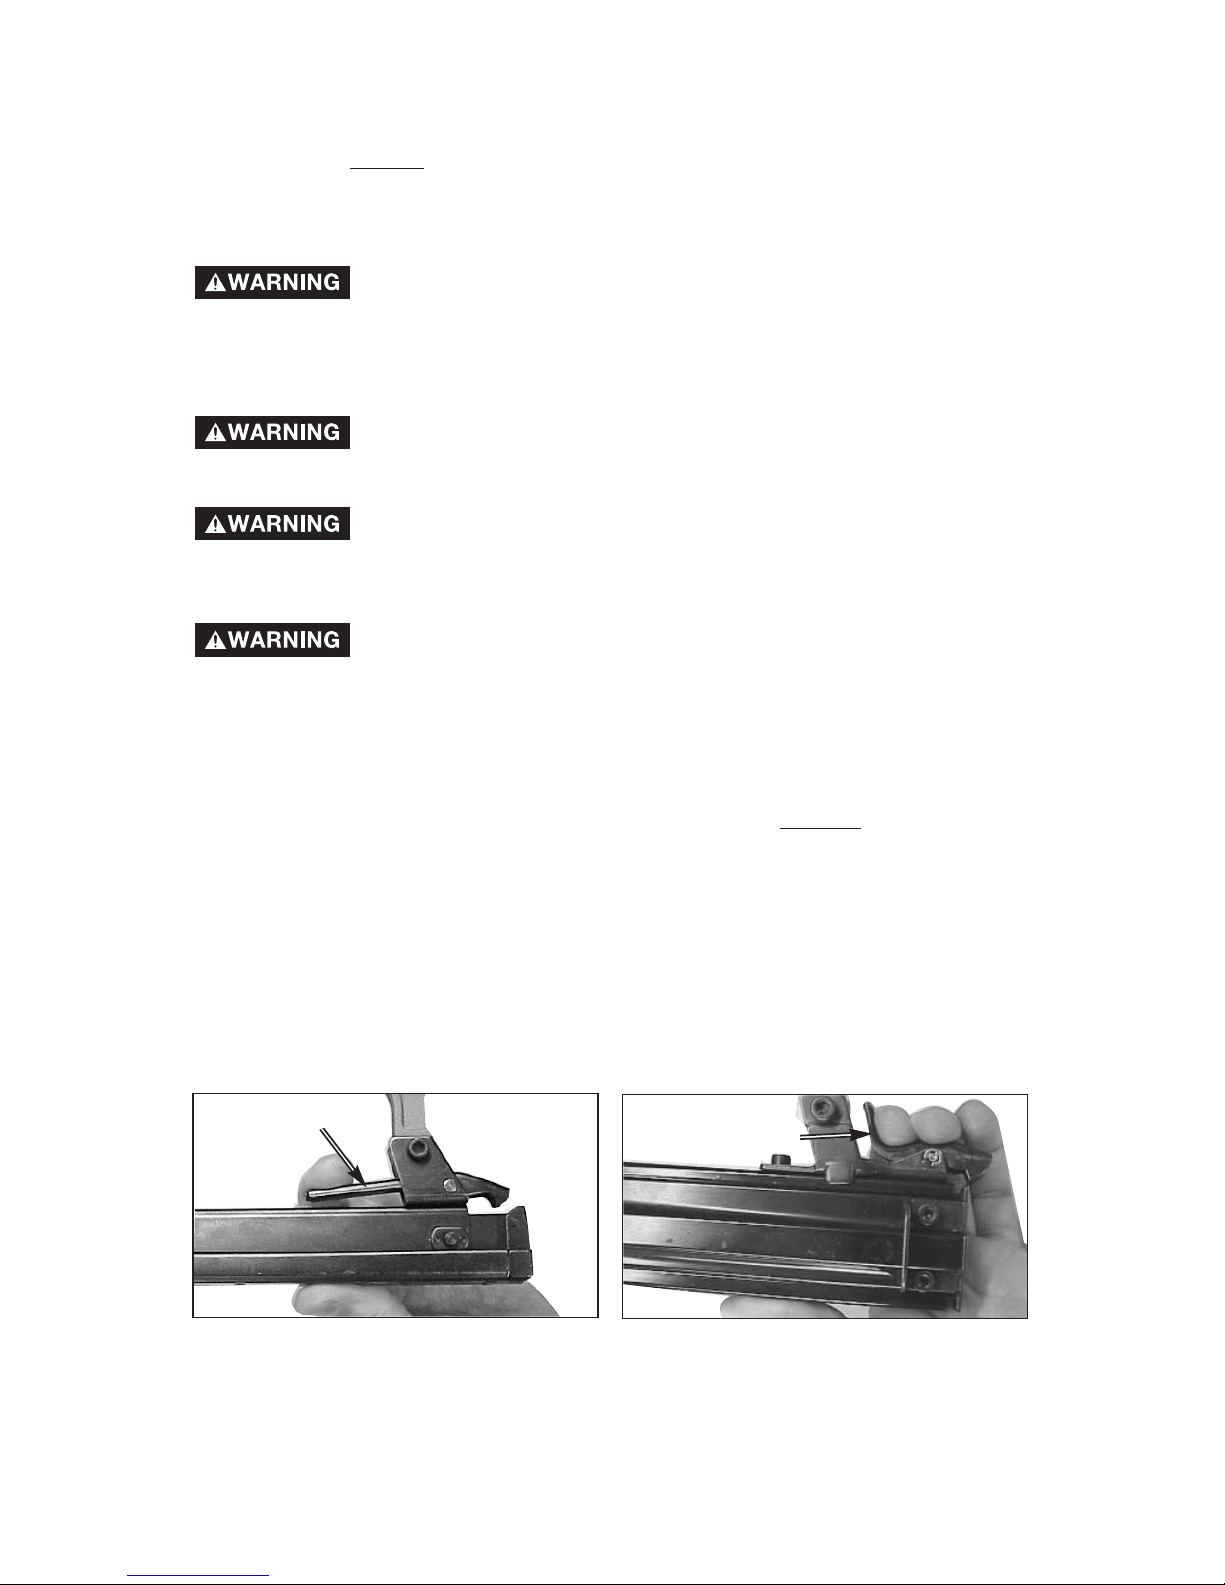
Loading the Tool
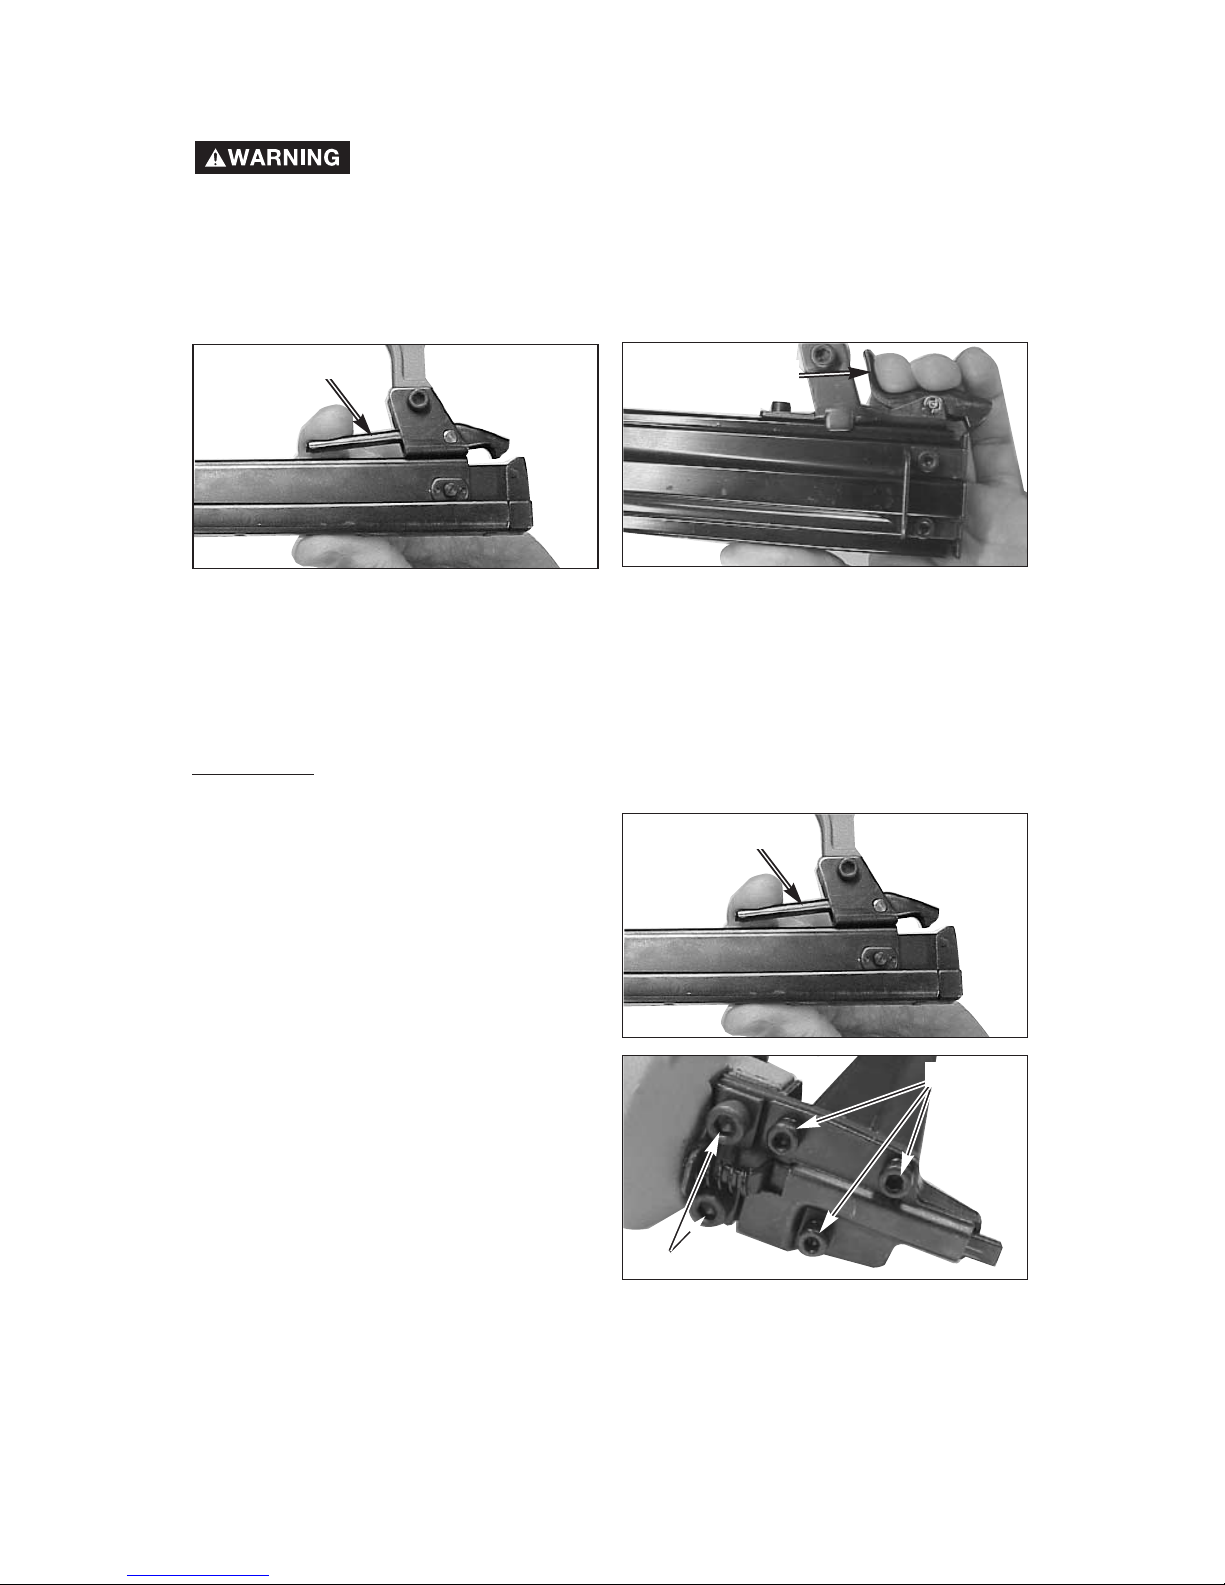
1. Disconnect air hose.
2 Depress magazine latch and slide magazine open.
Stapler
Magazine Latch
Brad Nailer
Magazine Latch
Page 10
10 - Eng
D24156
READ THIS MANUAL AND UNDERSTAND ALL SAFETY WARNINGS AND
INSTRUCTIONS BEFORE OPERATING TOOL.
OPERATING THE TOOL
1. Add one drop of DeVilbiss Air Tool Oil (supplied) into the air inlet. High
speed spindle oil, such as Unocal RX22, or 3-in1 oil can be used.
Keep out of the reach of children. If taken internally, do not
induce vomiting, call a doctor immediately or contact your local
poison control center.
2. Connect the Tool to the air supply.
3. Regulate the air pressure to obtain a minimum of 75 PSI at the tool.
4. Set air pressure regulator to 75 PSI and test for proper fastener penetration
by driving fasteners into a sample piece of wood. If the fasteners do not
achieve the desired penetration, adjust the air pressure to a lower or higher
setting until the desired penetration is achieved. Do not exceed the
maximum operating PSI at the tool.
NOTE;
Check and replace any damaged or worn components on the tool. The
safety warning labels on the tool must also be replaced if they are not legible.
Protect your eyes and ears. Wear Z87.1 safety glasses with side
shields. Wear hearing protection. Employers and users are responsible for ensuring the user or anyone near the tool uses the prescribed
safety equipment.
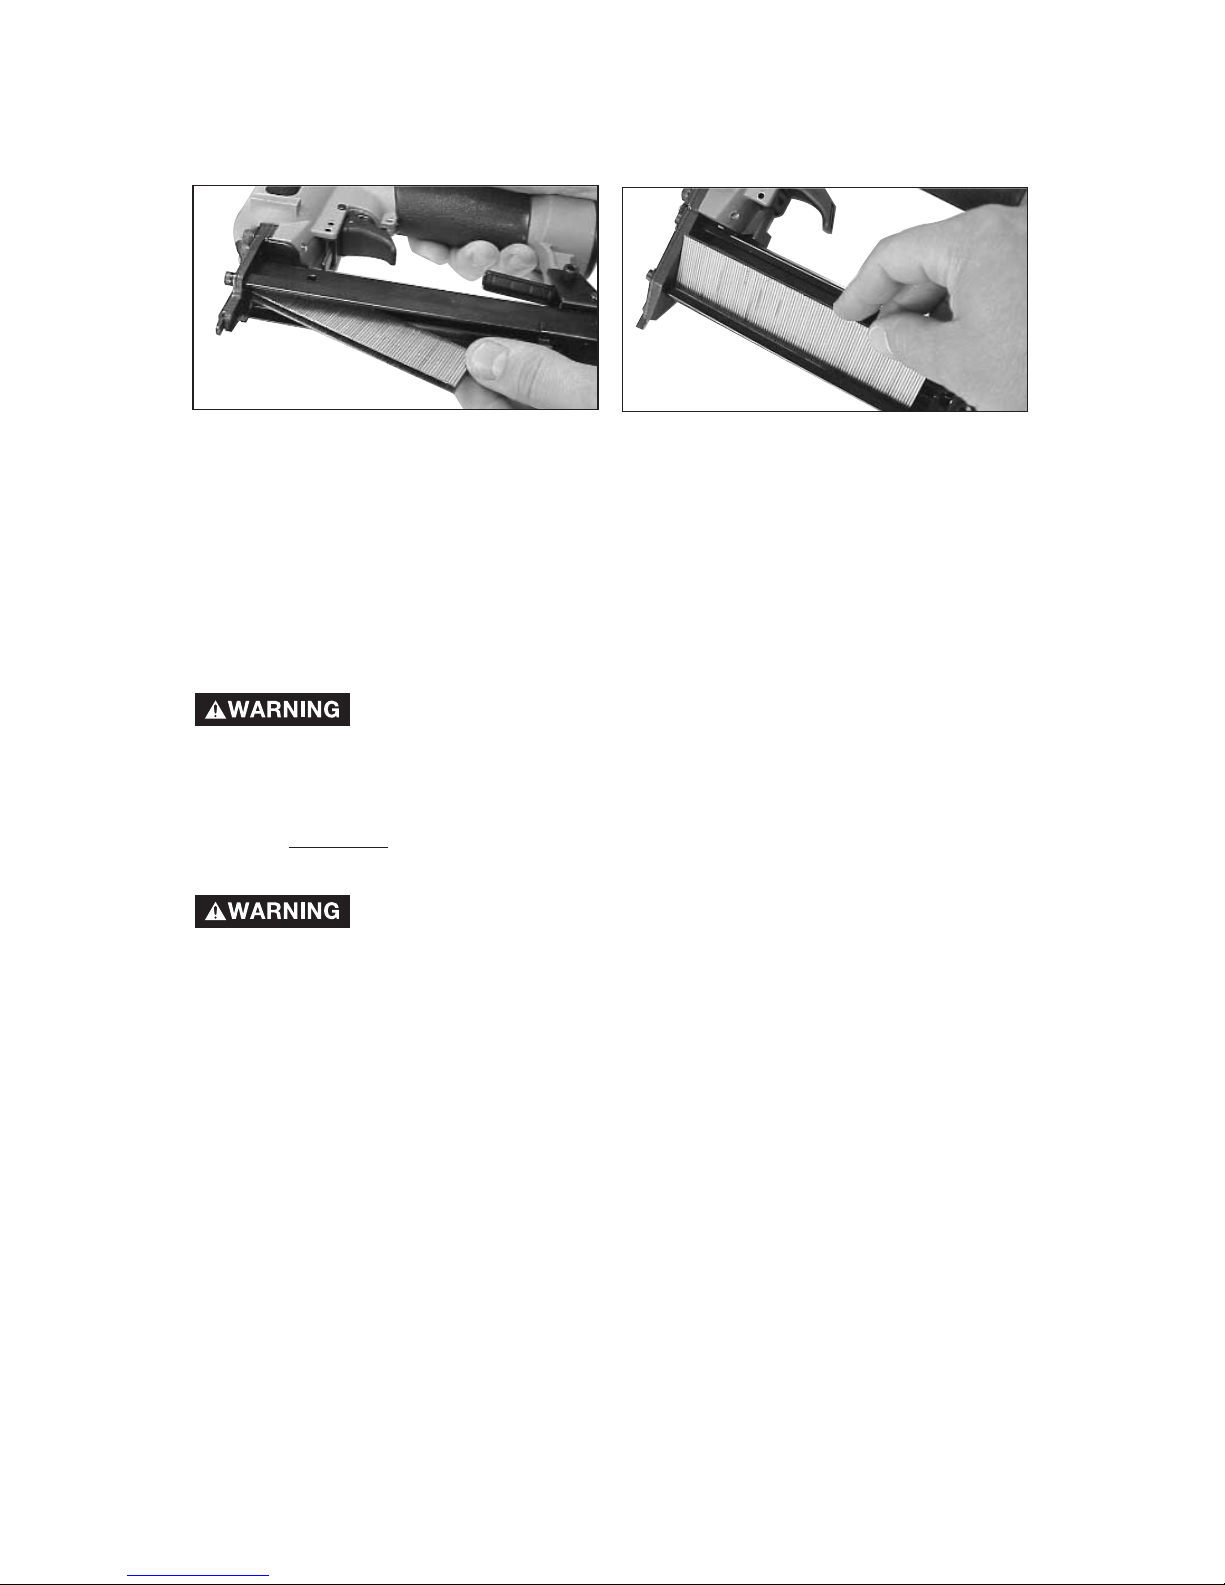
3. Insert a stick of fasteners into the magazine. Make sure fasteners are not
dirty or damaged. Use DeVilbiss fasteners or equivalent for proper fastener
performance.
NOTE: On brad nailer make sure the pointed ends of the fasteners are loaded
with the points downward.
4. Slide magazine until it locks in place.
Stapler
Brad Nailer
Page 11
11 - Eng
D24156
CLEARING A JAM FROM THE TOOL
Disconnect tool from air supply before adjusting, clearing jams,
servicing, relocating or during non-operation. Failure to do so
could result in serious injury or property damage.
FASTENER JAM INSIDE MAGAZINE:
1. Disconnect tool from air hose.
2. Release the magazine latch to open the magazine.
3. Remove jammed fasteners.
4. Reload fasteners into magazine. Refer to Loading the Tool section in this
manual.
Stapler
Brad Nailer
Magazine Latch
Magazine Latch
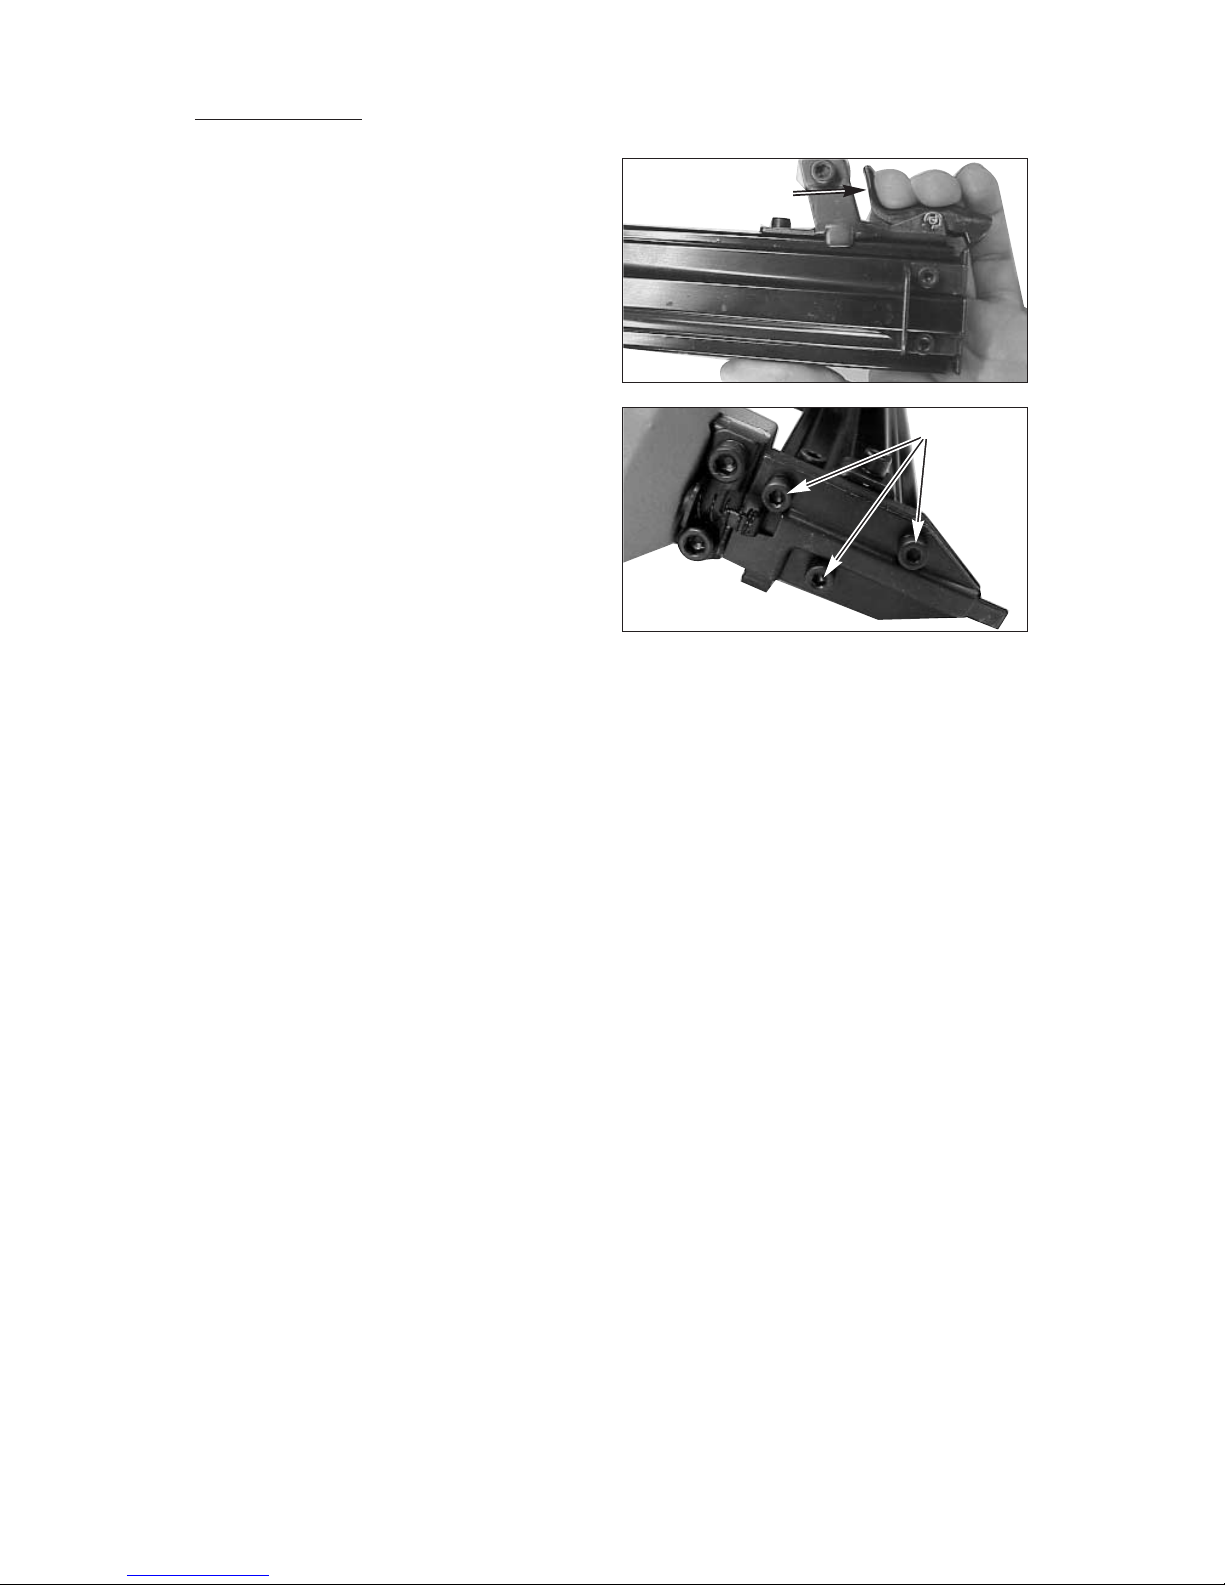
FASTENER JAMMED IN FASTENER DISCHARGE AREA:
For Stapler
1. Disconnect tool from air hose.
2. Release the magazine latch to open
the magazine.
3. Remove fasteners from magazine.
4. Loosen the three screws on the driver
guide cover.
5. Remove the two screws holding the
driver guide cover to the gun body.
IMPORTANT: Before removing driver
guide cover note the orientation of all
parts.
6. Slide driver guide cover out until
jammed fastener is visible
7. Using pliers remove fasteners.
8. Slide drive guide cover into place and
line up holes in spring retainer and
bracket. Replace screws.
9. Tighten all screws securely.
10. Reload fasteners into magazine. Refer to Loading the Tool section in this
manual.
Remove
Magazine Latch
Loosen
Page 12
For Brad Nailer
1. Disconnect tool from air hose.
2. Release the magazine latch to open
the magazine.
3. Remove fasteners from magazine.
4. Remove the three screws on the
driver guide cover.
IMPORTANT: Before removing driver
guide cover note the orientation of all
parts.
6. Slide driver guide cover and driver
cover out until jammed fastener is
visible
7. Using pliers remove fasteners.
8. Slide drive guide cover and driver
cover into place and line up holes.
Replace screws.
9. Tighten screws securely.
10. Reload fasteners into magazine. Refer to Loading the Tool section in this
manual.
12 - Eng
D24156
Remove
Magazine Latch
Page 13

13 - Eng
D24156
TROUBLESHOOTING
PROBLEM
CAUSE
CORRECTION
Fasteners are not the correct
size.
See specification and
fastener sections for correct
fastener information.
Fasteners are
jammed in tool
Air pressure regulated too
high
Adjust air pressure to the
correct PSI, see
specifications.
Brad
Nailer/Stapler
misfires or
sinks two
nails/staples at
the same time
Sluggish
operation
Loose drive guide screws Tighten screws.
Tool does
nothing
Air supply inadequate
Check PSI and CFM
Week drive
Tool fails to drive
fastener
Inadequate air flow or
pressure to tool.
Check air flow and pressure
to tool.
Fasteners are bent Replace with undamaged
fasteners.
Air supply inadequate
Check PSI and CFM
Tool runs slow
or has loss of
power
Tool not lubricated
sufficiently.
Tool needs to be lubricated.
Inadequate air flow or
pressure to tool.
Check air flow and pressure
to tool.
Page 14
14 - Eng
D24156
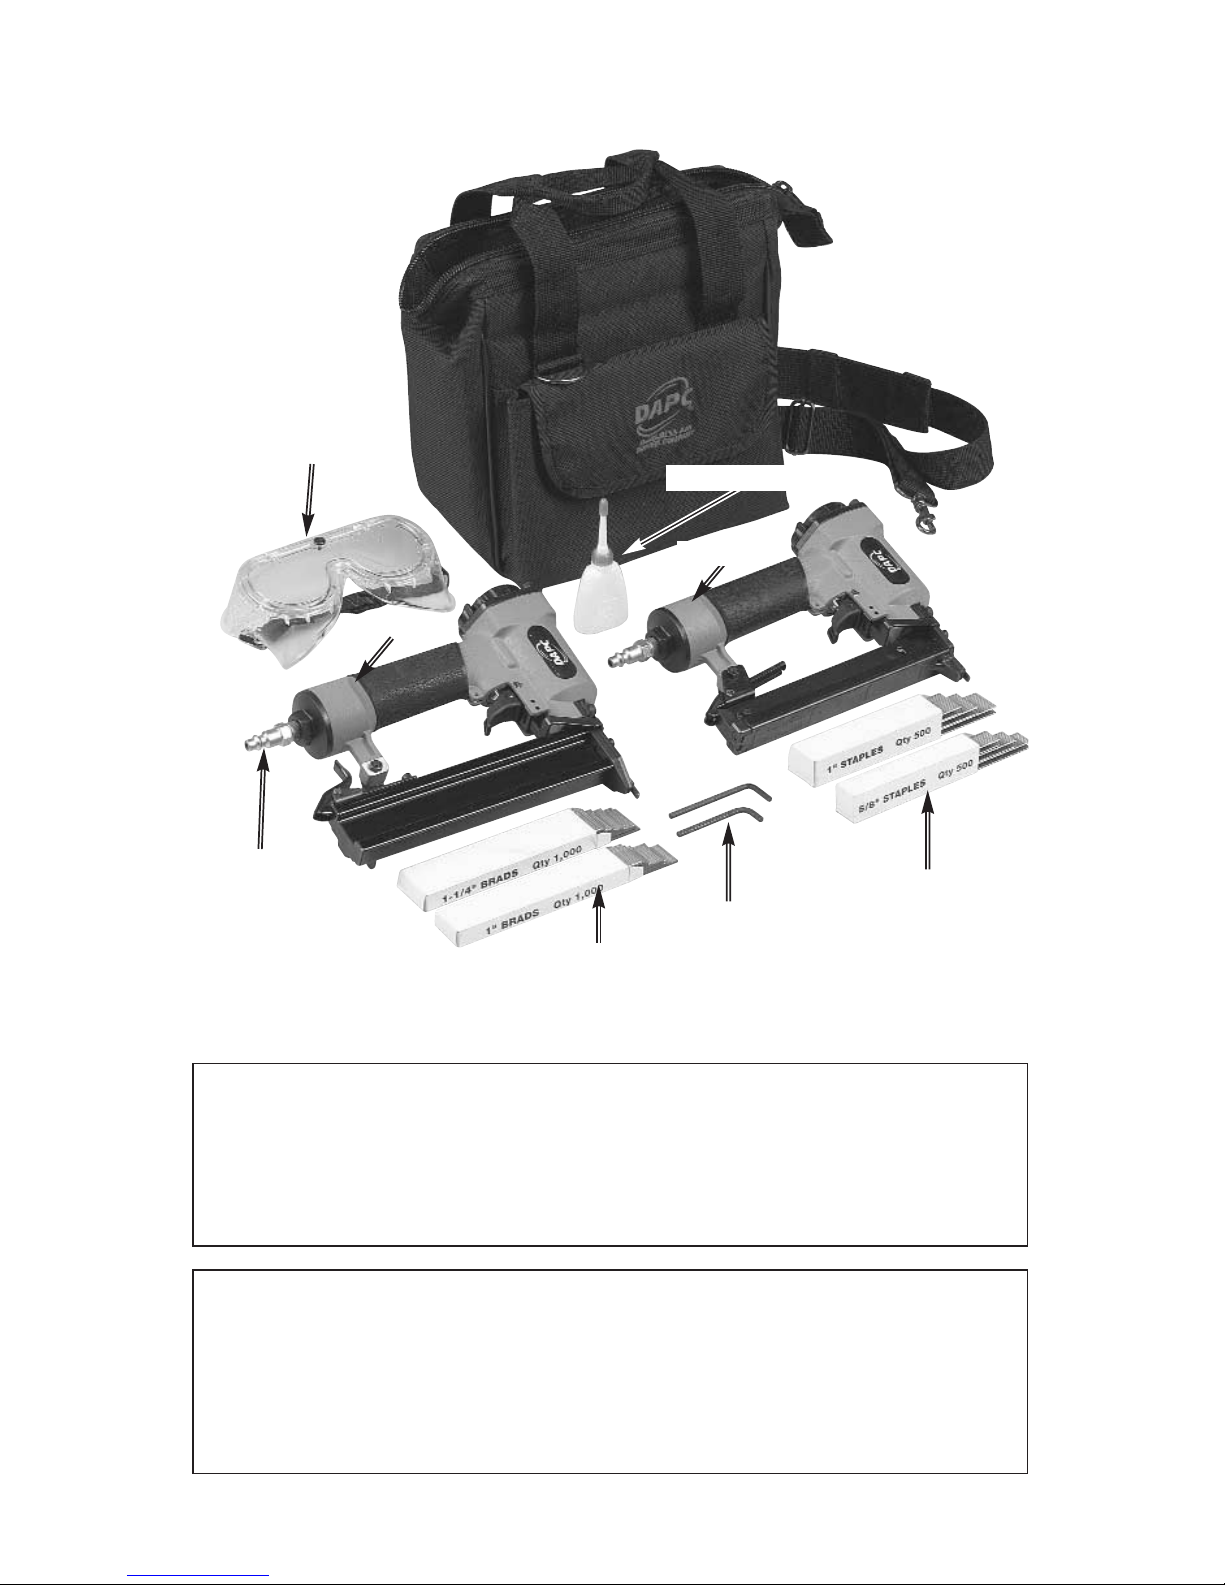
STAPLER/BRAD NAILER KIT ANK20
Narrow
Crown
Staplers
Fasteners
1/4" NPT
Inlet Plug
(AC100)
3mm & 4 mm
Allen
Wrenches
Safety Glasses
Stapler
Lubricating Oil
Brad Nailer
Fasteners
Brad Nailer
SPECIFICATIONS
Stapler
Max. P.S.I. 120
Operating Pressure 60-100 PSI
Air Inlet 1/4 NPT
Magazine Capacity 100 staples
Recommended Fasteners 18 gauge narrow crown staples, 1/4”x3/8” to 1”
Brad Nailer
Max. P.S.I. 120
Operating Pressure 60-100 PSI
Air Inlet 1/4 NPT
Magazine Capacity 100 brads
Recommended Fasteners 18 gauge brads, 5/8” to 1-1/4”
Page 15
15 - Eng
D24156
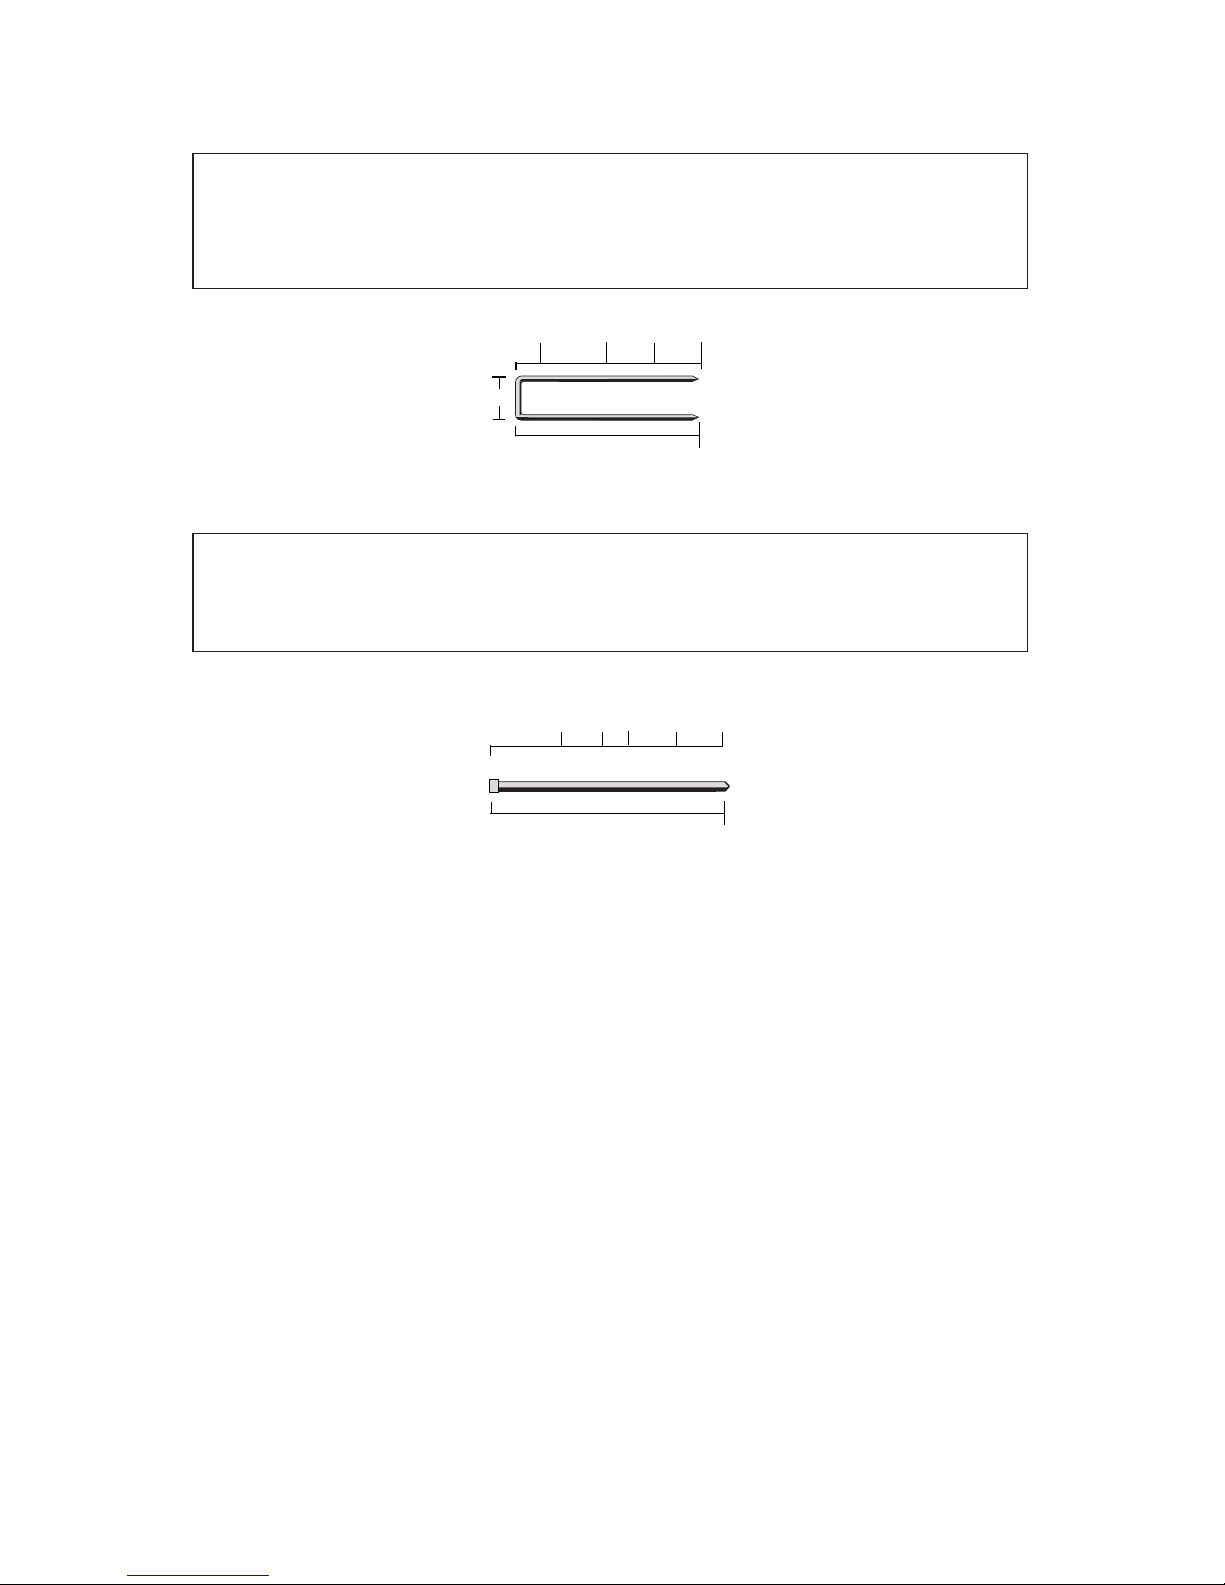
FASTENERS
Fasteners for the brad nailer fit and interchange with fasteners for the following
brands of guns:
2by4, Stanley-Bostitch, Senco, Paslode, Porter-Cable, Duofast, Craftsman
Fasteners for the stapler fit and interchange with fasteners for the following
brands of guns:
2by4, Senco, Porter-Cable, Duofast, Craftsman
3
/
4
”
1
/
2
”
3
/
8
”
1
/
4
”
Tool Range
1”
1
1
1
/
/
4
”
1
1
4
”
1”
3/4”
3/8”
5/8”
Tool Range
Page 16
16 - Eng
D24156
LIMITED WARRANTY
All merchandise manufactured by DeVilbiss Air Power Company Manufacturing is warranted to be free
of defects in workmanship and material which occur during the first year from the date of purchase by
the original purchaser (initial user). Products covered under this warranty include: air compressors, *air
tools, accessories, service parts, pressure washers, and generators used in consumer applications
(i.e., personal residential household usage only).
Air compressors, *air tools, accessories, service parts, pressure washers, and generators used in
commercial applications (income producing) are covered by a 90 day warranty.
DeVilbiss Air Power Manufacturing will repair or replace, at DeVilbiss’ option, products or components
which have failed within the warranty period. Repair or replacement, and service calls on 60 and 80
gallon air compressors, will be handled by Authorized Warranty Service Centers and will be scheduled
and serviced according to the normal work flow and business hours at the service center location,
and depending on the availability of replacement parts.
All decisions of DeVilbiss Air Power Company Manufacturing with regard to this policy shall be final.
This warranty gives you specific legal rights, and you may also have other rights which vary from state
to state.
RESPONSIBILITY OF ORIGINAL PURCHASER (Initial User):
o
To process a warranty claim on this product, DO NOT return it to the retailer. The product must be
evaluated by an Authorized Warranty Service Center. For the location of the nearest Authorized
Warranty Service Center call 1-800-888-2468, Ext. 2, 24 hours a day, 7 days a week or visit our
web site @ devap.com.
o
Retain original cash register sales receipt as proof of purchase for warranty work.
o
Use reasonable care in the operation and maintenance of the product as described in the Owners
Manual(s).
o
Deliver or ship the product to the nearest DeVilbiss Air Power Manufacturing Authorized
Warranty Service Center. Freight costs, if any, must be paid by the purchaser.
o
Air compressors with 60 and 80 gallon tanks only will be inspected at the site of installation.
Contact the nearest Authorized Warranty Service Center, that provides on-site service calls, for
service call arrangement.
o
If the purchaser does not receive satisfactory results from the Authorized Warranty Service
Center, the purchaser should contact DeVilbiss Air Power Company Manufacturing.
THIS WARRANTY DOES NOT COVER:
o
Merchandise sold as reconditioned, floor models and/or display models. Any damaged or
incomplete equipment sold "as is".
o
Merchandise used as "rental" equipment.
o
Merchandise that has become inoperative because of ordinary wear, misuse, freeze damage, use
of improper chemicals, negligence, accident, improper and/or unauthorized repair or alterations
including failure to operate the product in accordance with the instructions provided in the
Owners Manual (s) supplied with the product.
*Air Tools: O-Rings and driver blades are considered ordinary wear parts, therefore, they are
warranted for a period of 45 days from the date of purchase.
o
An air compressor that pumps air more than 50% during a one hour period is considered misuse
because the air compressor is undersized for the required air demand. Maximum compressor
pumping time per hour is 30 minutes.
o
Merchandise sold by DeVilbiss Air Power Manufacturing which has been manufactured by and
identified as the product of another company. The product manufacturer's warranty will apply.
o
Repair and transportation costs of merchandise determined not to be defective.
o
Cost associated with assembly, required oil, adjustments or other installation and start-up cost.
o
Any incidental, indirect or consequential loss, damage, or expense that may resulT from ANY
defect, failure or malfunction of the product. Some states do not allow the exclusion or limitation
of incidental or consequential damages, so the above limitation or exclusion may not apply to
you.
o
Implied warranties, including those of merchantability and fitness for a particular PURPOSE, are
limited to one year from the date of original purchase. Some states do not allow limitations on
how long an implied warranty lasts, so the above limitations may not apply to you.
213 Industrial Drive • Jackson, TN 38301-9615
Telephone: 1-800-888-2468 , Ext. 2
FAX: 1-800-888-9036
 Loading...