

Page 1

Quick Guide
Dynamic balance
www.develop.eu
ineo
+
3350/3850
Page 2

Page 3

Table of contents
1 Introduction
1.1 Welcome .......................................................................................................................................... 1-3
1.2 User's Guides .................................................................................................................................. 1-3
Booklet manual .................................................................................................................................. 1-3
User's guides included in User's Guide CD/DVD-ROM .................................................................... 1-3
1.3 User's Guide CD/DVD-ROM........................................................................................................... 1-4
1.3.1 Operating environment .......................................................................................................................1-4
1.4 Notations and symbols used in this manual................................................................................. 1-5
Procedural instruction........................................................................................................................ 1-5
Symbols used in this manual............................................................................................................. 1-5
Product and key names..................................................................................................................... 1-5
Notations of application names ......................................................................................................... 1-5
2 Overview of This Machine
2.1 About this machine......................................................................................................................... 2-3
2.1.1 Name of each part ..............................................................................................................................2-3
Front side........................................................................................................................................... 2-3
Rear side............................................................................................................................................ 2-4
2.1.2 Option configuration ...........................................................................................................................2-5
2.2 About power supply........................................................................................................................ 2-7
2.2.1 Power Switch and Power key locations..............................................................................................2-7
2.2.2 Turning the Power Switch ON or OFF ................................................................................................2-8
2.2.3 Using the Power key...........................................................................................................................2-9
2.3 Control Panel................................................................................................................................. 2-11
2.4 Operating the Touch Panel .......................................................................................................... 2-13
2.5 Main Menu ..................................................................................................................................... 2-15
2.6 Entering characters ...................................................................................................................... 2-16
When using the Power key as a Power Save key.............................................................................. 2-9
When using the Power key as a Sub Power OFF key ..................................................................... 2-10
Tap................................................................................................................................................... 2-13
Flick.................................................................................................................................................. 2-13
Displaying the Keypad..................................................................................................................... 2-13
Switching to the entry or selection screen....................................................................................... 2-14
Precautions on using the Touch Panel ............................................................................................ 2-14
3 Loading Paper
3.1 Paper................................................................................................................................................ 3-3
3.1.1 Checking the available paper types....................................................................................................3-3
3.1.2 Checking the available paper sizes ....................................................................................................3-4
3.1.3 Precautions for correct operations .....................................................................................................3-5
Unavailable paper .............................................................................................................................. 3-5
Storing paper ..................................................................................................................................... 3-5
3.2 Loading paper into the Manual Feed Tray.................................................................................... 3-6
3.3 Loading paper into Tray 1 .............................................................................................................. 3-8
ineo+ 3350/3850 Contents-1
Page 4

4 Initial Settings of This Machine
4.1 Preparation for network connection (for administrators) ........................................................... 4-3
Checking a LAN cable for connection ............................................................................................... 4-3
Assigning an IP address .................................................................................................................... 4-3
4.2 Preparation for fax (for administrators)........................................................................................ 4-4
Checking the modular cable connection........................................................................................... 4-4
Specifying the type of telephone line................................................................................................. 4-4
Preparing to use the machine in a Private Branch Exchange (PBX) environment............................. 4-4
Selecting a receiving method............................................................................................................. 4-4
Registering sender information.......................................................................................................... 4-4
Setting the date and time for the machine......................................................................................... 4-4
4.3 HDD settings (for administrators).................................................................................................. 4-5
5 Basic Usage
5.1 Using the print function (Windows environment)......................................................................... 5-3
5.1.1 Printer driver........................................................................................................................................5-3
5.1.2 Preparation for printing (network connection) ....................................................................................5-4
Checking a LAN cable for connection ............................................................................................... 5-4
Checking the network settings .......................................................................................................... 5-4
Installing the printer driver ................................................................................................................. 5-4
5.1.3 Preparation for printing (USB connection)..........................................................................................5-5
Changing the installation settings (Windows 7/8/Server 2008 R2/Server 2012) ............................... 5-5
Installing the printer driver ................................................................................................................. 5-6
5.1.4 Initial settings of the printer driver ......................................................................................................5-7
5.1.5 How to print ........................................................................................................................................5-7
5.2 Using the scan function.................................................................................................................. 5-8
5.2.1 Available operations in the scan function...........................................................................................5-8
5.2.2 How to send........................................................................................................................................5-9
5.3 Using the fax function................................................................................................................... 5-11
5.3.1 Fax function ......................................................................................................................................5-11
5.3.2 How to send......................................................................................................................................5-12
5.3.3 Introduction of fax transmission function .........................................................................................5-14
5.3.4 Introduction of fax receiving function ...............................................................................................5-14
5.3.5 Introduction of internet fax function..................................................................................................5-15
5.4 Using the copy function ............................................................................................................... 5-16
5.4.1 How to copy......................................................................................................................................5-16
5.4.2 Introduction of copy function............................................................................................................5-18
5.5 Printing a file stored on USB memory......................................................................................... 5-19
5.6 Registering a destination ............................................................................................................. 5-21
Supported USB memory devices .................................................................................................... 5-19
How to print ..................................................................................................................................... 5-19
Address book................................................................................................................................... 5-21
Registering one-touch destinations in the address book ................................................................ 5-21
6Index
Contents-2 ineo+ 3350/3850
Page 5

1
Introduction
Page 6

1.1 Welcome
1 Introduction
1.1 Welcome
Thank you for purchasing this machine.
This guide describes basic procedures required to use this machine and how to configure initial settings. For
information on the detailed functions and operation procedures, refer to the User's Guide included in the Us-
er's Guide CD/DVD-ROM.
To use this product securely, be sure to read the [Safety Information Guide] before using this machine.
1.2 User's Guides
Booklet manual
Manual title Overview
[Safety Information Guide] This guide describes notes and precautions that should be fol-
1
lowed to use this machine.
Please be sure to read this manual before using this machine.
User's guides included in User's Guide CD/DVD-ROM
Manual title Overview
[Quick Guide] (This guide) This guide describes how to perform basic operations of this
machine and configure initial settings.
[User's Guide Introduction] This guide contains information that is useful to know before be-
ginning to operate this machine, such as the name of each part
and how to turn the power on and off, use the Control Panel,
and load an original or paper.
[User's Guide Print] This guide describes how to install the printer driver as well as
basic usage and applications.
[User's Guide Copy] This guide describes various methods to make copies.
[User's Guide Scan] This guide describes scan transmission operations and neces-
sary preparations.
You can scan a paper document, convert it to digital data, and
send the result to the computer or server.
[User's Guide Fax] This guide describes fax operations and necessary prepara-
[User's Guide Network Fax] This guide describes fax (Internet fax) operations using the net-
[User's Guide PC-FAX] This guide describes PC- Fax operations and necessary prepa-
[User's Guide Advanced Functions] This guide describes how to install optional license kits and
[User's Guide Maintenance/Troubleshooting]
[User's Guide Description of Utility
Keys]
[User's Guide Applied Functions] This guide describes the special usages of this machine such as
tions.
work and necessary preparations.
rations.
You can send the original data created on the computer by fax
directly without printing it out to paper.
functions that can be used by installing the license kits.
This guide describes how to replace consumables, clean this
machine, and perform troubleshooting.
This guide describes Utility settings such as [User Settings] and
[Administrator Settings] for this machine.
how to use Web Connection, manually install the printer driver,
configure print settings using Linux, and use the authentication
unit.
ineo+ 3350/3850 1-3
Page 7

1
1.3 User's Guide CD/DVD-ROM
User's Guide CD/DVD-ROM is contained in the package of this machine. The CD/DVD-ROM includes the
user's guides required to use this machine.
1.3.1 Operating environment
Item Description
Supported operating
systems
Supported browsers
Required application For Windows
Display resolution 1024 e 768 pixels or more
Microsoft Windows XP (SP3) / Windows Vista (SP2) / Windows 7 (SP1)/ Windows 8
Apple Mac OS X 10.4/10.5/10.6/10.7/10.8
*
For Windows
• Internet Explorer 6.x/7.x/8.x/9.x/10.x
• Firefox 3.5 or later/ESR 10.0 or later
For Mac OS
• safari 2.x/3.x/4.x/5.x/6.x
• Adobe Reader 9.x/10.x/11.x
For Mac OS
• Adobe Reader 8.x/9.x/10.x/11.x
User's Guide CD/DVD-ROM
1.3
*
JavaScript must be enabled.
1-4 ineo+ 3350/3850
Page 8
1.4 Notations and symbols used in this manual
Tips
Related setting
Related setting (for the administrator)
1.4 Notations and symbols used in this manual
Procedural instruction
0 This check mark symbol shows a precondition of a procedure.
1 This format number "1" represents the first step.
2 This format number represents the order of consecutive steps.
% This symbol indicates a supplementary explanation of a procedural instruction.
Symbols used in this manual
NOTICE
This symbol indicates a risk that may result in damage to this machine or documents.
Follow the instructions to avoid property damage.
This symbol indicates supplemental information of a topic as well as options required to use a function.
dReference
This symbol indicates reference functions related to a topic.
1
This shows the settings related to a particular topic for any user.
This shows the settings related to a topic only for administrators.
Product and key names
Notations used
in this manual
[ ] An item enclosed in brackets [ ] indicates a key name on the Touch Panel or com-
Bold text This presents a key name, part name, product name, or option name on the Control
Description
puter screen, or the name of a user's guide.
Panel.
ineo+ 3350/3850 1-5
Page 9

2
Overview of This Machine
Page 10

Page 11
2
2 Overview of This Machine
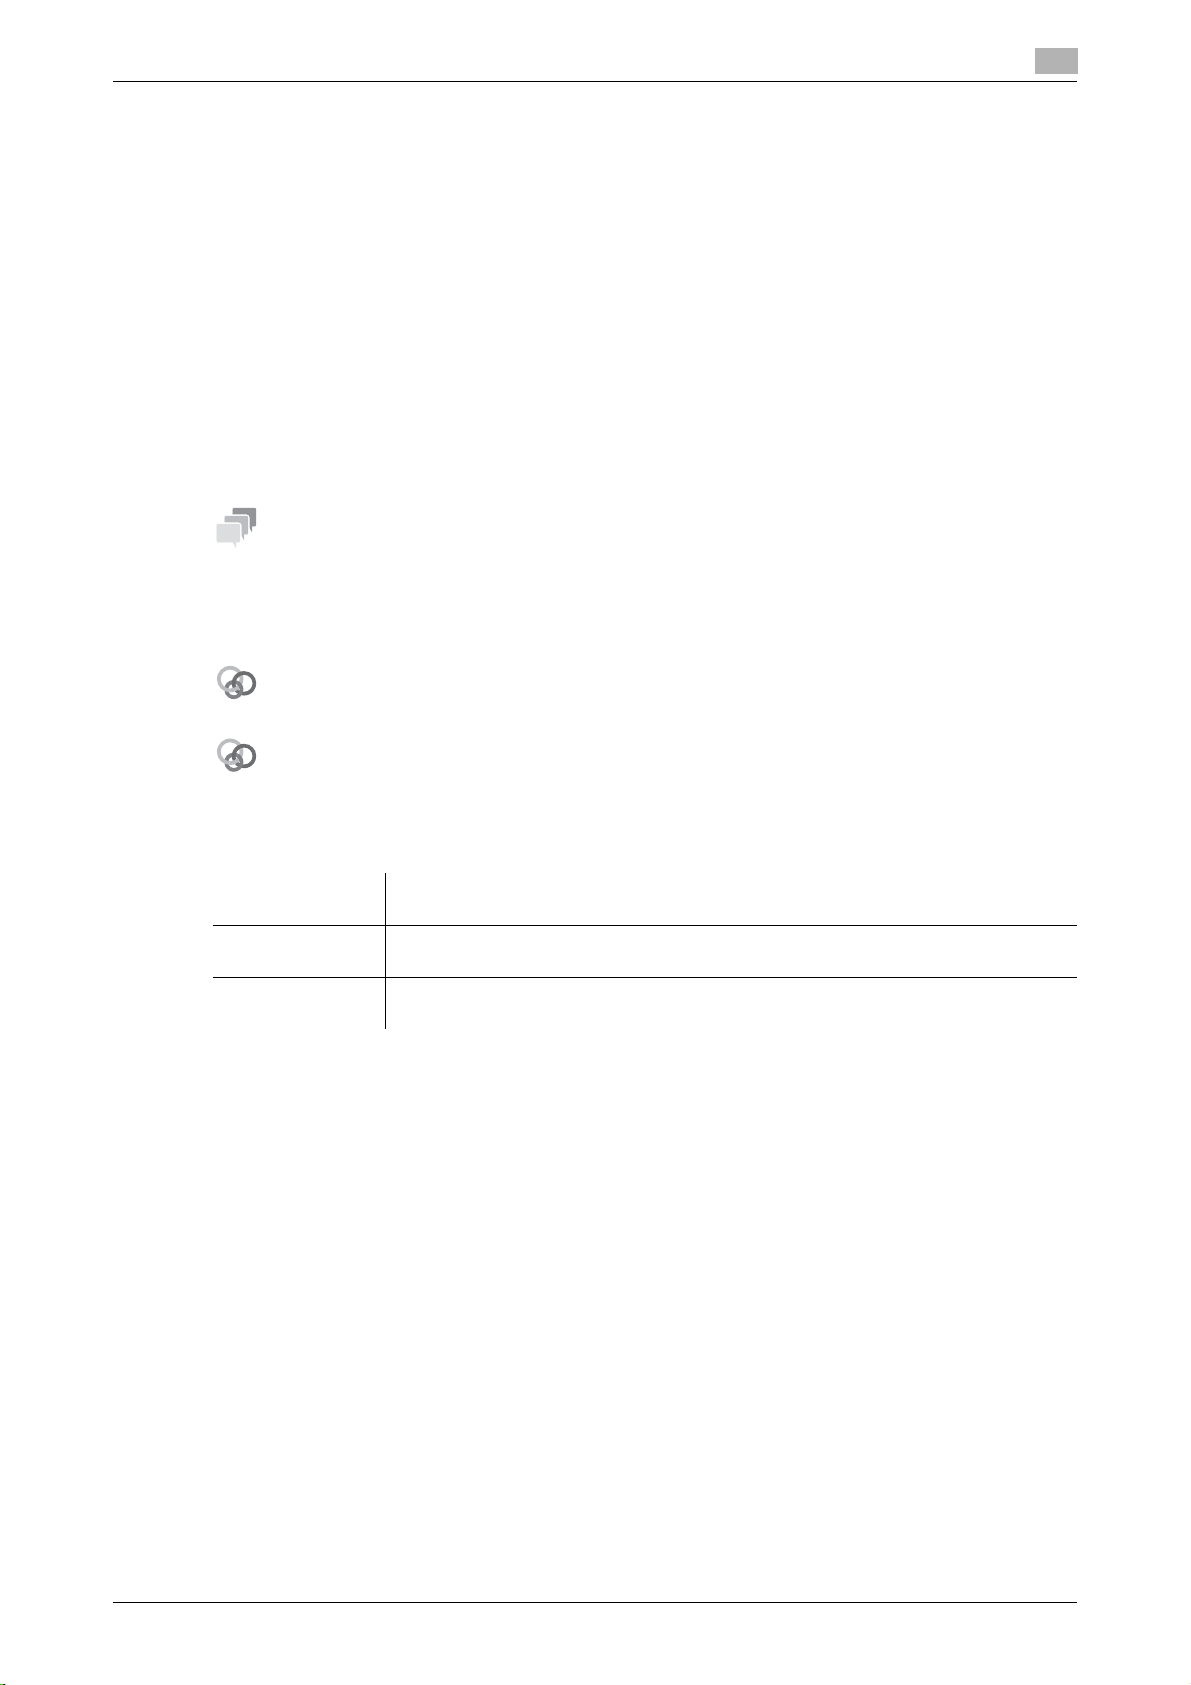
2.1 About this machine
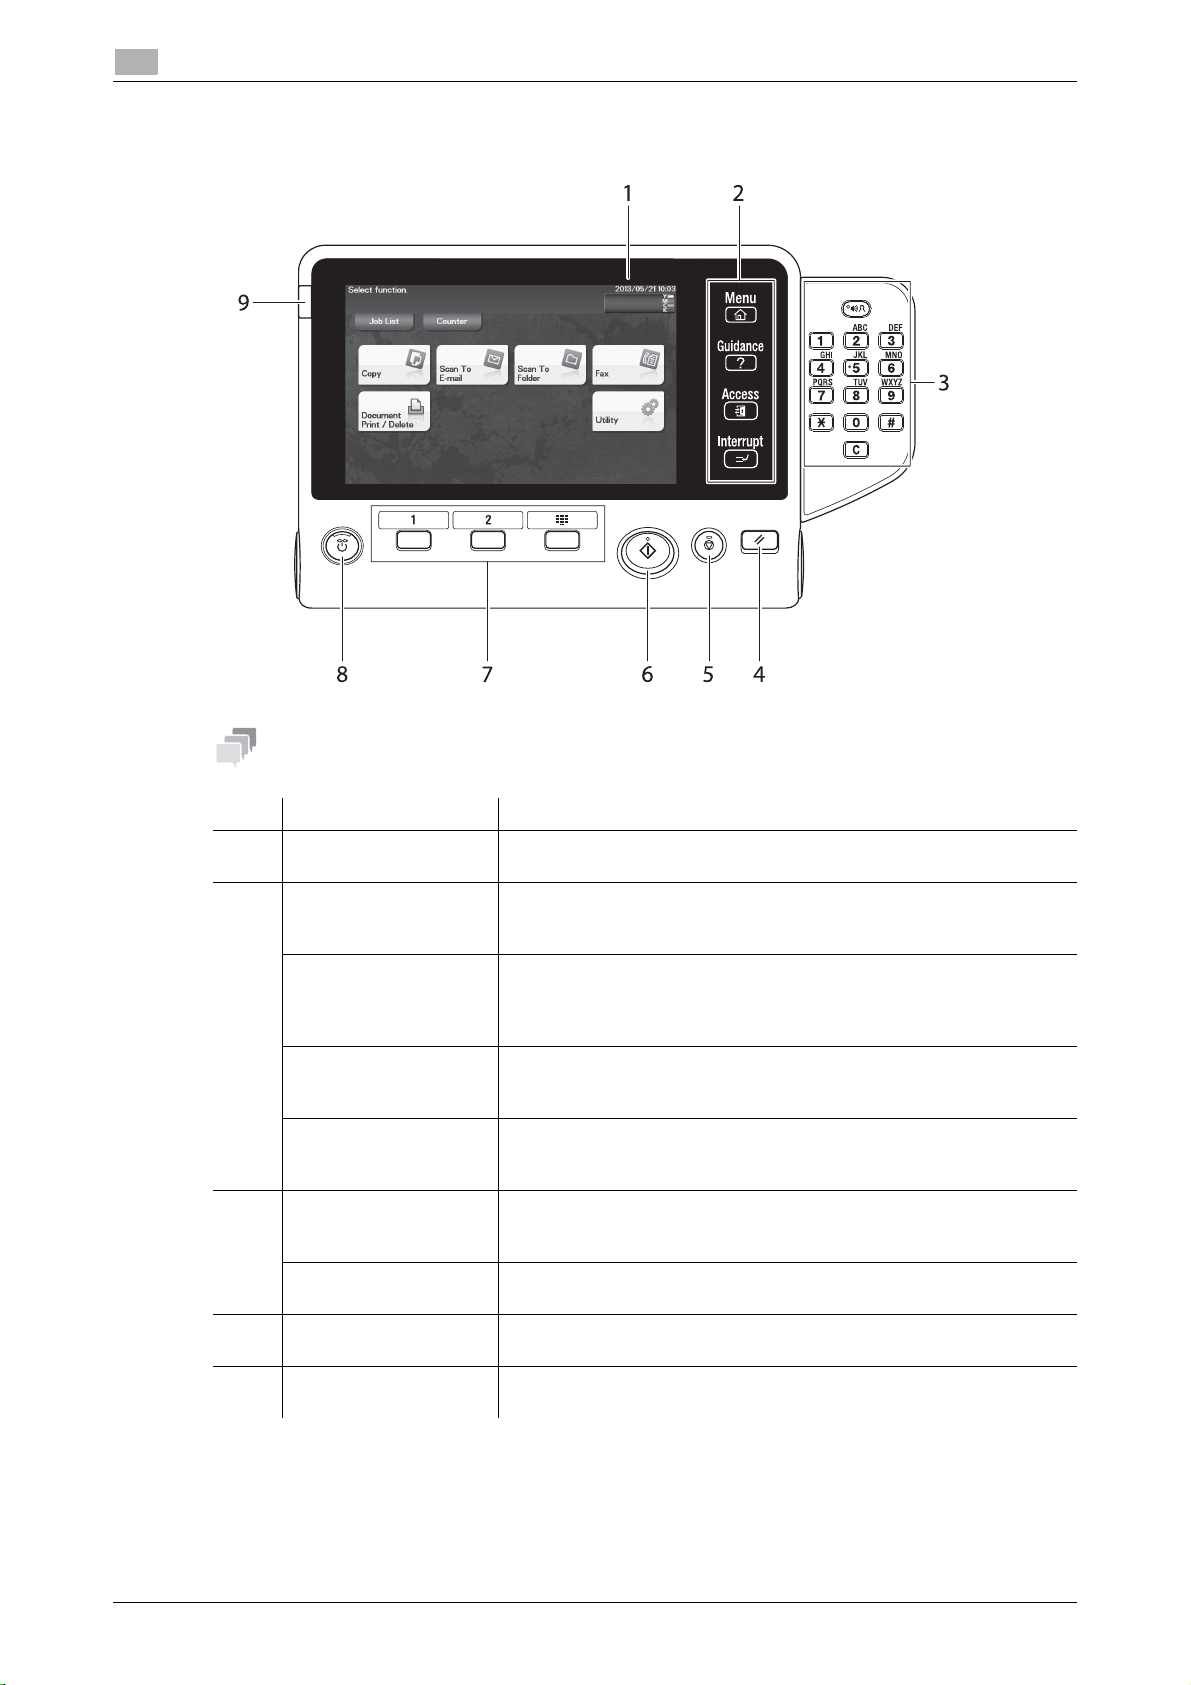
2.1.1 Name of each part
Front side
About this machine
2.1
2-b
2-a
1
6
5
No. Name
1 Control Panel
2 Automatic Document Feeder (ADF)
2-a ADF Feed Cover
2-b Document Guide
2-c Document Feed Tray
2-d Document Output Tray
2-e Document Stopper
3 USB Host Port
4 Manual Feed Tray
5 Tray 1
6 Data Indicator
2
2-c
2-d
2-e
3
4
2-3 ineo+ 3350/3850
Page 12
2.1 About this machine
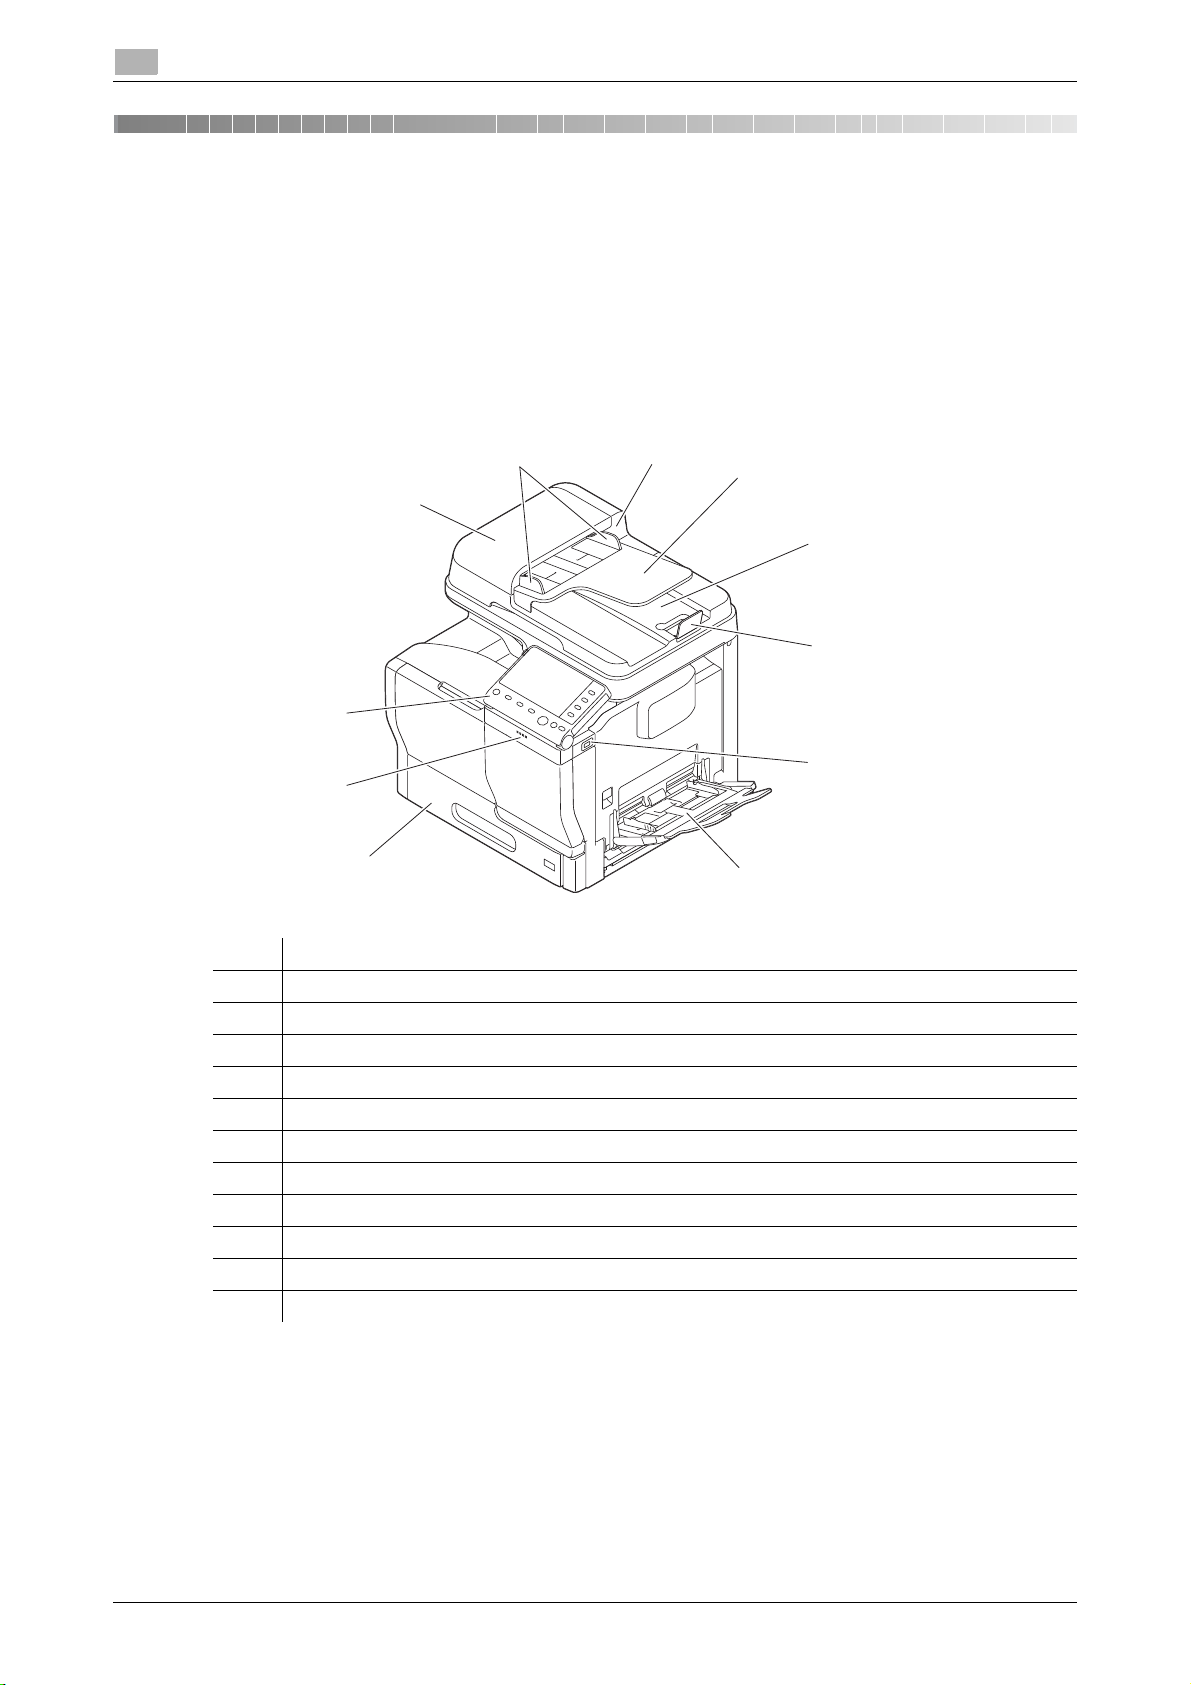
Rear side
This view shows the machine with the optional Fax Kit FK-512 and Mount Kit MK-738 installed. These are
provided as standard on ineo+ 3850 models sold in North America.
2
3
1
4
5
6
No. Name
1 Power Switch
2 Power Connection
3 USB Port (Type B)
4 Ethernet port (1000Base-T/100Base-TX/10Base-T)
5 TEL (telephone) Jack
6 LINE (telephone line) Jack
2
ineo+ 3350/3850 2-4
Page 13

2
2.1.2 Option configuration
About this machine
2.1
1
2
3
4
56
No. Name Description
1 Authentication Unit
AU-201
2 Working Table WT-P02 Provides an area to temporarily place an original or other materials.
3 Finisher FS-P03 Staples the printed sheets.
4 Keypad KP-101 Located on the side of the Control Panel.
5 Paper Feed Unit
PF-P13
6 DESK DK-P03 Used to install this machine on the floor.
The following optional components are built into this machine and are not shown in the figure above.
7 Fax Kit FK-512 Used to operate this machine as a fax machine.
8 Mount Kit MK-738 This unit is required to install the Fax Kit.
9 i-Option LK-106 Used to add a bar code font, which is one of special fonts.
10 i-Option LK-107 Used to add a unicode font, which is one of special fonts.
11 i-Option LK-108 Used to add an OCR font, which is one of special fonts.
12 i-Option LK-111 Supports the ThinPrint function, which is one of a number of ad-
Performs user authentication by scanning information recorded on
the IC card.
This is also used when the Authentication Unit or Finisher is installed.
For staples, use Staple Kit SK-501.
Allows you to enter numbers by using the Hardware Keypad.
Allows you to load up to 500 sheets.
There are two slots in which the Paper Feed Unit can be installed.
This component may not be able to be used depending on the region the machine is used in.
This is provided as standard on ineo+ 3850 models sold in North
America.
This is provided as standard on ineo+ 3850 models sold in North
America.
vanced functions.
2-5 ineo+ 3350/3850
Page 14

2.1 About this machine
dReference
For details on how to register i-Option license kits, refer to Chapter 2 in [User's Guide Advanced Functions].
2
ineo+ 3350/3850 2-6
Page 15
2
2.2 About power supply
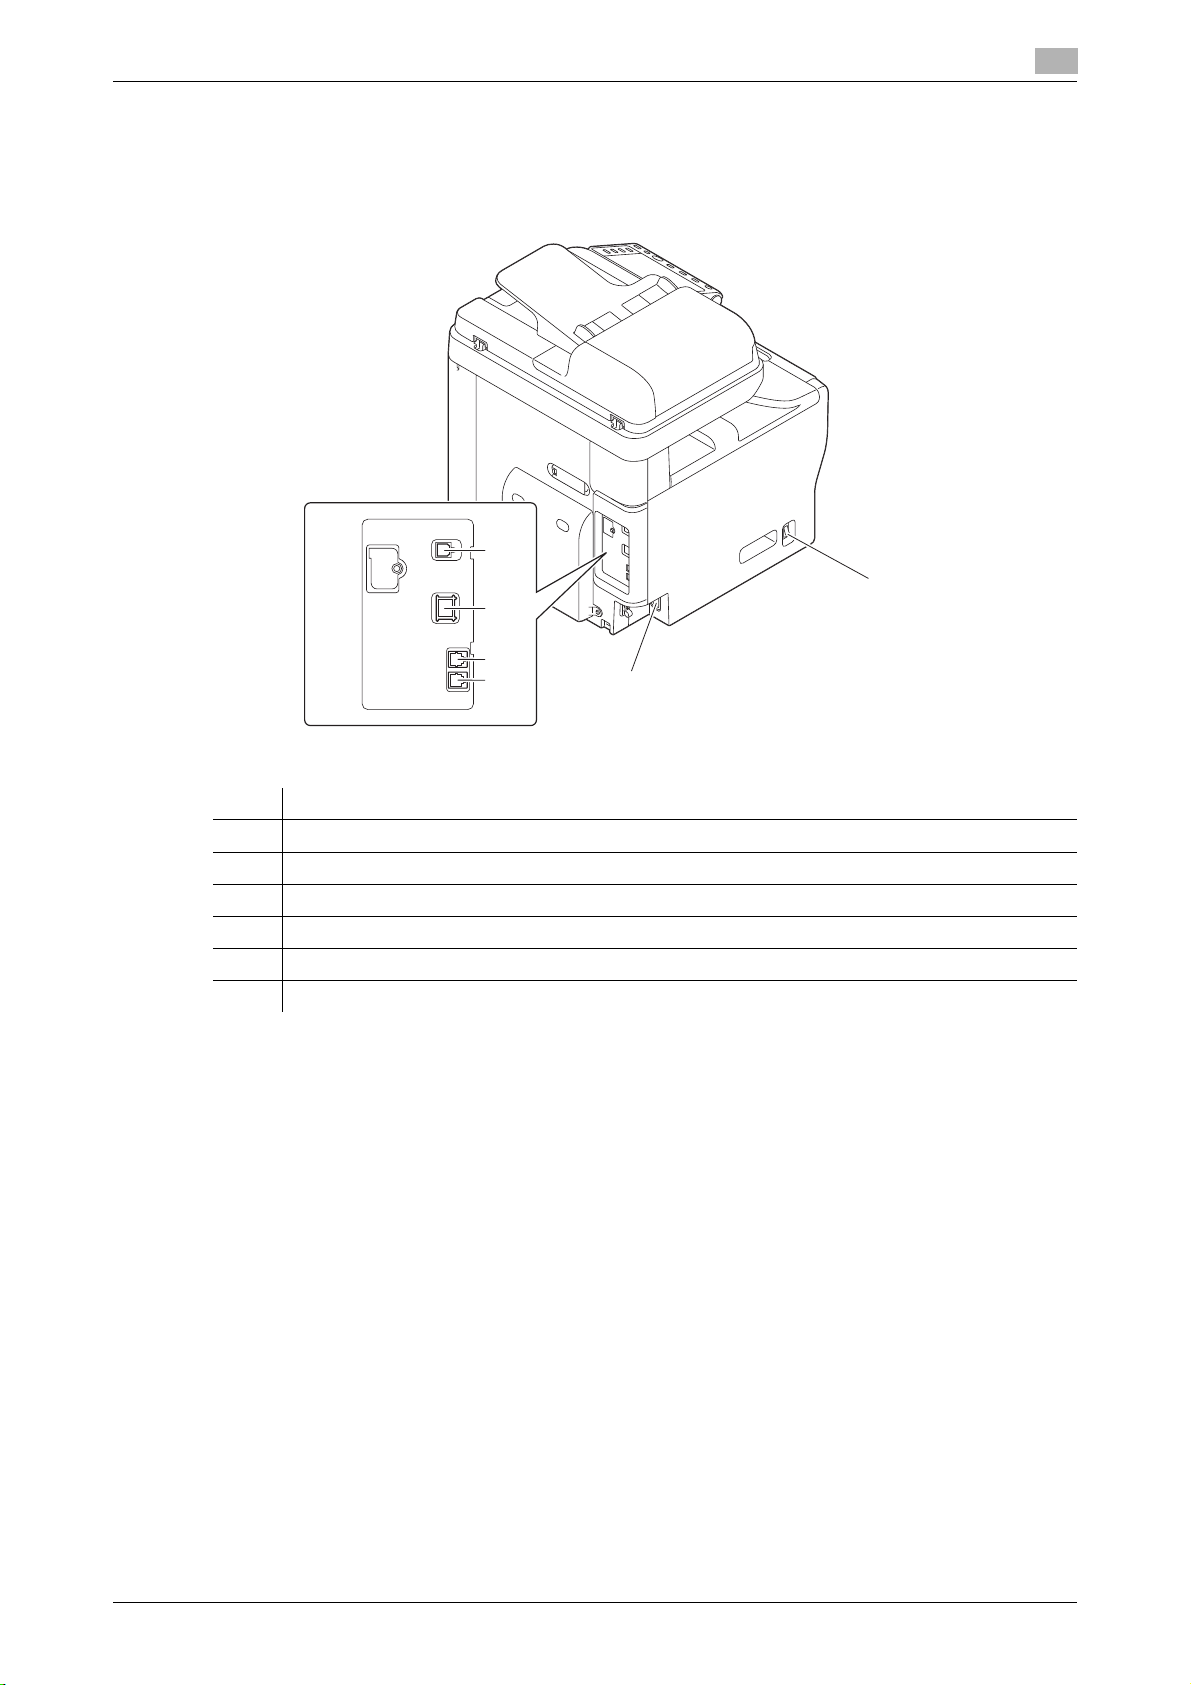
2.2.1 Power Switch and Power key locations
This machine has two power switches: Power Switch outside the machine and Power key on the Control
Panel.
About power supply
2
2.2
1
No. Name Description
1 Power Switch Press this switch when turning the main power of this machine on or
off, or when restarting this machine.
2 Power key Press this key to switch this machine to Power Save mode. This func-
NOTICE
While printing, do not turn the Power Switch off or press the Power key. Otherwise, it may lead to a paper
jam.
If the Power Switch is turned off or the Power key is pressed while this machine is running, the system deletes the currently loaded data or communicating data as well as queued jobs.
tion reduces power consumption and has more significant power saving effect.
For details, refer to page 2-9.
2-7 ineo+ 3350/3850
Page 16

2.2 About power supply
2.2.2 Turning the Power Switch ON or OFF
1 When turning the main power on, press n of the Power Switch.
A screen appears to show that this machine is in the process of start-up.
When the main menu icon is displayed, this machine is ready to use.
2 When turning the main power off, press o of the Power Switch.
2
NOTICE
When restarting this machine, turn the Power Switch off and on again after 10 or more seconds have elapsed.
Not doing so may result in an operation failure.
ineo+ 3350/3850 2-8
Page 17
2
Related setting (for the administrator)
2.2.3 Using the Power key
Press the Power key to switch this machine to Power Save mode.
You can select [Power Save] or [Sub Power OFF] as Power Save mode that is activated when the Power key
is pressed.
To configure settings: [Utility] - [Administrator Settings] - [System Settings] - [Power Supply/Power Save Set-
tings] - [Power Save Key] (The default varies depending on the region the machine is used in.)
When using the Power key as a Power Save key
When the Power key is pressed, the status of this machine changes as shown below. Depending on how
long the Power key is pressed, the state of the power saving mode to be activated will differ.
About power supply
2.2
Power key Status of
this machine
Short press Low Power
mode
(Default)
Sleep mode Flash:
Hold down Sub Power
OFF
Press the Power key to select whether to switch to Low Power or Sleep mode.
To configure settings: [Utility] - [Administrator Settings] - [System Settings] - [Power Supply/Power Save Settings] - [Power Save Settings] (Default: [Low Power])
Status of
LED
Flash:
Blue
Blue
Light up:
Orange
Description
Turns off the display of the Touch Panel to reduce power use.
This machine returns to Normal mode when it receives
data or faxes or when the user operates the Touch Pan-
el.
Provides a greater power saving effect than Low Power
mode. The time required to return to Normal mode is
longer than that from Low Power mode.
This machine returns to Normal mode when it receives
data or faxes or when the user operates the Touch Pan-
el.
Provides a greater power saving effect than Sleep mode.
While the sub power is turned off, this machine can receive data or faxes, however, it cannot scan or print an
original.
If data or faxes are received while the sub power is
turned off, they are printed when the machine returns to
Normal mode.
To enable the machine to return to Normal mode from
the Sub Power OFF status, press the Power key again.
2-9 ineo+ 3350/3850
Page 18

2.2 About power supply
When using the Power key as a Sub Power OFF key
When the Power key is pressed, the status of this machine changes as shown below. Depending on how
long the Power key is pressed, the state of the power saving mode to be activated will differ.
2
Power key Status of
this machine
Short press Sub Power
OFF
Hold down ErP Auto
Power OFF
Status of
LED
Light up:
Orange
Flash:
Orange
Description
Provides a greater power saving effect than Sleep mode.
While the sub power is turned off, this machine can receive data or faxes, however, it cannot scan or print an
original.
If data or faxes are received while the sub power is
turned off, they are printed when the machine returns to
Normal mode.
To enable the machine to return to Normal mode from
the Sub Power OFF status, press the Power key again.
This function provides a more significant power saving
effect than the Sub Power OFF mode, which is close to
the state where the main power is turned off.
In ErP Auto Power OFF mode, this machine cannot receive data or faxes, and also it cannot scan or print an
original.
To enable the machine to return to Normal mode from
the ErP Auto Power OFF status, press the Power key
again.
ineo+ 3350/3850 2-10
Page 19
2
Tips
2.3 Control Panel
Control Panel
2.3
This figure shows the Control Panel with an optional Keypad installed.
No. Name Description
1 Touch Panel Displays setting screens and messages.
Directly press this panel to carry out operations.
2 [Menu] Tap this key to display the Main Menu. The [Menu] lights up in blue
[Guidance] Tap this key to display the help screen. The [Guidance] lights up in
[Access] Tap this key to perform authentication on the Login screen if user au-
[Interrupt] Tap this key to interrupt active jobs on this machine and deal with a
3 Keypad Use this keypad to enter numeric values such as the number of copies
C (Clear) All the numeric values (number of copies, magnification, size, etc),
4 Reset Press this key to reset the settings you entered or changed on the
5 Stop Press this key to temporarily stop an active copy, scan, or print job.
when the Main Menu is displayed.
For details on the Main Menu, refer to page 2-15.
blue when the Help Menu is displayed.
This function displays the explanation and operation procedure of a
function on the Touch Panel, enabling you to view them.
thentication or account track is installed on this machine.
Tap [Access] under the login condition to log out.
quick copy job.
[Interrupt] lights up in blue during interrupt processing.
or zoom ratio. This keypad is also used to select a numbered setting
key.
which have been entered by keypad, are canceled.
Control Panel.
To restart, press the Start key.
2-11 ineo+ 3350/3850
Page 20

2.3 Control Panel
Note
No. Name Description
6 Start Press this key to start an operation such as copying, scanning, faxing,
7 Register Key 1 to Reg-
8 Power key Press this key to switch this machine to Power Save mode.
9 Warning Indicator Indicates the status of this machine by the lamp color, flashing, or a
ister Key 3
2
or printing.
• Lights up blue: This machine is ready to start operating.
• Lights up orange: This machine is not ready to start operating.
If this indicator lamp lights up orange, check whether any warning or
message is displayed on the Touch Panel.
Press each key to switch the display of the Touch Panel to a function
assigned to a Register key.
• The default function assigned to the Register key varies depending on the region the machine is used in.
• A fu nc tion t o b e assi gn ed to a Register key can be changed to suit
your environment. For details, refer to Chapter 7 in [User's Guide
Introduction].
For details, refer to page 2-9.
lamp lighting up.
• Flash in orange: Warning
• Lights up orange: The machine has stopped.
ineo+ 3350/3850 2-12
Page 21

2
2.4 Operating the Touch Panel
Tap
Lightly touch the screen with your finger, then take your finger off the screen immediately. This action is available when selecting or determining a menu.
Flick
Operating the Touch Panel
2.4
Make a slight fillip while sliding your finger on the screen.
Displaying the Keypad
Tap a number or input area on the screen to display the Keypad.
Used to enter numerals.
2-13 ineo+ 3350/3850
Page 22

2.4 Operating the Touch Panel
Switching to the entry or selection screen
Tap a target input area or icon to switch to the entry or selection screen.
Used to switch to the Select screen to enter text or select a registered item.
Precautions on using the Touch Panel
This machine features a capacitance-base touch panel. Note the following points when operating the Touch
Panel.
- Use your finger or the Stylus Pen. Note that the Touch Panel will not respond appropriately if you op-
erate it using your nail or a pen tip instead of your finger or the Stylus Pen.
- Applying a strong force to the Touch Panel will damage the Touch Panel, and potentially cause a
breakage.
- When operating the Touch Panel, do not press on it using excessive force or with a pointed object such
as a mechanical pencil.
- Be careful not to operate Touch Panel with wet fingers. It may cause Touch Panel to operate in unex-
pected ways.
- If you operate the Touch Panel with a gloved finger, the Touch Panel will not respond normally. You
should operate it with a bare finger or using the Stylus Pen.
- Note that the Touch Panel may not respond normally if the distance between the user and fluorescent
light is 19-11/16 inches (500 mm) or less when you operate the Touch Panel.
- You must not use the Touch Panel beside equipment that generates electrical noises such as an electric
generator or air conditioner. Otherwise a malfunction may be caused by an influence of electrical noises.
2
ineo+ 3350/3850 2-14
Page 23

2
Note
2.5 Main Menu
Tap [Menu] on the Control Panel to display the Main Menu.
The Main Menu is a basic screen to perform operations of this machine. Switch from the Main Menu to each
function mode.
Item Description
[Job List] Tap this button to check active jobs or job logs. If necessary, you can perform
job operations such as deleting a standby job.
Main Menu
2.5
A job refers to an individual operation unit such as printing, sending, receiving,
or saving.
[Counter] Tap this button to display the total number of pages printed on this machine
on a function or color basis.
This information will help you gain an understanding of the usage status of this
machine.
[Copy] Tap this button to display the main screen in copy mode.
[Scan To E-mail] Tap this button to display the main screen in Scan To E-mail mode.
[Scan To Folder] Tap this button to display the main screen in Scan To Folder mode.
[Fax] Tap this button to display the main screen in Fax mode.
[Document Print/Delete]
[Utility] Tap this button to configure settings of this machine, register destinations, and
[APP] Displayed when an application that is supported by OpenAPI is registered on
For details on the copy mode, refer to page 5-16.
For details on the Scan To E-mail mode, refer to page 5-8.
For details on the Scan To Folder mode, refer to page 5-8.
For details on the Fax mode, refer to page 5-11.
Tap this button to operate files on this machine's HDD or on the USB memory
device connected to this machine.
For details on how to print a file on the USB memory device, refer to page 5-19.
check the status of consumables.
For details on Utility, refer to [User's Guide Description of Utility Keys].
this machine.
2-15 ineo+ 3350/3850
Page 24

2.6 Entering characters
2.6 Entering characters
When entering characters to register an address or program, use the keyboard screen displayed on the
Touch Panel.
Item Description
Keyboard Tap the keys of characters you want to enter.
[C] Tap this key to delete a character or value you entered.
[ ]/[ ] Tap this key to move the cursor.
[e] Tap this key to delete characters you entered one by one.
[Cancel] Text entry is interrupted and the page returns to the previous screen.
The character or value you entered is deleted.
[OK] Define the entered character or numeric values.
2
ineo+ 3350/3850 2-16
Page 25

3
Loading Paper
Page 26

Page 27

3
3 Loading Paper
3.1 Paper
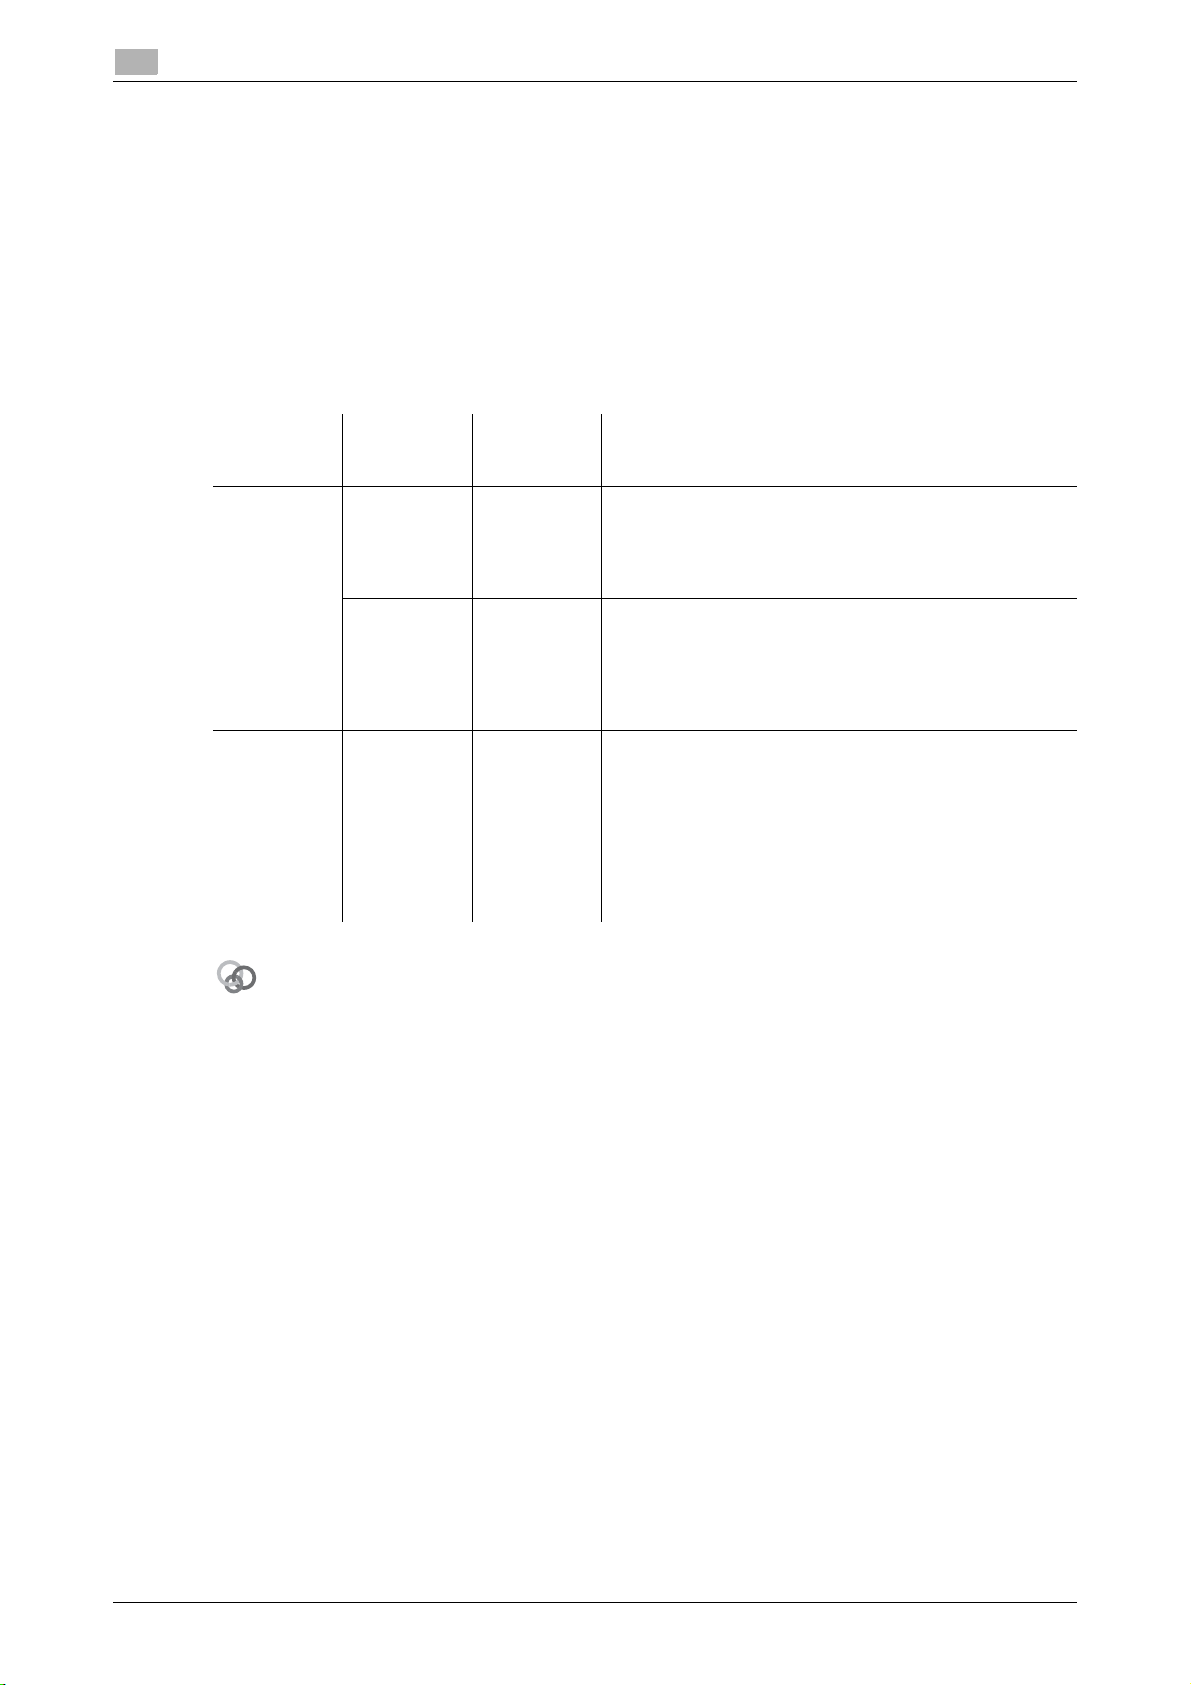
3.1.1 Checking the available paper types
Paper type Paper weight Paper capacity
Plain paper
Recycled paper
Single Side Only
Special Paper
Letterhead
Colored Paper
User Paper 1
User Paper 2
Thick 1
User Paper 3
Thick 1+
User Paper 4
Thick 2
User Paper 5
*1
*2
*3
*4
*5
*5
*5
*5
*5
Coated Paper 1 26-5/8 lb to 31-15/16 lb
Coated Paper 1+ 32-3/16 lb to 41-3/4 lb
Coated Paper 2 42 lb (158 g/m
Postcards - Manual Feed Tray: 20 sheets
Envelopes
*6
Label sheets - Manual Feed Tray: 20 sheets
15-15/16 lb to 23-15/16 lb
(60 g/m
24-3/16 lb to 31-15/16 lb
(91 g/m
32-3/16 lb to 41-3/4 lb
(121 g/m
42 lb to 55-7/8 lb
(158 g/m
(100 g/m
(121 g/m
2
to 90 g/m2)
2
to 120 g/m2)
2
to 157 g/m2)
2
to 210 g/m2)
2
to 120 g/m2)
2
to 157 g/m2)
2
) Manual Feed Tray: 20 sheets
- Manual Feed Tray: 10 sheets
Manual Feed Tray: 100 sheets
Tray 1: 550 sheets
Manual Feed Tray: 20 sheets
Tray 1: 20 sheets
Manual Feed Tray: 20 sheets
Tray 1: 20 sheets
Manual Feed Tray: 20 sheets
Tray 1: 20 sheets
Manual Feed Tray: 20 sheets
Tray 1: 20 sheets
Manual Feed Tray: 20 sheets
Tray 1: 20 sheets
Tray 1: 20 sheets
Tray 1: 20 sheets
Tray 1: 30 sheets
Tray 1: 20 sheets
Paper
3.1
*1
Paper on which you will not print on both sides (for example, when something is already printed on the front
side).
*2
Fine and other special paper.
*3
Paper where company names, preset text, and other text are already printed.
*4
Colored paper.
*5
Paper that is registered as a frequently used paper type.
*6
Tray 1 supports only Envelope #10 and End-opening envelope #3.
NOTICE
Paper other than plain paper is referred to as special paper. When loading special paper into the paper tray,
specify the correct paper type. Otherwise, it may result in a paper jam or image error.
3-3 ineo+ 3350/3850
Page 28

3.1 Paper
Tips
3.1.2 Checking the available paper sizes
Paper feed port Allowable sizes
Manual Feed Tray A4, A5, A6, B5 (JIS), B6
Legal (8-1/2 e 14), Letter (8-1/2 e 11), SP Folio (8-1/2 e 12-11/16), Executive
(7-1/4 e 10-1/2), Statement/Invoice (5-1/2 e 8-1/2)
Foolscap (8 e 13), 8-1/8 e 13-1/4, Folio (8-1/4 e 13), Government Legal (8-1/2
e 13), 8-1/2 e 13-1/2, 16K, Kai 16, Kai 32
Postcard (100 mm e 148 mm), Reply postal card (148 mm e 200 mm)
Photo Size 4 e 6, Photo Size 10 e 15
Envelope #10, Western-style envelope #6, Envelope DL, Western-style envelope #2, End-opening envelope #3, End-opening envelope #4
B5 (ISO), UK Quarto (8 e 10), Government letter (8 e 10-1/2)
Width: 3-5/8 e 8-1/2 (92 mm e 215.9 mm), Length: 5-13/16 e 14 (148 mm e
355.6 mm)
Tray 1 A4, A5, A6, B5 (JIS), B6
Legal (8-1/2 e 14), Letter (8-1/2 e 11), SP Folio (8-1/2 e 12-11/16), Executive
(7-1/4 e 10-1/2), Statement/Invoice (5-1/2 e 8-1/2)
Foolscap (8 e 13), 8-1/8 e 13-1/4, Folio (8-1/4 e
e 13), 8-1/2 e 13-1/2
Postcard (100 mm e 148 mm), Reply postal card (148 mm e 200 mm)
Photo Size 4 e 6, Photo Size 10 e 15
Envelope #10, End-opening envelope #3
Government letter (8 e 10-1/2)
3
13), Government Legal (8-1/2
- For all paper sizes, the area excluding 3/16 inches (4.2 mm) from the paper edge at printing and 3/16
inches (4 mm) from the paper edge at copying is judged to be a printable area. When configuring a user
setting of the page size using the application, specify the paper size within the printable area so that
the optimal result is obtained.
- On an envelope, it is only possible to print on the front (address) side. Also, the result of printing on the
seal overlapping part on the front side cannot be assured. The area that cannot be assured varies depending on envelope types.
- The page margin setting is determined depending on your application. If the default paper size or margin is selected, there may be some part of the paper that is not able to be printed on. To obtain the
optimal result, configure the custom setting so that an image is included in the printable area of this
machine.
ineo+ 3350/3850 3-4
Page 29

3
Tips
3.1.3 Precautions for correct operations
Unavailable paper
Do not load the following types of paper into the tray. Not observing these precautions may lead to reduced
print quality, a paper jam, or machine damage.
- Paper that has been printed on using a heat-transfer printer or an inkjet printer
- Folded, curled, wrinkled, or torn paper
- Paper that has been left unwrapped for a long period of time
- Paper that is damp, perforated, or that has been hole punched
- Extremely smooth or extremely rough paper, or paper with an uneven surface
- Treated paper such as carbon-backed paper, thermal paper, pressure-sensitive paper, or iron-on
transfer paper
- Paper that has been decorated with foil or embossing
- Paper of a non-standard shape (paper that is not rectangular)
- Paper that is bound with glue, staples or paper clips
- Paper with labels attached
- Paper with ribbons, hooks, buttons, etc., attached
- Paper with different paper quality (roughness) on the front and back sides
- Paper that is too thin or too thick
- Paper containing static electricity
- Acidic paper
- Other types of unavailable paper
Paper
3.1
Storing paper
To store paper, be sure to note the following points.
- Store paper on an even, horizontal surface, and do not take the paper out of its packaging until it is
loaded into a tray. If paper is left for a long period of time outside its package, it may cause a paper jam.
- When not using paper that has been taken out of its package once, return it to the original package and
store it in a horizontal, cool, dark place.
- Do not store paper in locations or in environments that are:
- Too humid
- Exposed to direct sunlight
- Subject to high temperatures (95°F (35°C) or more)
- Too dusty
- Do not set paper against the other or store it vertically.
When purchasing a large quantity of paper or special paper, carry out a trial print to check the printing quality
in advance.
3-5 ineo+ 3350/3850
Page 30

3.2 Loading paper into the Manual Feed Tray
3.2 Loading paper into the Manual Feed Tray
When selecting a paper size other than for paper trays, use the Manual Feed Tray.
To use the Manual Feed Tray, load paper and specify the paper type.
0 For details on the available paper types and sizes, refer to page 3-3.
1 Open the Manual Feed Tray.
2 Spread out the paper guide.
3
3 Push up the center of the flip-top plate until the lock latches (white) at the right and left are locked.
ineo+ 3350/3850 3-6
Page 31

3
Loading paper into the Manual Feed Tray
3.2
4 With the side to be printed on facing down, insert the paper as far as possible into the feed slot.
NOTICE
Load paper within the guide indicating the upper limit.
If paper is curled, flatten it before loading.
5 Align the paper guide to the paper size.
6 Change the paper type and paper size on the Control Panel. When loading custom sized paper, also
specify the paper size.
% To configure settings: [Utility] - [User Settings] - [Printer Settings] - [Paper Setting] - [Paper Tray] -
[Manual Feed]
3-7 ineo+ 3350/3850
Page 32

3.3 Loading paper into Tray 1
3.3 Loading paper into Tray 1
0 For details on the available paper types and sizes, refer to page 3-3.
0 Tray 2/3 is available when the optional Paper Feed Unit is installed. For details on how to load paper
into Tray 2/3, refer to Chapter 6 in [User's Guide Introduction].
1 Pull out Tray 1.
2 Press the flip-top plate down until it is locked.
3
3 Spread out the paper guide.
ineo+ 3350/3850 3-8
Page 33

3
Loading paper into Tray 1
4 Load paper into the tray with the print side facing up.
% Load a postcard or reply postal card, turning the short side to the right side of the tray.
NOTICE
Do not load the sheets up to the point where the top of the stack is higher than the , mark.
If paper is curled, flatten it before loading.
5 Align the paper guide to the paper size.
3.3
6 Close Tray 1.
7 Change the paper type and paper size on the Control Panel.
% To configure settings: [Utility] - [User Settings] - [Printer Settings] - [Paper Setting] - [Paper Tray] -
[Tray 1]
3-9 ineo+ 3350/3850
Page 34

4
Initial Settings of This
Machine
Page 35

Page 36

4.1 Preparation for network connection (for administrators)
Tips
4 Initial Settings of This Machine
4.1 Preparation for network connection (for administrators)
Checking a LAN cable for connection
Check that a LAN cable connected to the network is connected to the LAN port of this machine.
For details on the cable connection port, refer to page 2-4.
Assigning an IP address
If this machine has a fixed IP address, manually enter the IP address, subnet mask, and default gateway address.
In the Control Panel, select [Utility] - [Administrator Settings] - [Network Settings] - [TCP/IP Setting] - [IPv4
Settings], then configure the following settings.
Settings Description
[IP Address] When manually specifying the IP address, enter the fixed IP address assigned
to the machine.
[Subnet Mask] When manually specifying the IP address, enter the subnet mask.
[Default Gateway] When manually specifying the IP address, enter the default gateway.
[IP Application Method
Auto Setting]
When automatically specifying the IP address, select the method for automatic
retrieval.
• [DHCP Settings]: [ON] is specified by default.
• [BOOTP Settings]: [OFF] is specified by default.
• [ARP/PING Settings]: [OFF] is specified by default.
• [AUTO IP Settings]: Fixed to [Enable].
4
- If this machine's IP address is changed and the network settings are completed, this machine restarts.
- To check the IP address assigned to this machine, print out the Configuration Page. To print out the
Configuration Page, select [Utility] - [User Settings] - [Printer Settings] - [Print Reports] - [Configuration
Page].
ineo+ 3350/3850 4-3
Page 37

4
Tips
Preparation for fax (for administrators)
4.2 Preparation for fax (for administrators)
To use the fax function, the optional Fax Kit FK-512 and Mount Kit MK-738 are required. These units are
provided as standard on models sold in North America.
Checking the modular cable connection
Check that a modular cable is connected between the LINE port and the relevant telephone line.
For details on the cable connection port, refer to page 2-4.
Specifying the type of telephone line
Specify the type (dialing method) of telephone line to which this machine is to be connected. The dialing
method must be correctly specified to ensure communication can take place.
To configure settings: [Utility] - [Administrator Settings] - [Fax Settings] - [Line Parameter Setting] - [Dialing
Method]
Preparing to use the machine in a Private Branch Exchange (PBX) environment
4.2
When you use this machine in a PBX environment, register an outside line number.
To configure settings: [Utility] - [Administrator Settings] - [Fax Settings] - [PBX Connection Settings]
Selecting a receiving method
Methods of receiving faxes include the following: This machine receives faxes automatically, and the user
receives faxes manually. Set the receiving method to suit your environment.
To configure settings: [Utility] - [Administrator Settings] - [Fax Settings] - [Line Parameter Setting] - [RX Mode]
Registering sender information
Register the name of this machine and the company name (sender name) as well as the fax number of the
machine.
The information you registered is added to faxes to be sent and output to faxes as a sender record when
being printed on receiving machines.
To configure settings: [Utility] - [Administrator Settings] - [Fax Settings] - [Header Information]
Setting the date and time for the machine
Set the date and time in this machine to have them printed on sent and received faxes. The date and time
you set will be the reference time for the Timer TX that enables communication to take place at a preset time.
To configure settings: [Utility] - [Administrator Settings] - [System Settings] - [Date & Time Settings]
4-4 ineo+ 3350/3850
Page 38

4.3 HDD settings (for administrators)
Related setting (for the administrator)
4.3 HDD settings (for administrators)
To encrypt data on this machine's HDD for protection, configure an HDD encryption setting.
If an HDD encryption setting is configured, the HDD is formatted, and data saved on the HDD is erased.
Therefore, we recommend that you finish an HDD encryption setting before using this machine.
To configure settings: [Utility] - [Administrator Settings] - [Security Settings] - [HDD Settings] - [HDD Encryp-
tion Setting]
When enabling the enhanced security mode to use this machine, you need to configure an HDD encryption
setting. For details on the enhanced security mode, refer to [Enhanced Security Mode] of Chapter 5 "Administrator Settings" in [User's Guide Description of Utility Keys].
4
ineo+ 3350/3850 4-5
Page 39

5
Basic Usage
Page 40

Page 41

5
Using the print function (Windows environment)
5 Basic Usage
5.1 Using the print function (Windows environment)
This section describes how to configure print settings in Windows environment.
dReference
For details on how to configure print settings in Mac OS environment, refer to Chapter 3 in [User's Guide
Print].
For details on how to configure print settings in Linux environment, refer to Chapter 5 in [User's Guide Applied
Functions].
5.1.1 Printer driver
Before using this machine as a printer, you need to install the printer driver on your computer.
The following types of printer drivers are available. Select the printer driver that meets your printing aims.
5.1
Printer driver Page description lan-
guage
PCL driver PCL6 This is a standard driver for printing general office
PS driver PostScript 3 Emulation This driver is effective for high-definition printing of
XPS driver XPS Developed after Windows Vista, this driver sup-
Description
originals.
Among the three drivers, this driver provides the
fastest printing speed.
data created in PostScript-supporting application
software from Adobe or other vendors.
This driver is often used in graphics and light printing applications where good color reproducibility is
important.
ports XML Paper Specification (XPS).
This driver has several advantages, including highquality reproduction of translucence.
5-3 ineo+ 3350/3850
Page 42

5.1 Using the print function (Windows environment)
5.1.2 Preparation for printing (network connection)
Checking a LAN cable for connection
Check that a LAN cable is connected to the LAN port of this machine.
For details on the cable connection port, refer to page 2-4.
Checking the network settings
Print out the Configuration Page, then check that an IP address is assigned to this machine.
To print out the Configuration Page, select [Utility] - [User Settings] - [Printer Settings] - [Print Reports] - [Con-
figuration Page].
dReference
If no IP address is displayed, you need to set up the network. For details, refer to page 4-3.
Installing the printer driver
Use the installer to install the printer driver on your computer.
0 Administrator privileges are required to perform this task.
0 Use the Drivers & Utilities CD/DVD-ROM.
5
1 Insert the printer driver CD/DVD-ROM into the CD/DVD-ROM drive of the computer.
% Make sure that the installer starts, then proceed to Step 2.
% If the installer does not start, open the printer driver folder on the CD/DVD-ROM, double-click [Set-
up.exe], then go to Step 3.
% If the [User Account Control] window appears, click [Continue] or [Yes].
2 Click [Printer/FAX].
3 Read the license agreement, then click [AGREE].
4 Check the contents of the [Readme] window, then click [Next].
5 Select [Install printers/MFPs], then click [Next].
Connected printers are detected.
% For Windows Vista/7/8/Server 2008/Server 2008 R2/Server 2012, you can select [Preference for
IPv4] or [Preference for IPv6]. The address has the preference when detected in both IPv4 and IPv6.
6 Select this machine, then click [Next].
% If this machine is not detected, restart it.
% You do not need to change the printing method from [Normal Printing] (Port 9100) unless otherwise
specified by the administrator. This guide describes how to configure the [Normal Printing] (Port
9100) setting.
% As the printing method, you can select [Normal Printing], [Internet Printing] (IPP), or [Secure Printing]
(IPPS). For details on the printing method, refer to Chapter 2 in [User's Guide Print].
% Among the connected printers, only the target model is automatically detected and displayed. If
multiple target models are displayed, check the IP addresses.
% If the connection to this machine cannot be recognized, it is not displayed in the list. In such a case,
select [Specify the Printer/MFP Except for the Above. (IP Address, Host Name...)], then manually
specify the IP address and host name of this machine.
7 Select the check box of the printer driver you want to install, then click [Next].
% For features of each printer driver, refer to page 5-3.
8 Check the components to be installed, and click [Install].
ineo+ 3350/3850 5-4
Page 43

5
Using the print function (Windows environment)
9 Change the printer name or print a test page, if necessary, then click [Finish].
The installation process of the printer driver is then completed.
Settings Description
[Review] Displays the installed components for checking.
[Rename Printer] Changes this machine name, if necessary.
[Property] Sets the optional operating environment of this machine.
[Print Setting] Changes the default print settings of this machine, if necessary.
[Print Test page] If necessary, print a test page to check that printing process works cor-
rectly.
dReference
When you finish installing the printer driver, configure the default settings of the printer driver. For details, refer
to page 5-7.
5.1.3 Preparation for printing (USB connection)
Changing the installation settings (Windows 7/8/Server 2008 R2/Server 2012)
If you are using Windows 7/8/Server 2008 R2/Server 2012, change the computer settings before installing
the printer driver.
5.1
1 Open the [Control Panel] window.
% In Windows 8, right-click the Start window, then click [All apps] - [Control Panel].
% In Windows Server 2012, click [Control Panel] in the Start window.
% In Windows 7/Server 2008 R2, open the Start menu, then click [Control Panel].
2 Click [System and Security] - [System].
3 Click [Advanced system settings] on the menu in the left-hand pane.
The [System Properties] window appears.
4 In the [Hardware] tab, click [Device Installation Settings].
5 Select [No, let me choose what to do], select [Never install driver software from Windows Update.], then
click [Save Changes].
% After you have installed the printer driver, change the setting back to [Yes, do this automatically (rec-
ommended)].
6 Click [OK] to close the [System Properties] window.
5-5 ineo+ 3350/3850
Page 44

5.1 Using the print function (Windows environment)
Installing the printer driver
Use the installer to install the printer driver on your computer.
0 Administrator privileges are required to perform this task.
0 Use the Drivers & Utilities CD/DVD-ROM.
1 Connect a USB cable to the USB port of this machine.
% For details on the cable connection port, refer to page 2-4.
% If a wizard window for adding new hardware opens, click [Cancel].
2 Insert the printer driver CD/DVD-ROM into the CD/DVD-ROM drive of the computer.
% Make sure that the installer starts, then go to Step 3.
% If the installer does not start, open the printer driver folder on the CD/DVD-ROM, double-click [Set-
up.exe], then go to Step 4.
% If the [User Account Control] window appears, click [Continue] or [Yes].
3 Click [Printer/FAX].
4 Read the license agreement, then click [AGREE].
5 Check the contents of the [Readme] window, then click [Next].
5
6 Select [Install printers/MFPs], then click [Next].
Printers being connected via USB ports are detected.
7 Select this machine, then click [Next].
8 Select the check box of the printer driver you want to install, then click [Next].
% For features of each printer driver, refer to page 5-3.
9 Check the components to be installed, and click [Install].
10 Change the printer name or print a test page, if necessary, then click [Finish].
The installation process of the printer driver is then completed.
Settings Description
[Review] Displays the installed components for checking.
[Rename Printer] Changes this machine name, if necessary.
[Property] Sets the optional operating environment of this machine.
[Print Setting] Changes the default print settings of this machine, if necessary.
[Print Test page] If necessary, print a test page to check that printing process works cor-
rectly.
dReference
When you finish installing the printer driver, configure the default settings of the printer driver. For details, refer
to page 5-7.
ineo+ 3350/3850 5-6
Page 45

5
5.1.4 Initial settings of the printer driver
When you use this machine for the first time, configure the printer driver so that it contains information such
as what options are installed on this machine and whether or not authentication settings have been configured.
1 Display the printer window.
% In Windows 8, right-click the Start window, then click [All apps] - [Control Panel] - [Hardware and
Sound] - [View devices and printers].
% In Windows Server 2012, open the Start window, then click [Control Panel] - [Hardware] - [View de-
vices and printers].
% In Windows 7/Server 2008 R2, open the Start menu, then click [Devices and Printers].
% In Windows Vista/Server 2008, click the Start menu, and select [Control Panel] - [Hardware and
Sound] - [Printers].
% In Windows XP/Server 2003, click the Start menu, then select [Printers and Faxes].
2 Open the printer properties.
% In Windows 7/8/Server 2008 R2/Server 2012, right-click the icon of the installed printer, and from
[Printer Properties], click the displayed printer name.
% In Windows XP/Vista/Server 2003/Server 2008, right-click the icon of the installed printer, then click
[Properties].
The [Properties] window appears.
Using the print function (Windows environment)
5.1
3 In the [Configure] tab, configure the information such as what options are installed on this machine and
whether or not authentication settings have been configured.
% By default, [Auto] in [Acquire Settings...] is enabled. The information on this machine is automatically
obtained and reflected to [Device Option].
% When [Auto] in [Acquire Settings...] is disabled, clicking [Acquire Device Information], obtains and
reflects the information on this machine to [Device Option].
% If you cannot communicate with this machine or you are using a USB connection in Windows XP or
Server 2003 environment, manually configure a setting in [Device Option]. Select the item to change
from the list, and set a value in [Setting].
4 Click [OK].
5.1.5 How to print
1 Open data of the original using the application software. From the [File] menu, select [Print].
2 In [Printer Name] (or [Select Printer]), make sure that the desired printer has been selected.
% The [Print] dialog box varies depending on the application software.
3 Specify the print range and the number of copies to print.
4 Click [Properties] (or [Preferences]) to change the print settings of the printer driver, if necessary.
% The print settings you have changed here return to the default values when you exit the application
software.
% For details on the print settings of the printer driver, refer to Chapter 2 in [User's Guide Print].
5 Click [Print].
Printing is executed.
5-7 ineo+ 3350/3850
Page 46

5.2 Using the scan function
5.2 Using the scan function
5.2.1 Available operations in the scan function
The original data scanned by this machine can be sent to a computer or server, or saved on the HDD of this
machine.
The Scan Function provides the following sub-functions.
Function Description
Scan to E-mail Sends a converted file to any E-mail address as an E-mail attachment.
SMB Send Sends a converted file to a shared folder of a computer. To use this function,
specify your computer or file server as a destination.
FTP TX Sends a converted file to the FTP server. This function is useful when transfer-
ring a file through the FTP server.
WebDAV Send Sends a converted file to the WebDAV server. This function is useful when
transferring a file through the WebDAV server.
Save to HDD Saves the original data scanned by this machine in the built-in HDD.
The original data saved in the HDD can be downloaded via the Web browser
on your computer.
Save to USB Memory Saves the original data scanned by this machine in the USB memory device
connected to the machine.
WS Scan Imports original data by issuing a scan instruction from a computer without
configuring complicated system settings, or sends original data scanned by
this machine to a computer.
This function is supported by Windows of Vista or later.
TWAIN/WIA Scan Converts the original data scanned by this machine into a file, and imports it
from a computer on the network using TWAIN/WIA-compatible applications.
5
dReference
It may be necessary to make the following settings prior to use the Scan Function. For details on how to use
each function, refer to [User's Guide Scan].
ineo+ 3350/3850 5-8
Page 47

5
5.2.2 How to send
1 Load the original.
2 Tap the key of the desired function.
% To use Scan to E-mail, tap [Scan To E-mail].
% To use SMB Send, FTP Send, WebDAV Send, Save to HDD, Save to USB Memory, or WS Scan,
tap [Scan To Folder].
Using the scan function
5.2
3 Specify the destination.
% You can select the desired destination from the pre-registered destination list, or directly enter des-
tination information. For details on how to register a destination, refer to page 5-21.
% You can specify multiple destinations.
5-9 ineo+ 3350/3850
Page 48

5.2 Using the scan function
4 Tap [Application], then configure scan option settings.
% Before scanning the original on this machine, you need to specify the size of the original to be
scanned. Before scanning the original, select [Application] - [Basic] - [Scan Size], then specify the
original size. If you fail to set the original size correctly, the image may be cut off.
5 Press the Start key.
% Tap [Check Settings] before sending data, and check the specified destination and settings if nec-
essary.
% To redo operations for specifying destinations or option settings, press Reset.
% If you press the Stop key while scanning the original, scanning stops. To cancel scanning the orig-
inal, delete inactive jobs from the Job screen.
5
Sending starts.
ineo+ 3350/3850 5-10
Page 49

5
5.3 Using the fax function
5.3.1 Fax function
The Fax is a communication function that uses a telephone line to send scanned originals (paper) or to receive
data sent from remote machines. This machine has various features for fax operations, including those enabling the user to change scan settings according to the original and to save incoming faxes in memory.
The following describes precautions that should be observed when using fax functions.
- To use fax functions, optional units must be installed except in certain regions.
- For ineo+ 3850: The optional Fax Kit FK-512 and Mount Kit MK-738 are required, excluding models
used in North America.
- For ineo+ 3350: The optional Fax Kit FK-512 and Mount Kit MK-738 are required.
- This machine can be connected to the following types of telephone lines.
- Public switch telephone network (including fax communication line)
- PBX (Private Branch Exchange, 2-wire)
- Fax data cannot be sent or received in color.
- You cannot connect a business phone as an external telephone.
- The call waiting function cannot be used simultaneously.
- If a dedicated digital line is multiplexed in an enterprise network, fax transmission speed may be limited,
or the Super G3 fax may not be available.
- Communication errors may occur on rare occasions due to factory default settings. This is because the
multiplex device limits the frequency band of the line to the utmost limit based on the assumption that
the line is intended for voice communication. Also, these restrictions differ depending on the devices
that are connected to the network. For details, contact your network administrator.
Using the fax function
5.3
dReference
To use the fax function, the operating environment must be configured on this machine in advance. For details, refer to page 4-4.
5-11 ineo+ 3350/3850
Page 50

5.3 Using the fax function
5.3.2 How to send
1 Load the original.
2 Tap [Fax].
5
3 Enter a fax number.
% You can select the desired destination from the pre-registered destination list, or directly enter des-
tination information. For details on how to register a destination, refer to page 5-21.
% Fax broadcasting can be performed by specifying multiple destinations.
ineo+ 3350/3850 5-12
Page 51

5
Using the fax function
4 Tap [Application], then configure fax option settings.
% Before scanning the original on this machine, you need to specify the size of the original to be
scanned. Before scanning the original, select [Application] - [Basic] - [Scan Size], then specify the
original size. If you fail to set the original size correctly, the image may be cut off.
5 Press the Start key.
% Tap [Check Settings] before sending data, and check the specified destination and settings if nec-
essary.
% To redo operations for specifying destinations or option settings, press Reset.
% If you press the Stop key while scanning the original, scanning stops. To cancel scanning the orig-
inal, delete inactive jobs from the Job screen.
5.3
Sending starts.
5-13 ineo+ 3350/3850
Page 52

5.3 Using the fax function
5.3.3 Introduction of fax transmission function
This section describes convenient fax transmission functions. For details on how to use each function, refer
to Chapter 4 in [User's Guide Fax].
Function Overview
Timer TX Timer TX automatically starts sending at a specified time if the time is pre-
specified.
Check Dest. & Send Check Dest. & Send checks the fax number specified for the fax transmission
against the destination fax number (CSI) and sends the fax only when they
match.
F-Code TX F-Code TX specifies the F code (SUB address and sending ID) to send a fax.
Confidential communication and relay distribution request are available.
• The confidential communication function is designed to communicate with
specific people using a Confidential RX User Box that requires a registered
number and a password.
• Relay distribution request is a function that the relay station, which has received a fax, distributes the received fax to a pre-registered group.
Quick Memory TX Fax transmission starts concurrently with scanning one page. The total num-
ber of pages transmitted can be entered in the sender record.
Password TX Password TX sends a fax with a password. It is used to send faxes to a device
on which fax peers are restricted by passwords (a device with Closed Network
RX enabled).
Polling TX Polling TX stores a file beforehand on the internal hard disk and sends it out
upon a request for reception (polling request) from the recipient.
5
5.3.4 Introduction of fax receiving function
This section describes the convenient fax receiving functions. For details on how to use each function, refer
to Chapter 6 in [User's Guide Fax].
Function Overview
In-memory proxy reception
TSI Routing TSI (Transmitting Subscriber Identification) Routing automatically forwards a
Forward TX Forward TX transfers a received fax to a pre-specified destination (fax, E-mail,
Memory RX Memory RX saves a received fax in this machine's memory without printing it.
Confidential RX Confidential RX is designed to communicate with specific people using a Con-
Closed Network RX Closed Network RX restricts the peers by passwords.
Polling RX Polling RX receives a polling file saved in a sending machine as instructed from
PC-Fax RX PC-Fax RX saves the received fax in memory. The saved fax can be printed or
Night RX Night RX prohibits printing of faxes received in the pre-specified nighttime
When the machine cannot print a received fax due to paper jam or exhaustion
of consumables, this function stores the received fax in memory until this machine is ready to print.
received fax to the pre-specified destination (SMB, FTP, or E-mail (Internet fax)
destination) based on the sender's fax number (TSI).
or Internet fax destination).
You can check the contents of the received fax and print out only the required
one.
fidential RX User Box that requires the registration number and password.
this machine.
downloaded, if necessary.
zone.
ineo+ 3350/3850 5-14
Page 53

5
5.3.5 Introduction of internet fax function
Internet fax is a function used to send and receive fax via enterprise network and Internet.
The same network as the one used by the computers is used to transmit faxes. Therefore, you can send and
receive faxes to/from distant locations without having to worry about high communication costs or sending
a large number of pages.
For details on the Internet fax function, refer to [User's Guide Network Fax].
Using the fax function
5.3
5-15 ineo+ 3350/3850
Page 54

5.4 Using the copy function
5.4 Using the copy function
5.4.1 How to copy
1 Load the original.
2 Tap [Copy].
5
3 If necessary, configure copy settings.
% Before scanning the original on this machine, you need to specify the size of the original to be
scanned. Before scanning the original, specify the original size in [Original Size]. If you fail to set the
original size correctly, the image may be cut off.
% For details on various copy settings, refer to page 5-18.
% The setting change is reflected on the image of [Output]. Therefore, you can configure the settings
while checking the output image.
ineo+ 3350/3850 5-16
Page 55

5
Using the copy function
4 If necessary, specify the number of copies using the Keypad.
% Tapping [No. of Sets] displays the Keypad.
% If [10 Key] is assigned to a Register key, you can press the Register key to display the Keypad on
the Touch Panel and enter data.
% To re-enter the number of copies, tap [C] (Clear).
5 Press the Start key.
% If necessary, before starting a copy, tap [Check Settings] to check the settings.
% If you press the Stop key while scanning the original, scanning stops. To cancel scanning the orig-
inal, delete inactive jobs from the Job screen.
5.4
The original is scanned, and copying starts.
5-17 ineo+ 3350/3850
Page 56

5.4 Using the copy function
5.4.2 Introduction of copy function
This section describes the convenient copy functions. For details on how to use each function, refer to [User's
Guide Copy].
Function Overview
[Interrupt] If you urgently want to make a copy, even if the machine is printing an original,
you can interrupt the active job and make an intruder copy.
[Proof Copy] Before beginning actual copying, do a single test copy and check it is accept-
able.
When making a large number of copies, use the proof copy function to prevent
a large number of copy errors from occurring.
[ID Copy] When you want to copy cards, such as an insurance card, a driver license card
and a business card, you can arrange the front and back sides of the card on
a single page and copy the images on to the same side of one sheet. This can
reduce the number of sheets used.
[Color ] Select a color for copying.
[Density] Adjust the density of a copy image.
[Original Type] Select the optimum settings for the original to copy it at the optimum image
quality level.
[Original Size] Select the size of the original to be scanned.
[Paper] Select the size and type of the paper for copying. You can also change the size
and type settings of the paper loaded in paper trays.
[Zoom] You can copy an original image enlarged or reduced by an arbitrary zoom ratio.
[Duplex/Combine] Copy an original onto both sides of paper. A multi-page original can be re-
duced and copied on the same side of a single sheet of paper.
[Finishing] you can select whether to sort the output sheets or group them when printing
multiple sets of copies.
[Separate Scan] If the number of original sheets is so large that they cannot be loaded into the
ADF at the same time, you can load them in several batches and handle them
as one job.
[Background Removal] You can adjust the background density of an original with the colored back-
ground such as newspaper or an original made with recycled paper.
[Glossy] Images are copied with a glossy finish.
[Image Adjust] You can adjust the color quality level of the original for copying.
[Page Margin] If you want to add a binding margin to bind copied sheets, you can adjust the
margin size.
5
ineo+ 3350/3850 5-18
Page 57

5
Tips
Printing a file stored on USB memory
5.5 Printing a file stored on USB memory
Supported USB memory devices
USB memory devices that have the following specifications can be connected to this machine.
Item Specifications
Supported media USB memory device (USB 2.0 supported)
File system FAT32
File Type PDF, Compact PDF, JPEG, TIFF, XPS, Compact XPS, OpenXPS, OOXML
(.docx/.xlsx/.pptx), and PPML (.ppml/.vdx/.zip)
Note the following points when connecting a USB memory device to this machine.
- Use the USB connector on the side that is near the Control Panel.
- Do not disconnect the USB memory device while saving a file to the USB memory or printing a file in
the USB memory.
- Use only a USB memory device on this machine. Do not use other USB devices (such as a hard disk
unit or USB switching hub).
- Do not connect or disconnect the USB memory device when the hourglass is displayed in the Control
Panel while this machine is active.
- Do not disconnect the USB memory device directly after connecting it.
5.5
How to print
1 Connect a USB memory device to the USB port of this machine.
2 Tap [Document Print/Delete].
3 Tap [External Memory].
5-19 ineo+ 3350/3850
Page 58

5.5 Printing a file stored on USB memory
4 Select a file to print, then tap [Print].
% Tap [Up] to move upward.
% Tap [Open] to open the folder and move downward.
5 If necessary, change print settings, then tap [Print].
Settings Description
[Paper Size] Select the size of paper for printing. The paper size can be specified when
the selected file type is TIFF or JPEG.
[Duplex] Select whether or not to print data on one side or both sides of sheets of
paper. To print data on both sides, select the binding position.
[Finishing] - [Collate] When printing data by multiple copies, select whether or not to feed out
copies separately one by one like "12345", "12345", and "12345".
5
ineo+ 3350/3850 5-20
Page 59

5
5.6 Registering a destination
Address book
Registering a frequently used destination on this machine will save you the trouble of having to enter it each
time you send data. A destination registered on this machine is called an Address Book.
Up to 2,000 address books can be registered. The destination types that can be registered are E-mail address, computer name, etc. depending on the transmission mode.
dReference
FTP, WebDAV, and Internet fax sending destinations can be only registered using Web Connection. For details on the registration procedure, refer to Chapter 2 in [User's Guide Applied Functions].
Registering one-touch destinations in the address book
Fax, E-mail, and SMB sending destinations can be registered from the Control Panel.
1 Tap [Utility] - [One-Touch/User Box Registration].
2 Select the type of destinations you want to register.
3 Enter destination information, then tap [OK].
[Fax]
Registering a destination
5.6
Settings Description
[No.] Destination registration number. The smallest available number that is not
used is automatically assigned.
[Name] Enter the destination name (using up to 72 characters).
[Favorites] Select this option to register a frequently used destination. The registered des-
tination is displayed in [Favorites], enabling you to easily specify a destination.
[Index] Select a corresponding character so that the destination can be index
[Fax number] Enter a destination fax number.
[Line Settings] If necessary, specify how to send a fax to a destination you want to register.
searched by name.
• When you use this machine in a PBX environment, tap [Outside] ([E] appears). A registered outside line number is automatically inserted.
• When you use this machine in a PBX environment, tap [Pause] following the
outside line number ([P] appears) to ensure dialing is successful.
• If you want to send out a push signal over the dial line, tap [Tone] ([T] appears).
• Enter [-] to separate a dial number. It does not affect the dialing of the number.
You may change the settings you made here before sending a fax.
• [ECM OFF]: ECM is an error correction mode defined by ITU-T (International Telecommunication Union - Telecommunication Standardization Sector). Fax machines equipped with the ECM feature communicate with each
other, confirming that the sent data is free of errors. This prevents image
blurring caused by telephone line noise.
If you send a fax using a telephone line in an environment containing static,
it may take a longer time to communicate. In this case, the communication
time can be reduced by setting ECM to OFF for transmission. However, image or communication errors may occur depending on the specified communication time value, so change the value to suit conditions.
• [V34 OFF]: V34 is a communication mode used for super G3 fax communication. However, when the remote machine or this machine is connected
to a telephone line via PBX, you may not establish a communication in super G3 mode depending on telephone line conditions. In this case, it is recommended that you set the V34 mode to off to send data.
• [Check Dest. and Send]: When using the Check Dest. And Send function,
select [Yes]. The fax number specified for fax is checked against the destination fax number (CSI), and the fax is sent only when they match.
5-21 ineo+ 3350/3850
Page 60

5.6 Registering a destination
Tips
[E-mail]
Settings Description
[No.] Destination registration number. The smallest available number that is not
[Name] Enter the destination name (using up to 72 characters).
[Favorites] Select this option to register a frequently used destination. The registered des-
[Index] Select a corresponding character so that the destination can be index
[E-mail] Enter the E-mail address as a destination (using ASCII characters of up to 320
[SMB]
Settings Description
[No.] Destination registration number. The smallest available number that is not
[Name] Enter the destination name (using up to 72 characters).
[Favorites] Select this option to register a frequently used destination. The registered des-
[Index] Select a corresponding character so that the destination can be index
[Connection] Register information of the destination computer.
[Host Name] Enter the host name or IP address of a destination computer.
[File Path] Enter the shared folder name of the computer specified in [Host Name] (using
[User ID] Enter the name of a user who has privileges to access the folder specified in
[Password] Enter the password (using up to 127 bytes).
[Browse] Detect the target computer on the network, then select the shared folder.
5
used is automatically assigned.
tination is displayed in [Favorites], enabling you to easily specify a destination.
searched by name.
bytes).
used is automatically assigned.
tination is displayed in [Favorites], enabling you to easily specify a destination.
searched by name.
• Example of computer name (host name) entry: "HOME-PC"
• Example of IP address (IPv4) entry: "192.168.1.1"
• Example of IP address (IPv6) entry: "fe80::220:6bff:fe10:2f16"
up to 255 bytes).
• Entry example: "scan"
When specifying a folder in the shared folder, insert a symbol, "\", between
folder names.
• Entry example: "scan\document"
[File Path] (using up to 255 bytes).
• For workgroup user, only type in the user name. Entry example: "User01"
• For domain user, type in user-name@domain-name. Entry example: "User01@abc.local"
Information of the selected folder is registered.
- To check the settings for a registered destination, select its registered name, then tap [Check Settings].
- To change the settings for a registered destination, select its registered name, then tap [Edit].
- To delete a registered destination, select its registered name, then tap [Delete].
ineo+ 3350/3850 5-22
Page 61

6
Index
Page 62

Page 63

6
6Index
A
Address Book 5-21
How to Register 5-21
C
Control Panel 2-11
Copy Function 5-16
How to Copy
Introduction of Copy Function 5-18
5-16
D
Destination Registration 5-21
E
Entering Characters 2-16
F
Fax Function 5-11
How to Send
Introduction of Receiving Function 5-14
Introduction of Transmission Function 5-14
Overview
Preparation 4-4
5-12
5-11
I
Internet Fax Function 5-15
K
Keypad 2-13
Preparation
4-4
Fax
Network Setting
Print (Network Connection) 5-4
Print (USB Connection) 5-5
Print Function
How to Print 5-7
Printer Driver
Initial Settings 5-7
Install (Network Connection)
Install (USB Connection) 5-5
4-3
5-3
5-3
S
Scan Function 5-8
How to Send 5-9
Overview
5-8
T
Text Entry 2-14
Touch Panel
Operation
Precautions for Correct Operations
Tray 1 3-8
2-13
U
USB Memory 5-19
How to Print 5-19
User's Guide
1-3
5-4
2-14
L
Loading Paper
Manual Feed Tray 3-6
3-8
Tray 1
M
Main Menu 2-15
Manual Feed Tray
3-6
N
Name of each Part 2-3
Front Side
Rear Side 2-4
Network Setting
2-3
4-3
O
Option Configuration 2-5
P
Paper
Available Paper Sizes
Available Paper Types
Storing Paper
Unavailable Paper
Power Supply 2-7
Power Key
Power Switch
3-5
3-5
2-9
2-8
3-4
3-3
6-3 ineo+ 3350/3850
Page 64

6
ineo+ 3350/3850 6-4
 Loading...