

Page 1

D 2150
Operator‘s Manual
Develop
Page 2

Page 3

i
Develop 2150
Thank you for choosing Deve l op.
This operator’s manual explain s how to oper ate th e cop ier and repleni s h it s s up pli es. It al s o g ives
some troubleshooting tips as well as general precautions to b e obs erved wh en o perating the copier.
To ensure the best performance and ef fecti ve us e of your copier, r ead t his man ual caref ull y unti l yo u
familiarize yourself tho roug hly w ith its o per atio n and f eatur es. A fter yo u have r ead t hr ough the
manual, keep it for ready reference.
Please use this manual as a quick and handy reference tool for immediately clarifying any question s
which may arise.
CE Marking (Declaration of Conformity)
We declare under our sole respo nsib ility that the copier and options to which this
declaration relates is in conf ormity with the specifications b elow.
This declaration is valid fo r t he area of the Eu ropean Unio n ( EU) o nly.
Product Type Copying Machine
Product Name Develop 2150
Options PF-204, PF-104, PF-4D, AFR-12, AF-5, ST-104, S-106, AD-8
Standards Safety*2
EMC*1
Notes
EC Directives Safety
EMC ::
:
EN 60 95 0 / 1992 (A 1 : 1993, A2 : 1993, A3 : 1995)
(Safety of information t echn ology equ ip ment, i ncluding
electrical business eq ui pmen t)
:
EN 55 02 2 Class B : 1994 (A1 : 1995)
(Limits and method for meas urement o f radio disturbance
characteristics of infor matio n t echn olo gy equ ip ment ( ITE))
EN 50 08 2-1 / 1992
(Electromagnetic compatib ility - Generic immunity stan dar d
Part1: Residential, commer cial an d l igh t in dus tr y)
IEC 801-2 / 1991 (Electro static discharge requirement)
IEC 801-3 / 1984 (Radi ated el ectro magnetic field requirement)
IEC 801-4 / 1988 (Electrical fast transient / bur st req ui remen t)
:
*1) EMC performance : This product was designed for operation
in a typical office envi ro nment.
*2) Fir st year of lab elin g acco rding to EC- directive 73/23/EEC
and 93/68/EEC :97
73 / 23 / EEC and 93 / 68 / EEC
89 / 336 / EEC and 93 / 68 / EEC
Page 4

ii
Contents
Chapters 1 through 3 contain the basic information for making copies.
Be sure to read these chapters before attempting to use your copier.
Chapter 1 Safety Note s p. 1
1. Installing The Copier p. 2
Installation Site
Power Source
Space Requirements
2. Precautions for Use p. 3
Operating Environment
Using the Copier Properl y
Moving
Care of Copier Supplies
Chapter 2 Getting to Know Your Copier p. 5
1. System Overview p. 6
2. Copier Parts and Accessories
Outside the Copier p. 8
Inside the Copier p. 9
Options p. 10
3. Control Panel Keys and Indicators
Basic Panel p. 12
Display Panel p. 14
4. Turning ON and OFF and Initial Mode p. 15
Turning ON and OFF
When the Copier is Turned ON
Initial Mode
5. Auxiliary Functions p. 16
Panel Resetting
Auto Panel Reset Functio n
Auto Copy Start Function
Auto Shut OFF Function
Interrupt Mode
Energy Saver Mode
Job Memory
Page 5

Chapter 3 Making Copies p. 19
iii
Contents
1. Basic Copying Overview p. 20
2. Placing Originals
Placing on the Original Glass p . 22
•
Using the Automatic/ Dupl exing Do cumen t Feeder p. 2 4
•
Using the Mixed Origin al D etectio n Mo de p . 25
•
Using the Single Aut omati c Documen t Feeding Mode
•
(SADF Mode) p. 26
3. Manual Bypass Copying p. 28
4. Copy Paper Size p. 30
5. Zoom Ratio p. 32
6. Image Density p. 34
7. Original Copy Type p. 36
1-sided 1-sided
•
1-sided 2-sided
•
2-sided 1-sided
•
2-sided 2-sided
•
Selecting Original Copy Type p. 38
•
Instructions for Lo adi ng Orig inal s p. 3 9
•
▲
▲
▲▲
▲
8. Finishing Mode p. 40
Non-Sort
•
Sort
•
Sort-and-Staple
•
Group
•
Manual Staple
•
Selecting the Finishing Mode p. 42
•
Using t he Manual S t aple Mode p. 43
•
Instr uc tions fo r Loading Original s for Finis hing Mode
•
p.44
Auto Dua l Functi on p.45
•
9. File Margin Mode p. 46
10. Cover Mode p. 47
▲
1-sided 1-sided (2in1)
•
1-sided 2-sided (2in1)
•
Book 1-sided
•
Book 2-sided
•
▲
▲
▲
▲
Chapter 1
Safety Notes
Chapter 2
Getting to
Know Your
Copier
Chapter 3
Making Copies
Chapter 4
Specia l Functions
Chapter 5
When an Indicator
Lights Up
Chapter 6
Troubleshooting
Chapter 7
Miscellaneous
Page 6
iv
Contents
Chapter 4 Special Functions p. 49
1. Meter Count p. 50
2. Toner Replenisher/Drum Dehumidifier p. 51
3. User’s Choice
Description of Each User ’s Choice Functions p. 52
Making the User’s Choice Settings p. 58
Chapter 5 When an Indicator Lights Up p. 59
1. When the Add Paper Indicator Lights Up p. 60
2. When the Add Toner Indicator Lights Up p. 63
3. When the Add Staples Indicator Lights Up p. 64
4. When the Closure Failure Indicator Lights Up p. 66
5. When the Misfeed I ndicator L ights Up
•
Misfeed Indicator and Monitor Display p. 68
•
Misfeed Clearing Procedures
Copier p. 69
Paper Feed Cabinet p. 72
Duplex Unit p. 73
Duplexing Document Feeder p. 74
Automatic Document Feeder p. 75
Sorter/Staple Sorter p. 76
6. When the Call-Tech.-Rep. Indicator Lights Up p. 77
7. Quick Reference for Other Indicators p. 78
Page 7
Chapter 6 Troubleshooting p. 79
v
Contents
1. When this Type of Copy is Produced p. 80
The image is too light
•
The image is too dark
•
The copy is blurry
•
The copy has dark specks or spots
•
The edge of the copy is dirt y
•
The image on the copy is not aligned properly
•
The copy has lines
•
2. The Copier is not functioning as designed p. 82
The Cont rol Panel s hows nothing
•
No copies are fed out when th e Start Key is p ressed
•
Control Panel Keys do not respond
•
The Copier is not activated when the Power Switch is
•
turned ON
Chapter 7 Miscellaneous p. 83
1. Specifications p. 84
Copier
•
Duplexing Document Feeder
•
Automatic Document Feeder
•
Sorter
•
Staple Sorter
•
Paper F e ed Cabinet
•
Duplex Unit
•
2. Care of the Copier p.88
3. Function Combination Matrix p. 90
4. Description of Copy Paper Size
and Zoom Ratio Table p. 92
(Original Size to Copy Paper Size)
5. Index p. 93
Chapter 1
Safety Notes
Chapter 2
Getting to
Know Your
Copier
Chapter 3
Making Copies
Chapter 4
Specia l Functions
Chapter 5
When an Indicator
Lights Up
Chapter 6
Troubleshooting
Chapter 7
Miscellaneous
Page 8
vi
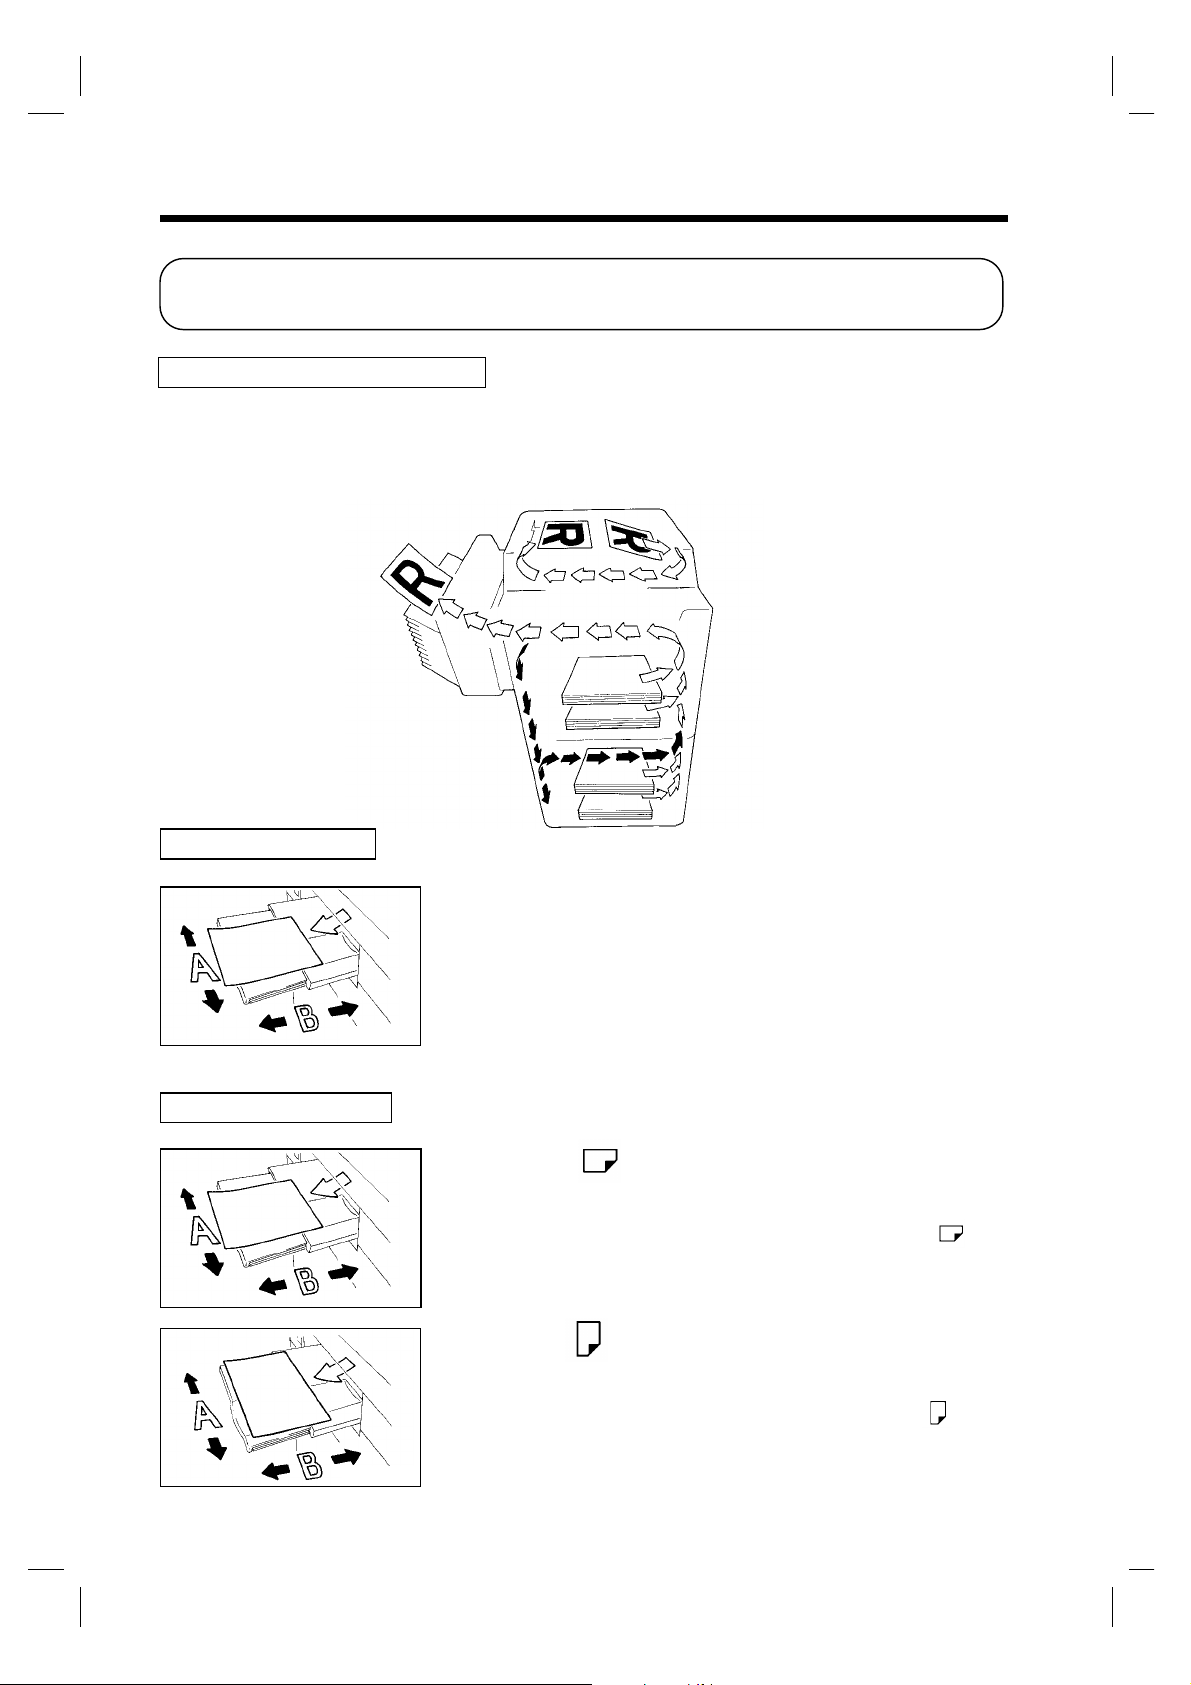
Terms and Symbols for the Type of Originals and Copy Paper
A few special terms and symbols are used in this manual to desig nate types of originals and copy
paper. This page explains about these terms and symbols.
Feeding Direction (copy paper path)
In this copier system, copy paper i s taken up fr om t he left- han d sid e of th e cop ier and fed t hr ough
the copier toward the right -hand side, face up onto the Copy Tray. In the figure below, t he direct ion
in which the copy paper is fed, as indicated by the arrow, is called the "feedi ng directio n."
"Width" and "Length"
1139O1610A
Terms and Symbols Used
1139O1610A
1151O107AA
When we talk about the s ize of th e or igi nal o r copy , we call s id e
A "widt h" and side B "len gth."
A: Width
B: Length
<Lengthwise >
When the original or cop y has a "leng th" lo ng er than i ts
"width," we call it "length wis e" and us e symb ol "L" or " ."
<Crosswise >
When the original or cop y has a "leng th" s hort er th an i ts
"width," we call it "crosswise" and use symbol "C" or " ."
1139O1610A
1139O1620A
Page 9

Chapter 1
Safety Notes
This chapter explains about the operating environment, conditions, and precautions for use.
1. Ins t alling th e Copier p. 2
Installation S ite
Power Source
Space Requirements
2. Precautions for U se p. 3
Operating Enviro nment
Using t he Copie r P r operly
Moving
Care o f Copier Su pplies
1
Chapter 1
Safety Notes
Page 10
2
1. Installing the Copier
Installation Site
To ensure utmost safety and p revent possible malfunctions of th e copier, install it in a location wh ich
meets the following req uirements.
◆
A place away from a curtain or the lik e that
may catch fire and burn easily .
◆
Chapter 1
An area where there is no poss ibi lity of
being splashed with water or other types of
liquid.
◆
An area free from direct sunlight.
◆
A place out of the direct air st ream of an air
conditioner, heater, or v ent ilato r.
◆
A well-ventilated place.
◆
Safety Notes
A dry place.
◆
A dust-free location .
◆
An area not subject to und ue vib rati on .
◆
A stable and level lo catio n.
◆
A place where ammonia or other org ani c
gas is not generated.
◆
A place which does not put the operator in
the direct stream of exhaust fr om the cop ier .
◆
A place which is not near an y kind of
heating device.
Power Source
The power source voltage requi rements are as f ol lows .
◆
Use a power source with lit tle v oltage fluctuation.
Voltage Fluctuatio n
Frequency Fluctuatio n
:
Within ±10%
:
Within ±0.3%
Space Requirements
To ensure easy copier operatio n, su pp ly rep lacement s and serv ice main tenan ce, adhere t o th e
recommended space requirements detailed below.
*
Be sure to allow a clearance of 150mm o r more at the b ack of t he co pier as th ere is a v entilation
duct.
230
405
1,632
1,359
1,055
650
304
1151O001AB
1,400
1,138
467
1,043
918
671
1151O002AB
Scale: mm
Page 11
2. Precautions for Use
Operating Environment
The operating environmental req ui rements of th e copier ar e as follo w s .
Temperature : 10°C to 30°C (50°F to 86°F) with a fluctuation of 10°C (50°F) per hour.
Humidity : 15% to 85% with a fluctuation of 20% per hour.
3
Using the Copier Properly
To ensure the optimum performance o f t he copier , fo llo w the p recau tio ns listed below.
◆
NEVER place a heavy object on the copier or s ubject the copier to shocks.
◆
NEVER open any doors, or turn OFF the cop ier while the copier is making copies.
◆
NEVER bring any magnetized object o r us e fl ammable sp ray s near th e cop ier.
◆
NEVER remodel the copier, as a fire or elect rical s hock co uld resu lt.
◆
ALWAYS insert the power plug all the way into the outlet.
◆
ALWAYS make sure that the outlet is vi s ibl e, clear of t he co pier or copier cabin et.
◆
ALWAYS provide good ventilation when making a large number of continuous copies.
NOTE
= Locate the Copier in a Well Vent ila ted Room =
A negligible amount of oz one is gene r ated during norma l operation of thi s c opier. An
unpleasant odor may, however, be cr eat ed in po orl y venti lated rooms during extensive copier
operations. For a comfor table, h ealt hy, a nd safe o pera tin g envir o nment , it is r eco m mended th at
the room be well ventilat ed.
REMARQUE
= Placer le copieur dans un e pi èce larg em ent ventilée =
Une quantité d’ozone négligable est dégagée pendant le fonctionnement du copieur quand
celui-ci est utilisé n ormalement. Cependant, une odeur désag r éable peut êtr e res s en tie d an s les
pièces dont l’aérati on es t in s uff isan te et lorsque une utilisati on pro longée d u copi eur es t
effectuée. Pour avoir la certitude de travailler dans un environnement réunissant des condit ion s
de confort, santé et de sécur ité, i l es t p r éférab le d e bien aérer la pièce ou se trouve le copieur.
Chapter 1
Safety Notes
Moving
If you need to transport th e cop ier over a lo ng distance, consult your Technical Representative.
Care of Copier Supplies
Use the following precautio ns w h en hand lin g th e copier s up pli es (to ner, pap er, et c.).
◆
Store the paper, toner, and o ther s uppl ies in a place free f rom di rect su nlight and away from any
heating apparatus. Keep them in a dr y, cl ean en viron ment .
◆
Store paper, which has been r emoved f rom its wrap per bu t n ot l oad ed into the drawer, in a
sealed plastic bag in a cool, dar k place.
◆
Keep supplies out of the reach o f children.
◆
If your hands become soil ed with to ner , wash th em with so ap an d water immed iately .
Page 12

4
2. Precautions for Use
Chapter 1
Safety Notes
Page 13

Chapter 2
Getting to Know Your Copier
This chapter gives you a bri e f de scription of the syste m a nd prelimina ry inform a tion about
the different parts of the system.
5
1. System Overview p. 6
2. Copier Parts and Accessories
Outside the Copier p. 8
Inside the Copier p. 9
Options p. 10
3. Cont r ol Panel K e y s and Indicators
Basic Panel p.12
Displ ay Panel p. 1 4
4. Turning ON and OFF and In itia l Mode p . 15
Turning ON and OFF
When the Copier is Turned ON
Initial Mode
5. Auxiliary Fu nctions p. 16
Panel Resetting
Auto Panel Reset Functio n
Auto Copy Start F unction
Auto Shut OFF Function
Interrupt Mode
Energy Saver Mode
Job Memory
Chapter 2
Getting to Know Your Copier
Page 14

6
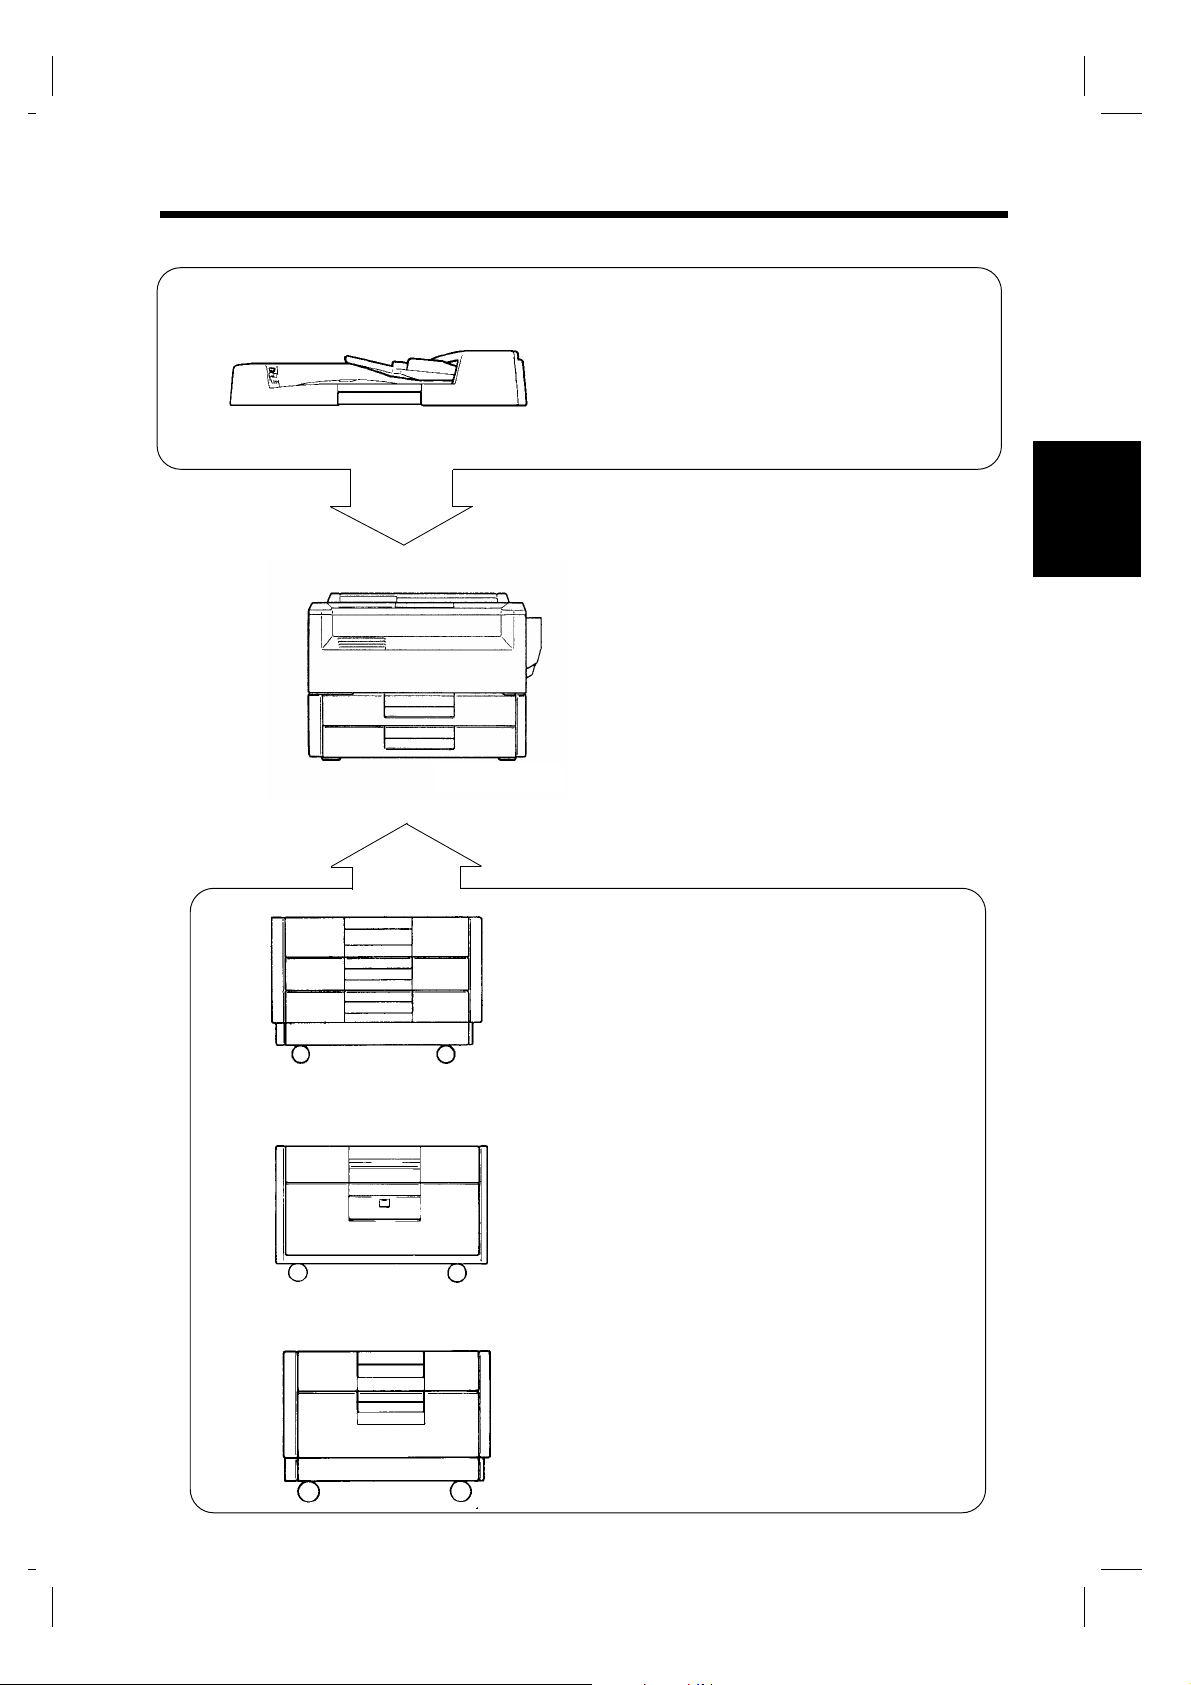
1. System Overview
◆Automatic Document Feeder AF-5 <Option>
Permits automatic feeding of mul tiple originals.
Chapter 2
◆10-B in Sorter S- 106 <Optio n>
Permits sorting or gr ouping co pi es int o u p
to 10 copy sets or stacks.
1151O006AA
◆Staple Sorter ST-104 <Option>
Getting to Know Your Copier
Automatically staples co py s ets or stacks
that are sorted or grouped th e same as with
the S-106.
◆ Duplex Unit AD-8 <Option>
Turns over 1-sided copies to make
2-sided copies.
1139O0020A
1139O0020A
1139O0030A
Page 15
1151O007AA
7
1. System Overview
◆Duplexing Document Feeder AFR-12
<Option>
In addition to the functio n of the AF-5,
it can turn over 2-sided originals.
Chapter 2
D2150
Equipped with two Paper Drawers and a
Multi Bypass Tray to hold up to 55 0
sheets of copy paper. The Manual Byp ass
Table al l ows you to make a copy on
paper which is not loaded i n any of the
Drawers and which is fed int o th e cop ier
manually via this Table.
1139O0180A
1139O1212A
1139O2020A
◆Paper Feed Cabinet PF-204<Option>
Equipped with two paper drawers to
hold up to 1,000 s heets of c opy paper
(80 g/
2
).
m
◆Paper Feed Cabinet PF-104<Option>
Holds up to 2,5 00 sheets o f c opy paper
(80 g/m
2
).
Gettin g to Know Your Cop ier
1139O1222A
◆Duplex Cabinet PF-4D<Option>
Turns o ve r 1-side d c opies to ma ke
2-sided copies. It is als o equipped
with a storage drawer for keepin g
copy paper and toner.
Page 16
8
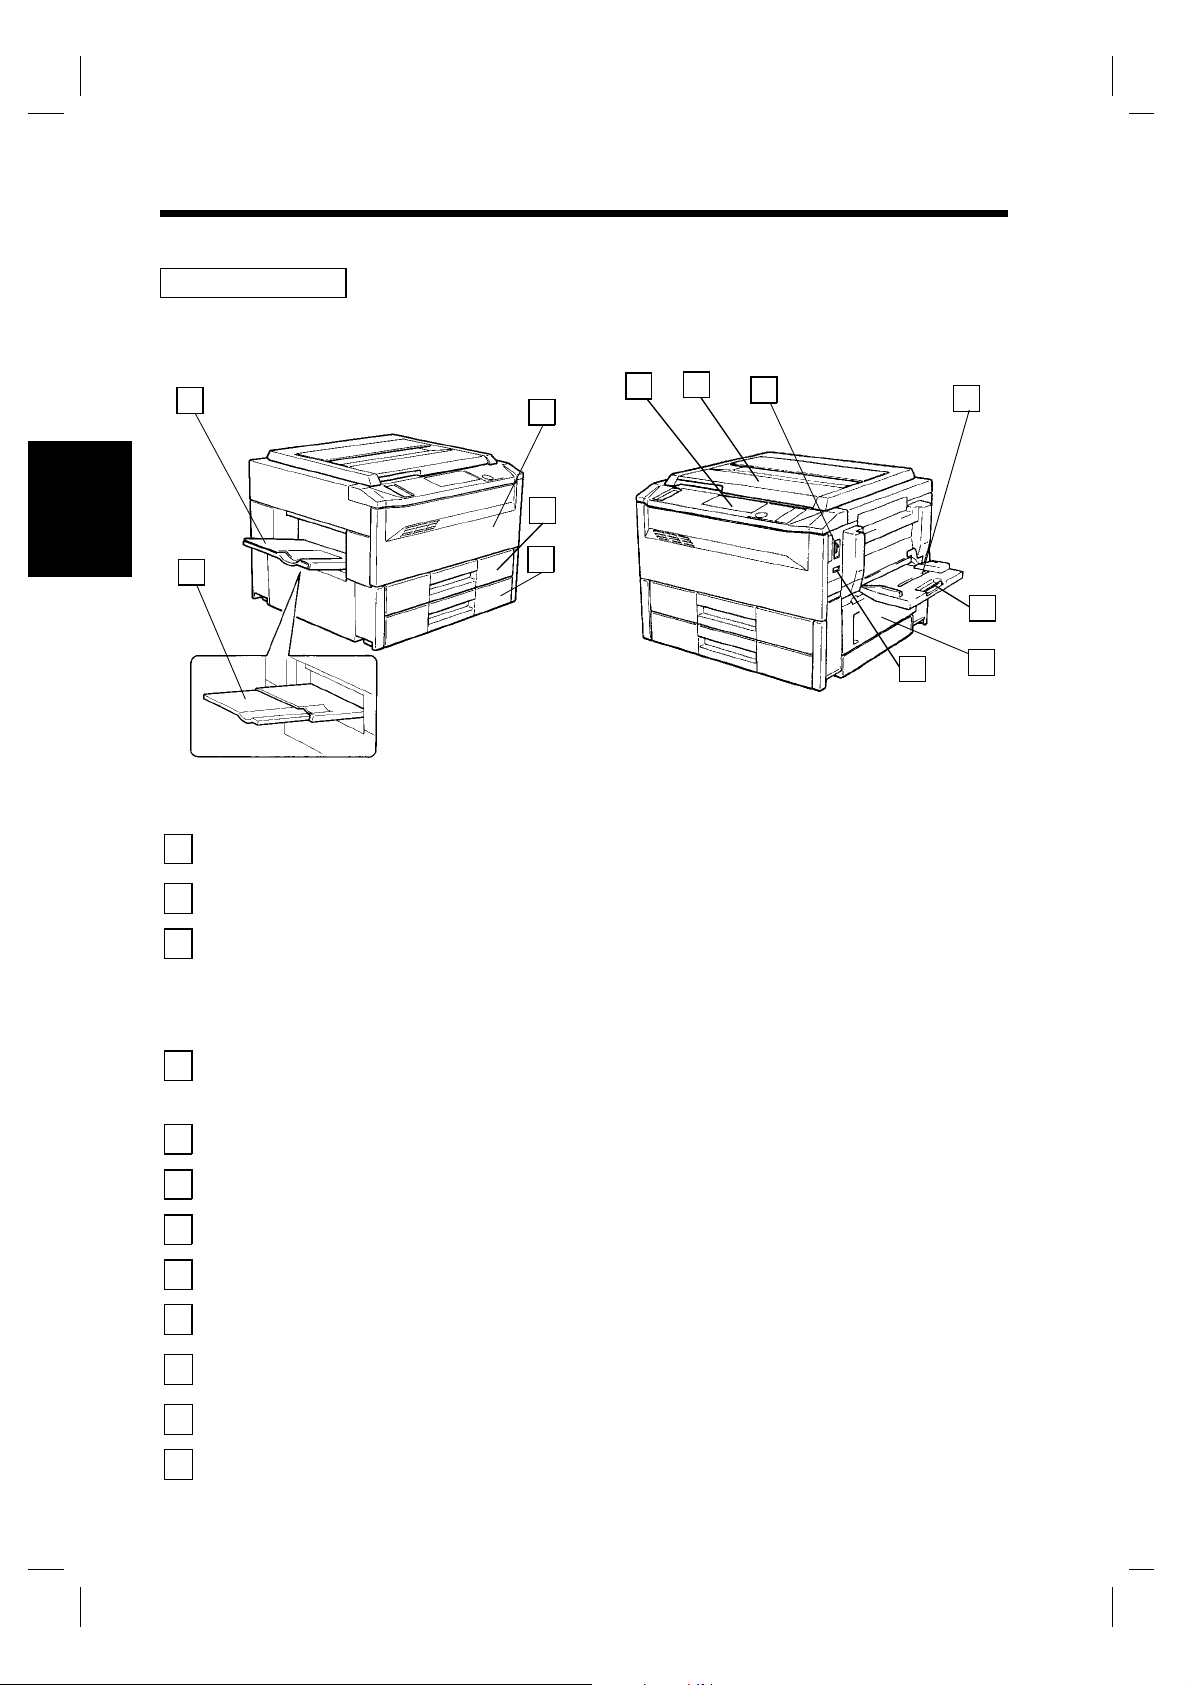
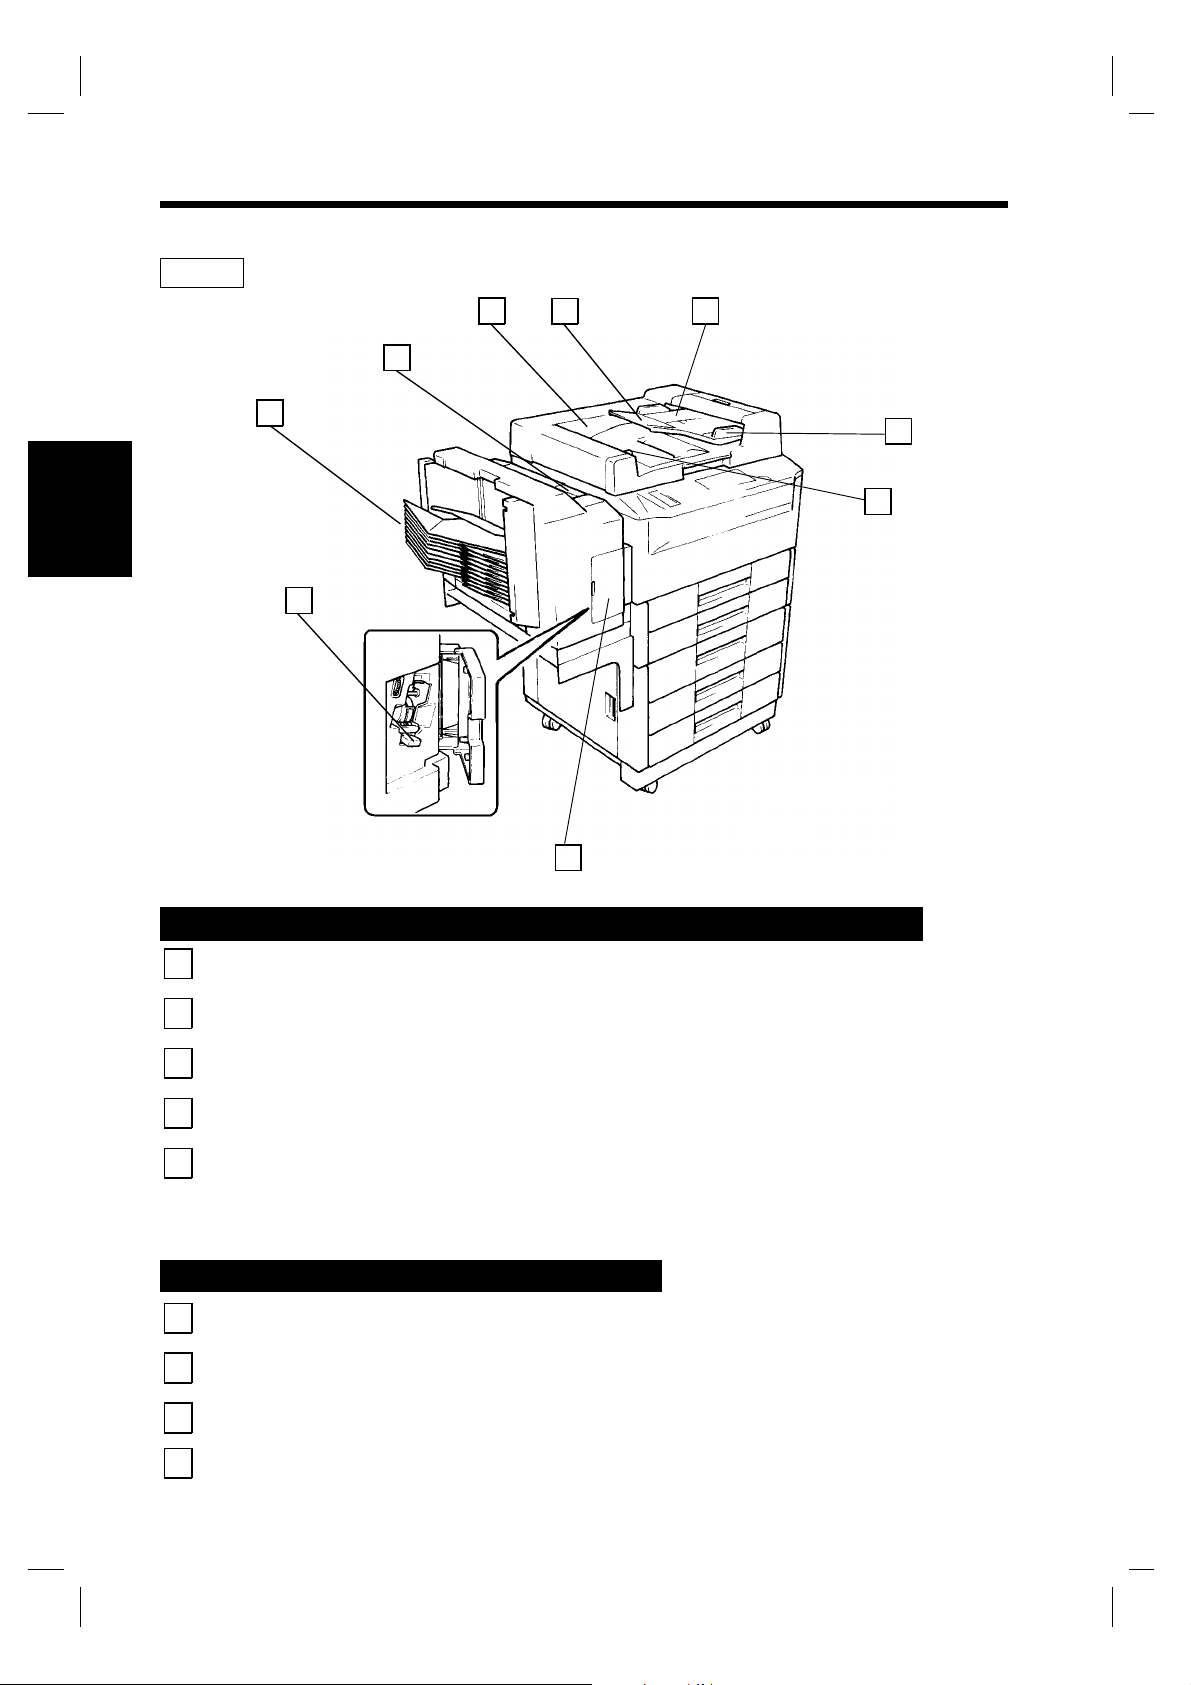
2. Copier Parts and Accessories
Outside the Copier
2
3
4
6
7
8
9
Chapter 2
1
Copy Tray
1
: Slide this out when making copies on lar ge- size pap er.
5
1139O1010A
12
1139O2030A
10
11
Extender
Getting to Know Your Copier
Copy Tray
2
Front Do or
3
1st Drawer
4
: Holds copi es fed out of the copier.
: Open for t he following purpo s e s :
•
Replacing the Toner Bottle.
•
Clearing a paper misfeed.
•
Cleaning the Corona Units.
: Holds up to 250 she et s of paper.
➭
➭
p. 63
p. 68
➭
p. 89
➭
p. 60
The Edge Guide and Trailing Edge S top are mo vable, allowing you to
load paper of different sizes .
2nd Drawer
5
: Holds up to 250 she et s of paper.
➭
p. 61
Control Panel
6
Original Cover
7
Power Switch
8
Multi Bypass
9
Tray
Multi Bypass Tray
10
Extender
Right Door
11
Total Counter
12
: Use to start a copy cycle or make various copy-job settings.
➭
p. 12
: Holds the original placed on the Orig inal Glas s in p osition.
: Use to turn ON and OFF the copier .
➭
p. 15
: Holds up to 50 sheets of standard pap er which is not loade d in any of
the Drawers.
: Slide this out when using large-size copy paper.
: Open to clear a paper misfeed.
➭
p. 28
➭
pp. 72, 73
➭
p. 28
: Shows the total number of copies made so far.
Page 17
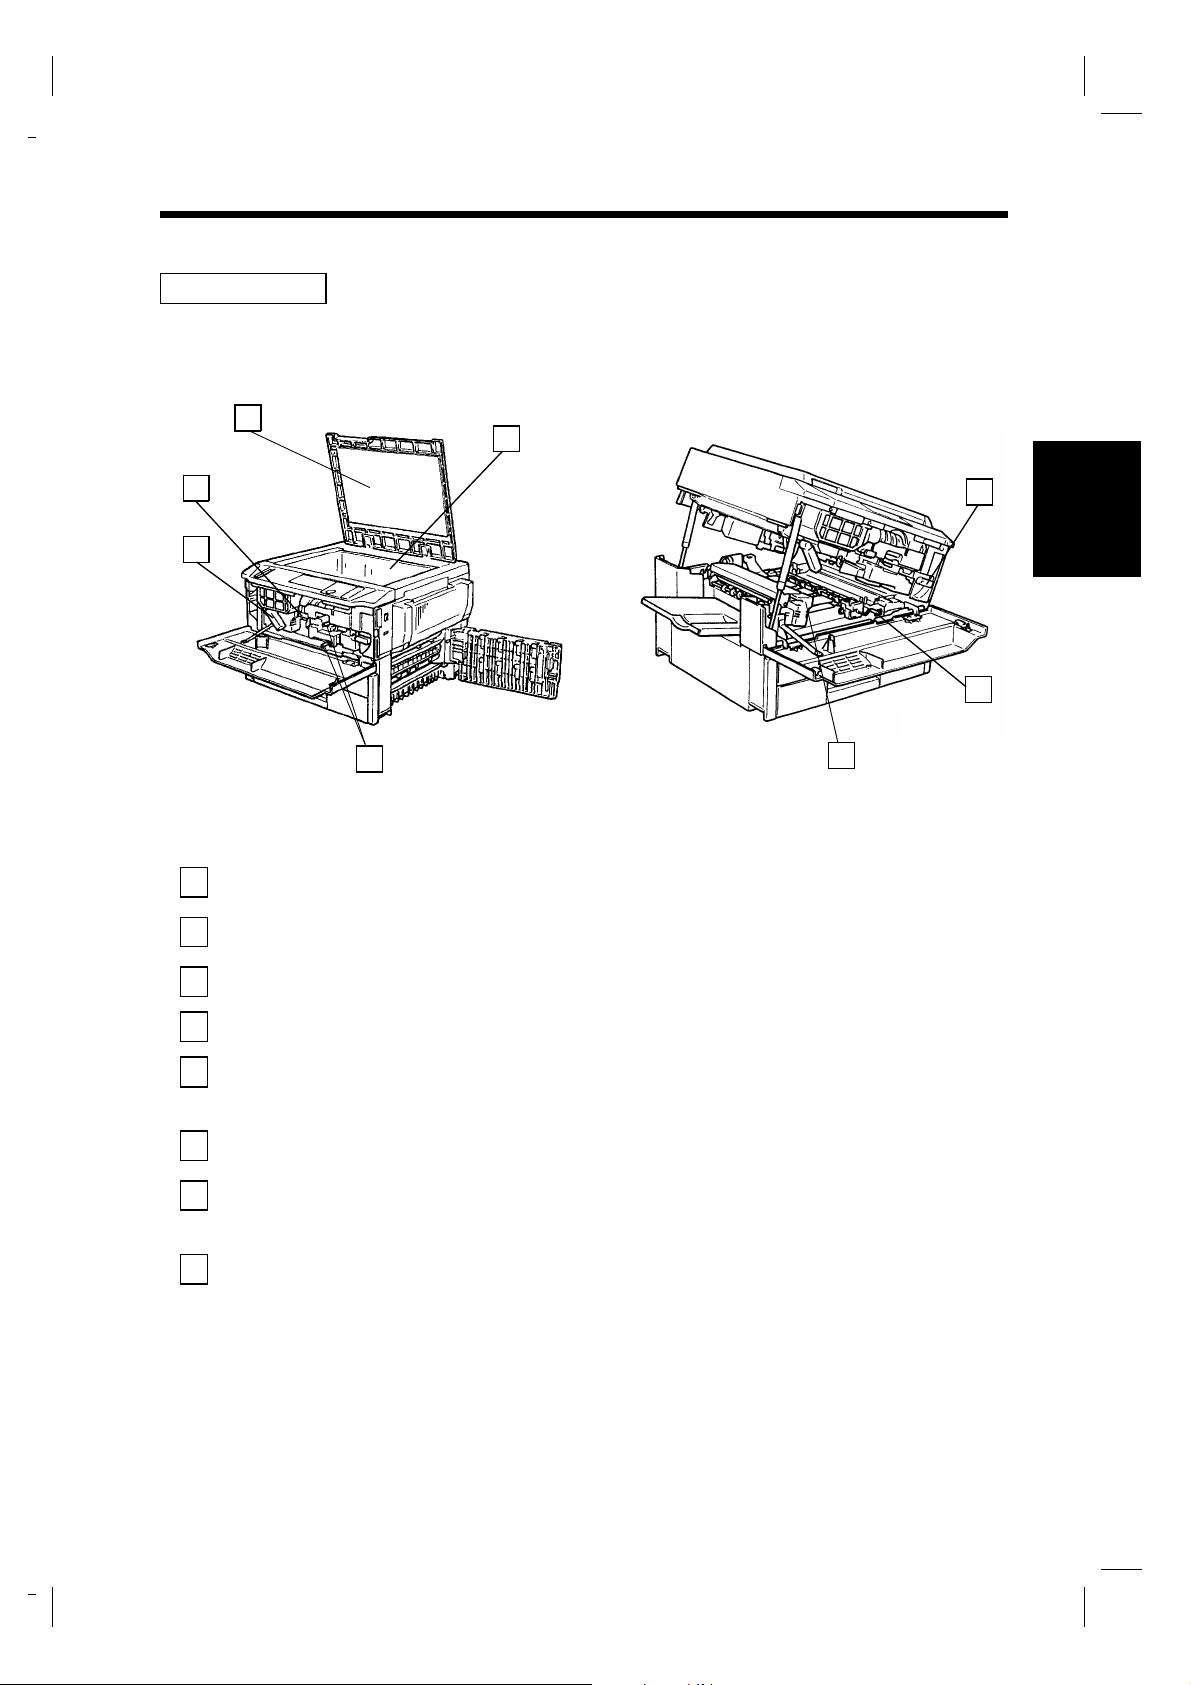
Inside the Copier
3
9
2. Copier Parts and Accessories
4
2
1
Lock Release Leve r
1
Toner Bottle
2
Holder
Original Pad
3
Original Glass
4
1139O2040A
5
8
: Turn clockwise to swing up the Upper Half of th e copier to clear a
paper misfeed.
: Swing open to replace the Toner Bottle.
➭
p. 63
: Holds the original in positio n on th e O rigin al G las s.
: Place the original face down on this Glass.
6
Chapter 2
7
1139O1030A
Getting to Know Your Copier
Corona Unit
5
Cleaning Lever
(Upper/Lower)
Imaging Unit Lock
6
Release Lever
Dehumidifier
7
Switch
Fusing Unit Handle
8
: Operate the Lever to clean the corresponding Co rona Un it if unwanted
➭
lines a re produce d on the co py.
p. 89
: Operate when replacing the Imaging Unit.
(For Technical Representati ve o nly)
: Turn ON to prevent condensation from forming on th e PC Dru m when
power is turned OFF.
(For Technical Representati ve o nly)
: Hold onto this Handle when liftin g the U pper Half of the Fusing Unit.
➭
p. 69
Page 18
10
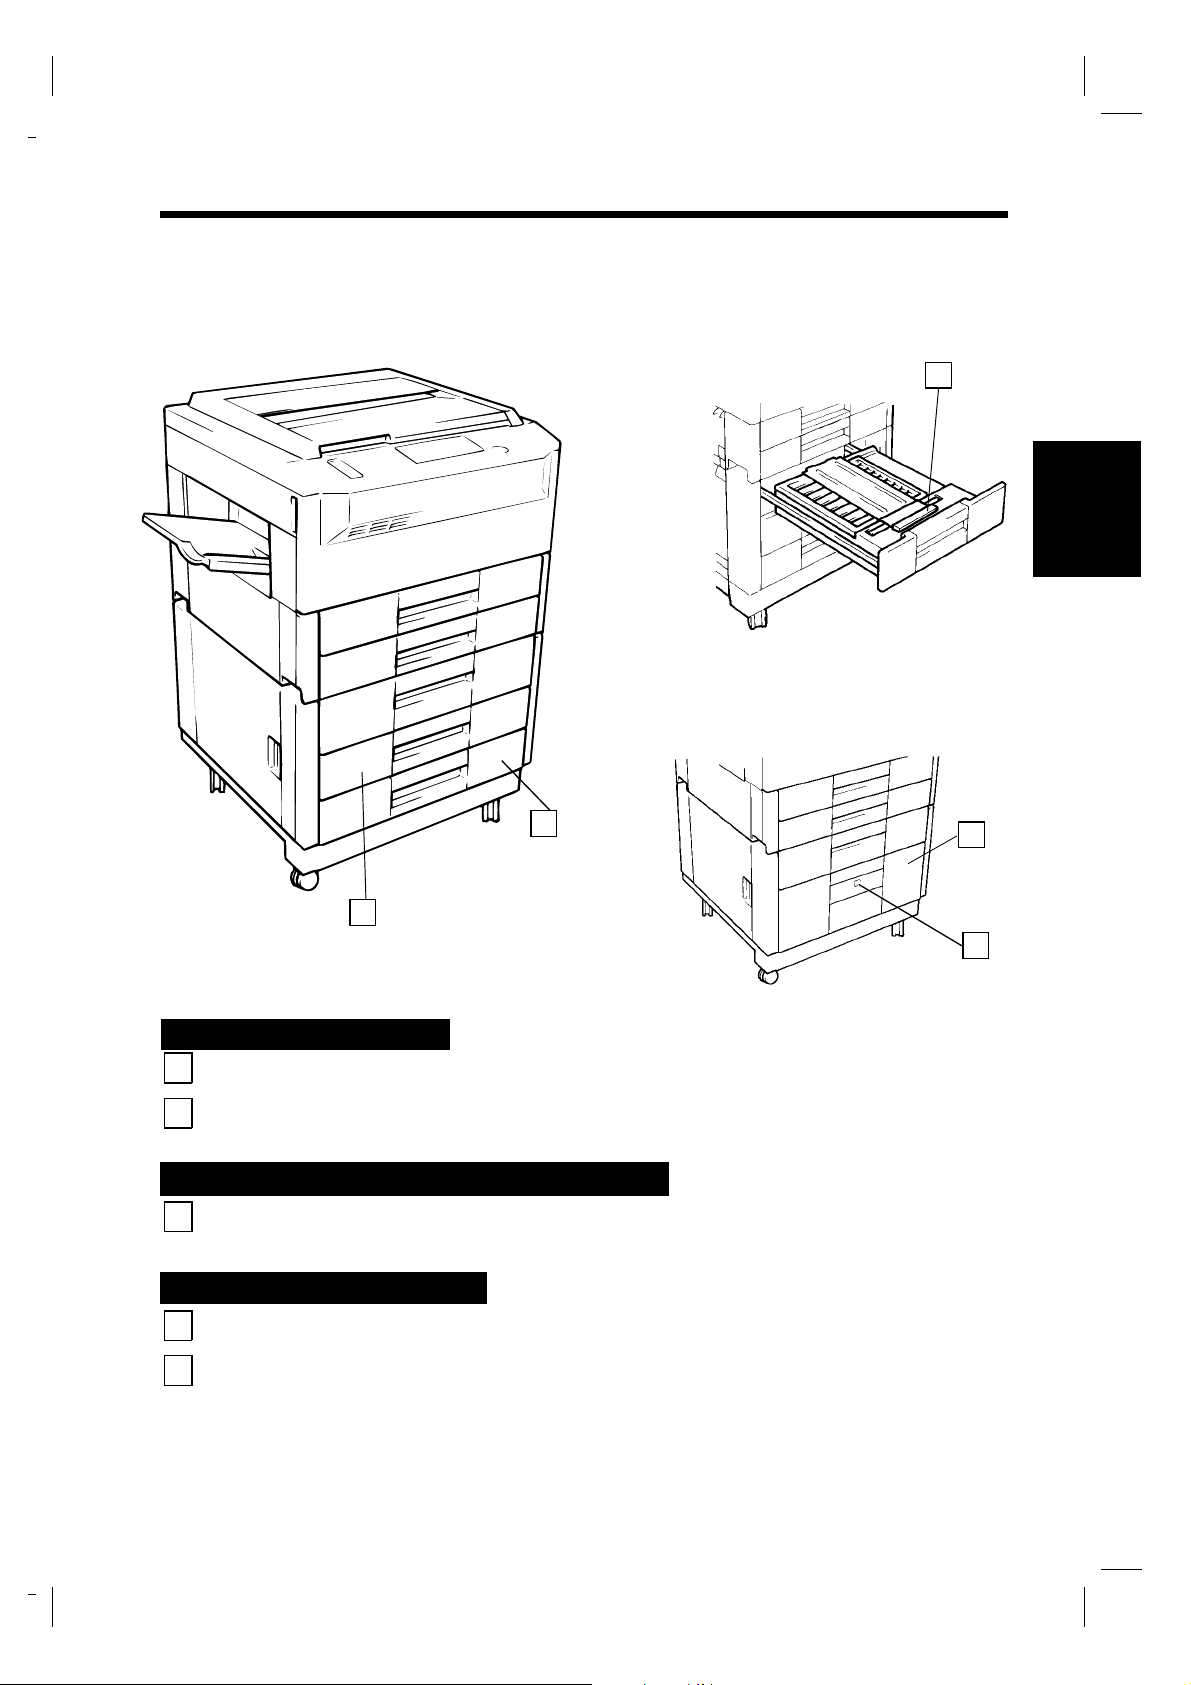
2. Copier Parts and Accessories
Options
1 2
9
8
Chapter 2
7
6
3
4
5
1151O012AB
Getting to Know Your Copier
Automatic Document Feeder AF-5 / Duplexing Document Feeder AFR-12
Document Exit
1
Tray
Document Feed
2
Tray Extender
Document Feed
3
Tray
Document Guide
4
Plate
Document
5
Turnover / Exit
Unit Door Lock
Release Key
: Receives originals that are automat ically ejected from the Automatic
/ Duplexing Document Feeder.
: Pull out when loading large-size or ig inal s .
: Load the originals face up on this tray .
: Slide the plate as necessary to the size o f t he o rigin als .
: Hold down when opening the Document Turnover/E xit Unit Door.
➭
(AFR-12 only)
p. 74
Staple Sorter ST-104 and 10-Bin Sorter S-106
Stapler Door
6
Staple Cartridge
7
Release Lever
Sorter Bins
8
Lock Release Leve r
9
: Open to replace the Staple Cartridge.
(ST-104 only)
➭
p. 64
: Move the Lever up to replace the Staple Cartridg e.
(ST-104 only)
➭
p. 64
: Hold sorted or grouped copies.
: Press to unlock the Sorter.
➭
p. 76
Page 19
11
2. Copier Parts and Accessories
3
1151O009AA
Chapter 2
2
1
1151O008AA
Paper Feed Cabinet PF-204
3rd Drawe r
1
4th Drawer
2
: Holds up to 500 she et s of paper.
: Holds up to 500 she et s of paper.
Duplex Unit AD-8 / Paper Feed Cabinet PF-4D
Misfeed Removal
3
Guide Plate
: Open to clear a paper misfeed.
Paper Feed Cabinet PF-104
3rd Drawe r
4
Paper Descent Key
5
: Holds up to 2,500 s hee ts of pap e r.
: Press before sliding the Drawer out o r after sliding the Drawer into the
copier.
➭
pp. 62, 72
➭
➭
p. 61
➭
p. 61
p. 73
➭
4
Getting to Know Your Copier
5
1151O010AA
p. 62
Page 20
12
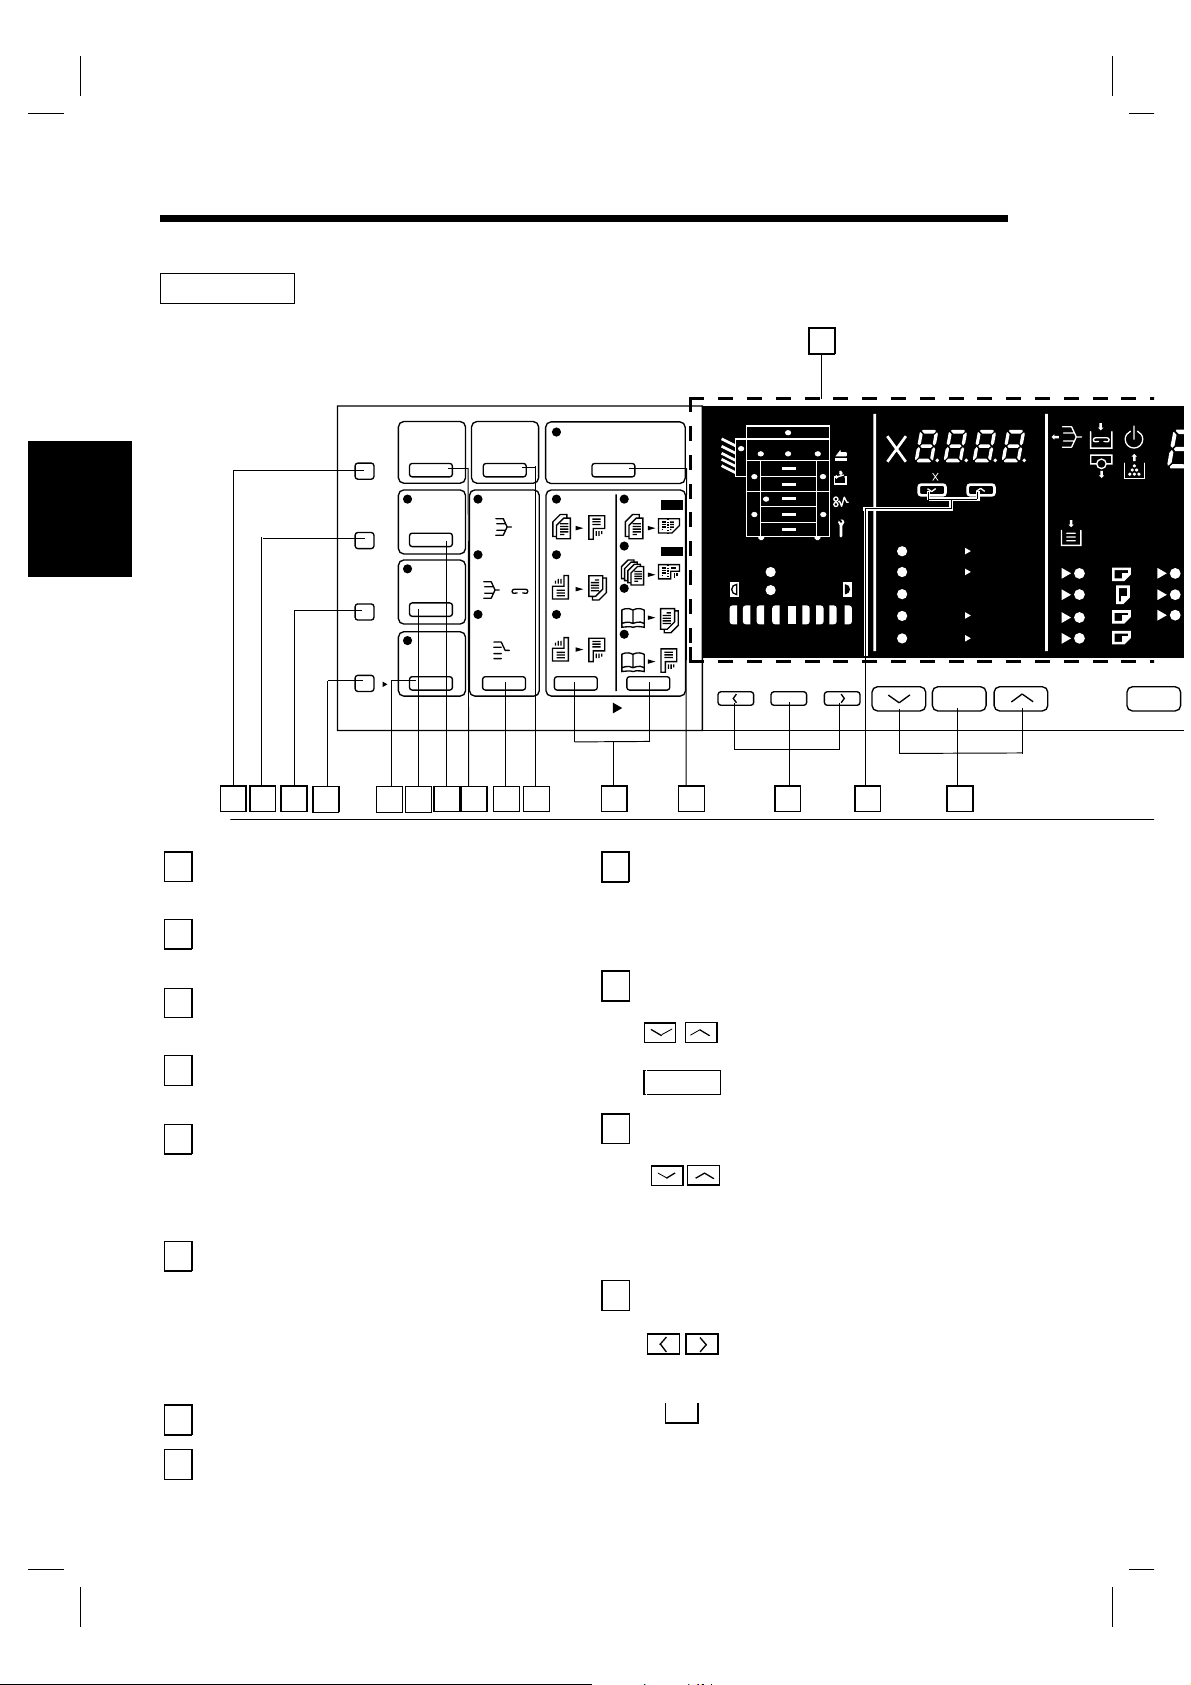
3. Control Panel Keys and Indicator s
Basic Panel
1
Meter
Count
Toner
Chapter 2
Drum
Dehumidify
Input
24 23 22
Display Panel
1
Getting to Know Your Copier
See the other pages in this manual.
➭
p. 14
Key Pad
2
21 1318 1416 15
Use to enter the number of copi es to be
made and other nume ric data.
Clear Key
3
Press to :
•
Reset the multi-copy entry to 1.
Energy Saving Key
4
Press to set the copier int o th e Energy
➭
Saver Mo de .
Interrupt Key
5
p. 17
Press once to interrup t a cu rr ent j ob with
a more urgent one. Press it again to
return to the previous j ob .
➭
p. 16
Panel Reset Key
6
Auto
Size
Margin
Cover
Job
Memory
20 191217
Manual
Staple
Sort
Sort &
Staple
Group
Mixed Orig. Det.
1
2
11
21
22
12
Book
Book
Orig. CopyFinishing
9
10
11
0.5~2.0
2in1
2in1
1
Lighter Darker
2
Auto
Photo
Auto / Photo
A
11 10
Auto
A4
A3
B4 A3
Full Size
B4 A4
A3 A4
Full Size Paper
Paper Select Key
Press to select the desired paper size or
the Paper Select Mode, either Auto or
Manual.
➭
p. 30
Zoom Ratio Select Key
:Press to select a desired fixed
zoom ratio.
:Press to select full size(100%).
Full Size
➭
p. 32
Zoom Up / Down Keys
:Press as necessary to change
the zoom ratio in 0.001
increments between the range
➭
of ✕0.500 and ✕2.000.
p. 33
A3
A4
A4
A5
Auto
B
F
I
Press to set the copier int o th e in itial
Exposure Control Keys
mode, clearing all settin gs mad e
previously on the control panel.
It does not, however, clear the contents
*
of the copying job prog ram memo ry and
the Interrupt Mode.
Stop Key
7
Press to stop a multi- cop y cycle.
Start Key
8
Press to start a copy cycle.
➭
p. 16
12
:Press as necessary to vary the
exposure level in the Manual
Exposure Mode.
:Press to select either the Auto
A
Exposure Mode, Manual
Exposure Mode, or Photo
➭
Mode.
p. 34
Page 21
13
3. Control Panel Keys and Indicators
to
oto
hoto
Darker
0.5~2.0
Auto
A4
A3
B4 A3
Full Size
B4 A4
A3 A4
Full Size Paper
Mixed Original Detection Key
13
Auto
A3
A4
A4
A5
Press when making copies usi ng the
Automatic / Duplexing Do cumen t Feeder
in which originals of ass o rt ed sizes are
➭
loaded together.
Orig Copy Key
14
▼
p. 25
Press to select the type o f copy in g jo b
you wish to make.
Manual Staple Key
15
Press to staple copy set s or stacks already
➭
made.
Finishing Key
16
p. 42
Press to select the finishing type you
➭
want.
Auto Size Key
17
p. 42
Press as necessary to sel ect th e Auto Si ze
➭
Mode.
File Margin Key
18
p. 32
Press to set the copier int o th e File
➭
Margin Mode.
Cover Key
19
p. 46
Press to set the copier int o th e Cover
➭
Mode.
p. 47
➭
S
B4
FLS.
Inch
p. 36
2 1
123
456
789
0C
7 8 10 9 6 5
Job Memory Select Key
20
Press to call up a copy jo b pro gr am
previously stored in th e pr ogram memo ry .
➭
p. 17
Job Memory Input K e y
21
Press to store a copy job prog ram i n th e
program memory.
Drum Dehumidify Key
22
Press to remove condensation formed on
the surface of the PC Drum.
Auxiliary Toner Replenishin g Key
23
Press when the image on the copy
becomes too light.
Meter Count Key
24
Press to check for each of th e curren t
counts of different electr on ic count ers o f
the copier.
➭ p. 50
4 3
1151O041DA
1151O041DA
➭
p. 17
➭
p. 51
➭
Chapter 2
Getting to Know Your Copier
p. 51
Page 22
14
3. Control Panel Keys and Indicators
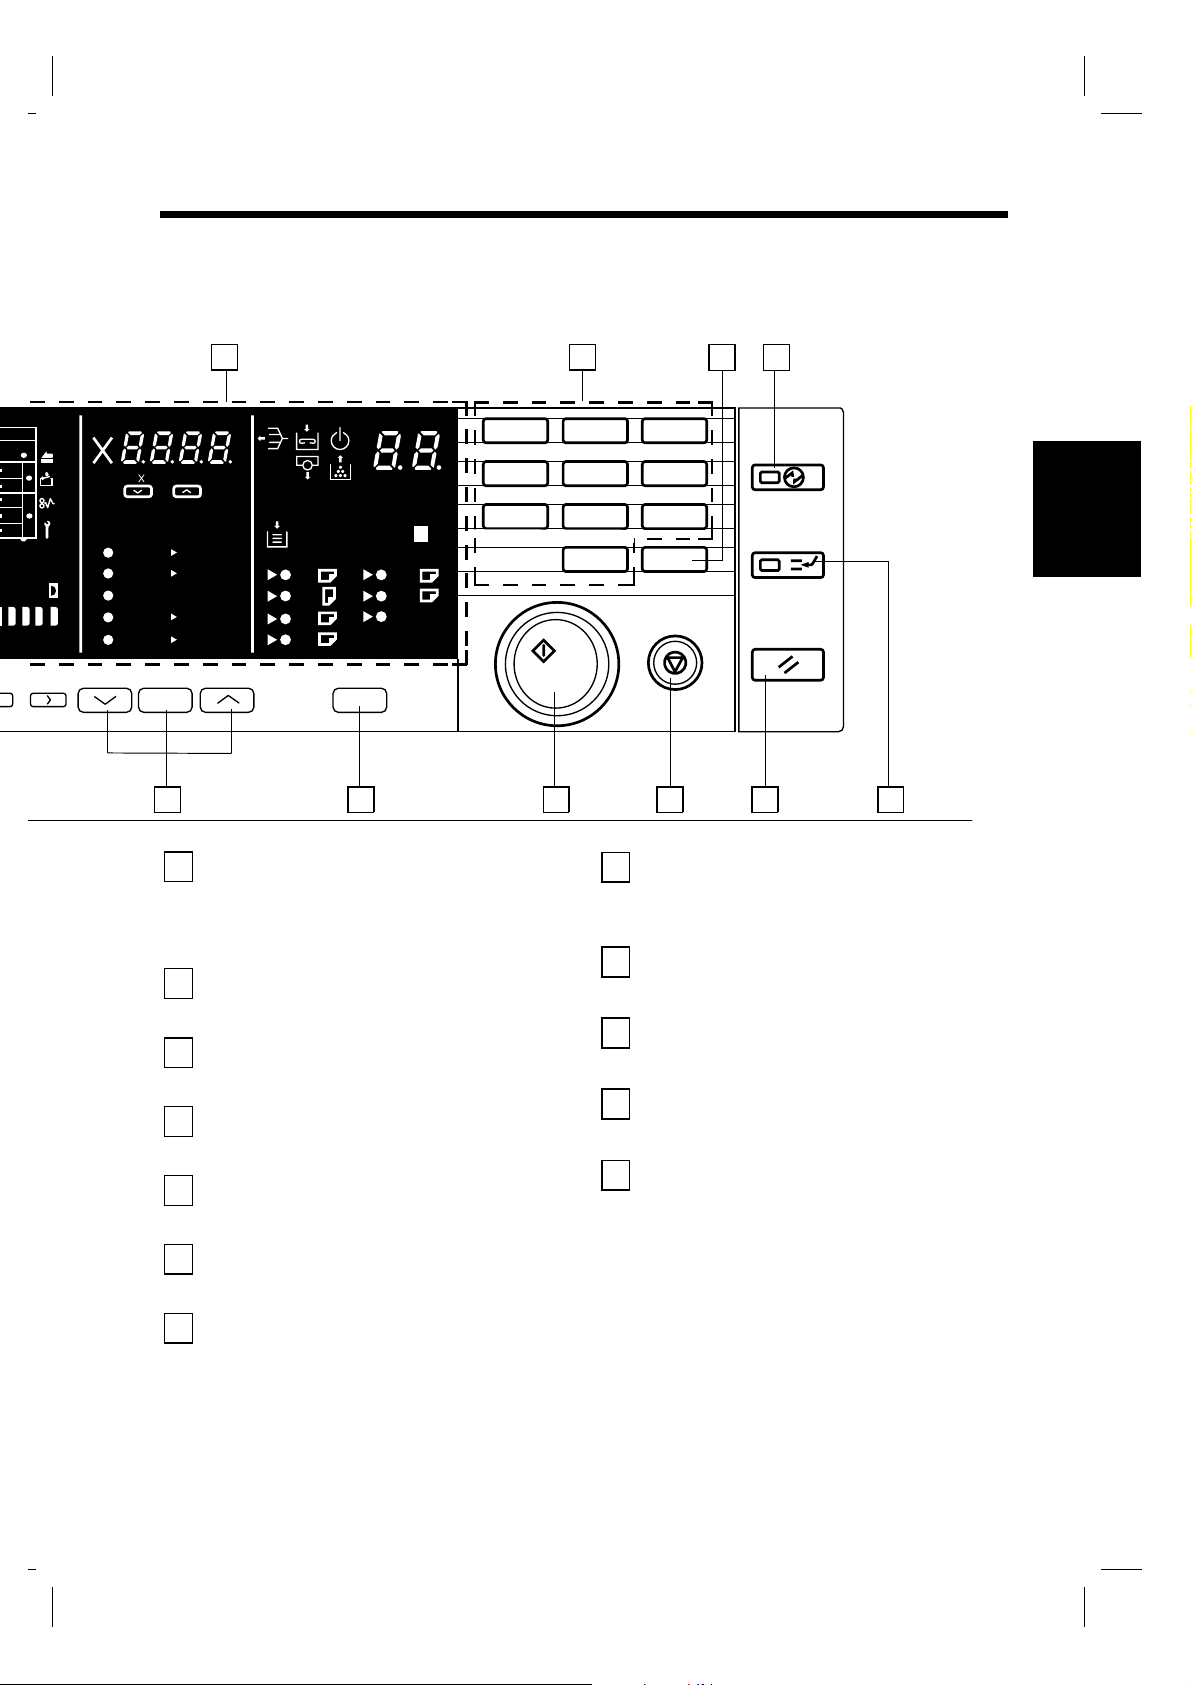
Display Panel
1 2 3
0.5~2.0
Auto
A4
Chapter 2
Closure Failure Indicator
1
Auto
Photo
Lighter Darker
Auto / Photo
A
A3
B4 A3
Full Size
B4 A4
A3 A4
Full Size Paper
Indicates that a door is lef t o pen or
Getting to Know Your Copier
2
an option is not set cor rectl y.
➭
p. 66
Misfeed Indicator
Indicates that a paper mis feed has
occurred in the copier or an
option.
Call-Tech.-Rep. Indicator
3
➭
p. 68
Indicates that the copier h as
developed a malfunction.
Remove Copies Indicator
4
Indicates that there is a co py or
copies left in the Sorter B ins.
Remove copies fr om a ll Bins.
➭
Add Staples Indicator
5
p. 78
Indicates that the Staple C art ridge
is running out of staples. Replace
the Staple Cartridge as soon as
➭
possible.
p. 64
4 5
A3
A4
A4
A5
10 9
6
Auto
7 8
S
B4
FLS.
Inch
6
7
➭
p. 77
8
9
10
123
456
789
0C
Wait Indicator
Indicates that the copier i s
warming up and no copy cycle
can be initiated. Wait un til it goes
➭
p. 78
out.
Add Toner Indicator
Indicates that the Ton er Bott le is
running out of toner. R eplace t he
Toner Bottle as s oon as po s s i ble.
➭
p. 63
Maintenance Call Indicator
Indicates when a regularly
scheduled preve nt ive mainte nance
call becomes necessary.
Call your Technical
Representative immediatel y.
➭
p. 78
Special Paper Indicator
Indicates that the special paper
S
setting has been made.
Add Paper Indicator
1151O041DA
1151O041DA
➭
p. 31
Indicates that the cur rently
selected drawer has run out o f
paper. A dd paper as necessary.
➭
p. 60
Page 23

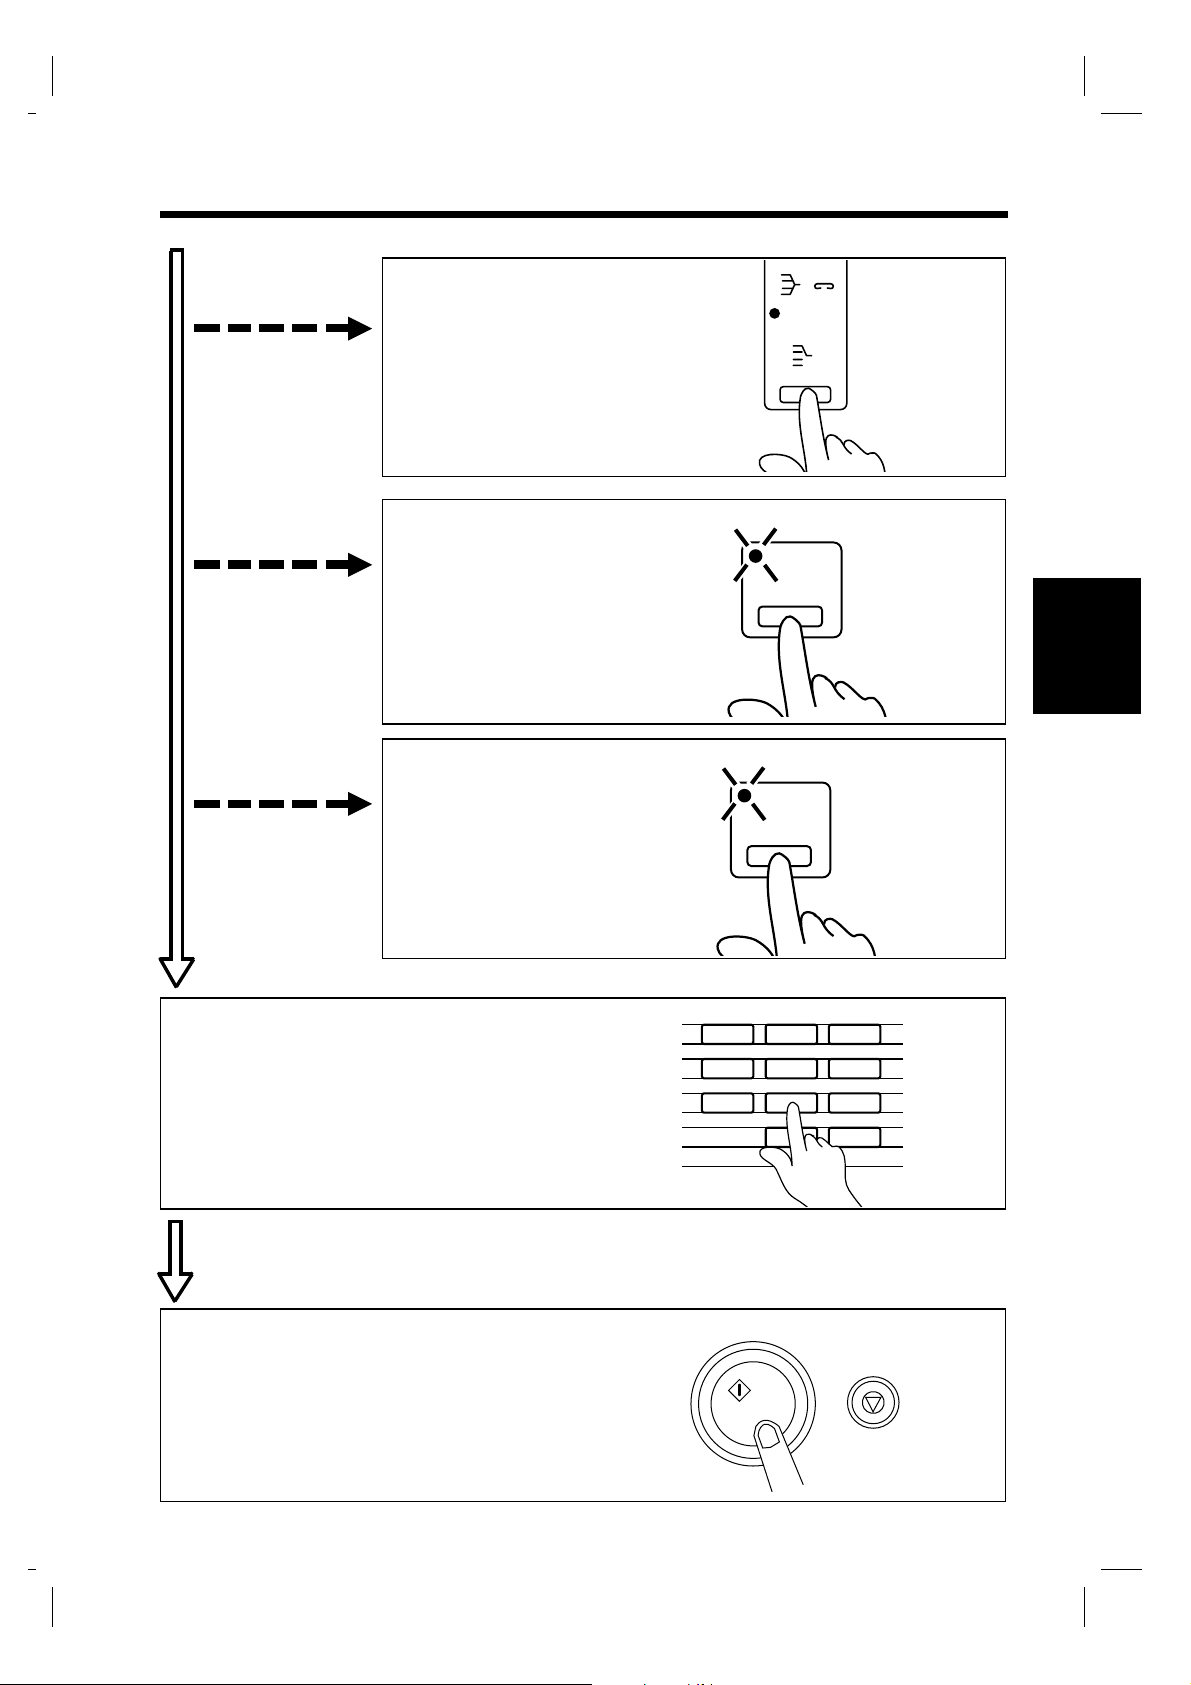
4. Turning ON and OFF and Initial Mode
S
S
Turning ON and OFF
●
Turning Copier ON
Press the Power Switch to t he I (ON) position.
●
Turning Copier O FF
Press the Power Switch to t he (OFF) position.
NOTE
The Auto Shut OFF function will automatically
shut down the copier a given period of time
1139O2060A
When Copier is Turned ON
The Wait Indicator lights up on the
control panel and th e Start Key turns orange,
indicating that t he co pier is n ow w arming u p.
Loading the origin als onto the Automatic /
Duplexing Document Feeder an d press ing the
Start Key can set the copier into the Auto Copy
Start Function.➭ p. 16
after the last activi ty (see p . 16 ).
In about 30 seconds, the Wait I nd icato r g oes
out, and the Start Key turns green. Now, the
copier is ready to make copies.
15
Chapter 2
123
456
Auto
A3
B4
A4
B5
FLS.
A4
Inch
A5
Paper
789
Start
Start Key : Orange L ight
0C
Stop
1139O4702A
1139O4702A
Auto
A3
B4
A4
B5
FLS.
A4
Inch
A5
Paper
Start Key : Green Light
123
456
789
0C
Start
Stop
1139O4722A
1139O4722A
Initial Mode
When the Power Switch is turned O N, the in itial settings are indicated on t he co ntrol panel.
* The initial settin gs ser ve as the reference for all control panel settings to be later made.
No. of copies
selected
Zoom Ratio : ✕1.000 Orig. Copy : From 1-sided
Paper : Auto P a per Finishing : Non-Sort
* The initial setting o f the O rig. Co py M ode is 1- sided original 2-sided copy if your co pi er is
equipped with a Duplex Unit.
: 1 Exposu re : Auto Exposure
▼
original to 1-sided
copy
▼
▼
Getting to Know Your Copier
Usef ul Tip
➭
The initial mode can be chan ged. For d etails, see User’s Choice.
p. 52
Page 24
16
5. Auxiliary Functions
Panel Resetting
The Panel Reset Key resets al l control panel
settings to default s ettings including the
number of copies and zoom ratio.
If an Automatic / Duplexing D ocument
*
Feeder is used, the original p resen t on
the Original Glass wil l be ej ected out of
the unit.
Useful Tip
The Panel Reset Key enables you to can cel
all previous setting s eff icien tly . To av oi d
Chapter 2
miscopy, try to press thi s Key bef ore
making any setting for yo ur own cop y job.
Auto Panel Reset Function
If no key on the Control Panel is pressed
within about 60 sec. after a copy cycle has
been completed or copy settings made, t he
Auto Panel Reset Function is activated to
Getting to Know Your Copier
return the copier to the default settings.
Useful Tip
The time for the copier to enter th e Auto
Panel Re s e t F unction can be chang e d to 30
sec.
Also, the Auto Panel Reset function can be
enabled or disabled by the User ’s C ho ice.
➭
p. 56
Auto Copy Start Function
Auto Shut OFF Functi on
The Auto Shut OFF Function shuts down the
copier a given period of time af ter the co pi er
has been used last. The ini tial s etting is 60 min.
Useful Tip
The time for the copier t o en ter t he Aut o
Shut OFF Mode can be selected from 1 to
120 min. by using the Us er’s Choi c e .
➭
p. 57
NOTE
Consult your Techn ical Repres en tat ive if
you do not want to a ctiva te th is function.
Interrupt Mode
The Interrupt Mode allows y ou to int err upt a
current job and run a diff erent on e. Press in g
the Interrupt Key once set s the copi er in to the
Interrupt Mode. Pressing the Key again
cancels the Interrupt Mod e and return s to the
previous settings.
Useful Tips
•
If the current job involves 2-sided
copying or Cover Mode, the copier
rejects an Interrupt Mo de.
•
If the current job involves S o rt,
Sort-and-Staple or Group, Non-Sort is
automatically select ed at t he same time
when the copier is set into the Interrupt
Mode.
Even during warm-up, the copier can be s et
into the Auto Copy Start Funct ion by lo adin g
the originals onto th e Automatic / Duplexing
Document Feeder and pressing the S tart Key.
This function allows a co py pr ocess to be
started as soon as the copi er co mplet es
warming up.
Page 25
17
5. Auxiliary Functions
Energy Saver Mode
Instead of turning the copier O FF, it ’s a g oo d
idea to use the Energy Saver Mode. This mode
will minimize the time fo r the cop ier to
complete the warm-up cycle to abou t 20 s ec.
•
The Energy Saver Mode is auto matically
activated a given period of time af ter t he
copier has been used last.
The initial setting is 15 min.
•
Pressing the En e rgy Saving K e y s e t s the
copier into the Energy Saver Mode.
•
To cancel the Energy Saver Mode, press any
key on the Control Panel, for instance, the
Start Key.
Useful Tip
The time for the copier to enter th e Ener gy
Saver Mo de ca n be sele c te d from 1 to 120
➭
min. by us i ng User’s Choice.
NOTE
p. 56
Job Memory
One copying job progr am th at is
frequently used can be stor ed i n memory
and called up later as neces sary .
Job Memory Setting
1
2
Press the job Memory Inp ut Key.
* The Job Memory Indicator Star ts
blinking.
Job
Input
Make the control panel settings for the
job to be stored in jo b memory .
Memory
Chapter 2
1139O8032A
The copier is shut down if the Auto Shut
OFF function activates w hile the copier is
in the Energy Saver Mode.
3
Getting to Know Your Copier
Press the Job Memory Select Key.
* The Job Memory Indicator lights
up and the copyin g job prog ra m has
been stored in job memory.
Job
Memory
1139O2572A
To call up the job program fro m
memory, press the Job Memory Select
Key.
NOTE
If you have stored a wrong job
program or if y ou want to
replace an old job program with
a new one, perform steps 1, 2,
and 3.
Page 26

18
Chapter 2
Getting to Know Your Copier
Page 27

Chapter 3
Making Copies
This cha pter shows you how to make copie s.
The "Basic Copying Overview" offers quick, at-a-glance instructions for making copies.
Each step is keyed to a pa g e number with a more detaile d description.
1. Basic Copying Overview p. 2 0
2. Placing Ori ginals
•
Placing on the Original Glass p. 22
•
Using the Automatic/D u plexi ng Documen t Feeder p . 24
•
Using the Mixed Origina l Detection Mode p. 25
•
Using the Single Au toma tic D ocum ent Feed in g Mode
(SADF Mode) p. 26
3. Manual Bypass Copying p. 28
4. Copy Paper Size p. 30
5. Zoom Ratio p. 32
6. Imag e D e ns i ty p. 34
•
Auto Exposure Mode
•
Manual Exposure Mode
•
Photo Mode
7. Original Copy Type p. 36
•
•
•
•
•
•
•
•
•
•
8. Finishing Mode p. 40
•
•
•
•
•
•
•
•
•
9. File Margin Mode p. 46
10. Cover Mode p. 47
▲
1-sided 1-sided
1-sided 2-sided
2-sided 1-sided
2-sided 2-sided
1-si de d 1-sided (2in1)
1-si de d 2-sided (2in1)
Book 1-sided
▲
▲▲
▲▲▲
▲▲
Book 2-sided
Selecting Original Copy Type p. 38
▲
Instructions for Loading Originals p. 39
Non-Sort
Sort
Sort -and-Stap l e
Group
Manua l Staple
Selecting the Finishin g Mode p. 42
Using the Manual Stapl e Mod e p. 43
Instructions for Loading Originals for Finishing Mode p. 44
Auto Dual Funct i on p. 45
19
Chapter 3
Making Copies
Page 28
S
20
1. Basic Copying Overview
•
Place the original in position (step 1), set the number o f copi es to be made ( step 9), and press the
Start Key (step 10). This wil l allow you to make a full-size copy or co pies on p aper of th e s ame
size as the original .
*Automatically selected in the initial mode are Auto Pa per, fu ll s ize, and Auto Exposure.
•
The selections will change the exposure lev el, zoo m rat io, t he type o f copy and s o on.
1. Placing the Original
•
•
Raise the Original Cov er and p lace th e
original face down on the Orig in al G lass .
➭
p. 22
Chapter 3
Load the originals face up in t he
Automatic/Duplex ing D ocu ment
➭
Feeder.
p. 25
Making Copies
To change the copy paper
size
To change the zoom ratio
To change the exposure
level
To make 2-sided copies
from 1-sided originals
1151O013AA
2. Press the Paper Select Key to
select the desired paper size.
➭
p. 30
3. Press the Keys to
select the desired fixed zoom
➭
ratio.
p. 32
4. Press the < > Keys to
adjust the exposure lev el.
➭
p. 34
5. Press the Orig. Copy Key
▲
to select the 2-sided copy
➭
mode.
p. 36
Auto
A3
A4
A4
A5
Full Size
Lighter Darker
Paper
Auto / Photo
A
21
22
B4
B5
FLS.
Inch
1139O2652A
Book
Book
1139O0082A
1151O016AA
1139O0082A
1139O2652A
1151O081CA
1
2
Orig. Copy
1151O086CA
Page 29
21
1. Basic Copying Overview
To sort c opies
To make a file margin
on the copy
To make a cover copy
6. Press the Finishing Key to
select the desired finishing
➭
mode.
p. 40
7. Press the File Margin Key
to set the copier into th e
➭
File Margin Mode.
p. 46
8. Press the Cover Key to set
the copier into the Cover
➭
Mode.
p. 47
Staple
Group
Finishing
1151O087CA
Margin
Chapter 3
1139O2552A
Cover
9. Setting the number of cop ies.
•
Set the desired number of copi es to be
made using the Key Pad.
*If you have entered a n incorr ect
number, press the Clear Key, t hen enter
the correct number.
10. Starting the copy cycle.
•
Press the Start Key.
*To stop the copy cycle, pres s th e Stop
Key.
123
456
789
0C
1139O2640A
Making Copies
1139O2562CA
1139O2640A
1134P342DA
Page 30
22
2. Placing Originals
Placing on the Original Glass
Different methods are used to p lace th e or ig inal dep ending on its type. Use the appropriate
procedure.
Sheet Originals
(Using plain paper or thick paper)
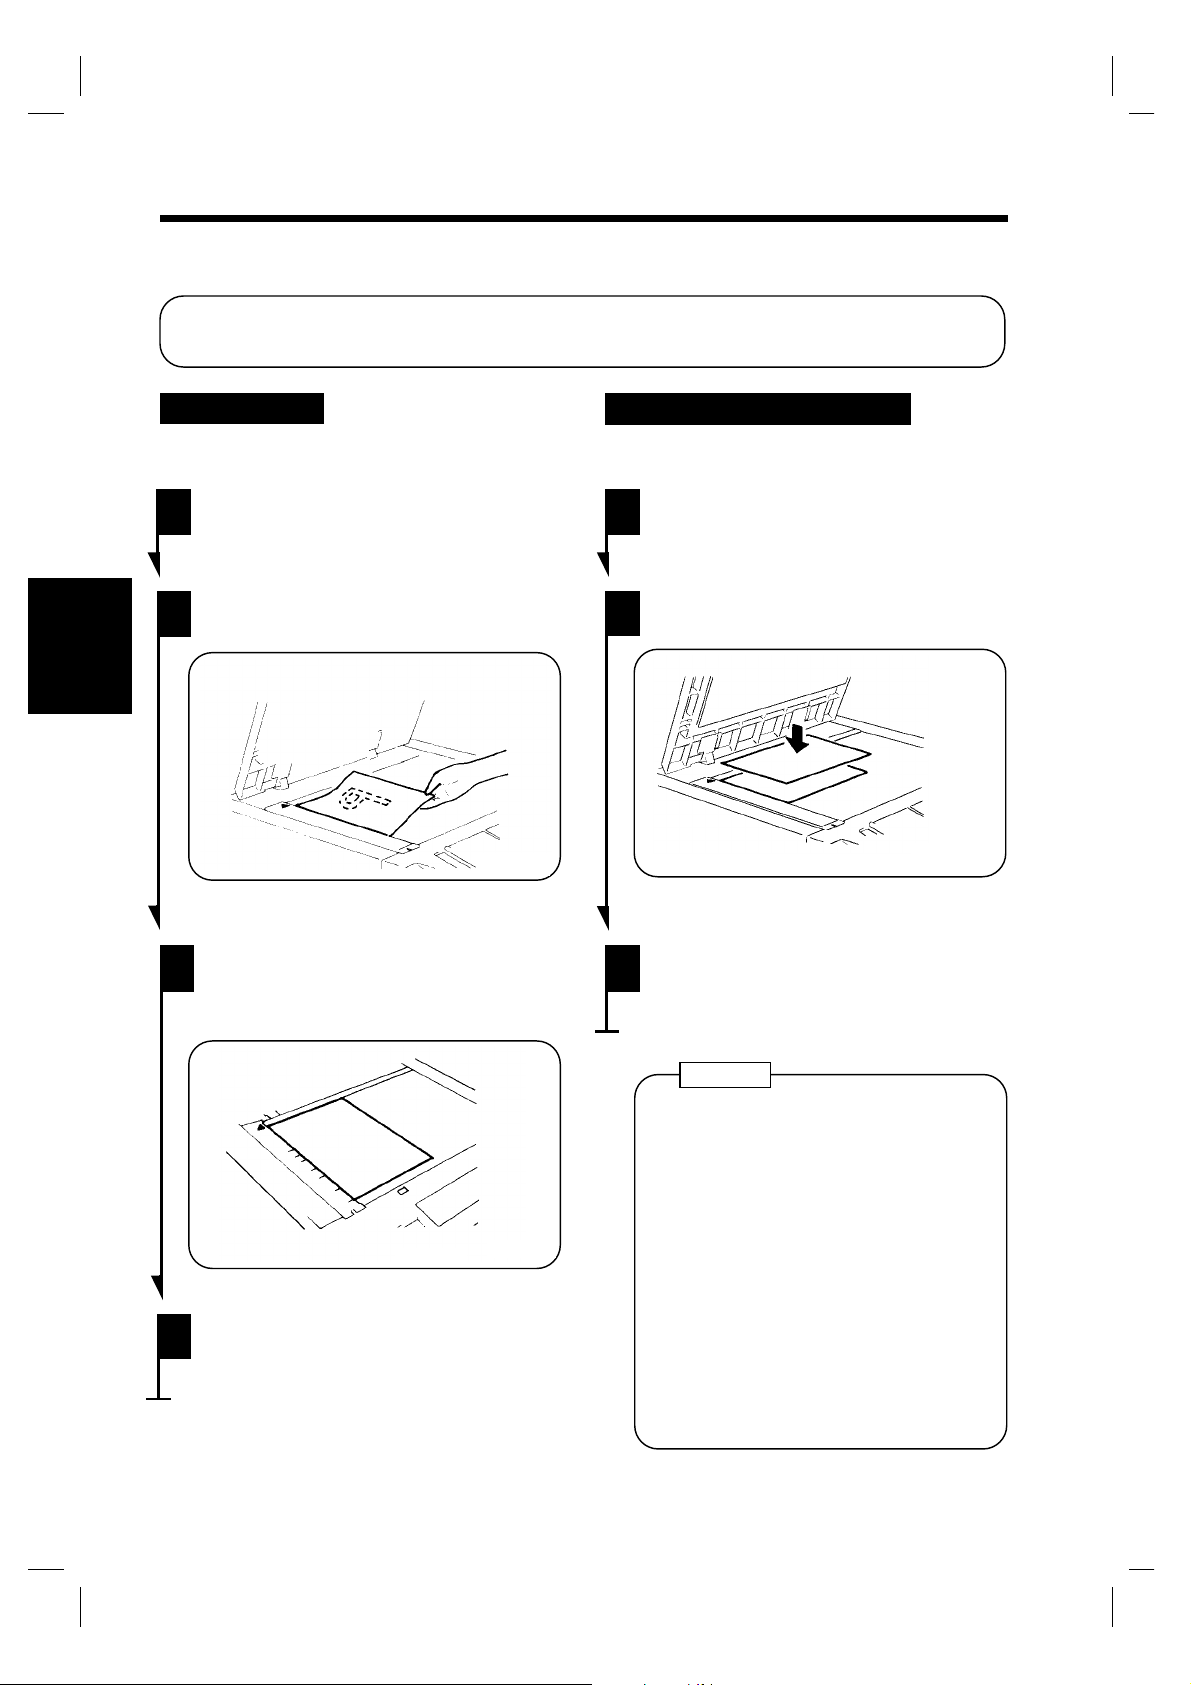
Raise the Original Cover .
1
2
Chapter 3
Making Copies
Place the original face down o n the
Original Glass.
Align the rear left corner o f t he
3
original with th e marker o n the
Original Width Scale.
▼
1151O0103AA
Highly Tra nsparent O r iginals
(Using transparenci es and tran slucent paper for
the original)
1
2
Place the original in the s ame way as
the sheet originals.
Place a blank sheet of paper of th e
same size over the original.
1139O0070A
Gently lower the Origin al Co ver.
3
4
Gently lower the Origin al Co ver.
1151O014AA
NOTE
The original sizes th at can be detected
in the Auto Paper Select Mode are
A3, B4, A4L, A4C, A5L.
When making copies from orig ina ls
other than the above, select the co py
paper size.
When using wrinkled or cur led
originals, the or ig inal s ize m ig ht no t be
detected correctly. So, sel ect th e copy
paper size and do not use t he Auto
Paper Select Mode.
➭
Copy Pape r Size
p. 30
Page 31

23
2. Placing Original s
Making Copies from A Book
Using Book Copy Mode
("Book" refers to an open bound original.)
Place the open book so that the
1
higher-numbered page faces to ward
the Original Width Scal e.
1134O037AA
Gently lower the Or igi nal Cov er.
2
NOTES
•
If the book is thick, make a copy wit h
the Original Cover r a is ed.
•
Not positioning th e op en boo k pro perly
will result in co pi es wit h p ages in
incorrect order.
•
Do not look directly at the Or ig ina l
Glass surface as a stro ng beam of light
is emitted.
Instructions for Original Placement
•
Be sure to raise the Ori gin al Cover 15°
or more before placing th e or iginal. If
the Original Cover is raised to an
angle less than 15°, the co pi er may fa il
to select the correct copy paper siz e o r
zoom ratio.
15°
1139O080AA
•
Do not place an origin al weig hin g
more than 3kg on the Origin al Gla ss .
•
When plac ing an op e n book, do not
press the book hard on th e Original
Glass, as trouble could re s ult.
Chapter 3
Making Copies
Page 32

24
2. Placing Original s
Using the Automatic/Duplexing Document Feeder
The Automatic/Duplexin g Docu ment Feeder auto matically feeds in sheet originals placed on the
Document Feed Tray one by one. After the copy cycle has been completed, it aut omati cally
ejects the original o ut o nt o th e Docu ment Exit Tray.
Some originals may not be su itab le for reliable operation of the Document Feeder. Here is a
guideline.
Originals Suitable for the Automatic/Duplexing Document Feeder
Type of Originals: Sheets (Plain paper)
Normal mode
•
1-Sided Original (weighing 50g/m2 to 110g/m2 )
•
2-Sided Original (weighing 60g/m2 to 90g/m2 )
•
Mixed Or i ginal Det e ct i on mode (weighing 60g/m2 to 90g/m2 )
Chapter 3
Original Size: 1-Sided Or igi nal, 2 -Sid ed Or igi nal, Mix ed Or igi nal Detection Mode
Lightweight Origin al M ode (4 0g /m
A3L, B4L, A4L, A4C, 210mm×330mm
A5L (Except for Mixed Original Detection Mode)
2-in-1 (Dual Original Scanning) mode : A4C
∗
Lightweight Original
Be sure to use the User’s C ho ice to tu rn ON the Lig htweig ht Original Mode when making copies
from the lightweig ht originals.
For a Lightweight or igi nal( 40 g/ m
Making Copies
Original Glass or to make copi es usin g t he SA DF Mode (Sin gl e Auto matic D ocument Feeding
➭
Mode).
p. 26
2
to 50g/m2 ), it is recommended to place it d ir ectly on to t he
2
to 110g/m2 )
Origin als Not Suit able
•
Typing paper, paraffin pa per, and o the r thin pa per
•
Thick p a per
•
Originals greater th an A3 or smaller than A5L
•
Transparencies, translu cent pap er
•
Wrinkled, dog-eared, curled, or t or n orig in als
•
Clipped or stapl ed orig in als
•
Carbon-backed originals
Typing paper,
paraffin paper,
and other thin
paper
Thick paper
For any of these types of originals, place the original manually on the Original Glass to make a
∗
copy.
➭
p. 27
Continuous
forms
Stapled
originals
Wrinkled or
dog-eared
original
1134O073AA
Page 33

25
2. Placing Original s
Loading t h e Or iginals
1
2
Slide the Document Guide Plate to the
size of the origin als.
When using large size orig inal s , fli p
∗
up the Document Feed Tray
Extend e r.
Load a neat stack of origi nals f ace up
on the Document Feed Tray.
NOTE
•
The maximum number of originals that
can be l oaded
A4 or smaller : Up to 50
A3 or B4 : Up to 30
•
Make sure that the top level of the
original stack do es not exceed the
marking.
•
Make sure that the Document Guide
Plate is in touch w ith the ed ges o f th e
original stack. If it’s not pressed snugly
against the the or ig ina l s ta ck, skewed
feeding could r e s ult.
1151O015AA
1151O016AA
▼
Using the M ix e d Or iginal Detec tion
Mode
Use the Mixed Original Detection mode to
make copies automatically fro m origi nals of
assorted sizes loaded in th e
Automatic/Duplexing Document Feeder.
If Auto Size is selected, you can make co pi es
of the same size from origin als of di fferen t
sizes.
1
2
Originals
Copies
Mixed Original Mode
1138O537AA
Auto Size Mode
1138O537AA
Copy Paper: A4
NOTE
The copier cannot staple to get her co pies o f
different sizes mad e in the Mixed Or ig in al
Detection mode.
Load the stack of originals so that the
rear edge of each original is pressed
against the rear Document Guide Plate.
Then, slide the front D ocument Gu ide
Plate against the front edg es of the
originals with t he greatest width.
1151O017AA
Press the Mixed Original Det ectio n Key.
Chapter 3
Making Copies
Manual
Staple
Sort
Mixed Orig. Det.
1
211
2in1
1139O2632A
Page 34

26
2. Placing Original s
Using the Single Automatic Document Feeding Mode (SADF Mode)
This is the mode in which you lo ad y our o ri ginals o ne b y o ne onto th e Auto matic/D u plex in g
Document Feeder to make a copy or copies f ro m it. Wh en you lo ad the or ig inal , the co pi er
automatically star ts th e cop y cy cle.
NOTES
•
Originals availabl e for the SADF Mode.
Type : Plain paper
Thickness : 35g/m
Size : A3 to A5L
•
The following features cannot be selected in the SADF Mode.
2-sided original 1-sided copy
2-sided original 2-sided copy
Dual Original Scanning Mode (2-in-1 Mode)
Cover Mode
Chapter 3
Open the Document Feed Table and
1
slide the Guide Plate to the size of the
original.
2
to 200g/m2 (AFR-12), 35g/m2 to 157g/m2 (AF-5)
▼
▼
3
The original is aut omati cally taken up
and the copy cycle is s tart ed.
Making Copies
Make sure that the Start K ey i s lit
2
green and insert the o riginal face down
into the Document Feed Table.
NOTES
•
Be sur e to place on e or iginal at a time.
•
Be sure to correct any f old or cu rl in
the original
.
1151O018AA
1151O019AA
4
Making sure that the Start K ey li gh ts
up green again, load the next or ig inal .
Page 35

Originals Not Suitable for the Automatic/Duplexing Document Feeder
Raise the Automatic/Duplexing
1
Document Feeder.
Place the original face down on the
2
Original Glass.
1151O020AA
27
2. Placing Original s
Chapter 3
Align the rear left corner o f t he
3
original with th e marker o n the
Original Width Scale. Then pres s the
rear edge of the origin al up agai nst the
Original Positio ni ng Plate at the rear
side of the Glass.
Original Positioning Plate
Original Width Scale
Gently lower the Au tomat ic/D up lex ing
4
Document Feeder.
Making Copies
1151O021AA
Page 36

28
3. Manual Bypass Copying
Use the Manual Bypass to make copies o n p aper no t lo aded in any Dr awer, or to copy onto
transparencies, translu cent paper , or any ot her special pap er.
When using the Multi Byp ass Tray, yo u can load mul tip le s heet s of cop y paper .
Copy Paper That Can be Used for Manual Bypass
Types of Paper
◆
•
Plain paper (weighing 60g/m2 to 90g/m2 )
•
Thick p a per (weighing 91g/m2 to 157g/m2 )
•
Transparencies, translu cent pap er
Paper Size
◆
•
Max. Siz e: 297mm × 432mm
•
Minimum Size: 100mm × 140mm
Capacity of the Multi By pass Tray
◆
•
Plain paper ... Up to 50 sheets
•
Plain paper (once-copied paper) ... Up to 20 sheets
•
Chapter 3
Thick paper, transparencies, translucent paper ... Up to 20 sheets.
Using the Multi Bypass Tray
1
Making Copies
Place the original on the Original
Glass and make the control panel
settings.
NOTE
The following functio ns ca nnot b e
selected for Manual Bypass:
Auto Paper, Auto Size, Book Copy, any
of the Finishing Modes, 2-Sided
Copying, and File Margin Mod e.
Swing down the Multi By pass Tr ay.
2
Slide the Guide Plate to t he size o f
the copy paper.
∗
Slide the Multi Bypass Tray Extender out
when usi ng l ar g e- size copy pa per.
3
Tray and insert it until it stops.
NOTE
•
The pape r should be loaded no h i gher than
the ▼ (Max. L evel Indicator).
•
Before inserting, fan the paper stack well if
you are us i ng transpa r encies or tr anslucent
paper.
•
Correct any curl if you are using thick paper.
•
The paper will be copied on the side facing
up.
Load a neat stack of copy paper on the
1139O0140A
1139O0130A
Page 37

29
3. Manual Bypass Copying
Ensure that the Indicator i s lit on
4
the Control Panel.
* If not, insert the paper st a ck on the
Tray again.
Using the Key Pad, set the numb er of
5
copies to be made.
123
456
789
1139O3690A
IMPORTANT
When making multiple cop ies u s ing
OHP transparencies , set th e Co py Tray
into the upper position if there is no
Sort e r or Staple S or t e r m ounted.
1139O3690A
Chapter 3
0C
Press the Start Key to star t the copy
6
cycle.
Making Copies
1139O2640A
1134P342DA
Page 38

S
30
4. Copy Paper Size
The selected copy paper size and th e paper source loaded with that paper are indi cated o n t he
control panel.
123
0.5~2.0
Auto
A4
B4 A3
Full Size
B4 A4
A3 A4
Full Size Paper
Lighter Darker
Auto / Photo
Chapter 3
Auto Paper Mode
Auto
Photo
A
The Auto Paper Mode automatically
selects the copy paper acco rdin g to th e s ize
of the original being u s ed and t he zo om
ratio selected for us e.
Making Copies
1
Press the Paper Select Key to s et th e
copier into the Auto Paper mode.
Auto
A3
A4
A4
A5
B4
B5
FLS.
Inch
456
A3
Auto
A3
A4
A4
A5
S
B4
FLS.
Inch
789
0C
1151O068DA
1151O068DA
Manual Selection
The copy paper size can be set manually
according to your need.
1
Press the Paper Select Key un til the
arrow indicates the co py pap er size o f
your choice.
A3
A4
A4
A5
B4
B5
FLS.
Inch
Paper
Paper
1139O0072A
1139O0072A
Useful Tip
This mode is efficient when y ou w ant t o
make copies on paper of the same size as
your originals au tomatically.
1139O0172A
1139O0172A
Paper Source Indicator
Eac h tim e the P aper S elect Key is presse d ,
the Paper Source Indica tor c yc les th rough
the different source locations.
Multi Bypass Tray
1st Drawer
2nd Drawer
3rd Drawer (Option)
4th Drawer (Option)
1139O3690A
1139O3690A
Page 39

31
4. Copy Paper Size
Auto Drawer Switching
If the Drawer currently sel ected f or use
runs out of pape r a nd there i s a nother
Drawer loaded with paper of the same s i ze
and in the same direction, the copier
automatically selects that second Drawer
to continue copying.
Useful Tip
This feature is a great advantag e when
you need t o make a la rge number of
copies on the same size paper. For
example, you can make up to 500
copies without interr uption if the 1st
and 2nd drawers are loaded with p aper
of the same size and in the same
direction.
Special Paper Setting
A Drawer, if set as a special paper draw er,
is excluded from paper sou rces th at can be
selected in the Auto Paper Mo de.
The Special Paper Indicator
Indicator light up w hen yo u select a particular
Drawer for which the speci al paper setting was
made.
A3
A4
A4
A5
Paper
and Paper Size
S
S
B4
B5
FLS.
Inch
1139O5402A
1139O5402A
Chapter 3
Useful Tips
•
You may be using both recycled as well
as plain paper loaded in your copier. If,
for example, you make the speci al pap er
setting for the drawer loaded with plain
paper, the copier does not s elect th at
particular drawer in th e Auto paper mo de.
This allows you t o make copies on
recycled paper first.
•
The special paper setting can be mad e
➭
using the User’s Choice Mo de.
p. 57
Making Copies
Page 40

32
5. Zoom Ratio
You can s e lect the de sired fixed zoom r a ti o by pres s i ng the
keys. There are three
different ways to choos e from to set the zoom ratio. Select one according to y our n eed.
123
0.5~2.0
Auto
Auto
Photo
Lighter Darker
Auto / Photo
A
A4
B4 A3
Full Size
B4 A4
A3 A4
Full Size Paper
Auto Size Mode
The copier is set into the Auto Size Mode
Chapter 3
in which the zoom ratio i s automatically
A3
Auto
A3
A4
A4
A5
S
B4
FLS.
Inch
456
789
0C
Fixed Zoom Ratios
The copier provides most fr equently used
zoom ratios ready for immedi ate use.
selected according to the size of the
original being used and the copy paper size
selected for use.
1
Press the
fixed z oom ratio of your choice.
Press the Auto Size Key. Th e Zoom
1
Making Copies
Ratio Indicator shows and the
Auto Size Mode Indicator
Auto
light s up.
Auto
Size
or
A4
B4 A3
Full Size
B4 A4
A3 A4
Full Size
Key to select a
A3
1151O068DA
1151O069DA
1139O2662A
1139O2662A
Select the copy paper size. ➭ p. 30
2
A3
A4
A4
A5
Usef ul Tip
This mode is very helpfu l for n eat f ilin g
when yo u need to make copies from
originals of assorted size.
B4
B5
FLS.
Inch
Paper
1139O2200A
NOTE
The Zoom Ratio Indicator d is p lays the
actual value of the selected ratio.
1139O2200A
Page 41

Using Zoom Up/Dow n Keys
Pressing the
zoom ratio shown in 0.001 increments.
You can hold down the key to change t he
ratio quickly.
or
key changes the
33
5. Zoom R atio
1
the desired zoom ratio is reach ed
0.5~2.0
Useful Tip
To save time, first select the f ix ed
zoom ratio nearest to the target ratio
Hold down the or key until
before using the
1151O050AA
or
Key.
1151O050AA
Chapter 3
Making Copies
Page 42

34
6. Image Density
Pressing the Exposure Control Keys < A > can adjust the image densi ty l evel of copi es
either in the Auto Exposure Mode, Manual Exposure Mode, or Photo Mode. Select the
appropriate mode according t o you r particular needs.
123
456
789
S
0C
Auto
Photo
Lighter Darker
Auto / Photo
A
0.5~2.0
Auto
A3
A4
B4 A3
Full Size
B4 A4
A3 A4
Full Size Paper
Auto
A3
A4
A4
A5
B4
FLS.
Inch
1151O068DA
Auto Exposure Mode
The copier reads the image dens ity of the
Chapter 3
original and automati cally adjusts the
exposure level for th e optimum copy
image density.
1
Making Copies
Press the Auto Exposure Mode Key A
as necessary to light up the Au to
Exposure Indicator
Auto
Lighter Darker
Auto / Photo
A
Each time the Auto Exposur e Mode Key
A is pressed, the Auto Exp osu re
Mode, M a nual Expo s ure Mode and
Photo Mode are selected alt ern ately .
Useful Tips
❍
Auto
1151O082AA
Manual Exposure Mode
In the Manual Exposure Mode, you can
vary the e xposure l e ve l in nine s t e ps .
1
.
Press the Exposure Control Key
< or > .
Lighter Darker
Auto / Photo
A
1151O081
To make the image darker:
Press or hold do wn t he Exposu re
Control Key > .
To make the image lighter:
Press or hold do wn t he Exposu re
Control Key < .
•
The exposure level in the Aut o
Exposure Mode can be varied by using
the User’s Choice, eith er "Darker" o r
➭
"Lighter."
•
The copier has been factory-set t o
p. 54
automatically select the Auto
Exposure Mode. The User’s Choi ce
can be used to change this def ault
setting to th e Manual Exposu re Mod e.
➭
p. 54
Page 43

Photo M ode
The copier can make a faithful r epr oducti on
of an original h a ving a half t one image s uc h
as photos. The image density of the photo
may be varied in nine steps.
35
6. Image Density
1
2
Press the Auto Exposure Mode Key
A as necessary to light up the Photo
Mode Indicator
Lighter Darker
Auto / Photo
❍
Photo
A
Photo
.
1151O080CA
Press the Exposure Control Key
< or > to set the desired Photo Mode
level.
Lighter Darker
Auto / Photo
A
1151O081CA
Chapter 3
Making Copies
To make the image darker:
Press or hold d ow n the Expo s ure
Control Key > .
To make the image lighter:
Press or hold d ow n the Expo s ure
Control Key < .
Page 44

36
▲
7. Original Copy Type
▲
Pressing the
Orig. Copy
Keys can select the setting for th e typ e of copy y ou w ant t o make
based on the type of original you ha ve .
There are eight different mo des av ailable. Select one according to your need .
Auto
Size
Margin
Cover
Job
Memory
Manual
Staple
Sort
Sort &
Staple
Group
Mixed Orig. Det.
1
2
11
12
21
Book
22
Book
Orig. CopyFinishing
2in1
2in1
1
Lighter Darker
2
Auto
Photo
Auto / Photo
A
Meter
Count
Toner
Drum
Dehumidify
Input
▲
Original Copy Types
Chapter 3
1-sided 1-sided
▲
Originals
Copies
•
Select this mode to make 1-sided copies from
1-sid e d original s .
0.5~2.0
A4
A3
B4 A3
Full Size
B4 A4
A3 A4
Full Size Paper
Auto
A3
A4
A4
A5
B4
FLS.
Inch
1151O070DA
1151O070DA
Making Copies
1-sided 2-sided
2-sided 1-sided
▲
Originals
▲
Original
Copy
Copies
1139O0280A
1139O0290A
The [1-sided 1-s ide d] type i s t he default
*
▲
setting in the i nit ial mode.
•
Select this mode to make 2-sided copies from
1-sid e d original s .
(Only whe n the Duplex Unit i s mounted.)
Two originals can be copi ed o nto on e copy.
*
•
Select this mode to make 1-sided copies from
2-sid e d original s .
(Only when the Duplexing Do cument F eeder
is mounted.)
1139O0310A
Page 45

37
7. Original Co py Type
▲
2-si de d 2-sided
1-si de d 1-sided [2-in-1]
1-sided 2-sided [2-in-1]
▲
Original
▲
Originals
▲
Originals
Copy
Copy
1139O0300A
Copy
1140O273
1139O0320A
•
Select this mode to make 2-sided co pi es fr om
2-sided originals.
(Only when the Duplexing D ocu ment Feed er
and Duplex Unit are mount ed.)
•
Select this mode to make a 1-s ided cop y,
through reducti on, from t w o 1-sided original s
side-by-side.
(Only when the Automatic/Du plex in g
Document Feeder is mounted.)
You need half as many sheets o f co py
*
paper as required otherwise.
NOTE
The size of the original should be A4
crosswise for 2- in -1 .
•
Select this mode to make a 2-s id ed co py,
through reducti on, from four 1-si ded
originals. Each pair of or igi nals will be placed
side-by-side on either side of the copy.
(Only when the Automatic/ Dupl exin g
Document Feeder is mounted.)
You need 1/4 as many sheets of copy paper
*
as required otherwis e.
NOTE
Chapter 3
Making Copies
▲
Book 1-sided
Original
▲
Book 2-sided
Original Copy
Copies
1139O1990A
1139O0330A
The size of the orig ina l sh ou ld be A4
crosswise for 2-in-1.
•
Select this mode to make a 1-sided co py of
each page of an open book.
•
Select this mode to make a 2-s id ed copy of
an open book. Each page of the open book
will be c opied onto one side of the co py.
(Only when the Duplex Unit is mo unted.)
Page 46

38
7. Original Copy Type
▲
Selecting Or iginal Copy Type
▲
1
Chapter 3
Press the Original Copy key to
select the Original Copy t ype.
21
Book
22
Book
Orig. Copy
Each time the left Original Copy Key
is pressed, the newly s elected or ig inal
type indicator lights as shown below.
12
▲
▲
Each time the right Origin al Co py
▲
Key is pressed, the newly selected type
indic a tor light s a s shown bel ow .
2in1
11
1
2
2in1
12
1151O086CA
Book
▲
Book
1
2
11
Making Copies
21
22
11
1151O083CA
1151O083CA
*
If there a re no lights, 1-s i de d 1-sid ed
▲
is selected.
1151O084CA
If there a re no light s , 1-sided 1-sided
*
1151O084CA
▲
is selected.
Useful Tip
The [1-sided 1-sided] type is the
▲
default setting in the initial mode. This
default setting can be changed using the
➭
User’s choice.
p. 55
Page 47

7. Original Co py Type
Instructions for Loading Originals
Use th e following procedure for loading originals t o m ake 1-sided copies from 2-s i ded origina ls.
Procedure
Load the originals cross wis e.
If the originals are loaded l eng thwise, the directions of the copy imag es w ill b e mix ed u p.
▲
39
Correct:
2-Sid ed O r i ginals
Loaded Cro ssw ise
Notes for 2-sided Copy Mode/2in 1 Mode
When making copies from 1-sided originals in the 1-sided 2-sided, 1-sided 1-sided (2in1),
or 1-sided 2-sided (2i n1) Mode, check the number of originals.
If an odd number of 1-si de d origin als are u s e d, add one blank sheet of paper a t the end of t he
original set.
▲
1-Sid ed C opies
1151O023AA
Incorrect:
2-Sided O r i ginals
Loade d Lengthw i s e
▲
1-Sided Copies
▲
Chapter 3
1151O022AB
Making Copies
Originals
1
2
3
4
5
Blank Sheet of Paper
2-Sided Copies
1
2
3
4
2-in-1 Copies
12
or
34
5
5
1151O059AA
Page 48

40
8. Finishing Mode
Pressing the Finishing K e y can select the des ired fini s hi ng mode.
There are five different finis hi ng mod es. Select th e on e accor ding t o y our n eeds.
Meter
Count
Toner
Dehumidify
Input
Drum
Auto
Size
Margin
Cover
Job
Memory
Chapter 3
Finishing Modes
Non-Sort
Originals
Making Copies
Manual
Staple
Sort
Sort &
Staple
Group
Mixed Orig. Det.
1
2
11
12
21
Book
22
Book
Orig. CopyFinishing
2in1
2in1
1
Lighter Darker
2
Copies
0.5~2.0
Auto
A3
A4
A4
A5
1151O070DA
Auto
Photo
Auto / Photo
A
A4
A3
B4 A3
Full Size
B4 A4
A3 A4
Full Size Paper
All copies are fed out onto the 1s t B in, without
being sorted, g rouped, sta pled, or punched.
B4
FLS.
Inch
1151O070DA
Sort
Originals
Sort-and-Staple
Originals
Copies
Copies
1st Bin
2nd Bin
3rd Bin
1076O146
1st Bin
2nd Bin
3rd Bin
1076O145
This mode is effective when makin g mu ltip le co pies
from multiple origin als.
Copies are sorted into complete sets of the originals.
(Only when the Sorter or Staple Sor ter i s mou nted. )
Copies are sorted into complete sets of the originals
and each set is stapled toget her .
(Only when the Staple Sorter is mounted.)
1151O108AA
Page 49

Group
Originals
Manual Staple
Sorting or Grouping
Originals
Copies
1st Bin
2nd Bin
3rd Bin
1076O147
Manual Staple
8. Finishing Mode
The copies made from each single ori ginal ar e
separat e d into groups. Each group contains the
same number of copies.
(Only when the Sorter or Staple Sor ter i s
mounted)
This mode allows you t o stap le co py sets alr eady
made in the Sort Mode or copy stacks mad e in the
Group Mode.
(Only when the Staple Sorter is mounted.)
This feature is efficien t fo r stapling originals after
*
making copies.
41
Chapter 3
1051O109AA
Useful Tip
The copier has been factory-set t o au tomat ically s elect Non-Sort. Also, the copier automatically
switches between the Sort and Non-So rt mo de
epending on the number of orig inals loaded in
d
the Automatic Document Feeder. User’s Ch oi ce can, however, be us ed t o chang e thi s def ault
setting.
pp. 55, 57
➭
Making Copies
Page 50

42
8. Finishing Mode
Selecting the Finishing Mode
Sort/Sort-and- Stap le/Gro up Mo de
(To sort or group copies)
1
Chapter 3
Making Copies
Press the Finishing Key to select the
desired mode.
Sort &
Staple
Group
Finishing
Each time the Key is pres sed, th e
•
newly s e le c ted fini s hi ng mode
indic a tor light s .
If there are no lights , th e Non-S ort
•
Mode is selected.
NOTE
•
Capacity of each Sorter Bi n
(Non-S or t Mode)
Sorter Bin Capacity
1st Bin Up to 50 sheets
2nd to 10th Bin Up to 25 sheets
1151O087CA
Using the Manual Staple Mode
(To staple copy sets already mad e in the So rt
Mode or copy stacks made in the Group Mode.)
1
2
Make sure that each copy set or st ack
has been fed into the Sorter B in.
Press the Manual Staple Key.
Then the copy set or stack in the So rter
Bin will be stapled.
Manual
Staple
1139O2732A
1139O2732A
(Sort / G r oup/Sort -and-Staple Mode)
Sorter Bin Capacity
1st to 10th Bin Up to 25 sheets
•
Thick paper, translucent paper, and
OHP transparencies cann ot be used
for making copies in the So rt, G rou p,
or Sort-and-Staple Mode.
Page 51

Using the Manual Staple Mode
(To use as a stapler)
43
8. Finishing Mode
Align the sheets of paper n eatly .
1
Insert the paper stack onto the 1st
2
Bin with its front su rface facing up.
1134O039AA
3
Press the Manual Staple Key.
The paper stack will be stapl ed.
Manual
Staple
Usef ul Tip
This feature is efficien t fo r stapling
originals after maki ng cop ies.
1139O2732A
1139O2732A
Chapter 3
Making Copies
1139O1320A
Stapling Position
1151O110AA
NOTES
•
Make sure of the stapling position and
press the paper s tack aga inst the
bracket.
•
Up to 50 sheets of (plain) paper can be
stapled.
•
Never attempt to reach for the stapling
position. This can be dan gero us.
Page 52

44
8. Finishing Mode
Instructions for Loading Originals for Finishing Mode
Note the correct direction of the originals if the copies ar e to be s tap led ei ther in the
Sort- a nd-Staple or Manual Staple mode.
Using the Automatic/Duplexing Document Feeder
Load the originals crossw ise in the Document Feeder. Ensure also that the stapling position is at the
rear left corner as indicated by the arrow.
Correct:
Originals loaded crossw ise
Copy
Stapling Position
Chapter 3
Making Copies
Placing t h e or iginal on t he Original Glass
Place the original, with its s tapling position at the upp er r ig ht corn er as shown in the illustrati on .
Correct:
Stapling Position
1151O024AB
Press the Manual Staple Key t o stap le copy sets or a copy stack.
*
1039O2230A
Page 53

8. Finishing Mode
Auto Dual Function
Each of t he Sort Bins holds u p to 25 sh e et s of paper. The Auto D ua l F unction , however, allows
sorting of cop i es of up to 50 origina ls under cer t a in condit ions.
Auto Dual Function in the So rt Mode
When 5 or less copies are made from an origi nal set consisting of more than 25 origi nals in the
Sort Mode, the Sorter or Staple Sorter is automatically switched into the Au to Du al F unctio n
using the 6th to 10th Bins.
Copies Bins Used
1st to 25th sorted copies 1st to 5th Bins
26th to 50th sorted copies 6th to 10th Bins
If the number of copies selected exceeds 5, the copy cycle stops at the 26th original.
*
To have a complete set from th e originals, place the copies from the 6th Bin on top of those from
*
the 1st Bin. In the same way , place t he co pies f rom th e 7th Bi n on to p of those from the 2nd Bin,
and so on.
45
Chapter 3
Auto Dual Function in Sort-and-Staple Mode
When 5 or less copies are made from an origi nal set consisting of more than 25 origi nals in the
Sort-and-Staple mode and the Aut o Dual functi on is activated, the Sort-and-Staple Mode is
automatically switched to the Sort Mode (no stapling takes p lace) .
When the Number of Copies Selected Exceeds 25 in the Group Mode
When more than 25 copies are to be g roup ed t ogether in to o ne gro up, the Sorter or Staple Sorter
uses t he s ubsequen t Bin to co ntinue grouping the c opies.
Original Copies Bins Used
1st
3rd to Nth: Same way up to 10th
1st to 25th copies 1st Bin
26th and subsequent copies 2nd Bin
If the Number of Copies Selected Exceeds 50 in the Non-Sort Mode
The capacity of the 1st Bin is 5 0 in th e Non-S ort M ode. If mor e than 50 copies ar e made in the
Non-Sort mode, the Sorter uses th e 1st, 2nd, a nd subsequent Bi ns to hold those exces s c opies.
Making Copies
Page 54

46
9. File Margin Mode
The copier provides a file mar gin (10mm) alo ng the l eading ed ge of the copy for your easy filing.
Both 1-sided and 2-sid ed ori gin als can be used in the File Margin Mode. Select t he ap prop riat e
Original Copy type according to th e or igi nals.
▲
1-Sided Copies wit h F ile Ma rgins
1-Sided Copies wit h F ile Ma rgins
1-Sided Originals
2-Sided Copy wit h Fi le Margi ns
1076O169
2-Sided Original
2-Sided Copy wit h File Margi ns
NOTE
You need to change the setting of t he Fil e Marg in function of User’s Choice according to the
➭
type of originals to be us ed when makin g copies in the File margin mode.
Chapter 3
p. 53
Loading the Originals
Using the Original Glass Using the Document Feeder
Making Copies
1076O170
1151O025AA
Position the file margin side to the right. Position the file margin side to the left.
Setting the File Margin Mode
Ensure the correct original d ir ectio n
1
and place the original.
Press the File Margin Key to set the
2
copier into the File Margin Mo de.
Margin
1139O2552A
Press the Original Copy Key to
3
select the desired job ty pe.
21
22
▲
Book
Book
Orig. Copy
1151O026AA
1
2
1151O086CA
Page 55

10. Cover Mode
The Cove r Mode let s you make a front cover for a copy set by copying the first page of an
original set on a diff erent ty pe o f paper , s uch as col or pap er. It may b e used to differ ent iate
the cover of a copy set from other pages.
47
Original Set Copy Se t
NOTES
•
This mode can only be select ed when the copi er is equ ip ped wit h th e Aut omat ic/D uplexin g
Document Feeder and the Multi Byp ass T r a y.
•
This mode cannot be selected when 1-sided 2-sided, 1-sided 2-sided (2in1), Bo ok
1-sid e d, or Book 2- s i de d Mode is S e le c te d.
▲
▲
▲
Special paper
Using the Cover Mode
1
Place the paper stack for the cover
sheet on the Multi Bypass Tray.
2
Load the originals into the
Automatic/Duplexing Docu ment
Feeder.
▲
1076O181
Chapter 3
Making Copies
1139O0140A
NOTES
•
Be sure to place the paper stack for the
cover sheet on the Multi Bypass Tr a y.
•
Capacity of the Multi Bypass Tray
Plain paper. . . . . . . . .Up to 50 sheets
Thick paper, transpar enci es,
translucent paper
Up to 20 sheets
. . . .
3
1151O016AA
Press the Cover Key to s et th e Cover
Mode.
Cover
1139O2562A
1139O2562A
Page 56

48
Chapter 3
Making Copies
Page 57

Chapter 4
Special Functions
This chapter explains about the special functions that can be used for specific purposes.
1. Meter Count p. 50
2. Toner Replenisher/Drum Dehumidifier p. 51
3. User’s Choice
Descri pt ion of Eac h U ser’s Choice Function p. 5 2
Making the User’s Choice Setti ng s p. 5 8
49
Chapter 4
Special Functions
Page 58

50
1. Meter Count
This function allows y ou to ch eck t he to tal co unt of each of the four different counter s.
Total
Shows the total number of cop ies made
since the installatio n o f t he co pier.
Size
Shows the number of copies made on
the copy paper of a preset size. (The
size will be set by your Techni cal
Representative.)
2-Sided Total
Shows the number of 2-sided copies
made.
2-Sided Size
Shows the number of 2-sided copies
made on the copy paper of a preset size
(the same size as set for "Size").
Counter Display
The Zoom Ratio Indicator sho ws t he u pper 3 digits o f th e count and the Multi-Copy Display
shows the lower 2 digits of the count.
Example : The count is 12,345(copi es).
Chapter 4
0.5~2.0
1151O60AA
Using the Meter Count Fun ction
Specia l F unctions
Press the Meter Count Key once.
1
*The count of the Tot al Coun ter is
shown across the Zoom Ratio I nd icato r
and Multi-Copy Dis play.
Meter
Count
Toner
Each time the Meter Count Key is pressed, the
counts of the four counters will b e s hown in the
following order.
Total Size 2-sided Total 2-sided Size
Auto
Size
Margin
1139o2492 A
2
With the count of th e 2- Sided Size
Counter displayed, press the Meter
Count Key.
*This restores the copi er to th e st ate
before e ntering the Meter C ount Mode.
Page 59

2. Toner Replenisher/Drum Dehumidifier
Toner Replenisher
The copier tends to exhaust t he supply of toner rapidly when making a number of copies from an
original with dark solid areas such as a photo. As a result, the image density of the copy will
become lighter. In such a case, you can use the To ner Rep len isher functi on to regain the normal
image density quickly.
Press the A uxiliary Toner Replenishi ng Key.
*This causes the copier to initiate toner replenishing, which lasts f or 90 second s at maxi mum.
NOTE
Toner
1139O2478A
1139O2482A
•
Do not turn the Power Switch OFF or
open the Front Door while th e copier
is replenishing toner.
•
Toner is not replenished if th e imag e
density is sufficiently h igh
51
Drum Dehumidifier
During times of high h umidity or w hen ther e are su dden r apid chan ges in hu mid ity (especi ally
when you are using a heater in win ter ), co nd ensatio n *1 co ul d for m on the surface of the PC
*2
Drum
to dry the surface of the PC Dr um.
*1
such as the surface of the PC Drum.
*2
Press the Drum Dehumidify Key .
*This sets the copier into the Drum D ehumidifier Mode which lasts for 90 seconds.
, resulting in blotch y copies. I n such in stances, use th e D rum Dehumi difier function
Condensation : A phenomenon in which small dr ops of wat er are fo rmed on cold s urfaces,
PC Drum : Functions in the copi er as fi lm in a camera.
Useful Tip
•
Drum
Dehumidify
A copy cycle can be initiated even
while the copier is in the Drum
Dehumidifier Mode.
Chapter 4
Specia l F unctions
1139O2472A
Page 60

52
3. User’s Choice
The copier has been set so t hat t he mos t frequ ent ly us ed settings are automatically sel ected i n
the initial mode. The User’ s Choice al lows y ou to sel ect the default settings which are
automatically selected in the initial mode according to you r ow n n eeds.
By setting defa ul ts for th e paper size , z oom raito, a nd other s e tt ings that are mos t frequent l y
used, time and effort to make ext ra settings will be eliminated that would otherwise be spent
when the copier is turned ON o r when the auto reset function is activated.
*For more details, consult y ou r Technical Representative.
Functions Available from User’s Choice
Choice Code Function Choice Code Function
U- 0 Mixed Original Detect ion U-20 Auot Panel Reset ON/OFF
U- 4 Lightweight Origin al U-21 Ener gy Saver ON Timin g
U- 9 F i le Margin U-23
U-10 Priority Paper Size/Source U-24
U-12 AP/AS/Manual Priority U-28 Auto Shut OFF Timin g
U-13 Defa ul t Auto Exposure Level U -51
U-14 Default Exposure Mode/Level U-52
Chapter 4
U-15 Defa ul t Finish i ng Mode U -53
U-18 Priority Orig. Copy Type U-54
▼
Description of Each User’s Choice Function
Auto Panel Reset for Plug-In
Counter
Sort/Non-Sort Auto Switching
ON/OFF
Special Paper setting
(1st Drawer)
Special Paper setting
(2nd Drawer)
Special Paper setting
(3rd Dra w e r)
Special Paper setting
(4th Drawer)
1151H07OBA
U-0 Mixed Or iginal Dete ct ion
Specia l F unctions
Select whether to enable th e Mi xed Orig inal Detection function or not wh en power
is turned ON or panel reset o n th e copier equipped with an Automatic/Duplex in g Document Feeder.
Setting
Descript ion
Initial Settin g
0 Mixed Origin al D etectio n f unction ON
1
Mixed Original Detectio n f unction OFF
1151H08OBA
U-4 Li ghtweight Origin al
Select the type of origin als u s ed o n the A DF. Set " 1" (Lightweight Original mode ON) if originals
lighter in weight than standard (weighing 40 to 50 g/m
Setting
Descript ion
0 Lightweight Orig inal mode OFF
1
Lightweight Original mod e ON
2
) are used with the ADF.
Initial Settin g
1151H09OBA
Page 61

3. User’s Choice
U-9 File Mar g in
Select whether the origi nal has a fi le marg in or no t fo r t he File Mar gin mode.
If "1" (original does no t h ave a file margin") is set and you attempt to make a copy fr om an or ig inal
which has a file margin on it, the copier is very likely to produce a co py wi th a margi n at an
incorrect positio n.
53
Setting
Descript ion
Initial Settin g
0 The original h as a fil e marg in
1 The original does not have a file margin
1151H11OBA
U-10 Priority Paper Size/Source
Select the priority paper size or paper so ur ce selected when the copier is set int o the A uto S ize or
Manual m ode.
Setting
0
1
2
3
4
5
6
7
10
11
12
Description
A3 (L)
B4 (L)
A4 (L)
B5 (L)
A5 (L)
FLS (L)
A4 (C)
B5 (C)
11" ✕ 17" (L)
11" ✕ 14" (L)
8-1/2" ✕ 14" (L)
Initial
Setting
Setting
13
14
15
20
21
22
23
Description
8-1/2" ✕ 11" (L)
5-1/2" ✕ 8-1/2" (L )
8-1/2" ✕ 11" (C)
1st Drawer
2nd Drawe r
3rd Drawe r
*Only when the Paper Feed
Cabinet is mounted
4th Drawer
*Only when the Paper Feed
Cabinet is mounted
Initial
Setting
Chapter 4
1151H12OBA
Specia l F unctions
Page 62

54
3. User’s Choice
U-12 AP/AS/Manual Priori t y
Select the priority copy in g mo de that is au to matically selected when the Power Switch is turned ON
or Panel Reset ke y is pres s e d
Setting
0
Auto Paper (AP)
Descript ion
1 Auto Size (AS)
2Manual
U-13 Default Auto Exposure Level
Determine the optimum expo sur e level in t he Aut o Ex pos ure mod e, variabl e in sev en steps.
Setting
46 Low (level 4)
47 Low (level 3)
48 Low (level 2)
49 Low (level 1)
50 Standard
Chapter 4
51 High (level 1)
52 High (level 2)
When the exposure level is "Low," th e greater the level number is, the lower the exposu re l evel.
When the exposure level i s "Hig h," the great er th e lev el nu mber is , th e hi gh er the exp osu re l evel.
Descript ion
Initial
Setting
1151H13BA
Initial
Setting
1151H14OBA
U-14 Default Exposure Mode/Level
Determine the default expo s ure mod e, eith er Au to o r Man ual, sel ected when the Power Switch is
turned ON or Pane l Reset ke y is pres s e d.
Specia l F unctions
If Auto is selected , thi s functi on also al lows y ou to set the d efault exposure level in the Manual
Exposure mode, variable in 9 step s , aft er the A uto Exp osu re mo de has been cancel ed.
If Manual is selected , the fun ctio n al s o all ows yo u t o set the default exposure level in the Manu al
Expos ure mode.
Auto Exposure Mode as Default
Setting
Default Mode Exposure Setting in Manual Mode
0Auto Manual EXP1
1Auto Manual EXP2
2Auto Manual EXP3
3 Auto Manual EXP4
4Auto Manual EXP5
5Auto Manual EXP6
6Auto Manual EXP7
7Auto Manual EXP8
8Auto Manual EXP9
Description
Initial
Setting
1151H15OBA
Page 63

Manual Exposure Mode as Default
55
3. User’s Choice
Setting
Descript ion
Initial Settin g
10 Manual Exposure Mode / EXP1
11 Manual Exposure Mode / EXP2
12 Manual Exposure Mode / EXP3
13 Manual Exposure Mode / EXP4
14 Manual Exposure Mode / EXP5
15 Manual Exposure Mode / EXP6
16 Manual Exposure Mode / EXP7
17 Manual Exposure Mode / EXP8
18 Manual Exposure Mode / EXP9
EXP Level
*
With EXP5 at the central level, the exposure
1151H16OBA
level is lower as the n umb er becomes s mall er,
and it is higher as th e number beco mes gr eater .
123456789
Lighter Darker
1139O5282A
U-15 Default Finishing Mode
Determine the priority f in is hi ng mod e s elected when t he co pier is eq uipped w ith a finis h ing option.
Chapter 4
Setting
Description
Initial Setting
0 Non-Sort
1 Sort
2Group
3 Sort-and-Staple
1151H18OBA
U-18 Priority Orig. Copy Type
Determine the orig. copy t ype auto matical ly selected when the Power Switch is turn ed ON or
▼
▼
Panel Re s e t key is pr e s sed.
Setting Description Initial Setting
0 1 1
1 1 2
2 2 2
3 1 1 (2in1)
4 1 2 (2in1)
*The initial setti ng is 1 2 if yo ur cop ier i s equ ipped wit h a Dup lex Unit. C ons ul t your Technical
Representative if you want to s elect 1 1 wh en you r copier is eq uipped a Dup lex Un it
▼
▼
▼
▼
▼
▼
▼
1151H19OBA
.
Specia l F unctions
Page 64

56
3. User’s Choice
U-20 Auto Pane l R e s e t ON /OF F
Select whether or not to activate the auto clear function aft er the lap s e of a given p eri od of
time after a copy cycle has been comp leted or a key on the co nt ro l panel has been operated.
Setting
Descript ion
Initial Settin g
0Disabled
1 Enabled : 30 sec.
2 Enab l e d : 1 min.
U-21 Energy Saver ON Timing
Select whether or not to set the copi er in to the En ergy Sav er mo de after the lapse of a given period
of time after a copy cycle has been co mplet ed or a k ey o n the con tr ol panel has been operated.
The period of time can fall within the range of 1 to 120 min.
*The initial settin g is 1 5 mi n.
Setting
1
2
3
:
Chapter 4
:
98
99
Enabled : 1 min.
Enabled : 2 min.
Enabled : 3 min.
:
:
Enabled : 98 min.
Enabled : 120 min.
Description
Initial Settin g
U-23 Auto Panel Reset for Plug- In Co unter
1151H19OBA
1151H20OBA
Select whether to set the copier in to t he in itial mode when the Plug-In Counter is pu lled ou t.
Specia l F unctions
0 Copier is not in itialized.
1
Copier is initialized when the Plug-In Counter is pulled out.
Setting
Description
Initial Setting
1151H22OBA
Page 65

57
3. User’s Choice
U-24 Sort/Non-Sort Aut o Swit c hing ON/OFF
Select whether to enable or disable the function that automat ically switches between the Sort and
Non-Sort mode depending on the numb er of o ri ginals lo aded in the ADF when t he copier is equipped
with an ADF and finishing optio n. I f "O N" is selected, Non-Sort is selected if onl y one o riginal is
loaded in the ADF and Sort is s elected if tw o or mo re orig in als are l oad ed in th e ADF.
Setting
Descript ion
Initial Settin g
0 Sort/Non-So rt sw itching OFF (disabled)
1
Sort/Non-Sort switching ON
(enabled)
1151H22OBA
U-28 Auto Shut OFF Timing
Select whether or not to enab le th e A uto S hu t OFF Function that turns power off aut omati cally
after the lapse of a given period of time after a copy cycle has been completed or a key o n t he
control panel has been oper ated .
*In the initial setting, the Auto Shut OFF Functio n is activated after 60 min.
Setting
0
1
2
3
:
:
98
99
Disabled
Enabled : 1 min.
Enabled : 2 min.
Enabled : 3 min.
:
:
Enabled : 98 min.
Enabled : 120 min.
Descript ion
Initial Settin g
1151H23OBA
U-51 to 54 Special Paper Setting
Designates each drawer of the cop ier fo r sp ecial p aper.
See p. 31 for more details on th e special paper setting.
U-51 : 1st Drawer
U-52 : 2nd Drawer
U-53 : 3rd Drawer (S e tt ing is po ssible only when the Paper F e e d Cabinet is m ounted)
U-54 : 4th Drawer (Setting is possible only when the Paper Feed Cabin et is mo unted)
Chapter 4
Specia l F unctions
Setting
0
1
Descript ion
Special paper setting is not made.
Special paper setting is made for the drawer.
Initial Settin g
1151H24OBA
Page 66

58
3. User’s Choice
Making the User’s Choice Mode Settings
Keep pressing the Panel Reset Key
1
for about 3 seconds.
* U is shown on the Zoom Ratio
Indicator.
Panel Reset
1139O4782A
1139O4782A
Zoom Ratio Indicator
1139O3850A
1139O3850A
Multi-Copy Display
1139O3860A
1139O3860A
Using the Key Pad, enter the d esired
2
Choice Code number.
5
*The Choice Cod e number is sh ow n
on the Zoom Raito Indicator.
123
456
Chapter 4
Zoom Ratio Indicator
789
0C
1139O4860A
Multi-Copy Display
Press the Clear Key.
4
*This clears the current sett ing (sh own
on the Multi-Copy Displ ay) of that
particular choice code.
123
456
789
0C
Zoom Ratio Indicator
1139O3870A
1139O3870A
Mult i -C o py Dis play
1139O3860A
Using the Key Pad, enter the new
setting.
*The Multi-Copy Display shows the
new setting.
123
456
789
1139O4870A
0C
Zoom Ratio Indi cator
Mult i -C o py Dis play
1139O2620A
1139O3860A
1139O4870A
1139O3870A
1139O3870A
1139O3860A
1139O3860A
1139O3870A
1139O3870A
1139O3890A
1139O3890A
NOTE
If you h a ve pressed an incorrec t
Specia l F unctions
enter the correct number.
number, press the Clear Key, then
6
Press the Start Key.
*This enters the new settin g.
Useful Tip
Press the Start Key.
3
*This enters the choice code selection
Repeat steps 2 to 6 to make new
settings for other User’s Choices.
and the current setting of th e choice
code i s s hown on the M ulti-Co py
Display.
Press the Panel Reset Key.
7
*This allows the copier to leave t he
User’s Choice Mode, and the control
panel shows the initial s ettin gs
again.
Zoom Ratio Indicator
1139O3870A
1139O3870A
1139O2360A
Multi-Copy Display
1139O3880A
1139O3880A
Page 67

Chapter 5
When an Indicator Lights Up
Replenishing Supplies, Clearing Misfeeds,
and Correcting a Closur e F ailur e
This chapter expla ins about th e deta ils of the va r i o us warning indications given on the
control panel, including those that entail inhibition of the initiation of a copy cycle. It also
shows action to be taken for each case.
1. When the Add Paper Indicator Lights Up p. 60
2. When the Add Toner Indicator Lights Up p. 63
3. When the Add Staples Indicator Lights Up p. 64
4. When the Closure Failure Indicator Lights Up p. 66
5. When the Misfeed Indicator Lights Up
•
Misfeed Indicator and Monitor Display p. 68
•
Misfeed Clearing Procedures
:
Copier p. 69
:
Paper Fe e d Cabinet p. 72
:
Duplex Unit p. 73
:
Duplexing Document Feeder p. 74
:
Automatic Document Feeder p. 75
:
Sorter/Staple Sorter p. 76
6. When the Call-Tech.-Rep. Indicator Lights Up p. 77
7. Quick Reference for Other Indicators p. 78
59
Chapter 5
When an Indicat or Li ghts Up
Page 68

60
1. When the Add Paper Indicator Lights Up
When the Drawer currently selected fo r us e has r un ou t o f
paper, the Add Paper Indicator lights up. At this time, you
cannot start a new copy cycle.
Auto
Photo
Lighter Darker
Auto / Photo
A
Example: 1st Drawer has ru n out o f
paper.
Adding Paper
1st Drawer
Slide out the 1st D rawer an d press
1
down the Paper Liftin g Plat e.
Chapter 5
Slide out the Edge Guides.
2
Auto
A3
A4
A4
A5
Paper
1151O071DA
B4
FLS.
Inch
1151O071DA
front side
1139O1370A
Use the following procedu re to load paper into the
Drawer.
NOTE
The pa pe r s hould be
loaded no higher than
the ▼ (Max. Level
Indicator) on th e Edge
Guide.
Slide the Edge Guides up agai nst the
Fan the pa per thoroughly.
4
1139O0400A
paper.
Gently slide the Dr awer back in .
1039O0420A
1139O0390A
Load the paper stack into the D rawer
3
When an Indicat or Li ghts Up
so that its front sid e faces d own.
Make sure that the paper stack rest s
under the two catches of the Dr awer.
1139O0410A
NOTE
When loading Inch Size paper into
the Drawer flip th e Market ing Ar ea
Switch, located in th e rear left corner
of the Drawer to "Inch".
Page 69

61
1. When the Add Paper Indicator Lights Up
2nd Drawer
1
2
Slide out the 2nd Dr awer and pr ess
down the Paper Liftin g Plate u nt il it is
locked into posi tio n.
Load the paper stack into the D rawer
so that its front sid e faces d own. Mak e
sure that the paper stack rests under
the two catches of the Drawer.
3rd/4t h Draw e r (PF-204)
1
Slide the drawer out of the copi er.
2
Load the paper stack into the D rawer
so that its front sid e faces d own.
1139O0460A
3
1039O0430A
NOTE
The pa pe r s hould
be loaded no higher
than the ▼ (Max.
Level Indicator) on
the Edge Guide.
1039O0450A
Gently slide the Drawer b ack in.
3
NOTE
The pa pe r s hould be
loaded no higher
Max.
1145O555KA
1145O555KA
Slide the Drawer back in.
than the ▼ (Max.
Level Indicator) on
the Edge Guide.
1139O1340A
Chapter 5
When an Indicat or Li ghts Up
Page 70

62
1. When the Add Paper Indicator Lights Up
3rd D r aw e r (PF-104)
1
Press the Paper Descent Key . This
releases the 3rd Drawer, allo wi ng you
to slide it out of the co pi er.
3
Load another paper stack in the left
half of the Drawer, front side face
down. Press the trailing edge of the
paper stack tightly up again st th e left
side of the Drawer.
1139O1552A
Indication of the Paper Descen t Key
Steady :
Light
1136O146AA
Blinking:
Light
1136O145AA
The 3rd Drawer has run out
of paper when a draw er other
than the 3rd is currently
selected for use.
The 3rd Drawer has run out
of paper when the 3rd
Drawer is current ly sele cted
for use.
NOTE
The paper should be
loaded no higher than
the ▼ (Max. Level
Indicator).
1151O112AA
Load the paper stack into the r ig ht half
2
of the Drawer, front side face dow n.
Press the leading edge o f the pap er
4
Gently slide the Drawer back i n and
press the Paper Descent K ey.
stack tightly up against the right side
Chapter 5
of the Drawer.
1139O1542A
1139O1532A
NOTE
The paper s hould be
loaded no higher
When an Indicat or Li ghts Up
than the ▼ (Max.
Level Indicator).
Page 71

2. When the Add Toner Indicator Lights Up
The Add Toner Indicator lights up wh e n toner
in the Toner Bottle is running out.
You can still make copies, b ut the image
density will become lig hter and lighter. It is
recommended, therefore, that you rep lace th e
Toner Bottle with a new one as so on as
possible.
Auto
Photo
uto / Photo
A
Darker
0.5~2.0
Auto
A3
A4
B4 A3
Full Size
B4 A4
A3 A4
Full Size Paper
Auto
A3
A4
A4
A5
B4
FLS.
Inch
1151O072DA
1151O072DA
63
Replacing the Toner Bottle
Open the Front Door.
1
2
Swing open the Toner Bo ttle Holder
and pull out the Ton er Bot tle.
Shake a new Toner Bottl e well.
3
1139O1380A
NOTE
Be careful, some toner may puff out from
the bottle.
Ensuring that the arr ows (Ö) on the
5
Toner Bottle are facing yo u, i nser t the
Bottle into po sition.
1139O1420A
NOTE
Insert the Bottle a ll th e way into the
copier until the markin g on th e
Bottle is aligned with t he marking
on the Toner Bottle Hold er .
Swing the Toner Bottle H old er cl osed
6
and close the Front Doo r.
Chapter 5
4
1139O1410A
With the Seal on the Toner Bottle
facing up, slowly peel off the S eal as
illustrated.
1139O1420A
1139O1390A
NOTE
•
Use ONLY the specified to ner for this
copier. Using any other tone r c ould
result in image trouble.
Auxiliary Toner Replenisher Mode
Use the Auxiliary Toner R epl enish er
Mode if the image is ligh t immed iately
after the Toner Bottle has been rep laced
➭
with a ne w one.
p. 51
When an Indicat or Li ghts Up
Page 72

64
3. When the Add Staples Indicator Lights Up
When the staples will soon run out, the Add
0.5~2.0
Auto
Photo
/ Photo
A
Darker
Auto
A4
A3
B4 A3
Full Size
B4 A4
A3 A4
Full Size Paper
Auto
A3
A4
A4
A5
B4
FLS.
Inch
Replacing the Staple Cartridge
1151O073DA
1151O073DA
Staple s Indicator lights up.
Replace the Staple Cartridg e with a new one by
following the procedure given below.
1
Press the Lock Release Lever of the
Staple Sorter and slide it away fr om
the copier.
1139O1350A
NOTE
1139O0490A
Open the Stapler Door.
2
Chapter 5
While lifting th e Lever upward, pull
3
the Sta ple Cartr i dge out of i ts port.
Check that no portion of the sta pl e belt
hangs out of the Cartridge. Break off
any portion of the belt that hangs out of
the Cartridge.
Insert the new Staple Cart ridge u nt il it
5
clicks into posi tio n.
1139O2190A
1139O1440A
Pull the staple bel t about 1" out of the
4
new Staple Cartridge and break off that
When an Indicat or Li ghts Up
portion.
1139O0970A
6
Close the Stapler Door and slide the
Staple Sorter back against the co pi er.
Page 73

65
3. When the Add Staples Indicator Lights Up
7
8
Place a sheet of paper into the 1 st Bin
of the Staple Sorter.
1139O1320A
Press the Manual Staple Key.
The copier automatically test-staples
*
the pa pe r 2 to 3 tim e s .
Meter
Count
Toner
Dehumidify
Drum
Auto
Size
Margin
Cover
Manual
Staple
Sort
Sort &
Staple
Mixed Orig. De
1
2111
12
1139O2512A
NOTES
•
Replace the Staple Cartridge only after
the Ad d Staple I ndicator lights up.
Removing the Staple Ca rtr id ge b efore
then will result in stapling trouble.
•
Immediately after the new Staple
Cartridge has been loaded, be sure to
follow steps 7 to 9.
•
Do not turn the g r e e n gear near t he
Cartridge inside the Stapler Unit.
9
Remove the sheet of paper from th e 1st
Bin and check that staples h ave been
driven into it.
1151O111AA
If no staples are evident, place
*
another sheet of paper in to t he 1 st
Bin and repeat steps 7, 8 and 9.
Chapter 5
When an Indicat or Li ghts Up
Page 74

66
4. When the Closure Failure Indicator Lights Up
The Closure Failure Ind icato r li ghts up if a
copier door or cov e r is left open, or an option
0.5~2.0
A4
Auto
Photo
Lighter Darker
Auto / Photo
A
A3
B4 A3
Full Size
B4 A4
A3 A4
Full Size Paper
1151O074DA
A3
A4
A4
A5
Monitor Display Check Location
Check that the Front Door is closed.
is not attached proper ly. At t his time, the
Monitor Display sho ws t he lo catio n o f t he
Auto
closure failure. You can no lo nger start a new
B4
copy cycle.
FL
Inc
Correct the closure fai lure by following the
procedure given below.
1151O063AA
1139O0570A
Check the Automatic/Duplexing Document Feeder.
Chapter 5
1139O0600A
1139O4000A
1151O028AA
Check that the Right Door is closed.
When an Indicat or Li ghts Up
1139O3230A
1139O2100A
Page 75

4. When the Closure Failure Indicator Lights Up
Monitor Display Check Location
Check th at t he Left Door i s cl osed.
1139O4010A
Check that the Lower Right Door is closed.
1139O4020A
Check that t he Lower Left Door is closed.
67
1139O4030A
1139O4040A
1139O4050A
Check that the Duplex Unit is locked into position.
Check that the Sorter or Staple Sorter is in position.
Chapter 5
When an Indicat or Li ghts Up
Page 76

68
5. When the Misfeed Indicator Lights Up
If a paper misfeed occurs durin g a co py cycle,
that copy cycle stops . At thi s time, th e M is feed
0.5~2.0
A4
Auto
Photo
Lighter Darker
Auto / Photo
A
A3
B4 A3
Full Size
B4 A4
A3 A4
Full Size Paper
1151O075DA
A3
A4
A4
A5
Misfeed Indicator and Monitor Display
Check the Monitor Dis play fo r t he lo catio n o f t he misf eed and clear the misfed sheet of paper
according to the procedu re giv en f or each locatio n.
Indica t or lights up, the Mo nitor Dis play show s
the location and you cannot start any new copy
Auto
cycle.
B4
FL
Inc
Copier ➭ p. 69
1139O4120A
Paper Feed Cabinet ➭ p. 72
Chapter 5
1139O4100A
Automatic/Duplexing Document Feeder
Í p. 74
When an Indicat or Li ghts Up
1139O4130A
Duplex Unit ➭ p. 73
1139O4080A
Sorter/Staple Sorter ➭ p. 76
1139O4110A
There is a misfeed at th at lo catio n wher e th e red indicato r (
●
sheet of paper stopped at th at lo cation where the red indicator (
1139O4090A
) is blinking. There might be a
●
) lights up.
Page 77

Misfeed Clearing Procedures
Copier (Fusing/Transport Section)
NOTE
Be careful not to touch th e area s
marked with High Voltage and
Caution: HOT with bare hands.
Open the Front Door. Tur n the Lock
1
Release Lever countercl ockwi se to
unlock and swing up the Upper Half of
the copier.
69
5. When the Misfeed Indicator Lights Up
Remove any sheet of paper from the
3
Transport Section.
1139O2120A
<If the Automatic/Duplex in g Docu ment
Feeder is mounted>
Unlock and swing up the Upper Half of th e
copier. Then lock Stopper M2 .
1151O113AA
Holding up the Fus ing U nit , pull out
2
the sheet of paper in th e di recti on of
the arrow.
4
Gently swing down and lock the Upper
Half of the copier. Then, close the
Front Door.
<If the Automatic/D uplexing Document
Feeder is mounted>
Slightly lift up the Up per Half o f the
copier and unlock Stopper M2 .
Gently swing down and lock the Upper
Half of the copier. Then, clos e th e Front
Door.
Chapter 5
When an Indicat or Li ghts Up
CAUTION : HOT
The Fusing Unit an d it s sur ro undin g
areas may be extremely hot. DO NOT
touch any part except the Fu s ing U nit
Handle (yellow).
1151O144AB
Page 78

70
5. When the Misfeed Indicator Lights Up
Copier (Paper Take-Up Section)
Open the Front Door. Tur n the Lock
1
Release Lever countercl ockwi se to
unlock and swing up the Upper Half of
the copier.
1139O2120A
<If the Automatic/Duplex in g Docu ment
Feeder is mounted>
Unlock and swing up the Upper Half of th e
copier. Then lock Stopper M2 .
4
5
Gently swing down and lock the Upper
Half of the copier. Then, close the
Front Door.
<If the Automatic/D uplexing Document
Feeder is mounted>
Slightly lift up th e Upper Half o f t he
copier and unlock Stopper M2 .
Gently swing down and lo ck th e Upp er Half
of the copier. Then, clos e the Fr ont D oor.
1151O114AB
Slide out the Drawer and u nload t he
paper from the Drawer. Next, push
down the Paper Lifting P late.
1151O113AA
Chapter 5
Open the Right Door an d pull out the
2
sheet of paper from the M ult i Bypass
Port.
Fan the pa per and re load it.
6
1139O2140A
Pull out the sheet of paper f ro m th e
3
Paper Take-Up Section and close the
When an Indicat or Li ghts Up
Right Door.
NOTE
Make sure that the paper stack rests
under the two catches of the Drawer.
Gently slide the Drawer back i n.
7
1139O2150A
Page 79

Copier (Multi Bypass Sectio n)
71
5. When the Misfeed Indicator Lights Up
1
2
Unload the stack of paper fr om the
Multi Bypass Tray.
1139O2160A
Open the Front Door. Turn th e Lock
Release Lever counterclockwise to
unlock and swing up t he Upper Half of
the copier.
1139O2120A
<If the Automatic/Duplex ing Docu ment
Feeder is mounted>
Unlock and swing up the Upper Half of the
copier. Then lock Stopper M2 .
4
Gently swing down and lock t he Upp er
Half of the copier. Then, close the
Front Door.
<If the Automatic/Dupl exin g Do cumen t
Feeder is mounted>
Slightly lift up the Upp er Half of th e
copier and unlock Stopper M2 .
Gently swing down and lock the Upper Half
of the copier. Then, close the Fro nt Do or .
1151O114AB
Chapter 5
3
1151O113AA
Remove any sheet of paper from the
Transport Section.
1139O0670A
5
Fan the paper thorough ly. Reload the
paper stack onto the Multi Bypass Tray.
1139O2090A
When an Indicat or Li ghts Up
Page 80

72
5. When the Misfeed Indicator Lights Up
Paper Feed Cabinet (PF-204)
Open the Lower Right Door and pu ll
1
out the sheet of paper.
Close the Lower Righ t D oor.
2
Slide the Drawer out of the copier.
3
Paper Feed Cabinet (PF-104)
1
Open the Lower Right Door and pull
out the s he e t of paper.
Close the Lower Right Door .
2
3
Press the Paper Descent Key. Th is
releases the Drawer, allowing you t o
slide it out of the co pi er.
1139O0640A
Unload the paper from the Drawer.
4
Chapter 5
1151O101CA
Fan the paper th oroughly and reloa d i t.
5
5
When an Indicat or Li ghts Up
1151O106CA
Slide the Drawer back in.
Unload the paper from the Dr awer. F an
4
the paper thoroughly and reload it.
Slide the Drawer back in and press the
Paper Descent Key.
1139O1552A
1139O1542A
6
Page 81

73
5. When the Misfeed Indicator Lights Up
5. When the Misfeed Indicator Lights Up
Duplex Unit
Open the Front Door. Tur n the Lock
1
Release Lever countercl ockwi se to
unlock and swing up the Upper Half of
the copier.
1139O2120A
<If the Automatic/Duplex in g Docu ment
Feeder is mounted>
Unlock and swing up the Upper Half of th e
copier. Then lock Stopper M2 .
1151O113AA
2
Open the Left Door and Lower Left
Door. Pull out the sheet of paper from
the Transport Section .
5
Close the Lower Right Do or .
6
7
Gently swing down and lo ck the U pp er
Half of the copier. Then, cl ose th e
Front D oor.
<If the Automatic/Dupl exin g Do cumen t
Feeder is mounted>
Slightly lift up the Up per Half o f the
copier and unlock Stopper M2 . Gently
swing down and lock the Upper Half of the
copier. Then, close the Fron t Doo r.
Slide out the Duplex Unit an d o pen
Misfeed Removal Guide Plate D . P ul l
out the sheet of paper from th e Dup lex
Unit.
Chapter 5
3
4
Close the Left Door and Lo wer Lef t
Door.
Open the Lower Right Door and pu ll
out the sheet of paper from the
Transport Section.
8
9
Securely close Misfeed Removal
Guide Plate D and slide the Du plex
Unit back into the copier.
Open and close the Front D oor t o r eset
the Misfeed Indicato r on th e contr ol
panel.
When an Indicat or Li ghts Up
Page 82

74
5. When the Misfeed Indicator Lights Up
5. When the Misfeed Indicator Lights Up
Duplexing Document Feeder
Remove the original st ack f rom the
1
Document Feed Tray.
Swing open Document Feed Unit D oo r
2
F1 and gently pull o ut t he o riginal.
1151O097AA
1151O031AA
5
6
Raise the Duplexi ng Documen t Feeder .
Opening the Document Tur no ver/F eed
Unit Guide Plate, gent ly pul l ou t th e
original from the Un it.
1151O033AA
Remove the original from t he Ori ginal
Glass and lower the Dupl exin g
Document Feeder.
Holding down the Lock Release
3
Button, swing open Docume nt
Chapter 5
Turnover/Exit Unit Door F2 and
carefully pull out the o ri gin al f ro m the
Exit Unit.
1151O032AA
Close F1 and F2.
Return the number of originals
7
indicated on the Disp lay to t he b ott om
of the original stack remo ved in step 1
and reload it onto t he Document Feed
Tray.
Example : Return two
originals.
4
When an Indicat or Li ghts Up
1151O098AA
Page 83

Automatic Document Feeder
75
5. When the Misfeed Indicator Lights Up
5. When the Misfeed Indicator Lights Up
Remove the original st ack f rom the
1
Document Feed Tray.
Swing open Document Feed Unit D oo r
2
F1 , and gently pull o ut t he o riginal.
Close F1 .
3
1151O097AA
1151O031AA
Remove the original fro m th e Original
6
Glass and lower the Automatic
Document Feeder.
Return the number of originals
7
indicated on the Disp lay to t he b ott om
of the original stack remo ved in step 1
and reload it onto t he Document Feed
Tray.
Example : Return two
originals.
Carefully pull out th e or ig inal fr om th e
4
Document Exit Unit.
Raise the Automatic Do cumen t Feeder .
5
Opening the Document Feed U nit
Guide Plate, gently pu ll o ut t he
original from the Un it.
1151O034AA
1151O033AA
1151O098AA
Chapter 5
When an Indicat or Li ghts Up
Page 84

76
5. When the Misfeed Indicator Lights Up
Sorter/Staple Sorter
Holding the Lock Release Lever, slide
1
the Sorter/Staple Sort er away f rom th e
copier.
Pull out the copy fr om th e Trans port
2
Section.
Slide the Sorter/St aple So rter back to
3
the copier.
Chapter 5
When an Indicat or Li ghts Up
Page 85

6. When the Call-Tech.-Rep. Indicator Lights Up
When a malfunction occurs in the copier, the
Call- T ec h. -Rep. Indi c ator lig ht s up and the
0.5~2.0
A4
Auto
Photo
Lighter Darker
Auto / Photo
A
A3
B4 A3
Full Size
B4 A4
A3 A4
Full Size Paper
1151O076DA
A3
A4
A4
A5
Resetting the Call-Tech.-Rep. Indicator
corresponding malf unction code appears across
the Zoom Ratio Indicator an d Mu lti- Co py
Auto
Display. At this t ime, th e St art Key turns to
orange and you cannot st art a n ew cop y cycle.
Try to clear the Call-Tech.-Rep . Indicator by
following the in stru ctio ns below.
77
Open the Front Door, then clo s e it.
1
This will reset t he C all- Tech.-Rep .
Indicator.
NOTE
Carry out this pr ocedure with the
Power Switch turned O N.
If the Call-Tech.-Rep. Indicator l igh ts u p
◆
again, call your Technical Repr es entat ive
immediately.
NOTES
•
When calling your Technical
Representative, give him or her t he
malfunction co de s hown acr os s t he
Zoom Ratio Indicator an d M ult i-Cop y
Display.
<Example> Malfunction C ode: C 00 10
0.5~2.0
1151O066AA
1151O066AA
•
After calling your Techn ical
Representative, turn OFF th e Pow er
Switch and unplu g t he power cord.
Chapter 5
When an Indicator Lights up
Page 86

S
78
7. Quick Reference for Other Indicators
Indicator Copier State Act ion
Wait Indicator The copier is warming up.
A copy cycle cannot be initiated
while the Wait Indicator remains lit.
1139O3260A
Wait until the Wait Indicator goes
out and th e Start Key turn s green.
Maintenance Call Indicator A regularly scheduled preventive
maintenance call becomes
necessary. (You can ma ke copies
while this Indicator is blinking.)
1139O3290A
Remove Copi es Indicat or There is a copy or cop i es l eft in the
Sorter Bin(s).
1139O3400A
Paper Size Di splay No Drawer s contain paper of the
right siz e t o run a copy cycle in the
Auto
A3
A4
A4
A5
Chapter 5
B4
B5
FLS.
Inch
1139O0262A
1139O0262A
Auto Paper mode.
Zoom Ratio Display The zoom ratio calculated based on
the original size and copy paper
size is outside the range between
Auto
A3
A4
B4 A3
Full Size
1139O5452A
1139O5452A
×
0.500 and ×2.000 to run a copy
cycle in the A uto Size mode.
Call you r Technical Rep resentative
immediately.
Remove th e copy or cop i es from
the Sorter Bin(s).
Load the right size paper into a
Drawer or select the ap propriate
copy pa per.
Cancel th e A ut o Si ze mode and
select th e ap pr opriate zoom r atio.
Multi-Copy Display You have entered 51 or more for
the number of copies to be made in
a 2-sided copying cycl e.
When an Indicat or Li ghts Up
1139O4990A
If you press the Start K ey, the
copier st arts the copy cycle to
make only 50 copies.
Page 87

Chapter 6
Troubleshooting
This cha pter gives y ou instructions on how to troubleshoot copier malfu nc tions.
1. When this Type of Copy is Produced p. 80
•
The image is too li gh t
•
The image is too dark
•
The copy is blurry
•
The copy has dark specks or spots
•
The edge of the copy is dirty
•
The im age on the co py is not aligned pr operly
•
The copy has lines
2. The Copier is not functioning as designe d p. 82
•
The Co nt r ol Panel s hows nothing
•
No copies are fed out w hen the Start Key is pressed
•
Control Panel Keys do not respond
•
The Copier is not act ivat ed when the Power S wi tch i s turn ed ON
79
Chapter 6
Troubleshooting
Page 88

80
1. When This Type of Copy is Produced
Symptom Possible Cause Action
The image is too light. The exposure level for the Auto
Exposure Mode is set at one of the
"Light" levels.
1074O108
The image is too dark. T he exposure level for the Auto
1074O109
Chapter 6
The copy is blurry. The paper is damp. Replace the paper.
The manual exposure level is set
on the lighter side.
You have been maki ng copies fr om
a photo or an original with a large
dark area.
The Toner has just been
replenished.
The Add Toner Indicator is lit up
on the Control Panel.
The paper is damp. Replace the paper. ➭ p. 60
Exposure Mode is set at one of the
"Dark" levels.
The manual exposure level is set
on the darker side.
The entire surface of the Original
Glass is dirty.
The original is not held tightly
against the Original Glass.
Change the setting of the User’s
Choice (E xposure Pri ority).
➭
p. 54
Cancel the Auto Exposure Mode
and select t he Manual Exposure
Mode to adjust the exposure level
to obtain a darker image.
➭
p . 34
Press the Exposure Control Key as
necessary to obtain a darker image.
➭
p. 34
The copier needs more toner.
Replenish toner by using the Toner
Replenisher Function.
The copier needs more toner.
Replenish toner by using the Toner
Replenisher Function .
Replace the Toner Bottle with a
new one.
Change the setting of the User’s
Choice (E xposure Pri ority).
➭
p. 54
Cancel the Auto Exposure Mode
and select t he Manual Exposure
Mode to adjust the exposure level
to obtain a lighter image.
➭
p. 34
Press the Exposure Control Key as
necessary to obtain a lighter image.
➭
p. 34
Wipe the Original Glass clean with
a soft dr y cl oth.
Place the original in position so
that it is held tightly against the
Original Glass.
➭
p. 63
➭
p. 88
➭
➭
p. 51
p. 51
Troubleshooting
1074O110
Page 89

1. When This Type of Copy is Produced
Symptom Possible Cause Action
The copy h as dark specks or spots. The Original G lass i s dirty. Wipe the Original Glass clean with
➭
pp. 88, 89
➭
➭
pp. 88, 89
➭
➭
p. 30
➭
p. 22
p. 30
➭
p. 22
p. 88
➭
➭
➭
p. 34
p. 32
➭
p. 22
p. 25
The Original Pad or Document
Feed Belt is dirty.
The original is very thin or highly
transparent.
1074O111
The edge of the copy is dirty. The Original Pad or Document
1074O112
The image on the copy is not
aligne d properly.
The information on the back side
of a two-sided, thin original may
be slightly reproduced on the copy.
Feed Belt is dirty.
You have selected a paper size
larger than the original.
(Zoom Ratio is set at full size
100%.)
The original is not placed in the
correct position. (Zoom Ratio is set
at full size 100%.)
The reduction ratio selected is not
in accord with the co py paper size.
(When doing manual r eduction
copying.)
The original is not placed in the
correct position.
The originals may not be suitable
for use in the Docume nt Feeder.
a soft dr y cl oth.
Wipe the Original Pad or
Document Feed Belt clean w it h a
soft cloth dampened wit h mild
detergent.
Place a blank sheet of pa per over
the original.
Set the copier into the Manual
Exposur e M od e and make the
exposure level lighter.
Wipe the Original Pad or
Document Feed Belt clean w it h a
soft cloth dampened wit h mild
detergent.
Select the sam e copy paper si ze as
the original.
Or, use the Auto Size Mode to
enlarge the copy to the appropriate
➭
size.
p. 32
Select the paper drawer that is
loaded in the same direction as the
original.
Or, reload the paper in the same
direction as the original.
Select the zoom ratio acco rding to
the copy paper size.
Or, use the Auto Size Mode to
reduce the copy to the a pp r opriate
➭
size.
p. 32
Place the original correctly on the
Original Glass.
Or, load it into the Document
Feeder cor r ectl y along the
Document Guide Plates.
Raise the Document Feeder and
place the originals on the Original
Glass one at a time.
81
Chapter 6
1074O113
The copy has lines. The Corona Units are dirty. Using the Corona Unit Cleaning
Levers, clean the Corona U nits.
➭
p. 89
Troubleshooting
Page 90

82
2. The Copier is not functionin g as designed
Symptom C he ck for: Action
The Control Panel shows nothing. I s only the Start Key lit up green? The copier is in the Energy Saver
Mode.
Press an y key on the C ontrol Pa nel
to cancel t he E nergy Saver Mode.
➭
p. 17
The copier is in the Auto Shut OFF
➭
Mode.
No copies are fed out w hen t he
Start Key is pressed.
Control Panel Keys do not respond. The Interru pt Key LED is lit up. The copier is in the interrupt mode.
The copier is n ot activated wh en
the Power Switch is turned ON.
The Wait Indicator is lit up. The copier was just turned ON and
The Warning Indicator is lit up. Check the Control Panel and take
The power cord is l ef t unplugged
from the power outlet.
p. 16
Interrupt
1139O2602A
Turn the Power Switch ON.
is warming up. Please wait.
action according to the particular
Indicator.
Press the Interrupt Key to cancel
the interrupt mode.
Plug the power cord into the power
outlet.
➭
p. 59
➭
p. 16
The room ci rcuit breaker is open. Close the ro om ci rcuit brea ker.
If these procedures do no t co rrect the problem, turn OFF the Power Switch, unplu g t he power co rd
*
from the power outlet and contact yo ur Techn ical R epres entat ive.
Chapter 6
Troubleshooting
Page 91

Miscellaneous
This chapter gives complete specifications of the copier system and options,
plus care a nd refere n c e information to facilit a te your use of the copier.
1. Specifications p. 84
•
Copier
•
Duplexing Document Feeder
•
Automatic Document Feeder
•
Sorter
•
Staple Sorter
•
Paper Fe e d Cabinet
•
Duplex Unit
2. Care of the Copier p. 88
3. Function Combinatio n Matr ix p . 90
4. Description of Copy Paper Size and Zoom Ratio Table p. 92
5. Index p. 93
83
Chapter 7
Chapter 7
Miscellaneous
Page 92

84
1. Specifications
Copier D2150
Type Desk To p Copier
Platen Ty pe Station ary
Photoconductor OPC
Copying S ystem Electrost ati c Dry Powdered Image Transfer to Plain Paper
Developing System Micro-Toning System
Fusing System Lamp-Heated Roller
Types of Originals Sheets, Books, and other three-dimensional objects
Maximum Original Size : A3 Lengthwise
Maximum Original Weight :
Kinds of Paper Plain paper ( 60g/m
Recycled paper
Special paper (Multi Bypass Tray only)
Thi c k paper ( 91 g/ m
Copy Paper Size First Drawer
A3L, B4L, A4L, A4C, B5C, A5L, FoolscapL(203×330mm, 216×330mm,
210×330mm)
(When the Marketing Area Switch is flipped to "Inch")
11"
17"L, LegalL (8-1/2"✕14"), Le t t er L, 8-1/4"✕13"L, 8"✕13"L,
✕
8-1/2"✕13"L, 5-1/2"✕8-1/2"L
2nd Drawer
A3L, B4L, A4L, A4C, A5L, FoolscapL
254mm
297mm✕216mmC, 216mm✕320mmL, 220mm✕280mmL, 297mm✕430mmL,
210mm
Multi Bypass Tray
Crosswise : 100mm to 297mm
Lengthwise : 140mm to 432mm
Paper Fe eding System F ir st D raw er : 250 sheets
2nd Drawer : 250 sh eet s
Multi Bypass Tray : 50 sheets ( 8 0g/m
Warm-up Tim e 30 seconds or less
First Copy A4C = 7.2 seconds or less
(in Full Size Mode using First Copier Drawer)
Copy Speed
(Approx.
Full size (×1.000)
A3L : 12 B4L : 13 A4L : 16 A4C : 21
copies/minute)
Magnification Ratios Fixed ratios
Full size: 1:1 ±0.005
Reduction ratios: ×0.500, ×0.707, ×0.816
Enlargement ratios: ×1.154, ×1.414, ×2.000
Zoom ratios: From ×0.500 to ×2.000 in ×0.001 increments
Multiple Copies Up to 99 copies (co unt-down system)
Exposu re C ontrol Aut o Exposur e M ode, Manual Ex posure Mo de and Photo M ode
Chapter 7
Lost Image 1-sided copy in the full siz e mode
Leading edge: 3 mm (approx. 1/8")
Trailing edge: 3 mm (approx. 1/8")
Front edge : 1 mm (approx. 1/25")
Power Requirements AC 110V, 115V, 120V, 127 V , 200V-240V; 50/60Hz
Power Consumption 1.3 kW (Max.)
Dimensions Width
Depth
Miscellaneous
Height
Weight 57.5 kg (Excluding Copy Tray, Starter, Toner, Copy Paper)
2
to 90g/m2 )
2
to 157g/m2 ), Transparencies, Tran sl ucent paper
203mmC, 203mm✕330mmL, 210mm✕280mmL, 216mm×297mmL,
✕
330mmL
✕
2
)
: 20 sheet s ( Recycled p aper or Special P aper )
:
650mm (E xcl uding Copy Tray)
:
633mm
:
480mm (Including Original Cover)
Page 93

Duplexing Document Feeder AFR-12
85
1. Specifications
Document Feeding
System
Standar d Mode : 1-s i ded original , 2-sided o r igi nal, 2-in-1, Sing l e Feeding
Mixed Original Detection Mode:
1-sided Mixed Original Detection
2-sided Mixed Original Detection
Lightweight Original Mode
Kinds o f O ri gi nal Plain paper
2
Original Weight 1-sided original Mode, 2-in-1 Mode : 50g/m
2-sided original Mode : 60g/m2 to 90g/m
Single Feeding Mode : 35g/m2 to 200g/m
Lightweight Original Mode : 40g/m2 to 110g/m
to 110g/m2
2.
2.
2
Original S i ze 1-sided/2-sided origin al Mode: A3L, B4L , A 4L , A4 C , A5 L, 210mm×330mm
2-in-1 Mode : A4C
Capacity of Document
Feed Tray
Copy Productivity 100
A4 or Smaller : 50 sheets (80g/m2 )
A3, B4 : 30 sheets (80g/m2 )
%
First Copy with ADF A4C = 11 seconds or less
Power Source DC24V supplied from copier
Power Consumption 48W or l ess
Dimensions Width: 610mm Depth: 505mm Height: 125mm
Weight 13 kg
Automatic Document Feeder AF-5
Document Feeding
System
Kinds o f O ri gi nal Plain paper
Original Weight 1-sided original Mode, 2-in-1 Mode : 50g/m
Original Size 1-sided original Mode: A3L, B4L, A4L, A4C, A5L, 210mm×330mm
Capacity of Document
Feed Tray
Copy Productivity 100
First Copy with ADF A4C = 11 seconds or less
Power Source DC24V supplied from copier
Power Consumption 48W or l ess
Dimensions Width: 587mm Depth: 505mm Height: 125mm
Weight 12 kg
Standar d Mode : 1-s i ded origin al , 2-in-1, Single Feedi ng
Mixed Original Detection Mode: 1-sided Mixed Original Detection
Lightweight Original Mode
2
to 110g/m
Mixed original Detection Mode : 6 0g /m2 to 90g/m
Single Feeding Mode : 35g/m2 to 157g/m
Lightweight Original Mode : 40g/m2 to 110g/m
2
2
2
2
2-in-1 Mode : A4C
A4 or Smaller : 50 sheets (80g/m
A3, B4 : 30 sheets (80g/m
2
)
2
)
%
Chapter 7
Miscellaneous
Page 94

86
1. Specifications
Sorter S-106
No. of Bins Sort Bins : 10
Modes Non-Sort Mode, Sort Mode, Grou p M ode
Kinds of Paper Non-Sort Mode
•
Plain paper, Recycled paper
•
Special Paper
T Thick paper, Transparencies, Translucent paper
Sort Mode, Group Mode
•
Plain paper, Recycled paper
Paper Si ze Non-Sort M ode, Sort Mode, Group Mode : A5 L t o A3L
Capacity of Bins Non-Sort Mode
•
Plain paper, Recycled paper
1st bin : 50 sheets
2nd to 10th bin : 25 sheets / bin
•
Special Paper
1st bin only : 10 sheets / bin
Sort Mode, Group Mode
•
Plain paper, Recycled paper
1st to 10th bin : 25 sheets / bin
Power Source DC24V supplied from copier
Power Consumption 72W or l ess
Dimensions Width : 400mm Depth : 562m Height : 404mm
Weight 15.8 kg
Staple Sorter ST-104
No. of Bins Sort Bins : 10
Modes Non-Sort M od e , S or t Mode, Grou p M ode, Sort- Staple Mode
Kinds of Paper Non-Sort Mode
•
Plain paper, Recycled paper
•
Special Paper
T Thick paper, Transp arencies, Transl u cent paper
Sort Mode, Group Mode, Sort-Staple Mode
•
Plain paper, Recycled paper
8-1/2"L t o 11" ✕ 17"L
1 piece
✕
✕
Paper Si ze Non-Sort M ode, Sort Mode, Group Mode : 5- 1/2"
Capacity of Bins Non-Sort Mode
Chapter 7
Power Source DC24V supplied from copier
Miscellaneous
Power Consumption 72W or l ess
Dimensions Width : 400mm Depth : 562mm Height : 404mm
Weight 18.1 kg
Accessori es Staple Cartridge, 5,000 staples / cartrid ge
Sort-S t a ple Mode : 8-1/2"
•
Plain paper, Recycled paper
1st bin : 50 sheets
2nd to 10th bin : 25 sheets / bin
•
Special Paper
1st bin only : 10 sheets / bin
Sort Mode, Group Mode, Sort-Staple Mode
•
Plain paper, Recycled paper
1st to 10th bin : 25 sheets / bin
11-1/2"L to 11" ✕ 17"L
✕
Page 95

Paper Feed Cabinet PF-204
87
1. Specifications
Kinds of Paper Plain paper, Recycled paper : Weighing 60g/m2 to 90g/m
2
Copy Paper Size 3rd Drawer : A5L to A3L
4th Drawer : 210mm×280mmL to A3L
Paper Feeding System Automatic feeding from drawer
Total Drawer C ap aci ty : 1,000 sh eet s (500sheets
2)
✕
Power Source DC24V supplied from copier
Dimensions Width : 610mm Depth : 595mm Height : 472mm
Weight 35.2 kg
Paper Feed Cabinet PF-104
Kinds of Paper Plain paper, Recycled paper : Weighing 60 g/m2 to 90g/m2
Copy Paper Size 3rd Drawer : A4C
Paper Feeding System Automatic feeding from drawer
Drawer Capacity : 2,500 sheets (80g/m
2
)
Power Source DC24V supplied from copier
Dimensions Width : 610mm Depth : 595mm Height : 472mm
Weight 36.5 kg
Paper Feed Cabinet PF-4D
Kinds of Paper Plain paper, Recycled paper : Weighing 60g/m2 to 90g/m
Copy Paper Size A5L to A3L
Multiple Copies 2-Sided Copies : 50 sheets
Power Source DC24V supplied from copier
Dimensions Width : 610mm Depth : 595mm Height : 472mm
Weight 39.7 kg
2
Duplex Unit AD-8
Kinds o f paper Plain paper, Recycl ed paper : Weig hing 60g/m2 to 90g/m
Capacity Up to 50 sheets (60g/m
Power Source DC24V supplied from copier
Weight 14.2 kg
Dimensions Stored in the Paper Feed Cabinet
Size : A5L to A3L
2
to 90g/m2 )
Up to 20 sheets (91g/m2 to 157g/m2 )
2
Chapter 7
Miscellaneous
Page 96

88
2. Care of the Copier
Cleaning
(Turn OFF the Power Switch of the copier when cleaning.)
Housing
Wipe the surface of the H ous ing clean
with a soft cloth damp ened with mi ld
home detergent.
Control Panel
Wipe the surface of the Contr ol Pan el
clean with a soft, dry cloth.
1139O1820A
Origin al Glass
Wipe the surface of the Orig inal Gl ass
clean with a soft, dry cloth .
1139O1840A
Front Door
Wipe the inside of the Front D oo r
clean with a soft cloth.
Chapter 7
Miscellaneous
NOTE
NEVER use a glass cleaner or any
other detergent to avoid damage to the
control panel keys a nd Dis pla y.
Original Pad
Wipe the surface of the Origi nal Pad
clean with a soft cloth dampened w ith
mild home detergent.
1139O1850A
1139O1830A
1139O1860A
Page 97

89
2. Care of the Copier
Corona Units
Gently slide ou t th e Upper Coro na
1
Unit Cleaning Lever as far as it goes.
Gently slide the Cleaning Lever back
2
into the original p osition.
1139O1870A
Document Transport Belt
Wipe the surface of the Document
Transport Belt clean with a s of t clo th
1
dampened with mild home detergen t.
2
Hold the Document Transport Belt by
both edges and pull it t o the left to
expose a fresh surface.
1139O1910A
3
4
1139O1880A
Gently slide ou t th e Lower C or ona
Unit Cleaning Lever as far as it goes.
1139O1890A
Gently slide the C lean ing Lever back
into the origi nal position.
Repeat steps 1 to 4 two to three times.
3
1151O1920A
Wipe the fresh surface clean with a
soft cloth dampened with mil d h ome
detergent.
Repeat these steps unt il th e ent ire
surface of the Belt is wip ed clean.
Chapter 7
Miscellaneous
1139O1900A
Page 98

90
3. Function Combination Mat rix
Orig.
Fin-
Function Set First
▼
Copy
ish-
ing
Image
Density
Paper
Size
Zoom
Ratio
Orig. Copy
▼
Finishing
Function Set Last
Orig.
▼
Copy
Finish-
ing
Image
Den-
sity
Paper
Size
Zoom
Ratio
Orig.
▼
Copy
Finish-
ing
Chapter 7
Functions
to be set
Last
Only
1 1
▼
Book 1
▼
Non-Sort
Auto Exposure
Photo Mode
Manual Exposure
Auto Paper
Manual Paper
Auto Size
Full Size(100%)
Reduc., Enlg.
Zoom
Margin
Interru pt
Job Pro gram
1 2
▼
2 1
▼
2 2
▼
1 1[2 in 1]
▼
1 2[2 in 1]
▼
Book 2
▼
Sort
Sort-Staple
Group
Cover
Multi Bypass
*SADF Mode
Manual Staple
●
1[2 in 1]
1
▼
2[2 in 1]
▼▼▼
1
Book 2
Sort
OOOOO
OMO●X
●●●●●
OOO●X
OOOOO
OOOOX
OOOO
OOO
OMO●X
●
●
●●●
OOO●O
Sort-Staple
Group
Cover
●
●
●
●
●●
●
OX
●
OX
●
●
X
1
▼
▼
Book 1
1
Non-Sort
Auto Exposure
Photo Mode
Manual Exp osure
Auto Paper
Manual Pap er Sel.
Auto Size
Full Size(100%)
Reduc., Enlg.
Zoom
Margin
OOOOOOOOOOOOO
●
OOOO●O●OOOOOO
●
OO OOOOOOOOOOOOOOOOOO●l●OO
OOO
OOO
OOO
OXOOOO
OOOOOO
OXOOOO●Ol
OOOOOOOO
OOOOOOOO●l
OOOOOOOO●l
OOOOOOOOOOOO OOOOOOOOOOOOO
●●●●●l●●●●●●●
●l●●●●●●●●●●●
●
●
●
●
●
●
OO●OOOOOOOOOOXOOOOOOO l●OX
O
OO●OOOOOOOOOOXOOOOOOO l
O
OXOOOO
O●OOOOOOOOOOOOOO l
OOXOOOOOOOOOOXOOOOOOOOOOOX
●●
●●
●
●
l OOOOOOOOOOOOO
l OOOOOOOOOOOOO l
●
l OOOOOOOOOOOOO
●
l OOOOO
●
l OOOOO
●
●
l OOOO●O●OOOOXO
M●OOOOOOOOOOXOOOOOOM l
XOOOOOOOOOOOOOXOOOXXOOO
OOOOOOOOOOOOOOOOOOOO
●●
OOOOOOOOOOOOOOOOOOOO
OOOOOOOOOOOOOOOOOOOO
l OOOOOOOOOOOXOOOO
●
●
OOOOOOOOOOOOOOOOO l
●
OOOOOOOOXOOOOX
●●
●
l●OOOOOOOOOOOOOO
●
●
OOOOOOOOOOOOOO
●
●
OOOOOOOOOOOOOO
●
●
●
●●●●●
●●●●●
l OOOOOOXOXOXX
●●
●
OOO
OXO
2
2
▼
▼
2 1
Interrupt
Job Program
KX●XlXX
X
2
1
●●●●●●
●●●●●●
●●●●●●●●●●●
●●●●●
●●●●
●
●● ●●●
●●● ●●
●●●● ●
●●●●●
●●●●
●
Multi Bypass
Remarks
L
A
B
AB
B
AB
AH
DE
EJI
DE
BCJG
BC
E
Miscellaneous
* SADF Mode
O
A-M
X
●
: Single Automatic Document Feed ing Mod e.
: The functions can be combined .
:
The functions can be combined cond iti on ally . ( See th e con dit ion s gi ven below . )
: The functions cannot be comb in ed. ( The fun ctio n set f irst takes precedence. )
: The functions cannot be comb in ed. ( The fun ctio n set last takes precedence. )
Page 99

3. Function Combination Matrix
Combina ti ons for Co mbined Functions
A to F : The settings can be made only when the copier is equipped with the follo wi ng op tio ns.
A : Duplex Unit
B : Duplexing Document Feeder
C : Automatic Document Feeder
D : 10-Bin Sorter
E : Staple Sorter
G : The Cover mode cannot be selected when an y of t he f oll owin g settings has been made for
Orig. C op y. If any o f them is selected after the Cover Mode has been selected, it cancel s the
▼
Cover Mode.
•
1 2
▼
•
1 2[2 in1]
▼
•
Book 1
•
Book 2
▼
▼
91
H : You cannot select Book 1 if you have previou sly l oad ed an or igi nal i nto th e Auto matic/
▼
Duplexing Document Feeder. If you l oad an o rigin al in to the Automatic/Duplexing Document
Feeder after you have selected Book 1, the copier cancels Book 1 and selects 1 1.
▼
▼
▼
I : The Sort-and-Staple mode can be used only when you load two or more originals into the
Automatic/Duplexing Document F eeder.
J : The Cover mode can be used only when the Automatic/Duplexing Documen t Feeder and Multi
Bypass Tray are used.
K : The Interrupt mode takes preceden ce. The Inter rupt mode cannot be used if 1 2, 2 2,
1 2[2in1], or Book 2 has b e en set in th e copy-job program previously called up.
▼
▼
▼
▼
L : A zoom ratio or a copy-job pr ogram set in the Interrupt mode cannot b e stor ed i n memory .
M : Book 1 or Book 2 can be combi ned with t he Sor t- and-Stap le mod e, but n o stap ling action
▼
▼
takes place. (The copier performs only boo k copy in g and so rti ng of copies , but n ot stapling.)
Chapter 7
Miscellaneous
Page 100

92
4. Description of Paper Size and Zoom Ratio Table
Paper Size
LEDGER 11" × 17" 279 mm × 432 mm
11" × 14" 11" × 14" 279 mm × 356 mm
COMPUTER 10-1/8" × 14" 257 mm × 356 mm
10" × 14" 10" × 14" 254 mm × 356 mm
9-1/4" × 14" 9-1/4" × 14" 236 mm × 356 mm
LEGAL 8-1/2" × 14" 216 mm × 356 mm
FOOLS CAP GOVERNMENT L E GAL 8-1/2" × 13" 216 mm × 330 mm
FOOLSCAP 8" × 13" 203 mm × 330 mm
FOOLSCAP 8-2/3" × 13" 220 mm × 330 mm
FOOLSCAP FOLIO 8-1/4" × 13" 210 mm × 330 mm
8-1/4" × 11-3/4" 8-1/4" × 11-3/4" 210 mm × 301 mm
LETTER 8-1/2" × 11" 216 mm × 279 mm
GOVERNMENT LETTER 8" × 10-1/2" 203 mm × 267 mm
QUARTO 8" × 10" 203 mm × 254 mm
STATEMENT INVOICE 5-1/2" × 8-1/2" 140 mm × 216 mm
Name Size (Metric) Size (Inch)
A3 297 mm × 420 mm 11-3/4" × 16-1/2"
B4 257 mm × 364 mm 10" × 14-1/4"
A4 210 mm × 297 mm 8-1/4" × 11-3/4"
B5 182 mm × 257 mm 7-1/4" × 10"
A5 148 mm × 210 mm 5-3/4" × 8-1/4"
B6 128 mm × 182 mm 5" × 7-1/4"
A6 105 mm × 148 mm 4-1/4" × 5-3/4"
POST CARD 100 mm × 148 mm 4" × 5-3/4"
Name Si ze (I n ch ) Size (Met ric)
Zoom Ratio Table (Original Size to Copy Paper Size)
Metric Areas
A4 ×0.707
A5 ×0.500
B4 ×0.866
B5 ×0.610
A5 ×0.707
A6 ×0.500
B5 ×0.866
B6 ×0.610
A3 ×1.414
B4 ×1.224
A6 ×0.707
B6 ×0.866
A4 ×1.414
A3 ×2.000
B4 ×1.733
B5 ×1.224
A4 ×2.000
A5 ×1.414
B5 ×1.733
B6 ×1.224
A4 ×0.816
A5 ×0.577
B5 ×0.707
B6 ×0.500
A3 ×1.154
A5 ×0.816
A6 ×0.577
B6 ×0.707
A3 ×1.640
A4 ×1.154
B4 ×1.414
A6 ×0.816
A4 ×1.640
A5 ×1.154
B4 ×2.000
B5 ×1.414
Chapter 7
Miscellaneous
Original Size Copy Paper Size Zoom Ratio
A3
297 × 420 mm
11-3/4" ×16-1/2"
A4
210 × 297 mm
8-1/4" × 11-3/4"
A5
148 × 210 mm
5-3/4" × 8-1/4"
A6
105 × 148 mm
4-1/4" × 5-3/4"
B4
257 × 364 mm
10" × 14-1/4"
B5
182 × 257 mm
7-1/4" × 10"
B6
128 × 182 mm
5" × 7-1/4"
Original Size Copy P a per Siz e Zoom Ratio
11" × 17"
279.4 × 431.8 mm
11" × 15"
279.4 × 381 mm
11" × 14"
279.4 × 355.6 mm
Legal
8-1/2" × 14"
215.9 × 355.6 mm
Foolscap
8-1/2" × 13"
215.9 × 330.2 mm
Letter
8-1/2" × 11"
215.9 × 279.4 mm
Invoice
5-1/2" × 8-1/2"
139.7 × 215.9 mm
Zoom Ratio = Copy Paper Size ÷ Original Size
1" (inch) = 25.4 mm
1 mm = 0.0394" (inch)
Inch Areas
11" × 14" ×0.823
Legal ×0.772
Foolscap ×0.764
Letter ×0.647
Invoice ×0.500
11" × 14" ×0.933
Legal ×0.772
Foolscap ×0.772
Letter ×0.733
Invoice ×0.500
Legal ×0.772
Foolscap ×0.772
Letter ×0.772
Invoice ×0.500
Foolscap ×0.928
Letter ×0.785
Invoice ×0.607
11" × 17" ×1.214
Letter ×0.846
Invoice ×0.647
11" × 17" ×1.294
11" × 14" ×1.076
Invoice ×0.647
11" × 17" ×1.294
11" × 14" ×1.272
11" × 17" ×2.000
11" × 14" ×1.647
Legal ×1.545
Foolscap ×1.529
Letter ×1.294
 Loading...