

Page 1

DEVELOP
SERVICE MANUAL & OPTIONS
D 16G
4986-7991-00
Page 2

Page 3

INDEX (Field Service)
GENERAL
MECHANICAL/ELECTRICAL
MAINTENANCE
DIS/REASSEMBLY,
ADJUSTMENT
CONTROL PANEL/SERVICE
MODE DESCRIPTIONS
TROUBLESHOOTING
Page 4

Page 5

CONTENTS
GENERAL
1. SPECIFICATIONS ...........................................................................................G-1
(1) Main Unit ..........................................................................................G-1
(2) GDI Printer Function ........................................................................G-3
2. PRECAUTIONS FOR INSTALLATION ............................................................G-4
2-1. Installation Site .........................................................................................G-4
2-2. Power Source ...........................................................................................G-4
3. PRECAUTIONS FOR USE ..............................................................................G-5
3-1. To Ensure the Printer is Used in an Optimum Condition .........................G-5
3-2. Operating Environment ............................................................................G-5
3-3. Power Requirements ................................................................................G-5
4. HANDLING OF THE CONSUMABLES ............................................................G-6
5. MISCELLANEOUS PRECAUTIONS ................................................................G-6
6. PARTS IDENTIFICATION ................................................................................G-7
MECHANICAL/
ELECTRICAL
1. COMPONENTS LAYOUT ................................................................................M-1
2. COPY PROCESS ............................................................................................M-2
3. PAPER PATH ..................................................................................................M-4
4. DRIVE SYSTEM ..............................................................................................M-5
5. OPERATING SEQUENCE ...............................................................................M-6
5-1. Print Start Sequence ................................................................................M-6
(1) When the pre-start control is not provided .......................................M-6
(2) When the pre-start control is provided .............................................M-7
5-2. Print End Sequence .................................................................................M-7
6. IC (IMAGING CARTRIDGE) SECTION ...........................................................M-8
6-1. Overview ..................................................................................................M-8
6-2. PC Drum ..................................................................................................M-10
6-3. Developing System ..................................................................................M-11
6-4. Detection of Toner Cartridge ....................................................................M-12
(1) Installation detection ........................................................................M-12
(2) Interchangeability detection .............................................................M-12
(3) Toner Near Empty and Toner Empty Detection ...............................M-12
7. DRUM CHARGE ..............................................................................................M-14
(1) Overview ..........................................................................................M-14
8. IR SECTION .....................................................................................................M-15
8-1. Image Data Processing ............................................................................M-15
8-2. Exposure Components Section ................................................................M-16
8-3. Scanner Drive Mechanism .......................................................................M-17
(1) Scanner Drive Mechanism ...............................................................M-17
8-4. Scanner Motor Drive Control ....................................................................M-17
9. PRINT HEAD (PH) ...........................................................................................M-18
9-1. Construction .............................................................................................M-18
9-2. Laser Exposure Process ..........................................................................M-19
i
Page 6

9-3. Laser Emission Timing ............................................................................ M-20
9-4. Laser Emission Area ............................................................................... M-21
(1) Main scanning direction ................................................................... M-21
(2) Sub-scanning direction .................................................................... M-21
10. PAPER TAKE-UP SECTION ........................................................................... M-22
10-1.Tray 1 ...................................................................................................... M-22
(1) Paper take-up mechanism .............................................................. M-22
(2) Double feed preventive mechanism ................................................ M-23
(3) Paper empty detection .................................................................... M-23
(4) Paper take-up retry function ............................................................ M-23
11. IMAGE TRANSFER ......................................................................................... M-24
11-1.Overview ................................................................................................. M-24
12. FUSING UNIT .................................................................................................. M-25
12-1.Overview ................................................................................................. M-25
12-2.Fusing Temperature Control ................................................................... M-26
(1) Temperature changes
(plain paper having a length of 186 mm or more) ........................... M-26
(2) Temperature control ........................................................................ M-26
(3) Temperature control mode .............................................................. M-27
(4) Printing temperature by paper type
in different temperature control modes ........................................... M-27
(5) Fusing temperature protect control ................................................. M-28
13. PAPER EXIT ................................................................................................... M-29
13-1.Paper Exit Mechanism ............................................................................ M-29
14. MISCELLANEOUS .......................................................................................... M-30
14-1.Cooling of the Printer Interior .................................................................. M-30
14-2.Original Cover Open/Close Detection Mechanism .................................. M-31
MAINTENANCE
1. MAINTENANCE SCHEDULE .......................................................................... E-1
1-1. Guidelines for Life Specifications Values by Unit .................................... E-2
(1) Life Specifications Values ............................................................... E-2
2. REPLACEMENT/CLEANING OF PARTS ....................................................... E-3
(1) Cleaning of the Paper Take-Up Roll ................................................ E-3
(2) Replacement of the Paper Take-Up Roll ......................................... E-3
(3) Replacement of the Image Transfer Roller ..................................... E-4
3. REPLACEMENT OF UNITS ............................................................................ E-5
(1) Replacement of the Toner Cartridge ............................................... E-5
(2) Replacement of the Drum Cartridge ................................................ E-7
(3) Replacement of the Fusing Unit ...................................................... E-8
DIS/REASSEMBLY,
ADJUSTMENT
1. SAFETY INFORMATION ................................................................................ D-1
1-1. Laser Safety ............................................................................................ D-1
1-2. Internal Laser Radiation .......................................................................... D-1
1-3. Laser Safety Label .................................................................................. D-4
1-4. Laser Caution Label ................................................................................ D-4
ii
Page 7

1-5. Precautions for Handling the Laser Equipment ........................................D-5
2. PRECAUTIONS FOR DISASSEMBLY/ADJUSTMENTS .................................D-6
2-1. Parts That Must Not be Touched .............................................................D-6
(1) Red Painted Screws ........................................................................D-6
(2) Variable resistors on board ..............................................................D-6
(3) Other Screws not Marked with Red Paint ........................................D-6
3. DISASSEMBLY/REASSEMBLY ......................................................................D-7
3-1. Identification of Exterior Parts and Removal Procedures for Them .........D-7
3-2. Removal of Circuit Boards and Other Electrical Components .................D-9
(1) Removal of the Controller/Mechanical Control Board ......................D-10
(2) Removal of the Control Panel ..........................................................D-10
(3) Removal of the Interface Board .......................................................D-11
(4) Removal of the Power Unit ..............................................................D-12
(5) Removal of the High Voltage Unit ....................................................D-14
3-3. Removal of Units ......................................................................................D-15
(1) Removal of the IR Unit .....................................................................D-15
(2) Removal of the PH Unit ...................................................................D-16
3-4. Disassembly of the Image Reading Section ............................................D-18
(1) Removal of the Original cover set sensor ........................................D-18
(2) Removal of the Upper Cover Assy. (Original Glass) ........................D-18
(3) Removal of the Scanner Motor ........................................................D-18
(4) Removal of the Scanner Assy. .........................................................D-19
(5) Removal of the Timing Belt ..............................................................D-20
3-5. Disassembly of the Main Drive Section ....................................................D-21
(1) Removal of the Main Motor ..............................................................D-21
(2) Removal of the Paper Empty Sensors .............................................D-21
(3) Removal of the Paper Take-Up Solenoid ........................................D-23
(4) Removal of the Paper Take-Up Clutch Gear ...................................D-24
(5) Removal of the Torque Limiter .........................................................D-25
(6) Disassembly of the Fusing Unit .......................................................D-26
4. ADJUSTMENTS ...............................................................................................D-29
4-1. Electrical/Image Adjustment .....................................................................D-29
(1) Accessing the Service Mode ............................................................D-29
(2) Accessing the “ADJUST” Menu .......................................................D-29
(3) Printing a Test Pattern .....................................................................D-29
(4) Margin Adjustment (Leading Edge/Trailing Edge/Both Sides) .........D-30
(5) Printer’s Main Scanning Registration Adjustment ............................D-31
(6) Printer’s Sub-Scanning Registration Adjustment .............................D-32
(7) Scanner’s Main Scanning Zoom Ratio Adjustment ..........................D-33
(8) Scanner’s Sub-Scanning Zoom Ratio Adjustment ...........................D-35
(9) Scanner’s Main Scanning Registration Adjustment .........................D-37
(10) Scanner’s Sub-Scanning Registration Adjustment ..........................D-39
5. MISCELLANEOUS ...........................................................................................D-40
5-1. Removal of the Mechanical Counter (Option) ..........................................D-40
5-2. Updating the Firmware .............................................................................D-41
(1) Installing the GDI Printer/TWAIN Driver Using Plug and Play .........D-41
5-3. Procedure for Updating the GDI Firmware ...............................................D-43
iii
Page 8

5-4. Remedy for a Failed Updating of the Firmware ....................................... D-45
5-5. Moving the EEPROM .............................................................................. D-47
CONTROL PANEL/SERVICE MODE DESCRIPTIONS
1. CONTROL PANEL DESCRIPTIONS .............................................................. S-1
1-1. Names of Control Panel Parts and Their Functions ................................ S-1
2. FUNCTIONS OF SWITCHES AND PARTS ON PWBs ................................... S-3
2-1. Circuit Board Locations ........................................................................... S-3
2-2. PWB-P (Controller/Mechanical Control Board) ....................................... S-3
2-3. PWB-IF (Interface Board) ........................................................................ S-4
3. UTILITY MODE ............................................................................................... S-5
3-1. Utility Mode Function Tree ...................................................................... S-5
3-2. Utility Mode Setting Procedure ................................................................ S-6
(1) Machine Setting ............................................................................... S-6
(2) Paper Source Setting ...................................................................... S-8
(3) Copy Setting .................................................................................... S-8
4. SERVICE MODE ............................................................................................. S-9
4-1. Service Mode Function Tree ................................................................... S-9
4-2. Service Mode Setting Procedure ............................................................. S-11
4-3. Service Mode Functions .......................................................................... S-12
(1) Service's Choice .............................................................................. S-12
(2) Adjust ............................................................................................ S-14
(3) Counter ............................................................................................ S-17
(4) Display ............................................................................................ S-19
(5) Function ........................................................................................... S-19
(6) Fixed Zoom Change ........................................................................ S-21
(7) Factory Test .................................................................................... S-22
(8) Clear Data ....................................................................................... S-22
5. SECURITY MODE ........................................................................................... S-23
5-1. Security Mode Function Tree .................................................................. S-23
5-2. Security Mode Setting Procedure ............................................................ S-23
(1) Security ........................................................................................... S-23
TROUBLESHOOTING
1. INTRODUCTION ............................................................................................. T-1
1-1. Electric Components Check Procedures ................................................. T-1
(1) Sensors ........................................................................................... T-1
(2) Switches .......................................................................................... T-2
(3) Solenoids ......................................................................................... T-2
(4) Motors ............................................................................................ T-3
1-2. Overall Control Configuration .................................................................. T-5
2. PAPER MISFEED ........................................................................................... T-6
2-1. Initial Check Items ................................................................................... T-6
2-2. Paper Misfeed Displays ........................................................................... T-7
2-3. Locations of Misfeed Detection Sensors ................................................. T-8
2-4. Misfeed Detection Timing and Troubleshooting Procedures ................... T-9
(1) Paper Take-Up/Transport Misfeed .................................................. T-9
(2) Fusing/Exit Misfeed ......................................................................... T-10
iv
Page 9

3. MALFUNCTIONS/WARNING ..........................................................................T-11
3-1. List of Malfunctions ..................................................................................T-11
3-2. Malfunction Detection Timing and Troubleshooting Procedures ..............T-14
(1) C0045: Fuser fan motor error ..........................................................T-14
(2) C0210: H.V. abnormal .....................................................................T-15
(3) C0500: Fuser warm up error ............................................................T-16
(4) C0510: Fuser temperature low ........................................................T-17
(5) C0520: Fuser overheat ....................................................................T-18
(6) C0650: Scanner home sensor error .................................................T-18
(7) C1200: ASIC memory abnormal ......................................................T-19
(8) C1300: Polygon mirror motor error ..................................................T-19
(9) C133B: Communication with option error ........................................T-20
(10) C133D: ROM checksum error ..........................................................T-20
(11) C13F0: Laser error ...........................................................................T-21
(12) C1468: EEPROM error ....................................................................T-21
(13) C14A3: IR lamp malfunction ............................................................T-22
4. MALFUNCTIONS RELATED TO POWER SUPPLY .......................................T-23
4-1. Power is not Turned ON. ..........................................................................T-23
5. IMAGE QUALITY PROBLEMS ........................................................................T-24
5-1. Troubleshooting Image Quality Problems ................................................T-24
5-2. Initial Checks ............................................................................................T-24
5-3. Troubleshooting for Specific Image Quality Problems .............................T-25
(1) Image reading system: Blank or black prints ...................................T-26
(2) Image reading system: Low image density ......................................T-27
(3) Image reading system: Foggy background or rough image .............T-28
(4) Image reading system: Black streaks or bands ...............................T-29
(5) Image reading system: Black spots .................................................T-30
(6) Image reading system: Blank streaks or bands ...............................T-31
(7) Image reading system: Uneven image ............................................T-32
(8) Printer system: Blank or black prints ................................................T-33
(9) Printer system: Blank spots .............................................................T-34
(10) Printer system: Smears on back ......................................................T-34
(11) Printer system: Low image density ..................................................T-35
(12) Printer system: Foggy background ..................................................T-36
(13) Printer system: Blank streaks or bands ...........................................T-37
(14) Printer system: Black streaks or bands ............................................T-38
(15) Printer system: Offset image ............................................................T-38
(16) Printer system: Uneven image .........................................................T-39
v
Page 10

Page 11

GENERAL
Page 12

Page 13

1. SPECIFICATIONS
(1) Main Unit
Desktop
Ty p e
Original scanning system
Photoconductor type
Copying system
Resolution
Paper feed-in system
Exposure system
Developing system
Drum-charging system
Image transfer system
Paper separation system
Fusing system
Max. Original size
Copy Medium
Paper source Tray1 Tray2 Bypass Tray
Plain paper (60 to 90 g/m
Recycled paper (60 to 90 g/m
Ty p e
Dimension
Special paper (91 to 163 g/m
Maximum (width × length) 216×356 mm
Minimum (width × length) 105×148 mm 105×148 mm
:
Scanning in main scanning direction with a 3-line color CCD
:
sensor, and scanning in sub-scanning direction with unit
scanning and sheet feed-through system
OPC (Organic Photoconductor)
:
Electrostatic dry Powdered image transfer to plain paper with
:
laser
600 dpi × 600 dpi, 600 dpi × 300 dpi
:
2-Way system (Tray1 and Bypass Tray)
:
*3-Way system is possible if optional PF-125 (Tray2) is
installed.
Unit scanning slit exposure
:
FMT single component developing
:
Rotating brush with pre-charge film
:
Roller transfer
:
Curvature separation + Charge Neutralizing needle
:
Heat roller
:
Up to Legal size
:
(16 to 24 lb.)
(16 to 24 lb.)
(24 to 43 lb.)
Transparencies ❍ – ❍
Label sheets ❍ – ❍
Envelopes ❍ – ❍
2
)
2
2
❍❍❍
)
❍❍❍
)
❍ – ❍
A4 L, Letter L
216×356 mm
NOTE
The dimension for Tray2 is fixed at A4L or Letter L.
G-1
Page 14

Continuous copy speed
(copies/min.)
Continuous print speed
(sheets/min.)
Warm-up time
First print time
First copy time
12 copies/minute (at full size and 600 dpi × 300 dpi, with
:
ADF)
More than 16 sheets/minute (with plain A4 L or Letter L
:
paper)
Less than 25 seconds (at a room temperature of 23 °C and
:
at the rated voltage)
16 seconds or less (at full size and 600 dpi × 300 dpi, with
:
plain A4 L or Letter L paper)
13 seconds or less (at full size and 600 dpi × 300 dpi, with
:
plain A4 L or Letter L paper)
*If the Start key is pressed more than 3 seconds after opening and closing the Original Cover or Auto Document Feeder
after the engine has warmed up
G-2
Page 15

Zoom Ratios
Metric Size English Size
Full size ×1.00 ×1.00
Enlargement
Fixed
Reduction
Var iabl e ×0.50 to ×2.00 (in ×0.01 increments)
Lens
Exposure Lamp
Fusing temperature
Power /Current Consumption (main unit only)
Voltage Maximum power consumption
110 V, 120-127 V 700, 770-880 W
220-240 V 740-830 W
Power source : 110 V, 120V-127 V, 220-240 V 50/60 Hz
:
Through lens (F=5.0, f=27.195)
:
Cold Cathode Florescent Lamp
:
200 °C
×1.15
×1.41
×2.00
×0.81
×0.70
×0.50
×1.29
×1.54
×2.00
×0.78
×0.64
×0.50
Main unit dimensions
(including Original
Cover)
Main unit weight
(2) GDI Printer Function
RAM
Interfaces
Printer Language
Fonts
Supported Operating
Systems
Web Browser
::Width....508 mm (20 inches)
Depth....608 mm (24 inches)
Height...408 mm (16 inches)
14.9 kg (32-3/4 lb.)
Share with copier.
:
IEEE 1284 (Parallel), USB Revision 1.1
:
(except for Windows 95 and Windows NT)
GDI
:
Windows
:
Windows XP (SP1 or later)/Windows 2000 (SP3 or later)/
:
Windows NT Workstation Version 4.0 (SP6a or later)/Windows Me/Windows 98 (SP1)/Windows 98 Second Edition/
Windows 95 OSR
Internet Explorer 4.0 or later
:
G-3
Page 16

2. PRECAUTIONS FOR INSTALLATION
2-1. Installation Site
To ensure utmost safety and avoid breakdown, the printer should NOT be used in a place:
• Where it will be subjected to extremely high or low temperature or humidity.
• Where it will be subjected to sudden fluctuations in either temperature or humidity.
• Which is exposed to direct sunlight.
• Which is in the direct air stream of an air conditioner, heater, or ventilator.
• Which has poor ventilation or is dusty.
• Which does not have a stable, level floor or where it will receive undue vibration.
• Which is near any kind of heating device.
• Which is near volatile flammables (thinner, gasoline, etc.).
• Where it may be splashed with water and electric leakage is likely to occur.
• Which puts the operator in the direct stream of exhaust from the printer.
• Where ammonia gas might be generated.
2-2. Power Source
• If any other electrical equipment is sourced from the same power outlet, make sure that
the capacity of the outlet is not exceeded.
• Use a power source with little voltage fluctuation.
• Never connect by means of a multiple socket any other appliances or machines to the
outlet being used for the printer.
• Ensure that the printer does not ride on the power cord or communications cable of other
electric equipment, and that it does not become wedged into or underneath the mechanism.
• Make the following checks at frequent intervals:
✽ Is the power plug abnormally hot?
✽ Are there any cracks or scrapes in the cord?
✽ Has the power plug been inserted fully into the outlet?
✽ Does something, including the printer itself, ride on the power cord?
Use an outlet with a capacity of 110/120/127 V, or 220-240 V.
G-4
Page 17

3. PRECAUTIONS FOR USE
3-1. To Ensure the Printer is Used in an Optimum Condition
• Never place a heavy object on the printer or subject the printer to shocks.
• Insert the power plug all the way into the outlet.
• Do not attempt to remove any panel or cover that is secured while the printer is in a print
cycle.
• Do not turn OFF the printer while it is in a print cycle.
• Provide good ventilation if the printer is to be used for a long time in a narrow room.
• Never use flammable sprays near the printer.
• If the printer becomes inordinately hot or produces abnormal noise, immediately turn it
OFF and unplug it.
• Do not turn ON the power switch at the same time that you plug the power cord into the
outlet.
• When unplugging the power cord, do not pull on the cord; hold the plug and pull it out.
• Do not bring any magnetized object near the printer.
• Do not place a vase or vessel containing water on the printer.
• Be sure to turn OFF the power switch at the end of the workday or upon power failure.
• Use care not to drop paper clips, staples, or other small pieces of metal into the printer.
3-2. Operating Environment
The operating environmental requirements of the printer are as follows.
• Temperature: 10 to 30 °C
• Humidity: 15 to 85 %
• Rate of temperature change: 10 °C/h
• Rate of humidity change: 20 %Rh/h
3-3. Power Requirements
The power source voltage requirements are as follows.
• Voltage fluctuation: AC110 V -10 %, AC127 V +6 % (Function)
AC220-240 V ± 10 % (Function)
AC110 V -15 %, AC127 V +6 % (Paper Feeding)
AC220-240 V +10 %, -15 % (Paper Feeding)
• Frequency fluctuation: 50/60 Hz ± 3 Hz
G-5
Page 18

4. HANDLING OF THE CONSUMABLES
Before using any consumables, always read the label on its container carefully.
• Paper can easily damp. To prevent absorption of moisture, store paper in a place with little moisture.
• Keep consumables out of the reach of children.
• Do not touch the PC Drum with bare hands.
• The same sized paper is of two kinds, short grain and long grain. Short grain paper
should only be fed through the printer crosswise, while long grain paper should only be
fed lengthwise. The wrapper of the paper is properly marked.
• If your hands become soiled with toner, wash them with soap and water.
• Do not throw away any used consumables. They are to be collected.
• Do not burn, bury in the ground, or throw into the water any consumables.
• Do not store consumables in a place which:
✽ Is hot and humid.
✽ Is subject to direct sunlight.
✽ Has an open flame nearby.
5. MISCELLANEOUS PRECAUTIONS
Use the following precautions when performing service jobs for a printer that uses a laser.
• When a service job needs to be performed in the laser beam path, such as when working
around the Print Head Unit or PC Drum, be sure first to unplug the power cord of the
printer from the outlet.
• If the service job requires that the power cord be left plugged in, observe the following
precautions:
1. Take off your watch, ring, and any other reflective object and wear laser protective gog-
gles.
2. Keep users away from the job site.
3. Do not bring a highly reflective tool into the laser beam path during the service job.
G-6
Page 19
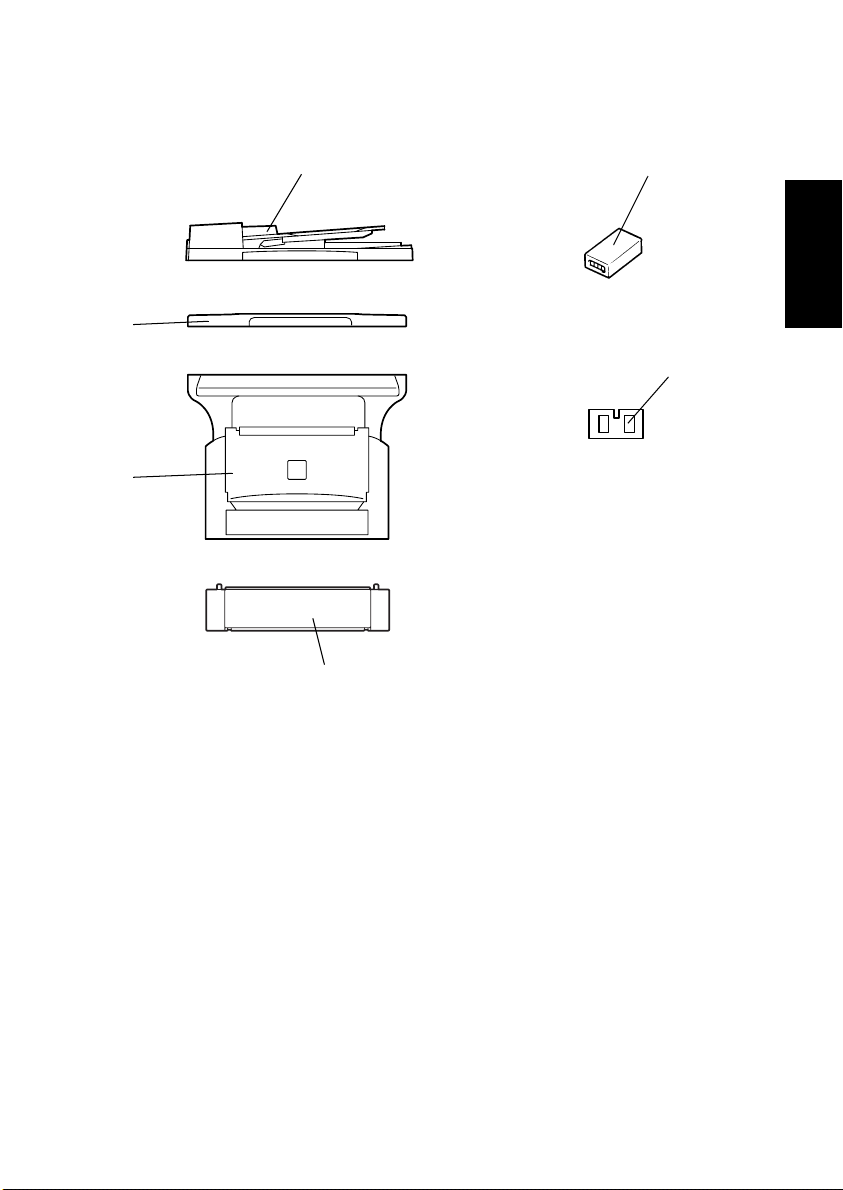
6. PARTS IDENTIFICATION
1
6
5
4
2
3
4980G001AA
1. Automatic Document Feeder AF-11
2. Mechanical Counter
3. Expansion memory 32-5 (32 MB)
4. Paper Feed Cassette PF-125
5. Main Unit D 16G
6. Original Cover OC-7
G-7
Page 20

Page 21

MECHANICAL/
ELECTRICAL
Page 22

Page 23
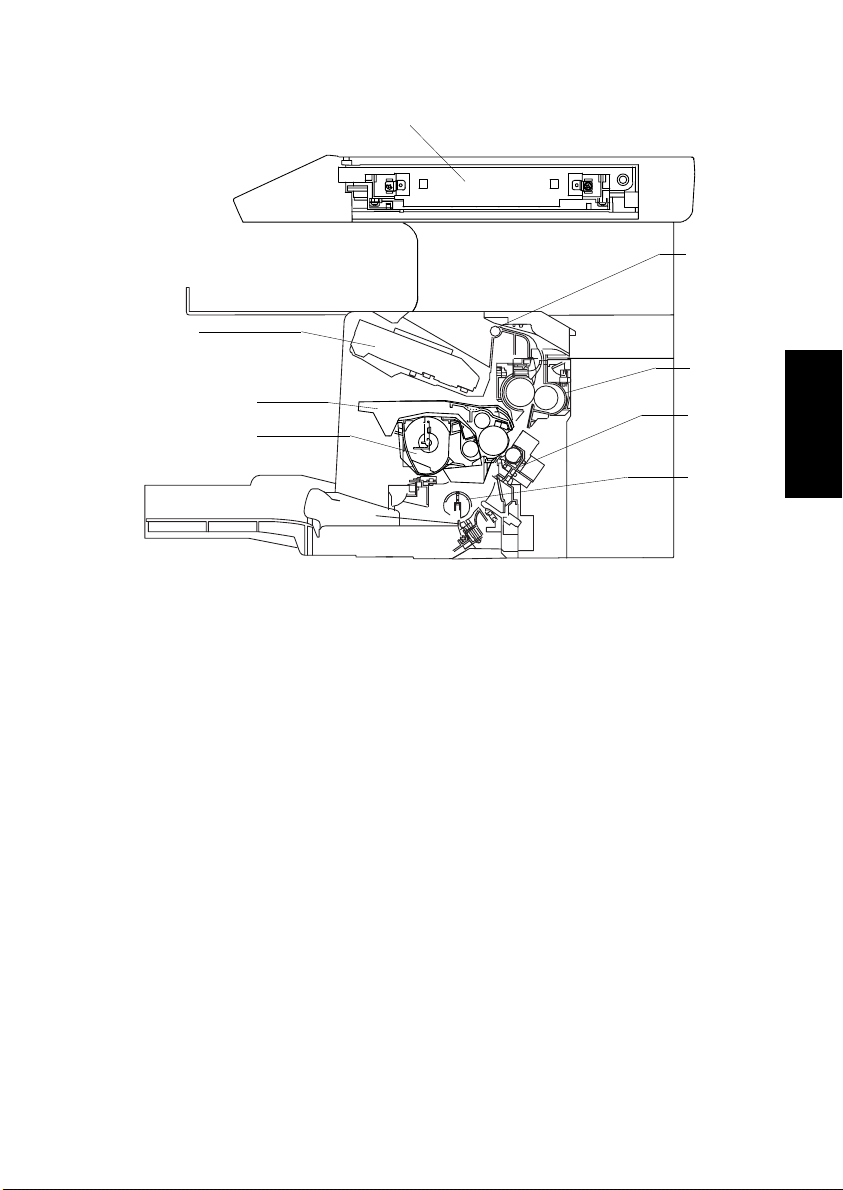
1. COMPONENTS LAYOUT
1
8
7
6
1: IR Unit 5: Paper Take-Up Roller
2: Exit Roller 6: Toner Cartridge
3: Fusing Unit 7: Drum Cartridge
4: Image Transfer Section 8: Print Head (PH) Unit
2
3
4
5
4980M004AA
M-1
Page 24
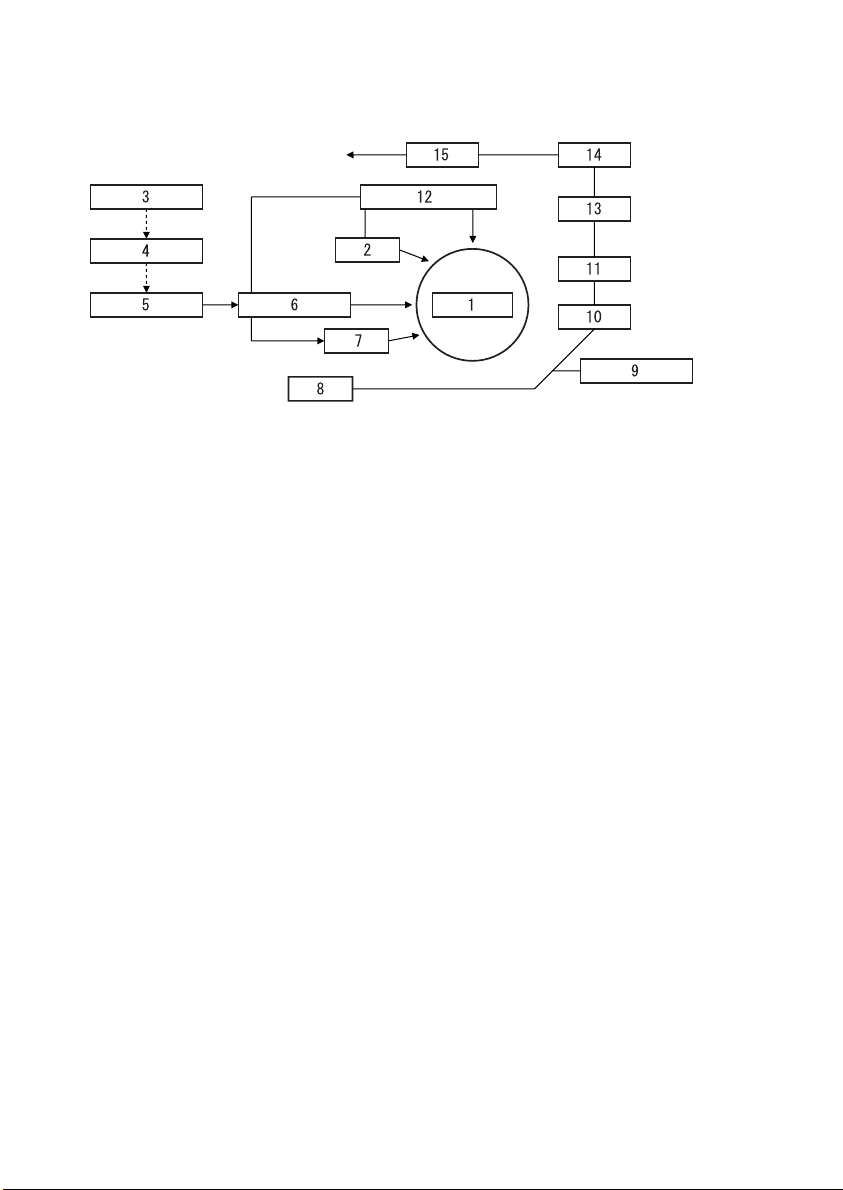
2. COPY PROCESS
4980M018AC
1. PC Drum
• A photoconductive layer is formed on an aluminum tube and an electrostatic latent image
is formed on this photoconductive layer.
2. PC Drum Charging
• Deposits a negative DC charge across the entire surface of the PC Drum.
3. Photoelectric Conversion
• The CCD Sensor converts the image data represented by light reflected off the original to
a corresponding analog electric signal which, in turn, is output to the IR image processing section.
4. IR Image Processing
• The electric signal is converted to an 8-bit digital image signal (A/D conversion) which, in
turn, goes through appropriate correction processes before being output to the PH image
processing section.
5. PH Image Processing
• After going through correction processes, the digital image signal is converted to a corresponding electric signal (D/A conversion), based on which control is provided for turning
ON or OFF the laser.
6. Laser Exposure
• The laser beam strikes the surface of the PC Drum, forming an electrostatic latent image.
7. Developing
• Toner negatively charged in the Developer Mixing Chamber is attracted onto the electrostatic latent image, changing it to a visible, developed image.
• A developing bias voltage (Vb) is applied to the Sleeve Roller to prevent toner from being
attracted onto those areas of the PC Drum that correspond to the background areas of
the original.
M-2
Page 25

8. Paper Feed
• Paper is fed from Tray 1.
9. Bypass Paper Feed
• Paper is fed from the Multiple Bypass Tray.
10. Image Transfer
• A DC positive charge is applied to the Image Transfer Roller to transfer the visible image
on the surface of the PC Drum onto the paper.
11. Paper Separation
• The Charge Neutralizing Plate neutralizes any charge left on the paper.
12. Recovery
• The residual toner on the surface of the PC Drum is temporarily recovered and is made
into even finer particles during the print end sequence before being recovered at the
Developing Unit.
13. Paper Transport
• The paper is transported onto the Fusing Unit.
14. Fusing
• The developed image is permanently fused to the paper by a combination of heat and
pressure applied by the Right and Left Fusing Rollers.
15. Paper Exit
• The paper is fed out onto the Exit Tray.
M-3
Page 26
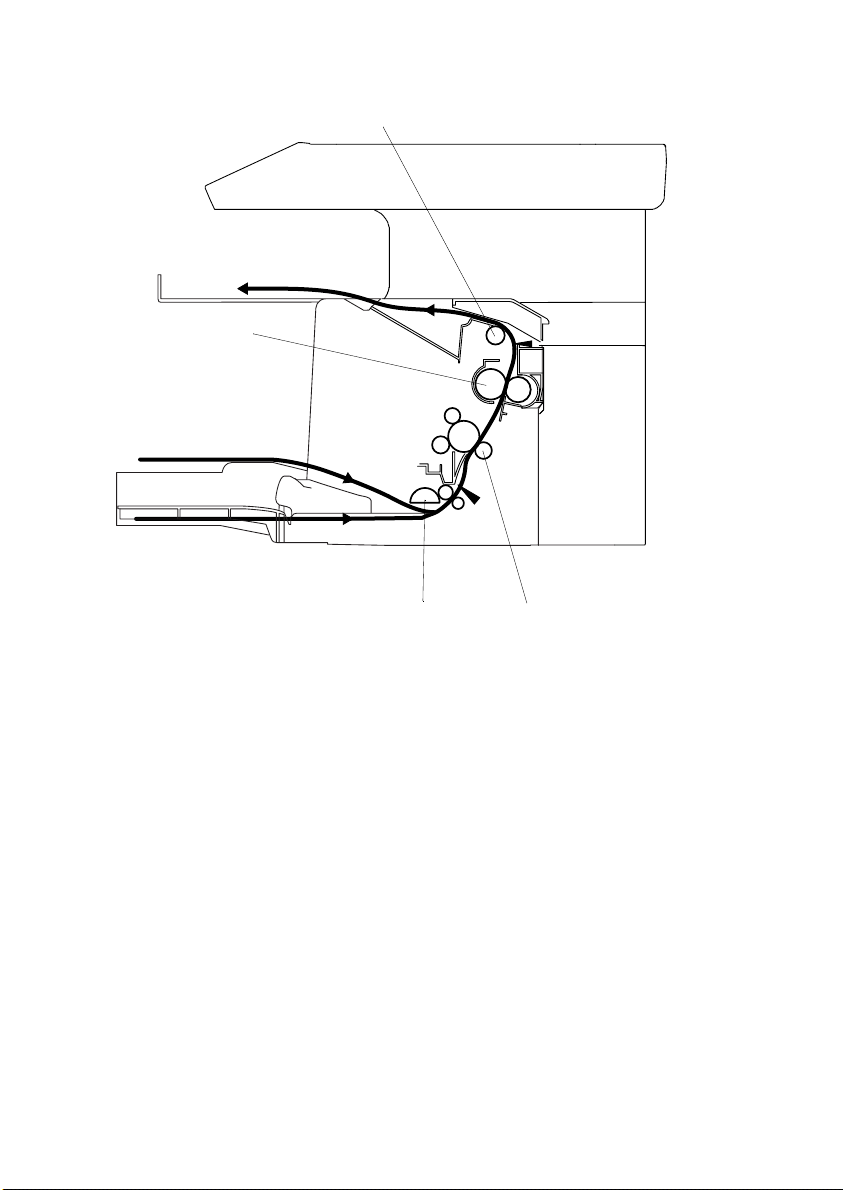
3. PAPER PATH
Exit Tray
Fusing Roller
Multiple Bypass Tray
Tray 1
Exit Roller
Paper Take-Up Roll
• The system employs a two-way paper supply system, in which paper is fed from either
Tray 1 or the Multiple Bypass Tray.
• When the optional Paper Feed Cassette is mounted, the system offers a three-way
paper supply system.
• The paper taken up and fed in by the Paper Take-Up Roll is transported through the
printer by the Image Transfer Roller, Fusing Roller, and Exit Roller and fed out of the
printer face down onto the Exit Tray.
Image Transfer Roller
4980M005AA
M-4
Page 27

4. DRIVE SYSTEM
6
5
4
1
2
3
4980M010AA
1: Scanner Unit 4: Main Motor
2: Image Transfer Roller 5: Scanner Motor
3: Paper Take-up Roller 6: Fusing Roller
M-5
Page 28
5. OPERATING SEQUENCE
5-1. Print Start Sequence
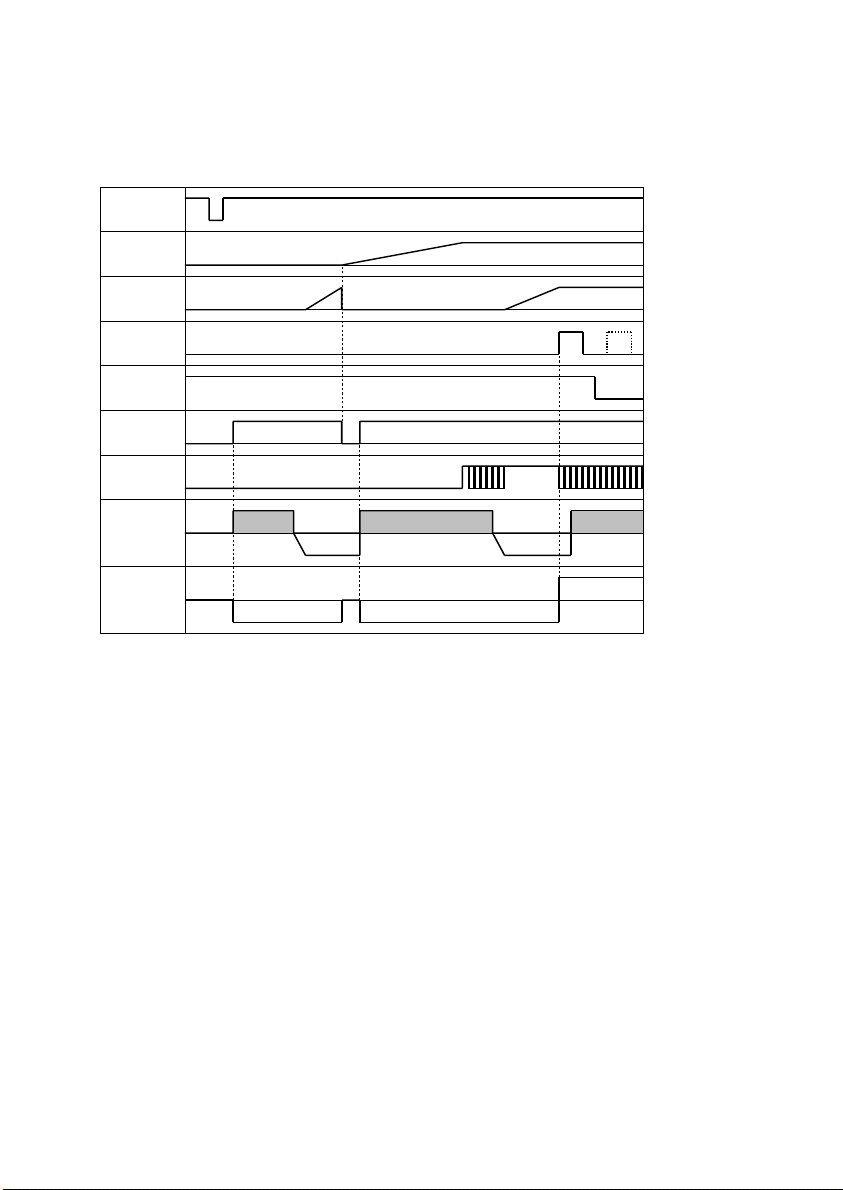
(1) When the pre-start control is not provided
Start key
ON
Polygon
Motor
Main
Motor
Paper TakeUp Solenoid
/S1
Drum Charge
Output
Exposure
Output
Developing Output
Image
Tr an s f er
Output
Drum charge DC
Charge
Reverse bias
Negative output
Drum charge DC
Charge
Negative output
Reverse bias
ON
Unexposed area
output
4980M013AA
M-6
Page 29
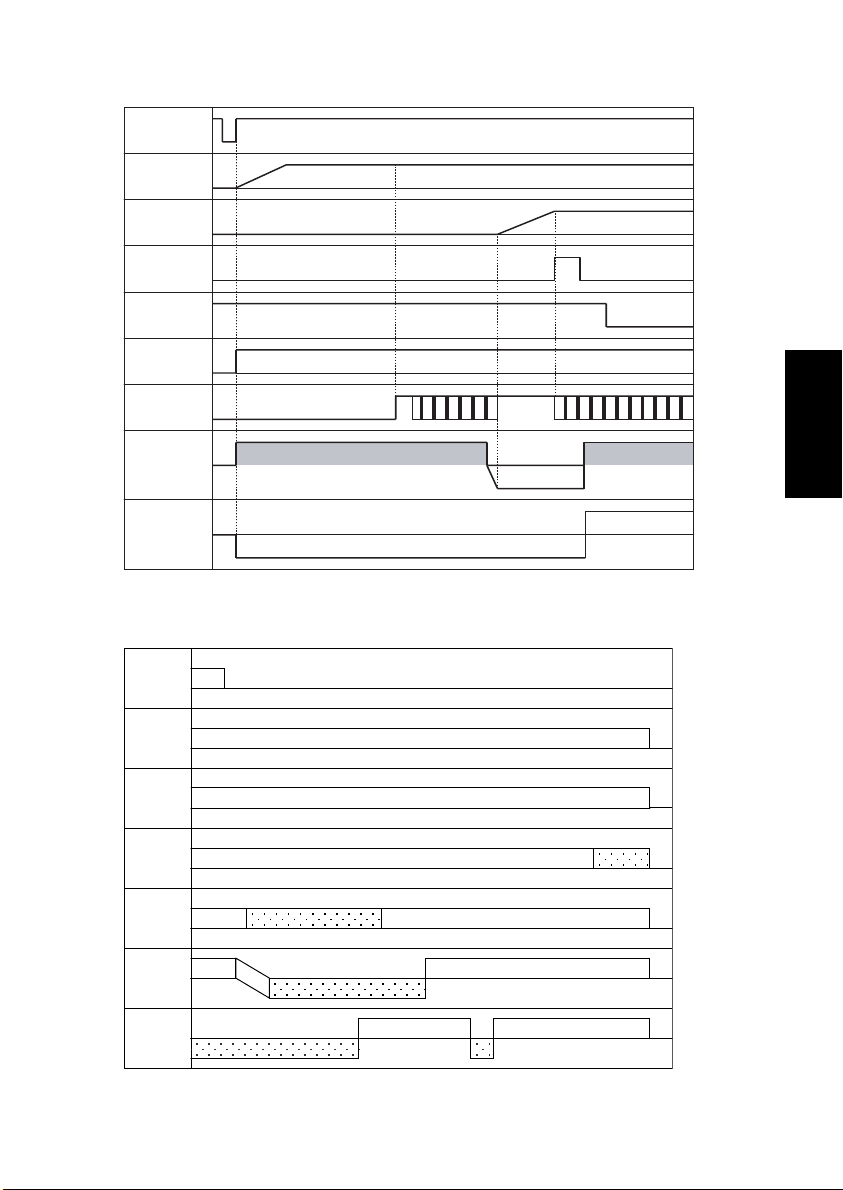
(2) When the pre-start control is provided
Start key
ON
Polygon
Motor
Main
Motor
Paper Take-Up
Solenoid
/S1
Drum Charge
Output
Drum charge DC Drum charge DC
Exposure
Output
Developing
Output
Charge
ON
Reverse bias
Image
Tr an s f er
Output
5-2. Print End Sequence
ON
PS3
Polygon
Motor
Main
Motor
Drum
Charge
Output
Laser
Output
Developing
Output
Image
Transfer
Output
ON
ON
Unexposed area illumination
ON
Substantially entire
surface exposure
Positive
Reverse bias
Negative output
DC
Unexposed area illumination
Negative
Charge
Negative
Unexposed area
output
4980M017AB
AC
4980M014AA
M-7
Page 30
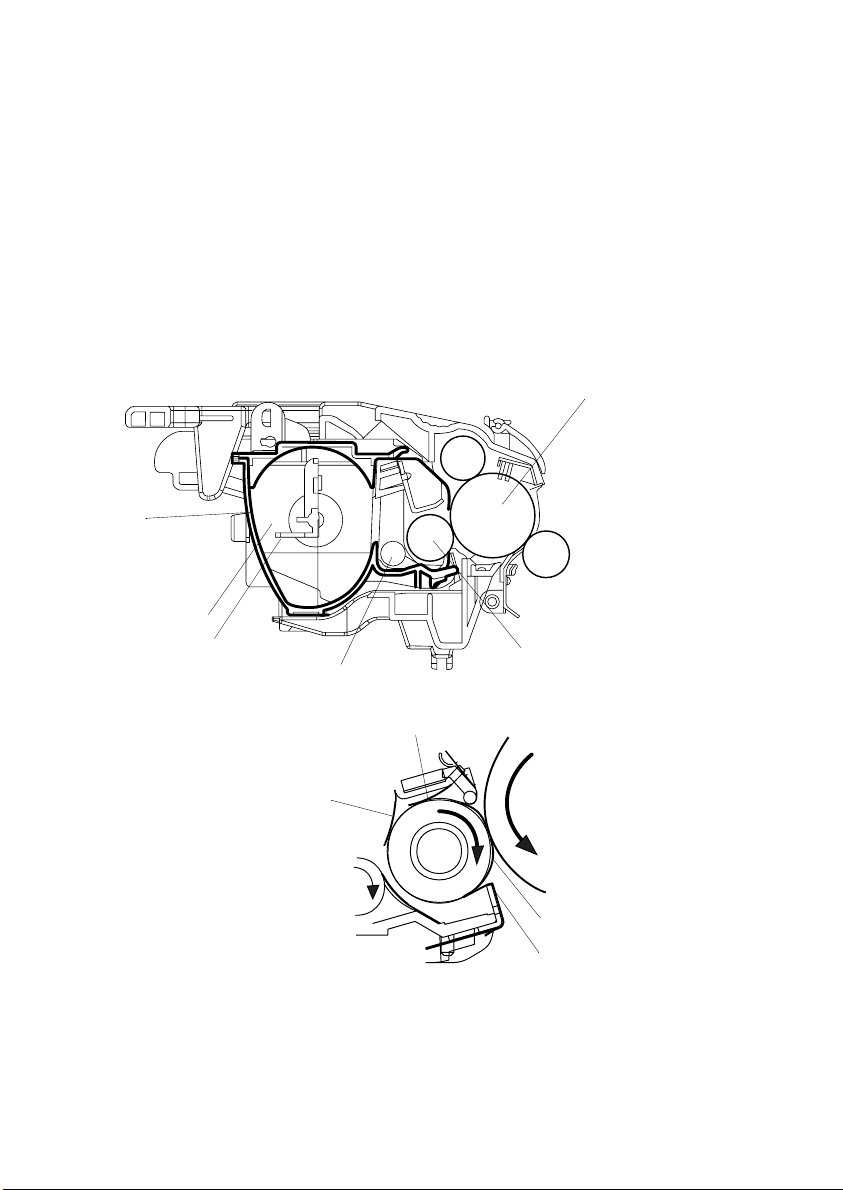
6. IC (IMAGING CARTRIDGE) SECTION
6-1. Overview
• The illustration below shows the construction of the Toner Cartridge and the Developing
Unit.
• This printer adopts the single-component FMT, or Fine Micro Toning, developing system.
• The Toner Agitating Screw conveys toner in the Toner Cartridge onto the Toner Supply
Roller.
• The Toner Supply Roller transports the toner to the Sleeve Roller. The Resin Sleeve of
the Sleeve Roller carries the toner onto the PC Drum to form a toner image on the latent
image formed on the surface of the PC Drum.
Imaging Cartridge (T/C + D/C)
T/C
Toner Hopper
Toner Agitating Screw
1st Toner Blade
Toner Supply Roller
2nd Toner Blade
4136M529AA
PC Drum
Sleeve Roller
4136M504AA
Resin Sleeve
Bias Seal
M-8
Page 31

• The Imaging Cartridge consists of a T/C (Toner Cartridge) and a D/C (Drum Cartridge)
(see the illustration below).
D/C (Drum Cartridge)
T/C (Toner Cartridge)
4136M511AA
Imaging Cartridge
4136M513AA
M-9
Page 32

6-2. PC Drum
• The PC Drum used in this printer is the organic photoconductor (OPC) type.
• The drum consists of two layers - Charge Transport Layer (CTL) and the Charge Generating Layer (CGL) - applied to an aluminum alloy base (cylinder).
Handling Precautions:
The PC Drum of this type exhibits light fatigue after being exposed to light for a long time,
which results in its sensitivity being changed. Therefore, always wrap the drum in the PC
Drum Cloth or a soft cloth immediately after it has been removed from the printer. Use
utmost care to prevent the surface of the PC Drum from being dirtied.
CTL
CGL
Aluminum Cylinder
1167M007AA
1139M007AA
• Grounding of the PC Drum
The ground contact point (Ground Plate) for the PC Drum is located inside the PC Drum
at its front side. It is, at all times, in contact with the shaft of the front plate of the Imaging
Cartridge. When the Imaging Cartridge is loaded in the printer, the set pin of the front
plate of the Imaging Cartridge contacts a side plate on the printer side, thereby providing
grounding. The potential on the surface of the PC Drum exposed to the laser beam is
then grounded through the Ground Plate, shaft, and set pin to the frame of the printer.
PC Drum
Ground Plate
Front Plate
Shaft
4136M514AB
M-10
Page 33

6-3. Developing System
• The 1st Toner Blade located above the Sleeve Roller spreads a thin, even coat of toner
over the Sleeve Roller.
• A negative charge is applied to the 2nd Toner Blade, which negatively charges the toner.
• The Sleeve Roller is negatively charged, which retains the toner thereon.
• The toner sticks to the area on the surface of the PC Drum that has been exposed to the
laser beam.
• The Bias Seal on the underside of the Sleeve Roller separates toner, which has not been
attracted onto the surface of the PC Drum, from the Sleeve Roller and returns it back to
the Toner Hopper. The same bias as that applied to the Sleeve Roller is applied to this
Bias Seal, thereby preventing toner from falling.
• The developing bias automatically adjusts the print image density over a range of seven
steps through feedback control. A bias voltage, reversed from the developing bias, is
applied before a print command is issued, before predrive, and during predrive, to prevent toner from sticking to the surface of the PC Drum.
2nd Toner Blade
1st Toner Blade
Toner Blade Voltage
Te r mi n a l
Toner Supply Roller
0992S24
PC Drum
Sleeve Roller
Bias Seal
4136M505AA
Developing
Voltage Terminal
Developing Lower Seal (Bias Seal) Terminal
Developing Lower Seal (Bias Seal) Terminal
Developing Voltage Terminal
Toner Blade Voltage Terminal
M-11
Page 34

6-4. Detection of Toner Cartridge
(1) Installation detection
• The Imaging Cartridge, when loaded in position, is detected as follows. At the completion of a warm-up cycle, the IC chip built into the Toner Cartridge (TC detection board)
detects electrically whether or not the cartridge is loaded in position.
(2) Interchangeability detection
• The built-in IC chip (TC detection board) detects the applicable marketing area of the
Toner Cartridge when power is turned ON or when the Front Door is opened and closed.
TC Detection Board
4136M537AB
4136M540AA
(3) Toner Near Empty and Toner Empty Detection
• The Toner Empty Detection Sensor detects the amount of toner still available for use.
Toner Empty Detection Sensor (TE1)
4136M540AA
M-12
Page 35

• The Toner Empty Detection Sensor has an LED and a reflecting light detection sensor
built into it. Light from the LED enters the toner detection window and is reflected off the
Reflection Mirror located inside the Toner Cartridge. The reflecting light detection sensor
detects this reflected light.
Toner Detection Window
4136M540AA
When a Sufficient
Amount of Toner is Left
Toner Agitating
Blade
To n er
LED LED
• The number of times, at which the input voltage to the reflecting light detection sensor
exceeds a predetermined period of time, is counted. When this count reaches a predetermined value, a toner near empty or a toner empty condition is detected.
• The toner near empty or toner empty condition is reset when the Front Door is opened
and closed.
Electrical Component Control Signal Blocked Unblocked WIRING DIAGRAM
TE1 PWB-P MPJ14-2 H L A-5
When There is only a Small
Amount of Toner left
Reflection
Mirror
Reflecting Light
Detection Sensor
4980M011AA
M-13
Page 36

7. DRUM CHARGE
(1) Overview
• The PC Drum is charged with static electricity before laser exposure.
• The Drum Charge Brush and the Pre-charge Film are used for charging.
• Since the Drum Charge Brush and the Pre-charge Film directly deposit charge on the PC
Drum, they produce little ozone. Further the charging voltage is low and the deposited
charge is even and stable across the surface of the PC Drum.
• The Pre-charge Film supplies a preliminary charge to the PC Drum prior to charging by
the Drum Charge Brush, thereby increasing charging efficiency.
Drum Cartridge
1
Drum Charge Brush
2
Paper Dust Remover
Drum Cover
Pre-charge Film
PC Drum
4136M519AA
1. Drum Charge Brush
2. PC Drum
3. Ground
4. Charge Bias
4
4136M528AA
3
M-14
Page 37

8. IR SECTION
8-1. Image Data Processing
1. Photoelectric Conversion
• The CCD Sensor reads the light reflected off the original and converts the data to a corresponding analog signal.
2. A/D Conversion
• The analog signal output from the CCD Sensor is converted to a corresponding 8-bit digital signal.
3. Shading Correction
• Corrected is an error that occurs due to variations in sensitivity of each CCD chip and the
light distribution varying along the length of the Exposure Lamp.
4. Gamma Correction
• The light reflection data read by the CCD Sensor is translated to corresponding image
density data.
5. Zoom Processing
• The synchronous timing of the input data (write) and output data (read) is varied to
decrease (reduction) or increase (enlargement) the number of data readings, thereby
reducing or enlarging the image in the main and sub scanning direction.
6. Background Level Detection
• The background of the original is detected to establish a threshold value between the
background and the image data.
7. Binarization
• The 8-bit image data is translated to one-bit (binary) data.
8. Data Buffer
• The binarized image data is amplified.
• The data is transmitted to the PH Section.
M-15
Page 38

8-2. Exposure Components Section
CCD Lens
5
1. Exposure Lamp
• A CCFL lamp is used to illuminate the surface of the original.
2. 1st Mirror
• Reflects the light reflected off the surface of the original, directing it to the 2nd Mirror.
3. 2nd Mirror
• Reflects the light reflected off the 1st Mirror, directing it to the 3rd/5th Mirror.
4. 3rd/5th Mirror
• Reflects the light reflected off the 2nd Mirror, directing it to the 4th Mirror.
• Reflects the light reflected off the 4th Mirror, directing it to the CCD through the Lens.
5. 4th Mirror
• Reflects the light reflected off the 3rd Mirror, directing it to the 3rd/5th Mirror.
1
3
4
2
4980M019AA
M-16
Page 39

8-3. Scanner Drive Mechanism
(1) Scanner Drive Mechanism
• The Scanner Motor drives the Scanner Assy through the Timing Belt.
Scanner Motor (M4)
Scanner Assy
Timing Belt
4980M002AA
8-4. Scanner Motor Drive Control
• The speed at which the Scanner moves (for scan and return motion) is controlled by
varying the period of the motor drive pulse that is timed with the reference clock.
High
speed
Low
Period
• The number of motor drive pulses as determined according to the paper size and zoom
ratio controls the amount of movement of the Scanner.
Electrical Component Control Signal ON OFF WIRING DIAGRAM
M4 PWB-P P105P-1~4 Pulse output B~C-7
speed
M-17
Page 40

9. PRINT HEAD (PH)
9-1. Construction
• The laser beam light emitted from the Print Head is used to scan the image as driven by
the Polygon Motor.
SOS Sensor
Semiconductor Laser
G1 Lens
G2 Lens
1st Mirror
2nd Mirror
SOS Mirror
4136M005AA
Polygon Mirror
M-18
Page 41

9-2. Laser Exposure Process
• The laser beam light emitted from the Print Head is used to create an electrostatic latent
image on the surface of the PC Drum.
• The following control is provided to correctly time image printing.
Print Head Unit
Polygon Motor
PC Drum
• When the printer receives a PRINT signal, the Polygon Motor and the Main Motor start
rotating and the paper is taken up and fed into the printer.
• The printing is started when the Controller/Mechanical Control Board sends a VIDEO
signal to the Print Head a given period of time after the leading edge of the paper actuates the Paper Take-Up Switch (TOD signal).
• The print start position of a new line as shifted from the previous one is established by
transmitting a VIDEO signal after the lapse of an appropriate period of time with reference to the SOS Sensor signal.
• The SOS Sensor provided in the PH ensures that the laser beam is emitted at the same
timing for all lines in the main scanning direction.
Laser Diode
SOS Sensor
4136M006AB
M-19
Page 42

9-3. Laser Emission Timing
• When a READY signal is detected a given period of time after the print command has
been issued, the Controller/Mechanical Control Board outputs a laser ON signal.
• The laser ON signal makes a laser beam to be emitted and the laser beam travels to the
Polygon Mirror, G1 Lens, and the SOS Mirror to eventually hit the SOS Sensor, which
generates an SOS signal.
• The SOS signal determines the laser emission timing for each line in the main scanning
direction.
SOS Mirror
SOS Sensor
Polygon Mirror
G1 Lens
Laser Unit
4136M517AA
M-20
Page 43

9-4. Laser Emission Area
(1) Main scanning direction
• The print start position is determined by the main scanning print start signal (/HSYNC)
output from the Controller/Mechanical Control Board and the width of the paper.
• The laser emission area is determined by the paper size.
(2) Sub-scanning direction
• The print start position is determined by the sub-scanning print start signal (/TOD) output
from the Controller/Mechanical Control Board and the length of the paper.
• The laser emission area is determined by the paper size.
/HSYNC
/VIDEO
/VIDEO
/TOD
M-21
4980M016AB
Page 44

10. PAPER TAKE-UP SECTION
10-1. Tray 1
(1) Paper take-up mechanism
• When the Paper Take-Up Solenoid is energized, drive from the Main Motor is transmitted
to the Paper Take-Up Roll through the Paper Take-Up Clutch, turning the Paper Take-Up
Roll.
• At the same time, the Depressing Cam turns so as to raise the Paper Lifting Plate. Then,
the top sheet of paper loaded in the tray is taken up and fed into the printer.
• The actual length of paper is detected based on the period of time through which the
Paper Take-Up Switch remains actuated (or through which the paper moves past the
switch) and the system speed. It is then determined whether or not the actual length
matches the paper length specified on the controller.
Paper Take-Up Switch (S1)
Paper Take-Up Solenoid (SL-1)
Standby When Paper is Taken up
Tr ay
Paper Take-Up Roll
Gear with
Depressing
Cam
Tr ay
4980M006AA
Depressing Cam
4136M556AA
4136M557AA
M-22
Page 45

Electrical Parts Control Signal ON OFF WIRING DIAGRAM
S1 PWB-P MPJ10P-2 L H F-3
SL1 PWB-P MPJ3P-2 L H I-3
(2) Double feed preventive mechanism
• A fixed paper separator pad is used to prevent the second and subsequent sheets of
paper from being taken up and fed in with the first one.
(3) Paper empty detection
• There are the Multipurpose Tray Paper Empty Sensor (PE1) and the Multiple Bypass
Tray Paper Empty Sensor (PE2) provided on the upper part of Tray 1. They function to
detect paper loaded in Tray 1 and the Multiple Bypass Tray, respectively.
• When there is a paper stack loaded in the tray, the actuator is raised to block the Paper
Empty Sensor.
• When paper runs out, the actuator drops into the hole in the tray, unblocking the Paper
Empty Sensor.
Multipurpose Tray
Paper Empty Sensor
(PE1)
Actuator
Multiple Bypass Tray
Paper Empty Sensor
(PE2)
Electrical Parts Control Signal Blocked Unblocked WIRING DIAGRAM
PE1 PWB-P MPJ12P-3 L H A-5
PE2 PWB-P MPJ15P-3 L H B-5
(4) Paper take-up retry function
• To reduce the number of paper misfeeds as a result of a paper take-up failure, a paper
take-up retry sequence is carried if the Paper Take-Up Switch is not actuated and deactuated within a predetermined period of time.
• This function is provided for paper take-up from any printer paper tray.
4980M007AA
M-23
Page 46

11. IMAGE TRANSFER
11-1. Overview
• The toner image formed on the surface of the PC Drum during the developing process is
transferred onto the paper.
• This printer adopts the roller image transfer system, in which the Image Transfer Roller is
used to transfer the image onto the paper.
• In the roller image transfer system, the paper is pinched between the PC Drum and the
Image Transfer Roller at all times during the print cycle. This results in a very little
amount of ozone being produced and there is a little chance of a double transferred
image occurring.
• To clean the Image Transfer Roller, reverse bias is applied to the Image Transfer Roller.
• The cleaning sequence is carried out when the printer is started, a print command is
issued, a print cycle is completed, and when the printer is started after a misfeed has
been cleared.
• There is the Charge Neutralizing Needle installed for neutralizing the paper after image
transfer.
PC Drum
PC Drum
Image Transfer Roller
Paper
M-24
Paper
Reverse
Bias
4121s034
Charge Neutralizing Needle
Image Transfer Roller
Image Transfer Bias
4136M515AA
Page 47

12. FUSING UNIT
12-1. Overview
• The toner image transferred onto the paper is securely fixed to the paper.
• A heated roller system is used as the fusing system. The paper, to which the toner
image has been transferred, is fed between the Fusing Roller heated by the Fusing
Roller Heater Lamp and the Pressure Roller. This permanently fixes the toner image in
the paper.
Fusing Paper Separator Finger
Actuator
Thermostat (TS1)
Exit Sensor
(PS1)
Thermistor
(TH1)
Fusing Roller
Heater Lamp (H1)
Fusing Roller
Electrical Parts Control Signal Blocked Unblocked WIRING DIAGRAM
PS1 PWB-P MPJ8P-3 L H F~G-2
Electrical Parts Control Signal
TH1 PWB-P MPJ2P-1 Analog Input F-2 to 3
Electrical Parts Control Signal ON OFF WIRING DIAGRAM
H1 PU-1 CN1PU-1-3 L H I-7
Low temp. High temp.
Pressure Roller
Fusing Entrance
Guide Plate
4136M520AA
WIRING DIAGRAM
M-25
Page 48

12-2. Fusing Temperature Control
(1) Temperature changes (plain paper having a length of 186 mm or more)
200 °C
Fusing Roller Temperature
130 °C
Mode before
temperature
control
Warm-up
Power OFF, Front
Door open/close
Temperature detected by Thermistor
Mode 0:
180 sec.
Mode 0
Mode 1 Mode 1
Mode 2
Mode 3
Mode 1:
300 sec.
Thermistor-detected temperature
Less than 50 °C50 °C to 125 °C125 °C or more
Mode 0 Mode 0 Mode 0
Mode 1
Mode 2:
208 sec.
at temperature control start
Mode 2 Mode 3
Mode 2 Mode 3
Mode 3
During print
cycle (600 dpi)
In standby
(2) Temperature control
• The fusing temperature is increased to a predetermined level during the warm-up cycle.
• The warm-up control is provided when power is turned ON, the Front Door is opened and
closed, and the Energy Save mode is canceled.
• In the standby state, the fusing temperature is set to a level (130 °C) lower than that during a print cycle, thereby cutting down power consumption.
• The temperature control mode when the control is resumed (when power is turned ON,
the Front Door is opened and closed, or the Energy Save mode is canceled) is set
according to the mode and the fusing temperature valid before the interruption.
• In the Energy Save mode, the Fusing Roller Heater Lamp is turned OFF to reduce power
consumption.
M-26
Page 49

(3) Temperature control mode
The fusing temperature is controlled during a print cycle according to the period of time
elapsed from the completion of the warm-up cycle.
• Mode 0
Mode 1 lasts for 3 min. If the temperature detected by the Thermistor is 50 °C or more
when mode 0 is interrupted, the operation is switched to mode 1. Mode 1 starts when
mode 0 is completed.
• Mode 1
Mode 1 lasts for 5 min. During this period, the printing temperature is gradually
decreased. As the printing temperature is reduced down to a predetermined level, mode
1 is completed and mode 2 starts.
• Mode 2
Mode 2 lasts for 208 sec.
• Mode 3
Mode 3 continues until the temperature control is interrupted (by opening and closing the
Front Door, etc.).
(4) Printing temperature by paper type in different temperature control modes
Mode 0 Mode 1 Mode 2 Mode 3
Standby 200 °C130 °C130 °C130 °C
200 °C (standard)
200 °C → 190 °C
205 °C → 215 °C
205 °C
Plain paper
Thick paper,
envelopes,
postcards
186 mm or
more
Less than
186 mm
186 mm or
more
Less than
186 mm
OHP 185 °C 185 °C → 175 °C
215 °C → 200 °C (set in Tech. Rep. Mode) *1
*1: Inferior fusing performance can at times result from plain paper (having a length of 186
mm or more) with the standard fusing temperature setting (200 °C). The “FUSER
TEMP Ad” setting of Tech. Rep. Choice available from the Tech. Rep. Mode can therefore be used to set a higher fusing temperature.
M-27
Page 50

(5) Fusing temperature protect control
ANIN
Comparative
Vol tage
CPU
Comparator
Fusing Unit
Thermistor (TH1)
Fusing Roller
Heater Lamp
Thermostat (TS1)
High-temperature
FUSER_LAMP
FUSER_LAMP_
RY
Controller/Mechanical Control Board Power Unit
<Soft protect>
• The comparator provided on the Controller/Mechanical Control Board is used as means
for detecting an abnormally high temperature through software approach. If the temperature detected by the Thermistor (voltage value) is greater than the comparative temperature 235 °C (voltage value), the triac relay is turned OFF to shut down the output of the
Heater Lamp.
<Hard protect>
• As a protection should there be a software failure, the Thermostat is used to shut down
current to the Heater Lamp when the temperature of the Fusing Roller becomes inordinately high.
Electrical Component Control Signal
TH1 PWB-P MPJ2P-1 Analog Input F-2~3
Electrical Component Control Signal ON OFF WIRING DIAGRAM
H1 PU-1 CN1PU-1-3 L H I-7
Protect Signal
Low temp. High temp.
T2
T1
Tr i ac
AC
4980M015AB
WIRING DIAGRAM
M-28
Page 51

13. PAPER EXIT
13-1. Paper Exit Mechanism
• The paper exit mechanism transports the paper that has been subjected to the fusing
process onto the Exit Roller.
• The Exit Sensor detects not only a paper misfeed but also an open Upper Cover.
Exit Tray
Exit Roll
Face-down Exit
Exit Sensor (PS1)
Exit Roller
4136M516AA
Electrical Parts Control Signal Blocked Unblocked WIRING DIAGRAM
PS1 PWB-P MPJ8P-3 L H F to G-2
M-29
Page 52

14. MISCELLANEOUS
14-1. Cooling of the Printer Interior
• The Cooling Fan Motors provided on the right and left frames of the printer draw outside
air from the outside into the printer interior and discharge heat inside the printer out. It
thereby prevents the temperature of the PH Unit and the printer interior from increasing.
Cooling Fan Motor 1 (M3)
PH Unit
Cooling Fan Motor 2 (M2)
Electrical Parts Control Signal ON OFF WIRING DIAGRAM
M2 PWB-P MPJ13P-1 to 4 Pulse I-3
M3 PWB-P MPJ6P-1 to 4 Pulse I-3
4980M001AA
M-30
Page 53

14-2. Original Cover Open/Close Detection Mechanism
• There is a magnet provided in the Original Cover, allowing the printer to detect the position of the cover whether the cover is raised or lowered.
• This magnet attracts the Original Cover Set Sensor provided on the printer side, thus
activating the sensor. The printer will then detect the position of the Original Cover.
Magnet
Original Cover Set Sensor (PS2)
Electrical Parts Control Signal Blocked Unblocked WIRING DIAGRAM
PS2 PWB-O P701O-1 to 2 L H F-9
4980M008AA
M-31
Page 54

Page 55

MAINTENANCE
Page 56

Page 57

1. MAINTENANCE SCHEDULE
• To ensure that the printer produces good printed pages and to extend its service life, it is
recommended that the maintenance jobs described in this schedule be carried out as
instructed.
PM Parts Clean Replace 1 Replace 2
When a paper
Paper Take-Up Roll
Image Transfer Roller – 50K ☞ E-4
Drum Cartridge – 20K 16K
Ton e r C a r t ri d ge – 6K 4.3K
Fusing Unit – 50K ☞ E-8
✽ Replace 1: Average number of prints during continuous printing
✽ Replace 2: Average number of prints during intermittent printing (2 pages/job)
NOTES
• K = 1,000 printed pages
• As a rule, the Drum Cartridge and Toner Cartridge are to be replaced by the user.
• The contents of the Maintenance List are subject to change without notice.
• For the part numbers, see Parts Manual and Parts Modification Notice.
take-up failure
occurs
Replace when a paper take-up
failure occurs
Ref. Page
in This
Manual
☞ E-3
☞ E-7
☞ E-5
E-1
Page 58

1-1. Guidelines for Life Specifications Values by Unit
• The life specifications value represents the number of printed pages produced or figures
equivalent to it when given conditions (see the Table given below) are met. It can be
more or less depending on how each individual printer is used.
Print Conditions
Job type 2P/J
Paper size A4 L/Letter L
B/W ratio B/W 6 %
(1) Life Specifications Values
Unit name Life value Detection
Ton e r C a r t ri d ge 4. 3 K
The remaining amount of toner is detected.
A “TONER EMPTY” error is detected
according to this value.
E-2
Page 59

2. REPLACEMENT/CLEANING OF PARTS
(1) Cleaning of the Paper Take-Up Roll
1. Remove the Imaging Cartridge.
☞ E-5
NOTE
• The Imaging Cartridge is the Drum Cartridge, to which the Toner Cartridge is mounted.
2. Using a soft cloth, wipe the surface of the Paper
Take-Up Roll clean of dirt.
4980E006AA
(2) Replacement of the Paper Take-Up Roll
1. Remove the Imaging Cartridge.
☞ E-5
2. Remove the Paper Take-Up Roll.
4980E007AA
E-3
Page 60

(3) Replacement of the Image Transfer Roller
1. Remove the Imaging Cartridge.
☞ E-5
2. Place the levers of the bushings (white) on the
right and left ends of the Image Transfer Roller
toward this side and remove the Image Transfer
Roller from the Image Transfer Roller holder.
4136E018AA
3. Pull out the bushings on the right and left ends,
and the gear, from the Image Transfer Roller
removed from its holder. Install the bushings and
the gear to the new Image Transfer Roller.
NOTES
4136E019AB
• Do not touch, or dirty with chemicals or toner, the
surface of the Image Transfer Roller, as indentations in and dirt on the surface of the Image Transfer Roller adversely affect the quality of the printed
image.
• When handling the Image Transfer Roller, hold
onto the shaft and bushings of the roller.
• Do not place a new Image Transfer Roller directly
on the floor or other surface.
4136E020AB
4. Insert the new Image Transfer Roller into the
Image Transfer Roller holder and place the levers
of the bushings into the original upward positions.
E-4
Page 61

3. REPLACEMENT OF UNITS
(1) Replacement of the Toner Cartridge
<Removal Procedures>
1. Lift up the Exit Tray and remove it.
2. Open the Front Door.
4980E009AA
3. Remove the Imaging Cartridge.
4136E006AA
4. Pull the lever of the Toner Cartridge in the direction shown in the illustration and disconnect the
Toner Cartridge from the Drum Cartridge.
NOTE
• If the Drum Cartridge is to be placed on a floor or
4136E007AC
similar place, use care to prevent toner from scattering around.
<Installation Procedures>
1. Take out a new Toner Cartridge and shake it in
the horizontal direction sufficiently so that toner is
agitated.
NOTE
• Placing the Toner Cartridge in an upright position
or shaking it vigorously will spill toner.
4136E008AA
E-5
Page 62

C4136o049AC
4136E009AC
2. Remove the protective cover from the Toner Cartridge.
3. Install the new Toner Cartridge to the Drum Cartridge.
NOTE
• Insert the Toner Cartridge along the guide provided
on the Drum Cartridge side and make sure that the
Toner Cartridge is not tilted when inserted.
4. Install the Imaging Cartridge in the printer.
NOTE
• Insert the Imaging Cartridge along the guide pro-
vided on the printer side. Ensure that the Imaging
Cartridge is not slid obliquely.
C4980o029AC
5. Close the Front Door.
Precautions for Replacing the Toner Cartridge
• Different types of Toner Cartridges are available for different regions. Therefore, check
the Toner Cartridge type before replacing it.
<Toner Cartridge Types for Each Region>
US & Canada: Toner Cartridge 101 C
Europe: Toner Cartridge 101 A
Other regions: Toner Cartridge 101 B
E-6
Page 63

(2) Replacement of the Drum Cartridge
<Removal Procedures>
1. Remove the Imaging Cartridge.
☞ E-5
2. Pull the lever of the Toner Cartridge in the direction shown in the illustration and disconnect the
Drum Cartridge.
4136E011AC
<Installation Procedures>
1. Mount the Toner Cartridge to a new Drum Cartridge.
NOTE
• Insert the Toner Cartridge along the guide provided
on the new Drum Cartridge side and make sure
that the Toner Cartridge is not tilted when inserted.
4136E012AC
2. Install the Imaging Cartridge in the printer.
4136E010AA
NOTE
• Insert the Imaging Cartridge along the guide pro-
vided on the printer side. Ensure that the Imaging
Cartridge is not slid obliquely.
3. Close the Front Door.
NOTE
• After replacing the Drum Cartridge, be sure to
reset the I/C counter in the Service Mode.
E-7
Page 64

(3) Replacement of the Fusing Unit
NOTE
• Immediately after turning off the printer, the area around the Fusing Unit is extremely hot.
Therefore, in order to reduce the risk of burns, wait until the unit has cooled down before
performing any operation.
<Removal Procedures>
1. Remove the Rear Cover.
☞ D-7
2. Unplug one connector on the Controller/Mechanical Control Board.
4980E004AA
3. Remove the two screws, and then remove the
Left Rear Cover.
4980U044AA
4980E008AA
4980E001AC
4. Remove the three screws, and then remove the
Circuit Board and Metal Bracket.
5. Remove the Upper Left Cover.
6. Remove the two screws, and then remove the
Upper Right Cover and Protective Metal Bracket.
NOTE
• The Protective Metal Bracket is tightened together
with the Upper Right Cover.
E-8
Page 65

<Installation Procedures>
B
C
4980E002AB
4980E003AA
A
7. Remove two screws, unplug three connectors,
and remove the Fusing Unit.
NOTE
• The surfaces around the Fusing Unit are very hot.
Use utmost care not to touch any surfaces other
than the Fusing Unit.
8. Remove the Fusing Unit.
1. Connect connector A.
2. Mount the Fusing Unit in the printer and secure it
in position by tightening the two screws.
3. Connect connectors B and C.
NOTE
• When installing the Fusing Unit, route the harness
as shown in the illustration and make sure that no
part of the harness is wedged between the Fusing
Unit and printer.
4136E017AC
NOTE
• When replacing a part comprising the Fusing Unit individually to correct an image problem or a defective part, see D-26 (“Disassembly of the Fusing Unit” of DIS/REASSEMBLY, ADJUSTMENT).
E-9
Page 66

Page 67

DIS/REASSEMBLY,
ADJUSTMENT
Page 68

Page 69

1. SAFETY INFORMATION
1-1. Laser Safety
• This is a digital machine certified as a class 1 laser product. There is no possibility of
danger from a laser, provided the machine is serviced according to the instruction in this
manual.
1-2. Internal Laser Radiation
Semiconductor laser
Maximum power of the laser diode 15 mW
Maximum average radiation power(*) 36.903 µW
Wavelength 770-800 nm
*:Laser Aperture of the Print Head Unit
• This product employs a Class 3b laser diode that emits an invisible laser beam. The laser
diode and the scanning polygon mirror are incorporated in the print head unit.
• The print head unit is NOT A FIELD SERVICE ITEM. Therefore, the print head unit
should not be opened under any circumstances.
Laser Aperture of
the Print Head Unit
D-1
C4980o053AB
Page 70

the U.S.A., Canada
(CDRH Regulation)
• This machine is certified as a Class I Laser product under Radiation Performance Standard according to the Food, Drug and Cosmetic Act of 1990. Compliance is mandatory
for Laser products marketed in the United States and is reported to the Center for
Devices and Radiological Health (CDRH) of the U.S. Food and Drug Administration of
the U.S. Department of Health and Human Services (DHHS). This means that the device
does not produce hazardous laser radiation.
• The label shown to page D-4 indicates compliance with the CDRH regulations and must
be attached to laser products marketed in the United States.
CAUTION
Use of controls, adjustments or performance of procedures other than those specified in
this manual may result in hazardous radiation exposure.
Semiconductor laser
Maximum power of the laser diode 15 mW
Wavelength 770-800 nm
All Areas
CAUTION
Use of controls, adjustments or performance of procedures other than those specified in
this manual may result in hazardous radiation exposure.
Semiconductor laser
Maximum power of the laser diode 15 mW
Wavelength 770-800 nm
Denmark
ADVARSEL
Usynlig Laserstråling ved åbning, når sikkerhedsafbrydere er ude af funktion. Undgå
udsættelse for stråling. Klasse 1 laser produkt der opfylder IEC60825 sikkerheds
kravene.
Halvlederlaser
Laserdiodens højeste styrke 15 mW
Bølgelængden 770-800 nm
D-2
Page 71

Finland, Sweden
VARO!
Avattaessa ja suojalukitus ohitettaessa olet alttiina näkymättömälle lasersäteilylle. Älä
katso säteeseen.
LOUKAN 1 LASERLAITE
KLASS 1 LASER APPARAT
VAROITUS!
Laitteen Käyttäminen muulla kuin tässä käyttöohjeessa mainitulla tavalla saattaa altistaa
käyttäjän turvallisuusluokan 1 ylittävälle näkymättömälle lasersäteilylle.
Puolijohdelaser
Laserdiodin suurin teho 15 mW
Aallonpituus 770-800 nm
VARNING!
Om apparaten används på annat sätt än i denna bruksanvisning specificerats, kan
användaren utsättas för osynlig laserstrålning, som överskrider gränsen för laserklass 1.
Halvledarlaser
Den maximala effekten för laserdioden 15 mW
Våglängden 770-800 nm
VARNING!
Osynlig laserstrålning när denna del är öppnad och spärren är urkopplad. Betrakta ej
strålen.
Norway
ADVERSEL
Dersom apparatet brukes på annen måte enn spesifisert i denne bruksanvisning, kan
brukeren utsettes for unsynlig laserstråling som overskrider grensen for laser klass 1.
Halvleder laser
Maksimal effekt till laserdiode 15 mW
Bølgelengde 770-800 nm
D-3
Page 72

1-3. Laser Safety Label
• A laser safety labels is attached to the outside of the machine as shown below.
4980D070AB
1-4. Laser Caution Label
• A laser caution label is attached to the inside of the machine as shown below.
D-4
4980D061AA
Page 73

1-5. Precautions for Handling the Laser Equipment
• When laser protective goggles are to be used, select ones with a lens conforming to the
above specifications.
• When a disassembly job needs to be performed in the laser beam path, such as when
working around the printerhead and PC Drum, be sure first to turn the copier OFF.
• If the job requires that the copier be left ON, take off your watch and ring and wear laser
protective goggles.
• A highly reflective tool can be dangerous if it is brought into the laser beam path. Use
utmost care when handling tools on the user’s premises.
D-5
Page 74

2. PRECAUTIONS FOR DISASSEMBLY/ADJUSTMENTS
2-1. Parts That Must Not be Touched
(1) Red Painted Screws
Purpose of Application of Red Paint
Red painted screws show that the assembly or unit secured can only be adjusted or set at
the factory and shall not be readjusted, set, or removed in the field.
If it becomes unavoidably necessary to disassemble any of these assemblies and units,
disassembly may be done provided that the conditions permitting reassembly are met.
Note also that when two or more screws are used on the part in question, only one representative screw may be marked with red paint.
(2) Variable resistors on board
Do not turn the variable resistors on boards for which no adjusting instructions are given in
ADJUSTMENT.
(3) Other Screws not Marked with Red Paint
Scanner Assy
4980D054AA
PH Unit
4980D014AA
D-6
Page 75

3. DISASSEMBLY/REASSEMBLY
3-1. Identification of Exterior Parts and Removal Procedures for
Them
1
2
3
4
8
C4980o003AC
5
6
7
9
10
C4980o057AB
D-7
Page 76

No. Name Removal Procedure
1 Original Cover Open the Original Cover → Pull it straight up.
Remove the Original Cover. → Remove the Control
Upper Cover Assy.
2
3 Control Panel
4 Exit tray While pressing out one side, remove the Exit tray.
5 Front Door
6 Bypass Tray –
7Tray1
8Left Cover
9 Right Cover
10 Rear Cover Remove the five screws, and remove the Rear Cover.
(Original Glass)
Panel. → Remove the six screws, and remove the Upper
Cover Assy. (Original Glass).
☞ D-18
Open the Original Cover. → Remove the three screws,
unplug the connector and the flat cable, and remove the
Control Panel.
☞ D-10
Open the Front Door. → While pressing in one side,
remove the Front Door.
Hold down the main unit with one hand and pull Tray1 off
toward you.
Open the Front Door. → Remove the screw, unhook the
six tabs, and remove the Left Cover.
Open the Front Door. → Remove the two screws, unhook
the four tabs, and remove the Right Cover.
D-8
Page 77

3-2. Removal of Circuit Boards and Other Electrical Compo-
nents
NOTES
• When removing a circuit board or other electric component, refer to the precautions for
handling PWBs and follow the corresponding removal procedures.
• The removal procedures given in the following paragraphs omit the removal of the component in question from a connector or a PWB support.
• Where it is absolutely necessary to touch the ICs and other electric components on the
board, be sure to ground your body.
PWB-O
PWB-P
HV1
4980D025AB
PU1
PWB-IF
A
4980D064A
Symbol Name Removal Procedures
PWB-P Controller/Mechanical Control Board ☞ D-10
PWB-O Control Panel ☞ D-10
PWB-IF Interface Board ☞ D-11
PU1 Power Unit ☞ D-12
HV1 High Voltage Unit ☞ D-14
D-9
Page 78

(1) Removal of the Controller/Mechanical Control Board
<Removal Procedures>
1. Remove the Rear Cover.
2. Disconnect all connectors and flat cables from
the Controller/Mechanical Control Board.
NOTE
• Use utmost care not to snap off the flat cable.
4980D003AB
3. Remove six screws and the Controller/Mechanical Control Board.
4980D004AB
(2) Removal of the Control Panel
1. Remove the Exit tray.
☞ D-7
2. Remove the Rubber cap, then remove the three
screws, unplug one connector and one flat cable,
and then remove the Control Panel.
4136D047AA
NOTE
• Use utmost care not to snap off the flat cable.
D-10
Page 79

(3) Removal of the Interface Board
1. Remove the Rear Cover.
☞ D-7
2. Unplug the three connectors on the Controller/
4980D063AA
3. Remove the two screws, and then remove the
4980U044AA
4. Remove the three screws, and then remove the
Mechanical Control Board.
Left Rear Cover.
Circuit Board and Metal Bracket.
4980E008AA
4980D065AA
4980D066AA
5. Remove the two screws, and then remove the
Protective Metal Bracket for the Interface Board.
6. Remove the seven screws, and then remove the
Interface Board.
D-11
Page 80

(4) Removal of the Power Unit
1. Remove the Right Cover.
☞ D-7
2. Remove the Left Cover.
☞ D-7
3. Remove the Rear Cover.
☞ D-7
4980D006AA
5. Remove the IR Unit.
☞ D-15
4. Unplug the two flat cables from the Controller/
Mechanical Control Board.
NOTE
• Use utmost care not to snap off the flat cable.
6. Remove the two screws, and then remove the
Left Rear Cover.
4980D060AA
4980E004AA
4980E008AA
7. Unplug one connector on the Controller/Mechanical Control Board.
8. Remove the three screws, and then remove the
Circuit Board and Metal Bracket.
D-12
Page 81

4980D009AB
4980D071AA
4980D072AA
9. Remove the three screws, unhook the tab, and
then remove the Left Rear Frame.
10. Remove the three screws from the Left Rear
Frame.
11. Remove the four screws, and then remove the
Metal Bracket.
12. Remove the two screws, unhook the tab, and
then remove the Left Rear Frame.
4980D010AC
4980E001AC
13. Remove the Upper Left Cover.
14. Remove the two screws, and then remove the
Upper Right Cover and Protective Metal Bracket.
NOTE
• The Protective Metal Bracket is tightened together
with the Upper Right Cover.
D-13
Page 82

4980E002AA
4980D011AC
4980D026AD
15. Remove the two screws, unplug the three connectors, and then remove the Fusing Unit Assy.
16. Remove three screws and the Power Switch stay.
17. Remove the Power Switch.
18. Remove four screws, disconnect three connectors, and remove the Power Unit Assy.
19. Remove four screws and the Power Unit.
4136D002AB
(5) Removal of the High Voltage Unit
1. Remove the Power Unit Assy.
☞ D-12
2. Remove one screw and the High Voltage Unit.
4136D003AB
D-14
Page 83

3-3. Removal of Units
(1) Removal of the IR Unit
1. Remove the Left Cover.
☞ D-7
2. Remove the Right Cover.
☞ D-7
3. Remove the Rear Cover.
☞ D-7
4980D007AA
4980D006AA
4. Unplug the connector.
5. Unplug the two flat cables from the Controller/
Mechanical Control Board.
NOTE
• Be extremely careful not to break the flat cables.
4980D008AB
6. Remove the two screws, unhook the two tabs,
and then remove the IR Unit.
D-15
Page 84

(2) Removal of the PH Unit
NOTES
• NEVER attempt to replace the PH Unit with power being supplied to the printer.
Doing that could lead to exposure to the laser beam, resulting in blindness
• NEVER attempt to disassemble or adjust the PH Unit.
Doing that could lead to exposure to the laser beam, resulting in blindness.
1. Remove the IR Unit.
☞ D-15
2. Remove the Fusing Unit.
☞ E-8
3. Remove the Exit tray.
☞ D-7
4. Remove the four screws, unhook the four tabs,
and then remove the Upper Cover.
4980D012AB
5. Disconnect one flat cable from the Controller/
Mechanical Control Board.
NOTE
• Use utmost care not to snap off the flat cable.
4980D005AA
1
2
3
6. Remove three screws and the PH Unit.
NOTE
• When reinstalling the PH Unit, tighten the screws
in the numerical order shown in the illustration.
4136D008AC
D-16
Page 85

Precautions for Removal/Reinstallation of the PH Unit
• NEVER touch the window on the backside of the PH Unit. A dirty window can cause an
image problem.
Window
4136D009AB
D-17
Page 86

3-4. Disassembly of the Image Reading Section
(1) Removal of the Original cover set sensor
1. Remove the Original Cover.
2. Remove the Control Panel.
☞ D-7
3. Remove the Original cover set sensor.
4980D073AA
(2) Removal of the Upper Cover Assy. (Original Glass)
1. Remove the Original Cover.
2. Remove the Control Panel.
☞ D-7
3. Remove the six screws, and remove the Upper
Cover Assy. (Original Glass).
4980D017AB
(3) Removal of the Scanner Motor
1. Remove the Original Cover.
2. Remove the Upper Cover Assy. (Original Glass).
☞ D-18
3. Remove the Left Cover.
☞ D-7
4. Unplug one connector from the Scanner Motor.
4980D007AA
D-18
Page 87

5. Remove the two screws, and then remove the
Scanner Motor Mounting Bracket.
4980D018AB
6. Remove the two screws, and then remove the
Scanner Motor.
4980D019AA
(4) Removal of the Scanner Assy.
1. Remove the Original Cover.
2. Remove the Upper Cover Assy. (Original Glass).
☞ D-18
3. Remove the two screws, and then remove the
Flat Cable Holding Plate.
4980D020AA
4980D021AA
4. Unplug the flat cable.
D-19
Page 88

5. Remove the Timing Belt and shaft, and then
remove the Scanner Assy.
4980D022AA
(5) Removal of the Timing Belt
1. Remove the Original Cover.
2. Remove the Upper Cover Assy. (Original Glass).
☞ D-18
3. Remove the Scanner Assy.
☞ D-19
4. Remove the C-clip.
5. Remove the washer.
6. Remove the Timing Belt.
4980D023AB
D-20
Page 89

3-5. Disassembly of the Main Drive Section
(1) Removal of the Main Motor
1. Remove the Left Cover.
2. Disconnect one connector.
3. Remove two screws, two washers, and the Main
Motor.
4136D010AB
(2) Removal of the Paper Empty Sensors
1. Remove the Imaging Cartridge.
2. Remove the Front Door.
NOTE
• The Imaging Cartridge is the Drum Cartridge, to which the Toner Cartridge is mounted.
3. Remove the Left and Right Covers.
☞ D-7
4. Remove the four connectors from the Paper
Take-Up Upper Guide Assy.
4980D015AB
4980D016AB
5. Unhook the two tabs, and then remove the Paper
Take-Up Upper Guide Assy.
D-21
Page 90

4980D027AC
6. Unhook two tabs and remove the tray.
7. Remove the Multi purpose Tray Paper Empty
Sensor.
4980D028AB
8. Remove the Multiple Bypass Tray Paper Empty
Sensor.
4980D029AB
9. Remove the Toner Empty detection sensor.
4980D030AA
D-22
Page 91

(3) Removal of the Paper Take-Up Solenoid
1. Remove the Left Cover.
☞ E-8
2. Disconnect one connector of the Paper Take-Up
Solenoid.
4136D058AA
3. Remove one screw and the Paper Take-Up Solenoid.
4136D059AA
Precautions for Installation of the Paper Take-Up Solenoid
1. Mount the Paper Take-Up Solenoid and tighten one screw.
2. Turn the gear in the direction of the arrow shown below so that the flapper of the Paper
Take-Up Solenoid catches the stopper of the gear.
Stopper
Gear
Flapper
4980D067AA
D-23
Page 92

(4) Removal of the Paper Take-Up Clutch Gear
1. Remove the Fusing Unit.
☞ E-8
2. Remove the Power Unit.
☞ D-12
3. Remove the Paper Take-Up Upper Guide Assy.
☞ D-21
4. Disconnect one connector and remove the Cooling Fan Motor 2.
5. Disconnect one connector of the Main Motor.
☞ D-21
4980D074AA
6. Remove the Paper Lifting Plate Assy.
7. Remove two springs.
4980D057AA
8. Disconnect one connector and one flat cable
from the Controller/Mechanical Control Board.
4136D016AB
4136D017AC
NOTE
• Use utmost care not to snap off the flat cable.
9. Remove the Top Cover, then remove four screws
and the PH Base Plate Assy.
10. Disconnect one connector of the Paper Take-Up
Solenoid.
11. Remove three screws and the Left Frame.
D-24
Page 93

12. Remove one screw and the Paper Take-Up Solenoid.
4136D018AA
13. Unhook two tabs and remove the Paper Take-Up
Clutch Gear.
4136D057AA
(5) Removal of the Torque Limiter
1. Remove the Paper take up Clutch Gear.
☞ D-24
Torque Limiter
Coupling
Gear
4136D043AA
2. Unhook three tabs and take apart the Paper
Take-Up Clutch Gear then, remove the Torque
Limiter.
Precautions for Installation of the Torque Limiter
Coupling Gear has five dent for adjustment the Take-up Roller position. When Torque Limiter is replaced, adjust the set position of the Coupling Gear so that the Take-up Roller
becomes level. The procedure is as follow.
4136D044AA
D-25
Page 94

After setting replaced Paper Take-Up Clutch Gear
(Torque Limiter) to the shaft, Rotate the Paper TakeUp Clutch Gear by hand (Need to be released Solenoid Flapper).
4136D060AA
Look at the stop position of the Take-Up Roller from Clutch Gear side.
1. When the Roller is leant to clockwise, move the
coupling Gear to A direction.
4136D046AA
2. When the Roller is leant to counter clockwise,
move the coupling Gear to B direction.
4136D045AA
(6) Disassembly of the Fusing Unit
NOTE
• The Fusing Unit is extremely hot immediately after the Power Switch has been turned
OFF. Allow a sufficient time to let it cool down before starting the procedure to prevent
burn.
1. Remove the Fusing Unit.
☞ D-8
Upper Fusing
Roller section
2. Remove the two screws, and then the Fusing
Unit is divided into the Upper Fusing Roller section and Lower Fusing Roller section.
Lower Fusing
Roller section
4136D021AA
D-26
Page 95

Lower Fusing
Roller section
3. Remove two bushings and the Pressure Roller.
4136D022AA
Upper Fusing
Roller
section
4136D040AA
4136D023AB
4136D024AB
Precautions for Installation of Bushings
• Make sure that the slits in the bushing are properly
aligned with the rib of the Fusing Unit.
4. Remove one screw and the terminal block.
5. Pull out the Fusing Roller Heater Lamp.
NOTES
• Do not touch the surface of the glass of the Fusing
Roller Heater Lamp with bare hands.
• When reinstalling the Fusing Roller Heater Lamp,
make sure that the side of the lamp having a voltage marking faces the gear side.
6. Pull out the drive gear from the Fusing Roller.
7. Pull out the Fusing Roller.
NOTE
• When removing and reinstalling the Fusing Roller,
keep the Fusing Roller Paper Separator Fingers in
their raised position. Use care not to damage the
surface of the Fusing Roller.
4136D033AA
8. Remove the four Fusing Roller Paper Separator
Fingers.
NOTE
• Use care not to lose the springs.
D-27
Page 96

4980D068AA
9. Remove one screw and the Thermistor.
NOTE
• When reinstalling the Thermistor, route the harness as shown in the illustration.
10. Remove two screws and the Thermostat.
D-28
Page 97

4. ADJUSTMENTS
4-1. Electrical/Image Adjustment
(1) Accessing the Service Mode
1. Press the Utility key.
2. Press the following keys in order to enter the Service mode.
Stop → 0 → 0 → Stop → 0 → 1
NOTE
• Be sure to keep the access procedure for the Service mode from any unauthorized persons not involved with service operations.
(2) Accessing the “ADJUST” Menu
1. Enter the Service mode.
2. Press the Zoom Select key to select the “ADJUST” menu.
(3) Printing a Test Pattern
NOTES
Print a test pattern when making the following adjustments.
• Printer’s main scanning & sub-scanning registration adjustments
• Scanner’s main scanning & sub-scanning registration adjustments
• Scanner’s zoom ratio adjustment
1. Enter the Service mode.
2. Press the Density Select key to select the function.
3. Select “PRINT TEST PATTERN” → “TEST PATTERN 1”.
4. Press the Start key to begin printing the test pattern.
D-29
Page 98

(4) Margin Adjustment (Leading Edge/Trailing Edge/Both Sides)
<Requirement>
A
Mode Function Item Setting Range
Service’s Choice
Perform this adjustment in the following cases.
• When the user requests a smaller margin
<Adjustment Procedure>
1. Enter Service’s Choice in the Service mode.
2. Select “LEADING EDGE ERASE”.
3. Specify the setting.
Setting Overview
To reduce the margin . . . . . Decrease the setting.
To increase the margin . . . . . Increase the setting.
B
4022D503AA
• Specify the amount erased at the leading edge
C
C
(width of A), trailing edge (width of B), and both
sides (width of C) of the paper.
• Default setting: 4 mm
Leading Edge Erase
Trailing Edge Erase
Vertical Edge Erase
1 increment = 1 mm
0 to 5
4. Specify settings for the “TRAILING EDGE ERASE” and the “VERTICAL EDGE ERASE”
functions in the same way.
D-30
Page 99

(5) Printer’s Main Scanning Registration Adjustment
<Requirement>
B
A
1382D011AA
Specification Mode Function Item Setting Range
0±2.0 mm “ADJUST” menu PRN MAIN REGIST
Perform this adjustment in the following cases.
• After the PH Unit has been replaced
<Adjustment Procedure>
1. Print the test pattern.
2. Check the amount that widths A and B in the test pattern are shifted.
If the shift is out of specification, adjust it according to the following procedure.
3. Enter the “ADJUST” menu in the Service mode.
4. Change the setting.
If the width of A is less than the width of B . . . . . Increase the setting.
If the width of B is less than the width of A . . . . . Decrease the setting.
✽ If the shift cannot be adjusted to within the specification with a single adjustment, perform
the adjustment again to change the setting.
5. Press the Yes key to apply the setting.
• Adjust the amount that widths A and B in the
printed test pattern are shifted so that the following
specification is met.
60 to 140
1 increment = 0.1 mm
NOTE
If the Stop key is pressed, instead of the Yes key, the main screen is displayed and the setting returns to that before it was changed.
6. Print a test pattern again and check it.
D-31
Page 100

(6) Printer’s Sub-Scanning Registration Adjustment
<Requirement>
4007D051AA
Specification Mode Function Item Setting Range
20±2.5 mm “ADJUST” menu PRN SUB REGIST
Perform this adjustment in the following cases.
• After the PH Unit has been replaced
• After the printer's main scanning registration adjustment has been performed
<Adjustment Procedure>
1. Print the test pattern.
2. Check that the width of C in the test pattern meets the specification.
If the width of C is out of specification, adjust it according to the following procedure.
3. Enter the “ADJUST” menu in the Service mode.
4. Change the setting.
If the width of C in the test pattern is longer than the specified width . . . . . Increase the set-
ting.
If the width of C in the test pattern is shorter than the specified width . . . . . Decrease the
setting.
✽ If the shift cannot be adjusted to within the specification with a single adjustment, perform
the adjustment again to change the setting.
5. Press the Yes key to apply the setting.
• Adjust the width of C in the printed test pattern so
that the following specification is met.
87 to 113
1 increment = 0.46 mm
NOTE
If the Stop key is pressed, instead of the Yes key, the main screen is displayed and the setting returns to that before it was changed.
6. Print a test pattern again and check it.
D-32
 Loading...