

Deutsche Telekom Sinus 54 ISDN User Manual
Deutsche
Telekom
The Telephone.
Functionel and Easy to Use.

A2
Introduction
By opting for telephone, you have selected an individually adaptable cordless telephone with a
wide choice of practical user facilities.
This User Guide is designed to help you make the most of your telephone.
Whether you use your telephon for private or business use, it offers
• excellent quality of speech thanks to digital technology,
• even greater mobility and a greater range/availability:
– greater mobility by simply expanding with additional handsets, with no major installation
effort involved.
You can operate up to 6 handsets on one base station, with the possibility of making a
free internal call between two handsets and, at the same time, an external call from
another handset.
– a greater range by expanding with an additional telephone radio relay involved a minimum
of installation work.
– greater availability
A handset can be operated on up to 4 base stations.
• the wide range of other user facilities you would expect from a cordless telephone.
To enable you to phone from your telephone, you should first read at least the sections listed below and follow the operating instructions given there:
• Key to controls
• Setting up and putting into service
• Incoming calls
• Outgoing calls
• During a call.
You can use two different four-digit PINs to protect your telephone against
• unauthorised modification of the system-specific settings (system PIN)
and
• unauthorised modification of the handset-specific settings (device PIN).
These PINs are factory set to "0000". The protection functions become effective as soon as you
replace the corresponding "0000" setting with your personal digit sequence "XXXX".
Take a moment to try out all the different functions on your telephone; this will enable you to get
to know and benefit from its wide range of user facilities.
Additional handsets, charging stations, battery cells and radio relays are available from Deutsche
Telekom.
Explanations
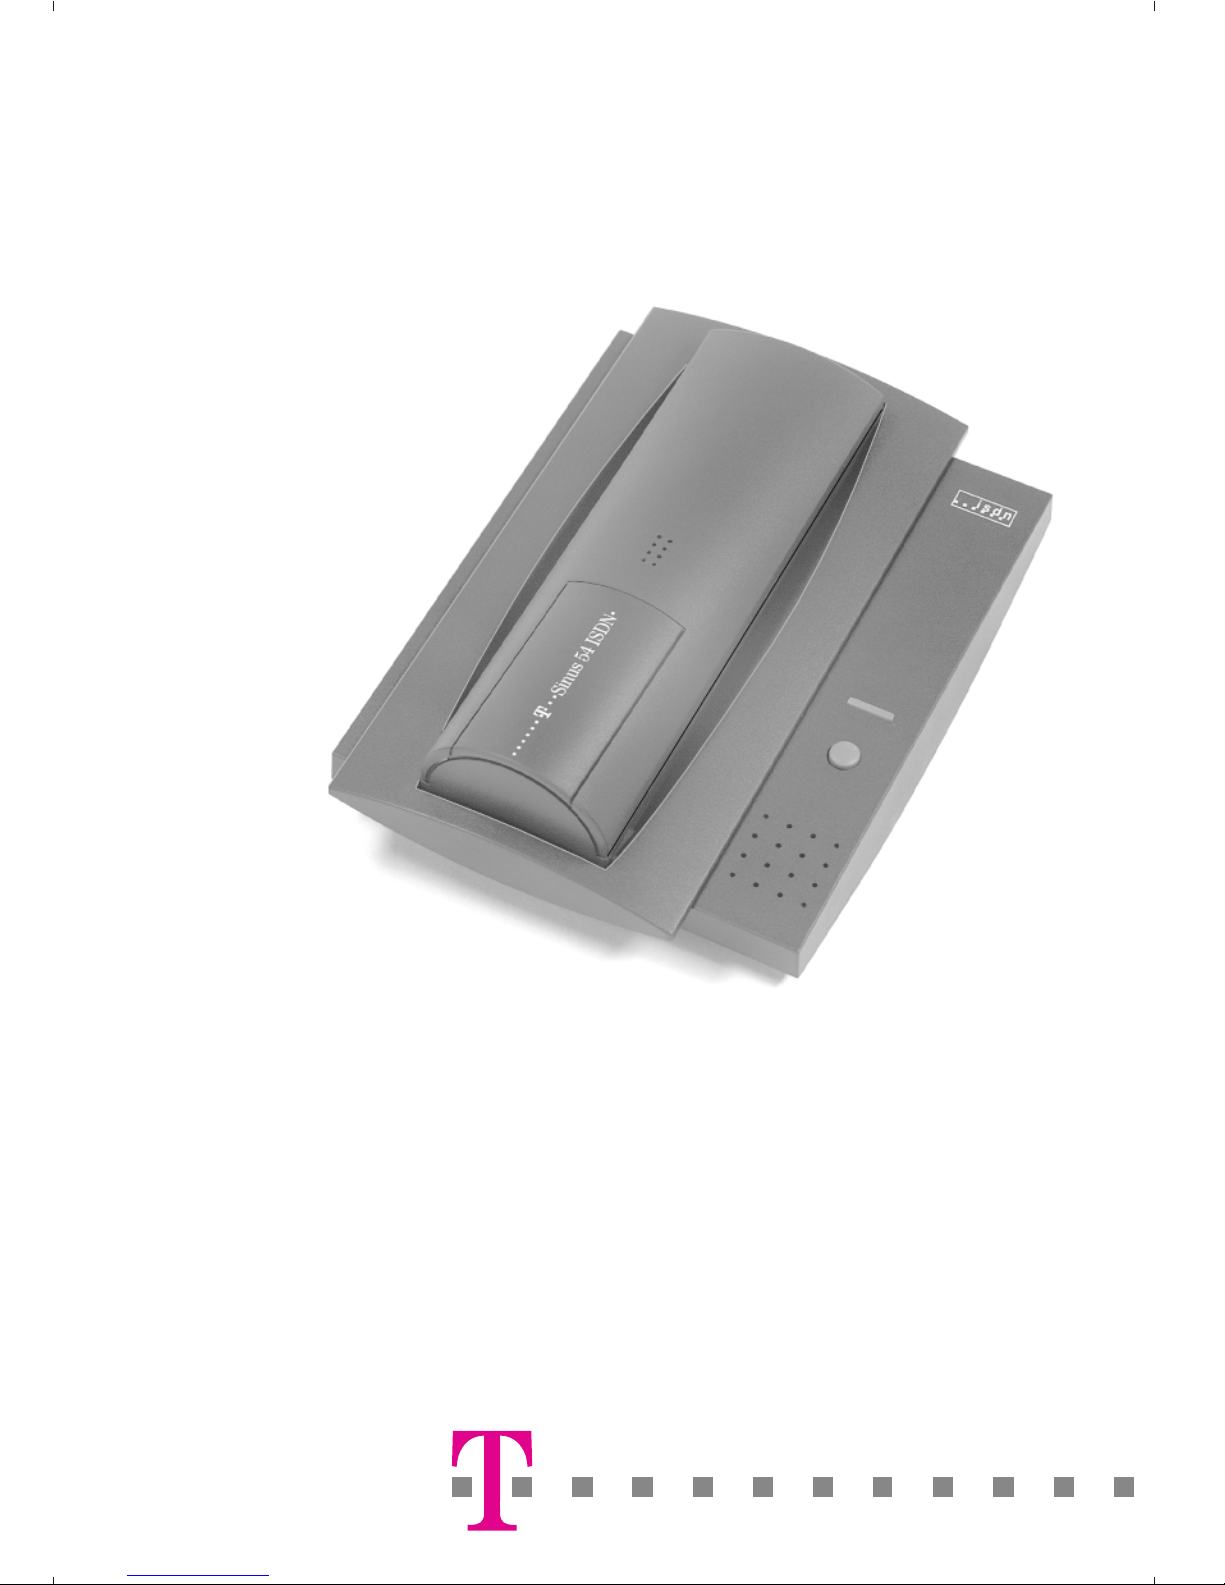
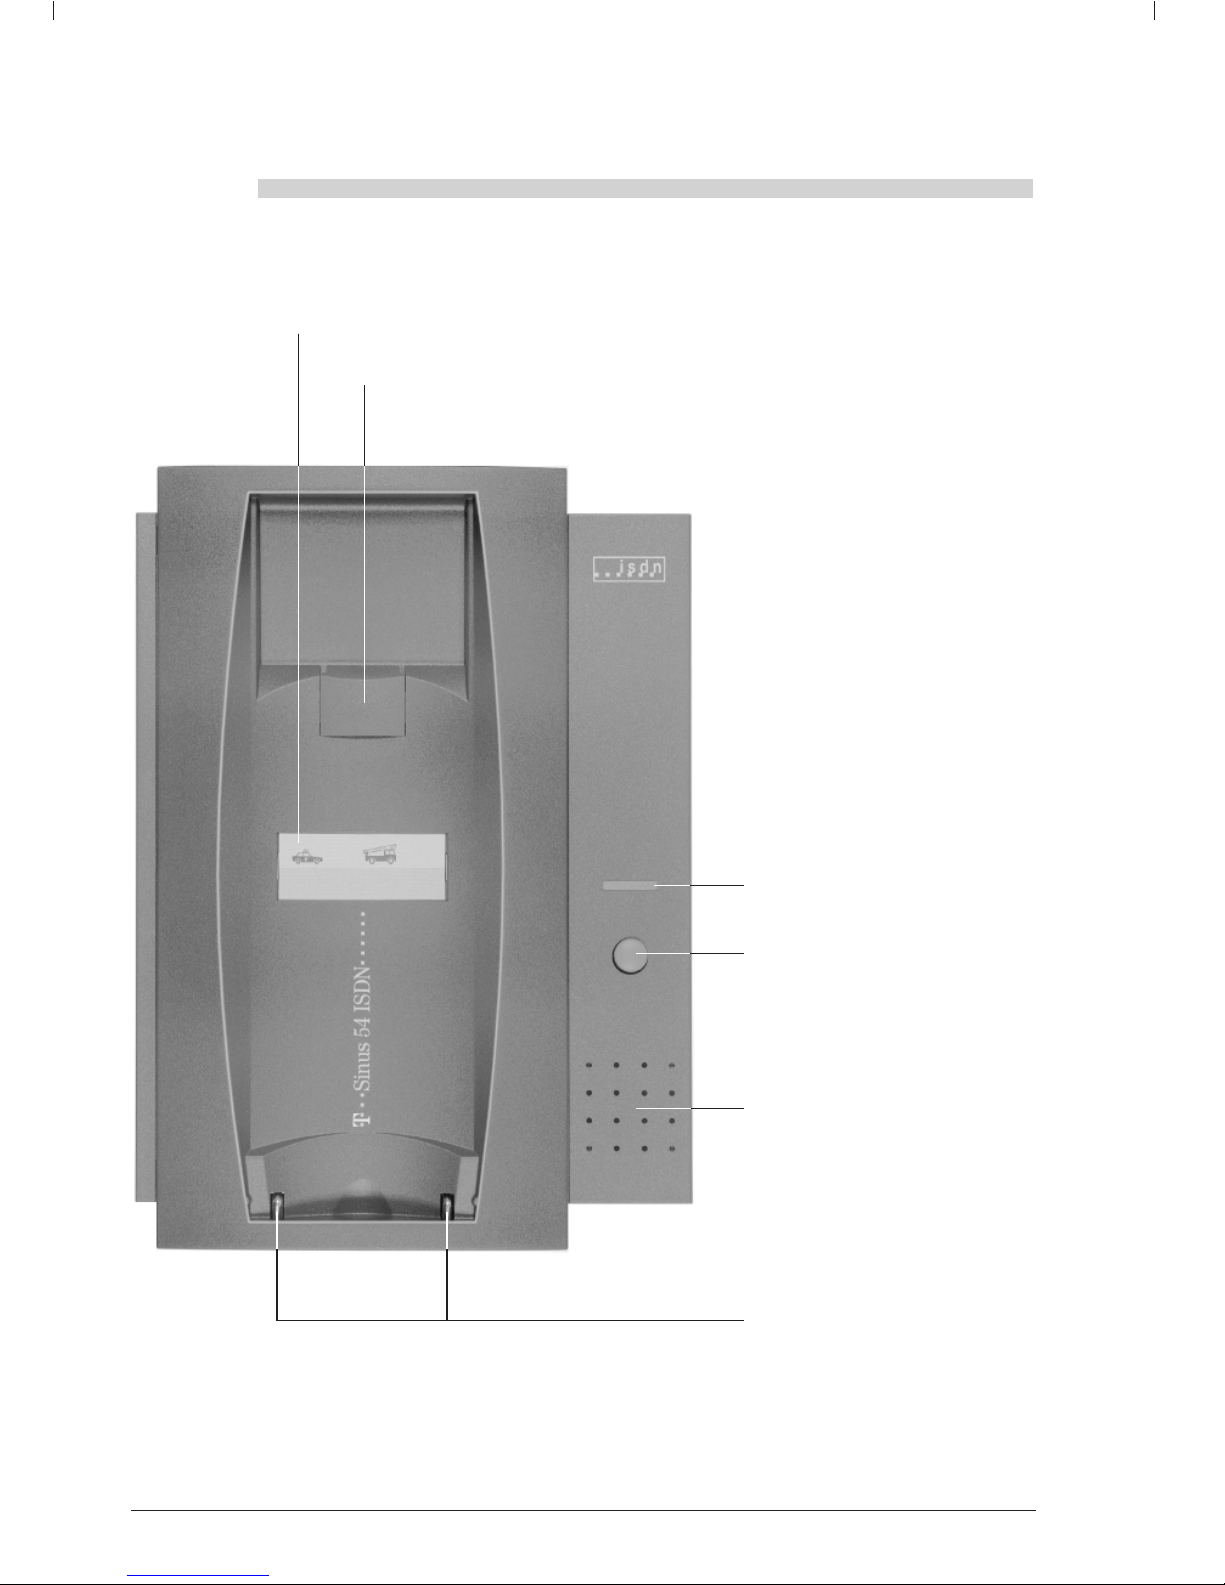
Base station
B1
Charge and connection indicator
Paging key
Loudspeaker (ringer)
Charge contacts
Hook for wall mounting
Label
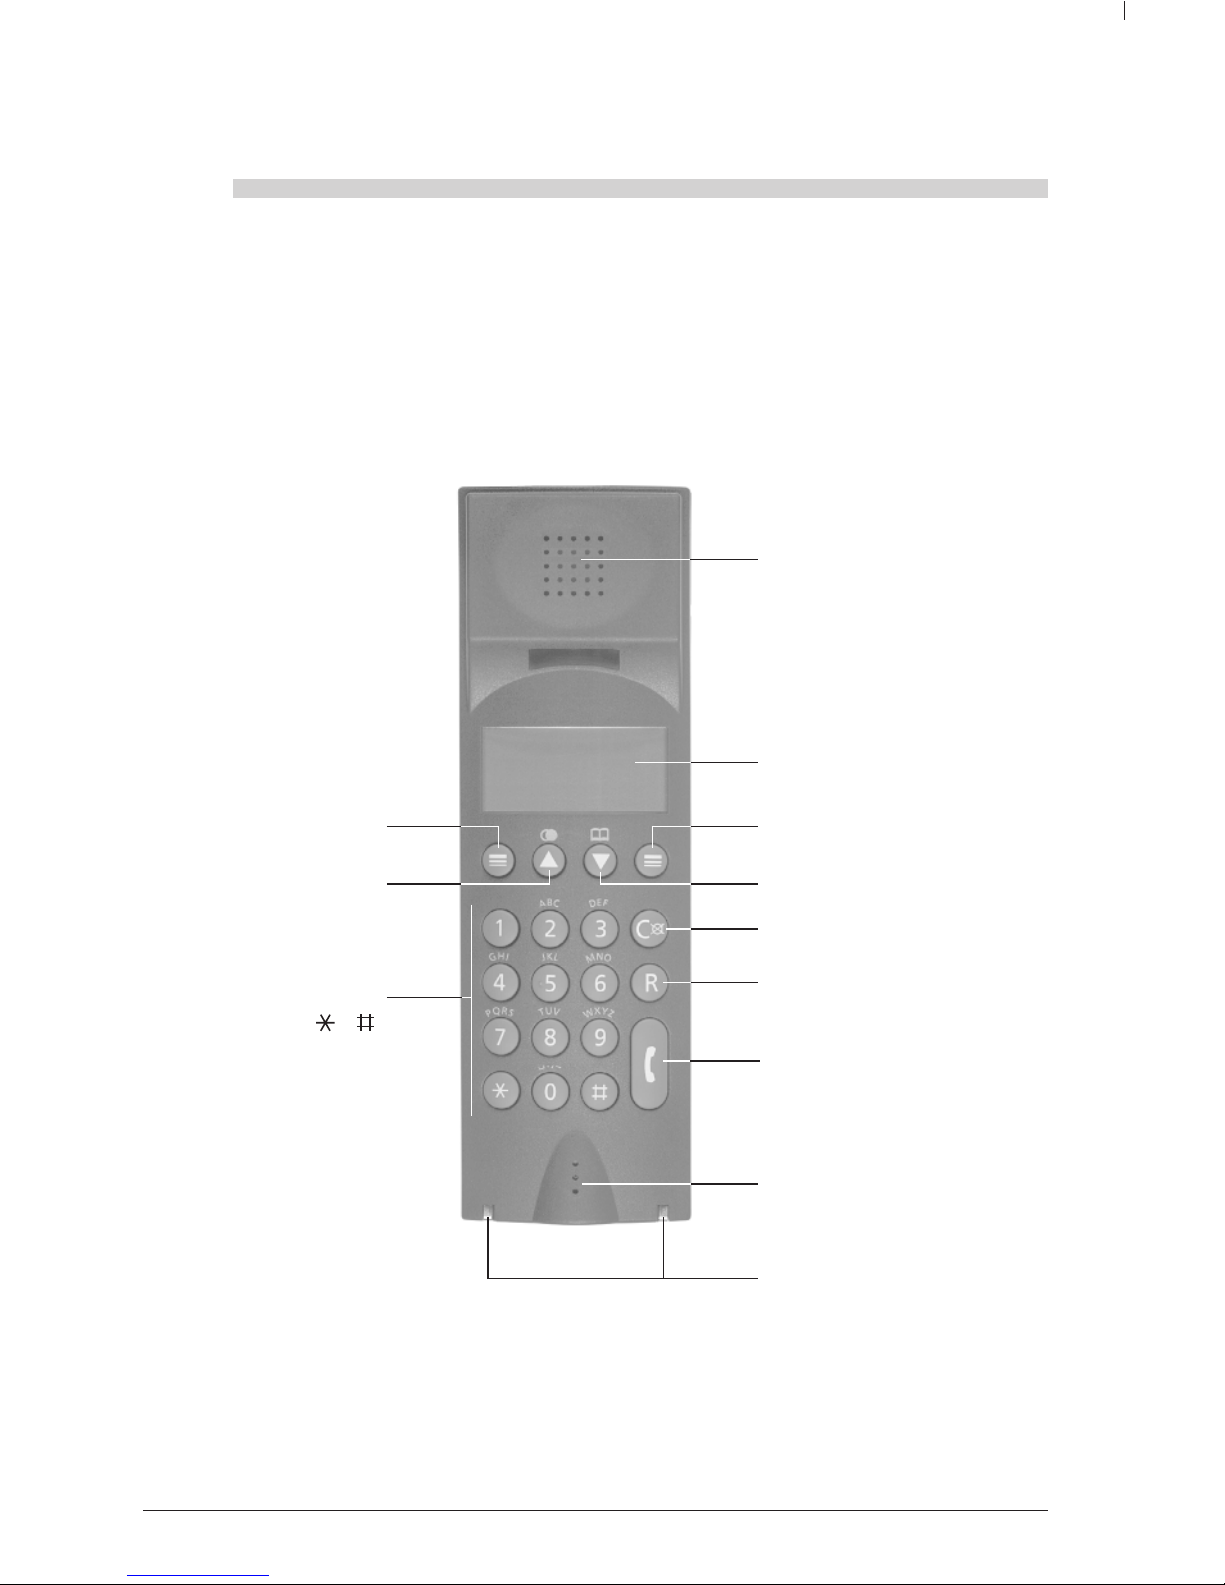
B2
Explanations
Handset
Receiver
Display
Delete/mute key
Signal key
Connect key
(seize/disconnect)
Microphone
Battery charge contacts
Keypad
0 – 9,
,
Softkey
Softkey
Arrow key backwards,
redial key and
call register
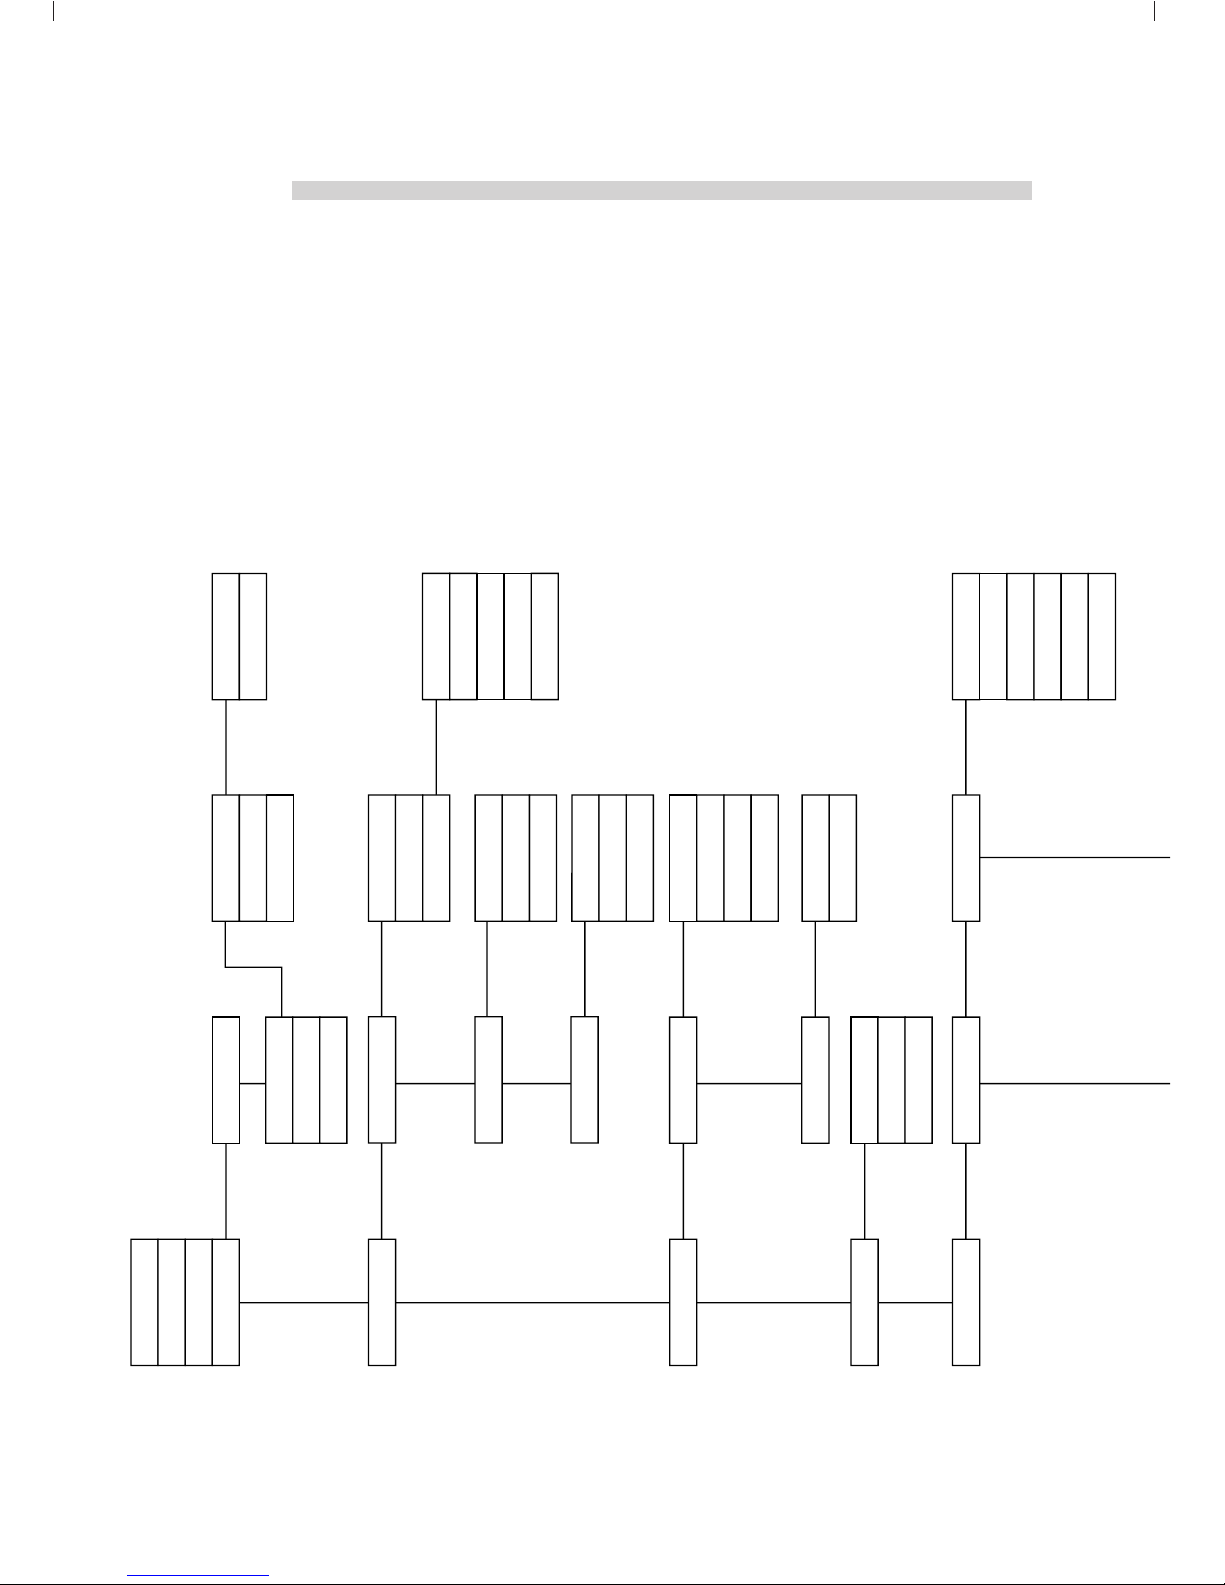
Der Menübaum
Im Ein-Zustand
Intern Menü
Tastenschutz
Ausschalten
Entparken
Umleiten
Anklopfen
CLIR
Uml. Sofort
Uml. nach 15s
MSN A
…
Uml. Besetzt
Dienste
An-/Abmelden
Stationswahl
Einstellen
Tonruf
Handgerät
Laut:
Takt:
Mel. I
Mel. 1
Mel. 2
Mel. 3
Anmelden
Abmelden
An Feststat.
An Fremdsys.
Fremdgerät
Relais
Handgerät
Relais
Automatisch
Station A
…
Entgelt
Abfragen
Anzeige
Faktor
Keine
Entgelt
Letzt:
Total:
System
Amt
Nr. 1:…MSN A
…
Dauer
Amt:
Nr.1:
…
Hörer-Laut
Tastenton
RW-Warnton
Direktruf
Dir.-Annahme
Auto DTMF
Sprache
Geräte-PIN
Zurücksetzen
System
Name/Nr. MSN
Auswahl MSN
Wahlsperre
1: Amtsperre
1: Amtsperre
Nummer:
1: Inland
1: Keine
1: Ausland
…
Rufverteiler
System-PIN
TK-Anlage
MSN A
…
MSN A
…
MSN A
Name MSN A
Mel. MSN A
Handgerät
Lieferzust.
Namenverz.
Lieferzust.
Systemeinst.
Feststation
English
Français
Italiano
Deutsch
Feststation
Laut:
Takt:
Mel.:
Amtskennzif.
Auto Keypad
Auto ECT
Nr.1 MSN A
…
MSN A
…

Herausgeber:
Deutsche Telekom AG
Änderungen vorbehalten
MNr 40 152 637EA
Stand Mai 1998
ABSC 20266977
3K.028

1
Inhaltsverzeichnis
Notes
Safety notes ........................................................................................................................................................ 4
Important notes on the use of battery cells ....................................................................................................... 4
Key to controls
Display: characters ans symbols........................................................................................................................ 5
Keypad................................................................................................................................................................. 6
Setting up and putting into service
What's included in the delivery package ........................................................................................................... 9
Default settings ................................................................................................................................................... 9
Installation location/Range ............................................................................................................................... 10
Desktop or wall-mounted, as you wish ........................................................................................................... 11
Connecting the base station ............................................................................................................................ 13
Inserting and charging the battery cells in the handset .................................................................................. 14
Fitting the clip to the handset........................................................................................................................... 15
Basic settings
Handset: ON, OFF, Lock state ......................................................................................................................... 16
Handset: Switching between states ................................................................................................................ 17
Programming the subscriber number (MSN = Multiple suscriber Number) ................................................... 18
Programming the name for MSN ..................................................................................................................... 19
Programming digit for MSN-specific melody................................................................................................... 20
Personal Identification Number (PIN) ............................................................................................................... 21
Entering a new system PIN .............................................................................................................................. 22
Entering a new handset PIN ............................................................................................................................. 23
Setting the handset volume .............................................................................................................................. 24
Activating/deactivating call waiting .................................................................................................................. 25
Setting the language for the menu prompting................................................................................................. 26
Incoming calls
Answering a call ................................................................................................................................................ 27
Answering a call ................................................................................................................................................ 28
Ending a call ...................................................................................................................................................... 28
Rejecting a call .................................................................................................................................................. 28
Call register ....................................................................................................................................................... 29
Offbook answering ............................................................................................................................................ 30
Outgoing calls
Selecting the multiple subscriber number ....................................................................................................... 31
Selecting a temporary multiple ......................................................................................................................... 32
Calling Line Identification Restriction ............................................................................................................... 33
Dialling from the numeric keypad ..................................................................................................................... 34
Ending a call ...................................................................................................................................................... 34
Off-line call preparation..................................................................................................................................... 34
Last number radial ............................................................................................................................................ 35
Enhanced-convenience dialling
About the phone book ...................................................................................................................................... 36
Storing an entry in the phone book ................................................................................................................. 37
Storing an entry in the phone book from off-line call preparation .................................................................. 38
Dialling from the phone book ........................................................................................................................... 39

2
Changing/deleting a phone-book entry ........................................................................................................... 40
Deleting all the entries in the phone book ....................................................................................................... 41
During a call
Mute switch ....................................................................................................................................................... 42
Adjusting the handset volume .......................................................................................................................... 43
Send DTMF function ......................................................................................................................................... 44
Automatic completion of call to busy subscriber ............................................................................................ 45
Activating the automatic CCBS........................................................................................................................ 45
Display for automatic CCBS ............................................................................................................................. 45
Parking ............................................................................................................................................................... 46
Parking a call ..................................................................................................................................................... 46
Retriering a parked, external call (unparking) .................................................................................................. 46
Answering call-waiting calls.............................................................................................................................. 47
Call diversion
Activating call diversion always ........................................................................................................................ 48
Deactivating call diversion always .................................................................................................................... 49
Activating call diversion o busy ........................................................................................................................ 50
Deactivating call diversion on busy .................................................................................................................. 51
Activating call diversion no reply ...................................................................................................................... 52
Deactivating call diversion no reply .................................................................................................................. 53
Charge/talk-time display
Introduction ....................................................................................................................................................... 54
Activating/deactivating the charge/talk-time display ...................................................................................... 55
Checking the amounts ...................................................................................................................................... 56
Changing the charge factor .............................................................................................................................. 57
Checking and deleting the amounts of all handsets and MSN ...................................................................... 58
Direct call
Activating direct call .......................................................................................................................................... 59
Dialling a direct call number ............................................................................................................................. 60
Deactivating direct call...................................................................................................................................... 60
Call barring
Activating call barring ....................................................................................................................................... 61
Paging
From base station to handset(s)....................................................................................................................... 62
Ringing tone
Setting the ringing tone on the handset .......................................................................................................... 63
Setting the ringing tone on the base station ................................................................................................... 65
Operation with several handsets
Explanations ...................................................................................................................................................... 66
Subscribing a handset to the base station ...................................................................................................... 66
Desubscribing a handset from the base station.............................................................................................. 68
Marking internal calls ........................................................................................................................................ 69
Checking the internal subscriber number ........................................................................................................ 70
Rejecting a call .................................................................................................................................................. 70
Inquiry / Swap / Three party conference / Call transfer .................................................................................. 71
Inquiry via telephone ......................................................................................................................................... 71
Swap via telephone........................................................................................................................................... 72
Three-party conference via telephone ............................................................................................................. 72

3
Call transfer via telephone ................................................................................................................................73
Inquiry via telephone ......................................................................................................................................... 74
Swap .................................................................................................................................................................. 74
Three-party conference .................................................................................................................................... 75
call transfer ........................................................................................................................................................ 75
Setting the ringing allocation for the handsets (exchange ring) ..................................................................... 76
Operation on several base stations
General explanations ........................................................................................................................................ 77
Application example .......................................................................................................................................... 77
Specifying the configuration ............................................................................................................................. 78
Subscribing handsets to base stations............................................................................................................ 79
Automatic switchover or manual selection of base station ............................................................................ 83
Operation on the telephone system
Entering/deleting the exchange indentification code (EIC) ............................................................................. 84
Sending an automatic keypad .......................................................................................................................... 85
Transfer with Disconnect .................................................................................................................................. 86
Operation on the telephone system
Subscribing a telephone handset to a foreign system.................................................................................... 87
Subscribing a foreign telephone handset ........................................................................................................ 88
Initialising
Restoring the handset to its default settings................................................................................................... 89
Restoring the basw station (system) to its default settings ............................................................................ 90
Restoring all telephone parameters to the default settings ............................................................................ 91
Acoustic signals
Tones in general ................................................................................................................................................ 92
Activating/deactivating keyclick ....................................................................................................................... 93
Range warning .................................................................................................................................................. 94
General information
Faults and self-help trouble shooding.............................................................................................................. 95
Warranty terms .................................................................................................................................................. 96
Customer service .............................................................................................................................................. 96
Cleaning - when necessary .............................................................................................................................. 96
Recycling ........................................................................................................................................................... 97
Approvals
CE-labelling ....................................................................................................................................................... 98
Technical Data 99
Write-on labels 100
Notes 101
Bohrschablone 102
Stichwortverzeichnis 105

4
Notes
Safety notes
• Warning
Only use approved nickel-cadmium (NiCd) batteries.
The handset battery compartment contains the corresponding warning notes.
The telephone is supplied complete with two rechargeable NiCd batteries, type AA (mignon
cells). Only NiCd batteries of the following types are approved for use as replacement or spare batteries: – RC 6/600 from Saft
– P/60 AA from Panasonic
– R6 NC-P from Philips
– AA 600 F from Furukawa
Replacement or spare battery cells as well as charging stations are supplied by Deutsche
Telekom.
• Using other battery cell types or non-rechargeable batteries/primary cells can be dangerous
and also lead to malfunctions and/or damage to the set.
• Understandably, Deutsche Telekom AG cannot assume any liability in such cases.
• Make sure the battery cells are fitted correctly.
• Do not dip the battery cells in water; do not throw into the fire.
• Battery cells become warm when being charged; this is a normal and harmless process.
• Do not use third-party charging stations as they may damage the battery cells.
• Only use the enclosed SNG 2 power supply unit for the base station.
Important notes on the use of battery cells
To ensure your battery cells have a long service life, please follow the following principles:
• The battery cells must be charged without interruption for at least 10 hours
prior to the initial commissioning.
• It takes several days for the battery cells to reach their full capacity and
therefore their full "stand-by and talk time".
• Make sure the charging contacts do not come into contact with metallic or
greasy parts.
If the telephone is not used over a longer period of time with the power switched off (e.g. during
holiday periods), the handset (i.e. the battery cells) must be charged before switching the telephone back on.
Please dispose of any defective battery cells in the proper manner (not in domestic waste).

5
Key to controls
Display: characters and symbols
Battery indicator
• When permanently lit, the telephone is ready to operate
• Flashes approx. 10 minutes before the battery cells go flat
• No indication: telephone switched off or battery cells flat
Connection indicator
• When permanently lit, there is a radio connection between the
handset and the base station
• Flashes while the call is being set up
Indicates the base station on which the handset is being operated
(operation with several base stations)
• When permanently lit, the handset is within range of a base station.
Incoming and outgoing calls are possible.
• Flashes when a base station is being searched. Incoming and
outgoing calls are not possible.
Signals letter input
ndicates a temporary switchover in dialling method
Indicates that a choice of other menus is available
012401313
Intern Menü
Symbols indicating the telephone’s
current operating mode
Current meaning of the softkeys
Message line
Digits and special
characters

6
Key to controls
Keypad
With the numeric keys you can use the characters printed above the keys for letter input
(phone book) as well as the functions marked on the keys themselves.
Softkeys – Left and right softkey.
The function of each softkey is indicated on the
bottom line of the display.
Arrow key backwards – "Scroll backwards" through the menu, phone book, last
number redial memory, call list, etc.
Last number redia – Press briefly and repeatedly in the idle state: calls up the
last five numbers dialled.
– Maintain key pressed in the idle state: access to the call list
(CLIP); then press briefly and repeatedly: calls up the last 5
caller entries.
Arrow key forwards – "Scroll forwards" through the menu, phone book, last num-
ber redial memory, call list, etc.
Phone book – Access to the phone book
C
Delete key – During a call:
Mutes the microphone
– During digit or letter input:
Short press: clears the last character
Long press: clears the entire line
0
79
8
465
132

7
Signal key – Signal key function (Flash) in connection
with a telephone system
Connect key – Seizes and terminates the connection
– Switches on the handset
– Aborts a programming session
1
Numeric key 1 – Number 1
2
Numeric key 2 – Number 2
– Letter input: A B C
3
umeric key 3 – Number 3
– Letter input: D E F
4
Numeric key 4 – Number 4
– Letter input: G H I
5
Numeric key 5 – Number 5
– Letter input: J K L
6
Numeric key 6 – Number 6
– Letter input: M N O
7
Numeric key 7 – Number 7
– Letter input: P Q R S

8
8
Numeric key 8 – Number 8
– Letter input: T U V
9
Numeric key 9 – Number 9
– Letter input: W X Y Z
0
Numeric key 0 – Number 0
– Character input: \ . , -
Star key – Can be used for various special functions
Hash key – Can be used for various special functions

9
Setting up and putting into service
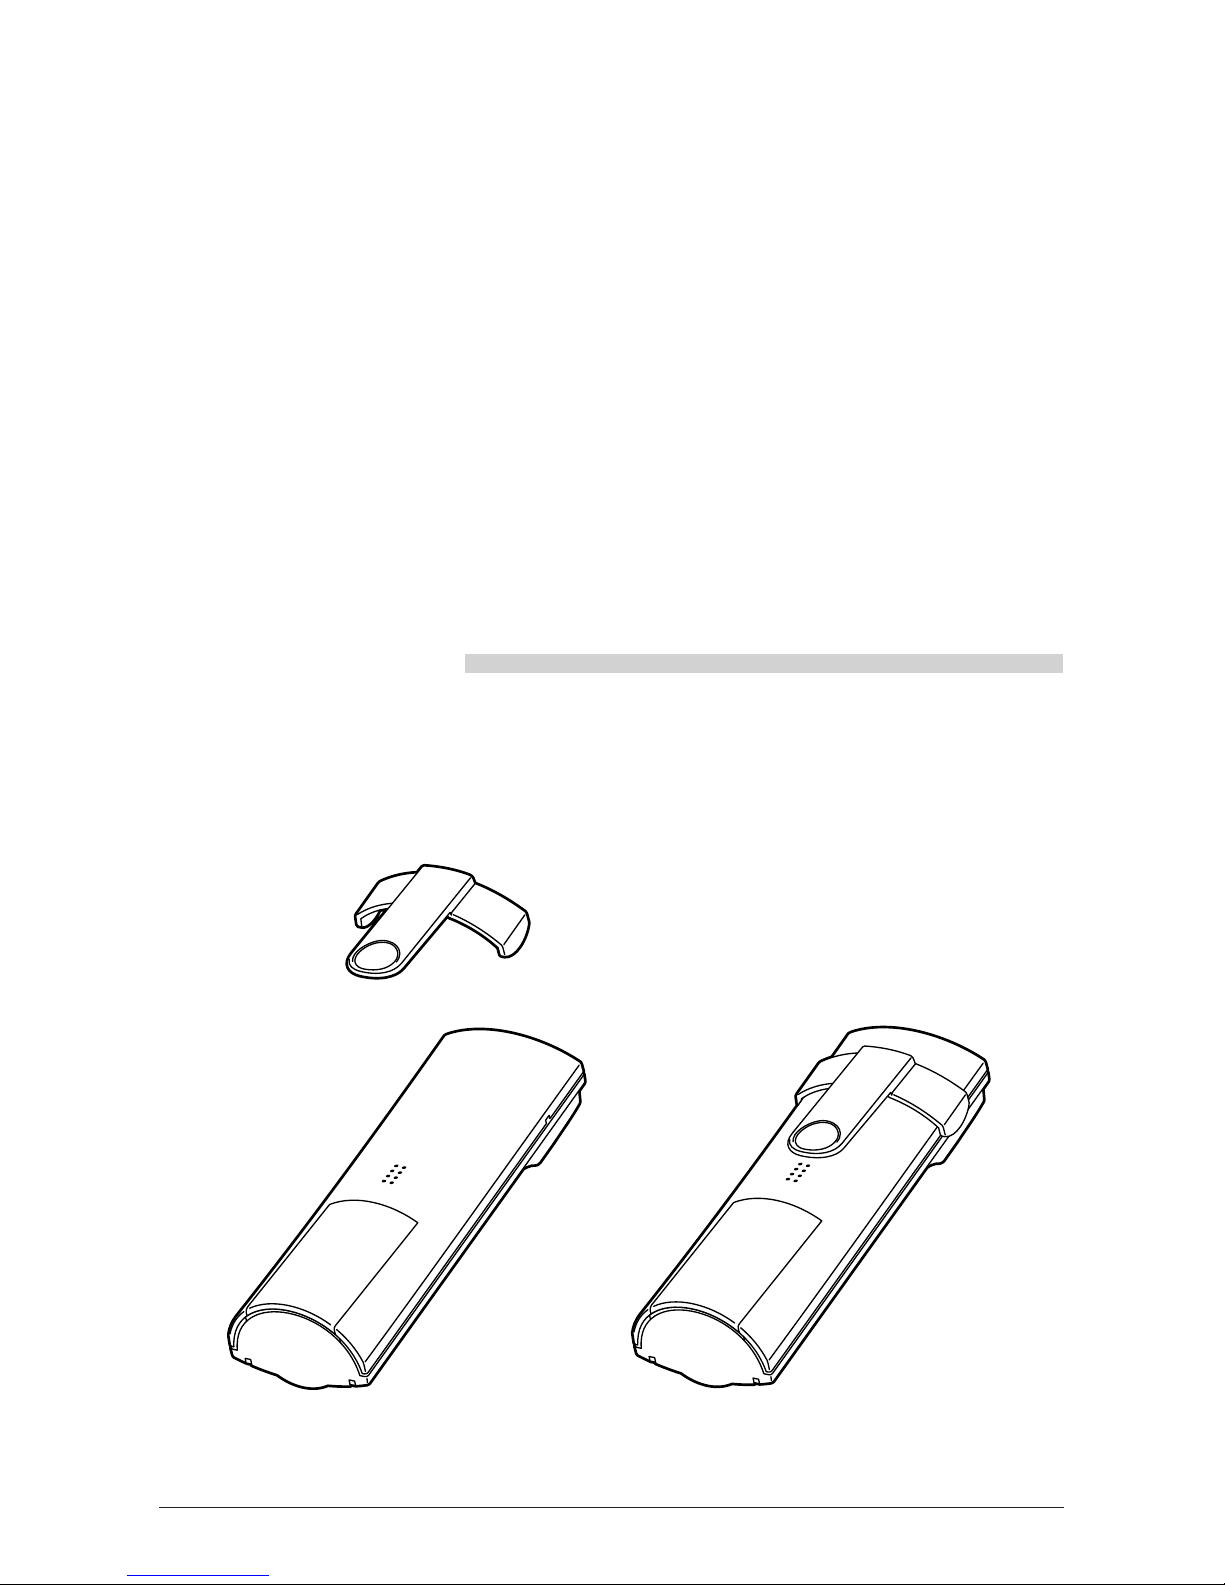
What’s included in the delivery package
Included in telephone package you will find the following:
• Base station
• Handset
• 2 battery cells
• Plug-in mains unit
• Connecting cord
• User Guide incl. Quick Reference User Guide
• Clip
• Drilling template
• Bag with two screws and two plugs for mounting the base station to the wall
Default settings
The Configuration section will tell you how to customise telephone.
The most commonly used functions on your telephone have been preset by the manufacturers
(Default Settings) so that you can start using the telephone as soon as the batteries have been
charged:
• Offhook answering: off
• Talk time display: off
• Units/amount display: on
• Calling Line Identification Restriction (CLIR): off
• Call waiting: on
• Language: English
• Handset/system PIN: 0000
• Handset: • Handset has subscribed with the base station
(intern 1)
• No barring, no direct call (emergency call) activated
• Exchange line activated
• Handset volume: normal (off)
• Key-click activated
• Range warning tone deactivated
• Station selection automatic
• Ringer volume level "4"
• Ringer tone sequence level "4"
• All MSN to digit 1
Digit 1: melody 1
Digit 2: melody 2
Digit 3: melody 3
Intern: melody 5
• Base station: • Ringer volume level "3"
• Ringer tone sequence level "4"
• Ringer melody level "1"
You are free to reprogram any of these default settings to suit your personal requirements and
local supply conditions.

10
Setting up and putting into service
Installation location/Range
Installation location
Do not position the base station in the immediate vicinity of other electronic appliances such as
hifi equipment, office equipment or microwave ovens; this will prevent any mutual interference.
Also avoid installing the base station in the vicinity of heat sources, such as radiators or in direct
sunlight. For the best possible range we recommend a central installation location at the centre
of your radius of action. Avoid installation in niches, small rooms and behind steel doors. To
prevent radio feedback in other telephones, we recommend the largest possible distance
(min. 1 m) between the base station or handset and the other telephone.
Setting up your telephone
Your telephone is designed to be used under normal operating conditions. Modern furniture is
treated with an endless variety of lacquer and plastic coatings, and looked after with a wide
range of polishes and finish preservatives. Therefore, it cannot be excluded that some of these
substances may contain agents which will attack or deform the plastic feet of the base station.
If the equipment feet are chemically altered in this way, they may leave unsightly marks on the
surface of furniture. Deutsche Telekom AG cannot accept any liability for damage of this kind.
We recommend that you use a non-slip underlay for your telephone, especially on new furniture
or furniture treated with lacquer-based preservatives.
Range
The radio range is approx. 300 m in the open. Ambient conditions can affect the range, as can
room and building-related factors. The effective range is lower inside buildings than outdoors.
Silent zones can occur due to the digital transmission in the frequency range used - and also
within the range, depending on the structural environment. In such cases the transmission
quality can be affected by repeated, short call interruptions. Normal call quality can be restored
simply by moving slightly out of the silent zone.
Listening protection
telephone transmits the voice data between base station and handset in cryptologically enciphered form (scrambling). As a result the tapping of your calls by other cordless telephones, radio
receivers, scanners, etc., is excluded.
Note for hearing-aid users
Before using the telephone, hearing-aid users should be aware that radio signals interfere with
hearing aids and can cause an unpleasant humming noise if sufficiently loud.
Important information
Whenever you make a telephone call, the handset and base station are connected with each
other via an enciphered radio channel. This means that no other cordless telephone can either
make calls at your expense or listen in to your telephone calls.

11
Setting up and putting into service
Desktop or wall-mounted, as you wish
Desktop version
The simplest option is to use telephone as a desktop unit. Simply set up the telephone where
you want it and connect.
Wall-mounted version
Turn the wall-mounting hook through 180° so that the handset can be suspended on the base
station (see Figure below). Swap the foot props around with the rubber feet on the back of the
base station so that the Telephonecan be secured vertically to the wall (see Figure on page 12).
The drilling templates supplied will help you to mount your telephone correctly.
Hook for
wall mounting
Slide upwards Push back in
Turn through 180°
12
Setting up and putting into service
9,0 VDC / 400 mA
9,0 VAC / 170 mA
Desktop Wall
13
Setting up and putting into service
Connecting the base station
Just a few small tasks are required for you to use your telephone.
Connecting cord
The connecting cord has two plugs of different
lengths. Insert the shorter one into the socket underneath your telephone until it is firmly connected.
This socket is identified by a small telephone symbol. Feed the cord through the moulded cable duct
provided. Connect the RJ-45 plug into your telephone socket.
Mains unit cable
Fit the plug from the mains unit cable (until it clicks
into place) into the socket identified with the mains
unit symbol, then feed the cable through the moulded cable duct provided. Next plug the plug-in
mains unit into a 220/230 V socket.
Note: • Your telephone will not function if
the mains unit is not plugged in or if
the power supply fails.
• The telephone may only be used in
conjunction with an SNG 2 af mains
unit, tested in compliance with EN60950 Protection Class 2.
• Make sure you do not confuse the plugs on the connecting cord and the mains
unit on the base station. Not only will the base station not function if the plugs
are incorrectly fitted, but it may also be damaged.
Disconnecting the base station connecting cables
First unplug the mains unit from the 220/230 V supply. To release the plugs on the connecting
cables, press the snap-in clip towards the plug body (using a small screwdriver for instance)
and, at the same time, pull the plug out by the cable.
Fitting the write-on label
After adding your local data, position the label in the space provided and clip the transparent
plastic cover into place over it.
9,0 VDC / 400 mA
9,0 VAC / 170 mA
14
Setting up and putting into service
Inserting and charging the battery cells in the handset
Inserting the battery cells
1. Place the handset in front of you. To remove the battery compartment cover, press it lightly
and slide it downwards.
2. Insert the 2 battery cells into the battery compartment (as shown): Make sure the polarity is
correct; it is indicated on the battery compartment.
3. Slide the battery compartment cover back over the battery cells and close the compartment.
You will hear the cover snap into place.
51°
10.195°
15
Setting up and putting into service
Charging the battery cells
IThe battery cells are not charged when supplied. To charge the batteries, you need to place
the handset on to the charging bracket of the base station. If the luminous display (green LED)
on the base station
• is flashing = batteries are being charged
• is steadily lit = batteries are charged
A single battery charge is sufficient for approx. 40 hours in "stand-by" mode or approx.
5 hours in "talk" mode.
The charging time takes approx. 5 hours.
Note: • Do not use batteries/primary cells, only NiCd battery cells. Observe the
"Important Notes" on Page 4.
Fitting the clip to the handset
Fit the supplied clip to the back of the handset with the clamp facing downwards. There are two
small holes down the sides at the level of the receiver. Place the clip on one of the holes and
snap it into place in the opposite hole.
10.195°

16
Basic settings
Handset: ON, OFF, Lock state
You can switch your handset to one of three states:
1. On state
The handset automatically switches itself to the ON state when
you insert its battery cells. It signals incoming calls, which you
can answer by pressing the Connect key. Outgoing calls are
also enabled.
2. OFF state
In this state, your handset is switched off. Incoming calls are
not signalled. Outgoing calls are not enabled.
3. Lock state
(to protect against accidentally pressing the keys when carrying
the handset) Incoming calls are signalled and can be answered
by pressing the Connect key. Your handset remains active in
the ON state for the duration of the call.
Outgoing calls are not enabled, i.e. to make a call you need to
switch the handset from Lock to ON.
Switching back to the ON state
If you are in the menu, the handset automatically switches back to the ON state if you do not
press any of its keys for 20 seconds (key input).
Intern Menü
---SCHUTZ--¢Aus
17
Basic settings
Handset: Switching between states
Handset switched to ON:
To switch the handset
– to the OFF state
Press "Menu" softkey
Press repeatedly until "Switch off"
appears
Press "Ok" softkey
Handset is now switched off
– to the Lock state
Press "Menu" softkey
Press "Ok" softkey
Handset switched to Lock:
To switch the handset
– to the ON state
Press "¢Off" softkey
Press "Ok" softkey
Handset switched to OFF:
To switch the handset
– to the ON state
Press the Connect key
Intern Menü
Tastenschutz
Zurück Ok
Ausschalten
Zurück Ok
Tastenschutz
Zurück Ok
---SCHUTZ--¢Aus
---SCHUTZ--¢Aus
Schutz Aus?
Zurück Ok
Intern Menü
Intern Menü
18
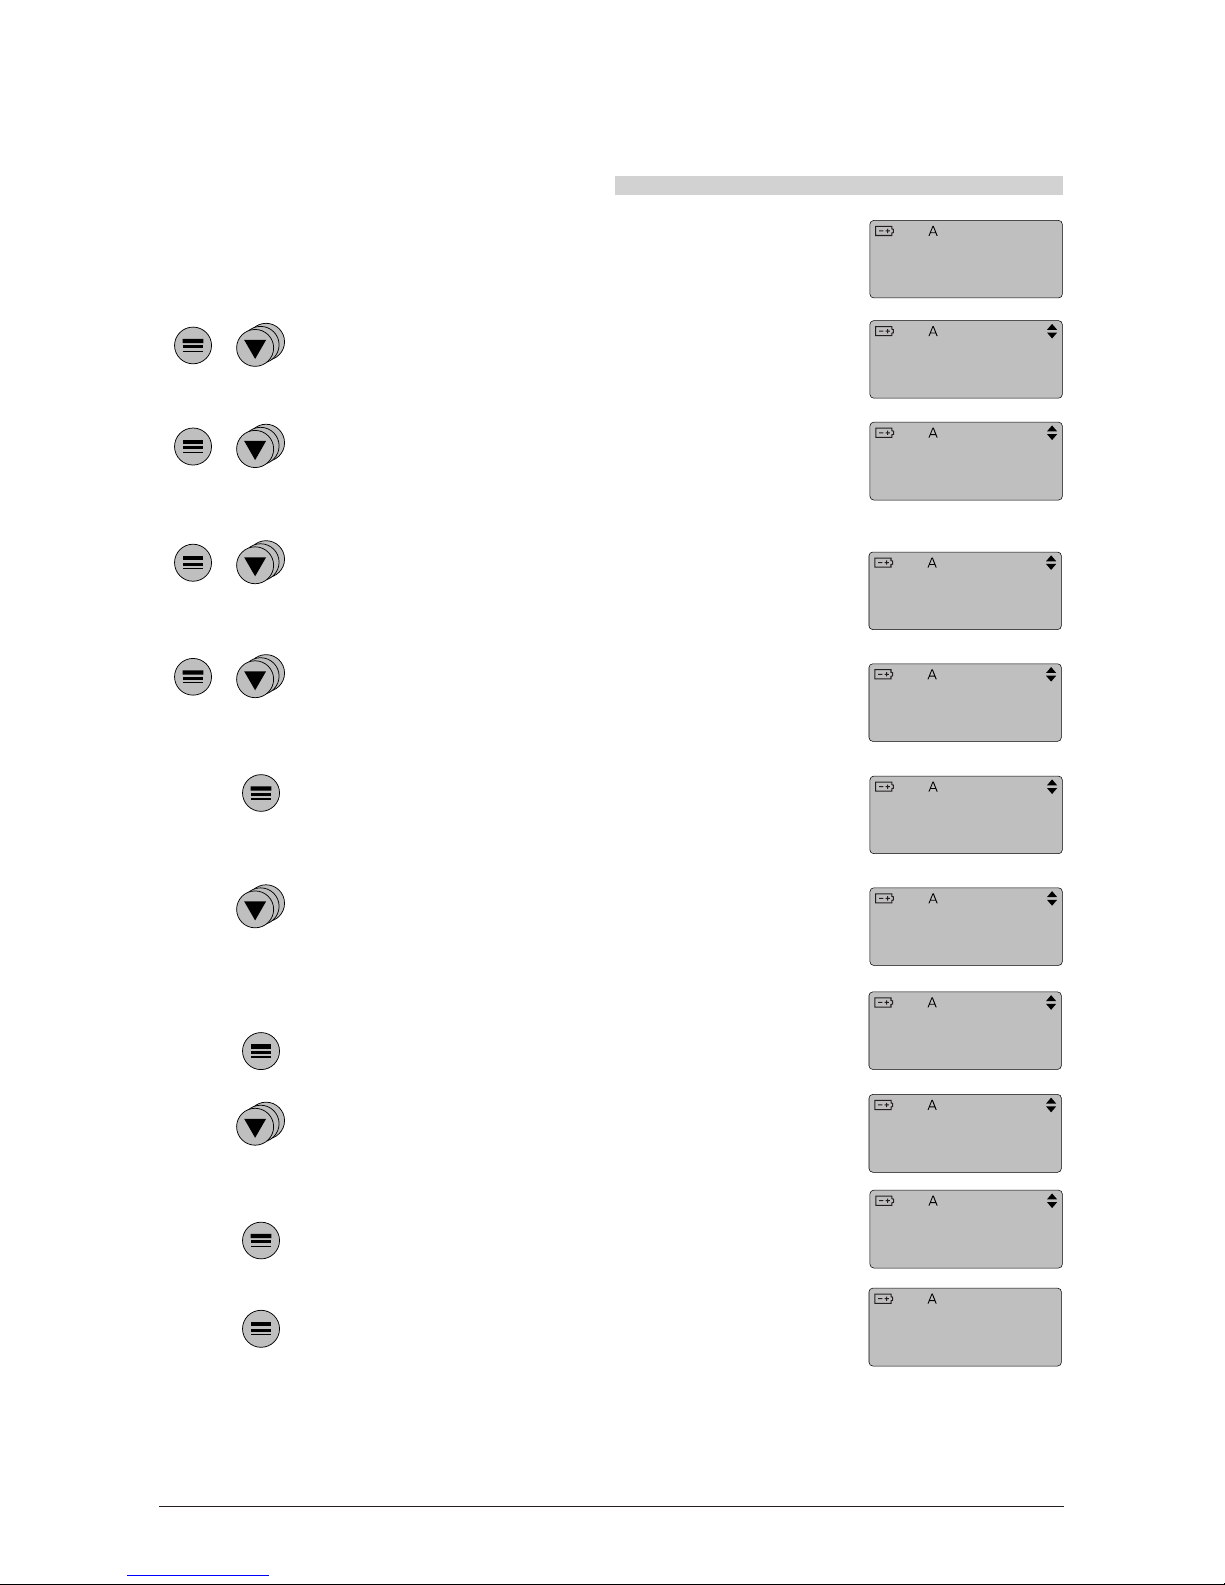
Basic settings
Programming the subscriber number (MSN = Multiple Subscriber Number)
It is important that you enter in your telephone one of the telephone numbers you have been
allocated by Deutsche Telekom. You can assign up to 5 different subscriber numbers (MSN, A,
B, C, D or E). This allows you for example to separate calls according to private and business.
A different melody will ring depending on the telephone number dialled. Further on you can
allocate a freely definable text to each MSN, which is then displayed when you receive a call.
(See "Answering a call".)
Handset switched to ON
Press "Menu" softkey, then press arrow
keys repeatedly until "Setup" appears
Press "Ok" softkey, then press arrow
keys repeatedly until "System" appears
Press "Ok" softkey, then press arrow keys
repeatedly until "Name/Nr. MSN" appears
Press "Ok" softkey, then press arrow keys
repeatedly until the corresponding MSN
appears
Press "Ok" softkey. If an MSN has already
been entered, it will appear now
Press "New" softkey
0
7 98
4 65
1 32
Key in one of allocated telephone numbers
Press "Ok" softkey.
The MSN is now stored
Press "Back" softkey five times…
Intern Menü
Einstellen
Zurück Ok
System
Zurück Ok
Name/Nr. MSN
Zurück Ok
MSN A
Zurück Ok
MSN A
Zurück Neu
Tel.Nr.:?
Zurück
Intern Menü
6217680
Zurück Ok
6217680
Zurück Neu
19
Basic settings
Programming the name for MSN
Handset switched to ON
Press "Menu" softkey, then press arrow
keys repeatedly until "Setup" appears
Press "Ok" softkey, then press arrow keys
repeatedly until "System" appears
Press "Ok" softkey, then press arrow keys
repeatedly until "Name/Nr. MSN" appears
Press "Ok" softkey, then press arrow keys
repeatedly until the corresponding MSN
appears
Press "Ok" softkey. If an MSN has already
been entered, it will appear now
Press arrow keys repeatedly until "Name
MSN A" appears. If a name has already
been entered, it will appear now
Press "New" softkey
0
7 98
4 65
1 32
Key in the relevant name (key in the letters,
see "About the phone book")
Press "Ok" softkey
Press "Back" softkey five times…
Intern Menü
Einstellen
Zurück Ok
System
Zurück Ok
Name/Nr.MSN
Zurück Ok
MSN A
Zurück Ok
MSN A
Zurück Neu
Name MSN A
Zurück Neu
Intern Menü
Name:?
Zurück
PRIVAT
Zurück Neu
PRIVAT
Zurück Ok
20
Basic settings
Programming digit for MSN-specific melody
Handset switched to ON
Press "Menu" softkey, then press arrow
keys repeatedly until "Setup" appears
Press "Ok" softkey, then press arrow keys
repeatedly until "System" appears
Press "Ok" softkey, then press arrow keys
repeatedly until the corresponding MSN
appears
Press "Ok" softkey. If an MSN has already
been entered, it will appear now
Softtaste "Ok" drücken. Falls bereits eine
MSN eingegeben wurde, wird diese
angezeigt
Press arrow keys repeatedly until "Mel.
MSN A:1" appears. If a name has already
been entered, it will appear now
Press "New" softkey
Press arrow keys to select the melody digit
you want
Press "Ok" softkey
Press "Back" softkey five times…
Note: • The base station ringer cannot be set specifically for each MSN. If several hand-
sets with different MSN are operated on a base station, we recommend that you
switch off the base station ringer (see page 64).
Intern Menü
Einstellen
Zurück Ok
System
Zurück Ok
Name/Nr.MSN
Zurück Ok
MSN A
Zurück Ok
MSN A
Zurück Neu
Mel.MSN A:1
Zurück Neu
Intern Menü
Melodie 1
Zurück
Mel.MSN A:3
Zurück Neu
Melodie 3
Zurück Ok

21
Basic settings
Personal Identification Number (PIN)
Your personal settings on the telephone can be protected in part by using two different, four-digit PINs.
The system PIN is required if you want to protect the system settings
• Call barring
• Units/amount display
• Log on/log off
• Resetting the base station to the default settings
• Resetting the system settings (call distribution and call barring)
• MSN configuration
• Direct call
• Call diversion
• Select MSN
• Call distribution
• System secret number
against unauthorised access.
With the handset PIN you can protect your telephone against
• unauthorised resetting of the name directory
• unauthorised resetting to the default settings
• handset secret number
geschützt werden.
In the default settings the handset PIN and system PIN are set to "0000", i.e. the PIN function is
deactivated. The protect function is activated when you replace the "0000" number with your
own personal digit sequence "XXXX".
Note: • If you forget the system PIN, you will have to call out the Telekom Custo-
mer Service at your expense to intervene on the telephone. Forgetting
the system PIN is like losing a key.
22
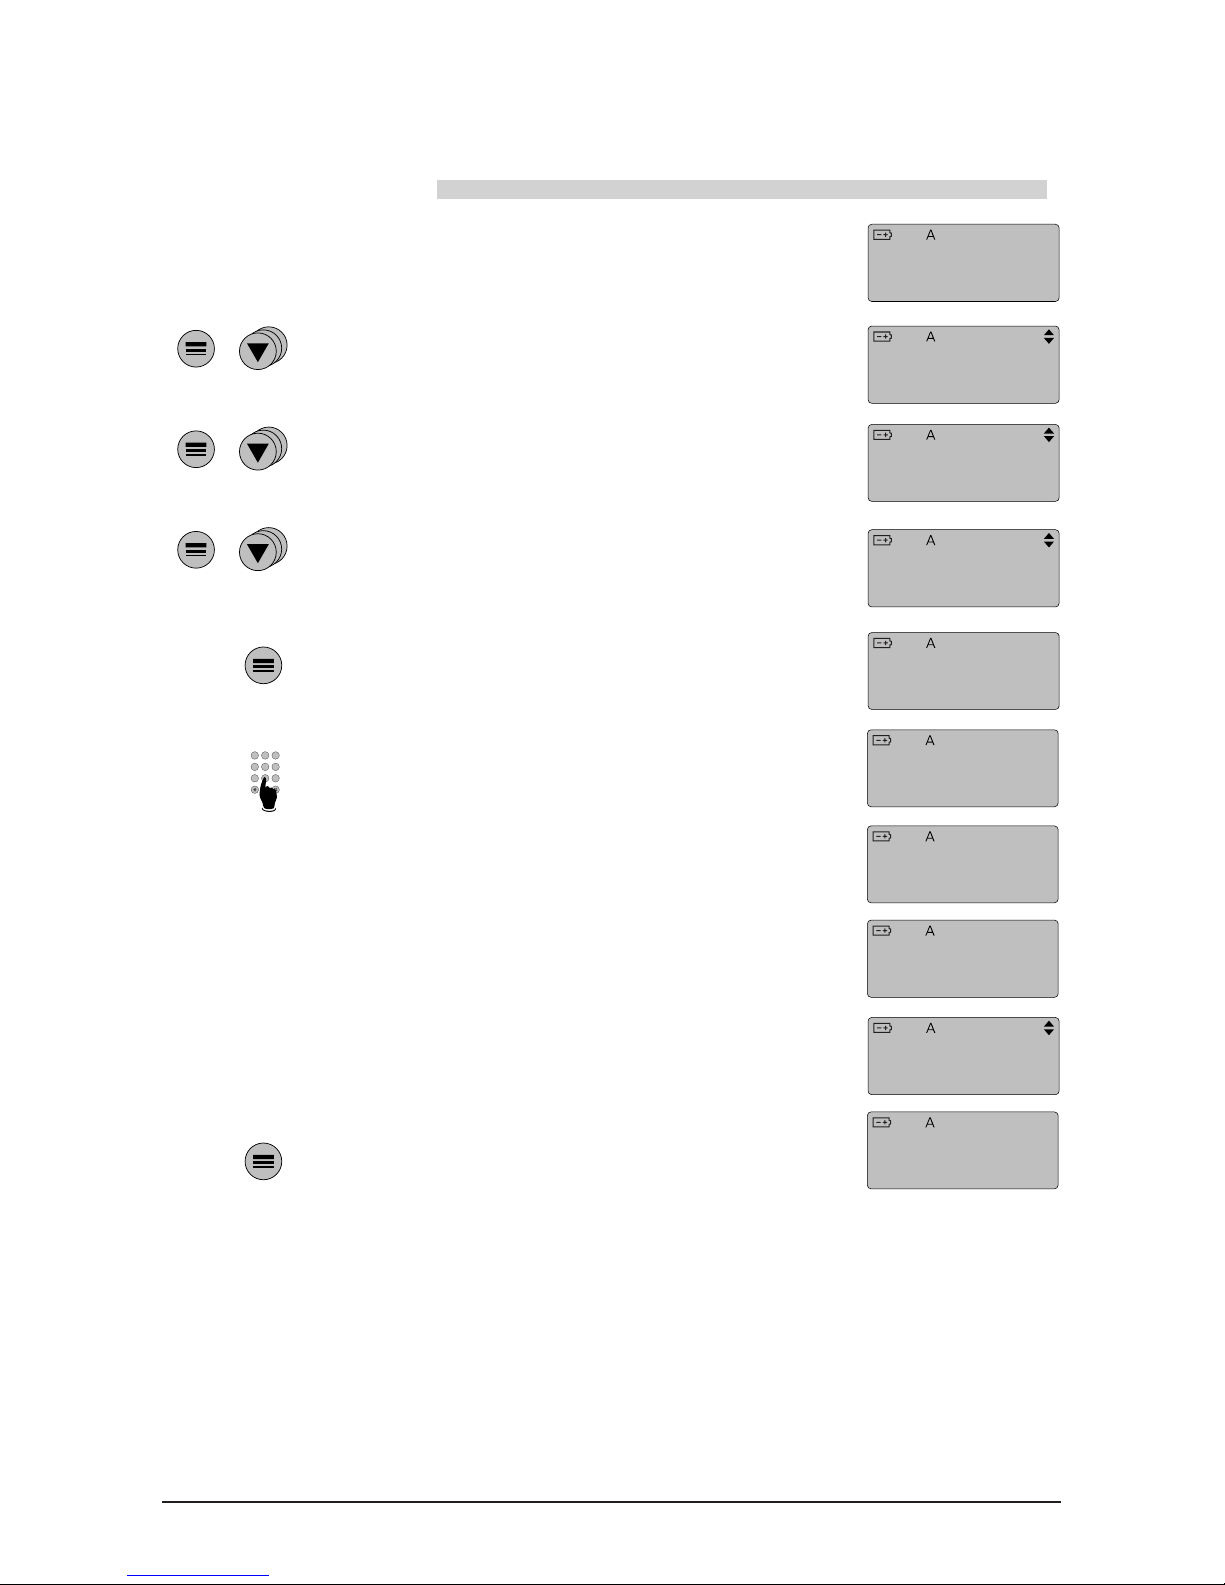
Basic settings
Entering a new system PIN
Handset switched to ON
Press "Menu" softkey, then press arrow
keys repeatedly until "Setup" appears
Press "Ok" softkey, then press arrow keys
repeatedly until "System" appears
Press "Ok" softkey, then press arrow keys
repeatedly until "System-PIN" appears
Press "Ok" softkey
0
7 98
4 65
1 32
Enter the new system PIN (four digits)
A " *" appears on the display for every digit
you enter.
Repeat the new system PIN
The new PIN is now stored
Press "Back" softkey three times…
Note: • To deactivate the PIN function, simply replace your personal digit sequence
"XXXX" with "0000".
• If a system PIN already exists, the handset will prompt you for your old PIN before the new one can be entered.
Intern Menü
Einstellen
Zurück Ok
System
Zurück Ok
System-PIN
Zurück Ok
Neue PIN?
____
Intern Menü
Neue PIN?
***_
Wiederholen!
____
System-PIN
Zurück Ok
System-PIN
gespeichert

23
Basic settings
Entering a new handset PIN
Handset switched to ON
Press "Menu" softkey, then press arrow
keys repeatedly until "Setup" appears
Press "Ok" softkey, then press arrow keys
repeatedly until "Device-PIN" appears
Press "Ok" softkey
0
7 98
4 65
1 32
Enter the new device PIN (four digits)
A "*" appears on the display for every digit
you enter.
Repeat the new device PIN
The new PIN is now stored
Press "Back" softkey twice…
Note: • To deactivate the PIN function, simply replace your personal digit sequence
"XXXX" with "0000".
• If a device PIN already exists, the handset will prompt you for your old PIN
before the new one can be entered.
Intern Menü
Einstellen
Zurück Ok
Geräte-PIN
Zurück Ok
Neue PIN?
____
Intern Menü
Neue PIN?
***_
Geräte-PIN
Zurück Ok
Wiederholen!
____
Geräte-PIN
gespeichert
 Loading...