

Page 1
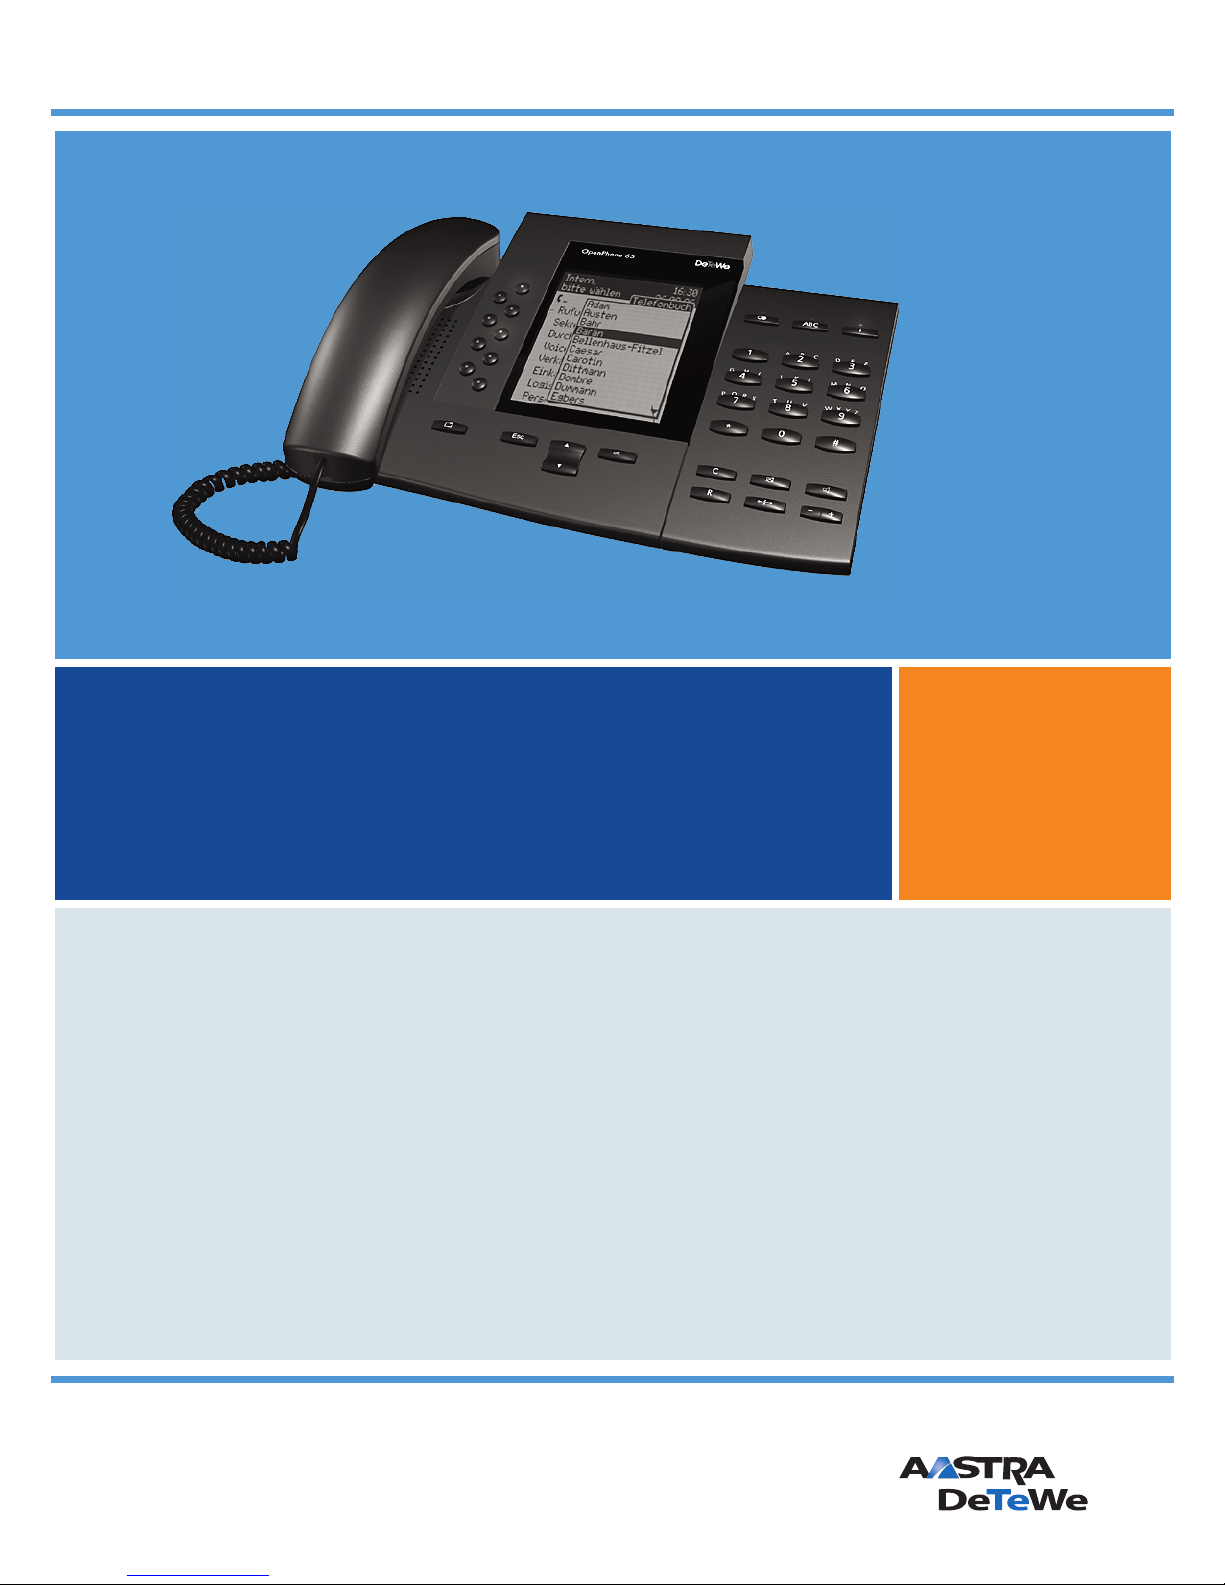
OpenPhone 61, 63, 65
on the Communications Systems
OpenCom 100 and OpenCom X300
User Guide
Page 2

Welcome to Aastra DeTeWe
Thank you for choosing this Aastra DeTeWe product. Our product meets the
strictest requirements with regard to quality and design.
This user guide will show you how to use your OpenPhone 71, 73 or 75 and answer
most of the questions that may arise.
If you require further technical support or information about other Aastra DeTeWe
products, please refer to our website at www.Aastra-DeTeWe.de.
It provides additional notes and tips on the product. We hope you enjoy using
OpenPhone.
OpenCom 100 and OpenCom X300 Product Families
This user guide applies to the OpenCom 100 and OpenCom X300 product families.
If a reference is made in the text to the OpenCom, the description applies to all
systems; if the individual characteristics are different, a special note is given.
OpenCom 100 Product Family
This product family comprises the OpenCom 107, OpenCom 130, OpenCom 131,
OpenCom 150 and OpenCom 510 communications systems.
OpenCom X300 Product Family
At the moment this product family comprises the OpenCom X320 communications system.
Page 3
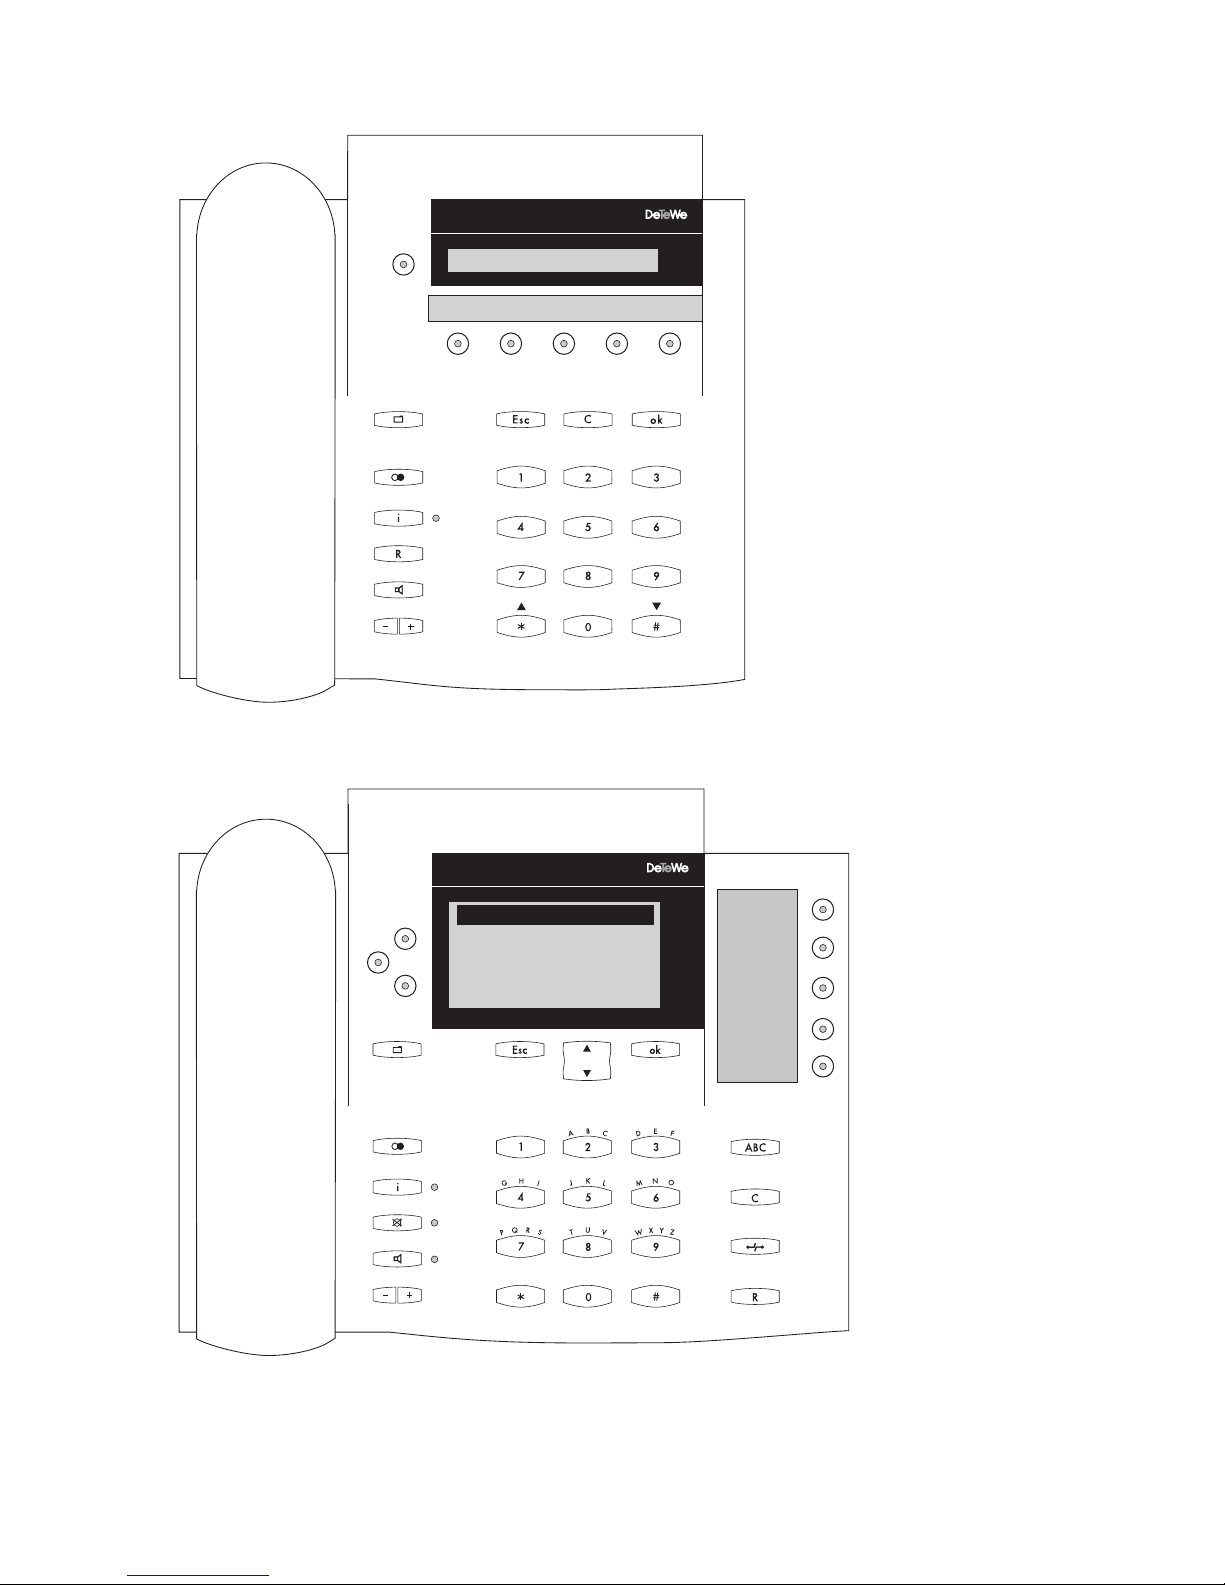
OpenPhone 61
& Hermann
E-Mail Toggle Conference Follow me Secretary
OpenPhone 61
B
C
A
H
G
R
Q
P
K
I
S
L
J
U
V
T
OpenPhone 63
Internal dialling 01:57
& 31
Charges
Telephone lock
E
F
D
N
O
M
Y
X
Z
W
E-Mail
Toggle
Conference
Follow me
OpenPhone 63
Secretary
Page 4
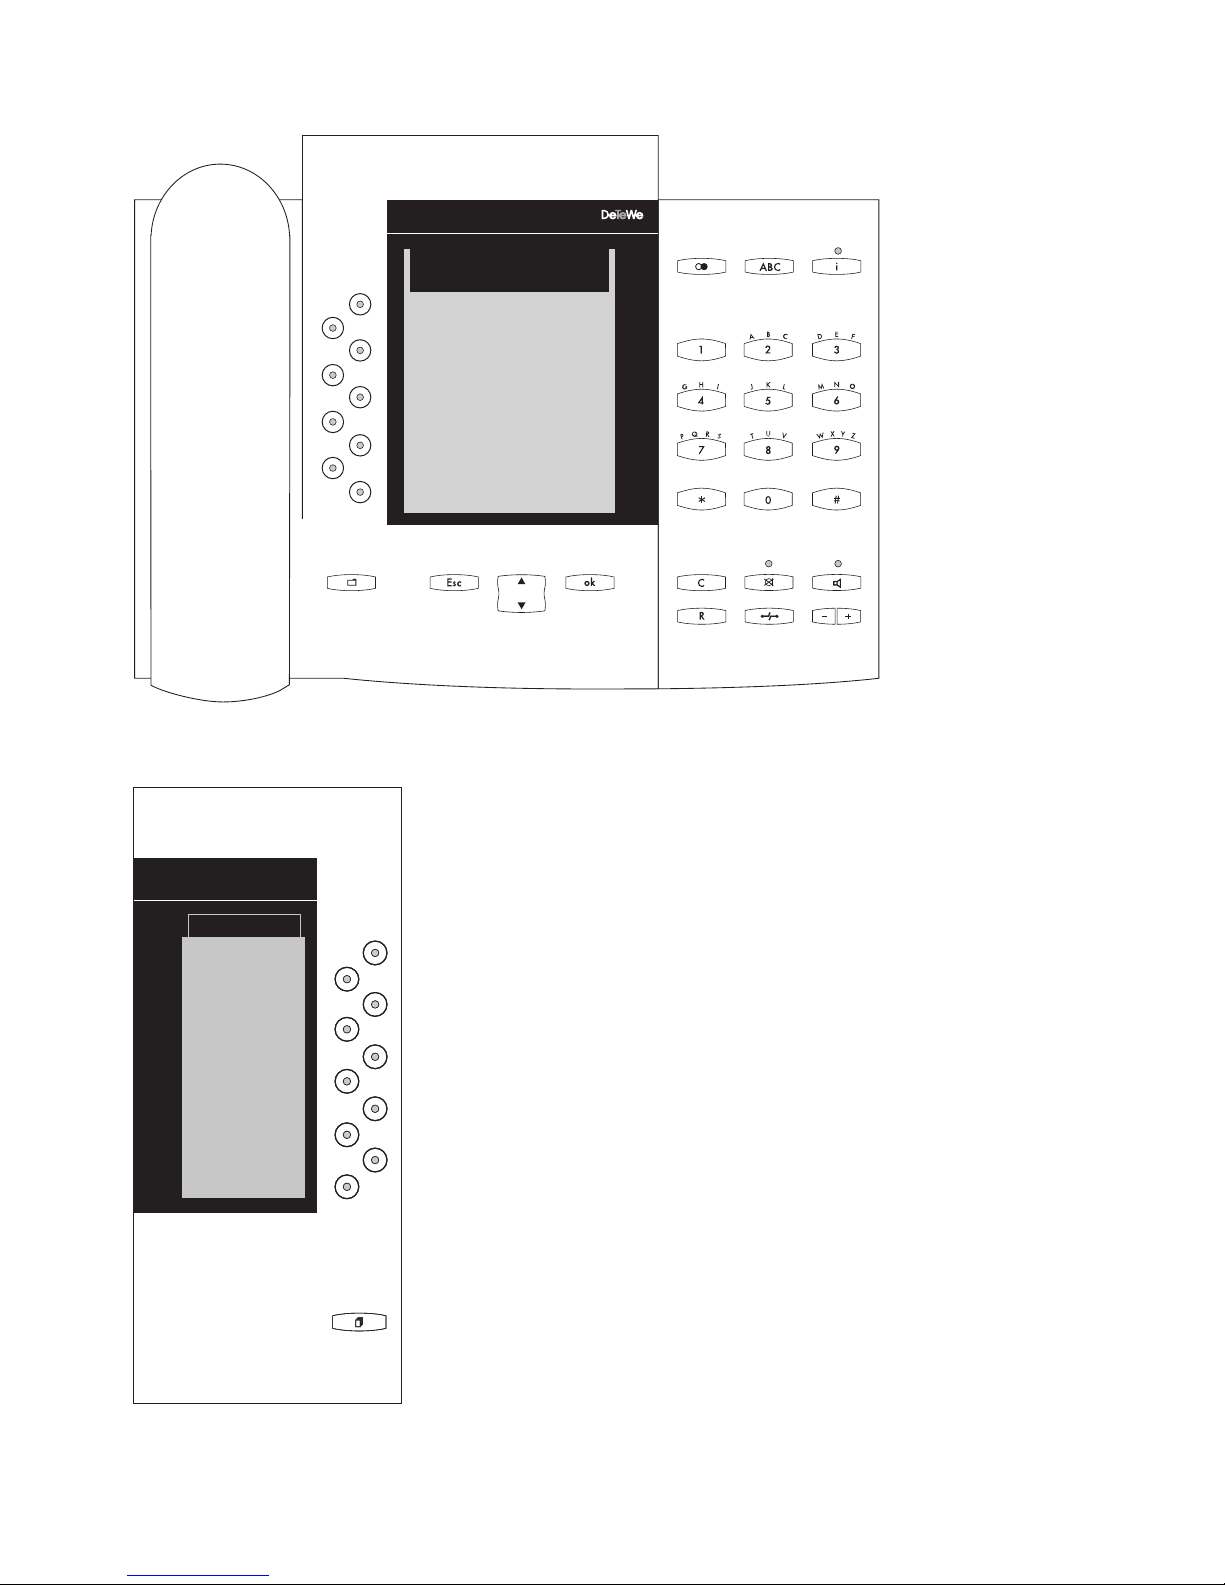
OpenPhone 65
OpenPhone 65
Internal dialling
Fri.22.Feb.02
& 33
Missed calls
E-Mail
Appointments
Voicebox mess.
Transfer
Charges
Messenger
Time control
12:35
Charges
Toggle
Conference
E-Mail
Appointments
Add-on device for the OpenPhone 65
Page 5

Table of Contents
1. System Telephones on the OpenCom 100/OpenCom X300. . . . . 7
1.1 Using Your Telephone . . . . . . . . . . . . . . . . . . . . . . . . . . . . . . . . . . . . . . . . . . . . 8
1.1.1 Safety Precautions . . . . . . . . . . . . . . . . . . . . . . . . . . . . . . . . . . . . . . . . . . . . . . . . 8
1.1.2 Declarations of Conformity . . . . . . . . . . . . . . . . . . . . . . . . . . . . . . . . . . . . . . . 8
1.1.3 Installation Site . . . . . . . . . . . . . . . . . . . . . . . . . . . . . . . . . . . . . . . . . . . . . . . . . . . 9
1.1.4 Cleaning . . . . . . . . . . . . . . . . . . . . . . . . . . . . . . . . . . . . . . . . . . . . . . . . . . . . . . . . . 9
1.1.5 Adjusting the Inclination. . . . . . . . . . . . . . . . . . . . . . . . . . . . . . . . . . . . . . . . . . 9
1.1.6 Wall Mounting. . . . . . . . . . . . . . . . . . . . . . . . . . . . . . . . . . . . . . . . . . . . . . . . . . .10
1.1.7 Labelling the Keys . . . . . . . . . . . . . . . . . . . . . . . . . . . . . . . . . . . . . . . . . . . . . . .11
1.2 Add-ons. . . . . . . . . . . . . . . . . . . . . . . . . . . . . . . . . . . . . . . . . . . . . . . . . . . . . . . . .12
1.2.1 U
1.2.2 a/b Adapter . . . . . . . . . . . . . . . . . . . . . . . . . . . . . . . . . . . . . . . . . . . . . . . . . . . . .15
1.2.3 Audio Adapter. . . . . . . . . . . . . . . . . . . . . . . . . . . . . . . . . . . . . . . . . . . . . . . . . . .16
1.3 Key Assignments . . . . . . . . . . . . . . . . . . . . . . . . . . . . . . . . . . . . . . . . . . . . . . . .18
1.3.1 Dial Keypad with ABC Assignment . . . . . . . . . . . . . . . . . . . . . . . . . . . . . . .18
1.3.2 Call Key 1 of the Telephone . . . . . . . . . . . . . . . . . . . . . . . . . . . . . . . . . . . . . .18
1.3.3 Call Keys with Other Telephone Numbers. . . . . . . . . . . . . . . . . . . . . . . . .18
1.3.4 MenuCard Key. . . . . . . . . . . . . . . . . . . . . . . . . . . . . . . . . . . . . . . . . . . . . . . . . . .19
1.3.5 Info Key . . . . . . . . . . . . . . . . . . . . . . . . . . . . . . . . . . . . . . . . . . . . . . . . . . . . . . . . .19
1.3.6 ABC Key . . . . . . . . . . . . . . . . . . . . . . . . . . . . . . . . . . . . . . . . . . . . . . . . . . . . . . . . .19
1.3.7 Arrow Keys . . . . . . . . . . . . . . . . . . . . . . . . . . . . . . . . . . . . . . . . . . . . . . . . . . . . . .20
1.3.8 OK Key . . . . . . . . . . . . . . . . . . . . . . . . . . . . . . . . . . . . . . . . . . . . . . . . . . . . . . . . . .20
1.3.9 Redial Key . . . . . . . . . . . . . . . . . . . . . . . . . . . . . . . . . . . . . . . . . . . . . . . . . . . . . . .20
1.3.10 Enquiry Key . . . . . . . . . . . . . . . . . . . . . . . . . . . . . . . . . . . . . . . . . . . . . . . . . . . . .20
1.3.11 Hands-Free/Open-Listening Key . . . . . . . . . . . . . . . . . . . . . . . . . . . . . . . . .20
1.3.12 Disconnect Key . . . . . . . . . . . . . . . . . . . . . . . . . . . . . . . . . . . . . . . . . . . . . . . . . .20
1.3.13 Muting Key. . . . . . . . . . . . . . . . . . . . . . . . . . . . . . . . . . . . . . . . . . . . . . . . . . . . . .21
1.3.14 C Key. . . . . . . . . . . . . . . . . . . . . . . . . . . . . . . . . . . . . . . . . . . . . . . . . . . . . . . . . . . .21
1.3.15 Plus/Minus Key . . . . . . . . . . . . . . . . . . . . . . . . . . . . . . . . . . . . . . . . . . . . . . . . . .21
1.3.16 ESC Key . . . . . . . . . . . . . . . . . . . . . . . . . . . . . . . . . . . . . . . . . . . . . . . . . . . . . . . . .22
1.3.17 Programmable Keys with LED Display . . . . . . . . . . . . . . . . . . . . . . . . . . . .22
Adapter . . . . . . . . . . . . . . . . . . . . . . . . . . . . . . . . . . . . . . . . . . . . . . . . . . . . .13
pn
1.4 Display and MenuCards. . . . . . . . . . . . . . . . . . . . . . . . . . . . . . . . . . . . . . . . . .24
1.4.1 Changing the Language . . . . . . . . . . . . . . . . . . . . . . . . . . . . . . . . . . . . . . . . .24
1.4.2 Info Line(s) . . . . . . . . . . . . . . . . . . . . . . . . . . . . . . . . . . . . . . . . . . . . . . . . . . . . . .25
1.4.3 Key Lines . . . . . . . . . . . . . . . . . . . . . . . . . . . . . . . . . . . . . . . . . . . . . . . . . . . . . . . .26
1.4.4 MenuCard Display . . . . . . . . . . . . . . . . . . . . . . . . . . . . . . . . . . . . . . . . . . . . . . .27
1.4.5 Invoking MenuCards and Selecting Items from the List. . . . . . . . . . . .28
1
Page 6

1.4.6 Setting Windows and their Characteristics . . . . . . . . . . . . . . . . . . . . . . . .29
1.4.7 Toggling . . . . . . . . . . . . . . . . . . . . . . . . . . . . . . . . . . . . . . . . . . . . . . . . . . . . . . . .30
1.4.8 Entering/Deleting Digits . . . . . . . . . . . . . . . . . . . . . . . . . . . . . . . . . . . . . . . . .30
1.4.9 Deleting Lists. . . . . . . . . . . . . . . . . . . . . . . . . . . . . . . . . . . . . . . . . . . . . . . . . . . .30
1.4.10 Entering Text . . . . . . . . . . . . . . . . . . . . . . . . . . . . . . . . . . . . . . . . . . . . . . . . . . . .31
1.4.11 Automatic Exit. . . . . . . . . . . . . . . . . . . . . . . . . . . . . . . . . . . . . . . . . . . . . . . . . . .31
1.5 The Keypad Module on the OpenPhone 65 . . . . . . . . . . . . . . . . . . . . . . .32
1.5.1 Selecting the Function Level . . . . . . . . . . . . . . . . . . . . . . . . . . . . . . . . . . . . .33
1.5.2 Operating the Keypad Module Keys . . . . . . . . . . . . . . . . . . . . . . . . . . . . . .33
1.6 External Audio Devices . . . . . . . . . . . . . . . . . . . . . . . . . . . . . . . . . . . . . . . . . .33
1.6.1 Configuring Audio Devices. . . . . . . . . . . . . . . . . . . . . . . . . . . . . . . . . . . . . . .33
1.6.2 Using the Audio Devices . . . . . . . . . . . . . . . . . . . . . . . . . . . . . . . . . . . . . . . . .34
2. Making Calls . . . . . . . . . . . . . . . . . . . . . . . . . . . . . . . . . . . . . . . . . . . . . . 36
2.1 General Functions . . . . . . . . . . . . . . . . . . . . . . . . . . . . . . . . . . . . . . . . . . . . . . .36
2.1.1 Internal and External Telephone Numbers . . . . . . . . . . . . . . . . . . . . . . . .36
2.1.2 Signalling on the Call Keys . . . . . . . . . . . . . . . . . . . . . . . . . . . . . . . . . . . . . . .37
2.1.3 Manual or Automatic Trunk Line Seizure . . . . . . . . . . . . . . . . . . . . . . . . .37
2.1.4 Calls in the Call-waiting Queue . . . . . . . . . . . . . . . . . . . . . . . . . . . . . . . . . . .38
2.1.5 Block Dialling/Automatic Dialling . . . . . . . . . . . . . . . . . . . . . . . . . . . . . . . .38
2.1.6 DTMF Postdial/VF Signalling . . . . . . . . . . . . . . . . . . . . . . . . . . . . . . . . . . . . .39
2.1.7 Muting . . . . . . . . . . . . . . . . . . . . . . . . . . . . . . . . . . . . . . . . . . . . . . . . . . . . . . . . . .39
2.1.8 Call-charge Display, Duration Display. . . . . . . . . . . . . . . . . . . . . . . . . . . . .39
2.1.9 Adjusting the Volume with the Plus/Minus Key . . . . . . . . . . . . . . . . . . .39
2.1.10 Redialling . . . . . . . . . . . . . . . . . . . . . . . . . . . . . . . . . . . . . . . . . . . . . . . . . . . . . . .40
2.1.11 Hands-free, Open-listening Mode . . . . . . . . . . . . . . . . . . . . . . . . . . . . . . . .41
2.1.12 Blocked/Unblocked Telephone Numbers . . . . . . . . . . . . . . . . . . . . . . . . .41
2.1.13 Keypad Dialling. . . . . . . . . . . . . . . . . . . . . . . . . . . . . . . . . . . . . . . . . . . . . . . . . .41
2.1.14 Least Cost Routing (LCR) . . . . . . . . . . . . . . . . . . . . . . . . . . . . . . . . . . . . . . . . .42
2.1.15 Transmission of Call Numbers . . . . . . . . . . . . . . . . . . . . . . . . . . . . . . . . . . . .43
2.1.16 MenuCards Before and During a Call . . . . . . . . . . . . . . . . . . . . . . . . . . . . .44
2.1.17 MenuCard “Selection” in the Idle State. . . . . . . . . . . . . . . . . . . . . . . . . . . .44
2.2 Making External/Internal Calls. . . . . . . . . . . . . . . . . . . . . . . . . . . . . . . . . . . .45
2.2.1 Making an External Call . . . . . . . . . . . . . . . . . . . . . . . . . . . . . . . . . . . . . . . . . .46
2.2.2 Making an Internal Call . . . . . . . . . . . . . . . . . . . . . . . . . . . . . . . . . . . . . . . . . .46
2.2.3 Using Destination Keys to Make Calls . . . . . . . . . . . . . . . . . . . . . . . . . . . . .47
2.2.4 Using Routes to Make Calls. . . . . . . . . . . . . . . . . . . . . . . . . . . . . . . . . . . . . . .47
2.2.5 Busy Display for Trunk Groups and Routes on the
System Telephone . . . . . . . . . . . . . . . . . . . . . . . . . . . . . . . . . . . . . . . . . . . . . . .48
2.2.6 Ending Calls . . . . . . . . . . . . . . . . . . . . . . . . . . . . . . . . . . . . . . . . . . . . . . . . . . . . .48
2
Page 7

2.2.7 MenuCard “Conversation”. . . . . . . . . . . . . . . . . . . . . . . . . . . . . . . . . . . . . . . .48
2.2.8 MenuCard “Busy” . . . . . . . . . . . . . . . . . . . . . . . . . . . . . . . . . . . . . . . . . . . . . . . .51
2.3 Accepting Calls . . . . . . . . . . . . . . . . . . . . . . . . . . . . . . . . . . . . . . . . . . . . . . . . . .52
2.3.1 By Lifting the Handset or Pressing a Key . . . . . . . . . . . . . . . . . . . . . . . . . .52
2.3.2 Automatic Call Connection. . . . . . . . . . . . . . . . . . . . . . . . . . . . . . . . . . . . . . .53
2.3.3 During Another Call . . . . . . . . . . . . . . . . . . . . . . . . . . . . . . . . . . . . . . . . . . . . .53
2.3.4 MenuCard “Call waiting” . . . . . . . . . . . . . . . . . . . . . . . . . . . . . . . . . . . . . . . . .54
2.3.5 MenuCard “Call” . . . . . . . . . . . . . . . . . . . . . . . . . . . . . . . . . . . . . . . . . . . . . . . . .54
2.3.6 Voicebox Queries . . . . . . . . . . . . . . . . . . . . . . . . . . . . . . . . . . . . . . . . . . . . . . . .55
2.4 Enquiry, Toggling, Transfer and Conference. . . . . . . . . . . . . . . . . . . . . . .55
2.4.1 Enquiry/Toggling by means of the R-Key or Another Call Key. . . . . .55
2.4.2 Transferring an Internal/External Call to an Internal Subscriber . . . .56
2.4.3 Transferring an External Call to an External Subscriber . . . . . . . . . . . .57
2.4.4 MenuCard “Subscr (Subscriber) on hold” . . . . . . . . . . . . . . . . . . . . . . . . .57
2.4.5 Internal/External Three-Party Conference. . . . . . . . . . . . . . . . . . . . . . . . .58
2.4.6 MenuCard “Conference” . . . . . . . . . . . . . . . . . . . . . . . . . . . . . . . . . . . . . . . . .58
2.5 Special Calls/Functions . . . . . . . . . . . . . . . . . . . . . . . . . . . . . . . . . . . . . . . . . .59
2.5.1 Accepting an Appointment Call . . . . . . . . . . . . . . . . . . . . . . . . . . . . . . . . . .59
2.5.2 Baby Call . . . . . . . . . . . . . . . . . . . . . . . . . . . . . . . . . . . . . . . . . . . . . . . . . . . . . . . .59
2.5.3 Announcements. . . . . . . . . . . . . . . . . . . . . . . . . . . . . . . . . . . . . . . . . . . . . . . . .60
2.5.4 Answering a Callback . . . . . . . . . . . . . . . . . . . . . . . . . . . . . . . . . . . . . . . . . . . .61
2.5.5 Doorbell, Door Opener . . . . . . . . . . . . . . . . . . . . . . . . . . . . . . . . . . . . . . . . . .61
2.5.6 Entrance Intercom Calls . . . . . . . . . . . . . . . . . . . . . . . . . . . . . . . . . . . . . . . . . .62
2.6 Making Calls from the Telephone Book . . . . . . . . . . . . . . . . . . . . . . . . . . .63
2.6.1 The Telephone Book . . . . . . . . . . . . . . . . . . . . . . . . . . . . . . . . . . . . . . . . . . . . .63
2.6.2 MenuCard “Phone book” . . . . . . . . . . . . . . . . . . . . . . . . . . . . . . . . . . . . . . . .63
2.6.3 Speed Dialling. . . . . . . . . . . . . . . . . . . . . . . . . . . . . . . . . . . . . . . . . . . . . . . . . . .64
2.6.4 Add Phone Numbers to Telephone Book from Lists or during a Call. .
65
3. Team Functions . . . . . . . . . . . . . . . . . . . . . . . . . . . . . . . . . . . . . . . . . . . 68
3.1 Managing Calls in a Team . . . . . . . . . . . . . . . . . . . . . . . . . . . . . . . . . . . . . . . .68
3.1.1 Making External/Internal Calls . . . . . . . . . . . . . . . . . . . . . . . . . . . . . . . . . . .68
3.1.2 Accepting Calls . . . . . . . . . . . . . . . . . . . . . . . . . . . . . . . . . . . . . . . . . . . . . . . . . .69
3.1.3 Enquiry, Toggling and Transfer . . . . . . . . . . . . . . . . . . . . . . . . . . . . . . . . . . .70
3.2 Programming the Call Keys . . . . . . . . . . . . . . . . . . . . . . . . . . . . . . . . . . . . . .71
3.2.1 MenuCard “Trunk key” . . . . . . . . . . . . . . . . . . . . . . . . . . . . . . . . . . . . . . . . . . .72
3.2.2 MenuCard “Team Key” . . . . . . . . . . . . . . . . . . . . . . . . . . . . . . . . . . . . . . . . . . .73
3.2.3 MenuCard “Busy Key”. . . . . . . . . . . . . . . . . . . . . . . . . . . . . . . . . . . . . . . . . . . .74
3
Page 8

3.2.4 Direct-call Key . . . . . . . . . . . . . . . . . . . . . . . . . . . . . . . . . . . . . . . . . . . . . . . . . . .74
4. Remote-controlled Functions . . . . . . . . . . . . . . . . . . . . . . . . . . . . . . 75
4.1 Remote-controlled Dialling (Call Through). . . . . . . . . . . . . . . . . . . . . . . .75
4.2 Remote-programmable Call Forwarding. . . . . . . . . . . . . . . . . . . . . . . . . .76
4.3 Remote-programmable Voicebox Configuration and Query . . . . . . .76
4.3.1 Setting up an Internet Connection from Remote (ISP Trigger Call) .77
5. Features and MenuCards . . . . . . . . . . . . . . . . . . . . . . . . . . . . . . . . . . 78
5.1 How to Set Features . . . . . . . . . . . . . . . . . . . . . . . . . . . . . . . . . . . . . . . . . . . . .78
5.1.1 Using MenuCards. . . . . . . . . . . . . . . . . . . . . . . . . . . . . . . . . . . . . . . . . . . . . . . .78
5.1.2 Using Programmed Keys . . . . . . . . . . . . . . . . . . . . . . . . . . . . . . . . . . . . . . . . .78
5.1.3 Using the Star and Hash Keys . . . . . . . . . . . . . . . . . . . . . . . . . . . . . . . . . . . .78
5.2 Main Menu . . . . . . . . . . . . . . . . . . . . . . . . . . . . . . . . . . . . . . . . . . . . . . . . . . . . . .79
5.2.1 MenuCard “Main menu” . . . . . . . . . . . . . . . . . . . . . . . . . . . . . . . . . . . . . . . . .79
5.2.2 MenuCard “Calls” . . . . . . . . . . . . . . . . . . . . . . . . . . . . . . . . . . . . . . . . . . . . . . . .80
5.2.3 MenuCard “Call forwarding” . . . . . . . . . . . . . . . . . . . . . . . . . . . . . . . . . . . . .83
5.2.4 MenuCard “Messages” . . . . . . . . . . . . . . . . . . . . . . . . . . . . . . . . . . . . . . . . . . .87
5.2.5 MenuCard “Phone settings” . . . . . . . . . . . . . . . . . . . . . . . . . . . . . . . . . . . . . .88
5.2.6 MenuCard “Protection” . . . . . . . . . . . . . . . . . . . . . . . . . . . . . . . . . . . . . . . . . .90
5.2.7 MenuCard “Connections” . . . . . . . . . . . . . . . . . . . . . . . . . . . . . . . . . . . . . . . .92
5.2.8 MenuCard “Phone book”. . . . . . . . . . . . . . . . . . . . . . . . . . . . . . . . . . . . . . . . .95
5.2.9 MenuCard “Hotel” . . . . . . . . . . . . . . . . . . . . . . . . . . . . . . . . . . . . . . . . . . . . . . .97
5.2.10 MenuCard “Voicebox” . . . . . . . . . . . . . . . . . . . . . . . . . . . . . . . . . . . . . . . . . . .97
5.2.11 MenuCard “Central settings” . . . . . . . . . . . . . . . . . . . . . . . . . . . . . . . . . . . . .98
5.3 Shortcut Menus . . . . . . . . . . . . . . . . . . . . . . . . . . . . . . . . . . . . . . . . . . . . . . . . .99
5.3.1 MenuCard “Info”. . . . . . . . . . . . . . . . . . . . . . . . . . . . . . . . . . . . . . . . . . . . . . . . .99
5.3.2 MenuCard “Active features” . . . . . . . . . . . . . . . . . . . . . . . . . . . . . . . . . . . . 100
5.3.3 MenuCard “Trunk key” . . . . . . . . . . . . . . . . . . . . . . . . . . . . . . . . . . . . . . . . . 100
5.3.4 MenuCard “Team key” . . . . . . . . . . . . . . . . . . . . . . . . . . . . . . . . . . . . . . . . . 101
5.3.5 MenuCard “Busy key” . . . . . . . . . . . . . . . . . . . . . . . . . . . . . . . . . . . . . . . . . . 101
5.4 Programmable Keys . . . . . . . . . . . . . . . . . . . . . . . . . . . . . . . . . . . . . . . . . . . 101
5.4.1 Programming a Destination. . . . . . . . . . . . . . . . . . . . . . . . . . . . . . . . . . . . 101
5.4.2 Programming Functions . . . . . . . . . . . . . . . . . . . . . . . . . . . . . . . . . . . . . . . 102
5.4.3 Stacking or Linking Functions . . . . . . . . . . . . . . . . . . . . . . . . . . . . . . . . . . 104
5.5 MenuCards in the Idle State . . . . . . . . . . . . . . . . . . . . . . . . . . . . . . . . . . . . 106
4
Page 9

6. Notes on disposal . . . . . . . . . . . . . . . . . . . . . . . . . . . . . . . . . . . . . . . . 107
Index . . . . . . . . . . . . . . . . . . . . . . . . . . . . . . . . . . . . . . . . . . . . . . . . . . . . 108
5
Page 10

6
Page 11

System Telephones on the OpenCom 100/OpenCom X300
1. System Telephones on
the OpenCom 100/OpenCom X300
The OpenPhone 61, OpenPhone 63 and OpenPhone 65 are corded system
telephones that you can operate on your OpenCom 100 or OpenCom X300 communications system. The novel MenuCard display makes your telephone easy to
operate and gives you fast access to your system’s wide range of different functions and features.
The OpenPhone 63 and the OpenPhone 65 have the same functionality, the only
difference being the size of the display and the number of programmable keys
available. Furthermore, the OpenPhone 65 can be expanded by means of an addon keypad module with a display.
The OpenPhone 63 and the OpenPhone 65 can be fitted with various adapters to
meet a wide range of specific requirements.
You can activate the features and program functions on the telephones themselves, or equally conveniently, use the Configurator of the OpenCom 100/
OpenCom X300.
Familiarise yourself with your telephone. Using this guide, you will learn how to
use many new functions that make communication and organisation easier.
The Glossary
Should you need further information about any system features described in this
user guide, please read the Glossary which comes with your communications
system.
You Need Authorisation
Most of the features mentioned in this user guide are only available to you if you
have the appropriate authorisation. This will be set up by your system administrator when configuring the communications system.
If you are unable to use a particular feature or have any questions, consult your
system administrator.
7
Page 12
System Telephones on the OpenCom 100/OpenCom X300 Using Your Telephone
Dealing with Malfunctions
Please refer to the chapter entitled “Frequently Asked Questions” in the “Mounting
and Commissioning” user guide for tips on how you can deal with any faults you
may experience with your telephone.
1.1 Using Your Telephone
1.1.1 Safety Precautions
The CE symbol on the product confirms that it meets the European guidelines on
user safety and electromagnetic compatibility valid at the time of authorisation.
WARNING! Do not open the telephone or the connected accessories,
as this could lead to you touching live parts.
Note: Repairs must only be carried out by authorised pers-
onnel.
■ Keep fluids and chemicals away from the telephone and its accessories.
■ Use only the AC adapter plug included in the delivery (if necessary).
■ Do not use AC adapter plugs that show visible damage (e.g. cracks in the
housing).
1.1.2 Declarations of Conformity
The OpenPhone 61, OpenPhone 63, OpenPhone 65 and OpenPhone 65 with
add-on keypad module conform to the requirements set down in the EU directive
99/5/EC. The Declarations of Conformity can be viewed at the Aastra DeTeWe Web
site at http://www.aastra-detewe.de.
8
Page 13

System Telephones on the OpenCom 100/OpenCom X300 Using Your Telephone
1.1.3 Installation Site
Do not install the telephone or its accessories
■ near water, moisture or in damp locations;
■ near sources of heat or in direct sunlight;
■ in unventilated rooms;
■ near devices that generate strong magnetic fields, electrical devices, fluore-
scent lamps, computers, radios or television sets;
■ in dusty places or places subjected to vibrations, shocks or extreme tempe-
rature fluctuations.
Place the telephones on a non-slip surface. The surface finish of your furniture may
affect the telephone’s pedestals, softening them and causing them to leave undesirable marks on your furniture.
1.1.4 Cleaning
Simply wipe your telephone with an antistatic or slightly damp cloth. Never use a
dry cloth or a cleaning agent.
1.1.5 Adjusting the Inclination
3
1
Pull the pedestals out (1) and turn them forwards or backwards (2) (two settings
are possible). Then push them back in again to fix their position (3).
2
9
Page 14
System Telephones on the OpenCom 100/OpenCom X300 Using Your Telephone
1.1.6 Wall Mounting
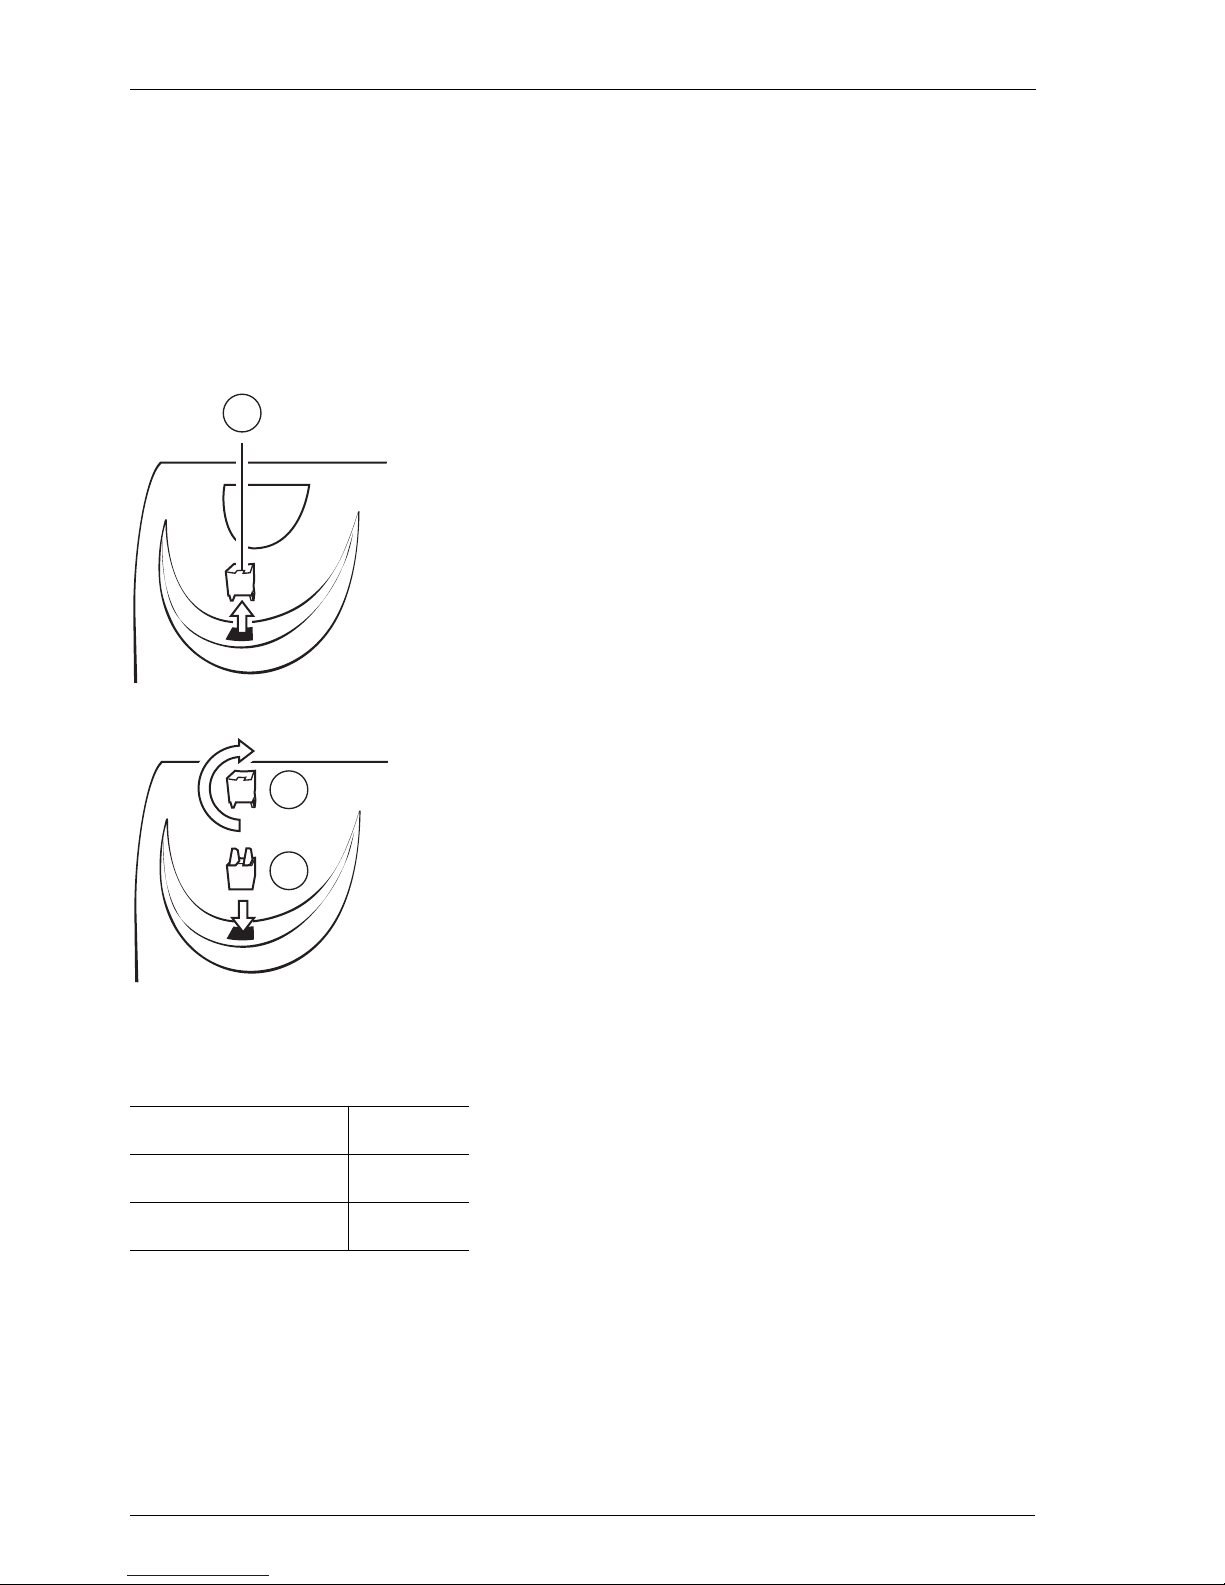
To mount your telephone to the wall, remove the pedestals by pulling them out
sideways, and insert them in the two recesses on the bottom of the telephone so
that it will hang directly against the wall later. Using a screwdriver, pry the
retention pin (1) for the handset out of its receptacle, turn it upside down (2) and
insert it again.
1
2
3
To mount your telephone to the wall, drill two holes at the following distance
apart:
OpenPhone 61 120 mm
OpenPhone 63 155 mm
OpenPhone 65 184 mm
Insert 6 mm screws in the holes, making sure their heads protrude 2.5 to 3 mm
from the wall and mount the telephone onto the screws.
10
Page 15

System Telephones on the OpenCom 100/OpenCom X300 Using Your Telephone
1.1.7 Labelling the Keys
The five keys to the right of the display of the OpenPhone 63can be programmed
as call keys or programmed with destinations or functions. The programming/assignment does not appear in the display. The OpenPhone 61 has five programmable keys below the display. Their assignment also does not have display support.
Inserting Label Strips
Label strips are supplied for the corresponding labelling. Proceed as follows to
label the insert:
■ Press down slightly on the bottom part of the cover, sliding it downwards so
that the top part of the cover snaps out and you can remove this and take out
the label strip. On the OpenPhone 61 slide the cover to the right to remove it.
■ Replace the printed strips.
■ To replace the cover, insert it in the slot, then slide it down and finally slide it up
until the catches snap into place. On the OpenPhone 61 you place the cover in
the slot and slide it to the left until it snaps into place.
Printing Label Strips
Using the Configurator of the Web console, you can print the labels for a selected
system telephone with the current key assignment (PBX Configuration: Devices:
System phones menu).
Labelling Function Keys
If you have programmed a function key then you can enter a label for this key
which will be shown in the display. You will find further information in the section
Programming a Key starting on page 103.
11
Page 16

System Telephones on the OpenCom 100/OpenCom X300 Add-ons
1.2 Add-ons
On the back of the OpenPhone 63 and the OpenPhone 65you will find sockets to
which add-ons and accessories can be connected, either directly or via various
adapters:
■ one socket on the OpenPhone 63, and
■ two sockets on the OpenPhone 65.
The following components are supported by the OpenCom 100/OpenCom X300:
■ U
■ a/b adapter
■ Power supply
■ Audio adapter
adapter
pn
(on a U
adapter and on an a/b adapter)
pn
The OpenPhone 63 and the OpenPhone 65 can be expanded as follows:
■ the OpenPhone 65 by up to three keypad modules.
Keypads are connected directly to the telephone (i.e. without adapters).
Please refer to the chapter entitled The Keypad Module on the OpenPhone 65
starting on page 32.
■ OpenPhone 63 and OpenPhone 65 can each be expanded by the connection
of a second OpenPhone.
A second telephone is connected via a U
adapter, if this is necessary. Only a limited number of system telephones can be
connected in this way for operation as second telephones.
■ OpenPhone 63 and OpenPhone 65 can each be expanded by various types of
external audio equipment, e.g. a headset or an external active speaker.
Connection is via an audio adapter.
Please refer to the chapter entitled External Audio Devices starting on page 33.
12
adapter and in addition via an AC
pn
Page 17

System Telephones on the OpenCom 100/OpenCom X300 Add-ons
The operating range of such add-ons depends on the maximum power of the Upn
interface of the communications system, and on the power consumption of the
respective equipment. The range can be increased by the deployment of
secondary AC adapters. For the relevant technical details and a complete overview
of the various equipment combinations that you can configure, please refer to the
chapter entitled “Accessories and Adapters” in the “Mounting and Commissioning” user guide. Please also refer to the information on the scope of available
features in expanded equipment combinations.
Note: Secondary devices are activated by the communications system. The communications system detects whenever
there are two adapters of the same type on an
OpenPhone 65. This is not permitted, and for this reason,
they are not released for operation.
CAUTIONT! Protect your equipment against static discharge!
Static electricity can damage the sensitive components of the OpenCom 100/
OpenCom X300. To avoid such damage when connecting add-ons, you must first
discharge the static electricity from your body. Work only in an antistatic environment. If possible, use conducting pads or antistatic mats.
1.2.1 Upn Adapter
A Upn adapter is an adapter with a Upn interface (1) for connecting an additional
OpenPhone, and a socket for an AC adapter (2).
You can use the AC adapter on the OpenPhone 63 and on the OpenPhone 65.
Note: Please operate only the AC adapter with the part no.
4505759 on the U
adapter with the part no. 4510694).
adapter (in Britain operate only the AC
pn
13
Page 18

System Telephones on the OpenCom 100/OpenCom X300 Add-ons
1
2
Upn adapter on the back of the OpenPhone 63
In order to install an adapter, you have to remove the cover from the back of the
OpenPhone. Insert the U
adapter in the socket until it snaps into place. It is pos-
pn
sible to install adapters during operation: you do not have to disconnect the telephone from the system in order to do this.
Note: In the case of a OpenPhone 65 you can plug a U
pn
ad-
apter into either of the two sockets. However, you can only
operate one U
Using the U
adapter you can connect an additional OpenPhone 63 or
pn
OpenPhone 65as a second telephone. A second telephone connected via a U
adapter on each OpenPhone 65.
pn
pn
adapter is completely independent of the first one. Connection via adapter is not a
parallel connection.
When connecting a second telephone, you require a UP cable. Use this cable to
connect the additional OpenPhone to the U
adapter (1) on the first telephone.
pn
The 2-wire UP cable must not exceed 30 m in length. Depending on the length of
the cable and the type of OpenPhone connected as a second telephone, there
may be insufficient feed power. This could result in a decrease of the ringer volume
and the open listening/hands-free volume of the second telephone. The feed
power can be increased by connecting an external AC adapter (2).
Note: U
adapters on the communications system can only
pn
be operated on telephones directly connected to the system. A U
adapter is not permitted on a second telephone.
pn
14
Page 19

System Telephones on the OpenCom 100/OpenCom X300 Add-ons
1.2.2 a/b Adapter
Using an a/b adapter, you can connect analogue telephones to the OpenPhone 63
and OpenPhone 65 system telephones.
Techni ca l Data
■ Dialling mode: DTMF
■ CLIP is not supported on connected analogue telephones.
■ Charge impulses are not transmitted, and charges are therefore not displayed
on analogue telephones.
Notes on connecting a/b adapters
The connection of an a/b adapter exceeds the feed power of the U
regardless of the range. For this reason you also have to connect a power supply to
the a/b adapter.
port (3 W),
pn
Note: Use the power supply with the part number 4505759;
in Britain the power supply with the part number 4510694.
You can connect one a/b adapter to an OpenPhone 63 or an OpenPhone 65.
You can connect one a/b adapter and one U
the telephone connected via the U
adapter, a OpenPhone 63 for example, no a/b
pn
adapter to an OpenPhone 65. On
pn
adapter can be operated.
If you combine an OpenPhone 65 via an a/b adapter and a U
adapter with two
pn
other telephones (i.e. three telephones altogether), you can make calls on a
maximum of two of them simultaneously.
CLIP = Calling Line Identification Presentation: Displays the telephone number of the caller.
15
Page 20

System Telephones on the OpenCom 100/OpenCom X300 Add-ons
1.2.3 Audio Adapter
The audio adapter is an adapter accessory with various sockets for connecting
external audio and signalling equipment.
You can use audio adapters on the OpenPhone 63 and on the OpenPhone 65 to
connect audio equipment and various accessories. The following interfaces are
available for external analogue equipment:
■ one 4-pole socket (1):
for connecting an ear cap, a second handset, a headset, an external active
loudspeaker, headphones or an external microphone
■ one stereo socket (2):
for connecting recording equipment
■ one dummy socket (3):
for a doorbell input
This connection is currently not supported by the OpenCom 100/
OpenCom X300, as the system uses a separate doorbell input.
■ one 6-pole socket (4):
for connecting a door display (a “door busy” indicator)
Note: The “door busy” indicator and the recording equipment are switched by the same relay. Although they can be
connected in parallel, they cannot be switched separately.
1 2
3 4
Audio adapter on the back of an OpenPhone 63
16
Page 21

System Telephones on the OpenCom 100/OpenCom X300 Add-ons
The safe operation of equipment in combination with audio equipment can only
be guaranteed when you use certified, original accessories. In order to avoid invalidating liability and warranty, connect only audio equipment certified for this
purpose via the audio adapter. You will find a list of such equipment in the
“Mounting and Commissioning” user guide. For further information, please
contact your Aastra DeTeWe Sales Department.
In order to install an adapter, you have to remove the cover from the back of the
OpenPhone. Insert the audio adapter in the socket until it snaps into place. It is
possible to install adapters during operation: you do not have to disconnect the
telephone from the communications system.
Connect the external equipment appropriately according to type.
Note: In the case of an OpenPhone 65, you can plug the
audio adapter into either of the two sockets. However, only
one audio adapter can be operated on each OpenPhone 65.
17
Page 22

System Telephones on the OpenCom 100/OpenCom X300 Key Assignments
1.3 Key Assignments
Note: Some of the keys have dual functionality (depending
on whether you simply press the key or press and hold it).
The keys are assigned on the telephone itself or via the Con-
figurator on the Web console.
The “MenuCards” described in what follows are windows that are displayed for the
purpose of setting features and functions. For more details, refer to the section
entitled Display and MenuCards starting on page 24.
1.3.1 Dial Keypad with ABC Assignment
This is for dialling telephone numbers or entering text. The key label does
not show all the available letters and special characters. For more information,
refer to the section entitled Entering Text on page 31.
1.3.2 Call Key 1 of the Telephone
The first of the keys allocated to the display (only one key on the OpenPhone
61) is occupied by your internal telephone number (main number). This internal
number is assigned an external number at which you can be reached. More than
one external number can be assigned to the key. If you wish to make a call, lifting
the handset seizes the key, and you can immediately dial an internal or external
number (depending on the system setting). Pressing and holding the key displays
a MenuCard which allows you to program telephone numbers (see the section
entitled MenuCard “Trunk key” starting on page 100).
A system setting makes it possible to have your internal number assigned to other
telephones as well. Calls will then be signalled to other telephones simultaneously.
1.3.3 Call Keys with Other Telephone Numbers
Additional internal numbers can be assigned to the keys to the left of the displays of the OpenPhones 63 and OpenPhone 65. Additional internal numbers can
also be assigned to the five programmable call keys to the right of the display on
the OpenPhone 63.
18
Page 23

System Telephones on the OpenCom 100/OpenCom X300 Key Assignments
These internal numbers are, in turn, assigned external numbers at which you can
be reached.
To make a call, you must first press the key. Pressing and holding the key displays a
MenuCard which allows you to program the functions of this key.
Note: To make team functions available, the system administrator can configure call keys as trunk keys, team keys,
busy keys or direct-call keys. For further information, please
refer to the chapters entitled Team Functions starting on
page 68 and “Team Functions” in the “Mounting and Commissioning” user guide.
1.3.4 MenuCard Key
This key is used to display MenuCards. A short press of the key shows a
selection of features that can be used in the current device status (e.g. during a
call). Pressing and holding the key shows the MenuCard containing the main
menu with all available settings.
Note: You need the appropriate authorisation to operate
this key on your system telephone. Consult your system administrator if your authorisation has to be changed.
1.3.5 Info Key
A short press of this key displays a MenuCard containing all the messages
that have arrived. If the LED next to the key flashes slowly, it means you are
receiving an incoming message. Pressing and holding the key down displays a
MenuCard containing the list of active features that restrict the reachability of the
telephone (e.g. call protection is on). The illuminated LED next to the key indicates
the status.
1.3.6 ABC Key
A short press of this key opens the MenuCard for the telephone book.
Pressing and holding the key shows you a list of the display languages you can set.
19
Page 24

System Telephones on the OpenCom 100/OpenCom X300 Key Assignments
Note: You need the appropriate authorisation to operate
this key on your system telephone. Consult your system administrator if your authorisation has to be changed.
1.3.7 Arrow Keys
These let you scroll through the MenuCards.
To do this on the OpenPhone 61, use the and keys.
1.3.8 OK Key
This is used to confirm your selection in the MenuCards.
1.3.9 Redial Key
Pressing this key opens a MenuCard containing a list of the last-dialled
numbers.
1.3.10 Enquiry Key
This is used to initiate an enquiry call.
1.3.11 Hands-Free/Open-Listening Key
This key (which has an LED) lets you make calls using the microphone and/
or loudspeaker. The illuminated LED of the key indicates that hands-free telephoning is activated. The LED flashes when open-listening is activated. On the
OpenPhone 61 only open listening is possible, and there is no LED indicator.
1.3.12 Disconnect Key
Pressing this key ends the current call (only on the OpenPhone 63 and the
OpenPhone 65).
20
Page 25

System Telephones on the OpenCom 100/OpenCom X300 Key Assignments
1.3.13 Muting Key
This key (which has an LED) deactivates the microphone. The ringer of your
telephone can be switched off for incoming calls over the muting key. You can
only mute the OpenPhone 61 using the “Connections” MenuCard.
1.3.14 C Key
A short press of this key deletes input or list entries in the menu. Pressing
and holding the key deletes a complete entry or a list, e.g. the call list.
1.3.15 Plus/Minus Key
The functions of this key depend on the device’s current status:
■ It adjusts the volume during open-listening/hands-free mode.
■ It adjusts the volume when making a call via the handset.
■ It adjusts the volume of the ringer tone during a call.
■ It sets the contrast of the display when the telephone is idle (only on the
OpenPhone 63 and the OpenPhone 65).
■ It switches features on/off quickly.
■ It changes the volume of the ringer tone and the melody in the menu.
■ It moves the cursor when entering telephone numbers or text.
Note: If you have already used the plus/minus key to open a
menu to set the display contrast or the volume, your current
setting will automatically be applied after three seconds, wit-
hout your using to confirm.
21
Page 26

System Telephones on the OpenCom 100/OpenCom X300 Key Assignments
1.3.16 ESC Key
This key is used to exit an input window without changing its contents and
to return to the menu branches.
1.3.17 Programmable Keys with LED Display
Your system telephone provides you with several keys, which you can indivi-
dually program, that have a LED display. These are:
■ on the OpenPhone 61 the five keys with LEDs below the display
■ on the OpenPhone 63 the five keys with LEDs to the right of the display. Additi-
onally you can also program the keys free left of the display, that is, all keys
which have not yet been assigned as call keys by the system administrator (see
also the section Call Keys with Other Telephone Numbers on page 18).
■ on the OpenPhone 65 the keys to the left of the display which have not been
assigned as call keys by the system administrator. Additionally you can also
program other functions on the keys of a keypad module.
Free programmable keys can be assigned as follows:
■ with call numbers (destination)
Please read the chapter entitled Programming a Destination starting on
page 101.
■ with functions (e. g. call forward)
Please read the chapter Programming Functions starting on page 102.
To use a configured programmable key, do the following:
■ A short press of the key dials the number or activates the function.
■ Pressing and holding the key down lets you program the key via a MenuCard.
22
Page 27

System Telephones on the OpenCom 100/OpenCom X300 Key Assignments
The locking of your telephone interface by the system administrator
The system administrator can lock your telephone’s interface via a setting for your
user group. With the exception of the number keys and the call key 1, all keys of
your telephone then have no functionality.
■ You can then make calls with your telephone but no system functionality can
be configured.
■ Additionally you can turn on and turn off the telephone lock of your telephone
(see also MenuCard “Protection” starting on page 90).
■ If the system administrator has authorised you, you can set the time group of
the communications system (see also MenuCard “Central settings” starting on
page 98). If your user group authorisation changes according to the time
group, then it is possible that the interface lock of your telephone will be cancelled.
Please consult your system administrator if you have questions concerning your
authorisation.
23
Page 28

System Telephones on the OpenCom 100/OpenCom X300 Display and MenuCards
1.4 Display and MenuCards
1.4.1 Changing the Language
Use the following procedure to set the display language:
1. Press the key (long press).
2. Using the arrow keys, scroll to the desired setting.
On the OpenPhone 61 you use the and keys.
3. Confirm the setting with the key.
In the Main menu you can use the
language.
4. First you select the entry
5. Use the arrow key to scroll to the desired setting.
On the OpenPhone 61 you use the and keys.
6. Confirm the setting with the key.
8 Display
4 Phone settings
and then
MenuCard to change the
Language
.
24
Page 29
System Telephones on the OpenCom 100/OpenCom X300 Display and MenuCards
1.4.2 Info Line(s)
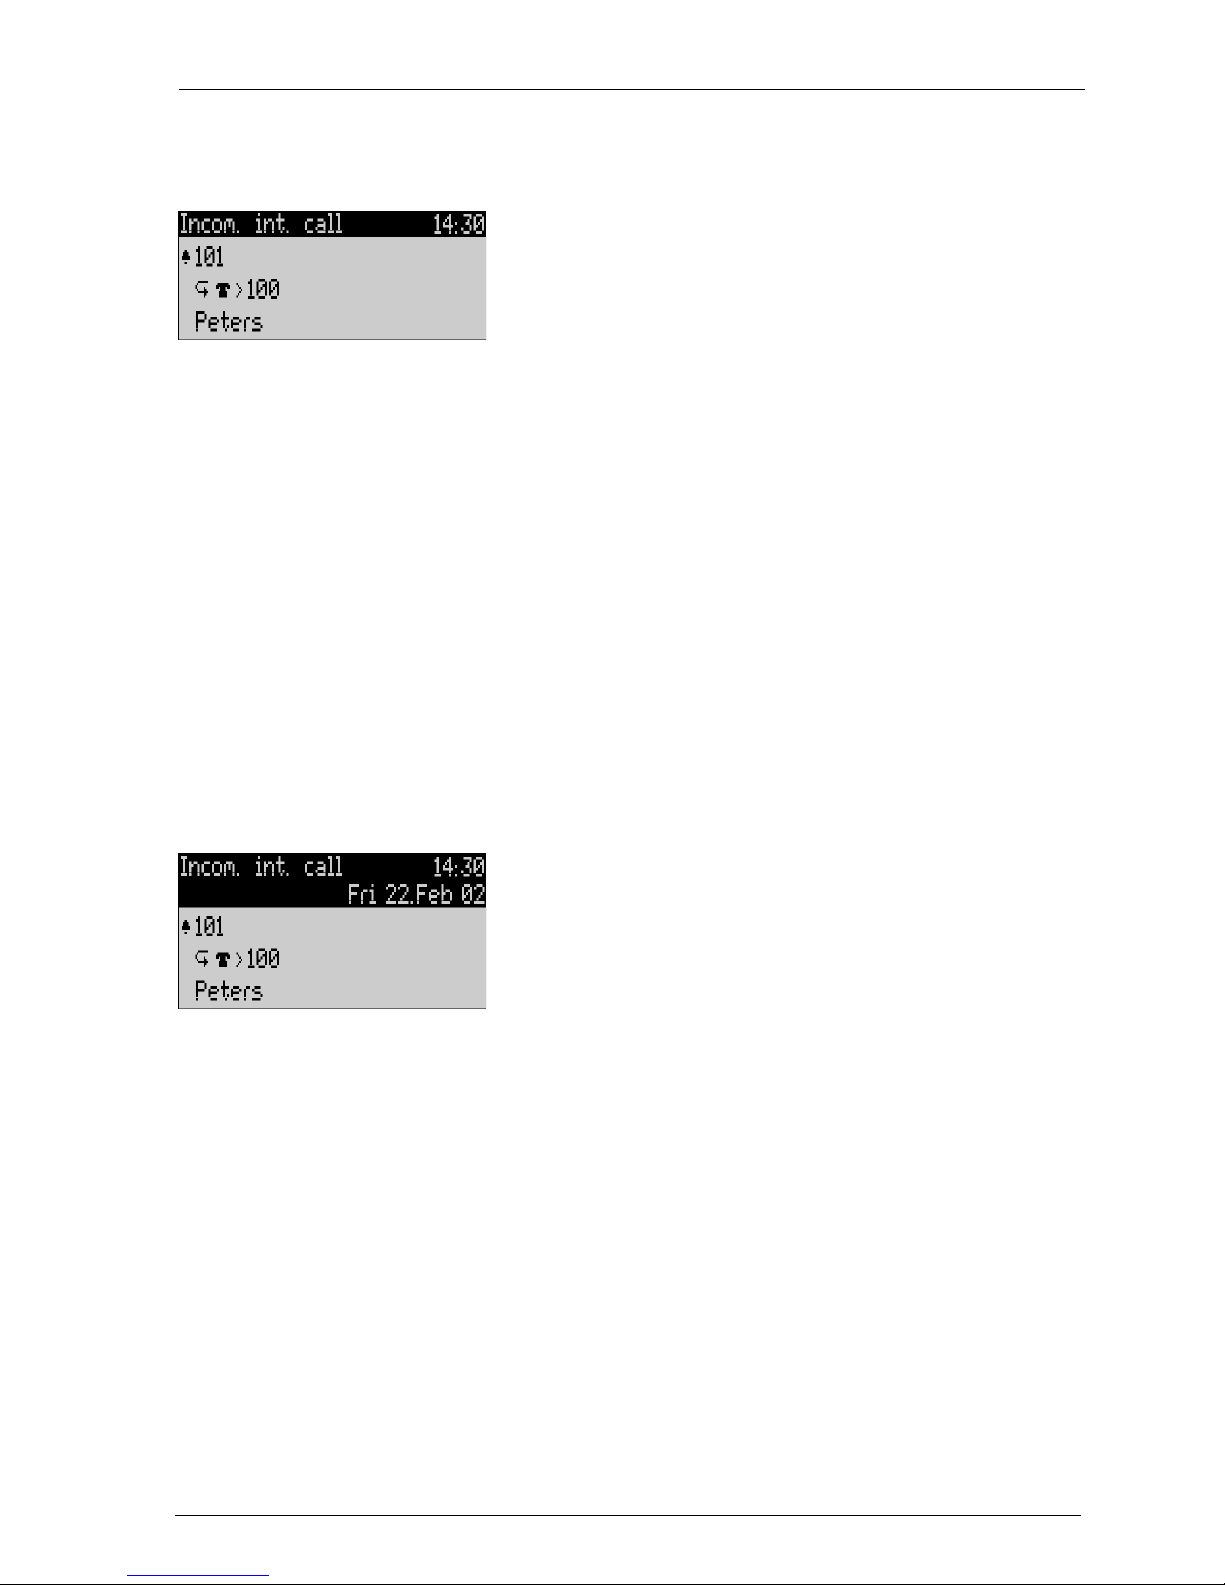
The OpenPhone 63 display
The first (and on the OpenPhone 65 the second) line of the display shows
additional current information. The line shown on the single-line display of the
OpenPhone 61 is the currently active one. In the second line of the OpenPhone 65
display you can, for example, view the capacity status of a call queue.
When the telephone is idle, you can see the subscriber’s name or the telephone
number – as assigned to the telephone in the Configurator of the Web console –
as well as the time (the OpenPhone 65 also displays the day of the week and the
date). If more than one key is assigned a telephone number, the assignment of the
call key 1 is always the one displayed.
For the system telephones OpenPhone 61/OpenPhone 63, the system administrator can adjust the setting so that the date is shown instead of the user name.
The OpenPhone 65 display
During a call, the current charge counter and annotation texts are displayed (if
configured). During an enquiry call you will see the number of the enquiry call you
dialled.
25
Page 30
System Telephones on the OpenCom 100/OpenCom X300 Display and MenuCards
1.4.3 Key Lines
The display next to the keys is assigned to them on a line-by-line basis. Depending
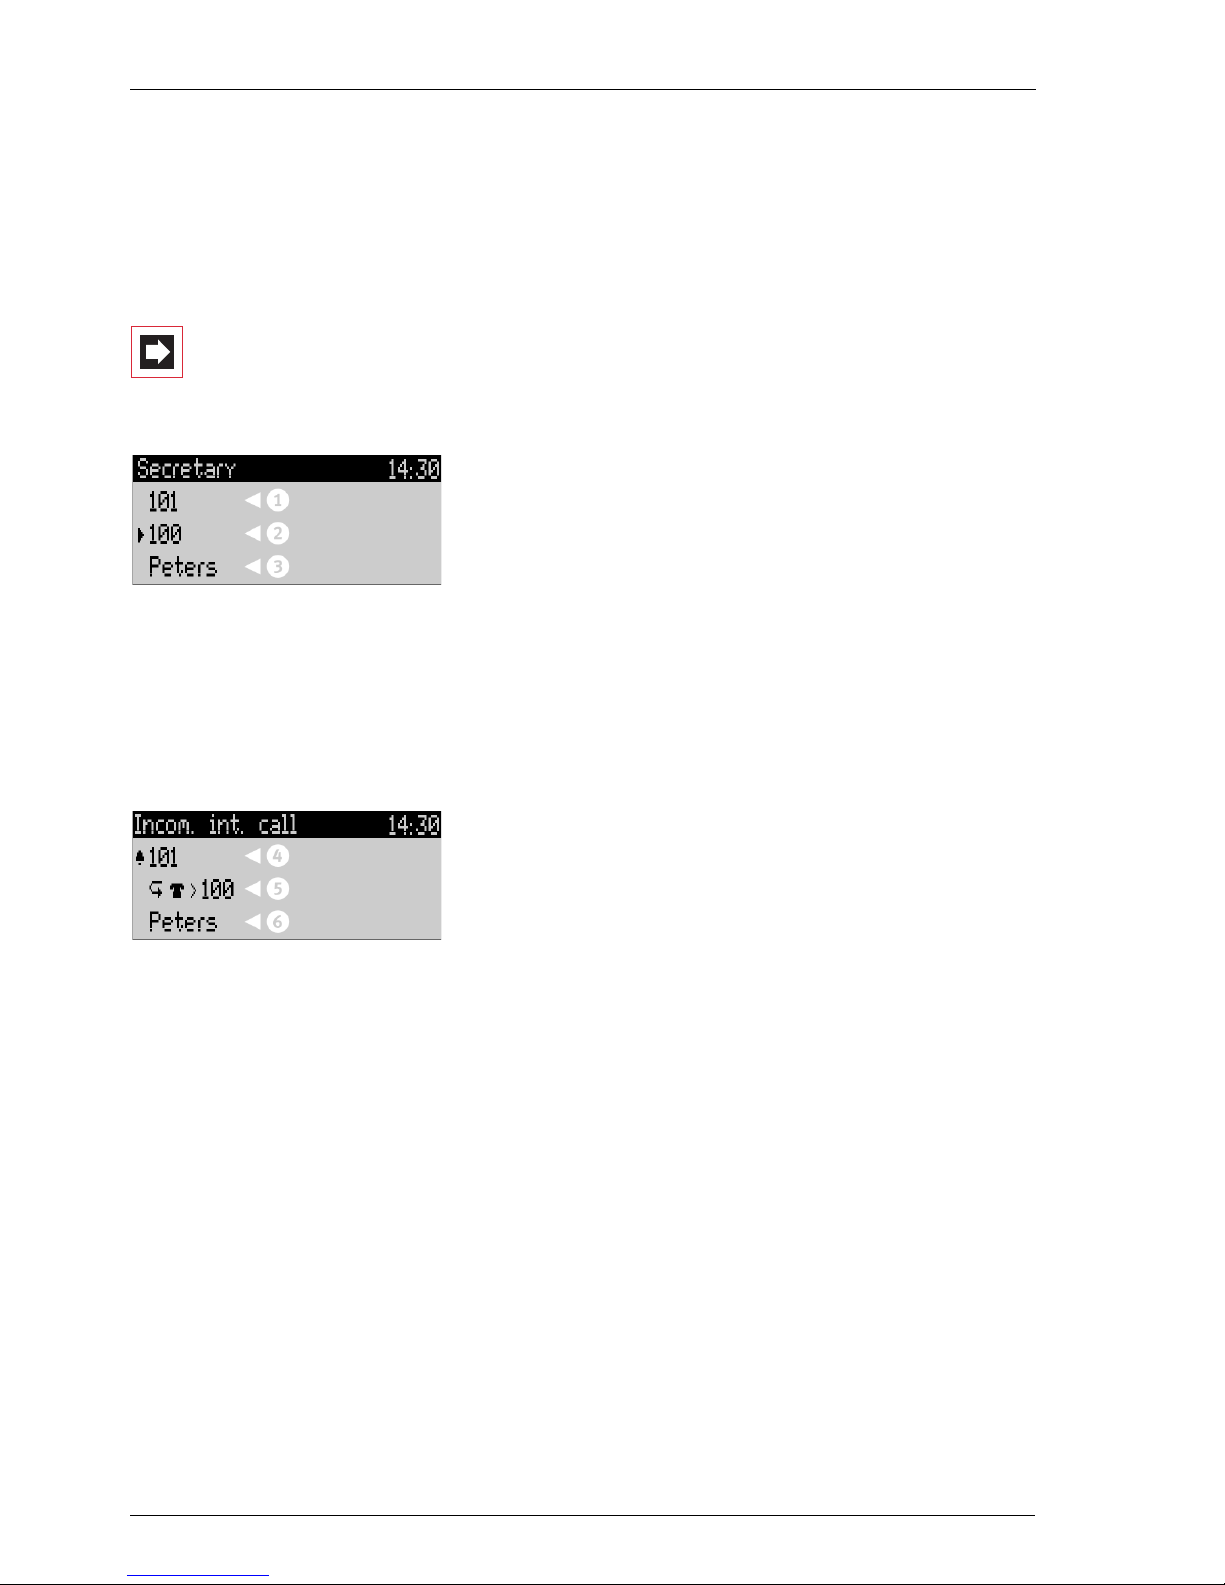
on the type of key, the following display texts are shown. On the OpenPhone 61
the display always shows the active line.
Note: The call and seizure states are identified by additional
symbols on the call keys. For details, refer to the section entitled Making Calls starting on page 36.
1 Call key in idle state: internal telephone number or a user-assigned text.
2 Call key during dial and connection state: dialled telephone number.
3 Destination key with names programmed: programmed name.
4 Call key during call state: telephone number (if transmitted) or the name of the
caller (if listed in the telephone book).
5 Function key programmed: name of feature with status display.
6 Destination key with name programmed. If no name was programmed, the
display shows the programmed telephone number instead of the name.
26
Page 31
System Telephones on the OpenCom 100/OpenCom X300 Display and MenuCards
1.4.4 MenuCard Display
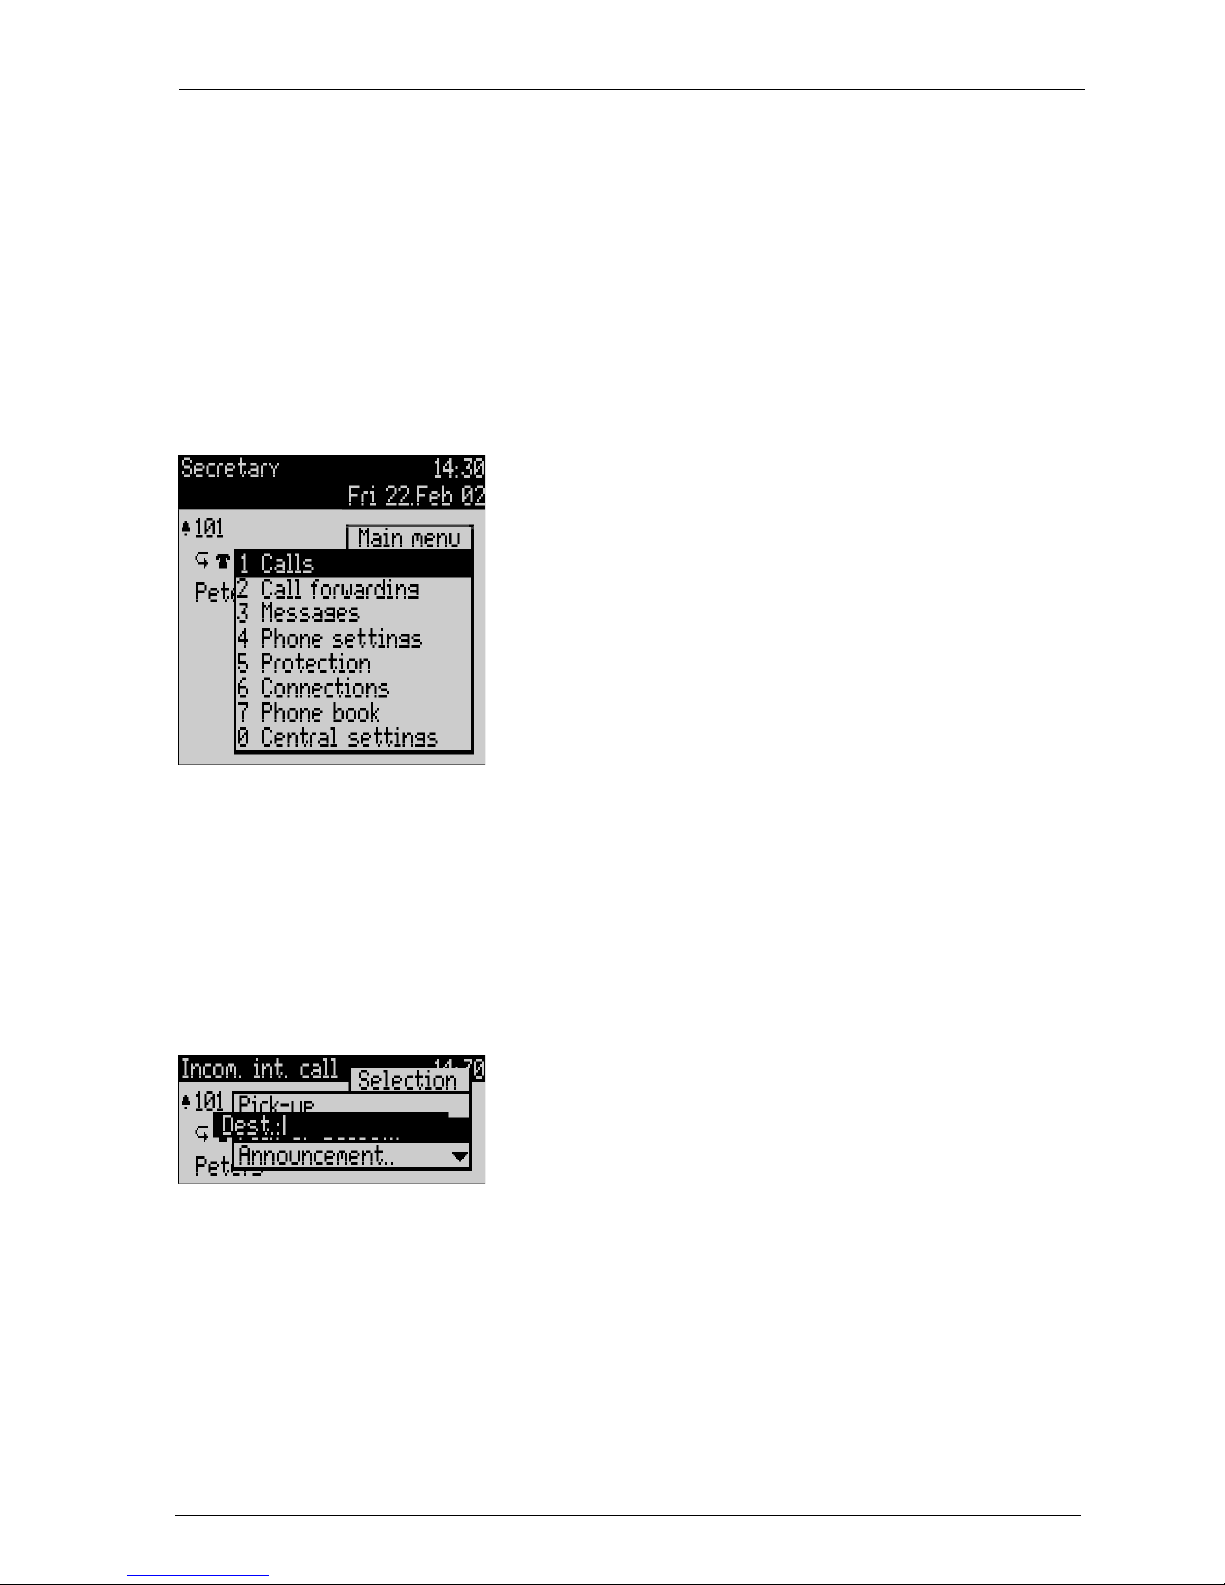
All the features of your telephone and the system are controlled via display
windows, as you are familiar with from your PC. These display windows look like
index cards and are called MenuCards. On the OpenPhone 61 the display shows
the active line of the MenuCard.
MenuCards are displayed using different keys. Please refer to the explanations in
the section entitled Key Assignments on page 18.
Menu Card display an the OpenPhone 65
The top line of a MenuCard contains the name of the menu or that of the selected
feature. The lines below it contain all the selectable features or lists of names and
numbers.
A MenuCard covers some of the key lines, but it is still possible to execute all the
functions assigned to the keys (e.g. accepting a call on a call key).
Other display windows for entering information (such as a telephone number) may be
superimposed on the MenuCards.
27
Page 32
System Telephones on the OpenCom 100/OpenCom X300 Display and MenuCards
1.4.5 Invoking MenuCards and Selecting Items from
the List
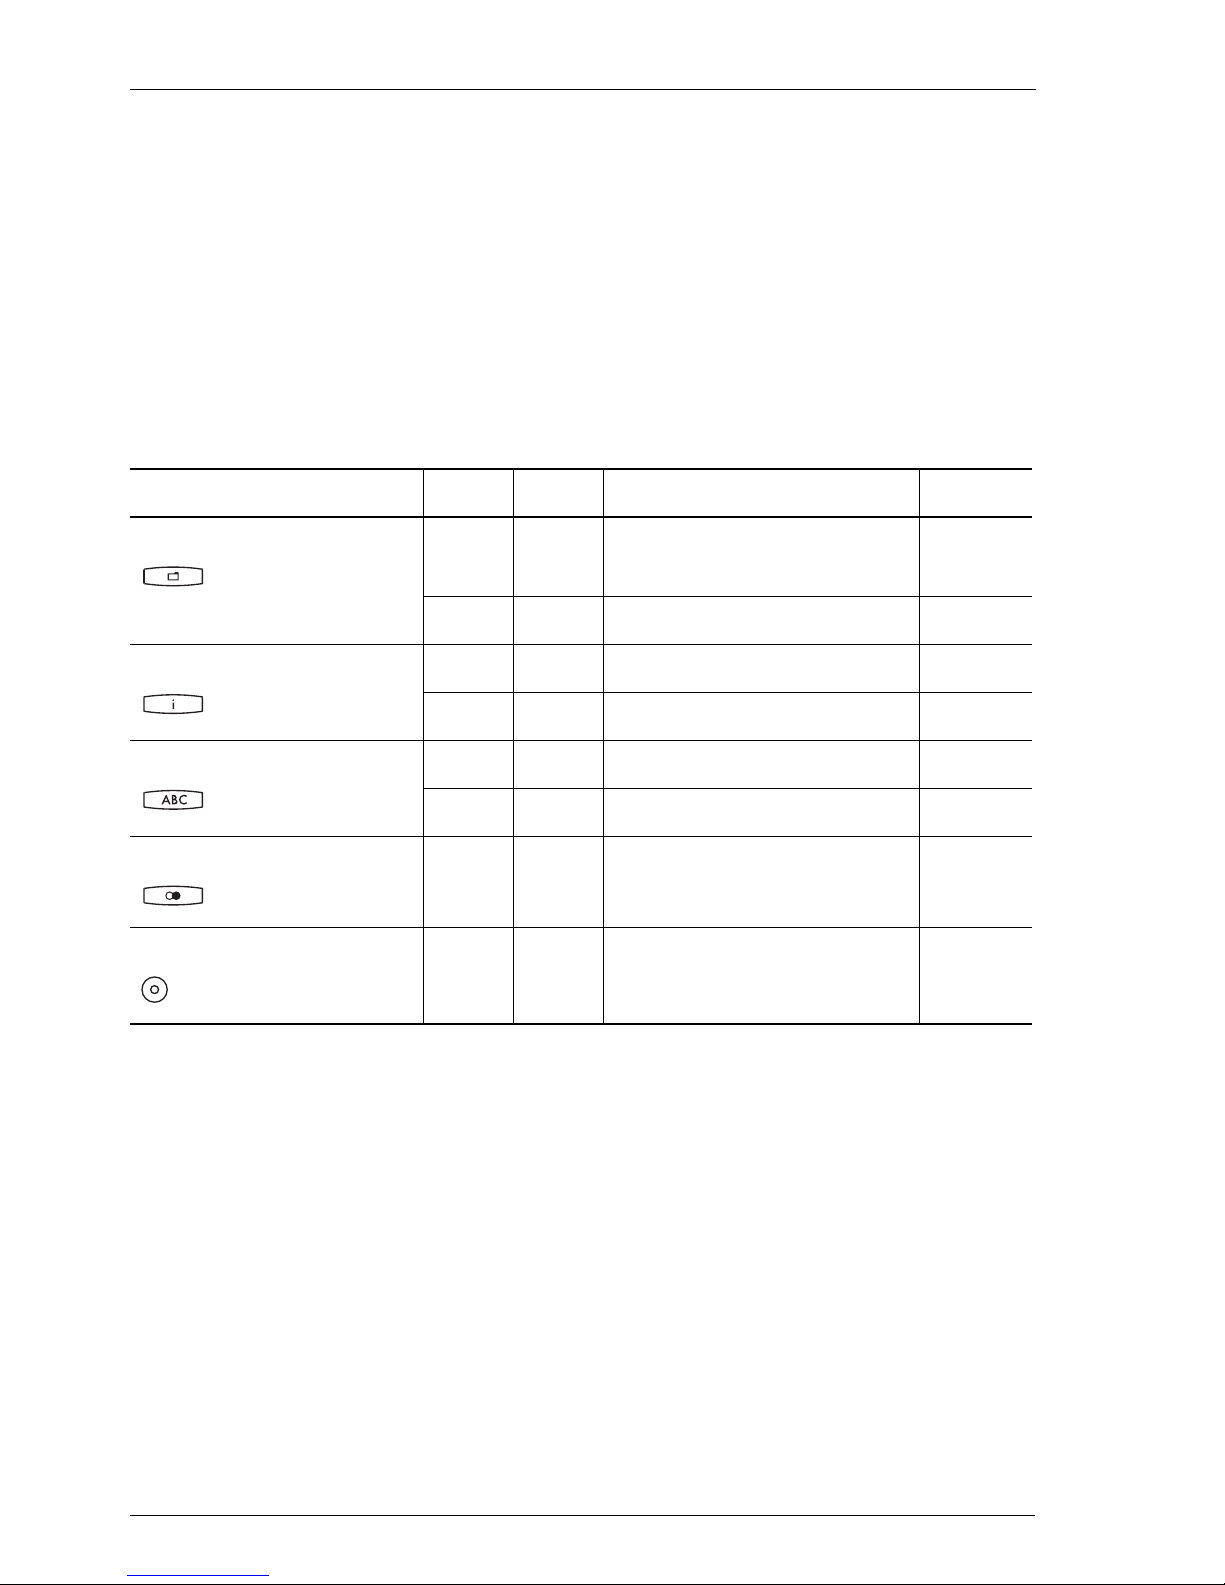
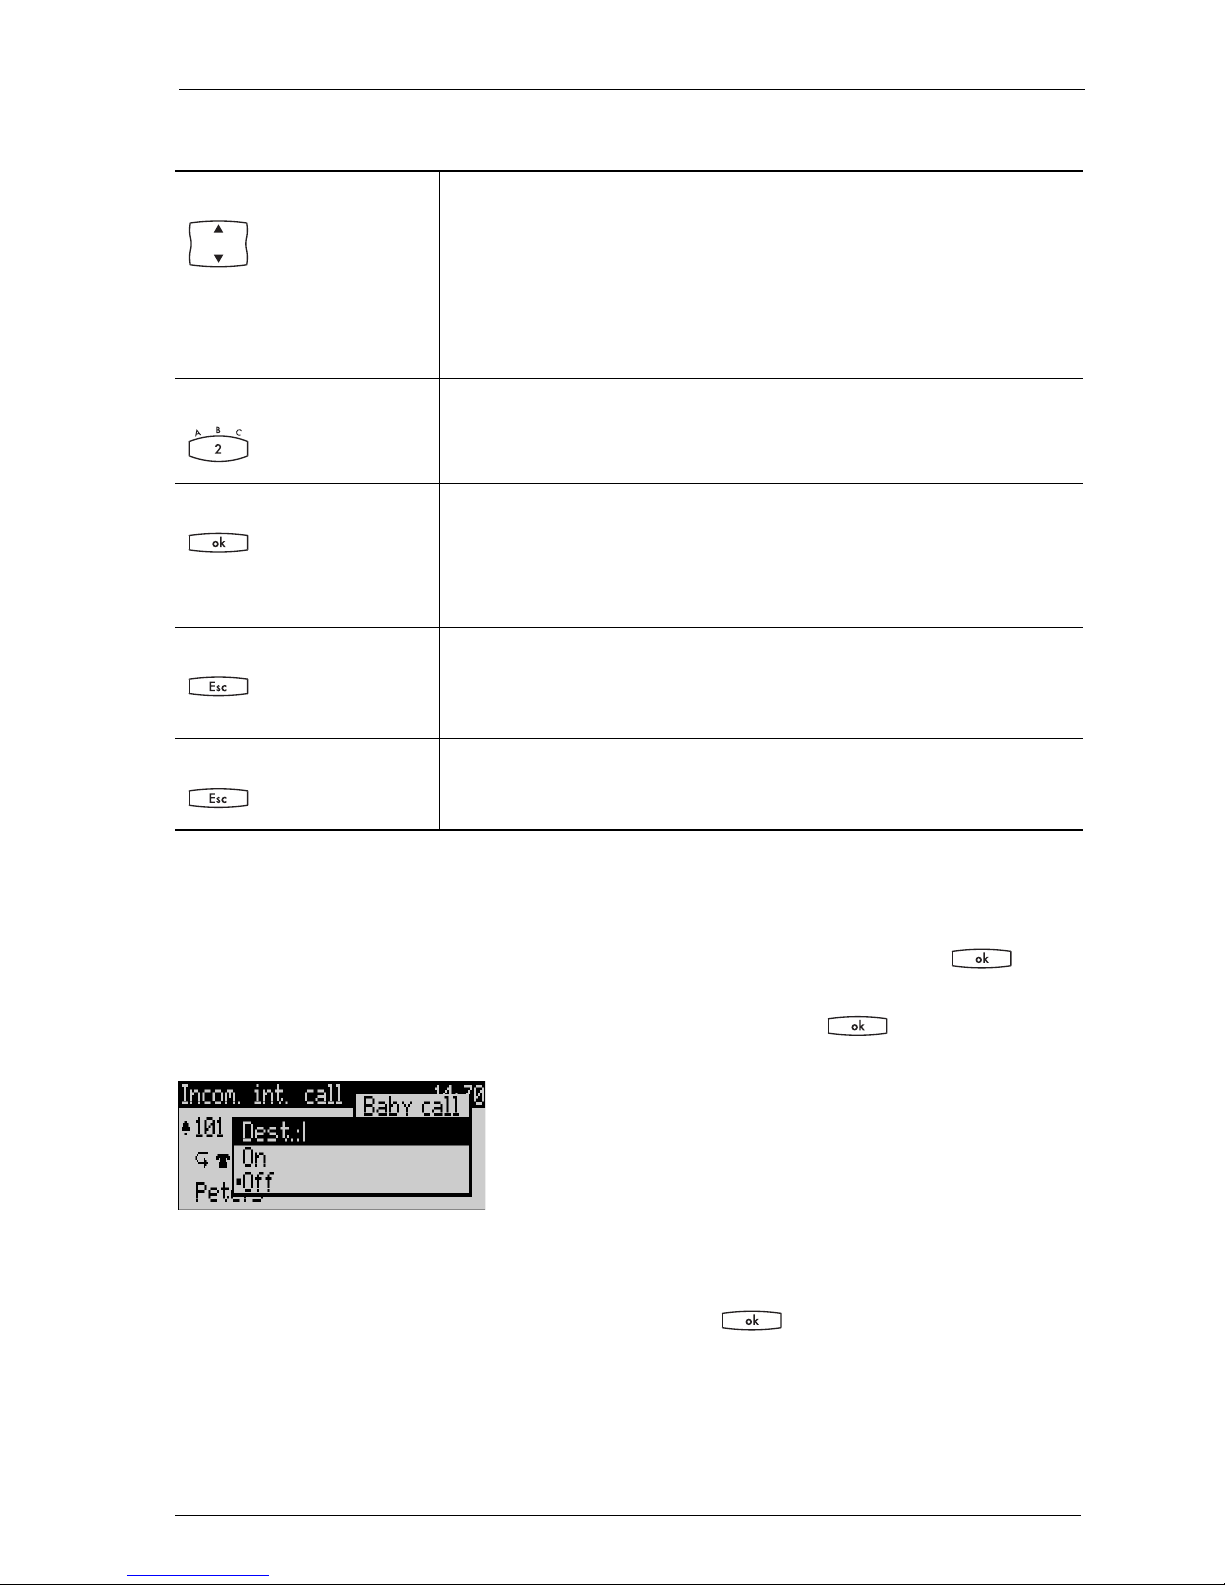
Use the keys described in the section entitled Key Assignments on page 18 to
invoke a MenuCard (see the table entitled Invoking MenuCards via the Keypad on
page 28). Note when a short or a long press of a key is required. Selecting list
entries is described in the table entitled Selecting Items from MenuCard Lists on
page 29.
Invoking MenuCards via the Keypad
Key Short Long MenuCard Page
MenuCard key x Depends on the device’s
status
xMain menu 79
Info key x Info / current messages 99
x Active features 100
ABC key x Telephone book 95
x Language setting (display) 24
Redial key x x Redialling list 40
Programmable key x Program the key 101
--
28
Page 33
System Telephones on the OpenCom 100/OpenCom X300 Display and MenuCards
Selecting Items from MenuCard Lists
Arrow keys or * or # The arrow keys or * or # keys (OpenPhone 61) are used to
select items in and/or scroll through the MenuCard lists.
If the list is longer than the display window, you will see
an arrow at the bottom of the window indicating there
are additional items. When you scroll down, another arrow will appear at the top of the window.
Number keys In the main menu, you can also make your selection by
entering the number to the left of the feature.
OK key Pressing this key confirms your selection or setting. De-
pending on the feature, it is executed now and you exit
the MenuCard, or additional setting windows are displayed.
ESC key, short press This cancels your selection/entry without making any
changes and takes you back to the next highest branch
of the menu tree.
ESC key, long press This closes the MenuCard without making any changes.
1.4.6 Setting Windows and their Characteristics
Two dots following a MenuCard item mean: After pressing the OK key a
sub-menu is opened in which you can select options or make enter input. The set-
tings in the sub-menu are stored after pressing the OK key .
In an input line (e.g. for a telephone number) you can make entries/changes straight
away. The cursor indicates the position at which the input or deletion is made.
Your inputs are stored after you press the OK key or scroll further with the
arrow key.
29
Page 34
System Telephones on the OpenCom 100/OpenCom X300 Display and MenuCards
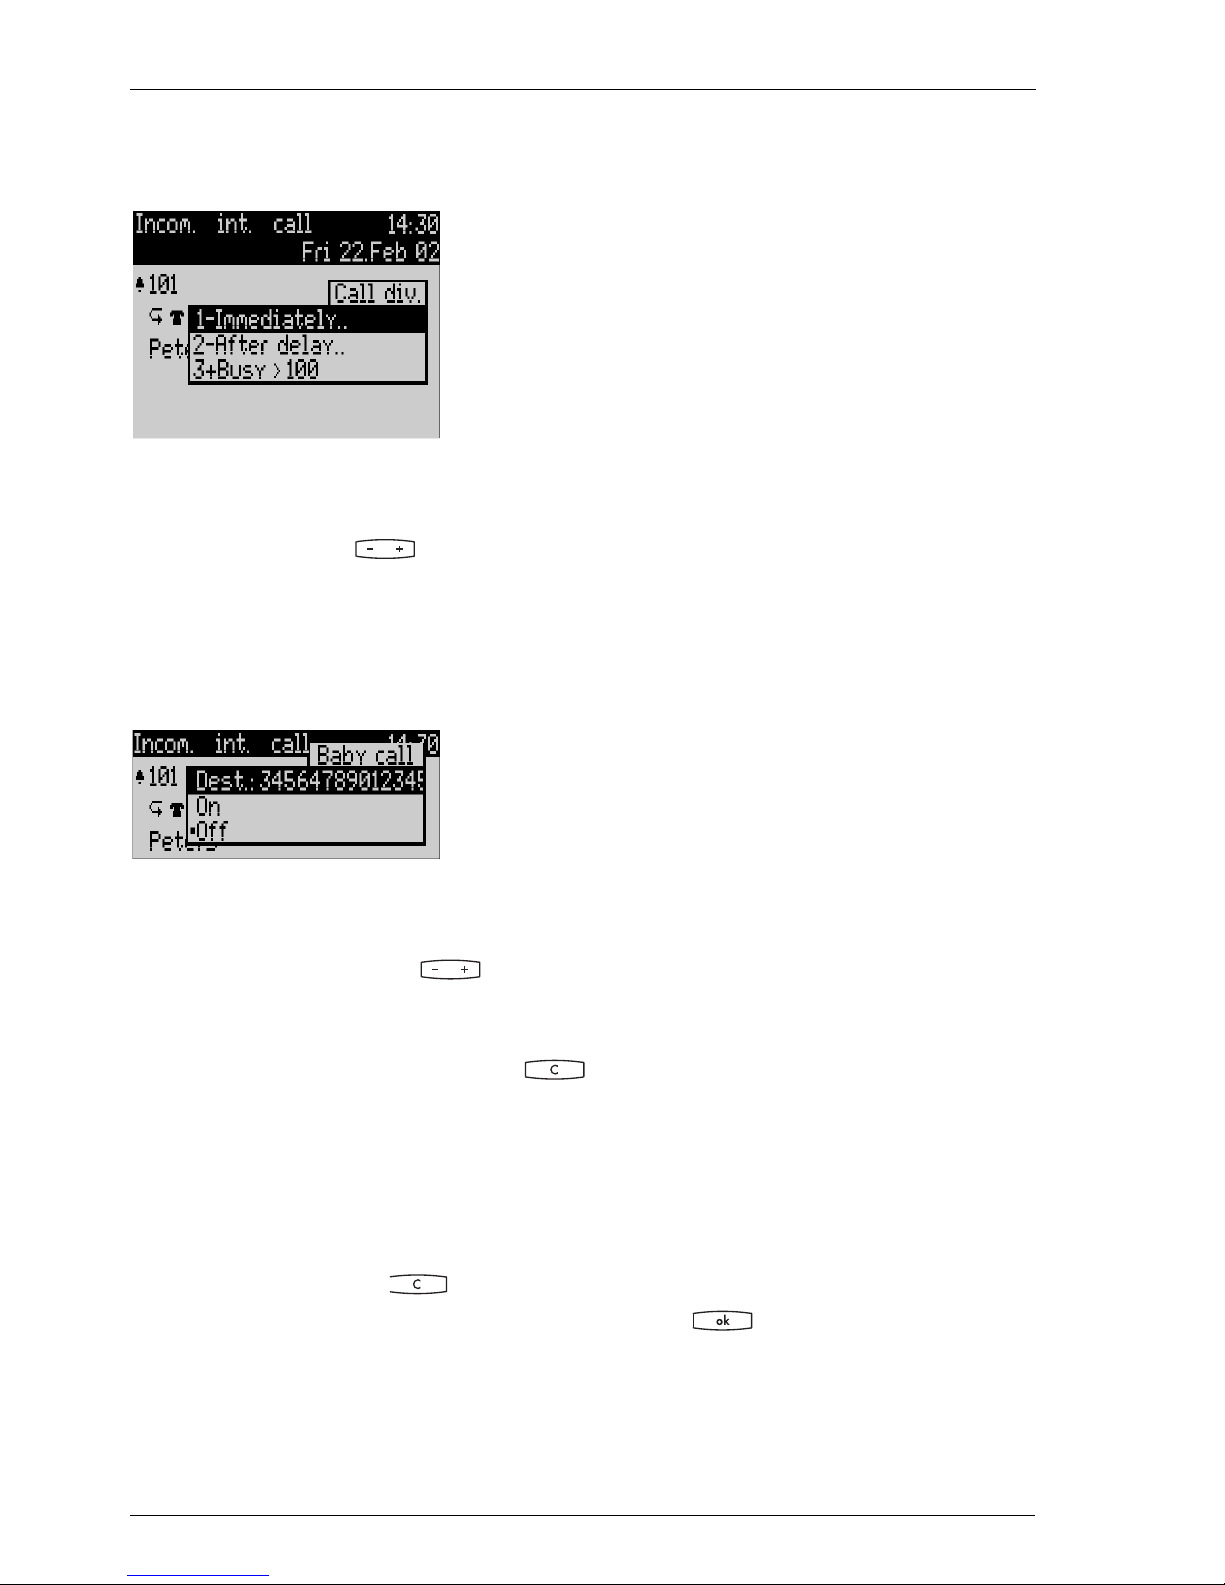
1.4.7 Toggling
A “+” sign to the left of the name of a feature indicates that it is activated and a “–” sign
that it is deactivated.
The plus/minus key lets you toggle between the on/off states, while the OK
key moves you to the next item in the setting window.
1.4.8 Entering/Deleting Digits
If numerical inputs are longer than the display field, the digits are pushed to the left out
of the visible area
Using the plus/minus key you can move the cursor and display the digits
that were previously not visible. The digits on the right will then disappear from
the display field. Inputs are always made to the immediate left of the cursor
position. A short press of the C-key deletes individual digits, whereas
pressing and holding the key deletes the complete entry.
1.4.9 Deleting Lists
In displayed lists (e.g. the call list) you delete individual items from the list with a
short press of the C-key . Pressing and holding the C-key deletes the entire
list, but only after the query
30
Are you sure?
Press to delete the list.
Page 35

System Telephones on the OpenCom 100/OpenCom X300 Display and MenuCards
1.4.10 Entering Text
In input lines for text, the numerical keypad automatically switches to the entry of
letters. You can enter the following characters by repeatedly pressing the number
keys:
Key Characters
1?!,.:"'
ABC2ДЕАБГЖЗ
DEF3ÈÉÊË[euro]
GHI4ÌÍÎÏ
JKL5
MNO6СЦТУФХШ
PQRS7ß
TUV8ÜÙÚÛ
WXYZ9
0¬(blank)@$&
*-+=~<>^%
#(){}[]/\
The input position moves automatically if you pause briefly between your inputs
or if you enter a new character. Pressing and holding a key switches your entry to
lower case mode. The lower case mode remains in effect until you press and hold a
key again. You can move the cursor by using the plus/minus key . Inputs are
always made to the immediate left of the cursor position. A short press of the C-
key deletes individual digits/characters, whereas pressing and holding the
key deletes the complete entry (in front of the cursor).
1.4.11 Automatic Exit
MenuCards close automatically under the following conditions:
■ In the idle or connection state, if you receive a call and accept it by lifting the
handset or pressing a key.
31
Page 36
System Telephones on the OpenCom 100/OpenCom X300 The Keypad Module on the
■ In the connection state, if you make inputs that require a new connection-
dependent MenuCard (e.g. you pressed the R-key to make an enquiry
call; see the section entitled Making Calls starting on page 36).
■ If you press a key that invokes a MenuCard other than the one displayed.
All inputs that have been saved in the MenuCards remain intact when you exit the
menu.
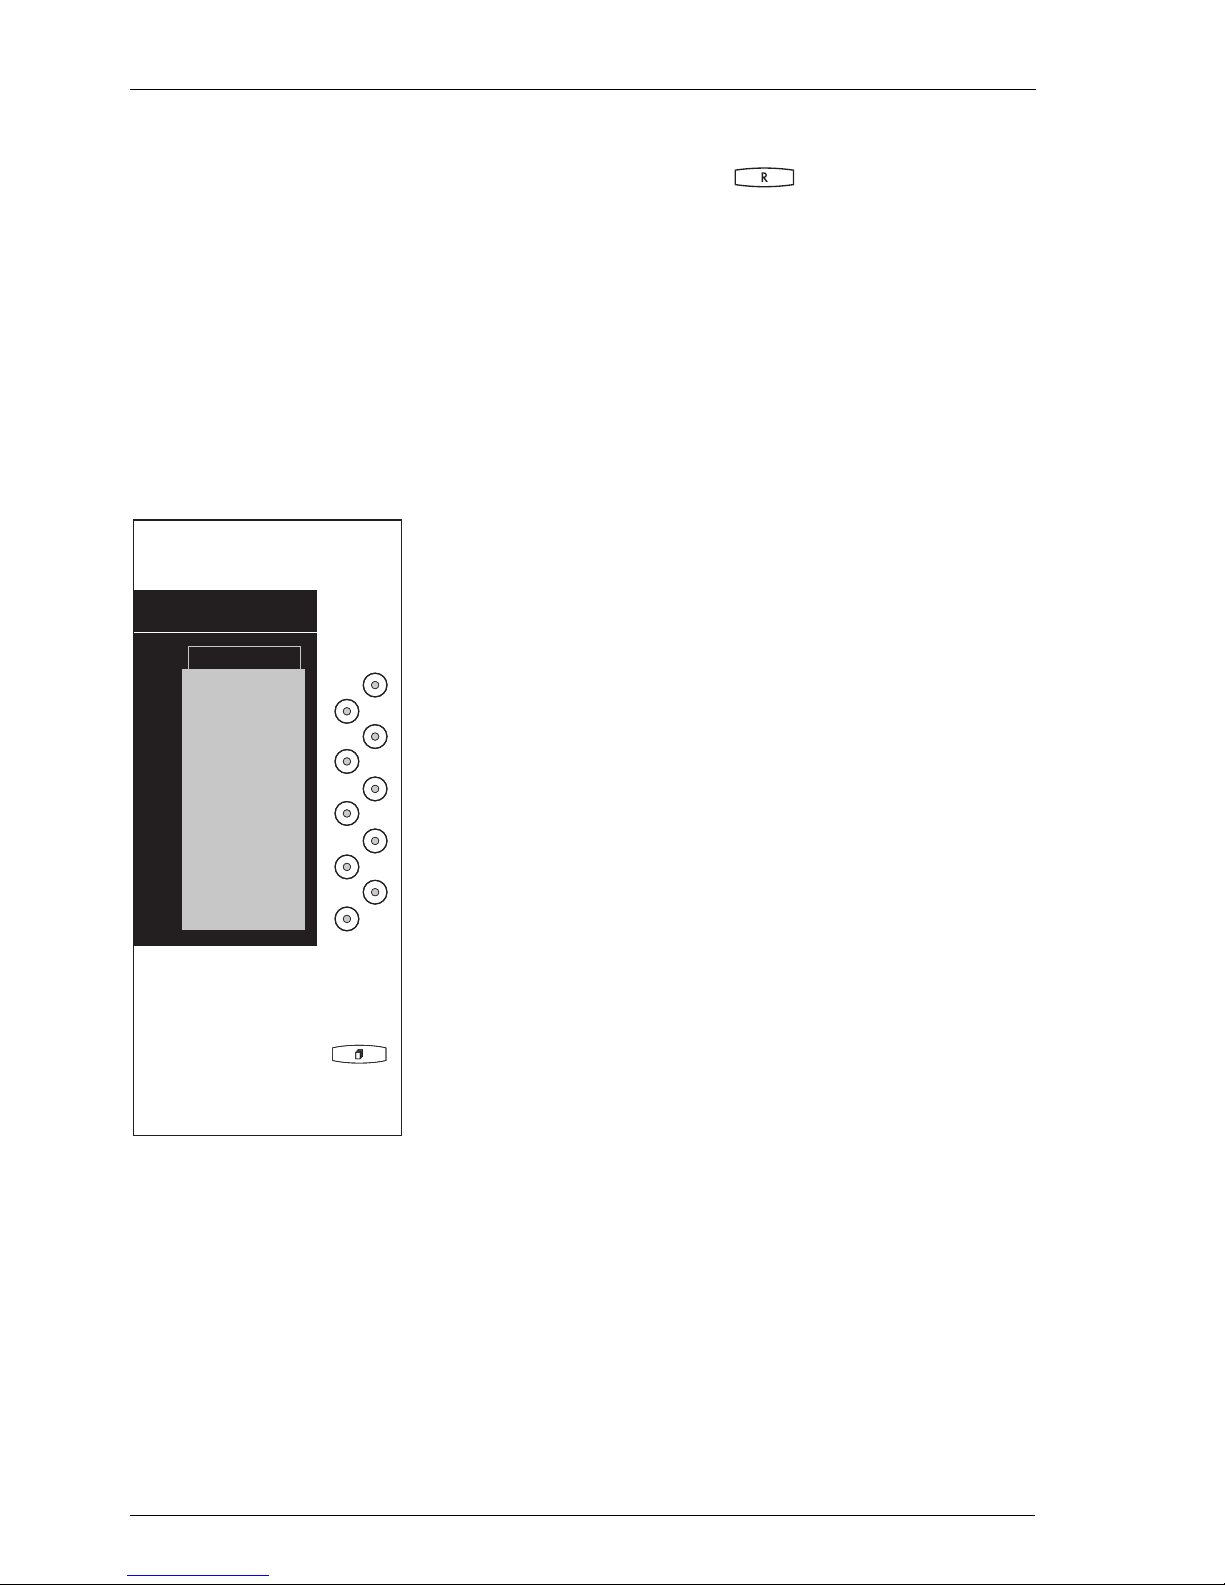
1.5 The Keypad Module on the OpenPhone 65
Charges
Toggle
Conference
E-Mail
Appointments
Keypad module for an OpenPhone 65
Up to three add-on keypad modules with display can be connected to the
OpenPhone 65. Each module has ten keys, which are assigned to the corresponding display lines.
The keys can be allocated in three levels, thereby providing you with 30 randomly
programmable memory locations for destinations and functions for each module.
At the first level of the keypad module call keys can be programmed (as trunk keys,
team keys, busy keys or direct-call keys). The number of keypad modules on an
32
Page 37

System Telephones on the OpenCom 100/OpenCom X300 External Audio Devices
OpenPhone 65 and their assignment are configured in the Configurator of the
Web console.
Please note: In order to plug in a keypad module, you must first unplug
your system telephone’s U
plugged in during operation, this is not permissible for key-
pad modules.
cable. Although adapters can be
pn
1.5.1 Selecting the Function Level
You switch levels by using the level key at the lower right. The icons in the
top line of the display tell you which level is set.
1.5.2 Operating the Keypad Module Keys
The keys of the keypad module are operated in the same way as programmed
keys, as described in this user guide (see the following sections: Programming a
Destination starting on page 101, Programming Functions starting on page 102,
and Programming the Call Keys starting on page 71).
Before programming a key, you must always select the desired level. All MenuCard
displays related to the keys of an add-on device are shown in the display of the
basic device.
1.6 External Audio Devices
1.6.1 Configuring Audio Devices
You use the
configure and activate the audio devices connected to your system telephone
(OpenPhone 63 or OpenPhone 65).
7 Add-on adapter
menu in the
Phone settings
menu group to
In the
followed by …
■ Under the menu item
Main menu
audio device connected to socket 1, or deactivate the socket. Select the type of
device that is to be activated (
you select
4 Phone settings
1 Add-on selection
, then
you enter the type of analogue
Ear cap, Second handset, Headset, Active
7 Add-on adapter
,
33
Page 38

System Telephones on the OpenCom 100/OpenCom X300 External Audio Devices
speaker box, Ext. microphone, DECT-Headset
deactivate the socket.
■ Use the menu item
■ Under the menu item
connected (via a relay to socket 2 or socket 4), or deactivate the socket. Only
one of the device types can be selected for activation:
equipment connected to socket 2) or
connected to socket 4). Select
Program one or, if necessary, several function keys to activate/deactivate the connected audio devices. You can then switch devices (e.g. a headset) on and off by
simply pressing a single function key (without e.g. having to use the hook-switch
for the headset). The current status is signalled visually.
4 Door display
5 Record
2 Add-on volume
to adjust the volume of the device.
3 Relay selection
Door display
off
to temporarily deactivate the socket.
you enter the type of device
). Select
(“Door busy” indicator
Off
Record
to temporarily
(recording
6 Second handset
7 Headset
1.6.2 Using the Audio Devices
Ear cap:
The ear cap is automatically activated when you lift the handset or switch the
loudspeaker on.
Second handset:
The second handset can only be switched on when you have lifted the (normal)
handset of the system telephone or switched on the loudspeaker.
To activate the second handset, use either a function key or the menu item
Second handset
Headset:
To activate the headset, use either a function key or the menu item
Switching on the headset is equivalent to lifting the handset. You can also use the
headset and handset simultaneously. When using a headsets it is useful to activate
the “En-bloc dialling” feature (see the section entitled MenuCard “Phone settings”
.
7 Headset
6
.
34
Page 39

System Telephones on the OpenCom 100/OpenCom X300 External Audio Devices
starting on page 88). For further information on connecting a DECT headset,
please contact the Aastra DeTeWe Sales Department.
Loudspeaker and headphones:
To activate an external loudspeaker or headphones, use the hands-free key .
The external loudspeaker will be used instead of the telephone’s built-in
loudspeaker.
Microphone:
An external microphone is activated automatically when you use the hands-free
key to switch on the loudspeaker. The external microphone is used instead
of the telephone’s built-in microphone.
Door display:
The door display lamp (the “door busy” indicator) lights up as soon as the handset
is lifted, the loudspeaker switched on or a headset activated. To activate/deactivate this function, use either a function key or the menu item
4 Door display
.
Recording:
You can start recording as soon as the handset has been lifted or the loudspeaker
switched on. To start recording, either use a function key or the menu item
5 Record
. Recording stops when the handset is replaced or the loudspeaker
switched off.
Note: If your recording equipment does not support the audio adapter’s start/stop signal, you will have to start and stop
the recording directly on the recording equipment itself. Activation via the telephone is then no longer necessary.
35
Page 40
Making Calls General Functions
2. Making Calls
2.1 General Functions
2.1.1 Internal and External Telephone Numbers
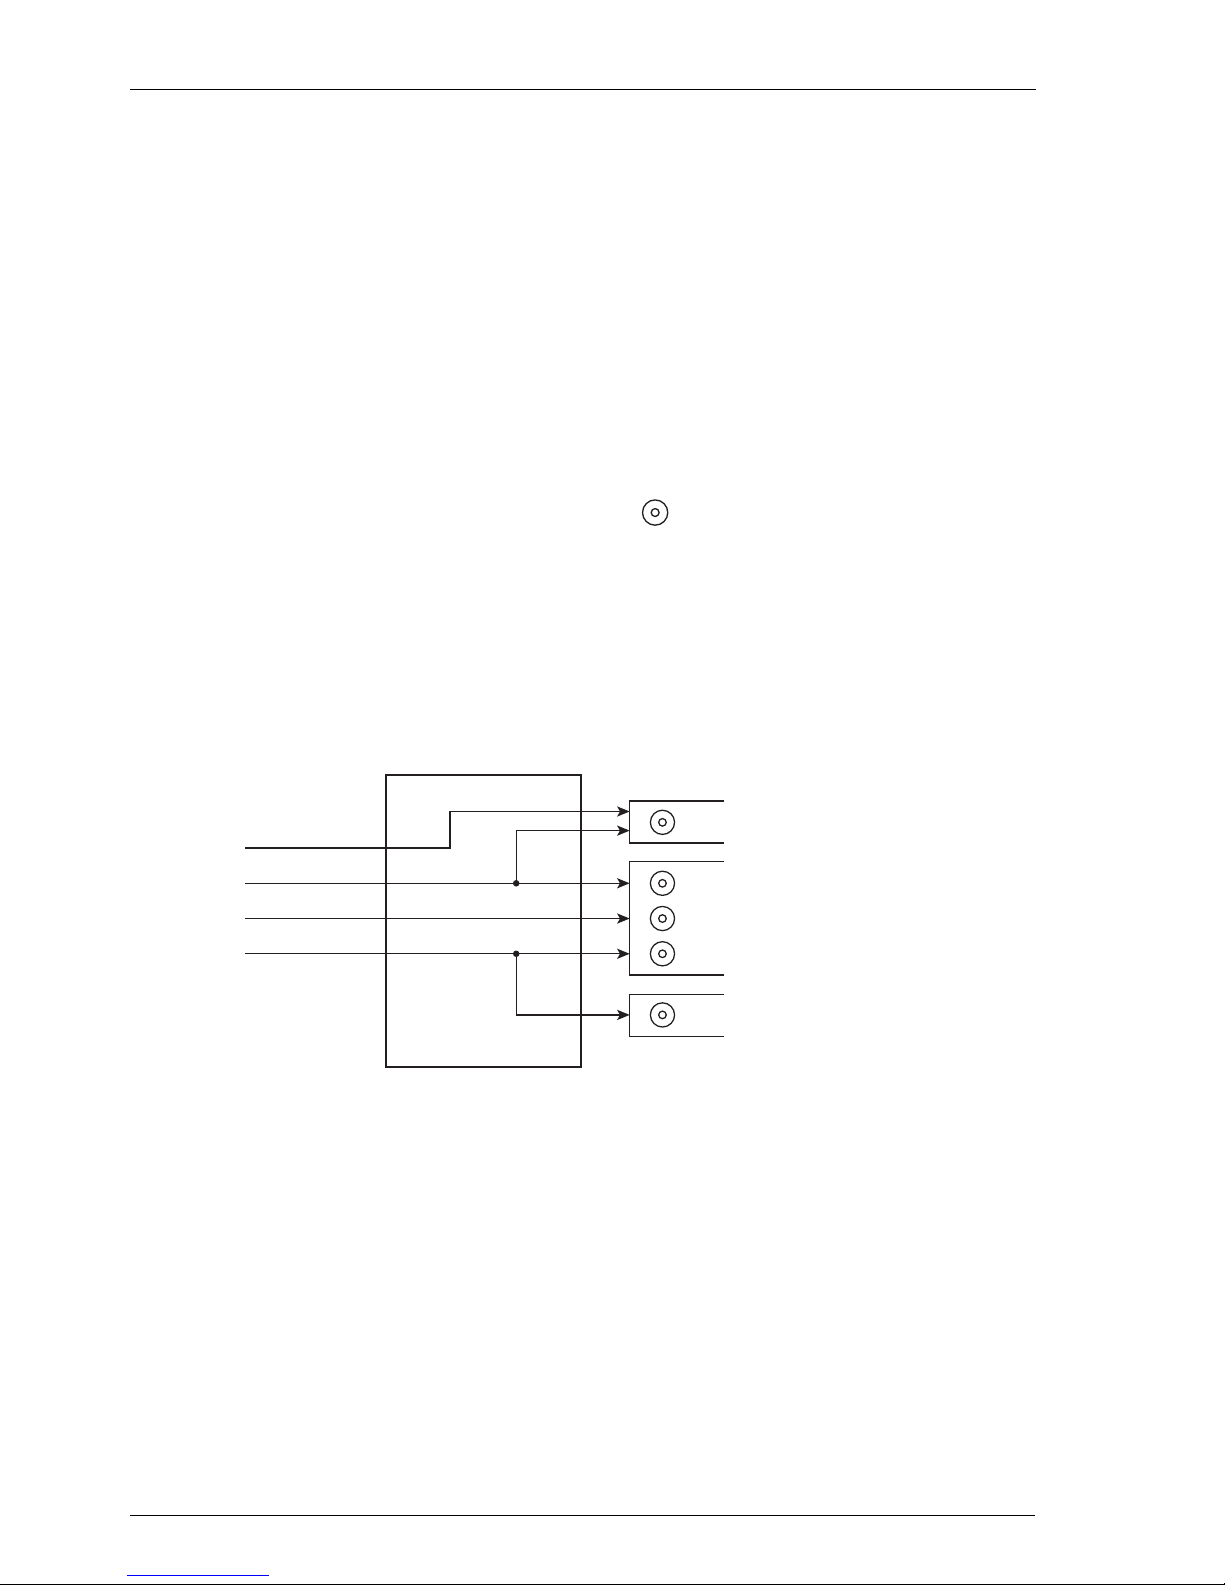
The internal number of your telephone is assigned when you configure your communications system.
The telephone number is linked to the call key of your telephone, which means
you receive calls on this key. You can have several internal telephone numbers on
different call keys on the OpenPhone 63 and the OpenPhone 65. The external telephone number(s) at which you can be reached is (are) assigned to the call key(s)
(with the internal number).
External
telephone numbers
4701 1678
4701 1234
4701 1345
4701 1456
Example of the assignment of internal and external telephone numbers
The above example shows that the system’s external telephone numbers are first
stored in the OpenCom 100/OpenCom X300. The telephones can be reached
selectively by means of call distribution of the numbers to the internal numbers
(call keys). As you see, telephone 1 and telephone 2 both ring when a call is made
to the number “4701 1234”. At the same time, telephone 1 can also be reached on
the number “4701 1678”.
Call distribution
scheme
OpenCom 100
Internal telephone numbers
on the call keys
Telephone 1
47
48
Telephone 2
49
50
Telephone 3
51
36
Page 41
Making Calls General Functions
2.1.2 Signalling on the Call Keys
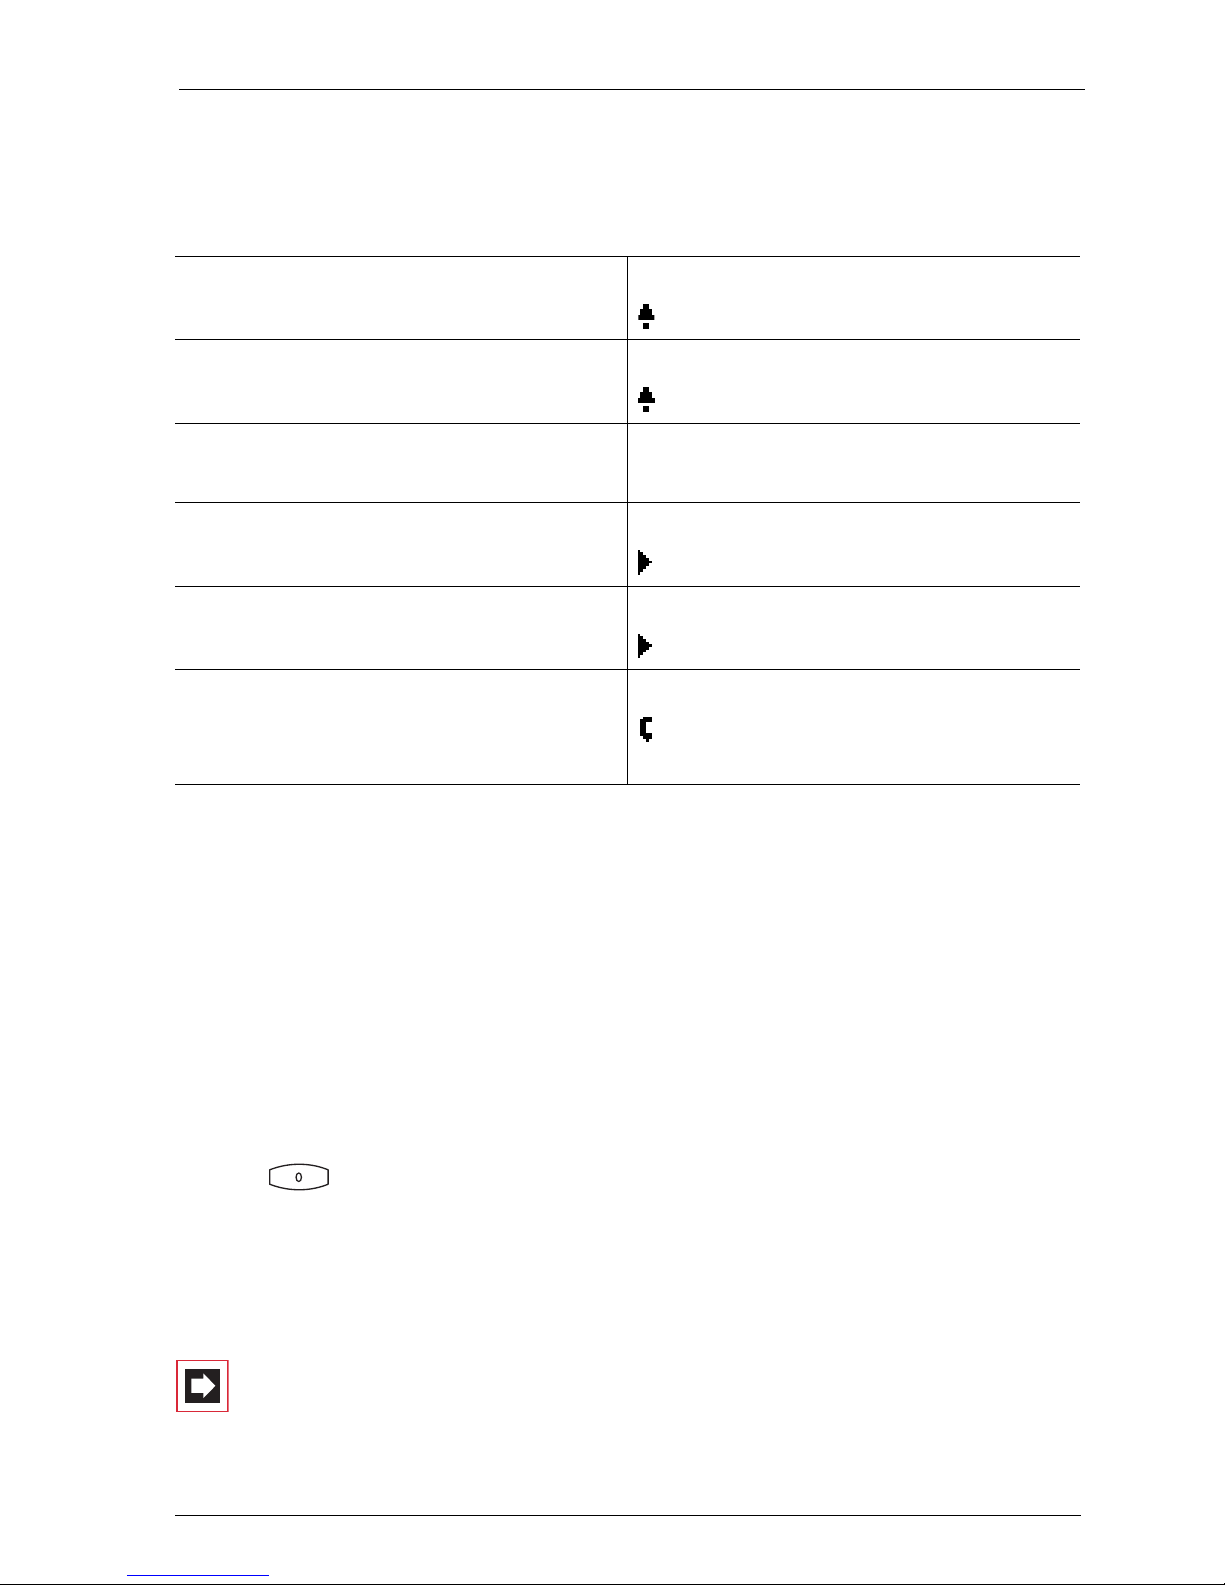
The LEDs and symbols on the call keys indicate the following states:
First call LED flashes
Bell flashes
Further call LED flashes rapidly
Bell flashes
Further call,
call-waiting queue is full
Key seized LED on
Call held LED flashes slowly
Team member’s key seized LED on
Short beep tone
(only on the OpenPhone 65)
Arrow on
Arrow flashes slowly
Handset on and display of team key
text
2.1.3 Manual or Automatic Trunk Line Seizure
If you hear an external dialling tone when you lift the handset, your telephone is
set to automatic trunk line seizure. If you hear an internal dialling tone when you
lift the handset, your telephone is set to manual trunk line seizure. You will find a
representation of the audio signals on the inside of the back cover.
If your telephone is set to manual trunk line seizure, all call keys on your telephone
first seize an internal line, and you can dial an internal number straight away. When
making external calls, you must first press the trunk line seizure code digit (pre-
setting: ).
Your system administrator configures this code digit for all subscribers on the
OpenCom 100/OpenCom X300 system and will tell you what value is currently
valid.
Note: This also applies to all enquiry calls and forwarding to
external destinations, but not to “Divert MSN”.
37
Page 42

Making Calls General Functions
If your telephone is set to automatic trunk line seizure, all call keys on your telephone seize a trunk line, and you can dial external numbers straightaway. In order
to reach internal subscribers, press the star key twice before dialling
the internal number.
2.1.4 Calls in the Call-waiting Queue
The system administrator can configure and activate a call-waiting queue espe-
cially for your telephone in the OpenCom 100/OpenCom X300 system. While you
are making a call, new calls can be queued. These callers first hear an
announcement (if the system administrator has preset an announcement) and
then the ring tone. The number of calls permitted in the call-waiting queue is set
by the system administrator during system configuration, 5 calls for example.
When this number is reached, further callers hear the busy tone. The calls in the
queue are put through in order of priority (baby calls, door calls, VIP calls, other
internal and external calls), irrespective of the order in which they came in.
Calls that have been in the queue for too long are removed, and the callers then
hear the busy tone. The period of time until a call is released is set by the network
operator. In Germany this is usually two minutes and in other European countries
usually three minutes.
Your telephone can have a call-waiting queue even if it belongs to a subscriber
group, where it simultaneously affects call forwarding.
If several telephone numbers are configured for your telephone (e.g. on trunk or
team keys), separate call-waiting queues are used for each number.
On the OpenPhone 65 incoming calls are signalled by means of a short tone; they
are also indicated on the display. If there are calls in the queue, the level indicator
appears at the beginning of the second line of the OpenPhone 65 display. If
several telephone numbers with call-waiting queues are configured for your telephone, the total number of entries appears.
2.1.5 Block Dialling/Automatic Dialling
If you activate the menu item
Phone settings
to them, if necessary) without lifting the handset. The number is displayed in the
Info line. Entries from the redial stack, the call list and the telephone book that are
38
, you can enter all telephone numbers (and correct or add digits
En-bloc dialling
in the MenuCard
Page 43

Making Calls General Functions
to be dialled using also appear in the Info line first. The number you have
selected is not dialled until you lift the handset or press the hands-free key .
It is useful to activate the “Block dialling” feature when using a headset (see the
section entitled MenuCard “Phone settings” starting on page 88).
If block dialling is switched off, the telephone switches to hands-free mode or
open-listening mode (OpenPhone 61) mode as soon as you enter a call number
and dial it.
2.1.6 DTMF Postdial/VF Signalling
Depending on the system’s configuration, your telephone is automatically set to
VF (voice frequency) signalling in the connection state. You can use this, for
example, to query an answering machine or a voice mailbox. Consult your system
administrator if you have questions concerning this function.
2.1.7 Muting
Pressing the muting key (only on the OpenPhone 63 and the
OpenPhone 65) deactivates the microphone during a call, and the person at the
other end of the line can no longer hear you. Press the key again to switch the microphone back on.
2.1.8 Call-charge Display, Duration Display
If your network operator transmits call charge information, and if you have dialled
an external number yourself, you will see the current amount of the charge in the
Info line during or at the end of a call. The menu item
Phone settings
display.
MenuCard lets you deactivate this or switch to the duration
Charge settings
in the
2.1.9 Adjusting the Volume with the Plus/Minus Key
Use the plus/minus key to adjust the volume of the loudspeaker in open-lis-
tening/hands-free mode or the volume of the handset during a call via the
handset, or the volume of the ringer tone when you receive a call.
39
Page 44

Making Calls General Functions
Note: When the telephone is in its idle state again, it reverts
to the default menu setting.
2.1.10 Redialling
Pressing the redial key displays a MenuCard containing the last ten
numbers dialled (with the most recent entry at the top). If a telephone number is
also stored in your system’s telephone book/name directory, you will see the name
as well.
Select the entry (phone number or name).
If you now press the button, the phone book will open (see explanation
further below).
If you picked up the receiver before calling up the redial list, the phone number
will now be dialled automatically.
If you do not pick up the receiver and then press the
button, you can
execute the following functions:
■
Dial
: Press the button or pick up the receiver. The phone number will
be dialled.
■
Phone book
existing entry (
: You can add the entry to a phone book (
2Add
). Please see: Add Phone Numbers to Telephone Book from
1 New entry
) or to an
Lists or during a Call starting on page 65.
■
Info
: You can obtain information on the called subscriber (e.g. his or her
phone number if his or her name is displayed in the redial list). You can see
when you last dialled this number and how often you have tried to reach the
subscriber.
Note: If your internal extension number (e.g. “30”) is configured on more than one terminal, you can view and edit the
redial list for the extension 30 on each of these terminals. If,
for instance, you delete the redial list on one terminal, it will
be deleted on all others as well.
40
Page 45

Making Calls General Functions
2.1.11 Hands-free, Open-listening Mode
In hands-free mode, the handset is on-hook (only on the OpenPhone 63 and the
OpenPhone 65). You hear the caller over the loudspeaker and speak through the
microphone of the handset (although it is on-hook). In the case of open listening,
the loudspeaker is activated in addition to your handset.
Calling via the Handset
To switch open listening on/off, press the hands-free key . To switch to
hands-free mode (only on the OpenPhone 63 and the OpenPhone 65), press and
hold down the hands-free key and replace the handset.
Initiating a Hands-free Call
Instead of lifting the handset, press the hands-free key . End the call by
pressing the hands-free key again (only on the OpenPhone 63 and the
OpenPhone 65).
2.1.12 Blocked/Unblocked Telephone Numbers
Note: Your telephone can be blocked from dialling all or se-
lected external numbers. Emergency numbers can be entered in a special list, irrespective of your trunk line access
rights, and thus always be dialled. Consult your system administrator for details.
2.1.13 Keypad Dialling
A number of European network operators need the keypad protocol in order to set
features (in Germany, for example, for the “Completion of Call on No Reply” (CCNR)
feature). Depending on your system configuration your telephone is automatically
set to keypad dialling during the connection state. If this is not the case, you must
switch your telephone over to the keypad protocol – before dialling – and enter
the code digits specified by the network operator. These are transmitted directly
to the exchange and evaluated there. You usually get an announcement as an acknowledgement. Consult your system administrator if you have questions concerning this function.
41
Page 46

Making Calls General Functions
H
Lift the handset and press the star key and the digits “1“ and “2”. This switches
your telephone over to the keypad protocol. You can now enter the code digits for
the appropriate keypad.
Note: In the idle state, keypad dialling is automatically active. Once the called subscriber answers the call, which can
be an external answering machine for example, you can execute the required functions by pressing the number keys.
2.1.14 Least Cost Routing (LCR)
Whenever you make an external call, your system automatically uses LCR to set up
a connection to a network operator that has been selected by the system administrator. If you do not wish to use this preferred connection and want to select a
network operator yourself for each call (i.e. on a call-by-call basis), then before
making the call, select
section entitled MenuCard “Selection” in the Idle State.
LCR off
from one of the MenuCards described in the
This is only necessary if LCR has been configured for you in the OpenCom 100/
OpenCom X300. Consult your system administrator about this.
Least Cost Routing (LCR) can be evaluated with call forwarding to external
numbers, provided your system administrator has configured LCR and its application in the OpenCom 100/OpenCom X300 correspondingly. Ask your administrator for the configuration applicable to you.
Note: Baby call and external call forwarding are not automatically switched via preferred connections. In this case, if
the network operator you wish to use is not the default operator, you can key in the appropriate operator’s code digits
before entering the telephone number.
42
Page 47

Making Calls General Functions
2.1.15 Transmission of Call Numbers
With ISDN there are different features which allow or prevent the transmission of
(external) call numbers between subscribers.
“CLIP”
“CLIP” is an abbreviation for “Calling Line Identification Presentation”. The caller’s
call number (if transmitted) is displayed by means of the corresponding call key. If
this number is also stored in your telephone book, the caller’s name is displayed.
“CLIP no screening” Feature
Using “CLIP no screening” outgoing connections instead of sending the real call
number of the caller, send another call number. Thus, instead of been shown your
number, the subscriber you have called is shown, for example, a service call
number. The feature “CLIP no screening” must be enabled by the network provider
and activated in the system configuration by the system administrator.
“CNIP” Feature
“CNIP” is an abbreviation for “Calling Name Identification Presentation”. In
addition to the call number, the name configured by the caller is also transmitted
and displayed on the corresponding call key. This assumes that the network provider transmits this information with the connection. If the caller's number is listed
in the OpenCom 100/OpenCom X300 telephone book, then this – local – entry is
displayed in preference.
“CLIR” Feature
“CLIR” is an abbreviation for “Calling Line Identification Restriction”. Before dialling
an external telephone number, you can decide from case to case if you wish to
prevent your telephone number from being displayed to the called subscriber. To
do this, select
Suppress number
from one of the MenuCards described in the
next section.
If this feature is not provided, your telephone number will always or never be displayed, depending on the system setting. Consult your system administrator for
more information.
43
Page 48

Making Calls General Functions
2.1.16 MenuCards Before and During a Call
When your telephone is in the idle or the connection state, a short press of
MenuCard key provides you with state-dependent MenuCards displaying
frequently used features you can activate.
Examples
Another telephone in your pick-up group rings, and you want to answer the call.
Lift the handset, press MenuCard key , select
. You are now connected to the caller.
Alternatively, let us assume the line you call is busy and you want the person with
this number to call you back. When you hear the busy signal, press the MenuCard
key and confirm
The state-dependent MenuCards are illustrated at the end of each of the following
sections.
Callback
Note: As a rule, the features are only available to you if they
can actually be executed.
with .
Pick-up
and confirm this with
2.1.17 MenuCard “Selection” in the Idle State
Press (but do not hold down) the MenuCard key (this also works if you have
already lifted the handset), then select …
Unpark call
previously parked, for instance to make enquiries or to forward calls (see
MenuCard “Conversation” starting on page 48).
Pick-up
: Accepts a call for another telephone in your pick-up group.
Pick-up select…
telephone number of the other telephone. If the other telephone is already in the
call state (e.g. an answering machine is in announcement mode), you pick up the
call. The subscriber for whom you picked up the call must belong to a user group
for which “Call removal” authorisation is activated, otherwise “Pickup selective” is
not possible.
44
: Consecutively unparks one or more connections which you have
: Accepts a call for any other telephone. To do this, enter the
Page 49

Making Calls Making External/Internal Calls
Announcement
announcement to another system telephone, or on a group of system telephones.
Charges
the total charges.
: For each trunk key, you can view the charges for the last call as well as
Door opener
Notes
: Note a call number and a name or dial a noted call number.
Suppress number
will not be presented to the called subscriber. This menu item is dependent on the
system settings.
Transmit number
the called subscriber. This menu item is dependent on the system settings.
LCRƒoff
: This switches off the LCR function.
: After entering the telephone number, you can initiate an
: This activates the door opener.
: For the following (internal or external) call, your call number
: For the following call, your call number will be presented to
VIP call
Main menu
starting on page 79. You can also open this menu by pressing and holding down
the MenuCard key.
: Your next internal call is made as a VIP call.
: This opens the Main menu; see the section entitled Main Menu
2.2 Making External/Internal Calls
If you hear an external dialling tone when you lift the handset, your telephone is
set to automatic trunk line seizure. If you hear an internal dialling tone when you
lift the handset, your telephone is set to manual trunk line seizure.You will find a
representation of the audio signals on the inside of the back cover (the page
before last of the PDF file).
If you hear the internal dialling tone, you must dial the trunk line seizure code
digit (presetting: ) before dialling the external telephone number. Your
system administrator configures this code digit for all subscribers on the
OpenCom 100/OpenCom X300 system and will tell you what value is currently
valid.
45
Page 50

Making Calls Making External/Internal Calls
Note: This also applies to all enquiry calls and forwarding to
external destinations, but not to “MSN” forwarding.
2.2.1 Making an External Call
with Automatic Trunk Line Seizure
H Lift the handset (your call key is seized)
and/or
press the particular call key (hands-free mode– only on the OpenPhone 63 and
the OpenPhone 65).
Z Dial the external number.
with Manual Trunk Line Seizure
H Lift the handset (your call key is seized)
and/or
press the particular call key (hands-free mode – only on the OpenPhone 63 and
the OpenPhone 65).
Z Dial the trunk line seizure code digit (presetting: ) and then the external
telephone number.
2.2.2 Making an Internal Call
with Automatic Trunk Line Seizure
H Lift the handset (your call key is seized)
and/or
press the particular call key (hands-free mode – only on the OpenPhone 63 and
the OpenPhone 65).
Press the star key twice …
46
Page 51

Making Calls Making External/Internal Calls
and dial the internal telephone number Z .
with Manual Trunk Line Seizure
H Lift the handset (your call key is seized)
and/or
press the particular call key (hands-free mode – only on the OpenPhone 63 and
the OpenPhone 65).
Z Dial the internal telephone number.
2.2.3 Using Destination Keys to Make Calls
You can assign telephone numbers to programmable keys and save them. To dial a
programmed number, simply press the destination key .
Your call key is seized.
2.2.4 Using Routes to Make Calls
HZ (routing code, tel. no.)
in enquiry calls:
G Z (routing code, tel. no.)
The OpenCom 100/OpenCom X300 establishes calls to the desired subscribers
either automatically or via specific routes. Your system administrator configures
these routes in the OpenCom 100/OpenCom X300 and specifies how each route is
seized. In order to manually seize a specific route for a call, you dial the routing
code before dialling the (internal or external) telephone number. By making calls
via specific routes, you can e.g. contact subscribers in the branches of a large
company network. It is also possible to use a manually-entered routing code to
record your call-charge data for private and business external calls separately.
The default route “External line” is always present and cannot be deleted. Auto-
matic trunk line seizure uses the OpenCom 100/OpenCom X300 trunk line seizure
code digit for the default route.
For information on the current routes and their codes, please contact your system
administrator.
47
Page 52

Making Calls Making External/Internal Calls
2.2.5 Busy Display for Trunk Groups and Routes on
the System Telephone
The system telephones can display whether all lines of a trunk group (bundle) or a
route are busy.
To do this, you must program a function key for the system telephone in the Con-
figurator (in the PBX Configuration: Devices: System phones menu, function
“Bundle state” or “Route state”). This function cannot be programmed on the
system telephone itself. Contact your system administrator if necessary so that this
key can be configured for you.
The name of the trunk group or route and the number of busy channels appear in
the display. This display is constantly refreshed.
If the “Route state” function is programmed and you press this key briefly, the
routing code will be dialled accordingly (e.g. “0”).
If all lines in the trunk groups or the route are busy, the LED on the programmed
function key is illuminated.
2.2.6 Ending Calls
Calls are ended by replacing the handset or pressing the disconnect key or,
in hands-free mode, by pressing the hands-free key . On the OpenPhone 61
you can only replace the handset. If the subscriber you are speaking to ends the
call while you are in hands-free mode, the busy tone for your telephone is
switched off after a few seconds and you can be reached again. This also applies if
you were connected to the other subscriber via your headset. The time frame after
which the busy tone is switched off is configured by the system administrator. All
other calls will be ended after 20 seconds if the handset is off-hook.
2.2.7 MenuCard “Conversation”
Press (but do not hold down) the MenuCard key , then select …
Phone book
new entry (
48
: You can add the other party’s phone number to a phone book as a
1 New entry
) or you can add it to an existing entry (
2Add
). Please see:
Page 53

Making Calls Making External/Internal Calls
Add Phone Numbers to Telephone Book from Lists or during a Call starting on
page 65.
Booking number
: By means of a booking number you can record the call data of
a connection to an external subscriber and save them in the OpenCom 100/
OpenCom X300 for further analysis. Booking numbers are useful, for example, for
calculating costs per client (fees and times) in an office. Select the menu item.
Under
No.
enter the booking number (8 digits maximum) and confirm your entry
with the button.
Hints on Booking Numbers
■ Entering a booking number during a call is possible only if the system adminis-
trator has activated this function for your user group. Only then will the
Booking number
■ For external connections established by you it is important how the route that
menu item be displayed.
you are using for the connection has been configured by the system administrator. Among other things, the system administrator specifies whether a
booking number is entered through the system terminal menu (and therefore
during the call). He can, however, also specify that booking numbers must be
entered with a code procedure. In that case the booking number must be
entered before the call is initiated and the connection is established. It is
entered after the routing code and before the actual destination number. In
this case it is not possible to enter the booking number during the call.
■ You can also program the function “Enter booking number” to a function key
(see also Programming Functions starting on page 102). Via this function key
you can then enter the booking number during the conversation. To program,
select the
menu
Connections: Dial: Booking number
.You can define a booking number that will be saved to the function key.
If you do not define a booking number, then you can – after pressing the
function key – enter any booking number. Ask your system administrator how
long a booking number can be (this depends on the system configuration) and
which booking numbers possibly already exist.
■ Calls made with booking numbers can be analysed with the OpenCom 100/
OpenCom X300 OpenCount web application.
Park call
: Users can park one or more callers to make other calls or put down
the receiver and engage in other activities. (This is fundamentally different from
entry from the
Main
49
Page 54

Making Calls Making External/Internal Calls
the “Hold Connection” function; with this function the connection with the caller
is terminated as soon as the called subscriber puts down the receiver). Parked calls
are recorded in a list on the system terminal. Users can accept the calls from the list
in whichever order they wish, enabling them to unpark specific calls as required.
Until his call is unparked, the caller will hear music on hold, provided music on
hold has been configured. If the user does not unpark the caller after a certain
amount of time, he will receive an automatic recall if the receiver has been
replaced (the display shows information on the recall). This automatically unparks
the caller. If, however, the user is still making another call and has not hung up, the
caller will hear the busy tone and will be “unparked”.
Authorisation for parking connections and the period of time after which there is a
recall is defined by the administrator during the configuration of the system.
Pick-up
*: Accepts a call for another telephone in your pick-up group. Your first
call is put on hold.
(*: Not possible if there are already two active calls.)
Note: If a called subscriber is a member of an (additional)
pickup group for which pickup protection (Prevent Pickup)
is active, then you cannot pick up calls to that subscriber’s
number.
Pick-up select…
*: You accept a call for any other telephone. To do this, enter
the number of that telephone. If the other terminal is already in the call state (e.g.
an answering machine is in announcement mode), you pick up the call. The subscriber for whom you picked up the call must belong to a user group for which
“Call removal” authorisation is activated, otherwise “Pickup selective” is not possible.
(*: Not possible if there are already two active calls.)
Note: If a called subscriber is a member of a user group for
which pickup protection is active, then you cannot selectively pick up calls to that subscriber’s number.
Hold
: Holding is a team function. When you place a call on hold, this call may be
picked up by another member of your team (see also the section Holding and
Transferring Calls with a Function Key starting on page 71).
Door opener
50
: Activates the door opener.
Page 55

Making Calls Making External/Internal Calls
Notes
number and a
with
Catch call
network operator’s exchange (if this service is enabled). The function is also possible if the caller has already hung up!
: You can note a telephone number during a call. Under
Text
Dial
, if required, and
.
: The telephone numbers of “malicious callers” can be saved in your
Save
the number. You can call the number
Dest.
, enter the
2.2.8 MenuCard “Busy”
Press (but do not hold down) the MenuCard key , then select …
Callback
possible for hunt group numbers).
Pick-up select…
the number of that telephone. If the other terminal is already in the call state (e.g.
an answering machine is in announcement mode), you pick up the call. The subscriber for whom you picked up the call must belong to a user group for which
“Call removal” authorisation is activated, otherwise “Pickup selective” is not possible.
(*: Not possible if there are already two active calls.)
: You leave your callback request with a busy internal subscriber (not
*: You accept a call for any other telephone. To do this, enter
Note: If a called subscriber is a member of a user group for
which pickup protection is active, then you cannot selectively pick up calls to this subscriber’s number.
VIP call
they have activated their call-waiting protection, call-protection or call-forwarding
function (only possible on system telephones).
(*: Not possible if there are already two active calls.)
*: Your call is acoustically signalled to called internal subscribers, even if
51
Page 56

Making Calls Accepting Calls
2.3 Accepting Calls
2.3.1 By Lifting the Handset or Pressing a Key
Normal Call
H/ Lift the handset or press the call key to which the call is being signalled
(hands-free mode – only on the OpenPhone 63 and the OpenPhone 65).
Lifting the handset always accepts the caller who has been waiting the longest
(note the bell symbol in the display).
VIP Call
Calls of this type from authorised subscribers are signalled to you even if you have
activated your call-waiting protection, call-protection or call-forwarding function.
You hear the ringing tone:
H/ Lift the handset and press the appropriate call key (hands-free mode – only
on the OpenPhone 63 and the OpenPhone 65).
Call for a Virtual Number (Tele Secretary)
In the OpenCom 100/OpenCom X300, numbers can be configured to which no
telephone and no subscriber are assigned (virtual numbers). The system administrator can forward a virtual number to another internal number, the number of
your telephone for example.
A forwarded call is signalled on the corresponding call key of your telephone. For
informational purposes the virtual number to which the call was originally made is
shown. The system administrator can also assign the virtual number a name. If this
has been done, the name is shown on the display of your telephone.
H/ Lift the handset or press the call key to which the call is being signalled
(hands-free mode – only on the OpenPhone 63 and the OpenPhone 65).
Note: You cannot forward an internal telephone number to
a virtual telephone number. The OpenCom 100/
OpenCom X300 cannot execute such a double forwarding.
52
Page 57

Making Calls Accepting Calls
2.3.2 Automatic Call Connection
In certain operational modes (e.g. in hands-free operation or when making calls
with a headset), it can be useful to be able to accept subsequent calls automatically. On your system telephone, you set the delay after which calls are automatically connected in the
5 Auto call Answer.
sub-menu of the
1 Calls
menu.
2.3.3 During Another Call
On the Same Call Key
G You are speaking on the telephone, hear the short tone (call-waiting signal) and
see the call on your display.
Press the call key assigned to the line on which you are speaking. This puts
your first call on hold and connects you to the new caller.
/
h Press the disconnect key to end the current call. On the OpenPhone 61
replace the handset.
Press the call key again.
G You are now reconnected to the subscriber you put on hold.
On a Different Call Key
G You are speaking on the telephone, hear the short tone (call-waiting signal) and
see the call on your display.
Press the flashing call key. This puts your first call on hold and connects you to
the new caller.
h Press the disconnect key to end the current call (only on the OpenPhone
/
63 the and OpenPhone 65) or replace the handset.
Then press the call key of the held subscriber. (The LED and arrow symbol flash
slowly.)
G You are now reconnected to the first subscriber.
53
Page 58

Making Calls Accepting Calls
VIP Call
You hear the call-waiting tone. During a call, press the call key that signals the call.
2.3.4 MenuCard “Call waiting”
You hear the call-waiting tone. Press (but do not hold down) the MenuCard key
, then select …
Accept
put on hold.
Reject
Deflect
after entering this subscriber’s telephone number as the
the “Deflect call” function if your user group is authorised to forward calls to
internal and/or external destinations.
: You accept the waiting call. The subscriber you were talking to before is
: The caller hears a busy signal.
: You do not accept the waiting call, but deflect it to another subscriber
Dest.
. You can only use
2.3.5 MenuCard “Call”
Press (but do not hold down) the MenuCard key , then select …
Reject call
Deflect call
scriber after entering this subscriber’s telephone number as the
only use the “Deflect call” function if your user group is authorised to forward calls
to internal and/ or external destinations.
: You reject the call. The caller hears a busy signal.
: You do not accept the call yourself, but deflect it to another sub-
Dest.
. You can
Door opener
54
: This activates the door opener.
Page 59

Making Calls Enquiry, Toggling, Transfer and Conference
2.3.6 Voicebox Queries
There are various ways of listening to the messages in your voicebox:
■ via OpenVoice (from a telephone whose number is not assigned to your voi-
cebox)
■ by calling the voicebox directly (from a telephone whose number is assigned
to your voicebox)
■ by means of the additional menu
section entitled MenuCard “Voicebox” on page 97).
Note: For detailed information on the utilisation and operation of OpenVoice, please refer to the add-on guide
“OpenVoice 200 – The Voicemail System in the
OpenCom 100/OpenCom X300 Communications Systems”.
9 Voicebox
in the Main menu (see the
2.4 Enquiry, Toggling, Transfer and Conference
2.4.1 Enquiry/Toggling by means of the R-Key or
Another Call Key
During a call, press the R-key (display in the Info line) and Z dial the
internal or external telephone number (for manually-seized trunk calls with the
trunk line seizure code digit, e.g. , see page 37),
or
press another call key to place an enquiry call with a team member.
The original call is put on hold while you are consulting with the third subscriber.
To toggle (i.e. switch backwards and forwards between the two subscribers),
press the key of the held subscriber (the LED and arrow symbol on this key flash
slowly).
55
Page 60

Making Calls Enquiry, Toggling, Transfer and Conference
h/ End enquiry/toggling by replacing the handset or pressing the dis-
connect key (only on the OpenPhone 63 and the OpenPhone 65).
/ Then press the key of the call on hold.
G You are now reconnected to the subscriber who had been held.
2.4.2 Transferring an Internal/External Call to an
Internal Subscriber
You have dialled an internal enquiry call (see the section entitled Enquiry/Toggling
by means of the R-Key or Another Call Key on page 55). When the subscriber
answers,
Gh inform them of the call transfer and hang up.
If the subscriber does not answer,
h hang up; the internal subscriber is called.
If the called internal subscriber answers, they are connected to the waiting call. If
this call is not accepted within a certain period of time (by default 45 seconds), you
are called back and, after lifting your handset or pressing the call key, are reconnected to the original subscriber and the display shows information on the recall.
The period of time after which a recall is made can be changed by your system
administrator. Ask your administrator for the current time value.
While a call is being transferred to another internal subscriber, the caller hears
music on hold. The setting “Music on hold upon transfer on calling” in the Con-
figurator of the Web console specifies whether callers continue to hear music on
hold on recall, or whether they hear the ringing tone again.
If the line of the called internal subscriber is busy,
h/ press the disconnect key or replace the handset (only on the Open-
Phone 63 and the OpenPhone 65) and then press
/ the call key or enquiry key on which the subscriber with whom you ori-
ginally spoke is waiting.
56
Page 61

Making Calls Enquiry, Toggling, Transfer and Conference
2.4.3 Transferring an External Call to an External
Subscriber
An external call can only be transferred to an external subscriber by means of the
MenuCard
To do this, press (but do not hold down) the MenuCard key and confirm
Subscriber on Hold
.
Transfer
External calls are interconnected within your telephone system, depending on
your system setting.
with the OK key .
Note: When you call an external number and then transfer
this person to another external party, you will bear the costs
for the call between these two external callers. You have no
way of influencing how long the transferred call will last. The
connection is established via the OpenCom 100/
OpenCom X300 and occupies two call channels (ISDN user
channels).
2.4.4 MenuCard “Subscr (Subscriber) on hold”
You are making an internal or external enquiry call (the R-key is depressed)
…
Press (but do not hold down) the MenuCard key , then select the following
from the
Transfer
are currently speaking.
Conference
Toggle
you are currently speaking, and the one with whom you last spoke.
Park call
meantime. (see MenuCard “Conversation” starting on page 48).
Subscr on hold
: You connect the subscriber on hold to the subscriber with whom you
: This initiates a three-party conference.
: This function enables you to switch between the subscriber with whom
: You can park one or more calls and make other phone calls in the
MenuCard:
57
Page 62

Making Calls Enquiry, Toggling, Transfer and Conference
Door opener
: You activate the door opener.
2.4.5 Internal/External Three-Party Conference
You have dialled an internal or external enquiry call (see the section entitled
Enquiry/Toggling by means of the R-Key or Another Call Key starting on page 55).
G If the subscriber answers, inform them of the conference and select the
Conference
rence is started.
h/ End the conference by hanging up or pressing the disconnect key (on
the OpenPhone 63 and the OpenPhone 65).
menu item from the MenuCard
Note: Interconnecting the two conference participants or
removing one of them from the conference is only possible
using the appropriate menu item in the MenuCard.
Subscriber on Hold
. The confe-
If you wish to speak to one of the conference participants separately again or
remove one of them,
press this participant’s call key. You are now speaking with this participant,
while the other participant is put on hold. Now you can toggle again.
End your conversation with this participant by pressing the disconnect
key (or by replacing the handset on the OpenPhone 61) and then press the call key
of the participant on hold.
2.4.6 MenuCard “Conference”
Press (but do not hold down) the MenuCard key , then select …
Disconnect:ƒ34565483
rence.
: This removes an external participant from the confe-
Disconnect:ƒ1234
Transfer
pants remain connected.
58
: This removes you from the conference, while the two other partici-
: This removes an internal participant from the conference.
Page 63

Making Calls Special Calls/Functions
End conference
Toggle
participants.
: This breaks up the conference and you can now switch between the two
Door opener
: This ends the conference.
: You activate the door opener using this.
2.5 Special Calls/Functions
2.5.1 Accepting an Appointment Call
You can save appointments with the menu item
Messages
At the appropriate time, the appointment message appears on the display and
your telephone rings for a period of one minute with the ringer volume steadily
increasing. Press the OK key once to switch the ringer signal off. Press
again to acknowledge the display signal.
If you lift the handset during an appointment call, a special tone (through the
handset) indicates that the ringer signal was an appointment call.
.
Appointments
in the MenuCard
You can also end the appointment call with the key or by lifting the
handset. Elapsed and active appointment calls are displayed in the
MenuCard.
Info
2.5.2 Baby Call
You can save an internal or external telephone number in the menu item
of the MenuCard
call
programmed telephone number is dialled when a specified period has expired
(presetting is five seconds after you have lifted the handset. If you begin dialling a
telephone number within the specified period, the baby call is cancelled. The baby
call can also be triggered by pressing the hands-free key or a call key .
Your system administrator configures the baby call period from 0 to 20 seconds for
all subscribers on the OpenCom 100/OpenCom X300, and will be able to tell you
the current value.
Protection
. If the menu item has been activated, this
Baby
59
Page 64

Making Calls Special Calls/Functions
2.5.3 Announcements
Announcements can only be made to system telephones.
… making an announcement
Briefly press the MenuCard key and select
you enter the telephone number.
The called subscriber hears a special information tone followed by your
announcement. If you make an announcement to a group of system telephones
(e.g. to a hunt group number on which calls are signalled simultaneously), all
called subscribers hear the announcement at the same time. You hear a signal
tone via your telephone when the (announcement) connection has been made to
all called subscribers. If one of these subscribers replies to the announcement (by
accepting the call), the announcement call to the other system devices is terminated.
If the called subscriber is a member of a user group for which Intercom protection
is active, no announcements are made to that subscriber’s telephone number.
… responding to an announcement
If you receive an announcement yourself, you will hear a special information tone.
To respond,
Announcement
. Under
Dest.:
H/ lift the handset or press the hands-free key.
or
briefly press the MenuCard key. In the MenuCard
Accept
Reject
the announcement then hears the busy tone.
You can also reject the announcement by pressing the disconnect key or a
function key on which you have programmed the
if you want to speak to the subscriber making the announcement. Select
if you want to terminate the announcement call. The subscriber making
Reject
Announcement
function.
, select
60
Page 65

Making Calls Special Calls/Functions
2.5.4 Answering a Callback
A callback request is executed when the other subscriber is free again. When you
hear the signal on your telephone, you…
H lift the handset, and the other subscriber will be called.
2.5.5 Doorbell, Door Opener
A doorbell is signalled to your call key and appears in the display.
... opening the door while the handset is on hook
H Lift the handset.
To open the door, select the
Door opener
menu item in the MenuCard displayed.
… opening the door during a call
G If the doorbell signal is triggered during a call, you will hear the call-waiting
tone.
Press the call key to which the door call is being signalled. This puts your first
call on hold and connects you to the visitor at the door.
To open the door, select the
Door opener
menu item in the MenuCard dis-
played.
Press the call key again.
G You are now reconnected to the subscriber you put on hold.
Note: The door opener menu item is not dependent on an
entrance intercom call. The door opener function controls a
switching contact in your system which can also be connected to other devices. Consult your system administrator for
further details.
61
Page 66

Making Calls Special Calls/Functions
2.5.6 Entrance Intercom Calls
Calling the Entrance Intercom
If your system is connected to an entrance intercom, you can use it as follows to
speak with a visitor:
H
In an enquiry call:
G
If you are operating a “DoorLine” entrance intercom, use the following code procedure to speak with a visitor:
H
In an enquiry call:
G
Signal when the Handset Is on Hook …
H Lift the handset.
■ If your system is connected to an entrance intercom, you can speak with your
visitor.
■ Otherwise you will hear a special door tone when you lift the handset.
Signal During a Call
G If the doorbell signal is triggered during a call, you hear a call-waiting tone.
Proceed as described in the chapter Doorbell, Door Opener, section … opening the
door during a call starting on page 61.
Door Call Forwarding
You can forward calls signalled from the doorbell to another (internal or external)
call number, a so-called “pharmacy line”. This is done by means of the
forwarding
menu (see the section entitled MenuCard “Call forwarding” starting
Call
on page 83).
62
Page 67

Making Calls Making Calls from the Telephone Book
Call Duration
All door calls are automatically terminated after a specific period has expired. This
ensures that forwarded door calls do not unintentionally lead to continuous calls
(e.g. to a mailbox).
Your system administrator can configure the period in the OpenCom 100/
OpenCom X300 from 30 to 300 seconds and will be able to tell you the current
value.
2.6 Making Calls from the Telephone Book
2.6.1 The Telephone Book
Approximately 2,000 entries can be saved in the telephone book of your communications system.
This number includes the centrally administered telephone book, the personal
entries of all subscribers, and, provided you are using the multi-company variant
of the OpenCom 100/OpenCom X300, the entries in the companies’ telephone
books.
How many entries you can save in your personal telephone book is determined by
your system administrator when configuring the OpenCom 100/OpenCom X300.
The personal entries are automatically sorted into the comprehensive register, but
can only be viewed on your telephone. (However, the system administrator or a
person with the corresponding authorisation can delete your telephone book
completely.)
For instructions on managing the telephone book, refer to the section entitled
MenuCard “Phone book” on page 95.
2.6.2 MenuCard “Phone book”
Press (but do not hold down) the ABC key , then select …
Look up name
entitled Entering Text on page 31). After pressing you will see the telephone
book beginning with the characters you entered. If you do not enter any cha-
racters and press , the list will begin with the first entry. Using the arrow
: Enter the letters/name to be searched for (see the section
63
Page 68

Making Calls Making Calls from the Telephone Book
keys, you can scroll through the list and select the desired name. If there is more
than one telephone number under the selected name (e.g. an office number and a
private number), you can select the desired number from the list. After * you
can dial the number with
numbers of the entry with
(*: If the handset was already off the hook before you called up the telephone
book, the number is dialled after you press OK.)
Dial
(or by lifting the handset), or display the telephone
Info
.
New preset
the display as a menu item when you open the telephone book. This allows you to
go to a specific section of the telephone book (e.g. to the entries of a particular
company) to search for and select a particular name there. You can enter up to six
search names; the names are entered in the MenuCard “Phone book”.
If the entries
pressed the ABC key briefly, this means that the menu for making selections
from the telephone book is available in the abbreviated form. You then make your
selection immediately, using the initial letters of the entry you are looking for. If
there is more than one entry with the same initial letter, select the desired one
with the arrow key. When you lift the handset, the telephone number stored under
the entry will be dialled. In the case of entries with more than one telephone
number, the preferred number will be dialled. If an entry has several telephone
: Here you can enter a letter or name. This entry will then appear in
Note: The MenuCard “Phone book” appears by default in
the abbreviated form without the
New preset
can use the Configurator in the Web console to activate
these additional entries for your user group.
Look up name
entries. If required, the system administrator
and
New preset
are not displayed when you have
Look up name
and
numbers, you can also select one explicitly. Press and select
Mobile
the handset).
or
Private
. Confirm your selection with and
2.6.3 Speed Dialling
All central telephone book entries can also be selected by two-digit or three-digit
speed-dialling numbers once they have been configured. The two-digit speeddialling numbers are in the range 00…99, the three-digit are in the range
000…999. Ask your system administrator how many digits are valid.
64
Dial
Office
(or by lifting
,
Page 69

Making Calls Making Calls from the Telephone Book
Selecting a Speed-Dialling Destination
HZ(SD no.)
alternatively:
H Z (SD no.)
Note: If you have the telephone book open, instead of
keying in the name (see the paragraph commencing “Look
up Name” in the previous section), you can also press the
key and enter the speed-dialling destination to find
the name entry.
2.6.4 Add Phone Numbers to Telephone Book from
Lists or during a Call
You can add phone numbers saved in your caller list or your redial list to a telephone book (see MenuCard “Calls” starting on page 80 and Redialling starting on
page 40). You can also add the other party’s phone number to the telephone book
during the call. (see MenuCard “Conversation” starting on page 48).
Select the
■
1 New entry
■
2Add
Add Phone Number as new Telephone Book Entry
Select
Personal, Central, Company
You can add the entry to your personal telephone book. If your system administrator has authorised you (or the user group you are part of) accordingly, you can
also edit the central telephone book and your company’s telephone book. Select
Phone book
menu item.
: You can add the phone number to a telephone book.
: You can add the phone number to an existing telephone book entry.
1 New Entry
and press the button.
:
the desired telephone book and press the button.
Office, Mobile, Private
Define the kind of phone number the list entry should be saved as. Confirm your
selection with the button.
:
65
Page 70

Making Calls Making Calls from the Telephone Book
Enter
Name
and
First Name
. Confirm each entry with the button.
You can add to the telephone book entry by entering further phone numbers.
If you add the entry to the central telephone book, you can assign a speed-dialling
number. Select
Abbrev. no.
and press the button. The system will offer a
speed-dialling number. You can accept this number or enter another one which is
not in use.
If the newly entered phone number is to be dialled automatically whenever you
call the subscriber (by using the telephone book) you can save this number as a
default number. To do this, select the list item
Default
and press the
button.
You can (automatically) suppress your own phone number if you dial the newly
entered phone number from the telephone book. To do this, select the list item
Suppress number
and press the button.
Save
the entry.
Add Phone Number to a Telephone Book Entry
Select
2Add
Personal, Central, Company
and press the button.
:
You can add the entry to your personal telephone book. If your system administrator has authorised you (or the user group you are part of ) accordingly, you can
also edit the central telephone book and your company’s telephone book. Select
the desired telephone book and press the button.
In the relevant telephone book, select the entry you would like to add to (please
also refer to the explanations under “Look up Name” in the chapter MenuCard
“Phone book” starting on page 63).
Office, Mobile, Private
:
Define the kind of phone number the list entry should be saved as. Confirm your
selection with the button.
Add more information to the entry as described in Add Phone Number as new Tele-
phone Book Entry on page 65
66
Page 71

Making Calls Making Calls from the Telephone Book
Save!
the entry.
67
Page 72

Team Functions Managing Calls in a Team
3. Team Functions
The system administrator can form a team with two or more telephones and
program team functions for these telephones by assigning internal telephone
numbers to the telephone’s call keys. For each programmed call key, the administrator can determine whether you can receive and make calls or whether you can
only call the other members in the team.
As a member of a team, you can see on your display which of the other team
members are currently busy. Team members can answer one another’s calls and
transfer them; they can also substitute for one another.
For an overview of the team functions and some examples of how they are used,
please refer to the chapter entitled “Team Functions” in the “Installation and Commissioning” user guide.
For information on the display texts, please refer to the chapter entitled Display
and MenuCards starting on page 24; for information on the call keys, refer to the
chapter entitled Key Assignments starting on page 18.
3.1 Managing Calls in a Team
In a team configuration, the operation of call keys is very similar to the operation
described in the previous chapters of this User Guide.
This chapter gives a brief explanation of how to operate the telephones in a team
configuration and refers you to other chapters where appropriate.
3.1.1 Making External/Internal Calls
For information on how to operate these functions, please also refer to the chapter
entitled Making External/Internal Calls starting on page 45.
Using Trunk Keys
H / Trunk key 1 is automatically seized when you lift the handset or press
the hands-free key (only on the OpenPhone 63 or the OpenPhone 65). You can
make internal and external calls
68
Page 73

Team Functions Managing Calls in a Team
If you have programmed two or more trunk keys on your system telephone,
you can seize them separately.
Using Team Keys
To call another team member, simply press their team key.
Using Busy Keys
The busy key tells you the current status of a team member’s telephone,
enabling you to react correspondingly. The LED on the busy key lights up when
the number configured for that key is busy. If you want to call another team
member (when the LED is off, i.e. when this team member’s telephone is not busy),
simply press their busy key. As opposed to the team key, the call here is established by your own trunk key, so that your telephone number is then busy.
Using Direct-call Keys
Via direct-call keys you can call team members even if they have programmed
a substitute.
3.1.2 Accepting Calls
For information on how to use this function, please also refer to the chapter
entitled Accepting Calls starting on page 52.
Using Trunk Keys
Calls are indicated on the appropriate trunk key by a visual signal and (if configured) acoustically as well. You can accept the call by
H picking up the handset or
pressing the trunk key or
pressing the hands-free key (only on the OpenPhone 63 and the
OpenPhone 65).
With the trunk keys you can set your telephone to idle either by programming call
protection, call diversion or a substitute. You can also change the call signalling
mode via the trunk keys (see the section entitled MenuCard “Trunk key” on
page 72).
69
Page 74

Team Functions Managing Calls in a Team
Using Team Keys
For calls for another team member, the call number of the caller (or the name if
there is a corresponding entry in the telephone book) and the user name of the
team member are shown alternately in the display. You can accept a call for
another team member by pressing the appropriate team key on your telephone.
You can put the accepted call through to the team member using the team key.
You can change the call signalling mode via the trunk keys (see the section
entitled MenuCard “Team Key” starting on page 73).
Using Busy Keys
When a call comes in for a team member, the LED for the programmed busy
key flashes. You accept the call by pressing the busy key. As opposed to the team
key, the call here is taken on your own trunk key, so that the called telephone
number remains free. You can forward the accepted call to the team member
(refer to section Transferring on page 71).
Using Direct-call Keys
Via direct-call keys you can only make calls to team and trunk keys programmed with the same telephone number. No calls are signalled to direct-call
keys.
3.1.3 Enquiry, Toggling and Transfer
For information on how to use these functions, please also refer to the chapter
entitled Enquiry, Toggling, Transfer and Conference starting on page 55.
Within a team you can put a call on hold for enquiries or transfers. Calls on hold are
indicated by the LED flashing slowly on your telephone.
While the call is on hold you can make an enquiry call to another member in the
team and transfer the call.
The following is a brief description of all call keys (trunk key, team key, busy key
and direct-call key).
Enquiry Calls
Press the call key of the team member with whom you want to consult. The original call is put on hold.
70
Page 75

Team Functions Programming the Call Keys
Toggling
To toggle (i.e. switch back and forth between the two subscribers in the call),
press the key of the held subscriber.
Transferring
G h Announce the call transfer to the other team member and put the handset
on the hook. The call on hold is now transferred to the other team member.
Holding and Transferring Calls with a Function Key
This function is useful for teams working in the same room where the members
can speak across the room. To use the “Hold” function, it must be programmed to
an unused function key.
G You are speaking via a call key, e.g. the trunk key with the telephone number
“11”.
h Press the “Hold” function key to put the call on hold. Put the handset on the
hook.
Tell the other team members that a call is on hold on the trunk key with the telephone number “11” and is waiting to be accepted by another team member.
G Accepting Calls with a Team Key: Another team member picks up the
handset and presses the team key to which the telephone number “11” has been
assigned.
Accepting Calls with a Trunk Key: Another team member presses the trunk
key to which the telephone number “11” has been assigned.
For information on how to program the function keys, please refer to the chapter
entitled Programming Functions starting on page 102.
3.2 Programming the Call Keys
The call keys are configured in the Configurator on the OpenCom 100/
OpenCom X300 Web console. For system telephones, you can configure the fol-
lowing:
■ the type of key (trunk key, team key, busy key or direct-call key),
71
Page 76

Team Functions Programming the Call Keys
■ the telephone number and the text currently assigned to the key,
■ the call-signalling mode for this key.
You can change the pre-settings for the text and the call signalling mode on the
appropriate key’s MenuCard (see the following sections: MenuCard “Trunk key” on
page 72, MenuCard “Team Key” on page 73, and MenuCard “Busy Key” on page 74)
as well as most of the settings for supported features.
If the configuration of a call key is changed in the Configurator, the telephone will
load the new settings and not be operational for a few moments. For more information on the configuration, refer to the online help of the OpenCom 100/
OpenCom X300.
3.2.1 MenuCard “Trunk key”
Press and hold down the trunk key for a moment, then select …
1 Modify text
: You will see the text currently assigned to the key. This text is
displayed on the display of your telephone. To change the text, press .
Delete the existing text with the key and enter new text, if required. Press
and confirm this with
Save
. If you delete the text without entering any new
text, only the key’s telephone number will be displayed.
2 Call diversion
the trunk key (
Immediately, After delay, Busy
: You can configure one or more types of call forwarding for
). Proceed as with Divert phone
(see the section entitled MenuCard “Call forwarding” starting on page 83). The callforwarding mode configured for a trunk key only applies to that key, not the telephone.
3 Substitution
the team. Select
Press . Select
: You can forward calls for this trunk key to another member of
Substitute
On/Off
and choose one of the team members from the list.
to switch the substitution function on or off.
Note: The menu entry Substitution is only displayed if the
allocated telephone number has been configured on another team member’s trunk or team key.
Calls for this trunk key are now only indicated on your telephone by a visual signal.
On the substitute’s telephone, the calls are indicated by a visual signal and acousti-
72
Page 77

Team Functions Programming the Call Keys
cally, even if the key there has been configured with a different type of call signalling. On the substitute’s telephone, the call is signalled acoustically with the
volume set for that telephone (see the section entitled MenuCard “Phone settings”
on page 88).
Calls from direct-call keys to your telephone are signalled acoustically even if you
have programmed a substitute (unless you have programmed call protection for
this trunk key).
4 Call signalling
Optical & acoustic, Optical only
Acoustic after delay
phone is to ring.
5 Call protect
only, or for external calls only. If call protection has been activated, this trunk key
will only indicate calls by means of a visual signal, even if they are made from a
direct-call key.
6 Ring tone
as described in the section entitled MenuCard “Phone settings” on page 88.
7 Charges
as the total charges.
: You can set the
: For each trunk key, you can view the charges for the last call as well
8ƒCall wait. prot.
number of this trunk key are not signalled by a call waiting tone. The caller hears
the busy tone.
: Determine whether call signalling to this key is to be
or
Acoustic after delay
, specify the number of seconds after which your tele-
: Switch call protection On or
Volume
: While you are making a call, other calls for the telephone
and
Off
Melody
for all calls, for internal calls
for each trunk key. Proceed
. If you select
Note: If the internal telephone number of this trunk key is
configured on several telephones, call-waiting protection is
also activated on these telephones.
3.2.2 MenuCard “Team Key”
Press and hold down the team key for a moment, then select …
1 Modify text
of your telephone. To change the text, press . Delete the existing text with
the key and enter new text, if required. Press and confirm this with
: The text currently assigned to the key is shown on the display
73
Page 78

Team Functions Programming the Call Keys
Save
. If you delete the text without entering any new text, only the key’s tele-
phone number will be displayed.
2 Call signalling
Optical & acoustic, Optical only
Acoustic after delay
phone is to ring.
3 Call protect
only, or for external calls only. If call protection has been activated, this team key
will only indicate calls by means of a visual signal, even if they are made from a
direct-call key.
4 Ring tone
as described in the section entitled MenuCard “Phone settings” on page 88.
: You can set the
5ƒCall wait. prot.
number of this team key are not signalled by a call waiting tone (but at the team
keys of other terminals unless a call waiting protection was programmed there).
: Determine whether call signalling to this key is to be
or
Acoustic after delay
, specify the number of seconds after which your tele-
: Switch call protection On or
Volume
: While you are making a call, other calls for the telephone
and
Off
Melody
for all calls, for internal calls
for each team key. Proceed
. If you select
3.2.3 MenuCard “Busy Key”
Press and hold the busy key down, then select …
1 Modify text
of your telephone. To change the text, press . Delete the existing text with
the key and enter new text, if required. Press and confirm this with
Save
. If you delete the text without entering any new text, only the key’s tele-
phone number will be displayed.
: The text currently assigned to the key is shown on the display
3.2.4 Direct-call Key
When a direct-call key is held down, no MenuCard is displayed. A direct-call key is
configured exclusively via the Configurator of the OpenCom 100/OpenCom X300
Web console.
74
Page 79

Remote-controlled Functions Remote-controlled Dialling (Call Through)
4. Remote-controlled Functions
The OpenCom 100/OpenCom X300 enables remote-controlled calls and remoteprogrammable call forwarding. These features are set up by the administrator
when configuring the system. To carry out these features the system PIN is
required.
The system PIN is issued by the system administrator, and it must be changed from
the factory setting (“0000”) to another value in order for the features described
below to function.
In addition, all the owners of voiceboxes can, with the corresponding authorisation, call their voiceboxes from external telephones. They can remotely access
and edit their messages as well as modify the central settings of their voiceboxes.
4.1 Remote-controlled Dialling (Call Through)
Without internal number assignment
Z (reserved tel. no.) Z (system PIN) (trunk line seizure code, e.g. )
Z (external tel. no.)
With internal number assignment
Z (reserved tel. no.) Z (system PIN) (trunk line seizure code, e.g. )
Z (external tel. no.) Z (internal tel. no.)
You can call the OpenCom 100/OpenCom X300 from an external telephone, from
your home for example, and then dial an external telephone number. The cost of
the call is then billed to the OpenCom 100/OpenCom X300 line. This way you can
take advantage of different tariff zones, for example.
For this feature, the system administrator must have set up a telephone number
(for remote control) in the OpenCom 100/OpenCom X300. In addition, the number
reserved in the OpenCom 100/OpenCom X300 can also be assigned an internal
telephone number via which the dialling is to be performed. In the case of remotecontrolled dialling, there is no check on authorisation.
Least Cost Routing (LCR) is used with remote dialling, provided the system administrator has correspondingly configured LCR and its application in the
OpenCom 100/OpenCom X300. Ask your administrator for the configuration
applicable to you.
75
Page 80

Remote-controlled Functions Remote-programmable Call Forwarding
4.2 Remote-programmable Call Forwarding
Configuring the function
Z (reserved tel. no.) Z (system PIN) Z (your internal tel. no.) (trunk
line seizure code, e.g. )
Z (destination tel. no.)
Deleting the function
Z (reserved tel. no.) Z (system PIN) Z (your internal tel. no.)
Using the telephone number reserved in the OpenCom 100/OpenCom X300 for
remote control, you can configure or delete call forwarding “Immediate” for your
own telephone number from a remote location. This remotely-programmed forwarding overwrites any other existing call forwarding. Forwarding “On Busy” and
“After Delay” are not affected. Incorrect or non-existent telephone numbers are
rejected. Your authorisation is checked in the same way as for forwarding within
the OpenCom 100/OpenCom X300.
A correct entry is confirmed with a positive acknowledgement signal, provided
the system administrator has not deactivated this function (in the Configurator,
PBX Configuration: System: Settings menu). The external call is subsequently
ended.
Note: The procedure is aborted if there is a pause of longer
than 60 seconds between the entry of two digits. With this
duration, remote-controlled functions using GSM cell phones can also be realised.
4.3 Remote-programmable Voicebox Configuration
and Query
If the system administrator has configured remote query authorisation for your
voicebox, you can query and configure your voicebox from an external telephone:
■ Using the OpenVoice telephone number (this number is included in the
incoming call distribution) …
you dial the MSN or the system number assigned by the system administrator
to the OpenVoice internal number.
76
Page 81

Remote-controlled Functions Remote-programmable Voicebox Configuration and Query
■ Using your own telephone number (this number is included in the incoming
call distribution, and you have activated call forwarding for this telephone to
the voicebox) …
you dial the MSN or the direct-dialling in number under which you can be
reached by external callers.
Note: For detailed information on the utilisation and operation of OpenVoice, please refer to the add-on guide “OpenVoice – The Voicemail System in the OpenCom 100/
OpenCom X300 Communications Systems”.
4.3.1 Setting up an Internet Connection from Remote
(ISP Trigger Call)
Z (reserved tel. no.) Z (system PIN)
If the communications system is connected to the Internet via a dialup connection, a user can initiate from external that the system establishes an Internet
connection (ISP Trigger call). The system is then reachable via the Internet and
enables to set up a connection for a VPN connection via RAS.
77
Page 82

Features and MenuCards How to Set Features
5. Features and MenuCards
5.1 How to Set Features
There are three different ways to set the features of your telephone and the
system:
5.1.1 Using MenuCards
Invoke the MenuCards using the appropriate keys as described under Display and
MenuCards on page 24 and define your settings. Use the arrow keys and the
key to select your settings and the key to switch between cards. In the
primary groups of MenuCards you can also select features directly by entering a
number. To do this, simply key in the number to the left of the feature.
5.1.2 Using Programmed Keys
Nearly all of the features can be programmed on a vacant (function) key and called
up by pressing the key or switching the function on or off (see Programmable Keys
starting on page 101).
5.1.3 Using the Star and Hash Keys
Many features can be set by entering code digits. This is done using the or
key combined with a specific string of code digits.
Code digit input is intended primarily for analogue telephones in your system. The
code digits can also be used on your system telephone and are described in the
“OpenCom 100/OpenCom X300 – Operation on Standard Terminals User Guide”
(this is supplied with the system). You can view the up-to-date online summary via
the Codes item in the System info menu of your communications system’s Web
console.
78
Page 83

Features and MenuCards Main Menu
5.2 Main Menu
5.2.1 MenuCard “Main menu”
This MenuCard contains all available features. Some of the menu items can be
found in other MenuCards as well. For example, incoming e-mails are located
under
key (if it has been configured accordingly). Features that affect the availability of your telephone (e.g. active call protection) can be found in the main menu
and also in the MenuCard
holding the Info key down .
The main menu is also used to program features on a key.
Press and hold the MenuCard key down or, if the telephone is idle, press
Messages
in the main menu and can also be called up by way of the Info
Active features
, which you can call by pressing and
(but do not hold down) the MenuCard key and select the menu item
Main menu
1 Calls
2 Call forwarding
you can program on your telephone. Further, the system administrator can
program call forwarding where the call number of the caller is analysed (“SCF:
Selective Call Forwarding”). Potentially this could be the reason why specific calls
do not reach you. If you have any questions concerning this functionality, please
consult your system administrator.
3 Messages
e-mails that you have received and sent. You can also configure appointments and
activate pre-defined messages (“Messenger” function).
4 Phone settings
meet your personal requirements (e.g. volume, ringer settings, and display contrast).
. This displays the primary groups of menus …
: This contains the most important features relevant to a call.
: This menu group contains all types of call forwarding that
: This menu group provides information about short messages and
: In this menu group you can configure your telephone to
5 Protection
telephone lock.
: Among other things, you can activate the call protection or the
79
Page 84

Features and MenuCards Main Menu
6 Connections
affect a call. Depending on the particular state, these features are also displayed in
the MenuCards that you can call during a connection.
7 Phone book
8 Hotel
telephone.
: This MenuCard is reserved for Hotels, it is only available at the reception
9 Voicebox
are offered this menu card on your system telephone. You use this menu card to
listen to and to configure your voice box.
0 Central settings
: This menu group provides you with all the features that can
: You can edit the system’s telephone books in this menu group.
: If the system administrator has configured a voicebox for you, you
: Here you can make system settings.
5.2.2 MenuCard “Calls”
Select
1ƒCall lists
, followed by …
■
1ƒMissed calls
tried to reach you. Which calls are recorded in your call lists is determined by
the authorisation of your user group. In the process of configuring your user
group, the system administrator will define whether or not internal calls,
external calls, calls when busy and calls from the door are entered into your call
lists. If a caller is listed in the system’s telephone book, the caller’s name is displayed instead of the telephone number. A call when busy is marked with a
handset symbol. A door call will – depending on the type of door intercom –
either be displayed with its call number or the name of the door bell. If a caller
has suppressed the display of his telephone number with CLIR, the call will still
appear in the call list. In the case of several calls with unknown numbers, they
are then grouped together in a single entry.
Select an entry (phone number or name).
If you press the button now, the telephone book opens (see below for
explanations).
: You see the telephone numbers of the callers who last
If you pick up the receiver before accessing the call list, the caller’s phone
number will be dialled automatically.
80
Page 85

Features and MenuCards Main Menu
Pressing the button without picking up the receiver first enables you to
execute the following functions:
Dial
–
–
Phone book
existing entry (
: Call the caller back. Press the button or pick up the receiver.
: Add the entry to the telephone book (
2Add
). Please see Add Phone Numbers to Telephone Book from
1 New entry
) or to an
Lists or during a Call starting on page 65.
Info
–
: You can select
Info
to display information about the caller. For
example, if the call list displays the caller’s name, you can view the telephone
number. You can also view the time of the call and the number of calls.
Note: If your internal phone number (e.g. “30”) is installed
on several terminals, you can view and edit the call list for extension 30 on each of these terminals. For example, if you delete the call list from one terminal, it will be deleted from all
others as well.
■
2ƒAccepted calls
: You see the telephone numbers of the callers with
whom you last spoke.
You can edit this list in the same way as the “missed calls list” (see previous
section).
Note: Calls coming in via team keys are not added to your
caller list.
■
3 Voicebox mess.
: You see the list of messages received and can edit
them.
–
Play
: Listen to the message the caller recorded. You can also use the number
keys 4 (rewind), 5 (pause) and 6 (fast forward) to control message playback.
Delete
–
–
Dial
: The message will be deleted after you press the button.
: Call the caller back. Press the button or pick up the receiver.
81
Page 86

Features and MenuCards Main Menu
–
Phone book
existing entry (
Lists or during a Call starting on page 65
: Add the entry to the telephone book (
2Add
). Please see Add Phone Numbers to Telephone Book from
1 New entry
) or to an
Forward
–
comment. Under
confirm a recorded comment by pressing the button.
–
Info
in the telephone book) and the date, time and length of the selected message.
Charges
the total charges.
3 Remote charges
OpenCom 100/OpenCom X300. To do so enter the internal number of the other
user. Alternatively, you can also choose an entry from your telephone book.
: Forward the message to another voicebox, with or without a
Dest.:
: Here you can see a caller’s telephone number (or name, if it is entered
: For each trunk key, you can view the charges for the last call as well as
: You can read out the charges of other users of the
Note: This function requires that your user group has been
assigned the “Costs” authorisation by the system administrator.
, enter the phone number of the other voice box, and
4 Hunt group
you can switch hunt group calls to your telephone on or off using
individual hunt group numbers or
groups). If several trunk keys or team keys on your terminal have been assigned to
a hunt group number, you will be offered a list of these keys (more precisely their
internal phone numbers) first, when you access this menu item. Select the key
(internal number) for which you want to activate or deactivate the hunt group.
Specifically select a hunt group number or choose the
be activated for all configured hunt group numbers.
If you assign a hunt group number to a function key, you can log out from and log
on to the hunt group by pressing a single key. The display will show which hunt
group number is assigned to the function key, which is useful if you are a member
of several hunt groups (please also refer to Programming Functions starting on
page 102).
: If hunt group numbers have been configured for your telephone,
On/Off
All
if you are a member of several hunt
All
item, if the setting is to
Note: If you are the last reachable member of the hunt
group and you log out then any further callers will hear a
busy signal.
(for
82
Page 87

Features and MenuCards Main Menu
5 Auto call Answer.
telephone are to be automatically accepted. Under
of time in seconds (this can be a value between 0 and 99). Then choose whether
automatic call connection should be activated for
or
calls
deactivate the function with
Int./ext. calls
: You can set the period of time after which calls on your
Duration:
enter the period
Internal calls, External
. You activate automatic call connection with On, and
Off
.
5.2.3 MenuCard “Call forwarding”
You can forward internal or external calls intended for yourself (with the exception
of hunt group calls) to another internal or external telephone number. You can
decide whether only internal, only external or both types of calls are forwarded. If
OpenVoice, the integrated voicemail system of the OpenCom 100/
OpenCom X300, is installed, you can also forward your calls to a voicebox configured for you.
Least Cost Routing (LCR) can be evaluated with call forwarding to external
numbers, provided your system administrator has configured LCR and its application in the OpenCom 100/OpenCom X300 correspondingly. Ask your administrator for the configuration that applies to you.
Calls can be forwarded either immediately, after a specified period of time (delay)
or if the line is busy. You can configure more than one call forwarding mode at the
same time (
figure call forwarding
and call forwarding
number.
When configuring the system, the system administrator specifies in seconds the
period of time after which a call is forwarded in the
mode. If more than one forwarding mode has been activated,
given priority.
Immediately, After delay
Immediately
After delay
Note: All calls for the telephone numbers of your telephone
are forwarded (with the exception of hunt group numbers). If
a number is stored on more than one telephone, then calls
made to any of the other telephones will be forwarded as
well.
for external calls to one telephone number,
for internal calls to a different telephone
or
Busy
). You can, for example, con-
After delay
forwarding
Immediately
is
83
Page 88

Features and MenuCards Main Menu
“Divert MSN” is available for ISDN multi-terminal accesses. For each MSN you can
use this form of call forwarding to forward incoming external calls to external
destinations, if you have the relevant authorisation.
“Divert door” is available for door calls. Providing you have the relevant authori-
sation, you can forward door calls signalled on your telephone to another (internal
or external) telephone (so-called “pharmacy line”).
1ƒDivert phone
: Select
Immediately, After delay
or
Busy
for the for-
warding mode and press . Then key in the destination of the call forwarding
as follows:
■ In the case of external telephone numbers, you can enter the number directly
if trunk line seizure is automatic. On the other hand, if trunk line seizure is
manual you enter the telephone number after keying in the trunk line seizure
code digit (the presetting is ).
■ In the case of internal telephone numbers, you enter the number directly if
trunk line seizure is manual. On the other hand, if trunk line seizure is automatic you enter the telephone number after pressing the star key twice
.
Then select whether
should be forwarded to
Internal calls, External calls
Dest.
. If you configure
Divert phone
or
Int./ext. calls
on a function
key (see also the section entitled Programming Functions starting on page 102),
you can in addition enter a
Text
to label the key. The label is displayed for informational purposes in the Configurator of the OpenCom 100/OpenCom X300, for
example. You activate call forwarding with
(
Immediately, After delay, Busy
) is indicated by a “+” sign. This is followed by
On
. Active call forwarding
the call forwarding destination. Using the plus/minus key , you activate or
deactivate call forwarding.
2ƒDivert key
: This function is only available in the menu if more than one trunk
key is configured on your telephone. In this case you can configure call forwarding
for each trunk key individually. From the list you select the key to which the
internal telephone number is assigned and which you want to forward. Proceed as
if you were configuring
3ƒDivertƒMSN
: Select the MSN (one of the telephone numbers supplied for the
Divert phone
multi-terminal access) you want to forward. Several MSNs can be grouped
84
(see the previous section).
Page 89

Features and MenuCards Main Menu
together. (This is configured by the system administrator.) Calls to the group of
MSNs can be forwarded to a common destination number. The
all configured MSNs to be forwarded to the same destination number.
You need the relevant authorisation to forward MSN groups and all MSNs. Only
then will the corresponding items appear in the menu. Contact your system administrator if you have questions regarding your authorisation and the current configuration of the MSN groups.
After you have selected an MSN, an MSN group or all MSNs, select the type of call
forwarding (
Dest.
.
Immediately, After delay
Note: For this type of call forwarding, the (external) destination number is always entered without the trunk line seizure
code digit.
or
Busy
), and then enter the external
All
item enables
If you configure
gramming Functions starting on page 102), you can in addition enter a
label the key. The label is displayed for informational purposes in the Configu-
rator of the OpenCom 100/OpenCom X300, for example.
Activate the function with
(
Immediately, After delay, Busy
phone number. A “?” preceding the entry,
there are different call forwardings activated for this group. Using the plus/minus
key , you activate or deactivate the call forwarding.
4ƒDivert door
door bell are forwarded.
DivertƒMSN
on a function key (see also the section entitled Pro-
Text
On
. In the selection list of MSNs, active call forwarding
) is indicated by a “+” sign preceding the tele-
? MSN Group 1
Note: If “Divert MSN” is executed in the exchange
(= external call forwarding, configured by the system administrator), it can take a few seconds after configuration for
call forwarding to be activated in the exchange.
: With this so-called “pharmacy line”, all calls signalled by the
for example, means that
to
If several door bells are configured on the communications system, first select the
door bell whose calls are to be diverted. How many door bells are available and
with which names they are listed in the menu, depends on the type of entrance
intercom. Consult your system administrator if you have questions concerning the
configuration of the door bells.
85
Page 90

Features and MenuCards Main Menu
You enter the telephone number under
■ In the case of external telephone numbers, you enter the number directly if
Dest.:
(destination) as follows:
trunk line seizure is automatic. On the other hand, if trunk line seizure is
manual you enter the number after keying in the trunk line seizure code digit
(the presetting is ).
■ In the case of internal telephone numbers, you enter the number directly if
external line seizure is manual. On the other hand, if external line seizure is
automatic you enter the number after pressing the star key twice .
Activate call forwarding with
5ƒRemote divert
: This function allows you to configure call forwarding for the
On
and deactivate it with
Off
.
phone numbers of other users. In order to do so, “Call forwarding for other user”
authorisation is required, otherwise this menu item will not be displayed on your
terminal. Also, you can configure call forwarding only for those users whose terminal has not been blocked for this type of access (these users will themselves
have authorisation to “Prevent call forwarding by other user”). Please consult your
system administrator if you have questions regarding these authorisations.
Enter the internal number that you want to forward or select a number from the
telephone book. The rest of the procedure is the same as configuring
phone
6ƒFollowƒme
(see page 84).
: This type of call forwarding is configured on a destination tele-
Divert
phone to which calls for an original (source) telephone are forwarded. The PIN of
the source telephone is required for this function (see page 91). On the destination
telephone, select
Source:
, enter the internal telephone number for which calls are to be forwarded
from the source telephone to the destination telephone. Then enter the
the source. Switch the follow me function on or off with
6 Follow me
from the “Call forwarding” MenuCard. As the
PIN:
On
or
Off
.
of
On the other telephone (source), you can deactivate the “follow me” function by
switching off
Divert phone
.
If the “follow me” function is active, all telephone numbers of the other telephone
are forwarded immediately (with the exception of hunt group numbers).
86
Page 91

Features and MenuCards Main Menu
5.2.4 MenuCard “Messages”
1 Short messages
system terminals. On arrival of a message (in the display of the system terminal) a
extra window is displayed for four seconds with the details of the sender.
1 Received mail
–
Show
: Select an entry and press . You see the “Subject” text of the
message, the sender and the date.
–
Forward
forward the message. Optionally you can select a call number from the telephone book. Confirm the entry/selection of the call number with .
: Select an entry. You can now edit the text of the message. Press
. Enter the internal call number of the user to whom you would like to
2 Outgoing mail
described in the above section, you can forward or display these messages.
3 New message
: You can send a new message to another user. First enter the text
: Short messages can be exchanged between users with
: A list of senders of messages is displayed.
: A list of messages sent by you is displayed. In the same way as
(max. 160 characters) and then press . Enter the internal call number of the
user to whom you would like to send the message. Optionally you can select a call
number from the telephone book. Confirm the entry/selection of the call number
with .
Messages can also be sent to system terminals from the OpenCTI 50Web appli-
cation. You will find more information on this in the OpenCom 100/OpenCom X300
online help.
2ƒE-Mail
text of the e-mail then appears (this can be up to 64 characters long).
The OpenCom 100/OpenCom X300 can be configured to notify you when you
receive an e-mail. When an e-mail is received, an additional window displays the
sender for a period of four seconds (on system telephone displays).
3 Appointments
Time
. You can enter a message text in
Determine how often you want to the appointment call to be signalled:
: You see the list of incoming e-mails (sender). Select an entry. The “Ref.”
: Select
Appointment 1
Reason
or
Appointment 2
(32 characters are possible).
. Enter the time in
Single
,
87
Page 92

Features and MenuCards Main Menu
Date
appointment with
When an appointment call is signalled to your telephone, it rings for a period of
one minute with the ringer volume steadily increasing. The appointment number
appears on the display. Press to query the reason for the appointment.
4ƒMessenger
OpenCom X300 users of your availability status, e. g. that you are currently not in the
office or are on holiday. The Messenger provides a number of specially prepared
message texts for this purpose. Select one of these message texts and press
appears on that subscriber’s display.
Optionally you can create your own text (max. length 23 characters). Select the
Text:
in the Messenger list and selected. You can overwrite this text at any time.
(enter the specific date),
On
.
: Using the Messenger, you can inform other OpenCom 100/
. If a subscriber now calls you from a system terminal, the selected text
menu entry, enter the text and press the key. The text is now saved
Mo–Fr, Sa–Su
or
Every day
. Activate the
You can also enter and select the Messenger text via the OpenCTI 50 Web application.
Note: The settings of the Messenger are saved and are also
available after a restart of the communications system.
5.2.5 MenuCard “Phone settings”
1ƒVolume
volume by using the key or entering a digit from to .
2 Ring tone
phone collectively or individually. You can specify whether a ring tone is to apply
to the entire telephone or whether calls to particular call keys are to be signalled in
different ways.
If keys on your telephone are assigned, you either select
tings, you select a key from the list of currently configured call keys.
: Select
1 Loudspeaker
: You can configure the ring tones for incoming calls on your tele-
or
2 Handset
. You can change the default
All
or, for individual set-
You can use different melodies and volumes to distinguish between four types of
incoming calls:
88
Page 93

Features and MenuCards Main Menu
–
1 External calls
–
2 Internal calls
–
3 VIP call
–
4 Door call
You can set the
Select a setting with the key.
4ƒMessage ring tone
on your system telephone or calls for members of your pick-up group. These can
then be distinguished from one another.
Select
of message, you can specify
of a melody. The short beep tone is the default setting for all messages. You select
a (different) setting using the key.
1 Short messages, 2 E-Mail, 3 Pick-up
1 Volume
and the
Note: In the Configurator of the Web console you can use
the option Dialling tones as cadences to specify whether
melodies are to be played in full or whether all melodies are
all to be played at the same speed (played as cadences). The
setting in the Configurator also affects melodies on system telephones if selected. This means you may only hear parts of
some melodies.
: You can set different ringer signals to signal messages
1 Volume
2 Melody
and
2 Melody
individually for each type of call.
or
4 Voicebox
, or a short beep tone instead
. For each type
Note: When configuring pickup groups in the Configurator of
the OpenCom 100/OpenCom X300, your system administrator can also determine whether calls for the members in your
pick-up group are indicated on your display as well.
5ƒEn-bloc dialling
or direct dialling (
Off
6ƒCharge settings
you can display them (
switch the charge display off (
7 Add-on adapter
devices connected to your system telephone, you use
select the type of analogue device connected to socket 1 (
,
handset
Headset, Active speaker box, Ext. microphone, DECT-
: This switches your telephone to automatic dialling (On)
).
: If your network operator transmits the call-charge data,
Charge
: In order to configure and activate the external audio
), switch to
Off
).
Duration
(call time indication) or
1 Add-on selection
to
Ear cap, Second
89
Page 94

Features and MenuCards Main Menu
Headset
You use
3 Relay selection
or socket 4. You can select either
socket 2) or
Select
You can activate or deactivate some external audio devices directly via the following menu items (each with the options
4 Door display
5 Record
6 Second handset
7 Headset
8ƒDisplay
the display contrast by using the key (or one of the digits from to
one from the list provided.
), or deactivate the socket with
2 Add-on volume
to select the type of device connected via a relay to socket 2
Door display
off
to deactivate the socket.
). With
: Select
Language
1 Contrast
to adjust the volume of the device. Use
(the “Door busy” indicator connected to socket 4).
you can set the language used on the display by selecting
off
Record
or
(recording equipment connected to
2 Language
on
.
or
off
):
. With
Contrast
you can adjust
If your OpenPhone 65 system telephone has been expanded by one or more addon keypad modules, you can set the display contrast for each keypad module
separately. Select
following menu. You set the display contrast in levels, using the key, or you
enter a digit from to .
1 Contrast
, then select the desired
Keypad module
from the
5.2.6 MenuCard “Protection”
1ƒCall prot. phone
calls or for internal only/for external calls only
and hunt group calls). The most recently activated call protection appears in the
first line. In order to change this, you select , then the desired type of protection (
your choice with
When call protection is activated, the caller hears either the idle or the busy tone.
The system administrator configures this when configuring user groups.
Internal calls, External calls
: This switches call signalling on your telephone for all
On/Off
or
and activate the function with
(with the exception of VIP
Int./ext. calls
On
.
). Confirm
2ƒCall prot. key
keys on your telephone, and switch signalling of calls for all calls or for internal
90
: You can configure call protection separately for the trunk
Page 95

Features and MenuCards Main Menu
only/for external only calls on or off (with the exception of VIP and hunt group
calls). Select the key for which you want to set call protection. Proceed as if you
were configuring
You can also configure call protection for a trunk key by holding the corresponding key down and then selecting the
When call protection is activated, the caller hears either the idle or the busy tone.
The system administrator configures this when configuring user groups. Calls from
direct call keys are only signalled visually on this trunk key.
Call prot. phone
Note: This type of call protection is only activated on the telephone on which it was set. Even if your internal telephone
number is configured on the trunk or team keys of other telephones, call protection is not automatically activated on
those telephones.
(see the previous section).
5ƒCall protect
menu.
3ƒTelephone lock
your telephone to a lower external access authorisation level. External dialling may
then be partially or fully restricted (emergency numbers can be stored in a special
list applicable to your user group and can then always be dialled, irrespective of
your external authorisation).
4ƒBaby call
: Enter the destination (
5ƒChange PIN
have forgotten your user PIN, contact your system adminstrator. Your user PIN can
have up to six characters.
6ƒDelete keys
numbers that you have assigned to the keys are deleted.
7 Availability
call protection, call-waiting protection, call forwarding).
: Enter your user PIN. Activating the telephone lock switches
Dest.:
: Enter your current user PIN and then the new PIN twice. If you
: After you have entered your user PIN, all functions and
: All active features that hinder your availability are cleared (i.e.
). Activate the baby call with On.
8ƒCall wait. prot.Term
calls are signalled by the call-waiting tone. The new caller hears the busy tone.
Activate the function with
your telephone.
(inal): During a telephone conversation, no further
On
.
Call wait. prot
applies to all trunk keys on
91
Page 96

Features and MenuCards Main Menu
9ƒCall wait. prot.Key
: You can activate call-waiting protection separately
for each trunk key on your telephone. Select the key for which you want to set call
protection and activate the function with
On
.
Note: This type of call-waiting protection is only activated
on the telephone on which it was set. If your internal call
number is also stored on the trunk or team keys of other telephones, call-waiting protection is not automatically activated on these telephones.
5.2.7 MenuCard “Connections”
Note: The following features are only offered to you if this is
permitted by the current call state of your telephone. You
can also find these features in the call-dependent MenuCards. If you want to program these features to a function
key, please use the Main menu.
Select
■
1ƒCall pick-up
1ƒPick-up
: This accepts a call for another telephone in your pick-up group.
followed by …
If the called subscriber is a member of a user group for which pickup protection is active, then you cannot pick up calls to this subscriber’s number.
■
2ƒPickup select…
: You can answer a call for any other telephone. To do
this, enter the telephone number of the other telephone. If the other terminal
is already in the call state (e.g. an answering machine is in announcement
mode), you pick up the call. The subscriber for whom you pick up the call must
belong to a user group for which the “Call seizure” authorisation is activated,
otherwise “Pickup selective” is not possible.
If the called subscriber is a member of a user group for which pickup protection is active, then you cannot pick up calls to this subscriber’s number.
■
3ƒUnpark call
: “Unparks” a previously parked caller (please also refer to
MenuCard “Conversation” starting on page 48).
Select
92
2ƒDial
followed by …
Page 97

Features and MenuCards Main Menu
■
1ƒAnnouncement
announcement on another system telephone. Under
: After entering the telephone number, you can initiate an
Dest.:
enter the telephone number. Announcements can also be directed to telephone numbers
under which several subscribers can be reached (see also Announcements
starting on page 60).
If the called subscriber is a member of a user group for which the “Intercom
protection” is active, no announcements are made to this subscriber’s telephone number.
■
2ƒDoor opener
■
3ƒPhone book
■
4 Note
: Note a telephone number and name or dial a previously noted phone
: This activates the door opener.
: This opens the telephone book (see page 63).
number.
■
5 Suppress number
: Your telephone number is not transmitted to the
caller for the subsequent (external or internal) conversation. This menu item
depends on the system settings.
■
6 Transmit number
: Your telephone number is transmitted to the caller for
the subsequent (external or internal) conversation. This menu item depends on
the system settings.
■
7 LCR off
■
8 Booking number
: Switches off LCR.
: You can use a booking number to record the call data
from a telephone call with an external subscriber and save this data for further
analysis in OpenCom 100/OpenCom X300. Booking numbers can be useful for
an office wanting to, for example, calculate the costs (fees accruing and time
spent) of conversations with clients. Select this function from the menu. Enter
the booking number under
Nr.
(max. 8 characters) and press to
confirm.
Select
■
3ƒNot available
1ƒCallback
: This leaves a request with another internal subscriber whose
line is busy to call you back (not possible with hunt group numbers).
followed by …
93
Page 98

Features and MenuCards Main Menu
■
2ƒVIP call
: Even if call protection, call-waiting protection or call-forwarding
is activated on the internal subscriber’s telephone, this function overrides
these restrictions and signals your call (N.B.: it only works if the subscriber has a
system telephone).
Select
■
4ƒCall
1ƒToggle
followed by…
: This switches you backwards and forwards between the subscriber
with whom you are currently speaking and the one with whom you last spoke.
■
2ƒTransfer
: This connects the subscriber on hold with the subscriber to
whom you are currently connected.
■
3ƒConference
■
4ƒMute
■
5 Hold
: This switches the microphone in the handset or telephone On/
: Hold is a team function. The caller is put on hold and can now be
: This initiates a three-party conference.
transferred to another member of the team (see also the section on Holding
and Transferring Calls with a Function Key starting on page 71).
■
6 Intercept
: The numbers of malicious callers can be saved in the exchange
of the network operator (if the service is available). The function is also possible
if the caller has already hung up!
Off
.
■
7 Reject
: You reject the call (this can be an announcement), and the caller
hears the busy tone.
■
8 Deflect call
: You do not accept the call. You specify the telephone
number of another subscriber with
after pressing the button. You can only use the “Deflect call” function if
your user group is authorised to forward calls to internal and/or external destinations.
■
9 Park call
: You can park one or more callers while you make other phone
calls (see MenuCard “Conversation” starting on page 48).
■
0 Disconnect
: (OpenPhone 61 only) You disconnect the current connection.
If you program this function to a function-key then your OpenPhone 61 will
provide a disconnect-key (see also Programming Functions).
94
Destination
, and forward the call there
Page 99

Features and MenuCards Main Menu
5ƒISP connection
: You can, with the necessary user group authorisation, configure your system telephone to display and edit connections to the Internet established via the OpenCom 100/OpenCom X300. First you program the
ISP connection
function to a function key. The key’s LED will light up as soon as
the OpenCom 100/OpenCom X300 establishes a connection to the Internet and
will remain illuminated for the duration of the connection.
■
1 Disconnect
You disconnect the current connection from the
OpenCom 100/OpenCom X300 to the Internet. This disconnects all active users
from the Internet simultaneously.
■
2 Allowed
You permit the establishment of Internet connections via the
OpenCom 100/OpenCom X300. Activate this with .
■
3 Prohibited
You forbid the establishment of Internet connections via the
OpenCom 100/OpenCom X300. Activate this feature with .
5.2.8 MenuCard “Phone book”
You can add, edit and delete entries in your personal telephone book in this
MenuCard. If your system administrator has assigned you (or the user group to
which you belong) the necessary authorisation, you can also edit the central telephone book and your company telephone book.
Information about company telephone books can be found in the user guide
entitled “Installation and Commissioning” in the chapter entitled “Multi-company
Variants” and in the online help to the OpenCom 100/OpenCom X300.
For each of your personal entries (i.e. per
numbers (
Office, Mobile
and
Private
number. This number will always be called automatically if no other number is
selected prior to the establishment of the call.
An entry in your company telephone book is created in exactly the same way as an
entry in your personal telephone book. It can then be used by all employees in
your company.
Name
) you can enter several telephone
) and set one of them as the default
In the central telephone book you can in addition assign a speed-dialling number
(
Abbrev. no.
) to each telephone number. The system offers you the next free
speed-dialling number.
95
Page 100

Features and MenuCards Main Menu
Creating a New Telephone Book Entry
In the MenuCard
Phone book
, select
1 New entry
.
In the MenuCard
Central
Enter the
For each entry, you can enter several telephone numbers (
or
Name
No. mobile
In the central telephone book you can assign a speed-dialling number
(
Abbrev. no.
Select
select the
system offers you the next free speed-dialling number. You can either accept this
or specify another speed-dialling number which is still free. Repeat these steps to
assign a speed-dialling number for another telephone number of the telephone
book entry. You exit this procedure by selecting
Abbrev. no.
Office, Mobile
Abbrev.no.
New entry
Company
and
and
) to one or several telephone numbers in the telephone book entry.
.
. Confirm your choice with .
First name
No. private
and confirm it with . In the MenuCard
, select the required telephone book:
. Confirm these with .
No. office
). Confirm each of these with .
or
Private
number and confirm it with . The
Ok
in the MenuCard
Personal
,
Abbrev. no.
,
,
Then select
select the
and confirm your choice with .
For each telephone number in a telephone book entry, you can specify whether
your own telephone number should be automatically suppressed whenever you
dial these numbers (from the telephone book). Select
confirm this with . In the MenuCard
phone number (
Repeat these steps where necessary to suppress the display of your own number
for other telephone numbers in the telephone book entry. Exit the setting by
selecting
, you can activate or deactivate the suppression of the telephone number.
Save
the entry.
Default
and confirm this with . In the MenuCard
Office, Mobile
Office, Mobile, Private
Ok
in the MenuCard
Note: If you do not activate the “Suppress number” for a telephone number saved in the telephone book, you can supp-
or
Private
telephone number as the default number
Suppress number
) and activate the function with On.
Suppress number
Default
Suppress number
select the tele-
. Using the plus/minus key
and
96
 Loading...