

Page 1
OpenPhone 28
on the OpenCom 100
Communications System
User Guide
Page 2

Welcome to DeTeWe
Thank you for choosing this DeTeWe
product. Our product meets the
strictest requirements with regard to
quality and design.
This User Guide will show you how
to use your OpenPhone 28 and
answer most of the questions that
may arise.
If you require further technical
support or information about other
DeTeWe products, please refer to our
website at
www.detewe.de.
OpenCom 100
Product Family
This user guide applies to the
OpenCom 100 product family
comprising the OpenCom 107,
OpenCom 130, OpenCom 131,
OpenCom 150 and OpenCom 510
systems.
If a reference is made in the text to
the OpenCom 100, the description
applies to all systems; if the individual characteristics are different, a
special note is given.
We hope you enjoy using
OpenPhone.
It provides additional notes and tips
on the product.
Page 3

Contents
OpenPhone 28 on the
OpenCom 100 Communications System 5
General Information 5
Authorisation is Required . . . . . . . . 5
The Glossary . . . . . . . . . . . . . . . . . . . . 6
Further Documentation . . . . . . . . . . 6
Safety Precautions . . . . . . . . . . . . . . 6
Conformity . . . . . . . . . . . . . . . . . . . . . 7
The Features of Your
Telephone 8
Using Your Telephone 8
General Information . . . . . . . . . . . . . 8
Power Supply / Power Failure /
Batteries . . . . . . . . . . . . . . . . . . . 8
Usage. . . . . . . . . . . . . . . . . . . . . . . . . . 8
DECT and GAP . . . . . . . . . . . . . . . . . . 9
Additional Notes . . . . . . . . . . . . . . . . 9
Installation 10
Scope of Delivery. . . . . . . . . . . . . . . 10
If your handset has not been
assembled . . . . . . . . . . . . . . . . . 10
If your handset has been completely
assembled . . . . . . . . . . . . . . . . . 10
MEM card . . . . . . . . . . . . . . . . . . . . . 10
Inserting the MEM card . . . . . . . . . 11
Removing the MEM card . . . . . . . . 11
Inserting the Battery . . . . . . . . . . . 11
Removing the Battery . . . . . . . . . . 12
Installing the Charger. . . . . . . . . . . 12
Charging the handset. . . . . . . . . . . 12
Charging the Replacement
Battery . . . . . . . . . . . . . . . . . . . . 13
Recommendations for
Battery Usage . . . . . . . . . . . . . . 13
Installing and Operating the
Headset . . . . . . . . . . . . . . . . . . . 14
Belt Clip . . . . . . . . . . . . . . . . . . . . . . . 15
Commissioning 16
Handset Subscription
(Checking In). . . . . . . . . . . . . . . 16
Background Information . . . . . . . . 16
Displays, Keys and Symbols 18
Displays . . . . . . . . . . . . . . . . . . . . . . . 19
Symbols in the Display. . . . . . . . . . 19
Information Line/Text Lines . . . . . 20
Softkey Line . . . . . . . . . . . . . . . . . . . 20
Illumination . . . . . . . . . . . . . . . . . . . 20
Softkeys and Other Keys 21
Softkey: Left key . . . . . . . . . . . . . . . 21
Softkey: Right key . . . . . . . . . . . . . . 21
Softkey: Arrow Keys . . . . . . . . . . . . 21
Softkey: OK . . . . . . . . . . . . . . . . . . . . 22
Softkey: Esc. . . . . . . . . . . . . . . . . . . . 22
Softkey: Redial . . . . . . . . . . . . . . . . . 22
Softkey: Menu . . . . . . . . . . . . . . . . . 22
Automatic Hiding of Menus . . . . . 22
Receiver Key . . . . . . . . . . . . . . . . . . . 23
Cancel Key. . . . . . . . . . . . . . . . . . . . . 23
R Key / Hash Key . . . . . . . . . . . . . . . 23
Star Key . . . . . . . . . . . . . . . . . . . . . . . 24
SOS Key . . . . . . . . . . . . . . . . . . . . . . . 24
Number Keys . . . . . . . . . . . . . . . . . . 24
1
Page 4

Making Calls 26
General Information 26
Description of Operating Steps . . .26
Switching the Device Off/On . . . . .26
Open Listening /
Hands-Free Usage. . . . . . . . . . .26
Muting . . . . . . . . . . . . . . . . . . . . . . . .26
Visual Call Indicator . . . . . . . . . . . . . 27
Time / Alarm . . . . . . . . . . . . . . . . . . . 27
Internal and External
Call Numbers . . . . . . . . . . . . . . . 27
Multiple Connections . . . . . . . . . . .27
DTMF Postdial/VF Signalling . . . . . 27
Call-charge Display . . . . . . . . . . . . .27
Redialling. . . . . . . . . . . . . . . . . . . . . . 27
Telephone Lock. . . . . . . . . . . . . . . . . 28
Blocked/Unblocked Call Numbers.28
Keypad Dialling. . . . . . . . . . . . . . . . . 28
Least Cost Routing (LCR) . . . . . . . . .28
Transmission of Call Numbers . . . .29
Calls in the Call-waiting Queue . . . 30
Menu Before and During
a Connection . . . . . . . . . . . . . . . 30
“Selection” Menu in the Idle State 31
Making External/Internal Calls 32
External Line Seizure (manually /
automatically) and Entering
Call Numbers . . . . . . . . . . . . . . . 32
Making a Call. . . . . . . . . . . . . . . . . . . 33
Making a Call from the Redial List 34
Making a Call from the Telephone
Book. . . . . . . . . . . . . . . . . . . . . . . 34
Making a Call from the Call List . . .35
Voicebox Queries . . . . . . . . . . . . . . . 36
Ending a Call . . . . . . . . . . . . . . . . . . .36
Using Routes to Make Calls . . . . . . 36
“Calling …” Menu . . . . . . . . . . . . . . 37
“Busy” Menu . . . . . . . . . . . . . . . . . . .39
Menu During a Call. . . . . . . . . . . . . . 39
Accepting Calls 40
Normal Call . . . . . . . . . . . . . . . . . . . . 40
VIP Calls . . . . . . . . . . . . . . . . . . . . . . .40
Calls During a Conversation . . . . . .41
“Call” Menu . . . . . . . . . . . . . . . . . . . . 41
“Call-Waiting” Menu . . . . . . . . . . . .41
Enquiry, Toggling, Transfer
and Conference 42
Enquiry/Toggling by Means of
the R-Key . . . . . . . . . . . . . . . . . . 42
Transferring an Internal/External
Call to an Internal Subscriber . 43
Transferring an External Call to an
External Subscriber. . . . . . . . . . 43
“Subscriber on Hold” Menu . . . . . .44
Internal/External 3-Party
Conference . . . . . . . . . . . . . . . . .45
“Conference” Menu . . . . . . . . . . . . .45
Special Calls/Conversations 46
Manual Emergency Call (SOS Call) 46
Automatic Emergency Call
(Mandown Call). . . . . . . . . . . . .47
Accepting an Appointment Call. . .47
Baby Call. . . . . . . . . . . . . . . . . . . . . . .47
Doorbell, Door Opener . . . . . . . . . .48
Entrance Intercom Calls. . . . . . . . . . 48
Announcements . . . . . . . . . . . . . . . .49
Answering a Callback. . . . . . . . . . . . 50
Making Calls from the
Telephone Book 50
The OpenCom 100
Telephone Book. . . . . . . . . . . . . 50
“Phone book” Menu. . . . . . . . . . . . .51
Speed-Dialling . . . . . . . . . . . . . . . . .52
Add Call Numbers to Phone Book
from Lists or During a Call. . . .52
The Local Phone Book of Your
OpenPhone 28. . . . . . . . . . . . . .53
2
Page 5

Features and Menus 55
How to Set Features 55
Using Menus. . . . . . . . . . . . . . . . . . . 55
Using the Star and Hash Keys . . . . 55
The Menus 55
“Main” Menu . . . . . . . . . . . . . . . . . . 56
“Calls” Menu. . . . . . . . . . . . . . . . . . . 57
“Call forwarding” Menu . . . . . . . . . 58
“Messages” Menu . . . . . . . . . . . . . . 61
“Phone settings” Menu . . . . . . . . . 62
“Protection” Menu . . . . . . . . . . . . . 67
“Connections” Menu. . . . . . . . . . . . 68
“Phone book” Menu . . . . . . . . . . . . 69
“Voicebox” Menu. . . . . . . . . . . . . . . 70
“Central settings” Menu. . . . . . . . . 71
Appendix 73
Care and Maintenance 73
Technical Data 74
Notes on disposal 75
Main Menu 76
Index 77
3
Page 6

4
Page 7

OpenPhone 28 on the
OpenCom 100
Communications System
General Information
The OpenPhone 28 is a cordless system terminal for use in conjunction
with the OpenCom 100 communications system. The newly designed
menus allow you to easily use and
quickly access your system's many
functions and features.
You can activate the features and
programme functions on the handset itself, or equally conveniently,
use the Configurator of the
OpenCom 100.
The OpenPhone 28 is suitable for use
in office, in outdoor or in dusty environments. The handset offers the
following special features:
■ SOS key for one touch emer-
gency call
■ Mandown switch: Position sen-
sor triggers emergency call automatically
■ The memory card inserted in
your handset (MEM card) saves
your personal settings and telephone book. If you should
change your handset, you will
be able to telephone immediately by inserting this MEM card
in the new device.
■ The device complies with indus-
trial standard IP54 (splash- and
dust proof)
Get to know your telephone equipment. You will discover many new
functions that simplify communication and organisation considerably.
Authorisation is Required
Most of the features mentioned in
this user guide are only available to
you if you have the appropriate user
authorisation. This will be set up by
your system administrator when
configuring the communications
system.
If you have any questions concerning a particular feature or are unable
to use a particular feature, consult
your system administrator.
OpenPhone 28 General Information
5
Page 8

The Glossary
This operating instruction describe
all the basic functions of your handset. Should you require further information on the communications system's features, please refer to the
glossary provided with your communications system.
Further Documentation
Please also refer to the other documentation supplied with the
components of your communications system. You can find this documentation on the OpenCom 100
product CD.
Safety Precautions
Only use this product in countries
where the relevant authorities have
authorised its operation.
This product complies with protection class IP54 according to IEC 529 /
EN 60 529 (dust-proof and splashproof).
■ Do not place the handset, the
charging station or accessories
near:
– water, moisture or damp areas
(e.g. bathroom)
– heat sources, direct sunlight or
inadequately ventilated areas
– devices that produce strong
magnetic fields, electrical
devices, fluorescent lamps,
computers, radios and televi-
sion sets
– areas where the equipment
may be covered, where its venti-
lation is impaired or where it
may be penetrated by fluids. Do
not leave the handset lying, for
example, uncovered outside in
the rain.
– areas subject to vibration,
shock or extreme temperature
fluctuations.
Please observe the following notes
on safety when setting up, connecting and using the handset:
Please observe the following notes
on safety when setting up, connecting and using the handset:
■ Do not place the handset in ar-
eas subject to danger of explosion.
6
General Information OpenPhone 28
■ Connect only approved accesso-
ries.
■ Only use the supplied AC
adapter with the no.
4999045014 (no. 4999051605
for the UK) or the AC adapter
plus (no. 4999070859, no.
4999070860 for the UK).
Page 9

■ Do not use AC adapters which
are visibly damaged (cracked or
broken casing).
■ Research has shown that in
certain cases mobile telephones
(DECT) that are switched on can
affect medical equipment. If you
are using mobile telephones
within a medical establishment,
then please observe its regulations.
■ Generally, other electronic
equipment is protected from interference by radio-based
equipment. Electronic equipment that is inadequately
shielded may be subject to malfunction.
■ Do not throw the battery pack
into a fire, as there is risk of explosion. To prevent injuries or
fire damage, do not connect the
contact points of the batteries
with other electroconductive
components or short-circuit
them.
WARNING!
Never
– open the telephone yourself!
– touch the plug contacts with
pointed metallic objects!
■ Only wipe your telephone clean
with a slightly damp cloth.
■ Place and/or store the handset
and accessories out of the reach
of small children.
Conformity
The CE symbol on the product confirms that it meets the technical
guidelines on user safety and electromagnetic compatibility valid at
the time of issue of the corresponding conformity declaration in line
with European Directive
99/5/EC.
The Declarations of Conformity can
be viewed at the DeTeWe web site at
http://www.detewe.
Please note: Please check before telephoning to make sure that
there are no small, loose pieces of
metal in the earpiece or loudspeaker
(reverse side) areas that could potentially stick to the built-in magnets in the casing (risk of injury).
OpenPhone 28 General Information
7
Page 10

The Features of Your
Tel eph one
Using Your Telephone
General Information
The OpenPhone 28 is a cordless telephone designed for operation in the
OpenCom 100 communications system. In addition to convenient
softkey control of system features,
this telephone also offers a variety of
features that allow you to make calls
more easily. You can also operate
your handset in other communications systems, which means you can
use the same handset in different
places. Furthermore, it is possible to
operate the handset in communications systems made by other manufacturers, as long as they meet the
GAP standard.
Power Supply / Power
Failure / Batteries
This product requires a 230 V alternating current power supply. This
product can only be switched off by
removing the adapter plug from the
mains socket.
ing adapter plug can be obtained as
accessory. Please consult with customer service of your supplier for
this.
In the case of power failure, all memory storage (program and user data)
are preserved without alteration.
Important tips regarding the use of
the batteries can be found on
page 13.
Usage
This handset, like any cordless telephone, operates using radio signals,
which do not always guarantee a
connection being established under
all circumstances. For this reason,
you should never rely solely upon
any cordless telephone for essential
communication (e.g. medical emergencies).
The mains supply voltage in some
countries is 110 V. The correspond-
8
Using Your Telephone OpenPhone 28
Page 11

DECT and GAP
Your handset uses a digital radio
connection in accordance with the
DECT (Digital Enhanced Cordless
Telephone) standard for the connection to the base station. The digital
channel guarantees superior voice
quality without static or background
noise. For signalling between the
communications system and the
handset, the OpenPhone 28 uses the
Generic Access Profile (GAP).
The Generic Access Profile (GAP) and
the DECT standard define procedures used by digital cordless telephones to establish connections.
The GAP standard is not manufacturer-specific so it is possible to combine the communication systems
and handsets of different vendors.
The basic functions (making and receiving calls) are always possible
with in these combinations, but
other functions provided by your
OpenCom 100 communications system together with your handset
(e.g. display of call numbers or call
charges) may not be available when
communications systems produced
by other manufacturers are used.
transmission quality can be diminished by multiple, short transmission gaps. Slight movement out of
the silent zone will restore typical
transmission quality. The connection
will be lost if the handset is moved
out of range.
In order to avoid radio coupling into
other electronic equipment, we recommend the maximum possible distance (min. 1m) between the handset and other devices (e.g. radios,
loudspeakers etc.).
Before using the handset, people
with hearing aids should note that
radio signals can couple into hearing
aids and if strong enough can cause
an unpleasant buzzing sound.
Additional Notes
Depending on the digital transmission in the frequency range used
and also on the technical environment within the range of coverage,
silent zones may occur. In this case,
OpenPhone 28 Using Your Telephone
9
Page 12

Installation
Scope of Delivery
Please check the contents upon receiving your OpenPhone 28:
■ Handset OpenPhone 28 with
belt clip and MEM card
■ Replacement battery
■ Charging station
■ AC Adapter (no. 4999045014,
no. 4999051605 for the UK)
230 V with connection cable
If your handset has not
been assembled
If your handset has been delivered
unassembled, you must:
■ insert the MEM card (see
page 11),
■ insert the battery (see page 11)
and
■ if necessary, remove the protec-
tive film from the display.
■ Your system administrator must
subscribe the handset to your
communication system.
Now install the charging station (see
page 12).
If your handset has been
completely assembled
If your handset has been delivered
completely assembled and it is subscribed to your communications system, then you only need to install
the charging station (see page 12).
MEM card
It is only possible to make a telephone call with your handset when
the MEM card has been inserted
(condition upon delivery). It saves
important data of your handset,
such as your personal telephone
book. If you should change your
handset at some point, you will be
able to telephone immediately using
this MEM card.
The MEM card manager can be obtained as an accessory and can be
used to edit the data stored on the
MEM card. If you wish to purchase
this product, please consult with
customer service of your supplier.
Your OpenPhone 28 is then ready to
operate.
10
Installation OpenPhone 28
Page 13
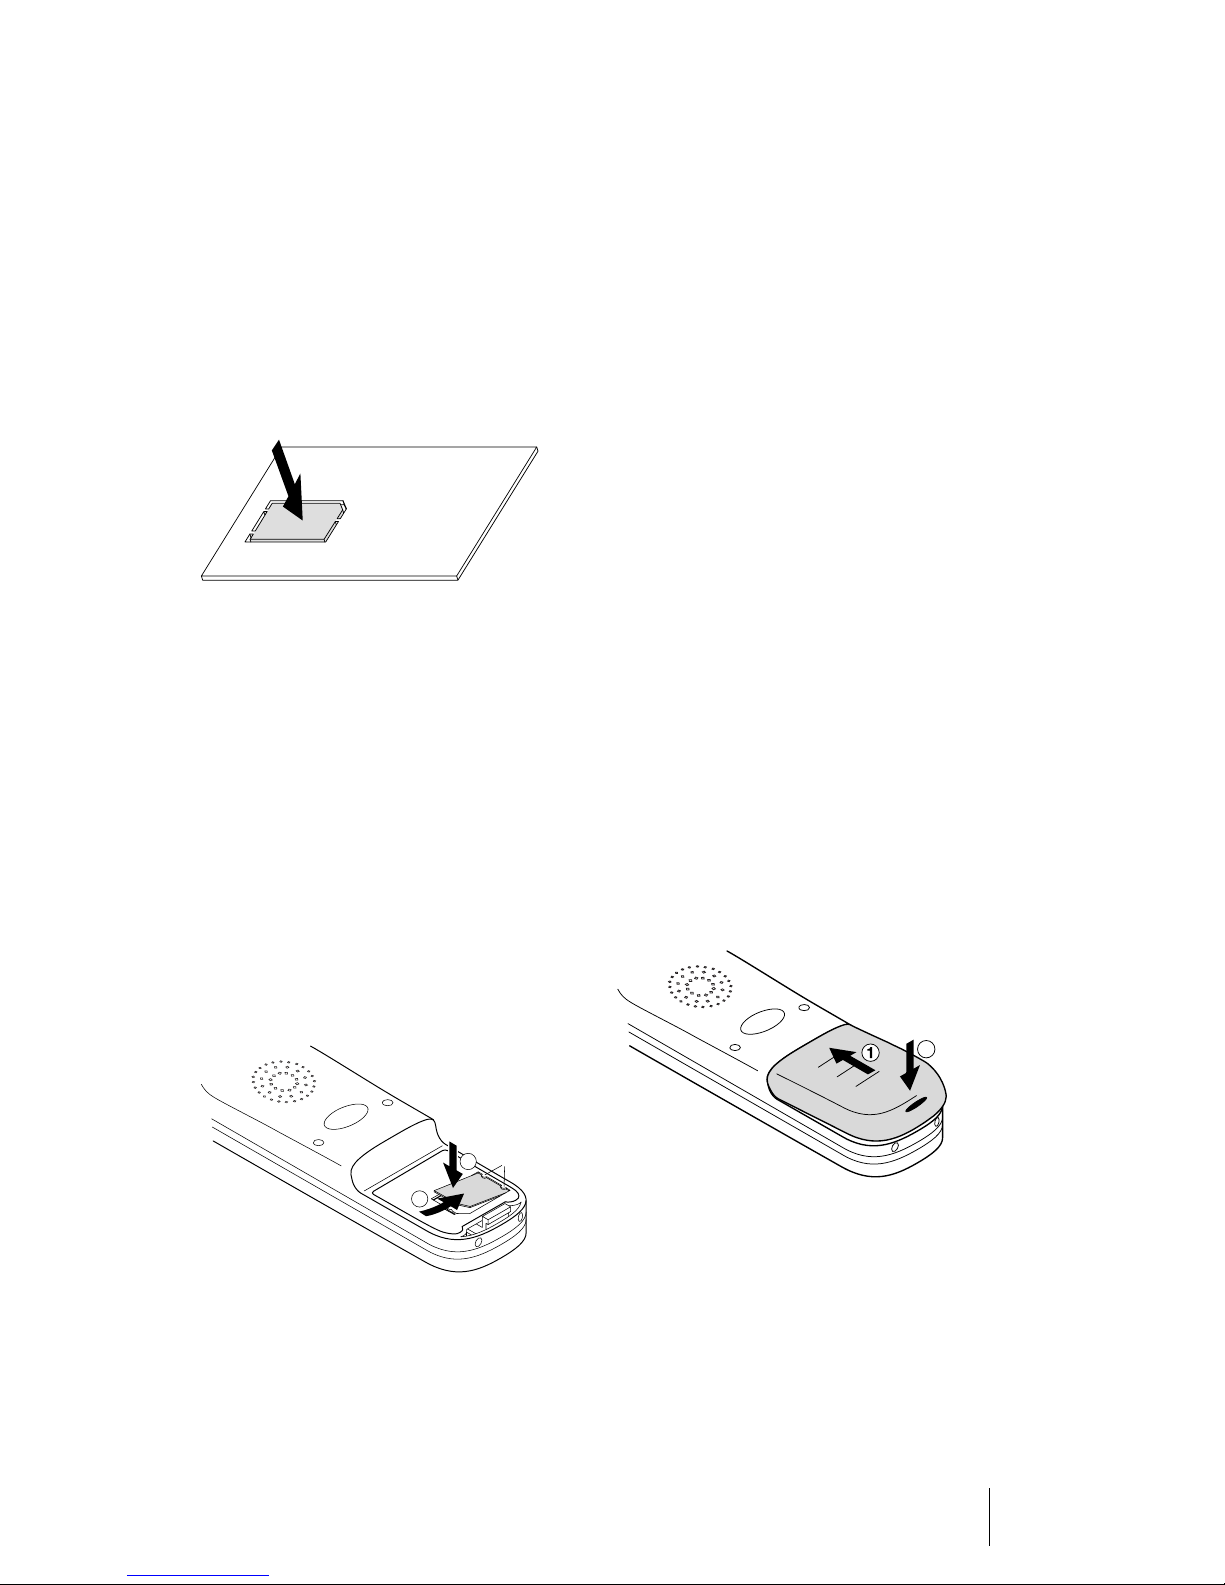
Inserting the MEM card
Removing the MEM card
Provided the MEM card has not been
inserted into the device or requires
replacing:
■ Using your finger, first remove
the small MEM card from the
larger frame.
MEM card in OpenPhone 28
■ Slide the short side of the MEM
card diagonally under the two
small crescents (a) in the MEM
card panel (1). The shiny goldcoloured contact points on the
MEM card should be facing
down!
■ Press the MEM card downwards
until the small catch (b) locks
(2).
It is only necessary to remove the
MEM card if you pass on the handset
or if you need the MEM card for a
new handset.
■ Remove the battery pack from
the handset (see page 12).
■ Press the little catch (b) upwards
and simultaneously lift the MEM
card up slightly.
■ Take the MEM card out.
Inserting the Battery
■ Slide the battery into the casing
(1).
■ Press down the battery at the
end with the latch until it audible snaps shut (2).
Inserting the MEM card
OpenPhone 28 Installation
2
a
2
1
b
Inserting the battery
11
Page 14
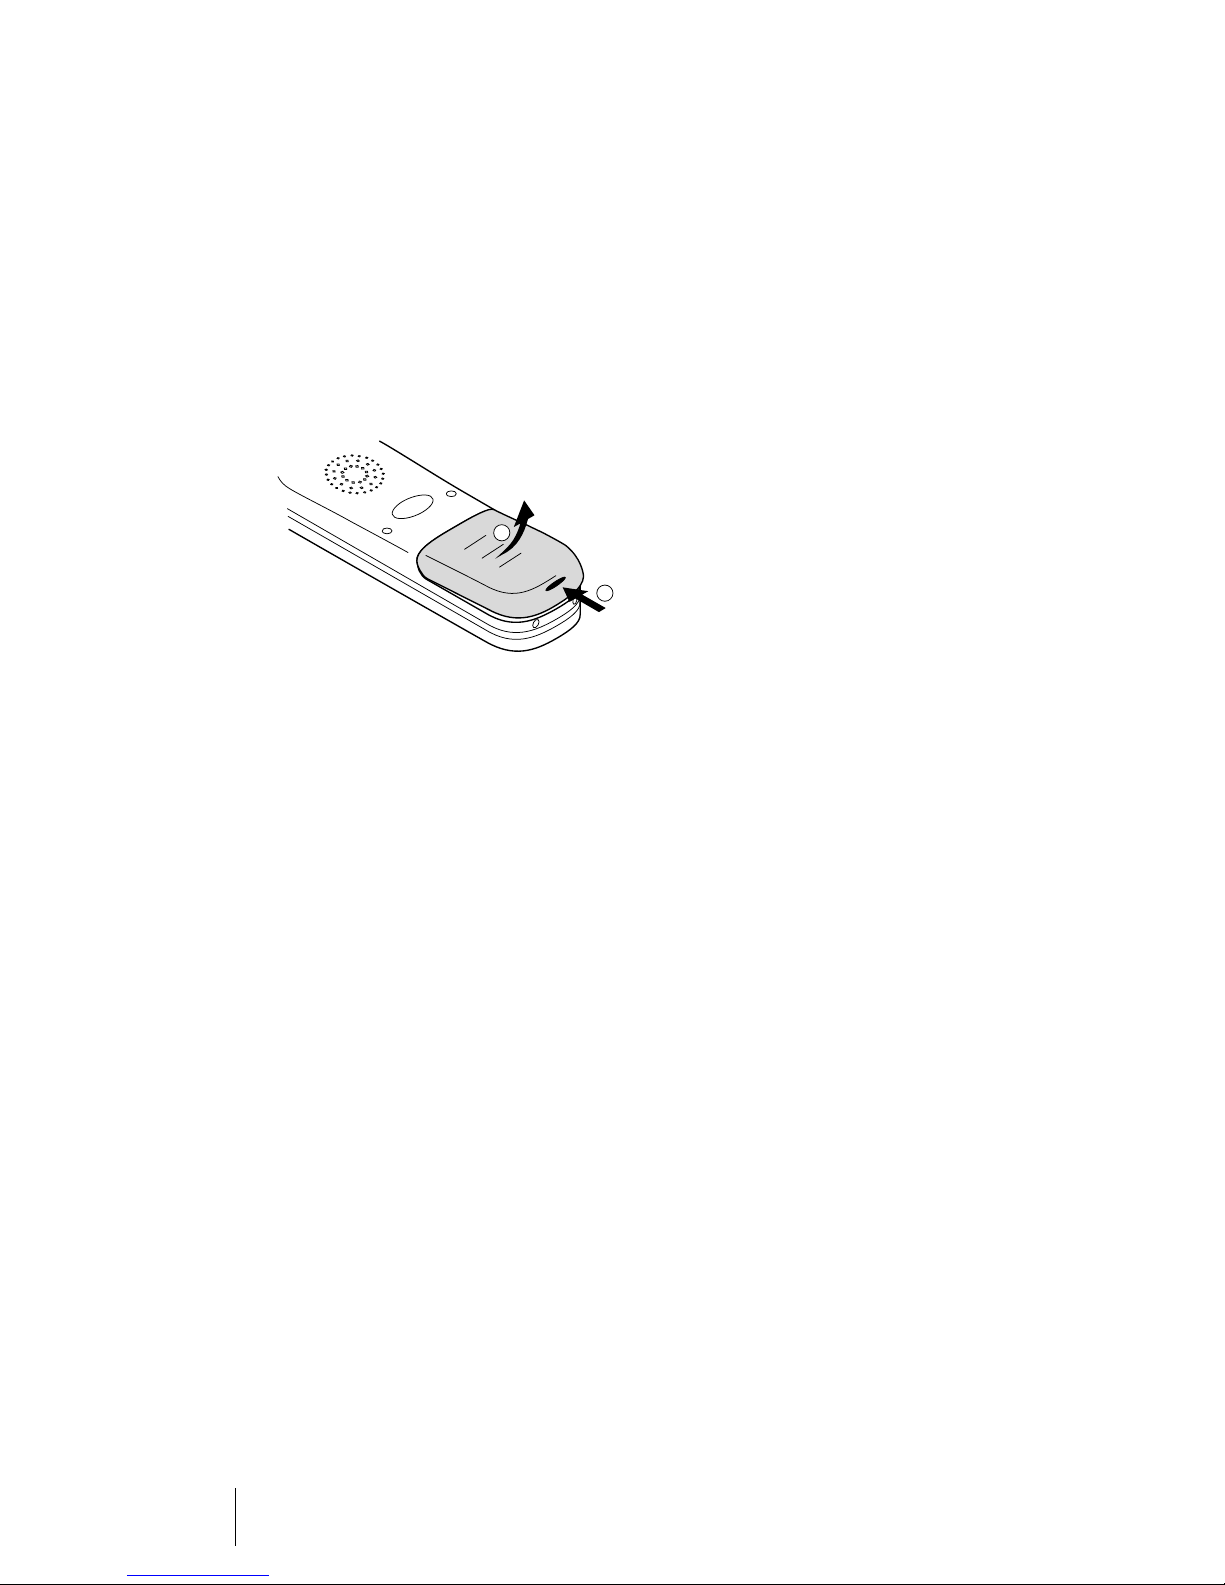
Removing the Battery
■ Place the handset with the dis-
play downwards on a flat surface.
■ Press the latch (1) and lift up the
battery pack at the same time
(2).
2
Recommendations for AC Adapter
Plug
The adapter plug components for
the standard charging station and
the charging station plus differ in respect to the low voltage pin assignments and the rating. Use only the
standard adapter plug (named
Adapter Plug No. 4999045014, no.
4999051605 for the UK) for the
standard charging station (here
named Charging Station) and only
the adapter plug plus (named
Adapter Plug Plus No. 4999070859,
no. 4999070860 for the UK) for the
1
charging station plus.
Removing the battery
Installing the Charger
Installation location
Place the charging station on a flat,
even surface, for example on a table.
Choose an area that is free of direct
sunlight and moisture.
Place the charging station on a non
slip underlay, especially when placing the charging station on furniture
that is new or treated with cleaning
agents. Varnish and cleaning agents
can dissolve the feet on the underside of the charging station and
leave unsightly marks on the surface
of your furniture. DeTeWe can not be
held liable for such damage.
■ Plug the small end of the con-
necting cord into the back of the
charging station.
■ Plug the adapter plug into a
power socket.
The charging station is now ready to
operate.
Charging the handset
Simply place the handset in the
charging station. You will hear an
acoustic confirmation signal. The
display illumination will illuminate
briefly. Your handset will remain
switched on or off.
The battery symbol in the symbol
line is animated until the battery is
completely charged. The batteries
12
Installation OpenPhone 28
Page 15
will turn slightly warm during charging. This is normal.
Charging Station (Standard)
■ The LED at the base of the charg-
ing station changes from green
to red and indicates that the replacement battery pack has
been inserted correctly and that
it is charging.
■ When the replacement battery
has been completely charged,
the charging procedure stops.
The LED turns back to green.
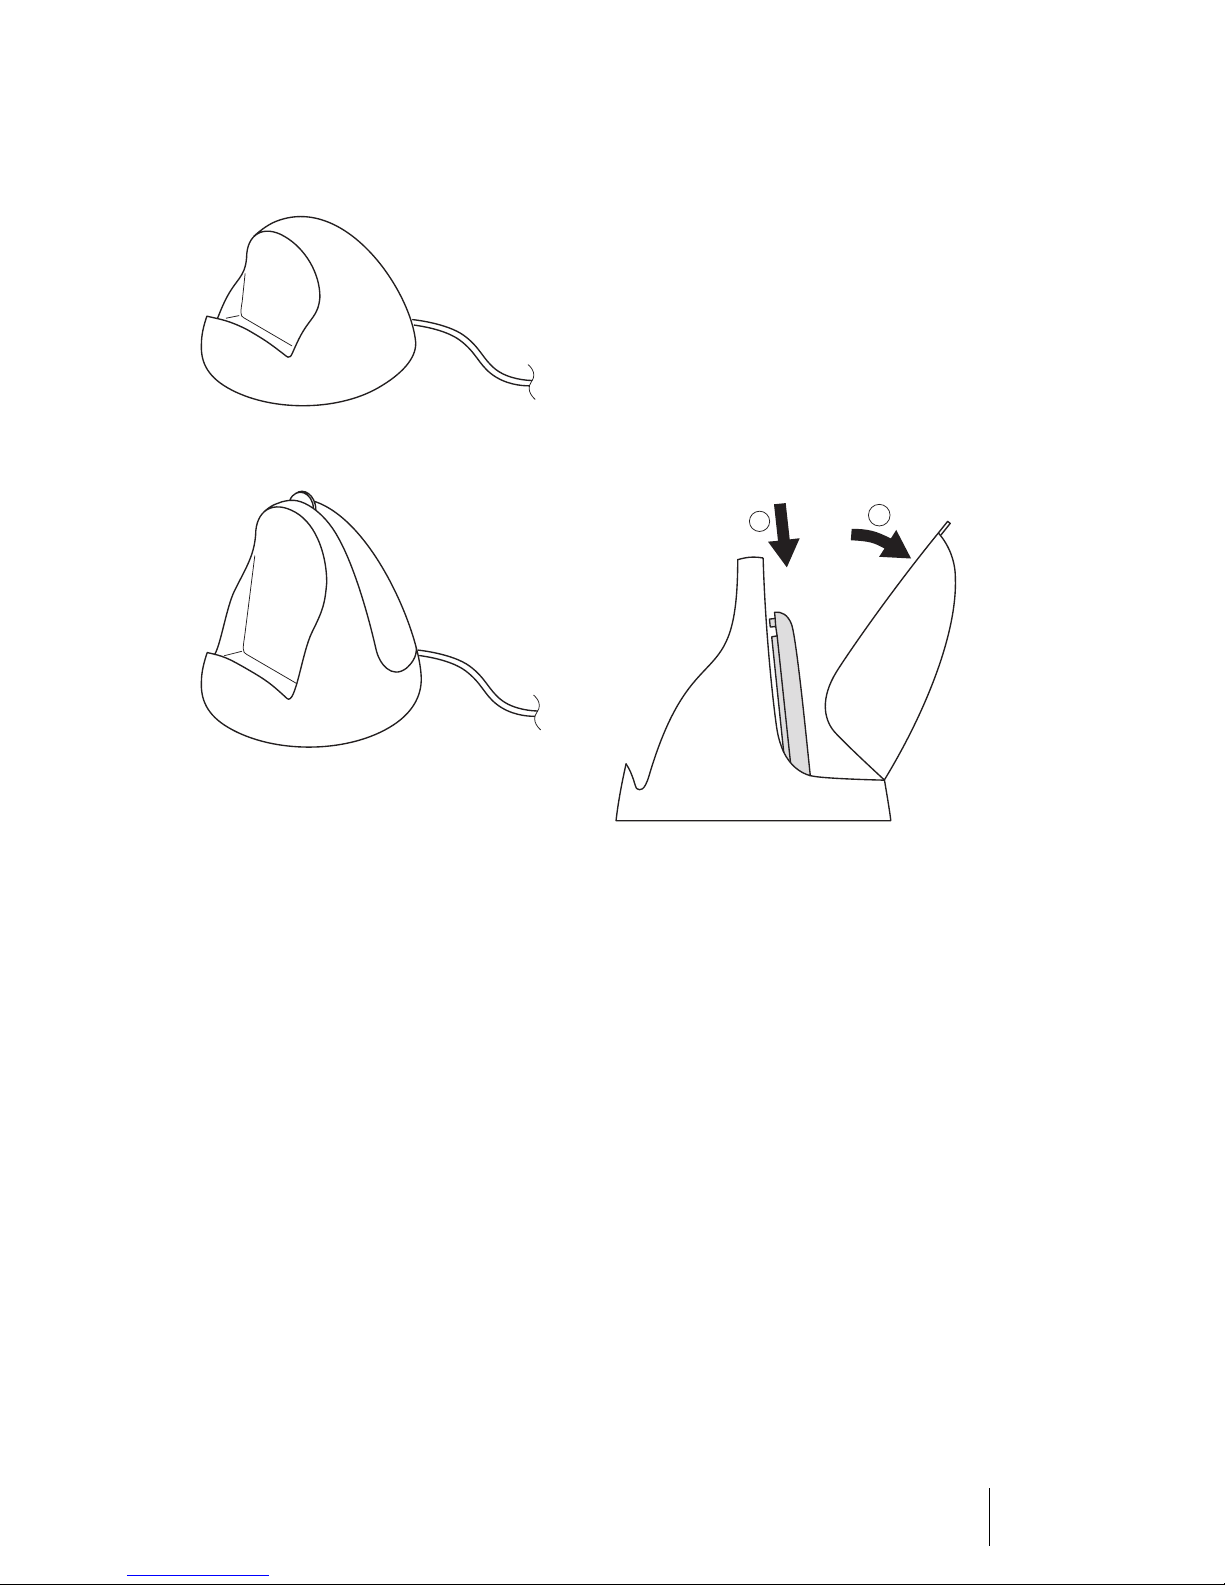
Charging Station Plus
Charging the
Replacement Battery
If you have a Charging Station Plus
(accessory part) you can use it to
charge a replacement battery pack.
The replacement battery pack can be
charged simultaneously with the
handset.
2
1
Charging Station Plus: Charging the
replacement battery
Recommendations for
Battery Usage
Do not throw the battery into a
fire, as there is risk of explosion.
■ Fold open the charging station
plus (1).
■ Place the replacement battery
correctly in the designated compartment (2).
OpenPhone 28 Installation
To prevent injury or fire damage, do
not connect the contact points of
the batteries with other electroconductive components or short-circuit
them.
When a new battery is inserted, the
charging level is initially unknown to
13
Page 16

the handset. The battery symbol is
first displayed in the handset after
the first complete charging cycle!
Place the handset in the charging
compartment for at least 14 hours
after inserting a new battery in order to completely charge it.
Charge Display
The charging status of the battery is
shown in the display as follows:
80 - 100 % charged
60 - 80 % charged
40 - 60 % charged
You can leave the handset permanently in the charging station. The
battery pack can not be overcharged.
You can remove the battery pack
from the handset if you are not going to use the telephone for an extended period of time, for example
when you go on holiday. You will see
that the battery pack will only have
discharged minimally when you reinstall it at a later date.
Do not leave the battery pack in direct sunlight. You will be rewarded
with a long battery life.
Charging and Operating Times
Charging time: (fully discharged
battery) approximately 5 hours to be
fully charged.
20 - 40 % charged
0 - 20 % charged
(Frame flashes) Battery
nearly discharged
Charge warning
When the battery capacity is nearly
exhausted, the battery symbol will
flash in the display.
If you are making a call at the time,
you still have up to three minutes of
talk time before the handset
switches itself off. If you are not
making a call and the handset is not
in the charging station, “Battery
empty” appears in the display. Now
you can no longer make a telephone
call.
Talk time: up to 8 hours (when fully
charged).
Stand-by time: up to 75 hours
(when fully charged).
Please note: Batteries with an unknown charging status are fully
charged in approximately 14 hours.
14
Installation OpenPhone 28
Installing and Operating
the Headset
A headset is available as an accessory for the handset:
■ Headset Standard T171
■ alternative: Headset Comfort
TC 500
Page 17
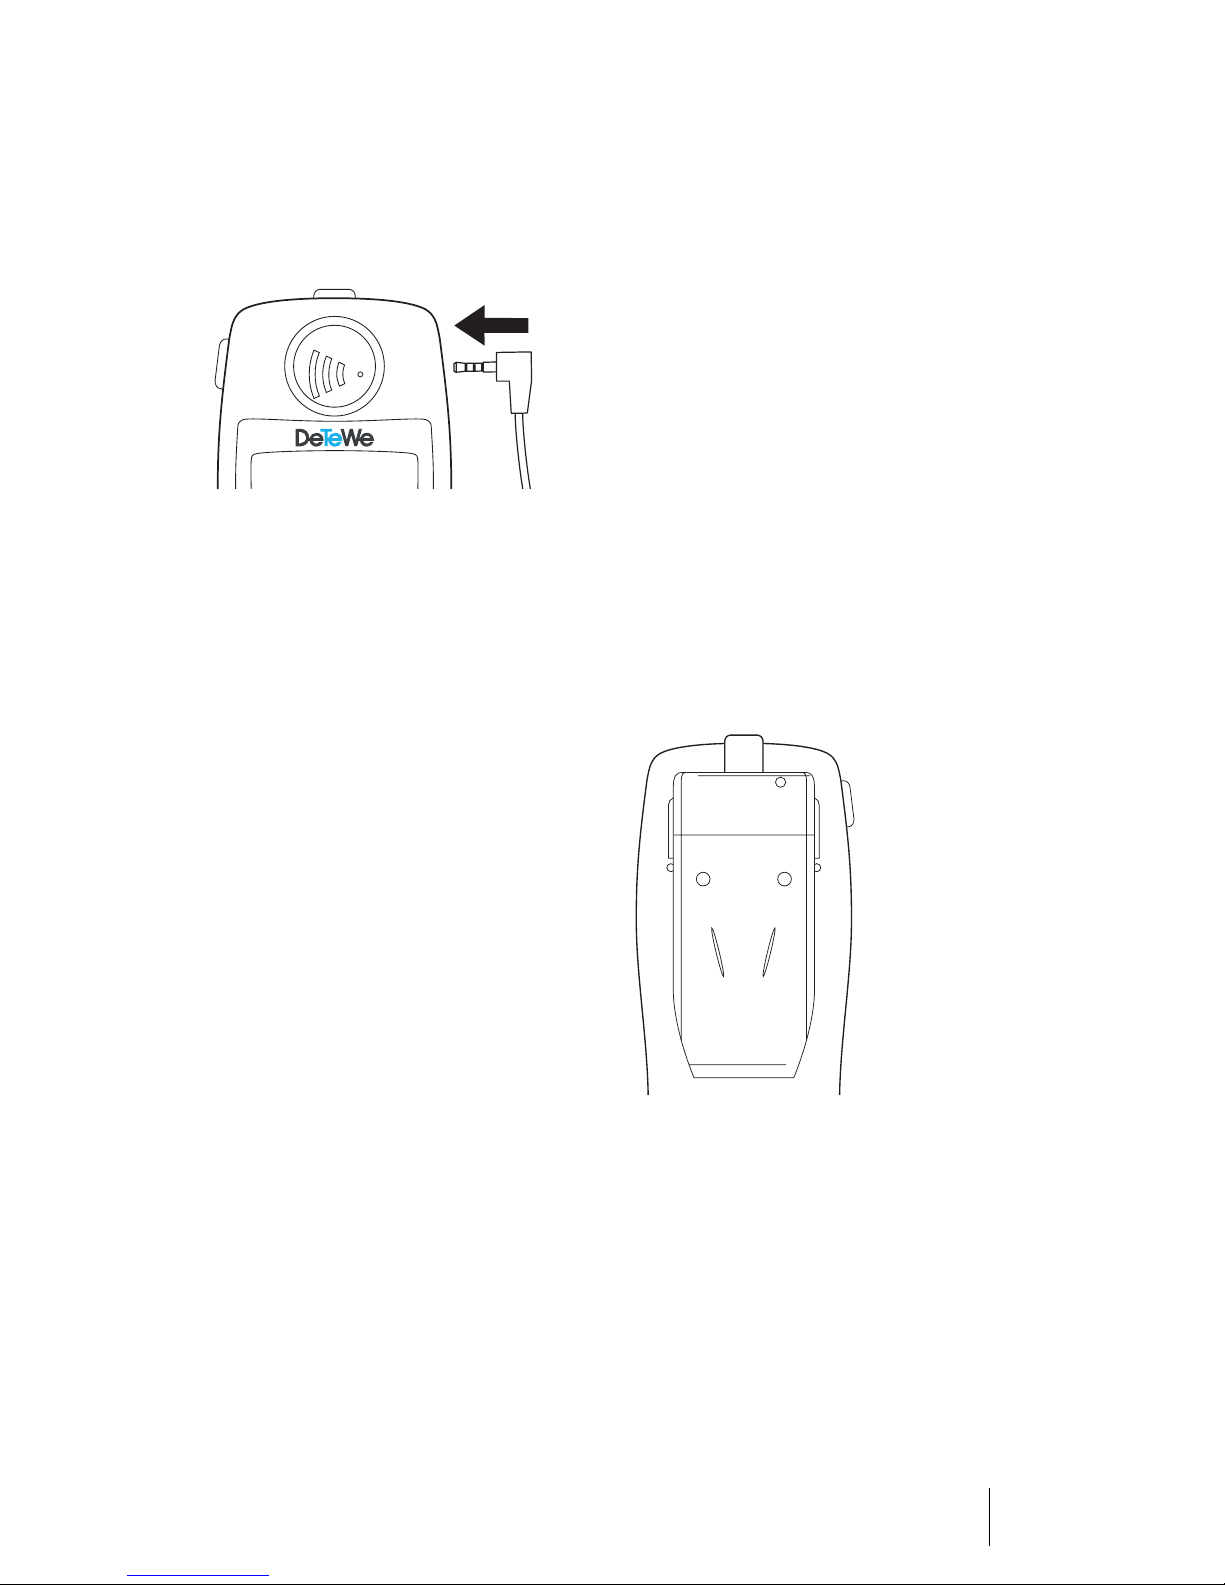
The port is located on the upper
right part of the handset. Carefully
pull off the protective covering of
the port.
Connecting the headset
Recommendation for Headset
Operation
If you connect the headset to other
electronic devices, potential extremely loud acoustic signals or feed
back noise can lead to hearing damage (acoustic shock). Hearing protection against loud noises is not
guaranteed if the headset is used
with other devices. Only use this
headset in conjunction with the
OpenPhone 28.
Push the plug of the headset completely into the port until it audibly
snaps into place.
For information on using the headset, please read the user guide.
The headset enables hands-free telephony. Your handset automatically registers when a headset is
plugged in. The microphone and the
earpiece of the handset are then automatically switched off. The loudspeaker can be switched on if you
want others to listen in.
The handset rings for incoming calls.
Everything else functions in the
usual manner. To adjust the ear-
piece volume, long press up or
down on the arrow keys until a low
confirmation tone can be heard. (see
Setting the volume starting on
page 26).
Belt Clip
The clip is attached on the back of
the handset with two small screws.
Belt clip
Please note: Attach the handset vertically on your clothing; this
ensures the correct functioning of
the “Automatic Emergency Call (Man-
down Call)” (see also page 47).
OpenPhone 28 Installation
15
Page 18

Commissioning
Handset Subscription
(Checking In)
Your handset can be operated in up
to ten different communications systems. To be able to do this, it must
be subscribed to every system, this
means: the handset must be
checked in.
Normally the check-in operation is
performed when commissioning the
handset. If you are operating your
handset in the OpenCom 100 communications system, checking in
your handset, as a rule, will done by
your system administrator.
For the communications systems
of other manufacturers:
Check-in your handset in the communications system as described in
the chapter “Phone settings” Menu
starting on page 62 (section “System”).
Background Information
Checking in
The OpenCom 100 check-in operation for handsets is initiated via the
Web console, either by the system
administrator or by a user with administrator rights. You will need the
following information if you wish to
subsequently subscribe a handset
yourself.
There are two check-in procedures.
Depending on which procedure is
used, there are different time limits
for the completion of the check in
and you may also have to enter an
authentication code.
■ Simplified procedure: The hand-
set must be checked in to the
communications system within
three minutes. This convenient
procedure enables you to check
in any DECT telephone within
this short period of time (“the
next handset is being checked
in”). This means: all menu items
in the “Subscription” menu must
be confirmed with
OK
.
16
Commissioning OpenPhone 28
■ Secured procedure: The handset
must be checked in within one
hour. You will need to know the
IPEI of your handset and you
may also have to enter an au-
thentication code (AC) for this
check-in procedure. The IPEI can
Page 19

be read from the handset's
“System” menu (see page 65);
the AC can be obtained from
your system administrator or
read from the DECT Phones
menu in the Configurator of the
OpenCom 100 (Web console).
Subscription
The handset will store a subscription
record for each communications
system it has been checked into.
Each subscription record includes,
among other information, a name;
whenever the handset enters the
range of a base station, this name
will be appear in the handset’s display.
Registration
Once the handset has been subscribed to one or more communications systems you can make and receive calls. If you have activated the
Auto Search feature (see page 63),
the handset (in the idle state) will
automatically register with the nearest base station within range. If you
do not want to use the auto search
feature, you can manually register
the handset with a base station using the subscription record stored in
the handset.
OpenPhone 28 Commissioning
17
Page 20
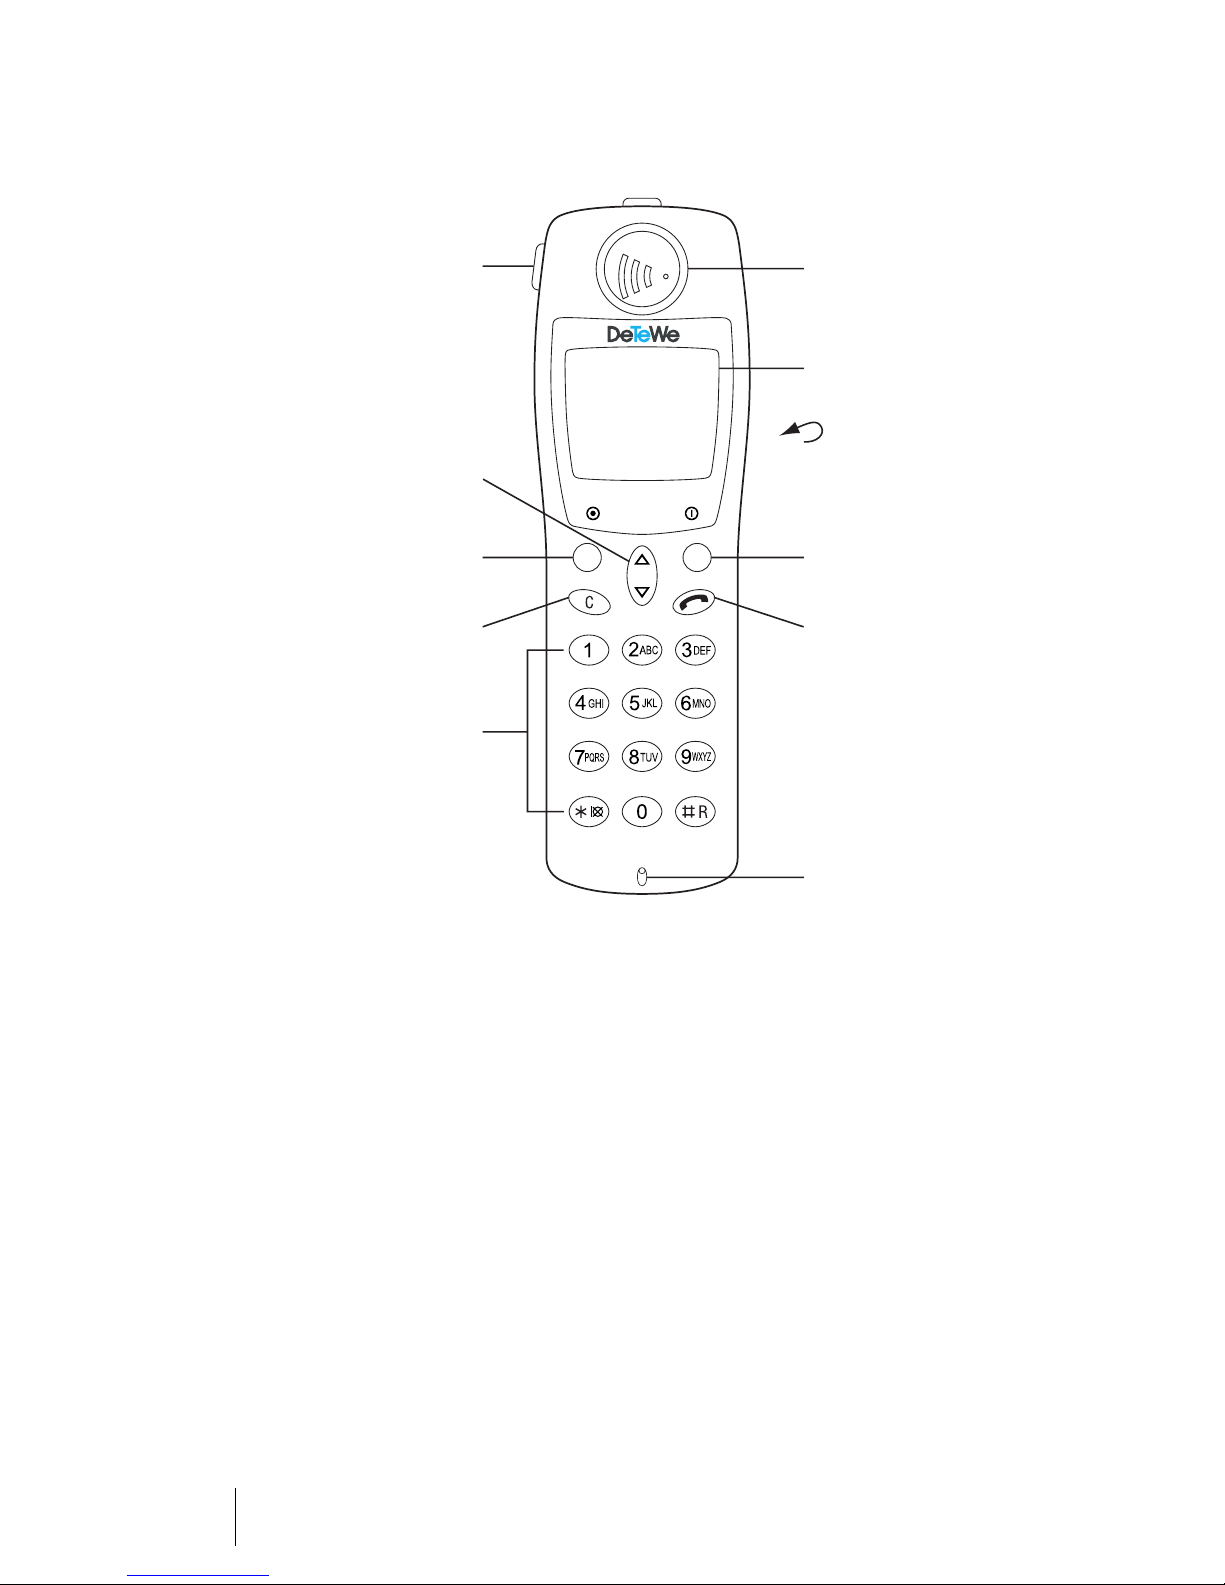
Displays, Keys and Symbols
SOS key
Arrow keys
Softkey
Cancel key
Keypad
Earpiece
Display
Rear:
Loudspeaker
Softkey
Receiver key
Operating Elements on the Handset
Microphone
18
Displays, Keys and Symbols OpenPhone 28
Page 21
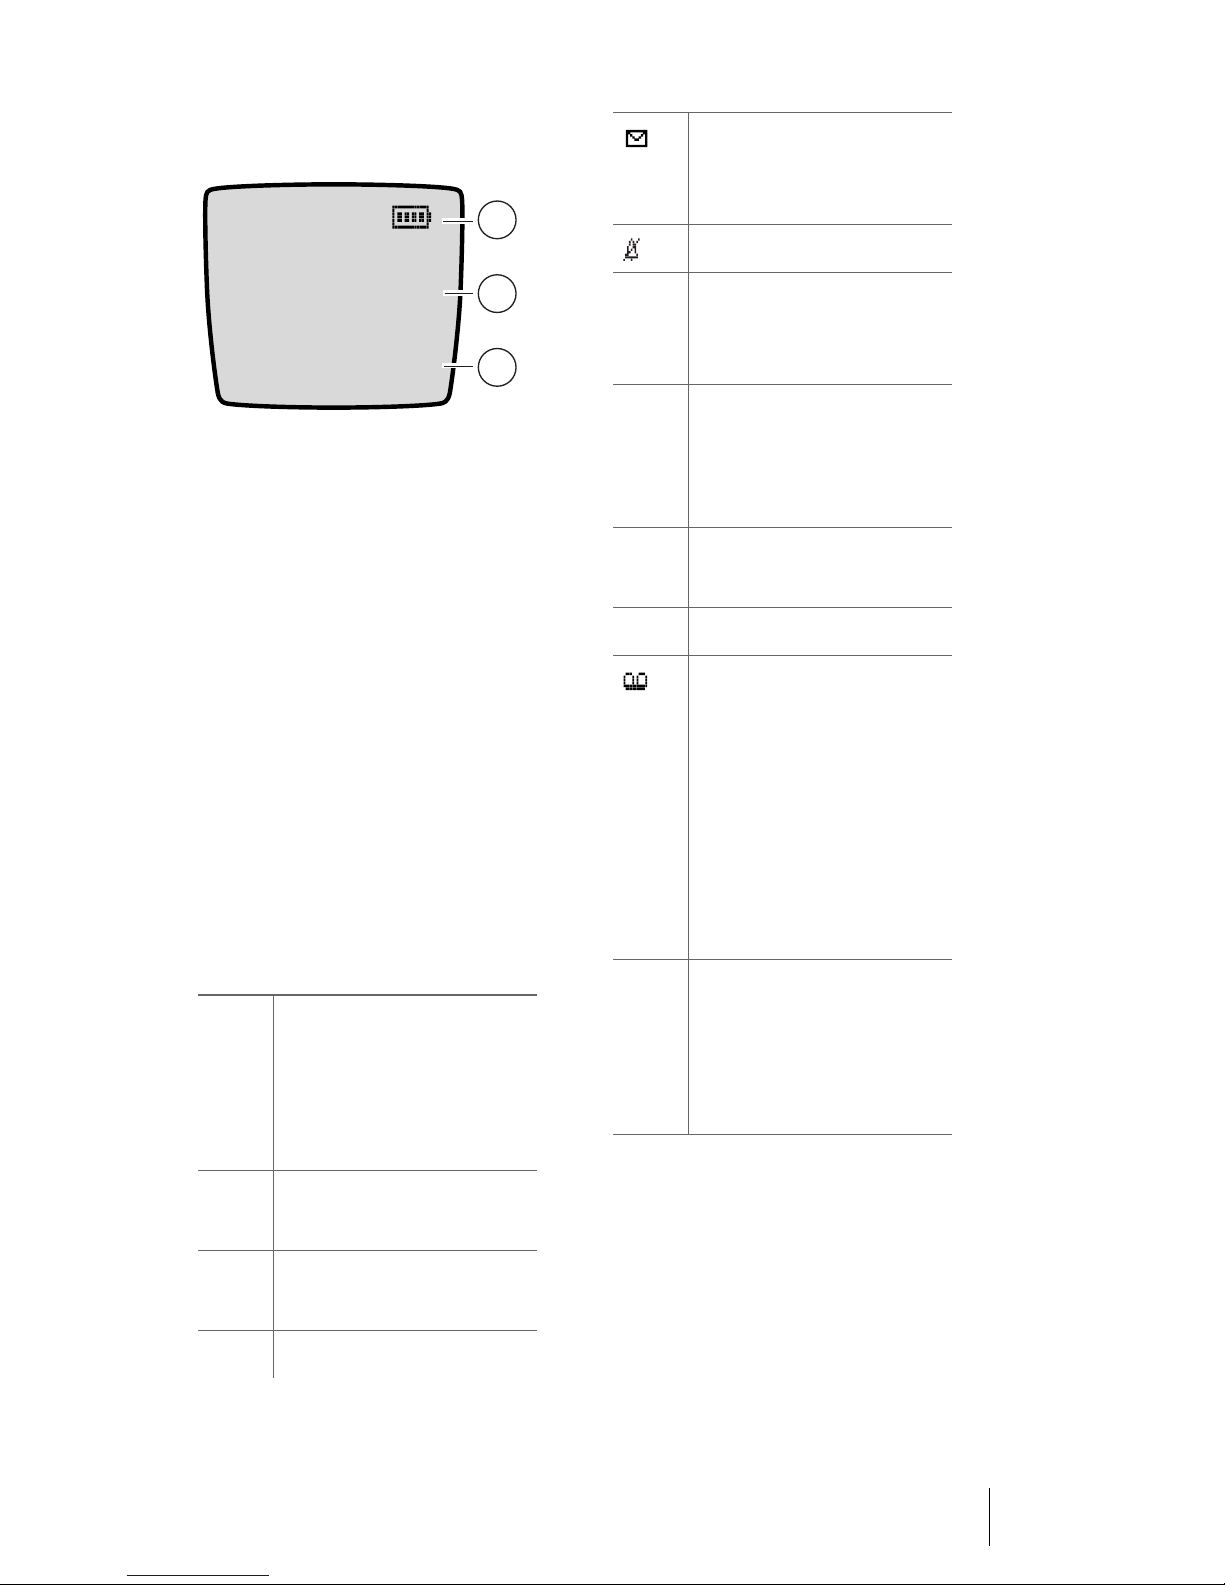
Displays
‹ œ »
OpenCom 100 43
Peter
12:15 ©
¤ Menu
¬
You have received messages (short messages,
E-mail).
1
Ring tones switched off
2
3
ƒ
Battery charging status
(see Charge Display starting on page 14)
1 Symbol line
2 Information/text lines:
display messages and …
in idle state: the system’s name of
with the handset’s internal call
number (if programmed), the programmed user name and the time;
in call state: display of the call numbers or names of callers/called subscribers
3 Softkey line
Symbols in the Display
œ
Quality of the radio connection (four bars means a
stable radio connection; a
single bar means an unstable radio connection)
©
º
¤
¬
You have programmed
and activated a local alarm
(see “Phone settings” Menu
starting on page 62).
You have activated the
keypad lock.
Redial list
You have received a voice
box message. This requires
a voicemail system to be
connected to your communications system. The
symbol is only visible if
there is no active connection to the communications system.
Telephone book
Arrow key up: Telephone
book of the OpenCom 100;
Arrow key down: local telephone book
¢
»
‡
OpenPhone 28 Displays, Keys and Symbols
Call state (receiver key
pressed)
Call state (speaker/hands
free activated)
Microphone switched off
19
Page 22

Information Line/
Tex t L i n e s
The three middle lines of the display
provide information on the current
call status or menu lists and texts.
In the idle state, the display shows
the programmed user name (see
also page 66) and the internal call
number that you have entered during subscription (see page 64).
If the handset is checked in on multiple base stations, the name of the
active base station with the internal
call number for the handset is displayed in the idle state.
Softkey Line
The texts and symbols in this line
refer to the keys underneath. The
contents of the line change according to the operating status.
Illumination
The display is automatically illuminated when calls are received or
when you press a key. The illumination is automatically switched off
again ten seconds after the last key
was pressed.
Selection lists (e.g. telephone book)
and the features menu are displayed
in a three-line section of the display.
The lines are scrolled up or down by
means of the arrow keys. An item
that can be selected is highlighted in
a dark colour.
PABX Menu
Calls
Call forwarding
Messages
OK ‘ Esc
20
Displays, Keys and Symbols OpenPhone 28
Page 23

Softkeys and Other Keys
The two keys below the display, as
well as the arrow keys, are known as
softkeys. The functions assigned to
the keys are shown in the lowest line
of the display. The key function
changes automatically according to
the operating status of the handset.
Softkey: Left key
short key press: selects the function
shown in the display
long key press: switches the handset
off
Softkey: Right key
short key press: selects the function
shown in the display
long key press: switches the handset
back on
Softkey: Arrow Keys
Above the arrow keys you will see
symbols that identify the individual
functions of the arrow keys:
F The “up” arrow key allows
¬
you to select call numbers
from the phone book of
your communications system OpenCom 100.
F The “down” arrow key
¬
allows you to select call
numbers from the local telephone book of your telephone.
{}
‘
When you are entering call
numbers or names, you can
make changes by moving a
cursor. The arrow keys allow you to move the cursor
to the beginning or end of
the entry.
If a selection list
(e.g. phone book or menu)
is displayed, you can use
the arrow keys to scroll to
the desired entry. If a continuous text is shown
(e.g. a message), you can
scroll up and down through
the text with the arrow
keys.
OpenPhone 28 Softkeys and Other Keys
‘
During a call you can
change the volume of the
receiver/loudspeaker using
the arrow keys.
21
Page 24

Softkey: OK
Softkey: Menu
Press OK to confirm the selected
function.
If a function only has one quickswitch option, it is operated by this
key. Active settings (ON) are indicated by a “
item; inactive settings (OFF) are indicated by a “-”.
“
” next to the relevant
Softkey: Esc
Short press the
the section of the menu currently
displayed. You will then see the selection from the previous menu or
the current idle or call display. When
you navigate within the menu and
long press the
menu closes and the telephone is in
idle state again.
Esc
softkey to exit
Esc
softkey, the
Softkey: Redial
¤
Enables you to select a call
number from the redial list.
A long key press in the idle state
shows the main menu of the
OpenPhone 28. Here you can edit all
the phone settings. The individual
menus are explained in the chapter
entitled “Main” Menu starting on
page 56.
A short key press invokes a menu
that depends on the state of the
OpenPhone 28. This menu only displays the relevant operations that
can currently be performed.
Automatic Hiding of
Menus
Menus are automatically hidden
under the following circumstances:
■ Whenever you receive a call
while your phone is in the idle or
call state.
■ In the call state, when you per-
form input that requires invok-
ing a new, call-dependent menu
(e.g. you press the R-key
make an enquiry).
R to
22
Softkeys and Other Keys OpenPhone 28
■ If you press a softkey that in-
vokes a menu other than the
one currently displayed.
If you have saved your input in a
menu, it remains saved when you
leave the menu.
Page 25

Receiver Key
Cancel Key
AThe receiver key has multiple
functions. Depending on the current
state of the telephone, for example,
idle state or call state (conversation),
a short press or a long press trigger
differing functions.
… in Idle state
short key press: The first available
line for outgoing connections is
seized.
long key press: Activates open
listening / hands free.
… during an Incoming call
short or long key press: The call will
be answered.
C This key cancels your menu se-
lection without saving the previous
entry. If you are entering numbers or
letters, this key deletes the last character. Holding
the complete entry.
C pressed deletes
R Key / Hash Key
# The functions of the R key (also
known as signal key) and the hash
key are defined on the same key. Depending on the current state of the
telephone, for example, idle state or
call state (conversation), a short
press or a long press trigger differing
functions.
… during a Conversation
short key press: Ends the conversation.
long key press: Activates open
listening / hands free.
… in a List, for example Call or
Redial list etc., or digits have
been entered
short or long key press: The first
available line for outgoing connections is seized and the call number is
dialled.
You will find tips for the seizure of
specific lines (via routes) on page 36.
… during a Conversation
long key press: You initiate an enquiry call.
…in Idle state
long key press: You switch on the
keypad lock. You can switch off the
keypad lock by pressing the
softkey followed by the
… when entering Text
You enter one of the characters that
are defined on the key
Number Keys starting on page 24).
º
# key.
# (see
OpenPhone 28 Softkeys and Other Keys
23
Page 26

Star Key
Number Keys
* The star key has multiple func-
tions. Depending on the current
state of the telephone, a long press
triggers differing functions.
…in Idle state
long key press: Switches the ringer
signal on or off.
… during a Conversation
long key press: Switches the microphone of the telephone on or off.
SOS Key
The SOS key is located on the left
side of the handset. In idle state, one
press on the key initiates an emergency call (see also Manual Emer-
gency Call (SOS Call) starting on
page 46).
The number keys are used to directly
enter call numbers and names, ABC
labelled (Vanity call numbers).
When entering text, you can use the
arrow keys to move the cursor towards the beginning or end of the
entry. The
numbers/characters. The
cancels the entire procedure. The input position moves on automatically
if there is input or no new character
for a time.
A long key press on the keys
C key deletes individual
Esc
key
2 to
9 toggles the input between up-
per and lower case.
You can enter the following characters by pressing the number keys
several times:
Key Upper-case letter Lower-case letter
1 ? ! , . : ; ” ‘ 1 ? ! , . : ; ” ‘
1
2
A B C 2 Ä Å À Á Ã Æ Ç a b c 2 ä å à á ã æ ç
3
D E F 3 È É Ê Ë € d e f 3 è é ê ë €
4
G H I 4 Ì Í Î Ï g h i 4 ì í î ï
5
J K L 5 j k l 5
6
M N O 6 Ñ Ö Ò Ó Ô Õ Ø m n o 6 ñ ö ò ó ô õ ø
24
Softkeys and Other Keys OpenPhone 28
Page 27

Key Upper-case letter Lower-case letter
7
P Q R S 7 ß p q r s 7 ß
8
T U V 8 Ü Ù Ú Û t u v 8 ü ù ú û
9
W X Y Z 9 w x y z 9
*
* - + = ~ < > ^ % * - + = ~ < > ^ %
0
0 (space) @ $ & 0 (space) @ $ &
#
# ( ) { } [ ] / \ # ( ) { } [ ] / \
The locking of your telephone
interface by the system
administrator
The system administrator can lock
your telephone’s interface via a setting for your user group. With the exception of the number keys and the
receiver key, all keys of your telephone then have no functionality.
■ You can then make calls with
your telephone but no system
functionality can be configured.
■ The redial functions, telephone
books of the communications
system, Info menu and state dependent menus are not available. (These menus are opened
by a short press on the
softkey, they are described in
the Making Calls starting on
page 26 chapter.) The local telephone book, however, is accessi-
Menu
ble as the lock only affects the
functionality of the communications system.
■ Additionally you can turn on and
turn off the telephone lock of
your telephone (see also “Protec-
tion” Menu starting on page 67).
■ If the system administrator has
authorised you, you can set the
time group if the communications system (see also “Central
settings” Menu starting on
page 71). If your user group authorisation changes according to
the time group, then it is possible that the interface lock of
your telephone will be cancelled.
Please consult your system administrator if you have questions concerning your authorisation.
OpenPhone 28 Softkeys and Other Keys
25
Page 28

Making Calls
General Information
Description of Operating
Steps
The following descriptions lists the
respective softkey functions which
are shown above the left and right
softkeys during the corresponding
situation of operation. These functions can be activated by pressing
the arrow keys or the
OK
softkey.
Switching the Device
Off/On
Your handset is after the first charging of the battery automatically
switched on and operational. You
can switch off the handset to maintain the charge state of your battery
for longer.
Switching the Handset Off
Long key press the
D key.
Open Listening /
Hands-Free Usage
To allow several people in the same
room to take part in a call, press either before or during a connection
the receiver key
Repeat the process to switch off. You
will achieve the best quality when
neither the loudspeaker nor the microphone are covered.
Setting the volume
During a call you can adjust the
speaker or earpiece volume to one of
seven levels. The current setting will
be shown in your display.
To adjust the earpiece volume, press
the arrow keys; to adjust the loudspeaker volume, switch the loudspeaker on (press the receiver key
A (long key press).
A) and then press the arrow keys.
Switching the Handset On
Long key press the
No ringer or alarm signal is emitted
(e.g. for an appointment call) while
the handset is switched off.
26
General Information Making Calls
E key.
Muting
During a call you can switch your
handset's microphone off with
Mute
. The person at the other end
of the line can no longer hear you.
Unmute
switches it back on.
Page 29

Visual Call Indicator
The receiver symbol ¢ in the display flashes and the display illumination is switched on to indicate an
incoming call.
Time / Alarm
Any further callers will hear a busy
signal.
If the system administrator has configured a call queue, further calls will
enter this queue (see also the section Calls in the Call-waiting Queue
starting on page 30).
In the idle state the display shows
the current system time. The system
time is automatically updated after
an external conversation. After the
first commissioning or after a battery change it might take a moment
for the current time to be transferred
from the OpenCom 100.
The handset provides you with a
programmable alarm function. See
page 65 for more details.
Internal and External Call
Numbers
The internal and external call numbers at which you can be reached are
assigned when your OpenCom 100
communications system is set up.
DTMF Postdial/
VF Signalling
In the connection state your telephone is automatically set to VF
(voice frequency) signalling. You can
use this, for example, to query an answering machine or a voicebox. Consult your system administrator if you
have questions concerning this function.
Call-charge Display
If your network operator transmits
call charge information, you will see
in the display – for a self dialled external calls – during or after the conversation the amount for this call.
Multiple Connections
Two calls can be made to your handset simultaneously. This means that
you can telephone with two parties,
toggle between these connections
or initiate a 3-party conference.
Making Calls General Information
Redialling
The last call numbers you dialled are
stored in the redial list (with the
most recent entry at the top). If a call
number is also stored in the
OpenCom 100 telephone book, you
will see the name.
27
Page 30

Telephone Lock
You can switch the handset telephone lock on or off using the
Protection - Telephone lock menu
after entering your PIN. Switching
on the telephone lock changes dialling rights. You may no longer be
able to make external calls or only
make them to a limited extent.
Blocked/Unblocked Call
Numbers
Your telephone can be blocked from
dialling all or selected external call
numbers. Emergency call numbers
(in Germany 110 and 112) can be entered in a special list, irrespective of
your trunk line access rights, and
thus always be dialled. Consult your
system administrator for details.
Keypad Dialling
A number of European network operators need the keypad protocol in
order to set features (in Germany, for
example, for the “Completion of Call
on No Reply” (CCNR) feature). Depending on your system configuration your telephone could be set to
keypad dialling during the connection state. If this is not the case, you
must switch your telephone over to
the keypad protocol – before dialling – and enter the code digits
specified by the network operator.
These are transmitted directly to the
exchange and evaluated there. You
usually get an announcement as an
acknowledgement. Consult your system administrator if you have questions concerning this function.
A*12
This switches your telephone over to
the keypad protocol. You can now
enter the code digits for the appropriate keypad.
Please note: The setting is deleted
again once the connection is terminated!
Least Cost Routing (LCR)
Whenever you make an external call,
your system automatically uses LCR
to set up a connection to a network
operator (provider) that has been selected by the system administrator.
If you do not wish to use this preferred connection and want to select
a network operator yourself for a call
(call-by-call), then before making
the call, select LCR off (see the
LCR off menu in the section “Selection” Menu in the Idle State starting
on page 31). This is only necessary if
LCR has been configured for you in
the OpenCom 100. Consult your system administrator about this.
Least Cost Routing (LCR) can be evaluated with call forwarding to external call numbers, provided your system administrator has configured
28
General Information Making Calls
Page 31

LCR and its application in the
OpenCom 100 correspondingly. Ask
your system administrator for the
configuration applicable to you.
must be enabled by the network
provider and activated in the system
configuration by the system
administrator.
Please note: Baby call and external call forwarding are not automatically routed via preferred connections. In this case, if you do not wish
to use the standard network operator, you can key in the appropriate
operator’s code digits before entering the call number.
Transmission of Call
Numbers
In ISDN there are different features
which allow or prevent the transmission of call numbers between the
calling and called subscribers.
CLIP feature
CLIP is an abbreviation for “Calling
Line Identification Presentation”.
The caller’s call number (if transmitted) is displayed. If this call number
is also stored in the OpenCom 100
telephone book, the caller’s name is
displayed.
“CLIP no screening” Feature
Using “CLIP no screening” outgoing
connections instead of sending the
real call number of the caller, send
another call number. Thus, instead
of been shown your number, the
subscriber you have called is shown,
for example, a service call number.
The feature “CLIP no screening”
CNIP feature
CNIP is an abbreviation for “Calling
Name Identification Presentation”.
In addition to the call number, the
name configured by the caller is also
transmitted and displayed on the
corresponding call key. This assumes that the network provider
transmits this information with the
connection. If the caller's call
number is listed in the
OpenCom 100 telephone book, then
this (local) entry is displayed in preference.
CLIR feature
CLIR is an abbreviation for “Calling
Line Identification Restriction”. Before dialling a call number, you can
decide from case to case if you wish
to prevent your call number from being displayed to the called subscriber. To do this, select Suppress
number (see also “Selection” Menu
in the Idle State starting on page 31).
If this feature is not provided, your
call number will always or never be
displayed, depending on the system
setting. Consult your system administrator for more information.
Making Calls General Information
29
Page 32

Calls in the
Call-waiting Queue
The system administrator can configure and activate a Call queue especially for your telephone in the
OpenCom 100 system. While you are
making a call, new calls will be put
into the queue; these callers first
hear an announcement (if the system administrator has preset an announcement) and then the ring
tone. The number of calls permitted
in the call-waiting queue is set by
the system administrator during system configuration, 5 calls for example. When this number is reached,
further callers hear the busy tone.
The calls in the queue are put
through in order of priority (baby
calls, door calls, VIP calls, other internal and external calls), irrespective
of the order in which they came in.
Calls that have been in the queue for
too long are removed, and the callers then hear the busy tone. The period of time until a call is released is
set by the network operator. In Germany this is usually two minutes and
in other European countries usually
three minutes.
every time a new call comes in. The
display indicates if it is an internal or
an external call. If call-waiting protection is deactivated and you end
the call, the next waiting call will be
signalled.
For more information please refer to
the chapter entitled “Call Queue” in
the “OpenCom 100 Mounting and
Commissioning” user guide.
Menu Before and During
aConnection
When the handset is in the idle or
call state, state-dependent menus
are displayed when you press the
Menu
softkey briefly. Frequently
used features are displayed, which
you can then activate.
Examples:
1. Another telephone in your pick-
up group rings and you want to
accept the call. Press the
softkey briefly, select Pick-up
and confirm your choice with
OK
. You will be connected with
the caller.
Menu
Your telephone can have a call-waiting queue even if it belongs to a subscriber group; it also works in combination with call forwarding.
Please note: If call-waiting protection is activated on your telephone,
you will hear the call-waiting tone
30
General Information Making Calls
2. Or a subscriber is busy and you
want to be called back. While
you hear the busy signal, press
the
Menu
softkey and confirm
Callback with
OK
.
Page 33

The state dependent menus are individually described at the end of the
following chapters respectively.
“Selection” Menu in the
Idle State
Please note: Menu items marked
with an * are only displayed if the
corresponding user authorisation
has been set in the Configurator.
Press the
is also possible when you have already pressed the receiver key
and then select …
Info: Via this menu entry you can
reach the various lists (e.g. call list),
as well as the view and edit the currently activated features (e.g. call
protection, call forwarding).
If new e-mails, short messages or
voicebox messages are available,
then you will see the corresponding
symbol in the top display line (see
also Symbols in the Display starting
on page 19).
Please note: In order to use the
functionality of the Info menu, your
communication system
OpenCom 100 must have a software
version of at least 5.22.
Unpark call: Consecutively unparks
one or more connections which you
have previously parked, for instance
to make enquiries or to forward calls
Menu
softkey briefly (this
A),
(see “Calling …” Menu starting on
page 37).
Pick-up:* You pick up a call made to
another telephone in your pick-up
group.
Pick-up select.:* You can answer a
call for any other telephone. To do
this, enter the call number of the
other telephone. If the other telephone is in the call state (e.g. an answering machine is making an announcement), you pick up the call.
The user for whom you are picking
up the call must belong to a user
group for which “Call removal” authorisation is activated, otherwise
“Pick-up selective” is not possible.
Please note: If the called subscriber is a member of a user group
for which pick-up protection is active, “Pick-up” and “Pick-up selective” are not possible.
Announcement:* Once you have
entered the call number, you can initiate an announcement to another
system terminal (or on a group of
system terminals).
Charges: You see the charges for the
last call and the total call charges for
your telephone.
Door opener:* This activates the
door opener.
Making Calls General Information
31
Page 34

Notes: Note down a call number and
a name or select a noted call
number.
Suppress number:* For the following (external or internal) call, your
call number will not be presented to
the called subscriber. This menu
item is dependent on the system
settings.
Transmit number:* For the following call, your call number will be presented to the called subscriber. This
menu item is dependent on the system settings.
LCR off:* This switches the LCR function off. When configuring your user
group the system administrator can
determine that LCR should not be
used. In this case this menu item will
not be displayed.
VIP call:* Your next call will be
treated as a VIP call. Even if the internal subscriber you are calling has activated call-waiting protection, call
protection or call forwarding (on his
system terminal), your call will still
be acoustically signalled.
Main menu: The main menu will be
displayed, see “Main” Menu starting
on page 56. You can also open this
menu with a long press on the
Menu
softkey.
Making External/Internal Calls
External Line Seizure
(manually /
automatically) and
Entering Call Numbers
If you hear an external dialling tone
when you press the receiver key,
your telephone is set to automatic
external line seizure. If you hear an
internal dialling tone when you
press the receiver key, your telephone is set to manual external line
seizure. Which kind of external line
seizure is applicable to you is preset
by the system administrator when
configuring your user group.
If your telephone is set to manual
external line seizure, an internal line
will first be seized. You can immediately dial an internal call number. For
external calls you will have to enter
the external line seizure digit (preset
to “0”) before dialling the call
number. Your system administrator
configures this code digit for all subscribers on the OpenCom 100 system
and will inform you of the current
code.
32
Making External/Internal Calls Making Calls
Page 35
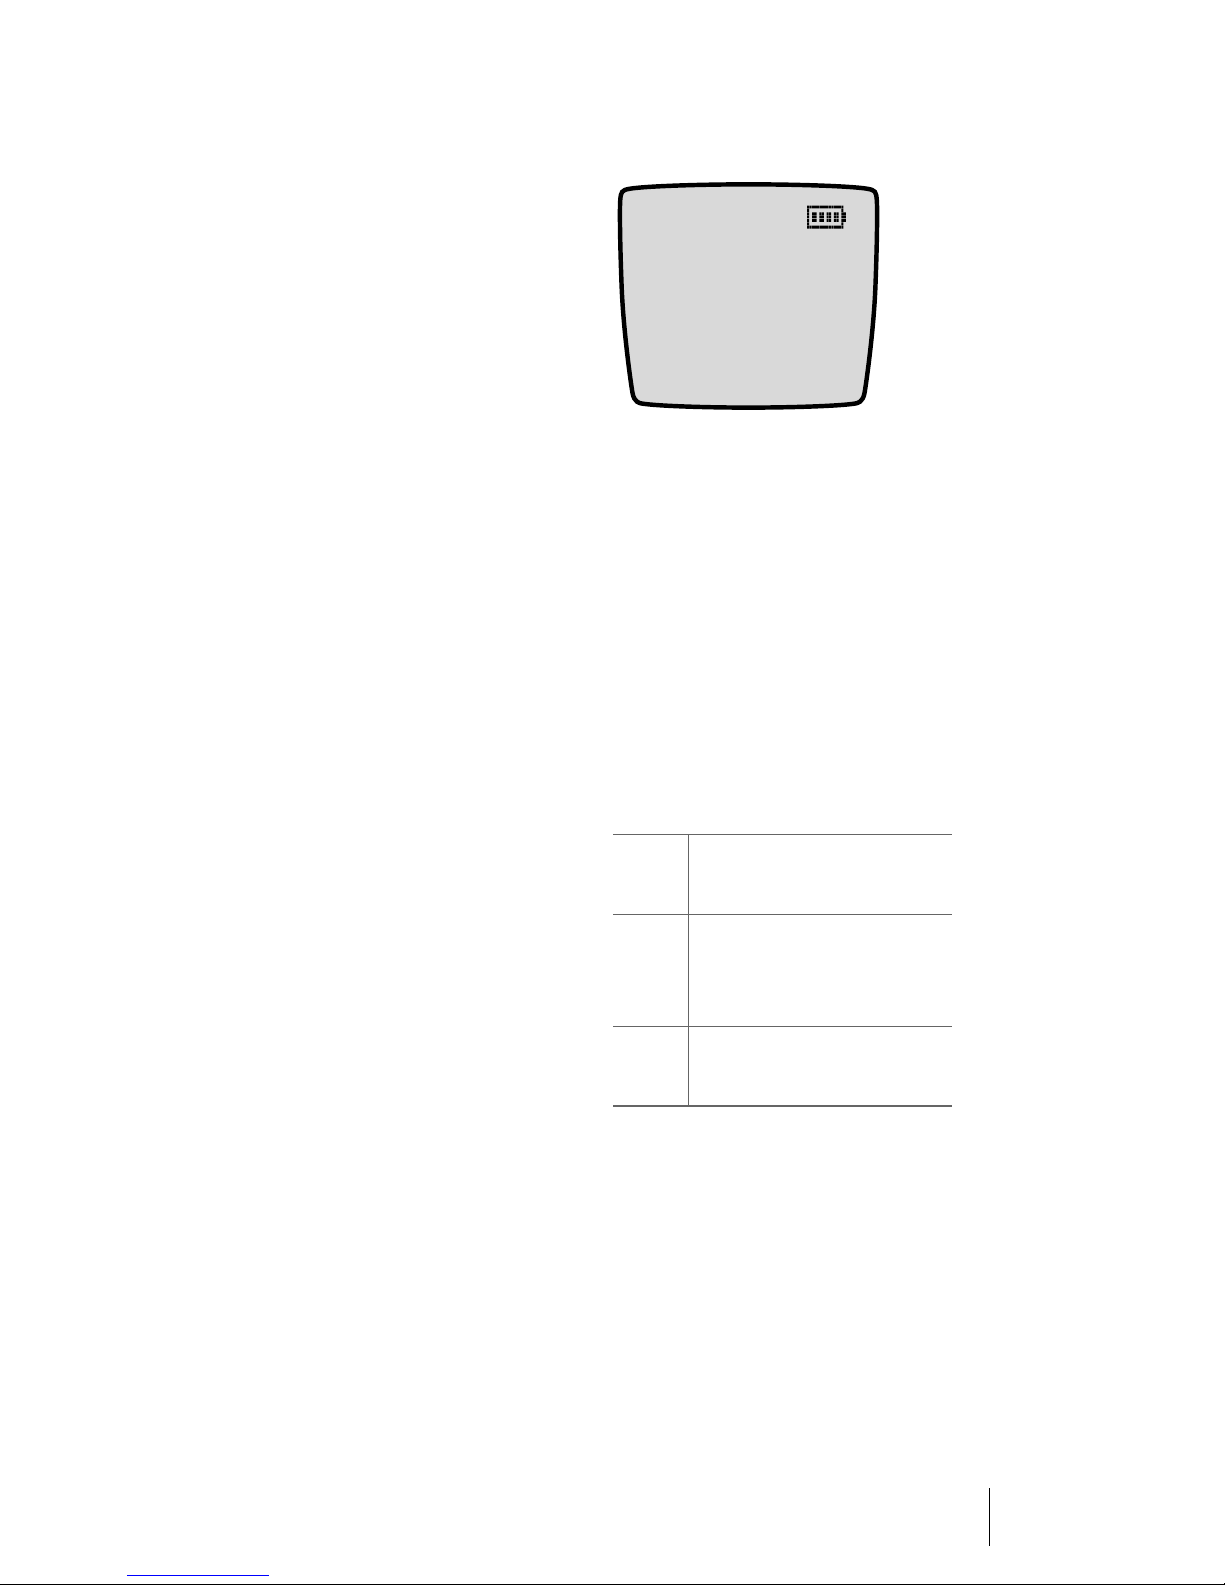
If your telephone is set to automatic
external line seizure, an external line
will be seized. You can immediately
dial an external call number. To
reach internal subscribers, press, before the internal call number, the
star key twice
If you are dialling a call number for a
enquiry call, or programming a destination call number, enter the call
numbers in accordance with the
type of external line seizure your
telephone is set to.
**.
Making a Call
œ ¢
12345
‘
Dialling:
Press the
number.
A key and dial the call
Menu
Example:
You want to programme call forwarding.
■ You can enter an external call
number directly if the telephone
is set to automatic line seizure. If
it is set to manual line seizure,
you will need to precede the external number with the external
line seizure digit (preset: “0”).
Exception: The destination of a
“Call forwarding MSN” is always
entered without a code digit.
■ You can enter an internal call
number directly if the telephone
is set to manual line seizure. If it
is set to automatic line seizure,
press the star key twice
before dialling the internal
number.
**
Pre-dialling:
Enter the call number and only press
the
A key once the call number is
complete.
Entering and Editing the
pre-dialling:
C short press:
delete individual numbers.
C long press:
delete the entire call
number
F Move the cursor to the in-
put position.
Making Calls Making External/Internal Calls
33
Page 36
Making a Call from the
Redial List
■ Delete all: Following a security
prompt, you can delete the entire redial list.
Redial
Max Peter
Joanne Newman
30011
OK ‘ Esc
Selection:
Press the left softkey
state. The last subscribers you called
will appear (call number or name).
Use the arrow keys to select an entry.
Dialling:
Press the
number will be dialled.
Additional options:
Press
with the following options:
■ Dial: Press
A key, the selected call
OK
to display a selection menu
will be dialled.
¤
in the idle
OK
. The call number
Please note: If your internal call
number (e.g. “30”) has been configured on more than one terminal,
you can display and edit the redial
list for the call number 30 on any
one of these terminals. If you, for
example, delete the redial list on
one of the terminals the list will also
be deleted on the other terminals.
Making a Call from the
Telephone Book
Selection:
In the idle state, press the arrow
key
F
■ upwards: You open the
OpenCom 100 telephone book
■ downwards: You open the local
telephone book of your telephone.
■ Delete: The number will be
deleted from the list.
■ Phone book: You can add the
number to the OpenCom 100
phone book (New entry) or to
an existing entry (Add). See
also: Add Call Numbers to Phone
Book from Lists or During a Call
starting on page 52.
34
Making External/Internal Calls Making Calls
TelBook
Newman, Joanne
Peter, Max
Smith, Wil
OK ‘ Esc
Page 37

Dialling from the OpenCom 100
telephone book
Enter the first letter/s of the desired
name. Press the
entry begins with the letter you
specified. Use the arrow keys
select an entry.
Press
A, the selected number will
be dialled.
Alternative: Press the
Now you can select one of the call
numbers stored in this entry (Office,
Mobile and Private). Press
to see a list enabling you to dial the
call number of the selected phone
book entry or to view more detailed
information on the entry.
Dialling from the local
telephone book
Enter the first letter/s of the desired
name. The first entry begins with the
letter you specified. Use the arrow
keys
F to select an entry.
Press
A, the selected number will
be dialled.
Alternative: Press the
softkey. You can now enter or delete
this telephone book entry, add a
new entry or delete all entries.
Please note: A detailed description of the topic can be found in the
chapter Making Calls from the Tele-
phone Book starting on page 50.
OK
softkey. The first
OK
softkey.
OK
Options
F to
again
Making a Call from the
Call List
Your handset saves in the call list the
call numbers of the subscribers that
did not reach you (Missed calls) or
with whom you last spoke (Accepted
calls). If the system administrator
has configured a voicebox for you,
the list also indicates the messages
left by callers.
If a caller has called more than once,
their calls are grouped in a single entry. If a caller has suppressed display
of their call number, the call will still
appear in the call list. In the case of
several calls with unknown call numbers, they are then grouped together in a single entry.
Entries in the “Missed calls” list are
deleted from that list if the caller has
subsequently been able to contact
you.
If a caller is stored in your telephone
book, the name will be displayed.
Selection:
In the idle state, press the
softkey briefly and select the
entry.
Select Missed calls or Voicebox
mess..
(To open the list of the accepted calls
use the “Calls” menu; please refer to
the section entitled “Accepted calls”
on page 57.)
Menu
Info
Making Calls Making External/Internal Calls
35
Page 38

Select an entry with the arrow keys.
Ending a Call
Dialling:
Press the
number will be dialled. If you have
selected a voicebox message, your
voicebox is called and you can listen
to the message.
A key, the selected call
Voicebox Queries
There are various ways of listening to
the messages in your voicebox:
■ via OpenVoice (from a telephone
that has not been assigned the
call number of your voicebox)
■ by calling the voicebox directly
(from a telephone whose call
number is assigned to your
voicebox)
■ by means of the additional
menu Voicebox in the Main
menu (see “Voicebox” Menu on
page 70).
Please note: For detailed information on the utilisation and operation of the OpenVoice, please refer
to the add-on guide “OpenVoice 200
– The Voicemail System in the
OpenCom 100 Communications System”.
Press A to end a call.
If the subscriber you are speaking to
ends the call, the busy tone for your
telephone is switched off after a few
seconds and you are again reachable. This also applies if you were connected using your headset. The time
before the busy tone is switched off
in hands-free mode is configured by
the system administrator. All other
connections are ended after
20 seconds when the receiver is not
replaced.
Using Routes
to Make Calls
HZ (routing code, tel. no.)
Enquiry calls:
GRZ (routing code, tel. no.)
The OpenCom 100 establishes calls
to the desired subscribers either automatically or via specific routes.
Your system administrator configures these routes in the
OpenCom 100 and specifies how
each route is seized. In order to manually seize a specific route for a call,
dial the routing code before dialling
the (internal or external) call
number. By making calls via specific
routes, you can, for example, contact
subscribers in the branches of a large
company network. It is also possible
to use a manually entered routing
36
Making External/Internal Calls Making Calls
Page 39

code to record your call-charge data
for external private and business
calls separately.
For information on the current
routes and their codes, please contact your system administrator.
“Calling …” Menu
Please note: Menu items marked
with an * are only displayed if the
corresponding user authorisation
has been set in the Configurator.
During a call, press the
briefly and then select …
Hands-free on or Hands-free off:
You switch hands free on or off.
Disconnect: The call will be disconnected.
Phone book: You can add the other
party’s call number to the
OpenCom 100 telephone book as a
new entry (New entry) or you can
add it to an existing entry (Add). See
also: Add Call Numbers to Phone Book
from Lists or During a Call starting on
page 52.
Park call:* You can park (one or
more) callers and make other calls,
or hang up and engage in other activities. Parked calls are recorded in a
list. You can remove the calls from
the list in whichever order you wish,
enabling you to “unpark” specific
Menu
softkey
calls as required. Until their call is
“unparked”, the caller will hear wait
music (Music on Hold); provided
wait music has been configured. If
you do not “unpark” the caller after a
certain amount of time, you will receive an automatic recall when your
telephone becomes available. This
automatically “unparks” the caller.
If, however, you are still making another call, the caller will hear the
busy tone and will be “unparked”.
Authorisation for parking connections and the period of time after
which there is a recall is defined by
the system administrator during the
configuration of the system.
Booking number:* By means of a
booking number you can record the
call data of a connection to an external subscriber and save them in the
OpenCom 100 for further analysis.
Booking numbers are useful, for
example, for calculating costs per client (fees and times) in an office. Select the menu item. Under No. enter
the booking number (8 digits maximum) and confirm your entry with
the
OK
softkey.
Incoming calls can also be associated
with a booking number. To do so,
simply press the
Menu
softkey after
you have accepted the call. Enter the
appropriate number under Booking
number.
Making Calls Making External/Internal Calls
37
Page 40

Notes on booking numbers
■ The system administrator de-
fines the length of the entered
booking number when he configures the system.
■ Entering a booking number dur-
ing a call is possible only if the
system administrator has activated this function for your user
group. Only then will the
Booking number menu item be
displayed.
■ For external connections estab-
lished by you it is important how
the route that you are using for
the connection has been configured by the system administrator. Among other things, the system administrator specifies
whether a booking number is
entered via the menu during the
call. He can, however, also specify that booking numbers must
be entered with a code procedure. In that case the booking
number must be entered before
the call is initiated and the connection is established. It is entered after the routing code and
before the actual destination
call number.
■ Calls made with booking num-
bers can be analysed with the
OpenCom 100 OpenCount web
application.
Pick-up:* You pick up a call made to
another telephone in your pick-up
group. Your first call is put on hold.
“Pick-up” is not possible if there are
already two active calls.
Pick-up select.:* You can pick up a
call to any other telephone. Enter
the call number of the other telephone. If the other telephone is in
the call state (e.g. an answering machine is making an announcement),
you pick up the call. “Pick-up selective” is not possible if there are already two active calls. The user for
whom you are picking up the call
must belong to a user group for
which “Call removal” authorisation is
activated, otherwise “Pick-up selective” is not possible.
Please note: If the called subscriber is a member of a user group
for which pick-up protection is active, “Pick-up” and “Pick-up selective” are not possible.
Intercept:* The call numbers of
“malicious callers” can be saved in
your network operator’s exchange (if
this service is enabled). This function
is also possible if the caller has already hung up!
Door opener:* This activates the
door opener.
38
Making External/Internal Calls Making Calls
Page 41

“Busy” Menu
Please note: Menu items marked
with an * are only displayed if the
corresponding user authorisation
has been set in the Configurator.
tion, your VIP call will be signalled
with a call-waiting tone.
Door opener:* This activates the
door opener.
You have called a busy subscriber.
Press the
then select …
Disconnect: The call will be
disconnected.
Callback:* You leave your callback
request with a busy subscriber (not
possible for hunt group numbers).
Pick-up select.:* You can pick up a
call to any other telephone. Enter
the call number of the other telephone. If the other telephone is in
the call state (e.g. an answering machine is making an announcement),
you pick up the call. The user for
whom you are picking up the call
must belong to a user group for
which “Call removal” authorisation is
activated, otherwise “Pick-up selective” is not possible.
Menu
softkey briefly and
Menu During a Call
You have dialled a call number and
the called subscriber has not yet accepted the call.
Press the
then select …
Disconnect: The call will be disconnected.
Door opener: This function activates
the door opener. (This menu item is
only displayed if you have been
given the corresponding user authorisation).
Menu
softkey briefly and
Please note: If the called sub-
scriber is a member of a user group
for which pick-up protection is active, then “Pick-up selective” is not
possible.
VIP call:* Even if the internal subscriber you have called has activated
call protection, your call will be signalled on his phone. If the subscriber
has activated call-waiting protec-
Making Calls Making External/Internal Calls
39
Page 42

Accepting Calls
Normal Call
When you receive a call, the caller’s
call number will be displayed (if
transmitted).
If this call number is listed in the telephone book of the OpenCom 100,
you will see the name of the caller
instead. In addition, you will see
whether the caller’s call number is
the office, the mobile or the private
number of a phone book entry (indicated by O:, M: or P:).
You will find further information on
the telephone book of the
OpenCom 100 and the local telephone book in the chapter Making
Calls from the Telephone Book starting on page 50.
Call for a virtual call number
(tele secretary)
In the OpenCom 100, call numbers
can be configured to which no telephone and no user are assigned (virtual call numbers). The system administrator can forward a virtual call
number to another internal call
number, the call number of your
telephone for example. Such a forwarded call is signalled as a normal
call on your telephone.
VIP Calls
These calls from authorised subscribers are signalled even when call
protection or call-waiting protection been activated and with call forwarding.
œ ¢
Incom. int. call
Max Peter
24
‘ Menu
To accept the call, press
the handset out of the charging station (if “Auto Answer” is activated;
see page 66).
Menu
opens the “Call” menu (see
page 41).
A or take
œ ¢
VIP call
Max Peter
40
‘ Menu
You hear a discreet ring tone and the
display shows the VIP call entry with
the caller’s call number. If the call
number is in the telephone book directory, you will see the entered
name.
40
Accepting Calls Making Calls
Page 43

Press
A to accept the call.
Calls During a
Conversation
External and/or internal calls during
a conversation are signalled by a notification tone and visually in the display.
œ ¢
Int. call wait.
Max Peter
40
‘ Menu
Press
R (long key press) to place
the current call on hold and accept
the waiting call.
Press
A to end the current call. The
waiting call will now be signalled as
a normal call.
Deflect call: You do not accept the
call yourself, but deflect it to another
subscriber. Enter the destination call
number and confirm this with
You can only use the “Deflect call”
function if your user group is authorised to forward calls to internal and/
or external destinations.
Door opener: This function activates
the door opener. (This menu item is
only displayed if you have been
given the corresponding user authorisation.)
OK
.
“Call-Waiting” Menu
You receive an incoming call in the
call state. Press the
briefly and then select …
Hands-free on or Hands-free off:
You switch hands free on or off.
Disconnect: You disconnect the current call and accept the waiting call.
Menu
softkey
Press
Menu
to access the “Call Wait-
ing” menu (see page 41).
“Call” Menu
You receive an incoming call in the
idle state. Press the
briefly and then select …
Reject call: You reject the waiting
call by pressing the
caller hears the busy tone.
Making Calls Accepting Calls
Menu
OK
softkey. The
softkey
Phone book: You can add the first
party’s call number to the
OpenCom 100 telephone book as a
new entry (New entry) or you can
add it to an existing entry (Add). See
also: Add Call Numbers to Phone Book
from Lists or During a Call starting on
page 52.
Park call:* You park the first call.
Then press the
your phone to accept new calls. The
waiting call will then be signalled
A key to enable
41
Page 44

like a normal call. Press the
you are now connected with the
waiting subscriber. After you have
finished this call you can “unpark”
the parked call by briefly pressing
the
Menu
softkey.
Reject: You reject the waiting call by
pressing the
hears the busy tone.
Accept: You accept the waiting call
by pressing the
rent call is held.
OK
softkey. The caller
OK
softkey. The cur-
A key,
Deflect: You do not accept the call
yourself, but deflect it to another
subscriber. Enter the destination call
number and confirm this with
You can only use the “Deflect call”
function if your user group is authorised to forward calls to internal and/
or external destinations.
Door opener: This function activates
the door opener. (This menu item is
only displayed if you have been
given the corresponding user authorisation.)
Enquiry, Toggling, Transfer
OK
.
and Conference
Enquiry/Toggling by
Means of the R-Key
During a connection you can consult
another subscriber.
During the call, press the
(long key press). The first call is put
on hold.
Now dial the other internal or
external call number (for manuallyseized external lines with the external line seizure code digit (e.g. 0) see
page 32).
R key
œ ¢
R:Peter
Newman
40
‘ Menu
The subscriber in enquiry is displayed
in the upper display line (R: ). Name (if
available in the telephone book) and
call number of the current subscriber
with whom you are speaking are displayed in the following two lines.
Press the
press) to return to the first call. Press
R key again (long key
R repeatedly to toggle between
the two calls (toggling).
42
Enquiry, Toggling, Transfer and Conference Making Calls
Page 45

To end the enquiry/toggling press
the
Menu
softkey and select the
Disconnect menu item. If you long
press the
connected to the subscriber on hold.
Pressing
to the subscriber you consulted.
R key again, you are re-
A transfers your first call
Transferring an Internal/
External Call to an
Internal Subscriber
You have dialled an internal consultation call (see Enquiry/Toggling by
Means of the R-Key starting on
page 42).
If the system administrator has set
the feature Music on hold upon
transfer on calling in the configurator, then the caller hears “Music on
Hold” while the call is being signalled at the other subscriber. This
setting also specifies whether the
caller hears “Music on Hold” on a recall, or whether they hear the ringing tone or busy tone.
If the called subscriber is busy, press
the
Menu
softkey and confirm
Disconnect with
another internal call number to
transfer the call or press the
to be connected to the caller again.
OK
. Then enter
R key
If the called subscriber accepts the
call, announce the call transfer and
press
A.
Or if you do not wish to wait for the
called subscriber to answer: Press
the
A key; the other subscriber will
be called.
If the called subscriber accepts the
call, he/she will be connected to the
waiting call. If the call is not accepted within a certain period of
time (by default 45 seconds), you
get an recall and after pressing
you are connected to the original
subscriber.
The period of time after which a recall is made can be changed by your
system administrator in the
OpenCom 100 and you can ask them
for the current time value.
A
Transferring an External
Call to an External
Subscriber
External calls can only be transferred
to an external subscriber via the
“Subscriber on hold” menu.
You have dialled an external number
for a consultation call (see Enquiry/
Toggling by Means of the R-Key starting on page 42); the original (external) caller is kept on hold.
Press the
confirm the Transfer with
Depending on your communications system’s settings, the external
calls will be joined together in your
communications system or the exchange of the network operator.
Menu
softkey briefly and
OK
.
Making Calls Enquiry, Toggling, Transfer and Conference
43
Page 46

Please note: If you connect two directly dialled calls, the charges will
be billed to your own account. You
will also have no control over the
duration of the transferred call.
“Subscriber on Hold”
Menu
Please note: Menu items marked
with an * are only displayed if the
corresponding user authorisation
has been set in the Configurator.
You have put a call on hold and are
making a consultation call.
Press the
then select …
Hands-free on or Hands-free off:
You switch hands free on or off.
Menu
softkey briefly and
Park call:* You can “park” the cur-
rent call (see also “Calling …” Menu
starting on page 37).
Booking number:* By means of a
booking number you can record the
call data of a connection to an external subscriber and save them in the
OpenCom 100 for further analysis.
(see also “Calling …” Menu starting
on page 37).
Call Diversion: You put your current
caller on hold and then call another
subscriber with whom you wish to
connect your current caller. Enter the
call number of the subscriber, to
whom you wish to transfer the call,
announce the call and press the
key. The call has now been transferred. After transfer, you are reconnected with the caller you originally
put on hold.
A
Disconnect: You disconnect the current call and return to dialling mode.
Enter a new call number for a further
enquiry or press the
be connected with the subscriber on
hold.
Phone book: You can add the call
number of the current subscriber to
the OpenCom 100 telephone book
as a new entry (New entry) or you
can add it to an existing entry (Add).
See also: Add Call Numbers to Phone
Book from Lists or During a Call starting on page 52.
R key. You will
Transfer:* You connect the subscriber on hold with the current subscriber.
Conference:* You initiate a
three-party conference.
Toggle: You toggle (i.e. switch) between the current and previous subscriber.
Door opener:* This activates the
door opener.
44
Enquiry, Toggling, Transfer and Conference Making Calls
Page 47

Internal/External 3-Party
Conference
You have dialled an internal or external enquiry call (see the section entitled Enquiry/Toggling by Means of the
R-Key starting on page 42).
If the subscriber accepts the call,
announce the conference and select
Conference from the “Subscriber on
hold” menu. This initiates the conference.
Press the
ence.
Please note: You can connect the
two conference participants with
each other or disconnect a specific
participant only by selecting the
corresponding item from the “Conference” menu.
If during the conference you want to
talk to the conference participants
separately again or disconnect them
individually, select the “Conference”
menu. Then select …
A key to end the confer-
End the conference by hanging up
or by selecting the End conference
menu item.
“Conference” Menu
Please note: Menu items marked
with an * are only displayed if the
corresponding user authorisation
has been set in the Configurator.
You have initiated a 3-party conference. Press the
and then select …
Hands-free on or Hands-free off:
You switch hands free on or off.
Disconnect (e.g. 034565483): You
disconnect the subscriber with the
call number 034565483 from the
conference (in this example an external subscriber).
Disconnect (e.g. 12): You disconnect the subscriber with the call
number 12 from the conference (in
this example an internal subscriber).
Menu
softkey briefly
■ Disconnect menu item to dis-
connect a specific subscriber
from the conference and continue the call with the other participant.
■ Toggle to end the conference.
Both connections are held and
you can toggle between the
subscribers using the
Making Calls Enquiry, Toggling, Transfer and Conference
R key.
Phone book: You can add the caller’s
call number to the OpenCom 100
telephone book as a new entry (New
entry) or you can add it to an existing entry (Add). See also: Add Call
Numbers to Phone Book from Lists or
During a Call starting on page 52.
Park call:* You park the consultation
call that you made before initiating
the conference (see also “Calling …”
45
Page 48

Menu starting on page 37); this ends
the conference.
Booking number:* If you have
called an external subscriber and
included him/her in the conference,
you can record the call data of this
connection and associate them with
a booking number (see also
“Calling …” Menu starting on
page 37).
Transfer:* You disconnect yourself
from the conference. The other subscribers remain connected.
End conference: You end the conference.
Toggle: You terminate the conference and can now toggle between
the subscribers.
Door opener:* This activates the
door opener.
Special Calls/Conversations
Manual Emergency Call
(SOS Call)
With this handset, emergency calls
can be triggered to an emergency
call number. You can enter the emergency call number in the “Phone settings: Telephone Option: Emergency
Opt.” menu (see page 65).
An emergency call will be signalled
for two minutes at the remote end.
The emergency call is made in
hands-free mode; hands-free mode
remains switched on even once the
remote end accepts. If the remote
end is busy then another emergency
call is made once the device (after
approximately two minutes) returns
to the idle state.
Triggering an Emergency Call
To trigger a manual emergency call,
long press the SOS key. The SOS key
is located on the left hand side of the
handset (see Displays, Keys and Sym-
bols on page 18).
You hear a confirmation tone.
Please note: The SOS key can only
be operated in the idle state. The
SOS key is also active when the keypad lock has been activated (see
page 67).
Deactivating an Emergency Call
To cancel an unintentional activated
emergency call, press the receiver
key
A.
46
Special Calls/Conversations Making Calls
Page 49

Automatic Emergency
Call (Mandown Call)
The handset can trigger an automatic emergency call (“Man Down
Call”). Prerequisite is that you have
programmed an emergency call
number (see page 65) and the function “Man Down Call” is on (see
page 65).
When the function “Man Down Call”
is activated then an integrated mercury-free position sensor continually determines the inclination angle
of the handset. Normally the handset is carried almost vertically, for instance using the belt clip directly
fastened to the body. The position
measurement occurs every five seconds and checks whether the device
is still in the vertical position. If the
device is more than 60 degrees away
from the vertical position, then at
the latest after ten seconds an alarm
is triggered.
If the function “Silent Alarm” is
switched on (see page 65) then the
programmed emergency call
number is immediately dialled. If the
function “Silent Alarm” is switched
off then a warning tone is sounded
for 30 seconds. If the warning tone is
not switched off then after the expiry of this time limit the emergency
call number is dialled. To switch off
the warning tone (and with it the
deactivation of the mandown call)
press the softkey
Esc
.
Please note: A change in the position of the handset is not sufficient
to deactivate the mandown call. The
position alarm is only triggered if
the device is switched on and in the
idle state (that is, for example, not
while scrolling through the menus).
Accepting an
Appointment Call
You can save appointments with the
Appointments menu item in the
Messages menu (see “Phone set-
tings” Menu starting on page 62).
At the appropriate time, the appointment number appears in the
display and (if entered) the appointment reason.
To view the appointment message
press the
the appointment call with
If you are in conversation during an
appointment call, you will hear a
special tone and the display indicates the appointment number.
Menu
softkey and confirm
OK
.
Baby Call
You can save an internal or external
call number in the menu item Baby
call of the “Protection” menu (see
“Protection” Menu starting on
page 67). If the “Baby call” function
has been activated and you press the
A key in the idle state, this pro-
Making Calls Special Calls/Conversations
47
Page 50

grammed call number is dialled
when a specified period (preset five
seconds) has expired. If you begin dialling a call number within the specified period, the baby call is without
function.
Consult your system administrator
for further details.
Entrance Intercom Calls
The time period is set to value between 0 and 20 seconds in the
OpenCom 100. It applies for all subscribers. Ask your system administrator for the current value.
Doorbell, Door Opener
A doorbell is indicated in the display.
... opening the door in the idle
state
Press the
To open the door, select the Door
opener menu item in the displayed
menu.
A key.
Calling the entrance intercom
If your system is connected to an
entrance intercom, you can use it as
follows to speak with visitors:
A*101
Enquiry call:
GR*101
If you are operating a “Doorline”
entrance intercom, use the following
code procedure:
A*102
Enquiry call:
GR*102
48
… opening the door during a call
If the doorbell signal during a call,
you will hear a discreet tone (callwaiting tone).
To open the door, select the Door
opener menu item in the displayed
menu.
Please note: The Door opener
menu item is not dependent on an
entrance intercom call. The door
opener function controls a relay
contact in your system which can
also be connected to other devices.
Special Calls/Conversations Making Calls
Door call in the idle state
Press the
the visitor.
Door call during a call
If the doorbell signal is triggered
during a call, you hear a call-waiting
tone. Proceed as described in the
section entitled Calls During a Con-
versation starting on page 41.
Door call forwarding
You can forward a call signalled from
the doorbell to another (internal or
external) call number, a so-called
A key. You can speak with
Page 51

“pharmacy line”.
This is done by means of the
following code-number procedure
(or via the Call forwarding menu;
see “Call forwarding” Menu starting
on page 58):
On:
A*151* (external
line seizure code digit, e.g.0)
Z (Destination call no.) #
Off:
A#151#
Your system administrator can configure in the OpenCom 100 a period
between 30 and 300 seconds and
will be able to tell you the current
value.
Announcements
Announcements can only be made
to system terminals (corded and
cordless system telephones of type
OpenPhone).
Several doorbells can be configured
in the OpenCom 100. You can forward these doorbells using the corresponding code number procedure. For example, dial the code
number
to doorbell 3 or to switch off call forwarding for doorbell 3.
How many doorbells are available
and with which code number procedure these can be forwarded depends on the entrance intercom
type that has been connected. Ask
your system administrator which
code number procedure you should
use.
Call duration
All door calls are automatically terminated after a specific period has
expired (presetting is 60 seconds).
This ensures that forwarded door
calls do not unintentionally lead to
continuous calls (e.g. to a mailbox).
153 to forward calls
… making an announcement
Press the
select the Announcement menu
item. Enter the call number under
To:.
The called subscriber hears a special
information tone followed by your
announcement. If you make an announcement to a group of system
terminals (e.g. to a hunt group
number on which calls are signalled
simultaneously), all called subscribers hear the announcement at the
same time. You hear a signal tone via
your telephone when the (announcement) connection has been
made to all called subscribers. If one
of these subscribers replies to the
announcement (by accepting the
call), the announcement call to the
other system terminals is terminated.
If the called subscriber is a member
of a user group for which Intercom
protection is active, no announce-
Menu
softkey briefly and
Making Calls Special Calls/Conversations
49
Page 52

ments are made to that subscriber’s
call number.
… responding to an
announcement
If you receive an announcement
yourself, you will hear a special
information tone. The display indicates Announcement and the
caller’s name.
To accept the announcement press
the
A key. Or you press the softkey
Menu
briefly, select the menu item
Accept and accept the announce-
ment with
To reject, briefly press the
softkey. Select Reject and confirm
with
announcement then hears the busy
tone.
OK
.
Menu
OK
. The subscriber making the
Answering a Callback
If you call another subscriber in your
OpenCom 100 communications system and the line is busy, you can request an automatic callback using
the corresponding menu item.
Briefly press the
Select Callback and confirm with
OK
.
A callback is carried out when the
other subscriber is available again.
Your telephone will then ring.
Press
A and the other subscriber
will be called.
Menu
softkey.
Making Calls from the Telephone Book
The OpenCom 100
Telephone B o o k
Approximately 2,000 entries can be
saved in the telephone book of your
communications system.
This number includes the centrally
administered telephone book, the
personal entries of all subscribers,
and, provided you are using the
multi-company variant of the
OpenCom 100, the entries in the
companies’ telephone books.
How many entries you can save in
your personal telephone book is determined by your system administrator when configuring the
OpenCom 100. The personal entries
are automatically sorted into the
comprehensive register, but can only
be viewed on your telephone and
can only be viewed by you. (How-
50
Making Calls from the Telephone Book Making Calls
Page 53

ever, the system administrator or a
person with the corresponding authorisation can delete your telephone book completely).
Please note: The OpenCom 100
phone book can also be edited from
the Web console, provided the system administrator has authorised
you to do so. Consult with the system administrator regarding authorisation.
For instructions on managing the
telephone book, refer to the section
entitled “Phone book” Menu starting
on page 69.
“Phone book” Menu
In the idle state briefly press the
upper arrow key
select …
F and then
(e.g. an office number and a private
number), the default number will be
dialled.
If you press the
select one of the call numbers in the
phone book entry (Office, Mobile or
Private) before establishing the connection. After confirming with
you can Dial the call number or view
the call number and speed-dialling
number (the latter only in the central phone book) with Info.
New preset: Here you can enter into
a list a letter or name. This entry will
then appear in the display as a menu
item when you open the telephone
book. This allows you to go to a specific section of the telephone book
(e.g. to the entries of a particular
company) to search for and select a
particular name there. You can enter
up to six search terms.
OK
softkey, you can
OK
Look up name: Enter the initial
character(s) of the desired name
(see Number Keys starting on
page 24). Press the
will see the first telephone book entry beginning with the characters
you entered. If you do not enter any
characters and press
begin with the first entry.
Using the arrow keys
scroll to the desired name.
Press the
scriber. If there is more than one call
number under the selected name
A key to call the sub-
OK
softkey. You
OK
, the list will
F, you can
Delete preset: Here you can, if required, delete programmed search
terms.
Please note: By default, the
“Phone book” menu appears in the
abbreviated form without the
Look up name and New preset entries. If required, the system administrator can use the Configurator in
the Web console to activate these
additional entries for your user
group.
If the entries Look up name and
New preset are not displayed, you
Making Calls Making Calls from the Telephone Book
51
Page 54

are viewing the abbreviated form of
the menu for making selections
from the telephone book.
Enter the initial letters of the desired
entry in the Name: field and, if necessary, scroll through the list using
the arrow keys
F.
Speed-Dialling
All central telephone book entries
can also be selected by two-digit or
three-digit speed-dialling numbers
once they have been configured. The
two-digit speed-dialling numbers
are in the range 00…99, the threedigit are in the range 000…999. Ask
your system administrator how
many digits are valid.
Selecting a speed-dialling
destination
A*7Z (SD no.)
Add Call Numbers to
Phone Book from Lists or
During a Call
You can add call numbers saved in
your caller list or your redial list to a
phone book (see “Calls” Menu start-
ing on page 57 and Making a Call
from the Redial List starting on
page 34). You can also add the other
party’s call number to the phone
book during a call.
Select the Phone Book menu item.
■ New entry: You can add the call
number to a phone book.
■ Add: You can add the call
number to an existing phone
book entry.
Add call number as new
phone book entry
Select New entry and press
OK
.
52
alternatively:
A*7*Z (SD no.) #
Please note: If you have the telephone book open, instead of keying
in the name (see “Calls” Menu starting on page 57 the paragraph commencing “Look up Name” on
page 51), you can also press the
key and enter the speed-dialling
number to find the name entry.
Making Calls from the Telephone Book Making Calls
*
Personal, Central, Company:
You can add the entry to your personal phone book. If your system administrator has authorised you (or
the user group you are part of) accordingly, you can also edit the central phone book and your company’s
phone book. Select the desired
phone book and press
Office, Mobile, Private:
Define the kind of call number the
list entry should be saved as. Confirm your selection with
OK
OK
.
.
Page 55

Enter Name and First name.
Confirm each entry with
You can add to the phone book entry
by entering further call numbers.
If you add the entry to the central
phone book, you can assign a
speed-dialling number. Select
Abbrev. no. The system will offer a
speed-dialling number. You can
accept this number or enter another
one which is not in use. Confirm with
OK
.
For each call number of the entry
you can determine whether your
own call number is to be suppressed
whenever you dial this call number
from the phone book. If you want
your call number to be displayed,
confirm Transmit number with
if not, use the arrow keys to scroll
down to Suppress number and confirm with
Then select the default number
(Default office, Default mobile or
Default private) and confirm with
OK
. The default number is the call
number that is used if you do not
select any other call number before
establishing the connection.
Press
Add call number to a phone book
entry
Select Add and press
OK
.
OK
to save the entry.
OK
OK
.
.
OK
Personal, Central, Company:
You can add the entry to your personal phone book. If your system
administrator has authorised you (or
the user group you are part of)
accordingly, you can also edit the
central phone book and your company’s phone book. Select the
desired phone book and press
In the relevant phone book, select
the entry you would like to add a
number to (please also refer to the
explanations under “Look up name”
in the section entitled “Phone book”
Menu starting on page 51).
Office, Mobile, Private:
Define the kind of call number the
list entry should be saved as. Confirm with
;
Please note: If you want to edit
phone book entries (to change the
name and call number, for example), use the “Phone book” menu
(see also “Phone book” Menu starting on page 69).
OK
.
OK
.
The Local Phone Book of
You r O p e n P ho n e 2 8
In addition to the telephone book of
your OpenCom 100 communications system, your OpenPhone 28
also has a local telephone book. In
this telephone book up to
100 personal entries can be saved.
This telephone book is saved on the
MEM card.
Making Calls Making Calls from the Telephone Book
53
Page 56

In the idle state briefly press the
lower arrow key
Search: Entering a single letter will
take you to the entries beginning
with this letter. If necessary, use the
arrow keys to select the desired
name.
Then press …
■ the receiver key A to dial.
F.
(key 1 … key 9) to view the associated entry in the local telephone
book. This copies the number to the
pre-dial where you can then dial it
by pressing
A.
■ the
The local telephone book’s menu
New: You create a new entry. Enter
the call number and then the name.
Confirm with
Edit: You edit the selected entry.
Save your changes with
Delete: You delete the selected entry (without a security prompt).
Delete All: Delete all entries of the
local telephone book after security
prompt.
Quick Call: You can allocate the
selected entry in the local telephone
book a speed-dialling number
(1…9). The speed-dialling number
programmed is displayed to the left
of the telephone book entry.
Options
the local telephone book menu.
softkey to display
OK
.
OK
.
When the OpenPhone 28 is in the
idle state, you can press and hold the
speed-dialling number
54
Making Calls from the Telephone Book Making Calls
Page 57

Features and Menus
How to Set Features
There are different ways to set the
features of your telephone and the
system:
Using Menus
Activate the menus with the corresponding softkey as described under
Displays, Keys and Symbols starting
on page 18 and make the appropriate setting.
Please note: Press the softkey
Menu
longer than you would when
telephoning. Only then will the
main menu appear in the display.
Use the arrow keys and the
softkey to select items.
OK
Using the Star and
Hash Keys
Many features can be set by entering
code digits. The code digits entry is
done using the
combined with a specific string of
code digits.
Code digit entry is intended primarily for analogue telephones in your
system. The code digits can also be
used on your system telephone and
are described in the “OpenCom 100
– Operation on Standard Terminals
User Guide” (this is supplied with the
system). You can view the up-todate online summary via the Codes
item in the System Info menu of
your communications system’s Web
console.
* and # keys
The Menus
Please note: Some menu points
are only displayed on your telephone if you belong to a user group
that is authorised to use the corresponding feature. If you are unable
to use a particular feature or have
Features and Menus How to Set Features
any questions, consult your system
administrator.
55
Page 58

“Main” Menu
This menu contains all available features. Some of the menu items can
also be found concurrently in other
menus. For example (if configured
accordingly), incoming e-mails are
located under Messages in the main
menu and can at the same time be
accessed via the Info menu (in idle
state press the
and confirm the first menu item Info
with
OK
).
Press and hold the
if the telephone is idle, press (but do
not hold) the
select the menu item Main menu.
This displays the primary groups of
menus …
Calls: This contains the most important features relevant to a call.
Call forwarding: This menu group
contains all types of call forwarding
that you can programme on your telephone. Further, the system administrator can programme call forwarding where the call number of
the caller is analysed (“SCF: Selective
Call Forwarding”). Potentially this
could be the reason why specific
calls do not reach you. If you have
any questions concerning this functionality, please consult your system
administrator.
Messages: This menu group provides information about short
messages and e-mails that you have
Menu
Menu
softkey briefly
Menu
softkey or,
softkey and
received and sent. You can also configure appointments and activate
pre-defined messages (“Messenger”
function).
Phone settings: In this menu group
you can configure your telephone to
meet your personal requirements
(e.g. volume, ringer settings, key
lock and display language).
Protection: Among other things,
you can activate the call protection
or telephone lock.
Connections: This menu group provides you with all the features that
can affect a call. Depending on the
particular state, these features are
also displayed in the menus that you
can call up during a connection.
Phone book: You can edit the system telephone books in this menu
group.
Voicebox: If the system administrator has configured a voicebox for
you, this menu will be available on
your system telephone. Use this
menu to listen to and to configure
your voice box.
Central settings: Here you can make
system settings. This is an optional
menu item, it is only available if your
system administrator has configured
the appropriate authorisation for
your user group.
56
The Menus Features and Menus
Page 59

“Calls” Menu
Select Call lists and then select …
■ Missed calls: You see the call
numbers of the callers who last
tried to reach you. Which calls
are recorded in your call lists is
determined by the authorisation
of your user group. In the process of configuring your user
group, the system administrator
will define whether or not internal calls, external calls, calls
when busy and calls from the
door are entered into your call
lists. If a caller is listed in the system’s telephone book, the
caller’s name is displayed instead of the call number. A call
when busy is marked with a
handset symbol. A door call
will – depending on the type of
door intercom – either will displayed with its call number or
name of the door bell. If he
called several times, his calls are
grouped together in a single entry. If a caller has suppressed display of the call number with
CLIR, the call will still appear in
the call list. In the case of several
calls with unknown call numbers, they are grouped together
in a single entry. Select an entry
and then one of the following
options.
– Dial: Call the caller back.
– Delete: The entry is deleted.
(An entry will be automatically
deleted after you called back the
caller).
– Phone book: You add the call
number of the caller to one of
the telephone books (see also
Add Call Numbers to Phone Book
from Lists or During a Call start-
ing on page 52).
– Info: You are shown the call
number or name of the caller,
the number of calls and time of
the last call.
– Delete all: You delete all entries from the call list.
Please note: If your internal call
number (e.g. “30”) is installed on
several terminals, you can view and
edit the call list for the call number
30 on each of these terminals. For
example, if you delete the call list
from one terminal, it will be deleted
from all others as well.
■ Accepted calls: You see the call
numbers of the callers with
whom you last spoke. You can
edit this list in the same way as
the “missed calls list” (see previous section).
■ Voicebox mess.: You see the list
of messages received. Each message is identified by the caller’s
call number or, if stored in your
telephone book, by the caller’s
Features and Menus The Menus
57
Page 60

name. Messages that have not
been yet been played back are
marked with a “+”; messages
that have been played back are
marked with a “-”. Select a message and then one of the following options.
– Play: Listen to the message
the caller recorded. You can also
use the number keys 4 (rewind),
5 (pause) and 6 (fast forward) to
control message playback.
– Dial: Call the caller back.
– Delete: The message will be
deleted.
– Phone book: You add the
caller’s call number to a telephone book (see also Add Call
Numbers to Phone Book from
Lists or During a Call starting on
page 52).
– Forward: Forward the message to a voicebox of another
OpenCom 100 user, with or
without a comment. Under To:,
enter the call number of the
other voicebox. End recording a
comment with the
– Info: View the call number or
user name of the caller, as well
as the date and time of the selected message.
– Delete all: You delete all messages stored in your voicebox.
A key.
Charges: You see the amount
charged for the last call and the total
charges for your device.
Remote charges: You can read out
the charges of other users of the
OpenCom 100, provided your system
administrator has given you “Costs”
authorisation. Enter the internal call
number of the other user.
Hunt group: If your telephone belongs to one or more hunt groups, a
selection list of corresponding hunt
groups will be displayed. You can
switch hunt group calls to your telephone on or off using On / Off (for
individual hunt group numbers or all
if you are a member of several hunt
groups). A “+” indicates that the
hunt group number it precedes is
switched on; a “-” indicates that the
hunt group number is switched off.
Please note: If you are the last
reachable member of the hunt
group and you log out then any further callers will hear a busy signal.
“Call forwarding” Menu
Notes on call forwarding
You can forward internal or external
calls intended for yourself (with the
exception of hunt group calls) to
another internal call number or, provided that you have the necessary
user group authorisation, to another
external call number. Calls can be
forwarded either immediately, after
58
The Menus Features and Menus
Page 61

a specified period of time (delay) or
if the line is busy. You can configure
more than one call forwarding mode
at the same time (Immediately,
After delay or Busy). You can, for example, configure call forwarding
Immediately for external calls to
one number, and call forwarding
After delay for internal calls to a different number. When configuring
the system, the system administrator specifies in seconds the period of
time after which a call is forwarded
in the After delay forwarding mode.
If more than one forwarding mode
has been activated, Immediately is
given priority.
Programming call forwarding
Select Call forwarding and then
select …
Call diversion: Select Immediately,
After delay or Busy for the forward-
ing mode. Then key in the call forwarding Dest. (for entering the call
number see also Making External/In-
ternal Calls starting on page 32).
Then select whether internal calls,
external calls or all calls should be
forwarded to the destination
number. Activate call forwarding
with On. Active call forwarding is indicated by a “+” sign, this is followed
by the call forwarding destination.
If OpenVoice, the integrated voice-
mail system of the OpenCom 100, is
installed, you can also forward your
calls to the call number of your voicebox.
Least Cost Routing (LCR) can be
evaluated with call forwarding to
external call numbers, provided your
system administrator has configured
LCR and its application in the
OpenCom 100 correspondingly. Ask
your administrator for the configuration that applies to you.
The OpenCom 100 may be configured with call numbers that are not
associated with a phone or a user
(virtual call numbers). Neither internal nor external call numbers can be
forwarded to a virtual call number;
the OpenCom 100 will not execute
this type of double forwarding.
Please note: All calls for the call
numbers of your device are forwarded (exception: hunt group
numbers). If a call number is available (that is, also on another device)
more than once, then calls to other
devices will also be forwarded. You
can activate all three types of forwarding simultaneously, in which
case the call forwarding Immedi-
ately has priority.
Divert MSN: With “Divert MSN”
(MSN = Call number on a multi-terminal access) it is possible for each
MSN to forward incoming external
calls to external destinations. Several MSNs can be grouped together
(this is configured by the system administrator) and forwarded to a
common destination call number.
Features and Menus The Menus
59
Page 62

The display indicates a list of the
configured MSNs and MSN groups.
Select an entry. Then select
Immediately, After delay or Busy
for the forwarding mode. Then key
in the external destination number
and activate the function. Active call
forwarding is indicated by a “+”.
This is followed by the call forwarding destination. A “?” preceding the
entry, ?MSNGroup1 for example,
means that call forwarding is active
for some MSNs or that there are various call forwards activated for this
group.
Please note: For the “Divert MSN”
call forwarding, the (external) destination call number is always entered without the trunk line seizure
code digit. If “Divert MSN” is executed in the exchange (= external
call forwarding, configured by the
system administrator), it can take a
few seconds after configuration for
call forwarding to be activated in
the exchange. All external calls to
the MSN are forwarded. You can activate all three types of forwarding
simultaneously, in which case the
call forwarding Immediately has
priority.
Divert door: Here you can programme a “Call forwarding immediately” for door calls. If several door
bells are configured on the
communications system, first select
the door bell whose calls are to be
diverted. How many door bells are
available and with which names
they are listed in the menu, depends
on the type of entrance intercom.
Consult your system administrator if
you have questions concerning the
configuration of the door bells. Then
key in the call forwarding Dest. (for
entering the call number see also
the chapter entitled Making Exter-
nal/Internal Calls starting on
page 32). Activate call forwarding
with On. Active call forwarding is indicated by a “+”, this is followed by
the call forwarding destination.
Remote divert: This function allows
you to programme call forwarding
for other OpenCom 100 users. In order to do so, “Call forwarding for
other user” authorisation is required,
otherwise this menu item will not be
displayed. Also, you can programme
call forwarding only for those users
whose terminal has not been
blocked for this type of access (these
users will have the authorisation
“Prevent call forwarding by other
user”).
Enter the internal call number for
which you want calls to be forwarded. The rest of the procedure is
identical with the one for configuring call forwarding for your own
telephone (see page 59).
Follow me: This call forwarding forwards calls from another device
(source) to your telephone. You must
know the device PIN of the other terminal. If “Follow me” is active, all
calls to the call numbers of the other
60
The Menus Features and Menus
Page 63

device are forwarded Immediately
to your telephone (with the exception of hunt group numbers).
As the Source, enter the internal call
number from which the calls should
be forwarded. Then enter the PIN of
the source. Activate the follow me
function with On option. The call
forwarding “Follow me” can be
switched off with the option Off at
either your own telephone or at the
other terminal. Alternatively, on the
other terminal, you can deactivate
“Divert call immediately”.
“Messages” Menu
Select Messages and then select …
Short messages: Short messages
can be exchanged between users
with system terminals. The arrival of
a message is indicated by a flashing
symbol in the display.
■ Received mail: A list of senders
of messages is displayed. Use
the arrow keys to scroll in the
display functions.
– Forward: Select an entry. You
can now edit the text of the
message. Press
OK
. Enter the internal call number of the user to
whom you would like to forward
the message. Optionally you can
select a call number from the
telephone book. Confirm the entry/selection of the call number
with
OK
.
– Delete all: You delete all messages.
■ Outgoing mail: A list of mes-
sages sent by you is displayed. In
the same way as described in
the above section, you can forward or display these messages.
■ New message: You can send a
new message to another user.
First enter the text (max.
160 characters) and press
OK
.
Enter the internal call number of
the user to whom you would like
to send the message. Optionally
you can select a call number
from the telephone book. Confirm the entry/selection of the
call number with
OK
.
– Show: Select an entry and
press
OK
. You see the “Subject”
text of the message, the sender
and the date/time.
– Delete: You delete the message.
Features and Menus The Menus
Messages can also be sent to system
terminals from the OpenCTI 50Web
application. You will find more information on this in the OpenCom 100
online help.
E-Mail: You will see the list (senders)
of received e-mails. Select an entry.
A selection menu appears allowing
61
Page 64

you to display the e-mail (subject,
sender, date/time), delete the selected email or delete the entire list
of emails. Use the arrow keys to
scroll through the display functions.
Appointments: You see the status of
both appointments. To programme
an appointment, select it with the
arrow keys and
can enter the time at which the appointment reminder is to be activated. Select Reason to enter the
reason for the appointment. Select
the type of reptition: Single, Date
(enter the specific date, DD.MM.YY
format), Mo - Fr or Sa - Su or Every
day. Activate the appointment call
with On or deactivate it with Off.
For an appointment call your telepone will ring. The appointment
number appears in the display. Press
the
A key to view the appointment
reason.
Messenger: Using the Messenger,
you can inform internal callers of
your availability status, for example
that you are currently not in the office or that you are on holiday. The
Messenger provides a number of
specially prepared message texts for
this purpose. Select one of these
message texts and press
message text will, for an internal
call, be displayed in the display of
the caller provided the telephone is
a system terminal. If you do not
want any message to be displayed,
set the text to “Available”.
OK
. Under Time you
OK
. The
Optionally you can create your own
text (max. length 23 characters). Select the Text: menu entry, enter the
text and press the
now saved in the Messenger list and
selected. You can overwrite this text
at any time.
You can also enter and select the
Messenger text via the OpenCTI 50
Web application.
Please note: The settings of the
Messenger are saved and are also
available after a restart of the communications system.
OK
key. The text is
“Phone settings” Menu
Select Phone settings and then
select …
Key Lock: You can lock the keypad of
your handset to prevent accidental
operation. Confirm with
tive keypad lock is symbolised by a
above the left softkey. To unlock the
keypad, press the left softkey and
then the
the keypad lock on by long pressing
the
Please note: The SOS key can also
be operated when the keypad lock
is activated.
Select Ringer Settings and then
select …
# key. You can also switch
# key.
OK
. An ac-
º
62
The Menus Features and Menus
Page 65

■ Melody: Depending on the type
of incoming call (e.g. internal
calls, external calls, messages
and VIP calls) a different melody
can be set. Select the call type
(Internal, External, Messages,
VIP). There are 30 different melodies available.
Then select the melody. Enter
1 … 9 or in quick succession two
digits 10 … 30 or modify the
displayed number with the arrow keys.
– Buzzer: Activate or deactivate
the acoustic ringer tone. If you
deactivate the signal generator
then this is shown in the display
with the
‹
symbol.
– Vibrator: Activate or deactivate the vibration signal generator.
Please note: If you deactivate all
signal generators, then the call is
only signalled with a flashing
¢
symbol in the display.
■ Type: As well as a melody, you
can assign a different kind of
signalling to every call: The active setting is displayed with
“
Select the desired setting and
confirm with
OK
.
– Full Melody: Ringer signalling
with a complete melody
– Single: As ringer signalling the
set melody will only be played
once.
– Chirp: Short melody, is also
only signalled once
■ Device: You can select the com-
bination of signal generators
with which the call will be signalled. An active signal generator is marked with
“
. Select the
desired signal generator and
switch it on or off with
OK
.
■ Volume: Select the ringer tone
volume signalling (1 … 7) via
entering the digit or with the ar-
.
row keys and confirm with
OK
.
System: This menu contains the
settings for subscribing the handset
to the base station (Subscription
and IPEI). Please refer to the information in the chapter entitled Com-
missioning starting on page 16 concerning the subscribing of a handset.
■ Subscription: Use this menu to
subscribe the handset to one or
more base stations. In this menu
you also administrate the subscription records that have been
set during check-in operation.
At least one subscription available: You see a list of base sta-
tion names to which the handset has subscribed and
additionally the Auto. Search
entry. Select the one of the en-
Features and Menus The Menus
63
Page 66

tries and press
Options
. You
can now make the further below
described settings for this entry.
No subscription available: You
see the note No Subscription.
Press
New
to add a subscription.
– Select (having selected Auto.
Search): If you have checked the
handset into multiple base stations, then the handset will (in
the idle state) automatically select a reachable base station.
Your handset will automatically
be “registered” at another base
station as soon as it is no longer
in range of the current base station.
– Select (having selected a different subscription entry): If you
have registered the handset at
multiple base stations, then you
can select which subscription
your handset should use.
– New: You subscribe the hand-
set (PP = Portable Part) to the
base station (FP = Fixed Part).
Possibly you will need the PARK
of the base station. If you wish
to check in the handset using
the secured procedure, you will
need the FP PIN of the base
station (also referred to as AC =
Authentication Code). If you are
using the simplified procedure,
leave this field blank. For more
information on checking in
handsets, refer to the
OpenCom 100 online help.
Enter the PARK and press
on
. Enter the Auth. code (Au-
thentication Code) and press
Go
OK
After a successful check in, you
can enter the name and number
for the subscription entry. Confirm with
OK
.
– Edit: You can edit the name
and display of the call number
(usually the internal/local call
number) for the selected subscription record. This information appears in the idle state
when the handset is registered
on the corresponding base station.
Please note: With the
OpenCom 100, you do not need to
enter an internal call number for the
handset since the communications
system manages internal call numbers automatically.
– Delete: Here you delete the
subscription record of the base
station in your handset. The
handset can only be operated on
this system when it has been
checked in again. When the last
entry in this list has been deleted, the handset automatically begins to search for a new
base station to subscribe to.
– Delete all: Here you delete all
subscriptions.
.
64
The Menus Features and Menus
Page 67

■ IPEI: You can read the interna-
tional handset identification
code (IPEI: International Portable Equipment Identity).
Please note: The handset can be
operated with a maximum of ten
communication systems. Before you
can make a call via the system, the
handset has to be registered in the
respective system (enrolment). A
system ID and access code may be
necessary for the enrolment process. Ask the respective system administrator for the valid code.
Telephone Option: This menu
contains further device-specific settings.
■ Auto Key Lock: Use
vate (
“
) or deactivate automatic
OK
to acti-
keypad lock. When the automatic keypad lock is active, the
keypad lock is automatically
switched on if you do not use
the device for more than
60 seconds in the idle state.
■ Key Click: For each key opera-
tion a short signal tone can be
activated. With
(
“
) or deactivate the key click.
■ Alarm: You can set a time be-
OK
you activate
tween 00:00 and 23:59 at which
time the handset will emit an
acoustic signal. The signal type
is defined by the ringer tone setting for external calls. The alarm
signal lasts approximately one
minute and can be switched off
by pressing any digit key. After
each signalled alarm, you will
need to reactivate the alarm
again.
– Set: Here you enter the wake
time, for example 12:15. Confirm your input with
– Active: With
(
“
) or deactivate the alarm.
OK
OK
you activate
.
Please note: When the alarm is active, the idle display shows an alarm
symbol ( ) next to the time.
■ Emergency Opt.: In this menu
©
you can set the options for the
emergency call and the emergency call key (see also Manual
Emergency Call (SOS Call) starting on page 46).
– Emergency Number: Here
you enter the call number that
will be called when the emergency call key is pressed or
when a mandown call is made.
Confirm your input with
OK
.
– Man Down Call: The mandown call (see also page 47) is initiated when the position sensor
of the handset is triggered. With
OK
you activate (“) or deactivate
this function.
– Silent Alarm: The mandown
call can, without any extra prealarm, be triggered by the hand-
Features and Menus The Menus
65
Page 68

set. If the function “Silent
Alarm” is activated, then the
programmed emergency call
number will be dialled immediately. Is the function deactivated
then a 30 second warning tone
is sounded. With
(
“
) or deactivate this function.
OK
you activate
Important Note
In accordance with your safety practice requirements, we advice you to
please pay attention to the following:
Operating your telephone in the operations type emergency call with
warning tone (i.e. “Silent alarm” is
switched off) means that calls continue to be signalled during the
30 second warning time. The warning tone will be repeated for a further 30 seconds after the completion
of the call or conversation and before the emergency call number will
be dialled. Because of this, a delay
can occur before the emergency call
is made. Therefore in sensitive safety
areas switch on the “Silent alarm”
menu item, so that an emergency
call is made immediately.
■ Auto Answer: If an headset is
plugged in then a connection is
automatically created, you can
make hands free calls. If the
caller hangs up then the connection will be disconnected.
Please note: If you are not using
the headset, then please deactivate
this function as unnoticed listeningin by a caller is possible.
If no headset is connected and
for an incoming call the telephone is removed from the
charging station, then the call is
answered without pressing the
receiver key
can activate (
A. With
“
) or deactivate
OK
you
this function.
Please note: This function should
only be used when the “Silent
charging” function described below
is off.
■ Silent Charging: The handset
does not signal any calls as long
as it is in the charger. This applies to acoustic signalling via
the ringer, to visual signalling
and the vibration signalling.
Callers hear a busy tone. As soon
as you remove the handset from
the charger, calls are signalled
again. With
(
“
) or deactivate this function.
■ Coverage Warn.: The coverage
OK
you can activate
warning sounds a warning tone
when leaving the radio range.
Use
OK
to activate (“) or deacti-
vate this function.
■ User Name: Here you enter or
edit the name that appears on
the display when the handset is
in the idle state. Use the
OK
softkey to save the setting.
66
The Menus Features and Menus
Page 69

Please note: The username saved
here is a two-character abbreviation displayed on this telephone
only. It is not identical to the username the administrator enters for a
user when configuring the
OpenCom 100 and which, for example, is used in the central phone
book.
■ Language: Select a language
from the list and confirm with
OK
. Display texts then appear in
this language.
■ Contrast: Select the level of the
display contrast (1 … 7) via entering a digit or with the arrow
keys and confirm with
OK
.
“Protection” Menu
Select Protection and then
select …
Call protect.: This switches the signalling of calls for all call numbers of
your device On/Off (with the exception of VIP calls). You can activate (
call protection for internal calls only,
for external calls only or for all calls.
When call protection is activated,
the caller hears either the ring or the
busy tone (the system administrator
configures this when configuring
user groups).
Please note: Call protection is only
activated on the terminal on which
it was set. Even if your internal call
“
number of the terminal is available
(that is, also on other terminals)
more than once, call protection is
not automatically activated there.
Telephone lock: Enter your device
PIN. Activating the telephone lock
switches your telephone to a lower
external access authorisation level.
External dialling may then be partially or fully restricted. Emergency
call numbers can be stored in a special list applicable to your user group
and can then always be dialled, irrespective of your external authorisation. For more information ask your
system administrator.
Baby call: Enter the destination call
number and activate or deactivate
the baby call (see also the chapter
entitled Baby Call starting on
page 47).
Change PIN: Enter your current
device PIN and then the new PIN
twice. If you have forgotten your
device PIN, contact your system
adminstrator.
)
Availability: All active features that
hinder your availability (call protection, call-waiting protection, call forwarding) are cleared.
Call wait. Prot: During a telephone
conversation, no further calls are signalled by the call-waiting tone; the
caller hears the busy tone. Activate
this function with on.
Features and Menus The Menus
67
Page 70

Please note: Call-waiting protection is only activated on the terminal on which it was set. Even if your
internal call number of the terminal
is available (that is, also on other
terminals) more than once, Callwaiting protection is not automatically activated there.
“Connections” Menu
Please note: The following features are available only if this is permitted by the current call state of
your telephone. You can also find
these features in the call-dependent menus.
If the called subscriber is a
member of a user group for
which pick-up protection is
active, then you cannot pick up
calls for their call number.
Please note: If the other terminal
is already in the call state (e.g. an
answering machine is in announcement mode), you pick up the call.
The subscriber for whom you pick
up the call must belong to a user
group for which the “Call removal”
authorisation is activated, otherwise “Pick-up selective” is not possible.
Select Dial, then …
Select Connections and then
select …
Select Call pick-up, then …
■ Pick-up: This accepts a call for
another telephone in your pickup group.
If the called subscriber is a
member of a user group for
which pick-up protection is
active, then you cannot pick up
calls to this subscriber’s call
number.
■ Pick-up select.: You can answer
a call for any other telephone. To
do this, enter the call number of
the other telephone.
■ Announcement: After entering
the call number, you can initiate
an announcement on another
system terminal. Enter the call
number under To:. Announcements can also be directed to
call numbers under which several subscribers can be reached
(see also Announcements starting on page 49).
If the called subscriber is a member of a user group for which intercom protection is active, no
announcements are made to the
subscriber’s call number.
■ VIP call: Even if the called inter-
nal subscriber (only with a system terminal) has call-waiting
protection, call protection or
call-forwarding activated, your
68
The Menus Features and Menus
Page 71

call will nevertheless be acoustically signalled.
■ Door opener: This activates the
door opener.
■ Phone book: This opens the
telephone book of the
OpenCom 100. You can now call
one of the stored subscriber
numbers (for this, see also Mak-
ing Calls from the Telephone Book
starting on page 50).
“Phone book” Menu
In this menu you can add, edit and
delete entries in your personal part
of the OpenCom 100 telephone
book. If the system administrator
has given you (or the user group to
which you belong) the corresponding authorisation, you can also edit
the central telephone book and your
company’s telephone book. An entry
in your company’s telephone book is
created in exactly the same way as
an entry in your personal telephone
book. It can then be used by all employees of your company.
Information about company telephone books can be found in the
user guide “Installation and Commissioning”, in the chapter entitled
“Multi-Company Variant” and in the
online help to the OpenCom 100.
Select Phone book and then
select …
■ New entry: Select the required
telephone book: Personal,
Company or Central. Enter the
name, first name as well as the
call number for the classifiers
Office, Mobile and Private.
For each call number in a telephone book entry, you can specify whether your own call
number should be automatically
suppressed whenever you dial
these call numbers (from the
telephone book). If your call
number should be displayed,
confirm Transmit number with
OK
. Otherwise use the lower arrow key to scroll to the Suppress
number menu item and then
press
OK
.
Please note: If you do not activate
the “Suppress number” function for
a call number saved in the telephone book, you can suppress the
display of your call number from call
to call, that is before you dial the
destination call number.
In the central telephone book
you can assign a speed-dialling
number to one or several call
numbers in the telephone book
entry. After you have enter the
call number, the system will automatically offer you the next
free speed-dialling number. If
you wish to assign this number,
press
OK
. If not, you can delete
this speed-dialling number using the
C key (if necessary
Features and Menus The Menus
69
Page 72

enter another free speed-dialling number) and confirm with
OK
.
Then select the default call
number (Default office, Default
mobile or Default private) and
confirm with
OK
. The default
number is the number that is
used if you do not select any
other call number before establishing the connection.
Press
OK
to save the telephone
book entry.
or, if stored in your telephone book,
by the caller’s name. Messages that
have not yet been played back are
marked with a “+”; messages that
have been played back are marked
with a “-”. Select a message and
then one of the following options.
■ Play: Listen to the message the
caller recorded. You can also use
the number keys 4 (rewind),
5 (pause) and 6 (fast forward) to
control message playback.
■ Dial: Call the caller back.
■ Edit: Select Personal, Company
or Central. In the Name field enter the first letter(s) of the name.
Then select the desired entry
from the list and confirm with
OK
. Select Delete or Edit. Select
Edit to edit all data of this entry.
The procedure is identical to the
one used to create a new phone
book entry.
“Voicebox” Menu
This menu item is only displayed if a
voicebox has been configured for
you! In this menu you can edit new
and existing voicebox messages and
change the voicebox settings.
Select Voicebox and then select …
■ Delete: The message will be de-
leted.
■ Phone book: You add the caller’s
call number to a telephone book
(see also Add Call Numbers to
Phone Book from Lists or During a
Call starting on page 52).
■ Forward: Forward the message
to a voicebox of another
OpenCom 100 user, with or
without a comment. Under To:,
enter the call number of the
other voicebox. End recording a
comment by with the
■ Info: You see the call number or
A key.
user name of the caller, as well
as the date and time of the message.
Voicebox mess.: You see the list of
received messages. Each message is
identified by the caller’s call number
70
The Menus Features and Menus
■ Delete all: You delete all mes-
sages stored in your voicebox.
Page 73

Call voicebox: Call your voicebox
and identify yourself with your code
when prompted to do so. OpenVoice
informs you whether you have any
new messages. You can also edit
new and existing messages and voicebox settings. Follow the voice
menu instructions.
Please note: For detailed information on utilisation and operation of
OpenVoice, please refer to the addon component’s guide “OpenVoice –
The Voicemail System in the
OpenCom 100 Communications System”.
“Central settings” Menu
In this menu you can define rules
and settings for the time management of your system.
The Time control menu item is available if the system administrator has
configured, for your user group, the
authorisation “Time control”. The
Date / Time menu item is available if
the system administrator has configured, for your user group, the authorisation “Configurator – active”.
If you have neither of these authorisations, then this menu will not be
displayed on your telephone.
Select Central settings and then
select …
■ Time control: In the
OpenCom 100 several time
groups can be configured.
Depending on the activated
time group, incoming calls are
signalled on different telephones. Switching between
these time groups can be done
automatically – according to a
timetable configured by the system administrator – or manually.
You can only programme these
functions if the system administrator has activated the “Time
control” authorisation for your
user group.
Select Automatic to activate automatic time control. The configured time groups then change
automatically according to the
timetable configured by the system administrator. This setting
remains active until one of the
available time groups is set
manually.
The system administrator can
configure up to ten time groups.
The time groups are either numbered (default setting) or they
have been given names by the
system administrator. You can
manually select a specific time
group; the automatic time control is then deactivated.
Features and Menus The Menus
Please note: Any divert “MSN” always remains in effect, regardless of
71
Page 74

the currently switched-on time
group.
■ Date / Time: The date and time
are taken over from the exchange on the first external outgoing call. If this information is
not transmitted by your network
operator, you can set the date
and time here yourself.
72
The Menus Features and Menus
Page 75

Appendix
Care and Maintenance
Your telephone is a product that
meets the highest standards of
design and manufacture. It should
therefore be treated with care.
Follow the advice below, and you
will be able to enjoy using this product for a long time.
Please pay attention to the safety
precautions in chapter Safety Pre-
cautions starting on page 6. These
precautions apply to the handset,
the charging station, the rechargeable batteries (the entire telephone),
as well as the accessories.
To clean the telephone, first remove
the charger adapter plug from the
mains socket. Wipe the equipment
with an anti-static cloth or a soft,
damp leather cloth, then with a dry
cloth.
rectly, contact your supplier's customer service.
Please note: Never spray your telephone with cleaning fluid or solvents.
Clean the charge contacts on the
handset and the charger by means
of a lint-free cloth.
If your telephone or one of the
accessories fails to function cor-
Appendix Care and Maintenance
73
Page 76

Technical Data
Standards: DECT, GAP
Frequency band: 1,88 - 1,9 GHz
Handset weight: approx. 117 g (including batteries)
Handset dimensions: 138 x 47 x 21 mm plus antenna
(L x W x H)
Display: 5-line graphic display
Battery: NiMH; 650 mAh
Stand-by time: up to 75 hours
Talk time: up to 8 hours
Charging time: approx. 5 hours (discharged battery
charged to full capacity)
Transmitter power 10 mW (average)
250 mW (maximum)
Operating temperature -10 °C to +45 °C (handset)
+5 °C to +40 °C (charging station)
Storage temperature -25 °C to +55 °C (handset)
Shipping temperature -25 °C to +70 °C (not incl. batteries)
-25 °C to +60 °C (incl. batteries)
Protection class IP 54, dust-proof and splash-proof
Accessories Charging station
Adapter plug (Europe)
Adapter plug (UK)
Charging station Plus
Adapter plug Plus (Europe)
Adapter plug Plus (UK)
Reserve battery pack
Headset
MEM card manager
Leather carry case
74
Technical Data Appendix
Page 77

Notes on disposal
In order to avoid any possible effects
resulting from the disposal of electrical and electronic equipment containing substances damaging to the
environment and human health, the
European Parliament and Council directives
■ 2002/96/EC on waste electrical
and electronic equipment
(WEEE) and
■ 2002/95/EC on the restriction of
the use of certain hazardous
substances in electrical and electronic equipment (RoHS)
have been transferred into national
law in all EU member states.
The primary aim of the legislation is
the prevention of waste electrical
and electronic equipment, and also
the recycling, material recovery and
any other form of recovery of such
waste in order to reduce the quantities of waste to be disposed of and
the amount of hazardous substances
from electrical and electronic equipment in waste.
The product is labelled with the
symbol illustrated above. If you wish
to dispose of this product, this symbol obliges you to do so separately
from unsorted domestic waste. Suitable facilities have been set up for
the return of waste electrical and
electronic equipment. Waste equipment can be handed in at these return centres free of charge. To find
out where these return centres are
located, please consult the information provided by the department of
your local authority responsible for
waste disposal.
Please note:
Electrical equipment does not belong in household waste.
Deposit it free of charge at a return
centre.
The product that you have purchased was developed in line with
the current state of the art in an environmentally friendly manner and
with a view to recycling. It therefore
meets the specifications of the European directives.
Appendix Notes on disposal
75
Page 78

Main Menu
Calls Call lists
Charges
Remote charges
Hunt group
Call forwarding Call diversion
Divert MSN
Divert door
Remote divert
Follow me
Messages Short messages
E-Mail
Appointments
Messenger
Phone settings Key Lock
Ringer Settings
System
Telephone Option
Protection Call protect.
Telephone lock
Baby call
Change PIN
Availability
Call wait. Prot
Missed calls
Accepted calls
Voicebox mess.
Received mail
Outgoing mail
New message
Melody
Typ e
Device
Volume
Subscription
IPEI
Auto Key Lock
Key Click
Alarm
Emergency Opt.
Auto Answer
Silent Charging
Coverage Warn.
User Name
Language
Contrast
Pick-up
Pick-up select.
Connections Call pick-up
Phone book New entry
Voicebox Voicebox mess.
Central settings Time control
76
Main Menu Appendix
Dial
Edit
Call voicebox
Date / Time
Announcement
VIP call
Door opener
Phone book
Play
Dial
Delete
Phone book
Forward
Info
Delete all
Page 79

Index
Numerics
3-party conference 45
A
Alarm 65
Announcement 31, 49, 68
Appointment call 47
Appointments 62
Arrow keys 21
Automatic keypad lock 65
Availability 67
B
Baby call 47, 67
Base station
Automatic Search 64
Selection 64
Batteries
Charging and operating times 14
Charging status 19
Initial commissioning 13
Inserting 11
Removing 12
Blocked/Unblocked Call Numbers 28
Booking number 37, 44, 46
Busy (Menu) 39
C
Call
Accepting 42
Deflecting 41, 42
Ending 36
Menu 41
Parking 37
Pick-up 68
Rejecting 41, 42
Transferring to an external
subscriber 43
Transferring to an internal
subscriber 43
Unparking 31
Call forwarding 59
Call number entry with external line
seizure (manual/automatic) 33
Door 60
For other users 60
For your telephone 59
Menu 58
MSN 59
MSN call forward 33
To Voicebox 59
Call indicator 27
Call list 57
Accepted calls 57
Making a call from 35
Missed calls 57
Voicebox messages 57
Call number
Suppress 32
Tra nsmi t 3 2
Call protection 67
Call transfer 43
Callback 39
Answering 50
Call-charge
Display 27
Calling 33
Calling … (Menu) 37
Calling the entrance intercom 48
Calls (Menu) 57
Call-waiting (Menu) 41
Call-waiting protection 67
Cancel key 23
Care and maintenance 73
Central Settings (Menu) 71
Central telephone book 50
Change PIN 67
Changing device PIN 67
Index
77
Page 80

Charge display 14
Charges 31, 58
Display 27
Charging time 14
Checking in 16
CLIP 29
CLIR 29
CNIP 29
Commissioning 16
Company telephone books 50
Conference 42, 44, 45
Ending 46
Menu 45
Connections (Menu) 68
Contrast 67
Coverage warning 66
D
Date 72
Declaration of Conformity 7
DECT 9
Deflect call 41
Dial 68
Disconnect 37, 39, 41, 44, 45
Display 18
Contrast 67
Lines 19
Door opener 31, 38, 39, 41, 42, 44, 46,
48, 69
Doorbell 48
DTMF 27
E
E-mail 19, 31, 61
Emergency number 65
Emergency options 65
Enquiry 42
Entrance intercom 48
Calls 48
External line 32
External seizure 32
F
Feature
Quick switch 22
Features 28
Follow me 60
G
GAP 9
H
Handset subscribing 64
Hands-free usage 26
Hash key 23
Using 55
Headset installation 14
Hearing aids 9
Hunt group 58
I
Illumination 20
Information line 20
Installation location 12
Intercept 38
IPEI 65
K
Key click 65
Key lock 62, 65
Keypad
Dialling 28
Lock 19
Keypad protocol 28
Keys 18
L
Language 67
Least Cost Routing (LCR) 28
Switching off 32
78
Index
Page 81

M
N
Main menu 32, 56, 76
Making a call 33
From the Redial List 34
Making a Call (Menu) 33
Man Down Call 47, 65
Melody 63
MEM Card
Inserting 11
Removing 11
MEM card 10
Menu
Busy 39
Call 41
Call forwarding 56, 58
Calling … 37
Calls 56, 57
Call-waiting 41
Central settings 56, 71
Conference 45
Connections 56, 68
During a call 39
Main menu 56
Making a Call 33
Messages 56, 61
Phone book 51, 56, 69
Phone settings 56, 62
Protection 56, 67
Selection (in the idle state) 31
Subscriber on hold 44
Voicebox 56, 70
Menus
Automatic Hide 22
Before and During a Connection 30
Using 55
Messages 61
Messenger 62
Microphone
Switched off 19
Switching off 26
Multiple Connections 27
Muting 26
Notes 32
Number keys 24
O
Open listening 26
Operating time 14
P
Park 41
Park call 37, 41, 44, 45
Personal telephone book 50
Pharmacy line 49
Phone book 37, 41, 44, 45, 69
Delete preset 51
Edit entry 70
Local 53
Look up name 51
Menu 51, 69
New entry 69
New preset 51
Phone settings (Menu) 62
Pick-up 31, 38, 68
Selective 31, 38, 39, 68
Postdialing (DTMF) 27
PP Subscribe 64
Protection (Menu) 67
R
Radio connection
Quality 19
Silent zones 9
Recall 43
Receiver key 23
Redial list 19
Redialling 27
Registration 17
Remote charges 58
Ringer settings 62
Type of incoming call 63
Index
79
Page 82

Ringer switched off 19
R-Taste 23
S
Safety precautions 6
Seizing a Line 32
Short messages 19, 31, 61
Signal key 23
Silent Alarm 65
Silent charging 66
Softkey
Arrow keys 21
Esc 22
Left key (Switching handset off) 21
Line 20
Menu 22
OK 22
Redial 22
Right key (Switching handset
on) 21
Softkeys 18, 21
SOS Key 24
Speaker 18
Speed dialling 52
Stand-by time 14
Star key 24
Using 55
Subscribe handset (PP) 63
Subscriber on hold (Menu) 44
Subscription 17
Switching (on/off) of features 22
Switching the handset off/on 26
Symbols 18
System 63
T
Telephone options 65
Tele-secretary 40
Text lines 20
Three party conference 27
Time 72
Time control 71
Time group 71
Toggling 27, 42, 44, 46
Transfer 42, 44, 46
Transferring an external
subscriber 43
Transferring to an internal
subscriber 43
Transmission of call number 29
U
Unparking calls 31
Username 66
V
VF signalling 27
VIP call 39, 40, 68
Initiating 32
Virtual call number 40
Visual call indicator 27
Voice Frequency (VF) 27
Voi cebox 70
Call 71
Menu 70
Messages 19
Querying 36
Voicebox messages 31
Voicemail system 59
Vol ume
Adjusting during a call 26
Talk time 14
Technical data 74
Telephone book 50
Calling from 34
Telephone lock 28, 67
Telephone numbers blocked/
unblocked 28
80
Index
Page 83

Page 84

DeTeWe Systems GmbH • Zeughofstraße 1 • D-10997 Berlin • Germany
www.detewe.de
Item No.: part of 69556.xxx
As of September 2005 (based on Release 7.0)
Subject to changes
 Loading...