


A member of
the Bosch Group
Solution Ultima
Operators Manual
ISSUE 1.00

Solution Ultima
Operators Manual
Copyright Ó 2001 by Detection Systems,
UK
Document Part Number Y9400
DOCUMENT ISSUE 1.10
Printed 17 April 2002
This documentation is provided to suit the Solution Ultima Control Panel (CC488).
Firmware Revision 1.00 – 1.09
Hardware Revision A - J
Alarm Link required = 2.72 or higher
Copyright Notice
All rights reserved. No part of this publication may be reproduced, transmitted or stored in a retrieval system in
any form or by any means, electronic, mechanical, photocopying, recording, or otherwise, without the prior
written permission of Detection Systems.
Trademarks
Throughout this document trademark names may have been used. Rather than put a trademark symbol in every
occurrence of a trademark name, we state that we are using the names only in an editorial fashion and to the
benefit of the trademark owner with no intention of infringement of the trademark.
Notice of Liability
While every precaution has been taken in the preparation of this document, neither Detection Systems nor any
of its official representatives shall have any liability to any person or entity with respect to any liability, loss or
damage caused or alleged to be caused directly or indirectly by the information contained in this book.
Detection Systems reserves the right to make changes to features and specifications at any time without prior
notification in the interest of ongoing product development and improvement.

Table Of Contents
INTRODUCTION...................................................................................................................................6
KEYPAD INDICATORS .......................................................................................................................7
Zone Indicators......................................................................................................................................................7
AWAY Indicator ...................................................................................................................................................7
STAY Indicator .....................................................................................................................................................9
System Unset ..........................................................................................................................................................9
MAINS Indicator...................................................................................................................................................9
Off Indicator / Zone Closed ..................................................................................................................................9
On Indicator / Zone In Alarm..............................................................................................................................9
FAULT Indicator.................................................................................................................................................10
Audible Indications .............................................................................................................................................10
SETTING THE SYSTEM....................................................................................................................11
Forced Setting ................................................................................................................................................11
Setting In AWAY Mode......................................................................................................................................11
Setting In STAY Mode 1.....................................................................................................................................12
Entry Guard Timer For STAY Mode.............................................................................................................12
Setting In STAY Mode 2.....................................................................................................................................13
Entry Guard Timer For STAY Mode.............................................................................................................13
Programming STAY Mode 2 Zones..................................................................................................................13
UNSETTING THE SYSTEM ..............................................................................................................14
ADDING USER CODES ......................................................................................................................14
ADDING RADIO REMOTE USER CODES.....................................................................................14
DELETING USER CODES/RADIO USER CODES ........................................................................15
RADIO TRANSMITTER OPERATIONS .........................................................................................15
KEYPAD DURESS ALARM...............................................................................................................16
KEYPAD PANIC ALARM ..................................................................................................................16
KEYPAD FIRE ALARM .....................................................................................................................16
KEYPAD MEDICAL ALARM ...........................................................................................................16
KEYPAD TAMPER (ACCESS DENIED) .........................................................................................16
OMITTING ZONES.............................................................................................................................17
Standard Omitting...............................................................................................................................................17
Code To Omit.......................................................................................................................................................18

FAULT ANALYSIS MODE ................................................................................................................18
Fault Descriptions................................................................................................................................................19
System Fault.......................................................................................................................................................19
Low Battery....................................................................................................................................................19
Date and Time ................................................................................................................................................19
RF Receiver Fail.............................................................................................................................................20
Horn Speaker..................................................................................................................................................20
Telephone Line Fail .......................................................................................................................................20
E2 Fault ..........................................................................................................................................................20
Fuse Fail .........................................................................................................................................................20
RF Low Battery..................................................................................................................................................20
Tamper Fail........................................................................................................................................................20
Sensor Watch Fault............................................................................................................................................20
RF Sensor Watch Fault ......................................................................................................................................20
Communication Fail...........................................................................................................................................21
DATE AND TIME................................................................................................................................ 21
TURNING OUTPUTS ON/OFF .........................................................................................................21
RESET LATCHING OUTPUTS.........................................................................................................22
CALL DIVERT ON/OFF (SYSTEM SET/UNSET) .........................................................................22
Call Divert Set Sequence.....................................................................................................................................22
Call Divert Unset Sequence ................................................................................................................................23
TESTING...............................................................................................................................................24
Horn Speaker Test...............................................................................................................................................24
Bell Test ................................................................................................................................................................24
Strobe Test ...........................................................................................................................................................24
Walk Test Mode...................................................................................................................................................24
Test Report...........................................................................................................................................................24
EVENT LOG......................................................................................................................................... 24
DAY ALARM........................................................................................................................................ 25
KEYPAD BUZZER TONE CHANGE ...............................................................................................25
REMOTE SETTING VIA TELEPHONE..........................................................................................25
AREAS....................................................................................ERROR! BOOKMARK NOT DEFINED.
Master Area Keypad Indicators.........................................................................................................................26
Zone Indicators ..................................................................................................................................................26
Area ON/OFF Indicators....................................................................................................................................26
Area Display Indicators .....................................................................................................................................26
Status Indicators.................................................................................................................................................26
AUX Indicator................................................................................................................................................26
MAINS Indicator............................................................................................................................................26
FAULT Indicator............................................................................................................................................26
PARTIAL Indicator........................................................................................................................................26

Operation Of Keypads In Areas ........................................................................................................................27
Area Addressable Keypad Operations ...........................................................................................................27
Master Area Keypad Operations....................................................................................................................27
DOMESTIC DIALLING......................................................................................................................27
Acknowledging Domestic Calls ..........................................................................................................................27
Programming Domestic Telephone Numbers...................................................................................................28
Disable Domestic Dialling...................................................................................................................................28
BASIC PAGER REPORTING ............................................................................................................29
Basic Pager Display Information .......................................................................................................................29
Site ID Number ..............................................................................................................................................29
Zone Status.....................................................................................................................................................29
System Status .................................................................................................................................................29
GLOSSARY OF TERMS.....................................................................................................................31
WARRANTY STATEMENT...............................................................................................................33
SPECIFICATIONS...............................................................................................................................33
INSTALLATION NOTES ...................................................................................................................35
INDEX....................................................................................................................................................39

6
Introduction
Solution Ultima Operators Manual
Congratulations on selecting the Solution Ultima control panel to protect you and your
property. So that you can obtain the most from your unit, we suggest that you take the time
to read through this manual and familiarise yourself with the numerous outstanding
operating features of this system. You will notice that in all aspects of planning, engineering,
styling, operation, convenience and adaptability, we have sought to anticipate your every
possible requirement.
Programming simplicity and speed have been some of the major considerations and we
believe that our objectives in this area have been more than satisfied.
This manual will explain all aspects of operating the control panel. All system parameters
and options are detailed; however, suitability is left up to the individual. Every system can
be tailored to meet all requirements quickly and easily.
Notice To All Owners
It is recommended that you test the sirens, strobe and zones at weekly intervals. Refer to
Testing on page 23 for further information.
Operators Manual UK Detection Systems

Solution Ultima Operators Manual 7
Keypad Indicators
Figure 1: CP5 Eight Zone
LED Keypad
The Keypad is the communications interface between you and your alarm system. The Keypad allows you to
issue commands and offers both visual and audible indications that guide you through the general operation.
The Keypad incorporates numerous indicators. There are zone indicators that are used to show the condition of
each zone and four others for general status. The following pages outline a list of situations and the relevant
indicators that will be seen.
Figure 2: CP5 Eight Zone
LCD Keypad
Zone Indicators
1 2 3 ….
The zone indicators (1-8) are used to display the status of the zones. The following table
lists the various circumstances that the indicators will display (i.e. Zone Closed / Zone
Open).
Zone Indicator Definition
On
Off
Flashing Fast
(0.25 Sec On/0.25 Sec Off)
Flashing Slow
(1 Sec On/1 Sec Off)
Zone Is Open
Zone Is Closed
Zone Is In Alarm Condition
Zone Is Manually Omitted Or Selected To Be Omitted
Table 1: Zone Indicator
AWAY Indicator
The AWAY indicator is used to display that the system is Set in AWAY Mode. The AWAY
indicator will also flash in unison with the STAY indicator when programming various
options throughout the operator’s manual.
Detection Systems Operators Manual UK

8 Solution Ultima Operators Manual
Refer to page 10 for information on the different methods of setting the system in AWAY
Mode.
AWAY Indicator Definition
On
Off
System Is Set In AWAY Mode
System Is Not Set In AWAY Mode
Table 2: AWAY Indicator
Operators Manual UK Detection Systems

Solution Ultima Operators Manual 9
STAY Indicator
The STAY indicator is used to display that the system is Set in STAY Mode 1 or STAY
Mode 2. The STAY indicator will also flash in unison with the AWAY indicator when
programming various options throughout the operator’s manual.
Refer to page 11 for information on the different methods of setting in STAY Mode 1. For
information and the method of setting in STAY Mode 2, refer to page 12.
STAY Indicator Definition
On
Off
Flashing Twice A Second
Flashing Once Every
3 Seconds
System Is Set In STAY Mode 1 Or STAY Mode 2
System Is Not Set In STAY Mode 1 Or STAY Mode 2
Zone Omitting Mode Or Setting STAY Mode 2 Zones
Day Alarm Status – Day Alarm Turned On
Table 3: STAY Indicator
System Unset
This indicator will display with the indicator when the system has been Unset.
MAINS Indicator
The MAINS indicator is used to display that the systems AC mains supply is normal or has
failed.
MAINS Indicator Definition
On
AC Mains Power Normal
Flashing
AC Mains Supply Has Failed
Table 4: MAINS Indicator
Off Indicator / Zone Closed
The indicator will display when the system is in the Unset state and will flash when a
zone becomes Open during the Unset state. The indicator will stop flashing when all zones
are Closed.
On Indicator / Zone In Alarm
The indicator will display when the system is Set in AWAY Mode and will flash when
an alarm occurs. The indicator will reset once a valid user code has been entered.
Detection Systems Operators Manual UK
10 Solution Ultima Operators Manual
FAULT Indicator
The FAULT indicator is used to display that the system has detected a system fault. Refer to
Fault Analysis Mode on page 17 for additional information on system faults.
Every time a new system fault has been detected (eg. FAULT indicator flashing), the
Keypad will begin to beep once every minute. Pressing the # button once will cancel the
once a minute beep and acknowledge the fault (eg. FAULT indicator on steady).
FAULT Indicator Definition
On
Off
Flashing
There Is A System Fault That Needs To Be Rectified
The System Is Normal, There Are No Faults
There Is A System Fault That Needs To Be Acknowledged
Table 5: FAULT Indicator
Audible Indications
In general, the audible indicators given out by the Keypad buzzer are as follows:
Audible Indicator Definition
Once Short Beep
Two Short Beeps
Three Short Beeps
One Long Beep
One Beep Every Second
One Short Beep Every
Minute
A Button Has Been Pressed On The Keypad, Or, End Of Exit
Time When Set In STAY Mode 1 Or STAY Mode 2
The System Has Accepted Your Code
The Requested Function Has Been Executed
Indicates the End Of Exit Time When Set In AWAY Mode,
Or The Requested Operation Has Been Denied Or Aborted
Walk Test Mode Is Currently Active Or Warning Before
Automatic Setting Takes Place
There Is A System Fault Waiting To Be Acknowledged
Table 6: Audible Indicators
Operators Manual UK Detection Systems

Solution Ultima Operators Manual 11
Setting the System
There are several different ways to Set the system depending on whether you are leaving the
premises and require all active zones to be in a ready state for an intruder, or, if you are
remaining in the premises and only require part of the system to be in a ready state for an
intruder.
If a zone is not Closed at the end of exit time, the zone will be automatically omitted and will
be constantly displayed on the Keypad. The zone will again become an active part of the
system when the zone has restored (i.e. If a window is left open after exit time has expired,
the window will not be an active part of the system until the window has closed. Opening
the window after exit time has expired will cause an alarm condition).
The different methods for setting the system include:
Ø AWAY Mode (Full Set)
Set the entire system. Refer to Setting In AWAY Mode on page 10.
Ø STAY Mode 1 (Part Set 1)
Set all zones except those programmed to be automatically omitted by the Engineer.
Refer to Setting In STAY Mode 1 on page 11.
Method One
Ø STAY Mode 2 (Part Set 2)
Set all zones except those programmed to be automatically omitted by the Master
Code holder. Refer to Setting In STAY Mode 2 on page 12.
Forced Setting
The feature of setting the system when a zone is not Closed is known as forced setting. If
the system does not set and a long beep is heard, forced setting is not permitted. If this is the
case, you must ensure that all zones are Closed or manually omitted before you can Set the
system. Refer to Omitting Zones on page 16 for more information.
Setting In AWAY Mode
When you leave your premises and require all zones to be in a ready state to detect intrusion,
you would set the system in AWAY Mode.
There are two different methods for setting the system in AWAY Mode. Method one is
standard and will always operate. Method two is optional and may be disabled by your
Engineer if you do not wish to use single button setting.
How To Set The System In AWAY Mode
1. Enter your user code followed by the # button (eg. 2580#).
Two beeps will be heard and the AWAY indicator will display. Exit time will now
commence counting.
Method Two
How To Set The System In AWAY Mode
1. Hold down the # button until two beeps are heard.
The AWAY indicator will display and exit time will commence counting.
Detection Systems Operators Manual UK

12 Solution Ultima Operators Manual
Setting In STAY Mode 1
STAY Mode 1 is only used when the perimeter and unused areas of the premises need to be
Set to detect any would be intruder from entering the premises and at the same time,
allowing you to move freely within an area that has been automatically omitted. Only your
security company can program zones to be automatically omitted in STAY Mode 1.
There are two different methods for setting the system in STAY Mode 1. Method one is
standard and will always operate. Method two is optional and may be disabled by your
Engineer if you do not wish to use single button setting.
Entry Guard Timer For STAY Mode
When setting the system in STAY Mode 1, an optional entry timer called Entry Guard Timer
For STAY Mode may be used to delay the sirens if a zone that has not been automatically
omitted has triggered into alarm condition. Entry Guard Timer For STAY Mode is the delay
time used for all zones except 24-hour zones when the system is Set in STAY Mode 1 or
STAY Mode 2.
If the Entry Guard Timer For STAY Mode has been programmed and a zone that has not
been automatically omitted has triggered, the Keypad will beep twice a second until the
Entry Guard Timer For STAY Mode has expired or the system has been Unset. If the alarm
condition has not been reset by entering your user code followed by the # button (eg. 2580#)
before the Entry Guard Time For STAY Mode expires, the sirens will activate into alarm.
Only your Engineer can program this feature.
Method One
Method Two
How To Set The System In STAY Mode 1
1. Enter your user code followed by the * button (eg. 2580*).
Two beeps will be heard and the STAY indicator will display. Exit time will now
commence counting.
Any zones that have been programmed to be automatically omitted in STAY Mode 1
will flash until exit time expires. At the end of exit time, all zones selected to be
automatically omitted will extinguish and the Keypad will give one short beep.
How To Set The System In STAY Mode 1
1. Hold down the * button until two beeps are heard.
The STAY indicator will display and exit time will now commence counting.
Any zones that have been programmed to be automatically omitted in STAY Mode 1
will flash until exit time expires. At the end of exit time, the zone indicators will
extinguish and the Keypad will give one short beep.
Operators Manual UK Detection Systems

Solution Ultima Operators Manual 13
Setting In STAY Mode 2
STAY Mode 2 is only used when the perimeter and unused areas of the premises need to be
Set to detect any would be intruder from entering the premises and at the same time,
allowing you to move freely within an area that has been automatically omitted. Any Master
Code holder can program programming zones to be automatically omitted in STAY Mode 2.
Entry Guard Timer For STAY Mode
When setting the system in STAY Mode 2, an optional entry timer called Entry Guard Timer
For STAY Mode may be used to delay the sirens if a zone that has not been automatically
omitted has triggered into alarm condition. Entry Guard Timer For STAY Mode is the delay
time used for all zones except 24-hour zones when the system is Set in STAY Mode 1 or
STAY Mode 2.
If the Entry Guard Timer For STAY Mode has been programmed and a zone that has not
been automatically omitted has triggered, the Keypad will beep twice a second until the
Entry Guard Timer For STAY Mode has expired or the system has been Unset. If the alarm
condition has not been reset by entering your user code followed by the # button (eg. 2580#)
before the Entry Guard Time For STAY Mode expires, the sirens will activate into alarm.
Only your Engineer can program this option.
How To Set The System In STAY Mode 2
1. Hold down the 0 button until two beeps are heard.
The STAY indicator will display and exit time will now commence counting.
Any zones that have been programmed to be automatically omitted in STAY Mode 2
will flash until exit time expires. At the end of exit time, all zones selected to be
automatically omitted will extinguish and the Keypad will give one short beep.
Programming STAY Mode 2 Zones
Programming zones to be automatically omitted in STAY Mode 2 can only be carried out if
you have a Master Code.
How To Program STAY Mode 2 Zones
1. Enter your Master Code followed by 4 and the # button (eg. 2580 + 4#).
Three beeps will be heard and the STAY indicator will begin to flash.
2. Enter the zone number that you wish to have automatically omitted followed by the *
button (eg. 1* = Zone 1 / 2* = Zone 2 etc).
You will notice that the zone you have selected to be automatically omitted in STAY
Mode 2 will now flash. If you have made a mistake, enter the same zone number
followed by the # button to clear the incorrect zone.
To select additional zones to be automatically omitted in STAY Mode 2, repeat Step 2
as many times as required.
3. Press the # button when you have selected all zones to be automatically omitted in
STAY Mode 2 to exit this mode. Two beeps will be heard and the STAY and AWAY
indicators will extinguish.
Detection Systems Operators Manual UK

14 Solution Ultima Operators Manual
Unsetting the System
When you enter the premises after the system has been Set in AWAY Mode, or if you have
Set the system in STAY Mode 1 or STAY Mode 2, you will need to Unset the system to
disable detection devices that will activate an alarm.
If there has been an alarm condition prior to Unsetting the system, a flashing zone indicator
will be displayed, indicating a previous alarm on that zone.
How To Unset The System
1. Enter your user code followed by the # button (eg. 2580#).
Two beeps will be heard.
Adding User Codes
Only the Master Code holder can add or change other system user codes including the
Master Code itself. Up to eight user codes may be programmed to operate the system.
How To Add A User Code
1. Enter your Master Code followed by 1 and the # button (eg. 2580 + 1#).
Three beeps will be heard and the STAY and AWAY indicators will begin to flash.
2. Enter the user code number (1 – 8) that you wish to add or change followed by the #
button (eg. 2# = User 2 / 8# = User 8 etc). Two beeps will be heard and the user
number that you just selected will now display on the Keypad indicators.
3. Enter the digits required for the new code followed by the # button (eg. If you wish the
user code to be 5768, you would enter 5768#). Two beeps will be heard and the
STAY and AWAY indicators will extinguish.
If you wish to add or change any further user codes, repeat this procedure as many
times as required.
Adding Radio Remote User Codes
Only the Master Code holder can add or change other system user codes. Up to eight radio
remote user codes (User Codes 9 – 16) may be programmed to operate the system.
How To Add A Radio Remote User Code
1. Enter your Master Code followed by 1 and the # button (eg. 2580 + 1#).
Three beeps will be heard and the STAY and AWAY indicators will begin to flash.
2. Enter the radio remote user code number (9 – 16) that you wish to add followed by the
# button (eg. 9# = User 9 / 16# = User 16 etc). Two beeps will be heard and the user
number that you just selected will now display on the Keypad indicators.
3. Enter the 9 digit ID number found on the back of the radio remote hand held
transmitter followed by the # button. Two beeps will be heard and the STAY and
AWAY indicators will extinguish.
If you wish to add or change any further radio remote user codes, repeat this procedure
as many times as required.
Operators Manual UK Detection Systems
Solution Ultima Operators Manual 15
Deleting User Codes/Radio User Codes
Only the Master Code holder can delete other system user codes.
How To Delete A User Code
1. Enter your Master Code followed by 1 and the # button (eg. 2580 + 1#).
Three beeps will be heard and the STAY and AWAY indicators will begin to flash.
2. Enter the user code number (1 – 16) that you wish to delete followed by the # button
(eg. 2# = User 2 / 16# = User 16 etc). Two beeps will be heard and the user number
that you just selected will now display on the Keypad indicators.
3. Press the * button to delete the user code that you have selected.
Two beeps will be heard and the STAY and AWAY indicators will extinguish. If you
wish to delete any further user codes, repeat this procedure as many times as required.
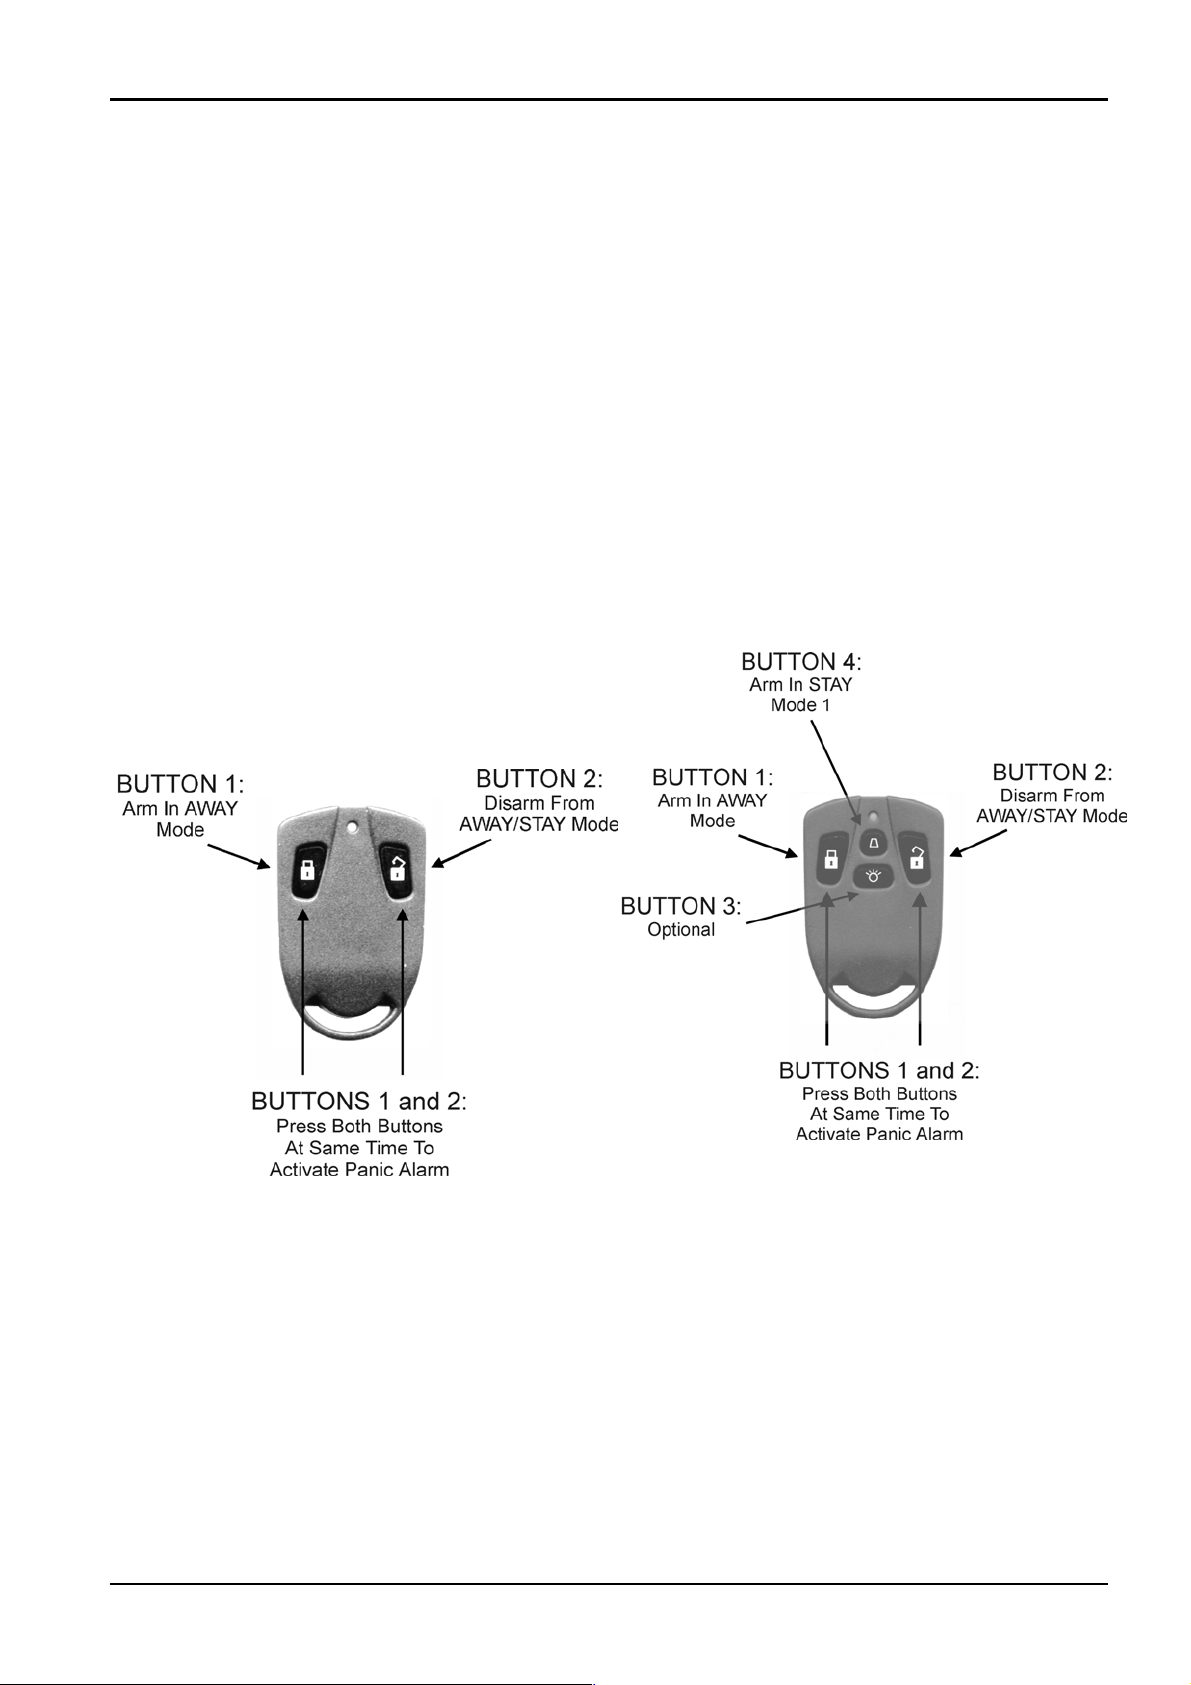
Radio Transmitter Operations
Detection Systems Operators Manual UK

16 Solution Ultima Operators Manual
Keypad Duress Alarm
A Keypad duress alarm is used as a silent hold-up alarm. This will only occur when the
number 9 is added to the end of any valid user code that us being used to Unset the system
(eg. 2580 + 9#). A duress alarm is only useful if your system is reporting back to a
monitoring station or pocket pager as domestic reporting (i.e. mobile phone etc) can’t
decipher which type of alarm had occurred.
Keypad Panic Alarm
An audible alarm will be activated when both the 1 and 3 buttons or both the *
and # buttons are pressed simultaneously. Contact your Engineer if you wish to
disable the ability to activate the Keypad panic alarm or if you wish to have the
Keypad panic alarm to be silent.
Keypad Fire Alarm
A distinct fire sound is emitted via the horn speaker when both the 4 and 6
buttons on the Keypad are pressed simultaneously. Contact your Engineer if you
wish to disable the ability to activate the Keypad fire alarm or if you wish to
have the Keypad fire alarm to be silent.
Figure 3: CP5 LED Keypad
Showing Audible Alarm
Buttons
Keypad Tamper (Access Denied)
Keypad tamper restricts the number of times an invalid user code can be used in an attempt
to operate the system. When the number of incorrect code attempts equals the number
programmed by your Engineer, the system will activate an alarm condition and if reporting
back to a security monitoring station, the system will send an access denied report.
If you wish the Keypads to shutdown and lockout for a period of time (0 – 150 seconds), ask
your Engineer to program this.
Keypad Medical Alarm
An audible alarm will be activated when both the 7 and 9 buttons on the Keypad
are pressed simultaneously. Contact your Engineer if you wish to disable the
ability to activate the Keypad medical alarm or if you wish to have Keypad
medical alarm to be silent.
Operators Manual UK Detection Systems

Solution Ultima Operators Manual 17
Omitting Zones
Omitting zones allow you to manually disable one or more zones before setting the system.
Once a zone has been omitted, access is allowed into that zone during the Set state without
activating an alarm.
An example when you may require to omit a zone before setting the system could be when a
PIR detector may be false alarming or that you may need to leave a pet inside a particular
zone whilst you are away.
Omitting zones is performed by one of two methods. Method two is optional and only
allows those user codes programmed by your Engineer to have access to omit zones.
Standard Omitting
Standard Omitting allows all operators to be able to omit zones without the need to know a
valid user code.
How To Omit A Zone
1. Press the * button twice to enter the omitting mode.
Three beeps will be heard and the STAY indicator will flash.
2. Enter the zone number (1 – 8) that you wish to select to omit followed by the * button.
(eg. 1* = Zone 1, 2* = Zone 2 etc).
As you select each zone to be omitted, you will notice that the corresponding zone
indicator will begin to flash. If you selected an incorrect zone to be omitted, enter the
incorrect zone number again followed by the * button.
Repeat Step 2 if more than one zone is required to be omitted until all zone that are
required to be omitted have been selected.
3. Press the # button after you have selected all zones to be omitted.
Two beeps will be heard and the system will return to the Unset state.
Detection Systems Operators Manual UK

18 Solution Ultima Operators Manual
Code To Omit
The method of code to omit restricts only those user codes that have the priority level “Code
To Omit” set to be able to omit zones. Therefore, if any user code has this priority level set,
the method of standard omitting will not function.
How To Omit A Zone
1. Press the * button followed by your user code and the * button again to enter the
omitting mode (eg. *2580*). Three beeps will be heard and the STAY indicator will
flash.
2. Enter the zone number (1 – 8) that you wish to select to omit followed by the * button.
(eg. 1* = Zone 1, 2* = Zone 2 etc).
As you select each zone to be omitted, you will notice that the corresponding zone
indicator will begin to flash. If you selected an incorrect zone to be omitted, enter the
incorrect zone number again followed by the * button.
Repeat Step 2 if more than one zone is required to be omitted until all zones that are
required to be omitted have been selected.
3. Press the # button after you have selected all zones to be omitted.
Two beeps will be heard and the system will return to the Unset state.
Fault Analysis Mode
If a system fault should occur, the FAULT or MAINS indicator will flash and the Keypad
will beep once ever minute.
If the AC mains supply has failed, the MAINS indicator will flash until the AC mains supply
has restored. Pressing the # button once will acknowledge the fault and stop the Keypad
from beeping once every minute.
How To Determine The Type Of System Fault
To determine which system fault has occurred, enter fault analysis mode by following the
steps outlined below.
1. Hold down button 5 until two beeps are heard.
The FAULT indicator will remain steady and the STAY and AWAY indicators will
flash in unison with each other.
A zone indicator will display to indicate the type of fault that has occurred (eg. Zone 1
= System Fault). Refer to Table 7: Fault Indicators on page 18 for the list of different
faults that may occur.
2. To further determine the type of fault condition (eg. System Fault), you will need to
press and hold down the button that corresponds to the zone indicator displayed (i.e. If
Zone 1 was displayed in Step 1, press and hold button 1 to display which system fault
has occurred).
3. To exit and return to the Unset state, press the # button. The FAULT indicator will
remain displayed and the Keypad will cease its once a minute beep.
Operators Manual UK Detection Systems

Solution Ultima Operators Manual 19
Zone
Indicator
1 System Fault
2 RF Low Battery
3 Zone Tamper Alarm
4 Sensor Watch Fault
Fault
Description
Hold Down
Button
1
2
3
4
Zone
Indicator
1
2
3
4
5
6
7
8
1 - 8
1 - 8
1 - 8
Fault
Condition
Battery Fail
Date & Time
RF Receiver Fail
Horn Speaker Fail
Telephone Line Fail
E2 Fault
Fuse Fail
AC Fail
Zones 1 - 8 RF Low Battery
Zones 1 - 8 Tamper Alarm
Zones 1 – 8 Sensor Watch
Fail
5 RF Sensor Watch
6 Communication Fail
Fault Descriptions
1
System Fault
A system fault will only display when any of the following faults occur. After entering fault
analysis mode, press and hold button 1 will determine which of the following faults have
occurred.
Low Battery
A low battery fault will register when the system detects a low capacity back-up battery.
The system automatically performs a battery test every 4 hours and also every time you Set
the system.
5
6
Table 7: Fault Indicators
1 – 8
1
2
Zones 1 - 8 RF Sensor Watch
Fail
Receiver 1 Fail
Receiver 2 Fail
Date and Time
The date and time fault will register every time the system has been powered down. This
type of fault will not cause the FAULT indicator to display on the Keypad unless your
Engineer has programmed the automatic setting time. Refer to page 20 to program the date
and time.
Detection Systems Operators Manual UK

20 Solution Ultima Operators Manual
RF Receiver Fail
The RF receiver fault will register once the system has detected that the wireless receiver
unit has been disconnected.
Horn Speaker
This fault will register when the system detects that the horn speaker has been disconnected.
This fault will clear once the horn speaker has been reconnected. Your Engineer will need to
program the system for this feature to operate.
Telephone Line Fail
A telephone line fault will register when the system detects that the telephone line has been
disconnected from the control panel. Your Engineer will need to program the system for this
feature to operate.
E2 Fault
An E2 fault will register when the system detects an internal checksum error. Contact your
Engineer as soon as this fault is displayed.
Fuse Fail
This fault will occur when either of the two 1 Amp fuses has blown. Contact your Engineer
as soon as this fault is displayed.
2
3
4
5
RF Low Battery
This fault will occur when any of the RF wireless devices has reported a low battery
condition to the control panel. Whilst you are in fault analysis mode, press and hold button 2
until two beeps are heard will display which zone has reported the RF Low Battery fault.
Tamper Fail
This fault will occur when any zone has become open circuit. By press and hold button 3
until two beeps are heard in fault analysis mode will display which zone has reported the
tamper fail fault.
Sensor Watch Fault
A sensor watch fault will register because one or more detection devices has failed to detect
any movement during the Unset state for the time period programmed by your Engineer.
The fault will clear once the zone in question has detected movement and reset.
Whilst you are in fault analysis mode, press and hold button 4 until two beeps are heard will
display which zone reported the sensor watch fault.
RF Sensor Watch Fault
An RF sensor watch fault will register because one or more RF detection devices has failed
to communicate to the RF radio receiver for the time period programmed by your Engineer.
The fault will clear once the RF device in question has successfully transmitted to the RF
radio receiver.
Whilst you are in fault analysis mode, press and hold button 5 until two beeps are heard will
display which RF detection device reported the RF sensor watch fault.
Operators Manual UK Detection Systems

Solution Ultima Operators Manual 21
6
Communication Fail
A communication fail will register when the control panel failed to communicate with the
receiving party (eg. monitoring company, mobile phone or pocket pager etc). The
communication fault will clear once the control panel has successfully reported to the
receiving party.
To determine which receiver has failed communication, press and hold button 6.
Date and Time
Programming the date and time is only required when you need functions such as automatic
test reports automatic setting and history events to operate correctly.
How To Program The Date and Time
1. Enter your Master Code followed by 6 and the # button (eg. 2580 + 6#).
2. Enter the day, month, year, hour and minute using the (DD, MM, YY, HH, MM)
Three beeps will be heard and the STAY and AWAY indicators will begin to flash.
format (i.e. DD = Day of the month, MM = Month of the year, YY = Current year,
HH = Hour of the day, MM = Minute of the day).
Please note that when programming the hour of the day, you will need to use
24:00 hour format.
3. Press the # button to exit and return to the Unset state.
Two beeps will be heard and the STAY and AWAY indicators will extinguish. If a
long beeps is heard, an error was made when entering the date and time.
Turning Outputs On/Off
This feature is only applicable if your Engineer has set up an output that can be turned on or
off via the Keypad. The output programmed by your Engineer could control a pool pump or
outside lighting etc. Up to three separate outputs may be programmed.
How To Turn An Output On or Off
1. Enter your Master Code followed by 5 and the # button (eg. 2580 + 5#).
Three beeps will be heard and the STAY and AWAY indicators will begin to flash.
2. Enter the output number (1 – 3) that you wish to turn on or off.
3. Press the # button to turn the output on or press the * button to turn the output off.
Three beeps will be heard if the output is turned on and two beeps will be heard if the
output is turned off.
Repeat Step 2 and Step 3 if more than one output is required to be turned on or off.
4. Press the # button to exit this function.
Two beeps will be heard and the STAY and AWAY indicators will extinguish.
Detection Systems Operators Manual UK

22 Solution Ultima Operators Manual
Reset Latching Outputs
This feature is only applicable if your Engineer has programmed an output to latch (remain
on) until you acknowledge the event that occurred.
How To Reset Latching Outputs
1. Hold down button 7 until two beeps are heard.
The output will now reset.
Call Divert On/Off (System Set/Unset)
This feature allows you to program the Call Divert Set Sequence and Call Divert Unset
Sequence.
Call Divert Set Sequence
This allows you to program the Call Divert sequence that will automatically operate when
you Set the system in the AWAY Mode. This feature is only available if your
telecommunications provider has the call-Divert option available.
Call Divert
You can redirect calls to anywhere in UK, including mobiles, pagers and answering services.
When Call Divert is turned on, your telephone will not ring.
Note: The examples below are using the BT call divert codes. These codes may differ if
different telephone network is being used.
How To Program The Call Divert Set Sequence
1. Enter your Master Code followed by 3 and the # button (eg. 2580 + 3#).
Three beeps will be heard and the STAY and AWAY indicators will flash.
2. Press button 1 followed by the # to select the Call Divert Set sequence. Three beeps
will be heard.
3. Enter the call divert sequence that you require (*21*Phone Number # PPPPP).
Remember that when you program a * in the Call Divert Set sequence, you enter
*1 when you program a # in the Call Divert Set sequence, you enter *2 and when
you program P (pause) in the Call Divert Set sequence, you enter *3.
4. Press the # button when finished.
Two beeps will be heard and the STAY and AWAY indicators will extinguish.
Note: To disable the Call Divert Set Sequence, enter the Call Divert sequence as
*4 (break) for Step 3.
Operators Manual UK Detection Systems

Solution Ultima Operators Manual 23
Call Divert Unset Sequence
This allows you to automatically disable the Call Divert sequence upon Unsetting the
system.
How To Program The Call Divert Unset Sequence
1. Enter your Master Code followed by 3 and the # button (eg. 2580 + 3#).
Three beeps will be heard and the STAY and AWAY indicators will flash.
2. Press button 2 followed by the # button to select the Call Divert Unset sequence.
Three beeps will be heard.
3. Enter the Call divert disable sequence that you require (#21# PPP).
Remember that when you program a # in the Call Divert Unset sequence, you
enter *2 and when you program P (pause) in the Call Divert Unset sequence, you
enter *3.
4. Press the # button when finished. Two beeps will be heard and the STAY and AWAY
indicators will extinguish.
Note: To disable the Call Divert Unset Sequence, enter the Call Divert sequence
as *4 (break) for Step 3.
Digit Required Number To Program Digit Required Number To Program
0
1
2
3
4
5
6
7
Table 8: Call Divert Set/Unset Dialling Digits
0
1
2
3
4
5
6
7
4 Second Pause
8
9
*
#
Break
8
9
*1
*2
*3
*4
Detection Systems Operators Manual UK

24 Solution Ultima Operators Manual
Te s t i n g
There are various functions that allow you to test that your system is operating correctly.
Horn Speaker Test
1. Hold down button 1 until two beeps are heard.
The horn speaker will sound for two seconds.
Bell Test
1. Hold down button 2 until two beeps are heard.
The bell output will operate for two seconds.
Strobe Test
1. Hold down button 3 until three beeps are heard.
The strobe will now flash.
2. Hold down button 3 until two beeps are heard.
The strobe will now stop flashing.
Walk Test Mode
Walk test mode allows you to test detection devices to ensure that they are operating
correctly. Every time you test a zone, the Keypad will sound one long beep and the horn
speaker will sound one short beep to indicate that the zone has been activated when testing.
Event Log
1. Enter your Master Code followed by 7 and the # button (eg. 2580 +7#).
Three beeps will be heard and the STAY and AWAY indicators will begin to flash.
The Keypad will beep once every second while the system is in walk test mode.
2. Activate all zones that are required to be tested.
3. When you have finished testing all zones required, press the # button to exit this
mode. Two beeps will be heard and the STAY and AWAY indicators will extinguish.
The system has now returned to the Unset state.
Test Report
This feature is only applicable if your system is reporting via the telephone. Press and hold
button 9 until two beeps are heard. The system will send a test report.
This function allows you to replay back the last forty events that occurred to the system. The
event Log will replay all alarms and setting/Unsetting of the system in AWAY Mode, STAY
Mode 1 and STAY Mode 2. However, the system cannot differentiate between setting the
system in STAY Mode 1 or STAY Mode 2.
How To Enter Event Log
1. Enter your Master Code followed by 8 and the # button (eg. 2580 + 8#).
Three beeps will be heard. The last forty events will display one at a time via the
Keypad indicators starting from the most recent event. A beep will be heard as each
event is displayed.
Operators Manual UK Detection Systems

Solution Ultima Operators Manual 25
Day Alarm
Day alarm allows a combination of zones to be monitored during the Unset state by beeping
the Keypad buzzer. Only your Engineer can program zones 1 – 4 to operate for day alarm.
Example
An example set-up of a day alarm could be the front door of a shop that has a pressure mat or
electronic beam that customers activate as they enter to and from the shop. As the customers
walk onto the pressure mat or break the electronic beam, the Keypad buzzer will beep.
How To Turn Day Alarm On
1. Hold down button 4 until three beeps are heard.
Day alarm will now be turned on. All zones programmed for day alarm operation will
cause the Keypad buzzer to beep during the Unset state when activated.
How To Turn Day Alarm Off
1. Hold down button 4 until two beeps are heard.
Day alarm will now be turned off.
Keypad Buzzer Tone Change
Holding down button 8 continuously will change the tone of the Keypad buzzer. There are
fifty different tones to choose from between 1500 Hz – 5000 Hz. If multiple Keypads have
been installed, each Keypad can have a different tone.
Remote Setting Via Telephone
This feature allows you to Set your system from any remote location via the telephone. For
obvious security reasons, the system cannot be Unset using this method. To make use of this
feature, you will require a touch-tone telephone. Your Engineer needs to program this
feature to operate.
How To Remotely Set Your System Via The Telephone
1. Call the telephone number that your control panel is connected to.
2. When the control panel answers the incoming call, a short jingle will be heard. Press
the * button on the touch-tone telephone for 1 - 3 seconds to Set the system.
If you hear modem tones when the control panel answers the incoming call, this
means that the system has been programmed for remote programming functions by
your Engineer. Simply wait for a pause between the tones before pressing the *
button.
After releasing the * button on the touch-tone telephone, two beeps will be heard to
indicate that the system has been Set in AWAY Mode.
3. Hang up the telephone and the system will remain Set.
Note: If your Engineer has programmed answering machine bypass, you will need to call
the control panel twice to make a connection with the system (eg. Call the telephone
number that your control panel is connected to and let the call ring no more than 4
rings and then hang up the telephone. Wait a minimum of 8 seconds before you call
the control panel back again).
Detection Systems Operators Manual UK
26 Solution Ultima Operators Manual
Areas
This feature is only applicable to the Solution Ultima control panel. Your control panel can
be partitioned or split into two individual areas. Both areas can be operated from one
“Master Area” Keypad, or from two separate “Area Addressable” Keypads.
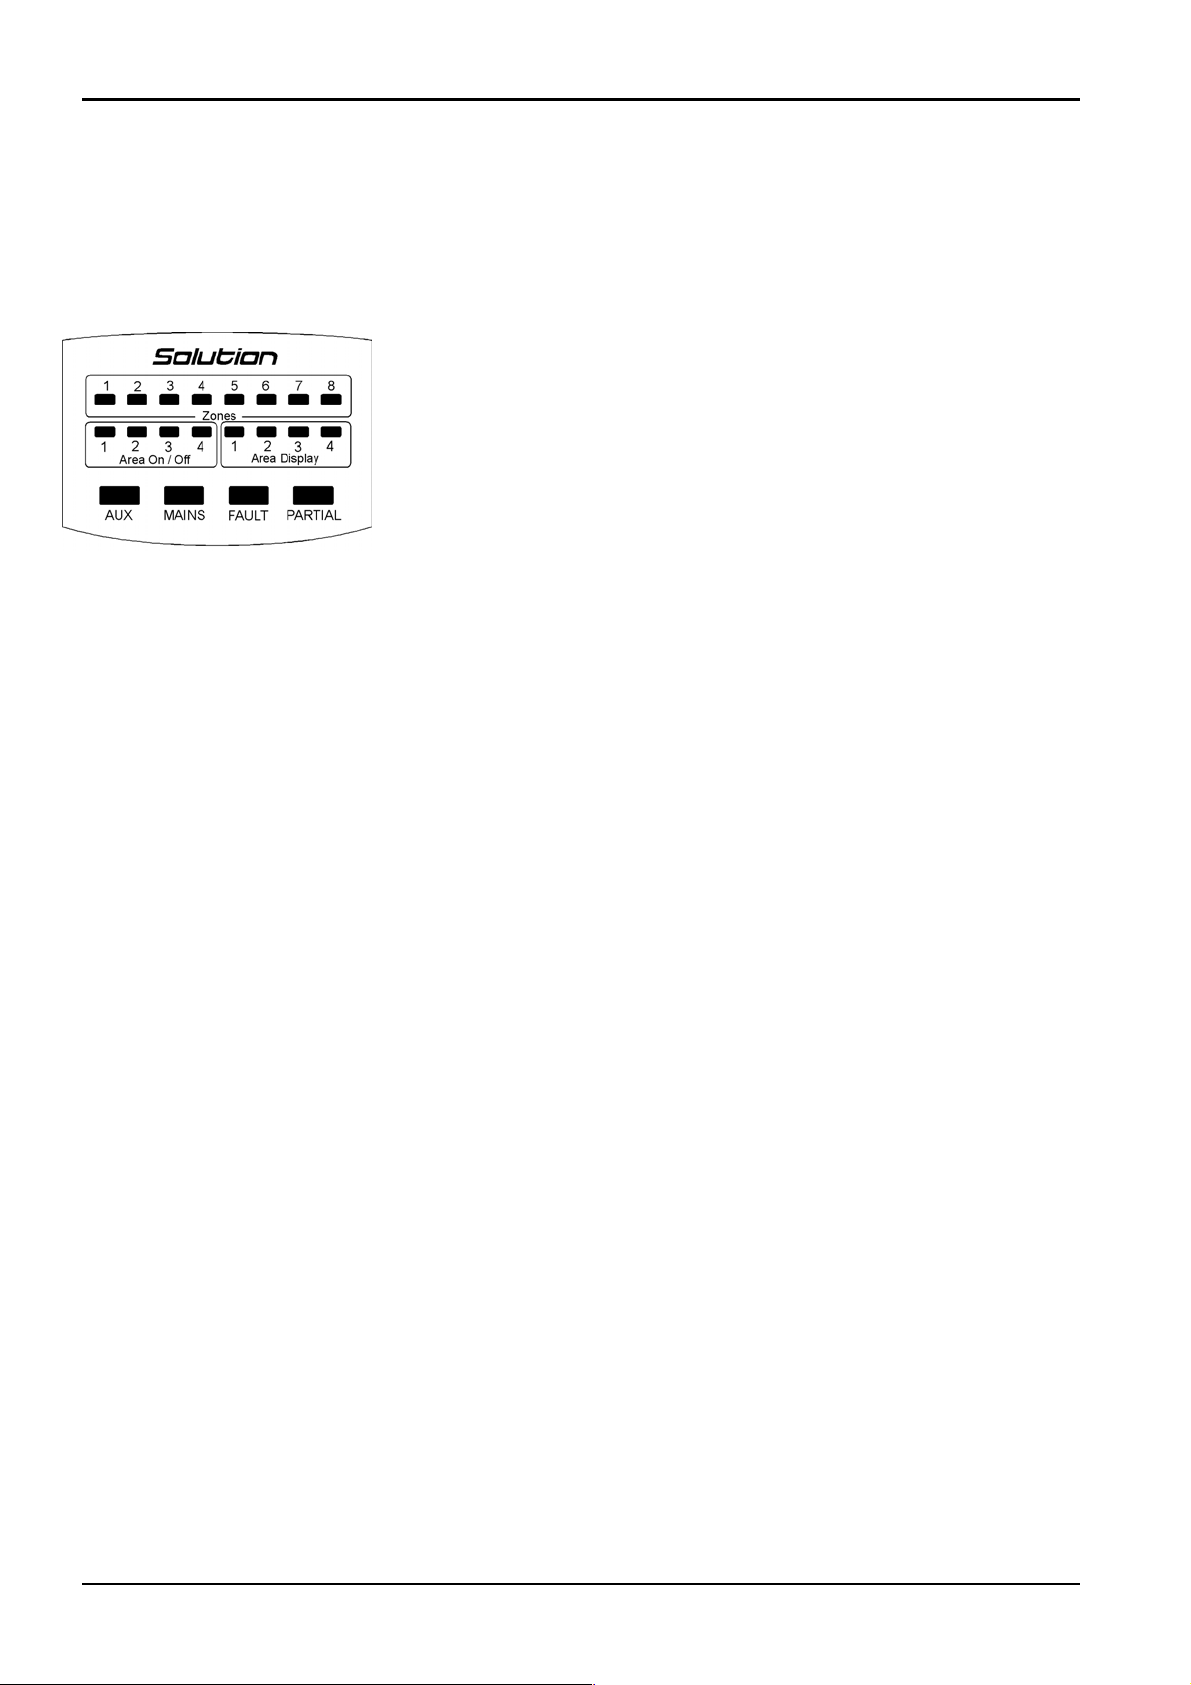
Master Area Keypad Indicators
The indicators on a “Master Area” Keypad are configured into four groups
(i.e. Zone Indicators, Area On/Off Display, Area Display and Status
Indicators). Refer to “Figure 5: Master Area Keypad”. The following is a
description of what the indicators mean.
Zone Indicators
Zone indicators 1 – 8 show the status of each zone. These zones belong to
the area that has the “AREA DISPLAY” indicator displayed (i.e. If an
Figure 4: Master Area Keypad
Area ON/OFF Indicators
The group of four “AREA ON/OFF” indicators display the status of each area (i.e. If an
indicator is displayed, that area is Set and if the indicator is not displayed, that area is Unset).
Note that only Area 1 and Area 2 can be used with the Solution Ultima control panel.
indicator is displayed, that zone is Open and if the indicator is not displayed,
that zone is Closed).
Area Display Indicators
The group of four “AREA DISPLAY” indicators show which area that the zones displayed
belong to.
Status Indicators
A group of four indicators display the following:
AUX Indicator
The AUX indicator displays when the control panel is using the telephone line
communicating to the receiving party.
MAINS Indicator
The MAINS indicator displays the status of the AC mains power (i.e. If the indicator is
illuminated, the AC mains power supply is normal. If the indicator is flashing, the AC mains
power supply has been disconnected or has failed).
FAULT Indicator
The FAULT indicator displays the status of the fault register (i.e. If the FAULT indicator is
flashing, the system has detected a fault that has not yet been acknowledged. If the FAULT
indicator is illuminated, the fault has been acknowledged. If the FAULT indicator is not
illuminated, the system has no faults).
PARTIAL Indicator
The PARTIAL indicator only displays when an area has been Set in STAY Mode 1 (i.e. If
the PARTIAL indicator is displayed, an area has been Set in STAY Mode 1. If the
PARTIAL indicator is not displayed, no areas have been Set in STAY Mode 1).
Operators Manual UK Detection Systems

Solution Ultima Operators Manual 27
Operation Of Keypads In Areas
Area Addressable Keypad Operations
If you have a system that has Areas with “Area Addressable” eight zone Keypads, the
operating procedure is exactly the same as described as a system with no areas except that all
operations are only relative to the area that the Keypad has been assigned to.
Master Area Keypad Operations
If you have a system that has Areas with a “Master Area” Keypad installed, the operating
procedure is exactly the same as described as a system with no Areas, except that all
operations are only relative to the area that is displayed by the “AREA DISPLAY” indicator.
Example
If the “AREA DISPLAY” displays number 2, all operations performed will only operate
Area 2. To operate Area 1, you will need to toggle the “AREA DISPLAY” indicator to
number 1 by pressing the # button. Pressing the # button again will toggle you back to Area
2 display.
Domestic Dialling
Domestic dialling can be used to call your mobile phone or a relative/friend in the event that
your control panel has activated an alarm. Up to three different telephone numbers may be
programmed for the control panel to call when alarm occurs. Only your Engineer can set the
system to report in the domestic format, however, the Master Code holder may change the
domestic telephone numbers at any time.
Acknowledging Domestic Calls
When an alarm condition occurs, the system will call the first telephone number that has
been programmed. When you answer an incoming call, you will hear the system emitting a
siren tone followed by a pause and repeat continually for two minutes (eg. siren tone – pause
– siren tone – pause).
If you do not acknowledge the call from the control panel during a pause between siren
tones, the control panel will simply hang up after two minutes has expired and call the next
telephone number.
Pressing the * button for 1 – 3 seconds during the pause will acknowledge the call and no
further calls will be made for that event. If the call has been successfully acknowledged, a
tone of decreasing pitch will be heard.
Digit Required Number To Program Digit Required Number To Program
0
1
2
3
4
5
6
7
0
1
2
3
4
5
6
7
4 Second Pause
8
9
*
#
Break
8
9
*1
*2
*3
*4
Table 9: Domestic Dialling Telephone Digits
Detection Systems Operators Manual UK

28 Solution Ultima Operators Manual
Programming Domestic Telephone Numbers
If your system has been set-up for domestic dialling, this function allows any Master Code
holder to program telephone numbers that the control panel will call in the event of an alarm.
How To Program Telephone Numbers
1. Enter your Master Code followed by 2 and the # button (eg. 2580 + 2#).
Three beeps will be heard and the STAY and AWAY indicators will begin to flash.
If there are telephone numbers already programmed, they will be displayed one digit
at a time via the Keypad indicators.
If there are no telephone numbers programmed, a further two beeps will be heard after
entering this mode. These two beeps are normally heard after the last digit of the last
telephone number has been displayed.
2. Enter all digits for the first telephone number (eg. 611931).
You will notice that as each digit is entered, the corresponding Keypad indicators will
display.
3. If there is more than one telephone number to be programmed, press *4. This will
insert a break between the first telephone number and the second telephone number.
If there is only one telephone number to be programmed, press the # button to exit this
function.
4. Enter all the digits of the second telephone number (eg. 611931).
You will notice that as each digit is entered, the corresponding Keypad indicators will
display.
5. After the last digit of the second telephone number has been programmed, press the #
button to exit this function unless a third telephone number is required. If there is a
third telephone number to be programmed, press the *4 button to insert a break
between the second telephone number and the third telephone number.
Disable Domestic Dialling
If at any time you wish to cancel domestic dialling (eg. You are moving house and do not
wish the system to continue calling your mobile phone etc), you may enter the following
sequence.
1. Enter you Master Code followed by 2 and the # button (eg. 2580 + 2#).
Two beeps will be heard and the STAY and AWAY indicators will begin to flash.
2. Press the * button followed by 4 and the # button (eg. *4#).
The STAY and AWAY indicators will now extinguish.
Operators Manual UK Detection Systems

Solution Ultima Operators Manual 29
Basic Pager Reporting
This feature is only applicable if your system is reporting to a pocket pager. Basic pager
reporting requires some interpretation of the numbers that appear of the display. However, it
is possible to differentiate between 1000 different systems when a number of control panels
are reporting to the one pocket pager.
[NOTE: THIS FEATURE IS NOT FULLY FUNCTIONAL IN THE UK AT
PRESENT]
Basic Pager Display Information
Site ID Number
This is the identification number of the control panel and can only be programmed by your
Engineer.
Zone Status
The zone status display shows you the status of each zone (1 – 8). The following table
describes what each number means when displayed on the zone status display.
Number
Displayed
0
1
2
3
Zone Normal
This indicates that the corresponding zone is in the Closed state.
Alarm
This indicates that the corresponding zone is Open and in alarm
condition.
Zone Bypassed
This indicates that a system operator has manually omitted the
corresponding zone. Refer to Omitting Zones on page 16 for information
on how to manually omit a zone(s) prior to setting the system.
Zone Trouble
This indicates that a zone was left Open after the end of exit time.
Table 10: Zone Status Display Descriptions
Zone
Description
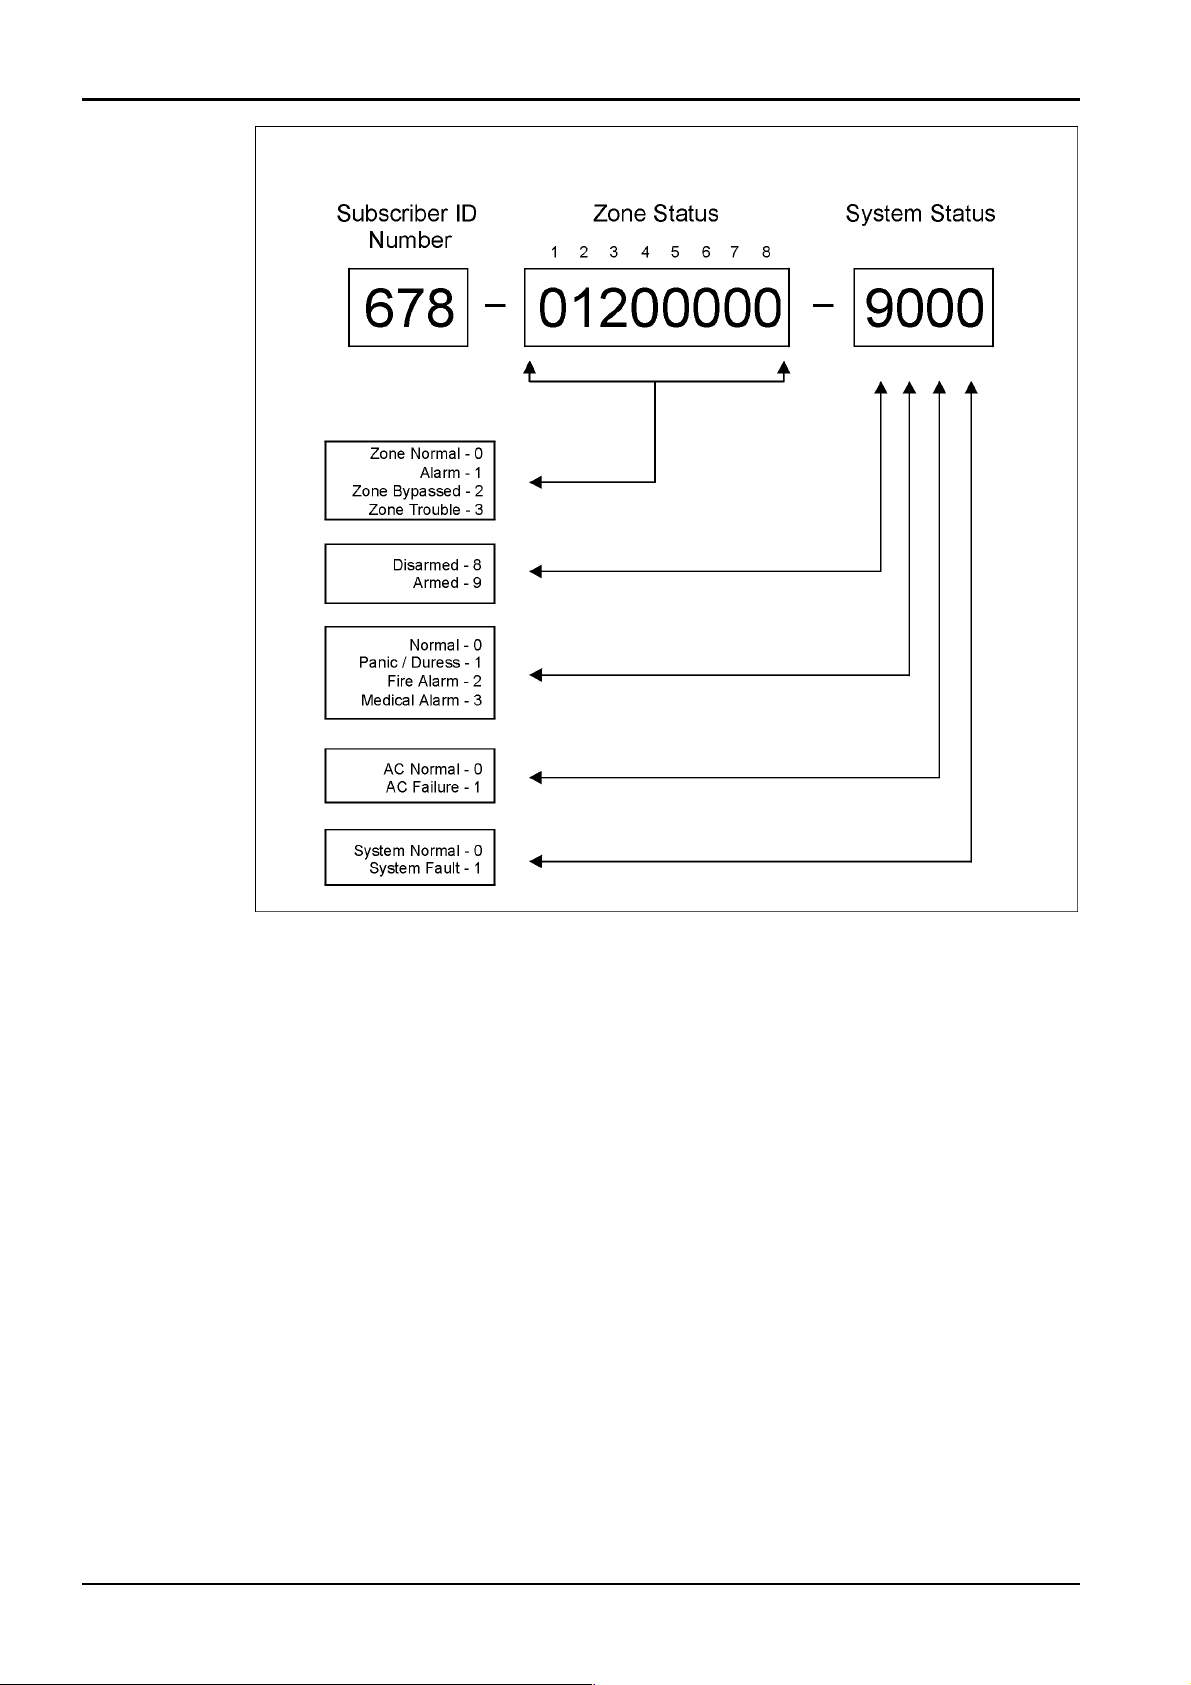
System Status
The system status information is divided up into 4 digits. The first digit of the system status
display indicates whether the system is Set or Unset (8=Unset / 9 = Set).
The second digit on the system status display indicates which Keypad alarm was triggered
by the operator (0 = No Keypad Alarm / 1 = Keypad Panic or Duress Alarm / 2 = Keypad
Fire Alarm / 3 = Keypad Medical Alarm).
The third digit on the system status display indicates when the AC mains supply has failed (0
= AC Supply is normal / 1 = AC Supply has failed).
The fourth digit on the system status display indicates when a system fault has occurred at
the control panel (0 = System Normal – There is no faults / 1 = System Fault – There is a
fault registered by the control panel).
Detection Systems Operators Manual UK
30 Solution Ultima Operators Manual
Figure 6: Basic Pager Display
The example above shows that the transmission has come from the control panel that has an
ID number of 678 and that zone 2 is in alarm. The example also displays that zone 3 has
been manually omitted and the system is Set.
Operators Manual UK Detection Systems

Solution Ultima Operators Manual 31
Glossary Of Terms
Term Description
Alarm Condition
Answering Machine
Bypass
Area Keypad
Set
Automatic Setting
Automatic Unsetting
AWAY Mode
Keypad
Is when your alarm system is Set and one of the detection devices have been
violated. A 24-hour zone (eg. smoke detector) can activate an alarm condition
when your system is Set or Unset.
Answering machine bypass has been incorporated so that it is possible to make a
connection with the system for remote setting operations when there is an
answering machine or facsimile machine on the same telephone line.
Used only when the system has two separate areas. All operations at the area
Keypad will not affect the other area.
When the system is in a ready state to accept alarms.
This feature allows the system to automatically Set at the same time every day in
AWAY Mode or STAY Mode 1.
This feature allows the system to automatically Unset at the same time every day.
This is the mode used to Set your system when you leave your premises.
The Keypad allows you to perform all functions such as setting/Unsetting and
carrying out functions such as adding and deleting system user codes.
Day Alarm
Detectors
Unset
Dynamic Battery Testing
Entry Time /
Entry Delay
External Equipment
Forced Setting
Handover Delay
This feature allows a combination of zones to be monitored while the system is
Unset.
Are devices connected to your alarm system used to detect intrusion and cause an
alarm condition. Some forms of detection devices include, PIR (Passive Infrared),
Smoke detectors, photoelectric beams, reed switches and vibration sensors.
Is when your system is in a state that will not accept burglary alarms. Only zones
programmed for 24-hour operation can sound an alarm when the system is Unset
(eg. Smoke Detectors etc).
Is a feature that is used to monitor and test the condition of your back-up battery.
Is the time allowed after entering your premises via a zone programmed for delay
(eg. Front Door) so that you can Unset the system.
Is any device connected to your system such as detectors, Keypads and sirens etc.
Is a situation where your alarm system is permitted to be Set when one or more
zones are Open or faulted.
When your system is Set and a zone programmed for delay has been violated, the
Fx zone will handover the remaining delay time to a zone programmed as
handover. The handover zone will not activate an alarm until the remaining delay
time has expired. A handover zone will act as an instant zone if violated before the
Fx zone is violated.
Hand Held Remote
Control
Detection Systems Operators Manual UK
Can be used to remotely operate your system via hand held transmitters (Also
known as RF keyfobs).

32 Solution Ultima Operators Manual
Term Description
Omitting
Master Code
Master Area Keypad
Monitoring Station
Panic Alarm
Closed
Sensor Watch
Allows you to manually disable (omit) one or more zones before setting the
system.
Is a numerical code used for setting and Unsetting the system as well as allowing
access to functions such as adding and deleting user codes etc.
This Keypad can only be used if your system Areas (CC488 Only). The Keypad
allows you to view and operate both areas from the same Keypad.
Is a secure location where a digital receiver monitors numerous alarm systems and
deciphers their alarm transmission reports. The operator can then advise the
appropriate authorities to take immediate action.
This type of alarm indicates to the monitoring station that there is an emergency
situation at your premises.
Refers to zone status. If a zone is Closed, the detection device is not violated and
the zone indicator will not be displayed on the Keypad.
Sensor watch gives the control panel the ability to recognise that detection devices
may have stopped working or that the view to a PIR detector has been blocked,
thus unable to detect any movement over the duration of the time programmed by
your Engineer.
Silent Alarm
STAY Mode 1
STAY Mode 2
Call Divert Set Sequence
Call Divert Unset
Sequence
Open
Your Engineer may program zones for silent operation. This means that when the
zone programmed for silent operation has been violated during the Set period, your
alarm system will communicate with the monitoring station without sounding the
sirens.
Is a condition that automatically omits zones when your system is Set in STAY
Mode 1. Only your Engineer can program zones to be omitted automatically in
STAY Mode 1.
Is a condition that automatically omits zone when your system is Set in STAY
Mode 2. Only the Master Code holder can program zones to be omitted
automatically in STAY Mode 2.
Call Divert setting is a feature that automatically calls the telephone exchange and
diverts your telephone number to another telephone when the system is Set in
AWAY Mode.
Call Divert Unsetting automatically calls the telephone exchange and un-diverts
your telephone number.
Refers to zone status. A zone is Open when a zone has been violated. The
corresponding zone indicator will display on the Keypad.
User Code
A user code is the personal identification number that the operator uses to Set and
Unset the system.
Zones
24-Hour Zones
A monitored input used to trigger an alarm condition when violated.
A monitored input programmed to trigger an alarm condition when violated when
the system is Set or Unset 24-hours a day.
Operators Manual UK Detection Systems

Solution Ultima Operators Manual 33
Warranty Statement
Detection Systems warrants this product to be free from defects in material and
workmanship for a period of three years from the date of manufacture as indicated by the
date stamp and / or serial number on the product.
Defective units returned by the purchaser at their own expense during this period will be
repaired or replaced at the option of the manufacturer. The repair or replacement will be free
of charge provided that the defects were not incurred during shipping or handling, or the
damage was not due to causes beyond the control of Detection Systems, such as lightning,
excessive voltage, mechanical shock, or damage arising out of abuse, alteration, or improper
application of the equipment.
Specifications
Temperature Range:
Humidity:
Power Source:
Stand-By Current:
Current Draw In Alarm Condition:
Current Draw In Alarm Condition With Keypad:
Back-Up Battery:
Dimensions (Case):
Weight:
Supplier Code:
0 – 45 Degrees Celsius
10% - 95%
240 Volt / 18 Volt AC @ 1.3 Amp
65 mA
115 mA
105 mA
6Ah / 12 Volt DC Rechargeable Sealed Lead Acid Battery
306 mm x 262 mm x 84 mm (Packed In Carton)
2.5 Kg
700601
Detection Systems Operators Manual UK

34 Solution Ultima Operators Manual
Operators Manual UK Detection Systems

Solution Ultima Operators Manual 35
Installation Notes
Installation Company
Technicians Name
Technicians Telephone Number
Installation Date
Warranty Expires
Panel Software Version
Service Notes
Detection Systems Operators Manual UK

36 Solution Ultima Operators Manual
Zone Descriptions
This allows you to describe each zone and tick which zones have been programmed to be automatically omitted
in STAY Mode 1 or have been programmed for day alarm operation.
Omitted In STAY
Mode 1
Zone 1
Zone 2
Zone 3
Zone 4
Zone 5
Zone 6
Zone 7
Day Alarm
Enabled
User Code Names
Default = 2580
User Code
User Code
User Code
User Code
User Code
Zone 8
Master
Code
Y User Code 9
1
User Code 10
2
User Code 11
3
User Code 12
4
User Code 13
5
User Code
6
User Code
7
User Code
8
Operators Manual UK Detection Systems
User Code 14
User Code 15
User Code 16

Solution Ultima Operators Manual 37
Entry / Exit Times
Entry Timer 1 Exit Time
Entry Timer 2 Entry Guard Time
Setting Options
Single Button Setting
Single Button Unsetting
Output Descriptions
Omitting Method
YES NO
YES NO
Forced Setting
Remote Setting Via
Telephone
Automatic Setting Time AM/PM
Automatic Unsetting Time AM/PM
Output 1 Output 3
Output 2 Output 4
Standard Omitting
YES NO
Code To Omit
YES NO
YES NO
YES NO
Communication Options
YES NO
ARC
Reporting
Domestic Reporting
YES NO
Domestic Reporting – No Of
Beeps
Other System Information
Siren Run Time Minutes
Can Your System Be
Serviced
By Another Technician
Detection Systems Operators Manual UK
YES NO
If Yes, Engineer’s Code

38 Solution Ultima Operators Manual
9 Digit RF User Code ID Numbers
9
10
11
12
Radio User Code 9 ID Number
(Place RF Radio Keyfob ID Sticker Here)
Radio User Code 10 ID Number
Radio User Code 11 ID Number
Radio User Code 12 ID Number
9 Digit RF Device ID Numbers
Zone
Number
1
RF Device 1 ID Number
(Place RF Device ID Sticker Here)
13
14
15
16
Zone
Number
Radio User Code 10 ID Number
Radio User Code 14 ID Number
Radio User Code 15 ID Number
Radio User Code 15 ID Number
RF Device 9 ID Number
2
3
4
5
6
7
RF Device 2 ID Number RF Device 10 ID Number
RF Device 3 ID Number RF Device 11 ID Number
RF Device 4 ID Number RF Device 12 ID Number
RF Device 5 ID Number RF Device 13 ID Number
RF Device 6 ID Number RF Device 14 ID Number
RF Device 7 ID Number RF Device 15 ID Number
8
Operators Manual UK Detection Systems
RF Device 8 ID Number RF Device 16 ID Number

Solution Ultima Operators Manual 39
Index
2
24-Hour Zones.............................................................. 31
A
Access Denied ..............................................................15
Adding User Codes....................................................... 13
Alarm Condition ........................................................... 30
Answering Machine Bypass ......................................... 30
Area Addressable Codepad........................................... 26
Area Display Indicator.................................................. 25
Area On/Off Indicator................................................... 25
Set ................................................................................. 30
Setting........................................................................... 10
AWAY Mode ........................................................... 10
Forced Setting .......................................................... 10
STAY Mode 1 .......................................................... 11
STAY Mode 2 .......................................................... 12
Telephone Setting..................................................... 24
Audible Indications......................................................... 9
Automatic Setting ......................................................... 30
Automatic Unsetting..................................................... 30
Aux Indicator................................................................ 25
AWAY Indicator ............................................................7
AWAY Mode ......................................................... 10, 30
B
Basic Pager ...................................................................28
Bell Test........................................................................ 23
C
Codepad.................................................................... 7, 30
Buzzer Tone ............................................................. 24
Duress Alarm............................................................ 15
Medical Alarm.......................................................... 15
Panic Alarm.............................................................. 15
Tamper Alarm ..........................................................15
Codepad Indicators
Audible Indications ....................................................9
AWAY Indicator........................................................ 7
FAULT Indicator........................................................ 9
MAINS Indicator........................................................ 8
Off Indicator............................................................... 8
On Indicator................................................................ 8
STAY Indicator.......................................................... 8
System Unset.............................................................. 8
Zone Indicators........................................................... 7
Communciation Fail .....................................................20
D
Date and Time............................................................... 18
Programming............................................................ 20
Day Alarm .................................................................... 24
Deleting User Codes..................................................... 14
Detectors....................................................................... 30
Unset............................................................................. 30
Unsetting....................................................................... 13
Domestic Dialling......................................................... 26
Acknowledging Domestic Calls............................... 26
Disable...................................................................... 27
Programming Telephone Numbers...........................27
Duress Alarm ................................................................15
Dynamic Battery Testing...............................................30
E
E2 Fault .........................................................................19
Entry Delay ...................................................................30
Entry Guard Timer ..................................................11, 12
Entry Time ....................................................................30
Event Memory...............................................................23
External Equipment.......................................................30
F
Fault Analysis................................................................17
Determine Fault Type ...............................................17
Fault Descriptions .........................................................18
Communciation Fail .................................................20
Date and Time...........................................................18
E2 Fault.....................................................................19
Fuse Fail....................................................................19
Horn Speaker ............................................................19
Low Battery ..............................................................18
RF Low Battery ........................................................19
RF Receiver Fail .......................................................19
RF Sensor Watch ......................................................19
Sensor Watch ............................................................19
System Fault .............................................................18
Tamper Fail...............................................................19
Telephone Line Fail..................................................19
FAULT Indicator ......................................................9, 25
Forced Setting .........................................................10, 30
Fuse Fail........................................................................19
H
Hand Held Remote Control...........................................30
Handover Delay.............................................................30
Horn Speaker.................................................................19
Horn Speaker Test.........................................................23
I
Installation Notes...........................................................34
Introduction.....................................................................6
Isolating.........................................................................31
Isolating Zones
Code To Isolate Method ...........................................17
Standard Method.......................................................16
L
LCD Codepad..................................................................7
Low Battery...................................................................18
M
MAINS Indicator ......................................................8, 25
Master Code ..................................................................31
Master Partitioned Codepad
Area Display Indicator..............................................25
Area On/Off Indicator...............................................25
Aux Indicator ............................................................25
FAULT Indicator ......................................................25
MAINS Indicator ......................................................25
Detection Systems Operators Manual UK

40 Solution Ultima Operators Manual
Operating ..................................................................26
Partial Indicator.........................................................25
Zone Indicators .........................................................25
Medical Alarm...............................................................15
Monitoring Station ........................................................31
O
Off Indicator....................................................................8
On Indicator ....................................................................8
Outputs
Reset Latching Outputs.............................................21
Turn On/Off ..............................................................20
P
Pager Reporting.............................................................28
Panic Alarm.............................................................15, 31
Partial Indicator.............................................................25
Partitioning
Area Addressable Codepad.......................................26
Area Display Indicator..............................................25
Area On/Off Indicator...............................................25
Aux Indicator ............................................................25
Codepad Operations..................................................26
Zone Indicators .........................................................25
R
Radio User Codes
Adding ......................................................................13
Transmitter Operations .............................................14
Remote Setting Via Telephone......................................24
Remote Control .............................................................30
RF Low Battery.............................................................19
RF Receiver Fail............................................................19
RF Sensor Watch...........................................................19
RF Transmitter Operations............................................14
S
Sealed ............................................................................31
Sensor Watch...........................................................19, 31
Silent Alarm ..................................................................31
Specifications................................................................ 32
STAY Indicator...............................................................8
STAY Mode 1......................................................... 11, 31
Entry Guard Timer ...................................................11
STAY Mode 2......................................................... 12, 31
Entry Guard Timer ...................................................12
Programming Zones .................................................12
Strobe Test .................................................................... 23
System Unset ..................................................................8
T
Tamper Fail................................................................... 19
Call Divert Set Sequence ..............................................21
Phone Setting Sequence................................................31
Call Divert Unset Sequence.................................... 22, 31
Telephone Line Fail...................................................... 19
Test Report....................................................................23
Testing
Bell Test ...................................................................23
Event Memory.......................................................... 23
Horn Speaker Test .................................................... 23
Strobe Test................................................................ 23
Test Report ............................................................... 23
Walk Test .................................................................23
Transmitter Operations .................................................14
U
Unsealed .......................................................................31
User Code .....................................................................31
User Codes
Adding...................................................................... 13
Deleting ....................................................................14
W
Walk Test...................................................................... 23
Warranty Statement ......................................................32
Z
Zone Indicators ......................................................... 7, 25
Zones.............................................................................31
Operators Manual UK Detection Systems

A member of
the Bosch Group
 Loading...