

Page 1
USER MANUAL
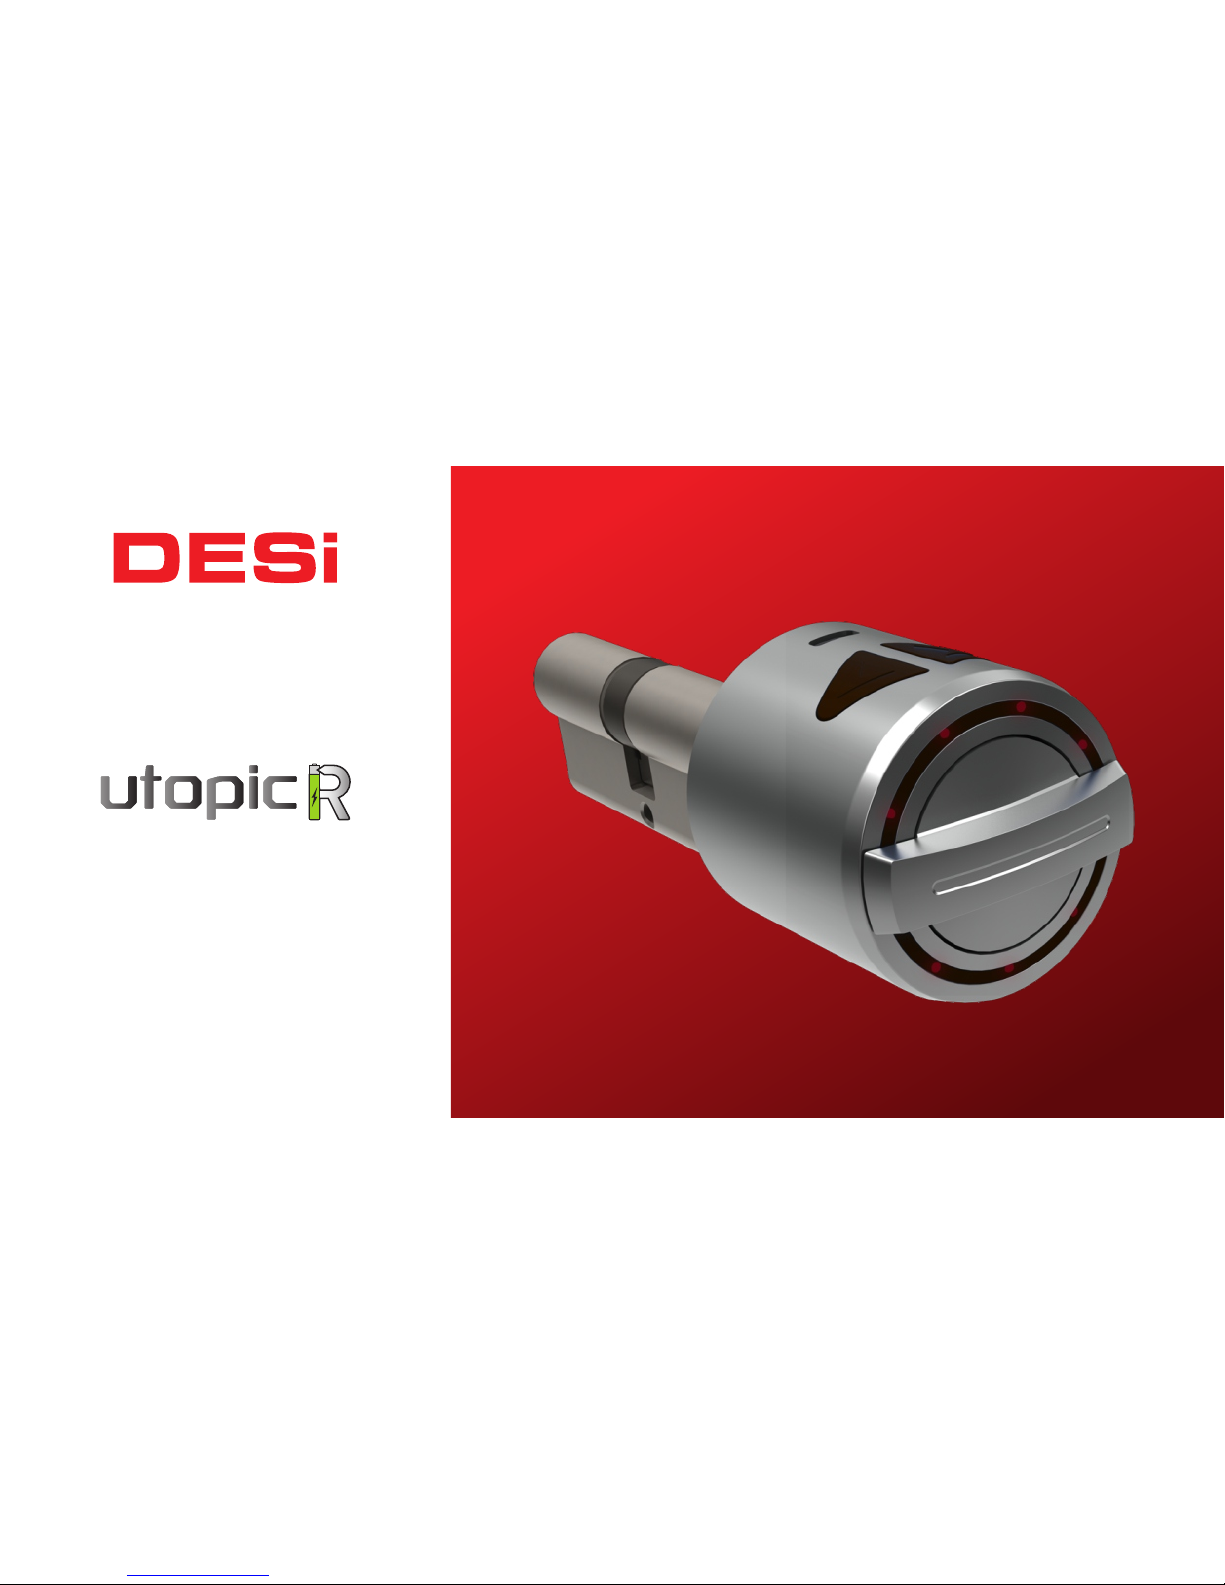
Wireless Motorized Cylinder
Page 2
!
GENERAL INFORMATIONS and WARNINGS
- Before using your motorized cylinder, Locking way and Number of turns should be adjusted
properly. Otherwise, the device would not work in a correct way.
- For emergancy conditions, we recommend you to put the keys to an accessible place (like car,
bag etc.)
- If there is any problem with door or locking mechanism, first of all, those problems need to be
solved. Door's mechanical parts and locking mechanism should be working properly.
- If there is a problem with the device, first look to the troubleshooting part of this manual. If you
cannot solve the problem, contact with your dealer.
- All the system need to be protected from water, direct sunlight and shocks.
- Auto-rotating parts of device may cause injuries during installation. BE CAREFUL!
2
Page 3

3
Controlling Options and Compatible Accessories
Wireless Fingerprint Readers
Wireless Keypad
Wireless Auto-Locking Module
Wireless Home Automation Interface
Remote Controllers
Remote Access Module
1.2. BOX CONTENT
(May vary according to model number)
1x Wireless Motorized Cylinder (with keys)
1x Charging Cable (USB)
1x Installation screw and Hex key
User Manual
1. FEATURES OF THE DEVICE
Structure
ABS Plastic
Cylinder Length
(outside) 31 mm x 35 mm (inside)
Inside part can extensile up to 47 mm
(Different cylinder lengths are available)
Batteries and Battery Life
Rechargable Lithium Ion batteries.
4 months or 2.000 operations (locking or unlocking) for 3
turn locks
Communication Capability
Bluetooth Low Energy
ISM RF 434 Mhz
Page 4
4
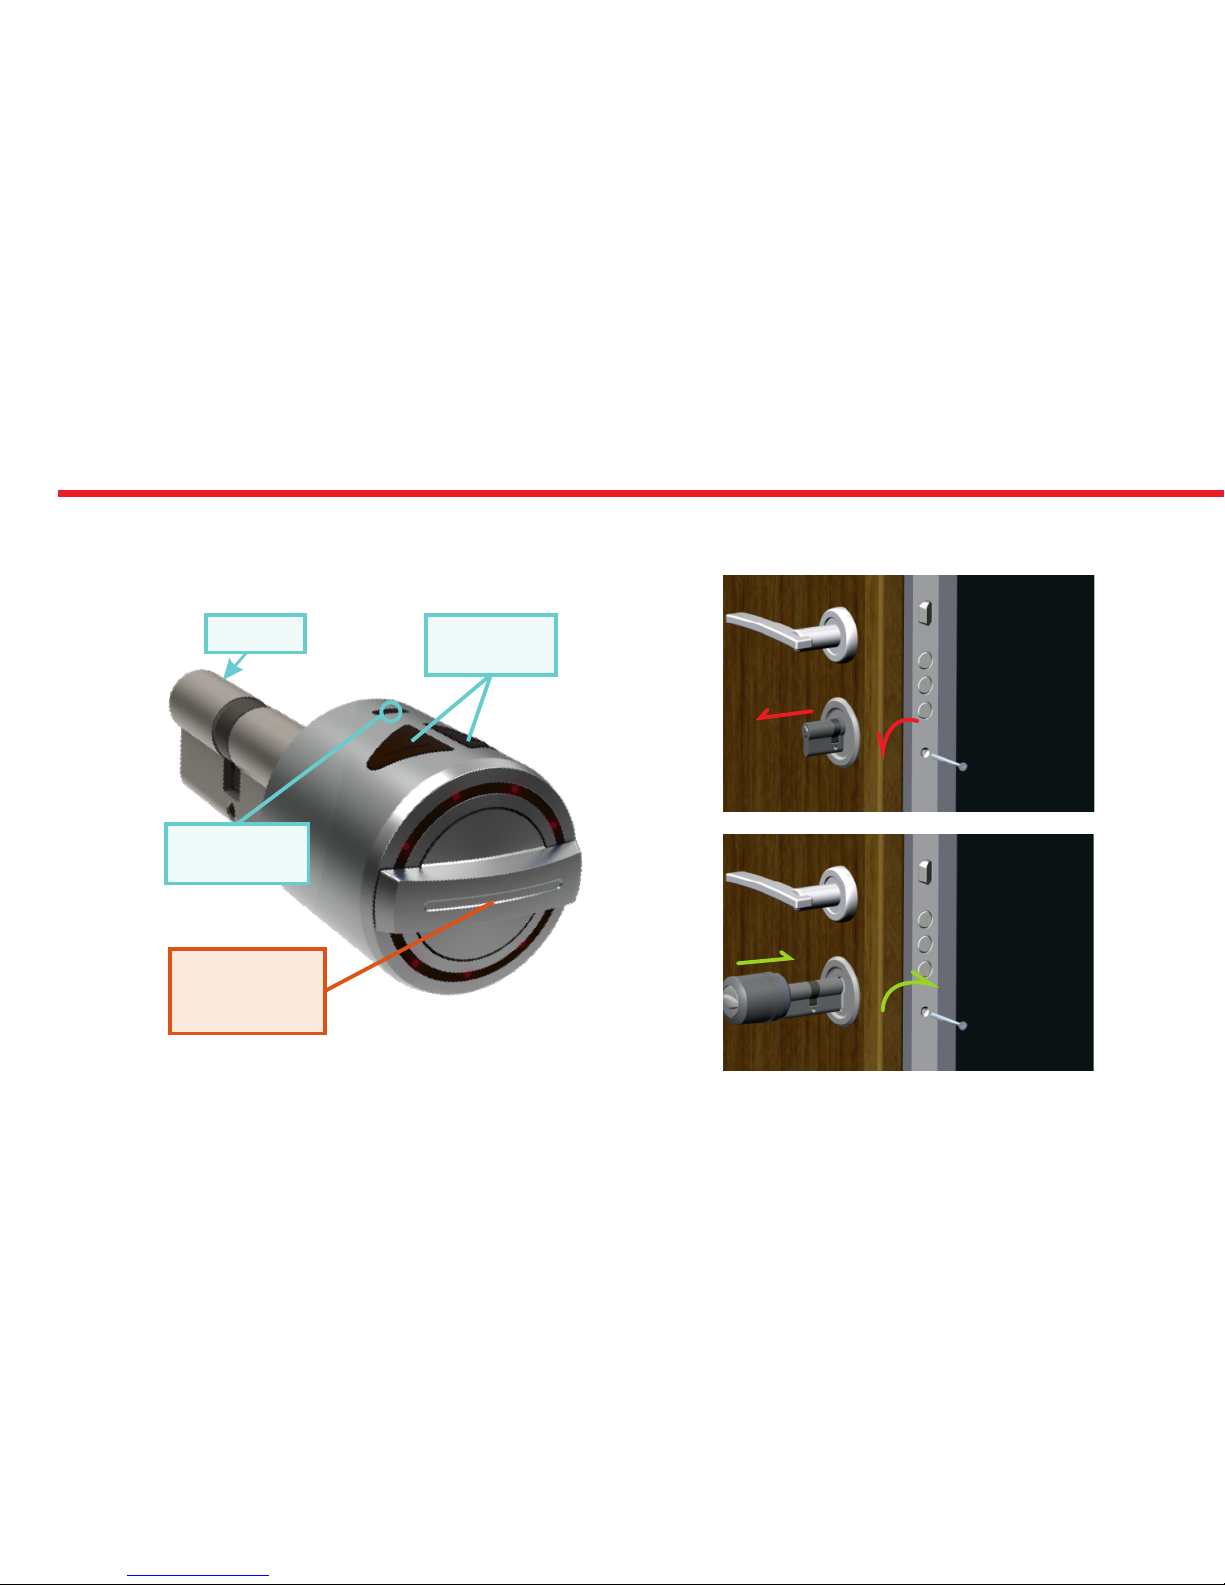
2. PARTS OF DEVICE and INSTALLATION
Control
Buttons
Cylinder
Handle for
Manual
Operation
microUSB
Charging Port
1.STEP
Remove
existing
cylinder.
2. STEP
Install
motorized
cylinder and
tighten
the screw
Page 5
5
In some security doors, even if you remove cylinder screw, you cannot remove cylinder due to cramped installation of
cylinder defender. Follow the instructions below, for that kind of situations:
- Untighten screws of cylinder defender (don’t remove the screws)
- Remove cylinder screw and take out the old cylinder.
- Disassemble the motozied part from the cylinder.
- Install the cylinder part to the door and tighten the cylinder screw.
- Tighten the screws of cylinder defender.
- Assemble the motorized part with cylinder.
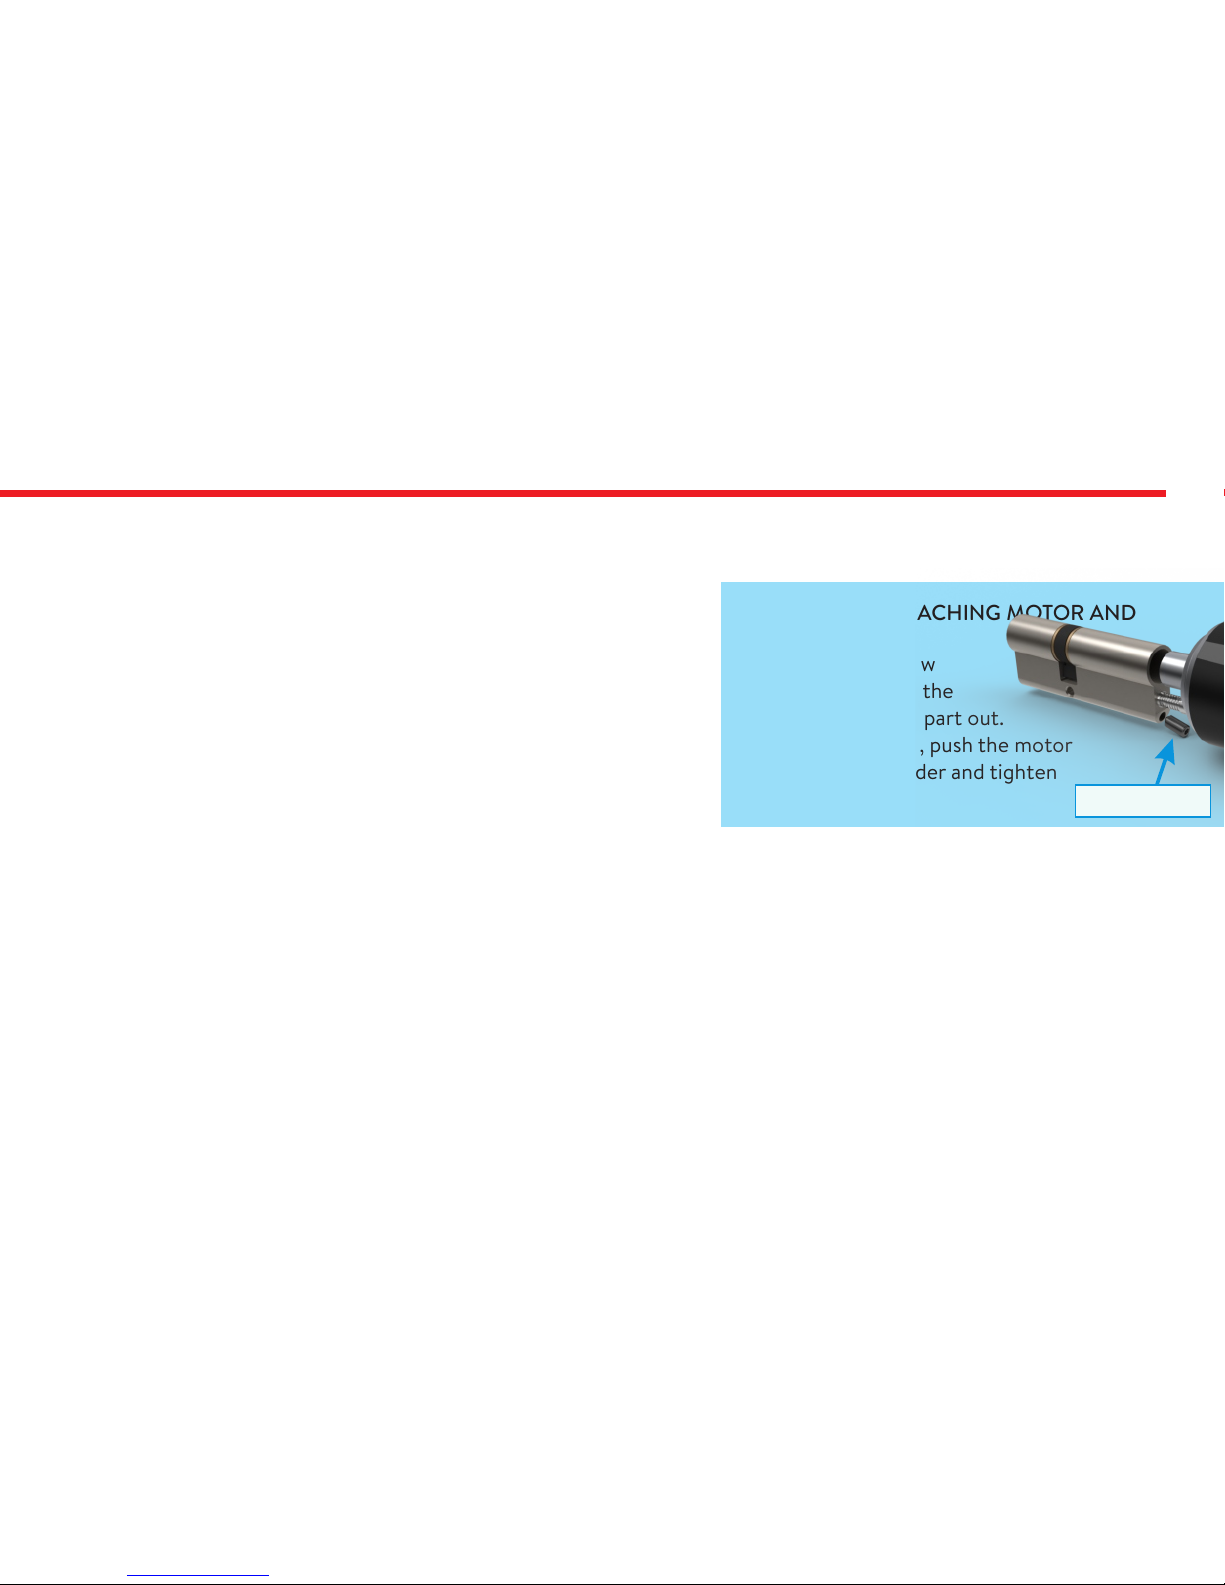
DETACHING / ATTACHING MOTOR AND
CYLINDER
Loosen the set screw
with hex key out of the
box. Pull the motor part out.
To attach two parts, push the motor
properly in to cylinder and tighten
the set screw.
Set Screw
The first controller enrolled to motorized cylinder is accepted as master
controller. The rest of controller will be user controllers.
3. MASTER CONTROLLER AND USER CONTROLLERS
Both, master and user controllers can be used to lock/unlock the motorized cylinder but only the master controller can
change settings of motorized cylinder.
If your device’s master controller is “Wireless Fingerprint Reader V1” jump to page 6.
If your device’s master controller is “Wireless Fingerprint Reader V2” jump to page 26.
If your device’s master controller is “Smart Phone” jump to page 46.
Page 6
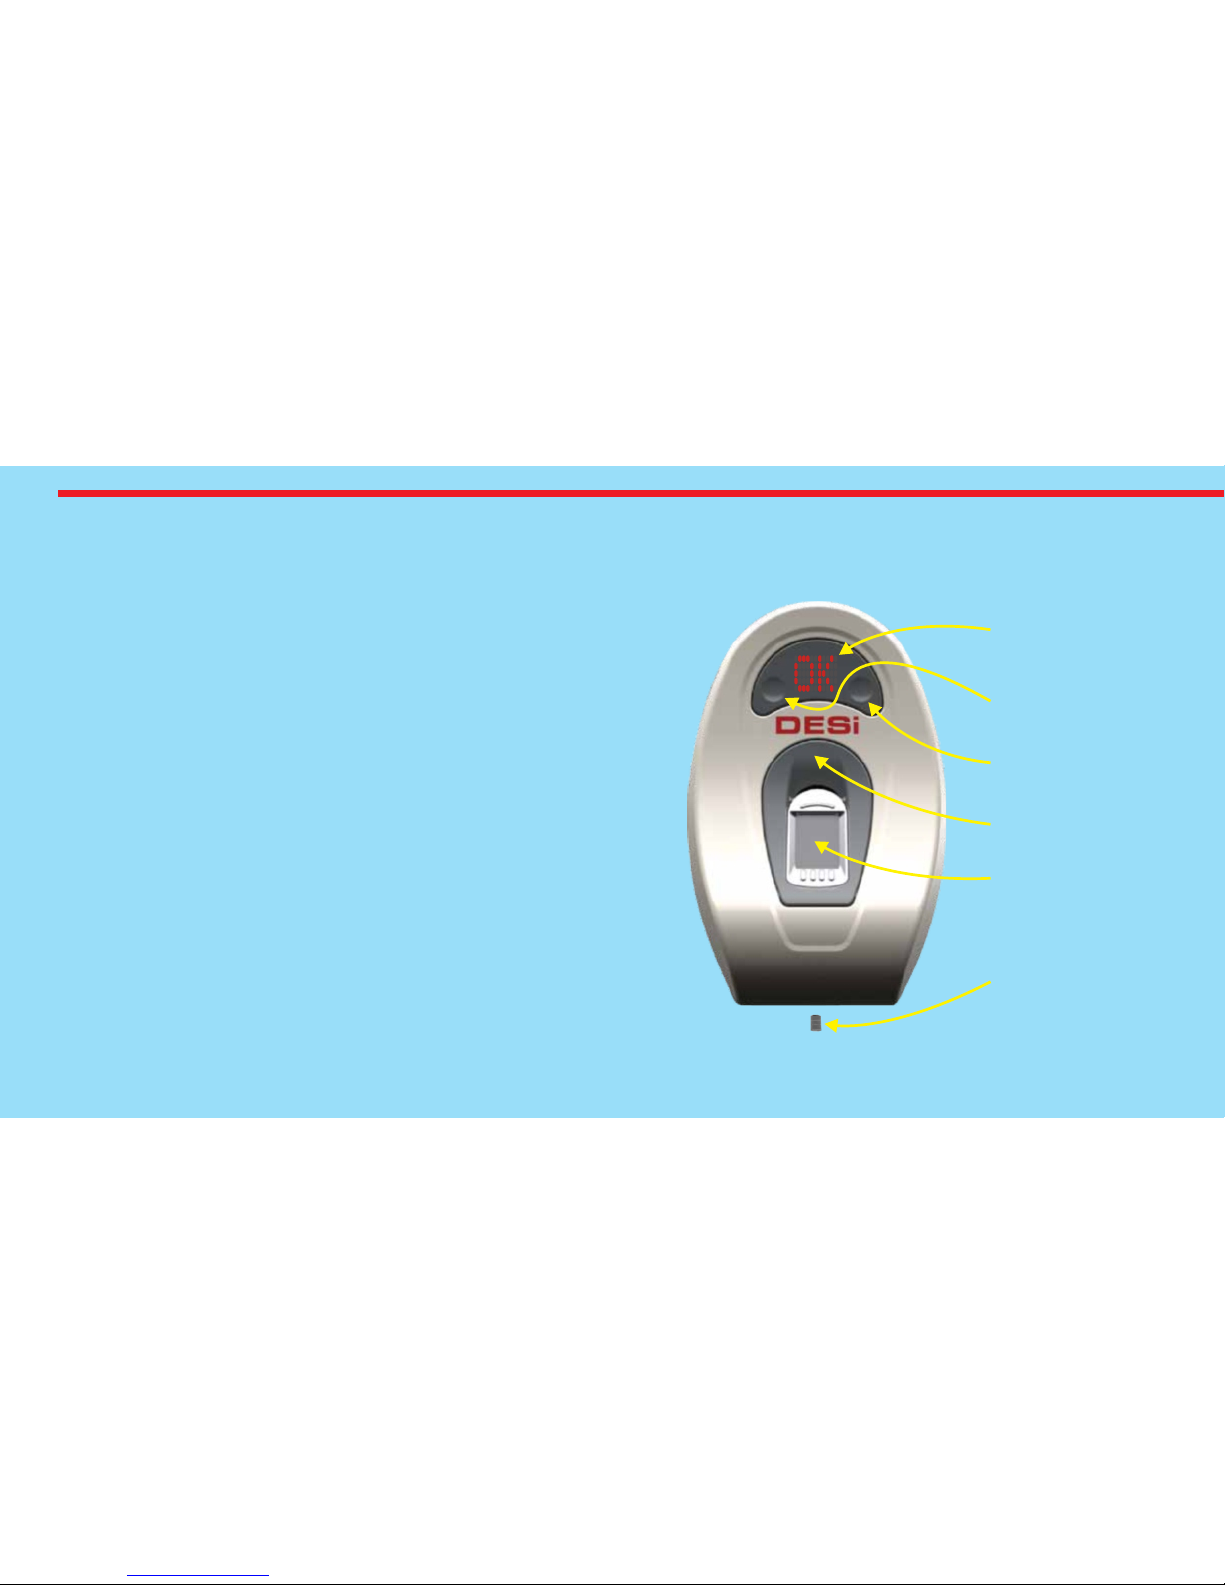
Display
Touch Button #1
Set Screw
Touch Button #2
Wake Up Button
Sensor
WIRELESS FINGERPRINT
READER (V1)
6
In this section, you can find details about installation and
usage of Wireless Fingerprint Reader Version 1.
If motorized cylinder bundled with fingerprint reader,
it would be the master controller of your motorized cylinder.
Before you use your motorized cylinder, you should adjust it
properly according to the lock which motorized
cylinder will work together. First, you should adjust
“direction of locking (4.3.5)” and than
“number of rotation (4.3.4)”.
If you want to change the master controller of motorized
cylinder, check “HOW TO RESET MOTORIZED CYLINDER”
topic on last page.
Page 7
7
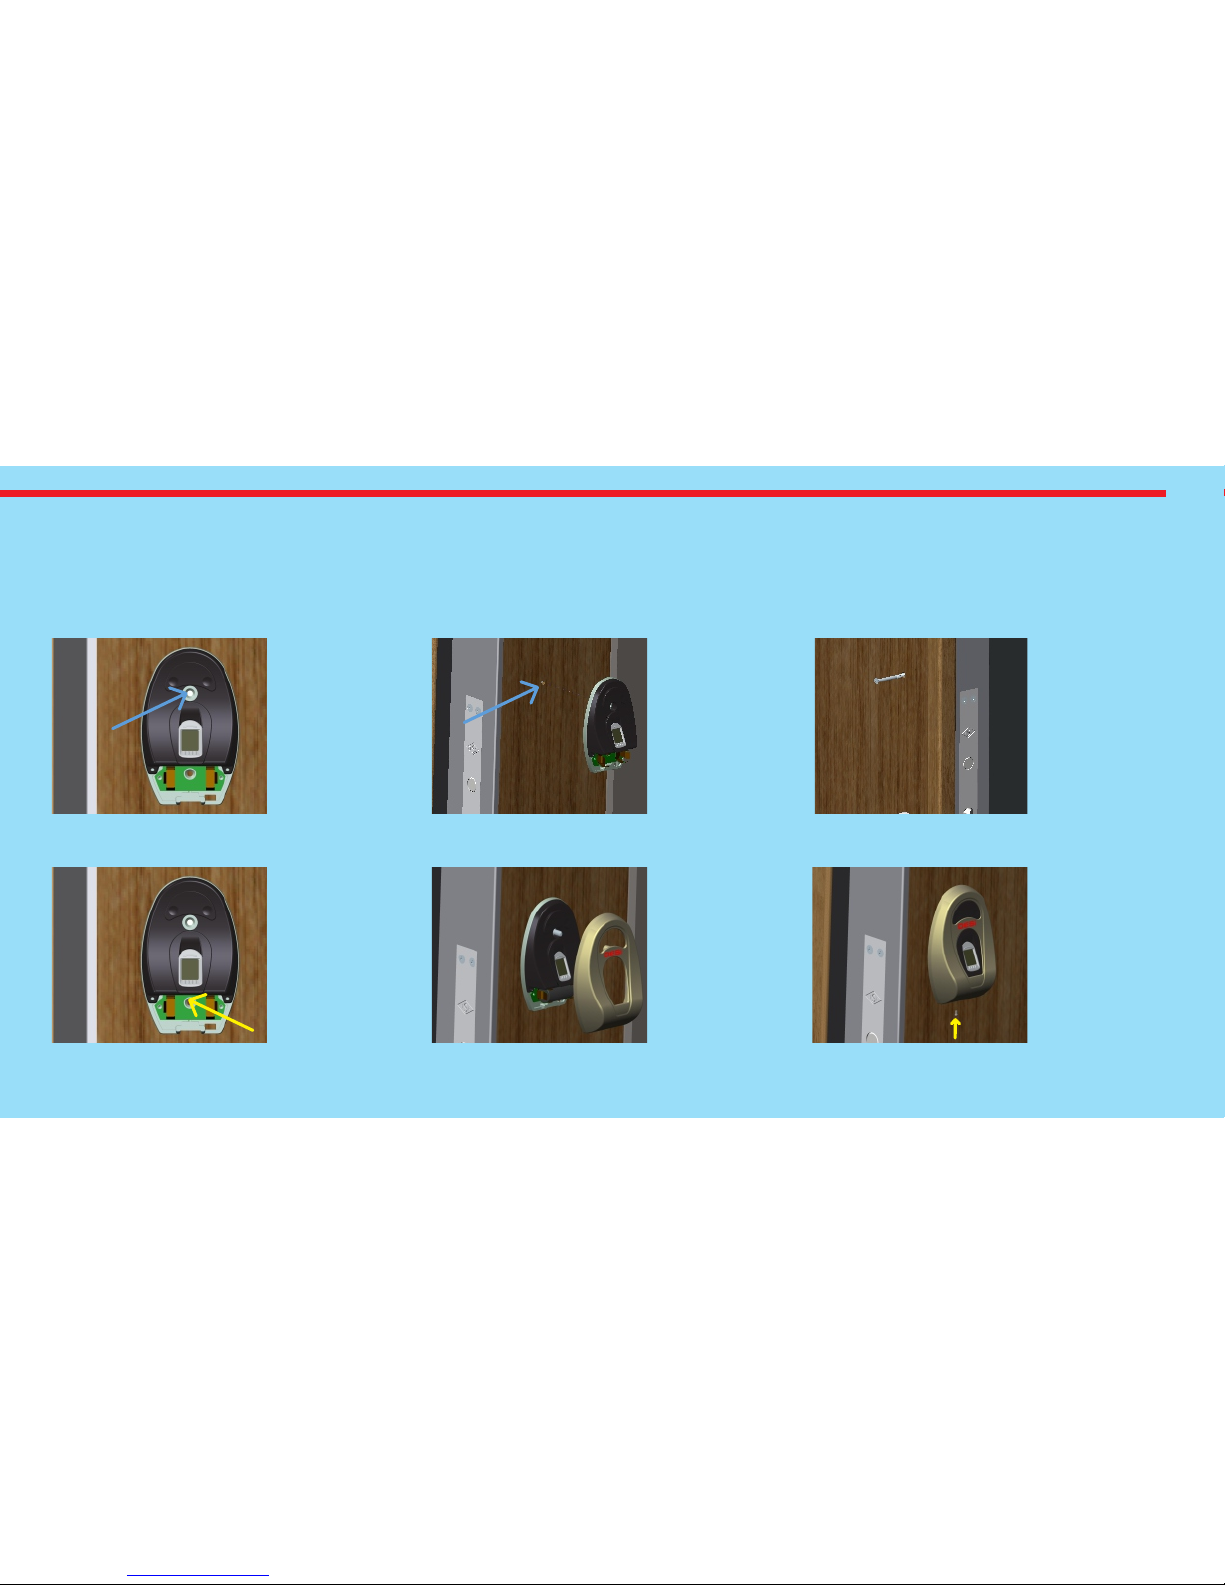
4.1. INSTALLATION OF WIRELESS FINGERPRINT READER V1
First of all, unscrew the set screw at the bottom of reader with a 19 mm (3/4") hex key and seperate metal part and plastic
part. After that, remove the battery, if it is already placed. Use one of the methods below:
4.1.1. First Method (from Inside)
1st Step1st Step1st Step 3rd Step3rd Step3rd Step
4th Step4th Step4th Step
2nd Step2nd Step2nd Step
5th Step5th Step5th Step 6th Step6th Step6th Step
Place reader
to the door
and make a
sign with a
pen through
hole.
Drill a hole
(side to side)
from signed
point with 5
mm bit.
Put the long
screw with
washer to hole
from inside.
Outcoming
part need to
be at most 12
mms.
Place reader
as in 1st step.
Tighten the
short screw
by using
pointed hole.
Install
battery and
fix the metal
cover with
long screw
installed at
3rd step.
Tighten the
set screw.
Page 8
8
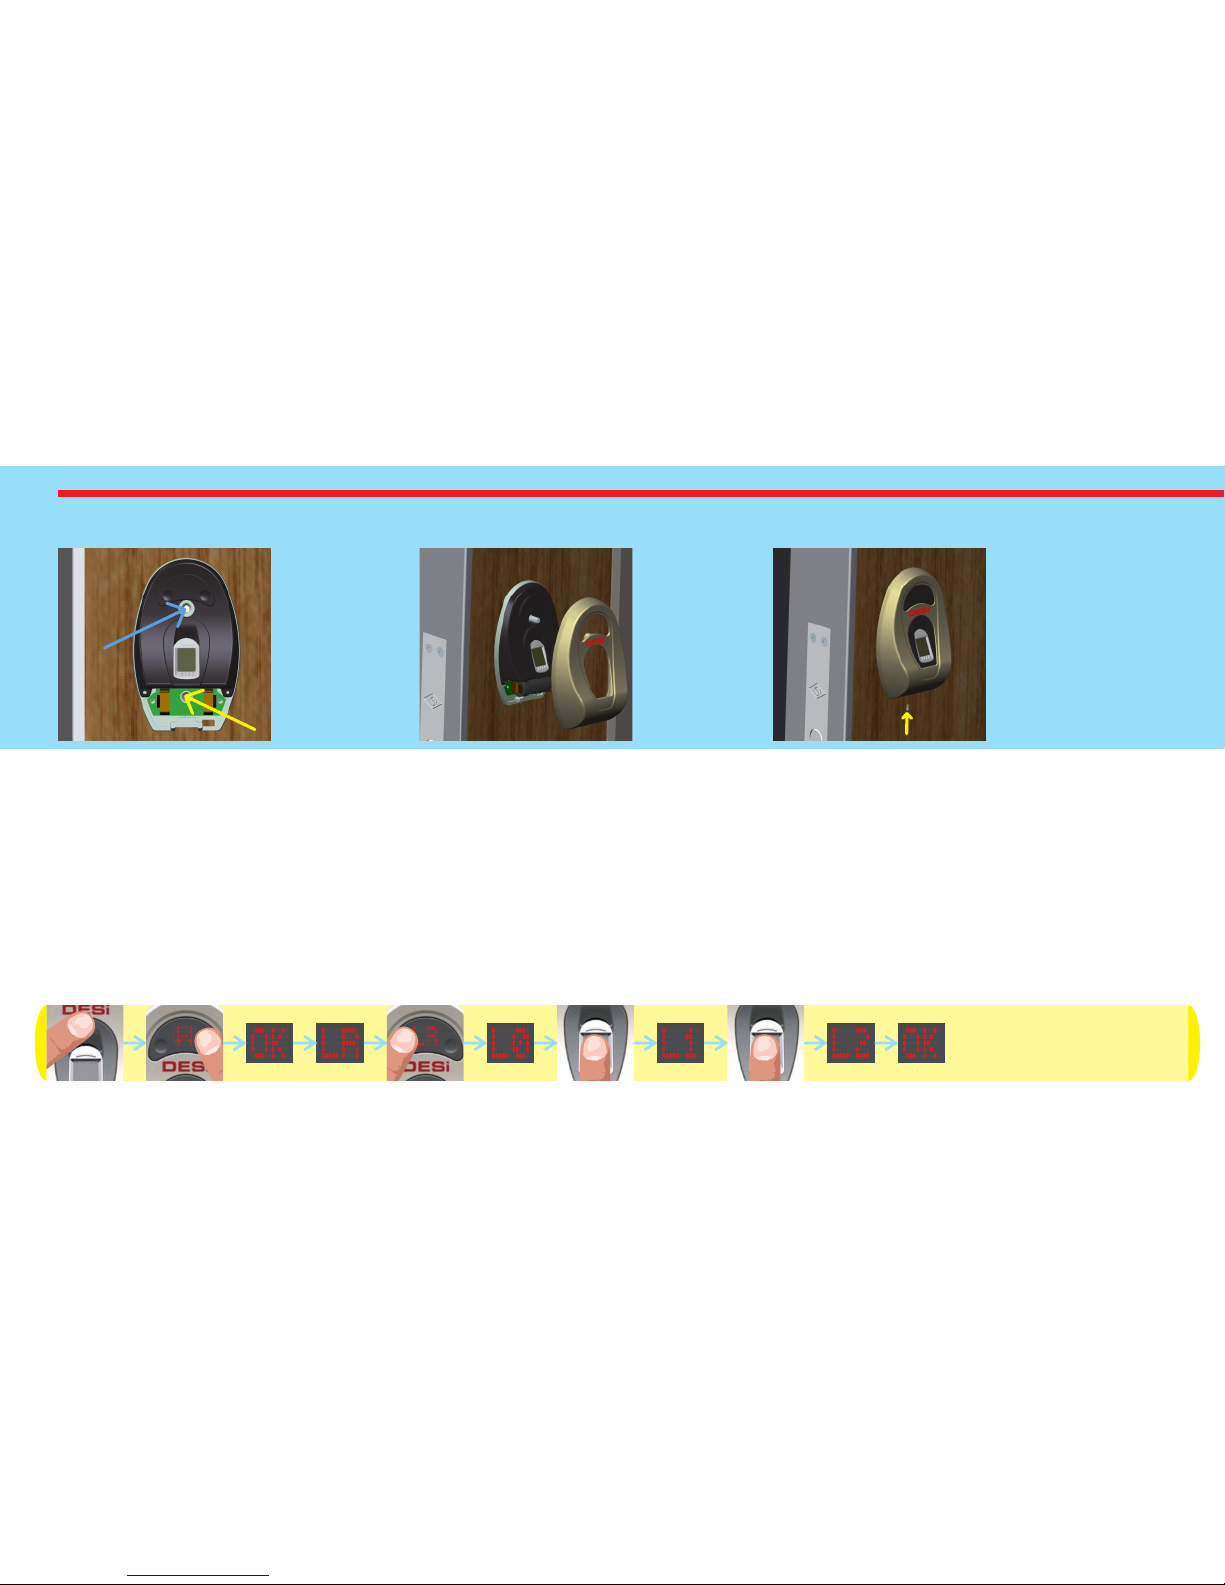
4.1.2. Second Method (from Outside)
4.2. ENROLLING FIRST (MASTER) FINGERPRINT
Fingerprint reader comes without any fingerprint in its memory. The first 3 fingerprints are accepted as master
fingerprints and administrative activities like enrolling or deleting fingerprint can be done by master fingerprints only.
Master fingerprints need to be chosen carefully. on’t enroll a child’s finger or a finger which is deformed D ny (or can be
d ) a eformed easily as master finger. To enroll first fingerprint:
- Touch to “wake up” and than “2". First “OK” and than “LR” will be displayed.
- Touch to “1". “L0" code will be displayed.
- Put the finger to the reader. “L1" code will be displayed.
- Put the same finger again. First “L2" and than “OK” code will be displayed.
Install
battery and
place the
metal cover.
1st Step1st Step1st Step 2nd Step2nd Step2nd Step 3rd Step3rd Step3rd Step
Place reader
to the door
and tighten it
with short
screws from
two holes.
Tighten
the set
screw.
Page 9
9
4.3. SETTINGS / ADMINISTRATION MENU
You can change settings of your motorized cylinder and perform administrative activities via this menu. Before using your
smart cylinder, “number of turns” and “locking way” settings should be adjusted properly. Otherwise, it would damage the
device’s mechanical structure.
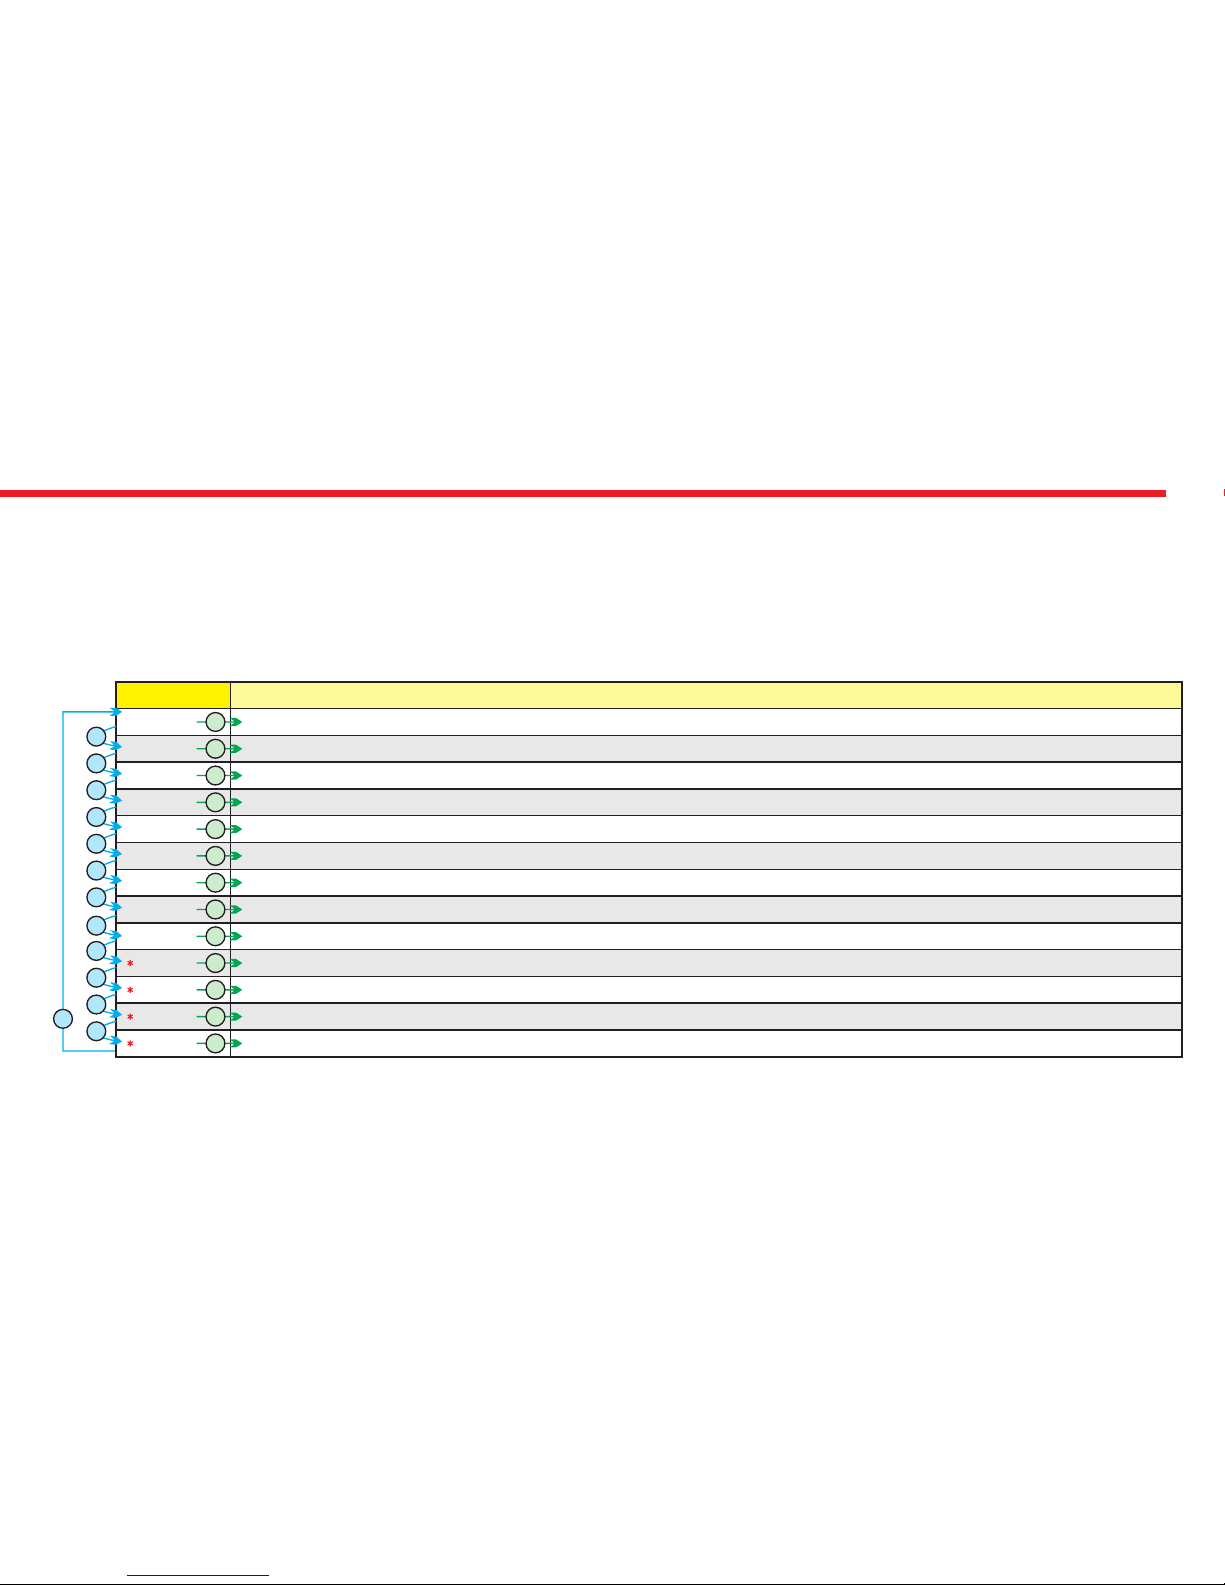
The menu items and order is as follows:
LR
DL
CL
TC
MW
UC
BU
RF
Display
Enrolling new fingerprints
Deleting enrolled fingerprints one by one
Deleting all fingerprints (Reseting fingerprint reader)
Adjusting motorized cylinder according to lock’s number of rotation to lock/unlock
Adjusting direction of locking according to door’s opening way
Showing total number of enrolled fingerprints in the device’s memory
Enabling or disabling buzzer sound (Warning tones are always active)
Enabling or disabling automatic locking mode which locks cylinder 1 minute after it is unlocked
Function
2
2
2
2
2
2
2
2
1
1
1
1
1
1
1
1
MA Enabling or disabling delayed locking which locks 5 s. after locking button on the cylinder is pressed.
1
2
ML
MD
MC
HT
Shifting the motorized cylinder to enrolling mode to learn new controllers
Deleting all controllers enrolled to cylinder except master controller.
Reporting number of controllers enrolled to motorized cylinder via buzzer sound
Adjusting latch retraction period.
2
2
2
1
1
1
1
2
* Not available in some versions of fingerprint reader.
Page 10
10
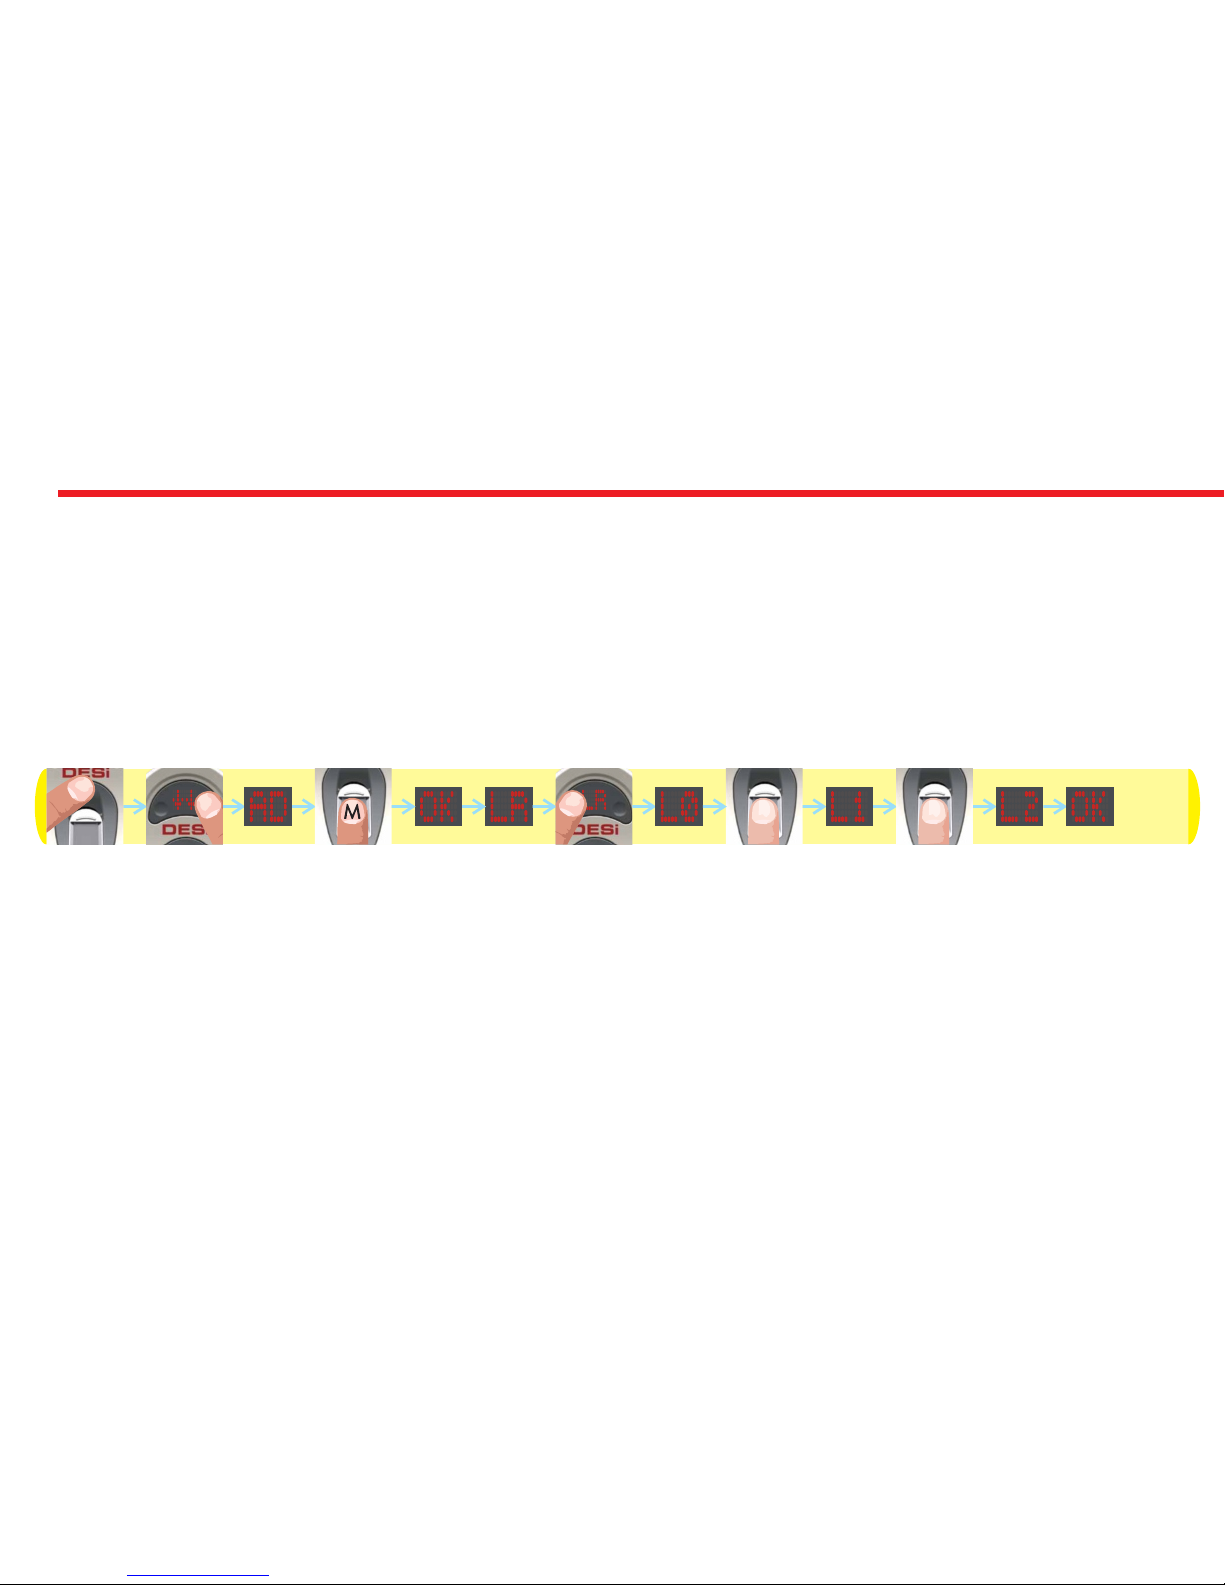
4.3.1. ENROLLING A NEW FINGERPRINT (LR)
If you want to enroll a new fingerprint to the reader, follow the steps below:
- Touch “WAKE UP”. Two arrows will appear on display. Than touch “2”. “AD” will be shown.
- Put one of the master fingers to the reader. First “OK” and than “LR” will be shown.
- Touch to “1” when “LR” is on display. “L0” will be shown.
- Put the new finger you want to enroll to the sensor. “L1” will be shown.
- Put the same finger again. First “L2” and than “OK” will be shown.
In this way, the new finperprint will be enrolled to the device. Schematic representation of operation is as follows:
NOTE 1: System assigns an id to fingers and this id is shown when finger is read.
NOTE 2: During enrollment, device reads the finger 2 times. If 2 reads don’t match, “EE” code will be displayed and reader
turns back to “L0" step. In this case, enrolling need to be repeated. Try to put your finger to the sensor in a similar way
during both read steps of enrollment
Page 11
11
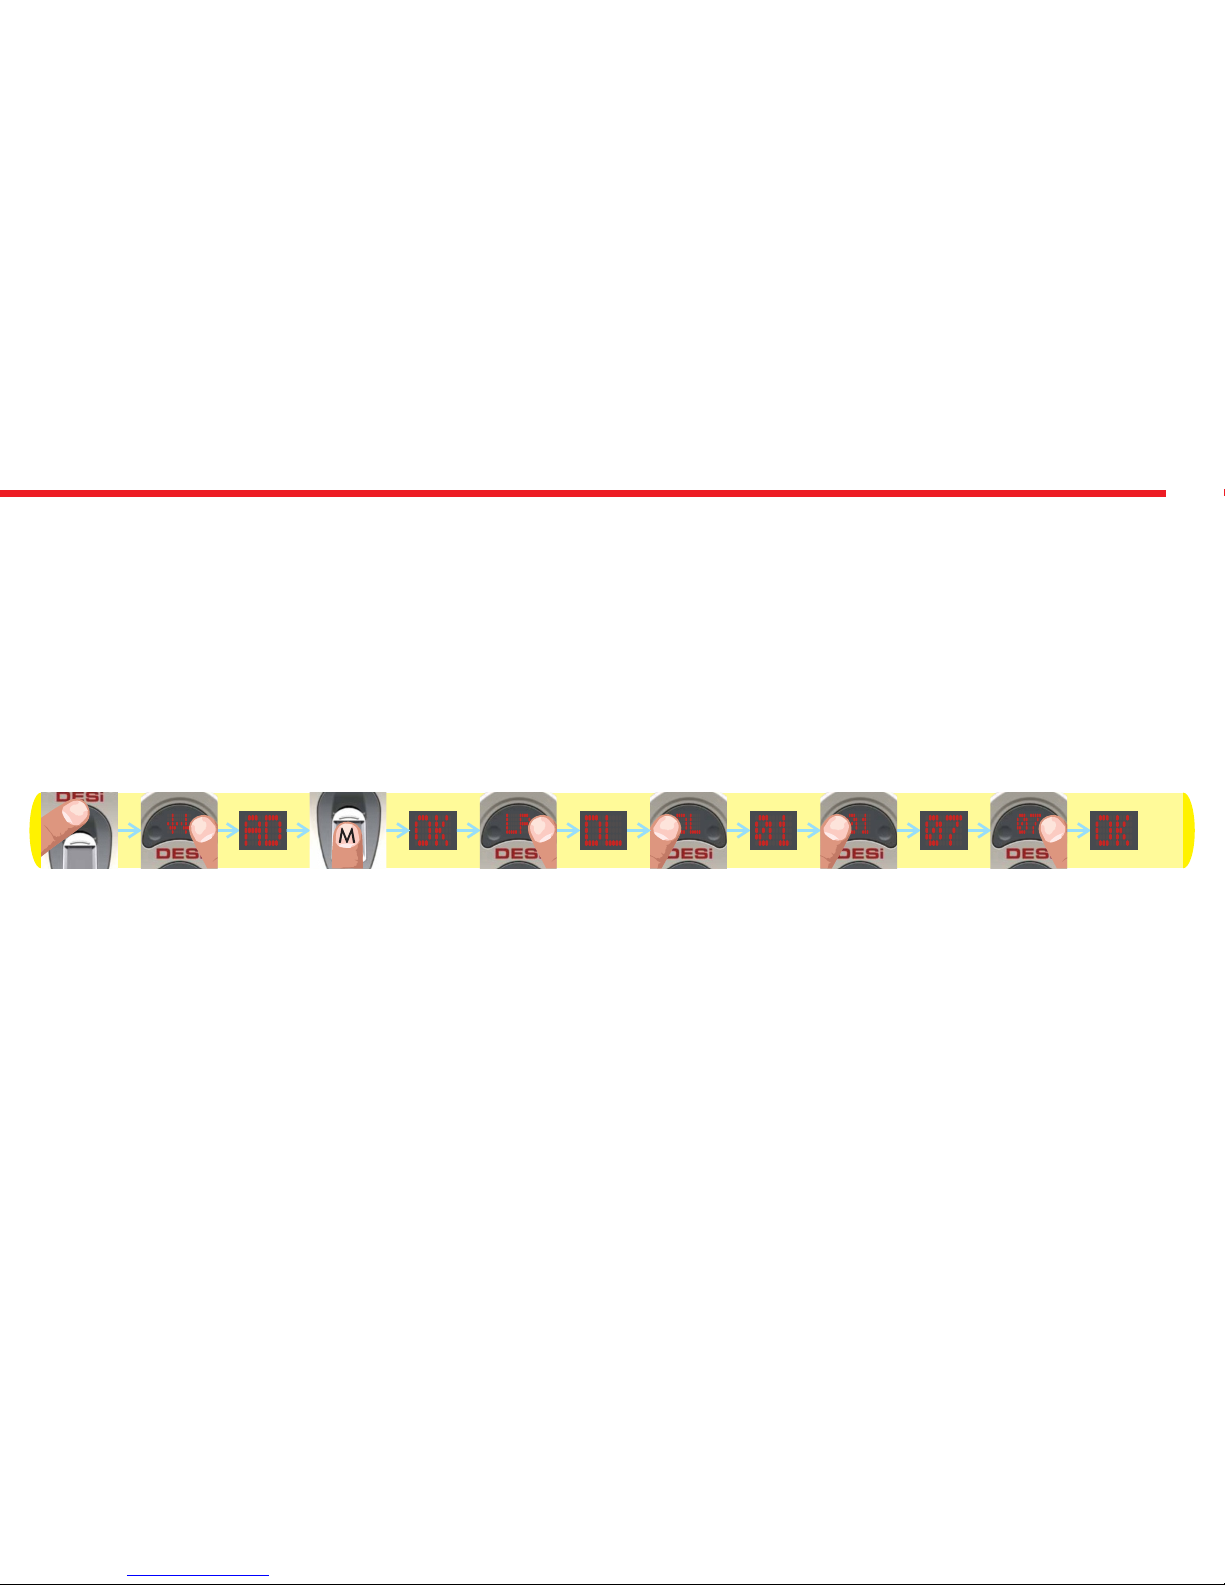
4.3.2.DELETING ENROLLED FINGERPRINTS ONE-BY-ONE (DL)
If you want to delete an enrolled fingerprint which you know the id number, follow the steps below:
- Touch “WAKE UP”. Two arrows will appear on display. Than touch “2”. “AD” will be shown.
- Put one of the master fingers to the reader. First “OK” and than “LR” will be shown.
- Touch to “2" till “DL” appears and touch to “1" when “DL” is on display. ”01" will be shown.
- Touch to “1" till you see the fingerprint id you want to delete and touch to “2" when related id is on display.
- “OK” will be shown.
In this way, the related finperprint will be deleted. Schematic representation of deleting a fingerprint (e.g. id is “07") is as
follows:
NOTE: System assigns an id to fingers and this id is shown when finger is read. By mistake, if you pass the id of fingerprint
you want to delete, wait a few seconds till display goes off and restart the procedure.
Page 12
12
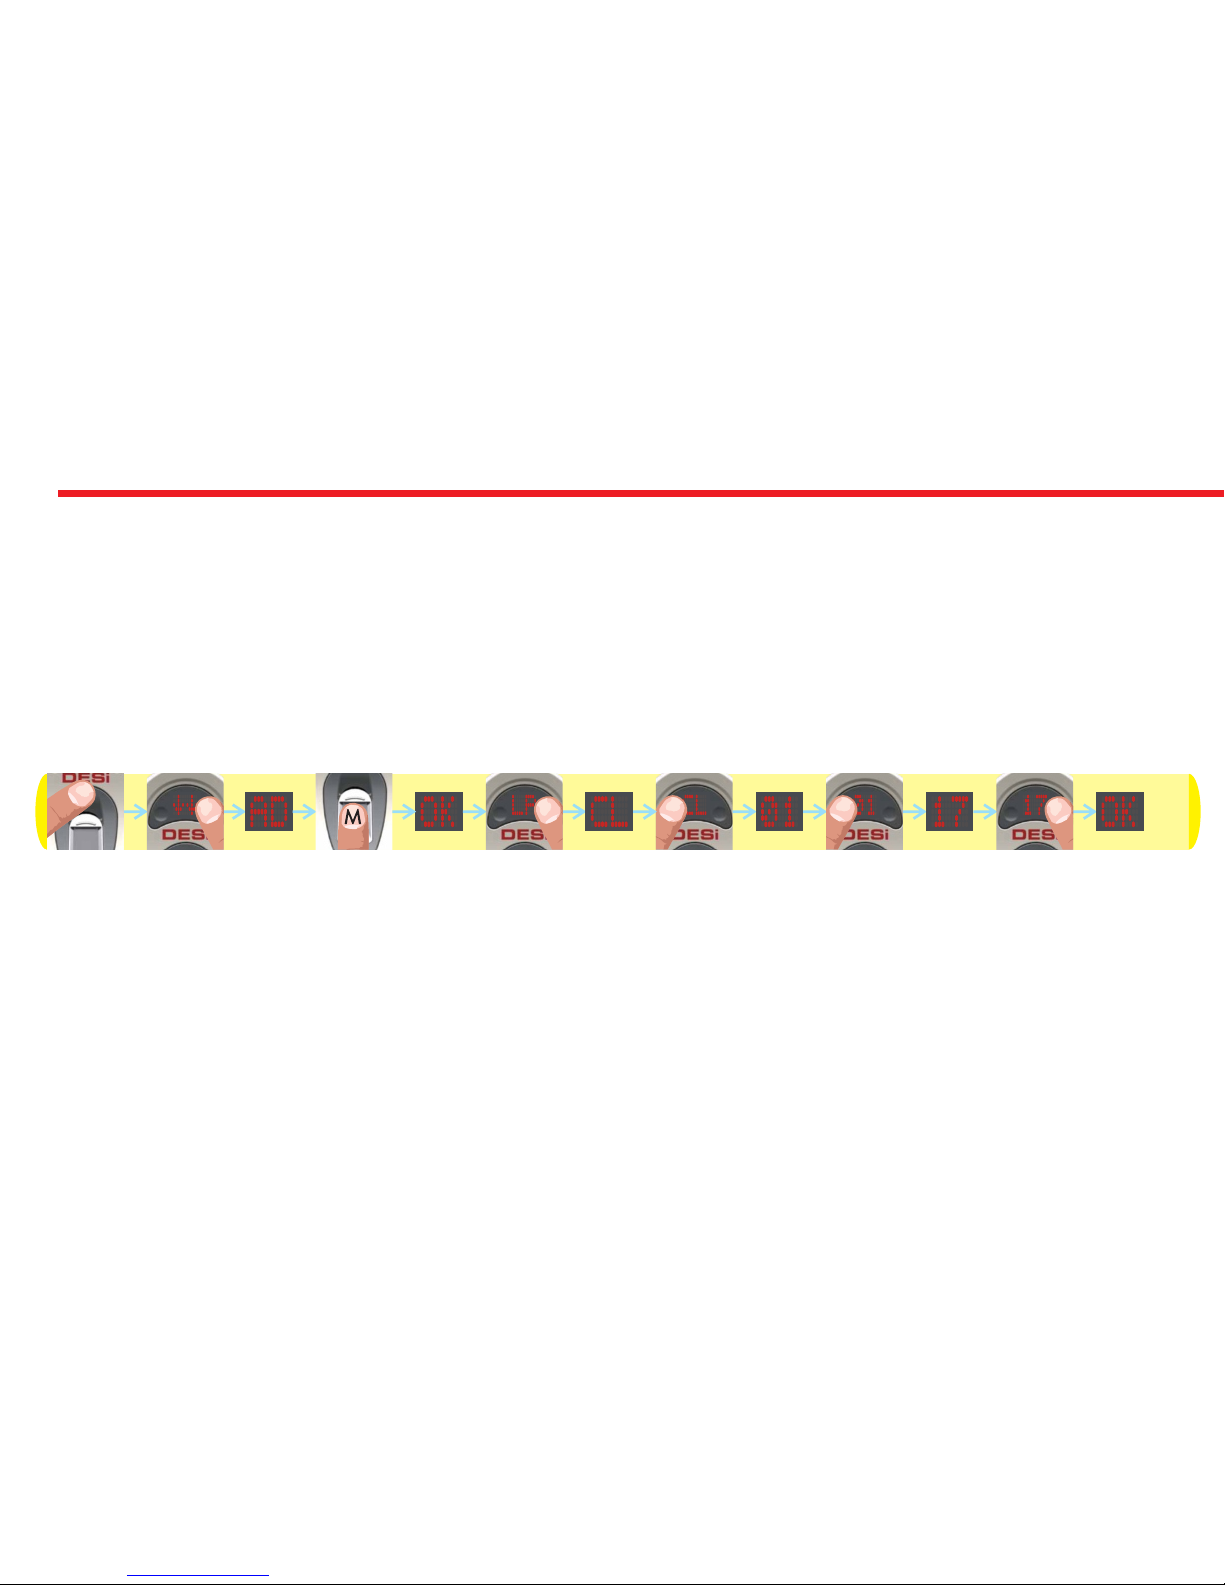
4.3.3. DELETING ALL FINGERPRINTS / RESET FINGERPRINT READER (CL)
If you want to delete all enrolled fingerprint readers (including masters) , follow the steps below:
- Touch “WAKE UP”. Two arrows will appear on display. Than touch “2”. “AD” will be shown.
- Put one of the master fingers to the reader. First “OK” and than “LR” will be shown.
- Touch to “2" till “CL” appears and touch to “1" when “CL” is on display. ”01" will be shown.
- Touch to “1" till you see “17" and touch to “2".
- “OK” will be shown.
In this way, all the finperprints (including masters) will be deleted. Schematic representation of operation is as follows:
NOTE: If you pass “17" by mistake, don’t touch any button and wait a few seconds till display goes off. After that restart the
procedure.
Page 13
13
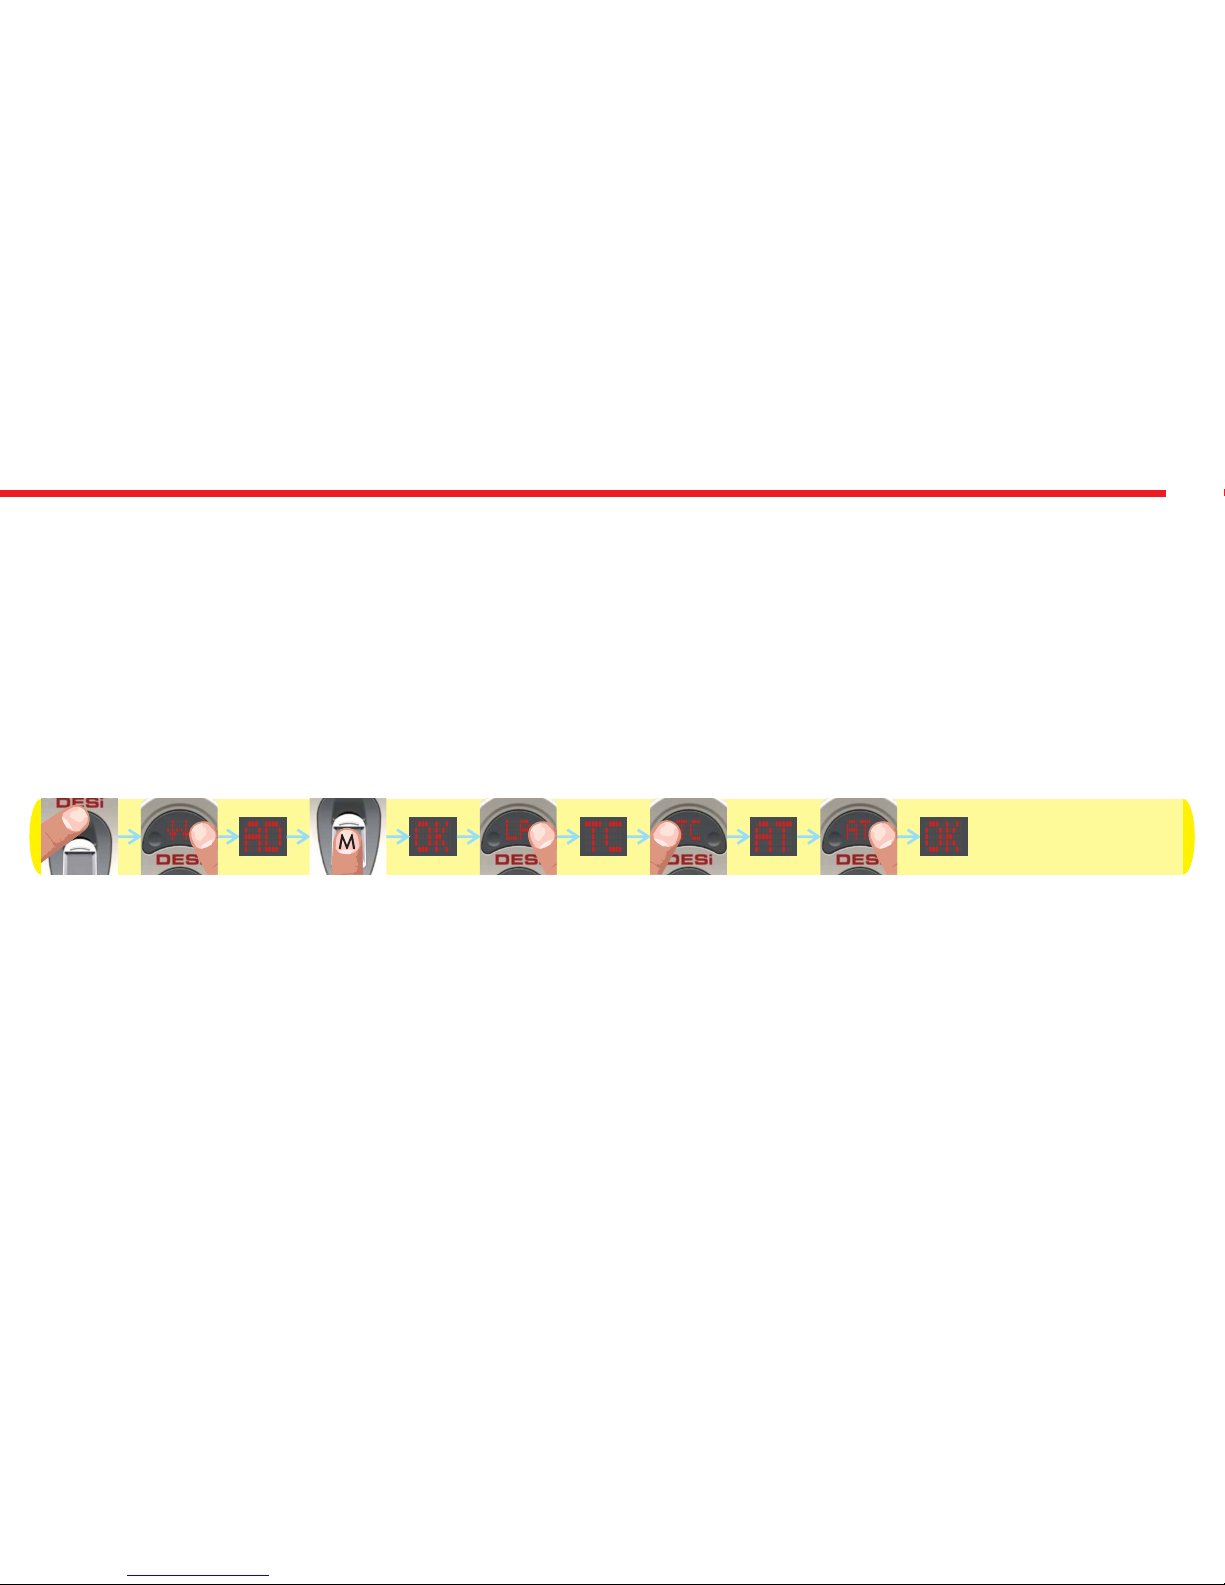
4.3.4. ADJUSTING MOTORIZED CYLINDER ACCORDING TO LOCK’S NUMBER OF ROTATION TO LOCK/UNLOCK (TC)
To adjust your motorized cylinder according to lock’s number of rotation, follows the steps below:
- First of all, close the door.
- Touch “WAKE UP”. Two arrows will appear on display. Than touch “2”. “AD” will be shown.
- Put one of the master fingers to the reader. First “OK” and than “LR” will be shown.
- Touch to “2" till “TC” appears and touch to “1" when “TC” is on display. ”AT" will be shown.
- Touch to “2". “OK” will be displayed and cylinder will automatically lock and unlock the door.
In this way, motorized cylinder will learn how many rotations is needed to lock / unlock the door. Schematic representation
of operation is as follows:
Page 14
14
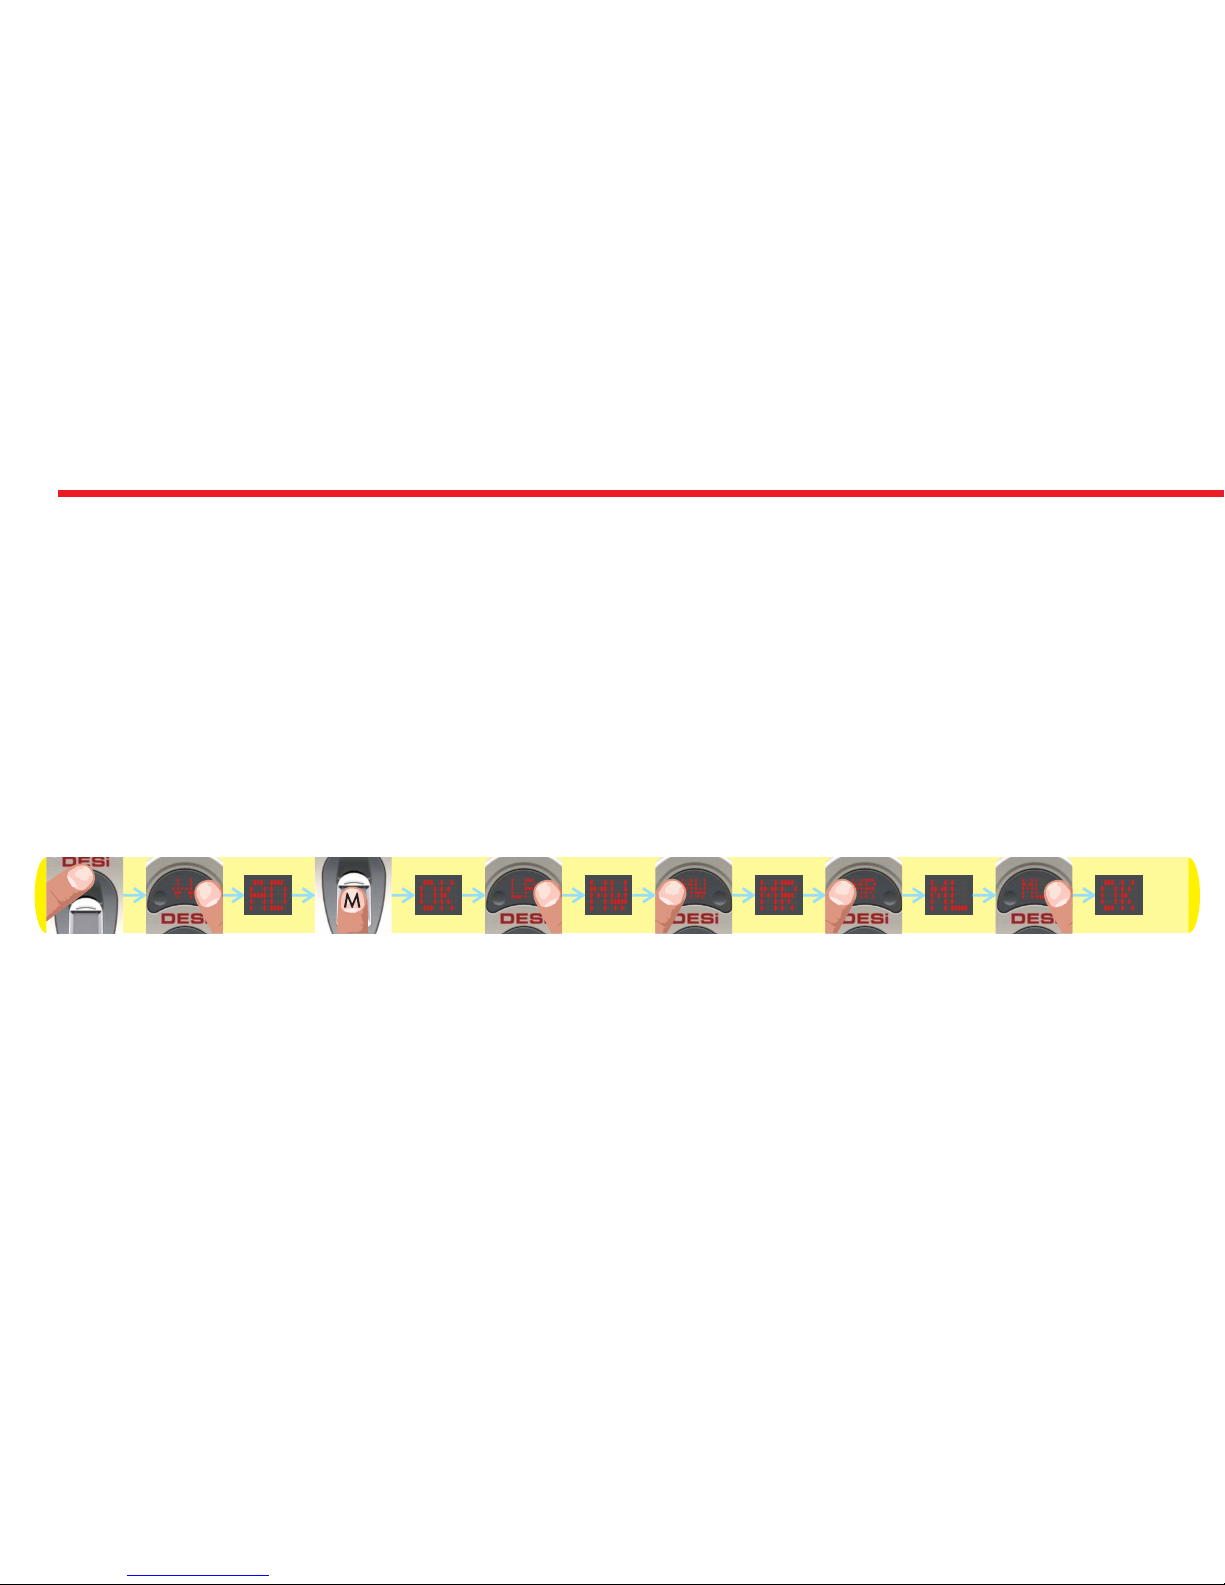
4.3.5. ADJUSTING DIRECTION OF LOCKING ACCORDING TO DOOR’S OPENING WAY (MW)
To adjust your motorized cylinder’s locking way according to the door, follows the steps below:
- Touch “WAKE UP”. Two arrows will appear on display. Than touch “2”. “AD” will be shown.
- Put one of the master fingers to the reader. First “OK” and than “LR” will be shown.
- Touch to “2" till “MW” appears and touch to “1" when “MW” is on display. ”MR” or “ML” will be shown.
- Touch to “1" to toggle between;
“MR” - right door,
“ML” - left door.
- When desired way is displayed, touch to “2". “OK” will be displayed.
In this way, motorized cylinder’s direction of locking will be set. Schematic representation of changing direction of locking
from right to left is as follows:
NOTE: To transfer settings to motorized cylinder, you need to lock or unlock motorized cylinder via master controller.
Page 15
15
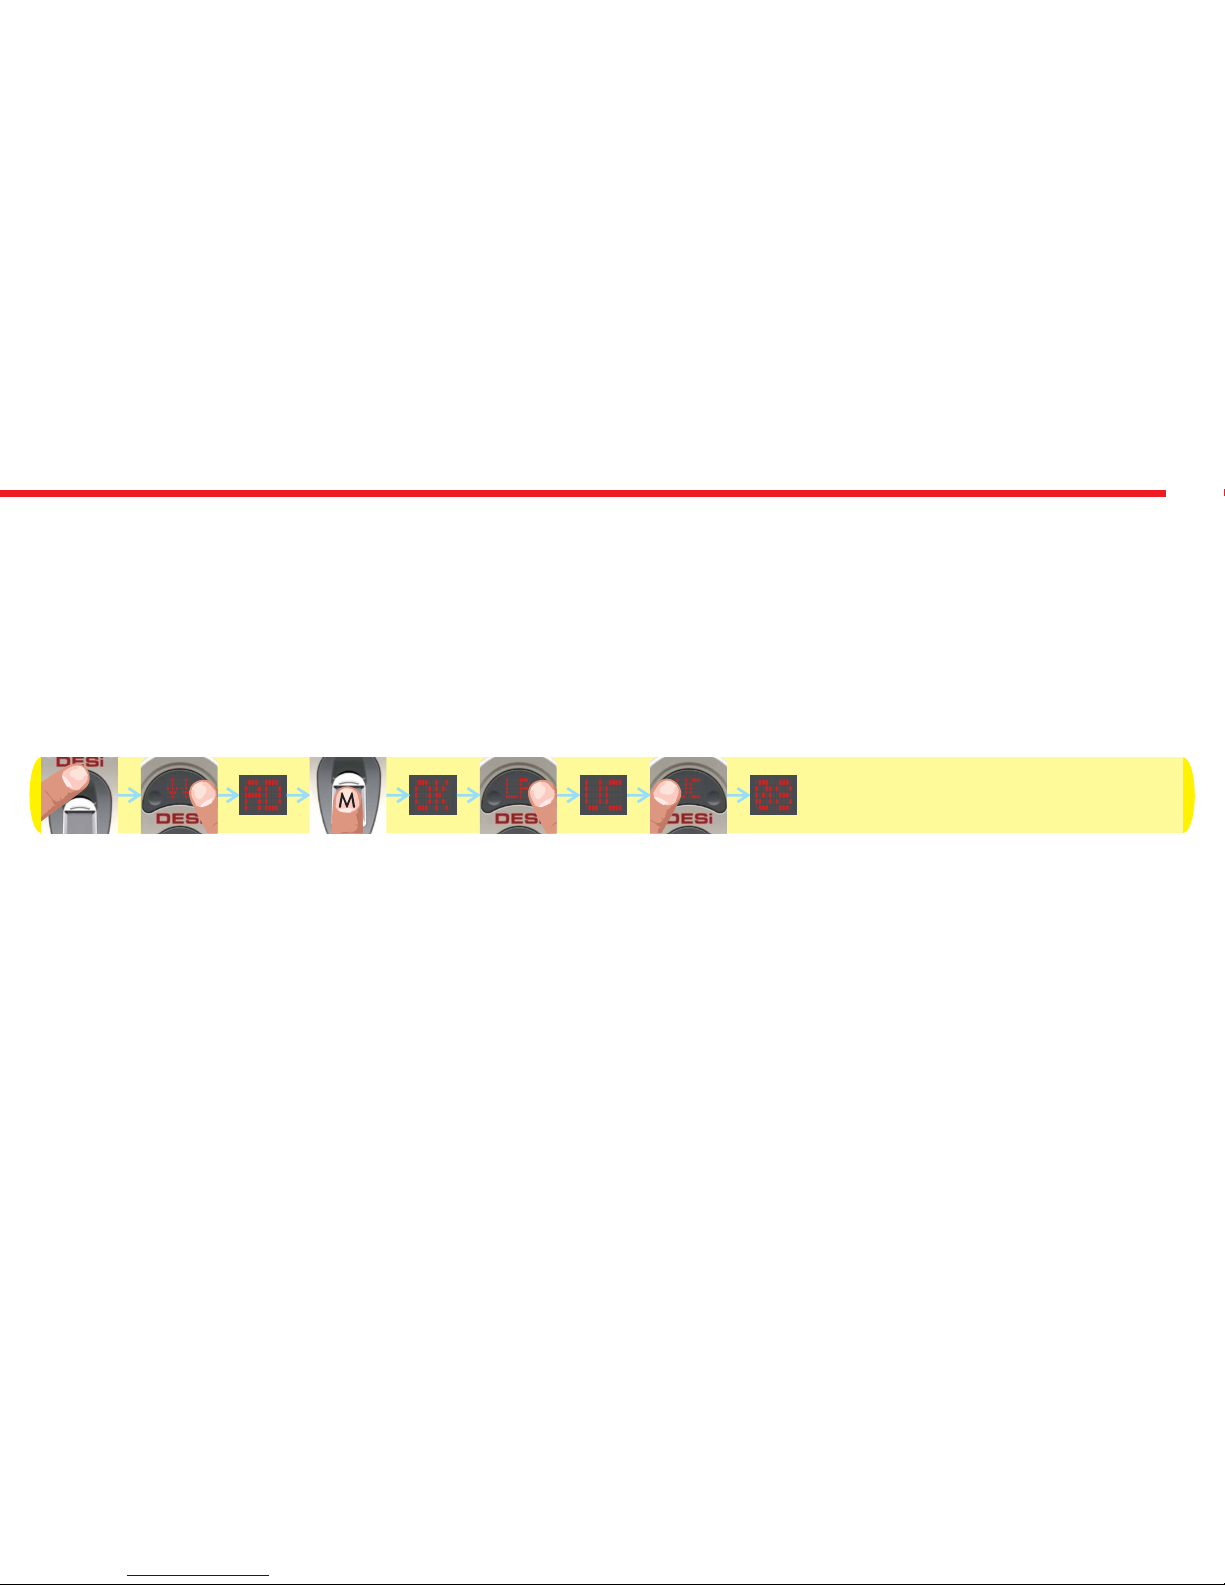
4.3.6. REPORTING TOTAL NUMBER OF ENROLLED FINGERS (UC)
To adjust your motorized cylinder’s locking way according to the door, follows the steps below:
- Touch “WAKE UP”. Two arrows will appear on display. Than touch “2”. “AD” will be shown.
- Put one of the master fingers to the reader. First “OK” and than “LR” will be shown.
- Touch to “2" till “UC” appears and touch to “1" when “UC” is on display.
In this way, number of enrolled fingerprints will be displayed. Schematic representation of this operation (which shows 8
fingerprints enrolled to reader) is as follows:
Page 16
16
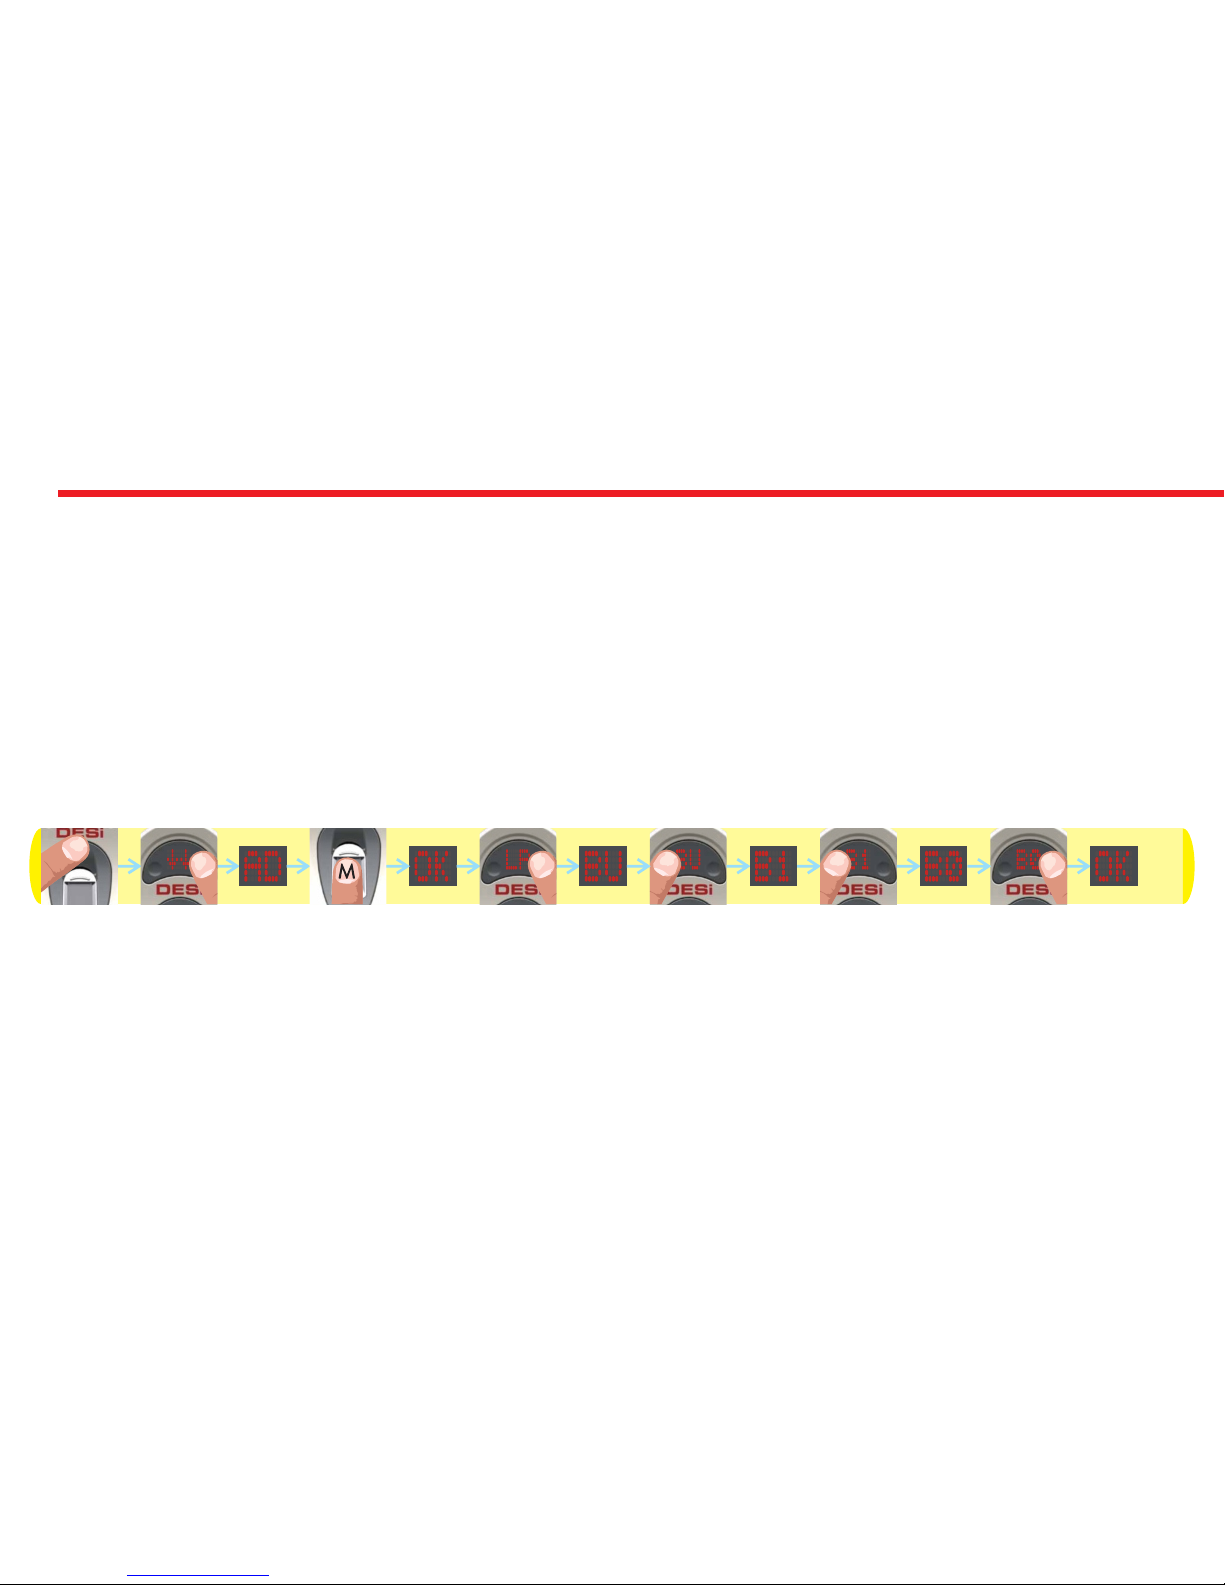
4.3.7. ENABLING OR DISABLING BUZZER SOUND (BU)
You can disabled (or enable) activation sounds by following steps below:
- Touch “WAKE UP”. Two arrows will appear on display. Than touch “2”. “AD” will be shown.
- Put one of the master fingers to the reader. First “OK” and than “LR” will be shown.
- Touch to “2" till “BU” appears and touch to “1" when “BU” is displayed. ”B0" or “B1" will be shown.
- Touch to “1" to toggle between;
“B0” - buzzer is disabled
“B1” - buzzer is enabled.
- When desired choice is displayed, touch to “2". “OK” will be displayed.
In this way, desired buzzer choice will be set. Schematic representation of disabling buzzer sound is as follows:
NOTE: To transfer settings to motorized cylinder, you need to lock or unlock motorized cylinder via master controller.
Page 17
17
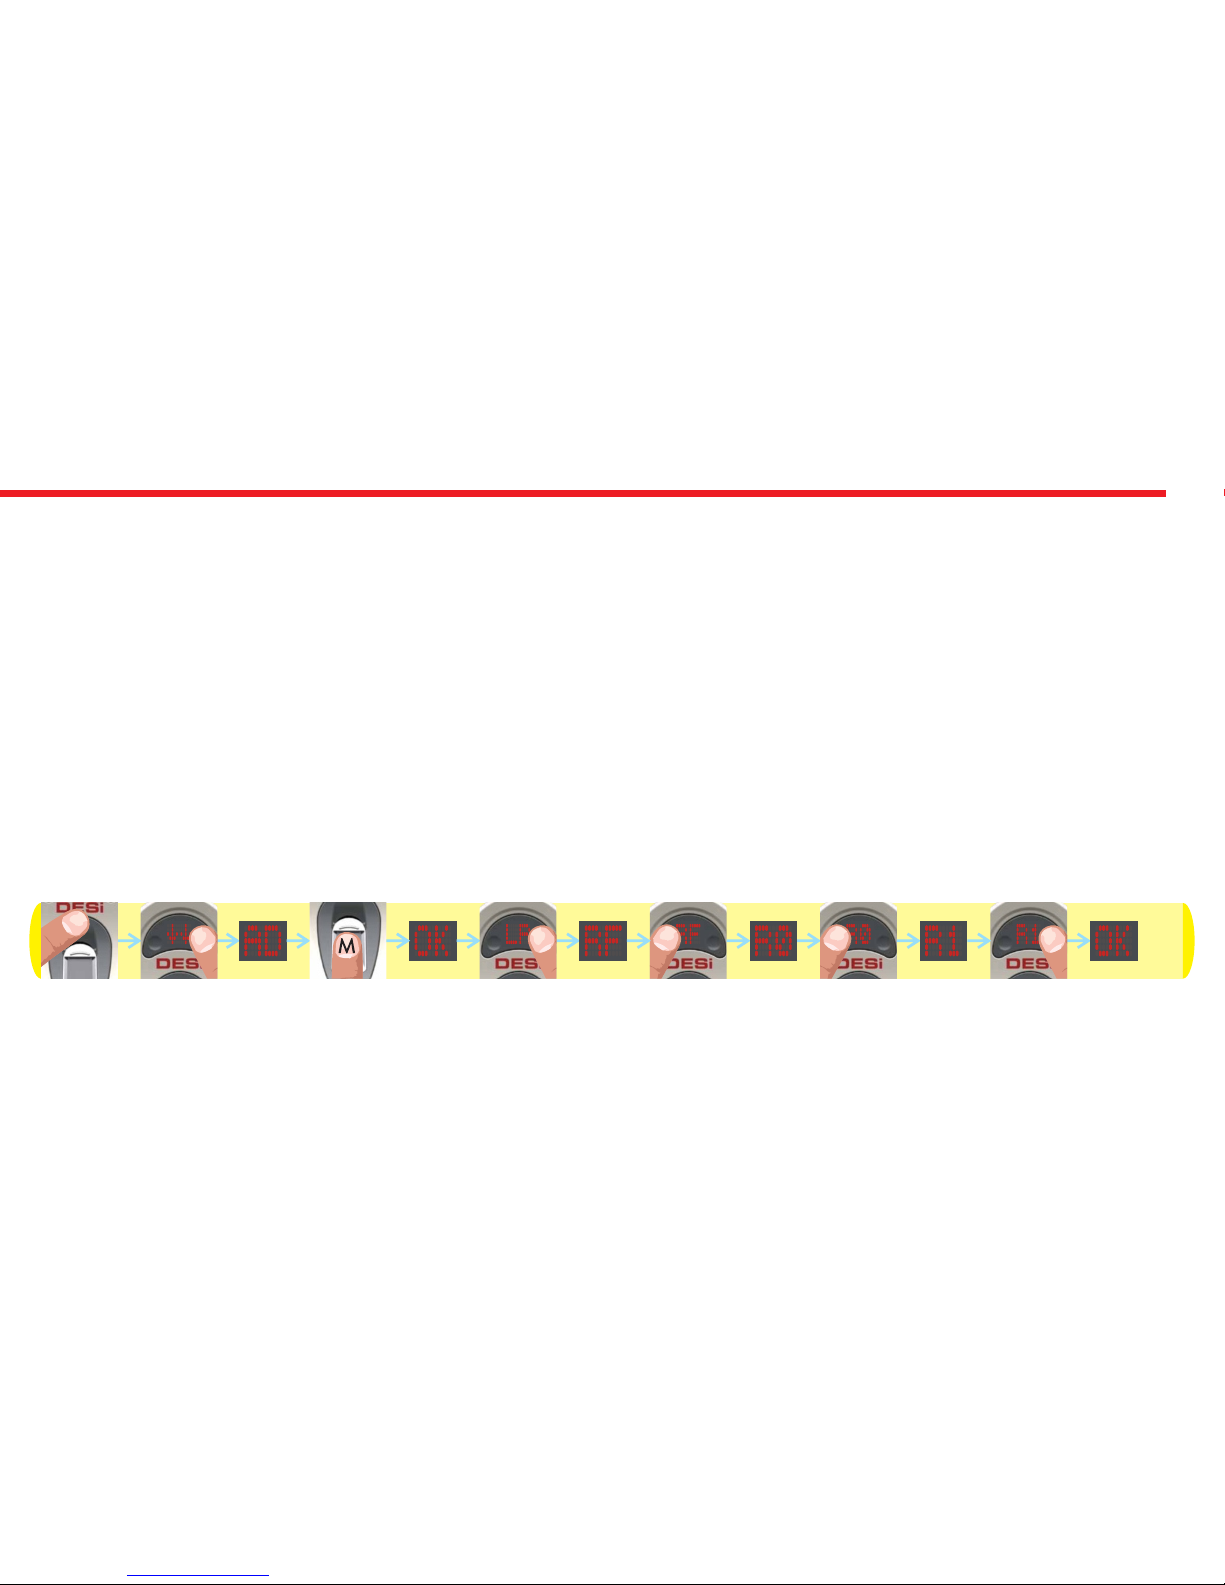
4.3.8. AUTO-LOCKING FEATURE (RF)
Your device has an automatic locking feature which locks itself 1 minute after it is unlocked. If you enable this feature, you
will be sure that your door is always locked.
You can enable or disable this feature by following steps below:
- Touch “WAKE UP”. Two arrows will appear on display. Than touch “2”. “AD” will be shown.
- Put one of the master fingers to the reader. First “OK” and than “LR” will be shown.
- Touch to “2" till “RF” appears and touch to “1" when “RF” is displayed. ”R0" or “R1" will be shown.
- Touch to “1" to toggle between;
“R0” - auto-locking is disabled
“R1” - auto-locking is enabled.
- When desired choice is displayed, touch to “2". “OK” will be displayed.
In this way, desired auto-locking choice will be set. Schematic representation of enabling auto-locking is as follows:
NOTE: To transfer settings to motorized cylinder, you need to lock or unlock motorized cylinder via master controller.
Page 18
18
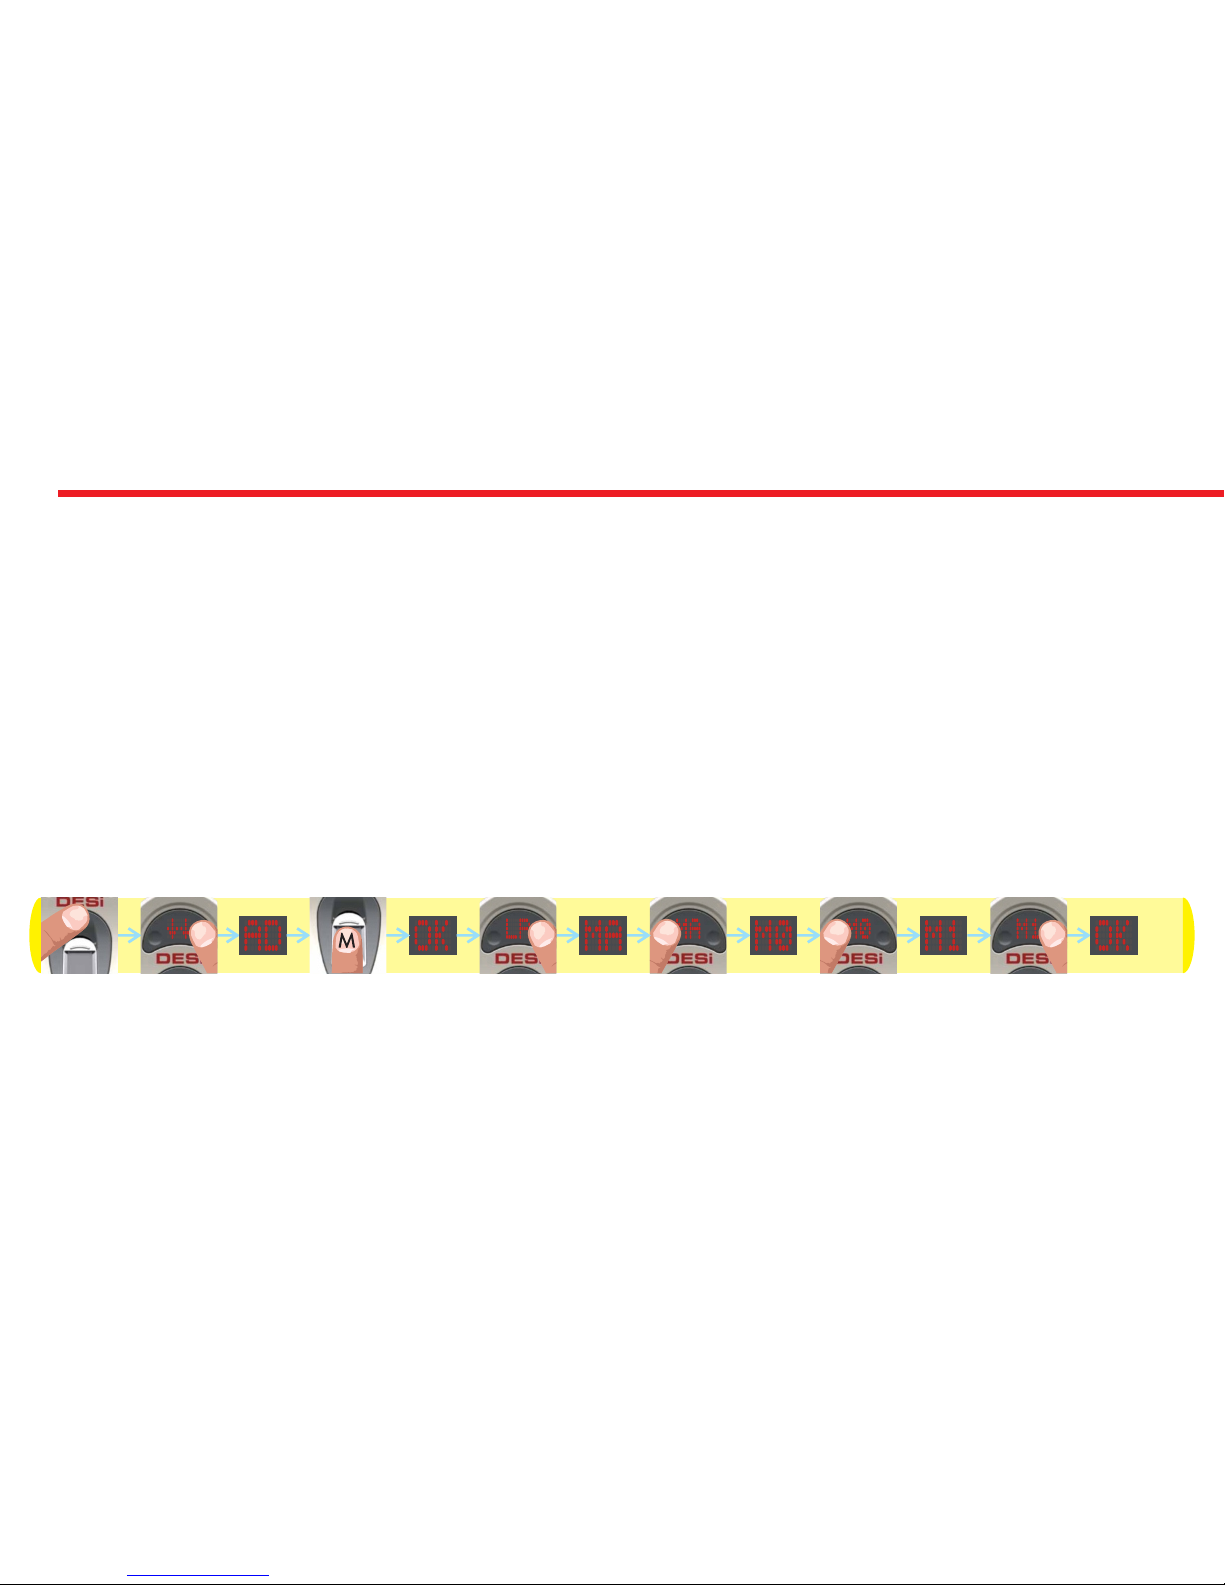
4.3.9. DELAYED LOCKING FEATURE (MA)
Your motorized cyclinder has a delayed locking feature which locks itself 5 second after you press the locking button on
the motorized cylinder. If this feature is enabled, when you are going out, if you touch locking button on motorized
cylinder and close the door in 5 seconds, it will lock the door automatically. You can enable or disable this feature by
following steps below:
- Touch “WAKE UP”. Two arrows will appear on display. Than touch “2”. “AD” will be shown.
- Put one of the master fingers to the reader. First “OK” and than “LR” will be shown.
- Touch to “2" till “MA” appears and touch to “1" when “MA” is displayed. ”M0" or “M1" will be shown.
- Touch to “1" to toggle between;
“M0” - delayed locking is disabled,
“M1” - delayed locking is enabled.
- When desired choice is displayed, touch to “2". “OK” will be displayed.
In this way, desired delayed locking choice will be set. Schematic representation of enabling delayed locking is as follows:
NOTE: To transfer settings to motorized cylinder, you need to lock or unlock motorized cylinder via master controller.
Page 19
19
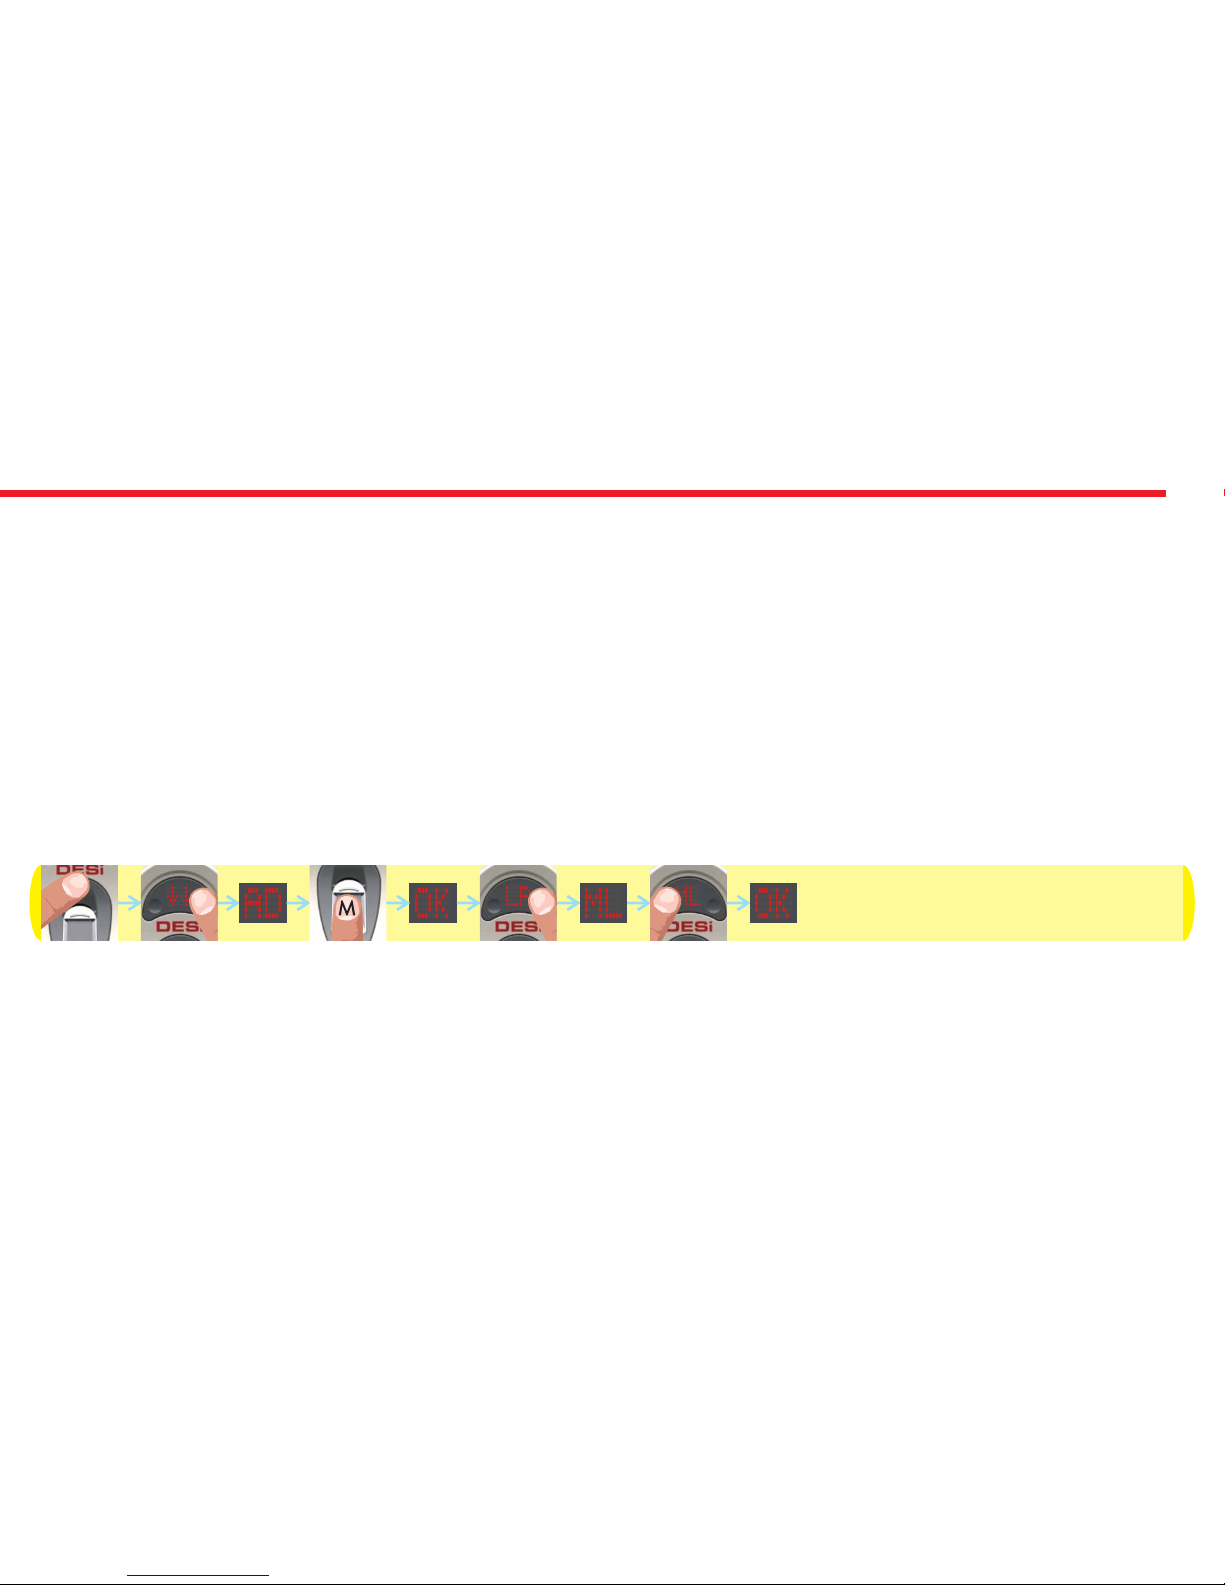
4.3.10. SHIFTING MOTORIZED CYLINDER TO ENROLLING NEW CONTROLLER MODE (ML)
Your motorized cylinder may learn up to 40 different controllers. To shift your motorized cylinder to enrolling new
controller mode, follows the steps below:
- Touch “WAKE UP”. Two arrows will appear on display. Than touch “2”. “AD” will be shown.
- Put one of the master fingers to the reader. First “OK” and than “LR” will be shown.
- Touch to “2" till “ML” appears and touch to “1" when “ML” is on display.
- “OK” will be displayed.
In this way, motorized cylinder will shift to enrolling new controller mode with a long warning tone. After that tone, you
need to send locking or unlocking signal via the new controller that you want to enroll to the motorized cylinder. If
enrolling will be succesful, you will hear two short warning tones from motorized cylinder.
Schematic representation of operation is as follows:
Page 20
20
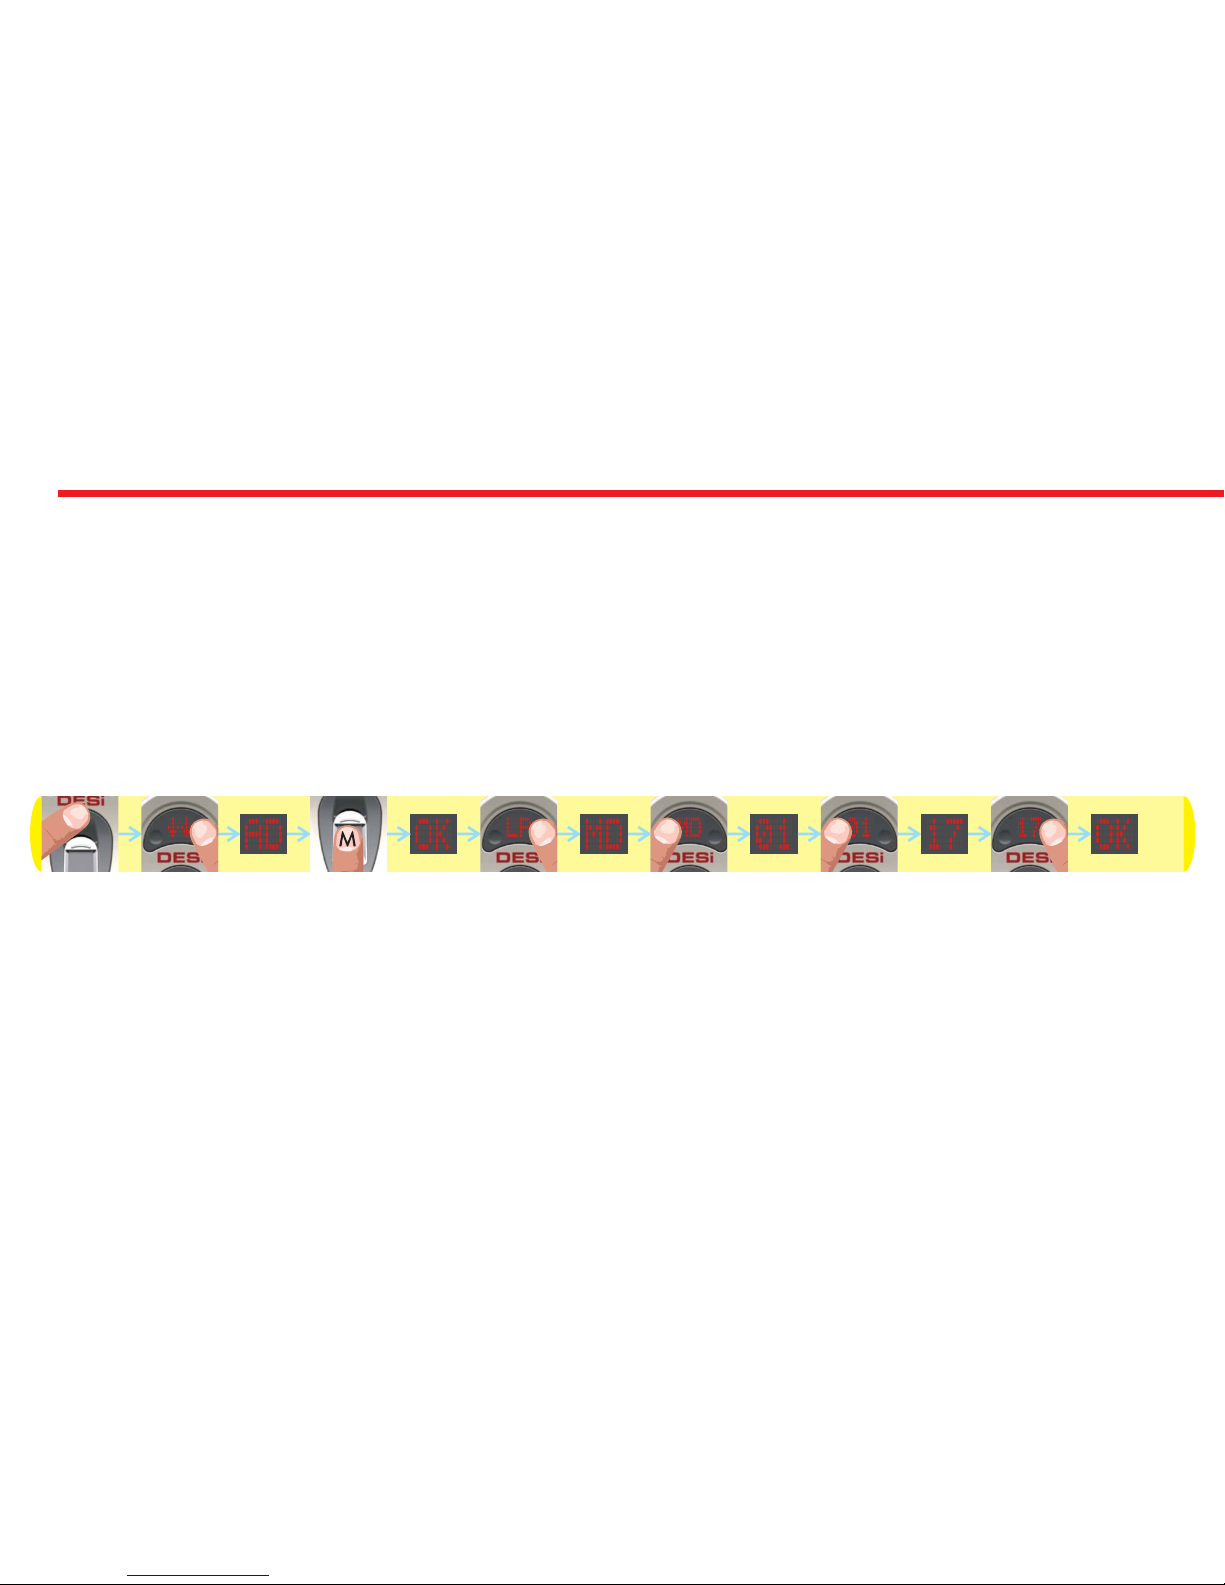
4.3.11. DELETING ALL ENROLLED CONTROLLERS OF MOTORIZED CYLINDER EXCEPT MASTER CONTROLLER (MD)
To delete all enrolled controllers of your motorized cylinder, follows the steps below:
- Touch “WAKE UP”. Two arrows will appear on display. Than touch “2”. “AD” will be shown.
- Put one of the master fingers to the reader. First “OK” and than “LR” will be shown.
- Touch to “2" till “MD” appears and touch to “1" when “MD” is on display. ”01" will be shown.
- Touch to “1" till you see “17" and touch to “2".
- “OK” will be shown.
In this way, motorized cylinder will delete all enrolled controllers of motorized cylinder with a long warning tone.
Schematic representation of operation is as follows:
NOTE: This operation doesn’t delete master controller from motorized cylinder’s memory. If you want to delete master
controller as well, please check “HOW TO RESET MOTORIZED CYLINDER” topic on page .....
Page 21
21
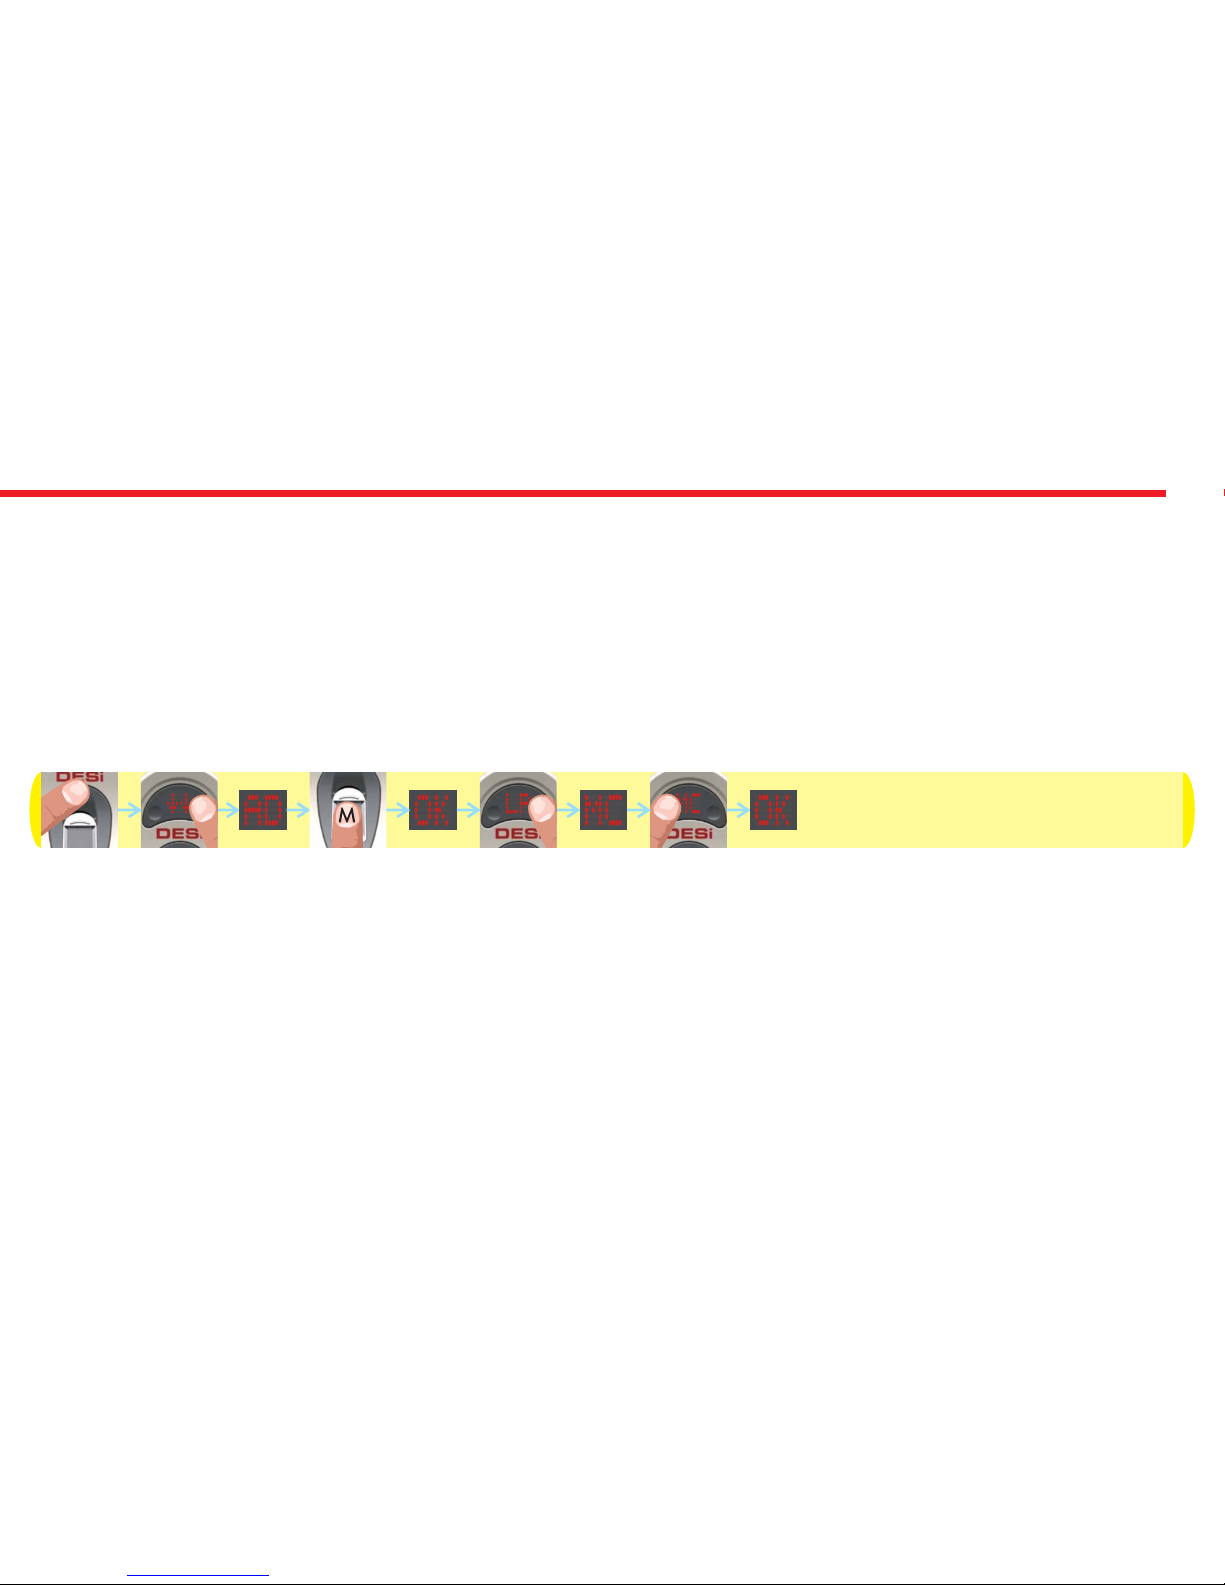
4.3.12. REPORTING NUMBER OF ENROLLED CONTROLLERS VIA BUZZER SOUND (MC)
Your motorized cylinder can report number of enrolled controllers via buzzer sound. To do this, follows the steps below:
- Touch “WAKE UP”. Two arrows will appear on display. Than touch “2”. “AD” will be shown.
- Put one of the master fingers to the reader. First “OK” and than “LR” will be shown.
- Touch to “2" till “MC” appears and touch to “1" when “MC” is on display.
- “OK” will be displayed.
In this way, motorized cylinder will start to report number of enrolled controllers via short warning tones.
Schematic representation of operation is as follows:
Page 22
22
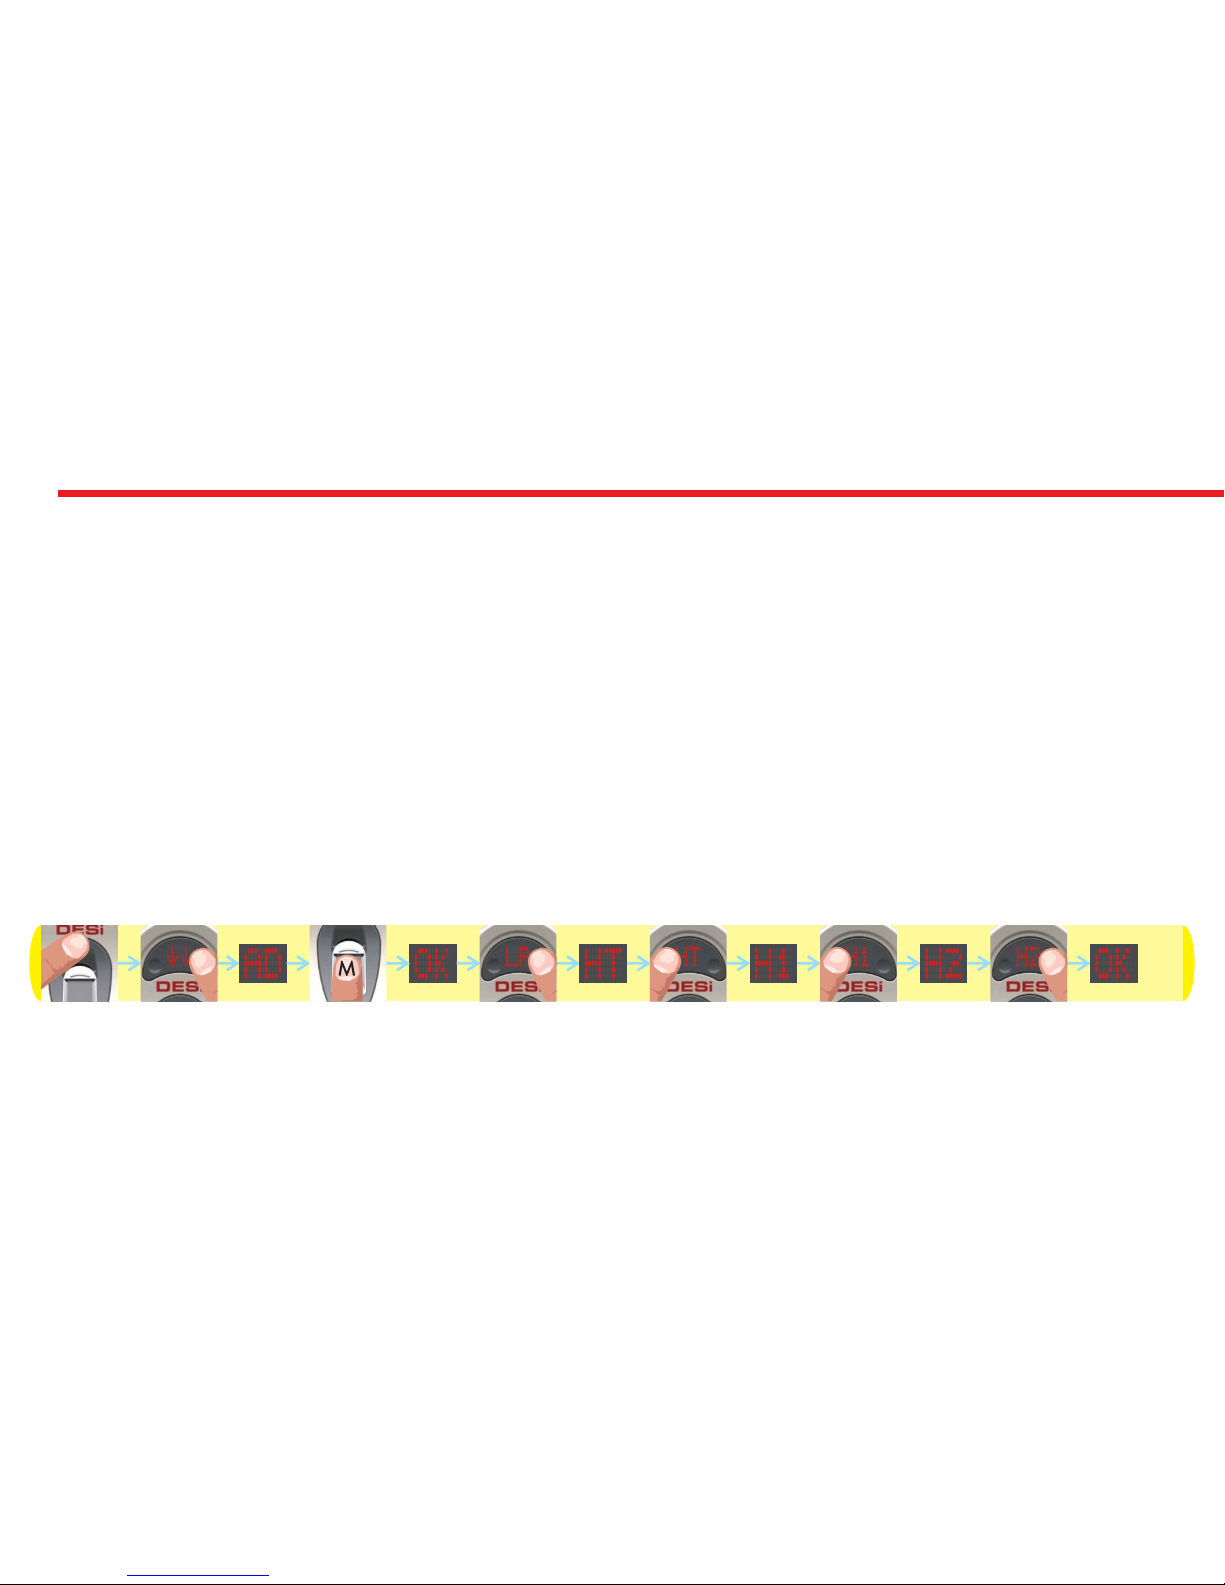
4.3.13. ADJUSTING LATCH RETRACTION PERIOD (HT)
According to type of your lock and usage, you would need to adjust the time period which the motorized cylinder will keep
latch of the lock inside when it unlocks the lock. To adjust latch retraction period, follows the steps below:
- Touch “WAKE UP”. Two arrows will appear on display. Than touch “2”. “AD” will be shown.
- Put one of the master fingers to the reader. First “OK” and than “LR” will be shown.
- Touch to “2" till “HT” appears and touch to “1" when “HT” is on display. ”H0",“H1", “H2" or “H3" will be shown.
- Touch to “1" to toggle between;
“H0” - No Latch (choose if the lock doesn’t have a latch)
“H1” - Short Period (latch will be kept inside the lock around 1 second and than released)
“H2” - Middle Period (latch will be kept inside the lock around 5 second and than released)
“H3” - Long Period (latch will be kept inside the lock around 9 second and than released)
- When desired choice is displayed, touch to “2". “OK” will be displayed.
In this way, latch retraction period of motorized cylinder will be adjusted. Schematic representation of adjusting latch
retraction period of 5 seconds is as follows:
NOTE: To transfer settings to motorized cylinder, you need to lock or unlock motorized cylinder via master controller.
Page 23

23
4.4. USAGE
Before using your motorized cylinder, you should adjust “direction of locking (4.3.5)” and “number of rotation (4.3.4)”
according to lock which will be used with motorized cylinder.
4.4.1. UNLOCKING AND OPENING THE DOOR
Touch to “WAKE UP” and put an enrolled finger to sensor. Fingerprint id will be displayed and motorized cylinder will
unlock and open the door. If the finger is not known or recognized, “NO” will be displayed.
You can also unlock and open the door via button on motorized cylinder. For emergancy conditions, the handle and key also can
unlock and open the door.
4.4.2. LOCKING THE DOOR
Touch to “WAKE UP” and than “1". System will lock the door.
You can also lock the door via button on motorized cylinder. For emergancy conditions, the handle and key also can lock the door.
4.4.3. CHILD LOCK
If you enable child lock feature, motorized cylinder will behave like a standard mechanical lock. You can use it either with a
mechanical key or the handle only. None of enrolled controllers (like fingerprint reader) will work till child lock is disabled.
To enable child lock, press and hold two buttons on the motorized cylinder till you hear a long (3 sec.) warning tone. To
disable child lock, press and hold two buttons on the motorized cylinder till you hear 3 short warning tones.
Page 24
24
4.5. MAINTENANCE
You can clean external surfaces by soft, slightly damp cloth. Never use abrasive chemicals or water for this purpose. Watch
electronic parts of the system during changing batteries. Don’t contact sharp or conductive materials to those parts.
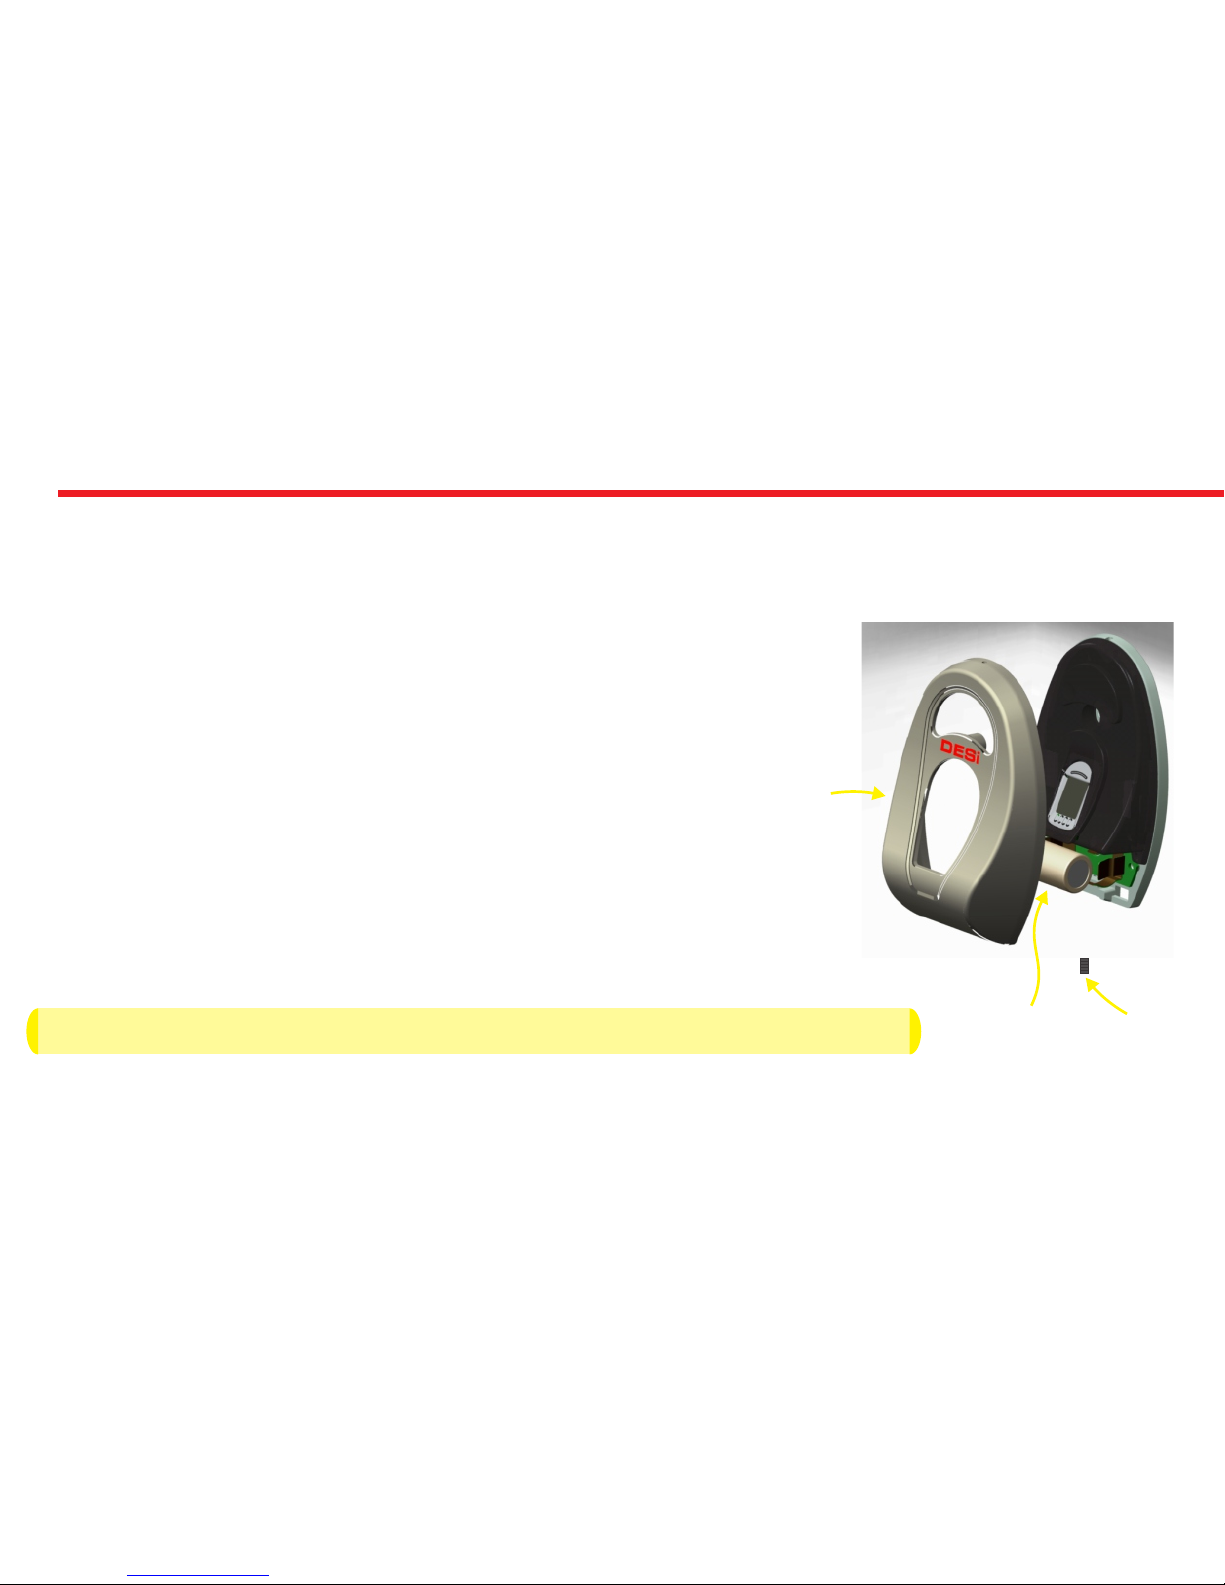
4.5.1. REPLACING FINGERPRINT READER’S BATTERY
If you start to see “BL” message on fingerprint reader’s display, you need to replace
the battery. Please get a new CR123A 3V lithium battery and follow steps below:
- Unscrew set screw (and unscrew long screw if you installed fingerprint reader from
inside) and remove metal cover.
- Replace the battery with new one. Watch the polarities!
- Place the metal part and tighten screws.
4.5.2. CHARGING MOTORIZED CYLINDER
If you hear triple warning tone after any operation (locking/unlocking),
or if the motorized cylinder rotates too slowly, you need to recharge it.
The device is fully charged around 3 hours.
We recommend to charge your device once in two months even the batteries are not empty.
USE PROVIDED CHARGING CABLE ONLY!
Set
Screw
Metal
Cover
Battery
Page 25

25
Page 26
DESi
26
WIRELESS FINGERPRINT
READER (V2)
In this section, you can find details about installation and
usage of Wireless Fingerprint Reader Version 2.
If motorized cylinder bundled with fingerprint reader,
it would be the master controller of your motorized cylinder.
Before you use your motorized cylinder, you should adjust it
properly according to the lock which motorized
cylinder will work together. First, you should adjust
“direction of locking (5.3.5)” and than
“number of rotation (5.3.4)”.
If you want to change the master controller of motorized
cylinder, check “HOW TO RESET MOTORIZED CYLINDER”
topic on last page.
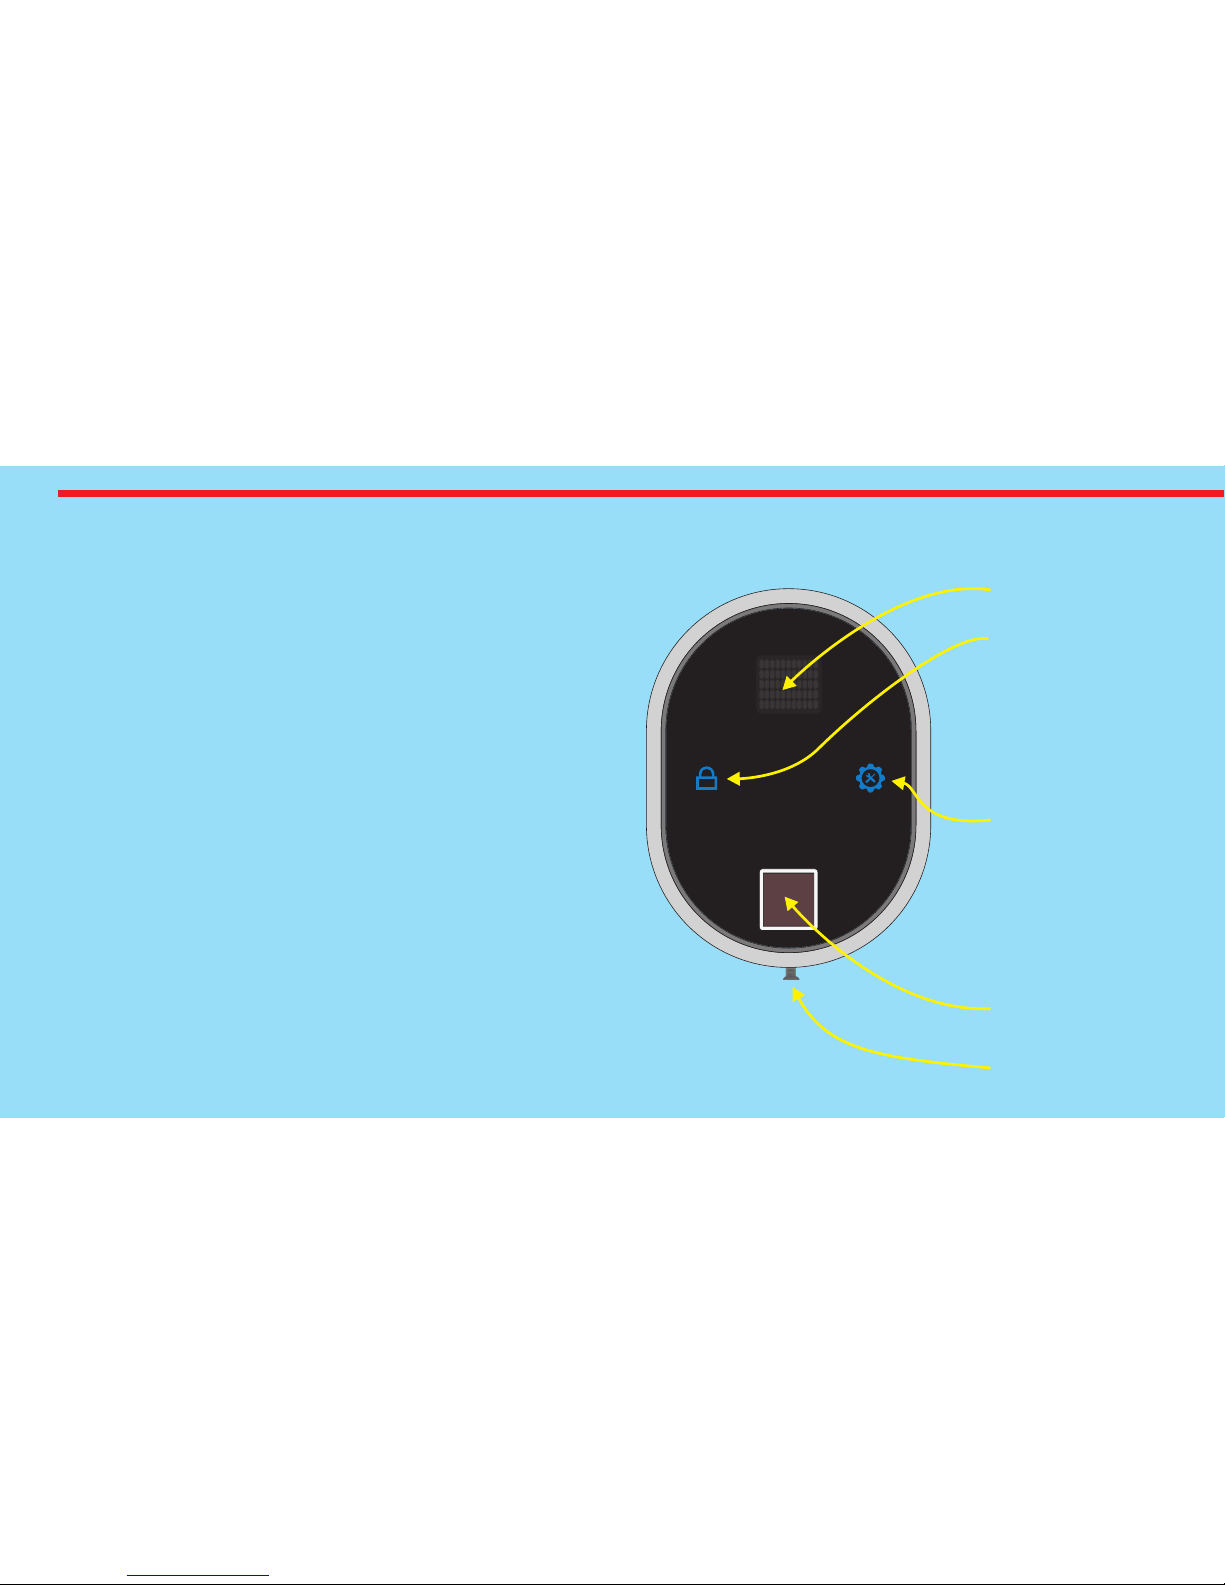
Display
Touch Button #1
- Lock
- Enter Shown Item
- Confirm Selection
Back Plate
Screw
Touch Button #2
- Enter Menu
- Shift to Next Item
- Rotate in Choices
Sensor
Page 27
27
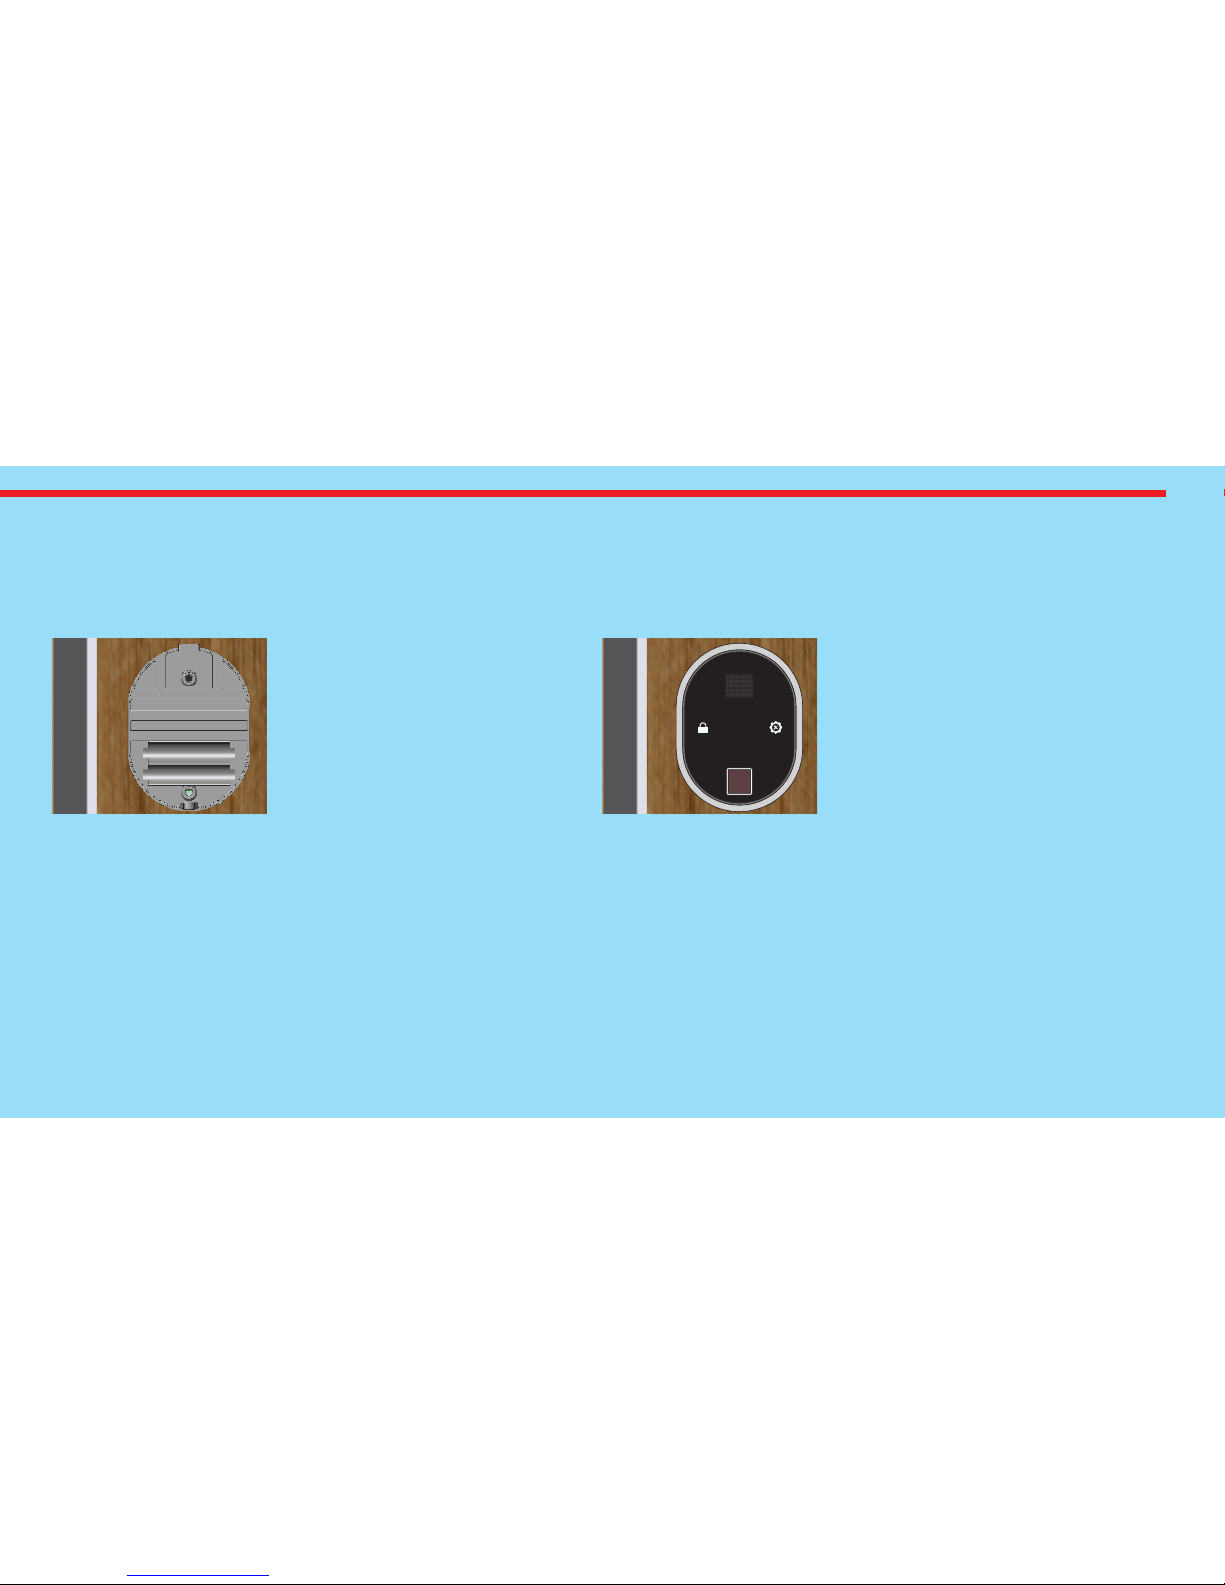
5.1. INSTALLATION OF WIRELESS FINGERPRINT READER V2
Unscrew back plate screw at the bottom of reader and seperate pack plate from device. After that, follow the steps below:
Place back plate to
the desired location
and fix it with 2
screws.
Place the device and
tighten back plate
screw.
DESi
2nd Step1st Step
Page 28
28
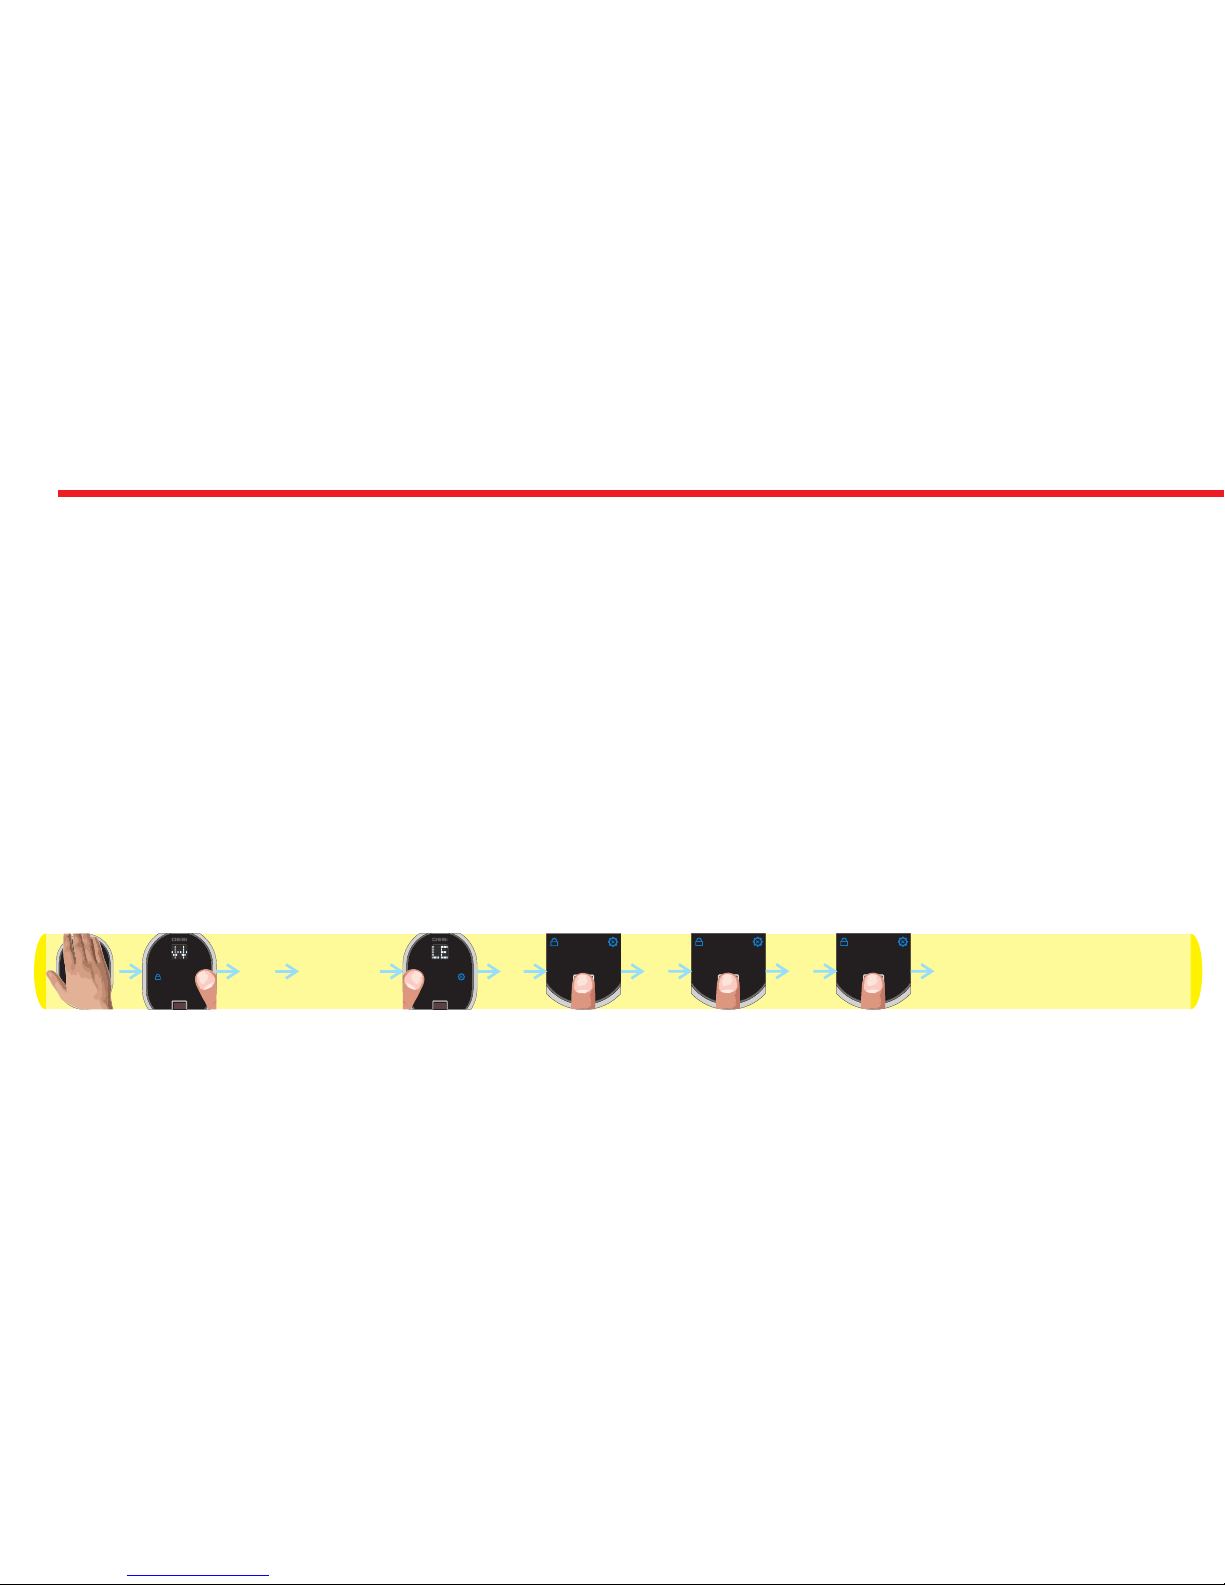
5.2. ENROLLING FIRST (MASTER) FINGERPRINT
Fingerprint reader comes without any fingerprint in its memory. The first 3 fingerprints are accepted as master
fingerprints and administrative activities like enrolling or deleting fingerprint can be done by master fingerprints only.
Master fingerprints need to be chosen carefully. on’t enroll a child’s finger or a finger which is deformed D ny (or can be
d ) a eformed easily as master finger.
To enroll first fingerprint:
- Touch to device with your palm to wake it up. Touch to “2". First “OK” and than “LEARN” will be displayed.
- Touch to “1". “L3" will be displayed.
- Put the finger to the reader till you see “OK” and remove. “L2" will be displayed.
- Put the same finger again till you see “OK” and remove. . “L1" will be displayed.
- Put the same finger again till you see “OK”.
After this step, your finger will be enrolled as first master. Schematic representation of operation is as follows:
DESi
OK LEARN L3
L2 L1 OK
Page 29
29
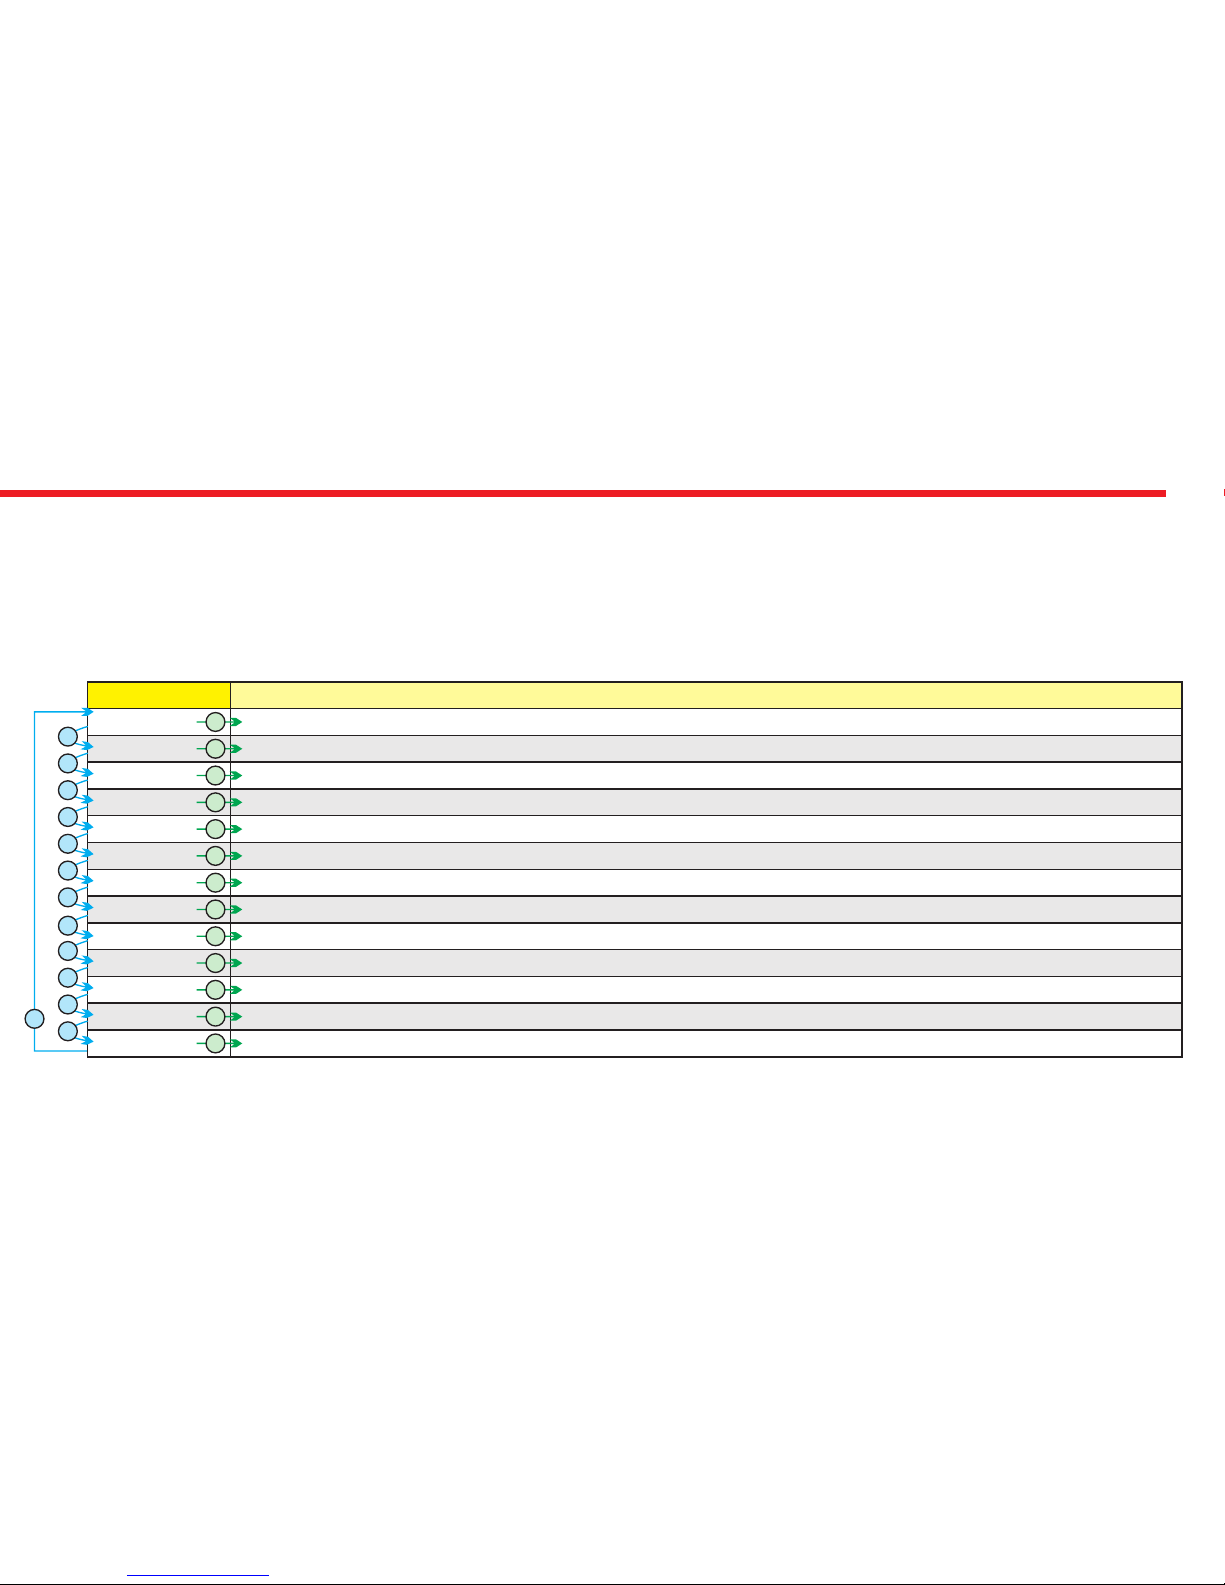
5.3. SETTINGS / ADMINISTRATION MENU
You can change settings of your motorized cylinder and perform administrative activities via this menu. Before using your
smart cylinder, “number of turns” and “locking way” settings should be adjusted properly. Otherwise, it would damage the
device’s mechanical structure.
The menu items and order is as follows:
LEARN
DELETE
RESET
TURN
MOTOR
USER
SOUND
NIGHT
Display
Enrolling new fingerprints
Deleting enrolled fingerprints one by one
Deleting all fingerprints (Reseting fingerprint reader)
Adjusting motorized cylinder according to lock’s number of rotation to lock/unlock
Adjusting direction of locking according to door’s opening way
Showing total number of enrolled fingerprints in the device’s memory
Enabling or disabling buzzer sound (Warning tones are always active)
Enabling or disabling automatic locking mode which locks cylinder 1 minute after it is unlocked
Function
2
2
2
2
2
2
2
2
1
1
1
1
1
1
1
1
MANUAL Enabling or disabling delayed locking which locks 5 s. after locking button on the cylinder is pressed.
1
2
R.LEARN
R.DELETE
R.COUNT
HOLD.TM
Shifting the motorized cylinder to enrolling mode to learn new controllers
Deleting all controllers enrolled to cylinder except master controller.
Reporting number of controllers enrolled to motorized cylinder via buzzer sound
Adjusting latch retraction period.
2
2
2
1
1
1
1
2
Page 30
30
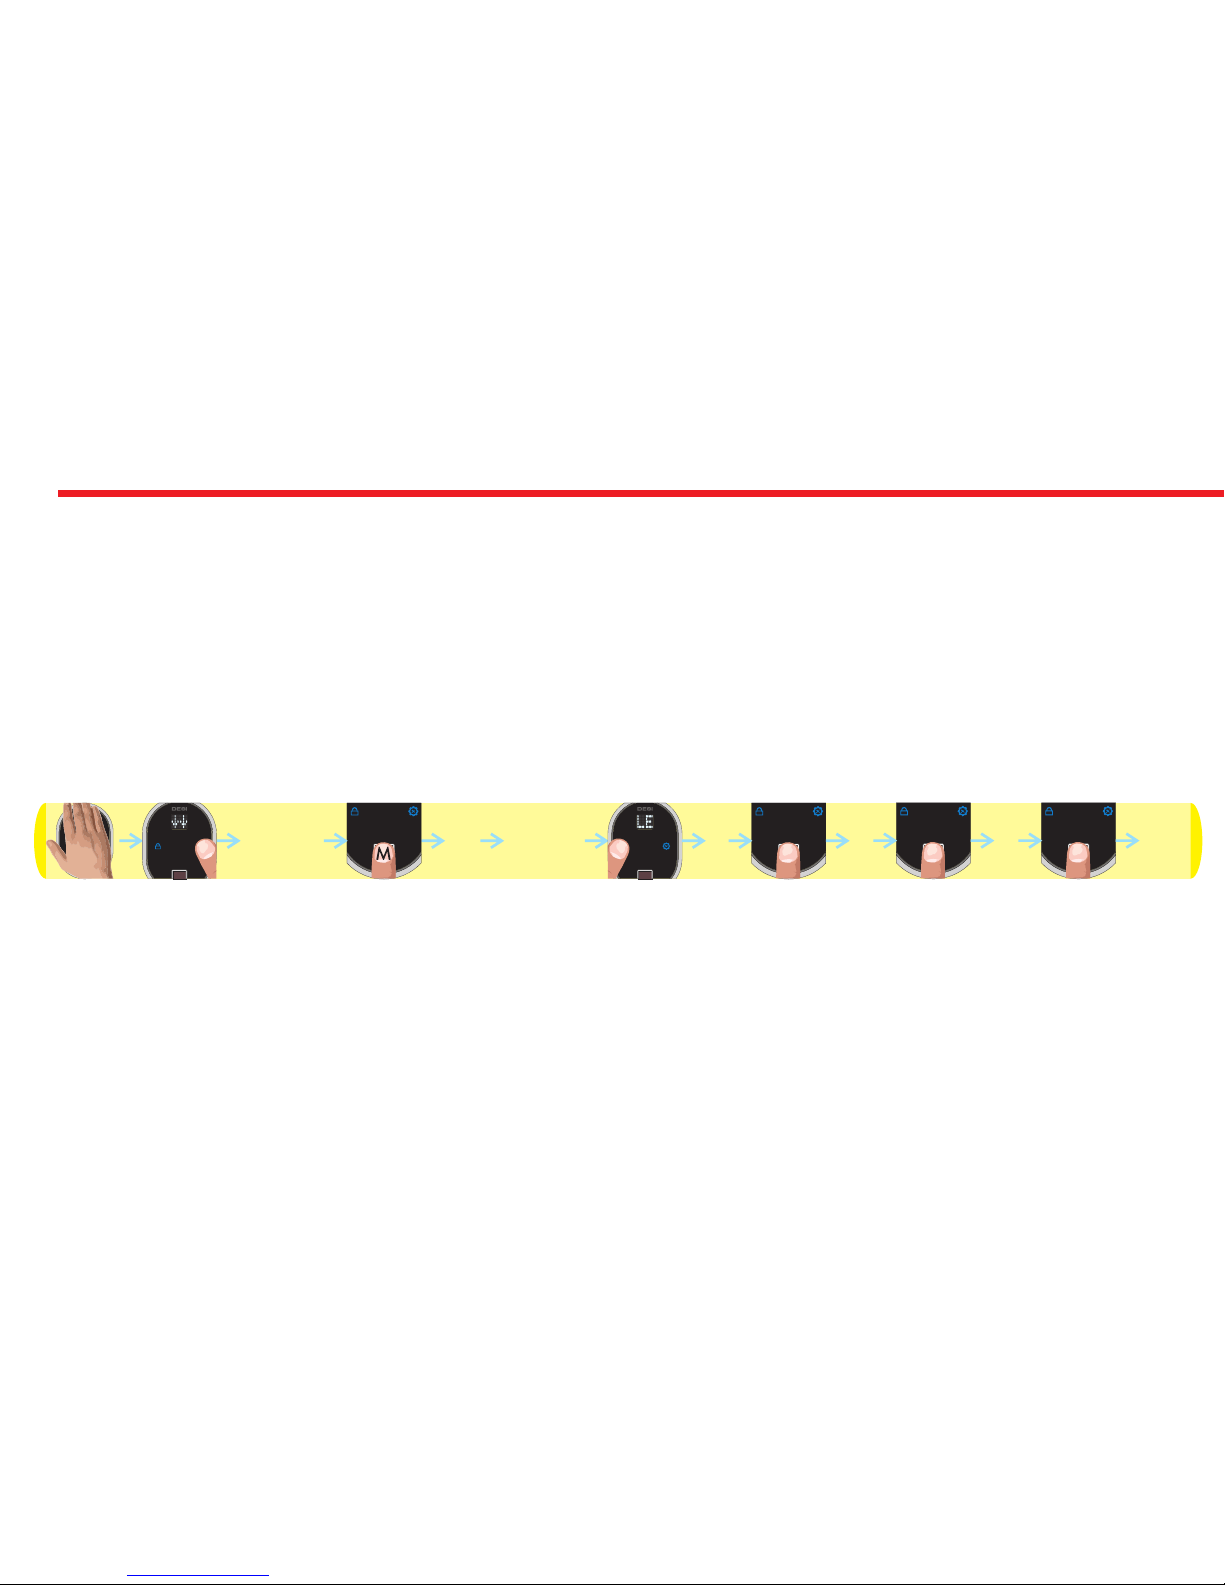
5.3.1. ENROLLING A NEW FINGERPRINT (LEARN)
If you want to enroll a new fingerprint to the reader, follow the steps below:
- Touch to device with your palm to wake it up. Two arrows will appear on display. Than touch “2”. “ADMIN” will be shown.
- Put one of the master fingers to the reader. First “OK” and than “LEARN” will be shown.
- Touch to “1” when “LEARN” is on display. “L3” will be shown.
- Put the finger to the reader till you see “OK” and remove. “L2" will be displayed.
- Put the same finger again till you see “OK” and remove. . “L1" will be displayed.
- Put the same finger again till you see “OK”.
In this way, the new finperprint will be enrolled to the device. Schematic representation of operation is as follows:
NOTE 1: System assigns an id to fingers and this id is shown when finger is read.
NOTE 2: During enrollment, device reads the finger 2 times. If 2 reads don’t match, “EE” code will be displayed and reader
turns back to “L0" step. In this case, enrolling need to be repeated. Try to put your finger to the sensor in a similar way
during both read steps of enrollment
DESi
OK LEARN L3
L2 L1 OK
ADMIN
Page 31
31
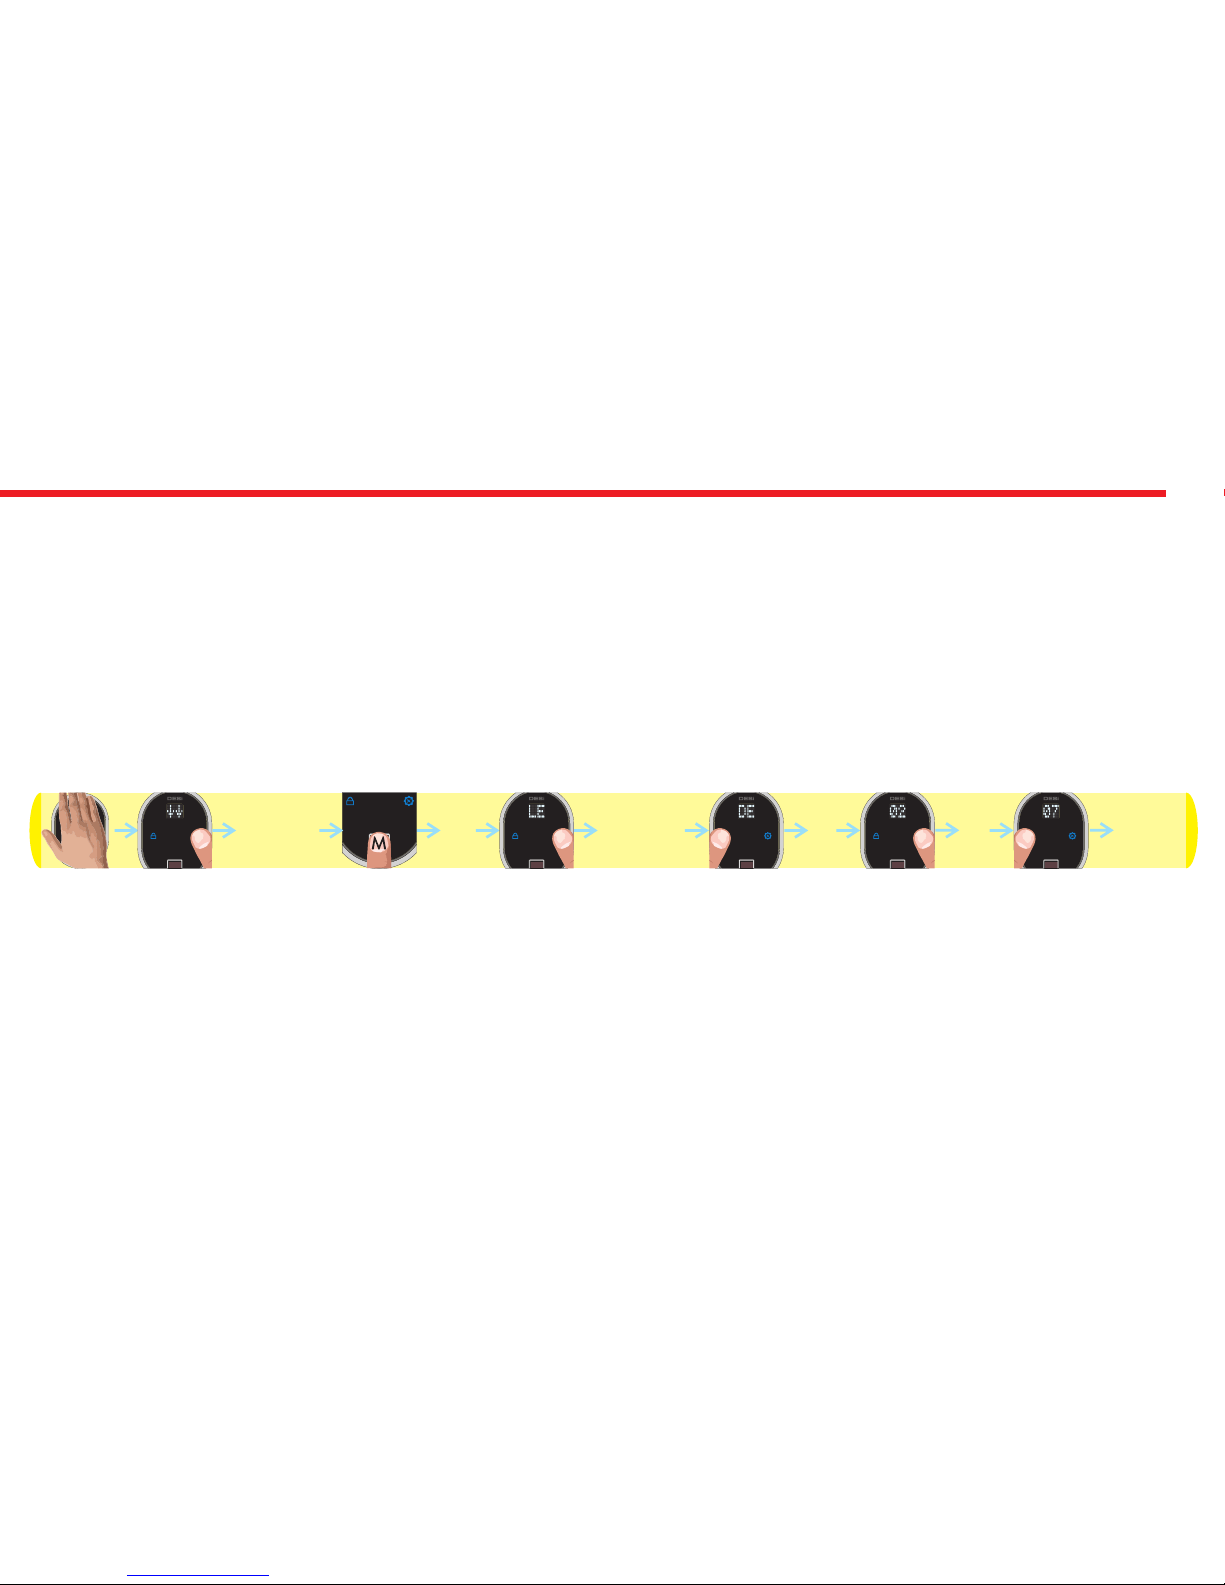
5.3.2.DELETING ENROLLED FINGERPRINTS ONE-BY-ONE (DELETE)
If you want to delete an enrolled fingerprint which you know the id number, follow the steps below:
- Touch to device with your palm to wake it up. Two arrows will appear on display. Than touch “2”. “ADMIN” will be shown.
- Put one of the master fingers to the reader. First “OK” and than “LEARN” will be shown.
- Touch to “2" till “DELETE” appears and touch to “1" when “DELETE” is on display. ”01" will be shown.
- Touch to “2" till you see the fingerprint id you want to delete and touch to “1" when related id is on display.
- “OK” will be shown.
In this way, the related finperprint will be deleted. Schematic representation of deleting a fingerprint (e.g. id is “07") is as
follows:
NOTE 1: System assigns an id to fingers and this id is shown when finger is read. By mistake, if you pass the id of fingerprint
you want to delete, wait a few seconds till display goes off and restart the procedure.
NOTE 2: First master fingerprint cannot be deleted in this way.
DESi
OK
02 07 OK
ADMIN DELETE
Page 32
32
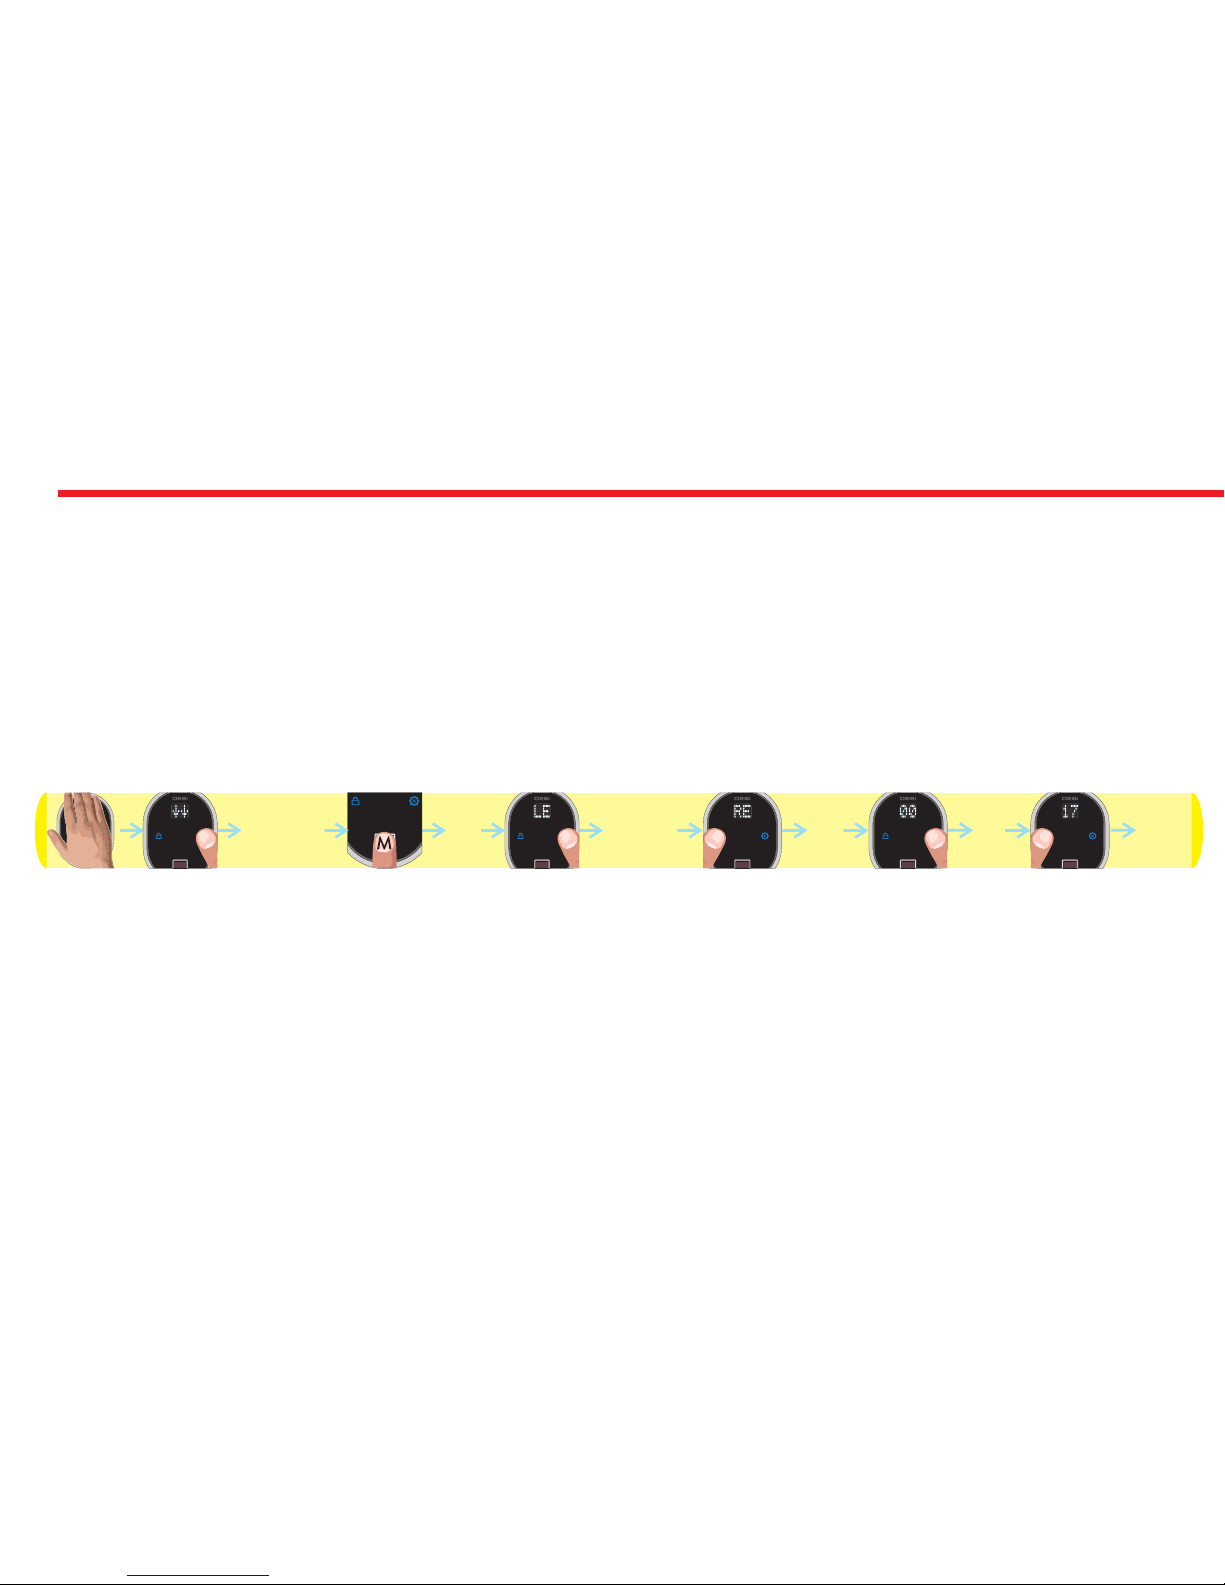
5.3.3. DELETING ALL FINGERPRINTS / RESET FINGERPRINT READER (RESET)
If you want to delete all enrolled fingerprint readers (including masters) , follow the steps below:
- Touch to device with your palm to wake it up. Two arrows will appear on display. Than touch “2”. “ADMIN” will be shown.
- Put one of the master fingers to the reader. First “OK” and than “LEARN” will be shown.
- Touch to “2" till “RESET” appears and touch to “1" when “RESET” is on display. ”01" will be shown.
- Touch to “2" till you see “17" and touch to “1".
- “OK” will be shown.
In this way, all the finperprints (including masters) will be deleted. Schematic representation of operation is as follows:
NOTE: If you pass “17" by mistake, don’t touch any button and wait a few seconds till display goes off. After that restart the
procedure.
DESi
OK
00 17 OK
ADMIN RESET
Page 33
33
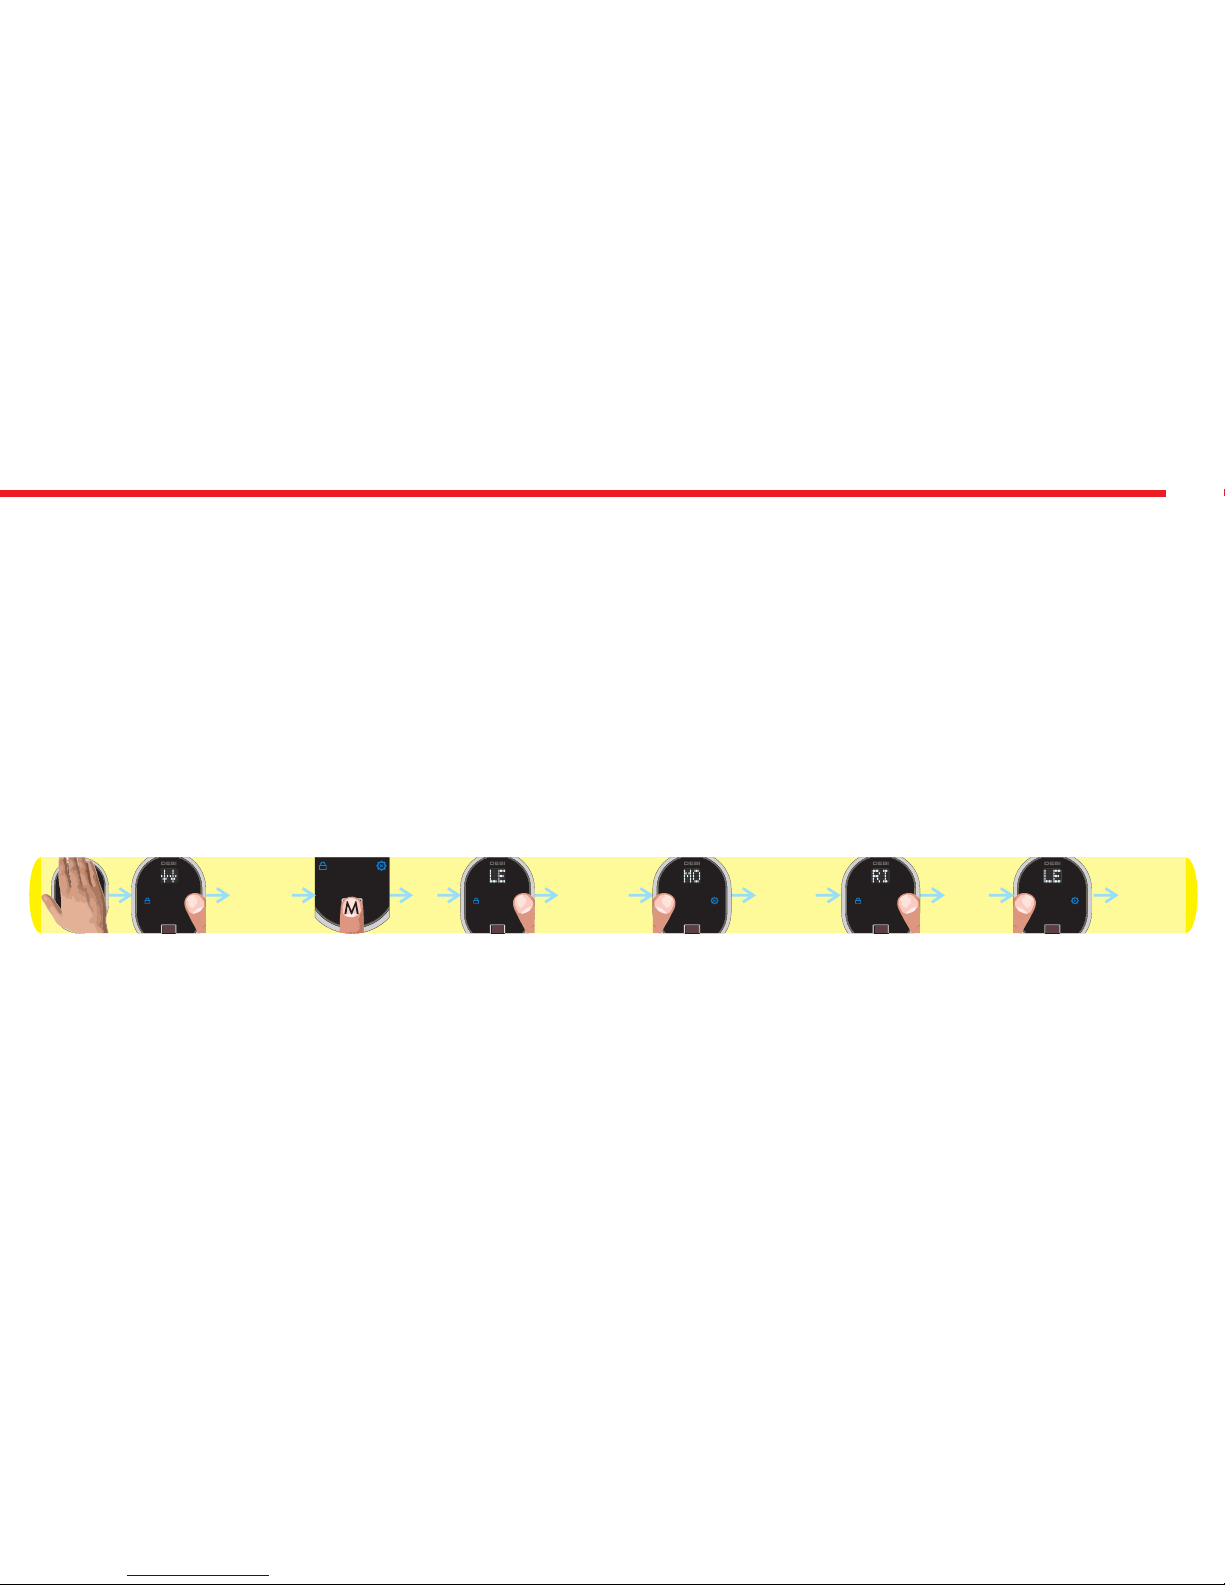
5.3.5. ADJUSTING DIRECTION OF LOCKING ACCORDING TO DOOR’S OPENING WAY (MOTOR)
To adjust your motorized cylinder’s locking way according to the door, follows the steps below:
- Touch to device with your palm to wake it up. Two arrows will appear on display. Than touch “2”. “ADMIN” will be shown.
- Put one of the master fingers to the reader. First “OK” and than “LEARN” will be shown.
- Touch to “2" till “MOTOR” appears and touch to “1" when “MOTOR” is on display. ”RIGHT” or “LEFT” will be shown.
- Touch to “2" to toggle between;
“RIGHT” - right door,
“LEFT” - left door.
- When desired way is displayed, touch to “1". “OK” will be displayed.
In this way, motorized cylinder’s direction of locking will be set. Schematic representation of changing direction of locking
from right to left is as follows:
NOTE: To transfer settings to motorized cylinder, you need to lock or unlock motorized cylinder via master controller.
DESi
OK
RIGHT
ADMIN MOTOR
OKLEFT
Page 34
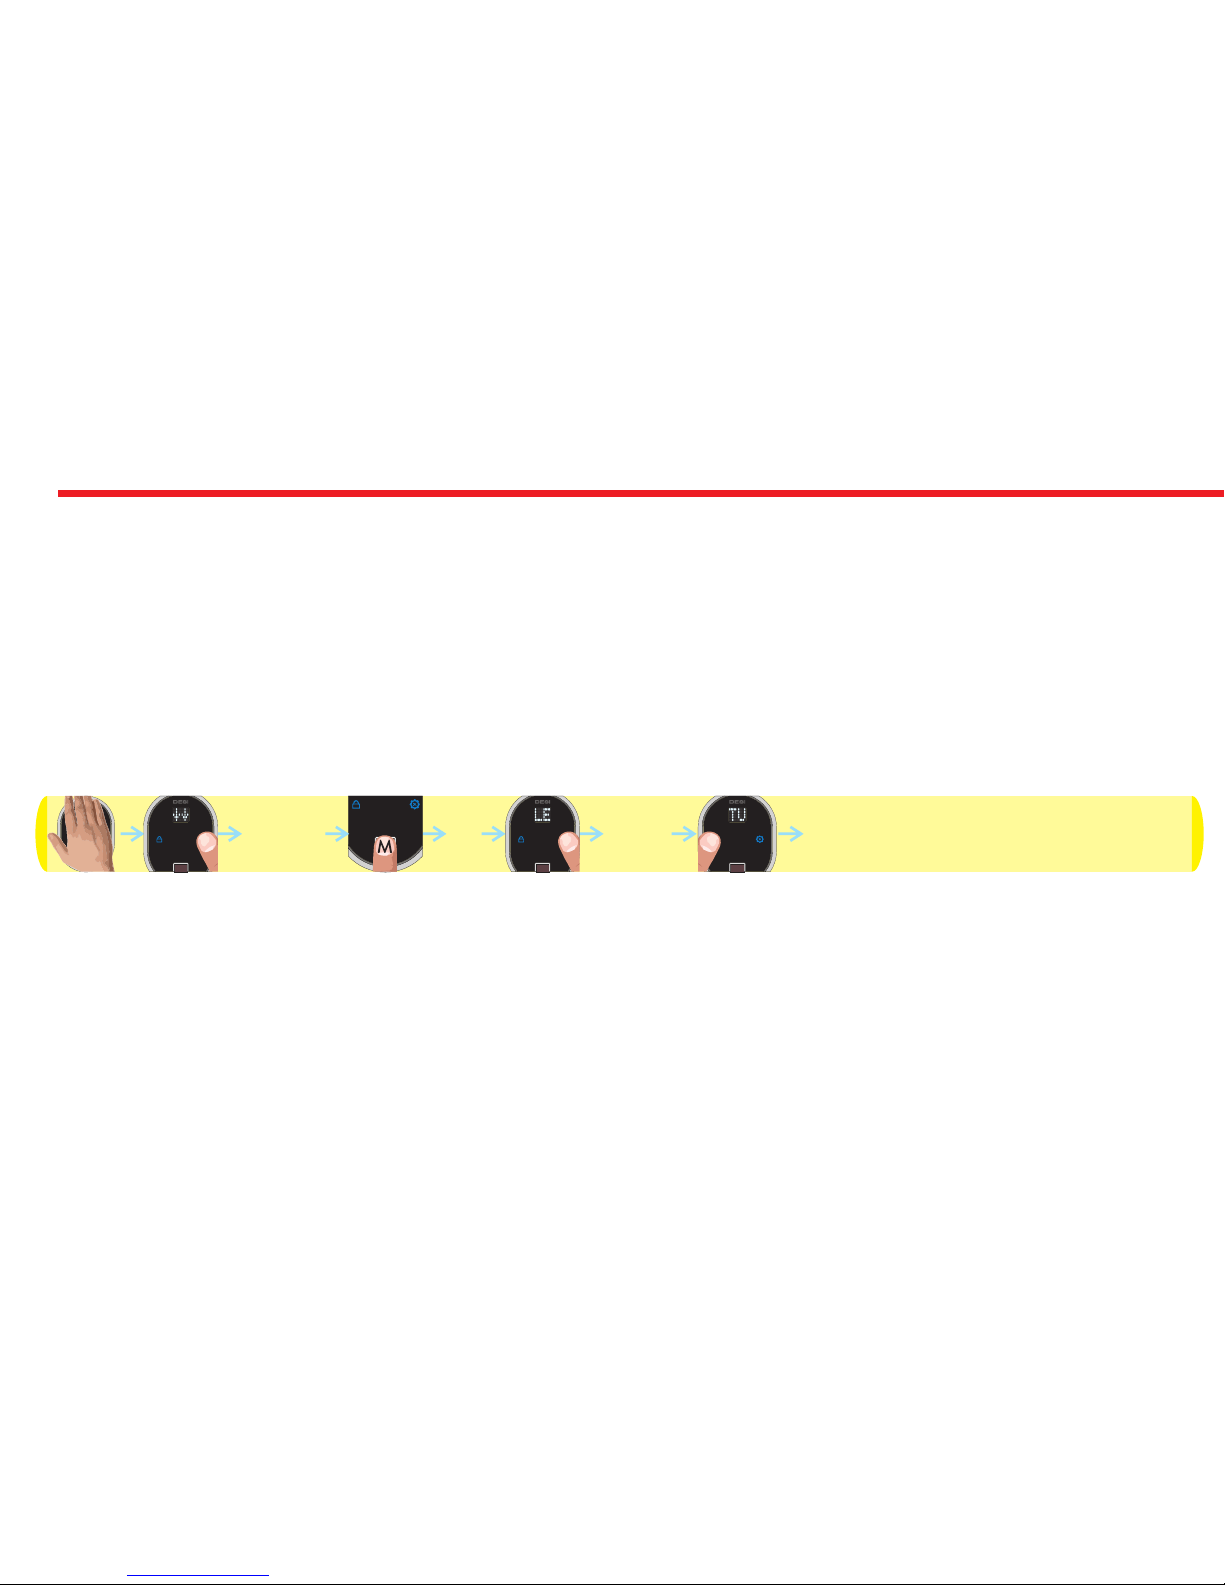
5.3.4. ADJUSTING MOTORIZED CYLINDER ACCORDING TO LOCK’S NUMBER OF ROTATION TO LOCK/UNLOCK
To adjust your motorized cylinder according to lock’s number of rotation, follows the steps below:
- First of all, close the door.
- Touch to device with your palm to wake it up. Two arrows will appear on display. Than touch “2”. “ADMIN” will be shown.
- Put one of the master fingers to the reader. First “OK” and than “LEARN” will be shown.
- Touch to “2" till “TURN” appears and touch to “1" when “TURN” is on display. ”OK" will be shown and cylinder will
automatically lock and unlock the door.
In this way, motorized cylinder will learn how many rotations is needed to lock / unlock the door. Schematic representation
of operation is as follows:
DESi
OK
OK
ADMIN TURN
34
Page 35
35
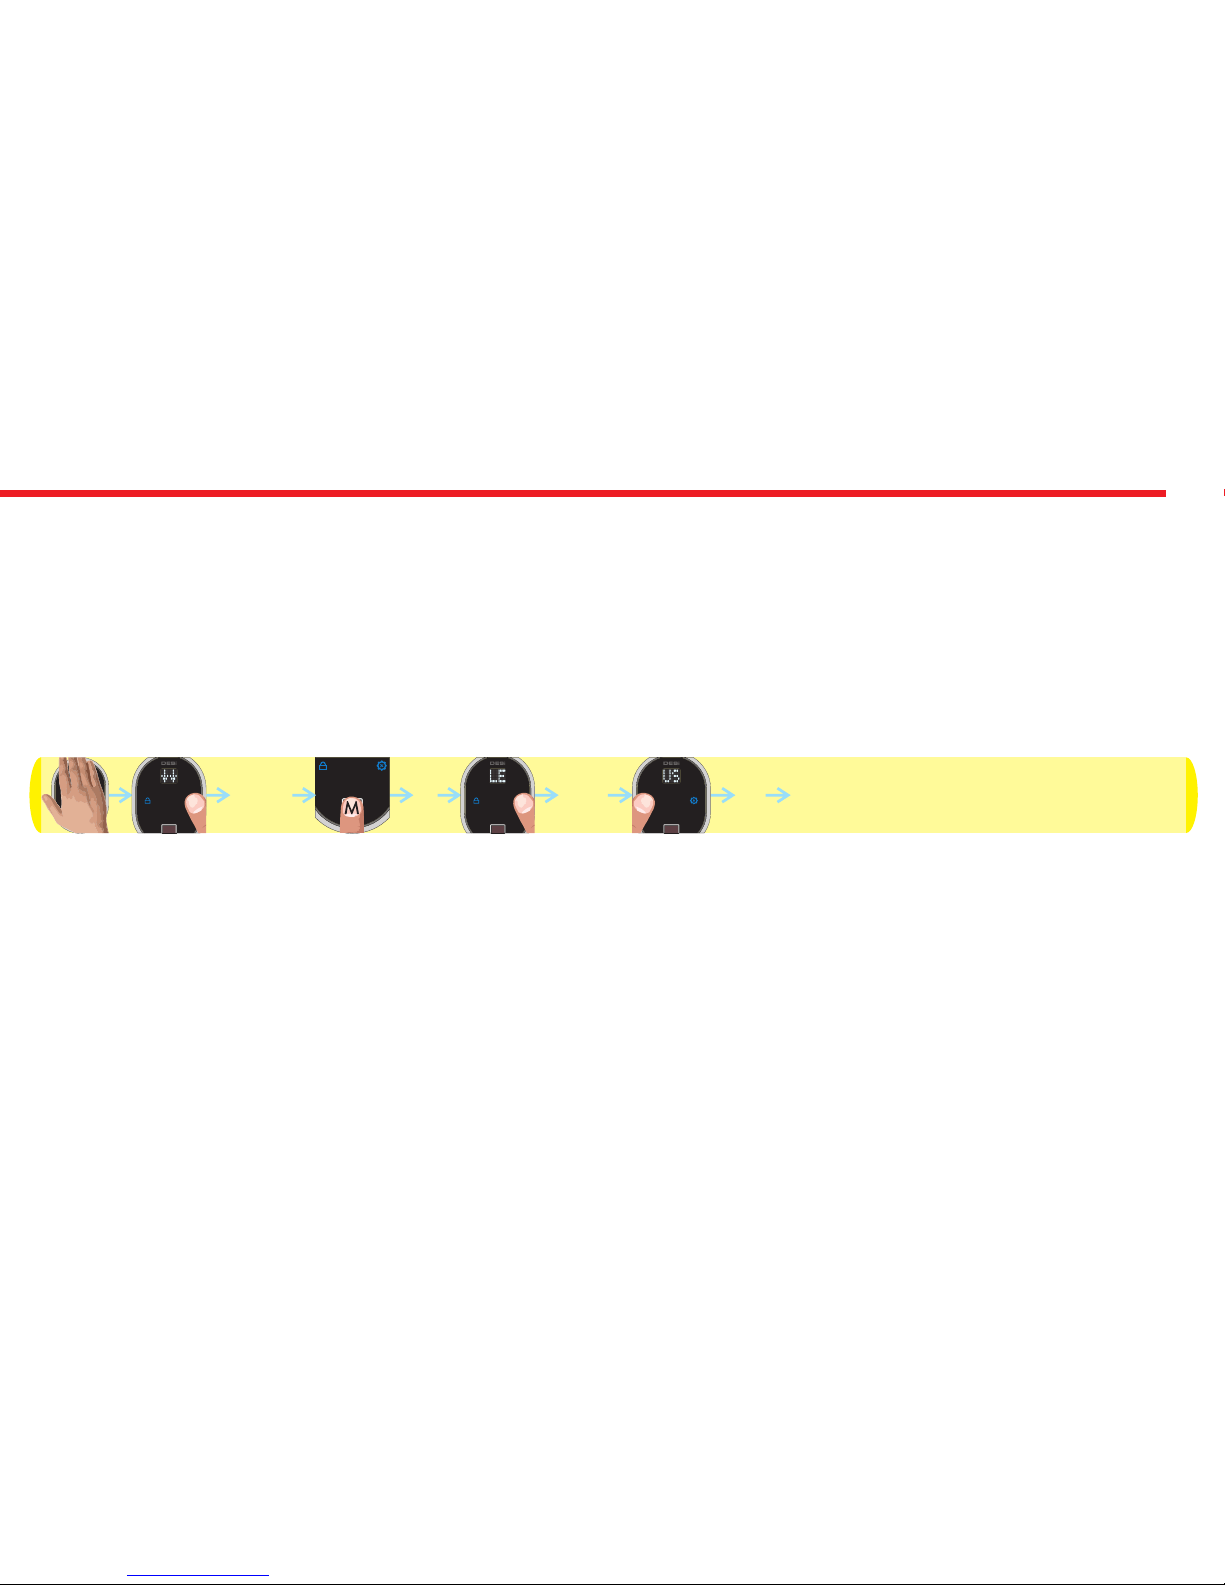
5.3.6. REPORTING TOTAL NUMBER OF ENROLLED FINGERS
To adjust your motorized cylinder’s locking way according to the door, follows the steps below:
- Touch to device with your palm to wake it up. Two arrows will appear on display. Than touch “2”. “ADMIN” will be shown.
- Put one of the master fingers to the reader. First “OK” and than “LEARN” will be shown.
- Touch to “2" till “USER” appears and touch to “1" when “USER” is on display.
In this way, number of enrolled fingerprints will be displayed. Schematic representation of this operation (which shows 8
fingerprints enrolled to reader) is as follows:
DESi
OK
OK
ADMIN USER
08
Page 36
36
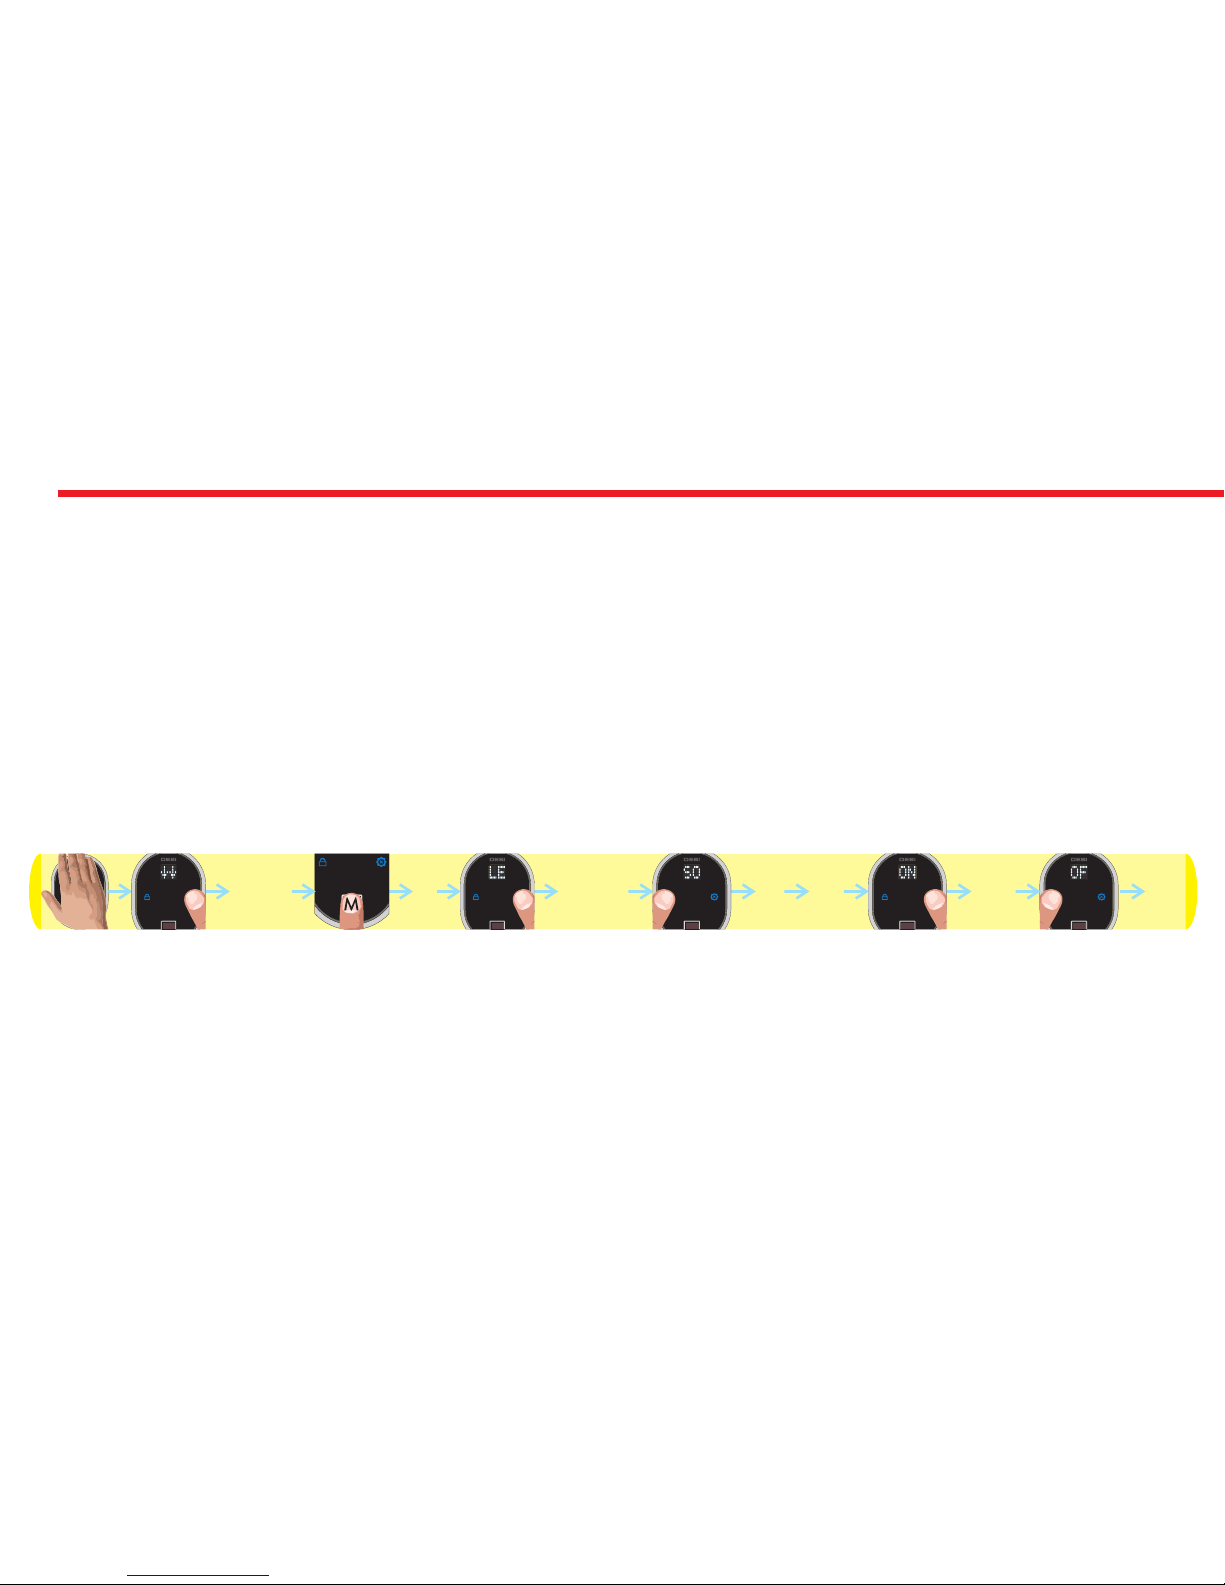
5.3.7. ENABLING OR DISABLING BUZZER SOUND
You can disabled (or enable) activation sounds by following steps below:
- Touch to device with your palm to wake it up. Two arrows will appear on display. Than touch “2”. “ADMIN” will be shown.
- Put one of the master fingers to the reader. First “OK” and than “LEARN” will be shown.
- Touch to “2" till “SOUND” appears and touch to “1" when “SOUND” is displayed. First “OK” than ”ON" or “OFF" will be
shown.
- Touch to “2" to toggle between;
“OFF” - buzzer is disabled
“ON” - buzzer is enabled.
- When desired choice is displayed, touch to “1". “OK” will be displayed.
In this way, desired buzzer choice will be set. Schematic representation of disabling buzzer sound is as follows:
NOTE: To transfer settings to motorized cylinder, you need to lock or unlock motorized cylinder via master controller.
DESi
OK
OK
ADMIN SOUND
OKOFFON
Page 37
37
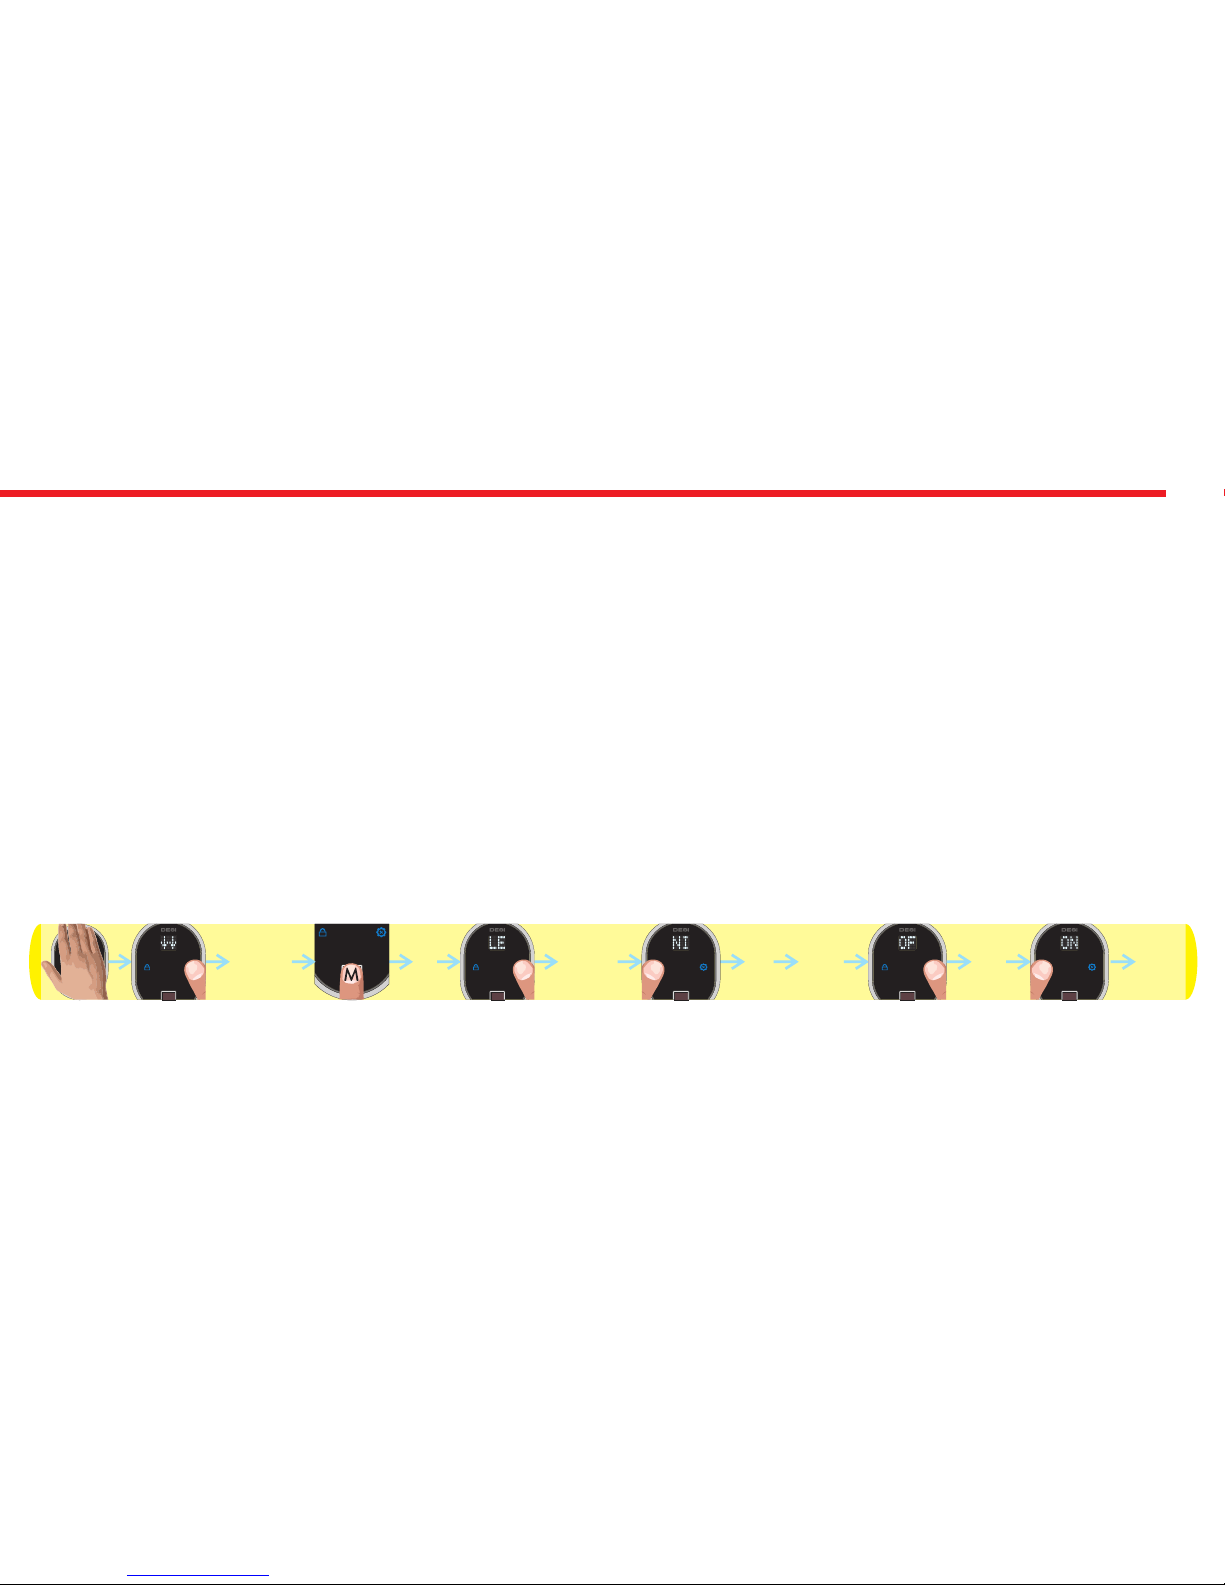
5.3.8. AUTO-LOCKING FEATURE
Your device has an automatic locking feature which locks itself 1 minute after it is unlocked. If you enable this feature, you
will be sure that your door is always locked.
You can enable or disable this feature by following steps below:
- Touch to device with your palm to wake it up. Two arrows will appear on display. Than touch “2”. “ADMIN” will be shown.
- Put one of the master fingers to the reader. First “OK” and than “LEARN” will be shown.
- Touch to “2" till “NIGHT” appears and touch to “1" when “NIGHT” is displayed. First “OK” than ”ON" or “OFF" will be
shown.
- Touch to “2" to toggle between;
“OFF” - auto-locking is disabled
“ON” - auto-locking is enabled.
- When desired choice is displayed, touch to “1". “OK” will be displayed.
In this way, desired auto-locking choice will be set. Schematic representation of enabling auto-locking is as follows:
NOTE: To transfer settings to motorized cylinder, you need to lock or unlock motorized cylinder via master controller.
DESi
OK
OK
ADMIN NIGHT
OKONOFF
Page 38
38
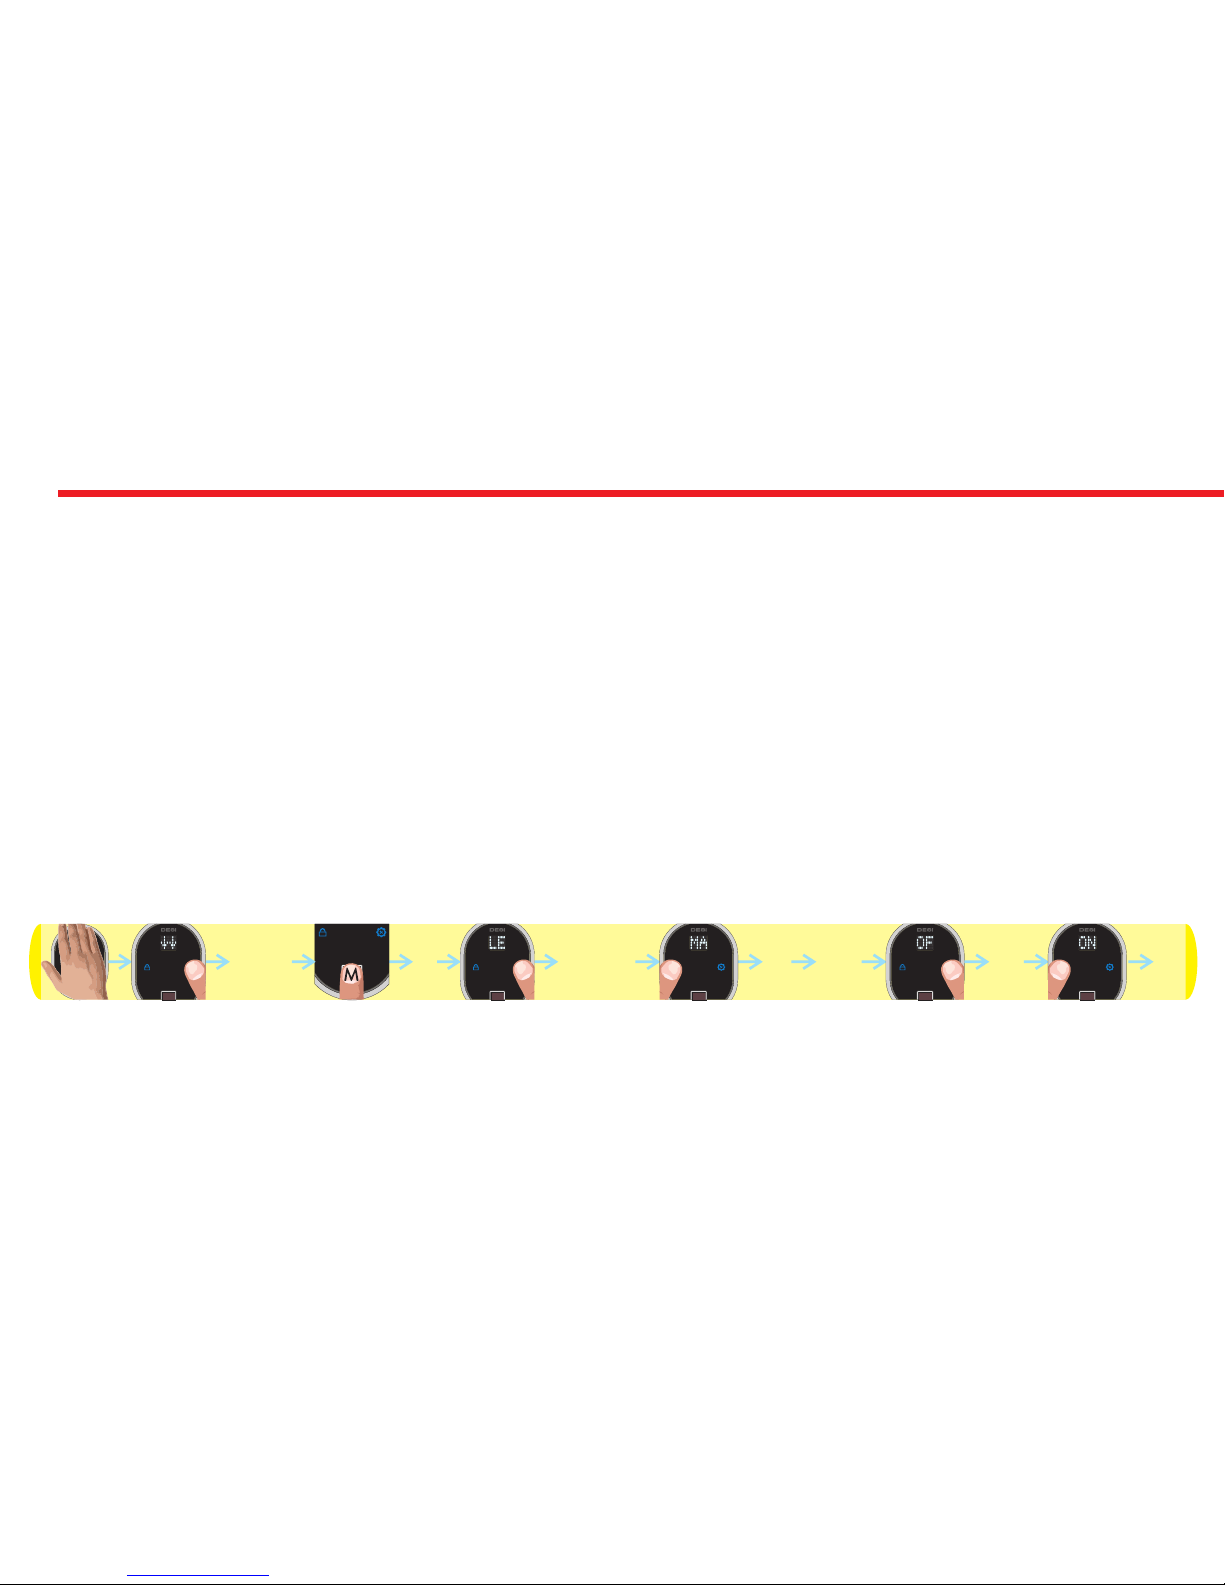
5.3.9. DELAYED LOCKING FEATURE
Your motorized cyclinder has a delayed locking feature which locks itself 5 second after you press the locking button on
the motorized cylinder. If this feature is enabled, when you are going out, if you touch locking button on motorized
cylinder and close the door in 5 seconds, it will lock the door automatically. You can enable or disable this feature by
following steps below:
- Touch to device with your palm to wake it up. Two arrows will appear on display. Than touch “2”. “ADMIN” will be shown.
- Put one of the master fingers to the reader. First “OK” and than “LEARN” will be shown.
- Touch to “2" till “MANUAL” appears and touch to “1" when “MANUAL” is displayed. First “OK” than “ON or “OFF” will be
shown.
- Touch to “2" to toggle between;
“OFF” - delayed locking is disabled,
“ON” - delayed locking is enabled.
- When desired choice is displayed, touch to “1". “OK” will be displayed.
In this way, desired delayed locking choice will be set. Schematic representation of enabling delayed locking is as follows:
NOTE: To transfer settings to motorized cylinder, you need to lock or unlock motorized cylinder via master controller.
DESi
OK
OK
ADMIN MANUAL
OKONOFF
Page 39
39
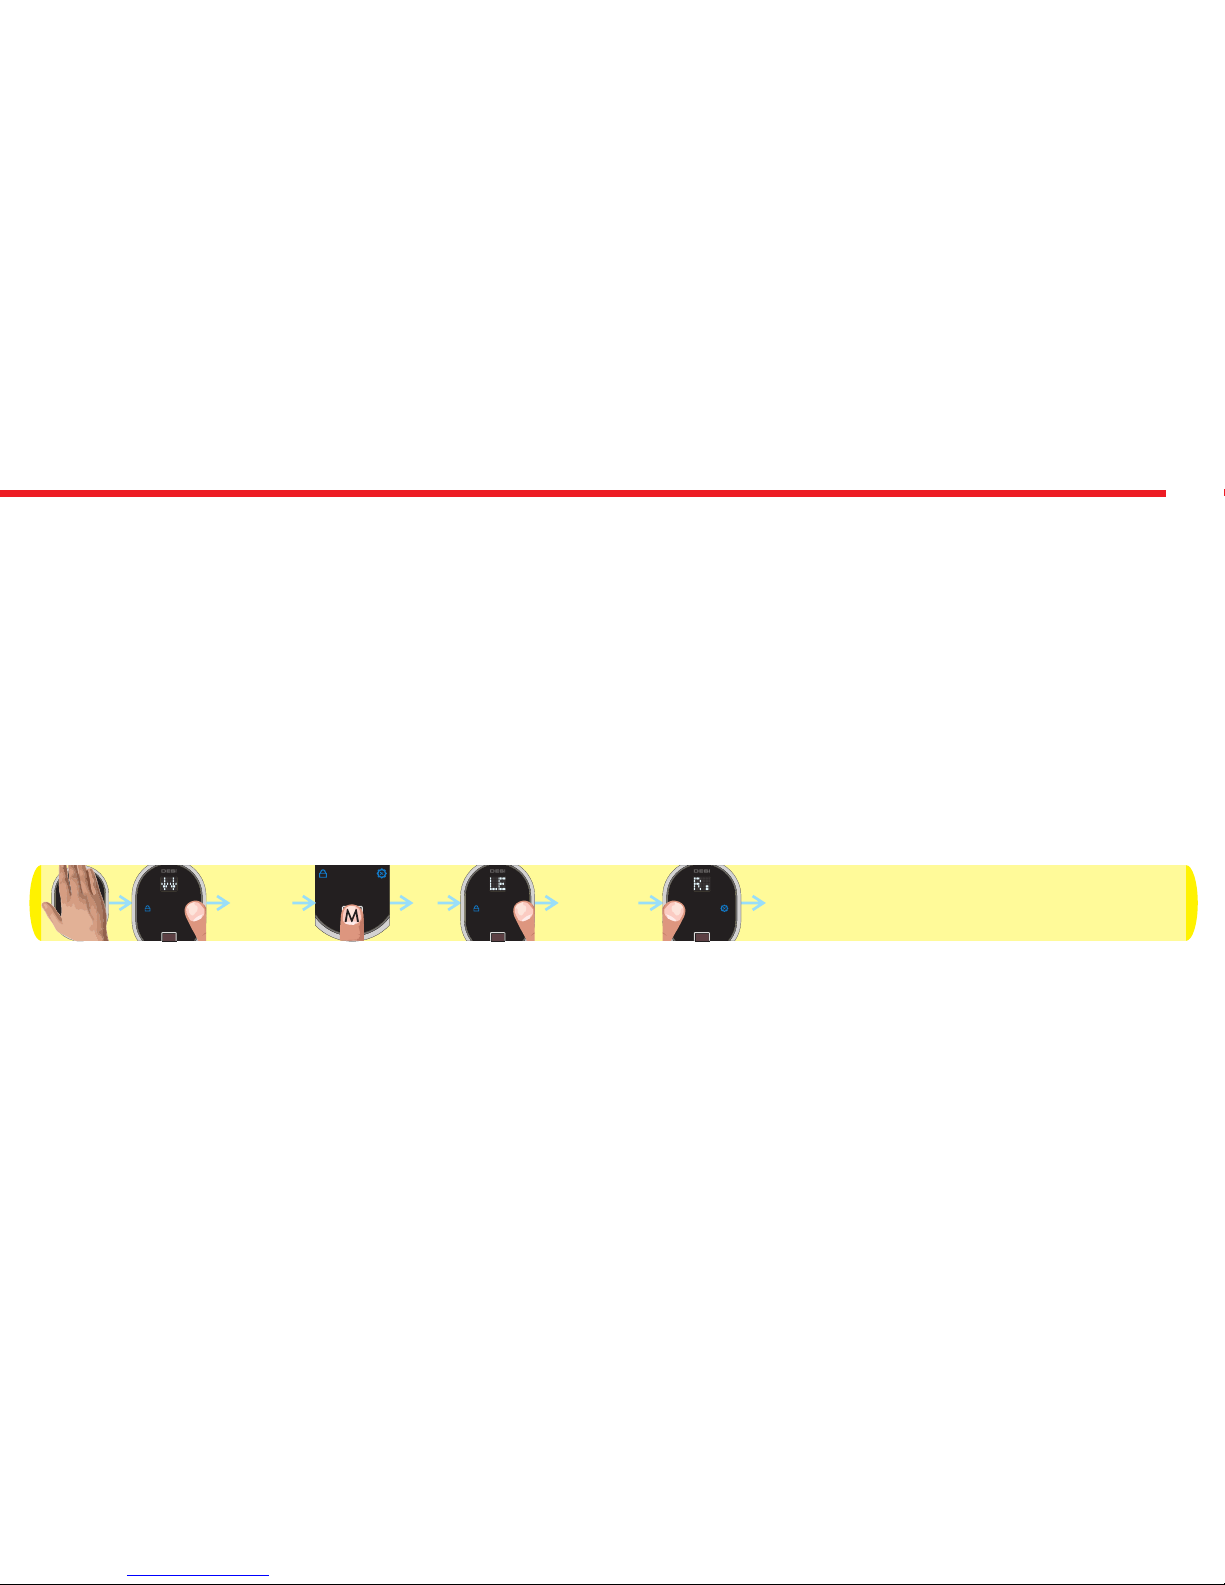
5.3.10. SHIFTING MOTORIZED CYLINDER TO ENROLLING NEW CONTROLLER MODE
Your motorized cylinder may learn up to 40 different controllers. To shift your motorized cylinder to enrolling new
controller mode, follows the steps below:
- Touch to device with your palm to wake it up. Two arrows will appear on display. Than touch “2”. “ADMIN” will be shown.
- Put one of the master fingers to the reader. First “OK” and than “LEARN” will be shown.
- Touch to “2" till “R.LEARN” appears and touch to “1" when “R.LEARN” is on display.
- “OK” will be displayed.
In this way, motorized cylinder will shift to enrolling new controller mode with a long warning tone. After that tone, you
need to send locking or unlocking signal via the new controller that you want to enroll to the motorized cylinder. If
enrolling will be succesful, you will hear two short warning tones from motorized cylinder.
Schematic representation of operation is as follows:
DESi
OK
OK
ADMIN R.LEARN
Page 40
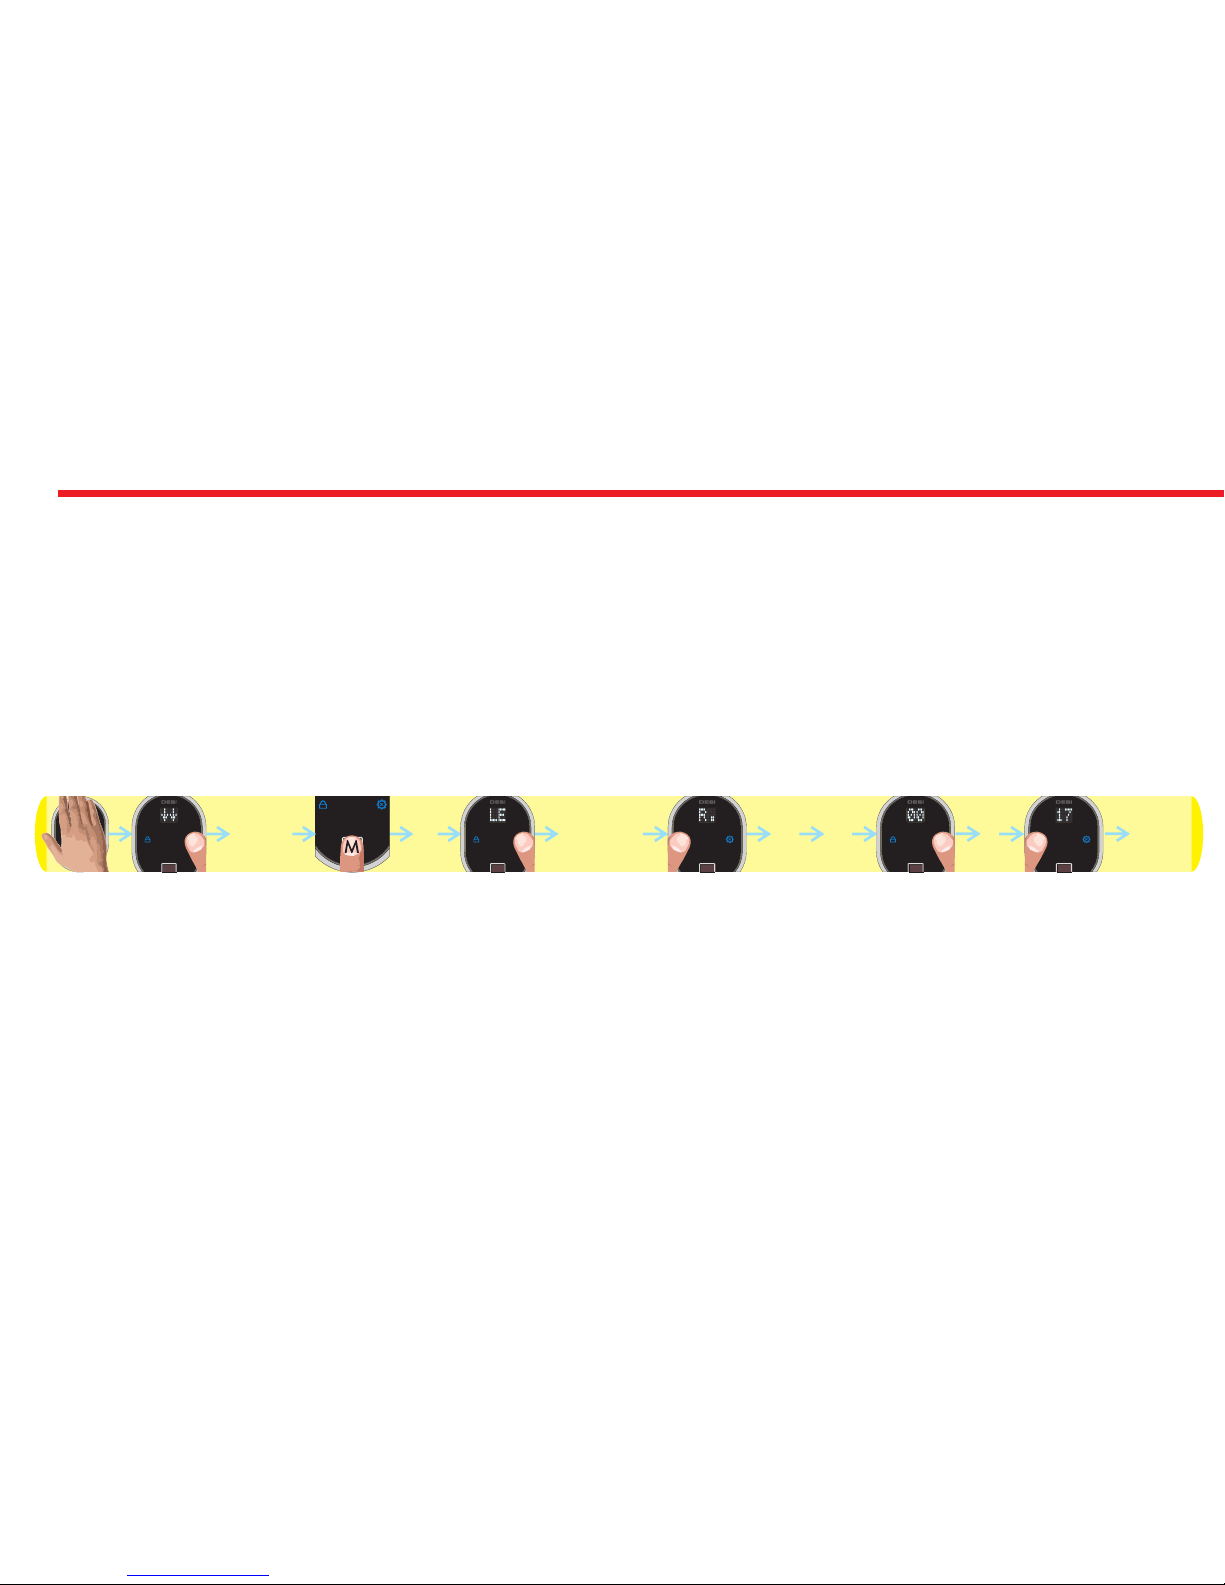
40
5.3.11. DELETING ALL ENROLLED CONTROLLERS OF MOTORIZED CYLINDER EXCEPT MASTER CONTROLLER
To delete all enrolled controllers of your motorized cylinder, follows the steps below:
- Touch to device with your palm to wake it up. Two arrows will appear on display. Than touch “2”. “ADMIN” will be shown.
- Put one of the master fingers to the reader. First “OK” and than “LEARN” will be shown.
- Touch to “2" till “R.DELETE” appears and touch to “1" when “R.DELETE” is on display. ”01" will be shown.
- Touch to “2" till you see “17" and touch to “1".
- “OK” will be shown.
In this way, motorized cylinder will delete all enrolled controllers of motorized cylinder with a long warning tone.
Schematic representation of operation is as follows:
NOTE: This operation doesn’t delete master controller from motorized cylinder’s memory. If you want to delete master
controller as well, please check “HOW TO RESET MOTORIZED CYLINDER” topic on page .....
17
OK
DESi
OKADMIN R.DELETE
OK 00
Page 41
41
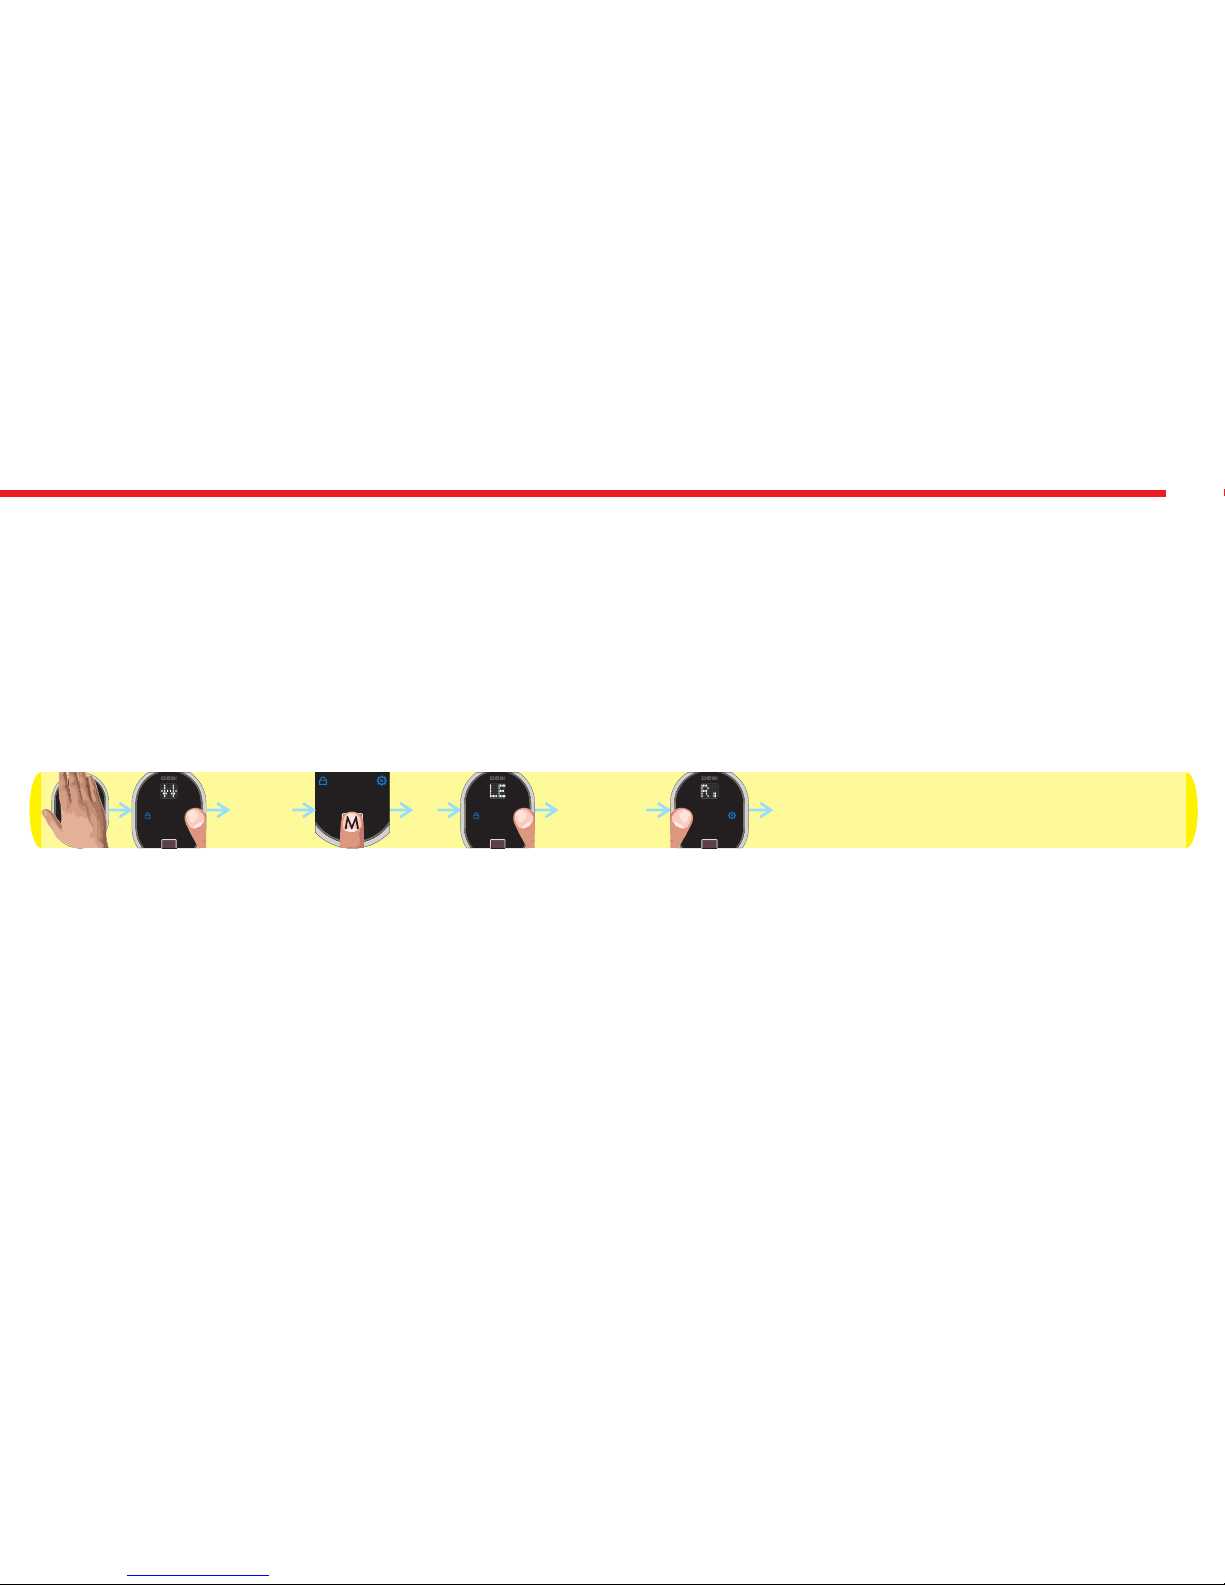
5.3.12. REPORTING NUMBER OF ENROLLED CONTROLLERS VIA BUZZER SOUND
Your motorized cylinder can report number of enrolled controllers via buzzer sound. To do this, follows the steps below:
- Touch to device with your palm to wake it up. Two arrows will appear on display. Than touch “2”. “ADMIN” will be shown.
- Put one of the master fingers to the reader. First “OK” and than “LEARN” will be shown.
- Touch to “2" till “R.COUNT” appears and touch to “1" when “R.COUNT” is on display.
- “OK” will be displayed.
In this way, motorized cylinder will start to report number of enrolled controllers via short warning tones.
Schematic representation of operation is as follows:
DESi
OK
OK
ADMIN R.COUNT
Page 42
42
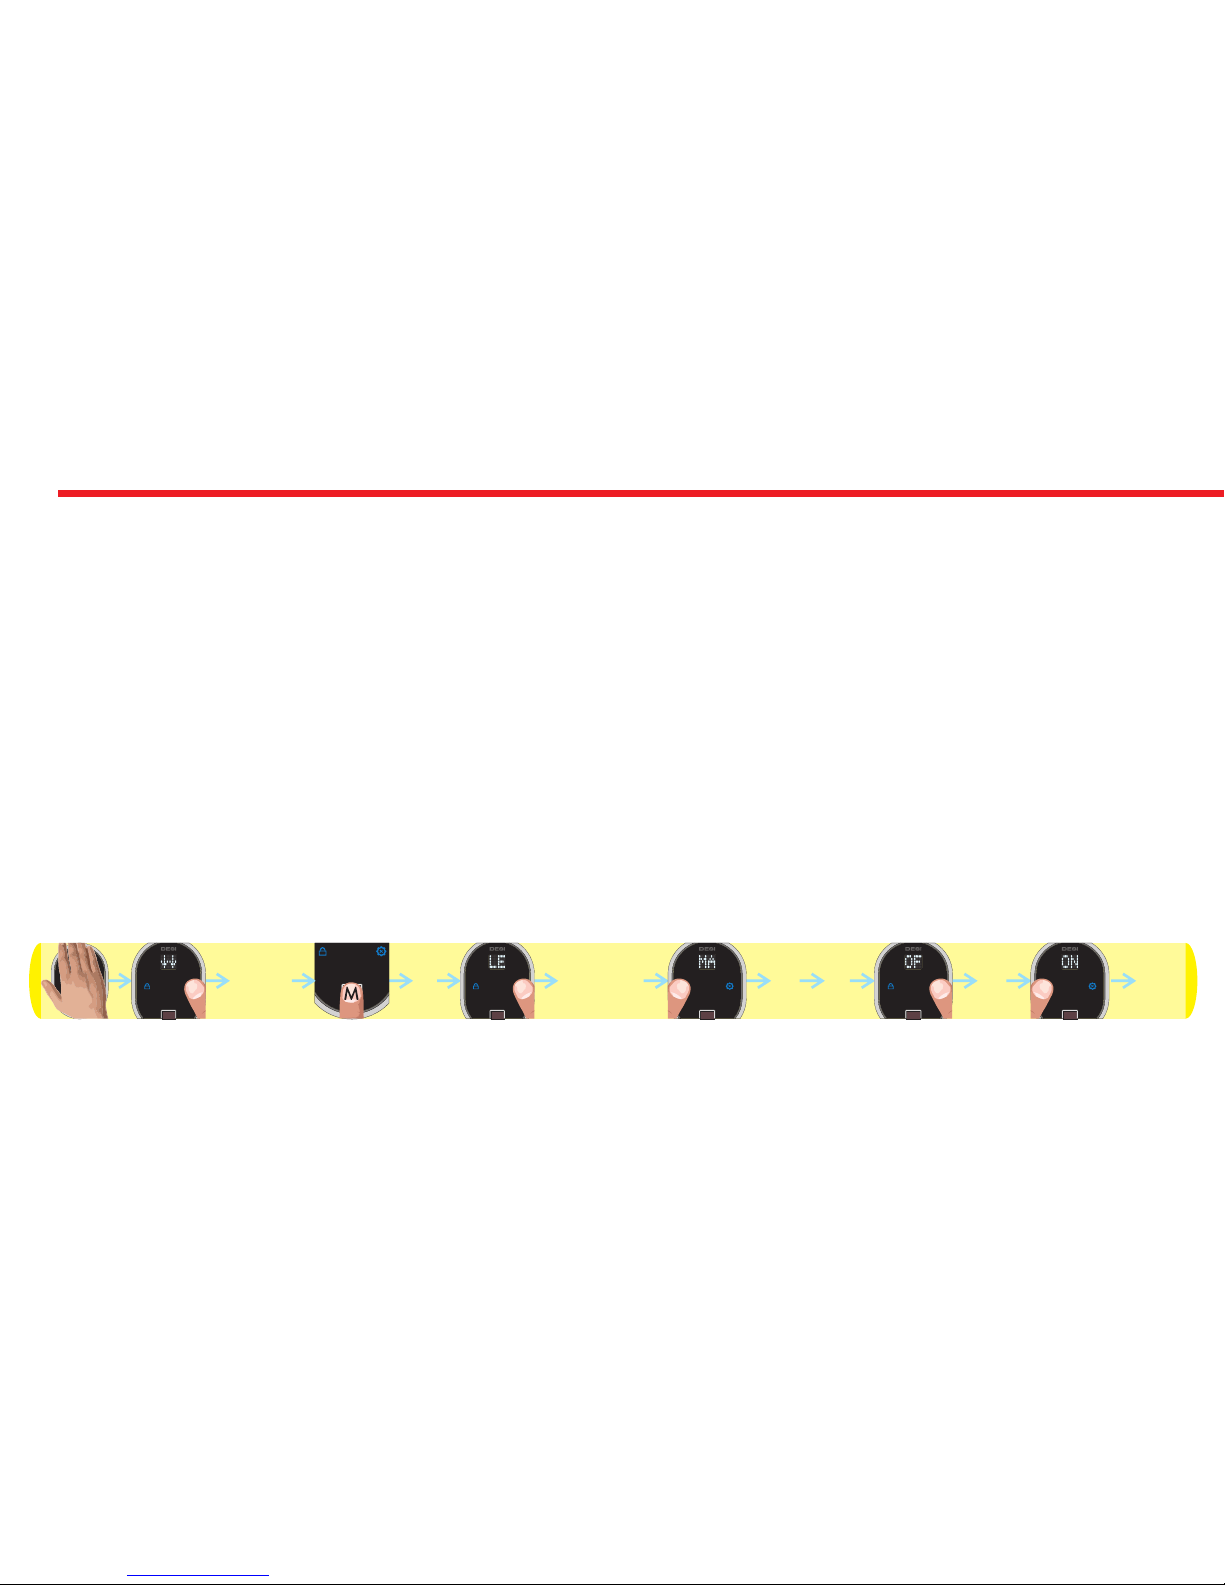
5.3.13. ADJUSTING LATCH RETRACTION PERIOD
According to type of your lock and usage, you would need to adjust the time period which the motorized cylinder will keep
latch of the lock inside when it unlocks the lock. To adjust latch retraction period, follows the steps below:
- Touch to device with your palm to wake it up. Two arrows will appear on display. Than touch “2”. “ADMIN” will be shown.
- Put one of the master fingers to the reader. First “OK” and than “LEARN” will be shown.
- Touch to “2" till “HOLD.TM” appears and touch to “1" when “HOLD.TM” is on display. ”H0",“H1", “H2" or “H3" will be
shown.
- Touch to “2" to toggle between;
“H0” - No Latch (choose if the lock doesn’t have a latch)
“H1” - Short Period (latch will be kept inside the lock around 1 second and than released)
“H2” - Middle Period (latch will be kept inside the lock around 5 second and than released)
“H3” - Long Period (latch will be kept inside the lock around 9 second and than released)
- When desired choice is displayed, touch to “1". “OK” will be displayed.
In this way, latch retraction period of motorized cylinder will be adjusted. Schematic representation of adjusting latch
retraction period of 5 seconds is as follows:
NOTE: To transfer settings to motorized cylinder, you need to lock or unlock motorized cylinder via master controller.
DESi
OK
OK
ADMIN HOLD.TM
OKH2H1
Page 43

43
5.4. USAGE
Before using your motorized cylinder, you should adjust “direction of locking (5.3.5)” and “number of rotation (5.3.4)”
according to lock which will be used with motorized cylinder.
5.4.1. UNLOCKING AND OPENING THE DOOR
Touch to device with your palm to wake it up and put an enrolled finger to sensor. Fingerprint id will be displayed and
motorized cylinder will unlock and open the door. If the finger is not known or recognized, “FALSE” will be displayed.
You can also unlock and open the door via button on motorized cylinder. For emergancy conditions, the handle and key also can
unlock and open the door.
5.4.2. LOCKING THE DOOR
Touch to device with your palm to wake it up and than touch to locking button. System will lock the door.
You can also lock the door via button on motorized cylinder. For emergancy conditions, the handle and key also can lock the door.
5.4.3. CHILD LOCK
If you enable child lock feature, motorized cylinder will behave like a standard mechanical lock. You can use it either with a
mechanical key or the handle only. None of enrolled controllers (like fingerprint reader) will work till child lock is disabled.
To enable child lock, press and hold two buttons on the motorized cylinder till you hear a long (3 sec.) warning tone. To
disable child lock, press and hold two buttons on the motorized cylinder till you hear 3 short warning tones.
Page 44
44
5.5. MAINTENANCE
You can clean external surfaces by soft, slightly damp cloth. Never use abrasive chemicals or water for this purpose. Watch
electronic parts of the system during changing batteries. Don’t contact sharp or conductive materials to those parts.
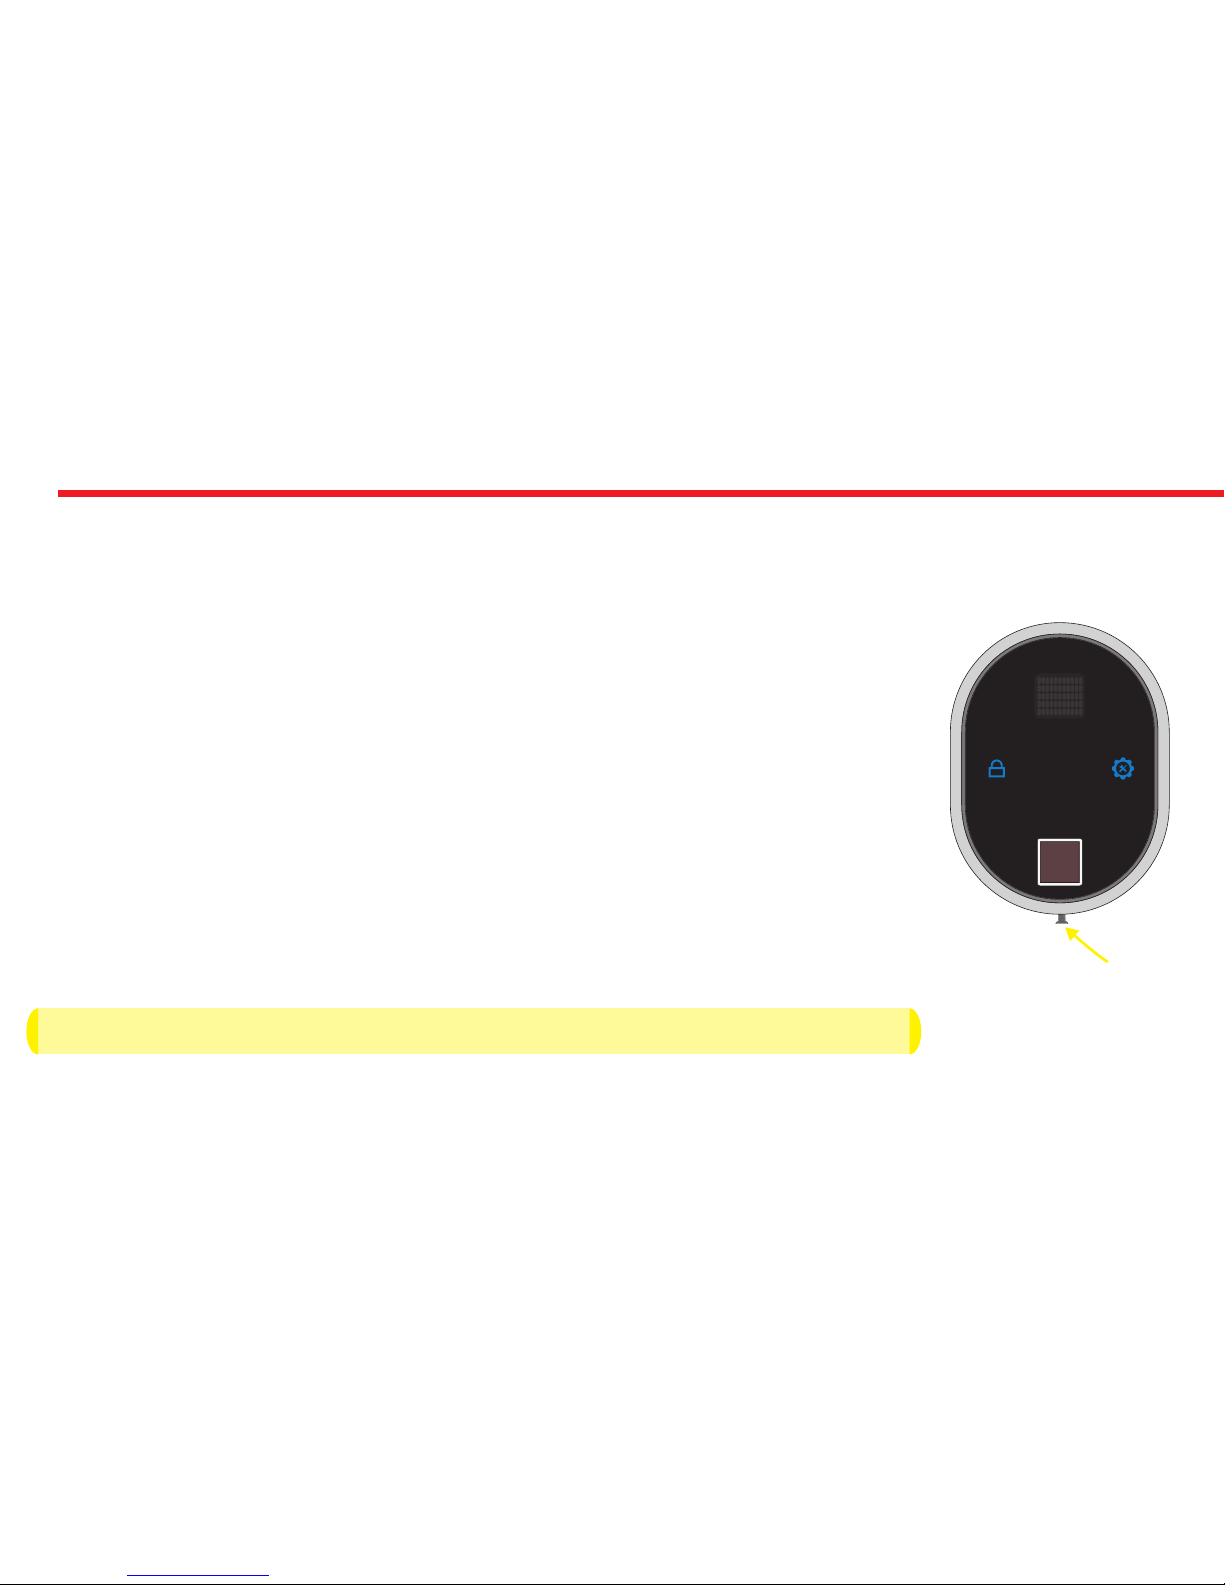
5.5.1. REPLACING FINGERPRINT READER’S BATTERY
If you start to see “BL” message on fingerprint reader’s display, you need to replace
the battery. Please get 2x AAA Alkaline batteries and follow steps below:
- Unscrew back plate screw. Hold fingerprint reader from bottom part, pull and lift up to detach
it from back plate.
- Replace the battery with new one. Watch the polarities!
- Attach fingerprint reader to back plate and tighten screws.
5.5.2. CHARGING MOTORIZED CYLINDER
If you hear triple warning tone after any operation (locking/unlocking),
or if the motorized cylinder rotates too slowly, you need to recharge it.
The device is fully charged around 3 hours.
We recommend to charge your device once in two months even the batteries are not empty.
USE PROVIDED CHARGING CABLE ONLY!
Back Plate
Screw
DESi
Page 45

45
Page 46
46
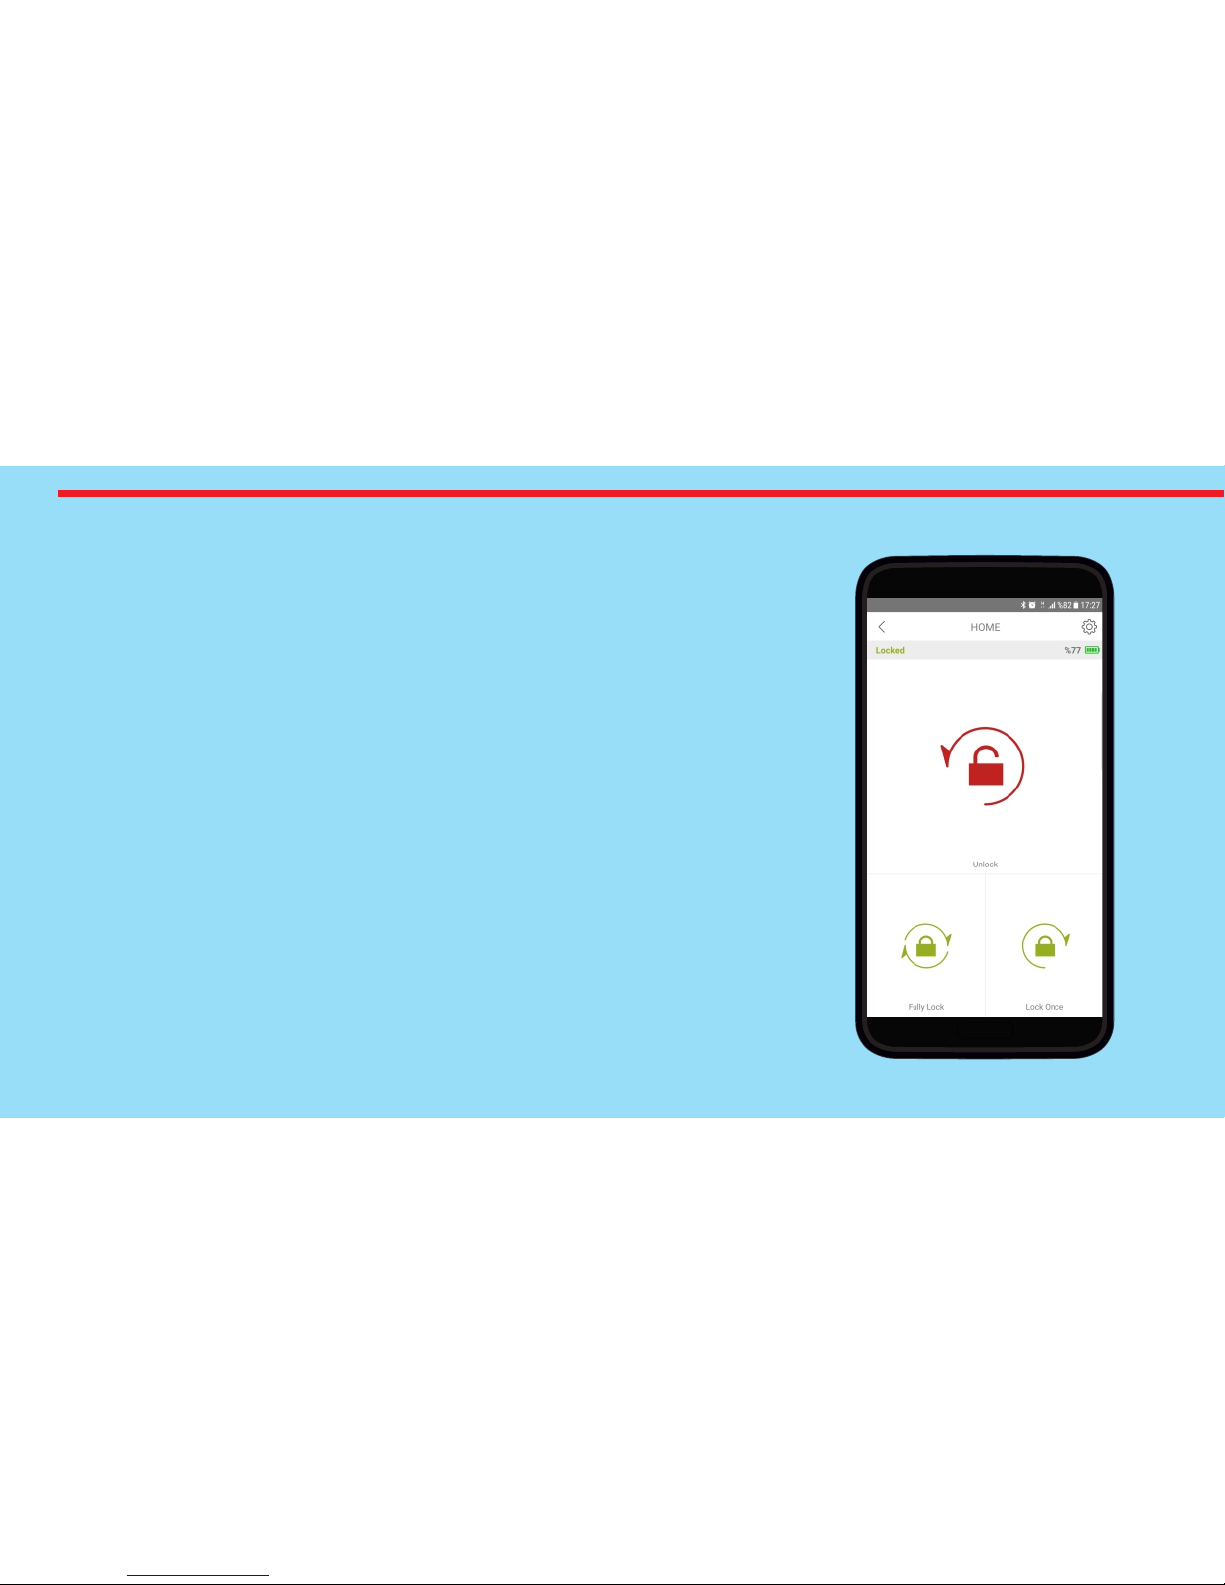
MOBILE APPLICATION
In this section, you can find details about usage of
Mobile Application
If there is no controller with your motorized cylinder and
if you enroll your smart phone as first controller,
it will be master controller of your motorized cylinder.
Before you use your motorized cylinder, you should adjust it
properly according to the lock which motorized
cylinder will work together. First, you should adjust
“direction of locking (6.2.5)” and than
“number of rotation (6.2.4)”.
If you want to change the master controller of motorized
cylinder, check “HOW TO RESET MOTORIZED CYLINDER”
topic on last page.
Page 47
47
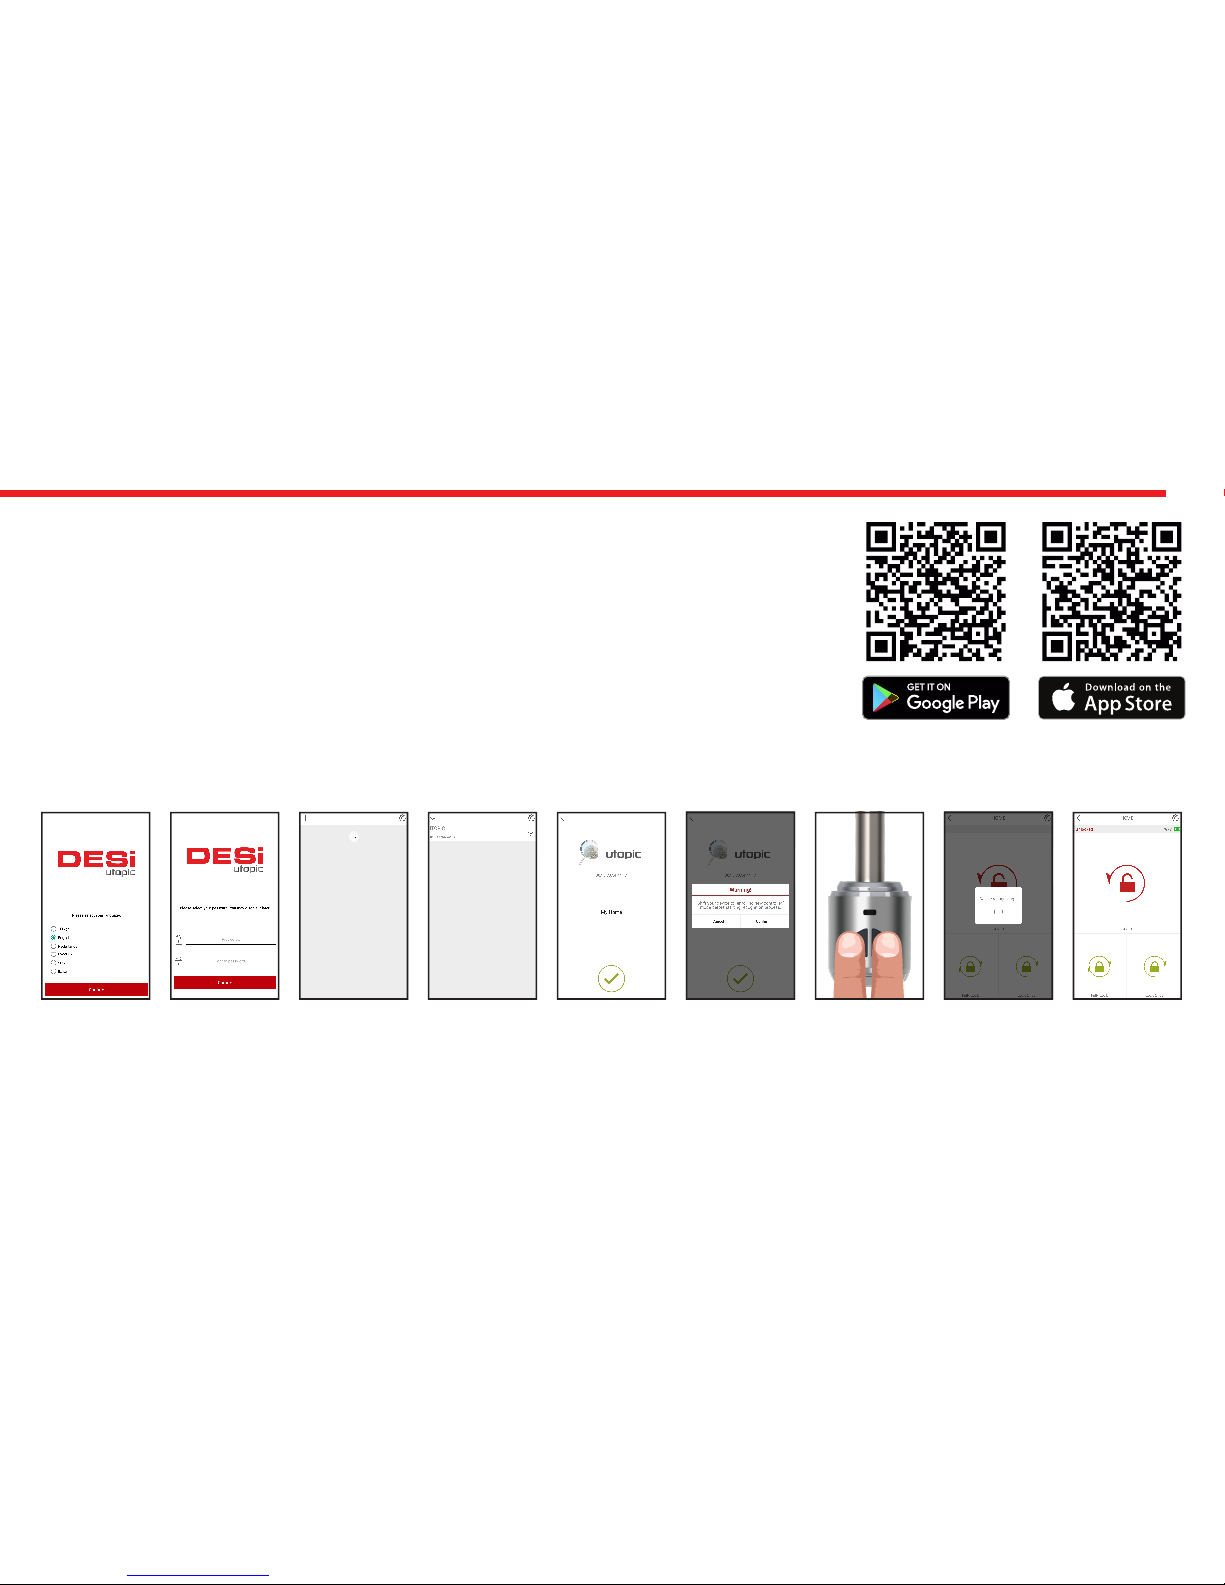
on application and device recognition process will start. If the matching is successful, you will hear 2 short tones from
motorized cylinder and your device will be master controller of motorized cylinder.
NOTE: For Android phones, application will ask to reach location services. This is needed for using Bluetooth properly.
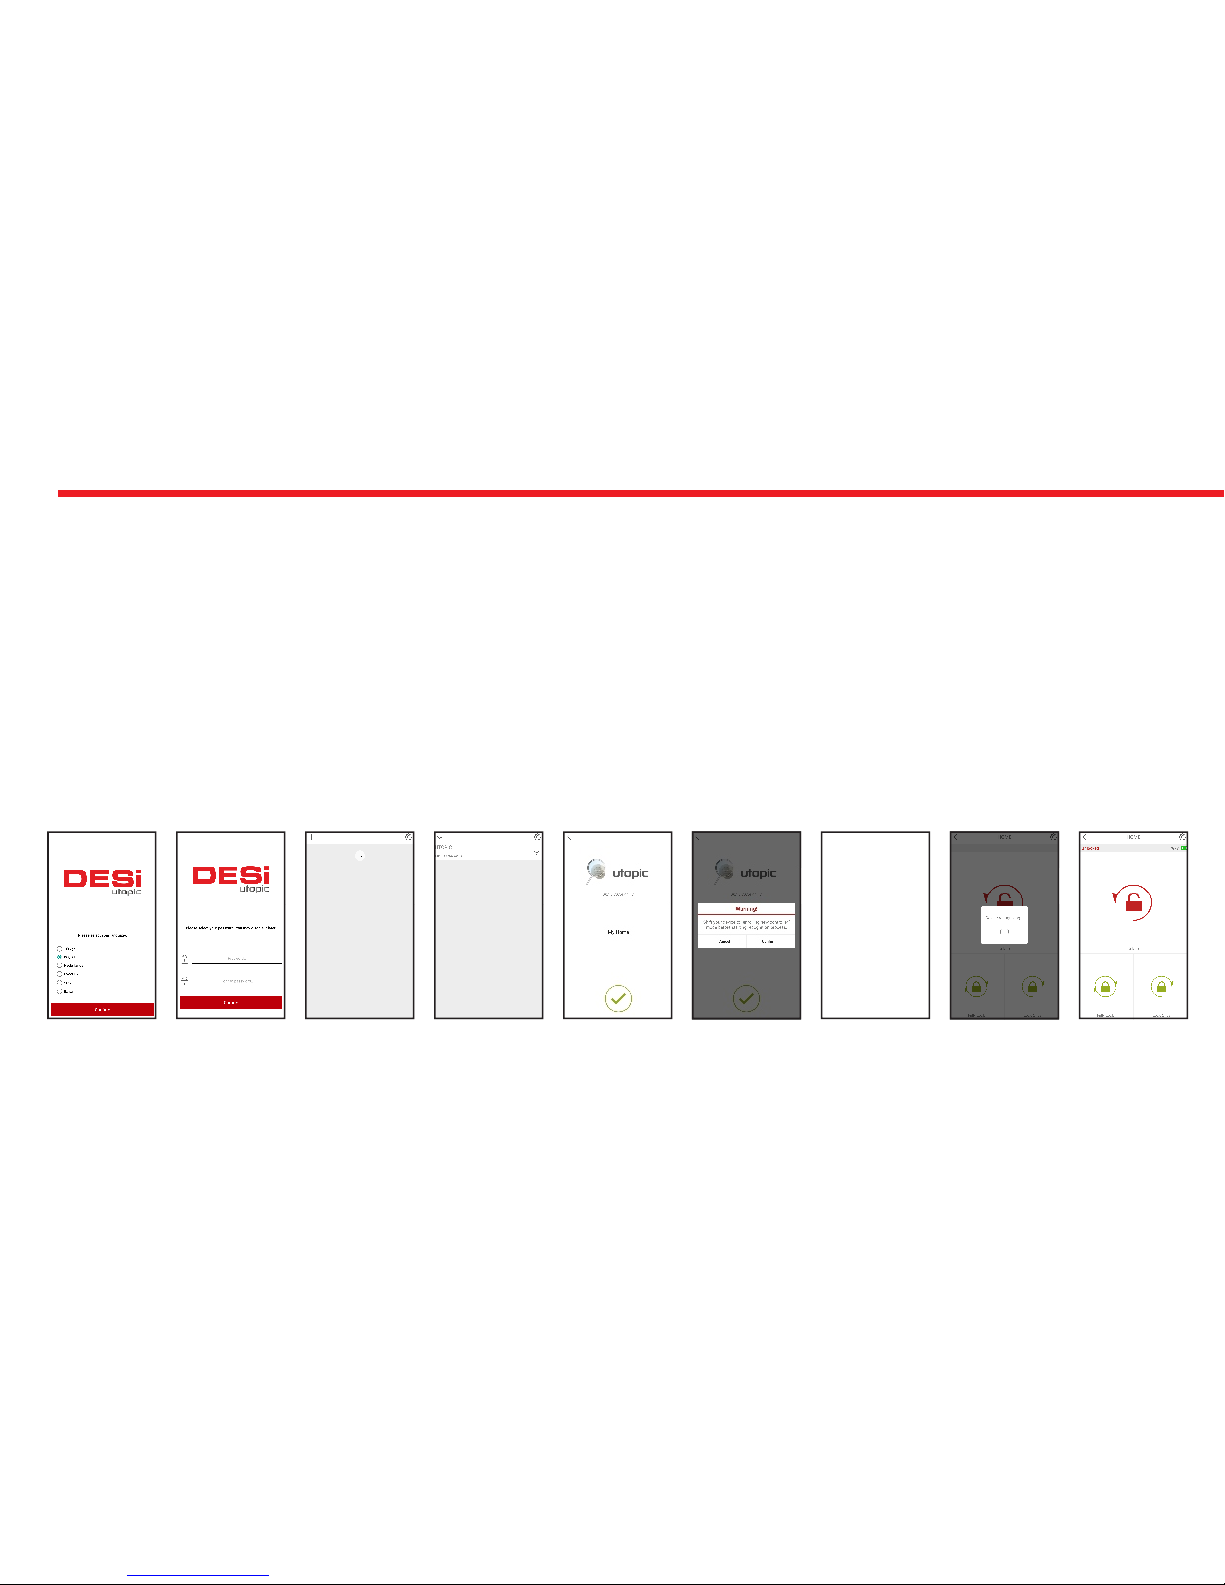
6.1. ENROLLING A MOBILE PHONE AS MASTER CONTROLLER
- Search “Desi Utopic” on stores. Download, install and run the application.
- Choose desired language and define a password.
- Touch “+” on the top left corner to see the list of Utopic motorized cylinders around.
- Touch to UTOPIC line and enter a name for your device and touch to green tick.
- A confirmation pop-up will appear. Before confirming, press/hold two buttons on
motorized cylinder till a long warning tone is heart, than you can release buttons.
- After long warning tone, a short warning tone will be heart. Now confirm the pop-up
Page 48
48
6.2. APPLICATION SETTINGS
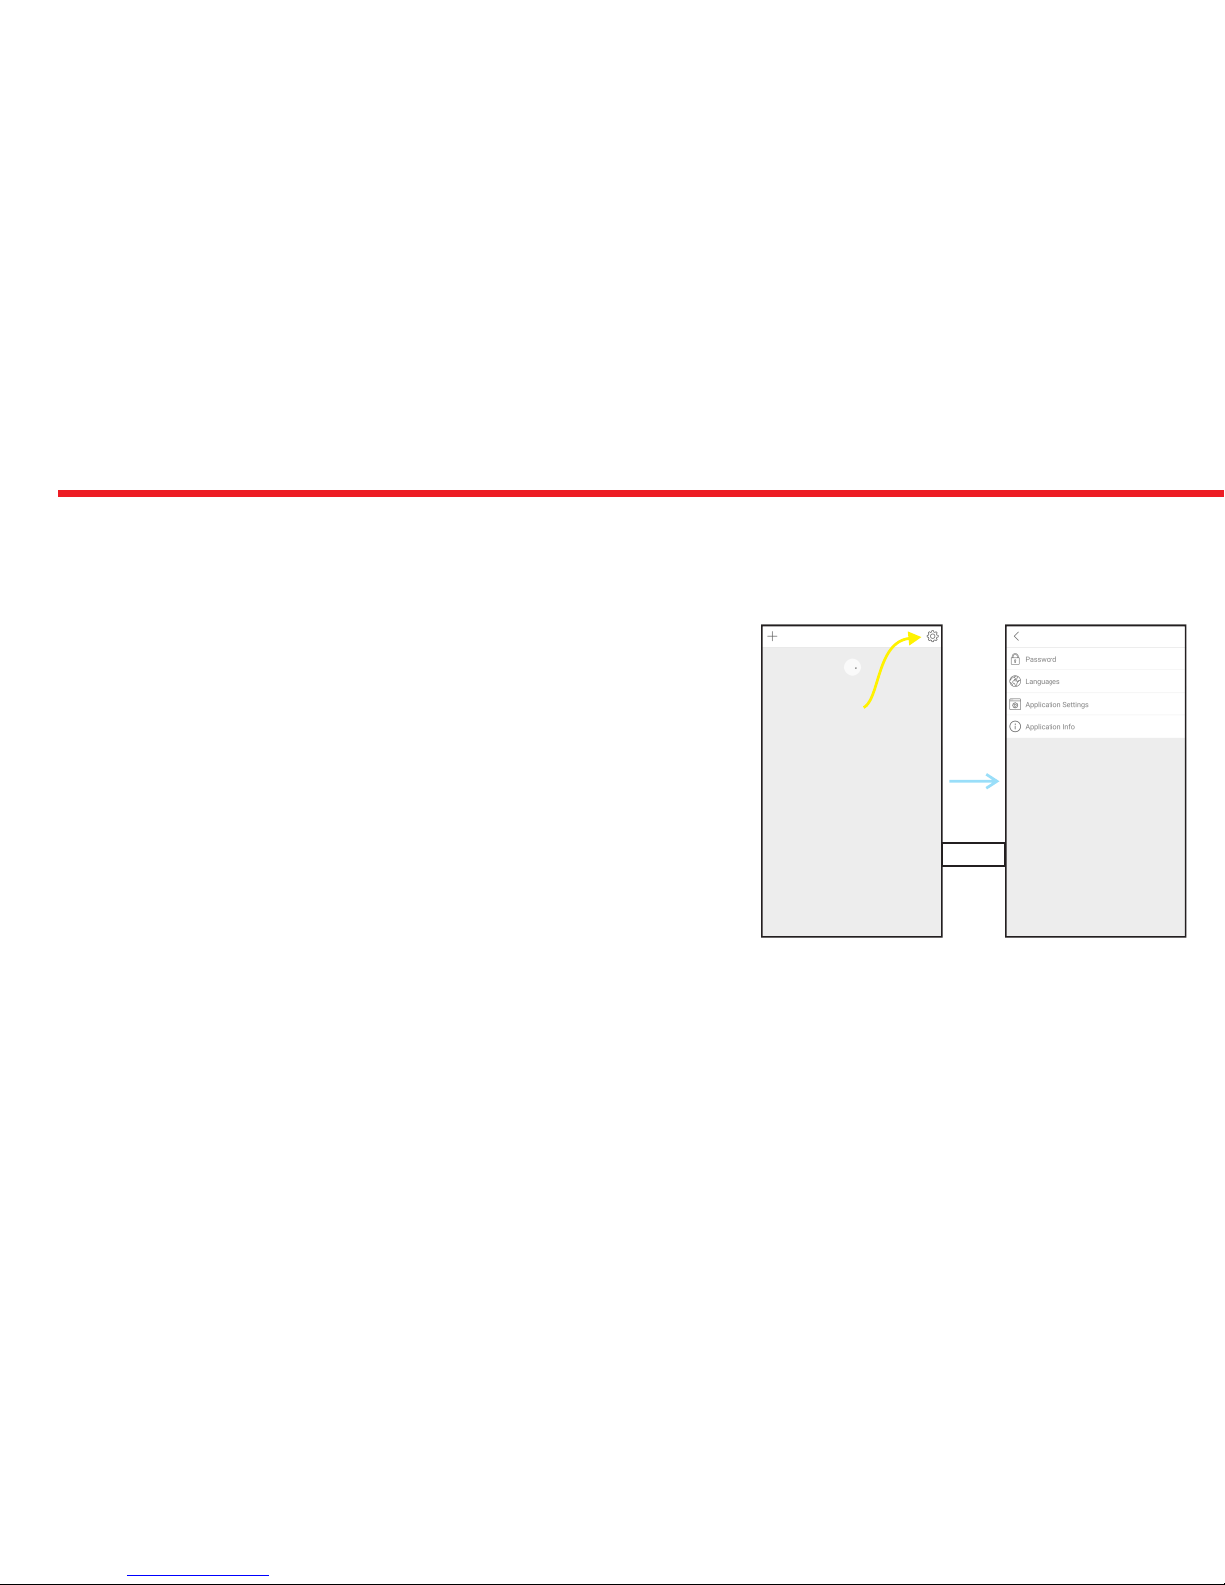
If you touch to menu button on the top right corner when it is not connected to motorized cylinder, you will reach to
settings menu of application. Related menu items are as follows:
PASSWORD: You can disable, enable or change the password of application.
LANGUAGES: You can change language of the application.
APPLICATION SETTINGS: You can disable / enable auto-connection
feature which connects to a known motorized cylinder around as soon as
the application is lunched.
APPLICATION INFO: You can see the version of installed application.
Menu
Button
Page 49
49
6.3. MOTORIZED CYLINDER SETTINGS / ADMINISTRATION MENU
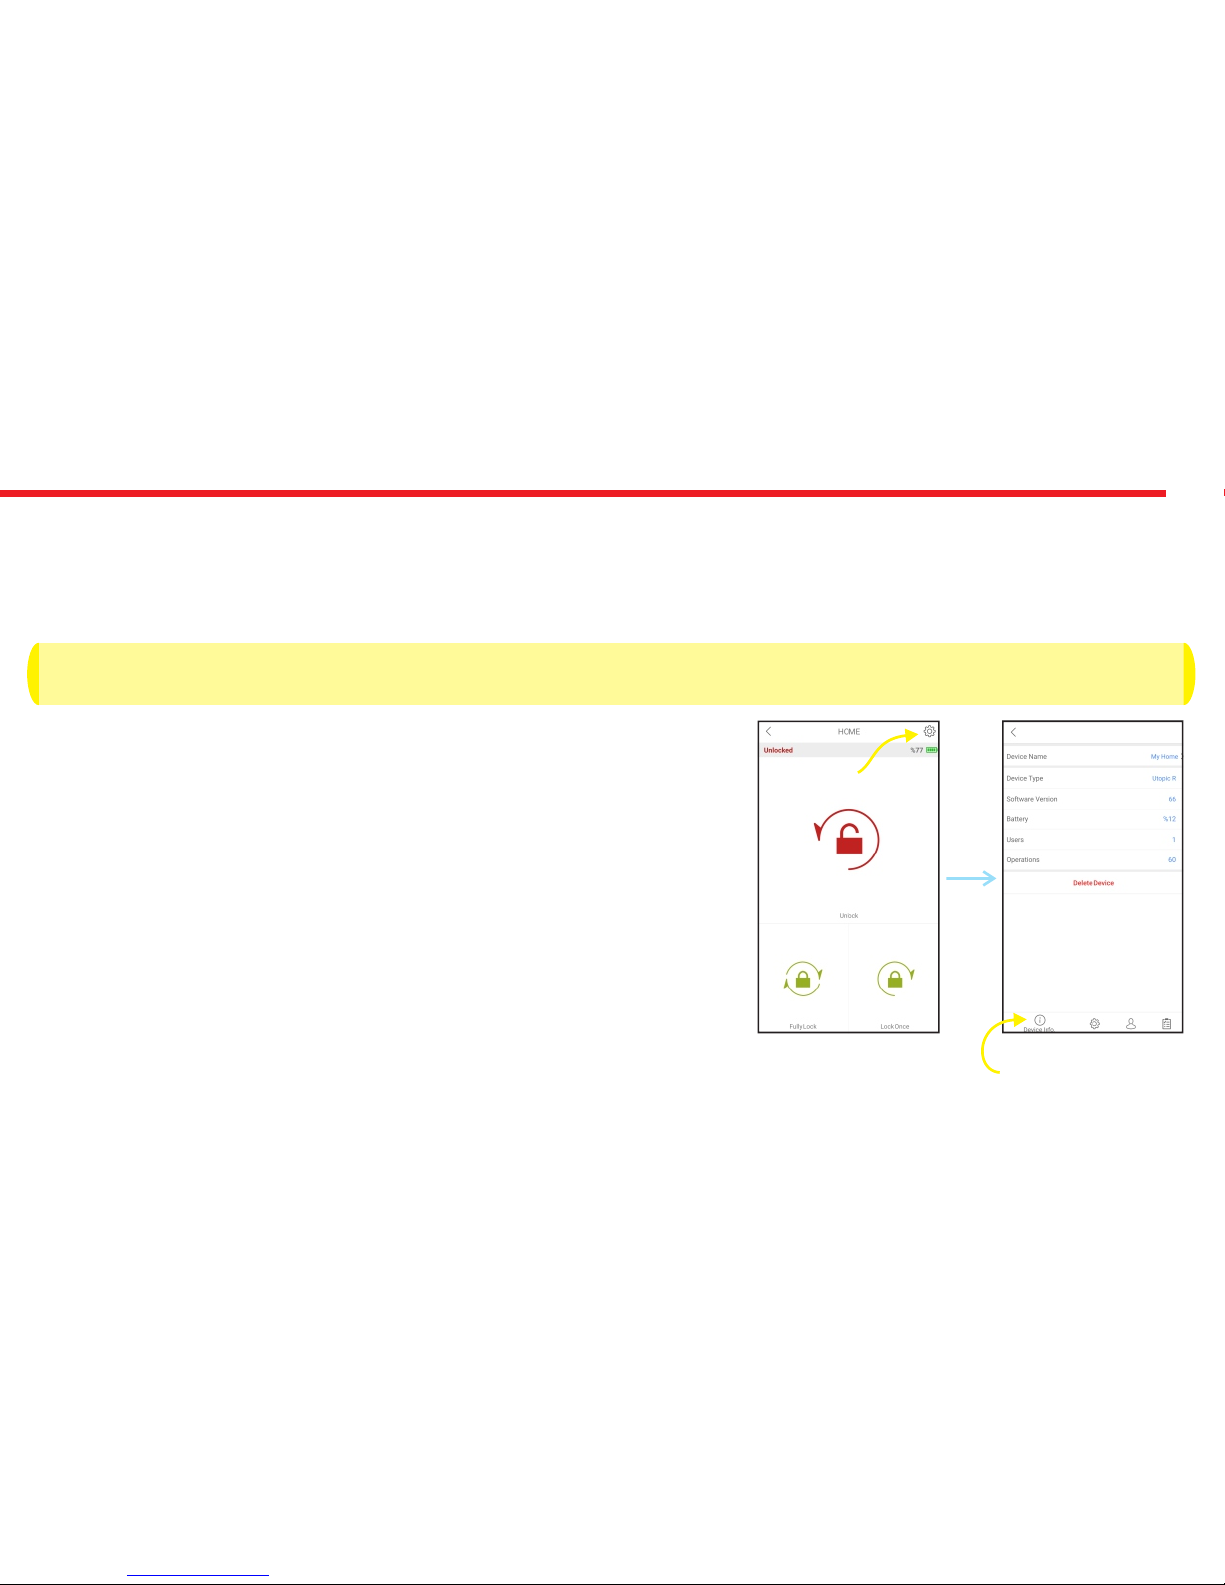
If you touch to menu button on the top right corner when the application is connected to motorized cylinder as master
controller, you will reach to settings menu of connected motorized cylinder. You can change settings of your motorized
cylinder and perform administrative activities via this menu.
Before using your smart cylinder, “locking way” and “number of turns” settings should be adjusted properly. Otherwise, it
would damage the device’s mechanical structure. Those two settings is written in . Please check next 2 pages.RED
Related menu has 4 tabs; Device Info, Knob Settings, Users, Reports
6.3.1. DEVICE INFO TAB
In this tab, you can see following information:
Device Name
Device Type
Device’s Firmware Version
Battery Level
Number of Enrolled Controllers
Number of Operations (Locking or unlocking)
If you want to delete connected device from your mobile application,
touch to “Delete Device” button in this menu.
Menu
Button
Device Info Tab
Page 50
50
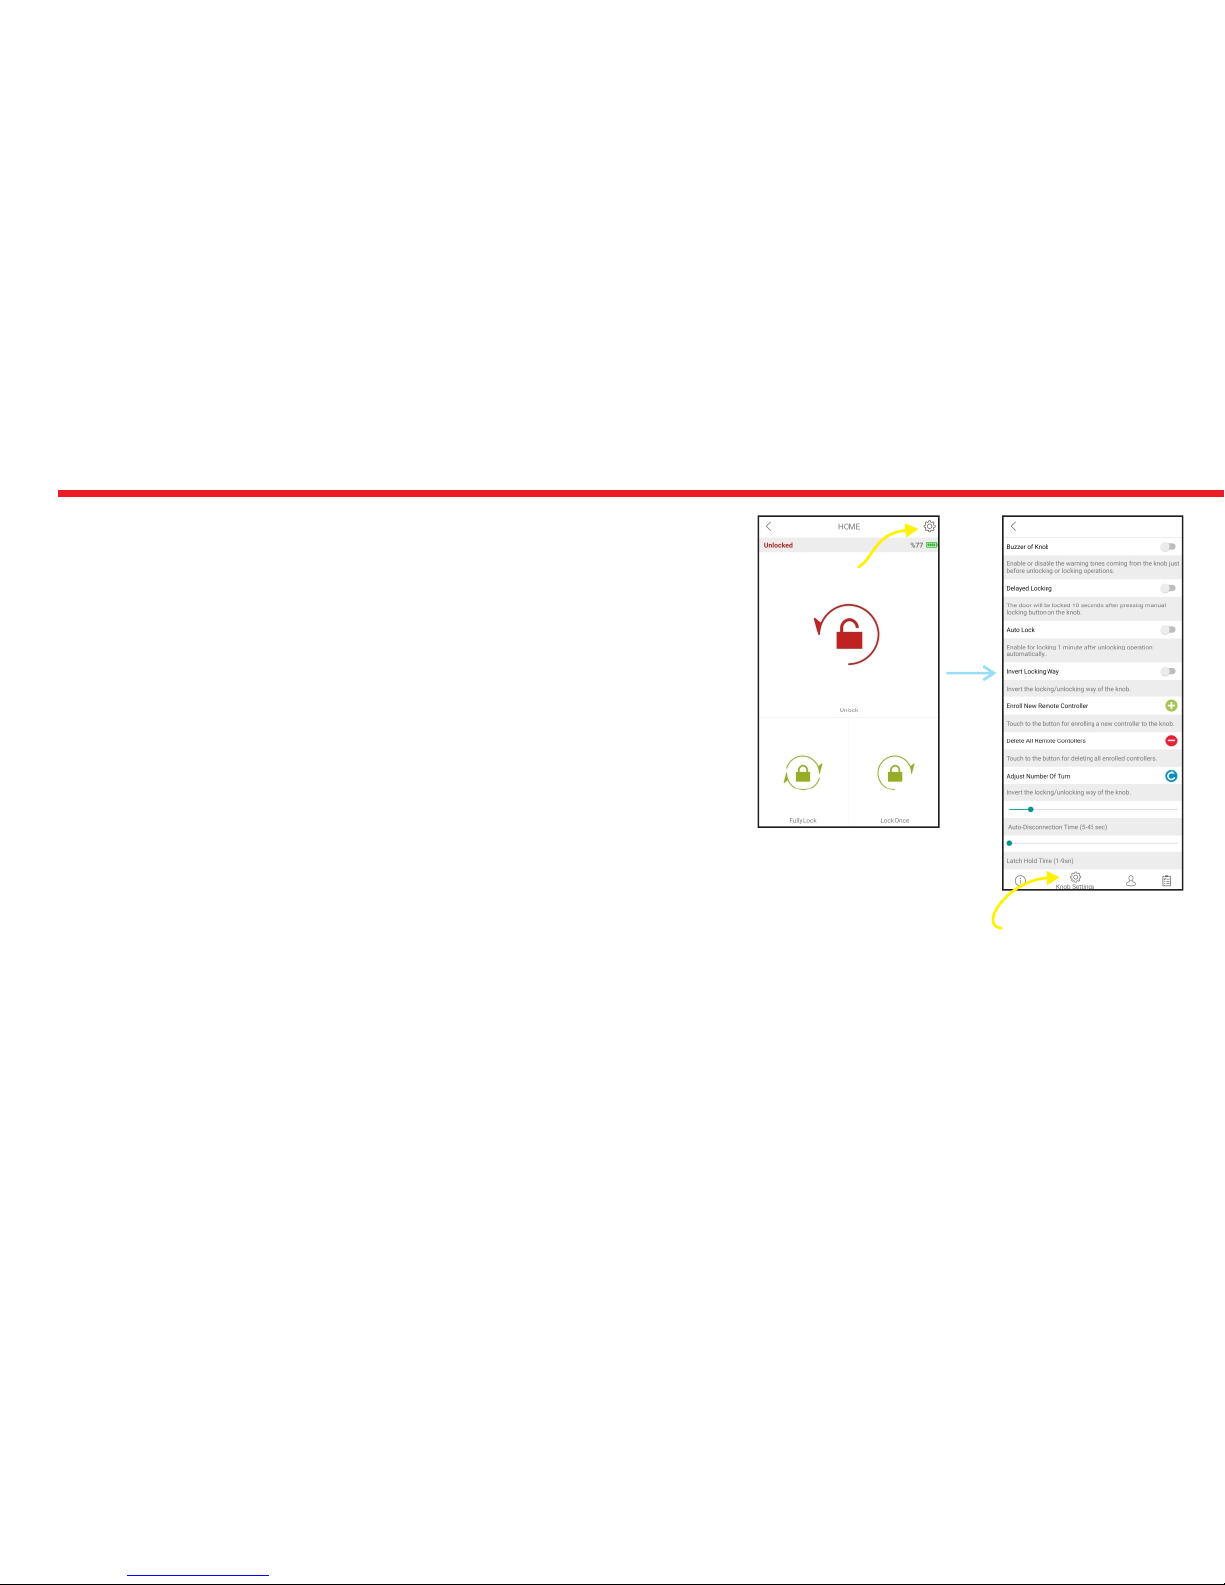
6.3.2. KNOB SETTINGS TAB (for master user only)
In this tab, there are following menu items:
BUZZER OF KNOB: You can enable / disable activation sounds coming
from motorized cylinder.
DELAYED LOCKING: Your motorized cyclinder has a delayed locking
feature which locks itself 5 second after you press the locking button on
the motorized cylinder. If this feature is enabled, when you are going out,
if you touch locking button on motorized cylinder and close the door in 5
seconds, it will lock the door automatically. On this menu item, you can
enable / disable this feature.
AUTO LOCK: Your device has an automatic locking feature which locks itself 1 minute after
it is unlocked. On this menu item, you can enable / disable this feature.
INVERT LOCKING WAY: You may need to change the direction of locking according to the door’s way which you will use
your motorized cylinder. You can invert locking way of device on this menut item.
Menu
Button
Knob Settings
Tab
Page 51

51
ENROLL NEW REMOTE CONTROLLER: Your motorized cylinder may learn up to 40 different controllers. To shift your
motorized cylinder to enrolling new controller mode, touch to “Green Plus” button. In this way, motorized cylinder will
shift to enrolling new controller mode with a long warning tone. After that tone, you need to send locking or unlocking
signal via the new controller that you want to enroll to the motorized cylinder in following ways:
- For fingerprint reader, wake it up and touch to lock button.
- For keypad, wake it up and touch to locking button.
- For remote controller, press any button till you hear a warning tone from cylinder.
- For auto-locker, make the magnet closer to small triangle (look to sides of device) and wait indicatior is lit.
- For enrolling a new mobile phone, please check page 54.
If enrolling will be succesful, you will hear two short warning tones from motorized cylinder.
DELETE ALL REMOTE CONTROLLERS: If you want to delete all the controllers of motorized cylinder, touch to “Red
Minus” button. The master controller cannot be deleted by using this menu item.
ADJUST NUMBER OF TURNS: Before using your motorized cylinder, you may need to adjust your motorized cylinder
according to lock’s number of rotation, To do this, close the door and than touch to “Blue Rotating Arrow” button.
Motorized cylinder will lock and than unlock the door and learn number of rotation.
AUTO DISCONNECTION TIME: You can adjust (with 5 sec. steps) the time period that application stays connected to
motorized cylinder after it is connected.
Page 52
52
AUTO DISCONNECTION TIME: According to type of your lock and usage, you would need to adjust the time period which
the motorized cylinder keeps latch of the lock inside when it unlocks the lock. You can use the slider to adjust latch
retraction period in 4 different way: From left to right; short (around half second), 3 seconds, 6 second and 9 seconds.
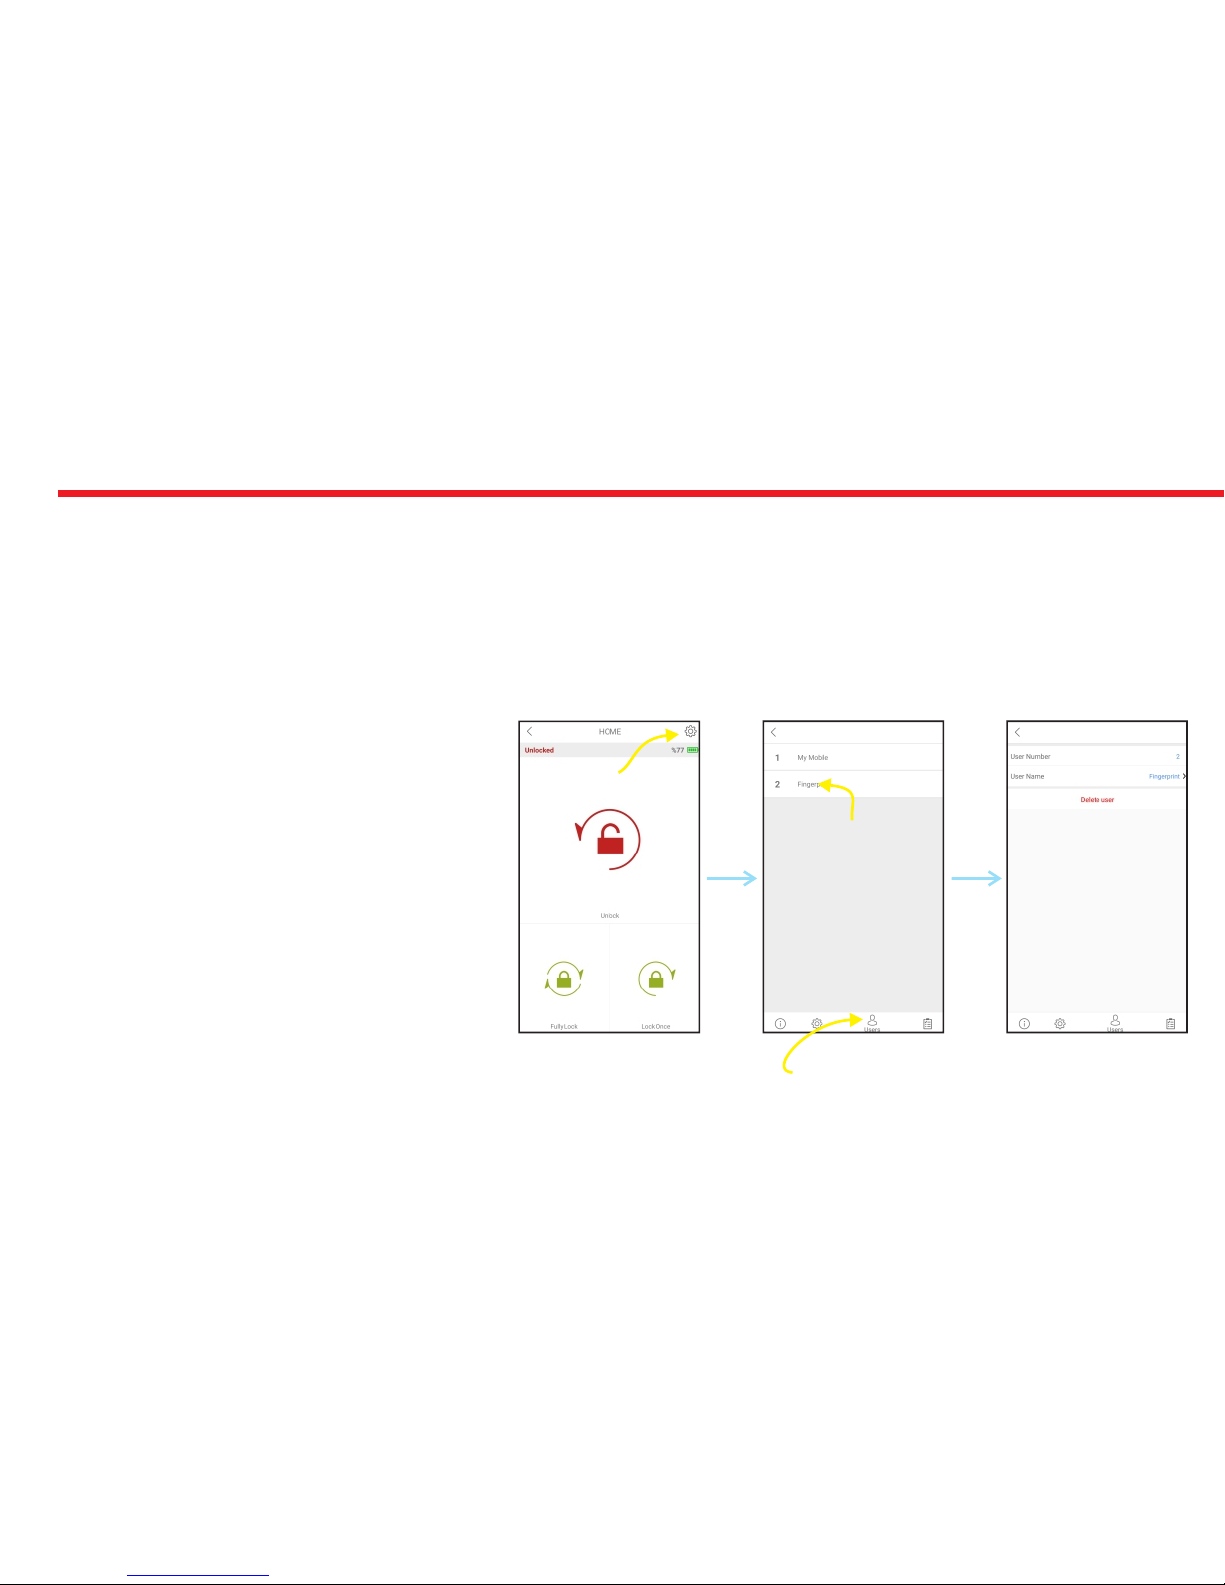
6.3.3. USERS TAB (for master user only)
In this tab, you can see all the controllers of your motorized cylinder (including accessories like auto-locking module, home
automation interface etc.) you can entitle them or you can delete the controllers except master controller.
If you touch any users, you can reach
dedicated page to edit name or delete
the controller,
Menu
Button
Users Tab
Touch to user
for dedicated
page
Page 53
53
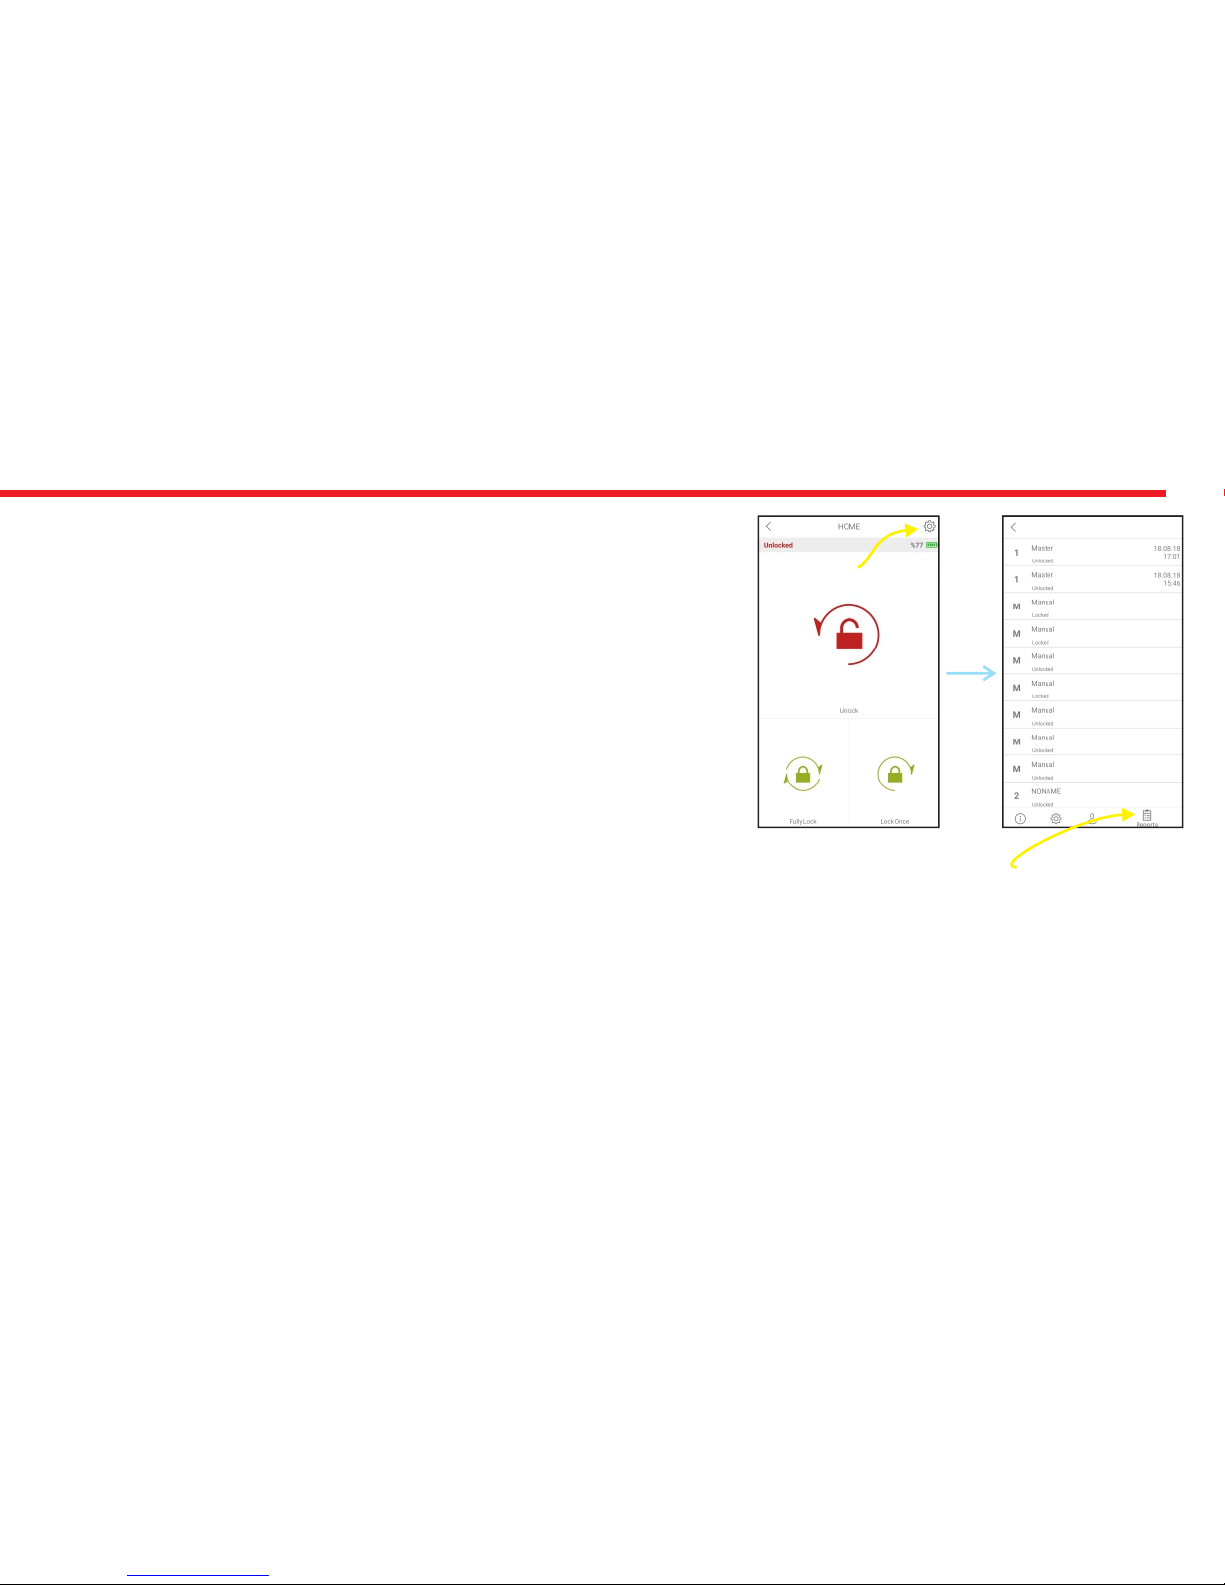
6.3.4. REPORT TAB (for master user only)
In this tab, you can see which user unlocked or locked the device. For
mobile devices, you can see date and time but for controllers like
fingerprint reader, remote controller, keypad etc. you cannot see date
and time.
Menu
Button
Reports Tab
Page 54
54
- Motorized cylinder will give a long (5 sec.) than a short warning tones. After short warning tone, confirm the pop-up on
NEW MOBILE DEVICE. Device recognition process will start. If the matching is successful, you will hear 2 short tones from
motorized cylinder and your device will be master controller of motorized cylinder.
NOTE: For Android phones, application will ask to reach location services. This is needed for using Bluetooth properly.
6.4. ENROLLING A NEW (USER) MOBILE PHONE VIA MASTER MOBILE PHONE
- With , search “Desi Utopic” on stores. Download, install and run the application. NEW MOBILE PHONE
- Choose desired language and define a password.
- Touch “+” on the top left corner to see the list of Utopic motorized cylinders around.
- Touch to UTOPIC line and enter a name for your device and touch to green tick.
- A confirmation pop-up will appear. Before confirming, connect to motorized cylinder with and MASTER MOBILE PHONE
touch menu button on the top right corner and go to Knob Settings Tab Touch to Green Plus Button next to “ENROLL A
NEW REMOTE CONTROLLER” line.
Shift your
cylinder to
Enrolling
Mode via
MASTER
MOBILE
PHONE and
confirm
Page 55

55
Page 56

56
Desi Alarm and Security Systems Inc. www.desi.com.tr
Topkapı Maltepe Cd. Anadolu Sk. N:1 Bayrampaşa - İstanbul / TURKEY
HOW TO RESET MOTORIZED CYLINDER
If you want to change master controller of motorized cylinder, you need to reset motorized cylinder. To do this, follow the
steps below:
- Press and hold 2 buttons on the motorized cylinder. A long warning tone will be heard. Continue to hold the buttons.
After a while, second long warning tone will start.
- During second warning tone, release the buttons and plug to charging port of motorized cylinder. the provided charger
Charger should be plugged to electricity as well.
- After a while, double tone and than triple tone will be heard. In this way, motorized cylinder will be reset and all the
controllers, including master controller, enrolled to the device will be deleted.
 Loading...