

TECHNICAL BULLETIN TB-3033
Chargebuster Ion Gun
Installation, Operation and Maintenance
The Chargebuster Ion Gun reduces a static charge of
±1000 V down to ±100 V in less than one second at a
distance of six inches (30-psi /0.2MPa inlet pressure).
Refer to the ESD Association ANSI/ESD Standard STM3.1
for the test procedure. The offset voltage (balance) is
within ±30 V of zero at a distance of six inches, significantly
less than the required limits of < ±50 volts per ANSI/ESD
S20.20.
“Necessary non-conductors in the environment cannot
lose their electrostatic charge by attachment to ground.
Ionization systems provide neutralization of charges on
these necessary non-conductive items (circuit board
materials and some device packages are examples of
necessary non-conductors). Assessment of the ESD
hazard created by electrostatic charges on the necessary
Figure 1. Desco 19590 Chargebuster Ion Gun, 120V
Description
The Desco 19590 Chargebuster Ion Gun is a Point-of-Use
Ionizer. It uses compressed air or nitrogen to neutralize
static charges in localized areas. Most companies
address ElectroStatic Attraction, visual imperfections,
and contamination issues by dislodging charged dust and
debris with compressed air ionizers. “There is sometimes
a need to provide static control in a small defined area or
location. This may be done to provide static control within
production equipment, in mini-environments, or to facilitate
particle removal from part of a product. Ionizers used for
this purpose may be blow-off guns or nozzles that work
with a supply of compressed air or nitrogen. They may use
either nuclear, soft x-ray or any of the previously described
types of corona ionization technology. It will be important
to choose a method of ionization and cleanliness of the
gas supply that is appropriate to the work area.” (ESD
handbook ESD TR20.20 section 5.3.6.5.2.4 Point-Of-Use
Ionization)
The modular and ergonomic design includes an ESD
protective flexible hose and is easily controlled by
depressing the trigger. The Desco 19590 Chargebuster
Ion Gun meets or exceeds the required limits of ANSI/ESD
S20.20 when tested in accordance with ANSI/ESD S3.1 and
ESD TR53.
Compact and lightweight, the Chargebuster Ion Gun’s
console can be mounted anywhere on the workstation for
easy access. The console connects to any supply of clean
dry air or nitrogen, and an internal disposable filter collects
residual particles, oil and moisture. The console, gun, and
air hose are static-dissipative. The 7 foot hose allows for
convenient neutralization of localized areas where desired.
nonconductors in the work place is required to ensure
that appropriate actions are implemented, commensurate
with risk to ESDS [ESD sensitive] items”. (ANSI/
ESDS20.20-2007 Foreword)
“The primary method of static charge control is direct
connection to ground for conductors, static dissipative
materials, and personnel. A complete static control program
must also deal with isolated conductors that cannot be
grounded, insulating materials (e.g., most common plastics),
and moving personnel who cannot use wrist or heel straps
or ESD control flooring and footwear. Air ionization is not
a replacement for grounding methods. It is one component
of a complete static control program. Ionizers are used
when it is not possible to properly ground everything and as
backup to other static control methods. In clean rooms, air
ionization may be one of the few methods of static control
available.” (ESD Handbook TR20.20 Ionization, section
5.3.6.1)
Packaging
1 Chargebuster Ion Gun with Hose and Disposable
Filter
1 Wall Transformer
1 10' Cable
1 Mounting Plate
1 Quick Coupling
1 S-Hook
4 Screws
1 Certificate of Calibration
Use replacement filter Item #19591 and
Use foot switch Item #19592
(24 VAC @ 1 A)
DESCO EAST - One Colgate Way, Canton, MA 02021-1407 • (781) 821-8370 • Fax (781) 575-0172 • Website: Desco.com
TB-3033 January 2011 Page 1 of 5
DESCO WEST - 3651 Walnut Avenue, Chino, CA 91710 • (909) 627-8178 • Fax (909) 627-7449
© 2011 DESCO INDUSTRIES INC.
Employee Owned
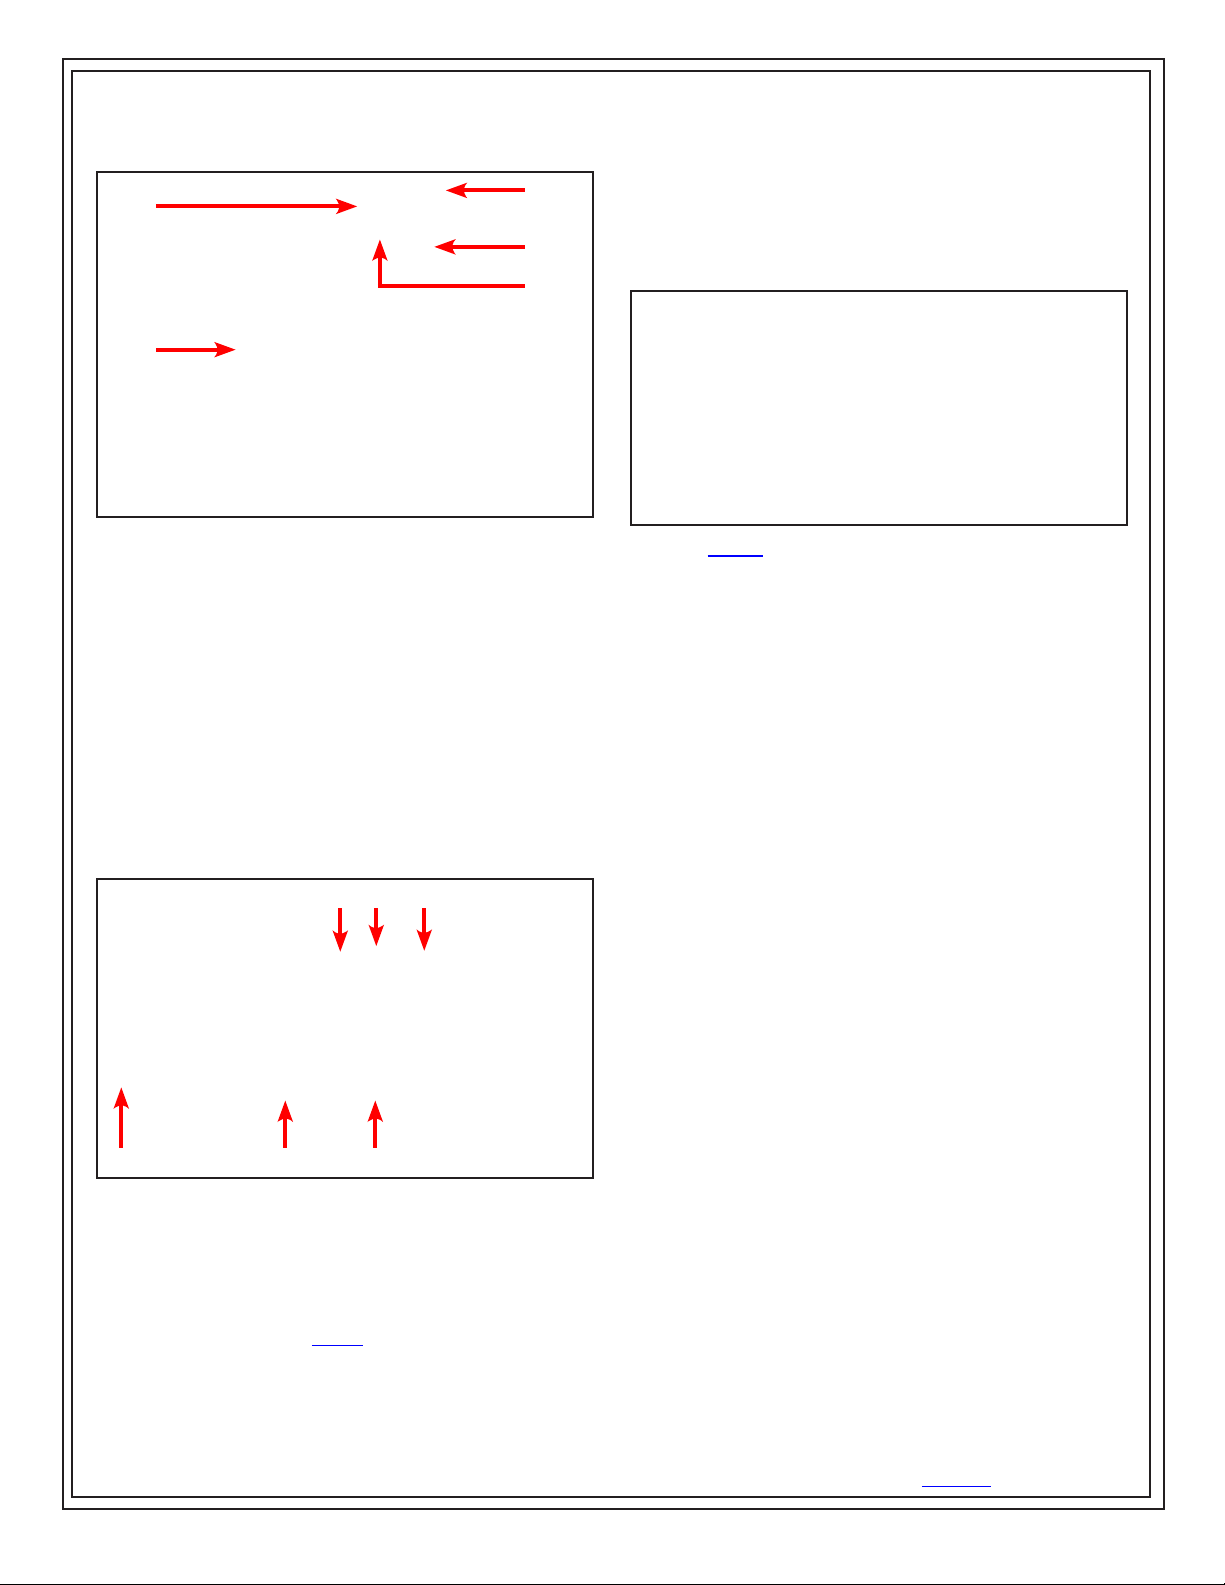
Features and Components
GUN AND HOSE
B
E. Disposable Filter Release / Lock Button: Push down
to release the disposable filter and hose assembly from
the console. This button should also click when properly
A
attaching the disposable filter and hose assembly to the
console.
C
D
E
Figure 2: Gun and hose features and components
A. Hanging Clip: Use to hang the gun on an apparatus.
May also be used with the included S-Hook.
B. Status LED: Illuminates when the trigger is held down.
Indicates when the gun is outputting ionized air.
C. Nozzle: Outputs ionized air when the trigger is held
down.
D. Trigger: Hold down to output ionized air.
E. Filter Connection: Hold down the metal tab to attach or
release the disposable filter.
CONSOLE
A B C
F. Disposable Filter: Filters particles, oil and moisture from
the incoming air supply.
Figure 4:
19592 optional foot switch should be
connected to the ion gun console Letter C in Figure 3
Installation
COMPRESSED GAS REQUIREMENTS
NOTE: Failure to use clean dry air or nitrogen may result
in damage to the Chargebuster Ion Gun that is not covered
under the Limited Warranty.
The compressed gas supply must be clean dry air or
nitrogen supplied by a delivery system that utilizes a
refrigerated dryer or equivalent water removal to achieve a
limit of about 550 ppm water vapor at 35°F (1.66°C) Dew
Point. To prevent particles from entering the console, a 2
micron coalescing filter or better is recommended upstream
of the gun console. Note that the filter in the console
collects small residual particles and aerosols and does not
act as a primary filter. The console filter is rated at 0.01
micron for particulates and is effective down to 0.008 micron
for aerosols.
D E F
Figure 3: Console features and components
A. Power LED: Illuminates when the power is turned ON.
B. Power Switch: Turns the power ON or OFF.
C. Foot Switch Jack: Foot Switch Jack: Connect the
optional foot switch item #19592 here. See Figure 4.
D. Supply Connection: Use with the quick coupling to
connect to an air supply.
DESCO WEST - 3651 Walnut Avenue, Chino, CA 91710 • (909) 627-8178 • Fax (909) 627-7449
DESCO EAST - One Colgate Way, Canton, MA 02021-1407 • (781) 821-8370 • Fax (781) 575-0172 • Website: Desco.com
TB-3033 Page 2 of 5
An adequate filter that can be recommended for the inlet
of the Chargebuster Ion Gun would be a Finite Filter Grade
10 Media Specification. This provides a 95% coalescing
efficiency for aerosols with a 0.7 micron (and greater)
particle retention. This removes gross amounts of particles,
water and/or oil and aerosols.
A Grade 6 Media provides 99.98% efficiency when almost
total removal of liquid aerosols and particles are required in
all pressure ranges down to 0.01 microns. Fine filters need
to be changed more often.
MOUNTING THE CONSOLE
Plug one end of the included 10’ cable into the jack on the
back of the console. Plug the other end of the cable into the
unplugged Wall Transformer.
© 2011 DESCO INDUSTRIES INC.
Employee Owned

Figure 5: Connecting the cable from the Wall Transformer
to the back of the console
Choose a location that will be convenient to the work area
and the gas supply. The Console takes up very little space
and is adaptable to a variety of permanent or temporary
installations. To minimize bends in the gun hose, orient the
console so that the open end points toward the work area
and the male connector points toward the air supply.
I. Use the included screws to attach the supplied
mounting plate to the threaded holes on the back of the
console.
Figure 7: Inserting the disposable filter
II. Connect the hose and disposable filter to the console.
Press the disposable filter release button on the front of
the console to lock it down. Push the fitting containing
the disposable filter all the way into the opening in the
console until it latches with a click. It fits only in the
correct orientation. The small plastic fitting on the end
of the disposable filter must align with the metal guide
coupling in the console. You may have to wiggle the
disposable filter slightly while inserting it.
Figure 6: Mounting the console to the mounting plate
II. Attach the plate to a flat surface, such as a wall or back
of a work bench, using suitable screws and fasteners.
When mounting to a hollow wall be sure to use #8
screws and 3/4” length anchors as a minimum.
MOUNTING TO A GAS SUPPLY
When a gas supply is close to the work area and fitted
with a standard industrial interchange quick coupling, you
may attach the console to the air supply fitting directly. If
necessary, use a prefilter as defined in the COMPRESSED
GAS REQUIREMENTS section of this technical bulletin.
ASSEMBLY
NOTE: Protect the hose from sharp objects, abrasion, and
high temperatures. Do not pull or pinch the hose while
assembling the components.
I. Insert the larger diameter end of the air filter into the
end of the flexible air hose connector. Press the metal
filter release tab at the end of the hose until it locks into
place.
DESCO WEST - 3651 Walnut Avenue, Chino, CA 91710 • (909) 627-8178 • Fax (909) 627-7449
DESCO EAST - One Colgate Way, Canton, MA 02021-1407 • (781) 821-8370 • Fax (781) 575-0172 • Website: Desco.com
Figure 8: Connecting the hose and disposable filter to the
console
III. Attach the included 1/4” NPT female quick connect
fitting to your gas supply line. Slide the outer ring on
the fitting towards the supply line to insert the mating
fitting on the console. You can attach the console
directly to the gas supply pipe or attach it using a hose
(not supplied). If necessary, use a prefilter as defined
in the COMPRESSED GAS REQUIREMENTS section
of this technical bulletin.
IV. If you would like to use the optional foot switch, plug its
cable to the jack located at the top of the console.
Operation
NOTE: Our recommendation is to set the pressure regulator
on your air or nitrogen supply between 20 and 65 psi
(0.14-0.45 MPa). Discharge times vary depending on air
pressure.
TB-3033 Page 3 of 5
© 2011 DESCO INDUSTRIES INC.
Employee Owned

Pressures of 30-40 psi (0.2-0.28 MPa) are commonly
used for decontaminating surfaces. OSHA regulations
recommend limiting hand-held air blow-off devices to
maximum pressures of 30 psi (0.2 MPa). The hose is rated
at 65 psi (0.45 MPa) at temperatures up to 75°F (24°C), and
the rating decreases at higher temperatures. When using
high pressures, consider the ambient room temperature as
well as heat from surrounding equipment.
I. Ensure that you are not holding down the trigger, and
turn on the power switch located at the top of the
console. The power LED should illuminate.
II. Hold the gun approximately six inches from the surface
you want to neutralize and blow-off. Aim the nozzle
and hold down the trigger. The LED on the back of the
gun should illuminate. Typically, static charges are
discharged within one second.
III. Release the trigger when the surface is clean.
If the optional foot switch is installed, you may use either
the foot switch or gun trigger.
II. Using a cloth moistened with the IPA solution, wipe
the exterior surfaces of the console and gun to
remove any dirt or dust that may have collected.
III. Using a swab moistened with the IPA solution,
gently clean the emitter points on the gun.
Extremely dirty points increase the time needed to
discharge static and can affect the ionization
balance.
REPLACING THE DISPOSABLE FILTER
Desco recommends that the
disposable
filter be
changed every 3 months or when it begins to look
dirty.
I. Turn power off at the console and disconnect the
console from the
II. Hold down the
gas
supply.
disposable
filter release button on
the side of the console.
III. Remove the hose and
disposable
filter from the
console by pulling the textured rubber plug where
the hose emerges from the console. Rocking the
plug back and forth can help loosen the filter. Do
not pull the hose itself.
Figure 9: Using the Chargebuster Ion Gun
Maintenance
“All ionization devices will require periodic maintenance for
proper operation. Maintenance intervals for ionizers vary
widely depending on the type of ionization equipment and
use environment. Critical clean room uses will generally
require more frequent attention. It is important to set-up
a routine schedule for ionizer service. Routine service is
typically required to meet quality audit requirements.” (ESD
Handbook TR 20.20 section 5.3.6.7 Maintenance / Cleaning)
IV. Remove the
disposable
filter from the hose fitting by
depressing the metal release tab on the fitting and
pulling off the air filter.
V. Replace with the new
disposable
filter by following
the procedure in the ASSEMBLY section on page
2.
Specifications
Ozone < 0.005 ppm
(24 hour accumulation)
Hose 65 psi (0.45 MPa)
Power Output 120 VAC
Gas Input 20-65 psi (0.14 - 0.45 MPa)
Clean dry air or nitrogen
Disposable Filter 99.9% efficient
0.01 micron particles
0.008 micron coalescing
Hose Length 7' (2.13 m)
Console Dimensions 8.5" x 3.0" x 1.6"
(21.6 cm x 7.6 cm x 4.1 cm)
CLEANING THE COMPONENTS
I. Turn off the console and disconnect it from its
electircal power and gas supply sources.
DESCO WEST - 3651 Walnut Avenue, Chino, CA 91710 • (909) 627-8178 • Fax (909) 627-7449
DESCO EAST - One Colgate Way, Canton, MA 02021-1407 • (781) 821-8370 • Fax (781) 575-0172 • Website: Desco.com
TB-3033 Page 4 of 5
© 2011 DESCO INDUSTRIES INC.
Employee Owned

Limited Warranty
Desco expressly warrants that for a period of one (1) year from the date of purchase, Desco Chargebuster Ion Guns will be free of defects in material
(parts) and workmanship (labor). Within the warranty period, the product will be tested, repaired, or replaced at Desco’s option, free of charge. Call our
Customer Service Department at
shipping instructions and address. Include a copy of your original packing slip, invoice, or other proof of purchase date. Any unit under warranty should be
shipped prepaid to the Desco factory. Warranty repairs will take approximately two weeks.
909-627-8178
(Chino, CA) or 781- 821-8370 (Canton, MA) for a Return Material Authorization (RMA) and proper
If your unit is out of warranty, call Customer Service at
909-627-8178
(Chino, CA) or 781-821-8370 (Canton, MA) for a Return Material Authorization
(RMA) and proper shipping instructions and address. Desco Charleswater will quote repair charges necessary to bring your unit up to factory standards.
Warranty Exclusions
THE FOREGOING EXPRESS WARRANTY IS MADE IN LIEU OF ALL OTHER PRODUCT WARRANTIES, EXPRESSED AND IMPLIED, INCLUDING
MERCHANTABILITY AND FITNESS FOR A PARTICULAR PURPOSE WHICH ARE SPECIFICALLY DISCLAIMED. The express warranty will not apply
to defects or damage due to accidents, neglect, misuse, alterations, operator error, or failure to properly maintain, clean or repair products.
Limit of Liability
Electronic ionizers use high voltage corona discharge and should not be used in or near flammable or explosive environments. In no event will Desco
or any seller be responsible or liable for any injury, loss or damage, direct or consequential, arising out of the use of or the inability to use the product.
Before using, users shall determine the suitability of the product for their intended use, and users assume all risk and liability whatsoever in connection
therewith.
TB-3033 Page 5 of 5
DESCO EAST - One Colgate Way, Canton, MA 02021-1407 • (781) 821-8370 • Fax (781) 575-0172 • Website: Desco.com
DESCO WEST - 3651 Walnut Avenue, Chino, CA 91710 • (909) 627-8178 • Fax (909) 627-7449
© 2011 DESCO INDUSTRIES INC.
Employee Owned
 Loading...