

Page 1
For more information, visit desatech.com
For more information, visit desatech.com
For Use When Converting Models CB36N and VCB36N
This conversion kit must be
installed by a qualifi ed service
agency.
Read these instructions completely before installing this conversion kit.
Before proceeding, make sure the gas control
valve is in the OFF position, all electrical power
to the appliance is off, and the fi replace is cool
to the touch.
CAUTION: The gas supply
shall be shut off prior to disconnecting the electrical power
before proceeding with the
conversion.
Parts included with this kit:
Part No. Description Qty.
117433-01 Instruction Sheet 1
108085-02 Pilot Orifi ce LP (0.30 mm) 1
26482 Main Burner Orifi ce (#55) 1
106380-01 Gas Valve Regulator LP 1
116635-06 Conversion Label, English 1
116636-06 Conversion Label, French 1
106080-01 Conversion Information Label 1
106739-01 Registration Gas Conversion 1
Tools Required
• 7/8" Open End Wrench or Adjustable Wrench
• 3/4" Open End Wrench or Adjustable Wrench
• Torx T20 or Slotted Screwdriver
• 5/32" Allen Wrench
• #2 Short Phillips Screwdriver
• Thread Sealant (Resistant to Propane/LP)
ACCESSING FIREPLACE
The gas control valve is located under the fi rebox
and is accessed by removing the lower louver panel.
The pilot and main burner orifi ce are accessed by
removing the glass door, logs and main burner.
Save this manual for future reference.
Save this manual for future reference.
INSTALLATION INSTRUCTIONS
FOR PCBM-36C CONVERSION KIT
From Natural Gas to Propane/LP Gas
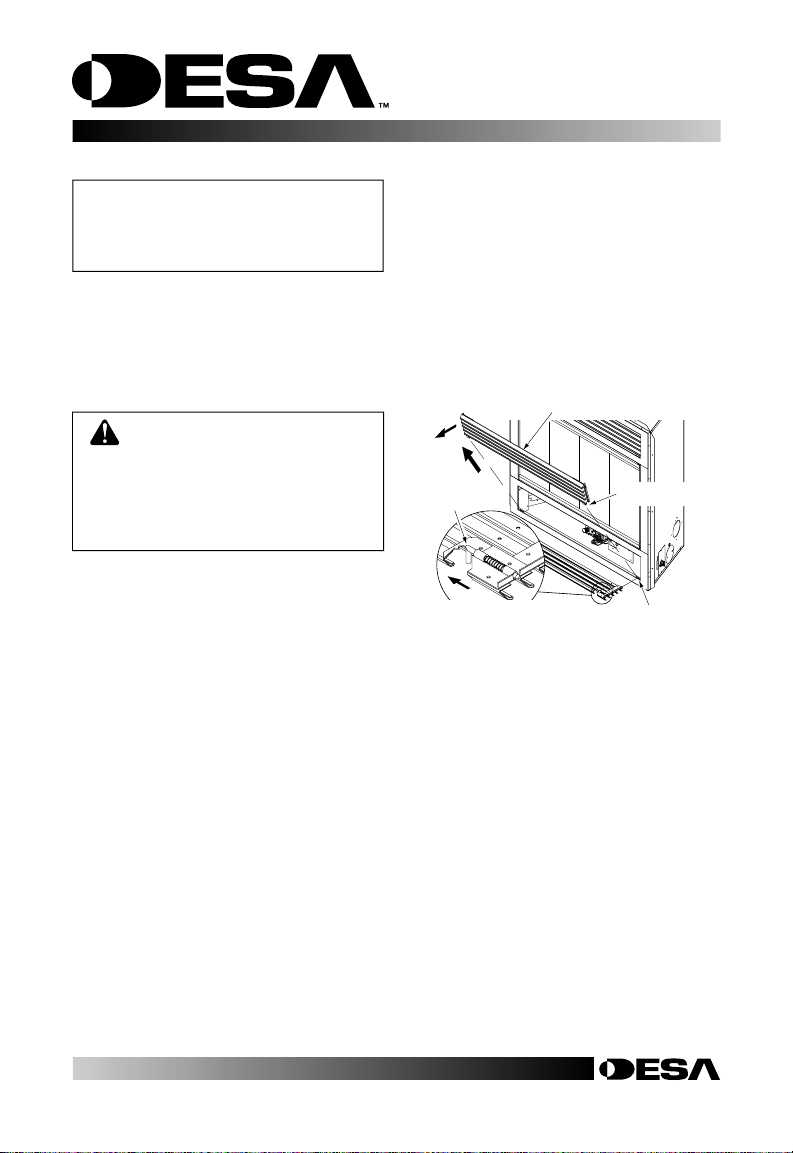
Removing Lower Louver Access Panel
1. With your index fi ngers locate the left and right
spring latches found just under the top louver
and draw them inward to release the pins hold-
ing the panel on the side face (see Figure 1).
2. Swing the louver panel out until it clears
the fi replace opening.
3. Pull the entire panel out until the bottom tabs
are free of the slots in the lower face frame.
2. Swing
Out Panel
3. Pull
Out Panel
Spring Latch
1. Draw Latches Inward
Figure 1 - Removing Lower Louver Access Panel
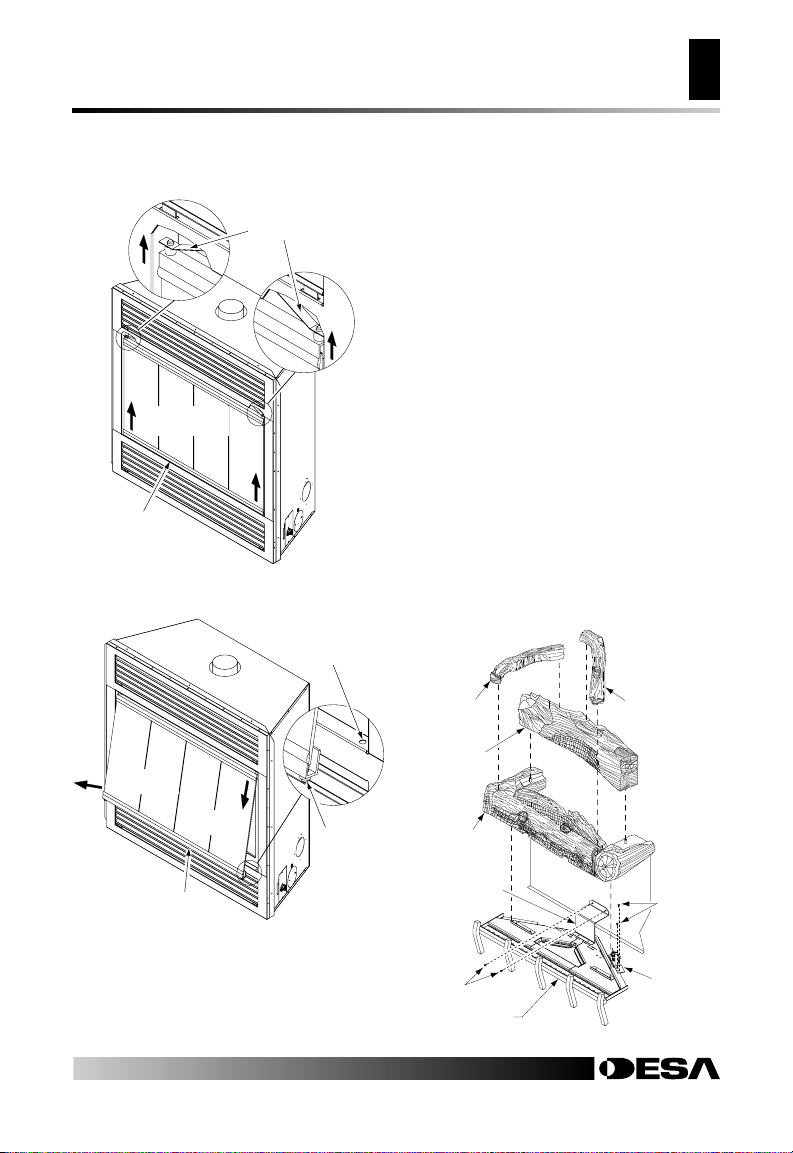
Removing/Replacing Glass Door
Remove the glass door to access the log and
burner assembly as follows:
1. Place a screw driver or your fi nger tips into the
gap between the lower glass panel rail and the
bottom face frame and lift glass door assembly
until the door pins clear the locating holes in the
bottom face frame (see Figure 2, page 2).
2. Swing bottom glass panel assembly out until
the door pins on the lower rail clear the bottom
face frame (see Figure 3, page 2).
3. Lower the door down until the upper door pins
are free of the locating holes in the spring clips
Place glass panel in a safe area.
4. Replace glass panel by inserting the top door
pins into the spring clips, lifting up at the
lower frame rail, and locating the bottom pins
in the holes on the lower face frame.
Lower Louver
Access Panel
Panel Tab
Locating Slot
Page 2

Page 3
ACCESSING FIREPLACE Continued
CONVERSION INSTRUCTIONS
Removing/Replacing Glass Door
Burner Orifi ce Conversion
2
ACCESSING FIREPLACE
Continued
Spring Clips
1. Lift Up Panel
at Lower Rail
Glass Panel
Frame Rail
Figure 2 - Removing/Replacing Glass Door
Locating
Hole
2. Swing Out
Panel
3. Lower
Panel Out
Door Pin
CONVERSION INSTRUCTIONS
Burner Orifi ce Conversion
1. Remove top, rear and base logs. See Figure 4.
2. Remove two screws holding the pilot bracket to
rear of the buner pan. (see Figure 4).
3. Remove two screws holding the rear log stand
to the rear panel of the fi rebox (see Figure 4).
4. Expose the main burner orifi ce by lifting the
burner pan assembly off the orifi ce mount.
5. Use a 1-1/8” back-up wrench on the bulkhead
fi tting and a 11/16” wrench to remove the main
burner orifi ce (see Figure 5, page 3).
6. Apply thread sealant to the male end of the #55
main burner orifi ce included with the kit and
remount the orifi ce into the bulkhead fi tting.
7.
Loosen the set screw on the main burner air
shutter, rotate to 3/4" open, and retighten
the set screw (see Figure 6, page 3).
8. Reposition burner with air shutter placed over
the orifi ce mount and replace two screws on rear
log stand and two screws at pilot assembly.
TOP
TOP
LEFT
LOG
REAR
LOG
RIGHT
LOG
Glass Panel
Frame Rail
Figure 3 - Removing/Replacing Glass Door
For more information, visit desatech.com
For more information, visit desatech.com
117433-01
PAN
REAR
PAN EL
SCREWS
PILOT
BRACKET
SCREWS
REAR LOG
STAND
BURNER
Figure 4 - Removing Logs and Burner Assembly
Page 4

CONVERSION INSTRUCTIONS Cont.
M
3
Gas Control Conversion
CONVERSION INSTRUCTIONS
Continued
11/16" WRENCH
1-1/8" BACK-UP
WRENCH
ORIFICE
MOUNT
ounting
Screws
Pressure
Regulator
Tow er
Diaphragm
/ Spring
Components
N
O
T
O
L
I
O
P
F
F
Figure 5 - Removing Main Burner Orifi ce
Burner
Tub e
Adjustment
Set Screw
Figure 6 - Adjusting Air Shutter
Air Shutter
Opening
Air Shutter Adjustment
3/4" = Propane/LP Gas
1/8" = Natural Gas
Figure 7 - Removing Mounting Screws, Regulator
Tower, and Diaphragm/Spring Components
Mounting Screws
Gas Control Conversion
Convert the gas control by swapping out the valve
regulator portion of the gas valve.
1. Using a Torx T20 or slotted screwdriver, remove
N
O
T
O
L
I
O
P
F
F
and discard the three mounting screws, pressure
regulator tower, and diaphragm/spring compo nents (see Figure 7).
2. Insure that the rubber gasket is properly position-
Rubber Gasket
ed on the new pressure regulator assembly. Install
LP pressure regulator assembly to valve using
the new mounting screws supplied with the kit.
Tighten screws securely (@ approximately 25
in-lbs.) (see Figure 8).
3. Install the identifi cation label enclosed with the
gas valve regulator to the valve body, where it
can easily be seen (see Figure 8).
Figure 8 - Installing Pressure Regulator Assembly
Identification Label
For more information, visit desatech.com
For more information, visit desatech.com
117433-01
Page 5

CONVERSION INSTRUCTIONS
Continued
Pilot Hood
5/32" Allen
Wrench
Pilot Orifice
Barrel Clip
Figure 9 - Converting Pilot Orifi ce
Pilot Orifi ce Conversion
1. Remove the pilot hood by pulling up until it
disengages from the barrel. Do not remove the
retainer clip (see Figure 9).
2. Remove the pilot orifi ce from inside the barrel
using a 5/32" allen wrench to unscrew the orifi ce.
3. Replace pilot orifi ce with LP orifi ce supplied
with this kit. The number 30 is stamped on the
sleeve for identifi cation. Insert the small end of
the new pilot orifi ce into the barrel and thread
until tight with the allen wrench.
4. Line up the notch on pilot hood to the positioning
tab on the barrel receiver and snap into postion.
IMPORTANT:
Be careful not to bend or kink the
aluminum tubing during conversion. Make sure
the pilot hood and orifi ce are properly mated and
aligned after fi nishing the conversion.
English This Side
Figure 10 - Applying Conversion Labels
117433-01
French This Side
V
E
N
T
E
Conv
D
G
A
ersion
T
S
ype
F
I
R
Minim
of
K
E
it
G
Model
as
um
For
Inlet S
P
urpose
M
upply P
an
i
o
fo
f
ld
In
O
put
re
Pressur
utput R
ssur
A
djustm
e 10.0"
Input
atin
g
R
(0-4500 Ft)
atin
g
Th
i
s
A
ppliance is Eq
with an S
.I.
0.820.651
T
. N
uipped
ova M
C
odel
V
om
alve
AN
plies
S
Z21.88
w
ith
C
SA
V
ented
-2000
2.33-200
G
as
0
Fire
Heater
place
Previous M
ode
l
#
Pilot Bracket
P
L
A
C
E
H
E
PCD
A
T
E
M-36R
R
P
ropane
e
T
/LP
en
t
11.0"
w
.c.
M
ax.
1
w.c.
3,000 Btu
M
ax.
2
0,000
M
/h
in.
1
3,000 Btu/h
B
tu/h
_
_
__
_
__
_
_
___
_
1
1
6
6
3
5
0
1
For more information, visit desatech.com
For more information, visit desatech.com
CONVERSION INSTRUCTIONS Cont.
Pilot Orifi ce Conversion
4
Conversion Labeling and Placement
Conversion Labeling and Placement
1. Apply the English and French conversion labels
over existing certifi cation labels (see Figure 10).
Existing certifi cation labels are located on the
lighting instruction plate inside the gas valve
compartment area. With permanent ink, print the
previous model number on the label in the space
provided (see Figure 11).
2. After fi lling in the data required on the conversion
information label (see Figure 12), affi x it to the
fl oor of the appliance where it is easily seen when
the lower louver access panel is removed.
VENTED GAS FIREPLACES
Conversion Kit Model PCBM-36C
Type of Gas Propane/LP
Minimum Inlet Supply Pressure 11.0" w.c.
For Purpose of Input Adjustment
Manifold Pressure 10.0" w.c.
Input Rating (0-4500 Ft) Max. 18,000 Btu/h
Orifice Size: No. 55 DMS
This Appliance is Equipped
with an S.I.T. Nova Model
0.820.617 Valve
Complies with
ANS Z21.50a-2003
CSA 2.22a-2003
Vented Gas Fireplaces
Previous Model # _____________
Figure 11 - Print Previous Model Number on
Conversion Labels
CONVERSION INFORMATION LABEL
This appliance was converted on
___ - ___ - ___ to ______________ gas
Day Month Year
with Kit No. _______________________
by _____________________________
_____________________________
_____________________________
(name and address of organization making
this conversion), which accepts the
responsibility that this conversion has been
properly made.
56060
Figure 12 - Conversion Information Label
116635-06
106080-01
Page 6

CONVERSION INSTRUCTIONS Cont.
5
Final Preparation
CONVERSION INSTRUCTIONS
Continued
Final Preparation
1. Reinstall logs. Refer to Installing Logs and Glow ing Embers in owner’s manual.
2. Leak chack the gas control and any connections
you’ve made before operating appliance. Refer
to Checking Gas Connections in owner’s manual.
3. Replace glass door panel. Refer to Removing/Re-
placing Glass Door, page 2.
4. Reinstall the bottom louver panel.
The conversion is now complete.
To operate your fi replace, refer to Operating Fireplace
in your appliance owner’s manual.
WARNING: Test all gas piping and connections for leaks
after installation or servicing.
Correct leaks at once.
WARNING: Never use an
open fl ame to check for a leak.
Apply noncorrosive leak detection fl uid to all joints. Bubbles
forming show a leak. Correct all
leaks at once.
WARNING: This conversion
kit shall be installed by a qualifi ed service agency in accordance
with the manufacturer’s instructions and all applicable codes and
requirements of the authority having jurisdiction. If the information
in these instructions is not followed exactly, a fi re, explosion, or production of carbon monoxide may
result causing property damage,
personal injury, or loss of life.
The qualifi ed service agency is responsible for the proper installation of this kit. The installation is
not proper and complete until the
operation of the converted appliance is checked as specifi ed in
the manufacturer’s instructions
supplied with the kit.
For more information, visit desatech.com
For more information, visit desatech.com
117433-01
Page 7

Page 8

WARRANTY AND REPAIR SERVICE
KEEP THIS WARRANTY
Model
Serial No.
Date Purchased
Always specify model and serial numbers when communicating with the factory.
We reserve the right to amend these specifi cations at any time without notice. The only warranty applicable is our
standard written warranty. We make no other warranty, expressed or implied.
LIMITED WARRANTY
PCBM-36C PROPANE/LP GAS CONVERSION KIT
DESA warrants this product to be free from defects for one (1) year from the date of fi rst purchase, provided that
the product has been properly installed, operated and maintained in accordance with all applicable instructions.
To make a claim under this warranty the Bill of Sale or cancelled check must be presented.
This warranty is extended only to the original retail purchaser. This warranty covers the cost of part(s) required
to restore this product to proper operating condition and an allowance for labor when provided by a DESA Authorized Service Center. Warranty part(s) MUST be obtained through autorized dealers of this product and/or
DESA who will provide original factory replacement parts. Failure to use original factory replacement parts
voids this warranty. The product MUST be installed by a qualifi ed installer in accordance with all local codes
and instructions furnished with the unit.
This warranty does not apply to parts that are not in original condition because of normal wear and tear or parts
that fail or become damaged as a result of misuse, accidents, lack of proper maintenance or defects caused by
improper installation. Travel, diagnostic cost. labor, transportation and any and all such other costs related to
repairing a defective product will be the responsibility of the owner.
TO THE FULL EXTENT ALLOWED BY THE LAW OF THE JURISDICTION THAT GOVERNS THE SALE
OF THE PRODUCT; THIS EXPRESS WARRANTY EXCLUDES ANY AND ALL OTHER EXPRESSED
WARRANTIES AND LIMITS THE DURATION OF ANY AND ALL IMPLIED WARRANTIES, INCLUDING
WARRANTIES OF MECHANTABILITY AND FITNESS FOR A PARTICULAR PURPOSE TO ONE (1)
YEAR FROM THE DATE OF FIRST PURCHASE; AND DESA’S LIABILITY IS HEREBY LIMITED TO THE
PURCHASE PRICE OF THE PRODUCT AND DESA SHALL NOT BE LIABLE FOR ANY OTHER DAMAGES
WHATSOEVER INCLUDING INDIRECT, INCIDENTAL OR CONSEQUENTIAL DAMAGES.
Some states do not allow a limitation on how long an implied warranty lasts or an exclusion or limitation of
incidental or consequential damages, so the above limitation on implied warranties or exclusion or limitation on
damages may not apply to you.
This warranty gives you specifi c legal rights and you may also have other rights that vary from state to state.
For information about this warranty write:
2701 Industrial Drive
P.O. Box 90004
Bowling Green, KY 42102-9004
www.desatech.com
117433-01
NOT A UPC
For more information, visit desatech.com
For more information, visit desatech.com
117433-01
Rev. A
08/05
 Loading...