

Desa RH10PT User Manual
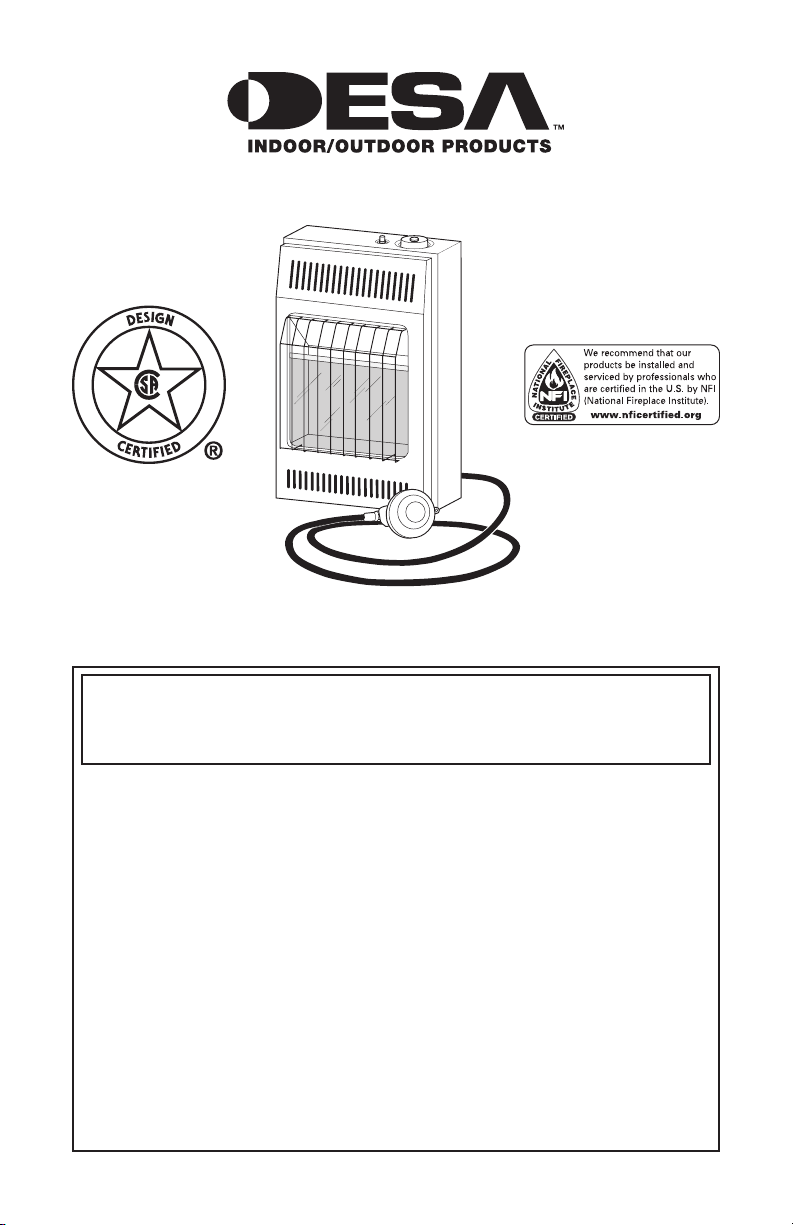
BLUE FLAME VENT-FREE PROPANE/LP GAS HEATER
OWNER’S OPERATION AND INSTALLATION MANUAL
MODELS REM10PT AND RH10PT
10,000 Btu/Hr Thermostatically-Controlled Heater
WARNING: If the information in this manual is not followed exactly, a fire or explosion may result causing
property damage, personal injury or loss of life.
— Do not store or use gasoline or other flammable
vapors and liquids in the vicinity of this or any other
appliance.
— WHAT TO DO IF YOU SMELL GAS
• Do not try to light any appliance.
• Do not touch any electrical switch; do not use any
phone in your building.
• Immediately call your gas supplier from a neighbor’s
phone. Follow the gas supplier’s instructions.
• If you cannot reach your gas supplier, call the fire
department.
— Installation and service must be performed by a quali-
fied installer, service agency or the gas supplier.
Save this manual for future reference.
For more information, visit www.desatech.com

WARNING: Improper installation, adjustment, alteration, service or maintenance can cause injury or property damage. Refer to this manual for correct installation
and operational procedures. For assistance or additional information consult a qualified installer, service
agency or the gas supplier.
WARNING: This is an unvented gas-fired heater. It uses
air (oxygen) from the room in which it is installed. Provisions for adequate combustion and ventilation air must
be provided. Refer to Air for Combustion and Ventilation
section on page 5 of this manual.
This appliance is only for use with the type of gas indicated on the rating plate. This appliance is not convertible for use with other gases.
State of Massachusetts: The installation must be made by a licensed plumber or gas fitter in the
Commonwealth of Massachusetts.
Sellers of unvented propane or natural gas-fired supplemental room heaters shall provide to each
purchaser a copy of 527 CMR 30 upon sale of the unit.
Vent-free gas products are prohibited for bedroom and bathroom installation in the Common
wealth of Massachusetts.
-
TABLE OF CONTENTS
Safety Information ............................................... 3
Local Codes ........................................................ 4
Unpacking ........................................................... 4
Product Identification ...........................................
Product Features ................................................. 5
Propane/LP Supply .............................................. 5
Installation ........................................................... 5
Operating Heater ................................................11
Inspecting Heater .............................................. 12
Cleaning and Maintenance ................................ 13
2
www.desatech.com
Troubleshooting ................................................. 14
Storage .............................................................. 17
Specifications .................................................... 17
5
Service Hints ..................................................... 17
Technical Service ..............................................
Service Publications .......................................... 17
Accessories ....................................................... 17
Replacement Parts ............................................ 17
Illustrated Parts Breakdown and Parts List ....... 18
Warranty
Information ........................... Back Cover
17
110373-01E
SAFETY INFORMATION
WARNING: This product contains and/or generates chemicals
known to the State of California
to cause cancer or birth defects
or other reproductive harm.
IMPORTANT: Read this owner’s
manual carefully and completely
be fore tr ying to assemb le,
operate or service this heater.
Improper use of this heater can
cause serious injury or death
from burns, fire, explosion,
electrical shock and carbon
monoxide poisoning.
DANGER: Carbon monoxide
poisoning may lead to death!
Carbon Monoxide Poisoning: Early signs of carbon
monoxide poisoning resemble the flu, with head
aches, dizziness or nausea. If you have these signs,
the heater may not be working properly. Get fresh
air at once! Have heater serviced. Some people
are more affected by carbon monoxide than others.
These include pregnant women, people with heart
or lung disease or anemia, those under the influence
of alcohol and those at high altitudes.
Propane/LP Gas: Propane/LP gas is a fuel gas.
Fuel gases are odorless. An odor-making agent
is added to fuel gases. The odor helps you detect
a fuel gas leak. However, the odor added to fuel
gas can fade. Fuel gas may be present even though
no odor exists.
Make certain you read and understand all warn
ings. Keep this manual for reference. It is your
guide to safe and proper operation of this heater.
WARNING: If the recreational
or commercial enclosure does
not have a window or roof vent,
DO NOT USE THIS HEATER
inside.
This heater should be inspected
before each use. Frequent cleaning may be required. The control
compartments, burners and circulating air passageways of the
heater must be kept clean.
Due to high temperatures, the
appliance should be located out
of traffic and away from combustible materials.
Children and adults should be
alerted to the hazard of high
surface temperature and should
-
stay away to avoid burns or
clothing ignition.
Do not place clothing or other
flammable material on or near
the appliance. Never place any
objects on the heater.
Heater will remain hot for a time
after shutdown. Allow surface to
cool before touching.
Young children should be care-
-
fully supervised when they are
near the heater.
WARNING: Any change to
this heater or its controls can
be dangerous.
Any safety screen or guard
removed for servicing the appliance must be replaced prior
to operating the heater.
WARNING: Do not use a
blower insert, heat exchanger
insert or other accessory not approved for use with this heater.
Keep the appliance area clear
and free from combustible ma
terials, gasoline and other flam
mable vapors and liquids.
110373-01E 3
www.desatech.com
-
-

SAFETY INFORMATION
Continued
1. Install and use heater with care. Follow all
local ordinances and codes. In the absence
of local ordinances and codes, refer to the
Standard for Storage and Handling of Liquefied Petroleum Gas, ANSI/NFPA 58 and the
Natural Gas Installation Code, CAN/CGA
B149.2. This instructs on the safe storage and
handling of propane/LP gases.
2. This appliance is only for use with the type
of gas indicated on the rating plate. This ap
pliance is not convertible for use with other
gases.
3. This heater may be used in a recreational
enclosure or temporary construction work
enclosure with a remote refillable propane/LP
cylinder ONLY when the cylinder is located
outdoors and the heater is used with the hose
kit #LPA3090 (included with this heater).
NEVER bring a refillable propane/LP cylinder
indoors. A fire or explosion can occur causing
property damage, serious injury or death.
4. Use only the hose and factory preset regulator
provided with the heater. Use only replacement
pressure regulators and hose assemblies speci
fied in this manual. See Accessories, page 17.
5. Inspect the hose before each use of the heater.
If it is evident there is excessive abrasion or
wear or the hose is cut, it must be replaced
prior to the heater being put into operation.
Use replacement hose assembly kit #LPA3090
(see Accessories, page 17).
6. Use only propane gas set up for vapor with
drawal.
7. This heater shall not be installed in a bedroom
or bathroom.
8. This heater needs fresh, outside air ventilation
to run properly. This heater has an Oxygen
Depletion Sensing (ODS) safety shutoff sys
tem. The ODS shuts down the heater if not
enough fresh air is available. You must provide
a minimum 10 square inches of ventilation air
for adequate combustion.
9. If heater shuts off, do not relight until you
provide fresh, outside air. If heater keeps
shutting off, have it serviced.
10. Keep all air openings in front and bottom of
heater clear and free of debris. This will insure
enough air for proper combustion.
11. Do not use heater if any part has been under
water. Immediately call a qualified service
technician to inspect the room heater and to
replace any part of the control system and any
gas control which has been under water.
12. Turn off and let cool before servicing. Only
a qualified service person should service and
repair heater.
13. Operating heater above elevations of 4,500
feet could cause pilot outage.
14. Turn off propane/LP supply when not in use.
15. Check heater for damage before each use. Do
not use a damaged heater.
16. Do not alter heater. Keep heater in its original
state.
17. Do not use heater if altered.
18. This heater can only be used in a recreational
or commercial enclosure with a window or
roof vent. This heater is not for outdoor use.
19. Before using the heater provide adequate
ventilation. An area of 10 square inches of
opening of a window or roof vent is needed
for adequate combustion and ventilation air.
LOCAL CODES
-
Install and use heater with care. Follow all local codes. In the absence of local codes, use the
latest edition of National Fuel Gas Code, ANSI
Z223.1/NFPA 54*.
*Available from:
American National Standards Institute, Inc.
1430 Broadway
National Fire Protection Association, Inc.
New York, NY 10018
Batterymarch Park
Quincy, MA 02269
UNPACKING
1. Remove heater from carton.
-
2. Remove all protective packaging applied to
heater for shipment.
3. Check heater for any shipping damage. If
heater is damaged, promptly return to dealer
where you bought heater.
4
www.desatech.com
110373-01E
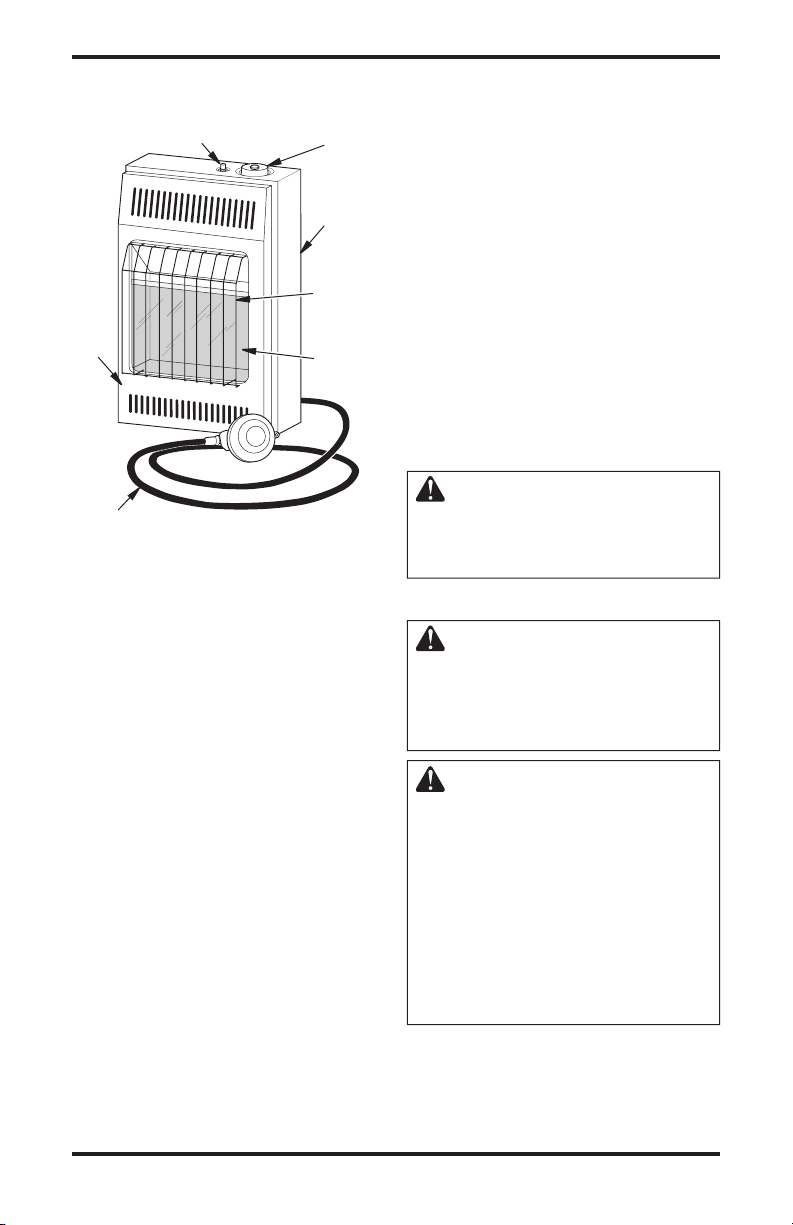
PRODUCT
IDENTIFICATION
Ignitor Button
Front
Panel
Regulator Hose
Figure 1 - Vent-Free Propane/LP Gas
Heater
Control
Knob
Heater
Cabinet
Grill
Guard
Glass
Panel
PRODUCT FEATURES
SAFETY PILOT
This heater has a pilot with an Oxygen Depletion Sensing (ODS) safety shutoff system. The
ODS/pilot is a required feature for vent-free room
heaters. The ODS/pilot shuts off the heater if there
is not enough fresh air.
PIEZO IGNITION SYSTEM
This heater has a piezo ignitor. This system requires no matches, batteries or other sources to
light heater.
PROPANE/LP SUPPLY
Propane/LP gas and propane/LP tank(s) are to be
furnished by the user. The propane/LP cylinder
to be used must be constructed and marked in
accordance with the specifications for the propane/LP gas cylinders of the U.S. Department of
Transportation (DOT).
Use this heater only with a propane/LP vapor
withdrawal supply system. See Chapter 5 of the
Standard for Storage and Handling of Liquefied
Petroleum Gas, ANSI/NFPA 58 and/or CAN/CGA
B149.2. Your local library or fire department will
have this booklet.
The amount of propane/LP gas ready for use from
propane/LP tanks varies. Two factors decide this
amount:
1. The amount of propane/LP gas in tank(s)
2. The temperature of tank(s)
This heater is designed for use with a 20 or 40
pound refillable propane/LP cylinder when used
as a self contained heating system (with hose and
regulator). Larger tanks may be used if installed
in a permanent gas supply system.
The propane/LP cylinder used must include a
collar to protect the cylinder valve and a listed
overfilling prevention device (OPD).
INSTALLATION
CHECK GAS TYPE
Use only propane/LP gas. If your gas supply is not
propane/LP, do not install heater. Call dealer where
you bought heater for proper type heater.
WARNING: This appliance
is equipped for propane/LP
gas. Field conversion is not
permitted.
LOCATING HEATER
WARNING: Maintain the minimum clearances shown in Figure
2, page 6. If you can, provide
greater clearances from floor,
ceiling and joining wall.
WARNING: Never install the
heater
• in a bedroom or bathroom
• where curtains, furniture,
clothing or other flammable
objects are less than 36" from
the front, top or sides of the
heater
• as a fireplace insert
• in high traffic areas
• in windy or drafty areas
110373-01E 5
www.desatech.com
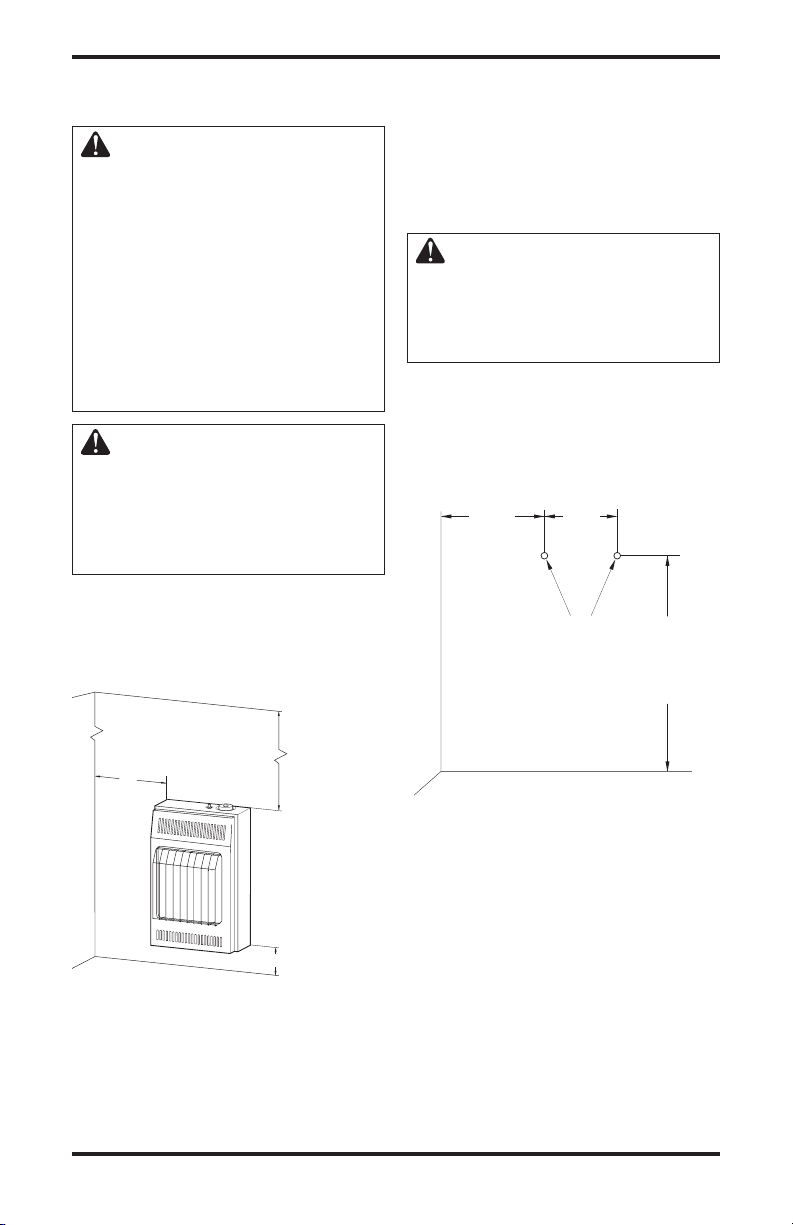
INSTALLATION
36"
3"
FLOOR
CEILING
Minimum
Minimum To Top Surface
Of Carpeting, Tile Or Other
Combustible Material
6"
Minimum
From
Sides Of
Heater
Right
Side
Left
Side
Continued
CAUTION: This heater creates warm air currents. These
currents move heat to wall surfaces next to heater. Installing
heater next to vinyl or cloth wall
coverings or operating heater
where impurities (such as, but
not limited to, tobacco smoke,
aromatic candles, cleaning flu
ids, oil or kerosene lamps, etc.) in
the air exist, may discolor walls
or cause odors.
CAUTION: If you install the
heater in a home garage
• heater pilot and burner must
be at least 18" above floor.
• locate heater where moving
vehicle will not hit it.
For convenience and efficiency, install heater
• where there is easy access for operation, inspec
tion and service
• in coldest part of room
THERMOSTAT SENSING BULB
The thermostat sensing bulb is located inside the
heater. Do not move this bulb during installation
or operation of the heater.
INSTALLING HEATER TO WALL
Marking Screw Locations
1. Determine where you will locate heater.
WARNING: Maintain mini-
mum clearances shown in Figure
3. If you can, provide greater
clearances from floor and join
ing wall.
2. Mark two mounting screw locations on wall
(see Figure 3).
Installing Two Mounting Screws
Note: Wall anchors and mounting screws are
in hardware package. The hardware package is
provided with heater.
8 7/8"
Minimum To
Maintain 6"
Clearance
From Wall
-
JOINING WALL
7 3/4"
Mounting
Screw
Locations
Minimum To
Maintain 3"
Clearance
From Floor
-
20 1/4"
Figure 2 - Mounting Clearances As
Viewed From Front of Heater
6
Minimum To
Top Surface
Of Carpeting,
Tile Or Other
Combustible
Material
Figure 3 - Mounting Screw Locations
Attaching To Wall Stud Method
For attaching mounting screw to wall stud
1. Drill hole at marked location using 9/64" drill
bit.
2. Insert mounting screw into wall stud.
3. Tighten screw until 1/16" space (thickness of
penny) is between screwhead and wall.
Attaching To Wall Anchor Method
Follow instructions below to attach mounting
screws to hollow walls (wall areas between studs)
or solid walls (concrete or masonry).
1. Drill holes at marked locations using 5/16"
drill bit. For solid walls (concrete or masonry),
drill at least 1 1/4" deep.
2. Fold wall anchor (see Figure 4, page 7).
www.desatech.com
FLOOR
110373-01E
 Loading...