

Page 1
MODEL TFD-1020DVBT
10" LCD TV DV D Combo
Page 2

Table of Contents
Contents
Table of Contents
Safety Precautions
Box Contents
Identification of Controls
Main Unit
Remote control unit
Insert the remote control battery
System Connections
Getting Started
Pewer Suppiy Preparation
Rechargeable Battery
Turning on the unit
TV Setup Menu
TV menu (only if switched to TV mode)
Playing a DVD or Video CD(Operation)
Basic operation
Audio CD and MP3/WMA Disc Features
Playing an Audio CD or MP3/WMA
Playing a JPEG Disc
Playing a DVD VR format Disc
Playing a MPEG4 Movie Disc
Program playback(not for Picture CD/MP3)
DIGITAL CARD and USB Device operation
2
4-7
6-7
7-12
7-8
11-12
13-18
13
14
15
15
16
17
10
13
1
3
4
5
6
8
8
9
SETUP Menu Setting(DVD/DVB)
General Operation
General Setup Page
Speaker Setup Page
Dolby Digital Setup
Preference Page
DVB-T Introduction
Area / Time Zone / Parental Age
Auto Scan
Manual Scan
Teletext
EPG
Reserve Channel
Channel Remap
Adjust Channel
OSD
Information on disc compatibility
Troubleshooting
Technical specifications
18-23
18
18-20
20
21
21-23
P9-P10P9-P10P9-P10
23-27
23
23
24
24
25
25
25
26
26
27
P9-P10P9-P10P9-P10
28
P9-P10
29
GB-1
Page 3
Safety Precautions
Before using your TV, plesse read these instructions completely, and
keep this manual for future reference.
Carefully observe and comply with all warnings, cautions and instructions
indicated on the unit or descrbed in the owner s manual.
The lightning flash with an arrowhead symbol, within an equilateral
triangle, is intended to alert the user to the presence of un-insulated
“dangerous voltage” within the product enclosure that may be of dufficient
magnitude to constitute a risk of electric shock to persons.
The exclamation mark within an equilateral triangle is intended to alert the
user to the presence of important operating and maintenance (servicing)
instructions in the literature accompanying the appliance.
If at any time in the future you should need to dispose of this product
please note that waste electrical products should not be disposed of with
household waste. Please recycle where facilities exist. Check with your
Local Authority or retailer for recycling advice. (Waste Electrical and
Electronic Equipment Directive)
This unit complies with the relevant European safety, electrical
interference and dangerous substances directives.
Manufactured under license from Dolby Laboratories. “Dolby”
“Pro Logic” and the double-D symbol are trademarks of Dolby
Laboratories.
The power cable/disconnect device shall remain easy to operate/
disconnect.
N
NOTES:
N
1. Read these instructions.
2. Keep these instructions.
3. Heed all warnings.
4. Follow all instructions.
5. Do not use this apparatus near water.
6. Clean only with dry cloth.
7. Do not block any ventilation openings. Maintain well-ventilated
conditions around the product. Do not put the product on a bed,
sofa or anything that blocks ventilation. Install according to the
manufacturer's instructions.
8. Do not install near any heat sources such as radiators, heat registers,
stoves or other apparatus (including amplifiers) that produce heat.
9. Read and follow all instructions to ensure correct and safe installation
and interconnection of the apparatus.
10.The apparatus must not be exposed to dripping or splashing and no
objects filled with liquids, such as vases, must be placed on the
apparatus.
11. The mains socket-outlet must be installed near the apparatus and
the mains plug should remain readily operable.
12. Protect the power cord from being walked on. Pay particular attention
to the AC adapter and connections.
13. Only use mounting systems specified by the manufacturer.
14. Use only with a cart, stand, tripod, bracket, or table specified by the
manufacturer, or sold with the apparatus. When a cart is used,
exercise caution when moving the cart/apparatus combination to
avoid injury from tip-over.
15. Unplug the apparatus during lightning storms or when unused for
long periods of time.
16. Refer all servicing to qualified service personnel. Servicing is
required when the apparatus has been damaged in any way, for
example if the power-supply cord or plug is damaged, liquid has
been spilled on or objects have fallen into the apparatus, if the
apparatus has been exposed to rain or moisture, if it does not
operate normally, or if it has been dropped.
Note: Do not touch the colour TFT LCD screen directly.
GB-2
Page 4
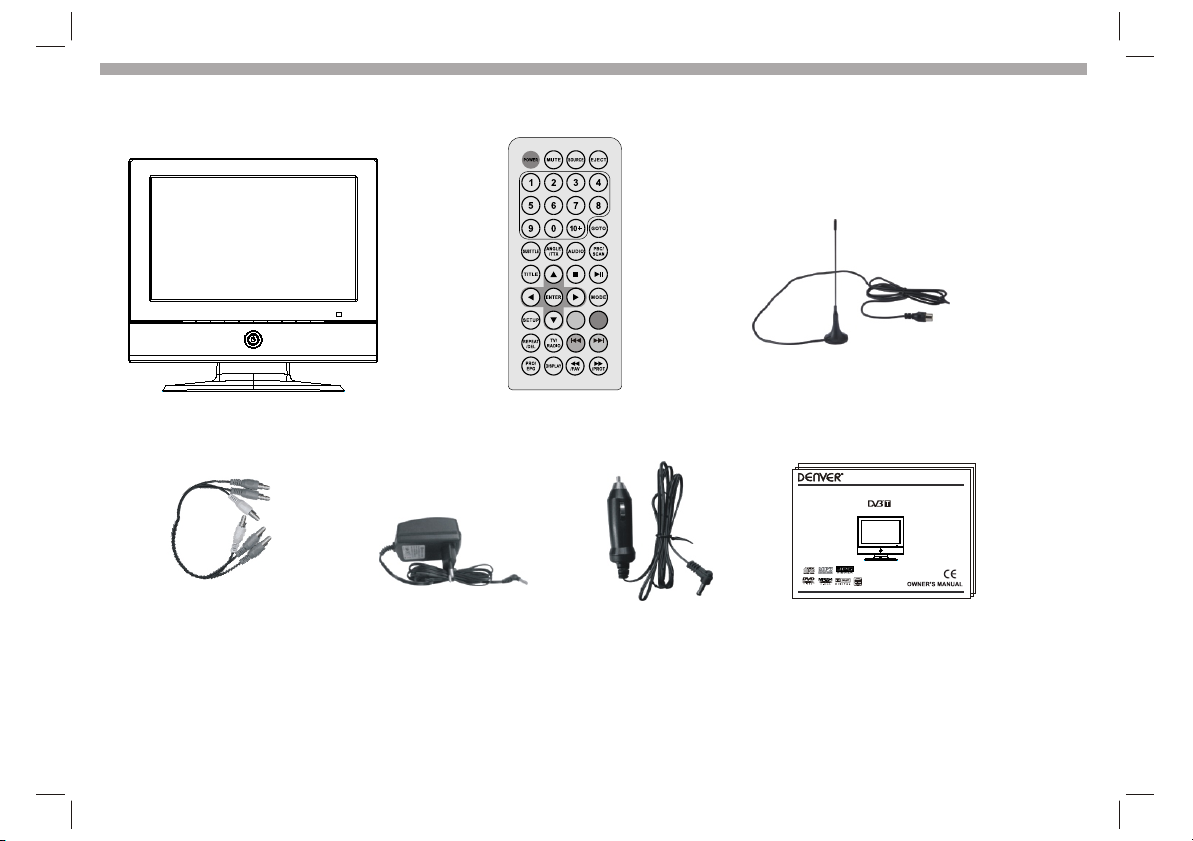
Box contents
TV set Remote control External TV Antenna
ZOOM
Y
G B
MENU
R
MODEL TFD-1020DVBT
10" LCD TV DVD Combo
Audio/Video cable
If any of the accessories are missing, contact your dealer as soon as possible. Keep all the original packaging in case you need to return
the set to the dealer
AC/DC Adapter Car Adaptor
This User Guide
GB-3
Page 5

Identification of Controls
Main Unit
11
12
6 7 8 9
24
10
13
14
15
16
17
17
18
19
20
21
22
23
5
4
2
1
3
1. SOURCE
2. SCAN :TV or DVB scan
3. MODE
Enter TFT setup menu and TV setup menu in TV mode.
4. CH-/ (Down)
5. CH+/ (Up)
6. VOL-/ (Left)
7. VOL+/ (Right )
8. SETUP: Enter DVD setup menu
9. ENTER.
10.EJECT: Open/Close disc.
11. Remote sensor.
12. Standby/on led indicator
13.ANT: antenna input.
14.IN AV OUT: AV out/in switch
15.VIDEO: Video input/output.
16.USB: USB port.
17.AUDIO: Audio input/output.
18.SD/MMC/MS: card slot.
19.VGA: VGA input.
20.Headphones jack.
21.POWER: power switch.
22.DC IN 9V: DC input.
23.CHARGE: Charge indicator, Red is charge, Green is full.
24. Disc in/out.
GB-4
Page 6
Identification of Controls
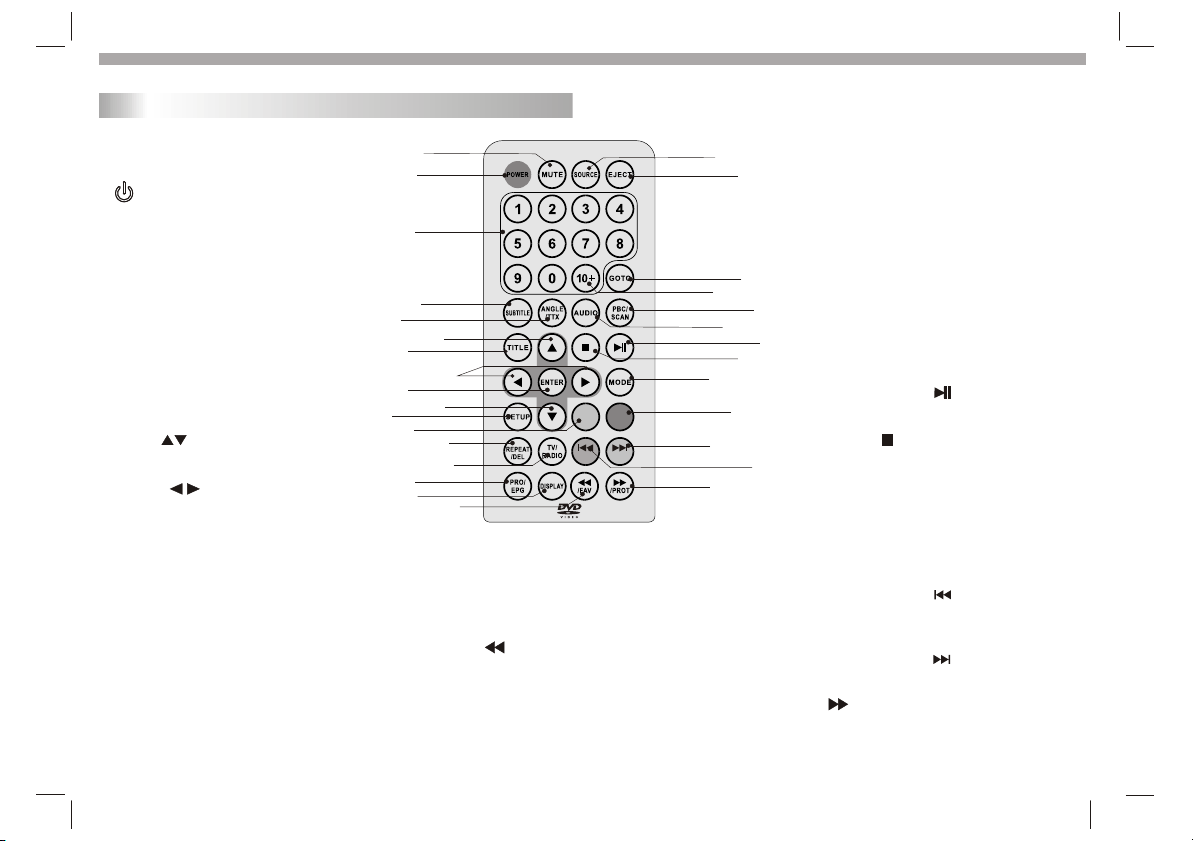
Remote control unit
1.MUTE
Disable Audio output.
2. POWER
Switches Player ON and Standby.
3.0-9 NUMBER BUTTON
Selects number, such as a TV channel.
4.SUBTITLE
Selects a subtitle language.
5.ANGLE/TTX
Selects a DVD camera angle if available
in DVD mode. Teletext key in DVB mode.
6.TITLE
Return to DVD title menu.
7. CH+/-( )
Channel up/down, cursor for OSD menu.
8. VOL+/-( )
Volume up/down, cursor for OSD menu.
9.ENTER
Confirms menu selection.
10.SETUP
Enter or exit setup menu.
11.ZOOM
Enlarges video image.
12.REPEAT/DEL
Repeat chapter, title, all in DVD mode.
Delete channel in DVB mode.
13.TV/RADIO(DVB only)
Switch TV and Radio channels.
1010
55
66
99
1111
1414
1515
11
22
33
44
77
88
77
1212
1313
1616
1717
1818
1919
2020
2222
2424
2525
MENU
ZOOM
R
Y
G
B
2626
2727
2929
14. PRO/EPG
Program in DVD mode.
EPG(Electronic program guide) in DVB mode.
15.DISPLAY
Accesses On-Screen display.
16. /FAV
Fast backward in DVD .Set favourite
channel in DVB mode.
17.SOURCE
Select DVD/USB/CARD/DVBT/TV in AV
out mode select VGA(PC)/AV IN in AV
in mode.
18. EJECT
Open/Close disc.
19.GO TO
Goto time point , title or chapter you want.
20.10+ BUTTON
Add 10+ to your selection with more
than one-digit.
21. PBC/SCAN
PBC on/off switch in VCD mode .
2121
Scan key in DVB mode.
22.AUDIO
2323
Selects an audio language.
23. PLAY/PAUSE ( )
Starts or pause playback(DVD only).
24. STOP ( )
Stops playback(DVD only).
2828
25.MODE
Enter the TV setup menu.
26.MENU
Accesses menu on a DVD disc.
Return toPBC menu on a VCD disc.
27. Reverse Skip ( )
Go to previous chapter / track or to the
beginning(DVD only).
28. Forward Skip( )
Go to the next chapter / track(DVD only).
29. /PROT
Fast forward in DVD. Set protect
channel in DVB mode.
GB-5
Page 7
Identification of Controls
System Connections
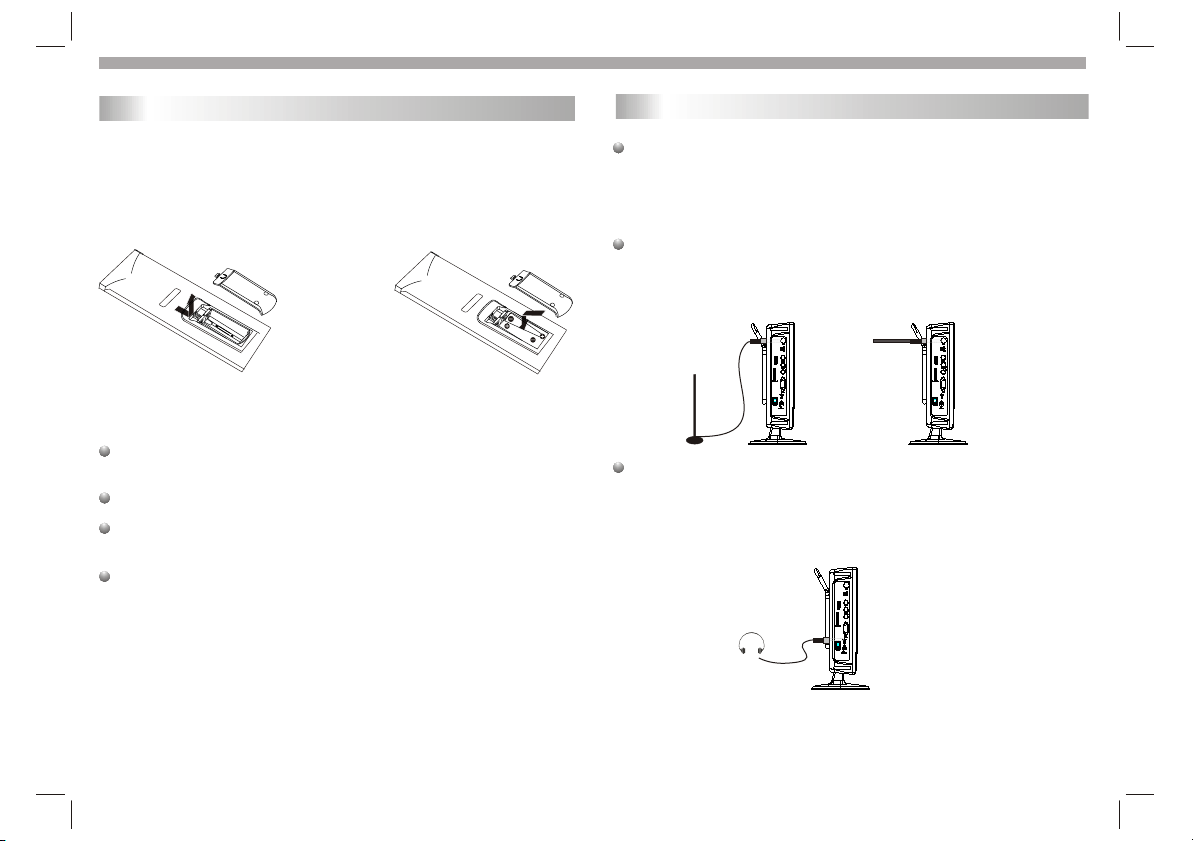
Insert the remote control battery
1.Open the battery door.
2.Insert two AAA size batteries
with correct polarity marked
inside the compartment.
1 2
For the best results,aim the remote towards at the player's remote
sensor within 5 metres and angles of 60 degrees or less.
Under normal use the battery will last for one year.
Remove battery when you are not using the DVD player for a long
time.
Precautions when using batteries
1. Use only the size and type of batteries specified.
2. Do not mix different types of batteries together or old batteries
with fresh ones.
3. Exhausted batteries have to be removed to prevent possible battery
leakage.
4. Dispose of batteries properly according to environmental regulations.
System Connections
Before you begin:
Do not connect the power cord until all other connections to
this player have been made.
Ensure that you observe the colour coding of cables when
connecting audio and video devices.
Connecting to an aerial or the external TV antenna:
This unit is equipped with a multi-standard tuner. Connect your
antenna connecter to the aerial input jack on the left side of the
player. Or you can also connect to the external antenna
(supplied) as shown below:
Connecting to headphones
Connect the headphones to the headphone jack on the left side
of the player, as shown below:
When headphones are connected the speaker output will be
turned off automatically. Prolonged use of headphones at full
volume may damage your hearing.
GB-6
Page 8
System Connections
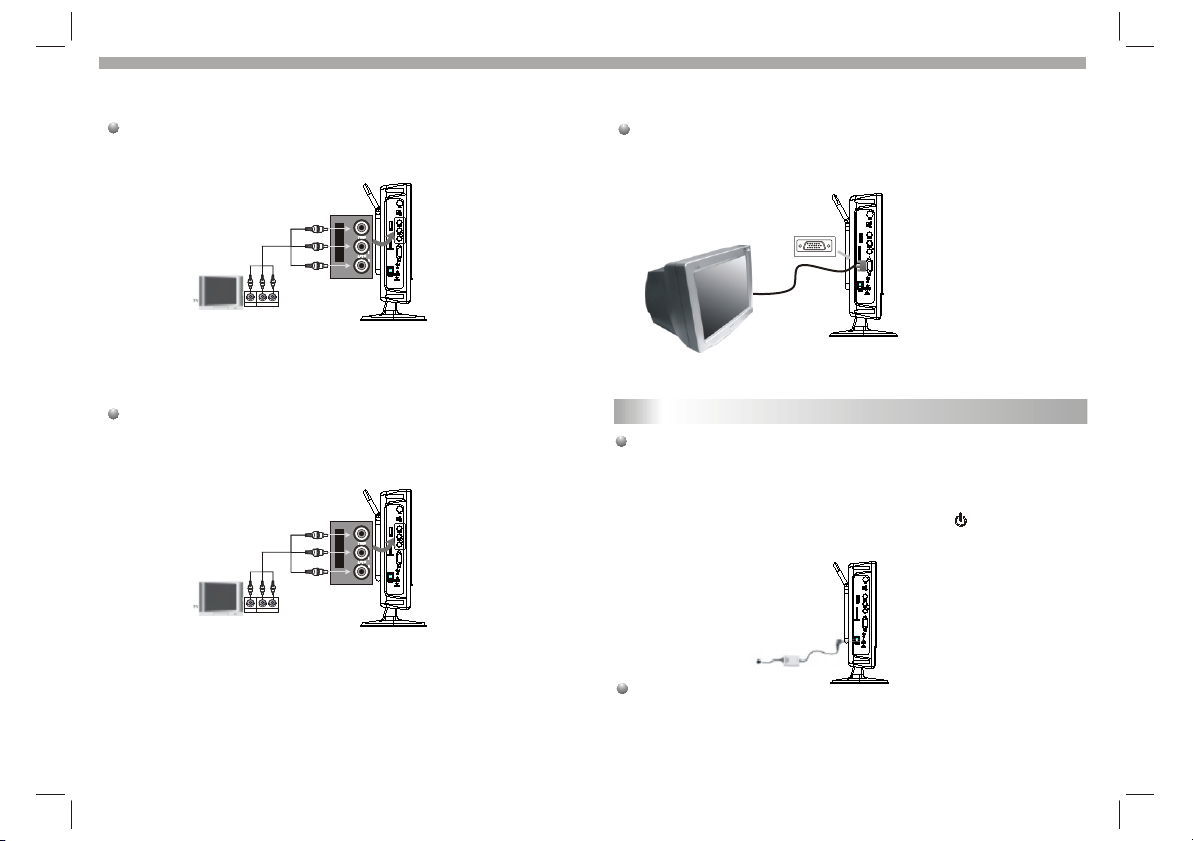
Connecting to External TV
Use the AV cables to connect the external TV set to the AV input jacks on
the left side of the unit, as shown below:
In DVD mode, set AV IN/OUT switch to ¡°OUT ¡±to output AV signal
to the external TV.
Connecting to a PC
Use the Mini D-Sub 15 Pin cable (not Supplied) to the connect the
PC and the VGA input jack on the left side of the unit, as shown below:
set AV IN/OUT switch to IN to input AV signal from the PC.
Connecting External A/V Sources to the appliance
Refer to your audio equipment's manual before connection.
Use the AV cables to connect the external A/V sources to the
AV input jacks on the left side panel of the unit, as shown below:
In DVD mode, set AV IN/OUT switch to ¡°OUT¡± to output AV signal to
the external A/V sources.
Power Supply Preparation
GB-7
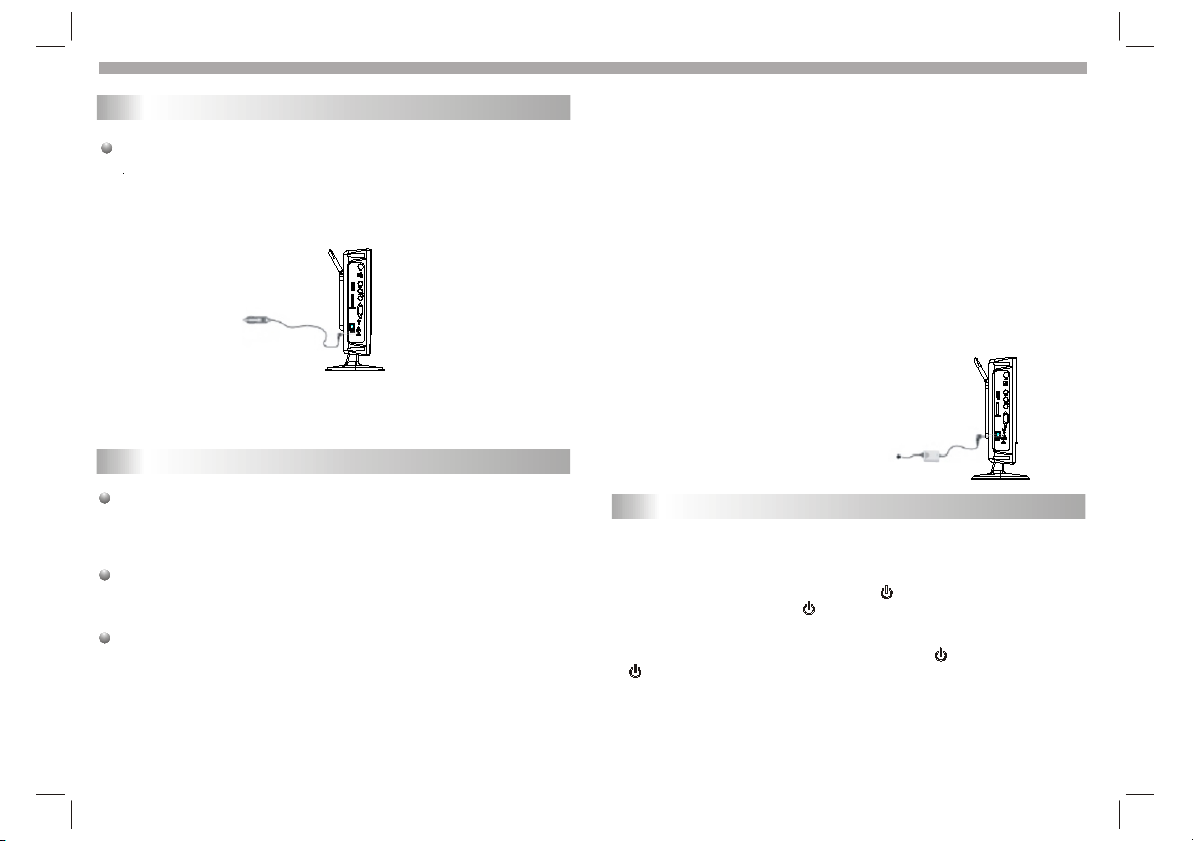
Using the AC Adapter
The player is supplied with an AC adapter for powering the unit and
charging the battery.
1. Connect AC adapter to the left side of the unit in the jack marked
DC 9V IN as shown on the right.
2. Plug the power cord into a wall AC outlet. The indicator
lights up. The indicator is red.
Note:
1. Turn unit's power off before unplugging.
2. In the case of using the adapter, the LCD screen will be brighter than
using the rechargeable battery.
AC/DC adapter
/on led
Page 9
Getting Started
Power Supply Preparation
Using the Car Adapter
The unit is supplied with a Car Adapter for powering the unit and
charging the battery in a vehicle.
Connect the car adapter power plug to the unit's DC IN 9V jack and the
other end to the vehicle cigarette lighter socket as shown on the right.
Car adapter
Attention
ØDo not operate the unit or view video while driving a vehicle.
ØPlace the unit in a proper position for viewing.
Rechargeable Battery
Replacing the fuse of the car adapter. Make sure the amperage
matches the specified value when replacing the fuse. If the fuse
is blown, check the power connection and replace with a new one. If
some problems occur, there must be a malfunction. In such cases,
please consult the nearest repair center.
Warnings:
Never use the fuse with a rated amperage over the one specified,
otherwise you may damage the unit.
About Rechargeable Battery Pack
The Unit includes a built-in lithium rechargeable battery. Charge
the battery fully before initial use. Charging time is normally about
5 hours. A fully charged battery delivers about 3 hours of use but
playing time varies from disc to disc. If the battery will not be used
for a long period of time, charge the battery up to 30%~60% of its
capacity before storage.
Working conditions and precautions for the rechargeable battery
ØNew battery should be fully charged before initial use.
ØBattery should only be used and charged when temperature is
between 32-100F.
ØNever put the battery in fire or water.
ØDo not expose the battery to high temperature or store in hot,
sunny place.
ØMaintain well-ventilated conditions around the product to avoid
overheating. Don't put the product on a bed, sofa or anything that
may block ventilation to the product.
ØDo not short the battery terminals.
ØDo not open the battery.
ØWhen charging the battery pack, the charge light will turn red,
When the charging is complete, the light will turn green.
ØWhen the battery is weak, low power indicator will appear on the
LCD screen. The player will turn off automatically several
minutes later.
Charging the Battery
The built-in battery can be charged by using the
supplied AC Adapter.
1. Plug one end of the supplied AC Adapter into
the unit's power jack marked with ¡°DC 9V IN ¡±
which is located on left side of the Player.
2. Plug the other end of the AC Adapter
Cord into a wall AC Outlet.
Turning On the Unit
Before Operation:
1. Connect the aerial cable or input source to the antenna input socket
at the left side of the set.
2. After connecting the power supply and switching the power switch to
¡°I¡±, turn the unit on, by pressing the button on the front panel
or the remote control, the indicator will turn to blue.
3. Use the SOURCE button to select the source: TV/DVD/USB/CARD/
DVBT in AV OUT mode or VGA in AV in mode.
4. To Switch the set to standby mode, press the button and the
indicator will turn red.
/on led
5. To turn off the unit, switch the Power switch to ¡°o¡±.
6. If you are not going to use the set for a long time, switch the power off
completely by unplugging the power supply cable.
/on led
AC/DC adapter
GB-8
Page 10
Getting Started
TV Setup menu
To enter the TV Setup menu, press the "MODE" button. To exit the
TV Setup menu, press it repeatedly.
General operation
1. Press the MODE button repeatedly to display the menus in the
following order:
PICTURE->VOLUME->OPTION-> SYSTEM-> PRESET
2. To select a menu item, press the buttons to scroll up and
down the list.
3. When a menu item is highlighted, use the buttons to adjust
the setting.
PICTURE
VOLUME
VOLUME 51
OPTION
VOLUME:Adjusts the VOLUME of
the sound.
BRIGHT 50
CONTRAST 50
COLOR 50
ENGLISH
RESET
BRIGHT:
Adjusts the brightness of the picture
CONTRAST:
Adjusts the contrast of the picture
COLOR:
Adjusts the colour of the picture
ENGLISH:
Select the On-Screen-Display,
language.
RESET:
Reset to the default settings.
GB-9
NORMAL
ZOOM 16:9
VGA and AV IN input
VGA: support 800x600x(60)HZ
AV IN: Support PAL and NTSC input.
NORMAL: Rotate the picture upside
down.
ZOOM: select the aspect ratio:
16:9 or 4:3.
Page 11

Getting Started
TV menu (only if switched to TV mode)
SYSTEM
S-ROLOC AUTO
S.SYS I
SWAP
5 4
COPY
S-ROLOC:select a color system:
S.SYS: select a sound system:
SWAP: Use the buttons to
channel eg.¡°4¡±will
to select the channel you want to swap, eg¡°5¡±.
Press the button to highlight the
press the button to swap.
COPY: Follow the steps in ¡°SWAP¡±
the other channel.
display on the right.Then, use the
AUTO,PAL,SECAM
I, L,BK,DK
currrent channel ¡°4¡±and then
to copy the current channel to
PRESET
AUTO SEARCH
SEARCH
FINE TUNE
BAND VHFL
POSITION 0
Skip OFF
AUTO SEARCH: Press the button and then the unit will search
for availableTV Channels from channel 0 automatically.
The current highlight ¡°SWAP¡±
buttons
When it finds a station, it will automatically store in the first location
and move to the next.
During autosearch, you can
autosearch is complete, the
SEARCH: Search for a station manually.
Press the or button once and the unit will search for a station.
FINE TUNE: Use the buttons to search forward and backward to
improve reception if necessary.
BAND: Select the frequency band: VHF,VHFL,VHFH
POSITION: Select a channel
SKIP: When you turn on the function, the current channel will be
skipped when you select the channels using the CH +/- buttons.
You can still select the channel .you have skipped using the
number buttons.
press the button to stop.When
unit will display the first station found.
GB-10
Page 12

Getting Started
Playing a DVD or Video CD(Operation)
Playback Setup
1. Set the power switch to¡° I¡± at the left side of the unit.
2. Press SOURCE to select DVD mode, and insert your disc,
with the playback side facing back. It will be loaded automatically.
3. To eject the disc, press the EJECT button.
Use the buttons to select the title/chapter you want to
play, then press ENTER to start.Press MENU to return to the
menu.
VCD
Use the number buttons to select the track you want to play and
press MENU to return to the menu (PBC on only).
Menu settings and operating procedures may differ.Follow the
instructions on each menu.
Notes:
N
1.If the parental control is set and the disc isn't fit for the rating
setting, you must input the password.(See "PARENTAL") .
2.DVDs may have a region code.Your player does not play
discs that have a region code different from your player.
3.Unless stated otherwise,all operations described are used the
remote control.Some features may also be available on the
setup menu.
Skip to another CHAPTER/TRACK
When a title on a disc has more than one chapter or a disc has
more than one track, you can skip to another chapter/track as
follows:
1.Press or briefly during playback to select the next
(or previous)chapter/track or to return to the beginning of the current
chapter/track.
2.Press twice briefly to skip back to the previous
chapter/track.
DVD
DVD
VCD
3.To go directly to any chapter during DVD playback, input the
chapter/track number .
Changing the Audio Channel
Press AUDIO repeatedly during playback to select a different audio
channel (Stereo, Left Mono, Right Mono or MIX-Mono).
DVD
Repeat
Most of the functions can be controlled by remote control unit.Most of the functions can be controlled by remote control unit.Most of the functions can be controlled by remote control unit.Most of the functions can be controlled by remote control unit.
You can play a title/chapter(track)/all on a disc repeatedly.
Press REPEAT during playback to select a desired repeat mode.
DVD Video Discs - " Repeat Chapter / Title/Off"
Chapter: repeats the current chapter.
Title: repeats the current title.
All : repeats all on a disc.
Off : does not play repeatedly.
Video CDs, discs - " Repeat Track /All/Off"
Track : repeats the current track
All : repeats all the tracks on a disc.
Off : does not play repeatedly.
Notes:
N
1.On a Video CD with PBC, you must set PBC to Off to enable the
repeat function.
DVD
Zoom
Use zoom to enlarge or reduce the video image:
1.Press ZOOM during playback or still playback to activate the
Zoom function. The square frame appears briefly in the right bottom
of the picture.
2. Each press of the ZOOM button changes the TV screen in the
following sequence:
3. Use the buttons to move the zoomed picture.
4. To resume normal playback, press ZOOM button repeatedly
until the picture size returns to normal.
VCD
VCD
VCD
GB-11
Page 13

Getting started
Playing a DVD or Video CD(Operation)
Note:Zoom may not work on some DVDs.
N
Special DVD Features- Checking the contents of DVD discs:
Menus DVDs may offer menus that allow you to access special
features. To use the disc menu, press MENU. Input the
corresponding number or use the buttons to highlight
your selection.Then press ENTER.
MENU
1. Press MENU.If the current title has a menu, the menu appears on
the screen. Otherwise, the disc menu may not appear.
2. The MENU offers features such as camera angles,spoken language
and subtitle options, and chapters for the title.
3. Press MENU to exit.
Camera Angle
If the disc contains scenes recorded at different camera angles, you
can change to a different camera angle during playback. Press
ANGLE repeatedly during playback to select a desired angle. Note
that the number of the current angle appears on screen.
.
Note:
N
The angle indicator will appear on the TV screen during scenes
recorded at different angles as an indication that angle switching is
possible.
Changing the Audio Language
Press AUDIO repeatedly during playback to select a different audio
language or audio track.With DVD-RW discs recorded in VR mode
that have both a main and a Bilingual audio channel, you can
switch between Main (L), Bilingual (R), or a mix of both (Main +
Bilingual) by pressing AUDIO.
Subtitles
Press SUBTITLE repeatedly during playback to select the different
subtitle languages.
DVD
DVD
DVD
TITLE button
DVD disc:
Press TITLE button to display the DVD menu or titles available
on the disc. Then you can use " " and ENTER button to select
programs.
Disc
The DVD player can play CD and MP3/WMA formatted recordings
on CD-R,CD-RW,DVD+R and DVD+RW discs.
Audio
Once an Audio CD is inserted it will be played automatically. Press
the DISPLAY button to display playblack information on screen,
such as track elapse time.
DVD
CD
GB-12
Page 14

Basic operation
MP3/WMA Disc Features
MP3
/
1. Press buttons to select a folder, and press ENTER to
enter the folder contents.
2. Press buttons to select a track then press or ENTER.
Playback starts.
MP3
/ disc compatibility with this player is limited as
follows:
1.Sampling frequency: within 8 - 48 kHz( ),within 32 - 48kHz
( ).
2.Bit rate: within 8 - 320kbps( ),32 - 192kbps ( ).
The player cannot read an / file that has a file
extension other than MP3/WMA.
CD-R physical format should be ISO 9660.
If you record MP3/ WMA files using a software that cannot create
a file system (eg. Direct-CD) it is impossible to playback MP3/WMA
files.We recommend that you use Easy-CD Creator,which creates
an ISO 9660 file system.
File names should have a maximum of 8 letters and must incorporate
an" .mp3" or " .wma" extension.
They should not contain special letters such as "/? * : < > l "etc.
The total number of files on a disc should be less than 650.
This DVD player requires discs and recordings to meet certain
technical standards in order to achieve optimal playback quality.
Pre-recorded DVDs are automatically set to these standards. There
are many different types of recordable disc formats(including CD-R
containing MP3 or WMA files) and these require certain pre-existing
conditions (see above) to ensure compatible playback.
WMA
WMA
WMA
MP3
MP3
MP3
WMA
WMA
Customers should note that permission is required in order to
download MP3 / WMA files and music from the Internet. Our company
has no right to grant such permission. Permission should always be
sought from the copyright owner.
Playing an Audio CD or MP3/WMA
MP3
CD
Pause
1. Press during playback.
2. To return to playback, press again.
Skip to another Track
1. Press or briefly during playback to go to the next
(or previous) track or to return to the beginning of the current track..
2. Press twice briefly to go back to the previous track.
3. You can play any track by inputting its number.
Repeat Track/Folder/All/Off
You can play a track/folder/all on a disc.
1. Press REPEAT when playing a disc. The repeat icon appears.
2. Press REPEAT to select a desired repeat mode.
For CD,
Track: repeats the current track.
All: repeats all the tracks on a disc.
Off(No display): normal playback.
For Mp3 and WMA,
SINGLE: play the current track only.
REPEAT ONE: repeat the current track.
REPEAT FOLDER: repeat the current folder.
FOLDER: play the current folder only.
SHUFFLE: play randomly.
RANDOM: play randomly and repeat.
WMA
CD
CD
MP3
MP3
WMA
WMA
GB-13
Page 15

Basic operation
Playing a JPEG Disc
Viewing a JPEG Disc
Using this DVD Player you can view Kodak PICTURE CDs
and discs
with JPEG files.
1.Insert a disc . The file menu appears on the TV
screen .
2. Press the buttons to select a folder, and press ENTER.
A list of files in the folder appears.
3. If you want to play a particular file, press then buttons to
highlight the file and press ENTER or .
4.If it is a Kodak Picture CD it will be played automatically.
NOTE:
Press" " to move to the next page , " " to return to previous
folder , and " MENU" return to menu.
JPEG
Zoom
N
1.Press 'ZOOM' .
2,Used " " to enlarge,or " " to reduce the picture.
To rotate picture
Press the buttons or during showing a picture to rotate
the picture clockwise or counter clockwise.
View the contents in thumbnail mode
when a JPEG disc is played,press the button to display JPEG
pictures in thumbnail mode.Use the buttons to select the
picture and press the ENTER button to play. Also, you can select
¡°Slide Show ¡±,¡°Menu ¡±(remote control key function) or ¡°Prev
Next ¡±(previous or next page).
JPEG disc compatibility with this player is limited as follows:
1.Depending upon the size and number of JPEG files, it could take
a long time for the DVD player to read the disc¡¯s contents. If you
don¡¯t see an on screen display after several minutes, some of the
files may be too large. Reduce the resolution of the JPEG files to
less than 2M pixels as 2760 x 2048 pixels and burn another disc.
2.The total number of files and folders on the disc should be less
than 650.Some discs may be incompatible due to a different
recording format or the condition of disc.Ensure that all the
selected files have the." jpg" extensions when copying into the CD
If the files have. "jpeg" extensions, please rename them as."jpg"
file.File names without."jpg" extension will not be able to be read
by this DVD player. Even though the files are shown as JPEG
image files in Windows Explorer.
GB-14
Page 16

Basic operation
Playing a DVD VR format Disc
This unit will play DVD-R/RW discs recorded using the DVD-Video
format that have been finalized using a DVD-recorder.
This unit will play DVD-RW discs recorded using the Video
recording (VR) format.
1. Insert a disc .The DVD-VR menu appears on the TV screen.
2. Press / to select a track then press or ENTER and
playback starts.
Note:
N
Unfinalized DVD-R/RW discs cannot be played in this player.Some
DVD-VR disc are made with CPRM data by DVD RECORDER.
Player does not support these kinds of discs and display
"unknown disc".
What is "CPRM"
CPRM is a copy protection system (with scramble system)only
allowing the recording of 'Copy once' broadcast programs.CPRM
stands for content Protection for Recordable Media.
This player is CPRM compatible, which means that you can record
copy-once broadcast programs, but you cannot then make a copy
of those recordings.CPRM recordings can only be made on
DVD-RW discs formatted in VR mode,and CPRM recordings can
onlybe played on players that are specifically compatible with CPRM.
Playing a MPEG4 Movie Disc
Using this DVD Player you can play MPEG4 disc.
1. Insert a disc .The folder menu appears on the TV screen.
2. Press the buttons to select a folder, and press ENTER.
A list of files in the folder appears.
3. If you want to play a particular file,press the buttons to
highlight the file and press ENTER or .
4. Press the button to exit.
5.Press NEXT to move to the next page.
MPEG4 disc compatibility with this player is limited as follows:
1.Available resolution size of the MPEG4 file is under 720x576 (W xH)
pixel.
2.The file name of the MPEG4 subtitle is available by 56 characters.
3.If there is on code to express in the MPEG4 file, it may be
displayed as " _ "mark on the display.
If the number of the screen frame is over 30 per second,this
unit may not operate normally.
If the video and audio structure of recorded file is not interleaved,
either video or audio is outputted.
Playable MPEG4 file
".avi ", ".mpg ", ".mpeg".
Playable Audio format
"AC3 ", "PCM ", "MP3 ", "WMA ".Sampling frequency:
within 8 - 48 kHz (MP3),within 32 - 48kHz (WMA) Bit rate:
within 8 - 320kbps (MP3), 32 - 192kbps (WMA)
GB-15
Page 17

Basic operation
Program playback(not for Picture CD/MP3)
DVD/VCD/CD
The program function enables you to select your favourite titles,
chapters or tracks and play them in a favourite order.
1. Press PROG while the disc is playing
The program menu appears.
Program:TT(06)/CH(- -)
TT: CH:
1
TT: CH:
2
TT: CH:
3
TT: CH:
4
TT: CH:
5
Exit
2.Use the number buttons (0-9) to input the titles, chapters or
tracks.
You can use the buttons to move to another field and
re-enter the title and chapter(or track).
You can also move to “EXIT”, “START”, or “NEXT”/“PREV”, and
press the ENTER button to confirm.
3.Move to “START” to start programmed playback.
Program:TT(06)/CH(- -)
TT: 06 CH:01
1
TT: 05 CH:01
2
TT: CH:
3
TT: CH:
4
TT: CH:
5
Exit
4. To resume normal playback from programmed playback, Press
PRO Gand move to “STOP” on the program menu. Press the ENTER
button to stop programmed playback.
Program:TT(06)/CH(- -)
TT: 06 CH:01
1
TT: 05 CH:01
2
TT: CH:
3
4
5
TT: CH:
TT: CH:
Exit
Start
Stop
6
7
8
9
10
6
7
8
9
10
6
7
8
9
10
TT: CH:
TT: CH:
TT: CH:
TT: CH:
TT: CH:
TT: CH:
TT: CH:
TT: CH:
TT: CH:
TT: CH:
TT: CH:
TT: CH:
TT: CH:
TT: CH:
TT: CH:
NEXT
NEXT
NEXT
Notes:
- Program can be activated only when a disc is in the DVD player.
- When the program menu appears, the setup menu setting is
not allowed.
GB-16
Page 18

Basic operation
EJECT
STEP
SUBTITLE
ANGLE/
TTX
AUDIO
PBC/
SCAN
TITLE
MUTE
SOURCE
DIGITAL CARD operationand USB Device
Digital cards (MMC/SD/MS) and USB device with MP3&Pictures
(.jpg) may be played through the unit.
How to select USB/SD/MMC/MS.
1. Turn the unit on.
2. Insert either a USB device or a SD/MMC/MS card into the USB
port or the card slot located on the left hand side of the appliance.
USB
Card
3. Press the "SOURCE" button to select USB or CARD mode,
if more than one media
is inserted.
SOURCE
MODE CH- CH+ VOL- VOL+
SCAN
SETUP
EJECT
SOURCE
SOURCE
How to play USB/SD/MMC/MS
An example of USB mode menu as following:
USB
Playing operations are the same as playing a Mp3 disc.
GB-17
Page 19

SETUP Menu Setting(DVD/DVB)
General Operation&General Setup Page
General Operation
1.Press SETUP to enter the Setup Menu.
2.Press ENTER to the next level submenu or confirm your
selection.
3.Press to enter the submenu or returen to the previous menu
4.Press to highlight the menu item.
To exit from the menu
Press SETUP to exit and the settings will be stored in the player's
memory even if the player is switched off.
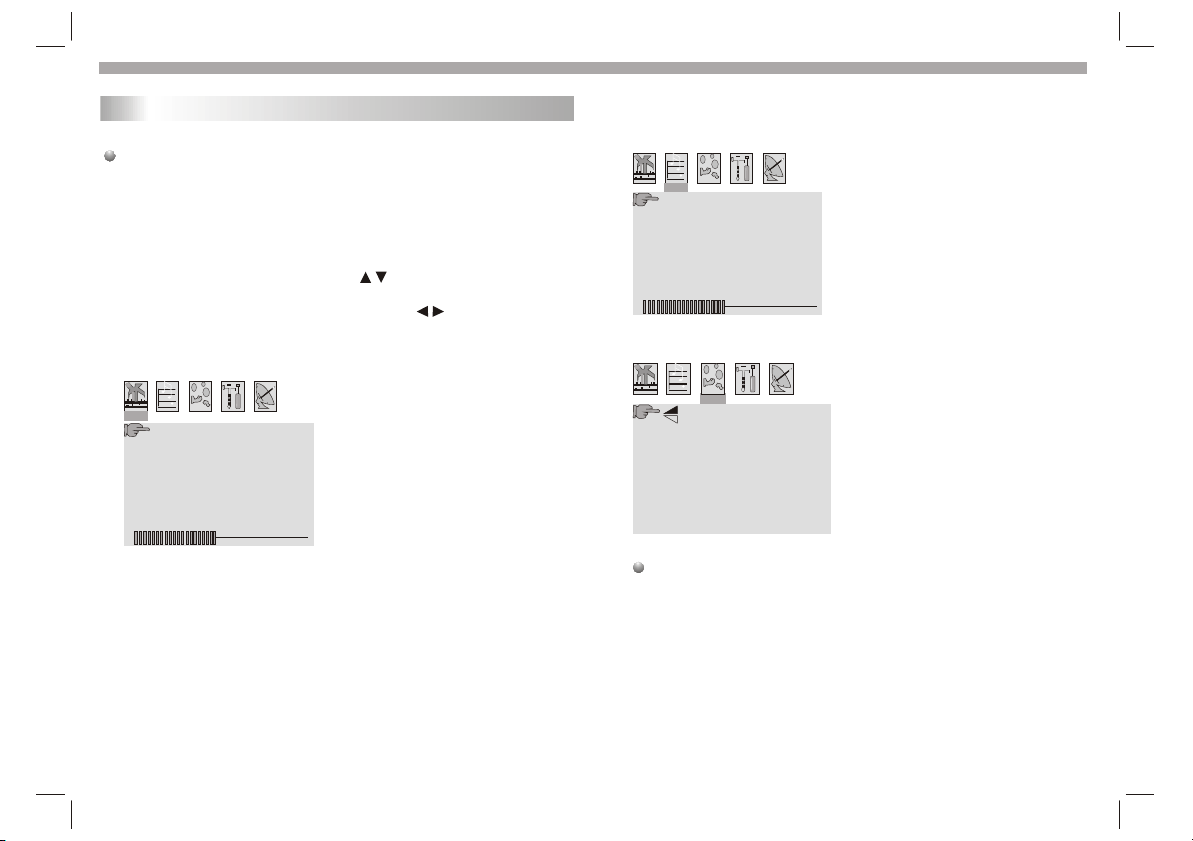
General Setup Page
The options included in General Setup page are:"TV DISPLAY",
"ANGLE MARK","OSD LANGUAGE","CLOSED CAPTIONS",
"SCREEN SAVER",Follow the steps below:
1.Press SETUP to enter the setup menu.
2.Press to select the 'General Setup page'.
TV Display
Set the aspect ratio of the DVD Player according to your TV.
enter
Dolby
- - GENERAL SETUP PAGE - -
TV DISPLAY
ANGLE MARK
OSD LANGUAGE
CLOSED CAPTIONS
SCREEN SAVER
GO TO GENERAL SETUP PAGE
Dolby
- - GENERAL SETUP PAGE - -
TV DISPLAY
ANGLE MARK
OSD LANGUAGE
CLOSED CAPTIONS
SCREEN SAVER
SET TV DISPLAY MODE
PS 4:3 PANSCAN
4:3 LETTERBOX
16:9
16:9
Wide
4:3
Letter Box
4:3
Pan Scan
4:3 PANSCAN
If you have a normal TV and want both sides of the picture to be
trimmed or formatted to fit your TV screen.
4:3 LETTERBOX
If you have a normal TV. In this case , a wide picture with black
bands on the upper and lower portions of the TV screen will be
displayed.
16:9
If you have a wide-screen TV,then you can select the item.
GB-18
Page 20

SETUP Menu Setting
General Setup Page
ANGLE MARK
Displays current angle setting information on the right hand corner
of the screen if available on the disc.
Dolby
- - GENERAL SETUP PAGE - -
Dolby
PS
ON
ENG
ON
ON
PS
ON
ENG
ON
ON
ON
OFF
ENGLISH
DANNISH
DUTCH
FINNISH
FRENCH
GERMAN
ITALIAN
PORTUGUESE
TV DISPLAY
ANGLE MARK
OSD LANGUAGE
CLOSED CAPTIONS
SCREEN SAVER
SET ANGLE MARK
On:Enable Angle Mark.
Off:Disable Angle mark.
OSD LANGUAGE
You can select your preferred language setting.This DVD
system will automatically switch to the selected language whenever
you load a disc.If the language selected is not available on the disc,
the disc's default language will be used instead.
- - GENERAL SETUP PAGE - -
TV DISPLAY
ANGLE MARK
OSD LANGUAGE
CLOSED CAPTIONS
SCREEN SAVER
SET OSD LANGUAGE
GB-19
CLOSED CAPTIONS
Closed captions are data that are hidden in the video signal on some
discs.Captions are different from subtitles because captions hearing
are impaired by showing the sound effects(e.g.,"phone ringing" and
" footsteps"),while subtitles cannot.
Before you select this function,please ensure that the disc contains
closed captions information and your TV set also has this function.
Dolby
- - GENERAL SETUP PAGE - -
TV DISPLAY
ANGLE MARK
OSD LANGUAGE
CLOSED CAPTIONS ONONON
SCREEN SAVER
CLOSED CAPTION
On:Enable Closed Captions.
Off:Disable Closed Captions.
SCREEN SAVER
This function is used to turn the screen saver On or Off.
- - GENERAL SETUP PAGE - -
TV DISPLAY
ANGLE MARK
OSD LANGUAGE
CLOSED CAPTIONS
SCREEN SAVER
SCREEN SAVER
On:In STOP,PAUSE or No DISC mode,if no actions are performed
about 3 minutes,the Screen Saver will be activated.
Off:Screen Saver is disabled.
Dolby
PS
ON
ENG
PS
ON
ENG
ON
ON
ON
OFF
OFF
Page 21

SETUP Menu Setting(DVD/DVB)
Speaker Setup Page
Speaker Setup Page
The options included in Speaker Setup Page is 'Downmix'.
Dolby
- - ANALOG AUDIO SETUP PAGE - -
DOWNMIX
GO TO SPEAKER SETUP PAGE
1.Press SETUP.
2.Press to select the 'Speaker Setup page'.
DOWNMIX
This options allows you to set the stereo analog output of your
DVD Player.
Dolby
- - ANALOG AUDIO SETUP PAGE - -
DOWNMIX
SET DOWNMIX MODE
LT/RT :Select this option if your DVD Player is connected to a
Dolby Pro Logic decoder.
Stereo :Select this option when output delivers sound from the
two front speakers only.
STR
LT/RT
STEREO
Dolby Digital Setup
Dolby Digital Setup
The options included in Dolby Digital Setup are: 'Dual Mono ' and
'Dynamic '.
Dolby
- - DOLBY DIGITAL SETUP - -
DUAL MONO
DYNAMIC
GO TO DOLBY DIGITAL SETUP
1.Press SETUP.
2.Press to select the 'Dolby Digital Setup'.
DUAL MONO
Dolby
- - DOLBY DIGITAL SETUP - -
DUAL MONO
DYNAMIC
DUAL MONO (1+1) SETUP
To select the setting that matches the number of speakers you have
connected.
STR
STEREO
L-MONO
R-MONO
MIX-MONO
GB-20
Page 22

SETUP Menu Setting(DVD/DVB)
Dolby Digital Setup
Stereo:Left mono sound will send output signals to Left speaker
and Right mono sound will send output signals to Right speaker.
L-Mono:Left mono sound will send output signals to Left speaker
and Right speaker.
R-Mono:Right mono sound will send output signals to Left speaker
and Right speaker.
Mix-Mono:Left and Right mixed mono sound will send output
signals to Left and Right speakers.
DYNAMIC
To optimize the dynamic sound output high volume outputs are
softened, enabling you to watch your favourite movie without
disturbing others.
The levels for dynamic selection:Full,7/8,3/4,5/8,1/2,3/8,1/4,1/8
and Off.
Dolby
- - DOLBY DIGITAL SETUP - -
DUAL MONO
DYNAMIC
SET DRC TO 1/8
STR
Full
-
-
-
-
-
-
-
-
-
-
-
-
-
-
-
-
Off
-
-
-
Preference Page
Preference Page
The options included in Preference page are : 'TV TYPE',
'PBC','AUDIO','SUBTITLE','DISC MENU','PARENTAL',
and 'DEFAULT '.
Dolby
- - - -PREFERENCE PAGE
TV TYPE
AUDIO
SUBTITLE
DISC MENU
PARENTAL
DEFAULT
GO TO PREFERENCE PAGE
1.Press SETUP.
2.Press to select the 'Preference Page'.
Note:
Some Preference features can be selected only during 'No
Disc' condition or de.STOP( ) mo
TV Type
Selecting the colour system that corresponds to your TV used in AV
outputs.This DVD Player is compatible with both NTSC and PAL.
In order for a DVD disc to play on this Player,the colour system of
the Disc,the TV and the DVD Player should match.
Dolby
- - - -PREFERENCE PAGE
PAL
TV TYPE
AUDIO
SUBTITLE
DISC MENU
PARENTAL
DEFAULT
SET TV STANDARD
PA
MULTI
NTSC
GB-21
Page 23

SETUP Menu Setting(DVD/DVB)
Preference Page
MULTI-Select this if the connected TV, is muliti system.
PAL - Select this if the connected TV is PAL system .It will change the
video signal of a NTSC disc and output in PAL format.
NTSC-Select this if the connected TV is NTSC system .It will change
the video signal of a PAL disc and output in NTSC format.
AUDIO,SUBTITLE AND DISC MENU
These options set the Audio , Subtitle and Disc menu language .
Dolby
- - - -PREFERENCE PAGE
TV TYPE
AUDIO
SUBTITLE
DISC MENU
PARENTAL
DEFAULT
PREFERRED AUDIO LANGUAGE
- 'Audio '(disc 's soundtrack)
- 'Subtitle '(disc 's subtitles)
- 'Disc Menu '(disc 's menu)
PARENTAL
Some DVDs may have a parental level assigned to the complete disc
or to certain scenes on the disc.This feature lets you set a playback
limitation level.The rating levels are from 1 to 8 and are country
dependent. You can prohibit the playing of certain discs that are not
suitable for your children or have certain discs played with alternative
scenes.
VCD,SVCD,CD have no level indication,so parental control function
has no effect on those kinds of discs.
PAL
ENG
ENG
Dolby
- - - -PREFERENCE PAGE
TV TYPE
AUDIO
SUBTITLE
DISC MENU
PARENTAL
DEFAULT
SET PG
PAL
ENG
ENG
ENGLISH
FRENCH
GERMAN
ITALIAN
PORTUGUESE
SPANISH
1 KID SAF
2 G
3 PG
4 PG13
5 PGR
6 R
7 NC17
8 ADULT
DVDs that are rated above the level you selected will not play
unless you enter your four-digit password and choose a higher level
rating.
To disable Parental controls and have all Discs play,choose 'Off'.
Note:
- Some DVDs are not encoded with a rating though the movie rating
may be printed on the Disc cover. The rating level feature does not
work for such Discs.
Rating explanations
1 KID SAF
- Kids material;recommended especially for children and viewers
of all ages.
2 G
- General Audience;recommended as acceptable for viewers of all ages.
3 PG
- Parental Guidance suggested.
4 PG13
- Material is unsuitable for children under age 13.
5-6 PG-R
- Parental Guidance-Restricted;recommended that parents restrict
children under 17 from viewing or allow to view only when supervised
by a parent or adult guardian.
7 NC17
- No children under age 17;not recommended viewing for children
under age 17.
8 ADULT
- Mature material;should be viewed only by adults due to graphic
sexual material,violence or language.
OFF
- It will play all discs.
NOTE:The default password is 1369.
GB-22
Page 24

SETUP Menu Setting
Preference Page
DEFAULT
Setting the 'Default ' function will reset all options and your personal
settings to the factory defaults and all your personal settings will be
erased.
- - - -PREFERENCE PAGE
TV TYPE
AUDIO
SUBTITLE
DISC MENU
PARENTAL
DEFAULT
LOAD FACTORY SETTING
PASSWORD SET UP PAGE
PASSWORD MODE:
ON: Need to enter password to change the parental level.
OFF: Disable the password function.
PASSWORD:
Set new password.
Note: The default password - 1369 is always valid.
Dolby
PAL
ENG
ENG
RESET
Area/Time Zone/ Parental Age
Area:Choose the area/region you lived.
Time zone: Choose the time zone you lived.
Parental Age: Choose the parental age control level.
Dolby
- - DVB-T Setup page - -
Area
Time Zone
Parental Age
Channel Setup
GER
Dis
Auto Scan
There are two ways to start auto scan.
In DVB mode, press PBC/SCAN key on the remote, then press
ENTER to confirm.
1. In DVB mode,Press " Setup" key.
2: Go to DVB-T Setup page.
3. Go to Channel Setup.
4. Go to Auto Scan and select " Start" .
5. Press ENTER.
Auto Scan
Status Found Channels
Freq: 545000KHz
TV Total No: 03
Radio Total No: 00
Find TV No: 03
Find Radio No: 00
Progress:
When all the digital TV and Radio stations have been found,
the scan progress will go to 100%,the program will play
automatically after 3 seconds.
Press PBC/SCAN key on the process of channel search,
Select OK,you may exit channel scan; Select Cancel, channel
scan would continue.
Auto Scan
Status Found Channels
Freq: 722000KHz
TV Total No: 00
Radio Total No: 00
TV 01 ÖÐÒ•”µÎ»Ì¨
TV 02 ÖÐҕЄ̨
TV 03 Éú»îîlµÀ
29%
Go To DVB-T Setup Page
GB-23
Cancel auto scan?
Cancel
OK
Page 25

DVB-T Introduction
Manual Scan
1.Press Setup key.
2.Go to DVB-T page.
3.Go to channel Setup.
4.Go to manual Scan and select " Start".
5.Press ENTER key.
Manual Scan
Status Found Channels
Freq: 050500KHz
Scan
Press & keys to select the frequency you want
Press number buttons on the remote directly
Press the ENTER button twice to confirm Scan, or press PBC/SCAN key
to cancel manual scan.
The Unit will scan for all the digital TV and radio stations available
in your area and list them below Found Channels.
Manual Scan
Status Found Channels
Freq: 545000KHz
Find TV No:03
Find Radio No: 00
Add
When all the digital TV and radio stations have been found, Select
£¢Add£¢ can add channels.
Press PBC/SCAN key to exit manual scan page and start to play
program.
TV 01 ¹«¹²ëŠÒ• PTS
TV 02 ÐЄÓëŠÒ• DiMo
TV 03 Æë¼ÒëŠÒ• MTV
Teletext
Pressing the Angle/TTX button to turn on/off teletext stream display.
Operation
Number key0-9:Main Page(800 pages)
arrow key: next/previous page
arrow key: sub page jump(283 pages)
Note:
When you press Audio button you can use the buttons as follow
Yellow/ZOOM : turn the text double
Red/MENU :Hold the current page
Green/ : Reveal the especial information.
Blue/ : Adjust the Mix
GB-24
Page 26

DVB-T Introduction
EPG
EPG(Electronic Program Guide)
The EPG menu is used to look at what is being broadcast on a TV or
radio channel later in the day.
1.To access the EPG menu, pressing PRO/EPG key on the remote
control.
2.Select £¢program£¢ on the EPG Menu and pop up a program list of this
channel in the day.
EPG 003 BBC TWO
Channel BBC TWO
Program
08:50-09:00 Snailsbu
Terrestrial Terrestrial
Terrestrial
09:00-09:20 Tweenies
2003/08/20 08:53:13
EPG 001 TV01
10:00-11:00 ´уЛОМбРМ¹Щ
11:00-12:00 Ê®°ËÁ_•h
12:00-13:00 ÖÐÒ•ÎçégЄ
Terrestrial
13:00-14:30 Ц°Á½-ºþ
2006/03/28 10:04:13
Reserve Program
001 BBC 29/03 14:30- 15:30
001 BBC1 29/03 15:30-16:30
001 BBC2 29/03 16:57-17:57
001 BBC3 29/03 17:00-18:00
Exit
Reserve Program Info
OK
Delete
Press Play key to see the Reserve Program Info.
Select Delete to cancel the program reserve, the channel
name would disappear from reserve program list.
Select OK to return to reserve program page.
Reserve Channel
Reserve channel is to remind you that the TV program will start at your
preset time.
1.To access the EPG menu, pressing PRO/EPG key on the remote
control.
2.Select £¢program£¢ on the EPG Menu and pop up a program list of this
channel in the day.
3.Press ENTER key on the remote and pop up a selection menu.
4.Select OK to reserve this program.
EPG 010 TV10
Reserve the program?
11:58-13:00
Terrestrial
Terrestrial
OK
Cancel
GB-25
Channel Remap
The Channel Remap option allow you to select how your channels will
be ordered in the channel list.
1. Press Setup key.
2.Go to the DVB-T Setup.
3.Go to channel Setup.
4.Go to Channel remap and select " Start".
5.Use keys to remove high-light to select the channel you want
to remap, then remove high-light to your target place.
6.Press ENTER key.
Channel Remap (001-004)
001 7 Digital
002 7 Digital 1
003 7 Digital 2
004 7 Digital 3
005 7 HD Digital
Channel Remap
Exit
NEXT
Channel Remap (001-004)
001 7 Digital
002 7 Digital 1
003 7 Digital 3
004 7 Digital 2
005 7 HD Digital
Channel Remap
Exit
NEXT
Page 27

DVB-T Introduction
Adjust Channel
£¢Adjust£¢ channel allow you to add delete your favourite channels
and add your protected channels.
Press key /FAV to set favorite channel,a red icon display
beside the channel name.
Press key REPEAT/DEL to set £¢delete£¢ channel, a cyan icon
display beside the channel name.
Adjust Channel (001-004)
001 7 Digital
002 7 Digital 1
003 7 Digital 3
004 7 Digital 2
005 7 HD Digital
Favorite
Delete Protected
Exit
Press key /PROT to set £¢protect channel£¢,you will see
the Parental Protected box.
Enter the pin code(136900) and then select OK to confirm, a
yellow icon will display beside the channel name.
Select Cancel to return.
Adjust Channel (001-004)
Parental Proiecied
001 7 Digital
Please Input the
002 7 Digital 1
Password to set
003 7 Digital 3
parental proteltion.
004 7 Digital 2
005 7 HD Digital
Favorite
xxxxxx
OK
Delete Protected
Exit
Cancel
NEXT
NEXT
OSD
CH-01
2155/95/95 ??:??:??
Audio: 00/00
CH-01
2155/95/95 ??:??:??
Audio: 00/00
Signal Strength: 0%
Signal Quality: 0%
CA
CA
Press DISPLAY key once/twice
Means a deleted channel
Means a locked channel
CA
Means a screambled channel
Has subtitle
Has teletext
Means a favorite channel
GB-26
Page 28

Information on disc compatibility
Disc formats supported by this DVD player:
MAXIMUM TIME
SIZE
12cm
12cm
12cm
133min(SS-SL)
242min(SS-DL)
266min(DS-SL)
484min(DS-DL)
74min
2
DISC LOGO CONTENTS
DVD
DVD-R
DVD+R
DVD-RW
DVD+RW
CD
Picture
The operating characteristics of some DVD discs are specified by
the software maker. Please refer to the instruction manual supplied
with the disc for further instructions.
This DVD Player will play most recordable (CD-R) OR re-writable
(CD-RW) CDs, and most recordable (DVD-R, DVD+R) or re-writable
(DVD-RW, DVD+RW) DVDs. In some cases, discs created by a
computer must be finalised in order to enable playback.
Discs created by some computers and/or software programs may not
be compatible. This will affect playback but is not a defect of this device.
Region code
This DVD player is designed and manufactured for
playback of region "2"encoded DVD software.
This unit can play only DVD discs labeled "2" or "ALL".
Audio+Video
Audio
Images (high
resolution despite
compression)
Disc terminology:
Title:
Generally, pictures or music compressed on a DVD are divided into
several sections, called ¡°titles¡±.
Chapter:
A chapter is a smaller segment of video, picture or music within a DVD
under the title. A title is comprised of one or more chapters, each
numbered for easy searching. Some discs may not have chapters.
Track:
A track is a segment of music on a CD or another type of disc.
Each track is numbered for easy searching.
Care of Discs
1. Hold the disc by placing your fingers in the centre and around the
edges. Do not touch the disc surface.
2. Do not bend the disc.
3. Do not expose the disc to direct sunlight or heating sources.
Store discs in their cases, vertically, and in dry conditions.
Prevent exposure to:
Direct sunlight
Heat
Extreme humidity
Clean the disc surface with a soft, dry cleaning cloth, Wipe the
disc surface gently, from the centre towards the outer edge.
Do not apply thinner, alcohol, chemical solvent, or sprays when
cleaning. Such cleaning fluids may permanently damage the
disc surface.
GB-27
Page 29

Troubleshooting
Should you experience problems, please consult the troubleshooting
guide below first.
Symptom
TV MODE
The appliance does
not work. No LED
The appliance does
not work.
No picture.
No picture.
Blue screen
Bad quality sound
or picture.
No sound
Teletext incomplete
or breaking up
DVD mode
The appliance will
not play discs
Player will not
eject disc.
Possible Fault
Power not connected to
the mains.
The fuse of the car
adapter is blown
The appliance is in
standby mode.
Backlight off
TV in VGA Mode
Set not tuned in.
Aerial not connected
Set switched to VGA mode
Poor signal
Volume turned down
or Mute set.
Poor signal
Disc inserted incorrectly
The disc is dirty or
damaged.
Player is malfunctioning.
Remedy
Check the AC/DC adapter
and AC mains cable are
properly connected.
Replace the fuse with
same capacity
Press the power button on
the remote control or TV.
The appliance is faulty
Select TV or DVBT mode,
or reconnect the appliance
to the PC. Ensure correct
AV IN/OUT Setting
Tune TV to local stations
Connect a good aerial signal.
Select TV mode. or DVBT
If using an indoor aerial,
replace it with an outdoor
aerial and try searching
again. Carry out fine tuning.
Turn the volume up or
switch off mute.
Check the aerial. Have a
new outdoor aerial fitted.
Insert disc correctly. The disc
must be inserted with the
playback side facing the back.
Clean disc and check for
damage.
Try another disc.
Turn off the TV completely,
wait for 30 seconds and
turn it back on.
USB, SD/MMC/MS
Unable to insert a
USB device or
SD/MMC/MS card
USB, SD/MMC/MS
device is not read
Remote control
The remote control
is not working
Intermittent
operation.
The device or card is
inserted the wrong
way around.
Some external hard disks may not be supported.
Hard disks that have built-in power supply
should be favoured.
NTFS format is not supported. Check if the USB
device file system is in FAT or FAT32 format.
Batteries are low
or empty.
An object is blocking
the remote control
infrared signal.
Batteries are low.
Ambient light is
too strong.
Insert the device or card
the right way around.
Change the batteries.
If is the remote control
is used frequently,
change the batteries
every 6 months.
Move objects that are
between the appliance
and the remote control.
Change batteries. Do not
place a strong light source
near the infrared receptor.
GB-28
Page 30

Technical Specifications
TV
TV System PAL BG/DK/I SECAM L/L
Screen size 10.2” (diagonal)
Aspect ratio 16:9
Resolution 800X3(RGB)X480
View angle 65¡ã(left)x65¡ã(right)
x45¡ã(up)x65¡ã(down)
Brightness (cd/m ) 250( cd/m )
Contrast 300:1
Response time 35 ms
Aerial input 75 ohm
Audio output 2x2 W
Mains power DC 9V/2A
Power consumption 15W
Dimensions 270X120.6X254MM
(include stand & handgrip)
270x58x222MM
Weight 2.15kg
Car adaptor 1.5A Fuse
DVD player
Discs and files supported DVD, DVD+R/RW, DVD-R/RW,
CD-DA, CD-R/RW, MP3, JPEG,
SVCD, VCD2.0, MPEG4,
TV system PAL/NTSC
DVB-T Recciver
Frequency VHF: 170MHz-230MHz
UHF: 470MHz-860MHz
Subtitle support YES
Teltext support YES
Program scan Auto/Manual
USB, card
USB port type 1.1
USB maximum handling capacity 2GB (Flash memory)
Card type SD/MMC/MS
Card maximum handling capacity 2GB (Flash memory)
Remote control
Type infrared
Operating distance 5 m
Operating angle 30¡ã (horizontal)
Batteries 2 x 1.5 V, size AAA
Dimensions 55 x 117.5 x14 mm
Weight 36 g (without batteries)
Note: due to continuing improvements, these technical
specifications are subject to change without notice.
GB-29
Page 31

Please fill the blank with the model number
of this player for future reference
Model no.:
 Loading...