

INSTRUCTION MANUAL
8
3 i
2.
ROCK
REP TR
TCM - 210
www.denver-electronics.com
Copyright. All rights reserved.
SUBJECT TO MODIFICATION WITHOUT NOTICE!
DENVER TCM-210 INSTRUCTION MANUAL
TO REDUCE THE RISK OF FIRE OR ELECTRIC SHOCK, DO NOT EXPOSE
THIS APPLIANCE TO RAIN OR MOISTURE.
Use of controls or adjustments or performance of procedures
other than those specified herein may result in hazardous
radiation exposure.
This Compact Disc player is classified as CLASS 1 LASER product.
Invisible laser radiation when open and interlocks defeated. Avoid
exposure to beam.
1 2 3
4
5
6
7
8
9
10
20
28
22
24 25 26 27
23
CLASS 1 LASER PRODUCT
KLASSE 1 LASER PRODUKT
LUOKAN 1 LASER LAITE
KLASS 1 LASER APPARAT
11
12
13
14
15
16
17
18
19
21
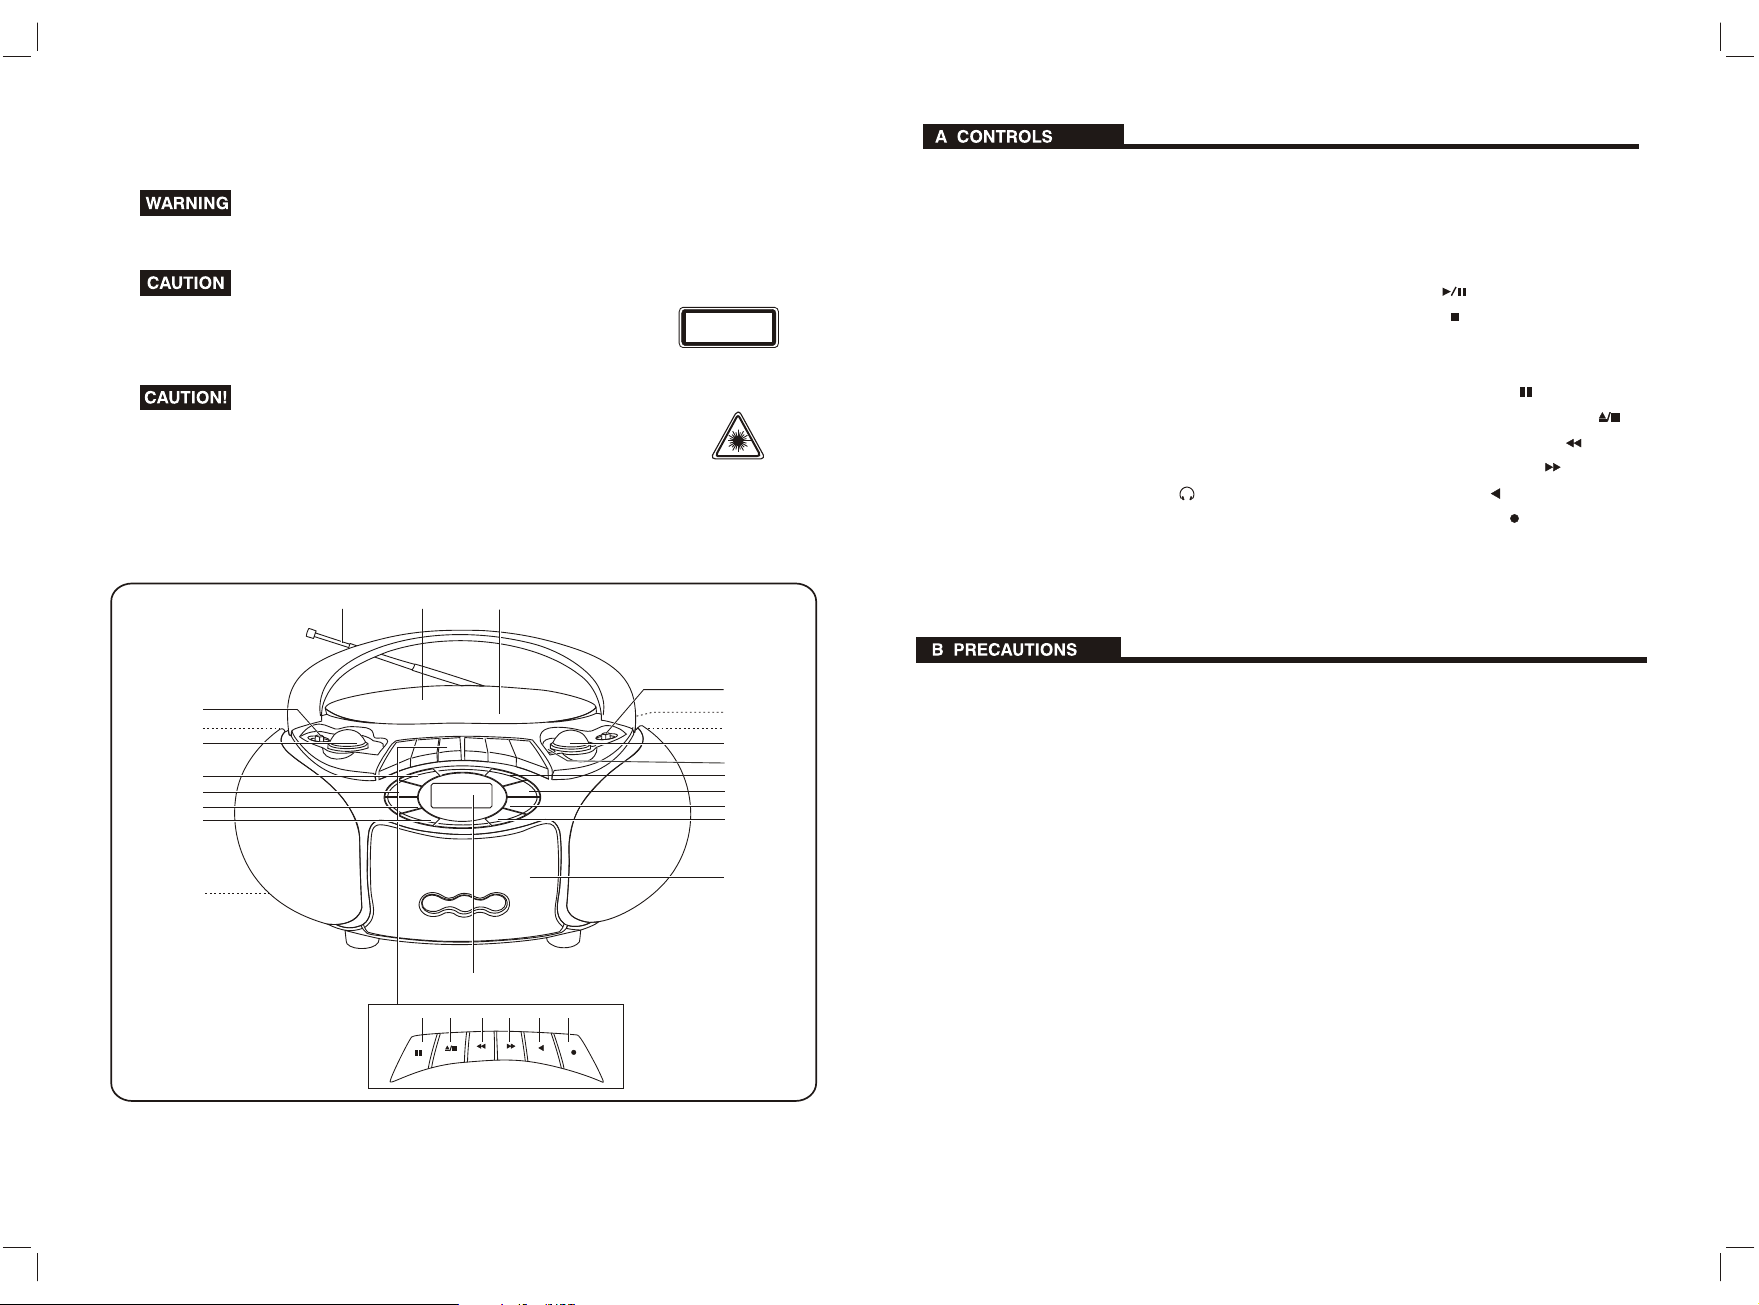
1. Telescopic aerial
2. CD compartment lid
3. CD open (OPEN/CLOSE)
4. Function/Power switch
(RADIO / TAPE / CD )
5. AC input socket (AC~ IN)
6. Volume control (VOLUME)
7. Program button(PROG.)
8. Mode button(MOCE)
9. Directory up button(DIR.UP)
10.Equilibrium button(EQ)
11. Band switch (AM/FM/FM ST)
12. Stereo headphones socket ( )
13. BEAT CUT switch (BEAT CUT)
14. Tuning control (TUNING)
15. Dial scale
Read the Operating Instructions carefully and completely
before operating the unit. Be sure to keep the Operating
Instructions for future reference. All warnings and cautions
in the Operating Instructions and on the unit should be
strictly followed, as well as the safety suggestions below.
Installation
1 Water and moisture - Do not use this unit near water,
such as near a bathtub, washbowl, kitchen sink, laundry
tub, in a wet basement, swimming pool, or the like.
2 Heat - Do not use this unit near sources of heat, including
heating vents, stoves, or other appliances that generate
heat.
3 Mounting surface - Place the unit on a flat, even surface.
4 Ventilation - The unit should be situated with adequate
space around it so that proper heat ventilation is assured.
Allow 10 cm(4 in.) clearance from the rear and the top of
the unit and 5 cm (2 in.) from each side.
- Do not place the unit on a bed, rug, or similar surface
that may block the ventilation openings.
- Do not install the unit in a bookcase, cabinet,
or airtight rack where ventilation may be impeded.
5 Objects and liquid entry - Take care that objects
or liquids do not get inside the unit through the
ventilation openings.
6 Condensation - Moisture may form on the CD Pickup
lens when:
- The unit is moved from a cold spot to a warm spot
16. Backward track/backward search button
(FR/BS)
17. Forward track/forward search button
(FF/FS)
18. Play button( )
19. Stop button( )
20. Battery compartment
21. Cassette compartment
22. Pause button(PAUSE )
23. Stop/Eject button (STOP/EJECT )
24. Fast forward button (F.FWD )
25. Rewind button (REWIND )
26. Play button (PLAY )
27. Record button (REC )
28. LCD
- the heating system has just been turned on
- the unit is used in a very humid room
- the unit is cooled by an air conditioner
When this unit has condensation inside, it may not
function normally. Should this occur, leave the unit for
a few hours, then try to operate again.
Electric Power
1 Power sources - Use on batteries or AC house current,
as specified in the Operating Instructions and marked
on the unit.
2 AC power cord
- When disconnecting the AC power cord, pull it out by
the AC power plug. Do not pull the cord itself.
- Never handle the AC power plug with wet hands, as
this could result in fire or shock.
- Power cords should be firmly secured to avoid being
bent, pinched, or walked upon. Pay particular attention
to the cord from the unit to the power socket.
- Avoid overloading AC power plugs and extension
cords. beyond their capacity, as this could result in fire
or shock.
3 When not in use - Unplug the AC power cord from the
AC outlet or remove all the batteries if the unit will not
be used for several months or more. When the cord is
plugged in ,a small amount of current continues to flow
to the unit, even when the power is turned off.

C POWER SUPPLY
IMPORTANT
Make sure that f is set to TAPE before connecting
the AC cord or inserting batteries.
CAUTION
Use only the supplied AC cord. Use with other cords may
result in the risk of fire.
Before operating the unit for the first time or operating the
unit in a new area, it is essential to assure that the setting
of the VOLTAGE SELECTOR corresponds with the local
voltage. To adjust the voltage, set the
to the local voltage with a screw driver.
Using on batteries
Open the lid of the battery compartment on the rear and
unction
VOLTAGE SELECTOR
D MAINTENANCE
To clean the cabinet
Use a soft cloth lightly moistened with mild detergent
solution. Do not use strong solvents such as alcohol.
benzine or thinner.
To clean the heads and tape paths
After every 10 hours of use, clean the Recording heads
and Playback head , the pinch roller and capstan .Use
a cotton swab 5 slightly moistened with cleaning fluid
or denatured alcohol.
E CD OPERATION
EQ
CLASSIC ROCK JAZZ POP
CD DISC MODE KEY
NORMAL REPEAT ONE REPEAT ALL
SHUFFINTRO
REPEAT 1 :"REPEAT 1" light on display and will
repeat the track you selected.
REPEAT ALL: "REPEAT ALL"light on display and will
repeat entire tracks.
INTRO: "INTRO"light on display and will play the first
10 seconds of each tracks..
SHUFF:"SHUFF"light on display,Plays every tracks in
random order .
ANTI SHOCK: "ESP"light on display, and will
anti-shock 45 seconds.
PROGRAM:
1.Press "PROG" KEY, Then "PROG 00" start flashing.
2.Press skip/searched or key to search the
track Number.
3.When desired track is display, press PROGRAM
key to register. Then track no display to "00"
display to "00" again.
4.Repeat 2-3 (up to 60 tracks) after register 60
tracks. display shows the first registered track.
5.Registered tracks can be check by press"PROG"
key, and it can be changed by repeat 2-3.
6.Press play key, then "PROG" stops flashing and
starts playing.
insert eight (size D) batteries, not supplied, with the and
marks correctly aligned. then close the lid.
To switch from AC power supply to battery power supply,
disconnect the AC cord from the AC inlet.
The batteries need to be replaced when:
The tape speed slows down, volume decreases, or
sound is distorted during operation.
notes on batteries
Do not mix different types of batteries or old batteries
with new ones.
Never recharge the batteries, apply heat to them or
take them apart.
Remove dead batteries.
If liquid leaks from the batteries, wipe thoroughly to remove.
Cassette tapes
To prevent accidental erasure, bread off the plastic tabs
on the cassette tape after recording with a screwdriver
or other pointed tool.
To record on the tape again, cover the tab openings with
adhesive tape, etc.
MP3 DISC MODE KEY
NORMAL REPEAT 1 REPEAT DIR
INTRO SHUFF REPEAT ALL
REPEAT 1: "REPEAT 1" light on display and will repeat
the track you selected.
REPEAT DIR: "REPEAT DIR" Repeat one directory.
REPEAT ALL: "REPEAT ALL "light on display and will
repeat entire tracks.
SHUFF: "SHUFF" light on display plays every tracks in
random order.
INTRO: "INTRO"light on display plays and will play the
first 10 seconds of each track.
ANTI SHOCK: anti-shock about 120 seconds default
when playing MP3 ,and "ESP" not display.
PROGRAM:
1.Press "PROG" key at STOP state, Then "00" in
"PGM 00 00-01"will flashing.
2.Press skip/searched or key to search the track
Number.
3.Press down "PROG" key they "00P" in "PGM 00 00P-01".
4.Press skip/searched or key to search the track
Number.
5.When desired track is display, press PROGRAM key
to register. Then track no. display to "00" again.
6.Repeat 2-5 (up to 60 files) after register 60 files.
display shows the first registered track.
7.Registered tracks can be check by press "PROG"
key, and it can be changed by repeat 2-5.
8.Press play key, then PROG stops flashing and starts
playing.
7.To clear programing. press the "STOP" key, then
press "PROG" key to program state, then press
"STOP" key ,or open the door or power off.
9.To clear programing. press the STOP key then press
"PROG" key to program state, then press "STOP" key,
or open the door or power off.
F TUNER OPERATION
1 Set function to RADIO.
2 Select a band with BAND.
3 Tune to a station with TUNING.
4 Turn VOLUME and press the BBS to adjust the sound.
For better reception - Extend the FM antenna and orient
it for the best reception; AM antenna is inside the unit.
Position the unit for the best reception.
FM /FM ST
Sets the FM sound to stereo or monaural.
FM ST: Reception is stereo. When receives FM stereo
signal, the FM ST indicator lights up.
FM: When an FM stereo broadcast contains noise,
set to FM. Noise is reduced, although reception is
monaural.
BEAT CANCEL SWITCH ON AM
When recording a radio program, an irritating "whistling"
sound may sometimes be heard. If this occurs, select
position 1 or 2. Leave the switch in the position that
gives the best results.
G TAPE OPERATION
Use Type 1 (normal) tapes only.
PLAYING BACK A TAPE
function
1 Set to TAPE.
2 Press STOP/EJECT to open the cassette
holder and insert a tape with the exposed side up and
the side to be played facing out.
3 Press PLAY to start play.
4 Turn VOLUME and press the BBS to adjust the sound.
STOP/EJECT - Stops play.
PAUSE - Pauses play. To resume play, press again.
F FWD/ REW - Fast forwards/rewinds. To
stop winding. press STOP/EJECT.
RECORDING
Note that recording is done on only one side of the tape.
1 Insert a tape with the side to be recorded facing out.
Wind up the tape to the point where recording starts.
2 Get ready to record from the source.
To record from a CD: set function to CD and start play.
To record from the tuner: set function to RADIO and
tune to a station.
To record from built in MIC: set function to TAPE
3 Press REC to start recording.
PLAY is pressed simultaneously.
To stop recording, press STOP/EJECT.
To erase a recording, set function to TAPE and start
recording.
H GENERAL
To turn off the unit, set function to TAPE.
To listen with the headphones, connect headphones with a stereo mini plug to the PHONES jack.
If an erroneous display or malfunction occurs, disconnect the AC cord and remove all the batteries to turn off the
display. Then turn the power back on.
COPYRIGHT
Please check the copyright laws relating to recordings from disc, radio or external
tape for the country in which the machine is being used.
I SPECIFICATIONS
Tuner section
Frequency range: FM : 88-108 MHz
AM : 525-1630 KHz
Deck section
Track format: 4 track, 2 channels
Frequency range: Normal tape
Recording system: AC bias
Erasing system: Magnet erase
Heads: Recording / playback head
Erasure head
CD player section
Disc: Compact disc
Scanning method: Non-contact optical scanner
(semiconductor laser)
General
Speaker: 92 mm cone type (2)
Output: Headphones jack (stereo jack)
Power output: 1.0 W +1.0 W
Power requirements: DC 12 V using eight size D batteries,
AC 230V, 50Hz
Weight: 2.9Kg (excluding batteries)
Dimensions: 334(W)x181(H)x255(D) mm
Accessory: AC cord (1)
Specifications and external appearance are
subject to change without notice.
 Loading...