

Page 1
Page 2

This unit is the new generation portable player. It supports multiple formats, such as MP1MP2MP3WMA WAV etc. The
perfect music quality, extremely high reliability and delicate appearance work together to make it a master piece in every
way. We sincerely hope that it will bring you the best enjoyment that this digital era can offer.
Function Overview
●Delicate appearance design
Square appearance design, suitable sense of touch
●Supporting multiple audio formats
such as MP1MP2MP3WMA WAV etc
●Firmware upgrade
The updated upgrade software is available for download to allow you to expand the functions of this player.
●Driver free USB memory
Manage your files in USB memory without specified software, no need drivers in WIN2000 or furthers.
●’Secret Space’
You can separate part of the memory encrypting and hiding in using programs provided, where data cannot be seen or
written by others.
●Recorder / Repeat
Voice can be recorded and saved in WAV or ACT format. Phrase/Contrast repeat available.
●7 Equalizer modes
Natural, Rock, Pop, Classic, Soft, Jazz, Bass
● Play modes
Normal, Repeat one, Folder, Repeat folder, Repeat All, Random, Intro
●Timing turning off
The player provides Sleep and battery saving mode, more convenience for you!
●Complete dynamical menu
Visualized dynamical menus with text instructions make you easy control.
Declarations
First, thank you for purchasing our digital MP3 player!
Before you use this unit, please read this manual carefully to learn how to properly use it.
To offer better services, the contents of this manual are subject to changes.
It is subject to change due to changed performance and functions without prior notice.
Page 1
Page 3

Contents
z
Function Overview ………………………………………………………………………………………………… 2
z
Declarations……………………………………………………………………………………………… 2
z
Know your player ……………………………………………………………………………………… 5
Exterior and Keys………………………………………………………………………………… 5
Display ……………………………………………………………………………………………… 5
Battery ……………………………………………………………………………………………… 5
z
Basic Functions ………………………………………………………………………………………… 6
Access to Menu………………………………………………………………………………… 6
Browse operation…………………………………………………………………………………………… 6
List of Menus …………………………………………………………………………………… 6
Volume Adjust …………………………………………………………………………………… 7
Power On/Off……………………………………………………………………………………… 7
Play & Stop………………………………………………………………………………………… 7
Start / Stop record ………………………………………………………………………………… 7
z
Key operations ………………………………………………………………………………………… 7
Keys function definition…………………………………………………………………………… 7
Keys processing definition………………………………………………………………………… 7
z
Play music ………………………………………………………………………………………………… 7
Simple operation…………………………………………………………………………………… 7
Equalizer mode……………………………………………………………………………………… 7
Synchronous Lyric Display (karaoke function)…………………………………………………………………… 8
Select or delete music file……………………………………………………………………………8
z
Record……………………………………………………………………………………………… 9
Recording on ‘Record Mode’ ……………………………………………………………………… 9
Recorde type……………………………………………………………………………………… 9
z
Play recorded files…………………………………………………………………………………………… 9
z
Convert ACT Files into WAV format………………………………………………………………………………10
●
E-book………………………………………………………………………………………………………………10
●
Using Telephone Book……………………………………………………………………………………10
How to find telephone information……………………………………………………………………………10
Create and Edit Telephone Book File……………………………………………………………………………10
●
Import and Export Telephone Book………………………………………………………………………………11
z
System Settings……………………………………………………………………………………………………… 11
How to entry setting……………………………………………………………………………… 11
Option introductions…………………………………………………………………………………… 11
System time setting………………………………………………………………………………… 11
Backlight timing setting………………………………………………………………………………… 12
Language Setting……………………………………………………………………………………… 12
Power off Setting……………………………………………………………………………………… 12
Contrast Setting ……………………………………………………………………………… 12
Page 2
Page 4
Online Mode Setting……………………………………………………………………………………… 12
Memory Information ……………………………………………………………………………… 12
Firmware version …………………………………………………………………………… 13
Firmware upgrade…………………………………………………………………………… 13
z
Use USB Disk ……………………………………………………………………………………………… 13
z
Upgrade Player ……………………………………………………………………………………………… 13
z
Other settings …………………………………………………………………………………………… 15
Select other fold………………………………………………………………………………………………… 16
Delete Mode………………………………………………………………………………………………… 16
Play Mode…………………………………………………………………………………………………… 16
Tempo rate ………………………………………………………………………………………………… 17
Repeat Mode ……………………………………………………………………………………………… 17
Replay times…………………………………………………………………………………………… 18
Replay gap ………………………………………………………………………………………… 18
z
New Function Recommends………………………………………………………………………………… 18
z
Troubleshooting……………………………………………………………………………………………… 21
z
Technical Specifications …………………………………………………………………………………… 22
Know your player
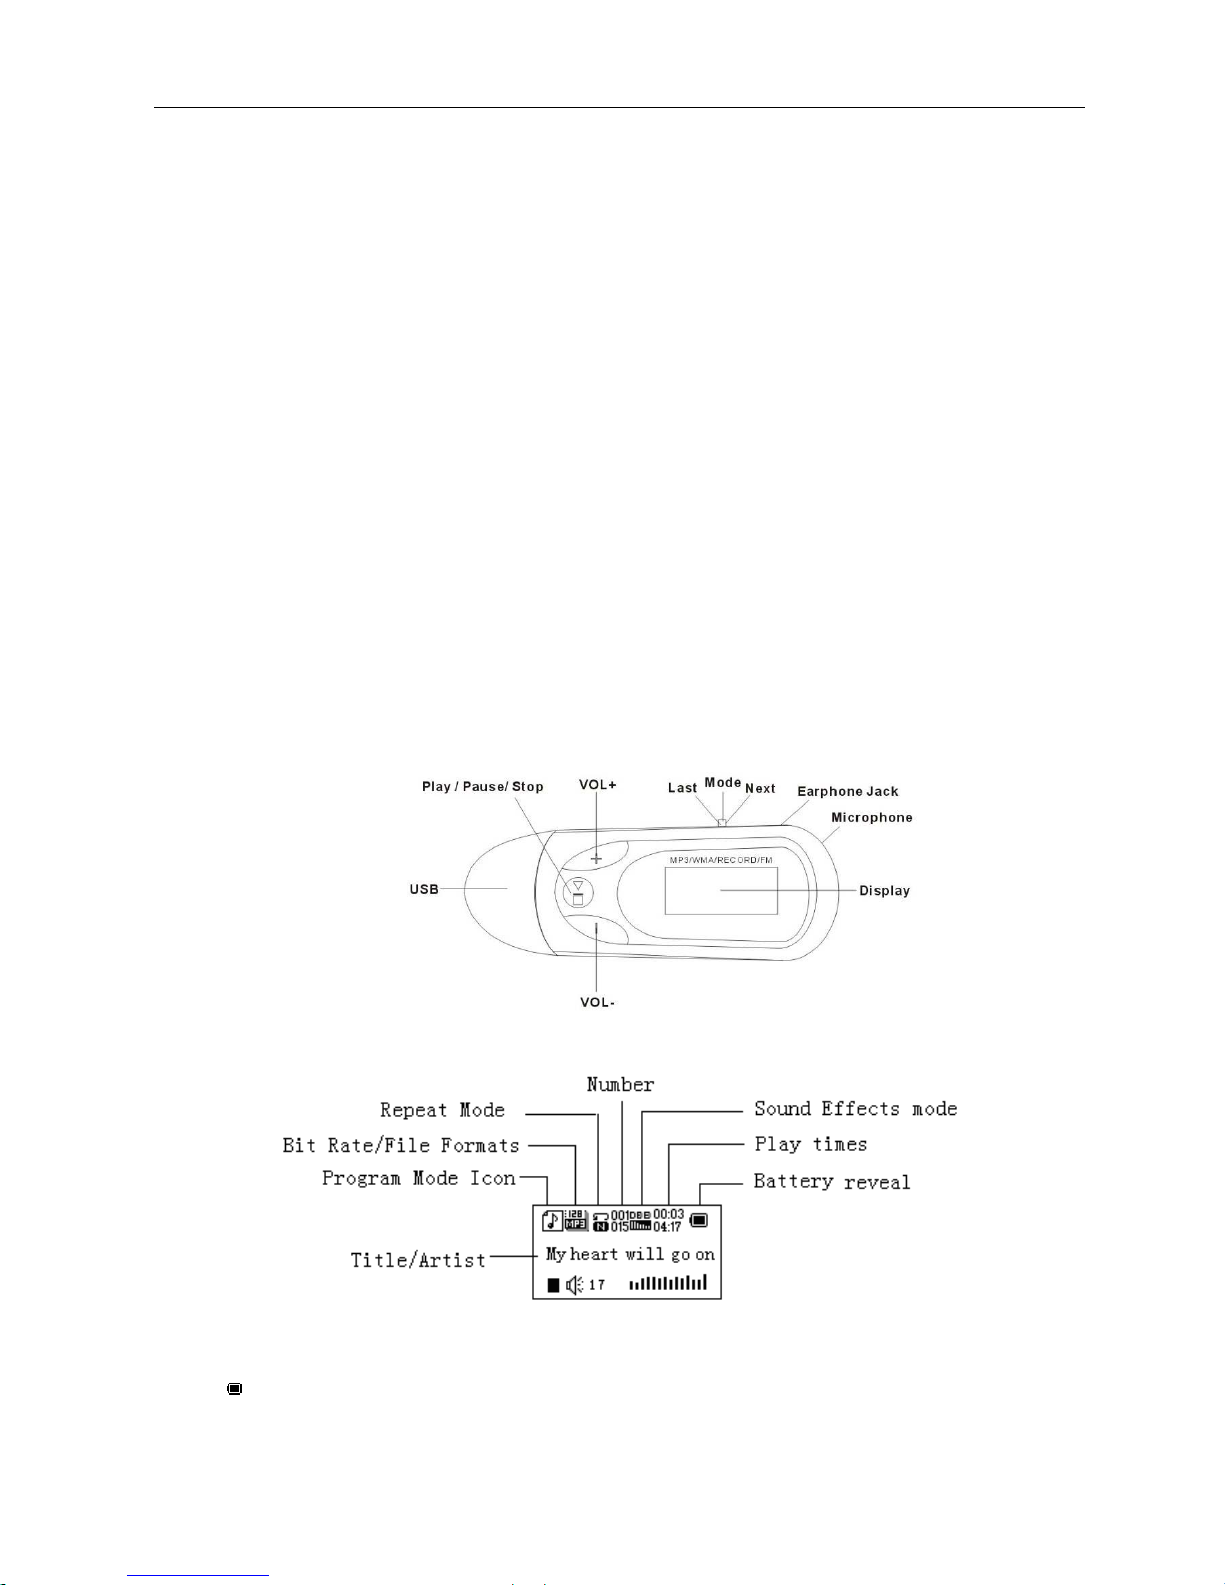
Exterior and Keys
Display
Battery
This unit use 9 level battery control.
Battery is full on 1.5V. As time goes on, capacity indication will monish.
Page 3
Page 5
Indicator shows blank when battery almost ran out. You should charge your battery at that time
.
Basic Function
z
Access to Menu
Press Mode to access menu. Main menu (long press to enter under stopping state), submenu when playing (short
press to enter) and submenu under stopping state (short press to enter).
z Browse operation
○ Browse music, menu
○ Fast Forward / Fast backward when playing music.
z List of Menu
To access different menu functions under main menu.
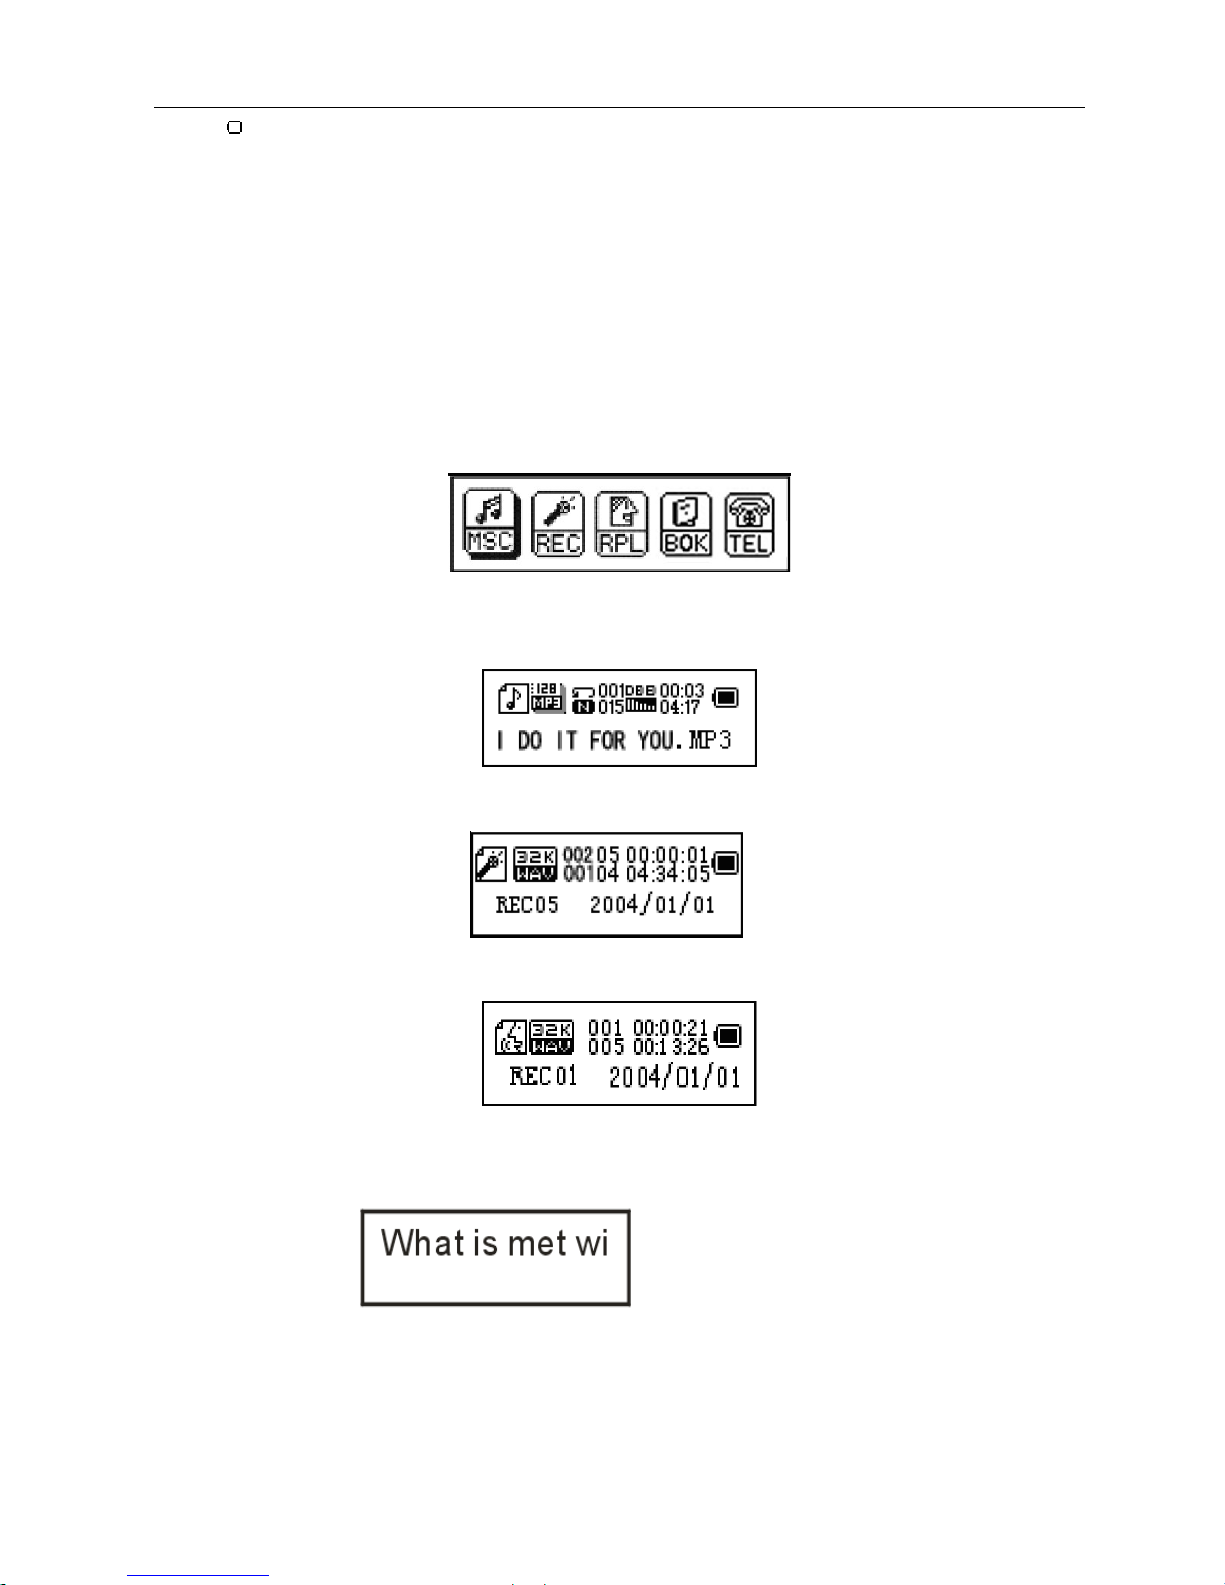
Main menu: (Short press Mode to access)
Music Mode:
Recorder Mode:
Voice Mode:
E-book:
Telephone book:
Page 4
Page 6
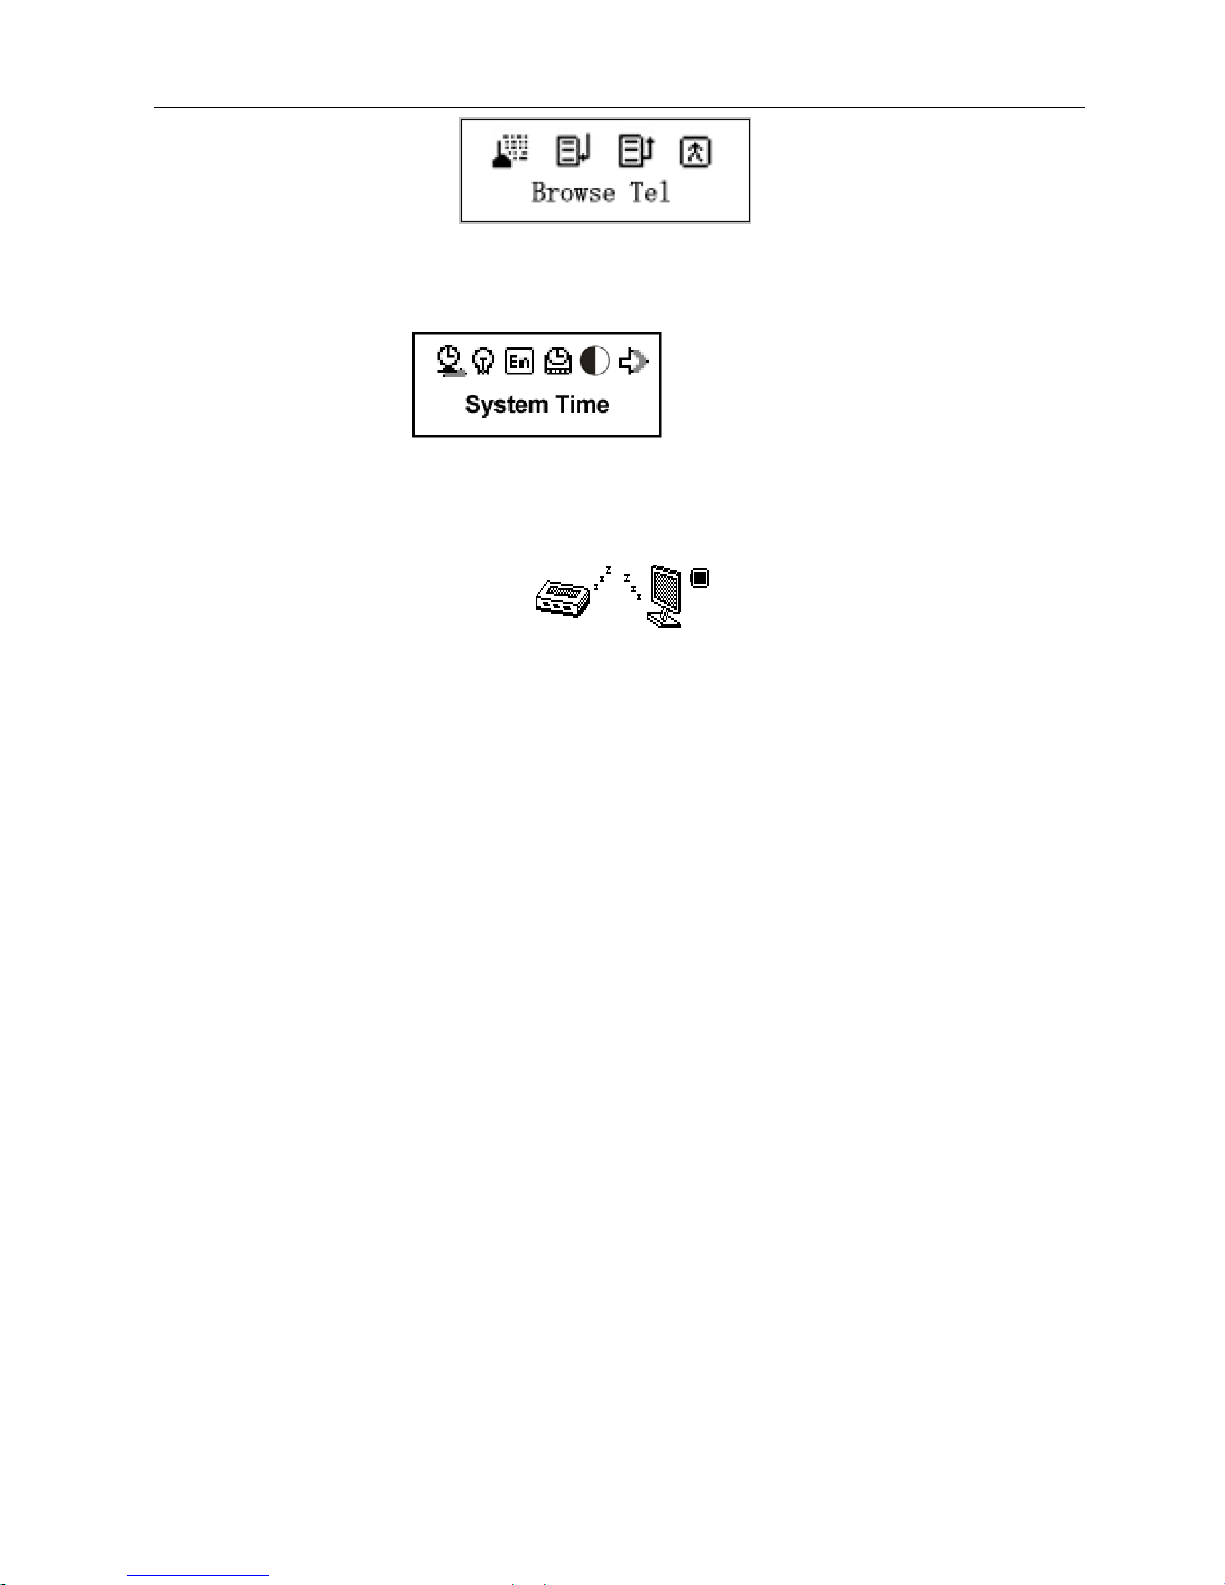
Settings:
USB Mode (Connect to PC):
z
Vol ume Ad jus t
Push VOL+ to increase volume: VOL-to decrease volume.
z Power on/off
Long press Play to switch on when the player is off.
Long press Play to switch off when the player is on.
z
Play & Stop ( Have pause function when recording); exit from submenu
Under music mode, short press Play to play music.
When playing music, press Play to pause; short press to stop playing.
z Start recording (short press) / Stop recording(long press)
Under recording mode, short Play to stop recording.
Key operations
z Keys Functions Definition
1
Play: Power On/Off, Play, Pause, Stop
2
Mode: Entry main menu or the previous menu.
3
Next Next, Fast Forward.
4
Last Previous, Fast Backward.
5
+
Increase the volume
6
Decrease the volume
7
USB: USB plug
8
Earphone Jack: Standard earphone socket
z
Key Processing Definition
Keys processing includes 4 actions: Short press, Long press, Hold, Push. If not mentioned, all actions are Short
press.
Short press: Press a key and valid immediately;
Long press: Press a key and hold it at least 1.2s, this action valid only once.
Page 5
Page 7
Push: Push a key, and valid when released.
Hold: Such as Fast Forward and Fast Backward.
Play music
z Simple operation
1. Insert earphone
2.
Insert the dry batteries or long press Play to switch the player on, then entry Music Mode and short press
Play to play music.
3. Select a music:
Last: Previous music;
Next: Next music.
Volume adjust: Press VOL+ to increase, VOL- to decrease.
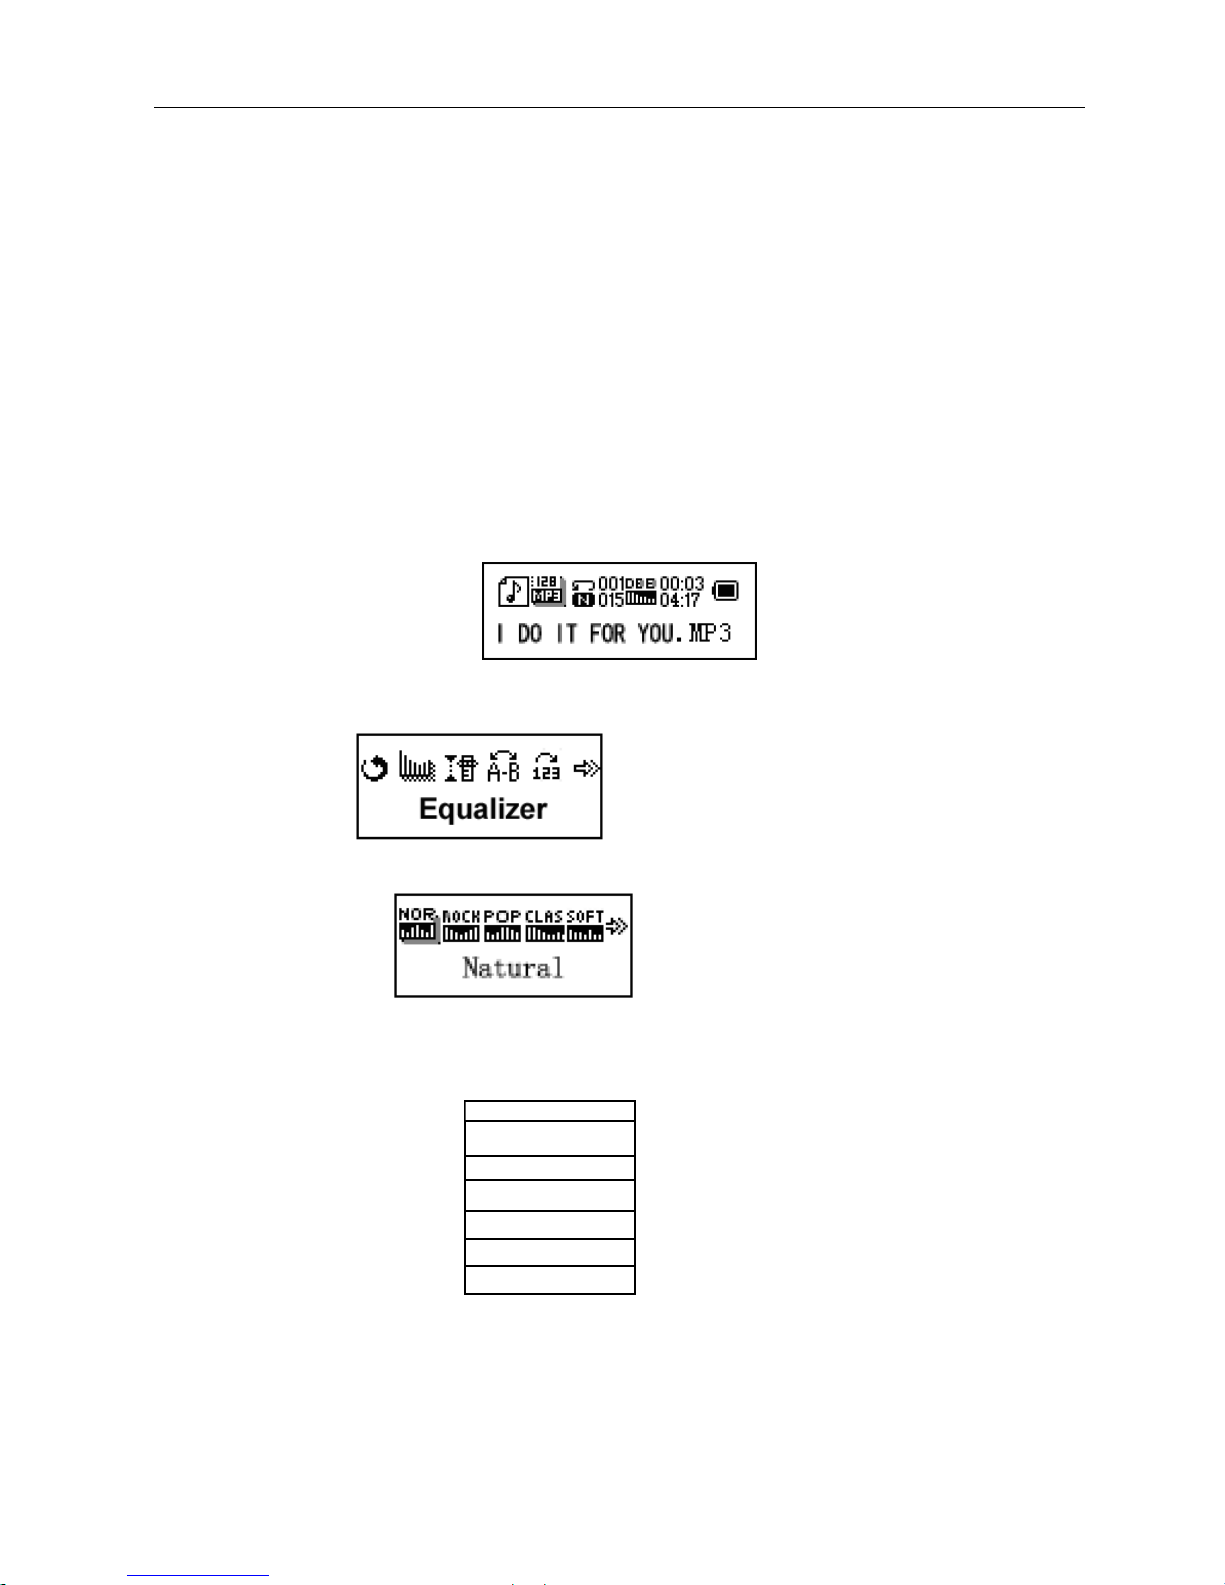
z Equalizer Mode
1. When playing music
2.
Press Mode to entry play submenu;
3.
Push Next key to select Equalizer Mode;
4.
Press Mode to entry ‘Equalizer Mode’ submenu.
5. Detail list of each equalizer (EQ):
Natural
Rock
Pop
Classical
Soft
Jazz
DBB
6.
Push Next to select and press Mode to confirm.
z Synchronous Lyric Display
The player supports lyric files with *.LRC suffix, and displays synchronously.
How to use lyric files?
Page 6
Page 8
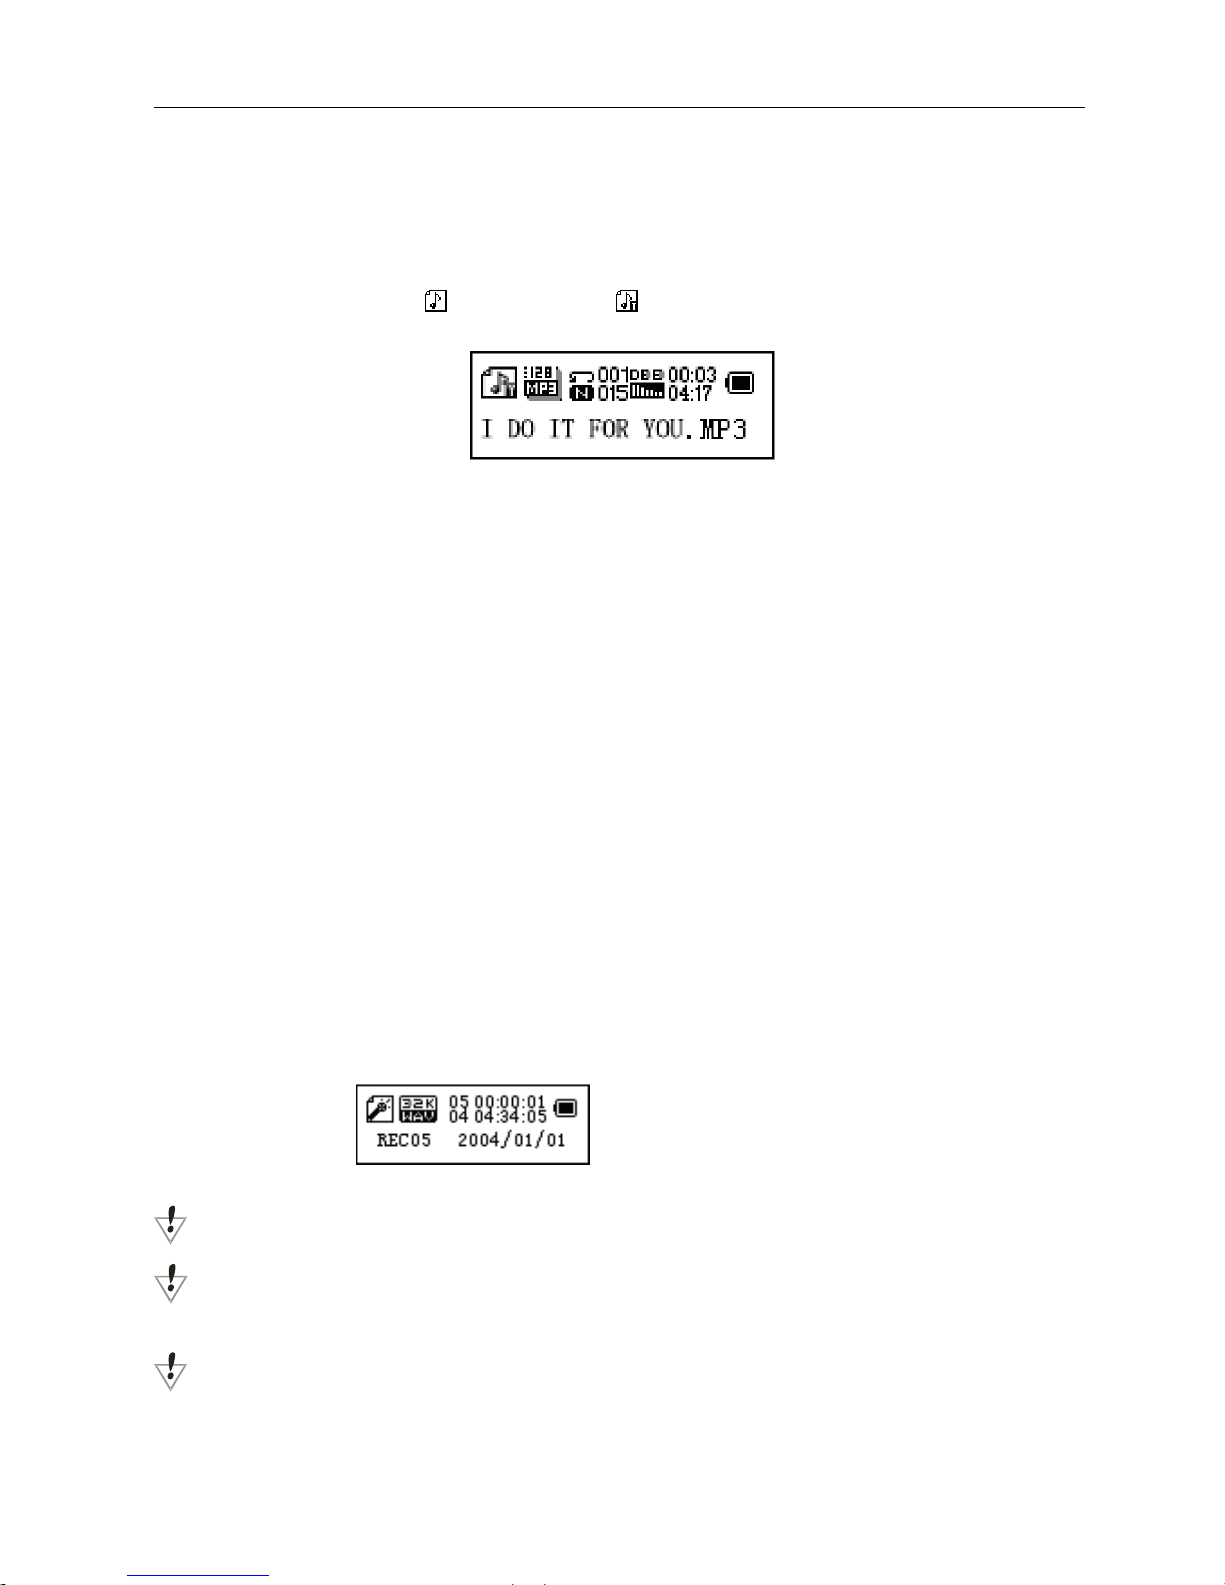
Please make sure the lyric has the same name to the music
For example:
Music file:
I DO IT FOR YOU.mp3
Lyric file
I DO IT FOR YOU.lrc
How to know if lyric available?
If lyric matched, the icon “
” will be replaced into “ ”.
1.
When find suited lyric
2.
Long press Mode to entry lyric interface;
3. Lyric displays
4.
Press Mode return to music mode.
●
Select or delete music file
Select music files: when pause to play music, short press Mode to enter into the menu, push Next to select the menu ,
and press Mode enter into Music. If have folders, press Mode again, push Next to select the song, then press Mode to
confirm and play.
Delete files: when pause to play music, short press Mode to enter into the menu, push Next to select Delete file or Delete
all, press Mode enter into Delete, select Yes to delete, select No to exit, then press Mode to delete the file.
Record
Please make sure the battery has enough capacity before making record.
Each folder can save up to 99 voice recording files.
●
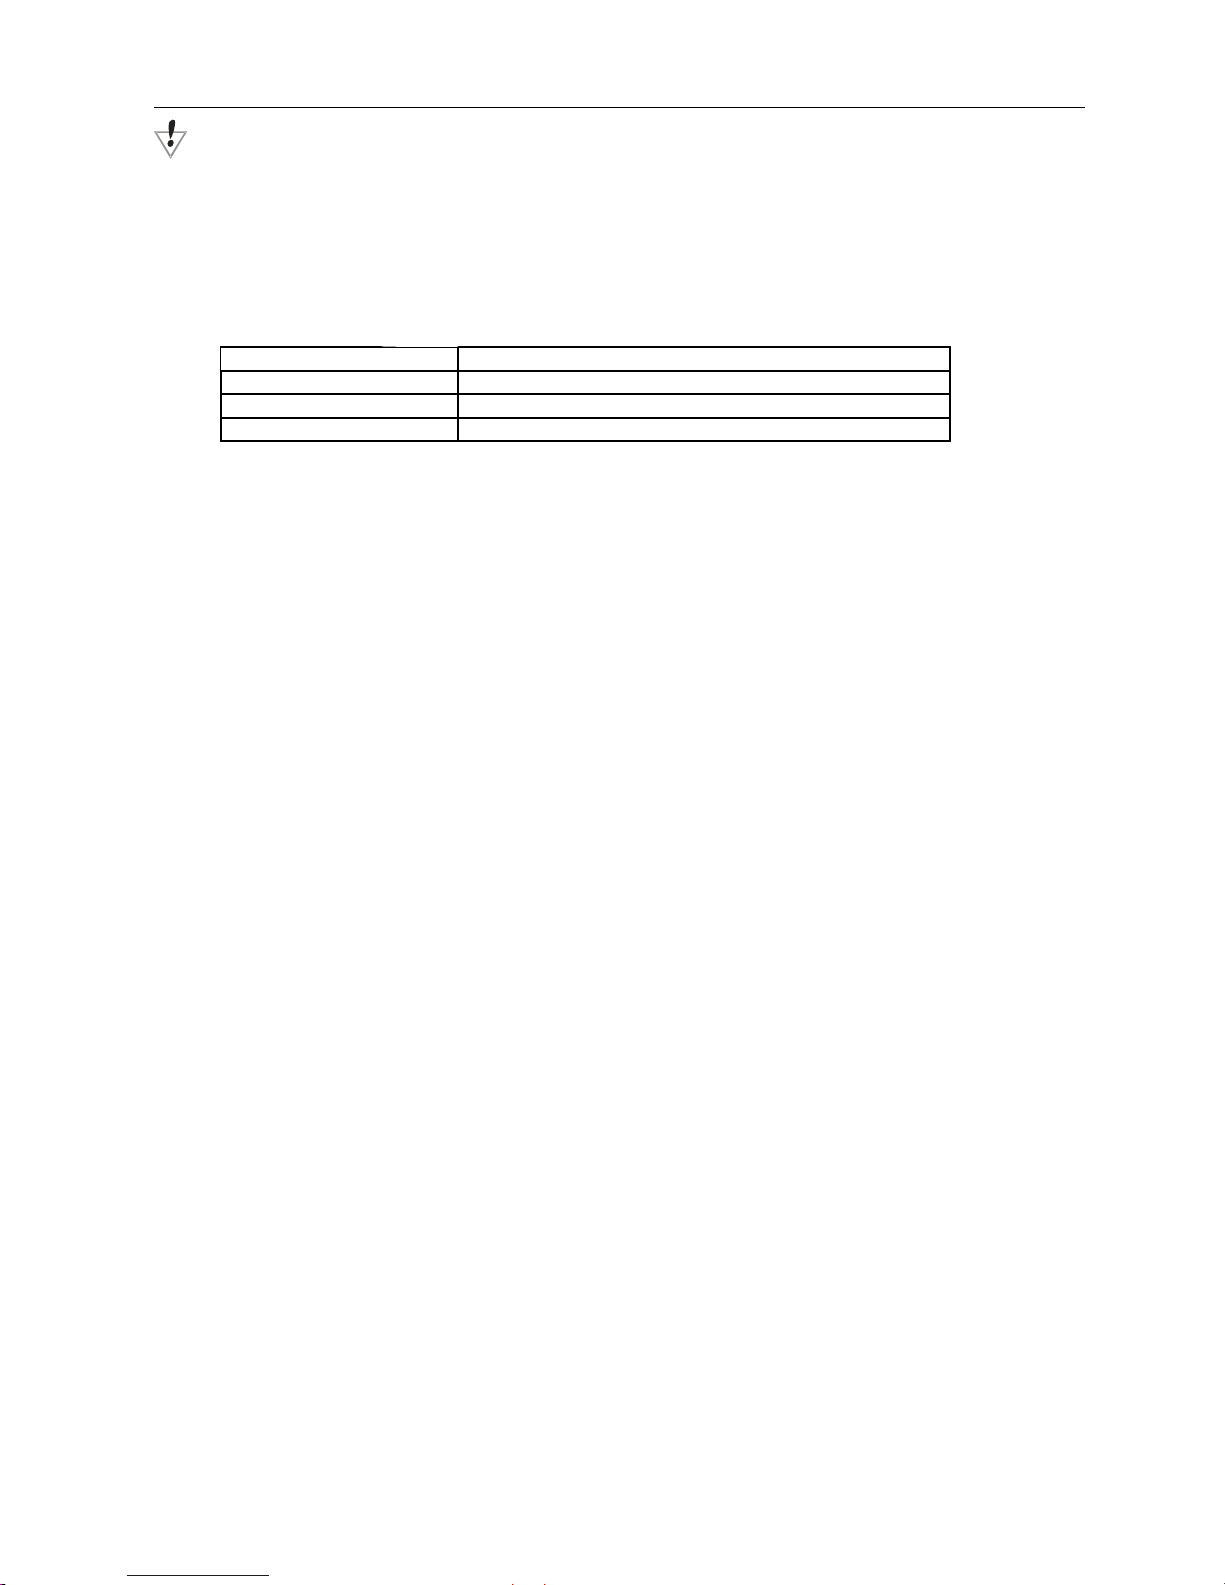
Recording on “Record mode”
1. Entry main menu:
2. Push Next key to Record mode
3. Push Mode to select Record mod, screen will display as below:
4. Press Play to start recording.
Voice will be recorded in current fold which set through ’Record stop / Main fold’
If displayed “Memory full”, it means no space to save new record files, please delete other files to release memory
space.
If “Folder full” shown, it means there are 99 record files in this folder. Please choose another one.
Page 7
Page 9
The player only responses to Play button and Mode button when record processing
z Record type
1. Under the interface of ‘Record stop’
2. Short press Mode to entry record submenu
3. Push Next to select ‘Record type’ submenu then short presses Mode to select.
Fine record wav filefine quality
Long record act file, normal quality
Fine voice control wav file, (Recording controlled by voice, pause when mute)
Long voice control act file, (Recording controlled by voice, pause when mute)
4. Press Next to select appropriate type and short press Mode to confirm.
5. Press Play to start recording
6. Short press Play to pause. Long press Mode to save and exit from the main menu.
Play recorded files
1. Entry main menu
2.
Push Next to select ‘Voi ce mode’
3.
Push Mode to entry playing interface
4.
Press Play again to play the file.
5. Select voice record files.
Last: Select previous file;
Next: Select the next file;
6. Volume control:
Push VOL+ to increase volume; VOL- to decrease volume.
7. Select files: when pause to play the recording files, short press Mode to enter into the menu, push Next to select the
menu, press Mode enter into Record. If have folders, press Mode again, push Next to select the file, then press Mode to
confirm and play.
8. Delete files: when pause to play the recording files, short press Mode to enter into the menu, push Next to select Delete
file or Delete all , press Mode enter into Delete, select YES to delete, select No to exit, then press Mode to delete the file.
Convert ACT Files into WAV format
The ACT file in this player can be converted into WAV format by the convert tool provided.
1.Run “Sound Converter tool” program, click Open button, as below
Page 8
Page 10
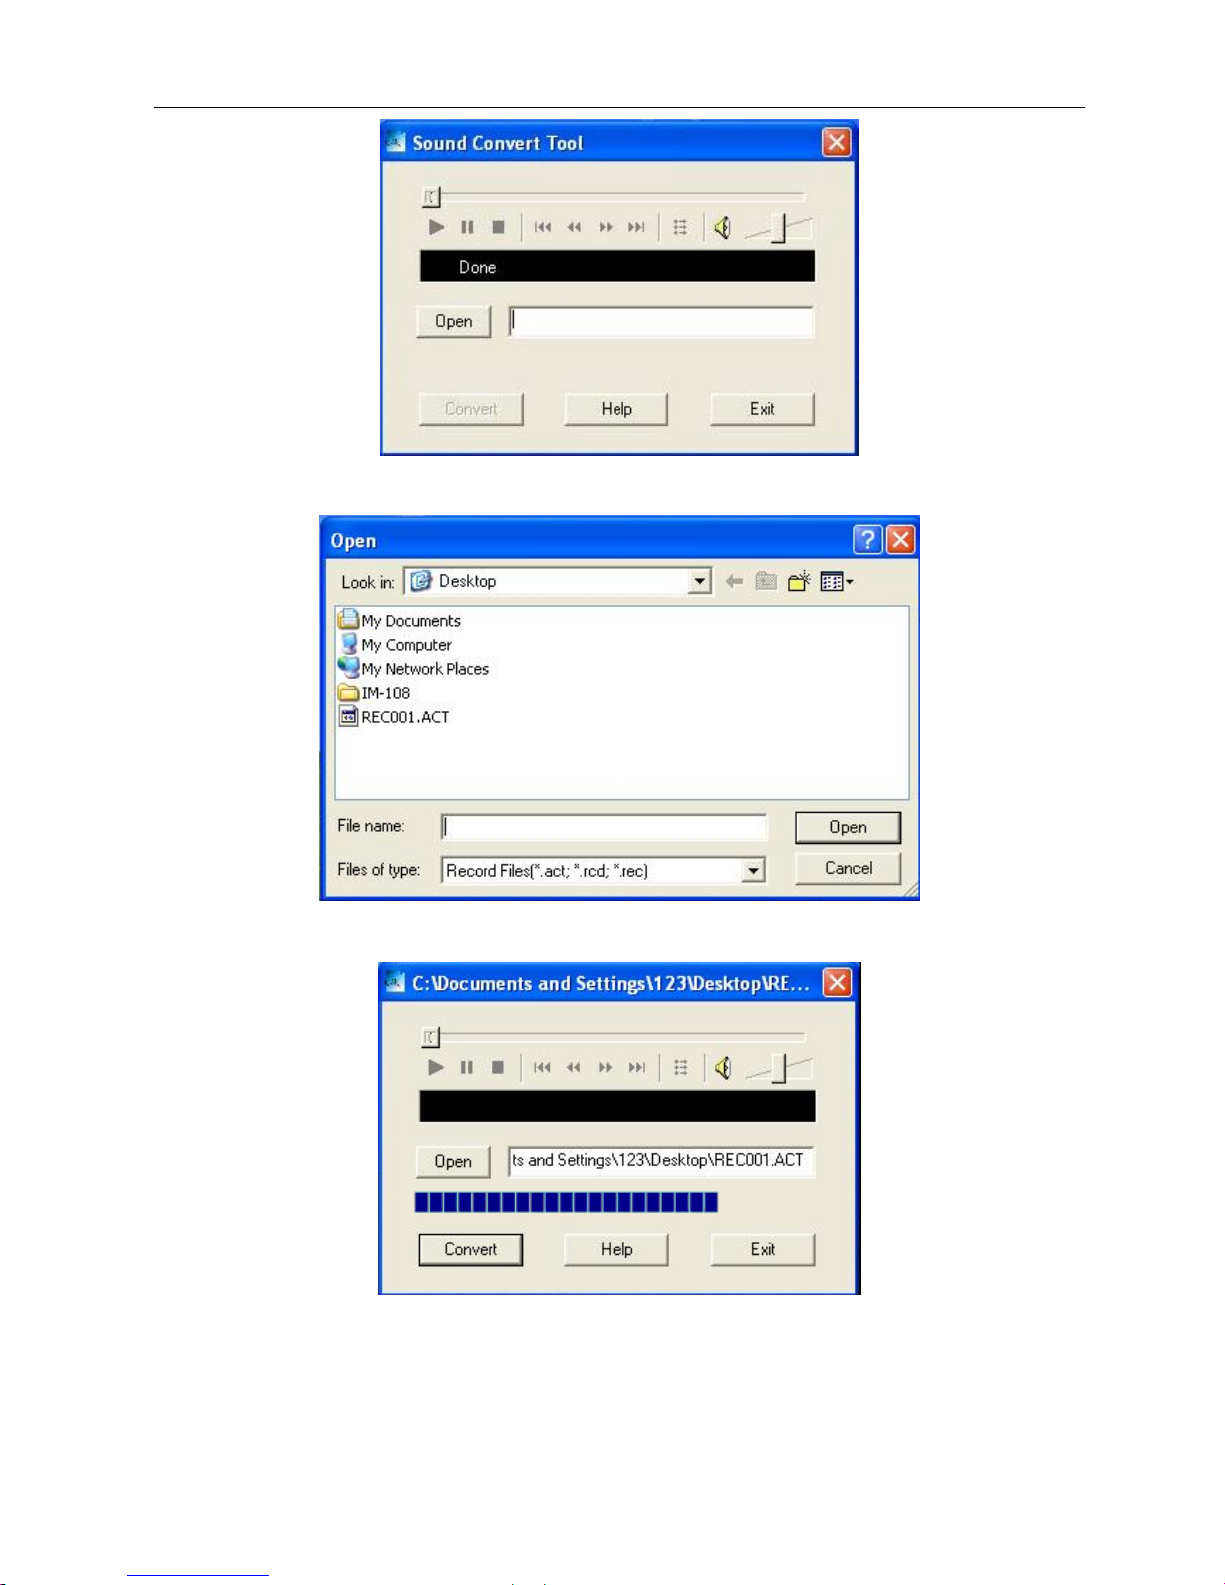
2. Select the ACT files you would like to convert
3. Click ‘Convert’ to select the saving place, then start to convert it to .WAV file.
Besides can convert ACT Files into WAV format, this tool can also play WVA and MP3 format files.
E-book
Page 9
Page 11

1. Entry main menu
2. Push Next/Last to select E-book
3. Short press Mode to enter into E-book
4. Push Next/Last to select the file.
5. Press Play to play the file.
6. Select files: Before playing the file, press Mode to enter into the menu, push Next to select the menu , press Mode
enter file selecting. If have folders, press Mode again, push Next to select the file, then press Mode to confirm and play.
7. Delete files: Before playing the file, press Mode to enter into the menu, push Next to select Delete file or Delete all ,
press Mode enter into Delete, select YES to delete, select No to exit, then press Mode to delete the file.
8. Setting mode: manual replay and auto replay
Using Telephone Book
●How to find telephone information?
Under other menu, push Next / Last to select Telephone Book, press Mode to entry.
1. Browse TEL
2. Import Tel File
3. Export Tel File
4. Exit
Push Next/Last select Browse TEL, press Mode to entry.
Push Next/Last to select the file you need to refer, press Mode to exit.
Browse TEL: Check the contact which you imported into, including Name, E-mail, Mobile, QQ, Telephone, Fax etc.
(Available only Telephone book has been stored. Otherwise you will receive warning: No File! Long press Mode
to exit!)
Import Tel File: Import Telephone book file from PC to player.
Export Tel File: Export Telephone book file from player to PC.
●
Create and Edit Telephone Book File
● Create a Telephone Book file
The Telephone Book file can be created by software tools provided
1. Run ‘Telephone Book’ program, click ‘OPEN’
Page 10
Page 12
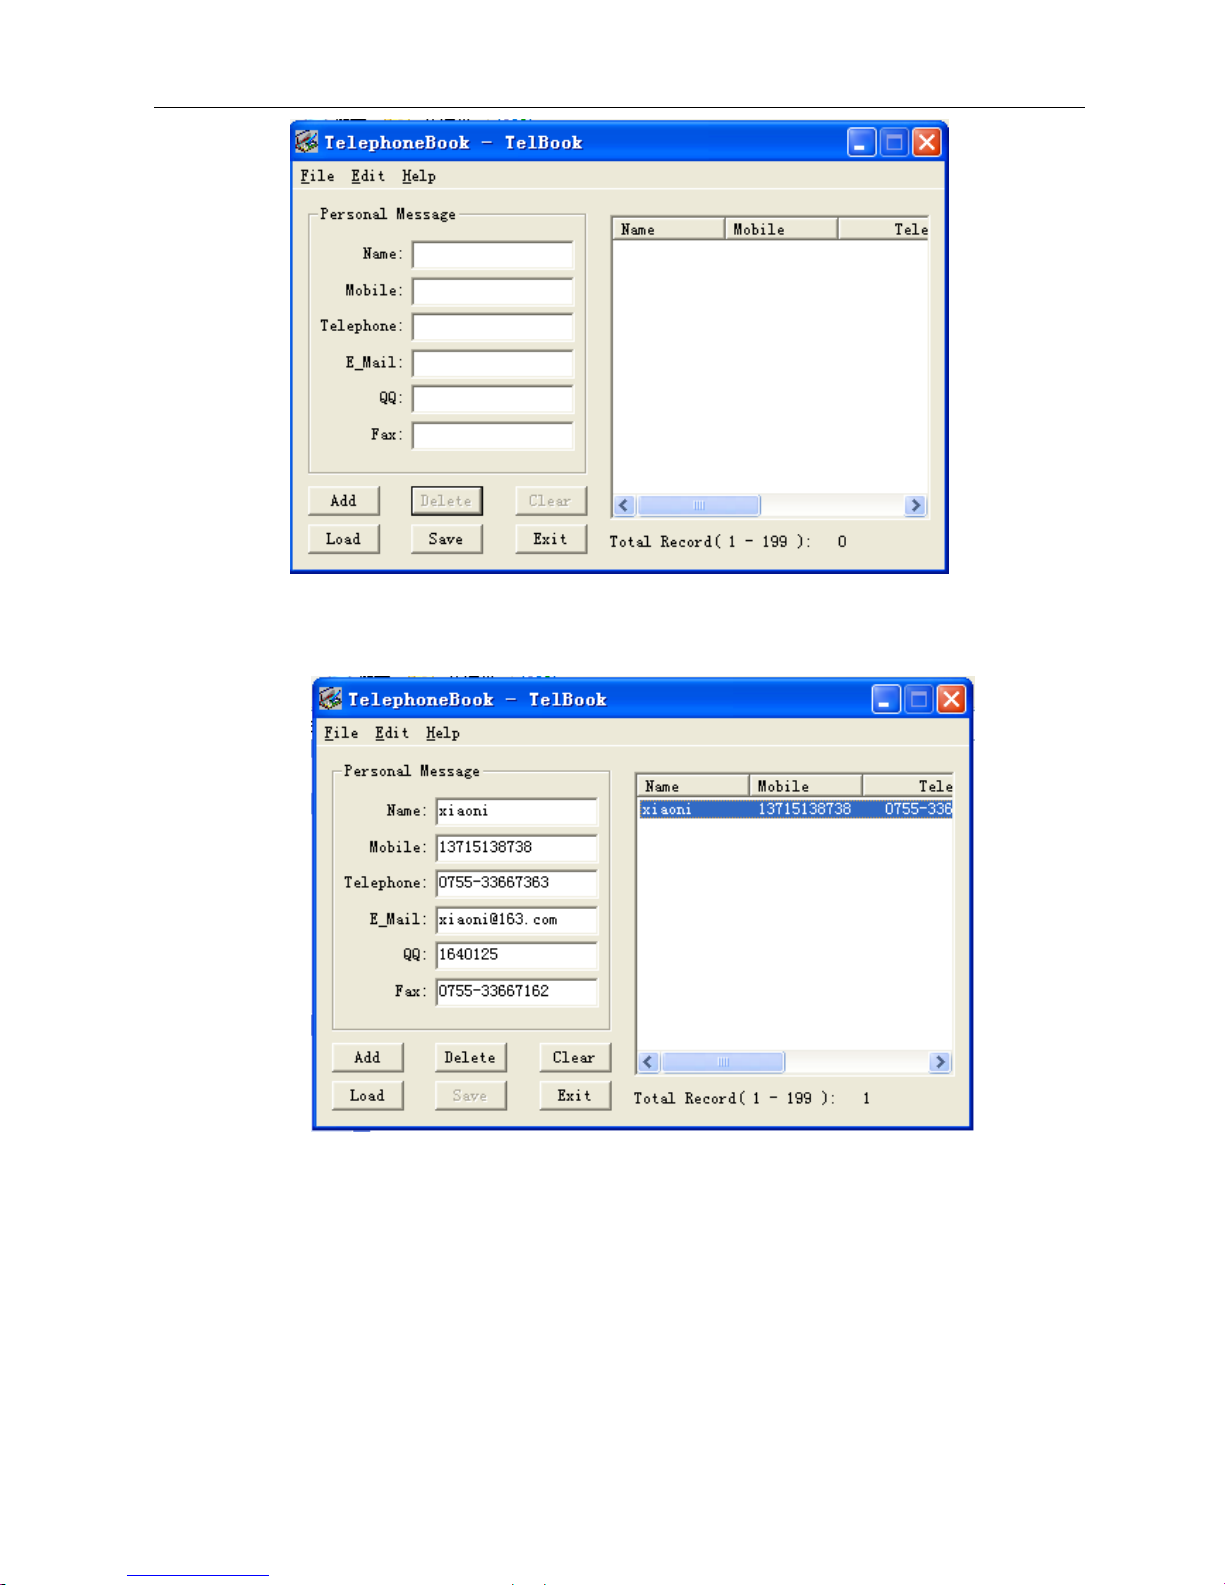
2. Input information according to the indication, then click ‘Add’, the system will record the information to the list. If you need
to add more information ,you can repeat the operation.
3.Click Save, it will show a file named “TELBOOK”. At that time, the telephone book is already created.
● Import and Export Telephone Book:
Import Telephone Book:
This function allows you import a telephone book to your MP3 player from PC:
z Create Telbook.bin by using provided Tel book editor Telbook.exe
z Connect the player by USB, copy telbook.bin to root directory of MP3 player.
z Switch the player on and entry Import Tel
Page 11
Page 13
z
Import telbook.bin into player
Export Telephone Book:
This function allows you export Telephone Book file and then you can edit it on PC:
z Switch the player on and entry into Export Tel
z Confirm the files which want to export.
Connect the player by USB, you can find telesave.bin in root and it can be copied and edited on PC
System Settings
z How to entry Setting
You can set system performances here , options may vary in different firmware version
1. Entry main menu
2. Push Next key to select “Setting”
3. Press Mode to entry “Setting”
●
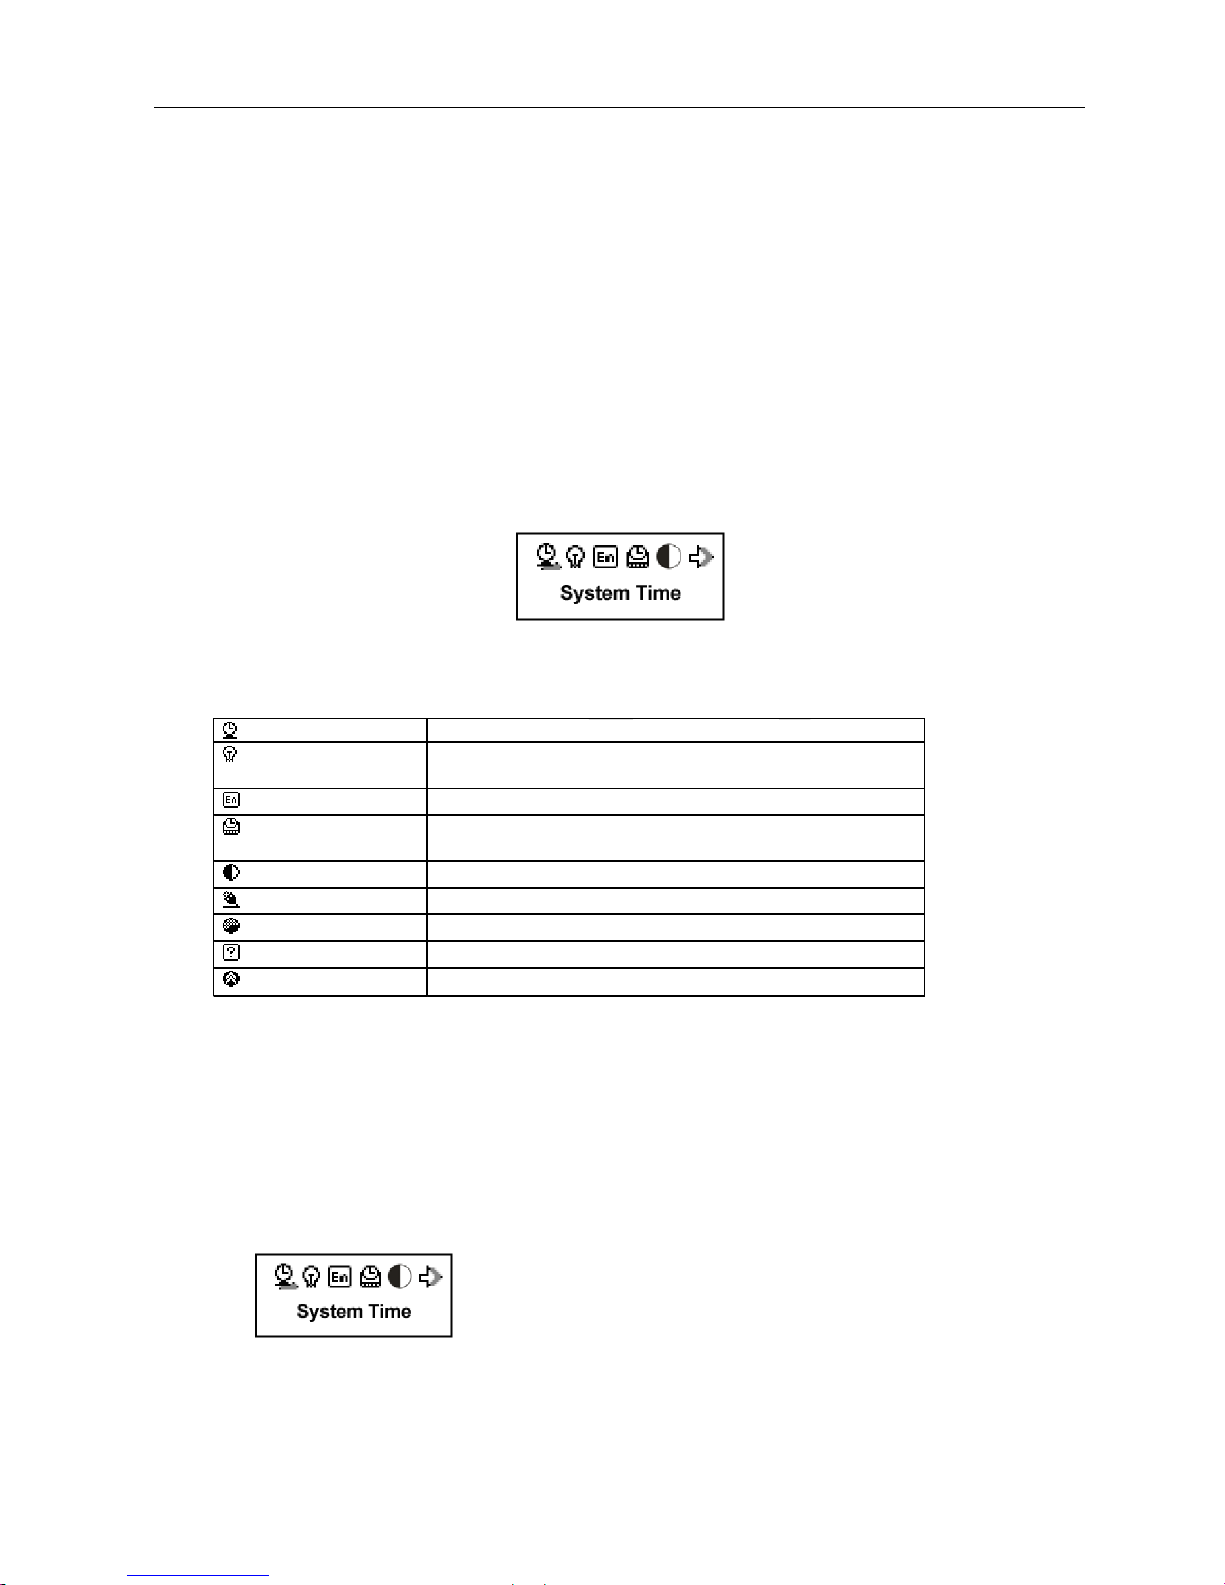
Option introductions:
1. Detailed instruction:
○
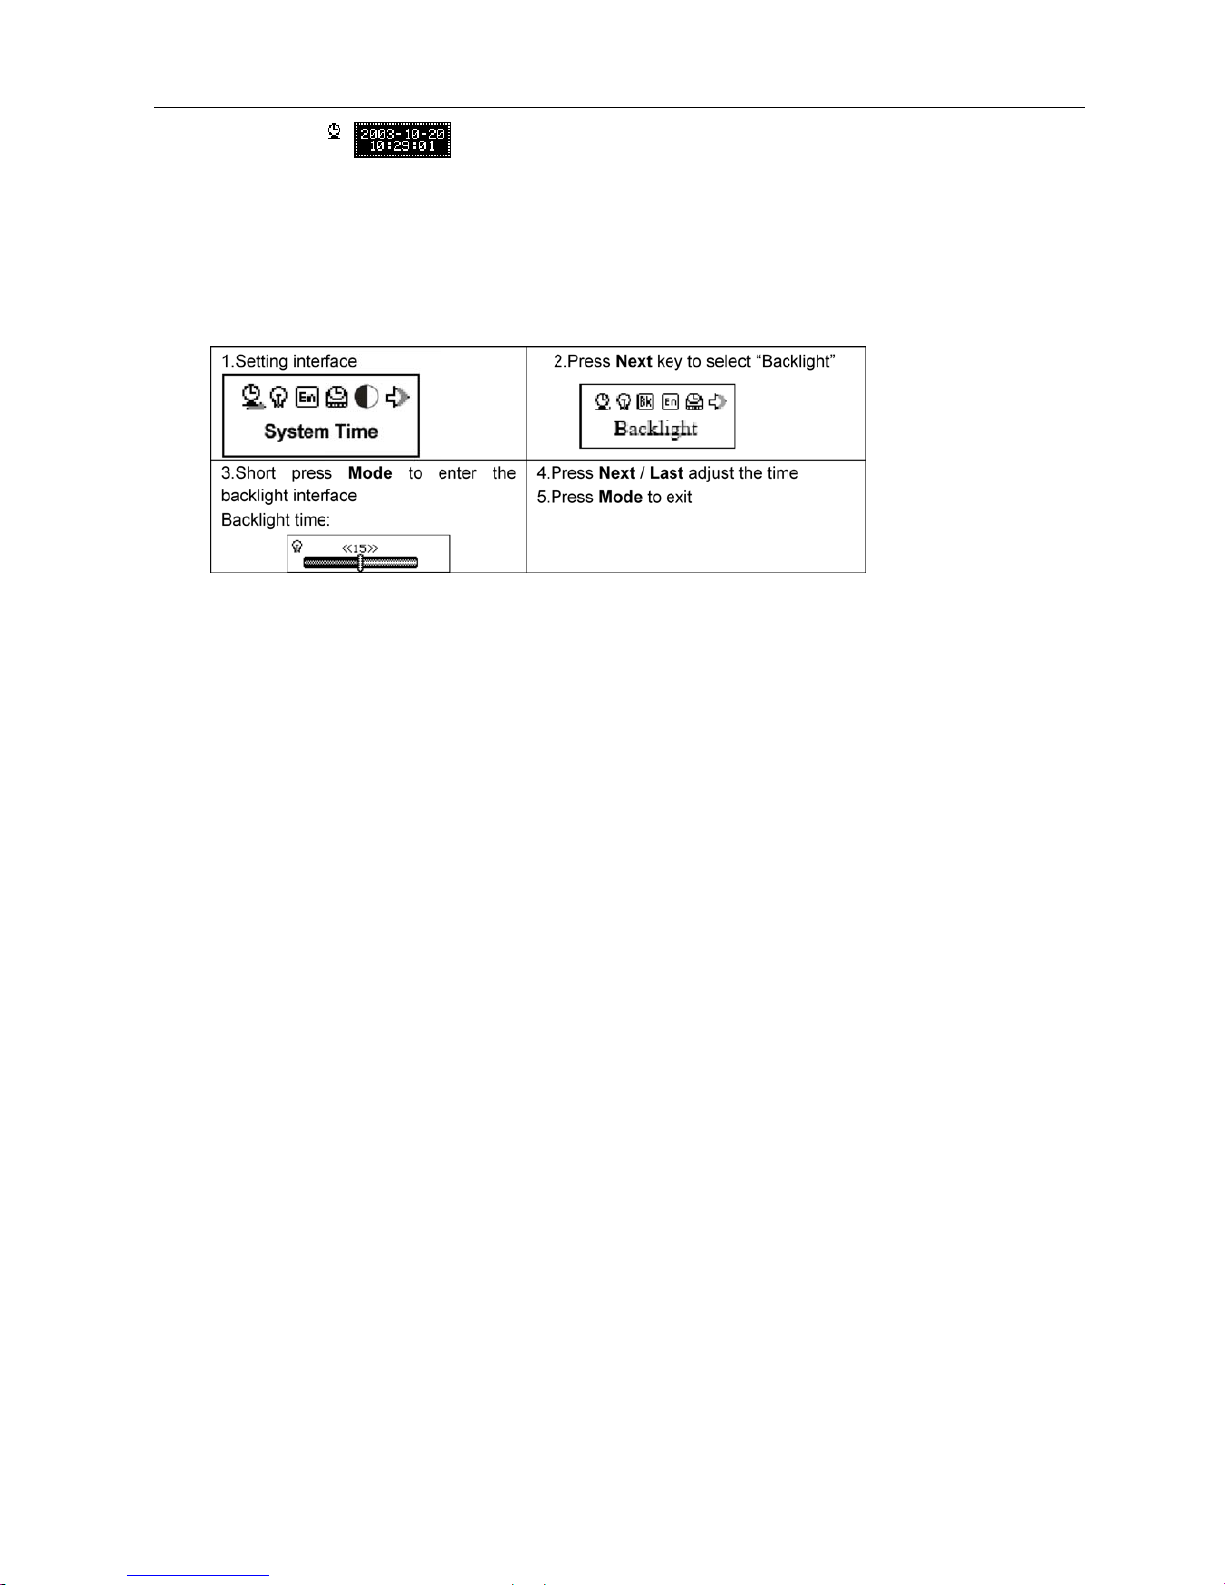
System time setting
1. Setting interface
2.
Short press Mode to entry the interface
Record time
Page 12
System time Set the date and time when the record file saved.
Backlight time Set the lasting time (second) after the backlight is lighted but
without any operation.
Language Select different languages
Power off Set a count down time in minutes, the player will shut off when
time out.
(Contrastr Setting) Set display’s contrast
Online Mode Options for ‘Secret Space’
(Memory info.) Check memory space and usage status
(Firmware Version Version of player’s firmware
( Firmware Upgrade) Use for upgrade firmware
Page 14
3.
Short Press VOL+, year time begin to twinkle , press VOL- to set the time.
4.
Press Next to increase, Last to decrease.
5.
Press Mode to exit.
○Backlight time setting
○Language setting
Language including: Chinese, English, Danish, German etc. Short press Mode to setting interface, push Next key to select
language setting, press Mode key to select language, then press Mode to confirm.
○Power off setting
Please note:
You can set time in seconds on ‘off time’ mode, allow the player shut down automatically when player become stop and idle
for the period you have set. This function is void if the time set to 0.
You can set time in seconds on ‘Sleep mode’, allow the player shut down automatically when the player become idle
(regardless current status) for the period you have set. It is designed for listening music before sleep. Please note: Sleep
mode valid only once after setting, you have to set again if you want to use it next time.
○Contrast setting
1. Select ’Contrast Adjust’ under setting interface
2. Press Mode to enter
3. Push Next / Last key to adjust the contrast
4. Press Mode to confirm
○Online mode setting
1. Select Online mode under setting interface
2. Press Mode to enter
3. Push Next / Last key to select: Multi drive, Normal only ,Encrypted only
4. Press Mode to confirm
Some operation systems (prior to Windows 2K SP4 version) may not recognize a USB disk with two disk symbols.
Therefore, you have to choose an active disk here when using ‘Secret Space’ function only the active disk can be found in
PC.
Page 13
Page 15
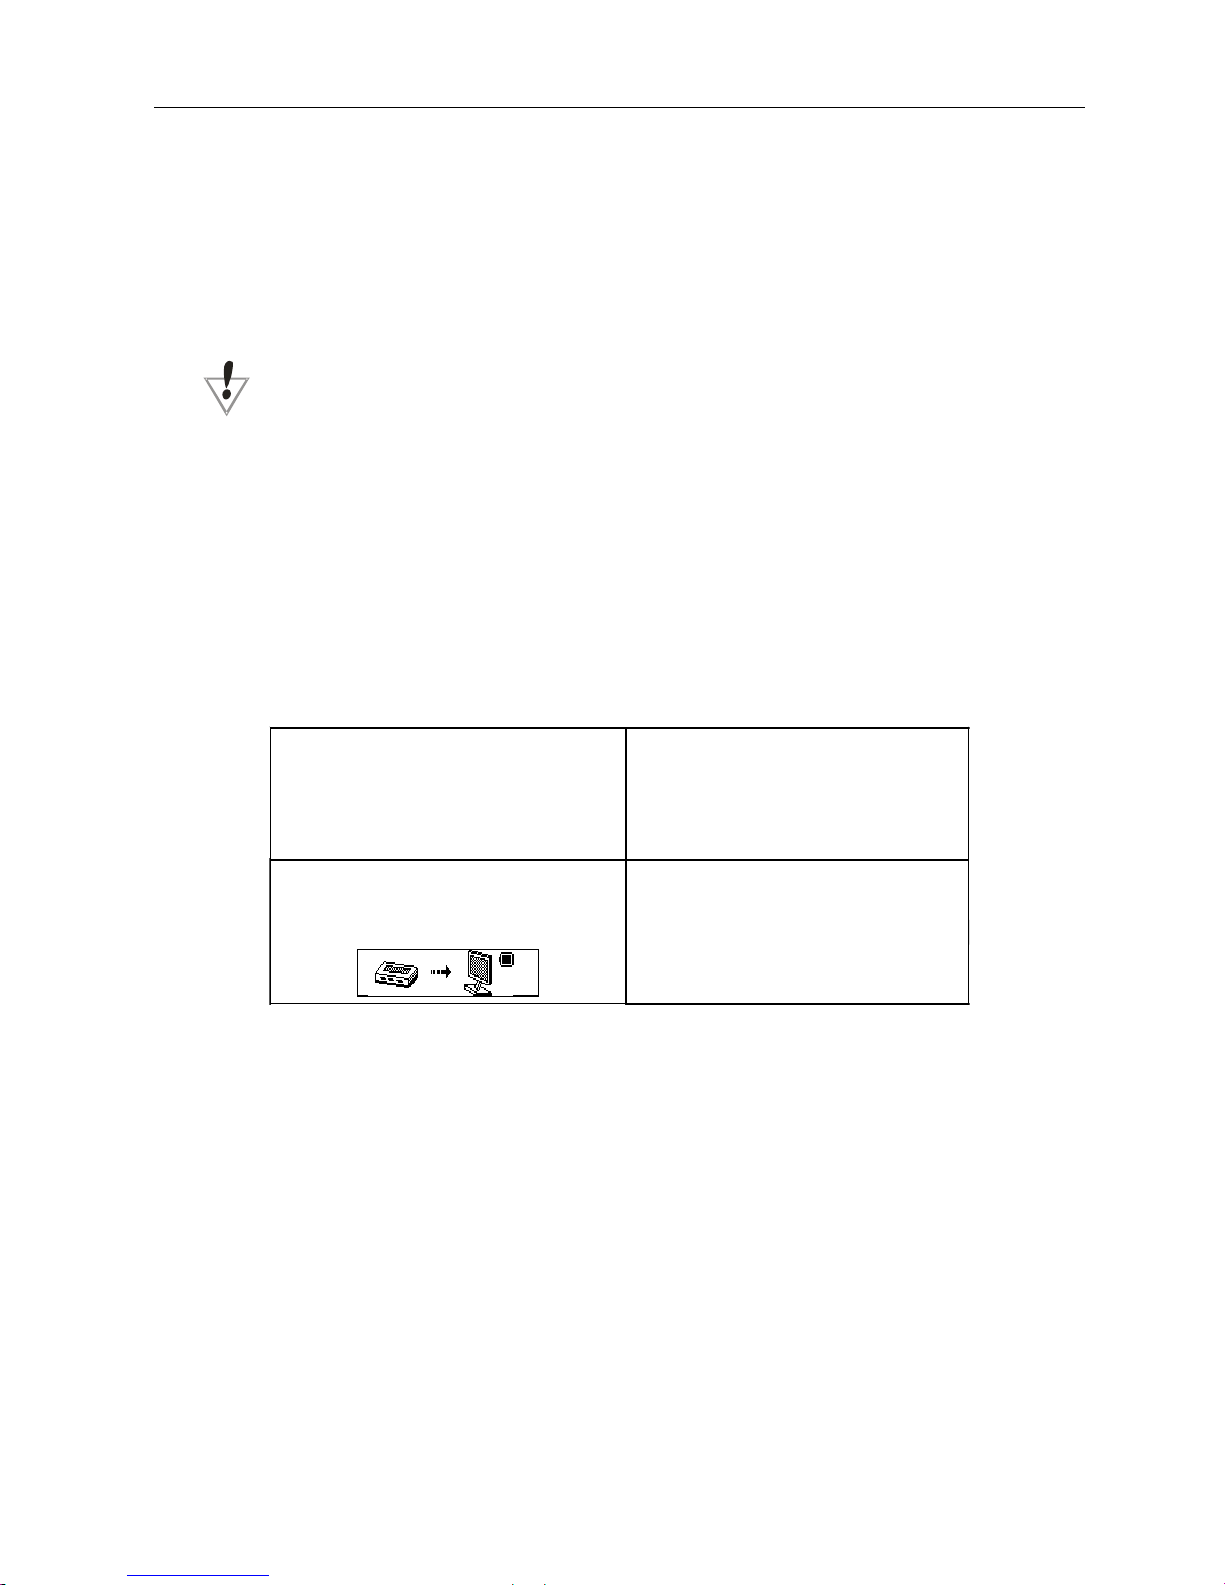
○Memory Information
You can check total memory space and the percentage of usage.
○Firmware version
You can find firmware’s version of the player.
○Firmware upgrade
Use for upgrade player’s firmware. Select this option when need upgrade.
Tips: Short press Mode after finish the setting. Press Play can exit current menu quickly, This function is valid
for all other menus.
Use USB Disk
The player is also a standard USB disk. Support Windows 2K, Windows XP, Windows Vista
The player supports USB power supply, can be used without battery when connected to PC. When on ’waiting mode’, short
press Mode return to main menu and selection the operation you need.
This player supports Suspend mode.
When connected to PC, The player works on the three modes below:
1. Waiting 2. Downloading
3. Uploading
Upgrade player
You can use PC software to maintain or upgrade player’s firmware.
1. Install the Product tool (Can be found on CDROM provided), and double click Setup to install. Connect the player
to PC after finish the installation.
2.Run “Media Player Utilities 1.58” under tool “Media Player Upgrade Tool”, as below:
Page 14
Page 16
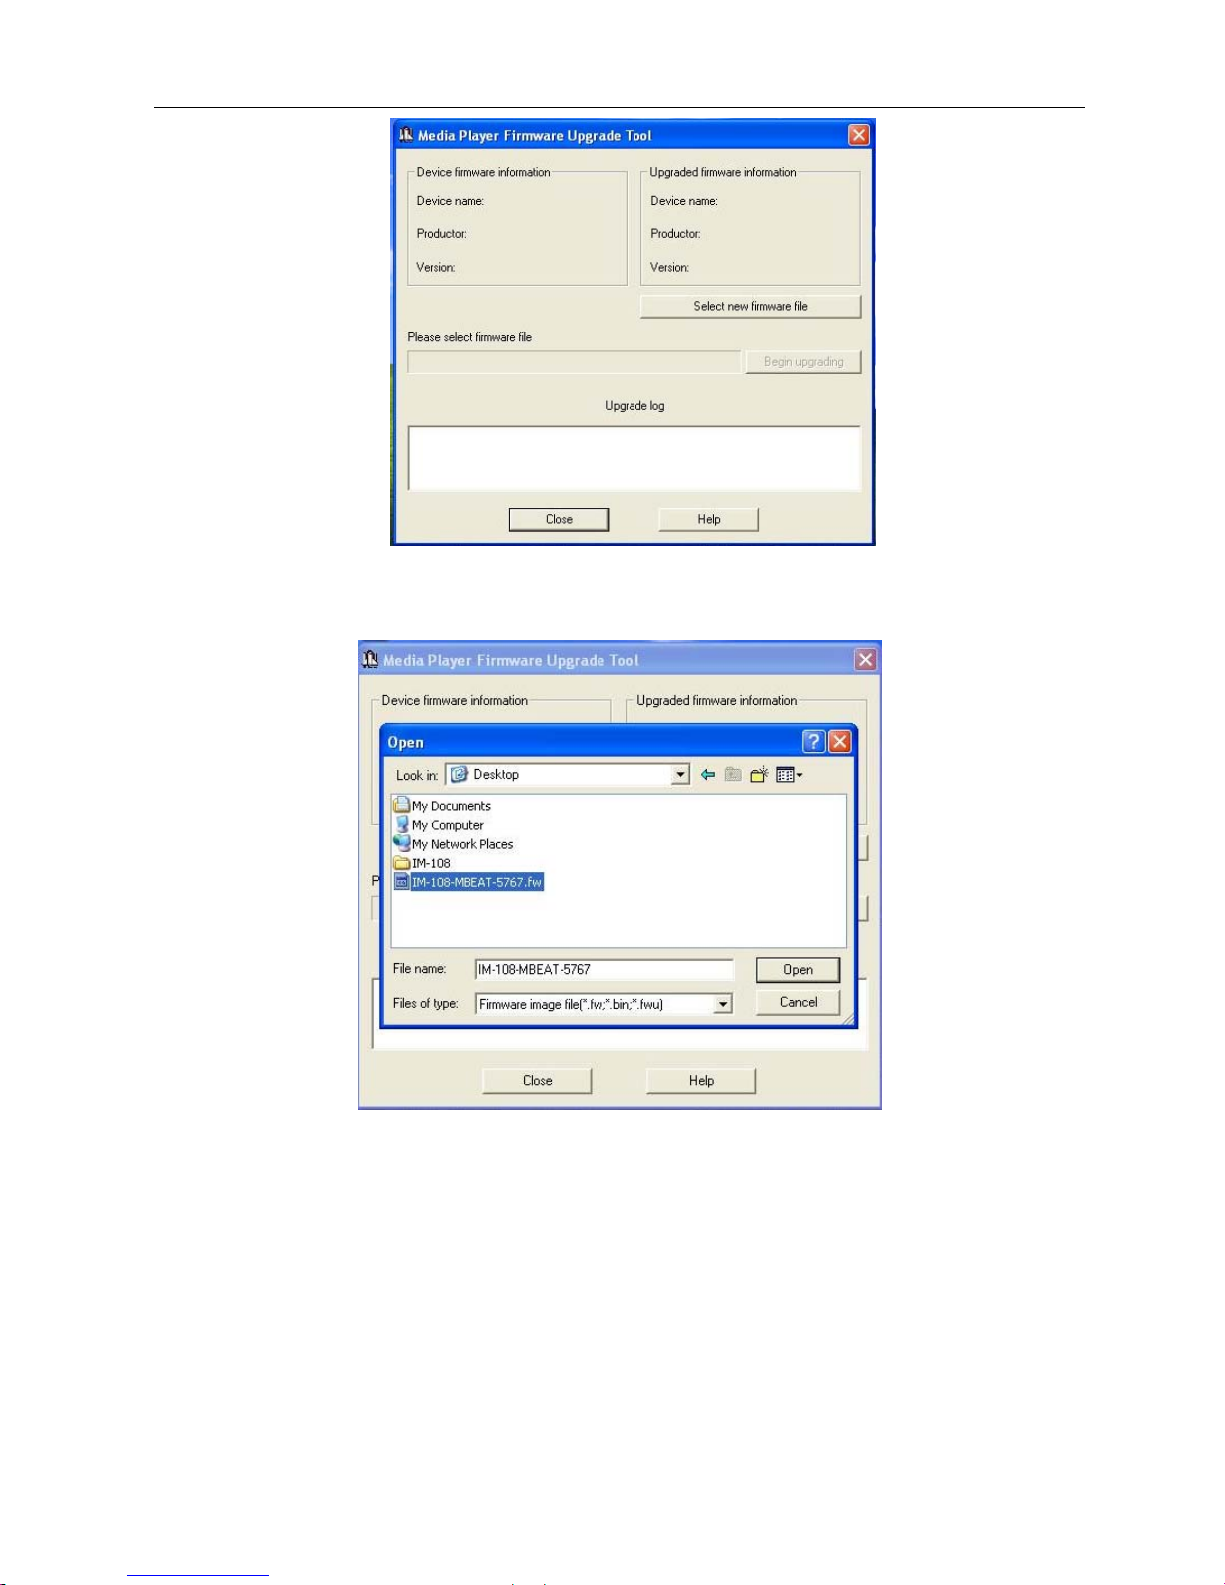
3. Select the new firmware program.
4. Click ‘Begin upgrading’, it will begin the upgrade process.
Page 15
Page 17
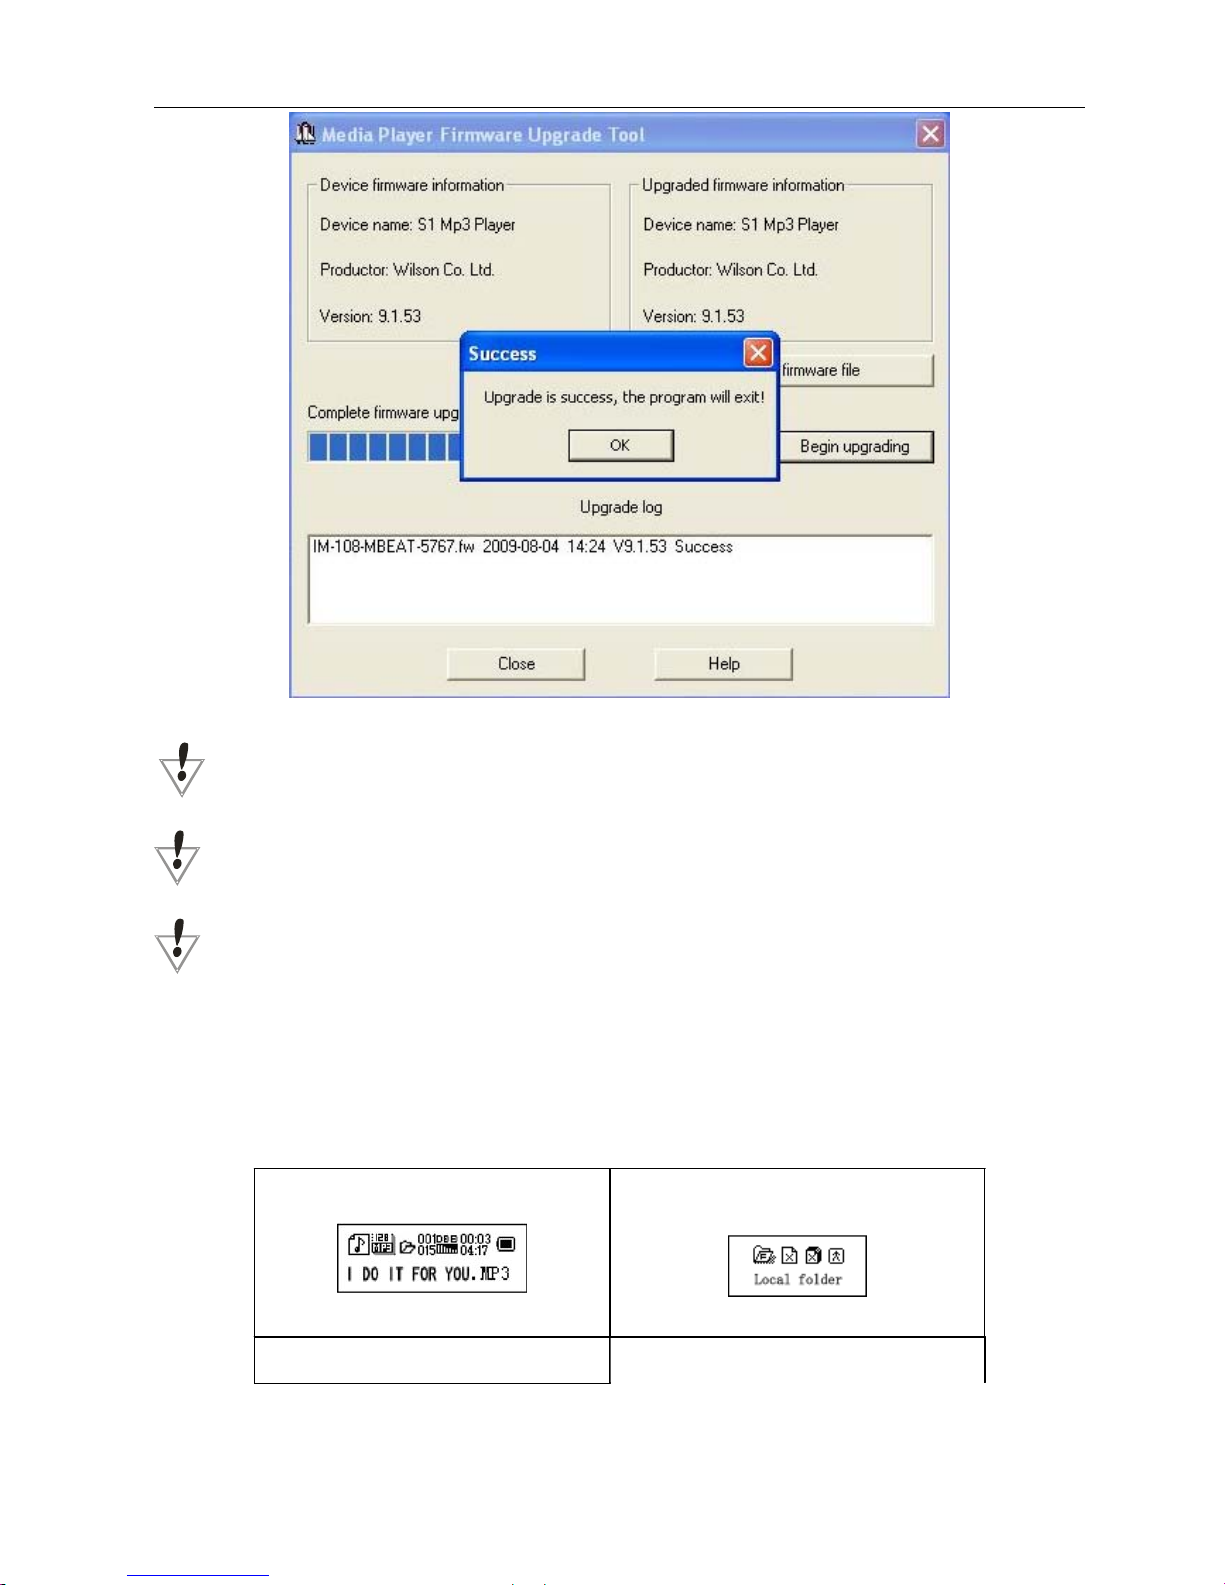
5.While upgrade successful, click OK. Remove the Mp3 and connect it to computer again.
Firmware upgrade is to improve player’s performance; you can still use it normally without doing upgrade process
Player may not work by incorrect process! Please read this manual carefully before doing upgrade process.
The upgrade software cannot work for other player.
Other settings
z
Select other fold (Stop submenu)
You can classify files into several different folders that easy to manage them (folders should be created on PC first).
The player can identify 9 folders in root
1.Under stop interface Such like music
mode
2.Press Mode to enter stop submenu
3.Press Mode again to enter menu selection
interface
4. Press Next or Last key to select under the
menu
Page 16
Page 18
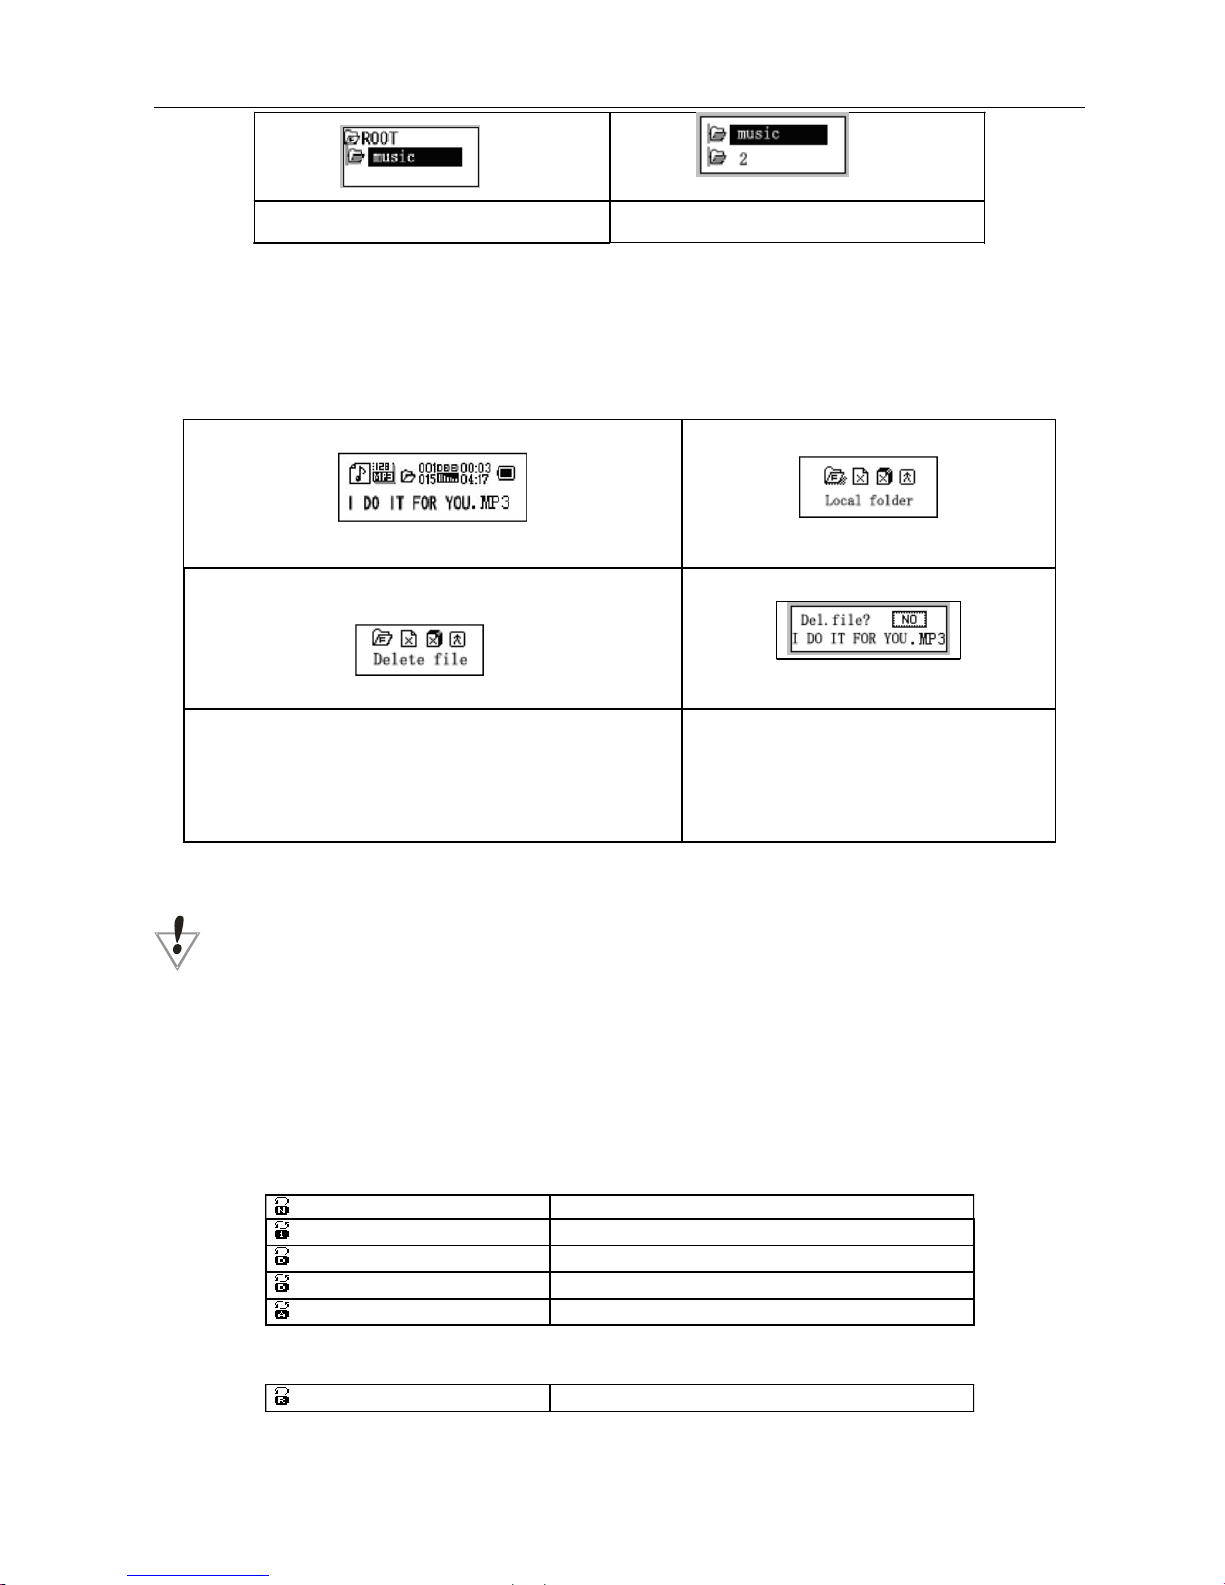
5.Press Mode to confirm the selected menu
Please note: You can set folders independently in Music / Recorder / Play mode
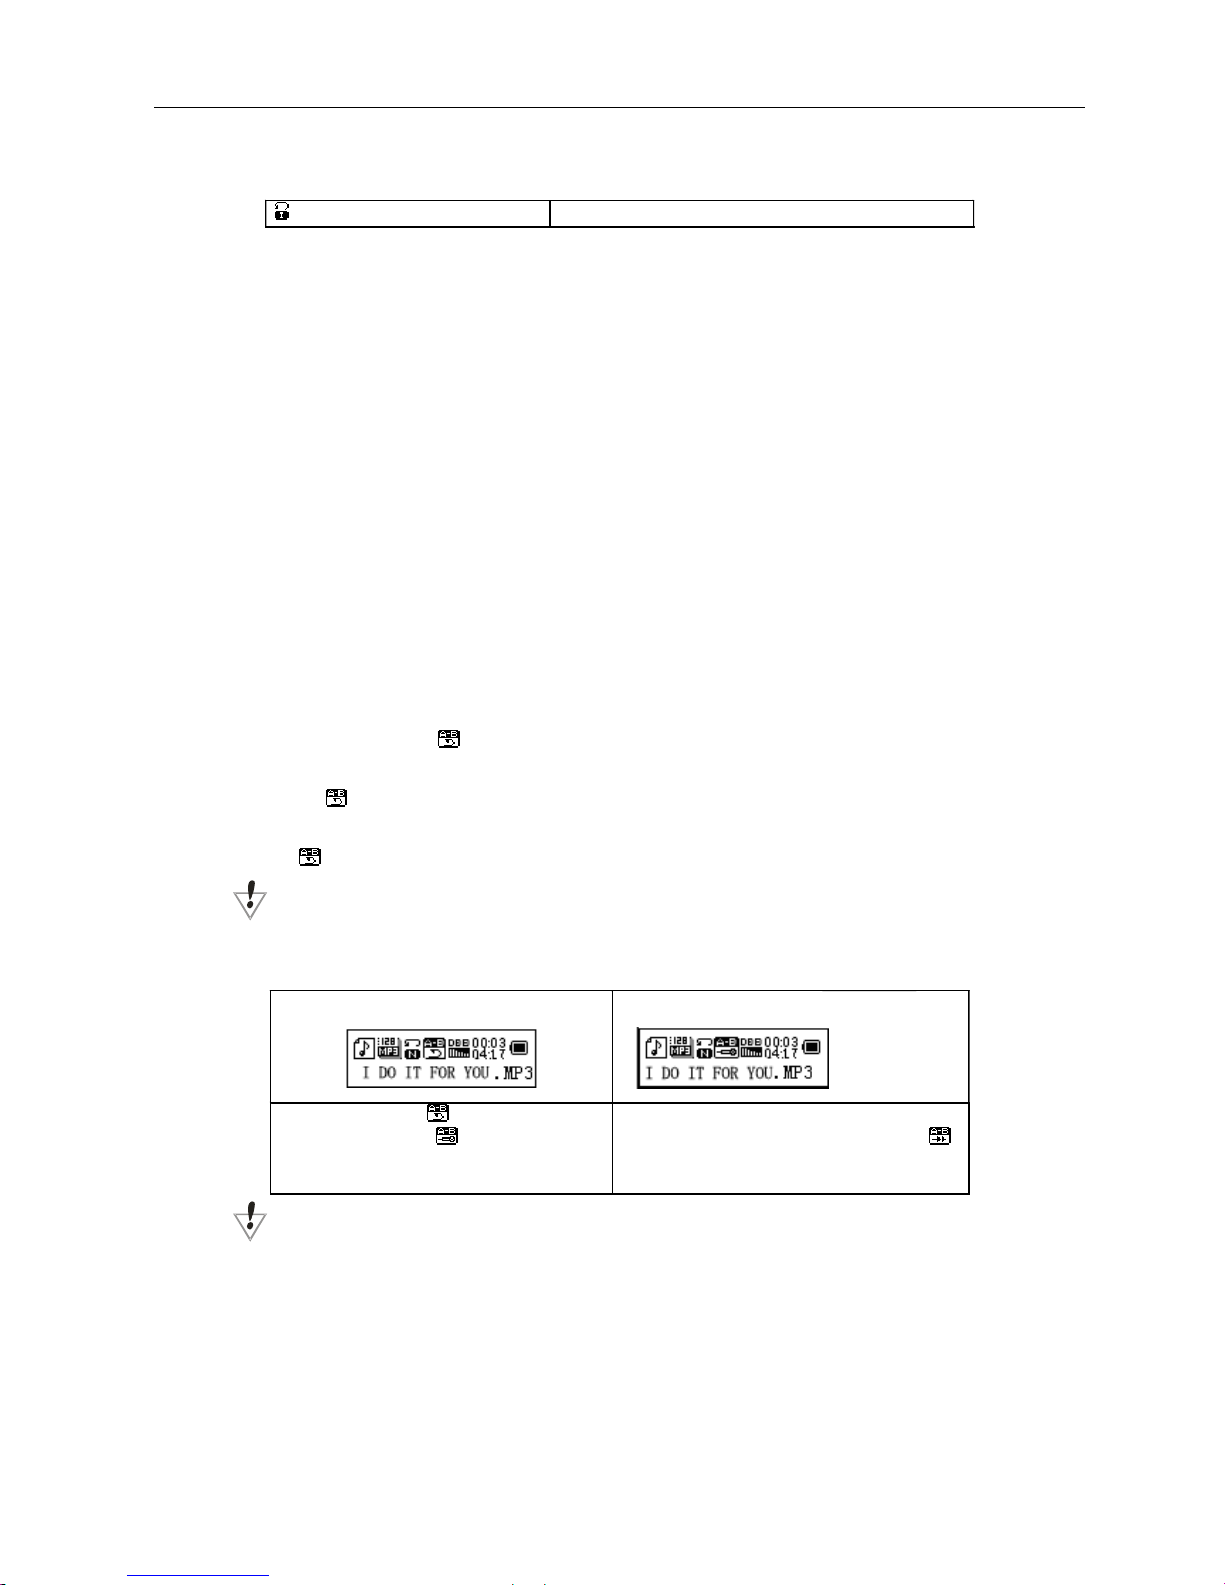
z Delete Mode (Stop submenu)
You can delete corresponding files/channels under Music/Playing modes.
1. Under stop interface 2.Press Mode to entry Stop submenu
3.Press Next or Last key to choose ‘Delete file’ or ‘Delete all’
4. Press Mode to entry delete interface.
5.Push Next key to choose “YES” 6.Press Mode to confirm delete
‘Delete all’ will delete all files in current folder of current mode. I.e. Choose ‘Delete all’ in Music mode will delete all
music files; recorder files will not be affected.
Please safely removed player and unplug USB after delete files on PC, otherwise some files will not be removed.
z Play mode (Play submenu)
You can choose different play mode (i.e. repeat, shuffle) when playing music or record files.
The first option on Play submenu is ‘Play mode’
○ REPEAT
Normal Playing music files in sequence until the end of folder
Repeat One Repeat single music file
Folder Play all music files in folder
Repeat Folder Repeat all music files in folder
Repeat All Repeat all music files
○SHUFFLE
Random Play music files in folder randomly
Page 17
Page 19
○INTRO
(Intro) Play the first 10s of each music files in sequence
z Tempo rate (Play submenu)
You can choose different play speed and it will not affect the sound. (Only valid for MP3 files)
1. While playing music
2.
Push Mode to entry play submenu
3.
Push Next key to select ‘Tempo rate’ option
4.
Push Mode key to entry
5.
Push Next key for faster, Last key for slower
Note:
Play speed will applied to every songs
● Repeat mode (Play submenu)
○A-B repeat
1. When play music or recorder
2. Push Mode key to entry play submenu
3. Push Next key to select ‘Repeat Mode’ option
4. Push Mode key to entry
Repeat Mode: ‘A’ of Symbol
flashes, waiting for starter A
5. Push Next key to confirm ‘A’
‘B’ of symbol
flashes, waiting for starter B
6. Push Next key
to confirm B
Symbol
fixed and starting repeat between A-B, while playing, you can push Last key to reset A point.
Under repeat mode, can directly push Next or Last key to set the play speed.
○ Karaoke Mode (No such Function in Playing mode)
1. A-B repeating 2.Push Next key to enter Karaoke mode
3. Repeat symbol ’ ’ will be replaced to
karaoke symbol ’
’. Player begins
recording voice to the length of A-B repeat
period.
4. Upon time reaches, player resume play
music file and the symbol replaced to’
’,
push Next key entry contrast function.
Press Next key returns to Repeat A-B status.
○Contrast Function (No such Function in playing mode)
Page 18
Page 20
1. While entry contrast function, repeat
symbol displayed as“
”, the original
sound will be played.
2. While finish original, repeat symbol
will be replaced to“
”, player will play
the voice recorded.
Push Last key return to ‘Karaoke mode’
Press Mode to exit repeat mode upon above three modes.
z Replay times (Play submenu)
Please consult into ‘Backlight time‘ setting
Repeat time determines the times of play A-B repeat until exit
z Replay gap (Play submenu)
Please consult into ‘Backlight time’ setting
Repeat interval determines the time period between previous repeat (in seconds)
New Function Recommends!
About Secret Space
Some MP3 user may worry about divulging secret. They do not want others to find private information contained,
therefore these data have to be removed before lend their own MP3 to others. It may cause some trouble.
However, this problem has totally solved by ‘Secret Space’ technique!
You can use provided software to divide the whole USB disk into two parts, and encrypt one of them. You can move
your privacy into the encrypted part; they will be protected by password.
1.Connect your player to PC
2.Run Media Player Disk Managerl which can be found in provided CDROM
Page 19
Page 21
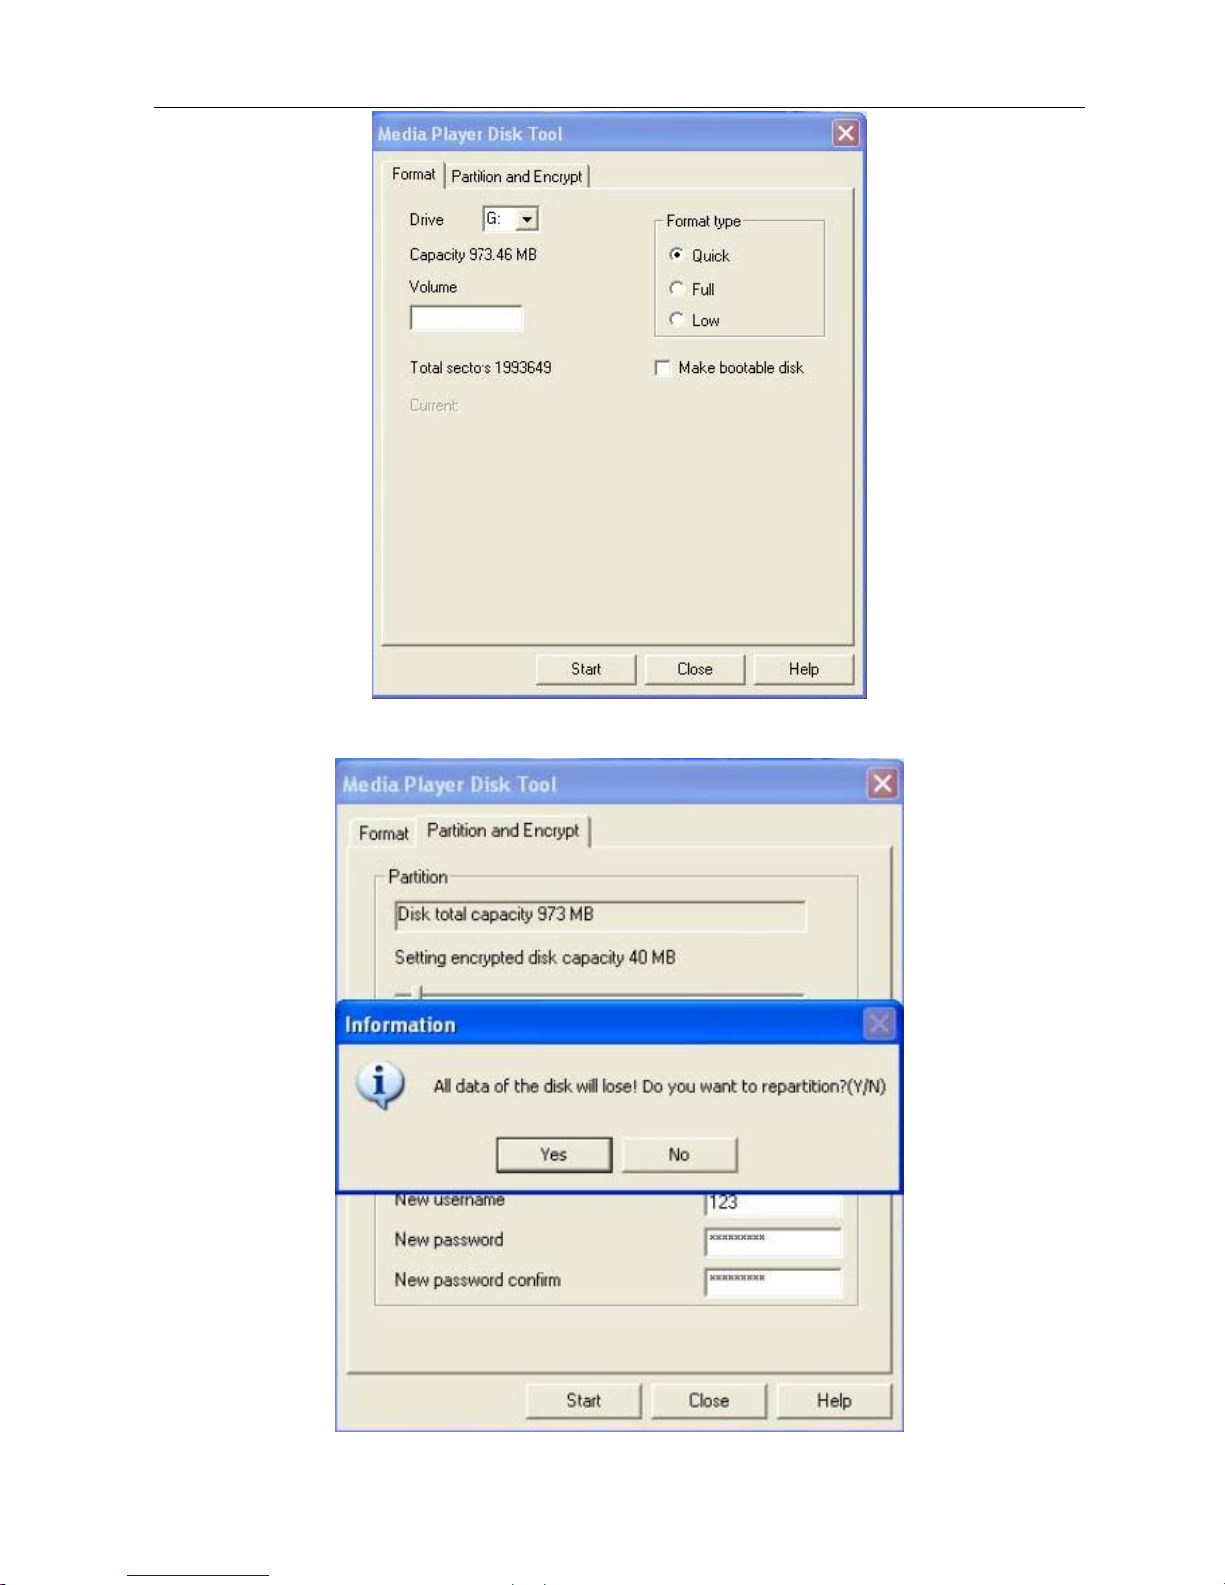
3.Select “Partition and Encrypt’ option, Allocate appropriate space and set username and password, and then click
Start. If there are some files in player, the computer will indicate as below:
Page 20
Page 22
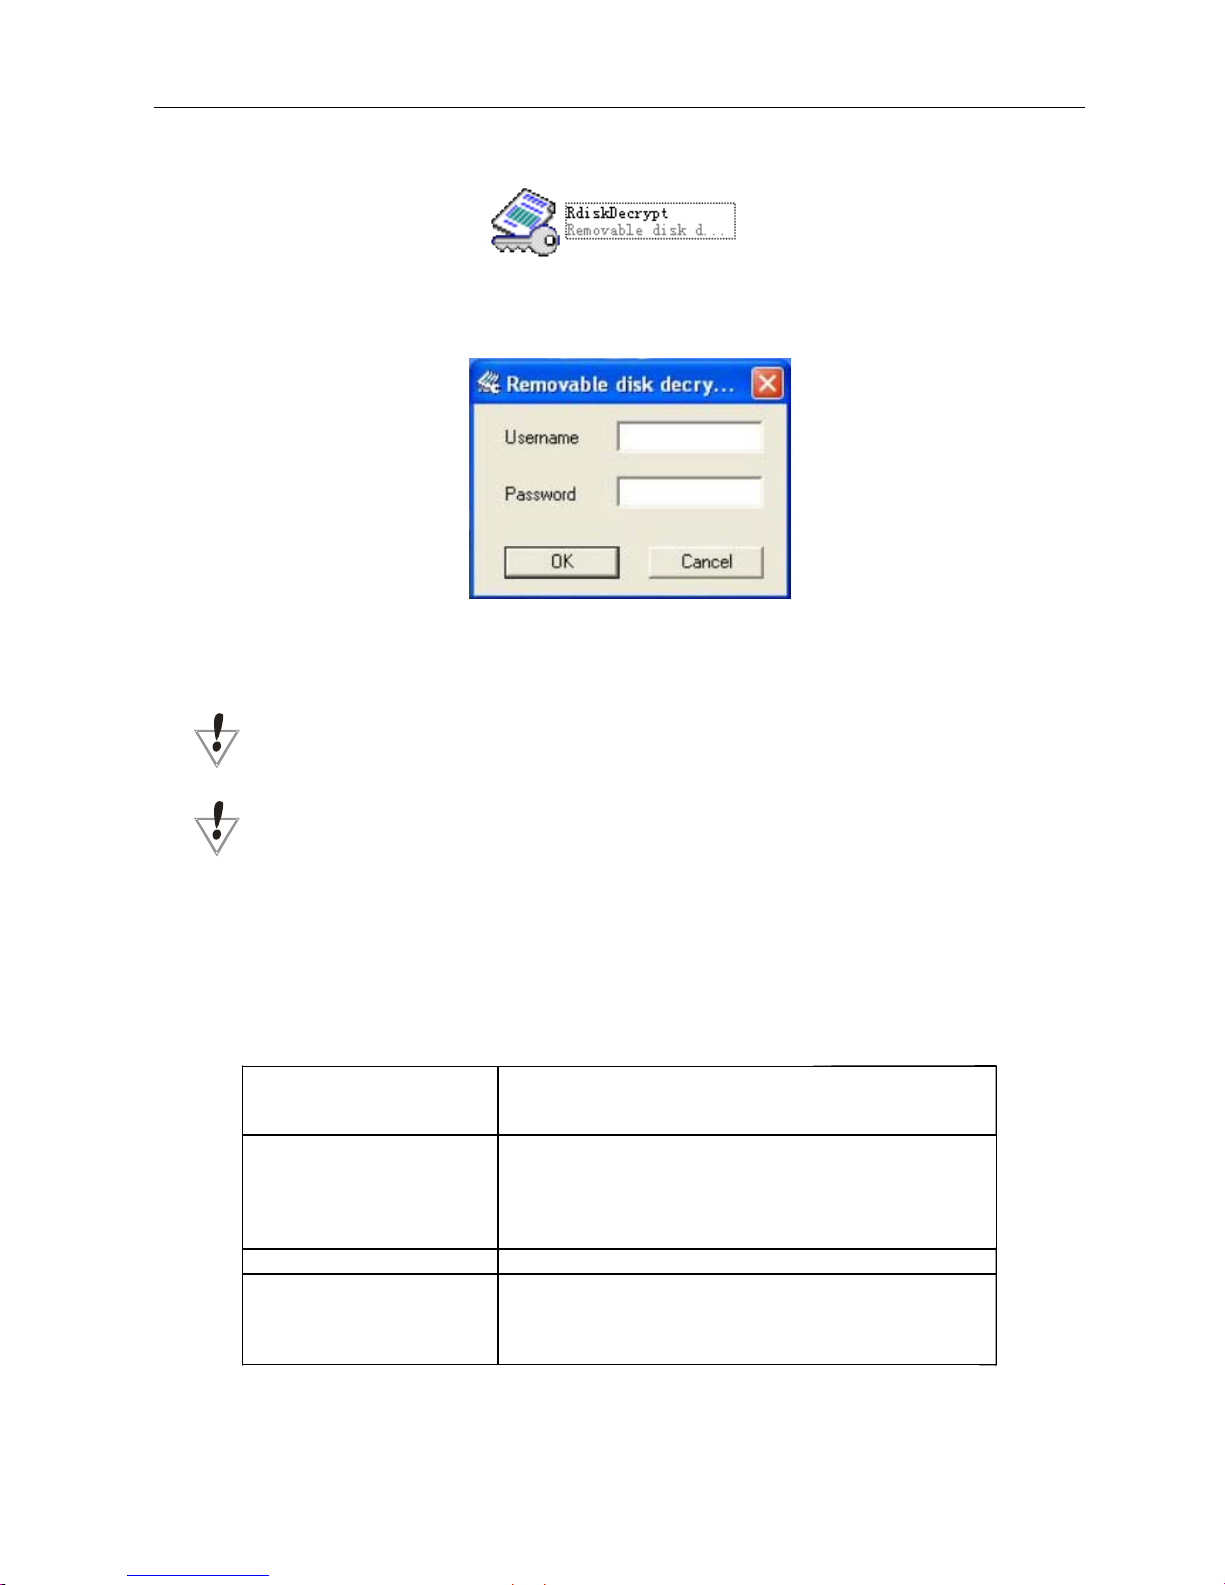
4.
After space partition, will find two disks (Only one disk can be seen under the version prior to Windows 2K
SP4), click the RdiskDecrypt , as below:
5.
Run the executable file ‘RdiskDecrypt.exe’ and input username and password. If all are correct, disk will be
opened, and files can be copied into.
6. You must enter username and password each time to open the encrypted disk.
Warning: Divide one disk into 2 parts will remove all data, and so does the combine process.
Warning: Please remember username and password. If you forget it, you can only making combine processing
and you will loss all encrypted data.
Troubleshooting
Page 21
No power Check if battery installed properly
Make sure the unit is powered on
Check if the battery have enough power
No sound Make sure volume is not on 0 position and the connection to
earphone is valid
Please make sure the earphone is clean
Damaged MP3 files may cause some noise and even cannot
be played.
Strange characters on display Make sure you have chose correct language
Cannot download Music Check USB, and make sure the player is properly connected to
the PC
Check if the driver installed well
Check if there is still blank memory
Page 23
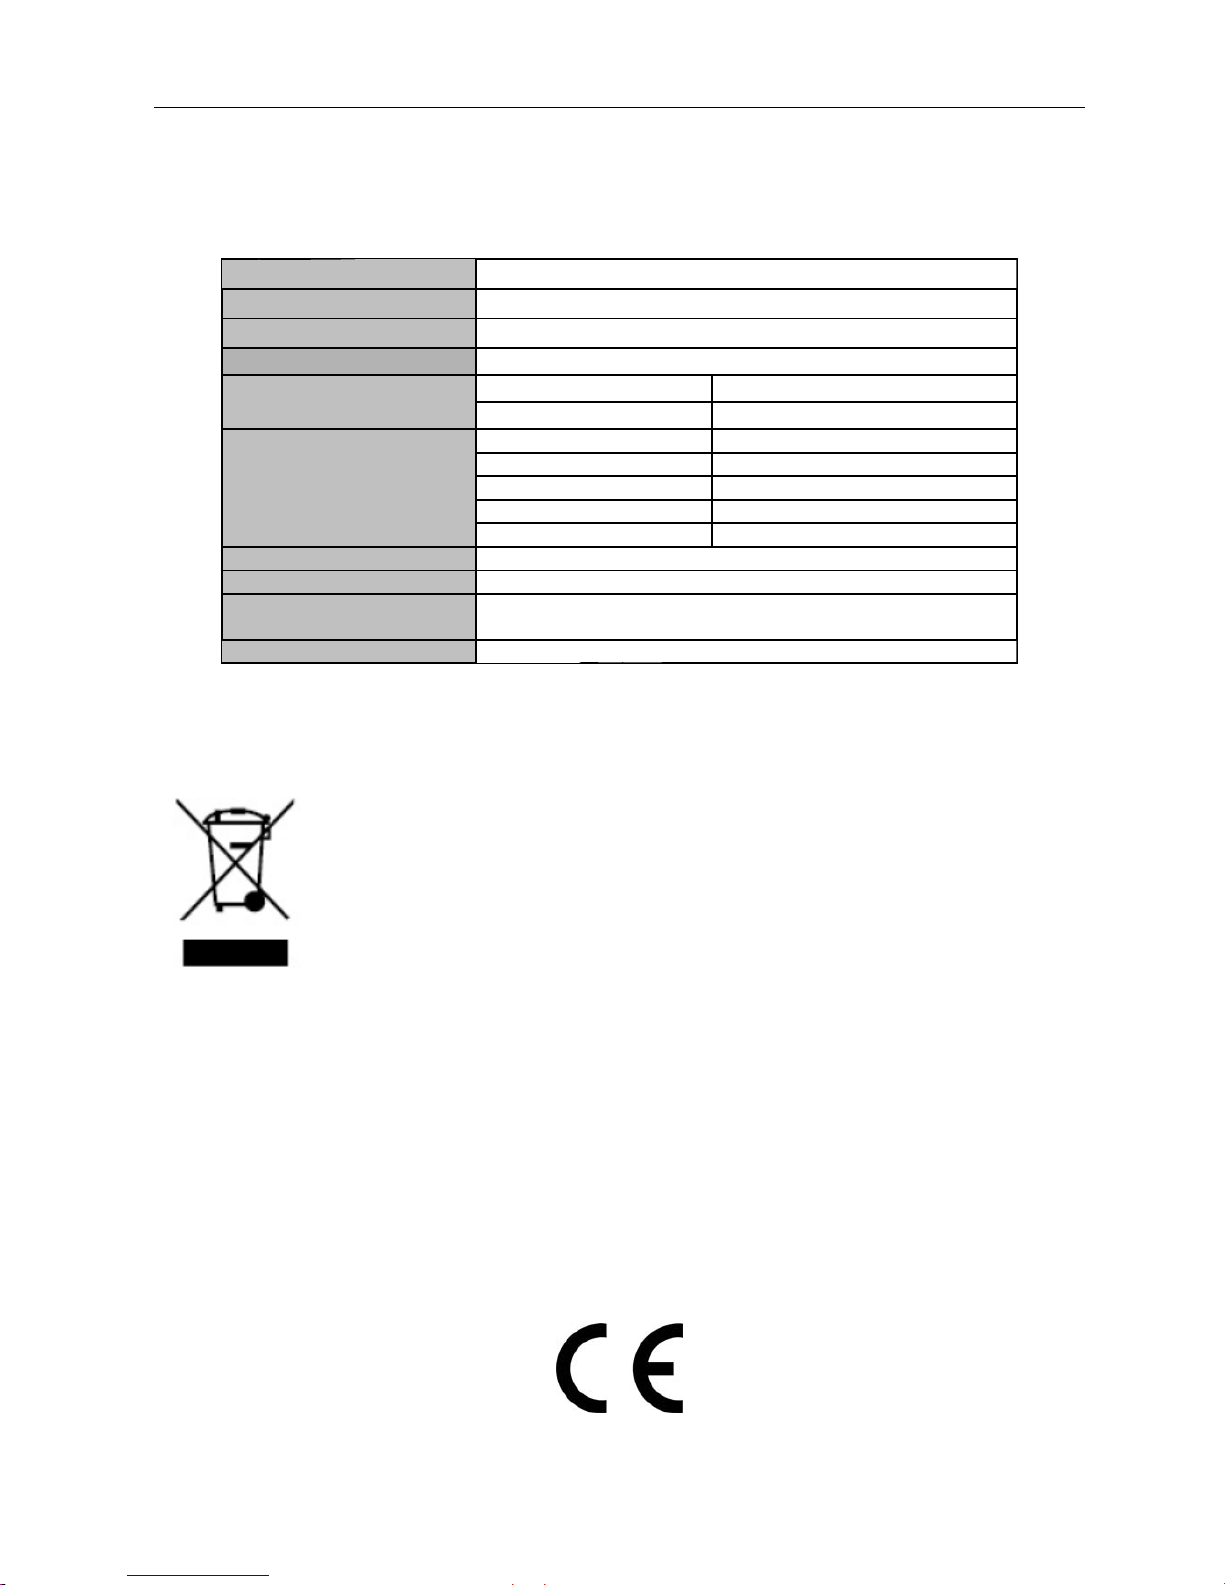
Technical Specifications
Screen Matrix (128*32) Liquid Crystal
Connect to PC High Speed USB2.0 (Read 1000K Byte, Write 800K Byte)
Memory 2GB
Power Supply Max 6 hours play modeup to battery capacity
Voice Recorder Sample rate 8KHz
Format WAV32K bpsACT8K bps
MP3WMA Max. Output L10mWR10mW32Ohm
MP3 Bit rate 8K bps – 320K bps
WMA Bit rate 5K bps – 320K bps
Freq. Response 20Hz – 20KHz
Max. Output L10mWR10mW32Ohm
Supported Music Formats MP1MP2MP3WMAWAV
Operate Temperature -5 to 40 degree
24 Languages Display Simple Chinese, English, Traditional Chinese, German, French,
Italian, Spanish etc
Supported Systems Windows2000Windows XPWindows Vista
Instructions on environment protection
ALL RIGHTS RESERVED
DENVER ELECTRONICS A/S
Page 22
Electric and electronic equipment contains materials, components and
substances that can be hazardous to your health and the environment, if the
waste material (discarded electric and electronic equipment) is not handled
correctly.
Electric and electronic equipment is marked with the crossed out trash can
symbol, seen below. This symbol signifies that electric and electronic
equipment should not be disposed of with other household waste, but
should be disposed of separately.
All cities have established collection points, where electric and electronic
equipment can either be submitted free of charge at recycling stations and
other collection sites, or be collected from the households. Additional
information is available at the technical department of your city.
Page 24

WWW.DENVER-ELECTRONICS.COM
Page 23
 Loading...