

Denver MCI-7800 Instruction Manual
INSTRUCTION MANUAL
DENVER MCI-7800
Digital MW/FM Stereo Tuner
CD/MP3 Player
Clock
Wall mountable
Remote Control
iPod Docking
www.denver-electronics.com
23
AC Power AC 230V, 50Hz
DC 3V (1.5V x 2 “AAA” batteries
for tuner and clock memory).
Batteries are not supplied.
Power Output 5 W/CH 10% THD
Dimension of:
Main Section 619(W) x 200(D) x
315.5(H)mm
Radio section Tuning : PLL with 40 Presets
(FM 30, MW 10)
Freq. Range : MW 522-1620KHz
FM : 87.5-108MHz
CD Section Vertical Front Loading CD
Speaker System Woofer: 4", 4 ohm
Tweeter: 2", 4 ohm
Remote Control 32 Keys, Battery size “CR2032”
(Battery Included)
SPECIFICATIONS
ACCESSORIES
Instruction manual
iPod Insert
Remote control handset with battery
MW loop antenna
Wall mounting bracket for main console & speakers
Dowel & screw
Bracket for speaker
1 pc
6 pcs
1 pc
1 pc
3 pcs
6 pcs each
2 pcs
Instructions on environment protection
Do not dispose of this product in the usual household garbage at the end of its lifecycle;
hand it over at a collection point for the recycling of electrical and electronic appliances. The
symbol on the product, the instructions for use or the packing will inform about the methods
for disposal.
The materials are recyclable as mentioned in this marking. By recycling, material recycling
or other forms of re-utilization of old appliances, you are making an important contribution to
protect our environment.
Please inquire at the community administration for the authorized disposal location.
ALL RIGHTS RESERVED
COPY RIGHT DENVER ELECTRONICS A/S
www.denver-electronics.com
77-20A1680000120 (English)
Manufacturer code: 3388
1 2
Please take good note of the following instructions:
Avoid strong magnetic fields, e.g. near TVs or
Speakers for other units.
Avoid using strong chemical agents to clean.
Do not grease or oil components, running
mechanisms, etc. The CD player is designed to
be maintenance free.
Take the unit to approved service point for
servicing.
The unit must be connected to the power
voltage which is the same as the local area. If
not, there is a danger of "burning" the unit that
causes a fire.
Do not expose to the temperature higher than
35
O
C.
Avoid installation near heaters or in areas
subjected to direct sunlight.
Ensure good air circulation.
Protect the unit from dust, moisture and water.
LASER SAFETY
This unit employs a laser. Only qualified service
personnel should attempt repair.
CAUTION
CLEANING:
Always disconnect unit from power supply before
attempting to clean it.
Use soft cloth moistened with soapy water, wipe gently.
Do not use solvents or abrasive materials.
CAUTION
CLASS 1 LASER PRODUCT
Use of Controls or adjustments or performance
of procedures other than those specified herein
may result in hazardous radiation exposure.
DANGER: INVISIBLE LASER
RADIATION WHEN OPEN AND
INTERLOCK FAILED OR DEFEATED.
AVOID DIRECT EXPOSURE TO BEAM.
CAUTION: HAZARDOUS LASER
RADIATION WHEN OPEN AND
INTERLOCK DEFEATED.
PRECAUTION : DO NOT EXPOSE THIS PRODUCT TO WATER OR HUMIDITY TO AVOID RISK OF
ELECTRIC SHOCK.
DEAR CONSUMER : PLEASE READ THE FOLLOWING
INSTRUCTIONS TO BETTER UNDERSTAND THE FUNCTIONS OF THIS
PRODUCT. AFTER READING THESE INSTRUCTIONS, PLEASE KEEP THEM FOR FUTURE REFERENCE.
SAFETY INFORMATION
CAUTION: TO REDUCE THE RISK OF ELECTRIC SHOCK,
DO NOT REMOVE COVER.
NO USER-SERVICEABLE PARTS INSIDE.
REFER SERVICING TO QUALIFIED SERVICE PERSONNEL
This symbol indicates that dangerous
voltage constituting a risk of electric
shock is present within this unit.
This symbol indicates that there are
important operating and maintenance
instructions in the literature
accompanying this unit.
CAUTION
RISK OF ELECTRIC SHOCK
DO NOT OPEN
!
!
TO AVOID THE HAZARDS OF FIRE OR ELECTRICAL SHOCK, DO NOT EXPOSE THIS APPLIANCE
TO RAIN OR OTHER MOISTURE.
This unit is made and tested to meet exacting safety standards
CAUTION - USE OF CONTROLS OR ADJUSTMENTS OR PERFORMANCE OF PROCEDURES OTHER
THAN THOSE SPECIFIED HEREIN MAY RESULT IN HAZARDOUS RADIATION EXPOSURE.
THIS UNIT SHOULD NOT BE ADJUSTED OR REPAIRED BY ANYONE EXCEPT QUALIFIED SERVICE
PERSONNEL.
FOR SAFE AND EFFICIENT OPERATION
- Do not damage the power cord.
- When not in use, disconnect the power cord from the outlet. Grasp the plug, not the cord, when
disconnecting the unit.
- If water should enter the unit, electrical shock or malfunction may result. Use in an area where there is low
humidity and little dust.
- Do not disassemble or alter the unit in any way.
- Do not use the unit in areas where extremes in temperature occur (below 5 C or exceeding 35 C), or
where it may be exposed to direct sunlight.
- Because of the CD player’s extremely low noise and wide dynamic range, there is a tendency to turn the
volume on the amplifier higher than necessary. Doing so may produce an excessively high output from the
amplifier, which can cause damage to your speakers. Please be careful in this regard.
- Sudden changes in the surrounding temperature can cause dew to form on the optical pickup lens inside
unit. Under this condition, the unit may be unable to operate properly. If this should occur, remove the disc
and allow the player to adjust to the surrounding temperature.
THIS UNIT SHOULD NOT BE ADJUSTED OR REPAIRED BY ANYONE EXCEPT
PROPERLY QUALIFIED SERVICE PERSONNEL.
- Please use the original CD software, and any copy discs are not recommendable for use.
To avoid electric shock, this unit must not be exposed to dripping water or water splash.
Minimum distances around the apparatus for sufficient ventilation;
The ventilation should not be impeded by covering the ventilation openings with items, such as newspapers,
table-cloths curtains, etc.
No naked flame sources, such as lighted candles, should be placed on the apparatus;
The use of apparatus in tropical and / or moderate climates.
Before scrapping the appliance, remove the batteries and place them in the appropriate battery collection
container.
CAUTION:
3
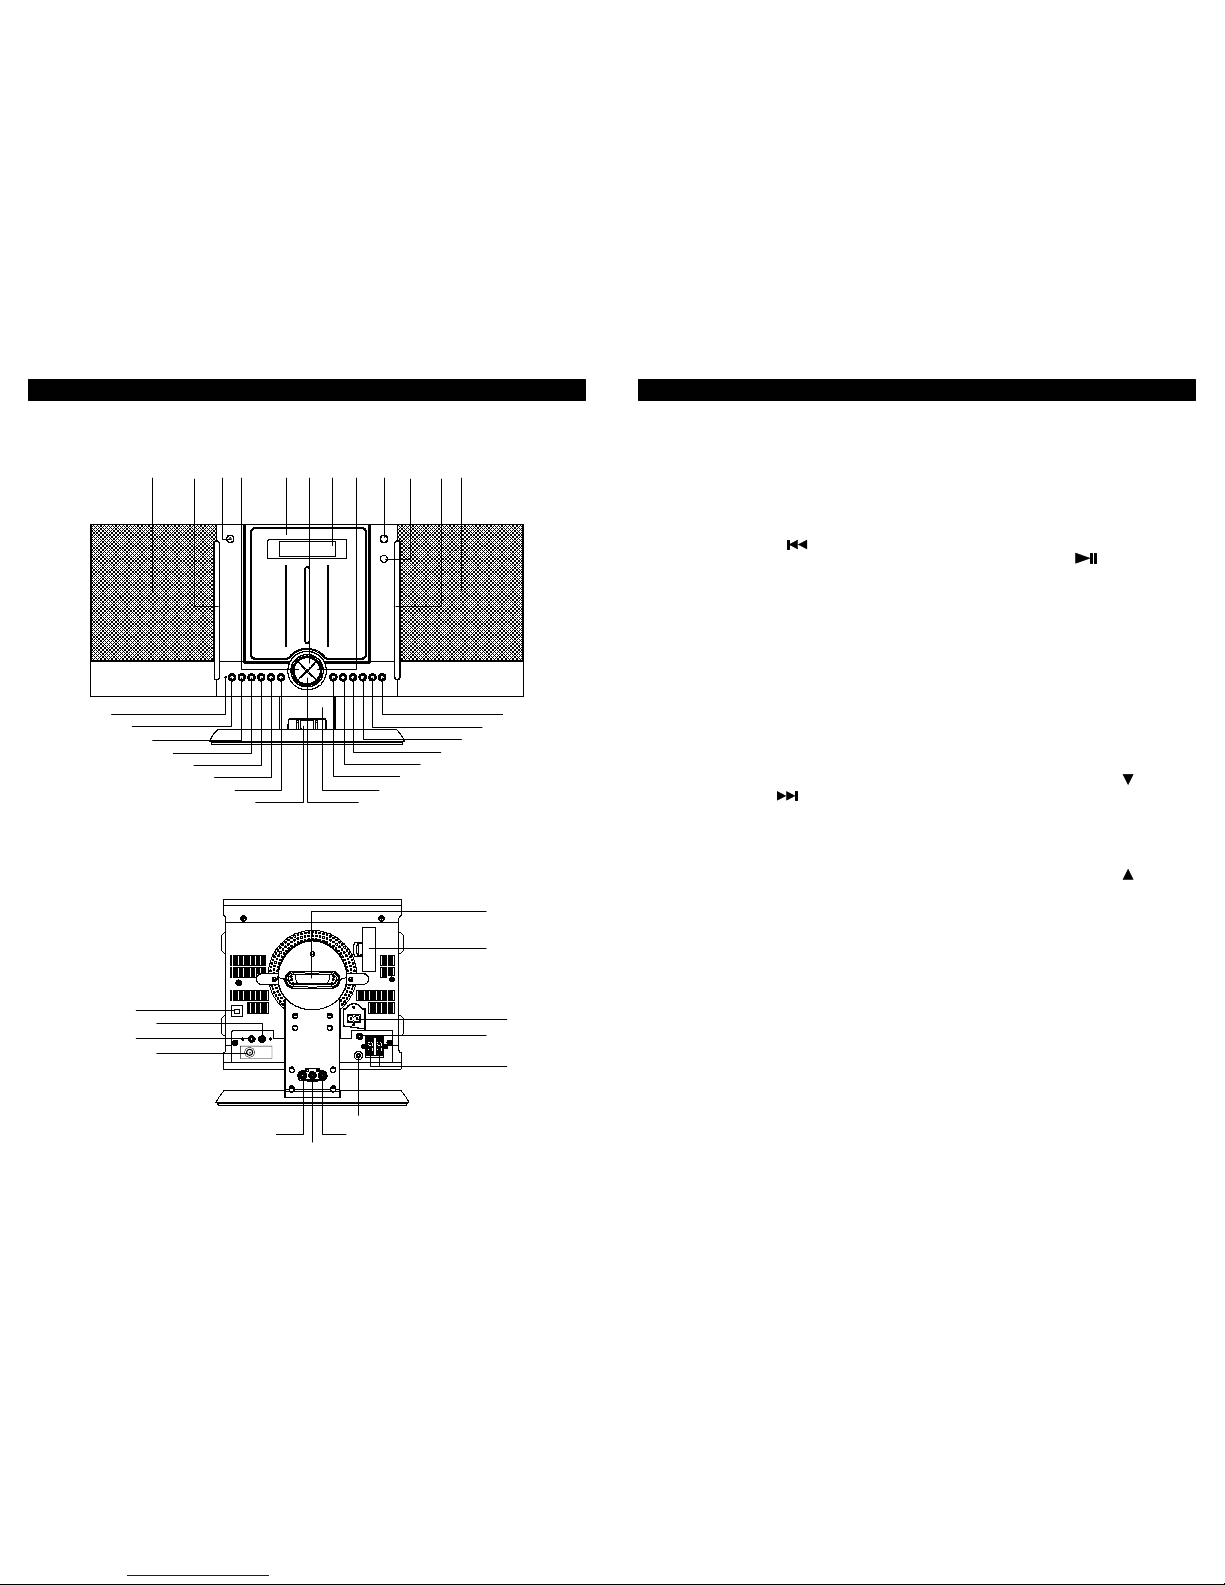
LOCATION OF CONTROLS - UNIT
112234 56789
14
15
16
17
18
19
20
23
24
25
26
27
28
22
4
10 11
21
13
29
30
31
36
38
37
39
35
41
32
33
34
40
LOCATION OF CONTROLS - UNIT (cont.)
Detachable Speaker (L)
Insert
CD Door OPEN/CLOSE Button
Open or close the CD door
iPod/CD-SKIP/TUNING/CLOCK Time
Backward Button ( )
-iPod/CD-Skip/search backward
-TUNER-Backward tuning or station
search
-Clock or Timer-Select the time
-SUREWAKE vol level setting adjustable
CD Door
Volume UP Button (+)
To increase volume level
LCD Display
Shows the operating status in all modes
iPod/CD-SKIP/TUNING/CLOCK Time
Forward Button ( )
-iPod/CD-Skip/search forward
-TUNER-Forward tuning or station search
-Clock or Timer-Select the time
-SUREWAKE vol level setting adjustable
POWER ON/STANDBY Button
To power ON, standby light should be
switched off
Remote Control Sensor
Insert
1.
2.
3.
4.
5.
6.
7.
8.
9.
Detachable Speaker (R)
Surround Indicator
SURROUND ON/OFF Button
Press to turn the surround sound ON or
OFF. The indicator lights while surround
is ON
iPod PLAY/PAUSE Button
To start iPod playback/short interruption
of iPod playback
AUX Button
To activate AUX mode
MP3 MODE/ST/MO/ENTER Button
-To display ID3 TAG information, if
available during MP3 playback
-To select Stereo or Mono in TUNER FM
mode
-To confirm iPod menu selected
10.
11.
12.
PRESET/FOLDER/SELECT Button
-Press to retrieve preset radio station up
-Press to retrieve MP3 folder up
-Press to select iPod menu up
iPod DOCK
Volume DOWN Button (-)
To decrease volume level
Pedestal
14.
15.
16.
17.
19.
20.
21.
22.
13.
PRESET/FOLDER/SELECT Button
-Press to retrieve preset radio station
down
-Press to retrieve MP3 folder down
-Press to select iPod menu down
18.
5
33.
AUDIO OUT for iPod (R)
AUDIO OUT for iPod (L)
VIDEO OUT for iPod
HEADPHONE Jack (3.5mm)
Connect a pair of stereo headphones
(not supplied) for private listening
Speaker Terminal
Connect the speaker wires to left and
right speakers
Subwoofer Jack
To connect powered subwoofer (not
supplied)
AC Input Socket
To connect to AC power cord
Note: The cord was fixed on main unit
Battery Cover/Compartment
For tuner and clock memory back-up, to
install 1.5V x 2 “AAA” Batteries
WALL MOUNTING SLOT
MW Antenna Socket
MW antenna connection socket (for the
loop antenna included in the accessories)
34.
35.
36.
CD/iPod STOP Button ( )
Interrupting the CD/iPod playback/clearing
the CD program/To iPod charging mode
CD PLAY/PAUSE Button
To play or pause CD playback
PROG/MENU/CLOCK SETTING Button
-Tuner/CD program/Clock setting button
(in off mode)
-iPod menu selection
TUNER/BAND Button
Sets to tuner (radio) mode and selects the
MW or FM band
DISPLAY ON/OFF Button
To select display back light on/off
AUX IN Jack (3.5mm)
AUX input for stereo line level input
23.
24.
25.
26.
27.
28.
32.
29.
LOCATION OF CONTROLS - UNIT (cont.)
AUX Socket (L) (LINE OUT)
AUX Socket (R) (LINE OUT)
FM Antenna (75 ohm socket)
6
37.
38.
39.
40.
41.
30.
31.
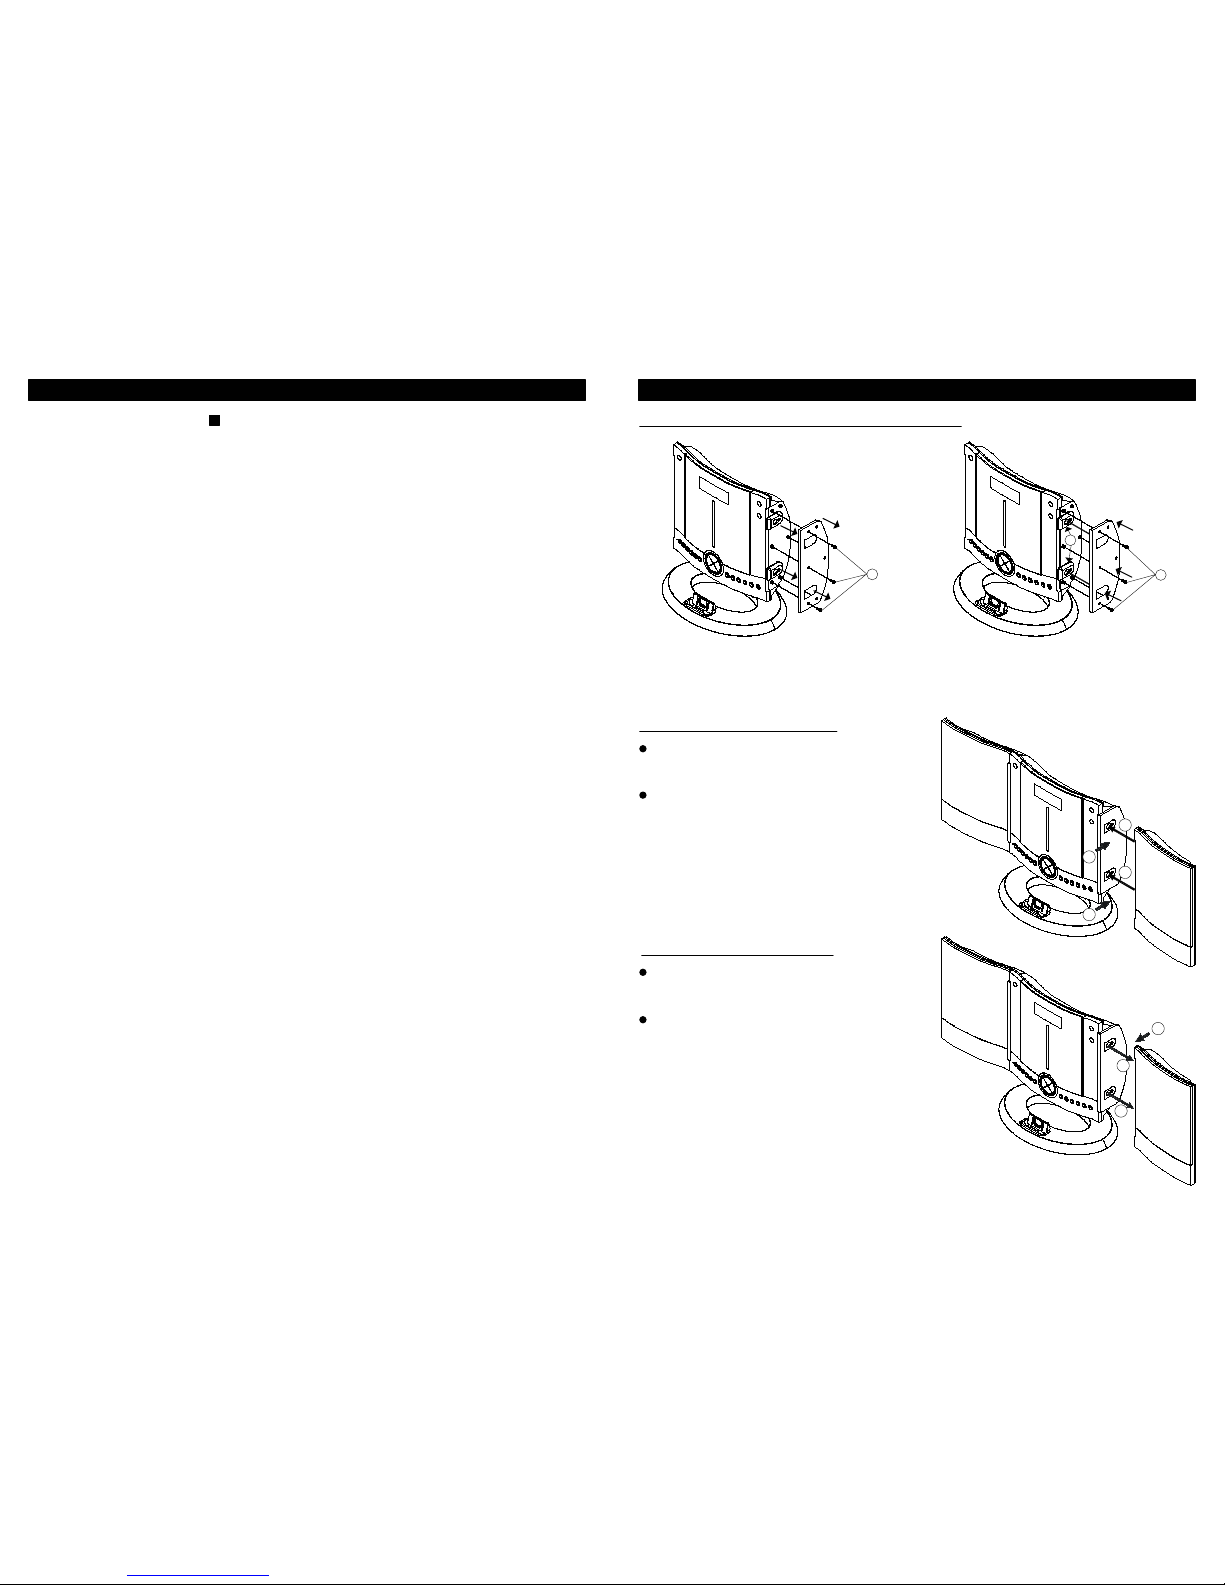
INSTALLATION (Speakers and Decorative Insert)
DISASSEMBLE AND FIX THE DECORATIVE INSERT
To fix the insert, place it with two holes
into main unit speaker holder (2), then fix
it by 3 pcs screws (3).
To remove the insert, release 3 pcs
screws (1), then pull out the insert from
the main unit.
PLACE AND FIX THE SPEAKER
Insert the speaker stud into the hole of the
main unit (1).
Push the speaker backward to the end until it
clicks (2).
DISASSEMBLE THE SPEAKER
Push the speaker forward from the back side
(1).
Release the speaker from the main unit
speaker holder (2).
1
2
3
2
2
1
1
2
1
2
 Loading...