

Page 1
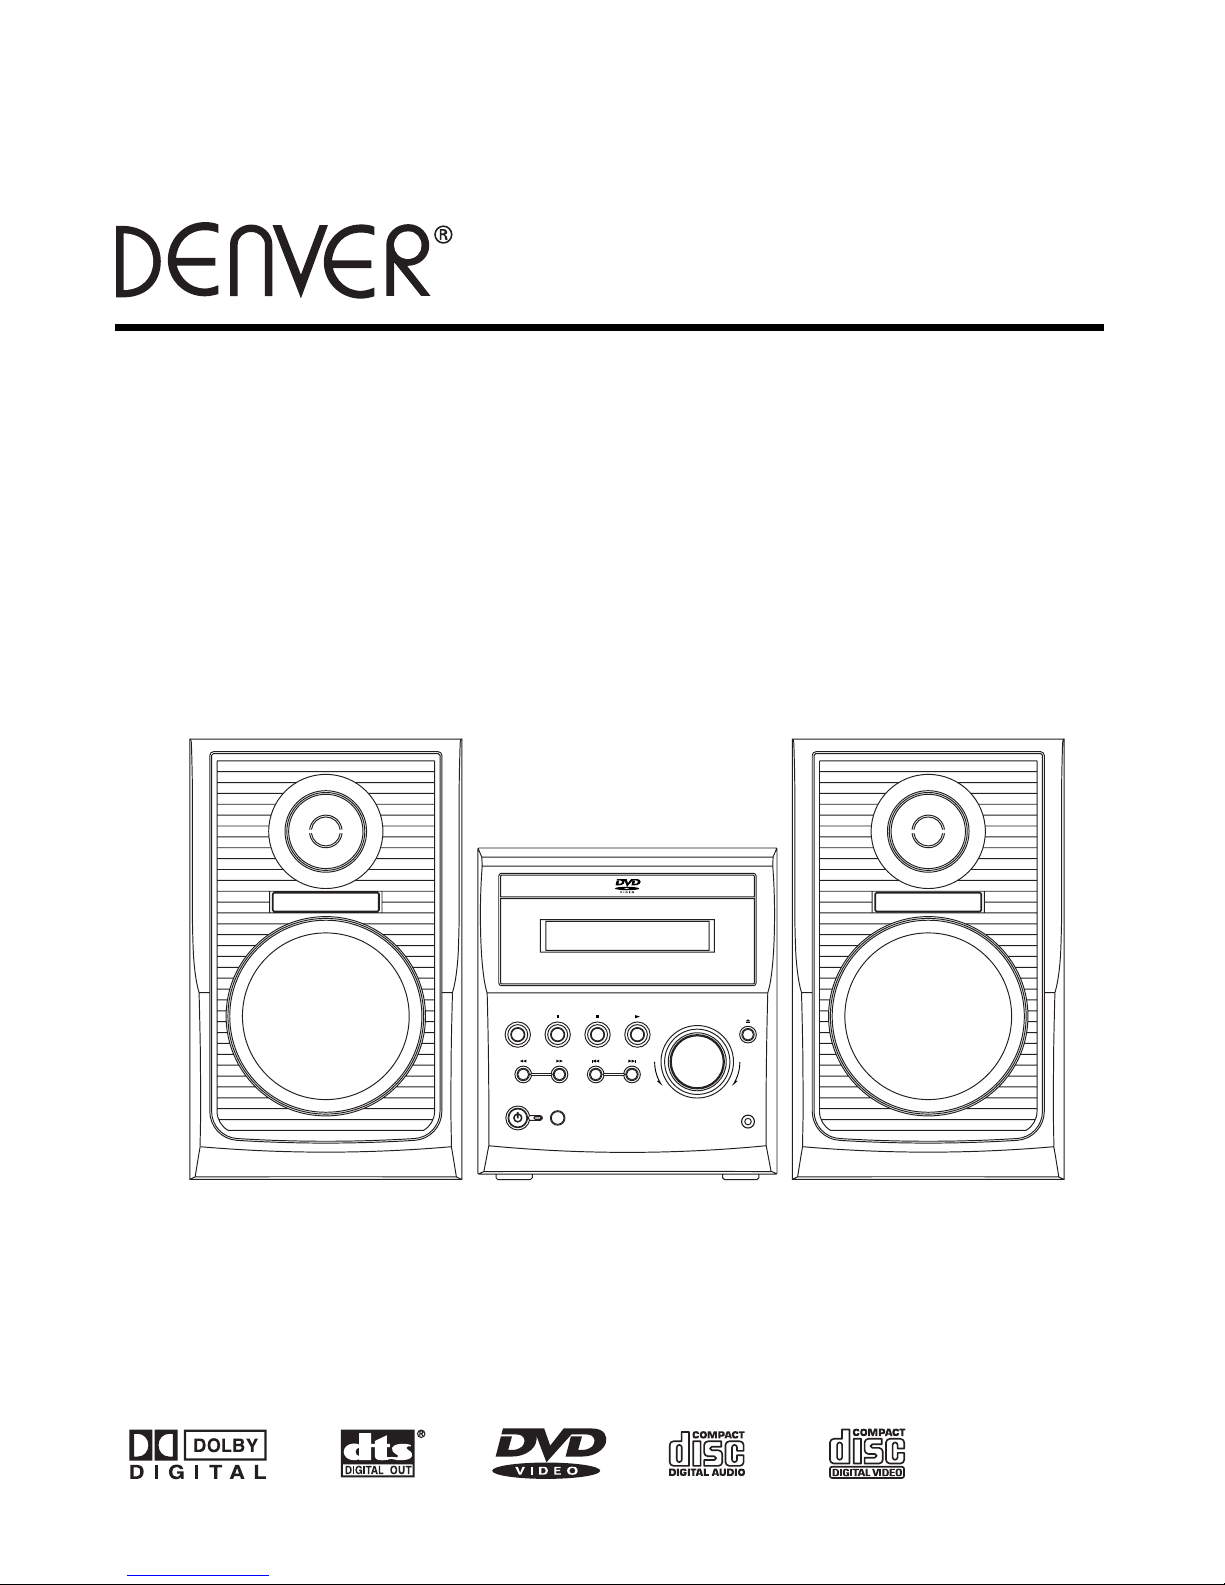
DVD / CD / DIGITAL TUNER
MICRO SYSTEM
VOLUME
OPEN/
CLOSE
MAX
PHONES
PLAY
ENTER
PAUSE
MEMORY
STOP
BAND
MIN
SKIP
-
TUNER PRESET
+
SEARCH
-
TUNING
+
IR
SENSOR
STANDBY
FUNCTION
POWER
DVD/CD DIGITAL TUNER MICRO SYSTEM
OPERATION MANUAL
mp3
MCD-30
Page 2
2
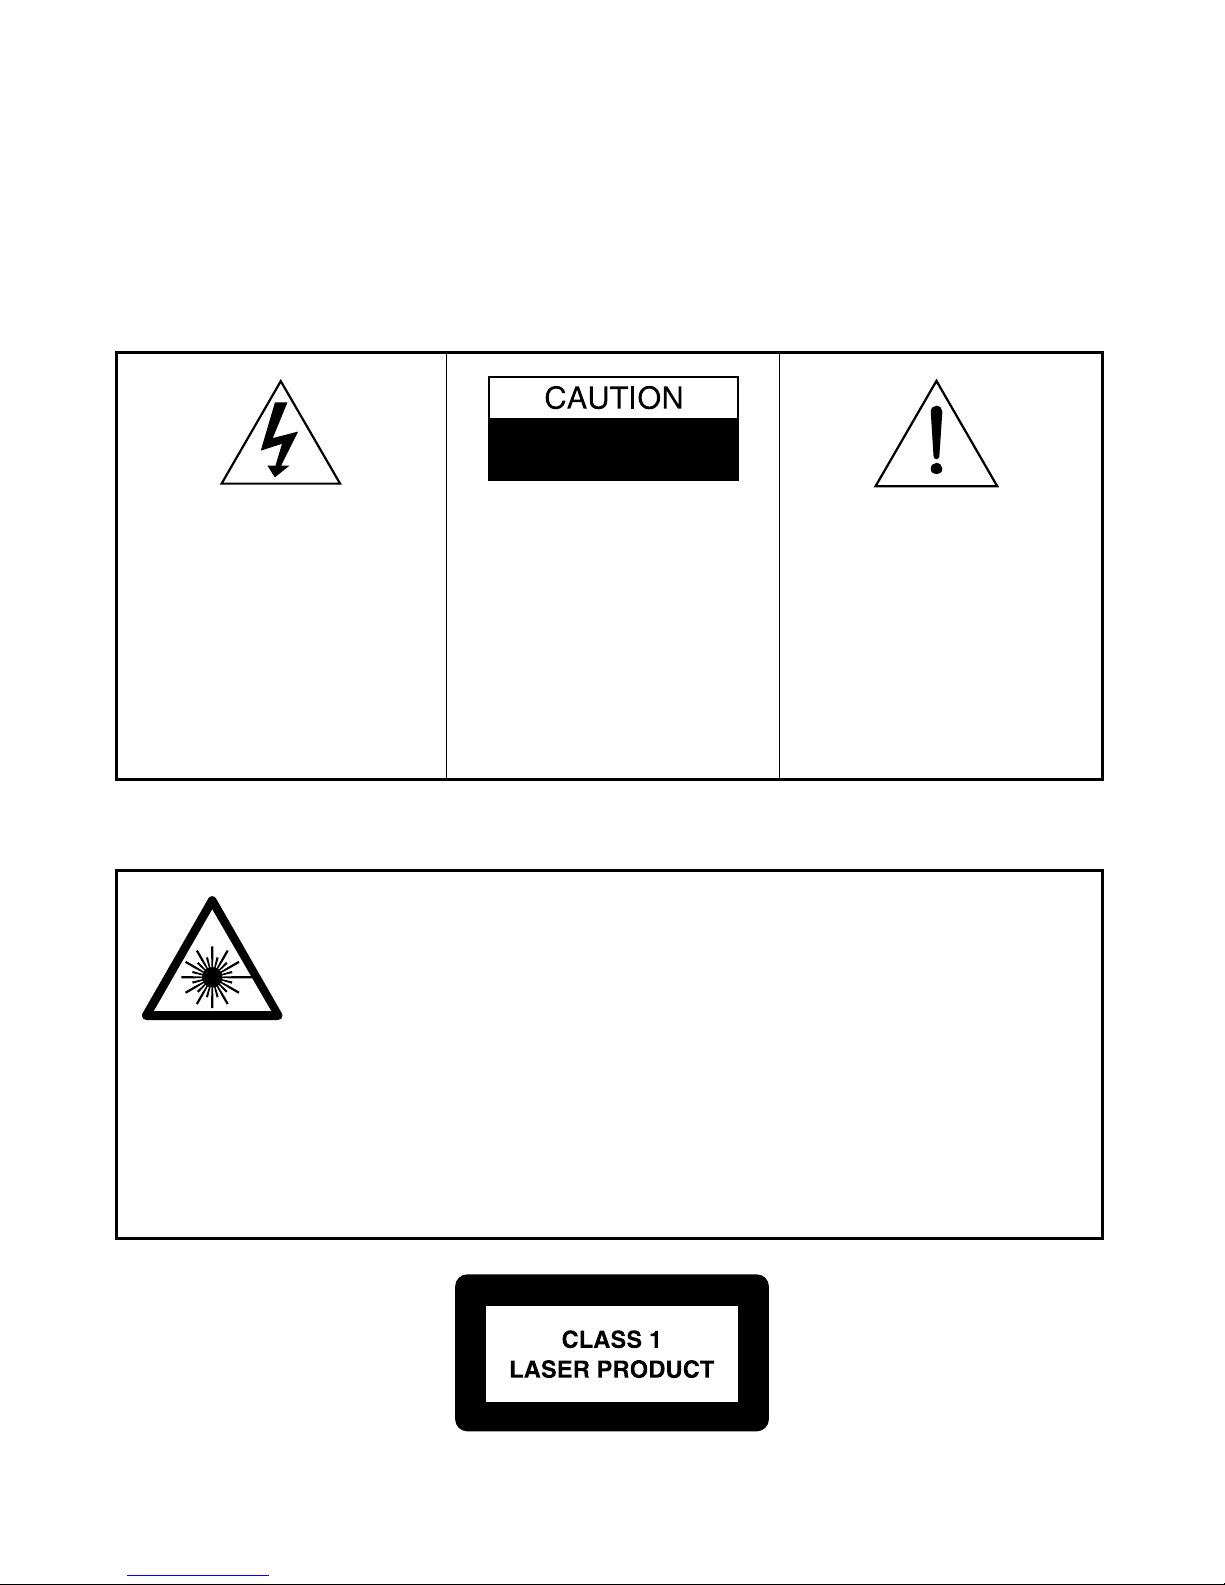
The lightning flash with arrowhead symbol, within an equilateral triangle, is intended to alert
the user to the presence of
uninsulated "dangerous voltage"
within the product's enclosure
that may be of sufficient magnitude to constitute a risk of electric shock to persons.
The exclamation point within an
equilateral triangle is intended
to alert the user to presence of
important operating and maintenance (servicing) instructions
in the literature accompanying
the appliance.
RISK OF ELECTRIC SHOCK
DO NOT OPEN
WARNING: TO REDUCE THE
RISK OF ELECTRIC SHOCK,
DO NOT REMOVE COVER (OR
BACK). NO USER-SERVICEABLE PARTS INSIDE, REFER
SERVICING TO QUALIFIED
SERVICE PERSONNEL.
PLEASE READ THE INSTRUCTION CAREFULLY BEFORE OPERATING THIS UNIT.
WARNING
To prevent fire or shock hazard, do not expose this appliance to rain or moisture.
IMPORTANT
Since the CD circuitry may cause interference to other radio tuners nearby, switch this unit off
when not in use or move it away from the affected radio tuner.
DANGER
LASER SAFETY
This unit employs an optical laser beam system in the CD mechanism,
designed with built -in safeguards. Do not attempt to disassemble,
refer to qualified service personnel. Exposure to this invisible laser
light beam may be harmful to the human eye.
THIS IS A CLASS-1 LASER PRODUCT. USE OF CONTROLS, OR
ADJUSTMENTS OR PROCEDURES OTHER THAN THOSE SPECIFIED HEREIN, MA Y RESUL T IN HAZARDOUS LASER LIGHT BEAM
EXPOSURE.
INVISIBLE LASER
RADIATION WHEN
OPEN AND INTERLOCK FAILED OR DEFEATED. AVOID DIRECT EXPOSURE TO
LASER BEAM.
Page 3
3
Before attempting to connect, operate or adjust this product, please read these
instructions completely and keep this manual for future reference.
Main Features
• Front loading DVD/MP3/CD Player.
• Built-in 2 channel amplifier (10W/CH. at 10% THD)
• FM / MW Tuner (can preset 20 radio stations)
(load impedance: FM 75ohm, MW Loop 300ohm)
• With 2.1 channel speaker system (Micro Speaker Box x 2)
• EQ at MP3/CD Mode (CONCERT, ROOM, HALL, ARENA, CHURCH, OFF)
• EQ at DVD Mode (ROCK, POP, LIVE, DANCE, TECHNO, CLASSIC, SOFT, SURR OFF)
• EQ at Tuner / Aux Mode (POP, ROCK, JAZZ, CLASSIC, FLAT)
• BASS ON/OFF at Tuner/AUX Mode
Standards
Video : NTSC, PAL and MULTI
Audio ; 2 Channel MPEG layer 2, 3.5mm Headphone Jack
Features of audio specification
- DTS (Digital Theater System) and Dolby AC3 Audio digital output
- Linear PCM output
Manufactured under license from Dolby Laboratories. “Dolby”, “Pro Logic” and
the double-D symbol are trademarks of Dolby Laboratories. Confidential unpublished works. ©1992-1997 Dolby Laboratories, Inc. All rights reserved.
This product incorporates copyright protection technology that is protected by
method claims of certain U.S. patents and other intellectual property rights owned
by Macrovision Corporation and other rights owners. Use of this copyright protection technology must be authorized by Macrovision Corporation, and is intended
for home and other limited viewing uses only unless otherwise authorized by
Macrovision Corporation. Reverse engineering or disassembly is prohibited.
Page 4
4
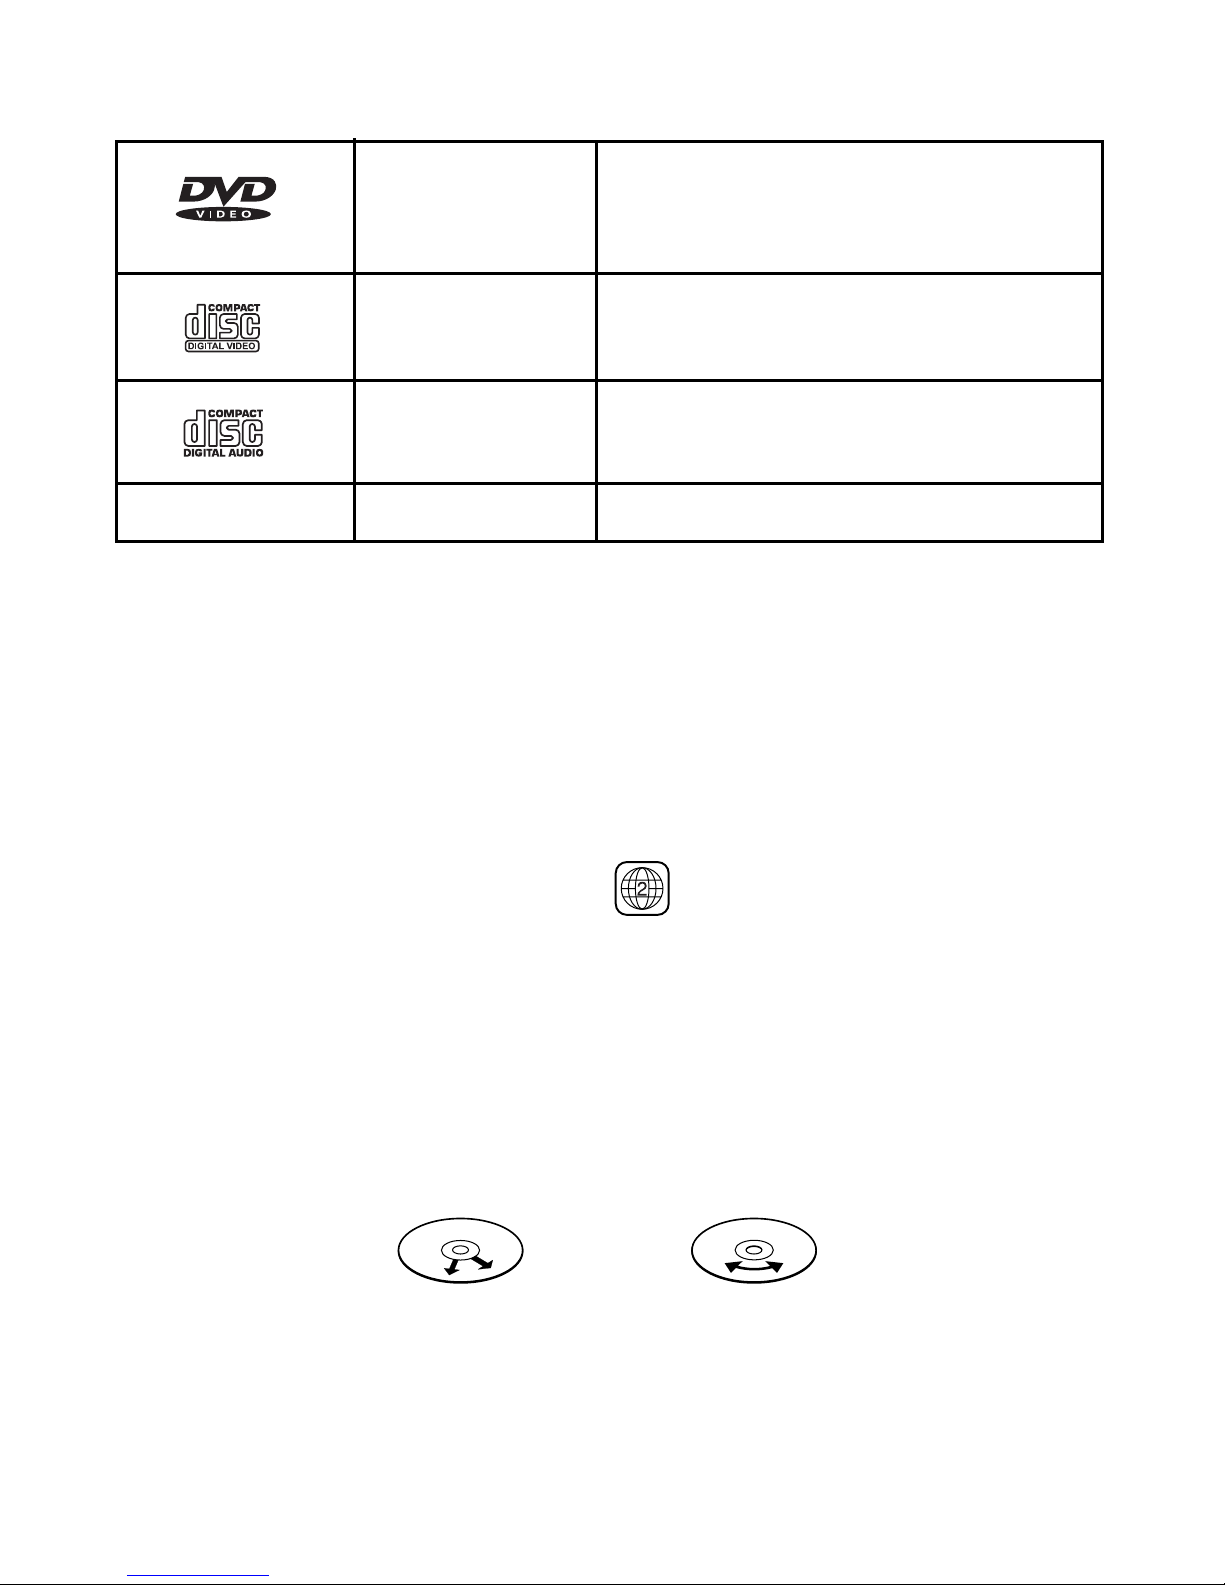
Disc types
* Player is CD-R, CD-RW compatible.
Note: CD-R, CD-RW Discs recorded with writing device can only be used when they are
properly finalized.
Region Management Information
This DVD Player is designed and manufactured to respond to the Region Management Information that is recorded on a DVD disc. If the Region number described on the DVD disc does
not correspond to the Region number of this DVD Player, this DVD player cannot play that
disc.
This Region number of this DVD/CD player is .
Disc manintenace
– Before playback, wipe the disc from the center hole toward the outer edge with a clean
cloth.
– Never use benzine, thinner, cleaning fluid, static electricity prevention liquids or any
other solvent.
Note : A dirty disc may cause a bad picture.
Audio & Video
Audio & Video
Audio
Audio
Disc size 12cm
single side, single layer / single side, double layer
PAL and NTSC DVD disc
Playback time 135min / 240min max.
Disc size 12cm / 8cm
VCD disc
Playback time 74min/20min max.
Disc size 12cm / 8cm
CD disc
Playback time 74min / 20min max
MP3 format disc
MP3
Correct
From the center to the edge
Incorrect
Page 5
5
Attention
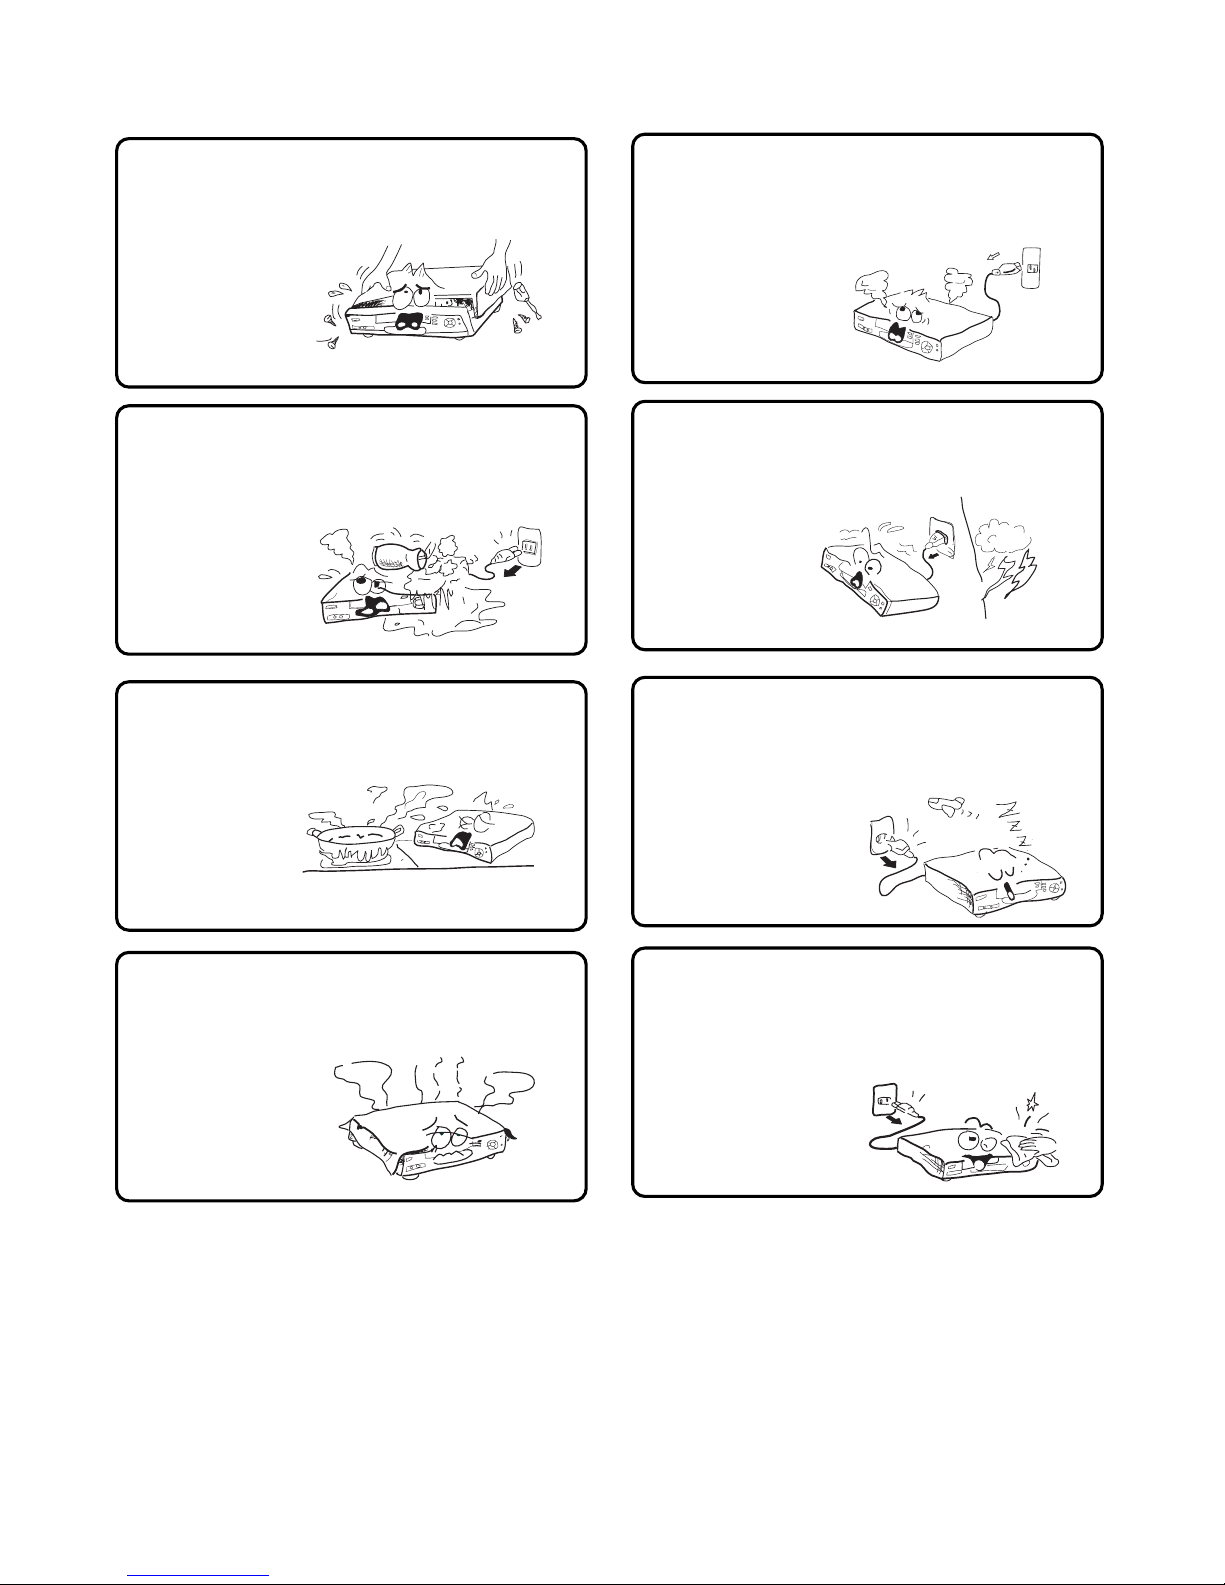
If smoke, malodor or unrelated noises are emitted from the unit, turn off the power and disconnect the AC power cord.
Attention
Touching the unit is dangerous during thunder.
Attention
When left unused for a long period of time, the
unit should be unplugged from the household
AC outlet.
Attention
Be sure to turn the unit off and disconnect the AC power
cord before cleaning the unit surface. If the surface is
dirty, wipe clean with a cloth which has been dipped in a
weak soap and water solution and
wrung out thoroughly,
and then wipe again
with a dry cloth.
Safety precautions
Warning
To avoid electrical shock, do not open the
cabinet, refer servicing to qualified personnel
only.
Warning
Keep the unit away from flower vases, tubs,
sinks, etc. If liquids are spilt into the unit, serious damage could occur.
Warning
Do not expose this equipment to rain or
moisture.
Warning
Do not block ventilation holes of the unit so that
air can circulate freely,
Note: This unit is a class 1 laser product and uses a visible laser beam which could
cause hazardous radiation exposure if directed. Be sure to operate it correctly as
instructed.
Page 6

6
Battery installation (remote control unit)
1. Remove the battery cover.
2. Insert two batteries (AA, R6, UM-3 types) making sure the polarity (+/-) matches the
marks inside the unit.
3. Replace the cover.
– Do not attempt to recharge, short-circuit, disassemble, heat or
throw the batteries into the fire.
– Do not mix old and new batteries. Dispose of properly in ac-
cordance with local laws.
Note : Weak batteries can leak and serveraly damage the remote control unit.
Remote Control Unit
1. Display Button
2. Eject Button
3. Numeric Buttons
4. Sleep Button
5. Direction Buttons
(Up / Down / Left / Right)
6. Title button
7. Memory/Pause Button
8. Subtitle Button
9. CD Fast Backward / Tuner Tuning Down Button
10. Angle Button
11. CD I<< Previous / Tuner Preset Down Button
12. Program button
13. Bass On/Off Button
14. Mute Button
15. Default Button
16. Shuffle Button
17. Repeat Button
18. Slow Button
19. FM ST. / Mono Button
20. Set up Button
21. Standby On/Off Button
22. Zoom Button
23. Enter/Play Button
24. EQ button
25. Step button
26. Volume Control Buttons
27. CD Fast Forward / Tuner Tuning Up Button
28. CD Stop / Tuner Band Select Button
29. Menu button
30. CD >>I Next / Tuner Preset Up Button
31. PAL / NTSC / MULTI Button
32. Function Button
33. Resume Button
34. Repeat A –B Button
35. Go To Button
36. Intro / Digest Button
37. EQ Graph Button
38. Audio Button
+
—
+
—
DISPLAY SETUP
ANGLE
ZOOM
SLEEP
EQ
RESUME
INTRO/
DIGEST
TITLE
SUBTITLE
PBC/MENU
GO TO
EQ GRAPH
REPEAT
AUDIO
ST/MONO
SLOW
A - B
DEFAULT
MUTE
FUNCTION
PROGRAM
BASS
SHUFFLE
PAL/NTSC/
MULTI
TUNER
PRESET
T
U
N
I
N
G
B
A
N
D
PREVIOUS
NEXT
1
2
3
4
5
6
7
8
9
10
11
12
13
14
15
16
17
18
19
20
21
22
24
23
25
26
27
28
29
30
31
32
33
34
35
36
37
38
Page 7
7
System Connection
• Read through the instruction before connecting the equipment.
• Set the power on the player and equipment to OFF position before connecting.
• Be sure that the colors of the connections and plugs match up when connecting
the cord.
• When connecting the speakers, be sure to connect the black line to the minus (–)
terminal and the red wire to the plus (+) terminal on the speakers and the unit. If
the wires are reversed, the sound will be distorted and will lack bass.
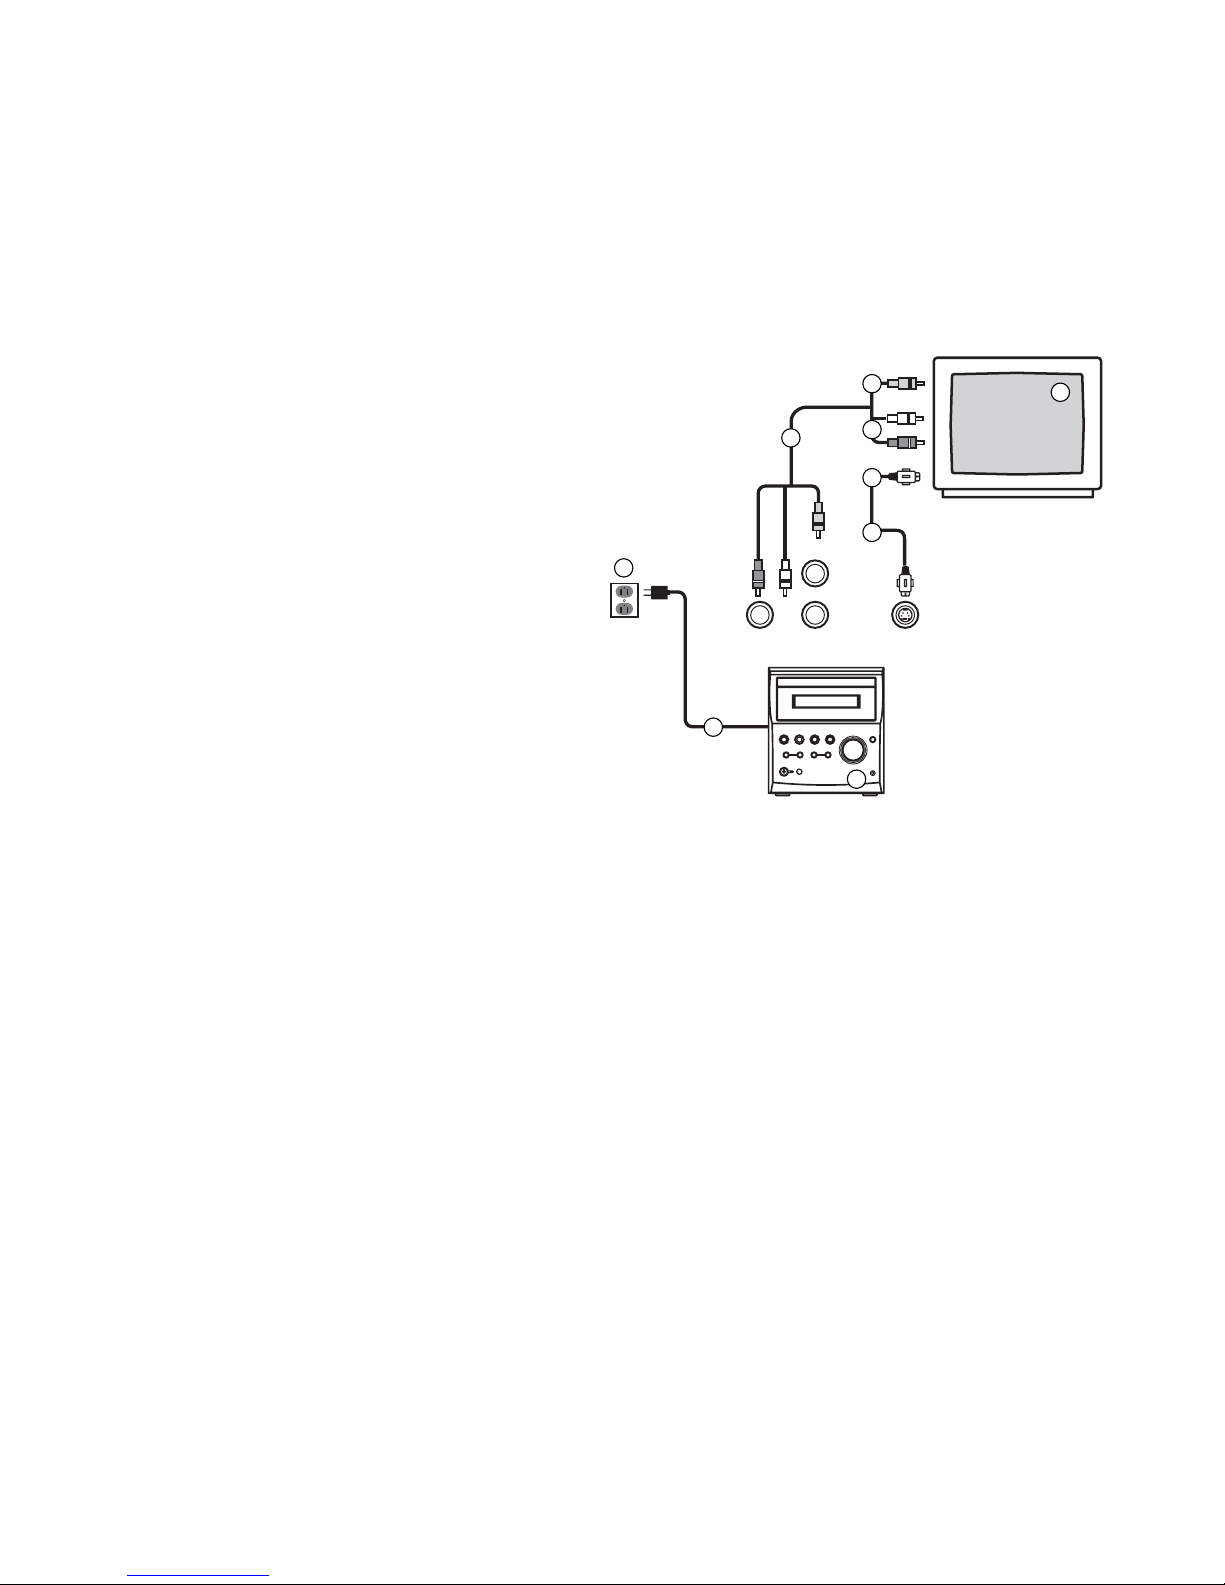
Connecting to a Stereo TV Set (Fig. A)
Note : Select Video input on TV set.
1. The TV set (not supplied)
2. The DVD player
3. Video (yellow) / audio (red, white) cable
4. To audio input connectors R (red), L (white)
5. To video input connector (yellow)
6. S-video input connector (not supplied)
7. To S-Video input connector
8 AC power cord
9. To AC power outlet
Using Audio/ Video Cable (see fig. A)
1. Power off the TV set and the DVD player
before connecting.
2. According to the input connectors equipped with
your TV, connect the audio/video cable (red,
white, yellow)
3. Connect S-video cable (not supplied) to DVD player if your TV has S-video input.
• When using S-video cable there is no need to connect the yellow video cable.
4. Connect one end of the power cord to the AC IN connector of the DVD player and the
other end to the power outlet.
S-video output connector
To achieve a sharper picture, the S (separate) video output connector separates the color (C)
and luminance (Y) signals before transmitting them to the TV. Use the S-video cord (optional)
when connecting the player to a TV set equipped with a S-video input connector for superior
picture quality.
1
4
3
7
6
5
9
8
2
AUDIO OUT
R L
VIDEO OUT
S-VIDEO
Fig. A
Page 8
8
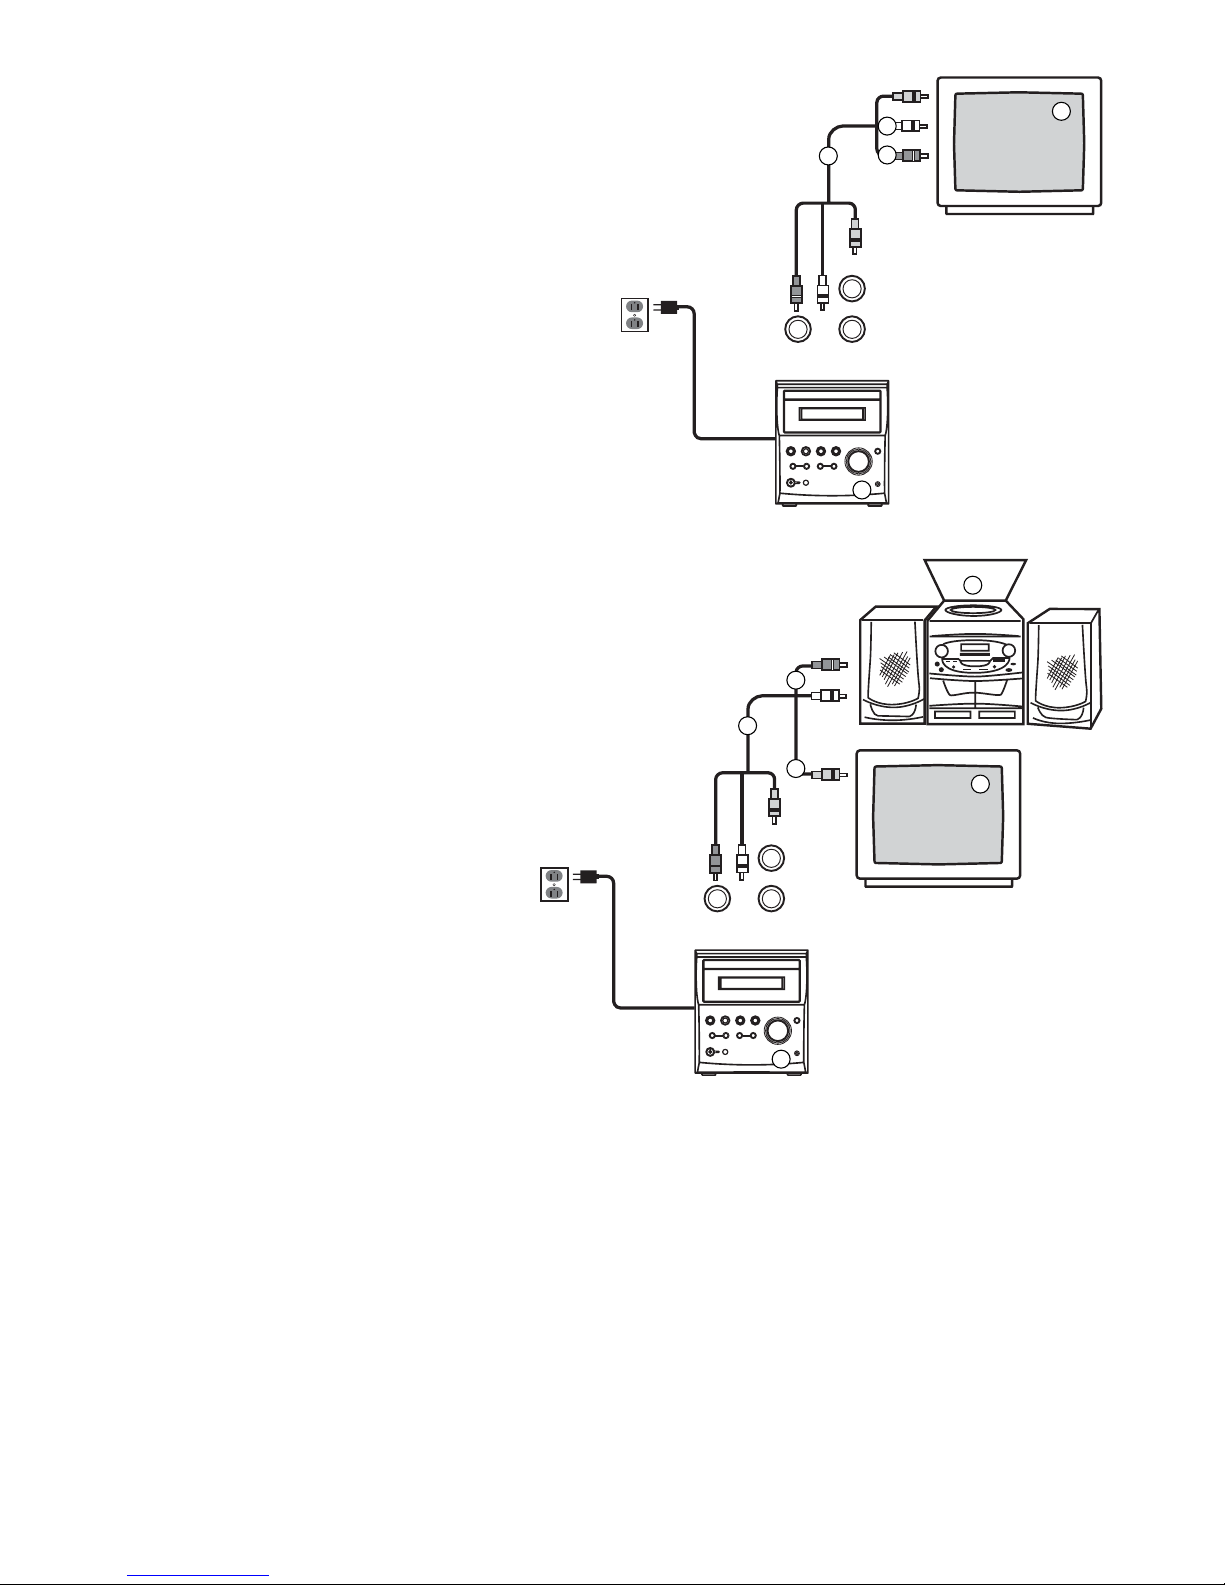
Connecting to a Monaural TV Set (Fig. B)
Note: Select VIDEO input on TV set.
1. The TV set (not supplied)
2. The DVD player
3. The video/audio cable
Note : Leave the red plugs disconnected
4. To audio input connector
5. To video input connector
Connecting to Audio Equipment (Fig. C)
1. The audio equipment (not supplied)
2. The TV set (not supplied)
3. The DVD player
4. The video/audio cable
5. To audio input connectors R (red), L (white)
6. To video input connector (yellow)
1
4
5
3
2
AUDIO OUT
R L
VIDEO OUT
Fig. B
Fig. C
2
1
5
6
4
3
AUDIO OUT
R L
VIDEO OUT
Page 9
9
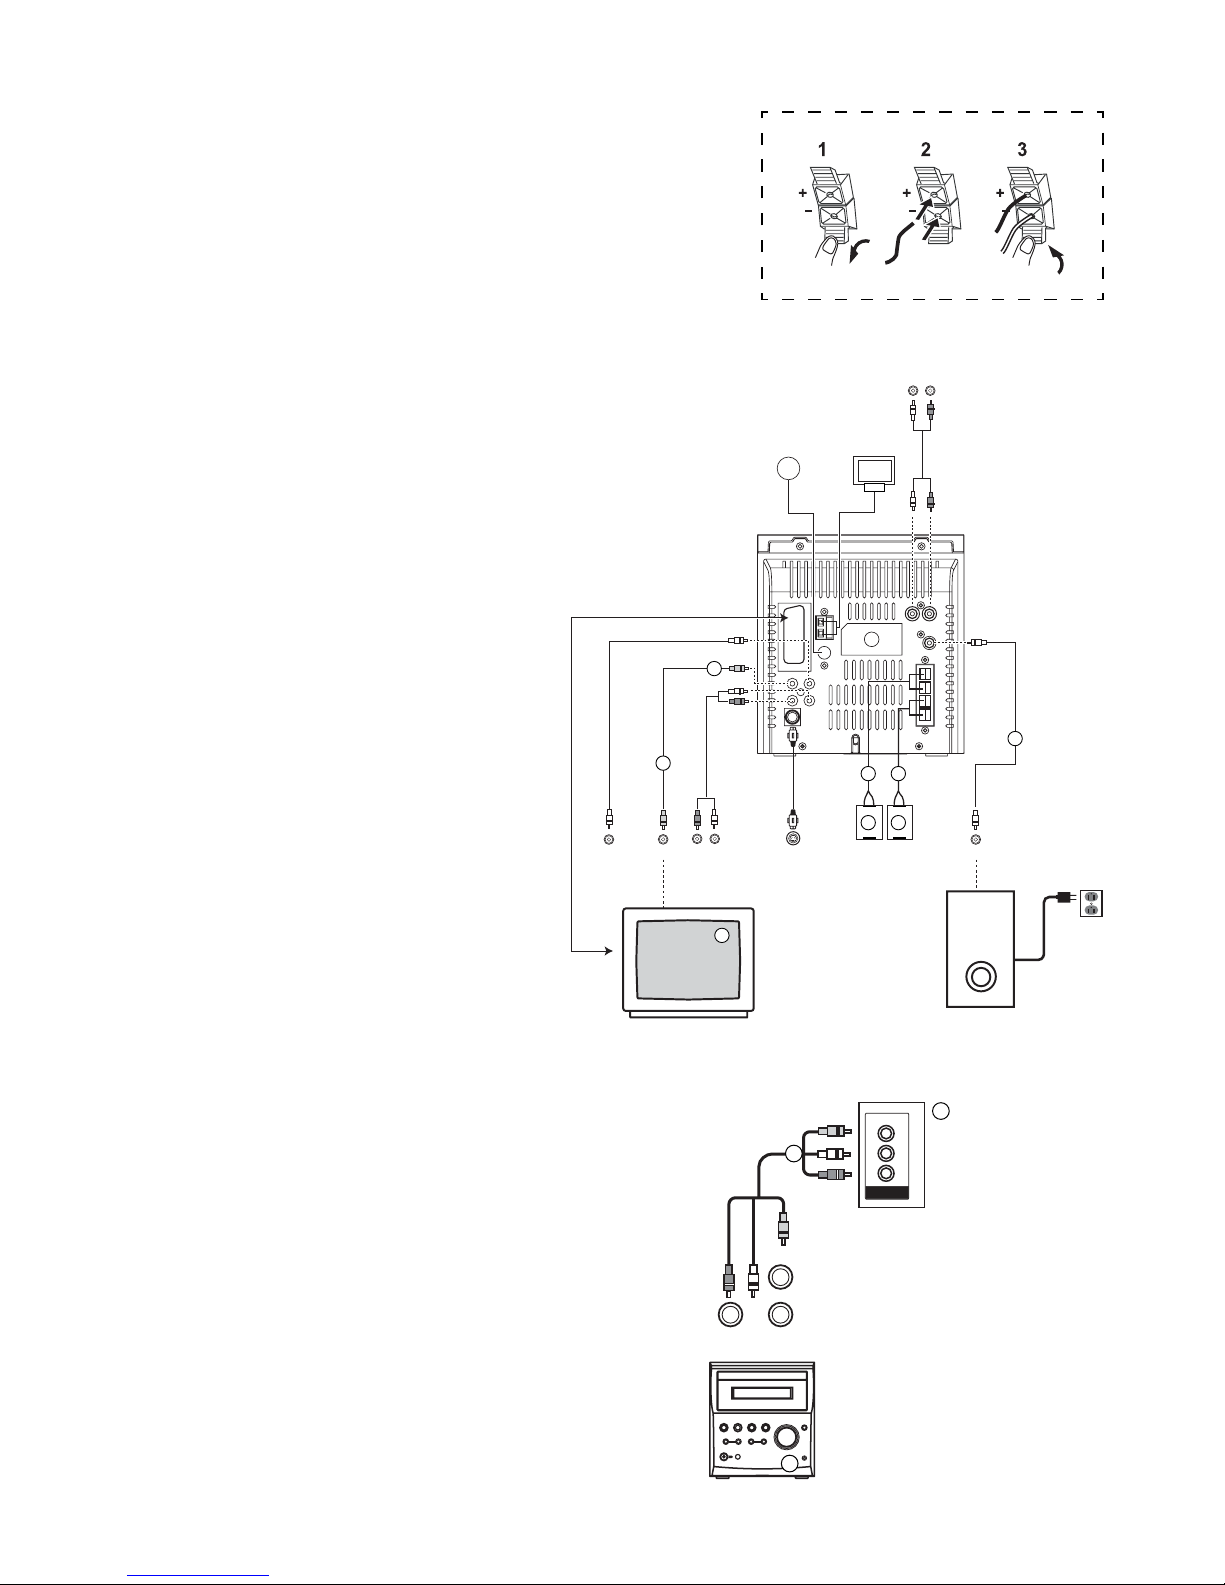
Rear Panel Connections (Fig. D)
1. The TV set (not supplied)
2. The DVD player
3. Speaker (Left)
4. To Speaker (L) Terminal
5. Speaker (Right)
6. To Speaker (R) Terminal
7. To Subwoofer Speaker Terminal (not supplied)
8. To video cable (Yellow)
9. To video input connector (Yellow)
CAUTION:
• Be sure to connect the black line to the minus (–) terminal and the red wire to the plus
(+) teminal on the speakers and the unit. If
the wires are reversed, the sound will be distorted and will lack bass.
• Do not mix the right speaker and
left speaker wires when connecting the speakers to the unit.
• Unplug the AC power cord from
the AC power outlet before connecting or disconnecting any
component.
•Your system is designed to use
speakers with an impedance of
4Ω or more.
• Use of speakers with an impedance less than 4Ω may damage
your unit.
Connecting to Other Audio Visual System (Fig. E)
1. The DVD player
2. Audio Visual equipment (not supplied)
3. The video/audio cables.
Fig. D
Fig. E
AUDIO INPUT
VIDEO
L
R
3
2
1
AUDIO OUT
R L
VIDEO OUT
AUX INPUT
L
R
SUB WOOFER
R
L
AC
~
IN
SPEAKER OUT
PERITELEVISION
MW Loop Antenna
(supplied)
AUDIO IN
FM Wire Antenna
(supplied)
S -VIDEO SPEAKER BOX SUB-WOOFER OUT
SUB-WOOFER
SPEAKER
(NOT SUPLIED)
AUDIO OUT
SCART
VIDEO OUTCOAXIAL
DIGITAL
AUDIO OUT
TO TV
SCART
1
35
46
8
9
7
Page 10
10
Using as DVD Player Only
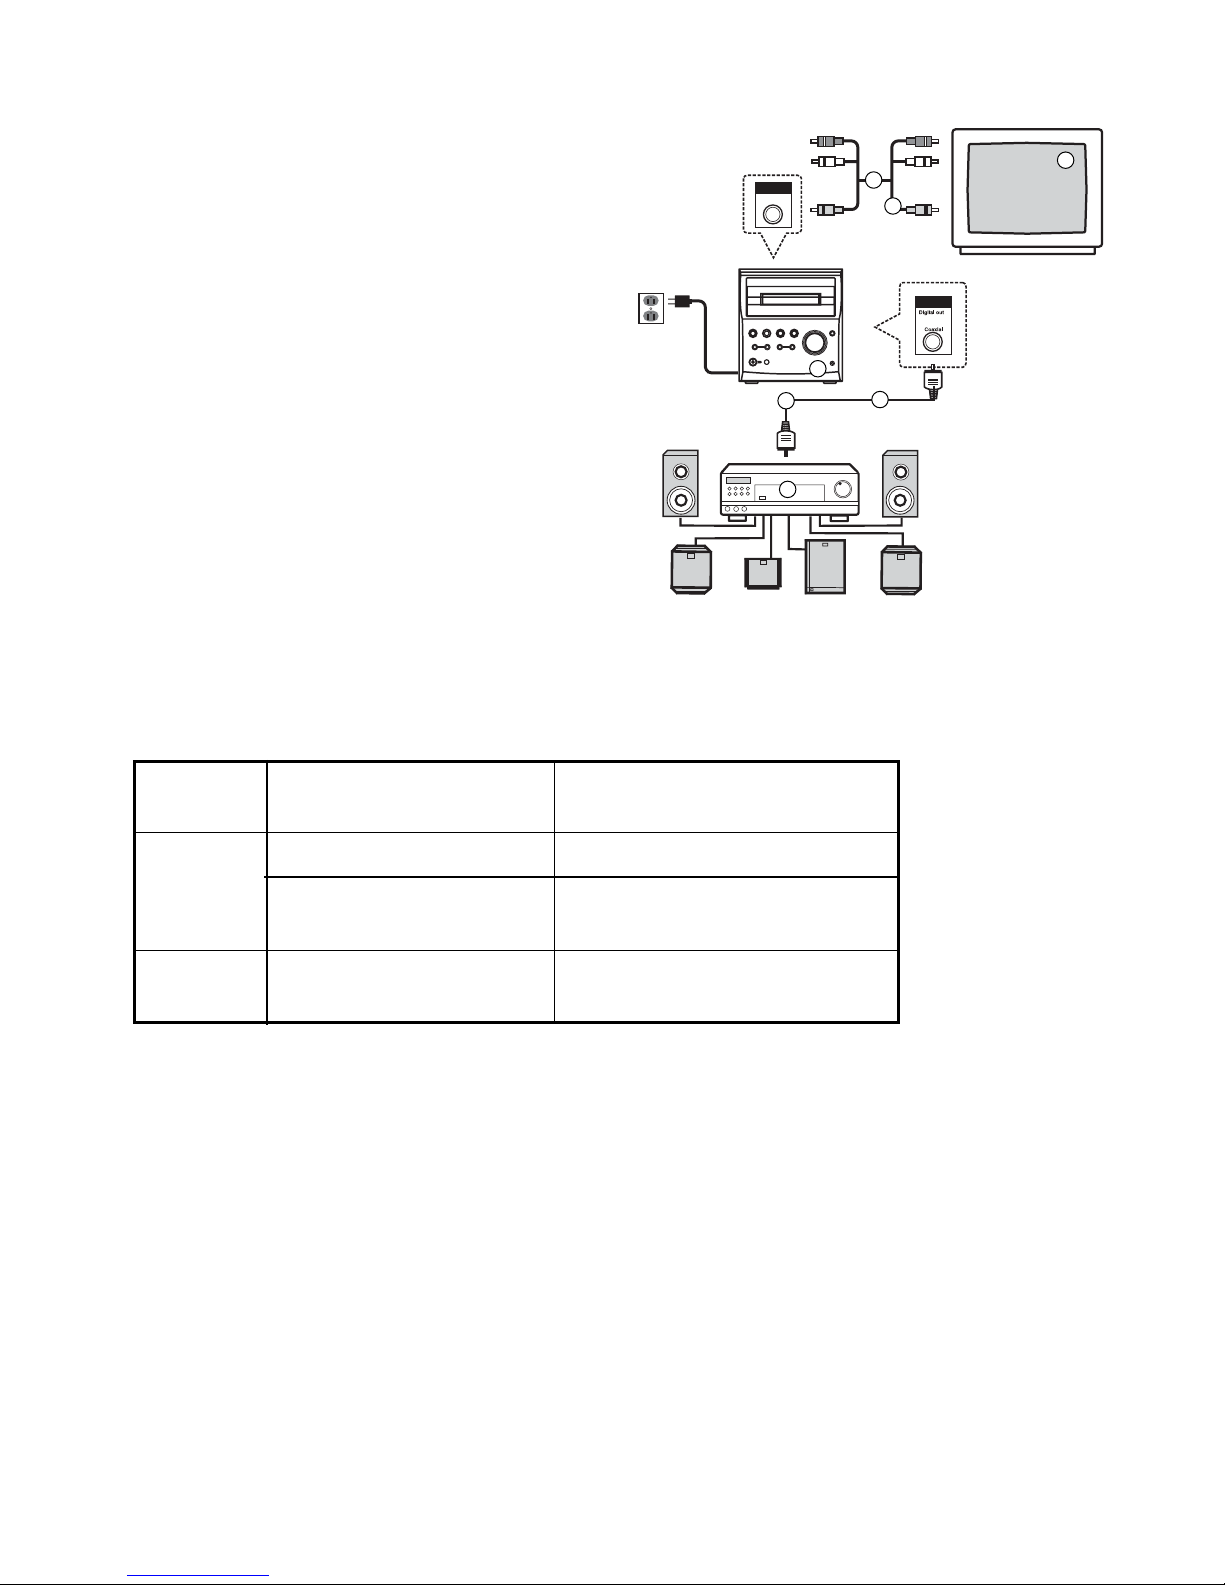
Connecting to a Decoder with Dolby Digital Processing (Fig. F)
1. The TV set (not supplied)
2. The DVD player
3. 5.1 Dolby Digital receiver or decoder (not
supplied)
4. The Audio/Video cord
Note : Leave the red and white plugs
disconnected.
5. to video input connector (yellow)
6. digital coaxial cable (not supplied)
7. to digital sound input (bit stream/PCM)
connector
REMINDER!
Always set your TV to “VIDEO”,
“S-VIDEO” or “S-VHS’ in order to
receive video signal from DVD player.
Concerning the digital audio output
Depending on the disc format either Dolby Digital Sound or Linear PCM, sound will be supplied from the unit’s digital audio output connector (PCM/Dolby digital) as shown in the following table.
DISC SOUND RECORDING DIGITAL AUDIO OUTPUT
FORMAT FROM CONNECTOR
DVD Dolby Digital Dolby Digital bit stream
Linear PCM Linear PCM
(96kHz sampling only)
Audio Linear PCM Linear PCM
CD (44.1kHz sampling only)
NOTE:
• The digital output provides signal when playing DVDs with 96kHz sampling.
For your reference
• Dolby Digital is a digital sound compression technique developed by the Dolby Laboratories Licensing Corporation. Supporting 5.1-channel surround sound, as well as stereo
(2-channel) sound, this technique enables a large quantity of sound data to be efficiently
recorded on a disc.
• Linear PCM is a signal recording format used in audio CDs. While audio CDs are recorded in 44.1kHz/16bit, DVDs are recorded in 48kHz/16bit up to 96kHz/24bit.
• If you have a Dolby Pro Logic Surround decoder, you will obtain the full channel Dolby
Digital soundtracks, as well as from titles with the Dolby Surround mark.
1
AUDIO OUT
VIDEO OUT
VIDEO
4
5
2
3
7
6
Fig. F
Page 11
11
CAUTION
Important note on the digital audio output connector:
• Do not connect to an amplifier (with an optical digital input connector) which does not
contain the Dolby Digital decoder as it may cause such a high level of noise that it may be
harmful to your ears and damage your speakers.
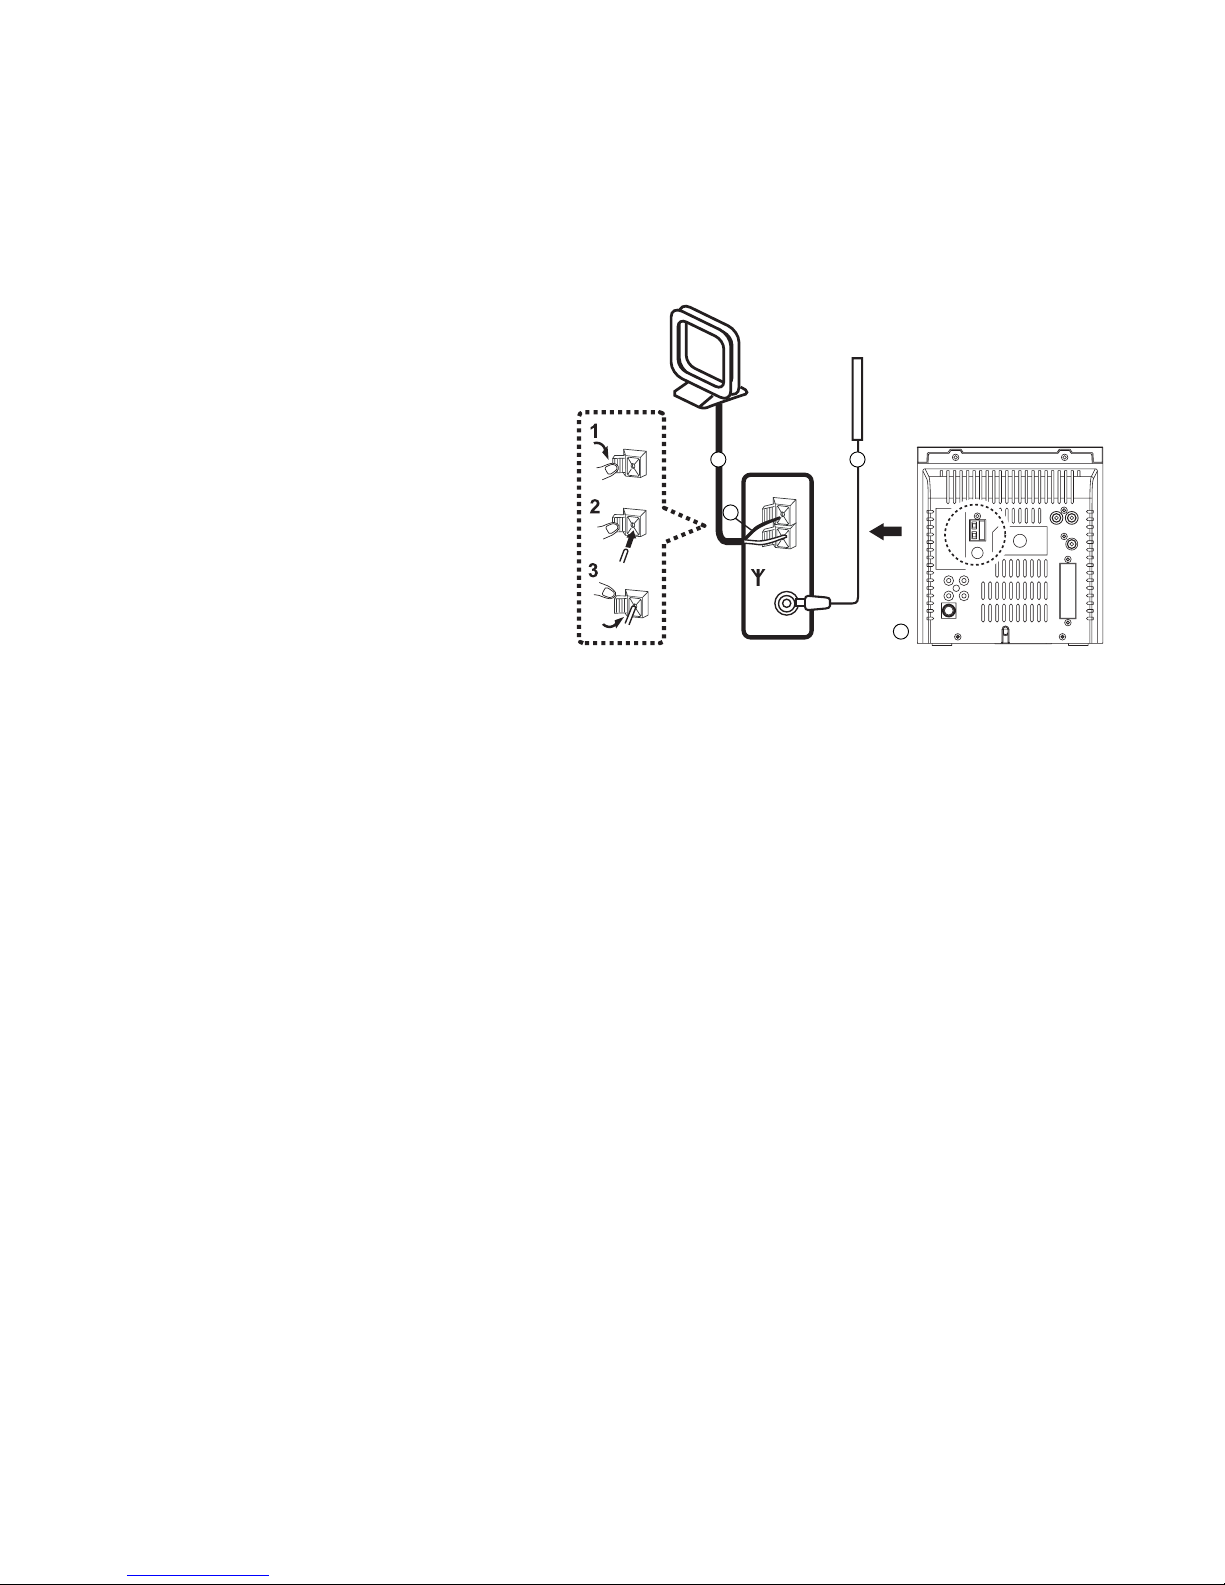
Connecting to Antenna (Fig. G)
1. The DVD player
2. FM wire antenna
3. MW loop antenna
4. To MW terminal
CAUTION
•To prevent noise pickup, do not
place the antenna on the system and
other components.
• Place the antenna away from the
unit for better reception.
• Be sure to fully extend the FM wire
antenna and keep it as horizonal
position.
• If the MW loop antenna and the FM
wire antenna are placed near the AC
power lead, it may cause interference in radion reception.
Fig. G
R
L
AM
75
FM
COXIAL
1
23
4
Page 12
12
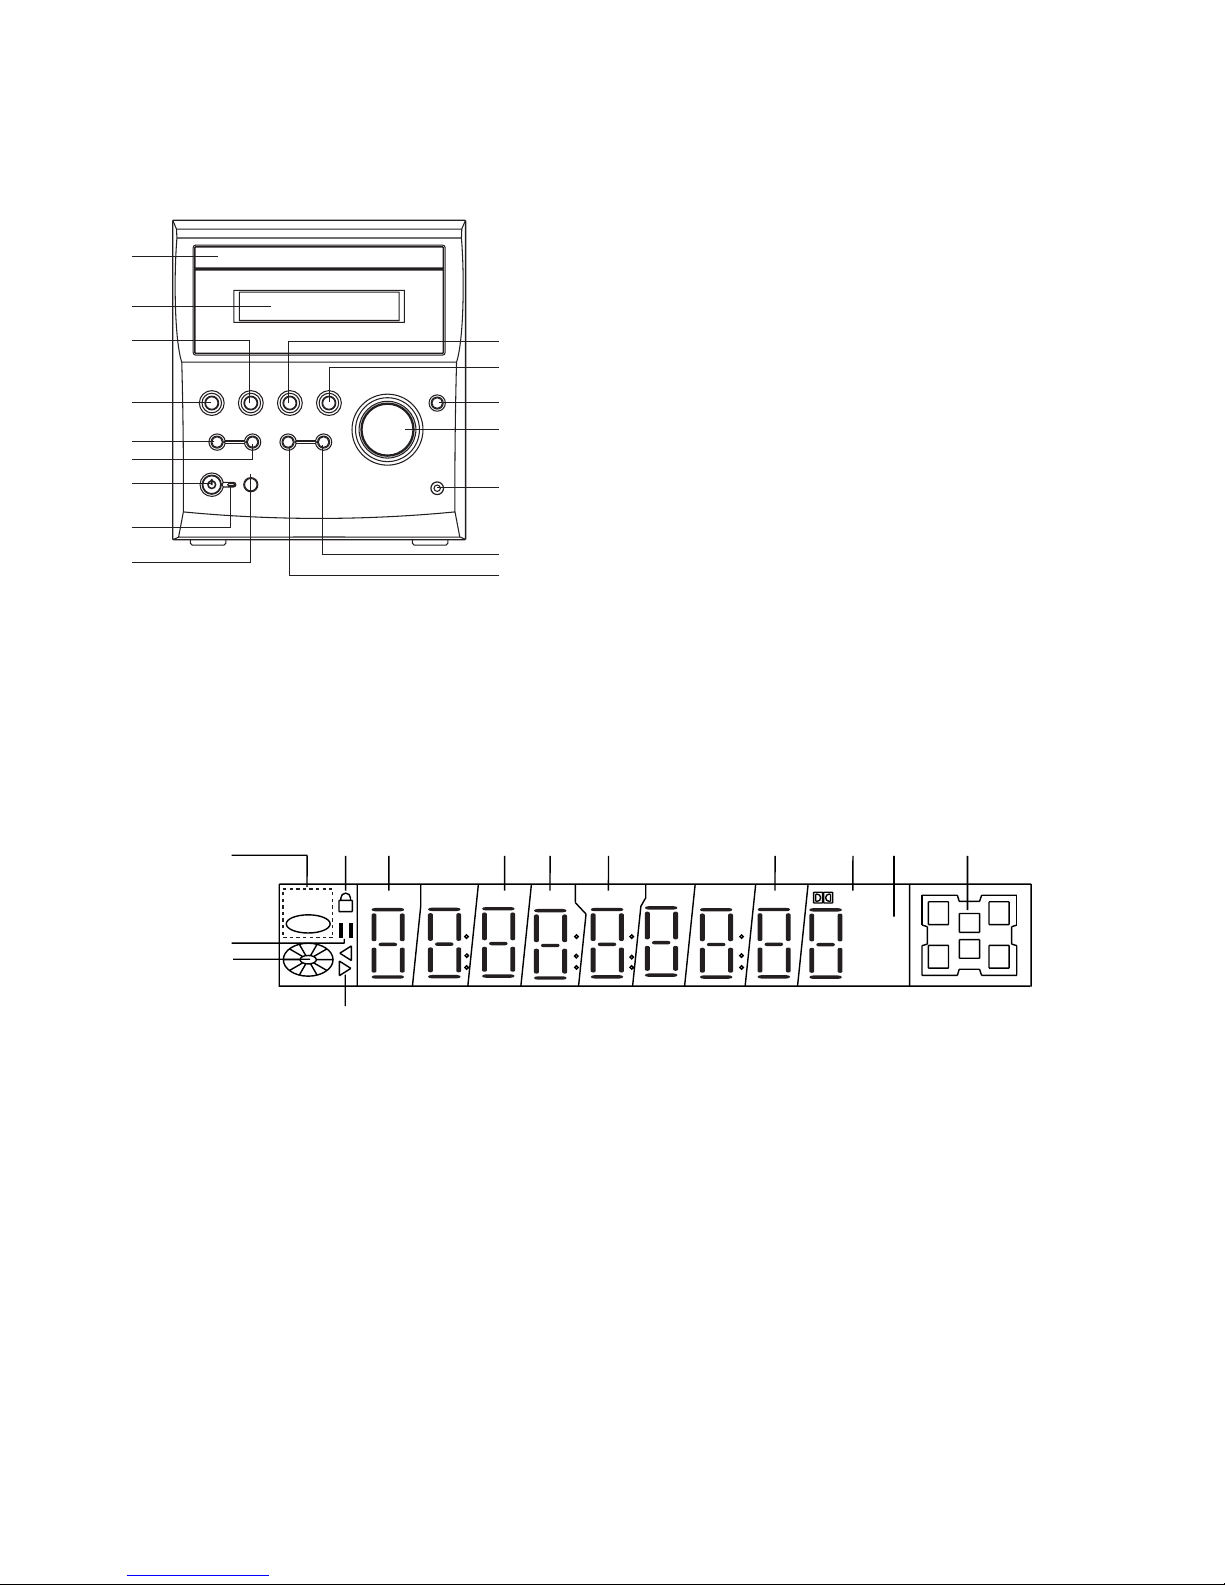
Front Panel Control
(Most of the functions can also be controlled by remote control unit)
1. Disc Tray
2. Display
3. Pause/Memory Button
4. Function Button
5. Search Down / Tuning –
6. Search Up / Tuning +
7. Power Button
8. Standby / On LED
9. Remote Sensor
10. Stop/Band Button
11. Play/Enter Button
12. Open/Close Button
13. Volume Control
14. Phone Jack
15. Skip Forward / Tuner Preset + Button
16. Skip Backward / Tuner Preset – Button
LCD Display
1. Disc Type Indicator
2. Play Mode Indicator
3. Lock Indicator
4. Pause Indicator
5. Play Indicator
6. Title Number
7. Chapter Number Indicator
8. ST. Indicator
9. Tuned Indicator
10. DTS Indicator
11. Sound Mode Indicator
12. KHz/MHz Indicator
13. Speaker Indicator
dts DIGITAL
LS RS
C
S
KHz
MHz
LR
ST. TUNEDCHPTITLE
DVD
VIDEO
1
4
2
36 78 9 10 1112 13
5
1
2
3
4
5
6
7
8
10
11
12
13
15
16
14
9
Page 13

13
BASIC PLAYBACK
This section explains you the basics on how to playback a DVD Video Disc.
PREPAREATION
• When you want to playback DVD video discs, turn on the TV and select the video input
source connected to the TV unit. Select DVD function on this unit.
• When you want to enjoy the sound of the DVD video discs or audio CDs from the audio
system, turn on the audio system and select the input source connected to the DVD unit.
• For connection details, see page 9 ~ 13.
• Set the playback picture size according to the aspect ratio of the connected TV at the SET -
UP menu (TV Aspect).
1. Press POWER Button on the front panel or Button on the remote control.
The DVD unit turns on and the display window lights.
2. Press FUNCTION Button on the front panel or remote control repeatedly until the DVD/CD
appears in the display window.
3. Press OPEN/CLOSE Button or Button on the remote control, the disc tray opens.
•You can open/close the disc tray by pressig this button.
4. Place a disc on the disc tray with playback side down.
• There are two different disc sizes. Place the disc in the correct guide on the disc tray. If
the disc is out of the guide, it may damage the disc and cause the DVD unit the malfunction.
• Do not place anything except 3” disc or 5” discs on the disc tray.
5. Press PLAY.
The disc tray will automatically close and playback begins.
• If the disc is placed in upside down (and it is a single sided disc), “NO DISC” or “DISC
ERROR” appears on the TV screen.
• If you insert an audio CD, it will auto start but the menu does not appear.
• After playing back all of the chapters in the title, the DVD unit automatically stops and
returns to the title menu.
6. Press the Numeric button(s) to select the desired item. Play of the selected item begins.
After operation
When the unit is not in use, remove the disc and press Button on the remote control or
POWER Button on main unit to turn off power.
Page 14

14
PLAYBACK
STOP PLAY
Press STOP during playback. Press RESUME to continue playing at the stop point, or press
STOP a second time to cancel resume.
RESUME PLAY
• When play is stopped, the unit memorizes the point where STOP is pressed (RESUME
function).
•Press PLAY and play will resume from that point.
NOTES
• Resume function will be cleared when STOP is pressed twice.
• Resume function will be cleared when power is turned off and then on.
• Opening the disc tray cancels Resume function.
• The Resume function may not be available on some DVD discs.
FRAME ADVANCE (DVD only)
Press STEP during playback.
• DVD
(each time you press STEP, the picture advances one frame).
To resume normal playback, press PLAY.
SKIP CHAPTERS AND TRACKS FORWARD OR BACKWARD
Skip Forward
Press NEXT button or SKIP button during playback. A chapter (DVD) or a track (CD) is
skipped each time the button is pressed.
Skip Backward
Press PREVIOUS button or SKIP button during playback.
• When the button is pressed once midway through a chapter/track, the DVD receiver returns to the beginning of that chapter/track.
• When it is pressed again, a chapter/track is skipped each time the button is pressed.
SCAN AT FAST FORWARD OR FAST BACKWARD PLAYBACK
You can playback discs at various speeds.
• Press and hold fast backward or fast forward button, to fast scan the disc in the
following order;
CD and DVD Disc Fast forward (fast backward): –> 2X –> 4X –> 8X –> 16X –> normal
Playing in Slow-Motion (for DVD only)
• Press SLOW Button during playback.
The playback speed becomes : –>1/2 –> 1/4 –> 1/6 –> 1/8 –> normal of the normal speed.
•To return to normal playback, press PLAY Button.
Notes:
• The sound is muted during the slow-motion playback.
• Subtitles do not appear on the screen during slow-motion playback.
• The SLOW SCAN Button does not work with Audio CDs.
Page 15

15
DISPLAY
1. Press DISPLAY button during playback
• First press of the DISPLAY, the OSD appears on TV as:
Title Elapsed
TT 04/55 CH 01/01 0:01:39
• Pressing a second time, the OSD shows:
Title Remain
TT 04/55 CH 01/01 0:01:11
• Third time, the OSD shows:
Chapter Elapsed
TT 04/55 CH 01/01 0:01:58
• Fourth time, the OSD shows:
Chapter Remain
TT 04/55 CH 01/01 0:01:08
• Fifth time, the OSD will clear and the screen returns to normal.
CHANGING SUBTITLE LANGUAGE
It is possible to change the subtitle language to a different language from the one selected at
the initial settings.
This operation works only with discs on which multiple subtitle language are recorded.
Note:
• In some cases, the subtitle language may not change to the selected one immediately.
• When a disc supporting the closed caption is played, the subtitle and the closed caption
may overlap each other on the TV screen. In this case, turn the subtitle off.
• When the desired language is not selected even after pressing the button several times, it
means that the language is not available on the disc.
• When the power is turned on or the disc is removed, subtitles appears in the language
selected at the initial settings. If this language is not recorded on the disc, the disc’s priority
language appears.
1. Press SUBTITLE during playback
When no subtitles are recorded, “OFF” will be displayed instead of the language number.
2. Press SUBTITLE repeatedly until the desired languge is selected.
Number of the subtitle language being played back is shown.
To eliminate the On Screen Subtitles
Press SUBTITLE repeatedly to select OFF.
Page 16

16
CHANGING AUDIO SOUNDTRACK LANGUAGE
During DVD function, it is possible to change the audio soundtrack language (or encoding
method, channel number) to a different language from the one selected at the initial settings.
This operation works only with discs on which multiple audio soundtrack languages are
recorded.
Notes:
• When the desired language is not selected even after pressing the button several times, it
means this language is not available on the disc.
• When the power is turned on or the disc is removed the language heard is the one selected
at the initial settings. If this language is not recorded on the disc, only the available language on the disc will be heard.
• Some discs may not respond to Audio feature.
DVD/CD
1. Press AUDIO during play.
Number of the audio soundtrack language being played back is displayed.
2. Press AUDIO repeatedly until the desired language (or encoding method, channel number)
is selected.
CHANGING SCENES
Some DVDs may contain scenes which have been shot simultaneously from a number of
different angles. For these discs, the same scene can be viewed from each of these different
angles using the ANGLE button. (The recorded angles differ depending on the disc used.)
Notes:
• This function only works for discs having scenes recorded at different angles.
REPEAT PLAY
Repeat viewing (listening)
1. Press REPEAT during playback.
Each time this button is pressed, the TV screen changes as shown below and the disc will
repeat a chapter or title (DVD) or a track (CD).
DVD
Repeat Chapter –> Repeat Title –> normal play
CD
Repeat Track –> Repeat All –> Repeat off
Repeating sections between two specific points (A–B repeat)
2. Press REPEAT A–B during play at the point where repeat play is to start (A).
3. Press REPEAT A–B during play at the point where repeat play is to be concluded (B).
Repeat play of the selection between points A and B starts.
To return to normal play
Press REPEAT A–B once.
Page 17
17
ZOOM FEATURES
The Zoom feature allows you to “ZOOM-IN” and enlarge the picture on the screen to 2 times
(x2), 3 times (x3) or 4 times (x4) than its normal size.
1. Press ZOOM during normal playback or still playback.
Each time you press ZOOM, it changes in the following order:
ZOOM 2 times –> 3 times –> 4 times –> normal
2. If you press /// buttons, the Zoom point shifts.
3. Press ZOOM repetitively to resume normal.
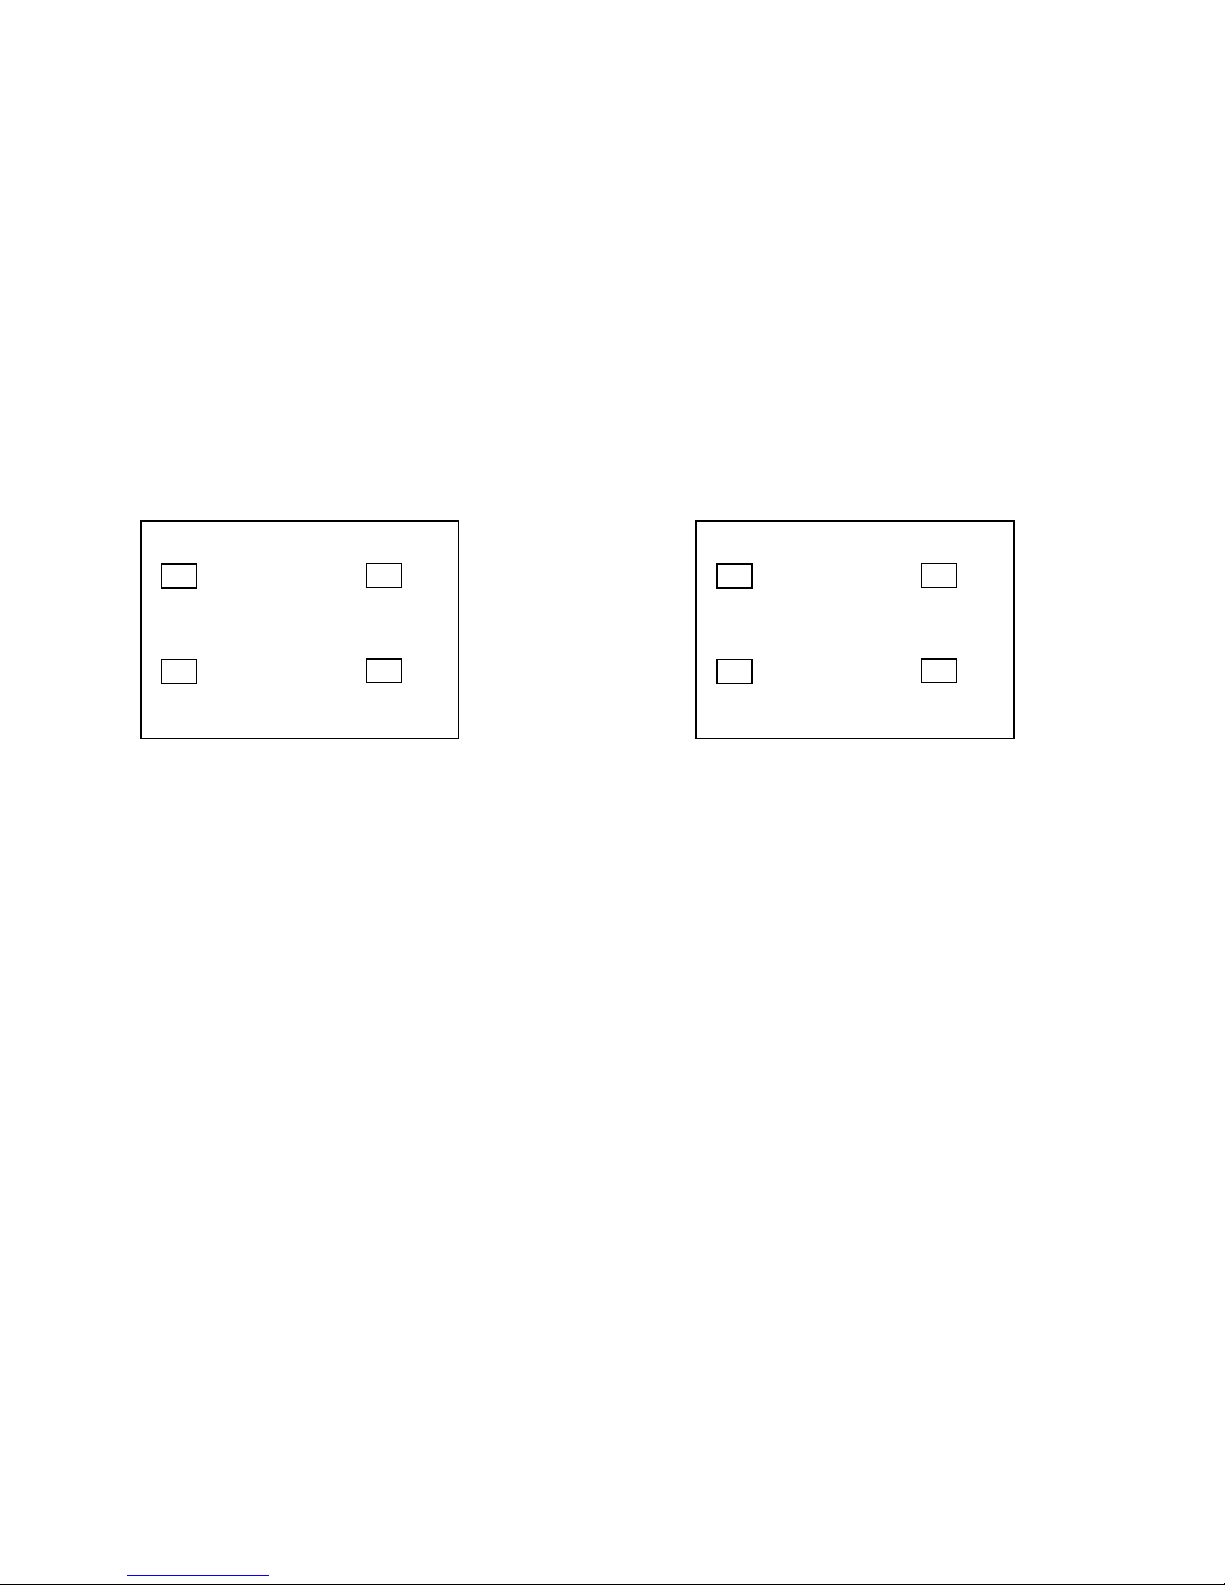
PROGRAM PLAY
The receiver can play the tracks on the disc in a desired order as programmed.
1. Press PROGRAM, to view the program screen.
When playing DVD When playing CD
TT: Title
CH: Chapter
2. Move ///to the 1 - 10 position to input the title No. and chapter No. If playing a CD,
input the track No.
3. Move ///to select start and then press ENTER to begin playing the program.
4. If you want to clear the program memory, you can enter to the program menu, and press
STOP.
MP3 PLAY
1. To Play an MP3 Disc
• Load MP3 disc
The MP3 menu displays and play starts automatically.
• Press ///Button to move the yellow bar to select a track and press ENTER.
• The track No. and current page can only be changed by moving the ///Button.
• Pressing NEXT, to play the next track.
2. Repeat
• Press REPEAT Button and the screen will show:
REPEAT ONE –> REPEAT FOLDER –> FOLDER (REPEAT OFF)
3. Shuffle
• Press SHUFFLE Button to initiate play in random order.
Program : TT(55) / CH ( - - )
01 TT : CH : 06
: :
: :
05 10
EXIT STOP NEXT
Program Track (01 -- 10)
01 TT : CH : 06
: :
: :
05 10
EXIT STOP NEXT
Page 18

18
SLEEP
Press SLEEP Button once or repetitively to set the sleep time to turn power off automatically
within increments of 10 minutes up to 120 minutes maximum.
EQ FUNCTION
During CD/MP3 mode :
• Press EQ Button to select any one of the available reverb sound effects:
CONCERT –> ROOM –> HALL –> ARENA –> CHURCH –> OFF
During DVD mode :
• Press EQ Button to select any desired preset sound equalization;
ROCK –> POP –> LIVE –> DANCE –> TECHNO –> CLASSIC –> SOFT –> SURR OFF
During AUX / TUNER mode :
• Press EQ Button to select the desired preset sound equalization;
POP –> ROCK –> JAZZ –> CLASSIC –> FLAT
RADIO STATION PRESETTTING
1. Press FUNCTION Button until the FM or MW appear in the display window.
2. Press the STOP / BAND Button to change the band.
3. Press and hold TUNING / or Button for about two seconds until the frequency
indication starts to change, then release.
4. Press MEMORY/PAUSE on the front panel or MEMORY/PAUSE Button on the remote
control. A preset number will flash in the display window.
5. Press the numeric button(s), to enter desired preset.
6. Repeat steps 3 to 5 to store other stations up to a maximum of 20.
LISTENING TO THE RADIO
1. Press the FUNCTION Button until the FM or MW appear in the display window.
2. Press STOP / BAND Button to select FM or MW.
3. Press TUNER PRESET / or Button or numeric button to select the desired
preset station.
To listen to non-preset radio stations
• Press TUNING/ or Button to manually select a station.
• Press and hold TUNING/ or Button for 2 seconds, then release, to tune only on
receivable stations.
To turn off the radio
Press POWER to turn the unit off or select another function mode (DVD/CD or AUX) by
pressing FUNCTION Button.
Page 19
19
SETTING UP MENU FOR DVD VIEWING
Once the initial settings have been completed, the DVD unit can always be operated under
the same conditions (especially with DVD discs). The settings will be retained in the memory
until they are changed, even if the power is switched off.
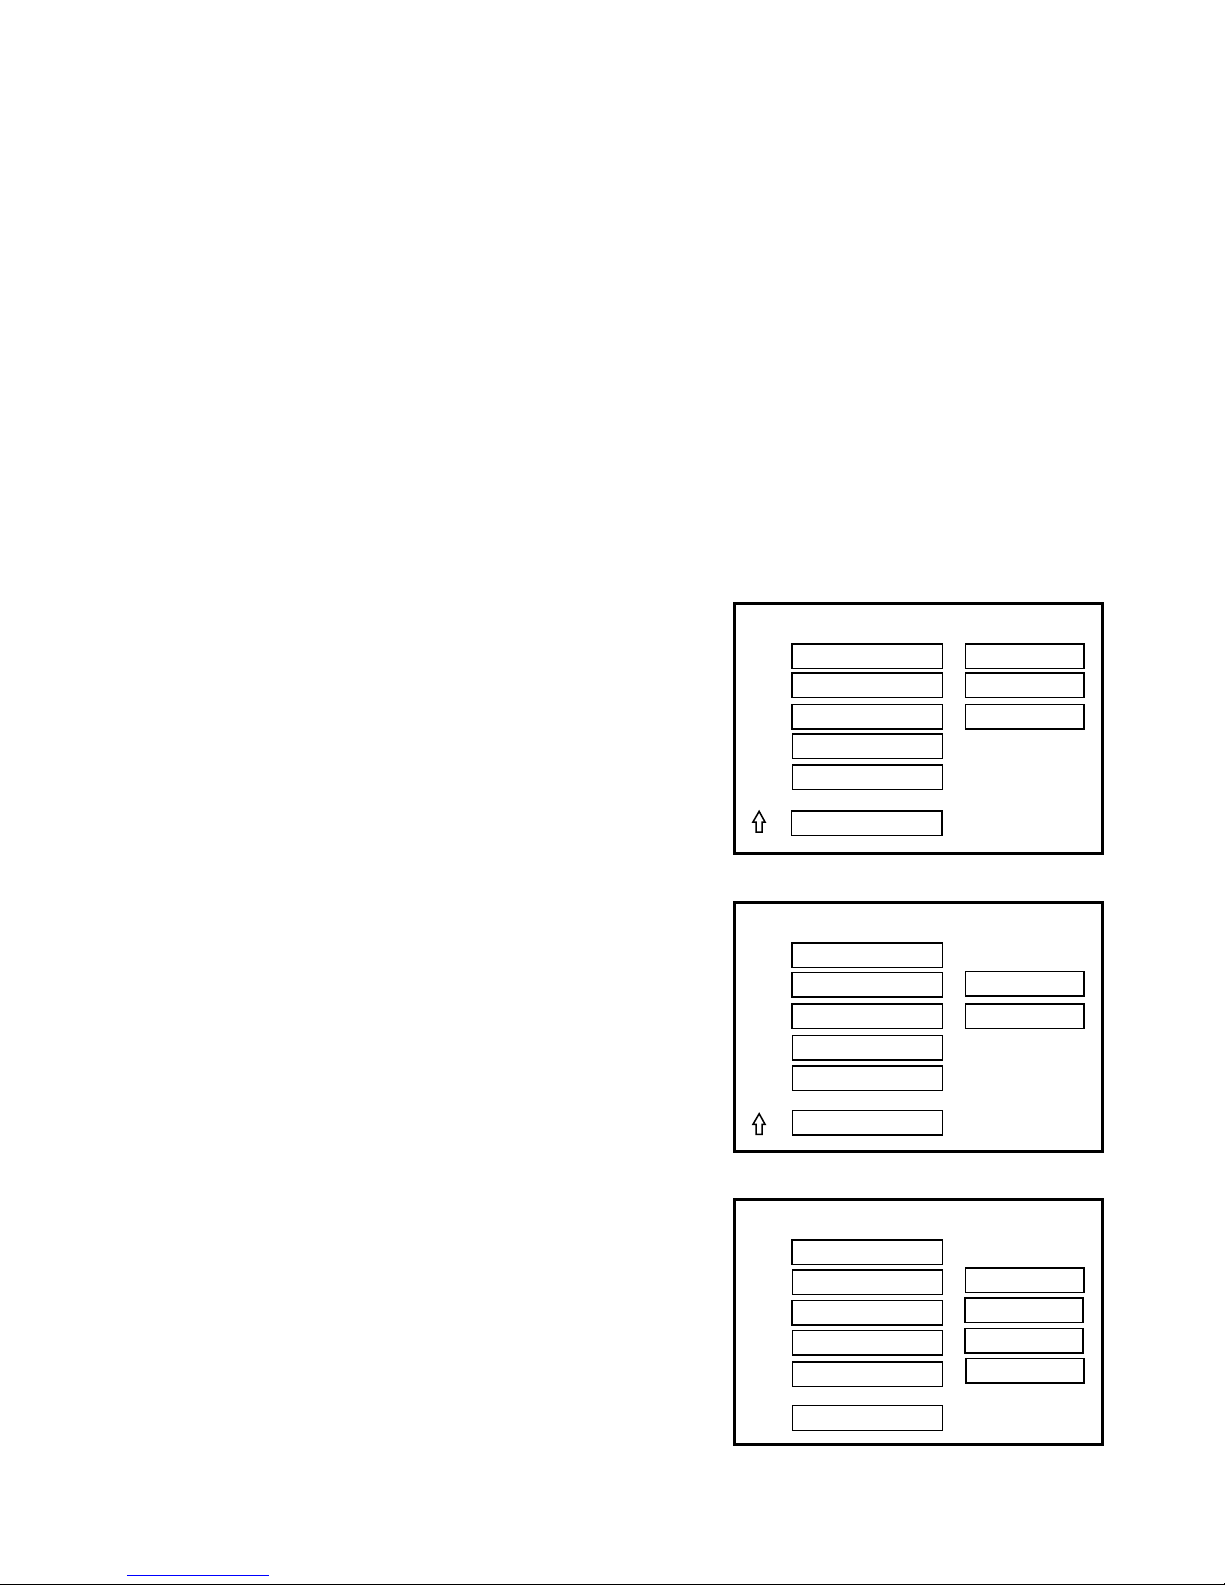
1. Press SETUP in the stop or playback mode. The SETUP menu will display.
2. Press / button to select options available and press ENTER Button to enter the main
page. The SETUP menu allows set up of the general, speaker, audio, and preferences.
To exit SETUP menu
Press button to select “EXIT SETUP” to exit the main page.
GENERAL SETUP
• Press / button to select GENERAL PAGE and press ENTER.
The left is the main menu, the right is the sub menu.
• Press / button to enter the sub menu and press ENTER to confirm.
1. To setup the TV screen aspect
• By selecting NORMAL/PS, the TV displays a
cropped fullscreen.
• By selecting NORMAL/LB, the TV screen displays
a complete picture.
• By selecting WIDE, the TV screen displays a
cropped image.
2. Setting camera angles
• Some DVDs are recorded with several video cameras from the different angles. When available,
different camera angles can be selected.
- ON, open the angle
- OFF, close the angle
• The disc must have the angle mark in order for
the set up to work.
3. Set up of the OSD LANGUAGE
•You can select the TV display language as desired:
ENGLISH, SPANISH, GERMAN, FRENCH by
entering the “OSD LANG” menu.
-- GENERAL PAGE --
TV DISPLAY
NORMAL/PS
ANGLE MARK
NORMAL/L2
OSD LANG WIDE
CAPTIONS
SCR SAVER
MAIN PAGE
-- GENERAL PAGE --
TV DISPLAY
ANGLE MARK
ON
OSD LANG
OFF
CAPTIONS
SCR SAVER
MAIN PAGE
-- GENERAL PAGE --
TV DISPLAY
ANGLE MARK ENGLISH
OSD LANG
SPANISH
CAPTIONS
GERMAN
SCR SAVER
FRENCH
MAIN PAGE
Page 20
20
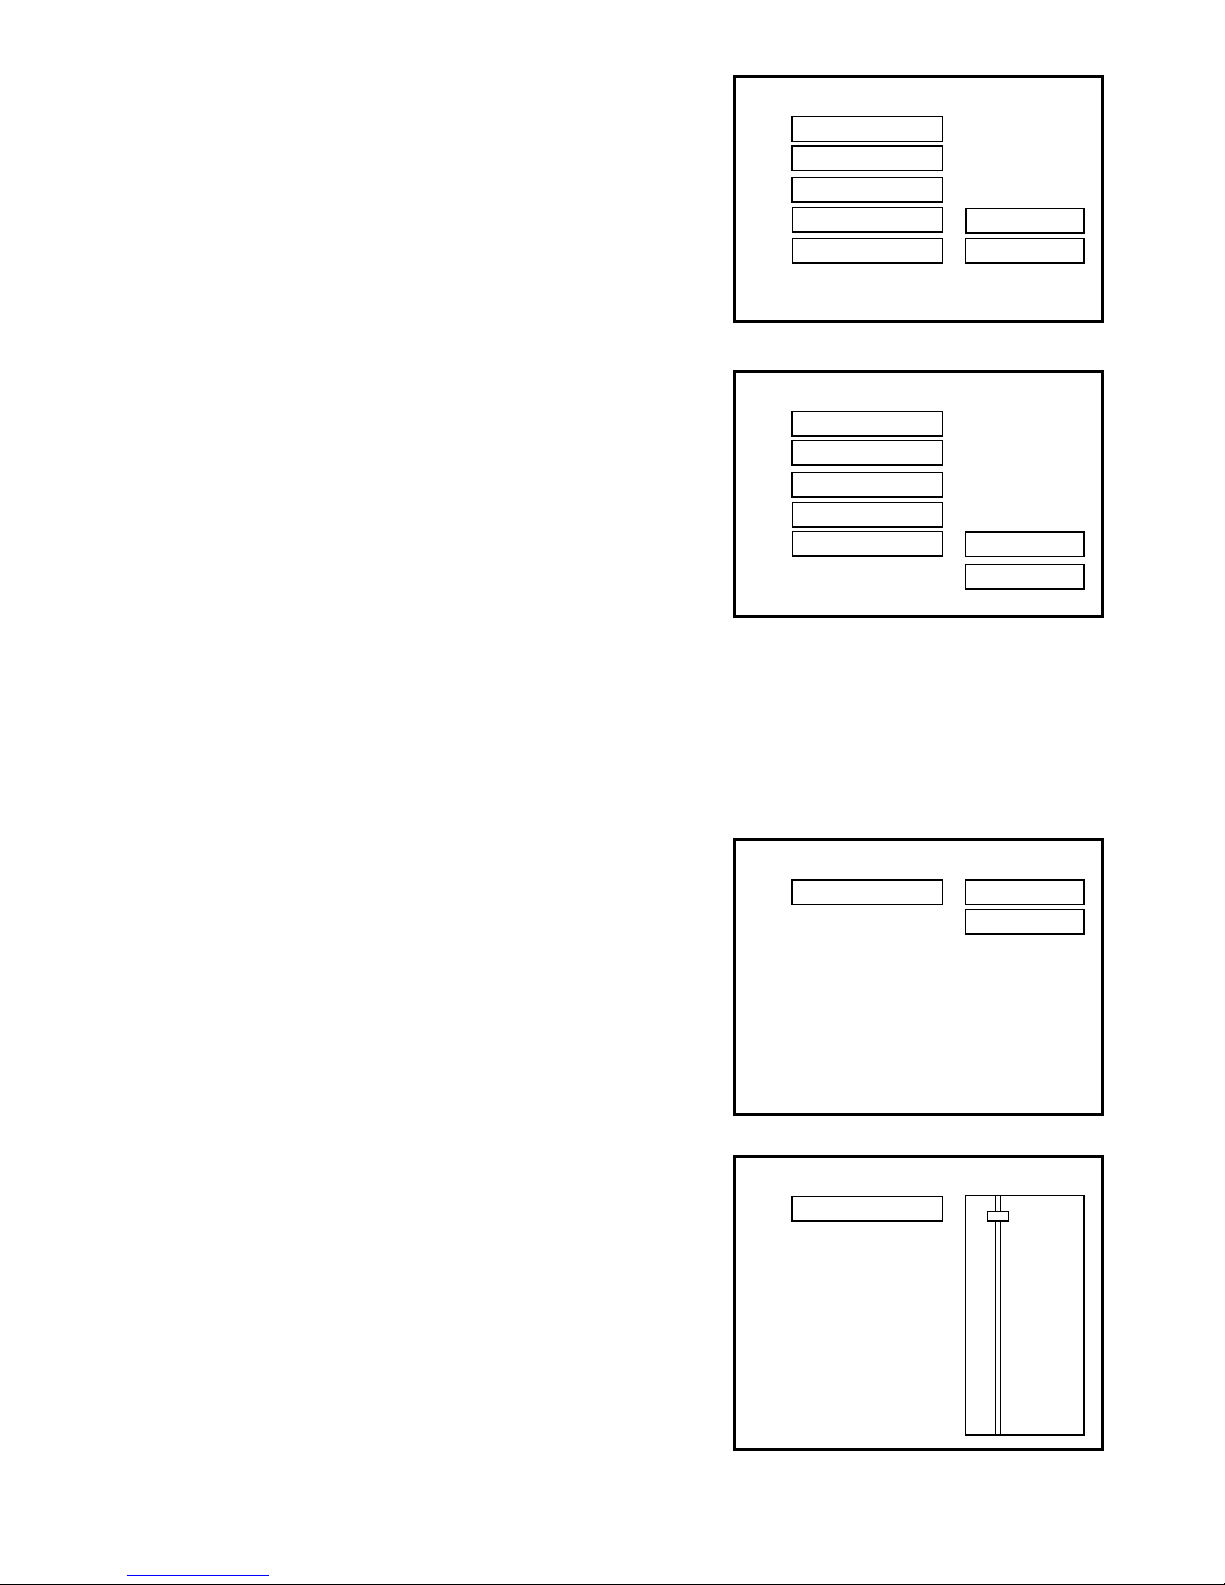
4. Setting up CAPTIONS
- ON, open the CAPTIONS available.
- OFF, close the CAPTIONS available.
5. Selecting the SCREEN SAVER
• When no disc is in the tray or playback has stopped
for some time, the unit will automatically open the
Screen Saver function. The screen will become
black and only the DVD pattern moves on the
screen. This function protects the TV screen from
damage.
- ON, open the SCR SAVER.
- OFF close the SCR SAVER.
SPEAKER SETUP
• Press / button to select SPEAKER SET UP PAGE and press ENTER.
The left is the main menu, the right is the sub menu.
• Press / button to enter the sub menu and press ENTER to confirm.
Setting the DOWNMIX MODE
•LT/RT
When playing a disc with PROLOGIC DOLBY
stereo. Select LT/RT.
• STRERO
When source is two channel, the audio output will
be in stereo signal. When source is 5.1 channel,
only output the left and right 2 channel signal is
provided.
Dolby Digital Setup
• Dynamic
Select the DOLBY output level off as desired.
-- GENERAL PAGE --
TV DISPLAY
ANGLE MARK
OSD LANG
CAPTIONS
ON
SCR SAVER
OFF
-- SPEAKER SETUP PAGE --
DOWNMIX
LT/RT
STEREO
--
DOBLY DIGITAL SETUP PAGE
--
DYNAMIC
––FULL
––
––3/4
––
––1/2
––
––1/4
––
––OFF
-- GENERAL PAGE --
TV DISPLAY
ANGLE MARK
OSD LANG
CAPTIONS
SCR SAVER
ON
OFF
Page 21
21
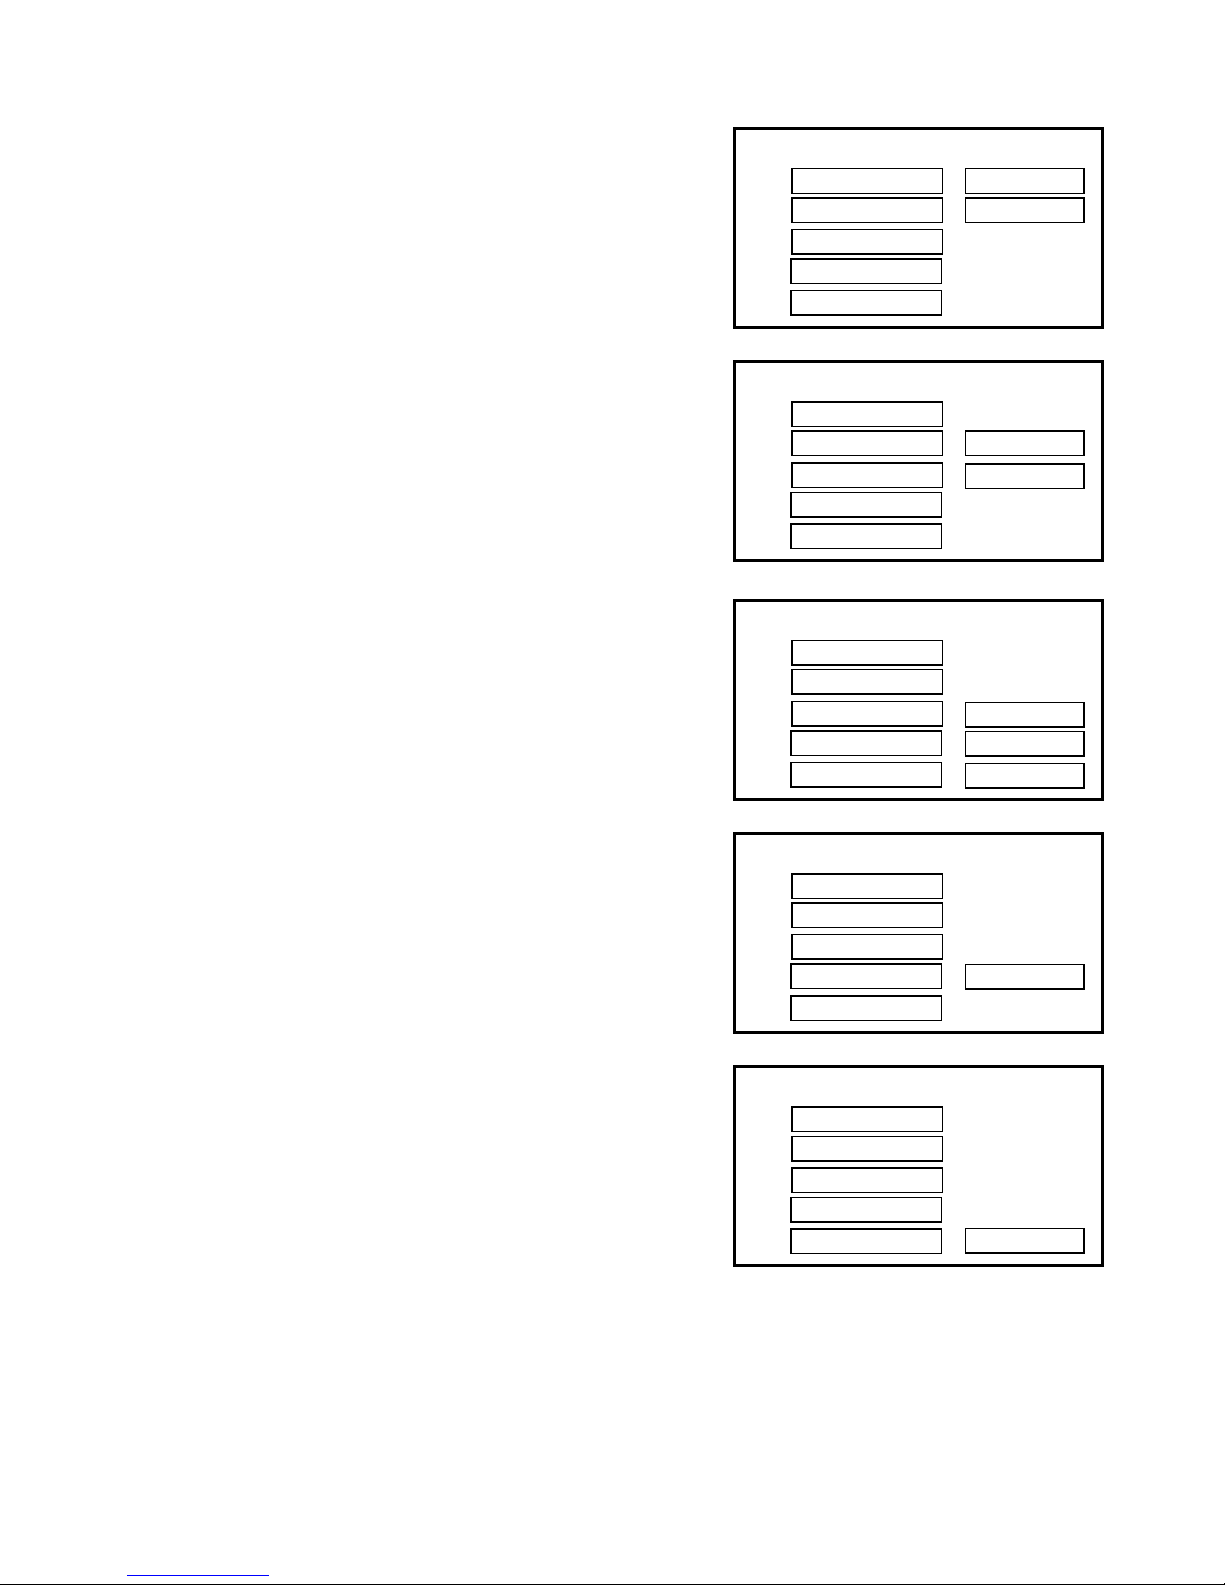
VIDEO SETUP
1. Setup COMPONENT
•Select OFF, the R.G.B. signals will not come out.
• Select RGB, the signals will come out, then the
video mode change to scart mode.
2. Setup TV MODE
• Select INTERLACE, the RGB output format is
interlace.
• Select P-SCAN, the RGB output format is noninterface.
3. SHARPNESS
Select the menu, when you press ///
Button can adjust the SHARPNESS level.
4. BRIGHTNESS
Select submenu of the BRIGHTNESS can adjust
the value by pressing/.
5. CONTRAST
Select submenu of the CONTRAST can adjust the
value by pressing /.
-- VIDEO SETUP PAGE --
COMPONENTOFF
TV MODE RGB
SHARPNESS
BRIGHTNESS
CONTRAST
-- VIDEO SETUP PAGE --
COMPONENT
TV MODE
INTERLACE
SHARPNESS P-SCAN
BRIGHTNESS
CONTRAST
-- VIDEO SETUP PAGE --
COMPONENT
TV MODE
SHARPNESS
HIGH
BRIGHTNESS
MEDIUM
CONTRAST LOW
-- VIDEO SETUP PAGE --
COMPONENT
TV MODE
SHARPNESS
BRIGHTNESS
00
CONTRAST
-- VIDEO SETUP PAGE --
COMPONENT
TV MODE
SHARPNESS
BRIGHTNESS
CONTRAST
00
Page 22
22
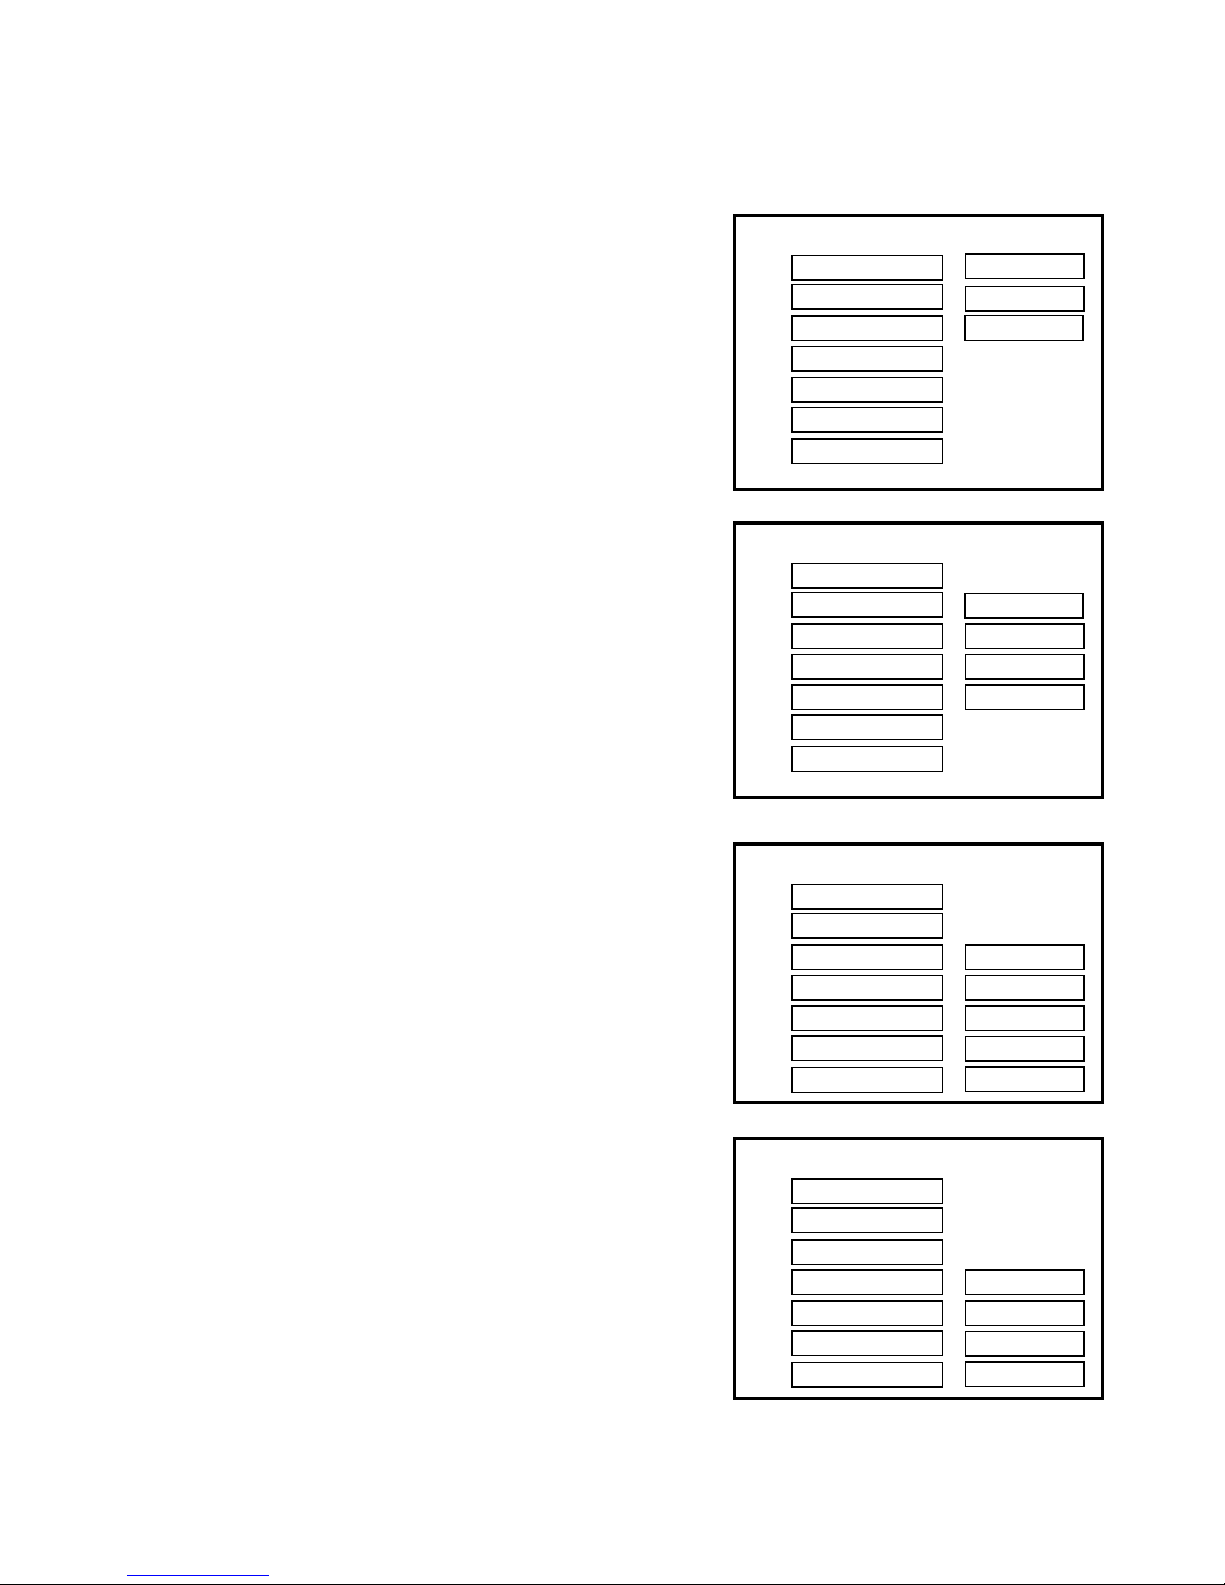
PREFERENCES SETUP
• Press / button to select PREFERENCES SET UP and press ENTER.
The left is the main menu, the right is the sub menu.
• Press / button to enter the sub menu and press ENTER to confirm.
1. Setting the TV TYPE
• If the TV set is MULTI, select MULTI.
• If the TV set is NTSC, select NTSC.
• If the TV set is PAL, select PAL
• Select MULTI if not sure of your TV type.
2. Setting up the AUDIO
• The audio set up allows access to the audio languages available on the disc.
For example, if the disc has English and French
audio format available, you can only select English or French.
3. SUBTITLE set up
• Selects the sub title languages available on current DVD title.
4. DISC MENU set up
• Selects the disc menu subtitle languages as available on current DVD title.
-- PREFERENCE PAGE --
TV TYPE
AUDIO
SUBTITLE
DISC MENU
ENGLISH
PARENTAL FRENCH
PASS WORD SPANISH
DEFAULT GERMAN
-- PREFERENCE PAGE --
TV TYPE
AUDIO
SUBTITLE
ENGLISH
DISC MENU FRENCH
PARENTAL SPANISH
PASS WORD GERMAN
DEFAULT OFF
-- PREFERENCE PAGE --
TV TYPE
MULTI
AUDI0
NTSC
SUBTITLE PAL
DISC MENU
PARENTAL
PASS WORD
DEFAULT
-- PREFERENCE PAGE --
TV TYPE
AUDIO
ENGLISH
SUBTITLE FRENCH
DISC MENU SPANISH
PARENTAL GERMAN
PASS WORD
DEFAULT
Page 23
23
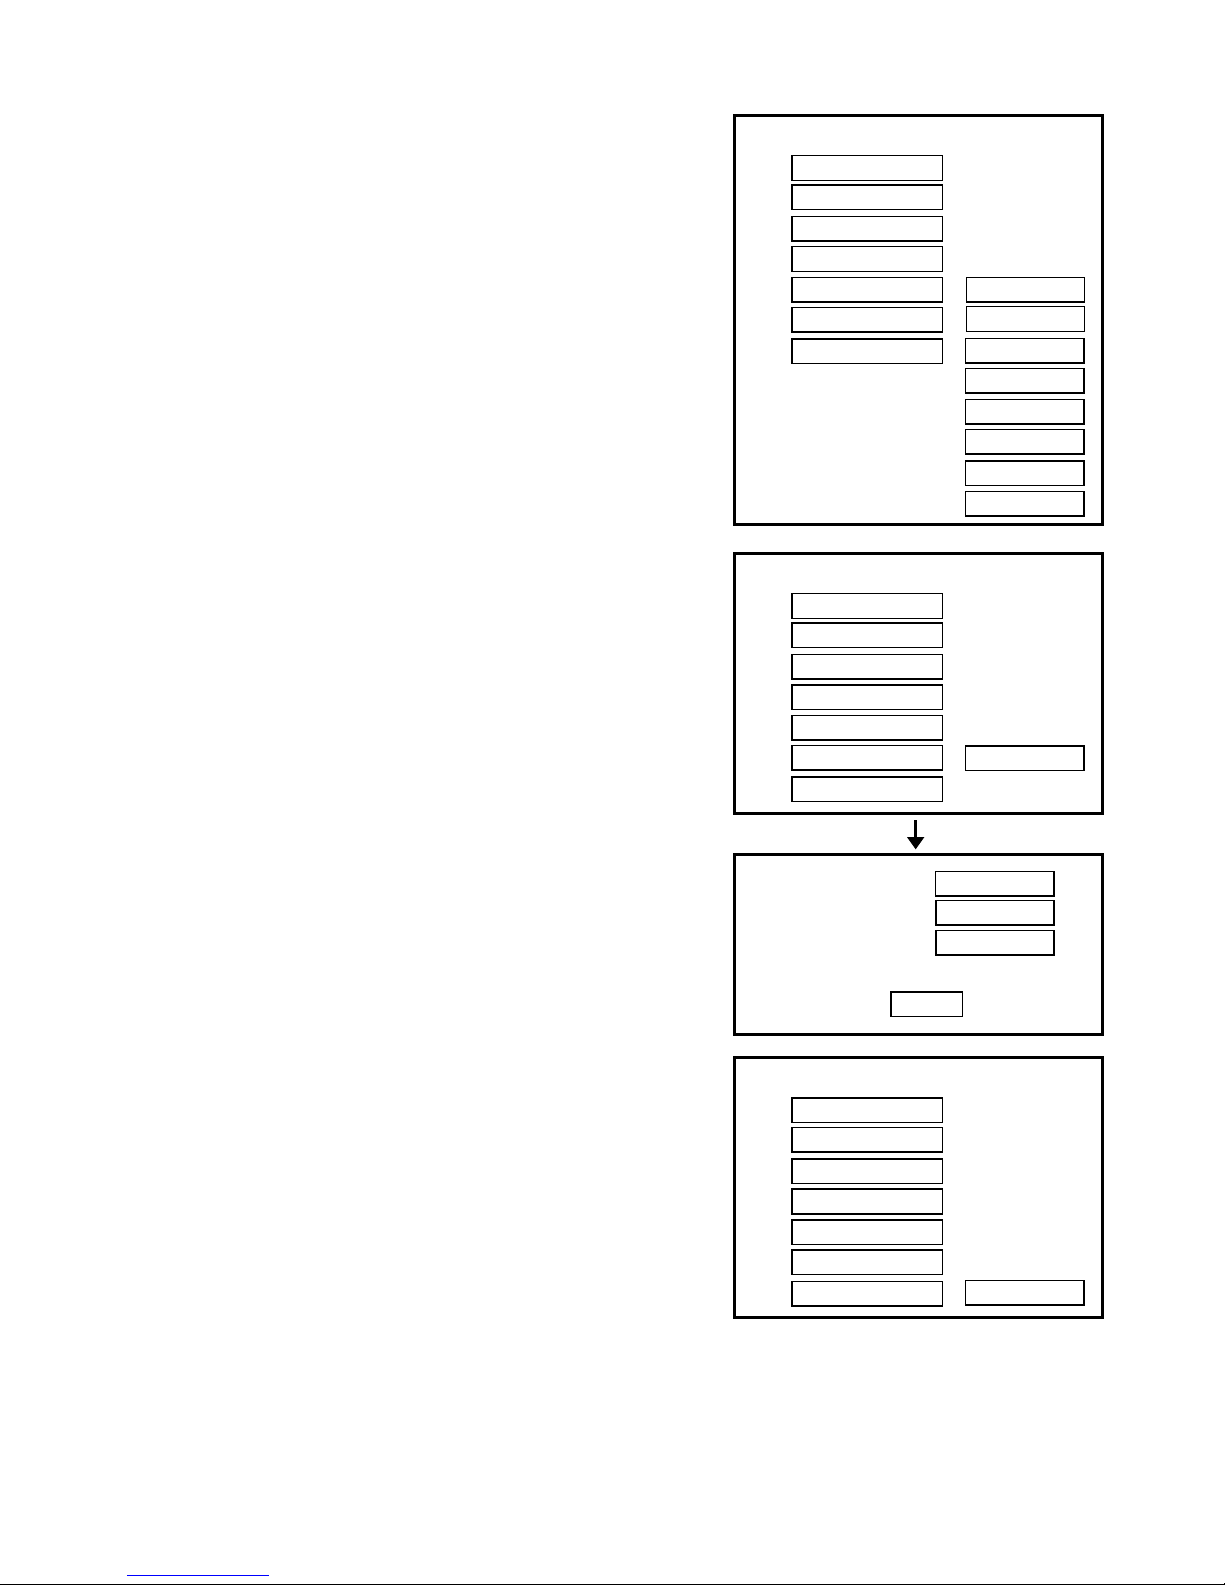
5. PARENTAL set up
• Selects the PARENTAL rating level of DVD title
playback which can be password protected.
6. Setting Up the PASSWORD
•To change setup to a new password, first select
“CHANGE”, then enter the original “1369”, select
“NEW PASSWORD” and enter the new password
and press ENTER to confirm. When “P ASSWORD
ON” is selected, it will ask for password.
7. Re setting to the DEFAULTS
•To cancel all setups and restore system to factory
defaults, select “RESET”.
-- PREFERENCE PAGE --
TV TYPE
AUDIO
SUBTITLE
DISC MENU
PARENTAL
PASS WORD CHANGE
DEFAULT
old Password
new Password
confirm PWD
OK
-- PREFERENCE PAGE --
TV TYPE
AUDIO
SUBTITLE
DISC MENU
PARENTAL
PASS WORD
DEFAULT
RESET
-- PREFERENCE PAGE --
TV TYPE
AUDIO
SUBTITLE
DISC MENU
PARENTAL
1 KID SAF
PASS WORD 2 G
DEFAULT 3 PG
4 PG 13
5 PGR
6 R
7 NC17
8 ADUL T
Page 24
24
TROUBLE SHOOTING
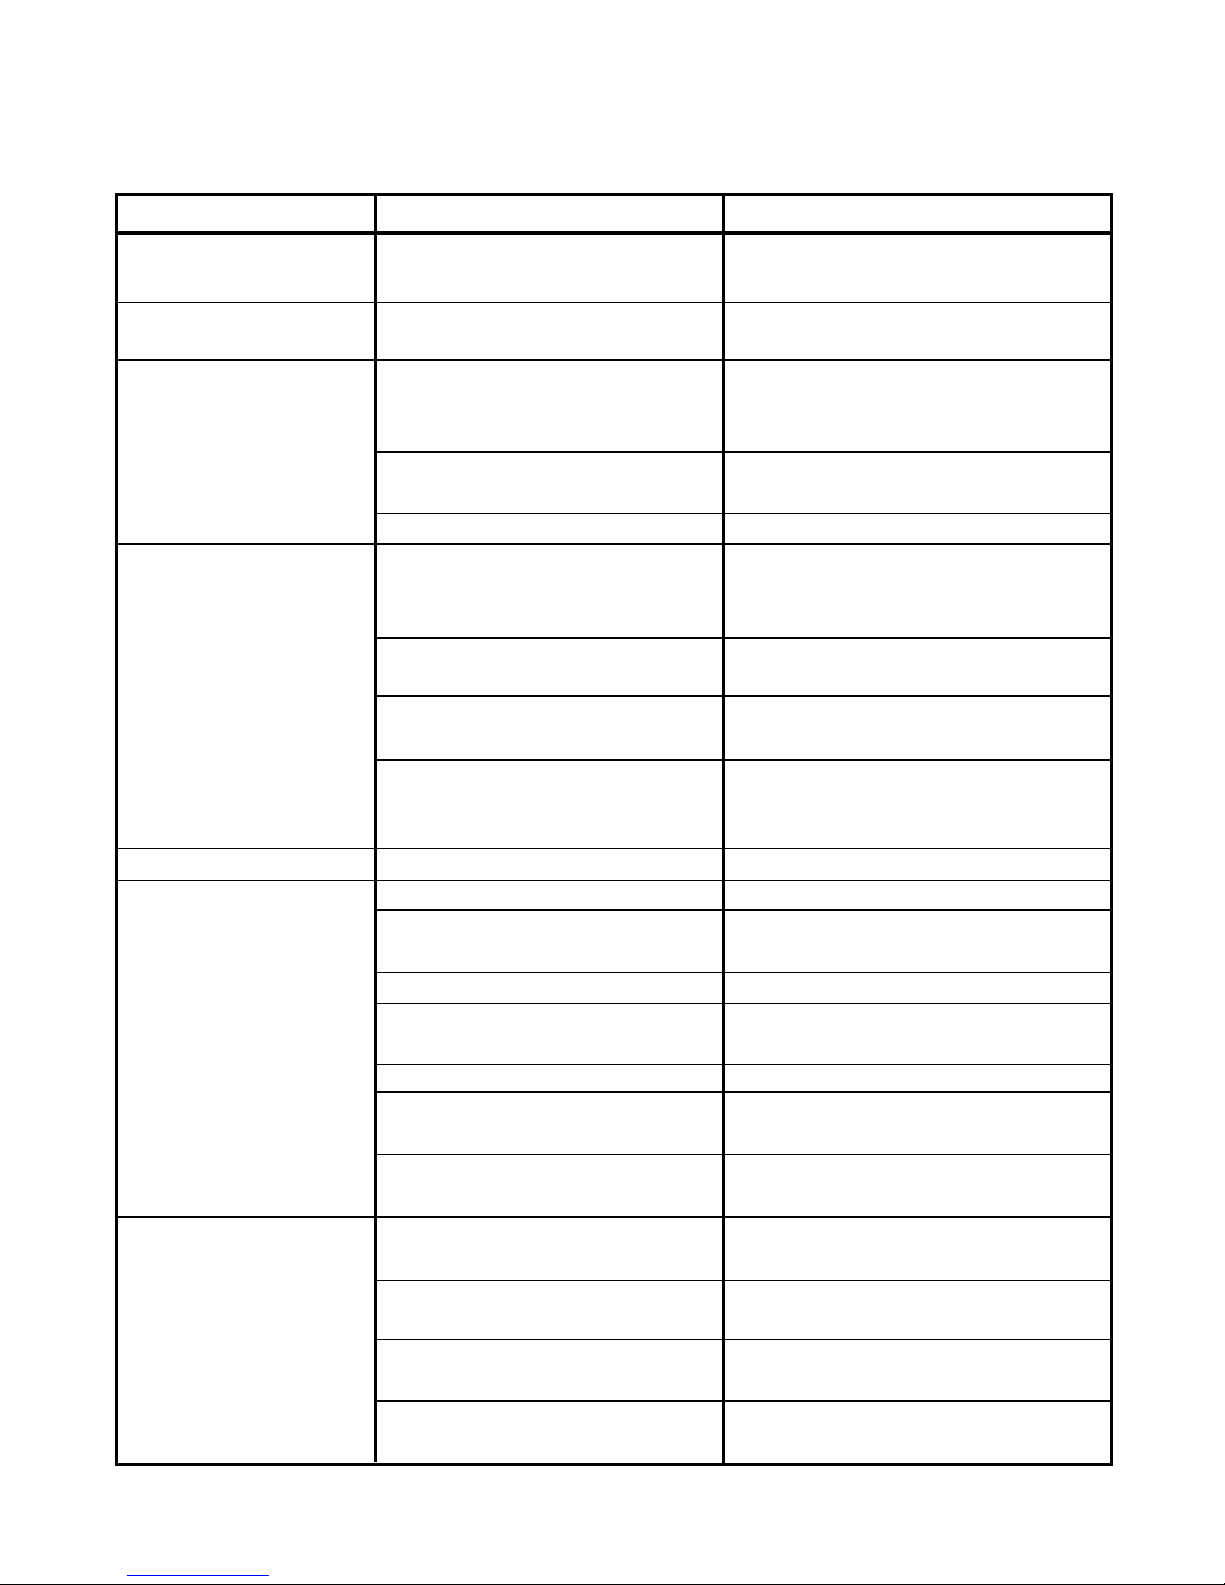
Check the following guide for the possible cause of a problem before contacting service.
Symptom
No Power
The power is on, but DVD
player does not work
No Picture
The playback picture is poor
The DVD player does
not start playback
No Sound
The Remote Control
does not work properly
Cause
• The power cord is disconnected.
• No disc is inserted.
• The TV is not set to receive DVD
signal output.
• The video cable is not connected
securely.
•
The connected TV power is turned off.
• The equipment connected with the
audio cable is not set to receive
DVD signal output.
• The audio cable is not connected
securely.
•
The power of the equipment connected
with the audio cable is turned off.
• The Digital Audio Output is set to
the wrong position.
• The disc is dirty.
• No disc is inserted.
• An unplayable disc is inserted.
• The disc is placed upside down.
• The disc is not placed with the
guide.
• The disc is dirty.
•A menu is on the TV screen.
• The Rating level is set.
•
The remote control is not pointed at
the remote sensor of the DVD player.
• The remote control is too far from
the DVD player.
•
There is an obstacle in the path of the
remote control and the DVD player.
• The batteries in the remote control are exhausted.
Correction
• Plug the power cord into the wall
outlet and unit securely.
•
Insert a disc. (Check that the DVD or audio CD indicator in the DVD display is lit.)
•
Select the appropriate video input mode
on the TV so the picture from the DVD
player appears on the TV screen.
• Connect the video cable into the
jacks securely.
•Turn on the TV.
• Select the correct input mode of the
audio receiver so you can listen to the
sound from the DVD player.
• Connect the audio cable into the
jacks securely.
•Turn on the equipment connected with
the audio cable.
•
Set the Digital audio Output to the correct
position, then turn on the DVD player
again by pressing the POWER button.
• Clean the disc.
• Insert a disc
•
Insert a playable disc. (Check the disc
type, color system and Regional code.)
•
Place the disc with the playback side down.
• Place the disc on the disc tray correctly inside the guide.
• Clean the disc.
• Press the SET UP button to turn off
the menu screen.
• Cancel the Rating function or change
the rating level.
• Point the remote control at the remote
sensor of the DVD player.
• Operate the remote control within
about 23ft (7m).
• Remove the obstacle.
• Replace the batteries with new ones.
Page 25

25
SPECIFICATION
General
Power supply AC 230V, 50Hz
Power Consumption 63W
Operating conditions Temperature: 5ºC to 35ºC, Operation status: Horizontal
Operating humidity 5% to 90%
Dimensions (W x H x D)
Main Unit 170 x 180 x 280 mm
Speaker 150 x 230 x 243 mm
Net Weight 8.9 kgs.
CD/DVD
Video Signal system PAL, NTSC & MULTI
Frequency Response (Audio) 4 Hz to 20 KHz
Signal-to-noise ratio (Audio) More than 60 dB (1 KHz, NOP, 20 KHz LPF/A-Filter)
Dynamic Rage (Audio) More than 60 dB
Harmonic distortion (Audio) 0.3 % (1 KHz, at 2W output)
Video
Video output 1.0V(p-p), 75ohm, and negative sync. RCA jack
S-video output
(Y) 1.0V (p-p), 75ohm, and negative sync. Mini DIN 4 pin x 1
(C) 0.3V (p-p), 75ohm
Tuner
Tuner Range 87.5 – 108 MHz
Intermediate Frequency (FM) 10.7MHz
Signal-to-Noise Ratio (FM) 40 dB
Frequency Response 150 – 12000Hz
Tuning Range (MW) 522 – 1620 KHz
Intermediate Frequency (MW) 450 KHz
Amplifier
Stereo Mode 10W + 10W (4ohm at 1KHz, THD 10%)
Speakers
Type Full Range Speaker x 2
Impedance 4 ohm (4”)
Frequency Response 120 – 20000Hz
Max. Input Power 15W
* Design and specification are subject to change without notice.
 Loading...