

Denver MCA-54 Instruction Manual
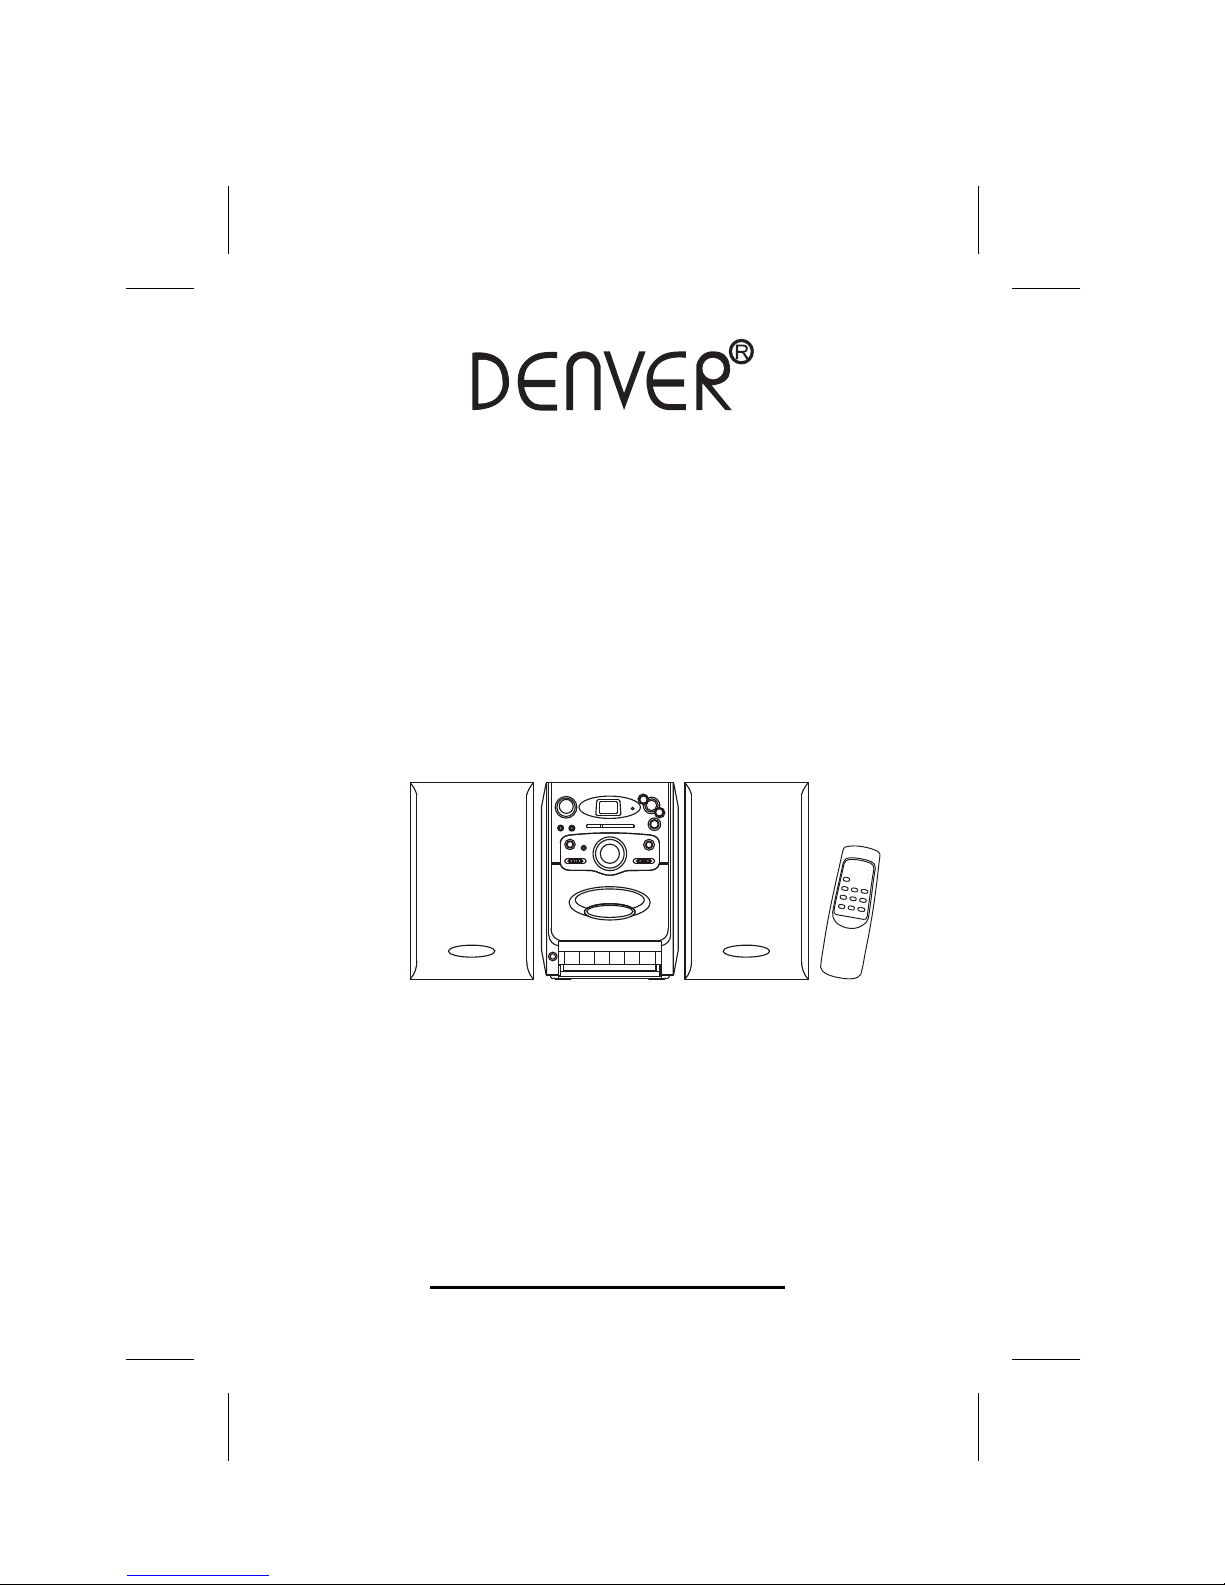
MICRO HI-FI SYSTEM
HIFI- MIKROSYSTEM
MICRO HI-FI SYSTEM
MICRO HI-FI SYSTEM
MICROCADENA HIFI
MINI IMPIANTO HI-FI
HIFI MIKROSYSTÉM
MCA-54
INSTRUCTION MANUAL
GEBRAUCHSANLEITUNG
BRUKSANVISNING
BETJENINGSVEJLEDNING
INSTRUCCIONES DE USO
MANUALE D'ISTRUZIONI
NÁVOD NA POUŽITIE
www.denver-electronics.com
KÄYTTÖOPAS
HI-FI-PIENOISJÄRJESTELMÄ
GB-1
For optimum performance, please read this manual very carefully before trying to use the system, in order to
familiarise yourself with its various features and allow it to give you many years of the utmost enjoyment
without any problems.
Important warnings
* Keep the manual containing the safety instructions and operating instructions in a safe place for future
reference.
* Avoid installing the system in any of the locations described below:
• Locations exposed to direct sunlight or close to radiating heating appliances such as electric
convectors.
• On top of other high fidelity stereo units releasing excessive heat.
• Locations where the air vents would be blocked or too dusty.
• Locations subject to constant vibrations.
• Damp locations.
* Make sure the air vents are not blocked.
* Handle the rotary controls and other switches as instructed in the manual.
* Before switching on the unit for the first time, make sure that the power cord is plugged in correctly.
* Keep your tapes and/or CDs in a sufficiently cool place to prevent any heat-induced damage.
* Dripping warning: "The product must never be exposed to dripping or splashing and no objects filled with
liquids (such as vases, pots, etc.) may be placed on top of the product ."
* Ventilation warning: "Normal ventilation of the appliance must not be prevented for the intended use."
WARNING : TO REDUCE THE RISK OF ELECTRIC SHOCK DO NOT REMOVE COVER(OR BACK),
NO USER SERVICEABLE PARTS INSIDE, REFER SERVICING TO QUALIFIED SERVICE
PERSONNEL.
CAUTION
ELECTRIC SHOCK HAZARD
DO NOT OPEN
HAZARDOUS VOLTAGE
P resence of a hazardous electric voltage inside the product, which may be of sufficient magnitude to induce
a risk of electric shock to persons.
HAZARDOUS VOLTAGE
The lightning flash with arrowhead symbol inside an equilateral triangle is intended
to alert the user to the presence of uninsulated "hazardous voltage" within the
product's enclosure, which may be of sufficient magnitude to induce a risk of
electric shock to persons.
WARNING
The exclamation mark inside an equilateral triangle is intended to alert the user to
the presence of important operating and maintenance (servicing) instructions in the
literature accompanying the product.
Notes:
This unit tends to become warm when used for prolonged periods of time. This phenomenon is normal and
does not indicate a problem inside the unit.
The CD player contains microprocessors liable to malfunction as a result of external electrical interference
or noise. If the CD player is not operating correctly, unplug the unit from its electrical power source and plug
it back in again.
GB-2
GB-3
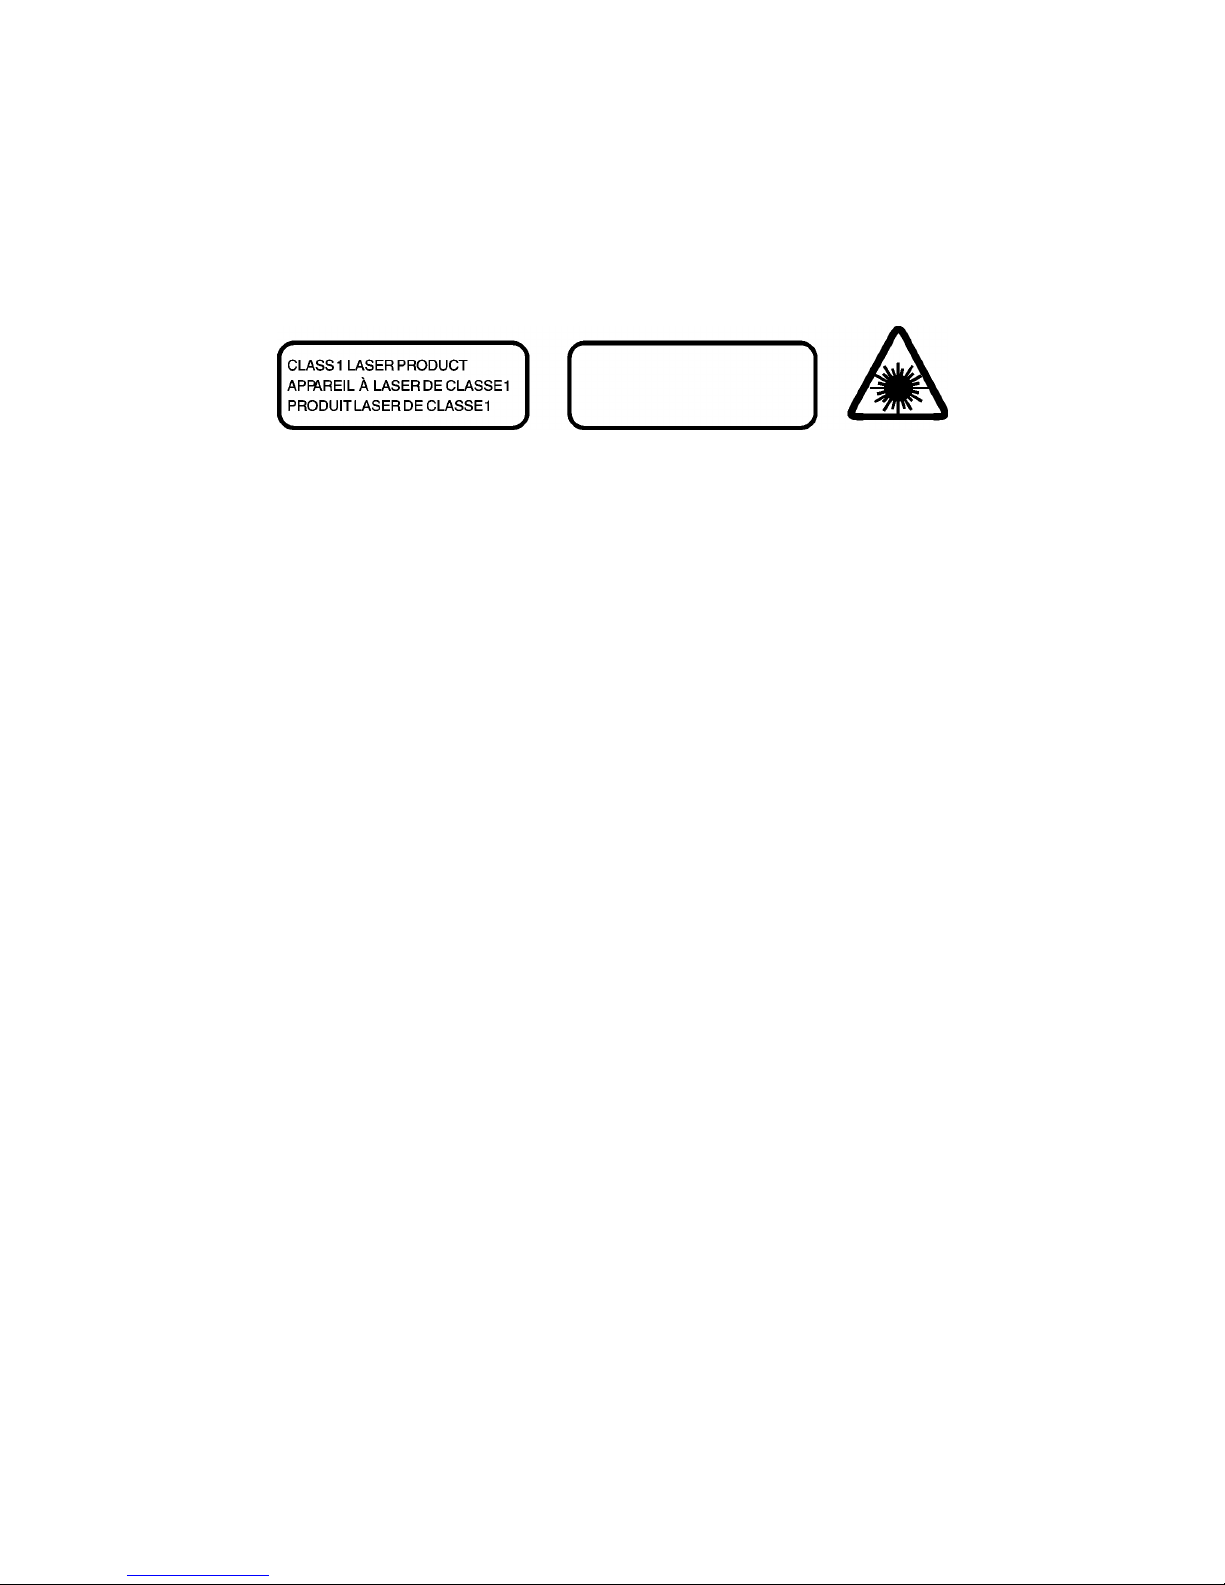
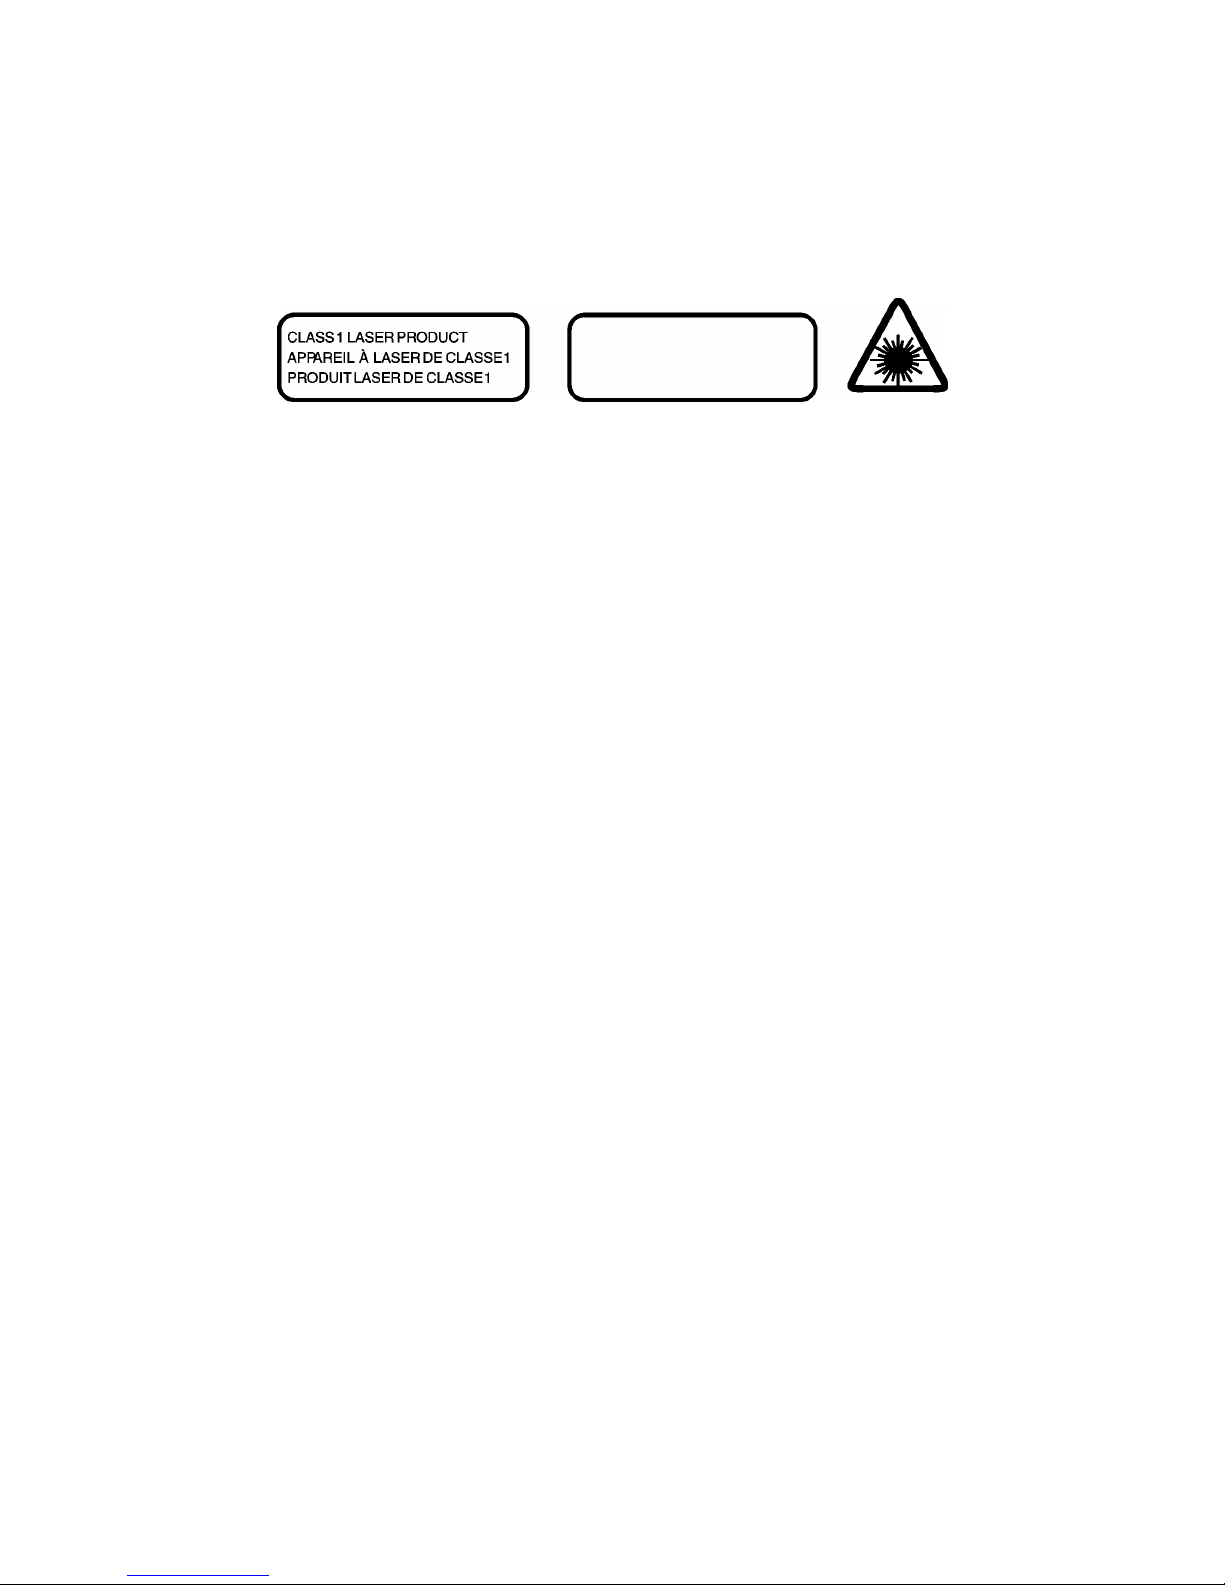
THIS IS A CLASS 1 LASER PRODUCT
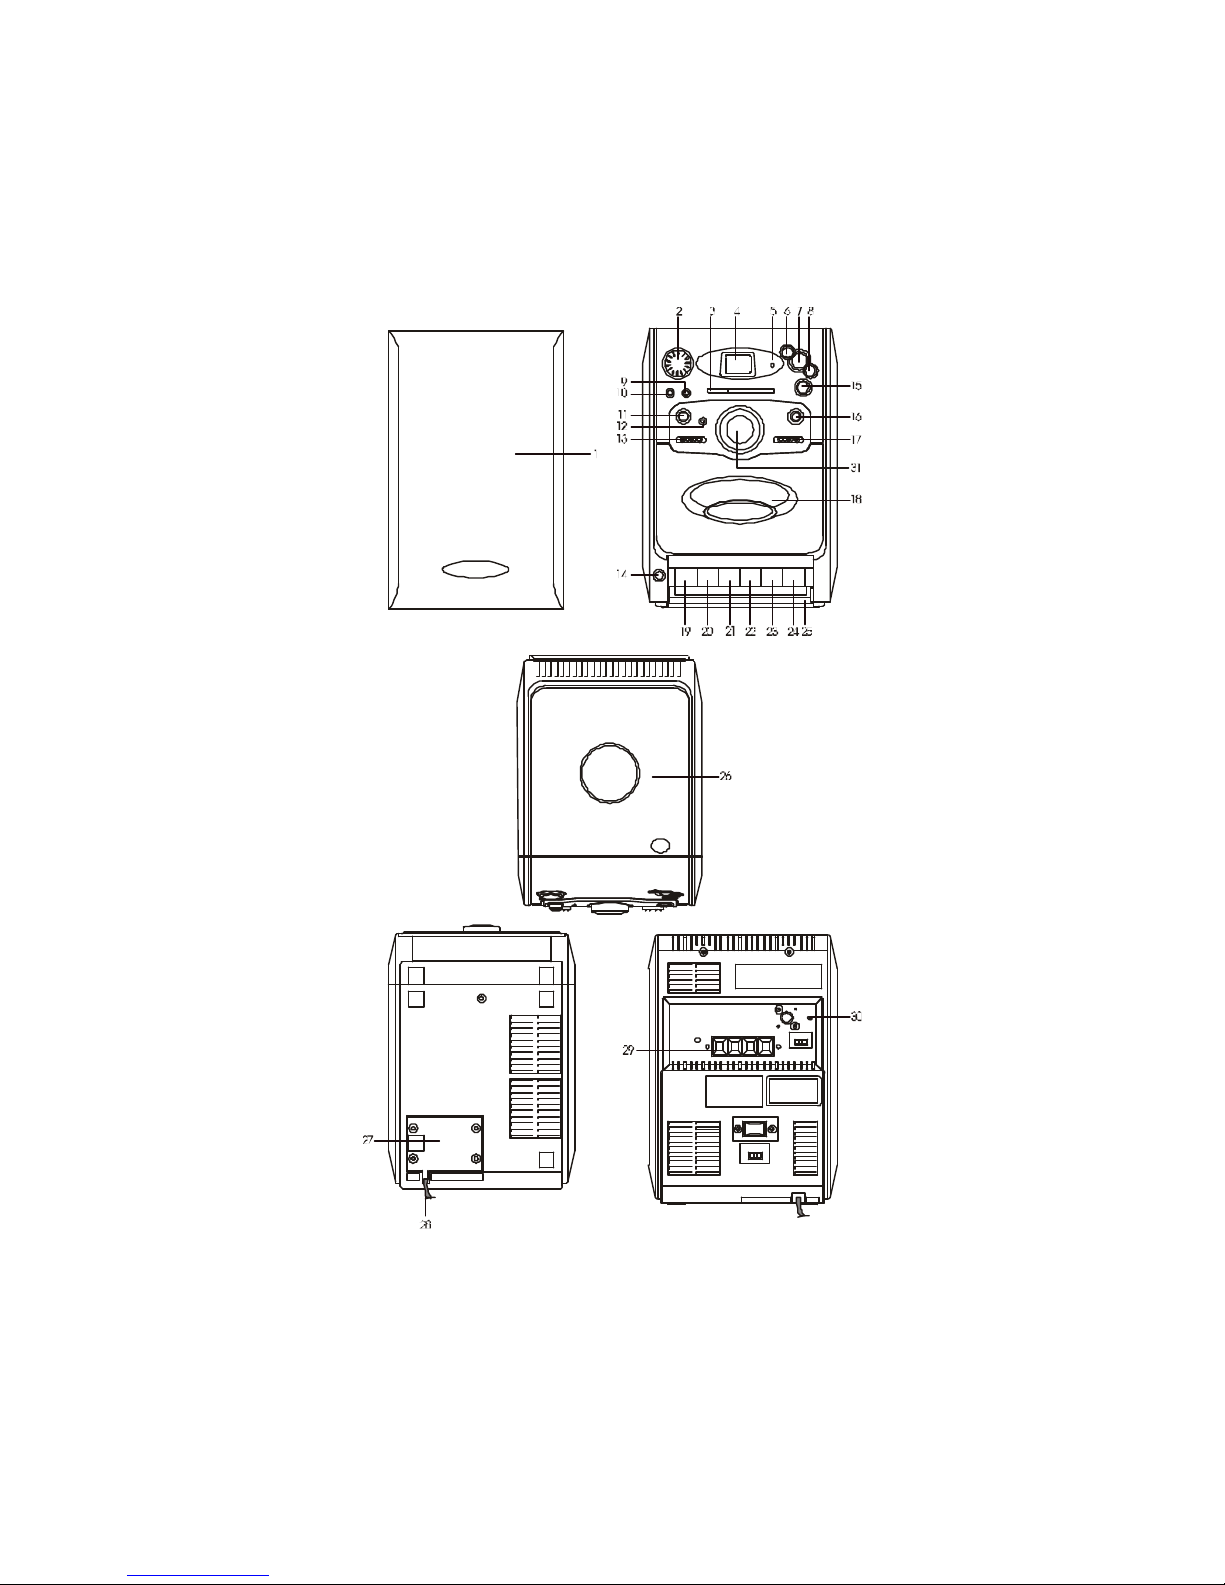
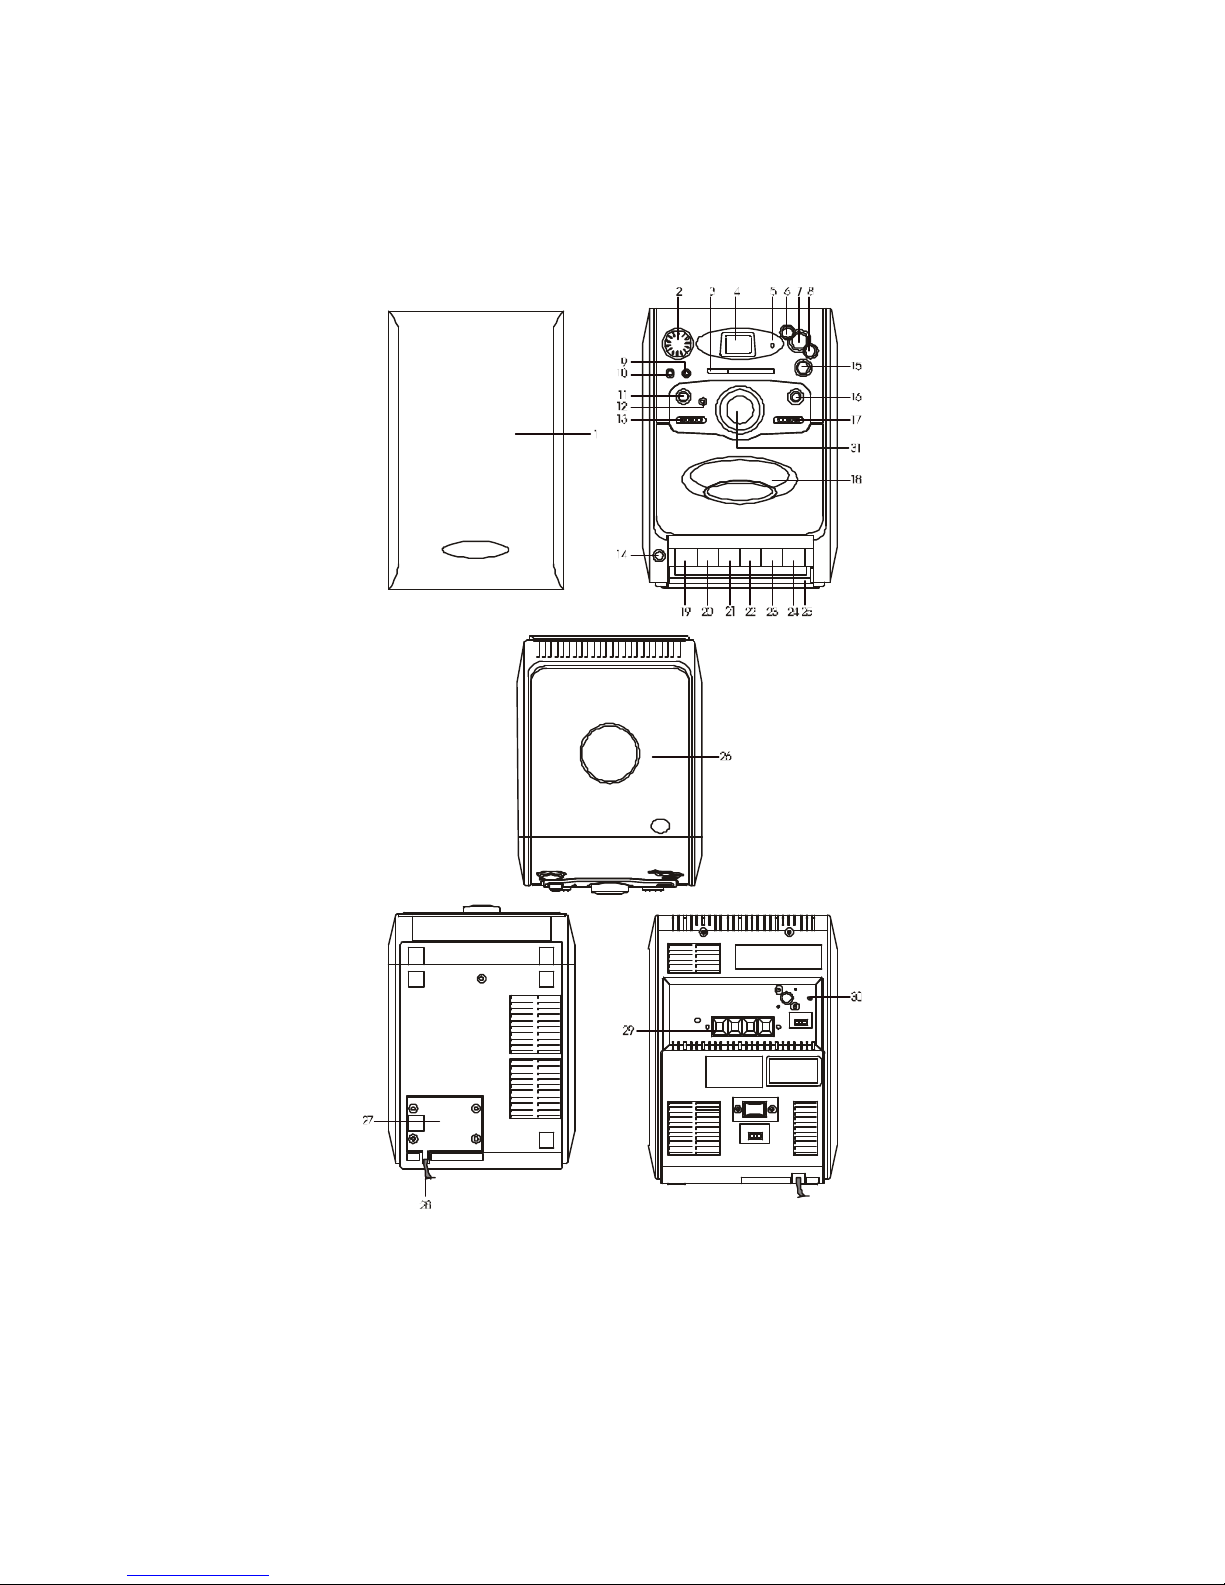
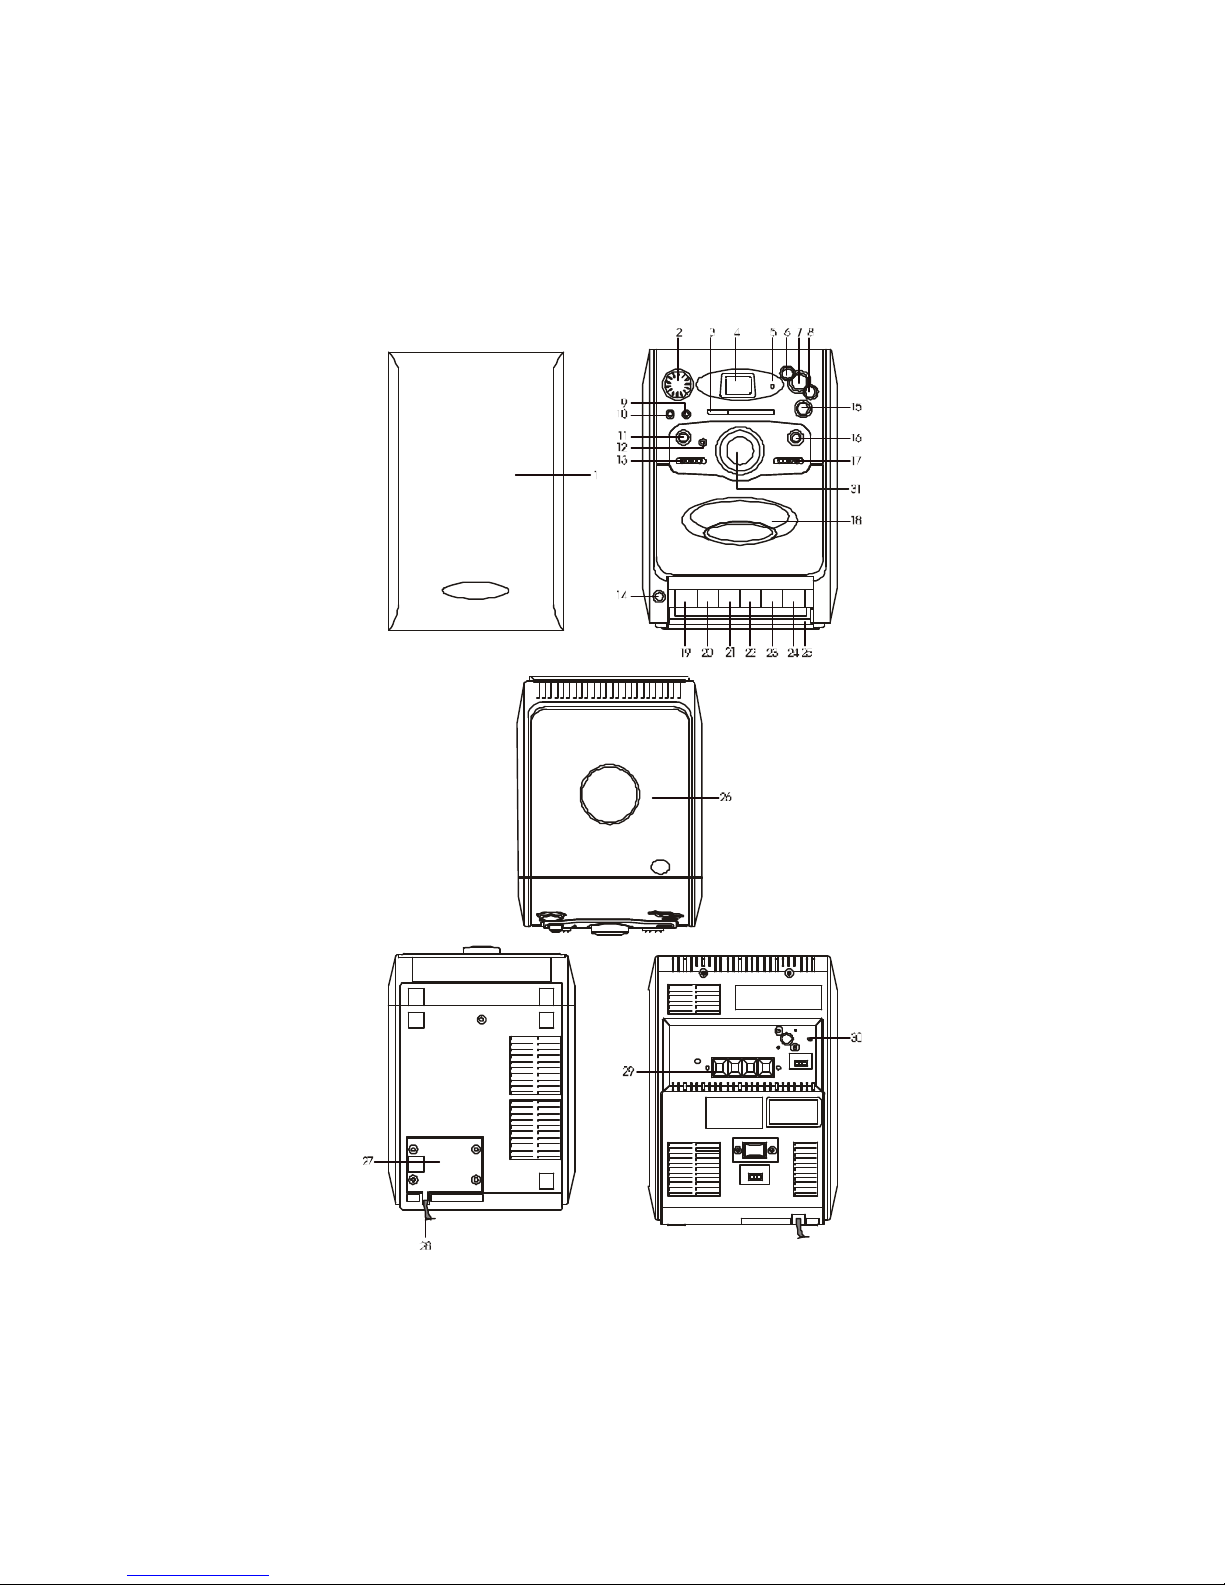
g LOCATION OF CONTROLS
1. SPEAKER
2. VOLUME UP & DOWN BUTTON
3. DIAL SCALE
4. LED DISPLAY WINDOW
5. FM STEREO LED INDICAT OR
6. CD SKIP / REV. BUTTON
7. CD PLAY / PAUSE BUTTON
8. CD SKIP / FF. BUTTON
9. CD PROGRAM BUTTON
10. CD REPEAT BUTTON
11. POWER / STANDBY SWITCH AND REMOTE CONTROL SENSOR
12 STANDBY LED INDICATOR
13. RADIO / TAPE / CD FUNCTION SELECTOR
14. HEADPHONE JACK
15. CD STOP BUTTON
16. BBS ON / OFF BUTTON
17. FM ST./ FM / AM BAND SELECTOR
18. CASSETTE DOOR
19. CASSETTE RECORD BUTTON
20. CASSETTE PLAY BUTTON
21. CASSETTE REWIND BUTTON
22. CASSETTE F.FWD BUTTON
23. TAPE STOP / EJECT BUTTON
24. CASSETTE PAUSE BUTTON
25. CASSETTE BUTTON COVER DOOR
26. CD DOOR
27. AC POWER CORD COVER
28. AC POWER CORD
29. SPEAKER TERMINALS
30. FM ANTENNA
31. TUNING CONTROL
W
ARNING
PRESENCE OF INVISIBLE LASER BEAM
WHEN PLAYER IS OPEN AND SAFETY
DEVICES ARE DEFEATED. AVOID ANY
DIRECT EXPOSURE TO THE BEAM
.

GB-4
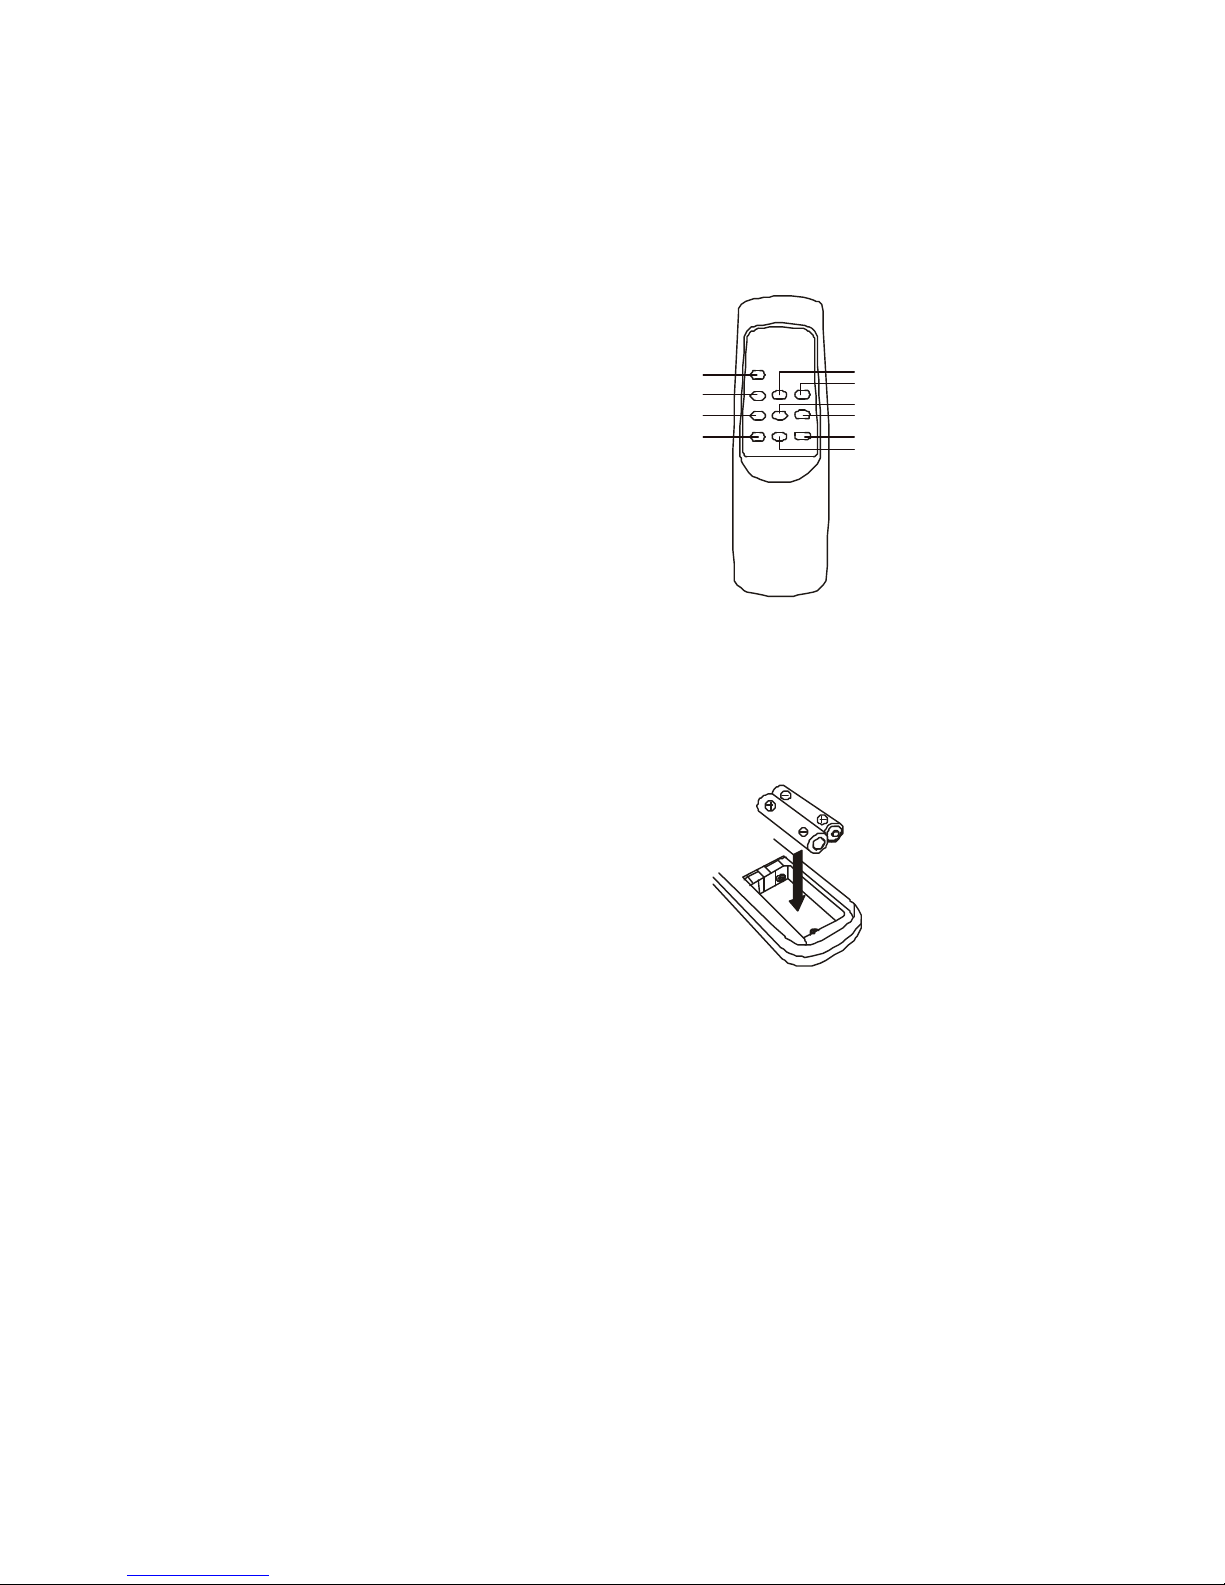
g REMOTE CONTROL
1. POWER BUTTON
2. CD RANDOM BUTTON
3. CD REPEAT BUTTON
4. MUTE BUTTON
5. CD STOP BUTTON
6. CD PLAY/PAUSE BUTTON
7. CD SKIP / REV. BUTTON
8. CD SKIP / FF. BUTTON
9. VOLUME DOWN BUTTON
10. VOLUME UP BUTTON
g INSERTING BATTERIES IN THE
REMOTE CONTROL UNIT
Press on the cover of the battery compartment and
slide it down to open the compartment.
Insert two AAA (or UM4 or LR03) size batteries into the
remote control, matching the polarity marks ("+" and
"-") contained in the battery compartment and on the
batteries themselves. Put the cover back onto the
battery compartment, press it lightly and push it
upwards until it snaps into place.
NOTES: Replace all the batteries at the same time.
Take the batteries out of the remote control if it is to
remain unused for a prolonged period. Do not mix dry
cells with rechargeable batteries. When the batteries
become weak, the remote control no longer functions
normally. If this occurs, remove the batteries and
replace them by new ones.
IMPORTANT: When replacing batteries, or disposing of
the appliance, be sure to follow current regulations
relating to their disposal. Please place in a specially assigned location to ensure that they are disposed of
safely in accordance with environmental protection requirements
g SETUP BEFORE USE
1. Connecting the speakers
Unreel the SPEAKER CABLES and connect them to the SPEAKER OUTPUT TERMINALS . Connect the
black wires to the black terminals. Connect the black and grey wires to the red terminals.
2. Connecting the power cord
Before use, plug the AC power cord into a mains outlet and then set the unit's main power switch to ON.
1
2
3
4
56789
10
** BATTERIES NOT INCLUDED **

GB-5
g OPERATING THE UNIT
When the unit is plugged into the mains, it is automatically switched to standby mode. To switch it on and off,
simply press the POWER button on the unit or the remote control. If you want to switch the power off
completely, you must unplug the power cord from the AC outlet .
g POWER / STANDBY
1. Press the POWER button on the unit (or the remote control) to switch it on.
2. Select the audio source (CD, Radio or Tape) by setting the function selector to the corresponding position.
3. Adjust the volume using the VOLUME button.
4. Press the POWER button the switch off the unit.
g LISTENING TO MUSIC WITH HEADPHONES
The unit is equipped with a jack for headphones. Insert the plug at the end of the headphone lead in this
jack. It is recommended to start listening at a low volume and increase the volume slowly until the desired
level is obtained.
g BBS SYSTEM
Pressing the BBS button boosts the bass level during playback.
g MUTE FUNCTION (on remote control)
Pressing the MUTE button on the remote control switches off the audio output temporarily. Press this button
again to resume normal playback.
g RADIO OPERATION
Set the function selector to RADIO.
FM
Select FM or FM STEREO using the BAND SELECTOR. Turn the TUNING KNOB until you have found the
desired station. The FM STEREO indicator light comes on when a stereo broadcast is received. Extend the
FM antenna completely and orient it to obtain the best possible FM reception.
AM
Select AM using the BAND SELECTOR. Turn the TUNING KNOB until you have found the desired station.
For AM reception, the unit is equipped with a built-in ferrite frame antenna which is directional. Therefore,
the unit must be oriented in order to pick up the strongest possible signal.
g CASSETTE OPERATION
Set the function selector to TAPE.
Playing a cassette
Ensure that the tape is taut in the cassette before use. To correct any slack in the tape, use a hexagonal
pencil or pen: insert it in the centre of the spool and turn it in order to tighten the tape. Press the CASS.
STOP / EJECT button to open the cassette door.
Insert a cassette into the compartment, with the open end facing downwards and the full reel on the left.
Insert the cassette firmly into the compartment and close the door, taking care not to touch the tape surface.
For playback, press the PLAY button. To interrupt playback briefly, press the PAUSE button on the unit. To
resume playback, press the PAUSE button again. To stop playback, press the STOP / EJECT button once.
To remove the cassette from the compartment, press the STOP / EJECT button again.
GB-6
Winding the tape
* Press the F.FWD button to fast forward the tape in the cassette.
* Press the REWIND button to fast rewind the tape in the cassette.
* Press the STOP / EJECT button to stop fast forwarding or rewinding, before you get to the end of the tape.
* When the end of the tape has been reached after fast forwarding or rewinding, you must press the STOP
/ EJECT button to release the F.FWD or REWIND button.
Recording from the radio
Set the function selector to RADIO; select AM or FM using the BAND SELECTOR and set the receiver to the
desired station (to do this, refer to the "RADIO OPERATION" section). Insert a blank cassette into the tape
deck and press the RECORD button (at the same time as the PLAY button). To stop recording, press the
STOP / EJECT button. To interrupt recording for brief intervals, use the PAUSE button.
Recording from a CD
Set the function selector to CD. Select the tracks to be recorded. Insert a blank cassette into the tape deck
and press the RECORD button (at the same time as the PLAY button). To stop recording, press the STOP /
EJECT button.
Note: Adjusting the volume and the BBS function have no effect on the contents of the recording.
Auto Stop
When the end of the tape is reached, either in recording or playback mode, the built-in auto stop system is
activated and releases the PLAY and/or RECORD buttons that were pressed down. The auto stop system
functions when recording from the built-in radio or CD player. However, it only affects the tape deck: the
radio or CD player will continue to play, even after the cassette has stopped.
Types of cassettes
To make satisfactory recordings, use only good quality iron oxide cassettes (TYPE 1 IEC). It is NOT
RECOMMENDED to use C120 cassettes in this unit.
Protecting recordings
Normally, all recordings on the tape are automatically erased when a new recording is made over them.
However, it is possible to protect recordings against accidental erasure by removing the tabs at the back of
the cassette.
When you hold the cassette with the recorded side on top and the exposed tape facing you, the protective
tab to be broken is that at the back right-hand side of the cassette.
All pre-recorded cassettes are protected in this way against any accidental erasure of commercial
recordings. A "protected" cassette prevents you from using the "RECORD" button (it will not stay pressed
down). If you try to make a recording and you realise that you cannot keep the button pressed down, do not
force the mechanism as you may damage it. Check whether there is a cassette in the unit and whether its
protective tab has been removed or not. It is still possible to make a recording on a cassette on which the
tabs have been removed by covering the tab openings using a piece of adhesive tape.

GB-7
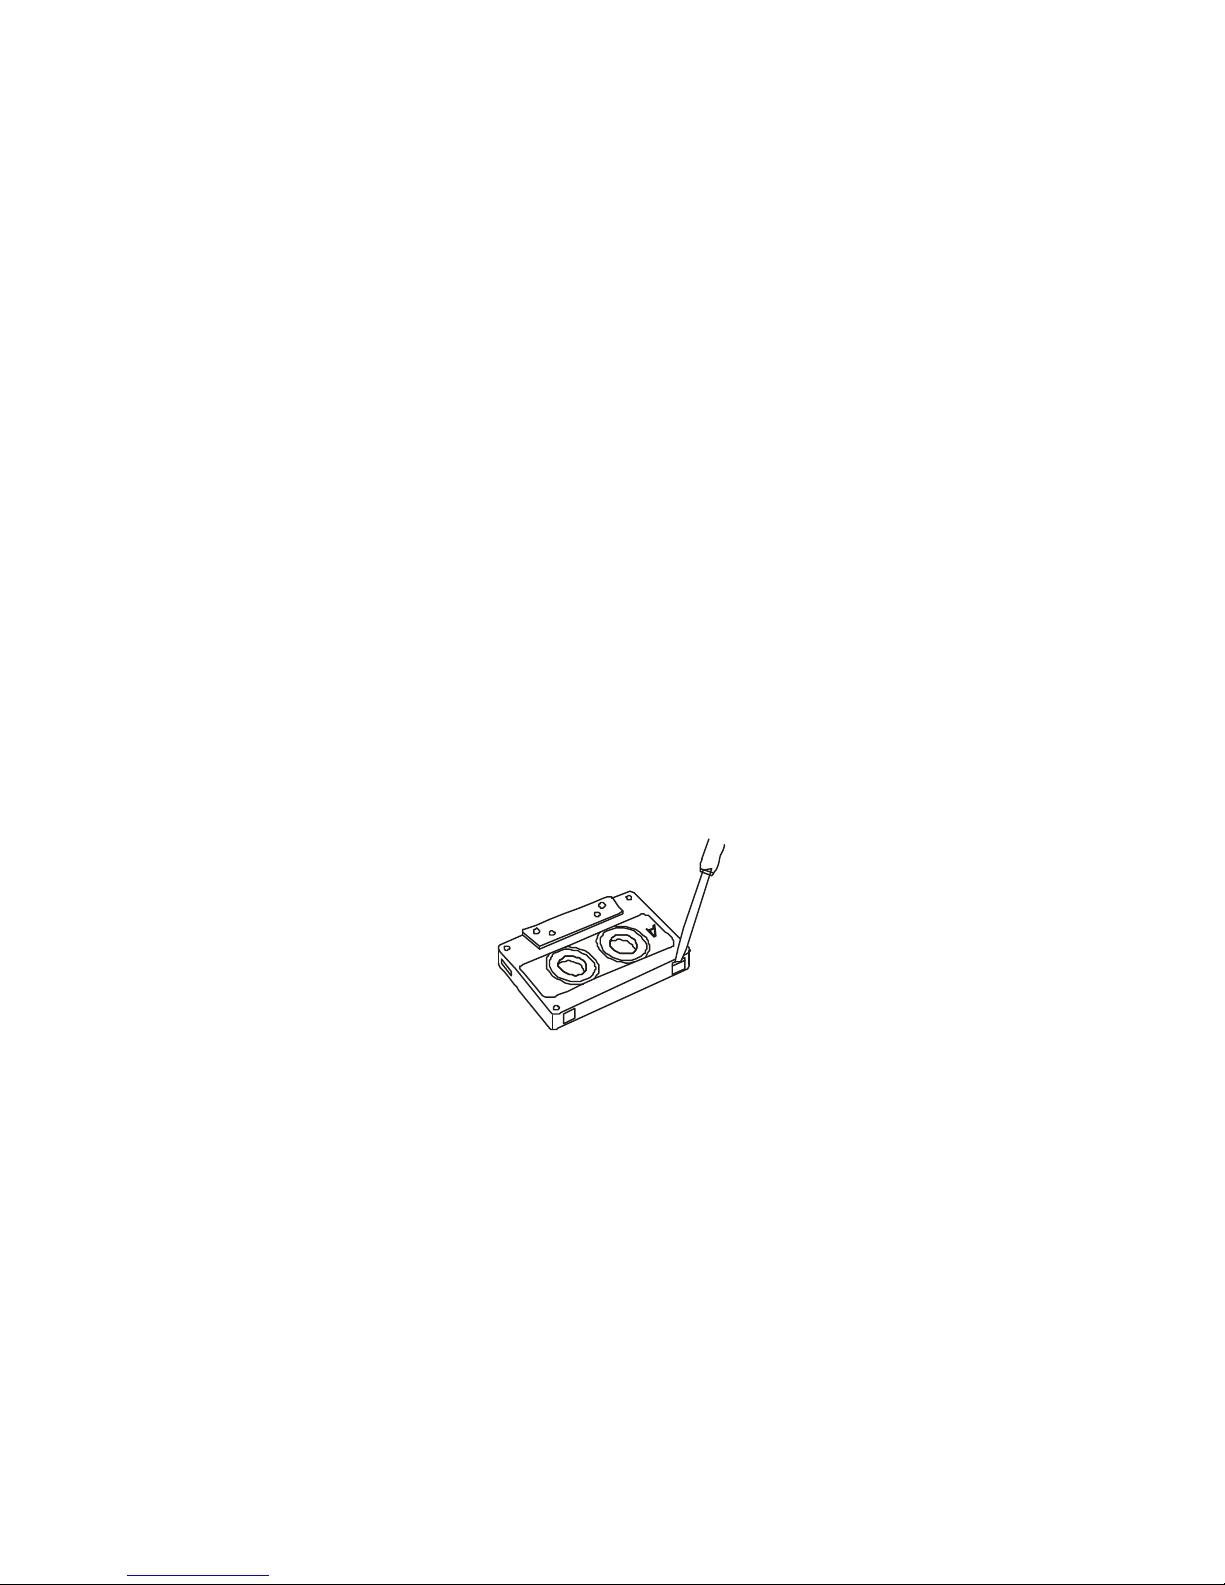
Cleaning the tape playback / recording mechanism
Clean the tape heads and capstan / pinch roller assemblies carefully approximately every 10 hours of
operation, in order to remove any oxide deposits and traces. Various products for this purpose are
commercially available.
RECORD / PLAY HEAD CAPSTAN
ERASE HEAD PINCH ROLLER
The erase and record / play heads, like the surface of the pinch roller, are delicate parts and must never be
touched with metal objects such as screwdrivers. For easier cleaning, you can press the PLAY button to
raise the head and the pinch roller so that they are easier to access. Remember to press the CASS. STOP
button once you have finished cleaning the mechanism.
The pinch roller may be damaged if the deck is left in PLAY mode when it is switched off.
Under no circumstances should you attempt to lubricate any part of the machine.
WARNING
Switch off the unit by unplugging the power cord from the AC outlet when not in use. Avoid exposure to rain
and moisture.
g CD PLAYER OPERATION
If the CD player is subjected to strong vibrations during playback, sound skips or tracking errors may occur.
As a result, it is preferable to install the unit flat on a stable surface.
Playing a compact disc
Press the POWER button to switch on the unit. Set the function selector to CD. Insert the disc with the label
side facing upwards and close the CD door. The LED display will then show the number of tracks on the CD.
If the CD is not inserted properly, playback cannot start.
Press the PLAY / PAUSE button on the CD player to start playback. The bottom right-hand indicator on the
display lights up. To stop playback, press the STOP button on the CD player.
* Make sure that the CD player is not in operation before opening the CD door, or press the STOP button on
the CD player before opening the CD door.
Pause
If you want to interrupt CD playback temporarily, press the PLAY / PAUSE button once. The bottom
right-hand indicator of the LED display starts flashing. Press the PLAY / PAUSE button again to resume
normal playback.
Skipping tracks
The track skip function can be used during playback or when the player is switched off to go to the start of a
particular track on the CD.
To skip forwards, press the SKIP/ FF. button on the CD player several times until you have reached the
desired track.
To skip back to the start of the current track, press the SKIP / REV. button once. To skip back to the start of
previous tracks, press the button several times until you have reached the desired track.
Searching for a specific passage in a track during playback
Press and hold the SKIP FF. / REV. button on the CD player: the player will perform a fast forward or reverse
search.
Release the button when you have reached the desired point in the track: playback at normal speed will
resume from this point. During the search, the volume is lowered.

GB-8
Programmed playback
The programming function enables you to play up to 30 tracks from a CD in any desired order.
1. Place the CD intended for programmed playback in the CD compartment. Press the PROGRAM button
once in STOP mode.
2. The "01" indicator lights up on the LED display.
3. Use the SKIP FF. or SKIP REV. buttons on the CD player to select the first track to be programmed.
4. When the desired track appears on the display, press the PROGRAM key a second time.
5. Repeat operations 3 and 4 to program up to 30 tracks.
6. Press the PLAY button on the CD player: the first track in the program starts playing. Once all the tracks
have been played, the display shows the total number of tracks.
7. To clear the program, press the STOP button twice, open the CD door and close it again, select another
function (except for CD) or switch to standby mode.
* There is no indication for PROGRAM play.
Random playback (on remote control only)
1. Press the RANDOM button once: the tracks will be played back continuously in random order.
2. Press the STOP button on the CD player to deactivate the random playback mode.
* There is no indication for RANDOM play.
Repeated playback
1 Press the REPEAT button on the CD player: the bottom centre indicator on the LED display will start
flashing. The current track will be played back repeatedly until you press the STOP button.
2. Press the REPEAT button on the CD player a second time: the bottom centre indicator on the LED display
will light up steadily. The entire CD will be played back in sequence repeatedly until you press the STOP
button.
3. Press the REPEAT or STOP button to deactivate the repeat function.

GB-9
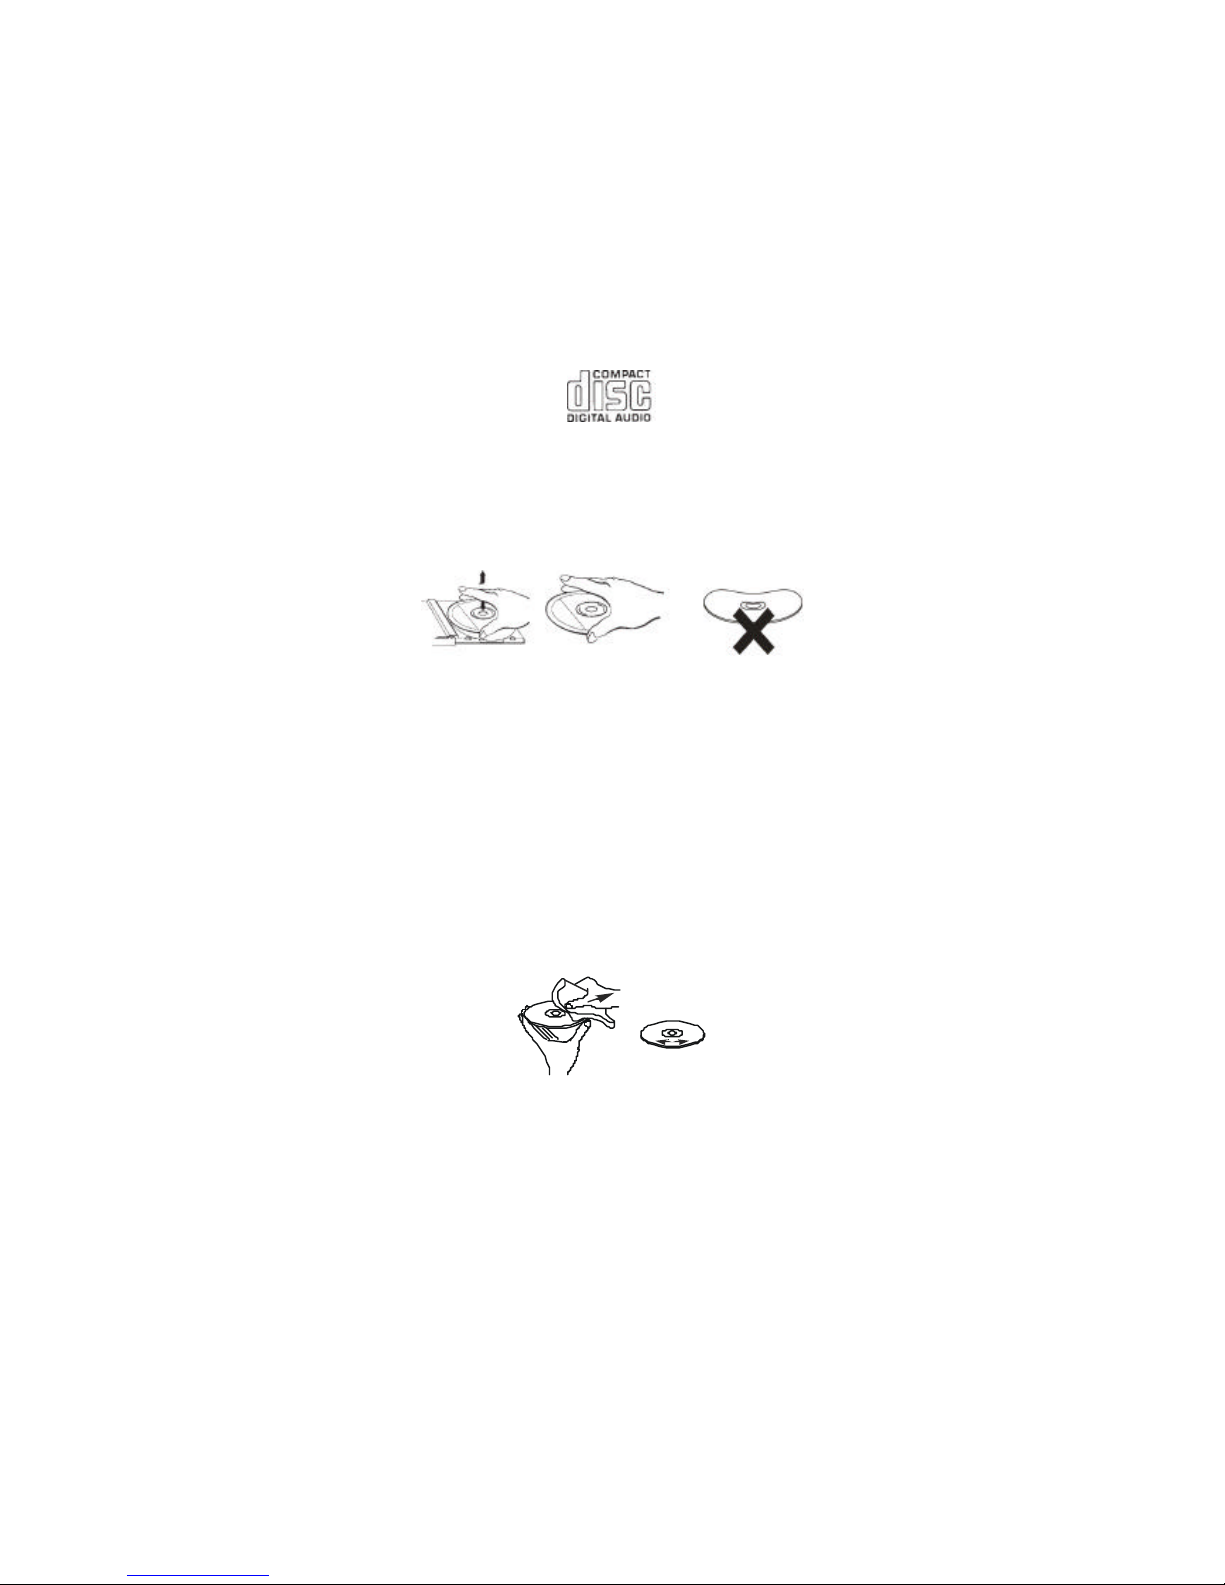
g HANDLING CDs
1. Always use CDs bearing the following logo:
2. Notes on handling CDs
When you take the CD out of its case to insert it into the player:
* Do not touch the reflective surface (recorded side).
* Do not attach any paper labels or write anything on the surface of the CD.
* Do not fold the CD.
3. Storage
* Store the CD in its case.
* Do not expose CDs to direct sunlight or high temperatures, high humidity or dusty environments.
4. Cleaning CDs
* If a CD has just been soiled with dust, fingerprints or other stains, wipe it with a soft cloth.
* The CD must be cleaned from the centre towards the edge.
* Never use benzene, thinners, record cleaning fluids or antistatic sprays.
* Remember to close the CD door so that the lens is not contaminated with dust.
* Do not touch the lens.
FROM THE CENTRE TOWARDS THE EDGE
CORRECT INCORRECT
GB-10
g SPECIFICATIONS
ELECTRICAL POWER SUPPLY : 230V~50Hz
OUTPUT POWER : 2 x 2 WATTS
UNIT DIMENSIONS : 154 (L) x 218 (D) x 221 (H) mm
SPEAKER DIMENSIONS: 138 (L) x 136 (D) x 221 (H) mm
NET WEIGHT: 4.3 kg
RADIO SECTION
FREQUENCY RANGE : FM 88 - 108 MHz
AM 540 - 1600 kHz
CASSETTE SECTION
TAPE SPEED: 4.75 cm/sec.
FREQUENCY RESPONSE : 125Hz - 8kHz
COMPACT DISC SECTION
OPTICAL SENSOR : 3-BEAM LASER
FREQUENCY RESPONSE : 100 Hz - 16 kHz
ALLE RETTIGHEDER FORBEHOLDES
COPY RIGHT DENVER ELECTRONICS A/S
www.denver -electronics.com
Instructions on environment protection
Do not dispose of this product in the usual household garbage
at the end of its lifecycle; hand it over at a collection point for
the recycling of electrical and electronic appliances. The
symbol on the product, the instructions for use or the packing
will inform about the methods for disposal.
The materials are recyclable as mentioned in this marking. By
recycling, material recycling or other forms of re-utilization of
old appliances, you are making an important contribution to
protect our environment.
Please inquire at the community administration for the
authorized disposal location.
DE-1
Um alle Vorteile dieses Geräts voll ausnutzen zu können, lesen Sie bitte vor jeglicher Verwendung die
vorliegende Gebrauchsanleitung aufmerksam durch. Sie können sich hierbei mit den verschiedenen
Funktionalitäten vertraut machen und über viele Jahre hinweg von der Klangqualität des Geräts optimal
profitieren.
Wichtige Hinweise
* Diese Anleitung mit Sicherheits- und Gebrauchsanweisungen ist an einem sicheren Ort aufzubewahren,
um später jederzeit auf sie zurückgreifen zu können.
* Die Aufstellung des Gerät s an einer Stelle nachstehender Art ist zu vermeiden:
• In direkter Sonneneinstrahlung oder in der Nähe von Heizkörpern.
• Über anderen, übermäßige Wärme erzeugenden HIFI-Geräten.
• Sehr staubige Umgebung oder Stellen, an denen die Lüftungsöffnungen behindert werden.
• Ständigen Schwingungen unterliegenden Stellen.
• Feuchte Umgebung.
* Darauf achten, dass die Lüftungsöffnungen des Geräts unverstellt bleiben.
* Die Drehknöpfe und anderen Schalter des Geräts den Anweisungen der Anleitung gemäß betätigen.
* Vor der ersten Einschaltung des Geräts sicherstellen, dass das Netzkabel richtig angeschlossen ist .
*Kassetten oder CDs vor Wärme geschützt an einem hinreichend kühlen Ort aufbewahren.
*Warnung vor Tropfwasser: "Das Gerät darf auf keinen Fall tropfendem oder spritzendem Wasser ausgesetzt
werden. Deshalb dürfen keinerlei mit Flüssigkeiten gefüllte Behälter (Vasen, Blumentöpfe usw.) auf dem Gerät
abgestellt werden.
*Warnung hinsichtlich der Lüftung: "Für den vorgesehenen Einsatz darf die normale Lüftung des Geräts auf
keinen Fall behindert werden."
ACHTUNG: ZUR VERMEIDUNG JEGLICHER GEFAHR EINES ELEKTRISCHEN SCHLAGS DARF DER
DECKEL (ODER DIE RÜCKSEITE) DES GERÄTS NICHT ABGENOMMEN WERDEN. DAS GERÄT
ENTHÄLT KEINE VOM BENUTZER AUSTAUSCHBARE N TEILE. ALLE REPARATUREN MÜSSEN VON
QUALIFIZIERTEN FACHKRÄFTEN ERLEDIGT WERDEN.
GEFAHR
NICHT ÖFFNEN, GEFAHR EINES
ELEKTRISCHEN SCHLAGS
GEFÄHRLICHE SPANNUNG
Im Gerät sind gefährliche elektrische Spannungen vorhanden, die zur Auslösung eines elektrischen
Schlags ausreichen können.
GEFÄHRLICHE SPANNUNG
Das gleichseitige Dreieck mit dem Blitzsymbol soll den Benutzer vor unisolierten
gefährlichen elektrischen Spannungen im Innern des Geräts warnen.
ACHTUNG
Das gleichseitige Dreieck mit dem Ausrufezeichen soll den Benutzer in den das
Gerät begleitenden Anleitungen auf wichtige Anweisungen hinweisen .
Hinweis:
Dieses Gerät erwärmt sich bei längerem Gebrauch. Dies ist ein natürlicher Vorgang und kein Anzeichen für
Probleme im Innern des Geräts.
Der CD-Player enthält Mikroprozessoren, deren Betrieb bei Vorhandensein von Netzstörungen oder von
anderen Geräten erzeugter elektromagnetischer Störungen beeinträchtigt werden kann. Arbeitet der
CD -Player nicht richtig, so ist das Gerät von seiner Stromversorgung zu trennen und erneut anzuschließen.
DE-2
DE-3
LASER-Produkt der Klasse 1
g BEDIENUNGEN UND VERSCHIEDENE ORGANE
1. LAUTSPRECHER
2. LAUTSTÄRKEKNOPF
3. RADIO-ABSTIMMSKALA
4. LED-DISPLAY
5. KONTROLLLEUCHTE DES FM-STEREOEMPFANGS
6. CD-RÜCKSPRUNG- / SCHNELLRÜCKLAUF (SKIP / REV.)
7. CD-WIEDERGABE -, PAUSETASTE (PLAY / PAUSE)
8. CD-VORWÄRTSPRUNG- / SCHNELLVORLAUF (SKIP / FF.)
9. CD-PROGRAMMIERTASTE (PROGRAM)
10. CD-WIEDERHOLTASTE (REPEAT)
11. SCHALTER FÜR EINSCHALTEN / WACHBETRIEB (POWER / STANDBY) UND
FERNSTEUERUNGSSENSOR
12 WACHBETRIEB-LEUCHTE
13. FUNKTIONSWAHLSCHALTER RADIO / KASSETTE / CD (RADIO / TAPE / CD)
14. KOPFHÖRER-ANSCHLUSS
15. CD-STOPP-TASTE (STOP)
16. TIEFENVERSTÄRKUNGSTASTE (BASSBOOST - BBS)
17. FREQUENZBAND-WAHLSCHALTER (FM ST./ FM / AM)
18. KASSETTENFACH-KLAPPE
19. KASSETTEN-AUFZEICHNUNGSTASTE (RECORD)
20. KASSETTEN-WIEDERGABETASTE (PLAY)
21. KASSETTEN-RÜCKSPULTASTE (REWIND)
22. KASSETTEN-SCHNELLVORLAUFTASTE (F.FWD)
23. STOPP- / KASSETTENAUSWURFTASTE (STOP / EJECT)
24. TASTE ZUM SCHALTEN DER KASSETTE AUF PAUSE (PAUSE)
25. TASTEN-SCHUTZABDECKUNG DES KASSETTENGERÄTS
26. CD-FACH-DECKEL
27. KLAPPE ZU NETZKABEL-EINRÄUMRAUM
28. NETZKABEL
29. SPEAKER-ANSCHLÜSSE
30. FM-ANTENNE
31. ABSTIMMTASTE
ACHTUNG
Ist das Gerät offen, oder sind seine
Sicherheits-vorrichtungen außer Kraft, so treten
unsichtbare Laserstrahlen aus dem Gerät aus.
Jegliche Berührung mit Laserstrahlen ist zu
DE-4
g FERNSTEUERUNG
1. EIN-/AUSSCHALTER
2. TASTE FÜR ZUFALLSBEDINGTE
CD -WIEDERGABE (RANDOM)
3. CD-WIEDERHOLTASTE (REPEAT)
4. STUMMTASTE (MUTE)
5. CD-STOPTASTE (STOP)
6. CD-WIEDERGABE - / PAUSE-TASTE
(PLAY/PAUSE)
7. CD-RÜCKSPRUNG- /SCHNELLRÜCKLAUF
(SKIP / REV.)
8. CD-VORWÄRSTSPRUNG- /
SCHNELLVORLAUF (SKIP / FF.)
9. LAUTSTÄRKE-REDUZIERTASTE
10. LAUTSTÄRKE-ERHÖHUNGSTASTE
g EINLEGEN DER BATTERIEN IN DIE
FERNSTEUERUNG
Zum Öffnen des Batteriefachs auf dessen Deckel
drücken und diesen nach unten schieben.
Zwei Batterien des Formats LR03 (oder UM4 oder
AAA) in die Fernsteuerung einlegen und dabei die im
Fach und auf den Batterien vermerkten
Polungskennzeichnungen ("+" und "-") beachten.
Den Deckel wieder auf das Batteriefach setzen. Hierzu
leicht auf den Deckel drücken und ihn nach oben
schieben bis er in seiner Position einrastet.
HINWEIS: Alle Batterien gleichzeitig austauschen.
Wird die Fernsteuerung längere Zeit nicht benutzt, so
sind die Batterien zu entnehmen. Keine normalen
Batterien mit wiederaufladbaren Batterien vermischen.
Wenn die Batterien erschöpft sind, arbeitet die
Fernsteuerung nicht mehr korrekt. In diesem Fall sind
die Batterien zu entfernen und durch neue Batterien zu
ersetzen.
WICHTIG: Ausgewechselte Batterien sind in Einklang mit bestehenden Vorschriften zu entsorgen. Wir
bitten Sie deshalb, sie an einer hierfür vorgesehenen Stelle abzugeben, um ihre sichere und
umweltgerechte Entsorgung zu gewährleisten
g VORBEREITUNGEN VOR DER VERWENDUNG
1. Anschluss der Speaker
Die SPEAKER-KABEL ausrollen und an den SPEAKER-AUSGANGSKLEMMEN anschließen. Die
schwarzen Drähte an den schwarzen Klemmen und die grau-schwarzen Drähte an den roten Klemmen
anschließen.
2. Anschluss des Netzkabels
Zur Verwendung des Geräts das Netzkabel an einer Steckdose anschließen und seinen Hauptschalter auf
(ON) schalten.
1
2
3
4
56789
10
**BATTERIEN NICHT IM LIEFERUMFANG ENTHALTEN**

DE-5
g VERWENDUNG DES GERÄTS
Das Gerät schaltet nach seinem Anschluss an einer Netzsteckdose automatisch auf Wachbetrieb. Um es
ein - oder auszuschalten, ist dann die Taste POWER des Geräts oder der Fernbedienung zu drücken. Soll
es vollständig abgeschaltet werden, so ist das Netzkabel aus der Steckdose zu ziehen.
g INBETRIEBNAHME / WACHBETRIEB DES GERÄTS
1. Die Taste POWER am Gerät (oder an der Fernbedienung) betätigen, um das Gerät einzuschalten.
2. Zur Wahl der Audioquelle (CD, Radio oder Kassette) den Betriebswahlschalter auf die entsprechende
Position stellen.
3. Mit der Taste VOLUME die Lautstärke einstellen.
4. Zum Abschalten des Geräts die Taste POWER drücken.
g MUSIKHÖREN MIT KOPFHÖRER
Das Gerät ist mit einer Kopfhörer-Anschlussbuchse ausgestattet, in welche der Stecker des Kopfhörers
einzuführen ist. Es wird empfohlen mit niedrigster Lautstärke zu beginnen und diese dann schrittweise auf
das gewünschte Niveau zu erhöhen.
g BBS-SYSTEM
Durch Drücken der Taste BBS kann bei der Wiedergabe die Stärke der Basstöne (Tiefen) angehoben
werden.
g STUMMFUNKTION (MUTE) (auf der Fernsteuerung)
Durch Drücken der Taste MUTE der Fernsteuerung kann die Ton-Wiedergabe kurzfris tig unterbrochen
werden. Zur Rückkehr zur normalen Wiedergabe ist diese Taste erneut zu drücken.
g VERWENDUNG IN RADIO-BETRIEB
Den Funktionswahlschalter auf RADIO stellen.
FM
Am FREQUENZBAND-SCHALTER FM oder FM STEREO wählen. Am ABSTIMMKNOPF den
gewünschten Sender einstellen. Bei Stereoempfang schaltet die Signalleuchte FM STEREO ein. Die
FM -Antenne voll ausfahren und so orientieren, dass bestmöglicher FM-Empfang erhalten wird.
AM
Mit dem FREQUENZBAND-SCHALTER AM wählen. Am ABSTIMMKNOPF den gewünschten Sender
einstellen. Der AM-Empfang erfolgt über eine fest eingebaute Ferrit-Rahmenantenne. Für optimalen
AM-Empfang ist deshalb das Gerät in der richtigen Richtung aufzustellen.
g VERWENDUNG MIT KASSETTE
Am Funktionswahlschalter TAPE wählen.
Wiedergabe einer Kassette
Vor dem Gebrauch darauf achten, dass das Band in der Kassette richtig gespannt ist. Zum Nachspannen
eines eventuell erschlafften Bandes einen Sechskantstab (Bleistif t, Kugelschreiber oder ähnliches) im
Zentrum der Spule einführen und so drehen, dass das Band gestrafft wird. Zum Öffnen des Kassettenfachs
die Taste CASS. STOP / EJECT betätigen.
Eine Kassette so in das Fach einführen, dass das Fenster mit sichtbarem Magnetband unten und die volle
Spule links zu liegen kommen. Die Kassette voll in ihr Fach drücken und die Klappe wieder schließen, dabei
das offenliegende Magnetband nicht berühren. Zur Wiedergabe der Kassette die Taste PLAY drücken. Um
die Wiedergabe vorüber gehend zu unterbrechen, die Taste PAUSE des Geräts drücken. Durch erneute
Betätigung dieser Taste den Betrieb wieder aufnehmen. Zum Anhalten der Wiedergabe die Taste STOP /
EJECT einmal drücken. Die Taste erneut drücken, um die Kassette aus ihrem Fach zu nehmen.
DE-6
Rückspulen der Kassette
* Die Taste F.FWD betätigen, um das Band in der Kassette schnell vorzuspulen.
* Zum schnellen Rückspulen des Bands die Taste REWIND betätigen.
* Die Taste STOP / EJECT drücken, um den schnellen Vor- oder Rücklauf zu beenden , bevor das Band sein
Ende oder seinen Anfang erreicht.
* Nach einem schnellen Vor - oder Rückspulen des Bands bis zum Anschlag muss zum Entriegeln der Taste
F.FWD oder REWIND die Taste STOP / EJECT gedrückt werden.
Aufnahme vom Radio
Den Betriebswahlschalter auf RADIO stellen, mit dem FREQUENZBAND-Wahlschalter FM- oder
AM-Betrieb wählen und auf den gewünschten Sender einstellen (siehe hierzu den Abschnitt
"VERWENDUNG BEI RADIOBETRIEB"). Eine unbespielte Kassette in ihr Fach einführen und die Taste
RECORD gleichzeitig mit der Taste PLAY betätigen. Um die Aufnahme abzubrechen, die Taste STOP /
EJECT drücken. Für kurzfristige Unterbrechungen der Aufzeichnung die PAUSE-Taste benutzen.
Aufnahme von einer CD
Den Betriebswahlschalter auf CD stellen. Die aufzunehmenden Titel wählen. Eine unbespielte Kassette in
ihr Fach einführen und die Taste RECORD zusammen mit der Taste PLAY betätigen. Um die Aufnahme
abzubrechen, die Taste STOP / EJECT drücken.
Hinweis: Einstellungen an Lautstärke und Bassboost-Funktion bleiben für den Inhalt der Aufzeichnung
ohne Wirkung.
Automatische Abschaltung
Wenn die Kassette ihr Ende erreicht, sow ohl bei der Wiedergabe als auch bei der Aufnahme, tritt das
automatische Abschaltsystem in Funktion und löst die eingedrückten Tasten PLAY und/oder RECORD. Das
Abschaltsystem arbeitet bei Aufnahme von Radio und von CD, wirkt jedoch nur auf das Kassettenteil. Das
Radio oder der CD-Player bleiben in Betrieb, auch nach dem Abschalten der Kassette.
Kassettentypen
Um gute Aufnahmen zu machen, sind ausschließlich Ferrit-Kassetten (TYP 1 IEC) guter Qualität zu
benutzen. Es wird davon abgeraten, mit diesem Gerät C120-Kassetten zu verwenden.
Schutz der Aufnahmen
Normalerweise werden auf einem Band vorhandene Aufzeichnungen automatisch gelöscht, wenn auf
demselben Band neue Aufnahmen gemacht werden. Jedoch können Aufzeichnungen durch Entfernen der
Löschschutzzungen auf der Rückseite der Kassette gegen ungewolltes Löschen geschützt werden.
Wird die Kassette mit der bespielten Seite nach oben und mit dem sichtbaren Band zum Benutzer zeigend
gehalten, so muss zum Löschschutz die hinten rechts gelegene Zunge entfernt werden.
Alle bespielt im Handel erworbenen Kassetten sind auf diese Weise gegen Überspielen geschützt. Ist eine
geschützte Kassette eingelegt, so kann die Aufnahmetaste "RECORD" nicht benutzt werden (man kann sie
nicht eindr ücken). Kann diese Taste beim Versuch einer Aufzeichnung nicht gedrückt werden, so ist sie
nicht mit Gewalt einzudrücken, da sonst der Mechanismus beschädigt werden kann. Zunächst prüfen, ob
sich im Gerät eine Kassette befindet, deren Löschschutzzunge entfernt worden ist. Geschützte Kassetten
können überspielt werden, indem die nach Entfernen der Löschschutzzungen entstandenen Öffnungen mit
Klebeband abgedeckt werden.

DE-7
Instandhaltung des Lese-/ Aufnahmemechanismus der Kassetten
Die Tonköpfe und die Antriebs- und Andrückrollen nach jeweils ungefähr 10 Betriebsstunden reinigen, um
alle Oxid-Ablagerungen zu entfernen. Zu diesem Zweck sind verschiedene Produkte im Handel erhältlich.
LESE- / AUFNAHMEKOPF ANTRIEBSROLLE
LÖSCHKOPF DRUCKROLLE
Löschkopf, Lese- und Aufnahmekopf, sowie die Oberfläche der Andrückrolle sind empfindlich und dürfen
auf keinen Fall mit metallenen Teilen, wie Schraubenziehern berührt werden. Zum Erleichtern der
Reinigung kann eventuell die Taste PLAY gedrückt werden, um Tonkopf und Andrückrolle leichter
zugänglich zu machen. Nach Beendigung der Reinigung darf nicht vergessen werden, die Taste CASS.
STOP zu drücken.
Die Antriebsrolle kann beschädigt werden, wenn das abgeschaltete Ge rät in Wiedergabeposition gelassen
wird (Taste PLAY gedrückt).
Es darf auf keinen Fall versucht werden, irgendwelche Teile des Geräts zu schmieren.
GEFAHR
Wird das Gerät nicht benutzt, so ist es durch Abziehen des Netzkabels von der Stromversorgung zu
trennen. Das Gerät keinen Regentropfen oder Feuchtigkeit aussetzen.
g VERWENDUNG BEI CD-BETRIEB
Ist der CD- Player während der Wiedergabe starken Schwingungen ausgesetzt, so kann es zu
Unterbrechungen der Tonwiedergabe oder fehlerhafter Beibehaltung der Spur kommen. Es ist deshalb
angebracht, das Gerät auf einer ebenen und stabilen Fläche abzustellen.
Wiedergabe einer CD
Das Gerät durch Drücken der Taste POWER in Betrieb nehmen. Den Betriebswahlschalter auf CD stellen.
Die CD mit der Etikettenseite nach oben einlegen und das CD-Fach schließen. Auf der CD-Anzeige wird
dann die Anzahl der auf der CD enthaltenen Titel angezeigt. Wurde die CD falsch eingeführt, so kann mit
dem Abspielen nicht begonnen werden.
Zum Starten der Wiedergabe die Taste PLAY / PAUSE des C D- Players drücken. Die Kontrolllampe unten
rechts leuchtet. Zur Unterbrechung der Wiedergabe die Taste STOP des CD -Players betätigen.
* Vor dem Öffnen des CD-Fachs sicherstellen, dass die CD gestoppt ist, oder vor dem Öffnen des Fachs
jeweils die STOP-Taste drücken.
Pause
Soll die Wiedergabe der CD vorübergehend unterbrochen werden, die Taste PLAY / PAUSE einmal
drücken, worauf die Kontrollleuchte unten rechts zu blinken beginnt. Die Taste PLAY / PAUSE erneut
betätigen, um zu normalem Wiedergabebetrieb zurückzukehren.
Überspringen von Titeln
Das Überspringen von Titeln kann während der Wiedergabe betätigt werden, oder auch bei Stop-Betrieb,
um zum Beginn eines Titels der CD zurückzukehren.
Zum Überspringen in Vorwärtsrichtung die Taste SKIP/ FF des CD- Players mehrmals betätigen, bis zum
Erreichen des gewünschten Titels.
Um zum Beginn des laufenden Titels zurückzuspringen, einmal die Taste SKIP / REV drücken. Um zum
Beginn der vorangehenden Titel zu springen, diese Taste mehrmals betätigen, bis zum Erreichen des
gewünschten Titels.
Aufsuchen eines besonderen Abschnitts innerhalb eines Titels während der Wiedergabe
Die Taste SKIP FF. / REV. des CD-Players drücken und gedrückt halten, worauf der CD-Player eine
schnelle Suche in Vorwärts- oder Rückwärtsrichtung ausführt.
Nach Erreichen der gewünschten Stelle im Titel diese Taste loslassen. Das Abspielen mit normaler
Geschwindigkeit beginnt wieder an dieser Stelle. Während der Suche ist die Lautstärke begrenzt.

DE-8
Programmierte Wiedergabe
Durch Programmieren der CD können bis zu 30 Titel in gewünschter Reihenfolge wiedergegeben werden.
1. Die von der Programmierung betroffene CD in das CD-Fach einlegen. Die Taste PROGRAM einmal bei
STOP -Betrieb betätigen.
2. Auf der LED-Anzeige leuchtet die Meldung "01".
3. Die Tasten SKIP FF. oder SKIP REV des CD- Players verwenden, um den ersten zu programmierenden
Titel zu wählen.
4. Sobald die gewünschte Titelnummer angezeigt wird, erneut die Taste PROGRAM betätigen.
5. Die Schritte 3 und 4 wiederholen, um maximal 30 Titel zu pro grammieren.
6. Die Taste PLAY des CD-Players drücken, worauf die Wiedergabe mit dem ersten Titel des Programms
beginnt. Nachdem alle Titel wiedergegeben wurden, erscheint auf der Anzeige die Gesamtzahl der Titel.
7. Zum Löschen des Programms zweimal die ST OP- Taste drücken, das CD-Fach öffnen und wieder
schließen, eine andere Funktion (außer CD) wählen oder auf Wachbetrieb schalten.
* Das Gerät besitzt keine Anzeige der programmierten Wiedergabe.
Wiedergabe in zufallsbedingter Reihenfolge (nur von Fernsteuerung)
1. Einmal die Taste RANDOM drücken, worauf die Titel fortgesetzt in zufallsbedingter Reihenfolge
wiedergegeben werden.
2. Die Taste STOP des CD-Players betätigen, um den Betrieb zufallsbedingter Wiedergabe auszuschalten.
* Das Gerät besitzt keine Anzeige der Wiedergabe in zufallsbedingter Reihenfolge.
Wiederholte Wiedergabe
1 Die Taste REPEAT des CD-Players drücken, worauf die untere mittlere Kontrollleuchte der LED-Anzeige
zu blinken beginnt. Der wiedergegebene Titel wird solange wiederholt abgespielt, bis die STOP-Taste
gedrückt wird.
2. Die Taste REPEAT des CD-Players erneut drücken, worauf die untere mittlere Kontrollleuchte des
CD -Players dauernd leuchtet. Hierauf wird die gesamte CD solange wiederholt in normaler Folge
abgespielt, bis die STOP-Taste gedrückt wird.
3. Zum Ausschalten der Wiederholfunktion die Taste REPEAT oder STOP betätigen.
DE-9
g UMGANG MIT CDs
1. Immer CDs mit folgendem Label verwenden:
2. Hinweise zum Umgang mit CDs
Bei der Entnahme der CD aus ihrer Box zum Einführen in das Gerät:
* Nicht die reflektierende Oberfläche berühren (Seite mit Aufzeichnungen).
* Keinerlei Etikett auf die CD kleben und diese nicht beschreiben.
* Die CD nicht verbiegen.
3. Einräumen
* Die CD in ihre Box einräumen.
* Die CDs keiner direkten Sonneneinstrahlung oder hohen Temperaturen aussetzen und von staubiger oder
feuchter Umgebung fernhalten.
4. Reinigung der CDs
* Wird eine CD durch Fingerabdrücke, Staub oder anderes verschmutzt, so ist sie mit einem weichen
Lappen abzuwischen.
* Zum Reinigen der CD von deren Mitte zum Rand wischen.
* Nie Benzol, Verdünnung, Schallplattenreinigungsflüssigkeiten oder antistatische Sprays verwenden.
* Nicht vergessen, den Deckel des CD-Players so zu schließen, dass die Linse nicht durch Staub
verunreinigt werden kann.
* Die Linse nicht berühren.
VON DER MITTE ZUM RAND
RICHTIG FALSCH
DE-10
g TECHNISCHE DATEN
STROMVERSORGUNG : 230V~50Hz
AUSGANGSLEISTUNG : 2 x 2 WATTS
ABMESSUNGEN DES GERÄTS : 154 (L) x 218 (T) x 221 (H) mm
ABMESSUNGEN DER SPEAKER: 138 (L) x 136 (T) x 221 (H) mm
NETTOGEWICHT : 4,3 kg
RADIOTEIL
FREQUENZBEREICH: FM 88 - 108 MHz
AM 540 - 1600 kHz
KASSETTENTEIL
DURCHLAUFGESCHWINDIGKEIT: 4,75 cm/s.
FREQUENZGANG: 125Hz - 8kHz
CD-PLAYER
OPTISCHER SENSOR : 3-STRAHL-LASER
FREQUENZGANG : 100 Hz - 16 kHz
ALLE RETTIGHEDER FORBEHOLDES
COPY RIGHT DENVER ELECTRONICS A/S
www.denver -electronics.com
Hinweise zum Umweltschutz
Dieses Produkt darf am Ende seiner Lebensdauer nicht über
den normalen Haushaltsabfall entsorgt werden, sondern muss
an einem Sammelpunkt für das Recycling von elektrischen und
elektronischen Geräten abgegeben werden. Das Symbol auf
dem Produkt, der Gebrauchsanleitung oder der Verpackung
weist darauf hin.
Die Werkstoffe sind gemäß ihrer Kennzeichnung wieder
verwertbar. Mit der Wiederverwendung, der stofflichen
Verwertung oder andren Formen der Verwertung von Altgeräten
leisten Sie einen wichtigen Beitrag zum Schutze unsrer Umwelt.
Bitte erfragen Sie bei der Gemeindeverwaltung die zuständige
Entsorgungsstelle.
DA-1
For at få bedste muligt udbytte og glæde af dit nye anlæg, er det en god idé at læse denne
betjeningsvejledning grundigt, inden du begynder at betjene anlægget. Derved danner du dig et overblik
over anlæggets funktioner, hvilket sikrer dig trofast og gnidningsløs ydelse og lytteglæde mange år frem i
tiden.
Vigtige bemærkninger
* Denne betjeningsvejledning bør opbevares omhyggeligt, så du om nødvendigt kan slå op i den igen
senere.
* Undgå at placere anlægget på steder, der passer til en af nedenstående beskrivelser:
• Steder, der er udsat for direkte sollys, samt tæt på varmekilder så som radiatorer og
varmluftsblæsere.
• Ovenpå stereoudstyr, der genererer for meget varme.
• Steder, hvor ventilation ikke kan finde sted, og steder med meget støv.
• Steder, der er udsat for konstante vibrationer.
• Fugtige eller våde steder.
* Sørg for aldrig at blokere anlæggets ventilationsåbninger.
Betjen knapper og kontakter i overensstemmelse med retningslinjerne i betjeningsvejledningen.
* Før du tænder for strømmen første gang, bør du sikre dig, at netledningen er forbundet korrekt.
* Opbevar dine bånd og CD'er på et køligt sted, så de ikke beskadiges af varme.
CAUTION
ELECTRIC SHOCK HAZARD
DO NOT OPEN
FORSIGTIG : UNDLAD AT FJERNE DÆKSLER (ELLER BAGSTYKKE) AF HENSYN TIL FAREN FOR
ELEKTRISK STØD. APPARATET INDEHOLDER INGEN DELE, SOM BRUGER SELV KAN SERVICERE.
OVERLAD ALT REPARATIONSARBEJDE TIL KVALIFICERET SERVICEPERSONALE.
FARLIG STRØMSTYRKE
Apparatets indre indeholder strømførende dele, hvis strømstyrke er tilstrækkelig til at udgøre
en fare for skade på personer ved elektriske stød.
BEMÆRK
Betjeningsvejledningen indeholder vigtige betjenings- og vedligeholdelsesinstrukser. For din
egen sikkerheds skyld er det vigtigt, at du læser betjeningsvejledningen.
ADVARSEL : UNDGÅ RISIKO FOR BRAND OG ELEKTRISK STØD, UDSÆT IKKE DETTE ANLÆG FOR
NOGEN FORMER FOR VÆSKE.
Bemærk:
Apparatet bliver varmt efter lang tids brug. Dette er normalt og er ikke udtryk for, at der er noget galt med
apparatet.
CD -afspilleren indeholder microprocessorer, der kan svigte som følge af ekstern elektrisk interferens eller
støj. Hvis CD-afspilleren ikke virker korrekt, bør du slukke for strømmen og dernæst tilslutte apparatet igen.
DA-2

DA-3
THIS IS A CLASS 1 LASER PRODUCT
g KNAPPER OG KONTROLLER
1. HØJTTALER
2. Knappen VOLUMEN
3. KANALVISER
4. LED DISPLAY VINDUE
5. LED INDIKATOR FOR FM STEREO
6. Knappen CD SKIP / REV. (spring tilbage)
7. Knappen CD PLAY / PAUSE (afspil / pause)
8. Knappen CD SKIP / FF. (spring frem)
9. Knappen CD PROGRAM
10. Knappen CD REPEAT (gentag)
11. Knappen POWER / STANDBY (tænd / sluk)
OG INFRARØD SENSOR TIL FJERNBETJENING
12 LED INDIKATOR FOR STANDBY
13. FUNKTIONSVÆLGER (RADIO / TAPE (bånd) / CD)
14. STIK TIL HOVEDTELEFONER
15. Knappen CD STOP
16. Knappen BBS ON / OFF (basforstærker)
17. KANALBÅNDSVÆLGER (FM ST./ FM / AM)
18. LÅGE TIL KASSETTERUM
19. Knappen CASSETTE RECORD (optag)
20. Knappen CASSETTE PLAY (afspil)
21. Knappen CASSETTE REWIND (spol tilbage)
22. Knappen CASSETTE F.FWD (spol frem)
23. Knappen CASSETTE STOP / EJECT (stop / båndudløser)
24. Knappen CASSETTE PAUSE
25. Udløser til KASSETTERUM
26. Låge til CD-rum
27. DÆKSEL TIL NETLEDNINGSINDGANG
28. NETLEDNING
29. HØJTTALERTERMINALER
30. FM ANTENNE
31. KANALVÆLGER
WARNING
PRESENCE OF INVISIBLE LASER BEAM
WHEN PLAYER IS OPEN AND SAFETY
DEVICES ARE DEFEATED. AVOID ANY
DIRECT EXPOSURE TO THE BEAM
.
 Loading...